
Seller Center Lazada - Home page (EN) | lazadacom can adjust the price and stock amount by download...
52
Seller Center Lazada 1 Android App - https://goo.gl/zjvvVV
Transcript of Seller Center Lazada - Home page (EN) | lazadacom can adjust the price and stock amount by download...

Table of content
1. How to Start Page 3
2. Feature Introduction Page 5
3. Products Menu
3.1 how to manage products Page 6-8
3.2 how to add a product Page 9-10
3.3 how to import products Page 11-25
3.4 how to manage images Page 26-27
4. Orders Menu
4.1 how to manage orders Page 28-30
4.2 how to click ready to ship Page 31-39
4.3 how to pack a product Page 40-41
2
3
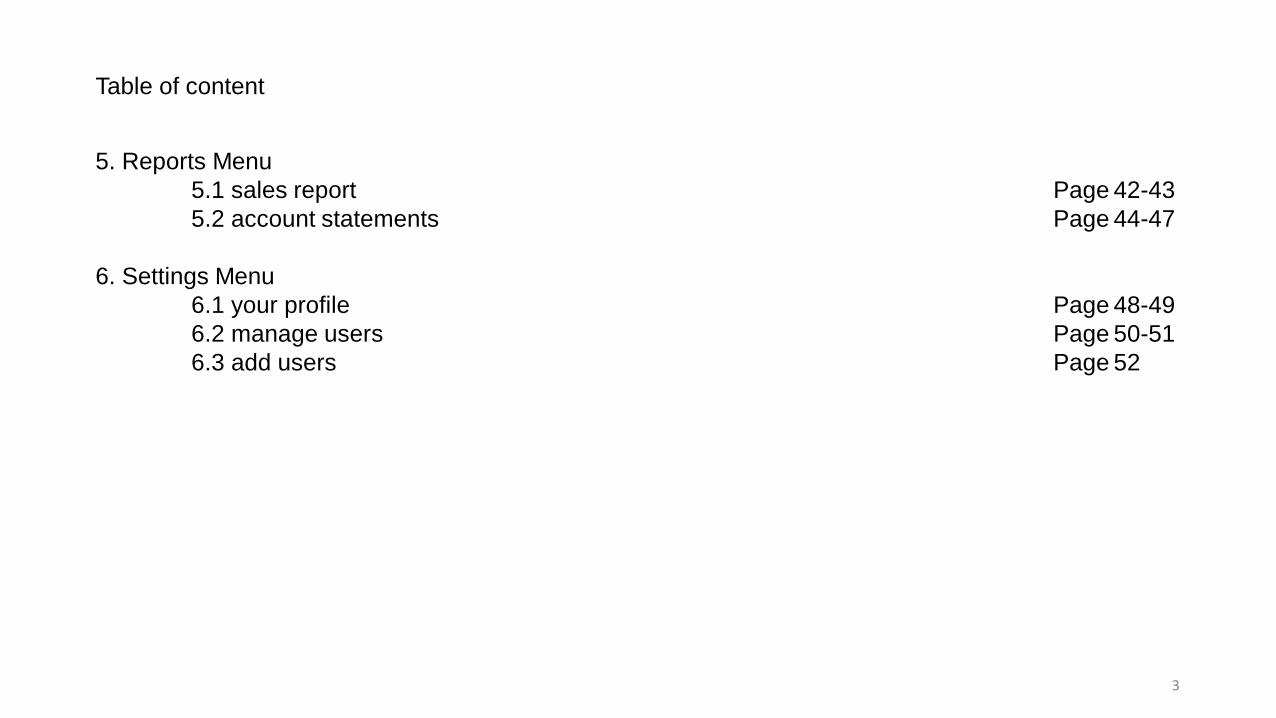
5. Reports Menu
5.1 sales report Page 42-43
5.2 account statements Page 44-47
6. Settings Menu
6.1 your profile Page 48-49
6.2 manage users Page 50-51
6.3 add users Page 52
Table of content
4
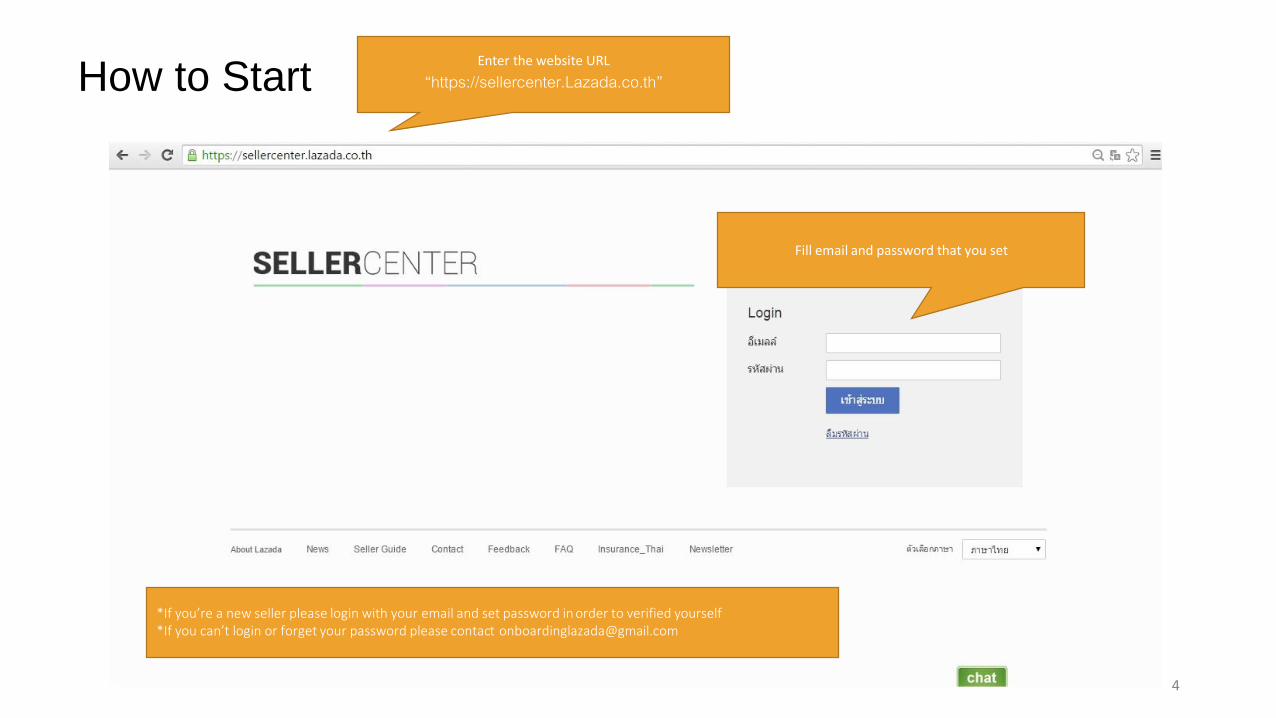
How to StartEnter the website URL
“https://sellercenter.Lazada.co.th”
Fill email and password that you set
*If you’re a new seller please login with your email and set password in order to verified yourself*If you can’t login or forget your password please contact [email protected]

5
Main menu
* New seller who just sent a contract, we will not active your shop until we already
approved it
Seller’s performance
*important in limit order that seller will be receive each day. You can learn more from
https://www.dropbox.com/s/3z3h186rc02pxpe/OVL_Thai.pptx?dl=0
You can change the language here
Updated news and coming up promotion
Features
*Lazada would like you to give your best service to our customers so we willing to help you in every way to achieve that goal and we also have
randomly check your products in order to avoid for counterfeit and copyright products
6
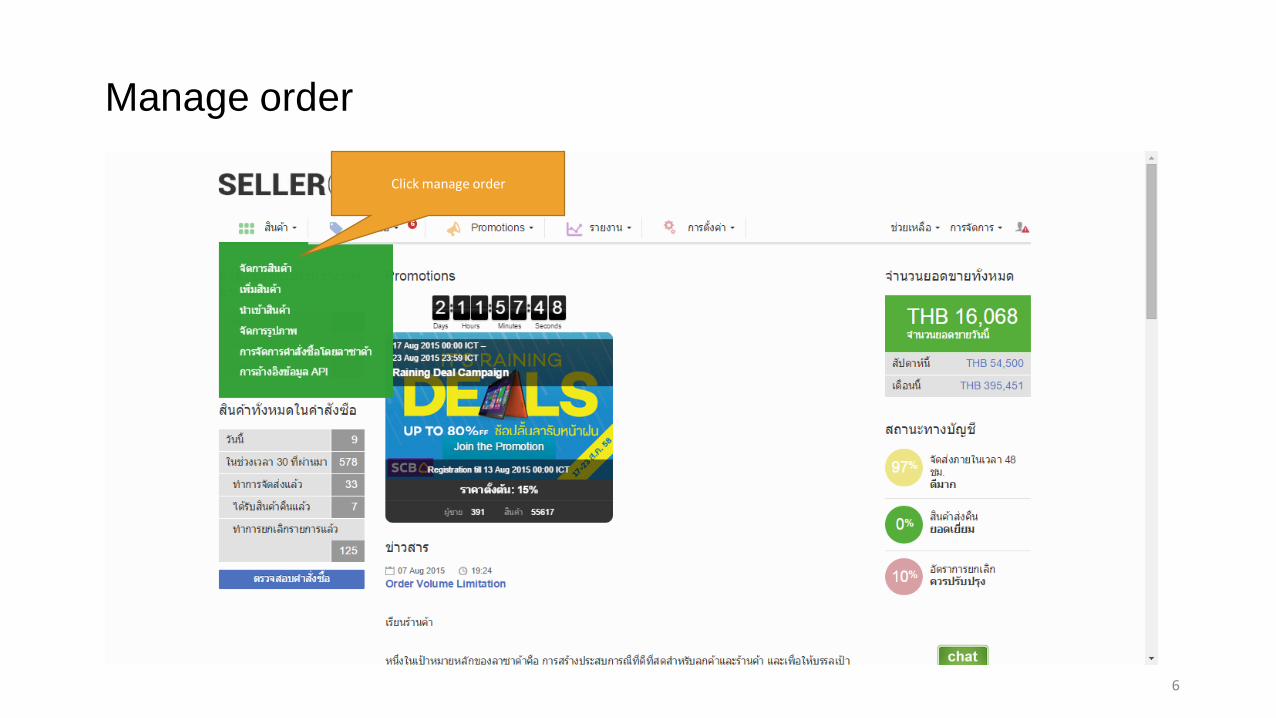
Manage order
Click manage order

7
Manage order
You can check the products by status here
If you want to edit or delete the information click at the pencil icon*to edit or change any information
about the products have to be approved by lazada every times
You can edit or change your stock amount from this page
*To edit this section no need to be approved from Lazada except in
case that you adjust the price higher or lower than 50% of the price you’ve set before
You can check status that your product is offline or online from a visible line
*you can learn more from the next page
You can use on-off button for all products to be an offline or
online status on Lazadawebsite
You can export the products information as
a file in order to edit*you can learn more about an export here
8
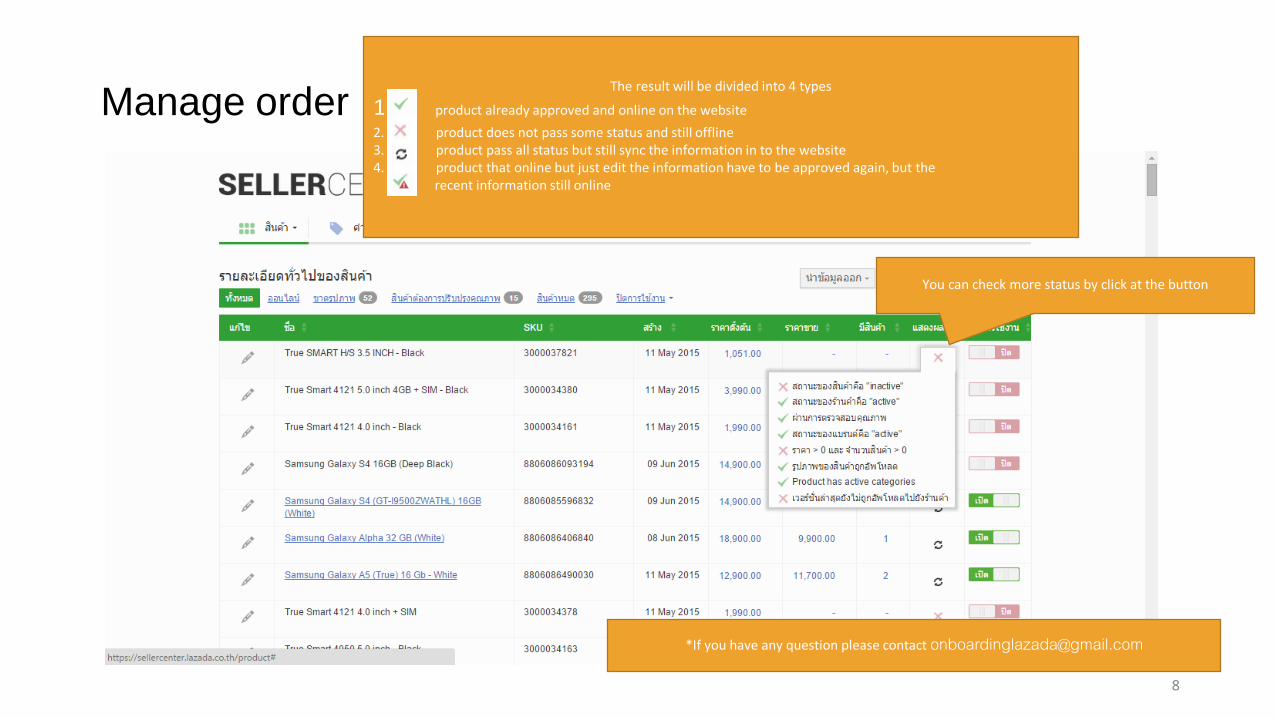
Manage orderThe result will be divided into 4 types
1. product already approved and online on the website
2. product does not pass some status and still offline3. product pass all status but still sync the information in to the website4. product that online but just edit the information have to be approved again, but the
recent information still online
*If you have any question please contact [email protected]
You can check more status by click at the button
9
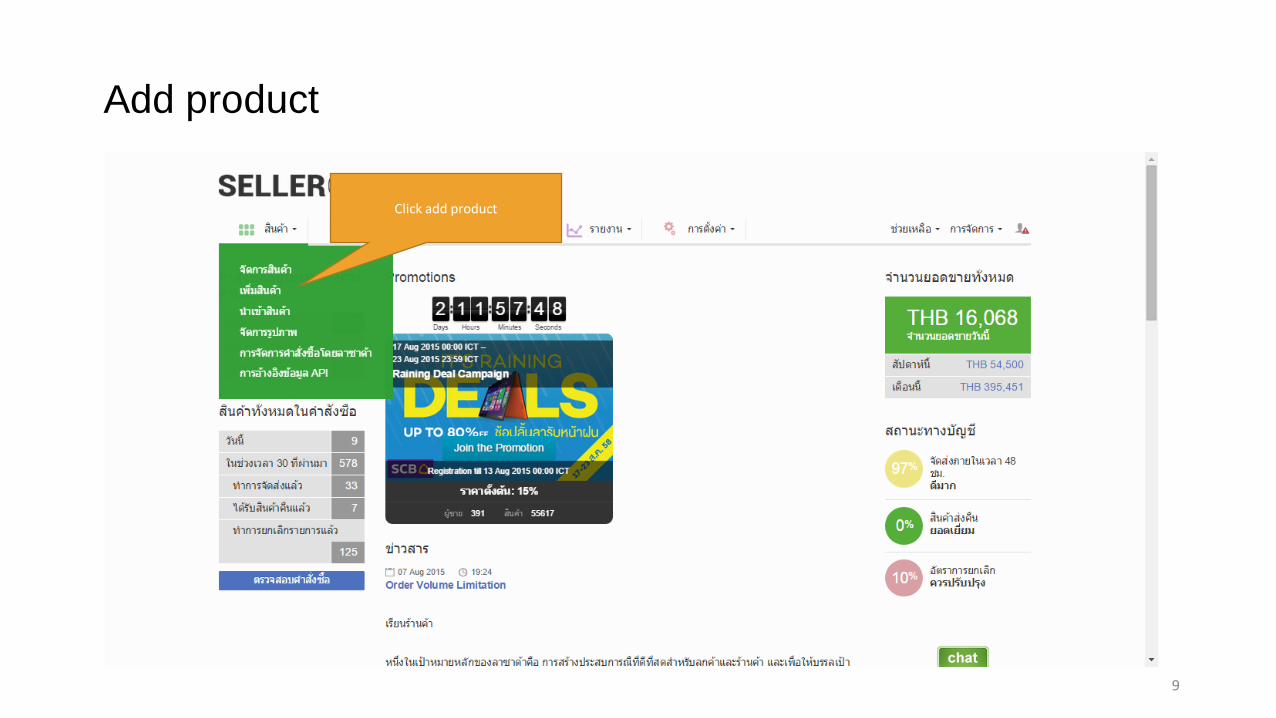
Add product
Click add product
10
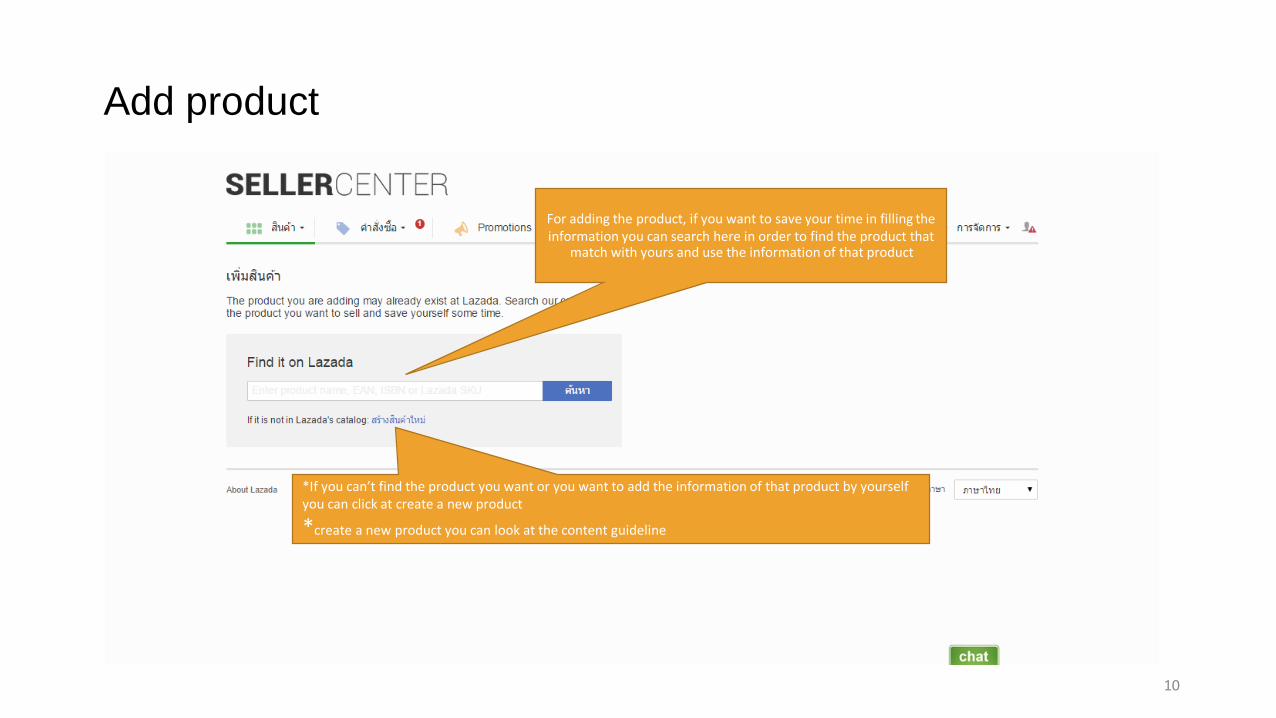
Add product
For adding the product, if you want to save your time in filling the information you can search here in order to find the product that
match with yours and use the information of that product
*If you can’t find the product you want or you want to add the information of that product by yourself you can click at create a new product
*create a new product you can look at the content guideline
11
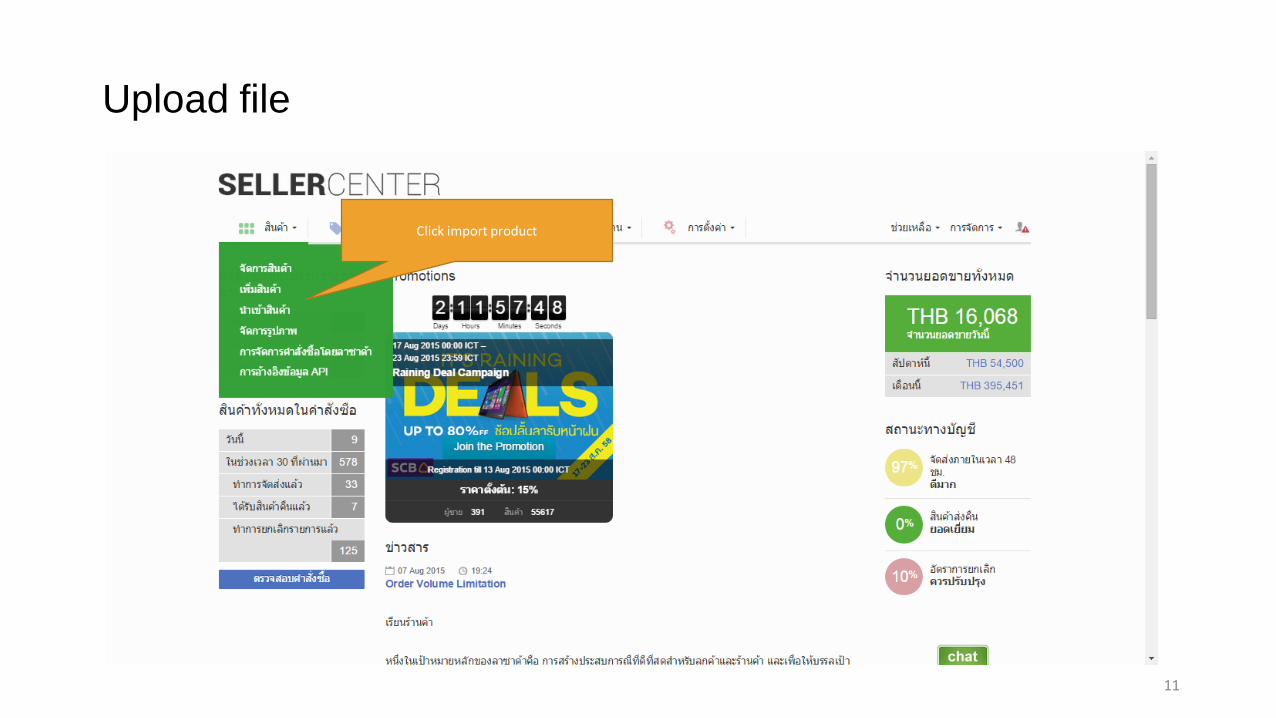
Click import product
Upload file

12
Upload file
You can adjust the price and stock amount by download file
From update the product
If you want to add new product you can do the same as upload file, but you have to download the template from product
creation by category here
*in case that you add a new product you have to download category to use with
*To upload file you must have OpenOffice program
Can download from this link https://www.openoffice.org/download/
13
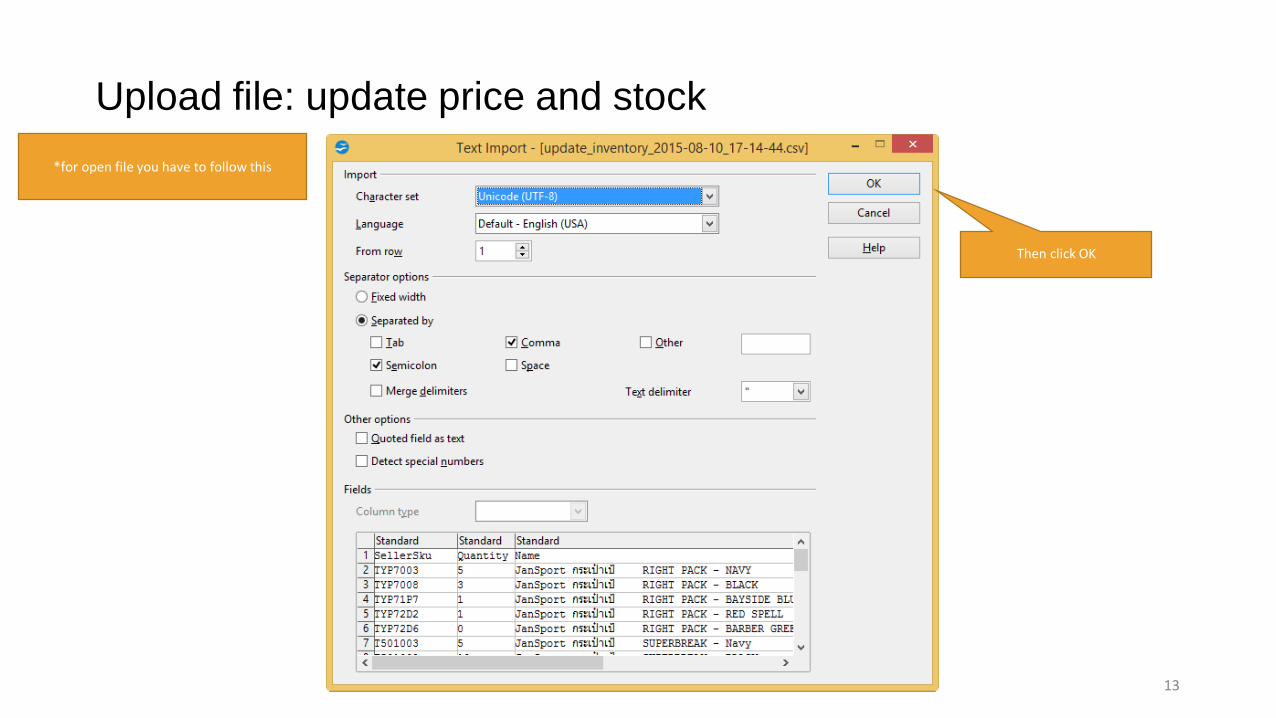
Upload file: update price and stock
*for open file you have to follow this
Then click OK

14
Upload file: update price and stock
You can adjust your stock from update warehouse’s fileYou can adjust the price by update price’s file
* Date pattern filling in SaleStartDate and SaleEndDate have to be yyyy-
mm-dd
15
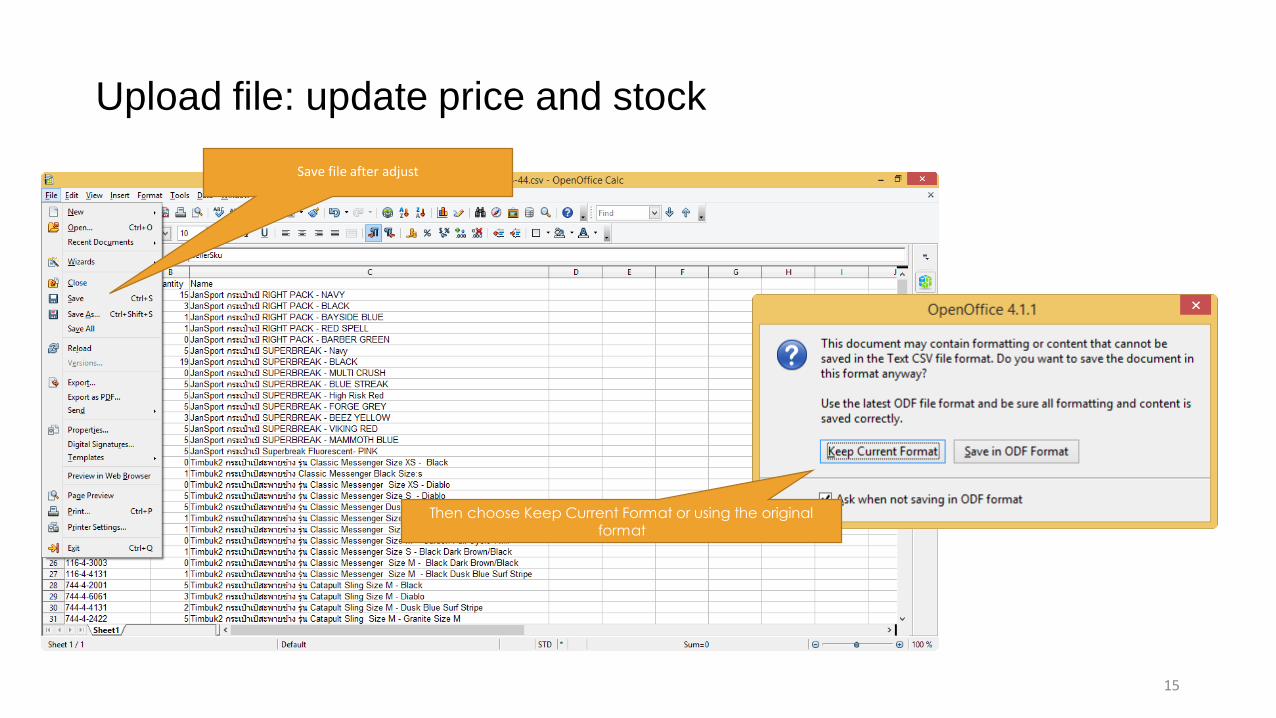
Upload file: update price and stock
Save file after adjust
Then choose Keep Current Format or using the original format

16
choose Import Mode to be update product
Upload file: update price and stock
Then click upload file
17
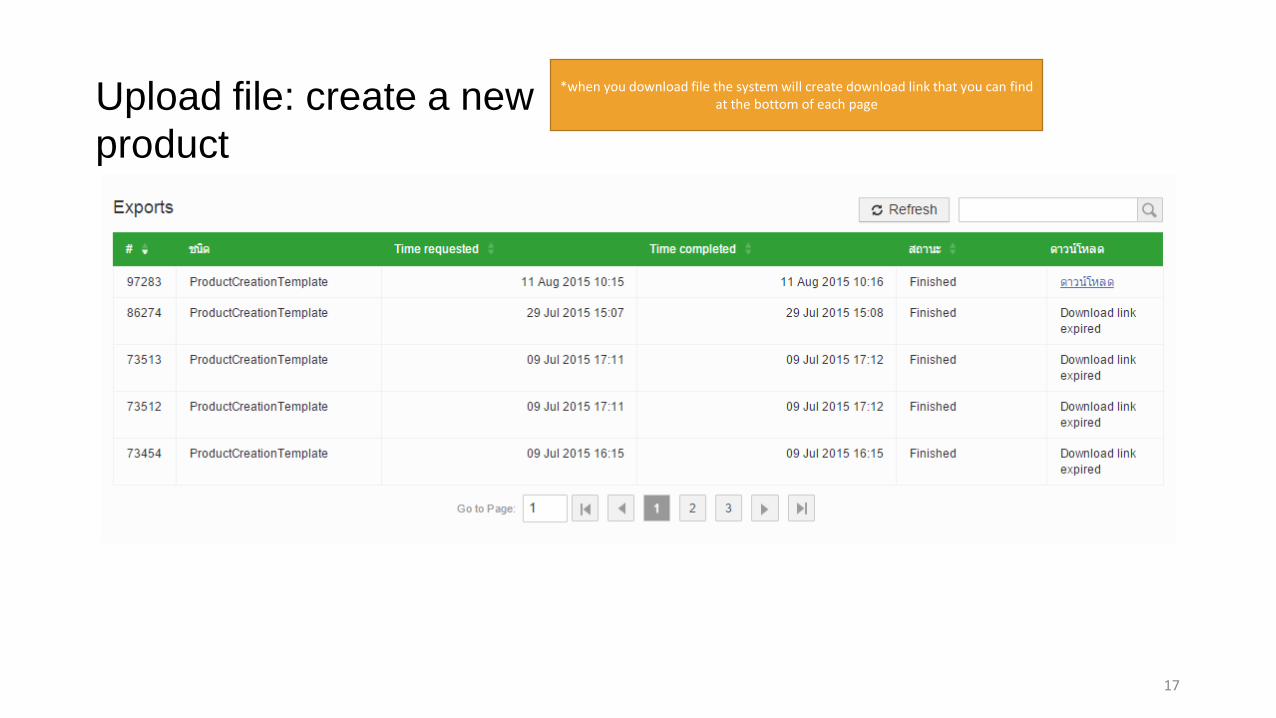
Upload file: create a new
product
*when you download file the system will create download link that you can find at the bottom of each page
18
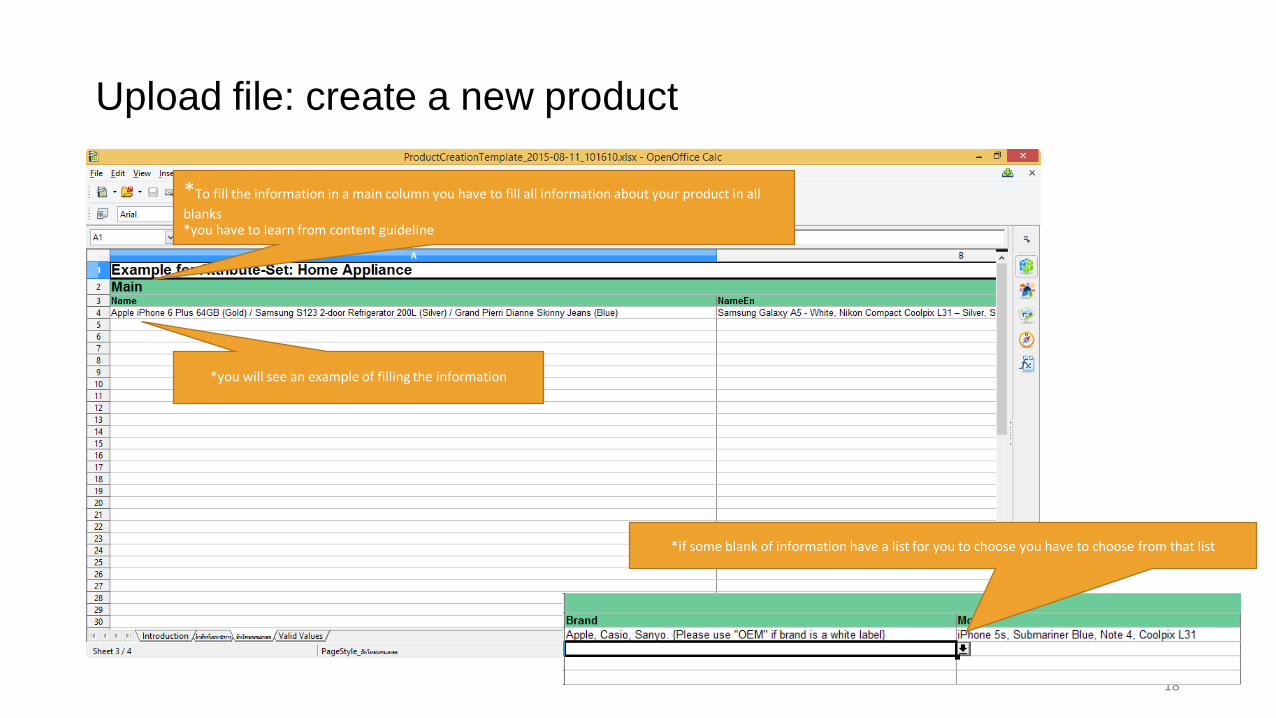
Upload file: create a new product
*To fill the information in a main column you have to fill all information about your product in all
blanks*you have to learn from content guideline
*if some blank of information have a list for you to choose you have to choose from that list
*you will see an example of filling the information
19
Upload file: create a new product
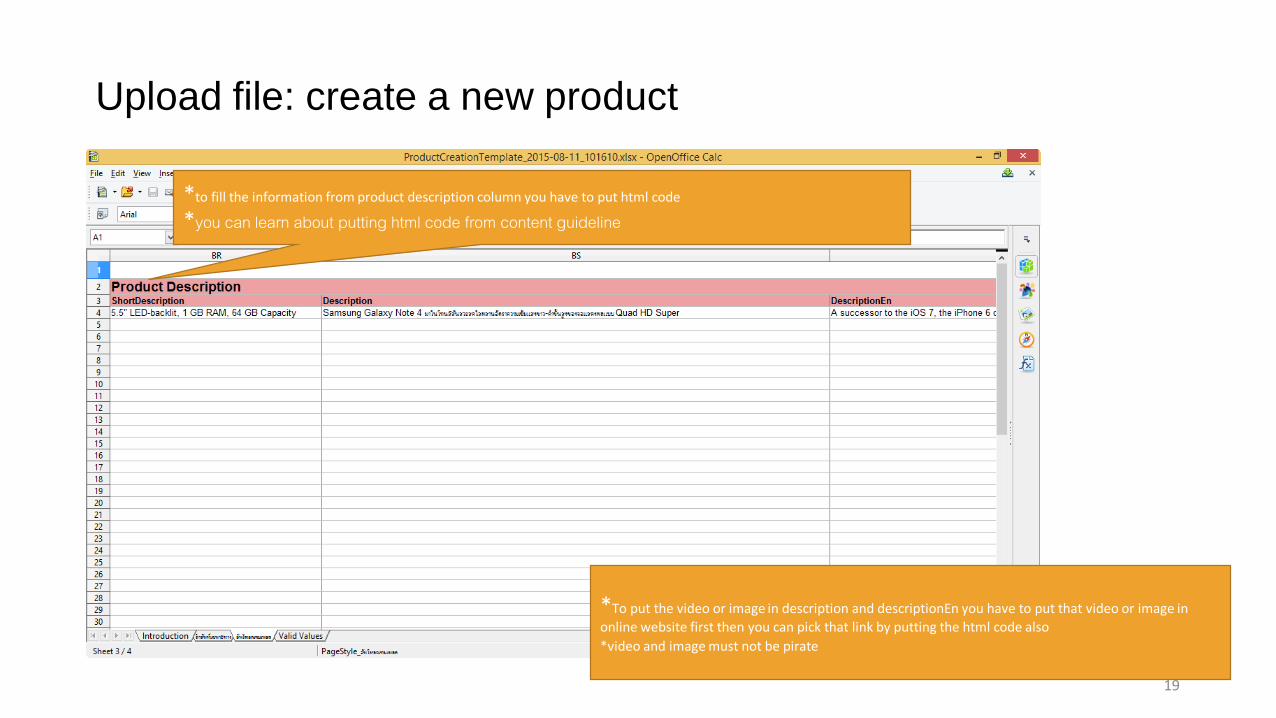
*to fill the information from product description column you have to put html code
*you can learn about putting html code from content guideline
*To put the video or image in description and descriptionEn you have to put that video or image in
online website first then you can pick that link by putting the html code also
*video and image must not be pirate
20
Upload file: create a new product
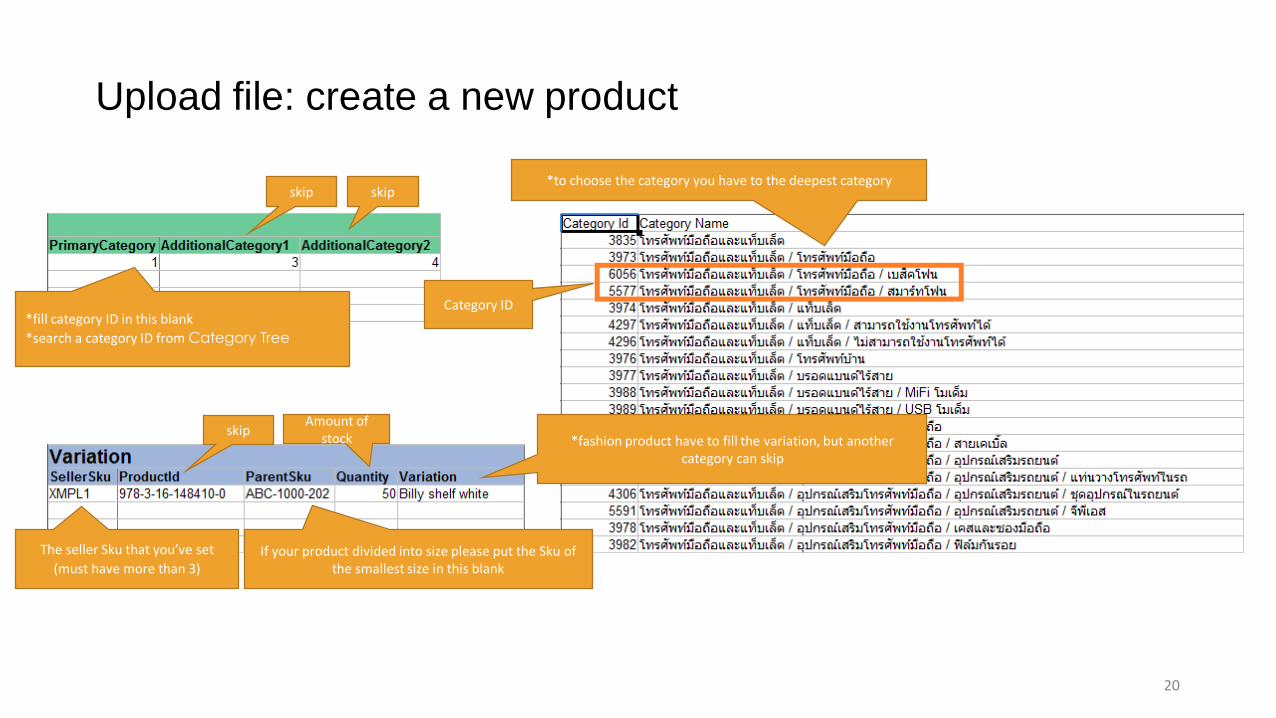
The seller Sku that you’ve set
(must have more than 3)
skip
If your product divided into size please put the Sku of the smallest size in this blank
Amount of stock *fashion product have to fill the variation, but another
category can skip
*fill category ID in this blank
*search a category ID from Category Tree
skip skip*to choose the category you have to the deepest category
Category ID

21
Upload file: create a new productFor delivery you have to put minimum at 5 days and maximum
at 7days
Product measures use as Cm. (widthx length x height) Product weight use as Kg.
Package size use as Cm. consist with width, length and height
Package weight use as Kg.
Set selling price or promotion
(if you have)
Set the price as original or full price
If you set the promotion price you have to set the beginning and last day of your promotion
*date pattern in SaleStartDate and SaleEndDate
have to be yyyy-mm-ddWarranty period Warranty condition and warranty by who
skip skip
*if you want to put the picture into file you have to put only the link of that picture*you can add more pictures after the file of that product is upload successful

22
Upload file: create a new product
Then choose Keep Current Format or use original format
After filling all information click SaveAs the file
Then choose Save as type to be Text
CSV (.csv)
choose Edit filter setting

23
Upload file: create a new product
Choose Character set to be Unicode (UTF-8)
Then click OK
24
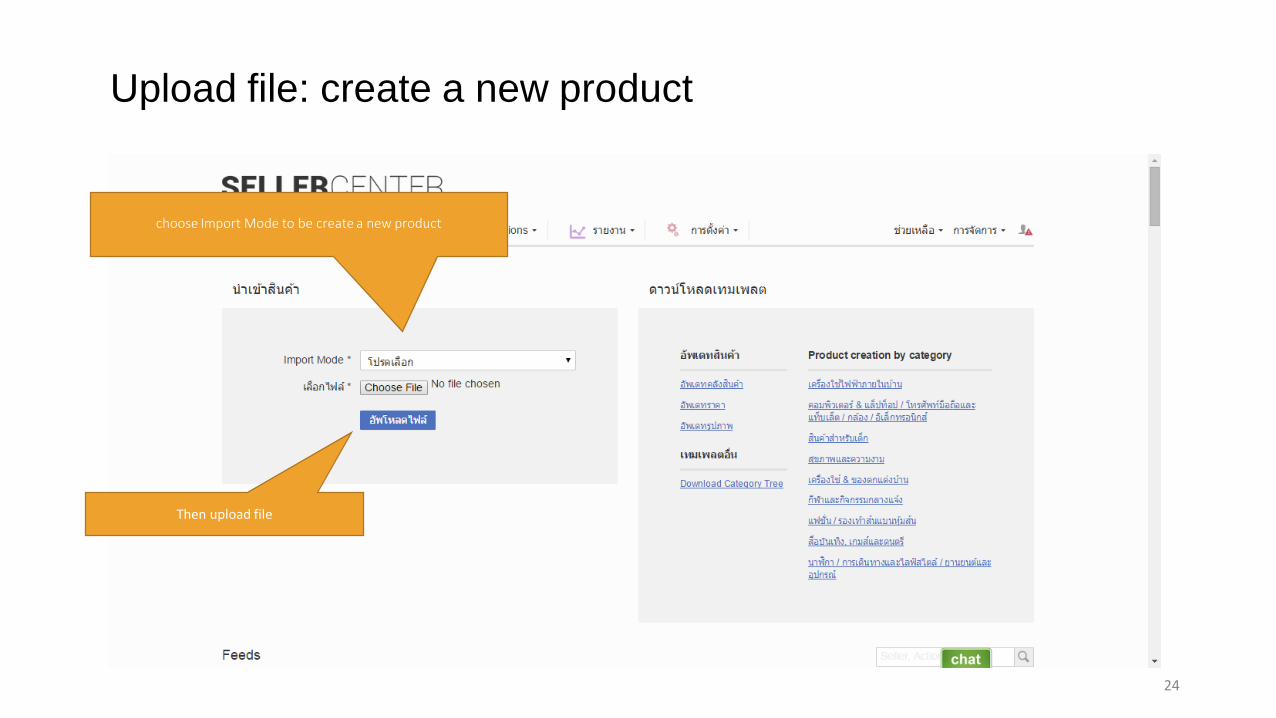
choose Import Mode to be create a new product
Then upload file
Upload file: create a new product

25
Upload file: verify an upload fileAfter upload the file you can verify the status by move to the
bottom of that page until you see Feeds
in continue column will report that which
Import Mode you choose
Upload status of that file
Amount of file that you already upload
Amount of file that fail to upload
*if you fail to upload for some please edit only that file and then upload again
You can verify the result of uploading from this rcolumn
*if the upload fail you can Download Report to verify which part is getting
wrong

26
Manage image
Click at manage image
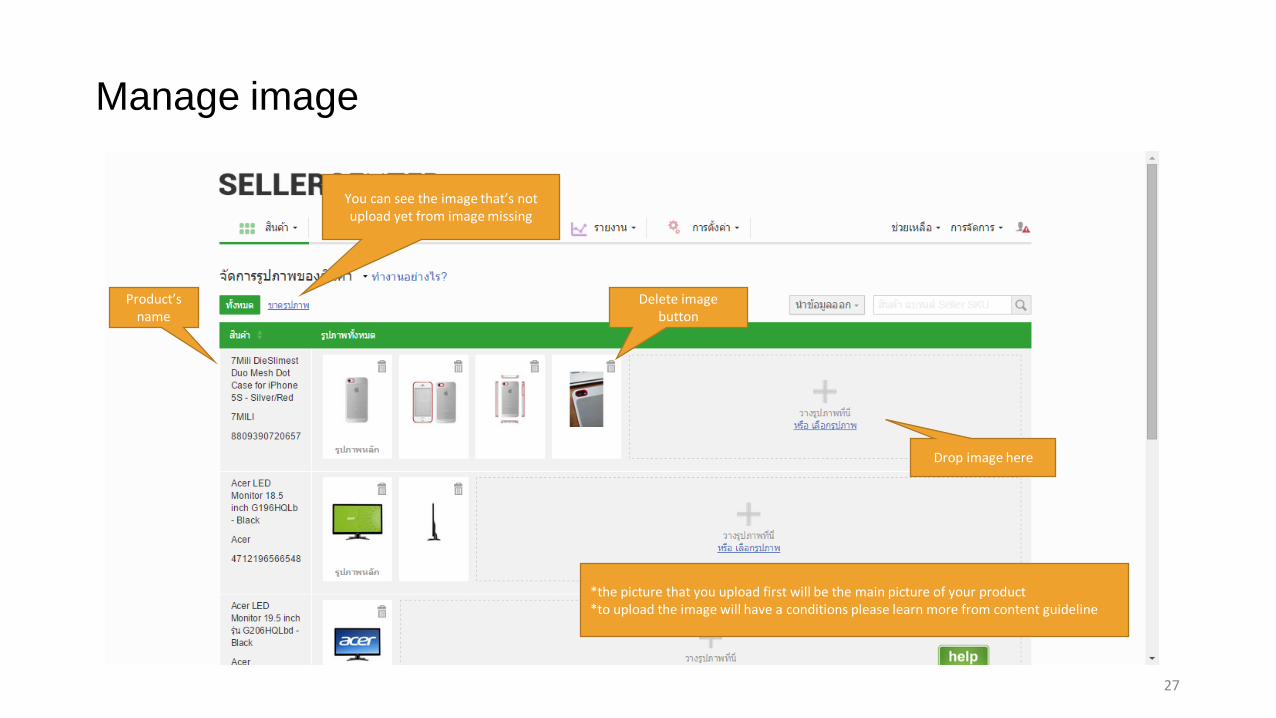
27
Manage image
You can see the image that’s not upload yet from image missing
Product’s name
Drop image here
Delete image button
*the picture that you upload first will be the main picture of your product*to upload the image will have a conditions please learn more from content guideline
28
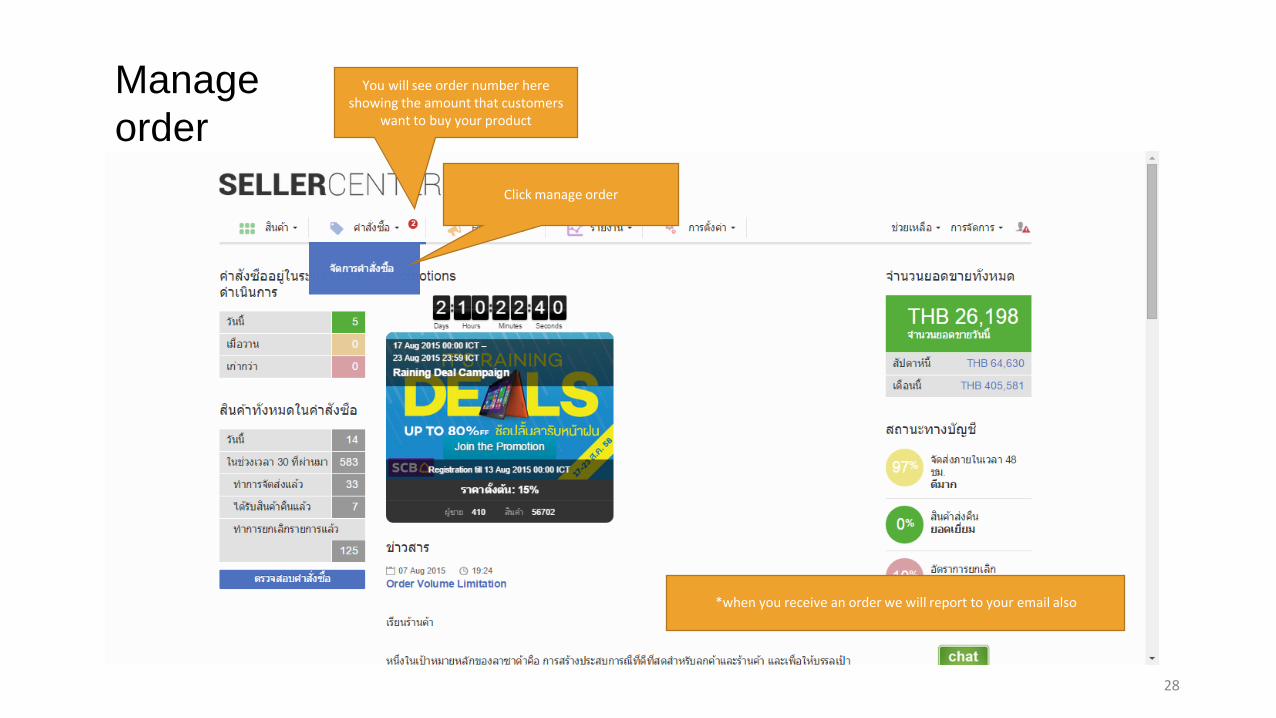
Manage
order
Click manage order
You will see order number here showing the amount that customers
want to buy your product
*when you receive an order we will report to your email also
29
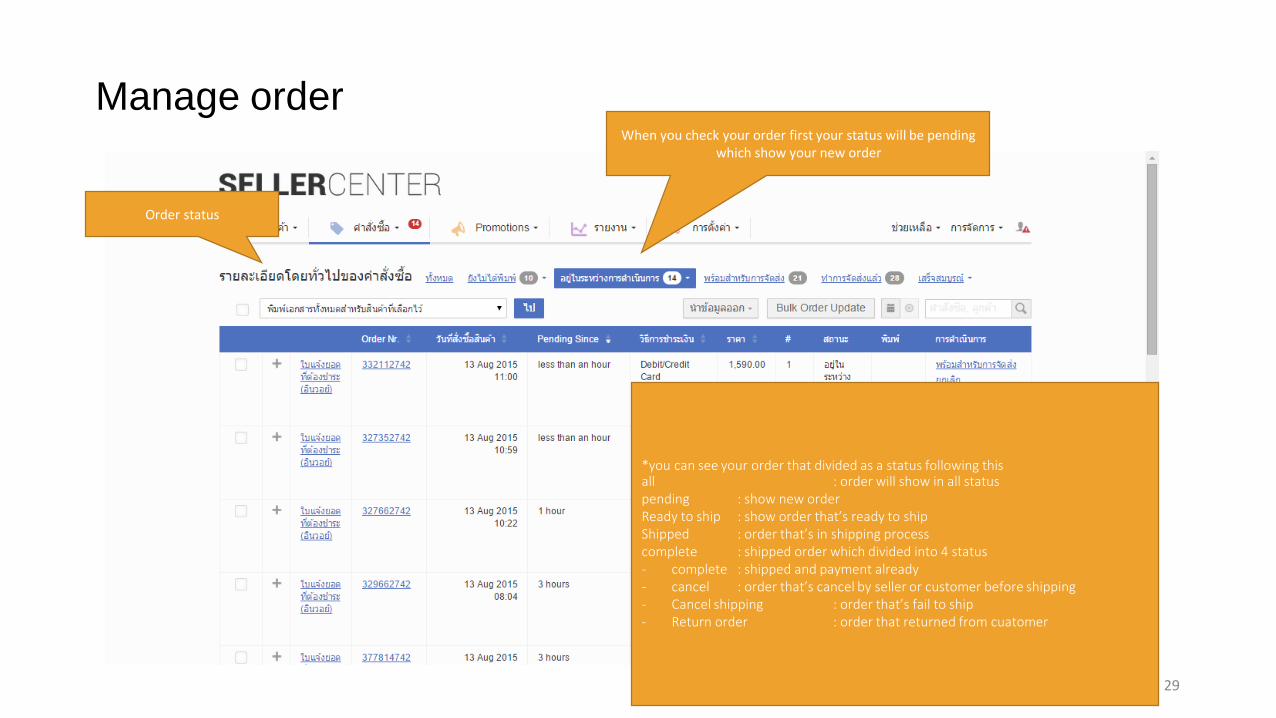
Manage orderWhen you check your order first your status will be pending
which show your new order
Order status
*you can see your order that divided as a status following thisall : order will show in all statuspending : show new orderReady to ship : show order that’s ready to shipShipped : order that’s in shipping processcomplete : shipped order which divided into 4 status- complete : shipped and payment already- cancel : order that’s cancel by seller or customer before shipping- Cancel shipping : order that’s fail to ship- Return order : order that returned from cuatomer
30
Manage order
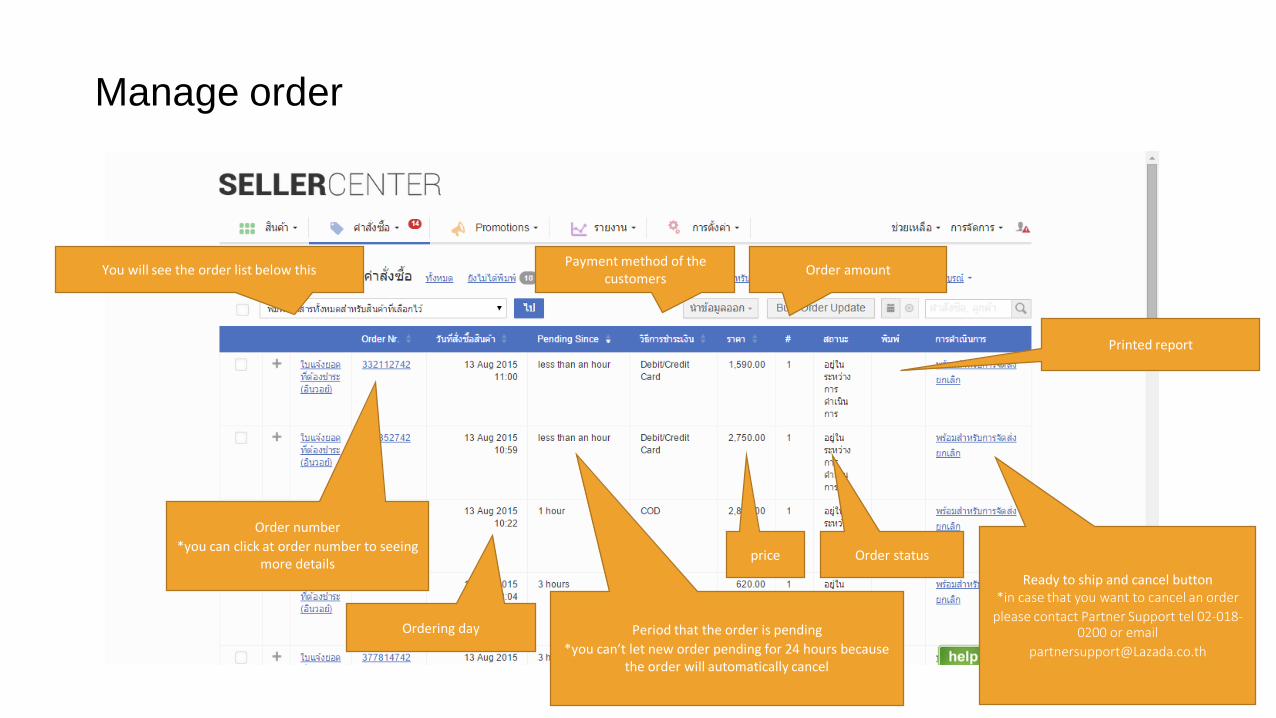
You will see the order list below this
Order number
*you can click at order number to seeing more details
Ordering day Period that the order is pending
*you can’t let new order pending for 24 hours because the order will automatically cancel
Payment method of the customers
price
Order amount
Order status
Printed report
Ready to ship and cancel button*in case that you want to cancel an order
please contact Partner Support tel 02-018-0200 or email
31
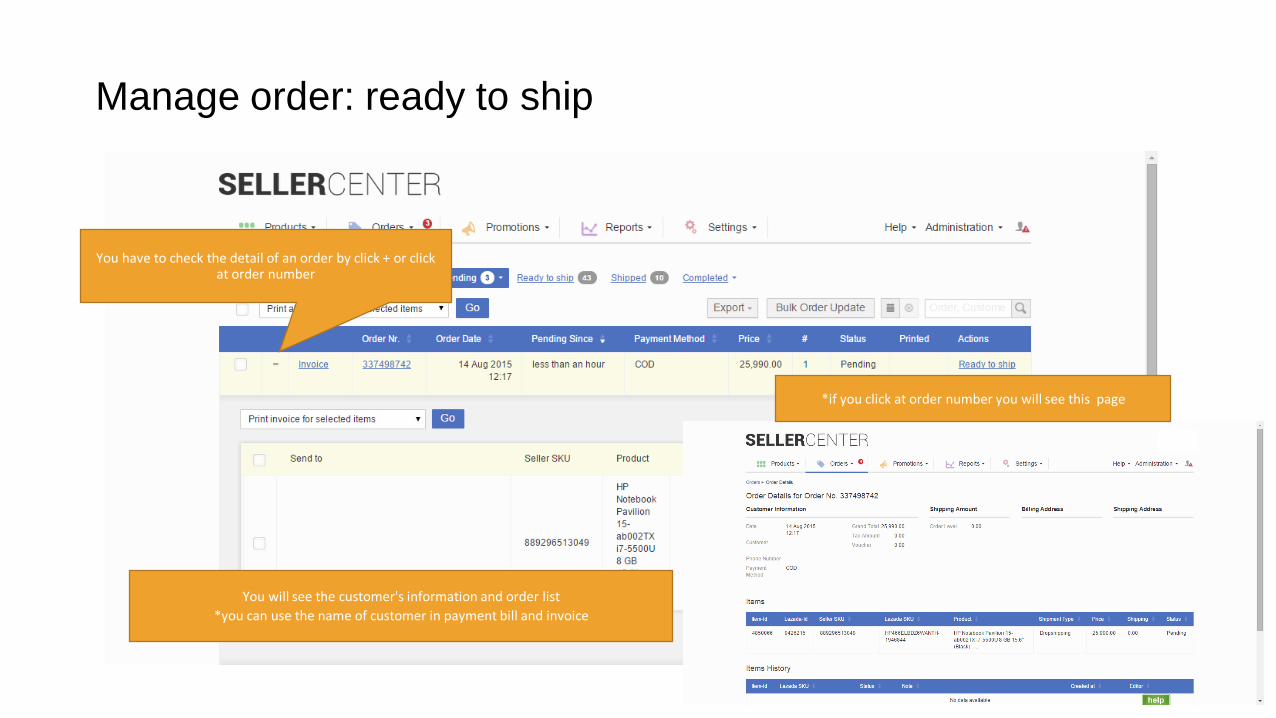
Manage order: ready to ship
You have to check the detail of an order by click + or click at order number
You will see the customer's information and order list
*you can use the name of customer in payment bill and invoice
*if you click at order number you will see this page
32
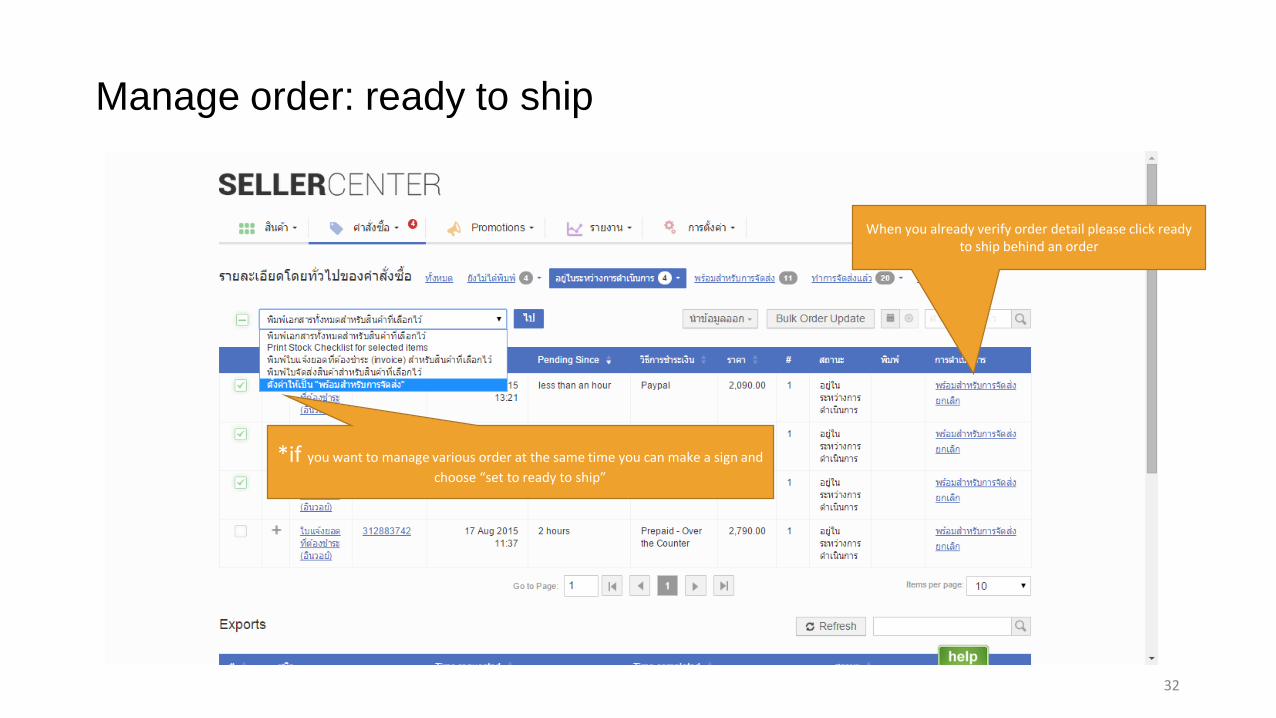
Manage order: ready to ship
When you already verify order detail please click ready to ship behind an order
*if you want to manage various order at the same time you can make a sign and
choose “set to ready to ship”

33
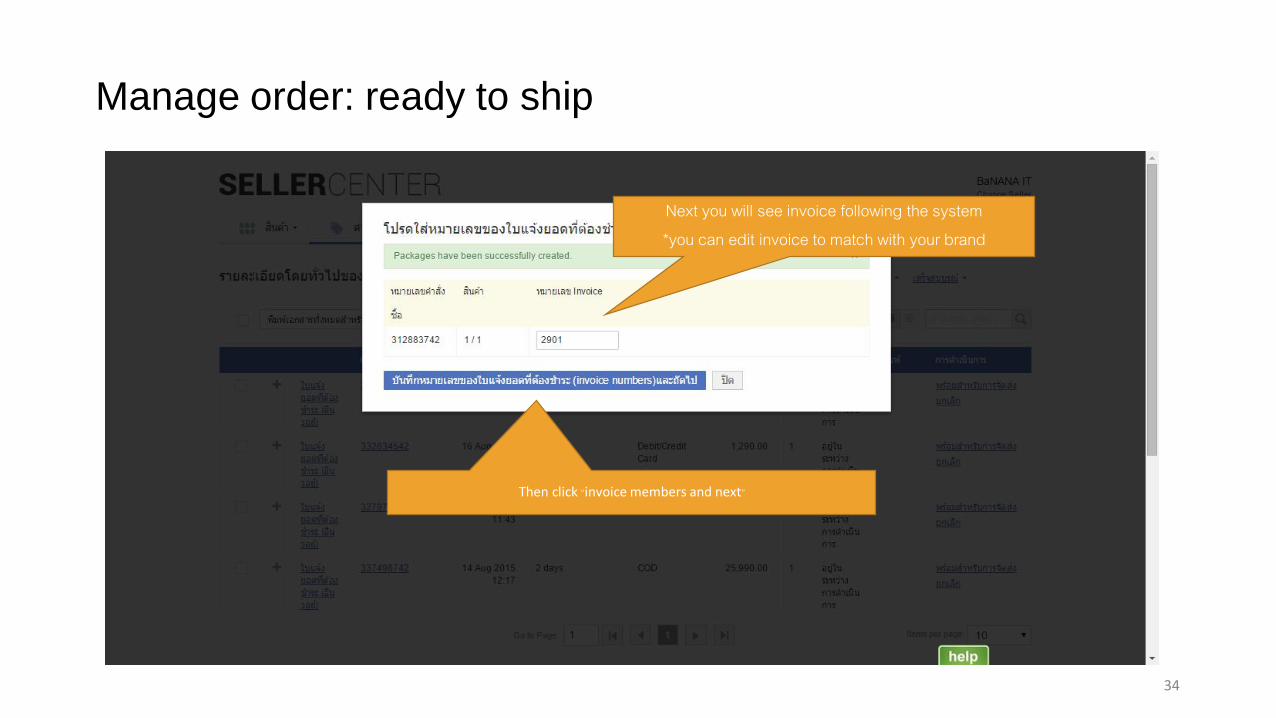
Manage order: ready to ship
you will see a window to choose the shipping please click at
“Create Package & Next”*for shipping Lazada will automatically choose for you
34
Manage order: ready to ship
Next you will see invoice following the system*you can edit invoice to match with your brand
Then click “invoice members and next”
35
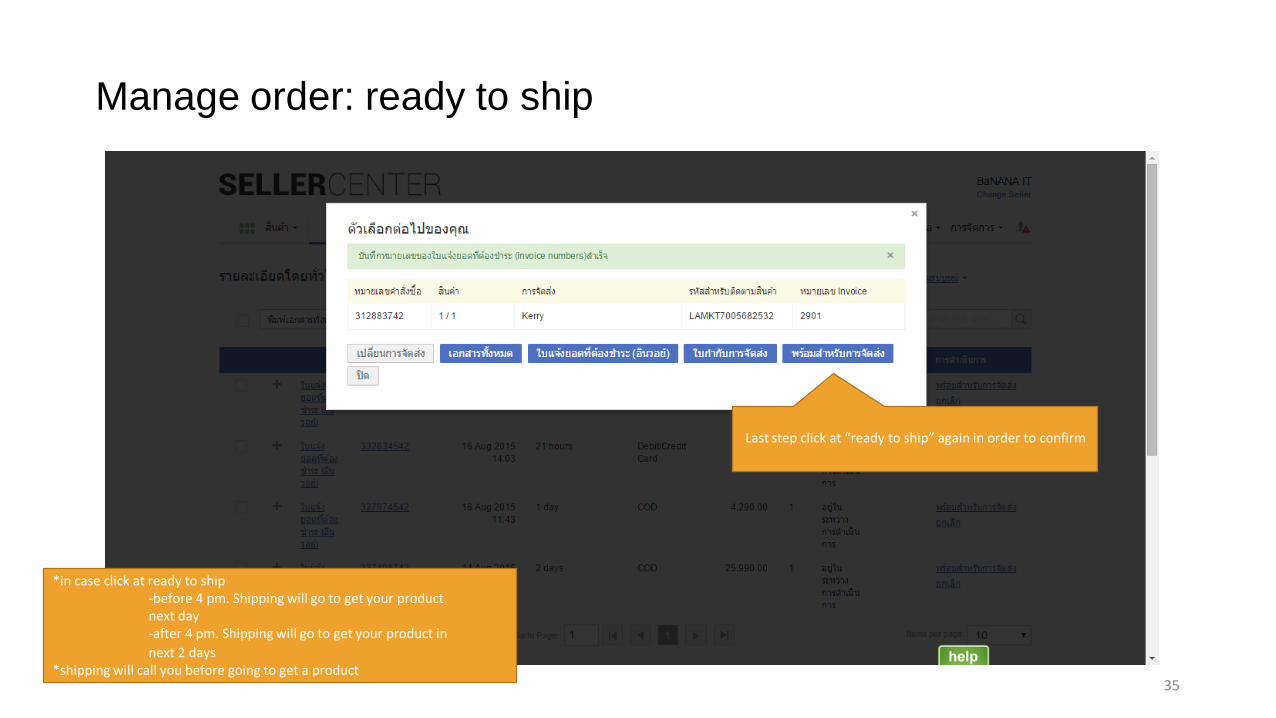
Manage order: ready to ship
Last step click at “ready to ship” again in order to confirm
*in case click at ready to ship-before 4 pm. Shipping will go to get your product next day-after 4 pm. Shipping will go to get your product in
next 2 days *shipping will call you before going to get a product

36
Manage order: ready to ship
After you click at ready to ship that order will move to shipped
status
Next step you have to print the document by choosing “print shipping labels for selected items”
37
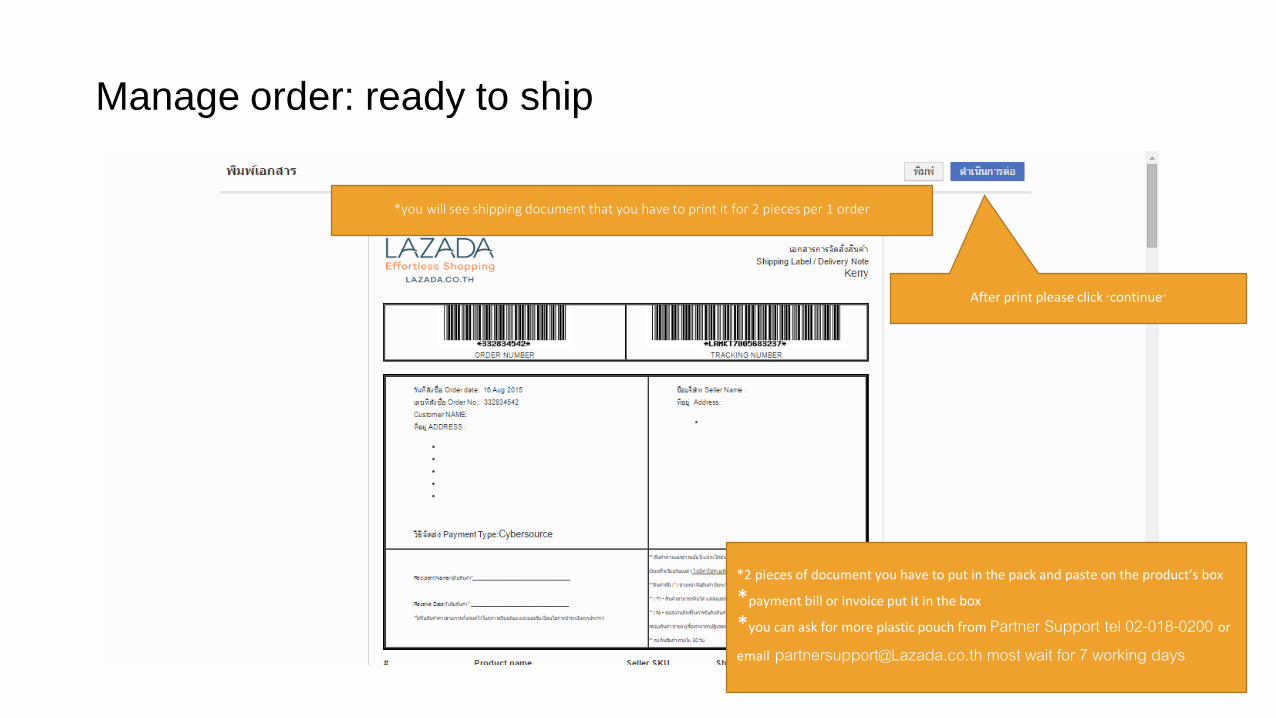
Manage order: ready to ship
*you will see shipping document that you have to print it for 2 pieces per 1 order
*2 pieces of document you have to put in the pack and paste on the product’s box
*payment bill or invoice put it in the box
*you can ask for more plastic pouch from Partner Support tel 02-018-0200 or
email [email protected] most wait for 7 working days
After print please click “continue”
38
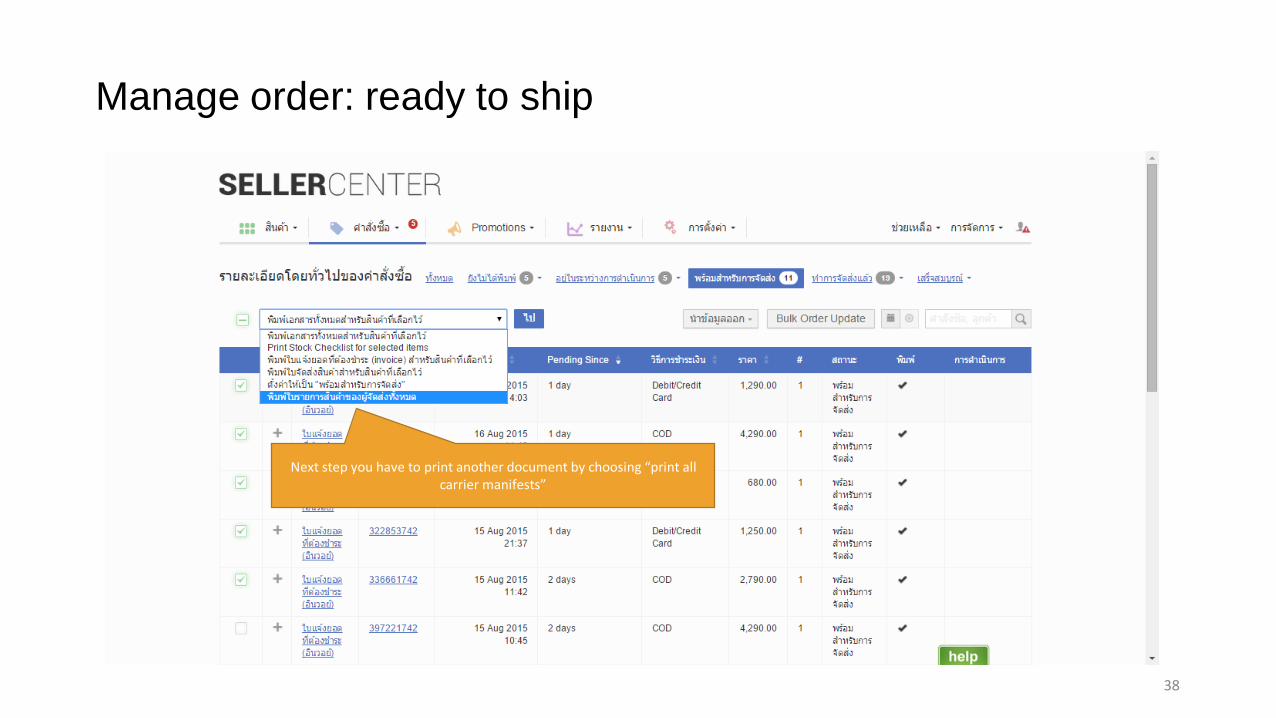
Manage order: ready to ship
Next step you have to print another document by choosing “print all carrier manifests”

39
Manage order: ready to ship
*verify order number and amount of box
Shipper will sign here
*you have to print this document for 2 pieces*1piece the shipper will sign and you keep it *another piece you give it to shipper
After printed please click“continue”
40
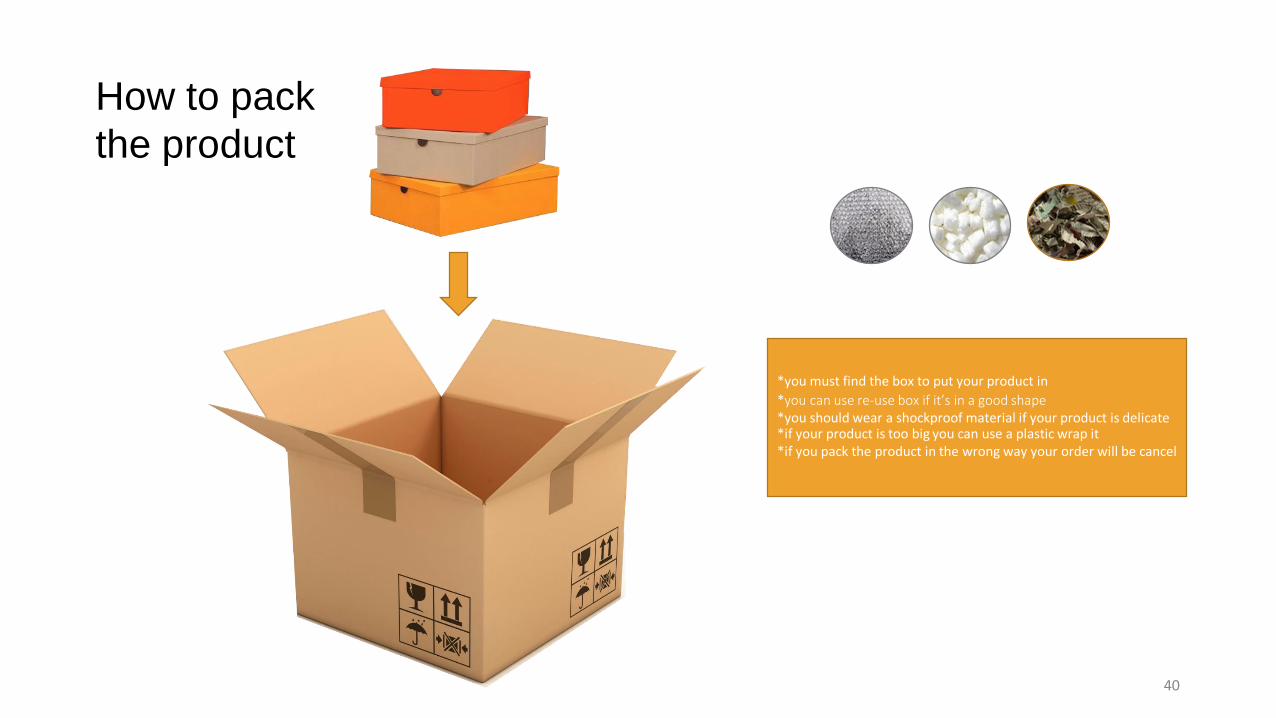
How to pack
the product
*you must find the box to put your product in
*you can use re-use box if it’s in a good shape*you should wear a shockproof material if your product is delicate*if your product is too big you can use a plastic wrap it *if you pack the product in the wrong way your order will be cancel
41
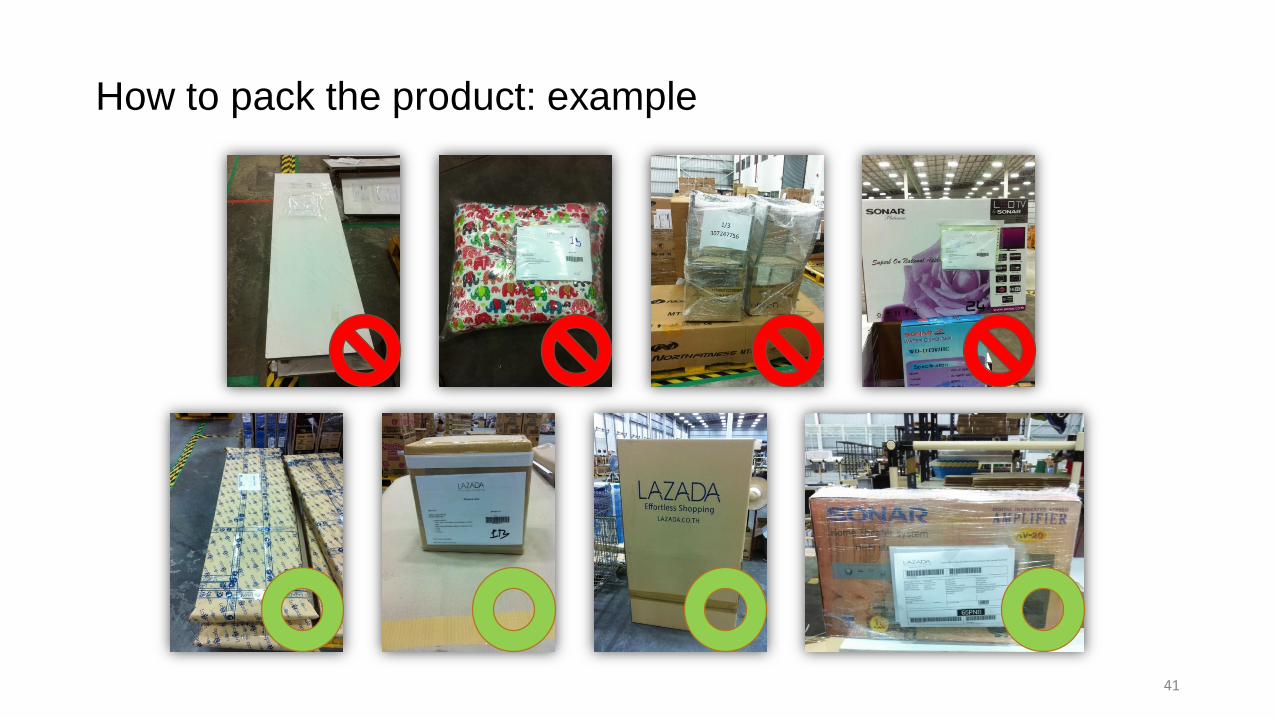
How to pack the product: example

42
Total sales report
Click at sales report
43
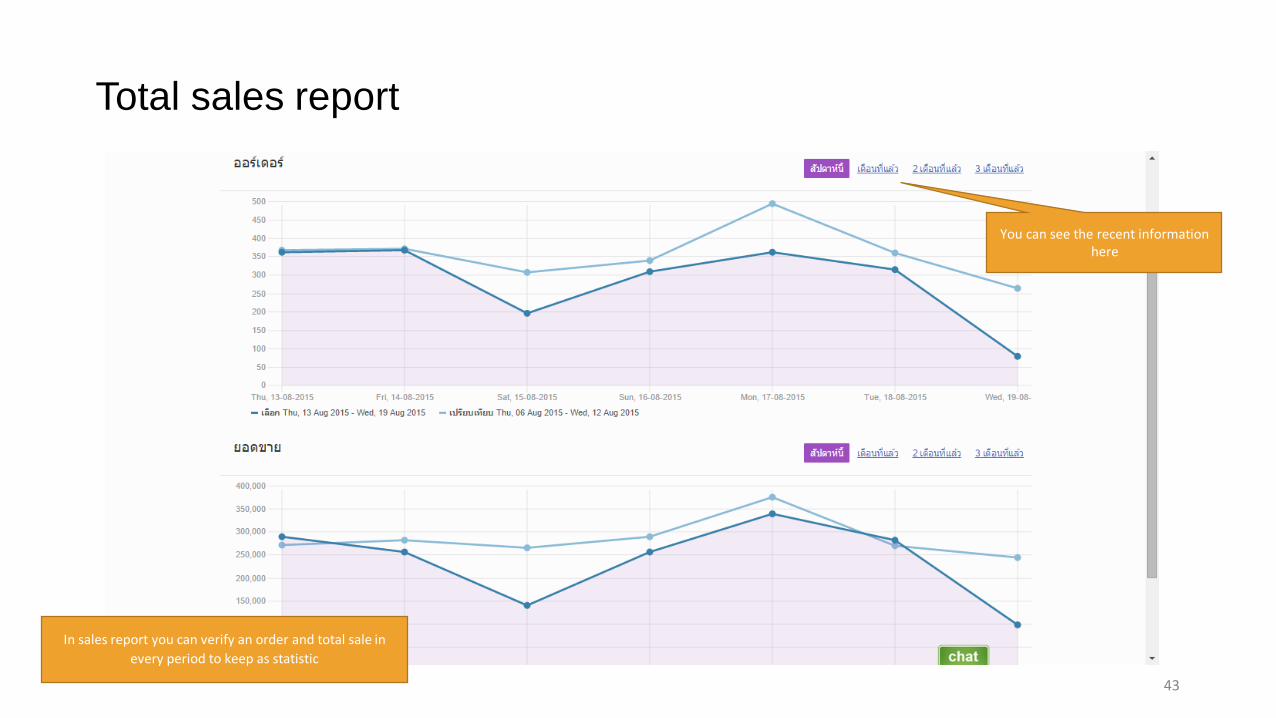
Total sales report
In sales report you can verify an order and total sale in
every period to keep as statistic
You can see the recent information here

44
Account statement
Click at account statements
45
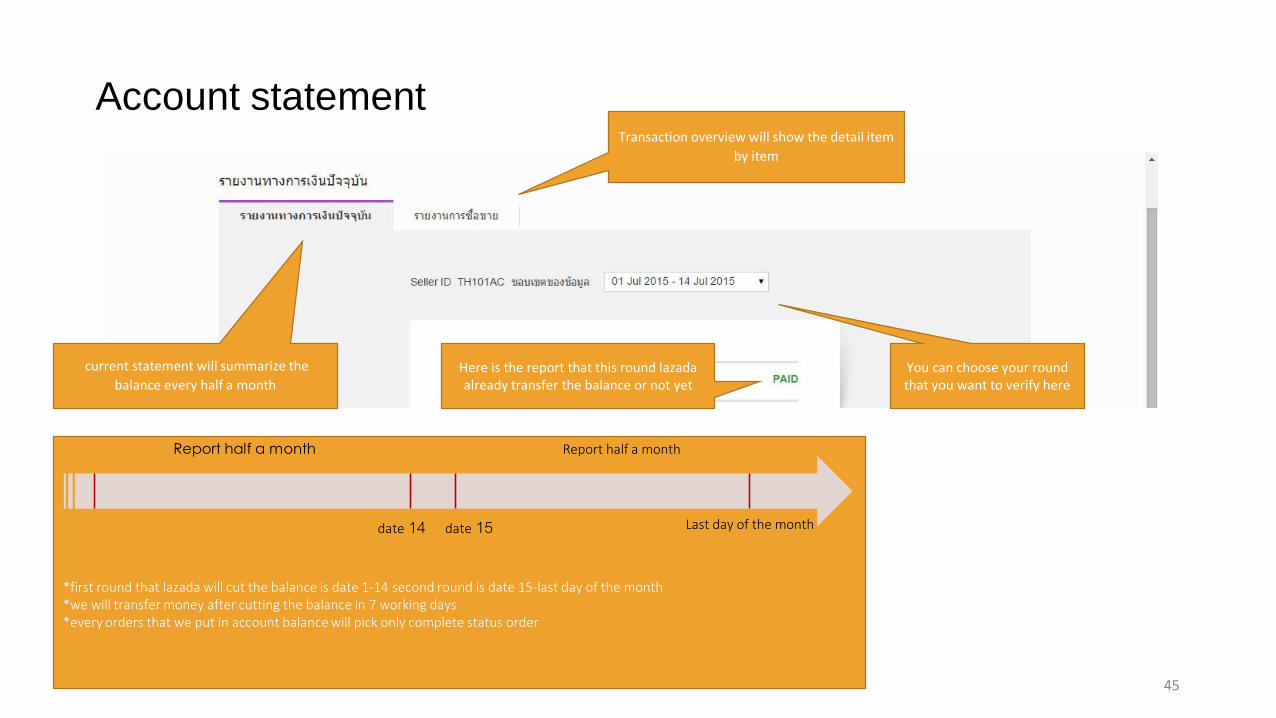
Account statement
current statement will summarize the
balance every half a month
Transaction overview will show the detail item
by item
You can choose your round that you want to verify here
Here is the report that this round lazadaalready transfer the balance or not yet
*first round that lazada will cut the balance is date 1-14 second round is date 15-last day of the month*we will transfer money after cutting the balance in 7 working days*every orders that we put in account balance will pick only complete status order
Report half a month
date 14 Last day of the monthdate 15
Report half a month
46
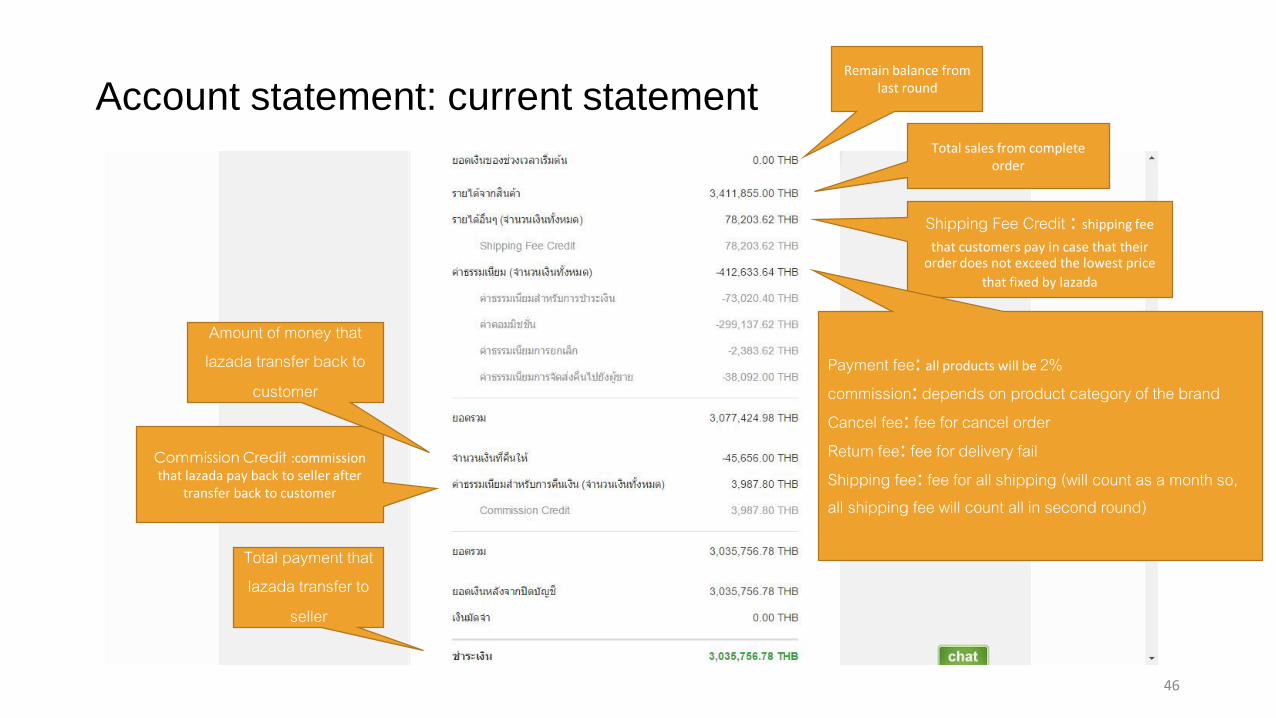
Account statement: current statementRemain balance from
last round
Total sales from complete order
Shipping Fee Credit : shipping fee
that customers pay in case that their order does not exceed the lowest price
that fixed by lazada
Payment fee: all products will be 2%commission: depends on product category of the brandCancel fee: fee for cancel orderReturn fee: fee for delivery failShipping fee: fee for all shipping (will count as a month so, all shipping fee will count all in second round)
Commission Credit :commission that lazada pay back to seller after
transfer back to customer
Amount of money that lazada transfer back to
customer
Total payment thatlazada transfer to
seller
47
Account statement:
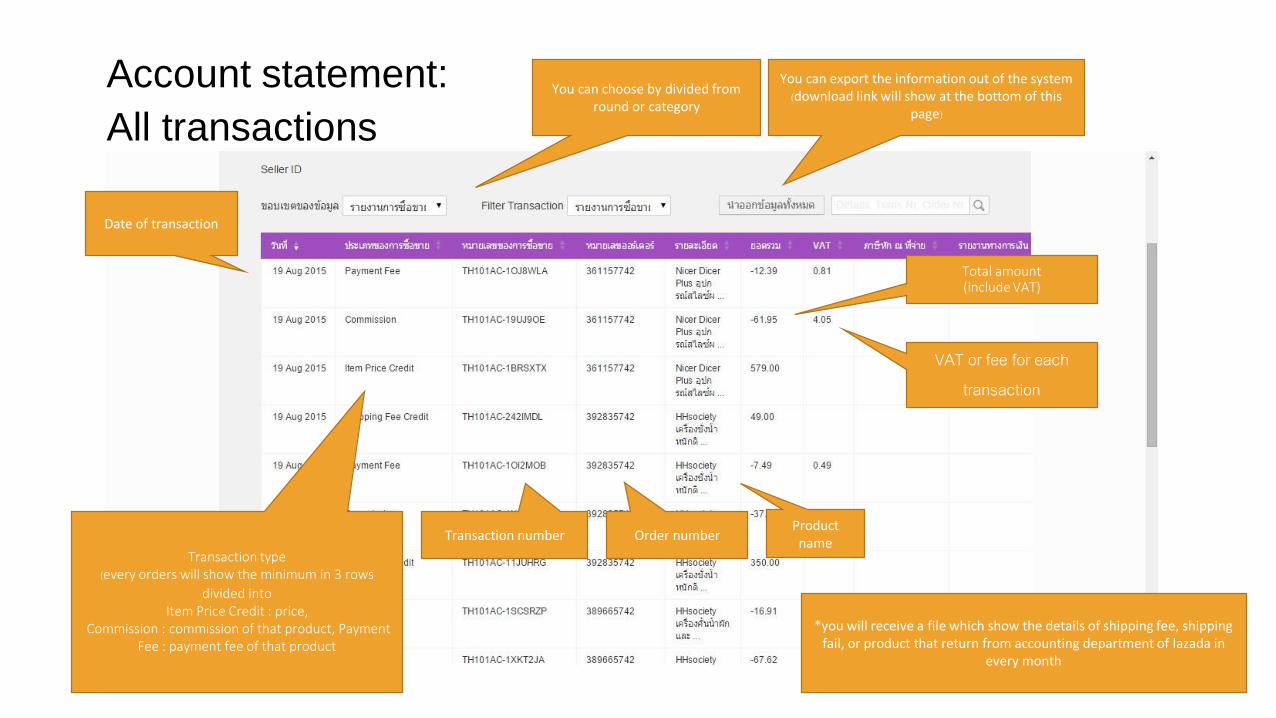
All transactions
You can choose by divided from round or category
You can export the information out of the system(download link will show at the bottom of this
page)
Date of transaction
Transaction type(every orders will show the minimum in 3 rows
divided into Item Price Credit : price,
Commission : commission of that product, Payment Fee : payment fee of that product
Transaction number Order numberProduct name
Total amount (include VAT)
VAT or fee for each transaction
*you will receive a file which show the details of shipping fee, shipping fail, or product that return from accounting department of lazada in
every month
48
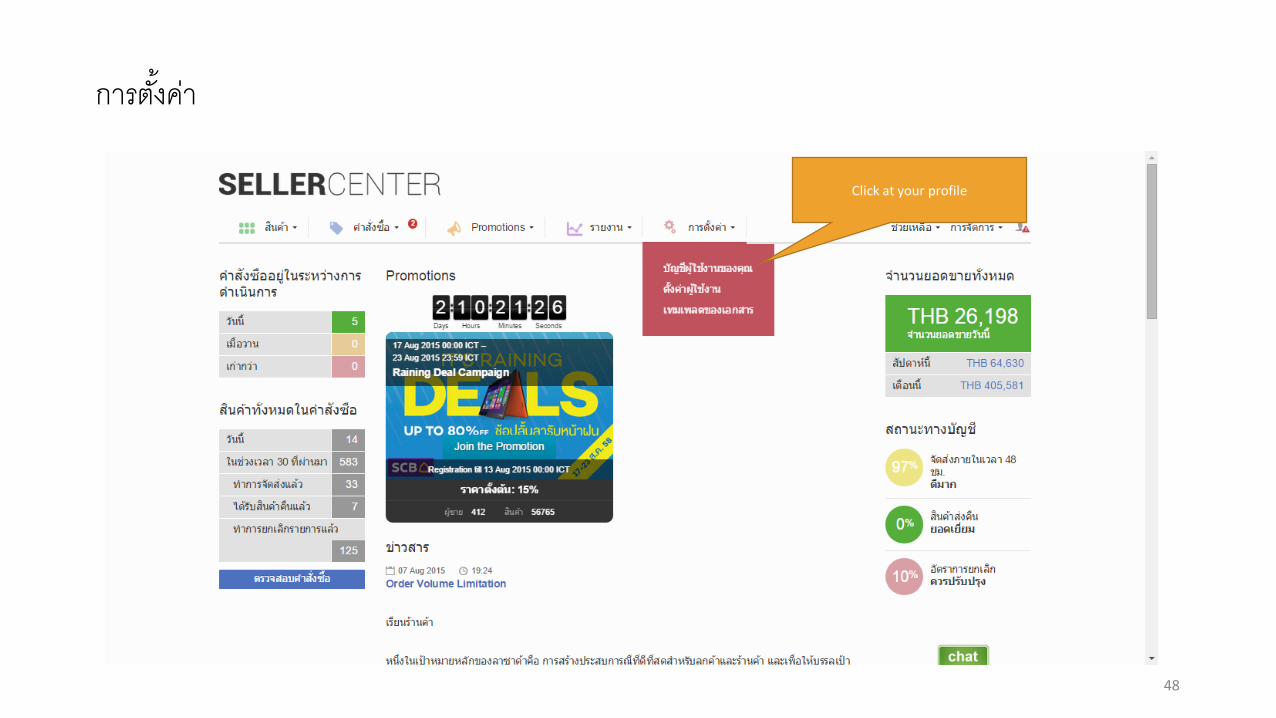
การตัง้คา่
Click at your profile

49
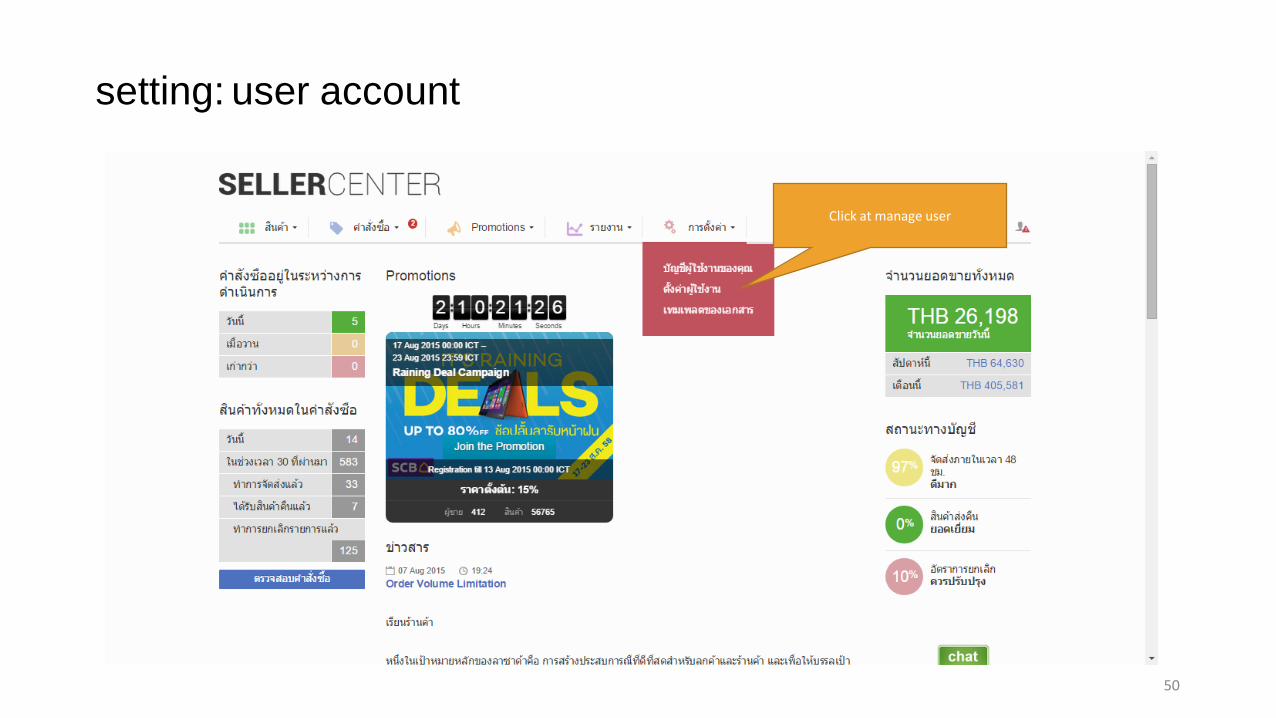
setting: user account
General information of sellerCommission of each
category
*to edit any information ofseller you have to contact lazada to edit for you - if you are new seller who just sign contract you can contact by email [email protected] If you are old seller you have to contact Partner Support email [email protected]
50
setting: user account
Click at manage user
51
setting: user account
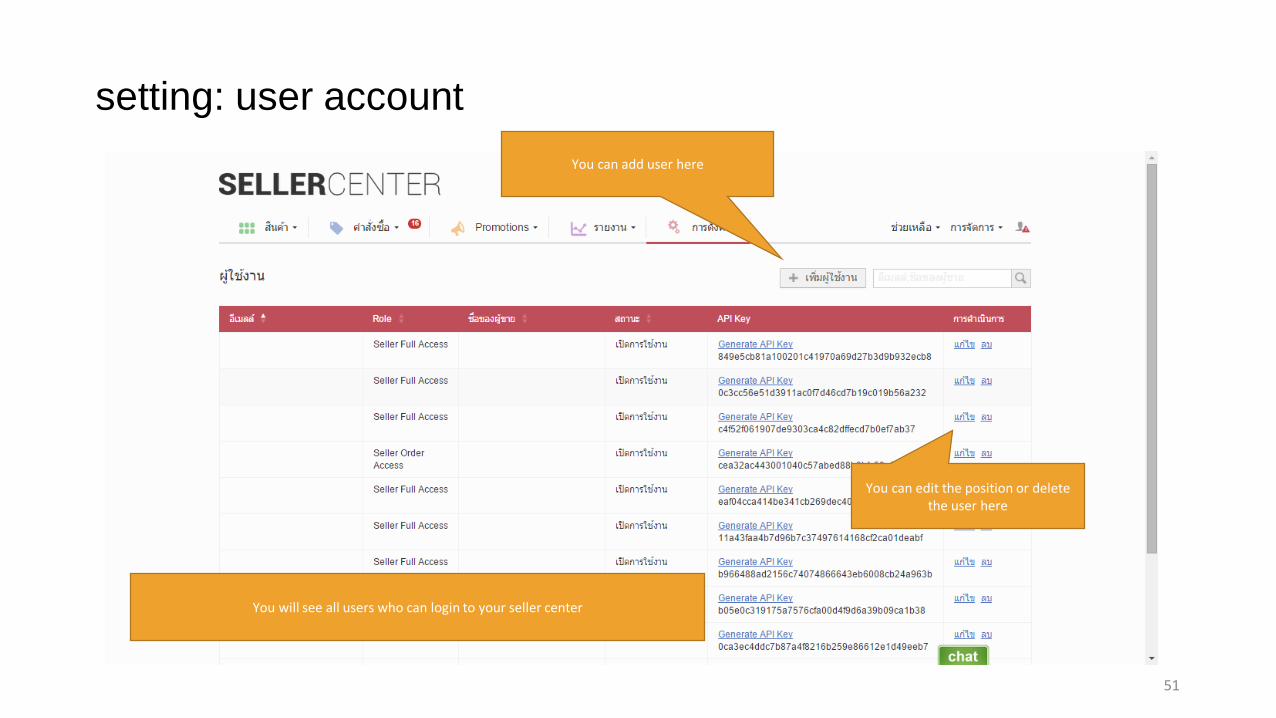
You can add user here
You will see all users who can login to your seller center
You can edit the position or delete the user here
52
setting: add user
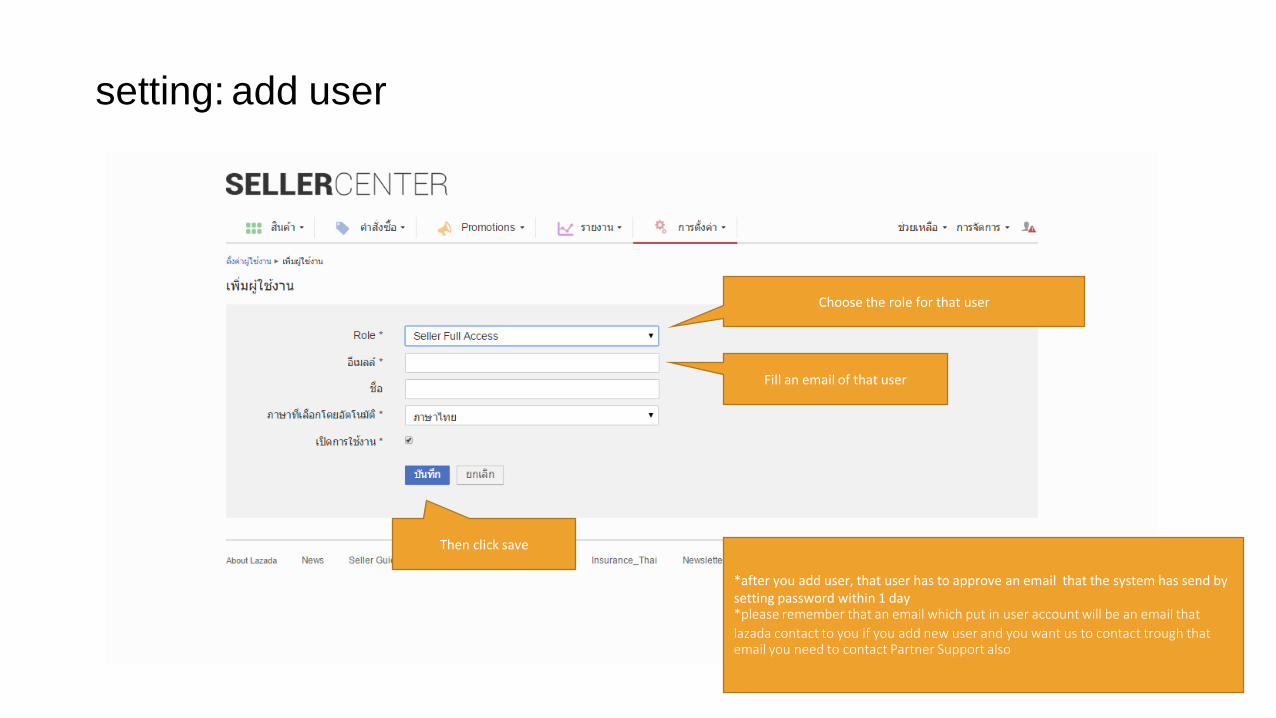
Choose the role for that user
Fill an email of that user
Then click save
*after you add user, that user has to approve an email that the system has send by setting password within 1 day*please remember that an email which put in user account will be an email that
lazada contact to you if you add new user and you want us to contact trough that email you need to contact Partner Support also