MSWORD 2007 Handouts
25
Using Microsoft Office 2007 Introduction to Word Handout INFORMATION TECHNOLOGY SERVICES California State University, Los Angeles Version 1.0 Winter 2009 Contents Launching Word 2007................ ........................ ........................ ........................ ........................ .. 3 Working with the Word 2007 User Interface...... .............................. ......................................... 3 Using the Office Button............................................................................................................ 4 Using the Quick Access Toolbar .............................................................................................. 5 Minimizing and Maximizing the Ribbon.................................................................................. 5 Using Dialog Box Launchers.................................................................................................... 6 Creating, Saving, and Closing Documents .......................... ........................................... ............ 6 Using Save As........................................................................................................................... 7 Closing a Document/Exiting Word........................................................................................... 8 Opening an Existing Document.............. ............................. ............................. ........................... 8 Editing a Docume nt ......... ............. ............. ............. ............. ............. ............. ............. ............. ..... 9 Selecting Text ........................................................................................................................... 9 Cut, Copy, and Paste................................................................................................................. 9 Cut..................................................................................................................................... 10 Copy.................................................................................................................................. 10 Paste.................................................................................................................................. 10 Accessing the Clipboard ......................................................................................................... 10 Deleting Clipboard Items.................................................................................................. 10 Removing Text........................................................................................................................ 11 Drag and Drop Editing............................................................................................................ 11 Formatting a Document ... ................... ................... ................... ................... ................... ........... 11 Live Preview ........................................................................................................................... 11 The Mini Toolbar.................................................................................................................... 12 Character Formatting .............................................................................................................. 12 Changing Font Typeface................................................................................................... 12 Changing Font Size........................................................................................................... 12 Changing Font Style ......................................................................................................... 13 Changing Font Color............................................................................................................... 13 Paragraph Formatting.............................................................................................................. 14 Paragraph Alignment ........................................................................................................ 14 Line Spacing ..................................................................................................................... 15 Indentations....................................................................................................................... 16 Setting Tab Stops.............................................................................................................. 17 Changing Styles ...................................................................................................................... 17 Numbers and Bullets............................................................................................................... 18 Setting Breaks ......................................................................................................................... 18 Changing Margins . .............. .............. .............. .............. .............. .............. .............. .............. ..... 19 For additional Microsoft Office handouts, visit http://www.cal statela.edu /its/docs/office.ph p
-
Upload
monsour-bautista -
Category
Documents
-
view
229 -
download
0
Transcript of MSWORD 2007 Handouts

8/3/2019 MSWORD 2007 Handouts
http://slidepdf.com/reader/full/msword-2007-handouts 1/25
Using Microsoft Office 2007Introduction to Word Handout
INFORMATION TECHNOLOGY SERVICES
California State University, Los AngelesVersion 1.0 Winter 2009
Contents
Launching Word
2007................
........................
........................
........................
........................
.. 3
Working with the Word 2007 User
Interface....................................
......................................... 3
Using the Office Button......................................................................................................Using the Quick Access Toolbar ........................................................................................Minimizing and Maximizing the Ribbon............................................................................
Using Dialog Box Launchers..............................................................................................
Creating, Saving, and Closing
Documents ..........................
...........................................
............ 6
Using Save As.....................................................................................................................
Closing a Document/Exiting Word.....................................................................................
Opening an Existing
Document..............
.............................
.............................
...........................
8
Editing a
Docume
nt .........
.............
.............
.............
.............
.............
.............
.............
.............
..... 9
Selecting Text .....................................................................................................................Cut, Copy, and Paste...........................................................................................................
Cut.................................................................................................................................Copy..............................................................................................................................Paste..............................................................................................................................
Accessing the Clipboard .....................................................................................................Deleting Clipboard Items..............................................................................................
Removing Text....................................................................................................................Drag and Drop Editing........................................................................................................
Formatting a
Document ...
...................
...................
...................
...................
...................
........... 11
Live Preview ....................................................................................................................... The Mini Toolbar................................................................................................................
Character Formatting ..........................................................................................................Changing Font Typeface...............................................................................................Changing Font Size.......................................................................................................Changing Font Style .....................................................................................................
Changing Font Color...........................................................................................................
Paragraph Formatting..........................................................................................................Paragraph Alignment ....................................................................................................Line Spacing .................................................................................................................Indentations...................................................................................................................Setting Tab Stops..........................................................................................................
Changing Styles ..................................................................................................................Numbers and Bullets...........................................................................................................
Setting Breaks .....................................................................................................................
Changing
Margins .
..............
..............
..............
..............
..............
..............
..............
..............
..... 19
For additional Microsoft Office handouts, visit http://www.calstatela.edu/its/docs/office.php

8/3/2019 MSWORD 2007 Handouts
http://slidepdf.com/reader/full/msword-2007-handouts 2/25
Viewing the
Document..
.................
.................
.................
.................
.................
.................
........ 20
Switching Document Views ...............................................................................................Magnifying a Document .....................................................................................................
Printing a
Documen
t.............
..............
..............
..............
..............
..............
..............
..............
.... 21
Previewing a Document......................................................................................................Printing Options..................................................................................................................
Printing the Current Page..............................................................................................
Printing Specific Pages .................................................................................................Printing a Selection from the Document.......................................................................Printing Multiple Copies...............................................................................................
Selecting a Printer...............................................................................................................
Using the Help
Function........
.....................
.....................
.....................
.....................
.................
24
Online Help..................................................................................................................
Introduction to Microsoft Word 2007 - 2

8/3/2019 MSWORD 2007 Handouts
http://slidepdf.com/reader/full/msword-2007-handouts 3/25
Introduction to Microsoft Word 2007Microsoft Word 2007 is a full feature word processing program that allows the user to ddocuments. The many formats available easily enable the user to produce professional reletters, essays and other documents incorporating the use of tables, charts, and graphics
2007 is part of Microsoft Office 2007, which includes other software applications. MicOffice 2007 offers Online Help for user assistance and questions related to the prog
This guide is an introduction to Word 2007 and illustrates the basic functions the program Start from the beginning for a general overview or choose the topics from the Contents
Launching Word 2007 There are six Open Access Labs (OAL’s) on campus. A user can start Word 2007 from
them.
To start Word 2007 from a station in the Open Access Labs:
1. Click the Start button at the bottom left corner of the screen.2. Select the All Programs option.3. Select the Microsoft Office folder.
4. Click the Microsoft Office Word 2007 icon.
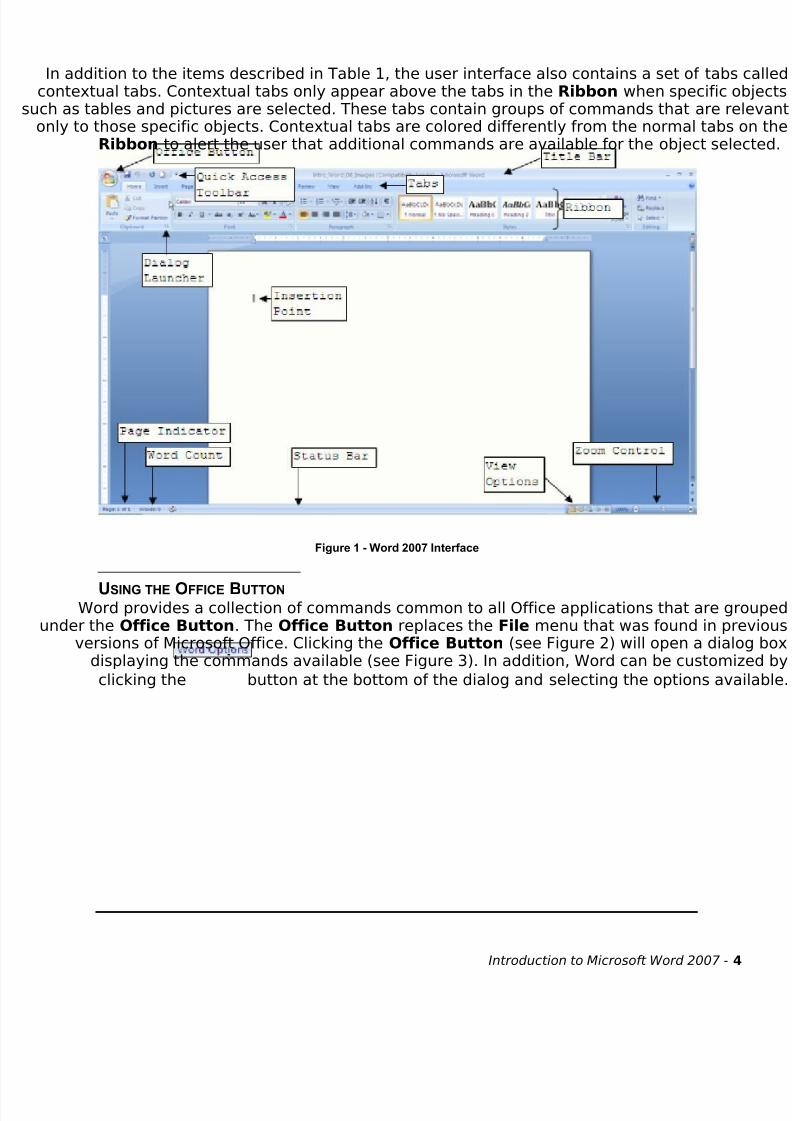
Working with the Word 2007 User InterfaceWord 2007 includes many enhancements to make working with the document easier,
make the document more professional looking. The redesigned user interface includcomponents illustrated in Figure 1. Refer to Table 1, for a brief description of each i
Table 1 - Word User Interface Components
Item Title BarOffice button
Quick Access ToolbarRibbon
TabsInsertionPointScroll BarsView OptionsDialogLauncherPage IndicatorMagnification
ControlWord Count
DescriptionContains the title of the document and the applicationGrouping of commands to save, open, print, and perform other
commands common to all Office applicationsCollection of buttons to quickly access regularly usedfeatures of the applicationContains many features formerly found in menu structuresIndividual collections (groups) of commands within the RibbonA flashing line on the screen that indicates where text willbe entered into a documentMove through the document, up or down, left or rightWord 2003 provides several different ways to view a documentA control for accessing more features contained within a groupon the RibbonIndicates the active page in the documentControls the magnification of the document
Continuous display of the number of words in the document
Introduction to Microsoft Word 2007 - 3
8/3/2019 MSWORD 2007 Handouts
http://slidepdf.com/reader/full/msword-2007-handouts 4/25
In addition to the items described in Table 1, the user interface also contains a set of tabs contextual tabs. Contextual tabs only appear above the tabs in the Ribbon when specific o
uch as tables and pictures are selected. These tabs contain groups of commands that are reonly to those specific objects. Contextual tabs are colored differently from the normal tabs
Ribbon to alert the user that additional commands are available for the object sele
Figure 1 - Word 2007 Interface
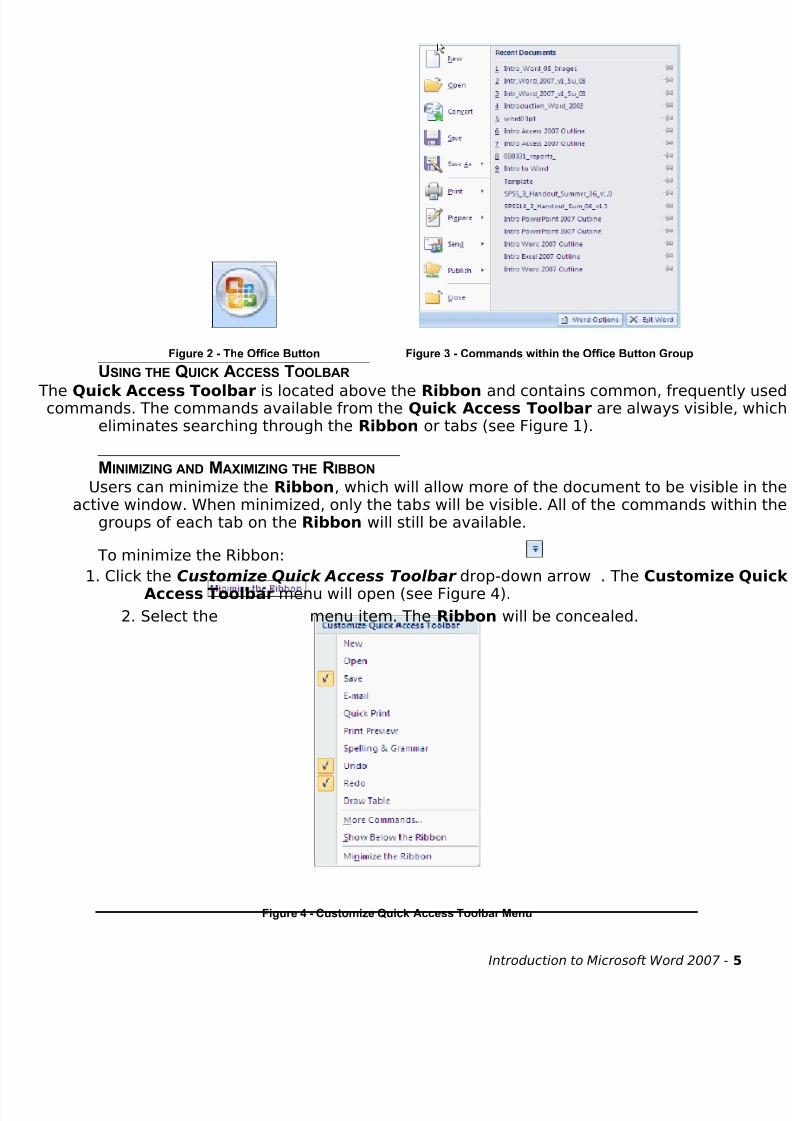
USING THE OFFICE BUTTON
Word provides a collection of commands common to all Office applications that are grunder the Office Button. The Office Button replaces the File menu that was found in pr
versions of Microsoft Office. Clicking the Office Button (see Figure 2) will open a dialodisplaying the commands available (see Figure 3). In addition, Word can be customiz
button at the bottom of the dialog and selecting the options avaclicking the
Introduction to Microsoft Word 2007 - 4
8/3/2019 MSWORD 2007 Handouts
http://slidepdf.com/reader/full/msword-2007-handouts 5/25
Figure 2 - The Office Button Figure 3 - Commands within the Office Button Group
USING THE QUICK ACCESS TOOLBAR
The Quick Access Toolbar is located above the Ribbon and contains common, frequentlycommands. The commands available from the Quick Access Toolbar are always visible,
eliminates searching through the Ribbon or tabs (see Figure 1).
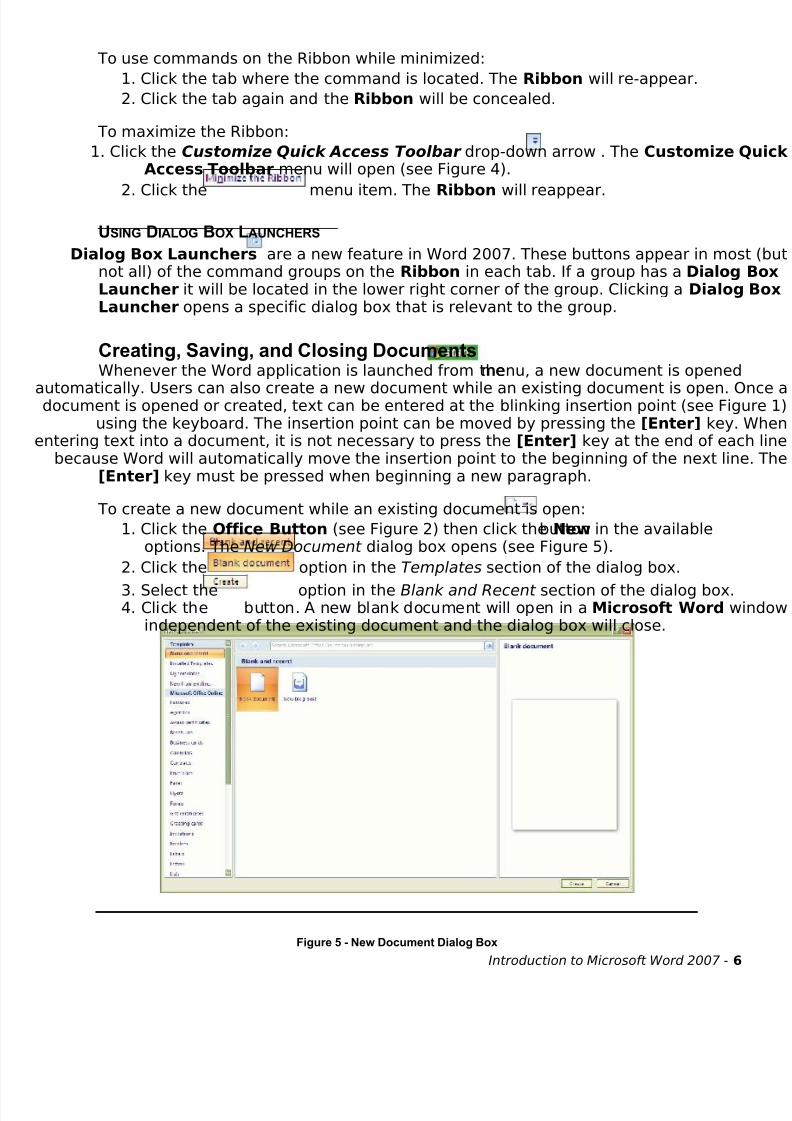
MINIMIZING AND MAXIMIZING THE RIBBON
Users can minimize the Ribbon, which will allow more of the document to be visibleactive window. When minimized, only the tabs will be visible. All of the commands with
groups of each tab on the Ribbon will still be available.
To minimize the Ribbon:
1. Click the Customize Quick Access Toolbar drop-down arrow . The Customize Access Toolbar menu will open (see Figure 4).
2. Select the menu item. The Ribbon will be concealed.
Figure 4 - Customize Quick Access Toolbar Menu
Introduction to Microsoft Word 2007 - 5
8/3/2019 MSWORD 2007 Handouts
http://slidepdf.com/reader/full/msword-2007-handouts 6/25
To use commands on the Ribbon while minimized:
1. Click the tab where the command is located. The Ribbon will re-appear.
2. Click the tab again and the Ribbon will be concealed.
To maximize the Ribbon:
1. Click the Customize Quick Access Toolbar drop-down arrow . The Customize Access Toolbar menu will open (see Figure 4).
menu item. The Ribbon will reappear.2. Click the
USING DIALOG BOX LAUNCHERS
Dialog Box Launchers are a new feature in Word 2007. These buttons appear in monot all) of the command groups on the Ribbon in each tab. If a group has a DialogLauncher it will be located in the lower right corner of the group. Clicking a DialogLauncher opens a specific dialog box that is relevant to the group.
Creating, Saving, and Closing DocumentsWhenever the Word application is launched from themenu, a new document is opened
automatically. Users can also create a new document while an existing document is open. Odocument is opened or created, text can be entered at the blinking insertion point (see Fig
using the keyboard. The insertion point can be moved by pressing the [Enter] key.entering text into a document, it is not necessary to press the [Enter] key at the end of eac
because Word will automatically move the insertion point to the beginning of the next lin[Enter] key must be pressed when beginning a new paragraph.
To create a new document while an existing document is open:
button in the available1. Click the Office Button (see Figure 2) then click the Newoptions. The New Document dialog box opens (see Figure 5).
option in the Templates section of the dialog box.2. Click the
3. Select the option in the Blank and Recent section of the dialog box.4. Click the button. A new blank document will open in a Microsoft Word w
independent of the existing document and the dialog box will close.
Figure 5 - New Document Dialog Box
Introduction to Microsoft Word 2007 - 6

8/3/2019 MSWORD 2007 Handouts
http://slidepdf.com/reader/full/msword-2007-handouts 7/25
To save a new document for the first time:
on the Quick Access Toolbar. The Save As dialog box o1. Click the Save button(see Figure 6).
2. Enter a name for the document in thetext box.
Figure 6 - Save As Dialog Box
NOTE: By default, documents are saved in the My Documents folder on the main drive of the
computer. If the user wants to save the document in a different folder or drive, click the
drop-down arrow and select a different location.
3. Click the button to save the file. The dialog box will close.
NOTE: By default, documents are saved with a file extension of .docx. This extension makes the
document compatible only with Word 2007. If this file extension is used, the document will not o
in previous versions of Word (97, XP, or 2003). If the user wants the document to be compatible
previous versions of Word then the Save As option should be used.
NOTE: After a document has been saved for the first time, clicking the Save button
Access Toolbar will save any changes without the Save As dialog box opening.
on the Quick
USING SAVE AS
The Save As option allows users to save a new or existing document in a different formatthan the default Word 2007 format. This can eliminate document incompatibility with use
do not use Word 2007.
To use the Save As option:1. Click the Office Button to display the commands within the Office Button g
2. Hover the mouse over the Save As button to display the options available (see Fig3. If compatibility with previous versions of Word is desired, select the
option. The Save As dialog box will open with the Word 97-2file format automatically selected.
Introduction to Microsoft Word 2007 - 7

8/3/2019 MSWORD 2007 Handouts
http://slidepdf.com/reader/full/msword-2007-handouts 8/25
4. If a different format is desired (such as a template or web page format) then cli
drop-down arrow and select the appropriate format.5. Enter a name for the file in the File name: textbox.
6. Click the button to save the document in a different format.
Figure 7 - Save As Options
CLOSING A DOCUMENT /EXITING WORD
If a document has been saved, a user can close the document (and the Word applicati
either clicking the Close buttonin the upper right corner of the Microsoft Word windoby clicking the Office Button and then clicking the Close button at the bottom of the
button at the bottom of the list of options or options (see Figure 7). Clicking the
button in the right corner of the title bar will close the Word application.Close
NOTE: If unsaved changes have been made to the document, the user will be prompted to save the
changes before the document closes and/or the application closes. If changes are not saved before
the document or exiting Word, then the changes will be lost.
Opening an Existing DocumentAfter creating and saving a document, the file resides on a disk. To view or edit an ex
document, it must first be opened from the disk.
To open an existing document:1. Click the Office Button.
2. Click the Open button in the list of available options (see Figure 7). The Open dialoappears (see Figure 8).
NOTE: If the desired document is not in the default folder, click the
navigate to the appropriate folder and/or drive.
drop-down arrow and
Introduction to Microsoft Word 2007 - 8

8/3/2019 MSWORD 2007 Handouts
http://slidepdf.com/reader/full/msword-2007-handouts 9/25
3. Click on the document name and, if necessary, click thebutton.
Figure 8 – Open Dialog Box
Editing a DocumentEditing a document can consist of the addition or removal of characters. To edit a docume
text to be edited must be selected. Text can be selected using the dragging and highlimethod with the mouse.
SELECTING TEXT
Selecting text will be an important step in cutting, copying, pasting, deleting, and editing a document. Table 2 describes different options for how to select text.
Table 2 - Options for Selecting Text
Action
Selecting a wordSelecting asentenceSelecting aparagraph
Selecting anyamount of text
Selecting theentire document
Descriptions
Double-click the wordHold down the [Ctrl] key on the keyboard then clickanywhere in the sentence to be selectedMove the pointer to the left of the paragraph until itchanges to a right-pointing arrow, and then double-click (asingle-click will select the entire line).Place the mouse in front of the text to select (it turnsinto an I-beam shape) then click and drag the mouse over
the textEither move the pointer to the left of any document textuntil it changes to a right-pointing arrow, and thentriple-click, or simply press the [Ctrl+A] key combinationon the keyboard
CUT, COPY, AND PASTE
When editing a document, it may be necessary to move or copy text, either within thedocument or between documents. The text that is cut or copied will be placed onto
Introduction to Microsoft Word 2007 - 9
8/3/2019 MSWORD 2007 Handouts
http://slidepdf.com/reader/full/msword-2007-handouts 10/25
Clipboard (a special area in the application from which material that has been cut or copiebe retrieved).
Cut The Cut feature removes the selected text from the document, and stores it on the Clipb
To cut text:1. Select the text to cut.2. Select the Home tab on the Ribbon.
3. Click the Cut button in the Clipboard group. The text is cut from its originalocation and stored on the Clipboard.
Copy The Copy feature is similar to the Cut feature except that the Copy feature does not remo
text from its original location. It creates a copy of the selected text and stores in onClipboard.
To copy text:
1. Select the text to copy.2. Click the Copy button in the Clipboard group. The original text remains th
same, and the copied text is stored on the Clipboard.
Paste The Paste feature inserts the contents of the clipboard at an insertion point or over a se
area.
To paste the last item cut or copied:1. Select the location to paste the text.
2. Click the Paste button in the Clipboard group.NOTE: The Cut, Copy, and Paste commands can also be
executed by right-clicking the selected text with the mouse. A
shortcut menu will appear containing these commands (see
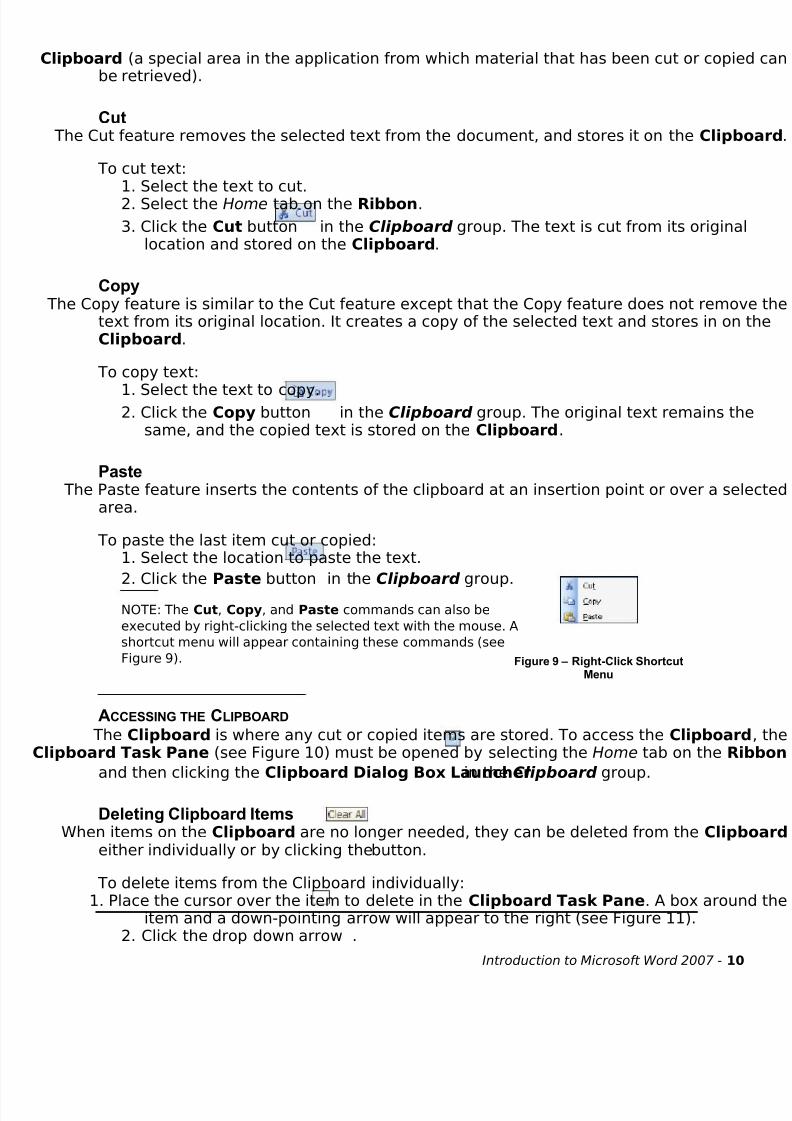
Figure 9). Figure 9 – Right-Click ShortcutMenu
ACCESSING THE CLIPBOARD
The Clipboard is where any cut or copied items are stored. To access the ClipboarClipboard Task Pane (see Figure 10) must be opened by selecting the Home tab on the R
in the Clipboard group.and then clicking the Clipboard Dialog Box Launcher
Deleting Clipboard ItemsWhen items on the Clipboard are no longer needed, they can be deleted from the Clip
either individually or by clicking thebutton.
To delete items from the Clipboard individually:1. Place the cursor over the item to delete in the Clipboard Task Pane. A box arou
item and a down-pointing arrow will appear to the right (see Figure 11).2. Click the drop down arrow .
Introduction to Microsoft Word 2007 - 10

8/3/2019 MSWORD 2007 Handouts
http://slidepdf.com/reader/full/msword-2007-handouts 11/25
3. Select the Delete option.
Figure 10 – Clipboard Task Pane Figure 11 – Deleting Clipboard Items
REMOVING TEXT
There may be times when it is necessary to delete text. Once the text has been selected, it celeted with a single keystroke. Either the [Backspace] or the [Delete] keys on the keyboabe used to remove one character at a time. The [Backspace] key removes the cha
immediately to the left of the cursor and [Delete] key removes the character immediatelyright of the cursor. Additionally, the [Delete] key can also be used to delete a whole
sentence, paragraph, or block of text at once after the text has been highlighted.
DRAG AND DROP EDITING
Word has a drag and drop editing feature that allows the user to move or copy text withoplacing it on the Clipboard.
To move text using drag and drop editing:1. Highlight the text to be moved.2. Click and hold the left mouse button over the highlighted text.3. Drag the mouse cursor to the new location and release the mouse button.
To copy text using drag and drop editing:1. Highlight the text to be moved.2. Press and hold the [Ctrl] key.3. Click and hold the left mouse button over the highlighted text.4. Drag the mouse cursor to the new location and release the mouse button.
Formatting a DocumentFormatting the characters in a document can enhance the appearance of the docume
provide a more professional appearance to the entire document.
LIVE PREVIEW
Live Preview is a new feature in Word 2007. In the case of character formatting, Live Papplies to the Font typeface, Font size, and Font color. Live Preview allows the user to vis
how a different typeface, size, or color will appear within the document. Live Previe
Introduction to Microsoft Word 2007 - 11

8/3/2019 MSWORD 2007 Handouts
http://slidepdf.com/reader/full/msword-2007-handouts 12/25
temporarily displays any changes to a selected object or selected text in the document wactually changing it.
THE MINI TOOLBAR
Another new feature in Word 2007 is the Mini Toolbar. The Mini Toolbar contains freqused formatting commands and appears in a semi-transparent mode whenever text is select
formatting. Moving the mouse over the toolbar activates it and makes the options availa
use (see Figure 12). Most of the formatting options on the Mini Toolbar are discussedfollowing sections.
CHARACTER FORMATTING
Character formatting enhances the appearance of text, and includes font typeface, font sizstyle, and font color. Character formatting is applied using the features on the Home tab
Ribbon in the Font group (see Figure 13).
Figure 12 - The Mini Toolbar Figure 13 – Font Group
Changing Font TypefaceA font typeface is defined as a group of characters sharing similar type attributes. The d
font typeface for new documents in Word 2007 is Calibri.
To change the font typeface for selected text:1. Select the text to change.
2. Click the Font Typeface drop-down arrow in the Font group. A list of availablewill appear.
3. Select the desired font name to change the font typeface.
Changing Font SizeFont size refers to the height of printed text on a page and is measured in units called p
There are 72 points in one inch. The higher the number entered for the font size, the largtext will be. The default font size for new documents in Word is 11 points.
To change the font size for selected text:1. Select the text to change.2. Select the Home tab on the Ribbon.3. Click the Font Size drop-down arrow
will appear.in the Font group. A list of available font size
NOTE: Font sizes are not listed in increments of one point. If a desired font size is not listed in th
Font Size drop-down list, click the number instead of the drop-down arrow, manually enter the
desired font size and press the [Enter] key to apply the new font size.
Introduction to Microsoft Word 2007 - 12

8/3/2019 MSWORD 2007 Handouts
http://slidepdf.com/reader/full/msword-2007-handouts 13/25
4. Select the desired font size.
Changing Font StyleFont style refers to font type enhancement. See Table 3 for examples of the available font
Table 3 – Font Styles
Button Font StyleBold
Italic
Underline
Strikethrough
Subscript
Superscript
Change Case
Example
Example of Bold text
Example of Italicized text
Example of Underlined text
Example of Strikethrough text
Example of
Example of
Subscripted text
textSuperscripted
Changes the case of the selected text
The Underline and Change Case font styles have several options available that can be accby clicking the drop-down arrow associated with each style (see Figure 14 and Figu
To change the font style for selected text:1. Select the text to change.2. Click the desired Font style button in the Font group.
NOTE: It is possible to apply more than one font style to text.
Figure 14 - Underlining Styles Figure 15 - Change Case Styles
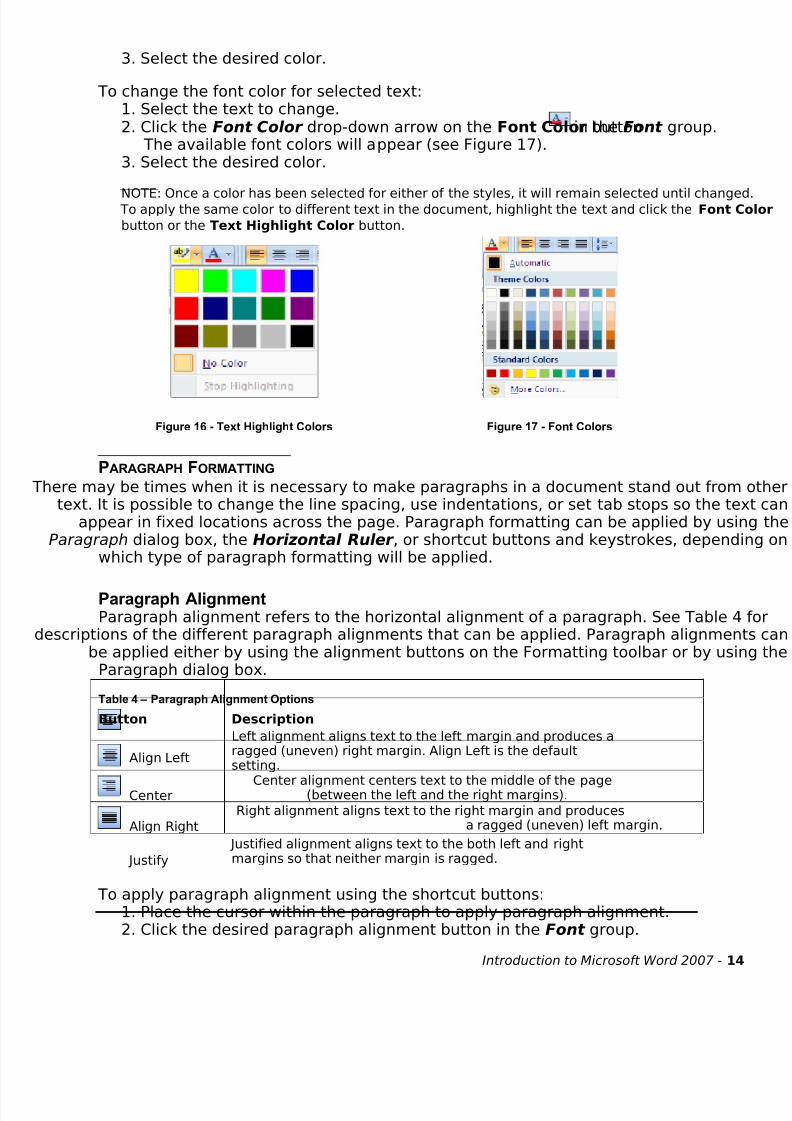
CHANGING FONT COLOR
Two aspects of font color can be styled. The background color of the text (also known Text Highlight Color) can be changed from the default color of white and the color of th
itself can be changed from the default color of black.
To change the Text Highlight Color for selected text:1. Select the text to change.
2. Click the Text Highlight Color drop-down arrow on the Text Highlight Color
in the Font group. The available highlight colors will appear (see Figure
Introduction to Microsoft Word 2007 - 13
8/3/2019 MSWORD 2007 Handouts
http://slidepdf.com/reader/full/msword-2007-handouts 14/25
3. Select the desired color.
To change the font color for selected text:1. Select the text to change.2. Click the Font Color drop-down arrow on the Font Color button
The available font colors will appear (see Figure 17).3. Select the desired color.
in the Font group.
NOTE: Once a color has been selected for either of the styles, it will remain selected until chang To apply the same color to different text in the document, highlight the text and click the Font C
button or the Text Highlight Color button.
Figure 16 - Text Highlight Colors Figure 17 - Font Colors
PARAGRAPH FORMATTING
There may be times when it is necessary to make paragraphs in a document stand out fromtext. It is possible to change the line spacing, use indentations, or set tab stops so the te
appear in fixed locations across the page. Paragraph formatting can be applied by usiParagraph dialog box, the Horizontal Ruler , or shortcut buttons and keystrokes, depend
which type of paragraph formatting will be applied.
Paragraph AlignmentParagraph alignment refers to the horizontal alignment of a paragraph. See Table 4
descriptions of the different paragraph alignments that can be applied. Paragraph alignmenbe applied either by using the alignment buttons on the Formatting toolbar or by usi
Paragraph dialog box.
Table 4 – Paragraph Alignment Options
Button
Align Left
Center
Align Right
Justify
Description
Left alignment aligns text to the left margin and produces aragged (uneven) right margin. Align Left is the defaultsetting.
Center alignment centers text to the middle of the page(between the left and the right margins).
Right alignment aligns text to the right margin and producesa ragged (uneven) left margin.
Justified alignment aligns text to the both left and rightmargins so that neither margin is ragged.
To apply paragraph alignment using the shortcut buttons:1. Place the cursor within the paragraph to apply paragraph alignment.2. Click the desired paragraph alignment button in the Font group.
Introduction to Microsoft Word 2007 - 14

8/3/2019 MSWORD 2007 Handouts
http://slidepdf.com/reader/full/msword-2007-handouts 15/25
To apply paragraph alignment using theParagraph dialog box:
1. Place the cursor within theparagraph to apply a newparagraph alignment.
2. Click the Paragraph Dialog Box
in the ParagraphLaunchergroup. The Paragraph dialog boxopens (see Figure 18).
3. Select the Indents and Spacing tabif it is not selected.
4. Click the Alignment: drop-downarrow in the General section
5. Select the desired paragraphalignment option.
6. Click the OK button.
Figure 18 – Paragraph Dialog Box
Line SpacingLine spacing refers to the distance between every line in a paragraph. Line spacing c
adjusted in the Paragraph dialog box, or by selecting the Home tab on the Ribbon and usi
Line Spacing drop-down listin the Paragraph. Spacing options in the list include 1.01.5, 2.0, 2.5, and 3.0.
NOTE: If the line spacing option desired is not in the Line Spacing drop-down list, selectfrom the list to open the Paragraph dialog box, or open the dialog box using the
steps described below
To apply line spacing using the Paragraph dialog box:1. Place the insertion point within the paragraph where the line spacing will be ap
2. Click the Paragraph Dialog Box Launcherin the Paragraph group. The Paragrapdialog box opens (see Figure 18).
3. Select the Indents and Spacing tab, if it is not selected.4. Click the Line spacing: drop-down arrow in the Spacing section.5. Click the desired selection (see Table 5).
6. If necessary, enter a value in the At: spin box7. Click the OK button.
Introduction to Microsoft Word 2007 - 15
8/3/2019 MSWORD 2007 Handouts
http://slidepdf.com/reader/full/msword-2007-handouts 16/25
Table 5 - Line Spacing Options
Option
Single
1.5 LinesDoubleAt Least
Exactly
Multiple
Description
Accommodates the largest font in the line with a small amount of extra spaceOne-and-one-half times that of single line spacing
Twice that of single line spacingSpecifies the minimum line spacing to fit the largest font on theline (specify point size in the At: spin box)Specifies fixed line spacing that Word does not adjust (specify
point size in the At: spin box)Sets line spacing that is increased or decreased from single linespacing by a percentage specified in the At: spin box (a value of 1.2 would increase line spacing by 20% of single spacing)
To apply line spacing using shortcut keystrokes:1. Place the insertion point within the paragraph where the line spacing will be ap2. Press the keystroke combination for the desired line spacing (see Table 6).
Table 6 – Keystroke Combinations for Setting the Line Spacing
Keystroke[Ctrl+1][Ctrl+5][Ctrl+2]
Line Spacing AppliedSingle Line Spacing1½ Line SpacingDouble Line Spacing
IndentationsAn indentation is the space between the text and the left and/or right margins. Indentatio
be applied by using the indentation markers on the Horizontal Ruler . See
Table 7 for descriptions of different types of indentations available.
Table 7 – Indentation Types
Indentation
Left and Right Indent
First Line Indent
Hanging Indent
DescriptionIndents the entire selected paragraph from the
Left/Right marginIndents only the first line of the selected paragraphfrom the Left marginIndents all lines of a paragraph other than the firstline from the left margin
The Horizontal Ruler (see Figure 19) should display automatically when Word 200launched. If not, display it by selecting the View tab on the Ribbon and checking thcheck
located above the Verticalbox in the Show/Hide group or by clicking the View Ruler buttonscroll bar on the right side of the Word interface.
Figure 19 – Horizontal Ruler: Indentation and Tab Stop MarkersFigure 20 -
Hanging Indent
To apply indentations using the Horizontal Ruler , simply drag the indentation marker(s) Horizontal Ruler to the point in the paragraph where the indent will begin (see Figure 1
Figure 20).
Introduction to Microsoft Word 2007 - 16

8/3/2019 MSWORD 2007 Handouts
http://slidepdf.com/reader/full/msword-2007-handouts 17/25
Setting Tab StopsAt times it is necessary to have text appear at fixed locations across the page. Tab stops c
used to space text in a paragraph. Each paragraph can have a different combination of tab Tab stops can be set by using the Tab Stop button on the Horizontal Ruler (see Figu
Table 8 describes the different types of tab stops available.
Table 8 – Tab Stops
Tab
Left–Aligned Tab
Center Tab
Right–Aligned Tab
Decimal Tab
Bar Tab
Descriptions
Text and numbers are aligned left to the tab stop Text and numbers center under a center tab stop
Text and numbers align right to the tab stop
Text and numbers align to the tab stop at the firstdecimal pointCreates a vertical line at the tab stop each time a newline is created
To set tab stops using the Horizontal Ruler:1. Place the insertion point within the paragraph where the tab stops will be set.
2. Click the Tab Stop button at the far left of the Horizontal Ruler until it changes type of tab desired (see Table 8).
3. Click the Horizontal Ruler where to set a tab stop. A tab stop marker will ap
NOTE: The text insertion point can be moved to the tab stop by pressing the [Tab] key at the
beginning of the line.
CHANGING STYLES
Styles are predefined combinations of character and paragraph formatting. Styles can be uidentify headings at the beginning of a section of a document, or applied to the text wparagraph. By using styles, it is easier to apply different character and formatting attrsimultaneously instead of having to apply them individually. When creating a new doc
approximately 16 different styles are available (see Figure 21). Whenever a new formattingis applied to the text of the document, a new style is created for that document so it can beto apply the same formatting attributes to another section later on with a single clic
Figure 21 – Default Styles Available in a New Document
To apply a heading style:1. Select the text where the style will be applied.
2. Click the More drop-down arrow in the Styles group. The list of available stylexpand similar to Figure 21.
3. Select the desired heading style. The style will be applied immediately to the setext.
Introduction to Microsoft Word 2007 - 17

8/3/2019 MSWORD 2007 Handouts
http://slidepdf.com/reader/full/msword-2007-handouts 18/25
NUMBERS AND BULLETS
When presenting a list of items, it is possible to number or bullet each item to distinguisfrom the other. A bulleted list is used for basic item lists while a numbered list is often
when the order is important (i.e. instructions). It is also possible to develop multilevel lists each line in the list is indented
To create a bulleted list:1. Select the text where bullets will be applied.
2. Click the Bullets buttonin the Paragraph group.
To create a numbered list:1. Select the text to add numbers to.
in the Paragraph group.2. Click the Numbering button
To create a multilevel list:1. Select the text where bullets will be applied.
2. Click the Multilevel List buttonin the Paragraph group.
NOTE: To select list style different than the default styles in the buttons, click the drop-down arron the right side of each button. The different options for each type of list will be displayed (se
Figure 22, Figure 23, and Figure 24).
Figure 22 - Bulleted List Options Figure 23 - Numbered ListOptions
Figure 24 - Multilevel List Options
To undo bulleted, numbered, or multilevel lists:1. Select the text.
2. Click the appropriate button in the Paragraph group.
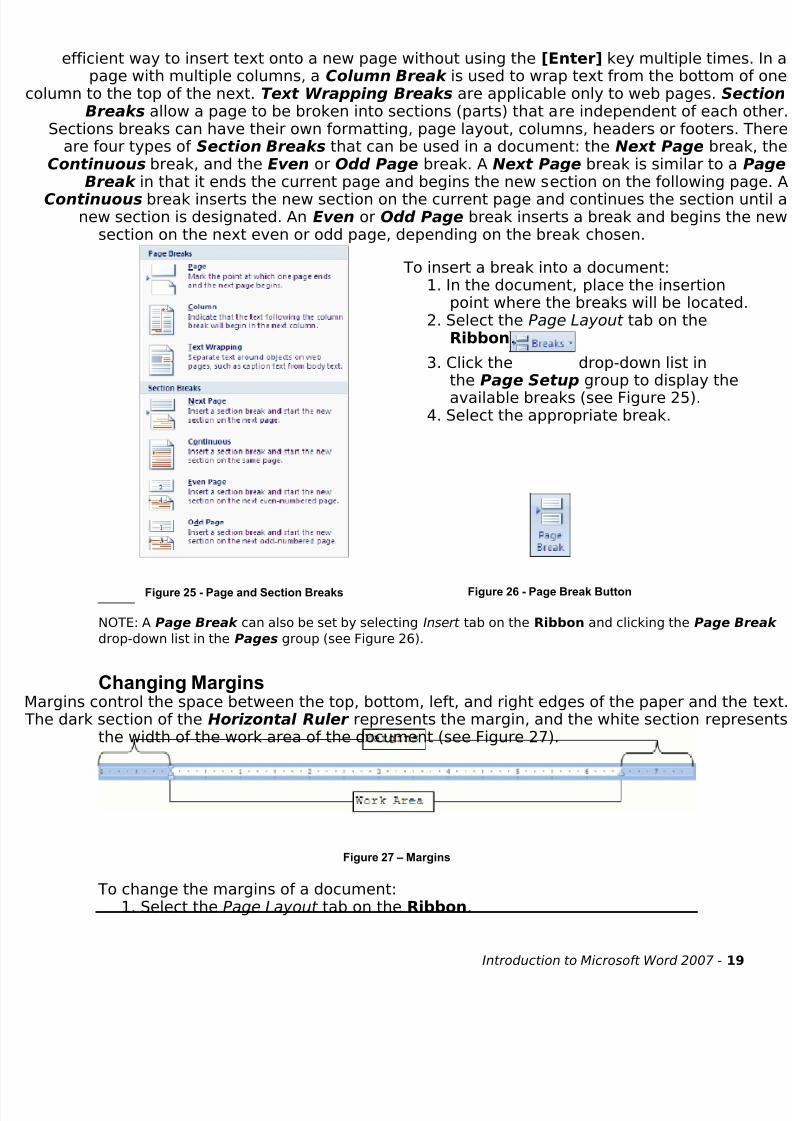
SETTING BREAKS
Documents can also be formatted with the inclusion of breaks. There are four types of bPage Break , Column Break , Section Break , and Text Wrapping Break . Page Break
Introduction to Microsoft Word 2007 - 18
8/3/2019 MSWORD 2007 Handouts
http://slidepdf.com/reader/full/msword-2007-handouts 19/25
efficient way to insert text onto a new page without using the [Enter] key multiple timepage with multiple columns, a Column Break is used to wrap text from the bottom
olumn to the top of the next. Text Wrapping Breaks are applicable only to web pages. SeBreaks allow a page to be broken into sections (parts) that are independent of each
Sections breaks can have their own formatting, page layout, columns, headers or footers.are four types of Section Breaks that can be used in a document: the Next Page brea
Continuous break, and the Even or Odd Page break. A Next Page break is similar to aBreak in that it ends the current page and begins the new section on the following p
Continuous break inserts the new section on the current page and continues the section new section is designated. An Even or Odd Page break inserts a break and begins th
section on the next even or odd page, depending on the break chosen.
To insert a break into a document:1. In the document, place the insertion
point where the breaks will be located2. Select the Page Layout tab on the
Ribbon.
drop-down list in3. Click thethe Page Setup group to display theavailable breaks (see Figure 25).
4. Select the appropriate break.
Figure 25 - Page and Section Breaks Figure 26 - Page Break Button
NOTE: A Page Break can also be set by selecting Insert tab on the Ribbon and clicking the Page B
drop-down list in the Pages group (see Figure 26).
Changing Marginsargins control the space between the top, bottom, left, and right edges of the paper and thhe dark section of the Horizontal Ruler represents the margin, and the white section repr
the width of the work area of the document (see Figure 27).
Figure 27 – Margins
To change the margins of a document:1. Select the Page Layout tab on the Ribbon.
Introduction to Microsoft Word 2007 - 19

8/3/2019 MSWORD 2007 Handouts
http://slidepdf.com/reader/full/msword-2007-handouts 20/25
2. Click the Margins drop-down list in the Page Setup group (see Figure 28) to displmargins options available (see Figure 29).
NOTE: If the desired margins are not available, custom margins can be applied by using the Pag
Setup dialog box (see Figure 30).
To set custom margins
option in the Pre-Set Margins list (see previous instructio1. Click the
Figure 29) OR1. Click the Page Setup Dialog Box Launcherin the Page Setup group. The Page
Setup dialog box opens (see Figure 30).3. Select the Margins tab if it is not already selected.
4. Enter the desired margin widths in the Top:, Bottom:, Left:, and Right: spin boxesthe Margins section.
5. Click the OK button.
Figure 28 - Margins Drop-Down List
Figure 29 - Pre-Set Margins Options Figure 30 - Page Setup Dialog Box Margins Tab
Viewing the Document
Word provides several different ways to view a document. The document can be magnimake it easier to read, or the magnification can be reduced to view more of the documorder for the user to get a better view.
SWITCHING DOCUMENT VIEWS
There are five different view styles to choose from. See Table 9 for the descriptionsdifferent view options. By default, new documents open in Print Layout view. Document
can be changed by clicking the appropriate button in the Document Views group in the Vieor the appropriate button on the bottom right of the Word User Interface (see Figur
Introduction to Microsoft Word 2007 - 20
8/3/2019 MSWORD 2007 Handouts
http://slidepdf.com/reader/full/msword-2007-handouts 21/25
Table 9 - Table Document View Options
View Option
Print LayoutFull Screen ReadingWeb Layout
Outline
Draft
Description
View the document as it will appear when printedMaximizes the space used in the windowView the document as it would look as a Web pageView the document as an outline and show the outliningtoolsAllows for quick editing of text; no headers or footersare visible
MAGNIFYING A DOCUMENT
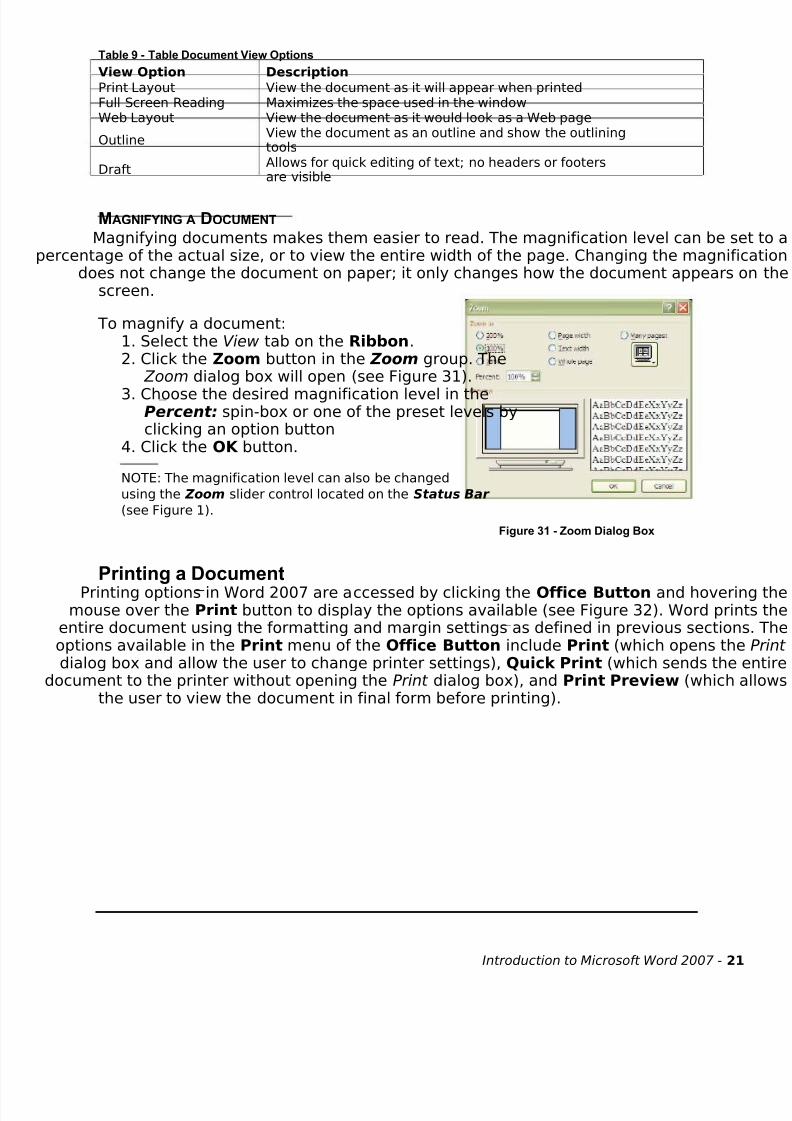
Magnifying documents makes them easier to read. The magnification level can be spercentage of the actual size, or to view the entire width of the page. Changing the magnifi
does not change the document on paper; it only changes how the document appears screen.
To magnify a document:1. Select the View tab on the Ribbon.2. Click the Zoom button in the Zoom group. The
Zoom dialog box will open (see Figure 31).
3. Choose the desired magnification level in thePercent: spin-box or one of the preset levels byclicking an option button
4. Click the OK button.
NOTE: The magnification level can also be changed
using the Zoom slider control located on the Status Bar
(see Figure 1).
Figure 31 - Zoom Dialog Box
Printing a DocumentPrinting options in Word 2007 are accessed by clicking the Office Button and hoveri
mouse over the Print button to display the options available (see Figure 32). Word prinentire document using the formatting and margin settings as defined in previous sectionoptions available in the Print menu of the Office Button include Print (which opens thedialog box and allow the user to change printer settings), Quick Print (which sends the
document to the printer without opening the Print dialog box), and Print Preview (which the user to view the document in final form before printing).
Introduction to Microsoft Word 2007 - 21

8/3/2019 MSWORD 2007 Handouts
http://slidepdf.com/reader/full/msword-2007-handouts 22/25
Figure 32 - Print Options Figure 33 - Close Print Preview Button
PREVIEWING A DOCUMENT
Before printing, it is best to preview the document to see how the text appears on each pagPrint Preview feature displays the pages as they will appear when printed. Using the
Preview feature can avoid wasting time and paper by viewing the draft version of the docu
To use Print Preview:1. Click the Office Button.
2. Hover the mouse over the Print button to display the printing options (see Figu
3. Click the option.
NOTE: Print Preview opens with one page of the document sized to fit in the window. Thedocument magnification can be changed by using the Zoom slider control as described in the
Viewing the Document section of this handout.
4. To exit Print Preview , select the Preview Tab on the Ribbon5. Click the Close Print Preview button in the Preview group (see Figure 33).
PRINTING OPTIONS
Printing options found in the Print dialog box (see Figure 34) include printing the currentselected text, a range of pages, or the entire document.
Introduction to Microsoft Word 2007 - 22

8/3/2019 MSWORD 2007 Handouts
http://slidepdf.com/reader/full/msword-2007-handouts 23/25
Figure 34 - Print Dialog Box
Printing the Current PageWhen printing a document, it is possible to print only the current page. This option is us
there were changes made to only one page after printing the entire document.
To print the current page:1. Make sure the insertion point is within the page to print.2. Click the Office Button.3. Click the Print option. The Print dialog box will open (see Figure 34).4. Click the Current Page option button in the Page range section.5. Click the OK button.
Printing Specific PagesIf needed, Word can print specific pages within a document. The pages do not haveconsecutive or in any particular order.
To print a selected page:1. Click the Office Button.2. Click the Print option. The Print dialog box will open (see Figure 34).3. Click the Pages: option button in the Page Range section.
4. Type in the page numbers to print, using commas to separate pages, or hyphens tadjacent pages. For example, 1-12 (pages 1 through 12 will print), or 14, 19, 24 (on
individual pages 14, 19, and 24 will print).5. Click the OK button.
Printing a Selection from the DocumentPrinting only a selection is useful to save time and paper if only an excerpt of a docum
required.
To print only the selected text from the document:1. Highlight the portion of the document to print.2. Click the Office Button.
Introduction to Microsoft Word 2007 - 23
8/3/2019 MSWORD 2007 Handouts
http://slidepdf.com/reader/full/msword-2007-handouts 24/25
3. Click the Print option. The Print dialog box will open (see Figure 34).4. Click the Selection option button in the Page Range section.
NOTE: If there is no text in the document selected before opening the Print dialog box, the Selec
option will not be available.
5. Click the OK button.
Printing Multiple Copies There are times when it is necessary to print multiple copies of a document.
To print multiple copies:1. Click the Office Button.2. Click the Print option. The Print dialog box will open (see ).
3. Enter the number of copies to print in the Number of copies: box in the Copies se4. Click the OK button.
NOTE: To get sets of multiple copies, check the Collate check box
spin box.
located under the
SELECTING A PRINTER
If there is a shared network of printers, like the set up of the library and computer labs, it necessary to choose the appropriate printer.
To select a printer:1. Click the Office Button.2. Click the Print option. The Print dialog box will open (see ).3. Click the Name: drop-down arrow.4. Select the printer from the drop-down list.5. Click the OK button
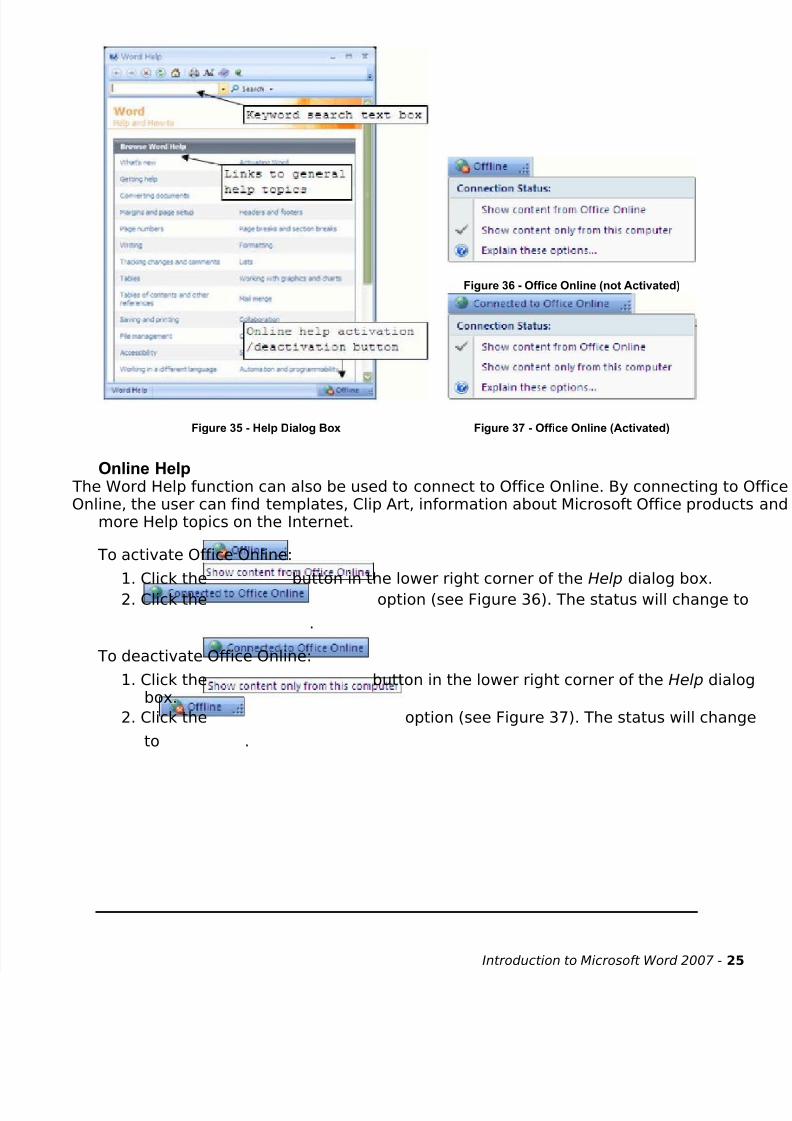
Using the Help FunctionWord 2007 has an extensive Help function to answer any questions the user may have reg
the commands and functions of Word. The Help function includes two components,component that is built in to the Word application and the online component that is avai
an active Internet connection is available. The Help function can be activated from the Wor
interface by clicking the Microsoft Word Help buttonlocated in the upper right corner of
the interface. It can also be activated from any open dialog box by clicking the Helpwhich is located in the upper right corner of all dialog boxes. Clicking either of these buttoopen the Help dialog box (see Figure 35). When the dialog box opens, the user is presente
a list of general help topics in the Browse Word Help section (see Figure 35). Clicking on the links will take the user to more detailed information about that topic. If the topic
present in the Browse Word Help section, the user can perform a search of the Help fun
To search the Help function:
1. Click inside the Search text box (see Figure 35).
2. Type in a keyword or keywords related to the topic.3. Press the [Enter] key. Word will search the Help function and present the user wit
of topics that are most relevant to the search.
Introduction to Microsoft Word 2007 - 24
8/3/2019 MSWORD 2007 Handouts
http://slidepdf.com/reader/full/msword-2007-handouts 25/25
Figure 36 - Office Online (not Activated)
Figure 35 - Help Dialog Box Figure 37 - Office Online (Activated)
Online Help The Word Help function can also be used to connect to Office Online. By connecting toOnline, the user can find templates, Clip Art, information about Microsoft Office produc
more Help topics on the Internet.
To activate Office Online:
1. Click the2. Click the
button in the lower right corner of the Help dialog box.option (see Figure 36). The status will change t
.
To deactivate Office Online:
1. Click thebox.
2. Click the
to .
button in the lower right corner of the Help dialo
option (see Figure 37). The status will chan