COE User Guide - Welcome to Broward County! Timecards and Sche… · 6.3 SCHEDULING NON-WORKED...
97
Managing Timecards and Schedules SUPERVISOR ROLE User Guide Time and Attendance
-
Upload
nguyenngoc -
Category
Documents
-
view
219 -
download
0
Transcript of COE User Guide - Welcome to Broward County! Timecards and Sche… · 6.3 SCHEDULING NON-WORKED...
Managing Timecards and Schedules SUPERVISOR ROLE
User Guide
Time and Attendance


TABLE OF CONTENTS CHAPTER 1: OVERVIEW ...............................................................................................1
1.1 OVERVIEW .............................................................................................................. 1 1.2 TIME AND ATTENDANCE SYSTEM MODULES ............................................................... 1 1.3 IMPORTANCE AND BENEFITS OF KRONOS................................................................... 2 1.4 GOALS AND OBJECTIVES .......................................................................................... 3
CHAPTER 2: GETTING STARTED ................................................................................5
2.1 THE PAYROLL PROCESS .......................................................................................... 5 2.1.1 BC-102 Workflow Process ............................................................................. 5
2.2 EMPLOYEE/SUPERVISOR ROLES AND RESPONSIBILITIES ............................................. 6 2.2.1 Non-Exempt (Hourly) Employee ...................................................................... 6 2.2.2 Exempt (Salaried) Employee ........................................................................... 6 2.2.3 Supervisors ...................................................................................................... 6 2.2.4 HR/Payroll Liaisons .......................................................................................... 7
CHAPTER 3: NAVIGATION BASICS .............................................................................9
3.1 LOG ON .................................................................................................................. 9 3.2 LOG OFF .............................................................................................................. 10 3.3 INACTIVITY TIMEOUT AND WARNING MESSAGE ......................................................... 10 3.4 NAVIGATING KRONOS SCREENS ............................................................................. 11
3.4.1 Key Areas Of Kronos Screens ..................................................................... 11 3.4.2 Showing and Hiding the Banner .................................................................. 12 3.4.3 Using the Tools Within the Banner .............................................................. 12 3.4.4 Using the Tools Within the Workspace ........................................................ 12
3.5 LOCATING EMPLOYEES USING QUICKFIND .............................................................. 13 3.6 ACCESSING EMPLOYEES’ PEOPLE RECORDS ........................................................... 14
CHAPTER 4: EDITING TIME AND ATTENDANCE DATA ........................................... 17
4.1 ACCESSING AND VIEWING EMPLOYEES’ TIMECARDS ................................................. 17 4.2 VISUAL INDICATORS ON THE TIMECARD ................................................................... 18 4.3 ADDING A MISSED PUNCH ...................................................................................... 19 4.4 ADDING COMMENTS AND NOTES ............................................................................. 20 4.5 OVERRIDING PUNCHES .......................................................................................... 21 4.6 PAYING EMPLOYEES FOR WORKING THROUGH MEALS ............................................. 22 4.7 MARKING EXCEPTIONS AS REVIEWED ..................................................................... 24 4.8 MAKING PAY CODE ADJUSTMENTS TO TIMECARDS ................................................... 25
4.8.1 Acceptable Formats for Entering Pay Code Amounts .................................. 25 4.9 STANDBY AND CALL OUT ....................................................................................... 27 4.10 REVIEWING TIMEKEEPING DATA IN GENIES .............................................................. 27
CHAPTER 5: SCHEDULING EMPLOYEES ................................................................. 29
5.1 ACCESSING THE SCHEDULE EDITOR ....................................................................... 29 5.2 NAVIGATING THE SCHEDULE EDITOR ....................................................................... 30 5.3 ASSIGNING A SCHEDULE PATTERN TO A NEW EMPLOYEE.......................................... 31 5.4 CANCELLING AND SAVING EDITS ............................................................................. 32
5.4.1 Cancelling Unsaved Edits ............................................................................ 33 5.4.2 Saving Edits ................................................................................................. 33
5.5 CHANGING AN EMPLOYEE’S SCHEDULE PATTERN..................................................... 34 5.6 CREATING A SCHEDULE PATTERN WITHOUT A PATTERN TEMPLATE .......................... 36 5.7 EDITING SHIFTS DIRECTLY IN THE SCHEDULE GRID .................................................. 38 5.8 ADDING A SHIFT USING THE SHIFT EDITOR .............................................................. 39

5.9 DELETING SHIFTS FROM EMPLOYEES’ SCHEDULES .................................................. 40
CHAPTER 6: MANAGING TIME OFF ........................................................................... 43
6.1 ACCEPTABLE FORMATS FOR ENTERING PAY CODE AMOUNTS ................................... 43 6.2 PRE-APPROVED TIME-OFF REQUESTS .................................................................... 43 6.3 SCHEDULING NON-WORKED HOURS ....................................................................... 45 6.4 NON-PRE-APPROVED TIME OFF REQUESTS ............................................................ 48 6.5 NEGATIVE ACCRUAL BALANCES .............................................................................. 49 6.6 PARTIAL ACCRUAL BALANCES ................................................................................ 50
CHAPTER 7: FINALIZING TIMECARDS ...................................................................... 53
7.1 REVIEWING TIME DATA USING GENIES ...................................................................... 53 7.1.1 Pay Period Close Genie............................................................................... 53 7.1.2 Daily Time Adjustment Genie ...................................................................... 54
7.2 APPROVING INDIVIDUAL TIMECARDS ........................................................................ 55 7.3 APPROVING MULTIPLE TIMECARDS .......................................................................... 56 7.4 USING THE GROUP EDIT RESULTS ........................................................................... 58 7.5 REMOVE APPROVALS ............................................................................................. 58
CHAPTER 8: DELEGATING TO A BACKUP SUPERVISOR ....................................... 61
8.1 REQUESTING BACKUP COVERAGE/DELEGATION ...................................................... 61 8.2 ACCEPTING OR DECLINING BACKUP COVERAGE/DELEGATION REQUESTS .................. 63 8.3 SWITCHING TO DELEGATED ROLES ......................................................................... 64 8.4 CANCELLING DELEGATIONS .................................................................................... 64
CHAPTER 9: REPORTS ............................................................................................... 67
9.1 GENERATING REPORTS ......................................................................................... 67 9.2 CREATING HYPERFIND QUERIES BOTH AD HOC AND PERSONAL ............................... 70
CHAPTER 10: PERFORMING HISTORICAL EDITS .................................................... 73
10.1 HISTORICAL EDITS ............................................................................................... 73
APPENDIX A: COMMONLY USED PAY CODES ........................................................ 75
APPENDIX B: KRONOS MINUTES CONVERSION TABLE ........................................ 77
APPENDIX C: PRE-DEFINED COMMENTS ................................................................. 79
APPENDIX D: GETTING SUPPORT............................................................................. 75
System Requirements ............................................................................................. 75 Where Do I Go For Help .......................................................................................... 75
APPENDIX E: GLOSSARY ........................................................................................... 77

Revision History Date Revision
3/25/2014 Version 1: Final User Guide Published
5/16/2014 Version 2 Edits:
3.1 Log On: Revised with direct link to access Kronos
4.1 Accessing and Viewing Employees’ Timecards: o Removed image for Salary Employee in Step 5 o Updated image heading to be applicable for all employees
5.3 Assigning a Schedule Pattern to a new Employee: o Revised Step 4 o Revised Step 8 o Added Step 10 and 12
5.5 Changing an Employee’s Schedule Pattern o Modified Introduction o Revised step 8
5.6 Creating a Schedule Pattern without a Pattern Template o Modified Introduction o Revised Note
6.2 Pre-Approved Time-Off Requests o Updated Step 2 with Schedule Editor image and added note o Added Step 7 to include how to view the details of a leave request o Revised Step 8 based on additional
7.1 Reviewing Time Data Using the Pay Period Close Genie o Changed Title to Reviewing Time Data Using Genies and added
introduction o Added 7.1.1 Pay Period Close Genie with previous procedure o Added 7.1.2 Daily Time Adjustment Genie and included new procedure
8.2 Added Note to end of section
6/25/2014 Version 3 Edits:
Table of Contents: Appendix C: Glossary formatted properly
3.6 Accessing Employees’ People Records o Added Step 2 to standard process. o Revised Step 5 to clarify the need to click the Person and Assignment
tabs
4.5 Overriding Punches o Updated Activity to include initial steps to perform in order to set up the
procedure and prior to following the procedure o Updated Step 5 to include reference the procedure 4.3 Adding a Missed
Punch, if necessary
4.8 Making Pay Code Adjustments to Timecards o Moved the Note referencing the Appendix C to the end of the procedure o Placed the Note about not adding a pay code to a row that contains
punches, before the procedure
5.5 Changing an Employee’s Schedule Pattern: Revised Step 4 to state Shift > Add Pattern
5.6 Creating a Schedule Pattern Without a Pattern Template: removed activity because not available in training database

Date Revision
6.2 Pre-Approved Time-Off Requests o Added Note to the end of procedure to state that Supervisors are to
Approve or Refuse leave requests and Approve cancelled leave requests that have been submitted.
7.1.2 Daily Time Adjustment Genie:
o Revised Step 1 to state Daily Time Adjustment Total.
o The Daily Time Adjust – Moved Day from Step 3 remains although it does not appear in the training database.
8.1 Requesting Backup coverage/Delegation:
o Updated Step 2 with revised screen shot o Revised text to refer to reflect change to name on screen: Supervisor &
FMLA from Delegation Manager
Corrected page numbers on Appendix A, B, C and D
8/8/2014 Appendix B added Kronos Minutes conversion table
8.1 Requesting Backup Coverage/Delegation o Added note about no Outlook notifications be sent
8.4 Cancelling Delegation o Added best Practice about notify the Payroll Liaison

Managing Timecards and Schedules User Guide
Version 4: 8/8/2014 1
CHAPTER 1: OVERVIEW
1.1 OVERVIEW
This User Guide is a training and reference manual, designed to assist Broward County users with
day-to-day payroll and timekeeping responsibilities related to the Supervisor Role.
The following symbols are used throughout this document:
Best Practice – Recommended procedure
Tip – Recommended idea
Caution – Requires special attention
Note – Special notation
1.2 TIME AND ATTENDANCE SYSTEM MODULES
The Time and Attendance System is a web based application made up of several modules that
seamlessly work together to automate Broward County’s time keeping activities.
Workforce Timekeeper Workforce Absence Manager Workforce Activities
Time Clock with Touch ID
Timestamp with PC
Mobile Application
View and Manage Timecards
View and Manage Schedules
Reports
Manage Leave and Attendance
Reports
Transit Trip Report Management
Grants Administration
Module definitions are as follows:
Workforce Timekeeper (WTK) – Automates the timekeeping process including Union and County rules into one enterprise solution. Used to process and manage employee timecards and schedules.
Workforce Absence Manager (WAM) – Used to manage County leave policies, including time off and FMLA (Family Medical Leave Act) requests.
Workforce Activities – Used to track Transit’s timesheet exceptions for Bus Operators. In addition, it will be used to track time spent on grant activities.

Managing Timecards and Schedules User Guide
Version 4: 8/8/2014 2
1.3 IMPORTANCE AND BENEFITS OF KRONOS
The Kronos system contains all County and Union pay rules, providing an automated and
streamlined approach to the County’s previous manual business processes for managing
employee time and attendance.
In addition to automation, the benefits of using the Kronos system include:
Accurate paychecks for Broward County employees
Timely payroll closeout and data processing to Payroll Central
Consistent agency processing of timecards at the end of each pay period
Efficient preparation and approval of timecards between employees and their supervisors
Another beneficial aspect of using an automated time and attendance system is that it promotes
Broward County Best Practices in time management. It encourages positive behaviors as it relates
to the users’ daily routines of employee time and attendance management. Business processes
are streamlined into one centralized enterprise-wide system.
While using the system, users will also realize the following benefits:
Efficiently manage employee work schedules and timecards
Easily track employee attendance and hours worked
Conveniently view employee timecards upon system entry
Quickly identify, review, and acknowledge timecard discrepancies at a glance
Routinely and frequently make necessary timecard adjustments.
Easily monitor attendance and leave requests, including vacations, sick days and FMLA
Quickly identify which employees are clocked in, and when they reported to work
Easily review employee accrual balances to approve or deny time off
Promptly approve or deny employee time off requests
Conveniently run reports when needed
Delegate their authority to a backup supervisor with a few simple clicks of the mouse

Managing Timecards and Schedules User Guide
Version 4: 8/8/2014 3
1.4 GOALS AND OBJECTIVES
Time and attendance automation reduces the opportunity for payroll processing errors and the
amount of manual data-entry required. The Kronos system allows timely processing of payroll
through real-time calculations, and ensures consistency in countywide interpretation of pay rules
from union contracts and pay policies. Kronos also delivers better management efficiency in the
way we capture time and process payroll and allows Broward County to realize environmental
benefits through the reduction of paper use and storage costs.

Managing Timecards and Schedules User Guide
Version 4: 8/8/2014 4

Managing Timecards and Schedules User Guide
Version 4: 8/8/2014 5
CHAPTER 2: GETTING STARTED
2.1 THE PAYROLL PROCESS
The BC-102 Personnel Action Form drives Broward County’s payroll process. Efficiency of
agency processing is paramount to employees being paid accurately and timely.
Tip Agencies should ensure that the staff responsible for processing the BC-102 Personnel Action Form completely understands the dynamics of the Cyborg fields required to update the form. Questions related to completion and submission of the BC-102 Personnel Action Form should be clarified by contacting Payroll Central.
2.1.1 BC-102 WORKFLOW PROCESS
The diagram below depicts the process of the BC-102 form and the importance of its
relationship between the Cyborg system, where employee data is stored, Kronos, where
employee time and attendance is captured and managed, and Time Clock devices, where
information is recorded.
Caution Employees cannot begin to work at Broward County or transfer to another agency until their BC-102 form has been processed in Cyborg.

Managing Timecards and Schedules User Guide
Version 4: 8/8/2014 6
2.2 EMPLOYEE/SUPERVISOR ROLES AND RESPONSIBILITIES
Every employee in Broward County will touch the Kronos system, whether to approve
timecards or to request time off. Following is a list of roles along with their respective
responsibilities related to time and attendance.
2.2.1 NON-EXEMPT (HOURLY) EMPLOYEE
Must clock in and out (punch in/out) and perform the following tasks at the Time Clock:
Enroll at their Home Group Time Clock (one of the agency’s assigned devices) using
the last 6-digits of their Employee ID and register a finger for Touch ID verification.
View schedules
View accruals
View timecard
Approve timecard
Submit time off requests
Note(s)
Time Off Requests can only be canceled at the Time Clock before it has been submitted for approval.
Hourly employees must access a PC or kiosk to cancel a submitted Time Off Request.
If an employee has no access to County email, they will access the Kronos email system (kmail) for confirmation and communication.
2.2.2 EXEMPT (SALARIED) EMPLOYEE
Do not clock in or out (punch in/out) at the Time Clock. Schedules for salaried employees
are already stored within the Kronos system. Salaried employees are required to use the
PC to access the system to perform the following tasks:
View accruals
View timecard
Approve timecard
Submit time off requests (if not working on a specific day)
Cancel time off requests
2.2.3 SUPERVISORS
The Supervisor role has direct reports and is responsible for approving or rejecting a
timecard and/or time-off request. This is a system function only and in no way affects their
actual Broward County position or job classification.
Tip Supervisors should reconcile employee timecards on a daily basis or as frequently as possible to review and/or clear any timecard exceptions in preparation of timecard approval at the end of the pay period.

Managing Timecards and Schedules User Guide
Version 4: 8/8/2014 7
Supervisor role responsibilities are as follows:
Manage Employee Timecards
Review flags
Resolve exceptions
Edit prior periods (historical edits)
Selecting leave or earnings codes
Add comments and notes to changes
Approve timecards by 10:00 a.m. every payroll Monday
Schedules Create schedules for part-time employees
Assign schedules to employees
Adjust schedules as needed
Other Tasks
Activate and deactivate delegation
Approve or deny time off requests
Approve or deny FMLA requests
Monitor attendance
Edit timecards after employee approval
Perform clock registration for new non-exempt (hourly) employees
Resolve issues direct reports may have related to the new automated process
Handle and report issues with Kronos/Cyborg systems and payroll processing to
Payroll Liaisons and/or ETS Service Desk
2.2.4 HR/PAYROLL LIAISONS
HR/Payroll Liaisons are the first line of communication between agency employees and
Payroll Central. HR/Payroll Liaisons are responsible for the following timekeeping tasks:
Employee Data
Receive, enter and verify real-time employee record data in both Cyborg and Kronos screens and update in Cyborg as needed.
Employee Timecards Review and notify supervisor of unattended timecard discrepancies and exception
flags in the system.
Payroll Closeout Ensure that employees and supervisors approve agency timecards. Perform final review, close-out and sign-off on Division by 11:00 a.m. every payroll
Monday.
Other Support Tasks Ensure at all times backup support is available to perform tasks when not in office. Receive and communicate information between Payroll Central and the Agency as
required. Support agency employees and supervisors with questions related to payroll and
timekeeping.

Managing Timecards and Schedules User Guide
Version 4: 8/8/2014 8
Managing Timecards and Schedules User Guide
Version 4: 8/8/2014 9
CHAPTER 3: NAVIGATION BASICS
3.1 LOG ON
The log on process helps to ensure that only authorized users can access information in Kronos.
Best Practice
It is recommended that the supervisor log on to the Kronos application at least once a day to review and work with their employees’ timecards and scheduling data.
Follow the steps below to log into Kronos.
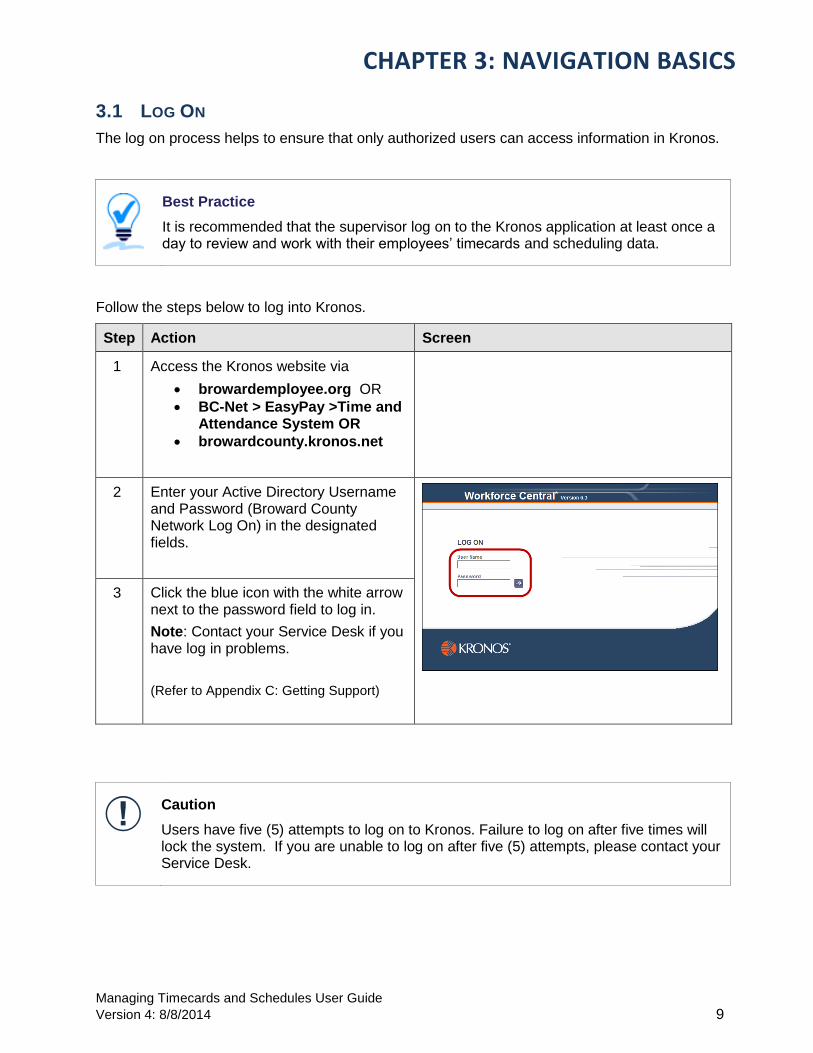
Step Action Screen
1 Access the Kronos website via
browardemployee.org OR
BC-Net > EasyPay >Time and Attendance System OR
browardcounty.kronos.net
2 Enter your Active Directory Username and Password (Broward County Network Log On) in the designated fields.
3 Click the blue icon with the white arrow next to the password field to log in.
Note: Contact your Service Desk if you have log in problems.
(Refer to Appendix C: Getting Support)
Caution
Users have five (5) attempts to log on to Kronos. Failure to log on after five times will lock the system. If you are unable to log on after five (5) attempts, please contact your Service Desk.

Managing Timecards and Schedules User Guide
Version 4: 8/8/2014 10
3.2 LOG OFF
Log off Kronos once you are finished working with the system. This will ensure that someone else cannot access or modify information if you step away from the computer.
Important: Due to the information contained in Kronos, you should log off when not actively working in the system.
Step Action Screen
1 Click the Log Off link in the upper right corner of the Kronos screen.
2 Click the Close (X) button of your browser window to completely exit the Kronos system.
3.3 INACTIVITY TIMEOUT AND WARNING MESSAGE
The inactivity timeout helps to protect information in Kronos in case you step away from your computer without logging off. The inactivity timeout protects sensitive information in the application.
If the application does not detect activity within a specific amount of time, it attempts to automatically log you off. To remain logged in you must click YES when the Timeout Warning message appears. When you regain access, the application restores the last screen you were viewing.
Inactivity Timeout Warning Message
Caution
Clicking the Close (X) button without first logging off can leave your connection to the application open, which might allow unauthorized people to view and edit information.

Managing Timecards and Schedules User Guide
Version 4: 8/8/2014 11
Best Practice
The inactivity timeout warning appears if there is no activity for approximately 15 minutes. The warning will remain visible on screen for approximately 3 minutes before you are actually timed out.
Caution
To remain logged in you must click YES when the Timeout Warning message appears. Otherwise, you will be logged out of the application and lose all unsaved edits.
3.4 NAVIGATING KRONOS SCREENS
The screen that appears after you log on is the Reconcile Timecard genie. A genie is a pre-
defined view that summarizes and organizes information according to common tasks you perform
on a regular basis. Genies are located under the My Genies tab on the banner.
3.4.1 KEY AREAS OF KRONOS SCREENS
# Area Description
1 Banner Located at the top of each timekeeping screen, the banner contains tabbed menus with links to the features you need to perform your tasks.
2 Workspace Located under the banner, the workspace contains detailed information about the employees in the selected Time Period.
3 Show and Time Period Show field where you can select a specific set of employees. Select All Home from the drop-down list in order to view your current direct reports.
Time Period field where you select the timeframe for which you want to view schedules and timecard data.

Managing Timecards and Schedules User Guide
Version 4: 8/8/2014 12
4 Actions Bar Contains options for editing data.
5 Quick Links Provides access to other areas of the application. You select the employees you want to review and use the quick links to access their information.
6 Refresh Use to update data on screens after changes have been made.
Caution - Do Not Use the Back Button
Kronos is a browser-based application. However, do not use browser’s navigation controls - the Back button on the toolbar, for example. Only use the links inside of Kronos to do your work.
3.4.2 SHOWING AND HIDING THE BANNER
You can click the Show/Hide button to toggle the display of the banner.
3.4.3 USING THE TOOLS WITHIN THE BANNER
You can navigate to any timekeeping screen using the tabs in the banner. When you click on a
tab, it displays a drop-down list of other screens to which you have access.
3.4.4 USING THE TOOLS WITHIN THE WORKSPACE
Quick links are located at the top of the workspace and allow you to access information specific
to one or more employees. For example, you can select one employee and click the Timecard
quick link to access his or her timecard. Or you can select multiple employees and click the
Schedule quick link to view schedules for just those employees whom you selected.

Managing Timecards and Schedules User Guide
Version 4: 8/8/2014 13
3.5 LOCATING EMPLOYEES USING QUICKFIND
When an employee notifies you about an issue with their timecard, the quickest way for you to
access their timecard is using the QuickFind genie. It is located under the My Genies tab on the
banner. You can use other genies to find the timecard, but this genie is designed to help you locate
an employee by the employee’s name or ID.
If you are unsure of the spelling of an employee’s name or know only some of the digits in an
employee’s ID number, you can include wildcard characters to help you find the employee with
only partial information.
Description Wildcard Character Example
An asterisk character or a percent symbol indicates multiple characters can occupy a position in the searchring.
Note: Use asterisk (*) as default
* *, s* finds all employees whose first name begins with the letter S.
% %1 finds all employees whose ID number ends with the number 1.
A question mark or underline character indicates a single character occupies a position in the search string
?
07?? finds all employees whose ID contains 4-digit numbers starting with 07.
_ Sm_th finds all employees whose last name starts with “Sm” and ends with “th” and has one letter in the center.
Activity:
Explore how you can use QuickFind to search for all employees whose last name begins with the same letter “M.”
Step Action Screen
1 Select MY GENIES > QuickFind.

Managing Timecards and Schedules User Guide
Version 4: 8/8/2014 14
Step Action Screen
2 Enter your search criteria in the Name or ID box.
3 Click Find.
3.6 ACCESSING EMPLOYEES’ PEOPLE RECORDS
The People record stores each employee’s pay policy rules and personal definitions. It contains
personal information, such as employee name and ID number, as well as job-related attributes
such as shift differentials, automatic breaks, and overtime limits. This information ensures the
employee is paid correctly for worked and non-worked hours. The personal information is
contained on the Person tab, and the job information is contained on the Job Assignment tab.
Activity:
“Henry Hallandale” is a new employee hired last week. Over the weekend, data for the new hire was imported into Kronos. You want to review the “Person Summary” information that was imported.
Step Action Screen
1 Note: The People record can be accessed from any Kronos genie.
Access any genie, such as the Reconcile Timecard genie.
Select MY GENIES > Reconcile Timecard
2 Select All Home from the Show drop-down list to view all the employees you are authorized to view. (The default is ‘All Home’).
From the Time Period drop-down list, select the specific time period or enter the Range of Dates.
3 Select the employee whose People record you want to view.

Managing Timecards and Schedules User Guide
Version 4: 8/8/2014 15
Step Action Screen
4 Click the People quick link.
5 Review the employees’ personal and job data by clicking on the Person and Job Assignment tabs.

Managing Timecards and Schedules User Guide
Version 4: 8/8/2014 16

Managing Timecards and Schedules User Guide
Version 4: 8/8/2014 17
CHAPTER 4: EDITING TIME AND ATTENDANCE DATA
4.1 ACCESSING AND VIEWING EMPLOYEES’ TIMECARDS
You can open employees’ timecards so that you can make any adjustments prior to payroll
processing.
Activity:
Using the time period range 10/27/2013 – 11/02/2013, Review the Reconcile Timecards for
“Henry Hallandale”, “Morris Margate”, “Patrick Plantation” (hourly employees) and “Sonia
Sunrise” (salary employee). Note that several employees have time and attendance exceptions.
Open each employee’s timecard to review.
Step Action Screen
1 Select MY GENIES > Reconcile Timecard.
2 Select All Home from the Show drop-down list to view all the employees you are authorized to view. (The default is ‘All Home’).
From the Time Period drop-down list, select the specific time period or enter the Range of Dates.
3 Click the name(s) of the employee(s) whose timecards you want to review.
To select multiple employees, hold the Ctrl key and click each employee’s name.
4 Click the Timecard quick link.
Important: When selecting multiple employee timecards from the Reconcile Timecard Genie and then accessing the Timecard Quick Link – REFRESH is no longer next to Time Period, it is now located on the Actions drop-down menu.

Managing Timecards and Schedules User Guide
Version 4: 8/8/2014 18
Step Action Screen
5 If you selected more than one employee, do one of the following:
Click the Next scroll button to move to the next employee. You can use the Previous scroll button to move to a previous employee.
Select an employee from the Name & ID drop-down list.
6 Place your cursor over the exception to display its description in a pop-up message.
4.2 VISUAL INDICATORS ON THE TIMECARD
Visual indicators appear on a timecard when exceptions occur.
The color-coded visual indicators are indicated below.
# Visual Indicator Description
1 Blue-border Date An excused absence for the day, such as Vacation, Bereavement, or Jury Duty
2 Red-border Date An unexcused absence for the day
3 Red-border Punch An exception, such as a late or early punch, or a short or long break
4 Green-bordered Punch Exception has been marked as reviewed
5 Solid-red Cell A missed punch
6 Purple Text A transaction that was added by the Kronos application
7 Yellow Note Icon One or more comments are attached to the punch or amount
3
4
5
6
2
1
7

Managing Timecards and Schedules User Guide
Version 4: 8/8/2014 19
4.3 ADDING A MISSED PUNCH
When an hourly employee forgets to punch in or out (clock in/out), a solid-red box appears in the
missed in or out cell.
Activity:
“Morris Margate” is an hourly employee that did not clock in. The supervisor needs to edit the
timecard and add the missing punch because the employee failed to clock in. Use time period
range 10/27/2013 – 11/02/2013 and enter an 11:00AM In punch on 10/30/2013.
Step Action Screen
1 Access the Reconcile Timecard genie.
Select MY GENIES > Reconcile Timecard
(Refer to Chapter 4.1, Accessing and Viewing Employees’ Timecards)
2 Select All Home from the Show drop-down list to view all the employees you are authorized to view. (The default is ‘All Home’).
From the Time Period drop-down list, select the specific time period.
3 Sort the Missed Punch column in descending order by clicking on the Missed Punch column heading.
4 Double-click the name of employee who has a check mark in the Missed Punch column and access their timecard(s).
5 Click the cell containing the missed punch exception.
Managing Timecards and Schedules User Guide
Version 4: 8/8/2014 20
Step Action Screen
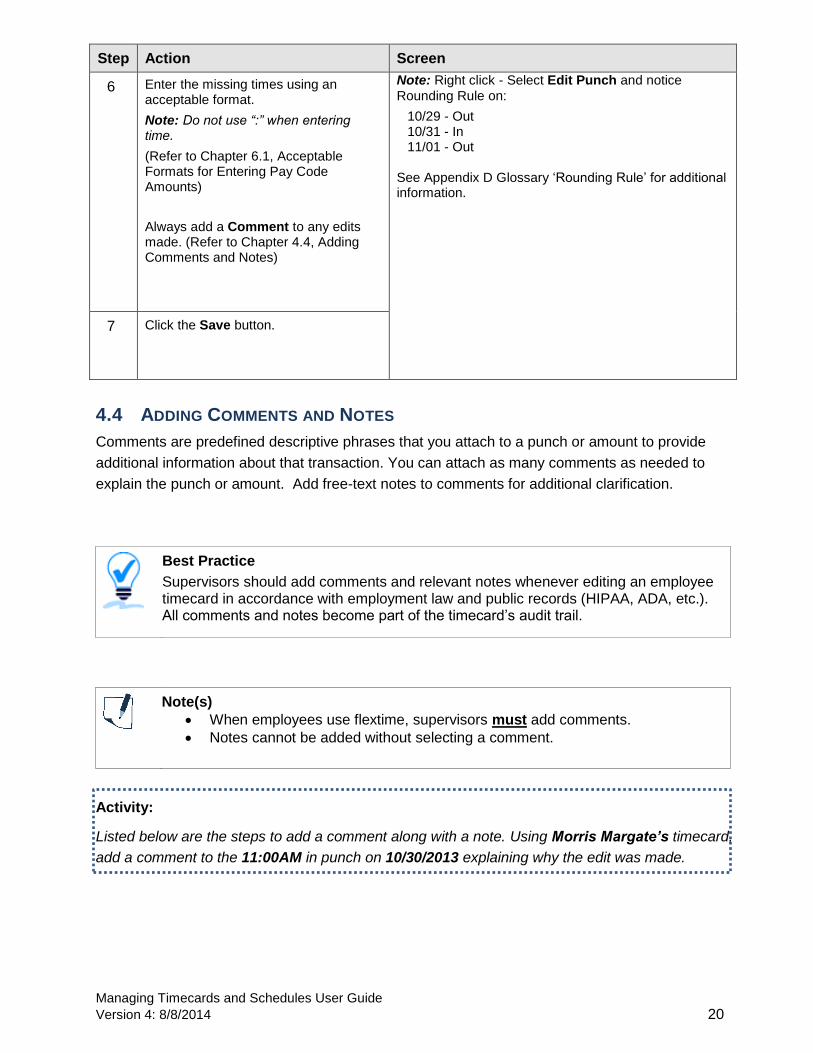
6 Enter the missing times using an acceptable format.
Note: Do not use “:” when entering time.
(Refer to Chapter 6.1, Acceptable Formats for Entering Pay Code Amounts)
Always add a Comment to any edits made. (Refer to Chapter 4.4, Adding Comments and Notes)
Note: Right click - Select Edit Punch and notice
Rounding Rule on:
10/29 - Out 10/31 - In 11/01 - Out
See Appendix D Glossary ‘Rounding Rule’ for additional information.
7 Click the Save button.
4.4 ADDING COMMENTS AND NOTES
Comments are predefined descriptive phrases that you attach to a punch or amount to provide
additional information about that transaction. You can attach as many comments as needed to
explain the punch or amount. Add free-text notes to comments for additional clarification.
Best Practice
Supervisors should add comments and relevant notes whenever editing an employee timecard in accordance with employment law and public records (HIPAA, ADA, etc.). All comments and notes become part of the timecard’s audit trail.
Note(s)
When employees use flextime, supervisors must add comments.
Notes cannot be added without selecting a comment.
Activity:
Listed below are the steps to add a comment along with a note. Using Morris Margate’s timecard,
add a comment to the 11:00AM in punch on 10/30/2013 explaining why the edit was made.

Managing Timecards and Schedules User Guide
Version 4: 8/8/2014 21
Step Action Screen
1 Select Comment > Add Comment
Result: The Add Comment screen
appears.
Tip: You can also right-click the cell and select a Comment from the shortcut menu.
2 Select a predefined phrase from the list of Comments.
See Appendix B ‘Predefined Comments’
Enter free-text to the Note section for additional clarification, if applicable.
3 Click the OK button.
Result: The comment and the applicable notes appear within the date where the comment was made.
4 Click the Save button.
4.5 OVERRIDING PUNCHES
Employees may occasionally forget to punch in and out (clock in/out) at the start of their shift, at
lunchtime, or at the end of their shifts. To calculate that the employee has worked time correctly,
the system needs to have the same number of in punches as out punches. If they do not match,
override the incorrectly labeled punch to correct it.
Activity:
On 10/31/2013, an hourly employee, “Patrick Plantation”, punches in (clocks in) in the morning
at 8:00AM and forgets to punch out (clock out) for lunch at 12:00PM, but then punches in (clocks
in) after lunch at 1:00PM and finally punches out (clocks out) at the end of the day at 5:02PM.
The 12:00PM punch needs to be added as punch out, and the 1:00PM punch needs to be
changed to an in punch. Use time period range 10/27/2013 – 11/02/2013.
Note: Perform the following steps to set up the scenario and before proceeding with the
procedure.
1. Right-click on 10/31 1:00 PM Punch
2. Select Edit
3. Select Out Punch in the Override field.
4. Click OK

Managing Timecards and Schedules User Guide
Version 4: 8/8/2014 22
Step Action Screen
1 Access the Reconcile Timecard genie.
Select MY GENIES > Reconcile Timecard
Select All Home from the Show drop-down list to view all the employees you are authorized to view. (The default is ‘All Home’).
From the Time Period drop-down list, select the specific time period.
2 Double-click the name of the employee whose timecards you want to review.
In the timecard, select the punch you want to override. Select Punch > Edit.
3 Select the punch type from the Override drop-down list to change punch from Out Punch to In Punch.
4 Click the Ok button.
5 Repeat steps 1-4 for any additional punch fields or Refer to Chapter 4.3, Adding A Missed Punch, if necessary.
6 Click the Save button and add Comment. (Refer to Chapter 4.4,
Adding Comments and Notes)
4.6 PAYING EMPLOYEES FOR WORKING THROUGH MEALS
In the Kronos system, work rules define basic time and labor conditions, such as how breaks and
meal deductions occur during shifts. For example, a work rule might stipulate that an employee
must work a minimum of five hours before a meal deduction of 30 minutes is applied automatically
to their time. This automatic deduction is reflected in the shift hours total. There may be times

Managing Timecards and Schedules User Guide
Version 4: 8/8/2014 23
when an employee works through their meal, so you will need to cancel the automatic meal
deduction to add the time worked to the timecard.
Activity:
“Penelope Pembroke”, is an hourly employee who worked through lunch. Cancel the automatic
meal deduction and add the appropriate comment. Use the time period range 10/27/2013 –
11/02/2013 and cancel the 30 minutes deduction on 10/30/2013.
Step Action Screen
1 Access the Reconcile Timecard genie.
Select MY GENIES > Reconcile Timecard
(Refer to Chapter 4.1, Accessing and Viewing Employees’ Timecards)
2 Select All Home from the Show drop-down list to view all the employees you are authorized to view. (The default is ‘All Home’).
From the Time Period drop-down list, select the specific time period.
3 Select the employee, right-click and then select Timecard.
4 Click the Out punch cell on the date you want to cancel the deduction.
5 Select Punch > Edit.
6 Select the deduction you want to cancel from the Cancel Deduction drop-down list.
Note: You can restore a meal deduction cancellation by selecting <None> from the Cancel Deduction drop-down list.
7 Click the OK button.

Managing Timecards and Schedules User Guide
Version 4: 8/8/2014 24
Step Action Screen
8 Click the Save button and add Comment. (Refer to Chapter 4.4,
Adding Comments and Notes)
4.7 MARKING EXCEPTIONS AS REVIEWED
Once you review an exception, mark the exception as reviewed and a green border will appear
around the cell containing the exception. The exception remains visible in the timecard and in
genies, but no longer appears in exception reports or queries. You can unmark an exception as
reviewed at any time.
Activity:
When an hourly employee, “Henry Hallandale”, comes in late on 10/30/2013, review the
exception in the system and mark the item as reviewed. No comments are necessary. Use time
period range 10/27/2013 – 11/02/2013.
Step Action Screen
1 In the timecard, select the cell containing the exception.
2 Determine if you want to mark or unmark an exception as reviewed.
If you want to… Then…
mark an exception as reviewed,
select Punch > Mark as Reviewed
unmark an exception as reviewed,
select Punch > Unmark as Reviewed
Note: You can also right-click the cell and select these options from the shortcut menu.
3 Review the results.
Note: Once the exception is marked as reviewed, a green border appears around the cell containing the exception.

Managing Timecards and Schedules User Guide
Version 4: 8/8/2014 25
4.8 MAKING PAY CODE ADJUSTMENTS TO TIMECARDS
Pay codes keep track of the type of worked and non-worked time that is entered in the timecard.
Examples of pay codes include: Regular, Overtime, Sick, Vacation.
4.8.1 ACCEPTABLE FORMATS FOR ENTERING PAY CODE AMOUNTS
Important: Use colons to properly enter pay code amounts. If you enter an amount without a
colon, Kronos interprets your entry as is, which may be a much larger amount than you meant. For
example, if you enter 730 (without the colon), Kronos interprets that as 730 hours.
Activity:
“Teresa Tamarac”, is an hourly employee leaving work early. The supervisor adds pay code USK
(Unscheduled Sick Leave) to the employee’s timecard to account for 3 hours of sick leave to
Friday, 11/01/13. Use time period range 10/27/2013 – 11/02/2013.
Step Action Screen
Best Practice
It is important to track hours to the correct pay code so that the employee is paid correctly.
Note
You cannot add a pay code to a row that contains punches; you must add a separate row for the pay code transaction.
Acceptable Format Example Interpretation (System) Calculation
Leading zeroes (optional)
07 7:00 hours 7 hours
08 8:00 hours 8 hours
Colon 7:30 7:30 hours
Important: Please see note above.
7 hours and 30 minutes
Decimal 8.5 8:30 hours 8 hours and 30 minutes
Full Schedule Day/ Half Schedule Day
full sched day/half sched day in the Amount field
Employees receive hours based on their scheduled assignments for that day
same

Managing Timecards and Schedules User Guide
Version 4: 8/8/2014 26
Step Action Screen
1 Access the Reconcile Timecard genie.
Select MY GENIES > Reconcile Timecard
(Refer to Chapter 4.1, Accessing and Viewing Employees’ Timecards)
2 Select All Home from the Show drop-down list to view all the employees you are authorized to view. (The default is ‘All Home’).
From the Time Period drop-down list, select the specific time period.
3 Select the employee, right-click and then select Timecard.
4 Identify the day with the unexcused absence and determine if the day already has punches.
If… then on the row of the date where you want to enter the pay code amount…
Yes, click the Insert Row icon.
No, select the pay code from the Pay Code drop-down list.
5 Click the Amount cell next to the pay code you selected.
Enter the number of hours, using an acceptable format, or select one of the scheduling amount options.
6 Click the Save button, and add Comment. (Refer to 4.4, Adding Comments and Notes)
Note Additional Pay Code types can be found in Appendix A, Commonly Used Pay Codes.

Managing Timecards and Schedules User Guide
Version 4: 8/8/2014 27
4.9 STANDBY AND CALL OUT
Example:
A supervisor assigns an hourly employee to be on standby.
If an employee is on standby, there are three variables.
a) The employee will be paid for a minimum numbers of hours (typically 2 hours) regardless of
being called in.
b) If the employee is called in, he will get paid for the hours plus the set rate (2 hours).
c) If an employee gets called in, he will also be guaranteed to be paid a set number of hours
plus his minimum set rate (2 hours), depending on the union contract.
Best Practice
Transactions that might override the employee’s default work rule assignment have been identified as Emergency Call Out and Standby, which requires the supervisor to perform rule override edits in the employee’s Timecard.
For more information see BC-Net > easyPay Website > Learning
4.10 REVIEWING TIMEKEEPING DATA IN GENIES
Genies present customized views of employee information in a summarized, easy-to-read format
to quickly analyze and respond to time, labor, scheduling, and attendance needs.
Activity:
Show the Reconcile genie and review the meaning of colored flags (checks), column headings,
sorting, etc.
Step Action Screen
1 Access the Reconcile Timecard genie.
(Refer to Chapter 6.2, Accessing and Viewing Employees’ Timecards)

Managing Timecards and Schedules User Guide
Version 4: 8/8/2014 28
Step Action Screen
2 Select All Home from the Show drop-down list to view all the employees you are authorized to view. (The default is ‘All Home’).
From the Time Period drop-down list, select the specific time period.
(Refer to Chapter 6.2, Accessing and Viewing Employees’ Timecards)
3 To sort information by one or two columns, click the column for the secondary sort first, and then click the column for the primary sort.
Note: Black flags indicate un-
reviewed exceptions and green flags indicate exceptions have been reviewed.
Managing Timecards and Schedules User Guide
Version 4: 8/8/2014 29
CHAPTER 5: SCHEDULING EMPLOYEES
Using the application’s scheduling capabilities, you can quickly compare the differences between
worked and scheduled time, and identify additional workload needs. Supervisors can also track
employees’ absences as well as early or late arrivals. To take full advantage of these capabilities,
you need to create, review, and maintain accurate schedules for employees in the application.
Organizations use schedules for two key reasons: to match staffing to workload requirements and
to manage time and labor data for individual employees.
When you manage time and labor data for individual employees with schedules, you can:
Track attendance
Specify how to enforce restrictions and round punches
Track exceptions such as when an employee is early, late, or absent
Associate work rules with the correct schedules
Schedule and view non-worked hours, such as vacations, in advance
Pre-populate employee timecards with standard schedule information
Best Practice
All employees must have their schedule updated in Kronos.
5.1 ACCESSING THE SCHEDULE EDITOR
Follow the steps below to access the Schedule Editor.
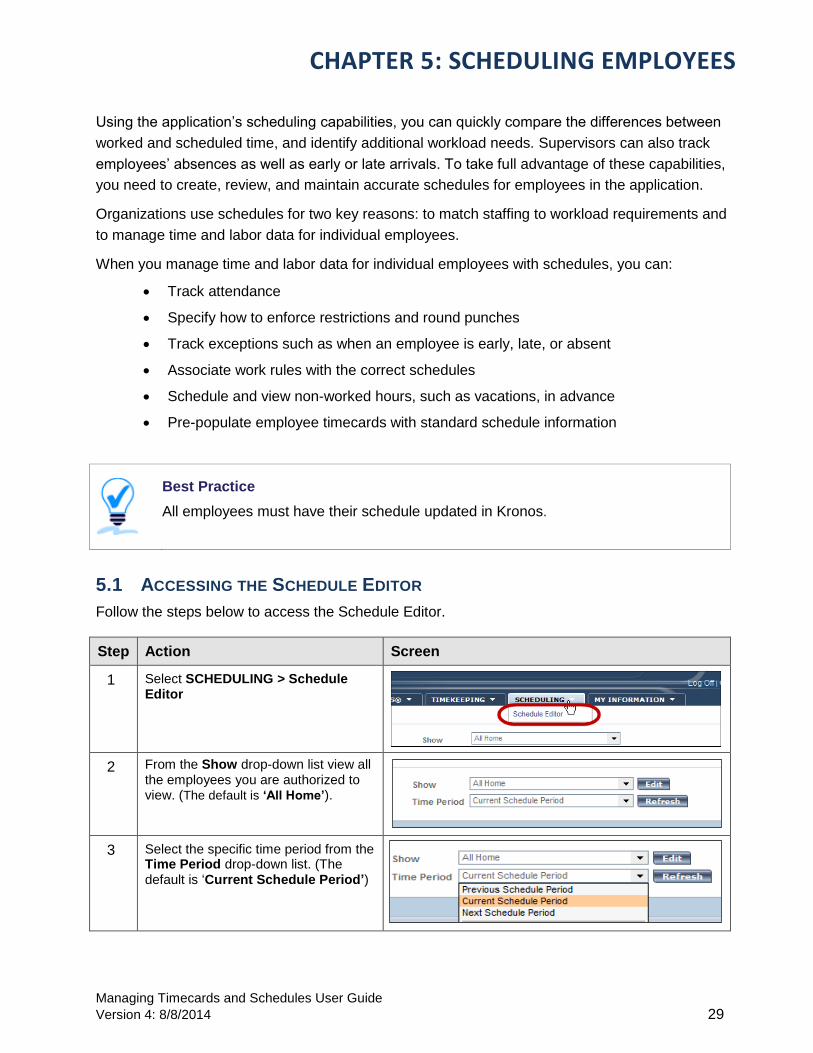
Step Action Screen
1 Select SCHEDULING > Schedule Editor
2 From the Show drop-down list view all the employees you are authorized to view. (The default is ‘All Home’).
3 Select the specific time period from the Time Period drop-down list. (The default is ‘Current Schedule Period’)

Managing Timecards and Schedules User Guide
Version 4: 8/8/2014 30
5.2 NAVIGATING THE SCHEDULE EDITOR
Use the Schedule Editor to schedule worked and non-worked hours. By using the Schedule Editor,
you can:
Add, edit, and delete scheduled shifts
Add pay codes for worked or non-worked hours
# Column, Row or Cell Displays or Lists…
1 Name Employee names.
2 Sch Hrs. Total number of scheduled hours by employee for the selected time period, with lunch deducted if applicable.
3 Date Shift start and end times, for each day in the selected time period. A date cell can also display pay codes to identify scheduled non-worked hours.
4 Scheduled Hours Total number of scheduled hours for all employees for the selected time period and for each date displayed
5 Number of Employees Total number of employees used to calculate total Scheduled Hours.
6 Workspace Expansion Bar
Separates employee details such as schedules, comments, accruals, totals etc. from the employee timecard. Important: If the Workspace Expansion Bar appears at the extreme bottom of the screen, Click and hold mouse over the center of the bar, then drag the bar up to desired the position to reveal additional employee details.
7 Person ID Last 6 digit number of employee ID number.

Managing Timecards and Schedules User Guide
Version 4: 8/8/2014 31
5.3 ASSIGNING A SCHEDULE PATTERN TO A NEW EMPLOYEE
Schedule patterns let you quickly apply a set of shifts to employees who work those same shifts on
a regular basis. A schedule pattern consists of one or more shifts that repeat over a specified time
period. When you create schedules for new employees add the shift days and times using a
predefined pattern template.
Activity:
“William Weston”, an hourly and full time employee, is working a schedule that is based on an
established schedule pattern. Assign the following schedule pattern for the employee:
560MTWHF800A-430P starting Sunday of the next schedule period.
Step Action Screen
1 Access the Schedule Editor.
Select SCHEDULING > Schedule Editor
(Refer to Chapter 5.1, Accessing the Schedule Editor)
2 From the Show drop-down list view all the employees you are authorized to view. (The default is ‘All Home’).
From the Time Period drop-down list, select the specific time period.
3 Select the employee who you will schedule using a pattern template. To select multiple employees, hold the Ctrl
key and click each employee’s name.
4 Select Shift > Add Pattern
Result: The ‘Pattern Editor’ window
will open.

Managing Timecards and Schedules User Guide
Version 4: 8/8/2014 32
Step Action Screen
5 Click the Insert Pattern button.
Result: The ‘Select Pattern’ window
will open.
6 Select a pattern from the list and click OK.
Note: If no pattern exists, Refer to 5.6, Creating a Schedule Without a Pattern Template.
7 From the Work Start Date drop-down list, specify the effective date on which the employee(s) starts working the pattern.
8 From the Pattern Start Date drop-down list, specify the effective date on which the pattern starts. Important: Leave the ‘Pattern Start Date as is.
9 From the End Date drop-down list, specify the last date the pattern will be effective. To have the pattern in effect with no end date, select Forever.
10 Checkmark Override Other Patterns if necessary to replace the existing shift pattern for those dates with the new shift pattern.
11 Click OK to add the pattern and the “pattern Editor” will close.
12 Click Yes in the message window.
13 Click the Save button.
5.4 CANCELLING AND SAVING EDITS
When you add and modify schedule data, the application displays your edits but does not save
them automatically. You must tell the application to save the data. Prior to saving your data, you
can cancel your edits if necessary. Data needs to be saved periodically.

Managing Timecards and Schedules User Guide
Version 4: 8/8/2014 33
Note When you edit a schedule, the Schedule Editor heading turns orange, and an asterisk appears next to it to let you know that your edits are not yet saved. After you save the edits, the Schedule Editor heading will revert to black text.
5.4.1 CANCELLING UNSAVED EDITS
The application does not save your edits until you click the Save button. Until that time, you can
remove or cancel your edits using the Refresh button. When you click Refresh, the application
redisplays the most recently saved information, overwriting all of your unsaved edits.
Listed below are the steps to cancel edits.
Step Action Screen
1 Perform edits to a schedule. Note: The Schedule Editor header is ‘Orange’ indicating unsaved data.
2 Click Refresh and review the schedule information.
Result: A pop-up message will appear saying: “You will lose any changes you have made if you continue. Do you want to continue?”
If you want to… click…
cancel your changes, Yes.
keep your changes, No.
5.4.2 SAVING EDITS
When you are satisfied with your edits, you must save them because the application does not save
your edits automatically.
Listed below are the steps to save edits.
Step Action Screen

Managing Timecards and Schedules User Guide
Version 4: 8/8/2014 34
Step Action Screen
1 Perform edits to a schedule. Note: The Schedule Editor header is ‘Orange’ indicating unsaved data.
2 Click Save.
Result: After you save the edits, the Schedule Editor heading will revert to black text.
5.5 CHANGING AN EMPLOYEE’S SCHEDULE PATTERN
Although you can assign a schedule pattern to an employee without a specific end date, you can
replace a schedule pattern for a specific or indefinite time period.
Activity:
Replace the schedule pattern assigned to “Teresa Tamarac” with a different schedule pattern
for the next two weeks. Add the 560MTWHF1000A-630P pattern starting next Sunday and
ending after two weeks (on Saturday).
Step Action Screen
1 Access the Schedule Editor.
Select SCHEDULING > Schedule Editor
(Refer to Chapter 5.1, Accessing the Schedule Editor)
2 From the Show drop-down list to view all the employees you are authorized to view. (The default is ‘All Home’).
From the Time Period drop-down list, select the specific time period.
3 Select the employee who you will schedule using a pattern template.
To select multiple employees, hold the Ctrl key and click each employee’s
name.

Managing Timecards and Schedules User Guide
Version 4: 8/8/2014 35
Step Action Screen
4 Select Shift > Add Pattern.
Result: The ‘Pattern Editor’ window
will open.
5 Click the Insert Pattern button.
Result: The ‘Select Pattern’ window
will open.
6 Select a new pattern from the list and click OK.
7 From the Work Start Date drop-down list, specify the effective date on which the employee(s) starts working the pattern.
8 From the Pattern Start Date drop-down list, specify the effective date on which the pattern starts. Important: Leave the ‘Pattern Start Date’s as is.
9 From the End Date drop-down list, specify the last date the pattern will be effective. To have the pattern in effect with no end date, select Forever.
10 Select the Override other patterns option.
11 Click OK to apply the edits and the ‘Pattern Editor’ window will close.

Managing Timecards and Schedules User Guide
Version 4: 8/8/2014 36
Step Action Screen
12 Click Yes in the message window.
13 Click Save to save your edits.
Best Practice
If your employee anticipates a new schedule change, they need to discuss the change with you. It is your responsibility to approve the new schedule and apply the pattern in Kronos. Management may dictate scheduling.
5.6 CREATING A SCHEDULE PATTERN WITHOUT A PATTERN TEMPLATE
If a schedule template does not exist, you can create a temporary schedule pattern manually and
apply it to one or more employees.
Note
A manually created schedule pattern is temporary; therefore, it cannot be saved as a template. This means that you cannot assign it to employees later.
Step Action Screen
1 Access the Schedule Editor.
Select SCHEDULING > Schedule Editor
(Refer to Chapter 5.1, Accessing the Schedule Editor)
2 From the Show drop-down list to view all the employees you are authorized to view. (The default is ‘All Home’).
From the Time Period drop-down list, select the specific time period.
3 Select the employee who you will schedule using a pattern template. To select multiple employees, hold the Ctrl
key and click each employee’s name.

Managing Timecards and Schedules User Guide
Version 4: 8/8/2014 37
Step Action Screen
4 Select Shift > Add Pattern.
Result: The ‘Pattern Editor’ window
will now open.
5 Select the days by clicking on Monday and then press and hold the ‘Shift’ key
and click on Friday.
6 Select the Insert Shift button.
7 Select a shift template and click OK.
Note: If no shifts exist, Refer to 5.8 Adding a Shift Using the Shift Editor.
8 Click the Insert Row icon to add a second week to the schedule pattern.
9 Select Monday through Friday of the second week.

Managing Timecards and Schedules User Guide
Version 4: 8/8/2014 38
Step Action Screen
10 Click the Insert Shift button.
11 Select a shift template and click OK.
12 From the Work Start Date drop-down list, specify the effective date on which the employee(s) starts working the pattern.
13 From the Pattern Start Date drop-down list, specify the effective date on which the pattern starts. Important: the ‘Work Start Date’ and the ‘Pattern Start Date’s should be the same.
14 From the End Date drop-down list, specify the last date the pattern will be effective. To have the pattern in effect with no end date, select Forever.
15 Click OK to apply the edits and close the ‘Pattern Editor’ window.
16 Click the Save button.
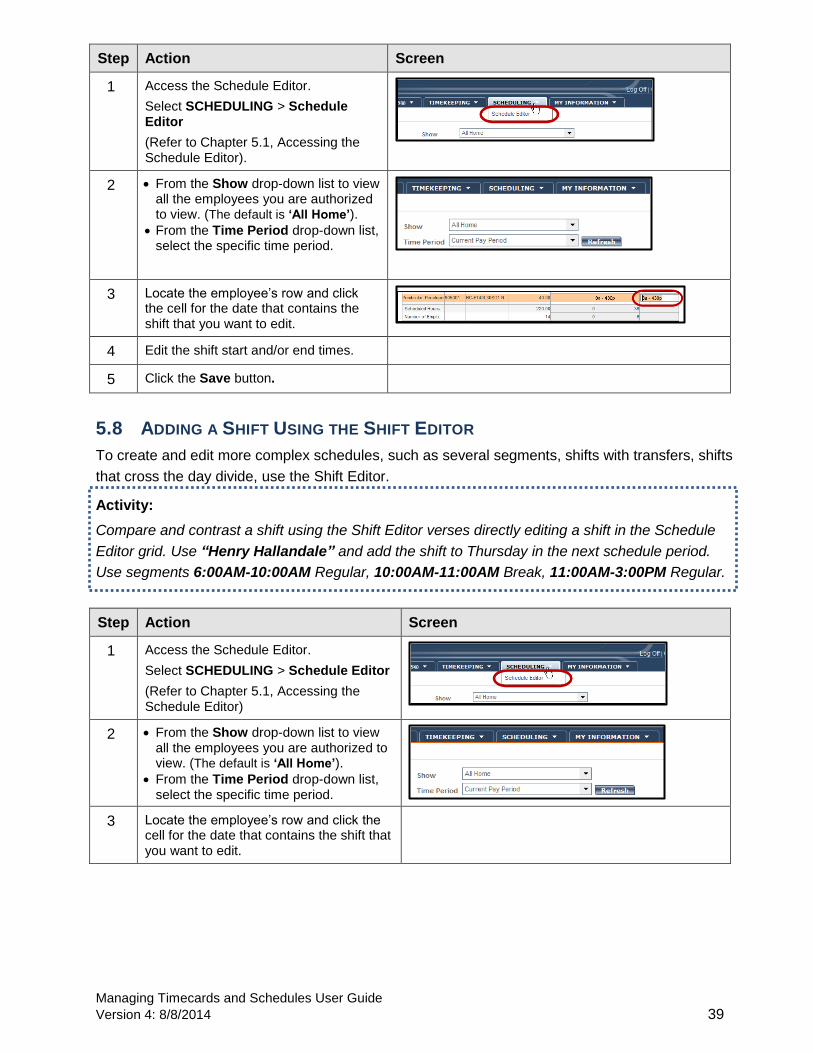
5.7 EDITING SHIFTS DIRECTLY IN THE SCHEDULE GRID
When your workload requirements vary or employees’ schedules change, you will need to edit
employees’ schedules.
Activity:
“Morris Margate”, an hourly employee, will be starting and ending a shift a half-hour earlier than
normally scheduled next Tuesday. Edit the employee’s shift as start time 10:30PM and end time
8:30AM on Tuesday in the next scheduled period.
Managing Timecards and Schedules User Guide
Version 4: 8/8/2014 39
Step Action Screen
1 Access the Schedule Editor.
Select SCHEDULING > Schedule Editor
(Refer to Chapter 5.1, Accessing the Schedule Editor).
2 From the Show drop-down list to view all the employees you are authorized to view. (The default is ‘All Home’).
From the Time Period drop-down list, select the specific time period.
3 Locate the employee’s row and click the cell for the date that contains the shift that you want to edit.
4 Edit the shift start and/or end times.
5 Click the Save button.
5.8 ADDING A SHIFT USING THE SHIFT EDITOR
To create and edit more complex schedules, such as several segments, shifts with transfers, shifts
that cross the day divide, use the Shift Editor.
Activity:
Compare and contrast a shift using the Shift Editor verses directly editing a shift in the Schedule
Editor grid. Use “Henry Hallandale” and add the shift to Thursday in the next schedule period.
Use segments 6:00AM-10:00AM Regular, 10:00AM-11:00AM Break, 11:00AM-3:00PM Regular.
Step Action Screen
1 Access the Schedule Editor.
Select SCHEDULING > Schedule Editor
(Refer to Chapter 5.1, Accessing the Schedule Editor)
2 From the Show drop-down list to view all the employees you are authorized to view. (The default is ‘All Home’).
From the Time Period drop-down list, select the specific time period.
3 Locate the employee’s row and click the cell for the date that contains the shift that you want to edit.

Managing Timecards and Schedules User Guide
Version 4: 8/8/2014 40
Step Action Screen
4 Select Shift > Add.
5 Enter values in the Start Time and End Time fields.
6 Click the Insert Row icon to add a
second segment to the shift.
7 Select the appropriate segment from the Type drop-down list.
8 Enter values in the Start Time and End
Time fields.
9 Click the Insert Row icon to add a third segment to the shift.
10 Select the appropriate segment from the Type drop-down list.
11 Enter values in the Start Time and End Time fields.
12 Confirm or modify the value in the End Date field.
13 Click OK and then click Save.
Tip – Use either 12 or 24 hour Time Format
Time is entered using either 12-hour or 24-hour time formats. You can enter 8:00 A.M. to 5:00 P.M. as 0800-1700 or 8a-5p. Kronos will automatically format the time for a 12-hour clock.
5.9 DELETING SHIFTS FROM EMPLOYEES’ SCHEDULES
When an employee is unable to work a scheduled shift, delete the shift from their schedule. This
prevents the application from flagging the employee as absent without an excuse.
Activity:
The shift is incorrectly entered and the supervisor will need to delete it. Delete “Minnie Cooper’s”
2:00PM-6:00PM shift on the Wednesday. (Current schedule period if class held before
Wednesday at 2:00PM; next schedule period if class held after Wednesday at 200PM).

Managing Timecards and Schedules User Guide
Version 4: 8/8/2014 41
Step Action Screen
1 Access the Schedule Editor.
Select SCHEDULING > Schedule Editor
(Refer to Chapter 5.1, Accessing the Schedule Editor)
2 From the Show drop-down list to view all the employees you are authorized to view. (The default is ‘All
Home’).
From the Time Period drop-down list, select the specific time period.
3 Locate the employee’s row and click the cell for the date that contains the shift that you want to edit.
4 Select Shift > Delete.
5 Click the Save button.
Tip
You can restore a deleted shift if it is part of a schedule pattern. Use the Restore
feature on the Actions menu to insert the original shift into the employee’s schedule.

Managing Timecards and Schedules User Guide
Version 4: 8/8/2014 42

Managing Timecards and Schedules User Guide
Version 4: 8/8/2014 43
CHAPTER 6: MANAGING TIME OFF
6.1 ACCEPTABLE FORMATS FOR ENTERING PAY CODE AMOUNTS
6.2 PRE-APPROVED TIME-OFF REQUESTS
Employees can submit time-off requests using the My Requests Calendar in the application. These
requests are stored in the Requests tab of the Schedule Editor, where you can evaluate them and
approve or reject them. This feature provides a consistent, easily accessible way for employees to
request or cancel time off, as well as a quick way for supervisors to evaluate and respond to
requests.
Activity:
A salaried employee has submitted a time-off request for annual leave that you need to review
and approve. Log-off as supervisor “Larissa Lauderhill” and then log back as employee,
“Sonia Sunrise” using empxxx (“xxx” is the same number used for trainxxx). Submit a request
for 8 hours of time off using pay code SVC starting at 8:30AM on the first Monday of the next
month. Then log back in as supervisor, “Larissa Lauderhill” using trainxxx to approve the
request.
Acceptable Format Example Interpretation (System) Calculation
Leading zeroes (optional)
07 7:00 hours 7 hours
08 8:00 hours 8 hours
Colon 7:30 7:30 hours
Important: If you enter an amount without a colon, Kronos interprets your entry as is, which may be a much larger amount than you meant. For example, if you enter 730 (without the colon), Kronos interprets that as 730 hours.
7 hours and 30 minutes
Decimal 8.5 8:30 hours 8 hours and 30 minutes
Full Schedule Day/ Half Schedule Day
full sched day/half sched day in the Amount field
Employees receive hours based on their scheduled assignments for that day
same

Managing Timecards and Schedules User Guide
Version 4: 8/8/2014 44
Step Action Screen
1 Access the Schedule Editor.
Select SCHEDULING > Schedule Editor
(Refer to Chapter 5.1, Accessing the Schedule Editor)
2 From the Show drop-down list, select the specific set of employees. From the Time Period drop-down list, select the time period during which the employee’s requested time off would occur.
Note: Before approving the leave request, use the schedule grid to view all previously approved time off requests for your staff in the selected time period.
Workspace Expansion Bar: this may be minimized hiding the Comments and Requests tabs. To expand, click and hold your mouse over the center of the bar, drag the bar up to the desired position.
3 Click the Requests tab.
4 From the Request for drop-down list, select Time-Off Requests.
5 From the Status drop-down list, select Submitted.
6 Click Reload.

Managing Timecards and Schedules User Guide
Version 4: 8/8/2014 45
Step Action Screen
7 To view more details about the leave request:
Select and right-click the request to access the shortcut menu
Select Edit Request
Then click Cancel to return to the request
8 Determine whether you are going to approve or reject the request.
Select and right-click the request to access the shortcut menu
To approve the request, select the Approved option
To reject the request, select the Refused option
9 Click Save.
Tip
When selecting an option from the ‘Request for’ drop-down list, you will not be able
to view the details of any requests if you select All Requests.
Note(s)
Supervisors are responsible to Approve or Refuse leave requests.
Supervisors also Approve cancelled leave requests that have been submitted.
6.3 SCHEDULING NON-WORKED HOURS

Managing Timecards and Schedules User Guide
Version 4: 8/8/2014 46
Non-worked paid hours include jury duty, election work, and training. You should schedule your
employees’ non-worked time when you know about it in advance.
Activity:
You need to modify an employee’s schedule to reflect jury duty leave. Use “Desmond Davie”
and add 4 hours of pay code to the First Tuesday in the next schedule period. Override the
currently scheduled shift.
Step Action Screen
1 Access the Schedule Editor.
Select SCHEDULING > Schedule Editor
(Refer to Chapter 5.1, Accessing the Schedule Editor)
2 From the Show drop-down list to view all the employees you are authorized to view. (The default is ‘All Home’).
From the Time Period drop-down list, select the specific time period.
3 Locate the employee’s row and click the cell for the date where you want to schedule non-worked hours.
4 Select Pay Code > Edit.
5 In the Effective Date field, confirm the date selected. (Or, if incorrect, enter the correct date.)
6 From the Pay Code drop-down list, select the pay code.

Managing Timecards and Schedules User Guide
Version 4: 8/8/2014 47
Step Action Screen
7 In the Amount field, do one of the following:
To schedule… enter/select…
a specific number of hours,
the amount of hours in the field
the entire number of hours that the employee is scheduled to work that day,
full sched day
from the drop-down list
half of the number of hours that the employee is scheduled to work that day,
half sched day
from the drop-down list
8 (Optional) If the non-worked hours must replace the employee’s existing shift, select the Override Shift check box and do one of the following:
If overriding … then select…
the employee’s entire shift
Whole shift
part of the employee’s scheduled shift
Partial shift
9 In the Start Time field, enter the effective time for the non-worked hours. If the employee already has a schedule, the shift start time is the default.
10 In the Repeat for (D) field, enter the number of consecutive days this edit applies. For example, if the employee has requested five consecutive days of training, enter 5.
11 Click OK and then click the Save button.
Managing Timecards and Schedules User Guide
Version 4: 8/8/2014 48
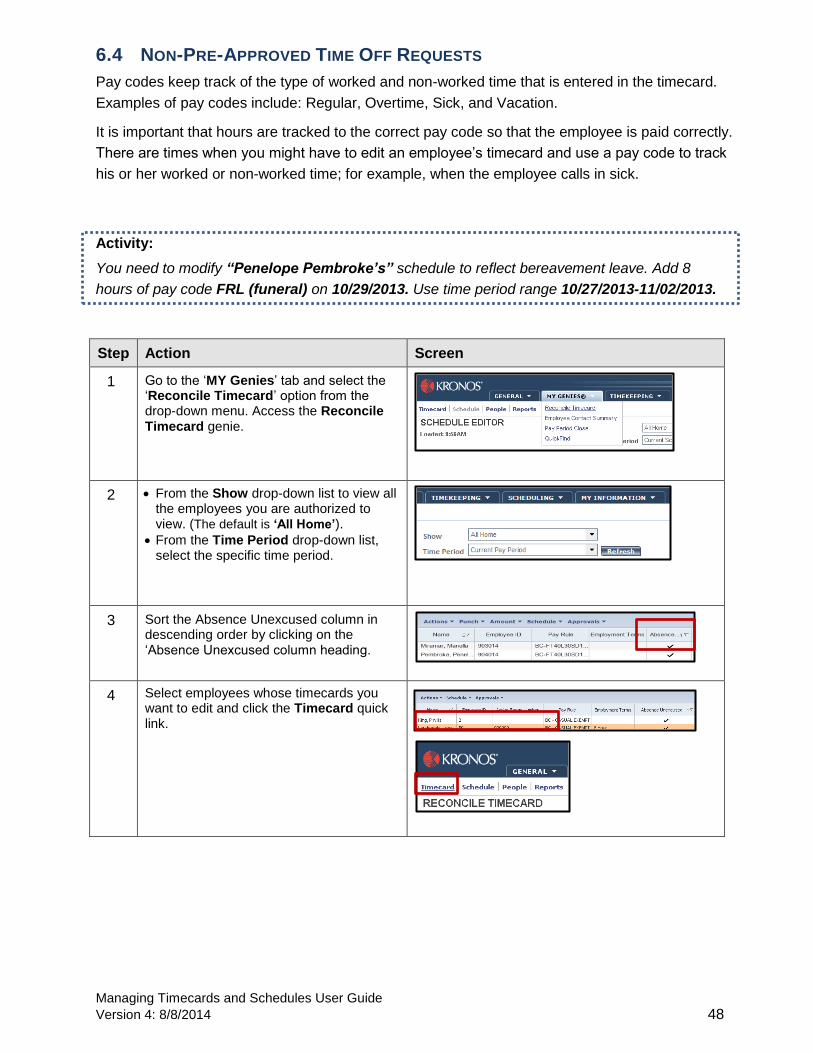
6.4 NON-PRE-APPROVED TIME OFF REQUESTS
Pay codes keep track of the type of worked and non-worked time that is entered in the timecard.
Examples of pay codes include: Regular, Overtime, Sick, and Vacation.
It is important that hours are tracked to the correct pay code so that the employee is paid correctly.
There are times when you might have to edit an employee’s timecard and use a pay code to track
his or her worked or non-worked time; for example, when the employee calls in sick.
Activity:
You need to modify “Penelope Pembroke’s” schedule to reflect bereavement leave. Add 8
hours of pay code FRL (funeral) on 10/29/2013. Use time period range 10/27/2013-11/02/2013.
Step Action Screen
1 Go to the ‘MY Genies’ tab and select the ‘Reconcile Timecard’ option from the drop-down menu. Access the Reconcile Timecard genie.
2 From the Show drop-down list to view all the employees you are authorized to view. (The default is ‘All Home’).
From the Time Period drop-down list, select the specific time period.
3 Sort the Absence Unexcused column in descending order by clicking on the ‘Absence Unexcused column heading.
4 Select employees whose timecards you want to edit and click the Timecard quick link.

Managing Timecards and Schedules User Guide
Version 4: 8/8/2014 49
Step Action Screen
5 Identify the day with the unexcused absence and determine if the day already has punches.
If… then on the row of the date where you want to enter the pay code amount…
Yes, click the Insert Row icon
Note: On the new row, select the pay code from the Pay Code drop-down list.
No, select the pay code from the Pay Code drop-down list
IF YES:
IF NO:
6 Select the Pay Code; click the Amount cell next to the pay code you selected. Enter the number of hours using an acceptable format.
7 Click the Save button. Click OK for pop-up window.
6.5 NEGATIVE ACCRUAL BALANCES
When employees do not have any accrued time to apply against a pay code, you must dock the
employee.
Activity:
“Mariella Miramar”, an hourly employee, was absent from work on 10/30/2013 due to illness and
has no accrued balances. This employee will be docked 8 hours due to the lack of available
accrued leave hours. Use time period range 10/27/2013-11/02/2013, pay code UNE, and add a
comment to the system reflecting the reason for the employee’s pay being docked the time missed
from work.
Step Action Screen
1 From the “My Genies” tab select the QuickFind option from the pull-down
menu.
2 Type employee name in the Name or ID field, then select the appropriate Time Period and click Find.

Managing Timecards and Schedules User Guide
Version 4: 8/8/2014 50
Step Action Screen
3 Double-click the employee name.
4 Enter the applicable code (UNE) and amount (8.0) in the Amount column.
Note: “UNE” Pay code will remain as unreconciled on the Pay Period Close genie.
5 Click on the Comment tab to select Add Comment reflecting the reason for the employee’s pay being docked.
(Refer to Chapter 4.4, Adding Comments and Notes)
6 Click the Save button.
6.6 PARTIAL ACCRUAL BALANCES
When employees do not have enough accrued time to apply against a pay code, you can split the
necessary amount of hours between different pay codes.
Activity:
“Sonia Sunrise”, a salaried employee, calls in sick for 8 hours and only has 4 hours of sick time
available. As the supervisor, you need to apply 4 hours to sick pay and apply the remaining using
the annual leave pay. Use the time period range 02/16/2014-03/01/2014 and add 4 hours of pay
code SSK and 4 hours of pay code SVC on 02/17/2014.
Step Action Screen
1 From the “My Genies” tab select the QuickFind option from the pull-down
menu.
2 Type employee name in the Name or ID field, then select the appropriate Time Period and click Find.

Managing Timecards and Schedules User Guide
Version 4: 8/8/2014 51
Step Action Screen
3 Double-click the employee name.
4 Delete amount of hours that was added to the specific date by the system (hours are in purple color).
Note: system generated hours worked
are in purple.
5 Click the Insert Row icon.
6 On the row for the appropriate date, select the relevant sick leave pay code.
5 Enter the applicable sick leave amount in the Amount column.
6 Click the Insert Row icon.
7 On the new row, select the relevant pay code for the balance of the vacation day.
8 Enter the applicable amount in the Amount column.
9 Click the Save button.

Managing Timecards and Schedules User Guide
Version 4: 8/8/2014 52

Managing Timecards and Schedules User Guide
Version 4: 8/8/2014 53
CHAPTER 7: FINALIZING TIMECARDS
7.1 REVIEWING TIME DATA USING GENIES
There are two (2) genies, the Pay Period Close and the Daily Time Adjustment genie, that can e
used to review time data.
7.1.1 PAY PERIOD CLOSE GENIE
The Pay Period Close genie helps to identify timecard discrepancies at the end of a pay period so
that you can perform final edits. All exceptions must be resolved before you approve
timecards. Otherwise, employees may not be paid correctly for that pay period.
Activity:
Review the Pay Period Close genie for final corrections prior to approving employee timecards.
Step Action Screen
1 Access the Pay Period Close genie.
Select MY GENIES > Pay Period Close
Best Practice
All check marks (flags) for missed punches must be cleared prior to approving timecards.
Note
UNE” Pay code will remain as unreconciled on the Pay Period Close genie.

Managing Timecards and Schedules User Guide
Version 4: 8/8/2014 54
Step Action Screen
2 From the Time Period drop-down list, select the specific time period.
7.1.2 DAILY TIME ADJUSTMENT GENIE
Prior to approving your employees’ timecards, use the Daily Time Adjustment genie to verify that all of your employees received the correct time adjustment amounts.
Step Action Screen
1 Click the TIMEKEEPING tab and select Daily Time Adjustment Totals.
2 View Daily Time Adjust – Sched Day for all hours of daily time adjustment that is Pending.
Note: This column should be Blank in the Previous Pay Period. If this column is populated in a previous Pay Period, a ticket needs to be opened with Payroll Central.
3 View Daily Time Adjust – Moved Day for all hours of daily time adjustment that has been earned.
Note: Contact Payroll Central for any
hours greater than 5 in this column.

Managing Timecards and Schedules User Guide
Version 4: 8/8/2014 55
7.2 APPROVING INDIVIDUAL TIMECARDS
After you finish editing your employees' timecards, you need to approve them so that payroll knows
that the timecards are ready for processing. After you approve a timecard, the employee cannot
make any edits to it unless you remove your approval.
Activity:
You have reviewed an employee’s time data and performed all necessary corrections. Approve
“Penelope Pembroke’s” timecard for the period range 10/27/2013 – 11/02/2013.
Step Action Screen
1 Access the Pay Period Close genie.
(Refer to Chapter 7.1 Reviewing Time Data Using the Pay Period Close Genie)
2 From the Show drop-down list, select the specific set of employees.
From the Time Period drop-down list, select the specific time period.
3 Select the employee, right-click and then select Timecard.

Managing Timecards and Schedules User Guide
Version 4: 8/8/2014 56
Step Action Screen
4 Select Approvals > Approve.
5 Determine if you want to check the approval status on the Timecard or the Pay Period Close screen.
If checking approval on…
then click…
Timecard, click the Sign-offs, Requests & Approvals tab and review the Approval by Manager information.
Pay Period Close,
click Refresh, and review the Manager Approval column.
Timecard:
Pay Period Close Genie:
Best Practice
Supervisors must approve all timecards no later than 10:00am on payroll Monday.
7.3 APPROVING MULTIPLE TIMECARDS
After you have reviewed and updated your employees’ timecards, you can approve them all at
once.
Activity:
You have reviewed and completed final corrections to most of your employees’ timecards. You will
then approve multiple timecards at once. Use the time period range 10/27/2013-11/02/2013 to
approve timecards for “Desmond Davie”, “Donna Deerfield”, and “Mariella Miramar”.
27

Managing Timecards and Schedules User Guide
Version 4: 8/8/2014 57
Step Action Screen
1 Access the Pay Period Close genie.
Select MY GENIES > Pay Period Close
(Refer to Chapter 7.1 Reviewing Time Data Using the Pay Period Close Genie).
2 From the Show drop-down list, select the specific set of employees.
From the Time Period drop-down list, select the specific time period.
3 Determine if you want to approve timecards for all or specific employees.
If approving timecards for…
then…
all employees, select Actions > Select All.
specific employees,
hold the Ctrl key and select each employee.
4 Select Approvals > Approve.
5 Click Yes to confirm your approval.

Managing Timecards and Schedules User Guide
Version 4: 8/8/2014 58
Best Practice
Supervisors must approve all timecards no later than 10am on payroll Monday.
7.4 USING THE GROUP EDIT RESULTS
When you perform edits on multiple employees’ timecards, you can use the Group Edit Results
genie to confirm that the edits were successful.
If one or more of the timecards are not approved, the Details link on the Group Edit Results
screen identifies whose timecard was not approved and why.
Activity:
Use the Group Edit Results genie to confirm success or failure of the multiple timecards you just
approved.
Step Action Screen
1 Select General > Group Edit Results.
2 Examine the Results column.
Note: Click the Details link in the Results column to view details of why an approval failed.
7.5 REMOVE APPROVALS
Approving a timecard prevents further edits to the timecard. When you need to change a timecard after it has been approved, you must first remove the approval.
Activity:
You discover that an employee’s timecard that you have approved contains a mistake. You need to remove your timecard approval. Remove the approval from “Teresa Tamarac’s” timecard for the time period range 10/27/2013 – 11/02/2013 and verify the time of your Removal Confirmation.

Managing Timecards and Schedules User Guide
Version 4: 8/8/2014 59
Step Action Screen
1 Access the Pay Period Close genie.
(Refer to Chapter 7.1 Reviewing Time Data Using the Pay Period Close Genie).
2 From the Show drop-down list, select the specific set of employees.
From the Time Period drop-down list, select the specific time period.
3 Select the employee, right-click and then select Timecard.
4 Select Approvals > Remove Approval.
Result: A confirmation message “Approval Removed” appears on the upper left corner of the screen.

Managing Timecards and Schedules User Guide
Version 4: 8/8/2014 60

Managing Timecards and Schedules User Guide
Version 4: 8/8/2014 61
CHAPTER 8: DELEGATING TO A BACKUP SUPERVISOR
8.1 REQUESTING BACKUP COVERAGE/DELEGATION
When a supervisor is unavailable to reconcile their employee timecards or approve/deny leave
requests, they have the ability to delegate temporarily their authority to another supervisor within
their department. The other supervisor uses their own username and password to perform the
delegated tasks. All edits they perform are recorded and assigned to their name for audit
purposes. This allows the business process to keep moving, even when supervisors are not there.
Within the delegation, the delegate has the ability to see and edit the employees and tasks of the
supervisor. It is possible to delegate to more than one person at a time to ensure coverage within
a department. It is also possible for one individual to accept more than one delegation at a time. It
is not possible to “piggyback” delegations. For example, one supervisor delegates to a second
supervisor, however, the second supervisor is not able to delegate to a third supervisor because
the third delegate will not be able to see the first supervisor’s employees and information.
Activity:
You need a delegate supervisor to cover your time and attendance responsibilities for your
employees while you are out on annual leave. As Supervisor, delegate your authority to “Peter
Pompano” for the period from the current date of training and end one week from today.
Step Action Screen
1 Select General > Actions.
2 From the list of Actions, select Supervisor and FMLA or your
assigned Role.

Managing Timecards and Schedules User Guide
Version 4: 8/8/2014 62
Step Action Screen
3 From the Delegate drop-down list, select the supervisor to whom you want to delegate your tasks.
4 Select the Start Date and End Date to indicate when you want to delegate your tasks.
5 From the Role drop-down list, select the profile that identifies the tasks that you want to delegate.
Note: Contact the ETS Service Desk if the role profile you require does not appear in the list.
6 Click the Save & Close button.
Result: The application sends the delegation request to the other supervisor’s Inbox.
Note
The Supervisor accepting the delegation will not receive Outlook email notifications; however they do have access to the delegates Kronos Inbox. The acting supervisor should also check the Schedule Editor for time off requests and cancellations for the period being covered.

Managing Timecards and Schedules User Guide
Version 4: 8/8/2014 63
8.2 Accepting or Declining Backup Coverage/Delegation Requests
When another supervisor sends you a delegation request to cover their tasks, you will see the
request in your Inbox. The delegation request specifies the start and end dates and the role you
will assume. You can accept or decline the request in Kronos.
Activity:
Another supervisor has requested that you accept a delegation of authority. You want to accept
the request. Log off as “Larissa Lauderhill” and log back in as “Peter Pompano” using delxxx
as both the user name and password (where “xxx” is the same number used for trainxxx).
Step Action Screen
1 Access the Inbox.
Select GENERAL > Inbox
2 From the Tasks tab, select the delegation request and click Edit.
3 In the Action section, click the Accept Delegation radio button.
4 (Optional) Enter a message to the requesting supervisor in the Comment
field.
5 Click the Save & Close button.
Note: Kronos automatically sends a message to the delegator to confirm that you have accepted the delegation request.
Note
Supervisors will need to log off and log on for the delegation action to activate in the system.

Managing Timecards and Schedules User Guide
Version 4: 8/8/2014 64
8.3 SWITCHING TO DELEGATED ROLES
After you accept a delegation request, the application automatically provides you access to the
tasks defined in the role profile on the specified start date. A Switch Role link appears as a quick
link so that you do not have to log on as the supervisor who delegated the tasks to you. The link
identifies which role you currently are working.
Activity:
Use the Switch Role link to switch between viewing your own direct reports and viewing the group
of employees that you have been delegated.
Step Action Screen
1 Click the Switch Role quick link.
Note: If you do not see the Switch Role link, log off and then log on again using your own user name and password.
2 Click to select the supervisor whose tasks you will perform as his or her delegate.
3 Click the Switch Role
8.4 CANCELLING DELEGATIONS
Once the end date of delegation occurs, the application automatically removes the rights of the
other supervisor. You can end the delegation earlier than the designated time period (anytime) by
removing the assignment.
Activity:
Use the delegation manager to cancel the existing delegation you assigned to your backup
supervisor.

Managing Timecards and Schedules User Guide
Version 4: 8/8/2014 65
Step Action Screen
1 Select General > Actions
2 From the list of actions, select Manager Delegation.
3 Click Remove Existing Delegation.
4 Click the Next button.
5 Select the existing supervisor delegation that you want to cancel and click Delete.
Best Practice
It is recommended that the Supervisor requesting delegation coverage, notify the Payroll Liaison of who has accepted the delegation request, and for what time period.

Managing Timecards and Schedules User Guide
Version 4: 8/8/2014 66

Managing Timecards and Schedules User Guide
Version 4: 8/8/2014 67
CHAPTER 9: REPORTS
9.1 GENERATING REPORTS
You can generate reports on a daily, weekly, or pay period basis, or any time you need information
to accomplish your business tasks.
Activity:
Run the Time Detail Report to view timecard details for each of your employees for the current pay
period.
Step Action Screen
1 Determine if you want the report to include specific employees or all employees.
If you want to include…
then…
one or more employees,
Access a genie.
Select the employees to include in the report by clicking the first employee in list and holding shift and clicking last employee in range.
Then click the Reports link.
all employees,
Select General > Reports.
2 On the Select Report tab, click the plus (+) to display a category’s contents.

Managing Timecards and Schedules User Guide
Version 4: 8/8/2014 68
Step Action Screen
3 Click a report name.
Note: The report’s description appears at the bottom of the screen.
4 Select the specific time employees from the People drop-down list.
5 Select the specific time period from the Time Period drop-down list.
6 Select one or more available options to identify the report information you need by selecting the specific Available options on left and clicking single right pointing arrow to move into the Selected column.
Note: Options can vary by report.

Managing Timecards and Schedules User Guide
Version 4: 8/8/2014 69
Step Action Screen
7 Select an Output Format.
Note: Reports that have (Excel) at the end of their names allow you to run the report in Microsoft Excel Document (.xls) format.
All other reports can only be run in Adobe Acrobat Document (.pdf) format.
8 Determine if you want to generate a report and send the report via email.
If… then…
Yes, click Email. Fill in the Recipients field in the Email dialog box and click OK.
No, click Run Report and proceed to Step 9.
Result: the Check Run Status tab appears.
9 Click Refresh Status.
Result: The Status column displays, Running, Complete or Failed once the application has finished the report.

Managing Timecards and Schedules User Guide
Version 4: 8/8/2014 70
Step Action Screen
10 To view a report, click a report name to highlight it and do any of the following:
To use menu options, click View Report.
To use mouse options, double-click the report name.
Note: Reports will periodically need to be purged if no longer needed. This can be done by selecting report and clicking the Delete button.
9.2 CREATING HYPERFIND QUERIES BOTH AD HOC AND PERSONAL
HyperFind queries are used to search People records and return employees that meet a specific
set of criteria. All the options in the Show drop-down list are HyperFind queries. If an existing
HyperFind query does not return the employees you need, you can create your own Ad Hoc query
or Personal query.
Ad Hoc queries are temporary and are available only during your current session. Once you log
off, Ad Hoc queries are no longer available. Personal queries are available only to you and remain
available until you remove them.
Activity:
Create an Ad Hoc query to see your direct reports, and review time and attendance data for the
employees in one of your departments.

Managing Timecards and Schedules User Guide
Version 4: 8/8/2014 71
Step Action Screen
1 Select Edit Ad Hoc from the Show drop-down list on any detailed genie.
2 Click Include or Exclude to include or exclude employees who match the selected condition.
3 Select a filter from one of the filter categories.
4 Click one or more conditions and specify any necessary information.
5 Click Add to select the condition.
6 Click Add Condition.
7 Repeat steps 2 through 6 to add additional conditions.
8 Click Save or Save As.
9 Enter a query name and description.
10 Determine the type of query to create.
If you want to use the query…
then select…
during your current session,
Ad Hoc – temporary query
visibility option
for multiple sessions,
Personal – visible only to me option
11 Click the OK button.
Note: If you created a Personal query, you will be able to view it in the Show
list.

Managing Timecards and Schedules User Guide
Version 4: 8/8/2014 72

Managing Timecards and Schedules User Guide
Version 4: 8/8/2014 73
CHAPTER 10: PERFORMING HISTORICAL EDITS
10.1 HISTORICAL EDITS
If a change needs to be made to an employee’s timecard after it is signed off and submitted to
payroll, a historical edit will be necessary.
Prior to initiating the correction, verify it has not already been corrected on the following:
Timecard
Time Detail Report. If it has not been corrected:
1. Verify information with the employee
2. Provide details in writing via email to the Payroll Liaison, who will then forward the
request to Payroll Central
Note
Request for Historical Edits are processed by Payroll Central. Supervisors will need to provide the necessary information to their Payroll Liaison.

Managing Timecards and Schedules User Guide
Version 4: 8/8/2014 74

Managing Timecards and Schedules User Guide
Version 4: 8/8/2014 75
APPENDIX A: COMMONLY USED PAY CODES
Pay Codes represent types of hours to be paid and categories used to organize time and money in the Kronos system. Examples are Regular, Overtime, Vacation, Sick, and Jury Duty, etc. The following list of pay codes is provided as a resource when recording unworked time, non-productive time, bonus and monetary amounts on an employee’s timecard.
Each three (3) letter pay code provided has a corresponding definition directly adjacent to the system code which will appear in the pay code drop-down list of an employee’s timecard.
CONTRIBUTING PAY CODE FOR ALL EXEMPT GROUPS
CNF - Conf Seminar
CTF - County Conference
DB1 - Disability
DB2 - Disability
DB3 - Disability
DB4 - Disability
DB5 - Disability
DB6 - Disability
ELW - Election Worked
Emergency Working Conditions
FAM- Family Sick
FRL - Funeral
HCR - Holiday Credit
JBL - Job Basis Leave
JRY - Jury Duty
RR$ - Rapid Reward $$
RRW - Rapid Reward
SSK - Scheduled Sick Leave
SVC - Sched Vacation
USK - Unscheduled Sick Leave
VCR - Donated Annual Leave
NON-PAY CODES
MOB - Military Mobilization
MLT - Military Training
SCR - Donated Sick Leave
UVC - Unsched Vacation
FUR - Furlough
EDU - Education

76 Managing Timecards and Schedules User Guide Version 4: 8/8/2014

77 Managing Timecards and Schedules User Guide Version 4: 8/8/2014
APPENDIX B: KRONOS MINUTES CONVERSION TABLE The BC-Net displays accrual as hours and decimal (fraction of an hour), while the Kronos application displays accrual in hours and minutes.
The sample accrual balance below demonstrates the accrual balance comparison between Kronos vs BC-NET.
Kronos Accrual Kronos Accrual Value BC-NET Accrual BC-NET Accrual Value
Sick Leave 200:15 150 SICK LEAVE 200.25
Family – Sick 24:30 155 FAMILY SICK 24.50
Annual Leave 90:45 160 VACATION 90.75
Job Basis 40:00 174 JOB BASIS LEAVE
40.00
The conversion table shows how Kronos minutes are converted to Payroll Decimal.
.

78 Managing Timecards and Schedules User Guide Version 4: 8/8/2014

79 Managing Timecards and Schedules User Guide Version 4: 8/8/2014
APPENDIX C: PRE-DEFINED COMMENTS Best Practice suggests that a Supervisor enter comments and/or notes to document an explanation for his activities in the system whenever making revisions, modifications or changes to an employee’s timecard.
Listed below are pre-defined commonly used comments and their respective field (Pay Code, Punch, or Shift) where they can be used.
PRE-DEFINED COMMENTS
Administrative Leave Pay Code
Exhausted Applicable Paid Leave Pay Code
Suspended With Pay Pay Code
Suspended Without Pay Pay Code
Used in place of Sick Leave Pay Code
Administrative Leave Pay Code
Early Out - Car Problems Punch
Early Out - Doctor Appointment Punch
Early Out - Family Emergency Punch
Early Out - Personal Business Punch
Early Out - Personal Emergency Punch
Early Out - Weather Punch
Employee Forgot to Punch Punch
Employee PIN Error Punch
Employee punched in error Punch
Training - Mandatory Punch
Training - County Related Punch
EOC/Volunteer/Disaster Punch
Exhausted Applicable Paid Leave Punch
Fieldwork - unable to swipe Punch
Forgot Badge Punch
Forgot to Punch Punch
Grievance meeting Punch
Interview - County Only Punch
Late in - Car Problems Punch
Late in - Doctor Appointment Punch
Late in - Family Emergency Punch
Late in - Overslept Punch
Late in - Personal Business Punch
Late in - Personal Emergency Punch
Late in - Traffic Punch
Late in - Weather Punch
Light Duty Punch
Medical Test - Mandatory Punch
Meeting Punch
Scheduled Overtime Punch
Suspended With Pay Punch
Suspended Without Pay Punch
Testing - County Only Punch
Time Clock not working Punch
Travel Time Punch
Union Business Punch

75 Managing Timecards and Schedules User Guide Version 4: 8/8/2014

75 Managing Timecards and Schedules User Guide Version 4: 8/8/2014
APPENDIX D: GETTING SUPPORT
SYSTEM REQUIREMENTS
PCs used to access the Kronos system should have the following software applications installed:
Internet Explorer v9 or higher running in compatibility mode
Java version 1.7.0_51 or higher
Adobe Acrobat Reader version 9 or higher
Note: Browser pop-ups should be allowed on your computer before accessing Kronos to ensure
access to pop-up windows and reports.
WHERE DO I GO FOR HELP
Tip
It is highly recommended that support matters are first vetted through internal support channels prior to contacting the ETS Service Desk.

76 Managing Timecards and Schedules User Guide Version 4: 8/8/2014

77 Managing Timecards and Schedules User Guide Version 4: 8/8/2014
APPENDIX E: GLOSSARY This section contains an alphabetical listing of key phrases and definitions related to the Kronos suite of applications (easyPay) and Broward County’s new time and attendance processes.
A more comprehensive search can be performed through the link in the top right corner of the Workforce Timekeeper banner:
Click the Search
Type the word or phrase of the topic of interest in the search field
Click the drop-down list and select either the book you wish to search or leave the default for All Available Books
Click Go! Results will be returned related to the subject of interest
TERM DEFINITION
ACCRUAL CODE Category that identifies the accrual balance type such as vacation, sick or bonus.
ACCRUALS Amounts of time or money an employee has earned commonly referred to as leave time, paid time off, or benefit time. This includes, personal days, vacation, sick time, etc.
ACCRUALS BALANCES
The amount of accrued time in a Leave category (see Timekeeping Accrual Balances). Categories include Annual Leave, Donated Annual Leave, Family – Sick, Holiday Comp, Job Basis, Overtime Comp, Personal, Sick Conversion, Sick Leave, Sick Leave Bonus, and Vacation.
Accrual balances cannot be negative so leave bidding will continue to be a manual process.
ACTIONS BAR Contains options for editing data.
ACTIVITIES Used to automate the processing of time spent on certain activities including Transit Trip Reports and Grants Administration.
AD HOC QUERY A temporary record search performed for use during the current session only.
These queries cannot be saved and will no longer be available once the user has logged out of the Kronos system.
ALL HOME Located on the Show drop-down list, ‘All Home’ returns the list of direct report employees currently assigned to the Supervisor.
ALL WTK EXCEPTIONS
Shows the status of all exceptions per employee.
APPROVALS SUMMARY
Shows status of approvals, number of exceptions, per employee.
ATTENDANCE Maintains Broward County’s employee attendance policies.
BANKED HOLIDAY If an eligible employee works on a holiday, in lieu of pay for the holiday, the hours worked can be “banked” as paid time off to be taken at a later date. (See also Holiday Credit).

78 Managing Timecards and Schedules User Guide Version 4: 8/8/2014
BANNER Located at the top of each timekeeping screen, the banner contains tabbed menus with links to the features you need to perform your tasks.
BROWARD COUNTY EMPLOYEE NUMBER
The individual identification number assigned to all employees in order to work at Broward County.
Employees must know the last six digits of their employee number in order to use the Time Clock.
CLOCK IN AND OUT
The action hourly employees perform at the Time Clock or PC to verify their arrival and departure from work.
COLLECTIVE BARGAINING AGREEMENT
Union agreements that govern pay and work rules for employees.
Amalgamated Transit Union, Local 1267
Amalgamated Transit Union, Local 1591 (White Collar)
Federation of Public Employees, (Blue Collar)
Federation of Public Employees, Non-Supervisory Unit
Federation of Public Employees, Supervisory Unit
Government Supervisors Association, Local 100 Professional Unit
Government Supervisors Association, Local 100 Supervisory Unit
System pay rules are separated by employee groups based on the above agreements where applicable.
Blue Collar (BC) Port Non-Supervisory (PORTN)
White Collar (WC) Port Maintenance (POMN)
GSA Professional (GSAP) Transit (TRAN)
GSA Supervisory (GSAS) Unrepresented (UNREP)
Port Supervisory (PORTS) Casuals
COURSE GUIDE User manual used for training purposes.
CYBORG Payroll system that processes the hours collected by the time and attendance system
DEFAULT VIEW The primary view a user will see upon initial login to Workforce Central via PC.
DELEGATE The person identified as the back-up resource to a supervisor who will perform supervisory tasks in his/her absence.
DEVICE GROUP All (department specific/Home Base) Time Clock devices assigned to an employee based on their department group. (e.g. Parks, Libraries, Aviation, and Port etc.)
DEVICE MANAGER Enables the flow of data between the Time Clock and the Timekeeper module.
DIRECT REPORTS Employees, whom the supervisor is responsible to manage, approve timecards and leave requests.
DISASTER PAY Pay to eligible employees for hours worked during declared emergency working conditions.
easyPAY Broward County’s Automated Time and Attendance system inclusive of the following Kronos applications: Workforce Central, Workforce Timekeeper, Workforce Absence Manager and Workforce Activities.

79 Managing Timecards and Schedules User Guide Version 4: 8/8/2014
ELECTION SERVICE
Pay for hours worked by employees in support of the Supervisor of Elections.
EMPLOYEE DETAILS POP-UP
The pop-up window that appears when hovering the mouse over the Name & ID field of the Timecard.
EMPLOYEE GROUP
The list of employees a supervisor has access to in the system.
EXEMPT EMPLOYEES
Also known as Salaried Employees are employees who are required to only track leave taken. Exempt employees use the system to submit leave requests and verify time worked at the end of each pay period.
Exempt employee’s Timecards are prepopulated with their schedule start and stop times and managed by exception pay.
Exempt employees will have access to edit their own Timecards to add, edit or modify their leave transactions and pay codes. A workflow notification will be sent to the supervisor on a weekly basis for exempt employees that show leave or time exceptions to their work schedule.
FLAGS Checks and colors that enable quick recognition of items/issues requiring attention in a timecard.
FLEXTIME The period of time an employee works to make up for hours missed during his regularly schedule shift.
Flextime allowance is based on agency and supervisor discretion. Employees will maintain their default schedule when using flextime. Supervisors must add a comment to the out punch indicating the flextime in cases of an exception.
FREE DAY Same as sick leave bonus day, however, with a one (1) year expiration time frame.
FUNCTION ACCESS PROFILE
Defines the system functionality available to the user.
GENERAL ACCESS CLOCKS
Bank of 3-Time Clocks located at GC East, GC West and the Emergency Operations Center for use by hourly employees to clock in and out when visiting these locations.
GENERAL TAB
GENIES Genies are online tools used to quickly group employees for actions such as timecard edits, accruals, schedules, and approvals.
GROUP EDIT Edits performed to several employee records at the same time by selecting multiple employees using the Shift + click or Ctrl + click keyboard functionality.
GROUP EDIT RESULTS
The on-screen report reflecting the results of a Group Edit. The columns contain the type of Group Edit, the date and time of the edit, the user who made the edit, the status of completed for processing, and results showing successes, failures, and totals, followed by employees who are associated with the errors.
To view the detailed explanations of failures resulting from a group edit. Click the ‘Details’ link in the results column.
HISTORICAL EDITS Adjustments, additions, deductions or moves made to employee timecard in a prior pay period.

80 Managing Timecards and Schedules User Guide Version 4: 8/8/2014
Agencies must notify Payroll Central when the need arises for Historical Edits to an employee’s timecard. Only Payroll Central maintains the authorization to modify an employee’s timecard after it has been signed off and processed by Payroll.
HOLIDAY CREDIT If an eligible employee works on a holiday, in lieu of pay for the holiday, the hours worked can be “banked” as paid time off to be taken at a later date. (See also Banked Holiday).
HOURLY EMPLOYEES
Also known as Non-exempt Employees are employees who are eligible for overtime provisions of the Fair Labor Standards Act (FLSA) and clock in or out of the system.
Hourly employees will have access to view their own timecards but are not allowed to edit time records, punches or leave transactions.
HYPERFIND QUERY
Accessed using the Show drop-down, used to group employees are custom-defined filters which enable Supervisors to view a specific set of employees. Default (built-in)
search criteria used to return employee specific information.
INBOX Located on the ‘General tab’, the Inbox is where the Tasks sub-tab, where users approve activities and process requests. And the Messages sub-tab where users can send and receive K-mail / email messages.
IS SUMMARY Summarizes user information including email addresses, badge number and supervisor.
JOB AIDES Quick reference cards providing users’ step-by-step instructions to perform tasks within the system.
KMAIL Kronos Mail: email notification system internal to Workforce Timekeeper, used by employees who do not otherwise have access to County email. Kmail communicates leave requests and approval or denial notifications to these employees.
KRONOS Vendor who developed the time and attendance system
KRONOS EXCEPTIONS
Markers that occur when employees work outside of their regular shift (i.e. late in, late out). Also noted by a colored box, red or green.
Broward County definition: An exception as anything that deviates from your regular work schedule.
LEAVE BANK Amount of leave an employee has accrued.
LEAVE CODES Codes used to identify the type of leave taken or banked.
LIMITED ACCESS CLOCK
Time Clock specifically assigned to an individual Agency where only employees who work for that Agency may clock in and out.
LOGIN/LOGOUT The act of accessing the Kronos system via PC.
LUNCH The amount of time configured for meals.
LUNCH PERIOD Specified time an employee has allocated for meals.
MISSED PUNCH Failure to clock in or out as scheduled.

81 Managing Timecards and Schedules User Guide Version 4: 8/8/2014
Kronos defines fixing a missed punch as completing a shift.
MOBILE APP Application assigned for use by a small number of field workers and small remote offices, based on agency need.
MY GENIES TAB Located on the Banner of the Workforce Timekeeper screen, the My Genies tab provides links to pre-defined (see Hyperfind) queries available to supervisors.
MY INFORMATION TAB
Located on the Banner of the Workforce Timekeeper screen where supervisors will access links to their own timecards via the My Timecard link, My Actions (Not currently in use), and My Reports which includes three (3) reports available which summarize their time information.
NAVIGATING PAGES
The act of using a series of mouse clicks, to move around within the Kronos application via PC.
NON EXEMPT EMPLOYEES
Hourly employees required to track all hours worked and leave taken.
OVERRIDE Changing a punch from in to out or out to in.
OVERTIME Amount of time worked in a period above an employee’s normally schedule work hours.
PAY AND SCHEDULE PERIOD
The two-week period for payroll beginning on Sunday and ending on Saturday.
PAY CODE Code used to indicate type of hours to be paid. Examples are vacation, sick etc. This is also recognized as categories used to organize time and money. Ex. regular or overtime
PAY PERIOD CLOSE SCREEN
This workspace summarizes pay cycle status for each employee, including approvals, total hours worked and accrual usage.
PAY RULES Pay rules control how time and attendance information is processed for each employee.
PAYROLL CENTRAL
Agency responsible for processing payroll and managing leave etc.
PAYROLL LIAISON Agency staff responsible for verifying no exception flags are in the system prior to pay period close; responsible for keeping real-time data accurate in Cyborg and Kronos systems, supporting agency staff with payroll-related matters and completing sign-off on division by 11 a.m. each Payroll Monday.
PAYROLL PROCESS
Actions taken by agency supervisors and payroll liaisons to manage employee timecards and attendance to efficiently process payroll to Payroll Central to ensure accurate, timely, and consistent payment of employees for time worked in a pay period.
PEOPLE EDITOR Kronos screen where supervisors can view and verify an employee’s Person Summary and Job Assignment information. Payroll Liaisons will also use this screen to verify the accuracy of data in the system.
PERSONAL QUERY
A custom record search created and saved by the users for their personal and individual use.

82 Managing Timecards and Schedules User Guide Version 4: 8/8/2014
These queries are visible only to the individual who create them and can be saved and recalled until removed from the Kronos system by that individual.
PROJECT VIEW This is used by Kronos to refer to salary employees’ timecard or hours worked screen.
PUNCH The act of clocking in or out at a Time Clock, indicating the beginning or end time of a shift.
QUICK LINKS Located just below the banner, and just above the Workspace on WTK screens. Quick Links provide single-click access to other areas of the Kronos application.
You must select at least one employee to review in order to use quick links to access their information.
QUICKFIND Allows users to search for one or more persons based on a name or person ID.
RECONCILE TIMECARD
Process used by supervisors and HR/Payroll Liaisons to manage employee timecards for payroll processing.
Supervisors and HR/Payroll Liaisons should review Timecards on a daily, weekly or pay period basis to identify and correct exceptions as they occur.
RECONCILE TIMECARD SCREEN
This screen/workspace is the default view provided to those individuals assigned to the supervisor role in the Kronos system. It provides a summarized timecard status for each employee, including missed punches, overtime, and early/late punches.
REFRESH Reset without saving. In the Actions menu on the top menu bar, clicking on Refresh resets the page without saving it.
Click Refresh only if you have saved the Timecard you are currently working on, OR if you want to start completely over with an unsaved Timecard.
REPORTS There are six categories of reports including but not limited to employee schedules, time card activities, accrual balances, punch origin, time card audits. Reports are in PDF format, and can be viewed on screen, printed or saved for future use. Every Broward county employee will have access to reports; the specific type will be dependent on their role in the system.
Supervisors can only run reports on employees who report directly to them. A secondary user login is available to authorized staff; by department/office, in order to generate comprehensive reports.
ROUNDING RULE Punches will be rounded using the 15/7 rounding rule (except for Transit, which is 1 minute). Any in or out punch will be paid starting and ending on the nearest 15 minute increment using a 7 minute grace rule. Any punches 8 minutes before or after the schedule (except for Transit) will be flagged as an exception.
Employees clocking in after their scheduled start time regardless of whether the time rounds back to their schedule start time would still be considered tardy and therefore subject to the appropriate corrective action.
SALARIED EMPLOYEES
Also known as Exempt Employees are employees who do not clock in or out but use the system to submit leave requests and verify time worked.
Salaried employee’s Timecards are prepopulated with their schedule start, stop times, and managed by exception pay.

83 Managing Timecards and Schedules User Guide Version 4: 8/8/2014
Salaried employees will have access to edit their own Timecards to add, edit or modify their leave transactions and pay codes. A workflow notification will be sent to the supervisor once per week for exempt employees that show leave or time exceptions to their work schedule.
SAVE Keeps hours entered on the Timecard until the Timecard is approved.
SCHEDULE EDITOR
Screen used to create, edit, assign or modify an employee’s schedule.
SCHEDULE PATTERN
The employees permanent schedule; also referred to as a frequently recurring schedule.
SCHEDULE RESTRICTIONS
Restrictions are points in time related to a schedule that prevent employees from punching in or out. Restrictions prevent employees from punching in if they are too early for a shift, too late for a shift, or unscheduled.
SCHEDULES Expected two-week standard work pattern assigned to employee timecards.
SCHEDULING TAB Provides a direct link to the Schedule Editor where supervisors can view and modify their employee schedules.
SEGMENT Parts of a shift such as the period between arriving to work and lunch | a lunch break | the period between lunch and the end of the scheduled workday.
SHIFT The span between an IN and an OUT punch in an employee’s workday (24 hours).
SHIFT CLOSE Summarizes shift information including missed punches.
SHIFT DIFFERENTIAL
Additional pay based on an amount of time an employee works during the second, third and weekend shifts, based on CBA provisions.
SHIFT START Summarizes shift information including home phone number.
SHIFT SWAP Shift Swap functionality allows an employee to request another employee within
the same labor level assignment to cover one of their shifts and escalate the request for supervisor approval.
SHOW FIELD Field where you can select a specific set of employees.
Select ‘All Home’ from the drop-down list in order to view currently assigned Direct Reports.
SIGN-OFF Performed by the Payroll Liaison, signing off is the act of preventing further timecard and schedule edits in a pay period. It grants final approval to timecards before they are processed by payroll.
STANDBY HOURS Guaranteed straight time pay (2 hours for a scheduled work day and 3 hours of scheduled day off) when assigned to be on standby time. Depending on the CBA provisions, sick leave and/or time adjustment contributes to Premium OT and Regular OT.
Supervisors must make a manual adjustment in the system for employees receiving standby hours pay.
SUPERVISOR Anyone who has direct reports and is responsible for approving or rejecting a

84 Managing Timecards and Schedules User Guide Version 4: 8/8/2014
timecard and/or time-off request is assigned the ‘supervisor role’ in the system.
This is a system function only and in no way affects your actual Broward position or job classification.
Supervisors can only use a PC to perform their tasks. Time Clocks will not be configured to allow supervisors to edit punches, add time transactions or approve Timecards.
TIME CLOCK Wall-based unit located at multiple entry points throughout Broward County workplaces used by hourly employees to record time worked, request leave, view schedules and other tasks.
TIME CLOCK W/TOUCH ID
Clock devices used by non-exempt employees to electronically report and approve timecard information and submit Time-off Requests to supervisors.
TIME DETAIL REPORT
Report that shows all entries on the employee Timecard, and includes hours worked and/or leave taken.
TIME PERIOD FIELD
Field where you select the timeframe for which you want to view schedules and timecard data.
TIMECARD Formerly known as a manual Timecard. The electronic views of an employee’s hours worked and/or leave at either a Time Clock or PC.
TIMECARD APPROVAL
The act of accepting timecards as accurate and complete for payroll processing. Done both by the employee individually and by the supervisor on timecards of an employee group.
TIMEKEEPING TAB Located on the Banner, the Timekeeping Tab provides links to the following:
Reconcile Timecard
Pay Period Close
All WTK Exceptions
Approvals Summary
Shift Start
Shift Close
IS Summary
TIMEOUT WARNING
This pop-up warning appears when a user has been logged onto the system for a period of 15 minutes with no activity.
If you have entered data but have not saved your work when this message occurs, you will lose any data entered since you last saved. Always remember to save your data and log off if you are going to be away from the computer for any amount of time.
TIMESTAMP The Workforce Central screen used to clock in and out on a PC, which enters an IN, and OUT punch to the employee timecard based on the current network time.
Once recorded, Timestamps cannot be changed by the employee.
TOUCH ID PAD Small pad located at the top right corner of the Time Clock used as a secondary verification source of employee’s identity upon clocking in and out.
TRANSFER Hours charged to a labor account that is different from an employee’s home account or hours charged to a work rule.

85 Managing Timecards and Schedules User Guide Version 4: 8/8/2014
TRIP REPORTS Specific to Transit, the feature within the Activities Module used to track time not identified in a Bus Operator’s schedule.
USERNAME First initial, last name used to log on to Kronos.
VISUAL INDICATORS
Color-coded indicators that appear on the timecard when exceptions occur. See section 4.2 Visual Indicators on Timecard for a list of indicators and descriptions.
WORKFLOW ALERTS
Email sent to supervisors and/or employees notifying them of a pending action or results of an action
WORKING OUT OF CLASS (PORT)
Pay to eligible employees assigned to work out of class in a higher job classification.
Unlike the other bargaining units where there is a qualifying time period to receive the working out of class pay as a percentage to their base hourly rate; the Port processes this adjustment as a wage calculation.
WORKSPACE Located under the banner, the workspace contains detailed information about the employees in the selected Time Period. The Workspace is also the primary work area within the Kronos system.
WORKSPACE EXPANSION BAR
Separates employee details such as Schedule, Comments, Accruals, and Totals etc. from the employee timecard and schedule.
If the Workspace Expansion Bar is at the extreme bottom of the screen, click and hold mouse over the center of the bar, drag the bar up to desired position to reveal additional employee details.