California Institute of Technologyimss-website.s3.amazonaws.com/Training...
51
Copyright © California Institute of Technology, 2002. All rights reserved. Using Workforce Timekeeper Payroll Activity Monitor Effective 05/18/11 Page 1 of 51 California Institute of Technology Human Resources Using Kronos Workforce Timekeeper A User Guide for Payroll Activity Monitors (PAM)
Transcript of California Institute of Technologyimss-website.s3.amazonaws.com/Training...
Copyright © California Institute of Technology, 2002. All rights reserved.
Using Workforce Timekeeper Payroll Activity Monitor Effective 05/18/11 Page 1 of 51
California Institute of Technology Human Resources
Using Kronos Workforce Timekeeper A User Guide for Payroll Activity Monitors (PAM)
Using Workforce Timekeeper – A Guide for Payroll Activity Monitors A guide that summarizes the most common manager tasks, which include using Workforce Genies, Timecards and Reports.
Kronos Workforce Central Suite
Copyright © California Institute of Technology, 2002. All rights reserved.
Using Workforce Timekeeper Payroll Activity Monitor Effective 05/18/11 Page 2 of 51
Table of Contents Chapter 1: Using Workforce Timekeeper 4 Using a Browser 5 Viewing Customized Displays 7 Logging On and Off 7 Logon Time Limit 7 Changing Your Password Option 8 Understanding the Display 9 Accessing Key Components and Launch Buttons 11
Chapter 2: Navigating Workforce Timekeeper 12 Navigating Workforce Timekeeper 13 Using Online Help 13 Understanding Menus and Dialog Boxes 14 Entering Information 15 Refreshing the Display 15 Workforce Genies 16 Creating a HyperFind Query 17 Selecting One or More Employees 20
Chapter 3: Using Timecards 22 Calculating and Displaying Timecard Totals 23 Timecard Indicators and Colors 24 Timecard Edits 25 Adding Punches 25 Saving Information 27 Deleting Punches 28 Using Refresh 29 Modifying Automatic Meal Deductions 30 Adding Worked and Leave Hours 31 Adding a Full Day of Leave Time 32 Historical Edits 33 Not Previously Reported Time 33 Historical Move 35 Deleting Historical Edits 36 Transferring Time 37 Applying a Pay Period Approval 38 Signing Off Timecards 40 Printing a Timecard 42 Sample Timecard Printout 44
Chapter 4: Generating Reports 45 Identifying Standard Report Categories 46 Running a Standard Report 47 Running a Customized Report 50 Printing a Report 51
Copyright © California Institute of Technology, 2002. All rights reserved.
Using Workforce Timekeeper Payroll Activity Monitor Effective 05/18/11 Page 3 of 51
Using Workforce Timekeeper Chapter 1
Copyright © California Institute of Technology, 2002. All rights reserved.
Using Workforce Timekeeper Payroll Activity Monitor Effective 05/18/11 Page 4 of 51
Using Workforce Timekeeper
Workforce Timekeeper (Kronos) software enables employees to use an industry-standard Web browser, such as Microsoft Internet Explorer or Netscape, to report leave exceptions. The application may be accessed from any computer (PC, Linux or MAC) from both on and off campus. A VPN account is not required in order to access it from off campus.
Instructional Videos are available at the following URL: http://www.imss.caltech.edu/cms.php?op=wiki&wiki_op=view&id=346
Using a Browser
Although the Workforce Timekeeper user interface contains numerous navigational buttons, dialog boxes, and drop-down lists within the workspace of each component, standard browser controls are also available. The browser controls have the following characteristics:
URL Address Combo box displays only the URL of the logon page and the URL of the Workforce Timekeeper main page.
Favorites (Bookmarks) allow you to add the Workforce Timekeeper URL to your browser’s Favorites list or bookmarks. You can then click on the bookmarked entry to launch the Workforce Timekeeper Log On display.
Back and Forward buttons allow you to return to pages that you previously accessed during the current session. If you do not save your changes before clicking the Back button, the following occurs:
If you use Internet Explorer, a message warns you that you have unsaved data and you can choose to continue the move and lose your changes, or cancel the move and save your changes. If you use Netscape or a Macintosh system, unsaved data is lost.
Refresh (Reload) reloads Workforce Timekeeper in its default state. It does not refresh the Workforce Timekeeper information.
Stop does not interrupt loading Workforce Timekeeper pages.
Print enables you to print reports from My Reports. In other Workforce Timekeeper components, however, clicking the browser Print button only prints the navigation bar; you must use the print controls within workforce Timekeeper.
Note: Only one Workforce Timekeeper browser session should be active at a time. Do not start additional Workforce Timekeeper sessions in separate browser windows.
Copyright © California Institute of Technology, 2002. All rights reserved.
Using Workforce Timekeeper Payroll Activity Monitor Effective 05/18/11 Page 5 of 51
Viewing Customized Displays
The Workforce Timekeeper display is customized according to Caltech’s time and attendance policies and access profiles.
Logging on
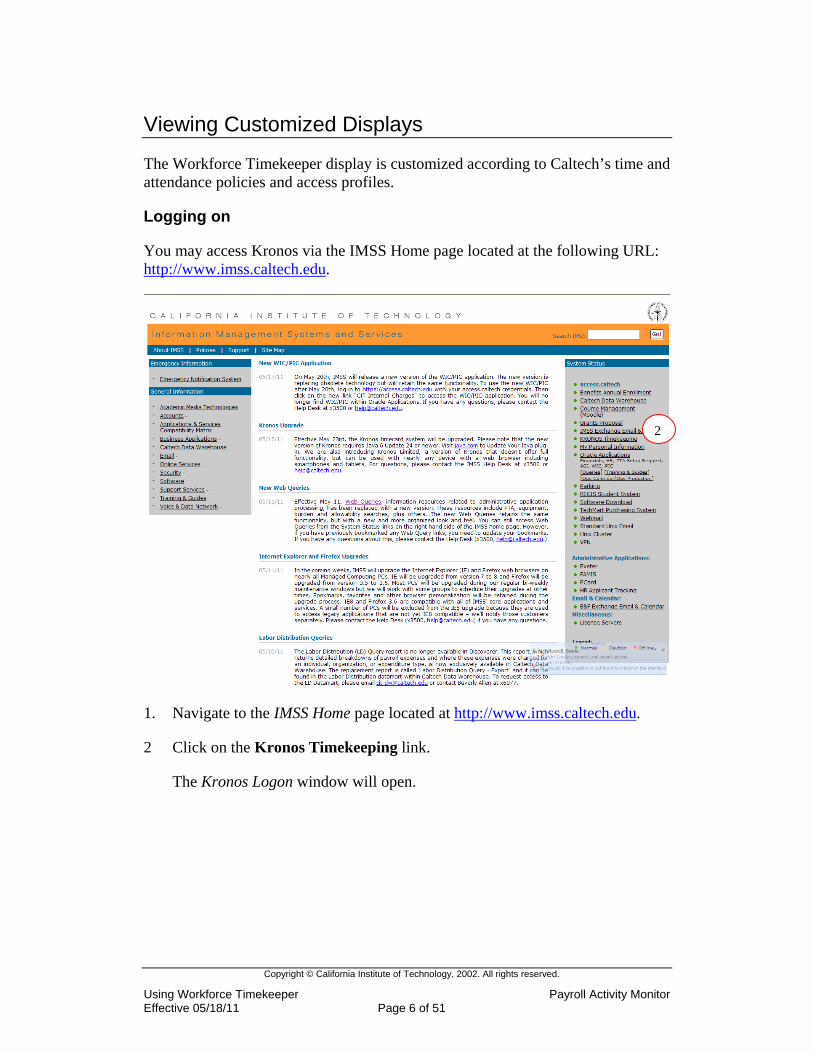
You may access Kronos via the IMSS Home page located at the following URL: http://www.imss.caltech.edu.
2
1. Navigate to the IMSS Home page located at http://www.imss.caltech.edu.
2 Click on the Kronos Timekeeping link.
The Kronos Logon window will open.
Copyright © California Institute of Technology, 2002. All rights reserved.
Using Workforce Timekeeper Payroll Activity Monitor Effective 05/18/11 Page 6 of 51
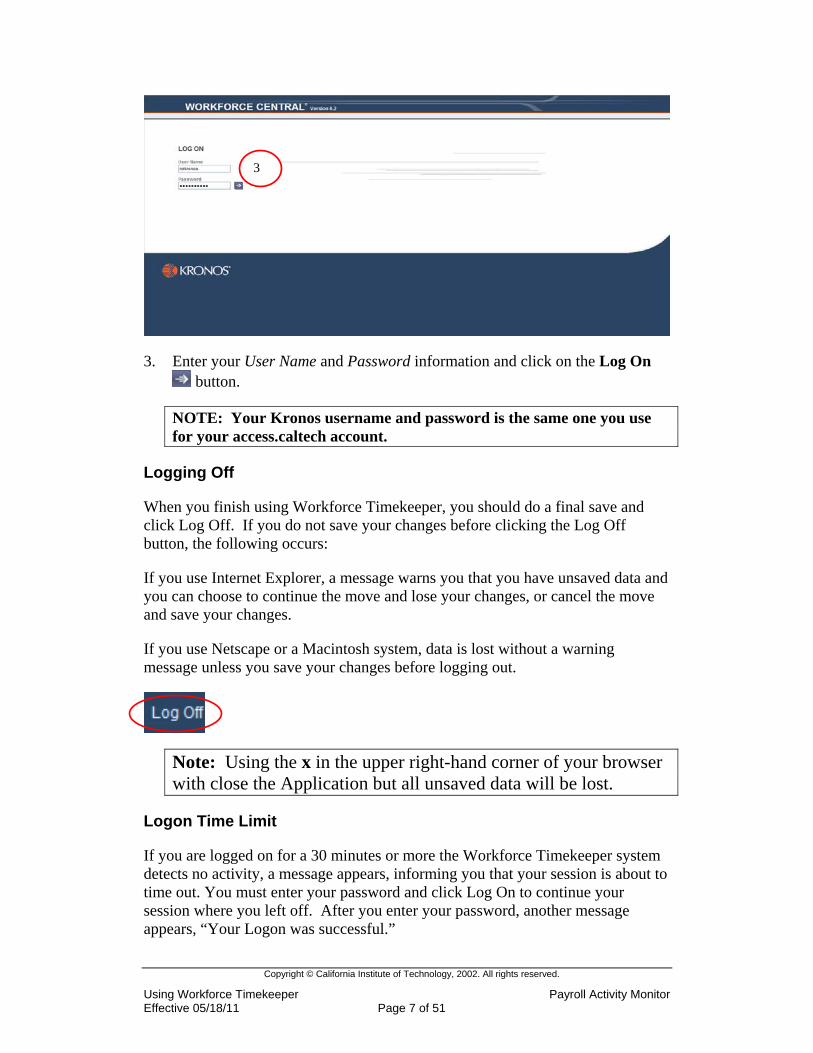
3. Enter your User Name and Password information and click on the Log On button.
NOTE: Your Kronos username and password is the same one you use for your access.caltech account.
Logging Off
When you finish using Workforce Timekeeper, you should do a final save and click Log Off. If you do not save your changes before clicking the Log Off button, the following occurs:
If you use Internet Explorer, a message warns you that you have unsaved data and you can choose to continue the move and lose your changes, or cancel the move and save your changes.
If you use Netscape or a Macintosh system, data is lost without a warning message unless you save your changes before logging out.
3
Note: Using the x in the upper right-hand corner of your browser with close the Application but all unsaved data will be lost.
Logon Time Limit
If you are logged on for a 30 minutes or more the Workforce Timekeeper system detects no activity, a message appears, informing you that your session is about to time out. You must enter your password and click Log On to continue your session where you left off. After you enter your password, another message appears, “Your Logon was successful.”
Copyright © California Institute of Technology, 2002. All rights reserved.
Using Workforce Timekeeper Payroll Activity Monitor Effective 05/18/11 Page 7 of 51
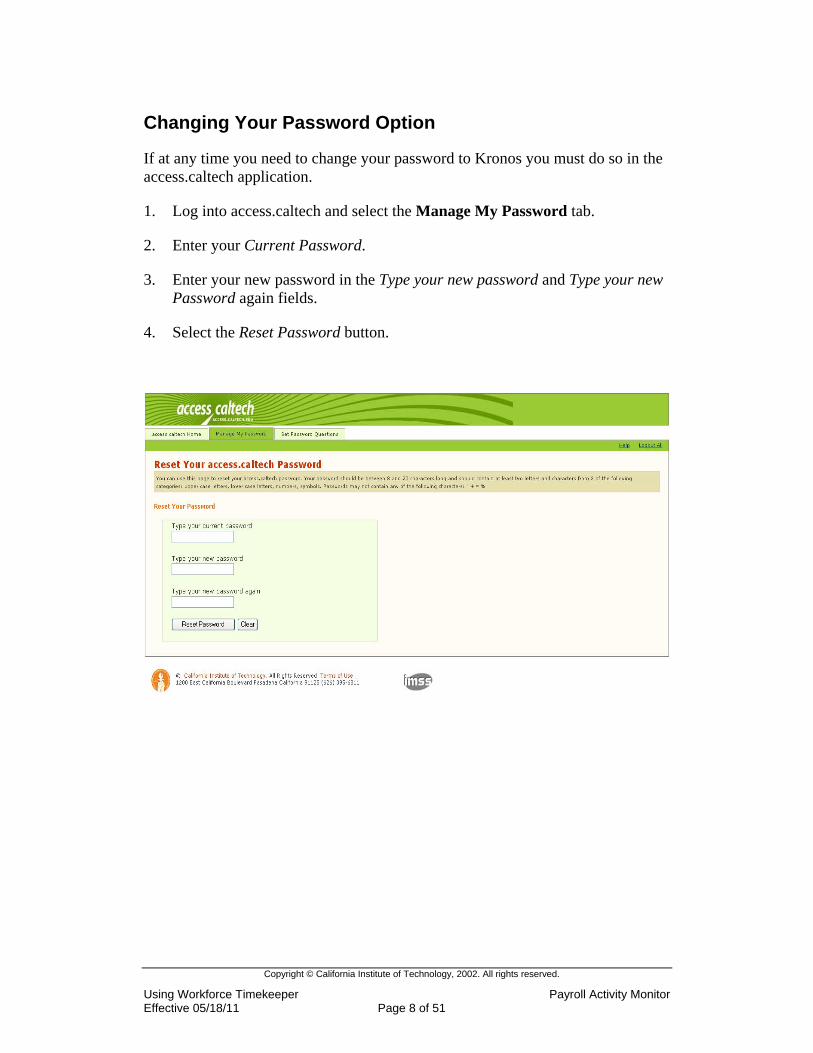
Changing Your Password Option
If at any time you need to change your password to Kronos you must do so in the access.caltech application.
1. Log into access.caltech and select the Manage My Password tab.
2. Enter your Current Password.
3. Enter your new password in the Type your new password and Type your new Password again fields.
4. Select the Reset Password button.
Copyright © California Institute of Technology, 2002. All rights reserved.
Using Workforce Timekeeper Payroll Activity Monitor Effective 05/18/11 Page 8 of 51
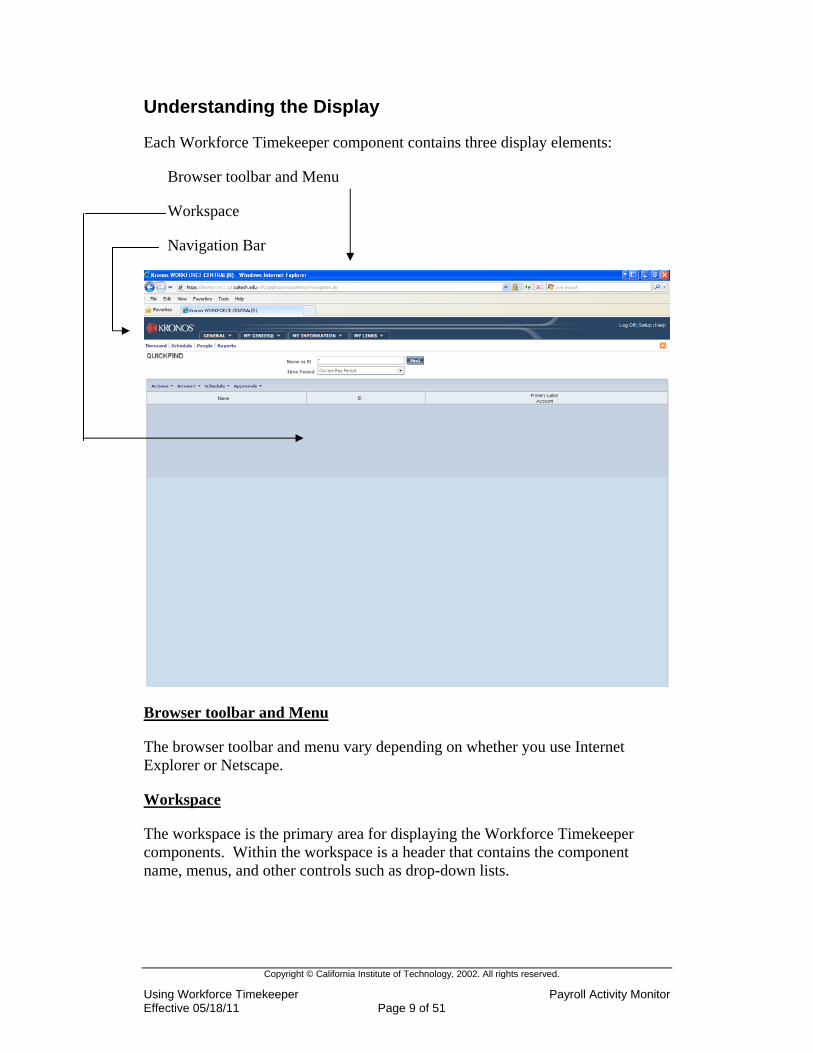
Understanding the Display
Each Workforce Timekeeper component contains three display elements:
Browser toolbar and Menu
Workspace
Navigation Bar
Browser toolbar and Menu
The browser toolbar and menu vary depending on whether you use Internet Explorer or Netscape.
Workspace
The workspace is the primary area for displaying the Workforce Timekeeper components. Within the workspace is a header that contains the component name, menus, and other controls such as drop-down lists.
Copyright © California Institute of Technology, 2002. All rights reserved.
Using Workforce Timekeeper Payroll Activity Monitor Effective 05/18/11 Page 9 of 51
Navigation Bar
The selections on the navigation bar vary, depending on Caltech’s policies and your access profiles. All users have access to the following options:
Log off link
A Hide and Show arrow in the upper-right corner, which allows you to reduce the size of the navigation bar and restore its default size with one click.
The Workforce Timekeeper components that you can access are grouped by category on the navigation bar. Categories include:
• My Genies are configurable tools for automating manager tasks by displaying a summary of selected employee information.
• Group Edit Results allows you to make changes to multiple employees at the same time.
• Reports are used to generate standard or custom reports.
• My Information is used to manage your own time: o My timecard o My Reports
• My Links is used to access HR related documentation: o CIT Policies o Kronos Training Materials
• Help invokes the online help.
Copyright © California Institute of Technology, 2002. All rights reserved.
Using Workforce Timekeeper Payroll Activity Monitor Effective 05/18/11 Page 10 of 51
Accessing Key Components and Launch Buttons
The components that are typically accessed include:
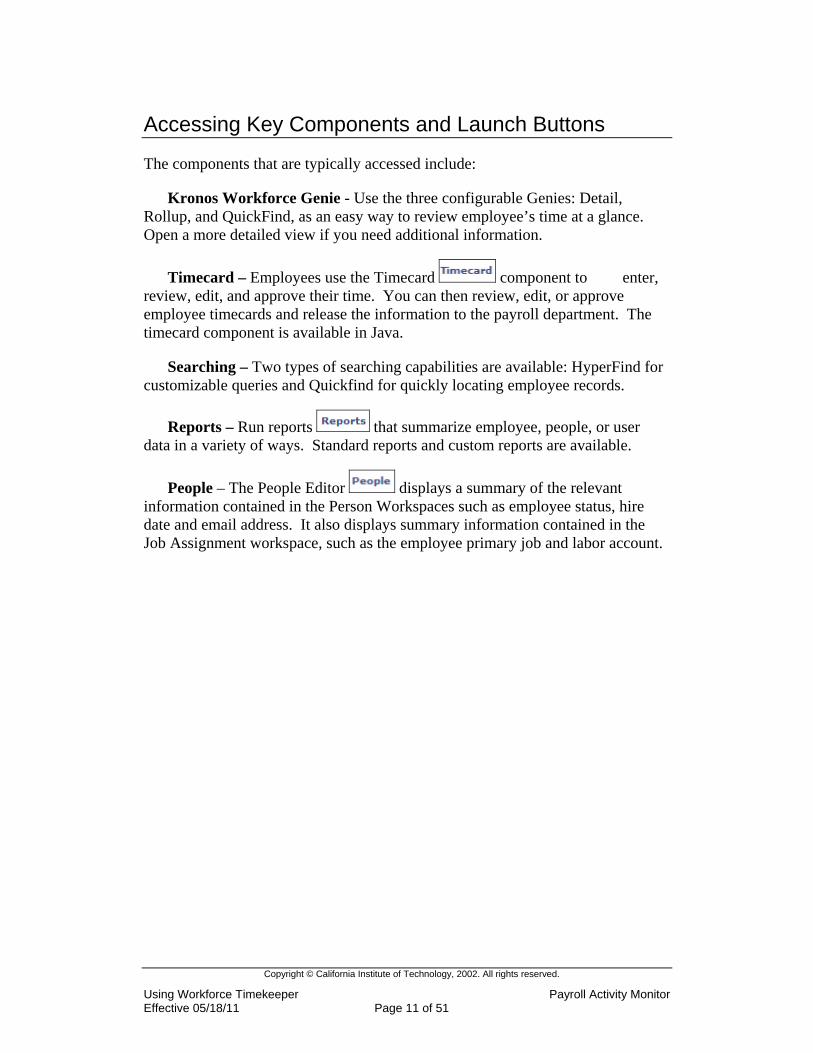
Kronos Workforce Genie - Use the three configurable Genies: Detail, Rollup, and QuickFind, as an easy way to review employee’s time at a glance. Open a more detailed view if you need additional information.
Timecard – Employees use the Timecard component to enter, review, edit, and approve their time. You can then review, edit, or approve employee timecards and release the information to the payroll department. The timecard component is available in Java.
Searching – Two types of searching capabilities are available: HyperFind for customizable queries and Quickfind for quickly locating employee records.
Reports – Run reports that summarize employee, people, or user data in a variety of ways. Standard reports and custom reports are available.
People – The People Editor displays a summary of the relevant information contained in the Person Workspaces such as employee status, hire date and email address. It also displays summary information contained in the Job Assignment workspace, such as the employee primary job and labor account.
Copyright © California Institute of Technology, 2002. All rights reserved.
Using Workforce Timekeeper Payroll Activity Monitor Effective 05/18/11 Page 11 of 51

Navigating Workforce Timekeeper Chapter 2
Copyright © California Institute of Technology, 2002. All rights reserved.
Using Workforce Timekeeper Payroll Activity Monitor Effective 05/18/11 Page 12 of 51
Navigating Workforce Timekeeper
In addition to the standard browser controls, you can select various Workforce Timekeeper components using the navigational buttons, dialog boxes, and drop-down lists that are located within the workspace of each component.
Using Online Help
All components within Workforce Timekeeper include access to online Help:
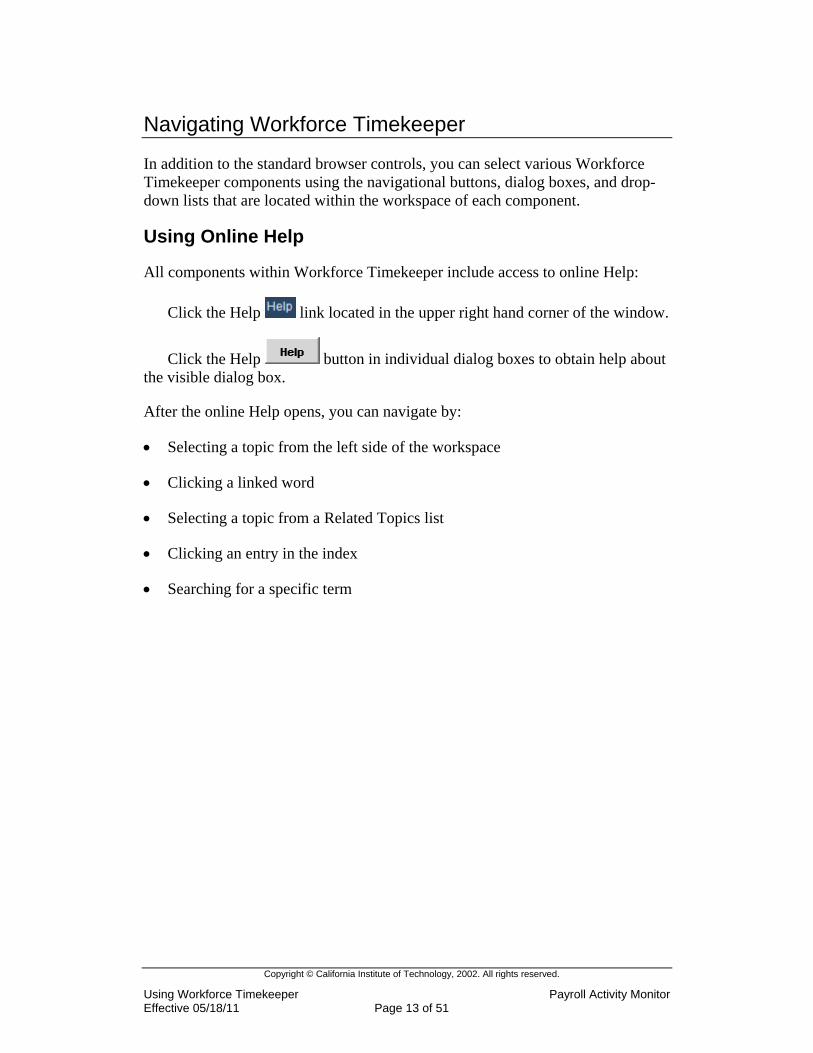
Click the Help link located in the upper right hand corner of the window.
Click the Help button in individual dialog boxes to obtain help about the visible dialog box.
After the online Help opens, you can navigate by:
• Selecting a topic from the left side of the workspace
• Clicking a linked word
• Selecting a topic from a Related Topics list
• Clicking an entry in the index
• Searching for a specific term
Copyright © California Institute of Technology, 2002. All rights reserved.
Using Workforce Timekeeper Payroll Activity Monitor Effective 05/18/11 Page 13 of 51
Understanding Menus and Dialog Boxes
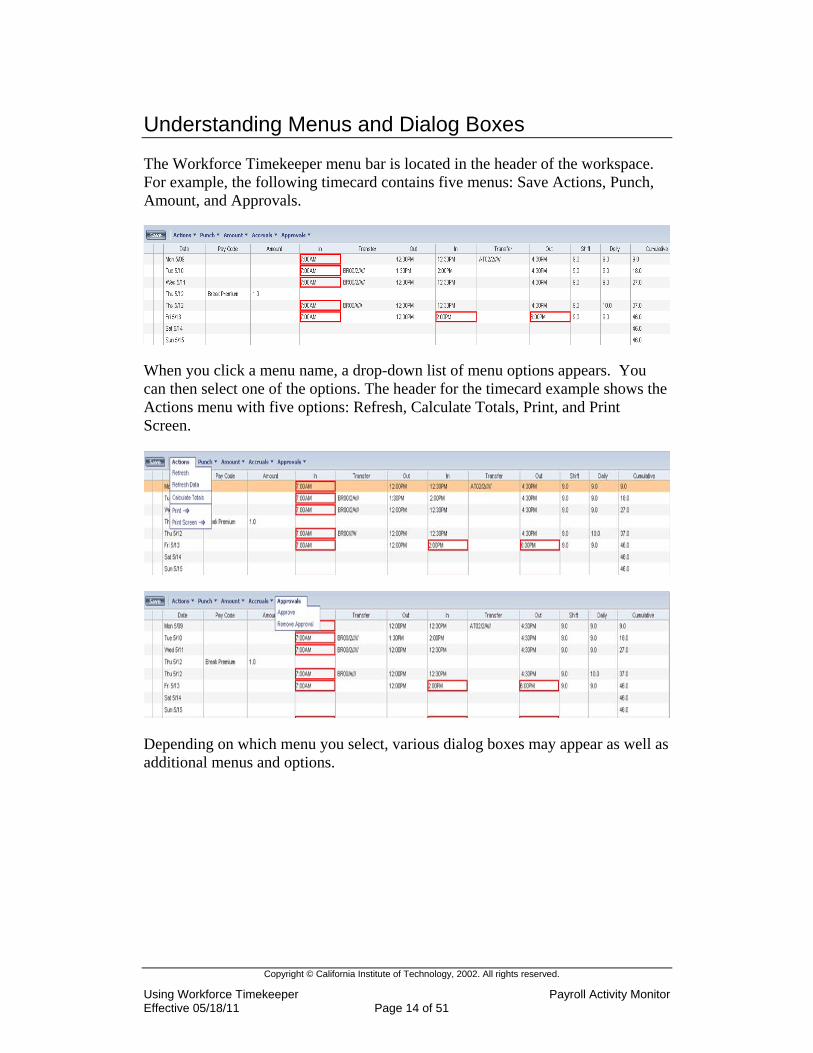
The Workforce Timekeeper menu bar is located in the header of the workspace. For example, the following timecard contains five menus: Save Actions, Punch, Amount, and Approvals.
When you click a menu name, a drop-down list of menu options appears. You can then select one of the options. The header for the timecard example shows the Actions menu with five options: Refresh, Calculate Totals, Print, and Print Screen.
Depending on which menu you select, various dialog boxes may appear as well as additional menus and options.
Copyright © California Institute of Technology, 2002. All rights reserved.
Using Workforce Timekeeper Payroll Activity Monitor Effective 05/18/11 Page 14 of 51
Entering information
Depending on the task, you can edit the timecard in a number of ways:
In cell editing – Many timecard functions allow you to enter, edit, and delete information directly in the cell using the keyboard.
Menus – The menus and options along the top of the timecard workspace allow you to make additional selections.
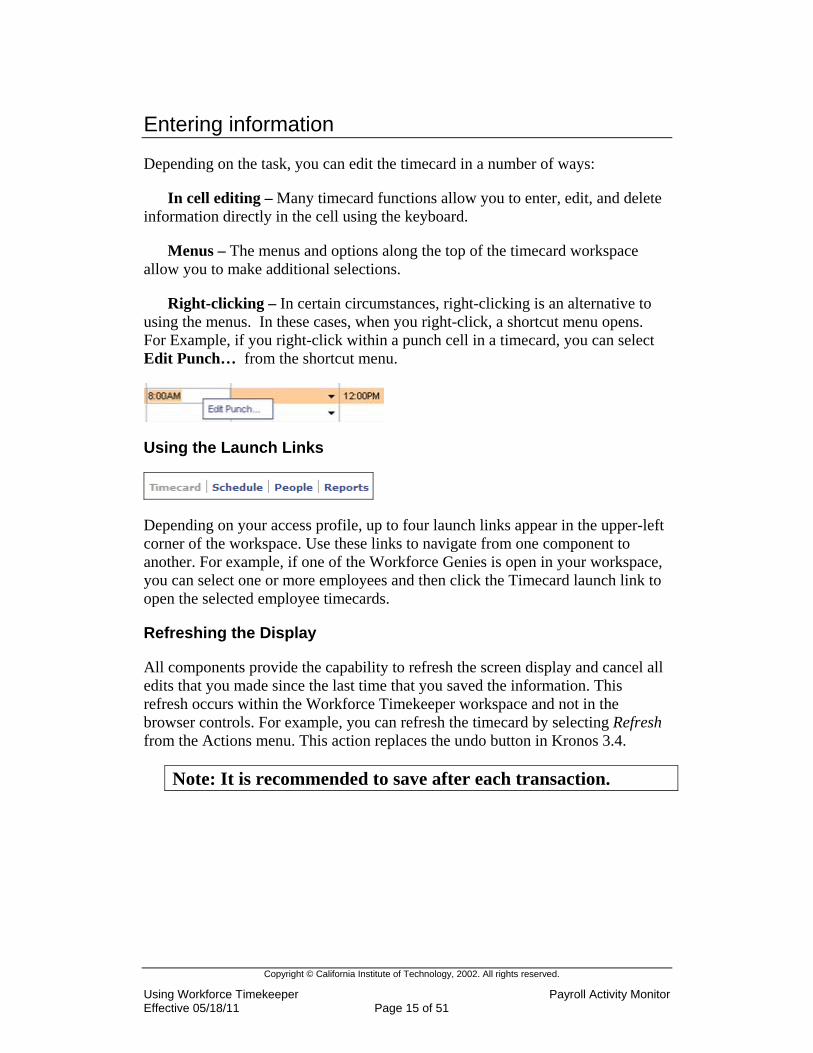
Right-clicking – In certain circumstances, right-clicking is an alternative to using the menus. In these cases, when you right-click, a shortcut menu opens. For Example, if you right-click within a punch cell in a timecard, you can select Edit Punch… from the shortcut menu.
Using the Launch Links
Depending on your access profile, up to four launch links appear in the upper-left corner of the workspace. Use these links to navigate from one component to another. For example, if one of the Workforce Genies is open in your workspace, you can select one or more employees and then click the Timecard launch link to open the selected employee timecards.
Refreshing the Display
All components provide the capability to refresh the screen display and cancel all edits that you made since the last time that you saved the information. This refresh occurs within the Workforce Timekeeper workspace and not in the browser controls. For example, you can refresh the timecard by selecting Refresh from the Actions menu. This action replaces the undo button in Kronos 3.4.
Note: It is recommended to save after each transaction.
Copyright © California Institute of Technology, 2002. All rights reserved.
Using Workforce Timekeeper Payroll Activity Monitor Effective 05/18/11 Page 15 of 51
Workforce Genies
The Workforce Timekeeper Genies summary displays allow you to:
• See summary information such as hours, exceptions, and schedules for employees.
• Make group edits for all, one, or a selected group of employees.
• Select a specific employee to view or edit more detailed information.
After the information appears, you can select one or multiple employees to make group edits or launch a different Workforce Timekeeper component for those employees.
Using Workforce Genies
Four types of Workforce Genies are available:
QuickFind
QuickFind Genie allows you to search for one or more people, based on their name and ID. You can also use wildcard characters (* % _ ?).
Pay Period Close
Pay Period Close Genie is the last step in the Timecard approval process. This Genie is used for Approval and Signoff. The approval lets the Payroll department know that the timecard is finished. The signoff is performed in order to prevent further edits to the timecard.
Pay Code Totals
Pay Code Totals Genie is a summary of the most common used earning elements such as; Regular Hours, Vacation, and Overtime.
Reconcile Timecard
Reconcile Timecard is a summarized display of an employee’s attendance record such as; Overtime, Unexcused Absence, and Late In.
Copyright © California Institute of Technology, 2002. All rights reserved.
Using Workforce Timekeeper Payroll Activity Monitor Effective 05/18/11 Page 16 of 51
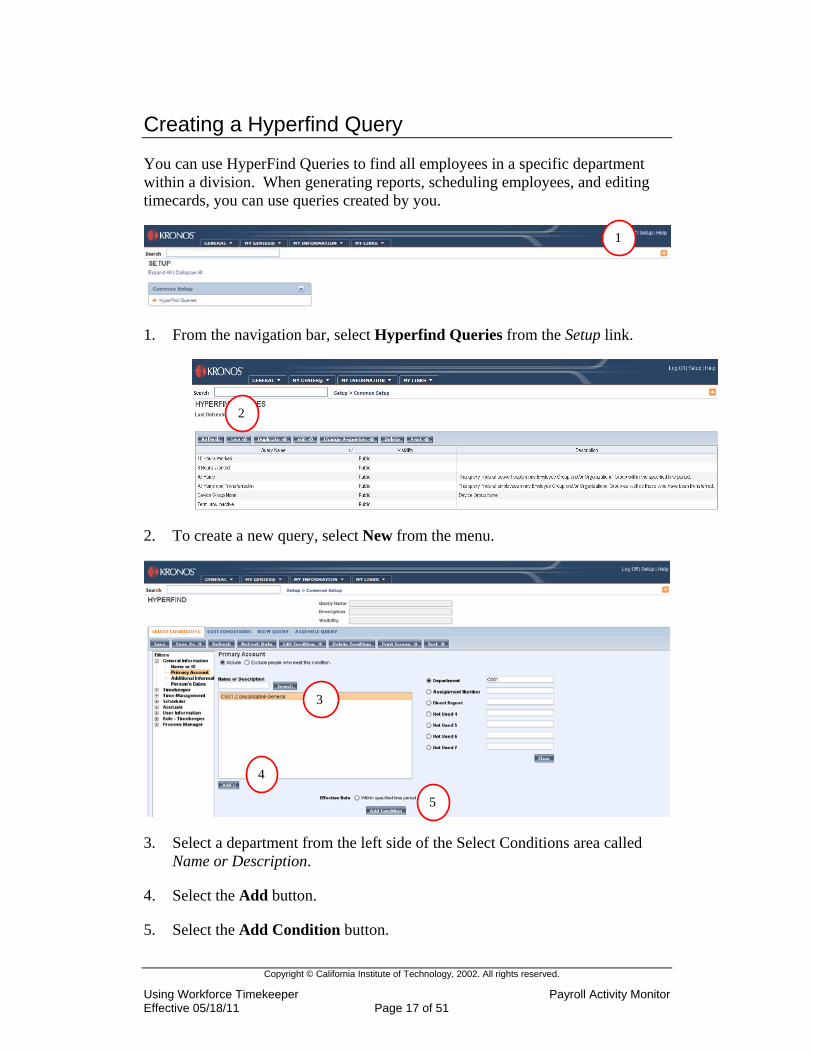
Creating a Hyperfind Query
You can use HyperFind Queries to find all employees in a specific department within a division. When generating reports, scheduling employees, and editing timecards, you can use queries created by you.
1
1. From the navigation bar, select Hyperfind Queries from the Setup link.
2
2. To create a new query, select New from the menu.
3
4
5
3. Select a department from the left side of the Select Conditions area called Name or Description.
4. Select the Add button.
5. Select the Add Condition button.
Copyright © California Institute of Technology, 2002. All rights reserved.
Using Workforce Timekeeper Payroll Activity Monitor Effective 05/18/11 Page 17 of 51
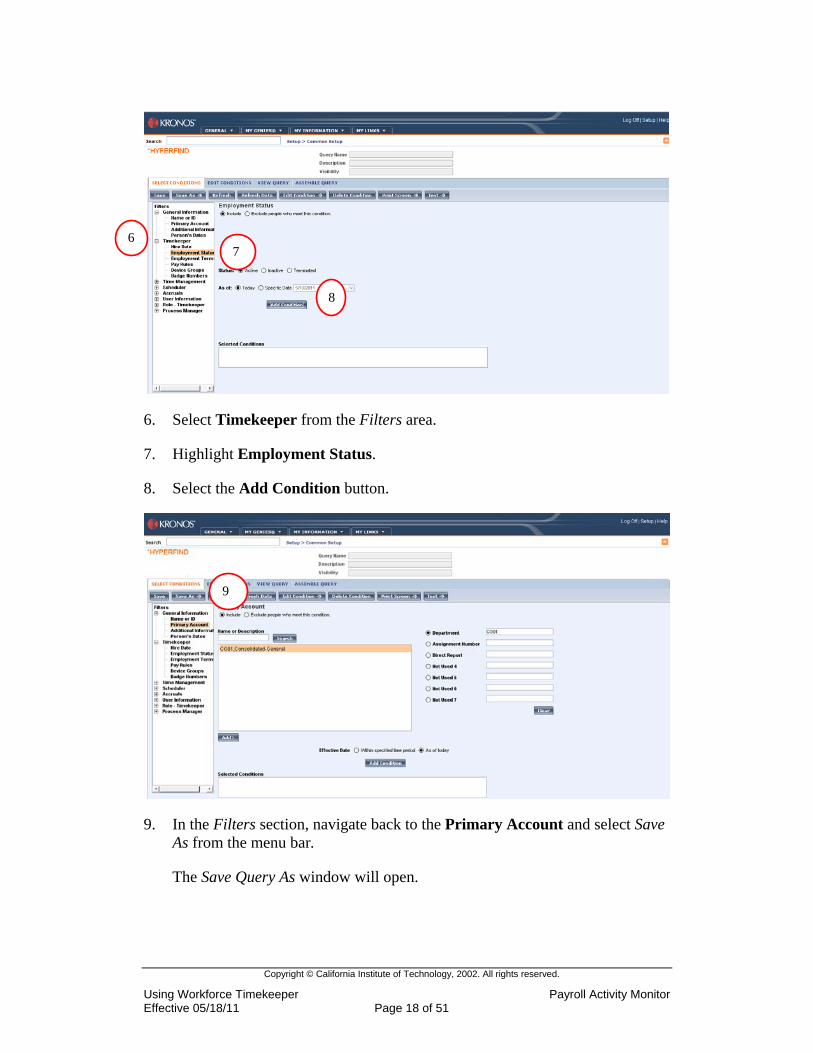
6 7
8
6. Select Timekeeper from the Filters area.
7. Highlight Employment Status.
8. Select the Add Condition button.
9
9. In the Filters section, navigate back to the Primary Account and select Save As from the menu bar.
The Save Query As window will open.
Copyright © California Institute of Technology, 2002. All rights reserved.
Using Workforce Timekeeper Payroll Activity Monitor Effective 05/18/11 Page 18 of 51
11
12
10
13
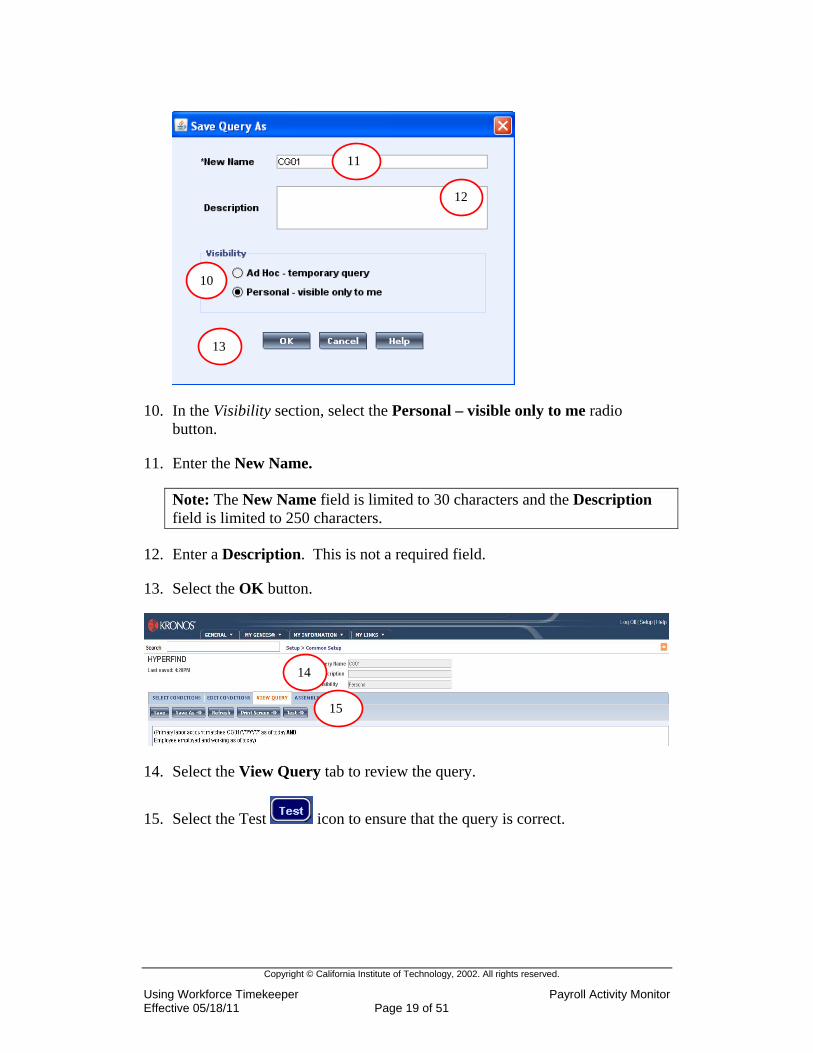
10. In the Visibility section, select the Personal – visible only to me radio button.
11. Enter the New Name.
Note: The New Name field is limited to 30 characters and the Description field is limited to 250 characters.
12. Enter a Description. This is not a required field.
13. Select the OK button.
15
14
14. Select the View Query tab to review the query.
15. Select the Test icon to ensure that the query is correct.
Copyright © California Institute of Technology, 2002. All rights reserved.
Using Workforce Timekeeper Payroll Activity Monitor Effective 05/18/11 Page 19 of 51
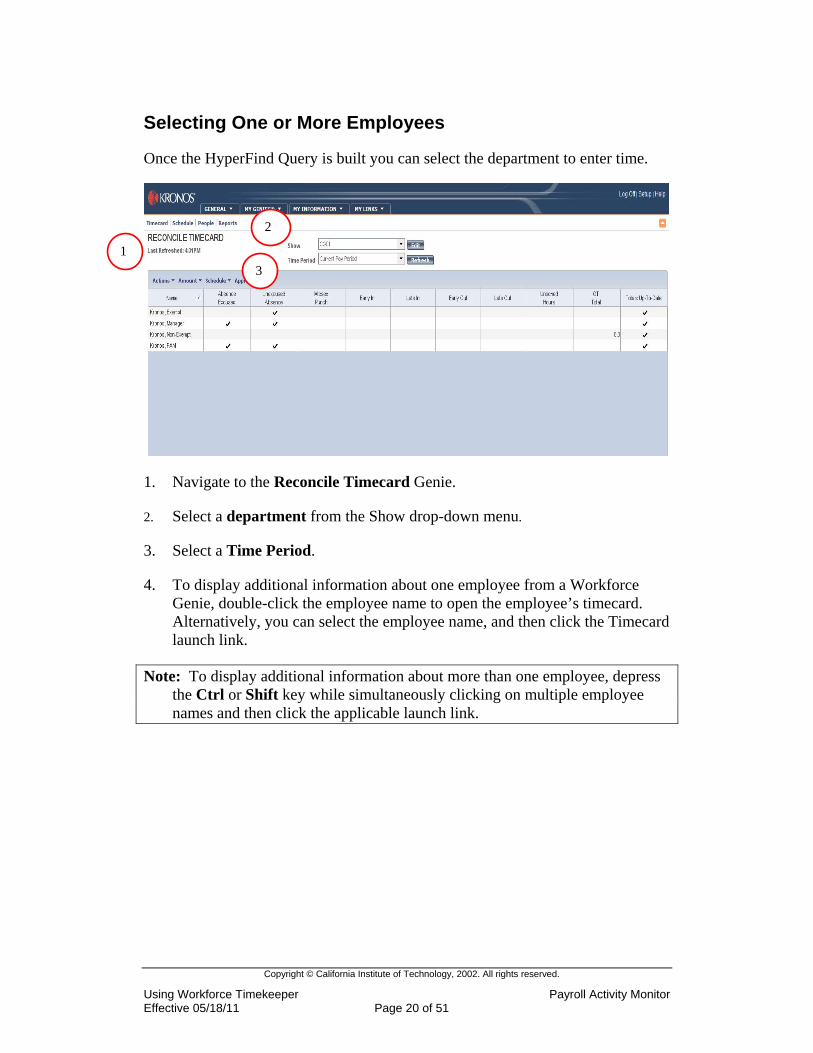
Selecting One or More Employees
Once the HyperFind Query is built you can select the department to enter time.
1. Navigate to the Reconcile Timecard Genie.
2. Select a department from the Show drop-down menu.
3. Select a Time Period.
4. To display additional information about one employee from a Workforce Genie, double-click the employee name to open the employee’s timecard. Alternatively, you can select the employee name, and then click the Timecard launch link.
Note: To display additional information about more than one employee, depress the Ctrl or Shift key while simultaneously clicking on multiple employee names and then click the applicable launch link.
2
3 1
Copyright © California Institute of Technology, 2002. All rights reserved.
Using Workforce Timekeeper Payroll Activity Monitor Effective 05/18/11 Page 20 of 51
5
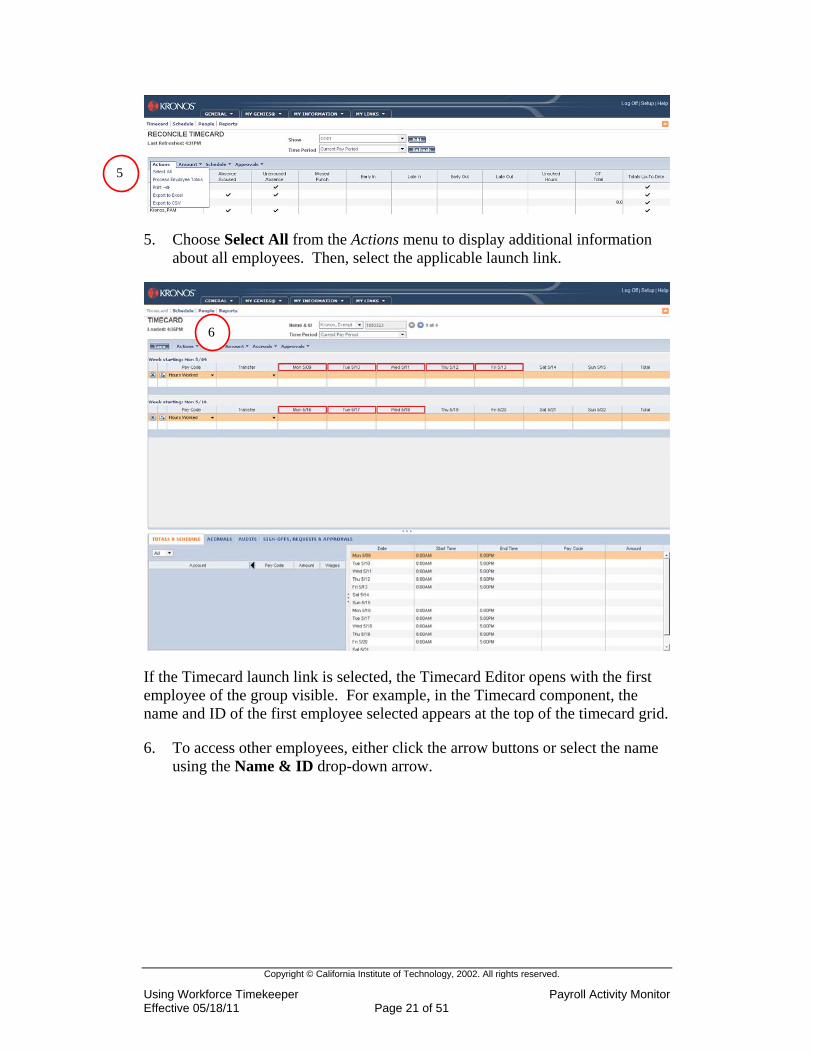
5. Choose Select All from the Actions menu to display additional information about all employees. Then, select the applicable launch link.
6
If the Timecard launch link is selected, the Timecard Editor opens with the first employee of the group visible. For example, in the Timecard component, the name and ID of the first employee selected appears at the top of the timecard grid.
6. To access other employees, either click the arrow buttons or select the name using the Name & ID drop-down arrow.
Copyright © California Institute of Technology, 2002. All rights reserved.
Using Workforce Timekeeper Payroll Activity Monitor Effective 05/18/11 Page 21 of 51
Using Timecards Chapter 3
Copyright © California Institute of Technology, 2002. All rights reserved.
Using Workforce Timekeeper Payroll Activity Monitor Effective 05/18/11 Page 22 of 51
Calculating and Displaying Timecard Totals
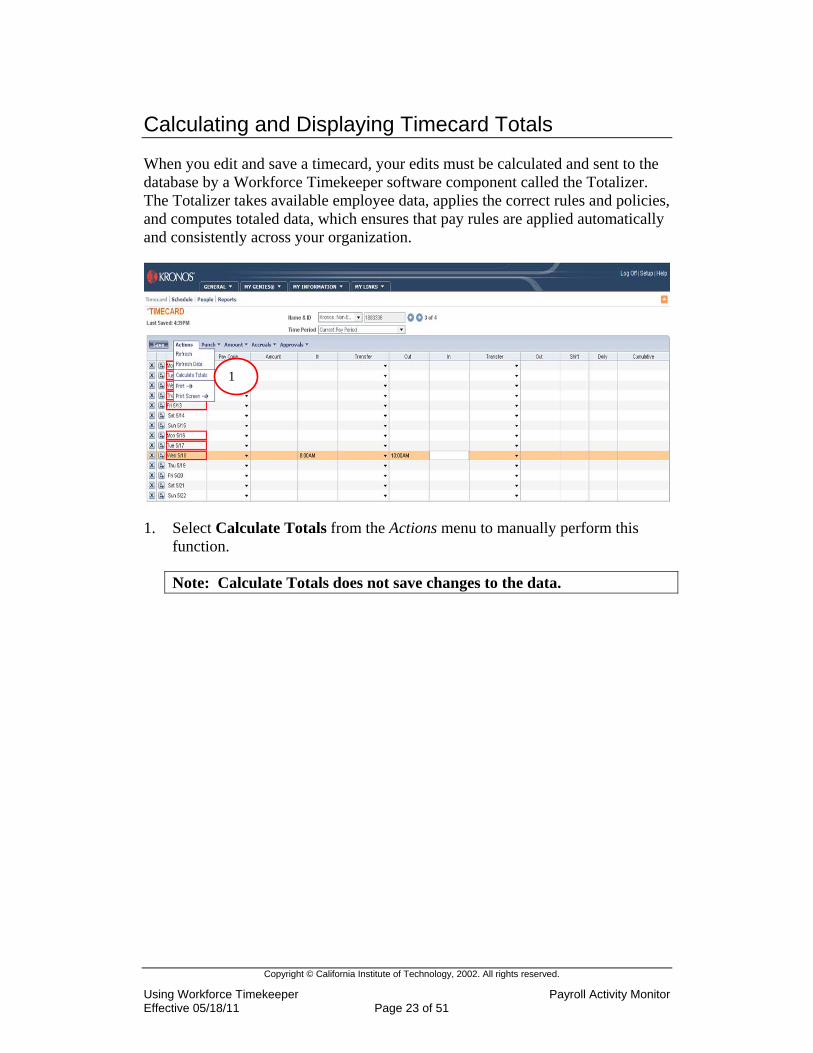
When you edit and save a timecard, your edits must be calculated and sent to the database by a Workforce Timekeeper software component called the Totalizer. The Totalizer takes available employee data, applies the correct rules and policies, and computes totaled data, which ensures that pay rules are applied automatically and consistently across your organization.
1. Select Calculate Totals from the Actions menu to manually perform this function.
Note: Calculate Totals does not save changes to the data.
1
Copyright © California Institute of Technology, 2002. All rights reserved.
Using Workforce Timekeeper Payroll Activity Monitor Effective 05/18/11 Page 23 of 51
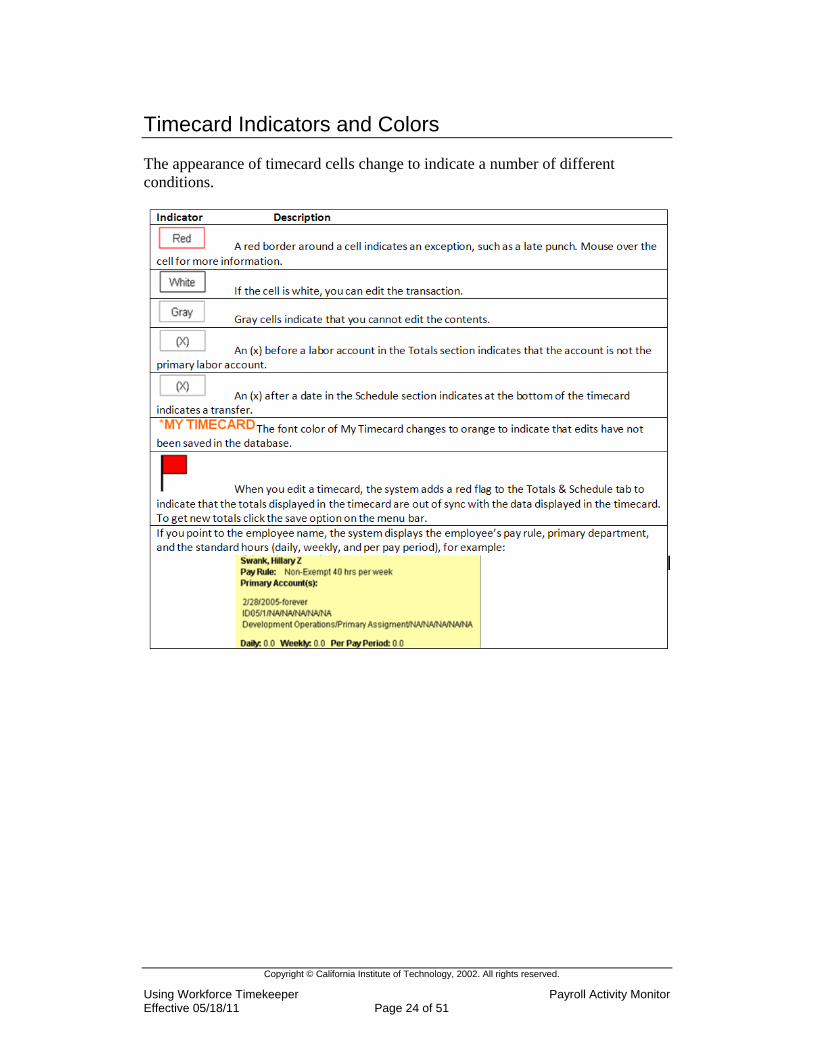
Timecard Indicators and Colors
The appearance of timecard cells change to indicate a number of different conditions.
Copyright © California Institute of Technology, 2002. All rights reserved.
Using Workforce Timekeeper Payroll Activity Monitor Effective 05/18/11 Page 24 of 51
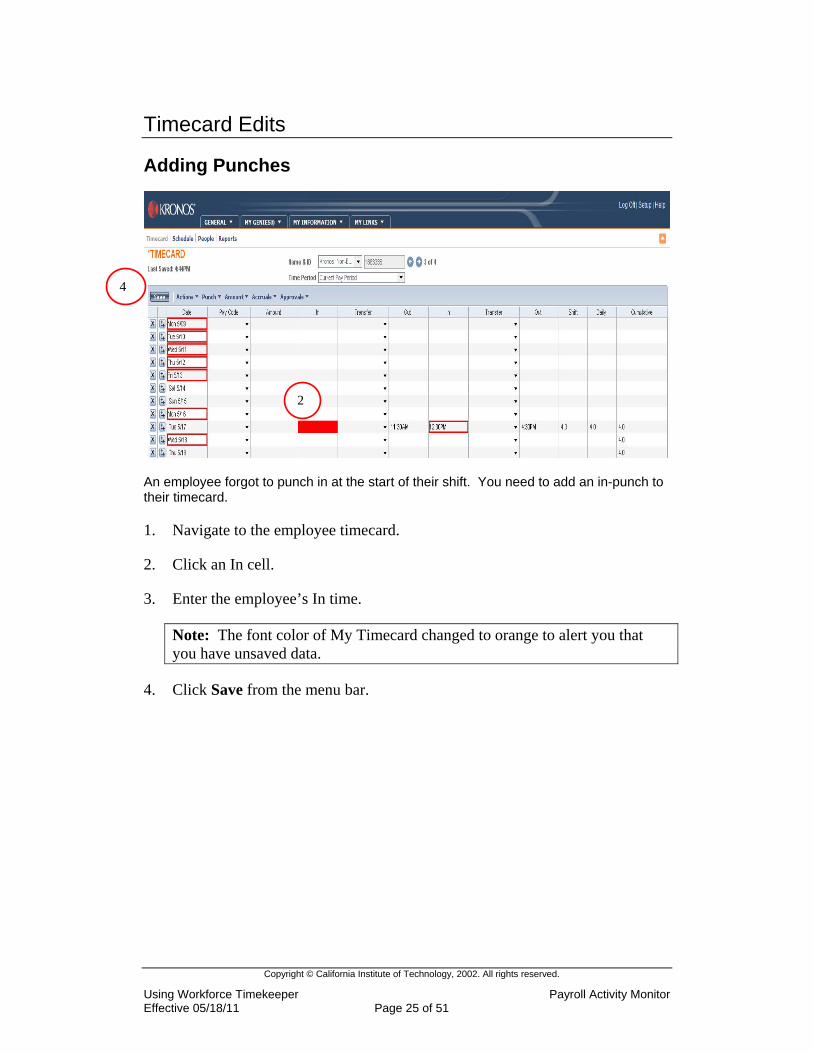
Timecard Edits
Adding Punches
4
2
An employee forgot to punch in at the start of their shift. You need to add an in-punch to their timecard.
1. Navigate to the employee timecard.
2. Click an In cell.
3. Enter the employee’s In time.
Note: The font color of My Timecard changed to orange to alert you that you have unsaved data.
4. Click Save from the menu bar.
Copyright © California Institute of Technology, 2002. All rights reserved.
Using Workforce Timekeeper Payroll Activity Monitor Effective 05/18/11 Page 25 of 51
4
2
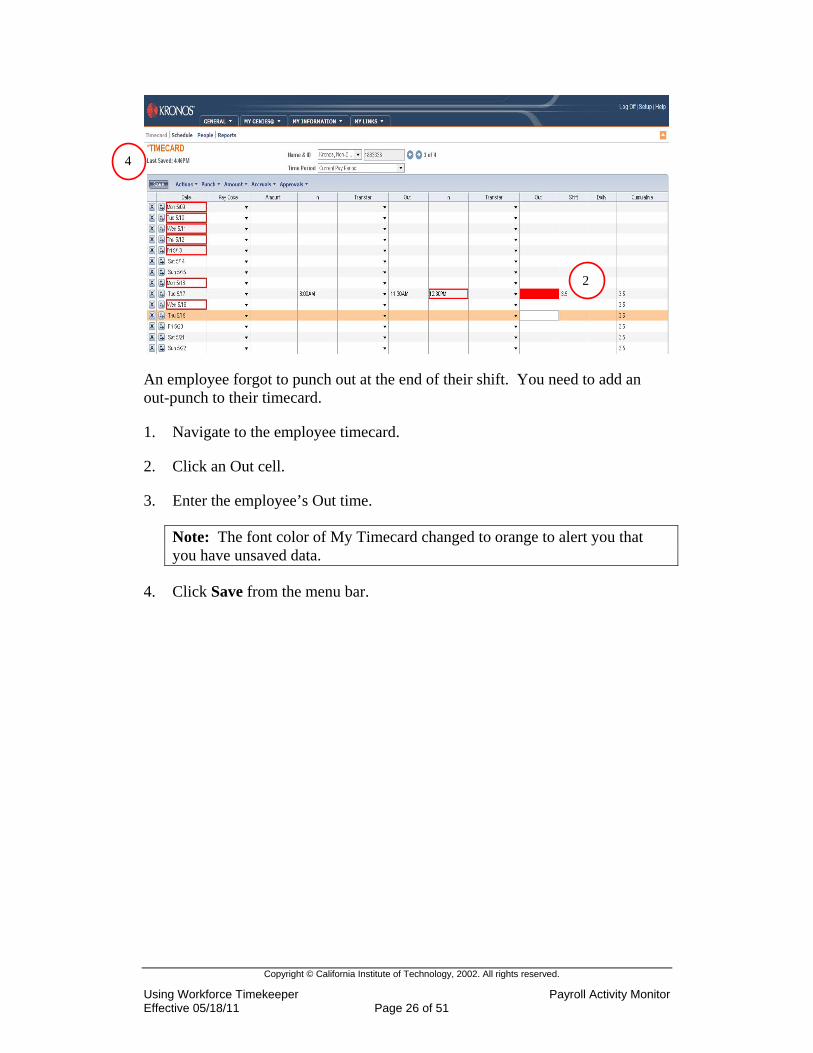
An employee forgot to punch out at the end of their shift. You need to add an out-punch to their timecard.
1. Navigate to the employee timecard.
2. Click an Out cell.
3. Enter the employee’s Out time.
Note: The font color of My Timecard changed to orange to alert you that you have unsaved data.
4. Click Save from the menu bar.
Copyright © California Institute of Technology, 2002. All rights reserved.
Using Workforce Timekeeper Payroll Activity Monitor Effective 05/18/11 Page 26 of 51
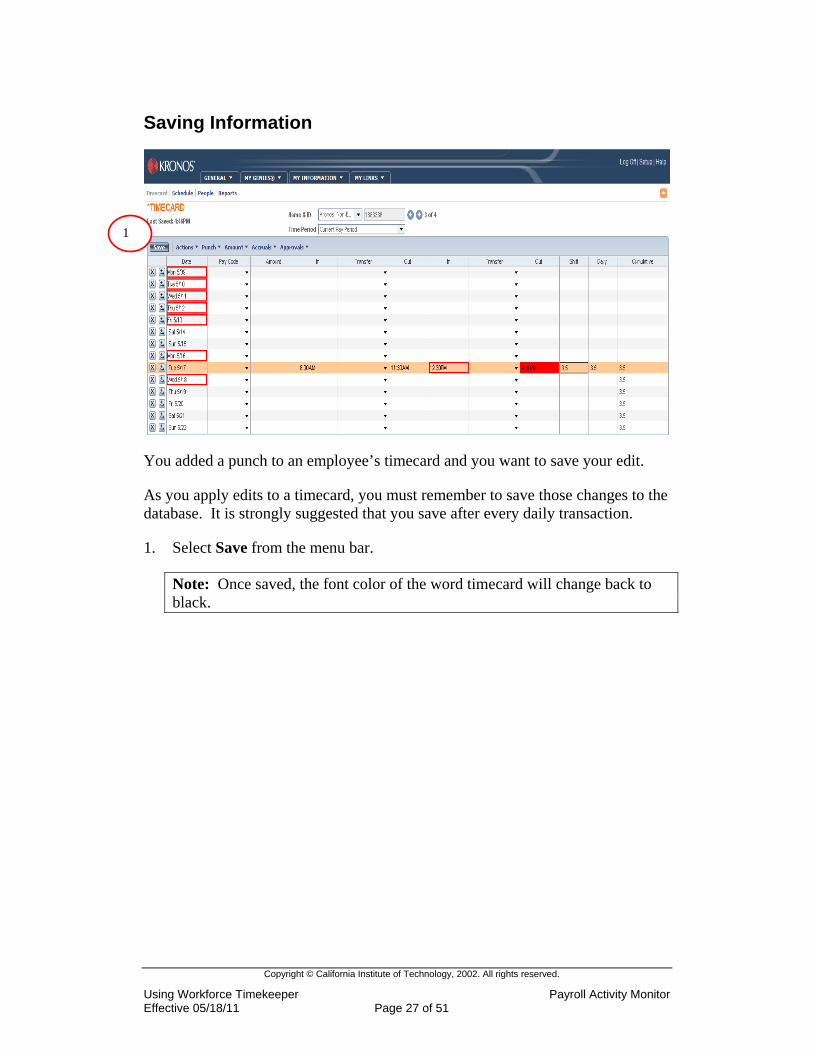
Saving Information
You added a punch to an employee’s timecard and you want to save your edit.
As you apply edits to a timecard, you must remember to save those changes to the database. It is strongly suggested that you save after every daily transaction.
1. Select Save from the menu bar.
Note: Once saved, the font color of the word timecard will change back to black.
1
Copyright © California Institute of Technology, 2002. All rights reserved.
Using Workforce Timekeeper Payroll Activity Monitor Effective 05/18/11 Page 27 of 51
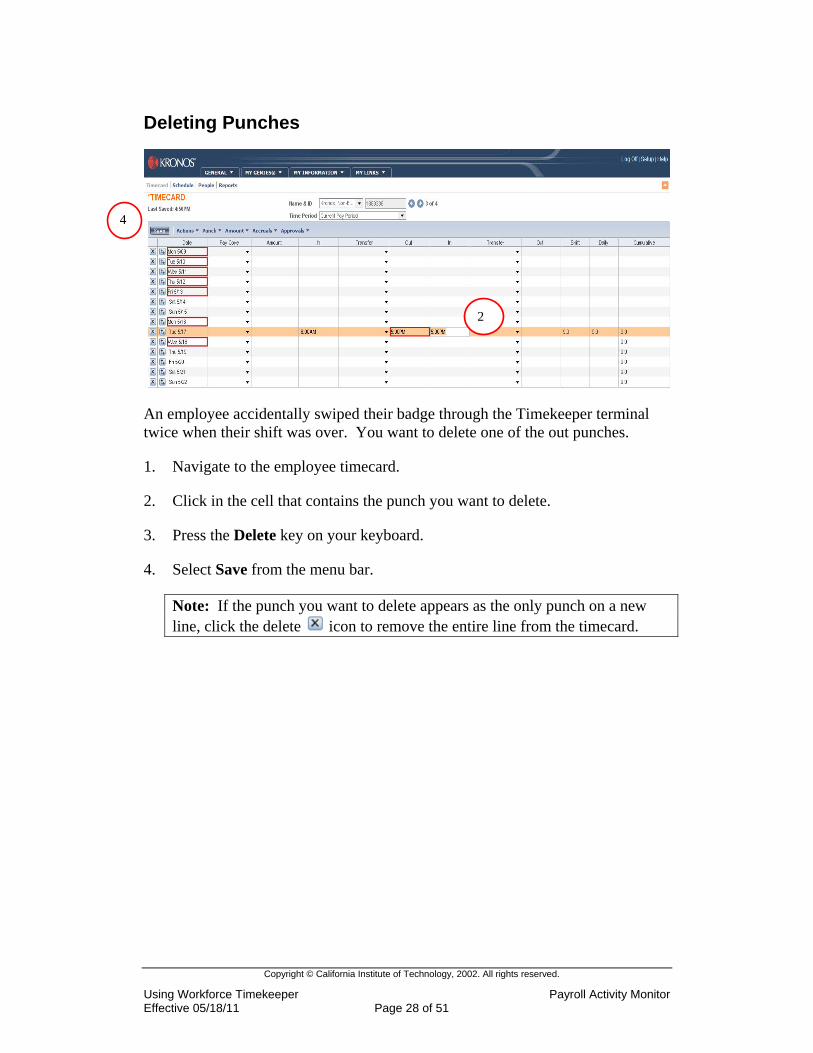
Deleting Punches
4
An employee accidentally swiped their badge through the Timekeeper terminal twice when their shift was over. You want to delete one of the out punches.
1. Navigate to the employee timecard.
2. Click in the cell that contains the punch you want to delete.
3. Press the Delete key on your keyboard.
4. Select Save from the menu bar.
Note: If the punch you want to delete appears as the only punch on a new line, click the delete icon to remove the entire line from the timecard.
2
Copyright © California Institute of Technology, 2002. All rights reserved.
Using Workforce Timekeeper Payroll Activity Monitor Effective 05/18/11 Page 28 of 51
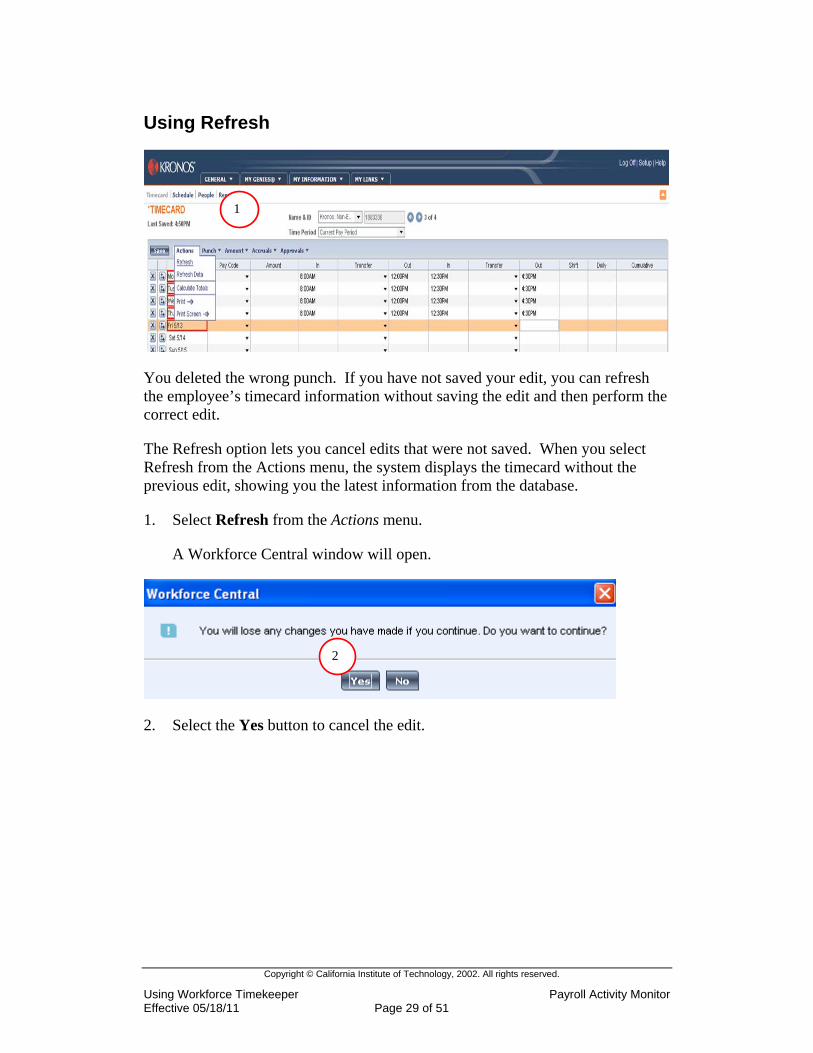
Using Refresh
1
You deleted the wrong punch. If you have not saved your edit, you can refresh the employee’s timecard information without saving the edit and then perform the correct edit.
The Refresh option lets you cancel edits that were not saved. When you select Refresh from the Actions menu, the system displays the timecard without the previous edit, showing you the latest information from the database.
1. Select Refresh from the Actions menu.
A Workforce Central window will open.
2
2. Select the Yes button to cancel the edit.
Copyright © California Institute of Technology, 2002. All rights reserved.
Using Workforce Timekeeper Payroll Activity Monitor Effective 05/18/11 Page 29 of 51
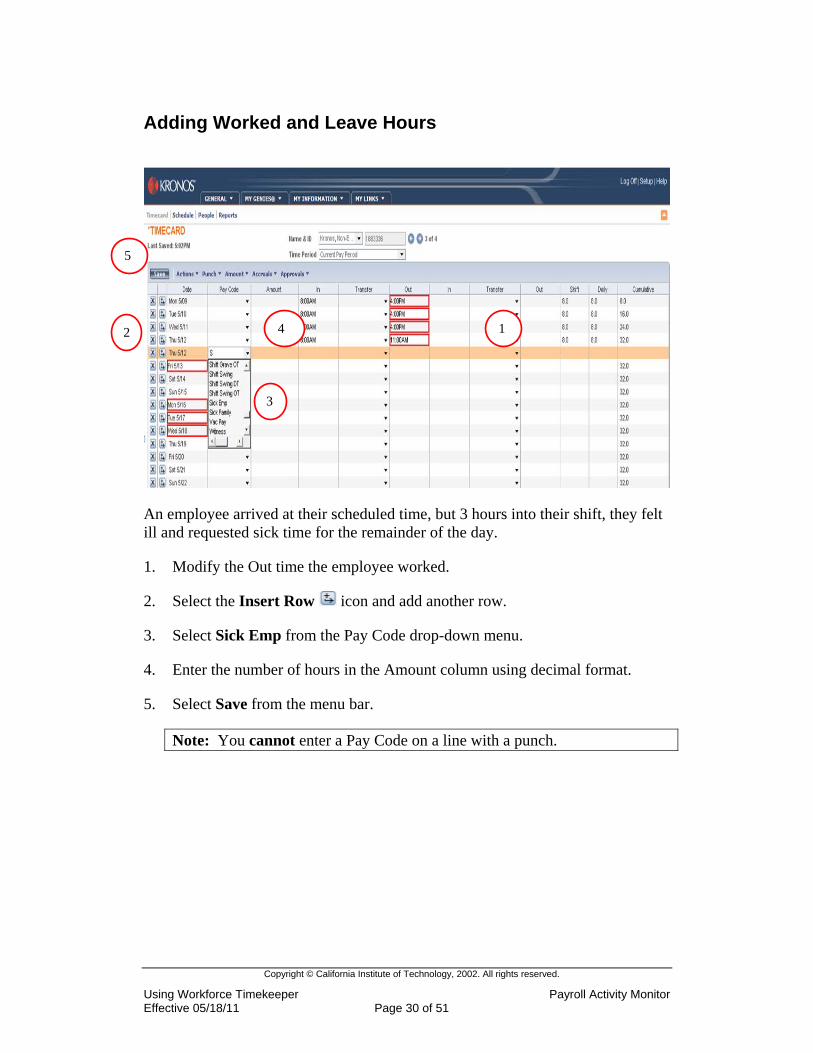
Adding Worked and Leave Hours
5
An employee arrived at their scheduled time, but 3 hours into their shift, they felt ill and requested sick time for the remainder of the day.
1. Modify the Out time the employee worked.
2. Select the Insert Row icon and add another row.
3. Select Sick Emp from the Pay Code drop-down menu.
4. Enter the number of hours in the Amount column using decimal format.
5. Select Save from the menu bar.
Note: You cannot enter a Pay Code on a line with a punch.
4 1
3
2
Copyright © California Institute of Technology, 2002. All rights reserved.
Using Workforce Timekeeper Payroll Activity Monitor Effective 05/18/11 Page 30 of 51
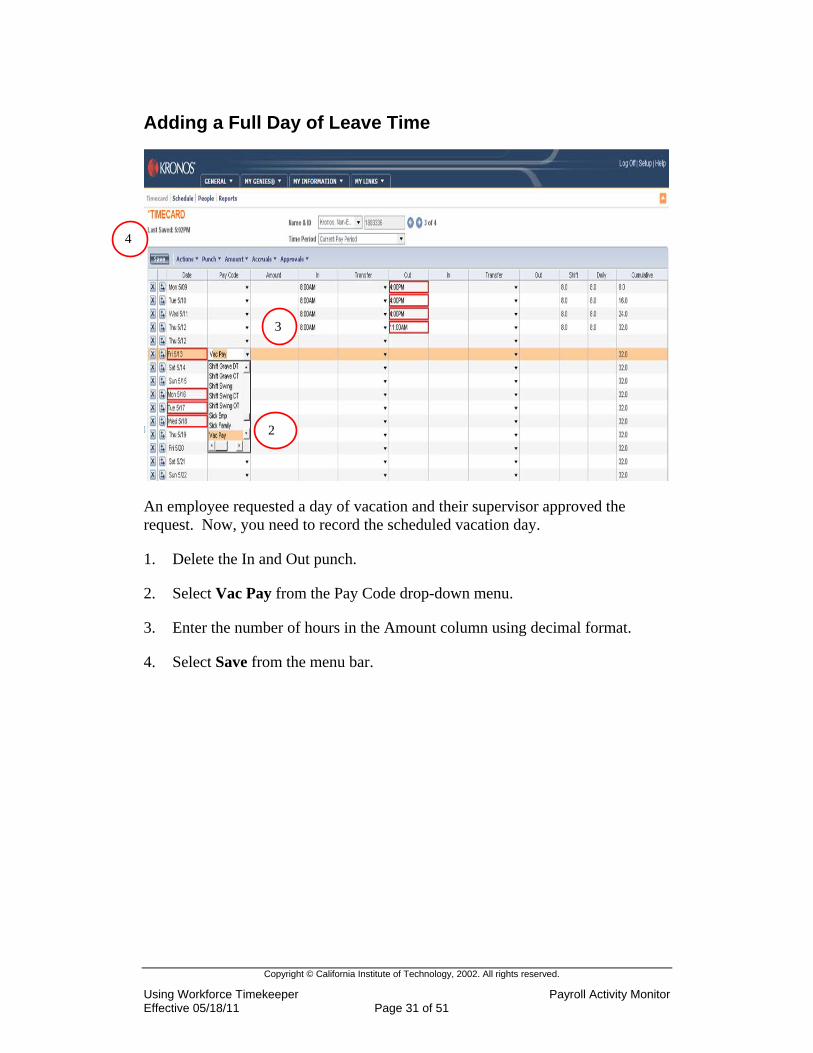
Adding a Full Day of Leave Time
4
3
2
An employee requested a day of vacation and their supervisor approved the request. Now, you need to record the scheduled vacation day.
1. Delete the In and Out punch.
2. Select Vac Pay from the Pay Code drop-down menu.
3. Enter the number of hours in the Amount column using decimal format.
4. Select Save from the menu bar.
Copyright © California Institute of Technology, 2002. All rights reserved.
Using Workforce Timekeeper Payroll Activity Monitor Effective 05/18/11 Page 31 of 51

Historical Edits
There are two types of historical edits: 1) Not Previously Reported Time (NPR) and 2) Historical Moves. These types of edits allow you to correct time from previous pay periods. After making a change to previously recorded time a new tab called “Historical Amounts” will appear underneath the timecard. You can use this tab to view any historical edits that you have made.
Creating Historical Edits
An employee worked 3 overtime hours on a Saturday from the previous pay period. The employee submits the Not Previously Reported (NPR) time with the Current Pay Period.
1) Not Previously Reported Time
1
1. Select Add Historical from the Amount menu.
The Add Historical Amount window will open.
Copyright © California Institute of Technology, 2002. All rights reserved.
Using Workforce Timekeeper Payroll Activity Monitor Effective 05/18/11 Page 32 of 51

2. Manually enter (i.e. mm/dd/yyyy) or use the Historical Date drop-down menu to enter the date on which the Saturday occurred.
3. Select Over time from the Pay Code drop-down menu.
4. Enter “3” in the Amount (HH:hh): field.
5. Using the drop-down menu, select the first day of the current pay period as the Effective Date.
6. Check the “Include in totals for effective date” box.
7. Select the OK button.
8. Select Save from the menu bar.
Note: The employee will not get paid for the NPR hours if the “include in totals for effective date” box is not checked.
Copyright © California Institute of Technology, 2002. All rights reserved.
Using Workforce Timekeeper Payroll Activity Monitor Effective 05/18/11 Page 33 of 51
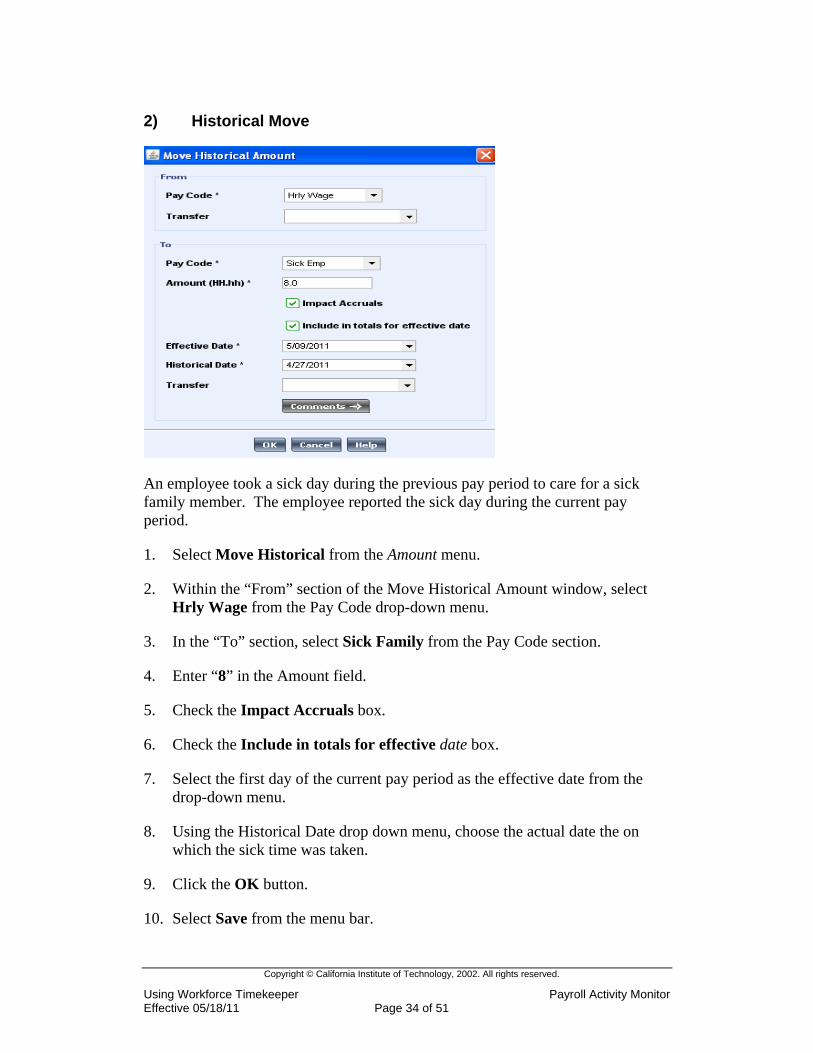
2) Historical Move
An employee took a sick day during the previous pay period to care for a sick family member. The employee reported the sick day during the current pay period.
1. Select Move Historical from the Amount menu.
2. Within the “From” section of the Move Historical Amount window, select Hrly Wage from the Pay Code drop-down menu.
3. In the “To” section, select Sick Family from the Pay Code section.
4. Enter “8” in the Amount field.
5. Check the Impact Accruals box.
6. Check the Include in totals for effective date box.
7. Select the first day of the current pay period as the effective date from the drop-down menu.
8. Using the Historical Date drop down menu, choose the actual date the on which the sick time was taken.
9. Click the OK button.
10. Select Save from the menu bar.
Copyright © California Institute of Technology, 2002. All rights reserved.
Using Workforce Timekeeper Payroll Activity Monitor Effective 05/18/11 Page 34 of 51
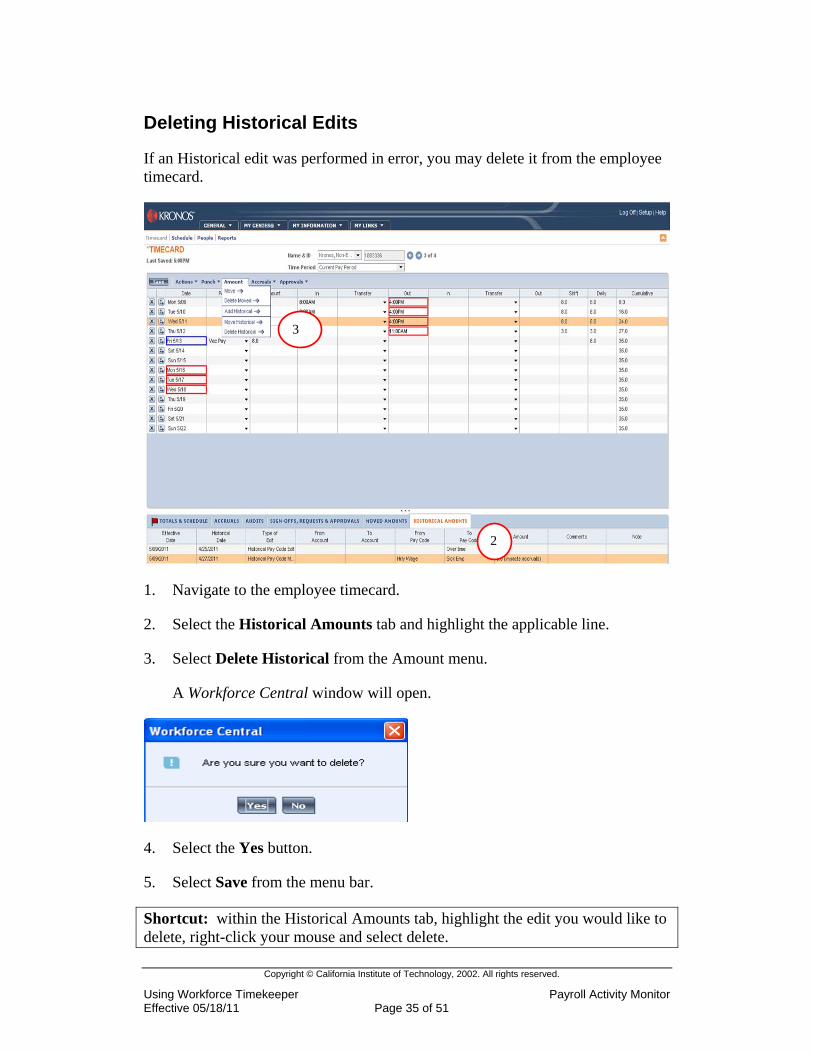
Deleting Historical Edits
If an Historical edit was performed in error, you may delete it from the employee timecard.
3
1. Navigate to the employee timecard.
2. Select the Historical Amounts tab and highlight the applicable line.
3. Select Delete Historical from the Amount menu.
A Workforce Central window will open.
4. Select the Yes button.
5. Select Save from the menu bar.
Shortcut: within the Historical Amounts tab, highlight the edit you would like to delete, right-click your mouse and select delete.
2
Copyright © California Institute of Technology, 2002. All rights reserved.
Using Workforce Timekeeper Payroll Activity Monitor Effective 05/18/11 Page 35 of 51
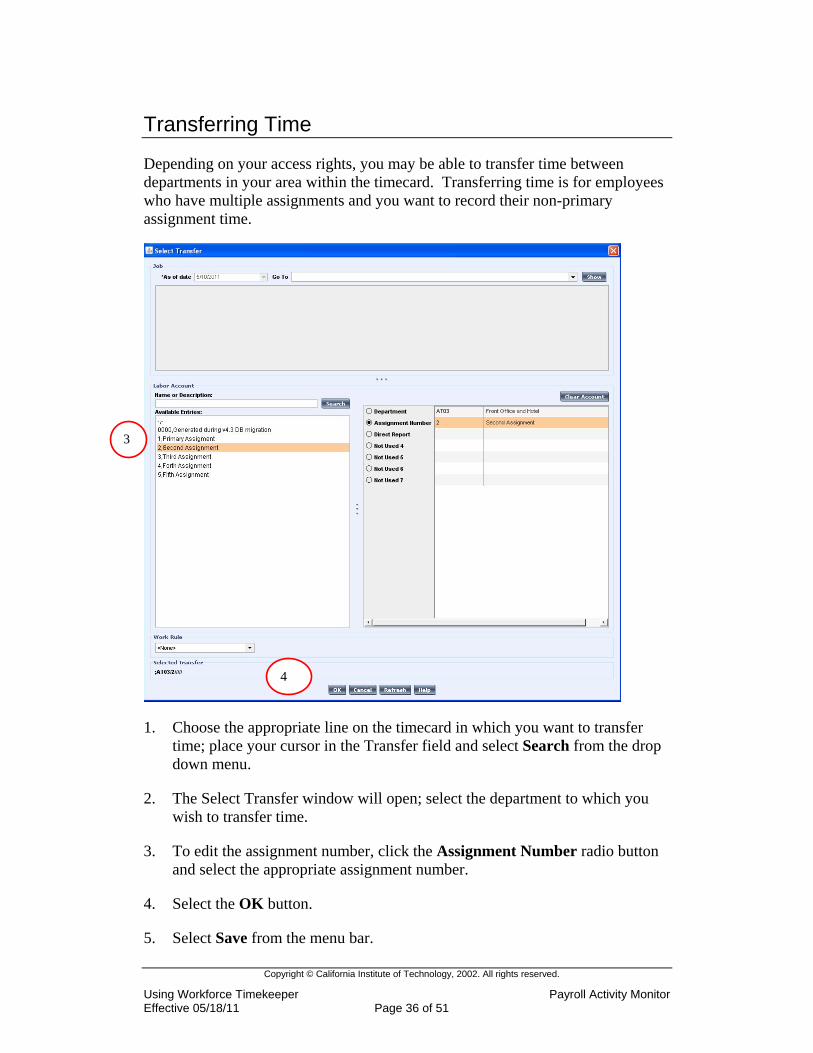
Transferring Time
Depending on your access rights, you may be able to transfer time between departments in your area within the timecard. Transferring time is for employees who have multiple assignments and you want to record their non-primary assignment time.
3
4
1. Choose the appropriate line on the timecard in which you want to transfer time; place your cursor in the Transfer field and select Search from the drop down menu.
2. The Select Transfer window will open; select the department to which you wish to transfer time.
3. To edit the assignment number, click the Assignment Number radio button and select the appropriate assignment number.
4. Select the OK button.
5. Select Save from the menu bar.
Copyright © California Institute of Technology, 2002. All rights reserved.
Using Workforce Timekeeper Payroll Activity Monitor Effective 05/18/11 Page 36 of 51
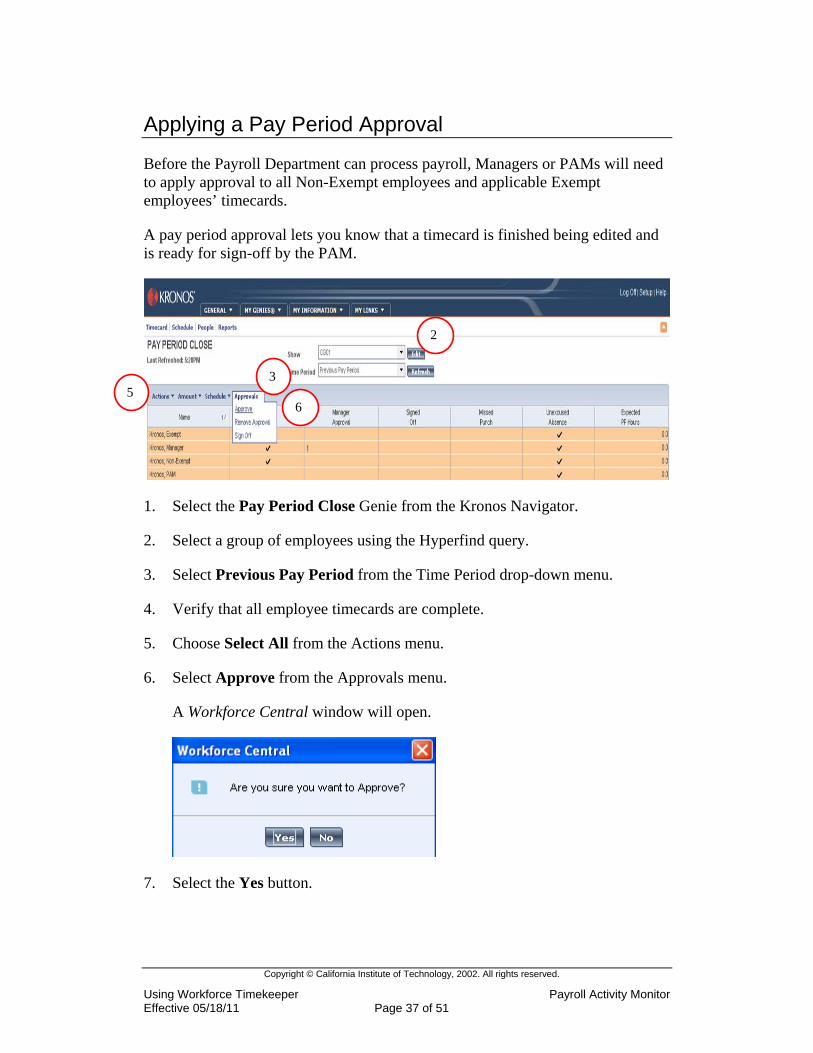
Applying a Pay Period Approval
Before the Payroll Department can process payroll, Managers or PAMs will need to apply approval to all Non-Exempt employees and applicable Exempt employees’ timecards.
A pay period approval lets you know that a timecard is finished being edited and is ready for sign-off by the PAM.
2
6
3 5
1. Select the Pay Period Close Genie from the Kronos Navigator.
2. Select a group of employees using the Hyperfind query.
3. Select Previous Pay Period from the Time Period drop-down menu.
4. Verify that all employee timecards are complete.
5. Choose Select All from the Actions menu.
6. Select Approve from the Approvals menu.
A Workforce Central window will open.
7. Select the Yes button.
Copyright © California Institute of Technology, 2002. All rights reserved.
Using Workforce Timekeeper Payroll Activity Monitor Effective 05/18/11 Page 37 of 51
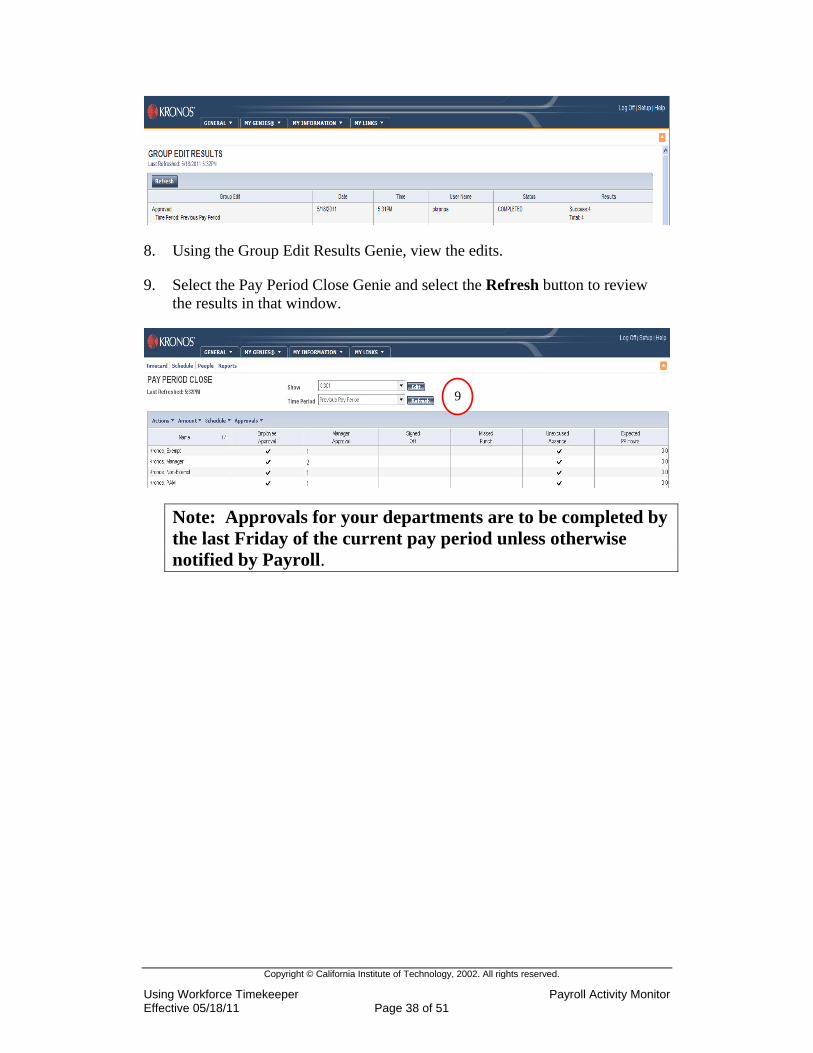
8. Using the Group Edit Results Genie, view the edits.
9. Select the Pay Period Close Genie and select the Refresh button to review the results in that window.
Note: Approvals for your departments are to be completed by the last Friday of the current pay period unless otherwise notified by Payroll.
9
Copyright © California Institute of Technology, 2002. All rights reserved.
Using Workforce Timekeeper Payroll Activity Monitor Effective 05/18/11 Page 38 of 51
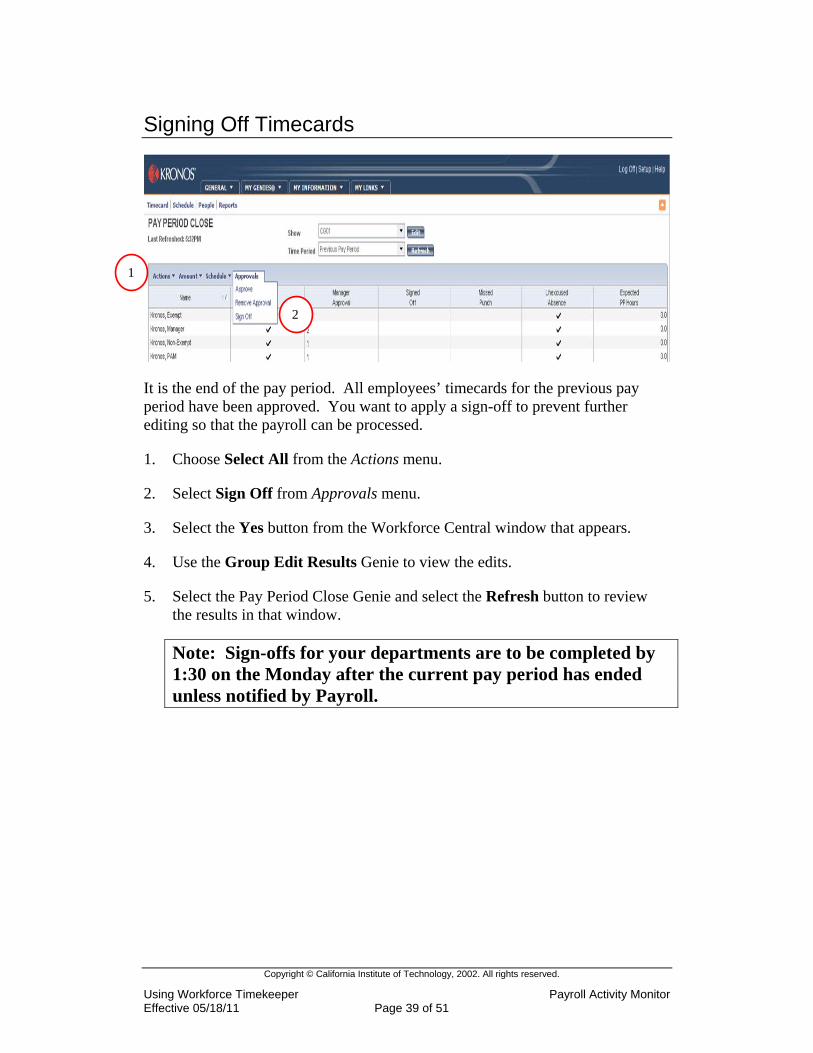
Signing Off Timecards
1
It is the end of the pay period. All employees’ timecards for the previous pay period have been approved. You want to apply a sign-off to prevent further editing so that the payroll can be processed.
1. Choose Select All from the Actions menu.
2. Select Sign Off from Approvals menu.
3. Select the Yes button from the Workforce Central window that appears.
4. Use the Group Edit Results Genie to view the edits.
5. Select the Pay Period Close Genie and select the Refresh button to review the results in that window.
Note: Sign-offs for your departments are to be completed by 1:30 on the Monday after the current pay period has ended unless notified by Payroll.
2
Copyright © California Institute of Technology, 2002. All rights reserved.
Using Workforce Timekeeper Payroll Activity Monitor Effective 05/18/11 Page 39 of 51
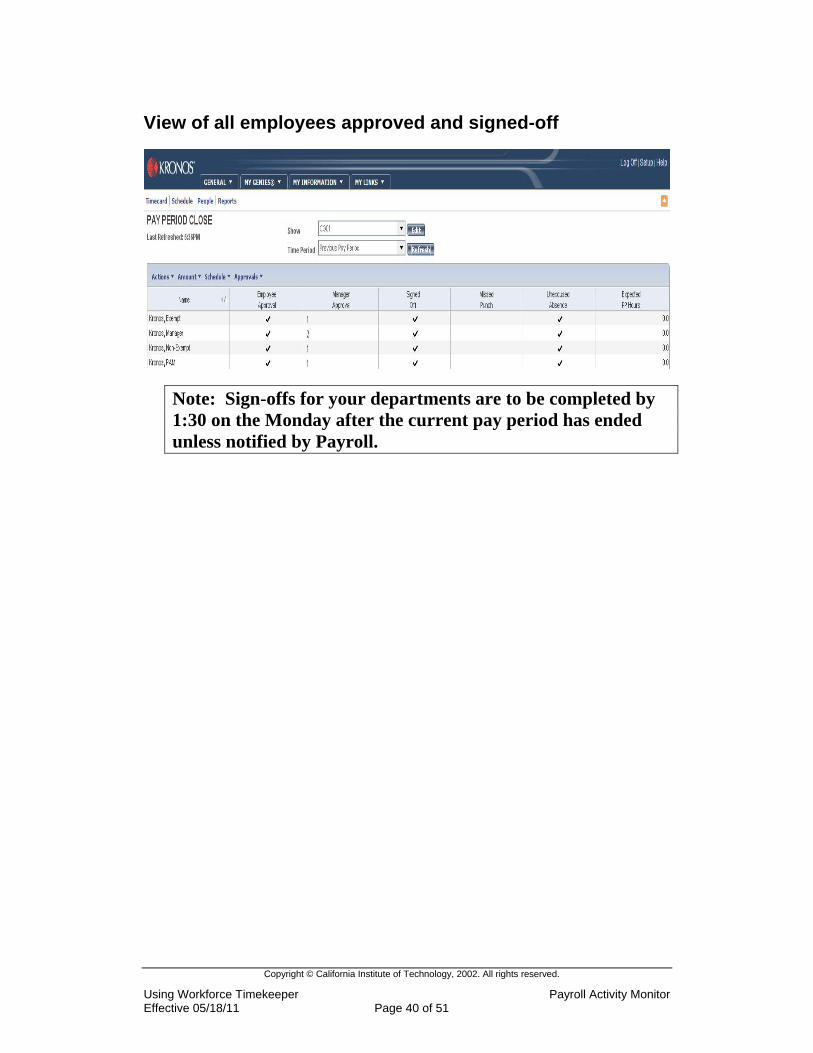
View of all employees approved and signed-off
Note: Sign-offs for your departments are to be completed by 1:30 on the Monday after the current pay period has ended unless notified by Payroll.
Copyright © California Institute of Technology, 2002. All rights reserved.
Using Workforce Timekeeper Payroll Activity Monitor Effective 05/18/11 Page 40 of 51
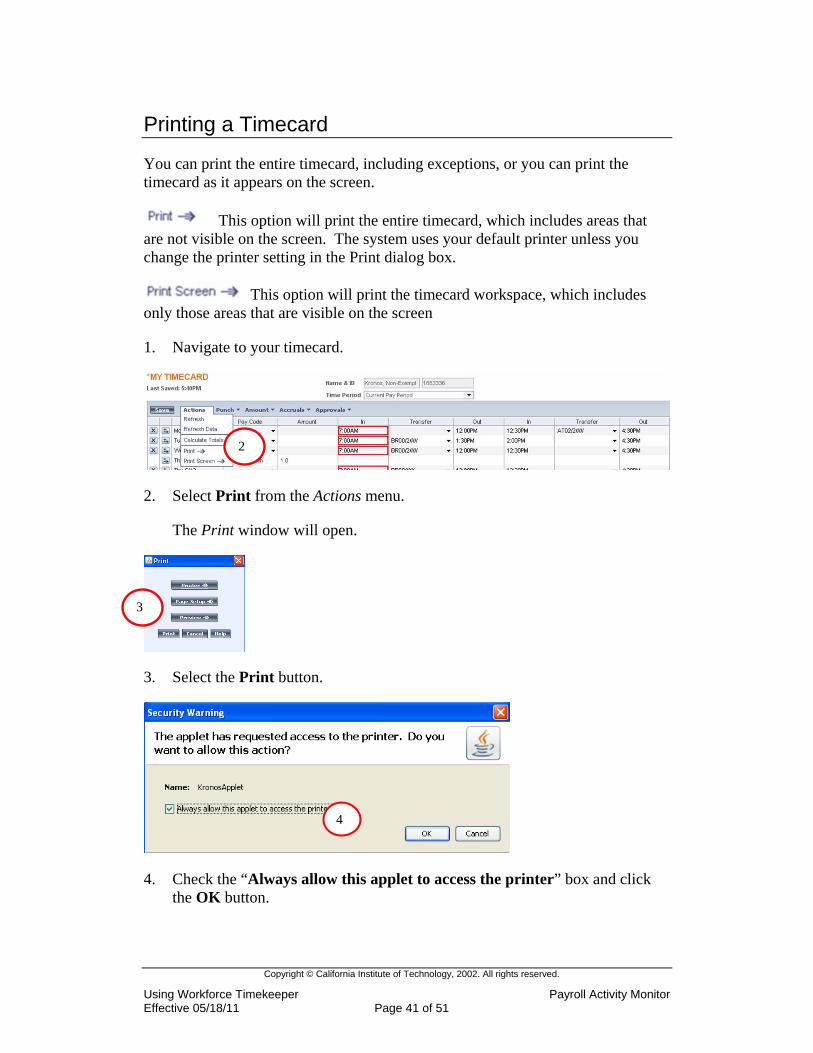
Printing a Timecard
You can print the entire timecard, including exceptions, or you can print the timecard as it appears on the screen.
This option will print the entire timecard, which includes areas that are not visible on the screen. The system uses your default printer unless you change the printer setting in the Print dialog box.
This option will print the timecard workspace, which includes only those areas that are visible on the screen
1. Navigate to your timecard.
2
2. Select Print from the Actions menu.
The Print window will open.
3
3. Select the Print button.
4
4. Check the “Always allow this applet to access the printer” box and click the OK button.
Copyright © California Institute of Technology, 2002. All rights reserved.
Using Workforce Timekeeper Payroll Activity Monitor Effective 05/18/11 Page 41 of 51
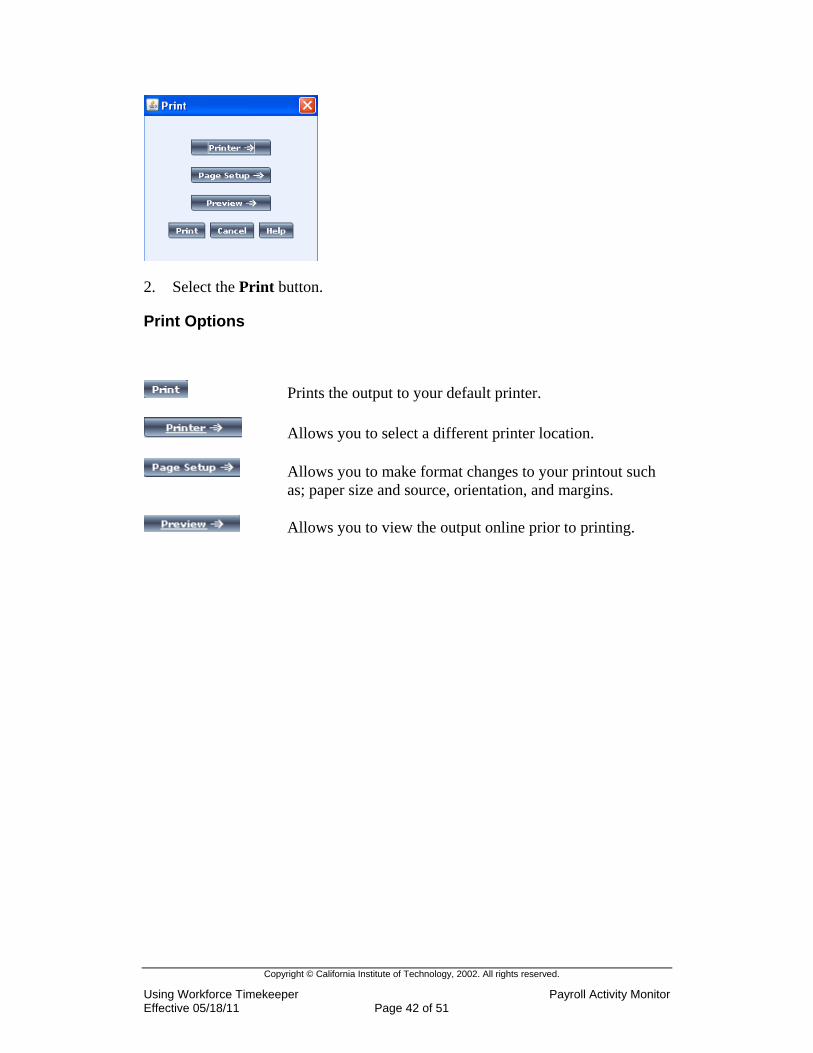
2. Select the Print button.
Print Options
Prints the output to your default printer.
Allows you to select a different printer location.
Allows you to make format changes to your printout such as; paper size and source, orientation, and margins.
Allows you to view the output online prior to printing.
Copyright © California Institute of Technology, 2002. All rights reserved.
Using Workforce Timekeeper Payroll Activity Monitor Effective 05/18/11 Page 42 of 51
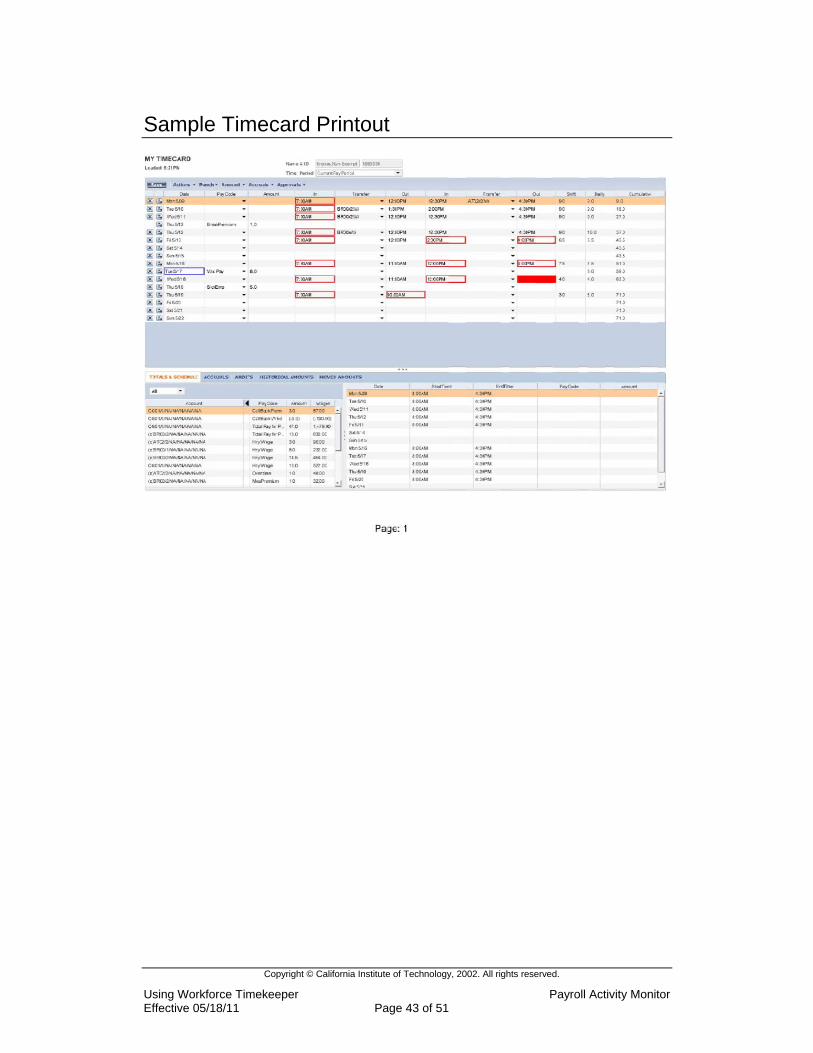
Sample Timecard Printout
Copyright © California Institute of Technology, 2002. All rights reserved.
Using Workforce Timekeeper Payroll Activity Monitor Effective 05/18/11 Page 43 of 51

Generating Reports Chapter 4
Copyright © California Institute of Technology, 2002. All rights reserved.
Using Workforce Timekeeper Payroll Activity Monitor Effective 05/18/11 Page 44 of 51
Printing Reports
Identifying Standard Reports Categories
All – The All category includes an alphabetical listing of each standard report and any custom reports to which you have access.
Accruals – The Accruals category contains reports that include accruals information, such as balances and projections and details about accrual activity.
Detail Genie – The Detail Genie category contains reports that include employee specific information such as absent employees and hours by job.
Roll-up Genie – The Roll-up Genie category contains reports for viewing hours signed-off information.
Scheduler – The Scheduler category contains reports that detail schedule and accruals information.
Timecard – The Timecard category contains reports that display accrual information, time and attendance information and schedules.
Copyright © California Institute of Technology, 2002. All rights reserved.
Using Workforce Timekeeper Payroll Activity Monitor Effective 05/18/11 Page 45 of 51
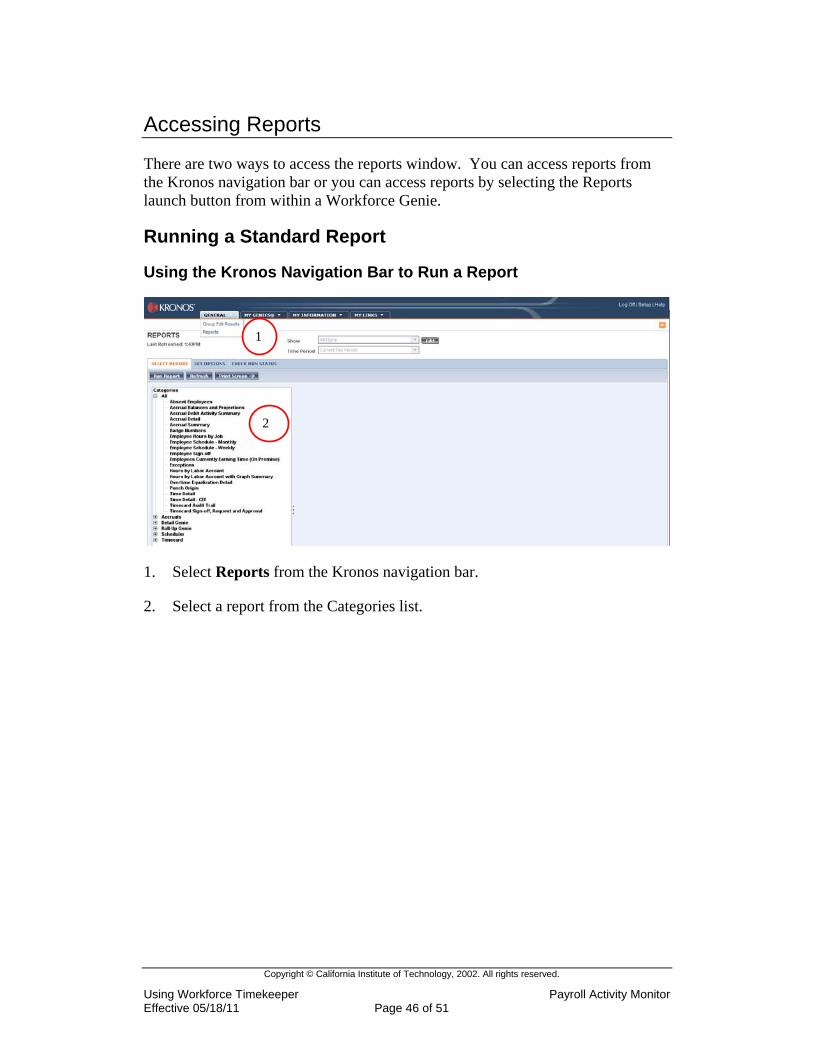
Accessing Reports
There are two ways to access the reports window. You can access reports from the Kronos navigation bar or you can access reports by selecting the Reports launch button from within a Workforce Genie.
Running a Standard Report
Using the Kronos Navigation Bar to Run a Report
1
2
1. Select Reports from the Kronos navigation bar.
2. Select a report from the Categories list.
Copyright © California Institute of Technology, 2002. All rights reserved.
Using Workforce Timekeeper Payroll Activity Monitor Effective 05/18/11 Page 46 of 51

6
3
Note: Leave the Show field as All Home in order to run a report listing all of your employees.
3. Select Range of Dates from the Time Period drop-down menu.
Note: You must always select Range of Dates as the time period in order to view the date parameters of the report.
The Select Range of Dates window will open.
4
5
4. Use the Start Date and End Date drop-down menus to enter the applicable date range.
5. Select the OK button.
6. Select the Run Report tab.
Copyright © California Institute of Technology, 2002. All rights reserved.
Using Workforce Timekeeper Payroll Activity Monitor Effective 05/18/11 Page 47 of 51
7
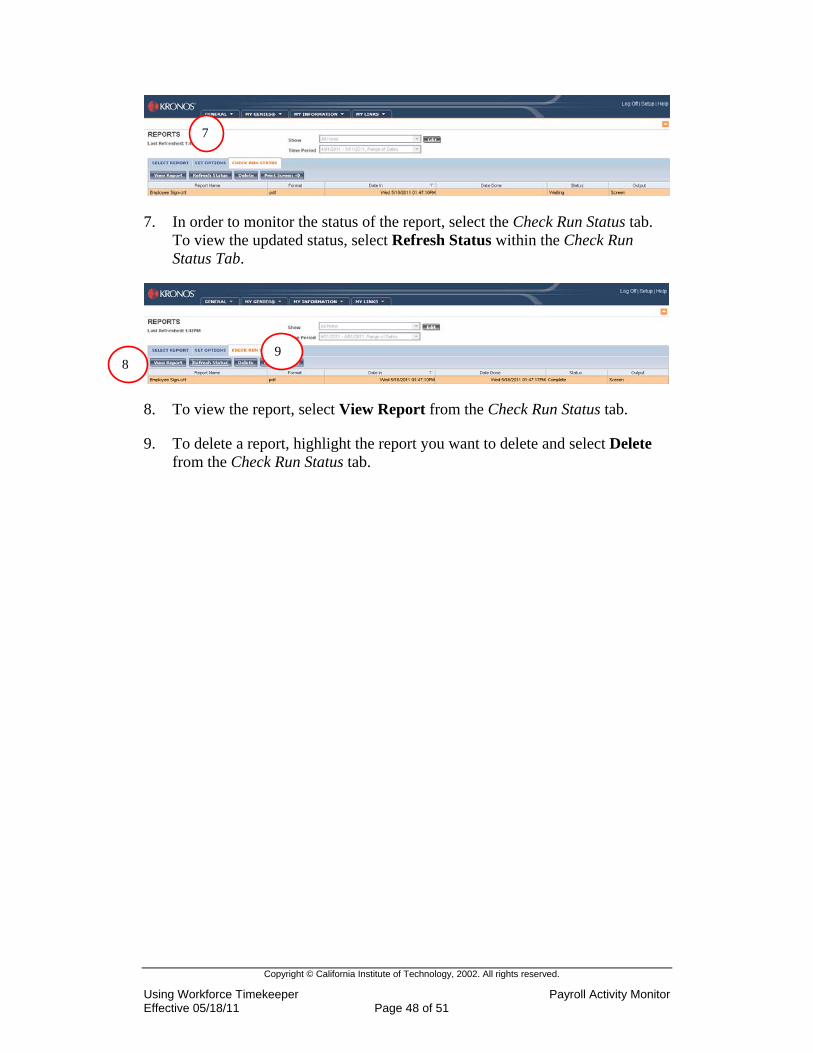
7. In order to monitor the status of the report, select the Check Run Status tab. To view the updated status, select Refresh Status within the Check Run Status Tab.
9 8
8. To view the report, select View Report from the Check Run Status tab.
9. To delete a report, highlight the report you want to delete and select Delete from the Check Run Status tab.
Copyright © California Institute of Technology, 2002. All rights reserved.
Using Workforce Timekeeper Payroll Activity Monitor Effective 05/18/11 Page 48 of 51

Copyright © California Institute of Technology, 2002. All rights reserved.
Using Workforce Timekeeper Payroll Activity Monitor Effective 05/18/11 Page 49 of 51
Running a Customized Report
Customized report options allow you to see only the data that you want in a report. These options differ for each report.
Use the following steps to select different options for customization:
1. Follow steps 1-5 from the Running a Standard Report section on page 47.
6. Select the Set Options tab and if the report is customizable a set of options will appear.
7. Select the option you would like to use.
8. Select Run Report from the Set Options tab.
6
7
8
Copyright © California Institute of Technology, 2002. All rights reserved.
Using Workforce Timekeeper Payroll Activity Monitor Effective 05/18/11 Page 50 of 51
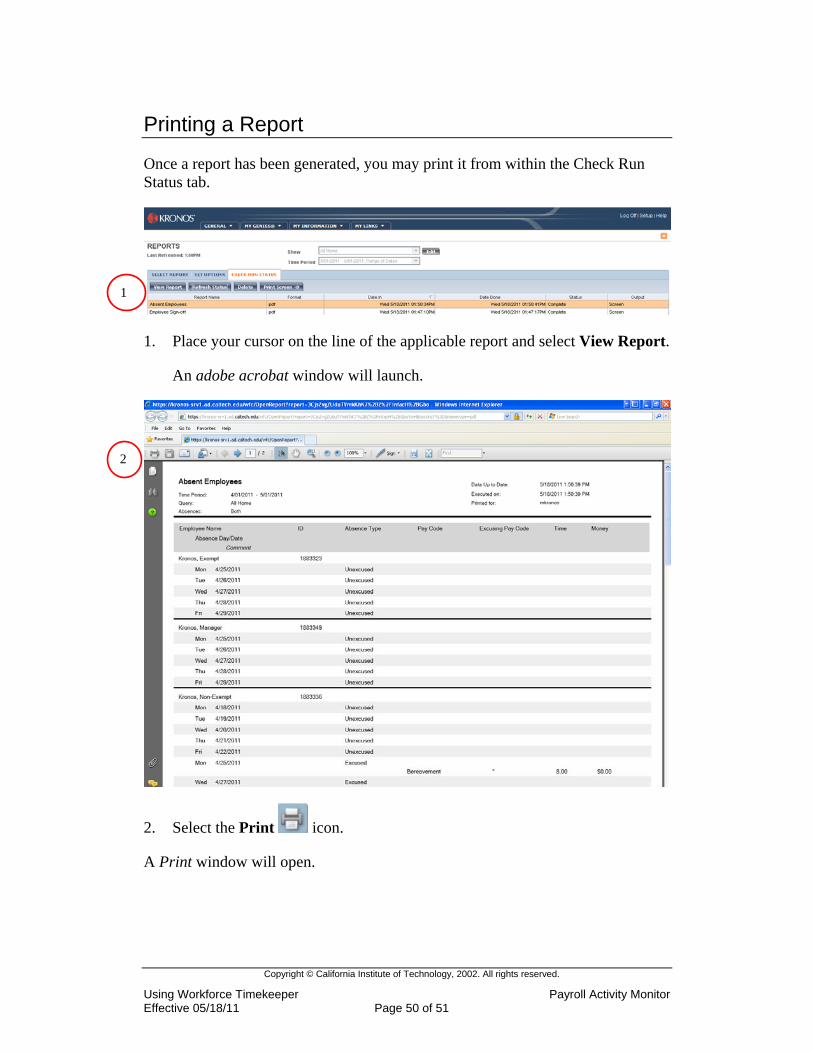
Printing a Report
Once a report has been generated, you may print it from within the Check Run Status tab.
1. Place your cursor on the line of the applicable report and select View Report.
An adobe acrobat window will launch.
2. Select the Print icon.
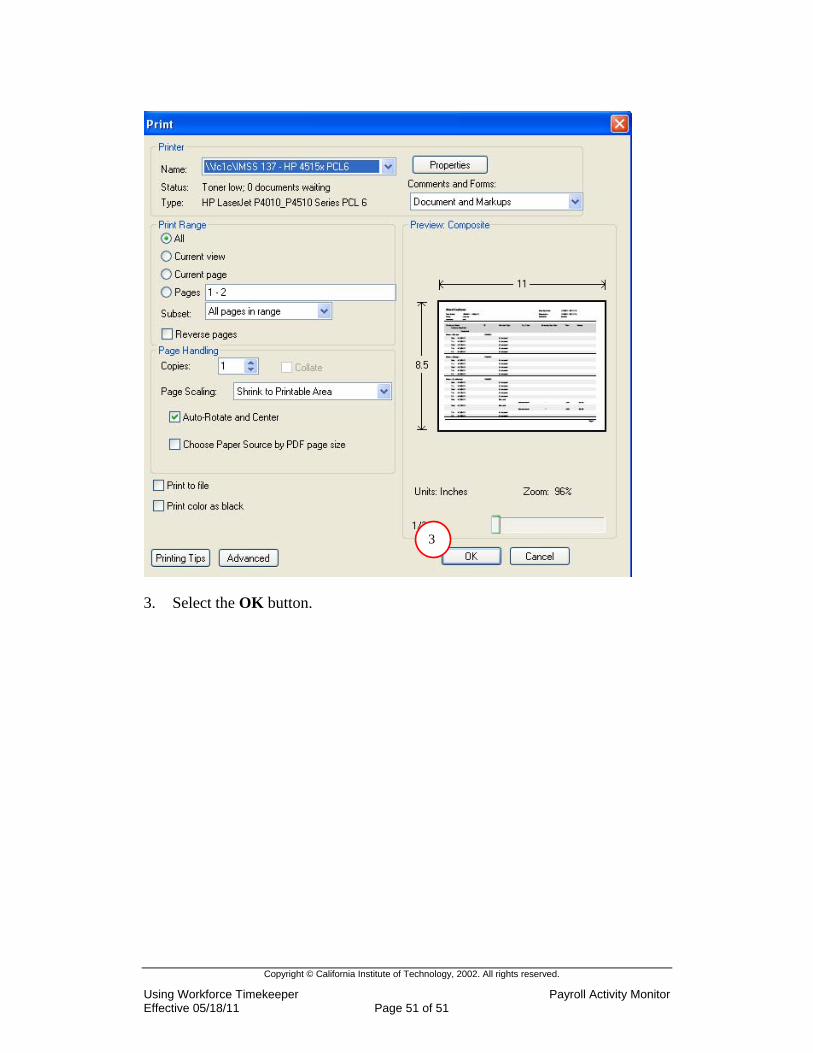
A Print window will open.
1
2
3
3. Select the OK button.
Copyright © California Institute of Technology, 2002. All rights reserved.
Using Workforce Timekeeper Payroll Activity Monitor Effective 05/18/11 Page 51 of 51