Si Te Bashkengjisim File Nje Mesazhi
9
Si te bashkengjisim files nje mesazhi Nje file i bashkengjitur eshte nje file te cilin e perfshini ne mesazhin tuaj dhe i dergohet marresit bashke me te. Mund te bashkengjisni te gjitha llojet e files: dokumente, audio, video, foto, pdf etj. Mund te bashkengjisni deri ne 50 file me madhesi totale 25 MB. SI? 1. Klikoni ne Compose Message per te krijuar nje e-mail te ri. 2. Klikoni ne tabin Attachment. 3. Klikoni ne butonin Attach Files. 1
-
Upload
matilda-hoxha -
Category
Documents
-
view
44 -
download
10
Transcript of Si Te Bashkengjisim File Nje Mesazhi

Si te bashkengjisim files nje mesazhi
Nje file i bashkengjitur eshte nje file te cilin e perfshini ne mesazhin tuaj dhe i dergohet marresit bashke me te. Mund te bashkengjisni te gjitha llojet e files: dokumente, audio, video, foto, pdf etj. Mund te bashkengjisni deri ne 50 file me madhesi totale 25 MB.
SI?
1. Klikoni ne Compose Message per te krijuar nje e-mail te ri.
2. Klikoni ne tabin Attachment.
3. Klikoni ne butonin Attach Files.
Hapet dritarja dialoguese Open file ku do te percaktoni files qe do te bashkengjisni.
1

4. Lokalizoni file qe doni te bashkengjisni, seleksionojeni ate dhe klikoni ne butonin OK ose OPEN.
5. File i perzgjedhur dhe emri shfaqet ne kutizen e pare te bashkengjitjes. Prisni deri sa ai te ngarkohet.
6. Per te bashkengjitur nje file tjeter perserisni hapat 3 dhe 4.
Tips:- Ju nuk mund te bashkengjisni me shume se nje file ne nje kutize.- Maksimumi i numrit te file qe mund te bashkengjisni eshte 50.- Totali i madhesise se files te bashkengjitur qe mund te dergoni eshte 25 Mb.- Ne rast se doni te hiqni nje nga files e bashkengjitur klikoni ne X e kutizes perkatese.
7. Pasi keni lidhur te gjithe file procedoni me textin e mesazhit, adresen etj. Dhe ne fund per te derguar mesazhin shtypni butonin SEND.
Nese done te bashkengjisni file me te medhenj se 25 Mb klikoni ne butonin Attach large files.
2

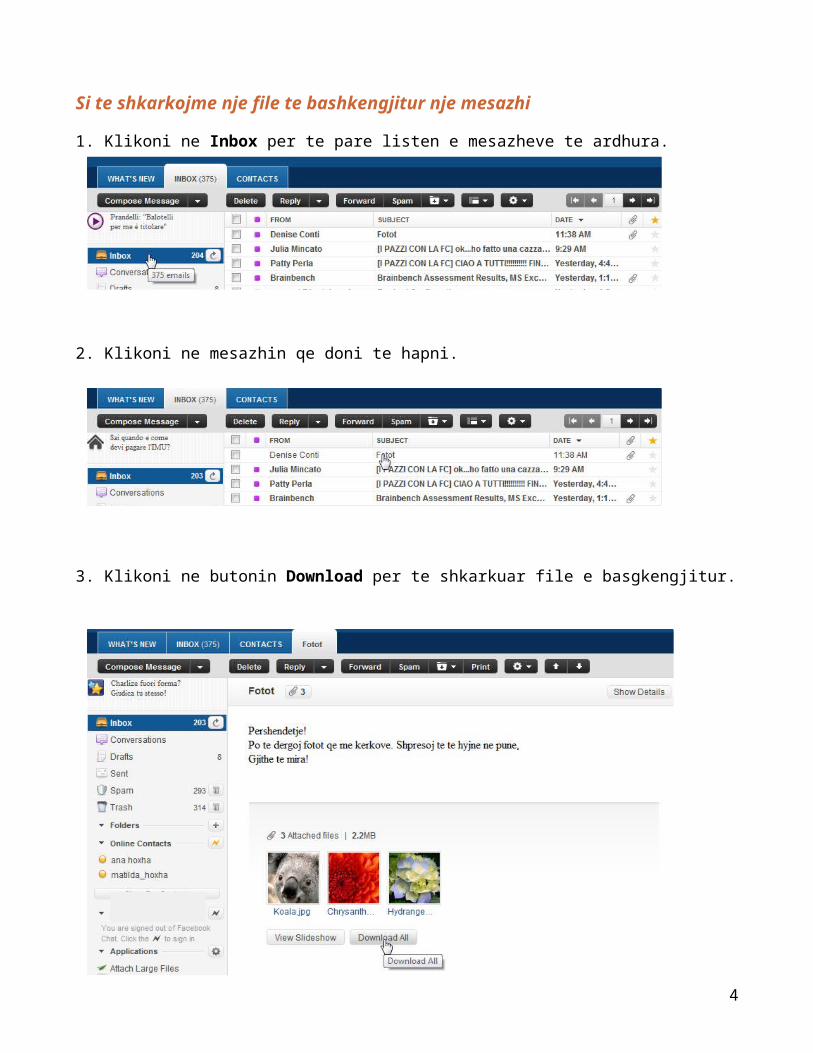
Si te shkarkojme nje file te bashkengjitur nje mesazhi
1. Klikoni ne Inbox per te pare listen e mesazheve te ardhura.
2. Klikoni ne mesazhin qe doni te hapni.
3. Klikoni ne butonin Download per te shkarkuar file e basgkengjitur.
3
E-mail for Beginners: Part 1
This icon indicates that there is a screen capture or animation describing the concept.
This icon indicates that there is a sound clip describing the tutorial.
Tutorial Overview
Topics covered in this tutorial (click link to jump to topic):
1. What is E-mail? 4.Setting Up Your E-mail Account(s)
2. Your E-mail Address
3.Information from your ISP
What is Email?
E-mail is an electronic version of sending a letter. You can send e-mail from your computer at any time of the day to any address around the world and your electronic letter will arrive at its destination seconds after you send it... even if the receiver lives on the other side of the world.
The receiver has to "pick-up" their mail - usually this means dialling their local Internet Service Provider to check their mail box before they will receive your e-mail. Today many people use broadband Internet connections that are "always on", and often work with computers daily, meaning they receive their e-mail more regularly.
E-mail is one of the most popular applications on the Net. It is a cheap and effective way to keep in touch with friends and family. To send a letter in Australia costs 50 cents (excluding the cost of paper for the envelope and letter), whereas, providing you have a computer, e-mail costs virtually nothing.
To use e-mail, you need software called a "mail client". Often people use "Outlook Express" or "Eudora Pro" for Windows machines or "Claris Emailer" for Macintosh computers.
The mail client simply allows you to:
compose e-mail to send to your ISP to be forwarded to your addressee, to receive e-mail, to read and file mail that has been sent and received,
to manage e-mail addresses of your contacts.
Your E-mail Address
Your e-mail address is usually your user name, followed by an @ sign, followed by the domain name of the Internet Service Provider (ISP) through which you are connecting to the Internet.
If your name is "Mary Smith" and your user name is "msmith", and you are connecting through the ISP Ozemail, your e-mail address will be "[email protected]".
4

Like a URL on the web, the "ozemail.com.au" is the domain name of the server you will dial to send and receive your e-mail. The "ozemail" is the name of the service provider, the "com" means "company" or "commercial", the "au" denotes "Australia" (if you left the "au" off the end then the e-mail message might be delivered to a mail server in America if there happen to be a "ozemail.com" domain name server there).
Information from your ISP
You will need 5 things before your e-mail software will be able to locate your ISP's mail servers and send and receive mail:
1. an Internet connection (dial up or broadband, it doesn't matter which type).2. the name of your POP (Post Office Protocol) server. The POP server is your inbound mail server - it receives your e-mail.
This is often the domain name preceded with the word "mail". e.g. mail.ozemail.com.au3. the address of the SMTP (Simple Mail Transfer Protocol) server. A SMTP server sends your e-mail. This is often the
domain name preceded with the word "mail" or "smtp". e.g. mail.ozemail.com.au4. your user name. "msmith" in the example above5. your password
All this information will be supplied to your by your ISP or web developer.
Note that some ISPs use the same address for both POP and SMTP servers (for example both the SMTP and POP servers could be called mail.ISPNAME.com.au).
Setting Up Your E-mail Account(s) in Outlook Express
To get started, open Outlook Express, go to the "Tools" menu, choose "Accounts", then hit the "Add" button on the top right of that dialogue box. Select "Mail".
Outlook Express will put you into a wizard to help you set up a mail account.
The wizard asks for the following information, in this order:
1. Your plain English name. This can be anything you like, but as this name will be appearing in your correspondent's inbox, it is better to give your name or business name. You can include spaces and uppercasing. Go "Next".
2. Then you will be asked for the e-mail address. Remember: all lower case and no spaces!3. Then you will be asked for the POP and SMTP servers as discussed above. The Smtp server is sometimes also called the
"Outbound" mail server. These will have been supplied to you by your ISP or web developer. Here are two examples:Pop server: mail.bellingen.com (this is the server that has your mailbox on it) Smtp server: mail.bigpond.com (this is the server that will send you email. Note it can be different than you Pop server)Again, all lowercase, and no spaces.
4. Once you have given your Pop and Smtp details, go "Next".5. Now you will be asked for your "account name" and password. The account name is your email address.
"[email protected]" in the example above. Go "Next".6. You will get the "Congratulations" message, now go "Finish". The wizard closes. A new line item for the account you
just added is visible in the "Internet Accounts" dialogue box.7. That's it. You are ready to test the connection. Close the "Internet Accounts" dialogue box. Go to your "Send and
Receive" button on the tool bar, click it once. You will see Outlook Express attempting to connect to all of your e-mail accounts. Note: you can check one account at a time if you do not want to check them all in one go by clicking on the little black down arrow beside the "Send and Receive" button.
The following Youtube video clip will step you through the above written instructions.
Today, most e-mail clients allow you to check multiple e-mail POP accounts in the same dial in session. This is because people often have 2 or more e-mail addresses or a family may have e-mail addresses for each of the individuals in the family.
Setting Up Your E-mail Account(s) in Outlook 2007
Set up instructions from Microsoft here.
The following Youtube video clip will step you through the above written instructions.
Was this tutorial helpful? If so, please support it with a donation >>
5

Best Answer - Chosen by Voters
#1: Log into your mail account -> click "options" near the upper right.
#2: On the options page click "account information" underneath "options" on the left side of the screen.
#3: This will probably bring you to a page which requires you to enter your password again "for security purposes" -> then you should see a "review my account information" screen.
#4: Scroll down to "member information" near the top, which contains basic information such as your gender, your email address, alternate address and "preferred content". Click "edit" at the top of this section, to the right of "member information" at the top.
#5: On the "edit" screen scroll down to "preferred content" under "general preferences". This will display your current setting as a link -> click on it.
#6: Now you'll see a page with a dropdown list from which you can select your preferred "language & content". From this list, select "English - United States".
#7: Click "finished", at this point you may be requested to enter your password one more time. That should take you to your "My Yahoo" page -> click on the e-mail link to go back to your mail account.
6