MyLab New Design
91
MyLab New Design • Registration Guide • Course Set-up • Site Feature Outline • How To
Transcript of MyLab New Design

MyLab New Design• Registration Guide• Course Set-up• Site Feature Outline• How To

TABLE OF CONTENTS
Teacher Registration
How to Sign in to your Pearson Account
MyPearson Homepage
COURSE SET UP
How to Create Your New Design Course
Entering Course Details
Wait Time for Course Creation
Accessing Your Course
Student Registration/Enable Students to Access Your Course
Edit Course Details
Delete a Course
Create/Copy Additional Courses and Sections
COURSE NAVIGATION
Where do I go from here?
Navigating the Course Menu
Course Home
Getting Started with Your Course
Why do I have an instructor AND a student account?
Assignment Calendar
Study Plans and Course Content
Pearson MyHistoryLab Learning Applications
eText & Chapter Audio
Student Resources
Student Grades
Communication Tools
Instructor Grades and Assignments
Instructor Resources
How to Create or Add a Syllabus
How to Create, Edit, or Delete an Announcement
Chat and ClassLive
Notifications
Customizing Your Notifications
How to Customize Your Course Menu/Navigation Bar
To add new menu items to the course menu:
To rearrange menu items in the course menu:
To rename a menu item in the course menu:

To a hide a menu item in the student view:
To archive a menu item:
To restore a previously archived menu item to the course menu:
To change the course's style:
ASSIGNMENTS
Students are reporting that the Study Plan assignment says In Progress when they claim to have
completed it?
If you read nothing else about the Study Plan, please read this summary!
How to Preview an Assignment
How to Assign Content to the Assignment Calendar
To assign a Study Plan:
To assign a Media Assignment:
How to Assign a Link from Class Prep to the Assignment Calendar
How to Assign a Link from the Multimedia Library to the Assignment Calendar
An Overview of Your Assignment Calendar
Advanced Calendar Views
To add a Note to the Calendar:
A Student View of Your Populated Assignment Calendar
Why are my assignment due times shifting on my calendar?
How to Edit an Assignment
How to Change the Point Value of Assignment Questions
An Overview of the MyHistoryLab Assignment Default Preferences
Changing the MyHistoryLab Global Preferences
How to Change the Default Preferences for a Single Assignment
Manage Course Materials
How to Edit Course Content
How to Add a Note to Study Plans & Course Content:
How to Re-Organize Chapter Content
How to Create Your Own MyLab Test with MyTest
How to Add Your Own Course Materials
GRADEBOOK
To Understand the Gradebook Layers, Try This Path: Course Average (What Is the Column on the Front Page of My Gradebook?) Using Gradebook Filters
How to Change the Gradebook from Percentages to Raw Scores
How to Hide/Show Columns
How to Add/Create Gradebook Columns

Types of Columns
What is a Custom View?
How to Create a Grade Schema
How to Apply a Grade Schema
How to Export Grades
How to Import Grades
How to View Submissions
How to View All Student Submissions for an Assignment
To view individual student submissions:
How to Re-Set/Delete a Student Submission
How to Accept a Late Submission
Reports
Notifications
COURSE MANAGEMENT
Active/Inactive Status
Temporary Access Status
How to Allow Access for Teaching Assistants (Section Instructor)
Create/Copy Additional Courses and Sections
How to copy an existing course
How to make multiple copies or sections of a course
Course Expiration
To extend the Course End date

TEACHER REGISTRATION The registration instructions provided are for customer with Pearson School Access Codes. Example of School Access Codes—Teacher access begins with: SENAST/EENAST or Student access begins with: SSNAST/FSCUST. Customers with any other code type, must being the registration process at www.PearsonMyLab.com. Instructions on how to navigate and use the site apply to ALL users. How to Register for a Pearson MyLab New Design Account 1. Go to www.PearsonSchool.com/Access
2. Enter the first 6 letters of your access code and select Enter Code
3. From the Covered Titles List, select your discipline, then your textbook title
4. Read and Accept the Pearson Pearson’s Privacy Policy and Licensing Agreement.
5. Creating your Pearson Account Do you have a Pearson Education Account? Select: • No, if this is your first Pearson MyLab product. -You will asked to create your user name and password.
• Yes, if you are already registered for a Pearson MyLab product. -You will be asked to enter your existing user name and password.
• Not Sure, the system will check for you.
• Enter your Access Code in the boxes provided.
• Select NEXT
6. Entering your profile Personal Information -It is recommended that you use your School Email address.
School Location -When in this section, after entering your school zip code a list of schools will appear. You will NOT see your school listed here. Select OTHER and manually enter your information.
When complete, select NEXT
7. On Screen Confirmation After you have completed the registration, you will receive a on-screen confirmation page. Here you may select to enter MyLab New Design immediately or if you wish to enter at later date you will do so at www.PearsonMyLab.com by selecting Sign In. You will then be prompted to enter the user name and password you created during the process above.
You will need to complete a course set-up and receive a course ID before your students can being registration. Please see details on the following pages.

How to Sign In to Your Pearson Account
1. To access your account, go to www.PearsonMyLab.com
2. Click Sign In.
3. Enter your educator username and password.
4. After entering your username and password, click Sign In.
*Note the Forgot Your Username or Password link. You and your students may click this link to retrieve a forgotten username or password.
5. When you sign in, you will arrive at the MyPearson homepage page. The MyPearson homepage page allows you to create new courses and/or access existing ones.

MyPearson Homepage
Your MyPearson Homepage is the central location for all your MyLab courses and Pearson resources. You will create your MyLab New Design courses here and may access additional resources. This page consists of the following four areas:
• MyLab/Mastering New Design- Lists all the MyLab New Design courses you are teaching. This is also where you will create your New Design courses.
• Your Course/Your Products- Helps you manage your Pearson Product subscriptions. • Announcements- Displays general announcements from Pearson Education and
provides timely information about each of your courses • Need Help- Provides links to resources to help you Get Started, Access Support and
Access Pearson Resources. The top right corner of the homepage provides links to:
• Account- Enables you to manage your Pearson account by editing your personal information.
• Help and Support- Opens a page with links to online Instructor or Student Help and New Design support resources.
• Sign Out- Ends your session.

COURSE SET UP
How to Create Your New Design Course
From your MyPearson homepage you will create your course sections. To Create Your New Design MyLab Course:
1. Click Create your New Course located in the MyLab/Mastering New Design area.
2. On the Create or Copy a Course page, search for course materials:
Select Search Course Materials. Enter the textbook Title or Author
OR
Select Browse by Discipline. Click the dropdown menu to locate your discipline.
3. Click Go. Review the contents listed under the titles for the types of content included in
the course material.
4. Click Select Course Materials to create your individual course. To ensure you have selected the proper course materials, make sure it says New Design to the right of the description.

Entering Course Details
1. Enter the Course Name. 2. (Optional) Enter a course Description to help distinguish this course from another course. For example, Mr. Smith Period 1 3. Select a course type.
For standard courses, in most cases you will select For Student Enrollment. 4. Select Course Enrollment Dates.
For Enrollment Start Date, click the calendar icon to select the month, day, and year when you want students to start enrolling in your course. The default is the current date. For Enrollment End Date, click the calendar to select the month, day, and year when you want students to stop enrolling in your course.
5. Select Course Duration Dates:
For Course Start Date, use the calendar to select the month, day, and year when you plan to begin teaching the course. The default is the current date. For Course End Date, use the calendar to select the month, day, and year when you want to close student access to your course. Students will be unable to access this course beyond the maximum course end date of 15 months after creation. As an educator, however, you will have access to the course until it is deleted.
When the course reaches its maximum end date, it enters a 12-month course retirement phase. At the end of this phase, email alerts remind you that your course is flagged for deletion, and provide information on how to make a copy of your course for reuse after the original course is deleted.
Tip: Leave the course start date default for the current date and set the course end date a month or so after the last day of classes to allow students time to complete makeup work, or to allow you time to copy course materials you plan to use again. 6. Under Make Available For Other Instructors To Copy, select:
Available For Copy to allow other educators to copy your course. Unavailable For Copy if you do not want other instructors to be able to copy your course.
7. Click Create Course Now.
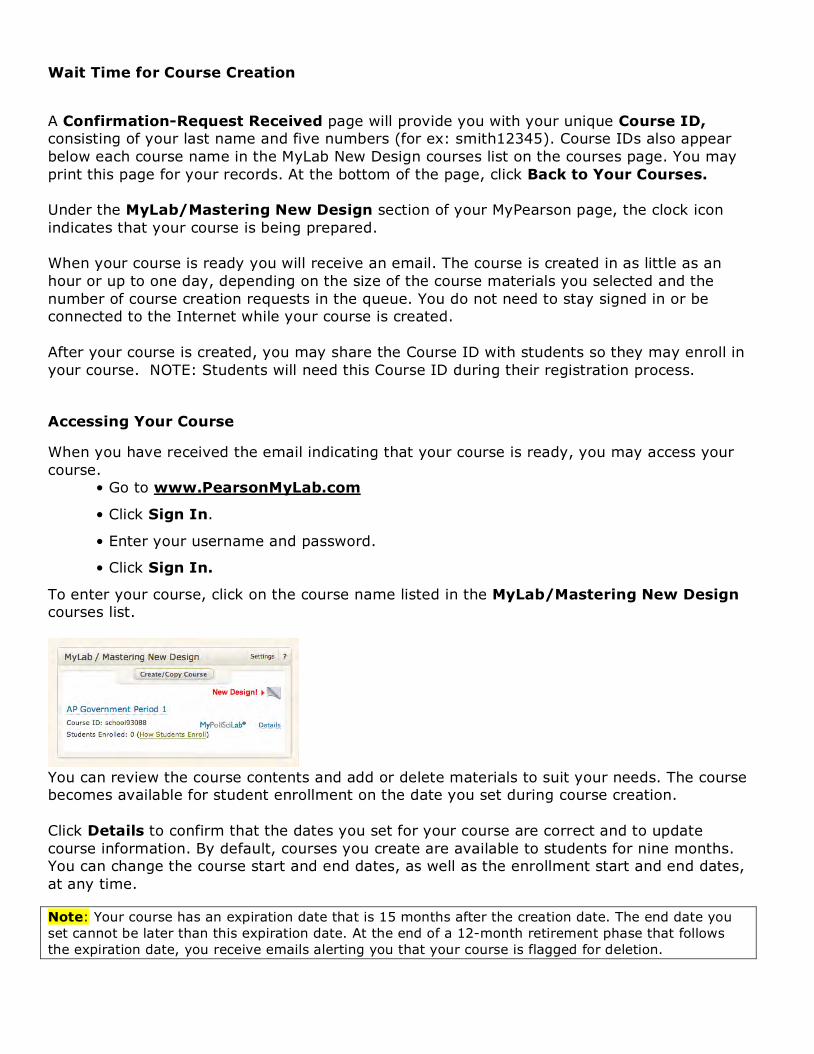
Wait Time for Course Creation
A Confirmation-Request Received page will provide you with your unique Course ID, consisting of your last name and five numbers (for ex: smith12345). Course IDs also appear below each course name in the MyLab New Design courses list on the courses page. You may print this page for your records. At the bottom of the page, click Back to Your Courses. Under the MyLab/Mastering New Design section of your MyPearson page, the clock icon indicates that your course is being prepared. When your course is ready you will receive an email. The course is created in as little as an hour or up to one day, depending on the size of the course materials you selected and the number of course creation requests in the queue. You do not need to stay signed in or be connected to the Internet while your course is created. After your course is created, you may share the Course ID with students so they may enroll in your course. NOTE: Students will need this Course ID during their registration process.
Accessing Your Course
When you have received the email indicating that your course is ready, you may access your course.
• Go to www.PearsonMyLab.com
• Click Sign In.
• Enter your username and password.
• Click Sign In.
To enter your course, click on the course name listed in the MyLab/Mastering New Design courses list.
You can review the course contents and add or delete materials to suit your needs. The course becomes available for student enrollment on the date you set during course creation. Click Details to confirm that the dates you set for your course are correct and to update course information. By default, courses you create are available to students for nine months. You can change the course start and end dates, as well as the enrollment start and end dates, at any time. Note: Your course has an expiration date that is 15 months after the creation date. The end date you set cannot be later than this expiration date. At the end of a 12-month retirement phase that follows the expiration date, you receive emails alerting you that your course is flagged for deletion.

STUDENT REGISTRATION
Enable Students to Access Your Course 1. Provide students the Course ID when the course or section is ready.
Note: Students must enter the Course ID when they register and enroll in your course. Course IDs are typically formatted with your last name followed by 5 digits (i.e. smith12345). They are also case sensitive and must be entered exactly as they appear on your courses list.
2. Provide students with the Pearson School Student Access Code. Students should following
the instructions below.
How Students Register
1. Go to www.PearsonSchool.com/Access
2. Enter the first 6 letters of your access code and select Enter Code
3. From the Covered Titles List, select your discipline, then your textbook title
4. Read and Accept the Pearson Pearson’s Privacy Policy and Licensing Agreement.
5. Creating your Pearson Account Do you have a Pearson Education Account? Select: • No, if this is your first Pearson MyLab product. -You will asked to create your user name and password.
• Yes, if you are already registered for a Pearson MyLab product. -You will be asked to enter your existing user name and password.
• Not Sure, the system will check for you.
• Enter your Access Code in the boxes provided.
• Select NEXT
6. Entering your profile Personal Information -It is recommended that you use your School Email address.
School Location -When in this section, after entering your school zip code a list of schools will appear. You will NOT see your school listed here. Select OTHER and manually enter your information.
When complete, select NEXT
7. On Screen Confirmation After you have completed the registration, you will receive a on-screen confirmation page. Here you may select to enter MyLab New Design immediately (you will need your course id from your teacher at this point) or if you wish to enter at later date you will do so at www.PearsonMyLab.com by selecting Sign In. You will then be prompted to enter the user name and password you created during the process above and you will need your course ID.

Edit Course Details
After you have created a course, you may need to edit one of the following course details:
1. Rename your course. 2. Add/delete/edit the Course Description. 3. Change the Course Type (For Student Enrollment or Instructor Use Only). 4. Edit the Course Enrollment Start and/or End Dates. 5. Edit the Course Start and/or End Dates. 6. Change the Copy Settings (available or unavailable to copy).
To edit course settings:
1. Click the Details link next to the right of the course name. 2. On the Course Details page, click Course Settings. 3. Click on the Course Name and Description link OR the Course Dates, Type and
Copy Settings link. 4. Make any edits and click Save.
Delete a Course
From the MyLab/Mastering New Design courses list:
1. Click the Details link next to the right of the course name 2. On the Course Details page, click Delete Course. 3. When the confirmation dialog appears, click Delete to permanently delete your
course, or click Cancel.

Create/Copy Additional Courses and Sections
You can create additional courses in a variety of ways. For example, you can browse or search for course materials in the catalog like when you created your first course or copy an existing course from your own account or another instructor’s account.
To create another course using the same course materials, you can: • Select the same textbook from the catalog to start from a fresh template • Copy an existing course that you created • Copy an existing course that another instructor created
Note: When you copy a course, the new course has a new course ID and an empty course roster and Gradebook.
How to copy an existing course: 1. In the MyLab / Mastering New Design courses list, click Create/Copy Course. 2. Select Copy a Course. Select Copy One of Your Existing Courses and select the course you want to copy from the dropdown menu. OR Select Copy Another Instructor’s Course and enter the course ID (received from the other instructor) of the course you want to copy. 3. Click Go. 4. Specify course information. 5. Click Create Course Now. A Confirmation-Request Received page will provide you with your unique Course ID for your new course. You can print this page for your records and click Back to your Courses page. On your MyLab/Mastering Courses page, the clock icon indicates that your course is being prepared. When your course is ready, you will receive an email.
COURSE NAVIGATION
Where do I go from here?
Navigating the Course Menu
The Course Menu, sometimes called the Navigation Bar, appears on the left side of the Course window, making the tasks you perform regularly more accessible. Use the Modify button above the Course Menu to add, rearrange, style and hide menu items in your course. Use the arrow icons to expand to full screen or collapse for easier viewing. The course setting links below the course title allows you to manage your course roster and files. All Course Menu tabs are listed below with a brief description of functionality.
Course Home
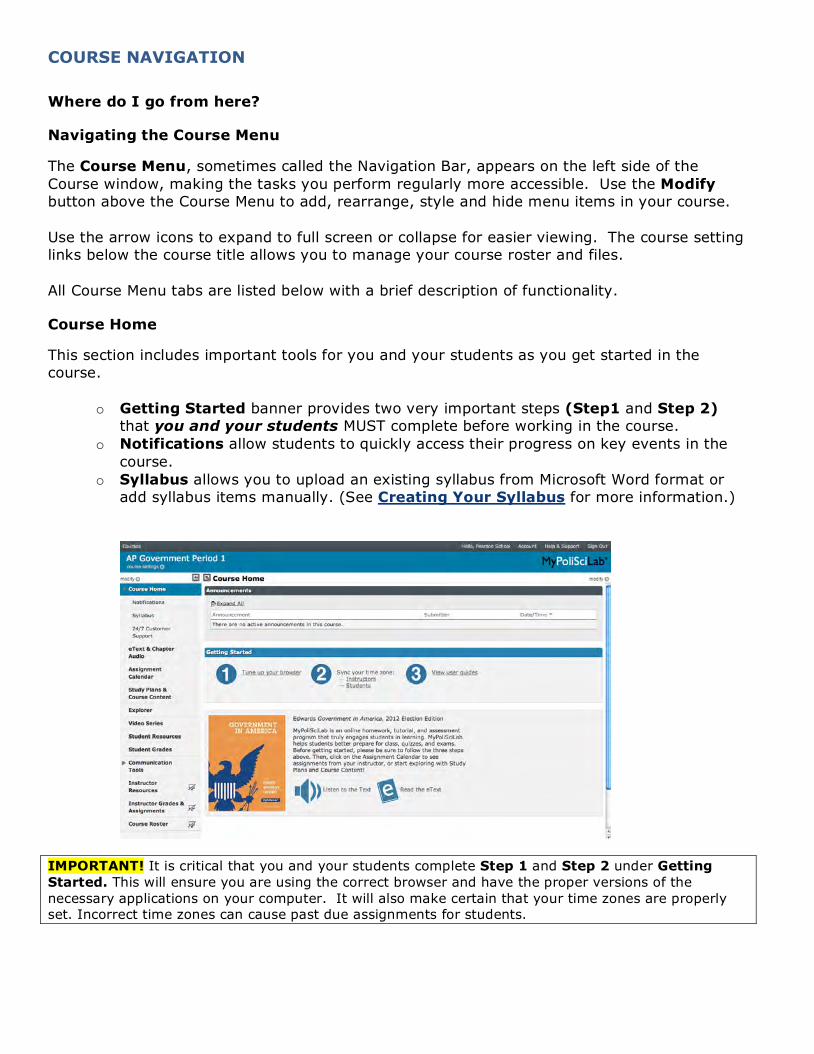
This section includes important tools for you and your students as you get started in the course.
o Getting Started banner provides two very important steps (Step1 and Step 2) that you and your students MUST complete before working in the course.
o Notifications allow students to quickly access their progress on key events in the course.
o Syllabus allows you to upload an existing syllabus from Microsoft Word format or add syllabus items manually. (See Creating Your Syllabus for more information.)
IMPORTANT! It is critical that you and your students complete Step 1 and Step 2 under Getting Started. This will ensure you are using the correct browser and have the proper versions of the necessary applications on your computer. It will also make certain that your time zones are properly set. Incorrect time zones can cause past due assignments for students.

Getting Started with Your Course
At the TOP of your Course Home page, you will find the GETTING STARTED banner.
Before you do anything in your course, you MUST COMPLETE the two GETTING STARTED steps below. 1. Tune Up Your Browser
• Click and complete the Tune Up Your Browser. • You must have ALL green checkmarks in order to confirm that your computer’s
browser is supported and that you have all the necessary plug-ins for maximum functionality of the site’s resources.
2. Sync Your Time Zone
• Click and sync your time zone for your Instructor profile. IMPORTANT: If your students do NOT set their time zone in accordance with your time zone, their assignments may record as PAST DUE in the gradebook.
IMPORTANT: While you are in Sync Your Time Zone, please DO NOT change your Username or Password while actively enrolled in a course.
Why do I have an instructor AND a student account? That student profile (student_student) is meant to provide a student view in order to reflect the instructor's course. Anytime an instructor is navigating between Course Home and Communication Tools, the instructor is in the student view using the student profile.
NOTE: That student profile (student_student) is actually ONE BIG NATIONALLY-USED ACCOUNT that is built into all of our New Design MyLabs. In other words, the student profile does NOT belong to the individual instructor. Every time an instructor changes the time zone of that student profile, it affects the student profile for every single instructor using our New Design MyLabs. In other words, your students are NOT seeing this shift… Only you are seeing this shift on your own (student view) Assignment Calendar tab.
Assignment Calendar
When you assign pre-loaded content, your assignments will be posted here. The Assignment Calendar is a visual tool that allows your students to understand what is expected of them in a single view. Your students can launch directly into the assignments from this calendar. (When you are in this tab, you viewing the site as a student, so you can see exactly what your students are seeing.) IMPORTANT! Any work completed from this Assignment Calendar will report to the Gradebook under the Assigned filter.

To learn how to assign content to your Assignment Calendar, please see the Assignments Section.
Study Plans and Course Content
Behind the Study Plans and Course Content tab, your students have open access to all of our pre-loaded assignments (Chapter Objectives, eText, Media Assignments, etc.) for self-study. Your students will select the appropriate chapter to access the resources. IMPORTANT! Any work completed from Study Plans and Course Content will report to the Gradebook under the Completed filter. For more detailed information regarding how to assign Study Plans and Course Content, see the Assignments Section.
Pearson MyLab Learning Applications
Your MyLab contains its own Discipline Specific Learning Applications. These applications appear on your MyLab Course Menu.
TIP While available from your MyLab Course Menu, the Learning Apps have also been integrated into each Chapter’s Media Assignments. For more detailed information regarding how to assign your MyLab specific Pearson Learning Application(s), see the Assignments Section.
eText & Chapter Audio
Our Pearson eText allows you to search, highlight and take private notes. It also includes full Chapter Audio. Both the eText and Chapter Audio are compatible with the iPad and Android tablets by downloading the FREE Pearson eText app and using your MyLab login/password for access.
• The Pearson eText iPad app requires iPad iOS4.2 and a valid Pearson Mastering/MyLabs username and password. The FREE App is available for download from the iTunes store.
• The Pearson eText Android app requires Android OS 3.1 or newer, a 7" or 10" tablet, and a valid Pearson Mastering/MyLabs username and password. The FREE App is available for download from Google® play.
Student Resources
This tab provides helpful study and research tools, resources, and links. A few examples of our valuable resources are listed below:
• Flashcards: These flashcards include the key terms from your textbook along with an adaptive speed-drill designed to help target your study time.
• MySearchLab: Pearson's MySearchLab™ offers extensive help on the research process and four databases of credible and reliable sources so students can quickly and efficiently do their research.
IMPORTANT! The Student Resources tab does NOT link to your Gradebook.
Student Grades
This Gradebook allows your students to track their individual progress. Their Gradebook is similar to yours, as it is a drill-down system. The Course column on the front page of the Gradebook is an average of all assignments completed to date.
Communication Tools
These tools are available to help you communicate with your instructor and / or classmates. See Communication Tools for more details.
o Discussion: Students and instructors can discuss and share ideas by creating discussion topics or adding responses.
o Chat & ClassLive: A collaborative online classroom where instructors and students can share a whiteboard, software applications, text, images and videos.
o Email: Instructors and students can send email to other members of their class.
Instructor Grades and Assignments
Behind this tab, you will find the tools you need to shape your course. These tools are
available exclusively for instructors are hidden from your students as is indicated by the icon.
o Assign Content: Allows you to assign content to your students using the Course Calendar. Please see the Assignments Section for a complete guide on how to create assignments using the Assignment Calendar.
o Manage Course Materials: Allows you to edit assignment content or create your own assignments. Please see the Assignments Section for a complete guide on how to create and edit assignments using the Course Materials tool.
o Gradebook: Allows you to view the Gradebook for your course. Please see the Gradebook Section for a complete guide to using your Gradebook.
o Custom View: Allows you to access a Custom View for your Gradebook. Please see the Gradebook Section to learn how to create a Custom View of your Gradebook.
o Reports: Allows you to view and generate Reports for your course. Please see the Gradebook Section to learn how to view and generate reports.
o Notifications: Allows you to View Course Performance information. See Notifications for more details.

Instructor Resources
Behind this tab, you will find the traditional text resources, as well as additional presentation resources, including Class Preparation and the Multimedia Library. These tools are available
exclusively for instructors are hidden from your students as is indicated by the icon.
Resources may vary by titlte.
o Test Bank: The test bank for your text contains thousands of questions to help build tests and quizzes for your class.
o PowerPoints: The PowerPoints for your text include lecture notes and images as well as highly-visual, interactive PowerPoints.
o Class Preparation: This online searchable database provides access to our "best of" INSTRUCTOR RESOURCES, including art and figures from our leading texts, videos, lecture activities, classroom activities, demonstrations, and much more.
o Instructor's Manual: This downloadable Instructor's Manual offers an exhaustive collection of resources for your text in an easy-to-use format, including activities, assignments, hand-outs, and more.
o Multimedia Library: This multimedia library provides quick and easy access to all the videos, simulations, and explore activities that support your text. Many of these resources are also available within your Course Content with accompanying self-scoring quizzes (Media Assignments). You may sort by chapter and/or multimedia type to quickly access these resources.
How to Create or Add a Syllabus
You have two options for adding your course syllabus. You can upload an existing syllabus in Microsoft Word format, or you can compose a syllabus using the Visual Editor tool.
NOTE: You cannot combine both methods of creating a syllabus. If you import your syllabus in Word format and then try to add syllabus items using the Visual Editor, your Word document will be deleted. Likewise, if you create a syllabus using the Visual Editor and then import a Word version of your syllabus, the composed syllabus will be deleted.
To create a syllabus:
1. Click Syllabus on the course menu. 2. Click modify and select Manage from the dropdown located at the top right of the
page.
If you wish to add a syllabus in Word format:
1. Select Upload Microsoft Word Syllabus (.doc). 2. Click Add. 3. Click Choose File to select your Word document.

4. Click Upload & Convert File.
Your Word document will be uploaded in HTML format.
If you wish to compose your syllabus using the Visual Editor tool:
1. Select Compose Text Item (Visual Editor). 2. Type in the Title for the syllabus item you are adding. 3. Use the content editor to add and format each syllabus item. 4. Click Add Item or Cancel to discard your changes. 5. Repeat these steps for each syllabus item you wish to add.
How to Create, Edit, or Delete an Announcement
Use course announcements to communicate important course information to students.
To add course announcements:
1. Click Course Home.
In some courses, you click Announcements to add course announcements.
Note: This feature might not appear in your course.
2. Click modify > Manage above the content pane.
3. Click Add Announcement.
4. Type a brief subject in the Subject text box.
5. In the content editor, type your announcement.
6. Select Display Dates for your announcement.
The Display Dates default to the course start and end dates. If you do not enter Display Dates, the announcement remains on the list throughout the entire course.
7. Click Add Announcement.
8. Click modify > View above the content pane.
You can update an existing course announcement at any time.
To edit course announcements:
1. Click Course Home.
In some courses, you click Announcements to view course announcements.
2. Click modify > Manage above the content pane.

3. Locate the announcement and click the Edit icon in the Edit column.
4. Modify the announcement in the content editor.
5. Select Display Dates for your announcement.
The Display Dates default to the course start and end dates. If you do not change Display Dates, the announcement remains on the list throughout the entire course.
6. Click Save Changes, or Cancel to discard changes.
You can permanently remove course announcements you no longer need.
To delete a course announcement:
1. Click Course Home.
In some courses, you click Announcements to view course announcements.
2. Click modify > Manage above the content pane.
3. Locate the announcement and click the Delete icon in the Delete column.
4. To confirm that you want to permanently delete the announcement, click Delete.
Communication Tools
We have provided you with additional tools to make communicating and sharing materials with your students easier.
• Email • Discussion • Chat & ClassLive
Email: Use the internal email feature to message your students directly with your MyLab course. You can choose to send a message to one, some, or all students and include attachments if desired. Discussion: Discussion allows you students to share ideas with you and with each other. You can create your own discussion topics and your students can respond to the topic as well as each other’s posts from within each discussion topic. Discussions can also be referred to as threaded discussions since your students’ lively responses from an intertwined thread. NOTE: Unlike Chat and ClassLive online classroom, discussions are asynchronous. Students do not have to participate at the same time; instead they add threads to the discussion at their own convenience.
To add a discussion topic:

1. Click the Discussion menu item. 2. In the upper right hand corner, click Modify > Manage. 3. The Discussion Manager will open. Click Add Topic. 4. For Title, add the subject of your topic. 5. Use the content editor to describe the topic or pose questions to your students. 6. Click Add Topic.
To manage your discussions, you can sort and filter responses, and mark them as unread. To sort responses:
1. Click any column header in a discussion thread to sort responses. 2. According to that label (i.e. click Author to sort the responses alphabetically by the
students’ names). To filter responses:
1. Click Show Options in a discussion thread to display additional fields. 2. Next to Select, choose to select All, None, Unread, Read or Inverse from the
options dropdown. 3. Click View Selected to only view those responses that match your selection.
To mark a response as unread/read:
1. Click the open envelope icon. To later mark the response as read, click the closed envelope icon.
OR
2. Click Show Options > choose Select All, None, Unread, Read or Inverse > Choose
Unread in the Mark selected as dropdown. To later mark the response as read, repeat the same steps and choose Read in the Mark selected as dropdown.

Chat and ClassLive Chat and ClassLive are two additional resources for communication with your students, as well as for them to communicate with each other. To create a chat room:
1. Click on the Chat & ClassLive menu item. 2. Click on the Chat button at the top of the screen. 3. Click Add Chatroom. 4. Choose Entire Class or opt for a private session. 5. Click Add Room.
Class Live is an interactive graphical chat tool that allows you to communicate with your students in real time. For example, you can place or draw objects on the whiteboard, you can share a software application from your computer, or you can participate in synchronous chat sessions with your students. Use ClassLive with a group of students, or use the tool for one-on-one help.
For more detailed instruction on ClassLive, please follow these instructions:
1. Click on the Chat & ClassLive menu item. 2. Click on the ClassLive button at the top of the screen. 3. Click on Lead Session. 4. Click Help on the menu. 5. Click on Moderator Help.
Notifications Notifications alert you to key events in your course and allow you to quickly access a number of critical reports:
o Alerts flag for you activities that are not passed, new grades, idle students, as well
as past due submitted and not submitted. o Action Items identify instructor grading needing your attention, as well as unread
emails from your students.
o Performance reports are available at the course and student level. Course Performance provides one quick snapshot into your student’s progress as a class. For a quick view into a particular student’s performance, use the Student Performance report.
You can access your course Notifications from the Instructor Grades and Assignments tab located on your Course Menu.

Notifications-Managing Your Alerts New Grades When students complete assigned activities, you will see the number of new grades that have been added to your Gradebook. From this tab, you can then Go to Gradebook to view them. Idle Students (How to See If Students Are Idle) Students are considered idle and will appear here if they have not entered your course in 1 month.
Past Due: Submitted (How to Accept Late Work) Students who have submitted assignments past the due date will appear on the right hand side. From here, you can choose to Accept or Decline submissions. You can do this for all students listed or on an individual basis. Accepted work will be graded and the grades will flow into your Gradebook. Instructor Grading (How to See When Manual Grading Is Required) Activities listed here require manual grading. These may include assignments that you created and added to your Assignment Calendar. To start grading, click on the activity. Once you have graded the activity, the results will flow into your Gradebook.
Notifications-Managing Course Performance Reports The Course Performance Reports provide a quick view of both course and student performance. Course Performance provides an average grade for ASSIGNED content to date, the percentage of Content Completed, and total Time on Task. This view of the average course performance includes the ability to drill-down from the chapter average to the question average.

Student Performance (How to See Time Spent in Lab by Student) provides an average Grade for ASSIGNED content to date for each individual student, the percentage of Content Completed, and total Time on Task. This view of the average student performance includes the ability to drill-down by assignment for each individual student.
Customizing Your Notifications
You can customize the notification information you and your students receive on the Today’s View Notifications tab by clicking on Customize on the far right side of the Notifications bar. Here you will be able to set the default view and chose to receive notifications (Alerts and Action Items) related to your course. Alerts The Alerts section is used to display notifications of new grades and other student submissions. Under Alerts, there are five areas:
• Notify me of all students not passing an activity within the time frame selected. • Notify me when new activity submissions have been posted to the Gradebook • Notify me if a student has not entered the Course in “X” month(s), week(s), day(s).

• Notify me if a student submits an activity past the due date. • Notify me if a student has not submitted an activity by the due date.
TIP: For first semester users, it is recommended that you leave the settings as they are. This will allow you and your students to easily manage Alerts.
How to Customize Your Course Menu/Navigation Bar In an effort to simplify the course navigation for your students, the Course Menu, or Navigation Bar, is customizable.
As an instructor, you can add, arrange, and hide menu items, as well as archive, restore, and delete them. You can also style your course by choosing from an assortment of design themes. By customizing the course menu, you can lead your students through your curriculum in a way that makes sense for each class.
To add new menu items to the course menu:
1. Click modify above the course menu.
2. Click Add & Arrange.
3. Click Add new item or Add new item to main level to add a new item to the main level of the course menu.
4. To nest a new item within another level of the course menu, click the expand icons and click Add new item to… at the level you want.
To more easily view the list, click expand all, and click the Resize icon to increase the window size.
5. For Select Item Type, select one of the following: o Content Page: Creates a content page for you to edit. o Threaded Discussion: Creates a discussion where you add topics for your
students to respond to. o Uploaded Content: Lets you upload an Adobe PDF file, Microsoft Office file,
HTML file, video, or image, and associate it with the new menu item. After creating the menu item, navigate to it and click modify > Upload MS Office File or modify > Upload Content (PDF, HTML, etc.) above the content pane.
6. Enter the Menu Item Name you want to appear in the course menu.
The recommended limit for menu items is 60 characters.
7. Select Hidden from Student if you do not want the menu item to appear in your students' course menu.
You do not need to hide the menu item while creating it. You can choose to hide the item in your student view at any time.
8. Click Save to add your new menu item, or Cancel to discard your changes.
9. Click Close and view the new menu item in the course menu.
Select the new menu item in the course menu to add content. You can also rearrange the items at any time to customize your course menu. If you want to change the first item students see when they open the course, you can change the course entry point.
To rearrange menu items in the course menu:
1. Click Modify above the course menu. 2. Click Add & Arrange. 3. Find the menu item in the list, clicking the expand icons or expand all to show the
item, if necessary.
To reorder items in the main level only, click collapse all.
4. Use the order column to change the position of the items in the list:
o Enter a new number for the item in the order column and press Enter, or
o Click the arrows to move the item to the next or previous position in the list.
It may take a few seconds for the item to appear in its new location after pressing Enter or clicking the arrows.
Note: The number shown in the order column is relative to the number of items and levels displayed in the list. The order numbers change dynamically when you click the expand or collapse icons.
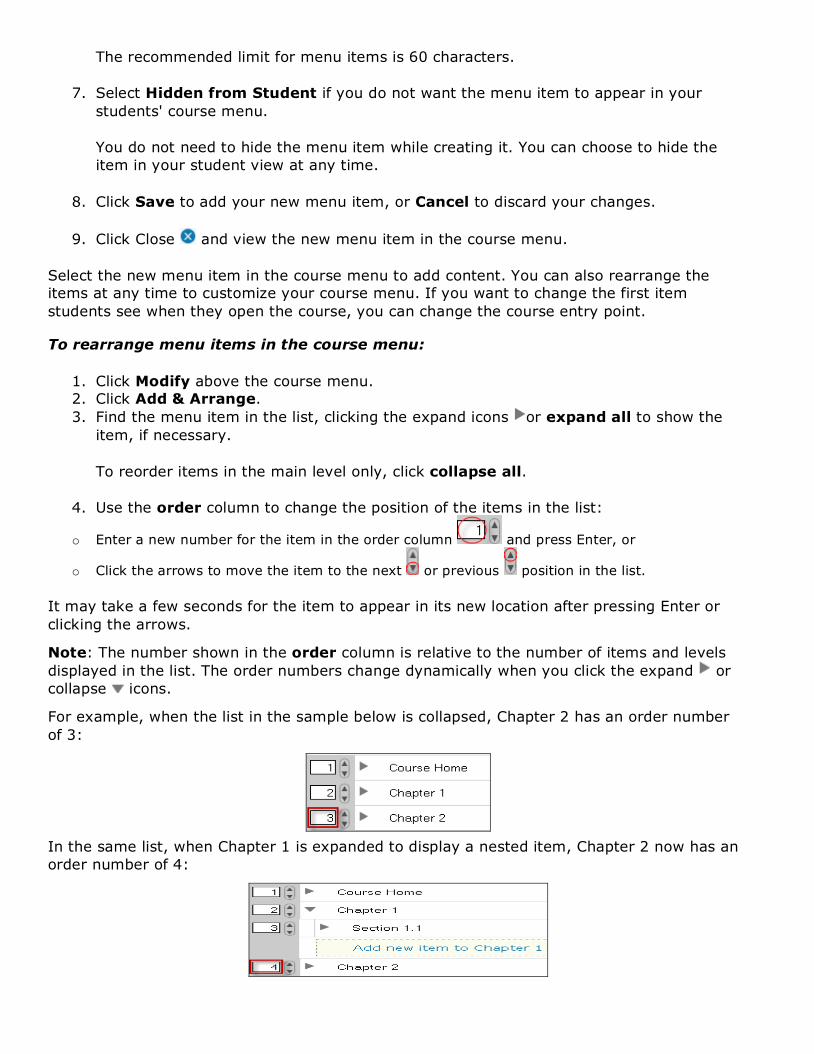
For example, when the list in the sample below is collapsed, Chapter 2 has an order number of 3:
In the same list, when Chapter 1 is expanded to display a nested item, Chapter 2 now has an order number of 4:

5. Click Close to view menu items in their new locations in the course menu.
To rename a menu item in the course menu:
1. Click modify above the course menu. 2. Click Settings or Add & Arrange. 3. Find the menu item in the list, clicking the expand icons to find the item, if necessary.
4. Click the menu item name and enter the new text. 5. Press Enter.
The list shows the new menu item name.
Note: If you do not press Enter, your name change is not saved.
6. Click Close and view the renamed menu item in the course menu.
Hide or Show Menu Items in Your Student View
You can hide specific menu items from students in the course menu. For example, you can hide a content page until you want students to see it.
You can show or hide a menu item at any time.
To hide an item in your instructor view of the course menu, as well as your students' course menu, you archive the menu item. Later you can restore the menu item.
To a hide a menu item in the student view:
1. Click modify above the course menu. 2. Click Settings. 3. Find the menu item in the list, clicking the expand icons to find the item, if necessary.
Note: You can press Tab to move to the next setting check box or item.
4. Click the hidden check box to hide an item from students.
To show the item to students, clear the item's hidden check mark.
5. Click Close .
The menu item appears with a hidden icon in your course menu to verify that it is hidden in your students' course menu.
Archive Menu Items
As an instructor, you can hide menu items from your students. Your own course menu, however, can become cluttered with hidden menu items. Instead, you can archive these menu items, removing them from the course menu. Later you can restore these menu items when they are needed.

To archive a menu item:
1. Click modify above the course menu. 2. Click Add & Arrange. 3. In the list, find the menu item you want to archive, clicking the expand icons to find
the item, if necessary.
4. Click the item's archive icon under the archive column.
The item is immediately removed from the menu item list.
5. To restore the archived menu item, click Restore.
Restore Archived Menu Items
You can restore the menu items that you previously archived. When you restore an archived menu item, it appears as the last item in your course menu. You can then move the item to a desired location in the course menu.
To restore a previously archived menu item to the course menu:
1. Click modify above the course menu. 2. Click Restore. 3. Select the menu item to be restored and click the restore icon in the restore
column.
The menu item is restored to the bottom of the course menu.
4. Click Add & Arrange to move the menu item to the correct location.
Select Style
You can customize the look of your course by selecting a color and style theme.
To change the course's style:
1. Click modify above the course menu. 2. Click Style. 3. Select the course style you want. 4. Click Save. 5. Click Close .
The banner and course menu reflect your choice.

ASSIGNMENTS
What Types of Assignments Are Provided?
Your Instructor Grades and Assignments houses all the tools you need to assign content to your students using the Assignment Calendar. It also allows you to edit assignment content and/or create your own assignments for your course.
The MyLab pre-loaded content creates an active learning pathway for students, as each chapter includes the following assignments:
• Review the Learning Objectives
• Read the eText
• Complete the Study Plan
• Take the Chapter Exam
• Experience the Media Assignments
• Explore More Chapters Resources

How the Study Plan Works Do you want to hold your students accountable for the course material and ensure they are better prepared for class? The Study Plan was the basis for creating Pearson MyLabs. The intent of the Study Plan is to assess and ensure student comprehension of the text material prior to attending class. The Study Plan is not meant to be a high-stakes assessment tool; rather, it is meant to lead a student down a personalized path, including multiple learning styles that result in content mastery. Study Plan Assignment Steps: 1. PRE-TEST: After reading the assigned material, students take the Pre-Test, which is a multiple choice quiz that can only be taken once. (1 attempt) NOTE: Why Does the Pre-Test Only Allow One (1) Attempt? The purpose of the Pre-Test is to assess the student’s comprehension level of the chapter content by reading alone. We use this one-time, clean assessment in order to provide the individualized Study Material. This is not an editable preference. 2. STUDY MATERIAL: Based on your students’ results, the MyLab creates a personalized Study Plan, which is a list of multimedia activities. Multimedia assets are used to present the same content but in a visual manner. Additionally, Formative Assessment questions are included to check comprehension of the activity completed, and to provide contextual feedback in the learning moment. 3. POST-TEST: Finally, students have unlimited attempts at the POST-TEST. They should continue to work through submissions until the pass criteria has been met at each level of the Study Material. The submission recorded in the Gradebook is always the most recent submission. This is not editable.
Students are reporting that the Study Plan assignment says In Progress when they claim to have completed it?
The Study Plan is designed to assist with the comprehension of the text material. This is accomplished through a 3-step process. Here’s how it works: Unbeknownst to the student, the Pre-Test (Step 1) questions are tied to each level of comprehension in the Study Material (Step 2). Once the one and only attempt at the Pre-Test has been completed, the student will receive a score at each LEVEL of the Study Material (Step 2). The pass criteria is set for 70% at each LEVEL of the Study Material. After working through the Study Material (Step 2), the student then takes the Post-Test (Step 3). Once again, the questions on the Post-Test (Step 3) are tied to the levels of the Study Material (Step 2). The student has unlimited attempts at the Post-Test (Step 3) in which he must exceed 70% at each LEVEL of the Study Material to prove mastery. IMPORTANT! If the student’s overall score is a cumulative 74%, but s/he has achieved LESS than 70% at a particular level of the Study Material, the Assignment Calendar and Gradebook status will remain In Progress. In order to flip the Study Plan status to complete, EACH LEVEL of the Study Material must be mastered with 70% or higher.

If you read nothing else about the Study Plan, please read this summary!
Study Plan Summary: • Because the Study Plan is an intricate, 3-part assignment, the only editable
preference is the pass criteria percentage.
• The Pre-Test allows for only one (1) attempt.
• The Post-Test allows for unlimited submissions. The MOST RECENT attempt is recorded in the Gradebook.
• The Pre-Test and Post-Test scores are recorded in the Gradebook.
• In order for the Study Plan status to show Completed, EACH LEVEL of the Study
Material must be mastered with 70% or higher.
Take the Chapter Exam Each chapter contains an assignable Chapter Exam containing (usually) 25 multiple choice questions. These pre-built Chapter Exams are comprised of unique questions, which are written specifically for your MyLab. Upon completion, students’ results appear in the Gradebook. By default, the Chapter Exams are built with the following preferences:
• Two (2) attempts • Three (3) hour time limit • HIGHEST grade reports to the Gradebook
NOTE: These preferences are editable via Preferences at both the Global and Individual Assignment levels. TIP: The Chapter Exams are formatted very similarly to the Study Plan Post-Test; however, the Chapter Exams are considerably more flexible. Using the Preferences, you may change which submission is recorded (highest, most recent, etc.), number of attempts, etc. If you wish to change the preferences for the Chapter exams, see Editing an Assignment and/or Selecting Preferences before adding it to your calendar.

Experience the Media Assignments Engage your students with a robust selection of videos, simulations and explorations that help students see concepts in action. Media Assignments begin by asking students to view a multimedia asset (such as a video, simulation, etc.), then respond to either multiple choice or short answer questions. The students will view a multimedia asset and respond to the accompanying assessment. The assessment may be multiple choice or short answer, so it is helpful to preview the Media Assignment before assigning to the calendar. NOTE: In the instructor view (via Assign Content or Manage Course Materials), Media Assignments may appear in italics if they have been used as part of the Study Plan assignment. Italicized Media Assignments are hidden from the student view by default. How to Unhide Media Assignments: 1. Go to Instructor Grades & Assignments > Assign Content. 2. Under View By, click on the dropdown and choose Content Type. 3. Under Show, click on the dropdown and choose Hidden Items. 4. Click Show/Hide to unhide the Media Assignments.

How to Preview an Assignment
Previewing content is recommended before assigning content to the Assignment Calendar.
1. Click on the Instructor Grades and Assignments tab located in the Course Menu. 2. Click Assign Content.
3. You will see a list of all Chapter Contents located on the left side of the screen. To the
right of Chapter Contents, you will see your Assignment Calendar (defaulting to the current month).
4. Select the desired chapter and click to expand.
5. Position your cursor over the chapter material you wish to assign. The assignment
will turn gray.
6. Position your cursor over the assignment name. A dropdown arrow will appear.
7. Select View from the dropdown menu.
8. A new window entitled Preview will appear allowing you to view the assignment. NOTE: You are unable to make any changes to your assignment while in the View mode. In order to edit or make changes, you must select Edit from the dropdown menu.

How to Assign Content to the Assignment Calendar
Your MyLab course contains pre-loaded content in a variety of assignment types. You may choose to assign this content to the Assignment Calendar for the student view. Once completed, the students’ results will automatically flow into your course Gradebook. To assign content to the Assignment Calendar:
1. Click on the Instructor Grades and Assignments tab located in the Course Menu. 2. Click Assign Content. 3. You will see a list of all Chapter Contents located on the left side of the screen. To the
right of Chapter Contents, you will see your Assignment Calendar (defaulting to the current month).
4. Select the desired chapter and click to expand. 5. Position your cursor over the chapter material you wish to assign. The assignment will
turn gray. 6. Check the box, then left-click and drag the assignment to the desired due date. 7. Once the assignment has been added to your calendar, you will see the following:
• A blue alarm clock will appear on your calendar. • A blue alarm clock will appear to the right of the assignment you added.

To assign a Chapter Exam:
1. Click on the Instructor Grades and Assignments tab located in the Course Menu. 2. Click Assign Content.
3. You will see a list of all Chapter Contents located on the left side of the screen. To the
right of Chapter Contents, you will see your Assignment Calendar (defaulting to the current month).
4. Select the desired chapter and click to expand.
5. Position your cursor over Take the Chapter Exam. The assignment will turn gray.
6. Check the box, then left-click and drag the assignment to the desired due date.
7. Once the Chapter Exam has been added to your calendar, you will see the following:
• A blue alarm clock will appear on your calendar. • A blue alarm clock will appear to the right of the assignment you added.
NOTE: You may also choose to Edit or change the Preferences by using the dropdown arrow next to the assignment name. See How to Edit an Assignment.

To assign a Study Plan:
1. Click on the Instructor Grades and Assignments tab located in the Course Menu. 2. Click Assign Content.
3. You will see a list of all Chapter Contents located on the left side of the screen. To the
right of Chapter Contents, you will see your Assignment Calendar (defaulting to the current month).
4. Select the desired chapter and click to expand.
5. Position your cursor over Complete the Chapter Study Plan. The assignment will
turn gray.
6. Check the box, then left-click and drag the assignment to the desired due date.
7. Once the Study Plan has been added to your calendar, you will see the following: • A blue alarm clock will appear on your calendar. • A blue alarm clock will appear to the right of the assignment you added.
NOTE: You may also choose to Edit or change the Preferences by using the dropdown arrow next to the assignment name. See How to Edit an Assignment.

To assign a Media Assignment:
1. Click on the Instructor Grades and Assignments tab located in the Course Menu. 2. Click Assign Content.
3. You will see a list of all Chapter Contents located on the left side of the screen. To the
right of Chapter Contents, you will see your Assignment Calendar (defaulting to the current month).
4. Select the desired chapter and click to expand.
5. Click on the Experience the Media Assignments folder.
6. Position your cursor over your desired Media Assignment. The assignment will turn
gray.
7. Check the box, then left-click and drag the assignment to the desired due date.
8. Once the Media Assignment has been added to your calendar, you will see the following:
• A blue alarm clock will appear on your calendar. • A blue alarm clock will appear to the right of the assignment you added.
NOTE: You may also choose to Edit or change the Preferences by using the dropdown arrow next to the assignment name. See How to Edit an Assignment.
NOTE: In the instructor view (via Assign Content or Manage Course Materials), Media Assignments may appear in italics if they have been used as part of the Study Plan assignment. Italicized Media Assignments are hidden from the student view by default. How to Unhide Media Assignments: 1. Go to Instructor Grades & Assignments > Assign Content. 2. Under View By, click on the dropdown and choose Content Type. 3. Under Show, click on the dropdown and choose Hidden Items. 4. Click Show/Hide to unhide the Media Assignments.
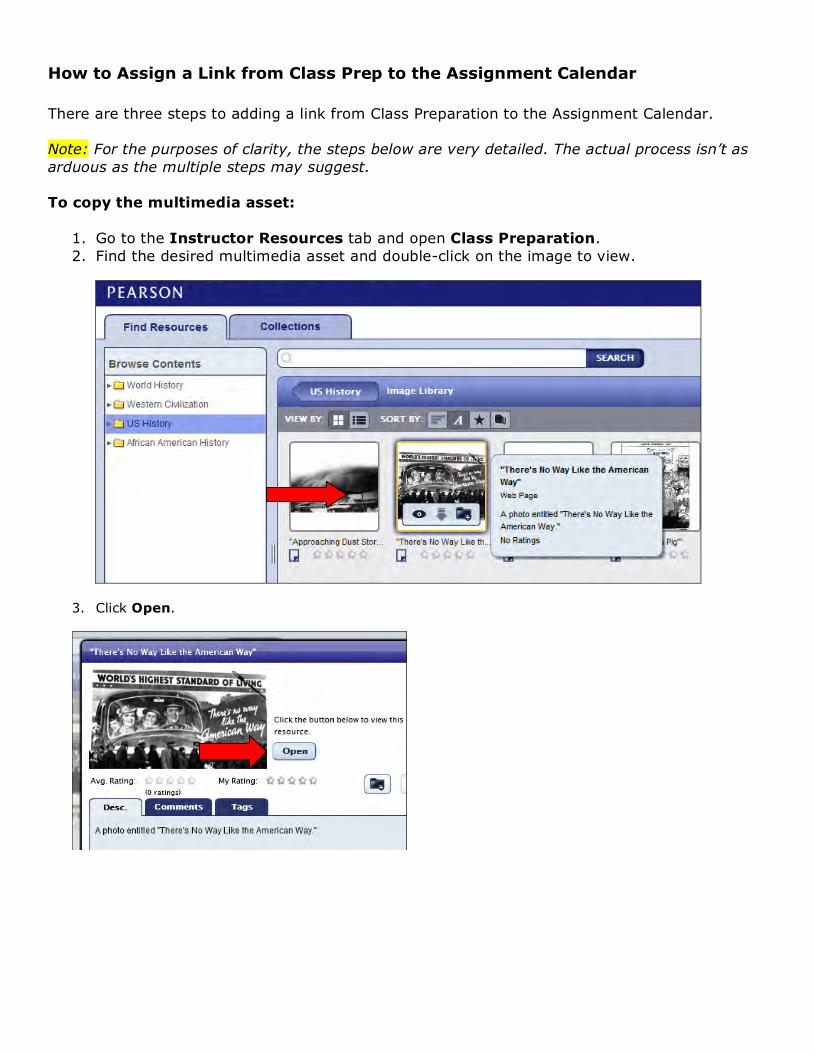
How to Assign a Link from Class Prep to the Assignment Calendar There are three steps to adding a link from Class Preparation to the Assignment Calendar. Note: For the purposes of clarity, the steps below are very detailed. The actual process isn’t as arduous as the multiple steps may suggest. To copy the multimedia asset:
1. Go to the Instructor Resources tab and open Class Preparation. 2. Find the desired multimedia asset and double-click on the image to view.
3. Click Open.
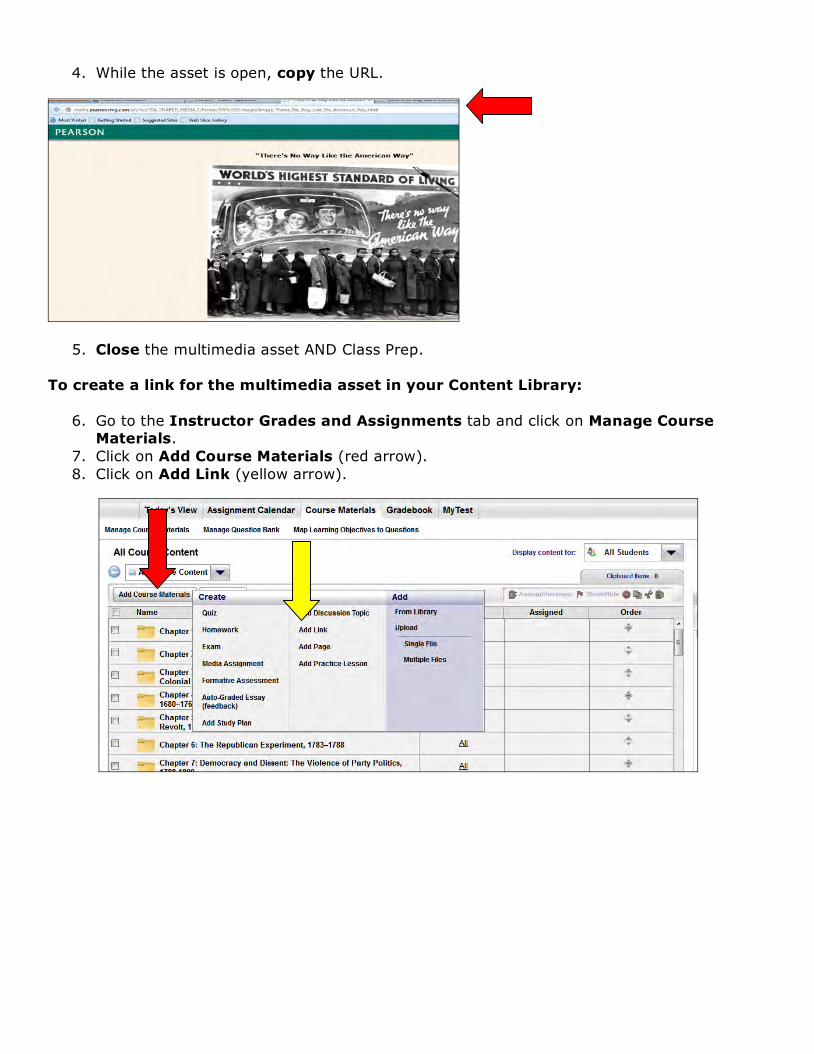
4. While the asset is open, copy the URL.
5. Close the multimedia asset AND Class Prep. To create a link for the multimedia asset in your Content Library:
6. Go to the Instructor Grades and Assignments tab and click on Manage Course Materials.
7. Click on Add Course Materials (red arrow). 8. Click on Add Link (yellow arrow).

9. Enter a title (red arrow) and PASTE the URL (that you COPIED in Step 3) into the box
(yellow arrow). 10.Click Add.
To add the new link to your Course Content: 11.Open the Course Content chapters to find the location where you’d like the link to
reside. Note: If you don’t choose a specific location, the link will live on the front page of your Course Content box—below the Chapter listings.) 12.Click on Add Course Materials. 13.From the Add column, click From Library. 14.Click on your link, then click Add and Close.
Your link will now reside in your Course Content, and you may now drag and drop per usual.

How to Assign a Link from the Multimedia Library to the Assignment Calendar There are three steps to adding a link from the Multimedia Library to the Assignment Calendar. To copy the multimedia asset:
1. Go to the Instructor Resources tab and open the Multimedia Library. 2. Find the desired multimedia asset. 3. While the asset is open, copy the URL.
4. Close the multimedia asset AND the Multimedia Library. To create a link for the multimedia asset in your Content Library:
5. Go to the Instructor Grades and Assignments tab and click on Manage Course Materials.
6. Click on Add Course Materials (red arrow). 7. Click on Add Link (yellow arrow).

8. Enter a title (red arrow) and PASTE the URL (that you COPIED in Step 3) into the box
(yellow arrow). 9. Click Add.
To add the new link to your Course Content: 10.Open the Course Content chapters to find the location where you’d like the link to
reside. Note: If you don’t choose a specific location, the link will live on the front page of your Course Content box—below the Chapter listings.) 11.Click on Add Course Materials. 12.From the Add column, click From Library.
13.Click on your link, then click Add and Close.
Your link will now reside in your Course Content, and you may now drag and drop per usual.

An Overview of Your Assignment Calendar Once an assignment has been added to the Assignment Calendar, you will see the assignment(s) listed along with the due date(s) and time(s). The due date will be based upon the Time Zone you set when you initially created your course.
Calendar Views
There are three ways to view your calendar:
• Monthly View will display the current month. Assignment due dates will display as blue alarm clock icons.
• Weekly View will display the current week. • Daily View will display all items that have been assigned and are DUE on that day.
You also have the ability to Add a Note while you are viewing your calendar in this mode.
Monthly View:
Weekly View:
Daily View:

To add a Note to the Calendar:
1. Click on the Instructor Grades & Assignments tab. 2. Click on Assign Content. 3. Click on Advanced Calendar above the calendar. 4. Go to the Daily View on your Calendar. 5. Click on Add Note. 6. Enter your note and click on Save and Close. 7. You will now see a note icon on your Calendar, as well as on the student Assignment
Calendar.
Daily View:

A Student View of Your Populated Assignment Calendar
When navigating between Course Home and Communication Tools, you are in the Student View. This built-in student profile allows you to share the same view as your students. When you or your students click on the Assignment Calendar tab, you will see the following:
• The monthly calendar with the assignment due dates identified by the blue alarm clock. • When clicking on an assignment due date, assignments will be listed along with the
current status of the assignment. From this view, students can quickly and easily access their assignment material.
Why are my assignment due times shifting on my calendar?
That student profile (student_student) is actually ONE BIG NATIONALLY-USED ACCOUNT that is built into all of our New Design MyLabs. In other words, the student profile does NOT belong to the individual instructor. Every time an instructor changes the time zone of that student profile, it affects the student profile for every single instructor using our New Design MyLabs. In other words, your students are NOT seeing this shift… Only you are seeing this shift on your own (student view) Assignment Calendar tab.
(According to our engineering team, the built-in dummy student (student_student) is meant to provide a student view in order to reflect the instructor's course, but the time zone of the built-in dummy student will continue to shift. We're not sure if we can change this default in the future (we’re fighting for it!), but in the meantime, the student profile time shift is "as designed.")
Lastly, if you are uneasy with this explanation, the band-aid is to enroll with Temporary Access as a student. You will have 17 days to see that the ACTUAL time on the student side is correct.

How to Edit an Assignment You may want to edit the course content, such as adding or deleting questions. You can easily accomplish this by using the Edit feature.
1. Click on the Instructor Grades and Assignments tab located in the Course Menu. 2. Click Assign Content. 3. You will see a list of all Chapter Contents located on the left side of the screen. To the
right of Chapter Contents, you will see your Assignment Calendar (defaulting to the current month).
4. Select the desired chapter and click to expand. 5. Position your cursor over the chapter material you wish to assign. The assignment
will turn gray. 6. Position your cursor over the assignment name. A dropdown arrow will appear. 7. Select Edit. 8. A new window entitled Edit Activity will open.
NOTE: Editing a Study Plan is strongly discouraged. The three components of the Study Plan are intricately tied together. Editing may dissolve these intricate ties. If you choose to edit the Study Plan, there is an additional step. After choosing Edit, the Study Plan window will open and you will have an option to edit the Pre-Test and/or Post-Test and/or Study Material separately. To edit questions from one of the above components of the Study Plan, click on the options dropdown arrow next to the respective item and choose Edit again. You are unable to edit the Study Plan after it has been accessed by any students.

Several tabs will appear at the top of the Edit Activity screen:
• Activity Details allow you to rename your assignment and provide an activity description.
• Questions allow you to add or delete, shuffle or randomize, and/or preview questions using the preview pane.
• Messages allow you to edit the existing set of instructions that are provided to students.
• Preferences allow you to control how your students navigate through the assessment. For example, you can adjust how students receive feedback and grades, and the number of attempts they can have on a test/quiz. You can also choose to add a timer to an assessment.
IMPORTANT! Once you have completed editing an assignment or activity, make sure to click Save and Return at the bottom of the page (or Cancel). This will ensure that you are taken back to the Assignment Calendar. Do not click Close Window or close out of the window using the X in the top right hand corner. NOTE: Editing a Study Plan is strongly discouraged. The three components of the Study Plan are intricately tied together. Editing may dissolve these intricate ties. If you choose to edit the Study Plan, there is an additional step. After choosing Edit, the Study Plan window will open and you will have an option to edit the Pre-Test and/or Post-Test and/or Study Material separately. To edit questions from one of the above components of the Study Plan, click on the options dropdown arrow next to the respective item and choose Edit again. You are unable to edit the Study Plan after it has been accessed by any students.

How to Add/Delete Questions to Pre-Built Assignments You may choose to add or delete questions to our content to better suit your personal course objectives. As a reminder, the following MyLab Assignments have pre-built assignments which can be modified to meet your needs:
• Take the Chapter Exam: has 25 multiple choice questions • Experience the Media Assignments: has 3-5 multiple choice and/or short answer
questions The following instructions for how to adding/deleting questions apply to any MyLab Pre-Built assignment. To add questions:
1. Click on the Instructor Grades and Assignments tab located in the Course Menu. 2. Click Assign Content. 3. You will see a list of all Chapter Contents located on the left side of the screen. To the
right of Chapter Contents, you will see your Assignment Calendar (defaulting to the current month).
4. Select the desired chapter and click to expand. 5. Position your cursor over the chapter material you wish to assign. The assignment
will turn gray. 6. Position your cursor over the assignment name. A dropdown arrow will appear. 7. Select Edit. 8. A new window entitled Edit Activity will open. 9. Click on the Questions tab. 10.Click Add Questions and choose:
a. Select Questions from Library to access the test bank questions –Or- b. Create New Questions
11.Check the box next to each question you want to add. 12.Click Add and Close to complete the question selection.
To delete questions:
1. Click on the Instructor Grades and Assignments tab located in the Course Menu. 2. Click Assign Content. 3. You will see a list of all Chapter Contents located on the left side of the screen. To the
right of Chapter Contents, you will see your Assignment Calendar (defaulting to the current month).
4. Select the desired chapter and click to expand. 5. Position your cursor over the chapter material you wish to assign. The assignment
will turn gray. 6. Position your cursor over the assignment name. A dropdown arrow will appear. 7. Select Edit. 8. A new window entitled Edit Activity will open. 9. Click on the Questions tab.

10.Place a checkmark next to each question you wish to delete (click on Show Question Preview in upper right hand corner to preview questions).
11.Click on the Delete link. 12.Click Save and Return.
How to Change the Date of an Assignment You have the option of changing the dates for assigned material.
1. To begin, go to Instructor Grades & Assignments, then Assign Content. 2. Locate the date the assignment was originally assigned. Make sure you are viewing
your calendar in the default Day Mode. 3. Click the down arrow next to your assignment to display the menu options. 4. Select Assignment Properties. 5. A new window entitled Assign will open. 6. Here you can:
1. Change the date of the assignment by simply clicking on a new date in the calendar which appears.
2. Set availability date range. 3. Select to whom you would like to make the assignment available (the default
is all). 7. When finished in the Assign screen, click Save to update your assignment or cancel.

How to Change the Point Value of Assignment Questions
1. Go to the Instructor Grades & Assignments tab. 2. Click on Assign Content. 3. Locate the assignment in the Chapter content and click on the dropdown to the right of
the item. 4. Click on Edit.
5. Click on the Questions tab. 6. Next to the Points value choose Edit from the dropdown (under Options).
Continued on the next page.
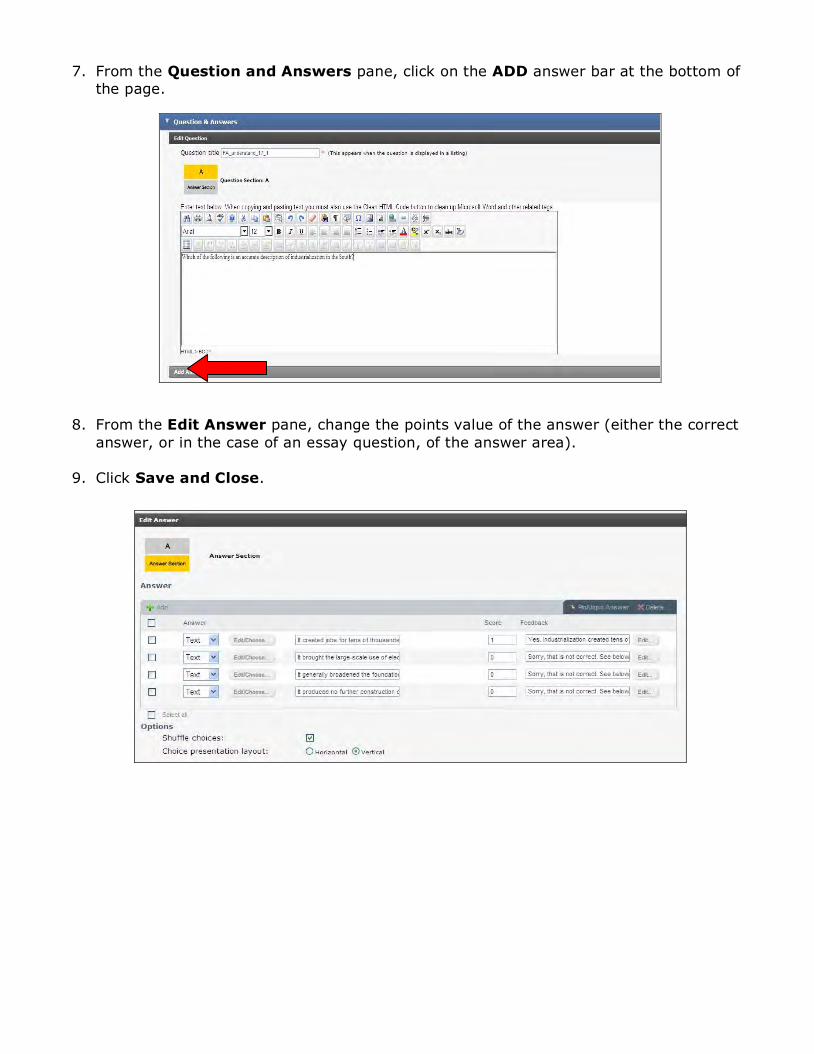
7. From the Question and Answers pane, click on the ADD answer bar at the bottom of
the page.
8. From the Edit Answer pane, change the points value of the answer (either the correct
answer, or in the case of an essay question, of the answer area). 9. Click Save and Close.

An Overview of the MyLab Assignment Default Preferences By default, the Pearson MyLab Assignment Preferences are set up as follows. Through a tool entitled Global Preferences, you can change any of the default preferences to best meet your course needs.
Preference Default General All activities are due at: 11:59 PM Grading Use percentage grades for this course Yes Provide a class average Yes Default display in Gradebook Assigned Items Activities*: General Allow students to save for later Yes Number of saves allowed 3 Require students to answer all questions Yes Number of Attempts 2 Display Total Points Yes Activities*: Timing Time to complete activity 3 hours Enable late submission Yes Activities*: Feedback Allow students to view summary Yes Activities*: Grading Record this score in gradebook highest Set passing threshold 70%
*Activities (aka Assignments) include: Take the Exam, Media Assignments, MyLab Quizzes

Changing the MyLab Global Preferences
Through a tool entitled Global Preferences, you can change any of the default MyLab Activity Preferences to best meet your course needs. To access Global Preferences:
• Navigate to Instructor Grades & Assignments • Next click Assign Content • In the top right hand corner, click Preferences
Once you have accessed the Preferences Tab, you will see a column entitled Instructor, below this column is a menu. To change any of the default settings as outlined above, you will navigate to the appropriate menu item depending on the change(s) you wish to make: o General--Use the General settings to set a due time for all assignments or to change font
size. Click Save Preferences when done. o Grading--Use the Grading settings to choose raw or average score, create or edit grade
schema, and to set display options for the Gradebook. Click Save Preferences when done.
o Activities--Use this screen to change global preferences for each activity type. These
activities include: Auto-graded Writing Assignments Homework Formative Assessments Media Assignments Quiz Exams
o Study Plan—Use the Study Plan settings to set the pass threshold for this assignment.
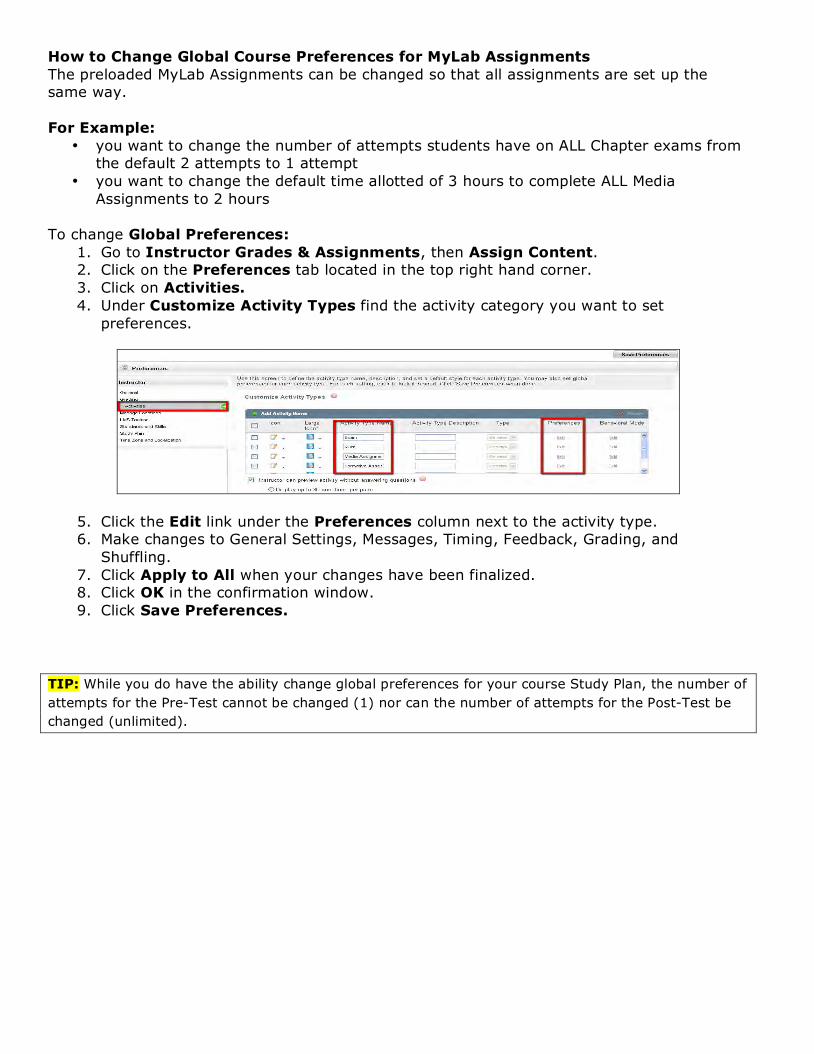
How to Change Global Course Preferences for MyLab Assignments The preloaded MyLab Assignments can be changed so that all assignments are set up the same way. For Example:
• you want to change the number of attempts students have on ALL Chapter exams from the default 2 attempts to 1 attempt
• you want to change the default time allotted of 3 hours to complete ALL Media Assignments to 2 hours
To change Global Preferences: 1. Go to Instructor Grades & Assignments, then Assign Content. 2. Click on the Preferences tab located in the top right hand corner. 3. Click on Activities. 4. Under Customize Activity Types find the activity category you want to set
preferences.
5. Click the Edit link under the Preferences column next to the activity type. 6. Make changes to General Settings, Messages, Timing, Feedback, Grading, and
Shuffling. 7. Click Apply to All when your changes have been finalized. 8. Click OK in the confirmation window. 9. Click Save Preferences.
TIP: While you do have the ability change global preferences for your course Study Plan, the number of attempts for the Pre-Test cannot be changed (1) nor can the number of attempts for the Post-Test be changed (unlimited).

How to Change the Default Preferences for a Single Assignment
As outlined above, you would use the Global Preferences tool in your MyLab course to change the preferences for all content of that assignment type at a course level. However, you may also wish to change the default preferences for a single assignment.
For Example: You want students to have 3 attempts (instead of the default 2) for just the Chapter 4 exam.
To Change the Default Preferences of a Single Assignment
1. Begin by navigating to Instructor Grades & Assignments and select Assign Content
2. Locate the assignment
3. From the drop down menu next to the assignment, select Edit
4. From the Edit page, select the Preferences tab
5.Make your changes
6. Select Save and Return

Manage Course Materials
How to Edit Course Content The Manage Course Materials tool allows you to edit assignment content and/or create your own assignments. Content that is created here is then available for instructor assignment via Assign Content, as well as for student self-study in the Study Plan and Course Content tab. You can access the Manage Course Materials from the Instructor Grades & Assignments tab on your course menu. As noted in the Assign Content instructions, the pre-loaded content creates an active learning pathway for students, as each chapter includes the following assignments:
• Review the Learning Objectives
• Read the eText
• Complete the Study Plan
• Take the Chapter Exam
• Experience the Media Assignments
• Explore More Chapters Resources
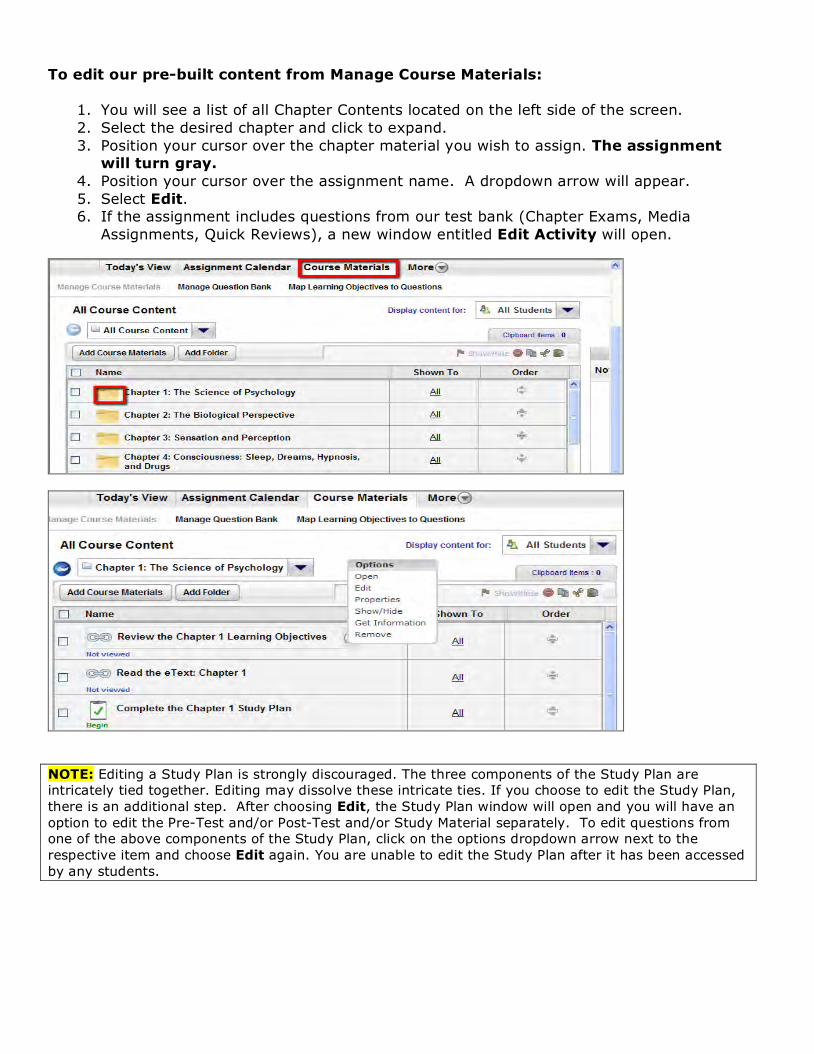
To edit our pre-built content from Manage Course Materials:
1. You will see a list of all Chapter Contents located on the left side of the screen. 2. Select the desired chapter and click to expand. 3. Position your cursor over the chapter material you wish to assign. The assignment
will turn gray. 4. Position your cursor over the assignment name. A dropdown arrow will appear. 5. Select Edit. 6. If the assignment includes questions from our test bank (Chapter Exams, Media
Assignments, Quick Reviews), a new window entitled Edit Activity will open.
NOTE: Editing a Study Plan is strongly discouraged. The three components of the Study Plan are intricately tied together. Editing may dissolve these intricate ties. If you choose to edit the Study Plan, there is an additional step. After choosing Edit, the Study Plan window will open and you will have an option to edit the Pre-Test and/or Post-Test and/or Study Material separately. To edit questions from one of the above components of the Study Plan, click on the options dropdown arrow next to the respective item and choose Edit again. You are unable to edit the Study Plan after it has been accessed by any students.

Several tabs will appear at the top of the Edit Activity screen:
• Activity Details allow you to rename your assignment and provide an activity description.
• Questions allow you to add or delete, shuffle or randomize, and/or preview questions using the preview pane.
• Messages allow you to edit the existing set of instructions that are provided to students.
• Preferences allow you to control how your students navigate through the assessment. For example, you can adjust how students receive feedback and grades, and the number of attempts they can have on a test/quiz. You can also choose to add a timer to an assessment.
IMPORTANT! Once you have completed editing an assignment or activity, make sure to click Save and Return at the bottom of the page (or Cancel). This will ensure that you are taken back to the Assignment Calendar. Do not click Close Window or close out of the window using the X in the top right hand corner. any students.

How to Add a Note to Study Plans & Course Content:
Using the Note function on the right side of the Manage Course Materials page will post to the student Study Plans & Course Content page. See images below. Instructor—Manage Course Materials
Student—Study Plans and Course Content

How to Create or Add Your Own Content You have the option of creating or adding your own content.
1. Go to Instructor Grades & Assignments. 2. Click on Manage Course Materials. 3. Navigate through the Course Content to find the location where you want the new
content to reside. 4. Click on Add Course Materials.
To create your own content:
1. From the Create column, click on your assignment type or add a link or page. 2. Click on Add to complete the action.
To add your own content:
1. From the Add column, click on Upload. 2. Choose Single File or Multiple Files. 3. Click on Add to complete the action.

How to Re-Organize Chapter Content
You may want to re-organize your Course Content or create folders to suit your course structure. Any changes made to Course Content organization will reflect in the Course Content of Assign Content (instructor) and Study Plans & Course Content (student). Organization tools include the Order column, as well as the ability to Assign/Unassign, Show/Hide, Remove, Copy, Cut, or Paste. To change the order of the chapter folders or assignments, use the arrows in the Order column. To Assign/Unassign, Show/Hide, Remove, Copy, Cut, or Paste, check the box next to the desired folder or assignment. The tool bar will activate. Click on your function of choice.
Activated Tool Bar

How to Create a Test Using Your MyLab MyTest To create a test that you will assign through the MyLab –OR- give as a paper test, you will use the MyTest tool. The MyTest tool can be accessed either from Assign Content or from Manage Course Materials.
IMPORTANT! If access to MyTest does not appear, click on the MORE tab. A dropdown menu will appear listing MyTest as an option.
IMPORTANT! To create a test to be delivered via an LMS, please see our external MyTest site at www.pearsonmytest.com.
To create a test with MyTest:
1. On the right side of your screen, click Create New Test and name it. 2. On the left side of the screen, you will see the available testbank content; click the +
to expand and view the assessments for each chapter or topic. 3. To add a question to your test, click and drag it from the left to the right. 4. To add multiple questions at one time, click the checkbox for each question you
want, and then click the Add button in the center of the screen. 5. Click Show Question Details (in the blue bar) to show/hide any question data such
as level of difficulty or page reference. 6. Click Create Test on the MyTest Toolbar to save your work so far. This test will be
kept online in your account.

Editing and Formatting your MyTest Test
1. To delete a question from the test, click the icon next to the question and click Delete. 2. To edit a question in the test, click the icon and select Edit. Use the editing tools to
modify the question, then click Save and Close at the bottom. 3. Using the MyTest toolbar, you can easily create your own question, scramble the test,
or click Edit Header to add a header, footer, or page numbers. 4. To change the font or font size, or margins, click the Preferences tab under the MyTest
logo (be sure to click Save to save font changes). 5. To go back to your test from Preferences, click MyTest on the top left navigation and
then click the name of the test you have saved test (on the right).
Tip: Please remember–after completing your MyTest, save your test before moving on.
CRITICAL LAST STEP: Importing Your MyTest Test to Your Course Content Once you have created your test or quiz using MyTest, you must now import it to your MyLab Course Content so that it can be assigned to the calendar.
To import your MyTest test/quiz to your Course Content: 1. Start from the Instructor Grades & Assignments. 2. Click on Manage Course Materials. 3. Click on Add Course Materials. 4. Under the Add column, click on From Library. 5. Click on MyTests Folder. 6. Select your test. 7. Click on Add and Close.
Your test will now reside in the Course Content box. To assign it to your Assignment Calendar, see Assigning Content to the Assignment Calendar. NOTE: Any tests that you created will appear at the bottom of your Table of Contents.


How to Add Your Own Course Materials
You have the ability through the Manage Course Materials of your MyLab to add your own links and/or files. To Add Course Materials:
• From the Course Materials section of your lab, locate the chapter where you wish to add your content. Put a check mark in the box to the left.
• Click on Add Course Materials and choose either Add Link or Add Page. • When prompted, name the assignment and upload your content. • Click Add to finish.
TIP: Although you will find Exam and Quiz on this menu, we strongly recommend using your internal MyTest tool instead. Please see the Creating a Test section.

GRADEBOOK
Your MyLab course offers a fully functioning Gradebook to manage all of your course grades in one place. In addition to the grades that populate automatically into the Gradebook, you can also manipulate and modify individual student grades, import and export from your learning management system, add custom Gradebook columns, calculate final grades, and more.
Navigating Your Gradebook
The Gradebook can be accessed from the Instructor Grades & Assignments tab on your Course Menu and operates similarly to the drill-down function of Assign Content. The Navigation area is located on the right side of the screen. Chapter Content is located at the top of the navigation area, while the Filters are located at the bottom.
NOTE: Columns are NOT automatically created when content is assigned; rather, the columns appear only when an assignment has been submitted. To find the results of a particular assignment, simply drill-down to find the desired chapter, then continue to drill-down until the assignment is located.

To Understand the Gradebook Layers, Try This Path:
1. Enter your Gradebook by clicking on Instructor Grades & Assignments, then Gradebook.
2. In the left navigation column, change your Assignment Status to All Items. 3. In the left navigation column, click on any Chapter title.
• The Chapter Exam column and the Study Plan column will populate. 4. In the left navigation column, you will now see two folders:
• Experience the Media Assignments—By clicking on this file, all individual Media Assignment columns will populate.
• Explore More Chapter Resources—By clicking on this file, you will have two additional options:
• Media Links—By clicking on this file, all individual Media Link columns will populate. • Quick Reviews—By clicking on this file, all individual Quick Review columns will
populate. •
Please note that the default setting for assignments is Assigned, which means anything you’ve assigned to the Assignment Calendar. This can be changed using the Filter in the Gradebook or in Global Preferences.
Course Average (What Is the Column on the Front Page of My Gradebook?)
The Course column on the Gradebook home page is the average of completed assignments to date.
Note: This is an average of all COMPLETED work, NOT all ASSIGNED work. This may cause confusion if this Completed average does not correlate with the Assigned grades that are actually being counted toward the student’s course grade. You may choose to hide this column. See below.
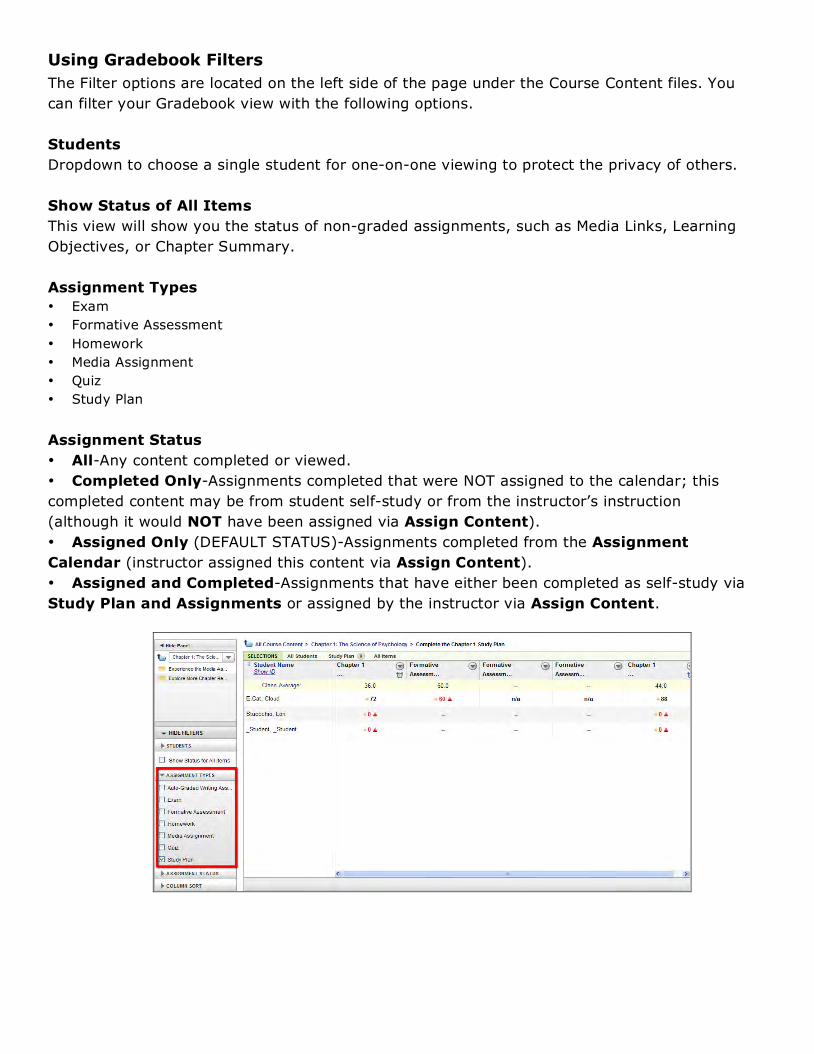
Using Gradebook Filters The Filter options are located on the left side of the page under the Course Content files. You can filter your Gradebook view with the following options. Students Dropdown to choose a single student for one-on-one viewing to protect the privacy of others. Show Status of All Items This view will show you the status of non-graded assignments, such as Media Links, Learning Objectives, or Chapter Summary.
Assignment Types • Exam • Formative Assessment • Homework • Media Assignment • Quiz • Study Plan
Assignment Status • All-Any content completed or viewed. • Completed Only-Assignments completed that were NOT assigned to the calendar; this completed content may be from student self-study or from the instructor’s instruction (although it would NOT have been assigned via Assign Content). • Assigned Only (DEFAULT STATUS)-Assignments completed from the Assignment Calendar (instructor assigned this content via Assign Content). • Assigned and Completed-Assignments that have either been completed as self-study via Study Plan and Assignments or assigned by the instructor via Assign Content.

How to Change the Gradebook from Percentages to Raw Scores The default for the Gradebook is percentages, but Global Preferences offer a raw score option. To change from percentages to raw score:
1. Click on Instructor Grades & Assignments. 2. Click on Gradebook.
3. Click on Preferences in the upper right corner of the page.
4. In the left navigation menu, click on Grading.
5. Click on Use raw score grades for this course.
6. Click on Save Preferences in the upper right corner.

How to Hide/Show Columns
You can control which Gradebook columns are visible to the student by utilizing the Hide and Show column feature. A hidden column is visible in your instructor Gradebook, but not viewable in the student view. Hidden columns appear with a strikethrough the column title. You can return to showing a hidden column at any time to make it appear in the student view. Examples of when you might want to hide a column:
• You are creating new columns, but don’t want students to see them right away. • You want to withhold students’ scores from the Grades view until after a specific date. • You want to remove any unused column from the students’ view without modifying the
activity.

How to Add/Create Gradebook Columns
You can create new columns in the Gradebook to reflect your grading needs. Added columns are used to track supplemental data, aggregate scores of selected assignments or to give points for attendance or participation. There are several different types of columns you can create:
Types of Columns
1. Numeric: Used when a grade will be manually entered, i.e. participation, etc. 2. Calculated: Use this column type if you wish to specify individual activities to be
calculated. An example of this might be a column that displays the average of chapter tests. This is the most commonly created column.
3. Import Grades: Use this column type to import grades from an external source using a .csv or comma separated file.
4. Selection List: Use this column to score students with “custom” grades, such as below average, satisfactory, and above average. This is a great options for tasks that do not need a numerical grade.
5. Free Text: Use this column to create alphanumeric “grades.” Different from Selection List columns, you can input different feedback to each student.
6. Total Column: Use this column type to assign weight distribution to a list of assignments.
To add a Column:
1. In the upper right corner of the screen, click on Create Column. 2. Using the dropdown menu, choose your column type. 3. Continue building your column in accordance with the prompts.
Best Practice: If you want to offer students extra credit points, create a numeric column in the Gradebook to track these points. The Gradebook will not allow students to earn more points than the max score, so obtaining more than 100% on an assignment is not possible. Tracking the credit points in a separate numeric column will allow you to add those points into the final score at the end of your course.

What is a Custom View?
A Custom View of your Gradebook allows you to compile a view of specific columns for a quick and easy customized snapshot. You can create the Custom View by copying Gradebook columns from any folder. Because the traditional Gradebook is a dropdown system that only allows a view by individual chapter, a Custom View allows a view of compiled assignments from multiple chapters. To create a Custom View:
1. Locate the desired column. 2. Click on the dropdown menu of the desired column. 3. Click on Save to Custom View.
Note: In order to add a created column to the Custom View, you must first create it in the Gradebook tab.

How to Create a Grade Schema
1. Go the column of your assignment in the gradebook. 2. Click on the dropdown menu. Choose Apply Grade Schema.
Note: Do not use 0 as the “Score From” or when the assignment becomes past due, the 0 will result in points.
3. Click on Add New Schema and create the desired schema. 4. Click Save and Close.
How to Apply a Grade Schema
1. Go the column of your assignment in the gradebook. 2. Click on the dropdown menu. Choose Apply Grade Schema. 3. Use the dropdown to select your grade schema. 4. Click Apply.

How to Export Grades
You may choose to export grades in order to keep a paper copy of the final grades, to transfer grades to an LMS, or to submit a hard copy to administration. To export grades:
1. To export grades from your Gradebook, select from the dropdown window at the bottom of the Gradebook page. You can download the Current Display or All Grades as a .csv file (which will open in Excel), tab delimited file or .pdf file.
2. Select your options, then click Download. 3. You also have the option to download grades from the Custom View tab.

How to Import Grades
If you would like to record outside content in your MyLab Gradebook, you can import grades into your MyLab Gradebook from a .csv or comma separated file. In order to import grades, you will need to download the current Student Roster from your MyLab Gradebook, edit grades for import, and create an import grades column to house them. To download roster:
1. Select the export Student Roster as .csv file and click Download from the download options located at the bottom left of the Gradebook.
2. Click Save to save the file to your computer. By default, this file is called StudentRoster.csv.
To prepare grades of import:
1. Open the Student Roster file you saved. You can open the .csv file in Microsoft Excel or any text editor.
2. Edit the Userscore (score earned by student) and Maxscore (maximum points available for the activity) for each student.
IMPORTANT! Do not alter any values in the .csv file for UserId, LastName, or FirstName).
3. If you leave the Userscore or Maxscore column blank for a student, you will be able to import the values you entered. However, you will see an error message when you import your file.
4. When you have completed your edits, save the file in .csv format. To import grades:
1. Return to the Gradebook tab. 2. Click Create Column and choose Import Grades. 3. Enter a Column Name and select the location in the Gradebook where you want to
insert the column. 4. Click OK.
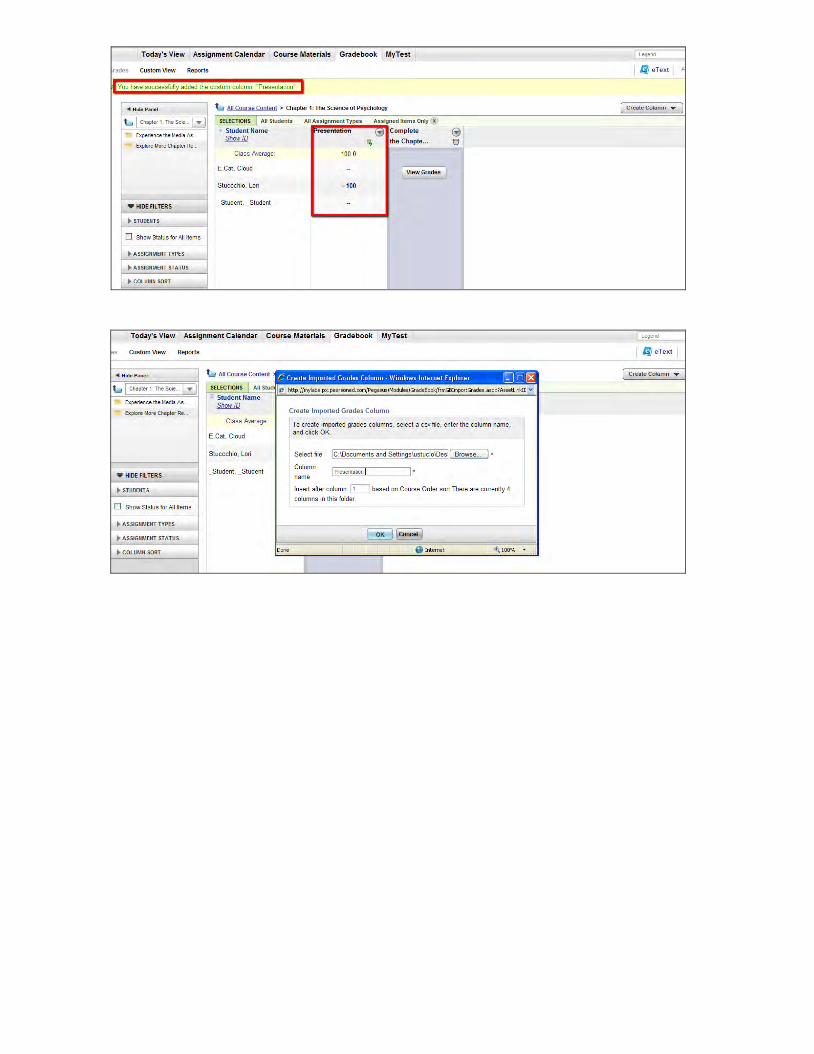

How to View Submissions
You can view your Student Submissions through the Gradebook in two ways—ALL and INDIVIDUAL.
How to View All Student Submissions for an Assignment: allows you to see the submissions for your entire class.
1. Locate the assignment in the Gradebook. 2. Click the dropdown menu next to the assignment name. 3. Click View All Submissions. A new window will open with all student submissions. You
can view individual student submissions by clicking on a student’s name. If a student has multiple submissions for an assignment, you can view each submission by clicking the plus sign next to the student’s name. You will then see all submissions for that assignment and can click on an individual submission.
To view individual student submissions:
1. Locate the assignment in the Gradebook. 2. Hover over the grade next to the student’s name and click the dropdown menu. 3. Click View/Grade Submission.
TIP: Since the Study Plan is a multi-layered assignment (Pre/Post Test) you will need to click the green View Grades button to open up the submissions.

How to Re-Set/Delete a Student Submission
As an instructor, you may want to Delete a Submission for a student in order to reset an attempt at a particular assignment. In some cases, a student will access an activity, but will not successfully submit an attempt. Your student might have lost Internet connectivity or provided another reason for this occurrence. In these cases, you might decide to reset the attempt and allow them to re-access the assignment.
1. Locate the assignment in the Gradebook. 2. Click the dropdown in the column header. 3. Click on View Submissions.
4. Click on the student's name and choose Delete in the gray bar.
5. Click Save and Close.

How to Accept a Late Submission When a student has submitted an assignment past the due date, you will need to Accept the Submission in order for the student to receive a grade for the activity. There are three ways to Accept Late Submissions—both starting in the Instructor Grades & Assignments tab:
1. Click on Notifications. • Under the Alerts sections of this page, click Past Due Submitted. All students who
have submitted assignments past the due date will appear to the right. • You can choose to Accept All or Accept on an individual basis.
-OR-
2. Accepting an Individual Past Due Assignment • In the Gradebook locate the assignment. • Click the dropdown menu next to student’s and click View/Grade Submission. • At the top of the View Submission window that opens, there will be an Accept button.
Click Accept • The assignment will then be accepted and the grade will appear in your Gradebook. -OR-
3. Accepting Multiple Students’ Past Due Assignments
• In the Gradebook, click the dropdown menu next to the assignment name and click View All Submissions.
• At the top of the new window that opens, there will be an Alert to let you know that there are students who have submitted the activity past the due date. You can choose to Accept All or you can accept on an individual basis.
• To accept a submission for a particular student, find the student’s name in the pop-up window. There will be a red clock next to all students who have a late submission. Open the student submission and click Accept Late Submission.
How to Manually Edit a Grade: 1. Locate the assignment in the Gradebook. 2. Mouse over the grade next to the student’s name and click the dropdown menu. 3. Click Edit Grade.

Reports
With the advanced reporting capabilities of your MyLab, you can run a number of activity reports for single or multiple students, assignments and sections. Course metrics, analysis of student performance, and individualized question performance can be accessed through this feature. All reports can be customized, exported and saved to the My Reports section for easy access. You can access your course reports from the Instructor Grades & Assignments tab. The Reports view of the Gradebook is organized by Performance Reports (on the left) and My Reports on the right. Performance Reports include:
• Student Results by Activity • Activity Results by Student • Study Plan Reports • Question Analysis Report
My Reports offers a repository for saved reports. You can access and rerun these reports with the saved parameters previously set.

Student Results by Activity This report shows the performance of a single student for one or more activities. Choose a selection of activities or select all activities for a specified date range for an individual student. From the information obtained, you can see the average score, average time spent, total time spent for the activities selected. You will also receive a breakdown of every submission including attempt, score, and time spent in that attempt.
TIP: Run this report for students who come to your office to analyze their course progress, or if a student has asked to see an analysis of the work they have completed in the MyLab course.

Activity Results by Students This report shows activity for one or more students. You can analyze all your students at once or choose a smaller group for one specific assignment. You can review the average sore and average time spent in the activity as well as a breakdown of each individual student’s statistics including attempts, date and time submitted, score and total time in the activity.
TIP: Run this report after an important assignment to review the correlation of the student grade versus time spent on the activity.
Study Plan Reports This report shows Study Plan results for one or more students. You can choose multiple study plans as well as multiple students to analyze. In addition to the average score and average time spent, you will also see a breakdown of the selected study plans for each student. The individual student analysis contains pre- and post-test scores with the percentage change and study material information.
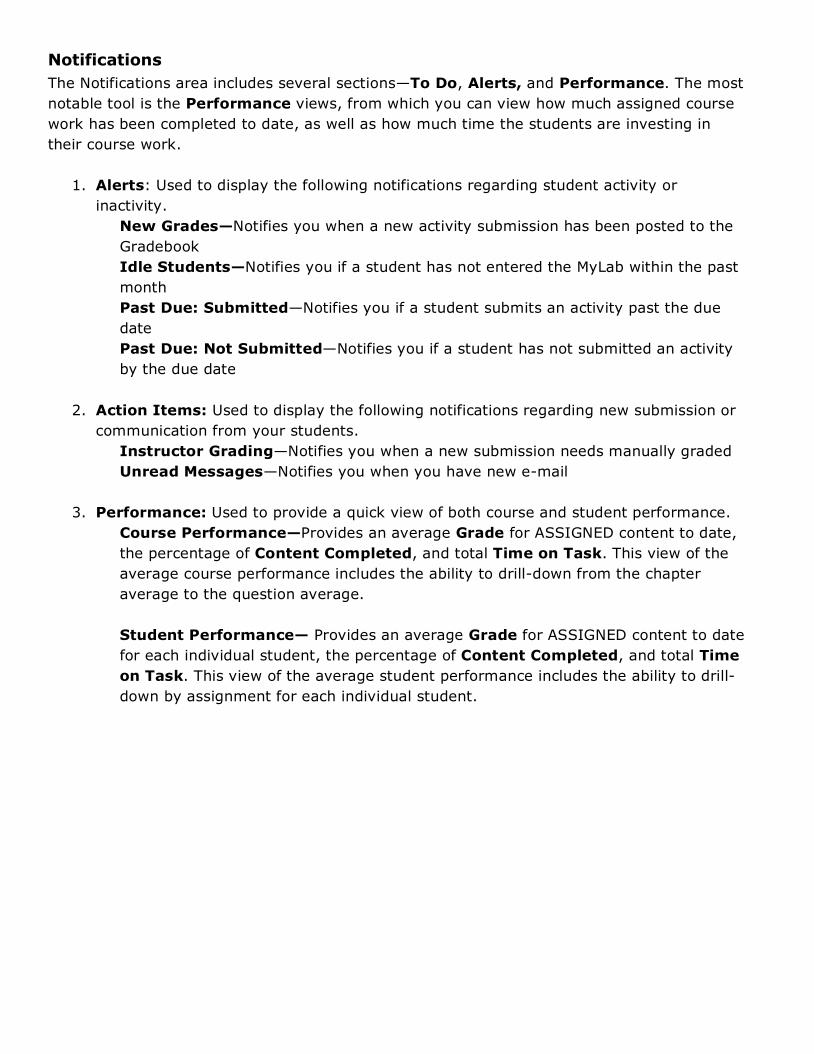
Notifications The Notifications area includes several sections—To Do, Alerts, and Performance. The most notable tool is the Performance views, from which you can view how much assigned course work has been completed to date, as well as how much time the students are investing in their course work.
1. Alerts: Used to display the following notifications regarding student activity or
inactivity. New Grades—Notifies you when a new activity submission has been posted to the Gradebook Idle Students—Notifies you if a student has not entered the MyLab within the past month Past Due: Submitted—Notifies you if a student submits an activity past the due date Past Due: Not Submitted—Notifies you if a student has not submitted an activity by the due date
2. Action Items: Used to display the following notifications regarding new submission or
communication from your students. Instructor Grading—Notifies you when a new submission needs manually graded
Unread Messages—Notifies you when you have new e-mail 3. Performance: Used to provide a quick view of both course and student performance.
Course Performance—Provides an average Grade for ASSIGNED content to date, the percentage of Content Completed, and total Time on Task. This view of the average course performance includes the ability to drill-down from the chapter average to the question average.
Student Performance— Provides an average Grade for ASSIGNED content to date for each individual student, the percentage of Content Completed, and total Time on Task. This view of the average student performance includes the ability to drill-down by assignment for each individual student.

COURSE MANAGEMENT
Manage Your Course Roster
The course roster allows you to see a list of all of the students that have registered and enrolled in your course. It displays the student’s name, email address, current role, status, and temporary access status (if applicable).
You can use the roster to view your full list of students, make a student inactive in your course, view a student’s temporary access status, and promote an individual to the role of Section Instructor/TA.
From your Course homepage:
1. Click the Course Settings link under that course title. 2. Choose Course Roster from the dropdown.
3. Review and/or make any changes to Role or Status.
4. Click Save when finished or Cancel.

Active/Inactive Status
When a student successfully registers and enrolls in your MyLab course, they are active. During the add/drop period, you might have students that drop the course and need to be removed from your MyLab course. Removing a student from your MyLab course is handled by changing the student Status to Inactive in the course roster. This will remove the student from your Gradebook and any class averages.
Temporary Access Status
Students waiting on financial aid to make course material purchases can get temporary access to your MyLab/Mastering course without payment for 17 days. All students who opt for temporary access will have red text beneath the student’s name indicating the status of the temporary access in the Course Roster. There are two different states:
• Temporary Access Expiration Pending • Temporary Access Expired
Temporary Access Expiration Pending:
• Red text is added beneath the student’s name notifying you of student’s temporary course access and lists access expiration date.
• Student Role is un-editable, prohibiting any changes to student’s role for individuals currently in temporary course access status.
Temporary Access Expired:
• Red text is added beneath the student’s name notifying you that temporary course access has expired and lists access expiration date.
• Entire row is disabled, prohibiting any changes to student’s role or status. Note: Students can change temporary access to fully active status at any time by entering purchase information.

How to Allow Access for Teaching Assistants (Section Instructor): You can promote one or more students to Teaching Assistant (Section Instructor). Their access allows them full access to your course.
• Your Teaching Assistants will need to enroll as a STUDENT in your course. (You may request student access codes from your local rep.)
• Once enrolled, you will change their Role from Student to Section Instructor. • As a Section Instructor, your Teaching Assistants will have full access to your course.
Note: If the student registering as a Teaching Assistant is already enrolled in the course as a
student, he or she needs to register again with a NEW login name using another Student
Access Code. In this case, the teaching assistant will have a student login name and a
teaching assistant login name.

Manage Files
This feature offers you a repository for course documents and files. You can upload, download, and organize materials by adding folders.
To add new folders:
1. Click Add Folder. 2. Enter Folder Name. 3. Click Add Folder or Save & Add Another Folder.
To upload a file:
1. Click Upload Files. 2. Click Browse, select the file to be uploaded, and click Open.
• If the selected file is a zip file and you want it unzipped as part of the upload process, select Unzip .ZIP file.
3. Click Upload File.
To download a file:
1. Click the checkbox next to the file(s) you wish to download, then click Download Files Note: You can select one or multiple files at once. When choose multiple files, it will produce a .Zip file.
2. Open or Save the file(s)

Create/Copy Additional Courses and Sections
You can create additional courses in a variety of ways. For example, you can browse or search for course materials in the catalog like when you created your first course or copy an existing course from your own account or another instructor’s account.
To create another course using the same course materials, you can:
• Select the same textbook from the catalog to start from a fresh template
• Copy an existing course that you created
• Copy an existing course that another instructor created
Note: When you copy a course, the new course has a new course ID and an empty course roster and Gradebook.
How to copy an existing course:
1. In the MyLab / Mastering New Design courses list, click Create/Copy Course.
2. Select Copy a Course.
• Select Copy One of Your Existing Courses and select the course you want to copy from the dropdown menu.
• OR Select Copy Another Instructor’s Course and enter the course ID (received
from the other instructor) of the course you want to copy.
3. Click Go.
4. Specify course information.
5. Click Create Course Now. A Confirmation-Request Received page will provide you with your unique Course ID for your new course. You can print this page for your records and click Back to your Courses page.
On your MyLab/Mastering Courses page, the clock icon indicates that your course is being
prepared. When your course is ready, you will receive an email.

Copying Your Course There are a few reasons that you might want to copy a course you created:
1. Accommodate all of the sections you are teaching in the same semester. Some instructors teaching more than one section per term prefer to create a standard course and simply make copies to accommodate all sections they are teaching.
2. Copy a course from one semester to another when using the same book/edition.
When using the same book/edition from one term to the next, you will most likely want to make a copy of your current course to take advantage of the changes, organization, settings, etc. that you have already set.
Note: When you copy an existing course, your original course remains untouched. Assessments copied with the course retain the same availability setting as in the original course.

Copying Another Instructor’s Course You may want to copy another instructor’s course if you are teaching a section of the same course or planning to teach the same course at a later date. Copying another instructor’s course allows you to take advantage of the changes, organization, etc. that instructor already set up. After you copy the course, you can customize it further. Note: Assessments copied with the course retain the same availability setting as in the original course set by the other instructor. How to make multiple copies or sections of a course:
1. In the MyLab / Mastering New Design courses list, click Create/Copy Course.
2. Select Make Multiple Copies or Sections of a Course.
3. From the list, select the course you want to copy and click Go.
4. In the Number of Courses box, enter the number of course copies you want to create and click Update.
5. Edit the course and section names as needed.
6. You can change the Course Enrollment Dates and Course Duration for all copies.
• After the course copies are created and appear in the MyLab / Mastering New Design courses list, you can change the course dates (and other course settings) for each individual course copy or section by clicking Details next to the course name.
7. When ready to create your copies, click Create Courses Now.

Course Expiration
When you originally create your MyLab course, you set a course end date. As the course end date nears, you will notice an hour glass icon next to your course title in the courses list indicating the course is about to end. When you see this icon in your courses list, you have two options:
1. If the course is still in use by registered students, you can extend the course end date up to a maximum of 24 months from the course creation date (see instructions below). Once the 24 months are up, the course enters a 3-month retirement (inactive) phase, after which it is removed from the system. If you have courses in the retirement process, you will receive three consecutive email reminders, including instructions on how to preserve or export your course materials.
2. If the course has ended and there are no active student users, you do not need to take any action. The course will automatically start the 3-month retirement phase 24 months after the course creation date.
To extend the Course End date:
1. From the Courses list, click on the Details link to the right of the course title. 2. Click on Course Settings. 3. Click on Course Dates, Types, and Copy Settings. 4. Extend the Course End Date (no longer than 24 months after the Course Creation
Date.) 5. Click Save.