UWP 3.0 WEB APP - productselection.net · UWP 3.0 WEB APP 9 Introduction In this chapter, we’re...
113
UWP 3.0 WEB APP INSTRUCTION MANUAL Mar. ’19
Transcript of UWP 3.0 WEB APP - productselection.net · UWP 3.0 WEB APP 9 Introduction In this chapter, we’re...
UWP 3.0 WEB APP
INSTRUCTION MANUAL
Mar. ’19
UWP 3.0 WEB APP 2
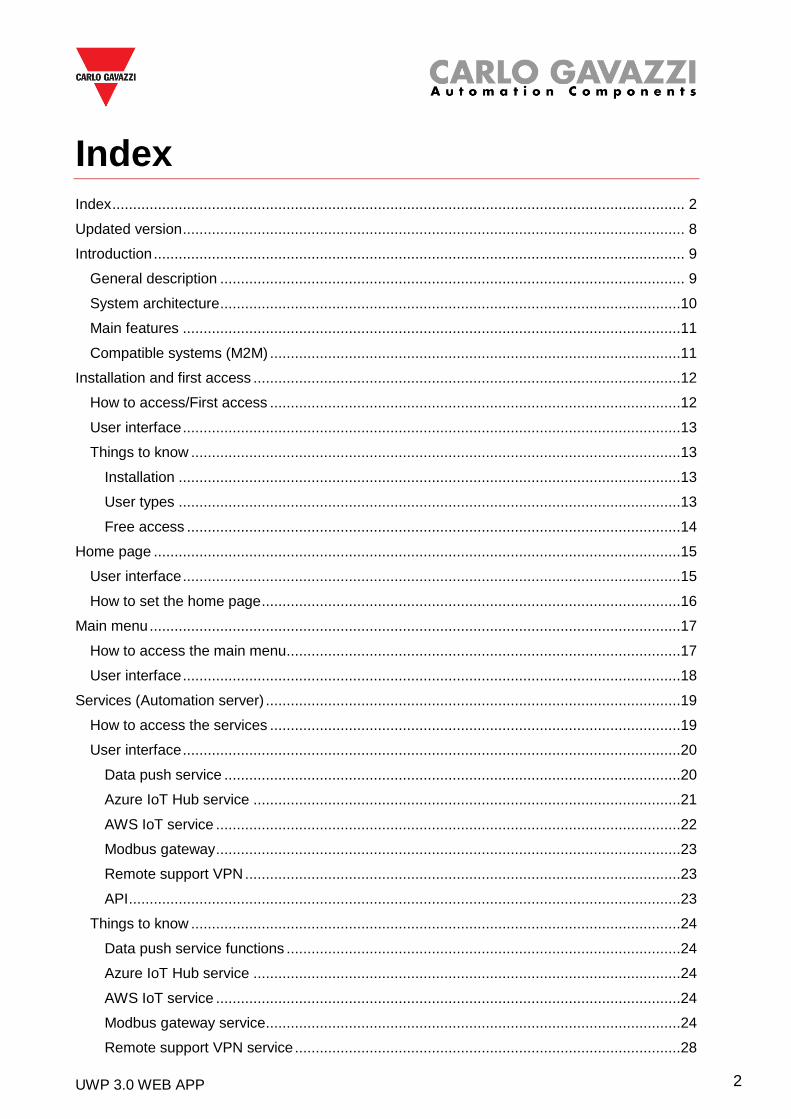
Index Index .......................................................................................................................................... 2
Updated version ......................................................................................................................... 8
Introduction ................................................................................................................................ 9
General description ................................................................................................................ 9
System architecture ...............................................................................................................10
Main features ........................................................................................................................11
Compatible systems (M2M) ...................................................................................................11
Installation and first access .......................................................................................................12
How to access/First access ...................................................................................................12
User interface ........................................................................................................................13
Things to know ......................................................................................................................13
Installation .........................................................................................................................13
User types .........................................................................................................................13
Free access .......................................................................................................................14
Home page ...............................................................................................................................15
User interface ........................................................................................................................15
How to set the home page .....................................................................................................16
Main menu ................................................................................................................................17
How to access the main menu ...............................................................................................17
User interface ........................................................................................................................18
Services (Automation server) ....................................................................................................19
How to access the services ...................................................................................................19
User interface ........................................................................................................................20
Data push service ..............................................................................................................20
Azure IoT Hub service .......................................................................................................21
AWS IoT service ................................................................................................................22
Modbus gateway ................................................................................................................23
Remote support VPN .........................................................................................................23
API .....................................................................................................................................23
Things to know ......................................................................................................................24
Data push service functions ...............................................................................................24
Azure IoT Hub service .......................................................................................................24
AWS IoT service ................................................................................................................24
Modbus gateway service....................................................................................................24
Remote support VPN service .............................................................................................28
UWP 3.0 WEB APP 3
API .....................................................................................................................................28
How to ...................................................................................................................................29
How to configure the Data push service .............................................................................29
How to configure the Azure IoT Hub service ......................................................................30
How to configure the AWS IoT service ...............................................................................31
How to manage the Modbus gateway service ....................................................................32
How to manage the remote support VPN service ...............................................................33
System settings ........................................................................................................................34
How to access the System settings .......................................................................................34
User interface ........................................................................................................................35
Settings menu ...........................................................................................................................36
How to access the settings menu ..........................................................................................36
User interface ........................................................................................................................37
Dashboards ..............................................................................................................................38
How to access a function dashboard .................................................................................38
How to access a custom dashboard ..................................................................................39
User interface ........................................................................................................................40
Common elements .............................................................................................................40
Widget dashboard ..............................................................................................................41
Custom chart dashboard ....................................................................................................42
Chart template dashboard ..................................................................................................43
Energy summary dashboard ..............................................................................................44
Things to know ......................................................................................................................45
What is a dashboard ..........................................................................................................45
Function dashboard ...........................................................................................................45
Custom dashboard.............................................................................................................46
How to ...................................................................................................................................47
How to create a custom dashboard ....................................................................................47
How to manage a chart template .......................................................................................48
Widgets .....................................................................................................................................49
User interface ........................................................................................................................50
Common components ........................................................................................................50
Things to know ......................................................................................................................51
What is a widget ................................................................................................................51
Types of widget ..................................................................................................................51
How to ...................................................................................................................................55
How to create a new widget ...............................................................................................55
UWP 3.0 WEB APP 4
How to create a chart .........................................................................................................56
How to remove a widget.....................................................................................................59
How to move a widget to another page ..............................................................................59
How to copy a widget .........................................................................................................59
How to schedule an event ..................................................................................................60
How to manage the widget settings ...................................................................................61
Types of Function .....................................................................................................................62
User interface ........................................................................................................................62
Light function .....................................................................................................................62
Dimmable light function ......................................................................................................63
Constant light function .......................................................................................................64
Smart light function ............................................................................................................65
Zone temperature function .................................................................................................66
Cooling temperature system function .................................................................................67
Heating temperature system function .................................................................................68
Roller blind function ...........................................................................................................69
Tilting roller blind function ..................................................................................................70
Window control function .....................................................................................................71
Program function ...............................................................................................................72
Dimmer sequence function ................................................................................................73
Car heating function ...........................................................................................................74
Simulated habitation function .............................................................................................75
Multigate function ...............................................................................................................76
Interval timer function .........................................................................................................76
Delay timer function ...........................................................................................................77
Recycling timer function .....................................................................................................78
Analogue comparator function ...........................................................................................79
Switch Function .................................................................................................................80
Master zone counter ..........................................................................................................81
Detection point (DPO) function ..........................................................................................81
Things to know ......................................................................................................................82
What is a function ..............................................................................................................82
Light functions ....................................................................................................................83
Temperature control functions............................................................................................83
Rolling shutters functions ...................................................................................................83
Sequence functions ...........................................................................................................84
Carpark functions ...............................................................................................................84
UWP 3.0 WEB APP 5
How to ...................................................................................................................................85
How to manage the Program function ................................................................................85
How to execute a set of steps one time only ......................................................................87
Alarms ......................................................................................................................................88
How to access the alarm dashboard ......................................................................................88
User interface ........................................................................................................................89
Main page ..........................................................................................................................89
Water alarm function ..........................................................................................................90
Smoke alarm function ........................................................................................................91
Main intruder alarm function ...............................................................................................92
Zone intruder alarm function ..............................................................................................93
Hour counter function .........................................................................................................94
Siren alarm function ...........................................................................................................95
Things to know ......................................................................................................................96
What is an alarm ................................................................................................................96
Types of alarm functions ....................................................................................................96
How to ...................................................................................................................................98
How to manage the alarms ................................................................................................98
Report .......................................................................................................................................99
How to access the report page ..............................................................................................99
User interface ........................................................................................................................99
Main page ..........................................................................................................................99
Accounts tab .................................................................................................................... 100
Schedules tab .................................................................................................................. 101
Templates tab .................................................................................................................. 102
History tab ....................................................................................................................... 103
Things to know .................................................................................................................... 104
What is a report ............................................................................................................... 104
How to (for admin users only) .............................................................................................. 105
How to create an FTP/FTPS account ............................................................................... 105
How to create an SMTP account ...................................................................................... 106
How to create an SFTP account ...................................................................................... 107
How to schedule a report ................................................................................................. 108
How to create a template ................................................................................................. 109
How to re-generate a report ............................................................................................. 110
Search .................................................................................................................................... 111
How to access the search menu .......................................................................................... 111
UWP 3.0 WEB APP 6
User interface ...................................................................................................................... 111
Things to know .................................................................................................................... 112
Search benefits ................................................................................................................ 112
How to ................................................................................................................................. 112
How to search a function.................................................................................................. 112
Useful links ............................................................................................................................. 113

UWP 3.0 WEB APP 7
UWP 3.0 WEB APP 8
Updated version
Content subject to change. Download the updated version: www.productselection.net
UWP 3.0 WEB APP 9
Introduction In this chapter, we’re going to describe the UWP 3.0 system.
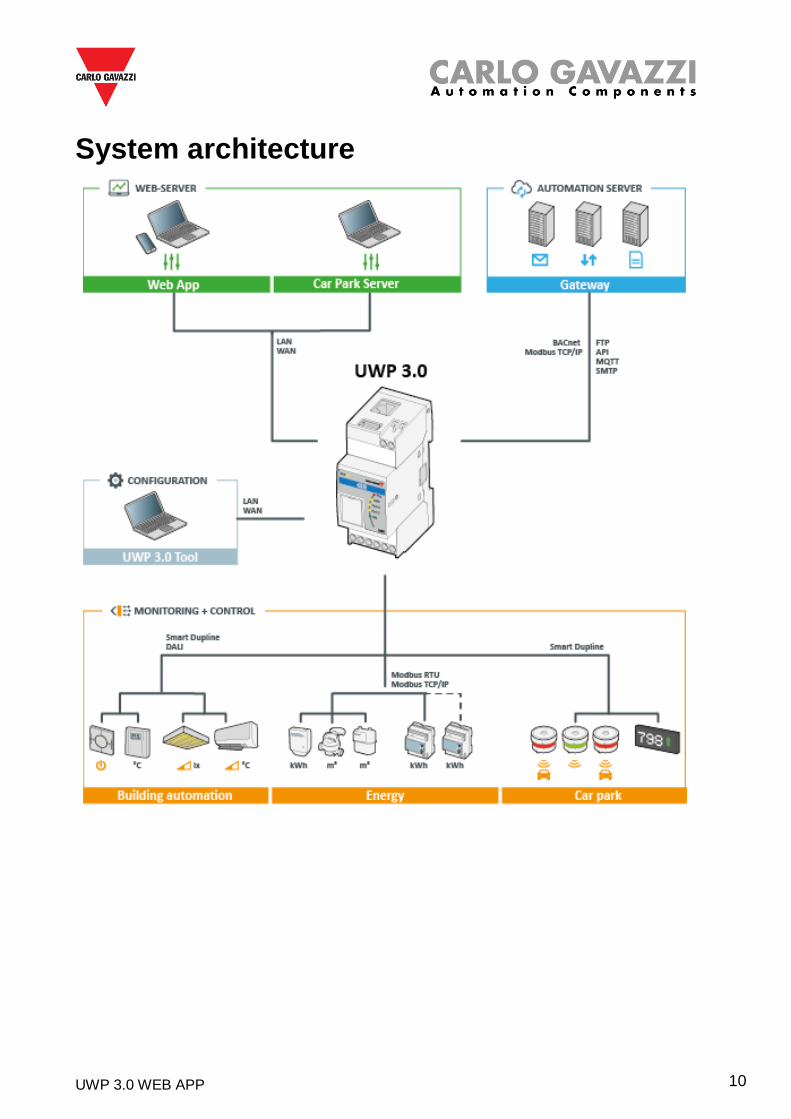
General description UWP 3.0 is a monitoring gateway and controller that allows to monitor and control installations
where Energy Efficiency Management, Building Automation and Car Park Guidance functions are
needed.
The system:
• monitors and controls connected devices via its local bus management functions;
• includes a web server with a powerful and intuitive user interface that displays custom
dashboards
• interacts with local devices and remote systems.
The UWP 3.0 embedded automation server (see Services (Automation server)) allows you to
exchange data locally or remotely via standard Internet protocols.
The UWP 3.0 Web App is the UWP 3.0 Web Interface accessible through standard browsers
such as Google Chrome, Mozilla Firefox or Microsoft Edge, from Mobile or Desktop devices.
Through widgets contained in predefined and custom dashboards, it allows you to:
• view and export collected data;
• control the automation functions;
• define specific settings.
UWP 3.0 WEB APP 10
System architecture
UWP 3.0 WEB APP 11
Main features The Web App allows you to:
• view collected data as real time values or charts; • generate data and events reports; • manage and adjust the functions parameters (e.g. to modify temperature set points); • send commands (e.g. to switch on/off or to select scenarios); • configure Data Push Services to FTP/SFTP/FTPS servers or Em2-Server (Carlo Gavazzi); • configure MQTT link to IoT Hubs (Microsoft Azure).
Compatible systems (M2M) The UWP 3.0 compatible systems are:
• Em2-Server (Carlo Gavazzi);
• FTP/SFTP/FTPS servers;
• Microsoft Azure IoT Hub.
UWP 3.0 WEB APP 12
Installation and first access This chapter is intended to describe the UWP 3.0 Web App installation process and the first
access.
How to access/First access In the following chapter, it is described the procedure to access the Web App.
STEP ACTION
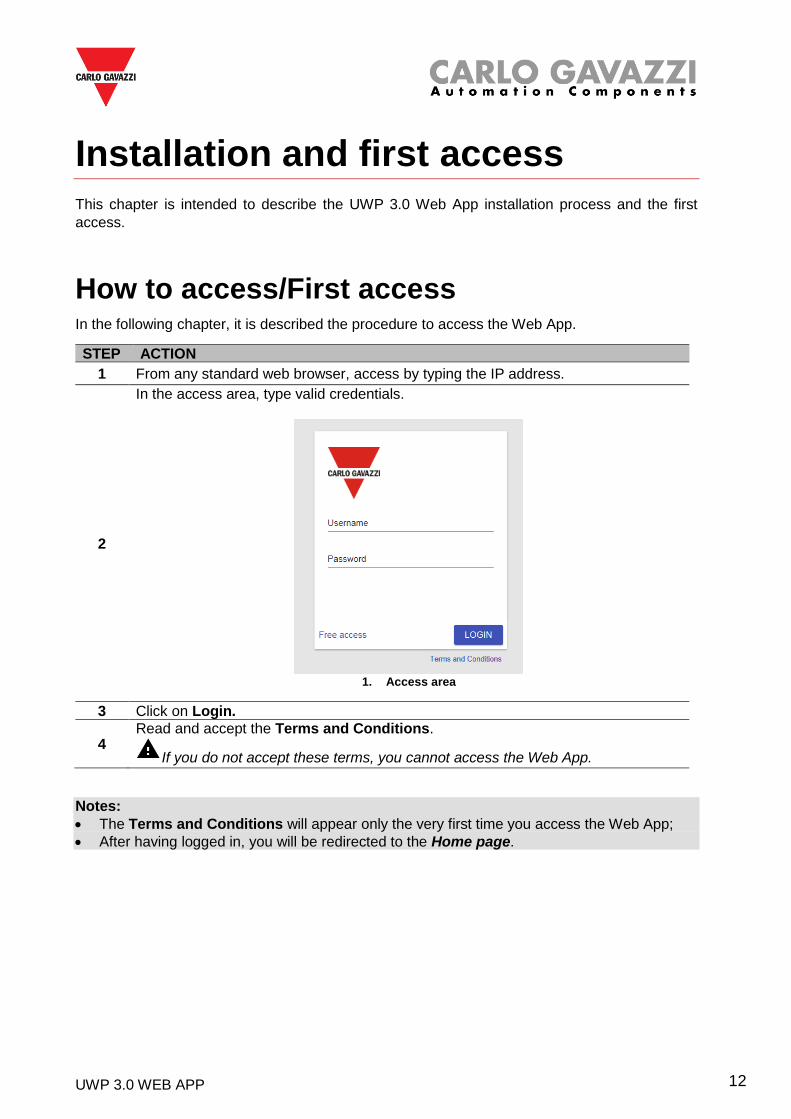
1 From any standard web browser, access by typing the IP address.
2
In the access area, type valid credentials.
1. Access area
3 Click on Login.
4 Read and accept the Terms and Conditions.
If you do not accept these terms, you cannot access the Web App.
Notes:
• The Terms and Conditions will appear only the very first time you access the Web App;
• After having logged in, you will be redirected to the Home page.
UWP 3.0 WEB APP 13
User interface COMPONENT DESCRIPTION
Custom logo (for more information, see Settings menu).
Username Password
Credentials (depending on the type of user*). *Note: see User types.
Free access
To access without credentials.
See Free access.
LOGIN To access the Web App.
Terms and Conditions Use conditions.
Read and accept them.
Things to know In this chapter, you can find information about the HW part installation and the supported types
of Users.
Installation
To install the HW part and for the system commissioning, refer to the UWP 3.0 Tool
(Configuration software) manual.
User types
The UWP 3.0 Web App manages two types of user:
• admin and
• user.
The admin user can access more functions than the user (see in the following chapters).
See the UWP 3.0 Tool manual.

UWP 3.0 WEB APP 14
Free access
If you select the Free access, the following options will not be available:
• Settings menu (see Settings menu);
• Editing mode (see the following chapters);
• Main menu options (except the logout; see Main menu).
UWP 3.0 WEB APP 15
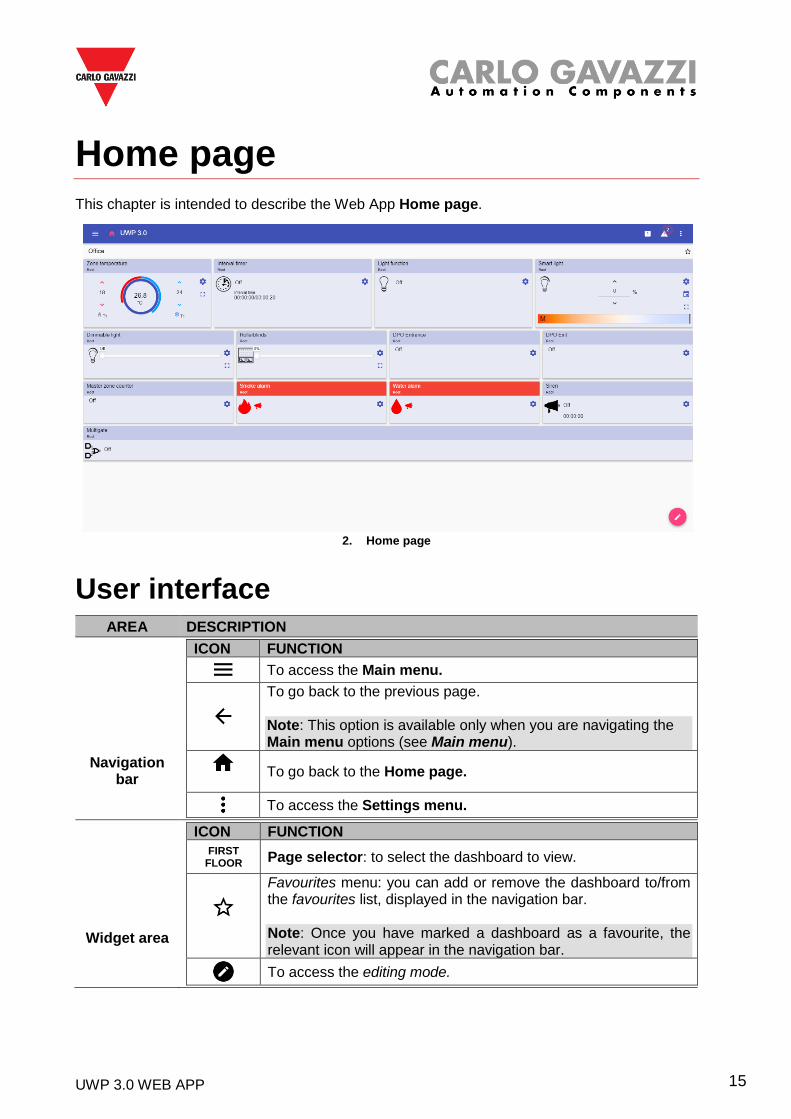
Home page This chapter is intended to describe the Web App Home page.
2. Home page
User interface AREA DESCRIPTION
Navigation bar
ICON FUNCTION
To access the Main menu.
To go back to the previous page. Note: This option is available only when you are navigating the Main menu options (see Main menu).
To go back to the Home page.
To access the Settings menu.
Widget area
ICON FUNCTION
FIRST FLOOR Page selector: to select the dashboard to view.
Favourites menu: you can add or remove the dashboard to/from the favourites list, displayed in the navigation bar. Note: Once you have marked a dashboard as a favourite, the relevant icon will appear in the navigation bar.
To access the editing mode.
UWP 3.0 WEB APP 16
How to set the home page STEP ACTION
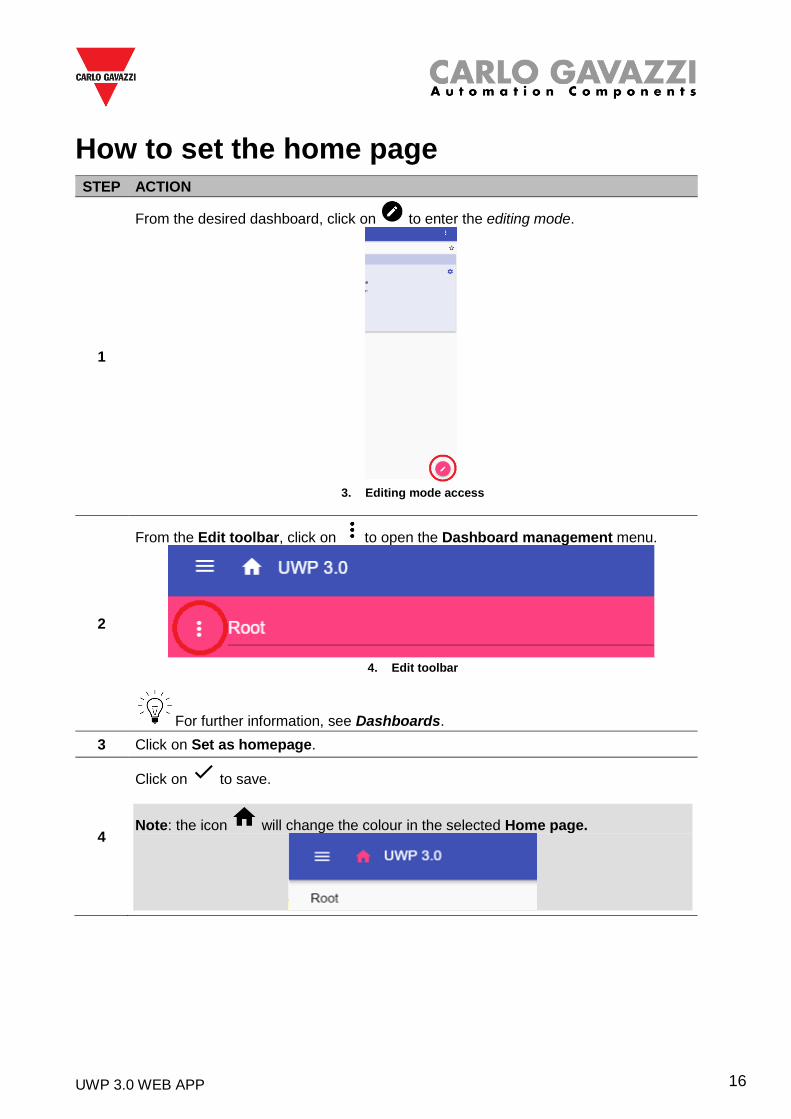
1
From the desired dashboard, click on to enter the editing mode.
3. Editing mode access
2
From the Edit toolbar, click on to open the Dashboard management menu.
4. Edit toolbar
For further information, see Dashboards.
3 Click on Set as homepage.
4
Click on to save.
Note: the icon will change the colour in the selected Home page.
UWP 3.0 WEB APP 17
Main menu This chapter is intended to describe the Web App Main menu.
How to access the main menu STEP ACTION
1
From the Navigation bar, click on to open the Main menu.
5. Main menu
2 Select the desired option (see the following chapter).
Note: This menu is not available if you choose the Free access.
UWP 3.0 WEB APP 18
User interface In this chapter, you can find information concerning the Main menu options.
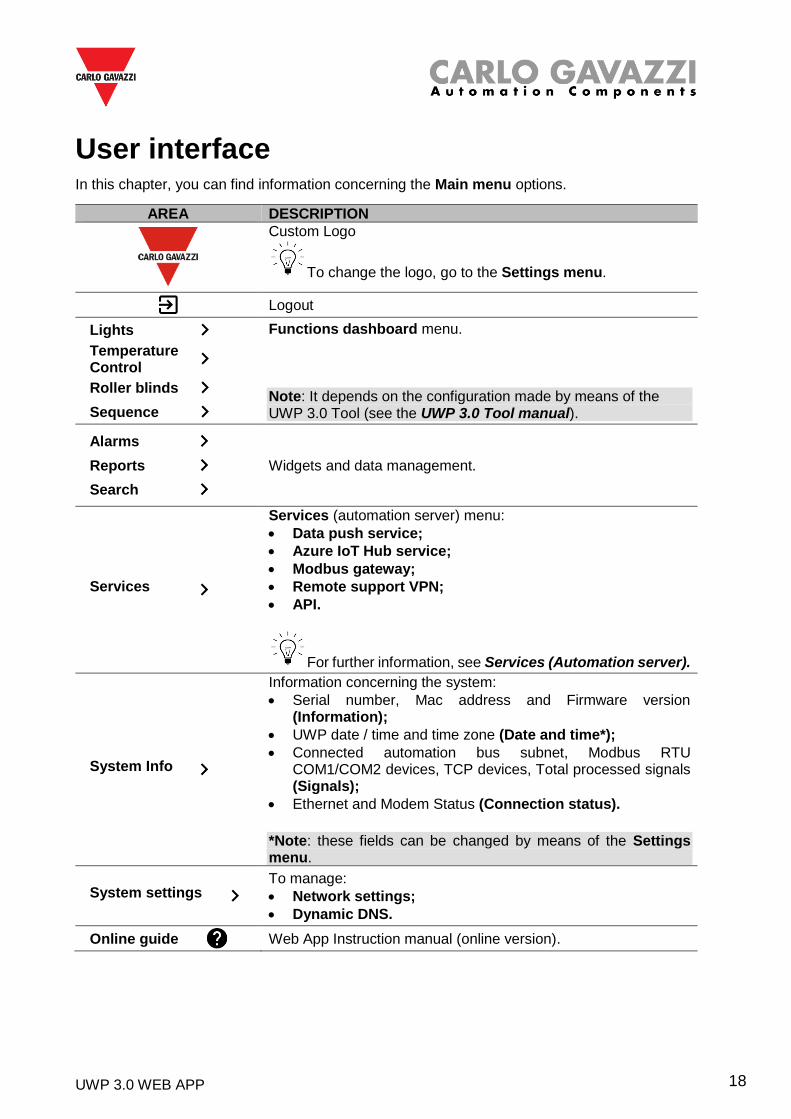
AREA DESCRIPTION
Custom Logo
To change the logo, go to the Settings menu.
Logout
Lights Temperature Control
Roller blinds
Sequence
Functions dashboard menu. Note: It depends on the configuration made by means of the UWP 3.0 Tool (see the UWP 3.0 Tool manual).
Alarms
Reports
Search
Widgets and data management.
Services
Services (automation server) menu:
• Data push service;
• Azure IoT Hub service;
• Modbus gateway;
• Remote support VPN;
• API.
For further information, see Services (Automation server).
System Info
Information concerning the system:
• Serial number, Mac address and Firmware version (Information);
• UWP date / time and time zone (Date and time*);
• Connected automation bus subnet, Modbus RTU COM1/COM2 devices, TCP devices, Total processed signals (Signals);
• Ethernet and Modem Status (Connection status).
*Note: these fields can be changed by means of the Settings menu.
System settings
To manage:
• Network settings;
• Dynamic DNS.
Online guide
Web App Instruction manual (online version).
UWP 3.0 WEB APP 19
Services (Automation server) This chapter is intended to describe the Automation server services: Data push, Azure IoT
Hub, AWS IoT, Modbus gateway, Remote support VPN and API.
How to access the services STEP ACTION
1
From the Navigation bar, click on to open the Main menu.
6. Main menu
2 Select Services
UWP 3.0 WEB APP 20
User interface The following chapters describe each service page structure.
Data push service
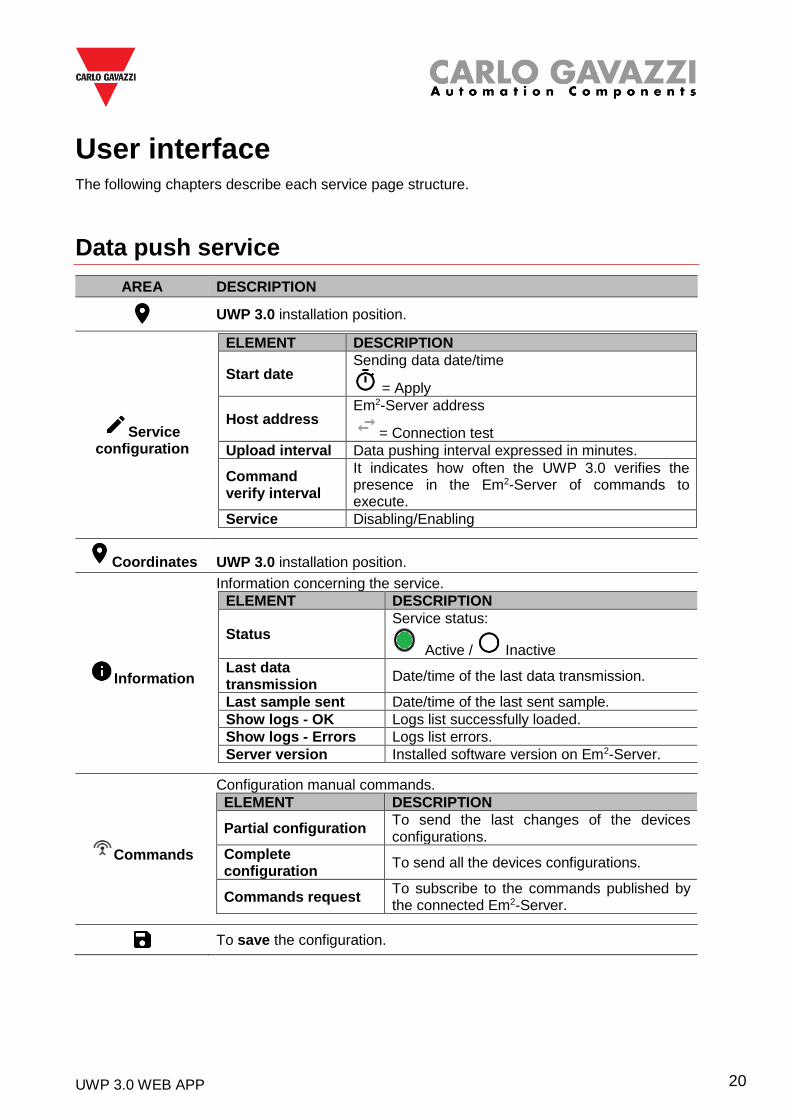
AREA DESCRIPTION
UWP 3.0 installation position.
Service configuration
ELEMENT DESCRIPTION
Start date Sending data date/time
= Apply
Host address Em2-Server address
= Connection test
Upload interval Data pushing interval expressed in minutes.
Command verify interval
It indicates how often the UWP 3.0 verifies the presence in the Em2-Server of commands to execute.
Service Disabling/Enabling
Coordinates UWP 3.0 installation position.
Information
Information concerning the service.
ELEMENT DESCRIPTION
Status Service status:
Active / Inactive
Last data transmission
Date/time of the last data transmission.
Last sample sent Date/time of the last sent sample.
Show logs - OK Logs list successfully loaded.
Show logs - Errors Logs list errors.
Server version Installed software version on Em2-Server.
Commands
Configuration manual commands.
ELEMENT DESCRIPTION
Partial configuration To send the last changes of the devices configurations.
Complete configuration
To send all the devices configurations.
Commands request To subscribe to the commands published by the connected Em2-Server.
To save the configuration.
UWP 3.0 WEB APP 21
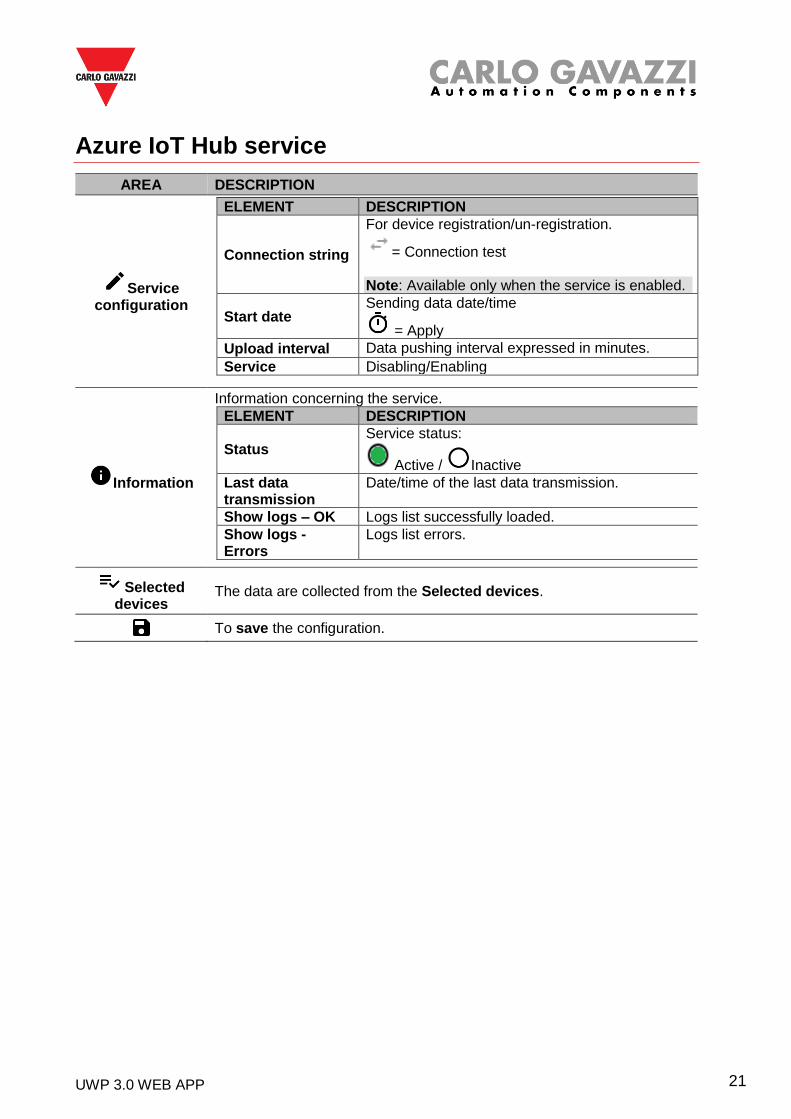
Azure IoT Hub service
AREA DESCRIPTION
Service configuration
ELEMENT DESCRIPTION
Connection string
For device registration/un-registration.
= Connection test Note: Available only when the service is enabled.
Start date Sending data date/time
= Apply
Upload interval Data pushing interval expressed in minutes.
Service Disabling/Enabling
Information
Information concerning the service.
ELEMENT DESCRIPTION
Status Service status:
Active / Inactive
Last data transmission
Date/time of the last data transmission.
Show logs – OK Logs list successfully loaded.
Show logs - Errors
Logs list errors.
Selected devices
The data are collected from the Selected devices.
To save the configuration.
UWP 3.0 WEB APP 22
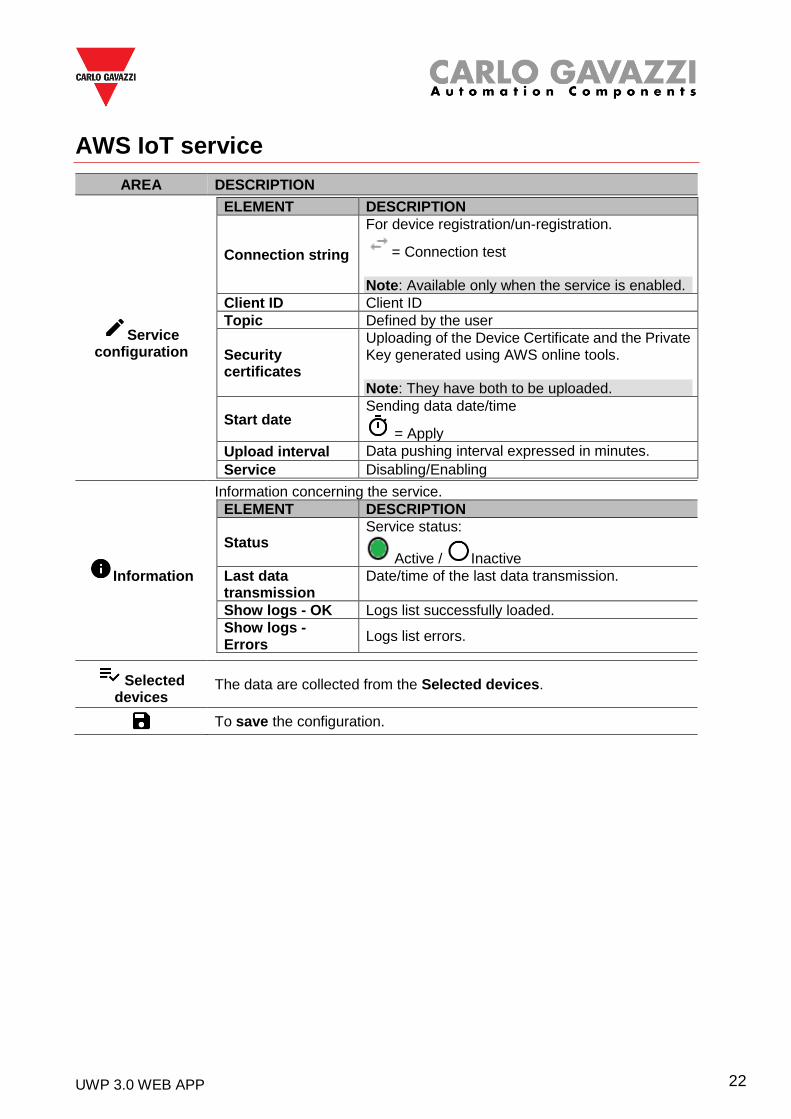
AWS IoT service
AREA DESCRIPTION
Service configuration
ELEMENT DESCRIPTION
Connection string
For device registration/un-registration.
= Connection test Note: Available only when the service is enabled.
Client ID Client ID
Topic Defined by the user
Security certificates
Uploading of the Device Certificate and the Private Key generated using AWS online tools. Note: They have both to be uploaded.
Start date Sending data date/time
= Apply
Upload interval Data pushing interval expressed in minutes.
Service Disabling/Enabling
Information
Information concerning the service.
ELEMENT DESCRIPTION
Status Service status:
Active / Inactive
Last data transmission
Date/time of the last data transmission.
Show logs - OK Logs list successfully loaded.
Show logs - Errors
Logs list errors.
Selected devices
The data are collected from the Selected devices.
To save the configuration.
UWP 3.0 WEB APP 23
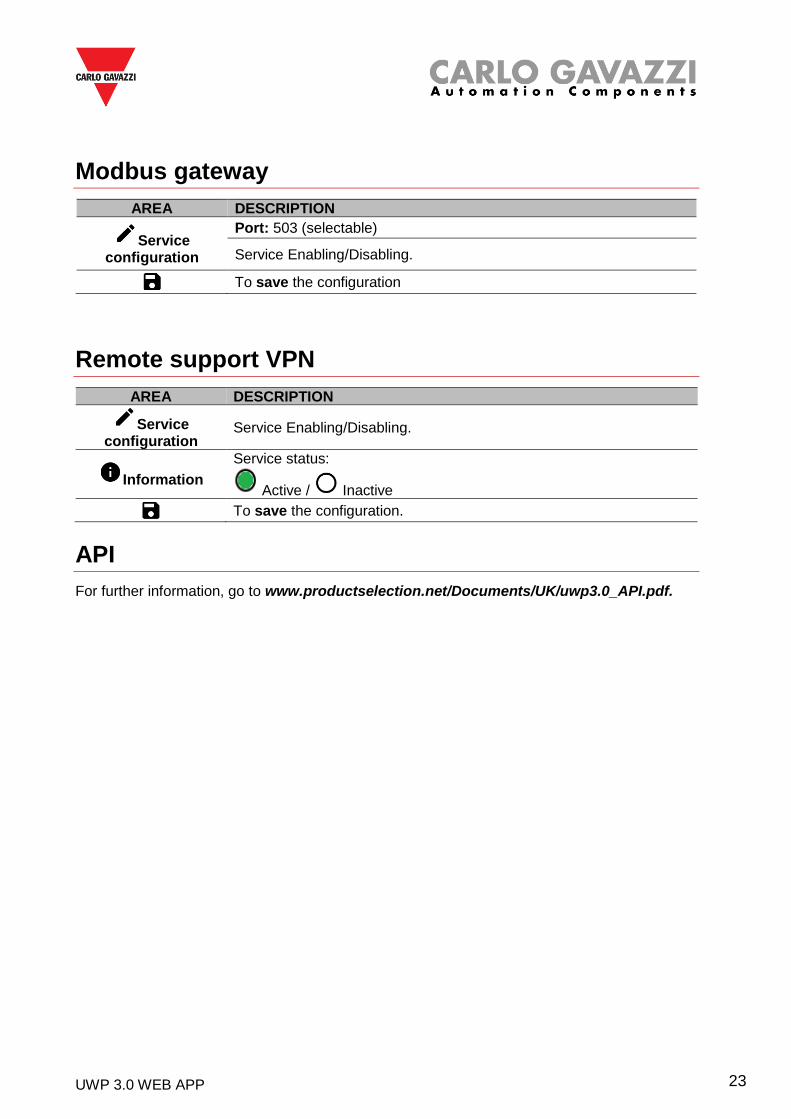
Modbus gateway
AREA DESCRIPTION
Service configuration
Port: 503 (selectable)
Service Enabling/Disabling.
To save the configuration
Remote support VPN
AREA DESCRIPTION
Service configuration
Service Enabling/Disabling.
Information
Service status:
Active / Inactive
To save the configuration.
API
For further information, go to www.productselection.net/Documents/UK/uwp3.0_API.pdf.
UWP 3.0 WEB APP 24
Things to know The following chapter describes the services available on the Web App.
Data push service functions
The Data push service allows you to send data from the UWP 3.0 to the Em2-Server.
Azure IoT Hub service
The Azure IoT Hub service allows you to send data from the selected devices to the UWP 3.0.
AWS IoT service
UWP 3.0 is compatible with Amazon AWS IoT. By having data available on Amazon AWS,
users can leverage the powerful Amazon tools for:
a) Integrating other data source data;
b) Sharing information with other systems;
c) Using the best Business Intelligence tools to dig into data.
For further information, go to www.productselection.net/Documents/UK/uwp3.0_AWS.pdf
Modbus gateway service
This bridging feature allows you to use the UWP 3.0 as a Modbus gateway, in order to route any Modbus TCP/IP request to a specific meter connected on the serial ports (COM1 and COM2) of the UWP 3.0. Once the service has been activated, two specific slave IDs are available, connecting to the relevant TCP port (default: 503):
• slave ID 248: dedicated ID to configure all Modbus gateway parameters. Specific registers allow to set properly all communication parameters that are needed to reach the desired meter connected on the serial ports (COM1 and COM2) of the UWP 3.0.
• slave ID 249: dedicated ID that collects all Modbus TCP/IP requests from the remote SCADA/software, to be routed to the desired slave ID (Target slave ID) connected on the ports (COM1 and COM2) of the UWP 3.0.
UWP 3.0 WEB APP 25
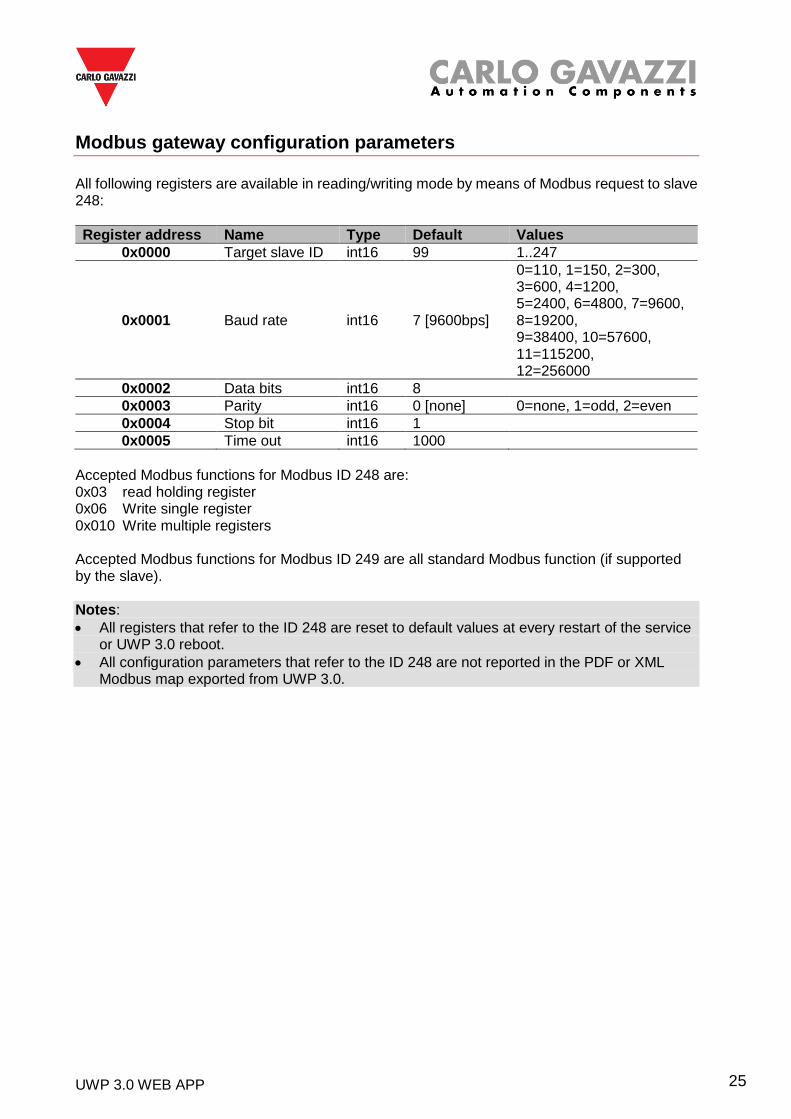
Modbus gateway configuration parameters
All following registers are available in reading/writing mode by means of Modbus request to slave 248:
Register address Name Type Default Values
0x0000 Target slave ID int16 99 1..247
0x0001 Baud rate int16 7 [9600bps]
0=110, 1=150, 2=300, 3=600, 4=1200, 5=2400, 6=4800, 7=9600, 8=19200, 9=38400, 10=57600, 11=115200, 12=256000
0x0002 Data bits int16 8
0x0003 Parity int16 0 [none] 0=none, 1=odd, 2=even
0x0004 Stop bit int16 1
0x0005 Time out int16 1000
Accepted Modbus functions for Modbus ID 248 are: 0x03 read holding register 0x06 Write single register 0x010 Write multiple registers Accepted Modbus functions for Modbus ID 249 are all standard Modbus function (if supported by the slave). Notes:
• All registers that refer to the ID 248 are reset to default values at every restart of the service or UWP 3.0 reboot.
• All configuration parameters that refer to the ID 248 are not reported in the PDF or XML Modbus map exported from UWP 3.0.

UWP 3.0 WEB APP 26
Example 1: reading of all default Modbus gateway parameters To read all default parameters, using the UWP 3.0 IP address and Modbus ID 248, the following request must be sent: Request
[00h] [00h] [00h] [00h] [00h] [06h] [F8h] [03h] [00h] [00h] [00h] [05h] Where… [00h] [00h] : Transaction Identifier [00h] [00h] : Protocol Identifier [00h] [06h] : Message Length, 6 bytes [F8h] : Modbus ID 248 [03h] : Function code [00h] [00h] : Address of the first register to be read [00h] [05h] : Number of registers to be read
Response [00h] [00h] [00h] [00h] [00h] [0Dh] [F8h] [03h] [0Ah] [00h] [63h] [00h] [07h] [00h] [08h] [00h] [00h] [00h] [01h]
Where… [00h] [00h] : Transaction Identifier [00h] [00h] : Protocol Identifier [00h] [0Dh] : Message Length, 13 bytes [F8h] : Modbus ID 248 [03h] : Function code [0Ah] : Byte count (number of following bytes) [00h] [63h] : Target slave ID (63h = 99d) [00h] [07h] : Baud rate (7 = 9600) [00h] [08h] : Data bits [00h] [00h] : Parity (0 = None) [00h] [01h] : Stop bit
UWP 3.0 WEB APP 27
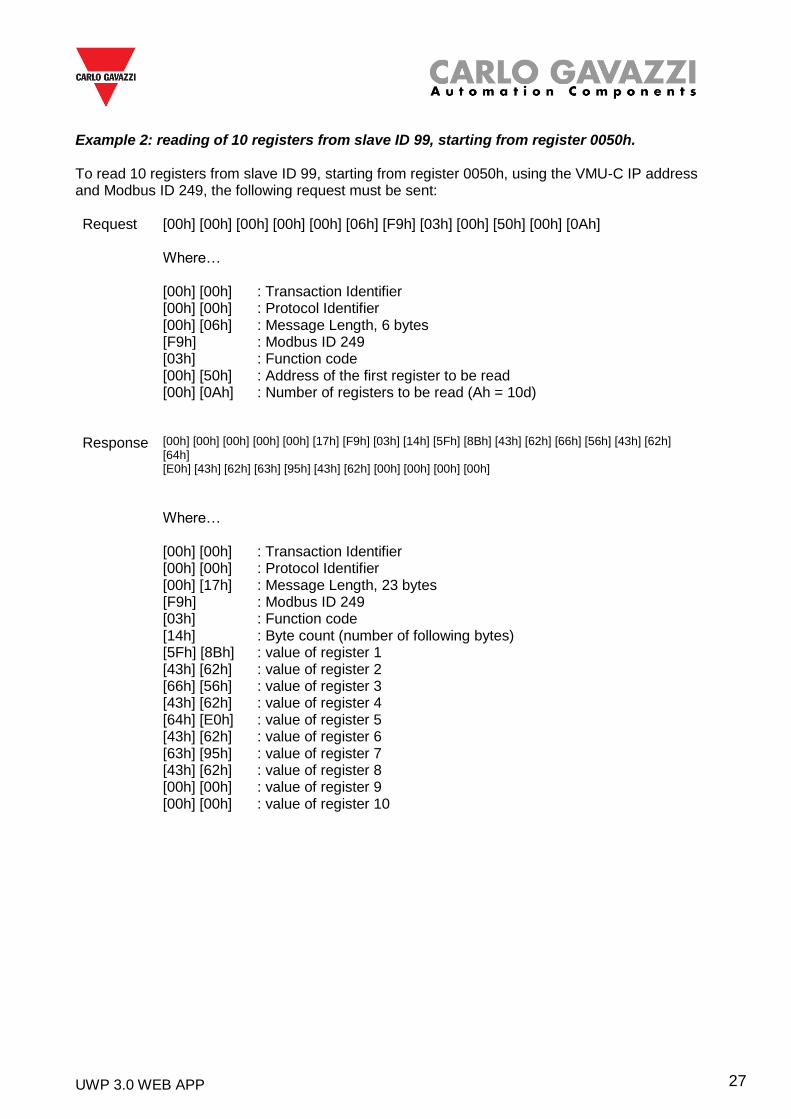
Example 2: reading of 10 registers from slave ID 99, starting from register 0050h. To read 10 registers from slave ID 99, starting from register 0050h, using the VMU-C IP address and Modbus ID 249, the following request must be sent: Request
[00h] [00h] [00h] [00h] [00h] [06h] [F9h] [03h] [00h] [50h] [00h] [0Ah] Where… [00h] [00h] : Transaction Identifier [00h] [00h] : Protocol Identifier [00h] [06h] : Message Length, 6 bytes [F9h] : Modbus ID 249 [03h] : Function code [00h] [50h] : Address of the first register to be read [00h] [0Ah] : Number of registers to be read (Ah = 10d)
Response [00h] [00h] [00h] [00h] [00h] [17h] [F9h] [03h] [14h] [5Fh] [8Bh] [43h] [62h] [66h] [56h] [43h] [62h] [64h] [E0h] [43h] [62h] [63h] [95h] [43h] [62h] [00h] [00h] [00h] [00h]
Where… [00h] [00h] : Transaction Identifier [00h] [00h] : Protocol Identifier [00h] [17h] : Message Length, 23 bytes [F9h] : Modbus ID 249 [03h] : Function code [14h] : Byte count (number of following bytes) [5Fh] [8Bh] : value of register 1 [43h] [62h] : value of register 2 [66h] [56h] : value of register 3 [43h] [62h] : value of register 4 [64h] [E0h] : value of register 5 [43h] [62h] : value of register 6 [63h] [95h] : value of register 7 [43h] [62h] : value of register 8 [00h] [00h] : value of register 9 [00h] [00h] : value of register 10
UWP 3.0 WEB APP 28
Remote support VPN service
The VPN service is a remote access service that Carlo Gavazzi Controls activates to provide
remote assistance.
API
The UWP Rest-API is a RESTful application programming interface (A.P.I.) that allows other
systems to interact with UWP by means of Web Services in a secure, scalable and reliable way.
Through this service, it’s possible to system integrators, software developers and system
administrators to access the UWP resources via URL paths, using standard HTTP commands such
as GET, POST, PUT, and DELETE. As a result, a JSON file is returned.
The description of UWP's Rest-API is beyond the scope of this document. For further information, go to www.productselection.net/Documents/UK/uwp3.0_API.pdf.
UWP 3.0 WEB APP 29
How to In the following chapters, you can find the procedures to configure the Data push, the Azure
IoT Hub services and to manage the Modbus gateway and VPN services. Moreover, you can
find a link that redirects you to a document dedicated to the API service.
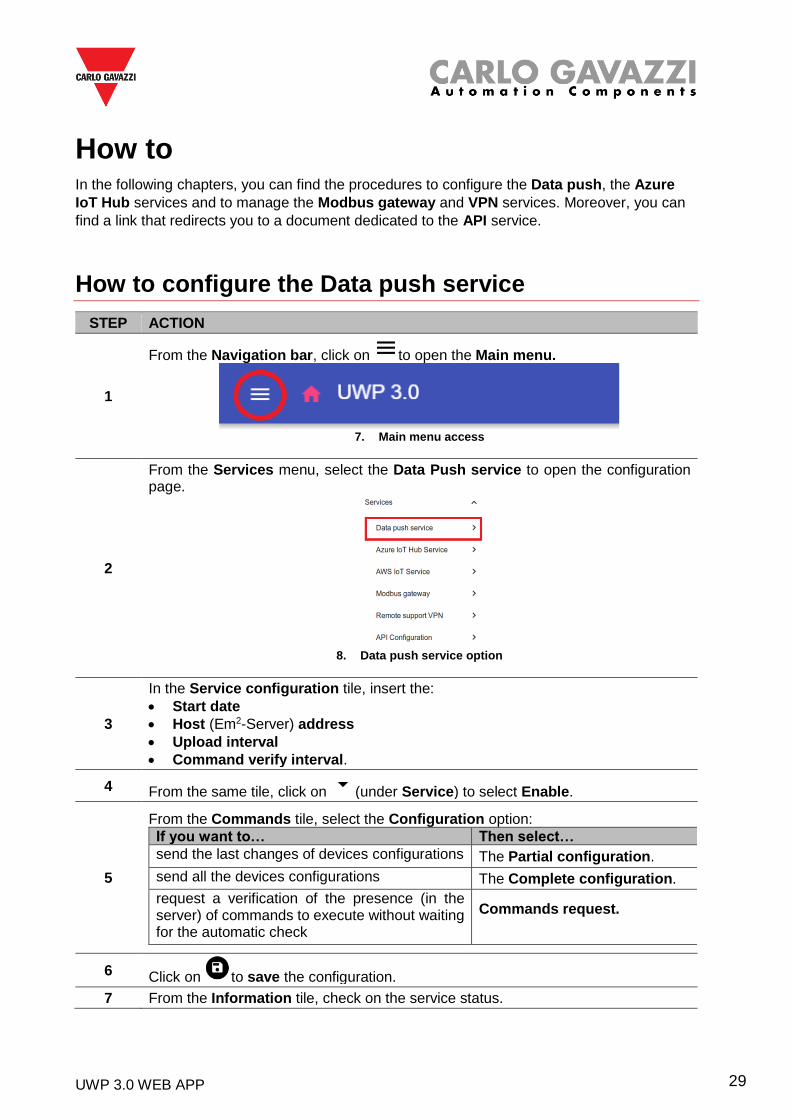
How to configure the Data push service
STEP ACTION
1
From the Navigation bar, click on to open the Main menu.
7. Main menu access
2
From the Services menu, select the Data Push service to open the configuration page.
8. Data push service option
3
In the Service configuration tile, insert the:
• Start date
• Host (Em2-Server) address
• Upload interval
• Command verify interval.
4 From the same tile, click on (under Service) to select Enable.
5
From the Commands tile, select the Configuration option:
If you want to… Then select…
send the last changes of devices configurations The Partial configuration.
send all the devices configurations The Complete configuration.
request a verification of the presence (in the server) of commands to execute without waiting for the automatic check
Commands request.
6 Click on to save the configuration.
7 From the Information tile, check on the service status.
UWP 3.0 WEB APP 30
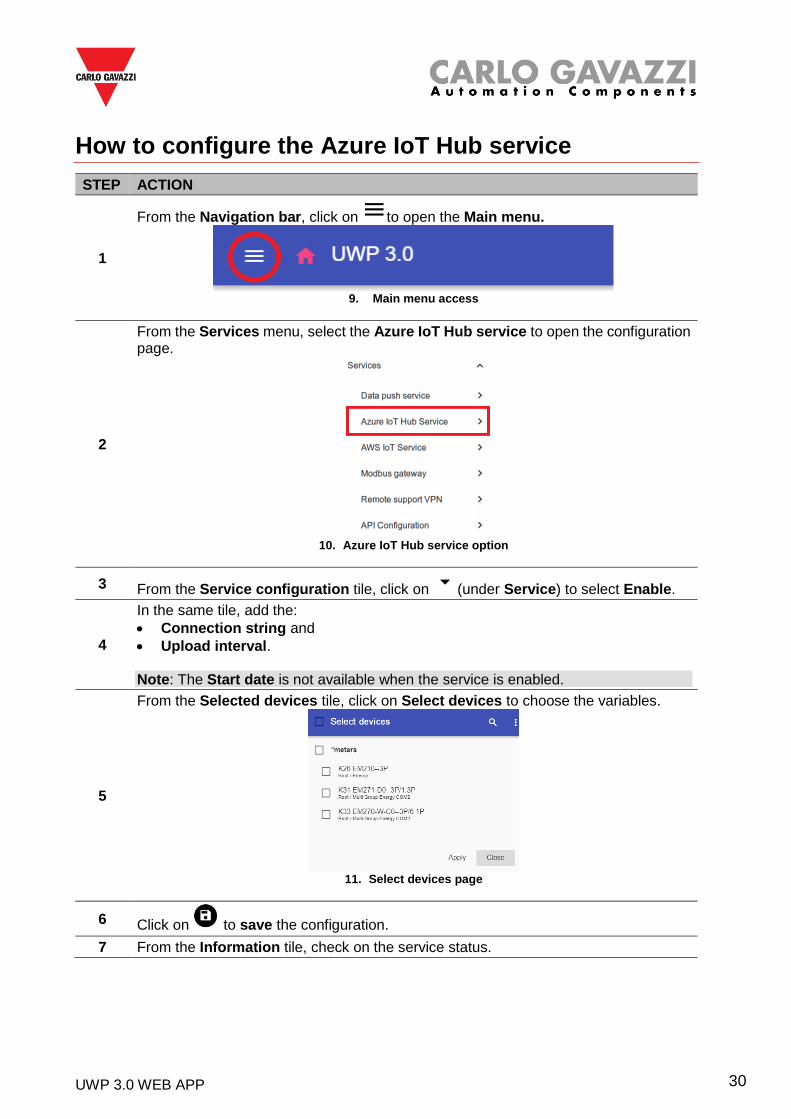
How to configure the Azure IoT Hub service
STEP ACTION
1
From the Navigation bar, click on to open the Main menu.
9. Main menu access
2
From the Services menu, select the Azure IoT Hub service to open the configuration page.
10. Azure IoT Hub service option
3 From the Service configuration tile, click on (under Service) to select Enable.
4
In the same tile, add the:
• Connection string and
• Upload interval.
Note: The Start date is not available when the service is enabled.
5
From the Selected devices tile, click on Select devices to choose the variables.
11. Select devices page
6 Click on to save the configuration.
7 From the Information tile, check on the service status.
UWP 3.0 WEB APP 31
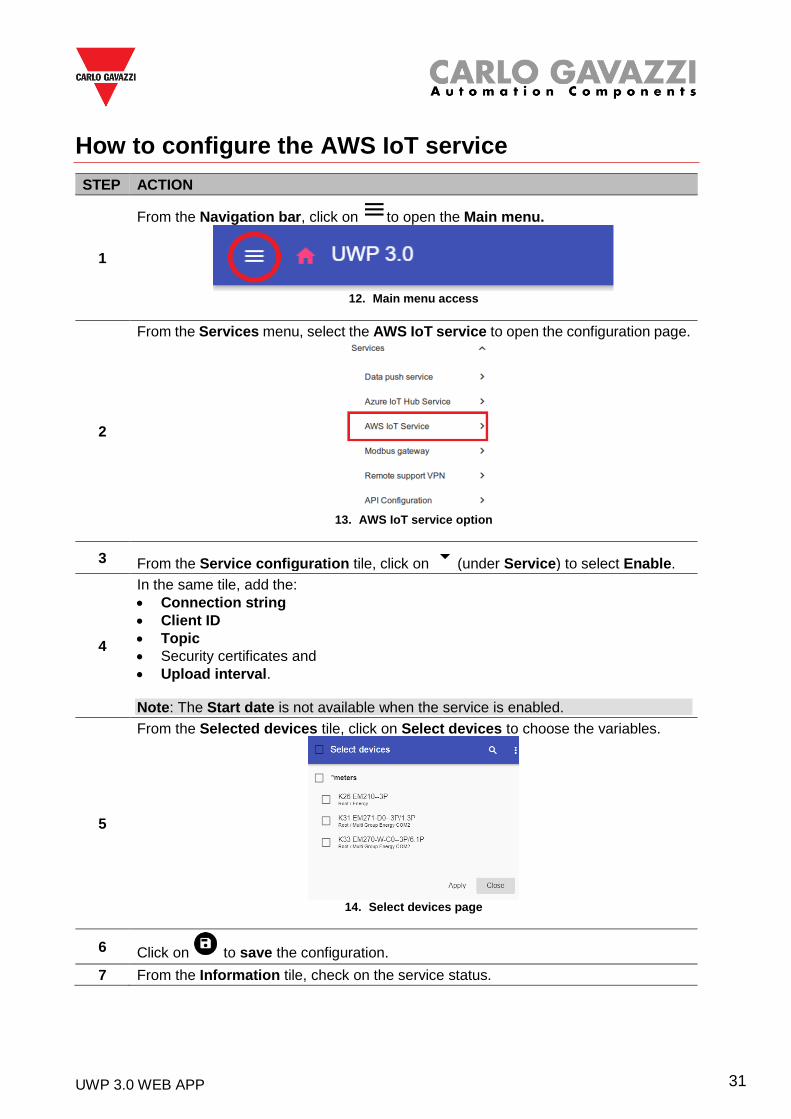
How to configure the AWS IoT service
STEP ACTION
1
From the Navigation bar, click on to open the Main menu.
12. Main menu access
2
From the Services menu, select the AWS IoT service to open the configuration page.
13. AWS IoT service option
3 From the Service configuration tile, click on (under Service) to select Enable.
4
In the same tile, add the:
• Connection string
• Client ID
• Topic
• Security certificates and
• Upload interval.
Note: The Start date is not available when the service is enabled.
5
From the Selected devices tile, click on Select devices to choose the variables.
14. Select devices page
6 Click on to save the configuration.
7 From the Information tile, check on the service status.
UWP 3.0 WEB APP 32
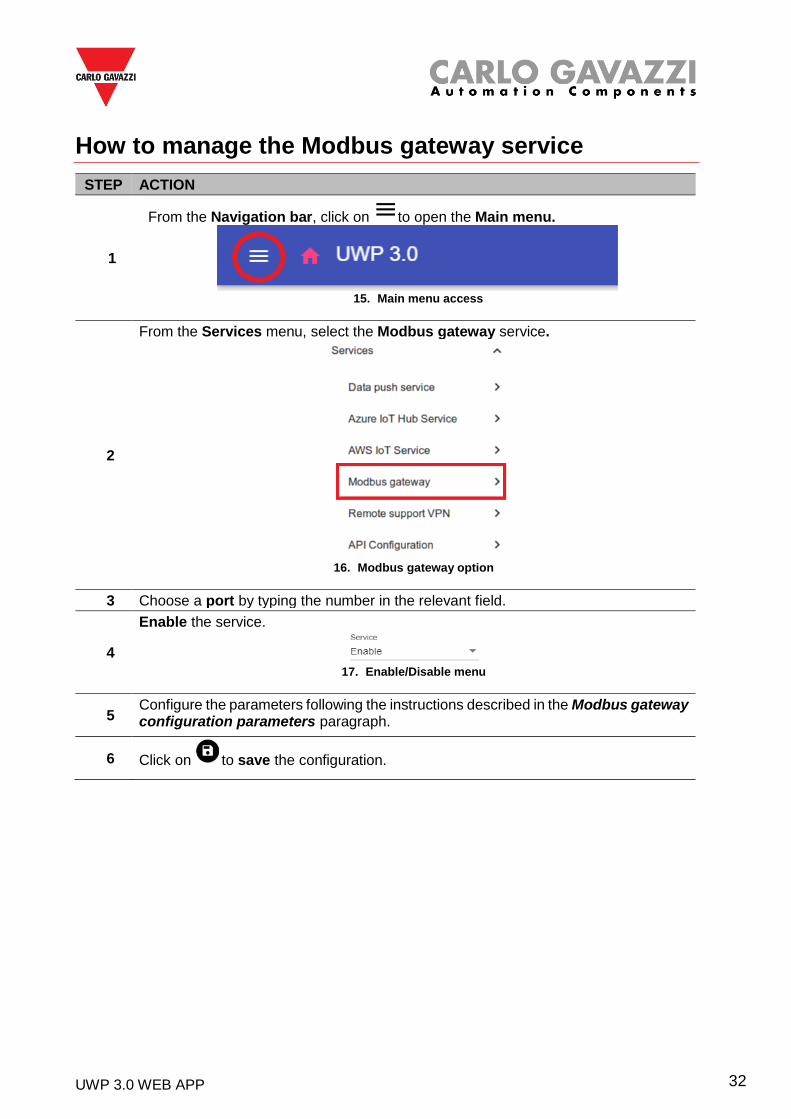
How to manage the Modbus gateway service
STEP ACTION
1
From the Navigation bar, click on to open the Main menu.
15. Main menu access
2
From the Services menu, select the Modbus gateway service.
16. Modbus gateway option
3 Choose a port by typing the number in the relevant field.
4
Enable the service.
17. Enable/Disable menu
5 Configure the parameters following the instructions described in the Modbus gateway configuration parameters paragraph.
6 Click on to save the configuration.
UWP 3.0 WEB APP 33
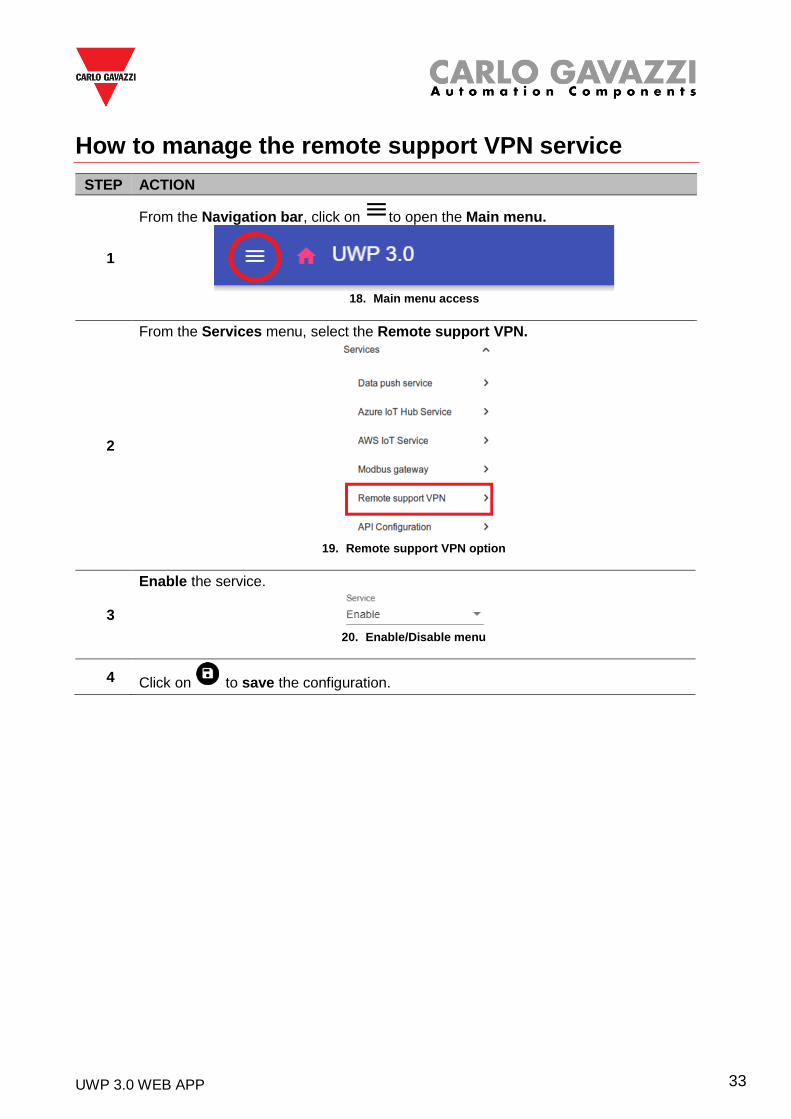
How to manage the remote support VPN service
STEP ACTION
1
From the Navigation bar, click on to open the Main menu.
18. Main menu access
2
From the Services menu, select the Remote support VPN.
19. Remote support VPN option
3
Enable the service.
20. Enable/Disable menu
4 Click on to save the configuration.
UWP 3.0 WEB APP 34
System settings This chapter is intended to describe the System settings.
How to access the System settings STEP ACTION
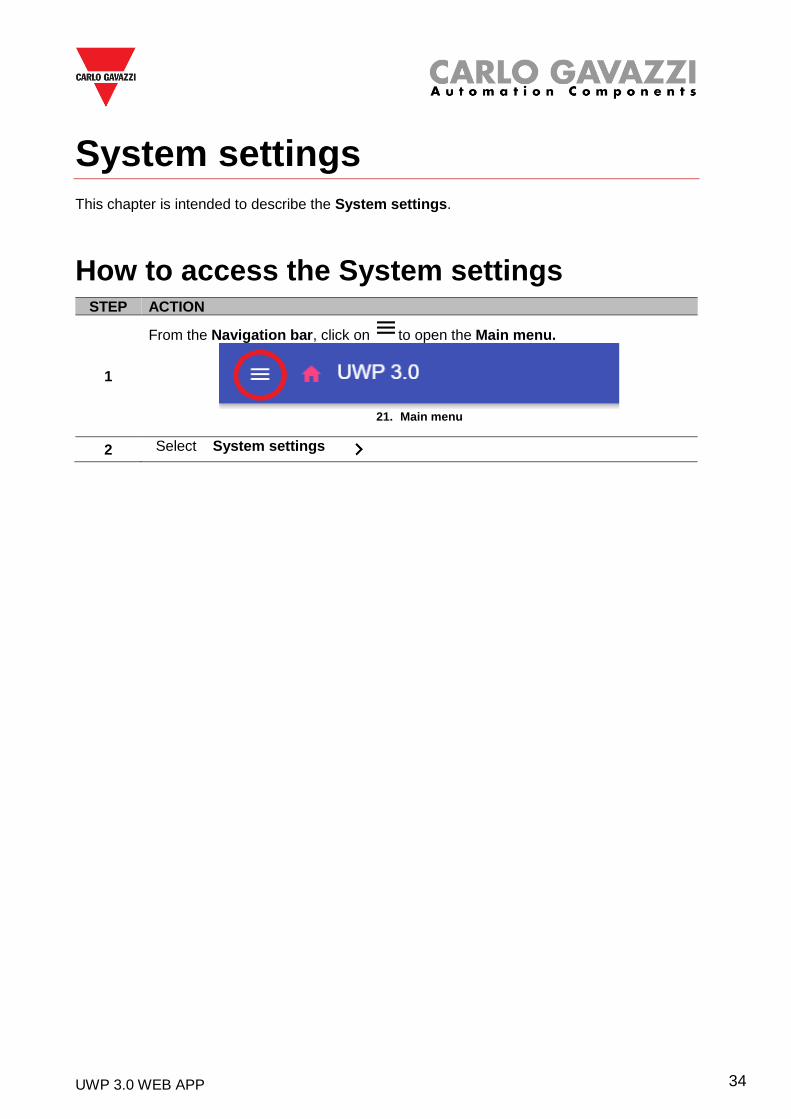
1
From the Navigation bar, click on to open the Main menu.
21. Main menu
2 Select System settings
UWP 3.0 WEB APP 35
User interface
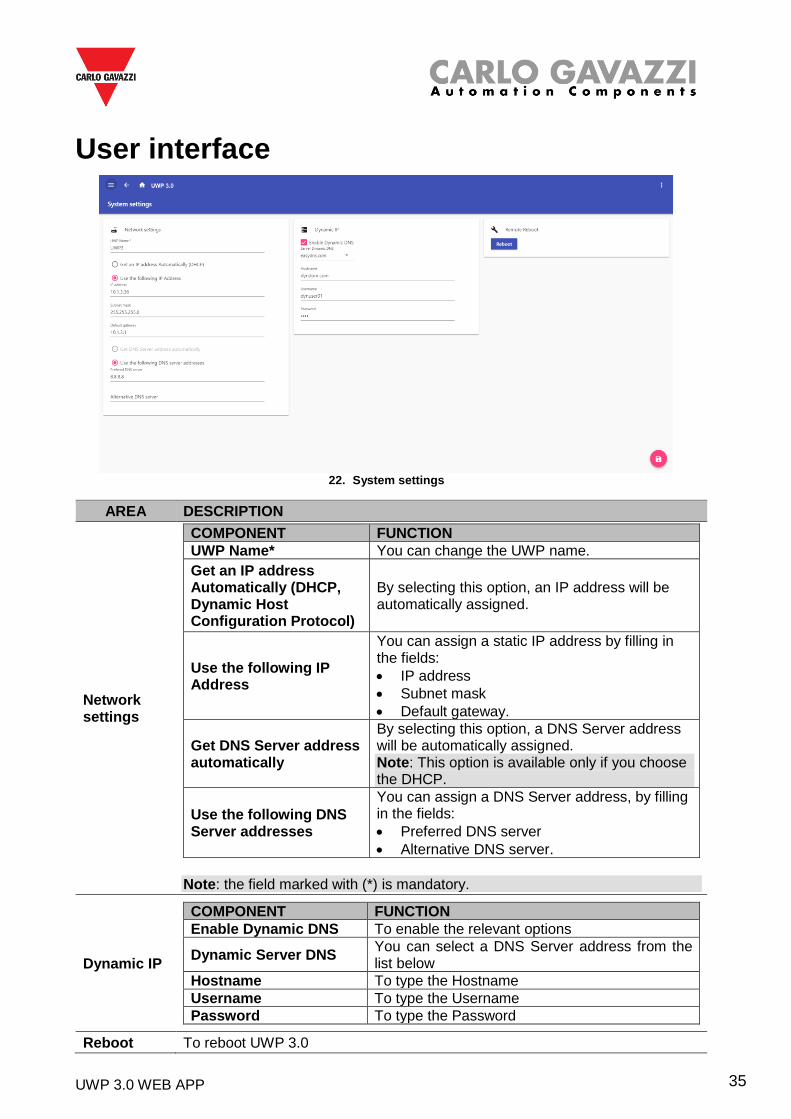
22. System settings
AREA DESCRIPTION
Network settings
COMPONENT FUNCTION
UWP Name* You can change the UWP name.
Get an IP address Automatically (DHCP, Dynamic Host Configuration Protocol)
By selecting this option, an IP address will be automatically assigned.
Use the following IP Address
You can assign a static IP address by filling in the fields:
• IP address
• Subnet mask
• Default gateway.
Get DNS Server address automatically
By selecting this option, a DNS Server address will be automatically assigned. Note: This option is available only if you choose the DHCP.
Use the following DNS Server addresses
You can assign a DNS Server address, by filling in the fields:
• Preferred DNS server
• Alternative DNS server.
Note: the field marked with (*) is mandatory.
Dynamic IP
COMPONENT FUNCTION
Enable Dynamic DNS To enable the relevant options
Dynamic Server DNS You can select a DNS Server address from the list below
Hostname To type the Hostname
Username To type the Username
Password To type the Password
Reboot To reboot UWP 3.0
UWP 3.0 WEB APP 36
Settings menu This chapter is intended to describe the Web App Settings menu.
Note: This menu is not available if you choose the Free access.
How to access the settings menu STEP ACTION
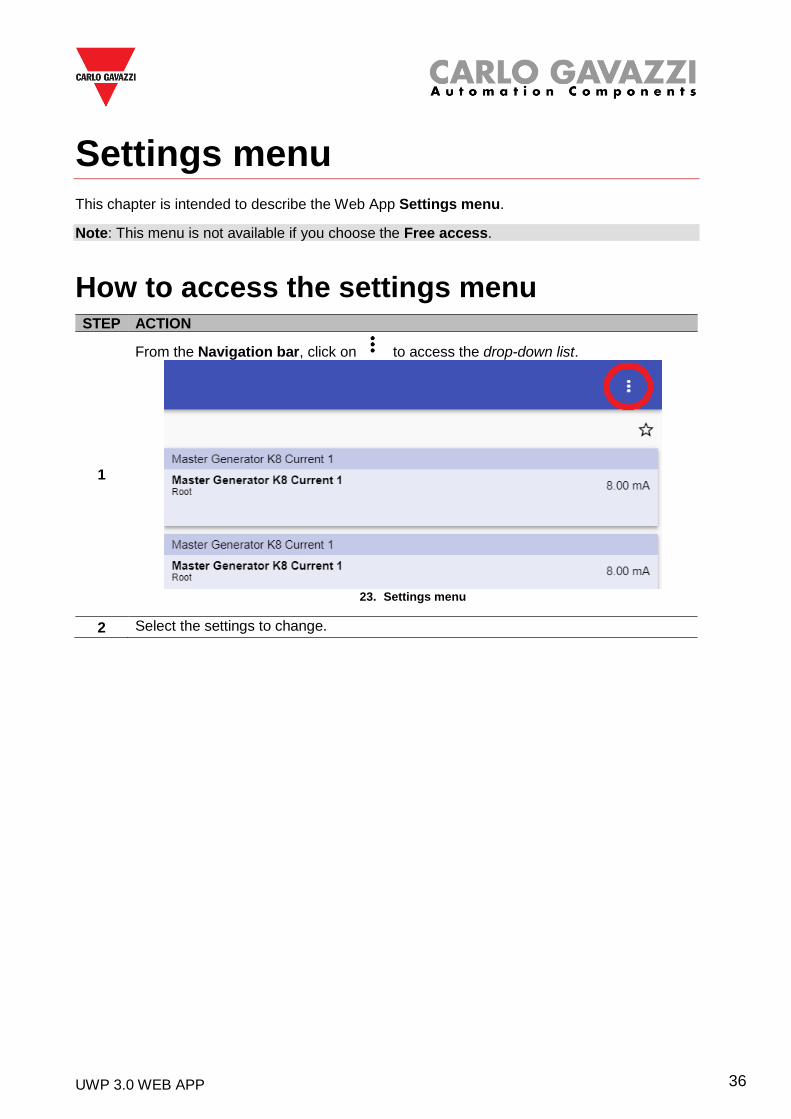
1
From the Navigation bar, click on to access the drop-down list.
23. Settings menu
2 Select the settings to change.
UWP 3.0 WEB APP 37
User interface AREA DESCRIPTION
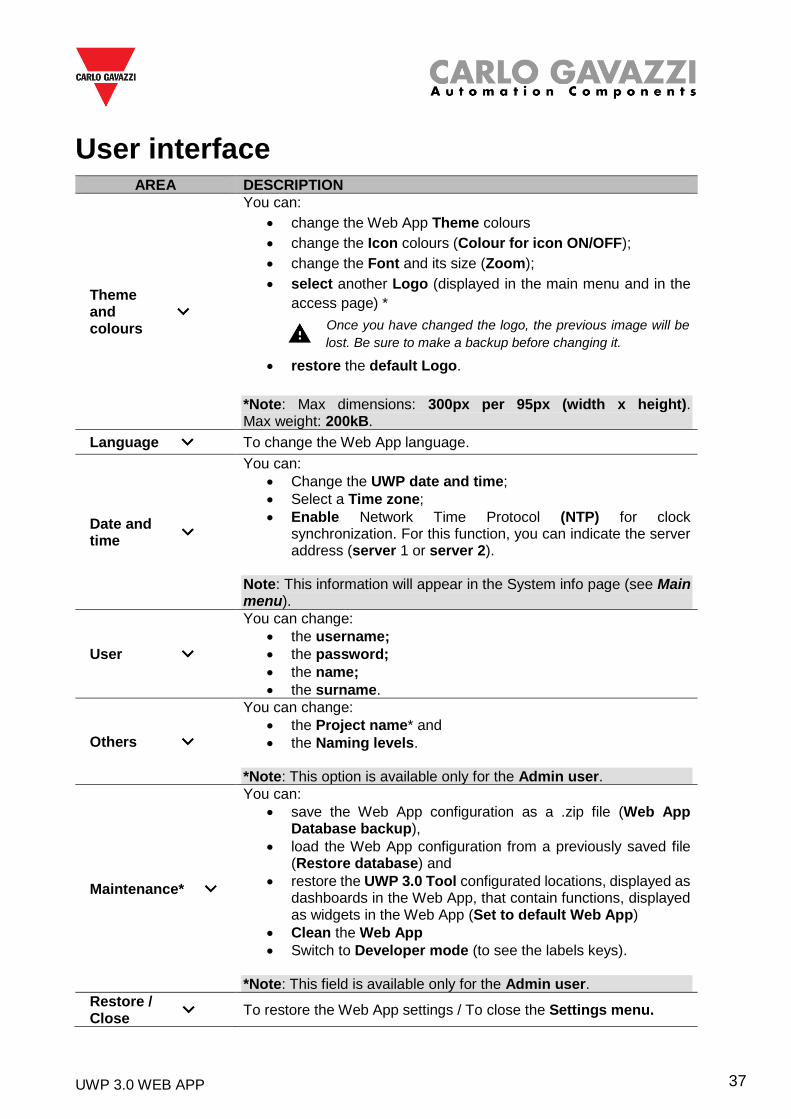
Theme and colours
You can:
• change the Web App Theme colours
• change the Icon colours (Colour for icon ON/OFF);
• change the Font and its size (Zoom);
• select another Logo (displayed in the main menu and in the
access page) *
Once you have changed the logo, the previous image will be
lost. Be sure to make a backup before changing it.
• restore the default Logo.
*Note: Max dimensions: 300px per 95px (width x height). Max weight: 200kB.
Language
To change the Web App language.
Date and time
You can:
• Change the UWP date and time;
• Select a Time zone;
• Enable Network Time Protocol (NTP) for clock synchronization. For this function, you can indicate the server address (server 1 or server 2).
Note: This information will appear in the System info page (see Main menu).
User
You can change:
• the username;
• the password;
• the name;
• the surname.
Others
You can change:
• the Project name* and
• the Naming levels. *Note: This option is available only for the Admin user.
Maintenance*
You can:
• save the Web App configuration as a .zip file (Web App Database backup),
• load the Web App configuration from a previously saved file (Restore database) and
• restore the UWP 3.0 Tool configurated locations, displayed as dashboards in the Web App, that contain functions, displayed as widgets in the Web App (Set to default Web App)
• Clean the Web App
• Switch to Developer mode (to see the labels keys). *Note: This field is available only for the Admin user.
Restore / Close
To restore the Web App settings / To close the Settings menu.
UWP 3.0 WEB APP 38
Dashboards This chapter is dedicated to the Web App Dashboards.
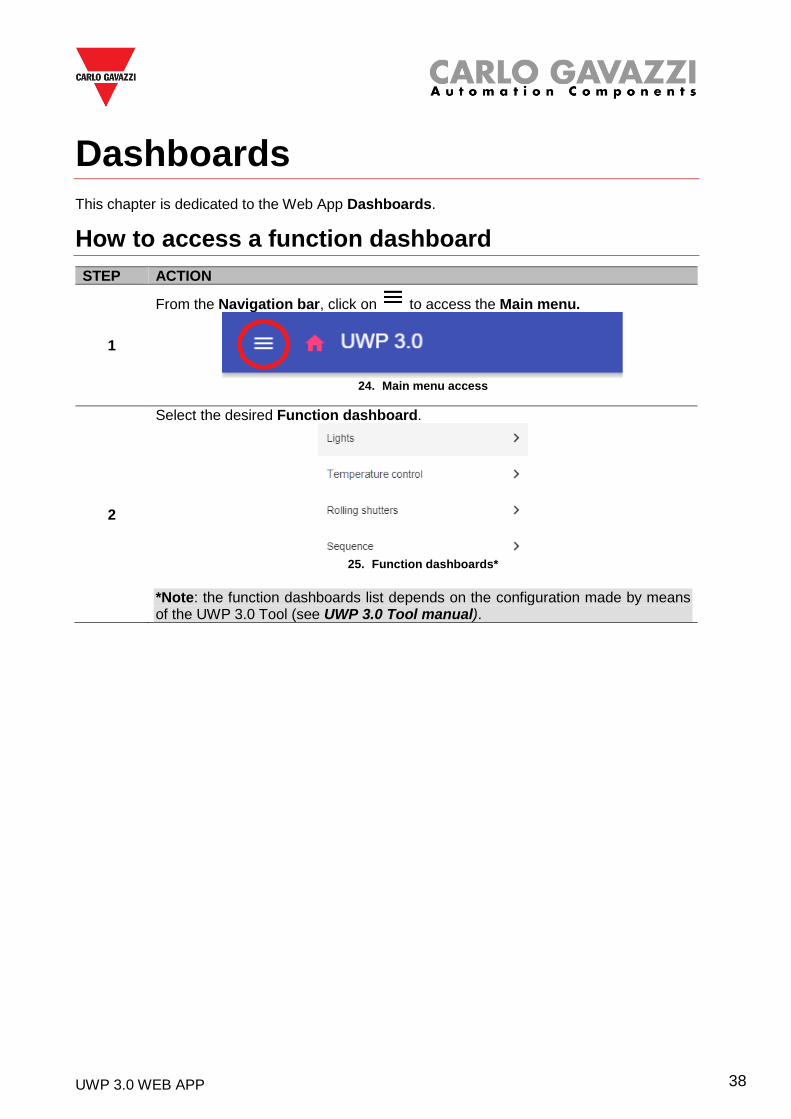
How to access a function dashboard
STEP ACTION
1
From the Navigation bar, click on to access the Main menu.
24. Main menu access
2
Select the desired Function dashboard.
25. Function dashboards*
*Note: the function dashboards list depends on the configuration made by means of the UWP 3.0 Tool (see UWP 3.0 Tool manual).
UWP 3.0 WEB APP 39
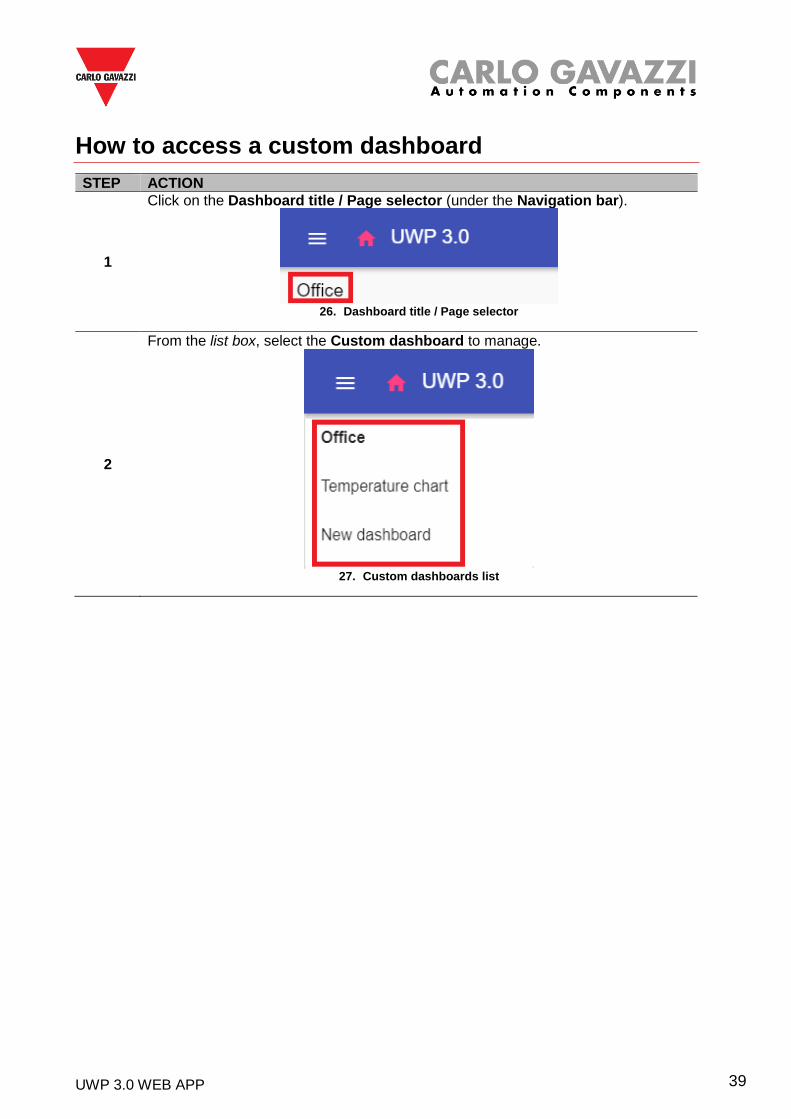
How to access a custom dashboard
STEP ACTION
1
Click on the Dashboard title / Page selector (under the Navigation bar).
26. Dashboard title / Page selector
2
From the list box, select the Custom dashboard to manage.
27. Custom dashboards list
UWP 3.0 WEB APP 40
User interface These chapters describe the different types of Dashboard structure and their common elements.
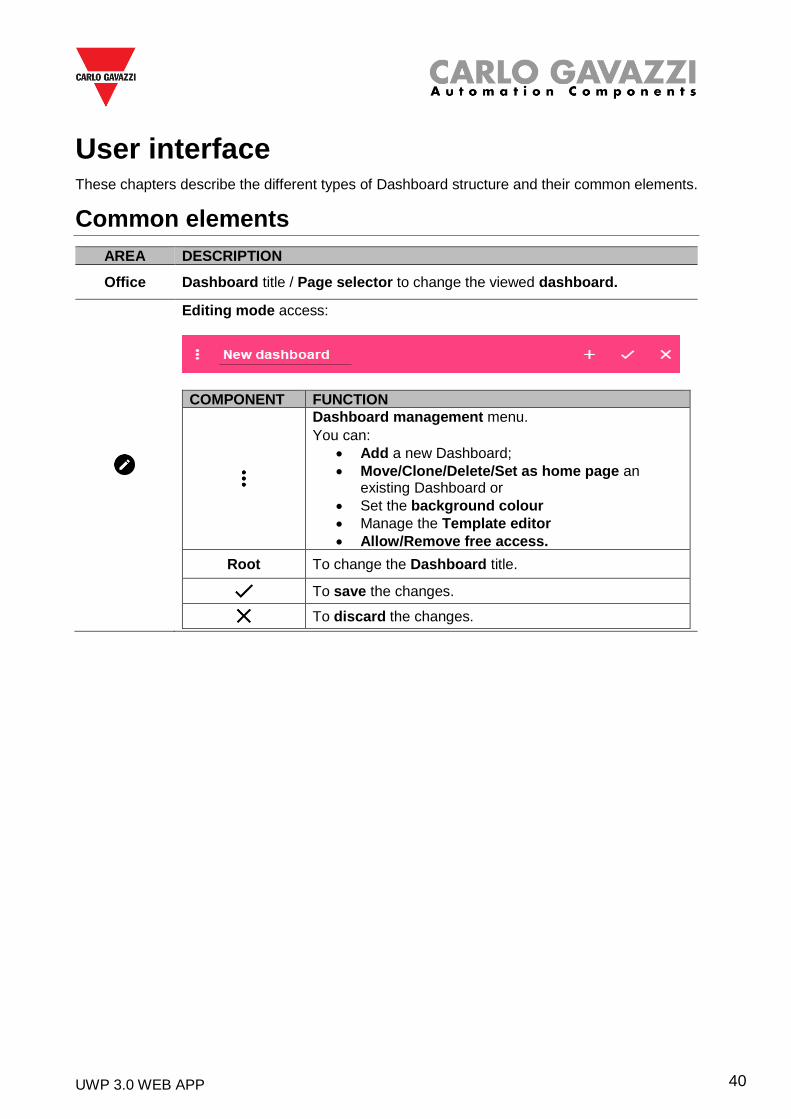
Common elements
AREA DESCRIPTION
Office Dashboard title / Page selector to change the viewed dashboard.
Editing mode access:
COMPONENT FUNCTION
Dashboard management menu.
You can:
• Add a new Dashboard;
• Move/Clone/Delete/Set as home page an existing Dashboard or
• Set the background colour
• Manage the Template editor
• Allow/Remove free access.
Root To change the Dashboard title.
To save the changes.
To discard the changes.
UWP 3.0 WEB APP 41
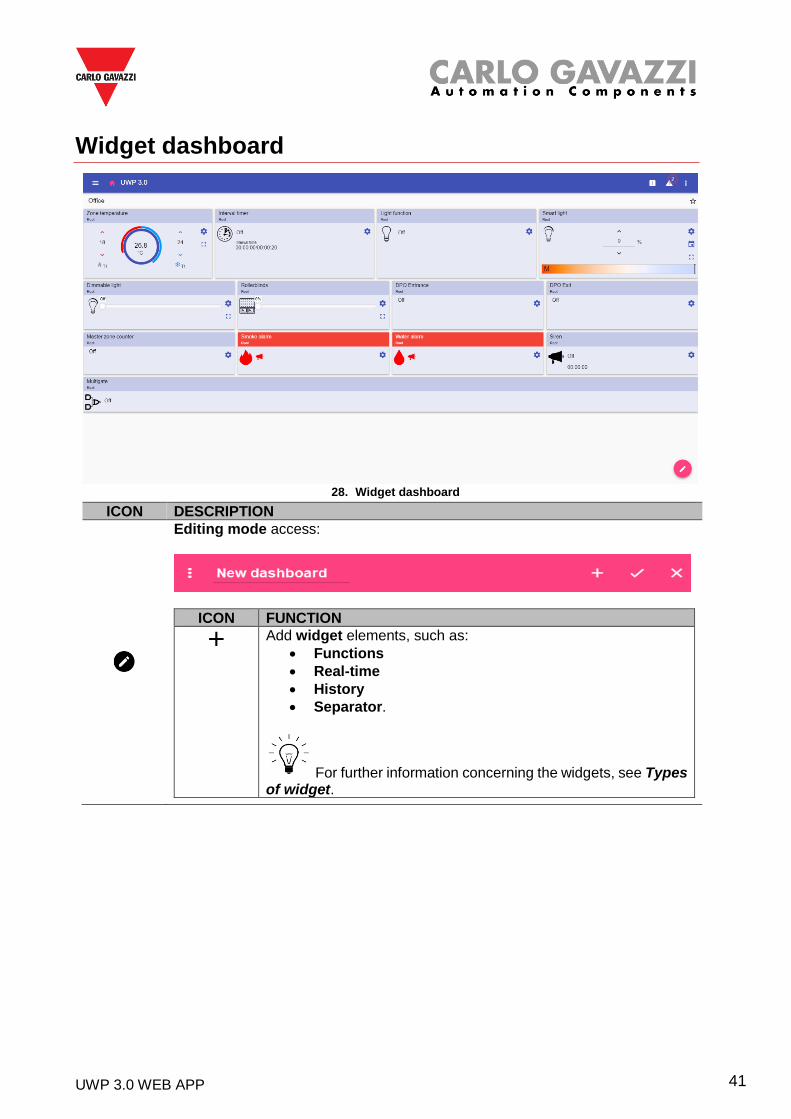
Widget dashboard
28. Widget dashboard
ICON DESCRIPTION
Editing mode access:
ICON FUNCTION
Add widget elements, such as:
• Functions
• Real-time
• History
• Separator.
For further information concerning the widgets, see Types of widget.
UWP 3.0 WEB APP 42
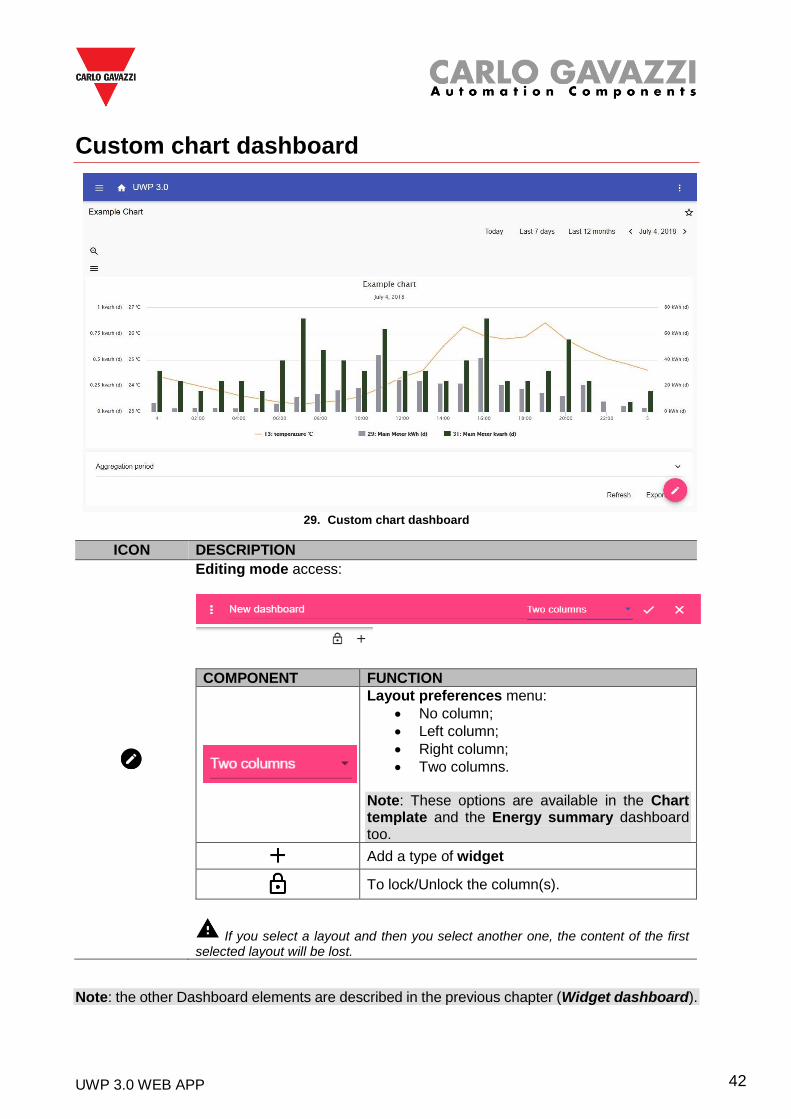
Custom chart dashboard
29. Custom chart dashboard
Note: the other Dashboard elements are described in the previous chapter (Widget dashboard).
ICON DESCRIPTION
Editing mode access:
COMPONENT FUNCTION
Layout preferences menu:
• No column;
• Left column;
• Right column;
• Two columns. Note: These options are available in the Chart template and the Energy summary dashboard too.
Add a type of widget
To lock/Unlock the column(s).
If you select a layout and then you select another one, the content of the first selected layout will be lost.
UWP 3.0 WEB APP 43
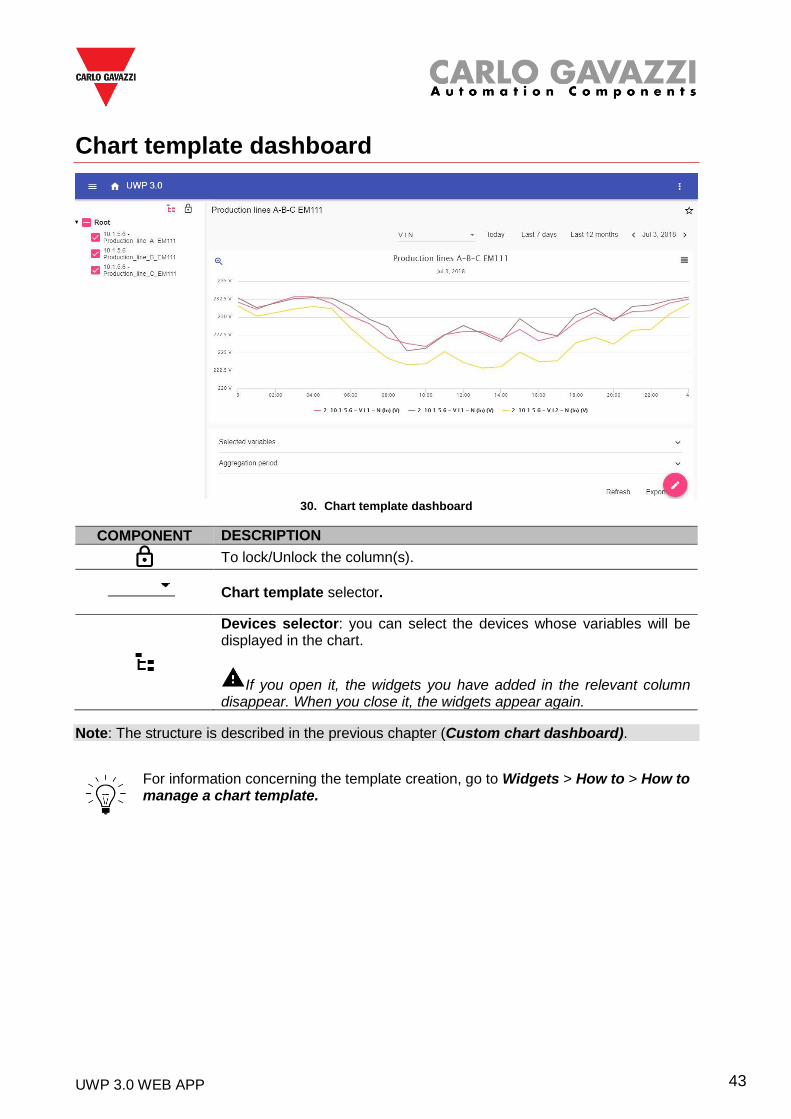
Chart template dashboard
30. Chart template dashboard
COMPONENT DESCRIPTION
To lock/Unlock the column(s).
Chart template selector.
Devices selector: you can select the devices whose variables will be displayed in the chart.
If you open it, the widgets you have added in the relevant column disappear. When you close it, the widgets appear again.
Note: The structure is described in the previous chapter (Custom chart dashboard).
For information concerning the template creation, go to Widgets > How to > How to manage a chart template.
UWP 3.0 WEB APP 44
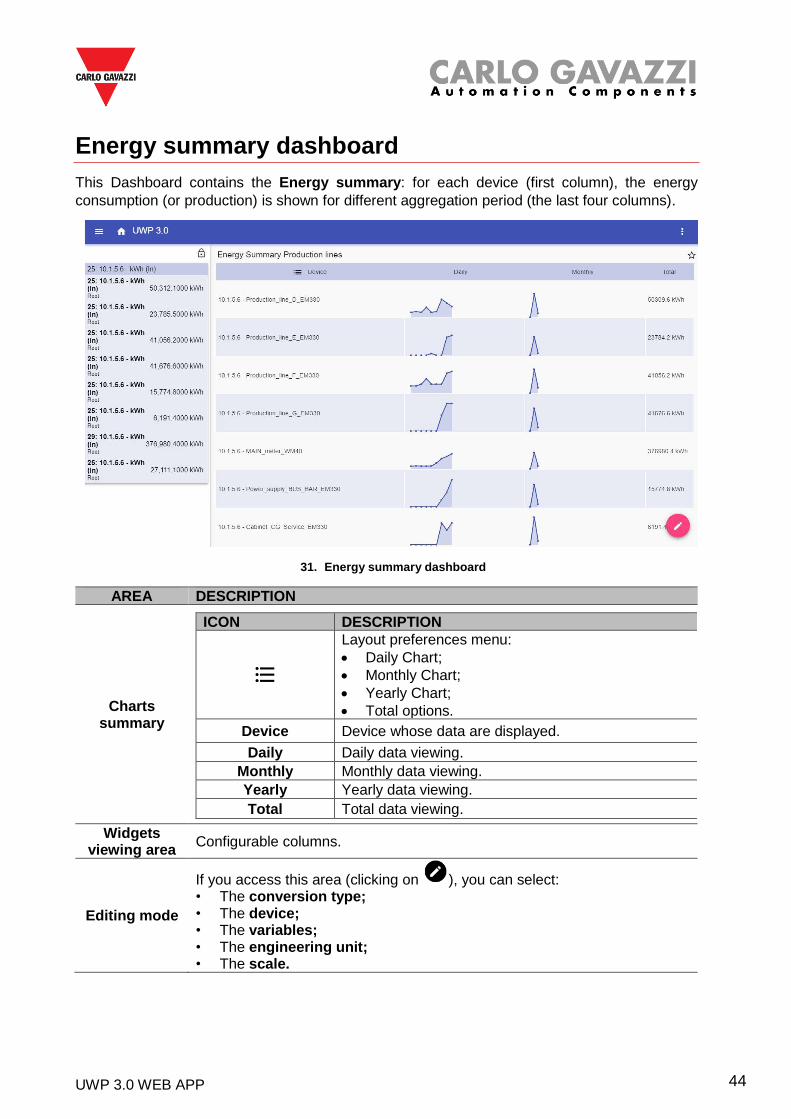
Energy summary dashboard
This Dashboard contains the Energy summary: for each device (first column), the energy
consumption (or production) is shown for different aggregation period (the last four columns).
31. Energy summary dashboard
AREA DESCRIPTION
Charts summary
ICON DESCRIPTION
Layout preferences menu:
• Daily Chart;
• Monthly Chart;
• Yearly Chart;
• Total options.
Device Device whose data are displayed.
Daily Daily data viewing.
Monthly Monthly data viewing.
Yearly Yearly data viewing.
Total Total data viewing.
Widgets viewing area
Configurable columns.
Editing mode
If you access this area (clicking on ), you can select: • The conversion type; • The device; • The variables; • The engineering unit; • The scale.
UWP 3.0 WEB APP 45
Things to know In these chapters, you can find information concerning the general concept of Dashboard and
the different types of Dashboard you can manage from the UWP 3.0 Web App.
What is a dashboard
A dashboard is a widgets container where you can easily perform the following actions:
• To view real-time data and charts;
• To verify the alarms;
• To send commands (e.g. switch lights on/off, set the temperature, etc.),
• To set function parameters.
UWP 3.0 Web App allows you to view two types of dashboard: The Function dashboard and
the Custom dashboard.
To get from one dashboard to another, it is possible to swipe left and right.
Function dashboard
A Function dashboard is automatically generated by the system during the configuration
process.
Each Function dashboard contains all the widgets belonging to a specific type of function,
whose name is given to the dashboard.
From the Web App, only the functions that have been set from the configuration software are available and they cannot be modified.
UWP 3.0 WEB APP 46
Custom dashboard
A Custom dashboard contains the widgets that you choose from the Web App.
In each dashboard, it is possible to set:
• the dashboard title and
• the associated widgets.
Moreover, there are four types of Custom dashboards:
• Widget dashboard. It allows you to manage and create widgets (see How to create a
new widget).
• Custom chart dashboard. This dashboard is dedicated to the charts creation and
management.
• Chart template dashboard. This dashboard is dedicated to the chart templates that you
can add, change or remove to create custom chart.
• Energy summary dashboard. This dashboard displays Daily, Monthly and Yearly
consumption data for an ordered list of meters (selected by the user).
Furthermore, by means of this page it is possible to:
1. Select the variables out of the list of the available variables in the target meter.
2. Change the engineering unit so as to align all the data to a common unit; a set of
conversion scale factors is available.
Nonetheless, you are free to change the scale according to the needs.
UWP 3.0 WEB APP 47
How to In the following chapters, you can find procedures to create a Custom dashboard.
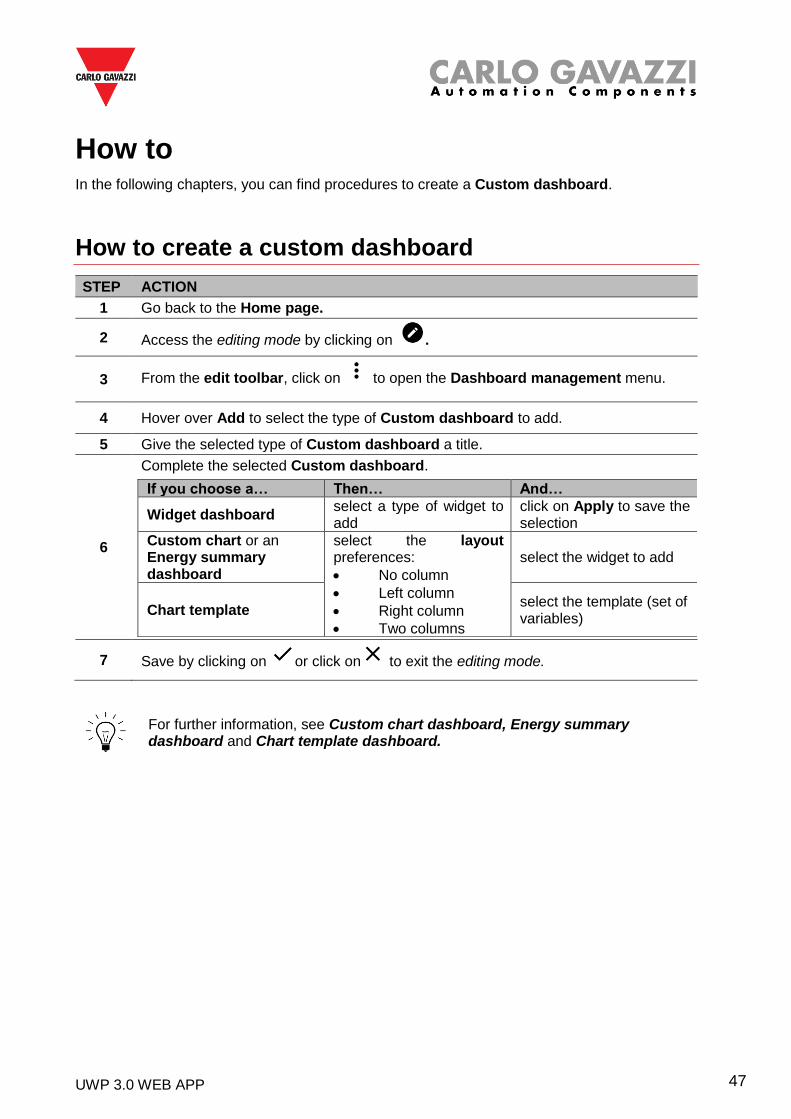
How to create a custom dashboard
STEP ACTION
1 Go back to the Home page.
2 Access the editing mode by clicking on .
3 From the edit toolbar, click on to open the Dashboard management menu.
4 Hover over Add to select the type of Custom dashboard to add.
5 Give the selected type of Custom dashboard a title.
6
Complete the selected Custom dashboard.
If you choose a… Then… And…
Widget dashboard select a type of widget to add
click on Apply to save the selection
Custom chart or an Energy summary dashboard
select the layout preferences:
• No column
• Left column
• Right column
• Two columns
select the widget to add
Chart template select the template (set of variables)
7 Save by clicking on or click on to exit the editing mode.
For further information, see Custom chart dashboard, Energy summary dashboard and Chart template dashboard.

UWP 3.0 WEB APP 48
How to manage a chart template
STEP ACTION
1 From a dashboard, click on to access the editing mode.
2 Click on to select the Template editor option.
3 From the Template editor page, click on to access the editing mode.
4
If you want… Then… And…
To create a new template
Click on , select the variables to include in the template
Click on Apply to save the selection
To modify an existing template
Flag the template to modify,
click on to change the variables to include
Click on to save the new selection
To delete an existing template
Flag the template to delete Click on to delete it
The default templates (the grey ones) can be not modified or removed.
5 Click on to save the changes.
UWP 3.0 WEB APP 49
Widgets This chapter is dedicated to the Widgets, focusing on:
• The structure;
• What is a widget;
• The types of widget and
• The procedures to manage the widgets.
UWP 3.0 WEB APP 50
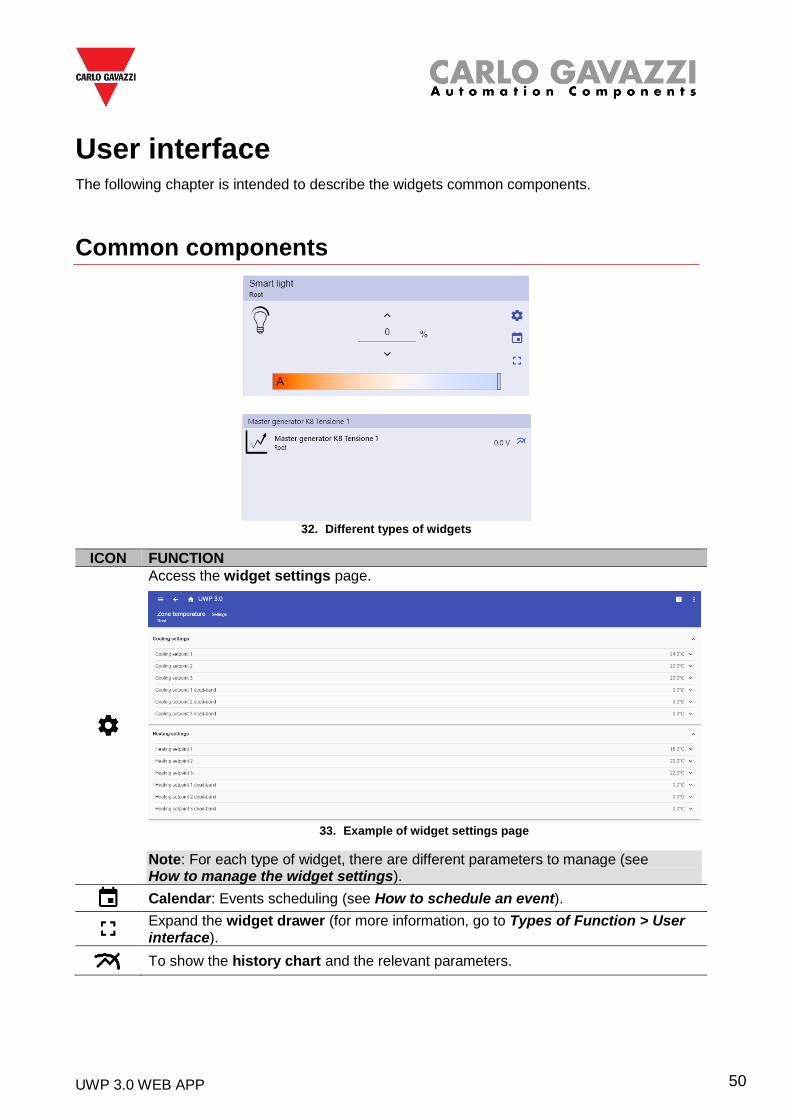
User interface The following chapter is intended to describe the widgets common components.
Common components
32. Different types of widgets
ICON FUNCTION
Access the widget settings page.
33. Example of widget settings page
Note: For each type of widget, there are different parameters to manage (see How to manage the widget settings).
Calendar: Events scheduling (see How to schedule an event).
Expand the widget drawer (for more information, go to Types of Function > User interface).
To show the history chart and the relevant parameters.
UWP 3.0 WEB APP 51
Things to know These chapters describe a widget (in the UWP 3.0 Web App context) and the types of widgets
available on UWP 3.0 Web App.
What is a widget
A widget is a graphic element contained in a dashboard that allows the user to interact with the
system managed by UWP 3.0.
According to the type of widget, the user can:
• View real-time data, the status of a function or an alarm condition;
• Access the settings of a function;
• Access the viewing area of a chart;
• Send commands;
• Customize the distribution of widgets.
Types of widget
This chapter is intended to describe the different types of widgets.
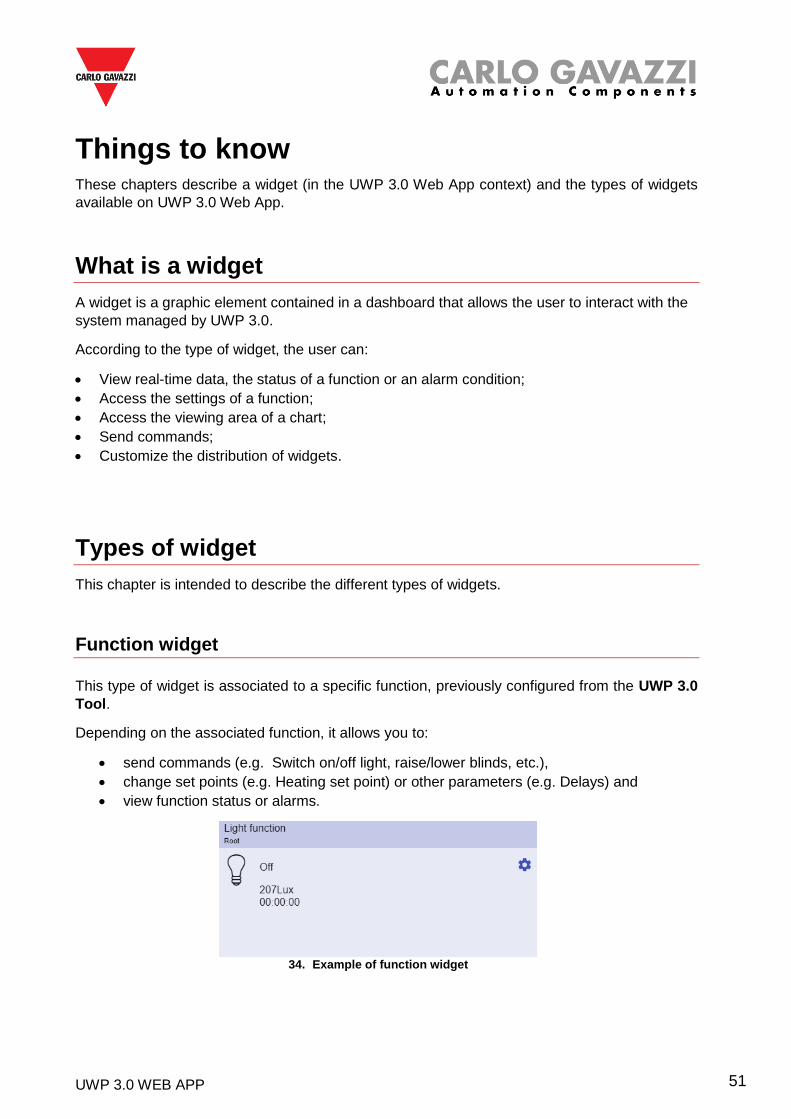
Function widget
This type of widget is associated to a specific function, previously configured from the UWP 3.0
Tool.
Depending on the associated function, it allows you to:
• send commands (e.g. Switch on/off light, raise/lower blinds, etc.),
• change set points (e.g. Heating set point) or other parameters (e.g. Delays) and
• view function status or alarms.
34. Example of function widget
UWP 3.0 WEB APP 52
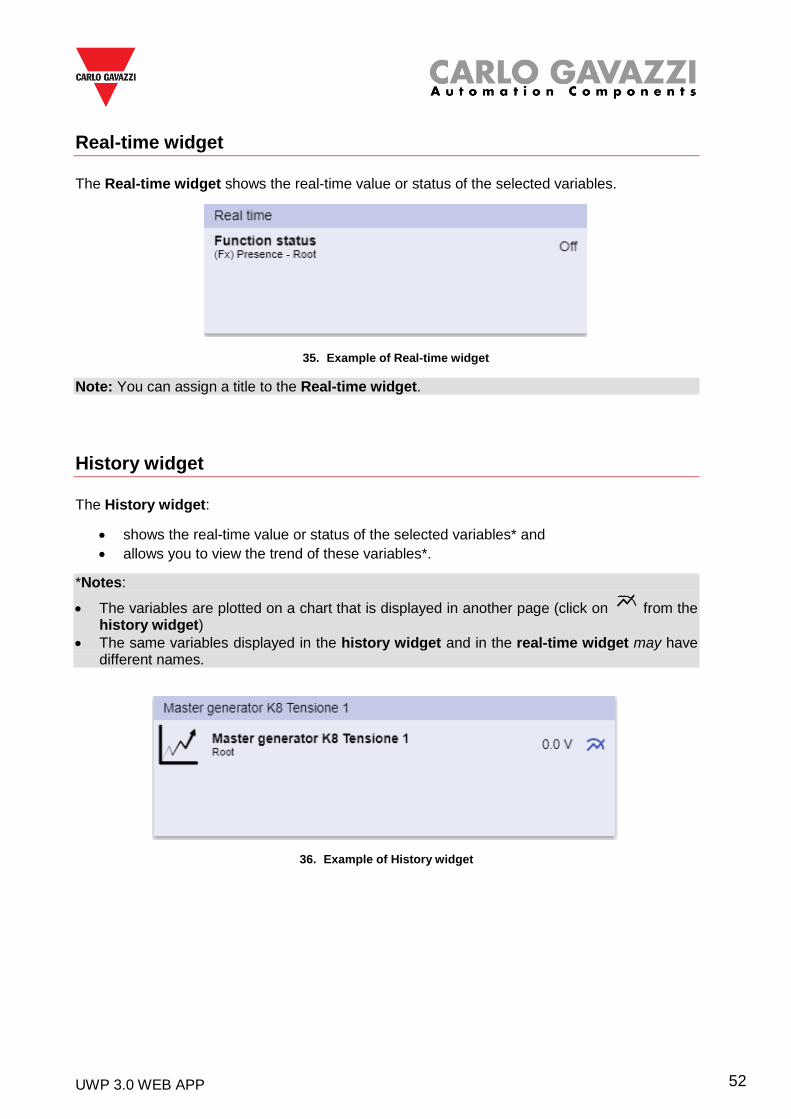
Real-time widget
The Real-time widget shows the real-time value or status of the selected variables.
35. Example of Real-time widget
Note: You can assign a title to the Real-time widget.
History widget
The History widget:
• shows the real-time value or status of the selected variables* and
• allows you to view the trend of these variables*.
*Notes:
• The variables are plotted on a chart that is displayed in another page (click on from the history widget)
• The same variables displayed in the history widget and in the real-time widget may have different names.
36. Example of History widget
UWP 3.0 WEB APP 53
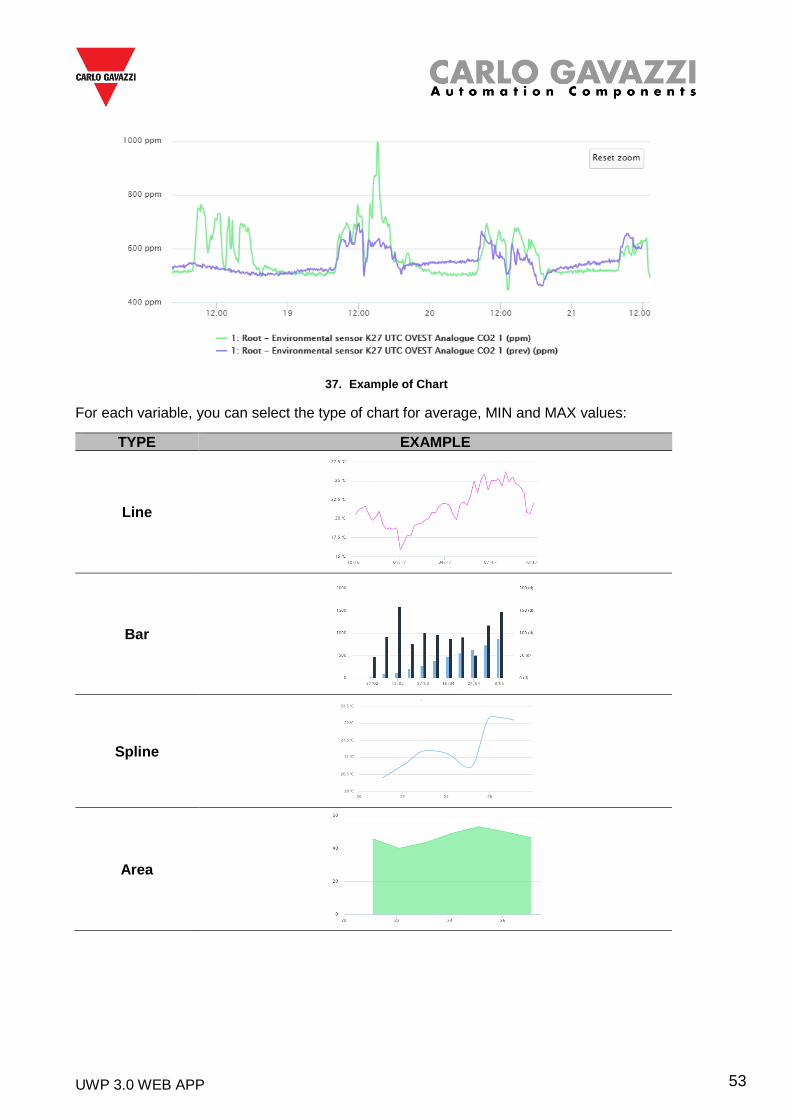
37. Example of Chart
For each variable, you can select the type of chart for average, MIN and MAX values:
TYPE EXAMPLE
Line
Bar
Spline
Area
UWP 3.0 WEB APP 54
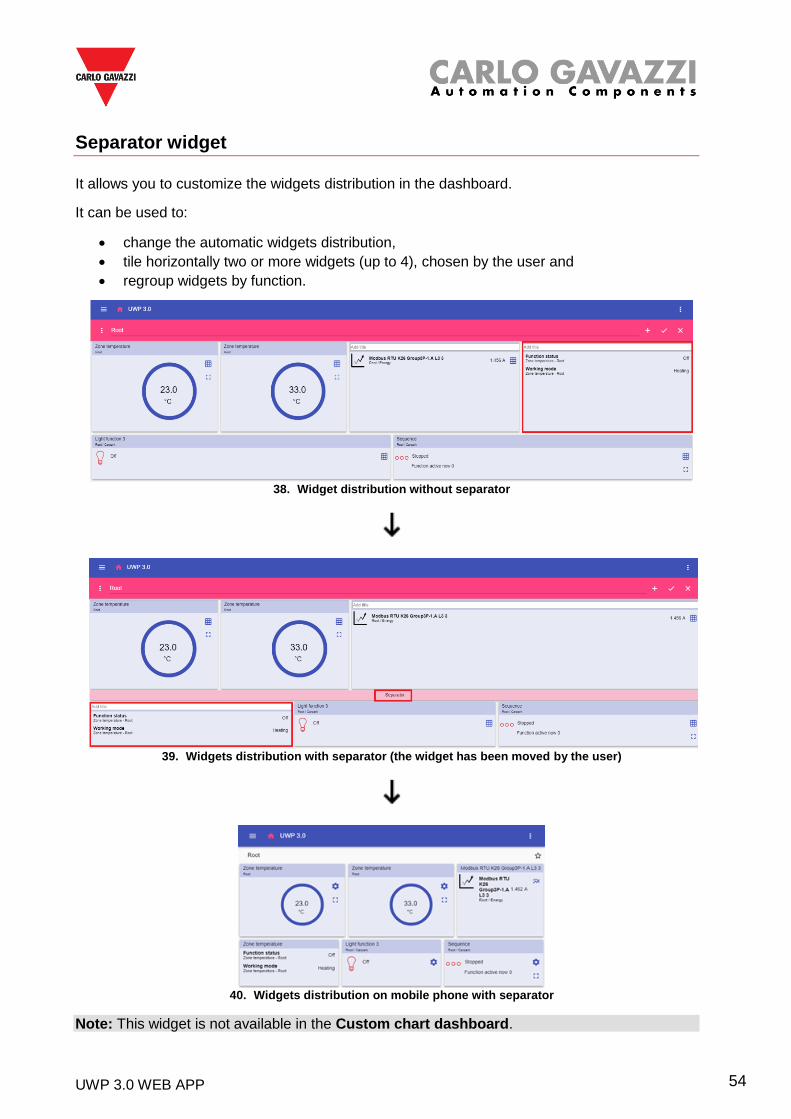
Separator widget
It allows you to customize the widgets distribution in the dashboard.
It can be used to:
• change the automatic widgets distribution,
• tile horizontally two or more widgets (up to 4), chosen by the user and
• regroup widgets by function.
38. Widget distribution without separator
39. Widgets distribution with separator (the widget has been moved by the user)
40. Widgets distribution on mobile phone with separator
Note: This widget is not available in the Custom chart dashboard.
UWP 3.0 WEB APP 55
How to This chapter is dedicated to the different procedures related to widgets.
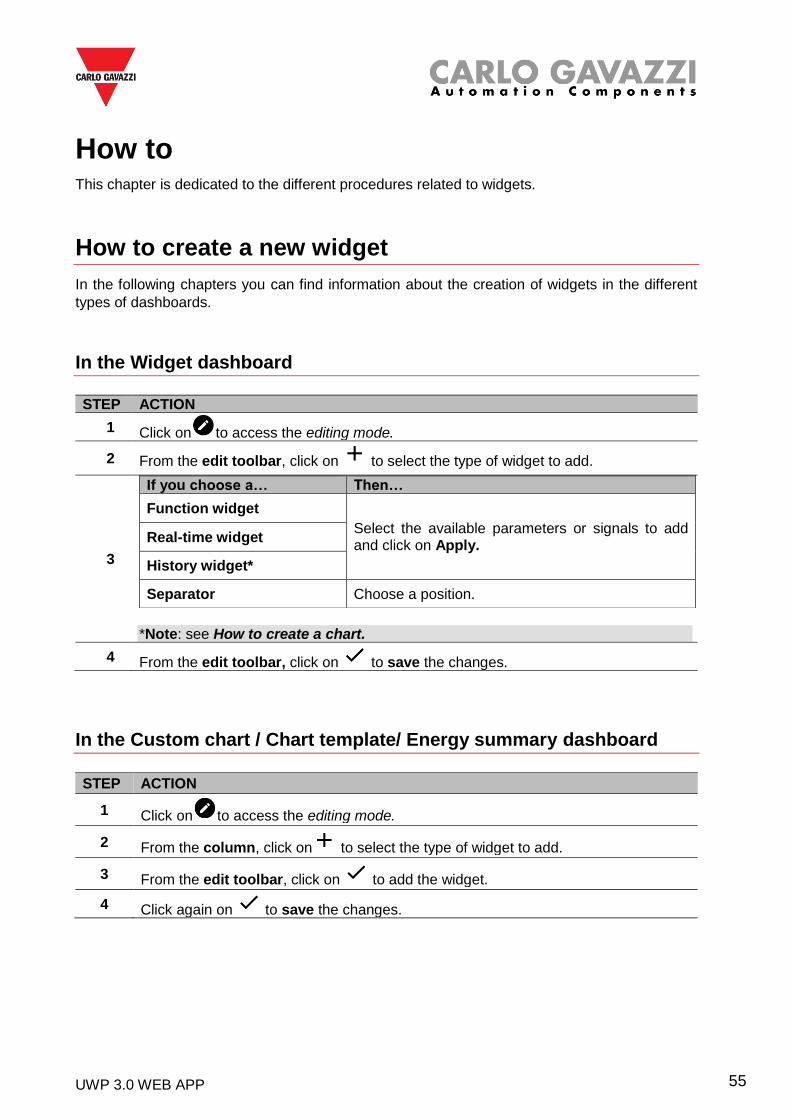
How to create a new widget
In the following chapters you can find information about the creation of widgets in the different
types of dashboards.
In the Widget dashboard
STEP ACTION
1 Click on to access the editing mode.
2 From the edit toolbar, click on to select the type of widget to add.
3
*Note: see How to create a chart.
If you choose a… Then…
Function widget
Select the available parameters or signals to add and click on Apply.
Real-time widget
History widget*
Separator Choose a position.
4 From the edit toolbar, click on to save the changes.
In the Custom chart / Chart template/ Energy summary dashboard
STEP ACTION
1 Click on to access the editing mode.
2 From the column, click on to select the type of widget to add.
3 From the edit toolbar, click on to add the widget.
4 Click again on to save the changes.
UWP 3.0 WEB APP 56
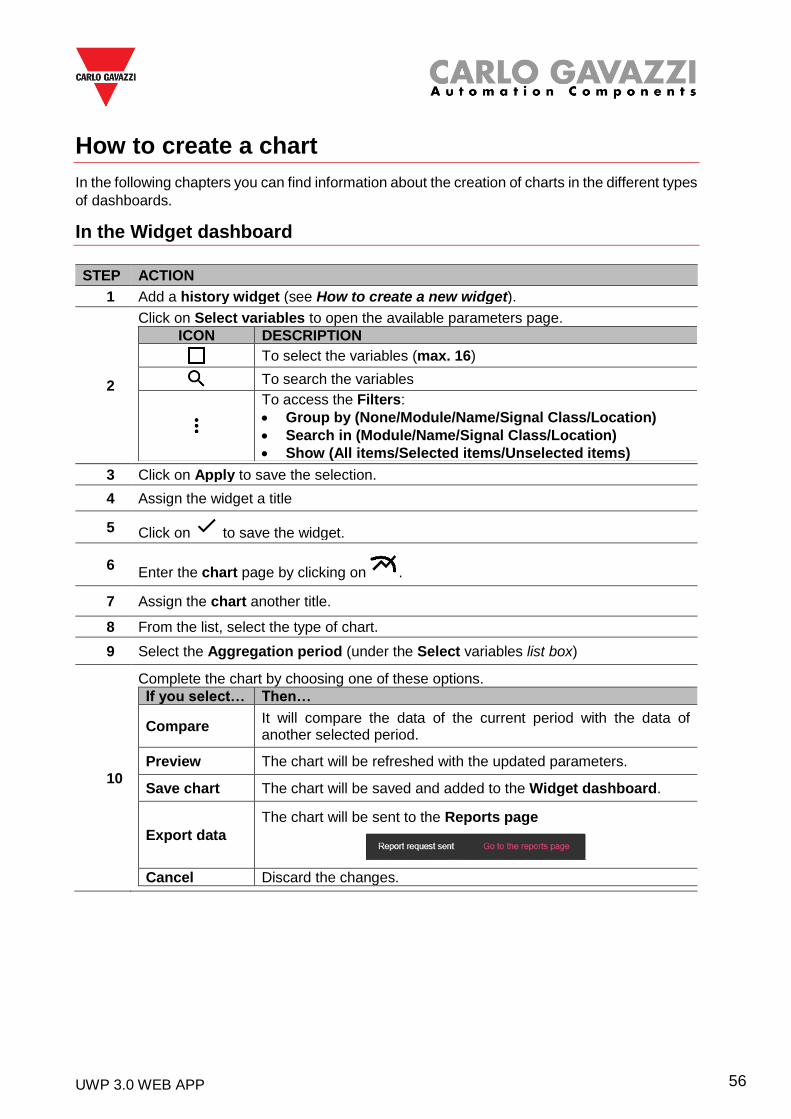
How to create a chart
In the following chapters you can find information about the creation of charts in the different types
of dashboards.
In the Widget dashboard
STEP ACTION
1 Add a history widget (see How to create a new widget).
2
Click on Select variables to open the available parameters page.
ICON DESCRIPTION
To select the variables (max. 16)
To search the variables
To access the Filters:
• Group by (None/Module/Name/Signal Class/Location)
• Search in (Module/Name/Signal Class/Location)
• Show (All items/Selected items/Unselected items)
3 Click on Apply to save the selection.
4 Assign the widget a title
5 Click on to save the widget.
6 Enter the chart page by clicking on .
7 Assign the chart another title.
8 From the list, select the type of chart.
9 Select the Aggregation period (under the Select variables list box)
10
Complete the chart by choosing one of these options.
If you select… Then…
Compare It will compare the data of the current period with the data of another selected period.
Preview The chart will be refreshed with the updated parameters.
Save chart The chart will be saved and added to the Widget dashboard.
Export data
The chart will be sent to the Reports page
Cancel Discard the changes.
UWP 3.0 WEB APP 57
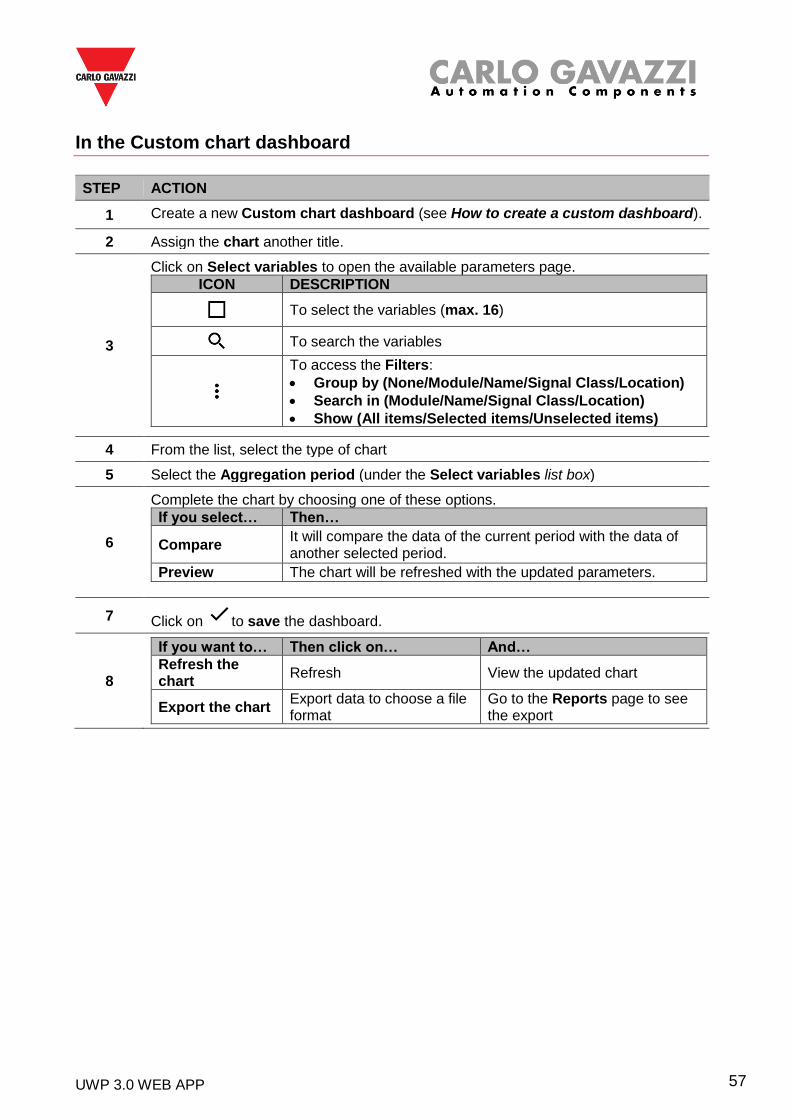
In the Custom chart dashboard
STEP ACTION
1 Create a new Custom chart dashboard (see How to create a custom dashboard).
2 Assign the chart another title.
3
Click on Select variables to open the available parameters page.
ICON DESCRIPTION
To select the variables (max. 16)
To search the variables
To access the Filters:
• Group by (None/Module/Name/Signal Class/Location)
• Search in (Module/Name/Signal Class/Location)
• Show (All items/Selected items/Unselected items)
4 From the list, select the type of chart
5 Select the Aggregation period (under the Select variables list box)
6
Complete the chart by choosing one of these options.
If you select… Then…
Compare It will compare the data of the current period with the data of another selected period.
Preview The chart will be refreshed with the updated parameters.
7 Click on to save the dashboard.
8
If you want to… Then click on… And…
Refresh the chart
Refresh View the updated chart
Export the chart Export data to choose a file format
Go to the Reports page to see the export
UWP 3.0 WEB APP 58
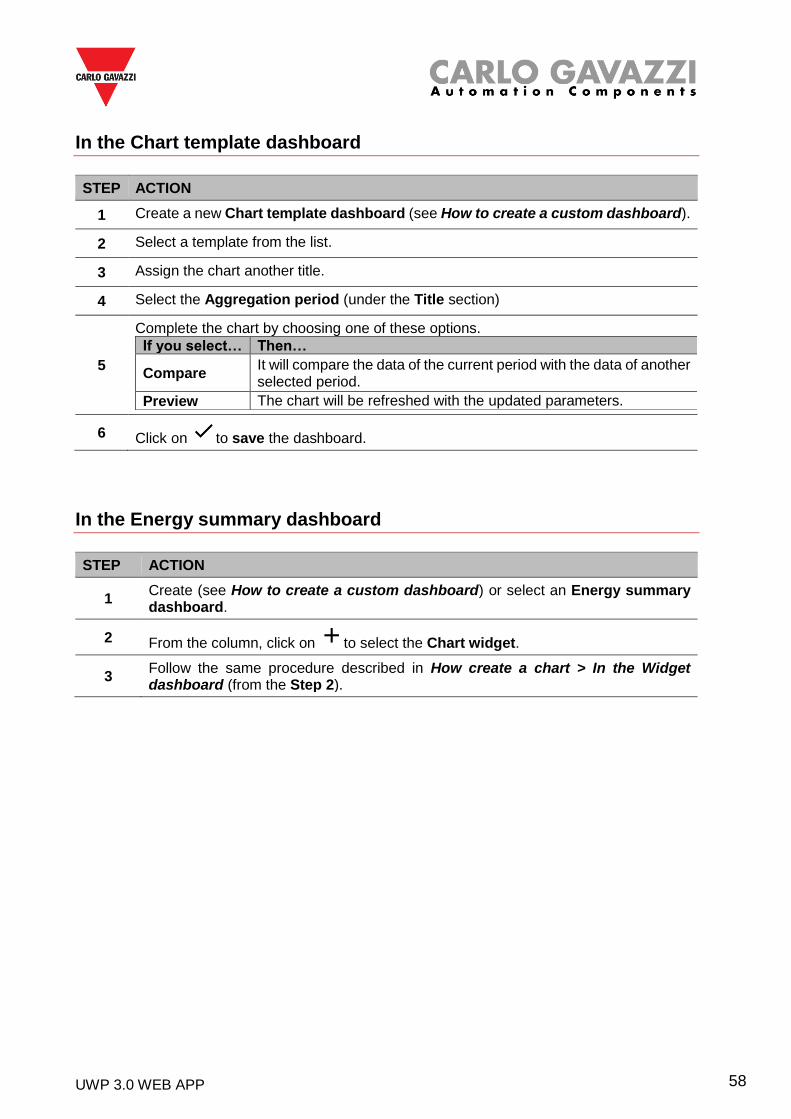
In the Chart template dashboard
STEP ACTION
1 Create a new Chart template dashboard (see How to create a custom dashboard).
2 Select a template from the list.
3 Assign the chart another title.
4 Select the Aggregation period (under the Title section)
5
Complete the chart by choosing one of these options.
If you select… Then…
Compare It will compare the data of the current period with the data of another selected period.
Preview The chart will be refreshed with the updated parameters.
6 Click on to save the dashboard.
In the Energy summary dashboard
STEP ACTION
1 Create (see How to create a custom dashboard) or select an Energy summary dashboard.
2 From the column, click on to select the Chart widget.
3 Follow the same procedure described in How create a chart > In the Widget dashboard (from the Step 2).
UWP 3.0 WEB APP 59
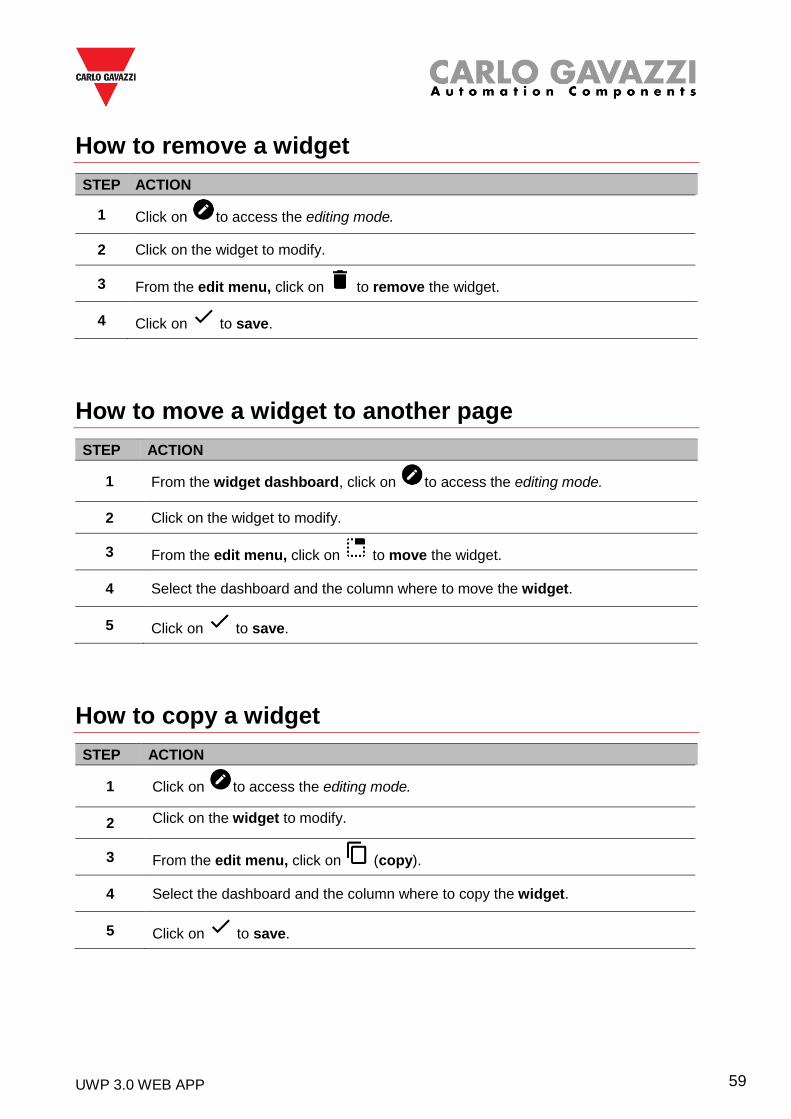
How to remove a widget
STEP ACTION
1 Click on to access the editing mode.
2 Click on the widget to modify.
3 From the edit menu, click on to remove the widget.
4 Click on to save.
How to move a widget to another page
STEP ACTION
1 From the widget dashboard, click on to access the editing mode.
2 Click on the widget to modify.
3 From the edit menu, click on to move the widget.
4 Select the dashboard and the column where to move the widget.
5 Click on to save.
How to copy a widget
STEP ACTION
1 Click on to access the editing mode.
2 Click on the widget to modify.
3 From the edit menu, click on (copy).
4 Select the dashboard and the column where to copy the widget.
5 Click on to save.

UWP 3.0 WEB APP 60
How to schedule an event
To schedule an event, follow the procedure described below.
STEP ACTION
1 From a widget, click on to access the event-scheduling page.
2 Click on to open the configuration area.
3
Fill in all the fields.
COMPONENT DESCRIPTION
Name In this field, you define the name of the event that will appear on the calendar.
Start date Date at which the event will start
Start time Time at which the event will start.
End date Date at which the event will finish.
End time Time at which the event will finish.
Event Action at start/end time
You can decide the action to be performed as the time period starts or finishes.
Action during the whole period
You can choose to:
• disable the automation or
• perform no action during the selected period.
4 Click on Save.
UWP 3.0 WEB APP 61
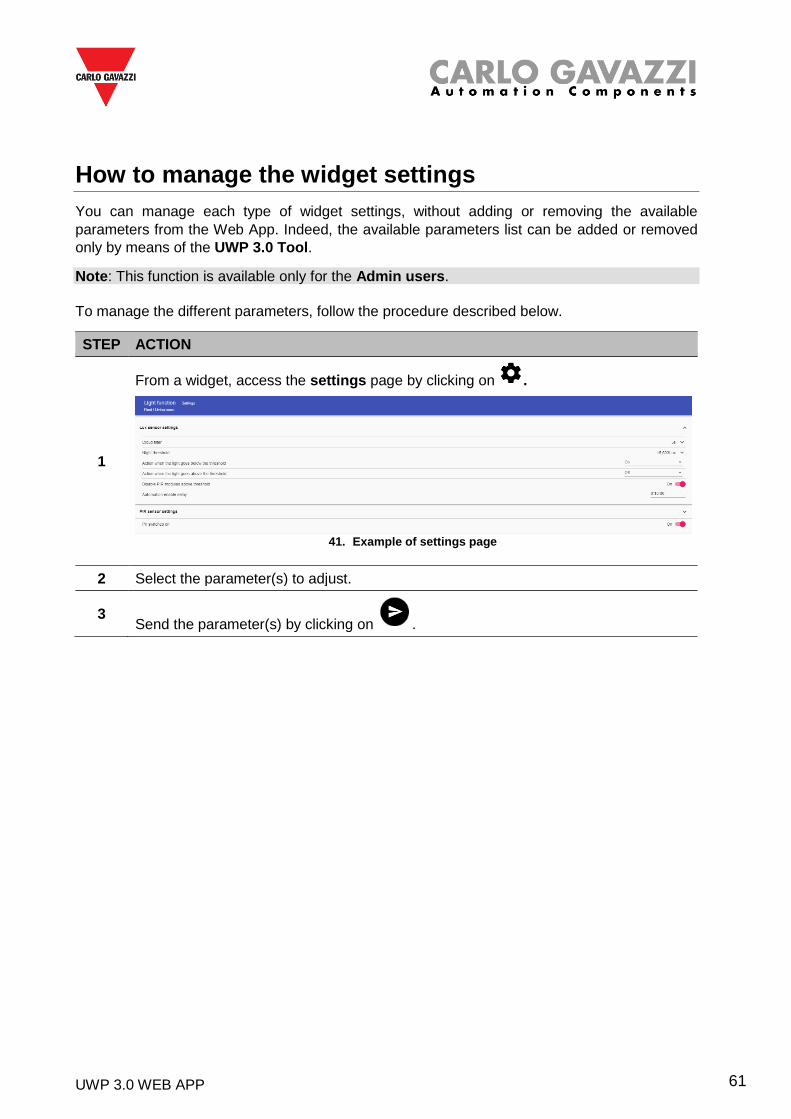
How to manage the widget settings
You can manage each type of widget settings, without adding or removing the available
parameters from the Web App. Indeed, the available parameters list can be added or removed
only by means of the UWP 3.0 Tool.
Note: This function is available only for the Admin users.
To manage the different parameters, follow the procedure described below.
STEP ACTION
1
From a widget, access the settings page by clicking on .
41. Example of settings page
2 Select the parameter(s) to adjust.
3 Send the parameter(s) by clicking on .
UWP 3.0 WEB APP 62
Types of Function This chapter is intended to describe the different types of functions available on the UWP 3.0
Web App.
The available parameters list can be added or removed only by means of the UWP 3.0 Tool. From the Web App, you can only adjust them.
User interface The following chapters present the different functions widgets structure.
Note: only the Admin users can adjust the functions settings described below.
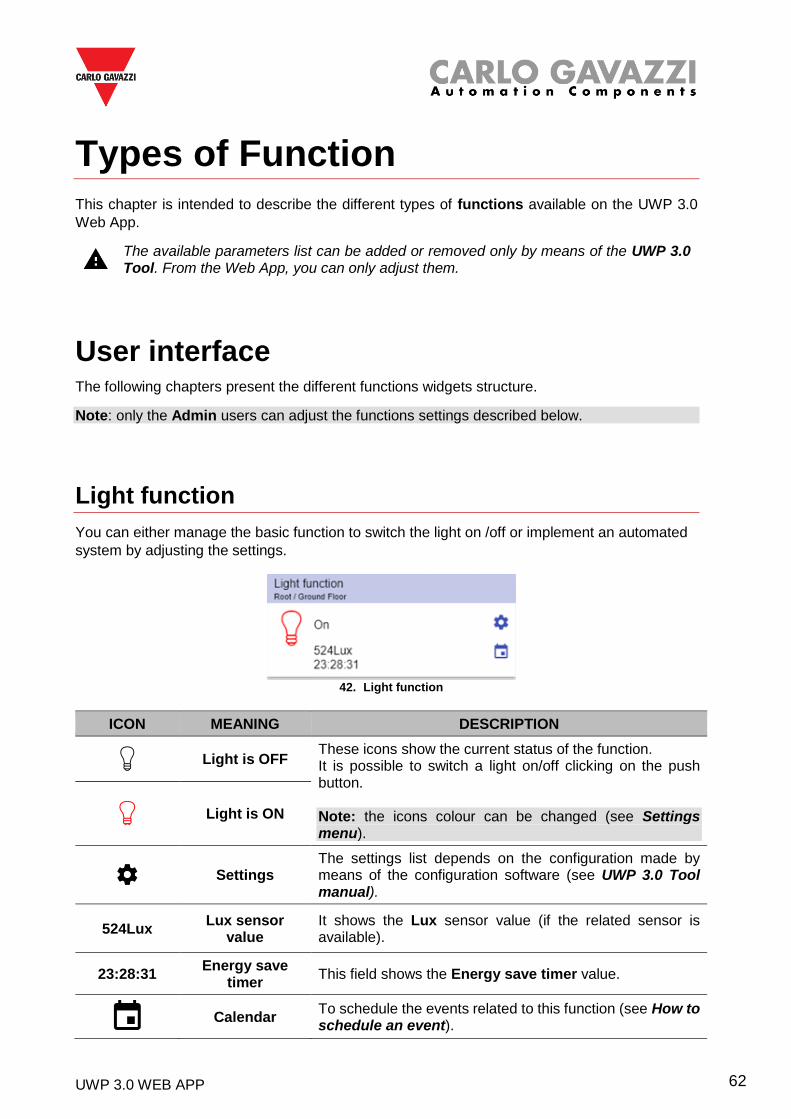
Light function
You can either manage the basic function to switch the light on /off or implement an automated
system by adjusting the settings.
42. Light function
ICON MEANING DESCRIPTION
Light is OFF These icons show the current status of the function. It is possible to switch a light on/off clicking on the push button. Note: the icons colour can be changed (see Settings menu).
Light is ON
Settings The settings list depends on the configuration made by means of the configuration software (see UWP 3.0 Tool manual).
524Lux Lux sensor
value It shows the Lux sensor value (if the related sensor is available).
23:28:31 Energy save
timer This field shows the Energy save timer value.
Calendar
To schedule the events related to this function (see How to schedule an event).
UWP 3.0 WEB APP 63
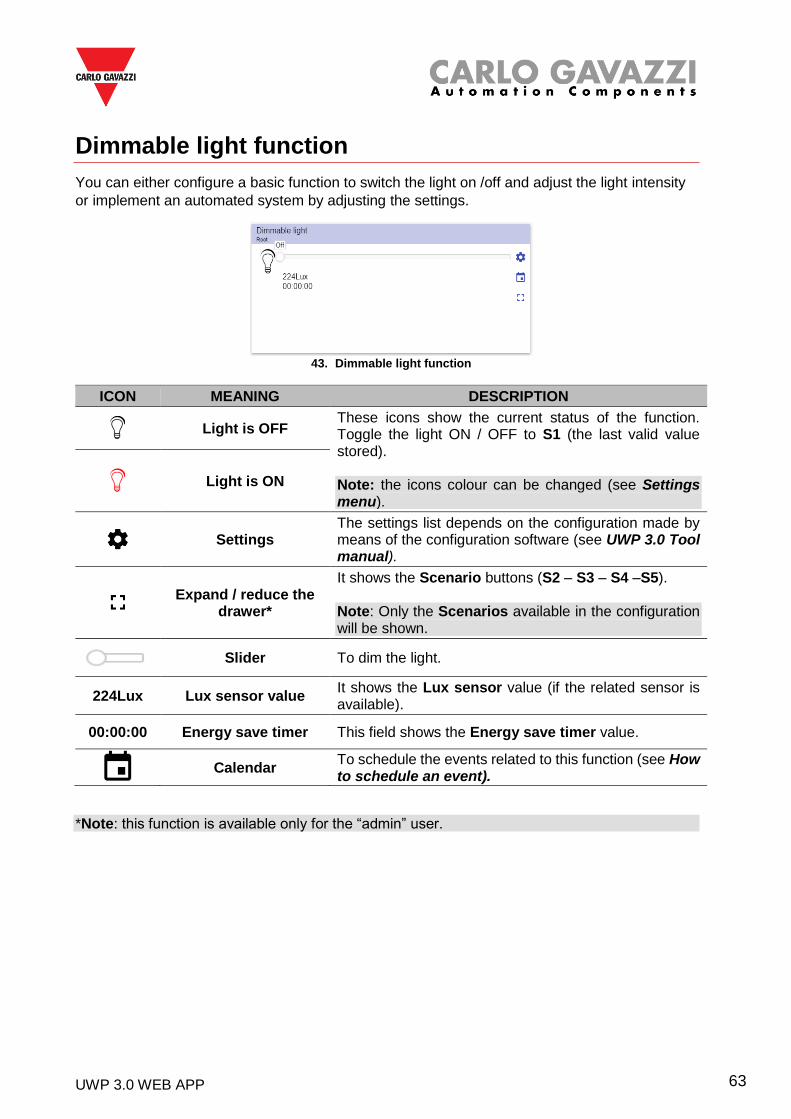
Dimmable light function
You can either configure a basic function to switch the light on /off and adjust the light intensity
or implement an automated system by adjusting the settings.
43. Dimmable light function
ICON MEANING DESCRIPTION
Light is OFF These icons show the current status of the function. Toggle the light ON / OFF to S1 (the last valid value stored). Note: the icons colour can be changed (see Settings menu).
Light is ON
Settings The settings list depends on the configuration made by means of the configuration software (see UWP 3.0 Tool manual).
Expand / reduce the
drawer*
It shows the Scenario buttons (S2 – S3 – S4 –S5). Note: Only the Scenarios available in the configuration will be shown.
Slider To dim the light.
224Lux Lux sensor value It shows the Lux sensor value (if the related sensor is available).
00:00:00 Energy save timer This field shows the Energy save timer value.
Calendar
To schedule the events related to this function (see How to schedule an event).
*Note: this function is available only for the “admin” user.
UWP 3.0 WEB APP 64
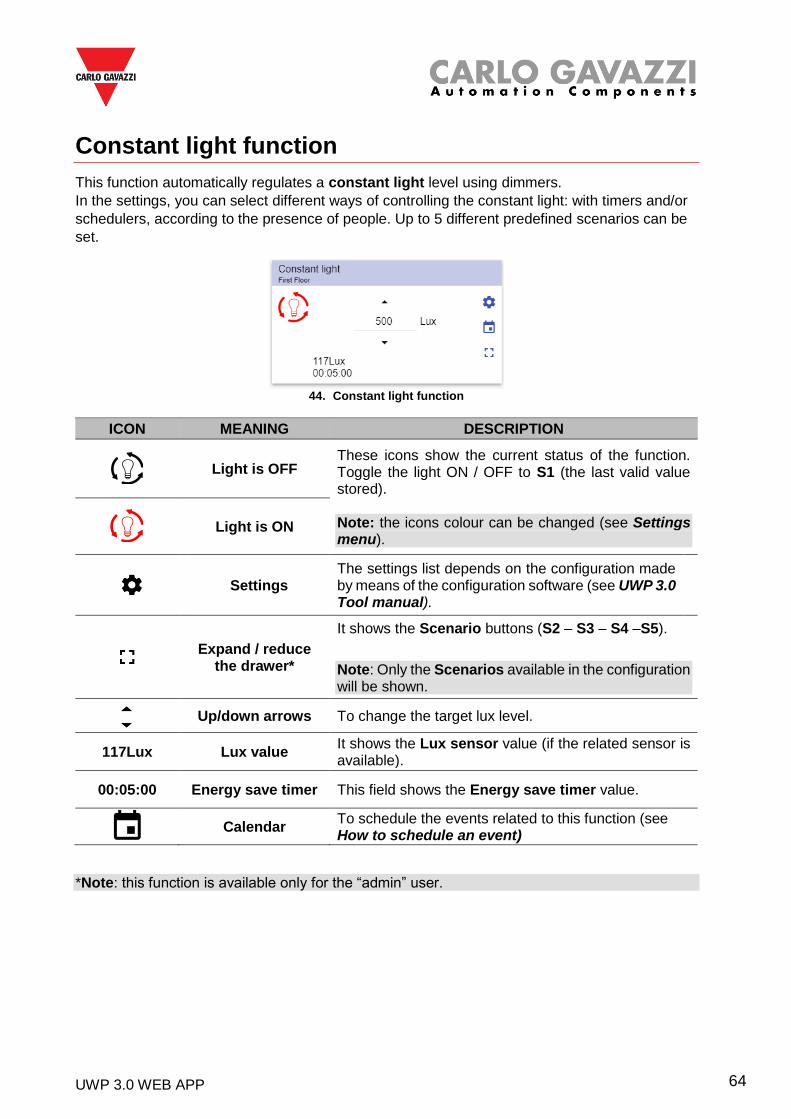
Constant light function
This function automatically regulates a constant light level using dimmers.
In the settings, you can select different ways of controlling the constant light: with timers and/or
schedulers, according to the presence of people. Up to 5 different predefined scenarios can be
set.
44. Constant light function
ICON MEANING DESCRIPTION
Light is OFF
These icons show the current status of the function. Toggle the light ON / OFF to S1 (the last valid value stored). Note: the icons colour can be changed (see Settings menu).
Light is ON
Settings
The settings list depends on the configuration made by means of the configuration software (see UWP 3.0 Tool manual).
Expand / reduce
the drawer*
It shows the Scenario buttons (S2 – S3 – S4 –S5).
Note: Only the Scenarios available in the configuration will be shown.
Up/down arrows To change the target lux level.
117Lux Lux value It shows the Lux sensor value (if the related sensor is available).
00:05:00 Energy save timer This field shows the Energy save timer value.
Calendar
To schedule the events related to this function (see How to schedule an event)
*Note: this function is available only for the “admin” user.
UWP 3.0 WEB APP 65
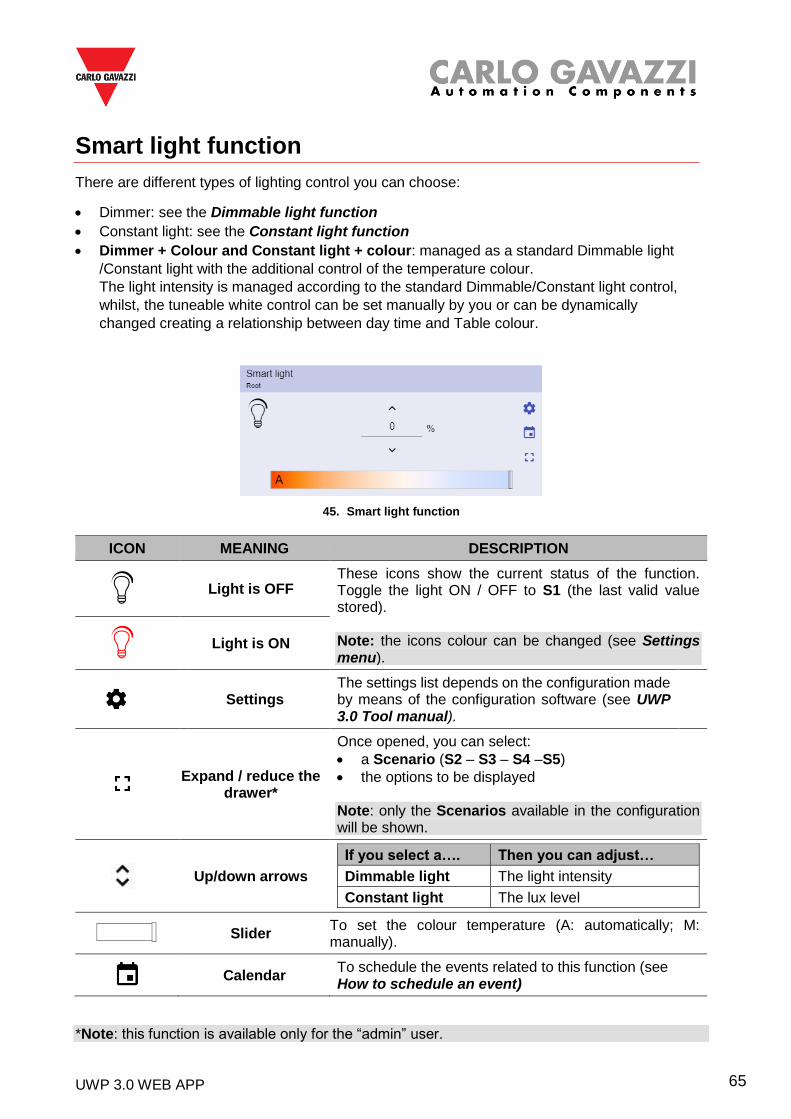
Smart light function
There are different types of lighting control you can choose:
• Dimmer: see the Dimmable light function
• Constant light: see the Constant light function
• Dimmer + Colour and Constant light + colour: managed as a standard Dimmable light
/Constant light with the additional control of the temperature colour.
The light intensity is managed according to the standard Dimmable/Constant light control,
whilst, the tuneable white control can be set manually by you or can be dynamically
changed creating a relationship between day time and Table colour.
45. Smart light function
ICON MEANING DESCRIPTION
Light is OFF
These icons show the current status of the function. Toggle the light ON / OFF to S1 (the last valid value stored). Note: the icons colour can be changed (see Settings menu).
Light is ON
Settings The settings list depends on the configuration made by means of the configuration software (see UWP 3.0 Tool manual).
Expand / reduce the
drawer*
Once opened, you can select:
• a Scenario (S2 – S3 – S4 –S5)
• the options to be displayed Note: only the Scenarios available in the configuration will be shown.
Up/down arrows
If you select a…. Then you can adjust…
Dimmable light The light intensity
Constant light The lux level
Slider
To set the colour temperature (A: automatically; M: manually).
Calendar
To schedule the events related to this function (see How to schedule an event)
*Note: this function is available only for the “admin” user.
UWP 3.0 WEB APP 66
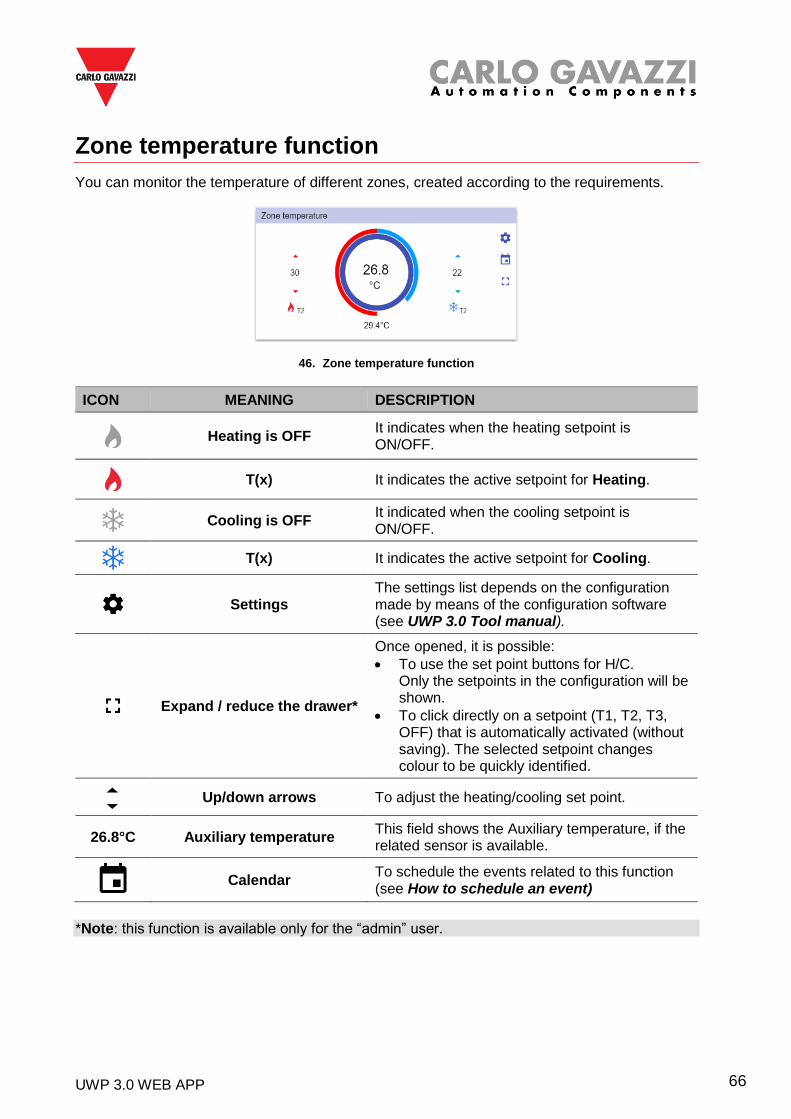
Zone temperature function
You can monitor the temperature of different zones, created according to the requirements.
46. Zone temperature function
ICON MEANING DESCRIPTION
Heating is OFF It indicates when the heating setpoint is ON/OFF.
T(x) It indicates the active setpoint for Heating.
Cooling is OFF It indicated when the cooling setpoint is ON/OFF.
T(x) It indicates the active setpoint for Cooling.
Settings The settings list depends on the configuration made by means of the configuration software (see UWP 3.0 Tool manual).
Expand / reduce the drawer*
Once opened, it is possible:
• To use the set point buttons for H/C. Only the setpoints in the configuration will be shown.
• To click directly on a setpoint (T1, T2, T3, OFF) that is automatically activated (without saving). The selected setpoint changes colour to be quickly identified.
Up/down arrows To adjust the heating/cooling set point.
26.8°C Auxiliary temperature This field shows the Auxiliary temperature, if the related sensor is available.
Calendar
To schedule the events related to this function (see How to schedule an event)
*Note: this function is available only for the “admin” user.
UWP 3.0 WEB APP 67
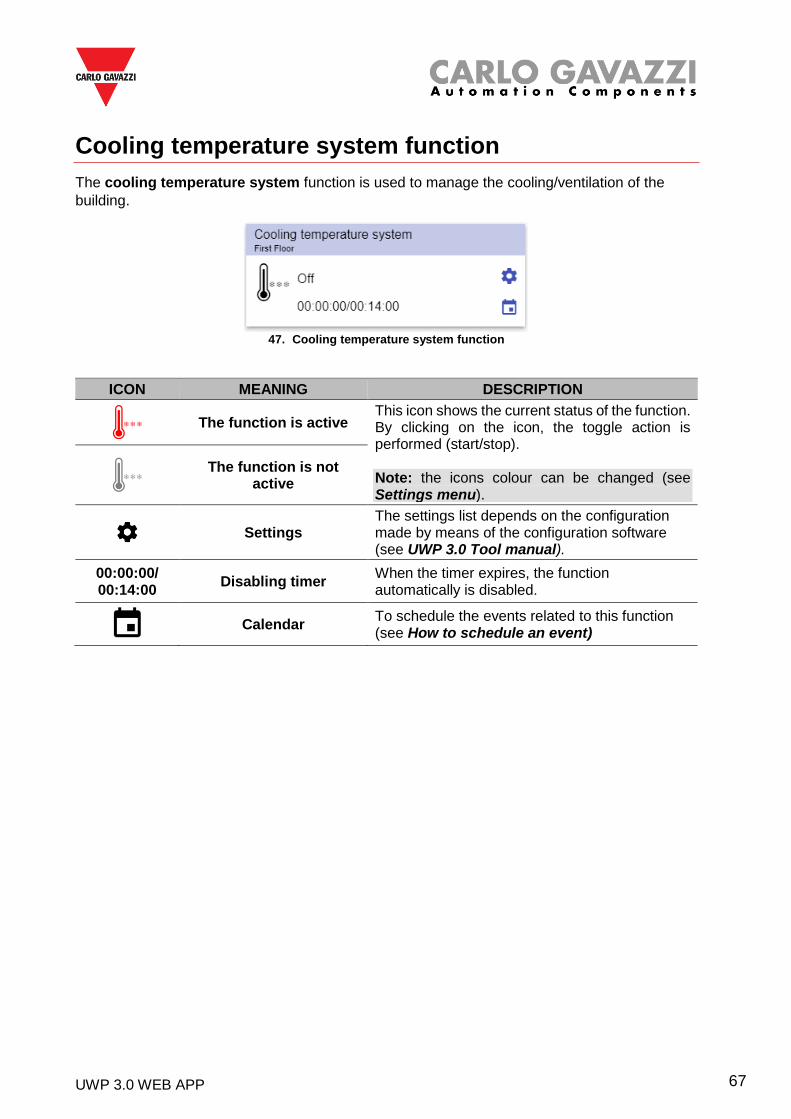
Cooling temperature system function
The cooling temperature system function is used to manage the cooling/ventilation of the
building.
47. Cooling temperature system function
ICON MEANING DESCRIPTION
The function is active
This icon shows the current status of the function. By clicking on the icon, the toggle action is performed (start/stop). Note: the icons colour can be changed (see Settings menu).
The function is not active
Settings The settings list depends on the configuration made by means of the configuration software (see UWP 3.0 Tool manual).
00:00:00/ 00:14:00
Disabling timer When the timer expires, the function automatically is disabled.
Calendar
To schedule the events related to this function (see How to schedule an event)
UWP 3.0 WEB APP 68
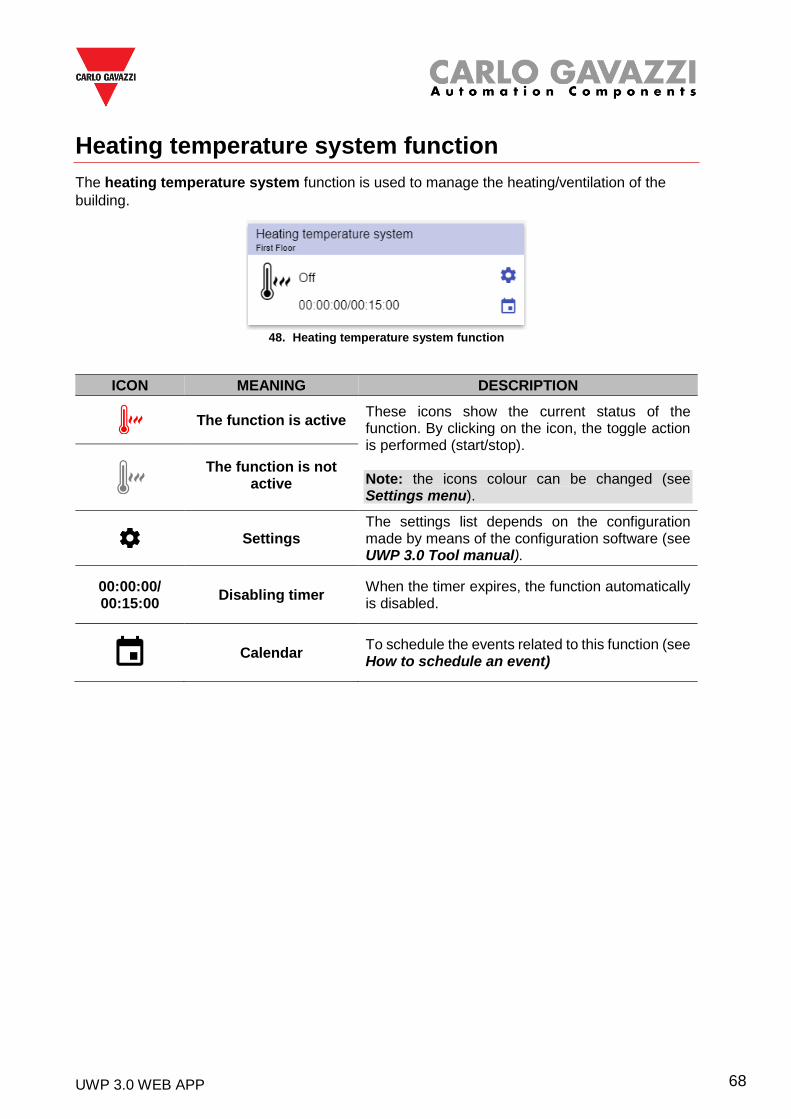
Heating temperature system function
The heating temperature system function is used to manage the heating/ventilation of the
building.
48. Heating temperature system function
ICON MEANING DESCRIPTION
The function is active
These icons show the current status of the function. By clicking on the icon, the toggle action is performed (start/stop). Note: the icons colour can be changed (see Settings menu).
The function is not active
Settings The settings list depends on the configuration made by means of the configuration software (see UWP 3.0 Tool manual).
00:00:00/ 00:15:00
Disabling timer When the timer expires, the function automatically is disabled.
Calendar
To schedule the events related to this function (see How to schedule an event)
UWP 3.0 WEB APP 69
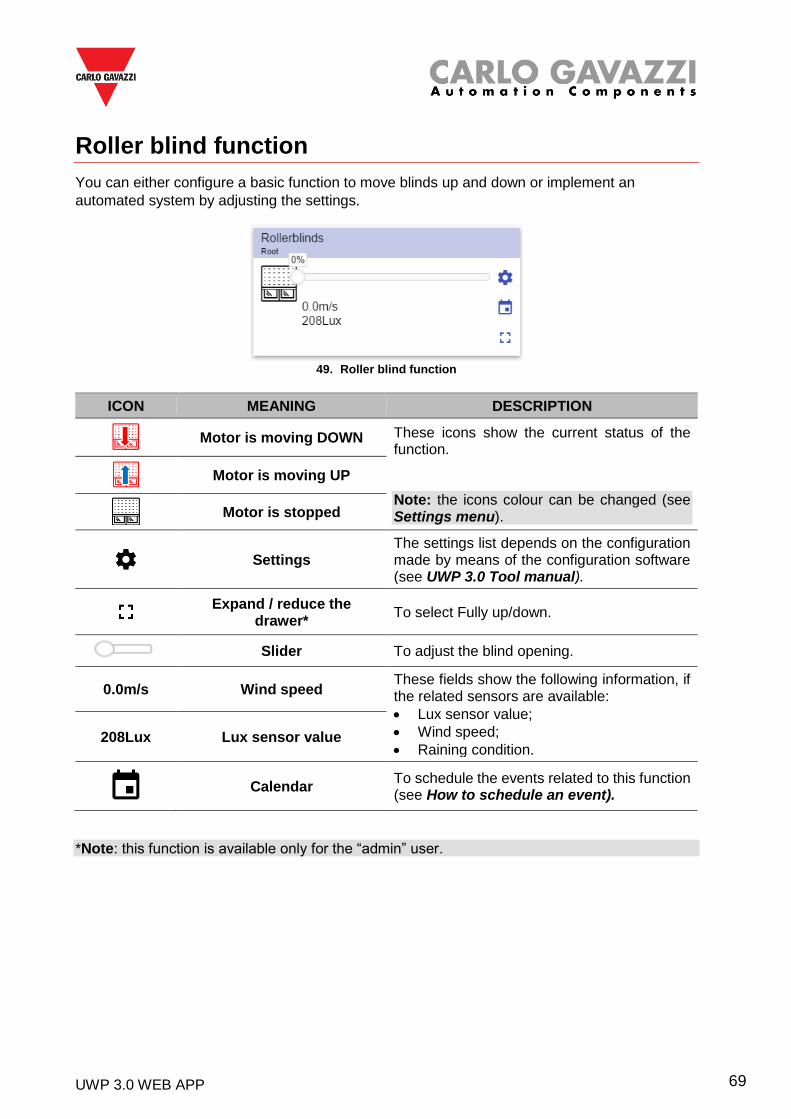
Roller blind function
You can either configure a basic function to move blinds up and down or implement an
automated system by adjusting the settings.
49. Roller blind function
ICON MEANING DESCRIPTION
Motor is moving DOWN These icons show the current status of the
function. Note: the icons colour can be changed (see Settings menu).
Motor is moving UP
Motor is stopped
Settings The settings list depends on the configuration made by means of the configuration software (see UWP 3.0 Tool manual).
Expand / reduce the
drawer* To select Fully up/down.
Slider To adjust the blind opening.
0.0m/s Wind speed These fields show the following information, if the related sensors are available:
• Lux sensor value;
• Wind speed;
• Raining condition. 208Lux Lux sensor value
Calendar
To schedule the events related to this function (see How to schedule an event).
*Note: this function is available only for the “admin” user.
UWP 3.0 WEB APP 70
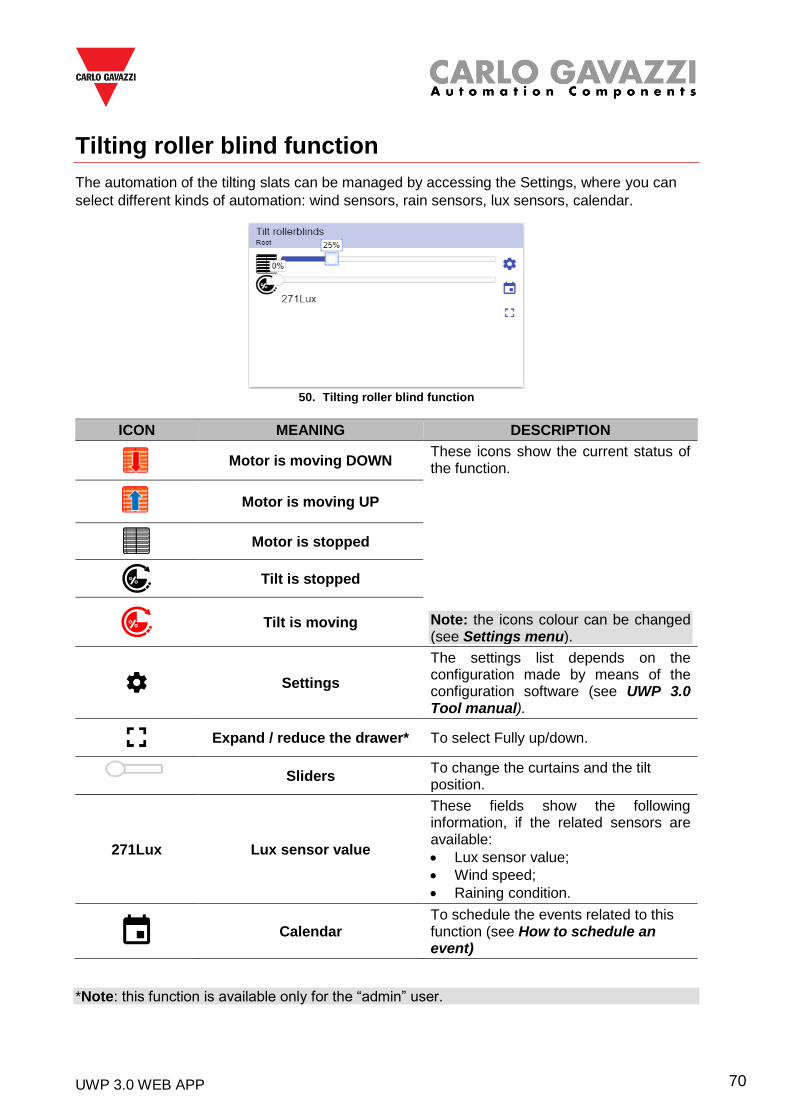
Tilting roller blind function
The automation of the tilting slats can be managed by accessing the Settings, where you can
select different kinds of automation: wind sensors, rain sensors, lux sensors, calendar.
50. Tilting roller blind function
ICON MEANING DESCRIPTION
Motor is moving DOWN
These icons show the current status of the function. Note: the icons colour can be changed (see Settings menu).
Motor is moving UP
Motor is stopped
Tilt is stopped
Tilt is moving
Settings
The settings list depends on the configuration made by means of the configuration software (see UWP 3.0 Tool manual).
Expand / reduce the drawer* To select Fully up/down.
Sliders To change the curtains and the tilt position.
271Lux Lux sensor value
These fields show the following information, if the related sensors are available:
• Lux sensor value;
• Wind speed;
• Raining condition.
Calendar
To schedule the events related to this function (see How to schedule an event)
*Note: this function is available only for the “admin” user.
UWP 3.0 WEB APP 71
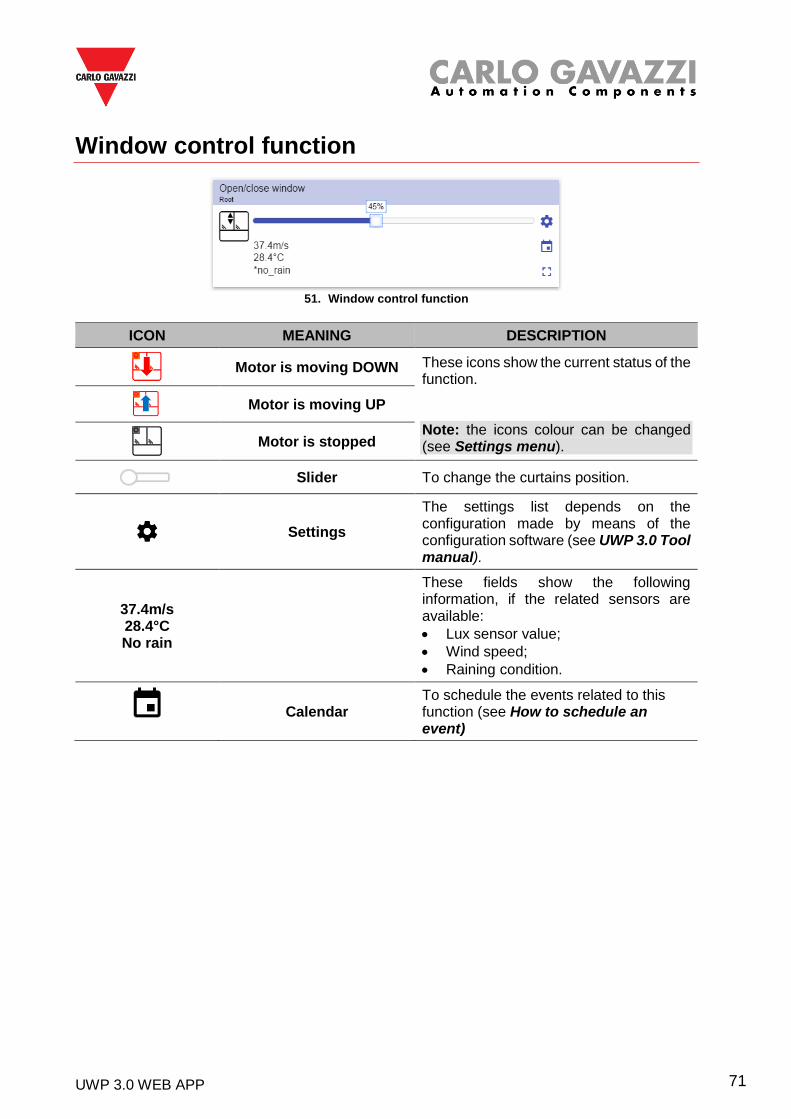
Window control function
51. Window control function
ICON MEANING DESCRIPTION
Motor is moving DOWN These icons show the current status of the
function. Note: the icons colour can be changed (see Settings menu).
Motor is moving UP
Motor is stopped
Slider To change the curtains position.
Settings
The settings list depends on the configuration made by means of the configuration software (see UWP 3.0 Tool manual).
37.4m/s 28.4°C No rain
These fields show the following information, if the related sensors are available:
• Lux sensor value;
• Wind speed;
• Raining condition.
Calendar To schedule the events related to this function (see How to schedule an event)
UWP 3.0 WEB APP 72
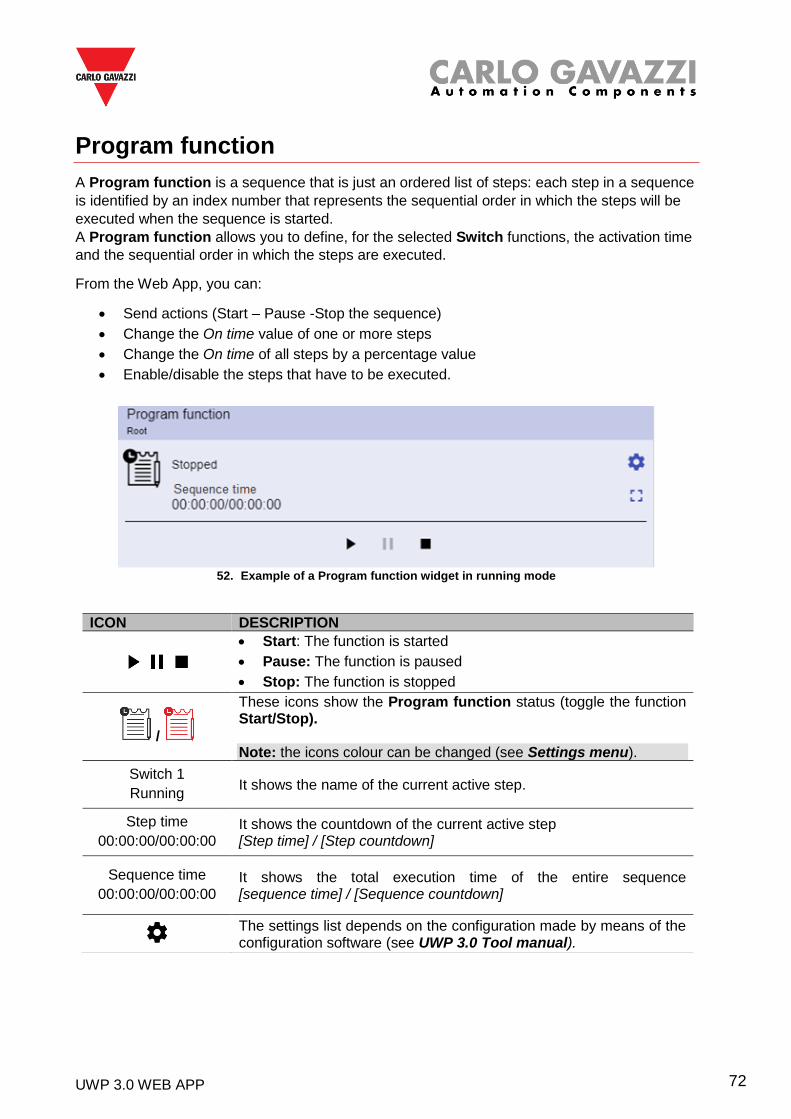
Program function
A Program function is a sequence that is just an ordered list of steps: each step in a sequence
is identified by an index number that represents the sequential order in which the steps will be
executed when the sequence is started.
A Program function allows you to define, for the selected Switch functions, the activation time
and the sequential order in which the steps are executed.
From the Web App, you can:
• Send actions (Start – Pause -Stop the sequence)
• Change the On time value of one or more steps
• Change the On time of all steps by a percentage value
• Enable/disable the steps that have to be executed.
52. Example of a Program function widget in running mode
ICON DESCRIPTION
• Start: The function is started
• Pause: The function is paused
• Stop: The function is stopped
/
These icons show the Program function status (toggle the function Start/Stop). Note: the icons colour can be changed (see Settings menu).
Switch 1
Running It shows the name of the current active step.
Step time
00:00:00/00:00:00 It shows the countdown of the current active step [Step time] / [Step countdown]
Sequence time
00:00:00/00:00:00 It shows the total execution time of the entire sequence [sequence time] / [Sequence countdown]
The settings list depends on the configuration made by means of the configuration software (see UWP 3.0 Tool manual).
UWP 3.0 WEB APP 73
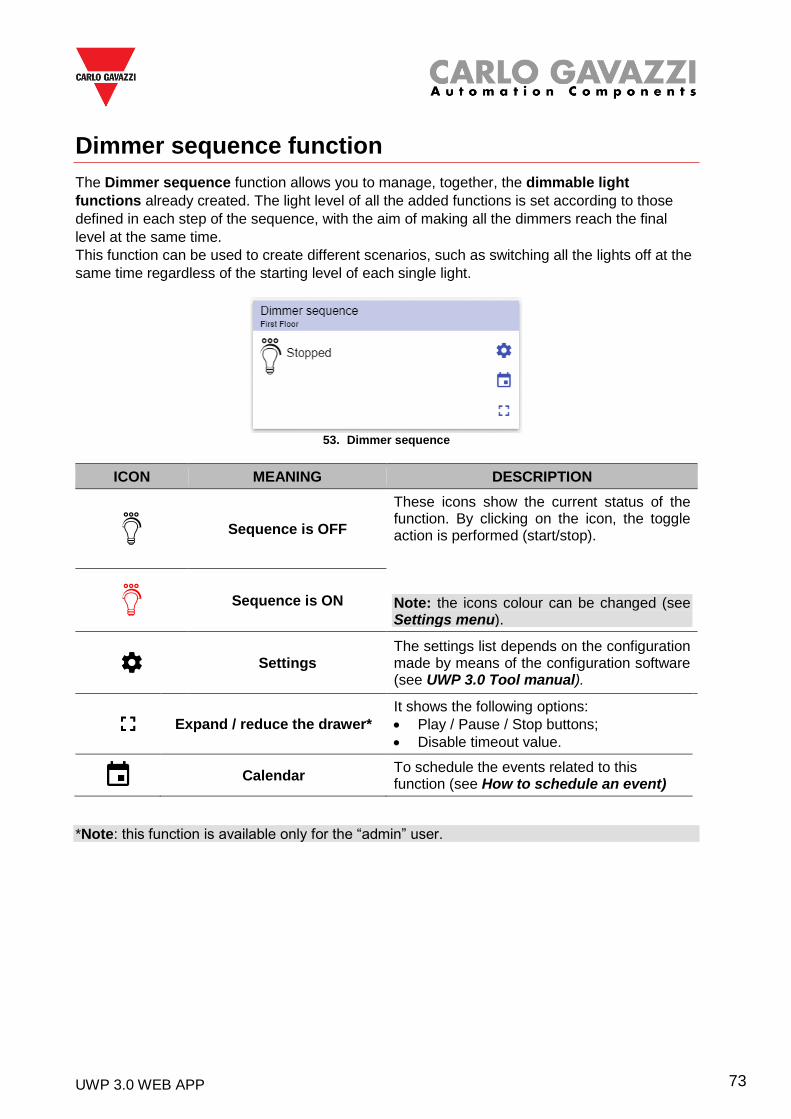
Dimmer sequence function
The Dimmer sequence function allows you to manage, together, the dimmable light
functions already created. The light level of all the added functions is set according to those
defined in each step of the sequence, with the aim of making all the dimmers reach the final
level at the same time.
This function can be used to create different scenarios, such as switching all the lights off at the
same time regardless of the starting level of each single light.
53. Dimmer sequence
ICON MEANING DESCRIPTION
Sequence is OFF
These icons show the current status of the function. By clicking on the icon, the toggle action is performed (start/stop). Note: the icons colour can be changed (see Settings menu).
Sequence is ON
Settings The settings list depends on the configuration made by means of the configuration software (see UWP 3.0 Tool manual).
Expand / reduce the drawer*
It shows the following options:
• Play / Pause / Stop buttons;
• Disable timeout value.
Calendar
To schedule the events related to this function (see How to schedule an event)
*Note: this function is available only for the “admin” user.
UWP 3.0 WEB APP 74
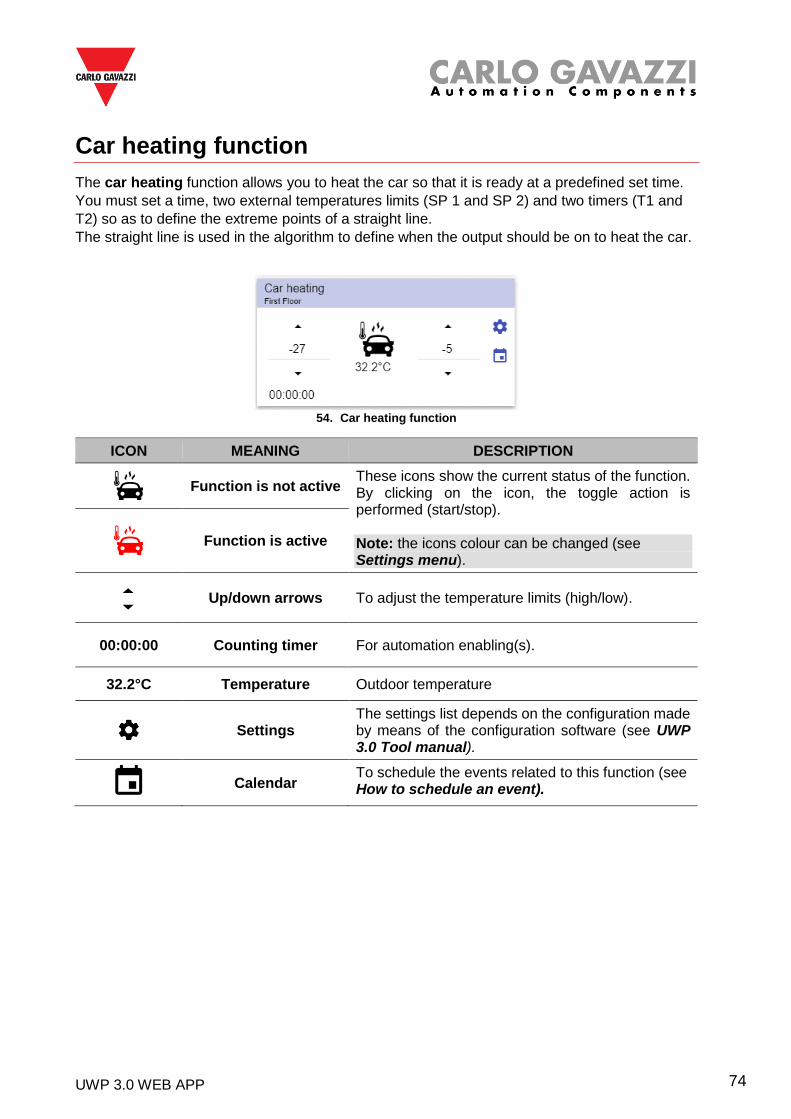
Car heating function
The car heating function allows you to heat the car so that it is ready at a predefined set time.
You must set a time, two external temperatures limits (SP 1 and SP 2) and two timers (T1 and
T2) so as to define the extreme points of a straight line.
The straight line is used in the algorithm to define when the output should be on to heat the car.
54. Car heating function
ICON MEANING DESCRIPTION
Function is not active
These icons show the current status of the function. By clicking on the icon, the toggle action is performed (start/stop). Note: the icons colour can be changed (see Settings menu).
Function is active
Up/down arrows To adjust the temperature limits (high/low).
00:00:00 Counting timer For automation enabling(s).
32.2°C Temperature Outdoor temperature
Settings The settings list depends on the configuration made by means of the configuration software (see UWP 3.0 Tool manual).
Calendar
To schedule the events related to this function (see How to schedule an event).
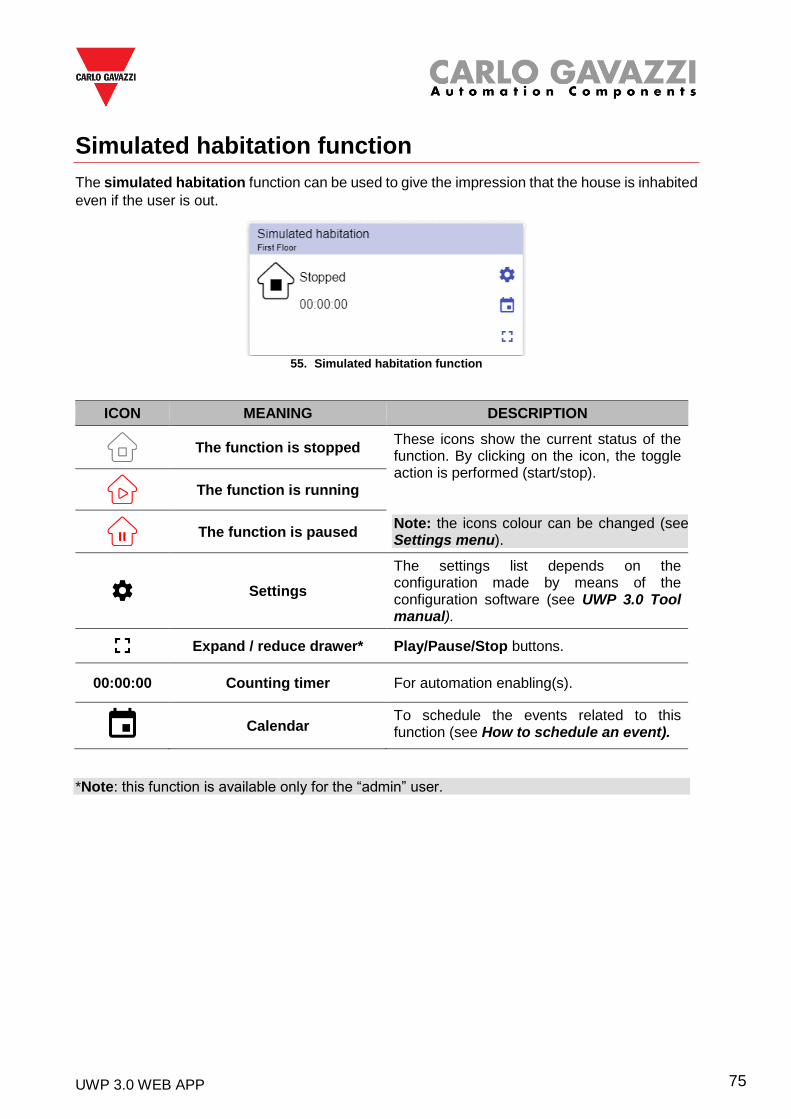
UWP 3.0 WEB APP 75
Simulated habitation function
The simulated habitation function can be used to give the impression that the house is inhabited
even if the user is out.
55. Simulated habitation function
ICON MEANING DESCRIPTION
The function is stopped
These icons show the current status of the function. By clicking on the icon, the toggle action is performed (start/stop). Note: the icons colour can be changed (see Settings menu).
The function is running
The function is paused
Settings
The settings list depends on the configuration made by means of the configuration software (see UWP 3.0 Tool manual).
Expand / reduce drawer* Play/Pause/Stop buttons.
00:00:00 Counting timer For automation enabling(s).
Calendar
To schedule the events related to this function (see How to schedule an event).
*Note: this function is available only for the “admin” user.
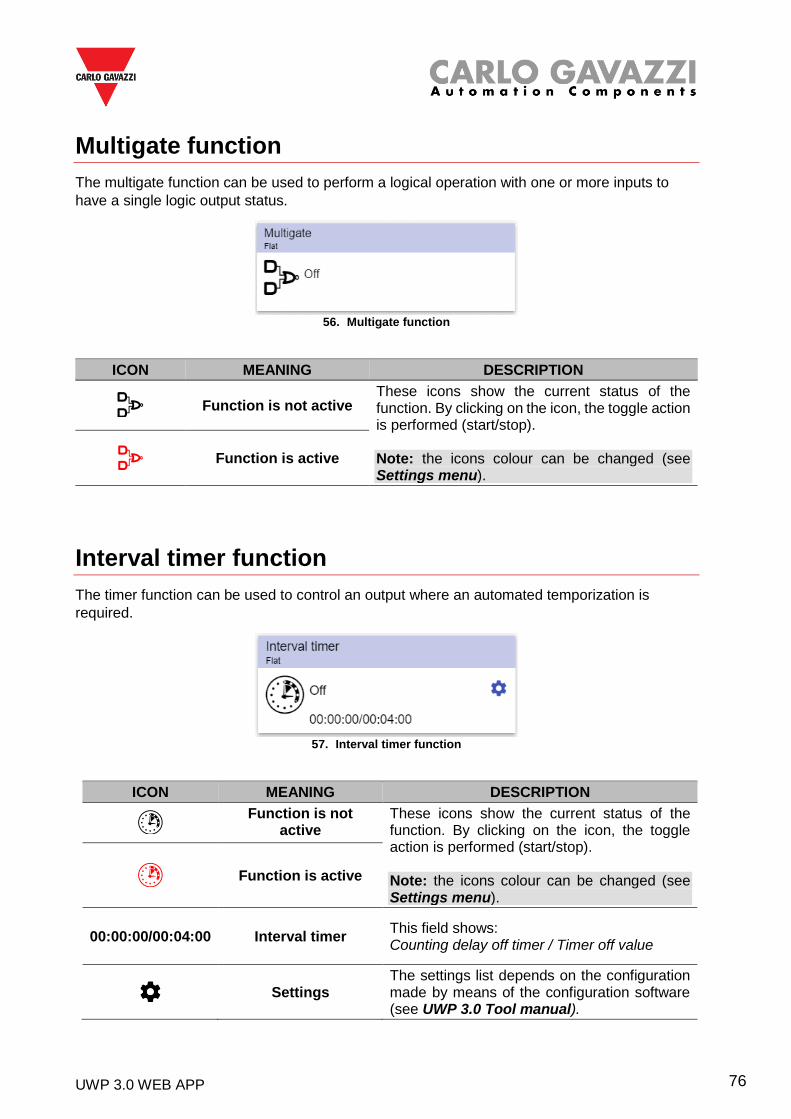
UWP 3.0 WEB APP 76
Multigate function
The multigate function can be used to perform a logical operation with one or more inputs to
have a single logic output status.
56. Multigate function
ICON MEANING DESCRIPTION
Function is not active
These icons show the current status of the function. By clicking on the icon, the toggle action is performed (start/stop). Note: the icons colour can be changed (see Settings menu).
Function is active
Interval timer function
The timer function can be used to control an output where an automated temporization is
required.
57. Interval timer function
ICON MEANING DESCRIPTION
Function is not
active These icons show the current status of the function. By clicking on the icon, the toggle action is performed (start/stop). Note: the icons colour can be changed (see Settings menu).
Function is active
00:00:00/00:04:00 Interval timer This field shows: Counting delay off timer / Timer off value
Settings The settings list depends on the configuration made by means of the configuration software (see UWP 3.0 Tool manual).
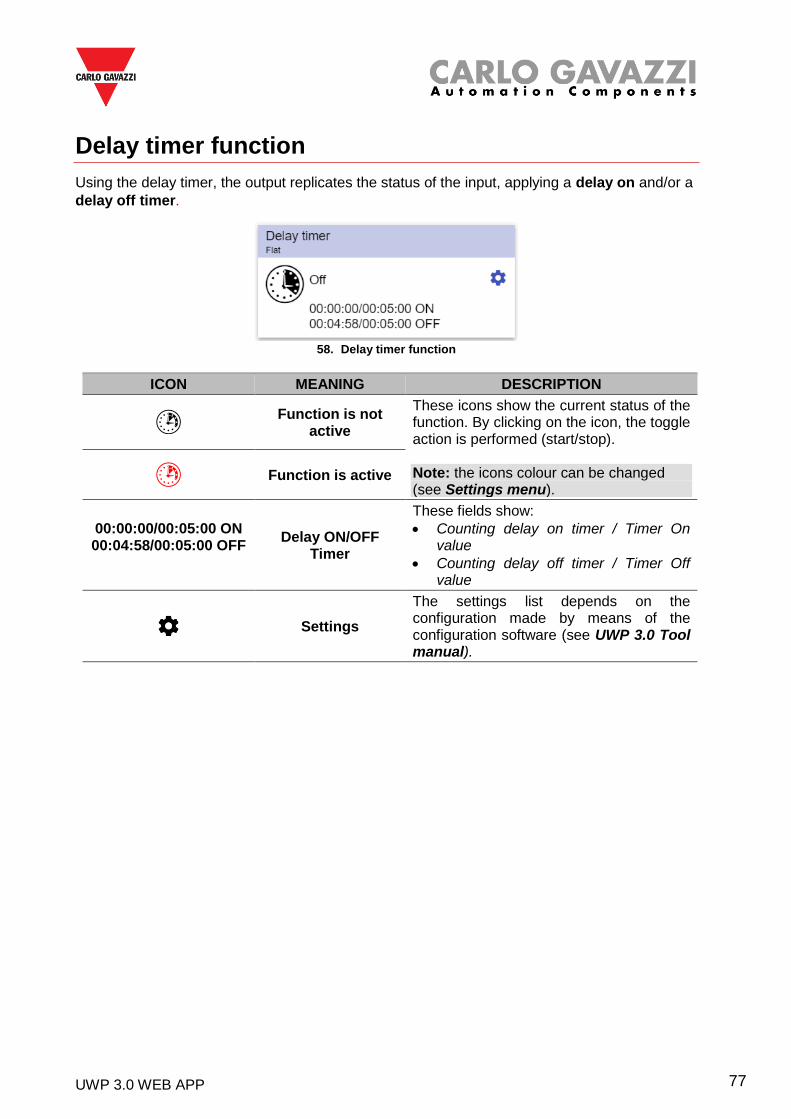
UWP 3.0 WEB APP 77
Delay timer function
Using the delay timer, the output replicates the status of the input, applying a delay on and/or a
delay off timer.
58. Delay timer function
ICON MEANING DESCRIPTION
Function is not
active
These icons show the current status of the function. By clicking on the icon, the toggle action is performed (start/stop). Note: the icons colour can be changed (see Settings menu).
Function is active
00:00:00/00:05:00 ON 00:04:58/00:05:00 OFF
Delay ON/OFF Timer
These fields show:
• Counting delay on timer / Timer On value
• Counting delay off timer / Timer Off value
Settings
The settings list depends on the configuration made by means of the configuration software (see UWP 3.0 Tool manual).
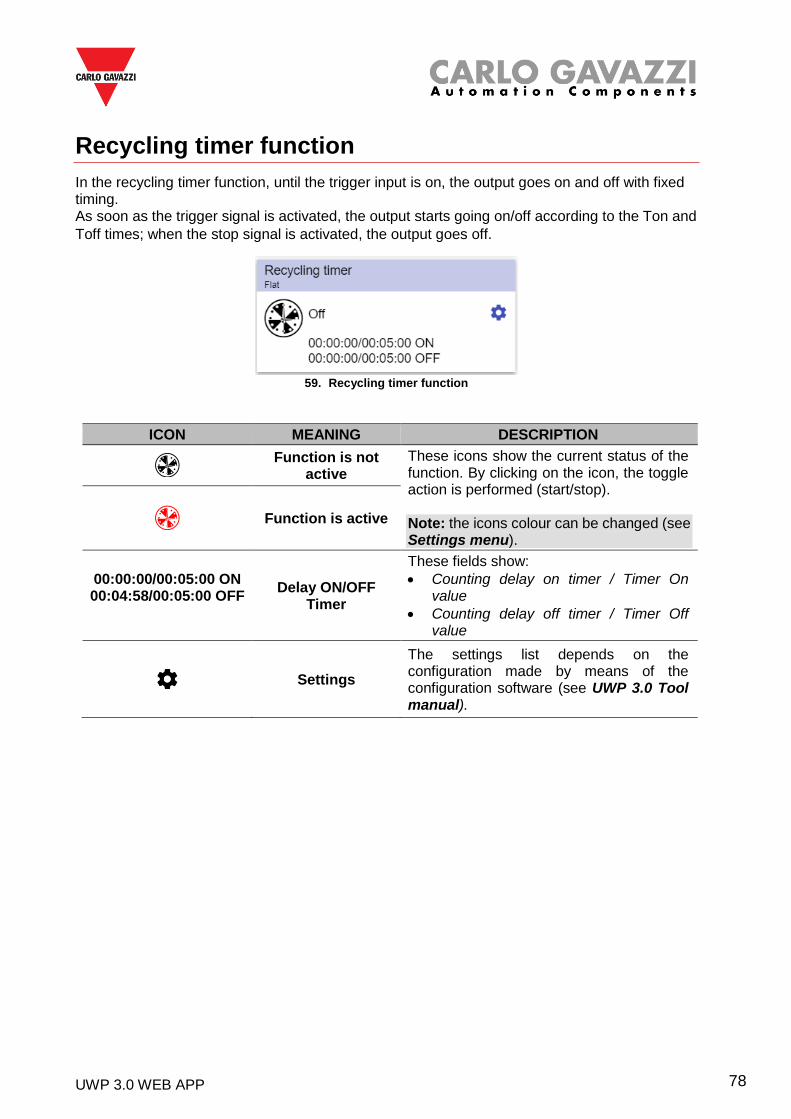
UWP 3.0 WEB APP 78
Recycling timer function
In the recycling timer function, until the trigger input is on, the output goes on and off with fixed timing. As soon as the trigger signal is activated, the output starts going on/off according to the Ton and
Toff times; when the stop signal is activated, the output goes off.
59. Recycling timer function
ICON MEANING DESCRIPTION
Function is not
active
These icons show the current status of the function. By clicking on the icon, the toggle action is performed (start/stop). Note: the icons colour can be changed (see Settings menu).
Function is active
00:00:00/00:05:00 ON 00:04:58/00:05:00 OFF
Delay ON/OFF Timer
These fields show:
• Counting delay on timer / Timer On value
• Counting delay off timer / Timer Off value
Settings
The settings list depends on the configuration made by means of the configuration software (see UWP 3.0 Tool manual).
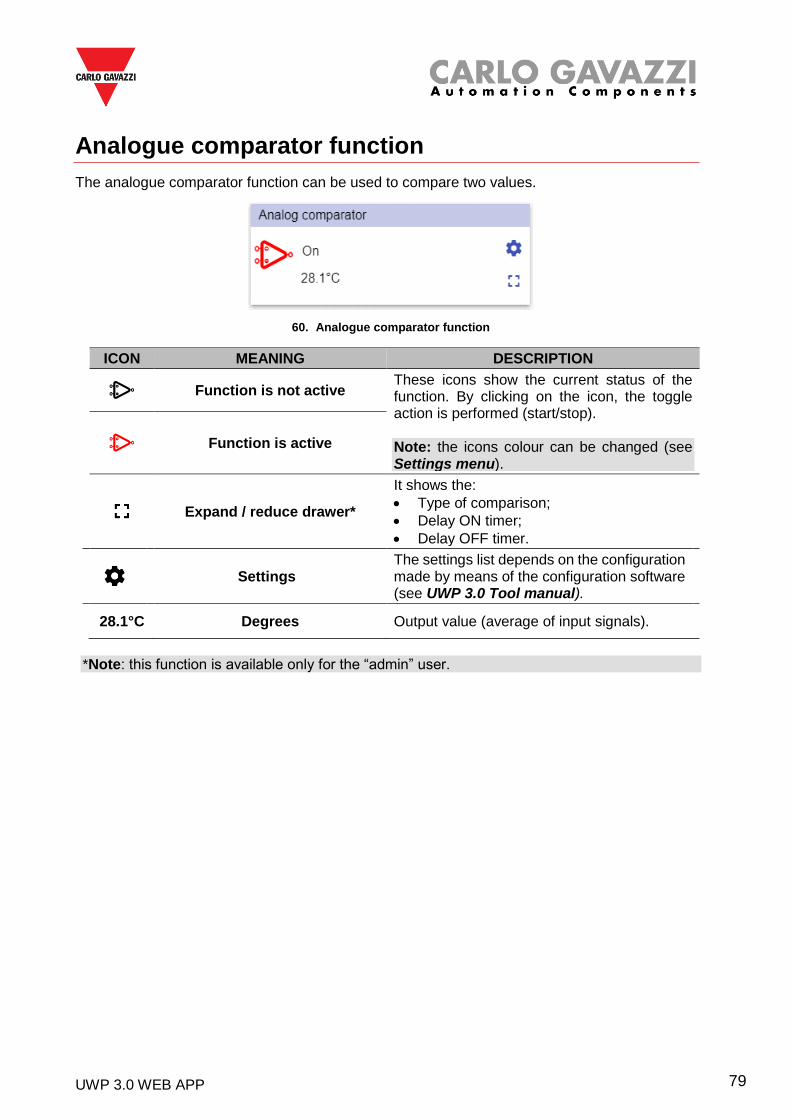
UWP 3.0 WEB APP 79
Analogue comparator function
The analogue comparator function can be used to compare two values.
60. Analogue comparator function
ICON MEANING DESCRIPTION
Function is not active These icons show the current status of the function. By clicking on the icon, the toggle action is performed (start/stop). Note: the icons colour can be changed (see Settings menu).
Function is active
Expand / reduce drawer*
It shows the:
• Type of comparison;
• Delay ON timer;
• Delay OFF timer.
Settings The settings list depends on the configuration made by means of the configuration software (see UWP 3.0 Tool manual).
28.1°C Degrees Output value (average of input signals).
*Note: this function is available only for the “admin” user.
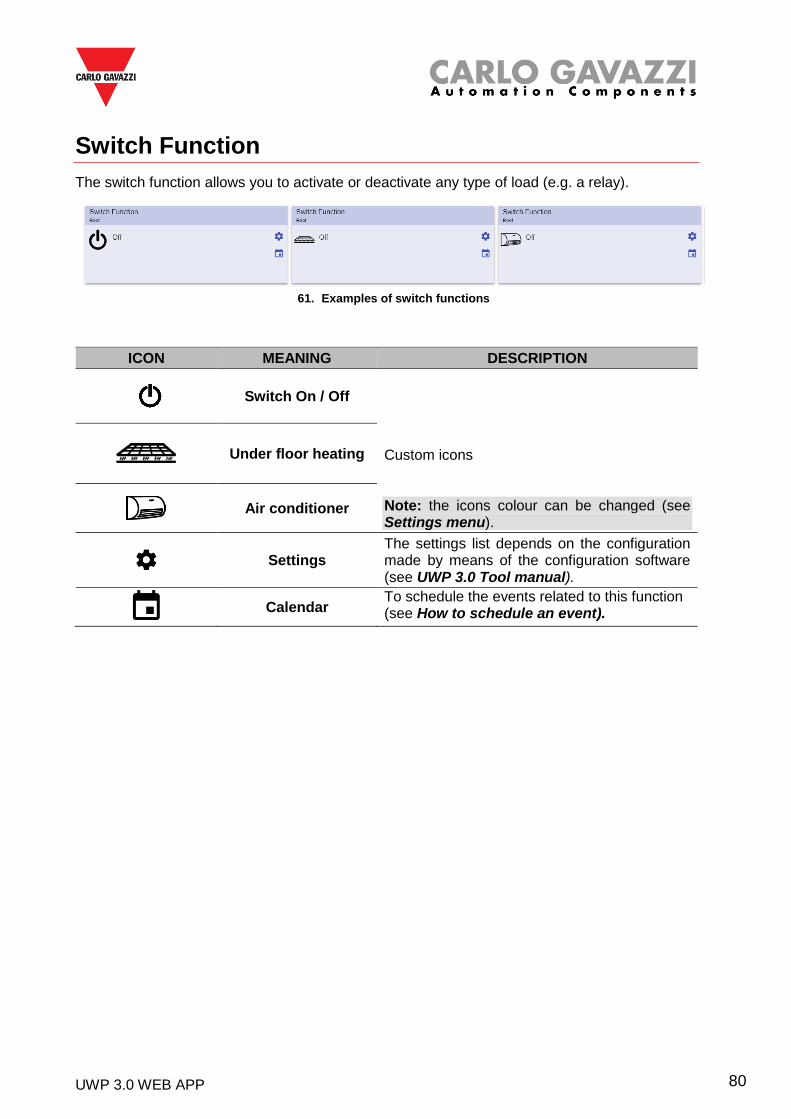
UWP 3.0 WEB APP 80
Switch Function
The switch function allows you to activate or deactivate any type of load (e.g. a relay).
61. Examples of switch functions
ICON MEANING DESCRIPTION
Switch On / Off
Custom icons Note: the icons colour can be changed (see Settings menu).
Under floor heating
Air conditioner
Settings The settings list depends on the configuration made by means of the configuration software (see UWP 3.0 Tool manual).
Calendar
To schedule the events related to this function (see How to schedule an event).
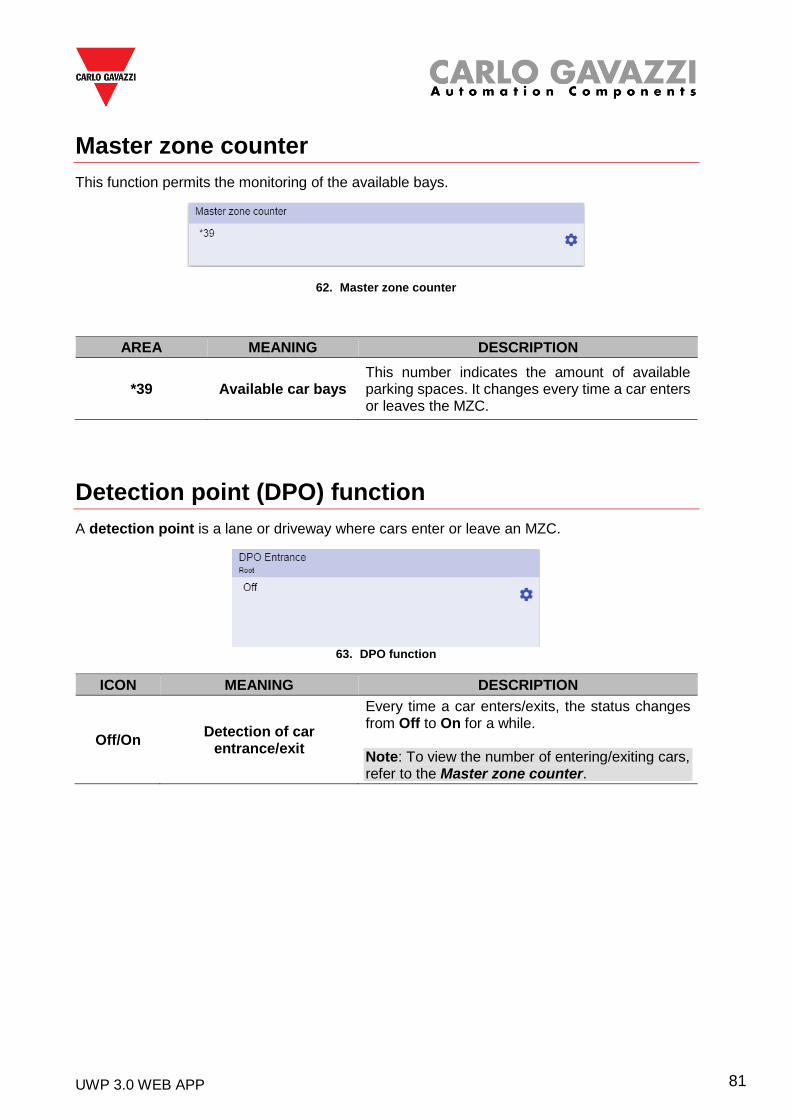
UWP 3.0 WEB APP 81
Master zone counter
This function permits the monitoring of the available bays.
62. Master zone counter
AREA MEANING DESCRIPTION
*39 Available car bays This number indicates the amount of available parking spaces. It changes every time a car enters or leaves the MZC.
Detection point (DPO) function
A detection point is a lane or driveway where cars enter or leave an MZC.
63. DPO function
ICON MEANING DESCRIPTION
Off/On Detection of car
entrance/exit
Every time a car enters/exits, the status changes from Off to On for a while. Note: To view the number of entering/exiting cars, refer to the Master zone counter.
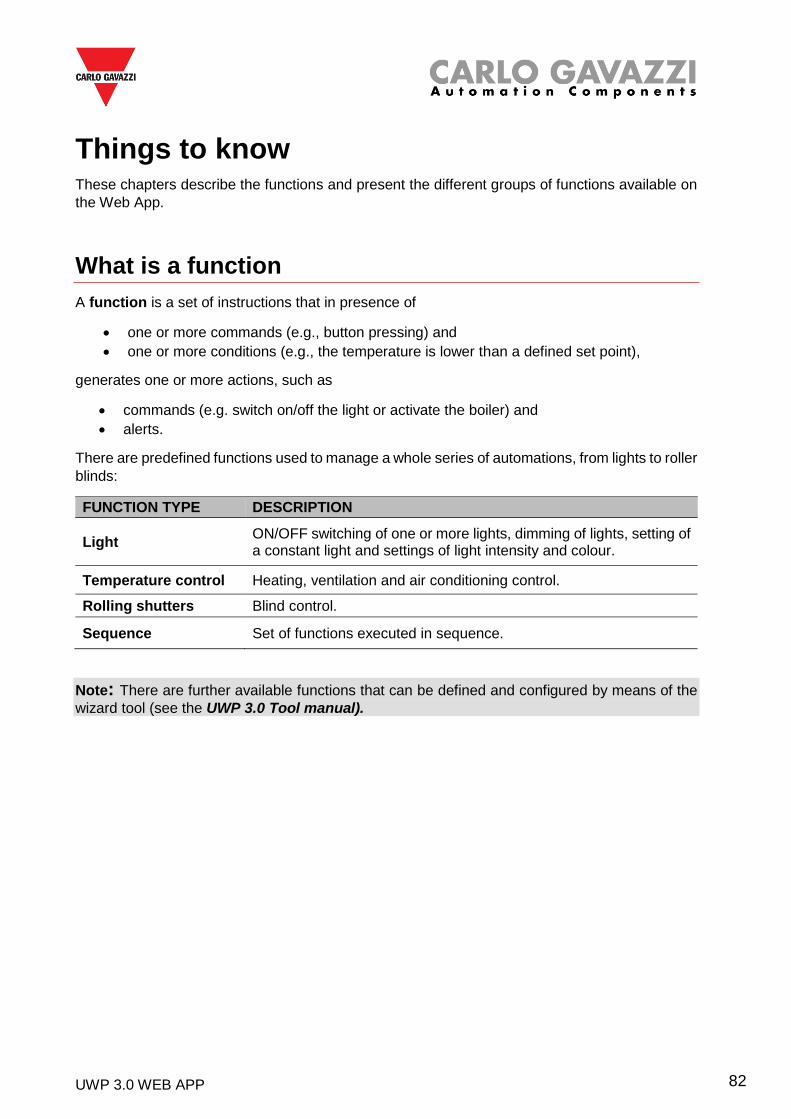
UWP 3.0 WEB APP 82
Things to know These chapters describe the functions and present the different groups of functions available on
the Web App.
What is a function
A function is a set of instructions that in presence of
• one or more commands (e.g., button pressing) and
• one or more conditions (e.g., the temperature is lower than a defined set point),
generates one or more actions, such as
• commands (e.g. switch on/off the light or activate the boiler) and
• alerts.
There are predefined functions used to manage a whole series of automations, from lights to roller
blinds:
FUNCTION TYPE DESCRIPTION
Light ON/OFF switching of one or more lights, dimming of lights, setting of a constant light and settings of light intensity and colour.
Temperature control Heating, ventilation and air conditioning control.
Rolling shutters Blind control.
Sequence Set of functions executed in sequence.
Note: There are further available functions that can be defined and configured by means of the
wizard tool (see the UWP 3.0 Tool manual).
UWP 3.0 WEB APP 83
Light functions
These functions allow you to manage one or more lights at the same time.
You can either configure:
• a basic function to switch the light on manually, or
• an automatic system by programming the relevant objects of the function.
From the Web App, you can:
• Switch a light on/off (Light function)
• Dim the light (Dimmable light function)
• Set a constant light (Constant light function)
• Set the light intensity and colour (Smart light function).
Temperature control functions
From the UWP 3.0 Tool, you can manage the temperature inside the building, creating different zones depending on the different requirements. Each zone function can correspond to a part of the building (e.g. an office) where the user wants to control the heating/cooling. On the Web App, the functions dedicated to the temperature control are:
• Zone temperature function;
• Cooling temperature system function;
• Heating temperature system function.
Rolling shutters functions
These functions allow you to manage the motor to control roller blinds.
You can either configure:
• a basic function to move blinds up and down or
• an automated system by programming the relevant objects of the function.
From the Web App, you can:
• Control the roller blind movement;
• Adjust the tilting slats;
• Control the window movement.
UWP 3.0 WEB APP 84
Sequence functions
The sequence functions allow you to put together the functions already created and
activate/deactivate them with just one click. All the selected functions are activated according to
a certain time and order. The sequence starts activating the first function in the list and goes on
to activate the others following the predefined order, until the last function in the list is executed.
The functions that can be controlled are:
• lights,
• roller blinds and windows,
• intruder alarm,
• sirens,
• timers and
• zone temperature functions.
From the Web App, you can manage a:
• Program function,
• Sequence function or
• Dimmer sequence function.
Carpark functions
The Carpark functions permit the monitoring of the Carpark system status (e.g. number of
available/occupied bays).
For further information, see the CP3 installation manual.
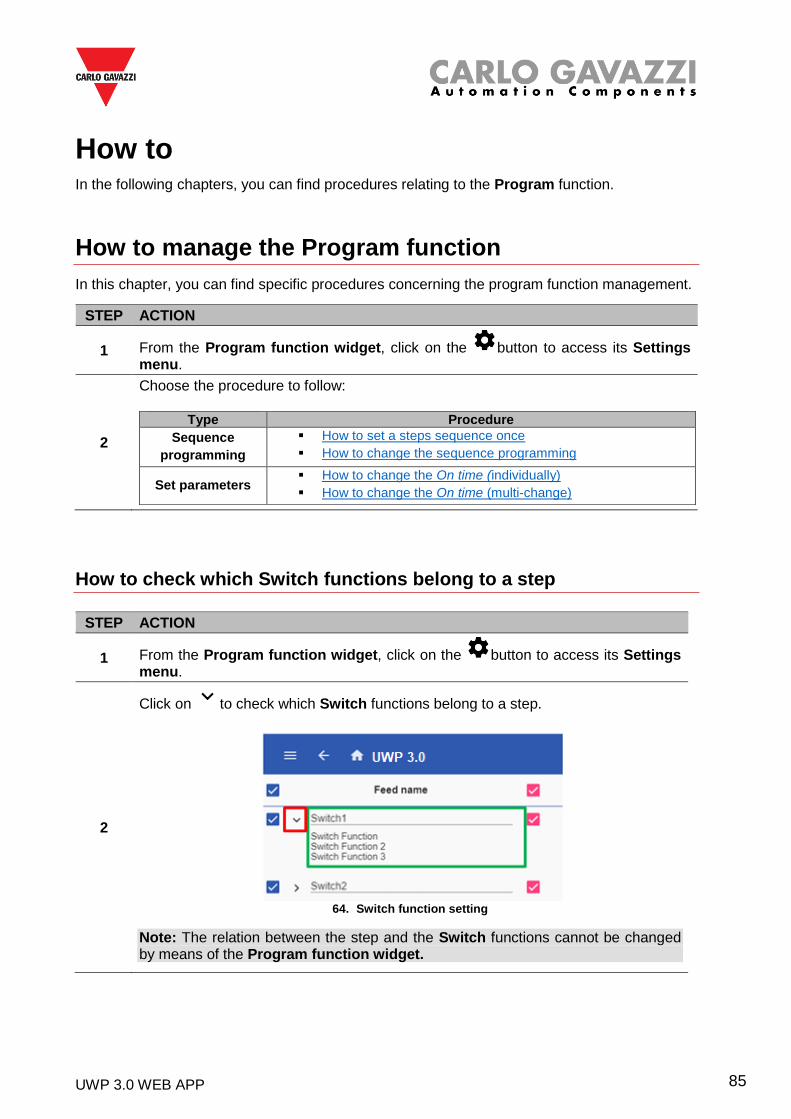
UWP 3.0 WEB APP 85
How to In the following chapters, you can find procedures relating to the Program function.
How to manage the Program function
In this chapter, you can find specific procedures concerning the program function management.
STEP ACTION
1 From the Program function widget, click on the button to access its Settings menu.
2
Choose the procedure to follow:
Type Procedure
Sequence
programming
▪ How to set a steps sequence once
▪ How to change the sequence programming
Set parameters ▪ How to change the On time (individually)
▪ How to change the On time (multi-change)
How to check which Switch functions belong to a step
STEP ACTION
1 From the Program function widget, click on the button to access its Settings menu.
2
Click on to check which Switch functions belong to a step.
64. Switch function setting
Note: The relation between the step and the Switch functions cannot be changed by means of the Program function widget.
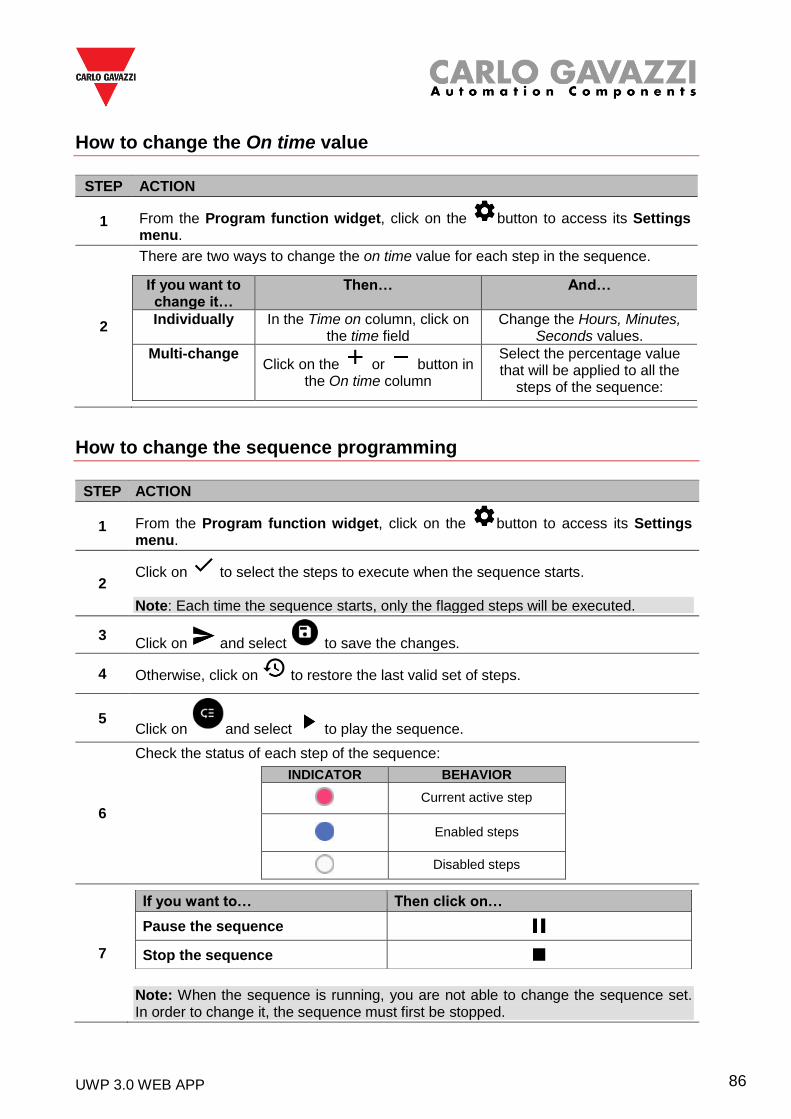
UWP 3.0 WEB APP 86
How to change the On time value
STEP ACTION
1 From the Program function widget, click on the button to access its Settings menu.
2
There are two ways to change the on time value for each step in the sequence.
If you want to change it…
Then… And…
Individually In the Time on column, click on the time field
Change the Hours, Minutes, Seconds values.
Multi-change Click on the or button in
the On time column
Select the percentage value that will be applied to all the
steps of the sequence:
How to change the sequence programming
STEP ACTION
1 From the Program function widget, click on the button to access its Settings menu.
2 Click on to select the steps to execute when the sequence starts. Note: Each time the sequence starts, only the flagged steps will be executed.
3 Click on and select to save the changes.
4 Otherwise, click on to restore the last valid set of steps.
5 Click on and select to play the sequence.
6
Check the status of each step of the sequence:
INDICATOR BEHAVIOR
Current active step
Enabled steps
Disabled steps
7
Note: When the sequence is running, you are not able to change the sequence set. In order to change it, the sequence must first be stopped.
If you want to… Then click on…
Pause the sequence
Stop the sequence
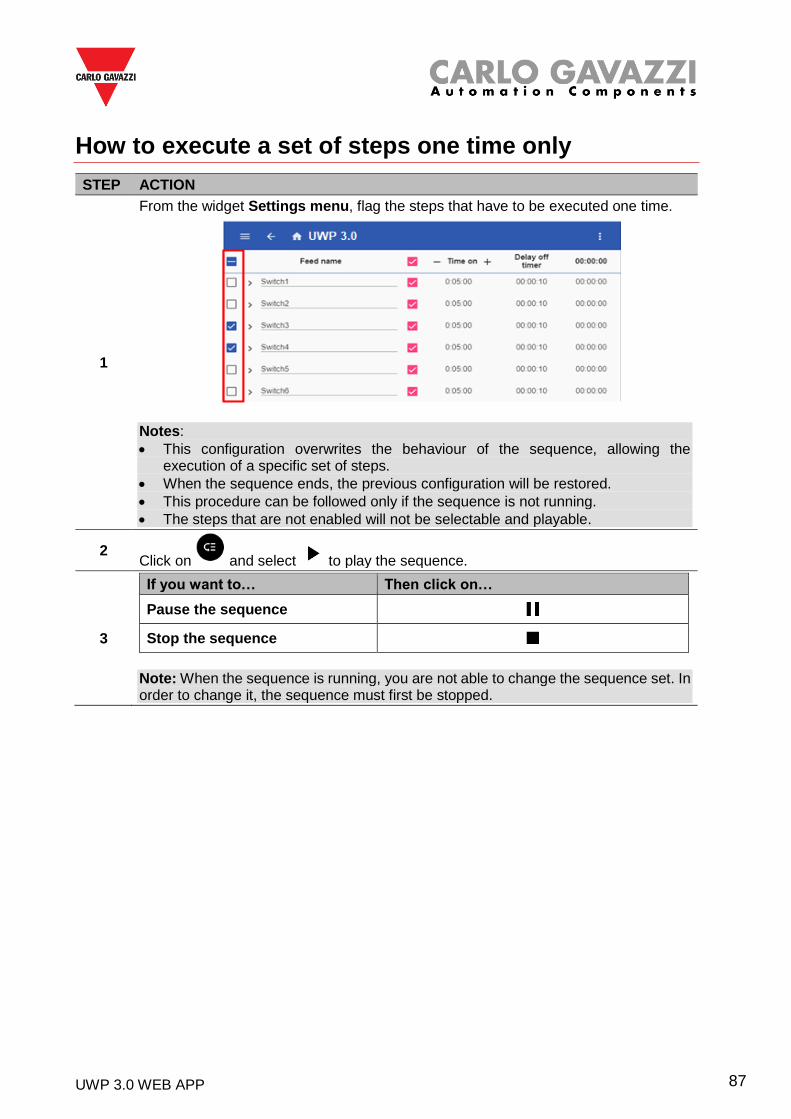
UWP 3.0 WEB APP 87
How to execute a set of steps one time only
STEP ACTION
1
From the widget Settings menu, flag the steps that have to be executed one time.
Notes:
• This configuration overwrites the behaviour of the sequence, allowing the execution of a specific set of steps.
• When the sequence ends, the previous configuration will be restored.
• This procedure can be followed only if the sequence is not running.
• The steps that are not enabled will not be selectable and playable.
2 Click on and select to play the sequence.
3
If you want to… Then click on…
Pause the sequence
Stop the sequence Note: When the sequence is running, you are not able to change the sequence set. In order to change it, the sequence must first be stopped.
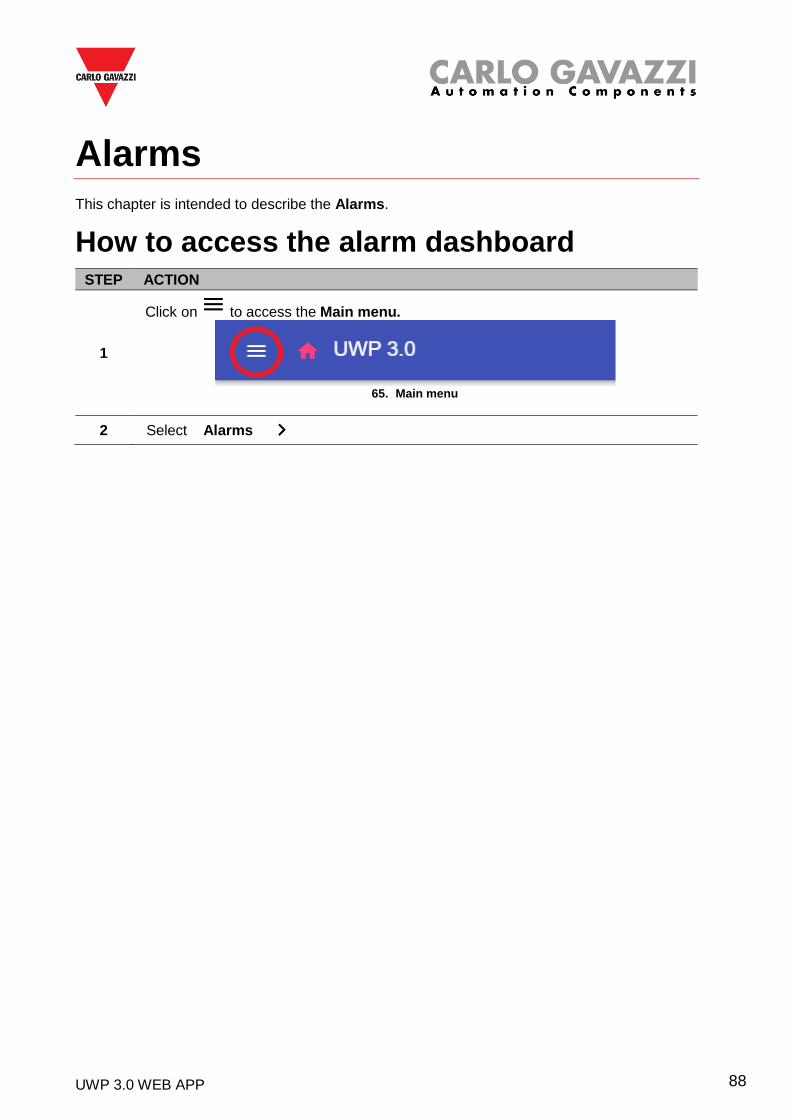
UWP 3.0 WEB APP 88
Alarms This chapter is intended to describe the Alarms.
How to access the alarm dashboard STEP ACTION
1
Click on to access the Main menu.
65. Main menu
2 Select Alarms
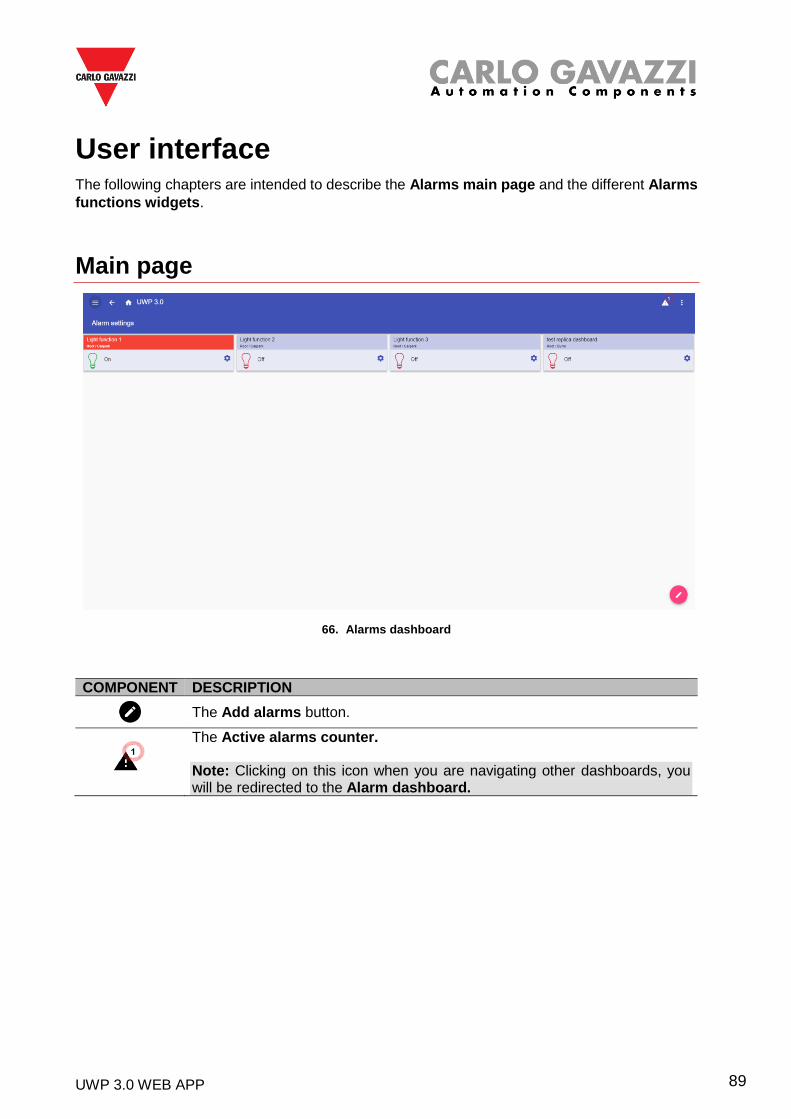
UWP 3.0 WEB APP 89
User interface The following chapters are intended to describe the Alarms main page and the different Alarms
functions widgets.
Main page
66. Alarms dashboard
COMPONENT DESCRIPTION
The Add alarms button.
The Active alarms counter. Note: Clicking on this icon when you are navigating other dashboards, you will be redirected to the Alarm dashboard.
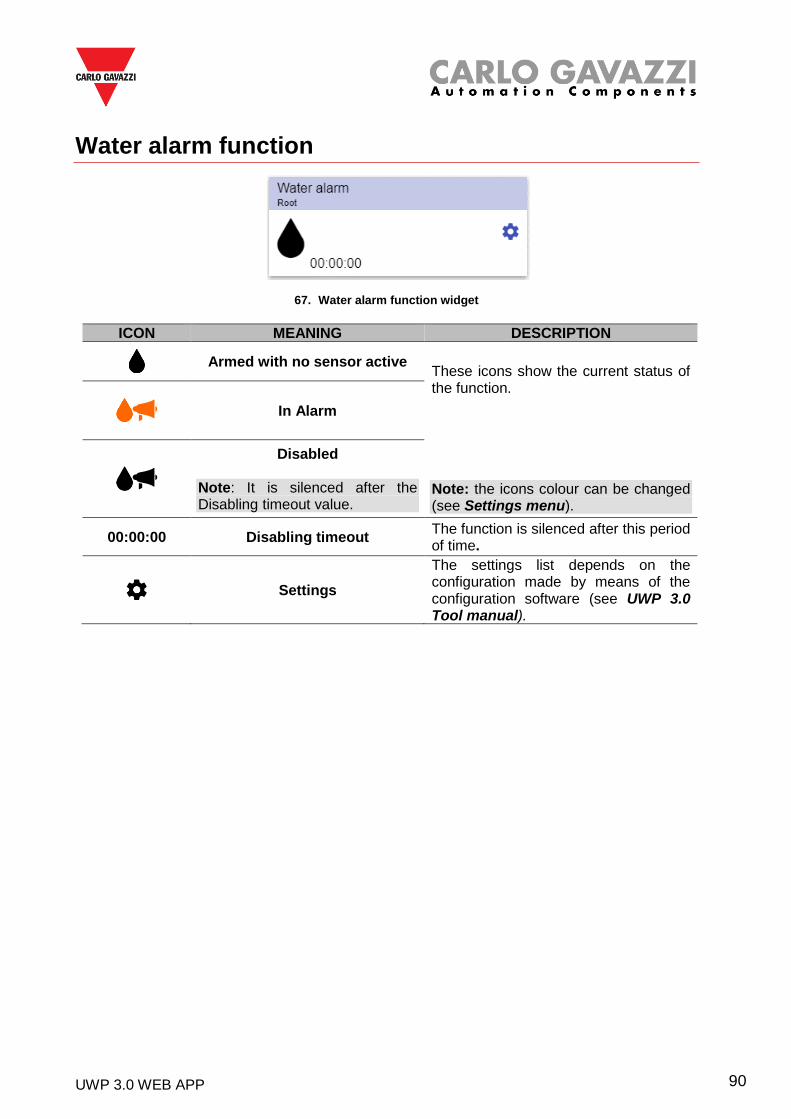
UWP 3.0 WEB APP 90
Water alarm function
67. Water alarm function widget
ICON MEANING DESCRIPTION
Armed with no sensor active These icons show the current status of the function. Note: the icons colour can be changed (see Settings menu).
In Alarm
Disabled
Note: It is silenced after the Disabling timeout value.
00:00:00 Disabling timeout The function is silenced after this period of time.
Settings
The settings list depends on the configuration made by means of the configuration software (see UWP 3.0 Tool manual).
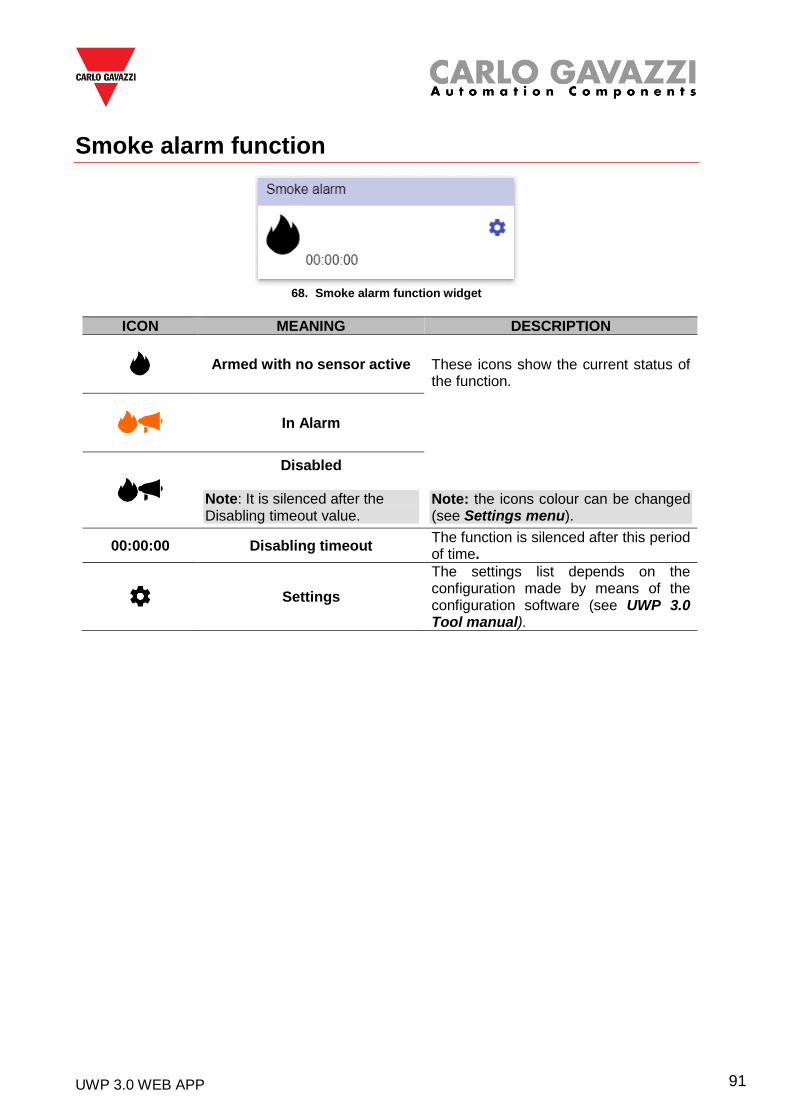
UWP 3.0 WEB APP 91
Smoke alarm function
68. Smoke alarm function widget
ICON MEANING DESCRIPTION
Armed with no sensor active These icons show the current status of the function. Note: the icons colour can be changed (see Settings menu).
In Alarm
Disabled Note: It is silenced after the Disabling timeout value.
00:00:00 Disabling timeout The function is silenced after this period of time.
Settings
The settings list depends on the configuration made by means of the configuration software (see UWP 3.0 Tool manual).
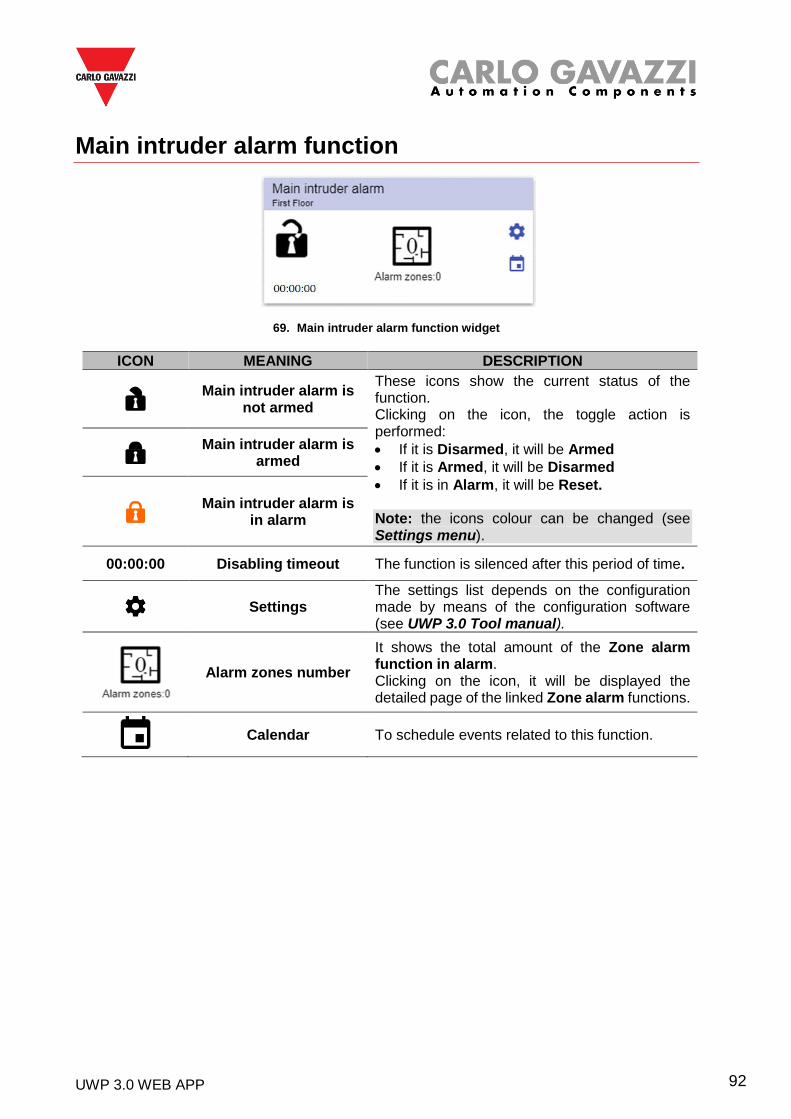
UWP 3.0 WEB APP 92
Main intruder alarm function
69. Main intruder alarm function widget
ICON MEANING DESCRIPTION
Main intruder alarm is not armed
These icons show the current status of the function. Clicking on the icon, the toggle action is performed:
• If it is Disarmed, it will be Armed
• If it is Armed, it will be Disarmed
• If it is in Alarm, it will be Reset. Note: the icons colour can be changed (see Settings menu).
Main intruder alarm is
armed
Main intruder alarm is
in alarm
00:00:00 Disabling timeout The function is silenced after this period of time.
Settings The settings list depends on the configuration made by means of the configuration software (see UWP 3.0 Tool manual).
Alarm zones number
It shows the total amount of the Zone alarm function in alarm. Clicking on the icon, it will be displayed the detailed page of the linked Zone alarm functions.
Calendar To schedule events related to this function.
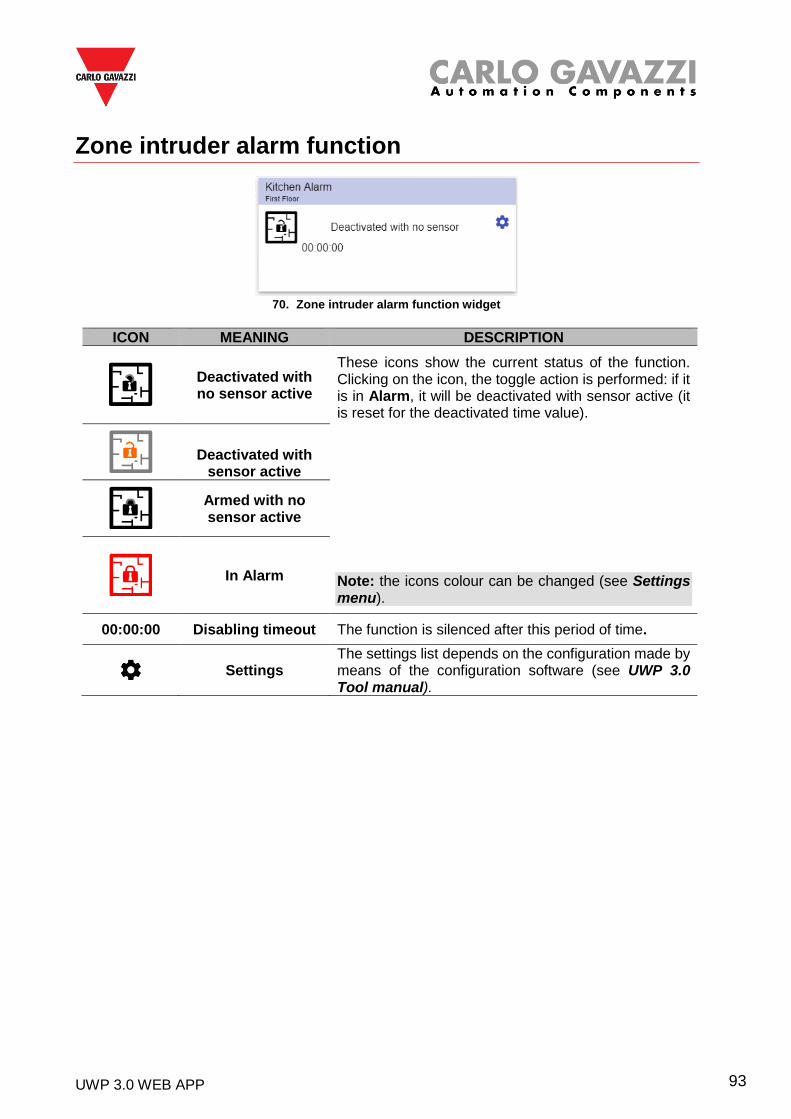
UWP 3.0 WEB APP 93
Zone intruder alarm function
70. Zone intruder alarm function widget
ICON MEANING DESCRIPTION
Deactivated with no sensor active
These icons show the current status of the function. Clicking on the icon, the toggle action is performed: if it is in Alarm, it will be deactivated with sensor active (it is reset for the deactivated time value). Note: the icons colour can be changed (see Settings menu).
Deactivated with
sensor active
Armed with no sensor active
In Alarm
00:00:00 Disabling timeout The function is silenced after this period of time.
Settings The settings list depends on the configuration made by means of the configuration software (see UWP 3.0 Tool manual).
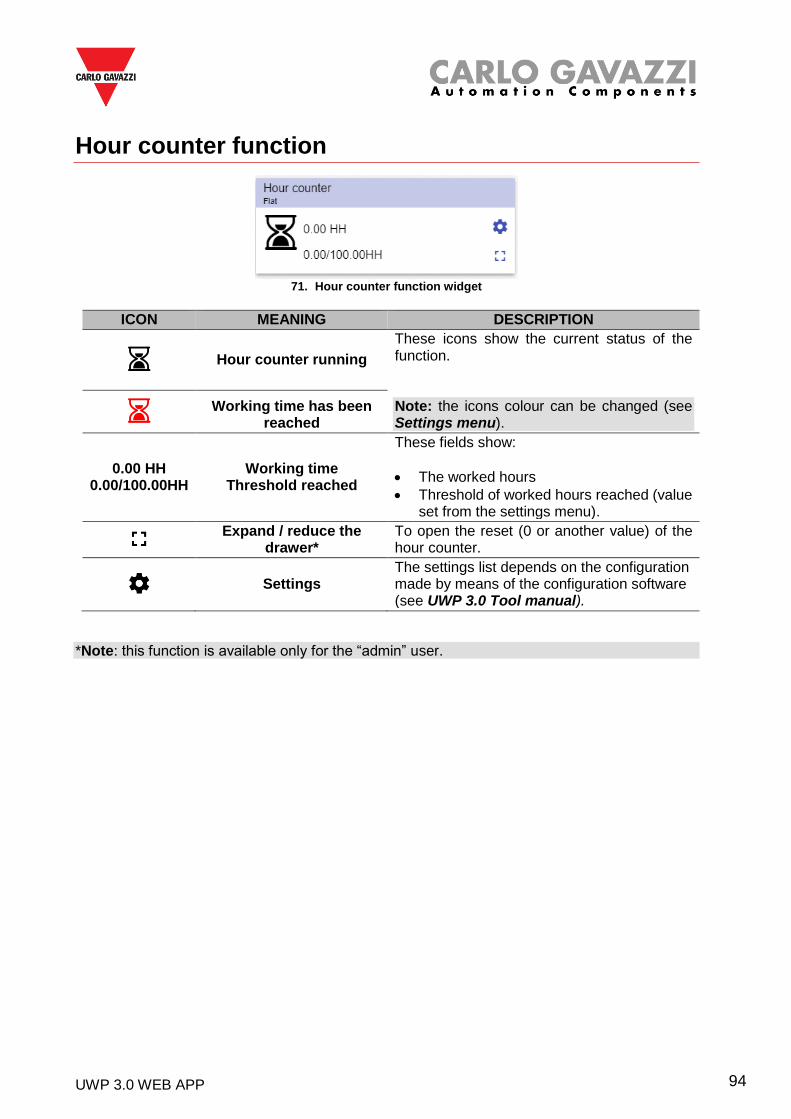
UWP 3.0 WEB APP 94
Hour counter function
71. Hour counter function widget
ICON MEANING DESCRIPTION
Hour counter running
These icons show the current status of the function. Note: the icons colour can be changed (see Settings menu).
Working time has been reached
0.00 HH
0.00/100.00HH
Working time Threshold reached
These fields show:
• The worked hours
• Threshold of worked hours reached (value set from the settings menu).
Expand / reduce the
drawer* To open the reset (0 or another value) of the hour counter.
Settings
The settings list depends on the configuration made by means of the configuration software (see UWP 3.0 Tool manual).
*Note: this function is available only for the “admin” user.
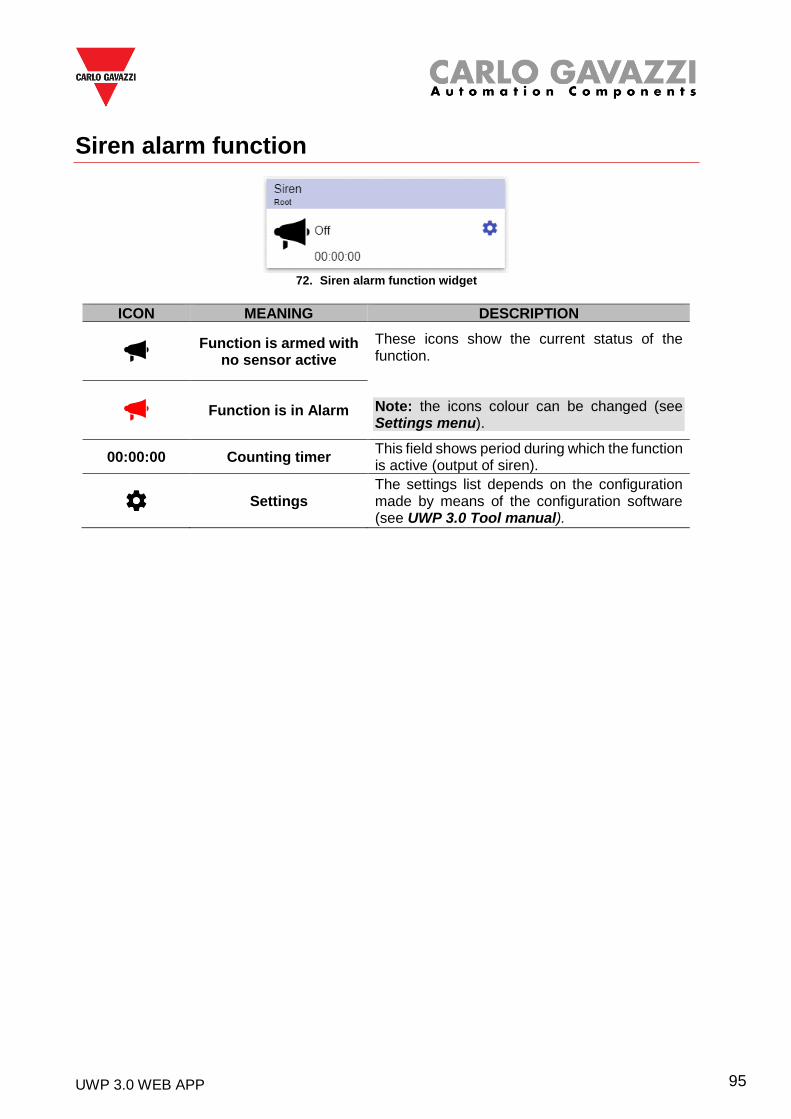
UWP 3.0 WEB APP 95
Siren alarm function
72. Siren alarm function widget
ICON MEANING DESCRIPTION
Function is armed with no sensor active
These icons show the current status of the function. Note: the icons colour can be changed (see Settings menu).
Function is in Alarm
00:00:00 Counting timer This field shows period during which the function is active (output of siren).
Settings The settings list depends on the configuration made by means of the configuration software (see UWP 3.0 Tool manual).
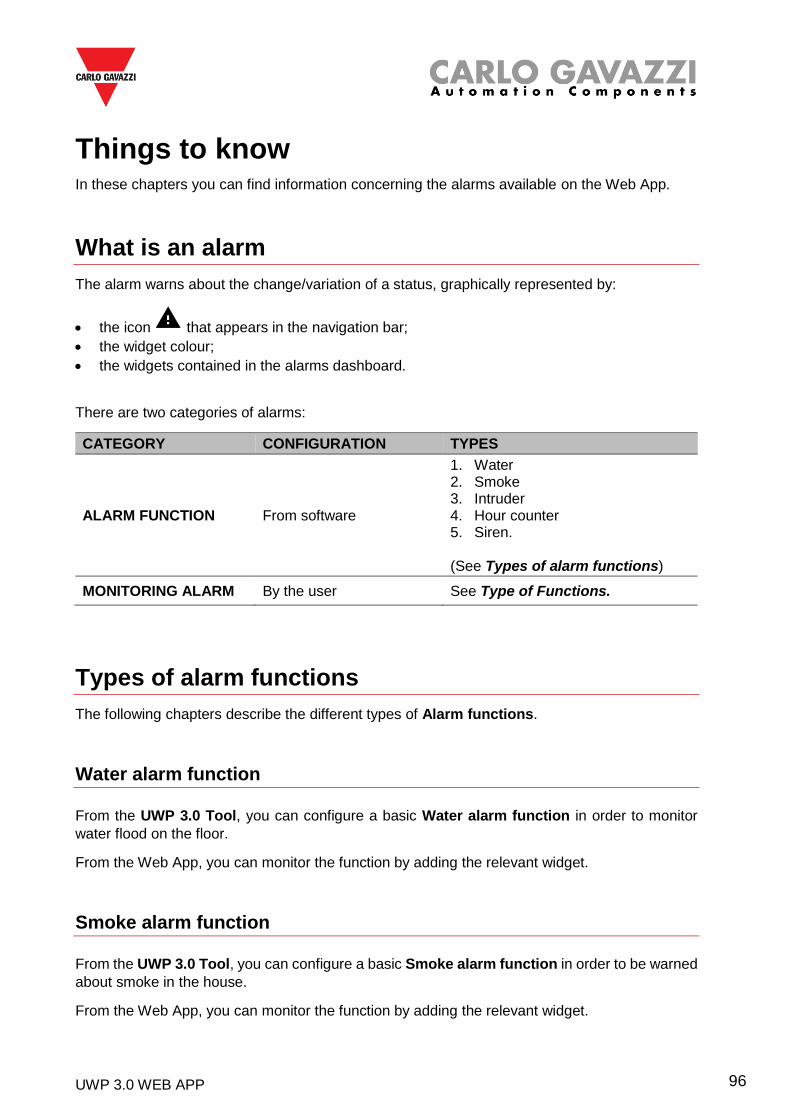
UWP 3.0 WEB APP 96
Things to know In these chapters you can find information concerning the alarms available on the Web App.
What is an alarm
The alarm warns about the change/variation of a status, graphically represented by:
• the icon that appears in the navigation bar;
• the widget colour;
• the widgets contained in the alarms dashboard.
There are two categories of alarms:
CATEGORY CONFIGURATION TYPES
ALARM FUNCTION From software
1. Water 2. Smoke 3. Intruder 4. Hour counter 5. Siren.
(See Types of alarm functions)
MONITORING ALARM By the user See Type of Functions.
Types of alarm functions
The following chapters describe the different types of Alarm functions.
Water alarm function
From the UWP 3.0 Tool, you can configure a basic Water alarm function in order to monitor
water flood on the floor.
From the Web App, you can monitor the function by adding the relevant widget.
Smoke alarm function
From the UWP 3.0 Tool, you can configure a basic Smoke alarm function in order to be warned
about smoke in the house.
From the Web App, you can monitor the function by adding the relevant widget.
UWP 3.0 WEB APP 97
Main and zone intruder alarm function
The intruder alarm function is used to protect the house against burglars and undesired intruders. To create an Intruder alarm function:
1. You have to create at least one Zone alarm function; each zone function might correspond to a part of the house that has to be monitored or just to a single sensor;
2. Then, you have to create a Main alarm function, used to manage all the zone functions. It is used for arming/disarming and collecting all the zone status.
From the Web App, you can monitor the function by adding the relevant widget.
Hour counter function
The purpose of the Hour counter function is to count the hours a function output has been
ON, since the last reset.
It is typically used:
1. in the Lighting control for preventive replacement of fluorescent light tubes before they
burn out or
2. for keeping track of HVAC (Heating – Ventilation – Air conditioner) pump running hours
for early replacement and for planning maintenance.
From the Web App, you can monitor the function by adding the relevant widget.
Siren alarm function
The Siren alarm function allows you to manage an output when an alarm is detected. It has two purposes:
• To allow you to have the maximum flexibility for the activation of the output.
• To allow you to use a single output signal as a common output for more alarms.
From the Web App, you can monitor the function by adding the relevant widget.
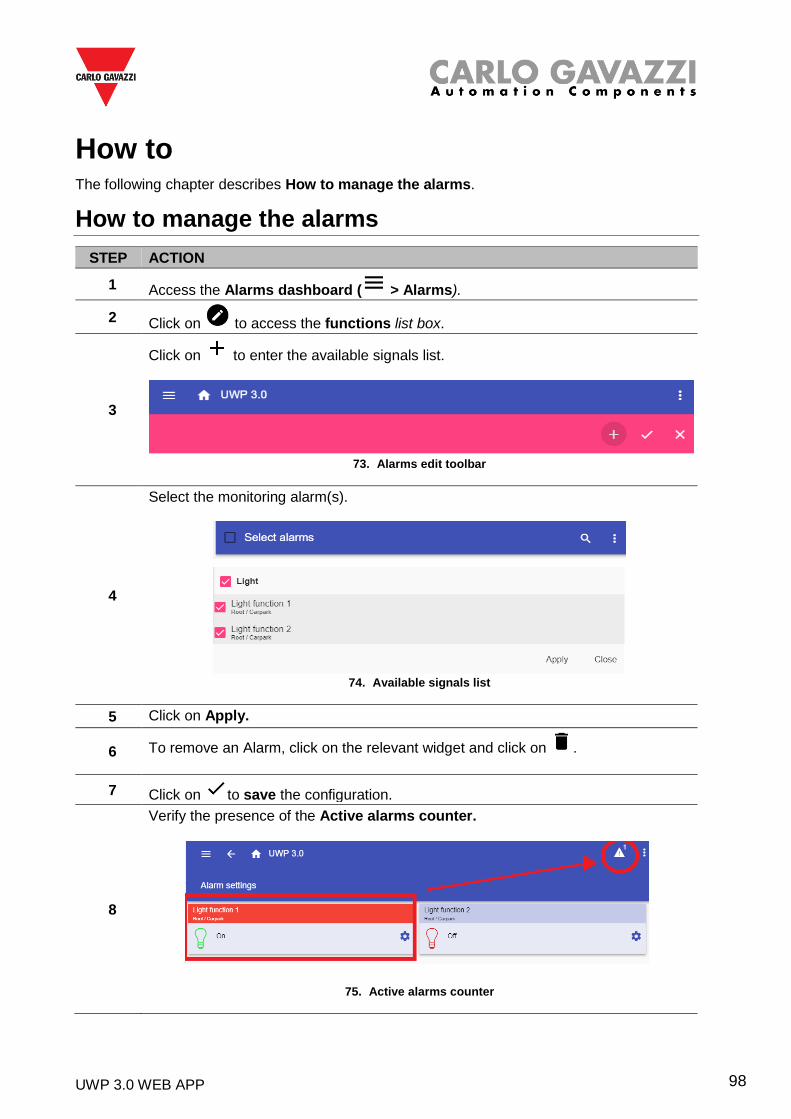
UWP 3.0 WEB APP 98
How to The following chapter describes How to manage the alarms.
How to manage the alarms
STEP ACTION
1 Access the Alarms dashboard ( > Alarms).
2 Click on to access the functions list box.
3
Click on to enter the available signals list.
73. Alarms edit toolbar
4
Select the monitoring alarm(s).
74. Available signals list
5 Click on Apply.
6 To remove an Alarm, click on the relevant widget and click on .
7 Click on to save the configuration.
8
Verify the presence of the Active alarms counter.
75. Active alarms counter
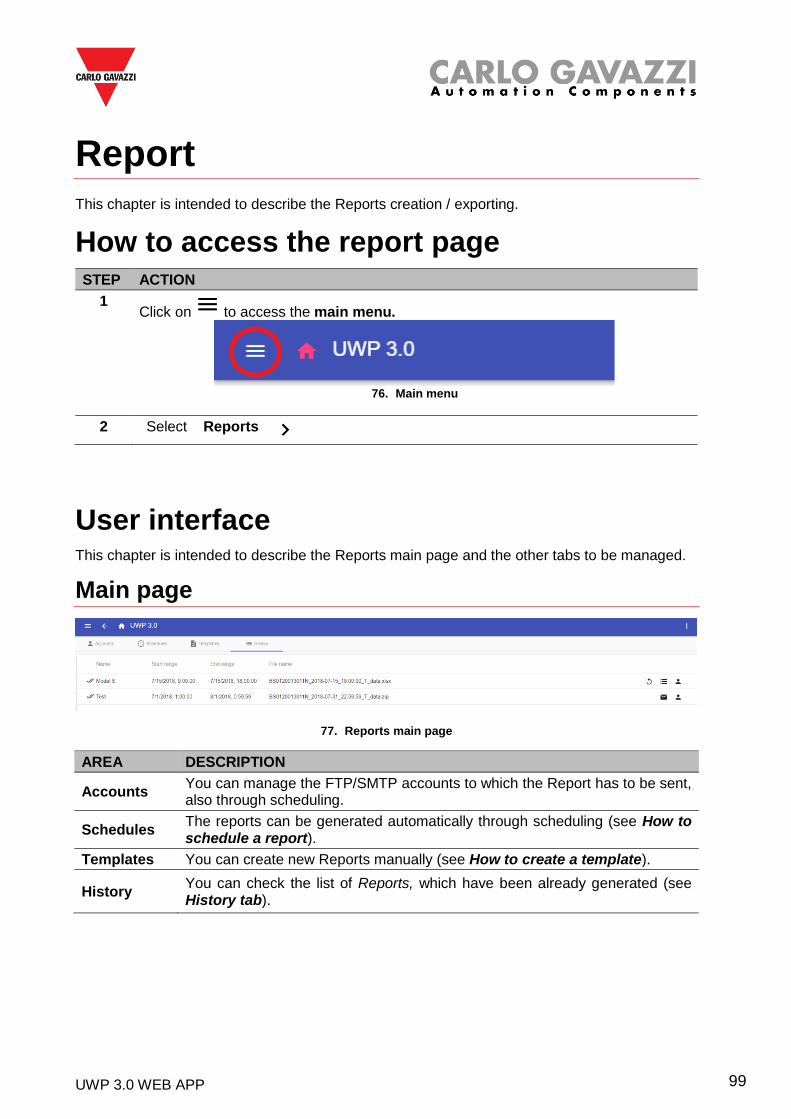
UWP 3.0 WEB APP 99
Report This chapter is intended to describe the Reports creation / exporting.
How to access the report page STEP ACTION
1 Click on to access the main menu.
76. Main menu
2 Select Reports
User interface This chapter is intended to describe the Reports main page and the other tabs to be managed.
Main page
77. Reports main page
AREA DESCRIPTION
Accounts You can manage the FTP/SMTP accounts to which the Report has to be sent, also through scheduling.
Schedules The reports can be generated automatically through scheduling (see How to schedule a report).
Templates You can create new Reports manually (see How to create a template).
History You can check the list of Reports, which have been already generated (see History tab).
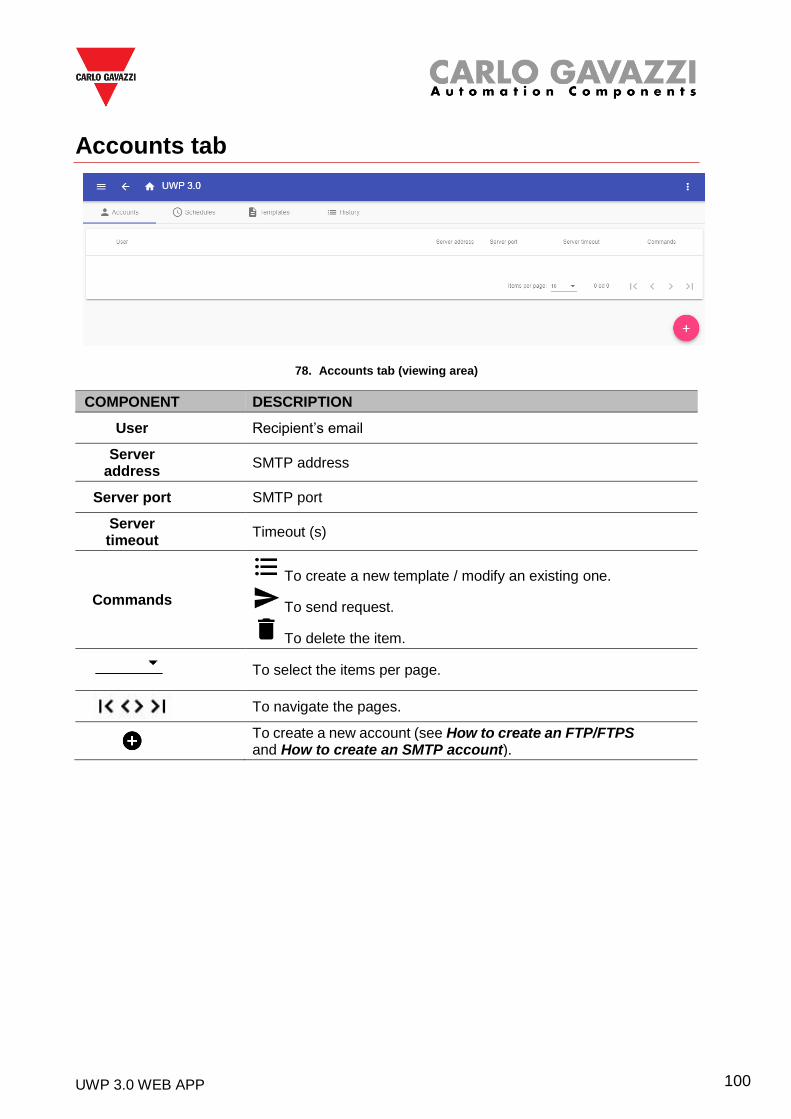
UWP 3.0 WEB APP 100
Accounts tab
78. Accounts tab (viewing area)
COMPONENT DESCRIPTION
User Recipient’s email
Server address
SMTP address
Server port SMTP port
Server timeout
Timeout (s)
Commands
To create a new template / modify an existing one.
To send request.
To delete the item.
To select the items per page.
To navigate the pages.
To create a new account (see How to create an FTP/FTPS and How to create an SMTP account).
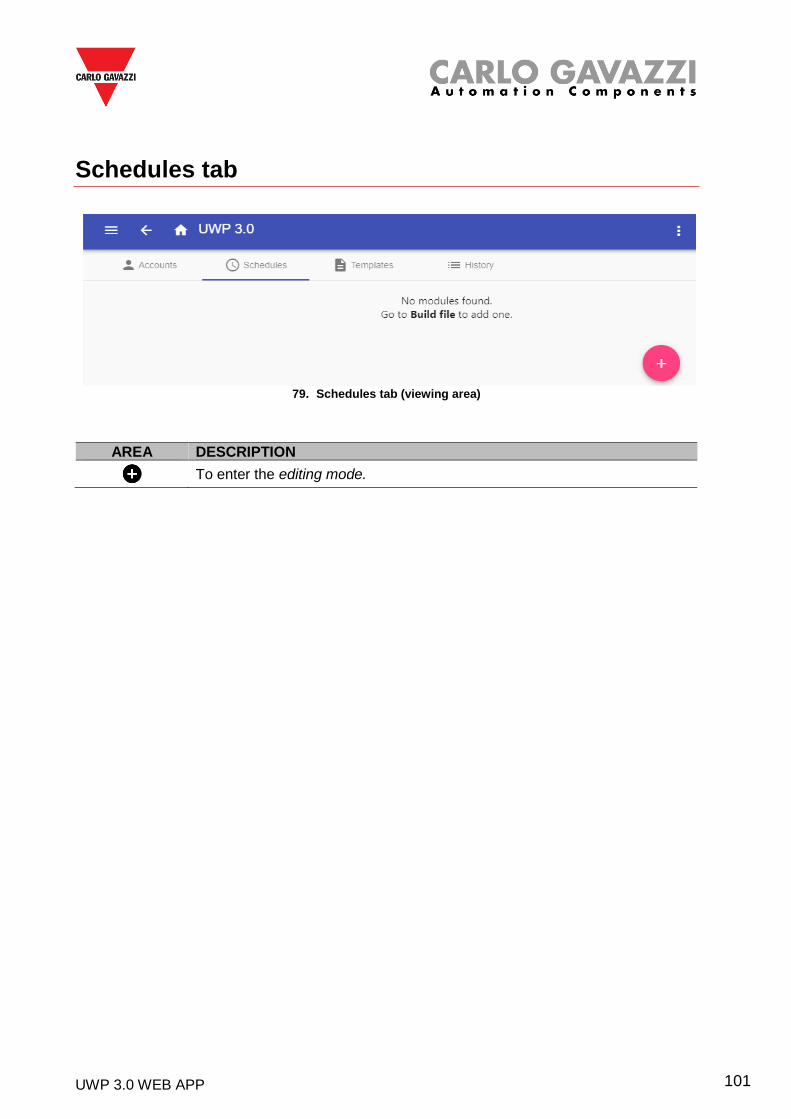
UWP 3.0 WEB APP 101
Schedules tab
79. Schedules tab (viewing area)
AREA DESCRIPTION
To enter the editing mode.
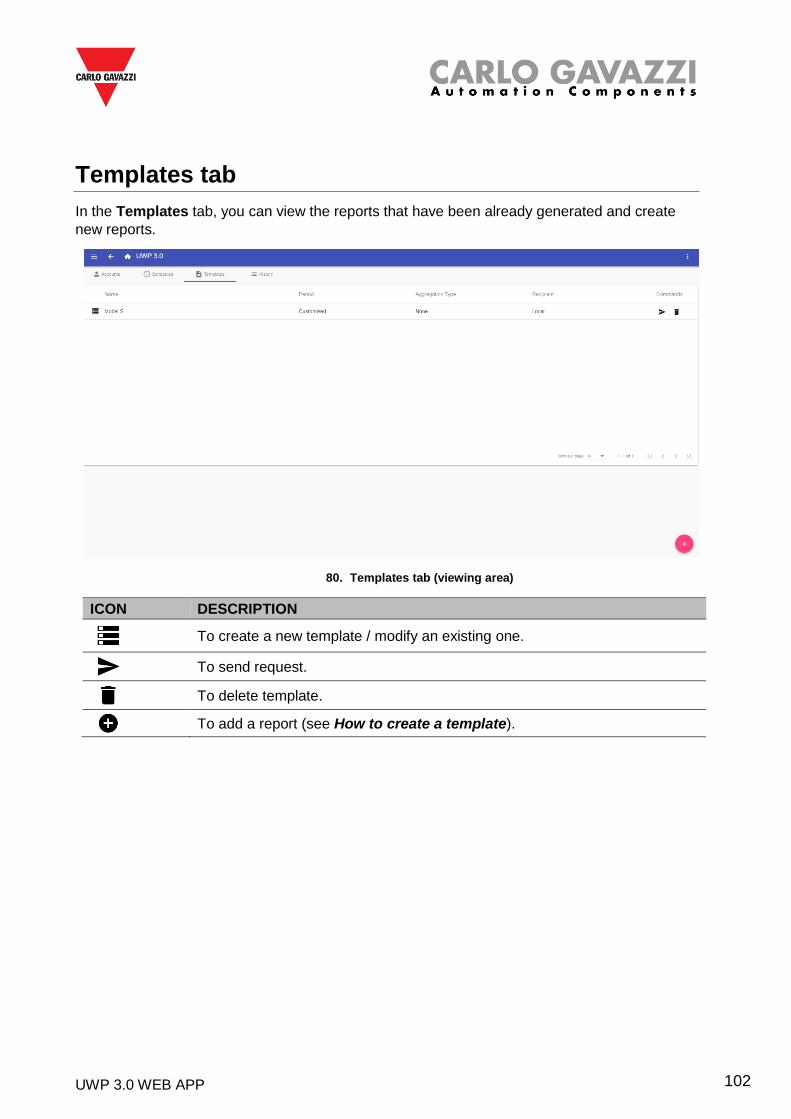
UWP 3.0 WEB APP 102
Templates tab
In the Templates tab, you can view the reports that have been already generated and create
new reports.
80. Templates tab (viewing area)
ICON DESCRIPTION
To create a new template / modify an existing one.
To send request.
To delete template.
To add a report (see How to create a template).
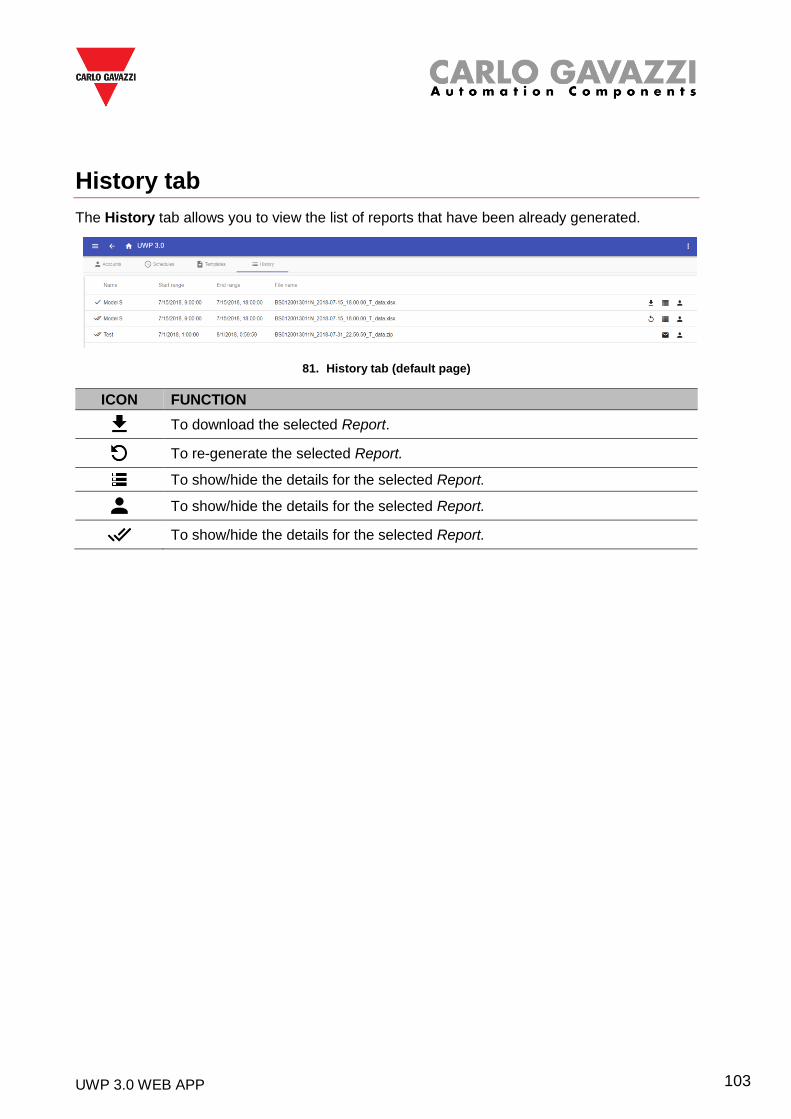
UWP 3.0 WEB APP 103
History tab
The History tab allows you to view the list of reports that have been already generated.
81. History tab (default page)
ICON FUNCTION
To download the selected Report.
To re-generate the selected Report.
To show/hide the details for the selected Report.
To show/hide the details for the selected Report.
To show/hide the details for the selected Report.
UWP 3.0 WEB APP 104
Things to know These chapters are intended to describe what is a report and the report automatic sending.
What is a report
A report is a file containing a log of data or events related to a determined period of time. It is based on a model defined by the user and it can be downloaded manually or sent automatically to an FTP/FTPS/SFTP server or to an email address through SMTP.
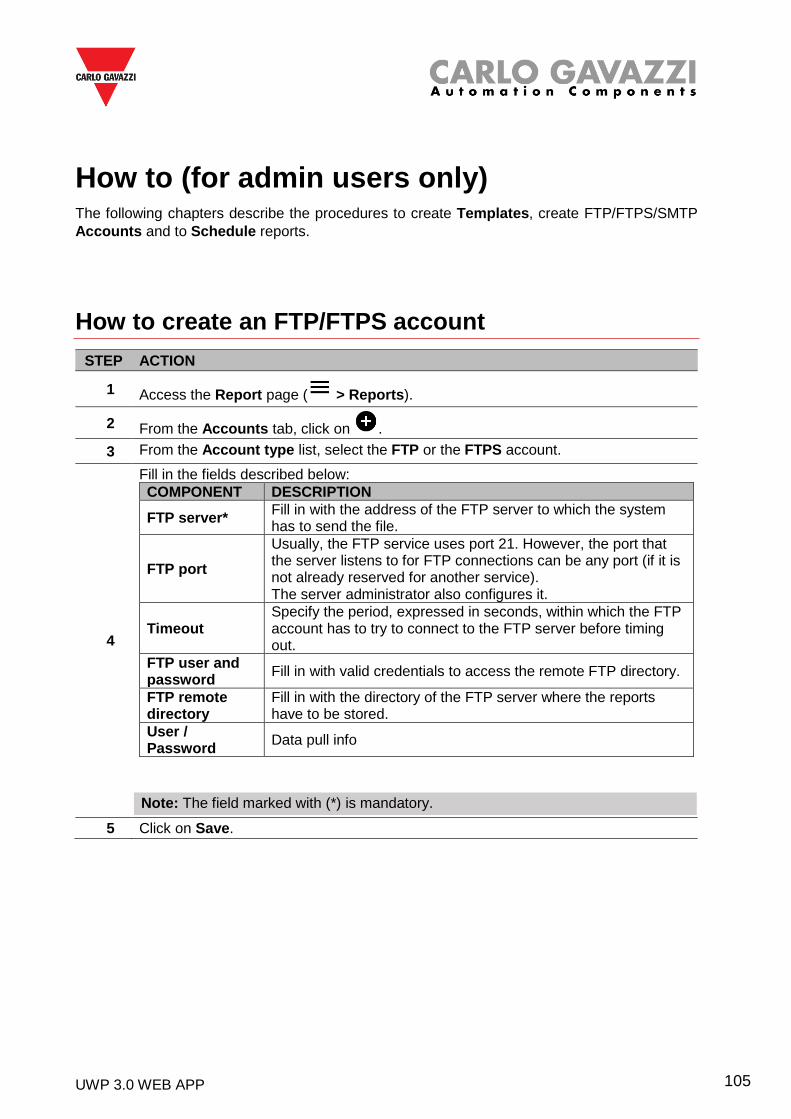
UWP 3.0 WEB APP 105
How to (for admin users only) The following chapters describe the procedures to create Templates, create FTP/FTPS/SMTP
Accounts and to Schedule reports.
How to create an FTP/FTPS account
STEP ACTION
1 Access the Report page ( > Reports).
2 From the Accounts tab, click on .
3 From the Account type list, select the FTP or the FTPS account.
4
Fill in the fields described below:
COMPONENT DESCRIPTION
FTP server* Fill in with the address of the FTP server to which the system has to send the file.
FTP port
Usually, the FTP service uses port 21. However, the port that the server listens to for FTP connections can be any port (if it is not already reserved for another service). The server administrator also configures it.
Timeout Specify the period, expressed in seconds, within which the FTP account has to try to connect to the FTP server before timing out.
FTP user and password
Fill in with valid credentials to access the remote FTP directory.
FTP remote directory
Fill in with the directory of the FTP server where the reports have to be stored.
User / Password
Data pull info
Note: The field marked with (*) is mandatory.
5 Click on Save.
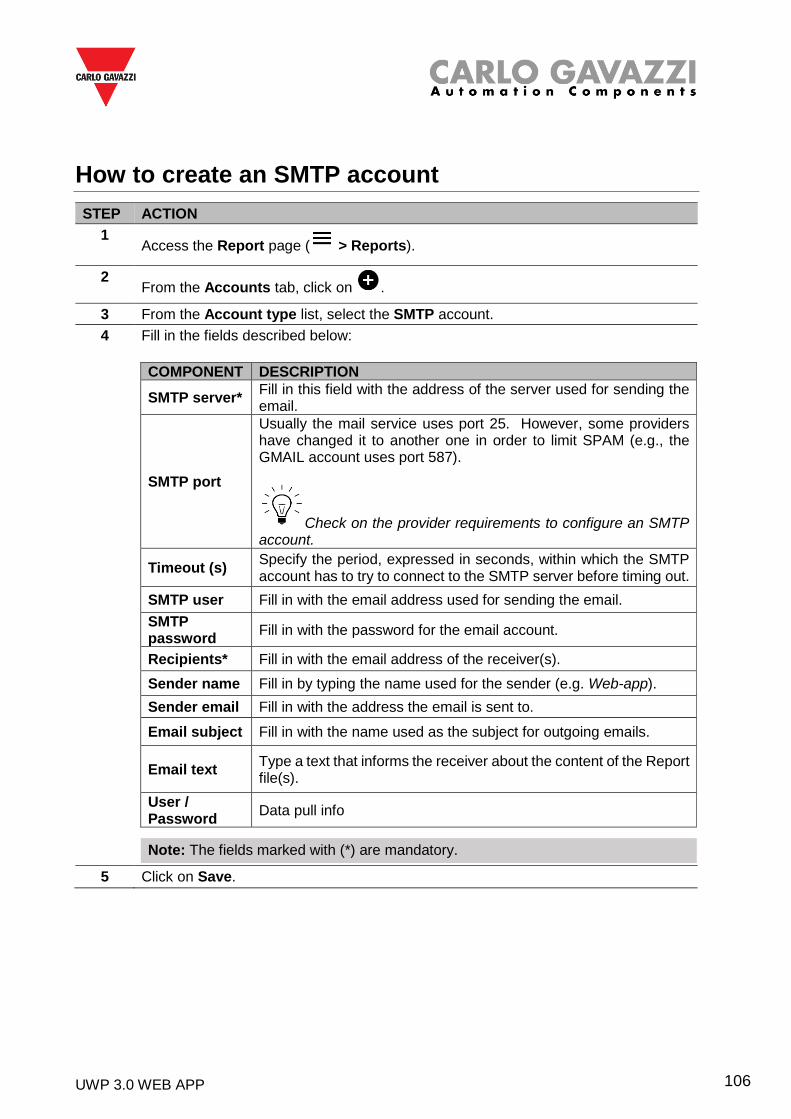
UWP 3.0 WEB APP 106
How to create an SMTP account
STEP ACTION
1 Access the Report page ( > Reports).
2 From the Accounts tab, click on .
3 From the Account type list, select the SMTP account.
4 Fill in the fields described below:
COMPONENT DESCRIPTION
SMTP server* Fill in this field with the address of the server used for sending the email.
SMTP port
Usually the mail service uses port 25. However, some providers have changed it to another one in order to limit SPAM (e.g., the GMAIL account uses port 587).
Check on the provider requirements to configure an SMTP account.
Timeout (s) Specify the period, expressed in seconds, within which the SMTP account has to try to connect to the SMTP server before timing out.
SMTP user Fill in with the email address used for sending the email.
SMTP password
Fill in with the password for the email account.
Recipients* Fill in with the email address of the receiver(s).
Sender name Fill in by typing the name used for the sender (e.g. Web-app).
Sender email Fill in with the address the email is sent to.
Email subject Fill in with the name used as the subject for outgoing emails.
Email text Type a text that informs the receiver about the content of the Report file(s).
User / Password
Data pull info
Note: The fields marked with (*) are mandatory.
5 Click on Save.
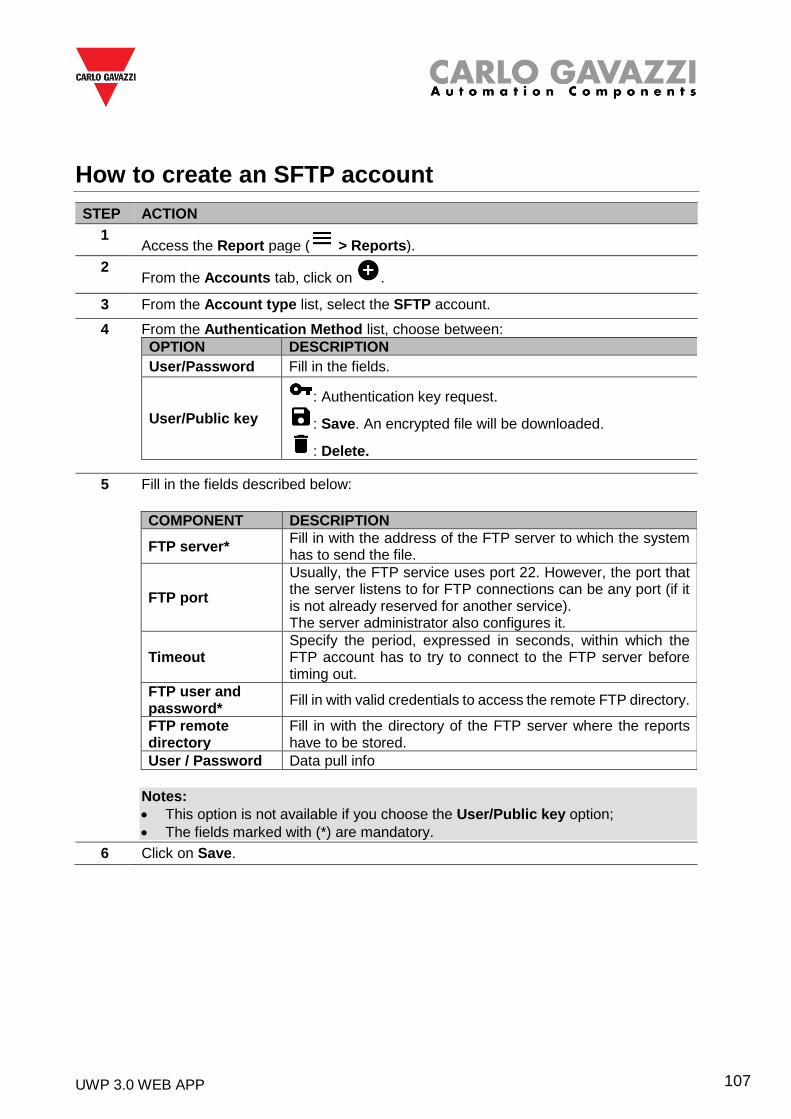
UWP 3.0 WEB APP 107
How to create an SFTP account
STEP ACTION
1 Access the Report page ( > Reports).
2 From the Accounts tab, click on .
3 From the Account type list, select the SFTP account.
4 From the Authentication Method list, choose between:
OPTION DESCRIPTION
User/Password Fill in the fields.
User/Public key
: Authentication key request.
: Save. An encrypted file will be downloaded.
: Delete.
5 Fill in the fields described below:
Notes:
• This option is not available if you choose the User/Public key option;
• The fields marked with (*) are mandatory.
COMPONENT DESCRIPTION
FTP server* Fill in with the address of the FTP server to which the system has to send the file.
FTP port
Usually, the FTP service uses port 22. However, the port that the server listens to for FTP connections can be any port (if it is not already reserved for another service). The server administrator also configures it.
Timeout Specify the period, expressed in seconds, within which the FTP account has to try to connect to the FTP server before timing out.
FTP user and password*
Fill in with valid credentials to access the remote FTP directory.
FTP remote directory
Fill in with the directory of the FTP server where the reports have to be stored.
User / Password Data pull info
6 Click on Save.
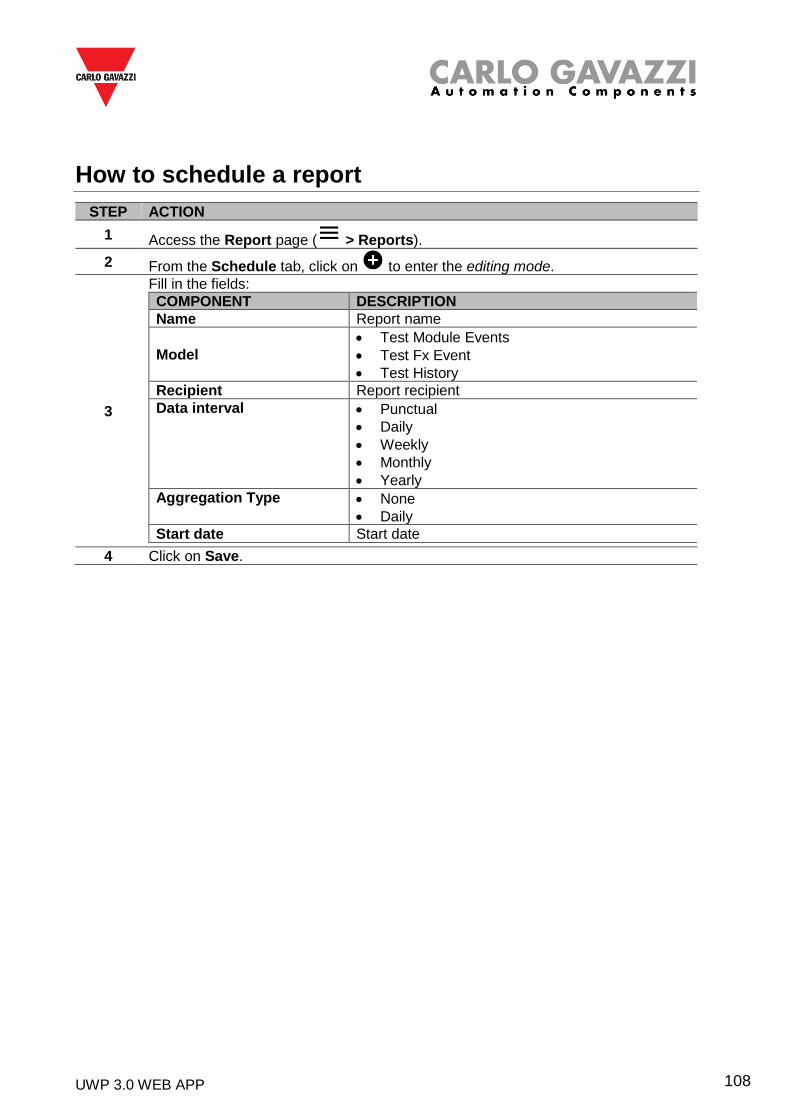
UWP 3.0 WEB APP 108
How to schedule a report
STEP ACTION
1 Access the Report page ( > Reports).
2 From the Schedule tab, click on to enter the editing mode.
3
Fill in the fields:
COMPONENT DESCRIPTION
Name Report name
Model
• Test Module Events
• Test Fx Event
• Test History
Recipient Report recipient
Data interval • Punctual
• Daily
• Weekly
• Monthly
• Yearly
Aggregation Type • None
• Daily
Start date Start date
4 Click on Save.
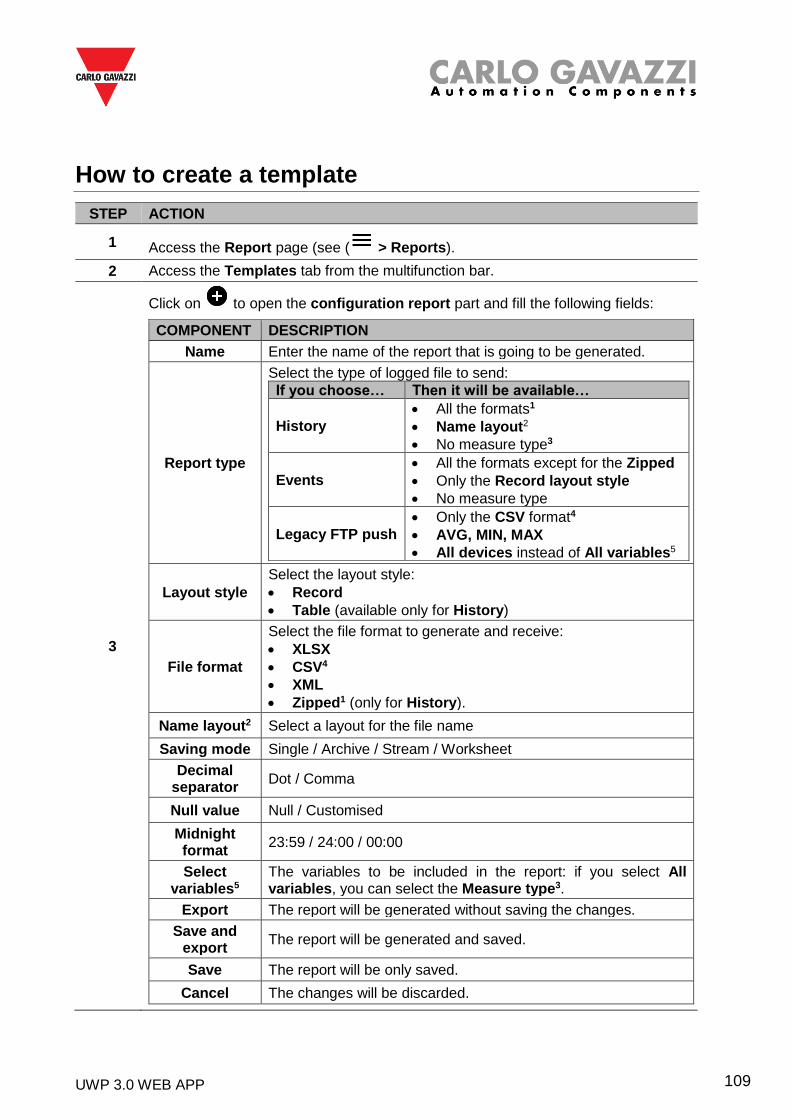
UWP 3.0 WEB APP 109
How to create a template
STEP ACTION
1 Access the Report page (see ( > Reports).
2 Access the Templates tab from the multifunction bar.
3
Click on to open the configuration report part and fill the following fields:
COMPONENT DESCRIPTION
Name Enter the name of the report that is going to be generated.
Report type
Select the type of logged file to send:
If you choose… Then it will be available…
History
• All the formats1
• Name layout2
• No measure type3
Events
• All the formats except for the Zipped
• Only the Record layout style
• No measure type
Legacy FTP push
• Only the CSV format4
• AVG, MIN, MAX
• All devices instead of All variables5
Layout style
Select the layout style:
• Record
• Table (available only for History)
File format
Select the file format to generate and receive:
• XLSX
• CSV4
• XML
• Zipped1 (only for History).
Name layout2 Select a layout for the file name
Saving mode Single / Archive / Stream / Worksheet
Decimal separator
Dot / Comma
Null value Null / Customised
Midnight format
23:59 / 24:00 / 00:00
Select variables5
The variables to be included in the report: if you select All variables, you can select the Measure type3.
Export The report will be generated without saving the changes.
Save and export
The report will be generated and saved.
Save The report will be only saved.
Cancel The changes will be discarded.
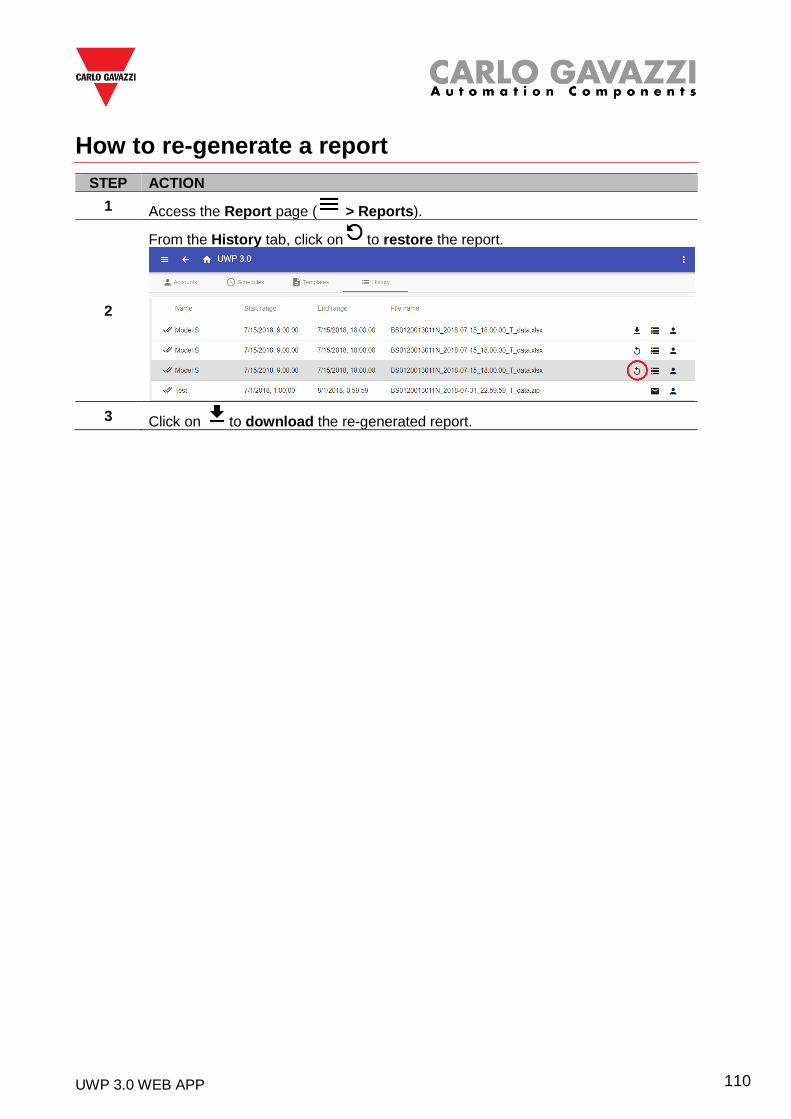
UWP 3.0 WEB APP 110
How to re-generate a report
STEP ACTION
1 Access the Report page ( > Reports).
2
From the History tab, click on to restore the report.
3 Click on to download the re-generated report.
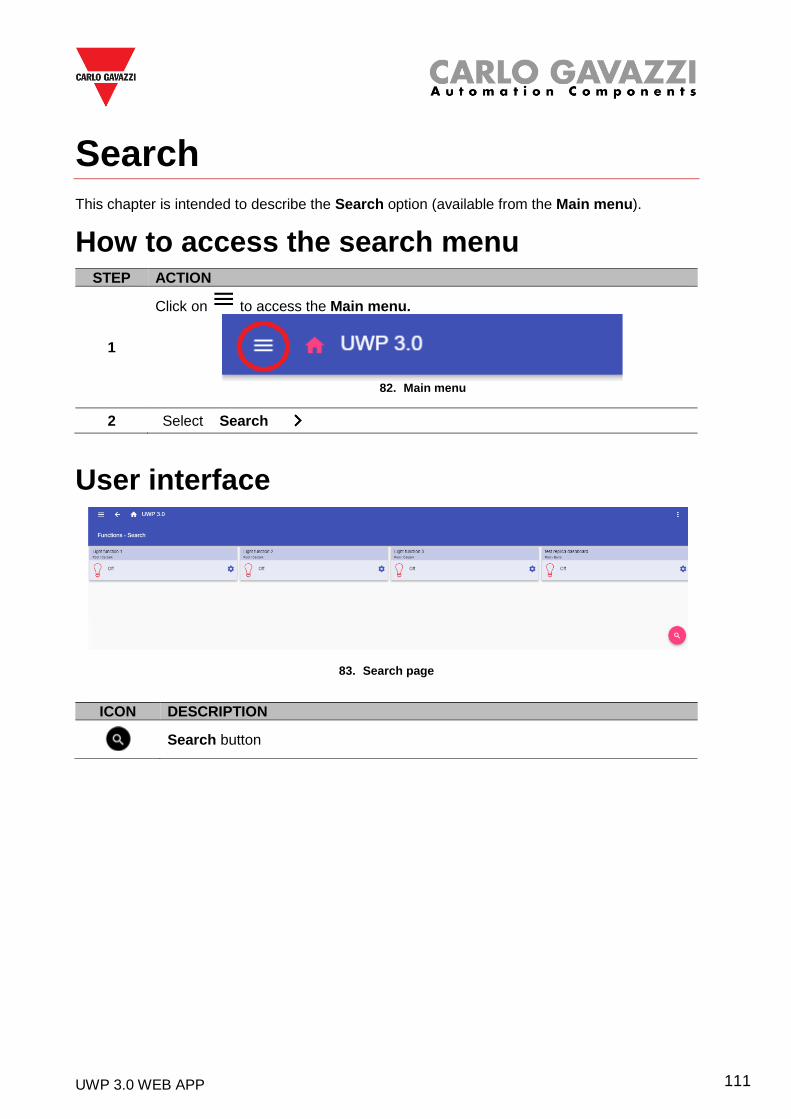
UWP 3.0 WEB APP 111
Search This chapter is intended to describe the Search option (available from the Main menu).
How to access the search menu STEP ACTION
1
Click on to access the Main menu.
82. Main menu
2 Select Search
User interface
83. Search page
ICON DESCRIPTION
Search button
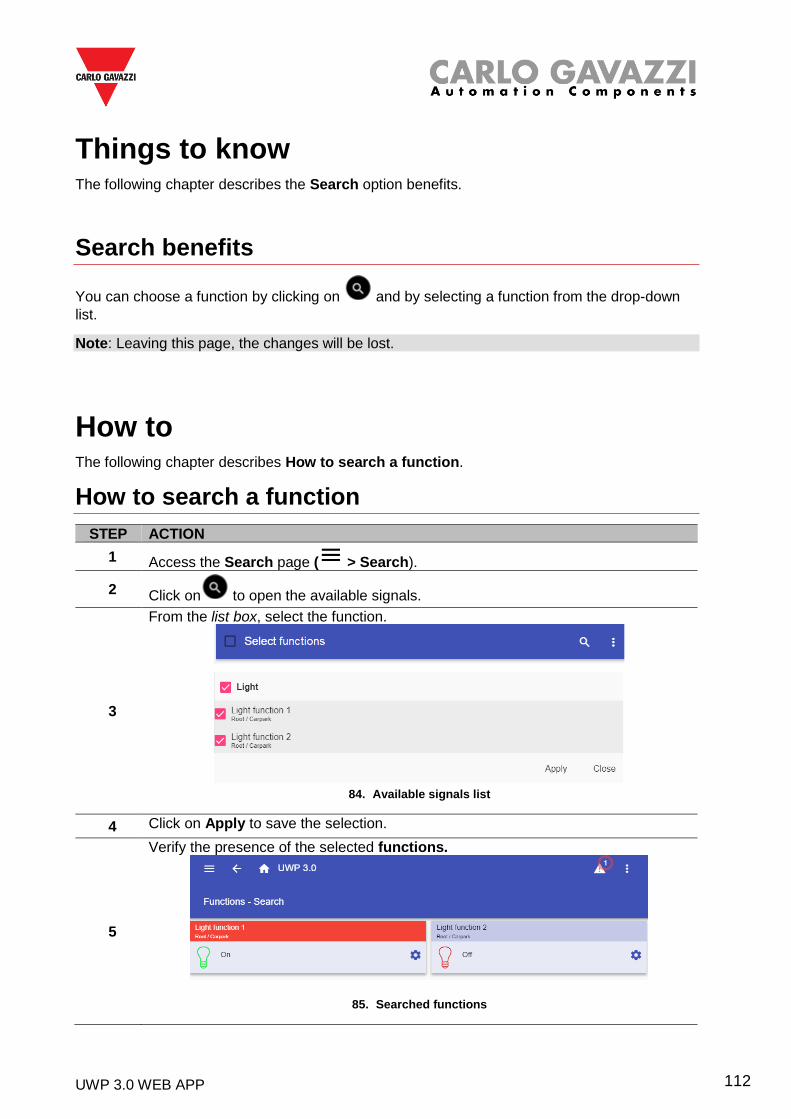
UWP 3.0 WEB APP 112
Things to know The following chapter describes the Search option benefits.
Search benefits
You can choose a function by clicking on and by selecting a function from the drop-down
list.
Note: Leaving this page, the changes will be lost.
How to The following chapter describes How to search a function.
How to search a function
STEP ACTION
1 Access the Search page ( > Search).
2 Click on to open the available signals.
3
From the list box, select the function.
84. Available signals list
4 Click on Apply to save the selection.
5
Verify the presence of the selected functions.
85. Searched functions
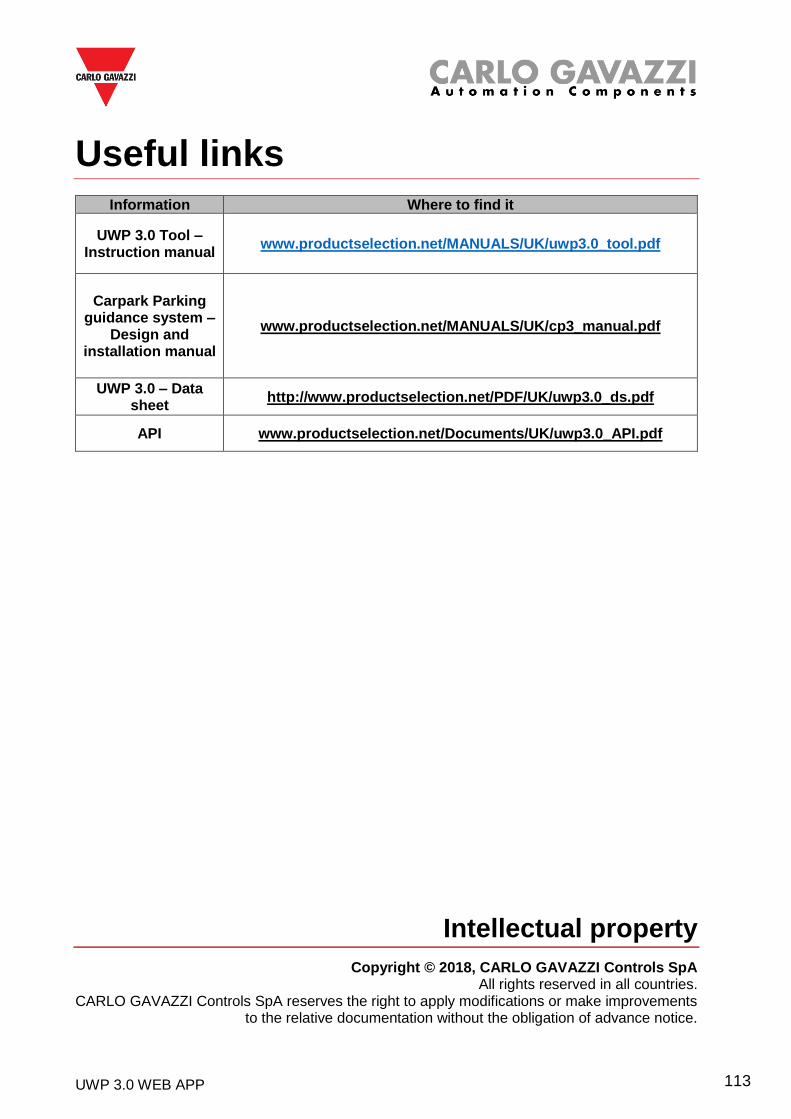
UWP 3.0 WEB APP 113
Useful links Information Where to find it
UWP 3.0 Tool – Instruction manual
www.productselection.net/MANUALS/UK/uwp3.0_tool.pdf
Carpark Parking guidance system –
Design and installation manual
www.productselection.net/MANUALS/UK/cp3_manual.pdf
UWP 3.0 – Data sheet
http://www.productselection.net/PDF/UK/uwp3.0_ds.pdf
API www.productselection.net/Documents/UK/uwp3.0_API.pdf
Intellectual property
Copyright © 2018, CARLO GAVAZZI Controls SpA All rights reserved in all countries.
CARLO GAVAZZI Controls SpA reserves the right to apply modifications or make improvements to the relative documentation without the obligation of advance notice.