Using Outlook - lrweb.beds.ac.uk · Using Outlook Introduction ... Undelete ... You can reduce the...
46
Using Outlook Introduction ................................................................................................... 3 Outlook 2011 (Macintosh OSX) .................................................................... 3 Generic E-Mail clients ................................................................................... 3 Outlook at home............................................................................................ 3 Web Browsers............................................................................................... 3 Mobile Devices.............................................................................................. 3 Outlook 2010 (Windows XP/7) ...................................................................... 3 Account size............................................................................................... 4 Maximum Attachment size ......................................................................... 4 Login ............................................................................................................. 5 Mail ............................................................................................................ 6 Inbox ....................................................................................................... 6 Reading and Unreading .......................................................................... 6 New item alert ......................................................................................... 7 Create new E-mail ..................................................................................... 8 Spell Checking ......................................................................................... 10 Signatures ................................................................................................ 11 Drafts ....................................................................................................... 12 Sent Items ................................................................................................ 13 Tracking ................................................................................................... 14 Deleted items ........................................................................................... 15 Undelete................................................................................................ 15 Emptying ............................................................................................... 15 Junk E-mail .............................................................................................. 16 Outlook 2010 Windows client ................................................................ 16 Outlook Web Application ....................................................................... 16 Dealing with Junk individually ............................................................... 17 Search ..................................................................................................... 18 Categories................................................................................................ 19 Why categorise items? .......................................................................... 19 Attachments ............................................................................................. 20 Adding attachments .............................................................................. 20 Saving attachments .............................................................................. 20 Calendar .................................................................................................. 21 Create new Appointment.......................................................................... 23 Scheduling Assistant ............................................................................. 23 Recurring appointments or meetings .................................................... 24 Share a Calendar ..................................................................................... 25 Viewing other calendars ........................................................................ 26 Private appointments ............................................................................ 26 Contacts ................................................................................................... 27 Address Book........................................................................................... 28 [email protected] ........................................................................ 28 Contacts & Suggested Contacts ........................................................... 28
Transcript of Using Outlook - lrweb.beds.ac.uk · Using Outlook Introduction ... Undelete ... You can reduce the...

Using Outlook
Introduction ................................................................................................... 3 Outlook 2011 (Macintosh OSX) .................................................................... 3 Generic E-Mail clients ................................................................................... 3 Outlook at home ............................................................................................ 3
Web Browsers ............................................................................................... 3 Mobile Devices .............................................................................................. 3 Outlook 2010 (Windows XP/7) ...................................................................... 3
Account size ............................................................................................... 4 Maximum Attachment size ......................................................................... 4
Login ............................................................................................................. 5 Mail ............................................................................................................ 6
Inbox ....................................................................................................... 6 Reading and Unreading .......................................................................... 6 New item alert ......................................................................................... 7
Create new E-mail ..................................................................................... 8
Spell Checking ......................................................................................... 10 Signatures ................................................................................................ 11
Drafts ....................................................................................................... 12 Sent Items ................................................................................................ 13 Tracking ................................................................................................... 14
Deleted items ........................................................................................... 15 Undelete ................................................................................................ 15
Emptying ............................................................................................... 15
Junk E-mail .............................................................................................. 16
Outlook 2010 Windows client ................................................................ 16 Outlook Web Application ....................................................................... 16 Dealing with Junk individually ............................................................... 17
Search ..................................................................................................... 18
Categories................................................................................................ 19 Why categorise items? .......................................................................... 19
Attachments ............................................................................................. 20 Adding attachments .............................................................................. 20 Saving attachments .............................................................................. 20
Calendar .................................................................................................. 21 Create new Appointment.......................................................................... 23
Scheduling Assistant ............................................................................. 23
Recurring appointments or meetings .................................................... 24 Share a Calendar ..................................................................................... 25
Viewing other calendars ........................................................................ 26 Private appointments ............................................................................ 26
Contacts ................................................................................................... 27 Address Book ........................................................................................... 28
[email protected] ........................................................................ 28 Contacts & Suggested Contacts ........................................................... 28

Using Outlook
ICT (August 2013) Page 2 v1.9r-w
Contacts & Suggested Contacts (Mobile) ............................................. 28
Global Address List ............................................................................... 28 All Address Lists ................................................................................... 28
Create new Folder ................................................................................... 29
Sharing folders ......................................................................................... 30 Sharing a folder with someone else ...................................................... 30 Adding a shared folder to your account ................................................ 31
Tasks ....................................................................................................... 33 To-do (follow-up flags) ............................................................................. 33
When should I use Tasks or To-do items? ............................................ 33 Rules ........................................................................................................ 34
Move rule .............................................................................................. 34 Where do I see my rules? ..................................................................... 34
Automatic replies ..................................................................................... 35
RSS Feeds ............................................................................................... 36
Unsubscribe .......................................................................................... 36 Search Folders ......................................................................................... 38
Follow up search ................................................................................... 38 Attachments search .............................................................................. 39
Quick Tips ................................................................................................ 40
Printing .................................................................................................. 40 Message Recall or Resend ................................................................... 40 Where is the Bcc option? ...................................................................... 41
Contact Groups ..................................................................................... 41 Voting .................................................................................................... 42
Message Conversations........................................................................ 43 Index ........................................................................................................... 45

Using Outlook
ICT (August 2013) Page 3 v1.9r-w
Introduction The University is switching from Novell GroupWise (GW) to Microsoft Exchange Online via Outlook for our corporate email and collaboration tool. Outlook 2011 (Macintosh OSX)
Macintosh Users can use the Outlook 2011 client. The client isn't identical to Outlook 2010, but they share some common principles and functionality. Read the separate Macintosh guide for 2011 for further details.
Generic E-Mail clients Visit the Outlook Web Application (OWA), login and then go to the Help icon and select 'About' to see POP, IMAP and SMTP settings for use in other generic e-mail clients. Outlook at home You need to have a University computer with Outlook installed, or have purchased Office for home use via the Viglen Work @ Home Program. See in.beds.ac.uk/ict/benefits for further details. Web Browsers If you don't have an Outlook client at home, you can use the web to access your account. Please read the Outlook Web Application (OWA) document for further information. Mobile Devices To use your mobile phone or tablet to read e-mails, read the separate Outlook Mobile guide. Outlook 2010 (Windows XP/7)
Figure 1 - Outlook Loading a Profile
Find the Outlook 2010 Plus icon on your desktop (Windows) and double-click to run it.

Using Outlook
ICT (August 2013) Page 4 v1.9r-w
Account size Your Outlook account is 25 GB, hosted externally by Microsoft.
Figure 2- Quota Information shows free space
In Outlook 2010, right click over the Outlook status bar and enable 'Quota Information' to see how much space is free in your account. Maximum Attachment size There is a maximum 25 Mb limit on sending or receiving attachments in a single e-mail.
Figure 3 - Outlook attachment size warning
If you try to send a larger attachment, you will get a warning from Outlook (above) and you won't be able to send the item. Anyone who sends an item to your account with an attachment that is too large will receive an undeliverable message, explaining that the message is larger than the allowed size limit for messages. You can reduce the size of file attachments before sending by using compression software like 7-Zip (included on all University staff PCs):
Right-click over the file to compress
Go to the 7-Zip option then select Add to “your file.zip” See Attachments for more details on sending attachments.
Using Outlook
ICT (August 2013) Page 5 v1.9r-w
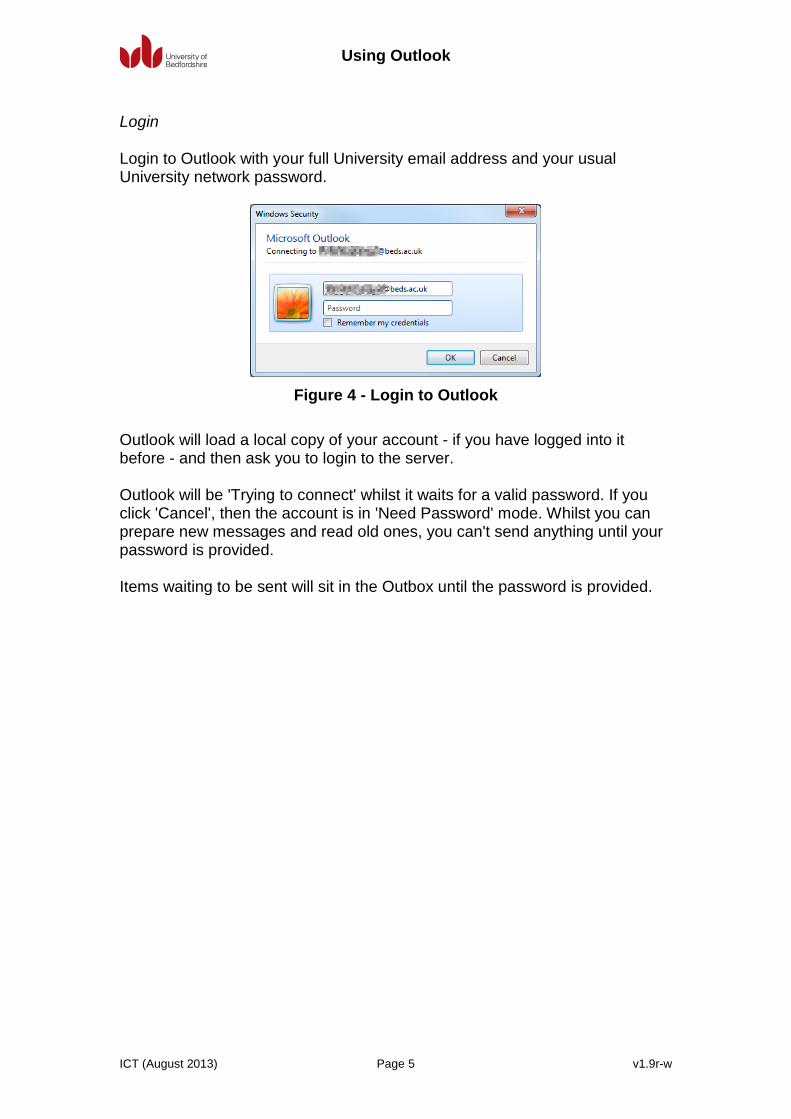
Login Login to Outlook with your full University email address and your usual University network password.
Figure 4 - Login to Outlook
Outlook will load a local copy of your account - if you have logged into it before - and then ask you to login to the server. Outlook will be 'Trying to connect' whilst it waits for a valid password. If you click 'Cancel', then the account is in 'Need Password' mode. Whilst you can prepare new messages and read old ones, you can't send anything until your password is provided. Items waiting to be sent will sit in the Outbox until the password is provided.

Using Outlook
ICT (August 2013) Page 6 v1.9r-w
From the Home tab, select the Mail button to switch to the Mail pane, or press Ctrl+1.
Inbox
Outlook delivers new items to the Inbox. If you create move rules, items deliver to other folders. More on rules and folders later!
Reading and Unreading The total number of unread items shows next to the Inbox or folder, e.g. (2). When you look at items inside, unread show in bold and have an unread icon.
Figure 5 - There are 2 unread items in this folder
Single left-click an item to display its content on the right. Alternatively, a double left-click opens a new window and displays the content. You can change a read item back to unread by right-clicking its icon and choosing Mark as Unread.
Select the Mail,
Calendar, Contacts or Tasks pane
from here (or press
Ctrl1 - Ctrl4 to select)
Show / hide ribbon menu
Status bar Quota size
The Outlook ribbon menu

Using Outlook
ICT (August 2013) Page 7 v1.9r-w
Unread items are shown with an unopened envelope icon, whilst read items appear with an opened envelope (see above). New item alert Outlook displays a pop-up alert when new mail arrives. Right-click over the Outlook system tray icon and deselect Show New Mail Desktop Alert to turn this alert off.
Figure 6 - Show New Mail Alert option
If you miss the alert, an unopened envelope icon sits in the system tray to tell you there are new unopened items.

Using Outlook
ICT (August 2013) Page 8 v1.9r-w
Create new E-mail Select the Home tab and choose New E-mail, press Ctrl+n or select New Items and choose E-mail Message. An 'Untitled – Message' window appears, where you type your new email. By default, it's in HTML. To compose as text, select the Format Text tab and choose Plain Text or Rich Text instead.
Figure 7 - New HTML email
Click on the To: button and select from the list of recipients. If you need to, change the Address List by selecting from:
An address book named after your email address
Contacts
Suggested Contacts
Contacts (Mobile)
Suggested Contacts (Mobile)
Offline Global Address List
Global Address List
All Address Lists See the Outlook Address Book for more details. Note that when you first start using it, Outlook won't auto-complete your To: entries as you type them. It will build-up a list of addresses over time and begin to offer addresses up as you type, but this won't happen immediately.

Using Outlook
ICT (August 2013) Page 9 v1.9r-w
The rest of the creation process is similar to most other email systems. Creating messages in HTML gives you formatting options (bold, italic, underline, text colour, and so on) that are not available when composing a text only message. You can also add tags to show the importance of the message. See Spell Checking and Signatures for other options.

Using Outlook
ICT (August 2013) Page 10 v1.9r-w
Spell Checking Automatic spell checking is off by default. Select File, Options, General, and then Mail. Tick the box for ‘Always check spelling before sending’ to turn it on. Select the ‘Spelling and AutoCorrect’ button for a host of proofing and advanced spelling options.
Figure 8 - Proofing options include spelling checks
Most proofing options are enabled by default.

Using Outlook
ICT (August 2013) Page 11 v1.9r-w
Signatures Go to Files, Options, Mail and click the ‘Signatures’ button, or create a new e-mail and click on the ‘Signature’ button in the ‘Include’ category on the ribbon menu, and choose ‘Signatures…’.
Figure 9 - Create or select a signature
Most people will only want one or two signatures, one for everyone or possibly one for internal and one for external recipients. You could create a signature specifically for replies, but most people don’t bother. Click on ‘New’ and type a name for your signature (e.g. ‘Internal’). Now click in the text editor and type in your signature text. If you want the signature automatically added to every e-mail you send, change the new messages option to select one of your defined signatures rather than ‘(none)’. If you leave this as ‘(none)’ then to add a signature, click on the ‘Signature’ button and choose one manually when creating a new e-mail. ICT recommends the following signature format: Joe Bloggs University of Bedfordshire IT Trainer ICT Room V007 Ext. 1234 01234 771234
Please note that if you have another Outlook client installed elsewhere, you will have to recreate your signatures because they are saved on the computer, not in your account on the server.

Using Outlook
ICT (August 2013) Page 12 v1.9r-w
Drafts
This is where you find saved items. They are either saved by you (by clicking the save icon when composing a new item) or saved automatically by Outlook. By default, the system saves every 3 minutes.
Go to File, Options, Mail and look in the 'Save messages' category to change the frequency (1-99 minutes). Once sent, the draft item disappears from this folder.

Using Outlook
ICT (August 2013) Page 13 v1.9r-w
Sent Items
Items sent from your account will appear in the Sent Items folder (left).
Figure 10 - There is 1 item waiting in the Outbox
When you click to send an item, Outlook places it in the Outbox folder (above), waiting for dispatch. If there are problems sending items, they will sit in the Outbox until the problem is resolved. This will be obvious, as the folder will have a number next to it, e.g. [1].
Figure 11 - Sent items going via the Outbox
As soon as the item has gone from the Outbox, a copy goes into the Sent Items folder. This usually takes just a few seconds. Note that the Outbox isn't available in the Outlook Web Application (OWA).

Using Outlook
ICT (August 2013) Page 14 v1.9r-w
Tracking Create a new message, then select the 'Options' tab. In the 'Tracking' section, enable the options for requesting a delivery and a read receipt.
Figure 12 - Tracking options
These settings are on an individual basis. To change the default and change some other options unavailable elsewhere, go to File, Options, Mail, Tracking. For example, you can set Outlook to automatically update the original sent item with the receipt information, then move the receipt to your Deleted Items folder.
To see your tracking information, look in Sent Items for items with the tracking icon (left). The icon won't appear as a tracking icon until there is some tracking information to report.
Open any item that displays the tracking icon and then click on the Tracking button from the ribbon menu to see the Read and/or Delivery tracking.
Figure 13 - Tracking info button
Note that all sent items will display the tracking icon from now on, unless you turn the default tracking options off.

Using Outlook
ICT (August 2013) Page 15 v1.9r-w
Deleted items
Right-click over an item and select Delete, or select the item and press the 'Delete' key. The item moves into the Deleted Items folder.
Undelete You can move items from this folder back into your account, effectively undeleting them. Just drag & drop them. Emptying Right click over the Deleted Items folder and then select ‘Empty folder’. This permanently removes the deleted items from the account. Note that the Deleted Items folder icon always looks the same in Outlook, regardless of whether it has items inside or not. However, a number will display next to it showing the total of unread items inside, e.g. (12).

Using Outlook
ICT (August 2013) Page 16 v1.9r-w
Junk E-mail
Anything Outlook thinks is spam appears in the Junk E-Mail folder.
For colleagues who are experiencing high volumes of e-mails going into Junk when they shouldn't be, the recommendation is to amend specific Junk settings in both the client and the Outlook Web Application (OWA): Outlook 2010 Windows client
In the Mail pane, select Junk then Junk E-Mail options from the Delete category in the Home tab
Select 'No Automatic Filtering' and then click OK.
Figure 14 - Outlook 2010 Junk settings
Outlook Web Application
Go to Options, then select See All Options
Select Block or Allow then select Don't move e-mail to my Junk E-Mail folder
Click Save.

Using Outlook
ICT (August 2013) Page 17 v1.9r-w
Figure 15 - Outlook Web Application - Junk settings
Dealing with Junk individually You can tell Outlook what to do with a specific email by right clicking over it. Near the foot of the pop-up menu is the Junk option. Blocking puts items in your Junk E-Mail folder. For more control, select Junk E-mail Options… from the bottom of the menu. From here, define what is safe, what is blocked and set your level of junk e-mail protection. Be careful with Junk settings, as you could accidentally junk emails that you need to see. Check the Junk E-Mail folder regularly before you empty it. If items that aren't spam appear, right-click and select ‘Junk’ and then ‘Not Junk’. The University has a separate system in place that prevents most spam emails from reaching accounts, so what gets through is a tiny percentage of what is actually hitting the email system from outside.

Using Outlook
ICT (August 2013) Page 18 v1.9r-w
Search There is a search box available in almost all Outlook screens. Click in the box and enter your search keyword(s). By default, Outlook will only search for the current type of item or search within the current folder. You can change this behaviour quite easily, by using the Search tab options that appear in the ribbon menu whenever you click in a Search box.
Figure 16 - Search tool options
For example, when viewing e-mails in the Mail pane, click in the Search box and then click the 'All Mail Items' button in the Search tab. Now enter your search keyword(s) and Outlook will search every folder. You can search on who the item is from, the Subject, whether it has attachments or not, and so on.

Using Outlook
ICT (August 2013) Page 19 v1.9r-w
Categories Next to each item in your account is an empty box. Clicking the box allows you to assign a category. Click on the box and a pop-up will ask what you want to do.
Figure 17 - Using a category for the first time
By default, categories are colour coded and given an obvious name, like ‘Red Category’. When you first choose a category, it will ask if you want to rename it. If you wish to rename a category at a later date, either right-click over an item then select ‘Categorize’ or select ‘Categorize’ from the ribbon menu. Now choose ‘All Categories’, select the Category to rename and then click ‘Rename’. Why categorise items? They are handy for visually spotting items in your account. You can also sort your items by category, grouping items in the same category together.
Figure 18 - Arranging by category
Just right-click over the ‘Arrange By’ column and select 'Categories'.

Using Outlook
ICT (August 2013) Page 20 v1.9r-w
Figure 19 - Arranged by category
Attachments You either add attachments to items you send or you save off attachments to an item in your account. Adding attachments
Add an attachment by selecting the Attach File button when creating your new item. If you want to attach a Calendar, another Outlook item (e.g. an email) or a business card, use the Attach item button instead.
Saving attachments Open the item. The attachments appear above the item content. Right click over the file and select Save As... to save it elsewhere. Once saved, you can then right click and select Remove attachment if you need to, or delete the entire item. Remove allows you to keep the message without having to keep the attachment in Outlook.
Using Outlook
ICT (August 2013) Page 21 v1.9r-w
Calendar
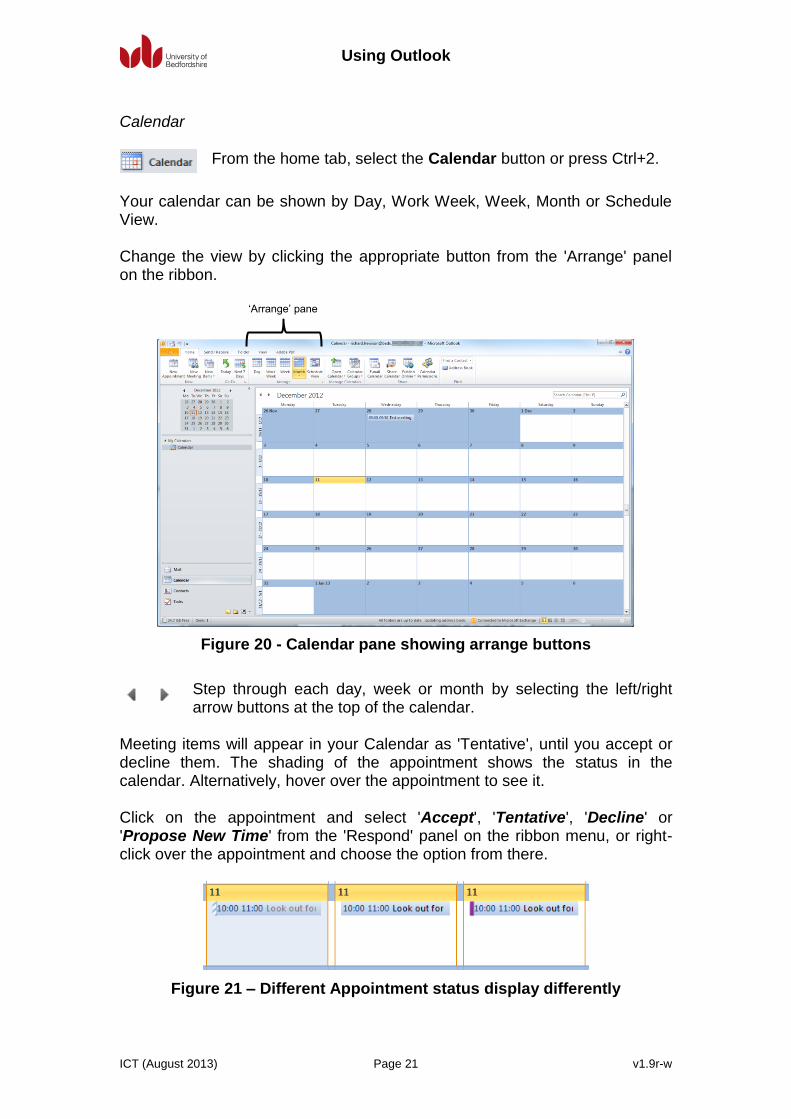
From the home tab, select the Calendar button or press Ctrl+2.
Your calendar can be shown by Day, Work Week, Week, Month or Schedule View. Change the view by clicking the appropriate button from the 'Arrange' panel on the ribbon.
Figure 20 - Calendar pane showing arrange buttons
Step through each day, week or month by selecting the left/right arrow buttons at the top of the calendar.
Meeting items will appear in your Calendar as 'Tentative', until you accept or decline them. The shading of the appointment shows the status in the calendar. Alternatively, hover over the appointment to see it. Click on the appointment and select 'Accept', 'Tentative', 'Decline' or 'Propose New Time' from the 'Respond' panel on the ribbon menu, or right-click over the appointment and choose the option from there.
Figure 21 – Different Appointment status display differently
‘Arrange’ pane

Using Outlook
ICT (August 2013) Page 22 v1.9r-w
You can then choose to show it in your calendar as 'Free', 'Tentative', 'Busy' or 'Out of Office'. You can see that on the left, the appointment is tentative (blue & white shading), whilst the same meeting appears blue (busy) and the example on the right is purple (out of office).

Using Outlook
ICT (August 2013) Page 23 v1.9r-w
Create new Appointment In the ‘Home’ tab, select ‘New Items’ and choose ‘Appointment’ or ‘Meeting’.
An ‘appointment’ is just for you, whilst a ‘meeting’ is for multiple attendees. You can change an appointment into a meeting by clicking the 'Invite Attendees' button whilst creating a new appointment item.
Note that if you send a meeting item from your account, your calendar shows the meeting even if you aren’t in the ‘To:’ list because you are the 'Meeting Organizer' (please excuse the American spelling!). As the organiser, you can click on the 'Tracking' button and see who has responded and who hasn't. Click the To: button to see your Offline Global Address List. You can add people or resources and categorise them. For example, Joe Bloggs and Fred Smith have to attend, so select one from the list and then click the 'Required' button. Now select the other and do the same. Now click Jane Doe and click on 'Optional' then click on Meeting Room 1 and click 'Resources'. OK to finish. Each attendee is now in the 'To:' field. Scheduling Assistant
You can check to see if any of the attendees are busy by using the Scheduling Assistant function from the ribbon (left).
Click the button. Each attendee appears on the left. You can change their role, choosing from 'Required Attendee', 'Optional Attendee' or 'Resource (Room or Equipment)'. The only one you can't change is the 'Meeting Organizer' (i.e. you!).
Figure 22 - The Scheduling assistant shows attendee’s availability

Using Outlook
ICT (August 2013) Page 24 v1.9r-w
You can see a legend in the bottom left corner that shows what the colours and shading mean. For example, blue is 'Out of Office' and purple is 'Busy'. A white bar with diagonal lines means that no scheduling information is found. The vertical bar shows the meeting time slot and duration. Enlarge, reduce and/or move to a different time slot by simply dragging and dropping. Recurring appointments or meetings
If you have a meeting or appointment on the same day of the week at regular intervals then create a new meeting or appointment and select the ‘Recurrence’ button.
Figure 23 - Set the appointment recurrence
Set the start and end times, the recurrence pattern and the start and end dates and Outlook will create the appointments or meetings for you.
Figure 24 - Right-click to cancel
To cancel a recurring meeting, right-click over the meeting in your calendar and select Cancel Meeting then choose if to cancel the single occurrence of the entire series of meetings. Outlook will send an e-mail to the invited attendees telling them of the cancellation.

Using Outlook
ICT (August 2013) Page 25 v1.9r-w
Share a Calendar Click the 'Calendar' button, then click 'Calendar' within 'My Calendars' and select the 'Share Calendar' button on the ribbon menu. A new window appears. Click the To: button to select whom to share with. You can also change other options, including a reciprocating request.
Figure 25 - Options for sharing your calendar
The 'Details' option gives you a choice of allowing them to see just your availability, or limited or full details of your appointments or meetings.
The default settings is colleagues can see when your free and busy, but without any specific details. From the Calendar, select the 'Calendar Permissions' button to change this.
Figure 26 - Calendar default permission settings

Using Outlook
ICT (August 2013) Page 26 v1.9r-w
Subject and Location is useful information. See Personal Assistant for details on giving more access to Calendars, folders and so on. You can easily change an appointment to be private if you don't want it to appear when others view your calendar. See below for further details. Viewing other calendars If you requested to share someone's Calendar via an Outlook e-mail, then the 'Allowed' e-mail from them has an 'Open this Calendar' button, which will add their Calendar to your Calendar view. Alternatively, go to your Calendar and right-click over My Calendars, select 'Add Calendar' and then 'Open Shared Calendar'. Click on the 'Name' button and select a person. By default, everyone can add anyone's calendar but the default setting is just showing if they're busy or not. Private appointments You can make an appointment of yours private, meaning it will only appear when you view your Calendar. When you share your Calendar with others, giving anyone 'Full Details' will override this.
Figure 27 - Right-click and mark your appointment as private
For new appointments, create the appointment and then click on the 'private' option from the tags section.
Right-click over any appointment you have created in your calendar, then select the 'Private' option. Using Day view, you will see a small padlock on the appointment. How others see a private appointment in your calendar depends upon the permissions you have given them:
Free/Busy time Appears as 'Busy'
Free/Busy time, subject, location Appears as 'Private Appointment'
Full Details Full Details!

Using Outlook
ICT (August 2013) Page 27 v1.9r-w
Contacts
When in the Home tab, select the Contacts button, or press Ctrl+3.
You can view your contacts by Business Card, Card, Phone or List. You see two default categories - Suggested Contacts and Contacts, along with any additional Contact folders migrated from your old GroupWise account. Contacts will initially just contain entries from your old GroupWise 'Frequent Contacts' address book. You can manually add to Contacts by right-clicking over an e-mail address when reading a message and selecting 'Add to Outlook Contacts'. Outlook automatically adds new e-mail addresses you have used to your 'Suggested Contacts', but it's up to you to choose which to add to 'Contacts'. Simply drag and drop the suggested contact items into your 'Contacts' folder. Contacts are also found by clicking the Address Book button on the Home tab's ribbon menu. The Address Book contains your contacts, suggested contacts and a number of lists including the centrally managed Global Address List, which contains every University colleague, room and group.

Using Outlook
ICT (August 2013) Page 28 v1.9r-w
Address Book
From the Home tab, select the Address Book icon from the Find category on the ribbon.
By default, Outlook will firstly look in the Offline Global Address List (see below for details). Outlook offers a number of different lists within the Address Book, which is searchable using the Search box in the top left corner. [email protected] Named after your University email address, this is your Address Book that contains many address lists. You can also manually add entries to the root of your Address Book by right-clicking and selecting 'New Entry'. Contacts & Suggested Contacts Why doesn't Outlook just put e-mail addresses directly into 'Contacts'? Well, because many mobile devices can synchronise with your Outlook Contacts, they could - over time - swell to quite a large number. To give you more control, Outlook suggests that they become contacts by placing them in the suggested list first. Right-click over an entry and select 'Add Contact' to move them. Contacts & Suggested Contacts (Mobile) This is a filter of your Contacts or Suggested Contacts, showing just those entries where mobile phone details are available. Global Address List The centrally managed Global Address List shows every person, room and group available to anyone with a University Outlook account. Outlook periodically places a local (offline) copy of the Global Address List onto your computer, so it is available when the online version isn't (for any reason). All Address Lists This shows everything in once place, categorised by contacts, groups, rooms and users.

Using Outlook
ICT (August 2013) Page 29 v1.9r-w
Create new Folder Right-click over the ‘Inbox’ and select ‘New Folder…’ then enter a name and click OK. Now choose where you wish to create the folder (i.e. in the root of your account, in the Inbox or maybe within another existing folder).
Figure 28 - Create a new folder then choose where to place it
Note that folders always appear alphabetically in Outlook. If you want them to appear in a different order, add them as a ‘Favorite’ by right clicking and selecting ‘Show in Favorites’. You can then rearrange the folders in Favorites by a simple manual drag and drop.

Using Outlook
ICT (August 2013) Page 30 v1.9r-w
Sharing folders To give a colleague rights to see items in a folder in your account, you need to assign them folder permissions in Outlook 2010. This document explains how to share a folder and from the opposite perspective, how to add a shared folder to your account. Sharing a folder with someone else You are person A. To share a folder with someone else (e.g. person B), you need to assign permissions to your account, your Inbox and the folder you want to share. For example:
[email protected] Inbox Folder 1 Folder 2 (the folder to share) Folder 3
1. In the 2010 client, right-click over your account at the very top of the
folder list (e.g. [email protected]) 2. Select ‘Folder permissions’ from the pop-up menu 3. In the Permissions tab, click ‘Add’ then double-click the person you
wish to give permissions to from the presented list. Click OK 4. For ‘Read’ select ‘None’. For ‘Delete’ select ‘None’. For ‘Other’ select
‘Folder visible’ and leave all other options unchecked (Figure 29). This assigns minimum permissions
Figure 29 – Minimum permissions on the account (left) and the Inbox (right)
Using Outlook
ICT (August 2013) Page 31 v1.9r-w
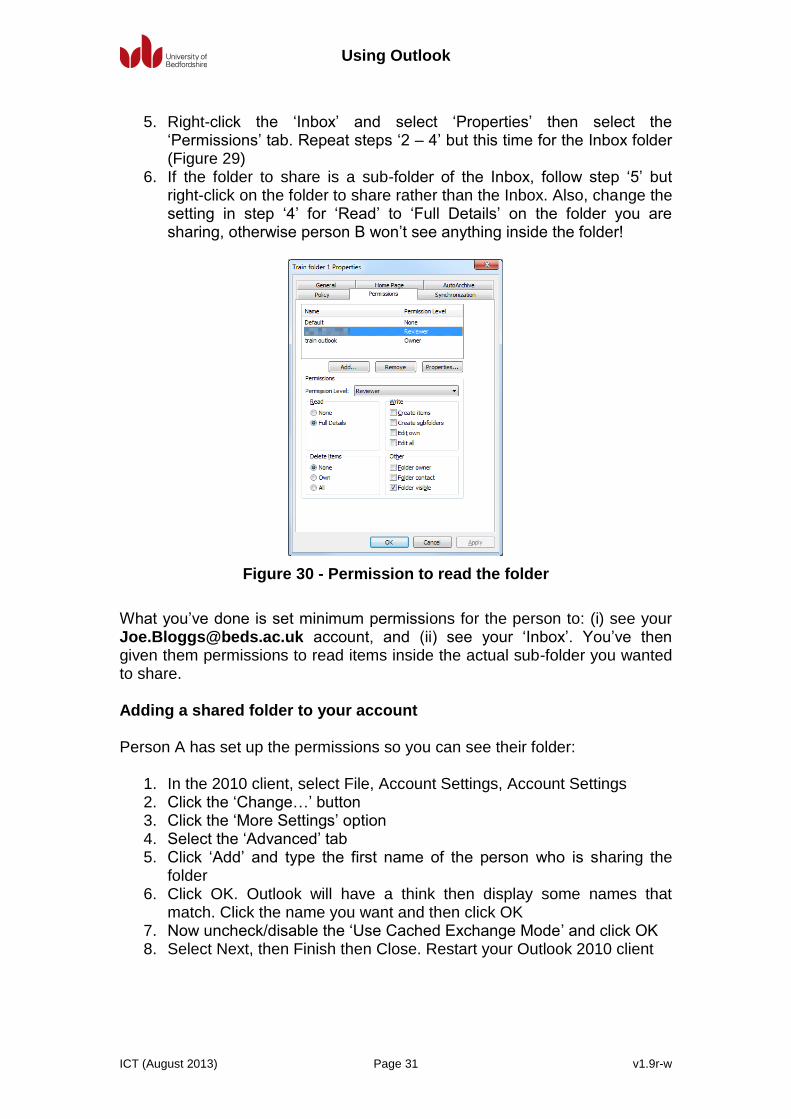
5. Right-click the ‘Inbox’ and select ‘Properties’ then select the
‘Permissions’ tab. Repeat steps ‘2 – 4’ but this time for the Inbox folder (Figure 29)
6. If the folder to share is a sub-folder of the Inbox, follow step ‘5’ but right-click on the folder to share rather than the Inbox. Also, change the setting in step ‘4’ for ‘Read’ to ‘Full Details’ on the folder you are sharing, otherwise person B won’t see anything inside the folder!
Figure 30 - Permission to read the folder
What you’ve done is set minimum permissions for the person to: (i) see your [email protected] account, and (ii) see your ‘Inbox’. You’ve then given them permissions to read items inside the actual sub-folder you wanted to share. Adding a shared folder to your account Person A has set up the permissions so you can see their folder:
1. In the 2010 client, select File, Account Settings, Account Settings 2. Click the ‘Change…’ button 3. Click the ‘More Settings’ option 4. Select the ‘Advanced’ tab 5. Click ‘Add’ and type the first name of the person who is sharing the
folder 6. Click OK. Outlook will have a think then display some names that
match. Click the name you want and then click OK 7. Now uncheck/disable the ‘Use Cached Exchange Mode’ and click OK 8. Select Next, then Finish then Close. Restart your Outlook 2010 client
Using Outlook
ICT (August 2013) Page 32 v1.9r-w
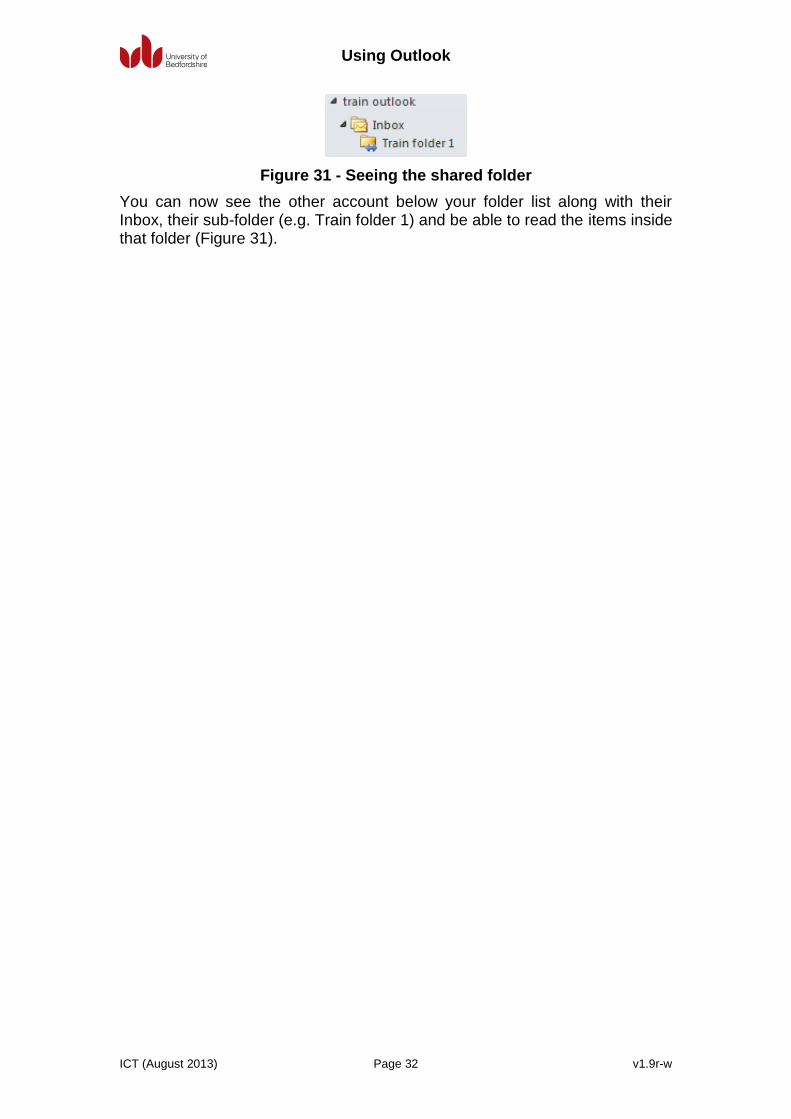
Figure 31 - Seeing the shared folder
You can now see the other account below your folder list along with their Inbox, their sub-folder (e.g. Train folder 1) and be able to read the items inside that folder (Figure 31).

Using Outlook
ICT (August 2013) Page 33 v1.9r-w
Tasks
From the Home tab, select the Tasks button, or press Ctrl+4.
Here you will see a list of Task items and To-do items. The list shows tasks and their due dates, as well as categories and so on. It will also show - via an icon - when the task is assigned to someone else.
Figure 32 - Example list of tasks
It's very easy to create a new task. When in the Task pane, click the New Task button. When elsewhere in Outlook, click the New Items button and select Task.
Add a Subject, Start Date, Due Date, Status, Priority, % Complete and so on.
If the task is for someone else, click the Assign Task button and add them into the To: field. If you change your mind, click the Cancel Assignment button to make the task yours again.
When you've completed the task, click the Mark Complete button, or enter a completion % and then assign the task to someone else to continue working on it.
To-do (follow-up flags) Tasks have these too, but you can turn any item into a To-do item by clicking the flag. A single click will flag the item to be completed today, whilst right-clicking the flag will give you options regarding flagging the item for tomorrow, next week and so on. Follow-up flags are shown in subtle shades of red/pink to indicate when they are due for completion. To mark a To-do item as finished, single-click it and the flag changes to a tick. To clear the flag completely, right-click the flag and select 'Clear flag'. When should I use Tasks or To-do items? Tasks have rigid start and end dates, whilst to-do's are reminders to do something, so they have more vague or flexible completion dates (e.g. Next Week). It's up to you if or when you use them.

Using Outlook
ICT (August 2013) Page 34 v1.9r-w
Rules In Outlook, you create rules using a simple rules wizard. If you want to create an 'out of office' rule, please see Automatic Replies to learn how to do this. Move rule Select an example email upon which you want to base a rule, e.g. an email from a particular email address.
In the ‘Move’ category of the ‘Home’ tab, click on the little arrow below the ‘Rules’ button. You have some choices. If you wish to move emails from or to that address or person, then select ‘Always Move Messages From’ or 'Always Move Messages To'.
Now choose an existing folder or select ‘New’ to create a new folder. When new unread items from that address arrive, they now appear in the folder rather than in the ‘Inbox’. Where do I see my rules? With no item selected, the ‘Rules’ button only gives you the option to 'Manage Rules & Alerts'. When you select this, you can create, change, copy, delete and run rules. The options button let you import/export rules.
Figure 33 - Manage your rules and alerts
Below these buttons, you will see a list of your current rules. A tick in the box means the rule is active. If you want to apply rules to your RSS Feeds, tick the box here (above).

Using Outlook
ICT (August 2013) Page 35 v1.9r-w
Automatic replies Go to the File drop-down menu, and then select the ‘Automatic replies (Out of Office)’ button.
Figure 34 - Setting up an automatic reply
You can set up the relevant dates and message and choose to include external email addresses, or maybe have a different message for externals. When you’re done, click OK. When Automatic Replies is active, a banner displays in Outlook to remind you. Because an automatic reply is based on a start and end date, it will only reply during those dates so you don't need to worry about not turning it off. Outlook doesn’t consider ‘Automatic Replies’ to be a rule, so it doesn’t appear in your list of rules when ‘Send automatic replies’ is enabled.
Using Outlook
ICT (August 2013) Page 36 v1.9r-w
RSS Feeds
Many websites offer RSS feeds. If you have chosen to subscribe to any, they appear in this folder.
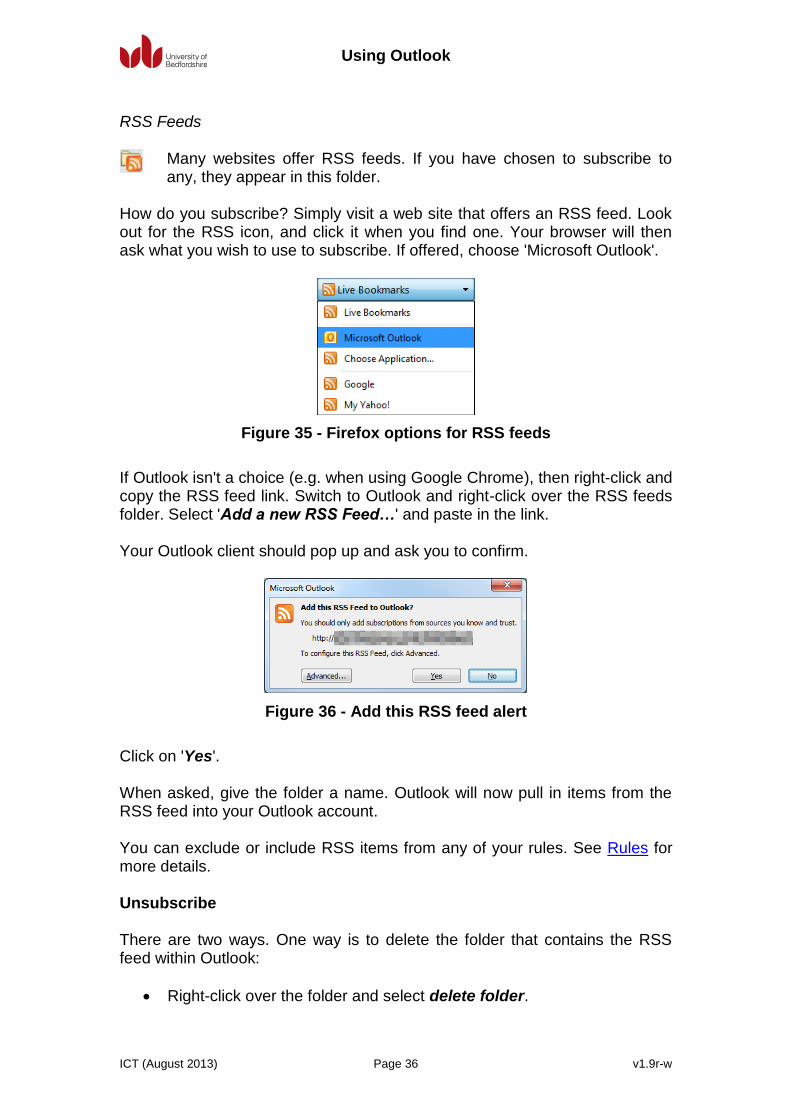
How do you subscribe? Simply visit a web site that offers an RSS feed. Look out for the RSS icon, and click it when you find one. Your browser will then ask what you wish to use to subscribe. If offered, choose 'Microsoft Outlook'.
Figure 35 - Firefox options for RSS feeds
If Outlook isn't a choice (e.g. when using Google Chrome), then right-click and copy the RSS feed link. Switch to Outlook and right-click over the RSS feeds folder. Select 'Add a new RSS Feed…' and paste in the link. Your Outlook client should pop up and ask you to confirm.
Figure 36 - Add this RSS feed alert
Click on 'Yes'. When asked, give the folder a name. Outlook will now pull in items from the RSS feed into your Outlook account. You can exclude or include RSS items from any of your rules. See Rules for more details. Unsubscribe There are two ways. One way is to delete the folder that contains the RSS feed within Outlook:
Right-click over the folder and select delete folder.

Using Outlook
ICT (August 2013) Page 37 v1.9r-w
The second method allows you to keep the items you have, but unsubscribe. To do this:
Select File. Click Account Settings.
Select the RSS Feeds tab. Select the relevant feed name. Select the Remove button.

Using Outlook
ICT (August 2013) Page 38 v1.9r-w
Search Folders
You can create search folders that look for specific types of email, and Outlook then presents the results inside the folder each time you select it.
Right-click over Search Folders and select New Search Folder… to begin defining your own. The search folder wizard contains many examples that you might choose to use, including:
Unread mail
Mail flagged for follow up
Mail either unread or flagged for follow up
Important mail
Mail from and to specific people
Mail from specific people
Mail sent directly to me
Mail sent to public groups
Categorized mail
Large mail
Old mail
Mail with attachments
Mail with specific words
Create a custom Search Folder Follow up search
One useful folder to create is one that searches for any items flagged as follow up (where you click the little flag on an item to turn it red).
Figure 37 - Creating a follow up search folder

Using Outlook
ICT (August 2013) Page 39 v1.9r-w
Create a new search folder and choose Mail flagged for follow up in the wizard. Click OK to finish. Attachments search Another useful search folder to create is one that displays all items with attachments. Create a new search folder and choose Mail with attachments. If your reason for choosing this is to find the larger emails in your account, you might wish to choose Large mail instead (and choose the size of mail you consider large. The default is 100kb). Although you might be tempted to use Search Folders instead of rules, be aware that you can't create Search Folders in the Outlook Web Application (OWA) and any new search folders don't appear in the OWA by default either.
Using Outlook
ICT (August 2013) Page 40 v1.9r-w
Quick Tips Printing There are two ways to print an E-mail (for example) in Outlook. One is right-click over the item and select 'Quick Print'. The second method is by opening the item so it's displayed in a new window, then selecting File, Print. Printing a Calendar is slightly different. Go to the 'Calendar' pane, ensure the relevant calendar is selected and then select File, Print and choose a style from the Settings menu, e.g. Daily, Weekly Agenda, Monthly, Trifold or Calendar Details. Message Recall or Resend You can only recall messages sent to University colleagues who also have an Exchange Online account. You can also only successfully recall if the recipient hasn't yet read the message.
Figure 38 - Message recall failure e-mail
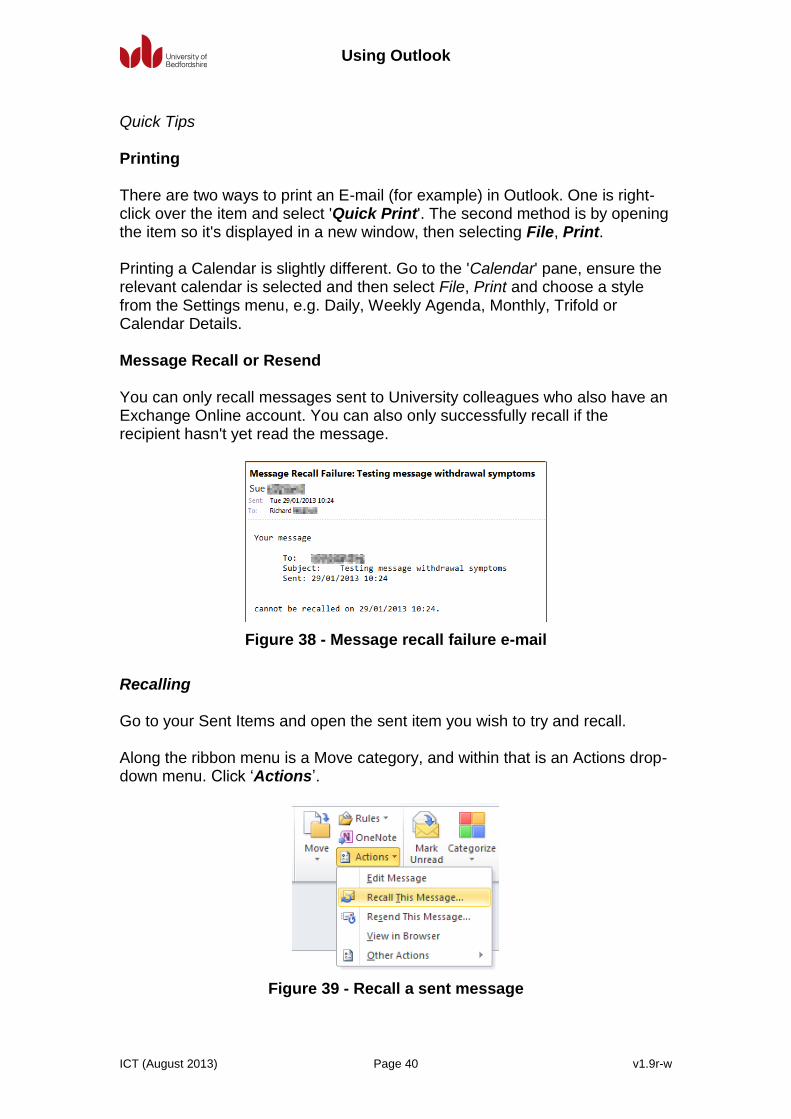
Recalling Go to your Sent Items and open the sent item you wish to try and recall. Along the ribbon menu is a Move category, and within that is an Actions drop-down menu. Click ‘Actions’.
Figure 39 - Recall a sent message

Using Outlook
ICT (August 2013) Page 41 v1.9r-w
Select Recall This Message... and you will then see a few more options, asking you to either:
Delete unread copies
Delete unread copies and replace with a new message You can also ask Outlook to send a message to you to confirm that the recall worked. Resending Select Resend This Message and the message window will pop up and you can compose a replacement message and send it. Where is the Bcc option? Click on the To: or the Cc: button and you will see the Bcc: option appears.
Figure 40 - The blind carbon copy option
Add the addresses of the people or groups (see below) you wish to blind carbon copy. You can permanently add the Bcc option to each new e-mail by creating a new email, then selecting the 'Options' tab and pressing the Bcc button on in the 'Show fields' category. Please note that if you receive an email in Outlook which you were a Bcc: recipient, Outlook will not show that you were blind carbon copied. You would need to look at the 'To' and 'Cc' entries and if you're name doesn't appear, then you must have been Bcc'd. Contact Groups
Send a message, appointment, task and so on to a group of people in one go by creating and then sending the item to a group.
Select the Contacts button from Home, then select New Contact Group from the ‘New’ category on the ribbon menu.

Using Outlook
ICT (August 2013) Page 42 v1.9r-w
Type a Name for the group, then click on the Add Members button. Choose from Contacts, Address Books or enter a new E-mail contact.
When you're finished, click the Save & Close button. The group appears in your Contacts list in your Address Book. When you compose a new message to the group, just start typing the group name into the To: filed and it should offer the group name to click on. It's often better to put a group in Bcc: so the recipients don't see the full list of recipients. Importing contact members If you have a list of e-mail addresses (one per line) that you wish to use as an Outlook Contact Group, read the following:
Copy the list of e-mail addresses as you would do normally (e.g. highlight and select ‘copy’ or press ctrl+c)
Click the 'Contacts' pane, then select 'New Contact Group'
Click 'Add Members' and choose 'From Outlook Contacts'
Under 'Address Book' change the entry to 'Contacts'
Click into the box next to the 'Members->' button in the bottom-left corner
Paste your list of e-mails into that box, then click OK
You are shown the list, so type in a name for your new Contact Group into the 'Name' box at the top
Finally, click on Save & Close. You now have your new Contact Group in Outlook, ready to be used! Voting You can add voting buttons to an email to elicit a quick straw poll on any subject you like. Here's how it works: Start a new e-mail message. Click the Options tab on the ribbon menu. Click on Use Voting buttons. You have three pre-defined options: Approve; Reject Yes; No Yes; No; Maybe There is also a ‘Custom...’ option that allows you to create a new one-off set of voting options.

Using Outlook
ICT (August 2013) Page 43 v1.9r-w
Figure 41 - Create some custom voting options
When you send the item, the recipients will see a Vote button in the Respond section of the ribbon menu of the message. Clicking the button reveals the options.
When you select an option to vote on, Outlook will ask if you wish to just send the response or edit it before sending. Responding to the vote triggers an e-mail back to you as the sender, that will have the option the voter chose pre-pending the subject of the e-mail. Note that the voter could vote again, so you would need to take into account multiple votes and possibly decide to accept the first response only (for example). Message Conversations You can get Outlook to display messages by conversation, where people have replied to messages. Click on the View tab on the ribbon, and then enable the ‘Show as Conversations’ option. You will be asked if you wish to apply the setting to just the folder you are in, or in all folders.
Figure 42 - A split conversation

Using Outlook
ICT (August 2013) Page 44 v1.9r-w
If Outlook states that it is a ‘Split conversation’, it simply means that there are messages elsewhere (in other folders) that are also part of the conversation. Click the triangle to expand the conversation to see all items.
Figure 43 - Seeing all conversation items
You can change how conversations behave by selecting the ‘Conversation settings’ option from the View tab on the ribbon menu.

Using Outlook
ICT (August 2013) Page 45 v1.9r-w
Index
accept ...................................................................................................... 21, 43 Account Settings ............................................................................................ 37 Add Members................................................................................................. 42 Address Book................................................................................. 8, 27, 28, 42 Address List ................................................................................... 8, 23, 27, 28 alert ............................................................................................................ 7, 36 Always Move Messages From ....................................................................... 34 Appointment ....................................................................................... 21, 23, 26 Assign Task ................................................................................................... 33 attachments ............................................................................. 4, 18, 20, 38, 39 auto-complete .................................................................................................. 8 Automatic replies ........................................................................................... 35 Bcc ........................................................................................................... 41, 42 Blind carbon copy .......................................................................................... 41 Busy ................................................................................................... 22, 24, 26 Calendar ...................................................................................... 20, 21, 25, 26 Calendar Permissions .................................................................................... 25 Cancel Assignment ........................................................................................ 33 category ........................................................................... 11, 12, 19, 20, 40, 41 Contacts ................................................................................... 8, 27, 28, 41, 42 Day view ........................................................................................................ 26 decline ........................................................................................................... 21 Deleted Items ........................................................................................... 14, 15 Details ...................................................................................................... 25, 26 draft item ........................................................................................................ 12 Empty folder ................................................................................................... 15 Favorite .......................................................................................................... 29 folder permissions .......................................................................................... 30 follow up ................................................................................................... 38, 39 Follow-up flags ............................................................................................... 33 Free ......................................................................................................... 22, 26 From .................................................................................. 6, 17, 21, 25, 28, 33 Global Address List ........................................................................................ 28 Google Chrome .............................................................................................. 36 HTML ........................................................................................................... 8, 9 IMAP ................................................................................................................ 3 Inbox .................................................................................................... 6, 29, 34 Junk ......................................................................................................... 16, 17 Junk E-Mail folder .................................................................................... 16, 17 Location ......................................................................................................... 26 Mail pane ................................................................................................... 6, 18 Manage Rules & Alerts .................................................................................. 34 Mark Complete ............................................................................................... 33 Meeting .............................................................................................. 21, 23, 24 Move ........................................................................................................ 34, 40 My Calendars ........................................................................................... 25, 26 New Contact Group ....................................................................................... 41

Using Outlook
ICT (August 2013) Page 46 v1.9r-w
New E-mail....................................................................................................... 8 New Folder..................................................................................................... 29 New Task ....................................................................................................... 33 Offline Global Address ............................................................................... 8, 23 Open this Calendar ........................................................................................ 26 Optional ......................................................................................................... 23 Out of Office ....................................................................................... 22, 24, 35 Outbox ........................................................................................................... 13 Outlook 2011
Macintosh ..................................................................................................... 3 Outlook account ................................................................................... 4, 28, 36 Outlook Web Application ...................................................................... 3, 13, 39 Personal Assistant ......................................................................................... 26 Plain Text ......................................................................................................... 8 POP ................................................................................................................. 3 private ............................................................................................................ 26 Propose New Time ........................................................................................ 21 Quota Information ............................................................................................ 4 recall ........................................................................................................ 40, 41 Recall This Message ...................................................................................... 41 Recurrence .................................................................................................... 24 Required ........................................................................................................ 23 Resend .................................................................................................... 40, 41 Resources ...................................................................................................... 23 Rich Text .......................................................................................................... 8 RSS Feeds......................................................................................... 34, 36, 37 rules ......................................................................................... 6, 34, 35, 36, 39 Scheduling Assistant ...................................................................................... 23 search ................................................................................................ 18, 38, 39 Search Folders ......................................................................................... 38, 39 Sent Items .......................................................................................... 13, 14, 40 Show fields..................................................................................................... 41 Show New Mail Desktop Alert .......................................................................... 7 Signatures .................................................................................................. 9, 11 SMTP ............................................................................................................... 3 spell checking ................................................................................................ 10 Suggested Contacts ....................................................................................... 28 Tasks ............................................................................................................. 33 Tentative .................................................................................................. 21, 22 Tracking ................................................................................................... 14, 23 unread ...................................................................................... 6, 15, 34, 38, 41 unsubscribe.................................................................................................... 37 Use Cached Exchange Mode ........................................................................ 31 voting ....................................................................................................... 42, 43