


The Complete Guide to Blacksmithing,...
230
Transcript of The Complete Guide to Blacksmithing,...


THE COMPLETE GUIDE TO
BlacksmithingHorseshoeing^ Carriage and
Wagon Building and
Paintina:
Eased en the
Text Book on Hofseslioemg i
By
Professor A. Lung-wit^ a
Director of the Shoeing School of the Royal Veterinary College I
at Dresden \
With Chapter3 onI
Cafria2:e-Iroaing, "^agon and Bwggy Painting, Var- \
nishing. Ornamenting, Etc.
By'
i'
;,
; iy ;i ;
' "!
Charles F. Adami : ! ;. .
',..;;
I L L U S T R A T "SJ'
; ' ,'^\ ".
CHICAGO
M. A, DONOHUE ": CO.
407-429 Dearborn St.
THELIBRARY OF
CONGRESS,
TwoCopiEfe REceivEO
JUL. 10 1902
CoPVWtGHT ENTRY
Class c^xxc. no.
COPY B.
tt/...
i-1
/ "!)^
Copyright 1902
M. A. DONOHUE " CO.
M, A. DONOHUE A CO.x
PRINTERS AND BIH0ER8, CHICAGO,

CONTENTS
Part I.
GENERAL BLACKSMITHING.
PAGE.
Chapter I. The Forge" Forga and Blast, Spring
Bellows, Care of Bellows, The Anvil, The Hammer,
Other Tools H
Chapter II. Operations in Forging "
The Fire, Flux,
Degrees of Heat, Drawing Down, Set-ojEf, Jumping or
Up-setting, Shutting Together, Hardening Steel, Case-
Hardening 26
Part II.
HORSESHOEING.
Chapter I. The Anatomy of the Horse's Foot"
The Hoof in General, The Wall, The Sole, The VvTiite
Line, The Frog, The Skin, The Coronary Band, The
Sensitive Structures 47
Chapter II. Growth and Condition of the Hoof"
Growth of the Hoof, Wearing of the Hoof Affected by
Position 01 Lcj^s, How to Judge a Hoof 57
Chapter HI. Shoeing Healthy Hoofs" The Pre-liminary
Examination, Raising and Holding the Foot,
Taking off the Old Shoes, Preparing the Hoof for
Shoes, Preparing the Hoof for Going Barefoot,
3

4 Contents.
PASE
Making Shoes, Character of the Shoe, Heel Calks, Toe
and Heel Calks, Peculiarities of Shoes for DiiTerent
Kinds of Feet, The Choice of the Shoe, Fitting Shoes,
Shoeing Heavy Draught Horses, Concluding Direc-tions,
Nailing the Shoe 73
Chapter IV, Forging and Interfering 105
Chapter V. Winter Shoeing. Care of the Hoof"
Ice-nails,Sharp Calks, Screw Calks, To Prevent Ball-ing
with Snow, Care of Unshod Hoofs, Washing,
Time to Shoe, Hoofs of Older Horses, Care of Shod
Hoofs 110
Chapter VI. Shoeing^ Defective Hoofs"
Lame-ness,
Inflammation of the Pododerm, Treatment,
The Bar-Shoe, "Nailing," Treatment for "Nailing,"
Street Nail, Calking, Corns, Treatment of Corns, In-flammation
of the Bulbs of the Heels, Founder, Horn
Tumor 118
Chapter VII. Various Defects"
Flat Hoof and
Dropping Sole, Stumpy Hoof, Contracted Hoof, Treat-ment,
Wry Hoofs, Crooked Hoofs, Side-Bone, Cracks,
Treatment of Cracks, Loose Wall, Hollow Wall,
Thrush of the Frog 135
Chapter VIII. Shoeing Mules and Oxen 150
Part III.
CARRIAGE BUILDING.
Chapter I. Carriage Ironing " Edge Plates, The
Wheel Plate, Bed Plates, Top Plate, The Transom
Plate, The Bottom Plate, Wheel Irons and Front
Bars, Head Irons, Hind Irons, Cross Spring, Branch
Steps, Steps with T-flap, The Wings, The Seat Rails,
Dash Iron, Boot Steps, Pole Socket, Springs, Tires..
153
LIST OF ILLUSTRATIONS.
NO. CUT. PAGE
1. A Brick Forge 12
2. An Iron Forge with Fan Blower 13
3. Bellows with Spring Attachment 15
4. Anvil 17
5. Blacksmith's Hammers 21
6. The Proper Kind of Hammer Eye 22
7. A Pair of Tongs 23
8. Split Joint 41
9. Butt Joint 41
10. T Joint 42
11. Section of the Foot 47
12. External Appearance of Foot 48
13. Bottom of Foot 51
14. Normal Position of Front Feet 61
15. Base-wide Position 62
16. Out-toe Position 63
17. Base-narrow, In-toe Position 63
18. Correct Position as Viewed from Side 64
19. Position Too Far Forward 65
20. Sheep-kneed Position 65
21. Acute-angled Foot 66
22. Bear-Foot 68
23. Lines of Flight, Regular, Base- wide, and Base-
narrow 69
24. Untrimmed and Trimmed Hoofs 82
25. Both Sides of aFront Shoe, Showing Concaving
and Position of Nails 85
26. Front Shoe. Hind Shoe 87
27. Heel Calks 91
28. A Horseshoe Nail 101

6 List of Illustrations.
CUT NO. PAGB
29. Interfering Shoe" Front 107
30 Dropped-Crease Interfering Hind Shoe 108
31. Hind Shoe for Toe-Cutters 109
32. An Ice-Nail 110
33. Inner Heel Calk Ill
34. Outer Heel Calk 112
35. Bar Shoe 121
36. Wide-Web Shoe for Foundered Hoof 134
37. Tip for Stumpy Hoof 137
38. Treatment of Cracks 144
39. Shoe for One Claw ofan
Ox 151
40. Key to Names of Carriage Irons 154
41. Bored Hubs 189
42.'-' Stagger" Mortised Hubs 190
43. Work Bench 193
44. Dished Spoke 197
45. Repairing Dished Wheel 197
46. Wheel fora
Wheelbarrow 201
47. Modern Farm "/agon 203
48. Front Bolster 204
49. Back Bolster 205
50. Good Form of Hounds 206

PUBLISflERS' PREFACE.
Without doubt the most thoroughly reliable
handbook of horseshoeing is the German text-book
of Professor Lungwitz, director x)f the
Shoeing School of the Royal Veterinary College
at Dresden. The conditions in Germany are
almost identical with those in this country,
and the Shoeing School superintended by Pro-fessor
Lungwitz may safely be regarded as the
best in the world. Certainly there isnone
like it in the United States.
But Professor Lungwitz 's discussion of the
anatomy of the horse's foot is too technical for
the ordinary reader, and his book gives no sug-gestions
on the elementary principles of black-
smithing, whichare prerequisites of any attempt
at shoeing a horse. To make the present hand-book
complete, these directions have been
added, and the text of Professor Lungwitz 's
book has been somewhat condensed and simpli-fied.
Moreover, a chapter on carriage-ironing,
with other general information, has been added.

8 Publishers^ Preface.
that the manual may be thoroughly prac-tical
and as complete as possible.
It is certainly true that every owner and
driver of horses, as well as every person who
professes to be a horseshoer, should have a
thorough knowledge of the horse's foot and
the requirements in the way of shoeing. But
how many do! Even farriers know no more
of the horse's hoof, and the scientific require-ments
for obtaining the best results in any given
case, than they have been able to pick up in
the exercise of their trade. This kind of knowl-edge
is notoriously imperfect. It will never
improve. And owners and drivers are for the
most part so ignorant that they could not tell
a front foot from a hind foot, or tell the differ-ence
between a job of shoeing that would make
a horse lame in a week, and one that would cure
the same lameness in even less time. And
this ignorance costs the owner many a hard-
earned dollar. No better investment can be
made than a little time spent in the study of
the horse's feet,by the help of a reallyscientific
manual. But it is better not to study any book
at all than one that is unreliable.
It is believed that the present volume will
meet the popular need better than any other that
has yet been issued. The authoritativeness

Pvhlishers' Preface. 9
of anything from thepens
of Professor Lungwitz
and Mr. Adams is uiiimpeachable, while the
publishers have given the volumea practical
character which must inevitably appeal to the
common senseof the
averagereader.

PART I.
GENERAL BLACKSMITHING,
CHAPTER I.
THE FORGE.
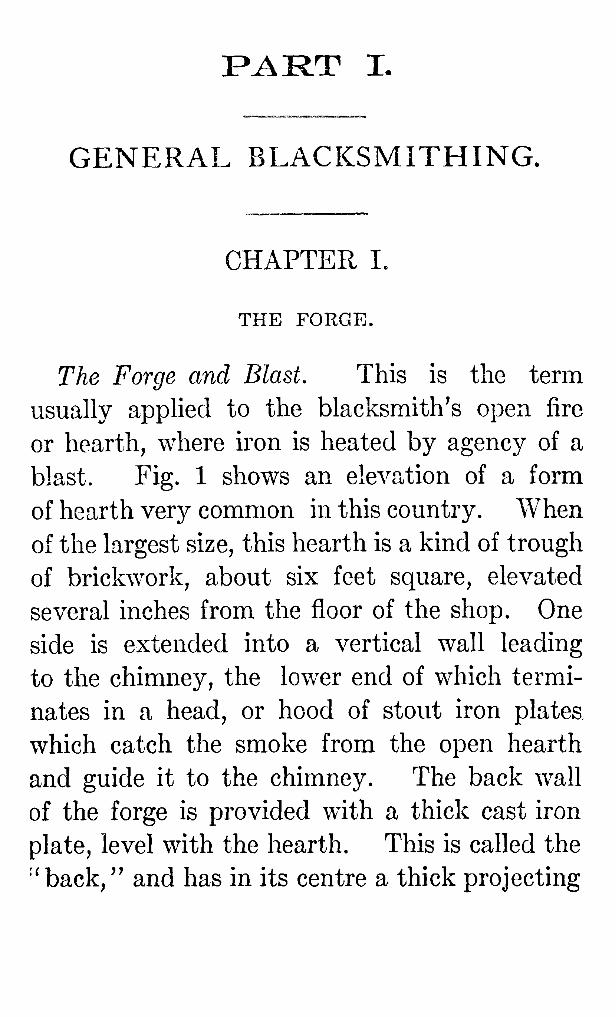
The Forge and Blast. This is the term
usually applied to the blacksmith'sopen fire
or hearth, where iron is heated by agency of a
blast. Fig. 1 shows an elevation of a form
of hearth very common in this country. When
of the largest size, this hearth is akind of trough
of brickwork, about six feet square, elevated
several inches from the floor of the shop. One
side is extended into a vertical wall leading
to the chimney, the lower end of which termi-nates
in a head, or hood of stout iron plates,
which catch the smoke from the open hearth
and guide it to the chimney. The back wall
of the forge is provided with a thick cast iron
plate, level with the hearth. This is called the
''back," and has in its centre a thick projecting
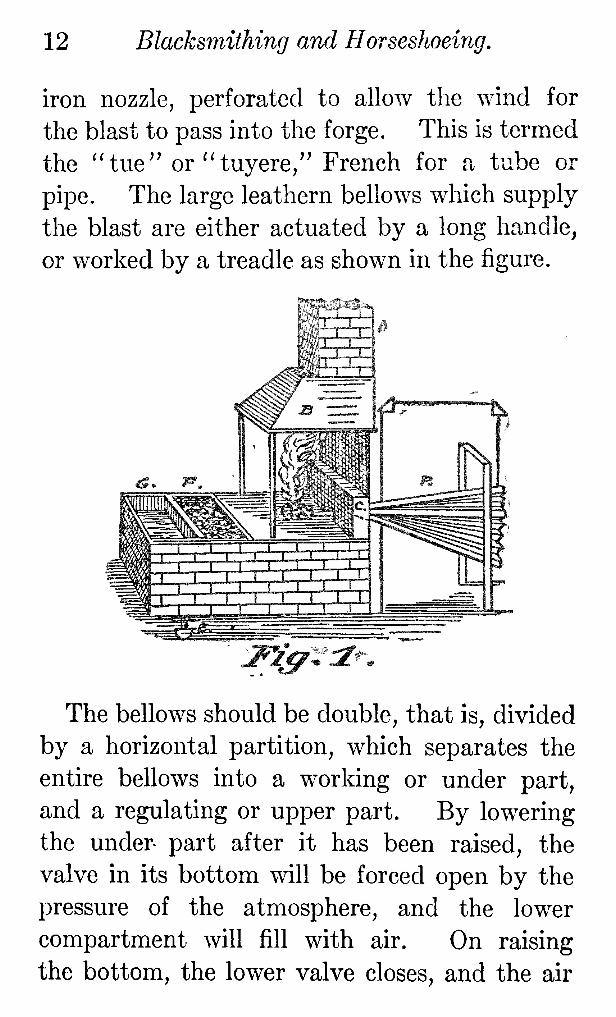
12 Blacksmithing and Horseshoeing.
iron nozzle, perforated to allov/ the wind for
the blast to pass into the forge. This is termed
the 'Hue" or'' tuyere," French for a tube or
pipe. The large leathern bellows which supply
the blast are either actuated by a long handle,
or worked by a treadle as shown in the figure.
The bellows should be double, that is,divided
by a horizontal partition, which separates the
entire bellows into a working or under part,
and a regulating or upper part. By low^ering
the under- part after it has been raised, the
valve in its bottom will be forced open by the
pressure of the atmosphere, and the lower
compartment will fill with air. On raising
the bottom, the lower valve closes,and the air

Carriage and Wagon Building. 13
in the under part is compressed and forced
through the valve in the partition,whence the
weight of the top drives it through the tuyere
or nozzle. The pressure may be increased by
putting weights upon the top. The bellovv's
may be driven b)^ machinery or power, where
such can be procured, quite as well as by hand.
Many prefer the circular bellows, or the fan;
and in large smithies air is supplied to a vast
number of forgesthrough pipes fed by air-pumps.
Vi.^
2^z^.2.

14 Blacksmithing and Horseshoeing,
Fig. 2 shows a steel portable forge, composed
entirely of iron and steel, with a fan worked
by a crank, the air-pipe passing downward
and through a 'tuyere" into the coal-box.
In front of the hearth are usually two plate-iron
troughs, one to contain coal, the other (the
slake trough) being filled with water.
The tuyere or tue iron is generally a simple
block of cast iron six or eight inches long and
three inches square, with a tapered bore of one
inch at the sm.aller and three inches at the
largerend. The narrow part, which is directed
to the fire,can be made narrower by placing an
iron ring of more or less thickness within the
aperture. Tuyeres have been contrived of
various forms, but probably none will be found
superior to that just described. Hot-air
tuyeres have been used, but are now generally
abandoned. The water tuyere is, on account
of its durability, very valuable. Here the
cast iron forge back is made hollow so that a
stream of water may circulate through it from
a small cistern. The water back is,therefore,
kept from becoming intensely hot, and it and
the tuyere last much longer.
The Spring Belloios. A noted smith says,
''Of all the bellows that I have seen or used,
one with the spring attached.
beats them all
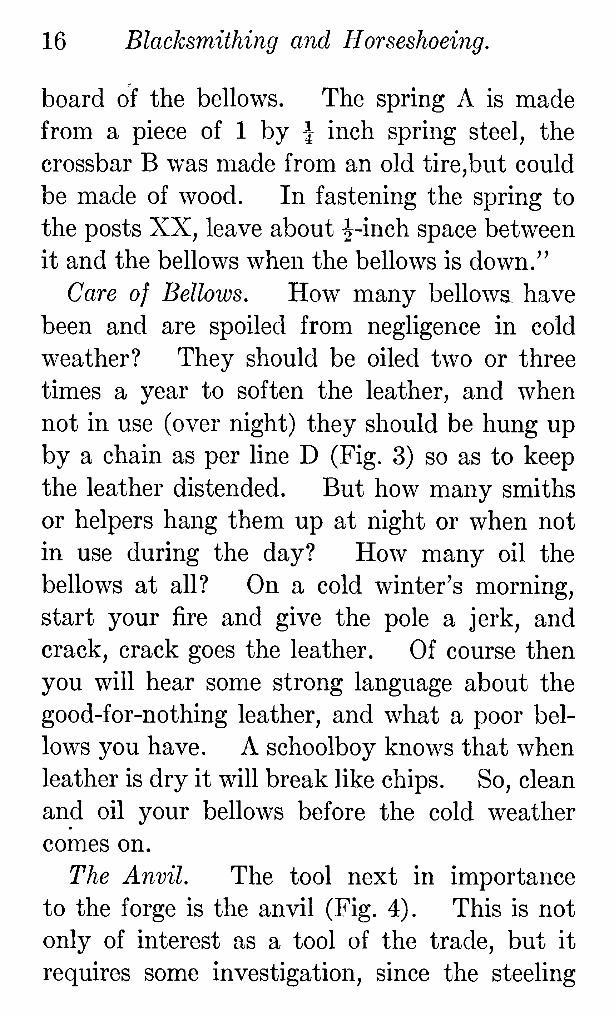
16 Blacksmithing and Horseshoeing.
board of the bellows. The spring A is made
from a piece of 1 by -} inch spring steel, the
crossbar B was made from an old tire^but could
be made of wood. In fastening the spring to
the posts XX, leave about J-ineh space between
it and the bellows when the bellows is down."
Care of Bellows. How many bellows have
been and are spoiled from negligence in cold
weather? They should be oiled tw^o or three
times a year to soften the leather, and when
not in use (over night) they should be hung up
by a chain as per line D (Fig. 3) so as to keep
the leather distended. But how many smiths
or helpers hang them up at night or when not
in use during the day? How many oil the
bellows at all? On a cold winter's morning,
start your fire and give the pole a jerk, and
crack, crack goes the leather. Of course then
you will hear some strong language about the
good-for-nothing leather, and what a poor bel-lows
you have. A schoolboy knows that when
leather is dry it will break like chips. So, clean
and oil your bellows before the cold weather
comes on.
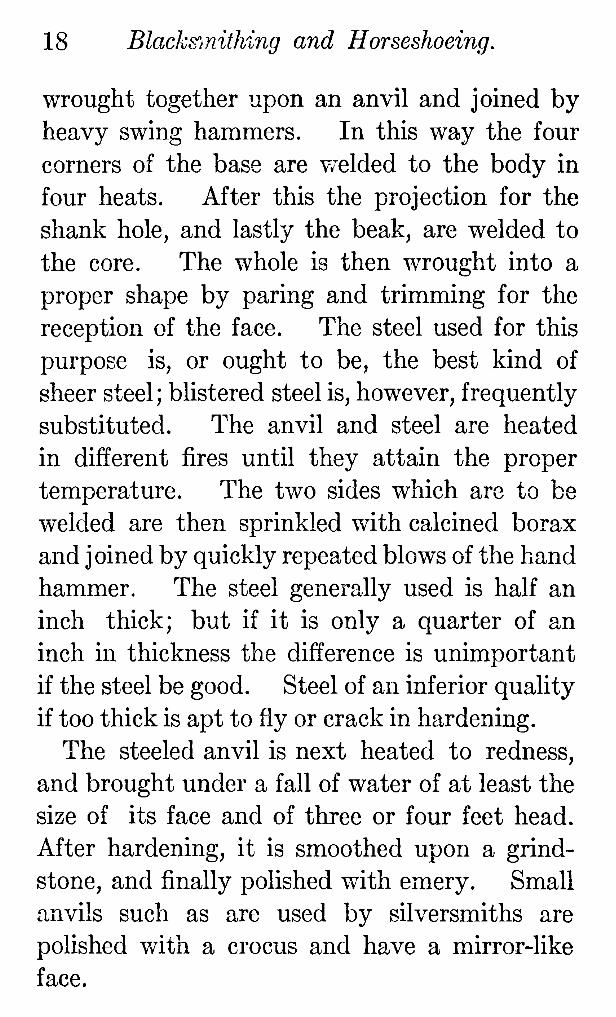
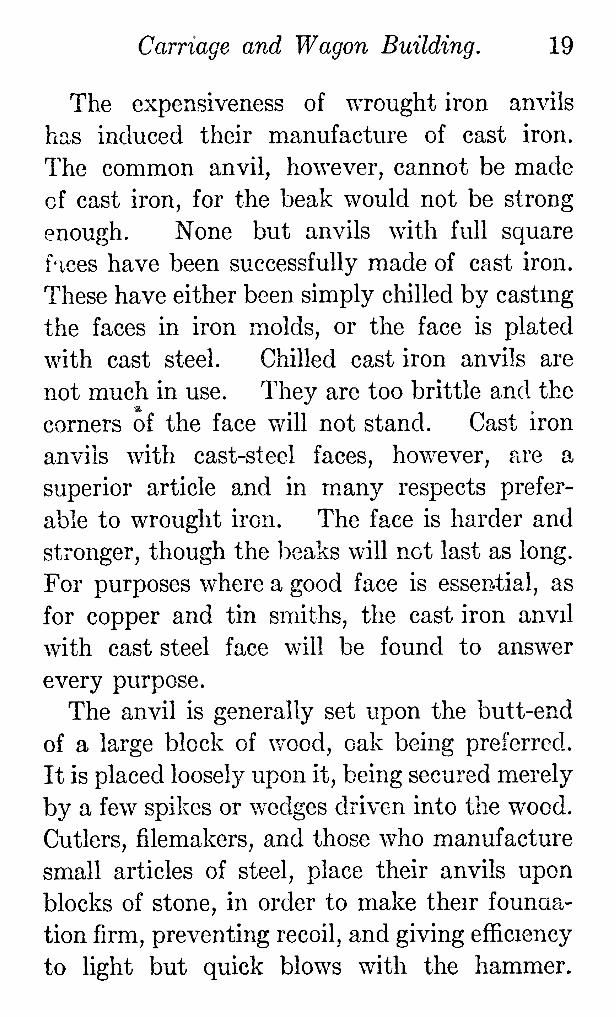
The Anvil. The tool next in importance
to the forge is the anvil (Fig. 4). This is not
only of interest as a tool of the trade, but it
requires some investigation, since the steeling

Carriage and Wagon Building. 17
of the anvil is a matter of importance. Anvils
for heavy work are generally square blocks of
iron,with steel faces. In many instances, how-ever,
it is merely a cast iron block with chilled
face. The common smith's anvil is made en-tirely
of wrought iron, and the upper part or face
is covered with hardened steel. The making
of an anvil is heavy work, as the whole of it is
^z^. #.
performed by hand. Anvils vary in weight
from less than one hundred pounds to over five
hundred. For their manufacture two large
fires are required. The principal portion, or
core of the anvil" a large square block of iron
"
is heated to the welding heat at a certain point
or corner in one of the fires,and the piece of iron
that is to form a projcting end is heated at
another fire. When the core and the corner
have both reached the welding heat, they are
18 Blacks"mithing and Horseshoeing.
wrought together upon an anvil and joined by
heavy swing hammers. In this way the four
corners of the base are welded to the body in
four heats. After this the projection for the
shank hole, and lastly the beak, are welded to
the core. The whole is then wrought into a
proper shape by paring and trimming for the
reception of the face. The steel used for this
purpose is, or ought to be, the best kind of
sheer steel ; blistered steel is,however, frequently
substituted. The anvil and steel are heated
in different fires until they attain the proper
temperature. The tv/o sides which are to be
welded are then sprinkled with calcined borax
and joined by quickly repeated blows of the hand
hammer. The steel generally used is half an
inch thick; but if it is only a quarter of an
inch in thickness the difference is unimportant
if the steel be good. Steel of an inferior quality
if too thick is apt to fly or crack in hardening.
The steeled anvil is next heated to redness,
and brought under a fall of water of at least the
size of its face and of three or four feet head.
After hardening, it is smoothed upon a grind-stone,
and finallypolished Vv^ith emery. Small
anvils such as are used by silversmiths are
polished v/ith a crocus and have a mirror-like
face.
Carnage and Wagon Building. 19
The expensiveness of wrought iron anvils
has induced their manufacture of cast iron.
The common anvil, however, cannot be made
cf cast iron, for the beak would not be strong
enough. None but anvils with full square
f'lces have been successfully made of cast iron.
These have either been simply chilled by castmg
the faces in iron molds, or the face is plated
with cast steel. Chilled cast iron anvils are
not much in use. They are too brittle and the
corners of the face will not stand. Cast iron
anvils with cast-steel faces, however, are a
superior article and in m.any respects prefer-able
to wrought iron. The face is harder and
stronger, though the beaks will not last as long.
For purposes where a good face is essen-tial,as
for copper and tin smiths, the cast iron anvil
with cast steel face will be found to answer
every purpose.
The anvil is generallyset upon the butt-end
of a large block of wood, oak being preferred.
It is placed loosely upon it,being secured merely
by a few spikes or wedges driven into the wood.
Cutlers, filemakers, and those who manufacture
small articles cf steel,place their anvils upon
blocks of stone, in order to make their founaa-
tion firm, preventing recoil,and giving efficiency
to fight but quick blows with the hammer.
20 Blacksmithing and Horseshoeing.
In working soft metals, such as copper and its
compounds, a layer of felt between the anvil
and the block will be found of advantage. The
anvils upon which steel articles are to be forged
are generally fashioned at the bottom in the
form of cubes, for insertion by means of wedges
either in stone or wooden stocks. A black-smith's
anvil, on the contrary, is formed with
projecting corner bases, which are bolted down
to the stock.
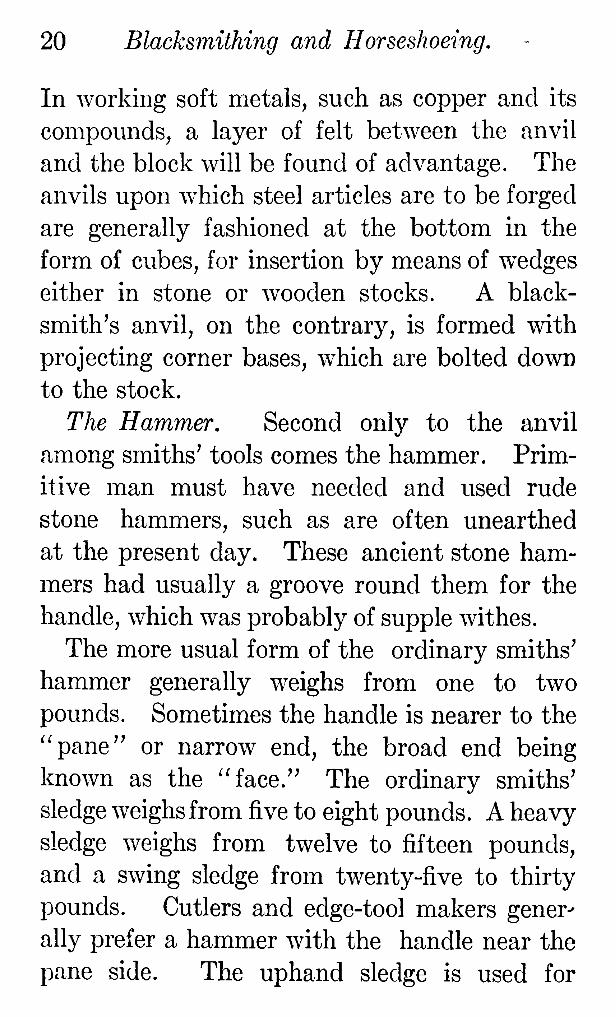
The Hammer. Second only to the anvil
among smiths' tools comes the hammer. Prim-itive
man must have needed and used rude
stone hammers, such as are often unearthed
at the present day. These ancient stone ham-mers
had usually a groove round them for the
handle, which was probably of supple withes.
The more usual form of the ordinary smiths'
hammer generally weighs from one to two
pounds. Sometimes the handle is nearer to the
''pane" or narrow end, the broad end being
known as the ''face." The ordinary smiths'
sledge weighs from five to eight pounds. A heavy
sledge weighs from twelve to fifteen pounds,
and a swing sledge from twenty-five to thirty
pounds. Cutlers and edge-tool makers gener-ally
prefer a hammer with the handle near the
pane side. The uphand sledge is used for

Carriage andJVagon Building. 21
comparatively light work. The swing or
'^about" sledge is grasped by both hands at
the extremity of the handle, and swung at arm's
length over the head, giving the heaviest pos-sible
blow of which a hand-hammer is capable.
There are two forms of the ordinary clip-
ping hammer (Fig. 5), either with the pane
parallelwith the handle as shown in the upper
figure, or with a ball pane or a pane elongated
at right angles with the handle. The pane
is mostly used for"
riveting, and it is quite a
question which is the best form. The hammer
is one of these tools that the workman gets used
to, and '^gets the hang of," and there is a good
deal in this term as appUed to a ham.mer, as
will be seen presently.
It takes about a year to get thoroughly at

22 Blacksmithing and Horseshoeing
home with either after having become accus-tomed
to the other or either of them.
We now come to the proper shape for the
eye, to enable it to hold the hammer firmly
and not in time get loose. The best form is
that shown in Fig. 6, the handle end or bottom
of the eye being rounded out as at B, and the
top being rounded across the hammer, but not
lengthwise. The rounding out prevents the
handle from getting too far through the eye,
and when the eye is wedged at the top with a
singlewedge, the spread across the eye prevents
the handle from coming loose. This locks the
handle firmly, while requiring one wedge only.
A wooden wedge is preferable to an iron one,

24 Blacksmithing and Horseshoeing.
the bits be angular, as they are then equally
useful for round rods or for square bars held at
opposite angles. When the bits of these tongs
are made long and bowed behind they are ex-tremely
useful for holding bolts, etc., the heads
of which can be placed in the hollow portion.
These two varieties of tongs will serve most
purposes.
Other Tools. Among the numerous other
tools that prove useful to the blacksmith are
punches and chisels (which may be held by
twisted hazel rods or tongs); 'Hop and bottom
tools,''used in pairs, one being set in the anvil
(the top and bottom ''fullers'' are used for
grooving in the hot iron around a horseshoe) ;
the set "hammer, "a small tool held against the
hot iron while its top is struck with the hammer,
thus rendering the blow more certain than if
made direct by the hammer; and "heading"
tools, employed in forging for swaging heads
on stems of bolts. Swages are of great utility.
They consist of tools having certain definite
shapes, so that the hot iron, being placed in or
below them, takes their shape when struck.
Sometimes they are used in pairs and sometimes
singly.
All smiths' tools are faced with steel, and
would in fact be cheaper in the end if they were

Carriage and Wagon Building. 25
wholly made of that metal. Tongs made of
spring steelare by far the best in the end, al-though
costing morein the first instance. Tools
shouldnever
be heated red hot, and when they
have to be brought into contact with heated
iron they should be frequently cooled. Tools
areheld by hazel rods soaked in water and
twisted to prevent hurting the hand by the
blow of the hammer.

CHAPTER II.
OPERATIONS IN FORGING.
The Fire. The coal employed in the smith's
forge is usually bituminous, anthracite not
being adapted to thepurpose.
No coals with
metallic mixtures are suitable, because these
are generally marked by thepresence
of sulphur
also, which isvery
detrimental. Charcoal
maybe substituted for coal.
The smith's firemay
be made eitheropen or
hollow, the latter being generally preferred.
When about to light his fire, the smithscrapes
back the cinders and removes the used ashes
or slack to the ashpit. Some wood shavings
are then placed uponthe nozzle of the tuyere
and lighted. When these are burning low
the cinders are raked back over them and the
bellows are set to work. In a short time a
white smoke rises, shortly aftervv^ard followed
by tongues of flame breaking forth. A thin
poker is now cautiously introducedas far as
the tuyere. Next the work is placed in the fire,
and fresh coal is laid on and over the fire and
28
Carriage and Wagon Building. 27
patted down with the fire shovel. As the
process goes on, fresh coal is-continually added
to the margin of the fire and pushed forward into
the heart of it as is required.
In large hollow.fires,after a tolerable fire has
been obtained by lighting in the usual manner,
the live coal is drawn forward on the hearth
so as to expose the aperture of the tuyere. A
suitable sized piece of iron (or the poker) is put
into this aperture. Small coal vvell wetted is
now placed round this iron and v/eil beaten
together into a mass termed the ^^ stock," the
length of v/hich from the tuyere nozzle is regu-lated
by the distance which it is desired the fire
should stand off from the tuyere. Then more
small coal is heaped up for a second stock oppo-site
the first,but farther out on the hearth.
These stocks should both be well beaten down
which is sometimes aided by the sledge hammer.
The iron which was inserted in the tuyere is
drawn out before the second hill of stock is
built up, leaving a hole for the tuyere pipe.
The two heaps of stock appear with a gap be-tween
them where the fire lies. Into this gap
or hollow space the weld is laid.covered over with
two or three pieces of wood and a heap of wetted
coal carefully banked over it and beaten down
by the shovel. A gentle blast is kept up
28 Blacksmithing and Horseshoeing.
while these operations are going on, and the
work is not taken out till the pieces of wood are
consumed and the flames penetrate the coals at
each end, when the work can be taken out
without fear of disfiguringthe fire. The instru-ment
generally employed to wet the coal is a
bundle of straw passed lightlythrough an iron
ring formed at the end of a rod and kept in
the slake trough. Damp, slack coal is thrown
on the fire in a layer two or three inches thick.
It will cake together, and after the loose coal is
burned out, form a hollow fire,the coke roof
reflectingan intense heat on the material be-neath
it. By no other means can a fire be made
to possess so intense a heat as by the method
we have described.
Flux. Sand or other material sprinkled upon
iron when near the welding heat serves to form
a flux or fluid glass with the iron. This flux
surrounds the hot iron or steel and protects it
against the impurities of the fuel,removing at
the same time the coating of dry scales from
the heated metals and greatly facilitatingthe
operation of welding.
For welding steel to steel and steel to iron,
we have a variety of degrees of heat to deal with
and the flux which serves to protect iron is insuf-ficient
to protect cast steel,just as, on the other

Carriage and Wagon Building. 29
hand, the flux which fits cast steel for welding
would be useless on iron. Impure wrought iron
will form a slag of its own material, while good
iron is protected, as we have intimated above,
by sprinklingfine sand over it.
But this method
will not answer with steel, or where steel and
iron are to be welded. For welding iron, clean
river sand, or powdered sandstone, make a good
flux; for steel,borax is generally used. With
common brine, clay makes a very fine flux and
clean surface to which steel readily adheres.
The material to be used as a flux is to be applied
shortly before the metal reaches the welding
heat, no matter how high or low that heat may
be. It will melt on the surface of the iron.
Borax in crystals as commonly sold is com-posed
of nearly one half water. On heating
these crystals in an iron pot they dissolve into
a clear liquid. On heating further, the v^ater
is evaporated and the residuum resumes the
appearance of a spongy mass, and by the con-tinued
application of heat this mass is converted
into a clear glass. This glass is what is called
calcined borax. It is entirely free from water
and not very likely to absorb it. It should be
prepared and powdered in advance, and be
always on hand for use. Borax thus prepared
is sufficient in nearly all cases. Still,some work-

30 Blacksmithing and Horseshoeing.
ers in steel prefer a mixture of two parts borax
with one of sal-ammoniac, or three parts of the
former with one of the latter article. This com-pound
is preferable for welding iron and steel.
Borax alone is rather too liquidfor iron. Where
it is to be welded to steel,a more efficient flux
is well-dried and finely-powdered potters'clay"
not common loam"
which has been moistened
with salt water; and it lasts long enough to be
brought to the anvil for welding.
The slag flows off or is forced out in bringing
the two surfaces together and pressing them
into close contact. If iron or steel is heated in
contact with air, it burns and forms a film of
infusible magnetic oxide, the metals cannot come
fairlyinto contact, and of course the welding is
imperfect. It cannot be sound. After the flux
is strewn on the iron, it is necessary to turn the
metal constantly in the fire,otherwise the flux
will flow to the lower parts and finally be lost.
A better method than that of sprinkling the sand
on the hot iron is to roll the metal in the pow-dered
flux, thus saving the latter and keeping
the fire more free from clinkers.
We do not advise mixing the sal-ammoniac
with borax, as the ammonia has a tendency to
convert the steel into iron. If pure borax is too
refractory,as is the case with some of the best
32 Blacksmithing and Horseshoeing,
the cast steel,differ very much according to the
process of manufacture."
That iron is the best, all things being equal,
which will bear the highest degree of heat. The
usual degrees of temperature recognized are
five,viz.: "
The black heat, just visible by daylight;
The low red or cherry red heat, appearing
crimson in daylight ;
The bright red or bright cherry red heat, in
which the black scales can be seen and look
black;
The white heat, when the scales are hardly
visible,or the scales and iron are nearly the same
color;
The welding heat, when the iron begins to
burn with vivid sparks.
The latter heat is very variable, pure fibrous
iron sustaining almost any degree of heat so
long as it is protected by a slag.
Steel does not bear the same degree of heat
without injury. The finest cast steel will hardly
sustain a bright red heat without falling to
pieces,rendering it imprudent to heat it higher
than a middling or cherry red. Blistered steel
will resist a far higher degree of heat than cast
steel,and good shear steel will endure a white
heat without much injury. German steel can
Carriage and Wagon Building. 33
be heated to the welding heat of good iron.
Although very sensitive to heat, steel will bear
much more forging than iron, if not previously
injured by too great a heat.
In forging steel, no heavy tools, at least no
heavy sledge, should be used. A good-sized
hammer with a rapid succession of strokes will
be sufficient. This is,in fact, the best method
of forging steel.
Iron is usually worked at the cherry red or
white heat, the welding heat being alone reached
in cases where that operation is to be performed.
As, however, the working of the iron tends to
separate its fibres, it is sometimes brought to
the welding heat and well hammered to ensure
their reunion.
When iron is heated to a dull red heat its
defects and cracks become very visible,and this
expedient is frequently resorted to to test or
examine doubtful forgings.
When it is requisitethat a forging be specially
sound, it is not uncommon to heat it and work
it well under the hammer. This process,which
is an imitation of that sustained in the original
manufacture, is termed 'taking a heat over
it." The "heat" is generally understood to
mean a welding heat.
The use of the sand, as we have already men-

34 Blacksmifhing and Horseshoeing.
tioned, is to preserve the surface of the heated
metal from oxidization, which would prevent the
union of the metal. When the sand is sprinkled
on red hot iron it falls off,but when on iron at
the welding heat it fuses and covers the face of
the iron with a vitreous or glassy glaze, which
protects it from contact with the air. When
this point of heat has been slightly exceeded,
the iron begins to burn and throw off a shower
of vivid sparks, hissing sharply, meanwhile; in
fact, it looks like a snowball, as smiths some-times
say.
When two pieces of iron are to be welded
together,it is essential that both reach the proper
heat at the same moment. This must be man-aged
by arranging them in the fire in a suitable
manner. The most intensely heating part of
the fire is, of course, opposite the tuyere or
blast,and the most backward piece is put there.
In all cases it is necessary to allow sufficient
time for the heat to soak in, as it were. If the
blast is urged too rapidly or forcibly,the out-side
of the iron m_ay be burned away (especially
if the piece be large) before the centre has ex-ceeded
a red heat. The heating should proceed
smoothly and gradually.
As the work cools it is not well to continue
the hammering which is intended to leave a

Carriage and Wagon Building. 35
smooth surface too long, as this may stretch
the outer surface more than the inner part, and
actually cause them to separate, leaving the
outer part quite distinct, as the bark of a tree
from its trunk. This has often been noticed
when bad forgings have been examined. Hence
the finishing,or '' battering off" as it is tech-nically
termed, should not be continued too
long.
Drawing Down. This is the usual term for
reducing the work. When the iron is to be
thinned in substance and expanded both in
length and breadth, the flat face of the hammer
is brought to bear upon it when at the proper
heat. If, however, it is to be stretched only
one way "
either in length or breadth"
the
pane of the hammer may be employed at right
angles to the direction in which the extension is
desired. Hammers are made with panes in
different directions for this purpose. Set ham-mers
are also used, being placed on the work
and their tops struck with the sledge. Tools
of tliis kind with very wide faces are sometimes
called ''flatters,''and "fullers'' are also em-ployed
for this kind of work.
When the object to be drawn down, say a
square bar, is to have its sides kept parallel,
the flat face of the hamm^er is used, and great

36 Blacksmithing and Horseshoeing.
care must be taken that it fall parallel to the
anvil. If the object under the hammer be a
square bar, it should be turned a quarter round
at each stroke, which, if done accurately, will
draw down the bar perfectly square.
The art of tlius twisting the work a quarter
round is difficult to acquire, and the early efforts
of the young smith are almost sure to have a
lozenge or diamond shaped section; but when
the knack is once acquired, it is astonishing how
true the smith will keep his work. He seems
to secure its squareness almost by instinct. Of
course bar iron, originallysquare, helps to en-sure
the object, as only two sides of a square
object need to be exposed to the hammer stroke,
their opposite parallelsides being similarlystruck
by the anvil upon the well-known principle of
mechanics, that action and reaction are equal.
The smith usually holds the work or tongs
lightly,not with too constrained a grasp, and
allows the hammer to fall perfectly fiat and in
the centre of the bar. It is good practice for
the young smith to hammer a bar of cold iron
or steel and observe the indentations afterwards.
If he do not bring down his hammer flat,the
marks on the bar will soon tell their tale.
We will now suppose that the smith wishes
to draw down to a point six inches of the end

Carriage and Wagon Building. 37
of a bar for a tongue or otherwise. When suf-ficiently
hot, the iron bar "is taken from the fire
and rested over the farther side of the anvil,
v/here the smith strikes it and turns it a quarter
round. He then gradually draws it toward
him, strikingit each time he makes the quarter
turn, until he finishes off at the point.
In smoothing off the work, the hammer is
brought down at one spot on the centre of the
anvil with the*face parallel,and the v/ork is
gradually brought under it.
In using the chisel or punch, the hazel withe
well soaked in water is to be preferred as a handle
as it prevents the jar from hurting the hand.
When the anvil chisel has been set in the hole
in the anvil and used for cutting off a piece of iron
the blows should be made gradually lighterand
lighter as the cutting is nearly completed. In
the use of the punch, especially if the piece of
iron worked is thick, care should be taken that
the punch does not stick to the iron. To pre-vent
this, a little coal dust may be sprinkled in
the hole. When the punch gets red hot it
should be immediately cooled off.
Set-off. A set-off is a reduction from the
original size of the bar with a square shoulder
or two square shoulders. For this, the part
where the shoulder is to be is placed at the edge
38 Blacksmithing and Horseshoeing.
of the anvil, and then struck with the hammer.
When two shoulders are to be made, the work
may be held at the edge of the anvil, and a set
hammer held in the proper position and struck.
This ''sets'' the upper shoulder, the lower one
being made by the anvil.
Note that the edges of the set hammer, etc.,
should not be too sharp, as they act partially
as chisels and injure the work. There is no
danger of this with the round-ended fullers,
which can be used in drawing down where a top
and bottom fuller are both employed. This latter
tool is also very handy when iron is to be set off
and extended laterally.Here the iron may first
be nicked across with the fuller,and then spread
out, the indentations being afterward smoothed
off with the hammer.
Jumping or Upsetting. This process is usu-ally
resorted to when it is required to render the
iron bar or whatever it may be a httle thicker
at some portion of its length, yet not so much
as to necessitate welding a collar on. For in-stance,
if the portion to be checked is at the
extreme end, a ''short heat'' is taken; that is
to say, the extreme end is made white hot, and
instantly thrust down or "jumped" several
times upon the anvil; or it is stood upon the
anvil with the cold end uppermost, and the lat-

40 Blacksmithing and Horseshoeing.
a little. The scarfs, or flat edges, are bevelled
to render their union more easy.
In ordinary lightwork, the sledge hammer is
generally used ^^uphand," that is to say, the
right hand is slid up the handle toward the head
as the tool is lifted,and slipped down again as
it descends. ''About sledge'' signifiesthat the
striker is to swing the sledge in a circle between
each blow, when his hands slide down to the
end of the handle and the blow is much heavier.
When the fireman wishes his assistant to dis-continue
striking,it is usually the custom for
liim to tap the anvil with his own hammer.
The double or alternate hammering between the
forger or fireman and hammerman should at
first be gently done, to avoid danger to the arm
from not holding the work level on the anvil.
The hammerman should first begin and strike
at the rate of one blow a second; after a few
blows the smith begins, and both hammer the
work at times, and at other times the anvil.
Great care should be taken that no coal dust
gets on the surfaces to be welded, or the joint
will certainly be spoiled.
This scarf joint,just described, is the almost
universal method of uniting two small pieces of
iron, whether square, round, or flat. In large
pieces one end is generally drawn down and the

Carriage and Wagon Building. 41
J^iy.
S.
other cleft (Fig. 8), or the ends are made to lit
each other square, a shallow slot made in each
and an iron tongue (called a charlin or stick-in
piece) laid in (Fig. 9). The first operation is
:F'i^,9
the tongue or splitjoint, the second the butt
joint,because the ends abut on each other. In
either case the ends are brought together in the
fire; the proper heat being attained, the joint
is jumped together by the end of each piece
being struck by heavy sledge hammers, the
heat being meanwhile kept up. Lastly, the
work is taken to the anvil and finished there.
Fig. 10 shows the T joint. In the first cut
the transverse bar is thinned down at this junc-tion
and the other chamfered or bevelled. When
the T is made of thick iron, it is well to upset

42 Blacksmithing and Horseshoeing.
the end of the stem piece and mold it with the
fuller to something the shape of the letter T.
A heat of both pieces is then taken and the full-ered
piece is welded to the bar, as shown.
Hardening Steel. The hardening of steel is
an operation which requires the exercise of some
judgment. The usual method is to heat the
steel to a certain point and then plunge it sud-denly
into cold water, tempering it afterwards.
This method is undoubtedly the correct one;
but the degree of heat to which the steel is to
be exposed before cooling is a matter of vast im-portance.
Some steel" the natural, for instance
"will bear a strong white heat and a plunge
into cold water before it assumes its greatest
hardness. Other steels, particularly the fine
cast steel,will not bear more than a brown or
cherry red heat; beyond that point it burns

Carriage and Wagon Building. 43
and becomes brittle in hardening. It may
safely be concluded that steel that does not
bear heat in forging will not bear it in hardening
The heat at which steel falls to pieces or melts
is too high for hardening, as steel hardened in
such a heat will fly or crack. The alterations
manifest in steel after hardening, as compared
with annealed steel,are the following: Its volume
is a little increased; the black scales which ad-here
to its surface flyoff,and the surface appears
clean, and of the color and lustre of iron; the
fracture is brighter, and crystals are visible.
Good steel as we have said before, is silver-
white, and is so hard that it will scratch pane
glass, and even a file. The cohesion, relative
and absolute, is increased if the heat has not
been too high before cooling. These are the
chief characteristics of good steel when hardened.
It is not possible to give any distinguishing
mark between steel, wrought iron, and cast
iron. As a general feature, however, w^e may
say that cast iron cannot be forged or welded,
or at least very perfectly; that wrought iron
feels softer under the hammer than steel in
forging; and that both impure wrought and
cast iron become very brittle in hardening.
The united hardness and tenacity of steel are
its chief characteristics. Good cast steel, or

44 Blacksmithing and Horseshoeing.
any other variety, if not freshly annealed or
hardened, and if free from fissures,will emit a
sonorous, silvery tone when a suspended bar is
struck. Iron, particularlyif good, emits a dull
leaden sound, while cast iron gives out a tone
like that of a cracked instrument.
The surest test of the quality of steel is to
draw a rod into a tapered point, harden it by a
gentle heat, and break off pieces from the
point. The degree of resistance to the hammer,
which of course should be a very small one, is
the test of the value of the steel. The best
steel is that which, under this treatment, is
found to be toughest and strongest.
Case-Hardening is that process by which
the surface of iron is converted into steel. In
this process the surface of the iron may be made
harder than the finest steel and still retain all
its toughness and malleabihty.
The articles to be case-hardened are to be
well polished,and if the iron is not quite sound,
or shows ash-holes, it is hammered over and
polished again "the finer the polish the better.
The articles are then embedded in coarse char-coal
powder in a wrought iron box or pipe,
which should be air tight. A pipe is preferable,
because it can be turned and the heat applied
more uniformly. The whole is then exposed
Carnage and Wagon Bmlding. 45
for twenty-four hours to a gentle cherry-red
heat in the flue of a steam boiler,or in some other
place where the heat is uniformly kept up.
This makes a very hard surface, and, on large
objects, one-eighth of an inch in depth may be
obtained. If so much time cannot be given to
the operation, and no deep hardening is re-quired,
the articles are embedded in animal
charcoal, or in a mixture of animal and coal. Four
or five hours, heat will make a good surface of
steel. If a single article,such as a small key
or other tool, is to be hardened, the coal must
be finely pulverized and mixed into a paste
with a saturated solution of salt: with this paste
the iron is well covered and dried. Over the
paste is laid a coating of clay, moistened with
salt water, which is also gently dried. The
whole is now exposed to a gradually increasing
heat up to a bright red, but not beyond it.
This will give a fine surface to small objects.
In all crises the article is plunged into cold
water when heated the proper time and up to
a proper degree.
A quick mode of case-hardening small objects
is to polish them well and heat to a dark red
heat; then roll in the powder of yellow prus-
siate of potash, and sprinkle the powder over.
The powder will melt on the surface, and the
46 Blacksmithing and Horseshoeing.
iron is then heated to a bright red and plunged
into cold water. The powder is obtained from
the crystal of prussiate of potash by gently
heating inan open pot to drive off the water.
The remaining powder is white. Close-fibred
pureiron should be selected.
For hardening, always use purewell water
fresh and cool from the well.

48 Blacksmithing and Horseshoeing.
familiar. Professor juungwitz in his Germa:i
text-book devotes considerable space to a tech-nical
and somewhat full study of the anatomy
of the horse's foot" a study of course necessary
for all scientific students who must pass a gov-ernment
examination. The present edition is
j^T^. y^

Carnage and Wagon Building. 49
intended for the common reader and not the
scientific special student, however, and a sim-pler
exposition of the subject has been chosen.
The best way to study the structure of a
horse's foot is to get the foot of a dead horse
and soak it in water for a week or two, when
it may easily be taken apart. When the hard
outer shell has been removed, the sensitive
inner foot may be dissected by the aid of a sharp
knife.
By comparing Figs. 11 and 12 we may get a
good idea of the general structure of the foot.
In Fig. 11 the fetlock joint where the cannon-
bone meets the long pastern is not shown, as
in Fig. 12, where the cannon-bone is indicated
by A, the fetlock joint by B, and the long pas-tern
by C. This is the bone which appears in
Fig. 11 as I.
The hoof is not solid, though it appears so
from the outside. What we see is the hard
outer wall or crust AA (Fig. 11). Beneath
that are the insensitive laminae, or leaves, BB,
next to which, lying against the bone, are the
sensitive laminae CC, which are a mass of nerves
and blood-vessels. There is an insensitive sole,
D, which is a kind of horny substance, and the
insensitive frog FF. Above these lie the sensi-tive
sole E and the sensitive frog G. The prin-
50 Blacksmithing and Horseshoeing.
cipal bones of the foot are four in number, I
the long pastern, K the short pastern, L the
coffin bone, and M the navicular bone, over
which as a fulcrum works the flexor perforans
tendon NN. 0 marks the seat of navicular
disease.
The Hoof in General. The hoof is not abso-lutely
regular in form, and each of the four feet
shows some peculiarity by which it is possible
to tell at a glance w^hether it is a fore foot or a
hind, a right or a left.
The fore feet are less pointed at the toe than
the hind, but more sloping. The two fore feet
and the two hind should be evenly balanced
and nearly alike.
The right hoof is distinguished
from the left by the fact that the outer border
is higher and more prominent, while the inner
is more upright.
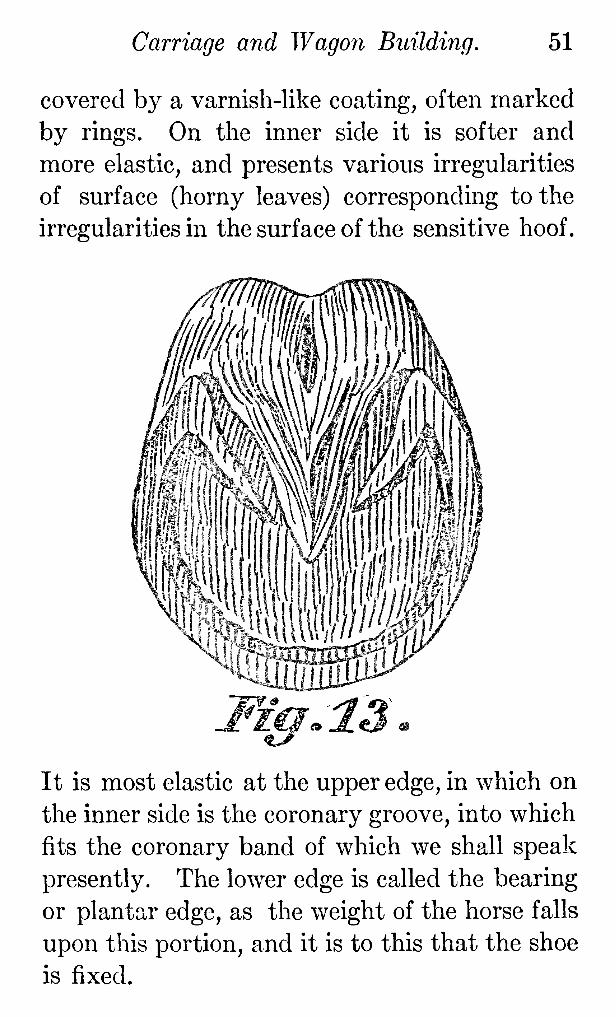
The Wall. This is the hard outer horn with
which the horseshoer has most to do. It is
more sloping in front than at the sides, and at
the back it turns in on itself to form the heels.
The turned in portions on either side the frog
are called the bars. The general shape of a fore
foot viewed from the bottom may be seen in
Fig. 13. It will be seen that the turned in por-tions
of the wall form the bars at a sharp angle.
Externally the wall is hard and smooth, being
Carriage and Wagon Building. 51
covered by a varnish-like coating, often marked
by rings. On the inner side it is softer and
more elastic,and presents various irregularities
of surface (horny leaves) corresponding to the
irregularitiesin the surface of the sensitive hoof.
Fi^.lS
It is most elastic at the upper edge, in which on
the inner side is the coronary groove, into which
fits the coronary band of which we shall speak
presently. The lower edge is called the bearing
or plantar edge, as the weight of the horse falls
upon this portion, and it is to this that the shoe
is fixed.

52 Blacksmithing and Horseshoeing
The thickness of the wall is variable. In
front feet it is thickest at the toe, and becomes
thinner toward the heels. In general, the most
slanting portion is always the thickest. The
thickness varies at the toe from three to five
eighths of an inch, and at the heels from one to
two fifths of an inch.
The wall consists of three layers, the outer
layer, a thin varnish-like covering that is very
hard, the middle layer which is thickest and
strongest, and the inner layer lying in parallel
horn leaves .corresponding to the surface of the
sensitive hoof. This inner layer is always
white, even w^hen the rest of the hoof is dark.
The Sole. The horn sole is about as thick
as the wall, covering the bottom of the foot and
curving upward into a hollow of the coffin bone.
It does not touch the ground ordinarily, and
the lower side is rough and often covered with
loose scales of dead horn which peel off of them-selves
and fall away. The upper side is covered
with velvet-like tissue which secretes the horn
that goes to form the hard sole.
The White Line marking the junction of the
sole and the wall, is formed by the inner layer
of the wall, which we have spoken of as com-posed
of horn leaves that are always white.
This white line may be traced all around the

Carriage and Wagon Building. 53
hoof and even up along the bars to the frog
and is soft and crumbUng, so that in places it
may disappear. Usually it is of a dirty whixe
color, due to discoloration from manure, dirt,
and iron rust. It is very important, as it shows
the thickness of the wall, and marks the line to
which the horseshoe nails should penetrate.
The Frog. This portion of the sole is a pro-jecting
horny formation lying on a thick fleshy
cushion from which it is secreted. The frog lies
as a wedge between the outer edges of the bars
or turned in portion of the hoof, with both of
which it is united. The horn is very soft and
elastic,and is divided into two portions b}^ the
cleft in its middle. On the upper side, just
over the cleft,is a small projection called the
'' frog stay," since it fits into the plantar cushion
and steadies the frog. When the horse's feet are
unshod the frog, sole, bars, and bearing edge
of the wall are nearly on a level, so that the
lower side of the hoof is nearly flat.
The outer horny portions of the hoof, com-posing
everything except the white inner layer,
are fibrous in structure, or tubes which run
downward in a cUrection parallelwith the general
direction of the hoof as a whole. The tubes
forming the sole are smaller than those in the
wall, and those in the frog are smaller still;but

54 Blacksmithing and Horseshoeing.
for all that, they are distinctlytubular in form.
There are two kinds of horn, soft horn as com-posing
the outer layer of the wall, the white
inner layer, and the frog; the rest of the hoof is
composed of hard horn. The soft horn easily
absorbs water, and quickly dries out again,
and grows brittle and cracks. In quality good
horn is fine and tough, bad horn coarse and
crumbling, often hard and brittle. All horn
is a poor conductor of heat, a most important
provision, since it serves to protect the horse's
feet alike in very hot countries and in very cold.
The Skin. The skin of the horse consists
of three layers,the epidermis, a hard surface of
horn-like cells which protects the true skin;
the dermis, or leather skin, and the subcuta-neous
tissue. The second layer or dermis ex-tends
over the entire hoof under the horny wall.
The epidermis comes to an end above the horny
wall in what is called the frog hand. This re-sembles
the extension of the skin at the base
of the human fingernails,and is a hard band
extending around the upper edge of the horny
hoof, ending in the fleshy frog. It serves to
protect the young horn beneath. It is a
fifth to a fourth of an inch wide. From this
band is secreted the varnish-like outer layer of
the wall.
56 Blacksmithing and Horseshoeing.
of blood" vessels andnerves,
and the horse is
thus enabled to feel the slightest pressure or
touch onthe outer horny covering. In disease
this sensitiveness causes a great deal of trouble.
In Fig. 11 we see the lines of the extensor
tendon, orfront sinew, and the perforans ten-don
or back sinew, both attached to the coffin
bone. These work over cartilages, and the
perforans tendon works over the navicular bone
above the large cushion which the sensitive
frog forms.
In a thin-skinned, well bred horse the tendons
can be distinctly felt through the skin, and it
is even possible to see their outlines. Frequent-ly,
however, these tendons become thickened
from inflammation due to injury, andso they
shorten and draw back the hoof, making the
stubbby-toed animal. When the tendonsare
not distended by inflammation and the sinews
and bones arefree from all thickenings, we say
the horse has a clean leg.

CHAPTER 11.
GROWTH AND CONDITION OF THE HOOF.
Growth of the Hoof. Like all parts of living
bodies, the hoof continually changes. The
horn grows like a fingernail, and unless it is
worn off at the bottom or bearing edge, it be-comes
too long; and if worn off too much, the
sensitive portions of the foot do not have suf-ficient
protection and the horse goes lame.
Moreover, when one portion grows unduly
it is at the expense of some other. If the heels
are too high, the frog diminishes until it is
insignificant. In a state of nature, however,
the horse's hoof keeps itself perfectly propor-tioned.
If the ground is hard, the horny por-tion
is worn away as fast as it grows; and if
the ground is soft, though the horny portion is
sometimes overgrown, it soon cracks and breaks
away. On cultivated ground, however, a horse
must have a very large range indeed if its feet
are to be left to take care of themselves. When
turned out in the ordinary enclosed pastures,
the horse should be brought in periodically to
57
58 Blacksmithing and Horseshoeing.
have its feet examined and the growth of horn
adjusted.
All shod hoofs become overgrown in from
four to fiTe weeks. In such cases there appears
to be an access of horn at the toe, since the
horny fibres do not grow straight down but
obliquely forward. Thus the plantar surface
of the foot is carried forward and is thrown out
of the proper relation with the rest of the foot,
injuriously affectingevery part of the foot and
indeed the whole leg.
The rate of growth of the v/all varies greatly
in different horses, and under different surround-ing
conditions. On an average the wall will
grov7 an inch in three months, and the whole
hoof is replaced in from ten to fifteen months.
The more actively a horse is exercised, the
faster does the hoof grow. Inflammation checks
growth, and the effects of it may frequently be
seen in rings on the hoof. These ringsin them-selves
are no detriment, but they show possible
lameness or illness.
When a hoof is shod, the bearing affects the
growth. If there is no bearing on a certain part,
it will grow more quickly, and so become even
with the portions on which there is bearing.
So if the hoof has been broken at the heels or
rasped away too much, or for the purpose of
Carriage and Wagon Building, 59
removing pressure on any given spot, in a month's
time that part will be found, in all probability,
to be flush with the shoe.
The only way in which the growth of the
horn can be stimulated is by apphcation to
the coronary band, as by a mild blister. No
ointments applied to the wall will affect the
growth, though they may soften the horn a little.
The sole grows in the same way as the wall,
but it wears away quite differently.It never
becomes overgrown like the wall, for when
overgrown it has a tendency to become detached
in flakes due to dryness and brittleness. The
ordinary movements of the horse cause the dry
portions to break up and fall off.
When the frog comes in contact with the
ground, it comes off in shreds. If it does not
touch the ground, it dries up and sometimes
sheds a large outer layer. Though the horn
of the frog is softer than that of the wall or the
sole,it stands wear as well as either of the other
parts, since it is so elastic and rests upon a still
more elastic cushion. Under any great pressure,
therefore,it yields,and leaves the wall and sole
to bear the strain. The growth of the frog
depends largelyupon the condition of the bars.
If they are overgrown, the frog is removed
from bearing, and wastes away. High heels

60 Blacksmithing and Horseshoeing.
are always accompanied by a small frog, and
low heels have a large frog.
Horn is porous and absorbs water readily.
If too much water is absorbed, the horn is,of
course, weakened. The natural protection to
this is the varnish-like outer wall, and when this
is removed by rasping, moisture is more easily
absorbed until the horn beneath beomes hard
and dry from exposure and friction. As we have
already said, horn is a poor conductor of heat,
and therefore if the horn is thick, fittinga hot
shoe for a reasonably short time does no harm;
but if the horn is thin, fittinga hot shoe must
be done quickly or the soft tissue beneath may
be damaged.
Although there is always a tendency on the
part of nature to correct errors, errors invariably
have their penalty. It is very important in shoe-ing
a horse that the bearing surface of the foot
on which the shoe is placed is perfectly even
and that the horn is equally high on both sides.
If one side is trimmed off more than another,
in time the side of the wall left too high will
become bent, and a crooked hoof results, in
which the rings are placed nearer together on
the low or concave side than on the high or
convex side. So, too, the toe, if left too long,
will in time become bent ; and heels which are

Carriage and Wagon Building. 61
left too long will in two or three months con-tract
just under the coronary band, or curl in-ward
at their lower borders.
Wear of the hoof Affected by Position of
Legs. As there are badly formed bodies, so
n^.i4.there are badly formed hoofs. The form of
the hoof depends largely upon the condition of
the limb. A straight limb has, as a rule, a
well-balanced, regular hoof, while a crooked
limb has a hoof to match. Some consideration
of limbs is therefore necessary to a true under-standing
of the wear of hoofs.
To judge the standing position of the fore
limbs, one must stand squarely in front of a

62 Blacksmithing and Horseshoeing.
horse, and for hind hmbs squarely behind; or
for backward and forward deviations, stand at
right angles at the side. Usually a horse moves
according to the way in which he stands, but
not always, and the moving position of the
horse should also be observed.
If viewed from the front, the limbs when
standing should appear perfectly perpendicular
JFigr.lff,
and a plumb line dropped from the shoulder
should pass down the middle of the limb, divid-ing
it equally, and meet the ground at the centre
of the toe.
In Figs.15, 16 and 17 we see various abnormal
positions. In Fig. 15 is represented the base-

64 Blacksmithing and Horseshoeing.
Fi^,ia .
In Fig. 18 we may see the normal position of
the Hmbs as viewed from the side. A plumb
line dropped from the middle of the shoulder
blade divides the foreleginto equal parts above
the fetlock, and touches the ground just back
of the heels. The line formed by the three
phalanges of the foot should form an angle of
forty-five to fiftydegrees with the ground.
In Fig. 19 we see an illustration of the leg
that stands too far forward. In Fig. 20 we have
the sheep-kneed position, in which the foot
stands in about its normal position, but the knee
is knocked back and the perpendicular line does
not divide the leg in half. In Fig. 21 we see
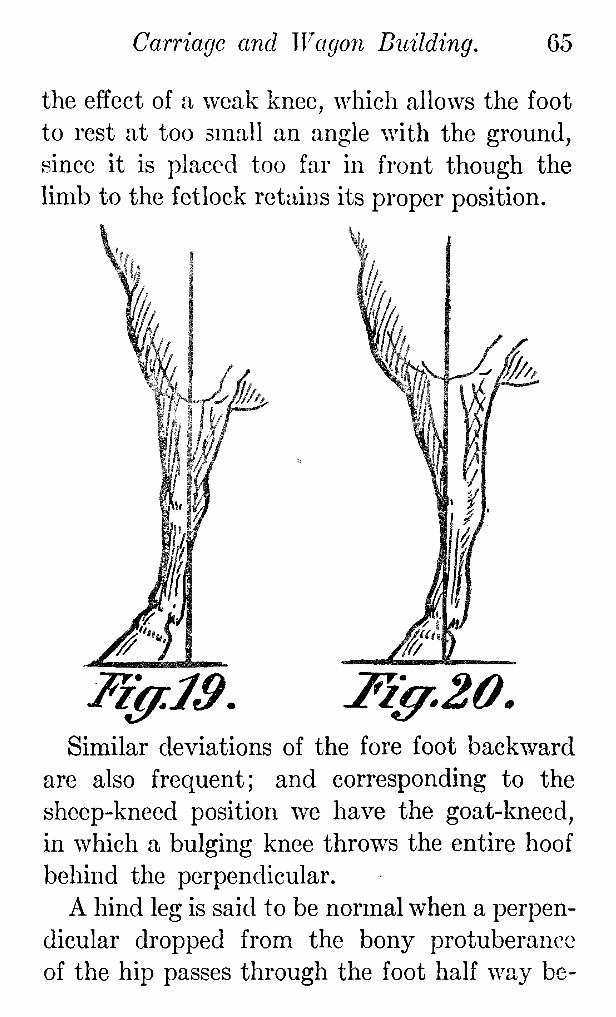
Carriage and Wagon Building. 65
the effect of a weak knee, which allows the foot
to rest at too small an angle with the ground,
since it is placed too far in front though the
limb to the fetlock retains its proper position.
^/c$?. J^^,"^,Similar deviations of the fore foot backward
are also frequent; and corresponding to the
sheep-kneed position we have the goat-kneed,
in which a bulging knee throws the entire hoof
behind the perpendicular.
A hind leg is said to be normal when a perpen-dicular
dropped from the bony protuberance
of the hip passes through the foot half way be-
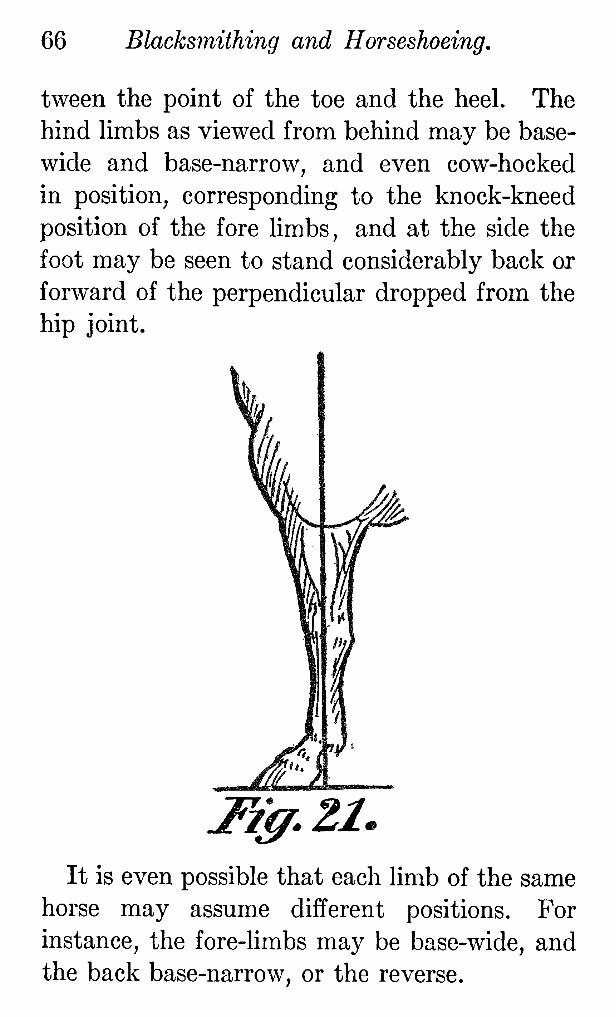
66 Blacksmithing and Horseshoeing,
tween the point of the toe and the heel. The
hind Umbs as viewed from behind may be base-
wide and base-narrow, and even cow-hocked
in position, corresponding to the knock-kneed
position of the fore hmbs, and at the side the
foot may be seen to stand considerably back or
forward of the perpendicular dropped from the
hip joint.
^iy,21.
It is even possible that each limb of the same
horse may assume different positions. For
instance, the fore-limbs may be base-wide, and
the back base-narrow, or the reverse.
Carriage and Wagon Building. 67
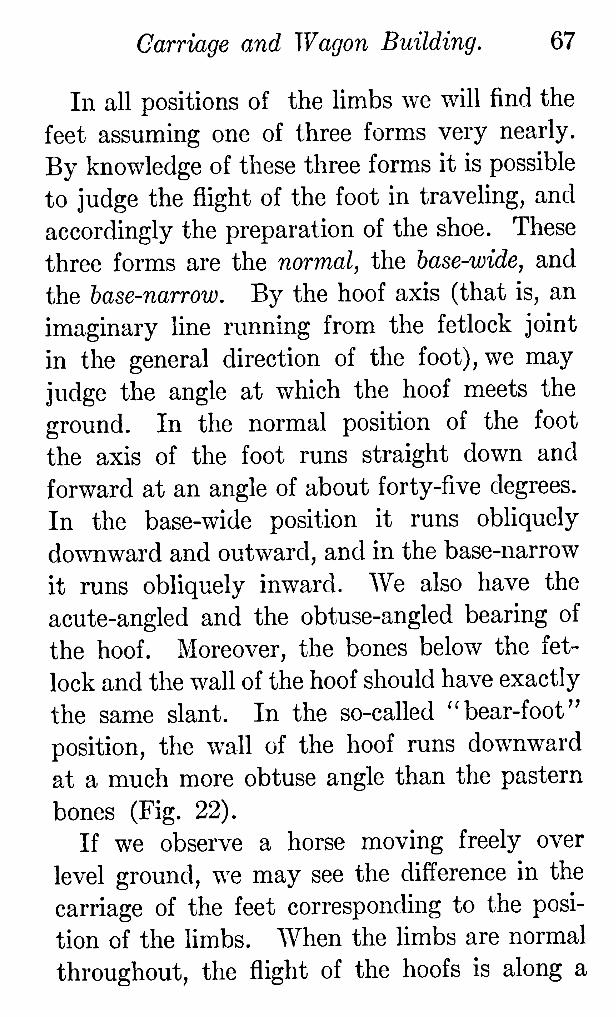
In all positions of the limbs we will find the
feet assuming one of three forms very nearly.
By knowledge of these three forms it is possible
to judge the flightof the foot in traveling,and
accordingly the preparation of the shoe. These
three forms are the normal, the hase-wide, and
the hase-narrow. By the hoof axis (that is,an
imaginary line running from the fetlock joint
in the general direction of the foot),we may
judge the angle at which the hoof meets the
ground. In the normal position of the foot
the axis of the foot runs straight down and
forward at an angle of about forty-fivedegrees.
In the base-wide position it runs obliquely
downward and outward, and in the base-narrow
it runs obliquely inward. We also have the
acute-angled and the obtuse-angled bearing of
the hoof. Moreover, the bones below the fet-lock
and the wall of the hoof should have exactly
the same slant. In the so-called '^ bear-foot"
position, the wall of the hoof runs downward
at a much more obtuse angle than the pastern
bones (Fig. 22).
If we observe a horse moving freely over
level ground, we may see the difference in the
carriage of the feet corresponding to the posi-tion
of the limbs. When the limbs are normal
throughout, the flightof the hoofs is along a

m Blacksmithing and Horseshoeing,
I
^igr.22
perfectly straight line, as represented in the
first diagram in Fig. 23. The toes point straight
forward, and the hoofs alightflat on the ground.
When the limbs stand in the base-wide posi-tion,
the flightof the hoofs is on the arc of a
circle bowing inward, and the hoof touches
the ground chiefly upon the outer toe. The
toes may point directly forward, or outward
as in the out-toe position.
The flightof the hoofs from the base-narrow
standing position is just the reverse, namely
in the arc of a circle bowing outward.
There are many variations due to different
conditions. For instance, a horse pulling a
heavy load, carrying its feet irregularlytouches
the ground with the toe first. Irregular car-riage
of the feet is not a serious objection to a
horse unless it result in interference or disease
of the joints.

Carriage and Wagon Building. 69
The hoof of the normal position and straight-forward
flighthas the inner'and the outer wall
about the same, though the outer may be a little
thicker, and somewhat more slanting, describ-ing
a slightlylarger circle. The height of the
wall at the heels, the side, and the toe should
be nearly in the proportion of 1 :2 :3.
The hoof of the base-wide position is always
irregular,the outer wall being longer and decid-edly
more slanting than the inner. The bear-ing
edge of the outer wall describes a circle
considerably larger, with the sharpest curva-ture
near the heels. If the foot is healthy the

70 Blacksmithing and Horseshoeing.
frog should be equally developed. As the irreg-ularity
of the hoof is due to the position of the
limbs, we should regard it as a normally irreg-ular
hoof, to distinguish it from one irregular
from disease.
The out-toe position of the feet is marked by
a curvature of the outer toe of the bearing-edge,
and an inner heel less developed than the inner
toe. The inner toe and outer heel, lying oppo-site
each other, are much less sharply curved.
The feet meet the ground with the outer toe
first.
The hoof of the base-narrow position is never
so irregular as that of the base-wide. The
inner wall is but little more oblique than the
outer, the most difference being observed at
the heels. The curve of the bearing-edge of
the wall is similar to that of the normal hoof,
except that the inner side wall and heel are a
little more sharply curved. Now and then the
outer heel is somewhat drawn in under the
foot. The form is most pronounced in bandy-legged
animals.
The hind hoof is affected in much the same
way as the fore hoof. It is, however, more
oval or pointed at the toe, while the fore hoof
is round, and it has a very, concave sole and a
steeper toe. The angle cf the toe with the

72 Blacksmithing and Horseshoeing.
heels should be well rounded and well devel-oped,
and inno way displaced.
There should beno separation of the sole along
the white line.
The frog should be strong and well devel-oped,
equal on both sides, and showing a broad,
shallow, dry cleft.
The bars shouldpass straight inward toward
the point of the frog. Any bending outward
toward the branches of the sole indicatea nar-rowing
of thespace belonging to the frog, or a
contraction of the heels.
There should beno red staining of the branch-es
of the sole at the heels. The cartilages above
the heels should be elastic, andno part of the
hoof should be weakened at theexpense
ofany
other portion.
Never judge the form or condition of a hoof
without also observing the entire limb.
In order to maintain the hoof ina healthy
condition, abundant exercise is indispensable.

CHAPTER III.
SHOEING HEALTHY HOOFS.
The Preliminary Examination. The ani-mal
should be examined first at rest and later
while in motion. The object is to get an accu-rate
knowledge of the peculiarities of the
movements of the limbs, and of the general
form and character of the feet and hoofs. It
is important to know how the hoof touches
and leaves the ground, and the general shape
and wear of the shoe, the distribution of nails,
etc. At the next shoeing further observations
may be made, the original ones being kept in
mind, and errors may be corrected.
In examining a horse, first let it be led on a
straight line from the observer. The ground
over which it passes should be as level as possi-ble.
Then have it led back toward the ob-server,
that he may see how the limbs move
and how the feet are set on the ground. A few
steps taken at a trot will show if the horse is
lame, and will also remove any doubt that may
exist'as to the general and predominating posi-
73

74 Blacksmithing and Horseshoeing.
tion of the legs. The general object is to deter-mine
whether the movements and position of
the feet are normal and regular. If they are
not, they may be classed as base-wide or base-
narrow.
When this matter has been settled,the ob-server
places him.self in front and first of all
fixes clearly in mind the direction of the foot-
axis and notes the general character of the
fore hoofs. It is particularly desirable to note
if the wall of the hoof has the same slant as the
pastern bones, or the leg from the fetlock to
the hoof, and v/hether the wall from the coronet
to the bearing-edge is perfectly straight. If
there is a curve from top to bottom, it is cer-tain
that some part of the wall is unnaturally
high, and the base of support is in some way
displaced.
In order to gain a complete knowledge of
the lines of flightof the hoofs and the positions
of the limbs, the horse must be led back and
forth a considerable number of times, and this
is the more necessary when the standing posi-tion
is not in every respect normal and the hoofs
are different.
Next examine the position of the limbs and
the shape of the feet in profile,or from the side.
A glance at the whole body will give an idea of

Carriage and Wagon Building. 75
the animaFs weight, height and length. Then
turn to the hmbs and hoofs. Especially take note
if the form of the hoof corresponds to the posi-tion
of the limb ; then, whether the slant of the
fetlock is the same as the wall of the toe, or if
the axis of the foot is straight or broken. Also
note if the toe is parallel with the heels,for some-times
the toe is bulging and sometimes hollowed
out between the coronet and bearing-edge, and
the lower edges of the heels may be drawn under
the foot.
If there are rings on the wall, their position
should be carefully noted. If they cross in
any way, thrush of the frog is indicated. At
the same time note particularly the length of
the shoes.
Next, raise the feet and notice the width of
the hoof, the arch of the sole,and the character
of the frog. Observe the position of the bulbs
of the heels, and see if there are any cracks
in the wall. Then look at the old shoes, noting
their form, age, position of nailholes and the
direction they take, and the general wear the
shoes have had. Particularly note if the old
shoe corresponds to the form of the hoof, if it
entirely covers the wall of the hoof, and if it
extends beyond the hoof and in any way has
caused interference or irregular wear.

76 Blacksmithing and Horseshoeing.
In examining the wear of the shoe, particu-larly
note unusual wear on one side, indicating
an irregular way of setting down the foot. If
the wear is uneven, an unnatural extension or
form of the wall is almost always found, too,
especially when the uneven wear has contin-ued
for some time. In most cases of that sort
it will be found that the worn branch of the
shoe is too near the centre of the foot, and the
other branch too far. Besides, increased wear
indicates that the portion of the wall above it
is too high, or that the wall on the opposite side
is too low\ The twisting movement of many
hind feet, for obvious physiological reasons,
should not be hindered in the shoeing.
Raising and Holding the Foot. It is well to
observe the following directions in raising a
foot, though usually no trouble will be experi-enced
if the horse has been accustomed to it.
Never take hold of a foot suddenly or with
both hands. See that the horse is standing so
that he can easily bear his weight on three legs,
and in raising the foot prepare the horse for
the act. If the horse does not take a suitable posi-tion,
move him about a little till his feet are
w^ell under his body.
For instance, in raising the left fore foot,stand on the left side facing the animal, speak
Carriage and Wagon Building. 77
gently to him, place the right hand on the ani-mal's
shoulder, and with the left rub down the limb
at the front. Gently press the horse over toward
the right side, and as soon as the weight has
been shifted on to the other side, the animal
naturally lifts his foot from the ground. Now
grasp the foot from the inside below the fetlock
v/ith the right hand, following with the left upon
the outside, turn partly to the right,and support
the horse's foot upon the left leg, standing as
quietly and firmly as possible. Never hold
the foot higher than the elbow joint,and usually
somewhat lower.
In hfting the left hind foot, stroke the animal
back to the hip with the left hand, supporting
the hand upon it while the right strokes the
limb downward, grasping it behind. Press
the animal over toward the right side with the
left hand, and with the right hand loosen the
foot and carry it forward and outward so that
it is bent at the hock. Then turn your body
toward the right and bring the left leg against
the outer side of the fetlock joint, carry the
foot backward, and pass the left arm over the
croup to the inner side of the hock. Finally
the pastern is held in both hands.
Be careful in Hfting a foot not to pinch or
squeeze a foot or lift it so high as to give unneces-

78 Blacksmithing and Horseshoeing.
sary pain. Work quietly, rapidly, causing
as little pain as possible, and the results will
be correspondingly more satisfactory. Espe-cially
be careful not to lift the foot of a young
horse too high, and from time to time let the
foot down to rest. Also in the case of
old and stiff horses, beware of liftingthe feet
too high, especially when beginning work.
Vicious horses must be handled severely in
many cases. Watch the ears and eyes, and
immediately punish any symptom of temper.
This may be done by loud words or by jerking
the halter. If this does not do any good, make
the horse back rapidly over a piece of soft
ground till he is tired out.
To help in supporting the hind foot, a leather
band or plaited rope may be fastened into the
tail and passed around the foot below the fet-lock,
the lower end being held by the hand.
This compels the horse to support a part of
the weight of the limb, and prevents damage
from kicking. Before placing this band around
the fetlock, the front foot on the same side
should be raised.
Before casting a refractory horse or placing
it in stocks, an experienced man should hold it
by the bridle and attempt to soothe it by gentle
words and caresses till he gains its confidence.

80 Blacksmithing and Horseshoeing.
matter. Its object is to shorten the hoof,
which has grown too long under the shoe. The
tools needed are the rasp and the hoof-knife.
On large or hard hoofs a pair of sharp nippers
or a sharp hewing knife with flat,smooth sides
may be used to hasten the work.
The hoof is first cleansed and the stubs of old
nails are removed. Bearing in mind the exami-nation
of the hoof and limb previously made
ask yourself how much horn is to be removed
and just where. In any case, remove loose or
detached portions of the wall, and scrape off the
flakes of dead horn from the sole. Then run
the rasp around the wall and break it off to the
depth to which it should be shortened.
Rule. Cut the wall down to the sole so that
not less than one-tenth of an inch of the surface
of the sole comes into the level of the bottom
edge of the wall.
The whole bearing surface, including the
edge of the sole and the white line, may be
rasped until horizontal. The point of the toe
may be turned up a little,however.
In dressing the frog, always leave it so that
it will project beyond the bearing surface about
the thickness of a flat shoe. Do not weaken it
by paring, else it will lose its activity and
shrink, and the hoof will become narrow.

Carriage and Wagon Building. 81
Never trim the frog at all unless it is too promi-nent,
except to remove loose or diseased portions
when the frog is affected by thrush.
Never shorten the bars except when too long.
In no case weaken their union with the sole.
They should be left nearly as high as the walls
at the heels, and the branches of the sole should
lie about a twelfth of an inch lower.
The angles of the bars with the wall require
attention. In unshod hoofs the bars run
straight back, but in shod hoofs the buttresses
(as the angles are called)curl inward and press
upon the frog, causing it to shrink. In such
cases the elongated pieces of horn should be re-moved
so as to make the bars straight.
Rule. The sharp edge of the lower side of
the wall should be rasped until the bearing sur-face
of the wall is no wider, than the actual thick-ness
of the wall along a Hne perpendicular to the
outer face.
In healthy hoofs, however, when the w^all is
straight from the coronet to the bearing surface,
the varnish-like outer surface should never be
rasped much above the bearing-edge. The only
exception is when there is an outward bending
of the lower edge of the wall, usually on the
inner side wall and heel.
In regard to the inclination of the plantar
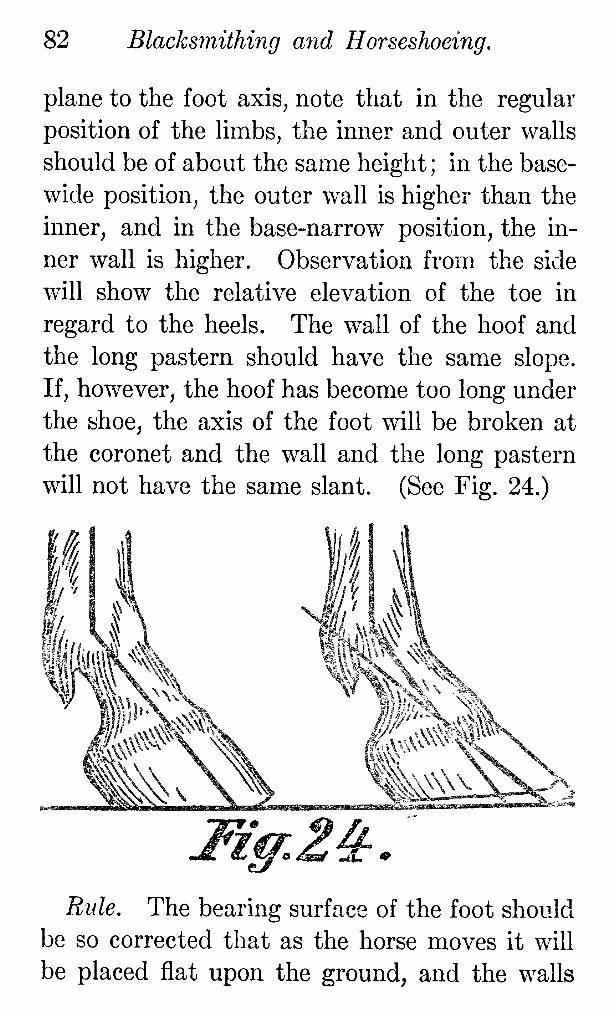
82 Blacksmithing and Horseshoeing.
plane to the foot axis, note that in the regular
position of the limbs, the inner and outer walls
should be of about the same height ; in the base-
wide position,the outer wall is higher than the
inner, and in the base-narrow position,the in-ner
wall is higher. Observation from the side
will show the relative elevation of the toe in
regard to the heels. The wall of the hoof and
the long pastern should have the same slope.
If,however, the hoof has become too long under
the shoe, the axis of the foot will be broken at
the coronet and the wall and the long pastern
will not have the same slant. (See Fig. 24.)
Fiff.2^.
Rule. The bearing surface of the foot should
be so corrected that as the horse moves it will
be placed flat upon the ground, and the walls

Carriage and Wagon Building. 83
of the hoof, in whatever direction they are
viev.ed, will be parallel with the axis of the
bones.
Great care must be taken in changing from
flat shoes to those w^ith calks or the reverse,
that the foot be so treated that it will set flat
on the ground w^hen the new shoes are on. Each
foot should be set down on the ground and care-fully
observed after it has been trimmed before
the nev/ shoe is put on. It should also be
compared carefully with the opposite hoof.
Until such an examination has been made, can
the hoof be said to be properly prepared for
shoeing? Each pair of hoofs (fore and hind)
should not only be equal, but also in proper
proportion to the weight of the body.
Preparing the Hoof for Going Barefoot.
Observe first, that to go barefoot the hoof
must have plenty of horn.
After the shoe has been removed the frog
should be pared dov/n nearly even with the wall,
and the sharp edge of the wail should be rounded
off,in some cases as far as the white line. If
this is not done, large pieces of the wall will
break away. The more slanting the w^all,the
more must a hoof be rounded. Going barefoot
strengthens the hoof, but hoofs without shoes
should be examined from time to time and any

84 Blacksmithing and Horseshoeing.
growing fault in the shape or direction of the
horn corrected without delay. The sharp edge
of the wall will in many cases have to be rounded
again and again, especiallyif the walls are very
oblique, and the heels may be shortened, since
they are not always worn away as rapidly as
the toe.
Making Shoes. Besides a good, tough iron,
the following tools are required : An anvil with
a round horn and a hole at one end, a round-
headed hammer, a round sledge, a stamping
hammer, a reliable steel pritchel,and a round
fuller. The workman must be quick and have
a good eye. A shoe should be made with care,
yet quickly enough to take advantage of the
heat.
To make a flat shoe, find the length of the
hoof from the angles of the heels to the toe and
the greatest width. These two measurements
added together give the length of the bar re-quired.
The bar selected should be one which
will require the least amount of working. Of
course in case heel calks are required, the bar
must be proportionately longer.
In making a front shoe (Fig. 25) the bar
should be heated to a white heat just beyond
the middle. Run over it lightly with the
hammer, turn it on edge, v/ork it down a trifle,
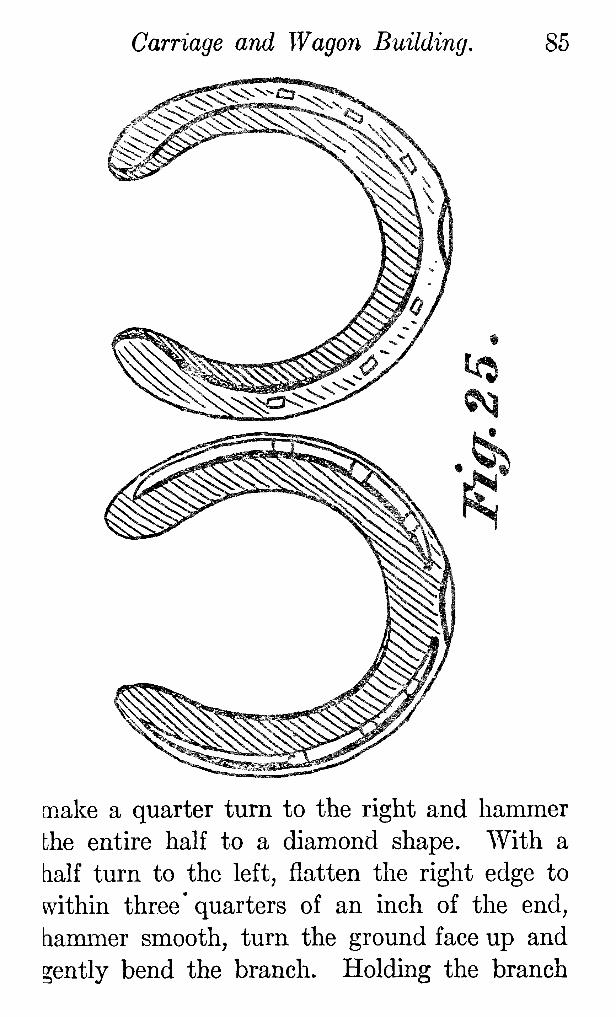
Carnage and Wagon Building. 85
make a quarter turn to the right and hammer
the entire half to a diamond shape. With a
half turn to the left,flatten the right edge to
within three' quarters of an inch of the end,
hammer smooth, turn the ground face up and
gently bend the branch. Holding the branch

86 Blacksmithing and Horseshoieing.
by the outer edge, bend it into a semicircle with
the round head of the hammer. The sledge
may be used in concaving it, which should be
done immediately. The concaving should ter-minate
three-fourths of an inch from the end.
Next fuller the branch, setting the fuller
about a twelfth of an inch from the edge for
small shoes, a little more for large shoes, and
proceeding toward the toe. Do this twice to
make the fulleringdeep enough. Next stamp
the holes and punch them through with the
pritchel,run over the surfaces and edges, fin-ishing
the outer edge upon the horn, and finally
hammer the bearing side perfectly smooth and
horizontal. Treat the left branch the same,
but carry the fulleringfrom the toe to the heel.
An ordinary shoe should be completed in two
heats, and a pair of shoes in from eight to fif-teen
minutes.
The hind shoe is made like the front shoe,
except that it is curved as shown in Fig. 26,
and concaving is unnecessary, though the inner
edge of the hoof surface should be rounded.
As the inner side of the shoe is thickened in
bending in proportion as the outer edge is
stretched, care miust be taken to even the side
up by hammering the shoe smooth.
The Character of a Shoe. Every peculiarity
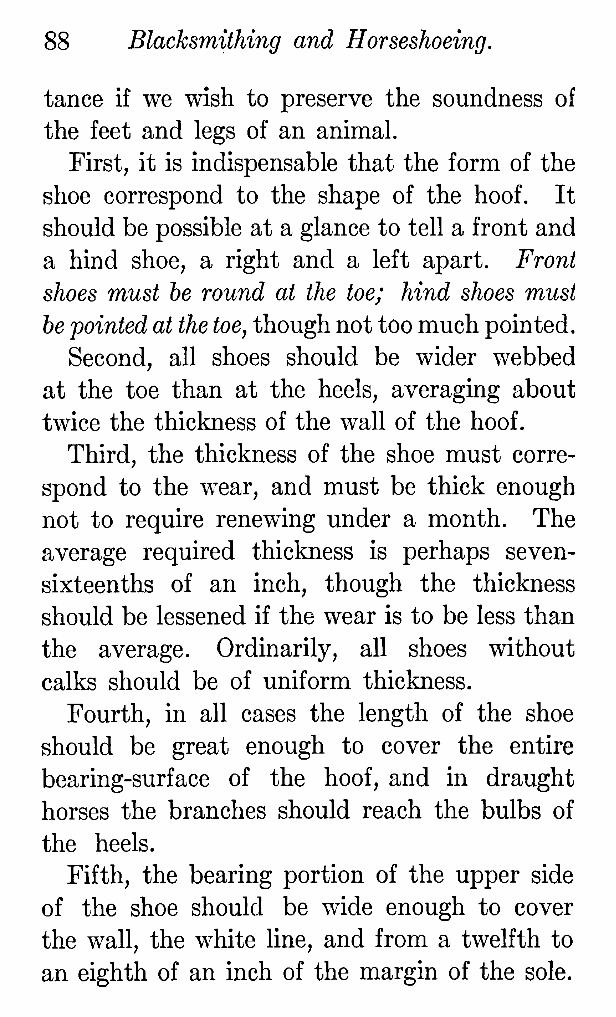
88 Blacksmithing and Horseshoeing.
tance if we wish to preserve the soundness of
the feet and legs of an animal.
First, it is indispensable that the form of the
shoe correspond to the shape of the hoof. It
should be possible at a glance to tell a front and
a hind shoe, a right and a left apart. Front
shoes must he round at the toe; hind shoes must
he pointed at the toe,though not too much pointed.
Second, all shoes should be wider webbed
at the toe than at the heels, averaging about
twice the thickness of the wall of the hoof.
Third, the thickness of the shoe must corre-spond
to the wear, and must be thick enough
not to require renewing under a month. The
average required thickness is perhaps seven-
sixteenths of an inch, though the thickness
should be lessened if the wear is to be less than
the average. Ordinarily, all shoes without
calks should be of uniform thickness.
Fourth, in all cases the length of the shoe
should be great enough to cover the entire
bearing-surface of the hoof, and in draught
horses the branches should reach the bulbs of
the heels.
Fifth, the bearing portion of the upper side
of the shoe should be wide enough to cover
the wall, the white line,and from a twelfth to
an eighth of an inch of the margin of the sole.

Carriage and Wagon Building. 89
The concaving is intended to prevent interfer-ence
with the concave portion of the sole, and
if the sole is very concave so that there is no
danger of its touching the shoe, concaving of
the shoe is not necessary. The ground side of
the shoe should be perfectly smooth and hori-zontal,
except for the rollingup of the toe.
Sixth, the outer edge of the shoe should
slope gently under the hoof, so that the ground
surface will be smaller than the hoof surface.
This tends to prevent interfering,or loosening of
the shoe from knocking against outside objects.
The inner border should be slightly rounded.
Seventh, the depth of the fullering should
be about two-thirds of the thickness of the shoe,
uniform in width, and clean. The object of it
is to make the shoe lighterin proportion to its
size. Besides, it aids in making the nailholes
uniform, and gives the shoe a rougher ground
surface.
Eighth, the nailholes have an importance that
can hardly be overstated, for upon their char-acter,
distribution, etc., depends the stability
of the shoe, as well as the avoidance of injuring
the sensitive foot, or splittingor breaking the
horn, and interference with the elasticity of
the foot.
A proper nailhole should taper evenly from
90 Blacksmithing and Horseshoeing.
the ground surface to the hoof surface, like a
tunnel. For a medium shoe, six nailholes
should be sufficient; but for a heavy shoe, es-pecially
one with heel and toe calks, eight
holes are required. In the latter case it is not
absolutely necessary that every nailhole should
contain a nail. Hind shoes usually require
one more nailhole than front shoes, though
seldom more than eight. In front shoes the
nailholes ma}^ extend back to the middle of
each branch, while in hind shoes they may ex-tend
two-thirds of the way back; but nails
should never be put in the toes. The distance
of the nailholes from the outer border will de-pend
upon the thickness of the v/all of the hoof,
and should be equal to the perpendicular thick-ness
of the wall (not the slanting thickness on
the ground surface of the hoof). It is clear,
therefore,that the distance of the nailholes from
the border will vary as the thickness of the
v/all of the hoof varies.
The direction of the nailholes m.iist correspond
to the slant of the wall. Nailholes near the
toes should usually incline somewhat inward,
those on the sides should incline les5,and those
tovv^ard the heels should be perpendicular to
the bearing surface of the shoe.
Ninth, clipsare the small ears drawn upward

Carriage and Wagon Building. 91
from the outer edge of the shoe. All shoes
should have clips at the toes, and a side clip
should be drawn up on that side of a shoe
which first meets the ground as the animal
moves. The clips prevent shifting or slipping
of the shoe, and should be higher and thicker
on the hind than on the front shoes. They
should be about as high (on a flat shoe) as the
thickness of the shoe, while on shoes with calks
they should be somewhat higher. They should
be strong and without flaw where they leave
the shoe.
Heel Calks. All calks on normal hoofs should
be so adjusted as to interfere as little as possible
with the setting down of the foot, and so that
the wear will be uniform. The branches,
therefore, should be a little thinner just in front
^"^, 27.
of the calks than is the toe. A front shoe with
heel calks must be comparatively long, and
should be rolled considerably at the toe, the
upward turn beginning at the inner border.
Heel calks may be three or four cornered and

92 Blacksmithing and Horseshoeing.
somewhat conical, and should not be higher
than the thickness of the shoe. The branches
should not rise excessively, but assume about
the direction shown in Fig. 27.
Toe and Heel calks. If there are to be both
toe and heel calks, the thickness of the shoe
should be uniform, and the calks should be
somewhat longer than if there are to be only
heel calks.
The toe calks should never be higher than
the heel calks.
Toe calks are formed by welding a piece of
steel to the toe. They may be of three kinds:
1 Sharp Toe Calks. One corner of a rather
wide piece of toe steel is drawn to a sharp point,
and when the shoe has been heated to a white
heat this sharp point is driven into the middle
of the toe. At the first heat, this piece of steel
standing upon one of its corners is driven down
and welded from the centre to the right and
left corners. A second heat will be required to
complete the work.
2 Blunt Toe Calk. This is a somewhat long,
four-cornered piece of steel with an ear on one
edge. It is welded on in one heat.
3 Coffin-Lid Toe Calk. This is like the blunt
calk, but the side that is to be welded to the
shoe is broader and longer than the ground side.

Carriage and Wagon Building. 93
They may be put on at one heat. This kind
can be more securely welded to the shoe and is
suitable for winter, as is the first kind.
Calks injure the elasticityof the foot and the
joints,since they raise the frog off the ground,
and furnish a smaller base of support than a
flat shoe. They are, nevertheless, indispensable
on slippery roads, especiallyin winter. When
conditions will permit they should be dispensed
with, especiallyon the front feet.
Peculiarities of shoes for Different Kinds of
Hoofs. 1. Shoe for a Normal Hoof. For a
normal foot a shoe should be moderately bev-elled
under the foot all around, and should be
longer than the hoof by about the thickness of
the shoe.
2. 'Shoe for a very Sloping or Acute- Angled
Hoof. Such a shoe should be strongly bevelled
under near the toe on the outer edge, but grad-ually
becoming perpendicular near the ends of
the branches. The nailholes at the toe should
incline inward somewhat more than usual, but
otherwise should be regular. The length should
be somewhat greater than in the case of a shoe
for the normal hoof.
3. Shoe for Bear-Shaped or Stumpy Hoof.
The outer edge should be perpendicular at the
toe, or even bevelled slightly outward if the

94 Blacksmithing and Horseshoeing.
hoof is very upright. The last nail should be
placed just beyond the middle of the shoe.
The shoe should be short, not over a tenth of an
inch longer than the hoof. In the case of a
hoof not only stumpy but ''bear-foot/' the
shoe should be long, however.
4. Shoe for Base-wide Hoof.
The outer branch
should have the outer edge bevelled inward,
the inner branch nearly perpendicular. The
holes in the outer branch of the shoe should
extend well back, while on the inner branch
they are to be crowded forward toward the
toe. The length will depend upon the slope of
the foot, the more sloping hoof requiring the
longer shoe.
5. Shoe for Base-narrow Hoof. The outer
edge of the outer branch should be bevelled
outward, the inner branch should be bevelled
strongly inv/ard. The nailholes in the outer
branch should be crowded toward the toe, and
on acount of the greater width of this branch,
may be punched farther in than the wall is
thick. On the inner branch, the nailholes are
to be distributed farther back and punched light.
The length will depend upon the slant of the
hoof. The outer branch should be an eighth of
an inch longer than the inner.
On a wide hoof the web of the shoe should be

96 Blacksmithing and Horseshoeing.
and in some cases they may be made durable
by welding in steel. For light work and soft
roads, use light shoes. Running horses require
very thin, narrow shoes made of steel.
Fitting Shoes. The circumference of the hoof
side of a shoe should always correspond exactly
to the circumference of the hoof itself when
dressed, and should fit the bearing-side of the
hoof air tight. All defects in the surface of the
hoof and the shoe, and in the nailholes, must
be carefully remedied during the fittingprocess.
A perfectly horizontal bearing surface is very
important, especiallyat the heels, and the bear-ing
surface should be quite smooth. Entirely
uniform heating is absolutely necessary in shap-ing
shoes, because with an irregular heat the
shoe is likely to get twisted at the warm spots.
The shoe should be perfectly straight, and
should be held up before the eye edgewise to see
that one side just covers the view of the other.
Flat shoes should be laid upon a level surface to
see that they touch at every point, except at
the rollingtoe.
Front shoes should be slightlyrolled up at the
toe. In most cases the roll should begin about
the middle of the web, and should extend up
about half the thickness of the iron. The roll
ensures a uniform wear of the shoe.

Carriage and Wagon Building. 97
The shoe, fairlyhot, should be placed on the
foot so that the toe clip will come directly in
front of the point of the frog, and the scorched
horn should be repeatedly removed with the
rasp until a perfect-fittingbed for the shoe has
been made. The horn sole should not be burnt,
because the velvety tissue of the sole lies directly
above it. The nailholes must under all circum-stances
cover the white line.
The shoes should correspond with the outer
edge of the wall of the hoof near the nailholes,
but farther back toward the heels the shoe
should widen until at the extremities it is a
twenty-fifth to a twelfth of an inch beyond the
hoof. This makes the shoes wear longer. In
hind shoes, however, the inner branch should
cbsely follow the wall, to prevent interfering
and loosening the shoe with the other foot.
Between the ends of the branches and the
frog there should be room enough to pass a
toothpick.
Important Rule. If the form of the hoof is
natural, and has not been altered by artificial
treatment, the shoe should in every case have
the form of the hoof; but if the hoof has been
changed, we should try to give the shoe the
form that the hoof had before the change took
place. Such treatment cannot injure the hoof,

98 Blacksmithing and Horseshoeing.
and in time it will bring the hoof back to its
original form.
In a regular foot we have seen that the shoe
should fit the foot, the nailholes come directly
over the white line,and there should be a little
space between the frog and the branches.
In irregularlyshaped hoofs we must consider
not only the form of the hoof, but the position
of the limbs and the distribution of bearing.
Where the most weight falls the' supporting sur-face
must he broader, and where the least weight
falls,the hearing surface shoidd he narrower.
Thus the irregular distribution of weight in an
abnorm^al hoof is regulated. The way in which
this is done in the various kinds of hoofs is as
follows :
In an acute-angled hoof the shoes must be
long, because most of the weight comes at the
back, v/hile the toe may be made narrow by
turning in or bevelling under.
In an obtuse-angled hoof the conditions are
reversed, and the surface of support should be
increased at the toe and lessened toward the
heels, the nailholes being directed straight or
slightly outward.
A base-wide hoof requires most support upon
the inner side, which should be widened while
the outer side is narrowed.
Carriage and Wagon Building. 99
The base-narrow hoof requires just the re-verse.
In the normal foot the ends of the branches
should be equally distant from the cleft of the
frog; but this is not the case in base-wide and
base-narrow hoofs. In the base-wide the outer
and in the base-narrow the inner branch should
be farther from the cleft.
The wide hoof has too large a base of support,
and so should be narrowed by bevellingthe shoe
under.
The narrow hoof has too small a base of sup-port,
and it must not be made smaller, and the
outer border should be perpendicular.
Shoeing Heavy Draught Horses, If the hoofs
have become injured or distorted, shoes in the
case of heavy draught horses must be slightly
modified. The following points should espe-cially
be noted. Every one of them is important.
If the hoof is out of shape, the shoe must be
so set as to come directly beneath every point
of the coronet, even if it projects somewhat
beyond the wall at the heels. The opposite
branch may usually follow the wall closely.
The new should be made fuller and wider
where the old shoe shows m.ost wear.
Especially remember, the shoe should be set
farther toward the most worn side. This
L.oFC.

100 Blacksmithing and Horseshoeing.
renders unnecessary the common practice of
bending out the outer branch and heel calks of
hind shoes.
Concluding Directions as to Fitting. When
the shoer is satisfied with the fit of the shoe,
it should be cooled, and brightened with a file,
and the nailholes opened with an oiled pritchel.
All sharp edges should be carefully filed down.
In filingthe outer border, file lengthwise, not
crosswise. Care must be taken not to bend the
shoe by improperly clamping it in the vise.
Nailing the Shoe. This is the process of
fastening the shoes on by special nails known
as horseshoe nails.
The nails whether made by hand or machine
should be of the best wrought iron, slender^
wedge-shaped, and twice as wide as they are
thick. The thickness must correspond to the
length. Never should the nail be longer than
is absolutely necessary in fastening the shoe.
Six to nine sizes are required.
The rough nails must go through a process
of shaping and bevelling to prepare them for
the hoof. While being made smooth and even
they should he hammered as lightlyas possible.
The nails must also be so shaped that they
will go through the horn straightand not curved.
A perfectly straight nail will pass through the

Carriage and Wagon Building, 101
horn in a curve, and not only does not hold well,
but is liable to injure the sensitive tissues.
Therefore curve the nail a littleso that the concave
side will be toward the frog.
The nail is to be bevelled at the point so that
it will form a one-sided wedge, with the slanting
side on the inside (Fig. 28). Nails driven low
should have a short bevel, nails driven high a
longer bevel. Never allow the bevel to form
a hook, and make it sharp but not thin, and
under no conditions imperfect. Machine-made
nails,ready for use, are to be preferred,though
hand-made nails are tougher.
Be perfectly certain the shoe is absolutely

102 Blacksmithing and Horseshoeing.
perfect in shape and fit before beginning to
nail. In nailing the horn should be spared as
much as possible, and never should the sensi-tive
tissue be injured.
The nails should always pass through the
white lines, and thence straight through the
wall, neither too high nor too low. If too high,
there is danger of pricking, if too low the nail-
holes will tear out easilywhen being clinched.
In driving a nail,hold it in the fingersas long
as possiblein order to preserve the correct direc-tion.
At each stroke of the hammer the nail
should penetrate one-fifth to one-fourth of an
inch. Hard driving and light tapping should
never be permitted.
When at a depth of five-eighths of an inch
nails are going soft, bending, giving a dull
sound, or causing pain, they should at once be
withdrawn.
Nails should be driven from five-eighths to
an inch and five-eighthshigh, according to the
size of the horse and the hoof.
As soon as the nail has been driven in, its
point should be bent down toward the shoe, to
avoid possibleinjuries. The nails should then
be gone over with the hammer till they are
driven well down into their holes,the hoof being
supported with the left hand. Pincers should

104 Blacksmithing and Horseshoeing.
onthe front hoofs. The hind hoofs
canbe
dinched in the hand.
When the shoeing is finished, the horse
should be led out tosee
if thenew shoeing has
accomplished thepurpose
assumed at the
start.
Last of all, coverthe entire hoof with
athin
layer of hoof-salve.
CHAPTER IV.
FORGING AND INTERFERING.
Forging is that peculiarity of gait in a horse
by which the toe of the hind foot strikes the
branches of the front shoe at the heels. It
makes an unpleasant noise, and is dangerous
to the horse. It may result in wounding the
heels of the fore feet, and damages the toes of
the hind, besides often pulling off the front
shoes.
The causes for forging may be: 1. because
the horse stands higher at thecroup than at the
withers, or has a short body and long legs, or
'^stands under ^' in front or behind (that is, the
feet come inside the perpendicular from shoul-der
or hip joint); or 2. because of unskilful
driving over heavy ground, or riding a horse
without holding him down at the mouth and
by pressing his sides with the knees; or again
3. because of simple fatigue, which may cause
interfering even in well built horses; or, finally,
4. because of poor shoeing, such as long toes
behind, or shoes in front that are too long.
105
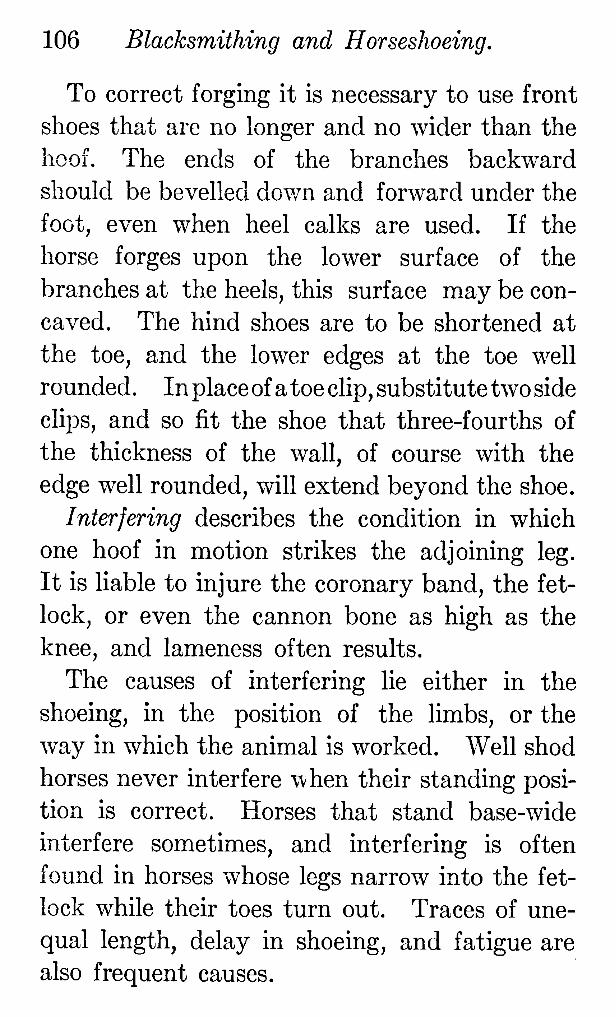
106 Blacksmithing and Horseshoeing.
To correct forging it is necessary to use front
shoes that are no longer and no wider than the
hoof. The ends of the branches backward
should be bevelled down, and forward under the
foot, even when heel calks are used. If the
horse forges upon the lower surface of the
branches at the heels,this surface may be con-caved.
The hind shoes are to be shortened at
the toe, and the lower edges at the toe well
rounded. In place of a toe clip,substitute two side
clips,and so fit the shoe that three-fourths of
the thickness of the wall, of course with the
edge well rounded, will extend beyond the shoe.
Interfering describes the condition in which
one hoof in motion strikes the adjoining leg.
It is liable to injure the coronary band, the fet-lock,
or even the cannon bone as high as the
knee, and lameness often results.
The causes of interfering lie either in the
shoeing, in the position of the limbs, or the
w^ay in which the animal is worked. Well shod
horses never interfere when their standing posi-tion
is correct. Horses that stand base-wide
interfere sometimes, and interfering is often
found in horses whose legs narrow into the fet-lock
while their toes turn out. Traces of une-qual
length, delay in shoeing, and fatigue are
also frequent causes.

Carriage and Wagon Building. 107
When a horse is found to interfere,he should
first be carefully examined to determine the
cause. If it is due to a twisted position of the
shoe, hoofs too v/ide, or raised clinches, the
remedy is obvious. If it is due to the position
of the limbs, we must first find the exact part
of the foot that does the striking. Carefully
regulating the bearing surface, the shoe may
be made straight along the place where inter-fering
occurs and the hoof narrowed at this
point. Also in fitting the shoe, one-third of
the thickness of the wall may extend beyond
the border of the shoe. In serious cases we may
use a shoe with no nails in the inner branch.
:Fi^.29,

108 Blacksmithing and Horseshoeing.
Fig. 29 shows the so-called 'interfering"
shoe, the inner branch of which is higher than
the outer, and it is so shaped that the hoof will
project somewhat beyond it. It may be re-commended
for use when the limbs stand base-
narrow. Each shoe must be carefully shaped
to meet each individual case, and the nailholes
on the inner branch should be punched some-what
nearer the edge than usual.
J^^. 3(?.
' ''The dropped-crease " interfering shoe is
shown in Fig. 30. The only nailhole in the inner
branch is at the toe. Such a shoe is valuable
for a hind hoof on a foot in which the toe turns
out, but better results may be obtained by using
a shoe whose inner branch is straightand with-

Carriage and Wagon Building. 109
out nails at the striking place. Such a shoe
may be fitted wide at the heels, and the inner
heel calk should be higher than the outer,
while the outer branch should be as narrow as
FijSl
it can be made (Fig. 31). To prevent shifting
on such a shoe, a side clip should be drawnup
on the outside.
The simpler and lighter the shoe, the less will
horses interfere. No shoeing will prevent inter-fering
in case of fatigue or bad harnessing.

CHAPTER V.
WINTER SHOEING. CARE OF THE HOOF.
What is called winter shoeing consists in pro-viding
the bearing surface of shoes with some
means to prevent slipping on ice and snow.
Sharp projections are supplied, and the prob-lem
is to keep these projections sharp. When
the ground is well covered with snow, all sharp
shoes will remain sharp; and when the ground
MgrSl.110

112 Blacksmithing and Horseshoeing.
corner rounded. The calk on the outer branch
is shown in Fig. 34.
Fig,3^.
For heavy draught horses a toe calk is re-quired.
This consists of toe-steel welded firmly
to the shoe. All calks should be tempered in
order as much as possibleto increase their dura-bility.
This may be done by sticking into
moist sand as far as the tap and allowing to
cool slowly from a cherry-red heat.
^crew Calks. Various machine-made screw
calks may be had, and should always be made
of steel. Any ordinary shoe may be fitted with
them by making holes in the ends of the branches
with a cylindrical hammer punch and cutting a
thread. The hole should be moderately counter-sunk
on the lower side, and the shoulder of the
calk should rest in the counter-sinking. The
thread should be clean and deep, but not too
coarse, and all calks should have the same sized

Carriage and Wagon Building. 113
thread and tap. A tap of one-half inch in diam-eter
is sufficient for the heaviest shoes. Screw
toe-calks are liable to become loose. The
great advantage of screw heel calks is that they
can be changed while the shoe is on the hoof,
and blunt or sharp calks may be put on as the
work requires. They have a tendency to
loosen and break off unless well made and of
the best material; but if care is taken they are
the best heel calks that can be used. Square
and round peg calks are cheaper and more easily
made, but are not so satisfactory as screw
calks.
Removable heel calks that do not need sharp-ening
have been invented and are to be recom-mended
for city use where horses must often
travel upon bare pavements even when the snow
lies on the ground. They have sharpened faces
of various shapes, such as that of an H or an
X. The wider and more extensive the wearing
surface presented by the calk the more dura-ble
will it prove. Calks with narrow edges
and few surfaces presented to the ground be-come
dull most quickly. Such calks are not
required in the country.
To Prevent Balling ivith Snow use shoes with
narrow web concave upon the ground surface,
and keep the frog and sole well oiled. S ole

114 Blacksmithing and Horseshoeing,
pads of leather, felt, or straw serve the same
end. The best method is to use a rubber sole
and frog pad. There is also a patent hoof cement
which is to be recommended.
Care of Unshod Hoofs. The care of the
hoofs of colts is very important. Abundant
exercise on dry ground free from stones is the
first requirement. Such exercise will cause the
hoofs to wear in a regular manner. Care should
be taken, however, to see from time to time if
the wear is uniform, and if it is not it should be
corrected by the rasp.
If colts are reared in the barn the hoof does
not receive sufficient v/ear and 'various difficul-ties
are sure to result. The wall becomes too
long and sometimes separates from the sole,and
the wall bends. Weak heels bend inw^ard upon
the frog; the toe becomes much too long, and
this affects the pastern, throwing it out of posi-tion
and spoiHng the gait. Therefore hoofs
should be shortened from time to time. The
heels which curve in should be pared with the
hoof-knife, and the outer edge of the bearing
wall rounded. Sometimes the hoof must be
readjusted in bearing level to prevent distortion,
and by this means the position of the limbs may
be corrected if bad. If taken in time, a good
hoof can be produced.

Carriage and Wagon Building. 115
Washing. It is highly desirable to preserve
cleanliness in all stable-reared colts by frequently
and thoroughly washing the hoofs and taking
care there is a good bedding of straw.
Tvne to Shoe. Too earl}^shoeing is very in-jurious,
as it interferes with the development
of the hoof. When shod too soon, colts are
often overworked and thereby ruined. Moder-ate
work in the fields does not harm your
horses, but for this shoes are not required.
Hoofs of Older Horses. The unshod hoofs
of older horses should be rounded at regular
intervals and the length of the walls regulated
when proper wear has not taken place.
Care of Shod Hoofs. Though shoeing is abso-lutely
necessary, shod hoofs are more liable to
injury than unshod. Shoeing prevents the
natural movements of the foot, interferes with
circulation, hinders the growth of horn, and
finally causes a gradual shrinking of the hoof.
Keeping horses in stables is also injurious,
since it prevents free movemxcnt, is unclean
when the floors are bad and the bedding filthy,
and causes dryness of the hoof. Continual
standing invariaby makes the hoofs contract,
and dryness adds to the evil, more especially
in the front hoofs. Hind hoofs receive suf-ficient
moisture from the manure. Uneven
116^ Blacksmithing and Horseshoeing.
floors tire the limbs. Accumulation of manure
and stationary sole-pads induce thrush of the
frog.
With proper care these evils may be lessened
or entirelyremoved. Not only should the hoofs
be shortened every four or five weeks, but prop-er
attention should be given to cleanliness and
moisture. These require dry straw and daily
picking out and washing of the feet. Such
measures will prevent thrush in the hind feet,and
daily washing will give the front feet the neces-sary
moisture. Washing adds greatly to the
elasticityof the shod hoof. To keep the mois-ture
in,the entire hoof should be oiled or coated
with hoof -salve. Patent salves are not needed.
Melted horse-grease, p̂ork fat, or any other fat
that is not rancid will answer.
Abundant (but not excessive) exercise is espe-cially
necessary to keep the hoof healthy. By
keeping up the circulation of blood it stimu-lates
the growth of horn. Horses which work
regularly have better hoofs, as a rule, than
those which stand in the stable. A poultice
of clay, bran, sawdust, or linseed meal is never
necessary if the hoofs have proper care; but
there are times when this is useful on front feet.
The feet may even be stood in pails of water.
Front hoofs are much more subject to dryness
Carriage and Wagon. Building. 117
than hind, and the shoe aids in thisas
it keeps
the foot off the ground. Oiling alone will not
soften horn. It must always be accompanied
by washing in water, and it is the water which
softens. Oiling beforea
hoof has been cleaned
is decidedly injurious, asit produces a greasy
'
'trust under which the horn becomes brittle.
The surest sign ofa
clean hoof is the color of
the horn. It willappear
translucent even after
it has been covered with ointment. Black-ened
ointments should never be used, as they
prevent properly judging the condition of the
hoof. When the roadsare wet and muddy, a
little wax orrosin
maybe added to the ointment,
asit prevents too great softening of the horn.
As all shoeing, eventhe best, injures the hoof
more or less, horses should occasionally be al-lowed
to go barefoot, and the more the better.
This appUes especially to horses out of service,
provided the nature of the hoof permits going
barefoot.

CHAPTER VI.
SHOEING DEFECTIVE HOOFS.
Lameness. Usually we do not consider a
hoof defective unless there is lameness; but
there may be disease, and we must consider that
there is whenever the appearance of the hoof
deviates from the normal as previously described.
Front hoofs are more easily affected than hind
hoofs, because they bear greater weight and
have more slanting walls. All sound hoofs
varying in shape from the normal or regular
are more liable to disease when the wall is slant-ing
or distorted than when stumpy or obtuse-
angled.
Inflammation of the Pododerm. The Podo-
derm is the sensitive skin under the horny wall
and sole. It shows itself in nearly every case
by lameness, and on close examination it will
be found that there is increased heat in the hoof,
and a stronger pulsation in the arteries, to-gether
with pain. The pain gives a timid,
shortened gait, especially on hard ground;
and sensitiveness may be detected b}^ pressing
on the hoof with the pincers, or lightly tapping
118

120 Blacksmithing and Horseshoeing,
lameness may be removed by proper shoeing,
change in the work done, and better care of the
feet. When the inflammation is intense, the
shoe should be removed for a few days. When
the inflammation is moderate, and confined to
some particular spot, it is sufficient to alter the
shoeing so as to regulate the distribution of
weight, and removing all superfluous horn,
especially from the wall and sole, in order to
make the horn more yielding and the poultices
more effective. The shoe should then be so
fitted that the diseased portion will be relieved
of the weight of the body and remain free from
all pressure. This can be done partly by
making the branch covering the affected por-tion
longer and wider, partly by cutting down
the bearing edge of the wall where this can
be done without weakening the wall and also by
concaving the upper surface of the shoe. As
difficulties are more usual in the back part of
the hoof, it is advisable to put the nailholes as
far front as practicable.
The Bar-Shoe. This form of shoe (shown in
Fig. 35) holds the first place among special
shoes for lame feet, and in many cases is to be
preferred to the large number of special kinds
that may be recommended. It is made like
an ordinary flat shoe, but requires a longer

Carnage and Wagon Building. 121
piece of iron. The ends of the branches are
bent inward over a dull corner of the anvil, are
bevelled, laid one over the other, and welded to
form the bar. The bar should be as wide and
thick as the rest of the shoe, but slightly con-caved
on the side of the frog.
Ti'p^SS.This form of shoe is valuable for the reason
that it protects certain sections of the wall from
pressure, permits part of the body weight to be
borne by the frog, and restores activity to dis-used
parts of the foot. It may give a larger
bearing surface for the hoof. By adding a
leather sole to the bar shoe we may distribute
the weight over the entire base of the foot, and
122 Blacksmithing and Horseshoeing,
this is desirable whenever the wall is not strong
enough to bear the weight alone.
To make the leather sole and fasten it in
place there must be holes in the ends of the
branches, to which the leather is firmly riveted
with small nails. The shoe should be wider
than the hoof, and the cHps higher than usual.
The shoe is first fitted. Then the grooves for
the clips are cut out of the leather, and the
leather is riveted to the shoe, all projecting
portions being cut away. The cleft of the frog
and other cavities of the sole are then smeared
thick with wood-tar and filled with oakum in
such a way that the packing will bear part of
the weight. The packing is of importance
because it prevents slime and sand from filter-ing
in, and preserves the horn, breaks the shock,
and produces a gradual expansion of the back
of the foot. Before the shoe is nailed on the
leather sole should be soaked in water.
''Nailing.'' Wounds to the sensitive tissue
caused by nails driven into the hoof for fasten-ing
shoes are usually spoken of under the gen-eral
term ''nailing." We distinguish direct
and indirect nailing, according as the eft^ects
are felt at the time or later.
In direct nailing the nail penetrates the tender
inner skin and akfays causes bleeding, even if

Carriage and Wagon Building. 123
blood is not observed. In extreme cases the
coffin bone is chipped.
In the case of indirect nailing,the nail does
not puncture the tender skin but passes very
near to it and crowds the soft horn against the
velvety tissue. This bulging presses on the
pododerm and causes inflammation and lame-ness,
which may not develop for several days.
Direct nailing causes instant pain, shown by
jerking the limb, etc., and then more or less
bleeding. Usually the blood flows from the nail-
hole, or blood may be seen on the point of the
nail ; but internal bleeding may take place with-out
any sign.In indirect nailingthere is no imme-diate
pain, often not for a day or tv^^o,but some-times
as soon as the horse bears his weight on
the foot. In the latter case, when the other
foot is raised the animal will throw his weight
on the workman, or become restless. But
usually pain does not develop for two or three
days, and sometimes not for a week or two.
In cases of that kind a careful examination
will reveal internal inflammation of the hoof,
increased warmth, some swelling of the hoof,
and pain when the hoof is tapped or pressed
with the pincers. Nailing may be suspected
in all cases if the shoeing has been recent, if
the hoof is small and narrow for the weight,

124 Blacksmithing and Horseshoeing.
if the walls have been thinned, or the nails driven
very high or irregularly.'
The most usual cause is an error in shoeing,
chiefly a disregard of the rule that nails should
penetrate the white line. Leading causes are:
1. Using badly punched shoes; 2. excessive
paring and shortening of the hoof; 3. weak-ening
the lower border too much by paring away
on the outside; 4. mistakes in fittingthe shoe,
such as using shoes too narrow, lettingthe toe-
clipspenetrate the horn too far (by which the
nailing around the toe, instead of penetrating
the white line, is carried back to the sole), or
using shoes in which the nailholes are improperly
directed; 5. using nails that are split,or badly
formed or bevelled, or that are too large; 6.
starting nails with the bevel on {he outside, or
drawing them too tight. Sometimes the cause
is old nail stubs in the horn, thin or broken
walls, or a soft and crumbling wall which makes
it difficult to know how the nail is being driven,
or restlessness of the animal while being shod.
When nailing is suspected, tap the clinches,
or press upon the sole and clinches with the
hoof-testers, and if this causes pain there can
be little doubt that ''nailing" is the trouble.
Carefully draw each nail separately till the
shoe can be removed, and examine each nail

Carriage and Wagon Building. 125
for blood stains or marks of pus, etc. Then
look on the sole for the nailholes, and if one be
found inside the white line,it is very probable
that the nail driven there has caused the injury.
Test every nailhole by passing a clean, new nail
into it and pressing the point toward the soft
tissues from time to time. Any sign of pain is
a good indication of ''nailing.''Of course the
nailholes in the shoe should be carefully exam-ined.
Treatment for Nailing. In case of an ordi-nary
prick with a nail,leave the nailhole empty
and fill with wax. In most cases no serious
trouble will follow. In case of serious direct
nailing,a most careful examination of the entire
shoeing should be made, especially noting if
any nail passes inside the white line. More or
less inflammation is to be expected, and this
should be provided for by restingthe animal and
cooling the foot.
A clean recent wound can never be helped by
enlarging the opening, or cutting or boring the
horn. On the contrary, this will produce
further injury.
In cases of indirect nailing, the results of
which are not observed for some days, it will
be observed when the injurious nail is with-drawn
that it is covered with pus or a dark, thin,

126 Blacksmifhing and Horseshoeing,
bad-smelling liquid. In all such cases the
liquid must be allowed to escape freely. To do
this it is usually sufficient to cut away a portion
of the wall about the nailhole, not more than the
thickness of the little finger,and then place the
foot in a warm bath to assist in the discharge.
It is a great mistake to remove all the loosened
horn. After the liquids have passed away, the
old horn will form the best dressing for the dis-eased
region till new horn is formed.
If when the nail and pus have been removed,
the pain does not cease, the foot should be placed
in a bath about 90" in temperature, with an in-fusion
of hayseed and a three to five per cent
solution of carbolic acid in water. The bath
must be kept really warm.
If the pain has been alleviated by two or three
hot baths, a few drops of tincture of myrrh
may be placed on the wound and the opening
closed with carbolized oakum or cotton.
A horse that has been nailed will be ready
for service again in a few days if he is provided
with a shoe which does not press upon the in-flamed
region. The shoe does not press when
it rests only upon the hearing edge of the wall,
while the white line and sole are entirely free.
Of course no nails can be driven near the in-flammation.

128 Blacksmithing and Horseshoeing.
the hoof and the shoe. In special cases a cov-ered
shoe may be required. This has a sheet-
iron cover, with a projection at the toe fitting
into a corresponding indenture in the shoe,
while at the heels it is fastened by screw heel
calks.
Calking. This is the usual name for wounds
to the coronet caused by the calks on the oppo-site
foot, or by the shoes of other horses. A
bruise on the coronet results in an interruption
of the formation of horn at that point, making
a cleft in the wall. The resulting lameness can
be affected in shoeing only by shortening the
wall under the affected part so that it will not
press uponthe shoe.
Corns. All bruises of the sole are usually
spoken of as ''corns,''and appear as yellowish
or reddish discolorations of the horn or white
line. In most cases there is a rupture of the
small blood vessels, causing a sort of blood
bUster under the horn. The staining of the
horn is due to the blood penetrating the horn
tubes. As the horn grows these patches are
carried downward, and finally come to view on
paring the hoof.
The usual place where corns appear is near
the heels, often in the angles between the bars

Carriage and Wagon Building. 129
and the wall, or in the bars themselves. We
distinguish corns of the sole,wall, and bars.
Corns chieflyaffect the front hoofs, most often
the inner half. Unshod feet are seldom affected.
There are three kinds of corns: 1. Dry, in
which the red-stained horn is dry, seldom ac-companied
by lameness; 2. Suppurating Corns,
the result of a serious bruise followed by the
formation of pus which is either thin and dark
gray in color, indicating superficialinflamma-tion
of the pododerm, or thick and yellow indi-cating
a deep inflammation causing lameness;
3. Chronic Corns, causing discoloration in all
possible hues. The horn is soft and moist or
crumbling and sometimes bloody. The inner
surface of the horn is covered with horny swell-ings,
and sometimes the coffin bone becomes
enlarged and loosened. The gait is short and
cautious ; but when the shoe presses on the corn
or the hoof gets dry, lameness follows.
The causes of corns are bad dressing of the
hoof and faulty shoes. If wide, flat hoofs are too
much trimmed, or the heels or bars or frog of
other hoofs are weakened, the toe is usually
left too long and corns follow. Shortening one
heel more than the other, thus unbalancing the
foot, is a frequent cause,. Hollowing the sole
excessively and thinning the heels are also often
130 Blacksmithing and Horseshoeing.
to blame. So, too, shoes not level on the hoof
surface, shoes too short in the branches, or
shoes which do not cover the bearing surface
of the wall, result in corns in many cases. Anoth-er
fault tending in the same direction is insuffi-cient
concaving; and shoes that become loose
and get shifted produce similar injuries. In
rare cases corns result from stones wedged be-tween
the frog and the branches of the shoe.
Dryness particularly favors the formation of
corns and first shows itself by a short, cautious
gait when the horse is put to work.
Treatment of Corns. First remove the cause.
In an acute-angled hoof the toe is likely to be
too long and should be shortened. If the quar-ters
are too high they should be shortened, and
care should be taken that the shoe that is fitted
does not interfere with the elasticityof any part
of the foot. Special care should be taken that
the ends of the branches do not rise,and that in
no case does the shoe press upon the sole.
In case of a suppurating corn, the shoe should
be left off for a few days, and then a bar-shoe
put on, as this best protects the bruised parts
from being pinched.
Chronic corns should be permanently pro-tected
from any pressure from the shoe by using
a leather sole on a bar-shoe. Blood-stained
Carriage and Wagon Building. 131
horn should not be dug out, but the whole region
thinned, avoiding injuring the sensitive tissue
or drawing blood. The hoof should be kept
cool and moist.
Inflammation of the Bulbs of the Heels. This
is due to external bruising, and may occur
on shod or uns'liod feet. We will find sweUing
and increased warmth, sometimes signs of
blood, and a short cautious gait or well marked
lameness in case only one foot is affected.
Such inflammation is due to going barefoot
on hard ground, shoeing feet with low heel bulbs
with shoes that are too short, too much pres-sure
on the frog by the bar of a bar-shoe, or
forging and grabbing.
First, cool by applying an ice poultice or
soak in cold water. Later drying applications
will help, especially if the frog-band has been
loosened from the bulbs of the heels, as for in-stance
a weak solution of sulphate of copper
(one part sulphate to twenty of water) and
fittingshoes with heel calks and making them
long in the branches and without pressure on
the walls at the heels.
Founder. This is inflammation of the podo-
derm due to chillingas a direct result of excess-ive
work or long standing in the stable. Often
the entire shape of the hoof is changed, and

132 Blacksmithing and Horseshoeing.
the disease is very painful. In most cases both
fore feet are affected" very rarely only one foot
or all four feet. When all the feet are affected,
traveling is nearly impossible, and there is a
high fever of the whole body.
The disease usually finds its seat in the fleshy
leaves of the toe, sometimes on the side walls
toward the heels. As the inflammation pro-ceeds
the fleshy leaves are separated from the
horny leaves, the position of the coffin bone
changes, and the coronet of the toe sinks, and
the form of the hoof is changed. It becomes
too high at the heels,rings form upon the walls,
and these rings show the course of the disease.'
At the toe they are close together, gradually
separating toward the heels. The wall of the
toe is sunken under the coronet, and the toe
itself is pushed forward. In time the white
line is widened, and becomes dry and crumbling
so that a crack is Hable to form between the
sole and the wall, leading to the formation of a
hollow wall.
If the inflammation does not occur too often
and disappears, no unnatural result follows
except that the horn remains rather brittle
afterward. If the inflammation is severe or
often repeated, the sole is flattened just in front
of the frog as a result of the sinking of the
Oarriage and Wagon Building. 133
coffin bone, and may even drop below the level
of the wall. In some cases the coffin bone will
even penetrate the sole in front of the point of
the frog, and the wall of the toe becomes per-manently
deformed. Skilful veterinary care
may remove the inflammation and prevent the
results described; but if this is not accom-plished
permanent deformity of the horny hoof
is inevitable.
A foundered horse can be used, but its gait
is extremely stiff and short, and the heels touch
the ground before the toe. This manner of
travelling wears off the branches of the shoe
with great rapidity.
In dressing such a foot, the thick projecting
wall at the toe may be removed without injur-ing
the hoof; the sole may be pared, and the
whole hoof trimmed to give a correct bearing
on the ground.
If the sole is still concave, the regular shoe will
answer; but if it is flat or dropping, it should
be protected by a shoe with a broad web and a
bar, as shown in Fig. 36. This kind of shoe
is especiallyuseful when the bearing surface of
the wall is broken or weak.
As long as the toe is affected,there should
be no toe clip,but two side clips,as shown in
Fig. 36. The wall between these clips should

134 Blacksmithing and Horseshoeing.
be lower, not over an eighth of an inch, to
prevent pressure on the sensitive parts. To
prevent the shoe from working forward, as it
often does in cases of this kind, clipsshould be
raised at the ends of the branches or in the
middle of the bar.
Horn Tumor. This is of rare occurrence, and
is not certainlyindicated unless it extends down
to the edge of the wall and causes a half moon-like
bending inward of the white line that is
waxen color,followed by crumbling of the wall.
It may not cause lameness, and can be removed
only by a veterinary doctor. In shoeing, care-fully
concave the shoe so as to remove all pres-sure
from the inflamed region.

136 Blacksmithing and Horseshoeing.
with hoof cement. The shoe should be Ught
and broad in the web, with deep concaving (as
circumstances require), extending from the
inner edge of the web to the outer edge of the
shoe and corresponding in shape to the bulge
of the sole. A bar-shoe is to be preferred, and
toe and heel calks are to be used to remove the
sole sufficientlyfrom the ground. The nails
should be thin and long, and two side clips
make the shoe more firm.
Flat and dropping soles cannot be cured,
and shoeing can do nothing more than render
such horses serviceable. Sensitive soles should
be smeared with crude turpentine or pine tar.
In cases of unusual sensitiveness, a leather sole
should be fitted.
Never drive a horse with dropping soles
faster than a walk over rough roads. During
wet weather the soles should be smeared with
hoof-ointment containing rosin to prevent soft-ening.
Stumpy Hoof. In a hoof of this character
the wall at the heels is too high for the toe, and
the toe stands very steep. It arises from various
affections (such as spavin) which tend to re-move
the heels from contact with the ground,
or from neglect of horses running barefoot, or
from shortening the toe too much.
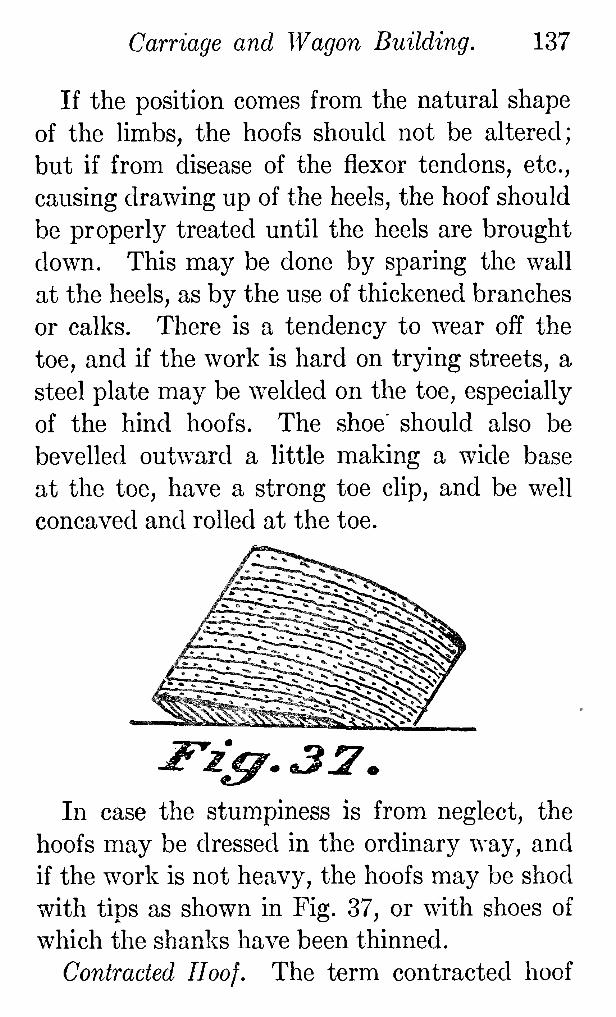
Carnage and Wagon Building. 137
If the position comes from the natural shape
of the Hmbs, the hoofs should not be altered;
but if from disease of the flexor tendons, etc.,
causing drawing up of the heels,the hoof should
be properly treated until the heels are brought
down. This may be done by sparing the wall
at the heels, as by the use of thickened branches
or calks. There is a tendency to wear off the
toe, and if the work is hard on trying streets, a
steel plate may be welded on the toe, especially
of the hind hoofs. The shoe' should also be
bevelled outward a little making a wide base
at the toe, have a strong toe clip,and be well
concaved and rolled at the toe.
J^z^. 32.
In case the stumpiness is from neglect, the
hoofs may be dressed in the ordinary way, and
if the w^ork is not heavy, the hoofs may be shod
with tips as shown in Fig. 37, or with shoes of
which the shanks have been thinned.
Contracted Hoof. The term contracted hoof

138 Blacksmithing and Horseshoeing.
indicates a hoof which for any reason is too nar-row
toward the heels. The wall runs obhquely
downward and inward. Sometimes only one
side is contracted. Usually the angles are
much prolonged and press on the frog, which
shrinks, and the bars run in outward circles.
Contraction is most often found on front feet,
especially those with acute-angled toe. If the
frog is found to be narrow and the fissures nar-row
and deep, there can be no doubt that the
hoof is contracted.
The causes of contraction are lack of exercise,
weakening the hoof toward the heels and leaving
the toe too long, or neglecting to remove spurs
of horn that press upon the frog. It is also
caused by using shoes with branches wide apart,
or inclined downward and inward so that the
weight of the body squeezes the heels to-gether.
Treatment. Remember that anything that
exercises a moderate pressure on frog, sole, or
bars tends to expand he hoof; hence frog
and sole pads are to be recommended. Con-tracted
hoofs cause nearly all the diseases of
the foot, such as corns, thrush, bar-cracks, etc.,
and therefore every effort should be made to
prevent them. Use flat shoes with a perfectly
horizontal bearing surface in the branches,
Carriage and Wagon Building. 139
and give abundant exercise, allowing the horse
to go barefoot as often as possible.
In very severe cases of contraction, if the
feet are not acute-angled, an expansive shoe,
with clips at the ends of the branches to press
upon the angles, is to be recommended. Under
no conditions use the expanding-screw except
under the advice of a doctor.
If the hoof is acute-angled, use the bar-shoe,
and if necessary even leather sole and foot-
packing. If the frog is foul it should be well
cleansed and disinfected with pine tar thinned
with alcohol or crude wood vinegar.
In addition we would recommend applying
tips, using shoes the bearing surface of whose
branches inclines downward and outward (or
if the contraction is on only one side, but a
single branch may be thus inclined); using
hoof-pads of rubber, straw, rope, cork, or hoof-
cement.
Sometimes wide hoofs are contracted, and
the contraction shows in a groove just under
the coronet, especiallynear the heels,but some-times
extending all around the hoof. Pain
is produced by tapping the contracted portion.s
Horses fresh from the pasture are very Hable to
this form of contraction, and as a rule lameness
does not disappear entirely until the wall has re-
140 Blacksmithing and Horseshoeing.
sumed its natural position once more. The wall
under the contracted portion should be lowered
so that it will not receive direct pressure, and
the bar-shoe should be used.
Sometimes the contraction is of the sole,and
the hoof curves from the coronet outward
and then inward, like a clav/. The sole is ex-ceedingly
concave, and the bearing surface of
the wall is lessened from toe to heel. The cause
is usually dryness and lack of exercise, and
shoes whose bearing surface is not horizontal.
Flat shoes perfectly horizontal should be used,
with strong clips at the ends of the branches.
In all forms of contraction abundant exer-cise
and daily washing are a necessary part of
the treatmicnt.
Wry Hoofs. These are hoofs of which one
side is slanting and the other steep. We have
already considered those forms of wry hoofs
resultingfrom the position of the limbs as base-
wide or base-narrow, and contraction of one
side from disease. We will here consider wry
hoofs caused by shortening one wall too much
in shoeing.
The general rule is, cut down the oblique
wall and spare the steep wall. This is just the
reverse of the treatment of wry hoofs due to
misshapen limbs, for in this case the wryness of

Carriage and Wagon Building. 141
the hoof does not correspond to the limb. To
take the weight from the steep wall we may use
a bar-shoe and concave the upper surface of the
bar under the outer branch of the frog. The
steep wall should not even rest upon the shoe,
or in any way be attached to it. It should be
left entirely free, either by cutting down the
wall itself,or beating dow^n the upper surface
of the shoe.
Any sort of shoe may be used, though a flat
shoe is best. If the foot has been improperly
pared and we cannot rectify this at once, we
may use a shoe with a thicker branch for the
steep side. Colts with wry hoofs can often be
cured by the simple process of correct shoeing.
We use a shoe thick beneath the contracted
wall, but gradually growing thinner around
the toe to the end of the other branch. In
some cases the branch may even end at the
middle or the side wall. This shifts the weight
of the body to the slanting wall and corrects
the bad shape in three or four months.
Crooked Hoofs are such as are so bent that
the bearing surface does not lie in proper rela-tion
to the coronet. They are caused by leaving
one half of the wall too high, or by using normal
shoes on hoofs of horses whose legs have the
base-wide position.
142 Blacksmithing and Horseshoeing.
The hoof should be so pared as to remedy
this defect as much as possible, and then the
shoe set out beyond the wall that is curved in
so that a straight edge from the coronet will
pass the curvature and touch the edge of the
shoe. The opposite wall that is curved inward
should be rasped down at the bearing edge until
a straight line will touch all the way from the
coronet to the shoe. Several shoeings will be
required to rectify the shape of the hoof.
Side-bone (ossificationof the lateral cartilage)
is hardening of the cartilage under the bulbs
of the heels into bone, and the disease is incura-ble.
It is found most often in heavy horses,
and causes lameness due to interference with
the free movements of the foot. When ad-vanced
it causes a marked bulging of the coronet
near the heels, and the protuberance is hard.
The gait is short, and lameness follows hard
work.
Special shoeing is helpful only when the outer
cartilage is ossified and the hoof is contracted
on that side. It will usually be found that the
outer branch of the old shoe is more worn than
the inner, and the outer wall will be found too
high. This is due to the fact that the horn of
the wall does not wear against the shoe, expan-sion
and contraction having been interfered

144 Blacksmithing and Horseshoeing.
cracks should be fastened together by various
means, such as, 1. Nails which rivet the crack
together, the holes for the nails having been
previously drilled; 2. Clamps forced into pock-ets
burnt into the horn on opposite sides of the
crack; 3. A thin plate of iron placed over the
crack and secured by small wood screws; 4.
wood screws screwed at right angles through
the crack; 5. A strap buckled round the hoof.
In all cases care should be taken that the
foot is so dressed that the shoe fits air-tight;
but before the shoe is nailed on pressure on
certain portions of the wall should be removed.
In case of toe-cracks we may raise clipsto press
against the angles of the heels. Two side toe-
clipsmay be drawn up, and the wall between
them pared down.
J'^. JS
In case of side-cracks,the portion of the wall
between the extension of the horn tubes to the
bearing surface and a perpendicular let down

Carriage and Wagon Building. 145
from the crack to the bearing surface should
be lowered (Fig. 38).
In case of cracks toward the heels, use a bar-
shoe and proceed as with side-cracks,even when
the perpendicular line falls beyond the angles.
Hoof pads are of great value, since they dis-tribute
a part of the weight over the frog and
sole.
When the crack is wide and the frog small,
shoes with bar-clipsmay be used. If the edges
of the crack are ragged and overlapping, the
overlapping horn should be trimmed away. The
horn over the coronary band on both sides of the
crack should be thinned, and the coronet should
frequently be moistened with laurel oil to guard
against renewal of the crack.
In case of inflammation, poultices are recom-mended
for several days. Fast trotting should
be avoided till the sound horn has grown down
at least two-fifths of an inch from the coronary
band.
Bar-cracks occur only on the fore hoofs, and
are due to contraction of the walls near the
heels, or leaving the wall too high. They are
usually accompanied by corns. If the crack
extends to the pododerm, lameness will result
and inflammation will set in which will extend to
other parts of the foot unless promptly treated.
146 Blacksmithing and Horseshoeing.
The portion of the hoof where the bars lie is so
elastic that the cracks open and close with each
step, and thus healing is made difficult.
Bar-cracks are usually not seen till the shoe
is removed, and they then appear as dark streaks
sometimes bloody or marked with hoof pus.
The horn in the vicinityof the crack should
be pared very thin, and the edges of the crack
cut away, and pressure on this part of the wall
should be removed. The wall near the heel
should be lowered and a bar-shoe used. When
the crack has been pared down, a deep groove will
appear, and if this is moist at the bottom the
crack should be packed with oakum wet with
myrrh or tincture of aloes, while the oakum
should be sealed over with grafting wax.
Low cracks are usually caused by insufficient
rounding of the bearing edge of the w^all,in case
of barefoot horses. They may also be caused by
too large nails in shoes punched too near the edge.
All that is necessary by w^ay of treatment is
proper shoeing. The bearing edge of the horn
under the crack may be cut away in a half moon,
and to prevent the crack from extending higher,
the upper end of the fissure should be burnt
out hollow or cut out with a hoof knife nearly
to the inner leafy layer of horn.
Clefts are cracks at right angles to the horn

Carriage and Wagon Budding. 147
tubes, and are most frequent on the inner toe and
side as a result of injury from sharp heel calks
improperly placed,though they may come from
suppuration. The shoer can do nothing in cases
of this kind, except to drive no nails in the horn
below the cleft (to avoid breaking it off),and by
shortening the wall below. If, however, the
horn is loose,it should be removed and the fissure
filled with grafting v/ax or horn cement.
Loose Wall is separation of the wall from the
sole along the white line. It is most frequent
on fore hoofs and on the inner side, especially
when the foot is wide and flat.
Loose wall is caused by very slanting walls,
outward bending of the bearing edge of the
wall, burning the horn wih hot shoes, dryness,
neglect of shoeing, excessive poulticingwith cow
dung, carelessness in preparing the bearing sur-faces
of the shoe^ and uneven fittingof the shoe.
The causes of the looseness should of course
be entirely removed and the vv^allproperly short-ened.
Then we may use a shoe with the bear-ing
surface inclined downward and inward. It
should be smooth and wide enough to cover
the bearing surface of the hoof as far in as the
border of the sole. In case of lameness, we should
use a bar-shoe or a leather sole. If the separa-tion
of the wall extends far,the wall should not

148 Blacksmithing and Horseshoeing.
be lowered, but the crack should be filled with
wood tar, crude turpentine, or soft grafting
wax. In case loose wall occurs on an unshod
hoof, the loose portion should be entirely re-moved
if possible; else the hoof should be shod.
The hoof should be cared for by shoeing at least
once a month and judicious moistening.
Hollow Wall may be suspected when a bulging
outward of the wall is observed, which sounds
hollow when tapped. It consists in separation
of the wall from the sensitive tissues,and is quite
rare. A crack will be seen in the white line,
though the separation of the wall may be less in
extent than the length of the crack. The cavity
frequently extends to the coronet, and is filled
with crumbling horn. Pain is not usual, but
lameness may in some cases result. It is caused
by chronic inflammation of the fleshy leaves. A
cure is possible,but requires time. In shoeing,
pressure should be removed from the hollow
section of wall, the cavity cleansed and filled
with tar, crude turpentine, or wax. If the
cavity is extensive, a bar-shoe should be used.
Thrush of the Frog makes the horn of the frog
ragged, and a bad-smelling, dark liquid collects
in the cleft. In the course of several months
the frog-band will be affected and irregularrings
and cross rings will be formed on the wall. The

Carriage and Wagon Building. 149
causeis lack of exercise in the fresh air, or too
great paring of the frog, removing the frog from
the ground by heel calks, orthe
useof frog pads
for several months in succession.
All thegreasy
horn of the frog should bere-moved,
aswell
asthe
overgrown angles. The
frog should be washedonce or
twicea day, exer-cise
should be abundant, and shoes without
aclks.

CHAPTER VIII.
SHOEING MULES AND OXEN.
The hoofs of mules and asses are similar to
those of horses, but the hoof of a mule is longer,
narrower,and round at the toe, the sole is well
arched, and the side walls steep. The hoofs
of asses are narrower and the wall relatively
thicker, while the frog is well developed, making
the hoof v/ide toward the heels. The horn of the
hoofs of mules and ass is tough.
Shoes should be light and narrow. Four
nails will hold on an ass's shos, five or six, a
mule's. The nails should be short, but strong
in the shank to prevent their bending.
Oxen require verydifferent shoes from horses
on account of the cloven hoof. The two pasterns
and the hoof bone are double, one bone for each
claw; and there is no frog. The wall and sole
are thin, the bulbs of the heels low. A thin, wide
shoe is therefore required, and there must be a
separate shoe for each claw.
The holes must be punched near the edge and
the nails should be short and strong. The shoe
for each claw has a long tongue on the inner
150
152 Blacksmithing and Horseshoeing.
by an assistanton
the opposite side. Incase
ofa
hind limb, a pole maybe placed in front
of the hock anda man at each end of the pole
may carrythe leg back and
up,where it should
be held in place. Obstinateoxen naay some-times
be controlled by giving a light blow with
a stick at the base of the horns. Ifmany
oxen are to be shod, stocks will be found neces-sary.
Whenno stocks
areavailable
we may
use an ordinary farmwagon.
Tie theox
with
head between front and hind wheels. Fasten
the large end ofa binding pole to the spokes of
the front wheel, letting it rest onthe hub. Swing
the pole to the side of theox
and underone
hind leg, bringing it around to the side of the
wagonand drawing it
uptill the leg swings
nearly free. The pole maybe fastened to the
rackor
other support. The most refractory
oxen maybe controlled in this
way by two
persons.

PART III,
CARRIAGE BUILDING
CHAPTER I.
CARRIAGE IRONING.
Carriage building is divided into three branches,
to each of which one man usually devotes his
attention. These are carriage-ironing, spring-
making, and tire-welding; but a good smith
should be master of all three or, in other words,
he should be able to iron a carriage complete.
(See Fig. 40).
Edge Plates. The first pieces of iron-work
that are made for a carriage are edge plates.
These consist of two flat iron plates from two
to four inches in width, and from three-eighths
to five-eighths of an inch thick, according to
the size and description of the carriage, and
they extend from the front to the back of the
body. It is always the best plan to have the
sides of the body in the shop to fit the plates
153

154 Blacksmithing and Horseshoeing.
J^^:r^ot
to. Some of the corners may be turned, but
where extra strength is required, they should
be v/elded. The plates should be well fitted
down to the wood without burning. They are
best fitted in two or three pieces, and then
welded together, the length being taken with
a pair of compasses. If the plate is straight
edgewise over the weld, one mark on each piece
will be sufficient to take the length with; but
if the plate is convex or concave edgewise, then
two marks are necessary, one on either side of
the plate. Before the last weld is made"
that
is,when the plate is in two pieces"the plate
Carriage and Wagon Building. 155
should be perfectlyfitted to within four inches
of the place where it is to be welded, and should
never be altered again after it is welded, except
the few inches left unfitted over the shut. The
holes which of necessity must be drilled should
not be too far apart, but close enough to hold
the plate firmly to the wood; yet they should
not be so close as to weaken the plate.
The Wheel Plate. The edge plates disposed
of, the next piece of iron-work that will be
wanted is the wheel plate; and if the carriage
is to be of modern design, the iron futchel and
cap, or middle of front bar, and the perch-bolt.
The dimensions of these must correspond to the
CLirriage.The wheel plate is made in two pieces,
and unless the bearings come very close together,
it should be made of half-round iron,with a small
flat edge, and upset to form the bearings; but
if the bearings come close together then flat
iron should be used, the space betv/een the
bearings being made half-round with a top tool.
The bearings should be left one inch longer
than they are required to be when finished,
and one-sixteenth inch thicker on the intended
outside than on the inside when the iron is in the
straight,as in compassing they always draw on
the outside edge and contract on the inside. A
circle should be drawn in chalk on the fitting-

156 Blacksmithing and Horseshoeing,
plate,the diameter of the intended wheel plate,so
as not to burn the pattern when compassing the
half-round iron. Do not bruise the edges of the
half-round iron any more than you can possibly
help, or you will soon get into trouble with the
viceman. The wheel plate when made should
be a perfect circle, and perfectly flat on the
flat side. If there is a sway-bar, it is usually
made with the wheel plate of the same iron,
and is about one-third of a circle of a much larger
diameter than the wheel plate, behind which
it is fixed,to give a larger bearing surface.
The futchel may be made in various forms
and shapes, and nearly every firm of co^ch-
buildcrs has a different style, hence it would
be impossible to lay down any definite rule for
making this piece of iron-work.
The perch-bolt is so simple that it needs no
description.
Bed Plates. While the carriage-maker is
making the carriage,the springs should be made,
a description of which will be given later on,
and Vv^e will proceed with our ironing. The
bed plates are next on the list. These consist,
of five plates, mostly half-round, and fitted to
three peculiarly-shaped pieces of timber, the
horn-bar, top bed, and bottom bed. The horn-
bar plate is sometimes made flat and sometimes
Carriage and Wagon Building. 157
"
half-round. If of the former style,it is of the
same width as the wood, and from a quarter
to three-eighths of an inch thick, drawn off to
one-eighth of an inch at the ends and fitted to
the back side of the horn-bar. If of the latter
style,it is usually one inch or one and one-eighth
wide, with a feather edge drawn off a little at
the end.
Top Plate. The top plate fits on the top
side of the top bed. It is half round with a
feather edge when finished,with fiat bearings
on each end which support the body, and
a fiat boss in the centre, with a square hole to
take the head of the perch-bolt. This plate
is best made of flat iron from an inch and a
half to two inches in width, and from one-half
to five-eighths of an inch thick, according to
the size of the carriage,upset in the middle to
form the boss, which should be one-eighth of an
inch thicker than the half-round when finished.
When the iron is upset, punch the square hole
and cut a little with a fuller to form the boss.
Next proceed to make the flat iron half round
with top tools, between the boss and the bear-ings,
compassing edgewise as you proceed if
necessary. This, like all other plates, should
be well fitted down to the wood without burn-ing.
When finished the plate should be a little

158 Blacksmithing and Horseshoeing.
under the width of the wood, except at the
bearings, which should be the exact width of
the wood.
The Transom Plate. The socket transom,
or transom plate, is fitted on the top side of the
bottom bed. It is somewhat shorter than the
top plate,having bearings on each end on which
the wheel-plate works. There is a socket weld-ed
in the centre in which works the perch-bolt.
The socket is first made of a piece of flat iron
2J inches byiinch, the ends are scarfed, bent
round, and welded on a small beak-iron, or
mandrel. When both ends of the socket are
welded, form a scarf like the brim of a hat-box
by hammering one end on the beak-iron, or on
the back edge of the anvil, with a bob punch
from the inside. Put a mandrel in the hole and
round up in the tools and the socket is finished.
Get a piece of flat iron a little heavier than that
used for the top plate,upset in the middle where
the socket is to be welded, punch a hole large
enough to admit the socket, which must drive
in tight,and it is then ready for welding. Have
a bolster in which the socket fits nicely greased,
and a mandrel that fits into the socket also
greased. Get the heat well, but without burn-ing
the top of the socket. This heat must be
worked very quickly, as there is a lot to do.
160 Blacksmithing and Horseshoeing.
like the other plates,to receive the nut of the
perch-bolt,and bearings at the ends to take the
springs. Sometimes there is a T-flap welded
on each end, that fits between the spring-block
and the wheel-iron head. At other times there
are butterflyflapswith holes to receive the spring
clips. The iron used for these flaps should be
twice the thickness the flaps are required to be
when finished. The beds and bed-plates are
concentric to each other, the perch-bolt passing
through the whole.
Wheel Irons and Front Bars. When the car-riage-maker
has got the carriage ready, the
wheel irons and front bar (if there be one)
may be made. These are the irons with a bolt
through the ends, which connect the shafts to
the carriage,and are made in a variety of dif-ferent
styles to suit the taste of the coach-
builder. The part which lips the bottom bed
on the spring bearing is termed the ''head.''
Some of these are made of flat iron, and the
round or oval iron welded on with a mitre, the
corners being turned. Others are made of
half-round iron, the round or oval iron being
drawn out of the half-round, and the corners
turned. Others, commonly called the ''sugar-
loaf head," are made out of the solid of square
iron,in which cases the corners are not turned,
Carriage and Wagon Building. 161
but the head is formed first by being cut in with
a fuller and then worked up square with a top
and bottom set. The back end of a wheel iron
is termed the 'Hail'' or ''stag/' and is made
either round or oval, and is connected to the
hind end of the futchel with a small boss or L-
flap. If it is an iron futchel, the wheel irons
are connected to the front bar, either with a
spUce or wood block, the splices being made
separate and fitted up by the viceman before
they are welded to the wheel-irons and front
bar or cap, In the case of wooden futchels,
the front bar is dispensed with, the futchel
plates taking its place, and the front ends of
the futchel connect it to the wheel-iron in the
place of a block or sphce. The wheels are shod
next, a description of which is given farther on.
Thus far the carriage may be ironed while
the body is being made. If the carriage is a
landau, victoria,or phaeton, a set of head props
will be required, and they are made after pat-terns
furnished by the body-maker.
Head Irons. The head joints that Hft the
head up and down are usually patented and
self-acting,and are made and fitted by work-men
employed by the patentee.
.
Hind Irons. In the first place the carriage-
maker, when the body is finished,makes the

162 Blacksmithing and Horseshoeing,
patterns of the piunp -handles or hind irons
which connect the hind springs and wheels to
the body. These, like the wheel irons, are made
in a variety of shapes. They are mostly made
of square iron, from IJ inch to IJ inch; some-times
they are made of Bessemer steel,to admit
of their being made very light. They take a
bearing on the top of the spring about six inches
long; this bearing is mostly half-round at the
top, whilst the bearing that takes the body is
half-round at the bottom; the space in between
and the ends are oval. Sometimes, to prevent
the pump-handles being cranked edgewise, a
flap is welded on the inside to take the
spring bearing. The flap is v/elded on while
the iron is square, and should be five-eighths
of an inch thick before being welded; this
should clean up nicely to seven-sixteenths of
an inch thick when finished. Weld this flap
on soundly, and while still welding hot, apply
the half-round or oval tools, as the case may
be. Both flaps on, proceed to draw the ends
off,and finish. Sometimes this style of pump-
handle has a wooden casing on the top, which
is artisticallycarved, in which case the top of
the pump-handle is left flat and the bottom
half-round.
Cross Spring. If the hind part of the car-
Carnage and Wagon Building. 163
"%
riage is to be hung on the side springs and top
halves, a cross spring and span-iron will be re-quired.
The latter spans the hind part of the
body above the cross spring. There is a T or
L-flap on each end, which fits on the front ends
of the pump-handles, for which purpose the ends
of the span iron often have to be cranked. The
iron between the centre bearing "which is about
six inches long and takes the cross spring "
and the flaps are mostly oval, and is made out
of one inch square iron, tooled on the angle.
The bearing is made separate, off a piece of flat
iron the width of the spring and about three
quarters of an inch thick, about three inches at
each end being made oval and welded on to
the other pieces when the ends are finished.
When the crank is very short (say one to two
inches deep) it is best turned before the flaps
are welded on; but when the cranks are deep
they may be turned afterwards. Although
the oval part of the span-iron is often very
much compassed and twisted, it will seldom
want any fitting in the wood-shop if it is set
true to the pattern when in the smith's shop,
provided, of course, the pattern is true to the
body.
Sometimes the span-iron is dispensed with,
and a small stay or bracket substituted, which

164 Blacksmithing and Horseshoeing.
consists of a short piece of oval iron with a T-
flap at each end, one to take the top of the
cross-spring,while the other is bolted on the
bottom of the body.
The axle-trees arrived from the makers, the
spHngs made and fixed to the axle-trees, the
carriage put together, and the wheels ready,
the body may be now what is technicallytermed
''hung" or mounted. The body steps may
nov/ be made. These also may be made in a
number of different styles. They may be either
branch tops or T-flaps, with plain treads or
gridirons for the steps, or they may be self-
acting, that is,opening and shutting with the
door. This class of step has the advantage of
being ahvays clean for the person to tread on,
and being self-acting,requires no folding up
when the door is closed. But they are seldom
used for any carriages except landaus, as they
are expensive to make and finish.
Branch Steps. The branch steps are made
of flat iron one inch by one-half or five-eighths,
each step being made in one piece. The iron
is cut off the required length and ovaled. The
ends of both pieces are then put into the fire,
and drawn off to form the flaps,which are half-
round, about one and three-eighths inches wide,
one foot, more or less,being left flat between the

Carriage and Wagon Building. 165
ovals. One piece may now be dropped, as one
heat will require all the attention. The one
piece is heated in the middle between the ovals ;
it is then bent double, the fiat sides of both flaps
coming together. The joint here"
the flat iron
"^ismade perfectly close,so as to be proof against
the admission of dirt. Some smiths put a small
piece of hoop iron in the joint at the crotch to
strengthen it,but this is to be avoided, as it is
very apt to fall out in the fire and give place to
dirt. But a shoulder may be formed on the in-side
when tooling in the. first place, which is al-ways
preferable. A good welding heat is now
taken on the flat iron at the crotch, care bemg
taken not to burn the oval. When on the anvil
it is first welded up square, then the corners are
worked in, and then it is ovaled. The flap to
hold the tread is now made, or the gridiron weld-ed
on, as the case may be. This step is now
laid aside, and the other treated in the same
manner. When the latter is made like the for-mer,
it is bent out at the bottom, and then the
branch opened out as near as possibleto the pat-tern
while the iron is hot. This is then laid aside
while the other is bent and opened out in the
same manner. This one, in its turn, is laid aside
to cool, while the other, "which by this time is
cold enough to handle" is set true to the pattern.

166 Blacksmithing and Horseshoeing.
This done, the other is also set true. They are
then ready to be fitted to the body.
Stej)swith T-Flaps. Steps with T-flaps are
somewhat plainer. A stump of inch or inch and a
quarter round iron is jumped onto a piece of fiat
or half-round iron about an inch and a half wide
by five-eighthsof an inch thick, about five inches
from the end, and welded in a bolster. It is cut
off five inches the other side of the stump and
another made in the same manner. The ends
are then drawn off half-round. These form the
flaps or top of steps. If the steps are to have
plain treads, the stump may be left long enough
to form the spade or flap to hold the tread;
but if the steps are to be very deep, and require
a long stem, it is advisable to weld on only a short
stump, and have a shut in the middle of the
stem, which may be either round or oval to order.
If the steps are to have gridiron treads, the frame
of the gridiron is,of course, made separate, the
bars being riveted in afterwards by the viceman.
A smaller stump is v/elded on a smaller piece of
iron than that used for the flaps,but in the same
manner. The iron intended for the frame is
drawn out half-round, one inch v/ide,and long
enough to make the whole frame. The corners
are then turned and the frame v/elded up, the
sides where the bars are to be riveted in being
168 Blacksmithing and Horseshoeing.
and scarfed. It is then jumped on a piece of
five-eighthsor three-quarters inch round, about
two inches from the end. This should be welded
in one heat, and squared up v/ith the set hammer
and scarfed in the place where the upright over
is wanted, then cut off about three inches the
other side of the flap,and hold in a pair of tongs.
The oval iron,having been cut off and upset, is
welded on in one heat, and cleaned up in the
oval tools. The three inches of round iron in the
tongs is now made oval, and the two inches of
the other side of the flap is drawn down to one
half inch round, and a corner turned to form
the bottom part of the handle. It is then laid
aside,and the other made in the same manner.
The middle is best made separate and welded to
the sides after. The top piece of oval is next
welded about two inches from the end onto the
upright oval of one of the sides. A piece of seven-
sixteenths inch round is now welded to the
end of the top piece of oval, and the corner
turned to form the handle. The top is now
held in a pair of tongs, while the handle is weld-ed
at the bottom, the flap drawn off half round,
and turned to the required angle. The other
side is treated in the same manner, the middle is
made and welded to the sides, and set true. A
dash iron should not require any fitting,but

Carnage and Wagon Building. 169
when fixed it should be perfectlysquare with the
seat rail. The boot-steps, bracket plates,front
stays, hind pole socket, and lamp irons all follow
in their turn, and are, of course, made to pattern.
The Boot Steps are somewhat smaller than
the body steps, and are fixed on the side of the
body just above the front wheels, and should
always match the body steps.
The hind Pole Socket is merely a socket with
two small stays to connect it to the carriage,to
support the hind end of the pole when the car-riage
is drawn by a pair of horses. The lamp
irons are two T-flaps welded to the sockets sup-plied
with the lamps. The splint-bar and shaft
plates are the only pieces of importance that re-main
to be made. The splint-barplate is fitted
on the bottom side of the bar. It is sometimes
flat and sometimes half round. A front pole
socket is fitted in the centre, and takes the two
middle roller bolts. Sometimes the socket is
made in the solid w^ith the plate. In that case
it is made separate and welded in. The two
shaft plates are fitted on the bottom side of the
shafts, and are made of half-round iron, flat-tened
out and bent round the hind end that
works in the futchel ends. They are drawn off
thin at the front ends, and all the holes punched.
Springs. Carriage springs are usually made
170 Blacksmithing and Horseshoeing.
in pairs, the front pair being made first. The
smith must know: 1. The description of the
spring; 2. the length of the spring and the com-pass:
3. the number of plates and the gauge
number of steel to be used, the number of holes,
and if more than one, the size and centres. The
dimensions obtained, proceed to make out the
measures in chalk on a piece of flat iron. Car-riage
springs are mostly elliptical,and when oth-erwise
are made by the same rule, except the
old-fashioned C springs, which are made to a
pattern.
Suppose the order is for a pair of elliptical
springs with cup heads, three feet three inches
long, nine inches span, six plates, Nos. 2, 3, and
4 steel. These springs are suitable for the
fronts of broughams, landaus, etc. It must be
borne in mind that three feet three inches is to
be the length of the springs when finished,so we
must allow an inch and a quarter in our measure
for what the steel will contract in compassing.
Thus our measure must be three feet and four
and a quarter inches. This is to be the length
of the backs in the straight,to and from the cen-tre
of the holes in the eye or head. The next
thing is to arrange the lengths of the various
plates. The ends of the long plates should
reach to the centres of the holes in the head, the
Carriage and Wagon Building. 171
next plate two and a half inches above that, the
next plate two and seven-eighths inches above
that, the next plate three and three-eighths
inches higher, and the short plate four inches
higher still. This will give you a short plate
about 15 i inches long.
Next cut down the steel No. 2 for the backs
and short plates. No. 3 for the long plates, and
No. 4 for all the other plates. The plates should
draw about two and a half inches each end,
therefore cut them down that much shorter.
Allow tw^o and a half inches for each eye and
an inch and a half for each head.
Now that all is ready, proceed to roll the eyes.
These may be made in one heat if worked quickly.
Thin out the end of the steel on the front edge
of the anvil, and roll a small, close eye. Insert
a mandrel slightlytapered, and insert another
the required size and quite parallel. Then with
a punch that fits the eye, make the hole perfectly
round by a light blow with the hand hammer.
While these ends are cooling, make two of the
heads.
The heads may be made in a number of differ-ent
ways, the simplest and quickest being the
best. This is as follows : Make a double clipoff
a piece of inch and an eighth or inch and a quar-ter
half-round iron feather edge. Upset the

172 Blacksmithing and Horseshoeing.
steel well, not too close to the end, the clipbeing
cold and the steel hot. Thin the end of the steel
a little,put on the clip,and drive the fangs well
into the hot steel. Then, with a nice clean, clear
fire,take a good welding heat, without burning
the steel. The feather edge of the half-round
iron will form a good scarf, and should weld up
quite sound and clean the first heat. Square it
up with the set hammer, round the ends of the
iron, and punch the holes, one square and the
other round, little more than half way through
from the inside. Now take another welding
heat, and work quickly with the hand hammer
on the anvil, and while it is still welding hot,
turn the lugs in the vice with a light,quick blow.
The corners turned, pinch one of the lugs in the
vice and draw the front of the head over the end
of the vice with the hand hammer. Serve
the other lug the same. Now take another
welding heat, and put a fuller,the width of the
steel and about half an inch thick, in the head,
and with a light, quick blow, form the cup in
which the eye is to fit. The holes are now
punched through from the outside. A tempo-rary
eye, the width of the spring, is put into the
head, and the lugs closed. A mandrel, square
at the top and round at the bottom, is driven
through the hole. It is then put in the vice,

Carriage and Wagon Building. 173
and the top of the head worked up square with
the hand hammer. The steel behind the head
is cleaned up with a flatter. It may now be got
hot and filed on the top with a rasp or coarse-
cut file,and the head is finished. The other is
made in the same manner.
While these two heads are cooling, roll the
other two eyes. Apply the measure first to see
how much steel the first two eyes have taken
up; then allow the same amount for the other
two.
Open heads are made in a somewhat different
style. A piece of flat iron an inch by three-
quarters or seven-eighths square, is bent round
about three inches from the end in the shape of
a hook. The end at the bend is then scarfed
with a fuller and welded onto the steel, which
has previously been upset and scarfed. The
iron is then cut off the length of the end that
has been turned, and the corners and inside of
the head worked up square with a small set.
Another welding heat is taken to secure any
Httle scarf that may have been opened in the
working up, and the lugs are finished to the
shape required. The holes in these heads are
best drilled, as they may then be placed to a
nicety.
The heads and eyes finished,proceed to build
174 Blacksmithing and Horseshoeing.
a hollow fire with wet small coal, and when
ready, commence to draw the plates.
The points of the plates should not be welding
hot when taken out of the fire,but a nice white
heat. A plate should be drawn from just above
where the point of the next plate will come,
and drawn out very thin at the points. The
slits for the studs to work in should be punched
in such a position that the points of the next
plate come one inch past it. Each point should
be drawn and finished in one heat. Draw one
end of all the plates first; then apply the meas-ure,
cut off any superfluous steel,and mark the
plates Nos. 1, 2, 3, and 4 with a centre punch or
the corner of the cold chisel. Then draw the
other ends.
When all the backs and plates are studded,
the backs are hardened and tempered in the
following manner: Heat No. 1 bottom back
from end to end to a light red heat. Compass
on the anvil a httle more than is actually needed,
so that, in setting,as few blows as possible may
be struck on the face side, which has to be filed
bright. Then plunge it in clean water. Now
proceed to temper for let down the hardened
back by drawing it slowly through the fire till
a piece of dry stick will blaze freely when rubbed
on the hot part. An old hammer shaft answers

176 Blacksmithing and Horseshoeing
tion, and pinch it in close to the back, as quickly
as possible. With one pair of pliers in each
hand, Hft the back with the plate upon end, and
pinch the lower end in the vice. The blow-boy
holds the two together at the top with one pair
of phers, while the smith and viceman, each
with a pair of pliers,pinch the hot plate well
into the back, beginning at the top and work-ing
downward. This should be repeated twice,
and the plate immediately released and cooled
quickly. In short, the whole must be done very
rapidly,or the plate will be too cold when dipped
to harden. Temper the plate in the same man-ner
as the back, and fit it to the back both flat
and edgewise.
It is advisable to finish one half of one spring
first,and put it together and try the compass.
If it is right,the spring may be taken apart to
make the others by. The long plate should
have more spring than any of the others, the
spring getting less and less as the plates get
shorter. The last should not have more than
a quarter of an inch. When finished,the spring
should be a perfect sweep on top, without a
break.
Tires. The only information needed by a
smith about to shoe a set of wheels is the size
of the iron for the tires and the stock-hoops.

Carriage and Wagon Building. 177
The wheels arc marked No. 1 and No. 2, the
iron for the tires laid flat on the ground, one
wheel placed on one end of the iron,and a chalk
mark put on the wheel where the end of the iron
comes. The wheel is then rolled along the iron
and the holes marked, one on each side of the
felloe joints,till the chalk mark on the wheel
comes round to the bar again. A mark is made
at this point. This is the dead length, so three-
quarters of an inch to an inch, according to the
size of the tire,must be allowed beyond this for
what the iron will contract in bending. The tire
is marked the same number as the wheel, and
the others treated in the same manner. The ends
of the bars are cut off,the holes centre punched,
and the ends bent a little about one foot over
the beak iron. They are then taken to the bend-ing
machine. This, in most shops, is merely a
piece of stiff,flat iron bent convex, with a piece
of small flat iron about one inch by half an inch
welded over the end in the form of a bridge about
one inch high. This is fixed by two or three
suitable stays to a wall or pillar,about five or
six feet from the ground.
The end of one of the bars is put on the com-passed
iron,the end catching under the bridge.
The other end is pulled down, hfted again, and
pushed farther through the bridge, and pulled
178 Blacksmithing and Horseshoeing.
down again; and so on to the end. When the
end gets too short to be pulled down by the
hand, a wrench or lever is applied. The front
tires being smaller than the hind, a wedge piece
is put on the top of the convex iron and the tire
bent over that, thus making a smaller circle.
This done, one of the tires is laid flat on the
wheel plate, which should always be perfectly
level. The flat or quick places are taken out of
the circle with a quarter hammer and dolly,
and the tire is set flat or edgewise to the wheel
plate.
When the wheels have all been treated in this
manner, the two front wheels are run with a
traveler. This is a circle cut out of a piece of
flat sheet iron about six inches in diameter with
a hole in the centre for a rivet to hold the handle,
which should clipthe traveler on each side like
a fork, as closely as possible, to admit of the
traveler working freely and true.
The wheel marked No. 1 is laid on the anvil
and a large bolt or mandrel put through the hole
in the wheel and the hole in the anvil. A chalk
mark is put on the edge of the wheel, and a notch
for a starting point cut in the traveler with a
file. The traveler is then applied to the wheel,
the marks being opposite each other, and the
wheel turned round with the left hand, while

Carriage and Wagon Building. 179
the traveler is held to the wheel with the right.
Vv^hen the wheel is turned round once, a chalk
mark is put on the traveler corresponding with
the mark on the wheel. This side of the trav-eler
is marked No. 1. The other front wheel
is run in the same manner, the mark being put
on the other side of the traveler. The front tire
marked No. 1 is now lodged on the anvil and forge.
The smith gets inside,and having set the notch
to the right end, runs the traveler round the tire.
The chalk mark on the traveler should come to
the other end of the tire. This will admit of one-
half inch being cut off each of the four corners
before scarfing. If the chalk mark on the trav-eler
runs short of the end, the tire is too long,
so must ha.ve a piece cut off. If, on the other
hand, the chalk mark runs beyond the end, the
tire is too short, so must not be further short-ened.
Now put the ends of the tire into a clean fire,
and v/hen hot cut what may be necessary off the
corners. Scarf the ends with a fuller,and close
them. Bend the tire to give a little spring to
hold the scarf together. Now take a good weld-ing
heat and finish the shut. This done, put a
chalk mark on the tire and run round with the
traveler.
If the tire is,say, an inch and a half by half
180 Blacksmithing and Horseshoeing.
an inch, and the joints in the felloes are closed
up, the tire should be left half an inch smaller
than the wheel; but if the joints are left open
at all,the tire should be left from five-eighthsto
seven-eighths of an inch smaller than the wheel.
The hind tires are left five-eighthsto an inch
smaller than the wheel.
The holes are now drilled not quitethrough with
a taper drill,just so that the drill pricks through.
The hole is then punched through with a small
hand punch. Sometimes the holes are not
drilled till the tires are on the wheels.
The tires are now ready for the furnace,
where they are heated all over to a blood heat.
While the tires are heating, one of the wheels is
screwed down to the wheel plate, the back side
uppermost, and some thin wedges are put under
the felloes on the outside to keep the tire from
dropping too far on the wheel.
Two dogs or wrenches are required to pull the
tire on with, and a quarter hammer to give a
blow if necessary, and two water buckets filled
with water to cool the tire as quickly as possible.
A sinking platform permitting the whole wheel
to be lowered into a tank of water is better.
The tire should be blood hot all over, not
black in places. When taken out of the furnace
it is picked up by the smith and hammerman

Carriage and Wagon Building. 181
with two pairs of tongs. One side is put on the
wheel, while the hammerman pulls the other
over with the dogs, and the smith taps it on
with the hammer. It is then cooled, and when
nearly cold is taken up off the wheel plate and
set to the wheel or rather the wheel is set to the
tire with a wooden mallet.
When putting the tire on, be sure the holes
are in their right position. The tire should not
require much hammering on, as it is very apt to
splitthe felloes. If it will not go on and it is the
rightsize,it must be because it is not hot enough,
so it should be made hotter.
If there is no furnace in the shop, the tires
have to be blown hot on the forge, which is very
inconvenient and takes much more time. In
that case the tire is laid on the forge so that one
part is in the fire. The fire is then covered up
with coal, and the tire is covered up with bricks,
wood, and shavings. The tire is blown hot,
and continually turned round with a wrench
till it is hot all over.
If there is more than one set of tires to be put
on, they should all be welded up first,so that
once heating the furnace will do for the lot.
The stock hoops are next made. The length
of iron required may be got by multiplying the
diameter of the stock by three and adding one-

182 Blacksmithing and Horseshoeing,
seventh. Thus if the diameter of the stock
was seven inches, 7x3= 21x1 -=22 inches.
Again, if the diameter of the stock is six inches,
6x3=18xJinch=18J, which is near enough
for all practical purposes. Greater accuracy
may be obtained by multiplying the diameter
by 3.1416, the relation between the diameter
and circumference of all circles.
A smith accustomed to the work will not
need to upset the ends ; but one not accustomed
to the work will require a half inch beyond the
dead length to upset. The back hoops are easy
enough, but the front hoops require a little skill
and attention when in the fire or a piece will be
burnt out of one edge before the middle is
red hot. They must be worked very quickly
when hot, as the heat is soon lost. They always
have a tendency to turn up on the edges and
leave a hollow place in the middle. This
should be carefully avoided, as it is almost im-possible
to get rid of this hollov/ place once it
appears, and to this end draw it more in the
middle than on the edges. When they are
welded sound, round them up on a mandrel or
beak-iron. Put the back hoops on warm and
file them. File the front hoops before putting
them on, and drive them on cold, as they have
two nails to hold them.
184 Blacksmithing and Horseshoeing,
for cutting the tenons at the ends of spokes.
There are hollow augers that are adjustable and
will turn a tenon of the exact size required.
Fifth, a variety of rabbet knives, panel rout-ers,
rasps, and files.
Sixth, a good compass.
Seventh, hammers, screwdrivers, etc., etc-
the tools common to all carpenter shops.
The Wheel Bench, Of course, the carriage
bodymaker must be provided with the ordinary
carpenter's bench, with vises,etc. But in addi-tion
to that he must have a specialwheel bench,
which may be arranged with devices for driving
spokes, boring tenons, driving on felloes,etc.
The best bench would doubtless be the solid
section of a tree, if one could be found as large
in diameter as the largest wheel to be made,
and if possible six inches larger,measuring from
the centre out. A hole large enough to take
the largest hub can be made in the centre, and
at the bottom of this hole an upright bolt about
an inch in diameter may be fixed securely, the
upper end being provided with a square thread
(or this bolt may be passed up from beneath).
This serves as an axle. Blocks may be placed
in the bottom of the hole to support the hub at
the right height, and when the hub has been
placed on the axle a plate with an inch hole in it

Carriage and Wagon Building. 185
may be laid over the top and screwed down by
a thumb screw on the bolt. The opening in the
hub for the box and axle should be filled at
point and butt with solid blocks bored in the
exact centre, the hole being just large enough
to allow the upright bolt to pass. If this does
not hold the hub firmly enough to allow of driv-ing
in spokes, a wedge may be placed at the
side of the hub opposite the end of the spoke,
so that the driving will come against the side of
the solid block.
If such a trunk cannot be found, a bench may
be made as follows: Get a hollow tree or log
twenty inches in diameter, with a rim of two
or three inches of solid wood under the bark.
The log may be cut eighteen inches long,dressed,
mortised like the hub of a wheel, (fourteen spokes
are required), and heavy spokes driven in. A
thick oak felloe is put on, and an iron tire two
inches wide. On the upper sides of the spokes
solid square oak pieces may be bolted, coming
out to the rim of the wheel and extending to
within a quarter of an inch of the hub. These
should be made true and level, and plated on
top with quarter inch iron. The wheel should
be given a dish, the spokes rising upward, so
that heavy pounding on the top may not make
the wheel dish the other way, that is,the felloe

186 Blacksmithing and Horseshoeing.
sink below the level of the hub. This bench
should be given several good coats of paint, and
set up a firm base. The bolt with a thumb
screw in the middle will be as in the preceding
bench.
Attachments of the Bench. The bench should
have a place especially arranged to give a grip
below for a clam.p to hold spokes down when
being driven in. This might be, say, fifteen to
eighteen inches from the hub. The clamp
might be a simple affair,and a slit in the bench
might allow it to be dropped down out of the way
when not in use. If,now, a block of the proper
height is placed under the spoke, and the spoke
clamped lightly down upon it,it will be driven
in at just the right angle.
At one side of the bench where it will not be
in the way, there should be firmly fixed a sort
of slide in which the frame of the hollow auger
may be placed. A thumb screw below will
permit of the frame being moved backward or
forward, so that the auger may be brought up
to the end of the spoke, whatever length it may
be. At the same time, it should be arranged
so that the auger may be taken out of the way
when not in use, as it would interfere with set-ting
the tire and similar operations.
Wheel Making. Much the most important

Carriage and Wagon Building, 187
part of carriage building is the making of the
wheels. More depends on the wheels than on
any other single part, and to be of any value
whatever they must be well made. At the
same time, it is the wheel that most often needs
repairing, and this cannot be done successfully
except by some one who knows how to build a
wheel.
The Material. The best wood for spokes,
felloes,whiffletrees,neck-yokes, shafts, and sim-ilar
parts is hickory. In case hickory is not
available, ash may be used for spokes,and locust
is even recommended. The hub should be of
oak if the wheel is heavy, or elm if the w^heel is
light. In all cases the best wood, perfectly sea-soned,
is not only desirable, but almost abso-lutely
necessary in wheel making. If the wood
is not well seasoned it will shrink, and the mo-ment
it does the wheel comes to pieces. It is
not quite so important that the hub be perfectly
seasoned, as in shrinking it contracts and holds
the spokes tighter; but the bands and similar
irons are pretty sure to come loose in a short
time if the hub is not well seasoned.
In these days spokes, hubs, and felloes are
turned out in quantity at factories much cheap-er
than they can possibly be made, and maich
more neatly. Felloes may be bent cr sav.ed,

188 Blacksmithing and Horseshoeing,
the bent ones being preferred. Hubs should
not be mortised long before they are used, since
the sides of the mortise will dry out a little even
in the best seasoned wood, and shrink, causing
the sides of the mortise to concave, and so give
an imperfect surface for the spokes to adhere to.
Peculiarities of Wheels. The first thing to be
noted about a wheel is what is called its '' dish."
If a wheel is so built that the spokes run at an
exact right angle to the centre of the hub,there
is danger that under strain they will work back
and forth, and under heavy strain of some kind
the wheel ''dish'' inward. The spokes should
turn outward from the hub very slightly,
the amount varying from a quarter of an inch
to three quarters, according to the size and char-acter
of the wheel. Wheelmakers have a variety
of ideas about the proper dish a wheel should
have; but the novice should in all cases follow
his pattern. If the dish is too great, it is obvi-ous
that with wear it will become greater. At
the same time there should be as little danger
as possible of the wheel being turned inside out,
so to speak, when it goes into a rut or runs
against a rock, or comes into collision with
another wagon.
A wheel must be set on the axle so that the
spokes will run perpendicularly down to the

Carriage and Wagon Building. 189
ground (or very nearly so) and the tread of the
tire will come flat and even on the ground.
This of course throws all the dish of the wheel
to the top, and at the top a pair of wheels is
often two inches or more farther apart than at
the bottom.
At the same time, the front wheels especially
are given a slight ''gather." The axle is so
bent that the wheels have a tendency to come
together. They are usually from a half to
three quarters of an inch nearer together in
front than behind. It is obvious that this
makes the wheel wear toward the shoulder of
axle, in spite of the taper of the axle spindle.
When wheels are put on in this way, they do
not necessarily come off if the nut works loose
and drops off. The ''gather'' should be very
slight,since it makes the wheels drag a little on
the ground, and so run harder. A quarter of
B.1^^.41
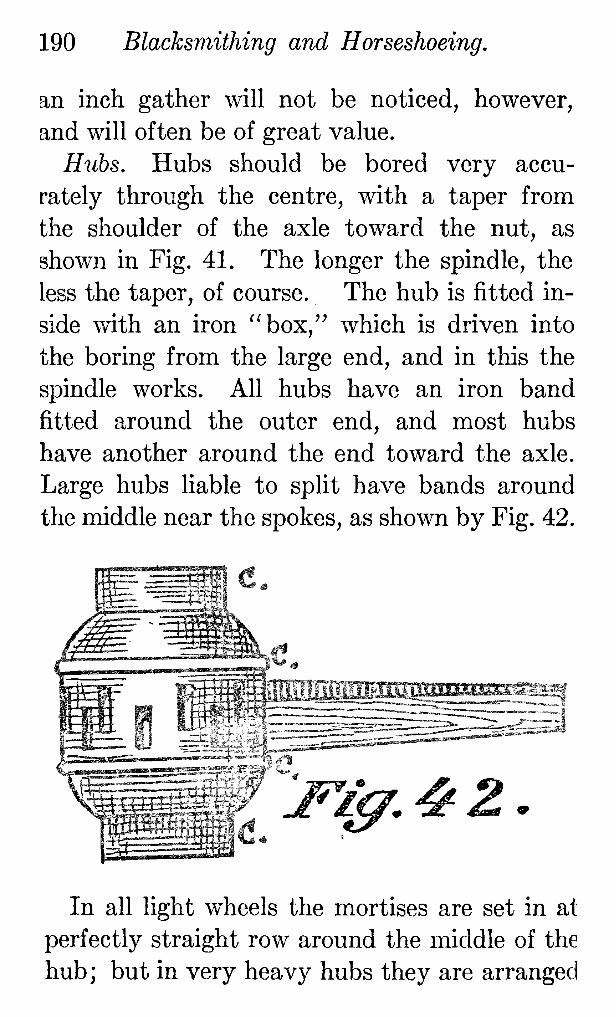
190 Blacksmithing and Horseshoeing,
an inch gather will not be noticed, however,
and will often be of great value.
Hubs. Hubs should be bored very accu-rately
through the centre, with a taper from
the shoulder of the axle toward the nut, as
shown in Fig. 41. The longer the spindle, the
less the taper, of course. The hub is fitted in-side
with an iron ''box," which is driven into
the boring from the large end, and in this the
spindle works. All hubs have an iron band
fitted around the outer end, and most hubs
have another around the end toward the axle.
Large hubs hable to split have bands around
the middle near the spokes, as shown by Fig. 42.
I^iff.^Z.
In all light wheels the mortises are set in at
perfectly straight row around the middle of the
hub; but in very heavy hubs they are arranged

192 Blacksmithing and Horseshoeing.
ingly the spoke will be thrown slightlyoutward,
to form the dish. The mortises should be cut
a little smaller than the spokes, so that when
the spokes are driven in they will not quite
reach the iron box within the hub.
The Spokes. When the hub is ready, and the
spokes are found to fit the mortises in the hub,
the hub should be screwed firmly on the bench.
Blocks with an inch hole in their centres for the
bolt should be fitted into each end of the bore
of the hub, and if necessary, the hub may be
firmly supported by a block or wedge on the
side opposite to which the spokes are to be driv-en.
The mortises should be an inch or two
above the level of the bench. A spoke may be
put in its place, and six or eight inches from
the outer end a block may be placed under it of
just the right height to give the wheel the de-sired
dish. Then the spoke may be held lightly
on the block by means of the clamp already
described.
It is a good idea to round off the corners of
the tenons of the spokes with the hammer, and
heat spoke ends and hub as much as possible
without scorching, before dishing.
When all is ready for driving the spokes in,
the insides of the mortises should be smeared
with glue. Then the spokes may be driven in

Carriage and Wagon Building. 193
with sharp blows of a heavy mallet. A light
hand hammer is not heavy enough. The wheel
must now be left for the glue to dry, say a day
or two, before further work.
For the next steps a bench such as that shown
in Fig. 43 will be found useful.
First, the ends of the spokes must be sawed
off at an even distance from the centre of the
jBY^.^a^
194 Blacksmithing and Horseshoeing.
hub, about a sixteenth of an inch less than the
diameter of the wheel is to be under the tire.
The right length may be found by means of a sim-ple
gauge. A strip of wood a quarter of an inch
thick and two inches wide may have an inch
hole bored near one end, and this may be slipped
over the bolt which serves as axle of the wheel
on the bench. A smaller hole may be bored
in which a pencil may be fixed at just the right
distance from the central hole. With the gauge
the workman may easily mark the ends of the
spokes where he wishes to saw them off.
When they have been sawed off even, they
should be tapered off to a blunt point, with the
draw knife, thus preparing them for the boring
of the hollow auger.
When the tenons have been bored so that
the shoulder will just fit up against the inside
of the felloe,the felloe pieces may be laid on the
bench and marked for the holes to correspond
to the tenons on the spokes. The diameter of
these tenons and the corresponding holes in the
felloe should be about a sixteenth less than half
the width of the felloe.
The Felloes. Care should be taken to see
that the felloes form a perfect circle. They are
liable to get warped to one side or the other,
Carnage and Wagon Building. 195
and if they are out of gear it will be hard to get
a true wheel.
The ends of the felloes where they come to-gether
to form the jointsshould be bevelled out-ward
a little,so that the ends meet on the inside
when in place (driven on the spokes), but do not
quite meet on the outside. This will prevent
the wheel from sagging at the joints. Also a
sixteenth of an nich of extra wood should be
allowed, so that if it is necessary to pass the saw
between any two pieces to make the jointsfit,
the wheel will not be made too small.
The holes in the felloe should be small enough
so that when the tenons of the spokes are driven
into them, the felloe will stay in place securely
without wedges; but in some cases it will be
necessary to drive wedges Ughtly into the ends
of the tenons. The end of the spoke should not
come quite out to the outer edge of the rim, for
if the spoke presses on the tire it is Hkely to
cause the spoke to bend out of shape.
The jointsof the felloes may be held securely
by dowels, or wooden pegs passing through the
ends which come together to form the joint, or
by iron clamps fittingover the inside of the fel-loe.
The latter are less hkely to splitthe felloe,
and in the hands of any but an expert workman
are safer on that account.
196 Blacksmithing and Horseshoeing.
When the felloe has been driven on, the gauge
will be required to mark on the felloe the exact
circumference of the circle which its outer edge
should form. When this mark has been made
all around the wheel, the outer side of the rim may
be planed off to the line with a concave plane.
Then the side of the felloe should be even up,
and then by means of a suitable gauge, the outer
side of the felloe should be made exactly per-pendicular
to the spokes. One end of the gauge
should touch the spokes at the hub, and the
square should come true across the outer side
of the felloe. Owing to the dish of the wheel,
and the subsequent plumbing of the spokes,
this will make the edge not quite parallelwith
the central line of the hub, but when the wheel
is on, the spokes will go straight down on a
plumb line to the ground, and the tire will tread
perfectly fiat on the ground.
(It may be said that in practice,it is best that
instead of having the spokes exactly plumb,
they should turn in a little,say a quarter of an
inch, on the ground, since under a heavy load
the axles will spring a little,and that v/ill bring
the wheels to a true plumb. It is under a heavy
load that there is most need for the wheels to
be exactly plumb.)
The wheels are now ready for the tires and

(Jarriage and Wagon Building. 197
other irons,the putting on of which has already
been described under '' Carriage Ironing."
Repairing Wheels. If a wheel is dished a
little too much when it is built, it will gradually
become dished a great deal too much, the tire
will become loose,and if not cared for the wheel
will soon go to pieces. It is therefore an impor-tant
matter to know how to take the dish out of
a badly dished wheel.
J^i^,4f4f.
Fig. 44 shows the appearance of the end of
the spokes of such a wheel. Not only is there
a decided bevel on the side on which a bevel is
expected,but the opposite side slants outward.
J!i'^,4^5,
Take off the tire of the wheel, carefully remove
the rim in such a way as not to splitit,and re-move
the spokes,working them back and forth
till they come loose. Trim the upper side of
the spoke as shown in Fig. 44, or the side that
198 Blacksmithing and Horseshoeing,
comes away from the wagon, perfectlystraight,
as shown in Fig. 45. Then carefully splitthe
end and insert a wedge as close to the bevelled
side as possible. This will throw the bevelled
side otit so as to fillup the mortise. Do not let
the end of the wedge come against the box in-side
the hub.
In driving the spokes in again, if grease has
accumulated in the mortises, wet the end of the
spoke and dip in wood ashes.
If a wheel gets turned inside out by an acci-dent,
two or three strong men can usually pull
it back so that it will dish the right way, and it
can be tightened up by wedges in the mortises.
Some of the wedges should be on the outside,
though most should be on the inside. Those
on the outside will prevent the wheel going to
the opposite extreme and becoming too much
dished.
In respoking old wheels, some have recom-mended
boiling the hub in water containing sal-
eratus, the saleratus to remove the grease.
Boiling hubs is not to be recommended, since
water is absorbed, the hub swells, and when it
dries out again the spokes become loose and the
irons come off. It is better to scrape out the
mortises thoroughly with a knife, till the wood
is well exposed.
200 Blacksmithing and Horseshoeing,
If a box gets loose, some heavy manila paper
may be cut in the form of a cross of Malta, the
round centre being left just large enough to cover
the end of the box, while some of the super-fluous
paper has been removed from the sides
which hang down. Enough thicknesses of
paper should be used to fill up the free space.
Then the box is driven into place, and the large
end is securely wedged. Of course the paper
that may remain about the small end may be
nicely trimmed away.
Something about Good Glue. Glue should not
be allowed to stand more than twenty-four
hours after it is mixed, or it will lose its power
and decompose. The moment a bad odor is
observed, a good workman will know that his
glue-pot should be cleaned out and fresh glue
prepared. The scum or skin that forms on the
top of glue is worthless, and should in all cases
be removed; and this must be done repeatedly.
Only freshly melted glue has good adhesive
properties.
Good glue is to be judged simply by its clear-ness.
If glue as it comes from the factory is
full of specks, it may be known that it is filled
with foreign material, or has begun to decom-pose.
It should be kept as nearly air-tight as

Gdrriage and Wagon Building. 201
possible, to prevent decomposition from the
moisture in the air.
Use the glue very thin" the thinner the better.
It should soak into the wood, and the faces of
the wood come close together with no layer of
glue between.
A Wheel for a Wheelbarrow. Making a wheel
for a wheelbarrow is not difficult. Of course,
the axle is fixed in the wheel, and runs in sockets
on the barrow at each end. Three quarters of
an inch is in most cases large enough. Any
solid piece of wood, nicely rounded, may be used
I^/^. 4f6.
for the hub, which should be bound with an iron
band on each side of the spokes. It will proba-bly
be best to arrange the mortises for the
spokes in the stagger style (see Fig. 42), and

202 Blacks miihing and Horseshoeing.
instead of being squared they may be round.
They should be bored as carefully and as evenly
as possible,one inch for v/ooden spokes, half an
inch (usually) for iron spokes. Iron spokes
will be most convenient, if the iron can be han-dled.
Eight spokes will usually be sufficient.
A good arrangement is shown in Fig. 46. It
will be seen that the spokes are bevelled off at
the end where they come together inside the
hub. For iron hubs, half-inch iron rods will do
very well. A tenon is made on the rim end of
the spokes, v/hich should set into a quarter or
three-eighths inch iron tire properly drilled.
The tenon ends should be a trifle smaller than
the spoke itself,"say three eighths of an inch,
if the spoke is iron and half an inch. If wooden
spokes are used, a felloe must be put on and
the wheel tired in the usual way. If iron spokes
are used, the spokes may run through the iron,
the tire being welded after the spokes are in
place and the tire set. The ends of the tenons
may then be filed off. Care should be taken
in rounding the tire,for any depression will make
the wheelbarrow run hard. If the rim is bent
over a model, the best results will be obtained.
Such a model may be made of w^ood and plated
with iron.
Making the Body of a Farm Wagon. It h
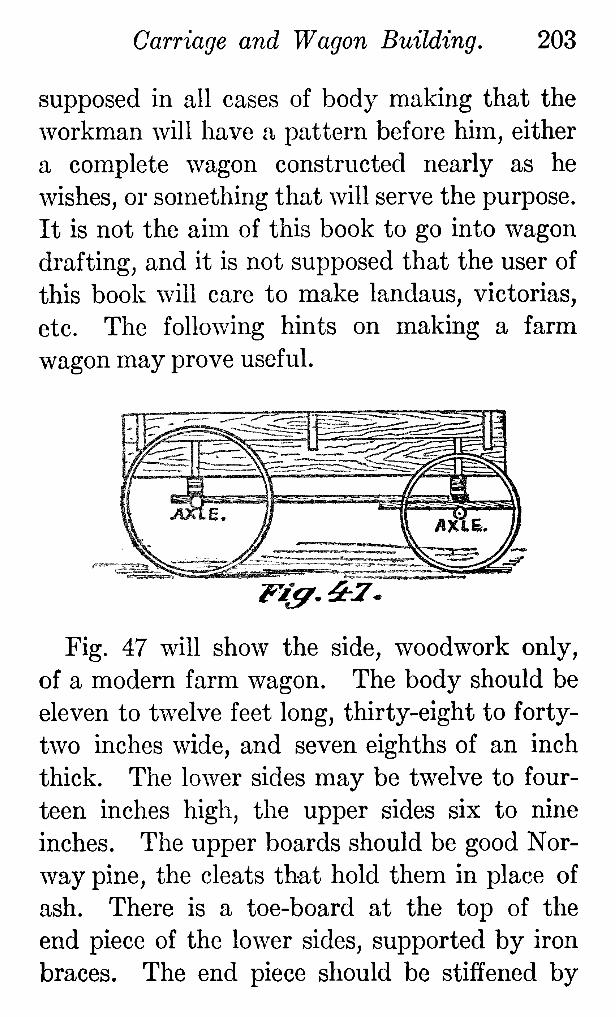
Carriage and Wagon Building. 203
supposed in all cases of body making that the
workman will have a pattern before him, either
a complete wagon constructed nearly as he
wishes, or something that will serve the purpose.
It is not the aim of this book to go into wagon
drafting, and it is not supposed that the user of
this book will care to make landaus, victorias,
etc. The following hints on making a farm
wagon may prove useful.
lFMi^.^2.
Fig. 47 will show the side, woodwork only,
of a modern farm wagon. The body should be
eleven to twelve feet long, thirty-eightto forty-
two inches wide, and seven eighths of an inch
thick. The lower sides may be twelve to four-teen
inches high, the upper sides six to nine
inches. The upper boards should be good Nor-way
pine, the cleats that hold them in place of
ash. There is a toe-board at the top of the
end piece of the lower sides, supported by iron
braces. The end piece should be stiffened by
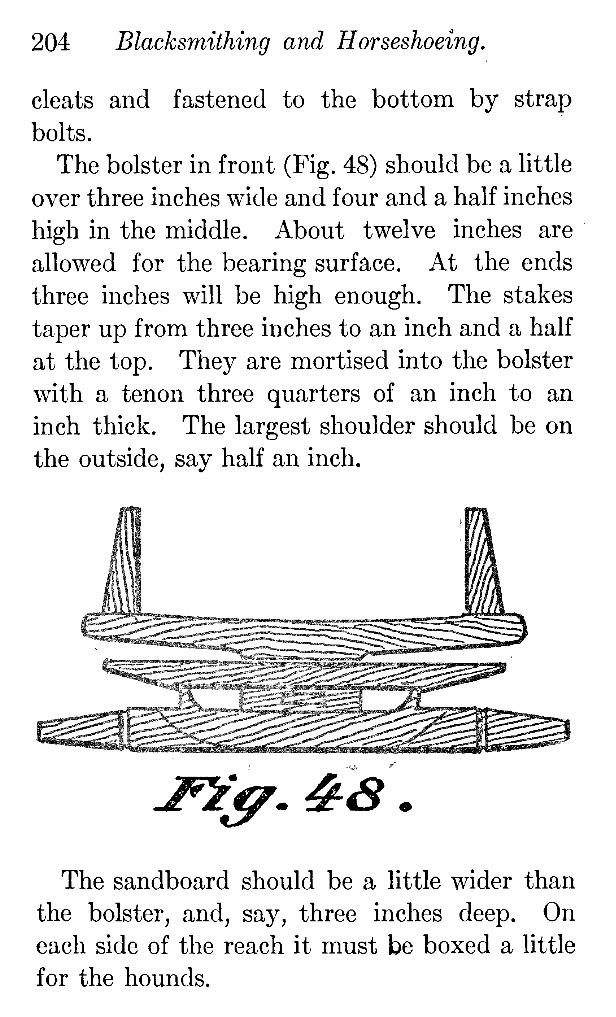
204 Blacksmithing and Horseshoeing.
cleats and fastened to the bottom by strap
bolts.
The bolster in front (Fig. 48) should be a little
over three inches wide and four and a half inches
high in the middle. About twelve inches are
allowed for the bearing surface. At the ends
three inches will be high enough. The stakes
taper up from three inches to an inch and a half
at the top. They are mortised into the bolster
with a tenon three quarters of an inch to an
inch thick. The largest shoulder should be on
the outside, say half an inch.
J^^. ^S.
The sandboard should be a little wider than
the bolster, and, say, three inches deep. On
each side of the reach it must be boxed a little
for the hounds.
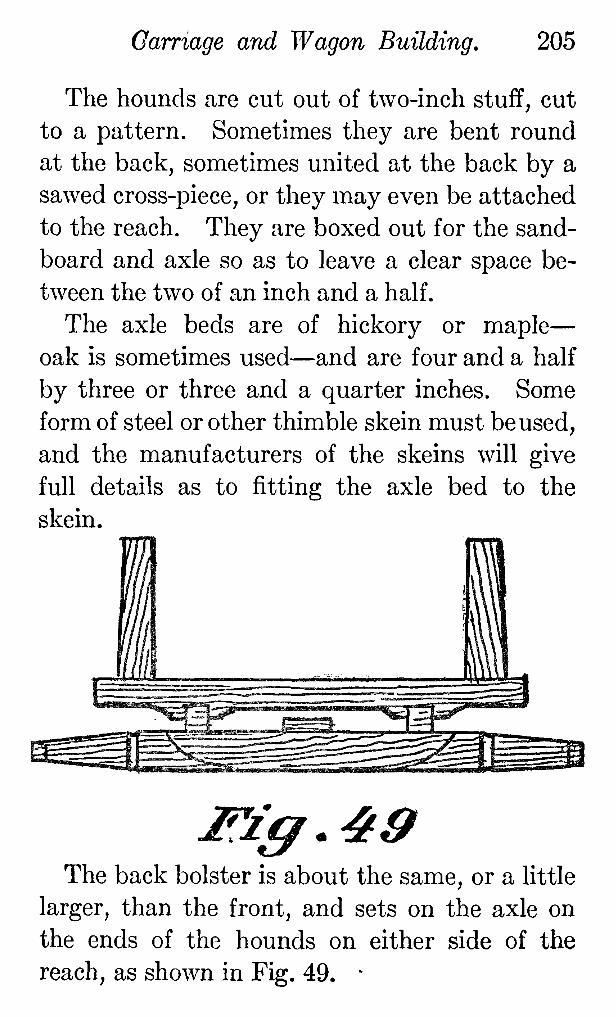
Carriage and Wagon Building, 205
The hounds are cut out of two-inch stuff,cut
to a pattern. Sometimes they are bent round
at the back, sometimes united at the back by a
sawed cross-piece,or they may even be attached
to the reach. They are boxed out for the sand-
board and axle so as to leave a clear space be-tween
the two of an inch and a half.
The axle beds are of hickory or maple "
oak is sometimes used"
and are four and a half
by three or three and a quarter inches. Some
form of steel or other thimble skein must be used,
and the manufacturers of the skeins will give
full details as to fitting the axle bed to the
skein.
jp'iff.^aThe back bolster is about the same, or a little
larger, than the front, and sets on the axle on
the ends of the hounds on either side of the
reach, as shown in Fig. 49. "

206 Blacksmithing and Horseshoeing.
There are two forms of pole used"
the still
and the drop "and the hounds must correspond.
A good form of hounds, both back and front,
is shown in Fig. 50. The back hounds lie above
the reach (or better, in the same plane with it).
The cross-bar of the front hounds lies on top of
the ends of the hounds, but runs under the
reach. The ends which meet the pole are five
inches apart, and plated with iron, which re-duces
the opening to the size of the pole. The
pole should be four inches square at the back,
tapering to two inches, and twelve feet long.
The back hounds are united by a plate of metal
where they m^eet the reach, and through this
plate a bolt passes. The reach pole should
work freely,so that it may be pushed back or
drawn in, allowing adjusting the length of the
wagon.
-^1^. SO.
The reach is two inches thick and four and a
half inches wide, and there should be half a
dozen holes which may be used for the bolt, in
varying the length of the wagon, the holes not

CHAPTER III.
CARRIAGE AND WAGON PAINTING.
In order to make a good job in painting a car-riage
or wagon, a place for doing the work is
required which is free from all dust. A little
dust will roll up under the brush and make no
end of bad work. This is especially true when
it comes to the varnish coats. In most build-ings
dust will accumulate on the rafters, and
when the wind blows it will shake down a great
deal of the dust. Before painting begins, such
a room should be well dusted throughout several
times, and a large canvas may be stretched
over thewagon or carriage, care being taken to
avoid canvas which will shed lint. Usually
varnishing is done in a small, closely-ceiled var-nish
room, that maybe heated, but a ventilator
running upfrom the centre is desirable in order
to secure a circulation of air for drying.
It is also very important that special care be
used in removing all dirt, dust, or the like, which
may get on the carriage in the natural order
of the work. Carriages or wagons being repaint-ed
must be cleaned most thoroughly, even down

Carriage and Wagon Building. 209
into the smallest crevice or corner (also scraped
vnth glass and sandpaper) ; and when pumice
stone or the like is used, the corners must be
well cleaned out with a dry brush, the ends of
which have been moistened in varnish (but
not enough to stick to the v/ork). The little
varnish will pick up the dust in corners where
nothing else will. If the wagon is washed,
it should be allowed to dry thoroughly before
any attempt at painting is made, and then it
should be dusted all over carefully with a proper
duster. Just before each coat, also, the work
should be most thoroughly dusted. It takes
much longer to clean and dust than it does to
lay on the paint or varnish.
Brushes. The first brush required is the
round bristle brush, No. 0000 (four noughts).
It is used for putting the priming on the body,
etc. As the bristles are too long as they come
from the store, they must be ''bridled,''or
bound round with twine about half their length.
A leather binding securely sewed is good. As
the brush gets worn down the ''bridle'' maybe
removed and the brush is as good as ever.
A small round bristle brush or" sash tool" No.
8 is required to clean up around panels, be-tween
spokes, etc.
A flat camel's hair brush is best for laying
210 Blacksmithing and Horseshoeing.
on color. Different widths will be required,
according to the character of the work, from
three-eighths to two inches. For laying color
on small panels, or any very fine work, or for
laying varnish, the fiat or flowing badger hair
brush is considered best, though camel's hair
will answer every purpose.
For laying varnish on the body, or where it
is desirable to have a brush that will carry a
good deal of varnish, the oval chiseled brush,
made of all white French bristles, is usually
preferred. To accompany this, for cleaning
up, a small flattened chisel brush is desirable.
Paints. A paint mill for grinding paints is
almost a necessity.
For white lead in oil,only the very best can
be considered even economical.
Raw linseed oil is the only oil used (boiled
oil is not suitable).
Two kinds of varnishes are required, rubbing
and finishing; the first for the coats that are to
be rubbed, the latter for the final coat..
We also need brown japan and turpentine,
and whatever colors may be desired. You will
find it costs about half for paint if you mix your
own colors, but it requires some skill to do it
properly.
Always mix fresh paint for every job. Paint
Carriage and Wagon Building. 211
that has stood exposed to the air becomes fatty,
or oily, as the painters say. It sticks, and is
unsuitable for carriage or wagon painting.
In mixing colors, always use a very little raw
linseed oil to make the color elastic. If none
is used the paint will crack and chip. A test
may be made by putting a little on a piece of
tin, and bending the tin when the paint is dry.
The paint should bend with the tin, and not fly
and crack in every direction. But the chief
ingredients for mixing colors are usually japan
and |turpentine,about two tablespoonfuls of
japan to a pint of the paint when mixed.
The paint should always be mixed in a per-fectly
clean dish, and if any skin appears, the
paint should be strained through cheese cloth
or muslin. Wire netting makes too coarse a
sieve for carriage paint.
To mix colors,lay out the dry color on a prop-er
stone and moisten with japan to a mush,
mixing with a palette knife. Then add turpen-tine
and grind through the mill with the mill
screwed up as fine as possible. If too thin, the
paint will not go through. When the paint is
ground, add about a tablespoonful of raw oil to
a pint of paint. Try the paint on the thumb
nail, blowing it to hasten drying. It should
have what is called an ''egg-shell"gloss, not

212 Blacksmithing and Horseshoeing.
too bright or too dull. If it dries dull, add a
trifle more oil; if too bright, add turpentine.
The proportions of oil and turpentine vary with
the color. Umber takes more oil,lampblack
less, etc. Vermilion should be mixed with
quick rubbing varnish, and no oil added, as oil
darkens it. Glazing colors should also be mixed
in varnish instead of oil and japan.
Great care should be used in selectingjapan.
Good japan does not curdle when mixed with
raw linseed oil.
Prepared black should be thinned with tur-pentine
to a cream-like consistency, and a very
little raw oil added, until it dries with the egg-shell
gloss. Too much oil is a detriment.
Putty is made by working whiting and dry
lead into keg lead to a suitable consistency, and
then adding a little brown japan to make the
putty dry quickly.
Black putty for fillingin around iron work
which does not fit exactly, is made of three-
fourths lamp black and one-fourth dry lead,
mixed with japan. For putting in glass,equal
parts of lamp-black and whiting mixed with
equal parts of rubbing varnish and japan will
be best. If the fibres of black velvet or plush
are mixed with it,no rattling of a vehicle will
jar the putty out. Usually putty should be

Carriage and Wagon Building. 213
colored to the color of the job. Common putty,
hke common paint, should never be used on a
wagon.
One Method of Carriage Painting. As soon as
the woodvv^ork is ready, before the irons are put
on, cover the wood with a coat of priming made
of oil and a little white lead, with a small amount
of japan if it is desired that the job dry in a hur-ry.
The oil is the main thing, and soaks into
the wood, including all parts to be covered with
the irons, and the lead fills up some of the pores.
When it has stood two days or thereabouts,
sandpaper with No. 2 paper, and fillup the larg-est
nailholes with white putty, or putty made
according to the first recipe,and colored.
Next put on the body (but not on the gears)
the first coat of lead. A suitable amount of
keg lead, say two pounds, is worked soft with
oil,and an equal amount of japan added. This
is thinned to the proper consistency with tur-pentine.
A rather light coat that will cover
the ground is all that is needed. It is well when
this coat is dry to go over all hardwood parts
and fill the seams with a putty made of equal
parts of dry lead and whiting, mixed with equal
parts of japan and rubbing varnish. This will
dry in a couple of hours, and the whole may be
sandpapered with the paper used on the priming
214 Blacksmithing and Horseshoeing.
coat. All that is necessary is to smooth the
paint, not to scour it all off.
For fine work we now follow with from two
to five coats of ''rough stuff." Fireproof
paint, Ohio paint, Grafton paint, and Enghsh
fillingare one and the same, though Enghsh
fillingcosts much more than the others. Mix
either of these with an equal weight of keg lead,
and add equal parts of brown japan and rubbing
varnish. When run through the mill looselyit
should be thinned to good working consistency
with turpentine. Dust the job carefully and
apply one coat after the other without sandpa-pering.
Apply only to the larger panels.
The wagon now receives the irons, the gears
having had only the priming.
If the gears are to be vermilion or any other
bright color,the first lead coat (put on after iron-ing)
should be slightlycolored with the same color.
This lead coat consists of keg lead mixed with
enough oil to permit its being worked up. Half
as much japan as oil is added, and the whole run
through the mill, when the paint is thin with
turpentine so that it will spread 'easily. Care
should be taken to cover the gears below as well
as on top, and finish up all bolts, nuts, etc,,
perfectly.
While the gear is drying, we may proceed to

216 Blacksmithing and Horseshoeing.
should be colored as before, and the paint laid
on smoothly and evenly.
We are now ready to paint the body. The
whole should be sandpapered with the finest
sandpaper. Sometimes a body color is laid on;
but in most cases the final color may be laid di-rectly
on the rough stuff. The color is mixed
with turpentine, and about two tablespoonfuls
of japan to a pint,with one tablespoonful of raw
oil.
A coat of color may be laid on the gears in
the same way. A second coat of color will fol-low
in a few hours, on both gear and body.
We nov/ rub the surface of the paint with
moss or curled hair, and apply a coat of rubbing
varnish mixed with the color. This coat should
not be slapped on, though it is to be rubbed
down.
The gears should be rubbed well before put-ting
on the first coat of color. Usually one
coat is sufficient,and when it has dried two or
three hours we may put on a heavy coat of rub-bing
varnish mixed with a little,color.
Allow the varnish coats two days to dry.
When the varnish coat is dry, it should be
rubbed with pulverized pumice, on the body,
while rubbing with curled hair will do for the
gears.

Carriage and Wagon Building. 217
To rub the body nicely,begin at the top and
work down. No. 12 or No. 14 pulverized pumice
is required, with woolen rags, water, sponge,
and chamois. Double the rag up, wet it,and
dip it in the pumice, and begin rubbing, bearing
on rather hard. You can tell by the touch
when the surface has been made sufficiently
smooth. When you have rubbed sufficiently,
wash well, and rub dry with the chamois. As
before, a small brush will be needed to get the
stone all out of corners, etc.
The gears are rubbed in the same way with
curled hair or moss.
Body and gears are now ready for striping.
The painting is complete, and varnishing alone
remains.
The Putty Method of Painting. A cheaper
method of paintingis by what is called the ''
put-ty"
process, which takes the place of rough
stuffing.
Apply the priming and the first coat of lead
as already described. Then mix keg lead v/ith
turpentine and japan to the consistency of a
stiff paste, adding a little of the color the vehicle
is to be painted. Put this onto a small portion
of the body (three or four panels) with a stiff
brush, and then, when the turpentine has evap-orated
and the color is quite dead, work it into
218 Blacksmithing and Horseshoeing.
all the pores of the wood with a broad-bladed
putty knife. Then scrape off clean all that has
not been taken up by the pores. When the
whole job has been covered, it may be set aside
to dry.
The gears may be treated in the same man-ner.
A piece of stout leather will serve for rub-bing
the putty coat into the spokes, etc.
When dry, sandpaper down nicely and apply
the color at once.
The Wood Filler Method. The wood filler
takes the place of the priming. It is put on the
framework before the panels are put in,and then
on the panels. Then the usual rough stuff is
put on, mixing it as follows: 3 parts Grafton
paint, 2 parts keg lead, 2 parts oil japan, 1 part
rubbing varnish. This is also put on the panels
before they are fitted. It makes a nicer job
around the fitting,and requires less labor.
After the filling,the gears are ironed, and all
rubbed down with No. 3 sandpaper. We then
put on a lead coat of keg lead, oil,japan, and
turpentine, and putty up all openings. Two
coats of lead with color in it should follow, and
then the color coat and color varnish, ready to
be mossed off.
Varnishing. To get a good varnish finish,a
uniform degree of heat should be maintained,
Carnage and Wagon Building. 2l9
which requires a heating apparatus in the var-nish
room. A self-feedingcoal stove may be
set up near the partition outside of the varnish
room, the partition at that place being sheet iron.
All the rubbing with water, etc., should be done
in the paint room, for no dust and no water
should ever be allowed on the floor of the var-nish
room.
The striping and lettering is done over the
first and only color varnish coat. Then comes a
coat of clear rubbing varnish, which must be
rubbed in the paint room with pulverized pumice
and water, as before described. When the body
has been returned to the varnish room, it should
be dusted, the ends of the duster being dipped
lightlyin a little varnish held in the hand and
then rubbed off so it will not stick.
For ordinary w^ork the flat bristle brush is
best.
In rubbing varnish, great care must be taken
that the pumice has no sand or grit in it; the
pail, water, rub-rags, chamois, etc., must be
perfectly clean, and of course the hands of the
varnishers must be thoroughly washed," and
not in the pail,either. The pumice should not
be allowed to dry on the surface, but should be
washed off frequently till the surface is quite
clean.
220 Blacksmithing and Horseshoeing.
As the varnisher lays on the varnish, he first
passes the wet sponge lightly over the work to
take off any remaining dust, and then does the
rough portions of a panel or the like first.
In rubbing, corners, angles, etc., need not be
touched, as there is danger of cutting through
the paint, and nothing is gained.
Put on plenty of varnish, and pick out any
specks that may appear, with sharpened whale-bone.
The first coat should stand at least two days,
and if possible four days, before being rubbed.
The rubbing is directed chieflyto getting out all
specks, etc. If the job is not a particular one,
curled hair rubbing will do. A second coat of
rubbing varnish is now added.
The third coat (of finish varnish) will be the
finishingcoat. When it has been laid on nicely
the job is done.
Ornamenting. As we nave already stated,
the ornamenting goes over the color varnish
coat.
For striping,small round brushes, known as
stripingpencils,are used. These are commonly
of camel's hair, though ox-hair brushes are good
for rough wagon striping. They range in size
from one-eighth inch up, and should be at least
two and a quarter 'inches long. If shorter.
Carriage arid Wagon Building. 221
it will be hard to make the stripe straight.
Striping is an art that must be learned, and
little can be said here which will help the ama-teur.
The pencil is held between the thumb
and forefinger,the other fingers being used to
steady the hand. The main thing is a good eye,
and plenty of practice.
A zinc palette is probably the best, as it can
easily be kept clean. It may be cut from any
smooth piece of zinc.
Small tin cups will do to hold the color.
After use, the pencils should be well cleaned
in turpentine, and they should be kept in a dust-
tight box with a piece of glass at the bottom on
which to spread the pencils. It is a good idea
to grease them with sweet oil after cleaning.
Colors for striping may be m^ixed the same as
body colors. Tube colors are not recommended,
as they are too '^ short ^'
"do not flow readily
from the brush.
Ornamental striping,or fancy stripingrequir-ing
turns, etc., must be done with a short brush,
say half an inch long.
Nowadays it is hardly worth while to attempt
any letteringor ornamenting other than striping,
since it is posssibleto purchase transfers or decal-
comaniawith all kinds of lettering,pictures,etc.,
most perfectly executed and easily varnished

222 Blacksmithing and Horseshoeing.
on; or patterns, stencils, etc., may be used
with far better results than can be secured by
handwork.
A homemade transfer may be made as follows :
Paint the design on the gummed side of a sheet
of gummed paper, hke that used for postage
stamps. When dry, press down upon this another
gummed sheet that has been evenly moistened
and let it dry between the leaves of a book.
When dry, dampen the back of the sheet on
which the drawing was made, and when soft
enough remove it. The design is transferred to
the panel by transfer varnish or rubbing var-nish,
and when dry, the paper dampened and
removed as before. This is much easier than
trying to do the work on the panel, and you can
experiment till you get a good drawing.
THE END.
H 52-79