Organizing Strategies Using Photoshop...
43
Organizing Strategies Using Photoshop Lightroom Andrew Rodney The Digital Dog www.digitaldog.net [email protected] This PDF with associated notes can be downloaded from http://www.digitaldog.net / or by emailing me at [email protected] Use the email address above if you need a PDF copy of this presentation. ©2009 Andrew Rodney
Transcript of Organizing Strategies Using Photoshop...
Organizing Strategies Using Photoshop Lightroom
Andrew Rodney The Digital [email protected]
This PDF with associated notes can be downloaded from http://www.digitaldog.net/ or by
emailing me at [email protected]
Use the email address above if you need a PDF copy of this presentation.
©2009 Andrew Rodney

Seminar Goals
! Discuss organizing strategies for your image collection. ! Define Raw and how it differs from Rendered imagery.! Define metadata editing and how it differs from pixel editing.! Discuss best practices for rendering and then pixel editing.! Rendered image correction in Lightroom versus Photoshop.
! This PDF with associated notes can be downloaded from http://www.digitaldog.net/ or by emailing me at [email protected]

! Ideally one (you can find all images). ! Downside is speed and catalog size. What’s the largest
drive you plan to use in the foreseeable future and can you store all data on this drive? Are you willing to purchase multiple drives for back up?
! Smaller catalogs: Can backup to smaller storage media, even DVD.
! Consider using LR’s Export/Import catalog command to combine or split the data (will demo).
! If using multiple catalogs, export/import presets, keywords, keep note of custom library settings (color labels, Collections etc).
Catalogs: One or more?
One problem with multiple catalogs on multiple drives is keeping all the user preferences updated. Show G-Tech drive and folder structures here.
One Catalog allows you to find all images, clone (backup) to other drives for location work. For this reason, and due to the large size of images, you may wish to keep a separate drive that contains only your Lightroom data files* and your images, nothing else. Then, smart backup applications that only copy newer data can do so without a loss of speed. At this time, portable FireWire/USB drives that are buss powered max out at 500 Gigs. Until your catalog approaches this limit, you may wish to consider one catalog and multiple sets of such drives for backup. *”xxx”Library-3 Previews.lrdata Contains the previews generated by LR. This document can get very large but saves time in viewing images at higher magnification. You can set the general preferences to delete these thumbnails after a fixed amount of time. If you have fewer images and lots of storage space, you might want to keep these thumbnails forever, or, wait as they are rebuilt if initially deleted. “xxx”Library-3.lrcat. The actual Lightroom database file. This gets backed up optionally if so configured in Preferences. Lightroom Settings. Both original and user created settings for such items as Presets, Web gallery templates, Export presets etc. A good idea to copy this data to the drive where images reside for backup and usage. IF you allow this data to be stored locally on your computer, no problem. But you may take a cloned drive on location and have these files back on the original machine. For this reason, you may wish to set the preferences for saving such settings WITH the Catalog (Store Presets with Catalog) found in Preferences>Presets. Note that the “Show Preset Folder” in preferences takes you to the local drive that contains these settings. Ensure that this folder and any copies (on a local drive) are up to date and in sync.

! 1.Make descriptive folder of images on hard drive.! 2.Copy images into this folder from card. This is for those not
comfortable with where LR “stores” images.! 3.Import into Lightroom (add keywords* apply a preset
rendering*). Note, size of embedded preview? 1:1 or Standard? Add metadata!
! 4.Batch Rename*.! 5.Convert to DNG (more on why later).! 6.Quick Develop multiple images (to look better).! 7.Rating: Colors, stars or flags (Picks, Rejects): P for Pick. X
for Reject. U is reset (neutral).! Delete rejects. May batch rename again.
Overview of ingestion tasks
*Optional at this stage of ingestion
YOMV: Your Order May Vary.
This is for those not comfortable with where LR “stores” the docs.
Some people NEVER delete an image, even if its a black frame. Others do. Its your call. But If you shoot a high volume of images, this can add up to a bulging catalog. Consider keeping these images outside the LR catalog structure and backed up elsewhere.
Preview size: you can pay me now or later. Do you want the import to be faster but editing (and viewing full rez) slower? It may not pay to build 1:1 previews until you edit down the images, otherwise youʼre filling the preview database with data it doesnʼt need and spending time waiting on such preview creations.

! Use card reader to copy files from cards to hard drive*. Some make a second copy “just in case” before formatting card.
! Once Lightroom builds high rez previews of this folder, you can format the card in-camera. LR/DNG conversion will help verify integrity of Raws while building previews.
! Do not format card until this step is verified!! Folder copied to hard drive can be archived to CD/DVD/Drive
at this step (2nd backup).This folder has high quality previews and sidecar files (or DNGs) so anyone reading this disk will have access to previews and metadata.
Copy from card to hard drive*Build Previews
* For those who are not yet comfortable with where their images reside in LR.
If you are paranoid about your images (and you have every reason to be), consider saving two sets of Raws at this point. You may wish to point Lightroom (LR) to the folder of Raws before duplicating the 2nd set so it can build high quality thumbnails. Initial thumbnails are built from the camera data and read by ACR or LR. Then ACR reads the Raw data and builds high quality thumbnails based on itʼs current settings. This also verifies the Raw data. Since this is time consuming, you only want to do this once. After this step, duplicating the folder will duplicate the cache files (thumbnails) assuming you have set Bridge for Distributed Cache (recommended). Lightroom thumbnails are saved in the database. This way, you only have to build the thumbnails once and should you copy this folder and provide to others, they will not need to rebuild the thumbnails (using settings you may not wish to represent your photos) Add Metadata such as copyright information and keywords. Work with that folder in the next steps and eventually convert to .DNG with all the data enclosed in this copy. The benefit of .DNG is you can now produce a set of Raws with all the, metadata, and ACR corrections “embedded” in each file. At this point you can archive this set of Raws on a CD or DVD.
Using Import to DNG AND using the option to backup files will produce a set of DNGs and a backup of the original Raw images. This might be useful if you really, really think you want the proprietary Raw data for future use. This is a better option than using the DNG conversion with the Raw original embedded since each DNG will be much larger.
Folders-Desktop and LR
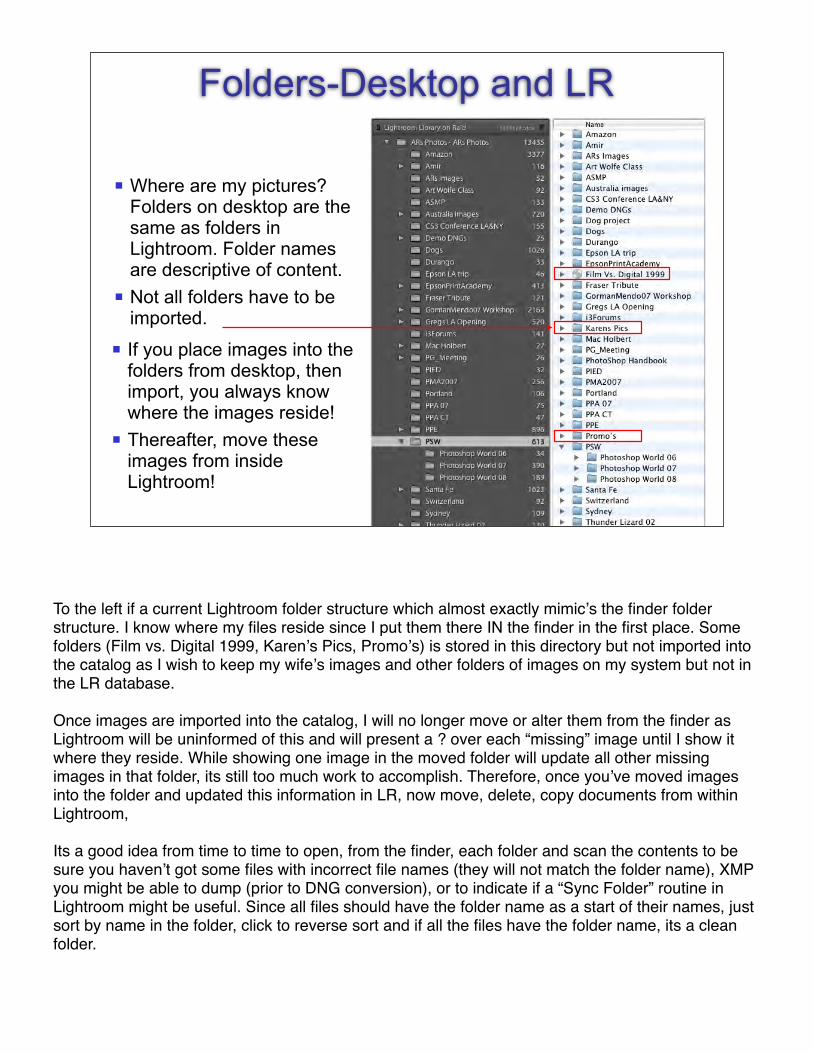
! Where are my pictures? Folders on desktop are the same as folders in Lightroom. Folder names are descriptive of content.
! Not all folders have to be imported.
! If you place images into the folders from desktop, then import, you always know where the images reside!
! Thereafter, move these images from inside Lightroom!
To the left if a current Lightroom folder structure which almost exactly mimicʼs the finder folder structure. I know where my files reside since I put them there IN the finder in the first place. Some folders (Film vs. Digital 1999, Karenʼs Pics, Promoʼs) is stored in this directory but not imported into the catalog as I wish to keep my wifeʼs images and other folders of images on my system but not in the LR database.
Once images are imported into the catalog, I will no longer move or alter them from the finder as Lightroom will be uninformed of this and will present a ? over each “missing” image until I show it where they reside. While showing one image in the moved folder will update all other missing images in that folder, its still too much work to accomplish. Therefore, once youʼve moved images into the folder and updated this information in LR, now move, delete, copy documents from within Lightroom,
Its a good idea from time to time to open, from the finder, each folder and scan the contents to be sure you havenʼt got some files with incorrect file names (they will not match the folder name), XMP you might be able to dump (prior to DNG conversion), or to indicate if a “Sync Folder” routine in Lightroom might be useful. Since all files should have the folder name as a start of their names, just sort by name in the folder, click to reverse sort and if all the files have the folder name, its a clean folder.
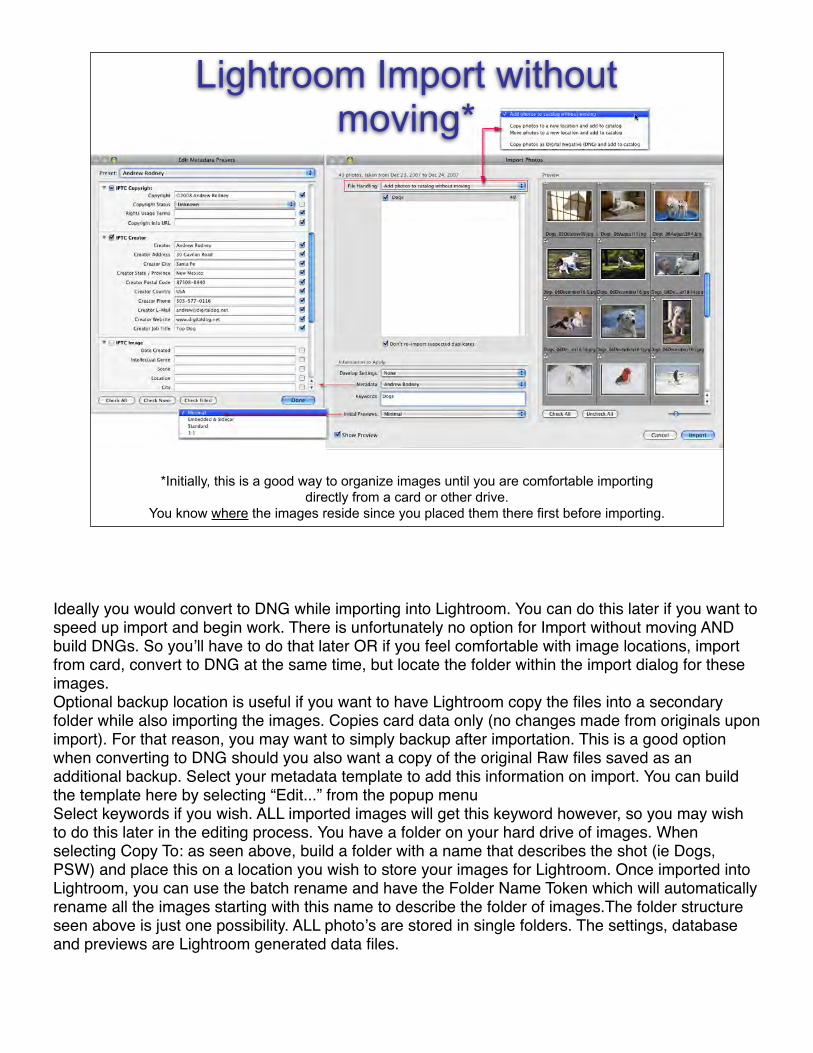
Lightroom Import without moving*
*Initially, this is a good way to organize images until you are comfortable importing directly from a card or other drive.
You know where the images reside since you placed them there first before importing.
Ideally you would convert to DNG while importing into Lightroom. You can do this later if you want to speed up import and begin work. There is unfortunately no option for Import without moving AND build DNGs. So youʼll have to do that later OR if you feel comfortable with image locations, import from card, convert to DNG at the same time, but locate the folder within the import dialog for these images. Optional backup location is useful if you want to have Lightroom copy the files into a secondary folder while also importing the images. Copies card data only (no changes made from originals upon import). For that reason, you may want to simply backup after importation. This is a good option when converting to DNG should you also want a copy of the original Raw files saved as an additional backup. Select your metadata template to add this information on import. You can build the template here by selecting “Edit...” from the popup menuSelect keywords if you wish. ALL imported images will get this keyword however, so you may wish to do this later in the editing process. You have a folder on your hard drive of images. When selecting Copy To: as seen above, build a folder with a name that describes the shot (ie Dogs, PSW) and place this on a location you wish to store your images for Lightroom. Once imported into Lightroom, you can use the batch rename and have the Folder Name Token which will automatically rename all the images starting with this name to describe the folder of images.The folder structure seen above is just one possibility. ALL photoʼs are stored in single folders. The settings, database and previews are Lightroom generated data files.

Lightroom Import-Copy/MoveImporting from a card or drive provides more options. But you need to know where you want
copied images to reside!
Configure File Handling: Copy (optionally convert to DNG) from Raws on hard drive and import.
Organize popup providesfolder structure options. Here I import an existing folder structure NOT one from a card. I want to maintain this structure!
This is usually what you see on a Card, folder structure not so useful.
Copy To: Select Folder from popup the location of the folder to copy photos.
File Handling controls the rest of the dialog seen above. Import from current location will build a pointer in the Lightroom database to the images where they reside on your hard drive. You can move images or copy them as well. The organize popup menu provides control over the folder structure. Often you will want to use the “Into one folder” option. KISS. Keep image storage simple. Always move files and folders form WITHIN Lightroom so it knows where the images reside on your drives!!! Unless you have lots of differing images on the card, in many folders, I prefer to import into a single folder, then move the images appropriately within Lightroom. I donʼt want LR making folders for me (By date as seen above).

Adding MetaDataApply these templates to selected images in
Bridge or Lightroom.Camera metadata recorded in
Lightroom.
You can use the same metadata templates in other Adobe applications. For example, in a PDF of this presentation. In Acrobat, go into “Document Properties” and click on the Description tab. Click on the Additional Metadata button to call up the XMP dialog seen above from Photoshop. You can do this in Bridge to PDFs and other documents of course.
These templates can be accessed when importing images into the Lightroom Library as well. You can then search for images based on any of this metadata. Metadata can be used to identify images in the Slideshow, Print and Web modules. You can even access this metadata for use in renaming images.
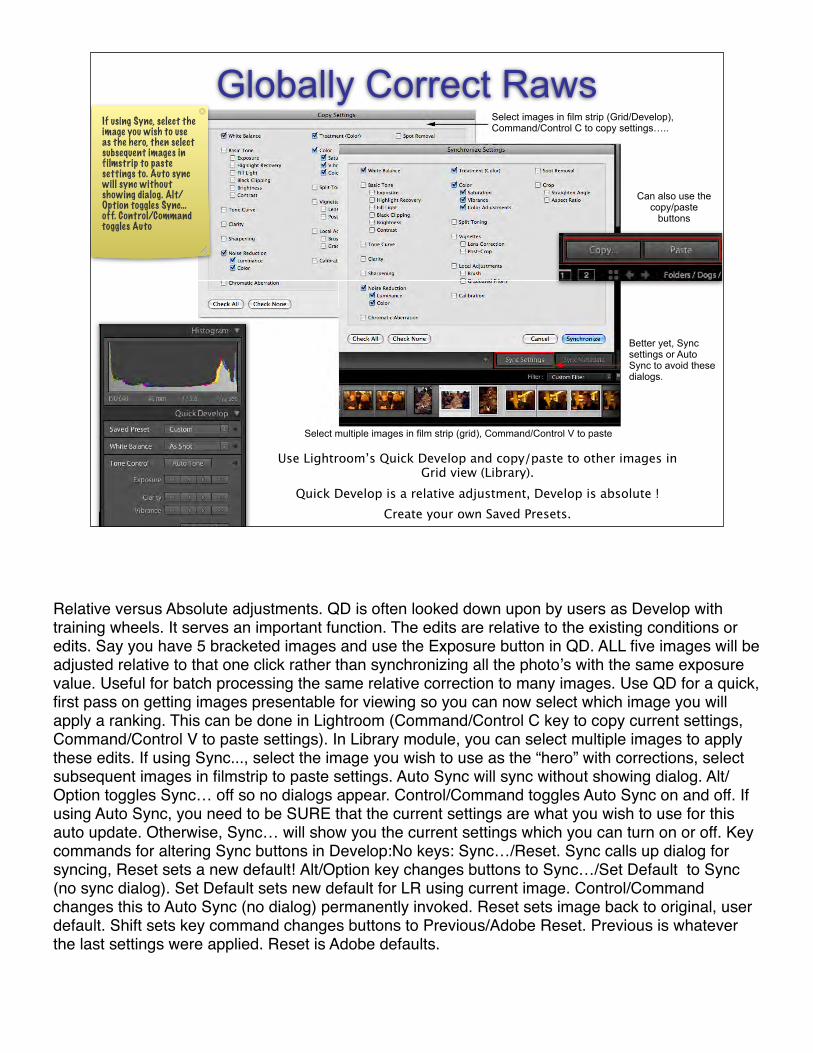
Globally Correct Raws
Use Lightroom’s Quick Develop and copy/paste to other images in Grid view (Library).
Quick Develop is a relative adjustment, Develop is absolute !Create your own Saved Presets.
Select multiple images in film strip (grid), Command/Control V to paste
Select images in film strip (Grid/Develop), Command/Control C to copy settings…..
Better yet, Sync settings or Auto Sync to avoid these dialogs.
If using Sync, select the image you wish to use as the hero, then select subsequent images in filmstrip to paste settings to. Auto sync will sync without showing dialog. Alt/Option toggles Sync… off. Control/Command toggles Auto
Can also use the copy/paste
buttons
Relative versus Absolute adjustments. QD is often looked down upon by users as Develop with training wheels. It serves an important function. The edits are relative to the existing conditions or edits. Say you have 5 bracketed images and use the Exposure button in QD. ALL five images will be adjusted relative to that one click rather than synchronizing all the photoʼs with the same exposure value. Useful for batch processing the same relative correction to many images. Use QD for a quick, first pass on getting images presentable for viewing so you can now select which image you will apply a ranking. This can be done in Lightroom (Command/Control C key to copy current settings, Command/Control V to paste settings). In Library module, you can select multiple images to apply these edits. If using Sync..., select the image you wish to use as the “hero” with corrections, select subsequent images in filmstrip to paste settings. Auto Sync will sync without showing dialog. Alt/Option toggles Sync… off so no dialogs appear. Control/Command toggles Auto Sync on and off. If using Auto Sync, you need to be SURE that the current settings are what you wish to use for this auto update. Otherwise, Sync… will show you the current settings which you can turn on or off. Key commands for altering Sync buttons in Develop:No keys: Sync…/Reset. Sync calls up dialog for syncing, Reset sets a new default! Alt/Option key changes buttons to Sync…/Set Default to Sync (no sync dialog). Set Default sets new default for LR using current image. Control/Command changes this to Auto Sync (no dialog) permanently invoked. Reset sets image back to original, user default. Shift sets key command changes buttons to Previous/Adobe Reset. Previous is whatever the last settings were applied. Reset is Adobe defaults.

Rate and Sort! Time to edit the picks from the files you can delete. Use Pick, Rejected and Neutral tags, then Ratings (0-5 key adds stars) or Colors Tags. Then you can view subsets using “Filters” area to show any combination. Build Collections.
! t
I use Picks/Rejects to do the rough edit. Then I might use starts on the Picks to further whittle down the best images. The Filters can be used to show and hide any subset of ratings used here. You can also build Collections of images. Like the iTunes PlayList, youʼre simply making virtual folders of images that point to the originals.

Batch Rename! Just one
possibility for batch renaming all files to make identifying them in the future easier.
! Dialog is sticky (remembers settings).
In Lightroom, I use the Folder name I place images into for file name generation.
Some like to start file names with the date but I like looking at the name that describes the images. In this case, shots the Epson Print Academy in New York. I start with Print Academy New York which is the folder name Iʼve placed the Raws. I then want the date and a sequence of numbers to follow. This makes each image name quite unique! The text (-) inserted in line 2 and 6 is just to separate the name and date and sequence numbers. The last data added is the all important file extension. The original file was called MG_0797.ACR2, not at all descriptive. The new file name is Print Academy NY_07January28(date)_0001(sequence). When the time comes that I will convert these files to .DNG, the name will remain the same but the extension will be updated (.DNG instead of .ACR2). Now I can archive the DNGs.
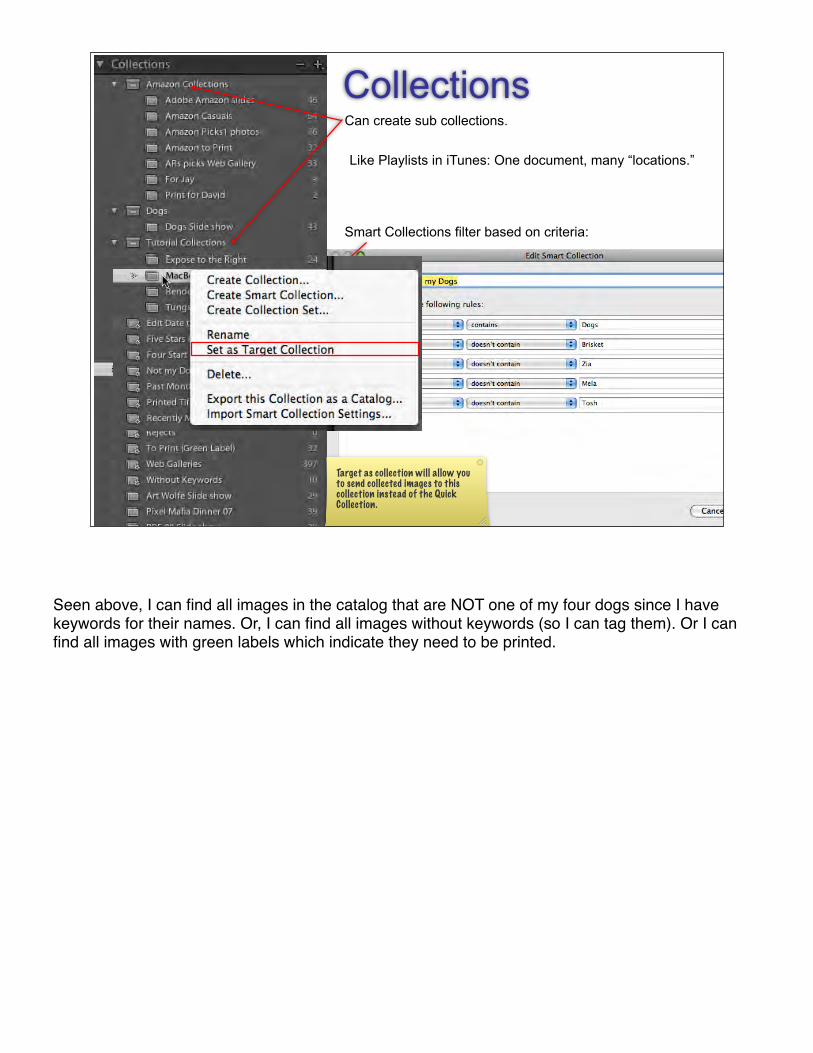
Collections
Like Playlists in iTunes: One document, many “locations.”
Smart Collections filter based on criteria:
Can create sub collections.
Target as collection will allow you to send collected images to this collection instead of the Quick Collection.
Seen above, I can find all images in the catalog that are NOT one of my four dogs since I have keywords for their names. Or, I can find all images without keywords (so I can tag them). Or I can find all images with green labels which indicate they need to be printed.

Develop Overview
! 1. Crop. You may wish to do this on a virtual copy.! 2. Main developing (top down, left right) Do Capture sharpen
here or use Photoshop, not both. ! 3. Do all global tone and color work, appropriate selective
work with new version 2.0 tools.! 4. Export or Edit in Photoshop and stack with original. Set
your preferences first! ProPhoto RGB, 16-bit TIFF. Ideally this is the “line in the sand” after which you will no longer conduct metadata processing in LR.
Your order vary but this is a basic outline you may wish to follow in a develop workflow.
Photoshop Overview
! 1.Run Noise Reduction if necessary.! 2.Capture Sharpen using Photokit Sharpener if NOT done in
LR.! 3.Pixel retouching (stuff you can’t do in LR).! 4.Setup a soft proof. Pick paper profile you’ll print to,
rendering intent, etc.! 5.Duplicate and edit a copy based on printer apply edits to
adjustment layers (Curves, Hue/Sat).! 6.Size (Image Size) desired print size. ! 7.Output sharpen using PhotoKit Sharpener.! 8.Print (Photoshop or back in Lightroom).
About sharpening: http://www.creativepro.com/story/feature/20357.html
PhotoKit Sharpener info: http://www.pixelgenius.com/sharpener/index.html
10% discount code for students: CMS4PHOTOG
Lightroomʼs Develop module and Print module use capture and output sharpening based on Pixel Geniusʼs Photoshop plug-in.
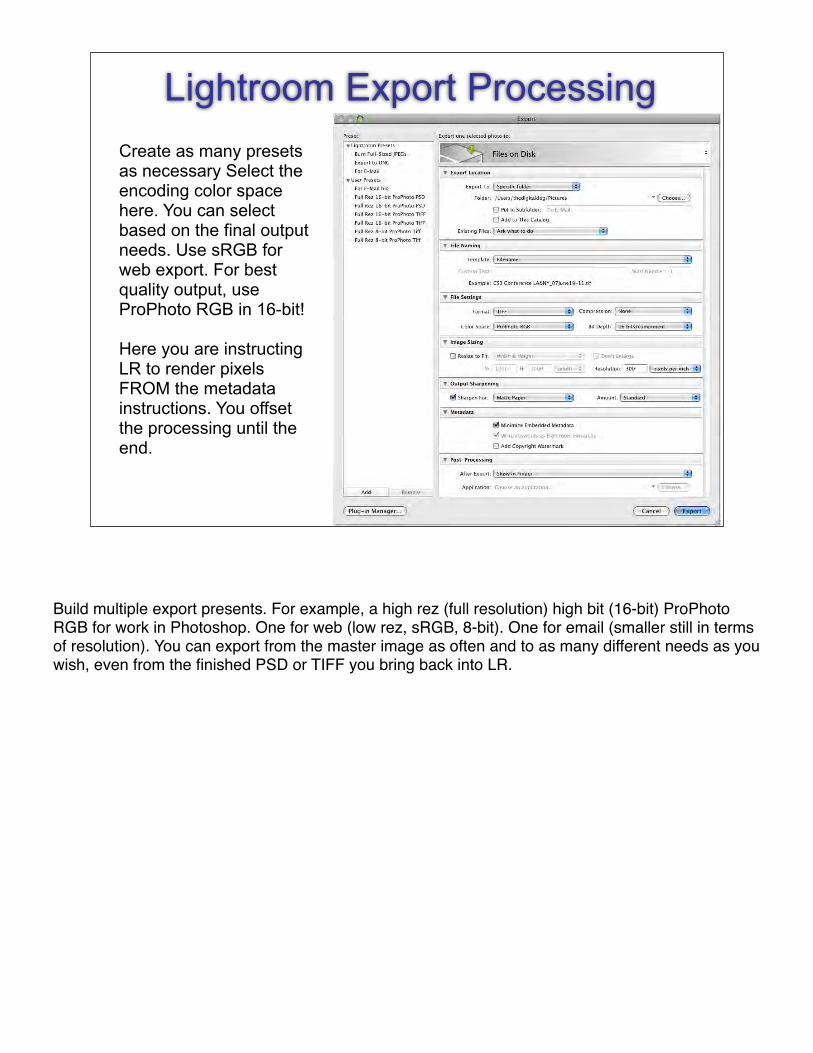
Lightroom Export ProcessingCreate as many presets as necessary Select the encoding color space here. You can select based on the final output needs. Use sRGB for web export. For best quality output, use ProPhoto RGB in 16-bit!
Here you are instructing LR to render pixels FROM the metadata instructions. You offset the processing until the end.
Build multiple export presents. For example, a high rez (full resolution) high bit (16-bit) ProPhoto RGB for work in Photoshop. One for web (low rez, sRGB, 8-bit). One for email (smaller still in terms of resolution). You can export from the master image as often and to as many different needs as you wish, even from the finished PSD or TIFF you bring back into LR.
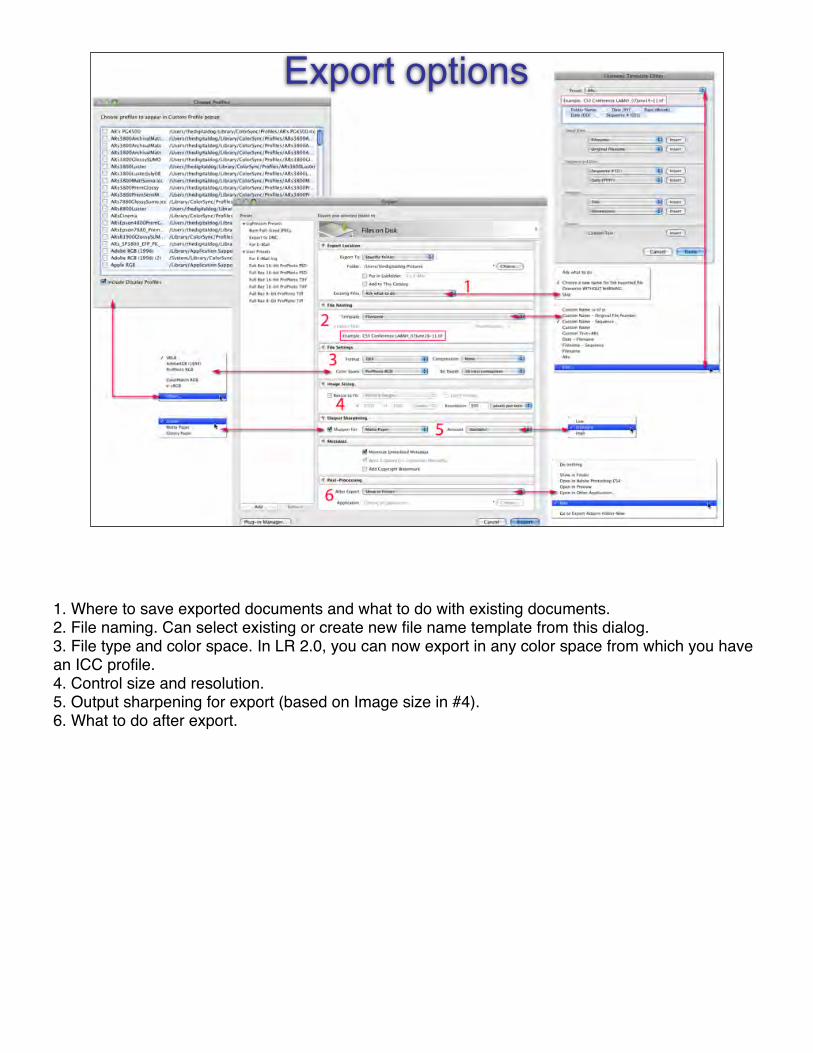
Export options
1. Where to save exported documents and what to do with existing documents.2. File naming. Can select existing or create new file name template from this dialog.3. File type and color space. In LR 2.0, you can now export in any color space from which you have an ICC profile.4. Control size and resolution.5. Output sharpening for export (based on Image size in #4).6. What to do after export.

Just as you did with the export presets, select the encoding color space for editing in Photoshop and file naming. New in 2.0 is the ability to select multiple additional editors.
External Editors
Best practice here would be to export highest resolution image, widest gamut, 16-bit data.
See: http://staging.digitalphotopro.com/tech/the-bit-depth-decision.html

Which RGB Working (editing) Spaces for export?
Ideally the working space can contain all captured colors and colors you wish to output. The “big 3” are:
sRGB: Smallest Gamut. Good for the web. Gamut of most displays.Adobe RGB (1998): Useful gamut for many output needs but larger than the gamut of most displays.ProPhoto RGB: Excellent in Raw workflow's. Not appropriate for 8-bit editing. Many possible colors outside display gamut!
While two of these working spaces can contain colors you cannot see on your display, you will be working with devices that can reproduce these colors.
Also see “The role of working space in Adobe applications”: http://www.adobe.com/digitalimag/pdfs/phscs2ip_colspace.pdf
ProPhoto RGB is supported in Adobe Camera Raw and Iʼve been using more and more as often I find I have images that exceed the gamut of Adobe RGB (1998). I encode the data into ProPhoto RGB in 16-bit.
See: http://www.adobe.com/digitalimag/pdfs/phscs2ip_colspace.pdf

Lightroom Print Processing
Beware of using Draft Printing expect for ‘quick and dirty’ output like proof sheets. You may find color inconsistencies. Draft mode uses the current embedded preview, not necessarily the rendering you select unless you build a high quality preview (1:1).
Preview Quality set to High produces ProPhoto RGB as are all 1:1 previews. Standard Previews are in Adobe RGB (1998). Original previews are assumed to be in sRGB. 1:1 previews will not be deleted unless
your chosen standard-sized preview is less than half the size of the full-sized preview.
Why is the Lightroom preview folder so big, even after purging the 1:1 previews?
Ian Lyons - 05:18am Aug 18, 2008 Pacific1:1 or full-size previews take up a large amount of HD space, often many 10’s of GB’s. This is why building them on demand is an alternative to building them up front, and why you have options for auto or manually purging them. That said, it may not always be possible to delete 1:1 previews - more later.
Standard-sized previews are based on the pixel size option you chose in Catalog Settings. You have 4 choices: 1024, 1440, 1680 and 2048. If all you want is standard-sized then choose a size equal to or slightly less than your screen size. Lr also builds smaller versions at the same time. These are used for the thumbnail, 1:2, 1:3 and 1:4 zoom levels. Adobe call this the "preview pyramid".
1:1 previews will not be deleted unless your chosen standard-sized preview is less than half the size of the full-sized preview. For example, you have images with pixel dimensions of 3072 by 2048 pixels (6MP camera such as Canon 10D) and have selected 1680 pixels for standard-sized previews. Since a 1680 pixel preview is more than half the size of the original the full-sized preview will be kept, even after using the purge 1:1 preview command. Had you chosen 1440 pixel for standard-sized previews then the full-sized would have been purged (i.e. 3072/2=1536, which is greater than 1440). Now take the example of a larger camera, say a 8MP camera such as the Canon 1DMKII with an image size of 3504 by 2336 pixels. With the standard-sized set at 1680 pixels the full-size will again be purged (i.e. 3504/2=1752 pixels, which is greater than 1680 pixels).
Another thing worth mentioning - Lightroom will usually delay purging previews for deleted images until after the application has been closed and reopened, even then it might take a few minutes to clear the purged previews. The idea here is to ensure the previews don’t get deleted whilst there’s still a chance that they may be needed (e.g. you removed images by mistake then use Undo

Virtual Copies
! One original, many variations described by metadata:

Adobe ACR Processing DifferencesSelect the encoding Color space here. You can select based on
the final output needs. Use sRGB for web export. For best quality output, use ProPhoto RGB in 16-bit!
Unlike Lightroom, the RGB values and Histogram are based on the current encoding color space (sRGB below).
In Lightroom, the RGB values and Histogram are based on Melissa RGB (ProPhoto RGB, sRGB 2.2
tone curve). The values are in percentages, not RGB numbers like ACR.
Clipping indicators:Black and white are tone clipping. Colors are saturation clipping based on the current encoding color space
Red indicates Red clippingGreen indicates Green clipping Blue indicates Blue clipping
Yellow indicates Red and Green Clip Magenta indicates Red and Blue Clip Cyan indicates Green and Blue Clip
Workflow Option link
Why DNG?
Aside from removing the proprietary issues of camera generated Raws, the advantages are:
! No Sidecar files to lose.! Smaller document size on disk*.! Large embedded previews (select this in Preferences>Import:
Convert to DNG Preferences).! Verification of data integrity. ! Open document standards.
* Not if you also embed the original Raw within the DNG. This is where the backup to additional drive upon Import might be useful when Importing and converting to DNG at the same time. The backup selected will copy the proprietary Raws, not the newer DNGs. However, these Raws will have no LR data from import (metadata, previews etc). They are simply copied “as is”.
Also see: http://www.ppmag.com/reviews/200709_adobedng.pdf
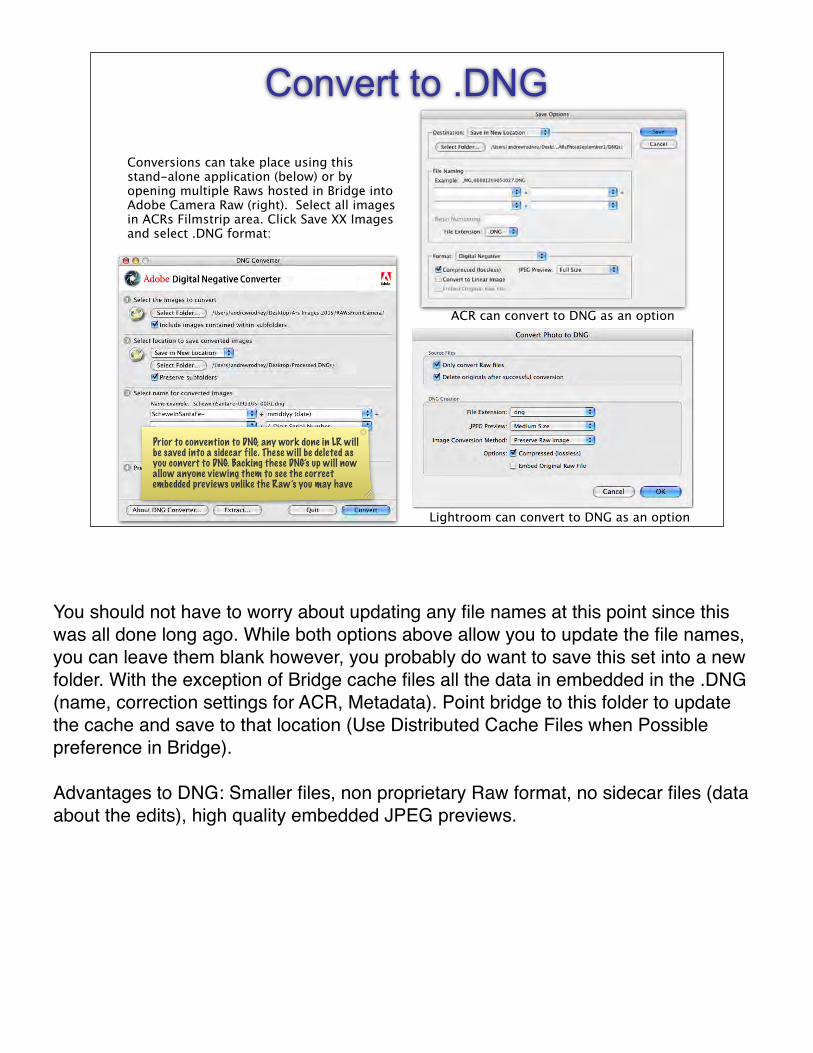
Convert to .DNG
Conversions can take place using this stand-alone application (below) or by opening multiple Raws hosted in Bridge into Adobe Camera Raw (right). Select all images in ACRs Filmstrip area. Click Save XX Images and select .DNG format:
Lightroom can convert to DNG as an option
Prior to convention to DNG, any work done in LR will be saved into a sidecar file. These will be deleted as you convert to DNG. Backing these DNG’s up will now allow anyone viewing them to see the correct embedded previews unlike the Raw’s you may have
ACR can convert to DNG as an option
You should not have to worry about updating any file names at this point since this was all done long ago. While both options above allow you to update the file names, you can leave them blank however, you probably do want to save this set into a new folder. With the exception of Bridge cache files all the data in embedded in the .DNG (name, correction settings for ACR, Metadata). Point bridge to this folder to update the cache and save to that location (Use Distributed Cache Files when Possible preference in Bridge).
Advantages to DNG: Smaller files, non proprietary Raw format, no sidecar files (data about the edits), high quality embedded JPEG previews.

DNG Profile Editor
! New tool to build “look profiles,” renderings you can apply separate from existing tools on multiple images.
! Ability to “match” in camera conversions to JPEG (Canon and Nikon only at this time).
! Ability to shoot Macbeth target and build custom profiles that are more “colorimetrically” correct (no more slow Photoshop scripts).
! This is an expert tool, so don’t access until you feel comfortable.
See: http://labs.adobe.com/wiki/index.php/DNG_Profileshttp://labs.adobe.com/wiki/index.php/DNG_Profiles_FAQ#WhatIsNewCM

To apply a custom profile to all NEW imported images, option click on Reset to
toggle it to “Set Default”
The new profile will be used for ALL imported images from the serial numbered camera IF
“Make Defaults to specific camera ISO
settings” seen here is OFF. Otherwise the
profile is applied based on the ISO of the current image.
About Raw Data and best practices for Raw rendering

What Is Raw?
! Most single shot digital cameras use CCD’s or CMOS chips which are unable to “see” true color.
! These chips are Monochromatic. ! Color is interpolated (during
demosaicing). The chips have a matrix of colored filters over each individual sensor.
! Multi-shot and scanning backs produce true color data much like a scanner using a trilinear CCD.
A Bayer Pattern
Definition of demosaicing from http://electronics.howstuffworks.com/digital-camera13.htm:
Digital cameras use specialized demosaicing algorithms to convert the mosaic of separate colors into an equally sized mosaic of true colors. The key is that each colored pixel can be used more than once. The true color of a single pixel can be determined by averaging the values from the closest surrounding pixels.
Also see:http://en.wikipedia.org/wiki/Demosaicing
What Is Raw?
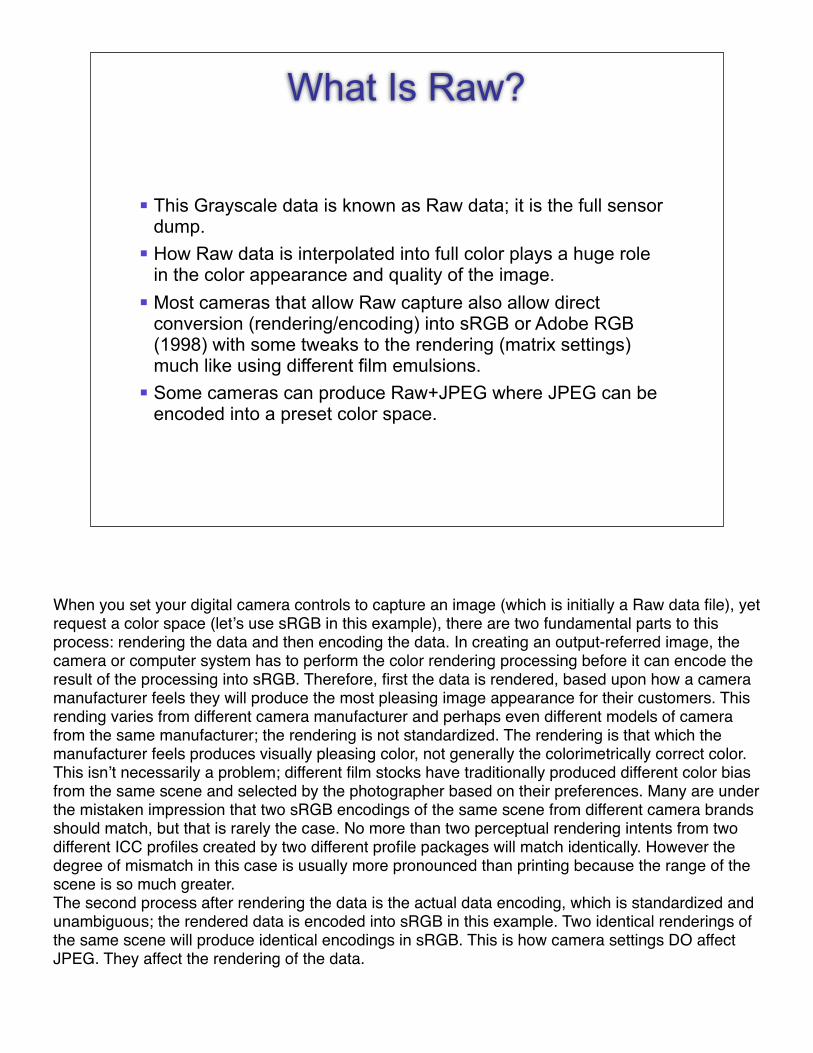
! This Grayscale data is known as Raw data; it is the full sensor dump.
! How Raw data is interpolated into full color plays a huge role in the color appearance and quality of the image.
! Most cameras that allow Raw capture also allow direct conversion (rendering/encoding) into sRGB or Adobe RGB (1998) with some tweaks to the rendering (matrix settings) much like using different film emulsions.
! Some cameras can produce Raw+JPEG where JPEG can be encoded into a preset color space.
When you set your digital camera controls to capture an image (which is initially a Raw data file), yet request a color space (letʼs use sRGB in this example), there are two fundamental parts to this process: rendering the data and then encoding the data. In creating an output-referred image, the camera or computer system has to perform the color rendering processing before it can encode the result of the processing into sRGB. Therefore, first the data is rendered, based upon how a camera manufacturer feels they will produce the most pleasing image appearance for their customers. This rending varies from different camera manufacturer and perhaps even different models of camera from the same manufacturer; the rendering is not standardized. The rendering is that which the manufacturer feels produces visually pleasing color, not generally the colorimetrically correct color. This isnʼt necessarily a problem; different film stocks have traditionally produced different color bias from the same scene and selected by the photographer based on their preferences. Many are under the mistaken impression that two sRGB encodings of the same scene from different camera brands should match, but that is rarely the case. No more than two perceptual rendering intents from two different ICC profiles created by two different profile packages will match identically. However the degree of mismatch in this case is usually more pronounced than printing because the range of the scene is so much greater.The second process after rendering the data is the actual data encoding, which is standardized and unambiguous; the rendered data is encoded into sRGB in this example. Two identical renderings of the same scene will produce identical encodings in sRGB. This is how camera settings DO affect JPEG. They affect the rendering of the data.
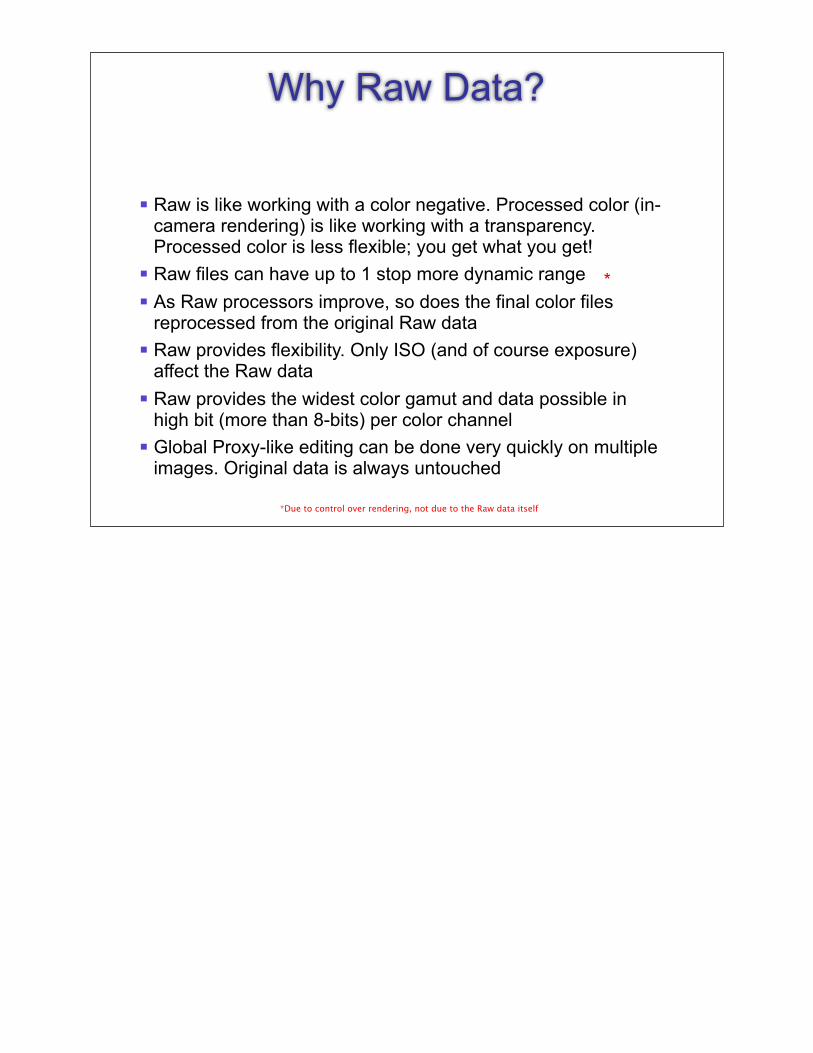
! Raw is like working with a color negative. Processed color (in-camera rendering) is like working with a transparency. Processed color is less flexible; you get what you get!
! Raw files can have up to 1 stop more dynamic range! As Raw processors improve, so does the final color files
reprocessed from the original Raw data! Raw provides flexibility. Only ISO (and of course exposure)
affect the Raw data! Raw provides the widest color gamut and data possible in
high bit (more than 8-bits) per color channel! Global Proxy-like editing can be done very quickly on multiple
images. Original data is always untouched
Why Raw Data?
*Due to control over rendering, not due to the Raw data itself
*
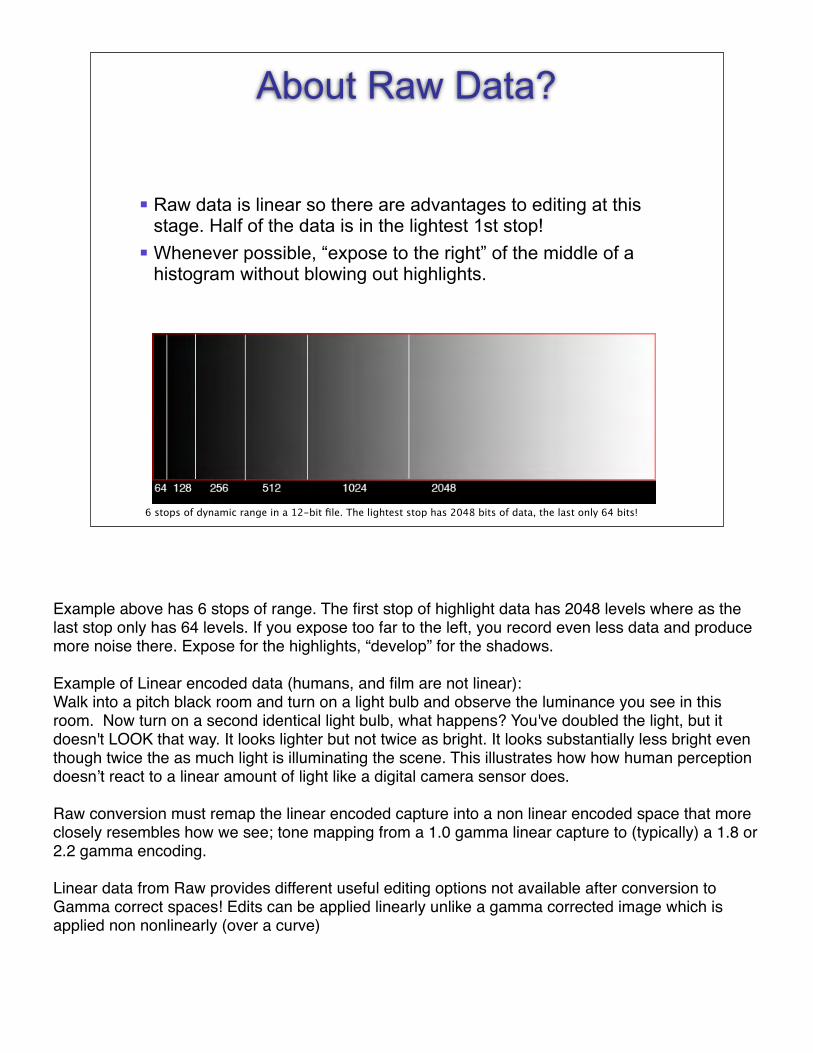
! Raw data is linear so there are advantages to editing at this stage. Half of the data is in the lightest 1st stop!
! Whenever possible, “expose to the right” of the middle of a histogram without blowing out highlights.
About Raw Data?
6 stops of dynamic range in a 12-bit file. The lightest stop has 2048 bits of data, the last only 64 bits!
Example above has 6 stops of range. The first stop of highlight data has 2048 levels where as the last stop only has 64 levels. If you expose too far to the left, you record even less data and produce more noise there. Expose for the highlights, “develop” for the shadows.
Example of Linear encoded data (humans, and film are not linear): Walk into a pitch black room and turn on a light bulb and observe the luminance you see in this room. Now turn on a second identical light bulb, what happens? You've doubled the light, but it doesn't LOOK that way. It looks lighter but not twice as bright. It looks substantially less bright even though twice the as much light is illuminating the scene. This illustrates how how human perception doesnʼt react to a linear amount of light like a digital camera sensor does.
Raw conversion must remap the linear encoded capture into a non linear encoded space that more closely resembles how we see; tone mapping from a 1.0 gamma linear capture to (typically) a 1.8 or 2.2 gamma encoding.
Linear data from Raw provides different useful editing options not available after conversion to Gamma correct spaces! Edits can be applied linearly unlike a gamma corrected image which is applied non nonlinearly (over a curve)
“Expose to the Right*” isn’t about over-exposure
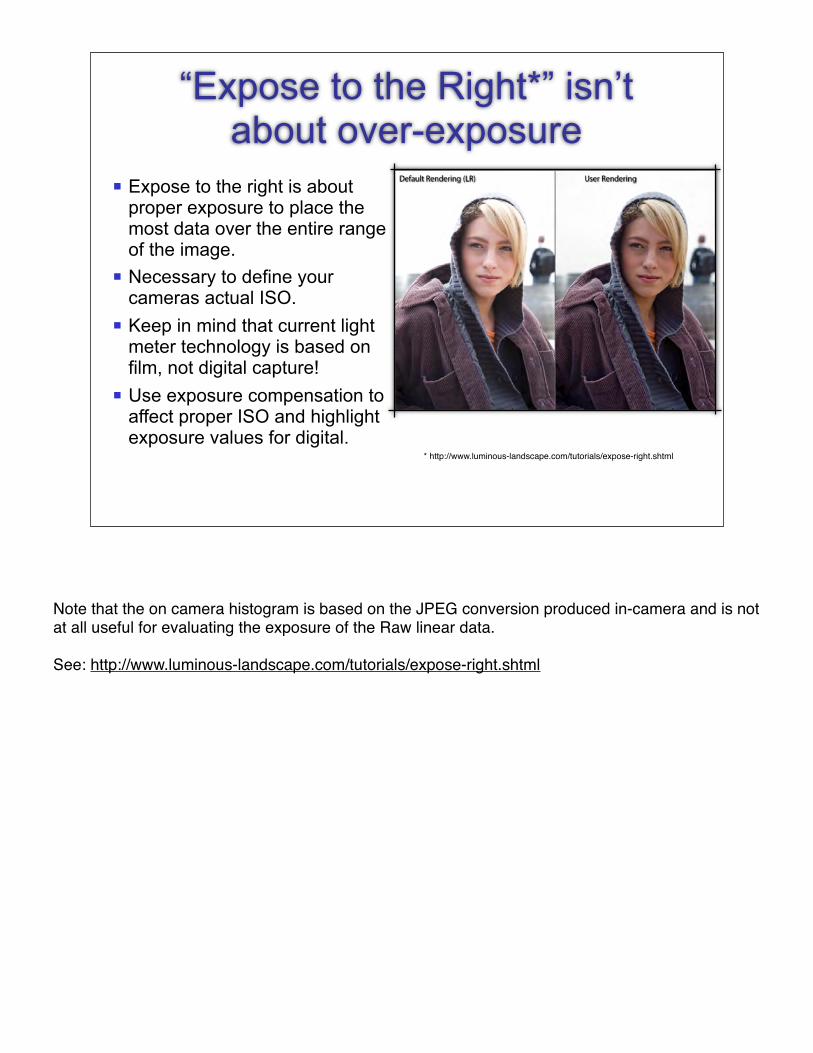
! Expose to the right is about proper exposure to place the most data over the entire range of the image.
! Necessary to define your cameras actual ISO.
! Keep in mind that current light meter technology is based on film, not digital capture!
! Use exposure compensation to affect proper ISO and highlight exposure values for digital.
* http://www.luminous-landscape.com/tutorials/expose-right.shtml
Note that the on camera histogram is based on the JPEG conversion produced in-camera and is not at all useful for evaluating the exposure of the Raw linear data.
See: http://www.luminous-landscape.com/tutorials/expose-right.shtml

Raw data is Scene Referred
! You say you want “Accurate Color” but what does that mean?! Scene referred is the measured color (colorimetry) of a the
scene you are photographing.! Scene referred rendering is not pleasing when viewed (due to
dynamic range, gamut etc).! Output referred is the rendering of scene rendered to a device
such as a display or other output device.! When you photograph the scene, you are not
reproducing it as it is (colorimetry) but as you wish it to appear on some output device!
! Rendering is therefore very subjective. Get it right here!
Scene colorimetry is related to a term called Input or Scene-Referred. Since we need to view this image on something like a display or a print which has a far more limited range than the scene, itʼs necessary to make the image appear more pleasing on the output device and to produce the desired color appearance the image creator wishes to express and reproduce. This is known as Output-Referred. The need to fit the color gamut and dynamic range of the scene-referred data to output referred data is called rendering. The camera usually performs this rendering when you select a color matrix setting such as sRGB or Adobe RGB (1998). If the camera is set to capture just Raw data, the rendering becomes the job of the image creator; you the photographer. When you produce an sRGB image file you aren't producing a colorimetric copy of the scene you took the picture of, you are producing an image as it would look rendered to an sRGB display or correctly previewed in an ICC aware application like Photoshop. What is being seen, and ultimately output, isnʼt a colorimetric representation of the actual scene (scene-referred). This is one reason why producing “accurate” color from a digital camera can be difficult.
See: www.color.org/ICC_white_paper_20_Digital_photography_color_management_basics.pdf
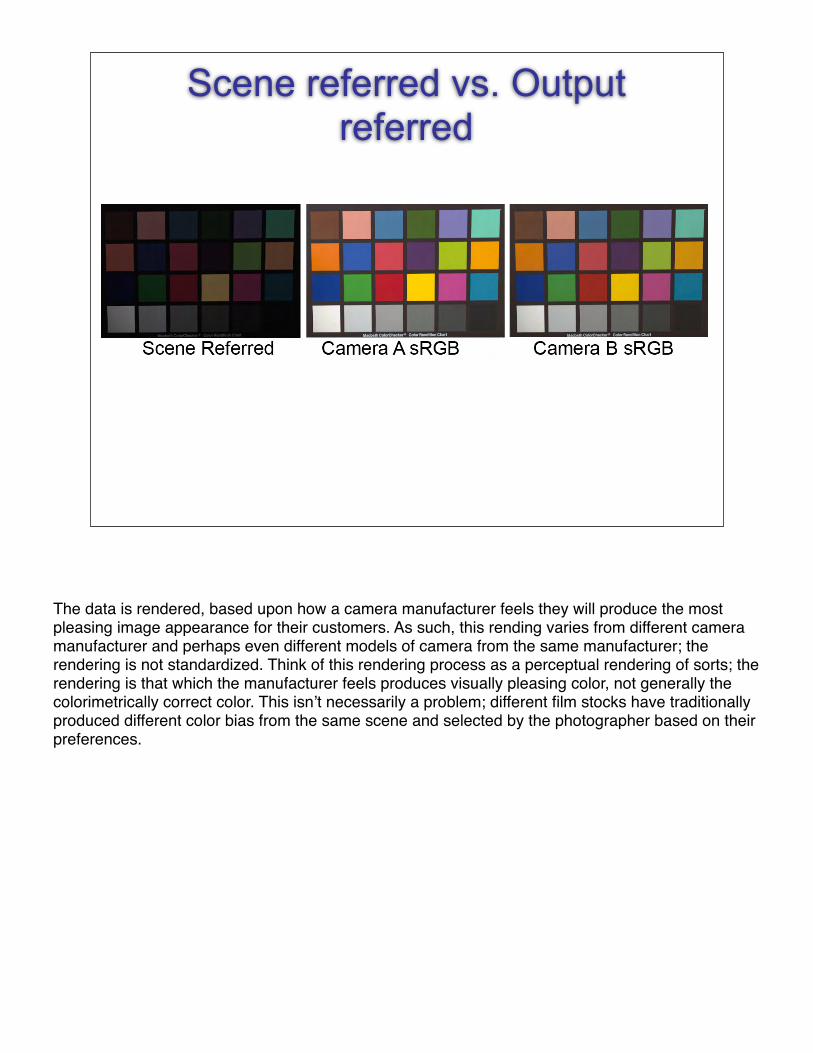
Scene referred vs. Output referred
The data is rendered, based upon how a camera manufacturer feels they will produce the most pleasing image appearance for their customers. As such, this rending varies from different camera manufacturer and perhaps even different models of camera from the same manufacturer; the rendering is not standardized. Think of this rendering process as a perceptual rendering of sorts; the rendering is that which the manufacturer feels produces visually pleasing color, not generally the colorimetrically correct color. This isnʼt necessarily a problem; different film stocks have traditionally produced different color bias from the same scene and selected by the photographer based on their preferences.
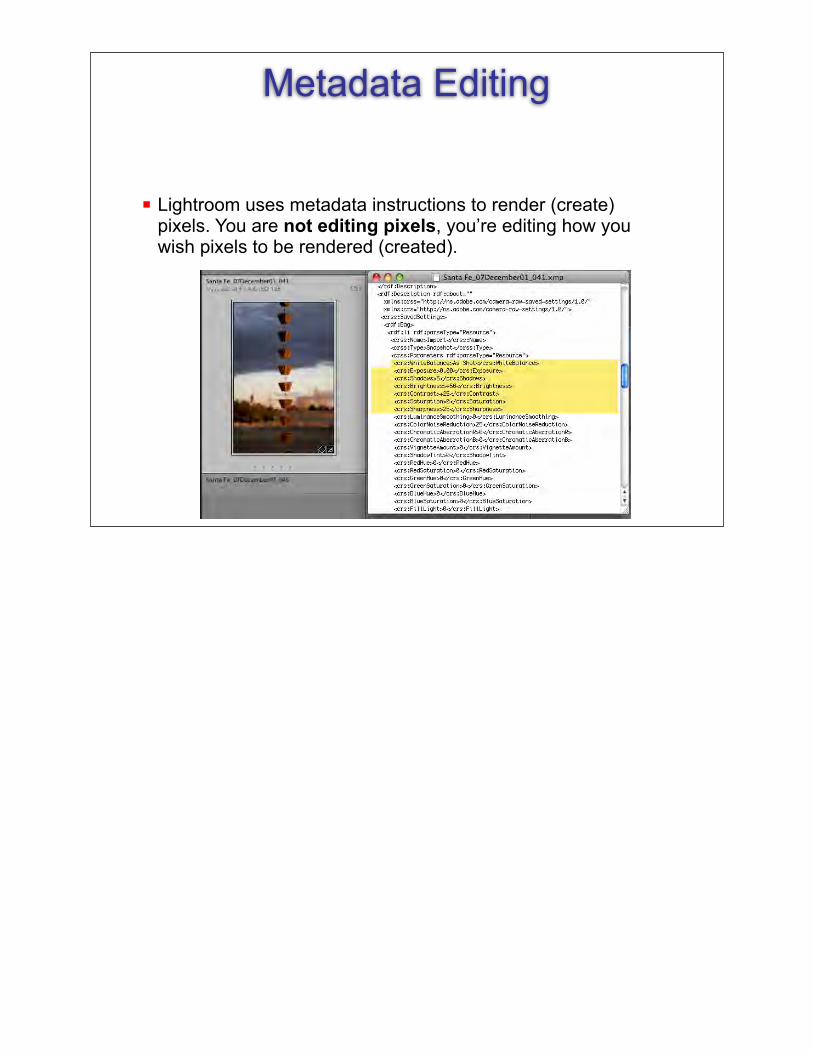
Metadata Editing
! Lightroom uses metadata instructions to render (create) pixels. You are not editing pixels, you’re editing how you wish pixels to be rendered (created).
A few words about rendering
! Rendering isn’t color correction, its pixel creation. Photoshop applies color correction to rendered pixels by altering their numeric values. This requires you open every pixel in an image into Ram (slow and damaging). Not so case with metadata editing.
! Raw rendering is truly non-destructive since the Raw data is never altered. Its is only a data source for the creation of pixels. Benefits include speed, flexibility, unlimited undos and history, virtual copies, fewer documents to store.
! Copy and paste some or all metadata instructions into multiple images is faster and more effective than editing pixels, one image at a time.
Example: Copy and paste removal of dust spot on hundreds of images automatically, compared to opening each in Photoshop and manually using the clone tool. Metadata instructions contain a history that never deletes after application quits.

Best Practices
! Expose for best Raw data!! Conduct all global tone and color ‘correction’ (rendering) in
Lightroom. Apply noise correction and capture sharpening. ! Target rendering for the best possible quality master image
from Lightroom for required selective pixel editing in Photoshop. Highest resolution, bit depth, color gamut.
! Exported images corrected in Photoshop can be stored back in Lightroom for print work, virtual copies (iterations based on retouch work), print, web and slideshow. One rendered master image can be used to create multiple iterations (different crops, Grayscale conversions etc).
! Net results are faster workflow, less Photoshop work, better quality data, fewer documents.
Highest quality for a master would be full resolution, 16-bit ProPhoto RGB.

Using Lightroom on existing rendered images*
! Instruction based editing allows for a single master image, multiple iterations (built only when necessary: JIT process).
! For global editing, less damage to pixels due to one set of processing instructions in correct processing order.
! Unlimited History states that remain intact with image.! Unlimited iterations using virtual copies. Non permanent
cropping, color and tone variations etc. ! Ability to print multiple sizes without altering original data.! Ability to build slideshows and web galleries without altering
original data.! All iterations are ‘stored’ in Library, easy to find and use.! Note that layers are NOT honored. RGB only.
*True for Raw originals

Camera Raw & Lightroom Color processing
! Uses two camera “profiles” D65 and Illuminate A (2856K) and can interpolate between the two using sliders (Temp and Tint). Far greater control over white balance than rendered images.
! Enormous control over color appearance (often superior to Photoshop). Do all the heavy global lifting here, not later in Photoshop! 85-90% of color & tone can be optimized here, without exotic and damaging pixel editing necessary (trips into Lab, excessive layer blending, Calculations). KISS.
! Since half of all data is contained in first stop of highlights, far greater control over highlight recovery and toning than Photoshop. Edits, applied with one process are applied over linear encoded data in high bit, high gamut color space.
ACR/LR is fully color managed because the numbers and previews match what you get in Photoshop.
The 4 RGB working spaces supported are sRGB, ColorMatch RGB, Adobe RGB (1998), and ProPhoto RGB.
In Lightroom, the color space encoding options are sRGB, Adobe RGB (1998) and ProPhoto RGB. Numeric scales is zero to 100% using Melissa RGB which Is ProPhoto RGB using an sRGB tone response curve instead of a 1.8 gamma encoding.

Adobe Raw processing! Work top down, left to right with the rendering toolset. ! White Balance first. A Macbeth color checker shot at the
beginning of each session is ideal. Use the 2nd White square (not Gray) to balance.
! Consider saving custom rendering settings for groups of similar images and making custom calibration presets using the Bruce Fraser technique (or DNG Editor**) with Macbeth color checker converted from LAB to working space*:
* http://www.creativepro.com/story/feature/21351.html**http://labs.adobe.com/wiki/index.php/DNG_Profiles
EXIF data from Raw *may* provide White Balance data for ACR but may look poor thus the white balance tool in ACR is useful. Use on WHITE, not gray. Useful to SAVE ACR White Balance ONLY in saved setting (do this under multiple lighting conditions, save and load as base setting). Make family of saved WB settings! Name camera and type of lighting/custom balance. Use HSB readout in Photoshop to enter into ACR calibration tab.
See: http://www.creativepro.com/story/feature/21351.html
http://labs.adobe.com/wiki/index.php/DNG_Profiles
Raw Rendering Review
! Rendering isn’t color correction, its pixel creation. Use Lightroom to render the best possible master image for handoff to Photoshop. This will eliminate laborious, complex Photoshop routines because all the heavy lifting was done from Raw by editing sets of instructions, not pixels.
! Raw rendering is truly non-destructive. You will produce the best data faster, and can do so with more images in less time.
! Photoshop is a pixel editor and as such is a more appropriate tool for precise, selective pixel editing, real retouch work, layer blending and so on. You should not need to ‘color correct’, at least globally ever again in Photoshop. Use the right tool for the right job!

Question & Answers
Thank you for coming. If you were provided with evaluation forms, please fill them out.
Thank you for coming. If you were provided with evaluation forms, please fill them out.
Web sites you might want to investigate:Holm and Rodney: http://www.color.org/documents/ICC_white_paper_20_Digital_photography_color_management_basics.pdf Reichmannʼs “Expose to the Right”: http://www.luminous-landscape.com/tutorials/expose-right.shtmlBruce Fraserʼs “Calibrating Camera RAW in Photoshop CS”: http://www.creativepro.com/story/feature/21351.htmlAllen Pachecoʼs modification of the Fraser Camera RAW calibration technique:http://home.comcast.net/~ajpacheco/CRCalibration.zipBruce Lindbloomʼs synthetic Color checker: http://www.brucelindbloom.com/