Mail Services Online Upload Instructions
10
Mail Services Online Upload Instructions Placing an order for automation mailing services is easier than ever with our new online order process. Tracking your expenditures is easier, too. After you place an order, you will receive an e-mail confirmation with a project reference number. This number will be included on your Service Unit Billing (SUB) so that you can easily reconcile your costs. In addition, we will send you an itemized e-mail confirmation when your project has been completed and billed. In order for us to complete your online project request, all information marked with a red asterisk (*) must be supplied. If you are not sure how to answer questions without the asterisk (*), you can leave them blank and we will complete them for you. STEP 1: Go to the Mail Services web site at: www.mailservice.bf.umich.edu Click on the File Upload button. ➮ 1 ➮ 1
Transcript of Mail Services Online Upload Instructions
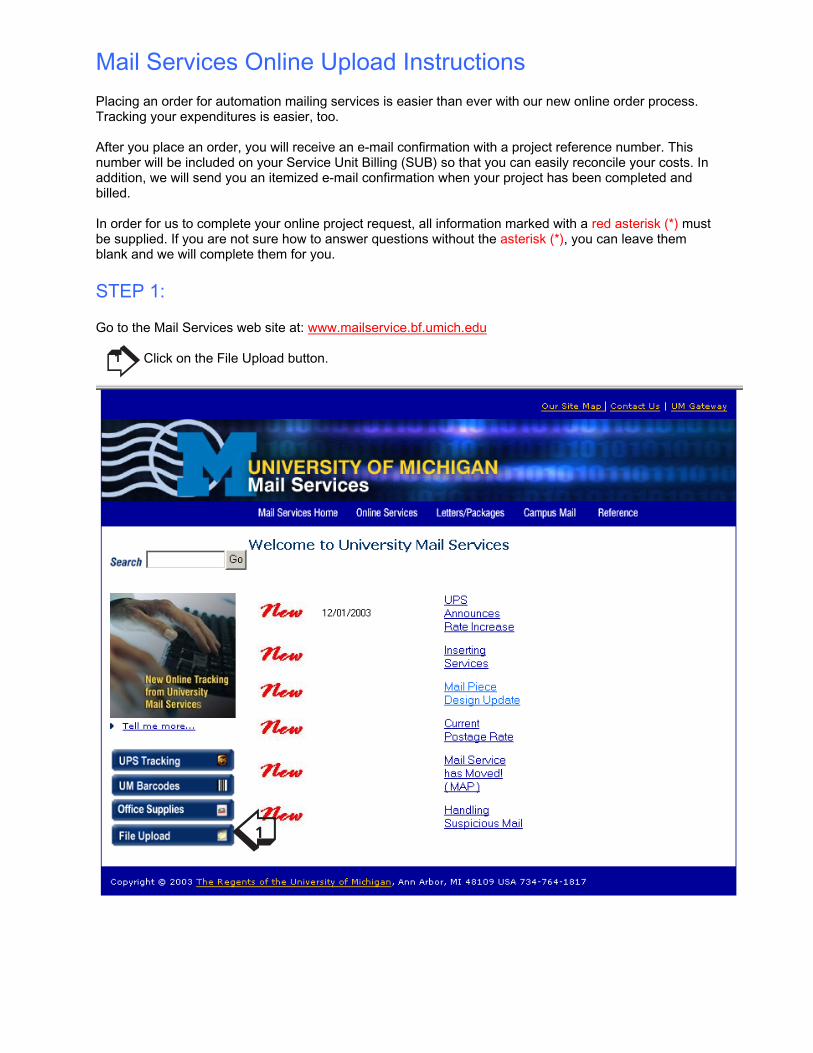
Mail Services Online Upload Instructions Placing an order for automation mailing services is easier than ever with our new online order process. Tracking your expenditures is easier, too. After you place an order, you will receive an e-mail confirmation with a project reference number. This number will be included on your Service Unit Billing (SUB) so that you can easily reconcile your costs. In addition, we will send you an itemized e-mail confirmation when your project has been completed and billed. In order for us to complete your online project request, all information marked with a red asterisk (*) must be supplied. If you are not sure how to answer questions without the asterisk (*), you can leave them blank and we will complete them for you. STEP 1: Go to the Mail Services web site at: www.mailservice.bf.umich.edu
1. Click on the File Upload button.
➮
1
➮1

STEP 2:
1. Fill in the project name with the title of the mail piece or project.
2. Fill in the estimated number of pieces (we will adjust for the actual number of pieces mailed).
3. Click on the “Next Step” button.
➮
1
➮2 ➮3
➮1
➮2
➮3

STEP 3:
1. Indicate whether you are going to provide your file via this upload site (recommended), e-mail it, or send a CD or disk to us.
2. How many files are you going to upload? 3. What future date do you want the project mailed? 4. Check one of the first five mail classes that apply. Add others at the bottom as required. 5. Check Inserting if you want your pieces to be inserted into envelopes using our high-speed equipment. If no
inserting is required skip to question 9 on the next screen. 6. Select an automation compatible envelope size up to 6 ½ x 9 ½. 7. If your inserting project includes flat collated sheets, tell us the number of sheets to be inserted into each
envelope. 8. If your inserting project includes enclosures, tell us the number of items to be inserted into each envelope.
(Continued on next page)
➮
1 ➮
2 ➮
3
➮
4}
➮
5 ➮
6 ➮
7 ➮
8
➮1
➮2
➮3
➮4
➮5
➮6
➮7
➮8

STEP 3
9. Check Addressing if you want your pieces to be addressed, and indicate whether they are letter size or flat size. If no addressing is required skip to question 13 below.
10. If you want us to ink jet a return address on a blank envelope or mail piece, give us the address. 11. Tell us if you want us to ink jet an indicia on the mail pieces. 12. Tell us if you want us to ink jet an endorsement on the mail pieces. 13. If your pieces are self-mailers and you want us to tab them, let us know. 14. Click on the “Next Step” button.
➮
9
➮
10}➮11
➮12➮
13
➮
14
➮9
➮10
➮11
➮12
➮13
➮14

STEP 4:
1. Tell us who you are. We will use the e-mail address you give us to send you updates and billing information.
2. Click on the “Next Step” button.

STEP 5: Please tell us what should be done with any excess materials after we have completed your mailing.
1. The system defaults to delivery by Campus Mail. Campus Mail is free, but is left at only one designated location per building. This service can only handle small volumes of returned material.
2. Materials can be returned via a fee-based courier to any location without volume restraints. 3. Hold at Mail Services for future mailings, no charge for short periods of time and for small
quantities. Long-term storage and skid storage can be moved to Fulfillment & Storage Services.
4. We can recycle your leftovers if you don’t want them back. 5. If they are to be sent to the same name and address as the original contact information,
check this box. 6. If you want them sent to another person or location, fill in the new delivery information here. 7. Click on the “Next Step” button.
➮1
➮2
➮3
➮4
➮5
➮6
➮7
➮
1➮
3➮
4
➮
6}➮
7
➮2
➮5

STEP 6:
1. Tell us what ShortCode to bill. 2. Click on the “Next Step” button.

STEP 7:
1. Give us any special instructions we need to meet your expectations. 2. Click on the “Next Step” button.

STEP 8:
1. Upload the file(s) you want to send us by clicking the “Browse” button, and then double click the target file.
2. Click on the “Create Job” button.

STEP 9:
You’re Done! We will send you an e-mail that itemizes your order and gives you your project number.