INSTRUMENTATION QP37.06 PRACTICES 7 Engineering€¦ · 3.17 AS1939 - Degrees of Protection of...
167
INSTRUMENTATION PRACTICES QP37.06 Revision 7 Engineering Any PRINTED copies of this procedure are UNCONTROLLED Page: 1 of 1 1.0 PURPOSE This manual outlines the procedures used at Arrium Mining and OneSteel Steelworks Sites. They describe the actions necessary for: (i) Purchase, calibration, installation and maintenance of measurement and control instrumentation. (Iii) Calibration of Accreditation and validation measurements. (iii) Installations. These specifications are to be used as a guide to Engineering and contractors for instrumentation required by the company. 2.0 SCOPE This manual applies to all person(s) who purchase / install / calibrate instrumentation at Arrium Mining and OneSteel Whyalla Steelworks. Note: This procedure excludes analytical equipment maintained by OneSteel contractor - Amdel. 3.0 REFERENCES 3.1 Whyalla Operations Automation Technology Plan. 3.2 QM37.01. - Electrical Equipment Supply and Installation Tender Manual 3.3 D1445. - LPD Design Reference Manual 3.4 MM1 - Management Manual. 3.5 AS1000 - The International Systems of Units (S.I.). 3.6 AS1349 - Bourdon Tube Pressure and Vacuum Gauges. 3.7 AS3000 - Electrical Installations (SAA wiring rules). 3.8 BS1041 - Temperature Measurement. 3.9 BS1042 - Measurement of Fluid Flow in Pipes. 3.10 BS3680 - Measurement of Liquid Flow in Open Channels. 3.12 ANSI MC 96.1 - Thermocouples and Thermocouple Extension Wire. 3.13 API RP 550 - Installation Society of America Recommended Practices and Standards. 3.14 ISO 5167 - Measurement of Fluid Flow.
Transcript of INSTRUMENTATION QP37.06 PRACTICES 7 Engineering€¦ · 3.17 AS1939 - Degrees of Protection of...

INSTRUMENTATION
PRACTICES
QP37.06 Revision 7
Engineering
Any PRINTED copies of this procedure are UNCONTROLLED Page: 1 of 1
1.0 PURPOSE
This manual outlines the procedures used at Arrium Mining and OneSteel Steelworks Sites. They describe the actions necessary for: (i) Purchase, calibration, installation and maintenance of measurement and control
instrumentation. (Iii) Calibration of Accreditation and validation measurements. (iii) Installations. These specifications are to be used as a guide to Engineering and contractors for instrumentation required by the company.
2.0 SCOPE
This manual applies to all person(s) who purchase / install / calibrate instrumentation at Arrium Mining and OneSteel Whyalla Steelworks.
Note: This procedure excludes analytical equipment maintained by OneSteel contractor - Amdel.
3.0 REFERENCES
3.1 Whyalla Operations Automation Technology Plan.
3.2 QM37.01. - Electrical Equipment Supply and Installation Tender Manual
3.3 D1445. - LPD Design Reference Manual
3.4 MM1 - Management Manual.
3.5 AS1000 - The International Systems of Units (S.I.).
3.6 AS1349 - Bourdon Tube Pressure and Vacuum Gauges.
3.7 AS3000 - Electrical Installations (SAA wiring rules).
3.8 BS1041 - Temperature Measurement.
3.9 BS1042 - Measurement of Fluid Flow in Pipes.
3.10 BS3680 - Measurement of Liquid Flow in Open Channels.
3.12 ANSI MC 96.1 - Thermocouples and Thermocouple Extension Wire.
3.13 API RP 550 - Installation Society of America Recommended Practices and Standards.
3.14 ISO 5167 - Measurement of Fluid Flow.

INSTRUMENTATION
PRACTICES
QP37.06 Revision 7
Engineering
Any PRINTED copies of this procedure are UNCONTROLLED Page: 2 of 1
3.0 REFERENCES (cont).
3.15 S.10 - Piping.
3.16 S.11 - Surface Protection.
3.17 AS1939 - Degrees of Protection of Electrical Equipment.
3.18 AS2380.1 - Electrical Equipment for Explosive Atmospheres - Explosion - Protection Techniques: General Requirements.
3.19 AS2380.4 - Electrical Equipment for Explosive Atmospheres - Explosion - Protection Techniques: Pressurised Rooms or Pressurised Enclosures.
3.20 AS2380.9 - Electrical Equipment for Explosive Atmospheres - Explosion - Protection Techniques: Type of Protection ‘n’ Non-sparking.
3.21 AS2381.1 - Electrical Equipment for Explosive Atmospheres - Selection, Installation and Maintenance: General Requirements.
3.22 AS2381.2 - Electrical Equipment for Explosive Atmospheres - Selection, Installation and Maintenance: Flameproof Enclosure ‘d’.
3.23 AS2381.6 - Electrical Equipment for Explosive Atmospheres - Selection, Installation and Maintenance: Increased Safety ‘e’.
3.24 AS2381.7 - Electrical Equipment for Explosive Atmospheres - Selection, Installation and Maintenance: Increased Safety ‘i’.
3.25 AS60079.1 - Electrical Apparatus for Explosive Gas Atmospheres: Flameproof Enclosure ‘d’.
3.26 AS60079.7 - Electrical Apparatus for Explosive Gas Atmospheres: Increased Safety ‘e’.
3.27 AS60079.10 - Electrical Apparatus for Explosive Gas Atmospheres: Classification of hazardous areas.
3.28 AS60079.11 - Electrical Apparatus for Explosive Gas Atmospheres: Intrinsic Safety ‘i’.
3.29 AS61241: 1.2 - Electrical Apparatus us in the presence of combustible dust – Electrical apparatus protected by enclosures and surface temperature limitation.
3.30 AS61779 - Electrical Apparatus for the detection and measurement of flammable gases.
3.31 AS61508 - Functional Safety of Electrical/Electronic/Programmable Electronic Safety-Related Systems.

INSTRUMENTATION
PRACTICES
QP37.06 Revision 7
Engineering
Any PRINTED copies of this procedure are UNCONTROLLED Page: 3 of 1
3.0 REFERENCES (cont).
3.32 AS61511 - Functional Safety Instrumented Systems for the Process Industry Sector
3.33 ISA100 - Industrial Wireless Standard
3.34 IEEE 802.15 - Wireless Personal Area Networks
3.35 IEEE 802.11 - LAN/MAN Wireless LANS
3.36 QP02.05 - Process Change and Equipment Modification Control.
3.37 WI.37EIC.101 - Notice of Correction.
3.38 OST-OHS-ELEC-PRO-001(QM37.02 P1 & P2) – OneSteel Electrical Safety Manual
3.39 WHY-OST-ELEC-PRO-001(QM37.02 3) – OneSteel Electrical Safety Manual – Whyalla Part 3
4.0 DEFINITIONS
Refer to Section 1 - ‘Definitions’ section.
5.0 PROCEDURE
5.1 Job Safety and Environmental Analysis
JOB HAZARD HAZARD CONTROL
Not required for this procedure.
Refer Hazard Register for any temporary hazards and their control measures. Refer Infosafe to access Material Safety Data Sheets
6.0 DOCUMENTATION
6.1 Attachment 1 - Amendment Sheet. 6.2 Attachment 2 - Index

INSTRUMENTATION
PRACTICES
QM37.06 Attachment 1
Revision 7
ENGINEERING
Any PRINTED copies of this procedure are UNCONTROLLED Page: 1 of 1
AMENDMENT SHEET (QM35.02 INFO)
SECTION
NUMBER
DESCRIPTION OF CHANGE DATE AUTHORITY
4 Addition of 4A.5.18 (e)
Calibration compliance with AS2275.
12/08/98 ‘As Sent’ authorised
4 Addition of figure 68 - Locking Bracket (lever) 12/08/98 ‘As Sent’ authorised
ALL Whole document updated 22/03/99 ‘As Sent’ authorised
2 attach 3 Change to ONE STEEL 1/08/00 ‘As Sent’ authorised
2 attach 4 Change to ONE STEEL 1/08/00 ‘As Sent’ authorised
6 Changes to suppliers of personal gas monitors 14/09/00 ‘As Sent’ authorised
DOCUMENT REVISED AND REISSUED - 20/12/2000
Section 3 Changes to wording 2/02/01 ‘As Sent’ authorised
Section 2 Changes to wording 28/08/01 ‘As Sent’ authorised
Section 3 Changes to wording 28/08/01 ‘As Sent’ authorised
Section 3 Changes to wording and addition of 3I 11/01/02 ‘As Sent’ authorised
2 attach 3 Addition of ‘OneSteel Stock Code’ 21/03/02 ‘As Sent’ authorised
2 attach 4 Addition of ‘OneSteel Stock Code’ 21/03/02 ‘As Sent’ authorised
Section 4 Addition of ‘Tube Fittings’ and ‘Orifice Plates 31/03/03 ‘As Sent’ authorised
Section 6 Changes to Personal Gas Monitors 31/03/03 ‘As Sent’ authorised
Section 6 Update current preferred suppliers 12/07/05 ‘As Sent’ authorised
ALL Whole Document Updated 08/05/07
All Revision Details Now Stored in Intelex

INSTRUMENTATION
PRACTICES
QM37.06 Attachment 2
Revision 7
ENGINEERING
Any PRINTED copies of this procedure are UNCONTROLLED Page: 1 of 5
SECTION INDEX
SECTION TITLE PAGE
1. Definitions
2. Measurement and Control Instrumentation
2A Responsibilities 1
2B System Overview 1
2C System Control 2
2D Calibration System 3
2E Operational / Routine Checking 3
2F Inspection Status of Measuring Equipment 4
2G Standards 4
2H Equipment Selection / Purchasing 5
3. Calibration Practices for Instrumentation
3A Calibration
3A.1 General 1
3A.2 Loop Testing General 1
3A.3 Loop Calibration Procedure 3
3A.4 Loop Procedure Record Keeping 3
3A.5 Accreditation Calibration 4
3A.5.1 As Found 6
3A.5.2 As Left 6
3A.5.3 Repeatability Test 7
3B Accreditation Calibration Loop Report Documenting 8
3B.1 Getting Started 8
3B.2 Individual Instrument Calibration Reports 8
3B.3 Uncertainty Calculations 9
3B.3.1 Uncertainty of Instrument being Calibrated 9
3B.3.2 Uncertainty of Input Test Equipment 10
3B.3.3 Uncertainty of Output Test Equipment 10
3B.4 Accreditation Loop Reports 11
3B.4.1 Paperwork 11
3B.5 Guidelines for Tricky Loops 12
3C Re-assessment of Calibration Frequency 12
3D Primary Elements 12
3E Certified Test Equipment 12
3F Repaired Test Instruments 12
3G Significant Figures 12
3H Validation Checks 13
3I Calibration / Checked stickers 13

INSTRUMENTATION
PRACTICES
QM37.06 Attachment 2
Revision 7
ENGINEERING
Any PRINTED copies of this procedure are UNCONTROLLED Page: 2 of 5
3J Documentation 13
SECTION INDEX
SECTION TITLE PAGE
4. Installation Practices of Instrumentation
4A Calibration
4A.1 Definition of Terms 1
4A.2 Pre-installation Calibration 2
4A.3 Identification 4
4A.4 Records 4
4A.5 Pre-installation Calibration Procedure 5
4A.5.1 General Notes 5
4A.5.2 Transmitters 6
4A.5.3 Pressure Transmitter 7
4A.5.4 Level Displacer Type 8
4A.5.5 Temperature Filled System Type 9
4A.5.6 Temperature Thermocouple Type 10
4A.5.7 Temperature Resistance Thermometer Type 10
4A.5.8 Receivers (Recorders and Indicators) 11
4A.5.9 Controllers 12
4A.5.10 Non-Transmitting Direct Reading Instruments 13
4A.5.11 Switches 13
4A.5.12 Solenoid Valves 13
4A.5.13 Control and On / off Valves 14
4A.5.14 Valve Positioners 15
4A.5.15 Analysis Equipment 15
4A.5.16 Flow Meters 16
4A.5.17 Radiation Density Gauge 16
4A.5.18 Single, Multi and Fixed Monitors 16
4A.5.19 Other Instrumentation 17
4A.6 Procedures for Installation Check Lists 17
4A.6.1 General 17
4A.6.2 Check List Signature 17
4A.6.3 Defects and Comments 17

INSTRUMENTATION
PRACTICES
QM37.06 Attachment 2
Revision 7
ENGINEERING
Any PRINTED copies of this procedure are UNCONTROLLED Page: 3 of 5
SECTION INDEX SECTION TITLE PAGE
4. Installation Practices of Instrumentation
4B Installation
4B.1 General 18
4b.11 Signalling 21
4b.1.2 Power Supplies / Relays 22
4b.1.3 Instrument Air Supply 22
4b.1.4 Enclosures 23
4b.1.5 Instrument Cable Installations 25
4b.1.6 Terminations 27
4b.1.7 Panel Wiring 27
4b.1.8 Cable Identification 28
4b.1.9 Use of Conduit 28
4b.1.10 Earthing 29
4b.1.11 Instrument Mountings 29
4b.2 Actuators 29
4b.3 Analysers 31
4b.4 Density Measurement 31
4b.5 Magnetic Flow Meters 32
4B.6 Orifice Plates and Venturis 32
4B.7 Other Flow Measuring Elements 32
4B.8 Other Level Measuring Elements 33
4B.9 Pyrometers 33
4B.10 Recorders 33
4B.11 Signal Isolators 34
4B.12 Switches, Indicators and Gauges 34
4B.13 Tapping Points and Pipe Sizes 36
4B.13.1 General 36
4B.13.2 Flow 37
4B.13.3 Pressure and Level 37
4B.13.4 Pipe Sizes 37
4B.14 Thermocouples and RTD's 38
4b.14.1 General 38
4b.14.2 Thermocouple / Current Converters 38
4b.14.3 Thermocouple Extension Cabling 39
4b.14.4 Thermocouple Pockets 39
4b.14.5 Thermocouple Calibration 41
4B.15 Transmitters 41
4B.16 Electromagnetic Flow meter 44
4B.16.1 Installation Conditions 44
4B.16.2 Mechanical Installation 44

INSTRUMENTATION
PRACTICES
QM37.06 Attachment 2
Revision 7
ENGINEERING
Any PRINTED copies of this procedure are UNCONTROLLED Page: 4 of 5
SECTION INDEX SECTION TITLE PAGE
4. Installation Practices of Instrumentation
4B Installation (cont).
4B.17 Valves 45
4B.17.1 Isolation Valves 45
4B.17.2 Control Valves 47
4B.17.3 Control Valve sizing 48
4B.17.4 Ball Valves 49
4B.17.5 Butterfly Valves 49
4B.17.6 Other Valves 50
4B.18 Weigh feeders, Belt Weighers and Weighbridges 50
4B.18.1 Accuracy Classes 50
4B.18.2 Belt Weighers 50
4B.18.3 Weighbridges 51
4B.18.4 Conveyer Belts 51
4B.19 Gas Monitors 52
4B.20 Installation Requirements for Orifice Plates 54
4B.20.1 General 54
4B.20.2 Minimum Upstream and Downstream straight lengths required for Installations between various fittings and the primary device. 55
4B.21 Tube Fittings 57
4B.21.1 General 57
4B.21.2 Hydraulic Swaging Unit 57
4B.21.3 Inter-changeability 57
4B.21.4 Safety Precautions 58
4B.21.5 Safe Component Selection 58
4C Testing 59
4C.1 General Pressure Testing 59
4C.1.1 Air Supply Testing 59
4C1.2 Transmission Tubes 60
4C1.3 Process Impulse Tubing 61
4C.2 Testing of Instrument Wiring 62
4C.2.1 “Power Off” Tests 62
4C.3 Loop Testing 62
4C.3.1 General 62
4C.3.2 Loop Testing Procedure 63
4C.3.3 Temperature Element Installations 64
4C.3.4 Analysers, Special Installations, Gas Monitors 64
4C.3.5 Gas Monitors 64

INSTRUMENTATION
PRACTICES
QM37.06 Attachment 2
Revision 7
ENGINEERING
Any PRINTED copies of this procedure are UNCONTROLLED Page: 5 of 5
4C Testing (cont)
4C.4 Painting 65
4C.5 Nameplates 65
4C.6 Keys and Documents with Equipment 65
4C.7 Sealing 65
4C.8 Commissioning 66
4D Intrinsic Installation 67
4D.1 Hazardous Area Classification 67
4D.1.1 General 67
4E SIL rated Installations 68
4E.1 SIL Installations 68
4E.1.1 Management Plan & Function Safety 68
4E.1.2 General 72
4E.1.3 Equipment 72
4E.1.4 Pre-commissioning 73
4E.1.5 Drawings 73
4E.1.6 Functional Testing 73
4E1.7 Wireless Instrument Network & Applications 73
5. Burner Management - YET TO BE WRITTEN
6. Preferred Manufacturers
7. Identification Colour Code for Pipework
8. Instrumentation Installation Reference Drawings Listing

INSTRUMENTATION
PRACTICES
QM37.06 Section 1
Revision 3
ENGINEERING
Any PRINTED copies of this procedure are UNCONTROLLED Page: 1 of 3
1. Definitions
Accreditation Measurement An Accreditation Measurement is one where the quantitative result is used to make Operational changes to the Plant / Process as it would otherwise affect the Quality of the Product (where accuracy and precision limits are required, or where the measurement will be used for fiscal transactions).
Accuracy (refer AS 3912.1) A qualitative term describing the degree of closeness with which the indications of an instrument approach the true value of the measurand.
Calibration (refer AS 3912.1) All the operations for the purpose of determining the values of the errors of measuring equipment, and measurement standards.
Certified Standard A standard, which has a current certificate of calibration as issued by an authorised statutory authority. Class
Reflects the reason why instrument loops are risk rated high / medium / low. eg product quality, personnel safety, cost or environment damage.
EIC Systems Term used to encompass Electrical Instrument and Control systems.
Functional Supervisor Are the supervisor/s: - a) Whose area of responsibility embraces the specific equipment referred to i.e. Production. b) Who is responsible for the people performing maintenance on the specified equipment,
ie. EIC Systems.
Hazardous Area: - An area in which an explosive atmosphere is present, or may be suspected to be present, in quantities such as to require special precautions for the construction, installation and use of potential ignition sources.
Hazardous Area - Explosive Gas Mixture A mixture with air, under normal atmospheric conditions, of flammable materials in the form of gas, vapour or mist, in which after ignition, combustion spread throughout the unconsumed mixture (i.e. an explosion).
Hazardous Area - Class 1 Area A hazardous area resulting from the pressure of a potential explosive gas atmosphere.
Hazardous Area - Class II Area
A hazardous area resulting from the presence of combustible dust.

INSTRUMENTATION
PRACTICES
QM37.06 Section 1
Revision 3
ENGINEERING
Any PRINTED copies of this procedure are UNCONTROLLED Page: 2 of 3
Hazardous Area - Zone 0
A zone in which an explosive gas atmosphere is present continuously, or is present for long periods , or the consequences of an explosion occurring in this area are considered severe enough to assign this classification.
Hazardous Area - Zone 1
A zone in which an explosive gas atmosphere is likely to occur in normal operation, or the consequences of an explosion occurring in this area are considered severe enough to assign this classification.
Hazardous Area - Zone 2
A zone in which an explosive gas atmosphere is not likely to occur in normal operation and, if it does occur, it will exist for a short period only, or the consequences of an explosion occurring in this area are considered severe enough to assign this classification.
Non - Hazardous Area
An area in which an explosive atmosphere is not expected to be present in quantities such as to require special precautions for the construction, installation and use of potential ignition sources.
Machines A machine is a unique item of equipment, such as a pump, gearbox, turbine or compressor. Two identical machines will have different Technical ID numbers (machine numbers), by definition, as the Technical ID Number is used to track the machine and to provide a facility for storing information related to each machine. A machine is always installed in a location. The criteria used to determine whether an item is to be called a machine are:- a) are costs going to be allocated against this item. b) is history of the item required. c) is there a need to keep track of the items movements. Loop Test Loop testing is checking the operation of entire loops with respect to calibration and any external interlocks back to the operator interface.
Normal Operations
Is the situation when the plant equipment is operating within its design parameters - Failures, such as the breakdown of pump seals, flange gaskets or Spillages caused by accident which involve repair or shutdown, are not considered to be part of normal operation.
Operational Checking In the context of this procedure an operational check shall mean checks performed by plant operations personnel that ensure the equipment is functional.
Primary / Secondary Elements Each instrument loop may be considered as two parts, the primary element and the secondary element(s). The primary element may be defined as the portion of the instruments, which converts the quantity that is being measured into a variable that operates the secondary element(s). The secondary element(s) then measures this new variable, which is arranged to

INSTRUMENTATION
PRACTICES
QM37.06 Section 1
Revision 3
ENGINEERING
Any PRINTED copies of this procedure are UNCONTROLLED Page: 3 of 3
depend upon the quantity being measured.
1. Definitions (cont). For example: - In a differential type flow meter, the primary element, which may be an orifice plate, converts rate of flow into a differential pressure the value of which depends upon the rate of flow. The secondary element is the instrument, which measures this differential pressure and converts it into an indication of the rate of flow, on a scale or chart, or an operator station on a distributive control system. Risk Rating The consequence of failure or the importance of repeatability / accuracy of a loop will determine its risk rating, High / Medium / Low.
Routine Checks In the context of this procedure “Routine Checks” shall mean the operation of checking, and adjusting when necessary the output values of a measuring device against a Works or Certified Standard.
SAP System The SAP System is a computer-based system consisting of integrated modules that provide operational and management support for "Supply" and "Plant Management" functions.
Traceability The concept of establishing a valid calibration of a measuring instrument by a step-by-step comparison with a higher order standard. The concept of traceability implies eventual reference to an appropriate national or international standard.
Uncertainty of Measurement (refer AS 3912.1) That part of the expression of the corrected result of a measurement which defines the range of values within which the true value or, if appropriate, the accepted true value is estimated to lie.
Validation The operation of checking the output of a measuring device against a measurement standard.
Works Standard A OneSteel Whyalla standard, which is not certified but has been approved by the Instrumentation Technical Leader for use during routine checking of measuring equipment

INSTRUMENTATION
PRACTICES
QM37.06 Section 3
Revision 2
ENGINEERING
Any PRINTED copies of this procedure are UNCONTROLLED Page: 1 of 13
2. Measurement and Control Instrumentation
2A Responsibility
2A.1 The EIC Tech Group Leader is responsible for the calibration program of all Accreditation Measurements, Loop Procedures and associated control instrumentation pertaining to the generic titles discussed in the Scope of this document.
2A.2 Specific calibration requirements necessary for NATA registration remains the responsibility of the Manager whose area of charge embraces the particular equipment. i.e.:- Tolerances.
2A.3 The Functional Supervisor (i.e. Leading Hand) shall ensure that all calibrations, repairs and installations are performed by staff having appropriate qualifications, training, experience, aptitude and supervision.
2A.4 Where calibration, maintenance and / or repair is sub-contracted, the responsibility for co-ordination and service monitoring lies with the Engineering Manager.
2A.5 Where a Supervisor organises the calibration of a Certified Standard, that person has the responsibility of keeping the records and retaining copies of the certificates for a minimum of five (5) years, or five (5) previous calibration results, whichever is the greater time interval.
5.2.6 Operational checking (see definitions) of Instrumentation is the responsibility of the Manager whose area of charge embraces these devices.
2B System Overview
2B.1 Control shall be maintained over the calibration of measuring, and test equipment such that it ensures confidence in decisions or actions based on the measurement of data.
2B.2 All calibration equipment is sealed for integrity. For safeguard against tampering this equipment is held by the Central Engineering
2B.3 The specification of new measuring equipment shall consider the range, precision, robust and / or statutory or regulating requirements. Prior to purchase, equipment selection should be done in conjunction with Central Engineering.
2B.4 Nonconforming measuring equipment shall be removed from use or clearly identified to prevent use until confidence can be expressed in the measurement data.
2B.5 All standards used by OneSteel Whyalla personnel for calibration of measuring equipment are registered and controlled. Use is made of OneSteel, SAP System in this regard.

INSTRUMENTATION
PRACTICES
QM37.06 Section 3
Revision 2
ENGINEERING
Any PRINTED copies of this procedure are UNCONTROLLED Page: 2 of 13
2B System Overview (cont).
2B.6 When Accreditation measurements are found to be outside of the required tolerance during a calibration, the reliability of previous results shall be assessed. Appropriate action will be taken with respect to any product whose inspection results or process parameters may have been in error (Refer WI37.EIC.101).
2B.7 Where required, a calibration may be performed by an approved body. This will be determined by the Functional Supervisor.
2B.8 The inspection status of all Accreditation measuring and control equipment is clearly displayed (refer section 2F).
2B.9 This procedure also applies to measuring and control equipment that is calibrated and / or repaired under contract.
2C System Control
2C.1 The EIC Tech Group Leader is responsible for maintaining a Master register (Instrument Listing) of all measuring devices and maintaining the test and measurement equipment used to calibrate the devices. The following details are kept:-
a) Plant Location/Area.
b) Machine Description.
c) Calibrated Range and Settings.
d) Risk.
e) Class.
f) Calibration Frequency.
g) Tolerance.
h) Equipment Function.
This Instrument Listing will be controlled within the OneSteel Intranet System.
2C.2 The EIC Tech Group Leader is responsible for reviewing this Instrument Listing at intervals not exceeding 12 months. OneSteel Whyalla SAP System will be used to guarantee automatic Work Order “drop downs” to ensure the review will be carried out. The review must include: -
a) Did all Accreditation measurements get calibrated and, in the stated time frame?
b) Did all Accreditation measurements calibrated results fall within the specified tolerances?
c) Were copies of the resultant calibration reports or notices filed appropriately in SAP where they can be accessed by the customer?
d) Do the results indicate a review of the calibration interval is necessary?
e) Did the customer generate any feedback re the Accreditation measurements results or changes?

INSTRUMENTATION
PRACTICES
QM37.06 Section 3
Revision 2
ENGINEERING
Any PRINTED copies of this procedure are UNCONTROLLED Page: 3 of 13
2C.3 Changes made to the Accreditation measuring devices register will be controlled by the EIC Tech Group Leader, via the Modification of Change Process (QP02.05)
Plant approval is required for changes to this register.
2D Calibration System
2D.1 The EIC Tech Group Leader is responsible for establishing documented Work Instructions/Loop Procedures covering the calibration method for each Accreditation measurement, this may include inspection status and calibration reports.
2D.2 The Functional Supervisor is responsible for the integrity of all measuring devices.
2D.3 The Functional Supervisor is responsible for maintaining a file of the original calibration certificates issued by external calibration authorities for a minimum of five (5) years.
2D.4 In accordance with NATA requirements the Functional Supervisor ensures a copy of the latest calibration certificates are available at each relevant testing facility.
2D.5 In the event that an Instrument is found to exceed the “stated tolerance” the Functional Supervisor is responsible for the notification of the relevant Supervisor whose product may be affected as per WI37.EIC.101. The validity of prior readings and their effect on product quality must be assessed by the Supervisor whose product may be affected. This Supervisor must notify their Functional Supervisor of any actions or recommendations that may need to be implemented. This may even extend to product recall. The EIC Functional Supervisor in conjunction with the EIC Tech Group Leader shall liaise with the affected products Owner / Supervisor and review the calibration interval and any associated maintenance program of the measurement Instrumentation.
2D.6 Test equipment that has been sent away for repair must be recalibrated before use.
2E Operational / Routine Checking
2E.1 Operational / routine checking of measurement Instrumentation and associated services equipment is the responsibility of the Functional Supervisor whose area of charge embraces the equipment.
2E.2 Work Instructions are developed by the responsible Supervisor (as per 2E.1) and include the method, standard(s) employed, delegated responsibility, permitted error, status identification and the extent of and upkeep of records.
2E Operational / Routine Checking (cont).
2E.3 Records are maintained detailing when each piece of equipment has been

INSTRUMENTATION
PRACTICES
QM37.06 Section 3
Revision 2
ENGINEERING
Any PRINTED copies of this procedure are UNCONTROLLED Page: 4 of 13
operationally checked. The mechanism for recording such information, including the signature of the person responsible for the check, is in the appropriate Work Instruction, refer clause 2E.2.
2E.4 The EIC Tech Group Leader shall be advised by the officer responsible (clause 2E.1) of any problems detected during the operational check that may require a review of the calibration, operational check and maintenance program.
2F Inspection Status of Measuring Equipment
2F.1 Measurement Instrumentation, which is subject to calibration and / or checking, is positively identified in accordance with clauses in section 2B and 2F.2.
2F.2 Standard stickers used to identify calibration status of ‘Accreditation Measurements Instrumentation’. Refer 3I.
2F.3 Measurement Instrumentation which shows no calibration status or Tech ID number traceable to the relevant Instrument Listing is not covered by this procedure and thus the output information from such equipment is for indication only.
2G Standards
2G.1 All Standards used by OneSteel Whyalla for calibration of measurement / control instrumentation shall be registered and approved by the EIC Tech Group Leader who is responsible for the calibration of this equipment.
2G.2 The Functional Supervisor is responsible for establishing documented Work Instructions covering the calibration or operational check for each Standard, (including identification and the type and upkeep of records).
2G.3 The Functional Supervisor is responsible for maintaining a file of original calibration certificates issued by the external calibration authorities and / or those issued by EIC Systems for a minimum of five (5) years or five (5) previous calibration results, whichever is the greater time interval.

INSTRUMENTATION
PRACTICES
QM37.06 Section 3
Revision 2
ENGINEERING
Any PRINTED copies of this procedure are UNCONTROLLED Page: 5 of 13
2H Equipment Selection / Purchase
2H.1 Equipment selection for measurement and control Instrumentation is the joint responsibility of the Manager, whose area of charge will ultimately embrace the new equipment, and the EIC Technical Group. Both parties must liaise prior to final selection / purchase to ensure uniformity across OneSteel Whyalla is maintained. Also consideration of the following should be made: -
a) Ability to be effectively maintained at OneSteel Whyalla.
b) Use can be made of common spares, by trying to standardise on various types of equipment across OneSteel Whyalla.
c) Previous trials / experience have shown the selected equipment did not perform satisfactorily in other areas and better equipment is available.
d) Can equipment interface with other systems?
e) A Corrective Action and Improvement Notice will be issued, in the event of Instrument purchase where the selected equipment cannot be effectively maintained by Central Engineering EIC Systems and, is done so without consultation of this group (as per QP.02.03).
Note: MAINTENANCE is only ONE aspect of equipment selection and does not necessarily take into account DESIGN requirements of the equipment / process, therefore consultation with plant based Engineering Departments will also be required (as per QP.37.02 - Design Control).
3. Calibration Practices for Instrumentation
3A Calibration
3A.1 General Australian Standard AS 10012 (Metrological Confirmation System for Measuring Equipment) calls for all relevant functions of measuring instruments to be calibrated against measurement standards, whose calibration is traceable to the National Standard of Measurement. Therefore, calibrations that are traceable to a NATA (National Association of Testing Authorities) registered test laboratory meet the above requirements and, therefore, provide a demonstrable confidence in measurement accuracy. OneSteel SAP System allows us to comply with the requirements of Calibration systems. Limitations within SAP mean that we have some exceptions when it comes to filing of Calibration reports. The EIC Tech Group Leader shall ensure that staff having appropriate qualifications, training, experience, aptitude and supervision performs all calibrations, repairs and installations.
3A.2 Loop Testing General The principle of Loop testing is to check the operation of entire loops including

INSTRUMENTATION
PRACTICES
QM37.06 Section 3
Revision 2
ENGINEERING
Any PRINTED copies of this procedure are UNCONTROLLED Page: 6 of 13
calibration and any external interlocks back to the operator interface. Individual instrument calibrations are only required if the loop / system fails to meet its objectives or tolerances, set out in the given procedure. Plant instrumentation is categorised by plant operational Managers at Electrical Services invitation:
3A.2.1 Class
Accreditation An Instrument / Loop that directly effects the quality of the finished sellable product. These Instrument / Loops must be treated as an
“Accreditation Calibration” (refer section 3.A.4)
Quality - The loop / instrument directly effects the quality of the process output, but not the quality of the sellable product.
Cost - Failure or out of tolerance calibration of the loop / instrument will cause damage / down time to the plant. Instrument may be involved in fiscal calculations, eg. Pellet Plant Jetty scale to the ship loader.
Environment - Failure or out of tolerance calibration of the loop / instrument may cause environmental damage.
Safety - Failure or out of tolerance calibration of the loop / instrument may have a personnel impact, injury or fatality.

INSTRUMENTATION
PRACTICES
QM37.06 Section 3
Revision 2
ENGINEERING
Any PRINTED copies of this procedure are UNCONTROLLED Page: 7 of 13
3A.2.2 Risk
Once designated a Class Plant instrumentation is then risk ranked High, Medium, Low to determine the severity of impact/consequence in case of failure /out of tolerance.
High:
Accreditation - All accreditation calibrations are risk ranked as high.
Quality - Process Output will be unusable if instrument is outside tolerance.
Cost - Millions of dollars damage - several days down time.
Environment - Major environmental event. Public / Media outrage, significant clean up cost, company reputation damaged.
Safety – Potential for fatality or multiple fatalities.
SIL – SIL Assessment for selected Safety Instrumented Functions
Medium:
Quality - Process output will produce a poor quality product if the instrument is outside tolerance.
Cost - $50,000 up to $500,000 plant damage or ½ to 1 day down time.
Environment - Significant / serious pollution. Public / Media attention drawn to company, likelihood of legal action. Significant clean up costs.
Safety - Serious injury. eg. Gassing requiring hospitalisation, multiple broken bones, high degree burns.
Low:
Quality - Product quality will be noticeably effected, however still of reasonable quality for use.
Cost - $1,000 up to $50,000 plant damage or up to ½ day down time.
Environment - Minor pollution, attract public / media attention, relatively easy to clean up.
Safety - Minor injury. eg. Gassing causing nausea, minor sprains or fractures, low degree burns.

INSTRUMENTATION
PRACTICES
QM37.06 Section 3
Revision 2
ENGINEERING
Any PRINTED copies of this procedure are UNCONTROLLED Page: 8 of 13
3A.3 Loop Calibration Procedure Receive scheduled SAP Drop down for loop calibration, and locate the specified Calibration Procedure as per the Work Order. The Electrical Services Instrument Listing governs frequency of Drop down. Loop procedures are assigned Tech ID numbers, which relate to the numbering system in the loop procedure index. All blank loop procedures are filed in the EIC Quality System. All necessary information is included in the procedure. i.e.:
all instruments in the loop.
A step-by-step loop testing procedure including tolerances.
Any interlocks and their function that require proving.
The number of personnel required for the test.
Test equipment required, including radios.
Time needed to complete the test.
Read the Procedure carefully. Carry out the procedure. If individual instruments require calibration due to loop being out of tolerance, do so as per a ‘Validation check’. Complete all loop test documentation by hand then return to the Functional Supervisor’s for checking and sign. Any issues / amendments with the procedure or the loop operation, installation, Tech ID number updates, etc. that cannot be fixed by the person carrying out the procedure must be brought to the attention of the Functional Supervisor and if necessary the relevant Plant Instrument Technician.
3A.4 Loop Procedure Record keeping It is the Functional Supervisor’s responsibility to scan the completed Loop Procedure document and attach a copy to the SAP functional Location. Any individual Validations that are completed as part of the Loop procedure must also be attached to that individual insts functional location. Issue Notice of Corrections as per WI37.EIC.101, if required. Pass the completed procedure to the Functional Supervisor for final checking. All procedure amendments must be carried out by the Engineering Records Document Controller.

INSTRUMENTATION
PRACTICES
QM37.06 Section 3
Revision 2
ENGINEERING
Any PRINTED copies of this procedure are UNCONTROLLED Page: 9 of 13
3A.5 Accreditation Calibration Procedure
The following information explains the Accreditation calibration documentation and process involved in calibrating instruments that come under the “HIGH” Accreditation Category. The Calibration of such instruments must be traceable to recognised standards.
Plant: What plant area does the instrument belong to.
Loop No. / Description: Quote from the Electrical Services Instrument Listing, the Loop Number and Loop Description of the instrument being calibrated.
Tech ID No. / Description: Quote from the Electrical Services Instrument Listing /SAP the Tech ID Number and Functional Location Description of the instrument being calibrated
Ambient Temp: State the ambient temp during the test in Deg. C.
Atmospheric Pressure: If known Quote the Atmospheric Pressure during the test. This is normally stated to be normal and is generally only required when calibrating particular Analysers.
Procedures: Declare what Quality Procedures the calibration is conforming to.
Tolerance: The required Tolerance of the instrument after calibration. If not known use information from previous years calibration reports.
Test Instrument Used: Input / Output: Proclaim the Tech ID Numbers of both Test Instruments used. This is to allow calculation of Input and Output uncertainties. If Gas bottles are used state their Numbers.
Note: Instruments has adopted a general rule that states all test equipment must be at least a factor of ten times more accurate than the device being calibrated (an order better).
Work Order No: “Quote the Work Order Number for the job”. This will allow easy traceability of history.
Input Range: Record the Input Calibration range and the units it is measured in”. If a T/C is used the type of T/C used should also be quoted beneath this range.
Output Range: Record the Output Calibration range and the units it is measured in.

INSTRUMENTATION
PRACTICES
QM37.06 Section 3
Revision 2
ENGINEERING
Any PRINTED copies of this procedure are UNCONTROLLED Page: 10 of 13
3A. 5 Accreditation Calibration Procedure (cont). Example of a filled in top section of a Calibration Report.
ACCREDITATION CALIBRATION REPORT (Standard Format)
Date 23/09/96
1/ Plant: Blast Furnace
2/ Loop No / Description: Loop 10 / Wind Volume -P&T compensated.
3/ Tech ID. No / Description: TXP2001 / Wind Volume Pressure.
4/ Ambient Temp: 20 Deg. C. Atmospheric Pressure: N.A
5/ Procedure(s): QM35.04
6/ Tolerance: +/- 0.5%
7/ Test Instrument Used: Input: TIC1010 Output TIC1008
8/ Work Order No: WO511685
9/ Input Range: 0 to 300 kPa Output Range: 4 to 20 mA
Where possible all calibrations should occur “on plant” as influence quantities are then taken into account. Prior to recording any observations run the Instrument through its full range at least three times in each direction. The device under test must be allowed to stabilise before any observations can be recorded. No tapping or vibrating is allowed unless specified. If observations are being taken from a gauge or recorder chart the 1/4 rule applies. This states that the minimum resolution of the instrument may be subdivided no more than 4 times to obtain a reading.

INSTRUMENTATION
PRACTICES
QM37.06 Section 3
Revision 2
ENGINEERING
Any PRINTED copies of this procedure are UNCONTROLLED Page: 11 of 13
3A.5.1 As Found
Run the instrument through its range this time recording the Initial readings at 0, 25, 50, 75, 100% of range.” If the initial “As Found” results are within tolerance make no adjustments to the device. Ignore the “As Found” box, complete 2 more full cycles and record the As Found results in the “As left” section of the report. Example of a report where initial results were in tolerance.
As Found As Left Mean
Output Up Down Output Up Down Up Down Up Down Correction
4.00 4.00 4.01 4.00 4.00 4.01 4.00
8.00 8.00 8.00 8.01 8.00 8.00 8.01
12.00 12.00 12.00 12.00 12.01 12.00 12.01
16.00 16.00 16.00 16.01 16.00 16.01 16.00
20.00 20.00 20.00 20.00 20.00 20.00 20.00
Note: If the instrument being calibrated cannot practically be checked at the 0, 25, 50, 75, 100% points. Fit Results to report as best as possible. e.g. An Analyser checked with two gas bottles, one 15% of range the other 95% of range. Results would be recorded in the normal 25% and 100% rows.
3A.5.2 As Left
If the instrument is outside its stated tolerance calibration is required. Make
adjustments to reduce error to a minimum. The final 3 times up / down observations are then recorded in the “as Left” section of the report. The mean error is calculated automatically when put on computer.
Example of a report where calibration took place.
As Found As Left Mean
Output Up Down Output Up Down Up Down Up Down Correction
4.00 3.61 3.61 4.00 4.00 4.00 4.01 4.00 4.00 4.00 -0.01%
8.00 7.68 7.67 8.00 8.00 8.02 8.00 8.02 8.02 8.00 -0.06%
12.00 11.71 11.71 12.00 12.05 12.05 12.04 12.05 12.04 12.05 -0.29%
16.00 15.64 15.64 16.00 16.01 16.00 16.01 16.00 16.00 16.01 -0.03%
20.00 19.64 19.64 20.00 20.00 20.00 20.00 20.00 20.00 20.00 0.00%
Note: In some cases it may not be practical to carry out 3 full traverses when obtaining final results. e.g. Pellet Plant Jetty scale. If this is the case simply enter the results that were obtained and state the reason why a full Accreditation Calibration couldn’t be done in the “Calibration comments” section.

INSTRUMENTATION
PRACTICES
QM37.06 Section 3
Revision 2
ENGINEERING
Any PRINTED copies of this procedure are UNCONTROLLED Page: 12 of 13
3A.5.3 Repeatability Test
Take ten (10) readings at or nearest to the midpoint of the instrument’s range approaching this point from the same direction each time and record the results”.
Repeatability Test
Test Result %
1 12.00 50
2 12.00 50
3 12.00 50
4 12.00 50
5 12.01 50
6 12.00 50
7 12.00 50
8 12.01 50
9 12.00 50
10 12.00 50
To provide continuity with other instruments within the loop all repeatability
tests must be done at or as near as possible to 50%. If unable to perform a repeatability test explain why in “Calibration comments” and leave blank.
Calibration Comments: “This area of the report is used to provide any relevant information regarding the calibration”. e.g. Span was adjusted now within tolerance. Pen replaced on recorder now working okay.
Calibrated By: “Sign Report as proof of authenticity and correctness”.
Once calibration has been completed, the device must be secured from tampering. e.g. Nail varnish on adjustment screws or a calibration void sticker placed over the devices access screws. Where items cannot be secured, they must be sealed in an enclosure and then its access screws must be sealed.
On completion of a Accreditation calibration a sticker must be applied to the device that states when and who calibrated it as well as when it is next due. (See attachment) File the Completed Calibration Report in Accreditation Calibrations tray in calibration room. If any loop or unit is found to be out of tolerance, report the results as per Section 2D.5 of this procedure.
CALIBRATION
BY _________ DATE_________
DUE ______________________

INSTRUMENTATION
PRACTICES
QM37.06 Section 3
Revision 2
ENGINEERING
Any PRINTED copies of this procedure are UNCONTROLLED Page: 13 of 13
3B Accreditation Calibration Loop Report Documenting
Note: To complete this stage of documenting the user must be suitably qualified in the understanding of Metrology. They must also have some experience in the use of Microsoft Excel, as this is the application used for our Accreditation Calibration reporting.
3B.1 Getting Started
Receive the completed calibration report. Ensure it has been correctly filled out as per Attachment: Calibration Report Documenting. If it isn’t, contact the individual responsible and obtain the required data and reinforce how it should be filled out (Attachment: Calibration Report Documenting). Accreditation Loop documentation is done using Microsoft Excel. Accreditation Calibration records are generated from the Technical Officer Folders on the main server: G:\Engineering\ElectServicesTech\Calibration Records\Accreditation Calibrations Within this folder is a directory relevant year and then their plants in order of Loop #’s as defined by the Electrical Services Instrument Listing
To start a new Accreditation report cut and paste the latest report and use it as proforma. Logically rename this new file and save it in to the appropriate folder for the time being.
3B.2 Individual Instrument Calibration Reports
Enter in the initial Instrument data from the hand written Calibration Report, to the first page of one of the unused worksheets in the Workbook. Change the “worksheet” name to that of the Instrument Tech ID Number for easy reference later. As left “Mean Corrections” and “Repeatability Test” means are calculated automatically on entering data correctly into this 1st page. To generate Instrument Uncertainty and Degrees of Freedom figures are required to be entered into the adjacent page two of this worksheet.
mean error = Sum of all final readings taken at that value Number of readings taken
** mean error is expressed as a percentage of Output range. The Percentage Error is calculated automatically based on 50% of the Stated output range and the repeatability test results of the calibration. This is then used to generate the standard deviation of the mean for the repeatability test.
Note: Information at the top of page two including loop data etc. should have been automatically transferred from page one if entered correctly.

INSTRUMENTATION
PRACTICES
QM37.06 Section 3
Revision 2
ENGINEERING
Any PRINTED copies of this procedure are UNCONTROLLED Page: 14 of 13
3B.3 Uncertainty Calculations
Total instrument uncertainty is evaluated by formulae displayed at the base of page three of Accreditation Calibration Report incorporating the uncertainty of instrument being calibrated, uncertainty of input test instrument’s / gases and the uncertainty of output test instrument’s / gases and the Degrees of freedom relating to these tests.
Note: Degrees of freedom are an expression of the confidence of the test for an Instrument based on the number of repeatability tests carried out to determine the instruments uncertainty. e.g. The reliability of the results of a test that was repeated 1000 times would be far better than those of a test carried out 10 times.
3B.3.1 Uncertainty of instrument being calibrated:
This is evaluated automatically if a repeatability test was able to be performed. Degrees of freedom (estimated number of tests) will also automatically be filled in.
If unable to do a repeatability test use a Type B method of uncertainty evaluation. • To allow this calculation to occur the area “S23:Z26” must be selected
copied and then pasted to Cell “S13”. Also change the wording from “Test Inst” to “Calibrated Inst” to make the calculation applicable.
• The semi range is the tolerance of the Instrument under test as a
percentage of its range. Enter this figure where prompted. • In a Type B method evaluation the Instrument Reliability figure is an
estimation of how many times out of 100 the test equipment will be
within the above tolerance. This figure is based on your experience with the test equipment. This figure is then used to derive the Degrees of freedom estimation.

INSTRUMENTATION
PRACTICES
QM37.06 Section 3
Revision 2
ENGINEERING
Any PRINTED copies of this procedure are UNCONTROLLED Page: 15 of 13
3B.3.2 Uncertainty of Input Test Equipment This is evaluated as a B type evaluation as in above(3) unless the Test equipment has been certified or has a certificate already stating its uncertainty and confidence level.
Note: Stated uncertainties and / or Test Instrument tolerances can be
found in “TIC Calibration Reports” filing cabinet and the “Test
Instrument” filing cabinet. Both of these cabinets are in the calibration room.
Read the calibration report if supplied. If uncertainty is stated in calibration
report divide by the coverage factor (if stated) and use this figure as the uncertainty figure. If unstated as a general rule divide by 2. This compensates for the fact that the uncertainty figure stated has already had a coverage factor applied to it. The uncertainty of the Instrument must be expressed as a percentage. Enter this figure where prompted. Calculate Instrument Reliability as previously described. If Uncertainty figures are stated for the Test Equipment. Leave blank the line where it asks for a tolerance to be entered.
3B.3.3 Uncertainty of Output Test Equipment This is evaluated as with the Input Test Equipment. • If there is no Output test instrument i.e. Instrument uses a display as
an output e.g. an indicator or recorder, take the minimum resolution of the instrument and divide this by two. Convert this figure to a
percentage of the instruments range and use this figure as the tolerance in your type B evaluation.
• Calculate Instrument Reliability with the last digit true and stable. e.g. If
the display flickers a lot, the reliability of that last digit would be reduced.
With all three uncertainties correctly calculated a Total Instrument Uncertainty figure should appear at the bottom of page 2 and on page one of the report followed by a Total Degrees of freedom figure. Save the document to the hard drive. This is all that can be done until all instrument’s within the loop are completed and correctly entered into the Workbook.

INSTRUMENTATION
PRACTICES
QM37.06 Section 3
Revision 2
ENGINEERING
Any PRINTED copies of this procedure are UNCONTROLLED Page: 16 of 13
3B.4 Accreditation Loop Reports The first sheet in any of the set-up loops or blanks is the Loop Report. This is the sheet that will be sent to the plant Managers on completion of the loop. This sheet should be left alone until all the instruments in the Loop have been entered into the Workbook. Customer, Loop Number / Description, calibrated loop Instruments and the summated Mean Loop Corrections should all be automatically displayed. The date must be entered manually in the appropriate cell as does the Loop range and Units. This information is available from previous years reports or the Electrical Services Instrument Lists Similar calculations to those involved with total individual instrument uncertainties
occur on this Worksheet in Cell Y: 26 and Y: 27 regarding total “Loop” Uncertainties and total Degrees of Freedom.
• This is relevant as it is necessary to use the STUDENTS t tables in conjunction with the total effective Degrees of freedom figure to generate the coverage factor figure on the loop report.
• The figure obtained from the table should be entered into the sentence at the bottom of the page.
The end result should be a statement showing all the mean corrections required to correct for any hysteresis errors as well as an uncertainty figure for the calibration expressed in the appropriate units to a 95 % confidence level. Save the document to the hard drive.
3B.4.1 Paperwork (Refer - Electrical Services Instrument Lists). Some minor formatting may be required to fit pages neatly for printing. Print the whole workbook. Chase the persons responsible for doing the calibrations and have them sign off the calibration reports. Once all the Calibration Loop’s individual calibrations are completed, EIC Tech Group Leader to review the reports and electronically sign them off. All Accreditation Calibration reports (individual and loop) are stored at the following location.
G:\Engineering\ElectServicesTech\Calibration Records\Accreditation Calibrations Once completed Save the Accreditation Loop report as a pdf and attach to the SAP functional location for that Loop. Individual calibration reports for devices with in the loop should be dissected and attached to the relevant individual item Functional location in SAP.

INSTRUMENTATION
PRACTICES
QM37.06 Section 3
Revision 2
ENGINEERING
Any PRINTED copies of this procedure are UNCONTROLLED Page: 17 of 13
3B.5 Guidelines for Tricky Loops
Loops that have multiple reading points e.g. Indicating recorders, may use only one of these outputs. e.g. Chart or indication. This choice should be made on the
reading deemed as used for control.
Loops that have multiple outputs e.g. celox’s must have two separate loop reports. Weighers and Analysers are often difficult to carry out repeatability tests on. So if necessary use a B type Uncertainty evaluation for these machine types. Limitations in the operation of the Black Body furnace make it unnecessary to carry out both up and down checks on pyros’s. This is also the case with Celox’s. Instruments with a calibration frequency greater than 12 months are entered into the new system from previous years calibration to allow calculation of the loop errors.
3C Reassessment of Calibration Frequency
The calibration interval of an instrument may be changed based on its previous calibration performance. This change must be approved be the department Instrument Technician. A process change form must be issued as per QP02.05 to all plants affected by any change of instrument frequency. This change must be documented and stored by the Central Engineering Modification Control System,
3D Primary Elements
At Whyalla Operations, all Primary Elements are purchased or manufactured to traceable
standards. Therefore the Central Engineering Instrument section DOES NOT calibrate Primary Elements. Our error estimates only consider the Secondary Elements in a loop. If requested, the Central Engineering Instrument section quotes necessary reference standards or will arrange for appropriate calibration of a Primary Element.
3E Certified Test Equipment
With Certified Test Equipment (equipment that is sent away for Calibration / Certification), only hard copies of the Calibration Results are kept. These reports are filed in the Central Engineering Instrumentation Calibration / Standards Room.
3F Repaired Test Instruments
If a test instrument has been repaired or serviced in anyway, it must be recalibrated prior to use. Unless NATA certificate report is supplied.
3G Significant Figures
Where equations are used for the conversion of % to engineering units, appropriate round off techniques must be used to ensure accurate statements (refer to Attachment 1 Significant Figures).

INSTRUMENTATION
PRACTICES
QM37.06 Section 3
Revision 2
ENGINEERING
Any PRINTED copies of this procedure are UNCONTROLLED Page: 18 of 13
3H Validation Checks
This form of calibration validates the performance of an “individual” Instrument. A validation requires a single traverse of the range of the instrument, and then adjustment takes place if required. This is followed by a final traverse, to give before and after adjustment results. Validation of an instrument may in advertently occur during some loop test procedures.
3I Calibration / Checked stickers
All single instruments that have a fixed calibration frequency and a defined range must have a calibration sticker attached after being worked on, eg. Accreditation calibrations, gas monitors, test equipment, etc.
If one of these instruments are worked on (adjusted / replaced) between their fixed calibration frequency, eg on a breakdown. The instrument must be recalibrated as per the Electrical Services Instrument Lists and a new sticker reflecting the instrument calibration frequency attached. If the instrument was an Accreditation calibration the loop uncertainty must be re-accessed. For the purpose of definition: Individual instruments included in Loop Checks are considered to not have a fixed frequency. Individual instruments without fixed frequency that are tested / checked / calibrated must have a checked sticker attached at that time.
3J Documentation
3I.1 Attachment 1 - Significant Figures and Degrees of Accuracy.
3I.2 Attachment 2 - T/C Table and Application Guide.
3I.3 Attachment 3 - Example of an MMS Calibration Report.
3I.4 Attachment 4 - Students “t” Table.
3I.5 Attachment 5 - Example of a Completed Loop Report.
3I.6 Attachment 6 - Example of Loop test Report.
CHECKED
BY
DATE
CALIBRATION
BY _________ DATE_________
DUE ______________________

QM37.06/1 - Section 3 16/11/2009 Page 1 of 2
SIGNIFICANT FIGURES AND DEGREES OF ACCURACY
Often we do not give all the figures when stating a total. For example, the attendance at a football match may be stated in print as 24,869 but in conversation we are more likely to give it as 25 thousand. The numbers retained (ie: - 25) are known as significant figures and the attendance of 25,000 is said to be correct to two significant figures. To three significant figures the attendance would be 24,900. For numbers less than one, any zeros at the beginning do not count. Thus 0.04587 is 0.0459 to three significant figures and 0.046 to two significant figures. Example: - Express correct to 3 significant figures. 30,756; 3.0756; 0.030756; 500.2; 0.02065 Answers: - 30,800; 3.08; 0.0308; 500; 0.0207 Degree of Accuracy. If we are given that the length of a brass rod is 8.43 cm (correct to 3 significant figures) then we must realise that the 8.43 could be the approximation for lengths lying between 8.425 to 8.435
cm. The true measurement could lie between 8.43 + 0.005 cm. The error permitted in accurate practical work is called the tolerance. Thus if a shaft is to be turned to a diameter of 2 cm with a tolerance of 5 thousandths, the finished work must lie between 1.995 and 2.005 cm in diameter. In calculations, which involve approximated numbers, we must be careful to assess the degree of accuracy of the result. For example, in calculating the area of a plate of length 11.16 cm and breadth 5,87 cm where one is correct to 4 and the other correct to 3 significant figures, if we multiply 11.16 by 5.87 we get 65.5092. Since the length could lie between 11.155 and 11.165 and the breadth between 5.865 and 5.875 then the area can lie anywhere between 65.424075 and 65.594375, ie: - between 65.4 and 65.6 to 3 significant figures. This shows that we can only obtain the answer accurately to two significant figures. The number of significant figures that can be depended upon in the final result is generally less than the least number of significant figures among the numbers employed. Thus multiplying a (to 3 significant figures) x b (to 4 significant figures) x c (to 3 significant figures) = abc (to 2 significant figures)

QM37.06/1 - Section 3 16/11/2009 Page 2 of 2
SIGNIFICANT FIGURES AND DEGREES OF ACCURACY
Example 1: Find the error, the relative error and the percentage error in taking a diameter of 3.572 cm as 3.6 cm giving the answers correct to three significant figures. True error or absolute error = stated value - true value = 3.6 - 3.575 = 0.0280 cm
Relative error = error = 0.028_
correct value 3.572 = 0.00784 Percentage error = relative error x 100% = 0.784% Example 2:
In the formula pv = k which relates to the pressure, volume
273+t and temperature of a gas, make t the subject of the formula. Determine the value of t to 3 significant figures given p = 233, v = 42.6 and k = 21.5. Multiplying both sides of the formula by 273+t we get pv = k(273+t) from which
pv = 273+t
k
and t = pv - 273
k Substituting the given values t = 233 x 42.6 - 273 21.5 = 461.7 - 273 = 188.7 Answer t = 189

QM37.06/2 - Section 3 16/11/2009 Page 1 of 2
APPLICATION AND SELECTION GUIDE
EMF Standards and Tolerances Mineral insulated thermocouples will normally be supplied with nominal emf/temperature characteristics complying with the new International Thermocouple Reference Tables which are published in the following standards: BS 4937 (UK) ASTM E230-72 (USA) JISC 1602 (JAPAN)
Conductor
Combination
International
Symbol
Nominal EMP
Specifications
Tolerances Nickel Chromium Nickel Aluminium
K BS 4937 Pt 4 (UK) ASTM E230-72 (USA) JISC 1602 (JAPAN)
2.2 from 0C - 300C
¾ % above 300°C
Iron / Constantan J BS 4937 Pt 3 (UK) ASTM E230-72 (USA) JISC 1602 (JAPAN)
2.2 from 0C - 300C
¾ % above 300°C
Copper / Constantan T BS 4937 Pt 5 (UK) ASTM E230-72 (USA) JISC 1602 (JAPAN)
0.8 from 0C - 100C
¾ % above 100°C
Pyrotenax Australia is a NATA registered temperature measurement laboratory
Typical Applications
Maximum
Operating
Temperature
Sheath
Material
Ref
Conductors
Metals
Ref
Typical Application Characteristics
-273°C 1250°C
Nicrosil Nicrosil Nisil
N As for 310 and 600. Suitable for direct exposure in air or other industrial atmospheres for electronic nuclear, aerospace and general manufacturing industries.
Excellent oxidation resistance and high temperature stability. Satisfactory performance in reducing conditions. Is not affected by nuclear irradiation or short-range ordering.
1100°C Stainless Steel 25/20 Chromium Nickel Steel to BS970 Grade 310
310 Nickel Chromium Nickel Aluminium
K Blast Furnace gases, reheat and annealing furnaces, brick kilns, flame failure devices, glass manufacture, power station boilers, open hearth furnace, flues, kilns, high temperature superheater tubes, open hearth furnaces.
Good oxidation resistance properties but should not be subjected to subsequent manipulation. Satisfactory in sulphur bearing atmospheres.
1100°C Inconel* 76/16/7 Nickel Chromium Iron to BS3074-NA14 ASTM-B-167
600 Nickel Chromium Nickel Aluminium
K Heat treatment processes, chemical reactors, annealing furnaces, soaking pits, man-made fibre production, glass tank flues.
Excellent oxidation resistance but should not be used in sulphur bearing atmospheres at temperatures above 550°C
800°C Stainless Steel 18/8/1 Chromium Nickel Titanium Stabilised Steel to BS970 Grade 321
321 Nickel Chromium Nickel Aluminium
K Nuclear energy “in-pile” instrumentation, annealing furnaces, acetic and nitric acid production, heat exchanges, stress relieving, footwear moulding, boiler steam and feed water.
Excellent resistance to corrosion retaining good ductility properties in a wide range of industrial applications.
750°C Stainless Steel 18/8/1 Chromium Nickel Titanium Stabilised Steel to BS970 Grade 321
321 Iron Constantan
J Reheat and annealing furnaces, aluminium heat treatment, chemical reactors, perfume distilling, coal briquetting plants, paper and pulp mills, polyethylene manufacture, tar stills.
Excellent resistance to corrosion retaining good ductility properties in a wide range of industrial applications.
750°C Stainless Steel 25/20 Chromium Nickel Steel to BS970 Grade 321
310 Iron Constantan
J Same as type J, 321 SS. Sheath. Good oxidation resistance properties but should not be subjected to subsequent manipulation.
-150°C to 400°C Cupro Nickel to BS2871-CN107 ASTM-ALLOY 715B
CN Copper Constantan
T Boiler flue gas at stack, food processing - bread ovens, etc., gearbox bearings, plastic moulding, sub-zero temperatures, turbo alternator condensers.
Excellent resistance to corrosive environments particularly under wet conditions.
-150°C to 400°C Stainless Steel 25/20 Chromium Nickel Steel to BS970 Grade 321
310 Copper Constantan
T Same as type T, CN Sheath. Good oxidation resistance properties but should not be subjected to subsequent manipulation.
Performance may vary in commercial use due to temperature, pressure, concentration and chemicals in the environment.
Other Conductor Types
(I) Nickel Chromium / Copper Nickel, Type E Conductors. (ii) Platinum / Platinum13% Rhodium Type R Conductors with 1/8” O.D.600 Inconel* sheath only. (iii) Platinum / Platinium10% Rhodium, type S Conductors with 1/8” O.D. Inconel* sheath only.
Optional sheath Materials
Sheath materials in 304, 316, 347 and 446 stainless steel are available for Types K, J and T.
*Registered Trade Name of Henry Wiggins & Co. Ltd.

QM37.06/2 - Section 3 16/11/2009 Page 2 of 2
APPLICATION AND SELECTION GUIDE
TABLE 1
Tolerance for thermocouples (reference junction at 0°C)
Tolerance Class 1 2 32)
Tolerance Value 1)
(±) 0.5°C or 0.004 · | t | 1°C or 0.0075 ·| t | 1°C or 0.015 ·| t | Temperature limits for validity of tolerances Type T -40°C to 350°C -40°C to 350°C -200°C to 40°C
Tolerance Value 1)
(±) 1.5°C or 0.004 · | t | 2.5°C or 0.0075 · | t | 2.5°C or 0.015 · | t | Temperature limits for validity of tolerances Type E
Type J Type K
-40°C to 800°C -40°C to 750°C -40°C to 1000°C
-40°C to 900°C -40°C to 750°C -40°C to 1200°C
-200°C to 40°C -200°C to 40°C
* Tolerance Value 1)
(±) 1°C or [1 + 0.003 (ItI-1100)] °C
1.5°C or 0.0025 · | t | 4°C or 0.05 · | t |
Temperature limits for validity of tolerances Type R or S
Type B 0°C to 1600°C -
0°C to 1600°C 600°C to 1700°C
- 600°C to 1700°C
*
1) The tolerance is expressed either as a deviation in degrees Celsius or as a percentage of the actual temperature. The greater value applies.
2)
Thermocouple materials are normally supplied to meet the manufacturing tolerances specified in the table for temperatures above -40°C. These materials, however, may not fall within the manufacturing tolerances for low temperatures given under Class 3 Types T, E and K thermocouples if thermocouples are required to meet limits of Class 3, as well as those of Class 1 and /or Class 2. The purchaser shall state this, and selection of materials is usually required.

QM37.06/3 - Section 3 16/11/2009 Page 1 of 1
EXAMPLE OF A MMS CALIBRATION REPORT
BHP LONG PRODUCTS DIVISION - WHYALLA PM705R-01 DATE: 28/11/96 TIME: 11:44:40
J FOULKES PAGE: 1
*** E N D O F R E P O R T ***

QM37.06/4 - Section 3 16/11/2009 Page 1 of 1
STUDENTS ‘t’ TABLE
Values of ‘t’ for Various Degrees of Freedom for a 95% Confidence Interval
Degrees of Freedom t Degrees of Freedom t
1 12.7 18 2.1
2 4.30 19 2.09
3 3.18 20 2.09
4 2.78 25 2.06
5 2.57 30 2.04
6 2.45 35 2.03
7 2.37 40 2.02
8 2.31 45 2.02
9 2.26 50 2.01
10 2.23 60 2.00
11 2.20 70 2.00
12 2.18 80 1.99
13 2.16 90 1.99
14 2.15 100 1.99
15 2.13 110 1.98
16 2.12 120 1.98
17 2.11 Infinite 1.96

QM37.06/5 - Section 3 22/04/2016 Page 1 of 7
Electrical Services - Instrumentation Whyalla Operations
Accreditation Measurement
Loop Calibration Report
Customer: Blast Furnace Report Date: 24-Sep-97
Loop Number / Description: Loop 7 / Natural Humidity.
Tolerance Loop: 1.0 gm/M3 Range: 2 to 20 gm/M
3
Calibrated Loop Instrument:
Tech ID Number / Name: TXP2011 / High Range Steam Flow SNC3084 / R-I Signal Container CCD0884 / DPCS 9 / Slot 35 Mean Loop Corrections: 0% -0.053 gm/M
3
25% -0.026 gm/M3
50% -0.025 gm/M3
75% -0.029 gm/M3
100% -0.01 gm/M3
The Uncertainty of the test was evaluated at 50% and found to be +/- 0.32 gm/M3. The uncertainty is given at the 95% confidence level, the coverage factor used was 2.00. By: .......................................... Approved By: .........................................
D. Hoffmann P. Rostig

QM37.06/5 - Section 3 22/04/2016 Page 2 of 7
ACCREDITATION CALIBRATION REPORT (Standard Format)
Date: 23/9/97 1/ Plant: Blast Furnace.
2/ Loop No / Description: Loop 7 / Natural Humidity
3/ Tech ID No / Description: TXP2011 / High Range Steam Flow
4/ Ambient Temp: 18 Deg. C. Atmospheric Pressure: N/A
5/ Procedure(s): QP35.03/4
6/ Tolerance: +/- 0.5% = +/- 0.08mA
7/ Test Instrument Used: Input: TIN0122 Output: TIN1091
8/ Work Order No: WO537864
9/ Input Range: 0 to 27 kPa Output Range: 4 to 20 mA
10/ As Found As Left Mean
Output Up Down Output Up Down Up Down Up Down Correction
4.00 3.97 3.98 3.98 3.97 0.16%
8.00 8.00 8.00 8.00 8.00 8.00 8.00 0.00%
12.00 12.00 12.01 12.01 12.00 12.01 12.01 -0.04%
16.00 16.01 16.01 16.01 16.01 16.01 16.01 -0.06%
20.00 20.00 20.00 20.00 0.00%
11/ Repeatability Test
Test Result %
1 12.00 50 Mean = 50.03%
2 12.00 50
3 12.00 50
4 12.00 50
5 12.01 50 Uncertainty = 0.86
6 12.00 50
7 12.00 50
8 12.01 50
9 12.00 50 Degrees of Freedom = 51.19
10 12.00 50
Calibration Comments
............................................................................................................................................................
............................................................................................................................................................
............................................................................................................................................................
............................................................................................................................................................
Calibrated By: ............................................ Checked By: ................................................. D. Hoffmann D. Hoffmann

QM37.06/5 - Section 3 22/04/2016 Page 3 of 7
ACCREDITATION CALIBRATION REPORT
Instrument Uncertainty Calculations
Date: 23/9/97 1/ Plant: Blast Furnace.
2/ Loop No / Description: Loop 7 / Natural Humidity
3/ Tech ID No / Description: TXP2011 / High Range Steam Flow
1/ Uncertainty of Instrument being calibrated Use Type B method of evaluation if unable to do a Repeatability Test. Standard Deviation = 0.033 Uncertainty, U1 = 0.01 Degrees of Freedom, V1 = 10
2/ Uncertainty due to Input Test Insts / Gas used Input - Use Type B method of evaluation if uncertainty is unknown. Test Inst. Tolerance (Semi Range), % = 1.48 Uncertainty, U2 = 0.854 Estimated Inst. Reliability = 90 times out of 100 Degrees of Freedom, V2 = 50
3/ Uncertainty due to Output Output - Use Type B method of evaluation if uncertainty is unknown. Test Inst. Tolerance (Semi Range), % = 0.16 Uncertainty, U3 = 0.092 Estimated Inst. Reliability = 98 times out of 100 Degrees of Freedom, V3 = 1250 UTotal = ((C1U1)
2 + (C2U2)
2 + (C3U3)
2) ½
= 0.86 Veff = UTotal
4
(U14/V1) + (U2
4/V2) + (U3
4/V3)
= 51.19

QM37.06/5 - Section 3 22/04/2016 Page 4 of 7
ACCREDITATION CALIBRATION REPORT (Standard Format)
Date: 23/9/97 1/ Plant: Blast Furnace.
2/ Loop No / Description: Loop 7 / Natural Humidity
3/ Tech ID No / Description: SNC3084 / R-I Signal Conditioner
4/ Ambient Temp: 17 Deg. C. Atmospheric Pressure: N/A
5/ Procedure(s): QP35.03/4
6/ Tolerance: +/- 0.5% = +/- 0.08mA
7/ Test Instrument Used: Input: TIN1132 Output: TIN1091
8/ Work Order No: WO
9/ Input Range: 484.6 to 560.3 ohms Output Range: 4 to 20 mA
10/ As Found As Left Mean
Output Up Down Output Up Down Up Down Up Down Correction
4.00 4.07 4.07 4.07 4.07 4.07 4.07 -0.44%
8.00 8.02 8.03 8.02 8.03 8.02 8.02 -0.15%
12.00 12.02 12.02 12.02 12.02 12.02 12.02 -0.12%
16.00 16.02 16.03 16.02 16.02 16.02 16.02 -0.14%
20.00 20.01 20.01 20.01 20.01 20.01 20.01 -0.06%
11/ Repeatability Test
Test Result %
1 12.02 50.13 Mean = 50.13%
2 12.02 50.13
3 12.02 50.13
4 12.02 50.13
5 12.02 50.13 Uncertainty = 0.24
6 12.02 50.13
7 12.02 50.13
8 12.02 50.13
9 12.02 50.13 Degrees of Freedom = 278
10 12.02 50.13
Calibration Comments
............................................................................................................................................................
............................................................................................................................................................
............................................................................................................................................................
............................................................................................................................................................
Calibrated By: ............................................ Checked By: ................................................. A. Wheeler D. Hoffmann

QM37.06/5 - Section 3 22/04/2016 Page 5 of 7
ACCREDITATION CALIBRATION REPORT
Instrument Uncertainty Calculations
Date: 23/9/97 1/ Plant: Blast Furnace.
2/ Loop No / Description: Loop 7 / Natural Humidity
3/ Tech ID No / Description: SNC3084 / R-I Signal Conditioner
1/ Uncertainty of Instrument being calibrated Use Type B method of evaluation if unable to do a Repeatability Test. Standard Deviation = 0 Uncertainty, U1 = 0 Degrees of Freedom, V1 = 10
2/ Uncertainty due to Input Test Insts / Gas used Input - Use Type B method of evaluation if uncertainty is unknown. Test Inst. Tolerance (Semi Range), % = 0.375 Uncertainty, U2 = 0.217 Estimated Inst. Reliability = 95 times out of 100 Degrees of Freedom, V2 = 50
3/ Uncertainty due to Output Output - Use Type B method of evaluation if uncertainty is unknown. Test Inst. Tolerance (Semi Range), % = 0.16 Uncertainty, U3 = 0.092 Estimated Inst. Reliability = 98 times out of 100 Degrees of Freedom, V3 = 1250 UTotal = ((C1U1)
2 + (C2U2)
2 + (C3U3)
2) ½
= 0.235 Veff = UTotal
4
(U14 / V1) + (U2
4 / V2) + (U3
4 / V3)
= 278

QM37.06/5 - Section 3 22/04/2016 Page 6 of 7
ACCREDITATION CALIBRATION REPORT (Standard Format)
Date: 23/9/97 1/ Plant: Blast Furnace.
2/ Loop No / Description: Loop 7 / Natural Humidity
3/ Tech ID No / Description: CCD0884 / DPCS 9 / Slot 35
4/ Ambient Temp: 20 Deg. C. Atmospheric Pressure: N/A
5/ Procedure(s): QP35.03/4
6/ Tolerance: +/- 0.25%
7/ Test Instrument Used: Input: TIN1132 Output: Indication
8/ Work Order No: WO357497
9/ Input Range: 4 to 20 mA Output Range: 0 to 100 %
10/ As Found As Left Mean
Output Up Down Output Up Down Up Down Up Down Correction
0 0.01 0.02 0.02 0.01 -0.02%
25 25.00 24.99 25.00 24.99 25.00 25.00 0.00%
50 49.95 49.98 50.01 50.00 49.95 49.95 0.03%
75 74.97 74.99 74.95 74.96 74.95 74.95 0.04%
100 100.03 100.00 99.95 0.01%
11/ Repeatability Test
Test Result %
1 49.95 49.95 Mean = 49.98 %
2 49.99 49.99
3 50 50
4 49.96 49.96
5 50 50 Uncertainty = 0.05
6 49.99 49.99
7 49.98 49.98
8 49.94 49.94
9 50.01 50.01 Degrees of Freedom = 209.2
10 49.99 49.99
Calibration Comments
............................................................................................................................................................
............................................................................................................................................................
............................................................................................................................................................
............................................................................................................................................................
Calibrated By: ............................................ Checked By: ................................................. D. Hoffmann D. Hoffmann

QM37.06/5 - Section 3 22/04/2016 Page 7 of 7
ACCREDITATION CALIBRATION REPORT
Instrument Uncertainty Calculations
Date: 23/9/97 1/ Plant: Blast Furnace.
2/ Loop No / Description: Loop 7 / Natural Humidity
3/ Tech ID No / Description: CCD0884 / DPCS 9 / Slot 35
1/ Uncertainty of Instrument being calibrated Use Type B method of evaluation if unable to do a Repeatability Test. Standard Deviation = 0.023 Uncertainty, U1 = 0.007 Degrees of Freedom, V1 = 10
2/ Uncertainty due to Input Test Insts / Gas used Input - Use Type B method of evaluation if uncertainty is unknown. Test Inst. Tolerance (Semi Range), % = 0.08 Uncertainty, U2 = 0.046 Estimated Inst. Reliability = 95 times out of 100 Degrees of Freedom, V2 = 200
3/ Uncertainty due to Output Output - Use Type B method of evaluation if uncertainty is unknown. Test Inst. Tolerance (Semi Range), % = 0.005 Uncertainty, U3 = 0.003 Estimated Inst. Reliability = 90 times out of 100 Degrees of Freedom, V3 = 50 UTotal = ((C1U1)
2 + (C2U2)
2 + (C3U3)
2) ½
= 0.047 Veff = UTotal
4
(U14 / V1) + (U2
4 / V2) + (U3
4 / V3)
= 209.2

INSTRUMENTS
LOOP TESTING PROCEDURES
QM37.13 SECTION - 0032
Revision 2
EIC SYSTEMS
Any HARD copies of this procedure are UNCONTROLLED QM37.06/6 - Section 3 22/04/2016 Page 1 of 6
Plant: Coke Ovens. Supervisor Sign off:
Procedure No/Name: 0032 / #2 Exhauster Bearing Temps.
Category: HIGH, Safety / Control
Loop Test Date SAP Order No. Test Carried Out By
Test Purpose: To prove loop and check alarm points.
Safety: Take Two & Test Before Touch
Equipment Required: Type J Thermocouple source.
.
Drawing References:

INSTRUMENTS
LOOP TESTING PROCEDURES
QM37.13 SECTION - 0032
Revision 2
EIC SYSTEMS
Any HARD copies of this procedure are UNCONTROLLED QM37.06/6 - Section 3 22/04/2016 Page 2 of 6
Procedure
This loop measures the bearing temperatures of the compressor. The signal goes to both a recorder, and Toshiba, which contains an alarm function.
Calibration
1. Confirm with exhauster house control that procedure can be performed.
Yes / No
2. Inform driver of intentions and explain procedure.
Yes / No
3. Connect test equipment up at thermocouple head for first bearing.
Yes / No
4. Input temperatures from table 1.
Yes / No
5. Verify from Citect and recorder that readings are correct. Check that alarm activates as temperature exceeds 64oC. Record in table 3.
Yes / No
6. If within tolerance proceed to step 9.
Yes / No
7. If recorder is out of tolerance, perform calibration. Record in table 4.
Yes / No

INSTRUMENTS
LOOP TESTING PROCEDURES
QM37.13 SECTION - 0032
Revision 2
EIC SYSTEMS
Any HARD copies of this procedure are UNCONTROLLED QM37.06/6 - Section 3 22/04/2016 Page 3 of 6
8. Repeat steps 4 to 7 until within tolerance and record in table 5.
Yes / No
9. Check installation.
Yes / No
10. Continue with other bearing thermocouples.
Yes / No
11. At the completion of the calibration procedure if the loop or part of the loop was or still is outside allowable tolerances note this in the
comments section and refer to WI37.EIC.101 (Notice of Correction).
Yes / No
Interlocks
There are no interlocks for this loop.

INSTRUMENTS
LOOP TESTING PROCEDURES
QM37.13 SECTION - 0032
Revision 2
EIC SYSTEMS
Any HARD copies of this procedure are UNCONTROLLED QM37.06/6 - Section 3 22/04/2016 Page 4 of 6
Routine Maintenance
1. Drain Pipework on transmitters, rod out takeoffs.
Yes / No
2. Ensure transmitters are connected up properly, back on line and not in alarm on screen.
Yes / No
3. Machine numbers are correct and legible on all loop instruments. Rectify if this not the case.
Yes / No
4. Location label next to inst. is correct and legible on all loop instruments. Rectify if this not the case.
Yes / No
5. Amend this document if necessary.
Yes / No
6. Review installation, does it comply with QM37.06 (Instrumentation Practices). Report to supervisor with details.
Yes / No
Tag Locations
Tag Name Description Overview # Group # Point #
T-1523 No. 2 Comp. Bearing Temp. 1 5 16 1
T-1524 No. 2 Comp. Bearing Temp. 2 5 16 2
T-1525 No. 2 Comp. Bearing Temp. 3 5 16 3

INSTRUMENTS
LOOP TESTING PROCEDURES
QM37.13 SECTION - 0032
Revision 2
EIC SYSTEMS
Any HARD copies of this procedure are UNCONTROLLED QM37.06/6 - Section 3 22/04/2016 Page 5 of 6
T-1526 No. 2 Comp. Bearing Temp. 4 5 16 4
T-1527 No. 2 Comp. Bearing Temp. 5 5 16 5
Comments about any Section:
Table 1
Loop Test Calibration Inputs:
Inst. Description Unit Test 2 Test 3 Test 4 Test 5 Test Inst. #
No. 2 Comp. Bearing T/C 1 - 25oC 50oC 75oC 100oC
No. 2 Comp. Bearing T/C 2 - 25oC 50oC 75oC 100oC
No. 2 Comp. Bearing T/C 3 - 25oC 50oC 75oC 100oC
No. 2 Comp. Bearing T/C 4 - 25oC 50oC 75oC 100oC
No. 2 Comp. Bearing T/C 5 - 25oC 50oC 75oC 100oC
Table 2
Expected Loop Test Calibration Outputs:
Display Point/Tag name Unit Test 2 Test 3 Test 4 Test 5 Alarm Tolerance
T-1523 POC 25oC 50oC 75oC 100oC 64oC +/- 2C
T-1524 POC 25oC 50oC 75oC 100oC 64oC +/- 2C
T-1525 POC 25oC 50oC 75oC 100oC 64oC +/- 2C
T-1526 POC 25oC 50oC 75oC 100oC 64oC +/- 2C

INSTRUMENTS
LOOP TESTING PROCEDURES
QM37.13 SECTION - 0032
Revision 2
EIC SYSTEMS
Any HARD copies of this procedure are UNCONTROLLED QM37.06/6 - Section 3 22/04/2016 Page 6 of 6
T-1527 POC 25oC 50oC 75oC 100oC 64oC +/- 2C
Table 3
Initial Calibration Loop Test Results:
Display Point/Tag name Unit Test 2 Test 3 Test 4 Test 5 Alarm
T-1523 POC
T-1524 POC
T-1525 POC
T-1526 POC
T-1527 POC

INSTRUMENTS
LOOP TESTING PROCEDURES
QM37.13 SECTION - 0032
Revision 2
EIC SYSTEMS
Any HARD copies of this procedure are UNCONTROLLED QM37.06/6 - Section 3 22/04/2016 Page 7 of 6
Table 4 - Individual Inst Calibration reports
Machine No.: Inst Description
(Loop ID)
Date:
Required Settings Input Output
Test Equipment Test Instrument In Test Instrument Out
% Input 0% 50% 100% 50% 0%
Before Adjustment
After Adjustment
Comments
Machine No.: Inst Description
(Loop ID)
Date:
Required Settings Input Output
Test Equipment Test Instrument In Test Instrument Out
% Input 0% 50% 100% 50% 0%
Before Adjustment
After Adjustment
Comments
Machine No.: Inst Description
(Loop ID)
Date:
Required Settings Input Output
Test Equipment Test Instrument In Test Instrument Out
% Input 0% 50% 100% 50% 0%
Before Adjustment
After Adjustment
Comments

INSTRUMENTS
LOOP TESTING PROCEDURES
QM37.13 SECTION - 0032
Revision 2
EIC SYSTEMS
Any HARD copies of this procedure are UNCONTROLLED QM37.06/6 - Section 3 22/04/2016 Page 8 of 6
Table 5
After Calibration Loop Test Results:
Display Point/Tag name Unit Test 2 Test 3 Test 4 Test 5 Alarm
T-1523 POC
T-1524 POC
T-1525 POC
T-1526 POC
T-1527 POC
Table 6
MMS/Physical location information
Inst. Description Physical Location Plant Area Section Unit Input Range Output Range
No. 2 Exhauster Bearing T/C’s No. 2 Exh. (North), Exhauster House CO - - - - Type J
Bearing Temperature Recorder Control Room, Exhauster House CO TLPCRE RECORD RC0018 Type J 0 - 100oC

INSTRUMENTATION
PRACTICES
QM37.06 Section 4
Revision 4
ENGINEERING
Any PRINTED copies of this procedure are UNCONTROLLED Page: 1 of 73
4. Installation Practices of Instrumentation
4A Calibration The electrical / instrument installation contractor is responsible for calibration of all instrumentation in its scope of work. All Calibration reports used shall be as per Attachment 6.2 for the relevant item calibrated. Central Engineering Project Controller can only give exceptions to this requirement.
4A.1 Definition of Terms
Pre-installation Calibration This is defined as the calibration of all instrumentation, prior to installation to ensure that each individual instrument is functionally correct and correctly calibrated.
Pressure Testing This is defined as the testing of all installations within the instrument installation to ensure they are pressure tight to the specified test conditions.
Pre-commissioning (including “Loop Testing”) This is defined as the checking for correct operation of all instrument systems and loops and the preparation of all instrumentation for commissioning.
Commissioning This is defined as the setting to work of all instrument systems and loops in the normal operating environment. Commissioning is normally considered complete once final product shipment has taken place; however, this period may be extended at the Project Controller's discretion. The calibration / testing personnel shall be fully conversant with the types of manufacturer's equipment to be calibrated / tested and where necessary the personnel shall attend relevant training courses at the expense of the Contractor. A suitable programme for calibration shall be provided and agreed by the Project Controller. This programme will define the overall sequence of the calibration / testing on the project. Any deviations from this sequence shall be agreed in writing. The Project Controller reserves the right to witness all calibrations / testing, and where suitable notice is not given by the Contractor or the programme of calibration / testing is changed, the Project Controller shall instruct the Contractor to re-calibrate / retest at the Contractor's sole expense that part of the work which the Project Controller wishes to witness.

INSTRUMENTATION
PRACTICES
QM37.06 Section 4
Revision 4
ENGINEERING
Any PRINTED copies of this procedure are UNCONTROLLED Page: 2 of 73
Commissioning (cont). The pre-installation calibration of instruments shall require a fully equipped lockable workshop. The Contractor is responsible to ensure that equipment is kept in a clean dry environment. Before calibration is commenced, a comprehensive list of test equipment to be used shall be submitted to the Project Controller. This test equipment shall have a standard of accuracy better than the manufacturer's stated accuracy for the instrument to be tested. All test equipment shall be calibrated in SI units and tests shall be reported in SI units (unless otherwise specified by the Project Controller in writing). Acceptable evidence of the satisfactory condition of equipment (e.g. up to date test certificates) shall be provided. Test equipment shall be frequently checked throughout the testing period and test certificates provided to the Project Controller on request. All relevant local and statutory safety requirements shall be compiled with and all personnel are to be fully conversant with these requirements. After calibration, all connections and entries shall be sealed to prevent subsequent ingress of moisture and dirt. Upon completion of pre-commissioning the installation shall be made ready for process commissioning. All work such as the setting of zero elevations and suppressions, any necessary liquid seals, purging requirements etc. shall be completed. At the completion of each test a suitable means of dictating the stage reached shall be used as detailed in Section 4A.3(a). This identification shall be shown on all components in the loop, thereby making all personnel aware of the current status of any installation.
Note: Approval shall be obtained from the Project Controller before Power / Pneumatic supplies are switched on to any equipment or section of plant.
4A.2 Pre-installation Calibration
All instrument action shall be subjected to a pre-installation calibration and this shall commence as soon as practicable after the receipt of the instrument. The calibration shall be performed in the manner described herein, with any adjustments being made in accordance with the manufacturer's instructions. (a) All shipping stops shall be removed from the instruments before starting the
procedures listed below. Miscellaneous components, e.g. charts, mercury, oil, shall be correctly installed.

INSTRUMENTATION
PRACTICES
QM37.06 Section 4
Revision 4
ENGINEERING
Any PRINTED copies of this procedure are UNCONTROLLED Page: 3 of 73
4A.2 Pre-installation Calibration (cont).
(b) The object of pre-installation calibration is to ensure that each instrument has been supplied in accordance with its specifications, is functionally correct and correctly calibrated.
(c) The Project Controller shall be informed immediately of any defects, which
cannot be rectified, or of any instrument which cannot be calibrated within a reasonable period of time. This notification shall be confirmed in writing.
(d) Where a pre-installation test is not specified, or where circumstances
prohibit the carrying out of the prescribed test, a test method shall be agreed with the Project Controller.
(e) The approval of the Project Controller shall be obtained in writing before any
non-standard modifications or adjustments are made. (f) In general all calibration will simulate as closely as possible design process
conditions, by the use of Manometers, Potentiometers, Resistance Bridges, Dead Weight Testers, and Test Pressure Gauges etc. utilising hydraulic, electric and pneumatic supplies.
(g) No calibration shall be carried out on electronic instruments until an
adequate warm up period has elapsed. Wherever possible, instruments shall be energised 24 hours before testing.
(h) All instruments, except as noted herein, are to be calibrated in the upscale
and downscale directions and if necessary adjusted until their accuracy’s conform to those limits stated by the manufacturer. Upon completion, calibration reports shall be handed to the Project Controller. All evidence and records of abortive tests shall also be handed to the Project Controller at this time. Upon completion of tests the instruments shall be drained, the miscellaneous components removed and shipping stops replaced.
Note: Draining the instruments of water used in testing is essential as a freeze precaution.

INSTRUMENTATION
PRACTICES
QM37.06 Section 4
Revision 4
ENGINEERING
Any PRINTED copies of this procedure are UNCONTROLLED Page: 4 of 73
4A.3 Identification
Each instrument supplied by the Contractor shall be identified by stamping the relevant tag number onto the instrument data plate and onto a stainless steel tag to be securely fixed to the body of the instrument by stainless steel wire. Where this tag has not been fitted by the instrument manufacturer the Contractor shall supply and fix such identification tag at his expense. (a) During the inspection, calibration, installation and pre-commissioning phases
of the work waterproof self-adhesive label shall be attached to each instrument indicating its current programmed status.
The coding shall be as follows:
Blue - Pre-installation calibrated / tested Yellow - Pressure Tested Green - Cables Tested Red - Pre-commissioned White - Commissioned
4A.4 Records
(a) The Contractor shall, as part of his responsibility, complete and maintain a comprehensive record of each instrument on the Project Controller's "Field Installation Check List" forms (refer Section 4, Attachment 2) applicable to each instrument, which shall include:
(i) The tag and process number. (ii) Manufacturer's name, make and model. (iii) Serial number. (iv) Visual inspection remarks and reports. (v) Keys, manual, instruction sheets and tools delivered with the unit. (vi) Pre-installation test results including adjustments or modifications
made, calibration charts and operating criteria. (vii) Pre-commissioning and commissioning checks, test and reports. (viii) Date of each entry or notation and the printed name of the person
performing the test. (ix) Information required in accordance with other sections of this
specification. (x) Marked up loop diagrams (as per D1445 – LPD Design Reference
Manual).

INSTRUMENTATION
PRACTICES
QM37.06 Section 4
Revision 4
ENGINEERING
Any PRINTED copies of this procedure are UNCONTROLLED Page: 5 of 73
4A.4 Records (cont). (b) The Contractor will be supplied with one complete set of drawings and
schedules to be used for recording in red:
(i) As-built modifications and changes to the original design. (ii) The position of site located field instruments, termination boxes and
similar ancillary equipment. (iii) Dimensional locations and routes of field run trays and ladders, cabling
and tubing. (iv) Sized and dimensional locations of site run process sensing lines, air
supply piping and other ancillary piping. (v) Detailed wiring diagrams and cable schedules showing cable
identification and terminal numbers, sizes, classifications and other relevant details (as per D1445 – LPD Design Reference Manual).
(vi) Details of cables and tubing run in each tray, rack, ladder conduit, duct and trench.
(c) Record sheets, as-built drawings and schedules shall be marked up each
day and made available for review when requested by the Project Controller. Progress shall be recorded each day on the approved programme and shall be reviewed each week with the Project Controller for co-ordination with other installation programmes.
(d) Not more than seven (7) days after mechanical completion of the installation
the Contractor shall compile the records, manuals, instruction sheets, tools, as-built drawings, sketches and diagrams, field installation check lists, and other relevant data into a complete dossier of the installation and hand them to the Project Controller.
(e) All drawings must conform to the (as per D1445 – LPD Design Reference
Manual)..
4A.5 Pre-installation Calibration Procedure
4A.5.1 General Notes (a) Flow installation, orifice plate / primary element, checking for
roundness, tapping burrs, upstream and downstream measuring of pipe bores etc., are covered in the installation specification. Orifice plates are scheduled for installation after flushing and line pressure testing is complete.
(b) The procedures given here are a guide only and the manufacturer's
instructions shall be used where applicable. (c) Where the term "suitable electrical supply" is used in the following
instructions references shall be made to the instrument manufacturer's specification to ascertain the source and characteristics of the supply to be used.
(d) The Contractor shall complete the Field Installation Check List sheet
for each instrument showing all required data from each instrument.

INSTRUMENTATION
PRACTICES
QM37.06 Section 4
Revision 4
ENGINEERING
Any PRINTED copies of this procedure are UNCONTROLLED Page: 6 of 73
4A.5.2 Transmitters Differential Pressure, Low Range Pressure and Force Balance Level: (a) After checking the instrument and data plate against its
specification, connect up a suitable air / electrical supply (see Clause 4A.2 (g)).
(b) Obtain the required actuating pressure by means of a variable air
supply. (c) The actuating pressure for the test shall be connected to the correct
instrument process connection via a Tee piece. The leg of the tee connected to the actuating pressure shall have a lock off valve and vent valve. The other leg of the tee shall be connected to a water / mercury manometer or suitable test gauge.
Note: The instrument process connection not used shall be vented throughout the test.
(d) Connect the output as follows:
(i) Electronic: To a suitable test meter. (ii) Pneumatic: Via a capacity chamber to a manometer or test
gauge.
(e) Align equipment at zero. (f) With "shut off" valve open and vent valve closed, apply an actuating
pressure of approximately full range. Close "shut off" valve and check system for leaks. When no fall off in pressure is observed, i.e. no leaks proceed as follows.
(g) Open "vent" valve and recheck zero. (h) Apply actuating pressure equivalent to 25, 50, 75 and 100 percent of
the instrument range. Record corresponding output readings. (i) Using the vent valve apply actuating pressures equivalent to 75, 50,
20 and 0 of the instrument range. Record corresponding output readings.
Note: To obtain a correct picture of the inherent hysteresis, readings taken on 4A.5.2 (h) shall be always "rising" and readings taken on 4A.5.2 (i) shall be always "falling". The percentage error calculated from the results of the above test shall not exceed the manufacturer's stated limits.
(j) Where necessary steps 4A.5.2 (h) and 4A.5.2 (i) shall be repeated
and the appropriate adjustments made until the manufacturer's quoted accuracy is obtained.
(k) Transmitters with indicating scales shall, where necessary, have
their indicators calibrated during these tests.

INSTRUMENTATION
PRACTICES
QM37.06 Section 4
Revision 4
ENGINEERING
Any PRINTED copies of this procedure are UNCONTROLLED Page: 7 of 73
4A.5.2 Transmitters (cont). (l) A static pressure test at 1.5 times working pressure or the
manufacturer's stated specification, whichever is the lower, shall be made. Zero shifts shall be within the stated manufacturer's tolerance and be recorded on the calibration report.
(m) The instruments shall then be identified as stated in Clause 4A.3 (a).
4A.5.3 Pressure Transmitter (a) After checking the instrument against its specification, connect up a
suitable air / electrical supply (see Clause 4A.2 (g)). (b) Obtain the required actuating pressure by means of variable
hydraulic or pneumatic supply or by means of a Dead Weight Tester.
(c) The actuating pressure for the test shall be connected to the correct
instrument process connection via a Tee. The leg of the tee connected to the actuating pressure shall have a shut off valve and vent valve. The other leg of the Tee shall be connected to a suitable Test Gauge.
(d) Connect the output as follows:
(i) Electronic: To a suitable test meter. (ii) Pneumatic: Via a capacity chamber to a manometer or test
gauge.
(e) Align equipment at zero. (f) With "shut off" valve open and vent valve closed, apply an actuating
pressure of approximately full range. Close "shut off" valve and check system for leaks. When no fall off in pressure is observed, i.e. no leaks proceed as follows.
(g) Open "vent" valve and recheck zero. (h) Apply actuating pressures equivalent to 25, 50, 75 and 100 percent
of the instrument range. Record corresponding output readings. (i) Using the vent valve apply actuating pressures equivalent to 75, 50,
25 and 0 of the instrument range. Record corresponding out readings.
Note: To obtain a correct picture of the inherent hysteresis, readings taken on 4A.5.2 (h) shall be always "rising" and readings taken on 4A.5.2 (i) shall be always "falling". The percentage error calculated from the results of the above test shall not exceed the manufacturer's stated limits.

INSTRUMENTATION
PRACTICES
QM37.06 Section 4
Revision 4
ENGINEERING
Any PRINTED copies of this procedure are UNCONTROLLED Page: 8 of 73
4A.5.3 Pressure Transmitter (cont). (j) Where necessary steps 4A.5.3 (h) and 4A.5.3 (i) shall be repeated
and the appropriate adjustments made until the manufacturer's quoted accuracy is obtained.
(k) Transmitters with indicating scales shall, where necessary, have
their indicators calibrated during these tests. (l) The instruments shall then be identified as stated in Clause 4A.3 (a).
4A.5.4 Level Displacer Type
Note 1. For transmitters of the external cage type, testing can often be carried out expeditiously when the transmitter has been fitted to the vessel. This method would appear to conflict with the general principles of PRE-INSTALLATION testing previously outlined. However, this method shall only be used with the approval of the Project Controller. CAUTION: Before this type of in-situ testing is commenced, the
following shall be ensured: (i) The plant / process conditions permit the use of
water. (ii) The vessel isolation valves are closed.
Note 2. For transmitters designed for use on services other than water at ambient temperature, allowance / adjustment shall be made for specific gravity at operating conditions.
Note 3. Transmitters, especially with abnormally long floats may, with the approval of the Project Controller, be calibrated by hanging weights in place of the displacers. The weights must be equal to the resultant downward force of the displacers at 0, 25, 50, 70 and 100 percent of the measuring range, correct for conditions.
(a) Fabricate a suitable test rig to enable the float to be operated by
raising and lowering the water level. Connect a water supply to the test rig via a Tee Piece. The leg of the tee connected to the water supply shall have a shut off valve and vent valve connected to a glass or plastic water column secured to the chamber with a common datum.
(b) After checking the relevant instrument against its specification,
connect up a suitable air / electrical supply (see Clause 4A.2 (g)). (c) Connect the out put as follows:
(i) Electronic: To a suitable test meter. (ii) Pneumatic: Via a capacity chamber to a manometer or test
gauge.

INSTRUMENTATION
PRACTICES
QM37.06 Section 4
Revision 4
ENGINEERING
Any PRINTED copies of this procedure are UNCONTROLLED Page: 9 of 73
4A.5.4 Level Displacer Type (cont).
(d) Align equipment at zero.
(e) With "shut off" valve open and drain valve closed raise the water level to 25, 50, 75 and 100 percent of instrument range as indicated on the graduating water column. Record the corresponding output readings.
(f) Using the drain valve lower the water level to 75, 50, 25 and 0 percent of the instrument range. Record corresponding output readings. The percentage error calculated form the results of the above test shall not exceed the manufacturer's stated limits.
Note: To obtain a correct picture of the inherent hysteresis, readings taken on 4A.5.2 (h) shall be always "rising" and readings taken on 4A.5.2 (i) shall be always "falling".
(g) Where necessary steps 4A.5.4 (e) and 4A.5.4 (f) shall be repeated and the appropriate adjustments made unit the manufacturer's quoted accuracy is obtained.
(h) Transmitters with indicating scales shall, where necessary, have their indicators calibrated during these tests.
(i) The instruments shall then be identified as stated in Clause 4A.3 (a).
4A.5.5 Temperature Filled System Type
(a) After check the instrument and data plate against its specification, connect up a suitable air / electrical supply [see Clause 4A.2 (g)].
(b) Immerse bulb in an oil or salt-water bath fitted with a certified thermometer.
(c) Connect the output as follows: (i) Electronic: To a suitable test meter. (ii) Pneumatic: Via a capacity chamber to a manometer or test
gauge.
(d) Raise the bath temperature to 50 and 100 percent of the instrument range. Record corresponding output readings. The percentage error calculated from the results of the above test shall not exceed the manufacturer's stated limits.
(e) Where necessary steps 4A.5.5 (d) shall be repeated and the appropriate adjustments made until the manufacturer's quoted accuracy is obtained.
(f) The instruments shall then be identified as stated in Clause 4A.3 (a).

INSTRUMENTATION
PRACTICES
QM37.06 Section 4
Revision 4
ENGINEERING
Any PRINTED copies of this procedure are UNCONTROLLED Page: 10 of 73
4A.5.6 Temperature Thermocouple Type (Millivolt to current converters for transmission of temperature). (a) After checking the instrument and data plate against its
specification, connect up a suitable electrical supply [see Clause 4A.2 (g)].
(b) Connect a "Workshop Calibrator" to the instrument input terminals. (c) Connect the output as follows:
(i) Electronic: To a suitable test meter. (ii) Pneumatic: Via a capacity chamber to a manometer or test
gauge. (d) Inject the relevant temperatures to obtain readings corresponding to
25, 50, 75 and 100 percent at instrument range. Record the corresponding readings.
(e) Repeat steps 4A.5.6 (e) but for falling values of 75, 50, 25 and 0
percent of instrument range. Record the corresponding output readings. The percentage error calculated from the results of the above test shall not exceed the manufacturer's stated limits.
Note: To obtain a correct picture of the inherent hysteresis, readings taken on 4A.5.6 (e) shall be always "rising" and readings taken on 4A.5.6 (f) shall be always "falling".
(f) Where necessary steps 4A.5.6 (e) and 4A.5.6 (f) shall be repeated
and the appropriate adjustments made until the manufacturer's quoted accuracy is obtained.
(g) The instruments shall then be identified as stated in Clause 4A.3 (a).
4A.5.7 Temperature Resistance Thermometer Type (Resistance to current converters). (a) After checking the instrument and data plate against its
specification, connect up a suitable electrical supply [see Clause 4A.2 (g)].
(b) Connect a suitable "Resistance Box / Calibrator" to the instrument
input terminals. Some systems/instruments do not accept the calibrator; use the Resistance box in this instance.

INSTRUMENTATION
PRACTICES
QM37.06 Section 4
Revision 4
ENGINEERING
Any PRINTED copies of this procedure are UNCONTROLLED Page: 11 of 73
4A.5.7 Temperature Resistance Thermometer Type (cont). (c) Connect the output as follows:
(i) Electronic: To a suitable test meter. (d) Using the Temperature / Resistance charts provided apply the correct
values of resistance for the measuring thermometer. Adjust the "Resistance Box" to obtain reading corresponding to 25, 50, 75 and 100 percent at instrument range. Record the corresponding readings or inject the relevant temperatures to obtain readings corresponding to 25, 50, 75 and 100 percent at instrument range. Record the corresponding readings.
(e) Repeat steps 4A.5.7 (d) but for falling values of 75, 50, 25 and 0
percent of the instrument range. Record the corresponding output readings.
The percentage error calculated from the results of the above test shall not exceed the manufacturer's stated limits.
Note: To obtain a correct picture of the inherent hysteresis, readings taken on 4A.5.7 (d) shall be always "rising" and readings taken on 4A.5.7 (e) shall be always "falling".
(f) Where necessary steps 4A.5.7 (d) and 4A.5.7 (e) shall be repeated
and the appropriate adjustments made until the manufacturer's quoted accuracy is obtained.
(g) The instruments shall then be identified as stated in 4A.3 (a).
4A.5.8 Receivers (Recorders and Indicators) (a) After checking the instrument and data plate against its
specification, connect up a suitable electrical supply [see Clause 4A.2 (g)].
(b) The magnitude of the signal injection shall be measured on an
accurate test gauge or meter. (c) Inject a signal equivalent to 0 percent of the instrument range and
adjust the zero. (d) Raise the signal values to 25, 50, 75 and 100 percent of the
instrument range and record the corresponding instrument readings. (e) Lower the signal to values corresponding to 75, 50, 25 and 0
percent of the instrument range and record the corresponding instrument readings.
Note: To obtain a correct picture of the inherent hysteresis, readings taken on 4A.5.8 (d) shall be always "rising" and readings taken on 4A.5.8 (e) shall be always "falling".

INSTRUMENTATION
PRACTICES
QM37.06 Section 4
Revision 4
ENGINEERING
Any PRINTED copies of this procedure are UNCONTROLLED Page: 12 of 73
4A.5.8 Receivers (Recorders and Indicators) (cont). (f) the percentage error calculated from the results of the above test
shall not exceed the manufacturer's stated limits. (g) Where necessary steps 4A.5.8 (d) and 4A.5.8 (e) shall be repeated
and the appropriate adjustments made until the manufacturer's quoted accuracy is obtained.
(h) The instruments shall then be identified as stated in 4A.3 (a).
4A.5.9 Controllers (a) The checking of Proportional, Integral and Derivative functions are
not covered by this procedure but the Project Controller reserves the right to request the checking of these functions to manufacturer's instructions.
(b) Controllers can be checked using a method known as the "Back to
Back" or Output to Input Method e.g. where an instrument panel is wired to terminal strips the output of a specified instrument may be connected to its own input with capacity added where necessary, thereby creating a system which if correct behaves like a "fast control loop". This system of checking may only be used with the written approval of the Project Controller.
Note: For this test the controller must be set at reverse action. (c) When a controller is integrally mounted with a recorder or indicator it
is obviously advantageous to check both systems at once. (d) The Contractor should note that the majority of controllers may be
included within a Distributed Control System and subsequently will not be checked as detailed. (i) After checking the instrument and data plate against its
specification, connect up a suitable electrical supply [see Clause 4A.2 (g)].
(ii) Connect a variable electrical supply via a test meter in the input connections.
(iii) Connect the output as follows: Electronic: To a suitable test meter.
(e) Using the manufacturer's instructions, carry out complete alignment
and controller checks, making the necessary adjustments to ensure correct operation with no "off set" between the measure variable and the set point independent of proportional band changes.
(f) Using manufacturer's instructions check the correct operation on all
positions, of the Auto / Manual transfer switch assembly.

INSTRUMENTATION
PRACTICES
QM37.06 Section 4
Revision 4
ENGINEERING
Any PRINTED copies of this procedure are UNCONTROLLED Page: 13 of 73
4A.5.9 Controllers (cont). (g) The controller shall be left with the correct action and ideally with
100% Proportional and 25% Integral and Derivative actions. (h) The instruments shall then be identified as stated in 4A.3 (a).
4A.5.10 Non-transmitting Direct Reading Instruments (a) Indicators and recorders shall be tested using the same operating
procedures as for transmitters on the same service, i.e. Pressure, Differential Pressure, flow, Temperature and Level, except that instrument readings will be noted instead of output readings.
(b) Indicating or Recording controllers shall have their measuring
elements checked as for transmitters on the same service, as stated in 4A.5.10 (a). Control actions shall be checked as specified in 4A.5.9.
(c) The instruments shall then be identified as stated in 4A.3 (a).
4A.5.11 Switches (Pressure, Differential Pressure, Flow, Temperature and Level Switches).
(a) Set the switch or switches at the setting given on the instrument
specification an using the appropriate operating method ensure, by means of a continuity tester, that each set of contacts make and / or break as required. Check the differential gap and tabulate the results.
(b) After testing, all connections and entries must be sealed to prevent
the subsequent ingress of moisture and dirt. (c) The instruments shall then be identified as stated in 4A.3 (a).
4A.5.12 Solenoid Valves (a) After checking the valve against its specifications, connect the
appropriate electrical supply via switch. (b) Connect an air supply of the correct pressure to the appropriate
port or ports. (c) Check the valves changeover action i.e. venting and shut off of
ports by operating the switch and compare the results with the specification.
(d) Check where applicable, electrical and manual reset override, and
time delay features. (e) Check tightness of shut off.

INSTRUMENTATION
PRACTICES
QM37.06 Section 4
Revision 4
ENGINEERING
Any PRINTED copies of this procedure are UNCONTROLLED Page: 14 of 73
4A.5.12 Solenoid Valves (cont). (f) The instruments shall then be identified as stated in 4A.3 (a).
4A.5.13 Control and On / Off Valves (a) Check valve data plate and where practical, physically check the
valve against the instrument specification. (b) Check that, where specified, the lubricator is fitted and is charged
with the correct lubricant. (c) Connect a regulation air supply via a Tee Piece to the "top work
connection". The other leg of the Tee Piece shall be connected to an accurate test gauge. Where a positioner is fitted it must be disconnected from the top work connection during the test.
Note 1. The air supply must be connected as stated and the use of the positioner bypass is prohibited.
Note 2. Control Valves, Power Cylinders, etc., often operate at pressure in excess of 40 kPa. Care must be taken to ensure that the test is carried out at the correct pressure.
(d) Increase the air pressure to load the actuator and check that the
valve spindle, with due reference to "Bench Set" taken up the correct position. Where necessary adjust the spring tension to obtain the correct "Start Position".
(e) When requested by the Project Controller the hysteresis shall be
checked as follows using a micrometer dial indicator (clock gauge) to measure the valve position. (i) Load the diaphragm with rising actuating pressure equivalent to
25, 50, 75 and 100 percent of the valve stroke. note the corresponding reading of the spindle positions on the dial indicator.
(ii) Load the diaphragm with the actuating pressure equivalent to 75, 50, 25 and 0 percent of the valve stroke and again note the corresponding readings on the dial indicator.
(iii) The valve should take up the same position in the upward and downward direction within the limits of +5% of the valve stroke reading on the dial indicator.
(f) Check the valve against the specification for correct action on air
failure. (g) Where the valve is specified to "Tight shut off" duties, the valve
shall be tested to ANSI B16.104-1976 Class IV.

INSTRUMENTATION
PRACTICES
QM37.06 Section 4
Revision 4
ENGINEERING
Any PRINTED copies of this procedure are UNCONTROLLED Page: 15 of 73
4A.5.13 Control and On / Off Valves (cont). (h) Control valves, with other types of actuators, e.g. piston operated,
air cylinder, electric motor and electro-hydraulic, and shall be tested to the manufacturer's instructions. The Contractor shall take particular care to ensure the correct setting of limit or torque switches before attempting to put power on the actuator.
(i) The valve shall then be identified as stated in 4A.3 (a).
4A.5.14 Valve Positioners (General Notes) Where a valve has a positioner fitted ensure that where applicable, steps 4A.5.13 (a) to 4A.5.13 (i) have been carried out and the positioner reconnected. (a) Connect an air supply to the positioner and set the appropriate
pressure. (b) Connect an appropriate variable 4-20 ma signal of the positioner. (c) Check stroking of control valve by applying signals to the
positioning and where necessary adjust the positioner using the manufacturer's instructions to obtain correct alignment.
(d) Where an air failure-locking relay is fitted, its action shall be
checked against the instrument specification. (e) The positioner shall then be identified as in 4A.3 (a).
Note: Valves in compressor recycle service and all valves of 150 mm or larger shall have their open and close full stroke time tested and recorded at this time.
4A.5.15 Analysis Equipment (a) Analysis and sampling equipment shall be checked against their
specification or receipt and shall be carefully examined for damaged glassware and other easily breakable components. Any defects must be reported to the Project Controller.
(b) No analysis testing shall be made without prior consultation with the
Project Controller. The Contractor shall carry out the required calibration procedures in strict accordance with the supplier's instructions.
(c) The instrument shall then be identified as stated in 4A.3 (a).

INSTRUMENTATION
PRACTICES
QM37.06 Section 4
Revision 4
ENGINEERING
Any PRINTED copies of this procedure are UNCONTROLLED Page: 16 of 73
4A.5.16 Flow Meters (a) The Contractor shall carry out the required calibration procedures
in strict accordance with the instrument supplier's instructions. (b) The instrument shall then be identified as stated in 4A.3 (a).
4A.5.17 Radiation Density Gauge Radiation density gauges and similar devices are the responsibility of the Safety Officer nominated by the Project Controller. The Safety Officer must approve any calibration of density gauges before the calibration is begun. (a) Before commencing calibration the technician must be fully
conversant with the instruction manual for the instrument being checked.
(b) Check the instrument against its specifications. (c) Further calibration testing should be carried out when the
instrument has been installed. These tests should be done in accordance with the manufacturer's instruction manual.
4A.5.18 Single, Multi and Fixed Monitors (a) Maintenance Services or designated contractor shall maintain all
gas monitor calibrations. (b) A challenge test must be performed prior to use of any personal
gas monitor (Single or Multi-gas) if a unit fails this test, the unit must immediately be returned to the Maintenance Services group.
(c) Calibration of a monitor will occur every 6 Months, or if the unit
requires servicing / calibration upon a challenge test failure. (d) Calibration reports will be recorded and kept by the Maintenance
Services group or contractor. (refer Section 4, Attachment 2 for examples of Gas Monitor Calibration Reports).
(e) All calibrations must comply with AS61779 Combustible Gas
Detection Instruments. All cells in the instrument must pass the step change response test to pass calibration (i.e. 90% of span in 30 seconds).
For details of Challenge Test Station Layout / Design, see Section 4B.19.

INSTRUMENTATION
PRACTICES
QM37.06 Section 4
Revision 4
ENGINEERING
Any PRINTED copies of this procedure are UNCONTROLLED Page: 17 of 73
4A.5.19 Other Instrumentation (a) The Contractor shall carry out calibration procedures in accordance
with the recommended practices as detailed by the relevant manufacturer of other types of instrumentation not already specifically mentioned. Evidence of such recommended methods shall be furnished by the Contractor to the Project Controller for approval, before the calibration is begun.
(b) Instruments shall then be identified as stated in 4A.3 (a).
4A.6 Procedures for Installation Check Lists
4A.6.1 General The Installation Check List will be used as an aid to finalising the construction contract and to identify the status of instrumentation prior to commissioning. The Contractor shall be responsible for completing an Installation Check List for each instrument item on the relevant form(s) given in Attachment 2. It is expected that Commissioning personnel will be on site during the final stages of construction for familiarisation and assistance where appropriate. Close co-operative between the Contractor and the Project Controller is essential to effect a smooth transition of responsibilities.
4A.6.2 Check List Signature At the end of each checklist is a section for signatures and dates. "Check By" is to be signed by the Project Controller on handover to commissioning. "Contractor / Vendor" is to be signed by the Contractor's Supervisor and / or Vendor Representative as appropriate. "Whyalla Operations" is to be signed by the Project Controller on handover to commissioning. The remaining two signature spaces are for Commissioning and Operations personnel on final handover.
4A.6.3 Defects and Comments It is important that any defects or comments are listed in a systematic manner and attached to the appropriate checklist. In this way all relevant information on each item of equipment will be available on one list with attachments.

INSTRUMENTATION
PRACTICES
QM37.06 Section 4
Revision 4
ENGINEERING
Any PRINTED copies of this procedure are UNCONTROLLED Page: 18 of 73
4B Installations
4B.1 General The design of the plant shall comply with requirements of the South Australian Department of Industrial Affairs and such other statutory authorities as have jurisdiction over the plant. All symbols for drawings etc. will be to AS1101.6. All drawings must conform to D1445 – LPD Design Reference Manual. It shall also remain the responsibility of the installation Contractor to provide to the Maintenance Services group, an "as-built" mark-up of each drawing at the conclusion of the commissioning phase. The Vendor shall supply four (4) only complete sets of operational manuals, maintenance manuals, spare parts listings and any other information necessary for the normal operation and maintenance of the equipment included in its supply. The Contractor specifying all instruments and ancillary equipment shall supply a list of instrument materials. With regard to installation materials such as tubing, cables, cable tray, conduits, or finishing materials such as junction boxes, cable glands, straps, clamps, etc., the Contractor need only advise the Maintenance Services group of the proposed type and manufacturer for approval. All materials used to complete the scope of work shall be new and be to the standard required in this or any supplementary document. Sub-Contractors Explosive-type fastening tools Coatings for repairing finishes Protection for tubes through partitions Thread sealants Fastening instruments and reticulation to process piping Masonry anchors Pipe and tube threads and conversion fittings Thread conversion fittings Compression fittings Cable glands and seals Wiring terminals Wiring lugs, spades and pins Conduit thread adaptors Silicone grease Air supply connection fittings Pneumatic tubing connection fittings Reticulation routine Alternative non-metallic reticulation supports Fastening reticulation to masonry Alternative finish on reticulation supports Fittings for edges and opening of trays and ladders

INSTRUMENTATION
PRACTICES
QM37.06 Section 4
Revision 4
ENGINEERING
Any PRINTED copies of this procedure are UNCONTROLLED Page: 19 of 73
4B.1 General (cont). Metal tags for labelling valves Corrosion inhibiting paint Compression crimp tools Sealing methods The installation Contractor shall supply four (4) only complete sets of maintenance manuals, instruction manuals, spare parts listing and any other information necessary for the normal operation and maintenance of any instrumentation that is Contractor supplied. The Contractor shall be required to supply any relevant data required by the Maintenance Services group to enable the Maintenance Services group to complete the plant operating manuals. This will be limited to any data associated with Contractor supplied equipment. The instruments and instrumentation systems shall be identified by a system of letters, numbers and basic pictorial symbols. The standard symbols and identification accepted are those issued by the Instrument Society of America under I.S.A. - S.5.1 and S5.3. Where more than one item of plant is supplied to perform a particular service, all such items of plant shall be identical so that they are completely interchangeable. No equipment or component shall be required to operate at conditions in excess of those specified in the appropriate standard or recommended by the manufacturer. Equipment installed shall be capable of withstanding conditions specified for the process. Field instrumentation shall be located in accordance with process requirements. The location of instruments shall allow permanent access for safe and effective maintenance. All instrumentation located in Hazardous Zones must comply with the relevant Standards for Intrinsic Safety. All instruments shall be installed in accordance with the manufacturer's specifications and so certified. For all measurements, two isolating valves in series shall be provided (only if pipe run is greater than 2.0 metres), one as close as possible to the tapping point (primary isolating valve) and one at the instrument; e.g., pressure gauge or transmitter (secondary isolating valve). Normally individual tapping points shall be provided for each instrument. Where a single point is used for multiple instruments the Maintenance Service shall approved the design. Instruments installed in the field shall be protected against rainfall and contaminates by an enclosure or hood.

INSTRUMENTATION
PRACTICES
QM37.06 Section 4
Revision 4
ENGINEERING
Any PRINTED copies of this procedure are UNCONTROLLED Page: 20 of 73
4B.1 General (cont).
All field-mounted equipment requiring wiring is to be cabled from below the instrument. All bolts, heads and nuts provided shall comply with an Australian or other approved international standard; be hexagonal in shape and truly faced. Washers shall be provided under both nuts and bolt heads. All nuts, bolts or other fastenings on any part of the plant shall, where required by securely locked by a means approved by the Maintenance Services group. All threads shall be metric unless otherwise approved by the Maintenance l Services group. All fastening devices shall be coated with a suitable covering to minimise the effects of corrosion. Prior to assembly of all threaded fixing devices, threads shall be coated with a suitable lubricant. When paint is to be used all parts shall be made completely clean and free from rust, scale or grease, and all external rough surfaces shall be filled. Filled temperature systems shall not be used without the approval of the Maintenance Services group. Capillary systems shall consist of 316 stainless steel tubing with stainless steel armour covered with a black polyethylene or polyvinyl chloride sheath. The maximum length of the capillary shall be 3000 mm. Unless otherwise specified, sensing element process wetted parts shall be 316 stainless steel materials. For corrosive or slurry applications, diaphragm seals shall be used with a Flushing Connection Ring. The construction of the diaphragm seal shall be such as to allow removal of the lower section for cleaning without loss of fill liquid. Fill liquid shall be selected having regard to process conditions; glycerine should fulfil most applications. Where pulsation is expected suitable adjustable dampeners shall be used. Dampeners should not be used in slurry applications. Pressure ranges should be selected so that the normal operating pressure will be between 50% and 70% of full-scale range. Siphons or "pigtail" condenser seals shall be provided in connections to close mounted gauges or transmitters in steam and other condensable vapour applications. Measuring on control systems shall be constructed in compliance with all the recommendations and requirements of the company's standards. Where no company standard exists, the standards of the Instrument Society of America (ISA 11th Edition or the latest of later editions as they become available) standards and recommended practices for instrumentation and control shall apply. All design calculations; transducers and measuring devices use units conforming to AS1000 - the International System of Units (SI) and its application.

INSTRUMENTATION
PRACTICES
QM37.06 Section 4
Revision 4
ENGINEERING
Any PRINTED copies of this procedure are UNCONTROLLED Page: 21 of 73
4B.1 General (cont).
Engineering Units The following engineering units shall be used as a basis for all plant instrumentation.
Variable Fluid Symbol Scale Unit
Flow Gases Nm3/h - Normal cubic meter per hour
Nm3/s - Normal cubic metre per second
Liquids m3/h - Cubic metre per hour
l/h - Litre per hour l/s - Litre per second Steam t/h - Tonne per hour kg/h - Kilogram per hour Solids t/h - Tonne per hour kg/h - Kilogram per hour
Pressure Gauge kPa - Kilopascal mm H2O - Millimetre of water Absolute kPa(a) - Kilopascal Vacuum mm H2O - Millimetre of water mm Hg - Millimetre of mercury Head m - Metres Level % - Percent m - Metres Temperature c - Degrees Celsius Density kg/m
3 - Kilogram per cubic metre
sg - Specific gravity % - Percent solids Torque % - Percent N-m - Newton metre Conductivity uS/cm - Microsiemen per centimetre Weight t - Tonne kg - Kilogram Viscosity cP - Centipose Current A - Ampere Voltage V - Volt Energy kWh - Kilowatt hour MJ - Megajoule
Base conditions shall be:
- Temperature: 0c - Pressure: 101.325 kPa
4B.1.1 Signalling All analogue control signals shall be 4-20 mA. Voltage signals such as 1-5 Volts may be used if approved by the Maintenance Services group. Voltage signals may be used within control panels. Solder lug connections are not acceptable.

INSTRUMENTATION
PRACTICES
QM37.06 Section 4
Revision 4
ENGINEERING
Any PRINTED copies of this procedure are UNCONTROLLED Page: 22 of 73
4B.1.2 Power Supplies / Relays Instruments (other than two wire transmitters) shall be site selectable for operation on 24 VDC or 240 VAC, 50 Hz. Where 240 VAC is selected an approved residual current protection device is to be fitted to the supply. 110 VAC, 50 Hz and 48 VDC may be acceptable subject to the Maintenance Services group's discretion. A UPS maybe required for certain applications. Power supplies may need special requirements. In general electronic applications they shall offer: Full isolation. Protection against electromagnetic radiation. Protection from live parts. Regulation at least to manufacturers specification of equipment to be
supplied.
4B.1.3 Instrument Air Supply The company's air supply has a pressure range of 400 to 650 kPa and is of poor quality containing particulate matter, water and oil. The systems shall contain all necessary pressure reducing, air cleaning and drying equipment required to ensure a continuous oil, moisture and particulate free instrument air. Such equipment shall be completely automatic. Provision for the reactivating of any air-drying facilities shall be supplied where required. The main instrument air header shall contain no sectioning valves unless specified by the Electrical Services group and each off-take to the instrument shall be fitted with an isolating valve. Control equipment shall be capable of normal operation with an instrument air pressure range of 400 to 650 kPa. At lower pressures, the controls shall fail-safe. Instrument air distribution pipe work shall be hot dipped galvanised and a minimum of 12 mm main. All pipe material smaller than 12 mm N.B. is to be 1/2" diameter 316 stainless steel unless otherwise agreed to by the Maintenance Services group. Any burrs are to be removed on all pipework and pipework cleaned internally prior to installation. A ½ inch BSP take off point complete with isolating valve will be provided within 5 metres of any point requiring instrument air. An isolating valve shall be installed close to (near as) each device requiring an instrument air supply. This valve shall be a quarter turn ball
valve. Installed so that the air supply forces the ball onto the fixed
seat. Instrument air will be reticulated at a nominal 700kPa pressure.

INSTRUMENTATION
PRACTICES
QM37.06 Section 4
Revision 4
ENGINEERING
Any PRINTED copies of this procedure are UNCONTROLLED Page: 23 of 73
4B.1.3 Instrument Air Supply (cont). Air supply lines shall be nominal 3/8" diameter minimum. Air signal lines shall be nominal 1/4" diameter unless otherwise specified. Pressure gauges (100 mm diameter) shall be provided on all isolatable sections of the system. The system shall include, two (2) parallel 100% duty in-line filters (min. 1/2") complete with change over valving, to allow for on-line maintenance. The system shall include a means of initiating low instrument air pressure alarms on main supply line before and after the filter (regulator) station unless otherwise approved. "Auto-drains" are to be provided on all low points of the instrument air header system or dropper mains such that no water will remain in the pipe work. All lines shall have sufficient fall so that moisture can be drained from the system. Filter regulators complete with integral 50 mm inlet and outlet pressure gauges are to be provided for each field instrument air-consuming device. The following tables (1 and 2) are to be used when designing air filtration and drying equipment for instrument air systems. The figure for dew point suppression for internal use is subject to the approval of the Maintenance Services group.
Table 1 - Air Filtration Equipment Requirements
PARTICLE SIZE
Primary Filters > 5
Secondary Filters > 0.3
Coalescing Filters 0.01 ppm at 21c
Table 2 - Dewpoint Suppression Equipment Requirements
External Use -23c (atmospheric) -1c at 6.3 bar
Internal Use -18c (atmospheric) 8c at 6.3 bar
Note: This means 23 or 18c below ambient temperature.
4B.1.4 Enclosures
Systems with sealed metal cabinets are preferred. Where cooling is required it shall be by heat exchangers or refrigeration units mounted on the cabinets.
Enclosures shall be of an IP or Nema standard design suited to the environmental conditions and application. The minimum rating shall be IP65 unless otherwise approved. Enclosures are to be painted in accordance with QM37.01.

INSTRUMENTATION
PRACTICES
QM37.06 Section 4
Revision 4
ENGINEERING
Any PRINTED copies of this procedure are UNCONTROLLED Page: 24 of 73
4B.1.4 Enclosures (cont).
Instruments and ancillary equipment in panels shall be installed so that each unit may readily be removed or serviced without interference from other units and so that access to mounting brackets, terminal blocks, etc., is in no way obstructed.
Where equipment is to be mounted on doors, the doors shall be of suitable construction to prevent distortion. In nominated enclosures and panels outlets shall be provided 240v AC power for auxiliary and test equipment. These power supplies shall include the necessary transformers and earth leakage protection and shall be a separate supply to the bulk instrument supply.
Junction boxes that are required to be bolted to Steel or concrete columns must be bolted to Unistrut that is welded or bolted to the column.
Junction box stands must be made of Unistrut and where required depending on the number of junction boxes fitted the stand may require bracing. The stand must be bolted or welded to the floor.
Junction boxes for use in areas where flammable vapours may exist shall conform to the applicable electric code requirements of AS 60079.7.
All junction boxes shall be fitted with approved terminals, mounted to supplier’s recommendations. Sufficient terminals shall be installed to terminate all cables with a further allowance of 25% spares. Junction boxes shall be of an approved type sized to suit the number of terminals required and the number of cable entries.
All junction boxes, terminal strips, etc. shall be permanently labelled using white plastic nameplates engraved to show a black core, in accordance with the instrument wiring drawings.
The fixing of labels shall not negate the enclosure rating.
Any equipment requiring accurate calibration or precise reading by the operating personnel shall be mounted not less than 1.2 m from the floor and not more than 1.8 m from the floor to the bottom or top edge of the instrument.
Internal panel lighting should be fluorescent tubes and operated by a door or tumbler switch unless otherwise specified.
All cable entries are to be fire stopped and are to enter from the bottom of the enclosure. Cables are not to be supported by the gland plate but are separately clamped. It shall be possible to install cables without dismantling any part of the enclosure.
Note: Section 8 for reference drawings.

INSTRUMENTATION
PRACTICES
QM37.06 Section 4
Revision 4
ENGINEERING
Any PRINTED copies of this procedure are UNCONTROLLED Page: 25 of 73
4B.1.5 Instrument Cable Installations Power wiring shall be colour coded in accordance with AS 3000 'SAA Wiring Rules’. Wire for use with low-level DC signals such as 4-20 mA will be colour coded as follows:
Black - Negative White - Positive Bare Copper - Screen Drain (Earth)
Instrumentation cables shall include 4-20 mA, 1-5 VDC, thermocouples, RTD and regulated instrument power supplies at 24 VDC and shall have a screen. All other cabling is classified as non-instrumentation.
Instrument cables shall not be run in the same conduit / cable tray as non-instrument cables. Cable routes are to be selected to avoid high temperature areas where possible.
All Cables run in cable tray shall be using steel wired armoured protected cabling, for mechanical protection. In the event that SWA cable is deemed no practical for part or whole of the installation, a detailed risk assessment shall be carried out by the OneSteel representative responsible for the repairs or installation. An application for exemption from QM37.06 along the risk assessment shall be submitted to the EIC & Reliability Manager for approval stating why and where the SWA will not be used. All cable tray / ladder shall be ran as close as practical to the field device. All conduits / cable trays etc. shall be earthed. Signal wiring shall originate in the control panel and be run continuously without splicing to the instrument junction boxes or direct to field instruments. Signal cable shield wires shall not be used as a zero voltage or signal return wire. Each signal cable shield wire shall be brought out at receivers end of the cable and terminated. Where the pigtail of the shield wire is longer than 15 mm, an insulating sleeve shall be placed over the bared wire before termination. The signal cable shield shall be brought out at the receivers’ end of the cable and terminated (The ‘RECEIVER’, in most cases, refers to the PLC / DPCS / Switchroom control panel or source of supply termination

INSTRUMENTATION
PRACTICES
QM37.06 Section 4
Revision 4
ENGINEERING
Any PRINTED copies of this procedure are UNCONTROLLED Page: 26 of 73
end). Where the pigtail of the shield wire is longer than 15mm, an
4B.1.5 Instrument Cable Installations (cont). insulating sleeve shall be placed over the bared wire before termination. The signal cable screens shall be bonded to an appropriate earth at one end only. Cables and supports shall be kept clear of process or service pipes, walkways and operating spaces. For reasons of plant security where multiple units of plant are installed, such as redundant data-buses, the cabling to each unit is to be run by not less than two separate routes. Cable runs shall be planned to keep crossovers to a minimum. All multi-core cabling shall contain at least 10% spare cores at commissioning. Associated fittings such as bends, tees, splices etc. shall be used as necessary for the correct installation of the duct. Cables are to be laid on approved racks or preformed trays (with the breadth of the tray in the vertical). Cables shall be supported to minimise sag and prevent undue strain on the cable. The spacing of the support shall not exceed one metre. The bending radius of cables shall not be less than that recommended by the manufacturer.
Cables shall be provided with supports located as close as is practicable to the point of termination to prevent strain on the terminal strips.
Where cables on trays pass under or adjacent to any process where spillage may occur, the cable trays are to be provided with appropriate covers.
Cables are to be evenly distributed over the appropriate racks.
Cables are to be evenly loaded and any tray may carry not more than two layers of cables.
Explosive driven fastenings will not be used.
Where installed near or below ground level conduits shall be run on the surface and provision made at each support point to "stand off" the conduit with fittings from the walls, floors, etc. metallic conduit joints and fittings shall be made weather and hose-proof by painting or gaskets as applicable. Goosenecks or other approved means shall be used in long conduit runs to accommodate relative expansion between conduits and support steelwork, etc.
Adequate drainage in ducts and conduct shall be provided.

INSTRUMENTATION
PRACTICES
QM37.06 Section 4
Revision 4
ENGINEERING
Any PRINTED copies of this procedure are UNCONTROLLED Page: 27 of 73
4B.1.6 Terminations
The following applies to all terminations except thermocouple termination or thermocouple extension wires. All wiring shall be connected to terminals using Crimp-on lugs (preferably "lip blade" type). Crimp-on lugs shall be of the heavy-duty pre-insulated type. Crimp-on lugs shall be the size manufactured for the conductor size used and shall be applied with a crimping tool approved by the company, which cannot be released until the crimping action has been completed.
All instrument terminal sizing and colour coding shall be taken from OneSteel specification QM37.01.
Termination Diagrams: These drawings shall show the connection points within the control room area, for the field equipment terminations. The Instrument Loop Diagrams shall be amended by the Contractor to include these termination points. In addition, the Contractor shall modify the Control room terminations in co-operation with the Company if their equipment is suitable for direct connection of field cables. The Contractor shall provide the modified drawings.
Terminal strips shall be arranged in columns with a minimum of 200 mm above the floor. Termination cabinets shall provide sufficient space and sufficient terminals to permit the connection of all incoming cable cores, including spares (approximately 20%). Every terminal shall be identified to facilitate terminal locations. Terminals shall be grouped according to function and each group clearly labelled designating the function. Particular attention shall be made in labelling to identify voltages. The termination strip used as the incoming termination of all field wiring into the control cabinets, shall be a knife termination. All cables shall be made off with approved, weatherproof, compression type plastic cable glands. A loop of cable shall be provided and suitable cable tied before final connection of all field devices. Generally, this loop shall have a radius equal to the minimum bending radius of the cable used, or in the case of instrumentation which is inserted into the process (e.g. probes and temperature elements) the loop shall be long enough to enable removal of the device from the process without disconnecting the cable.
4B.1.7 Panel Wiring All wiring shall be carried out so that the arrangement of the wiring does not interfere with or obstruct access to individual item for removing or testing. Sufficient free length shall be provided to allow re-termination and testing to be carried out.

INSTRUMENTATION
PRACTICES
QM37.06 Section 4
Revision 4
ENGINEERING
Any PRINTED copies of this procedure are UNCONTROLLED Page: 28 of 73
4B.1.7 Panel Wiring (contd) Wiring within the panel shall be run in rectangular plastic ducts. Multicore cables are to be fully terminated on terminal strips.
Where possible all field cables MUST be terminated and wired to specific functions terminations blocks. Spare cores of field cables shall be sufficient length to reach all termination units and shall be stripped and secured. Marshalling racks are not to be used unless approved by the Maintenance Services group.
4B.1.8 Cable Identification
Individual cores of pairs in multi-core cables shall be uniquely identified. All cables shall be labelled with an approved labelling system in the following locations: i) At each end of each cable, ii) At each side of each wall or floor opening, iii) Whenever cables enter or leave cable tunnels, conduits or trenches, iv) Within switch boards, cubicles and local control stations, above the
gland plates.
4B.1.9 Use of Conduit / Water Pipe Where metal conduits are required for thermocouple extension or compensating cables, elbows and tees are not to be used but deep junction boxes should be installed where sharp change in direction takes place or where wire either enter or leave the common conduit at individual measuring points. All pipe threads are to be clean and free of burrs or jagged edges that could damage the wire, and tightened to prevent the entry of water or any other contaminates. Non-metallic conduit shall be used in positions where corrosion of metallic conduit may be excessive. Flexible connections shall be Anaconda PVC sheathed conduit. Non-metallic conduit shall be ridged PVC or other approved material. Screwed conduit fittings shall be of the inspection type except where exposed to the weather. The covers shall be fitted with gaskets to prevent entry of foreign matter. The open conduit system of cabling with bushing or collars to prevent damage to cables may be used where approved by the Maintenance Services group. All cable entries/penetrations of floors, walls, partitions, ceilings, etc. shall be fire stopped. Typically a mixture of relatively coarse vermiculite and plaster of Paris in the ratio 8:3. For support purposes 12 mm hexagonal galvanised chicken wire may be used.

INSTRUMENTATION
PRACTICES
QM37.06 Section 4
Revision 4
ENGINEERING
Any PRINTED copies of this procedure are UNCONTROLLED Page: 29 of 73
4B.1.10 Earthing Earthing requirements are to comply with the manufacturers' specification in general. Power earth's are to be separated from instrument earth. Earthing of instruments to be in accordance to AS3000 and QM37.01, Section 5.5. All equipment is to be provided with earth connections. Earth conductors shall be at least seven-strand 0.85 mm diameter bare copper conductor sheathed in green PVC. Within cabinets the frame of component shall be connected to earth. The earthing shall be arranged so that removal of any earthing connection to a component shall not affect, even momentarily continuity of the earthing conductors associated with any other component. Earthing of components by means of mounting fastenings is not permitted.
4B.1.11 Instrument Mountings All instruments that require pipe mountings must use 50 mm water pipe and be welded or bolted to structure unless approved by the Maintenance Services group.
Note: Section 8 for reference drawings.
4B.2 Actuators An actuator shall comprise of a drive or power unit for moving the driven device, control equipment for controlling the operation of that unit, for signalling its position when requested and all power and control connections necessary between control equipment and drive unit. Actuators shall not be mounted on plant without approval. Actuators mounted in severe environments are to be of a type approved by the Electrical Services group. Actuators mounted in the vicinity of burners shall be suitable for operation at
ambient temperatures of 100C. Valve actuators shall normally be the spring and diaphragm or piston type. All actuators shall be adequate to stroke the valve under the maximum differential pressure to which the valve may be exposed, and to prevent instability of the valve plug or vane over its full travel. Spring range shall normally be 20 -100 kPa with minimal bench set. Initial spring compression (bench set) shall be adjustable while valve is in service. Other ranges, or bench setting to manufacturer's recommendation may be used when necessary.

INSTRUMENTATION
PRACTICES
QM37.06 Section 4
Revision 4
ENGINEERING
Any PRINTED copies of this procedure are UNCONTROLLED Page: 30 of 73
4B.2 Actuators (contd) Actuators shall be preferably of a pneumatic type and shall be capable of operating at 400kPa air supply pressure. All pneumatic tubing integral with the actuator should be metal. Electric Actuators may be considered for certain applications. Power actuators shall be of approved design, complete with all necessary power units, mechanisms, interlocking, safety and alarm devices, mechanical stops and spindle position indicators. Linear actuators shall have their piston rods sealed against dust and moisture by expanding bellows of material suitable for all ambient conditions likely to occur. The bellows shall be vented. All pins and other bearing surfaces shall preferably be of the self-lubricating type. Alternatively provision shall be made for grease lubrication, and shall be subject to the approval of the Maintenance Services group. All necessary interconnecting lines and brackets are to be provided. Actuators for operating valves shall be supported so that there is no relative movement between the valve and its actuator. Usually from the valve body itself or from a common structure for the valve and actuator. Actuators shall be provided with a mechanical means of preventing over-running safe limits of travel of the actuator and / or driven device should the normal travel limiting device fail. Torque limiting or thrust limiting devices shall be provided. Such devices shall be of a type which cannot self reset after an operation but which will reset automatically when the actuator receives a signal to drive in the opposite direction. Solid-state switches shall be used to control "modulating" duty actuators. Preference will be given to an arrangement in which the power supply system to the solid state switches is isolated from its source by means of transformers or another approved form of surge suppression. Reversing contacts shall be used for the control of ON / OFF duty actuators. All actuators are to drive their respective device to appropriate fail-safe positions on signal or power air failure. Valve positioners shall be fitted with a filter regulator, air supply gauge, air output gauge and control air gauge. A by-pass switch shall be provided to allow the input signal to be connected direct to a control valve actuator. All on valve tubing between positioners and actuators shall be 316 stainless steel.
Note: Section 8 for reference drawings.

INSTRUMENTATION
PRACTICES
QM37.06 Section 4
Revision 4
ENGINEERING
Any PRINTED copies of this procedure are UNCONTROLLED Page: 31 of 73
4B.3 Analysers
All gas analysers should be installed to manufacturers’ specifications.
New installations, or installations installed where the process gas sample is in a closed room environment must be submitted to the gas committee for approval.
Field mounted analysers shall be of corrosion resistant material, weatherproof construction and suitable for outdoor installation.
The sampling system shall be designed to suit each application and details submitted to the Maintenance Services group for approval.
The sample shall be metered, regulated, cooled, cleaned or treated as required to obtain a satisfactory sample for the analyser.
The sampling system shall be designed for ready access for maintenance and service.
The sampling system shall be as short as possible.
The sampling system shall not contain "U-bends" where there is no drain.
4B.4 Density Measurement The preferred method of density measurement shall be nuclear type density meters. The preferred style shall be via an ionisation chamber. Any equipment offered must comply with the requirements of both State and Commonwealth statutory bodies. The contractor shall supply all necessary details and drawings required to support licence applications for site installation. All necessary warning signs and notices shall be included in the Contractor's supply. On applications on pipelines 50 mm diameter and above, clamp on type units shall be used. On pipeline below 50 mm diameter, Z type in line units shall be used. Lead absorber plates shall be supplied for calibration of the meter if required. Automatic source decay compensation is a desired feature and should be included. Source, detector and transmitter housing shall be of corrosion resistance materials, weatherproof and suitable for outdoor mounting. All density transmitters shall incorporate an integrally mounted indicator.
Note: Section 8 for reference drawings.

INSTRUMENTATION
PRACTICES
QM37.06 Section 4
Revision 4
ENGINEERING
Any PRINTED copies of this procedure are UNCONTROLLED Page: 32 of 73
4B.5 Magnetic Flow Meters All magnetic flow meters shall be suitable for flange mounting into the process line. The nominal flange rating shall be ANSI 150 RF unless otherwise specified by the Maintenance Services group. Meter liner material and electrode materials shall be selected to best suit the application. Earth straps shall be used in all installations.
4B.6 Orifice Plates and Venturis The design, manufacture and installation of all orifice plates including tapping, condenser pots and accessories for flow metering shall be the responsibility of the contractor and must conform to BS 1042 / AS 2360. Each orifice is to be fitted with a stainless steel tag welded to the edge and bent at right angles in the direction of the flow projecting outside the main. The date, internal diameter (bore) design flow, design differential are all to be engraved on the tag. A copy of the orifice calculation sheet shall be supplied to the Maintenance Services group. In general, tapping points for metering will be:
Gas D and D / 2 Combustion Air D and D / 2 Water and Liquids D and D / 2 (except where carrier ring type orifice is
specified). Steam Corner tapping in orifice using carrier ring.
Tapping points in mains should be located at accessible positions consistent with minimum accumulation of dirt, condensate or trapped air. Connections to tapping points should be made by drilling the main and removing any burrs from the inside of the main before welding the socket in position.
4B.7 Other Flow Measuring Elements Devices such as vortex meters, variable area meters, target flow meters, turbine, and positive displacement and Pitot tubes may be utilised for specific applications. The application of any of these types is subject to the approval of the Maintenance Services group. Materials of construction shall be selected to best suit the application. All flow measurement devices shall have the facility to incorporate a locally mounted analogue or digital indicator, preferably integrally with the transmitter.

INSTRUMENTATION
PRACTICES
QM37.06 Section 4
Revision 4
ENGINEERING
Any PRINTED copies of this procedure are UNCONTROLLED Page: 33 of 73
4B.8 Other Level Measuring Elements Level measuring devices such as hydrostatic head transmitters, bubbler tubes with differential pressure transmitter to sense level may be utilised for certain applications. The application of any of these types is subject to approval by the Maintenance Services group. Ultrasonic level sensors shall be the preferred means of measurement for all vessels, sumps etc., and containing slurries. Sensor facing materials shall be selected to best suit the application and environment conditions.
4B.9 Pyrometers Should have a 25.4 mm (max) spot size over 600 mm distances. It is preferred that the pyrometer be calibrated at the Maintenance Services group. Air for purging pyrometers must have an air filter, mist separator and air regulator. All pyrometers must be supplied with accompanying calibration manuals.
4B.10 Recorders Unless otherwise specified, recorders are to provide a continuous trace and shall have at least two pens. Recorders having electrical inputs shall be ranged 4 -20 mA or 1-5 V. Those having pneumatic inputs shall be ranged 20 -100 kPa. Recorders receiving inputs from thermocouple or resistance bulb temperature elements will have their ranges individually specified. Recorder size shall be 144 mm * 144 mm or larger DIN format of scanfold chart type and shall clearly indicate the present value for the recorded quantity. The chart speed shall be selectable and include a speed of 20 mm / hr. The chart width shall be 100 mm or greater and unless otherwise stated 0-100% linear. The pen contact point on the chart and a minimum of 50 mm or 2 hours of record shall be clearly visible at all times. All recorders must be programmable. Circular chart recorders, where specified, shall use charts having a nominated diameter of 300 mm and a calibrated pen travel of not less than 100 mm. The charts shall rotate once in 24 hours. Traces shall be individually identified by colour and where possible by numbers. Easy access to the chart, writing pen and indicating pointer shall be provided by means of a hinged door. All points requiring lubrication shall be easily accessible. Ready access shall be provided to all adjustable parameters.

INSTRUMENTATION
PRACTICES
QM37.06 Section 4
Revision 4
ENGINEERING
Any PRINTED copies of this procedure are UNCONTROLLED Page: 34 of 73
4B.11 Signal Isolators Signal isolators shall be used to provide isolation of any remote monitoring of signals used as: (a) part of a control loop, or (b) associated with plant interlocking or safety. Signal isolators shall be programmable where possible (microprocessor based instruments). Neither open circuiting nor short-circuiting of the secondary loop shall effect the operation of the primary loop. Signal isolators shall be auxiliary powered (24v DC), unless otherwise approved by the Maintenance Services group. Signal isolators shall have terminals that have easily accessible.
Note: Section 8 for reference drawings.
4B.12 Switches, Indicators and Gauges All pressure switches shall be accompanied by pressure gauges. The switch and gauge shall be mounted on a freestanding support plate or enclosure. All wetted parts are to be selected based on the application. The preferred type of locally mounted indication for temperatures shall be bimetallic type thermometer. Digital indicating instruments shall have an accuracy of at least +/- 0.1% of span and shall be at least 96 mm * 48 mm DIN format in size. Analogue instruments shall have an accuracy of at least +/- 2% of span and shall be at least 144 mm * 36 mm DIN format in size. Instruments shall be capable of operating with an elevated zero. Where digital displays are provided the instrument shall allow zero and span to be adjusted. Instruments on panels shall be flush mounted and provided with narrow bezels. Normal working indication shall be at a point corresponding to 50% of full scale. Indicating lights shall have lamps that are replaceable from the front of the panel without the use of tools.

INSTRUMENTATION
PRACTICES
QM37.06 Section 4
Revision 4
ENGINEERING
Any PRINTED copies of this procedure are UNCONTROLLED Page: 35 of 73
4B.12 Switches, Indicators and Gauges (cont). These lamps shall normally be of LED cluster type unless otherwise approved by the Maintenance Services group. Lenses shall be of plastic with a robust anti-shrink ring. Permanent colour lenses shall be supplied. Painted lenses, coloured glass lamps or coloured lamp covers are not acceptable. The colours of indicating lights and their meaning for information and control shall be taken from AS60947: 5.1 Lamp holders shall be made of a high grade plastic. The head diameter of the thermometer shall be 100 mm usually. The dial shall be white with black graduations and be protected with an extra heavy cover glass or plastic. The case shall be heavy duty, weatherproof, moisture proof and of the every angle type if required for easy readability. The stem connection shall be ½ inch BSP thread and be compatible with the thermowell. Temperature and pressure gauges are to be 3/8" BSP tapered connection and 100 mm diameter (with 1% accuracy). 316 stainless steel armoured capillary temperature indicators shall be used if filled systems are required. All field or machine mounted instrumentation gauges are to be mounted on a freestanding plate as described above or directly on to the main if approved by the Maintenance Services group. Indicating pressure gauges for mounting on panels shall be back connected, flush mounting. Gauges for field applications shall be bottom connected surface mounting for mounting plate installations or bottom connected direct mounting for direct process line mounting. Pressure gauges shall be fitted with blow off backs to protect the dial and case against pressure element failure. Pressure gauge scales shall be white with black graduations.
Note: Section 8 for reference drawings.

INSTRUMENTATION
PRACTICES
QM37.06 Section 4
Revision 4
ENGINEERING
Any PRINTED copies of this procedure are UNCONTROLLED Page: 36 of 73
4B.13 Tapping Points and Pipe Sizes
4B.13.1 General Tapping points locations and their method of installation shall be approved by the Maintenance Services group. The following guidelines shall be forwarded: (a) No tube slope shall be less than 1 in 12 and should be as short as
possible.
(b) The tubing configuration shall be arranged so that vapour and liquid blocks will not occur.
(c) Plugged tees shall be provided for rodding out where solids deposition may occur, or where "wet legs" are required for condensing vapours.
(d) Each differential pressure cell / switch shall be provided with an integrally mounted 316 stainless steel 3-valve manifold.
(e) A transmitter / switch shall be located as closely as possible to its process connection having proper regard to maintenance access. Particular attention shall be paid to making the instrument process tubing as short as possible for viscous fluids or fluids containing solids.
Tapping points in horizontal or sloping runs of pipe are to be: a) For steam or condensate - horizontal.
b) All other liquids - 30 to 45 below the horizontal.
c) For gases - above the horizontal.
Piping shall be fixed to ensure rigidity and mechanical strength. (Typically at intervals of not more than half a meter). Expansion loops or bends shall be provided to allow for relative movement between the tapping point and transmitter or instrument due to thermal expansion during normal operation. Adequate provision shall be made against the effects of vibration. The open ends of drain and blowdown piping shall be solidly anchored to prevent movement under any operating conditions. Supports attached to steelwork shall be by welding or clamping. Attachments to concrete work or masonry shall be by means of bolts grouted in with cement mortar, expanding bolts or by an approved fastener. Joints in instrument piping, other than those required attaching piping to fittings or valves shall be kept to a practicable minimum.
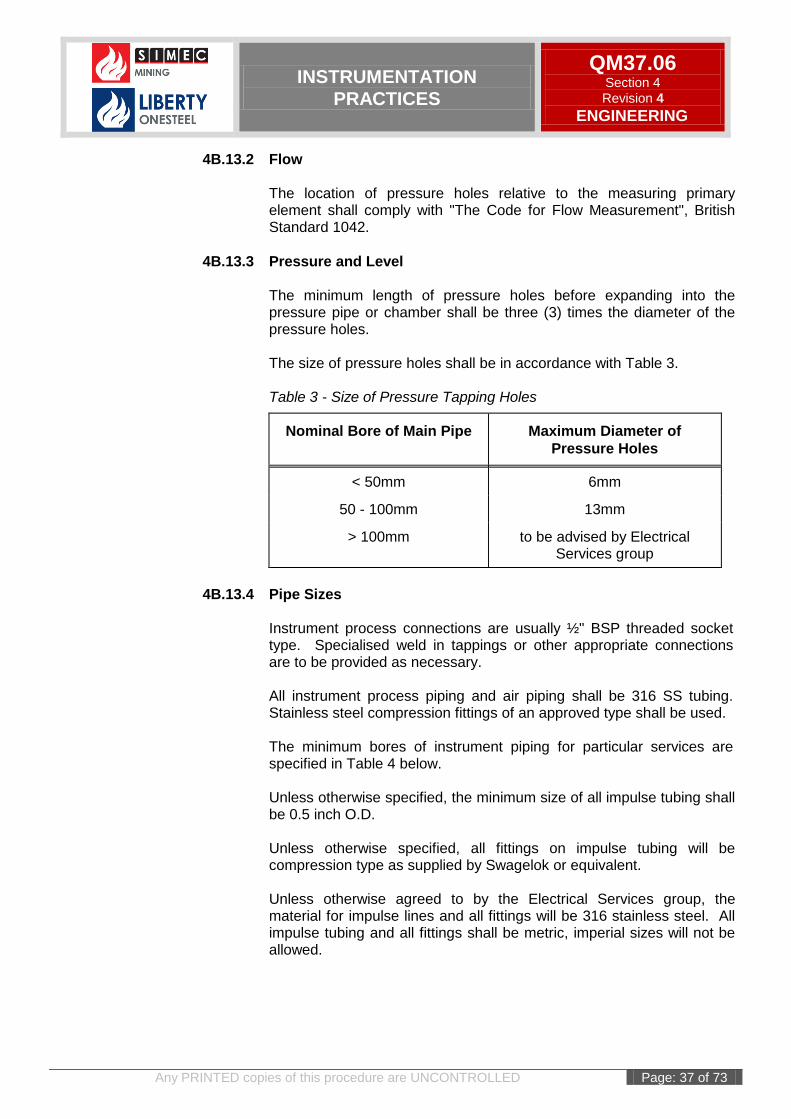
INSTRUMENTATION
PRACTICES
QM37.06 Section 4
Revision 4
ENGINEERING
Any PRINTED copies of this procedure are UNCONTROLLED Page: 37 of 73
4B.13.2 Flow The location of pressure holes relative to the measuring primary element shall comply with "The Code for Flow Measurement", British Standard 1042.
4B.13.3 Pressure and Level The minimum length of pressure holes before expanding into the pressure pipe or chamber shall be three (3) times the diameter of the pressure holes. The size of pressure holes shall be in accordance with Table 3. Table 3 - Size of Pressure Tapping Holes
Nominal Bore of Main Pipe Maximum Diameter of
Pressure Holes
< 50mm 6mm
50 - 100mm 13mm
> 100mm to be advised by Electrical Services group
4B.13.4 Pipe Sizes Instrument process connections are usually ½" BSP threaded socket type. Specialised weld in tappings or other appropriate connections are to be provided as necessary. All instrument process piping and air piping shall be 316 SS tubing. Stainless steel compression fittings of an approved type shall be used. The minimum bores of instrument piping for particular services are specified in Table 4 below. Unless otherwise specified, the minimum size of all impulse tubing shall be 0.5 inch O.D. Unless otherwise specified, all fittings on impulse tubing will be compression type as supplied by Swagelok or equivalent. Unless otherwise agreed to by the Electrical Services group, the material for impulse lines and all fittings will be 316 stainless steel. All impulse tubing and all fittings shall be metric, imperial sizes will not be allowed.

INSTRUMENTATION
PRACTICES
QM37.06 Section 4
Revision 4
ENGINEERING
Any PRINTED copies of this procedure are UNCONTROLLED Page: 38 of 73
4B.13.4 Pipe Sizes (cont). Table 4 - Minimum Instrument Pipe Sizes
Types of Service Nominal Bore
Fluids containing particulate matter 20mm
Installation under vacuum 15mm
All other services 10mm
The bending of piping shall be carried out in such a manner as to ensure that the pressure rating is not adversely affected and that mechanical integrity is observed. Where piping may be subject to blocking, all changes in direction between the tapping point and the instrument-isolating valve shall be made with cross pieces fitted with screwed plugs to facilitate rodding. The Maintenance Services group may waive this requirement in certain applications.
4B.14 Thermocouples and RTD’s
4B.14.1 General Resistance bulbs shall be used for all differential measurements; for temperatures lower than 400°c; or where high accuracy's are required. The standard for resistance bulbs will be the three wire type with platinum element of nominally 100 ohms resistance at 0°C. Other requirements regarding thermowells, connection heads, etc. are the same as those required for thermocouples. Thermocouple junctions shall not be bonded to the tip of the sheath. Thermocouple heads shall be a suitable alloy, with a weatherproof gasketed screw on the cover having a 20 mm conduit thread entry for extension cable connection. Thermocouple heads shall be mounted at a sufficient distance from the entrance to the pipe or vessel to ensure that a temperature of 100°c is never exceeded. Suitable glands, nut and fittings shall be employed to hold the thermocouple firmly in the correct location in the thermowell.
4B.14.2 Thermocouple / Current Converters Thermocouple / current converters shall be used for monitoring and control-point measurement. The signal range shall be 4 -20 mA dc for 0 - 100% of calibration range with full electrical isolation provided between the low level input signal and the transmitted output current, with zero / span adjustment.

INSTRUMENTATION
PRACTICES
QM37.06 Section 4
Revision 4
ENGINEERING
Any PRINTED copies of this procedure are UNCONTROLLED Page: 39 of 73
Converters shall have the facility of output signal upscale / down
4B.14.2 Thermocouple / Current Converters(contd) scale drive on input open circuit. Converters shall be arranged to permit easy range changing, preferably by plug in range card. Converters shall be programmable.
4B.14.3 Thermocouple Extension Cabling (see also Cable Installations) Thermocouple extension wire shall conform to ANSI colour coding and tolerances. All thermocouple extensions and compensating wire is to be run for its entire length in galvanised water pipe, conduit or cable
tray installed in such a way to protect them from excessive heat (>50 C), moisture and mechanical damage. The company reserves the right to insist on the use of galvanised water pipe for all thermocouple compensating cable runs if so determined by the Electrical Services group. The diameter of the pipe or conduit being determined by the number of lead wires to be run. Conduit must be sufficiency large to permit easy drawing of the cable.
Thermocouples shall be grounded at the control room end; thermocouple shield wiring shall be grounded through the sheath at the control room end, and shall be isolated from ground at all other points. At each junction box that the cable is terminated, the screen will be terminated and be continued in the subsequent cable leaving the junction box. Compensating cables other than armoured multi-cores should be protected by conduit or trunking so that they are not subject to excessive flexing or bending which might change the thermoelectric characteristics. Each individual run of wire must be continuous throughout its entire length without joins, except where the main trunk cable consists of multi-pairs extension cable terminated at the field end in an approved shielded metal junction box. Multi-core Dekoron cabling may be used in systems providing remote cold junction compensation. Where MIMS cabling is specified, stainless steel junction boxes and sealed entries are to be used. Only direct connected terminations (e.g. blue points) are permitted.
4B.14.4 Thermocouple Pockets Thermocouples shall be housed in protective pockets unless otherwise specified and inserted in the medium to be measured. All thermocouples shall conform to current IPTS requirements. Thermocouple pockets shall be designed to have low thermal mass and high conductibility to the sensing element. The pocket shall also be designed to prevent mechanical failure of pockets due to

INSTRUMENTATION
PRACTICES
QM37.06 Section 4
Revision 4
ENGINEERING
Any PRINTED copies of this procedure are UNCONTROLLED Page: 40 of 73
4B.14.4 Thermocouple Pockets (contd)
stresses imposed by the service conditions. Welded in pockets will be of a material compatible with the parent material. Screwed in pockets shall be 316 S.S., solid machined construction unless otherwise agreed by the Electrical Services group. The Process Fitting should not be incorporated in the Pocket Design and should be installed as a separate item. Test pockets, when required, shall have chained covers to prevent ingress of dirt when not in use. Where several pockets are required at adjacent points along a pipeline to measure the same temperature they will be installed in staggered positions around the pipe in such a way that all pockets will be subjected to the same temperature and flow conditions.
Where a reasonably accurate measurement is required in pipes smaller than 100 mm and where flow must not be unduly restricted by the bulk of the pocket the following will be adopted (refer section 8). A short length of 100 mm bore piping will be inserted to accommodate an angled pocket and the pipe swaged and welded to the main piping to achieve gradual change in the cross section.
Where an error of measurement of the order of 7 oC can be tolerated in pipes smaller than 100 mm bore the immersed length of pockets may be reduced to 40 mm. Such pockets shall be appropriately and specific approval obtained for their use. In pipes or tanks, which are normally or partially filled with fluid the pocket, is to be located so as to position the temperature sensor in the fluid in under the estimated minimum level condition. Pockets shall be inserted to measure temperature at the centre of the duct or pipe and shall be designed to withstand maximum fluid velocities under the most severe operating conditions. Where necessary pocket length may be reduced provided that accuracy of measurement is not unduly affected.
Check that the unsupported length of pocket does not exceed the maximum permissible value. If it does, reduce the length of pocket appropriately. This will reduce the accuracy of measurement a little, but for well lagged pockets, the error due to inadequate immersion is relatively small as long as the pocket is immersed more than 80 mm. When fast response to temperature changes is essential, good contact between the thermocouple tip and the pocket shall be ensured by spring loading the thermocouple junction against the pocket end. Where the pipe around the pocket is insulated, only the pocket

INSTRUMENTATION
PRACTICES
QM37.06 Section 4
Revision 4
ENGINEERING
Any PRINTED copies of this procedure are UNCONTROLLED Page: 41 of 73
extension shall protrude through the insulation.
4B.14.5 Thermocouple Calibration Thermocouples manufactured to an approved standard need not be site calibrated unless for quality / Accreditation applications.
4B.15 Transmitters Transmitters shall be state of the art type, implementing the latest sensing techniques in conjunction with advanced microprocessor technology, and the measured variable displayed locally by LCD or analogue indicator. The only exception being air powered transmitters. Transmitters are classified as follows:
Category A Refers to high accuracy equipment which is beyond commercial specification and which is generally specified in detail for the application concerned.
Category B Refers to medium accuracy equipment of the highest commercial grade available.
Category C Refers to equipment where high reliability in service is the main requirement which accuracy is of lesser importance.
Table 3 outlines accuracy limits of transmitters. The errors shall not be increased by more than 0.5% of the tabulated value during the extremes of power supply voltage or frequency occurring continuously.
Table 3 Classification and Transmitter Specifications
Category Measuremen
t
Accuracy
*
Reproducibilit
y
Temp.
Effect *
%
Long Term
Stability
Temperature 0.25 0.1 0.8 0.1
A Pressure 0.3 0.1 0.8 0.5
Differential Pressure (Flow Others)
0.3 0.25 1.0 0.5
Temperature 0.75 0.1 1.0 -
Pressure 0.5 0.1 1.0 0.5
Differential Pressure
0.5 0.25 1.0 0.5
B Speed 1.0 0.1 1.0 0.8
Position 1.0 0.1 1.0 0.8
Signal Converters (Flow Others)
1.0 0.1 1.0 0.8
C All Others 2.0 0.5 1.5 1.0
* As defined by ISA-S51.1 - Process Connections - ½ NPT Female.

INSTRUMENTATION
PRACTICES
QM37.06 Section 4
Revision 4
ENGINEERING
Any PRINTED copies of this procedure are UNCONTROLLED Page: 42 of 73
- Conduit Thread M2.0 X 1.5 Female. Electronic transmitters shall be fitted with easily accessible output terminals for routine checking. The output signal range shall be 4 -20 mA dc.
4B.15 Transmitters (cont). When the transmitter is not integrally mounted with the sensor element the transmitter shall be pipe stand mounted. For all temperature measurement signals being monitored remotely by control room instruments the preferred method of signal transmission shall be by transmitters. The output signal shall be an isolated 4-20 mA signal, linear. Subject to ambient temperature considerations the temperature transmitter may be mounted in the head of the measuring element. All transmitters shall be fitted with a local indicator such that it can be calibrated from (0 - 100%). They should include mechanical and / or electrical damping. Transmitters, which are located in a non-hazardous area, shall be of weatherproof, dust tight and corrosion resistant construction. Transmitters that are located in hazardous areas shall be approved for use in such areas and shall require the use of intrinsic safety zener barriers. Each transmitter shall be furnished with a universal mounting bracket for 50mm NB pipe. Transmitters shall be capable of withstanding supply polarity reversal and transients due to signal wiring reversal. They shall also be capable of withstanding open circuit and short circuit of signal wiring. Transmitters shall be of modular construction, and mounted in weatherproof, dust proof and explosion proof (where necessary) cases. Transmitters shall have easily accessible span and zero adjustment, fitted with protective covers to avoid unauthorised disturbance of settings.
Facilities for connection of test equipment shall be provided. Output terminals shall be easily accessible.
Transmitters shall be capable of withstanding a minimum over ranging of 150%. Under range protection shall also be fitted where necessary. Devices for measuring differential pressure shall be capable of withstanding full static pressure across the sensing element; this overload shall not necessitate re-calibration.
Every transmitter shall have documentation on technical details such as span, accuracy, reproducibility, repeatability, temperature effect and discrimination.
Pressure and differential pressure transmitters of categories A and B shall be constructed so that the sensing assembly is completely isolated from the electronic components.
The discrimination is defined as a variation of transmitter input before a change in output is produced, expressed as a percentage of transmitter span.

INSTRUMENTATION
PRACTICES
QM37.06 Section 4
Revision 4
ENGINEERING
Any PRINTED copies of this procedure are UNCONTROLLED Page: 43 of 73
Pressure and differential pressure transmitters shall be "bench" calibrated using the approved calibration equipment. Those used in plant thermal performance evaluation shall be calibrated "in situ" at three points over the
4B.15 Transmitters (cont).
operating range. The transmitter shall be calibrated without the electrical and mechanical connections of the sensor being disturbed.
Differential pressure type sensors shall have stainless steel bodies unless otherwise specified by the Electrical Services group.
Transmitters may be flange or pipe stand mounted. When the transmitter is flange mounted the minimum flange size shall be 50mm ANSI RF, the pressure rating to match the vessel rating. When the transmitter is pipe mounted, process lines shall be 0.5 inch O.D. stainless steel.
For liquid pressure transmitters an accurate measurement of the head due to the difference in elevation between the tapping point and the location of the transmitter. This head shall be taken into account in the calibration of the transmitter. Pressure transmitters so adjusted shall be labelled accordingly.
A correction shall also be made where necessary for the difference in static elevation of the transmitter with respect to the calibration equipment.
Any transmitter, whose output becomes the input to more than one loop, will have its external circuit so designed such that neither an open circuit nor a short circuit occurring in any of the shared loops will effect any other shared loop.
Note: Refer Section 8 for reference Drawings Listing.

INSTRUMENTATION
PRACTICES
QM37.06 Section 4
Revision 4
ENGINEERING
Any PRINTED copies of this procedure are UNCONTROLLED Page: 44 of 73
4B.16 Electromagnetic Flow meter
4B.16.1 Installation Conditions (Refer Section 8 for reference drawings) (1) To ensure accurate flow measurements install the meter with at
least five pipe diameters of straight pipe upstream of the meter. Restrictions such as cones or orifice plates more than five diameters upstream have negligible effect.
(2) Downstream pipe configurations more than two diameters from
the meter have no effect on measurement accuracy. Avoid installation where high levels of vibration may be encountered. Both the sensor and the electronics unit must be protected from direct sunlight by some form of shading to avoid excessive temperature rise. Do not install the meter in conditions of widely varying temperatures or where it can be damaged by dripping, spillage, etc. Consider the access required for fitting the meter to the pipeline and making the electrical connections.
4B.16.2 Mechanical Installation
Handling (Refer Section 8 for reference drawings) (1) Sling the meter into position using slings and shackles attached to
the eyebolts. Safe working loads and safety precautions for two-leg slings are given in BS3458.
Attitude (Refer Section 8 for reference drawings (1) Install the meter in the pipeline with the data plate at the upstream
end. (2) When installed in a horizontal pipeline the electronics or
termination box must be uppermost. (3) Ensure that the meter is filled with liquid at all times. This can be
achieved by installing in the low point of a U-shaped pipeline. (4) When installed in a vertical pipeline ensure that the meter is
positioned such that the electronics or termination box is accessible.
(5) If the meter is in a vertical pipeline, the flow should be upward.

INSTRUMENTATION
PRACTICES
QM37.06 Section 4
Revision 4
ENGINEERING
Any PRINTED copies of this procedure are UNCONTROLLED Page: 45 of 73
4B.17 Valves There are two categories of valves: 1. Isolation valves 2. Process valves All process control and isolation valves shall be of an approved type. Valve type approval shall be given on receipt of completed valve specification sheets and shall include valve actuator selection.
Note: Globe Valves are not to be used on any installation that may require rodding out through valve.
4B.17.1 Isolation Valves Valve associated with instrumentation, primary elements and process transmitters are classified as follows: 1. Isolation of process impulse line at the tapping points on process
(termed primary isolating valves.) 2. Isolation of impulse line directly at the transmitter end (termed
secondary isolating valves.) Primary valves shall be of locking bracket type as shown in example; figure 68, conforming to an approved design and material as follows: Those of the same size and type shall be of the same make. Secondary valves such as Transmitter manifolds shall consist of secondary isolating valves and equalising valves. Blowdown valves and vent / fill valves may be required depending on application. The manifold shall be a single unit directly mounted on the transmitter body and shall be an approved type. The complete assembled manifold shall be 316 Stainless Steel. Independent secondary isolating valves shall be provided unless the primary isolating valves are accessible from the transmitter location.

INSTRUMENTATION
PRACTICES
QM37.06 Section 4
Revision 4
ENGINEERING
Any PRINTED copies of this procedure are UNCONTROLLED Page: 46 of 73
4B.17.1 Isolation Valves (cont).
Figure 68 Locking Bracket (lever)

INSTRUMENTATION
PRACTICES
QM37.06 Section 4
Revision 4
ENGINEERING
Any PRINTED copies of this procedure are UNCONTROLLED Page: 47 of 73
4B.17.1 Isolation Valves (cont). Where valve glands may be subjected to excessive heat during erection due to welding in, heat treatment or similar cause, the gland packing shall be removed before erection and replaced before the valve is placed in service. All gland packing shall be of pre-formed cross section and shall preferably be fully pre-formed. Gland packing for valves having stainless steel spindles shall not contain graphite. (a) Isolation valve specification must be suitable for the process for
which it is being used. (b) Ball valves are to be used on processes which require a periodic
clean out (i.e. on tapping points for flow or pressure measuring systems on gas mains.
(c) Ball valves must be installed so that the process medium forces the ball onto the fixed seat.
(d) Ball valves are to be used where possible in preference to gate valves or globe valves.
4B.17.2 Control Valves Where possible, control valve design shall be such that the valve action may be reversed in the field without additional parts. Valves shall be designed to "fail safe" on air failure. All globe type control valves shall have removable seats and plugs. The preferred packing is non-lubricated Teflon V-rings. However, other types of packing shall be considered where process conditions warrant. An extension bonnet shall be used if necessary to ensure that the temperature limit of the packing is not exceeded. The minimum body size shall be 25mm. Valve sizes below 25mm shall be effected by the use of reduced trim. An appropriate means of cavitation control, such as the use of special trim or relocation of the control valve, shall be used to eliminate cavitation and / or flashing, wherever possible. Noise abatement techniques shall be used, where required, to maintain noise levels generated by control valves within the limits permitted by applicable codes and ordinances. The maximum acceptable noise level shall be 85 dB at 1 metre. Valve body and trim materials shall be selected to best suit the service and application. All valve bodies shall be flanged, with a minimum rating of 150 lb ANSI raised face. Air operated actuators shall be used in all applications unless specified otherwise. Input signal range shall be 20-100 kPa.

INSTRUMENTATION
PRACTICES
QM37.06 Section 4
Revision 4
ENGINEERING
Any PRINTED copies of this procedure are UNCONTROLLED Page: 48 of 73
4B.17.2 Control Valves (cont). All control valves shall be fitted with an electro-pneumatic positioner, unless otherwise agreed by the Maintenance Services group. Double seated valves must not be used for duties requiring tight shut-off. Single seated, top guided valves may be used subject to the Electrical Services group approval. The control signals shall be 4 - 20 mA or 20 - 100 kPa. Positioners shall conform to the actuator specification and shall be of an approved type. The positioner and actuators shall be supplied as an optional assembly. The control valves specification sheets shall be completed and submitted for each control valve. Block valves shall normally be full port gate or ball valves. When control valves are smaller than line size, block valves shall be one size larger than the control valve. In no case shall block valves be smaller than control valves. Bypass valves shall normally have a capacity at least equal to the circulated or required CV of the control valve but no greater than twice the calculated CV of the control valve. Globe valves shall normally be used as bypass valves up to 100 mm. However, if the capacity requires greater than 100 mm globe valve, gate or ball valves may be used. In cases where the predicted noise level in the control valve is a problem, the noise in the bypass valve shall also be considered.
4B.17.3 Control Valve Sizing Valve sizing shall be based on a maximum capacity of 1.3 times the normal maximum flow or 1.1 times the absolute maximum flow, whichever is greater. For the best results in controllability, the pressure drop allowed for the control valve shall be 33% of the total system friction head at design flow including the valve. Control valves in low friction head systems will be reviewed on an individual basis. Process considerations shall determine valve characteristics required. Globe type control valves shall be sized to be 60% to 80% open at normal flow, for valves with an equal percentage characteristic; and 50% to 70% open at normal flow for valves with a linear characteristic. Butterfly control valves shall be sized to be 30° to 45° open at normal flow.

INSTRUMENTATION
PRACTICES
QM37.06 Section 4
Revision 4
ENGINEERING
Any PRINTED copies of this procedure are UNCONTROLLED Page: 49 of 73
4B.17.3 Control Valve Sizing (cont). Saunders patent type control valves shall be sized for 100% of flow at 50% lift and sized to operate between 25% and 35% lift at normal flow. Sleeve type control valves shall be sized between 20% and 50% valve closure at normal flow.
4B.17.4 Ball Valves Ball valves must not be left in any position other than full open or full closed as otherwise the spindle seal is subjected to full line pressure for an extended period and dirt is liable to accumulate between the ball and the valve body causing the valve to freeze up.
4B.17.5 Butterfly Valves
Butterfly valves shall be of robust construction. Actuators shall be mounted on the valve body. For abrasive gas, or for water service, valves with an approved lining shall be used. The position of the valve disk shall be permanently indicated on the valve shaft and shall be visible from the actuator side of the valve. Pneumatic cylinders shall be used in preference to pneumatic diaphragms on valves over 200 mm diameter. Butterfly valve shafts and disk locating pins shall be stainless steel. For abrasive gas, or for water service, valves with high-grade rubber lining shall be used. Valve disc shafts must pass completely through the disc. Valves shall be installed horizontally in line with the pipe. All shafts must have engraved clearly on one end and shall be easily seen when installed a line indicating the precise plane of the disc, as a position indicator. On larger valves, the main may need to be opened to verify valve position if this has not been proved. Pneumatic cylinders should be used in preference to pneumatic diaphragms in valves over 300 mm diameter to avoid possible oscillation. Gland rings shall be tightened by stud and nut, not by rotation of a screwed gland nut. Butterfly valve shafts and disc locating pins shall be stainless steel.

INSTRUMENTATION
PRACTICES
QM37.06 Section 4
Revision 4
ENGINEERING
Any PRINTED copies of this procedure are UNCONTROLLED Page: 50 of 73
4B.17.6 Other Valves
Gate valves, needle valves, packless line valves etc., of a suitable kind may be used subject to the Electrical Services group approval, in cases where the use of the recommended valve raises problems.
Note: Refer Section 8 for reference drawing listing.
4B.18 Weighfeeders, Belt Weighers and Weighbridges The installation of these devices must satisfy the manufacturers installation specifications.
4B.18.1 Accuracy classes Belt weighers are divided into two accuracy classes: class 1 and class 2. Class 1 The totalisation scale interval of the belt weigher must be
less than or equal to 0.05% of the load totalised in one hour at maximum flow rate, or more than or equal to 0.002% of this load.
Class 2 The totalisation scale interval of the belt weigher must be
less than or equal to 0.1% of the load totalised in one hour at maximum flow rate, or more than or equal to 0.004% of this load.
4B.18.2 Belt Weighers Belt weighers consist of a container (hopper) or a belt to hold the material being weighed, a weighing method, and a readout device. Belt weighers should comply with the following conditions: Roller track The upper generatrices of rollers and sets of rollers
from along the conveyer track should be paralleled for each group of rollers. The rollers situated in the immediate vicinity of the end drums (the driving and idling drums respectively) need not comply with this requirement.
The trough angle of the belt should not exceed:
20 degrees for class 1 30 degrees for class 2.
The inclination of the belt should not exceed:
6 degrees for class 1 12 degrees class 2, provided that the product does not slip.
On belt weighers in class 1 the rollers of the weighing unit and the carrying rollers situated immediately before and after the weigh table should be mounted on ball bearings or any other similar type of bearing.

INSTRUMENTATION
PRACTICES
QM37.06 Section 4
Revision 4
ENGINEERING
Any PRINTED copies of this procedure are UNCONTROLLED Page: 51 of 73
4B.18.2 Belt Weighers (contd) The alignment of these rollers for a load approximately equal to half the maximum capacity of the weighing unit should be within 0.3 mm; the eccentricity should not exceed 0.2 mm. The weigher shall be continuous in operation and be of the mechanical level / load cell type. The system shall be robust and easily serviceable. The supplier shall provide an accurate means of calibration for the system. The system shall incorporate means to correct for variations in the conveyor belt speed. The system shall have a continuous rate readout calibrated in tonnes per hour. The maximum accumulative error between weekly checks shall be ± 05 % of full scale. The output signals from the transmitter shall be an isolated 4-20 mA signal linear rate signal and a pulse for totalisation of flow by means of a suitable electronic counter or similar device.
4B.18.3 Weighbridges Selection and installation of these units will be based on the "application"' it is to be used and in conjunction with the Maintenance Services group's Project Controller, ensuring all major design requirements of the selected unit(s) are met. As a guide, the consideration given for weigh scales may be used.
4B.18.4 Conveyor Belt The belt should not have more than two parts, each part having the same characteristics. Each joint should form a straight line and the angle between the joint and lateral edge of the belt should not exceed 45 degrees. The unwound length of the belt should not exceed either the distance travelled by any point on the belt in 1.5 minutes at the lowest nominal speed or 100 mm whichever is shortest. The displacement transducer should be positioned so that it accurately reflects the speed of the belt at the load receptor for all flow rates between the maximum and minimum values. The parts of the scale of the instantaneous load and flow rate indicators corresponding to values outside the range between the maximum and minimum values of the capacity of the weighing unit and of the flow rate should be clearly differentiated from the rest of the

INSTRUMENTATION
PRACTICES
QM37.06 Section 4
Revision 4
ENGINEERING
Any PRINTED copies of this procedure are UNCONTROLLED Page: 52 of 73
scale.
4B.18.4 Conveyor Belt (contd) These indicators may be replaced or supplemented by a recorder provided that it does not affect the results. The instantaneous load indicator is also the flow rate indicator it should bear the inscription: "Flow rate valid for a belt speed of ... m/s." Totalisation indicating and printing devices, which indicate only the positive values, should be engaged and should operate when the flow rate has reached 5% of the maximum flow rate. Consideration of the following criteria will be helpful in arriving at a sound decision:
• Need for close accuracy control and measurability • Production output • Headroom • Operating cost • Readout capabilities
4B.19 Gas Monitors Fixed Gas Monitors should be rounded in accordance with the preferred units design requirements. Location of Fixed Monitors must be assessed in consultation with ‘OHS’ Dept. Health Coordinator for that plant area and Maint Services Instrument Tech Group before final installation. Figure 76 shows design of Challenge Station required by Whyalla Operations. This challenge Test Station shall have prevision for a total of 4 gas bottles to be connected, with the use of a 5-way valve and the common port used as the outlet port. This allows the challenge station to be used to challenge both singles and multigas personal gas monitors. Consideration of the following criteria will be helpful in arriving at a sound decision:

INSTRUMENTATION
PRACTICES
QM37.06 Section 4
Revision 4
ENGINEERING
Any PRINTED copies of this procedure are UNCONTROLLED Page: 53 of 73

INSTRUMENTATION
PRACTICES
QM37.06 Section 4
Revision 4
ENGINEERING
Any PRINTED copies of this procedure are UNCONTROLLED Page: 54 of 73
Figure 76 Challenge Gas Station
8
2 1
5
3 6
7 4
350
265
Box Dimensions 350 x 265 x 150
Outlet
Rotameter
5 Way
Valve
Notes: 1. 5 way valve - Whitey Part No. SS-43FZ2. 2. Rotameter - Fischer and Porter, 0.25SCFH, Pressure rating 1700 KpG. 3. All pipework is to be ¼” Stainless Steel. 4. Pipework connections ¼” Stainless Steel Bulkheads. 5. Any unused port are to be plugged at the valve. 6. The common port is to be the outlet port. 7. All ports not used to be plugged at the Bulkhead connection (outside the box). 8. The output port is to be mounted on the face of the box, with a ¼” Stainless Steel
(approximately 1” in length).

INSTRUMENTATION
PRACTICES
QM37.06 Section 4
Revision 4
ENGINEERING
Any PRINTED copies of this procedure are UNCONTROLLED Page: 55 of 73
4B.20 Installation Requirements for Orifice Plates
4B.20.1 General
4B.20.1.1 the method of measurement applies only to fluids flowing through a pipeline of circular cross-section.
4B.20.1.2 The pipe shall run full at the measuring section.
4B.20.1.3 The primary device shall be installed in the pipeline at a position such that the flow conditions immediately upstream approach those of a fully developed profile and are free from swirl. Such conditions can be expected to exist if the installation conforms to requirements given in this clause.
4B.20.1.4 The primary device shall be fitted between two sections of straight cylindrical pipe of constant cross-sectional area, in which there is no obstruction or branch connection (whether or not there is flow into or out of such connections during measurement) other than those specified in this part of the procedure. The pipe is considered as straight when it appears so by visual inspection. The required minimum straight lengths of pipe, which conform to the description above, vary according to the nature of the fittings, the type of primary device and the diameter ratio. They are specified in tables B420.1. (at the end of this section)
4B.20.1.5 The pipe bore shall be circular over the entire minimum length of straight pipe required. The cross-section is taken to be circular if it appears so by visual inspection. The circularity of the outside of the pipe can be taken as a guide, except in the immediate vicinity of the primary device where special requirements shall apply according to the type of primary device used.
Seamed pipe may be used provided that the internal weld bead is parallel to the pipe axis throughout the length of the pipe and satisfies the special requirements for the type of primary element. The seam shall not be situated in any
section of 30 centred on any pressure tapping.
4B.20.1.6 The internal diameter D of the measuring pipe shall comply with the values given for each type of primary device.
4B.20.1.7 The inside surface of the measuring pipe shall be clean and free from encrustations, pitting and deposits, and shall conform with the roughness criterion for at least a length of 10D upstream and 4D downstream of the primary device.

INSTRUMENTATION
PRACTICES
QM37.06 Section 4
Revision 4
ENGINEERING
Any PRINTED copies of this procedure are UNCONTROLLED Page: 56 of 73
4B.20.1 General (cont)
4B.20.1.8 The pipe may be provided with drain holes and / or vent holes for the removal of solid deposits and fluids other than the measured fluid. However, there shall be no flow through the drain holes and vent holes during the measurement of the flow.
The drain holes and vent holes shall not be located near to the primary device, unless it is unavoidable to do so. In such a case, the diameter of these holes shall be smaller than 0.08D and their location shall be such that the distance, measured on a straight line from one of these holes to a pressure tapping of the primary device placed on the same side of this primary device, is always greater than 0.5D. The axial planes of the pipe containing respectively the centre-line of a pressure tapping the centre-line of a drain hole or
vent hole shall be offset by at least 30.
4B.20.1.9 The pipe and the pipe flanges shall be lagged. It is, however, unnecessary to lag the pipe when the temperature of the fluid, between the inlet of the minimum straight length of the upstream pipe and the outlet of the minimum straight length of the downstream pipe, does not exceed any limiting value for the accuracy of flow measurement required.
4B.20.2 Minimum upstream and downstream straight lengths required for
installation between various fittings and the primary device.

INSTRUMENTATION
PRACTICES
QM37.06 Section 4
Revision 4
ENGINEERING
Any PRINTED copies of this procedure are UNCONTROLLED Page: 57 of 73
4B.20.2.1 The minimum straight lengths are given in table 4B20.1.
4B.20.2.2 The straight lengths given in table 4B20.1 are minimum values, and the use of straight lengths longer than those indicated is always recommended. For research work in particular, straight lengths of at least twice the upstream values given in table 4B20.1 are recommended for “zero additional uncertainty”.
4B.20.2.3 When the straight lengths are equal to or longer than the values given in table 4B20.1 for “zero additional uncertainty”, there is no need to add any additional deviation to the discharge coefficient uncertainty to take account of the effect of such installation conditions.
4B.20.2.4 When the upstream or downstream straight length is sorter than the ‘zero additional uncertainty” values and equal to or greater than the “0.5% additional uncertainty”. Values, as given in table 4B20.1, an additional uncertainty of 0.5% shall be added arithmetically to the uncertainty on the discharge coefficient.
4B.20.2.5 If the straight lengths are shorter than the “0.5% additional uncertainty” values given in table 4B20.1, this section given no information by which to predict the value of any additional uncertainty to be taken into account; this is also the case
when the upstream and downstream straight lengths are both shorter than the “zero additional uncertainty” values.
4B.20.2 Minimum upstream and downstream straight lengths required for
installation between various fittings and the primary device. (cont)
4B.20.2.6 The values mentioned in table 4B20.1 shall be fully open. It is recommended that control of the flow-rate be effected by valves located downstream of the primary device. Isolating valves located upstream shall be fully open and shall be preferably of the “gate” type.
4B.20.2.7 After a single change of direction (bend or tee), it is recommended that if pairs of single tappings are used they be installed so that their axes are perpendicular to the plane of the bend or tee.
4B.20.2.8 The values given in table 4B20.1 were obtained experimentally with a very long straight length upstream of the particular fitting in question and so it could be assumed that the flow upstream of the disturbance was virtually fully developed and swirl-free. Since in practice such conditions are difficult to achieve, the following information may be sued as a guide for normal installation practices.
a) If the primary device is installed in a pipe leading from an upstream open space or large vessel, either directly or through any fitting, the total length of pipe between the open space and the primary device shall never be less

INSTRUMENTATION
PRACTICES
QM37.06 Section 4
Revision 4
ENGINEERING
Any PRINTED copies of this procedure are UNCONTROLLED Page: 58 of 73
than 30D. If any fitting is installed, than the straight lengths given in table 4B20.1 shall also apply between this fitting and the primary device.
b) If several fittings other than 90bends are placed in series upstream from the primary device, the following rule shall be applied: between the fitting (1) closest to the primary device and the primary device itself, there shall be a minimum straight length such as is indicated for the fitting
(1) in question and for the actual values of in table 4B20.1. But, in addition, between this fitting (1) and the preceding one (2) there shall be a straight length equal to one-half of the value given.
Refer Attachment 1 – Section 4

INSTRUMENTATION
PRACTICES
QM37.06 Section 4
Revision 4
ENGINEERING
Any PRINTED copies of this procedure are UNCONTROLLED Page: 59 of 73
4B.21 Tube Fittings
4B.21.1 General
The fitting consists of four components – nut, back ferrule, front ferrule and body – it becomes a five-piece connection when affixed to the tubing. The two-ferrule design and sequential action of the fitting overcome variations in tube materials, wall thicknesses and hardness to ensure safe, reliable, leak-free connections. (Fractional tube fitting is the preferred sixes).
4B.21.2 Hydraulic Swaging Unit
A hydraulic swaging unit must be used when installing 1¼, 1½, 2 inch, 28, 30, 32 and 38 mm Swagelok tube fittings. The unit is designed to swage the ferrules on the tubing prior to the final assembly into a fitting. It ensures a safe and reliable, torque-free, leak-proof seal on large size carbon steel and stainless steel tubing.
4B.21.3 Interchangeability
Manufacturers of competitive tube fittings often claim that their components are interchangeable with other tube fitting components.
We believe that interchanging and intermixing tube-fitting components of different designs, or made by different manufacturers, can result in leaks and tube slippage in a percentage of cases. We also believe this practice can be dangerous in Accreditation applications.
Leak-tight seals that will withstand high pressure, vibration, vacuums, and temperature changes depend upon close tolerances and consistent, exacting quality control in conjunction with a good principle.
The full value of the tube fitting is lost when components from other manufacturers are interchanged or intermixed with ours. We believe
that any manufacturer’s fitting performs best when only that manufacturers components are used in its fittings.
We do not believe that a tube fitting made up by interchanging
and intermixing components of other manufacturers tube fitting

INSTRUMENTATION
PRACTICES
QM37.06 Section 4
Revision 4
ENGINEERING
Any PRINTED copies of this procedure are UNCONTROLLED Page: 60 of 73
components will perform to the high standard.

INSTRUMENTATION
PRACTICES
QM37.06 Section 4
Revision 4
ENGINEERING
Any PRINTED copies of this procedure are UNCONTROLLED Page: 61 of 73
4B.21.4 Safety Precautions
Do not bleed system by loosening fitting nut or fitting plug.
Do not make up and tighten fittings when system is pressurised.
Never allow problems to go unreported.
Always use proper thread lubricants and sealants on tapered pip threads.
Avoid combining or mixing materials or fitting components from various manufacturers – tubing, ferrules, nuts and fitting bodies.
Never disassemble new or unused fittings.
Additional tubing considerations:
1. Metal tubing material should be softer than fitting material. For example: stainless steel tubing should not be used with brass fittings
2. When tubing and fittings are made of the same material, tubing must be fully annealed.
3. Always use an insert with extremely soft or pliable plastic tubing.
4. Extremes of wall thickness should always be checked against fitting manufacturer’s suggested minimum and maximum wall thickness limitations.
5. Surface finish is very important to proper sealing. Tubing with any kind of depression, scratch, raised portion, or other surface defect will be difficult to seal, particularly in gas service.
6. Tubing that is oval, that will not easily fit through fitting nuts, ferrules, and bodies should never be forced into the fitting.
4B.21.5 Safe Component Selection
When selecting a component, the total system design must be considered to ensure safe, trouble-free performance. Component function material compatibility, adequate ratings, proper installation, operation, and maintenance are the responsibility of the system designer and user.
CAUTION:
Do not mix or interchange parts with those of other
manufacturers.

INSTRUMENTATION
PRACTICES
QM37.06 Section 4
Revision 4
ENGINEERING
Any PRINTED copies of this procedure are UNCONTROLLED Page: 62 of 73
4C Testing The Instrument Contractor is responsible for testing the installed instrumentation as described in this section.
4C.1 General Purpose Testing The object of this phase of the testing procedure is to ensure that all instrument lines and tubing are pressure tight to the specified working / testing conditions. The pressure testing of any site fabricated equipment, i.e. cooling chambers, capacity pots, catch pots etc., shall be witnessed by the Project Controller unless this has been waived in which case, the test certificate must be handed to the Project Controller. The instrument lines and tubing to be tested can be classified in the following categories: (i) Air supply lines (ii) Transmission / signal lines (iii) Process Impulse Tubing The pressure testing of air supply lines, transmission lines and process impulse tubing on a given loop shall be completed before the final loop testing. If the transmitter has to be disconnected for loop testing only one connection has to be rechecked. The procedure to be adopted for pressure testing shall include the following: (i) Cleaning or blowing out all lines and tubes to remove scale, rust or other
foreign materials. (ii) Proving all joints at the specified test pressures. (iii) Blowing out all water used after hydraulic testing of process impulse
tubing.
4C.1.1 Air Supply Piping General Note:
The extent of the testing to be performed by the Contractor shall be as otherwise defined by the Project Controller (generally the testing shall be for the line downstream of a given isolation valve and this valve together with all upstream pipework will have been previously tested by others). (a) Each instrument air supply line shall be disconnected
immediately upstream of, and adjacent to, the individual air filter / regulator and blown out with clean air, until clear of all foreign materials.
(b) A suitable test gauge shall then be connected to the open end of
the line.

INSTRUMENTATION
PRACTICES
QM37.06 Section 4
Revision 4
ENGINEERING
Any PRINTED copies of this procedure are UNCONTROLLED Page: 63 of 73
4C.1.1 Air Supply Piping (cont). (c) Open the isolation valve immediately upstream of the piping to
be tested and when the line is pressurised closed the valve. The gauge reading shall not fall by more that 70 kPa in 10 minutes. If the leakage rate is above 70 kPa in 10 minutes the joints shall be checked with soap solution and remade as necessary.
(d) When the leakage rate is below 70 kPa in 10 minutes the gauge
shall be removed, the line reconnected and the joints not previously proven checked with soap solution.
(e) The line should then be identified as stated in paragraph 4A.3
(a). (f) If the air supply has not been established prior to these tests the
lines may be "blanked off" at the upstream limit, i.e. downstream of the isolating valve, and pressurised via a portable compressor to 700 kPa (g).
4C.1.2 Transmission Tubes General Note: (a) Each individual line shall be disconnected at both ends and
blown through with clean air. (b) The lines shall then be blanked off and pressurised to 140 kPa
from an existing air supply, via a pneumerstat or bubble bottle. After pressuring, the bubble rate shall be less than one bubble in 10 seconds. If an air supply is not readily available, the lines can be pressurised using a foot pump with a manometer feed into the system. With the pressure source isolated the reading must not fall.
The line shall then be reconnected and when an air supply is established, the joints not proven shall be tested with soap solution. This can be achieved by setting the transmitter / controller outputs to maximum.
(c) Underground tubes shall be tested before backfilling is
commenced. (d) The line shall then be identified as stated in paragraph 4A.3 (a).

INSTRUMENTATION
PRACTICES
QM37.06 Section 4
Revision 4
ENGINEERING
Any PRINTED copies of this procedure are UNCONTROLLED Page: 64 of 73
4C.1.3 Process Impulse Tubing General Notes:
The extent of the testing to be performed by the Contractor will be as described below or as otherwise defined by the Project Controller (generally the testing shall be for the tube downstream of the process isolation valve). (a) Process impulse tubing shall, where practical, be disconnected
at both ends and connected to a hydraulic pump with a suitable test gauge fitted.
(b) After flushing the line with water the open end shall be blanked
off and the line shall be pressurised to 1½ times the maximum working pressure (corrected for temperature). The line shall then be isolated from the pressure source and the pressure should not fail.
(c) After testing the lines shall be reconnected to the instrument
manifold and all manifold valves shall be checked for tight shut off.
(d) Attention is drawn to the fact that various test are carried out by
others on the process piping, e.g. hydraulic tests, flushing, etc. During hydraulic tests on the process pipework the instrument must be disconnected to ensure that initial isolations are leak proof. During flushing it must be ensured that all installed instruments are suitably and positively isolated from the process line.
Instrument fitted with manifolds must have their bypass valve open. All analyser sample systems with retractable probes must have their probes withdrawn.
(e) The Contractor must check that all instrument pressure tappings
have been drilled through the pipe wall.

INSTRUMENTATION
PRACTICES
QM37.06 Section 4
Revision 4
ENGINEERING
Any PRINTED copies of this procedure are UNCONTROLLED Page: 65 of 73
4C.2 Testing of Instrument Wiring
4C.2.1 “Power Off’ Tests
Immediately after cables are laid and before connection, all wiring shall be checked for polarity continuity and insulation resistance between conductors to earth. These tests must be carried out before final loop tests.
Continuity and insulation resistance checks shall be carried out using the proper test equipment to comply with the requirements of Section E of the IEEE rules and regulations, or the rules and regulations with which the installation has to comply.
Underground wiring shall be tested before backfilling is commenced.
The wiring shall then be identified as stated in 4A.3 (a).
4C.3 Loop Testing
4C.3.1 General
(a) The object of "Loop Testing" is to prove that the installed instrument functions correctly and is in fit condition for handing over to the Project Controller. The electrical / instrument contractor is responsible for loop testing.
(b) The procedure to be adopted in carrying out these tests is detailed below, but in general the complete instrument loop shall be tested as one system, and where necessary, adjustments shall be made to calibrations. Associated alarms and trips shall be checked during loop testing.
(c) Loop Testing is a two person operation; one person in the field and one person in the control room. These people must be provided by the Contractor along with adequate means of remote communication, i.e. field telephone or radio contact, as approved by the Project Controller.
(d) During loop testing the Project Controllers and the Maintenance Services group representative shall normally be in attendance to check out their inter-related sections of the work during trip and alarm checks. Their attendance will be requested giving adequate notice.
(e) Loop Testing shall never be carried out on electronic equipment that has not been allotted an adequate warm up period. Where possible the instrument shall be energised at least 24 hours before testing.
(f) All loop testing shall be documented using the Instrument Loop Test Field Installation checklists (see 4A.4 (a)).

INSTRUMENTATION
PRACTICES
QM37.06 Section 4
Revision 4
ENGINEERING
Any PRINTED copies of this procedure are UNCONTROLLED Page: 66 of 73
4C.3.1 General (cont).
(g) In all instances the Project Controller will witness the final loop tests and countersign the checklists. The Project Controller shall be informed in advance, when final tests are being performed.
(h) Upon completion the check lists, which record all results for every installation, shall be handed to the Project Controller.
(i) On completion of loop testing all controllers shall be left with correct action and with 100% proportional band setting.
4C.3.2 Loop Testing Procedure
(a) Inspect the loop, setting air / electrical supplies where appropriate. Check in particular that the control valves air supply pressures are set in accordance with the specification.
(b) For electronic loops check polarities, measure the loop
impedance and make the necessary compensating adjustments. (c) Using applied input signals, transmitter output signals equivalent
of 0, 50 and 100 percent of the instrument range shall be generated to check the response of all other instruments and control valve(s) in the loop.
Instrument zero settings and calibration adjustments shall be made as necessary.
For special considerations on electrical temperature instruments
see section 4C.3.3. (d) Switch the controller to manual operation and by applying the
appropriate signal ensure that the control valve or valves stroke correctly. Valve positioner gauges shall also be checked during this stage.
(e) Apply an actuating signal to the controller equivalent to 50
percent of the instrument range and adjust the manual regulator output to 50 percent. Adjust the controller set point to 50 percent and by switching the auto / manual transfer switch, check for "Bumpless" transfer. Using the manufacturer's instructions adjust where necessary until satisfactory "Bumpless" transfer is achieved.
(f) Check alarm and trip actions by varying the actuating signals
and adjust as necessary. The function of the binary logic sequence of all alarms and control system shall be checked and all sequential timers shall be set at this time.
(g) Locally mounted controller or transmitted only loops shall be
tested in a similar manner to that specified above omitting transmitter and / or auto / manual checks if necessary.

INSTRUMENTATION
PRACTICES
QM37.06 Section 4
Revision 4
ENGINEERING
Any PRINTED copies of this procedure are UNCONTROLLED Page: 67 of 73
4C.3.2 Loop Testing Procedure (cont).
(h) After each loop is satisfactorily tested the controller shall be switched to manual, with the final control element in the fail safe position, and identified as specified in paragraph 4A.1 (a).
4C.3.3 Temperature Element Installations (Thermocouple and Resistance Thermometers)
(a) Thermocouples and resistance thermometers shall be removed from their wells and checked for damage. The resistance of each resistance thermometer shall be measured at ambient temperature and resistance and temperature noted.
(b) After testing, thermocouples / resistance thermometers shall be
replaced in their thermowells and reconnected. It is important to ensure that the element length matches its associated thermowell and that the polarity of the thermocouple connection is maintained.
(c) To assist in the identification of thermocouple compensating
cable conductors the following guide is given: (i) For type J thermocouples (iron / constantan) the positive wire is
magnetic). (ii) For type K thermocouples (chromel / alumel) the negative wire is
slightly magnetic). (d) For galvanometer deflection type installations using
thermocouples compensating lead resistance shall be adjusted. (e) If a two wire resistance thermometer system is employed "Make
up" resistance's shall be adjusted.
4C.3.4 Analysers, Special Installations (a) Analytical and Special Installations shall be checked in
accordance to the manufacturer's instructions and / or by agreement with the Project Controller.
(b) Trips and alarms not previously covered in the loop tests e.g.
initiating devices which stop / start pumps etc., shall be checked out in conjunction with the Project Controller.
(c) All systems shall be checked for "fail safe" operation, which will
include the checking of "Burn out" features on thermocouple installations.
4C.3.5 Gas Monitors See Section 4A.5.18 for challenge test details.

INSTRUMENTATION
PRACTICES
QM37.06 Section 4
Revision 4
ENGINEERING
Any PRINTED copies of this procedure are UNCONTROLLED Page: 68 of 73
4C.4 Painting
Brackets, supports and other material not already protected in an approved manner shall be primed and painted in accordance with the painting specification S.11.
4C.5 Nameplates The Contractor shall identify all equipment with identifying nameplates and tag numbers, which will be in accordance with the label schedules and tag numbers as per the data sheets. Nameplates shall be affixed adjacent - not on the particular item of equipment. All nameplates shall be installed with lettering horizontal and be fixed with plated non-corrosive screws. All labels shall be of traffolyte material with black lettering on white background. The minimum size for all field-installed labels shall be 50 mm x 25 mm with 6 mm lettering.
4C.6 Keys and Documents with Equipment Where keys, packing slips, guarantees and instructions etc., are supplied with equipment to be installed, the Contractor shall hand these over to the Project Controller. All keys and instructions necessary for Contractor to execute his work will be made available on a loan basis. On completion of the work, the Contractor shall return all such items to the Project Controller. The general requirements for master keying are for two master key systems and one common key with Lockwood lock.
4C.7 Sealing All openings (made by Contractor or provided by others) in or through building walls, floors, etc., for instrument reticulation shall be effectively sealed by Contractor in a manner approved by the Project Controller. Cable duct openings at ground level and all cable entries into trenches into buildings shall be effectively sealed by the Contractor in a manner approved by the Project Controller to prevent entry of insects and rodents. All spare conduit and cable entries in equipment shall be effectively plugged and sealed by the Contractor in a manner approved by the Project Controller to prevent the ingress of moisture and vermin. All openings, through roofs and external walls shall be made weatherproof, including the installation of flashing and / or rain hoods to prevent entry of driving rain and seepage.

INSTRUMENTATION
PRACTICES
QM37.06 Section 4
Revision 4
ENGINEERING
Any PRINTED copies of this procedure are UNCONTROLLED Page: 69 of 73
4C.8 Commissioning
The Contractor shall make available, on a rate basis, a commissioning engineer and two (2) instrument technicians. This team, if required by the Project Controller, shall be responsible for the dynamic tuning of each plant loop, modifications deemed necessary during the commissioning period and any plant optimisation required by the Project Controller. The Project Controller, giving at least two (2) weeks’ notice, will advise the requirement for the commissioning team to the Contractor.

INSTRUMENTATION
PRACTICES
QM37.06 Section 4
Revision 4
ENGINEERING
Any PRINTED copies of this procedure are UNCONTROLLED Page: 70 of 73
4D Intrinsic Installation
4D.1 Hazardous Area Classification
4D.1.1 General
1. Classification of areas are to be completed using Australian Standard (AS 2430 - parts 1, 2 and 3 “Classification of Hazardous Areas and various parts of AS 2381 series).
2. All area’s classified and all concerns for Plants are recorded in each plants’ Hazard Register. A review of the Hazard Register should be made before installing any equipment
The design, construction, maintenance, testing and inspection of installation of the appropriate EICequipment shall be carried out by competent persons.
Only a competent qualified trade person is to perform work in area’s
that have been hazardous area classified. Competency may be demonstrated in accordance with AS 4761
“Competencies for working with electrical equipment for hazardous areas, or equivalent training and assessment framework.
A record of all Hazardous Area Classifications should be maintained
and any modifications to existing equipment should include the consideration of HAZARDOUS AREA classification to AS 2430 - 1, 2 and 3. This should include drawings for HAZARDOUS AREAS.
The appropriate signage for the designation if such areas should be
installed and maintained so that they are legible at all times. Hazardous Area Classification as defined by the Australian Standard
AS 2430 - 1, 2 and 3 should not be confused with other areas that are normal HAZARD (or HAZARDOUS AREAS) due to other process hazards such as molten metal, mobile equipment, etc,

INSTRUMENTATION
PRACTICES
QM37.06 Section 4
Revision 4
ENGINEERING
Any PRINTED copies of this procedure are UNCONTROLLED Page: 71 of 73
4E SIL (Safety Integrity Level) rated Installations
4E.1 SIL Installations
4E.1.1 Management Plan of Functional Safety at OneSteel Whyalla.

INSTRUMENTATION
PRACTICES
QM37.06 Section 4
Revision 4
ENGINEERING
Any PRINTED copies of this procedure are UNCONTROLLED Page: 72 of 73

INSTRUMENTATION
PRACTICES
QM37.06 Section 4
Revision 4
ENGINEERING
Any PRINTED copies of this procedure are UNCONTROLLED Page: 73 of 73
4E.1.2 OneSteel SIL Risk Review Matrixes.
OneSteel SIL REVIEW RISK MATRIX – Financial 16-Feb – 09 Generic Financial Losses Only W1 W2 W3
CONSEQUENCE FREQUENCY
Type S
Safety
E
Environmental
F
Financial
1
Unlikely
<1/1000y
2
Low
<1/100y
3 (W1)
In plant
lifetime
<1/10y
4 (W2)
Once per
decade
<1/y to
≥1/10y
5 (W3)
≥1/y
D=0.1
Severity
5 (A3) Equipment Damage >A$10m
Plant Downtime > 10 days
2
2
2
3
TH
A3
4 (A2) Equipment Damage >A$1m
Plant Downtime > 5 days
1
1
1
2
3
A2
3 (A1) Equipment Damage >A$1000k
Plant Downtime > 1 days
a
a
a
1
2
A1
2 (A0) Equipment Damage >A$10,000
Plant Downtime > 0.5 days
NR
NR
NR
a
1
A0
1 (A0) Equipment Damage ≤ A$10,000
Plant Downtime < 0.5 days
NR
NR
NR
NR
a
A0
0 - - - NR NR NR NR NR
Matrix Legend: NR = Not SIL Rated: TH = Too High – Redesign required; ‘a’ = Protection in Control System acceptable
Note: Based on generic risk graph IEC61511 calibrated for financial loss of 1,000/y for a single event.

INSTRUMENTATION
PRACTICES
QM37.06 Section 4
Revision 4
ENGINEERING
Any PRINTED copies of this procedure are UNCONTROLLED Page: 74 of 73
There is no penalty for high impact events

INSTRUMENTATION
PRACTICES
QM37.06 Section 4
Revision 4
ENGINEERING
Any PRINTED copies of this procedure are UNCONTROLLED Page: 75 of 73
OneSteel SIL REVIEW RISK MATRIX
26-Feb – 09 Current
CONSEQUENCE FREQUENCY Type S
Safety
E
Environmental
F
Financial
1
Unlikely
1/10,000y
2
Low
1/1000y
3
In plant
lifetime
1/100y
4
Once per
decade
1/10y
5 (W3)
1/1y
Severity
5 Multiple Fatalities
Catastrophic Event
Refer to the Financial Risk Graph
2
3
3
TH
TH
4 Single Fatality or Permanent Disability
Major Environmental
Event
Refer to the Financial Risk Graph
2
2
3
3
TH
3 Serious Injury
Serious Pollution
Refer to the Financial Risk Graph
1
1
2
2
3
2 Significant Injury
Significant Pollution
Refer to the Financial Risk Graph
NR
NR
1
2
2
1 Minor Injury
Minor Pollution
Refer to the Financial Risk Graph
NR
NR
NR
1
2
0 - - - NR NR NR NR NR
Matrix Legend: NR = Not SIL Rated: TH = Too High – Redesign required
Note: Based on current risk graph from QP29.13/1 Rev Jan 2009

INSTRUMENTATION
PRACTICES
QM37.06 Section 4
Revision 4
ENGINEERING
Any PRINTED copies of this procedure are UNCONTROLLED Page: 76 of 73
4E.1.2 General
Installations of equipment with a SIL rating are to comply to the normal installation requirements as per OST-OHS-ELEC-PRO-000 & WHY-OST-ELEC-PR-001, with the following additions.
4E.1.3 Equipment
4E.1.3.1 Identification of Instrumentation
A label is to be fixed to each SIL rated instrument by either of the
following methods: Fixed screwed or a Stainless Steel cable tie. The wording of the label to be: “WARNING”
This Instrument is part of a SIL Rated Loop
The label is to be 6.5 cm Wide x 2.5 cm high gravoply. Text is to Black lettering on a Yellow background
4E.1.3.2 Identification – General All Junction Boxes, Cables and Wires associated with SIL rated loops
are to have an X place in front of the number. i.e
Wire Numbers X1010101
Cable Numbers ISX14536-01
Junction Box STX-01
4E.1.3.3 Field Inputs and Outputs Every field input and output should be fused, or current limited. For Safety instrumented systems (SIS), this should be done either as a part of the SIS or through the use of external fuses. Each field input and output should have its own dedicated wiring to the safety controller system.
4E.1.3.4 Cable Installation All wiring, barriers and terminal blocks used for SIL installations shall only be used for such equipment. There shall be total separation between normal signalling and SIL signalling installations and clearly labels as part of a SIS.
4E.1.3.5 Replacement A SIL rated instrument can only be replaced with another SIL rated instrument of the same SIL level. The SIL compliance certificate of the
new instrument MUST be provided to the Project Controller for inclusion in the SIL Loop dossier.

INSTRUMENTATION
PRACTICES
QM37.06 Section 4
Revision 4
ENGINEERING
Any PRINTED copies of this procedure are UNCONTROLLED Page: 77 of 73
4E.1.4 Pre-commissioning
Prior to the commissioning of a SIL rated loop, all SIL rating compliance
certificates MUST be provided to the Project Controller for inclusion in the SIL Loop dossier.
4E.1.5 Drawings
All drawings associated with SIL rated loops are to have the following
notation included: - “The design for this circuit utilises approved SIL rated components and
has been designed in accordance with all the requirements laid down by the applicable approval authorities. Any modifications to the original circuit design or approved installation shown may invalidate the SIL rating of this circuit and may need re-certification.
4E.1.6 Functional Testing Functional testing is an essential activity that has to be carried out
periodically (12 months minimum) to verify the integrity of safety instruments systems and to ensure that the target safety integrity level (SIL) is met. The test must include the complete system, that is, sensors, the logic solver, the final element, and associated alarms, and must be based on clear and well-defined objectives, responsibilities. Each loop requires a separate procedure. These procedures are to be written by the project team and handed over to OneSteel, as part of the complete SIL loop dossier
4F .1.7 Wireless Instrument Network and Applications
-YET TO BE WRITTEN
4G Documentation:
4G.1 - Upstream/Downstream fittings Information
4G.2 - Field Installation Checklist / Calibration Reports
4G.3 - QM37.06 Exemption form

QM37.06/1 Section 4 - 4G1 16/11/2009 Page 1 of 1
Upstream (inlet) side of the primary device
Downstream
(outlet) side
of the primary
device
Single 90
bend or tee
(flow from
one branch
only)
Two or more
90 bends in
the same
plane
Two or more
90 bends in
different planes
Reducer 2D to
D over a length
of 1.5D or 3D
Expander 0.5D
to D over a
length of D or
2D
Globe valve
fully open
Full bore ball
or gate valve
fully open
Abrupt
symmetrical
reduction
having a
diameter ration
0.5
Thermometer
pocket or well*)
of diameter
0.03D
Thermometer
pocket or well*)
of diameter
between 0.03D
and 0.13D
Fittings
(columns 2 to
8)
1 2 3 4 5 6 7 8 9 10 11 12
0.20 10 (6) 14 (7) 34 (17) 5 16 (8) 18 (9) 12 (6) 4 (2)
0.25 10 (6) 14 (7) 34 (17) 5 16 (8) 18 (9) 12 (6) 4 (2)
0.30 10 (6) 16 (8) 34 (17) 5 16 (8) 18 (9) 12 (6) 5 (2.5)
0.35 12 (6) 16 (8) 36 (18) 5 16 (8) 18 (9) 12 (6) 5 (2.5)
0.40 14 (7) 18 (9) 36 (18) 5 16 (8) 20 (10) 12 (6) 6 (3)
0.45 14 (7) 18 (9) 38 (19) 5 17 (9) 20 (10) 12 (6) 6 (3)
0.50 14 (7) 20 (10) 40 (20) 6 (5) 18 (9) 22 (11) 12 (6) 30 (15) 5 (3) 20 (10) 6 (3)
0.55 16 (8) 22 (11) 44 (22) 8 (5) 20 (10) 24 (12) 14 (7) 6 (3)
0.60 18 (9) 26 (13) 48 (24) 9 (5) 22 (11) 26 (13) 14 (7) 7 (3.5)
0.65 22 (11) 32 (16) 54 (27) 11 (6) 25 (13) 28 (14) 16 (8) 7 (3.5)
0.70 28 (14) 36 (18) 62 (31) 14 (7) 30 (15) 32 (16) 20 (10) 7 (3.5)
0.75 36 (18) 42 (21) 70 (35) 22 (11) 38 (19) 36 (18) 24 (12) 8 (4)
0.80 46 (23) 50 (25) 80 (40) 30 (15) 54 (27) 44 (22) 30 (15) 8 (4)
*) The installation of thermometer pockets or wells will not alter the required minimum upstream lengths for the other fittings.
NOTES
1. The minimum straight lengths required are the lengths between various fittings located upstream or downstream of the primary device itself. All straight lengths shall be measured from the upstream face of the primary device
2. Values without parentheses are “zero additional uncertainty” values.
3. Values in parentheses are “0.5% additional uncertainty” values

FIELD INSTALLATION CHECKSHEET
QM37.06/2 - Section 4 - 4G2 22/04/2016 Page 1 of 32
FIELD INSTALLATION CHECKLIST / CALIBRATION REPORTS
Title Pages Page No.
Control Valve
Electronic / Pneumatic Controller
Electronic Displacer Type Transmitter
Electronic Pressure Transmitter
Electronic Temperature Transmitter
Flow Switch
Isolation Valve with Pneumatic Actuator
Level Switch - Capacitance
Level Switch - Microwave
Level Switch
Limit Switch
Magnetic Flow Meter
Miscellaneous
Nuclear Density Gauge
Orifice Plate
Pneumatics Pressure Transmitter
Positive Displacement Meter
Pressure Gauge
Pressure Switch
Signal Conditioner
Solenoid / Air Pilot Valve
Temperature Gauge
Temperature Switch
Turbine Meter
Ultrasonic Level Transmitter
Vortex Flow Meter
Instrument Loop Test
Instrument Defects
Single Gas Monitor
Multi-gas Monitor
Oxygen Gas Monitor
1
1
1
1
1
1
1
1
1
1
1
1
1
1
1
1
1
1
1
1
1
1
1
1
1
1
1
1
1
1
1
2
3
4
5
6
7
8
9
10
11
12
13
14
15
16
17
18
19
20
21
22
23
24
25
26
27
28
29
30
31
32

FIELD INSTALLATION CHECKSHEET
QM37.06/2 - Section 4 - 4G2 22/04/2016 Page 2 of 32
Page 1 of 1
CONTROL VALVE SAP PM Order No.
Contractor/Dept: .................................................. Contract No: ................................................... Tag No: .................................................... Manufacturer: ................................................... Plant: .................................................... Model No: ................................................... Area: .................................................... Serial No: ................................................... Tech ID No: .................................................... Loop Description: ................................................
1. INSTRUMENT VISUAL CHECK 1.1 Compliance with Data Sheet No: ........................................................ Revision: .......................
Type: Ball / Gate / Plug / Butterfly * Body Size ................................. Actuator Action Fail Open / Close Body Material ................................. Supply Pressure .......................... kPa Trim Material ................................. Pneumatic Conn. ................................. Press. Temp. Rating .................................
ACCESSORIES Limit Switches Y/N * Solenoid Valve Y/N *
Date: ........................
2. CALIBRATION RECORD
Input (Rising) Valve Posn. % Error Input (Falling) Valve Posn. % Error 0% ........................ .............. 100% ......................... ............. 25% ........................ .............. 75% ......................... ............. 50% ........................ .............. 50% ......................... ............. 75% ........................ .............. 25% ......................... ............. 100% ........................ .............. 0% ......................... .............
Comments: ................................................................................................................................................ ................................................................................................................................................
Calibration Device: ................................................................ Date: ........................
3. INSTALLATION IN ACCORDANCE WITH SECTION 4B Area Classification: ................................. Fittings - Size / Material Y/N * Cable Glands ................................. Pneumatic Conn. Cable Numbers ................................. Loop Proven DCS / Field Pass Y/N * Wire Numbers ................................. Pressure Test Pass Y/N * Crimped Connectors .................................
Comments: ................................................................................................................................................ ................................................................................................................................................
Date: ........................
CHECKED BY: .................................................................... ....................................... (signature) (date)
The above checks were carried out to our satisfaction Y/N * Refer to attached sheets for defects listing / comments Y/N *
ONESTEEL APPROVALS: ........................................ .............................................. .................................
(signature) (position) (date)
...................................... .............................................. .................................
(signature) (position) (date)
CONTRACTOR: .................................................................. ....................................... (signature) (date)
CUSTOMERS PROJECT CONTROLLER: .................................................................... ................................. (signature) (date)
* Delete where not applicable, if no comment

FIELD INSTALLATION CHECKSHEET
QM37.06/2 - Section 4 - 4G2 22/04/2016 Page 3 of 32
Page 1 of 1
ELECTRONIC / PNEUMATIC CONTROLLER SAP PM Order No.
Contractor/Dept: .................................................. Contract No: ................................................... Tag No: .................................................... Manufacturer: ................................................... Plant: .................................................... Model No: ................................................... Area: .................................................... Serial No: ................................................... Tech ID No: .................................................... Loop Description: ................................................
1. INSTRUMENT VISUAL CHECK 1.1 Compliance with Data Sheet No: ........................................................ Revision: .......................
Element Type Receiver / Diaphragm / Bourdon / Bellows / Electronic * Element Material ................................. Power Air Supply ................................. Press. Temp. Rating ................................. Input Signal ................................. Enclosure Rating ................................. Output Signal ................................. Functions P/I/D/B/On-Off * ....... Action Dir / Rev * Set Point Rem / Loc. Comp ..... Indicator Scale ................................. Diaphragm Seal Y/N * Filter Regulator .................................
Date: ........................
2. CALIBRATION RECORD Calibrated Range: ……………………….
Input (Rising) Output (Rising) % Error Input (Falling) Output (Falling) % Error 0% ........................ .............. 100% ......................... ............. 25% ........................ .............. 75% ......................... ............. 50% ........................ .............. 50% ......................... ............. 75% ........................ .............. 25% ......................... ............. 100% ........................ .............. 0% ......................... .............
Comments: ................................................................................................................................................ ................................................................................................................................................
Calibration Device: ................................................................ Date: ........................
3. INSTALLATION IN ACCORDANCE WITH SECTION 4B Impulse Lines - Size / Material Y/N * Area Classification: ................................. Air Lines - Size / Material Y/N * Cable Glands Y/N * Fittings Y/N * Cable Numbers Y/N * Loop Proven DCS / Field Pass Y/N * Wire Numbers Y/N * Pressure Test Pass Y/N * Crimped Connectors Y/N *
Comments: ................................................................................................................................................ ................................................................................................................................................
Date: ........................
CHECKED BY: .................................................................... ....................................... (signature) (date)
The above checks were carried out to our satisfaction Y/N * Refer to attached sheets for defects listing / comments Y/N *
ONESTEEL APPROVALS: ........................................ .............................................. .................................
(signature) (position) (date)
...................................... .............................................. .................................
(signature) (position) (date)
CONTRACTOR: .................................................................. ....................................... (signature) (date)
CUSTOMERS PROJECT CONTROLLER: .................................................................... ................................. (signature) (date)
* Delete where not applicable, if no comment

FIELD INSTALLATION CHECKSHEET
QM37.06/2 - Section 4 - 4G2 22/04/2016 Page 4 of 32
Page 1 of 1
ELECTRONIC DISPLACER TYPE TRANSMITTER SAP PM Order No.
Contractor/Dept: .................................................. Contract No: ................................................... Tag No: .................................................... Manufacturer: ................................................... Plant: .................................................... Model No: ................................................... Area: .................................................... Serial No: ................................................... Tech ID No: .................................................... Loop Description: ................................................
1. INSTRUMENT VISUAL CHECK 1.1 Compliance with Data Sheet No: ........................................................ Revision: .......................
Displacer Material ................................. Range ................................. Body Material ................................. Power Supply ................................. Press. Temp. Rating ................................. Signal Range ................................. Enclosure Rating ................................. Cable Connection ................................. Displacer S.G. ................................. Process Connection .................................
ACCESSORIES Vent Y/N * Drain Y/N * Indicator Y/N *
Date: ........................
2. CALIBRATION RECORD Calibrated Range: ……………………….
Input (Rising) Output (Rising) % Error Input (Falling) Output (Falling) % Error 0% ........................ .............. 100% ......................... ............. 25% ........................ .............. 75% ......................... ............. 50% ........................ .............. 50% ......................... ............. 75% ........................ .............. 25% ......................... ............. 100% ........................ .............. 0% ......................... .............
Comments: ................................................................................................................................................ ................................................................................................................................................
Calibration Device: ................................................................ Date: ........................
3. INSTALLATION IN ACCORDANCE WITH SECTION 4B Area Classification: ................................. Mounting Correct Y/N * Cable Glands Y/N * Cable Number Y/N * Wire Number Y/N* Loop Proven DCS / Field Pass Y/N * Crimped Connectors Y/N *
Comments: ................................................................................................................................................ ................................................................................................................................................
Date: ........................
CHECKED BY: .................................................................... ....................................... (signature) (date)
The above checks were carried out to our satisfaction Y/N * Refer to attached sheets for defects listing / comments Y/N *
ONESTEEL APPROVALS: ........................................ .............................................. .................................
(signature) (position) (date)
...................................... .............................................. .................................
(signature) (position) (date)
CONTRACTOR: .................................................................. ....................................... (signature) (date)
CUSTOMERS PROJECT CONTROLLER: .................................................................... ................................. (signature) (date)
* Delete where not applicable, if no comment

FIELD INSTALLATION CHECKSHEET
QM37.06/2 - Section 4 - 4G2 22/04/2016 Page 5 of 32
Page 1 of 1
ELECTRONIC PRESSURE TRANSMITTER SAP PM Order No.
Contractor/Dept: .................................................. Contract No: ................................................... Tag No: .................................................... Manufacturer: ................................................... Plant: .................................................... Model No: ................................................... Area: .................................................... Serial No: ................................................... Tech ID No: .................................................... Loop Description: ................................................
1. INSTRUMENT VISUAL CHECK 1.1 Compliance with Data Sheet No: ........................................................ Revision: .......................
Element Material ................................. Range ................................. Body Material ................................. Power Supply ................................. Press. Temp. Rating ................................. Signal Range ................................. Enclosure Rating ................................. Process Connection ................................. Cable Connection .................................
ACCESSORIES Diaphragm Seal Y/N * Indicator Y/N *
Date: ........................
2. CALIBRATION RECORD Calibrated Range: ……………………….
Input (Rising) Output (Rising) % Error Input (Falling) Output (Falling) % Error 0% ........................ .............. 100% ......................... ............. 25% ........................ .............. 75% ......................... ............. 50% ........................ .............. 50% ......................... ............. 75% ........................ .............. 25% ......................... ............. 100% ........................ .............. 0% ......................... .............
Comments: ................................................................................................................................................ ................................................................................................................................................
Calibration Device: ................................................................ Date: ........................
3. INSTALLATION IN ACCORDANCE WITH SECTION 4B Impulse Line Size / Material Y/N * Area Classification: ................................. Fittings - Size / Material Y/N * Cable Glands Y/N * Seal Pot Y/N * Cable Number Y/N * Loop Proven DCS / Field Pass Y/N * Wire Number Y/N * Pressure Test Pass Y/N * Crimped Connectors Y/N * Equalising Valve Manifold Y/N *
Comments: ................................................................................................................................................ ................................................................................................................................................
Date: ........................
CHECKED BY: .................................................................... ....................................... (signature) (date)
The above checks were carried out to our satisfaction Y/N * Refer to attached sheets for defects listing / comments Y/N *
ONESTEEL APPROVALS: ........................................ .............................................. .................................
(signature) (position) (date)
...................................... .............................................. .................................
(signature) (position) (date)
CONTRACTOR: .................................................................. ....................................... (signature) (date)
CUSTOMERS PROJECT CONTROLLER: .................................................................... ................................. (signature) (date)
* Delete where not applicable, if no comment

FIELD INSTALLATION CHECKSHEET
QM37.06/2 - Section 4 - 4G2 22/04/2016 Page 6 of 32
Page 1 of 1
ELECTRONIC TEMPERATURE TRANSMITTER SAP PM Order No.
Contractor/Dept: .................................................. Contract No: ................................................... Tag No: .................................................... Manufacturer: ................................................... Plant: .................................................... Model No: ................................................... Area: .................................................... Serial No: ................................................... Tech ID No: .................................................... Loop Description: ................................................
1. INSTRUMENT VISUAL CHECK 1.1 Compliance with Data Sheet No: ........................................................ Revision: .......................
Element Type T/C Type E / J / K / N / R / T RTD Pt 100 ohm Y/N * Thermowell Material. ................................. RTD Ni Y/N * Dimensions U .............. T ............ Output Signal ................................. Mounting ................................. Thermowell Conn. ................................. Enclosure Rating ................................. Device Connection ................................. Cable Connection .................................
ACCESSORIES Indicator Y/N *
Date: ........................
2. CALIBRATION RECORD Calibrated Range: ……………………….
Input (Rising) Output (Rising) % Error Input (Falling) Output (Falling) % Error 0% ........................ .............. 100% ......................... ............. 25% ........................ .............. 75% ......................... ............. 50% ........................ .............. 50% ......................... ............. 75% ........................ .............. 25% ......................... ............. 100% ........................ .............. 0% ......................... .............
Comments: ................................................................................................................................................ ................................................................................................................................................
Calibration Device: ................................................................ Date: ........................
3. INSTALLATION IN ACCORDANCE WITH SECTION 4B Thermowell Size / Material Y/N * Area Classification: ................................. Element Size / Material Y/N * Cable Glands Y/N * Cable Numbers Y/N * Mounting Correct Y/N * Wire Numbers Y/N * Loop Proven DCS / Field Pass Y/N * Crimped Connectors Y/N *
Comments: ................................................................................................................................................ ................................................................................................................................................
Date: ........................
CHECKED BY: .................................................................... ....................................... (signature) (date)
The above checks were carried out to our satisfaction Y/N * Refer to attached sheets for defects listing / comments Y/N *
ONESTEEL APPROVALS: ........................................ .............................................. .................................
(signature) (position) (date)
...................................... .............................................. .................................
(signature) (position) (date)
CONTRACTOR: .................................................................. ....................................... (signature) (date)
CUSTOMERS PROJECT CONTROLLER: .................................................................... ................................. (signature) (date)
* Delete where not applicable, if no comment

FIELD INSTALLATION CHECKSHEET
QM37.06/2 - Section 4 - 4G2 22/04/2016 Page 7 of 32
Page 1 of 1
FLOW SWITCH SAP PM Order No.
Contractor/Dept: .................................................. Contract No: ................................................... Tag No: .................................................... Manufacturer: ................................................... Plant: .................................................... Model No: ................................................... Area: .................................................... Serial No: ................................................... Tech ID No: .................................................... Loop Description: ................................................
1. INSTRUMENT VISUAL CHECK 1.1 Compliance with Data Sheet No: ........................................................ Revision: .......................
Thermal Actuated Y/N * Power Supply ................................. Paddle Y/N * Element Material ................................. Rotameter Y/N * Contact Type SPDT / DPDT Enclosure Ring ................................. Contact Rating ................................. Mounting ................................. Process Connection ................................. Flow: Top of Pipe Y/N * Left to Right Y/N * Side of Pipe Y/N * Right to Left Y/N * In Line Y/N *
Date: ........................
2. CALIBRATION RECORD
Switch Trip Point ................................. Actuating Flow Rising ................................. % Error ......................................................... Actuating Flow Falling ................................. % Error ......................................................... Switch Dead Band .................................
Comments: ................................................................................................................................................ ................................................................................................................................................
Calibration Device: ................................................................ Date: ........................
3. INSTALLATION IN ACCORDANCE WITH SECTION 4B Area Classification: ................................. Mounting Correct Y/N * Cable Glands Y/N * Cable Number Y/N * Wire Numbers Y/N * Loop Proven DCS / Field Pass Y/N * Crimped Connectors Y/N *
Comments: ................................................................................................................................................ ................................................................................................................................................
Date: ........................
CHECKED BY: .................................................................... ....................................... (signature) (date)
The above checks were carried out to our satisfaction Y/N * Refer to attached sheets for defects listing / comments Y/N *
ONESTEEL APPROVALS: ........................................ .............................................. .................................
(signature) (position) (date)
...................................... .............................................. .................................
(signature) (position) (date)
CONTRACTOR: .................................................................. ....................................... (signature) (date)
CUSTOMERS PROJECT CONTROLLER: .................................................................... ................................. (signature) (date)
* Delete where not applicable, if no comment

FIELD INSTALLATION CHECKSHEET
QM37.06/2 - Section 4 - 4G2 22/04/2016 Page 8 of 32
Page 1 of 1
ISOLATION VALVE PNEUMATIC ACTUATOR SAP PM Order No.
Contractor/Dept: .................................................. Contract No: ................................................... Tag No: .................................................... Manufacturer: ................................................... Plant: .................................................... Model No: ................................................... Area: .................................................... Serial No: ................................................... Tech ID No: .................................................... Loop Description: ................................................
1. INSTRUMENT VISUAL CHECK 1.1 Compliance with Data Sheet No: ........................................................ Revision: .......................
Type Ball / Gate / Plug / Butterfly * Body Size ................................. Actuator Action Fail Open / Close Body Material ................................. Solenoid Voltage AC / DC Trim Material ................................. Limit Sw. Contact Rating ................................. Press. Temp. Rating ................................. Supply Pressure .......................... kPa
ACCESSORIES Limit Switches Y/N * Solenoid Valve Y/N *
Date: ........................
2. CALIBRATION RECORD
Comments: ................................................................................................................................................ ................................................................................................................................................
Calibration Device: ................................................................ Date: ........................
3. INSTALLATION IN ACCORDANCE WITH SECTION 4B Area Classification: ................................. Fittings - Size / Material Y/N * Cable Glands Y/N * Y/N * Cable Numbers Y/N * Loop Proven DCS / Field Pass Y/N * Wire Numbers Y/N * Pressure Test Pass Y/N * Crimped Connectors Y/N *
Comments: ................................................................................................................................................ ................................................................................................................................................
Date: ........................
CHECKED BY: .................................................................... ....................................... (signature) (date)
The above checks were carried out to our satisfaction Y/N * Refer to attached sheets for defects listing / comments Y/N *
ONESTEEL APPROVALS: ........................................ .............................................. .................................
(signature) (position) (date)
...................................... .............................................. .................................
(signature) (position) (date)
CONTRACTOR: .................................................................. ....................................... (signature) (date)
CUSTOMERS PROJECT CONTROLLER: .................................................................... ................................. (signature) (date)
* Delete where not applicable, if no comment

FIELD INSTALLATION CHECKSHEET
QM37.06/2 - Section 4 - 4G2 22/04/2016 Page 9 of 32
Page 1 of 1
LEVEL SWITCH - CAPACITANCE SAP PM Order No.
Contractor/Dept: .................................................. Contract No: ................................................... Tag No: .................................................... Manufacturer: ................................................... Plant: .................................................... Model No: ................................................... Area: .................................................... Serial No: ................................................... Tech ID No: .................................................... Loop Description: ................................................
1. INSTRUMENT VISUAL CHECK 1.1 Compliance with Data Sheet No: ........................................................ Revision: .......................
Supply Voltage ................................. Contact Type SPDT / DPDT Enclosure Rating ................................. Contact Rating ................................. Probe Length .......................... mm Time Delay ................................. Probe Material .................................
Date: ........................
2. CALIBRATION RECORD
Switch Trip Point ................................. Actuating Flow Rising ................................. % Error ......................................................... Actuating Flow Falling ................................. % Error ......................................................... Switch Dead Band .................................
Comments: ................................................................................................................................................ ................................................................................................................................................
Calibration Device: ................................................................ Date: ........................
3. INSTALLATION IN ACCORDANCE WITH SECTION 4B Area Classification: ................................. Mounting Correct Y/N * Cable Glands Y/N * Cable Numbers Y/N * Wire Numbers Y/N * Loop Proven DCS / Field Pass Y/N * Crimped Connectors Y/N *
Comments: ................................................................................................................................................
................................................................................................................................................
Date: ........................
CHECKED BY: .................................................................... ....................................... (signature) (date)
The above checks were carried out to our satisfaction Y/N * Refer to attached sheets for defects listing / comments Y/N *
ONESTEEL APPROVALS: ........................................ .............................................. .................................
(signature) (position) (date)
...................................... .............................................. .................................
(signature) (position) (date)
CONTRACTOR: .................................................................. ....................................... (signature) (date)
CUSTOMERS PROJECT CONTROLLER: .................................................................... ................................. (signature) (date)
* Delete where not applicable, if no comment

FIELD INSTALLATION CHECKSHEET
QM37.06/2 - Section 4 - 4G2 22/04/2016 Page 10 of 32
Page 1 of 1
LEVEL SWITCH - MICROWAVE SAP PM Order No.
Contractor/Dept: .................................................. Contract No: ................................................... Tag No: .................................................... Manufacturer: ................................................... Plant: .................................................... Model No: ................................................... Area: .................................................... Serial No: ................................................... Tech ID No: .................................................... Loop Description: ................................................
1. INSTRUMENT VISUAL CHECK 1.1 Compliance with Data Sheet No: ........................................................ Revision: .......................
Power Supply ................................. Contact Type ................................. Sensor Cable Length ................................. Contact Rating ................................. Enclosure Rating .................................
Date: ........................
2. CALIBRATION RECORD Calibrated Range: ……………………….
Input (Rising) Output (Rising) % Error Input (Falling) Output (Falling) % Error 0% ........................ .............. 100% ......................... ............. 25% ........................ .............. 75% ......................... ............. 50% ........................ .............. 50% ......................... ............. 75% ........................ .............. 25% ......................... ............. 100% ........................ .............. 0% ......................... .............
Comments: ................................................................................................................................................
................................................................................................................................................
Calibration Device: ................................................................ Date: ........................
3. INSTALLATION IN ACCORDANCE WITH SECTION 4B Area Classification: ................................. Mounting Correct Y/N * Cable Glands Y/N * Failsafe Set .................................. Cable Numbers Y/N * Delay Set .................................. Wire Numbers Y/N * Loop Proven DCS / Field Pass Y/N * Crimped Connectors Y/N *
Comments: ................................................................................................................................................
................................................................................................................................................
Date: ........................
CHECKED BY: .................................................................... ....................................... (Signature) (date)
The above checks were carried out to our satisfaction Y/N * Refer to attached sheets for defects listing / comments Y/N *
ONESTEEL APPROVALS: ........................................ .............................................. .................................
(Signature) (position) (date)
...................................... .............................................. .................................
(Signature) (position) (date)
CONTRACTOR: .................................................................. ....................................... (signature) (date)
CUSTOMERS PROJECT CONTROLLER: .................................................................... ................................. (signature) (date)
* Delete where not applicable, if no comment

FIELD INSTALLATION CHECKSHEET
QM37.06/2 - Section 4 - 4G2 22/04/2016 Page 11 of 32
Page 1 of 1
LEVEL SWITCH SAP PM Order No.
Contractor/Dept: .................................................. Contract No: ................................................... Tag No: .................................................... Manufacturer: ................................................... Plant: .................................................... Model No: ................................................... Area: .................................................... Serial No: ................................................... Tech ID No: .................................................... Loop Description: ................................................
1. INSTRUMENT VISUAL CHECK 1.1 Compliance with Data Sheet No: ........................................................ Revision: .......................
Type Float / Displacer * Switch SPDT / DPDT Mounting Cage / Direct Contact Rating ................................. Press. Temp. Rating ................................. Enclosure Rating ................................. Displacer / Float Mtl. ................................. Displacer / Press. Temp. Rating ................... Connection Size .................................
ACCESSORIES Filter Regulator Y/N * Drain Y/N *
Date: ........................
2. CALIBRATION RECORD
Switch Trip Point ................................................. Actuating Level Rising ................................................. % Error ....................................... Actuating Level Falling ................................................. % Error ....................................... Switch Dead Band .................................................
Comments: ................................................................................................................................................ ................................................................................................................................................
Calibration Device: ................................................................ Date: ........................
3. INSTALLATION IN ACCORDANCE WITH SECTION 4B Area Classification: ................................. Mounting Correct Y/N * Cable Glands Y/N * Cable Number Y/N * Loop Proven DCS / Field Pass Y/N * Wire Number Y/N * Crimped Connectors Y/N *
Comments: ................................................................................................................................................ ................................................................................................................................................
Date: ........................
CHECKED BY: .................................................................... ....................................... (signature) (date)
The above checks were carried out to our satisfaction Y/N * Refer to attached sheets for defects listing / comments Y/N *
ONESTEEL APPROVALS: ........................................ .............................................. .................................
(signature) (position) (date)
...................................... .............................................. .................................
(signature) (position) (date)
CONTRACTOR: .................................................................. ....................................... (signature) (date)
CUSTOMERS PROJECT CONTROLLER: .................................................................... ................................. (signature) (date) Delete where not applicable, if no comment

FIELD INSTALLATION CHECKSHEET
QM37.06/2 - Section 4 - 4G2 22/04/2016 Page 12 of 32
Page 1 of 1
LIMIT SWITCHES SAP PM Order No.
Contractor/Dept: .................................................. Contract No: ................................................... Tag No: .................................................... Manufacturer: ................................................... Plant: .................................................... Model No: ................................................... Area: .................................................... Serial No: ................................................... Tech ID No: .................................................... Loop Description: ................................................
1. INSTRUMENT VISUAL CHECK 1.1 Compliance with Data Sheet No: ........................................................ Revision: .......................
Proximity ................................. Enclosure Rating ................................. Mechanical ................................. Temperature Rating ................................. Power Supply ................................. Contact Type SPDT / DPDT Contact Rating .................................
Date: ........................
2. CALIBRATION RECORD
Comments: ................................................................................................................................................
................................................................................................................................................
Calibration Device: ................................................................ Date: ........................
3. INSTALLATION IN ACCORDANCE WITH SECTION 4B Area Classification: ................................. Mounting Correct Y/N * Cable Glands Y/N * Cable Number Y/N * Wire Number Y/N * Loop Proven DCS / Field Pass Y/N * Crimped Connectors Y/N *
Comments: ................................................................................................................................................
................................................................................................................................................
Date: ........................
CHECKED BY: .................................................................... ....................................... (signature) (date)
The above checks were carried out to our satisfaction Y/N * Refer to attached sheets for defects listing / comments Y/N *
ONESTEEL APPROVALS: ........................................ .............................................. .................................
(signature) (position) (date)
...................................... .............................................. .................................
(signature) (position) (date)
CONTRACTOR: .................................................................. ....................................... (signature) (date)
CUSTOMERS PROJECT CONTROLLER: .................................................................... ................................. (signature) (date)
* Delete where not applicable, if no comment

FIELD INSTALLATION CHECKSHEET
QM37.06/2 - Section 4 - 4G2 22/04/2016 Page 13 of 32
Page 1 of 1
MAGNETIC FLOW METER SAP PM Order No.
Contractor/Dept: .................................................. Contract No: ................................................... Tag No: .................................................... Manufacturer: ................................................... Plant: .................................................... Model No: ................................................... Area: .................................................... Serial No: ................................................... Tech ID No: .................................................... Loop Description: ................................................
1. INSTRUMENT VISUAL CHECK 1.1 Compliance with Data Sheet No: ........................................................ Revision: .......................
Body Material ................................. Power Supply ................................. Electrode ................................. Output Signal ................................. Liner Material ................................. Output Meter Y/N * Press. Temp. Rating ................................. Scale ................................. Enclosure Rating .................................
Date: ........................
2. CALIBRATION RECORD Calibrated Range: ……………………….
Input (Rising) Output (Rising) % Error Input (Falling) Output (Falling) % Error 0% ........................ .............. 100% ......................... ............. 25% ........................ .............. 75% ......................... ............. 50% ........................ .............. 50% ......................... ............. 75% ........................ .............. 25% ......................... ............. 100% ........................ .............. 0% ......................... .............
Comments: ................................................................................................................................................
................................................................................................................................................
Calibration Device: ................................................................ Date: ........................
3. INSTALLATION IN ACCORDANCE WITH SECTION 4B Area Classification: ................................. Mounting Correct Y/N * Cable Glands Y/N * Y/N * Cable Number Y/N * Loop Proven DCS / Field Pass Y/N * Wire Numbers Y/N * Crimped Connectors Y/N *
Comments: ................................................................................................................................................
................................................................................................................................................
Date: ........................
CHECKED BY: .................................................................... ....................................... (signature) (date)
The above checks were carried out to our satisfaction Y/N * Refer to attached sheets for defects listing / comments Y/N *
ONESTEEL APPROVALS: ........................................ .............................................. .................................
(signature) (position) (date)
...................................... .............................................. .................................
(signature) (position) (date)
CONTRACTOR: .................................................................. ....................................... (signature) (date)
CUSTOMERS PROJECT CONTROLLER: .................................................................... ................................. (signature) (date)
* Delete where not applicable, if no comment

FIELD INSTALLATION CHECKSHEET
QM37.06/2 - Section 4 - 4G2 22/04/2016 Page 14 of 32
Page 1 of 1
MISCELLANEOUS SAP PM Order No.
Contractor/Dept: .................................................. Contract No: ................................................... Tag No: .................................................... Manufacturer: ................................................... Plant: .................................................... Model No: ................................................... Area: .................................................... Serial No: ................................................... Tech ID No: .................................................... Loop Description: ................................................
1. INSTRUMENT VISUAL CHECK 1.1 Compliance with Data Sheet No: ........................................................ Revision: .......................
Element Material ................................. Range ................................. Body Material ................................. Air Supply ................................. Press. Temp. Rating ................................. Signal Range ................................. Enclosure Rating .................................
ACCESSORIES ................................ Y/N * ................................ Y/N * ................................ Y/N * Output Gauge Y/N *
Date: ........................
2. CALIBRATION RECORD Calibrated Range: ……………………….
Input (Rising) Output (Rising) % Error Input (Falling) Output (Falling) % Error 0% ........................ .............. 100% ......................... ............. 25% ........................ .............. 75% ......................... ............. 50% ........................ .............. 50% ......................... ............. 75% ........................ .............. 25% ......................... ............. 100% ........................ .............. 0% ......................... .............
Comments: ................................................................................................................................................ ................................................................................................................................................
Calibration Device: ................................................................ Date: ........................
3. INSTALLATION IN ACCORDANCE WITH SECTION 4B Impulse Lines Size / Material Y/N * Area Classification: ................................. Air Lines Size / Material Y/N * Cable Glands Y/N * Fittings Y/N * Cable Numbers Y/N * Loop Proven DCS / Field Pass Y/N * Wire Numbers Y/N * Pressure Test Pass Y/N * Crimped Connectors Y/N *
Comments: ................................................................................................................................................ ................................................................................................................................................
Date: ........................
CHECKED BY: .................................................................... ....................................... (signature) (date)
The above checks were carried out to our satisfaction Y/N * Refer to attached sheets for defects listing / comments Y/N *
ONESTEEL APPROVALS: ........................................ .............................................. .................................
(signature) (position) (date)
...................................... .............................................. .................................
(signature) (position) (date)
CONTRACTOR: .................................................................. ....................................... (signature) (date)
CUSTOMERS PROJECT CONTROLLER: .................................................................... ................................. (signature) (date)
* Delete where not applicable, if no comment

FIELD INSTALLATION CHECKSHEET
QM37.06/2 - Section 4 - 4G2 22/04/2016 Page 15 of 32
Page 1 of 1
NUCLEAR DENSITY GAUGE SAP PM Order No.
Contractor/Dept: .................................................. Contract No: ................................................... Tag No: .................................................... Manufacturer: ................................................... Plant: .................................................... Model No: ................................................... Area: .................................................... Serial No: ................................................... Tech ID No: .................................................... Loop Description: ................................................
1. INSTRUMENT VISUAL CHECK 1.1 Compliance with Data Sheet No: ........................................................ Revision: .......................
Source Material ................................. Detector Weight ............................ kg Shutter Activation ................................. Power Supply ................................. Weight ................................. Output Meter Y/N * Transmitter Mount ................................. Sample Period ................................. Output ................................. Power Supply .................................
Date: ........................
2. CALIBRATION RECORD
Register Value Register Value Register Value Register Value 0 ................ 7 .................. 14 ................. 21 ................. 1 ................. 8 .................. 15 ................. 22 ................. 2 ................. 9 .................. 16 ................. 23 ................. 3 ................. 10 .................. 17 ................. 24 ................. 4 ................. 11 .................. 18 ................. 5 ................. 12 .................. 19 ................. 6 ................. 13 .................. 20 .................
Comments: ................................................................................................................................................ ................................................................................................................................................
Calibration Device: ................................................................ Date: ........................
3. INSTALLATION IN ACCORDANCE WITH SECTION 4B Pipe Saddle, Head Secure Y/N * Area Classification: ................................. Source Shutter in Store Position Y/N * Cable Glands Y/N * Mounting Correct Y/N * Cable Numbers Y/N * Safety Signs Installed Y/N * Wire Numbers Y/N * Loop Proven DCS / Field Pass Y/N * Crimped Connectors Y/N *
Comments: ................................................................................................................................................ ................................................................................................................................................
Date: ........................
CHECKED BY: .................................................................... ....................................... (signature) (date)
The above checks were carried out to our satisfaction Y/N * Refer to attached sheets for defects listing / comments Y/N *
ONESTEEL APPROVALS: ........................................ .............................................. .................................
(signature) (position) (date)
...................................... .............................................. .................................
(signature) (position) (date)
CONTRACTOR: .................................................................. ....................................... (signature) (date)
CUSTOMERS PROJECT CONTROLLER: .................................................................... ................................. (signature) (date)
* Delete where not applicable, if no comment

FIELD INSTALLATION CHECKSHEET
QM37.06/2 - Section 4 - 4G2 22/04/2016 Page 16 of 32
Page 1 of 1
ORIFICE PLATE SAP PM Order No.
Contractor/Dept: .................................................. Contract No: ................................................... Tag No: .................................................... Manufacturer: ................................................... Plant: .................................................... Model No: ................................................... Area: .................................................... Serial No: ................................................... Tech ID No: .................................................... Loop Description: ................................................
1. INSTRUMENT VISUAL CHECK 1.1 Compliance with Data Sheet No: ........................................................ Revision: .......................
Type Conical / Quarter Circle / Square Edge * Tappings Flanges / D and D-2 / Corner * Pipe ID .......................... mm Orifice Plate Material ................................. Orifice “D” .......................... mm Flange Material ................................. Mounting Retrievable / Carrier Ring / Pipe Flanges * Flange Rating .................................
Date: ........................
2. CALIBRATION RECORD
Comments: ................................................................................................................................................
................................................................................................................................................
Calibration Device: ................................................................ Date: ........................
3. INSTALLATION IN ACCORDANCE WITH SECTION 4B Straight Length Upstream .................................. Straight Length Downstream .................................. Mounting Correct Y/N *
Comments: ................................................................................................................................................
................................................................................................................................................
Date: ........................
CHECKED BY: .................................................................... ....................................... (signature) (date)
The above checks were carried out to our satisfaction Y/N * Refer to attached sheets for defects listing / comments Y/N *
ONESTEEL APPROVALS: ........................................ .............................................. .................................
(signature) (position) (date)
...................................... .............................................. .................................
(signature) (position) (date)
CONTRACTOR: .................................................................. ....................................... (signature) (date)
CUSTOMERS PROJECT CONTROLLER: .................................................................... ................................. (signature) (date)
* Delete where not applicable, if no comment

FIELD INSTALLATION CHECKSHEET
QM37.06/2 - Section 4 - 4G2 22/04/2016 Page 17 of 32
Page 1 of 1
PNEUMATIC PRESSURE TRANSMITTER SAP PM Order No.
Contractor/Dept: .................................................. Contract No: ................................................... Tag No: .................................................... Manufacturer: ................................................... Plant: .................................................... Model No: ................................................... Area: .................................................... Serial No: ................................................... Tech ID No: .................................................... Loop Description: ................................................
1. INSTRUMENT VISUAL CHECK 1.1 Compliance with Data Sheet No: ........................................................ Revision: .......................
Element Material ................................. Range ................................. Body Material ................................. Air Supply ................................. Press. Temp. Rating ................................. Signal Range ................................. Enclosure Rating ................................. Process Connection ................................. Pneumatic Conn. .................................
ACCESSORIES Filter Regulator Y/N * Gauge Y/N * Diaphragm Seal Y/N * Output Gauge Y/N *
Date: ........................
2. CALIBRATION RECORD Calibrated Range: ……………………….
Input (Rising) Output (Rising) % Error Input (Falling) Output (Falling) % Error 0% ........................ .............. 100% ......................... ............. 25% ........................ .............. 75% ......................... ............. 50% ........................ .............. 50% ......................... ............. 75% ........................ .............. 25% ......................... ............. 100% ........................ .............. 0% ......................... .............
Comments: ................................................................................................................................................
................................................................................................................................................
Calibration Device: ................................................................ Date: ........................
3. INSTALLATION IN ACCORDANCE WITH SECTION 4B Impulse Lines Size / Material Y/N * Mounting Correct Y/N * Air Lines Size / Material Y/N * Pressure Test Pass Y/N * Fittings Size / Material Y/N * Equalising Valve Manifold Y/N *
Comments: ................................................................................................................................................
................................................................................................................................................
Date: ........................
CHECKED BY: .................................................................... ....................................... (signature) (date)
The above checks were carried out to our satisfaction Y/N * Refer to attached sheets for defects listing / comments Y/N *
ONESTEEL APPROVALS: ........................................ .............................................. .................................
(signature) (position) (date)
...................................... .............................................. .................................
(signature) (position) (date)
CONTRACTOR: .................................................................. ....................................... (signature) (date)
CUSTOMERS PROJECT CONTROLLER: .................................................................... ................................. (signature) (date)
* Delete where not applicable, if no comment

FIELD INSTALLATION CHECKSHEET
QM37.06/2 - Section 4 - 4G2 22/04/2016 Page 18 of 32
Page 1 of 1
POSITIVE DISPLACEMENT METER SAP PM Order No.
Contractor/Dept: .................................................. Contract No: ................................................... Tag No: .................................................... Manufacturer: ................................................... Plant: .................................................... Model No: ................................................... Area: .................................................... Serial No: ................................................... Tech ID No: .................................................... Loop Description: ................................................
1. INSTRUMENT VISUAL CHECK 1.1 Compliance with Data Sheet No: ........................................................ Revision: .......................
Type Rotary Gear / Birotor / Spiral Rotor * Body Size ................................. Output Single / Dual Pick-up * Body Material ................................. Pre Amplifier Y/N * Rotor Material ................................. Power Supply ................................... Press. Temp. Rating ................................. Signal Output ................................... Enclosure Rating ................................. ‘K’ Factor ................................... Local Totaliser ........................ digits Strainer Y/N * Type Elec / Mech / Reset / Non Reset * Bearings Type ................................. Mesh Size ................................... Temp. Compensator Y/N *
Date: ........................
2. CALIBRATION RECORD Calibrated Range: ……………………….
Input (Rising) Output (Rising) % Error Input (Falling) Output (Falling) % Error 0% ........................ .............. 100% ......................... ............. 25% ........................ .............. 75% ......................... ............. 50% ........................ .............. 50% ......................... ............. 75% ........................ .............. 25% ......................... ............. 100% ........................ .............. 0% ......................... .............
Comments: ................................................................................................................................................ ................................................................................................................................................
Calibration Device: ................................................................ Date: ........................
3. INSTALLATION IN ACCORDANCE WITH SECTION 4B Area Classification: ................................. Mounting Correct Y/N * Cable Glands Y/N * Cable Numbers Y/N * Wire Numbers Y/N * Loop Proven DCS / Field Pass Y/N * Crimped Connectors Y/N *
Comments: ................................................................................................................................................ ................................................................................................................................................
Date: ........................
CHECKED BY: .................................................................... ....................................... (signature) (date)
The above checks were carried out to our satisfaction Y/N * Refer to attached sheets for defects listing / comments Y/N *
ONESTEEL APPROVALS: ........................................ .............................................. .................................
(signature) (position) (date)
...................................... .............................................. .................................
(signature) (position) (date)
CONTRACTOR: .................................................................. ....................................... (signature) (date)
CUSTOMERS PROJECT CONTROLLER: .................................................................... ................................. (signature) (date)
* Delete where not applicable, if no comment

FIELD INSTALLATION CHECKSHEET
QM37.06/2 - Section 4 - 4G2 22/04/2016 Page 19 of 32
Page 1 of 1
PRESSURE GAUGE SAP PM Order No.
Contractor/Dept: .................................................. Contract No: ................................................... Tag No: .................................................... Manufacturer: ................................................... Plant: .................................................... Model No: ................................................... Area: .................................................... Serial No: ................................................... Tech ID No: .................................................... Loop Description: ................................................
1. INSTRUMENT VISUAL CHECK 1.1 Compliance with Data Sheet No: ........................................................ Revision: .......................
Body Material ................................. Window Material ................................. Connection Size ................................. Diaphragm Fitted Y/N * Dial Size ................................. Liquid Filled Y/N * Scale ................................. Element Material .................................
ACCESSORIES Snubber Y/N * Pigtail Y/N *
Date: ........................
2. CALIBRATION RECORD Calibrated Range: ……………………….
Input (Rising) Output (Rising) % Error Input (Falling) Output (Falling) % Error 0% ........................ .............. 100% ......................... ............. 25% ........................ .............. 75% ......................... ............. 50% ........................ .............. 50% ......................... ............. 75% ........................ .............. 25% ......................... ............. 100% ........................ .............. 0% ......................... .............
Comments: ................................................................................................................................................
................................................................................................................................................
Calibration Device: ................................................................ Date: ........................
3. INSTALLATION IN ACCORDANCE WITH SECTION 4B Mounting Correct Y/N * Fittings Size / Material Y/N * Pressure Test Pass Y/N *
Comments: ................................................................................................................................................
................................................................................................................................................
Date: ........................
CHECKED BY: .................................................................... ....................................... (signature) (date)
The above checks were carried out to our satisfaction Y/N * Refer to attached sheets for defects listing / comments Y/N *
ONESTEEL APPROVALS: ........................................ .............................................. .................................
(signature) (position) (date)
...................................... .............................................. .................................
(signature) (position) (date)
CONTRACTOR: .................................................................. ....................................... (signature) (date)
CUSTOMERS PROJECT CONTROLLER: .................................................................... ................................. (signature) (date)
* Delete where not applicable, if no comment

FIELD INSTALLATION CHECKSHEET
QM37.06/2 - Section 4 - 4G2 22/04/2016 Page 20 of 32
Page 1 of 1
PRESSURE SWITCH SAP PM Order No.
Contractor/Dept: .................................................. Contract No: ................................................... Tag No: .................................................... Manufacturer: ................................................... Plant: .................................................... Model No: ................................................... Area: .................................................... Serial No: ................................................... Tech ID No: .................................................... Loop Description: ................................................
1. INSTRUMENT VISUAL CHECK 1.1 Compliance with Data Sheet No: ........................................................ Revision: .......................
Element Type Diaphragm / Bellows / Piston * Switch SPDT / DPDT Element Material ................................. Contact Rating ................................. Press. Temp. Rating ................................. Pneumatic Rating .......................... kPa Enclosure Rating ................................. Process Connection ................................. Pneumatic Conn. ................................. Cable Connection .................................
ACCESSORIES Filter Regulator Y/N * Gauge Y/N * Diaphragm Seal Y/N *
Date: ........................
2. CALIBRATION RECORD Switch Trip Point ................................................ Actuating Pressure Rising ................................................ % Error ....................................... Actuating Pressure Falling ................................................ % Error ....................................... Switch Dead Band ................................................
Comments: ................................................................................................................................................ ................................................................................................................................................
Calibration Device: ................................................................ Date: ........................
3. INSTALLATION IN ACCORDANCE WITH SECTION 4B Impulse Line Size / Material Y/N * Area Classification: ................................. Mounting Correct Y/N * Cable Glands Y/N * Fittings Size / Material Y/N * Cable Numbers Y/N * Loop Proven DCS / Field Pass Y/N * Wire Numbers Y/N * Pressure Test Pass Y/N * Crimped Connectors Y/N *
Comments: ................................................................................................................................................ ................................................................................................................................................
Date: ........................
CHECKED BY: .................................................................... ....................................... (signature) (date)
The above checks were carried out to our satisfaction Y/N * Refer to attached sheets for defects listing / comments Y/N *
ONESTEEL APPROVALS: ........................................ .............................................. .................................
(signature) (position) (date)
...................................... .............................................. .................................
(signature) (position) (date)
CONTRACTOR: .................................................................. ....................................... (signature) (date)
CUSTOMERS PROJECT CONTROLLER: .................................................................... ................................. (signature) (date)
* Delete where not applicable, if no comment

FIELD INSTALLATION CHECKSHEET
QM37.06/2 - Section 4 - 4G2 22/04/2016 Page 21 of 32
Page 1 of 1
SIGNAL CONDITIONER SAP PM Order No.
Contractor/Dept: .................................................. Contract No: ................................................... Tag No: .................................................... Manufacturer: ................................................... Plant: .................................................... Model No: ................................................... Area: .................................................... Serial No: ................................................... Tech ID No: .................................................... Loop Description: ................................................
1. INSTRUMENT VISUAL CHECK 1.1 Compliance with Data Sheet No: ........................................................ Revision: .......................
Type ................................. Input Signal ................................. I/P Converter ................................. Output Signal ................................. P/I Converter ................................. Enclosure Rating ................................. E/I Converter ................................. Cable Connection ................................. Signal Isolator ................................. Power Supply .................................
ACCESSORIES Filter Regulator Y/N * Gauge Input / Output Y/N * Indicator Y/N *
Date: ........................
2. CALIBRATION RECORD Calibrated Range: ……………………….
Input (Rising) Output (Rising) % Error Input (Falling) Output (Falling) % Error 0% ........................ .............. 100% ......................... ............. 25% ........................ .............. 75% ......................... ............. 50% ........................ .............. 50% ......................... ............. 75% ........................ .............. 25% ......................... ............. 100% ........................ .............. 0% ......................... .............
Comments: ................................................................................................................................................ ................................................................................................................................................
Calibration Device: ................................................................ Date: ........................
3. INSTALLATION IN ACCORDANCE WITH SECTION 4B Air Lines Size / Material Y/N * Area Classification: ................................. Fittings Size / Material Y/N * Cable Glands Y/N * Mounting Correct Y/N * Cable Number Y/N * Loop Proven DCS / Field Pass Y/N * Wire Number Y/N * Pressure Test Pass Y/N * Crimped Connectors Y/N *
Comments: ................................................................................................................................................ ................................................................................................................................................
Date: ........................
CHECKED BY: .................................................................... ....................................... (signature) (date)
The above checks were carried out to our satisfaction Y/N * Refer to attached sheets for defects listing / comments Y/N *
ONESTEEL APPROVALS: ........................................ .............................................. .................................
(signature) (position) (date)
...................................... .............................................. .................................
(signature) (position) (date)
CONTRACTOR: .................................................................. ....................................... (signature) (date)
CUSTOMERS PROJECT CONTROLLER: .................................................................... ................................. (signature) (date)
* Delete where not applicable, if no comment

FIELD INSTALLATION CHECKSHEET
QM37.06/2 - Section 4 - 4G2 22/04/2016 Page 22 of 32
Page 1 of 1
SOLENOID / AIR PILOT VALVE SAP PM Order No.
Contractor/Dept: .................................................. Contract No: ................................................... Tag No: .................................................... Manufacturer: ................................................... Plant: .................................................... Model No: ................................................... Area: .................................................... Serial No: ................................................... Tech ID No: .................................................... Loop Description: ................................................
1. INSTRUMENT VISUAL CHECK 1.1 Compliance with Data Sheet No: ........................................................ Revision: .......................
Trim Material ................................. DC / AC Voltage ................................. Body Material ................................. Insulation Class ................................. Port Configuration ................................. Power Consumption ................................. Enclosure Rating ................................. Pneumatic Connection ................................. CV Factor ................................. Cable Connection .................................
ACCESSORIES Filter Regulator Y/N * Gauge Y/N * Manual Reset Y/N *
Date: ........................
2. CALIBRATION RECORD
Comments: ................................................................................................................................................
................................................................................................................................................
Calibration Device: ................................................................ Date: ........................
3. INSTALLATION IN ACCORDANCE WITH SECTION 4B Mounting Correct Y/N * Area Classification: ................................. Air Lines Size / Material Y/N * Cable Glands Y/N * Fittings Size / Material Y/N * Cable Number Y/N * Loop Proven DCS / Field Pass Y/N * Wire Number Y/N * Pressure Test Pass Y/N * Crimped Connectors Y/N *
Comments: ................................................................................................................................................
................................................................................................................................................
Date: ........................
CHECKED BY: .................................................................... ....................................... (signature) (date)
The above checks were carried out to our satisfaction Y/N * Refer to attached sheets for defects listing / comments Y/N *
ONESTEEL APPROVALS: ........................................ .............................................. .................................
(signature) (position) (date)
...................................... .............................................. .................................
(signature) (position) (date)
CONTRACTOR: .................................................................. ....................................... (signature) (date)
CUSTOMERS PROJECT CONTROLLER: .................................................................... ................................. (signature) (date)
* Delete where not applicable, if no comment

FIELD INSTALLATION CHECKSHEET
QM37.06/2 - Section 4 - 4G2 22/04/2016 Page 23 of 32
Page 1 of 1
TEMPERATURE GAUGE SAP PM Order No.
Contractor/Dept: .................................................. Contract No: ................................................... Tag No: .................................................... Manufacturer: ................................................... Plant: .................................................... Model No: ................................................... Area: .................................................... Serial No: ................................................... Tech ID No: .................................................... Loop Description: ................................................
1. INSTRUMENT VISUAL CHECK 1.1 Compliance with Data Sheet No: ........................................................ Revision: .......................
Element Material ................................. Thermowell Material ................................. RTD Pt 100 ohm Y/N * Element Sheath ................................. Other Y/N * Size ................................. Dial Size ................................. Thermowell Dim. U ............. T .............. Scale .................................
Date: ........................
2. CALIBRATION RECORD Calibrated Range: ……………………….
Input (Rising) Output (Rising) % Error Input (Falling) Output (Falling) % Error 0% ........................ .............. 100% ......................... ............. 25% ........................ .............. 75% ......................... ............. 50% ........................ .............. 50% ......................... ............. 75% ........................ .............. 25% ......................... ............. 100% ........................ .............. 0% ......................... .............
Comments: ................................................................................................................................................ ................................................................................................................................................
Calibration Device: ................................................................ Date: ........................
3. INSTALLATION IN ACCORDANCE WITH SECTION 4B Mounting Correct Y/N * Pressure Test Pass Y/N *
Comments: ................................................................................................................................................ ................................................................................................................................................
Date: ........................
CHECKED BY: .................................................................... ....................................... (signature) (date)
The above checks were carried out to our satisfaction Y/N * Refer to attached sheets for defects listing / comments Y/N *
ONESTEEL APPROVALS: ........................................ .............................................. .................................
(signature) (position) (date)
...................................... .............................................. .................................
(signature) (position) (date)
CONTRACTOR: .................................................................. ....................................... (signature) (date)
CUSTOMERS PROJECT CONTROLLER: .................................................................... ................................. (signature) (date)
* Delete where not applicable, if no comment

FIELD INSTALLATION CHECKSHEET
QM37.06/2 - Section 4 - 4G2 22/04/2016 Page 24 of 32
Page 1 of 1
TEMPERATURE SWITCH SAP PM Order No.
Contractor/Dept: .................................................. Contract No: ................................................... Tag No: .................................................... Manufacturer: ................................................... Plant: .................................................... Model No: ................................................... Area: .................................................... Serial No: ................................................... Tech ID No: .................................................... Loop Description: ................................................
1. INSTRUMENT VISUAL CHECK 1.1 Compliance with Data Sheet No: ........................................................ Revision: .......................
Element Type ................................. T/C Type E / J / K / N / R / T * RTD Pt 100 ohm Y/N * Thermowell Material ................................. RTD Ni Y/N * ......................... Dimensions U .............. T .............. Material ................................. Connection Size ................................. Switch Form SPDT / DPDT * Device Connection ................................. Contact Rating ................................. Enclosure Rating ................................. Cable Connection .................................
Date: ........................
2. CALIBRATION RECORD Switch Trip Point ................................................ Actuating Temperature Rising .............................................. % Error ....................................... Actuating Temperature Falling ............................................. % Error ....................................... Switch Dead Band ................................................
Comments: ................................................................................................................................................ ................................................................................................................................................
Date: ........................
3. INSTALLATION IN ACCORDANCE WITH SECTION 4B Area Classification: ................................. Mounting Correct Y/N * Cable Glands Y/N * Y/N * Cable Numbers Y/N * Loop Proven DCS / Field Pass Y/N * Wire Number Y/N * Crimped Connectors Y/N *
Comments: ................................................................................................................................................ ................................................................................................................................................
Calibration Device: ................................................................ Date: ........................
CHECKED BY: .................................................................... ....................................... (signature) (date)
The above checks were carried out to our satisfaction Y/N * Refer to attached sheets for defects listing / comments Y/N *
ONESTEEL APPROVALS: ........................................ .............................................. .................................
(signature) (position) (date)
...................................... .............................................. .................................
(signature) (position) (date)
CONTRACTOR: .................................................................. ....................................... (signature) (date)
CUSTOMERS PROJECT CONTROLLER: .................................................................... ................................. (signature) (date)
* Delete where not applicable, if no comment

FIELD INSTALLATION CHECKSHEET
QM37.06/2 - Section 4 - 4G2 22/04/2016 Page 25 of 32
Page 1 of 1
TURBINE METER SAP PM Order No.
Contractor/Dept: .................................................. Contract No: ................................................... Tag No: .................................................... Manufacturer: ................................................... Plant: .................................................... Model No: ................................................... Area: .................................................... Serial No: ................................................... Tech ID No: .................................................... Loop Description: ................................................
1. INSTRUMENT VISUAL CHECK 1.1 Compliance with Data Sheet No: ........................................................ Revision: .......................
Body Size ................................. Output Single / Dual Pick-up * Body Material ................................. Pre Amplifier Y/N * Rotor Material ................................. Power Supply ................................. Press. Temp. Rating ................................. Signal Output ................................. Enclosure Rating ................................. ‘K’ Factor ................................. Local Totaliser ........................ digits Strainer Y/N * Type Elec / Mech / Reset / Non Reset * Bearing Type ................................. Mesh Size .................................
Date: ........................
2. CALIBRATION RECORD Calibrated Range: ……………………….
Input (Rising) Output (Rising) % Error Input (Falling) Output (Falling) % Error 0% ........................ .............. 100% ......................... ............. 25% ........................ .............. 75% ......................... ............. 50% ........................ .............. 50% ......................... ............. 75% ........................ .............. 25% ......................... ............. 100% ........................ .............. 0% ......................... .............
Comments: ................................................................................................................................................ ................................................................................................................................................
Calibration Device: ................................................................ Date: ........................
3. INSTALLATION IN ACCORDANCE WITH SECTION 4B Area Classification: ................................. Mounting Correct Y/N * Cable Glands Y/N * Cable Numbers Y/N * Wire Number Y/N * Loop Proven DCS / Field Pass Y/N * Crimped Connectors Y/N *
Comments: ................................................................................................................................................ ................................................................................................................................................
Date: ........................
CHECKED BY: .................................................................... ....................................... (signature) (date)
The above checks were carried out to our satisfaction Y/N * Refer to attached sheets for defects listing / comments Y/N *
ONESTEEL APPROVALS: ........................................ .............................................. .................................
(signature) (position) (date)
...................................... .............................................. .................................
(signature) (position) (date)
CONTRACTOR: .................................................................. ....................................... (signature) (date)
CUSTOMERS PROJECT CONTROLLER: .................................................................... ................................. (signature) (date)
* Delete where not applicable, if no comment

FIELD INSTALLATION CHECKSHEET
QM37.06/2 - Section 4 - 4G2 22/04/2016 Page 26 of 32
Page 1 of 1
ULTRASONIC LEVEL TRANSMITTER SAP PM Order No.
Contractor/Dept: .................................................. Contract No: ................................................... Tag No: .................................................... Manufacturer: ................................................... Plant: .................................................... Model No: ................................................... Area: .................................................... Serial No: ................................................... Tech ID No: .................................................... Loop Description: ................................................
1. INSTRUMENT VISUAL CHECK 1.1 Compliance with Data Sheet No: ........................................................ Revision: .......................
Transducer ................................. Transmitter ................................. Mounting ................................. Mounting ................................. Housing Material ................................. Enclosure Rating ................................. Range ................................. Power Supply ................................. Cable Length ................................. Output ................................. Indicator Scale .................................
Date: ........................
2. CALIBRATION RECORD Calibrated Range: ……………………….
Input (Rising) Output (Rising) % Error Input (Falling) Output (Falling) % Error 0% ........................ .............. 100% ......................... ............. 25% ........................ .............. 75% ......................... ............. 50% ........................ .............. 50% ......................... ............. 75% ........................ .............. 25% ......................... ............. 100% ........................ .............. 0% ......................... .............
Comments: ................................................................................................................................................ ................................................................................................................................................
Calibration Device: ................................................................ Date: ........................
3. INSTALLATION IN ACCORDANCE WITH SECTION 4B Transducer Mounting (Clear View) Y/N * Area Classification: .............................. Transmitter Mounting (shaded) Y/N * Cable Glands Y/N * Y/N * Cable Numbers Y/N * Loop Proven DCS / Field Pass Y/N * Wire Numbers Y/N * Y/N * Crimped Connectors Y/N *
Comments: ................................................................................................................................................ ................................................................................................................................................
Date: ........................
CHECKED BY: .................................................................... ....................................... (signature) (date)
The above checks were carried out to our satisfaction Y/N * Refer to attached sheets for defects listing / comments Y/N *
ONESTEEL APPROVALS: ........................................ .............................................. .................................
(signature) (position) (date)
...................................... .............................................. .................................
(signature) (position) (date)
CONTRACTOR: .................................................................. ....................................... (signature) (date)
CUSTOMERS PROJECT CONTROLLER: .................................................................... ................................. (signature) (date)
* Delete where not applicable, if no comment

FIELD INSTALLATION CHECKSHEET
QM37.06/2 - Section 4 - 4G2 22/04/2016 Page 27 of 32
Page 1 of 1
VORTEX FLOW METER SAP PM Order No.
Contractor/Dept: .................................................. Contract No: ................................................... Tag No: .................................................... Manufacturer: ................................................... Plant: .................................................... Model No: ................................................... Area: .................................................... Serial No: ................................................... Tech ID No: .................................................... Loop Description: ................................................
1. INSTRUMENT VISUAL CHECK 1.1 Compliance with Data Sheet No: ........................................................ Revision: .......................
Body Material ................................. Mounting Flange / Wafer * Shedder Material ................................. Power Supply ................................. Sensor Material ................................. Output ................................. Press. Temp. Rating ................................. Output Meter Y/N * Enclosure Rating .................................
Date: ........................
2. CALIBRATION RECORD Calibrated Range: ……………………….
Input (Rising) Output (Rising) % Error Input (Falling) Output (Falling) % Error 0% ........................ .............. 100% ......................... ............. 25% ........................ .............. 75% ......................... ............. 50% ........................ .............. 50% ......................... ............. 75% ........................ .............. 25% ......................... ............. 100% ........................ .............. 0% ......................... .............
Comments: ................................................................................................................................................ ................................................................................................................................................
Calibration Device: ................................................................ Date: ........................
3. INSTALLATION IN ACCORDANCE WITH SECTION 4B Area Classification: ................................. Cable Glands Y/N * Cable Numbers Y/N * Mounting Correct Y/N * Wire Numbers Y/N * Loop Proven DCS / Field Pass Y/N * Crimped Connectors Y/N *
Comments: ................................................................................................................................................ ................................................................................................................................................
Calibration Device: ................................................................ Date: ........................
CHECKED BY: .................................................................... ....................................... (signature) (date)
The above checks were carried out to our satisfaction Y/N * Refer to attached sheets for defects listing / comments Y/N *
ONESTEEL APPROVALS: ........................................ .............................................. .................................
(signature) (position) (date)
...................................... .............................................. .................................
(signature) (position) (date)
CONTRACTOR: .................................................................. ....................................... (signature) (date)
CUSTOMERS PROJECT CONTROLLER: .................................................................... ................................. (signature) (date)
* Delete where not applicable, if no comment

FIELD INSTALLATION CHECKSHEET
QM37.06/2 - Section 4 - 4G2 22/04/2016 Page 28 of 32
Page 1 of 1
INSTRUMENT LOOP TEST SAP PM Order No.
Contractor/Dept: .................................................. Contract No: ................................................... Tag No: .................................................... Manufacturer: ................................................... Plant: .................................................... Model No: ................................................... Area: .................................................... Serial No: ................................................... Tech ID No: .................................................... Loop Description: ................................................
LOOP NUMBER: ....................................................................................................................................................
Referenced FIC sheets APPLY ONLY to Instruments in this loop.
Item No. Detail Refer FIC Tag Number Remarks
1 Impulse Tube ............................... ................................ .........................................
2 Signal Tube ............................... ................................ .........................................
3 Transmitter ............................... ................................ .........................................
4 Transducer ............................... ................................ .........................................
5 Field Switch ............................... ................................ .........................................
6 Controller ............................... ................................ .........................................
7 Indicator ............................... ................................ .........................................
8 Recorder ............................... ................................ .........................................
9 Control Valve ............................... ................................ .........................................
10 Solenoid Valve ............................... ................................ .........................................
11 Isolation Valve ............................... ................................ .........................................
Comments: ................................................................................................................................................
................................................................................................................................................
................................................................................................................................................
................................................................................................................................................
Date: ........................
CHECKED BY: .................................................................... ....................................... (signature) (date)
The above checks were carried out to our satisfaction Y/N * Refer to attached sheets for defects listing / comments Y/N *
ONESTEEL APPROVALS: ........................................ .............................................. .................................
(signature) (position) (date)
...................................... .............................................. .................................
(signature) (position) (date)
CONTRACTOR: .................................................................. ....................................... (signature) (date)
CUSTOMERS PROJECT CONTROLLER: .................................................................... ................................. (signature) (date)
* Delete where not applicable, if no comment

FIELD INSTALLATION CHECKSHEET
QM37.06/2 - Section 4 - 4G2 22/04/2016 Page 29 of 32
Page 1 of 1
INSTRUMENT DEFECT SAP PM Order No.
Contractor/Dept: .................................................. Contract No: ................................................... Tag No: .................................................... Manufacturer: ................................................... Plant: .................................................... Model No: ................................................... Area: .................................................... Serial No: ................................................... Tech ID No: .................................................... Loop Description: ................................................
DEFECT LIST ACTION TO BE TAKEN BY WHOM
.................................................................. .................................................................. ...................................
.................................................................. .................................................................. ...................................
.................................................................. .................................................................. ...................................
.................................................................. .................................................................. ...................................
.................................................................. .................................................................. ...................................
.................................................................. .................................................................. ...................................
.................................................................. .................................................................. ...................................
.................................................................. .................................................................. ...................................
.................................................................. .................................................................. ...................................
.................................................................. .................................................................. ...................................
.................................................................. .................................................................. ...................................
.................................................................. .................................................................. ...................................
.................................................................. .................................................................. ...................................
.................................................................. .................................................................. ...................................
.................................................................. .................................................................. ...................................
.................................................................. .................................................................. ...................................
.................................................................. .................................................................. ...................................
.................................................................. .................................................................. ...................................
.................................................................. .................................................................. ...................................
.................................................................. .................................................................. ...................................
.................................................................. .................................................................. ...................................
.................................................................. .................................................................. ...................................
.................................................................. .................................................................. ...................................
.................................................................. .................................................................. ...................................
.................................................................. .................................................................. ...................................
.................................................................. .................................................................. ...................................
.................................................................. .................................................................. ...................................
COMMENTS ..........................................................................................................................................................
................................................................................................................................................................................
................................................................................................................................................................................
................................................................................................................................................................................
................................................................................................................................................................................
................................................................................................................................................................................

FIELD INSTALLATION CHECKSHEET
QM37.06/2 - Section 4 - 4G2 22/04/2016 Page 30 of 32
Page 1 of 1
SINGLE GAS MONITOR CALIBRATION REPORT SAP PM Order No.
Contractor/Dept: .................................................. Contract No: ................................................... Tag No: .................................................... Manufacturer: ................................................... Plant: .................................................... Model No: ................................................... Area: .................................................... Serial No: ................................................... Tech ID No: .................................................... Loop Description: ................................................
CALIBRATION REPORT FOR SINGLE GAS MONITORS
TECH ID NUMBER ........................................................................... DATE CALIBRATED ........................
TOXIC GAS (1) INITIAL FINAL
Bottle No. ....................................... Zero ................................ Zero ...............................
Gas Value ....................................... Span ................................ Span ...............................
T30 Calculated ……………………… Alarm 1 ................................ Alarm 1 ...............................
T30 Actual …………….……………….. Alarm 2 ................................ Alarm 2 ...............................
T30 Actual = Value at 30 seconds after step change of Span Gas Value applied. T30 Calculated = 90% of Span Gas Value. (Prior to test, span set to 100% of Span Gas Value).
CALIBRATED BY ...................................................................................................................................................
COMMENTS ..........................................................................................................................................................
................................................................................................................................................................................
................................................................................................................................................................................

FIELD INSTALLATION CHECKSHEET
QM37.06/2 - Section 4 - 4G2 22/04/2016 Page 31 of 32
Page 1 of 1
MULTI GAS MONITOR CALIBRATION REPORT SAP PM Order No.
Contractor/Dept: .................................................. Contract No: ................................................... Tag No: .................................................... Manufacturer: ................................................... Plant: .................................................... Model No: ................................................... Area: .................................................... Serial No: ................................................... Tech ID No: .................................................... Loop Description: ................................................
CALIBRATION REPORT FOR MULTI GAS MONITORS
TECH ID NUMBER ........................................................................... DATE CALIBRATED ........................
TOXIC GAS (1) INITIAL FINAL
Bottle No. ....................................... Zero ................................ Zero ...............................
Gas Value ....................................... Span ................................ Span ...............................
T30 Calculated ……………………… Alarm 1 ................................ Alarm 1 ...............................
T30 Actual …………….……………….. Alarm 2 ................................ Alarm 2 ...............................
TOXIC GAS (2) INITIAL FINAL
Bottle No. ....................................... Zero ................................ Zero ...............................
Gas Value ....................................... Span ................................ Span ...............................
T30 Calculated ……………………… Alarm 1 ................................ Alarm 1 ...............................
T30 Actual …………….……………….. Alarm 2 ................................ Alarm 2 ...............................
EXPLOSIVE GAS INITIAL FINAL
Bottle No. ....................................... Zero ................................ Zero ...............................
Gas Value ....................................... Span ................................ Span ...............................
T30 Calculated ……………………… Alarm 1 ................................ Alarm 1 ...............................
T30 Actual …………….……………….. Alarm 2 ................................ Alarm 2 ...............................
OXYGEN % INITIAL FINAL
Bottle No. 1 ....................................... Bottle 1 ................................ Bottle 1 ...............................
Gas Value 1 ....................................... Bottle 2 ................................ Bottle 2 ...............................
Bottle No. 2 ....................................... Bottle 3 ................................ Bottle 3 ...............................
Gas Value 2 ……………………… Airset ................................ Airset ……………………… Alarm 1 Alarm 1
Bottle No. 3 ……………………… Alarm 1 ................................ Alarm 1………………………
Gas Value 3 ……………………… Alarm 2 ................................ Alarm 2………………………
T30 Calculated ……………………… T30 Actual …………….………………
T30 Actual = Value at 30 seconds after step change of Span Gas Value applied. T30 Calculated = 90% of Span Gas Value. (Prior to test, span set to 100% of Span Gas Value).
CALIBRATED BY ...................................................................................................................................................
COMMENTS ..........................................................................................................................................................
................................................................................................................................................................................

FIELD INSTALLATION CHECKSHEET
QM37.06/2 - Section 4 - 4G2 22/04/2016 Page 32 of 32
Page 1 of 1
OXYGEN GAS MONITOR CALIBRATION REPORT SAP PM Order No.
Contractor/Dept: .................................................. Contract No: ................................................... Tag No: .................................................... Manufacturer: ................................................... Plant: .................................................... Model No: ................................................... Area: .................................................... Serial No: ................................................... Tech ID No: .................................................... Loop Description: ................................................
CALIBRATION REPORT FOR OXYGEN GAS MONITORS
LOCATION ........................................................................................
COMMENTS
OXYGEN % INITIAL FINAL
Bottle No. 1 ....................................... Bottle 1 ................................ Bottle 1 ...............................
Gas Value 1 ....................................... Bottle 2 ................................ Bottle 2 ...............................
Bottle No. 2 ....................................... Bottle 3 ................................ Bottle 3 ...............................
Gas Value 2 ……………………… Airset ................................ Airset ……………………… Alarm 1 Alarm 1
Bottle No. 3 ……………………… Alarm 1 ................................ Alarm 1………………………
Gas Value 3 ……………………… Alarm 2 ................................ Alarm 2………………………
T30 Calculated ……………………… T30 Actual …………….………………
Calibrated by: ………………………………………. Date Calibrated …./…/… Next Calibration Due …/…/… (Month / year ONLY)
T30 Actual = Value at 30 seconds after step change of Span Gas Value applied. T30 Calculated = 90% of Span Gas Value. (Prior to test, span set to 100% of Span Gas Value).
PARTS USED: .......................................................................................................................................................
................................................................................................................................................................................
..................................................................................................................................................................................................

QM37.06 Exemption form
QM37.06/3 - Section 4 - 4G3 22/04/2016 Page 1 of 1
Name / Contractor or OneSteel Whyalla Department : Contact Number :
(Phone or Fax)
Exemption from clause (s):
For Installation: (Job / Location):
Reasons fro Exemption : (Attach sketch or drawing if applicable):
OneSteel Whyalla References : (Drawings, Sketches or Documents):
Approved Approved with Conditions Not Approved
Notes: Conditions for Approval or reasons for Refusal etc.
EIC & Reliability
Managers Signature
Date

INSTRUMENTATION
PRACTICES
QM37.06 Section 5
Revision 1
ENGINEERING
Any PRINTED copies of this procedure are UNCONTROLLED Page: 1 of 1
5. Burner Management - YET TO BE WRITTEN

INSTRUMENTATION
PRACTICES
QM37.06 Section 6 Revision 2
ENGINEERING
Any PRINTED copies of this procedure are UNCONTROLLED Page: 1 of 1
PREFERRED MANUFACTURERS Central Engineering EIC Systems group are to be involved in the tender process for the selection of instrumentation. This ensures spares, compatibility, inventory, internal & external technical support issues are taken into consideration prior to selection.
NOTE: Instruments to be HART compatible where possible.
ABB Barksdale Cidra Combustion Engineering Ltd. Durag Effector Emerson Endress + Hauser Fisher Flowserv (formally Valtek) GEFRAN Honeywell Hydac Kent Keystone Land Mann Milltronics Moore MTL OneTemp Ramsey Siemens Sistec SMC Square D Temperature Controls Toledo UE Vega Webtech Worcester Yokogawa
Gas Monitors: Personal Single Gas Monitors: Drager Single Gas Wall Mounted / Fixed: Drager Personal Multi Gas Monitor: Drager Multi Gas Monitor: Drager

INSTRUMENTATION
PRACTICES
QM37.06 Section 7
Revision 3
ENGINEERING
Any PRINTED copies of this procedure are UNCONTROLLED Page: 1 of 1
GAS WATER
ACID
OIL MISC
BLAST FURNACE
COKE OVENS
NITROGEN
OXYGEN
L.P.G.
CHLORINE
AMMONIA
ARGON
CARBON DIOXIDE
FIRE WATER
FIRE FOAM
FRESH
CIRCULATING
SALT
DEMINERALISED
STEAM
SULPHURIC
HYDROCHLORIC
CAUSTIC SODA
COMPRESSED AIR
ELECTRICAL
FUEL
HYDRAULIC
LUBRICATING
SAND RED OXIDE
SAND
GOLDEN TAN
GOLDEN TAN
SAND
SAND
SAND
SAND
SAND
SAND
SAND
LILAC
LILAC
SILVER GRAY
JADE GREEN
JADE GREEN
JADE GREEN
SIGNAL REDGOLDEN YELLOW RED OXIDE
WHITE GREEN GRAY
GOLDEN YELLOW BLACK
GREEN GRAY SIGNAL RED WHITE
GOLDEN YELLOW EXAMPLE
SIGNAL RED GREEN GRAY
BLUEBELL GREEN GRAY
DEEP STONE GREEN GRAY
GOLDEN TAN BLACK
LETTICE SALMON PINK
GOLDEN YELLOW
CRIMSON RED SHAMROCK
CLARET RED ORANGE
LILAC RICH BLUE ORANGE
AQUA WHITE WHITE VIOLET
ORANGE
CLARET RED
WHITE COOTAMUNDRA
LETTICE
JADE GREEN NUT BROWN COOTAMUNDRA
COOTAMUNDRA
SAPPHIRE BLUE
SIGNAL RED
Y44
Y44
Y44
Y44
Y44
Y44
Y44
Y44
Y44
R63
R63Y14
N32
Y14
N32 R13
N32Y14
R13 N32
N32B41
N32Y55
Z53
Z53
Z53
G33 R42
Y14
R13
R13 B14
G21
G21
G21
T45
G21 T45X55
G33
T45
N24 R55
P23
P23
P23
X15
X15
B11
R55
R15 G23
B25 P13
X15
For more details relating to Pipework Colour Coding refer: Sketch S9218 available in the Engineering Drawing System
REFER FORM37.169

INSTRUMENTATION
PRACTICES
QM37.06 Section 8
Revision 1
ENGINEERING
Any PRINTED copies of this procedure are UNCONTROLLED Page: 1 of 2
Drawing Number
Drawing Title
150401 Instrumentation standards Oxygen & ph Flow assemblies Instrument installation details
150402 Instrumentation standards Knife gate valve position instrument installation details
150403 Instrumentation standards Locally mounted switch instrument installation standard
150404 Instrumentation standards Sonar flow meter instrument installation standard
150405 Instrumentation standards Free floating level switch instrument installation standard
150406 Instrumentation standards Speed sensor instrument installation standard
150407 Instrumentation standards Vibration Velocity sensor instrument installation standard
150413 Installation Details, Cable ladder supports - welded type
150414 Installation Details, Cable ladder supports - clamped type
150415 Installation Details, cabling galvanised water pipe (GWP) - welded type
150416 Installation Details, cabling galvanised water pipe (GWP) - clamped type
150417 Installation Details, Underground cabling
150418 Installation Details, Column mounted equipment - welded type
150419 Installation Details, Column mounted equipment - clamped type
150420 Installation Details, Distribution board & control panels mounting brackets
150421 Installation Details, Distribution board & control panel walkway mounting brackets - welded type
150422 Installation Details, Distribution board & control panel walkway mounting brackets - bolted type
150423 Installation Details, Conveyor trip wire
150244 Equipment labels, Typical arrangement & details
150245 Equipment labels, Typical arrangement & details
150426 Instrument support details, instrument stand - welded type
150427 Instrument support details, instrument stand - clamped type
150428 Instrument standards Protection Covers, General arrangement
150429 Instrument support details, instrument stand - single
150430 Instrument support details, instrument stand - double
150431 Instrument standards, Diff. Press measurement s flow - clean liquids. Instrument below tap, Instrument Installation detail
150432 Instrument standards, Diff. Press measurement s flow - steam/condensing vapour (Instrument below tap), Instrument Installation detail
150433 Instrument standards, Diff. Press measurement s flow - dry air/gas (Instrument below tap), Instrument Installation detail
150434 Instrument standards, Diff. Press measurement s flow - dry air/gas (Instrument above tap), Instrument Installation detail
150435 Instrument standards, Diff. Press measurement s flow averaging pitot tube - gas & liquids, Instrument Installation detail
150436 Instrumentation standards, Magnetic low meter (remote), Instrument Installation detail
150437 Instrumentation standards, Flow meter - Thermal dispersion, Instrument Installation detail
150438 Instrumentation standards, Flow switch - Thermal dispersion, Instrument Installation detail
150439 Instrumentation standards, Flow meter - Vortex, Instrument Installation detail
150440 Instrument standards, Diff. Press transmitter, slurries and aggressive fluids, Instrument Installation detail
150441 Instrumentation standards, Pressure transmitter - clean liquids, Instrument Installation detail
150442 Instrumentation standards, Differential Pressure transmitter - clean liquids, Instrument Installation detail
150443 Instrumentation standards, Differential Pressure indicator - clean liquids, Instrument Installation detail
150444 Instrumentation standards, Pressure gauge - direct mount - with bleed instrument detail
150445 Instrumentation standards, Pressure gauge - direct mount - no bleed instrument detail
150446 Instrumentation standards, Pressure gauge - diaphragm seal instrument installation detail
150447 Instrumentation standards, Pressure gauge - steam or hot vapour instrument installation detail

INSTRUMENTATION
PRACTICES
QM37.06 Section 8
Revision 1
ENGINEERING
Any PRINTED copies of this procedure are UNCONTROLLED Page: 2 of 2
150448 Instrumentation standards, Pressure transmitter - toxic high temperature instrument installation detail
150449 Instrumentation standards, Pressure transmitter - slurries and aggressive fluids instrument installation detail
150450 Instrumentation standards, Pressure transmitter - direct mounted instrument installation detail
150451 Instrumentation standards, Pressure transmitter - steam or hot vapour instrument installation detail
150452 Instrumentation standards, Flow transmitter - close coupled instrument installation detail
150453 Instrumentation standards, Level transmitter/switch - clean liquids instrument installation detail
150454 Instrumentation standards, Level gauge - clean liquids direct mount instrument installation detail
150455 Instrumentation standards, Differential pressure transmitter pressurised tank instrument installation details
150456 Instrumentation standards Level transmitter/switch clean liquids Bubble tube (open tank) instrument installation details
150457 Instrumentation standards Ultrasonic level detector (remote) instrument installation details
150458 Instrumentation standards Nucleonic level detector instrument installation details
150459 Instrumentation standards Bubble level detector instrument installation details
150460 Instrumentation standards Ultrasonic level detector (remote) instrument installation details
150461 Instrumentation standards Level transmitter - Flanged-Non-Pressurised tank instrument installation details
150462 Instrumentation standards - Level - toxic/high temperature diff press transmitter (pressurised tank) instrument installation details
150463 Instrumentation standards Local pneumatic control instrument installation details
150464 Instrumentation standards Inst air supply & cable to actuated on/off & control valves instrument installation details
150465 Instrumentation standards Thermowells instrument installation details
150466 Instrumentation standards Temperature transmitter & indicator instrument installation details
150467 Instrumentation standards Nucleonic density detector indicator instrument installation details
150468 Instrumentation standards In line torroidal conductivity sensor instrument installation details
150469 Instrumentation standards Sample take-off (conductivity) instrument installation details
150470 Instrumentation standards Instrument air sub header instrument installation details
150471 Electrical Standards Cable ladder installation details
150472 Electrical Standards Earthing installation details
150473 Electrical Standards Cable Finishing installation details
150474 Electrical Standards Underground Cabling installation details