Implementing “Find Articles”: A low-altitude view of metasearching

peoplefluent
APPLICANT TRACKING SYSTEM
MANAGE APPLICANTS FIND AND VIEW A REQUISITION The ATS Home Screen shows a list of your requisitions in the workflow pane on the left.
This screen shot shows all Open requisitions. Use the drop-down menu to choose a different set of requisitions to display, or to perform a “Quick Find” search for a particular requisition.
Notice the folder icon to the left of the job title. The folder color indicates its status: green for Open, blue for Filled, purple for Pending, orange for Cancelled, grey for On Hold. The orange paper behind the folder indicates that there has been recent activity. The blue pushpin indicates that it is currently posted to the jobs site. The numbers in parentheses indicate the total number of applicants associated with the job (blue) and how many have had new activity in the last 24 hours (green).
Click on a job title to view the requisition information.
Note that Job Title will always show in the Workflow Pane, whereas the Posting Title (which may be different) is what job applicants see.
peoplefluent APPLICANT TRACKING SYSTEM
MANAGE APPLICANTS
Copyright © 2013 by Massachusetts Institute of Technology. All Rights Reserved Page 2
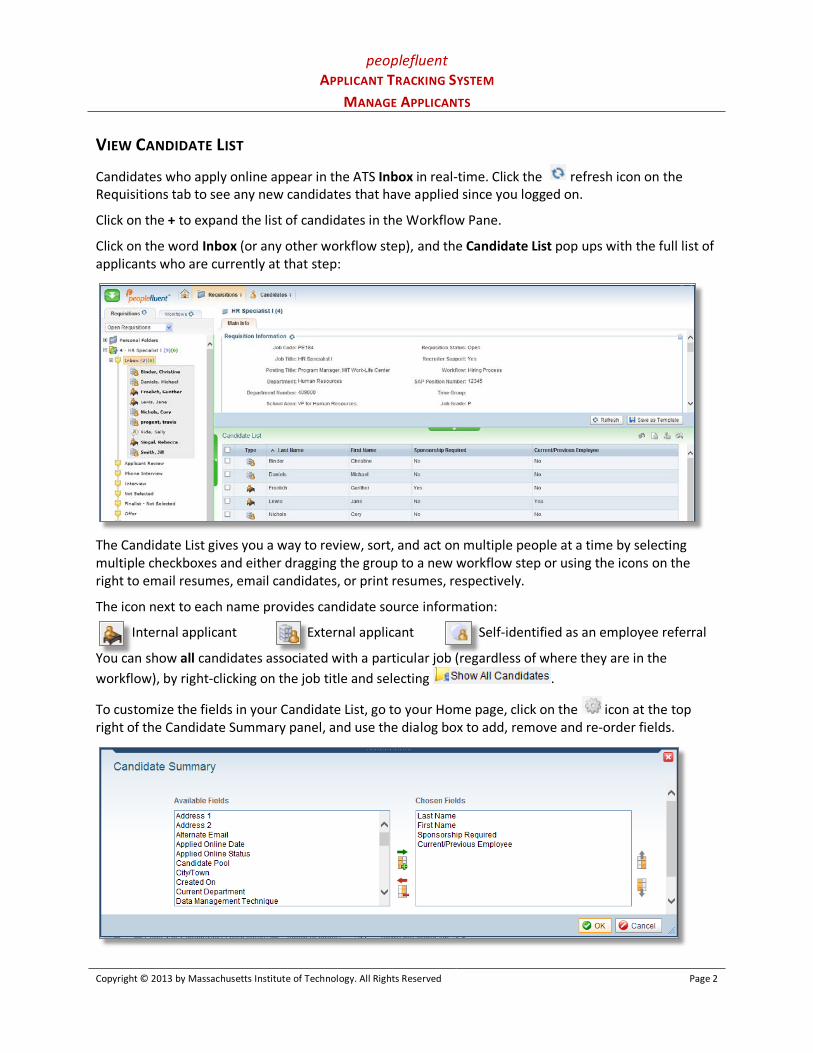
VIEW CANDIDATE LIST
Candidates who apply online appear in the ATS Inbox in real-time. Click the refresh icon on the Requisitions tab to see any new candidates that have applied since you logged on.
Click on the + to expand the list of candidates in the Workflow Pane.
Click on the word Inbox (or any other workflow step), and the Candidate List pop ups with the full list of applicants who are currently at that step:
The Candidate List gives you a way to review, sort, and act on multiple people at a time by selecting multiple checkboxes and either dragging the group to a new workflow step or using the icons on the right to email resumes, email candidates, or print resumes, respectively.
The icon next to each name provides candidate source information:
Internal applicant External applicant Self-identified as an employee referral
You can show all candidates associated with a particular job (regardless of where they are in the workflow), by right-clicking on the job title and selecting .
To customize the fields in your Candidate List, go to your Home page, click on the icon at the top right of the Candidate Summary panel, and use the dialog box to add, remove and re-order fields.

peoplefluent APPLICANT TRACKING SYSTEM
MANAGE APPLICANTS
Copyright © 2013 by Massachusetts Institute of Technology. All Rights Reserved Page 3
VIEW CANDIDATE DETAILS Click on a candidate’s name to view the details of their application. Each tab contains different data.
The Resume Tab shows an html version of the resume; it’s usually close but not always identical to the document that the candidate submitted. To open or download the original resume in Word, click the icon to the right of the word Resume.
The Candidate Info tab shows current contact information and work eligibility status. (The system does NOT automatically reject people without work authorization, so these fields are important to check.)
peoplefluent APPLICANT TRACKING SYSTEM
MANAGE APPLICANTS
Copyright © 2013 by Massachusetts Institute of Technology. All Rights Reserved Page 4
MOVE CANDIDATES THROUGH THE WORKFLOW The workflow pane allows you to easily see and update where each candidate is in the hiring process. Each step is associated with a particular set of activities, as outlined below.
Note: If you are getting recruiter support, you won’t need to look at applicants until a subset of them has been pre-screened and moved to the Applicant Review, Phone Interview, or Interview step (whichever one you and the recruiter have agreed on). Otherwise, you will start moving applicants right from the Inbox.
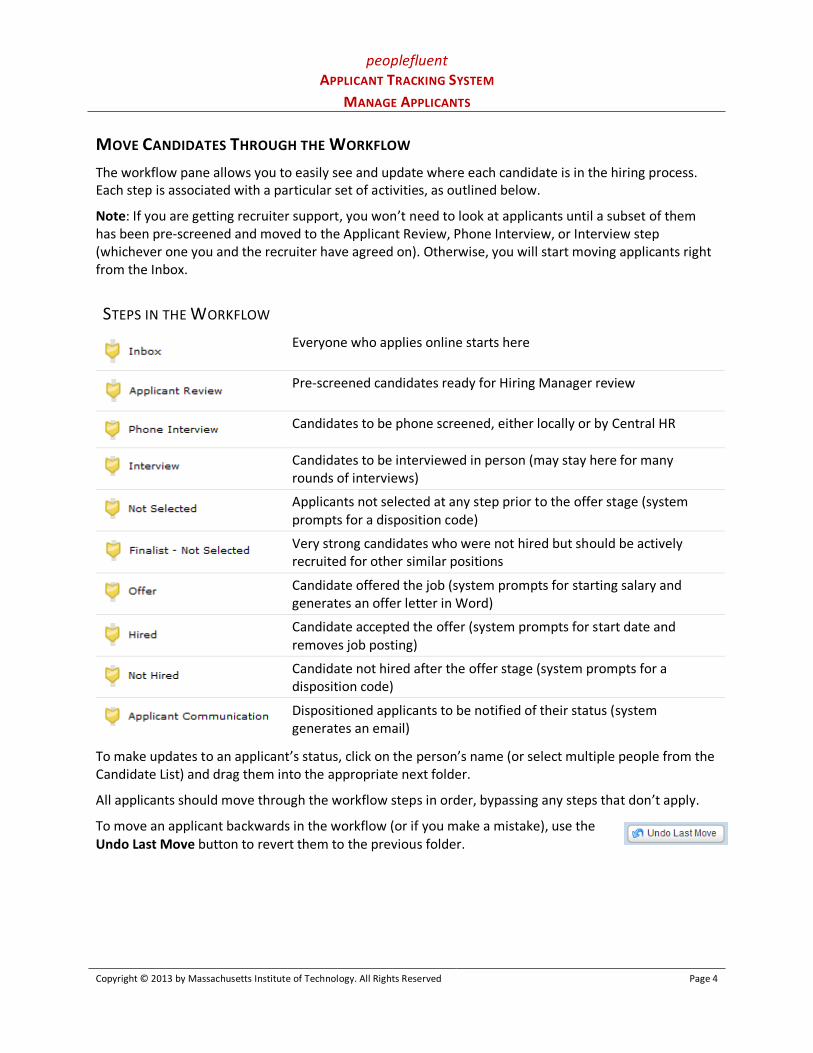
STEPS IN THE WORKFLOW
Everyone who applies online starts here
Pre-screened candidates ready for Hiring Manager review
Candidates to be phone screened, either locally or by Central HR
Candidates to be interviewed in person (may stay here for many rounds of interviews)
Applicants not selected at any step prior to the offer stage (system prompts for a disposition code)
Very strong candidates who were not hired but should be actively recruited for other similar positions
Candidate offered the job (system prompts for starting salary and generates an offer letter in Word)
Candidate accepted the offer (system prompts for start date and removes job posting)
Candidate not hired after the offer stage (system prompts for a disposition code)
Dispositioned applicants to be notified of their status (system generates an email)
To make updates to an applicant’s status, click on the person’s name (or select multiple people from the Candidate List) and drag them into the appropriate next folder.
All applicants should move through the workflow steps in order, bypassing any steps that don’t apply.
To move an applicant backwards in the workflow (or if you make a mistake), use the Undo Last Move button to revert them to the previous folder.
peoplefluent APPLICANT TRACKING SYSTEM
MANAGE APPLICANTS
Copyright © 2013 by Massachusetts Institute of Technology. All Rights Reserved Page 5
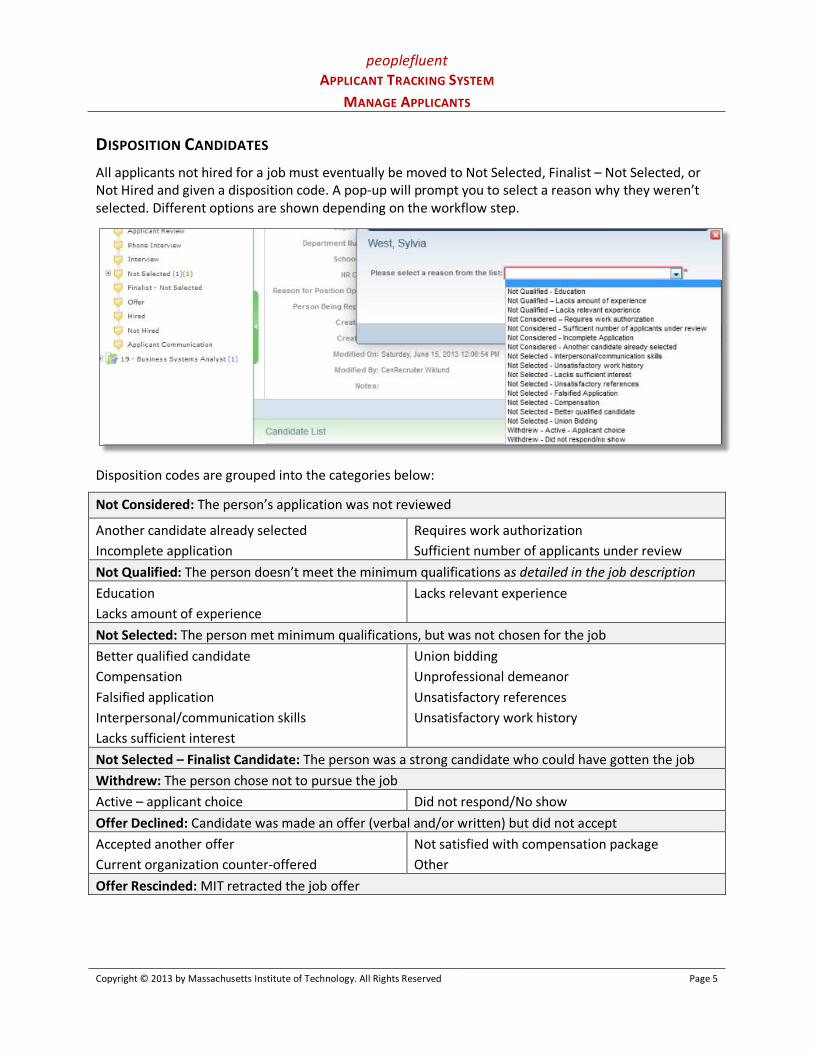
DISPOSITION CANDIDATES All applicants not hired for a job must eventually be moved to Not Selected, Finalist – Not Selected, or Not Hired and given a disposition code. A pop-up will prompt you to select a reason why they weren’t selected. Different options are shown depending on the workflow step.
Disposition codes are grouped into the categories below:
Not Considered: The person’s application was not reviewed
Another candidate already selected Incomplete application
Requires work authorization Sufficient number of applicants under review
Not Qualified: The person doesn’t meet the minimum qualifications as detailed in the job description Education Lacks amount of experience
Lacks relevant experience
Not Selected: The person met minimum qualifications, but was not chosen for the job Better qualified candidate Compensation Falsified application Interpersonal/communication skills Lacks sufficient interest
Union bidding Unprofessional demeanor Unsatisfactory references Unsatisfactory work history
Not Selected – Finalist Candidate: The person was a strong candidate who could have gotten the job Withdrew: The person chose not to pursue the job Active – applicant choice Did not respond/No show Offer Declined: Candidate was made an offer (verbal and/or written) but did not accept Accepted another offer Current organization counter-offered
Not satisfied with compensation package Other
Offer Rescinded: MIT retracted the job offer

peoplefluent APPLICANT TRACKING SYSTEM
MANAGE APPLICANTS
Copyright © 2013 by Massachusetts Institute of Technology. All Rights Reserved Page 6
EMAIL CANDIDATES NOT SELECTED You can choose to notify dispositioned applicants of their status right away, wait until the job has been filled, or someplace in between.
To launch this communication, drag one or more candidates from Not Selected into the Applicant Communication step at the very bottom of the workflow. A dialog box will prompt you to choose an email template. Check the box to automatically send the same email to everyone you’ve moved.
The email template places the not-selected candidates’ names on the BCC line. Keep them there so you don’t expose their email addresses to each other.
Leave the To: address blank.
The email is sent from “MIT Staffing Services” <[email protected]>
Click Email to send the email(s).
If you click Cancel, the candidates will stay in the communications folder but will not actually have been sent an email. Use the Undo Last Move button to revert each person to the prior step, and re-drag them to Applicant Communication when you are ready to send the message.

peoplefluent APPLICANT TRACKING SYSTEM
MANAGE APPLICANTS
Copyright © 2013 by Massachusetts Institute of Technology. All Rights Reserved Page 7
EXTEND AN OFFER Move the top candidate to the Offer folder. You will be prompted to enter the candidate’s Annual Salary or Hourly Rate. (Fill in one or the other, depending on the kind of job.) Enter it with dollar sign, commas, etc., exactly how it should show up in the offer letter.
Note: This value will be stored in the system, but will not be viewable by Hiring Managers in case not all HMs should see it.
Click OK and you are then prompted to select offer letter template (exempt or nonexempt).

peoplefluent APPLICANT TRACKING SYSTEM
MANAGE APPLICANTS
Copyright © 2013 by Massachusetts Institute of Technology. All Rights Reserved Page 8
Once you choose the template, you have the option to save the Word document for later editing or open it immediately. (You can also cancel it, and either use your department’s standard offer letter template or not send one at all if the person doesn’t need the confirmation in writing.)
Be sure to proofread it and add your contact information, which it is not stored in the ATS.
For efficiency, you can use Word’s Save & Send feature to send from your email address without actually saving the offer letter to a permanent location.
COMPLETE THE CANDIDATE’S PREHIRE CHECKS Use the Pre-hire Info tab to record the results of reference checks, employment verification, and education verification. Providing this information is a recommended best practice.
Open the Candidate, and click the Pre-Hire tab. Click on the edit icons beside each category to display fields to capture the information.
peoplefluent APPLICANT TRACKING SYSTEM
MANAGE APPLICANTS
Copyright © 2013 by Massachusetts Institute of Technology. All Rights Reserved Page 9
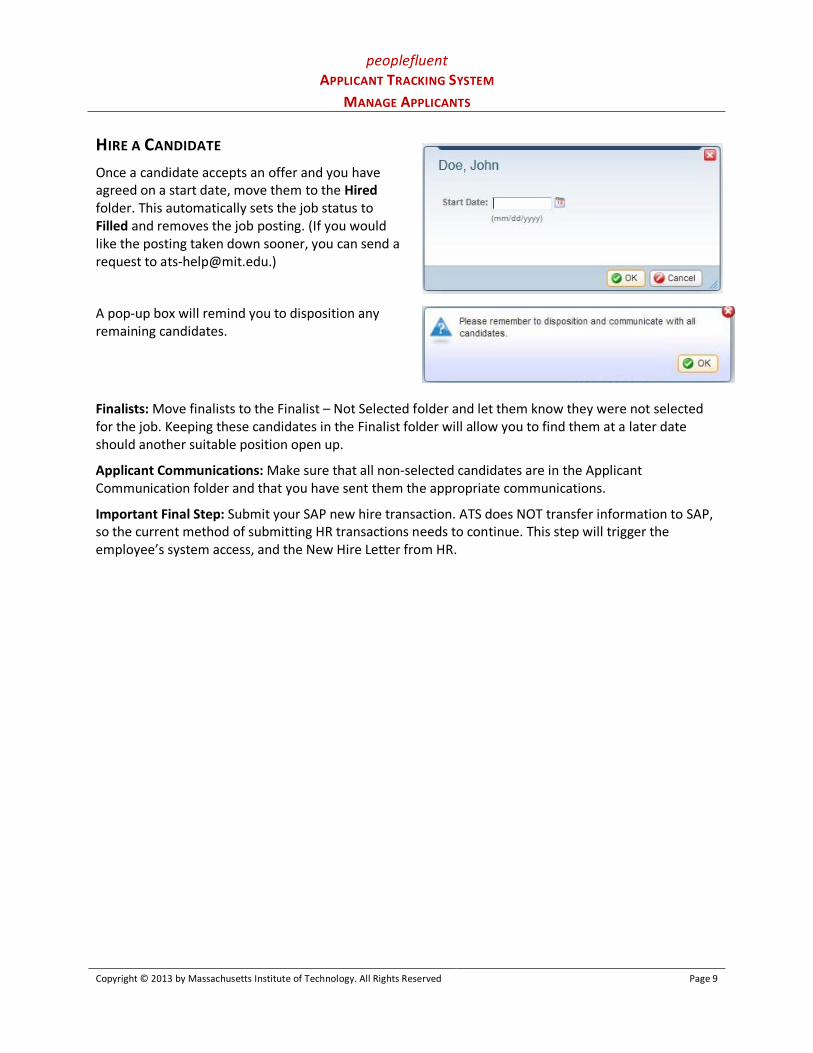
HIRE A CANDIDATE Once a candidate accepts an offer and you have agreed on a start date, move them to the Hired folder. This automatically sets the job status to Filled and removes the job posting. (If you would like the posting taken down sooner, you can send a request to [email protected].)
A pop-up box will remind you to disposition any remaining candidates.
Finalists: Move finalists to the Finalist – Not Selected folder and let them know they were not selected for the job. Keeping these candidates in the Finalist folder will allow you to find them at a later date should another suitable position open up.
Applicant Communications: Make sure that all non-selected candidates are in the Applicant Communication folder and that you have sent them the appropriate communications.
Important Final Step: Submit your SAP new hire transaction. ATS does NOT transfer information to SAP, so the current method of submitting HR transactions needs to continue. This step will trigger the employee’s system access, and the New Hire Letter from HR.