Ethereum Consortium Network Deployments Made Easy · PDF fileEthereum Consortium Network...
13
Ethereum Consortium Network Deployments Made Easy Christine Avanessians | Senior Program Manager Update History October 19, 2016: The document was revised to reflect the most recent update to the template. Moving forward, this document will be replaced by documentation directly provided with the template. For further revisions of the document and new content, please visit: ReadMe. Overview The next phase of our support of blockchain on Microsoft Azure is the release of the Ethereum Consortium Blockchain Network solution template in the Azure Quick Start Templates that simplifies the infrastructure and protocol substantially. This template deploys and configures a private Ethereum network from the Azure Portal or cmdline with a single click. While there are many valuable scenarios for the public Ethereum network, we expect in many enterprise scenarios, you will want to configure Ethereum to build out and deploy your own consortium network. After reading this article, you will Obtain working knowledge of blockchain, Ethereum, and one consortium network architecture Learn how to deploy and configure a multi-node Ethereum consortium network with the published ARM template About blockchain For those of you new to the blockchain community, this is a great opportunity to learn about the technology in an easy and configurable manner on Azure. Blockchain is the underlying technology behind Bitcoin; however, it is much more than just a virtual currency. It is a composite of existing database, distributed system, and cryptographic technologies that enables secure multi-party computation with guarantees around immutability, verifiability, auditability, and resiliency to attack. Different implementations employ different mechanisms to provide these attributes. Ethereum is one such protocol, with several different implementations. While this article will not go into the details of the Ethereum protocol, implementations, architecture, or public network, it is still important to briefly describe a simplified application and network architecture to better understand the different deployment topology options now available. Ultimately, there is no single canonical network layout; it all depends on the use cases and stage within the development lifecycle. Similar to applications interacting with databases today, decentralized applications will communicate and execute logic against the Ethereum blockchain. A private Ethereum network consists of a peer-to-peer decentralized network of nodes. These nodes maintain a copy of the data store (i.e. distributed ledger) and run a virtual machine to support arbitrary computation against the ledger, while maintaining consensus. Smart contracts are the mechanism that allows for this complicated computation on the network, similar to stored procedures on traditional databases. Nodes are divided into mining and transaction nodes (non-mining nodes). Transaction nodes maintain a copy of the distributed ledger, but are used to submit or look up transactions from the network. Applications interact with these nodes using Ethereum’s web3 JavaScript object to execute and store important transactions within their application. A wallet is usually backed by a transaction node on the public network. Mining nodes process and commit transactions to the underlying distributed database (i.e. ledger) through a consensus process.
Transcript of Ethereum Consortium Network Deployments Made Easy · PDF fileEthereum Consortium Network...

Ethereum Consortium Network Deployments Made Easy Christine Avanessians | Senior Program Manager
Update History October 19, 2016: The document was revised to reflect the most recent update to the template. Moving
forward, this document will be replaced by documentation directly provided with the template. For further
revisions of the document and new content, please visit: ReadMe.
Overview The next phase of our support of blockchain on Microsoft Azure is the release of the Ethereum Consortium
Blockchain Network solution template in the Azure Quick Start Templates that simplifies the infrastructure and
protocol substantially. This template deploys and configures a private Ethereum network from the Azure
Portal or cmdline with a single click. While there are many valuable scenarios for the public Ethereum
network, we expect in many enterprise scenarios, you will want to configure Ethereum to build out and deploy
your own consortium network.
After reading this article, you will
Obtain working knowledge of blockchain, Ethereum, and one consortium network architecture
Learn how to deploy and configure a multi-node Ethereum consortium network with the published
ARM template
About blockchain For those of you new to the blockchain community, this is a great opportunity to learn about the technology in
an easy and configurable manner on Azure. Blockchain is the underlying technology behind Bitcoin; however,
it is much more than just a virtual currency. It is a composite of existing database, distributed system, and
cryptographic technologies that enables secure multi-party computation with guarantees around immutability,
verifiability, auditability, and resiliency to attack. Different implementations employ different mechanisms to
provide these attributes. Ethereum is one such protocol, with several different implementations.
While this article will not go into the details of the Ethereum protocol, implementations, architecture, or public
network, it is still important to briefly describe a simplified application and network architecture to better
understand the different deployment topology options now available. Ultimately, there is no single canonical
network layout; it all depends on the use cases and stage within the development lifecycle.
Similar to applications interacting with databases today, decentralized applications will communicate and
execute logic against the Ethereum blockchain. A private Ethereum network consists of a peer-to-peer
decentralized network of nodes. These nodes maintain a copy of the data store (i.e. distributed ledger) and
run a virtual machine to support arbitrary computation against the ledger, while maintaining consensus. Smart
contracts are the mechanism that allows for this complicated computation on the network, similar to stored
procedures on traditional databases.
Nodes are divided into mining and transaction nodes (non-mining nodes). Transaction nodes maintain a copy
of the distributed ledger, but are used to submit or look up transactions from the network. Applications
interact with these nodes using Ethereum’s web3 JavaScript object to execute and store important
transactions within their application. A wallet is usually backed by a transaction node on the public network.
Mining nodes process and commit transactions to the underlying distributed database (i.e. ledger) through a
consensus process.

Getting Started To begin, you will need an Azure subscription that can support deploying several virtual machines and
standard storage accounts. By default, most subscription types will support a small deployment topology
without needing to increase quota.
Once you have a subscription, go to Azure Quick Start Templates and search for “Ethereum Consortium
Blockchain Network”.
Select the template that is returned in the search results to take you to the Deployment page and then the
‘Deploy to Azure’ button to take you to the Template deployment wizard in the Azure Portal. Note, you will be
prompted to sign into your account and Azure subscription in the process if you are not already logged in.
Once signed in, you land within the Template deployment wizard as shown below.
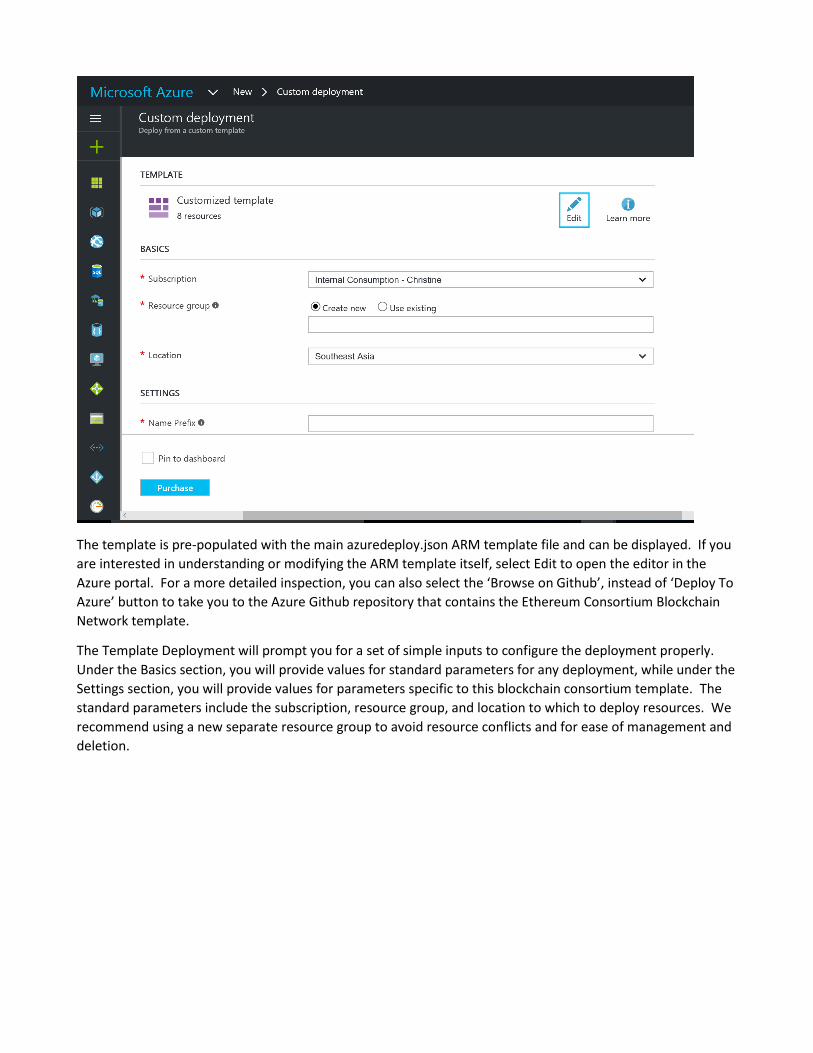
The template is pre-populated with the main azuredeploy.json ARM template file and can be displayed. If you
are interested in understanding or modifying the ARM template itself, select Edit to open the editor in the
Azure portal. For a more detailed inspection, you can also select the ‘Browse on Github’, instead of ‘Deploy To
Azure’ button to take you to the Azure Github repository that contains the Ethereum Consortium Blockchain
Network template.
The Template Deployment will prompt you for a set of simple inputs to configure the deployment properly.
Under the Basics section, you will provide values for standard parameters for any deployment, while under the
Settings section, you will provide values for parameters specific to this blockchain consortium template. The
standard parameters include the subscription, resource group, and location to which to deploy resources. We
recommend using a new separate resource group to avoid resource conflicts and for ease of management and
deletion.

In addition, you will need to specify:
Parameter Name Description Allowed
Values
Default
Value
Name Prefix (namePrefix) A string used as a base for naming the
deployed resources.
6 characters
or less
NA
Administrator User Name
(adminUserName)
The user name of the administrator for
each of the virtual machines deployed.
This user name is also used when
creating the Ethereum account.
1-64
characters
gethadmin
Administrator User Password
(adminUserPassword)
The password for the administrator
account for each of the virtual machines
deployed. While all VMs initially have
the same password, you can change the
password after provisioning.
12 -72
characters
NA
Ethereum Account Password
(ethereumAccountPsswd)
The administrator password used to
secure the Ethereum account imported
into each node. This account is setup in
the genesis block and pre-allocated with
one trillion Ether.
12 or more
characters
NA

Ethereum Account
Passphrase
(ethereumAccountPassphrase)
The password used to generate the ECC
private key associated with the default
Ethereum account that is generated. A
pre-generated private key does not need
to be explicitly passed in. Consider a
password with sufficient randomness to
ensure a strong private key.
12 or more
characters
NA
Ethereum Network ID
(ethereumNetworkID)
The network ID for the consortium
Ethereum network being deployed.
Each Ethereum network has its own
Network ID, with 1 being the ID for the
public network. While we have
restricted network access for mining
nodes, we still recommend using a large
number to prevent collisions.
5 -
2,147,483,647
10101010
Number of Consortium
Members
(NumConsortiumMembers)
The number of members to simulate
within the network. Each consortium
member receives a subnet containing
one mining node (virtual machine)
backed by one storage account as the
initial footprint.
2-5 2
Number of Mining Nodes per
Member
(NumMining
NodesPerMember)
The number of mining nodes deployed
per subnet.
The total number of mining nodes
equals NumConsortiumMembers x
NumMiningNodesPerMember.
1- 19 1
Mining Node VM Size
(mnNodeVMSize)
The virtual machine size used for mining
nodes.
Standard A,
Standard D,
Standard D-v2,
Standard F
series
Standard
D1
Number of Transactional
Nodes
(numTxNodes)
The number of transaction nodes to
provision as part of the network.
1 - 5 1
Transaction Node VM Size
(txNodeVMSize)
The virtual machine size used for
transactional nodes.
Standard A,
Standard D,
Standard D-v2,
Standard F
series
Standard
D1
Finally, acknowledge legal terms and click ‘Purchase’ to deploy. Depending on the number of VMs being
provisioned, deployment time can vary from a few minutes to tens of minutes.

Ethereum consortium network architecture on Azure While there is no single canonical architecture for a consortium network, this template provides a sample
architecture to use to get started quickly. Fundamentally, the network consists of a set of shared transaction
nodes with which an application can interact to submit transactions and a set of mining nodes per consortium
member to record transactions. All nodes are within the same virtual network, though each consortium
member’s subnet can be easily pulled into individual VNets communicating through application gateways. The
network is illustrated in the figure below.
Mining Nodes Each consortium member is given a separate, identical subnet containing one or more mining nodes, backed
by a storage account. The first default VM in the subnet is configured as a boot node to support dynamic
discoverability of the nodes in the network. Mining nodes communicate with other mining nodes to come to
consensus on the state of the underlying distributed ledger. There is no need for your application to be aware
of or communicate with these nodes. Since we are focused on private networks, these nodes are isolated
from inbound public internet traffic adding a secondary level of protection. Outbound traffic is allowed, but
not to the Ethereum discovery port. While each member’s VMs are in a separate subnet, the individual nodes
are still connected and communicating with one another via Ethereum’s discovery protocol.
All nodes have the latest stable Go Ethereum (Geth) client software and are configured to be mining nodes. All
nodes use the same Ethereum account (Ethereum address and key pair) that is protected by the Ethereum
account password. The public private key pair generated from the Ethereum passphrase provided is stored on
each of the Geth nodes. As mining nodes mine, they collect fees that are added to this account.
Transaction Nodes All consortium members share a set of load-balanced transaction nodes. These nodes are reachable from
outside the virtual network so that applications can use these nodes to submit transactions or execute smart
contracts within the blockchain networks. All nodes have the latest stable Go Ethereum (Geth) client software

and are configured to maintain a complete copy of the distributed ledger. These nodes use the same
Ethereum account, protected by the Ethereum account password provided.
We have explicitly separated the nodes that accept transactions from the nodes that mine transactions to
ensure that the two actions are not competing for the same resources. We have also load-balanced the
transaction nodes within an availability set to maintain high availability.
Ethereum configuration Besides the infrastructural footprint and configuration of nodes, the blockchain network itself is created. The
genesis block is configured with the desired Ethereum network id, an appropriate mining difficulty, and a pre-
configured account. The mining difficult varies depending on the number of mining nodes deployed to ensure
mining time remains short even in the beginning. The pre-configured account contains 1 trillion Ether to seed
the consortium network with enough gas (Ethereum’s fuel) to handle millions of transactions. Since the
mining nodes use this account, their collected fees feed back into the account to ensure continual funds.
Administrator page Once the deployment has completed successfully and all resources have been provisioned, you can go to the
administrator page to get a simple view of your blockchain network.
The admin site URL is the DNS name of the load balancer; it is also the first output of the template
deployment. To find the template output, select the resource group just deployed. Select the Overview tab,
then Last Deployment.
Finally, select Microsoft.Template and look for the outputs section.

You can get a high level overview of the topology you just deployed by reviewing the Ethereum Node Status
section. This section includes all node hostnames and the participant to which the node belongs. It also
displays node connectivity with the peer count. Peer count is the minimum of the number of mining nodes in
the network and twenty-five where twenty-five is the configured maximum peer count, as in the public
Ethereum network. Note, that peer count does not restrict the number of nodes that can be deployed within
the network. Occasionally, you will see peer count fluctuate and be less for certain nodes. This is not always a
sign that the nodes are unhealthy, since forks in the ledger can cause minor changes in peer count. Finally, you
can inspect the latest block seen by each node in the network to determine forks or lags in the system.
The node status is refreshed every 10 seconds. Reload the page via the browser or "Reload" button to update
the view.

Create Ethereum Account To create an additional account, you can use a variety of solutions. One such solution is MetaMask, a Chrome
extension that provides an “identity vault” and connection to an Ethereum network, public, test or custom.
MetaMask formulates a transaction to register the account in the network. This transaction, like any other
transaction, will go to one of the transaction nodes, and eventually be mined into a block as illustrated below.
To install the extension in Chrome, go to Customize and control Google Chrome (Overflow button), More
Tools, Extensions, Get More Extensions, and search for MetaMask.
Once installed, open MetaMask and create a new vault. By default, the vault will be connected to the Morden
Test Network. You will need to change this to connect to the deployed private consortium network,
specifically to the load balancer in front of the transaction nodes. From the template output, retrieve the
exposed Ethereum RPC endpoint at port 8545, the second template output, and enter it in custom RPC as
shown below.

By creating the vault, you create a wallet containing an account. To create additional accounts, select Switch
Accounts and then the ‘+’ button as shown below.
Initiate Initial Ether Allocation Through the administrator page, you can formulate a transaction to transfer Ether from the pre-allocated
account to another Ethereum account. This Ether transfer is a transaction that is sent to the transaction node
and mined into a block as illustrated below.
Via the clipboard icon in the MetaMask wallet, copy the address of the Ethereum account to which you want
to transfer ether and go back to the administrator page. Paste the copied account into the input field to
transfer 1000 ether from the pre-allocated Ethereum account to your newly created account. Click submit and
wait for the transaction to be mined into a block.
Once the transaction is committed into a mined block, the account balance in MetaMask for your account will
reflect the transfer of 1000 Ether.

Transfer of Ether between Accounts At this point, you are ready to execute transactions within your private consortium network. The simplest
transaction is to transfer Ether from one account to another. To formulate such a transaction, you can use
MetaMask once again, transferring money from the first account used above to a second account.
From Wallet 1 in MetaMask, click on send. Copy the address of the second wallet created into Recipient
Address input field and amount of Ether to transfer in the Amount input field. Click send and accept the
transaction.
Once again, when the transaction is mined and committed into a block, the account balances will be reflected
accordingly. Note, wallet 1’s balance is deducted a bit more than 15 Ether, since you had to pay a mining fee
to process the transaction.

Accessing Nodes You can remotely connect to the virtual machines on which the transaction nodes run via SSH with your
provided admin username and password. Since the transaction node VMs do not have their own public IP
addresses, you will need to go through the load balancer and specify the port number. The SSH command to
run to access the first transaction node is the third template output (for the sample deployment: ssh -p 3000
[email protected]). To get to additional transaction nodes, increment
the port number by one (e.g. the first transaction node is on port 3000, second, is 3001, third is 3002, etc.).
Since the virtual machines on which the mining nodes run are not externally accessible, you will need to go
through one of the transaction nodes. Once you have SSH’ed into a transaction node, you can SSH into any of
the mining nodes.
Next Steps You are now ready to focus on application and smart contract development against your private consortium
blockchain network. Happy coding!