eSTART User Guide for Timekeepers and...
43
eSTART User Guide for Timekeepers and Administrators August 2015
Transcript of eSTART User Guide for Timekeepers and...

eSTART
User Guide for
Timekeepers and Administrators
August 2015
Estart7_User_Guide_For_Timekeepers_And_Administrators.Docx 8/24/2015
General Information About This Manual
This manual is designed to provide State employees with an overview of the eSTART Time and
Attendance System. This manual provides basic procedures; however, you may need to seek
clarification on specific agency procedures or rules from your agency personnel manager or
supervisor.
Nothing in this handbook should be construed to amend any laws, regulations, policies or
procedures established by the State of Alabama or specifically the Alabama State Personnel
Department.
Certain procedures contained within this manual are subject to change or revision without prior
notice. Employees will be notified as soon as possible when changes or revisions occur.
All leave accruals and usages in eSTART are estimates and/or projections that are based on the
concept that all employees earn leave and have leave to use. These estimates and projections may
not be accurate.

Table of Contents Create HyperFind Query by Manager ........................................................................................................... 1
Creating a New HyperFind Query .............................................................................................................................. 1
New Employee Updates ................................................................................................................................ 4
Locate employee records .......................................................................................................................................... 4
Edit employee records .............................................................................................................................................. 4
Updates to Existing Employee Records ...................................................................................................... 10
Transfers between Agencies ................................................................................................................................... 10
Changing an Exempt Employee to Punch ................................................................................................................ 11
Changing from Non-Exempt Employee to Exempt .................................................................................................. 13
Promotion to Manager or Change to Manager’s Direct Reports ............................................................................ 13
My Views>My Genies ................................................................................................................................. 14
Move Amounts ............................................................................................................................................ 15
Board Meeting Pay Code ............................................................................................................................ 17
Pay Period Close and Sign-Off ................................................................................................................... 18
Sign-Off Preparation ................................................................................................................................................ 18
Sign-Off .................................................................................................................................................................... 20
HyperFind Query Setup by Agency/Division ............................................................................................... 23
Creating a New HyperFind Query ............................................................................................................................ 23
Assigning a Personal HyperFind Query to Another Person ..................................................................................... 25
Delegate Profile Setup (Short-Term Delegation) ........................................................................................ 26
Delegate Profile Setup (Step 1) ............................................................................................................................... 26
Assigning the Delegate Profile to the People Editor (Step 2) .................................................................................. 27
Delegate Manager Setup (Long-Term Delegation) ..................................................................................... 28
Rules, Cascades and Interfaces ................................................................................................................. 29
Holiday Credit Rules ................................................................................................................................................ 29
Part-Time Employees .......................................................................................................................................... 29 Hourly Employees ............................................................................................................................................... 29 Timestamp/Punch Employee .............................................................................................................................. 30 Exempt Employees ............................................................................................................................................. 31 Non-Traditional Employees ................................................................................................................................ 32
Bereavement Rules ................................................................................................................................................. 33
Bereavement ...................................................................................................................................................... 33
Cascades .................................................................................................................................................................. 34
Annual Leave Cascade ........................................................................................................................................ 34
Interfaces ................................................................................................................................................................ 35
Compensatory Time Leave Payout ..................................................................................................................... 35
Appendix ..................................................................................................................................................... 36
eSTART User Guide for Timekeepers and Administrators
1
Create HyperFind Query by Manager
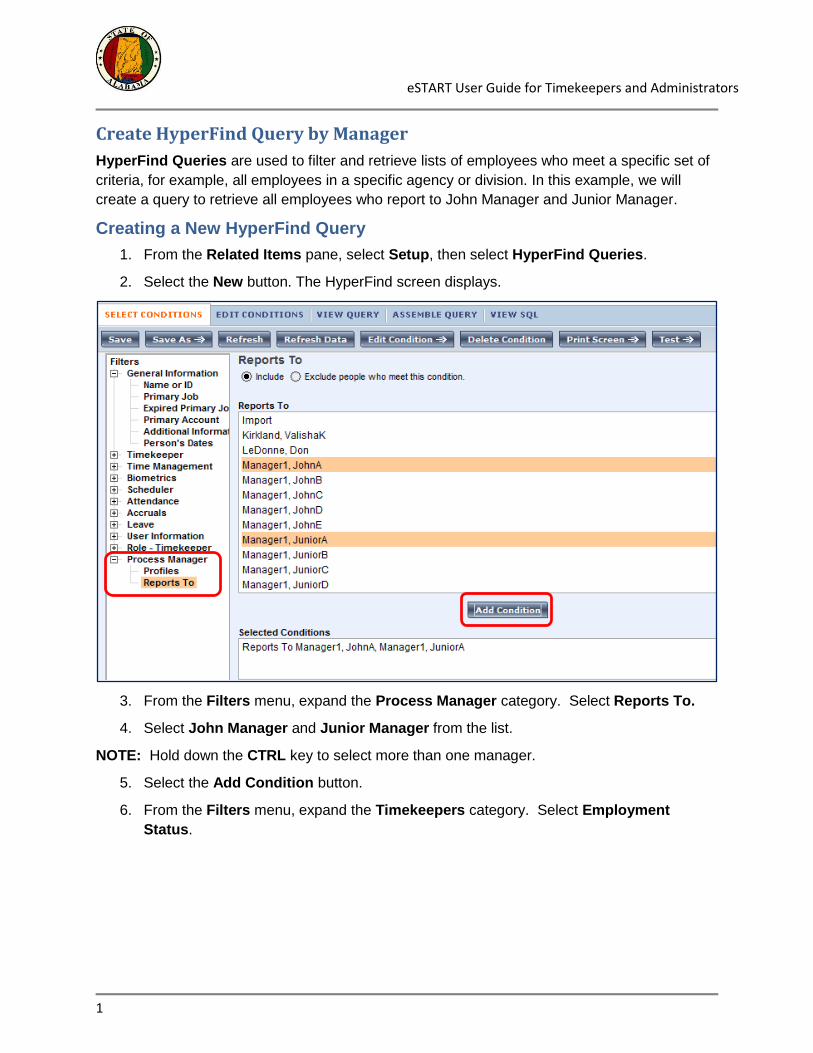
HyperFind Queries are used to filter and retrieve lists of employees who meet a specific set of
criteria, for example, all employees in a specific agency or division. In this example, we will
create a query to retrieve all employees who report to John Manager and Junior Manager.
Creating a New HyperFind Query
1. From the Related Items pane, select Setup, then select HyperFind Queries.
2. Select the New button. The HyperFind screen displays.
3. From the Filters menu, expand the Process Manager category. Select Reports To.
4. Select John Manager and Junior Manager from the list.
NOTE: Hold down the CTRL key to select more than one manager.
5. Select the Add Condition button.
6. From the Filters menu, expand the Timekeepers category. Select Employment
Status.

eSTART User Guide for Timekeepers and Administrators
2
7. To have the query retrieve only employees who are active as of today, no changes are
needed to the criteria. Select Add Condition.
8. To test the query, select the Test button. A listing of employees should display.
9. If the employee list is correct, close the test page. Then select Save.
NOTE: HYPERFIND in the upper left-hand corner will display as *HYPERFIND in orange font
until saved.

eSTART User Guide for Timekeepers and Administrators
3
10. The Save Query As window displays.
11. Select Personal-visible only to me. The Description field is optional.
12. Enter the name of the new query.
13. Select OK. You now have access to the HyperFind from any of your Show drop-downs.
NOTE: If a public HyperFind query is needed, contact your eSTART Administrator.
. Another option is to select
Group>Add to Group from the
Action bar.
eSTART User Guide for Timekeepers and Administrators
4
New Employee Updates
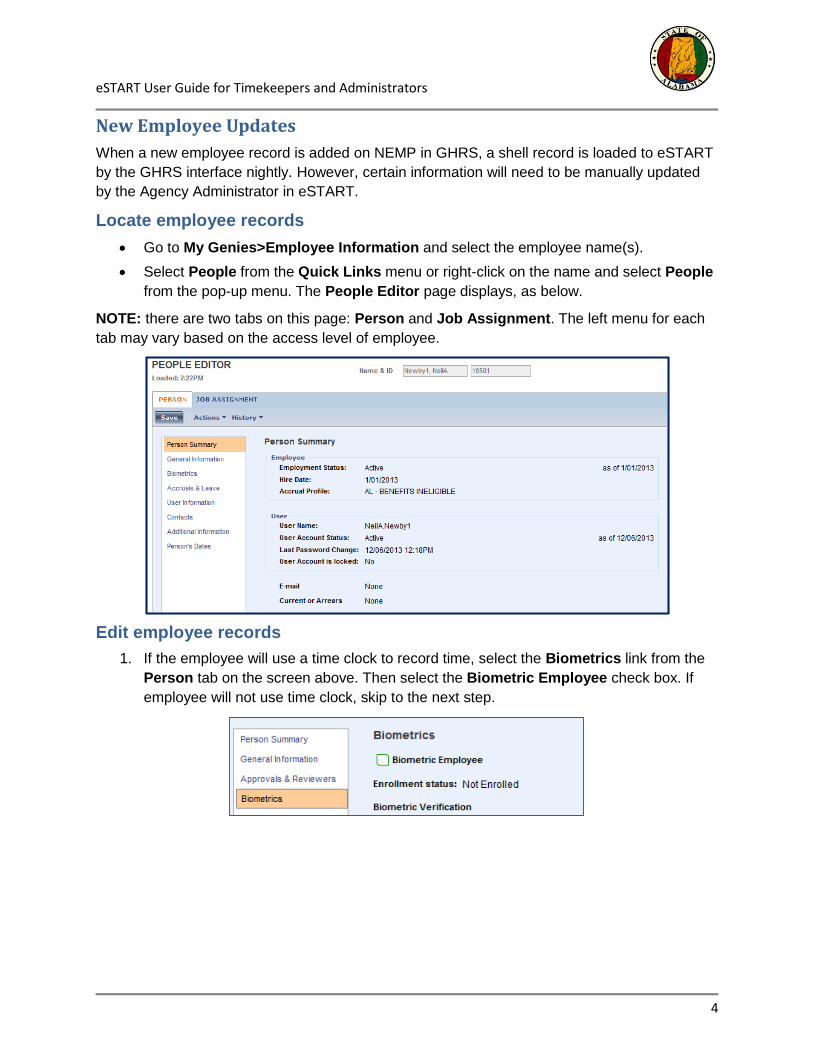
When a new employee record is added on NEMP in GHRS, a shell record is loaded to eSTART
by the GHRS interface nightly. However, certain information will need to be manually updated
by the Agency Administrator in eSTART.
Locate employee records
Go to My Genies>Employee Information and select the employee name(s).
Select People from the Quick Links menu or right-click on the name and select People
from the pop-up menu. The People Editor page displays, as below.
NOTE: there are two tabs on this page: Person and Job Assignment. The left menu for each
tab may vary based on the access level of employee.
Edit employee records
1. If the employee will use a time clock to record time, select the Biometrics link from the
Person tab on the screen above. Then select the Biometric Employee check box. If
employee will not use time clock, skip to the next step.

eSTART User Guide for Timekeepers and Administrators
5
2. Select Accruals & Leave tab.
Each employee must be assigned a Leave Administrator. This allows the Leave
Administrator to receive notification when the employee submits an extended leave
case.
a. To assign a Leave Administrator to the employee, open the Leave
Administrator drop-down and select the Leave Administrator’s name from the
drop-down.
3. Select the User Information tab.
a. If the user has an Active Directory ID (usually an email address), change the
User Name to the employee’s email address, i.e.
b. Select LDAP from the Authentication Type drop-down. The user’s password
will be their network password.
eSTART User Guide for Timekeepers and Administrators
6
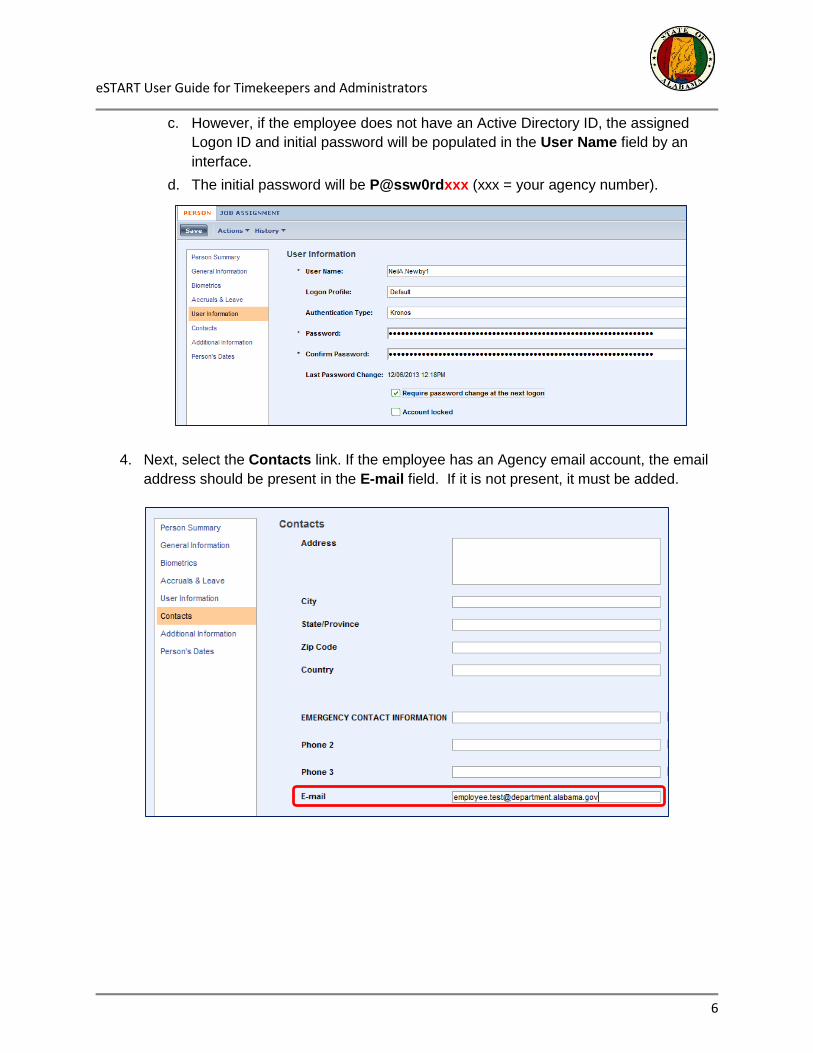
c. However, if the employee does not have an Active Directory ID, the assigned
Logon ID and initial password will be populated in the User Name field by an
interface.
d. The initial password will be P@ssw0rdxxx (xxx = your agency number).
4. Next, select the Contacts link. If the employee has an Agency email account, the email
address should be present in the E-mail field. If it is not present, it must be added.

eSTART User Guide for Timekeepers and Administrators
7
5. Select Additional Information.
a. In the right column of the table, key the information that applies to the employee
for:
i. Current/Arrears – LEAVE FIELD BLANK – DO NOT KEY
ii. OT/Comp – If the employee is non-exempt and has been approved for
overtime, key OT in this field. Else it will default to Comp. The field will
be blank for Exempt employees who do not earn OT or Comp.
iii. Lunch Length - (0, 30 or 60) – the length of the employee’s lunch time.
iv. Schedule Type - See the legend below for the values of this field.
v. Key the Approver ID (employee ID) of the employee’s manager.
Schedule Type:
8 – 8 hour employee – Traditional schedule
8N – 8 hour employee - Non-Traditional schedule
8PI – 8 hour Exempt employee who punches IN ONLY
8PA – 8 hour Exempt employee who punches IN and OUT
10 – 10 hour employee
12 – 12 hour employee
24 – 24 hour employee
eSTART User Guide for Timekeepers and Administrators
8
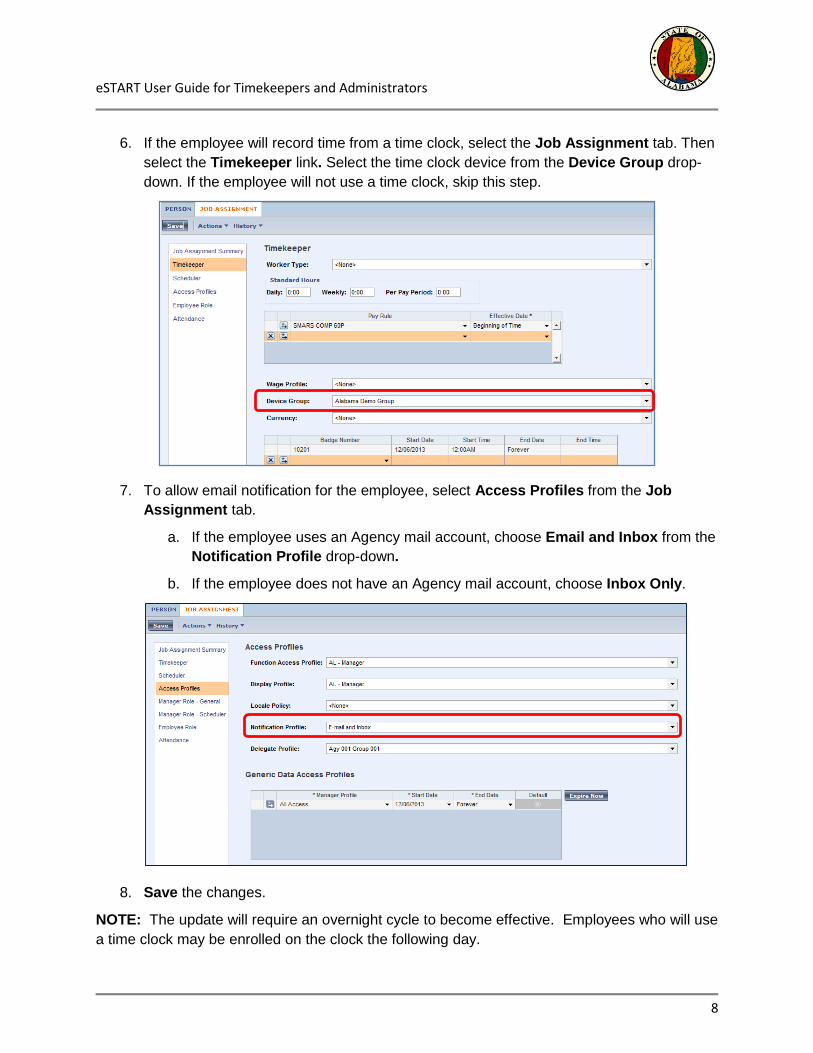
6. If the employee will record time from a time clock, select the Job Assignment tab. Then
select the Timekeeper link. Select the time clock device from the Device Group drop-
down. If the employee will not use a time clock, skip this step.
7. To allow email notification for the employee, select Access Profiles from the Job
Assignment tab.
a. If the employee uses an Agency mail account, choose Email and Inbox from the
Notification Profile drop-down.
b. If the employee does not have an Agency mail account, choose Inbox Only.
8. Save the changes.
NOTE: The update will require an overnight cycle to become effective. Employees who will use
a time clock may be enrolled on the clock the following day.

eSTART User Guide for Timekeepers and Administrators
9
9. Link to Schedule from the Quick Links menu or go to Related Items>Schedule Editor
to add a work schedule for the employee. The Schedule Editor page displays.
10. Select the By Group tab.
Groups allow multiple employees to be assigned the same work pattern. The pattern is
assigned to the group and applied to all employees within the group.
If the employee will have a regular schedule, it is best to add them to an existing group.
Contact your eSTART Administrator if a new group is needed.
11. Highlight the row with the employee name.
12. Right-click on the employee and choose Add to Group from the menu. Another option
is to select Group>Add to Group from the Action bar. The window below displays.
13. Select the new Schedule Group assignment, Start Date and End Date. Select
Forever if no specific End Date.
NOTE: Non-exempt employees must be assigned to a schedule group with a specific lunch
time, such as 0700-0400pm L60 12-00. “L60” refers to the length of the lunch time. There are
also groups with 30-minute lunches, which will be denoted as “L30”. The “12-00” refers to the
start time of the lunch. There are existing groups with varying lunch start times in the list, such
as 11:15 or 12:30.
The groups ending with Auto-PFS are to be used for FLSA exempt employees only.
14. Leave the check box selected for Remove employees from other schedule
inheritance groups for selected date range. Click OK. Then Save the page.
eSTART User Guide for Timekeepers and Administrators
10
Updates to Existing Employee Records
IMPORTANT: Employee and Manager timecard approval, as well as Agency sign-off
should occur as soon as possible after the employee transfers or leaves the agency.
Transfers between Agencies
Transfer In
Employees transferring into an agency will not be viewable via eSTART until all the
documentation has been processed through State Personnel and their information has
been updated in GHRS.
Set up the transferred employee in their new agency using the Edit employee records
section above.
Transfer Out or Separations of Service
The employee and manager should approve the final timecard as soon as the
employee completes his last hours with the agency. The Agency Administrator must
sign-off on the timecard no later than the next business day.
NOTE: Failure to immediately sign-off may result in the last timesheet and leave event not
being processed accurately. These must be manually corrected in GHRS.
Once an employee’s timecard is signed off, the employee’s Approver ID must be
removed from the People>Additional Information tab after the last pay period has
been signed off. If this is not done, the employee will continue to display in the
employee listings for the current manager.
The record may now be updated in GHRS to reflect the transfer.
IMPORTANT! DO NOT update an employee’s timecard for any pay period following their last
day at the agency. This will be the responsibility of the current agency.
Also, if an employee’s separation is updated in GHRS before the timecard is signed off, the
Terminated Employees HyperFind query must be used to locate the employee.
NOTE
An individual timecard may be signed off before the end of the pay period, if necessary.
eSTART User Guide for Timekeepers and Administrators
11
Changing an Exempt Employee to Punch
Punch In
If the Agency decides to have exempt employees punch, the following changes must be made
to the People Editor.
The Punch In feature is used to allow employees to punch in at the start of their shift only. They
will not be required to punch in or out any other time of day. When the decision is made for an
exempt employee to punch in, the following change must be made in the People Editor.
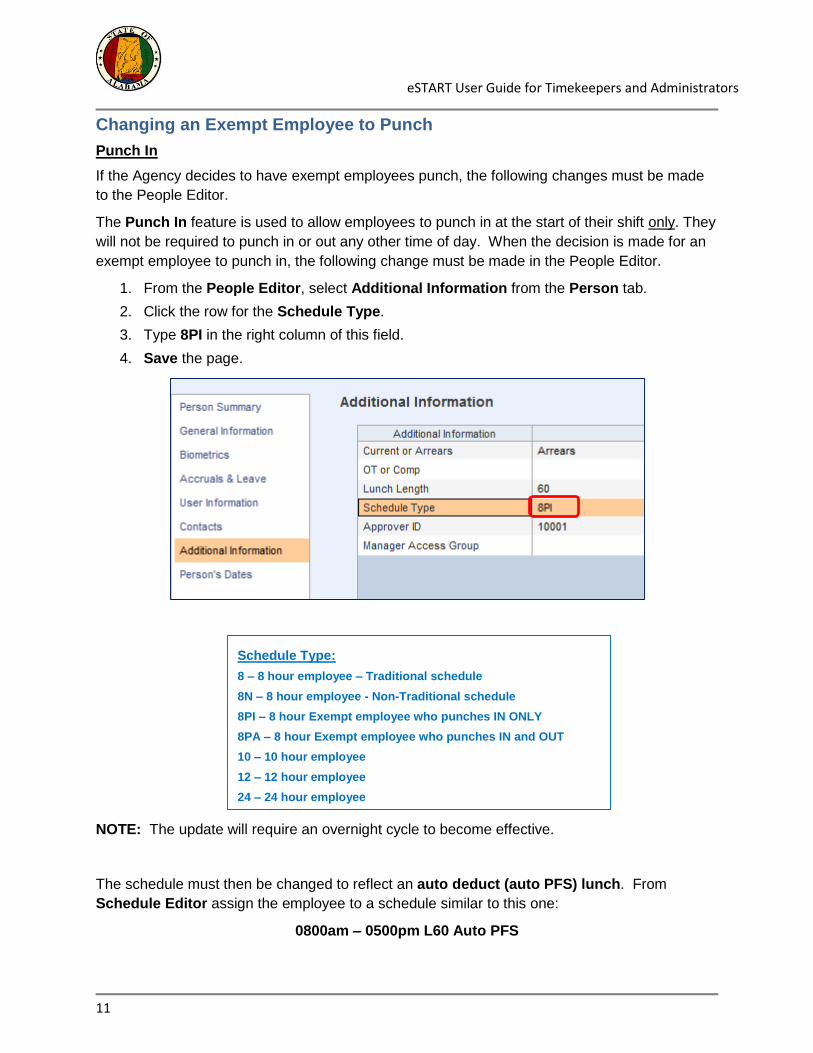
1. From the People Editor, select Additional Information from the Person tab.
2. Click the row for the Schedule Type.
3. Type 8PI in the right column of this field.
4. Save the page.
NOTE: The update will require an overnight cycle to become effective.
The schedule must then be changed to reflect an auto deduct (auto PFS) lunch. From
Schedule Editor assign the employee to a schedule similar to this one:
0800am – 0500pm L60 Auto PFS
Schedule Type:
8 – 8 hour employee – Traditional schedule
8N – 8 hour employee - Non-Traditional schedule
8PI – 8 hour Exempt employee who punches IN ONLY
8PA – 8 hour Exempt employee who punches IN and OUT
10 – 10 hour employee
12 – 12 hour employee
24 – 24 hour employee
. Another
option is to select Group>Add to
Group from
the Action bar
.

eSTART User Guide for Timekeepers and Administrators
12
Punch All
For exempt employees who will punch in and out at the beginning and end of their shifts, as well
as in and out for lunch, their Schedule Type setting will be 8PA.
When the decision is made for an exempt employee to punch all their time, the following change
must be made in the People Editor.
1. From the People Editor, select Additional Information from the Person tab.
2. Click the row for the Schedule Type.
3. Type 8PA in the right column of this field.
4. Save the page.
NOTE: The update will require an overnight cycle to become effective.
Employees who will punch all their time (8PA) must have a work schedule with a non-auto
deduct (auto PFS) lunch. Since the employee will be punching in and out for lunch, their lunch
would no longer be automatically deducted. The employee would need to be assigned to a
schedule with a lunch time similar to this one:
0800 – 0500pm L60 12:00.
Schedule Type:
8 – 8 hour employee – Traditional schedule
8N – 8 hour employee - Non-Traditional schedule
8PI – 8 hour Exempt employee who punches IN ONLY
8PA – 8 hour Exempt employee who punches IN and OUT
10 – 10 hour employee
12 – 12 hour employee
24 – 24 hour employee
. Another
option is to select Group>Add to
Group from
the Action bar
.
eSTART User Guide for Timekeepers and Administrators
13
Changing from Non-Exempt Employee to Exempt
When an employee’s pay rule is changed from non-exempt to exempt, the change must be
updated and approved in GHRS. Once this is done, the interface will update the employee’s
information in the People Editor.
If the exempt employee will not punch his time:
o The schedule must then be changed to reflect an auto deduct (auto PFS)
lunch. The employee would need to be assigned to a schedule similar to this
one: 0800 – 0500pm L60 Auto PFS.
If the agency decides to have the exempt employee punch their time, see the previous section.
Promotion to Manager or Change to Manager’s Direct Reports
When a person is promoted to manager, or when the manager’s direct reports change, the
manager’s employee ID must be keyed on the People Editor for each employee. If the ID is
not changed, the employee will continue to display in the employee listings for the current
manager. However, both managers will continue to see the employee in their listings for the
pay period in which the ID was changed.
NOTE: Both managers will continue to see the employee in their listings for the pay period in
which the ID was changed.
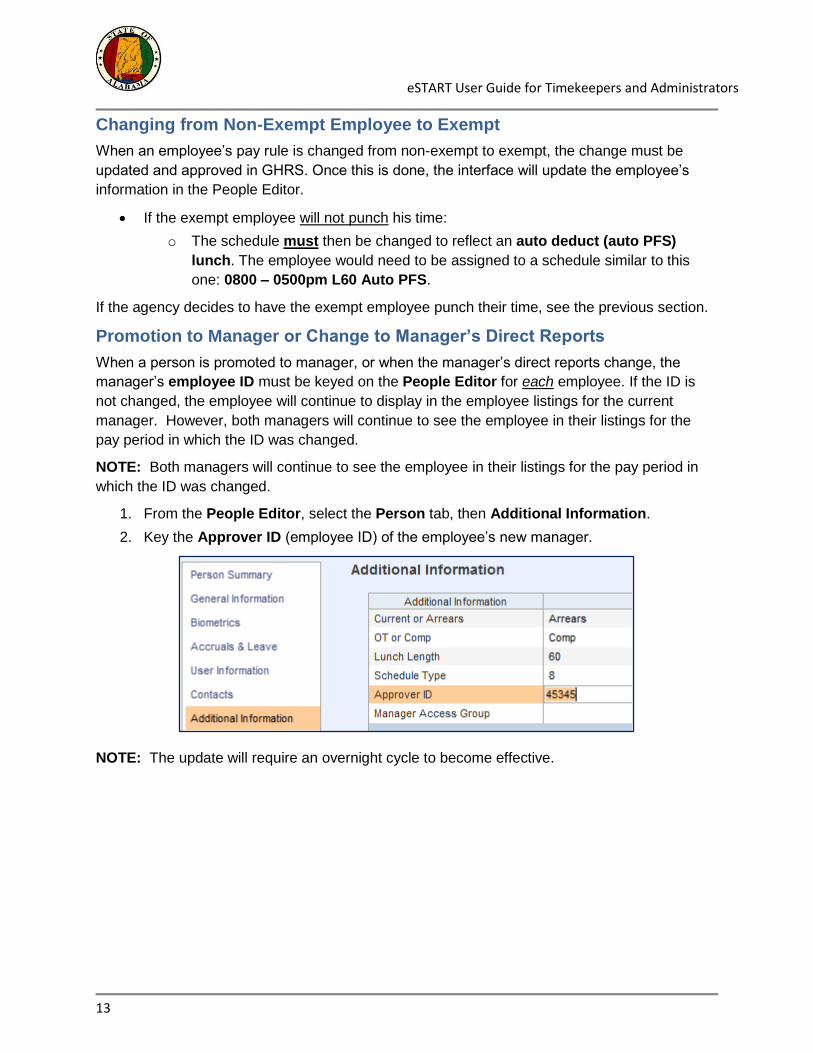
1. From the People Editor, select the Person tab, then Additional Information.
2. Key the Approver ID (employee ID) of the employee’s new manager.
NOTE: The update will require an overnight cycle to become effective.
eSTART User Guide for Timekeepers and Administrators
14
My Views>My Genies
Genies are “customized online reports” that are useful for viewing timecard and employee
information. This information has been separated into different views to allow specific
information to be retrieved. The columns may also be sorted in order to filter certain information
to the top or bottom of the list.
Employee Information View – provides information pertaining to the employee’s Name,
ID, Pay Rule, Labor Account, Hire Date, Employment Terms, Current/Arrears, Schedule
Group and Assigned Manager. It is information from the People Editor that is most
commonly needed.
Employee Hours View – provides Name, ID and Pay Rule, contains their Regular and
Non-Worked Hours totals, as well as OT and Comp time totals for the Time Period
selected.
Employee Holiday Credit View – provides basic Name, ID and Pay Rule information,
as well as Holiday Taken and Holiday Earned totals. The Holiday Taken column is for
non-exempt employees. The Holiday Taken-Exempt column contains the totals for
exempt employees.
Custom Field Reporting View – retrieves information from the Person>Additional
Information section of the People Editor. It contains Name, ID, Pay Rule, Schedule
Group, Lunch Type, Employee Type, Approver ID, Current/Arrears and OT/Comp.
Bereavement Leave View – will provide Name, ID and Pay Rule, as well as the
employee’s total amount of sick time in the Sick Hours column and any Bereavement
Owed hours.
QuickFind – useful when searching for an individual employee. The search can be
conducted by using either a portion of the last name, followed by an asterisk (*), or by
keying the Employee ID.
Leave Cases View – used to review case information pertaining to employees on
extended leave.
Leave Hours View – used to review leave hours pertaining to employees on extended
leave.
There are several other useful Genies in the My Genies drop-down. Some are used to
view information on accruals, verify the biometric status, view employees who are on
premises and Reconcile Timecard. The Pay Period Close genie is used at the end of
the pay period during agency sign-off and is referenced in a separate section of this
guide.

eSTART User Guide for Timekeepers and Administrators
15
Move Amounts
Part-time, semi-monthly workers have a pre-determined number of regular work hours for each
payroll cycle. On occasion they may work additional hours or have extra hours due to the
number of work hours in the pay period. These additional hours must be moved to a different
pay code to post correctly in GHRS.
1. From the employee timecard, select the correct pay period.
2. Highlight the date row in the timecard for the hours you want to move.
3. From the Totals & Schedule tab, select Daily from the drop-down menu.
4. Choose Amount>Move from the Action Bar on the timecard.
5. The Move Amount window displays.
6. Enter the number of hours in the Amount field. These are the additional hours over the
generated hours in GHRS for the pay period.
7. Verify the Effective Date and Transfer field.
8. Select OK.

eSTART User Guide for Timekeepers and Administrators
16
9. Select Save.
10. To verify, highlight the Date row again in the timecard.
11. From the Totals & Schedule tab, select Daily from the drop-down menu.
The Additional Hours pay code and time should display correctly in the pane.
A Moved Amounts tab is also added to the timecard page.
NOTE: For part-time, semi-monthly employees who work fewer than their specified hours for
the pay period, the non-worked hours should be added to the timecard using the pay code for
Leave Without Pay to prevent overpayment.
eSTART User Guide for Timekeepers and Administrators
17
Board Meeting Pay Code
A Board Meeting pay code is available to allow an agency to enter the amount of pay for its
board members.
The board members will display in your employee listings when using All Home and
Transferred In from the Show drop-down. However, there is a separate selection for Board
Members that may be used if desired. These timecards will need to be signed off if the Board
Meeting pay code is present. The board members will not be required to approve their
timecards, unless the agency or board requires it.
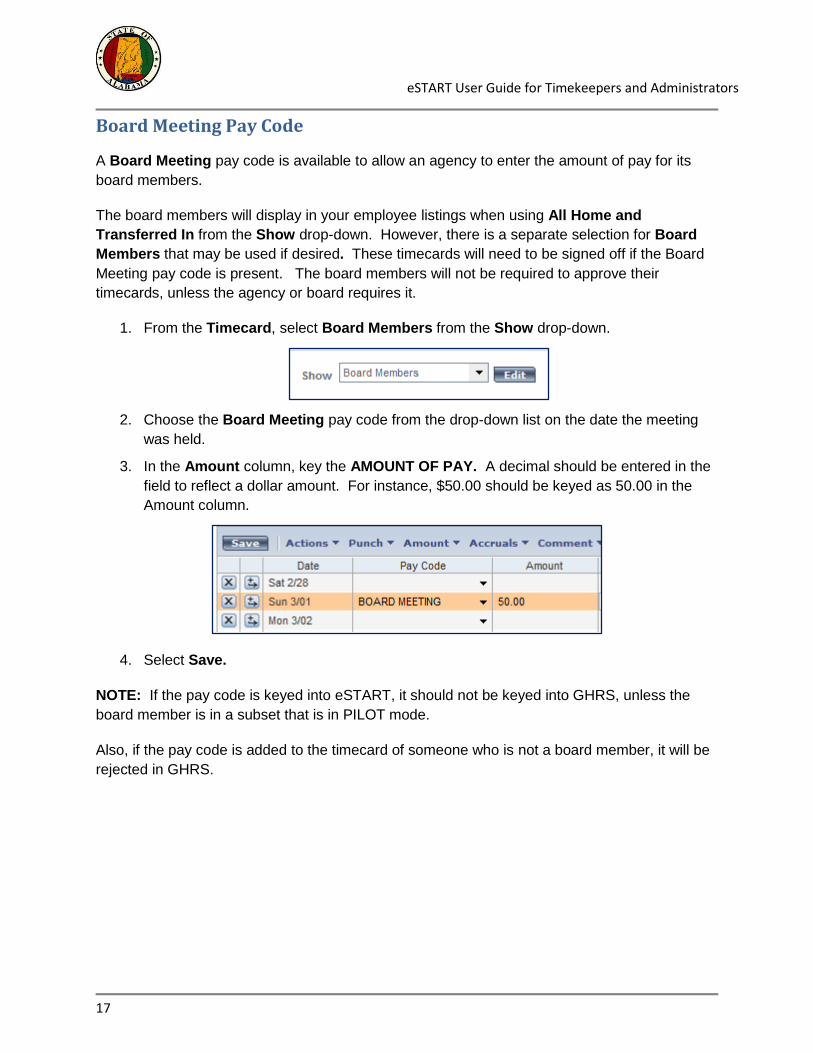
1. From the Timecard, select Board Members from the Show drop-down.
2. Choose the Board Meeting pay code from the drop-down list on the date the meeting
was held.
3. In the Amount column, key the AMOUNT OF PAY. A decimal should be entered in the
field to reflect a dollar amount. For instance, $50.00 should be keyed as 50.00 in the
Amount column.
4. Select Save.
NOTE: If the pay code is keyed into eSTART, it should not be keyed into GHRS, unless the
board member is in a subset that is in PILOT mode.
Also, if the pay code is added to the timecard of someone who is not a board member, it will be
rejected in GHRS.
eSTART User Guide for Timekeepers and Administrators
18
Pay Period Close and Sign-Off
NOTE: To retrieve shorter, more manageable employee listings, set up HyperFind queries by agency/division. See separate section for creating HyperFind queries.
Also, a Sign-Off Preparation Checklist job aid is available on the eSTART Online Resources website or can be found in the Appendix section of this course guide.
Sign-Off Preparation
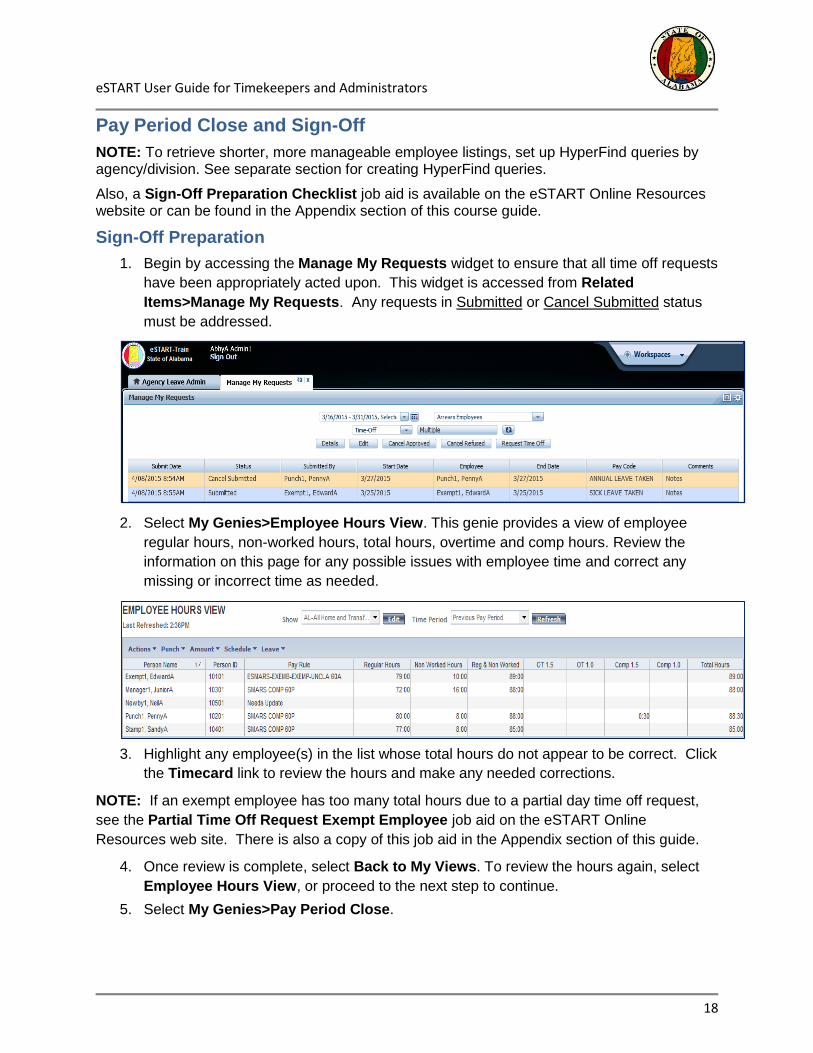
1. Begin by accessing the Manage My Requests widget to ensure that all time off requests
have been appropriately acted upon. This widget is accessed from Related
Items>Manage My Requests. Any requests in Submitted or Cancel Submitted status
must be addressed.
2. Select My Genies>Employee Hours View. This genie provides a view of employee
regular hours, non-worked hours, total hours, overtime and comp hours. Review the
information on this page for any possible issues with employee time and correct any
missing or incorrect time as needed.
3. Highlight any employee(s) in the list whose total hours do not appear to be correct. Click
the Timecard link to review the hours and make any needed corrections.
NOTE: If an exempt employee has too many total hours due to a partial day time off request,
see the Partial Time Off Request Exempt Employee job aid on the eSTART Online
Resources web site. There is also a copy of this job aid in the Appendix section of this guide.
4. Once review is complete, select Back to My Views. To review the hours again, select
Employee Hours View, or proceed to the next step to continue.
5. Select My Genies>Pay Period Close.

eSTART User Guide for Timekeepers and Administrators
19
6. Select Arrears Employees from the Show drop-down. Then select Previous Pay
Period from the Time Period drop-down.
7. Indicators for each column as follows:
a. A check mark in the Employee Approval column indicates employee approval.
b. A 1 in the Manager Approval column indicates one manager has approved. The
number will change if more than one manager approves. Any missing manager
approvals will need to be obtained before sign-off can be performed.
c. A check mark in the Missed Punch or Unexcused Absence column indicates
the presence of these exceptions in the timecard.
d. If a check mark is present in the Unexcused Absence column AND an amount
is present in the Leave Without Pay column, this is an acceptable exception.
However, go to the employee timecard to determine if any other unexcused
absences are present that DO NOT have LWOP. These should be corrected by
the manager.
e. If Needs Update displays in the Pay Rule column for an employee, the
employee information must be updated in the People Editor before sign-off can
occur. This occurs once all approvals are applied in GHRS and passed to
eSTART. If the pay rule is not updated before the sign-off date in eSTART,
entries must be completed in GHRS to ensure the employee is paid correctly.
8. Click on any column header to sort indicators to the top of the list. Click a second time to sort for missing indicators.
VERY IMPORTANT: Managers must correct any unexcused absences and missing punches before sign-off can be completed.

eSTART User Guide for Timekeepers and Administrators
20
Sign-Off
NOTE: The Timekeeper role will not have access to the Sign-Off functionality.
On the 5th business day before each payday, a sign-off reminder notification will be sent to
Agency Administrators.
Once all exceptions have been corrected and all approvals obtained, the timecards are ready
for sign-off.
VERY IMPORTANT! Sign-off for each of the items below must be done separately.
Sign-off for Arrears employees should be completed in Previous Pay Period.
Sign-off for Current employees should be completed in Current Pay Period.
o Not all agencies will have employees paid in the current pay period.
Arrears Employee Sign-off
1. From Pay Period Close, choose all Arrears employees in the list using the Arrears
Employees selection in the Show drop-down.
2. Use Actions>Select All to select all the employees in the list.
3. Choose Previous Pay Period from the Time Period drop-down.
4. Select Approvals>Sign Off to sign-off on all timecards.
5. Click the Refresh button to view the check marks in the Signed Off column.
6. Click the Signed Off column header once to sort any non-signed off timecards to the top
of the list. Review these and if necessary, make corrections and apply sign-off ONLY to
these timecards.
IMPORTANT NOTE!
DO NOT re-apply sign-off to timecards that are already signed off. This will apply the sign-off to the Current Pay Period.
After sign-off is complete, check for any failures from Related Items>Group Edit Results (See
section below for viewing Group Edit Results).
If for some reason sign-off needs to be removed, contact your eSTART Administrator.

eSTART User Guide for Timekeepers and Administrators
21
Current Employee Sign-Off
1. From Pay Period Close, choose all Current employees in the list using the Current
Employees selection in the Show drop-down.
2. Use Actions>Select All to select all the employees in the list.
3. Choose Current Pay Period from the Time Period drop-down.
4. Select Approvals>Sign Off to sign-off on all timecards.
5. Click the Refresh button to view the check marks in the Signed Off column.
6. Click the Signed Off column header once to sort any non-signed off timecards to the top
of the list. Review these and if necessary, make corrections and apply sign-off again
ONLY to these timecards.
After sign-off is complete, check for any failures from Related Items>Group Edit Results (see
next section for instructions).
VERY IMPORTANT: All employee timecards MUST be signed off by the agency. No
employee data is sent to GHRS for timecards that are not signed off.
If for some reason sign-off needs to be removed, contact your eSTART Administrator.
Terminated Employee Sign-Off
As instructed earlier, the timecard of a terminated employee should be signed off as soon as the
employee completes his last day at the agency and the manager approval is applied. However,
this should be verified to ensure these timecards have been signed off.
NOTE: The Terminated Employees hyperfind must be used to retrieve employees in
terminated status.
1. From Pay Period Close, choose all Terminated employees in the list using the
Terminated Employees selection in the Show drop-down.
2. Use Actions>Select All to select all the employees in the list.
3. Choose Previous Pay Period from the Time Period drop-down.
4. Select Approvals>Sign Off to sign-off on all timecards.
VERY IMPORTANT! DO NOT update or sign-off on an employee’s timecard for any pay period
following their last day at the agency. This will be the responsibility of the current agency.
eSTART User Guide for Timekeepers and Administrators
22
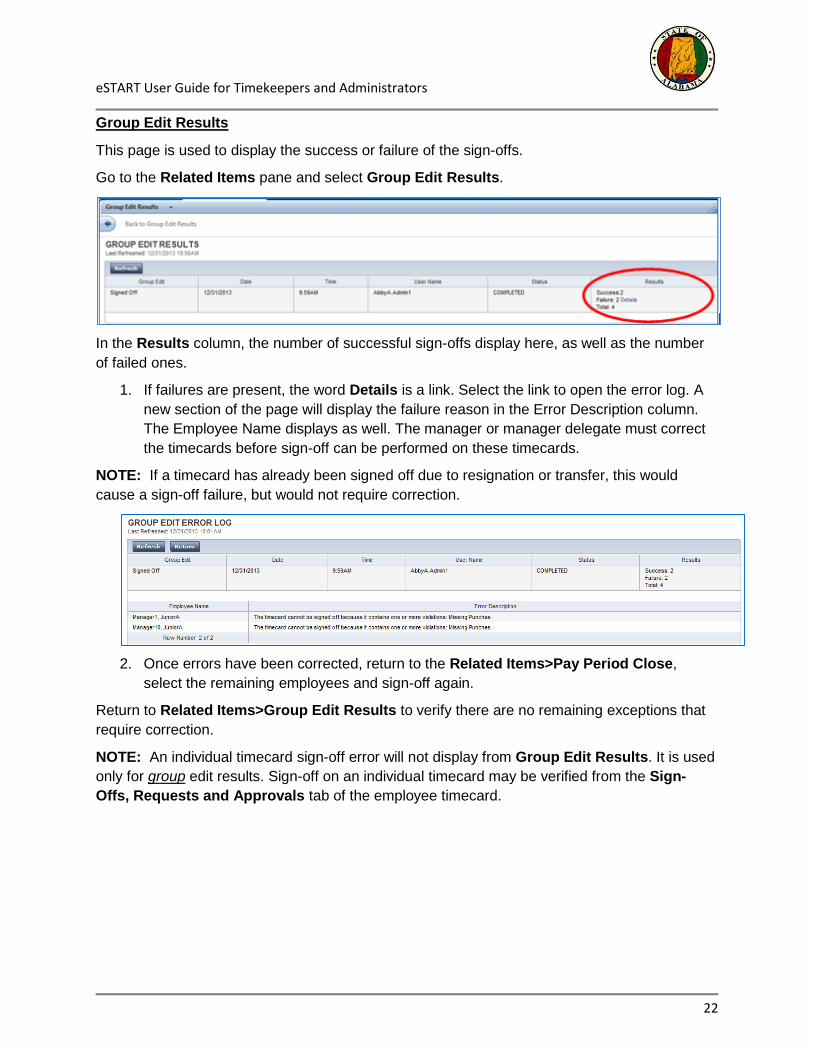
Group Edit Results
This page is used to display the success or failure of the sign-offs.
Go to the Related Items pane and select Group Edit Results.
In the Results column, the number of successful sign-offs display here, as well as the number
of failed ones.
1. If failures are present, the word Details is a link. Select the link to open the error log. A
new section of the page will display the failure reason in the Error Description column.
The Employee Name displays as well. The manager or manager delegate must correct
the timecards before sign-off can be performed on these timecards.
NOTE: If a timecard has already been signed off due to resignation or transfer, this would
cause a sign-off failure, but would not require correction.
2. Once errors have been corrected, return to the Related Items>Pay Period Close,
select the remaining employees and sign-off again.
Return to Related Items>Group Edit Results to verify there are no remaining exceptions that
require correction.
NOTE: An individual timecard sign-off error will not display from Group Edit Results. It is used
only for group edit results. Sign-off on an individual timecard may be verified from the Sign-
Offs, Requests and Approvals tab of the employee timecard.
eSTART User Guide for Timekeepers and Administrators
23
HyperFind Query Setup by Agency/Division
HyperFind Queries are used to filter and retrieve lists of employees who meet a specific set of
criteria, for example, all employees in a specific agency or division. In this example, we will
create a query to retrieve all employees in the Agency, Division 0000.
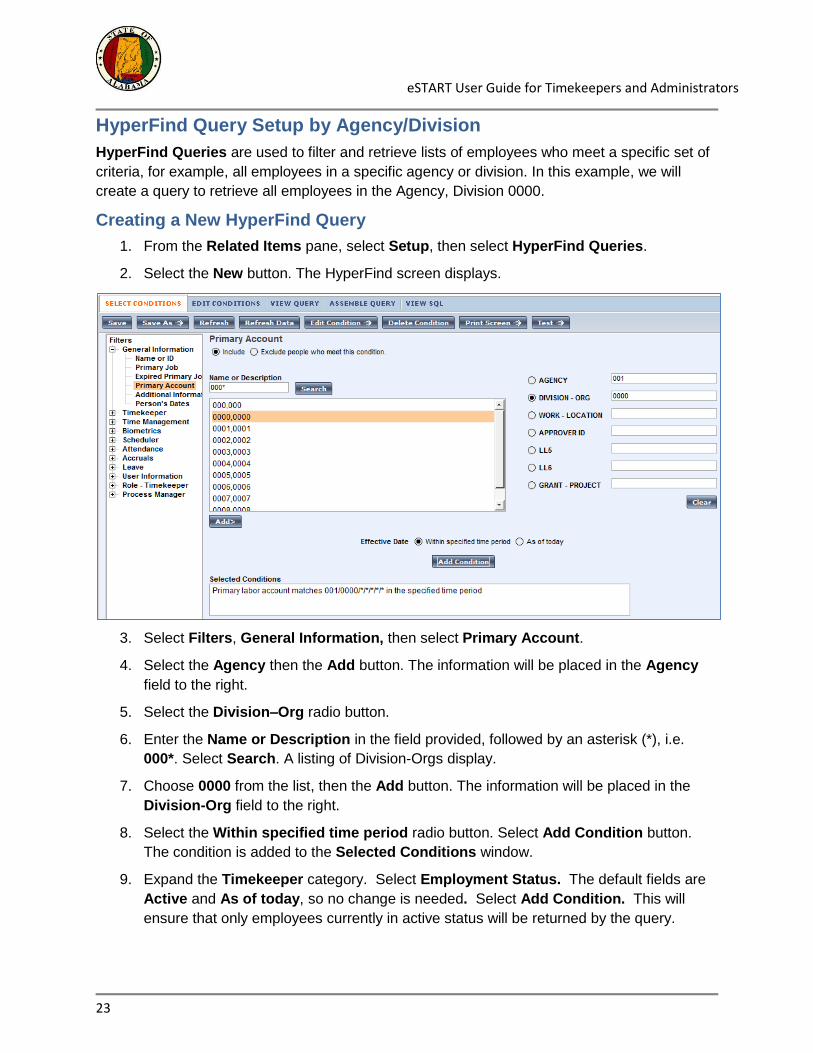
Creating a New HyperFind Query
1. From the Related Items pane, select Setup, then select HyperFind Queries.
2. Select the New button. The HyperFind screen displays.
3. Select Filters, General Information, then select Primary Account.
4. Select the Agency then the Add button. The information will be placed in the Agency
field to the right.
5. Select the Division–Org radio button.
6. Enter the Name or Description in the field provided, followed by an asterisk (*), i.e.
000*. Select Search. A listing of Division-Orgs display.
7. Choose 0000 from the list, then the Add button. The information will be placed in the
Division-Org field to the right.
8. Select the Within specified time period radio button. Select Add Condition button.
The condition is added to the Selected Conditions window.
9. Expand the Timekeeper category. Select Employment Status. The default fields are
Active and As of today, so no change is needed. Select Add Condition. This will
ensure that only employees currently in active status will be returned by the query.
eSTART User Guide for Timekeepers and Administrators
24
10. To test the query, select the Test button. A listing of employees should display.
11. If correct, close the test page. Then select Save.
NOTE: HYPERFIND in the upper left-hand corner will display as *HYPERFIND in orange font
until saved.
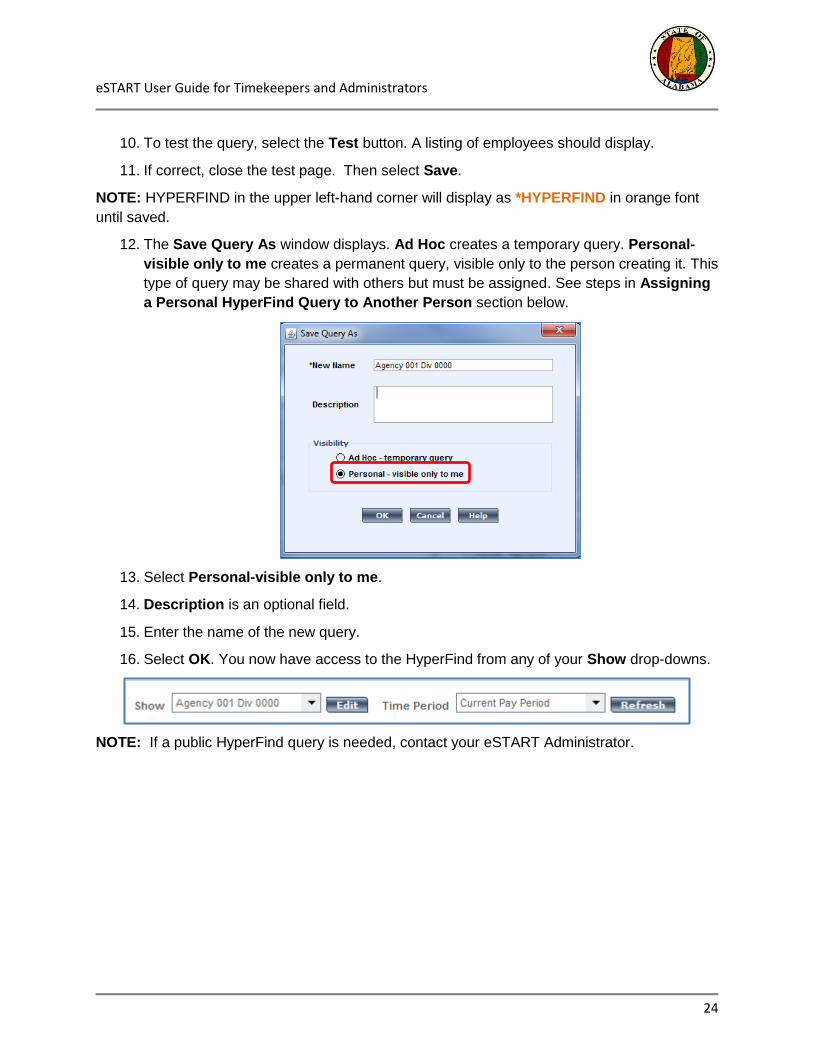
12. The Save Query As window displays. Ad Hoc creates a temporary query. Personal-
visible only to me creates a permanent query, visible only to the person creating it. This
type of query may be shared with others but must be assigned. See steps in Assigning
a Personal HyperFind Query to Another Person section below.
13. Select Personal-visible only to me.
14. Description is an optional field.
15. Enter the name of the new query.
16. Select OK. You now have access to the HyperFind from any of your Show drop-downs.
NOTE: If a public HyperFind query is needed, contact your eSTART Administrator.
. Another option is to select
Group>Add to Group from the
Action bar.
eSTART User Guide for Timekeepers and Administrators
25
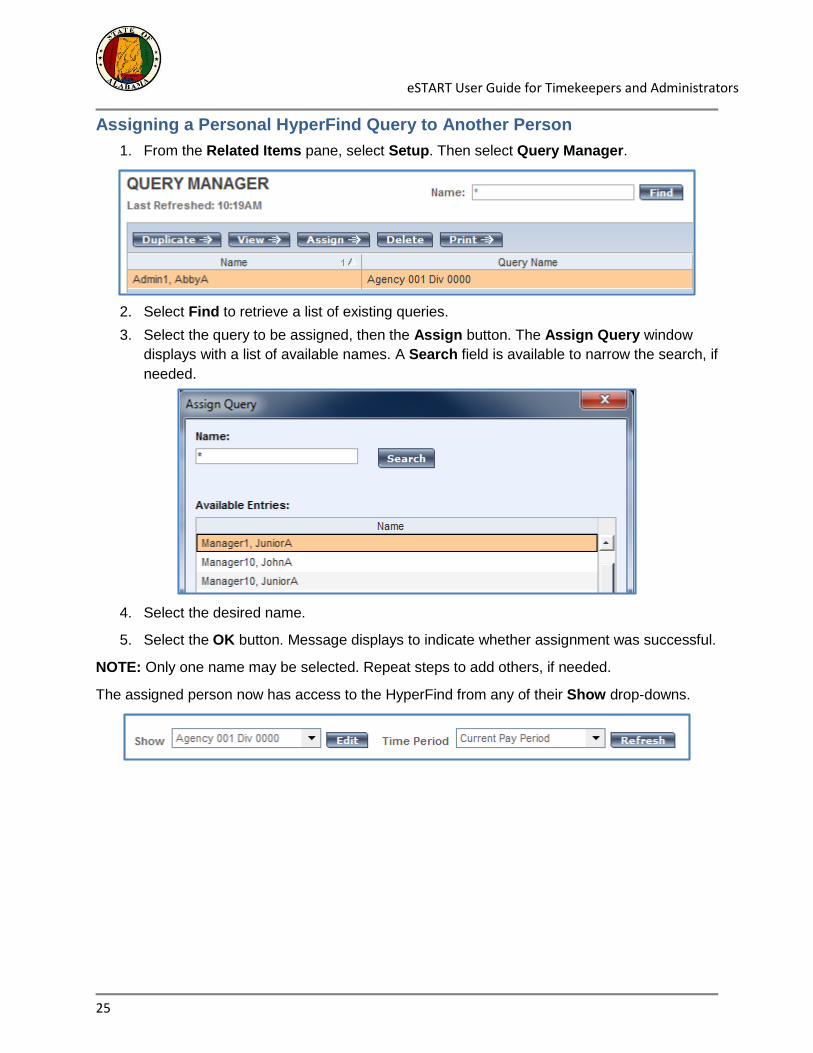
Assigning a Personal HyperFind Query to Another Person
1. From the Related Items pane, select Setup. Then select Query Manager.
2. Select Find to retrieve a list of existing queries.
3. Select the query to be assigned, then the Assign button. The Assign Query window
displays with a list of available names. A Search field is available to narrow the search, if
needed.
4. Select the desired name.
5. Select the OK button. Message displays to indicate whether assignment was successful.
NOTE: Only one name may be selected. Repeat steps to add others, if needed.
The assigned person now has access to the HyperFind from any of their Show drop-downs.

eSTART User Guide for Timekeepers and Administrators
26
Delegate Profile Setup (Short-Term Delegation)
The Delegate Profile is used by managers to temporarily delegate their eSTART duties to
another manager when away from the office. It contains a listing of other division managers to
which duties can be delegated. Delegate profile setup is a two-step process you must complete
for each division in your agency.
Delegate Profile Setup (Step 1)
1. From the Related Items pane, select Setup. Then select Delegate Profiles.
2. Select New from the Delegate Profiles screen.
3. The screen below displays. Enter the name of the profile in the Name field.
4. Select the Search button to retrieve a list of manager delegates. To narrow the search,
enter a letter or letters of the last name in front of the asterisk (*), then select Search.
5. The Available Delegates display. Select the desired delegate(s), then the right arrow
button to move from Available Delegates to Selected Delegates.
NOTE: To select more than one delegate, hold down the CTRL key and click on each name,
then the right arrow button. Additionally, if a new manager is added, the agency administrator
will need to manually add the new manager to the delegate profile.
6. Select the Save button.

eSTART User Guide for Timekeepers and Administrators
27
Assigning the Delegate Profile to the People Editor (Step 2)
The Delegate Profile must be added to the manager’s People Editor in order to be used.
1. From the Agency Administrator workspace, select My Genies>QuickFind. (Both
Reconcile Timecard and QuickFind may be accessed from the Related Items pane
located on the right-side of the screen.)
2. Locate manager(s) to be added to the delegate profile.
3. Highlight the manager name(s).
4. Select People from the Quick Links menu.
5. Select Job Assignment tab.
6. Select Access Profiles.
7. Select the delegate profile name from the Delegate Profile drop-down.
8. Click Save.
The delegates should now be available on the Temporary Delegate pane. Refer to the Manager
Delegation for Requesting Backup Coverage job aid for assistance.
9. Repeat for each manager.
NOTE: A person cannot edit his/her own People Editor record. For those who need to be
added to the new Delegate Profile, Step 2 - Assigning the Delegate Profile to the People Editor
will need to be completed by another Agency Administrator.
. Another option is to select Group>Add to Group from the Action bar.

eSTART User Guide for Timekeepers and Administrators
28
Delegate Manager Setup (Long-Term Delegation)
This process is used to grant a non-manager the long-term ability to complete manager
functions for specified manager(s). It should only be used for long-term delegation.
For short-term delegation coverage, such as leave time with a specific end date, the Manager
Delegation process should be used. This is accessed from Related Items>Temporary
Delegation.
1. From My Genies>Reconcile Timecard or QuickFind, select the name of the person to
be designated as the Delegate Manager. Right-click and choose People from the menu.
(Both Reconcile Timecard and QuickFind may be accessed from the Related Items
pane located on the right-side of the screen.)
2. In the People Editor, from the Person tab, select Additional Information from the left
menu. In the Manager Access Group field, key the Employee ID number(s) of the
manager(s) whose employees are being delegated.
NOTE: More than one ID may be keyed, but no more than 11 are allowed. The ID(s) should be
keyed in the format below, with a comma separating each number and no spaces: Ex:
12345,56789,90123.
3. Select the Job Assignment tab. Select Access Profiles from the left menu. From the
Function Access Profile drop-down choose AL-Delegate Manager. Select Save.
NOTE: These changes will not become effective until the following business day.

eSTART User Guide for Timekeepers and Administrators
29
Rules, Cascades and Interfaces
Holiday Credit Rules
For most employees, the holiday will be credited if the employee is in pay status any portion of
the work day before and the day after the holiday. One exception to this is a part-time or hourly
employee.
Part-Time Employees
Part-time employees receive holiday credit based on their schedule. If the holiday falls on a
scheduled work day and the employee is in pay status the day before and after, the holiday will
be granted based on the scheduled number of hours for that day.
If the employee is not scheduled to work on the holiday, no credit will be granted.
Hourly Employees
Hourly employees will not automatically receive holiday credit. The timecard will have a
placeholder displaying the holiday, but no credit will actually be given to the employee.
Therefore, the holiday will need to be manually added to the timecard for the eligible hourly
employee.
1. On the date of the holiday, select the Insert Row button.
2. Select Holiday Earned from the Pay Code drop-down list.
3. In the Amount column, key the number of hours for the holiday.
4. Select the Save button.
5. If the employee observed the holiday, insert a second row to the timecard and select
Holiday Taken in the Pay Code column. Enter the number of Holiday hours taken in the
Amount column. Reminder: punches cannot be entered on the same line as the holiday.
6. Select the Save button.
NOTE: The Totals & Schedule portion of the timecard displays the number of Holiday Taken
hours and the Holiday Earned hours.
eSTART User Guide for Timekeepers and Administrators
30
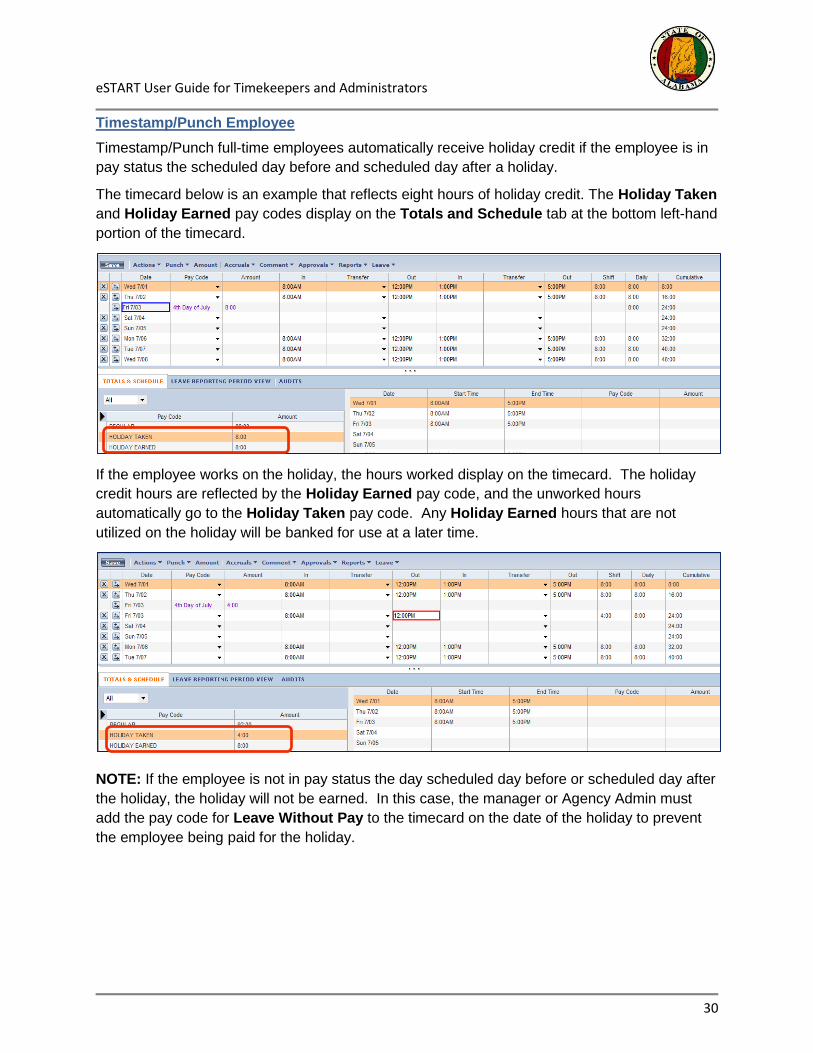
Timestamp/Punch Employee
Timestamp/Punch full-time employees automatically receive holiday credit if the employee is in
pay status the scheduled day before and scheduled day after a holiday.
The timecard below is an example that reflects eight hours of holiday credit. The Holiday Taken
and Holiday Earned pay codes display on the Totals and Schedule tab at the bottom left-hand
portion of the timecard.
If the employee works on the holiday, the hours worked display on the timecard. The holiday
credit hours are reflected by the Holiday Earned pay code, and the unworked hours
automatically go to the Holiday Taken pay code. Any Holiday Earned hours that are not
utilized on the holiday will be banked for use at a later time.
NOTE: If the employee is not in pay status the day scheduled day before or scheduled day after
the holiday, the holiday will not be earned. In this case, the manager or Agency Admin must
add the pay code for Leave Without Pay to the timecard on the date of the holiday to prevent
the employee being paid for the holiday.

eSTART User Guide for Timekeepers and Administrators
31
Exempt Employees
Full-time, exempt employees will automatically receive credit for a holiday but must be in pay
status the work day before and after the holiday. The manager does not have to make any
changes to the timecard for the employee to receive credit. However, the holiday credit may
need to be replaced with Leave Without Pay, if the employee is not eligible for the holiday,
based on the agency’s policy for pay status.
For exempt employees, the Holiday Earned and Holiday Taken – Exempt pay codes display
with the number of holiday hours granted to the employee based on their work schedule.
If the exempt employee works on the holiday and should bank the holiday hours to be used at a
later date, the manager will need to make adjustments to the timecard to reflect the correct
hours worked.
NOTE: The employee also has the option of punching their time when working on a holiday.
Using the “insert” icon located to the left of the date of the holiday, insert an additional
row into the timecard.
In the In and Out columns, enter the time that reflects the schedule that the employee
worked. Reminder: punches cannot be entered on the same row as the holiday.
Select the Save button. Notice the Holiday Earned pay code below.
Notice the holiday credit amount in the timecard is now zero and only eight hours of Holiday Earned displays in the lower left portion of the timecard. The Holiday Taken pay code no longer displays.
eSTART User Guide for Timekeepers and Administrators
32
Non-Traditional Employees
Non-Traditional employees are those whose work schedules fall outside of the normal Monday
through Friday work week. For example, those who work overnight shifts or those who work
four 10-hour days a week are considered non-traditional employees.
Non-Traditional employees will automatically receive holiday credit hours based on their
schedule type. That is, whether their schedule requires an 8, 10, 12 or 24 hour day. eSTART
will apply 8, 10, 12 or 24 hours of Holiday Earned for these employees, provided the employee
is in pay status on the scheduled day before and scheduled day after the holiday. The Holiday
Earned hours will be automatically banked.
NOTE: The holiday will be credited even if the employee is not scheduled to work on the
holiday, provided they are in pay status the scheduled work day before and after.
If the employee is not in pay status the scheduled day before or scheduled day after the holiday,
the holiday will not be earned. In this case, the manager or Agency Admin must add the pay
code for Leave Without Pay to the timecard on the date of the holiday to prevent employee
payment for the holiday.
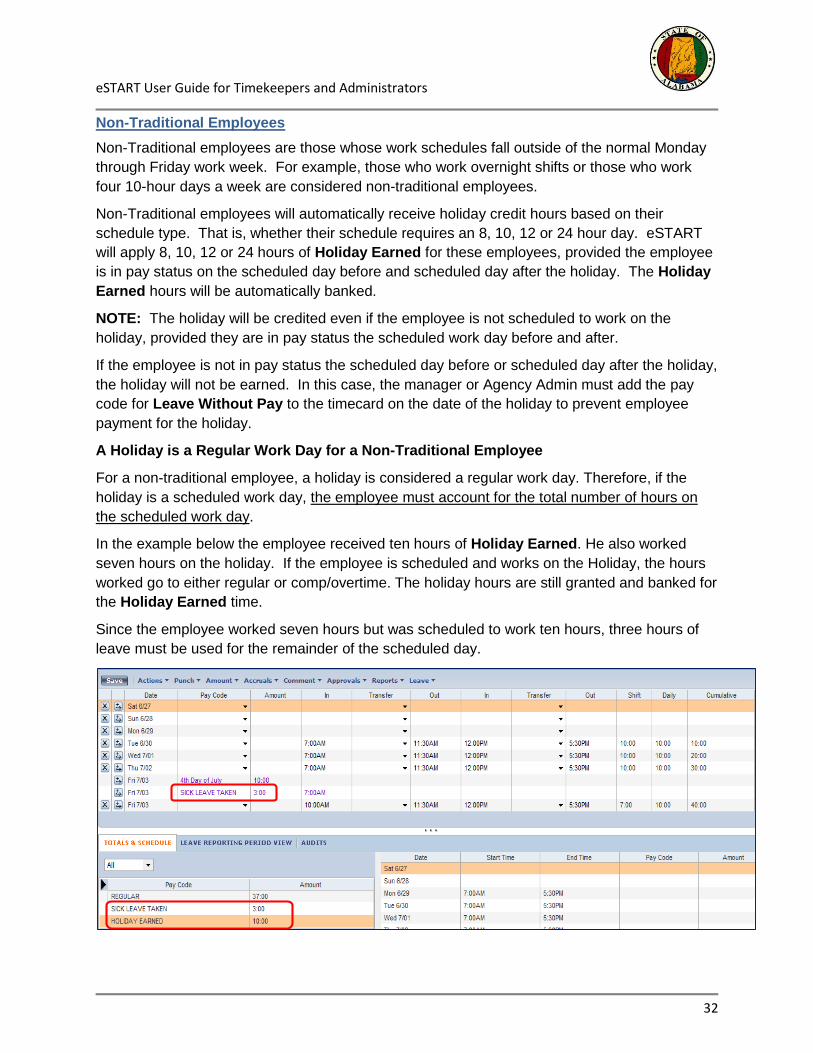
A Holiday is a Regular Work Day for a Non-Traditional Employee
For a non-traditional employee, a holiday is considered a regular work day. Therefore, if the
holiday is a scheduled work day, the employee must account for the total number of hours on
the scheduled work day.
In the example below the employee received ten hours of Holiday Earned. He also worked
seven hours on the holiday. If the employee is scheduled and works on the Holiday, the hours
worked go to either regular or comp/overtime. The holiday hours are still granted and banked for
the Holiday Earned time.
Since the employee worked seven hours but was scheduled to work ten hours, three hours of
leave must be used for the remainder of the scheduled day.

eSTART User Guide for Timekeepers and Administrators
33
Bereavement Rules
Bereavement
When an employee takes leave for bereavement and does not have a sufficient sick leave
accrual balance, the appropriate bereavement payback agreement document must be
completed by the employee and forwarded to the Timekeeper/Agency Administrator.
The Timekeeper/Agency Administrator will add the SICK LEAVE BEREAVEMENT OWED pay
code to the employee’s timecard. The amount owed will display a negative balance in the
employee’s accruals until the balance is paid back.
The bereavement time will then be paid back based on the payback agreement established by
the agency. Bereavement payback will continue to be handled in GHRS. The totals will be
updated in eSTART through an interface from GHRS.
NOTE: A HyperFind Query for Bereavement Leave Owed is available to allow an easy way to
track employees who have a negative bereavement owed balance.
eSTART User Guide for Timekeepers and Administrators
34
Cascades
Annual Leave Cascade
A cascade defines how leave time is processed in the system. If Annual Leave is selected in
eSTART, leave will be used, based on the time of the year, in the order as described in the
chart below:
Annual Leave Cascade
January 1 – July 31 August 1-December 31
Comp Time Personal Day
Excess Annual Excess Annual
Annual Comp Time
Annual
NOTE The following are not impacted by the cascade:
The employee should follow the agency’s policy and procedures regarding the usage of personal leave days before August 1st.
Holiday banked time should be scheduled by the supervisor in the quarter in which it was earned.
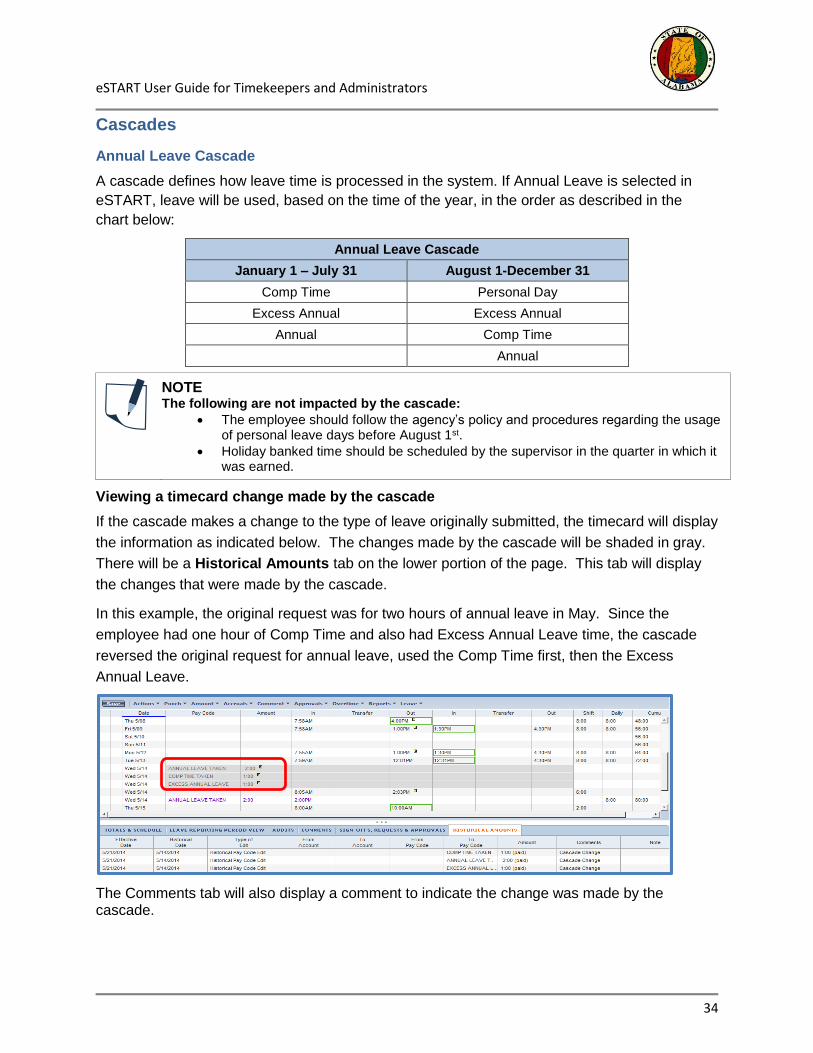
Viewing a timecard change made by the cascade
If the cascade makes a change to the type of leave originally submitted, the timecard will display
the information as indicated below. The changes made by the cascade will be shaded in gray.
There will be a Historical Amounts tab on the lower portion of the page. This tab will display
the changes that were made by the cascade.
In this example, the original request was for two hours of annual leave in May. Since the
employee had one hour of Comp Time and also had Excess Annual Leave time, the cascade
reversed the original request for annual leave, used the Comp Time first, then the Excess
Annual Leave.
The Comments tab will also display a comment to indicate the change was made by the cascade.
eSTART User Guide for Timekeepers and Administrators
35
Interfaces
Compensatory Time Leave Payout
Comp Time hours over an employee’s regular work hours are sent to a Comp Time Earned
bucket. For non-law enforcement employees, the bucket limit is 240 hours. For law enforcement
employees, the bucket limit is 480. Any hours earned that exceed the 240 or 480 limit are sent
to a Comp Overage bucket.
Once an employee’s balance reaches 220 hours for non-law enforcement or 440 hours for law
enforcement, a notification is sent to the employee, the employee’s manager, and all Agency
Administrators indicating that the employee’s Comp balance is nearing its limit and needs to be
addressed. A liquidation request should then be sent to State Personnel.
eSTART has an automated interface to GHRS that runs on Wednesday and Saturday each
week. Any Comp Overage hours for the week will be added to the timecard on the current pay
period and sent to GHRS in the next extract file.
eSTART User Guide for Timekeepers and Administrators
36
Appendix
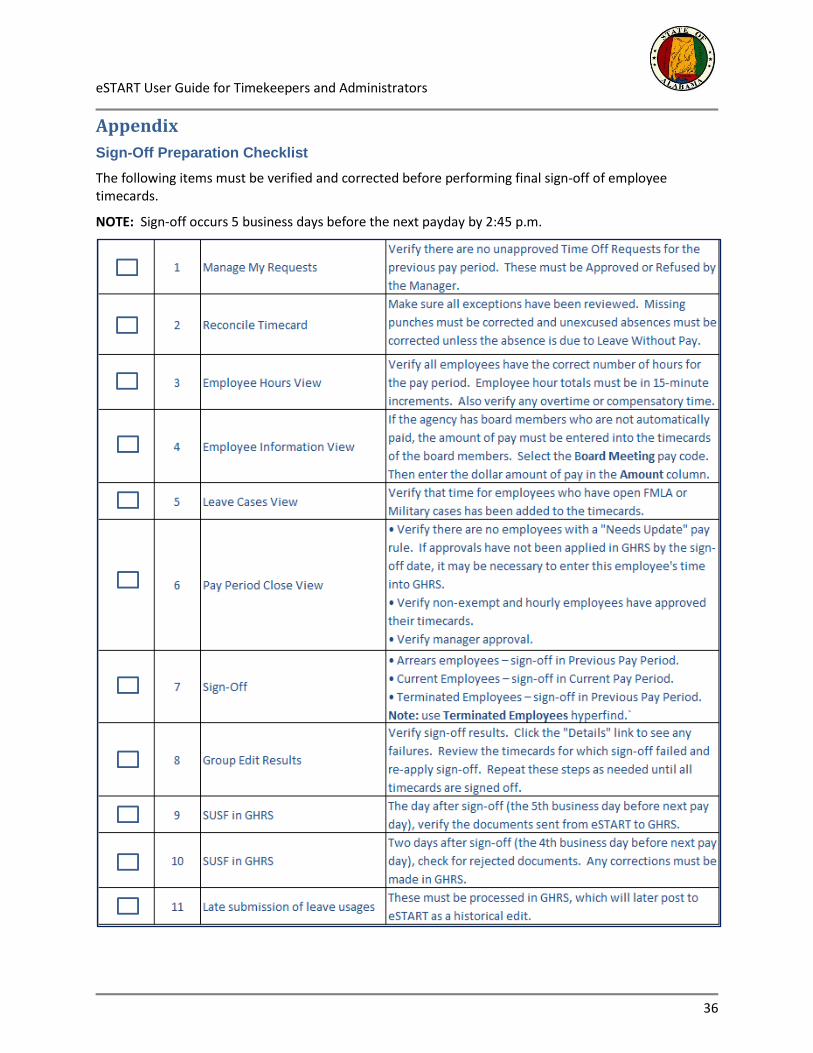
Sign-Off Preparation Checklist
The following items must be verified and corrected before performing final sign-off of employee timecards.
NOTE: Sign-off occurs 5 business days before the next payday by 2:45 p.m.
eSTART User Guide for Timekeepers and Administrators
37
Partial Day Time Off Requests for Exempt Employees
Rules for Partial Day Time Off Requests
An exempt employee has an assigned schedule with an automatically generated lunch time of either 30
or 60 minutes. In a normal day, the lunch is automatically deducted once the employee has worked for
4:01 hours. However, if the exempt employee takes a partial day of leave, the following rules apply:
1. If the employee submits a time off request and the start time of the request allows for the employee to
work at least 4:01 hours in the morning portion of his shift, the lunch will be automatically deducted.
For example, if his schedule is 8am – 5pm and the start time of the request is 12:15pm, he would
work at least 4:01 hours before the leave start time. His lunch will be automatically deducted.
2. If the start time of the request allows for the employee to work at least 4:01 hours in the afternoon
portion of his shift, the lunch will be automatically deducted. For example, if his schedule is 8am –
5pm and the start time of the request is 9am for 2 hours, he would work at least 4:01 hours in the
afternoon. His lunch will be automatically deducted.
3. But, if the start time of the request results in fewer than 4:01 worked hours in the morning and fewer
than 4:01 worked hours in the afternoon, the lunch will not be automatically deducted. This scenario
always requires manual intervention from the employee’s manager. See the example below.
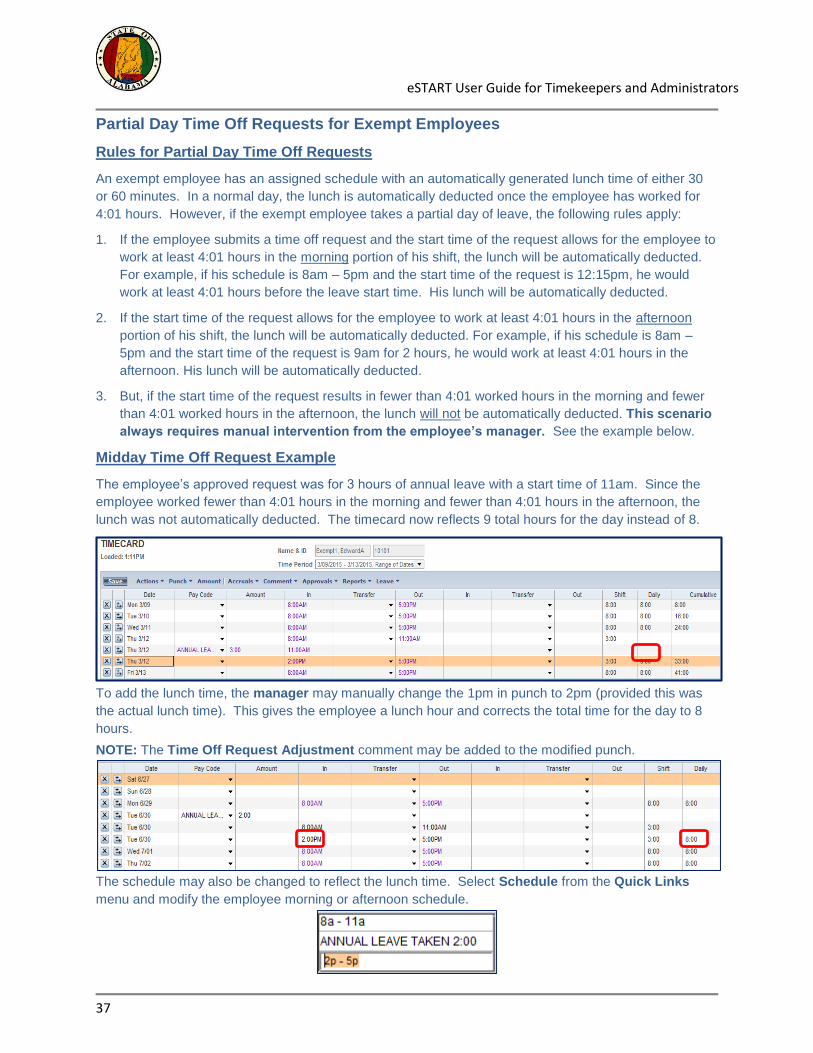
Midday Time Off Request Example
The employee’s approved request was for 3 hours of annual leave with a start time of 11am. Since the
employee worked fewer than 4:01 hours in the morning and fewer than 4:01 hours in the afternoon, the
lunch was not automatically deducted. The timecard now reflects 9 total hours for the day instead of 8.
To add the lunch time, the manager may manually change the 1pm in punch to 2pm (provided this was
the actual lunch time). This gives the employee a lunch hour and corrects the total time for the day to 8
hours.
NOTE: The Time Off Request Adjustment comment may be added to the modified punch.
The schedule may also be changed to reflect the lunch time. Select Schedule from the Quick Links
menu and modify the employee morning or afternoon schedule.

eSTART User Guide for Timekeepers and Administrators
38
Lunch Time Included in the Time Off Request
NOTE: Employees should always submit their requests for only the number of hours of actual
leave taken. Lunch time should not be included.
However, if the lunch time was erroneously included in the time off request, the best option is to have the
employee cancel and resubmit the request for the correct number of hours. See the Time Off Requests
job aid for employees on the eSTART Online Resources website for instructions on cancelling the
request. Reminder: The manager must approve the cancelled request and select “Restore Schedule”
when approving the cancellation.
Another option for the manager is to manually change the number of hours of the request from Schedule
Editor. The schedule will also need to be edited in order to account for the lunch time.
From the employee timecard, click Schedule from the Quick Links menu or select Schedule Editor from
the Related Items pane.
1. Select the pay code in the cell of the scheduled day.
2. Right-click and select Edit>Pay Code from the pop-up menu.
3. The Pay Code Editor displays.
4. Change the Amount field to 2:00. The Pay Code or Start Time of the request may also be
edited here if needed.
5. Click OK to return to Schedule Editor.
6. To modify the schedule for the lunch time, click in the cell for either the morning or afternoon shift
and type in the correct time. In the example, 1p was changed to 2p.
7. Save the Schedule Editor page.
8. Return to the timecard to verify the change.
eSTART User Guide for Timekeepers and Administrators
39
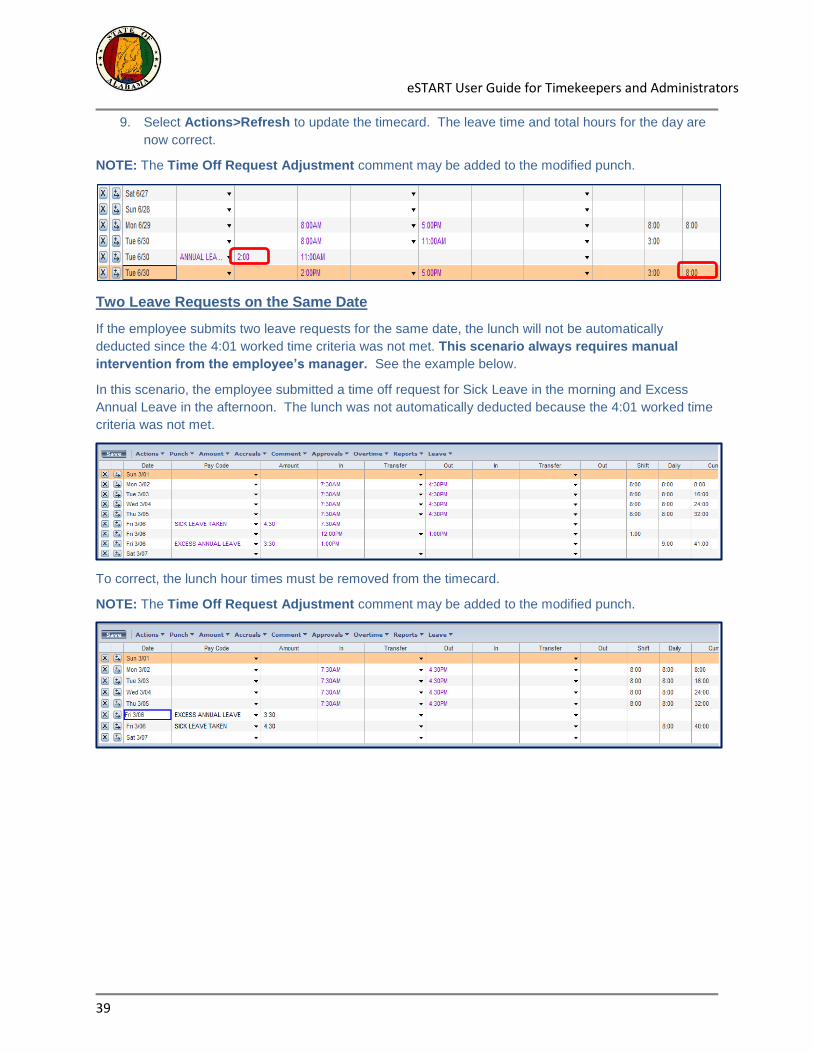
9. Select Actions>Refresh to update the timecard. The leave time and total hours for the day are
now correct.
NOTE: The Time Off Request Adjustment comment may be added to the modified punch.
Two Leave Requests on the Same Date
If the employee submits two leave requests for the same date, the lunch will not be automatically
deducted since the 4:01 worked time criteria was not met. This scenario always requires manual
intervention from the employee’s manager. See the example below.
In this scenario, the employee submitted a time off request for Sick Leave in the morning and Excess
Annual Leave in the afternoon. The lunch was not automatically deducted because the 4:01 worked time
criteria was not met.
To correct, the lunch hour times must be removed from the timecard.
NOTE: The Time Off Request Adjustment comment may be added to the modified punch.

eSTART User Guide for Timekeepers and Administrators
40
NOTES: