
Dual or Multiple Gtids with the Galileo Desktop - Travelport Desktop -Dual Gtids Galileo Desktop –...
17
Dual or Multiple Gtids with the Galileo Desktop ª Copyright Galileo International™ Partnership 2003
-
Upload
truongthien -
Category
Documents
-
view
232 -
download
3
Transcript of Dual or Multiple Gtids with the Galileo Desktop - Travelport Desktop -Dual Gtids Galileo Desktop –...

DDuuaall oorr MMuullttiippllee GGttiiddss wwiitthh tthhee GGaalliilleeoo DDeesskkttoopp
Copyright Galileo International™ Partnership 2003

Galileo Desktop-Dual Gtids
Galileo Desktop – Dual Gtids
In This Guide
The Galileo Desktop is able to support more than one Gtid allowing users to change their emulation quickly and effortlessly. This guide will demonstrate how to switch Viewpoint to access a second Gtid and also show how to have multiple Focalpoint windows with different Gtids.
Previously a user may have had Service Bureau functionality to change pseudo, but this would not have changed their currency, so the user often would need to close the application, change their client id manually, re-launch and re-download their Gtid each time the agent needs to change currency. Whilst Service Bureau Gtids are still required for large locations, smaller agencies, with few sites may be able to use this following solution instead of deploying Service Bureau in their business.
Configuration requirements:
In earlier versions of Focalpoint a maximum of two Gtids could be attache d to the one client id.
With the Galileo Desktop (version 4.1.2.39) only the first Gtid associated to a Client ID is usable.
Additional Gtids will each require their own client id.
There are two methods mentioned in this document. The first is to change all Focalpoint windows to a different Gtid, and the other is to have many windows open, accessing different Gtids simultaneously .
Whilst both methods will work simultaneously it is best to learn one method or the other as using both can lead to confusion and the possibility that PNRs are created and ticketed in the wrong pseudo.

Galileo 360 Desktop-– Dual Gtids
Galileo 360 Desktop-– Dual Gtids 3
Table of Contents
In This Guide................................ ................................ ................................ ................................ ......2 Configuration requirements:..........................................................................................................2
Table of Contents ...............................................................................................................................3 Changing the TCP/IP configuration settings ...................................................................................4 To edit a configuration: .................................................................................................................5 To create a new configuration: ................................ ................................ ................................ ......6 To copy a configuration: ...............................................................................................................7 To delete a configuration: .............................................................................................................8
Creating Focalpoint Windows with different Gtids ..................................................................................9 Points to note when using more than one Gtid in the Focalpoint environment.................................11
Changing Gtids for Viewpoint & other Companion Tools......................................................................13 Points to note when changing the default Client ID.......................................................................14
Connectivity types.............................................................................................................................15

Galileo 360 Desktop-– Dual Gtids
Galileo 360 Desktop-– Dual Gtids
Changing the TCP/IP configuration settings
Before making any changes it is strongly recommended that a copy of the dat32com.ini file be save. This file can be found in the c:\fp\machine\ directory.
During installation of the Galileo Desktop application it is recommended that only one Client Identifier is added and tested.
Once confirmation , that connectivity to the host has been established, proceed with these steps to add additional client identifiers.
The Focalpoint TCP/IP Configuration settings dialog is used to add, view, edit, and delete your configuration settings. The configuration contains the default connection and attributes associated with your agency. If you wish to view or change the default settings, such as your keyboard mode, you can use this dialog to do so. You can also use this dialog to set up another host connection.
To add additional Gtids or change existing settings, access to the Focalpoint TCP/IP Configuration settings dialog box which is available through the Windows® Control Panel.
On XP machines the control panel has Category view & Classic view.
The Galileo TCP/IP icon will be found in the “other control panel options” when in Category view.

Galileo 360 Desktop-– Dual Gtids
Galileo 360 Desktop-– Dual Gtids 5
To edit a configuration:
From the Host/Galileo Desktop TCP/IP Configuration dialog box:
1. Click to select and highlight the connection you want to edit.
2. Click Edit.
The Connection dialog box is displayed.
3. Make your changes.
4. Click OK, then click OK again.
Galileo 360 Desktop-– Dual Gtids
6 Galileo 360 Desktop-– Dual Gtids
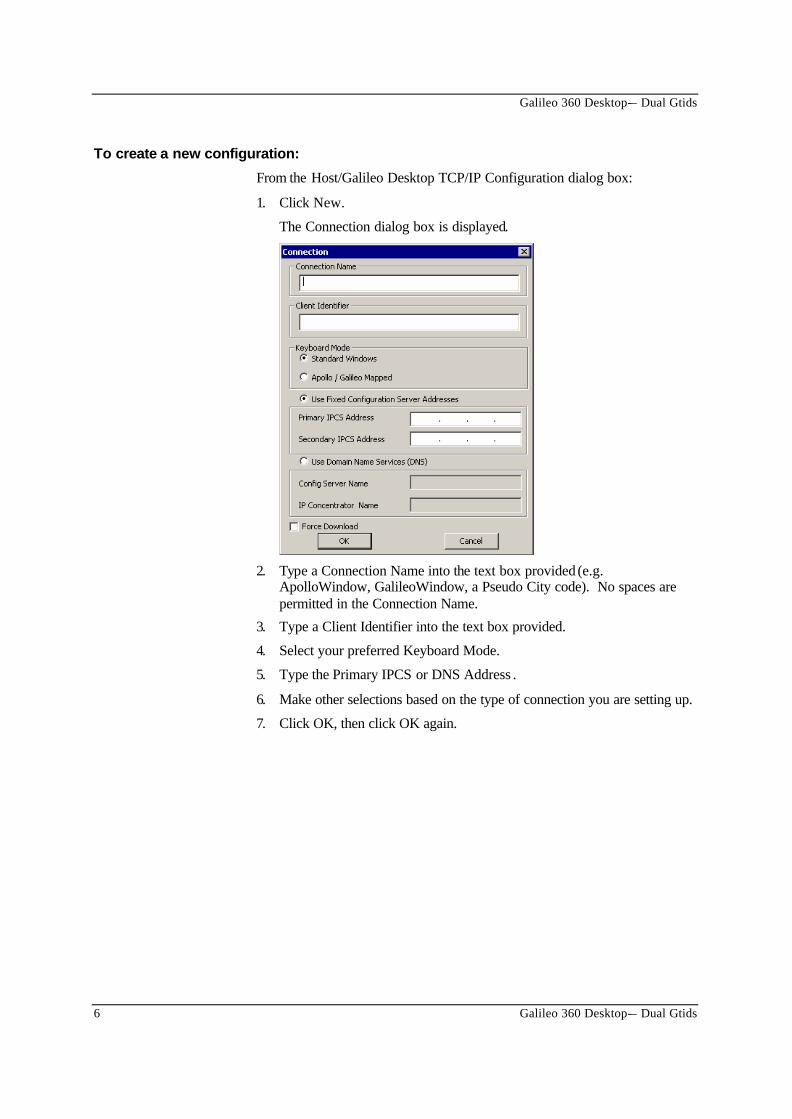
To create a new configuration:
From the Host/Galileo Desktop TCP/IP Configuration dialog box:
1. Click New.
The Connection dialog box is displayed.
2. Type a Connection Name into the text box provided (e.g.
ApolloWindow, GalileoWindow, a Pseudo City code). No spaces are permitted in the Connection Name.
3. Type a Client Identifier into the text box provided.
4. Select your preferred Keyboard Mode.
5. Type the Primary IPCS or DNS Address .
6. Make other selections based on the type of connection you are setting up.
7. Click OK, then click OK again.

Galileo 360 Desktop-– Dual Gtids
Galileo 360 Desktop-– Dual Gtids 7
To copy a configuration:
From the Host/Galileo Desktop TCP/IP Configuration dialog box.
1. Click to select and highlight the connection you want to copy.
2. Click Copy.
The Connection dialog box is displayed.
3. Type a new Connection Name into the text box provided (e.g.
ApolloWindow, GalileoWindow, a Pseudo City code). No spaces are permitted in the Connection Name.
4. Type a Client Identifier (if different) into the text box provided.
5. Select your preferred Keyboard Mode.
6. Type the Primary IPCS or DNS Address (if different).
7. Make other selections based on the type of connection you are setting up.
8. Click OK, then click OK again.

Galileo 360 Desktop-– Dual Gtids
8 Galileo 360 Desktop-– Dual Gtids
To delete a configuration:
From the Host/Galileo Desktop TCP/IP Configuration dialog box.
1. Click to select/highlight the connection you want to delete.
2. Click Delete.
3. Click OK.
Galileo 360 Desktop-– Dual Gtids
Galileo 360 Desktop-– Dual Gtids 9
Creating Focalpoint Windows with different Gtids
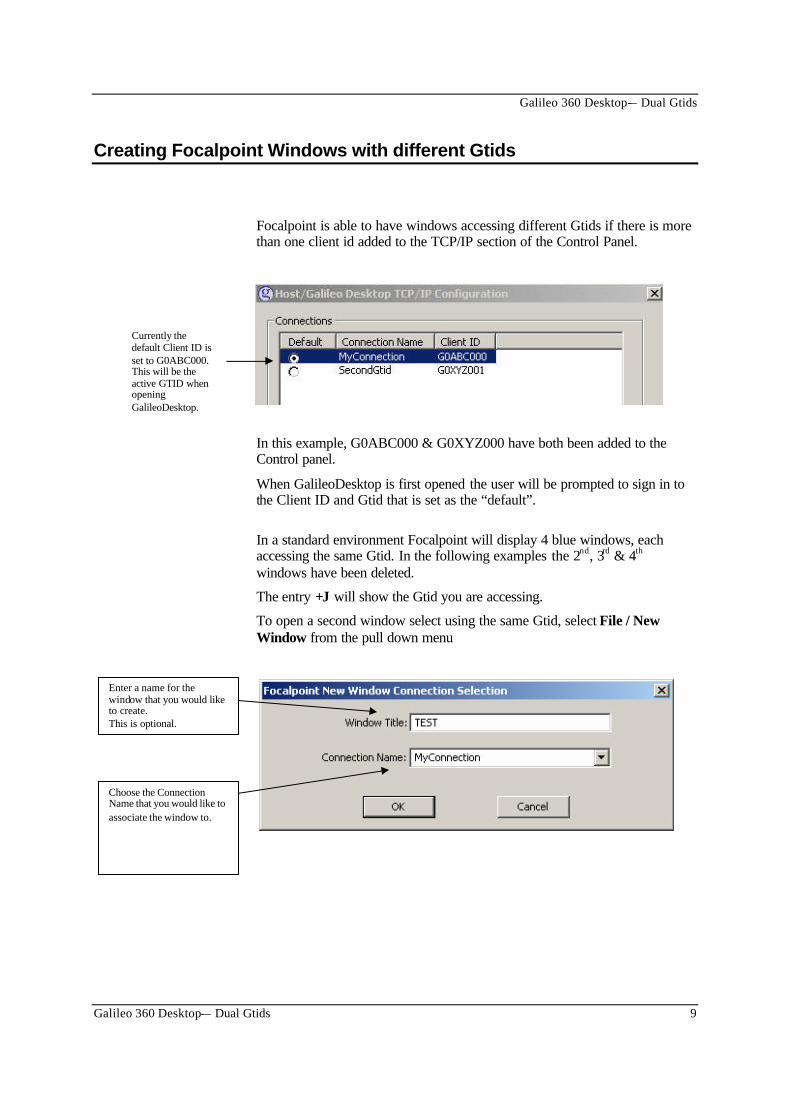
Focalpoint is able to have windows accessing different Gtids if there is more than one client id added to the TCP/IP section of the Control Panel.
In this example, G0ABC000 & G0XYZ000 have both been added to the Control panel.
When GalileoDesktop is first opened the user will be prompted to sign in to the Client ID and Gtid that is set as the “default”.
In a standard environment Focalpoint will display 4 blue windows, each accessing the same Gtid. In the following examples the 2nd, 3rd & 4th windows have been deleted.
The entry +J will show the Gtid you are accessing.
To open a second window select using the same Gtid, select File / New Window from the pull down menu
Currently the default Client ID is set to G0ABC000. This will be the active GTID when opening GalileoDesktop.
Enter a name for the window that you would like to create. This is optional.
Choose the Connection Name that you would like to associate the window to.

Galileo 360 Desktop-– Dual Gtids
10 Galileo 360 Desktop-– Dual Gtids
In this example, the Connection is not changed.
A second window has been created with the same GTID as the first window.
To open a second window select using the other Gtid, select File / New Window from the pull down menu.
Give the window a name and then from the Connection Name pull down option select the other session name, the click OK.
You can see that the second window has now created itself with a different Gtid.
The window name appears here.
The Gtids are the same. +J will display this information.

Galileo 360 Desktop-– Dual Gtids
Galileo 360 Desktop-– Dual Gtids 11
Points to note when using more than one Gtid in the Focalpoint environment
Selecting File Revert will delete any added windows and restore the display to 4 standard blue windows all using the default Gtid.
The default Gtid is displayed in the control panel Galileo TCP/IP icon.
The GalileoDesktop will automatically save the layout of windows at the moment of closure. If multiple windows, with different gtids, have been created, these windows will redisplay when the GalileoDesktop is next launched.
Users can create multiple windows on each GTID. Multiple Gtids can be stored in the control panel and all gtids can be assigned a window in Focalpoint at any time. There is no limit to the amount of windows available.
Viewpoint will only display bookings created in the “Default” Focalpoint window.
Using File Revert will restore all windows to the Gtid with the Default mark against it.

Galileo 360 Desktop-– Dual Gtids
12 Galileo 360 Desktop-– Dual Gtids
Companion tools.
Following is a listing of all companion tools including Viewpoint that rely on the Gtid installed in the terminal. Some programs interact with the default Gtid only, while others interact with the Focalpoint window directly.
When using these companion tools ensure the PNR is displayed in the correct window.
Viewpoint Default Gtid
Relay Response Capture Active Window
Relay Queue Manager Active Window
Relay Booking File to Client File Active Window
Relay Client File Editor Active Window
Relay Ticket Exchange Default Gtid
Relay Printer Recovery Default Gtid
Relay Custom Check Active Window
Replay Active Window
CrossCheck Travel Default Gtid
Idiom Default Gtid

Galileo 360 Desktop-– Dual Gtids
Galileo 360 Desktop-– Dual Gtids 13
Changing Gtids for Viewpoint & other Companion Tools
Below is a listing of companion tools that are only able to interact with the default Client ID.
• Viewpoint
• Relay Ticket Exchange
• Relay Printer Recovery
• CrossCheck Travel Download
• Idiom Itinerary
These applications can be used with any Client ID and Gtid installed on the terminal, but the client id must become the “Default” session before they can be used.
To make a second or subsequent Client ID and Gtid interact with these tools follow these steps.
Close GalileoDesktop.
Open the Galileo TCP/IP icon in the Control Panel.
Simply click on the default circle next to the Client ID that you want to become the default.
Re-launch the GalileoDesktop application.
Changing the Default radio button will allow the all Companions Tools to be used

Galileo 360 Desktop-– Dual Gtids
14 Galileo 360 Desktop-– Dual Gtids
Points to note when changing the default Client ID
When changing the default Client ID in the control panel all existing Focalpoint windows change to the new Gtid.
When making the Top (or first) Client ID the default again, the windows will change back to their original setup.
Great care must be taken when using multiple windows and changing the Control Panel Default at the same time as the possibility that PNRs are created and ticketed in the wrong pseudo can occur.
Note t he GTIDS are the same in all windows now when changing the Default.
Galileo 360 Desktop-– Dual Gtids
Galileo 360 Desktop-– Dual Gtids 15
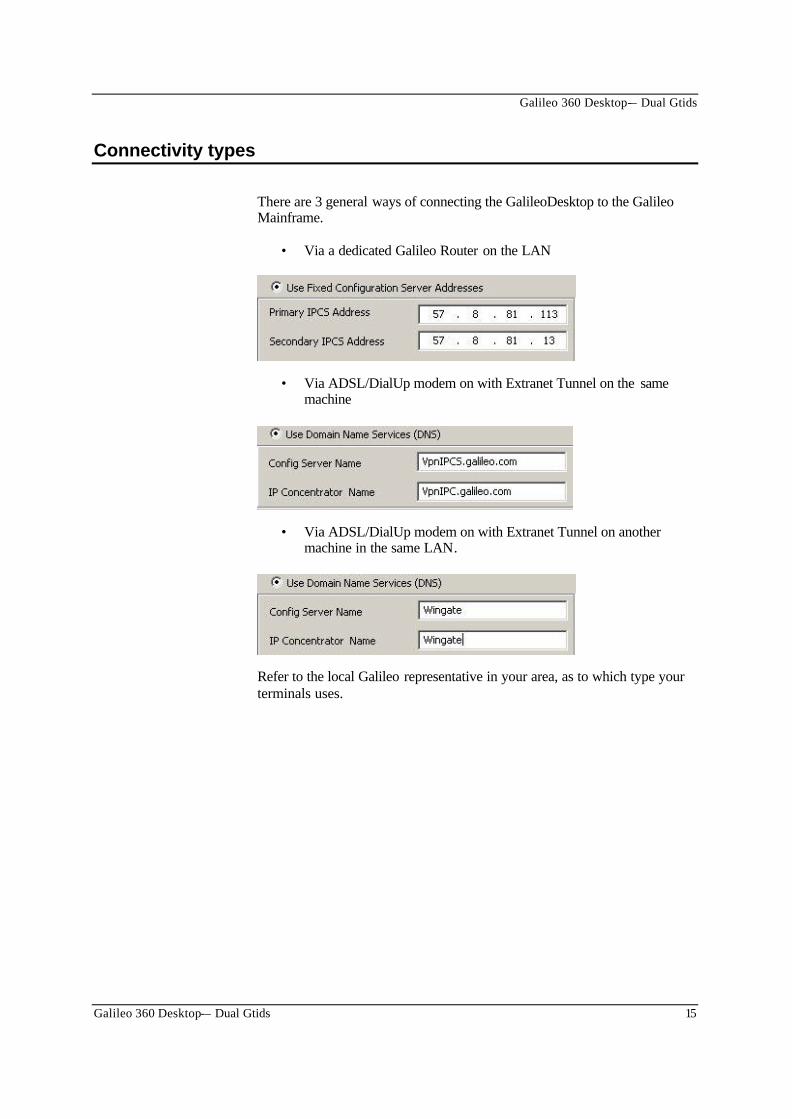
Connectivity types
There are 3 general ways of connecting the GalileoDesktop to the Galileo Mainframe.
• Via a dedicated Galileo Router on the LAN
• Via ADSL/DialUp modem on with Extranet Tunnel on the same machine
• Via ADSL/DialUp modem on with Extranet Tunnel on another machine in the same LAN.
Refer to the local Galileo representative in your area, as to which type your terminals uses.

Galileo 360 Desktop-– Dual Gtids
16 Galileo 360 Desktop-– Dual Gtids
These settings can be mixed on the same machine as shown below.
When in the office, the settings point to the Galileo Router on 57.8.81.113 and when away from the office LAN the VPNIPC/s.Galileo.Com Client id is used after activating the Nortel Extranet.
Office settings for Galileo Router FocalpointNet settings for use with Extranet.
When in the OFFICE the LAN Router carries the Galileo messages, but when ON THE ROAD or at home the user can activate their extranet VPN tunnel and change their default radio button.
The User therefore has two different Gtids accessing the same PCC.

Galileo 360 Desktop-– Dual Gtids
Galileo 360 Desktop-– Dual Gtids 17
Acknowledgement: This study guide was developed by Galileo Southern Cross, Solution Services
Copyright: ©2004 Galileo International. All Rights Reserved.
Apollo, Galileo, the Butterfly Device, the Globe Device, Focalpoint, FocalpointNet, e-Agent, e-Cruise, Viewpoint, the Viewpoint Logo and Galileo Desktop are either registered trademarks, or service marks of Galileo International in the United States and/or
other countries.
Microsoft, Internet Explorer, Windows and Windows NT are registered trademarks of Microsoft Corporation. 03/2004


![Galileo - Manuale d'usogalileo-ofrm.ised.it/galileo/Galileo - Manuale utente.pdf · Manuale d’uso [OFR] - Progetto GALILEO - Manuale d’uso Documento di proprietà di ISED S.p.A.](https://static.fdocuments.net/doc/165x107/5b7292867f8b9a95348d2403/galileo-manuale-dusogalileo-ofrmiseditgalileogalileo-manuale-manuale.jpg)


