BMC Service Request Management 2.2.00 User’s Guide
96
www.bmc.com Service Request Management 2.2.00 User’s Guide June 2008
description
BMC Service Request Management 2.2.00 User’s Guide
Transcript of BMC Service Request Management 2.2.00 User’s Guide
www.bmc.com
Service Request Management 2.2.00
User’s Guide
June 2008
If you have comments or suggestions about this documentation, contact Information Design and Development by email at [email protected].
Contacting BMC Software
You can access the BMC Software website at http://www.bmc.com. From this website, you can obtain information about the company, its products, corporate offices, special events, and career opportunities.
United States and Canada
Address BMC SOFTWARE INC2101 CITYWEST BLVDHOUSTON TX 77042-2827 USA
Telephone 713 918 8800 or800 841 2031
Fax 713 918 8000
Outside United States and Canada
Telephone (01) 713 918 8800 Fax (01) 713 918 8000
© Copyright 2006-2008 BMC Software, Inc.
BMC, BMC Software, and the BMC Software logo are the exclusive properties of BMC Software, Inc., are registered with the U.S. Patent and Trademark Office, and may be registered or pending registration in other countries. All other BMC trademarks, service marks, and logos may be registered or pending registration in the U.S. or in other countries. All other trademarks or registered trademarks are the property of their respective owners.
Linux is the registered trademark of Linus Torvalds.
IT Infrastructure Library® is a registered trademark of the Office of Government Commerce and is used here by BMC Software, Inc., under license from and with the permission of OGC.
ITIL® is a registered trademark, and a registered community trademark of the Office of Government Commerce, and is registered in the U.S. Patent and Trademark Office, and is used here by BMC Software, Inc., under license from and with the permission of OGC.
UNIX is the registered trademark of The Open Group in the US and other countries.
BMC Software considers information included in this documentation to be proprietary and confidential. Your use of this information is subject to the terms and conditions of the applicable End User License Agreement for the product and the proprietary and restricted rights notices included in this documentation.
Restricted rights legendU.S. Government Restricted Rights to Computer Software. UNPUBLISHED -- RIGHTS RESERVED UNDER THE COPYRIGHT LAWS OF THE UNITED STATES. Use, duplication, or disclosure of any data and computer software by the U.S. Government is subject to restrictions, as applicable, set forth in FAR Section 52.227-14, DFARS 252.227-7013, DFARS 252.227-7014, DFARS 252.227-7015, and DFARS 252.227-7025, as amended from time to time. Contractor/Manufacturer is BMC Software, Inc., 2101 CityWest Blvd., Houston, TX 77042-2827, USA. Any contract notices should be sent to this address.
Customer Support
You can obtain technical support by using the Support page on the BMC Software website or by contacting Customer Support by telephone or email. To expedite your inquiry, please see “Before Contacting BMC Software.”
Support website
You can obtain technical support from BMC Software 24 hours a day, 7 days a week at http://www.bmc.com/support_home. From this website, you can:
■ Read overviews about support services and programs that BMC Software offers.■ Find the most current information about BMC Software products.■ Search a database for problems similar to yours and possible solutions.■ Order or download product documentation.■ Report a problem or ask a question.■ Subscribe to receive email notices when new product versions are released.■ Find worldwide BMC Software support center locations and contact information, including email addresses, fax
numbers, and telephone numbers.
Support by telephone or email
In the United States and Canada, if you need technical support and do not have access to the Web, call 800 537 1813 or send an email message to [email protected]. (In the Subject line, enter SupID:<yourSupportContractID>, such as SupID:12345.) Outside the United States and Canada, contact your local support center for assistance.
Before contacting BMC Software
Have the following information available so that Customer Support can begin working on your issue immediately:
■ Product information
— Product name— Product version (release number)— License number and password (trial or permanent)
■ Operating system and environment information
— Machine type— Operating system type, version, and service pack— System hardware configuration— Serial numbers— Related software (database, application, and communication) including type, version, and service pack or
maintenance level
■ Sequence of events leading to the problem
■ Commands and options that you used
■ Messages received (and the time and date that you received them)
— Product error messages— Messages from the operating system, such as file system full— Messages from related software
License key and password information
If you have a question about your license key or password, contact Customer Support through one of the following methods:
■ E-mail [email protected]. (In the Subject line, enter SupID:<yourSupportContractID>, such as SupID:12345.)
■ In the United States and Canada, call 800 537 1813. Outside the United States and Canada, contact your local support center for assistance.
■ Submit a new issue at http://www.bmc.com/support_home.
Contents
Preface 7
Type of SRM users . . . . . . . . . . . . . . . . . . . . . . . . . . . . . . . . . . . . . . . . . . . . . . . . . . . . . . . . . 7New icon . . . . . . . . . . . . . . . . . . . . . . . . . . . . . . . . . . . . . . . . . . . . . . . . . . . . . . . . . . . . . . . . . 8SRM documentation . . . . . . . . . . . . . . . . . . . . . . . . . . . . . . . . . . . . . . . . . . . . . . . . . . . . . . . 8
Chapter 1 Introducing SRM and the support roles 11
Understanding Service Request Management. . . . . . . . . . . . . . . . . . . . . . . . . . . . . . . . . 12SRM benefits. . . . . . . . . . . . . . . . . . . . . . . . . . . . . . . . . . . . . . . . . . . . . . . . . . . . . . . . . . 13Main components of SRM . . . . . . . . . . . . . . . . . . . . . . . . . . . . . . . . . . . . . . . . . . . . . . 14
Service Request Management user roles . . . . . . . . . . . . . . . . . . . . . . . . . . . . . . . . . . . . . 14User . . . . . . . . . . . . . . . . . . . . . . . . . . . . . . . . . . . . . . . . . . . . . . . . . . . . . . . . . . . . . . . . . 14Business Manager . . . . . . . . . . . . . . . . . . . . . . . . . . . . . . . . . . . . . . . . . . . . . . . . . . . . . 15SRM Administrator . . . . . . . . . . . . . . . . . . . . . . . . . . . . . . . . . . . . . . . . . . . . . . . . . . . . 15Service Catalog Manager . . . . . . . . . . . . . . . . . . . . . . . . . . . . . . . . . . . . . . . . . . . . . . . 15Business Relationship Manager. . . . . . . . . . . . . . . . . . . . . . . . . . . . . . . . . . . . . . . . . . 16Work Order Manager and Work Order Assignee . . . . . . . . . . . . . . . . . . . . . . . . . . 16Service Request Coordinator . . . . . . . . . . . . . . . . . . . . . . . . . . . . . . . . . . . . . . . . . . . . 17Fulfillment Provider . . . . . . . . . . . . . . . . . . . . . . . . . . . . . . . . . . . . . . . . . . . . . . . . . . . 17
Chapter 2 Using the Request Entry Console 19
Using the Request Entry Console . . . . . . . . . . . . . . . . . . . . . . . . . . . . . . . . . . . . . . . . . . . 20Request Entry Console functions. . . . . . . . . . . . . . . . . . . . . . . . . . . . . . . . . . . . . . . . . . . . 22Search stage—Searching for a service . . . . . . . . . . . . . . . . . . . . . . . . . . . . . . . . . . . . . . . . 24
Browsing for services . . . . . . . . . . . . . . . . . . . . . . . . . . . . . . . . . . . . . . . . . . . . . . . . . . 25Listing related services . . . . . . . . . . . . . . . . . . . . . . . . . . . . . . . . . . . . . . . . . . . . . . . . . 26Browsing the sub-categories . . . . . . . . . . . . . . . . . . . . . . . . . . . . . . . . . . . . . . . . . . . . 27
Select stage—Choosing a service . . . . . . . . . . . . . . . . . . . . . . . . . . . . . . . . . . . . . . . . . . . . 28Review stage—Viewing service description . . . . . . . . . . . . . . . . . . . . . . . . . . . . . . . . . . 29Provide Information stage—Entering your requester data . . . . . . . . . . . . . . . . . . . . . . 31Submit stage—Creating a service request . . . . . . . . . . . . . . . . . . . . . . . . . . . . . . . . . . . . 33Cart Review stage—Using the cart . . . . . . . . . . . . . . . . . . . . . . . . . . . . . . . . . . . . . . . . . . 34Using the Request Entry Console to manage service requests . . . . . . . . . . . . . . . . . . . 37
Viewing service requests that need attention . . . . . . . . . . . . . . . . . . . . . . . . . . . . . . 37Adding an entry to the activity log. . . . . . . . . . . . . . . . . . . . . . . . . . . . . . . . . . . . . . . 39Viewing service requests in Draft mode . . . . . . . . . . . . . . . . . . . . . . . . . . . . . . . . . . 40Viewing service requests closed from the last time you visited SRM . . . . . . . . . . 42Viewing your open requests . . . . . . . . . . . . . . . . . . . . . . . . . . . . . . . . . . . . . . . . . . . . 43
Contents 5
Reopening service requests . . . . . . . . . . . . . . . . . . . . . . . . . . . . . . . . . . . . . . . . . . . . . 45Viewing your favorite services . . . . . . . . . . . . . . . . . . . . . . . . . . . . . . . . . . . . . . . . . . 47Viewing your open submitted service requests . . . . . . . . . . . . . . . . . . . . . . . . . . . . 48Viewing service requests in your open cart . . . . . . . . . . . . . . . . . . . . . . . . . . . . . . . . 54Viewing your service cart requests . . . . . . . . . . . . . . . . . . . . . . . . . . . . . . . . . . . . . . . 55
Quick Picks . . . . . . . . . . . . . . . . . . . . . . . . . . . . . . . . . . . . . . . . . . . . . . . . . . . . . . . . . . . . . . 58Waiting for approval on service requests . . . . . . . . . . . . . . . . . . . . . . . . . . . . . . . . . . . . . 59Switching users—Creating requests on behalf of other users . . . . . . . . . . . . . . . . . . . . 61Using broadcasts. . . . . . . . . . . . . . . . . . . . . . . . . . . . . . . . . . . . . . . . . . . . . . . . . . . . . . . . . . 64
Viewing broadcasts . . . . . . . . . . . . . . . . . . . . . . . . . . . . . . . . . . . . . . . . . . . . . . . . . . . . 64Modifying a broadcast message. . . . . . . . . . . . . . . . . . . . . . . . . . . . . . . . . . . . . . . . . . 65
Providing feedback. . . . . . . . . . . . . . . . . . . . . . . . . . . . . . . . . . . . . . . . . . . . . . . . . . . . . . . . 65Making suggestions . . . . . . . . . . . . . . . . . . . . . . . . . . . . . . . . . . . . . . . . . . . . . . . . . . . . 65Filling out the service survey . . . . . . . . . . . . . . . . . . . . . . . . . . . . . . . . . . . . . . . . . . . . 68
Setting Request Entry Console preferences . . . . . . . . . . . . . . . . . . . . . . . . . . . . . . . . . . . 69
Chapter 3 Business Manager role 71
Opening the Business Manager Console. . . . . . . . . . . . . . . . . . . . . . . . . . . . . . . . . . . . . . 72Using the Business Manager Console to manage service requests . . . . . . . . . . . . . . . . 73
Search criteria—Managing service requests . . . . . . . . . . . . . . . . . . . . . . . . . . . . . . . 75Request Status Flashboards . . . . . . . . . . . . . . . . . . . . . . . . . . . . . . . . . . . . . . . . . . . . . 76Viewing a list of service requests by status . . . . . . . . . . . . . . . . . . . . . . . . . . . . . . . . 78
Viewing request details . . . . . . . . . . . . . . . . . . . . . . . . . . . . . . . . . . . . . . . . . . . . . . . . . . . . 79Adding work information to the service request. . . . . . . . . . . . . . . . . . . . . . . . . . . . . . . 80Reviewing the approval cycle of a service request . . . . . . . . . . . . . . . . . . . . . . . . . . . . . 81Generating reports . . . . . . . . . . . . . . . . . . . . . . . . . . . . . . . . . . . . . . . . . . . . . . . . . . . . . . . . 83
Setting report options . . . . . . . . . . . . . . . . . . . . . . . . . . . . . . . . . . . . . . . . . . . . . . . . . . 83Generating standard reports . . . . . . . . . . . . . . . . . . . . . . . . . . . . . . . . . . . . . . . . . . . . 83Generating reports using qualifications . . . . . . . . . . . . . . . . . . . . . . . . . . . . . . . . . . . 84
Setting Business Manager Console preferences . . . . . . . . . . . . . . . . . . . . . . . . . . . . . . . . 88
Index 91
6 User’s Guide

Preface
This guide describes how to use BMC Service Request Management (SRM) 2.2.00. This application runs on the BMC Remedy Action Request System (AR System) platform and consumes data from the BMC Atrium Configuration Management Database (CMDB).
SRM provides a consistent user interface where users can request a service or report an incident through the service desk. End users or service desk staff can select services that IT supports from a Service Catalog that the Business Service Manager sets up.
SRM works with other processes, such as Incident Management and Change Management, to resolve the user’s request or incident. SRM manages the entire process, from submission to completion.
Type of SRM users This guide is for the following SRM users:
� Users who consume services from the service catalog and who initiate service requests.
� Business service managers and request catalog managers who set up the service catalog and define the process for each catalog offering.
The following SRM users will also found this guide helpful.
� Application administrators who configure and administer the application.
� Service desk staff (or the frontline support staff) who handle the customer’s calls or web submissions, create or modify service requests, and communicate the resolutions.
� Fulfillment providers (or backline support staff) who work on change requests, incidents, or work orders that are generated from service requests.
NOTE Localized documentation is available to users who make requests from the public view of a service request. It consists of a separate set of localized HTML help files that are accessed from the web-based forms by clicking the Help link. For more information, see the BMC Service Request Management 2.2.00 Administrator’s Guide.
Preface 7
BMC Service Request Management 2.2.00
New iconThis guide contains the New icon, to identify information that is new or substantially changed with version 2.2.00.
SRM documentation The following table lists the documentation available for SRM.
Unless otherwise noted, online documentation in Adobe Acrobat (PDF) format is available on product installation CDs or DVDs, on the Customer Support website (http://www.bmc.com/support_home), or both. You can order printed documentation from the Customer Support website.
NOTE To access the support website, you need a support contract.
You can access application help by clicking on Help links within the application.
Title Document provides Audience Format
BMC Service Request Management 2.2.00 Release Notes
Information about new features and known issues.
Everyone Print and PDF
BMC Service Request Management 2.2.00 Installation Guide
Procedures for installing the BMC Service Request Management application.
Administrators Print and PDF
BMC Service Request Management 2.2.00 Configuration Guide
Procedures for configuring the BMC Service Request Management application.
Administrators Print and PDF
BMC Service Request Management 2.2.00 Administrator’s Guide
Procedures to administer the BMC Service Request Management application.
Administrators Print and PDF
BMC Atrium CMDB 2.x Common Data Model Diagram
Hierarchical diagram of all classes in the Common Data Model (CDM), including unique attributes and applicable relationships.
Administrators PDF
BMC Atrium CMDB 2.x Concepts and Best Practices Guide
Information about CMDB concepts and best practices for planning your BMC Atrium CMDB implementation.
Executives and administrators
Print and PDF
BMC Atrium CMDB 2.x Developer’s Reference Guide
Information about creating API programs, C and Web Services API functions and data structures, and a list of error messages.
Administrators and programmers
8 User’s Guide
SRM documentation
BMC Atrium CMDB 2.x Installation and Configuration Guide
Information about installing and configuring BMC Atrium CMDB, including permissions, class definitions, reconciliation, and federation.
Administrators Print and PDF
BMC Atrium CMDB 2.x Javadoc API Help
Information about Java® classes, methods, and variables that integrate with BMC Atrium CMDB.
Programmers HTML
BMC Atrium CMDB 2.x Master Index
Combined index of all books. Everyone Print and PDF
BMC Atrium CMDB 2.x Release Notes
Information about new features and known issues.
Everyone Print and PDF
BMC Atrium CMDB 2.x User’s Guide
Information about using BMC Atrium CMDB, including searching for and comparing CIs and relationships, relating CIs, viewing history, and launching federated data.
Users Print and PDF
BMC Remedy 7.1.00 Approval Server Guide for Users and Administrators
Topics on installation and configuration of the Approval Server, how to use the Approval Server, and understanding the approval workflow.
Users and administrators
Print and PDF
BMC Remedy IT Service Management 7.0 Configuration Guide
Procedures for configuring the BMC Remedy IT Service Management applications.
Administrators Print and PDF
BMC Service Level Management 7.0 Configuration Guide
Procedures for configuring the BMC Service Level Management application.
Administrators Print and PDF
BMC Service Level Management 7.x Installation Guide
Procedures for installing the BMC Service Level Management application.
Administrators Print and PDF
BMC Service Level Management 7.x Release Notes
Information about known issues in each release of BMC Service Level Management. Also provides a list of new features included with the application.
Everyone PDF
BMC Service Level Management 7.x User’s Guide
Procedures for using the BMC Service Level Management application; includes new features and overview.
Everyone Print and PDF
BMC Remedy 7.0 Task Management Administrator’s Guide
Procedures to configure Task Management.
Administrators Print and PDF
Title Document provides Audience Format
Preface 9

BMC Service Request Management 2.2.00
10 User’s Guide
Chapter
1
Introducing SRM and the support rolesService Request Management (SRM) supports the Service Desk function of the Information Technology Infrastructure Library® (ITIL®). The Service Desk is the only function or department specifically defined within ITIL because it is critical in IT user support. The goal of the Service Desk is to provide a “single point of contact” between the IT user and the IT organization.
The Service Desk manages user-facing activities related to basic ITIL processes, such as Incident Management, Change Management, Service Level Management, and so on.
This section describes the BMC Remedy SRM module.
The following topics are provided:
� Understanding Service Request Management (page 12)� Service Request Management user roles (page 14)
Chapter 1 Introducing SRM and the support roles 11
BMC Service Request Management 2.2.00
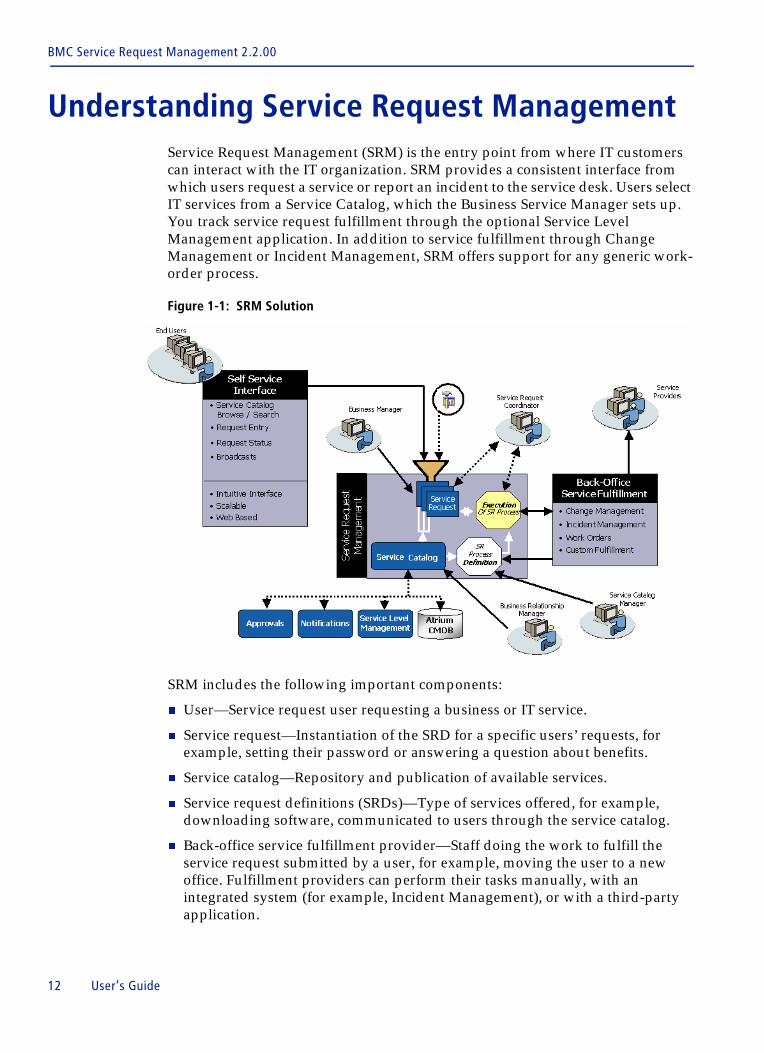
Understanding Service Request Management Service Request Management (SRM) is the entry point from where IT customers can interact with the IT organization. SRM provides a consistent interface from which users request a service or report an incident to the service desk. Users select IT services from a Service Catalog, which the Business Service Manager sets up. You track service request fulfillment through the optional Service Level Management application. In addition to service fulfillment through Change Management or Incident Management, SRM offers support for any generic work-order process.
Figure 1-1: SRM Solution
SRM includes the following important components:
� User—Service request user requesting a business or IT service.
� Service request—Instantiation of the SRD for a specific users’ requests, for example, setting their password or answering a question about benefits.
� Service catalog—Repository and publication of available services.
� Service request definitions (SRDs)—Type of services offered, for example, downloading software, communicated to users through the service catalog.
� Back-office service fulfillment provider—Staff doing the work to fulfill the service request submitted by a user, for example, moving the user to a new office. Fulfillment providers can perform their tasks manually, with an integrated system (for example, Incident Management), or with a third-party application.
12 User’s Guide
Understanding Service Request Management
BMC SRM shares a common foundation with BMC Remedy IT Service Management (ITSM) 7.0—both are built on the BMC Remedy Action Request System and SRM leverages the foundational elements of the ITSM 7.0 suite, for example, workflow, approvals, task management, notification, email, and so on. This integration platform simplifies and reduces the management costs. SRM also captures the relationships between catalog items and business service definitions through its integration with the BMC Atrium CMDB. SRM ties into Service Level Management (SLM) so that request service targets are rolled into comprehensive service level agreements and contracts. Finally, SRM is integrated with BMC Remedy Change Management and BMC Remedy Incident Management. You can also integrate SRM with other third-party applications.
SRM benefits SRM solves the business problem of customers not knowing where or how to request services. They might not even know which services IT provides. SRM helps internal groups manage customer expectations; for example, it provides information about the level of service employees can expect when their hard drive is broken or they have lost their password.
In addition, support organizations do not always understand how much money is spent on service fulfillment or its quality. They frequently do not know where requests are coming from, what types of requests they receive most often, and what their service goals are and if they are meeting them. SRM helps support organizations understand customer expectations and how to fulfill them. Finally, SRM can show the value that support organizations provide to the business by demonstrating the cost of the services they offer and providing insight into the resources necessary when providing certain kinds of services.
The following are some of the benefits of using SRM:
� Standardized catalog of services—In an easy-to-use web user interface, users can review all the available services to which they are entitled, request them, and see their status online. Services are described in easy-to-understand language that makes sense for the audience, not technical IT jargon. Service providers set expectations by describing how much services cost and how long it takes to deliver them. Most important, service providers can set clear expectations to customers when the service will be delivered.
� Integration of service catalog with fulfillment processes—Service requests are transparently connected to the back-end fulfillment processes and providers, for example, BMC Remedy Change Management or some other third-party application. This seamless integration makes sure service delivery is consistent and reduces service delivery costs through automation.
� Complete tracking and management of requests from start to finish—You can build and manage service targets for the delivery of all services through the entire lifecycle of the service request; for example, you can show that a request for a new server takes four days to fulfill. You can make sure that service delivery is on time and meets customer satisfaction. Finally, you can make available more effective management of customer demand, your resources, and business costs.
Chapter 1 Introducing SRM and the support roles 13
BMC Service Request Management 2.2.00
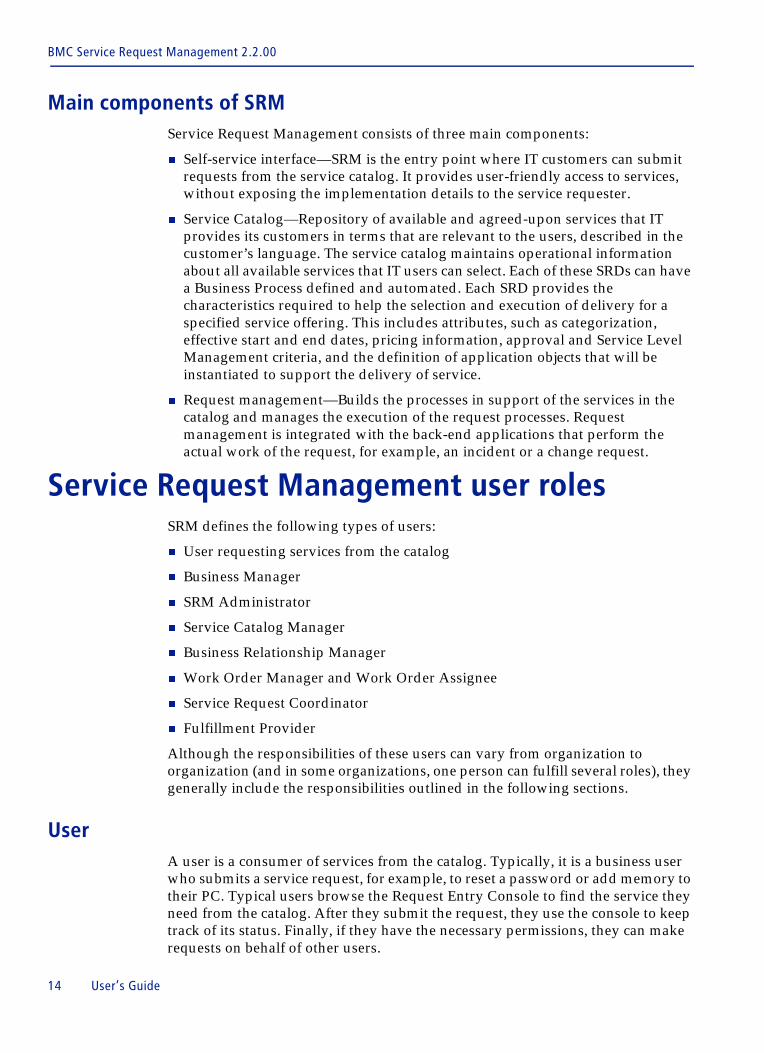
Main components of SRM Service Request Management consists of three main components:
� Self-service interface—SRM is the entry point where IT customers can submit requests from the service catalog. It provides user-friendly access to services, without exposing the implementation details to the service requester.
� Service Catalog—Repository of available and agreed-upon services that IT provides its customers in terms that are relevant to the users, described in the customer’s language. The service catalog maintains operational information about all available services that IT users can select. Each of these SRDs can have a Business Process defined and automated. Each SRD provides the characteristics required to help the selection and execution of delivery for a specified service offering. This includes attributes, such as categorization, effective start and end dates, pricing information, approval and Service Level Management criteria, and the definition of application objects that will be instantiated to support the delivery of service.
� Request management—Builds the processes in support of the services in the catalog and manages the execution of the request processes. Request management is integrated with the back-end applications that perform the actual work of the request, for example, an incident or a change request.
Service Request Management user rolesSRM defines the following types of users:
� User requesting services from the catalog
� Business Manager
� SRM Administrator
� Service Catalog Manager
� Business Relationship Manager
� Work Order Manager and Work Order Assignee
� Service Request Coordinator
� Fulfillment Provider
Although the responsibilities of these users can vary from organization to organization (and in some organizations, one person can fulfill several roles), they generally include the responsibilities outlined in the following sections.
User A user is a consumer of services from the catalog. Typically, it is a business user who submits a service request, for example, to reset a password or add memory to their PC. Typical users browse the Request Entry Console to find the service they need from the catalog. After they submit the request, they use the console to keep track of its status. Finally, if they have the necessary permissions, they can make requests on behalf of other users.
14 User’s Guide
Service Request Management user roles
In addition, the IT organization in big companies can use SRM to manage the very technical “intra-IT” requests they receive between their own departments, for example, to add an extent to a database.
For more information about the user’s role and step-by-step procedures for completing tasks, see “Using the Request Entry Console” on page 20.
Business Manager The business manager is responsible for managing users. Business managers are also themselves consumers of SRM. Their activities and responsibilities include:
� Approving requests. For example, the business manager is notified and is required to approve all requests from his organization where the price is greater than $500.
� Reviewing the consolidated or individual status of service requests in their organization.
� Running reports on service requests.
For more information about the business manager’s role, see “Using the Business Manager Console to manage service requests” on page 73.
SRM Administrator The responsibilities of the SRM administrator include installing and licensing SRM, and configuring it to meet your organization’s business needs. Additional configuration tasks include:
� Installing and configuring SRM
� Assigning licenses
� Integrating back-office applications with SRM
Moreinformation
� For information about configuring SRM, see the BMC Service Request Management 2.2.00 Configuration Guide.
� For information about installing SRM, see the BMC Service Request Management 2.2.00 Installation Guide.
� For information about administering SRM, see the BMC Service Request Management 2.2.00 Administrator’s Guide.
Service Catalog ManagerService Catalog Managers (sometimes also called request catalog managers) are responsible for creating and managing the Service Request Definitions and, specifically, the fulfillment process definitions within the Service Catalog. They work closely with the business relationship manager to build and implement the requests from the business, for example, that a certain request requires a certain type of specific process.
Chapter 1 Introducing SRM and the support roles 15
BMC Service Request Management 2.2.00
To build the process, the Service Catalog Manager must understand the data that needs to be provided to the steps in the process and the connections to the back-end service fulfillment applications. They also manage the SRD lifecycle as it moves from draft to approval, and then finally to deployment.
For more information about the Service Catalog Manager’s role, see the BMC Service Request Management 2.2.00 Administrator’s Guide.
Business Relationship Manager The business relationship manager works closely with both the business and IT to define the service request requirements, for example, the services that are required, a reasonable turnaround time for a service, or a reasonable price that the business is willing to pay. Business relationship manager activities include:
� Defining SRDs inside the service catalog, working with the Service Catalog Manager. This can include examining service request trends and creating new SRDs based on that analysis, for example, creating a specific SRD if users are having ongoing problems changing their passwords.
� Negotiating service targets for requests.
� Reviewing request delivery achievement with IT and business management to make sure business expectations are being met.
These activities overlap significantly with the responsibilities of the Service Catalog Manager.
Work Order Manager and Work Order AssigneeSRM comes bundled with Work Order Management, which provides basic facilities for assignment, status, work information, and task management.
Work order managers focus on the type of work order that is created. These managers are usually outside typical IT groups. They are usually the heads of the functional groups who deliver a particular service. For example, the manager in charge of Facilities would be the work order manager for all facility work orders, while the manager in charge of Telecommunications would be the work order manager for phone work orders. As a result, if you created a service request for a new employee, your request would create one work order to the Facilities department for a new office, another work order to the Telecommunications departments for a new phone, and so on.
In large companies, the work order manager’s main responsibilities usually involve planning and oversight. But in small companies, the work order manager can function also as the work order assignee who is actually performing the work order. Work order managers are responsible for administering Work Order Management, for example, creating, planning, and tracking the work order. Work order managers have access to the Work Order Console. This console is their entry point to manage work orders and it provides a dedicated workspace for them.
16 User’s Guide
Service Request Management user roles
Work order assignees are responsible for planning and implementing assigned work orders. Work order assignees also have access to the Work Order Console. This console is their entry point to create work orders and tasks.
For more information about the work order manager and work order assignee roles, see the BMC Service Request Management 2.2.00 Administrator’s Guide.
Service Request Coordinator The Service Request Coordinator—or the service request agent in ITIL terminology—is a member of the frontline support staff responsible for troubleshooting requests that are exceptions to the normal process. But service request coordinators do not typically work the requests themselves; that responsibility is the task of the back-office fulfillment providers.
Service request coordinator activities include:
� Making sure requests are executed on time.
� Reviewing approval status of requests.
� Troubleshooting issues with request fulfillment.
For more information about the service request coordinator’s role, see the BMC Service Request Management 2.2.00 Administrator’s Guide.
Fulfillment Provider After a request has been approved, the execution process then starts. The execution of the process causes the request to become instantiated in the back-office service fulfillment. When a service is requested, it might generate an incident, a change request, or a work order. A single request can even generate multiple incidents, change requests, and work orders.
Fulfillment providers are in charge of backend fulfillment requests, for example, working as the change assignee, incident assignee, or the work order assignee, to make sure the request is fulfilled properly. When a service request generates incidents, changes, and so on, fulfillment providers do not manage them differently than they would any other tickets they are assigned to.
Fulfillment providers are simply the people working with a back-end fulfillment application doing their typical job, for example, using Change Management to work on change requests. They complete their tasks in the fulfillment application, and then they update their task status on their specific applications. The states of the back-end fulfillment applications are rolled up into the request status that is visible to the user.
For more information about the fulfillment providers’s role, see the BMC Service Request Management 2.2.00 Administrator’s Guide.
Chapter 1 Introducing SRM and the support roles 17
BMC Service Request Management 2.2.00
18 User’s Guide
Chapter
2
Using the Request Entry ConsoleThe Request Entry Console serves as the front end for the service catalog. You can use the user-friendly interface to search for available services, and then submit and view your requests.
The following topics are provided:
� Using the Request Entry Console (page 20)� Request Entry Console functions (page 22)� Search stage—Searching for a service (page 24)� Select stage—Choosing a service (page 28)� Review stage—Viewing service description (page 29)� Provide Information stage—Entering your requester data (page 31)� Submit stage—Creating a service request (page 33)� Cart Review stage—Using the cart (page 34)� Using the Request Entry Console to manage service requests (page 37)� Quick Picks (page 58)� Waiting for approval on service requests (page 59)� Switching users—Creating requests on behalf of other users (page 61)� Using broadcasts (page 64)� Providing feedback (page 65)� Setting Request Entry Console preferences (page 69)
Chapter 2 Using the Request Entry Console 19
BMC Service Request Management 2.2.00
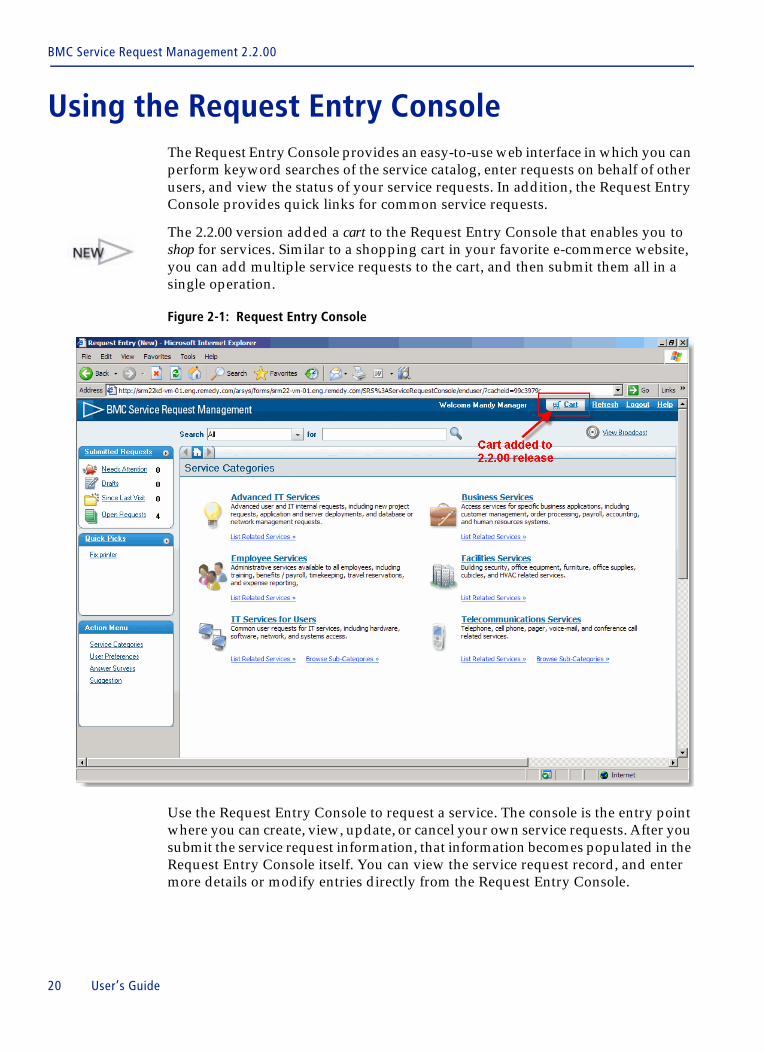
Using the Request Entry Console The Request Entry Console provides an easy-to-use web interface in which you can perform keyword searches of the service catalog, enter requests on behalf of other users, and view the status of your service requests. In addition, the Request Entry Console provides quick links for common service requests.
The 2.2.00 version added a cart to the Request Entry Console that enables you to shop for services. Similar to a shopping cart in your favorite e-commerce website, you can add multiple service requests to the cart, and then submit them all in a single operation.
Figure 2-1: Request Entry Console
Use the Request Entry Console to request a service. The console is the entry point where you can create, view, update, or cancel your own service requests. After you submit the service request information, that information becomes populated in the Request Entry Console itself. You can view the service request record, and enter more details or modify entries directly from the Request Entry Console.
20 User’s Guide
Using the Request Entry Console
The process of requesting a service consists of six stages that track the progress of your request, as indicated by best practices.
� “Search stage—Searching for a service” on page 24
� “Select stage—Choosing a service” on page 28
� “Review stage—Viewing service description” on page 29
� “Provide Information stage—Entering your requester data” on page 31
� “Submit stage—Creating a service request” on page 33
� “Cart Review stage—Using the cart” on page 34
User scenario You must print a presentation for an important meeting in two hours. The printer needs a new toner cartridge. You open the Request Entry Console and search for a service. In the service catalog under the Hardware category, you find the service you need—Acme Corporation entitles you to the Silver level printer repair service. For Silver level service, IT has a service target to fix a printer in one hour, charged at a cost of $100 to your department.
You select the service, enter all the required information, and submit the request. Because your SRM Administrator has configured SRM so that you receive an email notification when the ticket is assigned, you are alerted that a service desk technician is assigned to work on your request.
You open the Request Entry Console to view all your submitted requests. Scrolling to your request, you see that the status is In Progress.
When the printer is fixed, you receive another email notification, alerting you that the printer is fixed and you can continue printing your presentation. Later that day, after a successful presentation on Service Desk Metrics to Acme upper management, you fill out a survey, indicating how pleased you are by the quick response to your request.
NOTE Users can also access the Search Knowledge application, if it is licensed and installed.
Chapter 2 Using the Request Entry Console 21
BMC Service Request Management 2.2.00
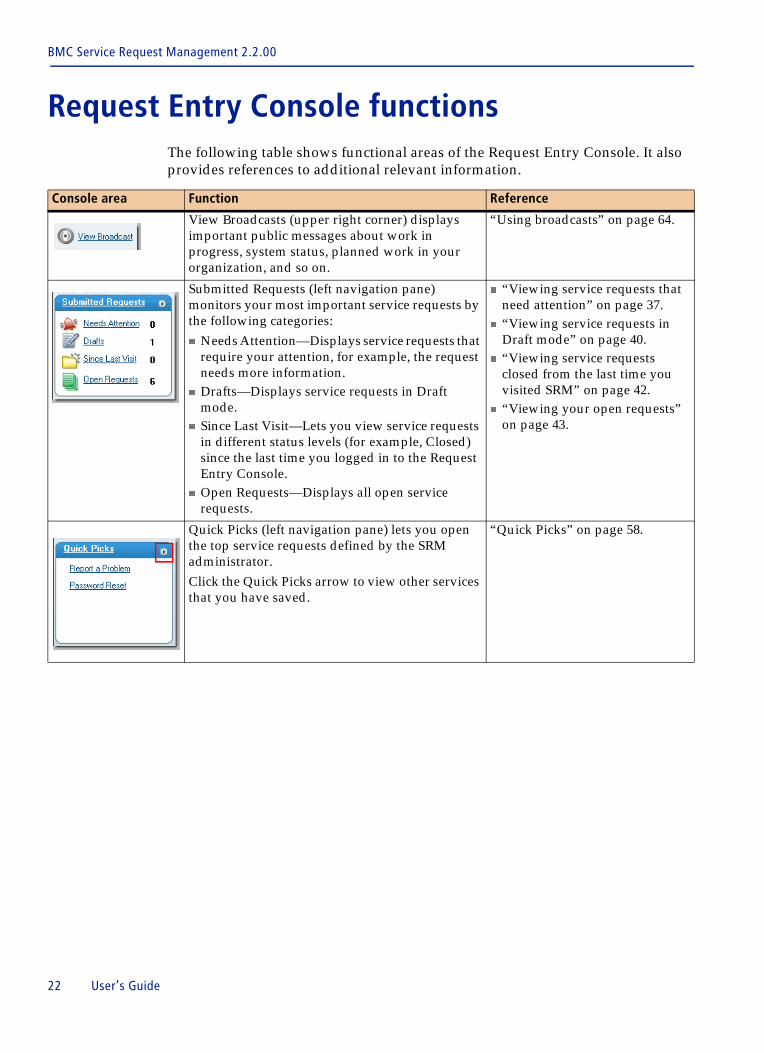
Request Entry Console functions The following table shows functional areas of the Request Entry Console. It also provides references to additional relevant information.
Console area Function Reference
View Broadcasts (upper right corner) displays important public messages about work in progress, system status, planned work in your organization, and so on.
“Using broadcasts” on page 64.
Submitted Requests (left navigation pane) monitors your most important service requests by the following categories:� Needs Attention—Displays service requests that
require your attention, for example, the request needs more information.
� Drafts—Displays service requests in Draft mode.
� Since Last Visit—Lets you view service requests in different status levels (for example, Closed) since the last time you logged in to the Request Entry Console.
� Open Requests—Displays all open service requests.
� “Viewing service requests that need attention” on page 37.
� “Viewing service requests in Draft mode” on page 40.
� “Viewing service requests closed from the last time you visited SRM” on page 42.
� “Viewing your open requests” on page 43.
Quick Picks (left navigation pane) lets you open the top service requests defined by the SRM administrator. Click the Quick Picks arrow to view other services that you have saved.
“Quick Picks” on page 58.
22 User’s Guide
Request Entry Console functions
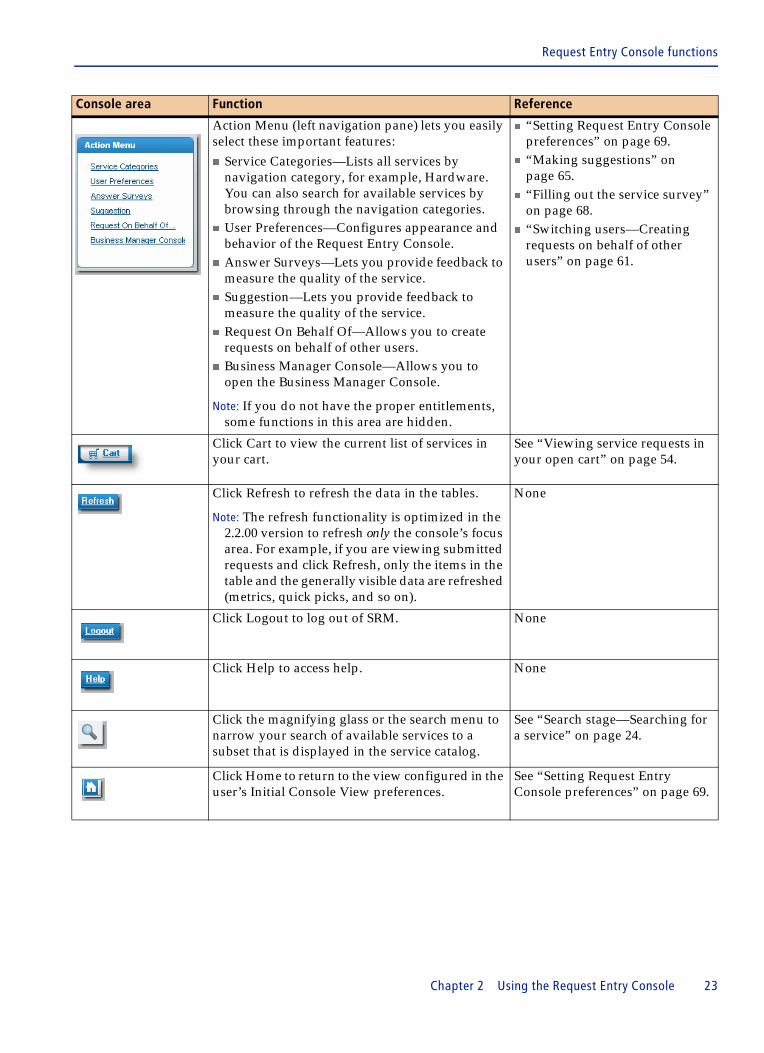
Action Menu (left navigation pane) lets you easily select these important features:� Service Categories—Lists all services by
navigation category, for example, Hardware. You can also search for available services by browsing through the navigation categories.
� User Preferences—Configures appearance and behavior of the Request Entry Console.
� Answer Surveys—Lets you provide feedback to measure the quality of the service.
� Suggestion—Lets you provide feedback to measure the quality of the service.
� Request On Behalf Of—Allows you to create requests on behalf of other users.
� Business Manager Console—Allows you to open the Business Manager Console.
Note: If you do not have the proper entitlements, some functions in this area are hidden.
� “Setting Request Entry Console preferences” on page 69.
� “Making suggestions” on page 65.
� “Filling out the service survey” on page 68.
� “Switching users—Creating requests on behalf of other users” on page 61.
Click Cart to view the current list of services in your cart.
See “Viewing service requests in your open cart” on page 54.
Click Refresh to refresh the data in the tables.
Note: The refresh functionality is optimized in the 2.2.00 version to refresh only the console’s focus area. For example, if you are viewing submitted requests and click Refresh, only the items in the table and the generally visible data are refreshed (metrics, quick picks, and so on).
None
Click Logout to log out of SRM. None
Click Help to access help. None
Click the magnifying glass or the search menu to narrow your search of available services to a subset that is displayed in the service catalog.
See “Search stage—Searching for a service” on page 24.
Click Home to return to the view configured in the user’s Initial Console View preferences.
See “Setting Request Entry Console preferences” on page 69.
Console area Function Reference
Chapter 2 Using the Request Entry Console 23
BMC Service Request Management 2.2.00
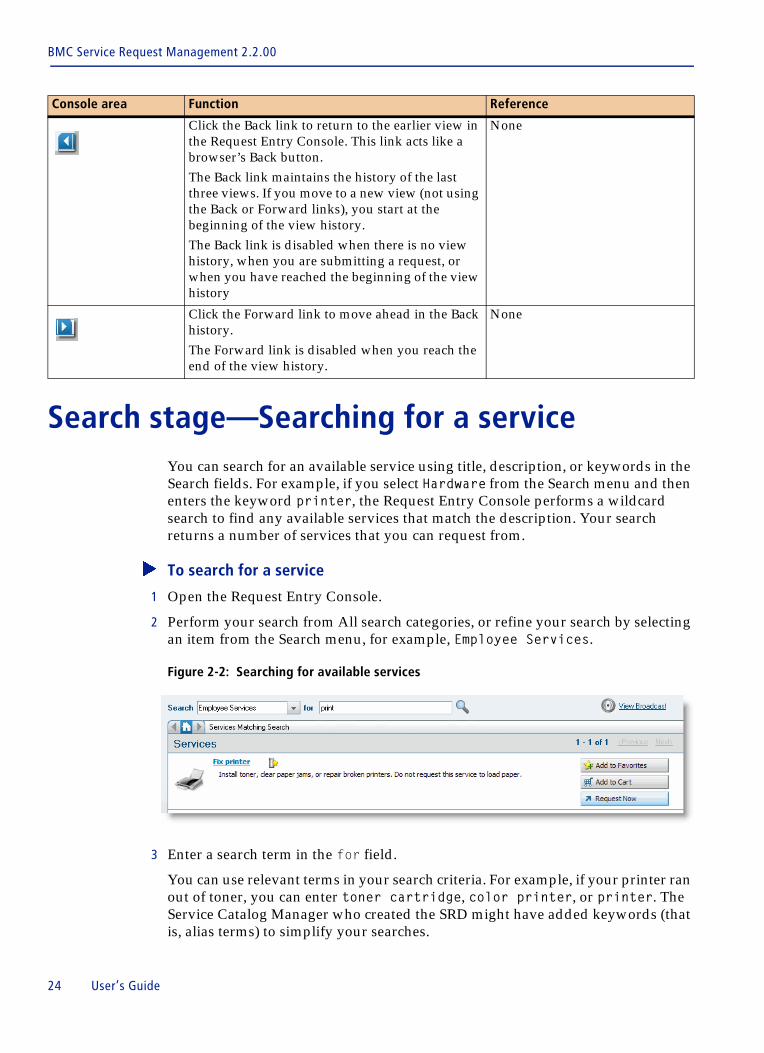
Search stage—Searching for a service You can search for an available service using title, description, or keywords in the Search fields. For example, if you select Hardware from the Search menu and then enters the keyword printer, the Request Entry Console performs a wildcard search to find any available services that match the description. Your search returns a number of services that you can request from.
� To search for a service
1 Open the Request Entry Console.
2 Perform your search from All search categories, or refine your search by selecting an item from the Search menu, for example, Employee Services.
Figure 2-2: Searching for available services
3 Enter a search term in the for field.
You can use relevant terms in your search criteria. For example, if your printer ran out of toner, you can enter toner cartridge, color printer, or printer. The Service Catalog Manager who created the SRD might have added keywords (that is, alias terms) to simplify your searches.
Click the Back link to return to the earlier view in the Request Entry Console. This link acts like a browser’s Back button. The Back link maintains the history of the last three views. If you move to a new view (not using the Back or Forward links), you start at the beginning of the view history. The Back link is disabled when there is no view history, when you are submitting a request, or when you have reached the beginning of the view history
None
Click the Forward link to move ahead in the Back history. The Forward link is disabled when you reach the end of the view history.
None
Console area Function Reference
24 User’s Guide
Search stage—Searching for a service
4 Click the magnifying glass.
A list of service requests that matches your search criteria appears. Your request enters the Select stage.
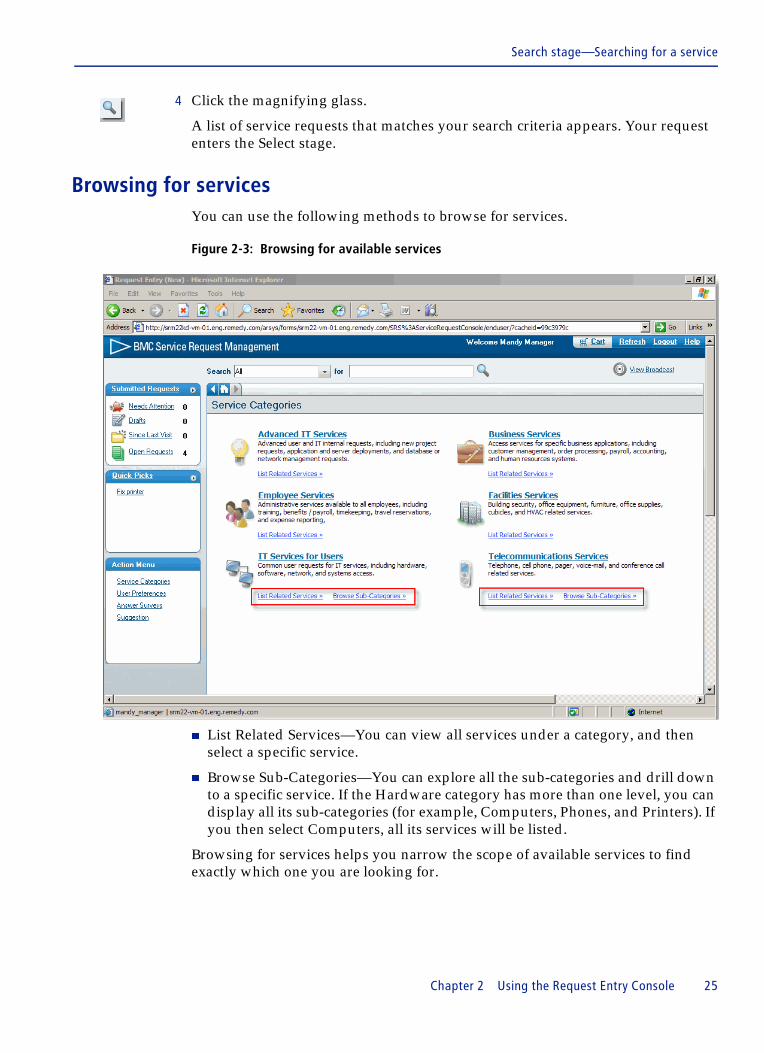
Browsing for services You can use the following methods to browse for services.
Figure 2-3: Browsing for available services
� List Related Services—You can view all services under a category, and then select a specific service.
� Browse Sub-Categories—You can explore all the sub-categories and drill down to a specific service. If the Hardware category has more than one level, you can display all its sub-categories (for example, Computers, Phones, and Printers). If you then select Computers, all its services will be listed.
Browsing for services helps you narrow the scope of available services to find exactly which one you are looking for.
Chapter 2 Using the Request Entry Console 25
BMC Service Request Management 2.2.00
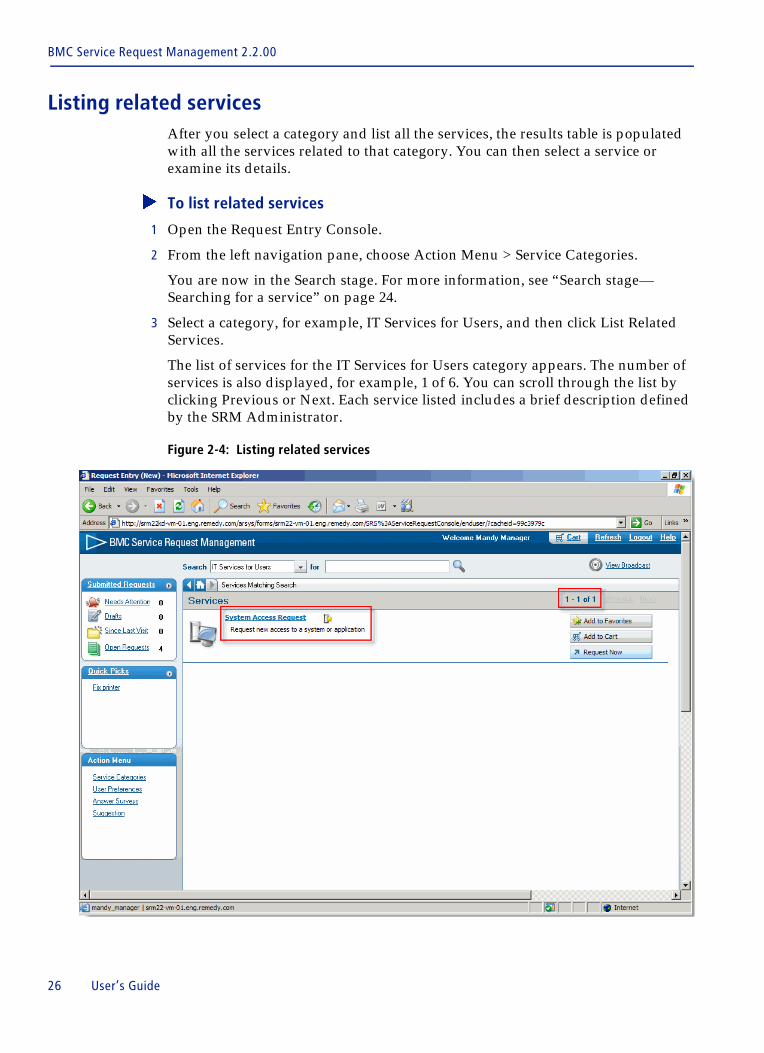
Listing related servicesAfter you select a category and list all the services, the results table is populated with all the services related to that category. You can then select a service or examine its details.
� To list related services
1 Open the Request Entry Console.
2 From the left navigation pane, choose Action Menu > Service Categories.
You are now in the Search stage. For more information, see “Search stage—Searching for a service” on page 24.
3 Select a category, for example, IT Services for Users, and then click List Related Services.
The list of services for the IT Services for Users category appears. The number of services is also displayed, for example, 1 of 6. You can scroll through the list by clicking Previous or Next. Each service listed includes a brief description defined by the SRM Administrator.
Figure 2-4: Listing related services
26 User’s Guide
Search stage—Searching for a service
4 Modify the results list by specifying a sort order of requests.
You can sort requests by My Favorites or System Favorites.
5 Click Add to Favorites.
The service is added to your list of favorites. You can also access it as one of your Quick Picks. (For more information, see “Quick Picks” on page 58.)
6 Click Request Now to choose a service from the list.
Your request enters the Provide Information stage.
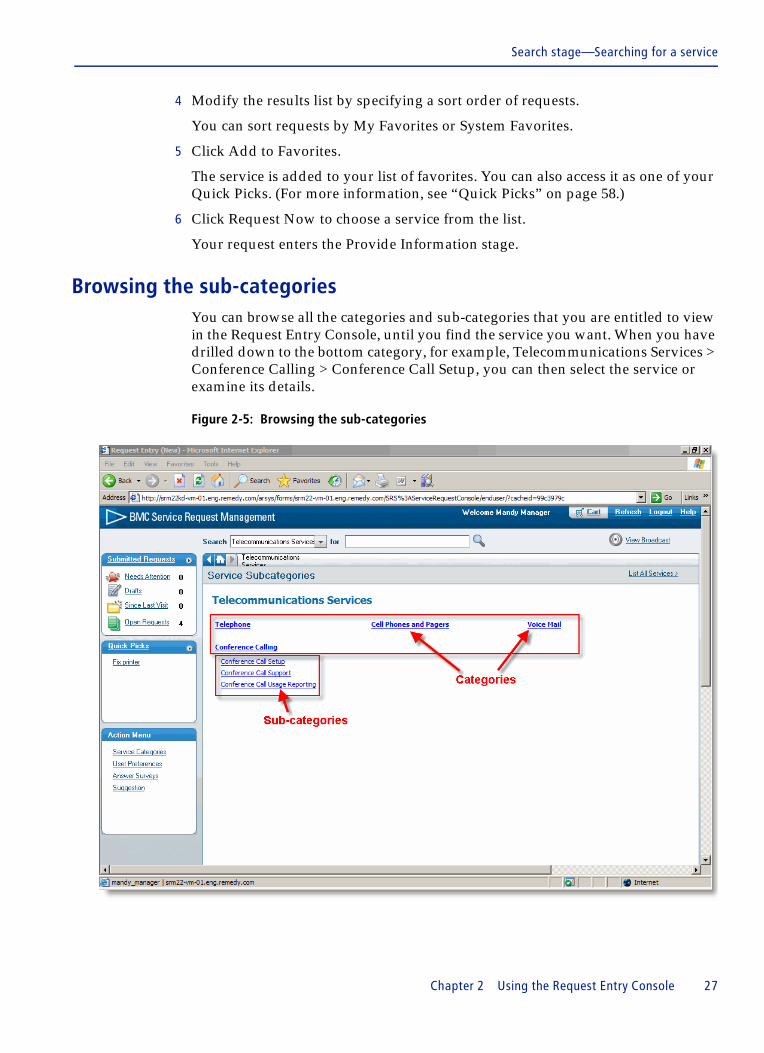
Browsing the sub-categories You can browse all the categories and sub-categories that you are entitled to view in the Request Entry Console, until you find the service you want. When you have drilled down to the bottom category, for example, Telecommunications Services > Conference Calling > Conference Call Setup, you can then select the service or examine its details.
Figure 2-5: Browsing the sub-categories
Chapter 2 Using the Request Entry Console 27
BMC Service Request Management 2.2.00
� To browse the sub-categories
1 Open the Request Entry Console.
2 From the left navigation pane, choose Action Menu > Service Categories.
You are now in the Search stage. For more information, see “Search stage—Searching for a service” on page 24.
3 Select a category, for example, Telecommunications Services, and then click Browse Sub-Categories.
If there are sub-categories, they are displayed, for example, Conference Calling. If there are additional sub-categories, they are displayed, for example, Conference Call Setup, Conference Call Support, and so on.
If there are no additional sub-categories, the list of services for the Telecommunications Services category appears.
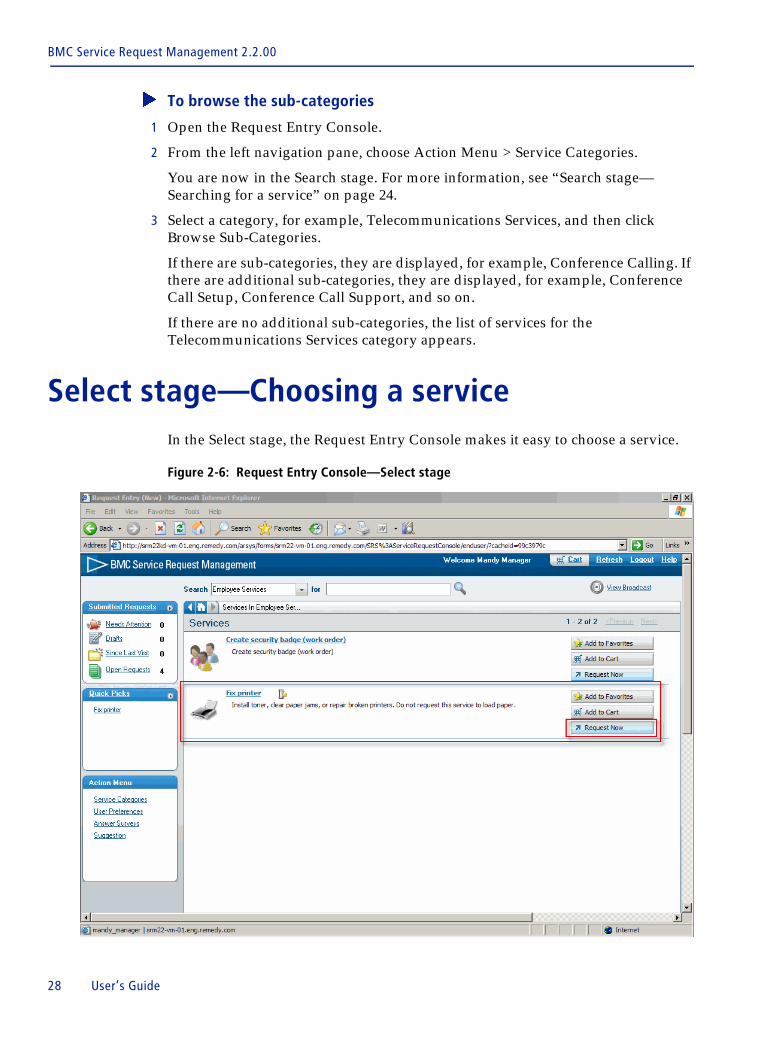
Select stage—Choosing a service In the Select stage, the Request Entry Console makes it easy to choose a service.
Figure 2-6: Request Entry Console—Select stage
28 User’s Guide
Review stage—Viewing service description
You can view details of the services that matched your search. You can also rank the services that are displayed. For example, you can sort them according to Favorites.
� To select a service
1 Perform a search for available services.
A list of available services appears in the Request Entry Console.
2 Perform one of the following actions:
� Click Request Now to choose the service. For more information, see “Provide Information stage—Entering your requester data” on page 31.
� Add the request to the cart. For more information, see “Cart Review stage—Using the cart” on page 34.
� Add the service to your list of favorites. For more information, see “Creating a list of my favorite services” on page 48.
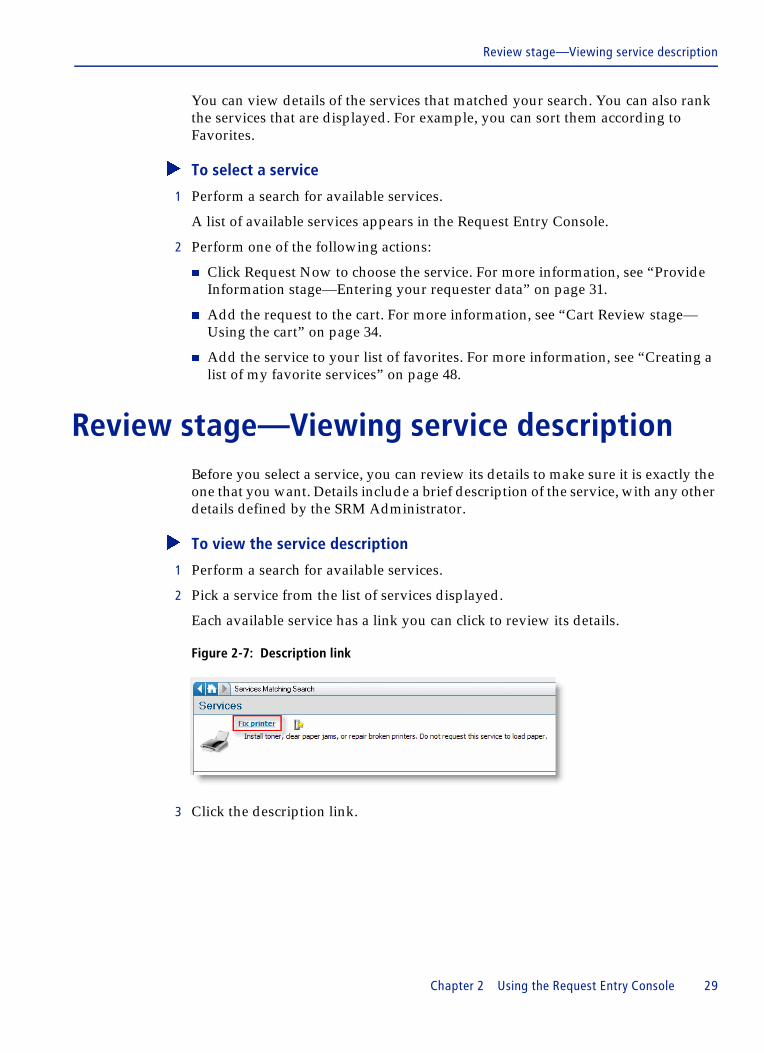
Review stage—Viewing service description Before you select a service, you can review its details to make sure it is exactly the one that you want. Details include a brief description of the service, with any other details defined by the SRM Administrator.
� To view the service description
1 Perform a search for available services.
2 Pick a service from the list of services displayed.
Each available service has a link you can click to review its details.
Figure 2-7: Description link
3 Click the description link.
Chapter 2 Using the Request Entry Console 29
BMC Service Request Management 2.2.00
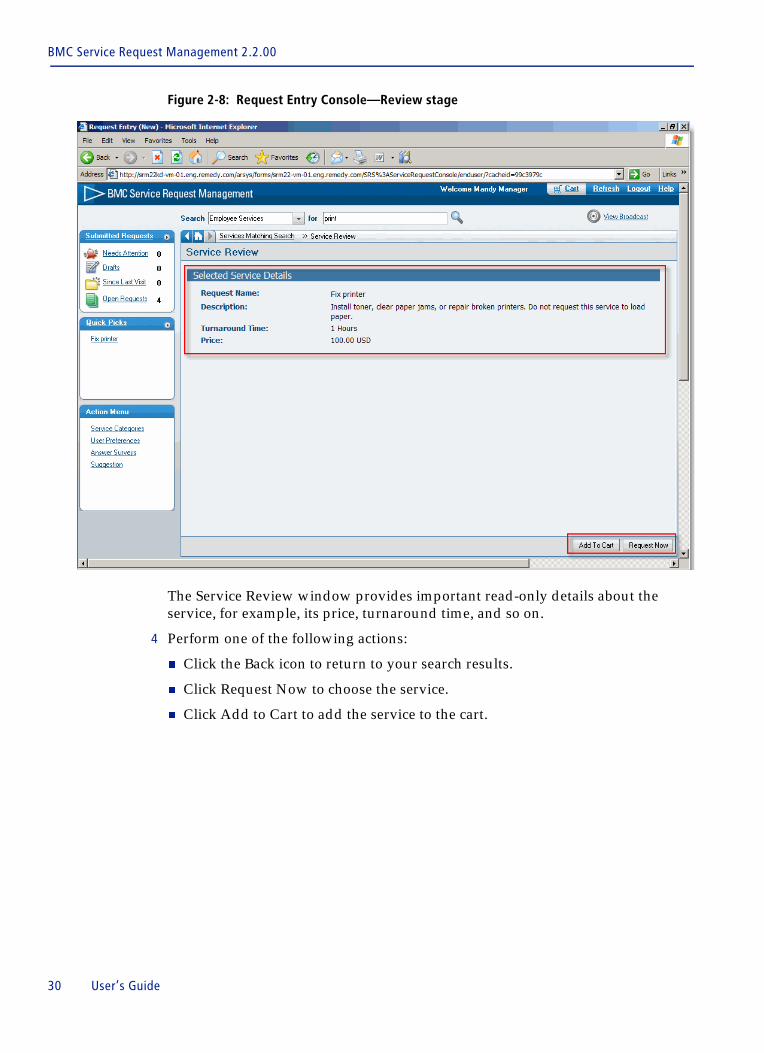
Figure 2-8: Request Entry Console—Review stage
The Service Review window provides important read-only details about the service, for example, its price, turnaround time, and so on.
4 Perform one of the following actions:
� Click the Back icon to return to your search results.
� Click Request Now to choose the service.
� Click Add to Cart to add the service to the cart.
30 User’s Guide
Provide Information stage—Entering your requester data
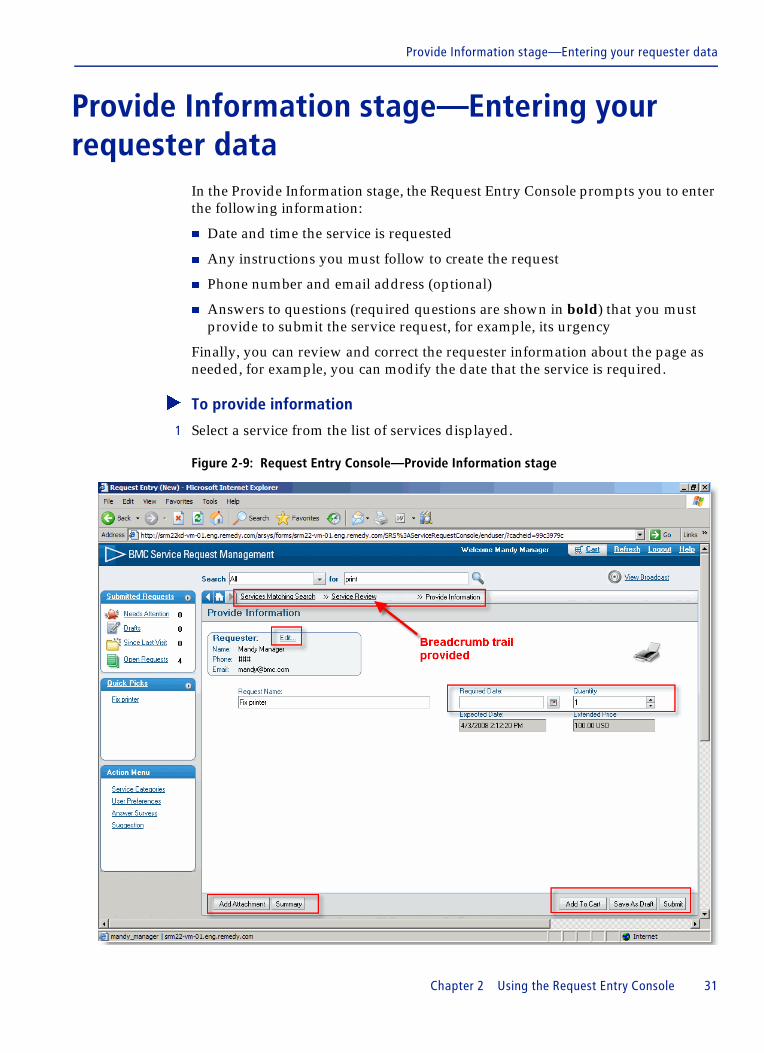
Provide Information stage—Entering your requester data
In the Provide Information stage, the Request Entry Console prompts you to enter the following information:
� Date and time the service is requested
� Any instructions you must follow to create the request
� Phone number and email address (optional)
� Answers to questions (required questions are shown in bold) that you must provide to submit the service request, for example, its urgency
Finally, you can review and correct the requester information about the page as needed, for example, you can modify the date that the service is required.
� To provide information
1 Select a service from the list of services displayed.
Figure 2-9: Request Entry Console—Provide Information stage
Chapter 2 Using the Request Entry Console 31
BMC Service Request Management 2.2.00
The breadcrumb trail displays a dynamic history of the earlier pages visited. You can click the links to return to an earlier status of the process, for example, to return to the Service Review.
2 Fill out the form details as needed:
a (Optional) Edit the Request Name field with a description more meaningful to you.
For example, if the service you are requesting uses a generic name, you can create a more precise description. You should enter descriptions that are meaningful both to you and to the staff member who is working the request.
b (Optional) Edit the requester details, for example, the phone number and email address.
c Enter the date when you need the service implemented.
d (Optional) Include an attachment.
e Answer the questions provided, especially any that are required to submit the request.
f Enter any other details.
If the administrator provided instructions to complete the request, for example, your computer name or your IP address, make sure you follow the instructions completely.
3 Perform one of the following actions:
� If you are sure this is the service you want to request and you have entered all the information correctly, click Submit. For more information, see “Submit stage—Creating a service request” on page 33.
� To review the details of the service you are requesting, click Summary to view a read-only description of the service. For more information, see “Submit stage—Creating a service request” on page 33.
� To add the service to the cart, click Add to Cart. For more information, see “Cart Review stage—Using the cart” on page 34.
� If you are not sure you have all the information you need, click Save as Draft. The request appears in the list of service requests in Draft mode. For more information, see “Viewing service requests in Draft mode” on page 40.
� Click the Back icon to return to your search results.
32 User’s Guide

Submit stage—Creating a service request
Submit stage—Creating a service request In the Submit stage, you can review the complete details of the service and then create the request. After you have submitted the service request, you can open the Request Entry Console and view important information about the request, for example, what stage it is in, who is working on it, the date and time when you can expect it to be resolved, and so on.
� To submit a service request
1 (Optional) After you enter all the request information, click Summary.
Figure 2-10: Request Entry Console—Submit stage
The breadcrumb trail displays a dynamic history of the earlier pages visited. Click the links to return to an earlier status in the process.
2 Review the details about the service request.
3 (Optional) Click the Back icon to enter more details about the request.
4 If you are satisfied with the request summary, click Submit.
The new request appears in the list of submitted service requests of the Request Entry Console.
Chapter 2 Using the Request Entry Console 33
BMC Service Request Management 2.2.00
For more information, see:
� “Using the Request Entry Console to manage service requests” on page 37
� “Viewing your open submitted service requests” on page 48
Cart Review stage—Using the cartIn the cart, you can easily combine multiple service requests into one order, and then submit it in one operation. For example, you might decide you want to create two requests at the same time—fix your printer and upgrade your computer to the latest version of MS Office.
In the Cart Review stage, you perform the following tasks before you submit the request:
� Review the contents of your cart. This includes quantities and extended price for each service, with a total price for the cart.
� Delete items in your cart or make changes to the information.
After you submit the cart, you can view the status of all the service requests in your cart.
IMPORTANT You can only open one cart at a time. The cart is not available to guest users.
� To use the cart
1 Perform a search for available services.
2 Click Add to Cart on any service’s description.
34 User’s Guide
Cart Review stage—Using the cart
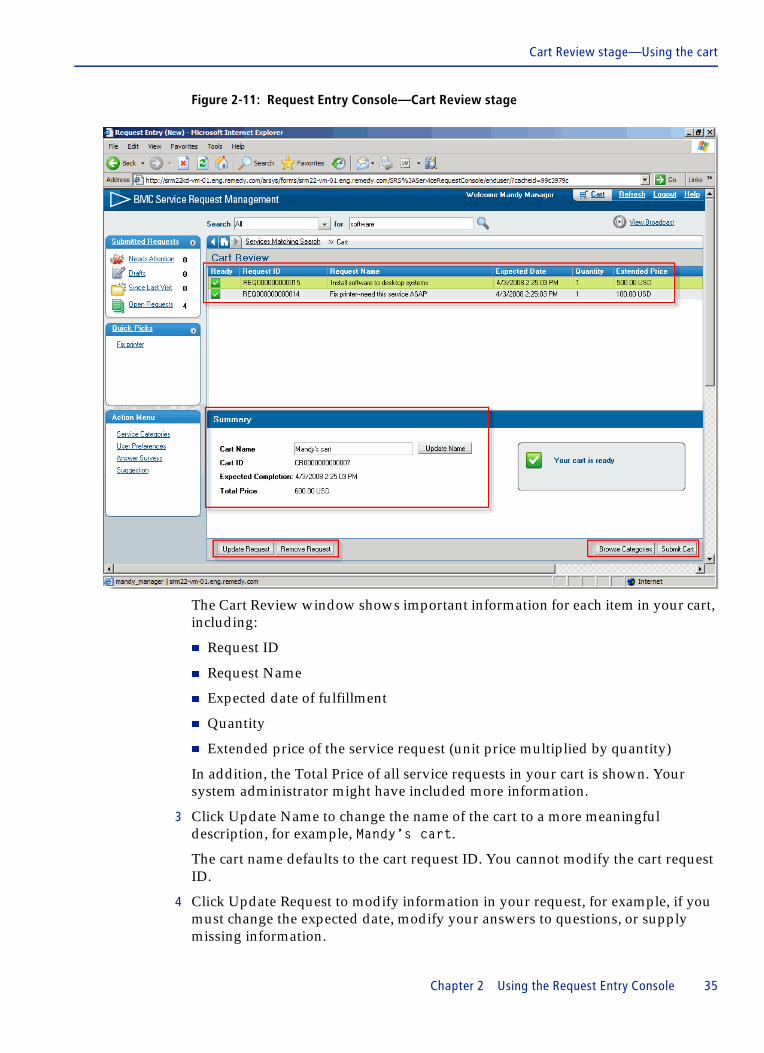
Figure 2-11: Request Entry Console—Cart Review stage
The Cart Review window shows important information for each item in your cart, including:
� Request ID
� Request Name
� Expected date of fulfillment
� Quantity
� Extended price of the service request (unit price multiplied by quantity)
In addition, the Total Price of all service requests in your cart is shown. Your system administrator might have included more information.
3 Click Update Name to change the name of the cart to a more meaningful description, for example, Mandy’s cart.
The cart name defaults to the cart request ID. You cannot modify the cart request ID.
4 Click Update Request to modify information in your request, for example, if you must change the expected date, modify your answers to questions, or supply missing information.
Chapter 2 Using the Request Entry Console 35
BMC Service Request Management 2.2.00
You must update requests that need attention before you can submit the cart. The Ready column in the Cart Review table shows any requests that require attention for some reason.
5 Select a service, and then click Remove Request to delete it from your cart.
6 Continue to add services to the cart.
To add more than one service to your order, enter a new search term in the Search box, or click Browse Categories to return to the home page.
7 Return to the cart when you finish shopping for services.
The Cart Review window lists all the services in your cart. For example, you might decide it is easier to combine all your service requests into one single operation instead of creating three separate requests. If needed, you can update a request or delete it.
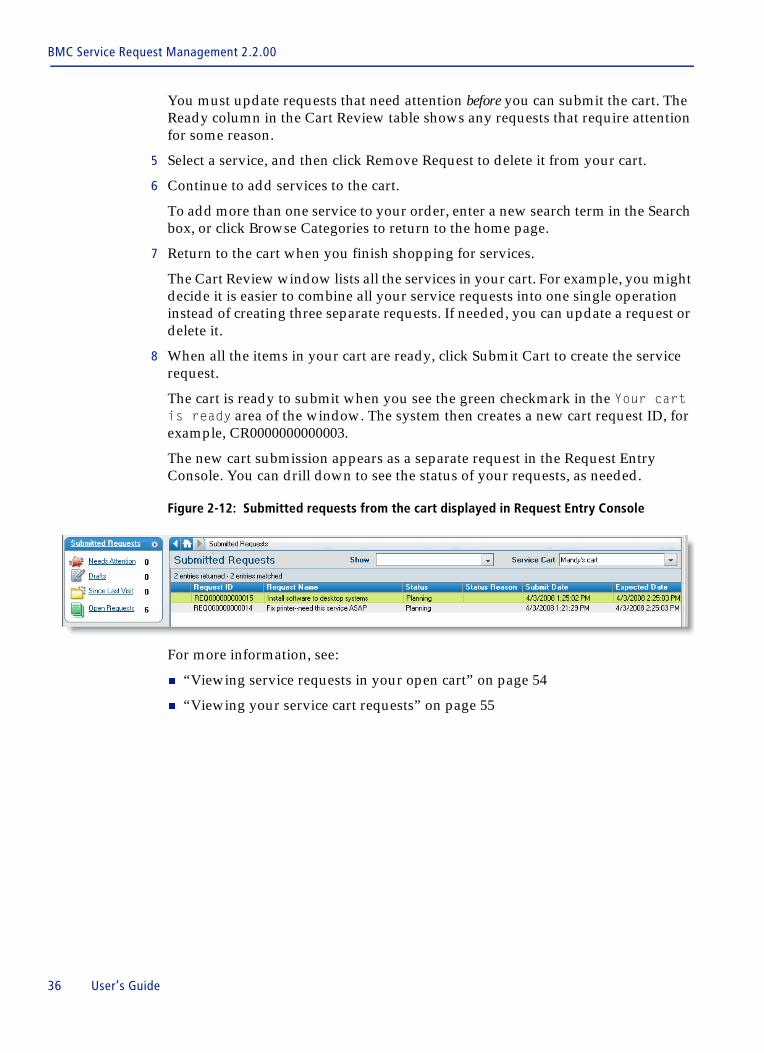
8 When all the items in your cart are ready, click Submit Cart to create the service request.
The cart is ready to submit when you see the green checkmark in the Your cart is ready area of the window. The system then creates a new cart request ID, for example, CR0000000000003.
The new cart submission appears as a separate request in the Request Entry Console. You can drill down to see the status of your requests, as needed.
Figure 2-12: Submitted requests from the cart displayed in Request Entry Console
For more information, see:
� “Viewing service requests in your open cart” on page 54
� “Viewing your service cart requests” on page 55
36 User’s Guide
Using the Request Entry Console to manage service requests
Using the Request Entry Console to manage service requests
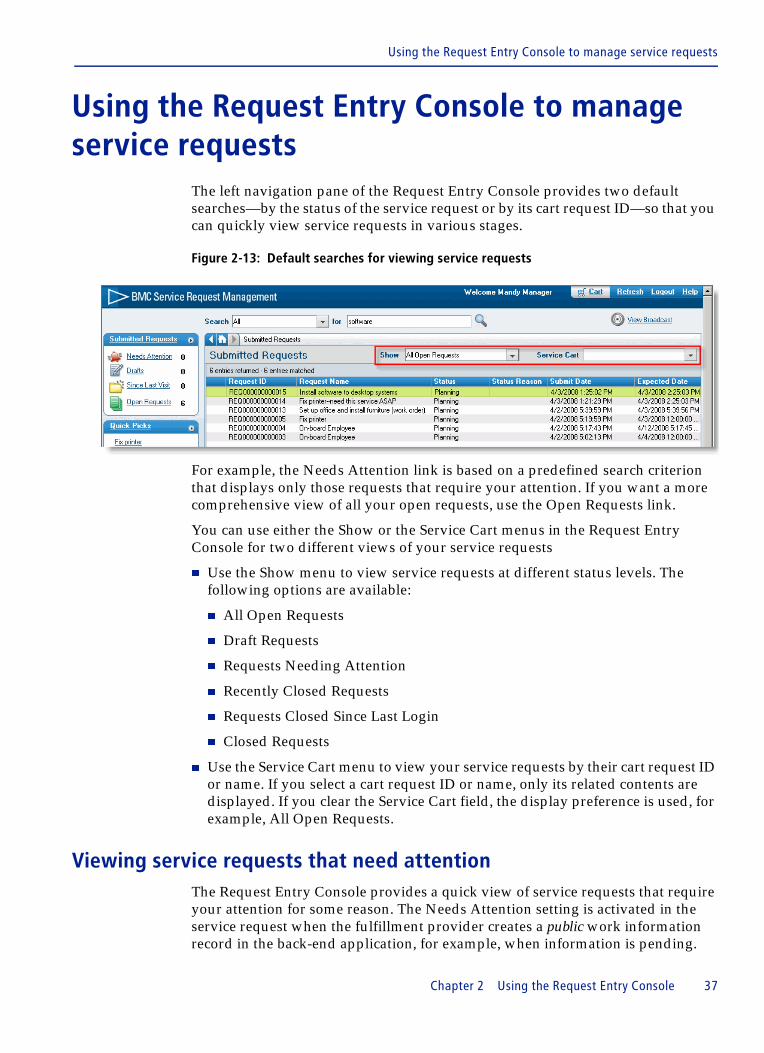
The left navigation pane of the Request Entry Console provides two default searches—by the status of the service request or by its cart request ID—so that you can quickly view service requests in various stages.
Figure 2-13: Default searches for viewing service requests
For example, the Needs Attention link is based on a predefined search criterion that displays only those requests that require your attention. If you want a more comprehensive view of all your open requests, use the Open Requests link.
You can use either the Show or the Service Cart menus in the Request Entry Console for two different views of your service requests
� Use the Show menu to view service requests at different status levels. The following options are available:
� All Open Requests
� Draft Requests
� Requests Needing Attention
� Recently Closed Requests
� Requests Closed Since Last Login
� Closed Requests
� Use the Service Cart menu to view your service requests by their cart request ID or name. If you select a cart request ID or name, only its related contents are displayed. If you clear the Service Cart field, the display preference is used, for example, All Open Requests.
Viewing service requests that need attention The Request Entry Console provides a quick view of service requests that require your attention for some reason. The Needs Attention setting is activated in the service request when the fulfillment provider creates a public work information record in the back-end application, for example, when information is pending.
Chapter 2 Using the Request Entry Console 37
BMC Service Request Management 2.2.00
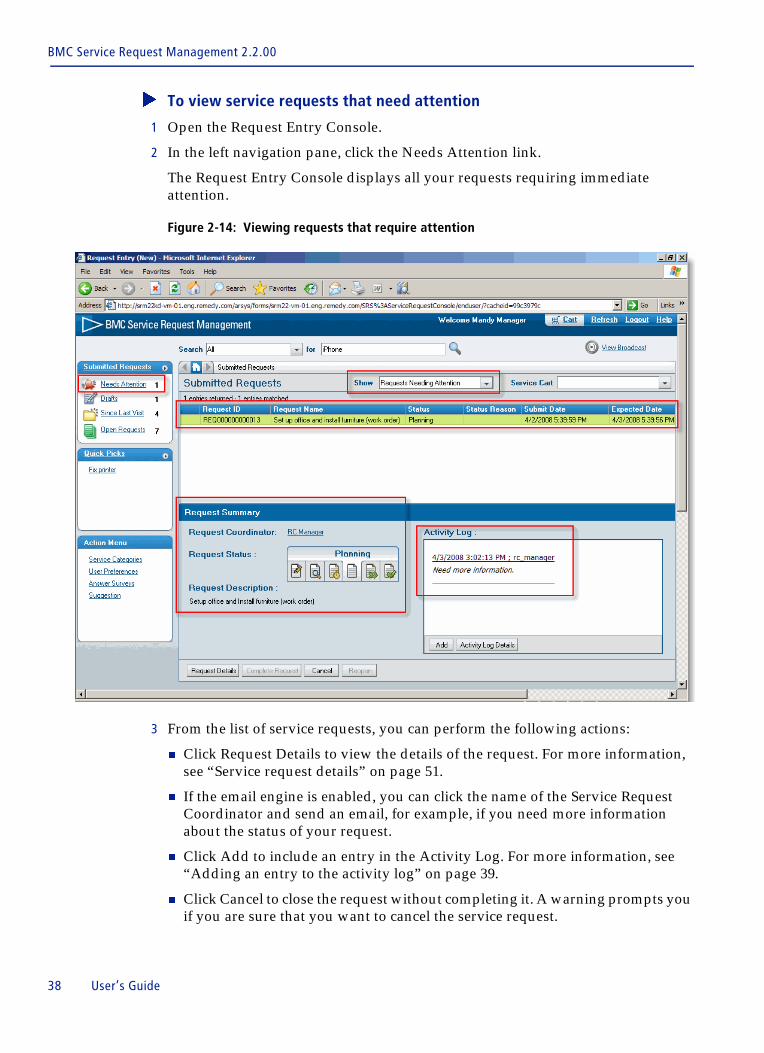
� To view service requests that need attention
1 Open the Request Entry Console.
2 In the left navigation pane, click the Needs Attention link.
The Request Entry Console displays all your requests requiring immediate attention.
Figure 2-14: Viewing requests that require attention
3 From the list of service requests, you can perform the following actions:
� Click Request Details to view the details of the request. For more information, see “Service request details” on page 51.
� If the email engine is enabled, you can click the name of the Service Request Coordinator and send an email, for example, if you need more information about the status of your request.
� Click Add to include an entry in the Activity Log. For more information, see “Adding an entry to the activity log” on page 39.
� Click Cancel to close the request without completing it. A warning prompts you if you are sure that you want to cancel the service request.
38 User’s Guide
Using the Request Entry Console to manage service requests
� Click Complete Request if a request is in the Draft status. The service request appears in the Provide Information stage. For more information, see “Provide Information stage—Entering your requester data” on page 31.
� To reopen a request that has been closed, see “Reopening service requests” on page 45.
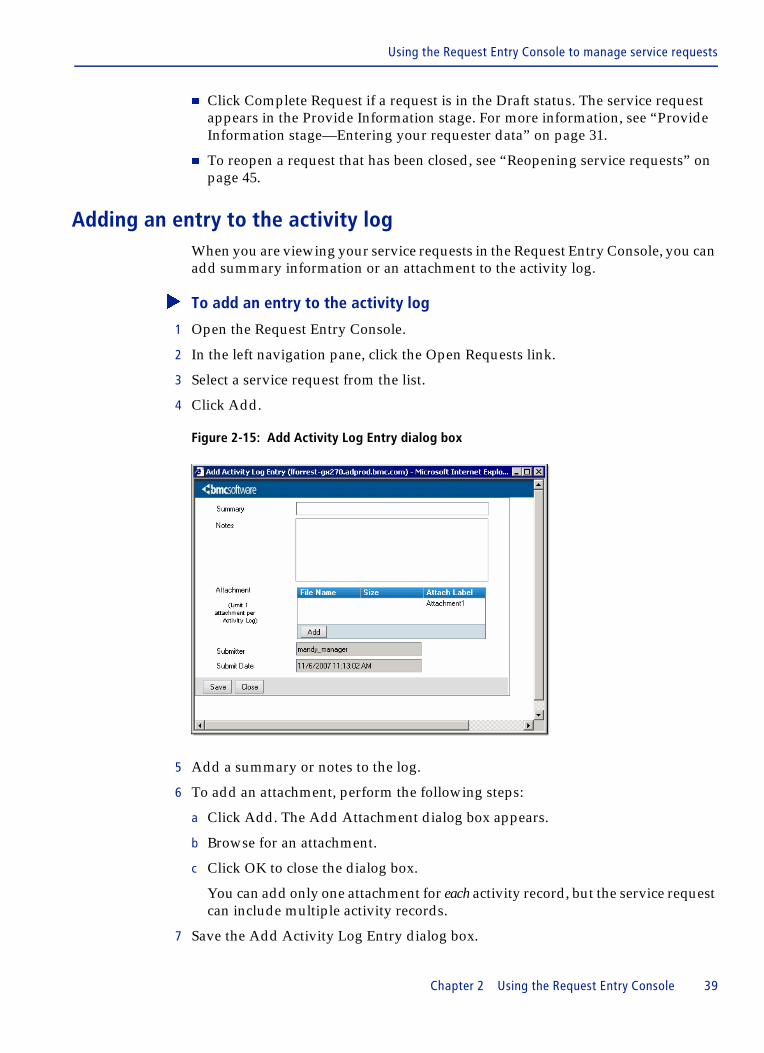
Adding an entry to the activity logWhen you are viewing your service requests in the Request Entry Console, you can add summary information or an attachment to the activity log.
� To add an entry to the activity log
1 Open the Request Entry Console.
2 In the left navigation pane, click the Open Requests link.
3 Select a service request from the list.
4 Click Add.
Figure 2-15: Add Activity Log Entry dialog box
5 Add a summary or notes to the log.
6 To add an attachment, perform the following steps:
a Click Add. The Add Attachment dialog box appears.
b Browse for an attachment.
c Click OK to close the dialog box.
You can add only one attachment for each activity record, but the service request can include multiple activity records.
7 Save the Add Activity Log Entry dialog box.
Chapter 2 Using the Request Entry Console 39
BMC Service Request Management 2.2.00
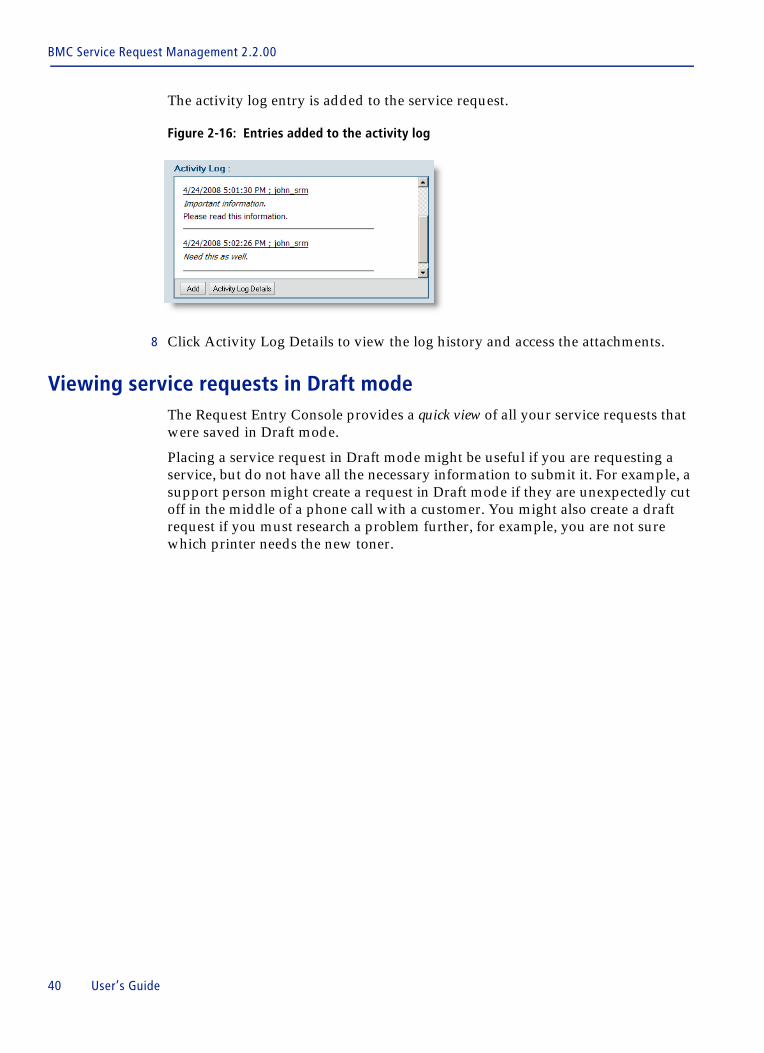
The activity log entry is added to the service request.
Figure 2-16: Entries added to the activity log
8 Click Activity Log Details to view the log history and access the attachments.
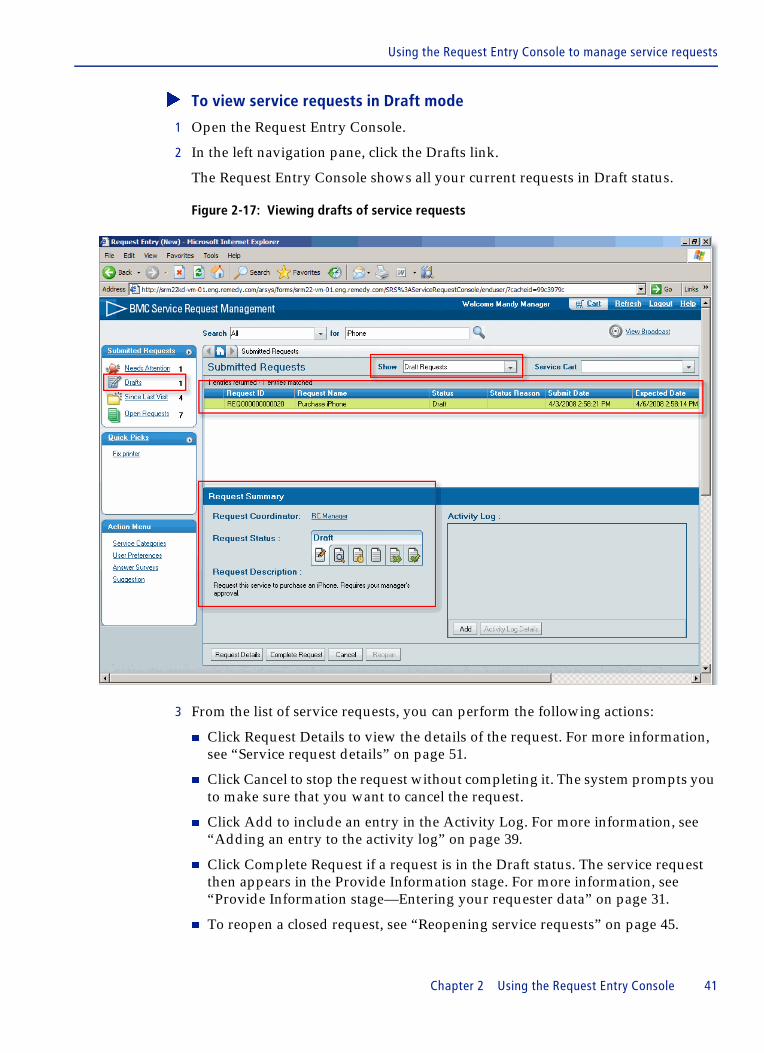
Viewing service requests in Draft mode The Request Entry Console provides a quick view of all your service requests that were saved in Draft mode.
Placing a service request in Draft mode might be useful if you are requesting a service, but do not have all the necessary information to submit it. For example, a support person might create a request in Draft mode if they are unexpectedly cut off in the middle of a phone call with a customer. You might also create a draft request if you must research a problem further, for example, you are not sure which printer needs the new toner.
40 User’s Guide
Using the Request Entry Console to manage service requests
� To view service requests in Draft mode
1 Open the Request Entry Console.
2 In the left navigation pane, click the Drafts link.
The Request Entry Console shows all your current requests in Draft status.
Figure 2-17: Viewing drafts of service requests
3 From the list of service requests, you can perform the following actions:
� Click Request Details to view the details of the request. For more information, see “Service request details” on page 51.
� Click Cancel to stop the request without completing it. The system prompts you to make sure that you want to cancel the request.
� Click Add to include an entry in the Activity Log. For more information, see “Adding an entry to the activity log” on page 39.
� Click Complete Request if a request is in the Draft status. The service request then appears in the Provide Information stage. For more information, see “Provide Information stage—Entering your requester data” on page 31.
� To reopen a closed request, see “Reopening service requests” on page 45.
Chapter 2 Using the Request Entry Console 41
BMC Service Request Management 2.2.00
IMPORTANT When the Submitter Mode is Locked on the server, users without a license can create a request as a draft, and return later to complete it. However, nobody, not even the AR System administrator, can change the value on the Submitter field after the request enters the system. In addition, SRM updates metrics forms in the background when you open the Request Entry Console. If a user with a Read license wants to update the request, the Submitter Mode must be Locked. If you have a Fixed or Floating license, you can set the Submitter Mode to Changeable. For more information, see the BMC Remedy Action Request System 7.1.00 Configuring guide.
Viewing service requests closed from the last time you visited SRMThe Request Entry Console provides a quick view of service requests that were closed from the last time that you visited SRM.
You can set your own preferences in the Request Entry Console, for example, you can specify that you want to see requests that were closed during the last five days. For more information, see “Setting Request Entry Console preferences” on page 69.
� To view service requests from the last time that you visited SRM
1 Open the Request Entry Console.
2 In the left navigation pane, click the Since Last Visit link.
The Request Entry Console shows all your requests that were closed since the last time you logged in to the system.
42 User’s Guide
Using the Request Entry Console to manage service requests
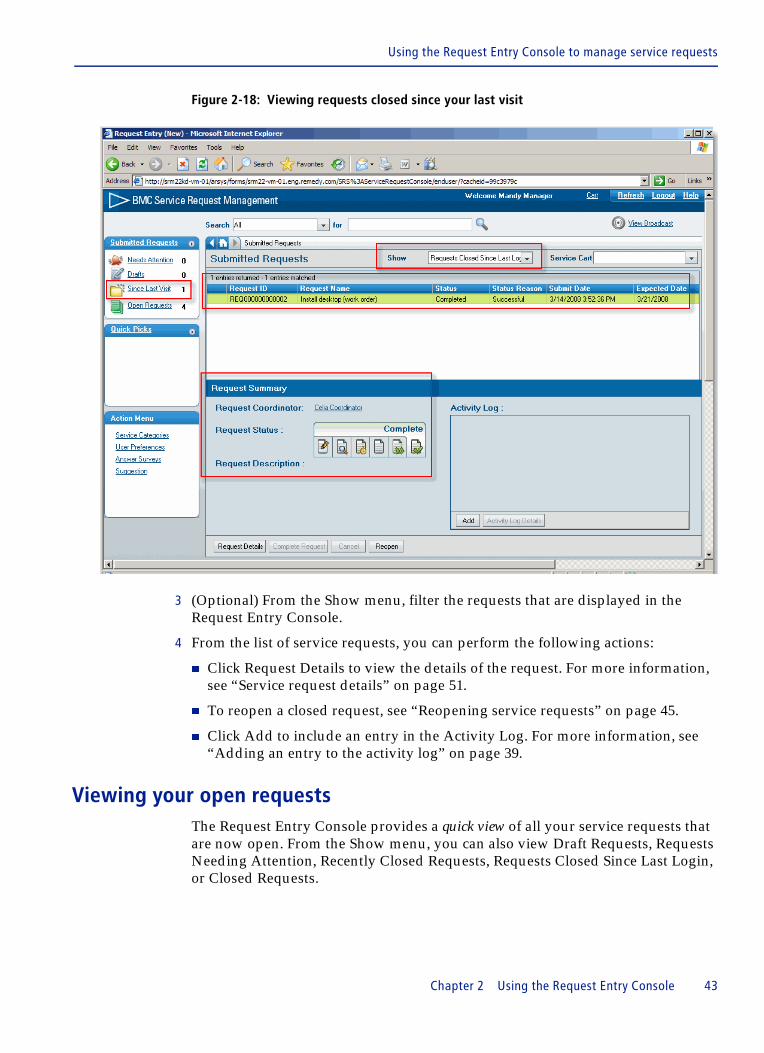
Figure 2-18: Viewing requests closed since your last visit
3 (Optional) From the Show menu, filter the requests that are displayed in the Request Entry Console.
4 From the list of service requests, you can perform the following actions:
� Click Request Details to view the details of the request. For more information, see “Service request details” on page 51.
� To reopen a closed request, see “Reopening service requests” on page 45.
� Click Add to include an entry in the Activity Log. For more information, see “Adding an entry to the activity log” on page 39.
Viewing your open requests The Request Entry Console provides a quick view of all your service requests that are now open. From the Show menu, you can also view Draft Requests, Requests Needing Attention, Recently Closed Requests, Requests Closed Since Last Login, or Closed Requests.
Chapter 2 Using the Request Entry Console 43
BMC Service Request Management 2.2.00
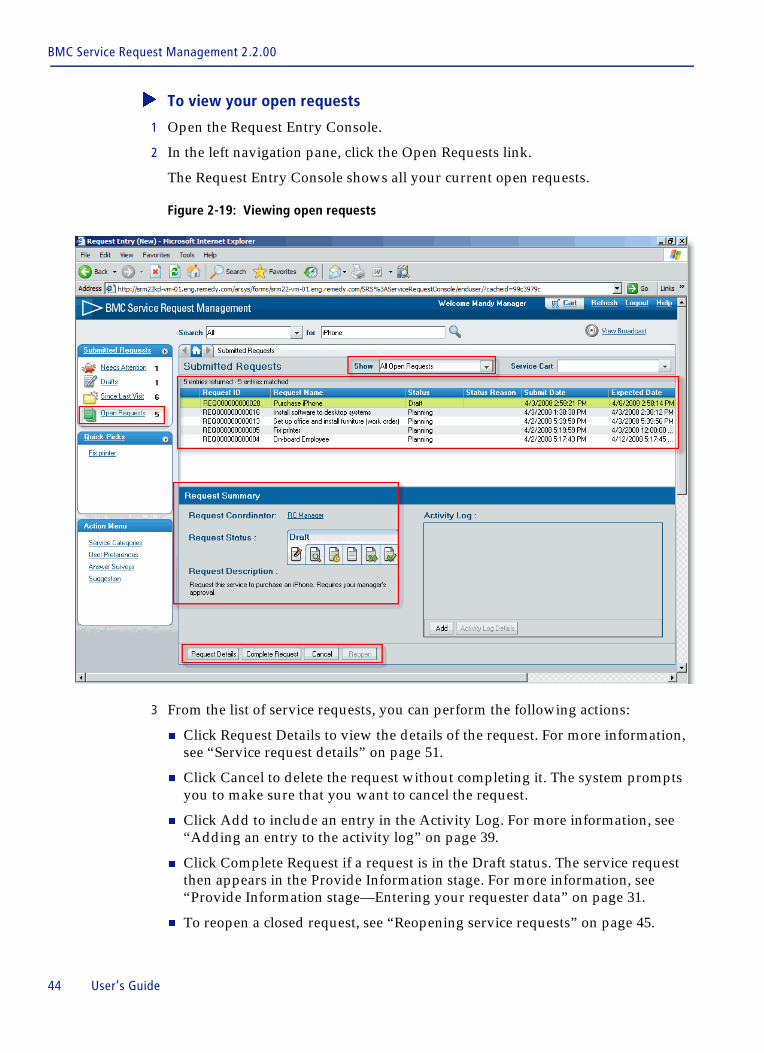
� To view your open requests
1 Open the Request Entry Console.
2 In the left navigation pane, click the Open Requests link.
The Request Entry Console shows all your current open requests.
Figure 2-19: Viewing open requests
3 From the list of service requests, you can perform the following actions:
� Click Request Details to view the details of the request. For more information, see “Service request details” on page 51.
� Click Cancel to delete the request without completing it. The system prompts you to make sure that you want to cancel the request.
� Click Add to include an entry in the Activity Log. For more information, see “Adding an entry to the activity log” on page 39.
� Click Complete Request if a request is in the Draft status. The service request then appears in the Provide Information stage. For more information, see “Provide Information stage—Entering your requester data” on page 31.
� To reopen a closed request, see “Reopening service requests” on page 45.
44 User’s Guide
Using the Request Entry Console to manage service requests
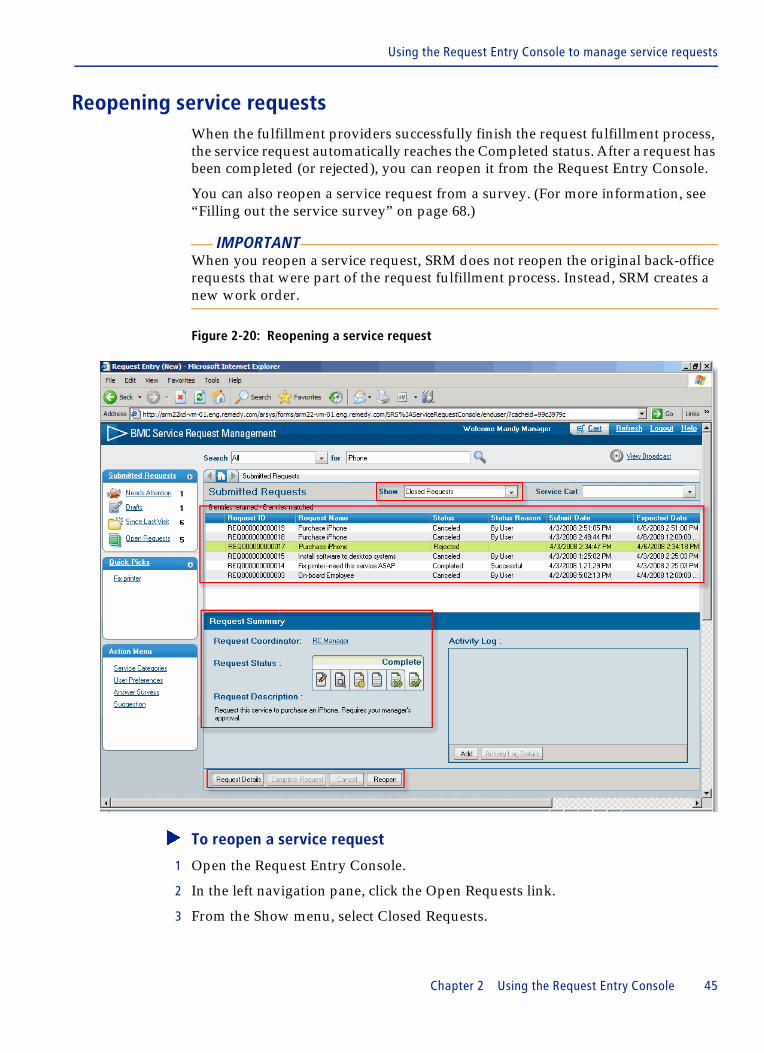
Reopening service requestsWhen the fulfillment providers successfully finish the request fulfillment process, the service request automatically reaches the Completed status. After a request has been completed (or rejected), you can reopen it from the Request Entry Console.
You can also reopen a service request from a survey. (For more information, see “Filling out the service survey” on page 68.)
IMPORTANT When you reopen a service request, SRM does not reopen the original back-office requests that were part of the request fulfillment process. Instead, SRM creates a new work order.
Figure 2-20: Reopening a service request
� To reopen a service request
1 Open the Request Entry Console.
2 In the left navigation pane, click the Open Requests link.
3 From the Show menu, select Closed Requests.
Chapter 2 Using the Request Entry Console 45
BMC Service Request Management 2.2.00
The results list displays all the closed service requests. For a more narrowly defined search, try selecting Recently Closed Requests or Requests Closed Since Last Login from the Show menu.
4 Select a request that has been rejected or completed.
5 Click Reopen.
A dialog box prompts to make sure you want to reopen the request.
6 If you are sure that you want to reopen the request, click Yes.
7 In the Request Work Info dialog box, add summary information, notes, and attachments as needed.
8 Click Save and close the dialog box.
You are notified that the request has been reopened.
9 From the Show menu, select All Open Requests, or click Open Request in the left navigation pane.
The request now appears as an open request.
46 User’s Guide
Using the Request Entry Console to manage service requests
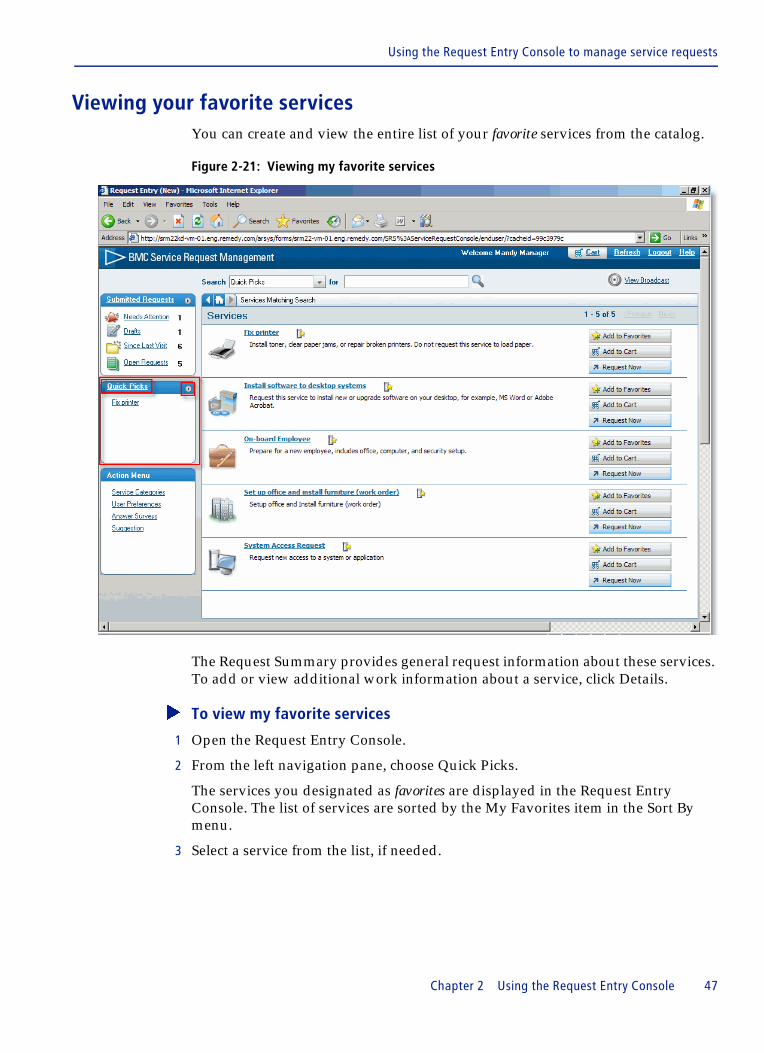
Viewing your favorite services You can create and view the entire list of your favorite services from the catalog.
Figure 2-21: Viewing my favorite services
The Request Summary provides general request information about these services. To add or view additional work information about a service, click Details.
� To view my favorite services
1 Open the Request Entry Console.
2 From the left navigation pane, choose Quick Picks.
The services you designated as favorites are displayed in the Request Entry Console. The list of services are sorted by the My Favorites item in the Sort By menu.
3 Select a service from the list, if needed.
Chapter 2 Using the Request Entry Console 47
BMC Service Request Management 2.2.00
Creating a list of my favorite services You can create a list of your favorite services from the catalog. For more information, see “Quick Picks” on page 58.
NOTE Guest users cannot create a list of favorite services.
� To create a list of favorite services
1 Open the Request Entry Console.
2 Perform a search for service requests.
For information, see “Search stage—Searching for a service” on page 24.
3 Click Add to My Favorites for the service you want to add to your favorites.
You can now access the service from the Quick Picks list.
4 (Option) If you no longer use a service, click Remove from Favorites.
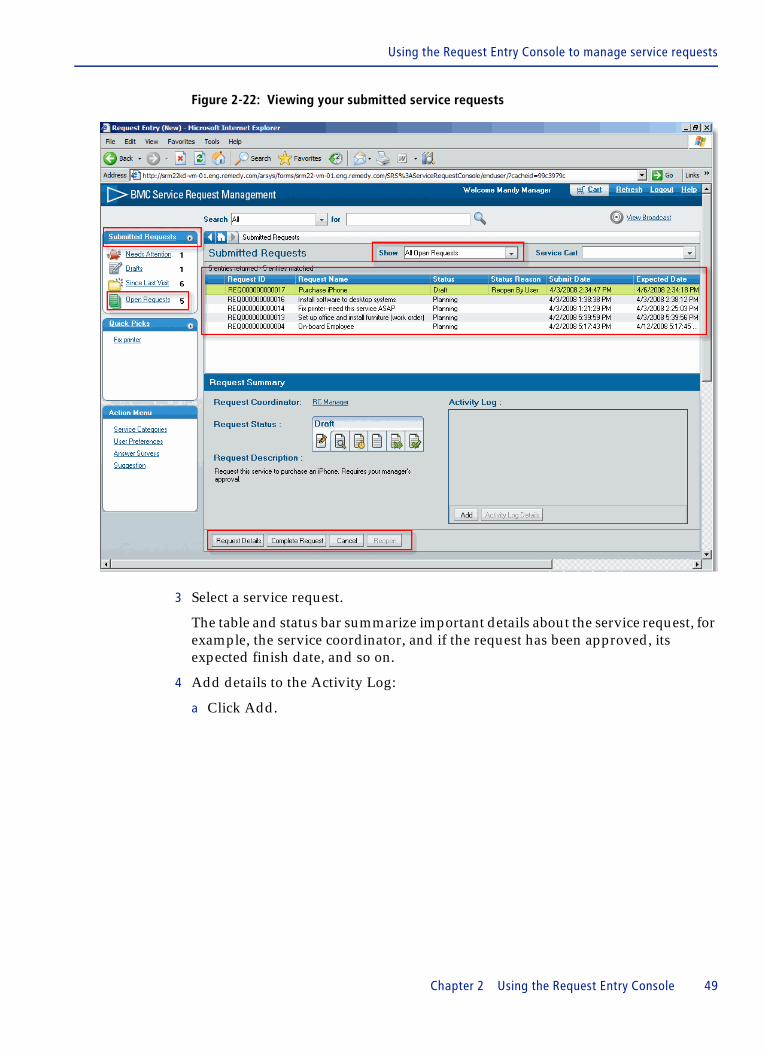
Viewing your open submitted service requests You can review a list of your open submitted service requests, a summary of their details, the activity log, and their status levels. You can display requests by selecting the status from the Show menu, for example, All Open Requests.
In addition, each entry displayed in the table of requests shows its relative status in the status bar.
From this window, you can cancel a request without completing it.
NOTE Guest users cannot cancel service requests that they have submitted.
� To view service requests
1 Open the Request Entry Console.
2 Perform one of the following actions:
� Choose Submitted Requests.
� Click the Open Requests link in the left navigation pane.
� From the Show field, select All Open Requests.
Your outstanding service requests are displayed.
48 User’s Guide
Using the Request Entry Console to manage service requests
Figure 2-22: Viewing your submitted service requests
3 Select a service request.
The table and status bar summarize important details about the service request, for example, the service coordinator, and if the request has been approved, its expected finish date, and so on.
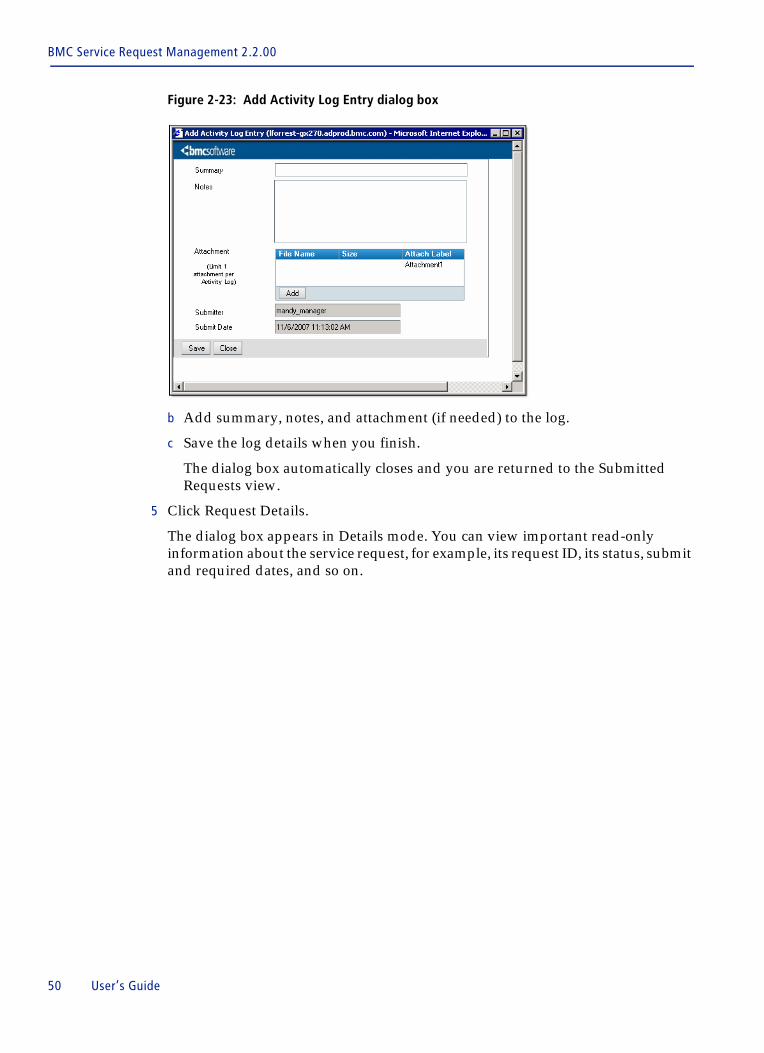
4 Add details to the Activity Log:
a Click Add.
Chapter 2 Using the Request Entry Console 49
BMC Service Request Management 2.2.00
Figure 2-23: Add Activity Log Entry dialog box
b Add summary, notes, and attachment (if needed) to the log.
c Save the log details when you finish.
The dialog box automatically closes and you are returned to the Submitted Requests view.
5 Click Request Details.
The dialog box appears in Details mode. You can view important read-only information about the service request, for example, its request ID, its status, submit and required dates, and so on.
50 User’s Guide
Using the Request Entry Console to manage service requests
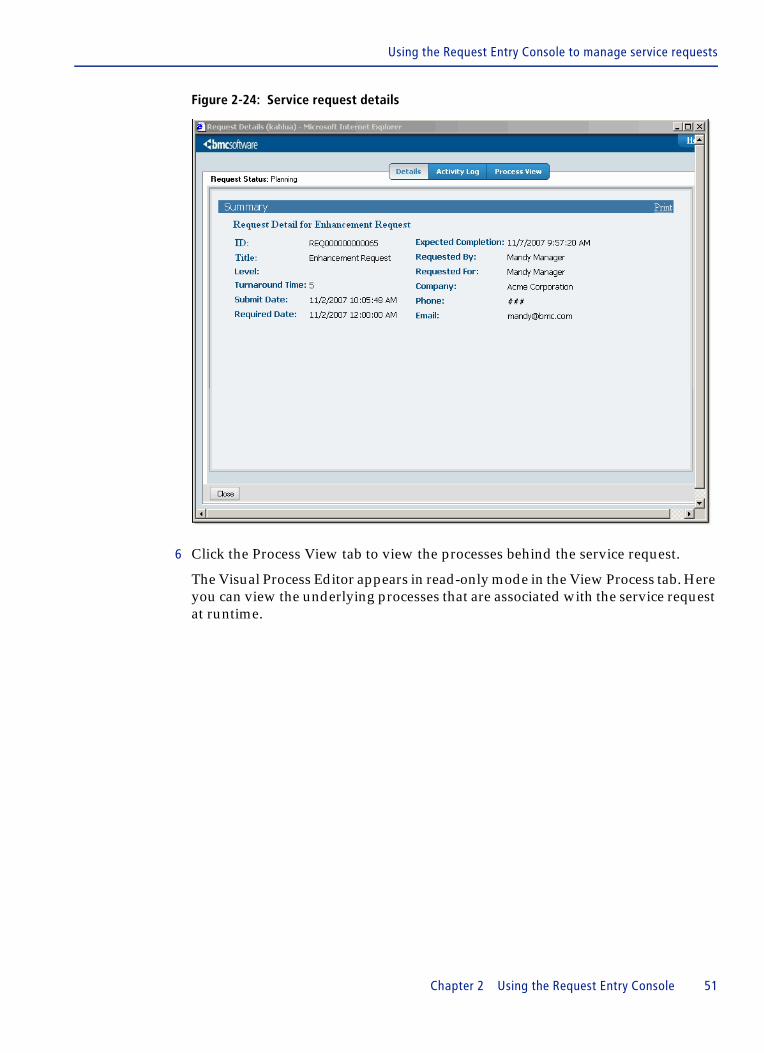
Figure 2-24: Service request details
6 Click the Process View tab to view the processes behind the service request.
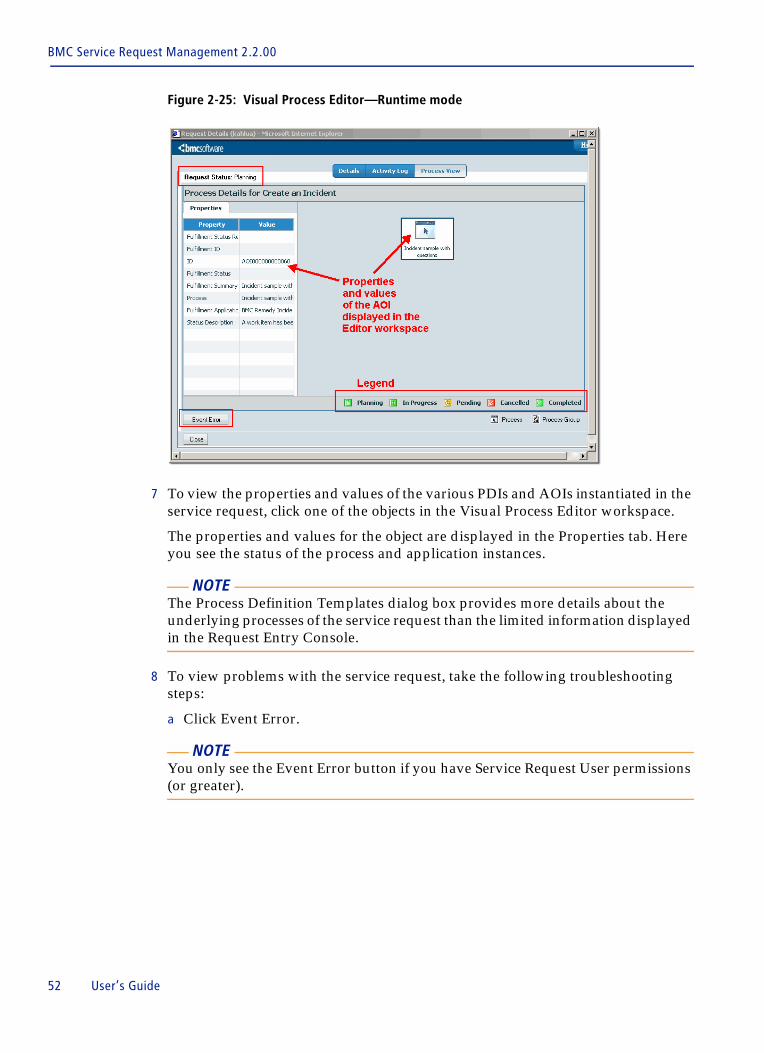
The Visual Process Editor appears in read-only mode in the View Process tab. Here you can view the underlying processes that are associated with the service request at runtime.
Chapter 2 Using the Request Entry Console 51
BMC Service Request Management 2.2.00
Figure 2-25: Visual Process Editor—Runtime mode
7 To view the properties and values of the various PDIs and AOIs instantiated in the service request, click one of the objects in the Visual Process Editor workspace.
The properties and values for the object are displayed in the Properties tab. Here you see the status of the process and application instances.
NOTE The Process Definition Templates dialog box provides more details about the underlying processes of the service request than the limited information displayed in the Request Entry Console.
8 To view problems with the service request, take the following troubleshooting steps:
a Click Event Error.
NOTE You only see the Event Error button if you have Service Request User permissions (or greater).
52 User’s Guide
Using the Request Entry Console to manage service requests
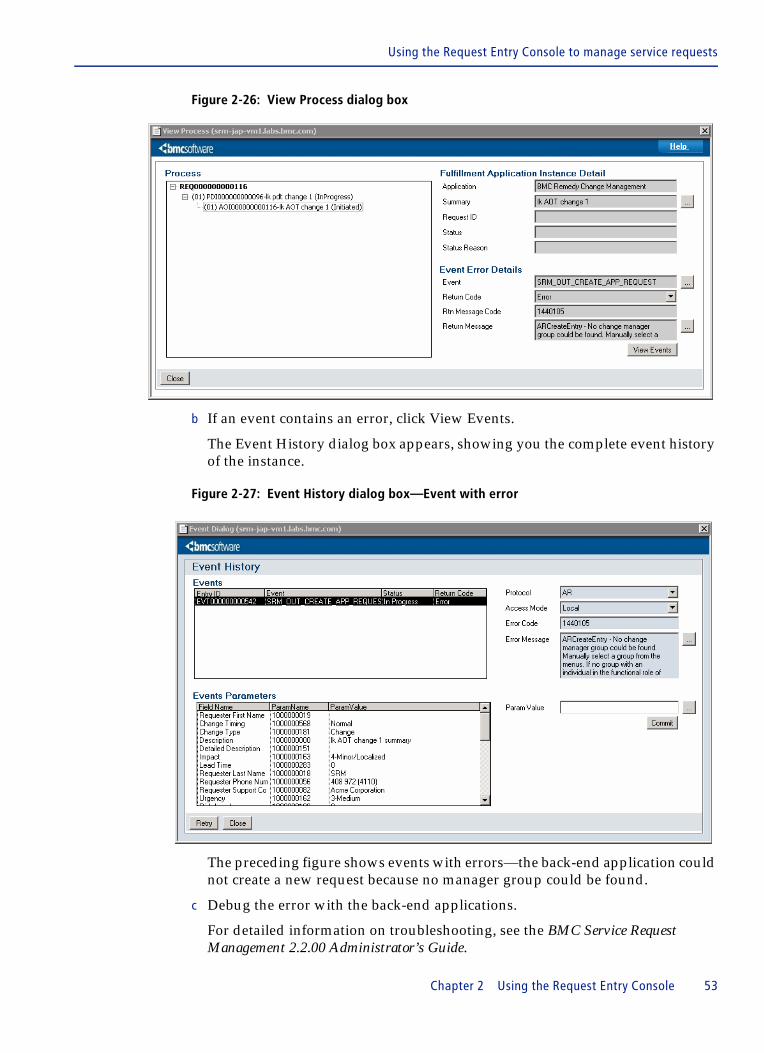
Figure 2-26: View Process dialog box
b If an event contains an error, click View Events.
The Event History dialog box appears, showing you the complete event history of the instance.
Figure 2-27: Event History dialog box—Event with error
The preceding figure shows events with errors—the back-end application could not create a new request because no manager group could be found.
c Debug the error with the back-end applications.
For detailed information on troubleshooting, see the BMC Service Request Management 2.2.00 Administrator’s Guide.
Chapter 2 Using the Request Entry Console 53
BMC Service Request Management 2.2.00
d Click Retry to re-start the application instance command.
e Close the Event History dialog box.
f Close the View History dialog box.
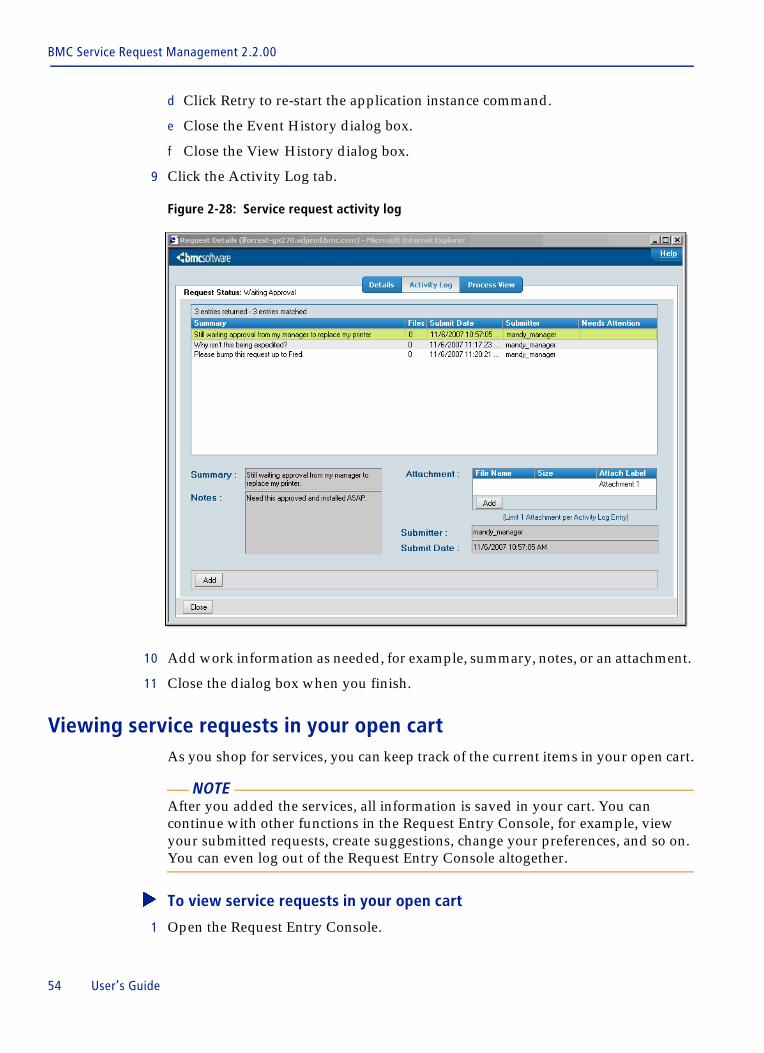
9 Click the Activity Log tab.
Figure 2-28: Service request activity log
10 Add work information as needed, for example, summary, notes, or an attachment.
11 Close the dialog box when you finish.
Viewing service requests in your open cartAs you shop for services, you can keep track of the current items in your open cart.
NOTE After you added the services, all information is saved in your cart. You can continue with other functions in the Request Entry Console, for example, view your submitted requests, create suggestions, change your preferences, and so on. You can even log out of the Request Entry Console altogether.
� To view service requests in your open cart
1 Open the Request Entry Console.
54 User’s Guide
Using the Request Entry Console to manage service requests
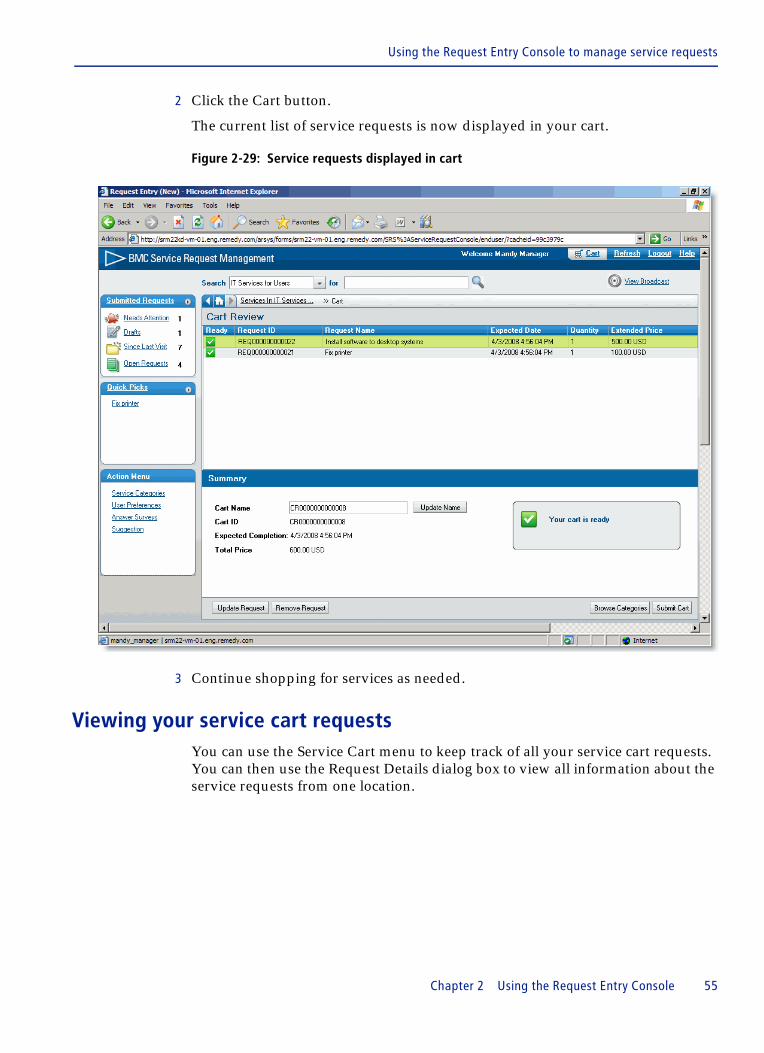
2 Click the Cart button.
The current list of service requests is now displayed in your cart.
Figure 2-29: Service requests displayed in cart
3 Continue shopping for services as needed.
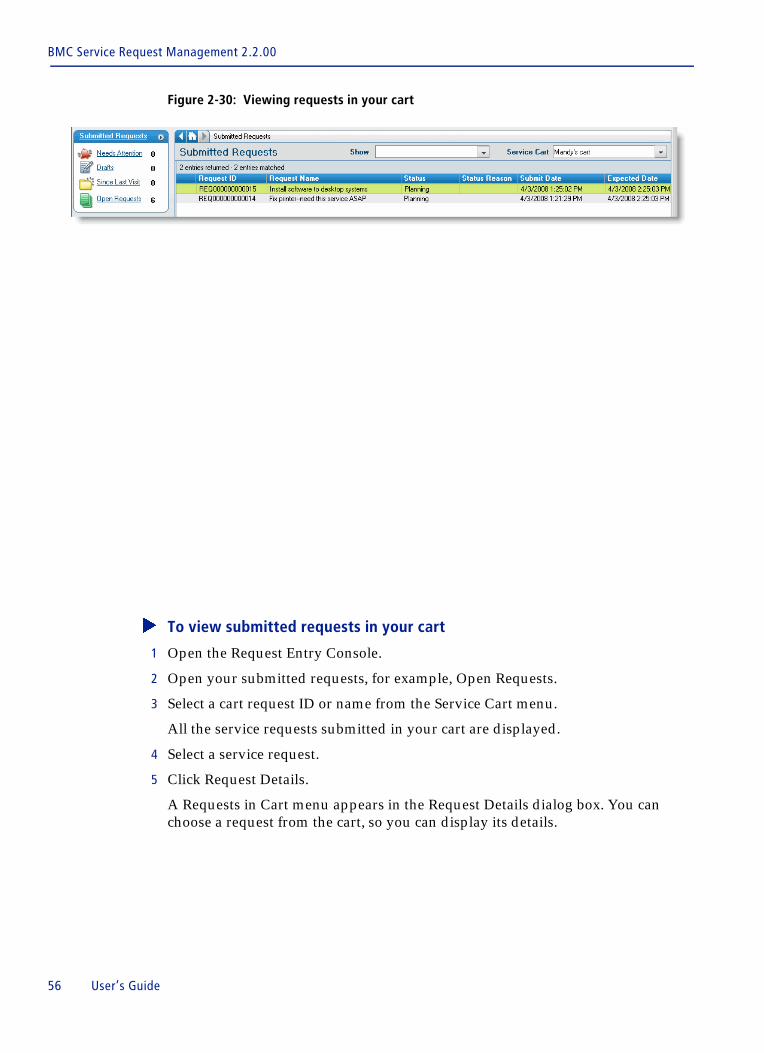
Viewing your service cart requestsYou can use the Service Cart menu to keep track of all your service cart requests. You can then use the Request Details dialog box to view all information about the service requests from one location.
Chapter 2 Using the Request Entry Console 55
BMC Service Request Management 2.2.00
Figure 2-30: Viewing requests in your cart
� To view submitted requests in your cart
1 Open the Request Entry Console.
2 Open your submitted requests, for example, Open Requests.
3 Select a cart request ID or name from the Service Cart menu.
All the service requests submitted in your cart are displayed.
4 Select a service request.
5 Click Request Details.
A Requests in Cart menu appears in the Request Details dialog box. You can choose a request from the cart, so you can display its details.
56 User’s Guide
Using the Request Entry Console to manage service requests
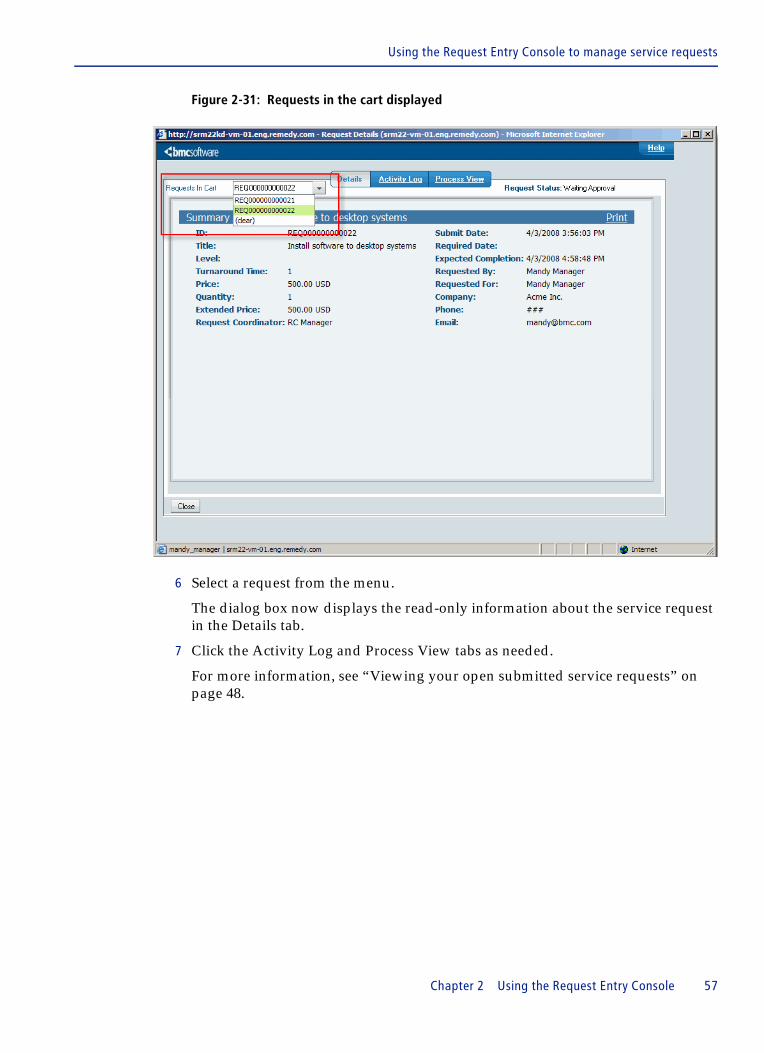
Figure 2-31: Requests in the cart displayed
6 Select a request from the menu.
The dialog box now displays the read-only information about the service request in the Details tab.
7 Click the Activity Log and Process View tabs as needed.
For more information, see “Viewing your open submitted service requests” on page 48.
Chapter 2 Using the Request Entry Console 57
BMC Service Request Management 2.2.00
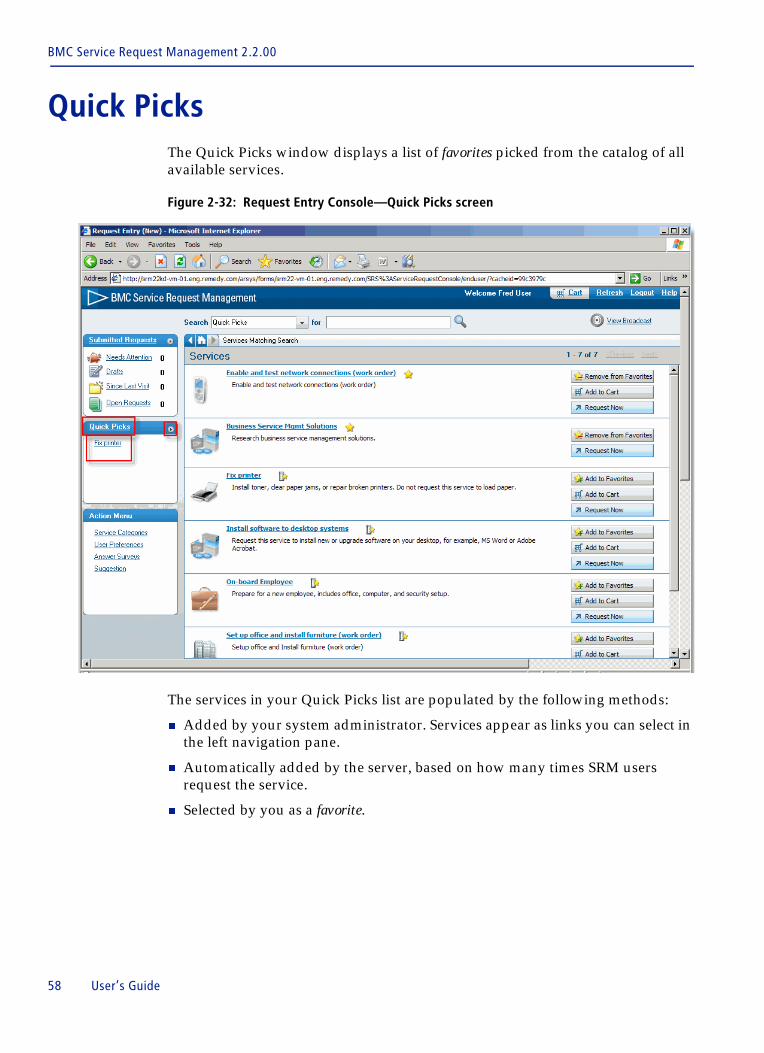
Quick Picks The Quick Picks window displays a list of favorites picked from the catalog of all available services.
Figure 2-32: Request Entry Console—Quick Picks screen
The services in your Quick Picks list are populated by the following methods:
� Added by your system administrator. Services appear as links you can select in the left navigation pane.
� Automatically added by the server, based on how many times SRM users request the service.
� Selected by you as a favorite.
58 User’s Guide
Waiting for approval on service requests
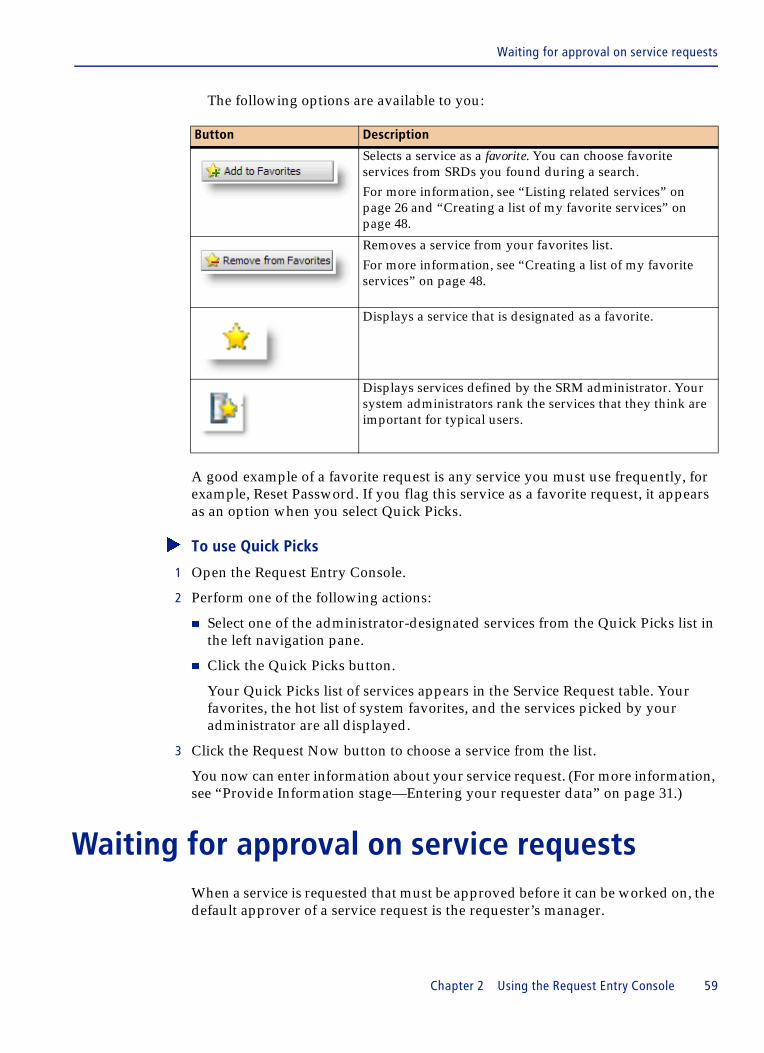
The following options are available to you:
A good example of a favorite request is any service you must use frequently, for example, Reset Password. If you flag this service as a favorite request, it appears as an option when you select Quick Picks.
� To use Quick Picks
1 Open the Request Entry Console.
2 Perform one of the following actions:
� Select one of the administrator-designated services from the Quick Picks list in the left navigation pane.
� Click the Quick Picks button.
Your Quick Picks list of services appears in the Service Request table. Your favorites, the hot list of system favorites, and the services picked by your administrator are all displayed.
3 Click the Request Now button to choose a service from the list.
You now can enter information about your service request. (For more information, see “Provide Information stage—Entering your requester data” on page 31.)
Waiting for approval on service requestsWhen a service is requested that must be approved before it can be worked on, the default approver of a service request is the requester’s manager.
Button Description
Selects a service as a favorite. You can choose favorite services from SRDs you found during a search. For more information, see “Listing related services” on page 26 and “Creating a list of my favorite services” on page 48.
Removes a service from your favorites list. For more information, see “Creating a list of my favorite services” on page 48.
Displays a service that is designated as a favorite.
Displays services defined by the SRM administrator. Your system administrators rank the services that they think are important for typical users.
Chapter 2 Using the Request Entry Console 59
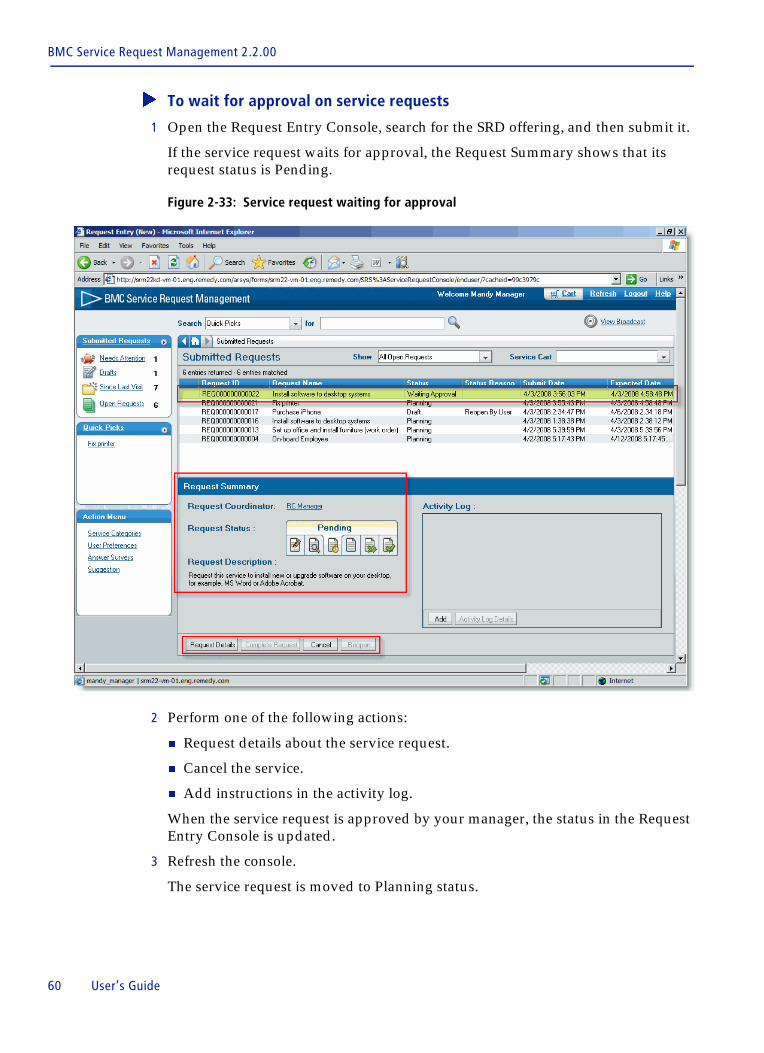
BMC Service Request Management 2.2.00
� To wait for approval on service requests
1 Open the Request Entry Console, search for the SRD offering, and then submit it.
If the service request waits for approval, the Request Summary shows that its request status is Pending.
Figure 2-33: Service request waiting for approval
2 Perform one of the following actions:
� Request details about the service request.
� Cancel the service.
� Add instructions in the activity log.
When the service request is approved by your manager, the status in the Request Entry Console is updated.
3 Refresh the console.
The service request is moved to Planning status.
60 User’s Guide
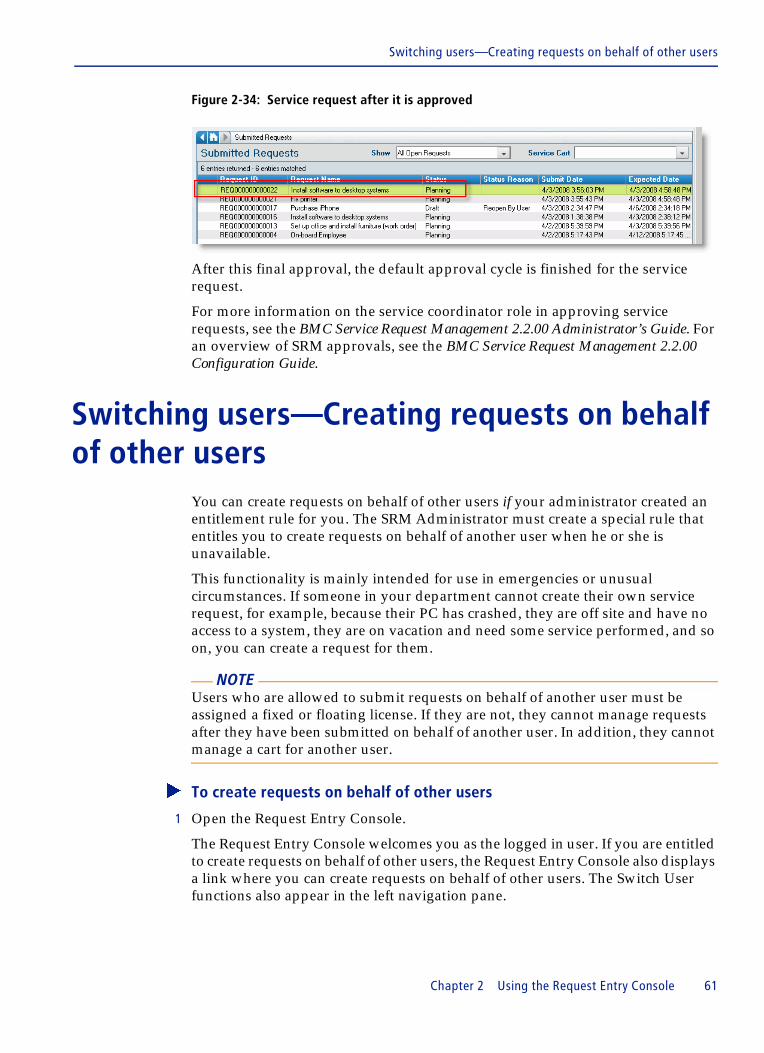
Switching users—Creating requests on behalf of other users
Figure 2-34: Service request after it is approved
After this final approval, the default approval cycle is finished for the service request.
For more information on the service coordinator role in approving service requests, see the BMC Service Request Management 2.2.00 Administrator’s Guide. For an overview of SRM approvals, see the BMC Service Request Management 2.2.00 Configuration Guide.
Switching users—Creating requests on behalf of other users
You can create requests on behalf of other users if your administrator created an entitlement rule for you. The SRM Administrator must create a special rule that entitles you to create requests on behalf of another user when he or she is unavailable.
This functionality is mainly intended for use in emergencies or unusual circumstances. If someone in your department cannot create their own service request, for example, because their PC has crashed, they are off site and have no access to a system, they are on vacation and need some service performed, and so on, you can create a request for them.
NOTE Users who are allowed to submit requests on behalf of another user must be assigned a fixed or floating license. If they are not, they cannot manage requests after they have been submitted on behalf of another user. In addition, they cannot manage a cart for another user.
� To create requests on behalf of other users
1 Open the Request Entry Console.
The Request Entry Console welcomes you as the logged in user. If you are entitled to create requests on behalf of other users, the Request Entry Console also displays a link where you can create requests on behalf of other users. The Switch User functions also appear in the left navigation pane.
Chapter 2 Using the Request Entry Console 61
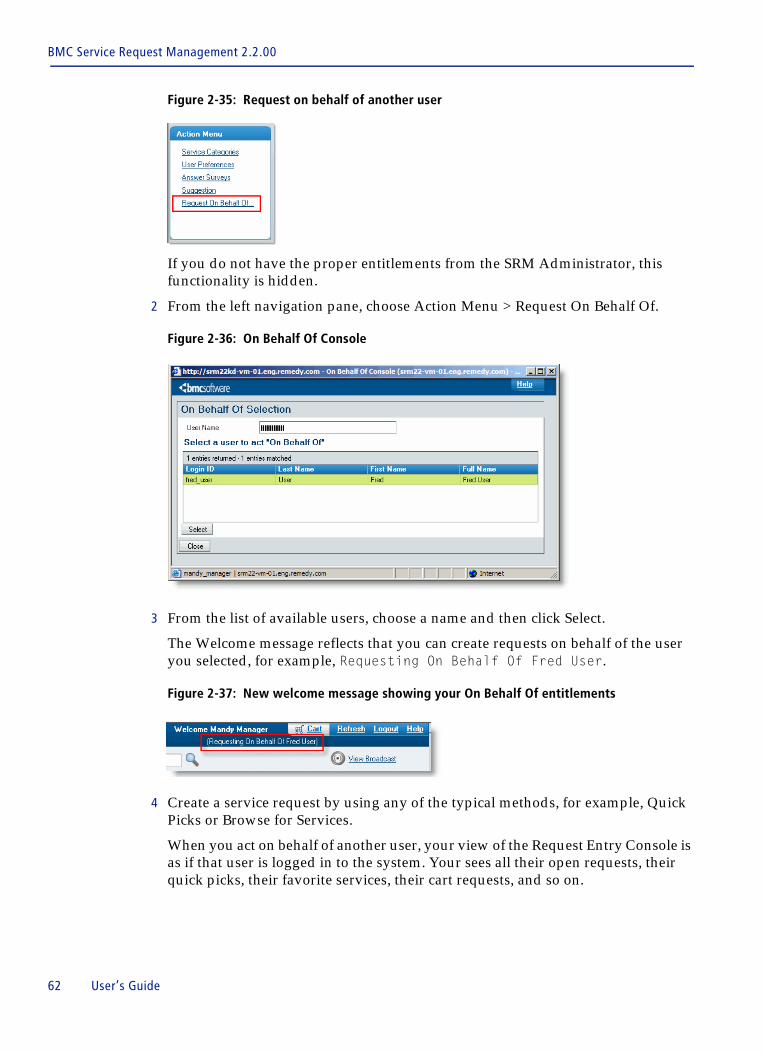
BMC Service Request Management 2.2.00
Figure 2-35: Request on behalf of another user
If you do not have the proper entitlements from the SRM Administrator, this functionality is hidden.
2 From the left navigation pane, choose Action Menu > Request On Behalf Of.
Figure 2-36: On Behalf Of Console
3 From the list of available users, choose a name and then click Select.
The Welcome message reflects that you can create requests on behalf of the user you selected, for example, Requesting On Behalf Of Fred User.
Figure 2-37: New welcome message showing your On Behalf Of entitlements
4 Create a service request by using any of the typical methods, for example, Quick Picks or Browse for Services.
When you act on behalf of another user, your view of the Request Entry Console is as if that user is logged in to the system. Your sees all their open requests, their quick picks, their favorite services, their cart requests, and so on.
62 User’s Guide
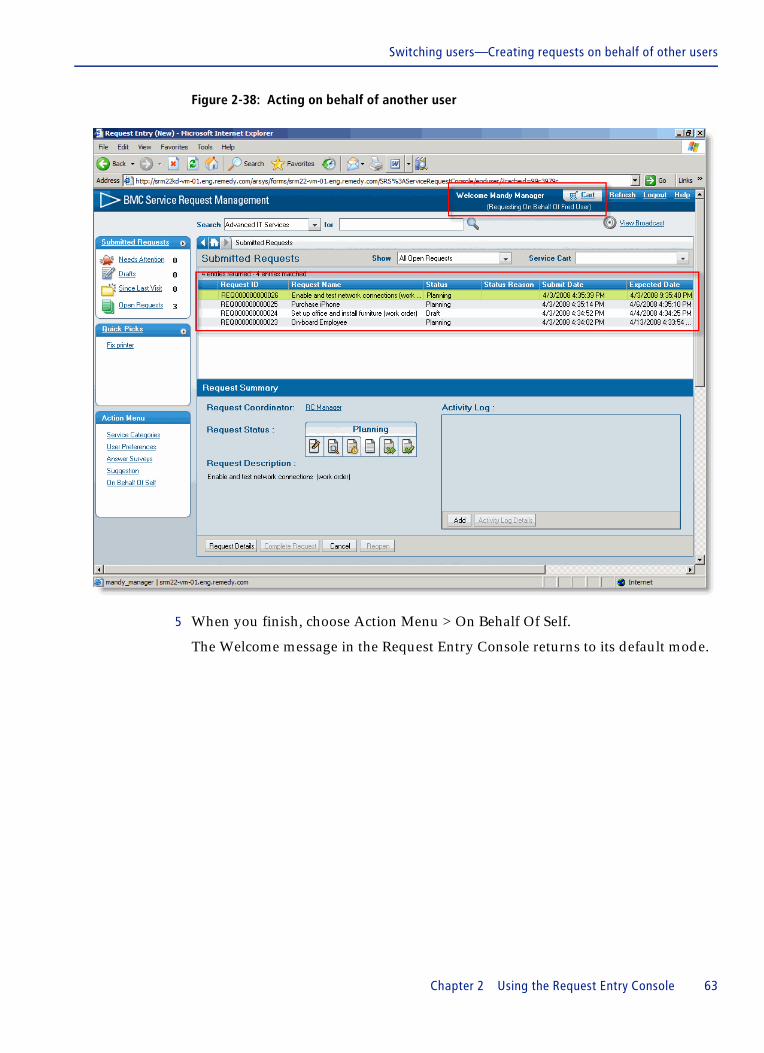
Switching users—Creating requests on behalf of other users
Figure 2-38: Acting on behalf of another user
5 When you finish, choose Action Menu > On Behalf Of Self.
The Welcome message in the Request Entry Console returns to its default mode.
Chapter 2 Using the Request Entry Console 63

BMC Service Request Management 2.2.00
Using broadcasts You can view messages that were broadcast to you from other groups in your organization. Broadcasts include messages about work in progress, system status, planned work, and so on.
Broadcasts are filtered by the logged-in user’s company, based on the following criteria:
� Broadcasts are filtered for the logged-in user’s company
� If the logged-in user’s company cannot be determined, then only Global broadcasts are displayed.
� Only broadcasts defined for the Global company are shown to guest users, who are not associated with a company.
Figure 2-39: Broadcasts Overview dialog box
Clicking the New Broadcast alert button opens the Broadcasts Overview in dialog mode, where you can see details of the broadcasts, depending on your permissions.
Viewing broadcastsThis section describes how to view broadcast messages. While viewing broadcasts, you can modify the message (if you belong to an authorized authoring group), create a new broadcast message, and under some circumstances (when viewing the message from the current record) relate the broadcast message to the current record.
64 User’s Guide
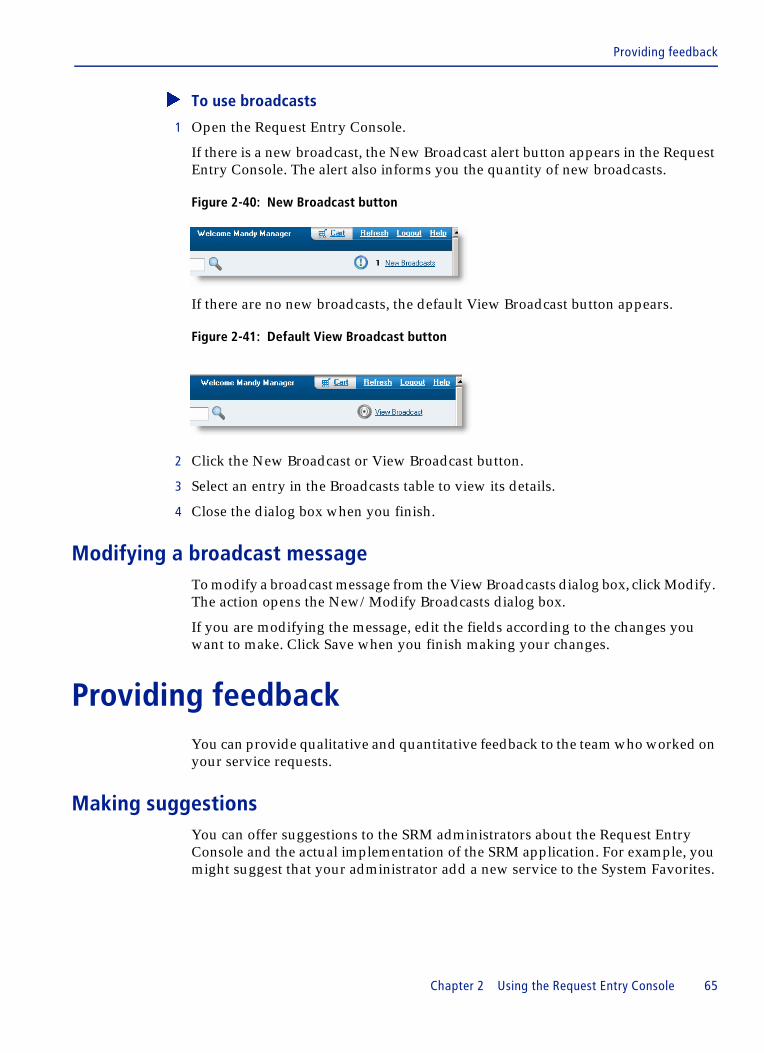
Providing feedback
� To use broadcasts
1 Open the Request Entry Console.
If there is a new broadcast, the New Broadcast alert button appears in the Request Entry Console. The alert also informs you the quantity of new broadcasts.
Figure 2-40: New Broadcast button
If there are no new broadcasts, the default View Broadcast button appears.
Figure 2-41: Default View Broadcast button
2 Click the New Broadcast or View Broadcast button.
3 Select an entry in the Broadcasts table to view its details.
4 Close the dialog box when you finish.
Modifying a broadcast message To modify a broadcast message from the View Broadcasts dialog box, click Modify. The action opens the New/Modify Broadcasts dialog box.
If you are modifying the message, edit the fields according to the changes you want to make. Click Save when you finish making your changes.
Providing feedback You can provide qualitative and quantitative feedback to the team who worked on your service requests.
Making suggestionsYou can offer suggestions to the SRM administrators about the Request Entry Console and the actual implementation of the SRM application. For example, you might suggest that your administrator add a new service to the System Favorites.
Chapter 2 Using the Request Entry Console 65

BMC Service Request Management 2.2.00
� To make suggestions
1 Open the Request Entry Console.
2 From the left navigation pane, choose Action Menu > Suggestion.
Figure 2-42: Suggestion dialog box
3 In the Suggestions dialog box, do the following:
a Select a category for your suggestion, for example, Common Requests or Metrics.
b Enter the other required information to create your suggestion.
NOTE If you are suggesting a new service, enter a suggested title and description.
4 Click Submit to create the suggestion.
66 User’s Guide
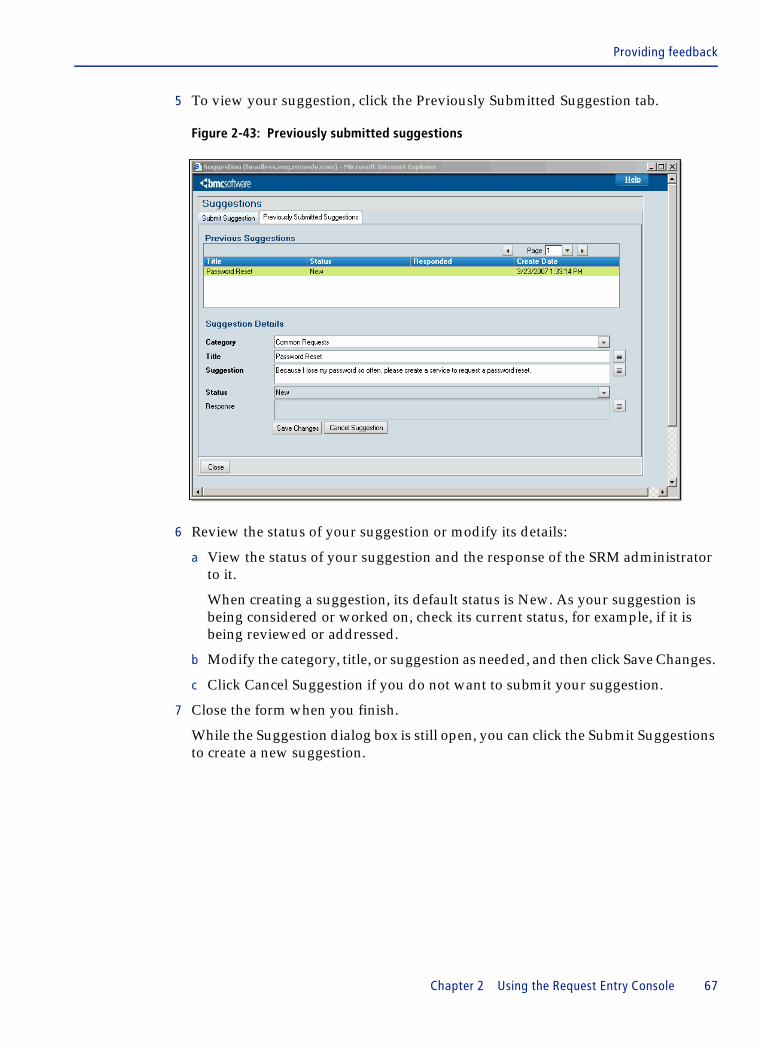
Providing feedback
5 To view your suggestion, click the Previously Submitted Suggestion tab.
Figure 2-43: Previously submitted suggestions
6 Review the status of your suggestion or modify its details:
a View the status of your suggestion and the response of the SRM administrator to it.
When creating a suggestion, its default status is New. As your suggestion is being considered or worked on, check its current status, for example, if it is being reviewed or addressed.
b Modify the category, title, or suggestion as needed, and then click Save Changes.
c Click Cancel Suggestion if you do not want to submit your suggestion.
7 Close the form when you finish.
While the Suggestion dialog box is still open, you can click the Submit Suggestions to create a new suggestion.
Chapter 2 Using the Request Entry Console 67
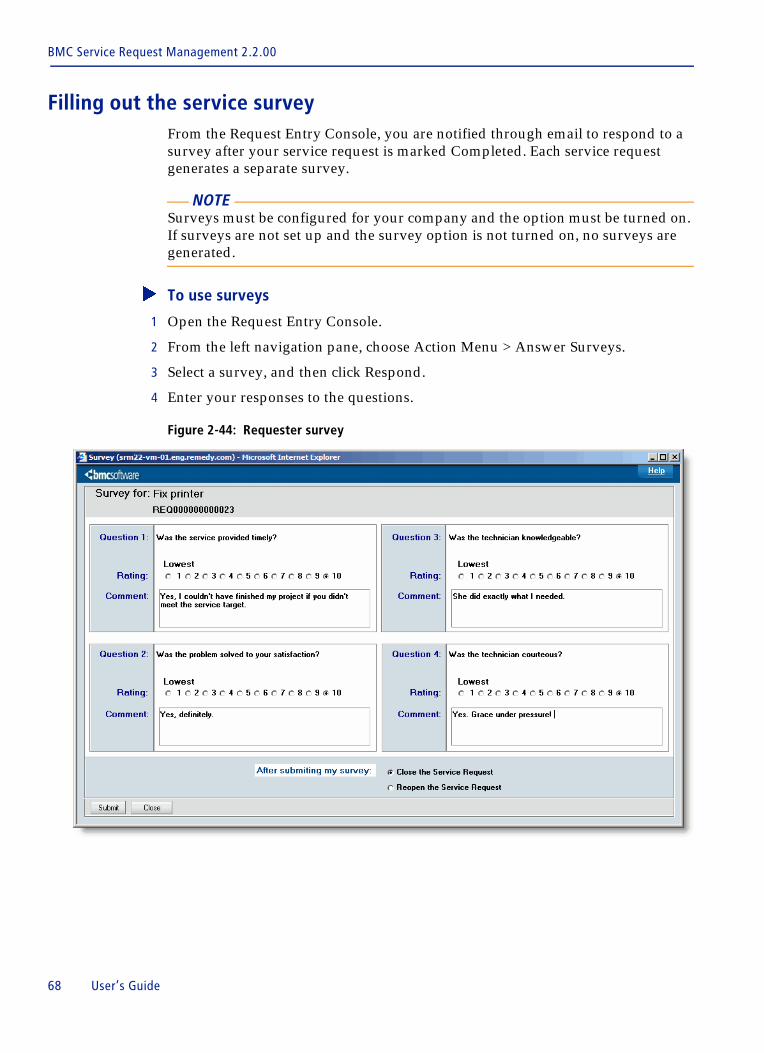
BMC Service Request Management 2.2.00
Filling out the service survey From the Request Entry Console, you are notified through email to respond to a survey after your service request is marked Completed. Each service request generates a separate survey.
NOTE Surveys must be configured for your company and the option must be turned on. If surveys are not set up and the survey option is not turned on, no surveys are generated.
� To use surveys
1 Open the Request Entry Console.
2 From the left navigation pane, choose Action Menu > Answer Surveys.
3 Select a survey, and then click Respond.
4 Enter your responses to the questions.
Figure 2-44: Requester survey
68 User’s Guide

Setting Request Entry Console preferences
5 Perform one of the following actions:
� Click Close the Service Request to save your answers to the survey and complete the service request.
� If you are not satisfied with the actions performed on the service request, click Reopen the Service Request to reopen the service request and move it out of the Closed status. (For more information, see “Reopening service requests” on page 45.)
� Click Close to shut the Survey dialog box without saving your answers.
� Click Submit to complete the service request.
Setting Request Entry Console preferences You can view and edit the default appearance of the Request Entry Console by choosing Action Menu > User Preferences in the left navigation pane. Depending on which consoles you have permissions to access, you can also view their preferences and options.
When the Request Entry Console opens, you can determine:
� Default console settings, which you can use to determine the console view that initially appears, for example, Submitted Requests
� Display of service requests, for example, All Open
� Requests closed since the last time you logged in to the Request Entry Console
� Sort order of results listed, for example, by My Favorites, System Favorites, or Hot List
NOTE Guest users cannot set Request Entry Console preferences.
� To set the Request Entry Console preferences
1 From the Request Entry Console, choose Action Menu > User Preferences.
2 From the Initial Console View field in the General Console Information area, select whether you want the Service Categories, Quick Picks, or Submitted Requests view to appear when the Request Entry Console appears.
The default setting is Service Categories. When you click the Home button in the Request Entry Console, you return to the view that you specify here. If there is no setting, the Home link returns you to the Service Categories view.
Chapter 2 Using the Request Entry Console 69
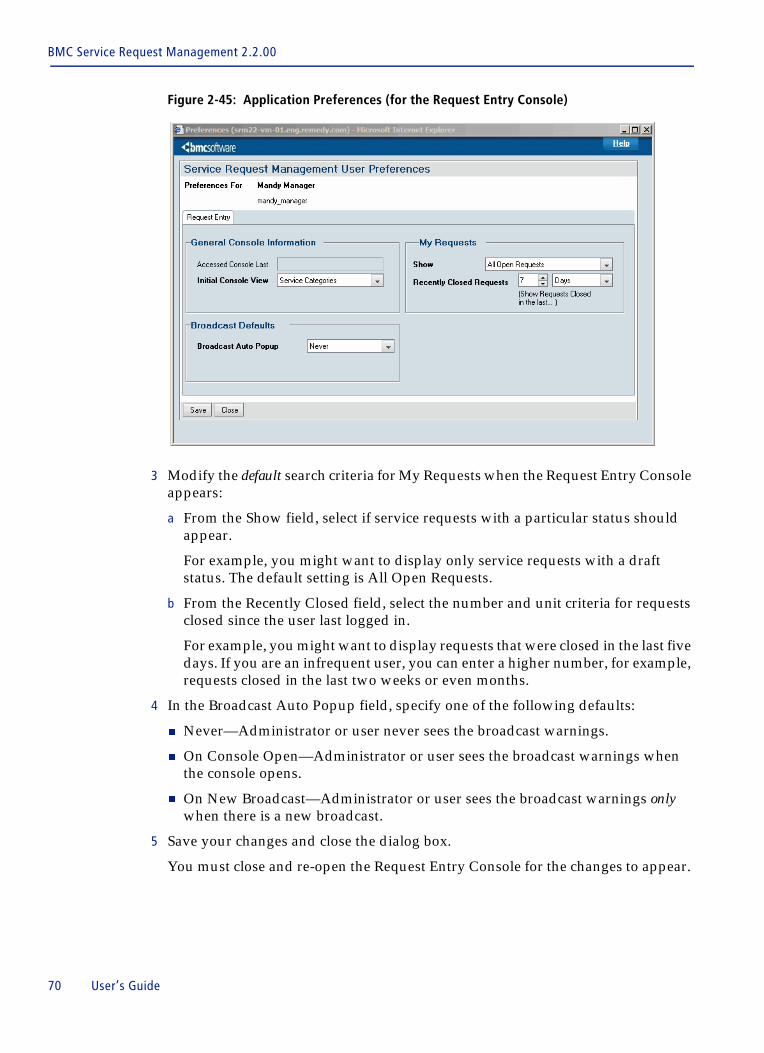
BMC Service Request Management 2.2.00
Figure 2-45: Application Preferences (for the Request Entry Console)
3 Modify the default search criteria for My Requests when the Request Entry Console appears:
a From the Show field, select if service requests with a particular status should appear.
For example, you might want to display only service requests with a draft status. The default setting is All Open Requests.
b From the Recently Closed field, select the number and unit criteria for requests closed since the user last logged in.
For example, you might want to display requests that were closed in the last five days. If you are an infrequent user, you can enter a higher number, for example, requests closed in the last two weeks or even months.
4 In the Broadcast Auto Popup field, specify one of the following defaults:
� Never—Administrator or user never sees the broadcast warnings.
� On Console Open—Administrator or user sees the broadcast warnings when the console opens.
� On New Broadcast—Administrator or user sees the broadcast warnings only when there is a new broadcast.
5 Save your changes and close the dialog box.
You must close and re-open the Request Entry Console for the changes to appear.
70 User’s Guide
Chapter
3
Business Manager roleBusiness Managers are responsible for managing users. Their activities and responsibilities include monitoring the current number of open and late requests, running request reports, and examining request trends.
NOTE The Business Manager must have Business Manager permissions.
The following topics are provided:
� Opening the Business Manager Console (page 72)� Using the Business Manager Console to manage service requests (page 73)� Viewing request details (page 79)� Adding work information to the service request (page 80)� Reviewing the approval cycle of a service request (page 81)� Generating reports (page 83)� Setting Business Manager Console preferences (page 88)
Chapter 3 Business Manager role 71
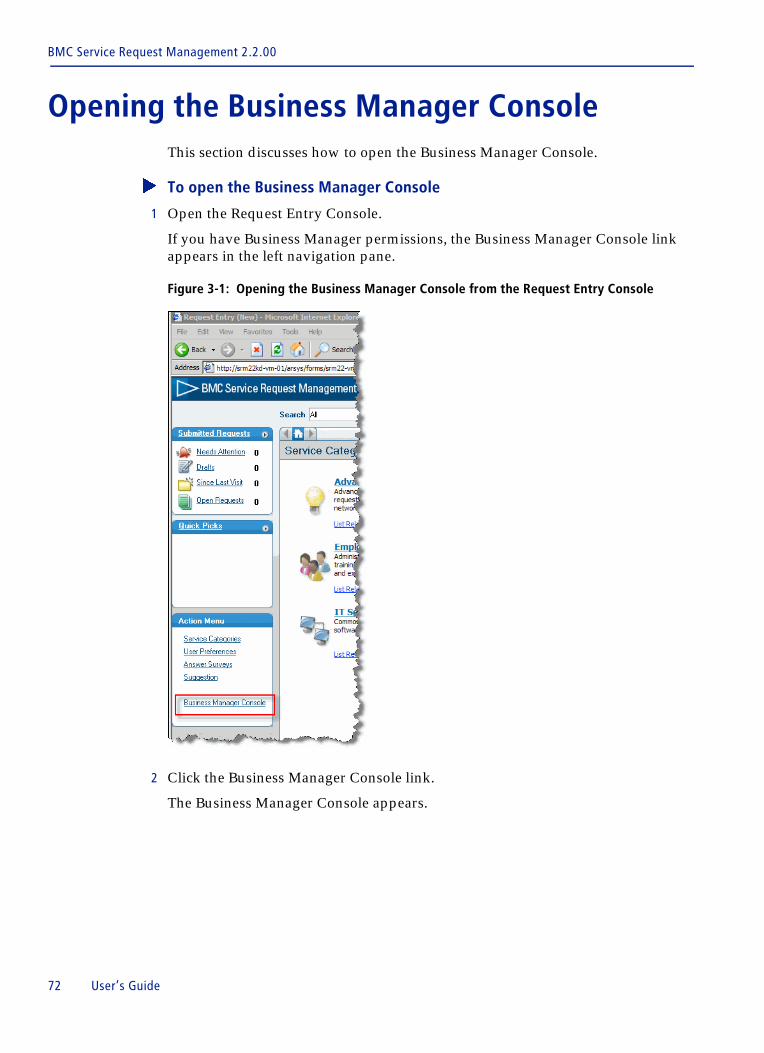
BMC Service Request Management 2.2.00
Opening the Business Manager ConsoleThis section discusses how to open the Business Manager Console.
� To open the Business Manager Console
1 Open the Request Entry Console.
If you have Business Manager permissions, the Business Manager Console link appears in the left navigation pane.
Figure 3-1: Opening the Business Manager Console from the Request Entry Console
2 Click the Business Manager Console link.
The Business Manager Console appears.
72 User’s Guide
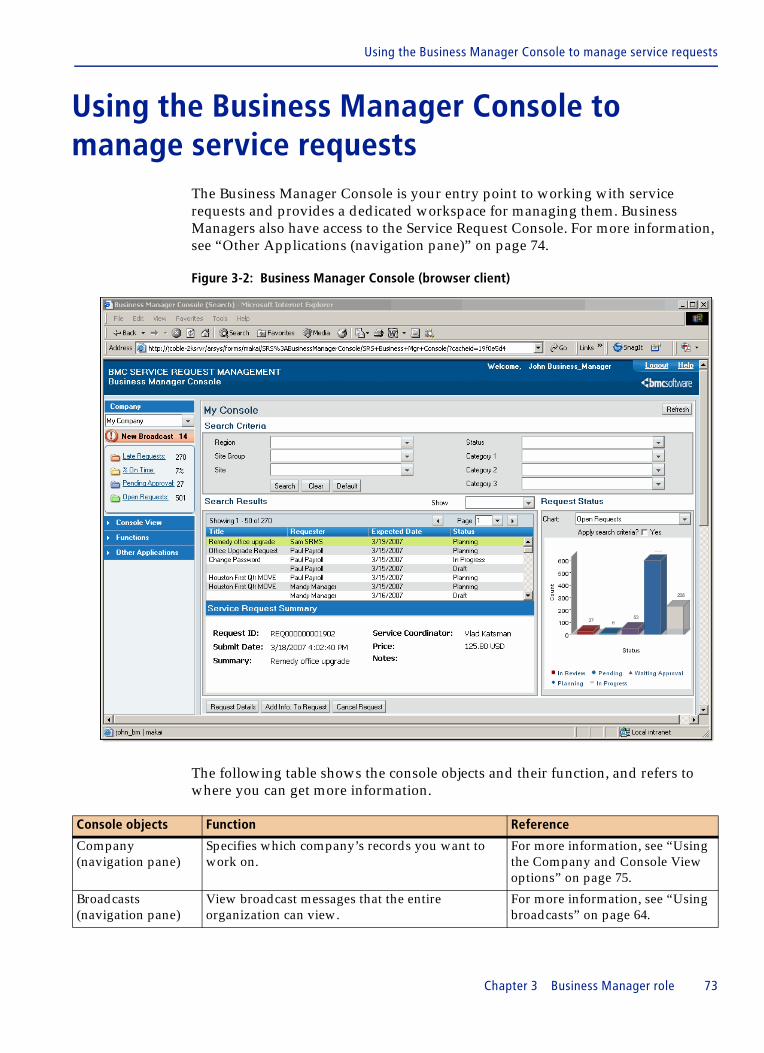
Using the Business Manager Console to manage service requests
Using the Business Manager Console to manage service requests
The Business Manager Console is your entry point to working with service requests and provides a dedicated workspace for managing them. Business Managers also have access to the Service Request Console. For more information, see “Other Applications (navigation pane)” on page 74.
Figure 3-2: Business Manager Console (browser client)
The following table shows the console objects and their function, and refers to where you can get more information.
Console objects Function Reference
Company (navigation pane)
Specifies which company’s records you want to work on.
For more information, see “Using the Company and Console View options” on page 75.
Broadcasts (navigation pane)
View broadcast messages that the entire organization can view.
For more information, see “Using broadcasts” on page 64.
Chapter 3 Business Manager role 73
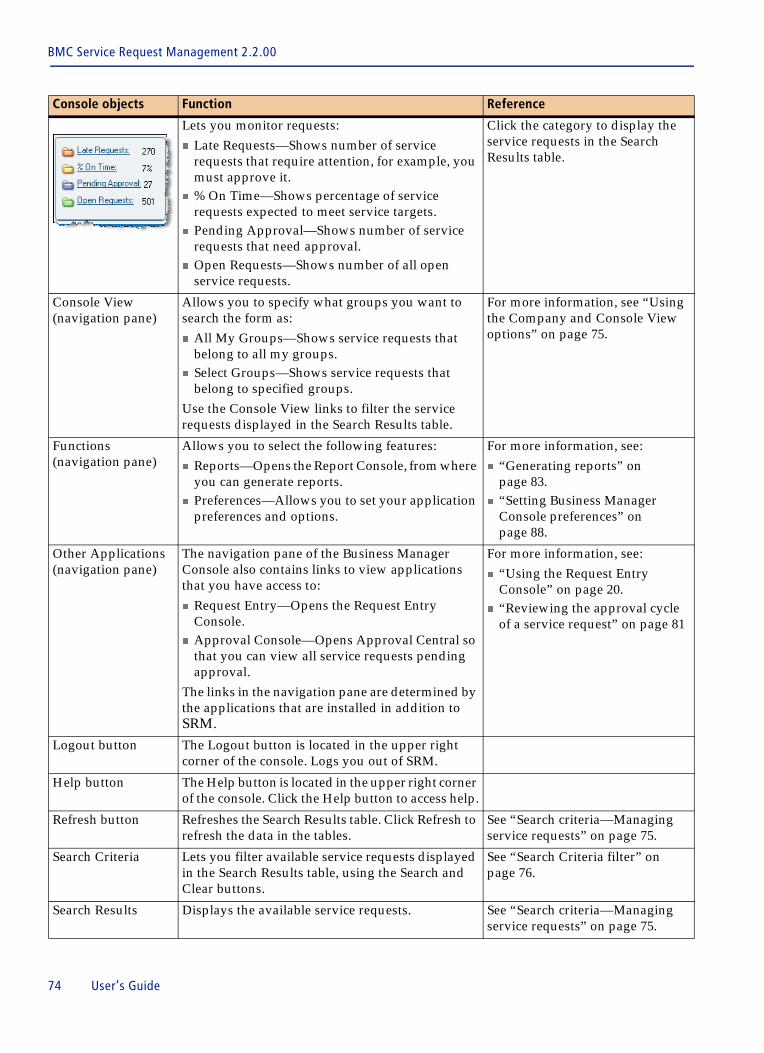
BMC Service Request Management 2.2.00
Lets you monitor requests: � Late Requests—Shows number of service
requests that require attention, for example, you must approve it.
� % On Time—Shows percentage of service requests expected to meet service targets.
� Pending Approval—Shows number of service requests that need approval.
� Open Requests—Shows number of all open service requests.
Click the category to display the service requests in the Search Results table.
Console View (navigation pane)
Allows you to specify what groups you want to search the form as:� All My Groups—Shows service requests that
belong to all my groups.� Select Groups—Shows service requests that
belong to specified groups.Use the Console View links to filter the service requests displayed in the Search Results table.
For more information, see “Using the Company and Console View options” on page 75.
Functions (navigation pane)
Allows you to select the following features:� Reports—Opens the Report Console, from where
you can generate reports.� Preferences—Allows you to set your application
preferences and options.
For more information, see:� “Generating reports” on
page 83.� “Setting Business Manager
Console preferences” on page 88.
Other Applications (navigation pane)
The navigation pane of the Business Manager Console also contains links to view applications that you have access to:� Request Entry—Opens the Request Entry
Console. � Approval Console—Opens Approval Central so
that you can view all service requests pending approval.
The links in the navigation pane are determined by the applications that are installed in addition to SRM.
For more information, see:� “Using the Request Entry
Console” on page 20.� “Reviewing the approval cycle
of a service request” on page 81
Logout button The Logout button is located in the upper right corner of the console. Logs you out of SRM.
Help button The Help button is located in the upper right corner of the console. Click the Help button to access help.
Refresh button Refreshes the Search Results table. Click Refresh to refresh the data in the tables.
See “Search criteria—Managing service requests” on page 75.
Search Criteria Lets you filter available service requests displayed in the Search Results table, using the Search and Clear buttons.
See “Search Criteria filter” on page 76.
Search Results Displays the available service requests. See “Search criteria—Managing service requests” on page 75.
Console objects Function Reference
74 User’s Guide
Using the Business Manager Console to manage service requests
Search criteria—Managing service requests You use the Business Manager Console to search for available service requests. The top part of the console lets you specify search criteria, while the Search Results table displays service requests in different states (for example, Pending Approval), based on your query. The Search Criteria area lets you filter out the service requests you see in the Search Results table. Leaving all fields blank results in a search for all service requests that the user has permissions to view.
Using the Company and Console View options You can further change the table’s contents by using the Company and Console View options in the left navigation pane of the console to see only, for example, all pending service requests that need approval. The Company and Console View options enable you to sort service requests by the following options:
Service Request Summary
Displays summary information about the service request.
Request Status Flashboard
Selects appropriate flashboards to display. See “Request Status Flashboards” on page 76.
Request Details button
Opens the Request Details dialog box. See “Buttons used with the Search Results table” on page 76.
Add Info. to Request button
Opens the Work Info dialog box. See “Buttons used with the Search Results table” on page 76.
Cancel Request button
Terminates the service request. See “Buttons used with the Search Results table” on page 76.
Console objects Function Reference
Company Filter the service requests displayed in the Search Results table based on company. The content of this list is tenancy-driven, subject to your access to various companies. If you only have permissions to view a single company, only that company appears in the list. Selecting Global allows only the service requests that are designated as “Global” to appear. Clearing the field allow all records to which the user has access to appear.
All My Groups Located under Console View, shows all the service requests that are assigned to all support groups that you belong to. If you belong to more than one support group, the service requests for all those groups are displayed.
Select Groups Located under Console View, shows all the service requests that are assigned to your support group.
Chapter 3 Business Manager role 75
BMC Service Request Management 2.2.00
Search Criteria filter You can also use the Search Criteria filter at the top of the console to filter which service requests you see:
After you perform your search, the results are displayed in the Search Results table. When you select a service request, an abbreviated list of details appears in the Service Request Summary.
In the Windows environment, if more service requests exist than the system can show in the table, you can see the next grouping of service requests by placing the cursor in the table and right-clicking, and then choosing either Next or Prev. When using a browser, use the arrow keys at the top corner of the table.
Buttons used with the Search Results table The buttons below the Service Request Summary allow you to manage the service requests.
Request Status Flashboards The Flashboards on the console graphically convey information to help you monitor the service requests in your system. They show you an overview of the current state of all service requests (as percentages) in graphical format.
Region Region affected by service request, for example, North America.
Site Group Site group affected by service request, for example, Northwest.
Site Site affected by service request, for example, Seattle. Status State of service request, for example, Draft or In Progress. Category 1 Top level category of service request, for example, Software. Category 2 Second-tier category, for example, Browser.Category 3 Third-tier category, for example, MS Explorer.Search button Performs search after you define your criteria. Clear button Removes all search criteria.Default button Resets all search criteria back to their default settings.
Request Details Opens Request Details dialog box. Here you can view a more complete list of the service request’s details.
Add Info. to Request Opens Work Info dialog box. You can view work information records or add work information to the service request.
Cancel Request Terminates the service request. A warning prompts you if you are sure that you want to cancel the service request. After the service request is canceled, its new status is listed in the Search Results table.
76 User’s Guide
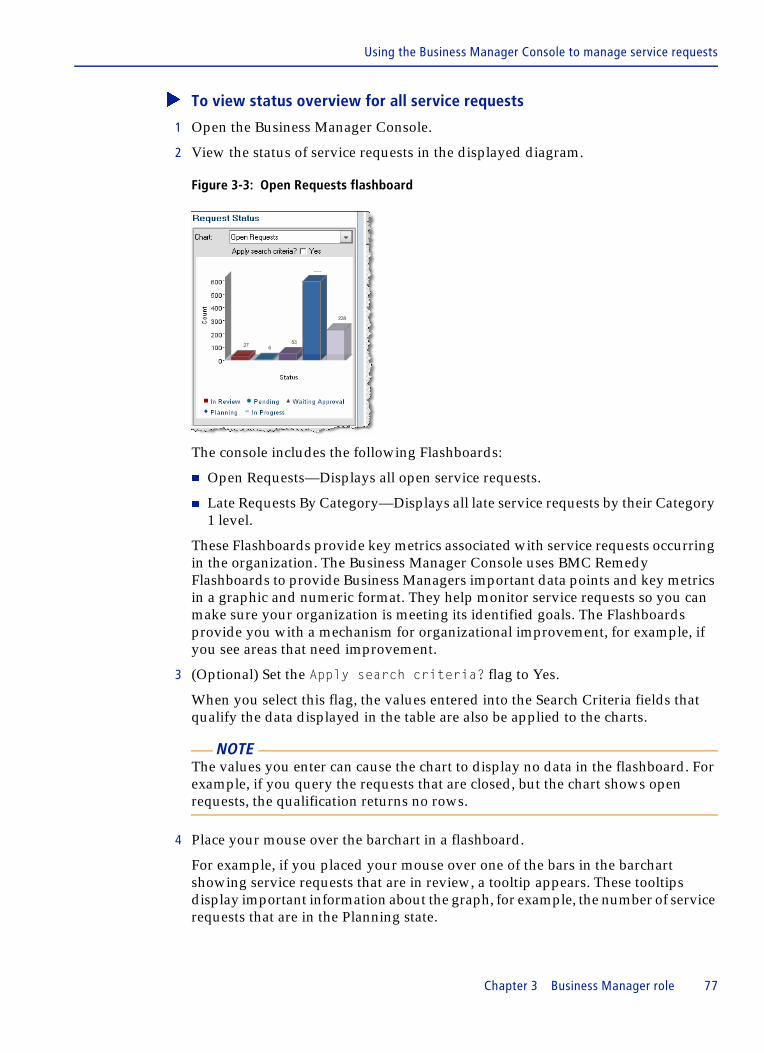
Using the Business Manager Console to manage service requests
� To view status overview for all service requests
1 Open the Business Manager Console.
2 View the status of service requests in the displayed diagram.
Figure 3-3: Open Requests flashboard
The console includes the following Flashboards:
� Open Requests—Displays all open service requests.
� Late Requests By Category—Displays all late service requests by their Category 1 level.
These Flashboards provide key metrics associated with service requests occurring in the organization. The Business Manager Console uses BMC Remedy Flashboards to provide Business Managers important data points and key metrics in a graphic and numeric format. They help monitor service requests so you can make sure your organization is meeting its identified goals. The Flashboards provide you with a mechanism for organizational improvement, for example, if you see areas that need improvement.
3 (Optional) Set the Apply search criteria? flag to Yes.
When you select this flag, the values entered into the Search Criteria fields that qualify the data displayed in the table are also be applied to the charts.
NOTE The values you enter can cause the chart to display no data in the flashboard. For example, if you query the requests that are closed, but the chart shows open requests, the qualification returns no rows.
4 Place your mouse over the barchart in a flashboard.
For example, if you placed your mouse over one of the bars in the barchart showing service requests that are in review, a tooltip appears. These tooltips display important information about the graph, for example, the number of service requests that are in the Planning state.
Chapter 3 Business Manager role 77
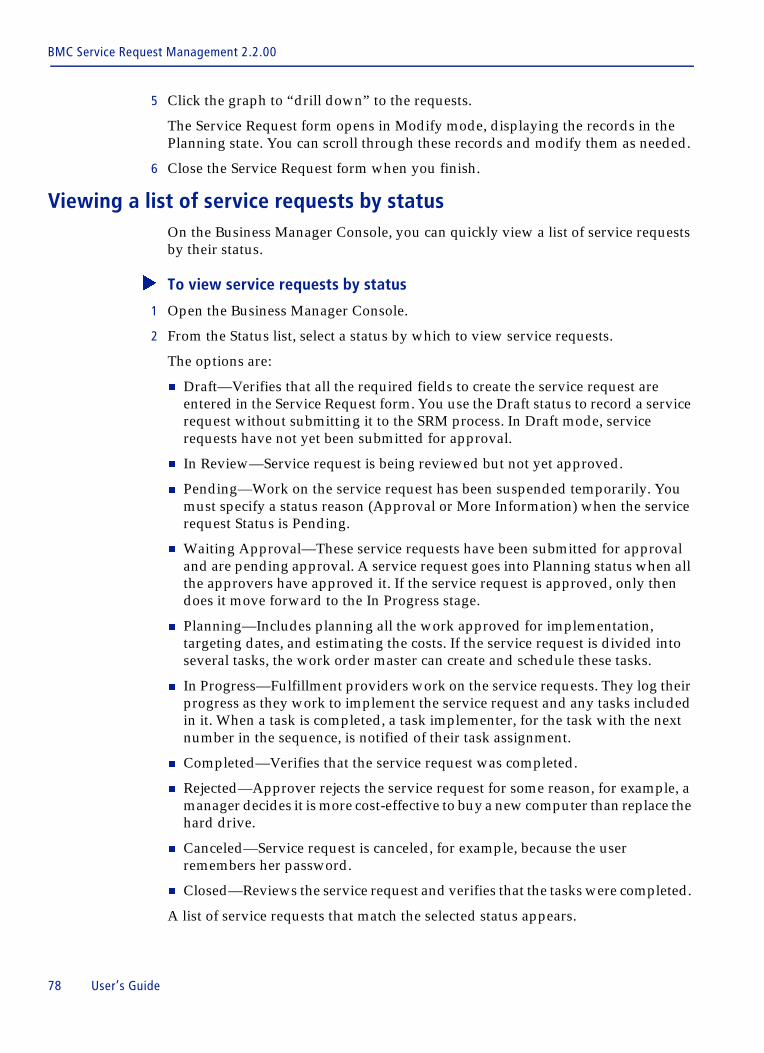
BMC Service Request Management 2.2.00
5 Click the graph to “drill down” to the requests.
The Service Request form opens in Modify mode, displaying the records in the Planning state. You can scroll through these records and modify them as needed.
6 Close the Service Request form when you finish.
Viewing a list of service requests by status On the Business Manager Console, you can quickly view a list of service requests by their status.
� To view service requests by status
1 Open the Business Manager Console.
2 From the Status list, select a status by which to view service requests.
The options are:
� Draft—Verifies that all the required fields to create the service request are entered in the Service Request form. You use the Draft status to record a service request without submitting it to the SRM process. In Draft mode, service requests have not yet been submitted for approval.
� In Review—Service request is being reviewed but not yet approved.
� Pending—Work on the service request has been suspended temporarily. You must specify a status reason (Approval or More Information) when the service request Status is Pending.
� Waiting Approval—These service requests have been submitted for approval and are pending approval. A service request goes into Planning status when all the approvers have approved it. If the service request is approved, only then does it move forward to the In Progress stage.
� Planning—Includes planning all the work approved for implementation, targeting dates, and estimating the costs. If the service request is divided into several tasks, the work order master can create and schedule these tasks.
� In Progress—Fulfillment providers work on the service requests. They log their progress as they work to implement the service request and any tasks included in it. When a task is completed, a task implementer, for the task with the next number in the sequence, is notified of their task assignment.
� Completed—Verifies that the service request was completed.
� Rejected—Approver rejects the service request for some reason, for example, a manager decides it is more cost-effective to buy a new computer than replace the hard drive.
� Canceled—Service request is canceled, for example, because the user remembers her password.
� Closed—Reviews the service request and verifies that the tasks were completed.
A list of service requests that match the selected status appears.
78 User’s Guide
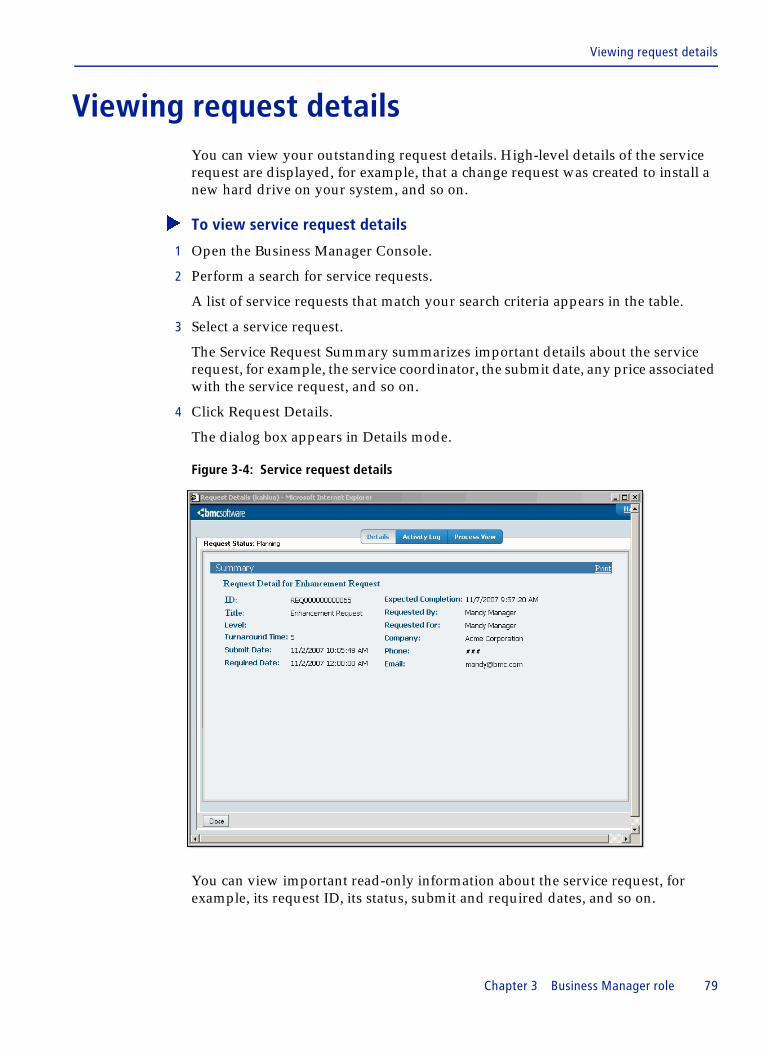
Viewing request details
Viewing request detailsYou can view your outstanding request details. High-level details of the service request are displayed, for example, that a change request was created to install a new hard drive on your system, and so on.
� To view service request details
1 Open the Business Manager Console.
2 Perform a search for service requests.
A list of service requests that match your search criteria appears in the table.
3 Select a service request.
The Service Request Summary summarizes important details about the service request, for example, the service coordinator, the submit date, any price associated with the service request, and so on.
4 Click Request Details.
The dialog box appears in Details mode.
Figure 3-4: Service request details
You can view important read-only information about the service request, for example, its request ID, its status, submit and required dates, and so on.
Chapter 3 Business Manager role 79
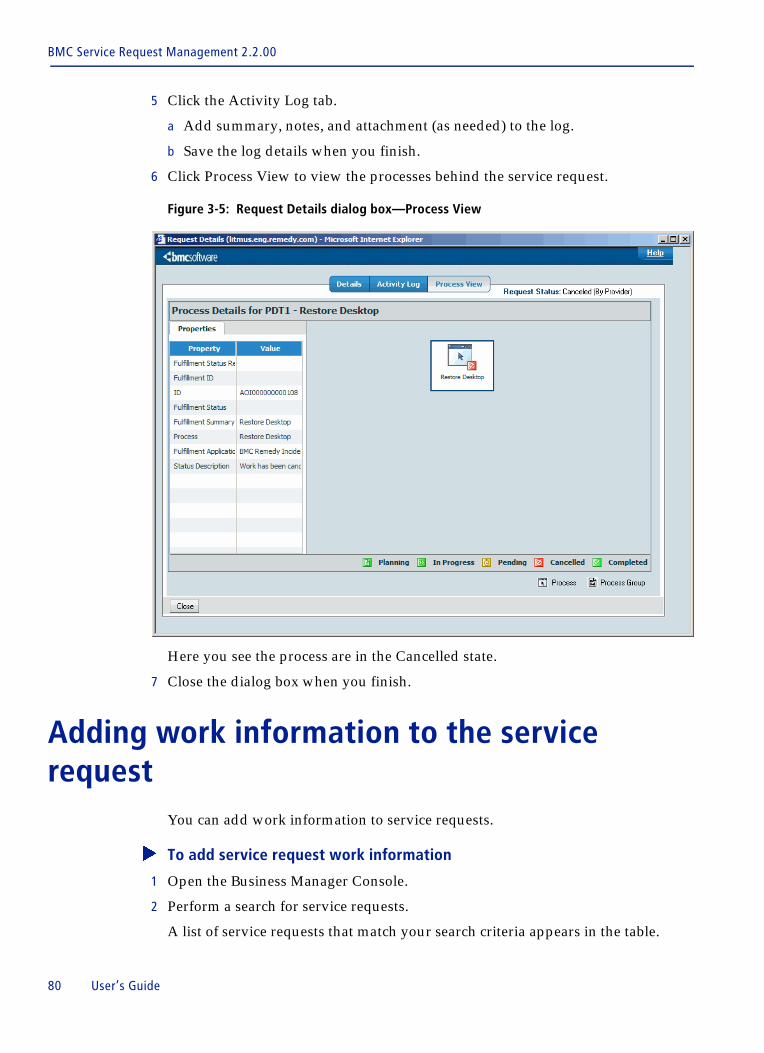
BMC Service Request Management 2.2.00
5 Click the Activity Log tab.
a Add summary, notes, and attachment (as needed) to the log.
b Save the log details when you finish.
6 Click Process View to view the processes behind the service request.
Figure 3-5: Request Details dialog box—Process View
Here you see the process are in the Cancelled state.
7 Close the dialog box when you finish.
Adding work information to the service request
You can add work information to service requests.
� To add service request work information
1 Open the Business Manager Console.
2 Perform a search for service requests.
A list of service requests that match your search criteria appears in the table.
80 User’s Guide
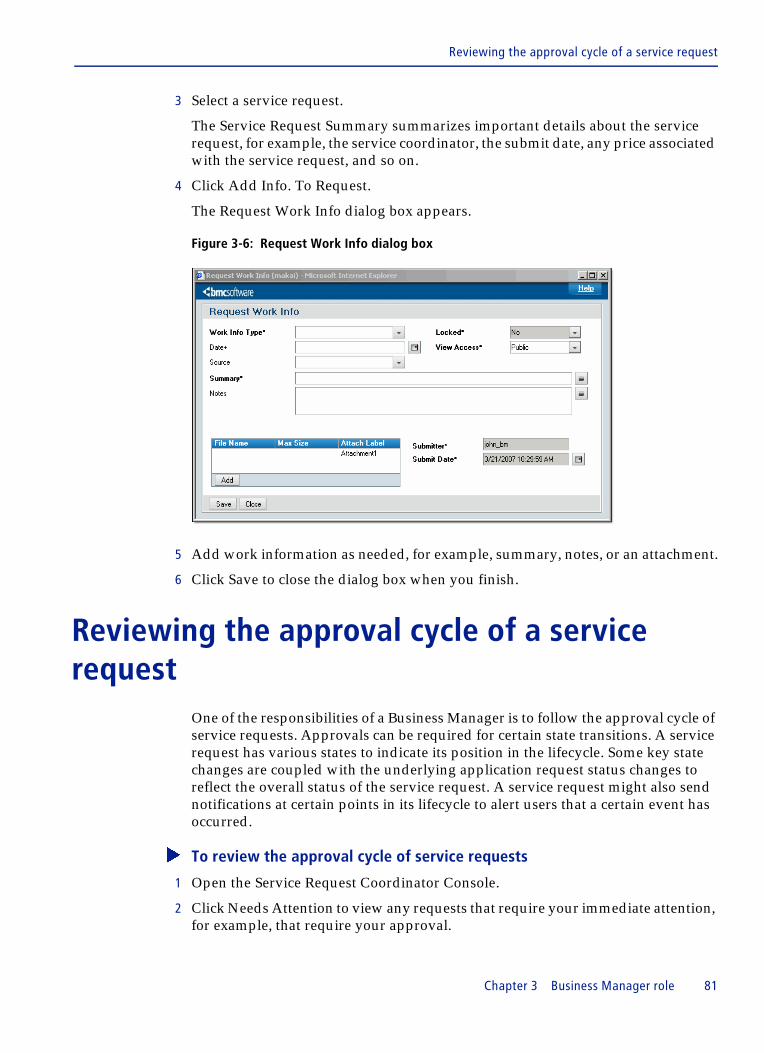
Reviewing the approval cycle of a service request
3 Select a service request.
The Service Request Summary summarizes important details about the service request, for example, the service coordinator, the submit date, any price associated with the service request, and so on.
4 Click Add Info. To Request.
The Request Work Info dialog box appears.
Figure 3-6: Request Work Info dialog box
5 Add work information as needed, for example, summary, notes, or an attachment.
6 Click Save to close the dialog box when you finish.
Reviewing the approval cycle of a service request
One of the responsibilities of a Business Manager is to follow the approval cycle of service requests. Approvals can be required for certain state transitions. A service request has various states to indicate its position in the lifecycle. Some key state changes are coupled with the underlying application request status changes to reflect the overall status of the service request. A service request might also send notifications at certain points in its lifecycle to alert users that a certain event has occurred.
� To review the approval cycle of service requests
1 Open the Service Request Coordinator Console.
2 Click Needs Attention to view any requests that require your immediate attention, for example, that require your approval.
Chapter 3 Business Manager role 81
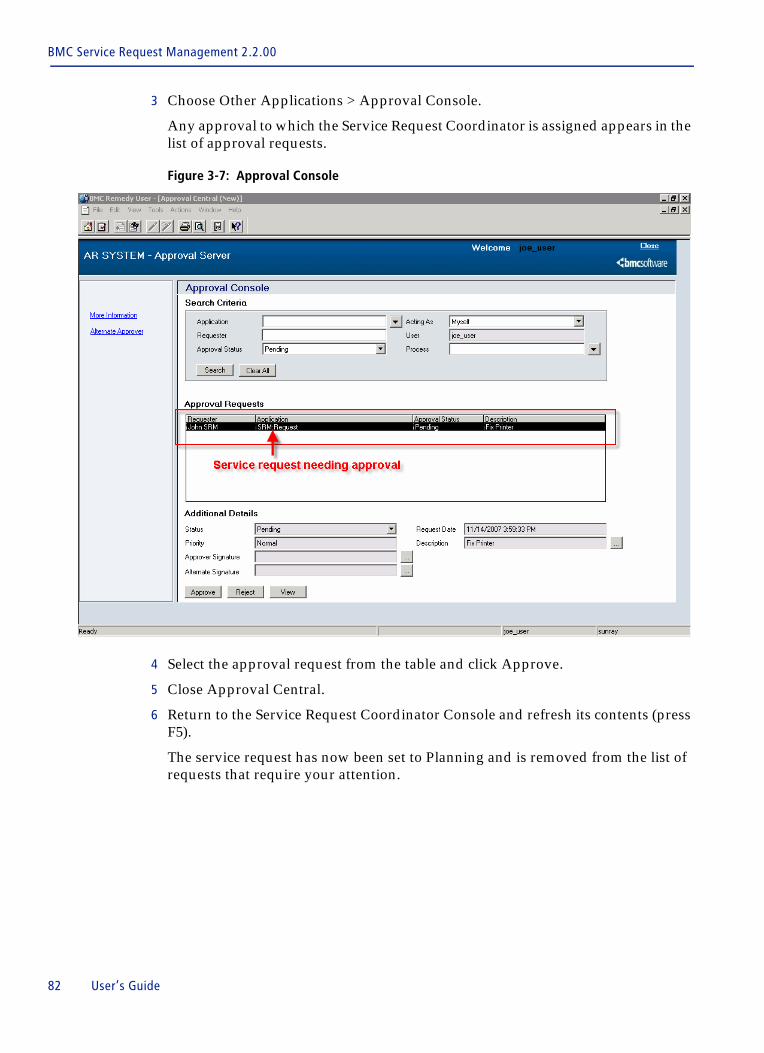
BMC Service Request Management 2.2.00
3 Choose Other Applications > Approval Console.
Any approval to which the Service Request Coordinator is assigned appears in the list of approval requests.
Figure 3-7: Approval Console
4 Select the approval request from the table and click Approve.
5 Close Approval Central.
6 Return to the Service Request Coordinator Console and refresh its contents (press F5).
The service request has now been set to Planning and is removed from the list of requests that require your attention.
82 User’s Guide
Generating reports
Generating reports SRM activities center on service request analysis, for example, determining the length of time spent on service requests, types of services requested, and frequently repeated requests. You can use a variety of predefined reports to give you access to information about these SRM activities. You use the Report Console to generate these reports. If the predefined reports return more information than you need, you can manage the scope of the report using qualifications.
You can also generate reports, with your own qualifications, advanced qualifications, and saved qualifications.
Setting report options If your administrator has not set up a preference server for centralized user preferences, you must enter the report server name and set the options to view and print reports.
� To set options to view and print reports
1 From the BMC Remedy User toolbar, choose Tools > Options.
The Options dialog box appears.
2 Click the Advanced tab.
3 In the Report Server field, enter the name of the server that you are logged on to.
4 Click OK.
NOTE If you are having formatting problems in viewing reports on the web, ask your administrator to make sure report configuration settings are defined in the AR System User Preference form, as described in the BMC Remedy Action Request System 7.0 Configuring guide.
Generating standard reportsUse this procedure to generate a standard report, without using qualifications (see “Generating reports using qualifications” on page 84 for information about generating reports with qualifications).
� To generate standard reports
1 To generate a report, perform one of the following steps:
� From the Work Order Console, choose Functions > Reports.
� From the Work Order form, choose Consoles > Reports.
The Report Console appears.
Chapter 3 Business Manager role 83
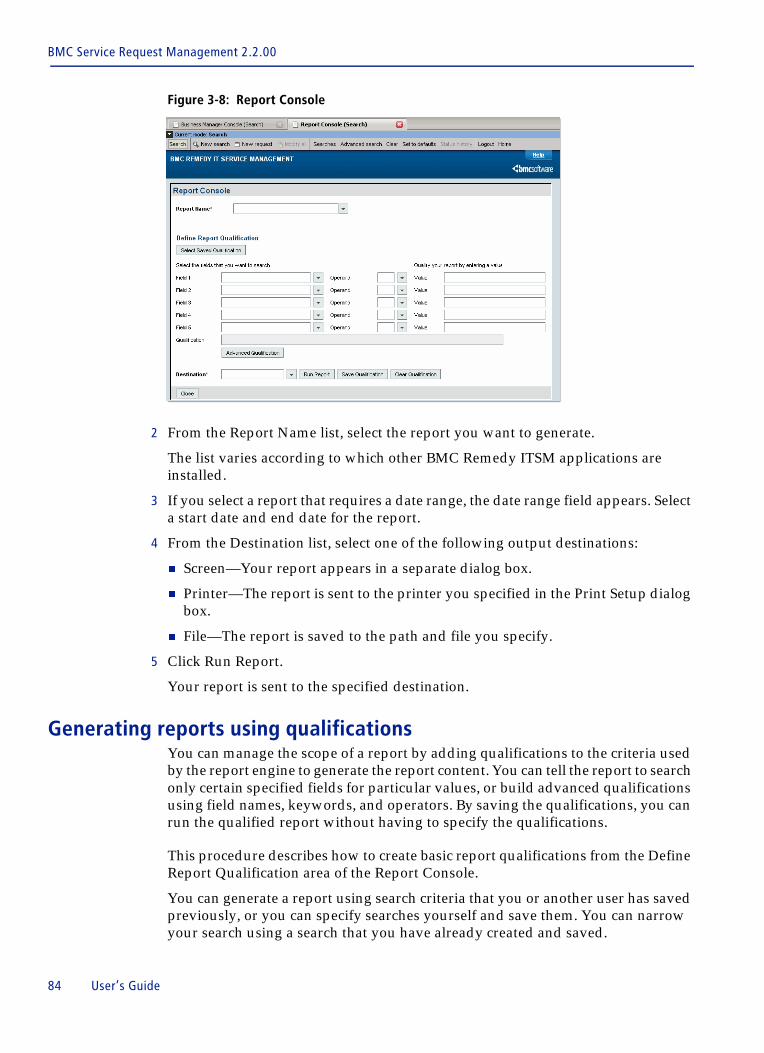
BMC Service Request Management 2.2.00
Figure 3-8: Report Console
2 From the Report Name list, select the report you want to generate.
The list varies according to which other BMC Remedy ITSM applications are installed.
3 If you select a report that requires a date range, the date range field appears. Select a start date and end date for the report.
4 From the Destination list, select one of the following output destinations:
� Screen—Your report appears in a separate dialog box.
� Printer—The report is sent to the printer you specified in the Print Setup dialog box.
� File—The report is saved to the path and file you specify.
5 Click Run Report.
Your report is sent to the specified destination.
Generating reports using qualifications You can manage the scope of a report by adding qualifications to the criteria used by the report engine to generate the report content. You can tell the report to search only certain specified fields for particular values, or build advanced qualifications using field names, keywords, and operators. By saving the qualifications, you can run the qualified report without having to specify the qualifications.
This procedure describes how to create basic report qualifications from the Define Report Qualification area of the Report Console.
You can generate a report using search criteria that you or another user has saved previously, or you can specify searches yourself and save them. You can narrow your search using a search that you have already created and saved.
84 User’s Guide
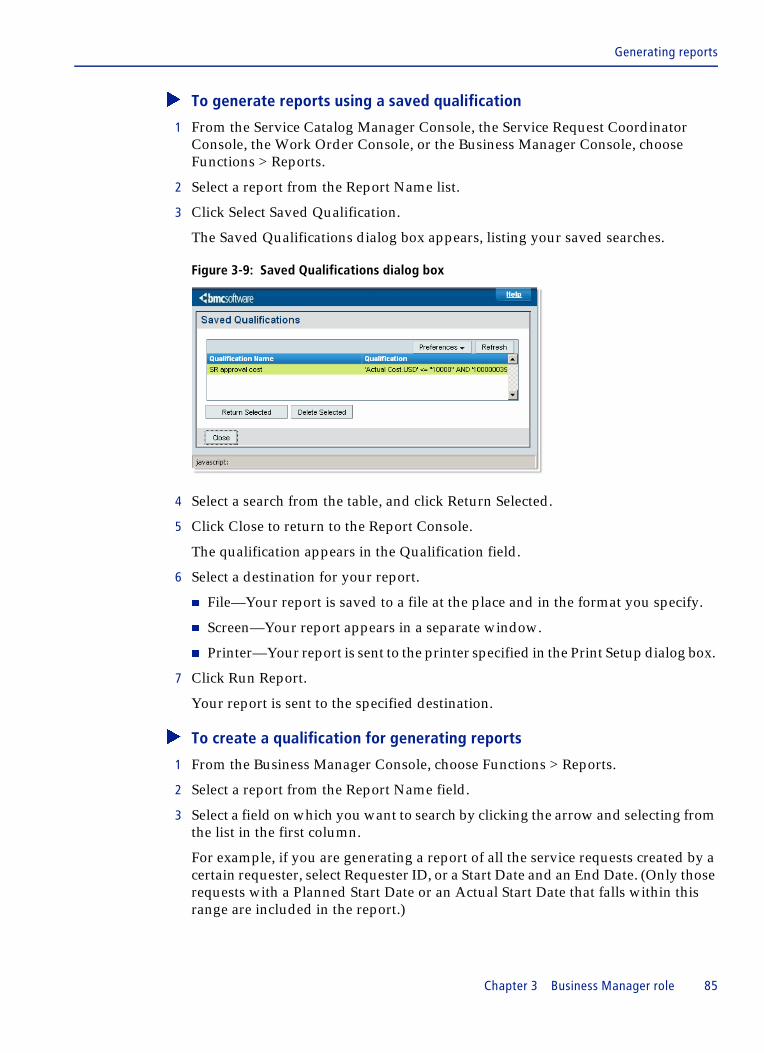
Generating reports
� To generate reports using a saved qualification
1 From the Service Catalog Manager Console, the Service Request Coordinator Console, the Work Order Console, or the Business Manager Console, choose Functions > Reports.
2 Select a report from the Report Name list.
3 Click Select Saved Qualification.
The Saved Qualifications dialog box appears, listing your saved searches.
Figure 3-9: Saved Qualifications dialog box
4 Select a search from the table, and click Return Selected.
5 Click Close to return to the Report Console.
The qualification appears in the Qualification field.
6 Select a destination for your report.
� File—Your report is saved to a file at the place and in the format you specify.
� Screen—Your report appears in a separate window.
� Printer—Your report is sent to the printer specified in the Print Setup dialog box.
7 Click Run Report.
Your report is sent to the specified destination.
� To create a qualification for generating reports
1 From the Business Manager Console, choose Functions > Reports.
2 Select a report from the Report Name field.
3 Select a field on which you want to search by clicking the arrow and selecting from the list in the first column.
For example, if you are generating a report of all the service requests created by a certain requester, select Requester ID, or a Start Date and an End Date. (Only those requests with a Planned Start Date or an Actual Start Date that falls within this range are included in the report.)
Chapter 3 Business Manager role 85

BMC Service Request Management 2.2.00
4 Select a qualifier from the Operand menu.
For example, to find matching values, select the equal sign (=).
5 Type the value by which you want to qualify the search in the Value field.
For example, to find all service requests created by Joe User, type Joe User.
Figure 3-10: Define Report Qualification area
6 Repeat these steps for other fields to further refine your search.
You can use all five rows in the area to define qualifications.
7 To save the qualification, click Save Qualification.
The Qualification Name dialog box appears.
NOTE By saving the qualification, you can rerun this report without defining the qualification again. See “To generate reports using a saved qualification” on page 85.
8 In the Qualification Name field, enter a name for your qualification, and click OK.
You can also select and modify a qualification, as needed.
When you click OK, a confirmation message appears, stating that your qualification is saved.
9 Select a destination for your report.
� File—Your report is saved to a file at the place and in the format you specify.
� Screen—Your report appears in a separate window.
� Printer—Your report is sent to the printer specified in the Print Setup dialog box.
10 Click Run Report.
Your report is sent to the specified destination.
86 User’s Guide
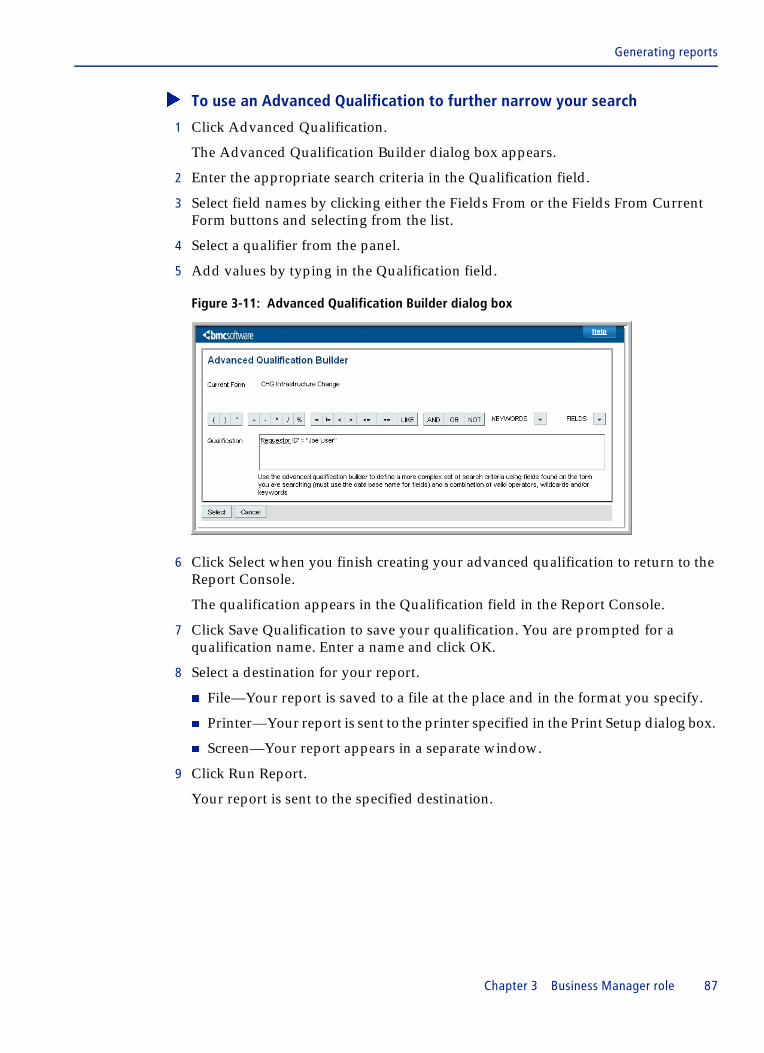
Generating reports
� To use an Advanced Qualification to further narrow your search
1 Click Advanced Qualification.
The Advanced Qualification Builder dialog box appears.
2 Enter the appropriate search criteria in the Qualification field.
3 Select field names by clicking either the Fields From or the Fields From Current Form buttons and selecting from the list.
4 Select a qualifier from the panel.
5 Add values by typing in the Qualification field.
Figure 3-11: Advanced Qualification Builder dialog box
6 Click Select when you finish creating your advanced qualification to return to the Report Console.
The qualification appears in the Qualification field in the Report Console.
7 Click Save Qualification to save your qualification. You are prompted for a qualification name. Enter a name and click OK.
8 Select a destination for your report.
� File—Your report is saved to a file at the place and in the format you specify.
� Printer—Your report is sent to the printer specified in the Print Setup dialog box.
� Screen—Your report appears in a separate window.
9 Click Run Report.
Your report is sent to the specified destination.
Chapter 3 Business Manager role 87
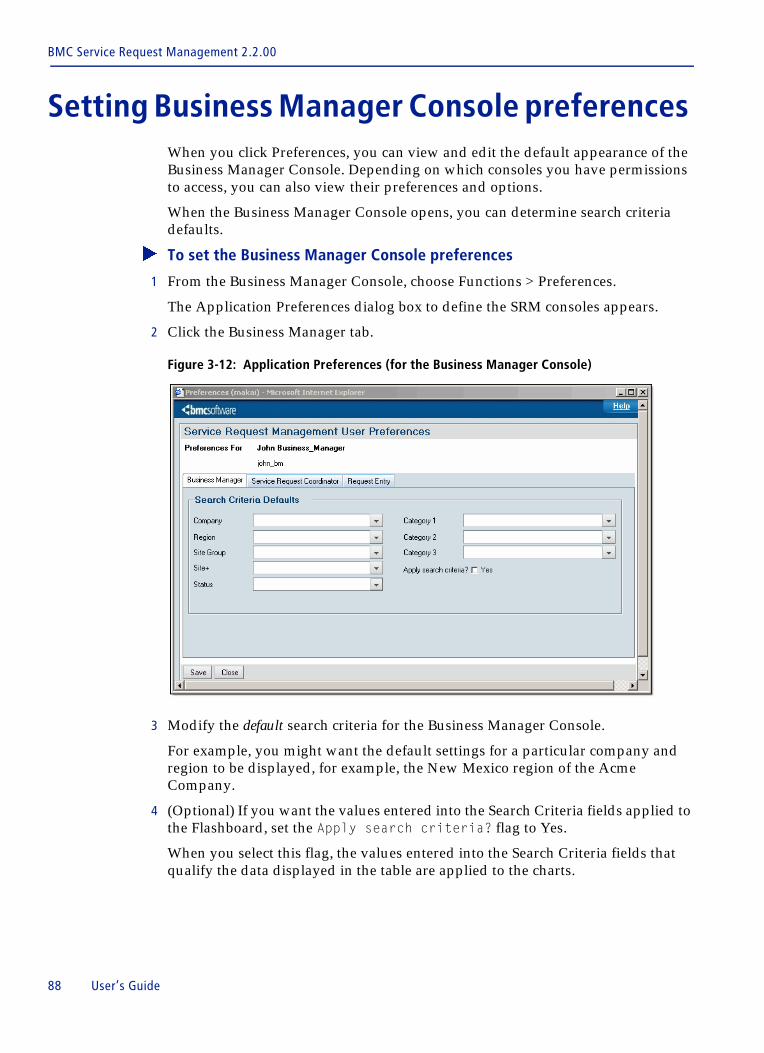
BMC Service Request Management 2.2.00
Setting Business Manager Console preferences When you click Preferences, you can view and edit the default appearance of the Business Manager Console. Depending on which consoles you have permissions to access, you can also view their preferences and options.
When the Business Manager Console opens, you can determine search criteria defaults.
� To set the Business Manager Console preferences
1 From the Business Manager Console, choose Functions > Preferences.
The Application Preferences dialog box to define the SRM consoles appears.
2 Click the Business Manager tab.
Figure 3-12: Application Preferences (for the Business Manager Console)
3 Modify the default search criteria for the Business Manager Console.
For example, you might want the default settings for a particular company and region to be displayed, for example, the New Mexico region of the Acme Company.
4 (Optional) If you want the values entered into the Search Criteria fields applied to the Flashboard, set the Apply search criteria? flag to Yes.
When you select this flag, the values entered into the Search Criteria fields that qualify the data displayed in the table are applied to the charts.
88 User’s Guide
Setting Business Manager Console preferences
NOTE By default, this setting is turned off. The values you enter can cause the chart to display no data in the flashboard. For example, if you query the requests that are closed, but the chart shows open requests, the qualification returns no rows.
5 Save your changes and close the dialog box.
You must close and open the Business Manager Console for the changes to be displayed.
Chapter 3 Business Manager role 89

BMC Service Request Management 2.2.00
90 User’s Guide
A B C D E F G H I J K L M N O P Q R S T U V W X Y Z
Index
Aaccessing applications from Business Manager
Console 74activity log, adding entry to 39adding work information to service requests 80administrators, SRM 15Advanced Qualification Builder dialog box 87approving service requests 59, 81audience for this guide 7
Bback-office service fulfillment providers 12BMC Service Request Management. See Service
Request ManagementBMC Software, contacting 2breadcrumb trail for service requests 32broadcast messages
guest users can only view global 64modifying 65viewing 64
Broadcasts Overview dialog box 64browsers, opening Request Entry console in 72browsing
categories in Request Entry console 27services in Request Entry console 25
Business Manager Consoleabout 73accessing applications from 74Company and Console View 75opening 72preferences 88search criteria filter 76Search Results table 76searching for service requests 75viewing
service request status 76service request work information 80service requests 79service requests by status 78
Business Manager tab 88business managers 15, 71business relationship managers 16
Ccart
added to 2.2.00 20adding services to 34requests, viewing in 55review stage 34service requests, viewing 54unavailable to guest users 34using 34
Cart Review stage of request 34catalog, service request 12categories, browsing in Request Entry console 27Company and Console View
Business Manager Console 75components, Service Request Management 14consoles, Business Manager 73creating
broadcast messages 65list of favorite services 48qualifications for reports 85service requests for other users 61service requests in Request Entry console 33
customer support 3
DDefine Report Qualification area 86Details tab 54dialog boxes
Advanced Qualification Builder 87Broadcasts Overview 64New/Modify Broadcasts 65Options 83Saved Qualifications 85View Broadcasts 65
documentation, SRM product 8
Index 91
A B C D E F G H I J K L M N O P Q R S T U V W X Y Z
Eend users, public 14
Ffavorite services
listing 48unavailable to guest users 48
feedback, providing for service requests 65filters, search criteria
Business Manager Console 76flashboards, service request status 76fulfillment providers 17functions in Request Entry console 22
Gguest users
cannot cancel service requests 48cannot set Request Entry Console preferences 69cart not available 34favorite services not available 48only global broadcasts available 64
Llicenses
on behalf of, fixed or floating required 61Submitter Mode locked 42
listing related services in the catalog 26
Mmodifying
broadcast messages 65My Favorites 59
NNew/Modify Broadcasts dialog box 65
Oon behalf of other users 61opening
applications fromBusiness Manager Console 74
Business Manager Console 72Options dialog box 83
Ppreferences
Business Manager Console 88Request Entry console 69
printing reports 83product support 3Provide Information stage of request 31public end users 14
Qqualifications
advanced 87creating for report generation 85generating reports with saved 85report 84
Quick Picks window 58
Rreopening service requests 45reports
generating SRM 83generating with qualifications 84printing 83setting options 83viewing 83
Request Details dialog box 48Request Entry console
browsing categories 27browsing services 25cart added to 2.2.00 20creating service requests 33entering requester data 31functions 22guest users cannot set 69managing service requests 20preferences 69Quick Picks window 58searching for services 24selecting services 28viewing
broadcasts 64service requests 37
request management, SRM 14Review stage of request 29roles
business manager 15business relationship manager 16fulfillment provider 17public end user 14
92 User’s Guide
A B C D E F G H I J K L M N O P Q R S T U V W X Y Z
roles (continued)service catalog manager 15service request coordinator 17SRM administrator 15SRM user 14work order manager 16
SSaved Qualifications dialog box 85search criteria filters, Business Manager Console 76Search Results table, Business Manager Console 76Search stage of request 24searching for services 24Select stage of request 28service catalog
about 12SRM 14
service catalog managers, about 15service fulfillment providers, back-office 12service request coordinators, about 17service request definitions, about 12Service Request Management
about 12back-office service fulfillment providers 12benefits 13business managers 15business relationship managers 16components 14documentation 8fulfillment providers 17public end users 14reports 83request management 14service catalog 12, 14service catalog managers 15service request coordinators 17service request definitions 12SRM administrators 15work order assignees 16work order managers 16
service requestsactivity log, adding entry to 39approvals, waiting for 59approving 81breadcrumb trail 32Business Manager Console and 73cart
adding to 34viewing 54viewing in 55
creating for other users 61
service requests (continued)creating in Request Entry console 33feedback 65guest users cannot cancel 48reopening 45request details 48Request Entry console and 20searching for 75stages
Cart Review 34Provide Information 31Review 29Search 24Select 28Submit 33
surveys 68viewing
Business Manager Console and 79closed 42draft mode 40open 43Request Entry console and 37status 78submitted 48those needing attention 37work information 80
visual process editor runtime mode 51work information 48
adding 80services
browsing for 25creating list of favorites 48listing related 26searching for 24selecting 28viewing favorite 47
SRM administrators 15SRM. See Service Request ManagementSRs. See service requestsstates and status, viewing service request 76, 78Submit stage of request 33Submitter Mode locked on server 42suggestions in service requests, making 65support, customer 3surveys, service request 68switching users 61System Favorites 59
Index 93
A B C D E F G H I J K L M N O P Q R S T U V W X Y Z
Ttables, Search Results 76tabs
Business Manager 88Details 54
technical support 3
Uusers
on behalf of 61public end 14SRM roles 14switching 61See also guest users
VView Broadcasts dialog box 65viewing
closed service requests 42favorite services 47reports 83service requests
details 79draft mode 40needing attention 37open 43Request Entry console and 37status 76, 78submitted 48
services in Quick Picks window 58visual process editor, service requests (runtime
mode) 51
Wwindows, Quick Picks 58work information
service requestadding 80viewing 80
viewingend user in service requests 48
work order assignees 16work order managers 16
94 User’s Guide


*89303**89303**89303**89303*
*89303*