Adobe Connect Trouble Shooting Guide - EQUELLA · Adobe Connect Trouble Shooting . 8 . Has your...
14
Adobe Connect Trouble Shooting Guide Version 11 August 2016
-
Upload
duongquynh -
Category
Documents
-
view
218 -
download
0
Transcript of Adobe Connect Trouble Shooting Guide - EQUELLA · Adobe Connect Trouble Shooting . 8 . Has your...

Adobe Connect Trouble Shooting Guide
Version 11 August 2016

Contents
Summary ........................................................................................................................... 3
Internet connection ........................................................................................................... 3
Firewall if accessing from work .......................................................................................... 3
Test your Computer for Adobe Connect ............................................................................. 3
Browser Problems and Flash .............................................................................................. 3
Extra settings for MACs ..................................................................................................... 4
System preferences ............................................................................................... 4
Safari security settings .......................................................................................... 5
Clear the cache .................................................................................................................. 6
Check the pop-up blockers are turned off .......................................................................... 6
First login to an Adobe Connect room................................................................................ 6
Enable Flash and install the Adobe Connect Add-in ............................................... 6
Do the audio set up wizard .................................................................................... 7
Checking later on that Flash is allowed.................................................................. 7
Has your headset been found?........................................................................................... 8
Analog? Plug your headset in correctly .............................................................................. 8
PC users of portable webcams ........................................................................................... 8
Persistent sound through computer problems ................................................................... 9
Headset selection on a PC (Windows 7) ............................................................................. 9
Headset selection on a MAC ............................................................................................ 10
Setting sound preferences ................................................................................... 10
Macs and Logitech Headsets ............................................................................... 11
Word to Mac Users ............................................................................................. 12
Headsets with additional volume and on/off controls ...................................................... 12
Check microphone is picked up in the Adobe Connect room ............................................ 12
Another way to check for microphone selection .............................................................. 13 Specific Problems ............................................................................................................. 14
Meeting login has expired message ................................................................................. 14
You can’t hear anything ................................................................................................... 14
Others cannot hear you when you speak ......................................................................... 14
Adobe Connect Add-in fails to install ............................................................................... 14
Failure of hardware ......................................................................................................... 14
Faulty headset .................................................................................................... 14
Faulty computer.................................................................................................. 14

Adobe Connect Trouble Shooting
3
Summary
Most problems so far have fallen into three categories: i. Students can’t log in
ii. Students log in but are booted out iii. Students are in but cannot speak when audio is given
Because other students can log in + don’t get booted out + have no microphone problems, then the problem is at the student end. The reasons can be quite difficult to pin down, but here are some things to check:
Internet Connection
You need a reliable Internet Connection or you will drop out: broadband ADSL 1 or 2 or cable, or if accessing at work, a LAN. Some broadband wireless services are not consistently strong and in that case you will experience lost connection or being “booted out”. This can also be the case with connection by satellite for those of you in the country – or you will be able to hear but when you speak there will be break up of sound.
Firewall: If you are trying to access while at work, especially schools, you may be blocked by their proxy server settings. In this case the room connect goes round in circles and never connects. Talk to your IT people at work to open the 8080 Port. If that doesn’t resolve the problem, it may be your computer settings so try:
i. In your browser, find the Internet Options or preferences to change proxy settings. ii. Enable the setting Use HTTP 1.1 through proxy connections and click OK. iii. Close all browser windows and re-open before trying to connect to the meeting again
Test your Computer for Adobe Connect Do to this Adobe Connect test site to see how your computer performs and what might be missing: https://webconf.acu.edu.au/common/help/en/support/meeting_test.htm
Browser Problems and Flash Update your browser so you have the latest Flash. Once installed, check you have enabled by going to the top left of the location bar. See some browser variations below:
Firefox This is an example of an up-to-date and enabled Flash plugin required to run Adobe Connect [webconf.acu.edu.au].
In Firefox, if the “Lego block” for Flash is red, Flash is blocked because it is out of date. You will need to download an up-to-date version and then click ‘Allow and Remember’. Internet Explorer is similar.

Adobe Connect Trouble Shooting
4
Chrome Your browser may also tell you your Flash Player is out of date – so please update your Flash plugin, or download a new browser. Remember there are more Flash updates than browser updates.
Chrome Your Flash may be up-to-date but you will still have to allow it.
Extra Settings for MAC System Preferences 1. The first is allowing the Adobe Connect Add-in when you first try to share a document in the Share Pod.
The image below shows only up to Step 2:
• When you have clicked the Security and Privacy tab, you will see a screen as opposite with the Accessibility menu selected.
• Here you can see that the user has previously allowed their Dropbox but not the ‘adobeconnectaddin’.
• Security & Privacy have also been unlocked (bottom left) so changes can be made.
• Tick the ‘adobeconnectaddin’, and lock at bottom left.

Adobe Connect Trouble Shooting
5
Safari browser Security Settings
Separate to your computer settings, the browser may block the Adobe Connect Addin and request that you change the Safari settings (only 2 steps shown below):
1. Go to the Safari menu, select Preferences, then Security 2. Click the ‘Plug-in Settings’ next to the ticked ‘Allow Plug-ins’, then see below:
3. Each ‘Configured website’ listed will have a drop-down menu for: allow, always allow, ask, block 4. Unfortunately to get this application to ‘Allow’ or ‘Allow Always’, you need to run it in unsafe mode
which is not a wise setting, even if for only one ‘trusted’ website.
Hence, if you are a Mac user on a desktop or laptop, it is preferable to use Firefox or Chrome and not Safari as there are fewer setting changes and no running in unsafe mode.

Adobe Connect Trouble Shooting
6
If Adobe Connect still does not work well in your browser, try the following: Clear the cache Firefox for PC > Tools > Options > Advanced > Network > Cached Web content > Clear Now Firefox for Mac > Firefox > Preferences > Advanced > Network > Cached Web Content > Clear now Internet Explorer 7 > Tools > Internet Options > Browsing History > Delete (avoid IE8) Internet Explorer 11 > Tools > Delete Browsing History Chrome on a Mac > Chrome in top Menu > Clear Browsing Data> Choose “the beginning of time” for
the ‘Obliterate the following items’ from a time span, then select cached images and files, download and browsing history
Chrome on a PC > Go to menu top right > select History > click ‘Clear browsing data’ at top Safari > under Safari menu item > Empty Cache
Check the pop up blockers are turned off (critical)
If you have a pop-up blocker enabled in your browser, the dialog box for downloading the Add-in will not appear. To correct this problem, temporarily disable the pop-up blocker. See below for instructions to do this: For Firefox browser, go to Tools (top menu next to Help) > Options > Content > un-tick the Block pop-
up windows For Chrome, go to menu and Settings > Advanced settings > Privacy > Content settings >>scroll down
to Pop-ups and select Allow all sites to show pop-ups or click Manage exceptions For Internet Explorer, go to Tools > Pop-up Blocker > Turn off Pop-up Blocker
For Safari, under the Safari menu item > click off Block Pop-Up Windows First login to an Adobe Connect Room (per computer)
Enable Flash & install the Adobe Connect Add-in The Add-in is a specialised version of Flash Player required for screen & document-sharing and for enhanced audio in Adobe Connect. This usually happens when you first log in but not always.
Always allow Flash when asked and then you will get the Adobe Add-in which is also important if you are going to be able to share documents from your computer in the main room or in the breakout rooms. Browsers usually ask you to update and so you should have the latest Flash: you just need to allow it. If not asked on logging in, see below.
Allowing Flash: click Allow and then Remember as in the Privacy screen of the Adobe Flash Player Settings figure top left.
At the bottom of the Adobe Flash Payer Settings, there are five icons – click the ‘microphone
icon’- adjust volume and tick Reduce Echo (above right figure).

Adobe Connect Trouble Shooting
7
Do the Audio Setup Wizard
When you enter the room after logging in, the first thing to do after checking you can hear the lecturer is the Audio Setup Wizard, particularly:
configure your headphones and microphone download the Adobe Add-in [only once per computer you use, though you may have
installed it on logging in] allow Flash [critical as Adobe Connect is Flash based]
Click on Meeting in the top menu on the left, then the Audio Setup Wizard – follow the steps. You need to do this every time use a different computer [See Join your online Classroom for details].
On clicking the Install add-in, you will get the popup below:
Click Yes to install
Checking later on that Flash is allowed (in the Adobe Connect room) You may have not allowed Flash on login the first time, or not clicked ‘Remember’ and so it appears every time you login. Additionally, your microphone has been clicked green but nobody can hear you, so: Right click a grey area in the Adobe Connect Room and you will
get a little ‘Settings’ label. Click this and you will get the Adobe Flash Player Settings box.
Click to Allow and also to remember. You can also click the microphone icon at the bottom to reduce echo as shown above.
The above is particularly important for those who find their microphone is working fine in other applications such as Skype but not in Adobe Connect.
If you are still having problems, try another browser and ensure your browser is updated so you have the latest Flash plugin/player.
Of course, your iPhone or Android ear plugs have no microphone, so don’t expect clicking the Adobe Connect meeting room microphone green to work!

Adobe Connect Trouble Shooting
8
Has your headset been found?
Critical: Plug your headset in before you start your computer/boot up. When a computer starts up, it finds all the peripherals and programs.
If you have a problem with sound coming through your computer speakers and not your headset – even though you select the headset in the Adobe Connect Audio Set-up Wizard – please shut down, plug in the headset and restart! When in your Adobe Connect room, do the Audio Set-Up Wizard under Meeting in the menu, and select your headset. Ensure it is not pointing to the internal default audio for your computer speakers. This will be terrible for other users in Adobe Connect as the microphone will go through your computer speakers and cause them echo and static discomfort. You will then be asked to be an observer and not use your mic – or leave the room as the learning cannot proceed.
In this instance, the computer has IDT Audio. From the drop-down box menu arrow, the Logitech USB Headset is selected.
If you can’t see the name of your headset and microphone, then exit the room and shut down your computer. Plug your headset in and then let your computer find the device as it starts or ‘boots’ up. A USB headset is easy: just put it into a USB port before you start up your computer.
Analog? Plug your headset in correctly Is your headset an analog with separate headset and microphone jack plugs as illustrated? The pink (sometimes orange) goes to the microphone port while the green goes in the headset or speaker port. If different colours, check the markings so you can see which one is the microphone plug.
PC users of portable webcams
These are normally very easy to install – just plug in and start up your computer.
Webcam overriding your microphone: There is a microphone in the webcam and occasionally the webcam overrides your headset microphone even if all other headset settings are in place. In this scenario, your voice is barely audible.
Solution:
• Go to the dropdown arrow next to the microphone
• Click Select Microphone • Select your Logitech USB
headset.

Adobe Connect Trouble Shooting
9
• Note: the IDT options are the inbuilt computer sound software for one particular computer, yours may be different, but don’t select.
• The Microphone (USB Audio Device) is actually the mic in the webcam – do not select.
Every computer will be different in how the software is named. You may have to try a couple of option until right.
Webcam selection
Sometimes there is an integrated webcam in your laptop monitor and you are using a second bigger monitor with a webcam.
In this case, select your USB Video Device.
Persistent sound through computer problems
When the sound still comes through your computer speakers and not through your headset, it causes echo for others in the room when they speak and you have your microphone on. If this is the case, and you have followed all the directions outlined earlier in this document, see below:
Headset selection on a PC – Windows 7 operating system
1. Go to Start >> Control Panel >> Sound
2. The Sound options are under 4 tabs: Playback, Recording, Sounds and Communications.
3. Choose Playback (what you hear via computer speakers or through your headset).
4. Every computer will be somewhat different but there is always a computer speakers’ function; here it is IDT.
5. Make your Logitech USB Headset is the Default Device by selecting it and going to the bottom and clicking ‘Set Default’.
You may have to disable the other playback devices such as listed here if the sound persists in coming through the computer speakers.
Now select the Recording Tab (your microphone) – see next page.

Adobe Connect Trouble Shooting
10
Select the Recording Tab (your microphone)
1. Select the Logitech USB Headset (or whatever name of your Headset)
2. Click Set Default.
3. Click Apply.
Headset selection on a MAC
Setting Sound Preferences: i. Plug your headset jacks into the back of your Mac; being careful to put the pink jack into the
microphone port and the green (or brown) into the audio/headset port. ii. Click apple icon top left and then System Preferences. Click the Sound icon. iii. Of the three tabs top centre, first click the Output tab. This is for audio. You should see:
iv. Click on the Headphones or Logitech USB Headset and check the Output volume at the bottom.
Adobe Connect Trouble Shooting
11
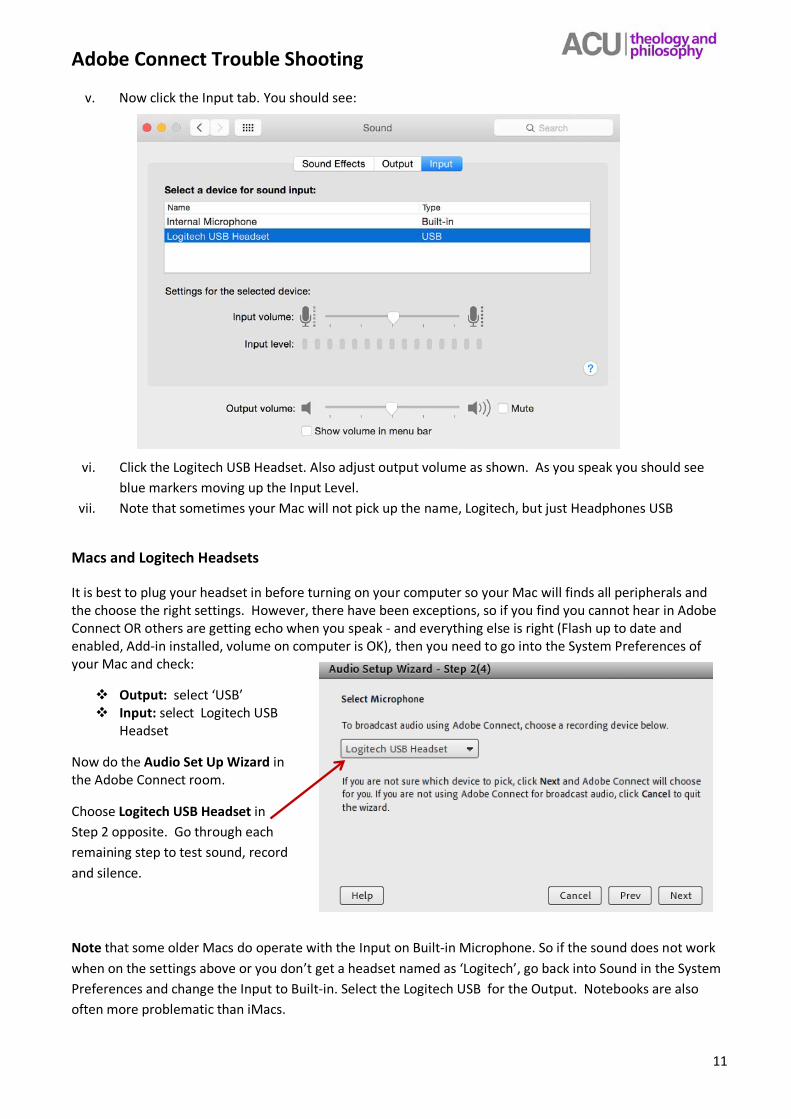
v. Now click the Input tab. You should see:
vi. Click the Logitech USB Headset. Also adjust output volume as shown. As you speak you should see blue markers moving up the Input Level.
vii. Note that sometimes your Mac will not pick up the name, Logitech, but just Headphones USB
Macs and Logitech Headsets
It is best to plug your headset in before turning on your computer so your Mac will finds all peripherals and the choose the right settings. However, there have been exceptions, so if you find you cannot hear in Adobe Connect OR others are getting echo when you speak - and everything else is right (Flash up to date and enabled, Add-in installed, volume on computer is OK), then you need to go into the System Preferences of your Mac and check:
Output: select ‘USB’ Input: select Logitech USB
Headset
Now do the Audio Set Up Wizard in the Adobe Connect room.
Choose Logitech USB Headset in Step 2 opposite. Go through each remaining step to test sound, record and silence.
Note that some older Macs do operate with the Input on Built-in Microphone. So if the sound does not work when on the settings above or you don’t get a headset named as ‘Logitech’, go back into Sound in the System Preferences and change the Input to Built-in. Select the Logitech USB for the Output. Notebooks are also often more problematic than iMacs.
Adobe Connect Trouble Shooting
12
Word to Mac Users
Headsets with additional volume and on/off controls Your headset may have a separate volume control as below:
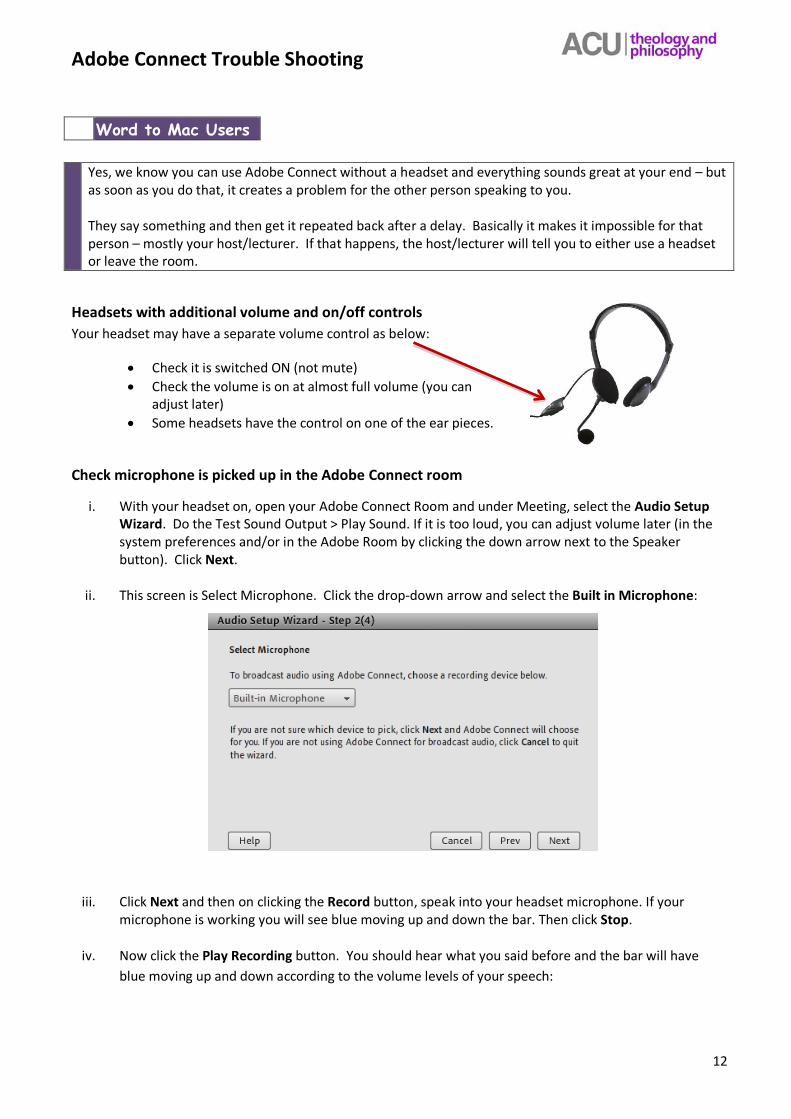
Check microphone is picked up in the Adobe Connect room
i. With your headset on, open your Adobe Connect Room and under Meeting, select the Audio Setup Wizard. Do the Test Sound Output > Play Sound. If it is too loud, you can adjust volume later (in the system preferences and/or in the Adobe Room by clicking the down arrow next to the Speaker button). Click Next.
ii. This screen is Select Microphone. Click the drop-down arrow and select the Built in Microphone:
iii. Click Next and then on clicking the Record button, speak into your headset microphone. If your microphone is working you will see blue moving up and down the bar. Then click Stop.
iv. Now click the Play Recording button. You should hear what you said before and the bar will have blue moving up and down according to the volume levels of your speech:
Yes, we know you can use Adobe Connect without a headset and everything sounds great at your end – but as soon as you do that, it creates a problem for the other person speaking to you. They say something and then get it repeated back after a delay. Basically it makes it impossible for that person – mostly your host/lecturer. If that happens, the host/lecturer will tell you to either use a headset or leave the room.
• Check it is switched ON (not mute) • Check the volume is on at almost full volume (you can
adjust later) • Some headsets have the control on one of the ear pieces.

Adobe Connect Trouble Shooting
13
v. Click Stop Playing and then Next. Go to the final screen of the Audio Setup and do the full silence test. Let it run to the end of the bar.
vi. Click Next and Finish. Your microphone should now be working in your Adobe Connect room. Do check you have clicked
the microphone icon on so it is green. It will flash if it picks up sound!
For adjusting audio and microphone levels just click the down arrows next to each icon and adjust either speaker or microphone volumes. Your host/lecturer will tell you if you are too loud and your microphone needs adjustment.
Another way to check for microphone selection If there are still problems with your computer not switching over to your microphone, go to the microphone icon in the top menu row:
click the drop-down arrow next to the microphone Choose Select Microphone Find and select the Logitech Headset in the list (or you other named headset) Do not select the system sound on your computer eg. IDT or Real

Adobe Connect Trouble Shooting
14
Specific Problems
Meeting Login has Expired Message: You cannot access this meeting because your meeting login has expired. Please log in to the meeting in a new window.
If you get this message, close the browser down and restart. Don’t just open a new window. Also try another browser if you can so the cache doesn’t create the same problem.
You can’t hear anything The sound/audio settings on the computer may be set at a very low level or even muted! Check your sound levels on your computer and not just in the Adobe Connect room.
Check your headset is plugged in properly, especially if an analog. Check the on-off and volume control on the headset cord or ear muff is on. Computer Sound levels: click the speaker icon on the status bar near the time (bottom right)
for PC users and see top right for Mac users. Check levels and that sound is not muted. Adobe Connect Sound levels: click the Adjust Speaker Volume in the dropdown next to the
audio icon in the menu bar top left. Do Audio Setup Wizard - this will not fix the problem if the preceding three items are not
correct.
Others cannot hear you when you speak (microphone icon is green but still doesn’t work) i. Number One reason: Flash has not been enabled: see pp3-4.
ii. Check you have not muted the sound system on your computer (This has happened to a student.)
iii. The microphone volume level in Adobe Connect is too low: adjust the microphone levels when you are in the meeting – click the down arrow next to microphone icon in the top left menu and Adjust Mic Volume
iv. The red light on your headset cord is blinking: press again to turn on. v. Using headphones without a microphone i.e. headphones for an iPhone! You need a
headset with a microphone! vi. Check set up again:
i. Check your headset configuration in System Preferences for Macs ii. Check your headset configuration in Control Panel for PCs
iii. Then check selection in Audio Setup Wizard in Adobe Connect
Adobe Connect Add-in fails to install If you fail to install the automatic one via the Audio Setup Wizard and/or are not prompted to install the Add-in when trying to screen or document share, then go to this download page:
http://www.adobe.com/support/connect/downloads-updates.html
As of January 2015, ACU has Adobe Connect 9, so find the download for this version and then the one for your operating system (Window, Mac OS). Note what the instructions say for those downloading from a Firefox browser (right click and save download to desktop and install later by double clicking).
Failure of hardware i. Faulty headset – if all other steps do no resolve your problem, try another headset to isolate
the problem. If the other headset works, return the faulty one to the store (with receipt). This has been an identified cause on a few occasions.
ii. Faulty computer – after everything else was tried, it was isolated as a laptop or desktop hardware problem that required a technician. The student was able to operate on a different computer.