Administrators’ Guide. - Corporate Online · Administrators’ Guide. Corporate Online. Give your...
38
Administrators’ Guide. Corporate Online. Give your business the edge.
Transcript of Administrators’ Guide. - Corporate Online · Administrators’ Guide. Corporate Online. Give your...

Administrators’ Guide.Corporate Online.Give your business the edge.
ContentsIntroduction 1Overview 1Preparatory Steps to Login 1Install drivers 1Change transport pin 1Register your Smartcard 2Activation of Smartcard 3Logging in 4Signing 5Logging out 5Navigating Around the System 5Section One – Initial Set-up 6User Groups 6About User Groups 6Creating User Groups 6Smartcard Users 7Creating a new Smartcard Service User 7Activating the Service Users Smartcard 8Individual User Settings 8Allocating accounts to the Service User 8Allocating accounts by user 9About permissions 10Payment instruction limits 10Setting permissions 11Cloning Service Users 12System Authorisation Settings 13About authorisation rules 13Creating a new authorisation rule 13Amending an authorisation rule 14Deleting an authorisation rule 14Creator authorisations 15About creator authorisations 15Section Two – On-Going Maintenance 16Activating a Service User’s Smartcard 16
Allocating Additional Accounts 16Allocating accounts by user 16Allocating accounts by account 17Cloning Service Users 19User Group 20Adding a new group 20Changing a group name 20Moving a Service User to another group 21Deleting a group 21About Smartcard Service Users 21Ordering a replacement Smartcard 21Amending a Smartcard User’s details 22Deleting a Smartcard User 23Viewing Smartcard details 23Requesting a Smartcard reader 24Amending System Settings 24Authorisation rules 24Amending permissions 24Supplementary Section 25Account Friendly Names 25About Reports 26Viewing reports 26Messages 27Reading and replying to personal messages 27Creating a new message 28Deleting a message 28About Audit Logs 29Finding audit log information 29Tokens 30Setting up Token users 30Frequently Asked Questions 31Set-up Example One 34Set-up Example Two 35Our Service Promise 36
1
Introduction.
Overview.
Welcome to the next generation of online banking from Bank of Scotland. Corporate Online brings together all of your domestic accounts in one, purpose-designed application, including international Non Sterling Currency accounts, payment transactions and foreign exchange. Simple, secure and quick, it’s little wonder that the Bank is an industry leader in online banking.
But we’re never content to sit back on our achievements. That’s why we constantly review and develop our online banking service – in close consultation with customers just like you. It’s all part of our commitment to offering customers the very best service – both online and off.
Corporate Online is a 2-tier system. There are System Administrators who set up and control the use of Corporate Online and Service Users who can view accounts and process transactions.
The Service User will use Corporate Online on a day-to-day basis whereas once the initial set-up is complete the System Administrator will only be required to login from time to time to carry out amendments.
This Administrators’ Guide has been designed to guide you through the set-up and control of Corporate Online. As a System Administrator you are able to:
► Create Service Users
► Control what they see and do
► Set payment and authorisation limits for each user
► Control the number of authorisations required for payments or transfers
Getting started is easy, you will need to create User Groups for your Service Users and if any Service User Smartcards
were ordered on your initial application these can then be set up and ‘Activated’ immediately.
If no Service User Smartcards were requested on your application, or if you require more these can be ordered using your System Administrator smartcard. It will take around five working days to receive your cards once you have placed your order.
Ô Please note:
Administrator’s Smartcards cannot be used to view any account information or to make any payments. If you want to be a Service User too, you must order a separate Smartcard.
We hope you find this guide to be useful. And remember, if we can help you with any aspect of your online banking experience, please do get in touch with our friendly, informative Helpdesk team.
You can reach them on 0345 300 6444† between 8.00am and 6.00pm, Monday to Friday. Or, if you prefer, you can email us at [email protected] but, please remember not to include any sensitive or confidential information as the security of emails cannot be guaranteed.
Preparatory Steps to Login.
Install drivers
Before you are able to Login to Corporate Online you must install the drivers for your Smartcard, which you can find on the CD-rom that has been supplied with the card reader.
Change transport pin
After you have installed the drivers you must change the initial PIN allocated to the card.
2
To Change Your Transport Pin:
1. Ensure the Card Reader is connected.
2. Insert your card into the reader (the light on the reader should stop flashing and remain constant).
3. Select Start | Programs | Gemplus | GemSAFE Toolbox
4. Click on Card Administration.
5. Click on Pin Management then Next.
6. Enter the supplied PIN in the Old PIN field.
7. Enter a new PIN in the New PIN field.
Your PIN can be a combination of numbers and lower case/capital letters and must be between six and eight characters long.
Register your Smartcard
Next you must register your Smartcard on Corporate Online.
To Register Your Smartcard:
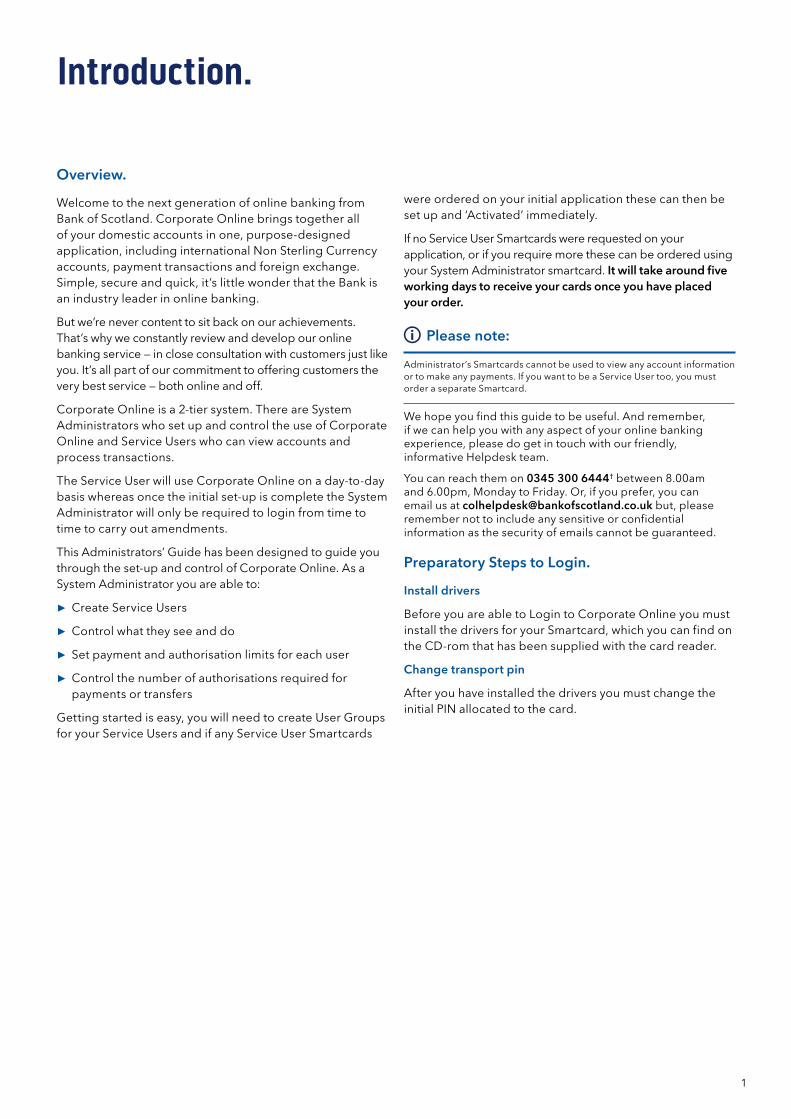
1. Go to bankofscotland.co.uk/corporate and click on the Corporate Online Login link.
2. The Login screen opens.
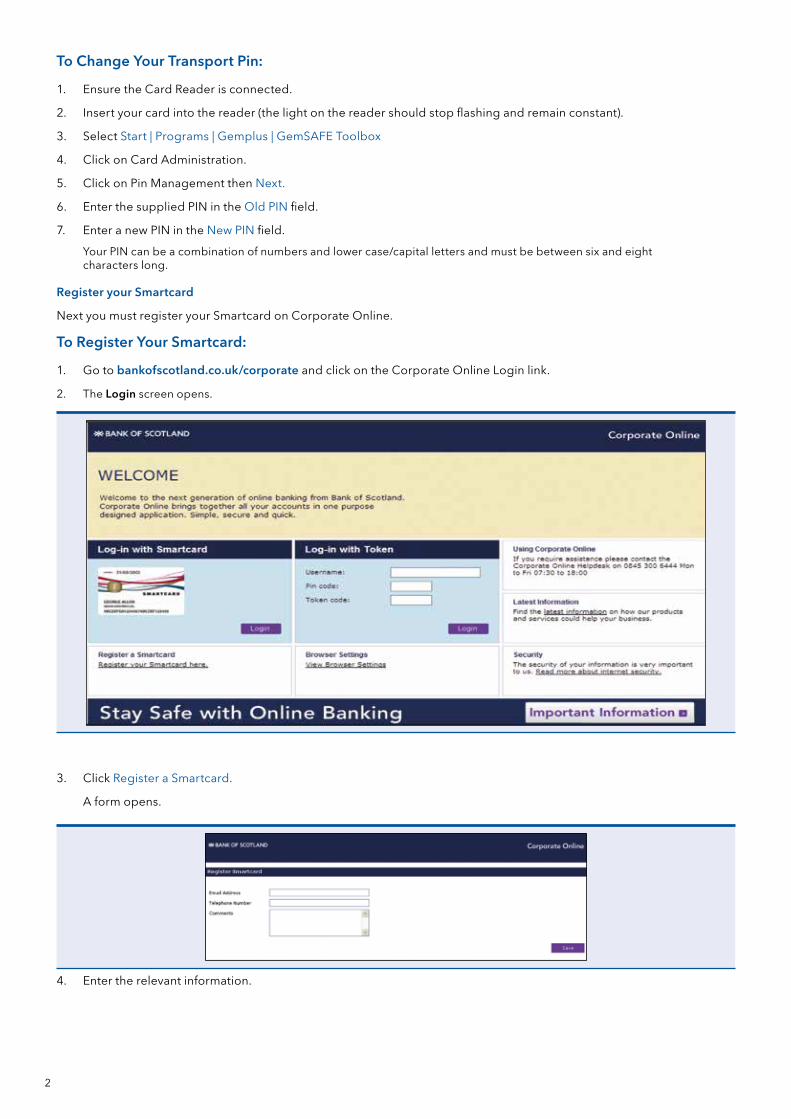
3. Click Register a Smartcard.
A form opens.
4. Enter the relevant information.
3
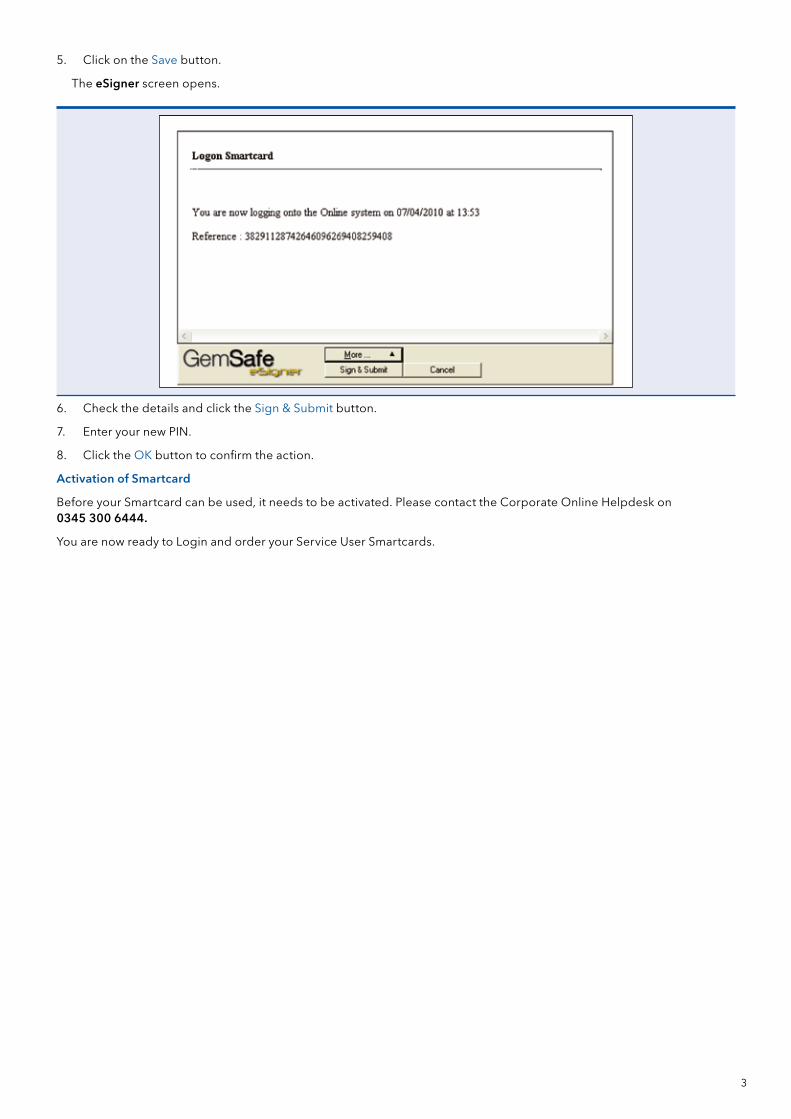
5. Click on the Save button.
The eSigner screen opens.
6. Check the details and click the Sign & Submit button.
7. Enter your new PIN.
8. Click the OK button to confirm the action.
Activation of Smartcard
Before your Smartcard can be used, it needs to be activated. Please contact the Corporate Online Helpdesk on 0345 300 6444.
You are now ready to Login and order your Service User Smartcards.
4
Logging in.
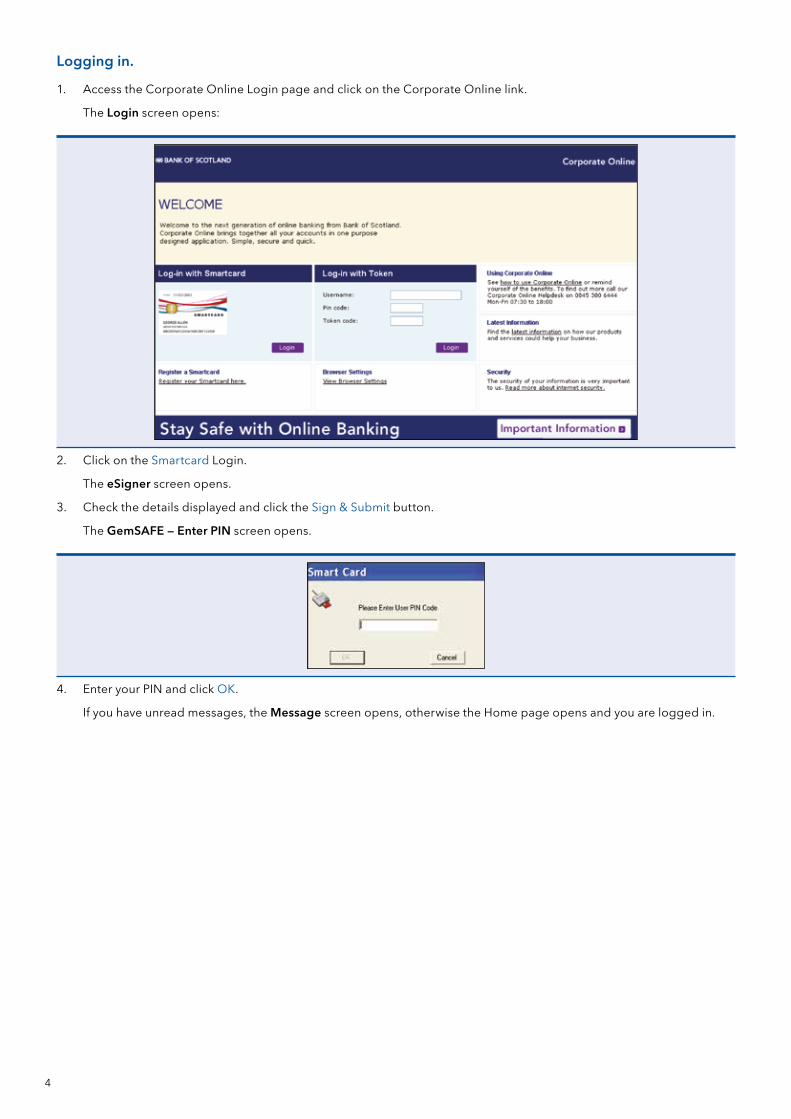
1. Access the Corporate Online Login page and click on the Corporate Online link.
The Login screen opens:
2. Click on the Smartcard Login.
The eSigner screen opens.
3. Check the details displayed and click the Sign & Submit button.
The GemSAFE – Enter PIN screen opens.
4. Enter your PIN and click OK.
If you have unread messages, the Message screen opens, otherwise the Home page opens and you are logged in.

5
Signing.
All instructions and requests must be signed by a valid Smartcard and PIN.
Each time you click on an action button such as SAVE, a new screen opens; displaying the details you are being asked to sign for.
To Sign:
1. Click the Sign & Submit button.
A new eSigner window opens requesting your PIN.
2. Enter your PIN and click OK.
The action is completed when the eSigner window closes.
Ô Note:
If you enter five consecutive incorrect PIN numbers, the card is disabled and you can no longer use it. If this happens you will need to complete an Amendment form to request a replacement. You can download a form at www.corporateonline.co.uk/bos/forms
Logging out.
When you have finished using Corporate Online you must log out to ensure that your connection has terminated securely.
To log out:
1. Click on the Logout link at the top right of the screen.
The system logs you out securely.
Please always ensure that your Smartcard is removed from the reader when you log out.
Navigating Around the System.
Bank of Scotland Corporate Online is easy to navigate around.
When you Login this screen opens:
The menu is displayed on the page, and there are also tabs to make navigation simple and quick. Each section is covered in more detail later in the guide.
6
Section One – Initial Set-up.
User Groups.
About User Groups
The first thing you must do is create a user group to which all subsequently created Service Users can be assigned. If you intend to have a limited number of Service Users, or you don’t need to set up varying authorisation rules, it may be best to create only one group and assign all your Service Users to this one group.
However, if you want to replicate the paper/manual signing authorities already in place, you will need to carefully consider the groups you assign your Service Users to because the authorisation rules you set are linked to the User Groups. Please refer to Authorisation Rules for more information.
Creating User Groups
To create a user group:
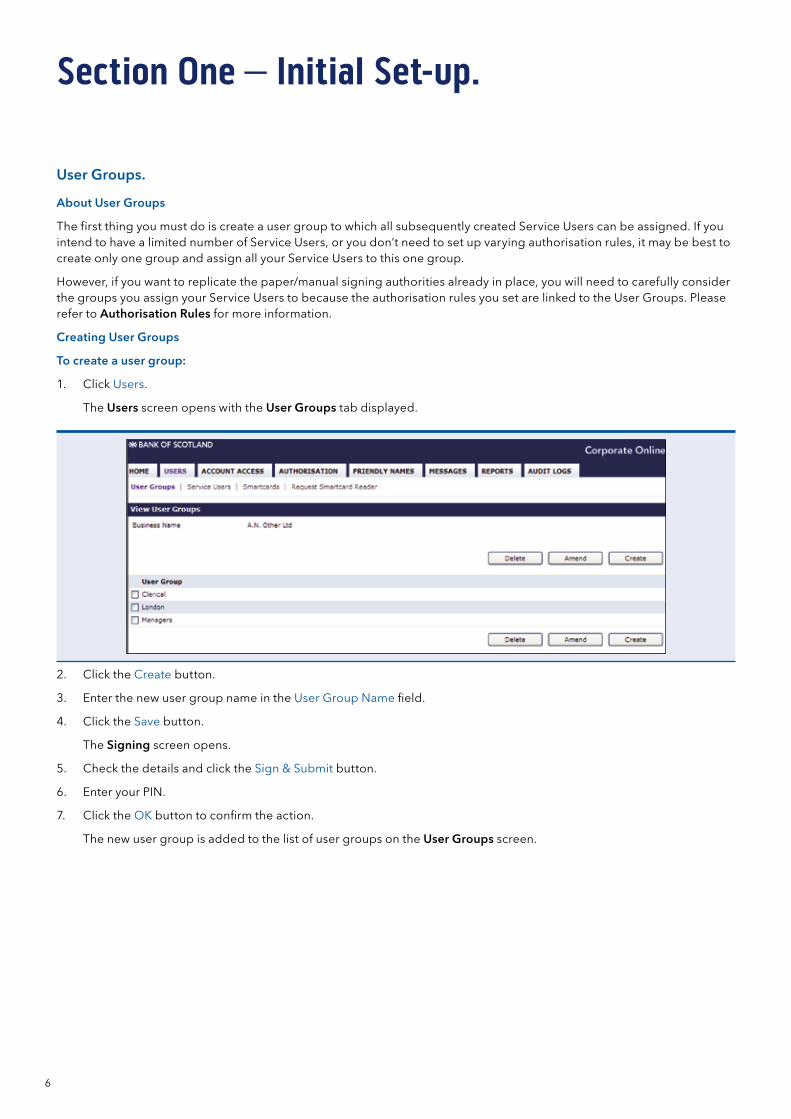
1. Click Users.
The Users screen opens with the User Groups tab displayed.
2. Click the Create button.
3. Enter the new user group name in the User Group Name field.
4. Click the Save button.
The Signing screen opens.
5. Check the details and click the Sign & Submit button.
6. Enter your PIN.
7. Click the OK button to confirm the action.
The new user group is added to the list of user groups on the User Groups screen.
7
Smartcard Users.
System Administrators cannot view account information or create payments and transfers so you will need to create Service Users in order to make use of Corporate Online.
Creating a new Smartcard Service User
To set up initial Smartcard Service Users:
If you ordered initial Smartcard Service Users on your application these can be set up, ‘Registered’ and ‘Activated’ now, please follow the points below for full instructions.
1. Click on Users, Service Users. The Service Users screen opens.
2. Any Smartcard Service Users already created will be listed under the ‘Users not in Group’ list. These Service Users can be allocated to a group by selecting the User, then User Group and clicking the Assign button.
3. When a Smartcard Service User is first created they won’t have any accounts allocated or account permissions set.
Please follow through ‘Individual User settings’ to allocate accounts and set account permissions.
4. Once the Smartcard Service User has been allocated to a User Group and had accounts and account permissions set, the Smartcard Service User will need to be ‘Registered’ and ‘Activated’ before use. Please see ‘Activating the Service Users Smartcard’ for full instructions.
To create a new Smartcard user:
If no Smartcard Service Users have been previously requested or if you wish to request further Smartcard Service Users please follow the points below.
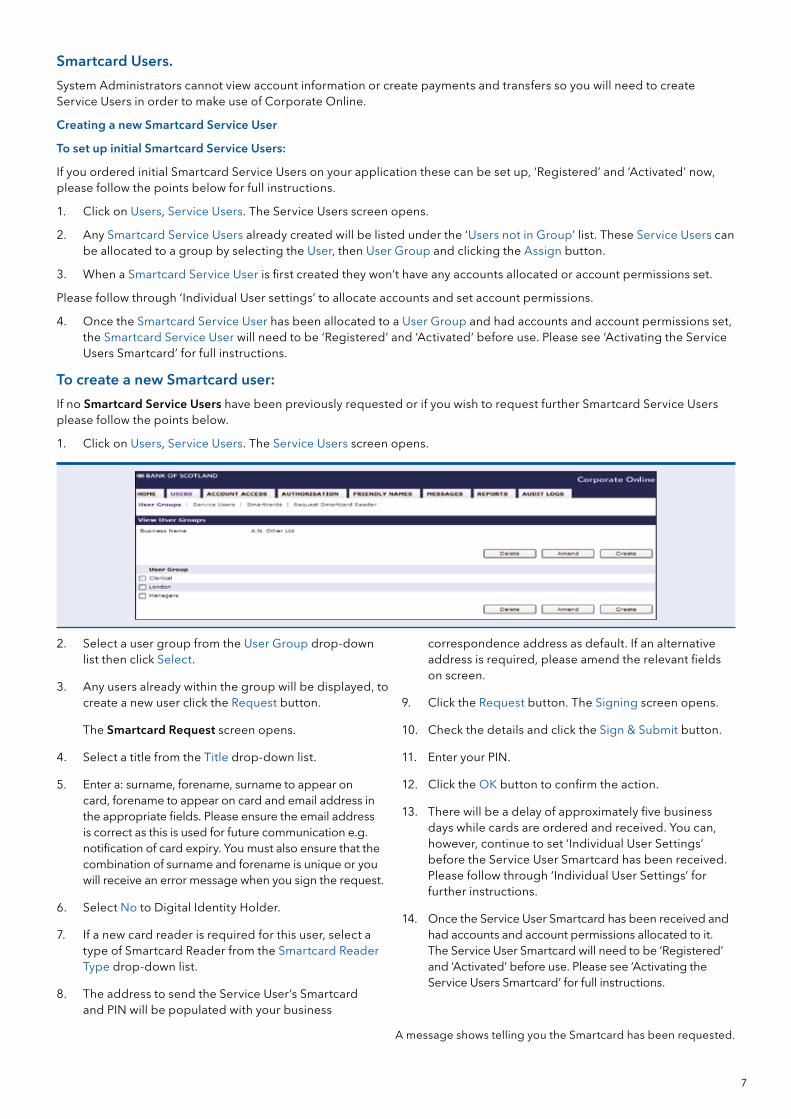
1. Click on Users, Service Users. The Service Users screen opens.
2. Select a user group from the User Group drop-down list then click Select.
3. Any users already within the group will be displayed, to create a new user click the Request button.
The Smartcard Request screen opens.
4. Select a title from the Title drop-down list.
5. Enter a: surname, forename, surname to appear on card, forename to appear on card and email address in the appropriate fields. Please ensure the email address is correct as this is used for future communication e.g. notification of card expiry. You must also ensure that the combination of surname and forename is unique or you will receive an error message when you sign the request.
6. Select No to Digital Identity Holder.
7. If a new card reader is required for this user, select a type of Smartcard Reader from the Smartcard Reader Type drop-down list.
8. The address to send the Service User’s Smartcard and PIN will be populated with your business
correspondence address as default. If an alternative address is required, please amend the relevant fields on screen.
9. Click the Request button. The Signing screen opens.
10. Check the details and click the Sign & Submit button.
11. Enter your PIN.
12. Click the OK button to confirm the action.
13. There will be a delay of approximately five business days while cards are ordered and received. You can, however, continue to set ‘Individual User Settings’ before the Service User Smartcard has been received. Please follow through ‘Individual User Settings’ for further instructions.
14. Once the Service User Smartcard has been received and had accounts and account permissions allocated to it. The Service User Smartcard will need to be ‘Registered’ and ‘Activated’ before use. Please see ‘Activating the Service Users Smartcard’ for full instructions.
A message shows telling you the Smartcard has been requested.
8
Activating the Service Users Smartcard
To Register the Service Users Smartcard:
1. Once the Smartcard is received the Service Users need to change their PIN and can then go to the login page.
2. Select the link to Login to Corporate Online and click the Register a Smartcard graphic on the Login screen.
The Register Smartcard screen opens.
3. The Service User should enter the relevant details on the form.
4. The Service User should click the Save button.
5. The Service User should click the Sign & Submit button.
6. The Service User should enter their PIN.
The Smartcard is registered by the system.
Once this has happened the System Administrator must login to allocate the Smartcard.
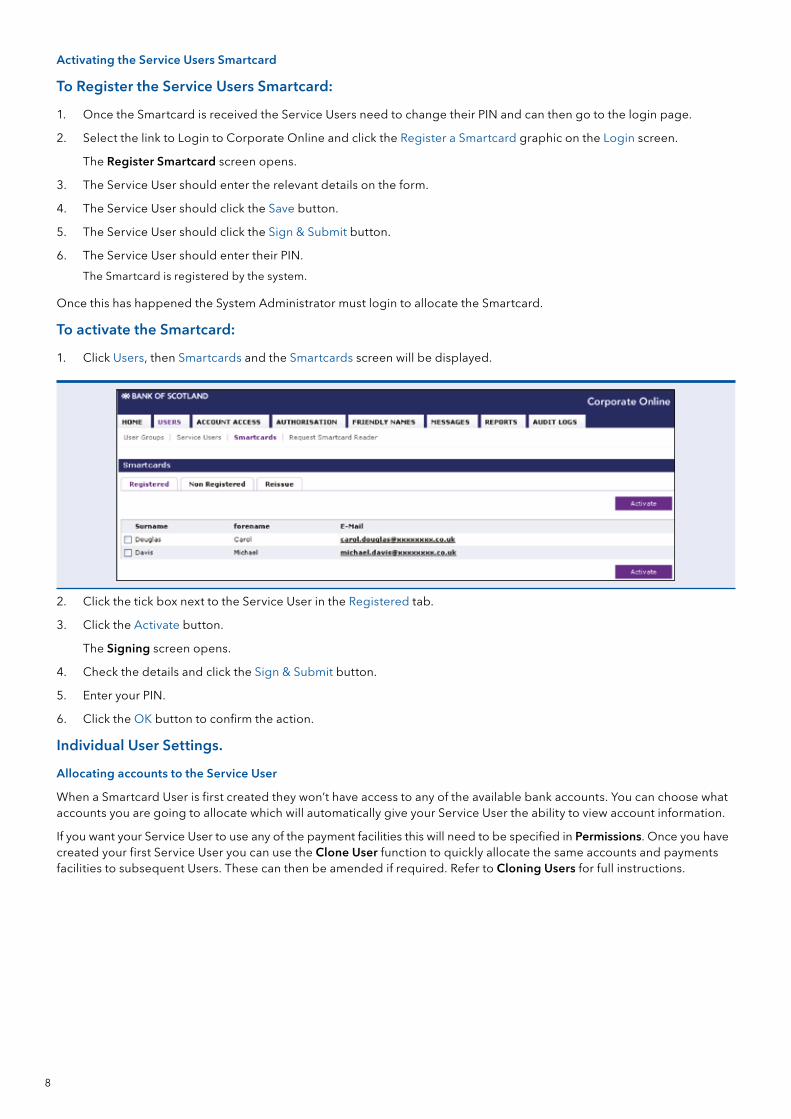
To activate the Smartcard:
1. Click Users, then Smartcards and the Smartcards screen will be displayed.
2. Click the tick box next to the Service User in the Registered tab.
3. Click the Activate button.
The Signing screen opens.
4. Check the details and click the Sign & Submit button.
5. Enter your PIN.
6. Click the OK button to confirm the action.
Individual User Settings.
Allocating accounts to the Service User
When a Smartcard User is first created they won’t have access to any of the available bank accounts. You can choose what accounts you are going to allocate which will automatically give your Service User the ability to view account information.
If you want your Service User to use any of the payment facilities this will need to be specified in Permissions. Once you have created your first Service User you can use the Clone User function to quickly allocate the same accounts and payments facilities to subsequent Users. These can then be amended if required. Refer to Cloning Users for full instructions.
9
Allocating accounts by user.
To allocate an account by user:
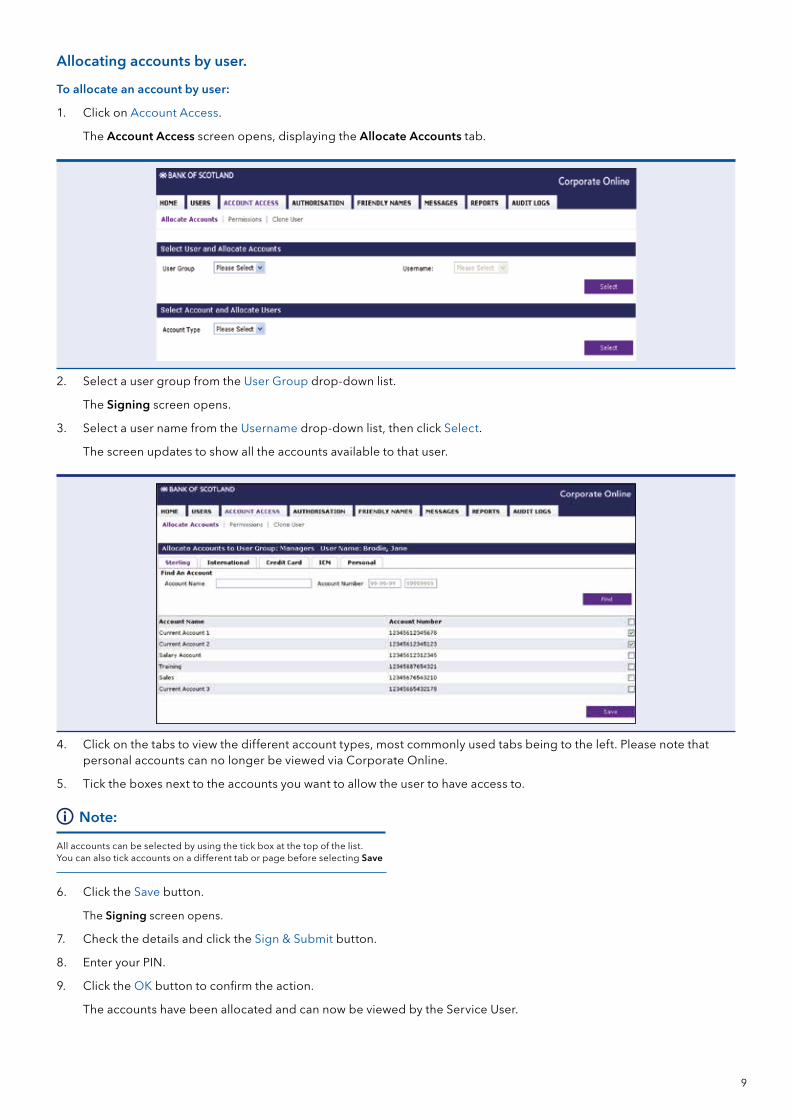
1. Click on Account Access.
The Account Access screen opens, displaying the Allocate Accounts tab.
2. Select a user group from the User Group drop-down list.
The Signing screen opens.
3. Select a user name from the Username drop-down list, then click Select.
The screen updates to show all the accounts available to that user.
4. Click on the tabs to view the different account types, most commonly used tabs being to the left. Please note that personal accounts can no longer be viewed via Corporate Online.
5. Tick the boxes next to the accounts you want to allow the user to have access to.
Ô Note:
All accounts can be selected by using the tick box at the top of the list. You can also tick accounts on a different tab or page before selecting Save
6. Click the Save button.
The Signing screen opens.
7. Check the details and click the Sign & Submit button.
8. Enter your PIN.
9. Click the OK button to confirm the action.
The accounts have been allocated and can now be viewed by the Service User.
10
About permissions
It is possible to control exactly what Service Users are able to see and do on accounts. This section of the guide outlines how to set account permissions and how to set payment and authorisation limits on different facilities for individual Service Users.
You are able to set permissions on the following facilities:
No accounts are selected by default for these permissions, except Enquire on Accounts where all allocated accounts are available by default.
Permissions can be set as required, e.g. allow a user to create payments on an account, but do not allow them to view the account statement/balance information.
► Transfers (Debit)
► Transfers (Credit)
► Sterling Payments – includes Bacs Single, Faster Payments, Bacs Multiple, and CHAPS
► International Payments – includes Basic Euro Moneymovers, Basic Euro Moneymovers with Live Rates, International Moneymovers, International Moneymovers with Live Rates and International Drafts
► Account Permissions – Authorise Payments, Cancel Payments and Enquire on Accounts
The default option is All for administer beneficiaries.
Other Permissions – Administer Beneficiaries
Payment instruction limits
A Payment/Dealing limit represents the largest single value payment instruction that a Service User may create. An Authorisation/Dealing limit represents the largest single value payment that a user may authorise. It is possible to set the Payment and Authorisation limits to different values as required. This means you as an Administrator control the type of payments, value and debit accounts that a Service User may use.
When a Service User has been allowed access to Create and Authorise Facilities by default all their limits are set to zero. This means that users are unable to create payments, until you have specified a limit.
The following is a list of facilities that can have limits:
Transfers
► Transfers (Credit). Transfers to and from your own bank accounts. This includes sterling and non streling accounts accessed on Corporate Online. The same limit is also applied to Transfers (Debit).
Sterling Payments
► Bacs Single Payments. Electronic equivalent of a cheque. Single debit to your account, single credit to the payment beneficiary. Suggested for supplier payments, when a payment reference may be needed.
► Faster Payments. Provides the ability to process a Faster Payment to a UK beneficiary with a single debit for each credit with a same day clearing cycle. Only available on payments up to a value of £99,999.00.
► Bacs Multiple. Single debit to your account, multiple credits to several beneficiaries. Ideal for wage/salary payments. This limit applies to the total value of credits within the Bacs Multiple batch.
► CHAPS Payments. UK domestic same day electronic cleared funds transfer. Used when cleared funds are required on the same day that your account is debited, by the payment beneficiary. For example: house purchase settlement or supplier will not release goods until paid etc.
International payments
► International Moneymovers. Payments to UK based currency accounts or to accounts held out with the UK.
► International Moneymovers with Live Rates. Payments to UK based currency accounts or to accounts held out with the UK with the added benefit of knowing what the rate of exchange will be.
► International Drafts. Order a bank draft drawn in a range of currencies, payable to any beneficiary.
► Basic Euro Moneymovers. Basic Euro Moneymover is a SEPA Credit Transfer. Euro Moneymover applies to payments within the European Union.
► Basic Euro Moneymovers with Live Rates. Basic Euro Moneymover is a SEPA Credit Transfer. Euro Moneymover applies to payments within the European Union with the added benefit of knowing what the rate of exchange will be.
The following is a list of facilities that have no set limit:
Account Permissions
► Authorise Payments
► Cancel Payments
► Enquire on Account
Other Permissions
► Administer Beneficiaries – This facility can be set to All or None for each Service User. If it is set to None the Service User is unable to change any beneficiaries that have already been created. They are unable to create any new beneficiaries and can only create payments from existing beneficiaries.
11
Setting permissions
To set permissions and limits:
1. Click on Account Access.
The Account Access link is displayed.
2. Click the Permissions link.
3. Select a user group from the User Group drop-down list.
4. Select a user name from the Username drop-down list.
5. Click the Select button.
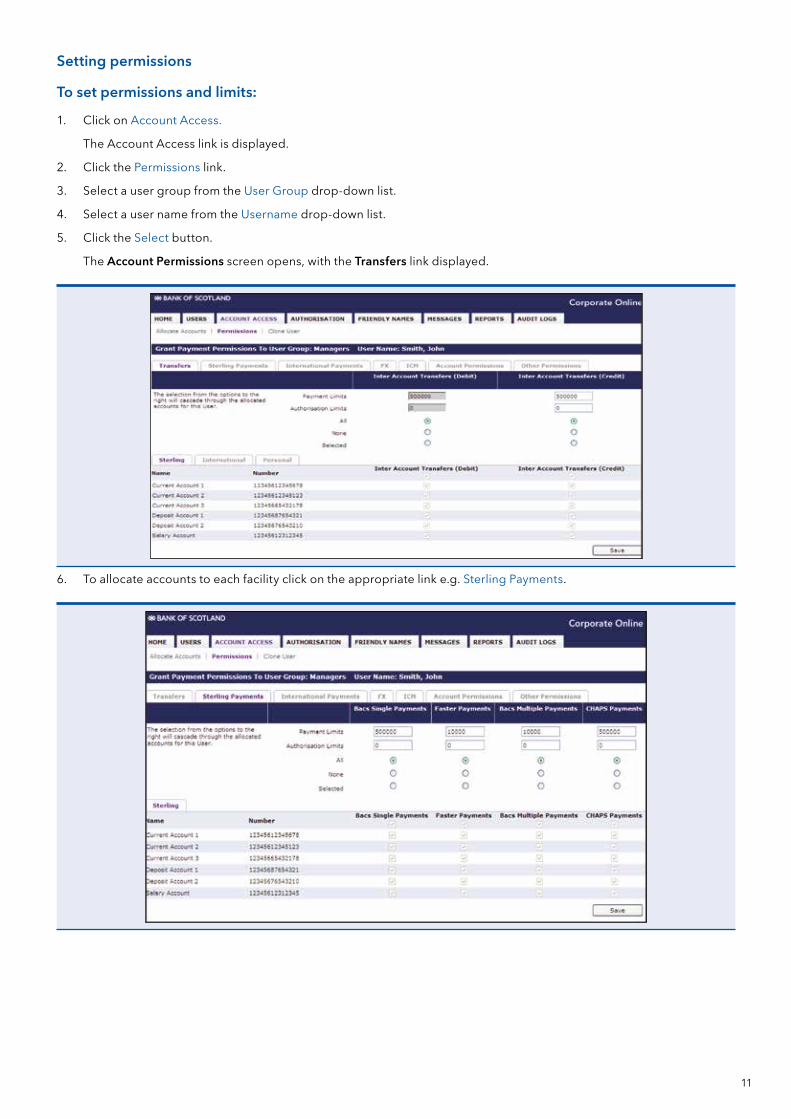
The Account Permissions screen opens, with the Transfers link displayed.
6. To allocate accounts to each facility click on the appropriate link e.g. Sterling Payments.
12
Setting permissions (continued)
7. Enter the Payment Limit, Authorisation Limits, and Dealing Limits as appropriate.
8. Click on the Type Of Access radio button you require: All, None or Selected.
Ô Please Note:
If you select All any account added to a Service User at a later date automatically get this facility on the new account. If you choose Selected you must specify the accounts to which you want this facility applied.
9. Click the Save button.
The Signing screen opens.
10. Check the details and click the Sign & Submit button.
11. Enter your PIN.
12. Click the OK button to confirm the action.
A message appears telling you that the account permissions have been successfully saved.
Cloning Service Users
To make it easier to create and set up multiple Service Users you can copy a Service User that you have already set up with accounts, facilities and limits. If the new Service User needs slightly different access then it can be amended once it has been cloned by going back to Allocate Accounts and Account Permissions.
To Clone a Service User
1. Click on Account Access.
The Account Access link is displayed.
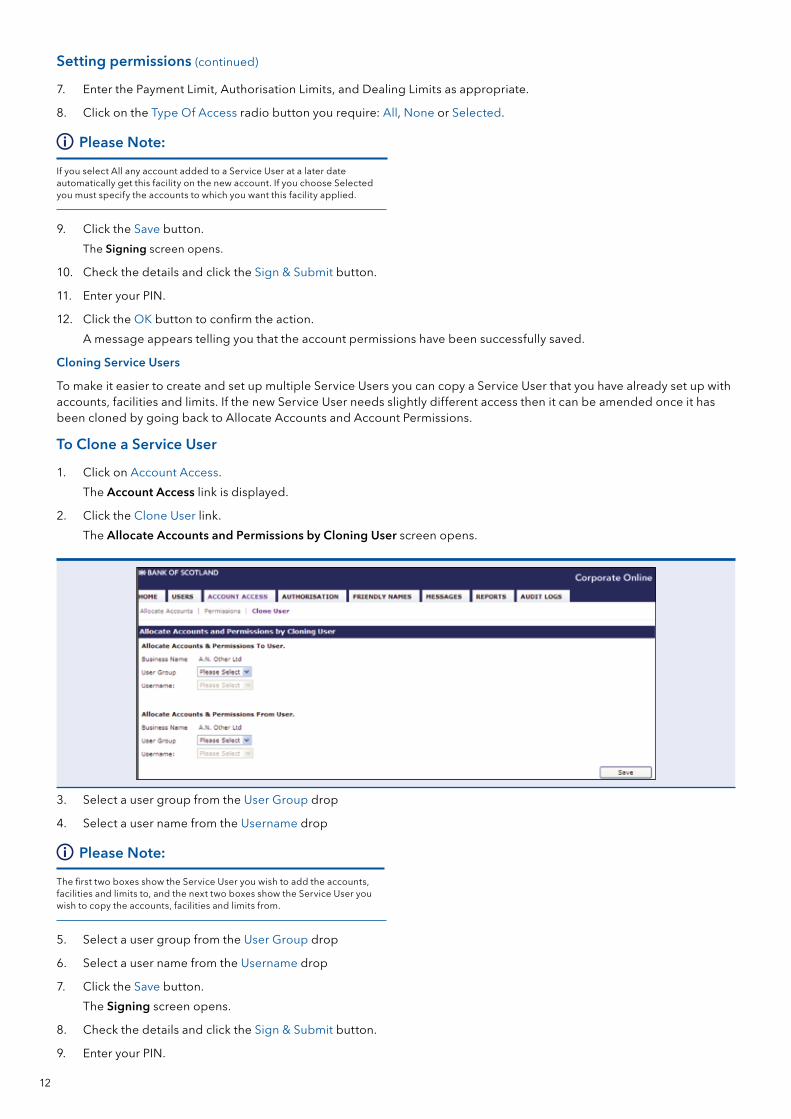
2. Click the Clone User link.
The Allocate Accounts and Permissions by Cloning User screen opens.
3. Select a user group from the User Group drop
4. Select a user name from the Username drop
Ô Please Note:
The first two boxes show the Service User you wish to add the accounts, facilities and limits to, and the next two boxes show the Service User you wish to copy the accounts, facilities and limits from.
5. Select a user group from the User Group drop
6. Select a user name from the Username drop
7. Click the Save button.
The Signing screen opens.
8. Check the details and click the Sign & Submit button.
9. Enter your PIN.
13
10. Click the OK button to confirm the action.
The accounts, facilities and limits have now been copied to the Service User.
System Authorisation Settings.
About authorisation rules
In addition to controlling what individual users can see and do (as described in account permissions), you can create a structure of authorisation limits, which are applied to specific types of payments, and can be on a tiered value basis. You can:
► Create a new rule
► Change a rule
► Delete a rule
The default setting for Corporate Online is two authorisations for all payment types; this can be amended to one authorisation if dual authorisation was not requested on the original application.
Creating a new authorisation rule
To create a new authorisation rule:
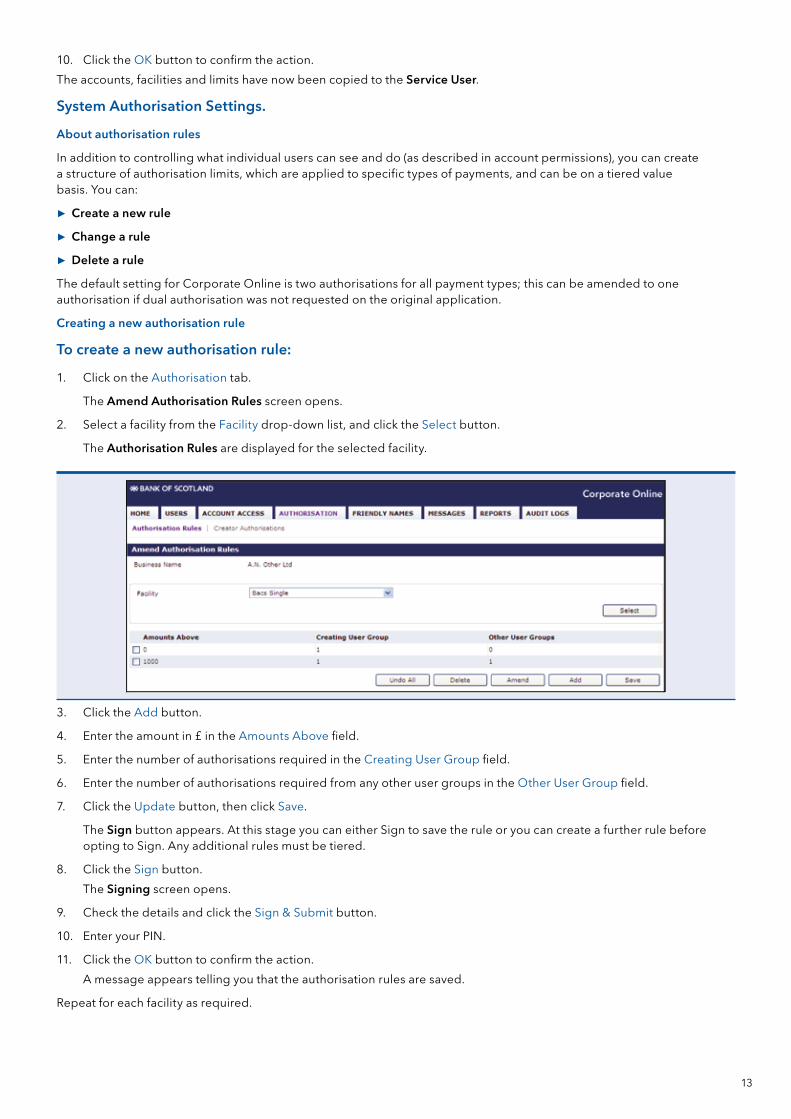
1. Click on the Authorisation tab.
The Amend Authorisation Rules screen opens.
2. Select a facility from the Facility drop-down list, and click the Select button.
The Authorisation Rules are displayed for the selected facility.
3. Click the Add button.
4. Enter the amount in £ in the Amounts Above field.
5. Enter the number of authorisations required in the Creating User Group field.
6. Enter the number of authorisations required from any other user groups in the Other User Group field.
7. Click the Update button, then click Save.
The Sign button appears. At this stage you can either Sign to save the rule or you can create a further rule before opting to Sign. Any additional rules must be tiered.
8. Click the Sign button.
The Signing screen opens.
9. Check the details and click the Sign & Submit button.
10. Enter your PIN.
11. Click the OK button to confirm the action.
A message appears telling you that the authorisation rules are saved.
Repeat for each facility as required.
14
Amending an authorisation rule
To amend an authorisation rule:
1. Click on Authorisation.
The Authorisation Rules screen opens.
2. Select a facility from the Facility drop-down list box, and click the Select button.
The Authorisation Rules are displayed for the selected facility.
3. Click the tick box next to the rule you want to amend, and click the Amend button.
4. Enter the new figure in the appropriate field.
5. Click the Update button, then click Save.
The Sign button appears.
6. Click the Sign button.
The Signing screen opens.
7. Check the details and click the Sign & Submit button.
8. Enter your PIN.
9. Click the OK button to confirm the action.
A message appears telling you that the authorisation rules are saved.
Deleting an authorisation rule
To delete an authorisation rule:
1. Click on Authorisation.
The Authorisation Rules screen opens.
2. Select a facility from the Facility drop-down list box, and click the Select button.
3. Click the tick box next to the rule you want to delete, and click the Delete button.
4. Click the OK button to confirm the action.
The Sign button appears.
5. Click the Sign button.
The Signing screen opens.
6. Check the details and click the Sign & Submit button.
7. Enter your PIN.
8. Click the OK button to confirm the action.
A message appears telling you that the authorisation rules are saved.
15
Creator authorisations.
About creator authorisations
In addition to controlling what individual users can see and do (as described in account permissions), and authorisation limits, you can choose to apply Creator Authorisations to specific types of payments, which if ticked means that a user can create and authorise their own payments (subject to permissions and authorisation limits).
To update creator authorisations
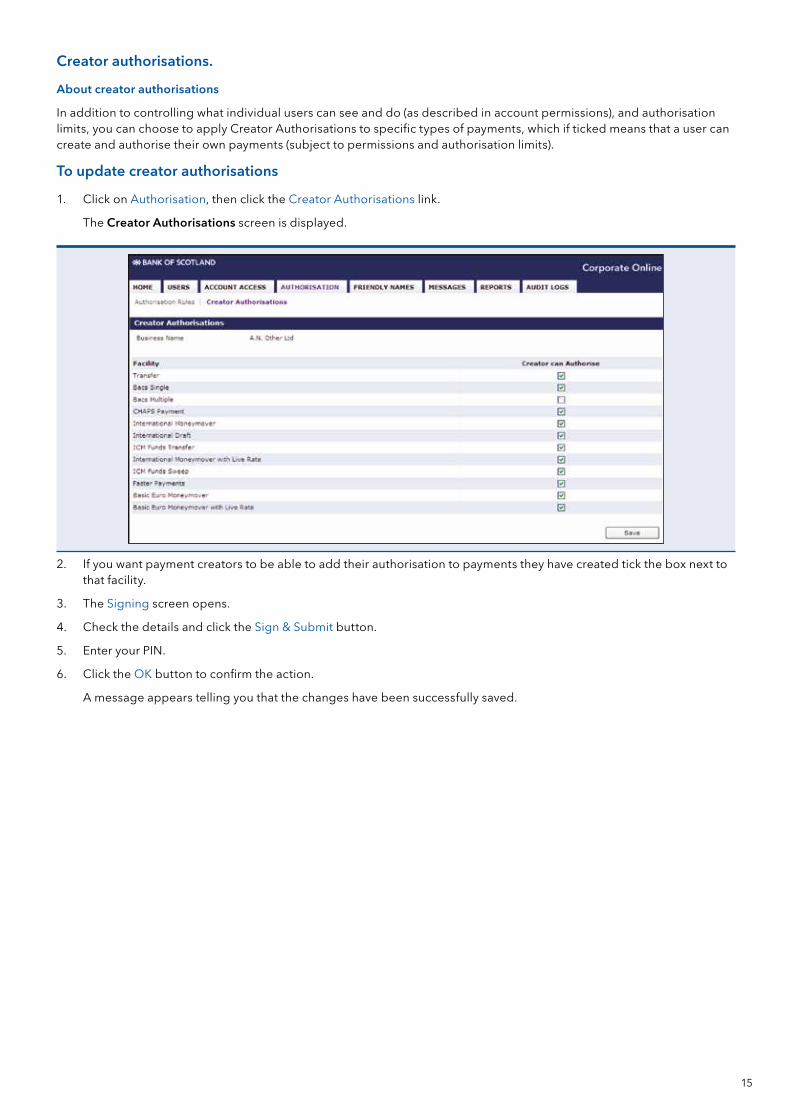
1. Click on Authorisation, then click the Creator Authorisations link.
The Creator Authorisations screen is displayed.
2. If you want payment creators to be able to add their authorisation to payments they have created tick the box next to that facility.
3. The Signing screen opens.
4. Check the details and click the Sign & Submit button.
5. Enter your PIN.
6. Click the OK button to confirm the action.
A message appears telling you that the changes have been successfully saved.
16
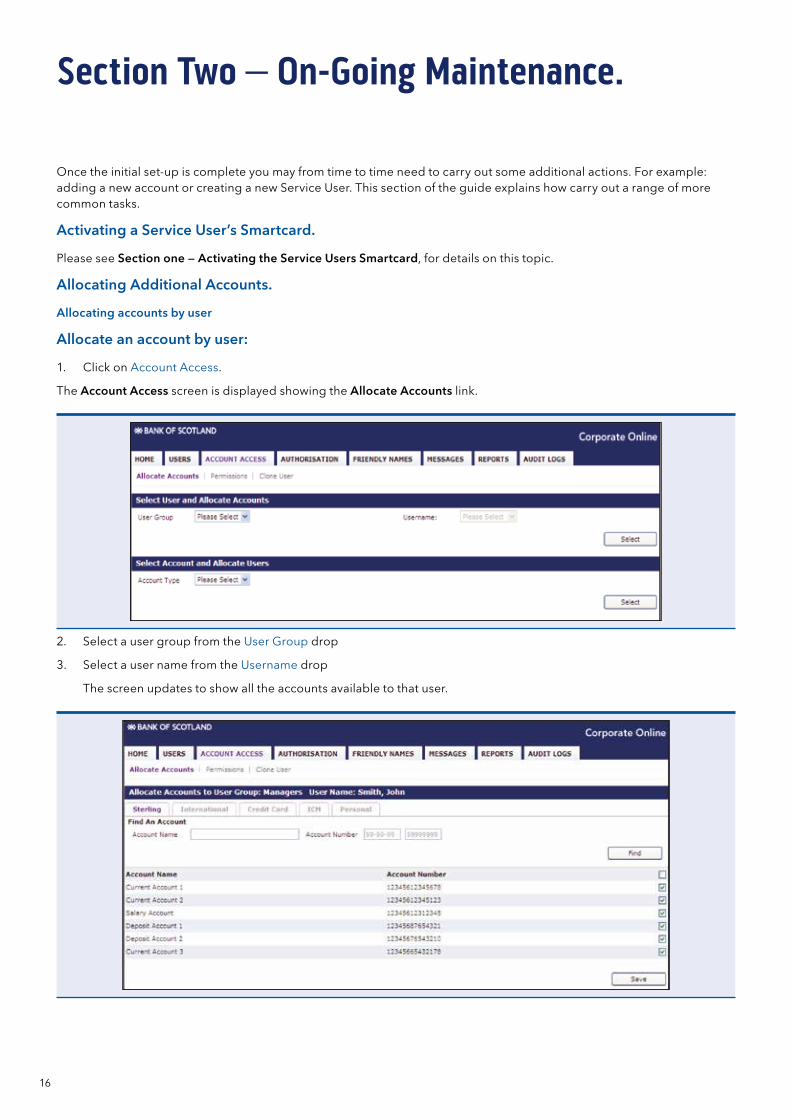
Section Two – On-Going Maintenance.
Once the initial set-up is complete you may from time to time need to carry out some additional actions. For example: adding a new account or creating a new Service User. This section of the guide explains how carry out a range of more common tasks.
Activating a Service User’s Smartcard.
Please see Section one – Activating the Service Users Smartcard, for details on this topic.
Allocating Additional Accounts.
Allocating accounts by user
Allocate an account by user:
1. Click on Account Access.
The Account Access screen is displayed showing the Allocate Accounts link.
2. Select a user group from the User Group drop
3. Select a user name from the Username drop
The screen updates to show all the accounts available to that user.
17
Allocate an account by user: (continued)
4. Click on the tabs to view the different account types.
5. Tick the boxes next to the accounts you want to allow the user to have access to.
Ô Note:
A Select All button is available to save time. Select All can be used to tick all accounts shown on this page and then if appropriate some can be de-selected. You can also tick accounts on a different link or page before selecting Save.
6. Click the Save button.
The Signing screen opens.
7. Check the details and click the Sign & Submit button.
8. Enter your PIN.
9. Click the OK button to confirm the action.
The accounts have been allocated and can now be viewed by the Service User.
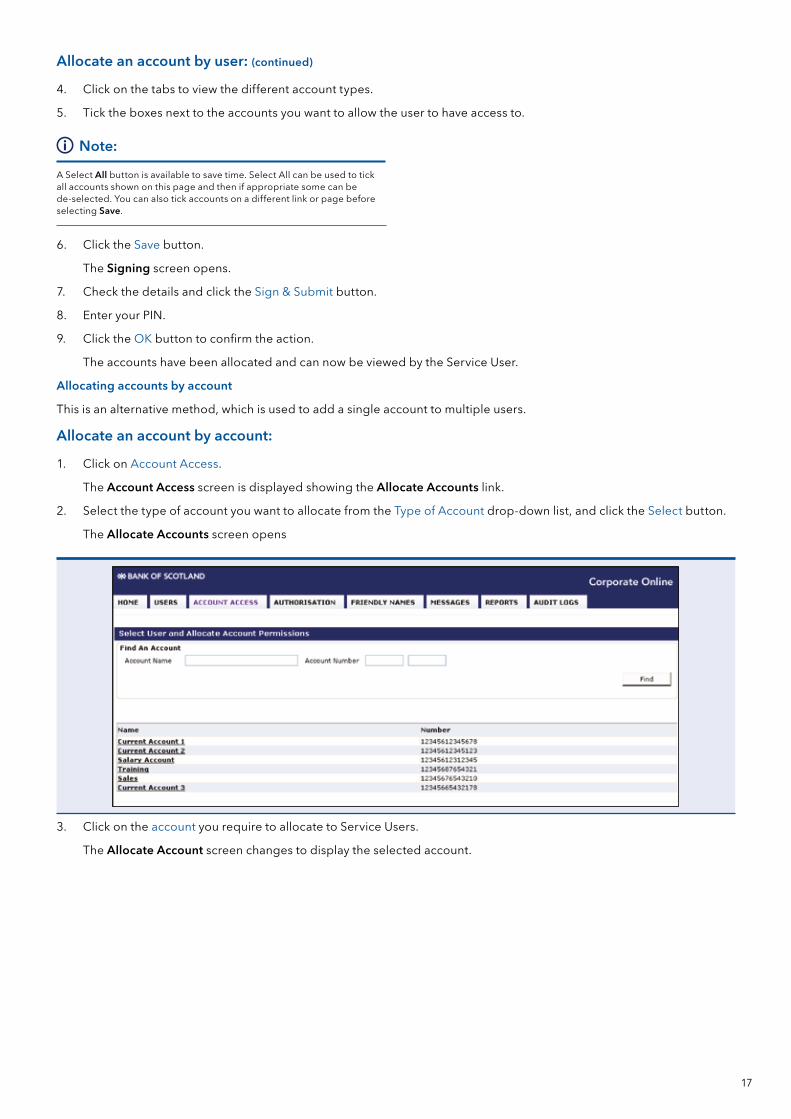
Allocating accounts by account
This is an alternative method, which is used to add a single account to multiple users.
Allocate an account by account:
1. Click on Account Access.
The Account Access screen is displayed showing the Allocate Accounts link.
2. Select the type of account you want to allocate from the Type of Account drop-down list, and click the Select button.
The Allocate Accounts screen opens
3. Click on the account you require to allocate to Service Users.
The Allocate Account screen changes to display the selected account.
18
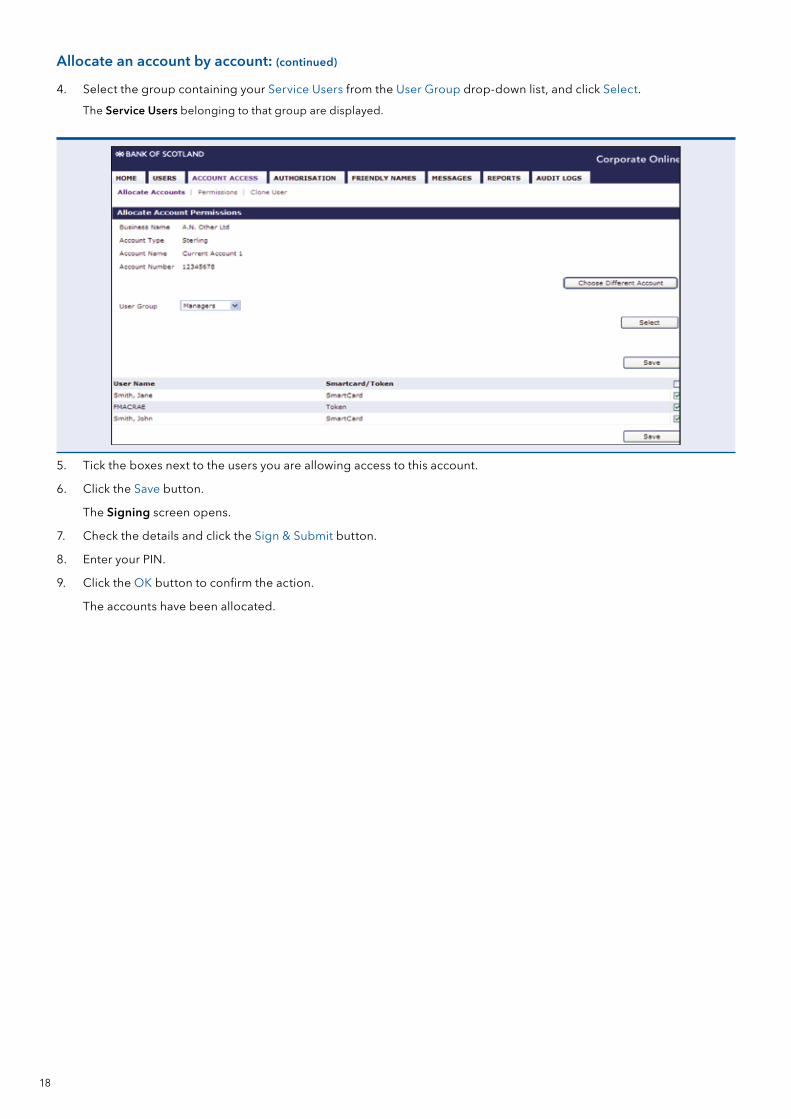
Allocate an account by account: (continued)
4. Select the group containing your Service Users from the User Group drop-down list, and click Select.
The Service Users belonging to that group are displayed.
5. Tick the boxes next to the users you are allowing access to this account.
6. Click the Save button.
The Signing screen opens.
7. Check the details and click the Sign & Submit button.
8. Enter your PIN.
9. Click the OK button to confirm the action.
The accounts have been allocated.
19
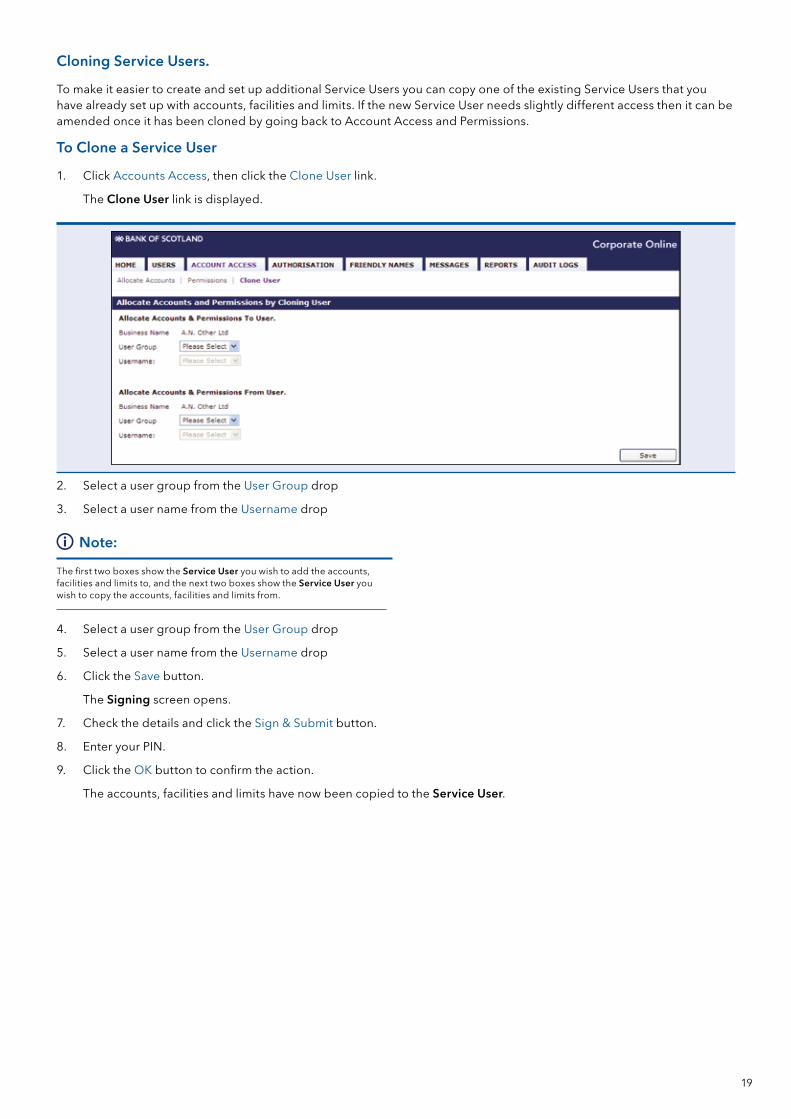
Cloning Service Users.
To make it easier to create and set up additional Service Users you can copy one of the existing Service Users that you have already set up with accounts, facilities and limits. If the new Service User needs slightly different access then it can be amended once it has been cloned by going back to Account Access and Permissions.
To Clone a Service User
1. Click Accounts Access, then click the Clone User link.
The Clone User link is displayed.
2. Select a user group from the User Group drop
3. Select a user name from the Username drop
Ô Note:
The first two boxes show the Service User you wish to add the accounts, facilities and limits to, and the next two boxes show the Service User you wish to copy the accounts, facilities and limits from.
4. Select a user group from the User Group drop
5. Select a user name from the Username drop
6. Click the Save button.
The Signing screen opens.
7. Check the details and click the Sign & Submit button.
8. Enter your PIN.
9. Click the OK button to confirm the action.
The accounts, facilities and limits have now been copied to the Service User.
20
User Group.
Adding a new group
Please see Section One – Creating User Groups, for details on this topic.
Changing a group name
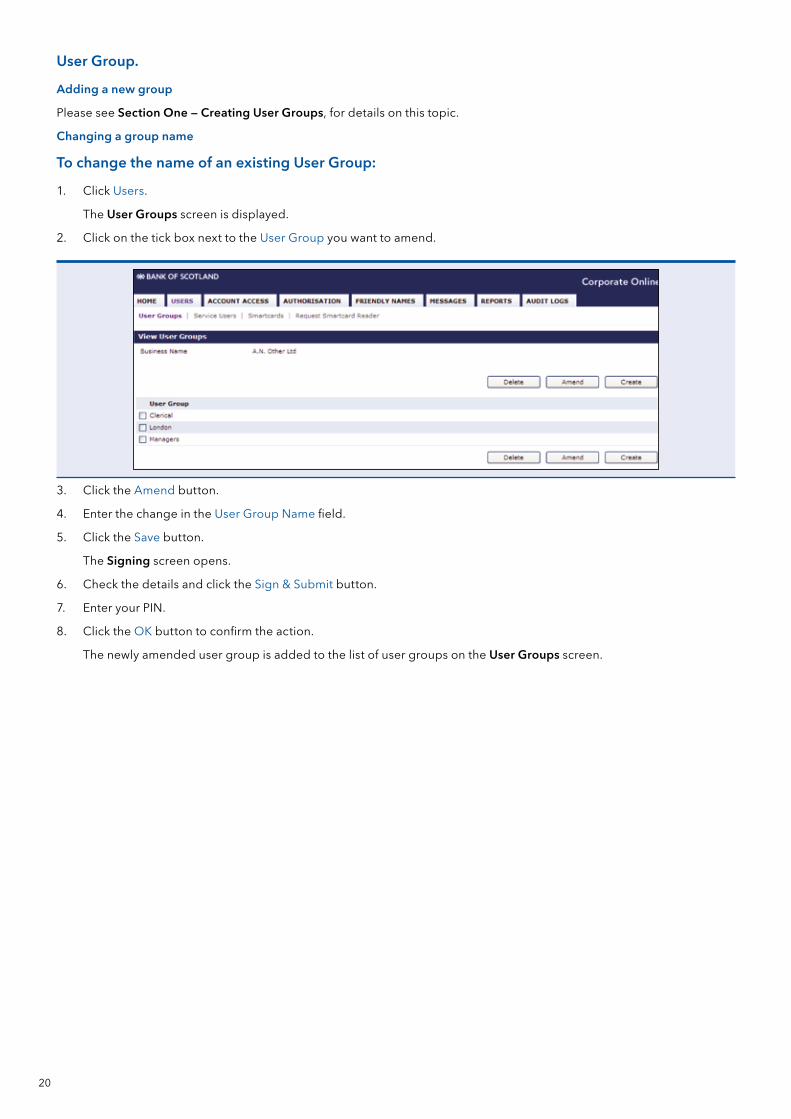
To change the name of an existing User Group:
1. Click Users.
The User Groups screen is displayed.
2. Click on the tick box next to the User Group you want to amend.
3. Click the Amend button.
4. Enter the change in the User Group Name field.
5. Click the Save button.
The Signing screen opens.
6. Check the details and click the Sign & Submit button.
7. Enter your PIN.
8. Click the OK button to confirm the action.
The newly amended user group is added to the list of user groups on the User Groups screen.
21
Moving a Service User to another group
To move a Service User to another Group:
1. Click Users, then click the Service Users link.
The Service Users screen opens.
2. Select a user group from the User Group drop-down list, then click the Select button.
3. Click on the Service User you want to move.
4. Click the Amend button.
The Amend Smartcard/Token User screen opens.
5. Select the user group you want to move the Service User to from the User Group Name drop-down list.
6. Click the Save button.
The Signing screen opens.
7. Check the details and click the Sign & Submit button.
8. Enter your PIN.
9. Click the OK button to confirm the action.
Deleting a group
A user group cannot be deleted if there are existing Users, approved or unapproved, within that group.
To delete a User Group:
1. Click Users.
The User Groups screen is displayed.
2. Click on the tick box next to the User Group you want to delete.
3. Click the Delete button.
The Signing screen opens.
4. Check the details and click the Sign & Submit button.
5. Enter your PIN.
6. Click the OK button to confirm the action.
The deleted group is removed from the list of users groups on the User Groups screen.
About Smartcard Service Users.This section of the guide explains in detail everything you need to know about Smartcards. Smartcards can be ordered and allocated to Service Users; they are used to Login to Corporate Online and to electronically sign requests and payments.
To find out how to create a new Smartcard Service User please see Section one, Smartcard Users.
Read this section to learn about Smartcard maintenance.
Ordering a replacement Smartcard
When a replacement Smartcard is ordered for a Service User, they retain all accounts, facilities, limits, templates and emails that have previously been available. On receipt of their replacement Smartcard the Service User is only required to change their PIN before being able to Login and use Corporate Online as before.
When ordering a replacement please ensure that the email address is correct as this will be used for future contact. For example: Smartcard expiry notification. If you are ordering a replacement Smartcard because the original has been lost or stolen you should also contact the Helpdesk on 0345 300 6444.
Replacements can only be ordered on Smartcards that have previously been registered by the Service User. Replacement Smartcards are chargeable and will be charged at the current rate as published on the Bank website.
To order a replacement Smartcard:
1. Click Users, then click the Service Users link.
The Service Users screen opens.
2. Within the Users in Group section select the group containing your Service Users and click on Select.
3. Click on the tick box next to the User you want a replacement Smartcard for and select Amend.
4. Click in the tick box beside Order Replacement Card.
5. Complete fields accordingly, whilst we recommend the PIN and Smartcard are sent to separate addresses, if the PIN is to be sent to the Business address please enter the Business name in the 1st line of the address.
6. Click the Save button.
The Signing screen opens.
7. Check the details and click the Sign & Submit button.
8. Enter your PIN.
9. Click the OK button to confirm the action.
The replacement Smartcard has been ordered and will be produced and sent out, to be with the user in approximately five days.
22
Amending a Smartcard User’s details
To amend a Smartcard User’s Details:
1. Click Users, then click the Service Users link.
The Service Users screen opens.
2. Select a user group from the User Group drop-down list, then click the Select button.
3. Click on the tick box next to the user whose Smartcard details you want to amend.
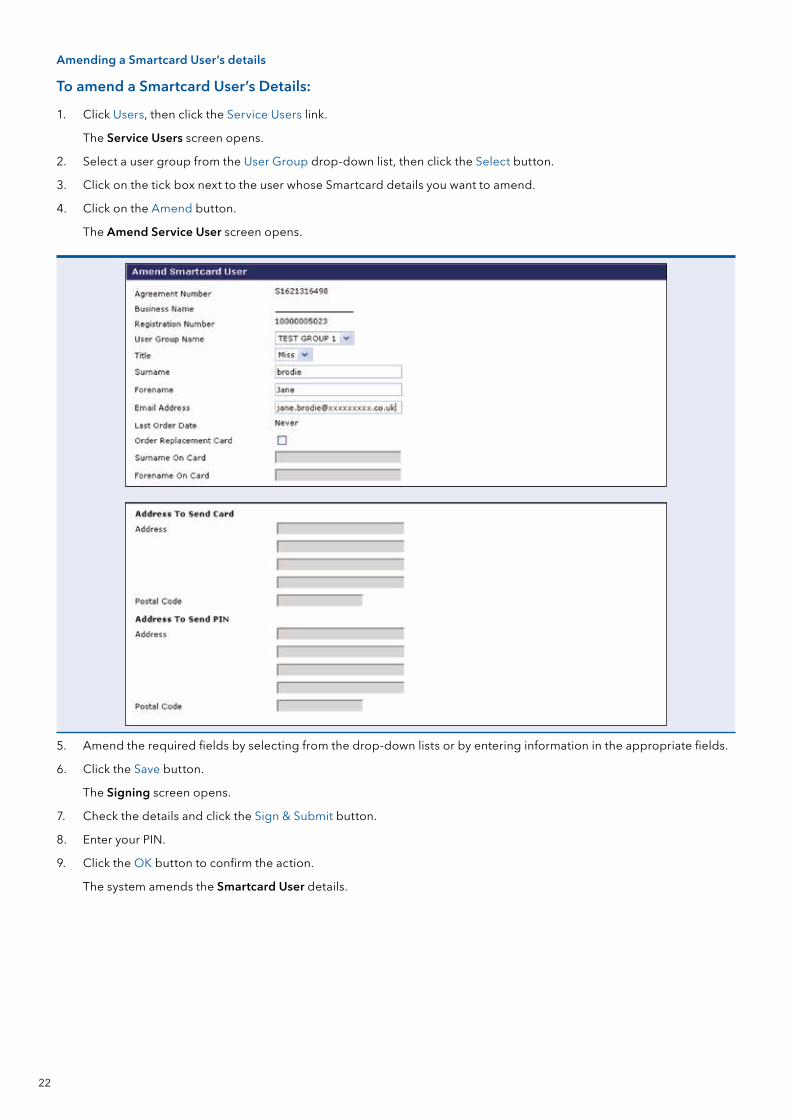
4. Click on the Amend button.
The Amend Service User screen opens.
5. Amend the required fields by selecting from the drop-down lists or by entering information in the appropriate fields.
6. Click the Save button.
The Signing screen opens.
7. Check the details and click the Sign & Submit button.
8. Enter your PIN.
9. Click the OK button to confirm the action.
The system amends the Smartcard User details.
23
Deleting a Smartcard User
Please ensure that any unauthorised payments created by the Smartcard User are deleted, before proceeding.
To delete Smartcard:
1. Click Users, then click the Service Users link.
The Service Users screen is displayed.
2. Select a user group from the User Group drop-down list, then click the Select button.
3. Click on the tick box next to the user whose Smartcard details you want to amend.
4. Click the Delete button.
The Delete Smartcard User screen opens.
5. Click the Delete button.
The Signing screen opens.
6. Check the details and click the Sign & Submit button.
7. Enter your PIN.
8. Click the OK button to confirm the action.
The Service Users screen opens with a message telling you that you have successfully deleted the user.
Ô Note:
If you are deleting a Smartcard please contact the Helpdesk on 0345 300 6444† to cancel the certificate.
Viewing Smartcard details
You can view the following details about Smartcards:
► Registered – shows a list of Registered Service Users that have not yet been activated. These cards cannot be used until activated by the System Administrator.
► Non-registered – shows a list of all new Smartcard Users who have not yet registered.
► Re-issue – shows a list of expired Smartcards that will be re-issued.
To view Smartcard details:
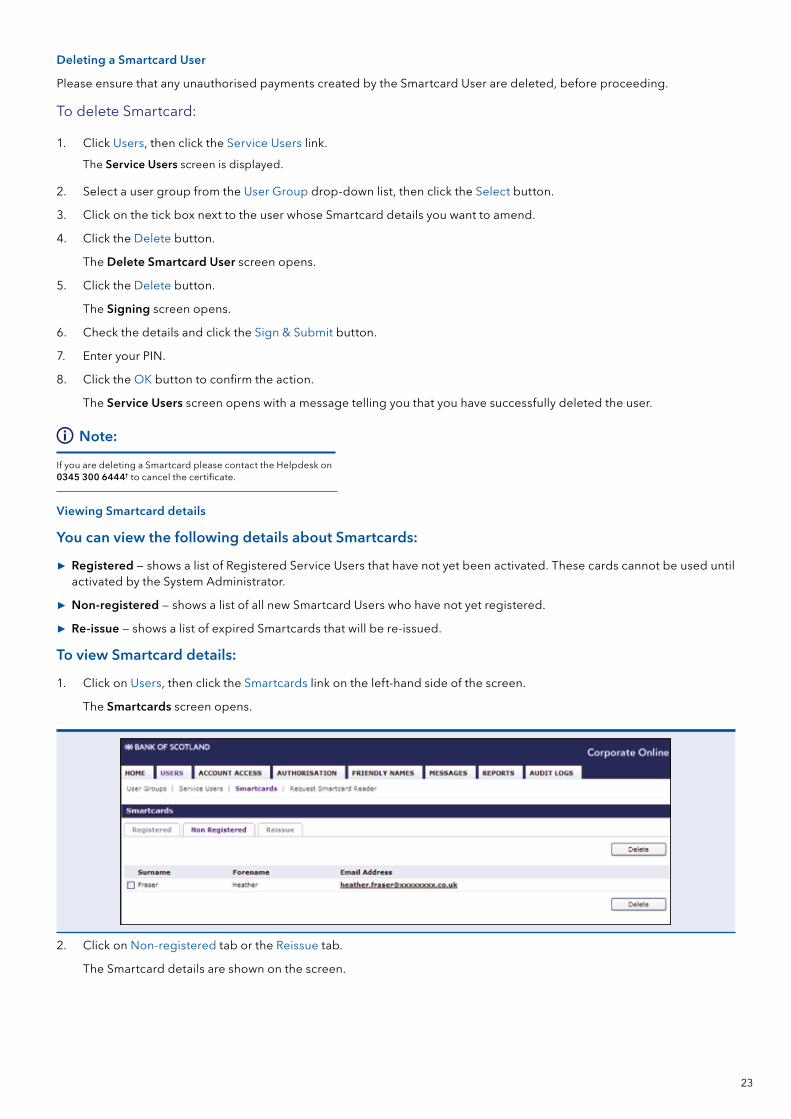
1. Click on Users, then click the Smartcards link on the left-hand side of the screen.
The Smartcards screen opens.
2. Click on Non-registered tab or the Reissue tab.
The Smartcard details are shown on the screen.
24
Requesting a Smartcard reader
Please note that the cost of the Smartcard Reader is debited from your account at the current rate as published on the Bank of Scotland website.
To request a Smartcard Reader:
1. Click on Users, then click the Request Smartcard Reader link.
The Request Smartcard Reader screen is displayed.
2. Enter how many readers of each type you require in the Readers required field.
3. Enter how many installation CDs required in the Media required fields.
4. Enter the name and address of where the reader is to be sent.
5. Click the Request button.
The Signing screen opens.
6. Check the details and click the Sign & Submit button.
7. Enter your PIN.
8. Click the OK button to confirm the action.
Amending System Settings.
Authorisation rules
As part of the on-going maintenance you may from time to time need to change user permissions and set limits. To find out more about authorisation rules please see Section one – System authorisation settings.
Amending permissions
If you have given your Service Users access to specific facilities using the Selected Type of Access rather than All, then any newly allocated accounts that require the View, Create or Authorise facilities will need to be enabled in Account Permission. If you have used All as the Type of Access for any facilities within Account Permissions then any newly Allocated accounts will automatically be given those facilities.
To amend permissions:
1. Click on Account Access, then click the Permissions link.
The Account Permissions screen opens.
2. Select a user group from the User Group drop-down list.
3. Select a user name from the Username drop-down list, then click the Select button.
4. Click on the appropriate tab that you want to amend permissions for.
5. Click on the Type Of Access radio button you require: All, None or Selected. If you use Selected you will also need to tick the relevant accounts.
6. Click the Save button.
The Signing screen opens.
7. Check the details and click the Sign & Submit button.
8. Enter your PIN.
9. Click the OK button to confirm the action.
A message appears telling you that the account permissions have been successfully saved.
25
Supplementary Section.
Account Friendly Names.
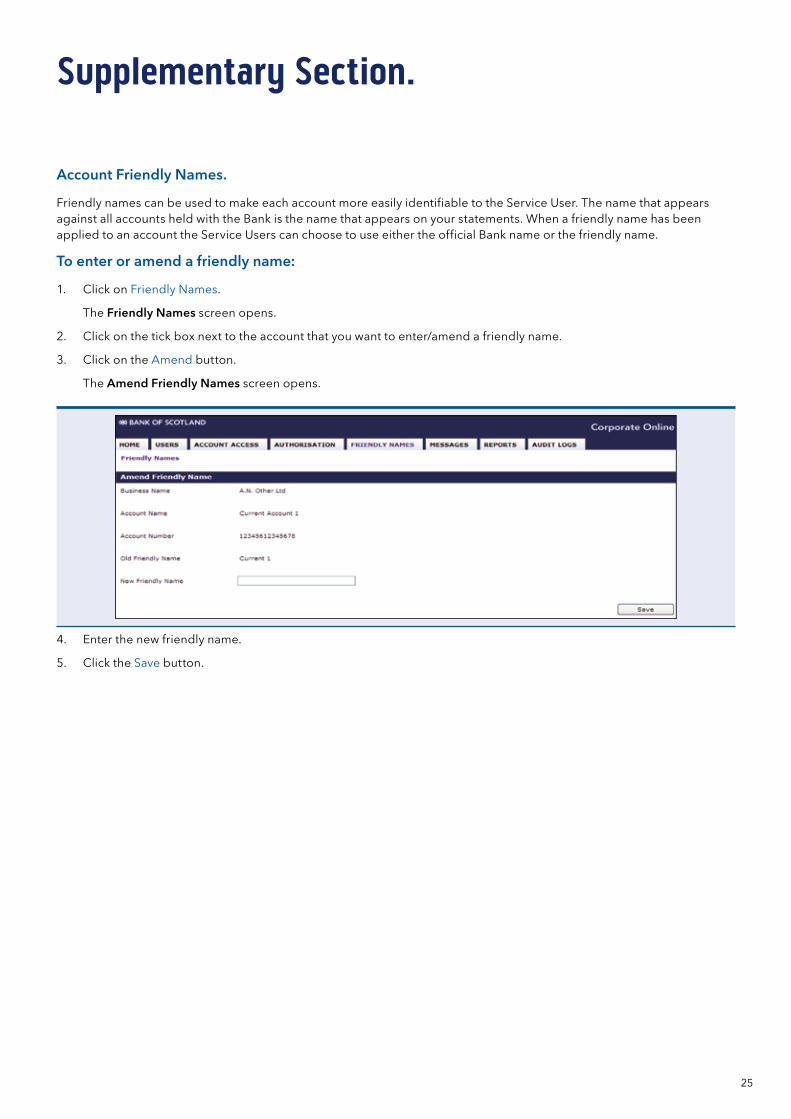
Friendly names can be used to make each account more easily identifiable to the Service User. The name that appears against all accounts held with the Bank is the name that appears on your statements. When a friendly name has been applied to an account the Service Users can choose to use either the official Bank name or the friendly name.
To enter or amend a friendly name:
1. Click on Friendly Names.
The Friendly Names screen opens.
2. Click on the tick box next to the account that you want to enter/amend a friendly name.
3. Click on the Amend button.
The Amend Friendly Names screen opens.
4. Enter the new friendly name.
5. Click the Save button.
26
About Reports.
Reports can be produced showing the agreed limits and profile summaries for all users. There are two types of report you can view:
► Cumulative limit report – this report is no longer available.
► User profile reports – these are individual reports that can be produced on: All Users, Select User Group or Select User. The reports available are:
► Login summary – details about the last time a user logged into Corporate Online.
► Facilities – limits – details the limits available to a user.
► Facilities – accounts – details the facilities available to a user on an account by account basis.
► Shared Account Group – this report displays a list of accounts that have been added to a Shared Account Group by Service Users.
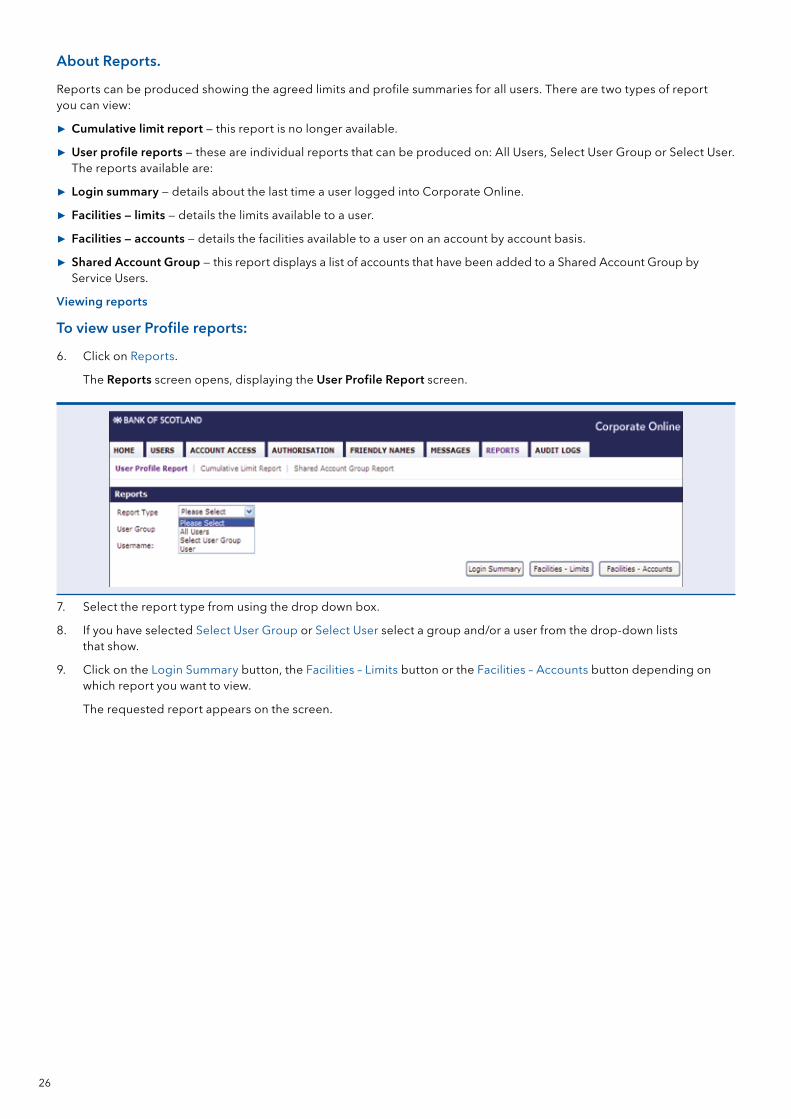
Viewing reports
To view user Profile reports:
6. Click on Reports.
The Reports screen opens, displaying the User Profile Report screen.
7. Select the report type from using the drop down box.
8. If you have selected Select User Group or Select User select a group and/or a user from the drop-down lists that show.
9. Click on the Login Summary button, the Facilities – Limits button or the Facilities – Accounts button depending on which report you want to view.
The requested report appears on the screen.

27
Messages.
Messages gives access to the Noticeboard – where system messages can be viewed, and the Inbox – where personal messages can be accessed.
Your Inbox displays personal messages sent in a secure manner between you and the Bank.
Reading and replying to personal messages
When you receive a new personal message you will see a sealed envelope in your Inbox. Messages that have already been viewed will be displayed with an open envelope.
To open a personal message:
1. Click on Messages, then click the Inbox link.
The Messages Inbox screen opens.
2. Click the tick box next to the message you want to open, then click the Read button.
The message opens.
3. To return to the Inbox click Messages.
Or
4. To reply to the message click the Reply button and enter your message in the Message field.
5. Click the Send button.
The Signing screen opens.
6. Check the details and click the Sign & Submit button.
7. Enter your PIN.
8. Click the OK button to confirm the action.
28
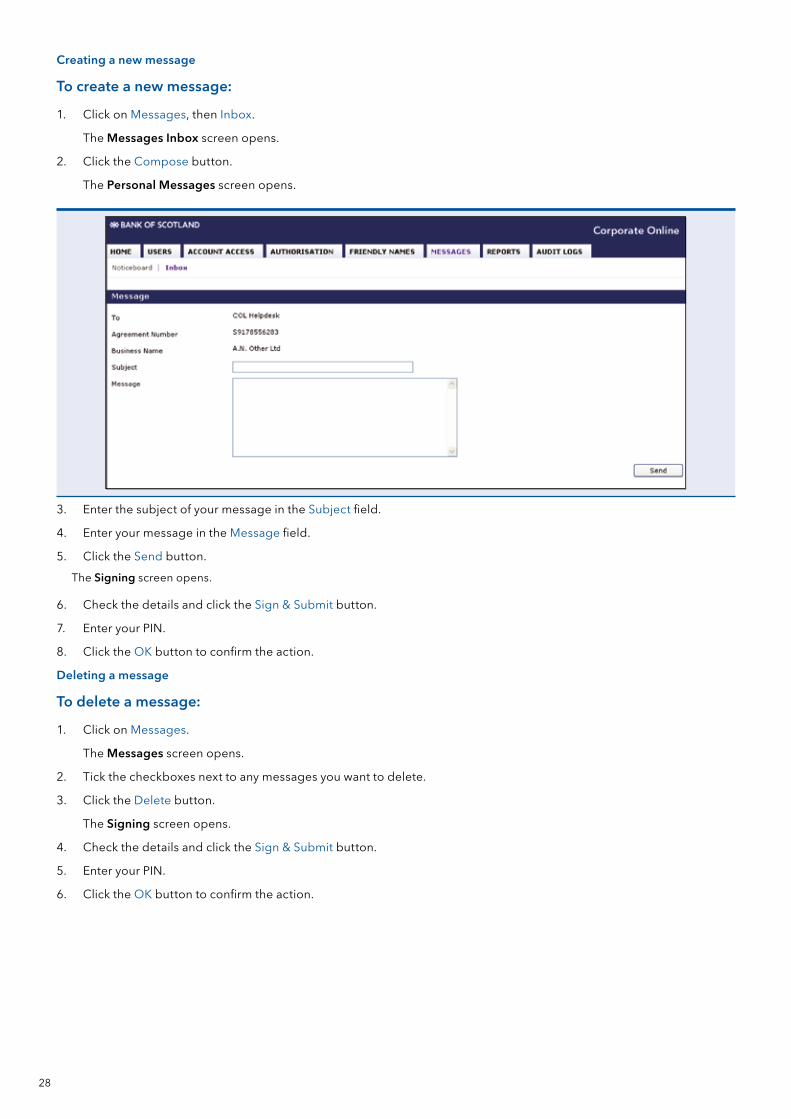
Creating a new message
To create a new message:
1. Click on Messages, then Inbox.
The Messages Inbox screen opens.
2. Click the Compose button.
The Personal Messages screen opens.
3. Enter the subject of your message in the Subject field.
4. Enter your message in the Message field.
5. Click the Send button.
The Signing screen opens.
6. Check the details and click the Sign & Submit button.
7. Enter your PIN.
8. Click the OK button to confirm the action.
Deleting a message
To delete a message:
1. Click on Messages.
The Messages screen opens.
2. Tick the checkboxes next to any messages you want to delete.
3. Click the Delete button.
The Signing screen opens.
4. Check the details and click the Sign & Submit button.
5. Enter your PIN.
6. Click the OK button to confirm the action.
29
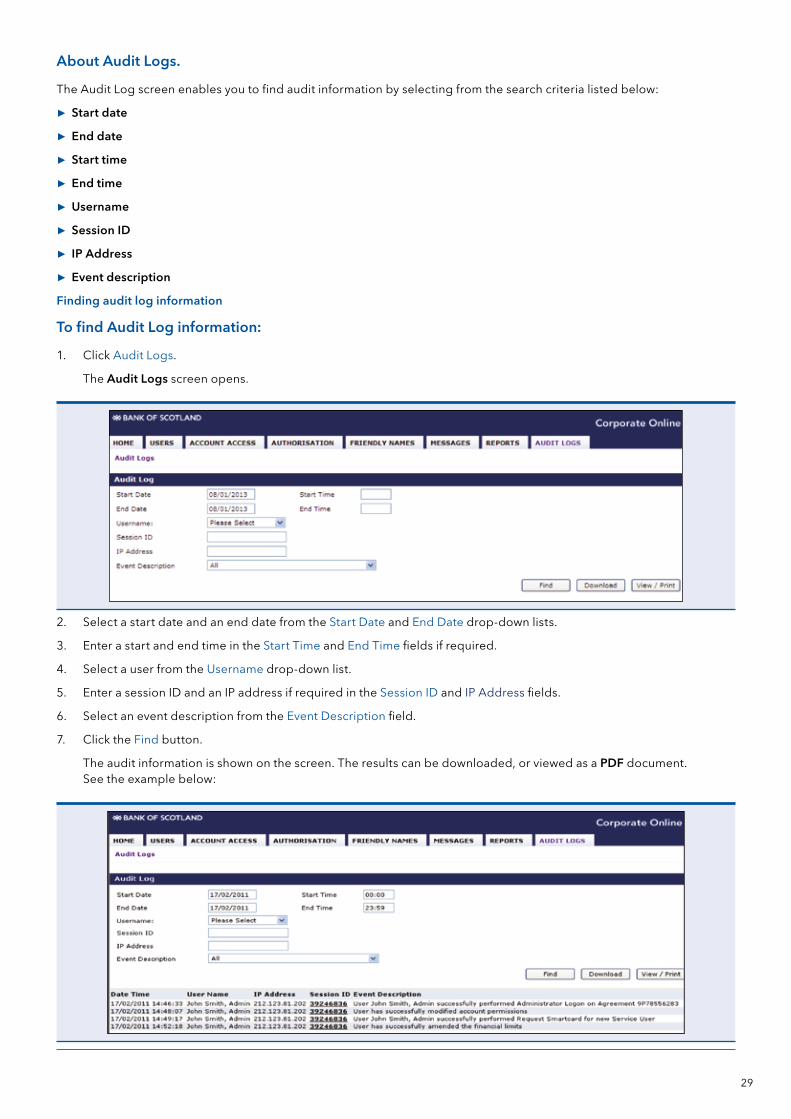
About Audit Logs.
The Audit Log screen enables you to find audit information by selecting from the search criteria listed below:
► Start date
► End date
► Start time
► End time
► Username
► Session ID
► IP Address
► Event description
Finding audit log information
To find Audit Log information:
1. Click Audit Logs.
The Audit Logs screen opens.
2. Select a start date and an end date from the Start Date and End Date drop-down lists.
3. Enter a start and end time in the Start Time and End Time fields if required.
4. Select a user from the Username drop-down list.
5. Enter a session ID and an IP address if required in the Session ID and IP Address fields.
6. Select an event description from the Event Description field.
7. Click the Find button.
The audit information is shown on the screen. The results can be downloaded, or viewed as a PDF document. See the example below:
30
Tokens.
Service Users who have Tokens have limited access to facilities. They can view account information and prepare payments and transfers, however, they cannot authorise payments or transfers.
Tokens have a limited lifespan of up to five years. They may be identified by the FOB ID and the expiry date of the token both shown on the reverse side of the Token.
Setting up Token users
A System Administrator may request Tokens in addition to those ordered on the original application form by sending a message to the Bank via the Inbox, see Supplementary section – Messages, for details on how to create and send a message. Once the Tokens have been received System Administrators can set up Service Users. Please note Tokens are no longer available to new customers, however, existing customers who use Tokens are still able to order/new replacement tokens as required.
To set up Token Users:
1. Click on Users, then click the Service Users link.
The Service Users screen opens.
2. Select a user group from the User Group field, and click the Select button.
3. Click the Token Users tab.
4. Click the Create button.
5. Enter details into the relevant fields and select a Token serial number from the unallocated Token Serial Number drop-down list.
6. Click the Create button.
The Signing screen opens.
7. Check the details and click the Sign & Submit button.
8. Enter your PIN.
9. Click the OK button to confirm the action.
Allocating accounts and access to payments and transfers is performed in the same way as it is for Smartcards, see Section one – Individual user settings, for further details on these functions.
31
Frequently Asked Questions.
Question Answer
Why can’t I see any account information or set up payments with my System Administrators’ Smartcard?
Corporate Online is a two-tier system with System Administrators and Service Users. As the System Administrator you are responsible for ordering and maintaining the Smartcards that will enable Service Users to view account information and make payments. Once the initial set-up is complete you will only need to login from time to time using your System Administrators’ Smartcard to make amendments to the individual Service Users. The Service Users, however, are likely to use their Smartcards daily. If you have not already ordered your Service Users Smartcards please refer to the Initial Set-up section for full instructions on creating User Groups and Service Users.
Now I am set up as an Administrator, how long will it be before my business can start to use this service fully, accessing bank account information and making payments?
Although you have your System Administrator Smartcard, it cannot be used to view account information or process payments. Accessing account information and payment processing is a function of the Service User Smartcards. If you have already ordered and received Service User Smartcards on your application these can be set up and used immediately. If you have not ordered any initial Service User Smartcards these should be ordered and you will receive them within five days.
You can find full instructions in the Initial Set-up section.
I have received my System Administrators’ Smartcard and card reader. What do I do with them?
You must: install the card reader software, change the supplied PIN to one of your own choice and register your Smartcard on Corporate Online. When your own card has been activated you must order the Smartcards for your Service Users. Full instructions can be found in the Initial Set-up section.
What happens if my new PIN is entered incorrectly? You have five attempts to enter the correct PIN before the Smartcard is locked. This type of Smartcard does not allow PINs to be unlocked. If your System Administrators’ Smartcard becomes locked a replacement card must be ordered by completing an Amendment Form, you can download this form from here: www.corporateonline.co.uk/bos/forms
Forward the completed form to your Relationship Team.
Do I need to complete an Amendment form if a Service User has locked their PIN?
No, you can order a replacement Service User card within Service Users. Follow these steps:
1. Click Users, Service Users, select the User Group and highlight the Service User.
2. Select Amend.
3. Tick the Order Replacement Card option.
Please ensure the email address displayed is still correct. When this card is received the Service User must change the PIN to one of their own choice after which they can log in to Corporate Online. Full instructions can be found under Ordering a replacement Smartcard on page 23.
32
Question Answer
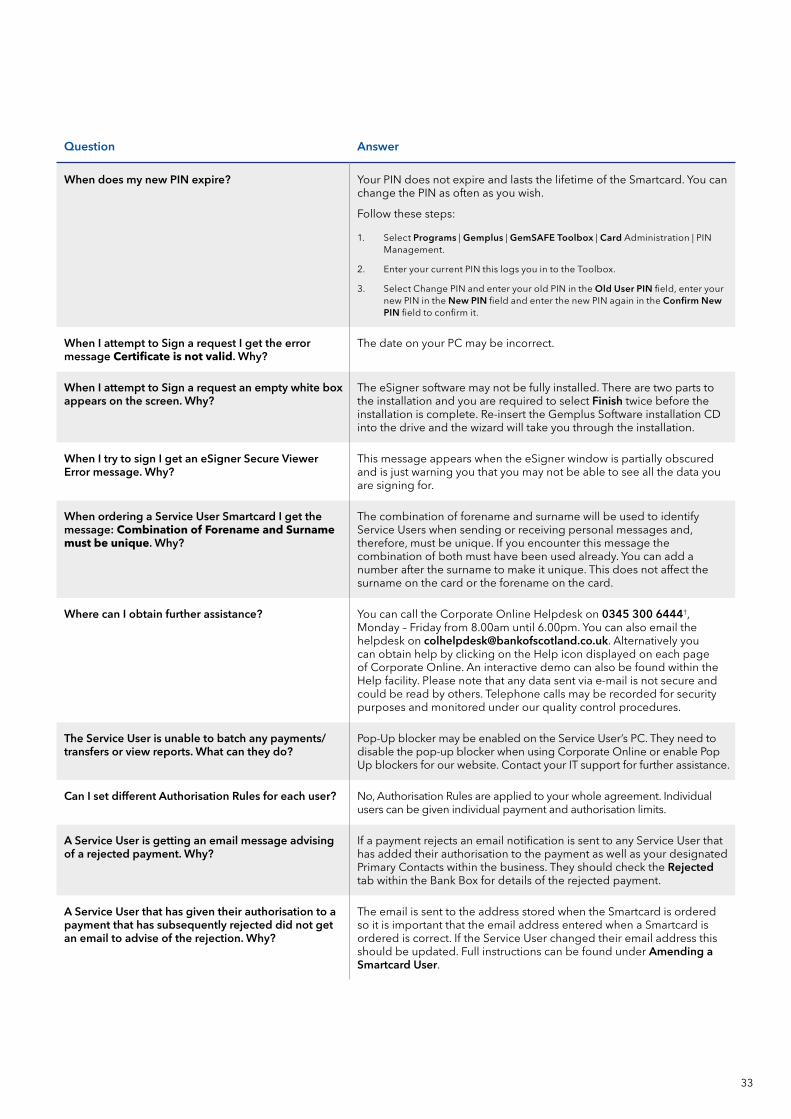
When does my new PIN expire? Your PIN does not expire and lasts the lifetime of the Smartcard. You can change the PIN as often as you wish.
Follow these steps:
1. Select Programs | Gemplus | GemSAFE Toolbox | Card Administration | PIN Management.
2. Enter your current PIN this logs you in to the Toolbox.
3. Select Change PIN and enter your old PIN in the Old User PIN field, enter your new PIN in the New PIN field and enter the new PIN again in the Confirm New PIN field to confirm it.
When I attempt to Sign a request I get the error message Certificate is not valid. Why?
The date on your PC may be incorrect.
When I attempt to Sign a request an empty white box appears on the screen. Why?
The eSigner software may not be fully installed. There are two parts to the installation and you are required to select Finish twice before the installation is complete. Re-insert the Gemplus Software installation CD into the drive and the wizard will take you through the installation.
When I try to sign I get an eSigner Secure Viewer Error message. Why?
This message appears when the eSigner window is partially obscured and is just warning you that you may not be able to see all the data you are signing for.
When ordering a Service User Smartcard I get the message: Combination of Forename and Surname must be unique. Why?
The combination of forename and surname will be used to identify Service Users when sending or receiving personal messages and, therefore, must be unique. If you encounter this message the combination of both must have been used already. You can add a number after the surname to make it unique. This does not affect the surname on the card or the forename on the card.
Where can I obtain further assistance? You can call the Corporate Online Helpdesk on 0345 300 6444†, Monday – Friday from 8.00am until 6.00pm. You can also email the helpdesk on [email protected]. Alternatively you can obtain help by clicking on the Help icon displayed on each page of Corporate Online. An interactive demo can also be found within the Help facility. Please note that any data sent via e-mail is not secure and could be read by others. Telephone calls may be recorded for security purposes and monitored under our quality control procedures.
The Service User is unable to batch any payments/transfers or view reports. What can they do?
Pop-Up blocker may be enabled on the Service User’s PC. They need to disable the pop-up blocker when using Corporate Online or enable Pop Up blockers for our website. Contact your IT support for further assistance.
Can I set different Authorisation Rules for each user? No, Authorisation Rules are applied to your whole agreement. Individual users can be given individual payment and authorisation limits.
A Service User is getting an email message advising of a rejected payment. Why?
If a payment rejects an email notification is sent to any Service User that has added their authorisation to the payment as well as your designated Primary Contacts within the business. They should check the Rejected tab within the Bank Box for details of the rejected payment.
A Service User that has given their authorisation to a payment that has subsequently rejected did not get an email to advise of the rejection. Why?
The email is sent to the address stored when the Smartcard is ordered so it is important that the email address entered when a Smartcard is ordered is correct. If the Service User changed their email address this should be updated. Full instructions can be found under Amending a Smartcard User.
A Service User is unable to see an account in Account Servicing. Why?
The System Administrator needs to give the Service User access to specific accounts in Account Access Allocate Accounts. Full account allocation instructions can be found.
33
Question Answer
When does my new PIN expire? Your PIN does not expire and lasts the lifetime of the Smartcard. You can change the PIN as often as you wish.
Follow these steps:
1. Select Programs | Gemplus | GemSAFE Toolbox | Card Administration | PIN Management.
2. Enter your current PIN this logs you in to the Toolbox.
3. Select Change PIN and enter your old PIN in the Old User PIN field, enter your new PIN in the New PIN field and enter the new PIN again in the Confirm New PIN field to confirm it.
When I attempt to Sign a request I get the error message Certificate is not valid. Why?
The date on your PC may be incorrect.
When I attempt to Sign a request an empty white box appears on the screen. Why?
The eSigner software may not be fully installed. There are two parts to the installation and you are required to select Finish twice before the installation is complete. Re-insert the Gemplus Software installation CD into the drive and the wizard will take you through the installation.
When I try to sign I get an eSigner Secure Viewer Error message. Why?
This message appears when the eSigner window is partially obscured and is just warning you that you may not be able to see all the data you are signing for.
When ordering a Service User Smartcard I get the message: Combination of Forename and Surname must be unique. Why?
The combination of forename and surname will be used to identify Service Users when sending or receiving personal messages and, therefore, must be unique. If you encounter this message the combination of both must have been used already. You can add a number after the surname to make it unique. This does not affect the surname on the card or the forename on the card.
Where can I obtain further assistance? You can call the Corporate Online Helpdesk on 0345 300 6444†, Monday – Friday from 8.00am until 6.00pm. You can also email the helpdesk on [email protected]. Alternatively you can obtain help by clicking on the Help icon displayed on each page of Corporate Online. An interactive demo can also be found within the Help facility. Please note that any data sent via e-mail is not secure and could be read by others. Telephone calls may be recorded for security purposes and monitored under our quality control procedures.
The Service User is unable to batch any payments/transfers or view reports. What can they do?
Pop-Up blocker may be enabled on the Service User’s PC. They need to disable the pop-up blocker when using Corporate Online or enable Pop Up blockers for our website. Contact your IT support for further assistance.
Can I set different Authorisation Rules for each user? No, Authorisation Rules are applied to your whole agreement. Individual users can be given individual payment and authorisation limits.
A Service User is getting an email message advising of a rejected payment. Why?
If a payment rejects an email notification is sent to any Service User that has added their authorisation to the payment as well as your designated Primary Contacts within the business. They should check the Rejected tab within the Bank Box for details of the rejected payment.
A Service User that has given their authorisation to a payment that has subsequently rejected did not get an email to advise of the rejection. Why?
The email is sent to the address stored when the Smartcard is ordered so it is important that the email address entered when a Smartcard is ordered is correct. If the Service User changed their email address this should be updated. Full instructions can be found under Amending a Smartcard User.

34
Set-up Example One
ABC Limited has a straightforward requirement from Corporate Online and they have decided they only want one authorisation on Inter Account Transfers but will require two authorisations on all other payment types. They are happy for all Service Users to add an authorisation to payments or transfers they have created.
1. The System Administrator sets up one User Group called Finance and creates all their Service Users in that group.
2. The System Administrator sets individual payment and authorisation limits for the first Service User. The System Administrator then uses the Cloning Service User facility to give all other Service Users access to the same accounts, facilities and limits. The Service Users now have the ability to create and authorise payments.
3. The System Administrator ticks all payment types in Creator Authorisations to allow Service Users to authorise any payments/transfers they have created.
4. Finally, the System Administrator selects Authorisation Rules. The System Administrator can control how many authorisations are required for each payment and also whether the authorisations continue to come from the same group as the creator of the payment or whether it must be someone from another group that provides the payment authorisation. The default setting for all payments and transfers is two authorisations but as indicated they can be amended. In this instance the System Administrator amends the number of authorisations required for any transfers over £0 from two to one. The authoriser will belong to the same group as the creator of the payment.
35
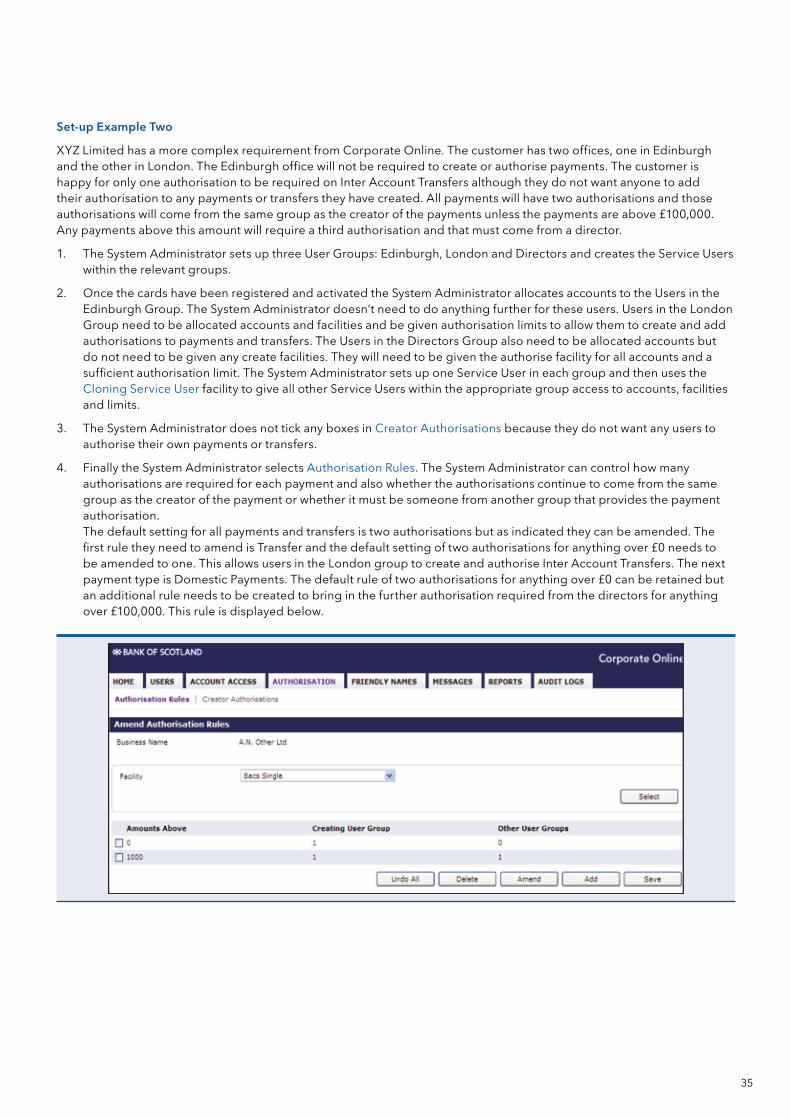
Set-up Example Two
XYZ Limited has a more complex requirement from Corporate Online. The customer has two offices, one in Edinburgh and the other in London. The Edinburgh office will not be required to create or authorise payments. The customer is happy for only one authorisation to be required on Inter Account Transfers although they do not want anyone to add their authorisation to any payments or transfers they have created. All payments will have two authorisations and those authorisations will come from the same group as the creator of the payments unless the payments are above £100,000. Any payments above this amount will require a third authorisation and that must come from a director.
1. The System Administrator sets up three User Groups: Edinburgh, London and Directors and creates the Service Users within the relevant groups.
2. Once the cards have been registered and activated the System Administrator allocates accounts to the Users in the Edinburgh Group. The System Administrator doesn’t need to do anything further for these users. Users in the London Group need to be allocated accounts and facilities and be given authorisation limits to allow them to create and add authorisations to payments and transfers. The Users in the Directors Group also need to be allocated accounts but do not need to be given any create facilities. They will need to be given the authorise facility for all accounts and a sufficient authorisation limit. The System Administrator sets up one Service User in each group and then uses the Cloning Service User facility to give all other Service Users within the appropriate group access to accounts, facilities and limits.
3. The System Administrator does not tick any boxes in Creator Authorisations because they do not want any users to authorise their own payments or transfers.
4. Finally the System Administrator selects Authorisation Rules. The System Administrator can control how many authorisations are required for each payment and also whether the authorisations continue to come from the same group as the creator of the payment or whether it must be someone from another group that provides the payment authorisation. The default setting for all payments and transfers is two authorisations but as indicated they can be amended. The first rule they need to amend is Transfer and the default setting of two authorisations for anything over £0 needs to be amended to one. This allows users in the London group to create and authorise Inter Account Transfers. The next payment type is Domestic Payments. The default rule of two authorisations for anything over £0 can be retained but an additional rule needs to be created to bring in the further authorisation required from the directors for anything over £100,000. This rule is displayed below.

Please contact us if you’d like this information in an alternative format such as Braille, large print or audio.
If you have a hearing or speech impairment you can use the Next Generation Text (NGT) Service (previously Text Relay/Typetalk) or if you would prefer to use a Textphone, please feel free to call us on 0345 300 2755 (lines open 7am-8pm, Monday to Friday and 9am-2pm Saturday)
Calls may be monitored or recorded in case we need to check we have carried out your instructions correctly and to help improve our quality of service. Please note that any data sent via email is not secure and could be read by others. Bank of Scotland plc. Registered Office: The Mound, Edinburgh EH1 1YZ. Registered in Scotland No. SC327000.
Authorised by the Prudential Regulation Authority and regulated by the Financial Conduct Authority and the Prudential Regulation Authority under Registration number 169628. Eligible deposits with us are protected by the Financial Services Compensation Scheme (FSCS). We are covered by the Financial Ombudsman Service (FOS).
Please note that due to FSCS and FOS eligibility criteria not all business customers will be covered.
Information correct as at: January 2018.
1/4520830-0 (01/18)