2001 WaveRunner GP800R - · PDF fileread this manual carefully before operation!...
123
READ THIS MANUAL CAREFULLY BEFORE OPERATION! OWNER’S/OPERATOR’S MANUAL LIT-18626-04-05 GP800R U.S.A. Edition 2001 WaveRunner
Transcript of 2001 WaveRunner GP800R - · PDF fileread this manual carefully before operation!...
READ THIS MANUALCAREFULLY BEFORE OPERATION!
OWNER’S/OPERATOR’SMANUAL
LIT-18626-04-05
GP800R
U.S.A. Edition
2001
WaveRunner

E
EJU00270
To the owner/operatorThank you for choosing a Yamaha water-
craft. This Owner’s/Operator’s Manual contains
information you will need for proper opera-tion, maintenance, and care. A thoroughunderstanding of these simple instructionswill help you to obtain maximum enjoymentfrom your new Yamaha. If you have anyquestions about the operation or mainte-nance of your watercraft, please consult aYamaha dealer.
Because Yamaha has a policy of continu-ing product improvement, this product maynot be exactly as described in this Owner’s/Operator’s Manual. Specifications are sub-ject to change without notice.
This manual should be considered a per-manent part of this watercraft and shouldremain with it even if the watercraft is subse-quently sold.
Important manual information:In this manual, information of particular
importance is distinguished in the followingways:
The Safety Alert Symbol meansATTENTION! BECOME ALERT!YOUR SAFETY IS INVOLVED!
WARNINGFailure to follow WARNING instructionscould result in severe injury or death tothe machine operator, passenger(s), abystander, or a person inspecting orrepairing the watercraft.
CAUTION:A CAUTION indicates special precau-tions that must be taken to avoid damageto the watercraft.
NOTE:A NOTE provides key information to makeprocedures easier or clearer.
EJU00271
WaveRunner GP800ROWNER’S/OPERATOR’S MANUAL
©2000 by Yamaha Motor Corporation, USA1st Edition, September 2000
All rights reserved. Any reprinting or unauthorized use without the written permission of Yamaha Motor Corporation, USA
is expressly prohibited.Printed in USA
P/N LIT-18626-04-05
EEJU00273
CONTENTS
READ THIS OWNER’S/OPERATOR’S MANUAL CAREFULLYBEFORE OPERATING YOUR WATERCRAFT.
GENERAL AND SAFETY INFORMATION 1
FEATURES AND FUNCTIONS 2
OPERATION 3
MAINTENANCE AND CARE 4
TROUBLESHOOTING AND EMERGENCY PROCEDURES 5
APPENDIX 6

E
1
EJU00274
GENERAL AND SAFETY
INFORMATIONIdentification numbers.............................1-1
Primary Identification (PRI-ID) number..1-1Hull Identification Number (HIN).............1-1Engine serial number..............................1-1
Emission control information.................1-2Approval label of Emission control certificate.................................................1-2Manufactured date label.........................1-2
Important labels........................................1-3Label location..........................................1-3Warning labels ........................................1-4Caution labels .........................................1-5Other labels.............................................1-6
Safety information..............................1-7Limitations on who may operate the watercraft.................................................1-7Cruising limitations..................................1-8Operation requirements..........................1-9Hazard information ...............................1-12Watercraft characteristics.....................1-12
Rules of the Road...................................1-14Steering and sailing rules .....................1-14Rules when encountering vessels .......1-15Other special situations ........................1-16Reading buoys and other markers.......1-16
To get more boating safety information ..............................................1-18
United States Coast Guard ..................1-18Other sources .......................................1-18Watercraft Education and Training.......1-18
Enjoy your watercraft responsibly.......1-19

1-1
E
EJU00699
Identification numbersRecord your Primary Identification (PRI-
ID) number, Hull Identification Number (HIN)and engine serial number in the spaces pro-vided, to assist you in ordering spare partsfrom a Yamaha dealer. Also record and keepthese ID numbers in a separate place incase your watercraft is stolen.
EJU00700
Primary Identification (PRI-ID) number
The PRI-ID number is stamped on a label 1attached to the inside of the engine compart-ment.
EJU00701
Hull Identification Number (HIN)
The HIN is stamped on a plate 2 attachedto the hull on the aft, starboard side.
EJU00288a
Engine serial number
The engine serial number is stamped ona label 3 attached to the engine unit.

1-2
E
EJU00631a
Emission control information
This engine conforms to the U.S. Environ-mental Protection Agency (EPA) regulationsfor marine SI engines for the year 2001.
Approval label of Emission control certificate
This label is attached to the electrical boxand the silencer of the carburetor.
1 Emission control information label
Manufactured date labelThis label is attached to the electrical box
and the silencer of the carburetor.
2 Manufactured date label

1-3
E
EJU00293
Important labelsLabel location
1-4
E
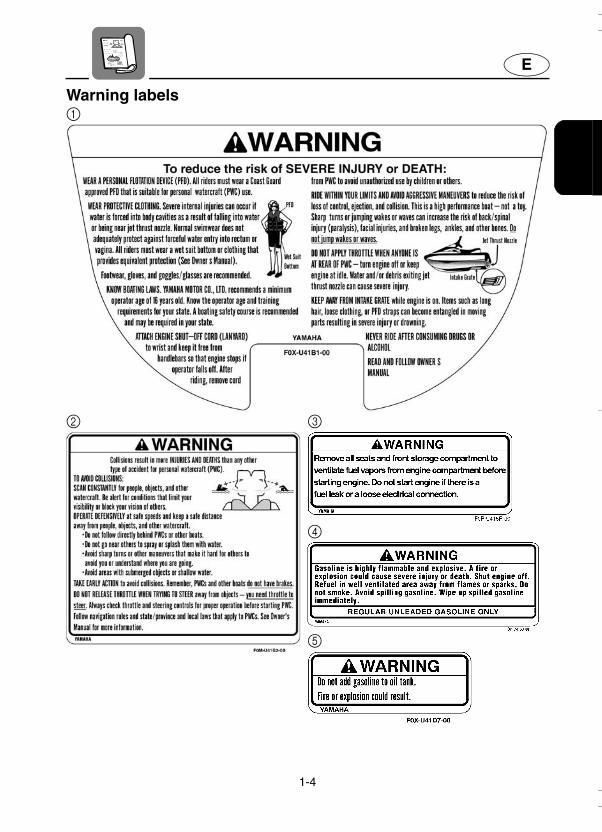
Warning labels1
2 3
4
5

1-5
E
Caution labels
6
7 8
9
0
A B

1-6
E
Other labelsC
D
E F
G

1-7
E
EJU00686
Safety informationThe safe use and operation of this
watercraft is dependent upon the use ofproper riding techniques, as well as uponthe common sense, good judgment, andexpertise of the operator. Every operatorshould know the following requirementsbefore riding the watercraft.● Before operating the watercraft, read the
Owner’s/Operator’s Manual, the RidingPractice Guide, the Riding Instructioncard and all warning and caution labelson the watercraft. Also, watch the BasicOrientation Video provided with yourwatercraft. These materials should giveyou an understanding of the watercraftand its operation.
● Never allow anyone to operate this water-craft until they too have read the Owner’s/Operator’s Manual, the Riding PracticeGuide, the Riding Instruction card and allwarning and caution labels, and if possi-ble watched the Basic Orientation Video.Showing them the video may help rein-force the information contained in thesematerials.
EJU00667a
Limitations on who may operate the watercraft● Yamaha recommends a minimum opera-
tor age of 16 years old.Adults must supervise use by minors.Know the operator age and trainingrequirements for your state. A boatingsafety course is recommended and maybe required in your state. You can findlocal rules by contacting the UnitedStates Coast Guard (USCG), the NationalAssociation of State Boating Law Admin-istrators, or your local Power Squadron.
● This watercraft is designed to carry theoperator and one passenger. Neverexceed the maximum load limit or allowmore than 2 persons to ride the watercraftat one time.
● Do not operate the watercraft with a pas-senger on board until you have consider-able practice and experience riding alone.Operating the watercraft with a passengerrequires more skill. Take the time tobecome accustomed to the handlingcharacteristics of the watercraft beforetrying any difficult maneuvers.
Maximum load: 160 kg (353 lb)Load is the total weight of cargo, opera-tor and passenger.
1-8
E
EJU00613
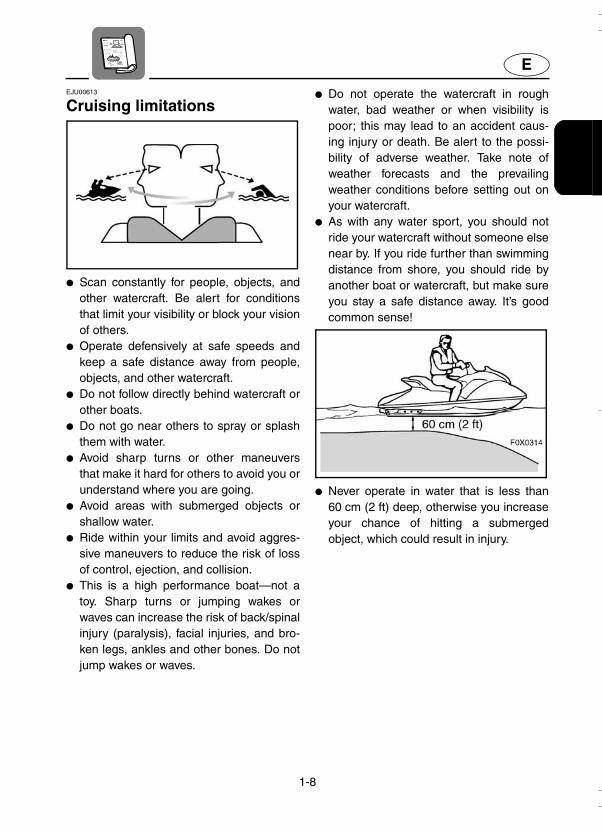
Cruising limitations
● Scan constantly for people, objects, andother watercraft. Be alert for conditionsthat limit your visibility or block your visionof others.
● Operate defensively at safe speeds andkeep a safe distance away from people,objects, and other watercraft.
● Do not follow directly behind watercraft orother boats.
● Do not go near others to spray or splashthem with water.
● Avoid sharp turns or other maneuversthat make it hard for others to avoid you orunderstand where you are going.
● Avoid areas with submerged objects orshallow water.
● Ride within your limits and avoid aggres-sive maneuvers to reduce the risk of lossof control, ejection, and collision.
● This is a high performance boat—not atoy. Sharp turns or jumping wakes orwaves can increase the risk of back/spinalinjury (paralysis), facial injuries, and bro-ken legs, ankles and other bones. Do notjump wakes or waves.
● Do not operate the watercraft in roughwater, bad weather or when visibility ispoor; this may lead to an accident caus-ing injury or death. Be alert to the possi-bility of adverse weather. Take note ofweather forecasts and the prevailingweather conditions before setting out onyour watercraft.
● As with any water sport, you should notride your watercraft without someone elsenear by. If you ride further than swimmingdistance from shore, you should ride byanother boat or watercraft, but make sureyou stay a safe distance away. It’s goodcommon sense!
● Never operate in water that is less than60 cm (2 ft) deep, otherwise you increaseyour chance of hitting a submergedobject, which could result in injury.

1-9
E
● This watercraft is not equipped with light-ing required for night operation. Do notoperate the watercraft after sunset orbefore dawn, otherwise you increase therisk of colliding with another boat, whichcould result in severe injury or death.
EJU00735a
Operation requirements● All riders must wear a Coast Guard
approved personal flotation device (PFD)that is suitable for personal watercraftuse.
● Wear protective clothing. Severe internalinjuries can occur if water is forced intobody cavities as a result of falling intowater or being near the jet thrust nozzle.Normal swimwear does not adequatelyprotect against forceful water entry intorectum or vagina. All riders must wear awetsuit bottom or clothing that providesequivalent protection. Such clothingincludes thick, tightly woven, sturdy andsnug-fitting apparel such as denim, butdoes not include spandex or similar fab-rics, like those used in bicycle shorts.
1 Coast Guard approved PFD2 Wetsuit bottom
● Eye protection is recommended to keepwind, water, and glare from the sun out ofyour eyes while you operate your water-craft. Restraining straps for eyewear aremade which are designed to float shouldyour eyewear fall in the water.Footwear and gloves are recommended.

1-10
E
● Helmets meeting Snell or DOT standardsare required for IJSBA-sanctioned races.You must decide whether to wear a hel-met while you ride for recreation. Youshould know that a helmet could help pro-tect you in certain kinds of accidents andthat it could also injure you in others.A helmet is designed to provide somehead protection. Although helmets cannotprotect against all foreseeable impacts, ahelmet might reduce your injuries in a col-lision with a boat or other obstacle.A helmet may have potential safety haz-ards, as well. Falling into the water couldrisk the chance of the helmet catchingwater, commonly known as “bucketing,”and the resulting strain on your neckcould cause choking, severe and perma-nent neck injuries, or death. A helmetcould also increase the risk of an accidentif it reduces your vision or hearing, or if itdistracts you or increases your fatigue.How should you decide if a helmet’spotential safety benefits outweigh itspotential risks for you? Consider your par-ticular riding conditions. Consider factorssuch as your riding environment, yourriding style and your riding ability. Alsoconsider the likelihood of traffic conges-tion, and the water surface conditions. Ifyou decide to wear a helmet based uponyour riding circumstances, choose onecarefully. Look for a helmet designed forpersonal watercraft use, if possible. Con-sider a helmet meeting Snell or DOT stan-dards. If you will be engaging in closed-course competition, follow the helmetrequirements of the sanctioning organiza-tion.
● NEVER operate the watercraft after con-suming alcohol or taking other drugs.
● For reasons of safety and proper care ofthe watercraft, always perform the pre-operation checks listed on page 3-5before operating the watercraft.
● The operator and passenger shouldalways keep both feet in the footwell whenthe watercraft is in motion. Lifting yourfeet increases your chances of losing yourbalance, and your feet being hit by objectsoutside the watercraft. Do not give a rideto a child whose feet cannot reach thefloor of the footwell.
● Passenger should firmly hold on to theoperator.
● Always consult your doctor on whether itis safe for you to ride this watercraft if youare pregnant or in poor health.

1-11
E
● Do not attempt to modify this watercraft!Modifications to your watercraft mayreduce safety and reliability, and renderthe watercraft unsafe or illegal for use.
● Attach the engine shut-off cord (lanyard)to wrist and keep it free from the handle-bars so that the engine stops if the opera-tor falls off. After riding, remove theengine shut-off cord from the watercraft toavoid accidental starting or unauthorizeduse by children or others.
● Scan carefully for swimmers and stayaway from swimming areas. Swimmersare hard to see and you could acciden-tally hit someone in the water.
● Avoid being hit by another boat! Youshould always take the responsibility towatch for traffic; other boaters may not bewatching for you. If they do not see you,or you maneuver more quickly than otherboaters expect, you risk a collision.
● Maintain a safe distance from other boatsor watercraft, and also watch for boats’ skiropes or fishing lines. Obey the “Rules ofthe Road,” and be sure to check behindyou before making a turn. (See Rules ofthe Road on pages 1-14 to 1-17.)
● This watercraft is included in the Class Ainboard boat classification of the U.S.Coast Guard. A watercraft of this typeMUST carry a fire extinguisher of a B-1classification, with a capacity of twopounds or more when navigating inwaters under Coast Guard jurisdiction. Inaddition, most state and local boatinglaws also require that the fire extinguisherbe approved by the USCG.
F0P03010

1-12
E
EJU00313
Hazard information
● When transporting or storing your water-craft, always place the fuel cock knob inthe “OFF” position, otherwise gasolinemay overflow from the carburetor.
● Never start the engine or let it run for anylength of time in an enclosed area.Exhaust fumes contain carbon monoxide,a colorless, odorless gas that may causeloss of consciousness and death within ashort time. Always operate the watercraftin an open area.
EJU00315a
Watercraft characteristics● Jet thrust turns the watercraft. Releasing
the throttle completely produces only min-imum thrust. If you are traveling at speedsabove trolling, you will have rapidlydecreasing ability to steer without throttle.You may still have some turning abilityimmediately after releasing the throttle,but once the engine slows down, thewatercraft will no longer respond to han-dlebar input until you open the throttleagain or you reach a trolling speed. Prac-tice turning in an open area withoutobstructions until you have a good feel forthis maneuver.
● This watercraft are water-jet propelled.The jet pump is directly connected to theengine. This means that jet thrust will pro-duce some movement whenever theengine is running. There is no “neutral”position.
● Keep away from intake grate 1 while theengine is on. Items such as long hair,loose clothing, or PFD straps can becomeentangled in moving parts resulting insevere injury or drowning.
● Never insert any object into the jet thrustnozzle 2 while the engine is running.Severe injury or death could result fromcoming in contact with the rotating partsof the jet pump.

1-13
E
● Stop the engine and remove the clip 3from the engine shut-off switch 4 beforeremoving any debris or weeds, which mayhave collected around the jet intake.
1-14
E
EJU00319
Rules of the RoadYamaha watercraft is legally consid-
ered a powerboat. Operation of thewatercraft must be in accordance withthe rules and regulations governing thewaterway on which it is used.
Just as there are rules that apply whenyou are driving on streets and highways,there are waterway rules that apply whenyou are operating your watercraft. Theserules are used internationally, and are alsoenforced by the United States Coast Guardand local agencies. You should be aware ofthese rules, and follow them whenever youencounter another vessel on the water.
Several sets of rules prevail according togeographic location, but are all basically thesame as the International Rules of theRoad. The rules presented here in thisOwner’s/Operator’s Manual are condensed,and have been provided for your conve-nience only. Consult your local U.S. CoastGuard Auxiliary or Department of MotorVehicles for a complete set of rules govern-ing the waters in which you will be operatingyour watercraft.
Steering and sailing rulesWhenever two vessels on the water meet
one another, one vessel has the right-of-way; it is called the “stand-on” vessel. Thevessel that does not have the right-of-way iscalled the “give-way” or “burdened” vessel.These rules determine which vessel has theright-of-way, and what each vessel shoulddo.
Stand-on vesselThe vessel with the right-of-way has the
duty to continue its course and speed,except to avoid an immediate collision.When you maintain your direction andspeed, the other vessel will be able to deter-mine how best to avoid you.
Give-way vesselThe vessel which does not have the right-
of-way has the duty to take positive andtimely action to stay out of the way of thestand-on vessel. Normally, you should notcross in front of the vessel with the right-of-way. You should slow down or change direc-tions briefly and pass behind the other ves-sel. You should always move in such a waythat the operator of the other vessel can seewhat you are doing.
The General Prudential Rule regardingthe right-of-way is that if a collision appearsunavoidable, neither boat has the right-of-way. Both boats must avoid the collision.
In other words, follow the standard rulesexcept when a collision will occur unlessboth vessels try to avoid each other. If that isthe case, both vessels become give-wayvessels.
1-15
E
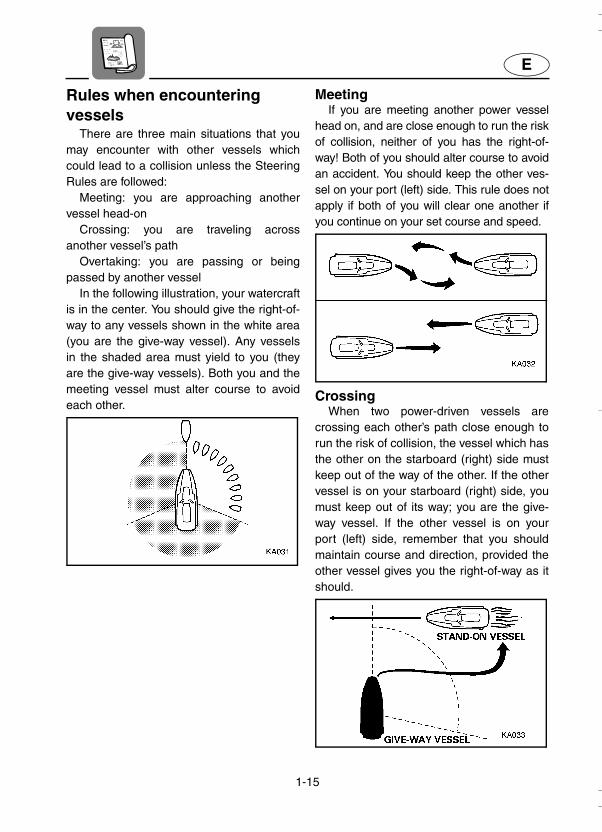
Rules when encountering vessels
There are three main situations that youmay encounter with other vessels whichcould lead to a collision unless the SteeringRules are followed:
Meeting: you are approaching anothervessel head-on
Crossing: you are traveling acrossanother vessel’s path
Overtaking: you are passing or beingpassed by another vessel
In the following illustration, your watercraftis in the center. You should give the right-of-way to any vessels shown in the white area(you are the give-way vessel). Any vesselsin the shaded area must yield to you (theyare the give-way vessels). Both you and themeeting vessel must alter course to avoideach other.
MeetingIf you are meeting another power vessel
head on, and are close enough to run the riskof collision, neither of you has the right-of-way! Both of you should alter course to avoidan accident. You should keep the other ves-sel on your port (left) side. This rule does notapply if both of you will clear one another ifyou continue on your set course and speed.
CrossingWhen two power-driven vessels are
crossing each other’s path close enough torun the risk of collision, the vessel which hasthe other on the starboard (right) side mustkeep out of the way of the other. If the othervessel is on your starboard (right) side, youmust keep out of its way; you are the give-way vessel. If the other vessel is on yourport (left) side, remember that you shouldmaintain course and direction, provided theother vessel gives you the right-of-way as itshould.

1-16
E
OvertakingIf you are passing another vessel, you are
the give-way vessel. This means that theother vessel is expected to maintain itscourse and speed. You must stay out of itsway until you are clear of it. Likewise, ifanother vessel is passing you, you shouldmaintain your speed and direction so thatthe other vessel can steer itself around you.
Other special situationsThere are three other rules you should be
aware of when riding your watercraft aroundother vessels.
Narrow channels and bendsWhen navigating in narrow channels, you
should keep to the right when it is safe andpractical to do so. If the operator of a power-driven vessel is preparing to go around abend that may obstruct the view of otherwater vessels, the operator should sound aprolonged blast of four to six seconds on thewhistle. If another vessel is around the bend,it too should sound the whistle. Even if noreply is heard, however, the vessel shouldstill proceed around the bend with caution. Ifyou navigate such waters with your water-craft, you will need to carry a portable airhorn, available from local marine supplystores.
Fishing vessel right-of-wayAll vessels fishing with nets, lines or
trawls are considered to be “fishing vessels”under the International Rules. Vessels withtrolling lines are not considered fishing ves-sels. Fishing vessels have the right-of-wayregardless of position. Fishing vessels can-not, however, impede the passage of othervessels in narrow channels.
Sailing vessel right-of-waySailing vessels should normally be given
the right-of-way. The exceptions to this are:1. When the sailing vessel is overtaking the
power-driven vessel, the power-drivenvessel has the right-of-way.
2. Sailing vessels should keep clear of anyfishing vessel.
3. In a narrow channel, a sailing vesselshould not hamper the safe passage of apower-driven vessel that can navigateonly in such a channel.
Reading buoys and other markers
The waters of the United States aremarked for safe navigation by the lateralsystem of buoyage. Simply put, buoys andmarkers have an arrangement of shapes,colors, numbers and lights to show whichside of the buoy a boater should pass onwhen navigating in a particular direction.The markings on these buoys are orientedfrom the perspective of being entered fromseaward (the boater is going towards theharbor). Red buoys are passed on your star-board (right) side when proceeding fromopen water into the harbor, and black buoysare to your port (left) side. An easy way toremember the meaning of the colors is thephrase “red right returning.” When navigat-ing out of the harbor, your position withrespect to the buoys should be reversed; redbuoys should be to port and black buoys tostarboard.
Many bodies of water used by boaters areentirely within the boundaries of a particularstate. The Uniform State Waterway MarkingSystem has been devised for these waters.

1-17
E
This system uses buoys and signs withdistinctive shapes and colors to show regu-latory or advisory information. These mark-ers are white with black letters and orangeborders. They signify speed zones,restricted areas, danger areas, and generalinformation.
Remember, markings may vary by geo-graphic location. Always consult local boat-ing authorities before riding your watercraftin unfamiliar waters.
1-18
E
EJU00320
To get more boating safety information
Be informed about boating safety. Addi-tional publications and information can beobtained from many organizations, includingthe following.
United States Coast GuardConsumer Affairs Staff (G-BC)Office of Boating, Public, and Consumer
AffairsU.S. Coast Guard HeadquartersWashington, D.C. 20593-0001Boating Safety Hotline: 1-800-368-5647
Other sourcesYou can find local rules by contacting the
National Association of State Boating LawAdministrators, or your local Power Squad-ron.
Watercraft Education and Training
The Online Boating Safety Course, avail-able through the watercraft section of theyamaha-motor.com website, is a free,50 question learning course available to thepublic. Upon successful completion of80 percent or better, the user can request acertificate of completion by mail or candownload one immediately. The OnlineBoating Safety Course, provided by theBoat/US Foundation, is approved by theNational Association of State Boating LawAdministrators (NASBLA) and recognizedby the United States Coast Guard. Thiscourse meets the education requirement forthose states that recognize non-proctored,NASBLA-approved courses.
Yamaha is the watercraft industry’s lead-ing manufacturer to build awareness andsupport for boating education. In 1997,Yamaha launched its GET W.E.T. (Water-craft Education and Training) initiative andhas since reached out to over one millionAmericans promoting the benefits of boatingeducation.
The Online Boating Safety Course:http://www.boatus.com/onlinecourse/

1-19
E
EJU00322
Enjoy your watercraft responsibly
You share the areas you enjoy whenriding your watercraft with others and withnature. So your enjoyment includes aresponsibility to treat these other people,and the lands, waters, and wildlife withrespect and courtesy.
Whenever and wherever you ride, think ofyourself as the guest of those around you.Remember, for example, that the sound ofyour watercraft may be music to you, but itcould be just noise to others. And the excit-ing splash of your wake can make wavesothers won’t enjoy. Avoid riding close toshoreline homes and waterfowl nestingareas or other wildlife areas, and keep arespectful distance from fishermen, otherboats, swimmers, and populated beaches.When travel in areas like these is unavoid-able, ride slowly and obey all laws.
Remember that pollution can be harmfulto the environment. Do not refuel or add oilwhere a spill could cause damage to nature.Remove your watercraft from the water andmove it away from the shoreline before refu-eling. And keep your surroundings pleasantfor the people and wildlife that share thewaterways: don’t litter!
When you ride responsibly, with respectand courtesy for others, you help ensurethat our waterways stay open for the enjoy-ment of a variety of recreational opportuni-ties.

E
2
EJU00326
FEATURES AND FUNCTIONS
Location of main components ...............2-1
Operation of controls and other functions....................................................2-5
Seat .........................................................2-5Hood........................................................2-6Fuel tank filler cap...................................2-6Oil tank filler cap......................................2-6Fuel cock knob........................................2-7Engine stop switch..................................2-8Engine shut-off switch.............................2-8Choke lever.............................................2-8Throttle lever ...........................................2-9Start switch..............................................2-9Cooling water pilot outlet ......................2-10Steering system....................................2-10Quick Shift Trim System (QSTS) selector..................................................2-11Engine overheat warning system.........2-13Handgrip................................................2-14Multifunction information center ...........2-15Tachometer...........................................2-16Speedometer ........................................2-16Reset button..........................................2-16Fuel meter.............................................2-17Hour meter ............................................2-17Fuel warning indicator...........................2-18Oil warning indicator .............................2-18Engine overheat warning indicator.......2-18Storage compartments .........................2-19Yamaha Adjustable Sponson(Y.A.S.)..................................................2-20

2-1
E
EJU00327
Location of main components
1 HandlebarsUse to control direction.
2 Fuel tank filler cap3 Rope hole4 Footwell
Use to place feet for balance.5 Intake grate
Prevents debris from getting into the jet pump.6 Speed sensor

2-2
E
1 Cooling water pilot outletUse to verify cooling water flow.
2 Bow eyeUse to attach rope for transporting, mooring ortowing the watercraft in an emergency.
3 Front storage compartment4 Hood5 Jet intake6 Handgrip7 Seat8 Glove compartment9 Yamaha Adjustable Sponson (Y.A.S.)
2-3
E
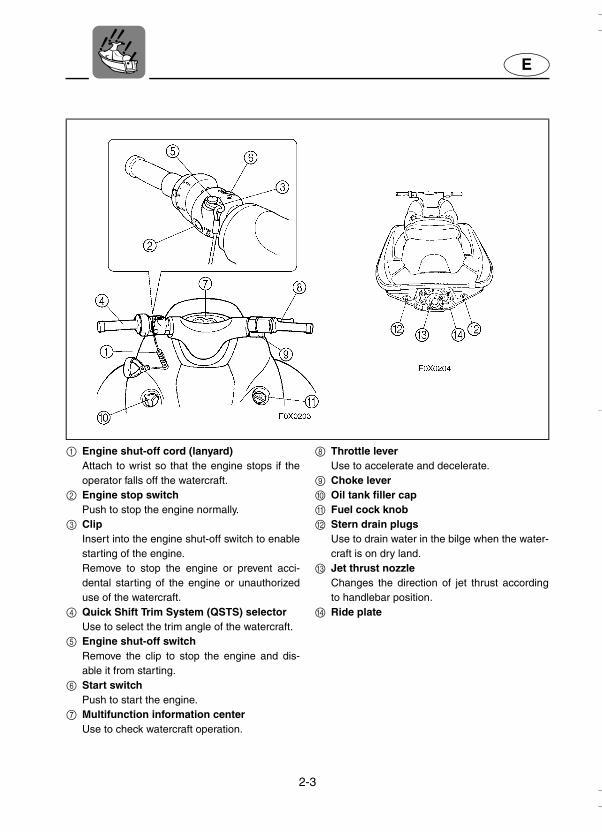
1 Engine shut-off cord (lanyard)Attach to wrist so that the engine stops if theoperator falls off the watercraft.
2 Engine stop switchPush to stop the engine normally.
3 ClipInsert into the engine shut-off switch to enablestarting of the engine.Remove to stop the engine or prevent acci-dental starting of the engine or unauthorizeduse of the watercraft.
4 Quick Shift Trim System (QSTS) selectorUse to select the trim angle of the watercraft.
5 Engine shut-off switchRemove the clip to stop the engine and dis-able it from starting.
6 Start switchPush to start the engine.
7 Multifunction information centerUse to check watercraft operation.
8 Throttle leverUse to accelerate and decelerate.
9 Choke lever0 Oil tank filler capA Fuel cock knobB Stern drain plugs
Use to drain water in the bilge when the water-craft is on dry land.
C Jet thrust nozzleChanges the direction of jet thrust accordingto handlebar position.
D Ride plate

2-4
E
1 Spark plugs/Spark plug caps2 Electrical box
Protects electrical components from water.3 Flush hose connector
Use to flush the engine cooling water pas-sages.
4 Spark plug lead5 Muffler6 Fuel filter7 Fuel tank
8 Oil tank9 Battery0 Fire extinguisher containerA Water separator

2-5
E
EJU00328
Operation of controls and other functions
EJU00335a
SeatThere is a seat latch 1 at the rear of the
seat to remove the seat.To remove the seat:
Pull the seat latch 1 up, and then pull theseat off.To install the seat:
Insert the projection on the front of theseat into the stay on the deck, and thenpush the rear of the seat down to lock it inplace securely.NOTE:Make sure that the seat is properly securedbefore operating the watercraft.

2-6
E
EJU00703
HoodTo open the hood, push the latch 1
down, and then lift the hood up.To close the hood, push the hood down to
lock it in place.NOTE:Make sure that the hood is properly securedbefore operating the watercraft.
EJU00347
Fuel tank filler capTo remove the fuel tank filler cap 1, turn it
counterclockwise.NOTE:Make sure that the fuel tank filler cap isproperly secured before operating the water-craft.
EJU00001N
Oil tank filler capTo remove the oil tank filler cap 2, turn it
counterclockwise.NOTE:Make sure that the oil tank filler cap is prop-erly secured before operating the watercraft.

2-7
E
EJU00704
Fuel cock knobThe fuel cock supplies fuel from the fuel
tank to the carburetors.The fuel cock knob 1 positions are
explained as follows and are shown in theillustration.OFF:
With the fuel cock knob in this position,fuel does not flow. Always turn the fuel cockknob to this position when the engine is notrunning.ON:
With the fuel cock knob in this position,fuel flows to the carburetors. Turn the fuelcock knob to this position when starting theengine and operating the watercraft.RES:
This indicates reserve. With the fuel cockknob in this position, the fuel reserve ismade available. Turn the fuel cock knob tothis position if you run out of fuel while oper-ating the watercraft. When this occurs,refuel as soon as possible and be sure toturn the fuel cock knob back to “ON”!
2-8
E
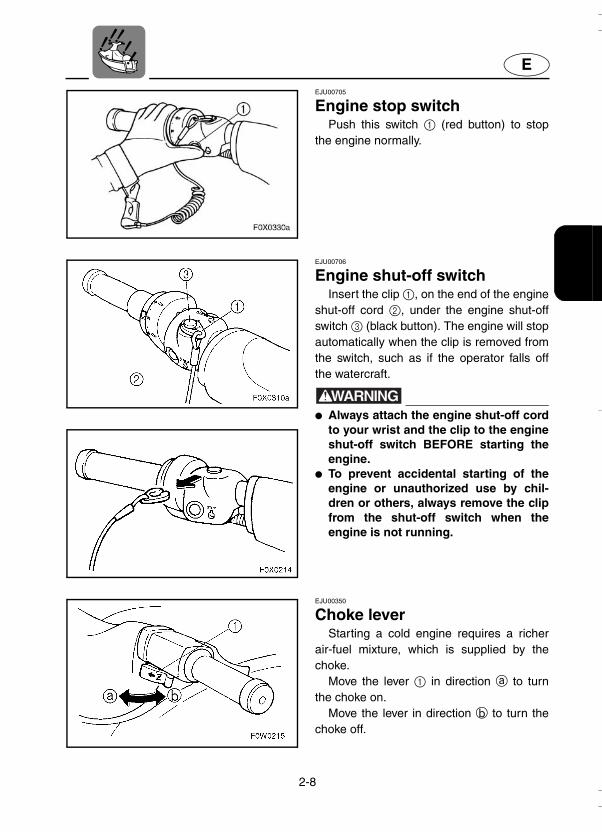
EJU00705
Engine stop switchPush this switch 1 (red button) to stop
the engine normally.
EJU00706
Engine shut-off switchInsert the clip 1, on the end of the engine
shut-off cord 2, under the engine shut-offswitch 3 (black button). The engine will stopautomatically when the clip is removed fromthe switch, such as if the operator falls offthe watercraft.
WARNING● Always attach the engine shut-off cord
to your wrist and the clip to the engineshut-off switch BEFORE starting theengine.
● To prevent accidental starting of theengine or unauthorized use by chil-dren or others, always remove the clipfrom the shut-off switch when theengine is not running.
EJU00350
Choke leverStarting a cold engine requires a richer
air-fuel mixture, which is supplied by thechoke.
Move the lever 1 in direction a to turnthe choke on.
Move the lever in direction b to turn thechoke off.

2-9
E
EJU00351
Throttle leverSqueeze the throttle lever 1 to increase
engine speed. Release the throttle lever to decrease
engine speed or to return it to the idle posi-tion.
EJU00353
Start switchPush the start switch 1 (green button) to
start the engine.NOTE:The engine will not start when the clip isremoved from the engine shut-off switch.
2-10
E
EJU00354
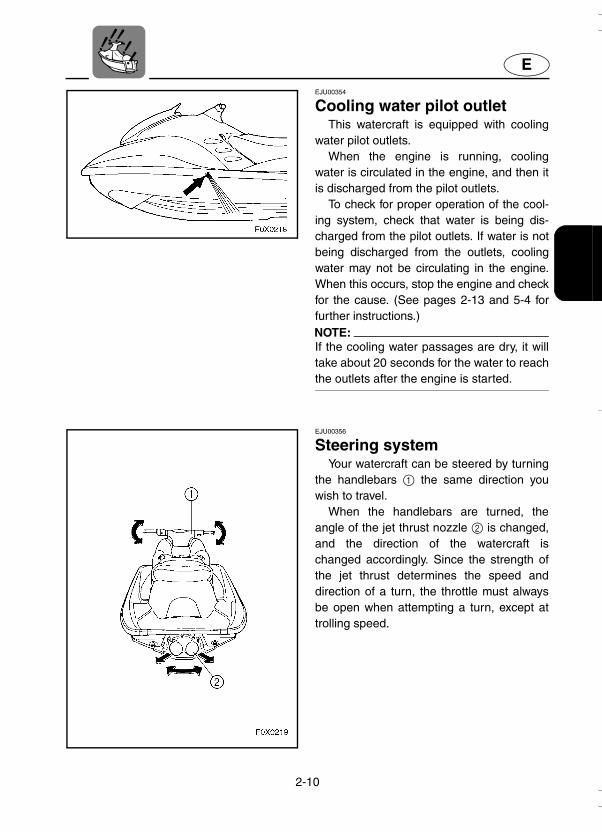
Cooling water pilot outletThis watercraft is equipped with cooling
water pilot outlets.When the engine is running, cooling
water is circulated in the engine, and then itis discharged from the pilot outlets.
To check for proper operation of the cool-ing system, check that water is being dis-charged from the pilot outlets. If water is notbeing discharged from the outlets, coolingwater may not be circulating in the engine.When this occurs, stop the engine and checkfor the cause. (See pages 2-13 and 5-4 forfurther instructions.)NOTE:If the cooling water passages are dry, it willtake about 20 seconds for the water to reachthe outlets after the engine is started.
EJU00356
Steering systemYour watercraft can be steered by turning
the handlebars 1 the same direction youwish to travel.
When the handlebars are turned, theangle of the jet thrust nozzle 2 is changed,and the direction of the watercraft ischanged accordingly. Since the strength ofthe jet thrust determines the speed anddirection of a turn, the throttle must alwaysbe open when attempting a turn, except attrolling speed.
2-11
E
EJU00360a
Quick Shift Trim System (QSTS) selector
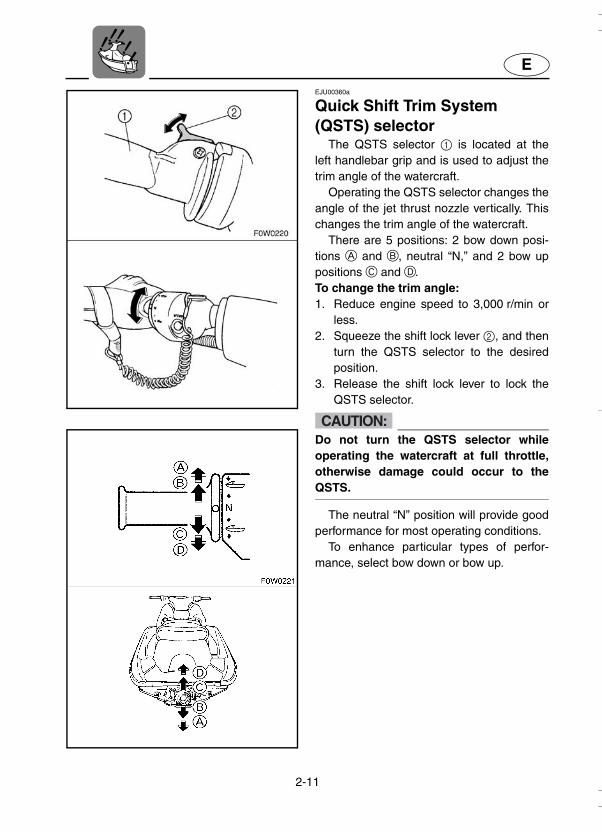
The QSTS selector 1 is located at theleft handlebar grip and is used to adjust thetrim angle of the watercraft.
Operating the QSTS selector changes theangle of the jet thrust nozzle vertically. Thischanges the trim angle of the watercraft.
There are 5 positions: 2 bow down posi-tions A and B, neutral “N,” and 2 bow uppositions C and D.To change the trim angle:1. Reduce engine speed to 3,000 r/min or
less.2. Squeeze the shift lock lever 2, and then
turn the QSTS selector to the desiredposition.
3. Release the shift lock lever to lock theQSTS selector.
CAUTION:Do not turn the QSTS selector whileoperating the watercraft at full throttle,otherwise damage could occur to theQSTS.
The neutral “N” position will provide goodperformance for most operating conditions.
To enhance particular types of perfor-mance, select bow down or bow up.

2-12
E
Bow downTurn the grip to A or B and the bow will
go down while the watercraft is on plane.Bow down puts more of the bow in the
water. This gives the watercraft more “hook,”which enhances turning performance. Thisposition will also help the watercraft get upon plane more quickly.
At higher speeds, however, the watercraftwill have greater tendency to “bow steer”and follow waves and wakes in the water.Fuel economy and maximum speed are alsoreduced.
Bow upTurn the grip to C or D and the bow will
go up while the watercraft is on plane. Bow up puts less of the bow in the water.
There is less water resistance, so straight-ahead acceleration when on plane and topspeed are enhanced.
In some conditions, however, the water-craft may tend to “porpoise” (hop in thewater). If the watercraft is porpoising,choose neutral or bow down.
2-13
E
YAMAHA
87
654
32
1
MPH FUELHOUR
x1000r/min
MULTIDISPLAY
WARNING
F0X0235
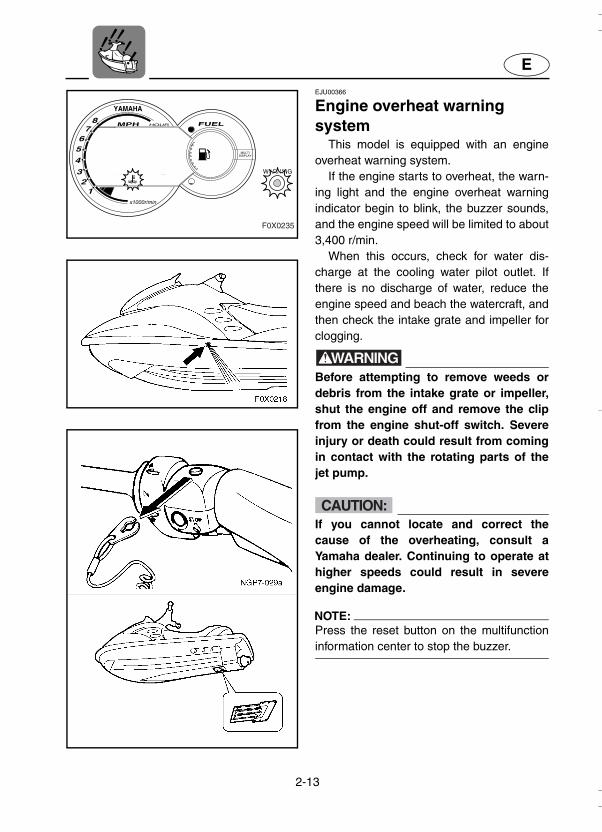
EJU00366
Engine overheat warning system
This model is equipped with an engineoverheat warning system.
If the engine starts to overheat, the warn-ing light and the engine overheat warningindicator begin to blink, the buzzer sounds,and the engine speed will be limited to about3,400 r/min.
When this occurs, check for water dis-charge at the cooling water pilot outlet. Ifthere is no discharge of water, reduce theengine speed and beach the watercraft, andthen check the intake grate and impeller forclogging.
WARNINGBefore attempting to remove weeds ordebris from the intake grate or impeller,shut the engine off and remove the clipfrom the engine shut-off switch. Severeinjury or death could result from comingin contact with the rotating parts of thejet pump.
CAUTION:If you cannot locate and correct thecause of the overheating, consult aYamaha dealer. Continuing to operate athigher speeds could result in severeengine damage.
NOTE:Press the reset button on the multifunctioninformation center to stop the buzzer.

2-14
E
EJU00367a
HandgripThe handgrip 1 provides a handhold for
boarding the watercraft.
CAUTION:Do not use to tow objects, lift watercraft,or attach tie downs, otherwise damagecould occur.

2-15
E
EJU00698b
Multifunction information center
This meter contains following functions forthe help and convenience of operation.1 Tachometer2 Speedometer3 Fuel meter4 Hour meter5 Warning light6 Oil warning indicator7 Engine overheat warning indicator8 Fuel warning indicator9 Reset button
CAUTION:● Do not run the engine at full throttle or
more than 15 seconds to check themeter for operation on land. Theengine could overheat.
● Use the specified resistor-type sparkplug and cap, otherwise the meter mayfunction erratically.
NOTE:All display light up and the buzzer soundstwice after the engine starts. Then, themeter will operate normally after few sec-onds. The current display will continue tooperate for 30 seconds after the enginestops.
2-16
E
YAMAHA
87
654
32
1
MPH FUELHOUR
x1000r/min
MULTIDISPLAY
F0X0228
YAMAHA
87
654
32
1
MPH FUELHOUR
x1000r/min
MULTIDISPLAY
F0X0229
F0X0230
RESET
4
32
1
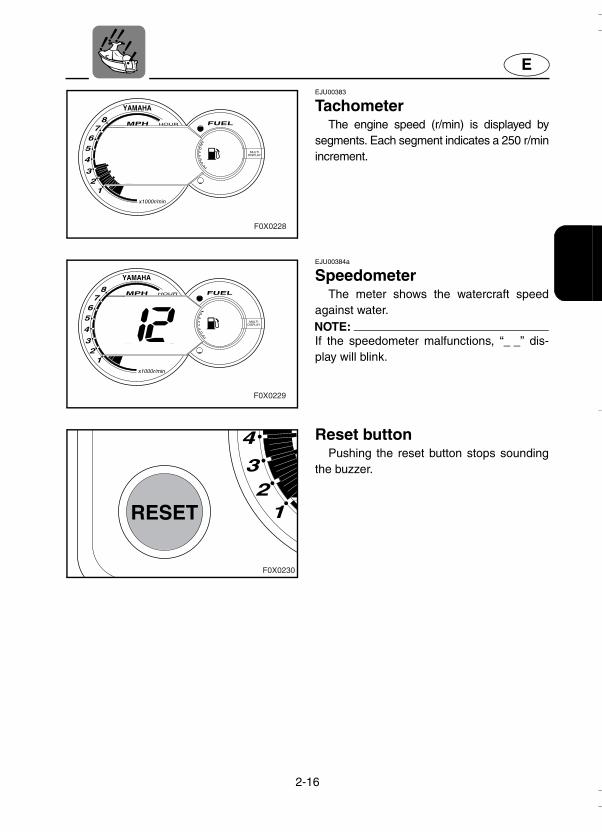
EJU00383
TachometerThe engine speed (r/min) is displayed by
segments. Each segment indicates a 250 r/minincrement.
EJU00384a
SpeedometerThe meter shows the watercraft speed
against water.NOTE:If the speedometer malfunctions, “_ _” dis-play will blink.
Reset buttonPushing the reset button stops sounding
the buzzer.
2-17
E
YAMAHA
87
654
32
1
MPH FUELHOUR
x1000r/min
MULTIDISPLAY
F0X0232
EJU00386a
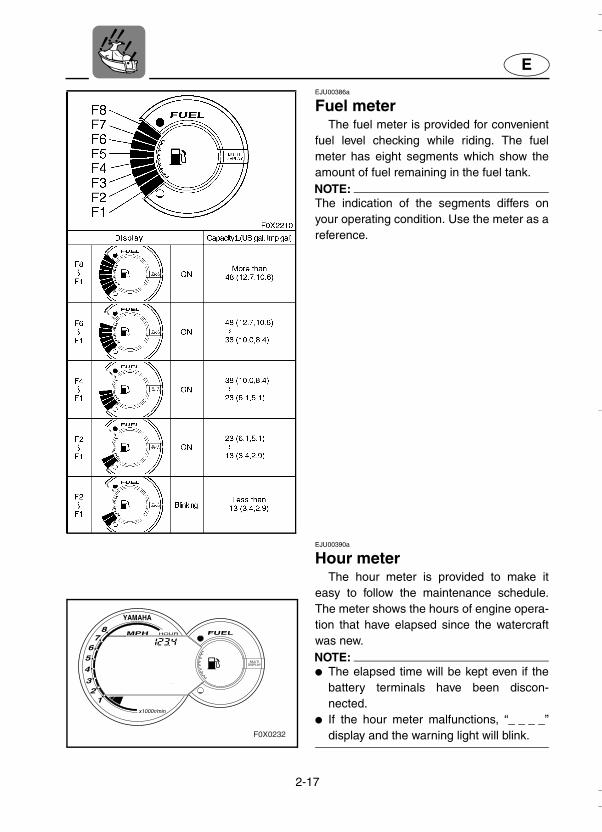
Fuel meterThe fuel meter is provided for convenient
fuel level checking while riding. The fuelmeter has eight segments which show theamount of fuel remaining in the fuel tank.NOTE:The indication of the segments differs onyour operating condition. Use the meter as areference.
EJU00390a
Hour meterThe hour meter is provided to make it
easy to follow the maintenance schedule.The meter shows the hours of engine opera-tion that have elapsed since the watercraftwas new.NOTE:● The elapsed time will be kept even if the
battery terminals have been discon-nected.
● If the hour meter malfunctions, “_ _ _ _”display and the warning light will blink.

2-18
E
YAMAHA
87
654
32
1
MPH FUELHOUR
x1000r/min
MULTIDISPLAY
WARNING
F0X0233
YAMAHA
87
654
32
1
MPH FUELHOUR
x1000r/min
MULTIDISPLAY
WARNING
F0X0234
YAMAHA
87
654
32
1
MPH FUELHOUR
x1000r/min
MULTIDISPLAY
WARNING
F0X0235
EJU00716a
Fuel warning indicatorIf the fuel remaining in the tank drops to
about 13 L (3.4 US gal, 2.9 lmp gal), thelowest two fuel level segments, the fuelwarning indicator and the warning lightbegin to blink. The buzzer also starts sound-ing intermittently.
The warning signals will be cleared whenthe engine restarts after refilling fuel.
EJU00717a
Oil warning indicatorIf the oil remaining in the tank drops to
about 1.7 L (0.45 US gal, 0.37 lmp gal) orthe oil filter is clogged, the oil warning indi-cator and the warning light begin to blink.The buzzer also starts sounding intermit-tently.
If the oil warning indicators begin to blink,refill with engine oil as soon as possible.
The warning signals will be cleared whenthe engine restarts after refilling engine oil.NOTE:If the warning indicators blink with adequateoil in the tank, check the oil filter for clog-ging.
EJU00718a
Engine overheat warning indicator
If the engine starts to overheat, theengine overheat warning indicator and thewarning light begin to blink. The buzzer alsostarts sounding.

2-19
E
EJU00672a
Storage compartmentsA front storage compartment and a glove
compartment are provided.NOTE:● Make sure that the storage compartments
are properly secured before operating thewatercraft.
● The storage compartments are notdesigned to be waterproof. If you carryobjects that must be kept dry, such as themanuals, put them in a waterproof bag.
Front storage compartmentThe front storage compartment 2 is
located at the bow.To open the front storage compartment,
push the hood latch 1 down, and then openthe hood. NOTE:The front storage compartment can beremoved to access the engine compartment.
Front storage compartment:Capacity: 16 L (4.2 US gal, 3.5 Imp gal)Load limit: 5 kg (11 lb)
To close the front storage compartment,push down on the rear of the hood until itlatches securely.

2-20
E
Glove compartmentA glove compartment 4 is located in front
of the seat. To open the glove compartment, slide the
latch 3 toward you, and then lift up the lid.To close the glove compartment, push the
lid down until it locks securely.
Glove compartment:Capacity: 2 L (0.53 US gal, 0.44 Imp gal)Load limit: 1 kg (2.2 lb)
Yamaha Adjustable Sponson(Y.A.S.)
The sponsons 1 have adjustable posi-tioning to allow the operator to enhanceeither straight-line performance or turningperformance according to the preferenceand operating conditions.Adjusting to upward A:
There will be less water resistance in thisposition, so straight-ahead accelerationwhen on plane and top speed will beenhanced.Adjusting to downward B:
This position will give the watercraft more“hook” which will enhance turning perfor-mance.

E
–MEMO–

E
3
EJU00410
OPERATION
Fuel and oil................................................3-1Gasoline ..................................................3-1Filling the fuel tank..................................3-32-stroke engine oil...................................3-4Filling the oil tank ....................................3-4
Pre-operation checks...............................3-5Pre-operation check list ..........................3-5Pre-operation check points.....................3-6
Operation.................................................3-13Engine break-in.....................................3-13Starting the engine................................3-15Stopping the engine..............................3-18Leaving the watercraft ..........................3-18
Operating your watercraft.....................3-19Getting to know your watercraft............3-19Learning to operate your watercraft .....3-19Riding watercraft with a passenger......3-20Starting the watercraft...........................3-21Boarding and starting in deep water ....3-23Capsized watercraft..............................3-25Turning the watercraft...........................3-27Stopping the watercraft.........................3-29Beaching the watercraft........................3-30Docking the watercraft..........................3-30Rough water operation .........................3-30
Post-operation checks ..........................3-31
Transporting ...........................................3-33

3-1
E
EJU00411a
Fuel and oilThis engine uses Yamaha’s oil injection
system, which provides superior lubricationby ensuring the proper oil ratio for all operat-ing conditions. No fuel premixing is neces-sary except during the engine break-inperiod. Simply pour gasoline into the fueltank and oil into the oil tank.
Gasoline
WARNINGGASOLINE AND ITS VAPORS AREHIGHLY FLAMMABLE AND EXPLOSIVE!● Do not smoke when refueling, and
keep away from sparks, flames, orother sources of ignition.
● Stop engine before refueling.● Refuel in a well-ventilated area. Do not
stand or sit on the watercraft whilerefueling in case of fire.
● Take care not to spill gasoline. If gaso-line spills, wipe it up immediately withdry rags. Always properly dispose ofgasoline-soaked rags.
● Avoid overfilling the fuel tank. Stop fill-ing when the fuel level just reaches thebottom of the filler tube. Do not fill upthe filler tube because fuel expands asit warms up and could overflow.
● Tighten the filler cap securely afterrefueling.
● If you should swallow some gasoline,inhale a lot of gasoline vapor, or getgasoline in your eyes, get immediatemedical attention.
● If any gasoline spills onto your skin,immediately wash with soap andwater. Change clothing if gasolinespills on it.

3-2
E
CAUTION:Use only fresh gasoline that has beenstored in clean containers.
GasoholThere are two types of gasohol: gasohol
containing ethanol and that containing meth-anol.
Gasohol containing ethanol can be usedif ethanol content does not exceed 10 % andthe fuel meets minimum octane ratings.
Gasohol containing methanol is not rec-ommended by Yamaha because it cancause fuel system damage or engine perfor-mance problems.
Recommended gasoline:Regular unleaded gasoline witha minimum octane rating of86 (Pump octane number) = (R+M)/290 (Research octane number)

3-3
E
EJU00724a
Filling the fuel tankCAUTION:
Be careful when refueling. Avoid gettingwater or other contaminants in the fueltank. Contaminated fuel can cause poorrunning or engine damage.
1. Open the hood and remove the frontstorage compartment, to check the fuellevel. (See page 2-19 for front storagecompartment.)
2. Open the fuel tank filler cap, and slowlyadd fuel to the fuel tank.
3. Stop filling when the fuel just reaches thebottom of the filler tube on the fuel tank.Do not fill into the filler tube, becausefuel could spill out.
Fuel tank capacity:Total: 60 L (15.9 US gal, 13.2 Imp gal)Reserve: 10 L (2.64 US gal, 2.20 Imp gal)

3-4
E
EJU00324a
2-stroke engine oil
If YAMALUBE 2-W is not available,another 2-stroke engine oil with an NMMA-certified TC-W3 rating may be used.
Recommended engine oil: YAMALUBE 2-W
EJU00419a
Filling the oil tank
WARNING● Do not add gasoline to the oil tank.
Fire or explosion could result.● Oil in the bilge is a serious fire hazard.
Wipe up any spilled oil immediately.
CAUTION:Do not allow the oil tank to become com-pletely empty. If the oil tank becomesempty the oil injection pump must bebled to ensure proper oil flow, otherwiseengine damage may occur. If bleeding ofthe oil pump is necessary, have aYamaha dealer bleed it.
1. Remove the seat to watch the oil level.(See page 2-5 for seat.)
2. Open the oil tank filler cap, and veryslowly add engine oil to the oil tank.
3. Stop filling when the oil just reaches thetop of oil tank visible.
Oil tank capacity:5.5 L (1.45 US gal, 1.21 Imp gal)
3-5
E
EJU00422
Pre-operation checksPre-operation check list
Before operating this watercraft, perform the checks in the following check list. See theaccompanying text in this chapter for details on how to perform the checks.
WARNINGIf any item in the pre-operation check list is not working properly, have it inspectedand repaired before operating the watercraft, otherwise an accident could occur.
NOTE:Pre-operation checks should be made thoroughly each time the watercraft is used. This pro-cedure can be completed in a short time. It is worth the time spent to assure safety and reli-ability.
ITEM ROUTINE PAGE
Engine compartment Remove the seat and front storage compartment to ventilate engine compartment. Check for fuel vapors or loose electrical connections
3-6
Bilge Check for water and fuel residue and remove if necessary
3-7
Throttle Check that the throttle lever springs back 3-10
Steering system Check for proper steering system operation 3-10
Fuel and oil Check fuel and oil level and add if necessaryCheck hoses and tanks for leakage
3-6
Water separator Check for water and drain if necessary 3-7
Battery Check electrolyte level and battery condition 3-8
Hood Check that the hood is properly secured 2-6
Seat Check that the seat is properly secured 2-5
Hull/Deck Check the hull and deck for cracks or other dam-age
—
Jet unit Check for debris and remove if necessary 3-11
Fire extinguisher Check the condition and replace if necessary 3-9
Engine shut-off cord Check condition and replace is frayed or broken 3-11
Switches Check the start switch, engine stop switch and engine shut-off switch for proper operation when the watercraft is in the water
3-12
Cooling water pilot outlet Check that water is discharged while the engine is running and the watercraft is in the water
3-12
Multifunction information center Check for warning indications and proper opera-tion
3-12

3-6
E
EJU00426
Pre-operation check pointsEngine compartment
Ventilate the engine compartment beforeeach use.
To ventilate the engine compartment,remove seat and front storage compart-ment. (See page 2-5 for seat, and 2-19 forfront storage compartment.) Allow theengine compartment to remain open for afew minutes to allow any fuel vapors toescape. Also, check for loose electrical con-nections.
WARNINGFailure to ventilate the engine compart-ment could result in fire or explosion. Donot start the engine if there is a fuel leakor a loose electrical connection.
EJU00427-30a
Fuel and oil systemsCheck the fuel system for leakage, cracks
or malfunctions before each use. (See page4-9 for check points and correct proce-dures.)1. Remove the fuel tank filler cap to release
any pressure that might have built up inthe fuel tank.
2. Remove seat and front storage compart-ment. (See page 2-5 for seat, and 2-19for front storage compartment.)
3. Check the fuel and oil levels in the tanksand replenish if necessary. (See pages 3-3and 3-4 for filling instructions.)
4. Turn the fuel cock to the “ON” position.

3-7
E
EJU00432a
Water separatorCheck the water separator 1 for water.
Normally the water separator is empty. Thewater separator retains any water enteringthrough the fuel tank breather hose if thewatercraft is capsized.
If water remains in the water separator,drain it by removing the drain screw 2.Install the drain screw again after drainingthe water separator.
EJU00433a
BilgeCheck for moisture and fuel residue in the
bilge.Excessive water in the bilge can splash
into the carburetor and engine which couldcause engine damage. To remove water from the bilge:1. Remove the stern drain plugs.2. Raise the bow of the watercraft until the
water drains.3. After the water has drained, wipe the
bilge with dry rags to make sure that thebilge is thoroughly dry.
4. Install the drain plugs.
CAUTION:● Make sure that the stern drain plugs
are tightened securely before launch-ing the watercraft.
● Clean any foreign materials, such asdirt or sand, from the drain plugthreads before installing the drainplugs.
3-8
E
EJU00435a
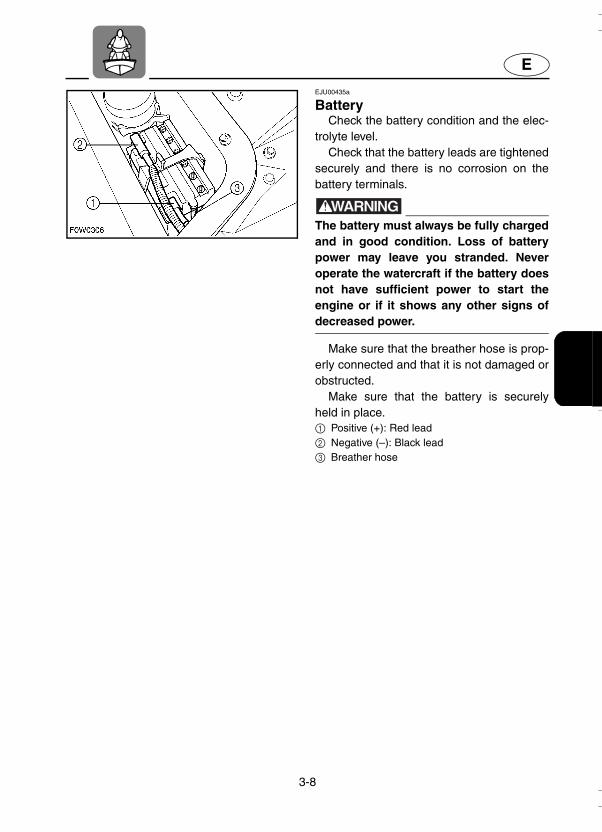
BatteryCheck the battery condition and the elec-
trolyte level. Check that the battery leads are tightened
securely and there is no corrosion on thebattery terminals.
WARNINGThe battery must always be fully chargedand in good condition. Loss of batterypower may leave you stranded. Neveroperate the watercraft if the battery doesnot have sufficient power to start theengine or if it shows any other signs ofdecreased power.
Make sure that the breather hose is prop-erly connected and that it is not damaged orobstructed.
Make sure that the battery is securelyheld in place.1 Positive (+): Red lead2 Negative (–): Black lead3 Breather hose

3-9
E
F0P03010
EJU00728
Fire extinguisherCheck that there is a full fire extinguisher
on board. The fire extinguisher container 1is located in the battery compartment.
To open the fire extinguisher containercap 2 remove the seat and turn it counter-clockwise.
After inserting the fire extinguisher makesure that the container cap is tightenedsecurely.NOTE:● See the instructions supplied by the fire
extinguisher manufacturer for checkingthe fire extinguisher. Always keep theextinguisher in the fire extinguisher con-tainer.
● Always carry a fire extinguisher on board.A fire extinguisher is not standard equip-ment with this watercraft. If you do nothave one, contact a Yamaha dealer or afire extinguisher dealer to obtain onemeeting the proper specifications.
Fire extinguisher:Classification: B-1Capacity: 2 lb or more

3-10
E
EJU00447
ThrottleSqueeze and release the throttle lever
several times to make sure that there is nohesitation in its travel. It should be smoothover the complete range, and spring back tothe idle position when released.
WARNINGBefore starting the engine, always checkthe operation of the throttle lever. Itshould move smoothly through its fullrange of operation, and should springback to the idle position when released.
EJU00448
Steering systemCheck for looseness in the handlebars.Turn them as far as possible to the right
and left to make sure that operation issmooth and unrestricted throughout thewhole range. Make sure that the jet thrustnozzle also changes directions as the han-dlebars are turned, and that there is no freeplay between the handlebars and the jetthrust nozzle.

3-11
E
EJU00451a
Jet unitCarefully check the jet intake for weeds,
debris, or anything else that might restrictthe intake of water. If the intake is clogged,cavitation could occur, reducing jet thrust,and possibly damaging the jet pump.
In some cases, the engine may overheatbecause of lack of cooling water, and dam-age to the engine could result. Engine cool-ing water is fed to the engine by the jetpump. (See page 5-4 for jet intake cleaningprocedures.)
WARNING● Keep away from intake grate while
engine is on. Items such as long hair,loose clothing, or PFD straps canbecome entangled in moving partsresulting in severe injury or drowning.
● Stop the engine and remove the clipfrom the engine shut-off switch beforeremoving any debris or weeds, whichmay have collected around the jetintake.
EJU00004n
Engine shut-off cord (lanyard)Check that the engine shut-off cord is not
frayed or broken. If the cord is damaged,replace it; never try to repair it or tie ittogether.

3-12
E
RESET
WARNING
YAMAHA
87
654
32
1
MPH FUELHOUR
x1000r/min
MULTIDISPLAY
F0W0225
EJU00452a
SwitchesCheck the start switch 1, the engine stop
switch 2, and the engine shut-off switch 3for proper operation.
To check these switches place the water-craft in the water to provide adequate cooling.Start the engine, and then pull the engineshut-off cord 5 to remove the clip 4 from theengine shut-off switch. Verify that the enginestops immediately. (See pages 3-15 to 3-18for information on proper operation of thestart switch, the engine stop switch and theengine shut-off switch.)
EJU00453
Cooling water pilot outletCheck that water comes out from the out-
lets while the engine is running and thewatercraft is in the water.
EJU00454
Multifunction information centerCheck the operation of the multifunction
information center. (See pages 2-15 to 2-18for multifunction information center.)

3-13
E
EJU00676a
Operation
WARNINGBefore operating your watercraft,become familiar with all controls. Con-sult your Yamaha dealer about any con-trol or function you do not fullyunderstand. Failure to understand howcontrols work could cause an accident orprevent you from avoiding an accident.
CAUTION:Make sure that stern drain plugs aresecurely tightened before launching thewatercraft.
EJU00459
Engine break-inThe engine break-in period is essential to
allow the various components of the engineto wear and polish themselves to the correctoperating clearances. This ensures properperformance and promotes longer compo-nent life.
CAUTION:● For the first tankful of operation, pre-
mix a 50:1 mixture of fuel and oil (inaddition to the oil in the oil tank).
● After break-in, use straight gasolinefor normal operation.
1. Launch the watercraft and start theengine. (See pages 3-15 to 3-17 forengine starting procedures.)
2. Run the engine at the lowest possiblespeed for 5 minutes.

3-14
E
3. Gradually open the throttle to 3/4 or less.4. Continue operation at 3/4 throttle or less
until the first tankful of fuel has beenused.
5. Fill the tank with straight gasoline, andthen proceed with normal operation.
CAUTION:Failure to follow the engine break-in pro-cedure properly can result in severedamage to the engine.

3-15
E
EJU00645a
Starting the engine
WARNINGNever start the engine or let it run for anylength of time in an enclosed area.Exhaust fumes contain carbon monox-ide, a colorless, odorless gas that maycause loss of consciousness and deathwithin a short time. Always operate thewatercraft in an open area.
1. Launch the watercraft in water free fromweeds and debris and at least 60 cm(2 ft) deep.
WARNINGNever operate in water that is less than60 cm (2 ft) deep, otherwise you increaseyour chance of hitting a submergedobject, which could result in injury.
CAUTION:Never operate in water that is less than60 cm (2 ft) deep, otherwise pebbles orsand could be sucked into the jet intake,causing impeller damage or engine over-heating.

3-16
E
2. Turn the fuel cock knob to the “ON” posi-tion.
NOTE:Before starting the watercraft, after it hasbeen sitting, remove the fuel tank filler capto release any built-up pressure in the tankdue to fuel expansion.
3. Attach the clip 1 to the engine shut-offswitch 2. Also, attach the engine shut-off cord 3 to your left wrist.
WARNINGCheck that the engine shut-off cord is notfrayed or broken, and keep it free fromthe handlebars so the engine stops if theoperator falls off. The engine shut-offcord may not pull free if wrapped aroundthe handlebars when the operator fallsoff, allowing the watercraft to continue torun and cause an accident.
NOTE:It is not possible to start the engine with theclip removed from the engine shut-offswitch.
4. Move the choke lever all the way in thedirection of the arrow to start a coldengine.
NOTE:The choke should not be used when theengine is warm.
3-17
E
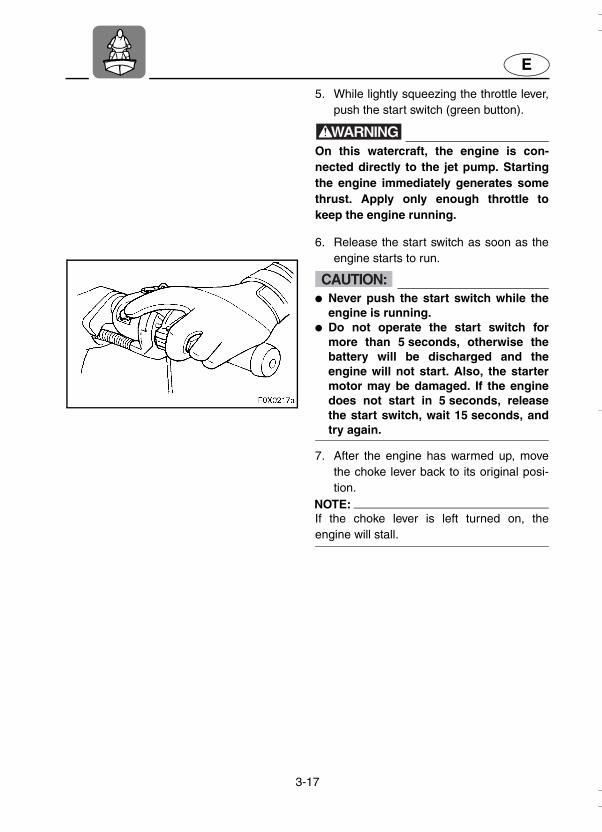
5. While lightly squeezing the throttle lever,push the start switch (green button).
WARNINGOn this watercraft, the engine is con-nected directly to the jet pump. Startingthe engine immediately generates somethrust. Apply only enough throttle tokeep the engine running.
6. Release the start switch as soon as theengine starts to run.
CAUTION:● Never push the start switch while the
engine is running.● Do not operate the start switch for
more than 5 seconds, otherwise thebattery will be discharged and theengine will not start. Also, the startermotor may be damaged. If the enginedoes not start in 5 seconds, releasethe start switch, wait 15 seconds, andtry again.
7. After the engine has warmed up, movethe choke lever back to its original posi-tion.
NOTE:If the choke lever is left turned on, theengine will stall.
3-18
E
EJU00463a
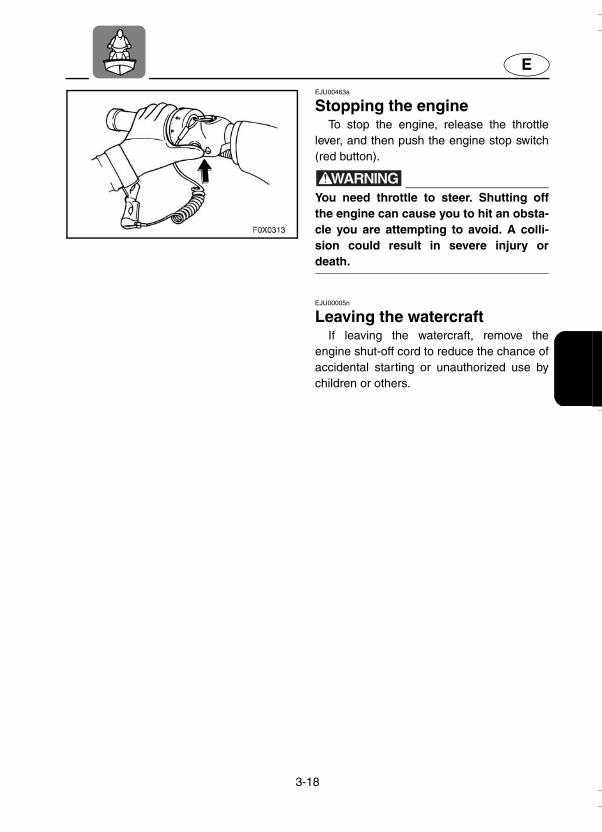
Stopping the engineTo stop the engine, release the throttle
lever, and then push the engine stop switch(red button).
WARNINGYou need throttle to steer. Shutting offthe engine can cause you to hit an obsta-cle you are attempting to avoid. A colli-sion could result in severe injury ordeath.
EJU00005n
Leaving the watercraftIf leaving the watercraft, remove the
engine shut-off cord to reduce the chance ofaccidental starting or unauthorized use bychildren or others.

3-19
E
EJU00674
Operating your watercraftGetting to know your watercraft
Operating your watercraft requires skillsacquired through practice over a period oftime. Take the time to learn the basic tech-niques well before attempting more difficultmaneuvers.
Operating your new watercraft can be avery enjoyable activity, providing you withhours of pleasure. However, it is essential tofamiliarize yourself with the operation of thewatercraft to achieve the skill level neces-sary to enjoy riding safely. Before operatingthis watercraft, read this Owner’s/Operator’sManual, the Riding Practice Guide, theRiding Instruction card and all warning andcaution labels on the watercraft. Pay particu-lar attention to the safety information onpages 1-7 to 1-13. Also, watch the BasicOrientation Video provided with your water-craft. These materials should give you anunderstanding of the watercraft and its oper-ation.
Remember: This watercraft is designed tocarry the operator and one passenger.Never exceed the maximum load limit orallow more than 2 persons to ride the water-craft at one time.
EJU00474
Learning to operate your watercraft
Before operating the watercraft, alwaysperform the pre-operation checks listed onpage 3-5. The short time spent checking thewatercraft will reward you with added safetyand reliability.
Check state and local laws before operat-ing your watercraft.
Operate defensively at safe speeds andkeep a safe distance away from people,objects, and other watercraft. Select a widearea to learn in, where you have good visi-bility and light boat traffic.
Use the buddy system—operate withsomeone nearby. Scan constantly for peo-ple, objects, and other watercraft. Be alertfor conditions that limit your visibility or blockyour vision of others.
Attach the engine shut-off cord (lanyard)to your wrist and keep it free from the han-dlebars so that the engine stops if the opera-tor falls off.
Wear a personal flotation device (PFD).All riders must wear a Coast Guardapproved PFD that is suitable for personalwatercraft use.
Maximum load: 160 kg (353 lb)Load is the total weight of cargo, opera-tor and passenger.
3-20
E
Wear protective clothing. Severe internalinjuries can occur if water is forced into bodycavities as result of falling into the water orbeing near the jet thrust nozzle. Normalswimwear does not adequately protectagainst forceful water entry into rectum andvagina. All riders must wear a wetsuit bot-tom or clothing that provides equivalent pro-tection.
Such clothing includes thick, tightlywoven, sturdy and snug-fitting apparel suchas denim, but does not include spandex orsimilar fabrics like those used in bicycleshorts. A full wetsuit can also protect againsthypothermia (subnormal body temperature)and abrasions.
Footwear and gloves are recommended.Eye protection is recommended to keep
wind, water, and glare from the sun out ofyour eyes while you operate your watercraft.Restraining straps for eyewear are madewhich are designed to float should your eye-wear fall in the water.
You should grip the handlebars firmly andkeep both feet on the floor of the footwell. Donot attempt to ride with passengers untilyour operating skills are fully developed.
EJU00736
Riding watercraft with a passenger
When a passenger is on board with theoperator, the watercraft handles differently,and is not as easy to maneuver, so operat-ing it requires a higher degree of skill.Before attempting to operate the watercraftwith a passenger on board, the operatormust practice operating the watercraft aloneenough to be able to acquire the necessaryskills.
The passengers must always wear USCGapproved PFD and wetsuit bottom or equiv-alent.
WARNINGDo not apply throttle when anyone is atrear of watercraft. Turn engine off or keepengine at idle. Water and/or debris exit-ing the jet thrust nozzle can cause severeinjury. The passenger should not attemptto board the watercraft if the operator isapplying throttle.
Do not give a ride to a child whose feetcannot reach the floor of the footwell. Thepassenger should hold on firmly to the oper-ator and keep both feet in the footwell.
WARNINGWhen a passenger is on board, makesure that he or she is holding on firmlyand has his or her feet in the footwellbefore you start to accelerate.

3-21
E
EJU00484
Starting the watercraft
WARNING● Scan constantly for people, objects
and other watercraft. Be alert for con-ditions that limit your visibility or blockyour vision of others.
● Operate defensively at safe speedsand keep a safe distance away frompeople, objects, and other watercraft.
● Do not follow directly behind water-craft or other boats. Do not go nearothers to spray or splash them withwater. Avoid sharp turns or othermaneuvers that make it hard for othersto avoid you or understand where youare going. Avoid areas with sub-merged objects or shallow water.
● Take early action to avoid collisions.Remember watercraft and other boatsdo not have brakes. Do not release thethrottle when trying to steer away fromobjects—you need throttle to steer.
● Practice reboarding in shallow waterbefore riding in deep water.

3-22
E
F0X0315
EJU00486a
Starting and boarding in shallowwater1. Do not start the engine in less than
60 cm (2 ft) of water. Put the watercraftin water that is deep enough, and thenboard the watercraft from the side or therear.
2. Attach the engine shut-off cord to yourleft wrist, and then install the clip to theengine shut-off switch.
3. Grip the handlebars with both hands,place both feet on the floor of the foot-well, start the engine, and start off.
Starting from a dock1. Board the watercraft from the side.2. Attach the engine shut-off cord to your
left wrist, and then install the clip to theengine shut-off switch.
3. Push the watercraft away from the dock,grip the handlebars with both hands,place both feet on the floor of the foot-well, start the engine, and start off.

3-23
E
F0X0316
F0X0317
F0X0318
EJU00490a
Boarding and starting in deep water
WARNING● Operator and passenger should prac-
tice getting on board in shallow waterbefore riding in deep water. Boardingin deep water requires more skill.
● The fatigue and exposure that couldresult after unsuccessful attempts toget back on the watercraft mayincrease the risk of injuries and drown-ing.
Boarding alone1. Swim to the rear of the watercraft and
place both hands on the boarding plat-form, pull yourself up, and then grasp thehandgrip with one hand.
2. Pull yourself up to a kneeling position onthe platform, and then move to the seatand sit astride.
3. Attach the engine shut-off cord to yourwrist, and then install the clip to theengine shut-off switch.
4. Grip the handlebars firmly with bothhands, place both feet in footwell, startthe engine, and look in all directionsbefore starting off.
WARNINGBefore starting off, make sure that thereare no boats, obstructions, or swimmersaround you.
3-24
E
F0X0319
EJU00737a
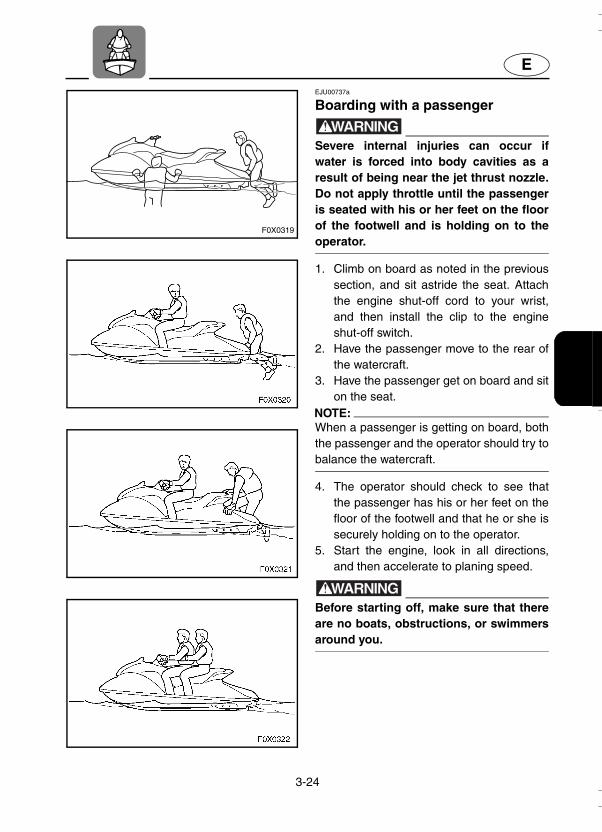
Boarding with a passenger
WARNINGSevere internal injuries can occur ifwater is forced into body cavities as aresult of being near the jet thrust nozzle.Do not apply throttle until the passengeris seated with his or her feet on the floorof the footwell and is holding on to theoperator.
1. Climb on board as noted in the previoussection, and sit astride the seat. Attachthe engine shut-off cord to your wrist,and then install the clip to the engineshut-off switch.
2. Have the passenger move to the rear ofthe watercraft.
3. Have the passenger get on board and siton the seat.
NOTE:When a passenger is getting on board, boththe passenger and the operator should try tobalance the watercraft.
4. The operator should check to see thatthe passenger has his or her feet on thefloor of the footwell and that he or she issecurely holding on to the operator.
5. Start the engine, look in all directions,and then accelerate to planing speed.
WARNINGBefore starting off, make sure that thereare no boats, obstructions, or swimmersaround you.

3-25
E
NOTE:The heavier the total weight of the operatorand passengers, the more difficult it will beto balance the watercraft. Do not operate thewatercraft when the total weight exceeds160 kg (353 lb) including any cargo. If it isdifficult to balance the watercraft at a stand-still, proceed as follows:1. The passenger must steady the water-
craft while the operator is boarding. Theoperator pulls himself up onto the plat-form into a seating position, then bal-ances the watercraft.
2. Attach the lanyard to your left wrist, theninstall the clip on the lanyard to theengine shut-off switch. Start the engineand keep it at idle.
3. The passenger pulls himself up on theplatform kneels down, then crawls ontothe seat as the watercraft accelerates.
4. The watercraft can now be acceleratedto planing speed, then the operator canreduce the throttle to the desired runningspeed.
EJU00677a
Capsized watercraftIf the watercraft capsizes, follow the pro-
cedures below carefully to prevent damageor injury.
WARNINGIMPROPER UPRIGHTING CAN CAUSEINJURY:● Shut engine off, and be sure engine
shut-off cord is removed from theengine shut-off switch.
● Do not put hand in intake grate.● Watch so you are not hit by the water-
craft as it comes over.
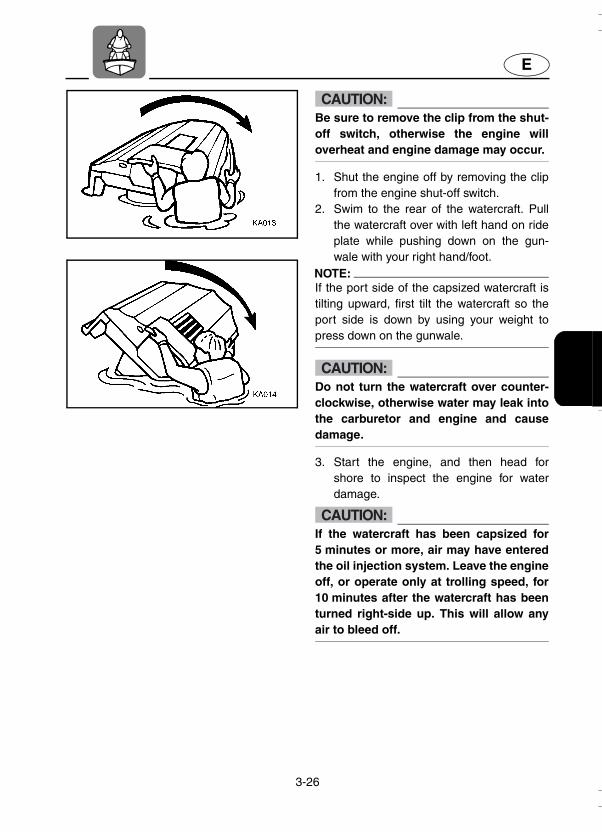
3-26
E
CAUTION:Be sure to remove the clip from the shut-off switch, otherwise the engine willoverheat and engine damage may occur.
1. Shut the engine off by removing the clipfrom the engine shut-off switch.
2. Swim to the rear of the watercraft. Pullthe watercraft over with left hand on rideplate while pushing down on the gun-wale with your right hand/foot.
NOTE:If the port side of the capsized watercraft istilting upward, first tilt the watercraft so theport side is down by using your weight topress down on the gunwale.
CAUTION:Do not turn the watercraft over counter-clockwise, otherwise water may leak intothe carburetor and engine and causedamage.
3. Start the engine, and then head forshore to inspect the engine for waterdamage.
CAUTION:If the watercraft has been capsized for5 minutes or more, air may have enteredthe oil injection system. Leave the engineoff, or operate only at trolling speed, for10 minutes after the watercraft has beenturned right-side up. This will allow anyair to bleed off.

3-27
E
A
B
C
D
EJU00499
Turning the watercraftSteering control depends on the combi-
nation of handlebar position and the amountof throttle.
Water sucked in through the intake grateis pressurized by the impeller in the jetpump. As the pressurized water is expelledfrom the pump through the jet thrust nozzle,it creates thrust to move and steer thewatercraft. The higher the engine speed, themore thrust is produced.
The amount of jet thrust, in addition to theposition of the handlebars, determines howsharply you turn.A. More throttle produces higher thrust, so
the watercraft will turn more sharply. B. Less throttle produces lower thrust, so
the watercraft will turn more gradually.C. Releasing the throttle completely pro-
duces only minimum thrust. If you aretraveling at speeds above trolling, youwill have rapidly decreasing ability tosteer without throttle. You may still havesome turning ability immediately afterreleasing the throttle, but once theengine slows down, the watercraft will nolonger respond to handlebar input untilyou apply throttle again or you reach atrolling speed.At trolling speed, the watercraft can beturned gradually by handlebar positionalone using just the amount of thrustavailable at idle.
D. If the engine is stopped while riding,there is no thrust. The watercraft will gostraight even though the handlebars areturned.
You need throttle to steer.

3-28
E
WARNING● Do not release the throttle when trying
to steer away from objects—you needthrottle to steer. A collision couldresult in severe injury or death.
● When operating at higher speeds,make gradual turns or slow downbefore turning. Sharp high-speed turnsmay cause the watercraft to slide side-ways or spin, throwing the operatorand passengers overboard whichcould cause an injury.

3-29
E
EJU00621
Stopping the watercraftThe watercraft is not equipped with a sep-
arate braking system. It is stopped by waterresistance when the throttle lever isreleased. From full speed, the watercraftcomes to a complete stop in approximately110 m (360 ft) after the throttle is releasedand the engine is stopped, although this dis-tance will vary depending on many factors,including gross weight, water surface condi-tions, and wind direction. The watercraftslows down as soon as the throttle lever isreleased, but will coast for a distance beforefully stopping. If you are not sure you canstop in time before hitting an obstacle, applythrottle and turn in another direction.
WARNING● Allow adequate stopping distance. ● Take early action to avoid collisions.
Remember, watercraft and other boatsdo not have brakes.
● Operate defensively at safe speedsand keep a safe distance away frompeople, objects, and other watercraftto give you time to stop.
● Do not shut the engine off when slow-ing down in case you need enginepower to steer away from a boat orother obstacle that comes into yourpath.

3-30
E
EJU00635
Beaching the watercraft1. Make sure no obstructions, boats or
swimmers are near the beach. Releasethe throttle lever about 110 m (360 ft)before you reach the intended beachingarea.
2. Approach the beach slowly and stop theengine before reaching land. Remem-ber: you need throttle to steer.
3. Get off the watercraft and pull it up onthe beach.
CAUTION:Small pebbles, sand, seaweed, and otherdebris can be pulled into the jet intakeand impair or damage the impeller.Always stop the engine and get offbefore beaching the watercraft.
EJU00505
Docking the watercraft1. Make sure that no obstructions, boats or
swimmers are close to the watercraft.Reduce speed about 110 m (360 ft)away from the dock.
2. Slowly approach the dock and stop theengine just before coming alongside it.
EJU00507
Rough water operationThe force of landing after jumping can
cause a strong impact on both the watercraftand the operator and passenger. It is possi-ble for the operator to hit his or her chest orjaw on the watercraft body or handlebarsand be injured. Do not operate the water-craft with your chin right above the handle-bars or with your feet outside the watercraft.Operating in rough water or jumping wavescan also crack the watercraft body or dam-age internal parts. Avoid operating in roughwater or bad weather conditions.

3-31
E
EJU00691a
Post-operation checksAlways perform the following post-opera-
tion checks after operating the watercraft.1. Remove the watercraft from the water.2. Wash down the hull, handlebars, and jet
unit with fresh water.3. Remove the seat and check the engine
compartment for water. To drain excesswater, remove the stern drain plugs, thenraise the bow of the watercraft enough toallow water in the bilge to drain out.
NOTE:This watercraft is equipped with an auto-matic bilge-draining system that removeswater from the engine compartment whileyou are underway. However, some residualwater will remain.
4. Put the watercraft in a horizontal posi-tion.
5. Flush the cooling system to prevent itfrom clogging with salt, sand, or dirt.(See page 4-1 for flushing the coolingsystem procedures.)
6. Drain residual water from the exhaustsystem by alternately squeezing andreleasing the throttle lever for 10 to15 seconds while the engine is running.
CAUTION:Do not attempt to run the engine at fullthrottle or for more than 15 secondswhile the watercraft is out of the water,otherwise the engine may overheat orseize.

3-32
E
7. If the watercraft will be stored for a weekor more, lubricate internal engine com-ponents to help prevent corrosion. (Seepage 4-3 for lubrication procedures.)
8. Rinse the engine and engine compart-ment with a small amount of water.
CAUTION:Do not use high pressure when rinsingthe engine or engine compartment assevere engine damage could result.
9. Wipe the engine and engine compart-ment dry with a clean cloth (repeatstep 3, if necessary).
10. Wipe the hull, handlebars, and jet unitdry with a clean cloth.
11. Spray a rust inhibitor, such as YamahaSilicone Protectant and Lubricant, onmetallic parts to minimize corrosion.
12. Allow the engine compartment to air drycompletely before reinstalling the seat.

3-33
E
EJU00679
Transporting
WARNINGAlways place the fuel cock knob in the“OFF” position when transporting thewatercraft, otherwise fuel could leak outinto the engine or engine compartment,which would create a fire hazard.
When transporting the watercraft on atrailer, secure the tie downs to the trailerthrough the bow eye and stern rope holes.
CAUTION:Do not route ropes or tie downs over theseat, as they may leave permanent markson the seat’s surface. Also, wrap theropes or tie downs with towels or ragswhere they touch the body of the water-craft to avoid scratching or damage.

E
4
EJU00515
MAINTENANCE AND CARE
Storage.......................................................4-1Flushing the cooling system...................4-1Lubrication...............................................4-3Fuel system.............................................4-4Battery.....................................................4-5Cleaning the watercraft...........................4-6
Maintenance and adjustments ...............4-7Owner’s/Operator’s Manual and tool kit .............................................................4-8Periodic maintenance chart....................4-9Inspecting the fuel system....................4-10Inspecting the oil injection system........4-12Inspecting the steering cable................4-13Inspecting and adjusting the throttle cable......................................................4-13Inspecting the QSTS mechanism ........4-14Cleaning and adjusting the spark plugs......................................................4-15Lubrication points..................................4-16Inspecting the battery ...........................4-19Adjusting the carburetor .......................4-21Replacing the fuse................................4-22Bleeding the oil injection pump.............4-22Adjusting the Yamaha Adjustable Sponson (Y.A.S.) ..................................4-23
Specifications .........................................4-24

4-1
E
EJU00516a
Storage
WARNINGAlways place the fuel cock knob in the“OFF” position when storing the water-craft, otherwise fuel could leak out intothe engine or engine compartment,which would create a fire hazard.
Storage for prolonged periods of time,such as winter storage, requires preventa-tive maintenance to ensure against deterio-ration. It is advisable to have the watercraftserviced by a Yamaha dealer prior to stor-age. However, the following procedures canbe performed by the owner.
EJU00913a
Flushing the cooling systemFlushing the cooling system is essential
to prevent the cooling system from beingclogged with salt, sand, or dirt.
CAUTION:● Do not supply water to the cooling
water passages when the engine is notrunning. The water could flow backthrough the muffler into the crankcasecausing severe engine damage.
● Do not run the engine for more15 seconds without supplying water,otherwise the engine may overheat.

4-2
E
1. Put the watercraft on land in a horizontalposition.
2. Open the flushing hose connector cap 1,and then insert the garden hose adapter 2into the flushing hose connector 3 andturn it until it is securely connected.
3. Connect the garden hose adapter to awater tap using a hose.
4. Start the engine, and then immediatelyturn the water supply on until water flowsout continually from the cooling waterpilot outlet.
5. Run the engine at idling speed for about3 minutes watching the engine condition.If the engine stops while flushing, turnthe water supply off immediately andrepeat the above steps.
6. Turn the water supply off, and then forcethe remaining water out from the coolingpassages by alternately squeezing, andreleasing the throttle lever for 10 to15 seconds.
7. Stop the engine.8. Remove the garden hose adapter and
secure the cap.

4-3
E
EJU00526a
Lubrication
WARNINGTo reduce the risk of fire or explosion:Never pour or spray gasoline, or any sub-stance other than engine fogging oilthrough the holes in the carburetorsilencer cover.
CAUTION:● Be sure to replace the caps securely
after fogging the engine. Otherwisewater could enter the engine andcause damage.
● Do not attempt to run the engine at fullthrottle or for more than 15 secondswhile the watercraft is out of the water,otherwise the engine may overheatand/or seize.
1. Open the silencer cap 1 on the silencer.2. Start the engine with the watercraft in a
well-ventilated area.3. With the engine running at a fast idle,
quickly spray as much fogging oil as pos-sible through the hole in the silencercover. Use Yamaha Stor-Rite Fogging Oilor an equivalent. Keep spraying until theengine stalls (or a maximum of15 seconds).

4-4
E
4. Install the cap securely.5. Remove the spark plugs and pour
approximately one tablespoon of engineoil into each cylinder. Grease the sparkplug threads and install the spark plugs.
6. Lubricate all cables such as the throttle,choke, and steering cables.
NOTE:Use a Yamaha Power Cable Luber andYamaha Lube-Zall to pressure lubricate thecables and purge out any moisture betweenthe inner and outer cables.
7. Lubricate the areas of the watercraftspecified under Lubrication points onpage 4-16.
EJU00528a
Fuel systemTop off the fuel tank with fresh gasoline
and add one ounce of Yamaha Fuel Stabi-lizer and Conditioner to each gallon of fuel.NOTE:Use of Yamaha Fuel Stabilizer and Condi-tioner eliminates the need to drain the fuelsystem. If the fuel system is to be drainedinstead, consult a Yamaha dealer.

4-5
E
EJU00530
BatteryIf the watercraft is not used for a month or
more, disconnect the (–) battery cable first,and then the (+) cable and breather pipe,and next remove the battery from the craft.
Clean the battery casing using freshwater.
If the battery terminals are dirty or cor-roded, clean the mating surfaces on the ter-minals for the battery cables using the wiringbrush or equivalents.
Recharge the battery, and then store it ina cool and dark place.
Apply the Yamaha marine grease/Yamahagrease A to the battery terminals.
Recharge the battery periodically at least2 months because a battery will dischargeelectricity by itself while storing.
CAUTION:The battery may be impossible to useagain if you store it for a longer timewithout recharging. Recharge the batteryperiodically.
NOTE:The battery condition can be found bychecking the specific gravity of the electro-lyte. However, you can also know the batterycondition roughly by measuring the voltageat both battery terminals. Recharge the bat-tery if the voltage is 12 volts or less.
Yamaha recommend checking the specificgravity of the electrolyte and charging bat-tery by a Yamaha dealer or a battery dealer.If you maintain the battery yourself, readcarefully the instructions for the tool andmachine before maintenance.
Specific gravity of electrolyte (for reference):
1.28 at 20 °C (68 °F)

4-6
E
EJU00531
Cleaning the watercraftClean the watercraft before storing for a
long period.1. Wash down the hull, handlebars, and
drive unit with fresh water.2. Rinse the engine and bilge area with
fresh water. Drain off all water and wipeup remaining moisture with clean, dryrags.
3. Spray the engine’s exterior with YamahaSilicone Protectant and Lubricant.
4. Wax the hull with a non-abrasive waxsuch as Yamaha Silicone Wax.
5. Wipe all vinyl and rubber components,such as the seat and engine compart-ment seals, with a vinyl protectant suchas Yamaha Protectant.

4-7
E
EJU00535a
Maintenance and adjustments
Periodic inspection, adjustment and lubri-cation will keep your watercraft in the safestand most efficient condition possible. Safetyis an obligation of the watercraft owner. Themost important points of watercraft inspec-tion, adjustment and lubrication areexplained on the following pages.
See your Yamaha dealer for genuineYamaha replacement parts and optionalaccessories designed for your watercraft.
Remember that failures that are the resultof the installation of parts or accessorieswhich are not qualitatively equivalent to gen-uine Yamaha parts are not covered by thelimited warranty.
WARNING● Be sure to turn off the engine when
you perform maintenance unless oth-erwise specified, otherwise an acci-dent or injury could result fromunexpected operation, moving parts,or electric shock. If the owner is notfamiliar with watercraft servicing, thiswork should be done by a Yamahadealer. Improperly serviced compo-nents could fail or stop operating cor-rectly, which could result in anaccident.
● Modifications to this watercraft notapproved by Yamaha may cause lossof performance or excessive noise, orrender it unsafe for use. Consult aYamaha dealer before attempting anychanges.

4-8
E
NOTE:A service manual is available for purchasethrough a Yamaha dealer for owners whohave the mechanical skills, tools, and otherequipment necessary to perform mainte-nance not covered by this Owner’s/Opera-tor’s Manual.
Owner’s/Operator’s Manual and tool kit
It is advisable always to carry the Owner’s/Operator’s Manual and tool kit with youwhenever you use the watercraft. For yourconvenience, a storage compartment 1 isprovided on the watercraft for the manualand tool kit.NOTE:To protect these materials from water dam-age, it would be a good idea to put them in awaterproof bag. If your Owner’s/Operator’sManual is damaged, order a replacementfrom a Yamaha dealer.
The service information included in thismanual is intended to provide you with thenecessary information for completing yourown preventive maintenance and minorrepairs. The tools provided in the tool kit 2are sufficient for this purpose. However, atorque wrench may also be necessary totighten nuts and bolts.

4-9
E
EJU00536Jl
Periodic maintenance chartThe following chart gives general guidelines for periodic maintenance. However, depend-
ing on your operating conditions maintenance may need to be performed more frequently.(●) This mark indicates maintenance that you may do yourself.(❍) This mark indicates work to be done by a Yamaha dealer.
*1: Grease capacity: 33.0–35.0 cm3 (1.11–1.18 oz)*2: Grease capacity: 6.0–8.0 cm3 (0.20–0.27 oz)
MAINTENANCE INTERVAL INITIALTHEREAFTER
EVERYPAGE
10hours
50hours
100hours
100hours
200hours
ITEM3
months6
months6
months12
monthsSpark plug Inspect, clean, adjust ● ● ● ● 4-15Lubrication points Lubricate ● ● 4-16Intermediate housing Lubricate ❍*1 ●*2 ●*2 4-17Fuel system Inspect ❍ ❍ 4-10Fuel filter Check, replace ❍ ❍ 4-11Fuel tank Clean ❍ 4-11Oil injection system Inspect, clean ❍ ❍ 4-12Trolling speed Adjust ● ● 4-21Carburetor throttle shaft Inspect ❍ ❍ —
Cooling water passages Flush ● (after every use)
4-1
Bilge strainer Clean ● ● ● —Impeller Inspect ● ● ● —Steering cable Inspect ● ● 4-13QSTS mechanism Inspect ● ● 4-14Throttle cable Inspect, adjust ● ● 4-13Stern drain plugs Inspect, replace ● 3-7
Battery Inspect
●(inspect fluid level before every use)
4-19
Rubber coupling Inspect ❍ —Nuts and bolts Tighten ❍ ❍ ❍ —

4-10
E
EJU00537
Inspecting the fuel system
WARNINGGasoline and its vapors are highly flam-mable and explosive.
Check the fuel system for leaks, cracks,or malfunctions. If any problem is found, dothe necessary repair or replacement asrequired. If repair is necessary, consult aYamaha dealer.Check:● Carburetor for leakage.● Fuel pump for malfunction or leakage.● Fuel tank for water or dirt.● Fuel tank for damage, cracks or leakage.● Fuel hose joint for leakage.● Fuel hose for cracks or other damage.● Fuel filter for leakage.● Fuel cock for leakage.● Air vent check valve for leakage.● Fuel tank filler cap for damage.
WARNINGFailure to check for and repair any fuelleakage may result in fire or explosion.

4-11
E
EJU00538
Fuel filterThis watercraft is equipped with a one-
piece, disposable fuel filter 1. The fuel filtershould be replaced once a year or afterevery 200 hours of operation, or if water isfound in the filter. Have a Yamaha dealerreplace the fuel filter if necessary.
WARNINGDo not try to replace the fuel filter your-self. An incorrectly installed filter canleak gasoline, which could lead to fire orexplosion. If necessary, have a Yamahadealer replace the fuel filter.
EJU00540
Fuel tankCheck the fuel tank 1 for leakage or
water in the tank. If water is found in the fuelsystem or if the fuel tank needs to becleaned have a Yamaha dealer service thewatercraft.

4-12
E
EJU00544
Inspecting the oil injection system
Check the oil injection system for leakage,cracks, or malfunctions. If necessary, have aYamaha dealer repair the oil injection sys-tem.Check:● Oil tank for damage, cracks or leakage.● Oil tank for water or dirt.● Oil hose and joint for damage or cracks.● Oil filter for dirt.● Oil pump for leakage.
Oil tankCheck the oil tank for leakage or water in
the tank. If water is found in the oil injectionsystem or if the oil tank needs to be cleanedhave a Yamaha dealer service the water-craft.
Oil filterCheck the oil filter for dirt and clogs. If the
oil filter is clogged, remove it from the oiltank together with the oil level sender andclean it.

4-13
E
EJU00546a
Inspecting the steering cableCheck for smooth operation of the handle-
bars and jet thrust nozzle.Turn the handlebars as far as possible to
the right and left and check that the differ-ence of distance A and B between the jetthrust nozzle and the nozzle is within 5 mm.
If steering is stiff or misadjusted, have aYamaha dealer service it.
Difference of A and B:Maximum 5 mm (0.20 in)
EJU00550
Inspecting and adjusting the throttle cable
Check that the throttle cable moves backto the set position smoothly and that freeplay is within specification. 1. Squeeze and release the throttle lever. If
the lever does not return smoothly, havea Yamaha dealer service it.
2. Adjust free play a by loosening the lock-nut 1 and turning the adjuster 2.
Throttle lever free play:4–7 mm (0.16–0.28 in)

4-14
E
EJU00551
Inspecting the QSTS mechanism
Check that the shift lock lever moves backto the lock position smoothly, that the QSTSselector locks and unlocks properly, and thatthe jet thrust nozzle moves up or down.1. Squeeze and release the shift lock lever.2. Check that the QSTS selector locks
when the lever is released. 3. Check that the selector turns smoothly
when the lever is squeezed and held inplace.
4. Check that the angle of the jet thrustnozzle changes when the selector isshifted from neutral to bow-up or bow-down.
If the mechanism does not work properly,have a Yamaha dealer service it.

4-15
E
EJU00552a
Cleaning and adjusting the spark plugs
The spark plug is an important enginecomponent and is easy to inspect. The con-dition of the spark plug can indicate some-thing about the condition of the engine. Forexample, if the center electrode porcelain isvery white, this could indicate an intake airleak or carburetion problem in that cylinder.Do not attempt to diagnose any problemsyourself. Have a Yamaha dealer service thewatercraft.
Remove and inspect the spark plug peri-odically; heat and deposits will cause thespark plug to slowly break down and erode.If electrode erosion becomes excessive, or ifcarbon and other deposits are excessive,replace the spark plug with the specifiedplug.
Measure the spark plug gap a with awire thickness gauge before installing thespark plug. Adjust the gap to specification ifnecessary.
To reinstall spark plug:1. Clean the gasket surface.2. Wipe any dirt from the threads of the
spark plug.3. Screw the spark plug to the correct
torque.
Standard spark plug: BR8ES
Spark plug gap:0.6–0.7 mm (0.024–0.028 in)
Spark plug torque:25 N·m (2.5 kgf·m, 18 ft·lb)
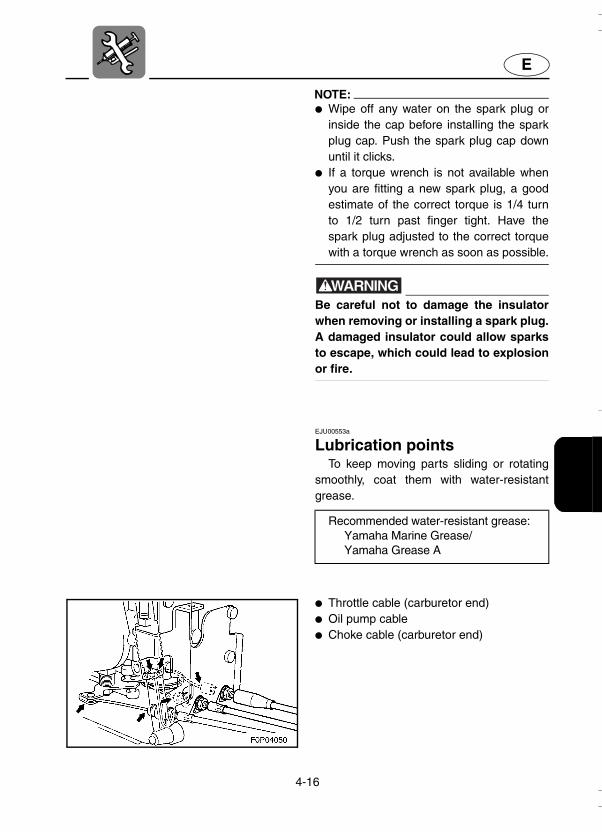
4-16
E
NOTE:● Wipe off any water on the spark plug or
inside the cap before installing the sparkplug cap. Push the spark plug cap downuntil it clicks.
● If a torque wrench is not available whenyou are fitting a new spark plug, a goodestimate of the correct torque is 1/4 turnto 1/2 turn past finger tight. Have thespark plug adjusted to the correct torquewith a torque wrench as soon as possible.
WARNINGBe careful not to damage the insulatorwhen removing or installing a spark plug.A damaged insulator could allow sparksto escape, which could lead to explosionor fire.
EJU00553a
Lubrication pointsTo keep moving parts sliding or rotating
smoothly, coat them with water-resistantgrease.
Recommended water-resistant grease:Yamaha Marine Grease/Yamaha Grease A
● Throttle cable (carburetor end)● Oil pump cable● Choke cable (carburetor end)

4-17
E
● Throttle cable (handlebar end)Pull the throttle lever and remove the seal 1.
Spray a rust inhibitor into the outer cable. Refitthe seal securely.
● Steering cable (handlebar end)
● Steering cable (nozzle end)● Nozzle pivot shaft● QSTS cable (nozzle end)
● QSTS cables (pulley end)

4-18
E
● QSTS cables (handlebar end)Remove the QSTS cable housing. Spray
a rust inhibitor into the outer cable.Reinstall the QSTS cable housing.
● YPVS cable
● Choke cable (handlebar side)Spray the rust inhibitor into the outer
cable.
EJU00566a
● Intermediate housingUsing a grease gun, fill the intermediate
housing with water-resistant grease throughthe grease nipple 1.
Grease capacity:Initial 10 hours or 1 month:
33.0–35.0 cm3 (1.11–1.18 oz)Every 100 hours or 6 months:
6.0–8.0 cm3 (0.20–0.27 oz)
4-19
E
EJU00572
Inspecting the batteryCheck the level of the battery electrolyte
and make sure the leads are secure.
WARNINGBattery electrolyte is poisonous and dan-gerous, causing severe burns, etc. Elec-trolyte contains sulfuric acid. Avoidcontact with skin, eyes or clothing.AntidotesExternal: Flush with water. Internal: Drink large quantities of wateror milk. Follow with milk of magnesia,beaten egg or vegetable oil. Call physi-cian immediately.Eyes: Flush with water for 15 minutesand get prompt medical attention.Batteries produce explosive gases. Keepsparks, flame, cigarettes, etc., well away.If using or charging the battery in anenclosed space, make sure that it is wellventilated. Always shield your eyes whenworking near batteries.KEEP OUT OF THE REACH OF CHIL-DREN.
CAUTION:Be careful not to place the battery on itsside.Make sure to remove the battery from thebattery compartment when adding bat-tery electrolyte or charging the battery.When checking the battery, make surethe breather hose is connected to thebattery and not obstructed.

4-20
E
To replenish the battery:1. Make sure that the electrolyte level is
between the upper 1 and lower 2 levelmarks.
2. Refill the battery with distilled water ifnecessary.
CAUTION:Normal tap water contains minerals thatare harmful to a battery. Use only dis-tilled water for replenishing the battery.
To recharge the battery:
CAUTION:Do not attempt to charge a battery hast-ily. Battery life may be shorter.
Yamaha recommend charging battery bya Yamaha dealer or a battery dealer. If youcharge the battery yourself, read the batterycharger instructions carefully before charg-ing and follow the points below.1. Remove all caps from the battery cell.2. Add distilled water to the specified level if
the electrolyte level is low.3. Set the charging rate to 1.9 ampere and
charge the battery slowly until the explo-sive gases become coming out vigor-ously from battery cells.
To connect the battery terminals:1. Make sure that the connections are correct
when you insert the battery in the watercraft. 2. Make sure that the breather hose is
properly connected and that it is notdamaged or obstructed.
3. Make sure that the battery is securelyheld in place.
1 Positive (+): Red lead2 Negative (–): Black lead3 Breather hose

4-21
E
EJU00573
Adjusting the carburetorThe carburetor is a vital part of the engine
and requires very sophisticated adjustment.Most adjusting should be left to a Yamahadealer who has the professional knowledgeand experience to perform it. However, theoperator may adjust the trolling speed aspart of the usual maintenance routine.
CAUTION:The carburetor was set at the Yamahafactory after many tests. If the settingsare disturbed by someone who does nothave the necessary technical knowledge,poor engine performance and damagemay result.
EJU00577a
Adjusting the trolling speed1. Put the watercraft in the water. 2. Start the engine and warm it up for 1 or
2 minutes. Using a diagnostic tachome-ter or, if necessary, the tachometer in themultifunction information center, adjustthe engine speed to specification.
3. Turn the throttle stop screw 1 clockwiseto increase engine speed if necessary.Turn it counterclockwise to decreaseengine speed if necessary.
Trolling speed: 1,250–1,350 r/min
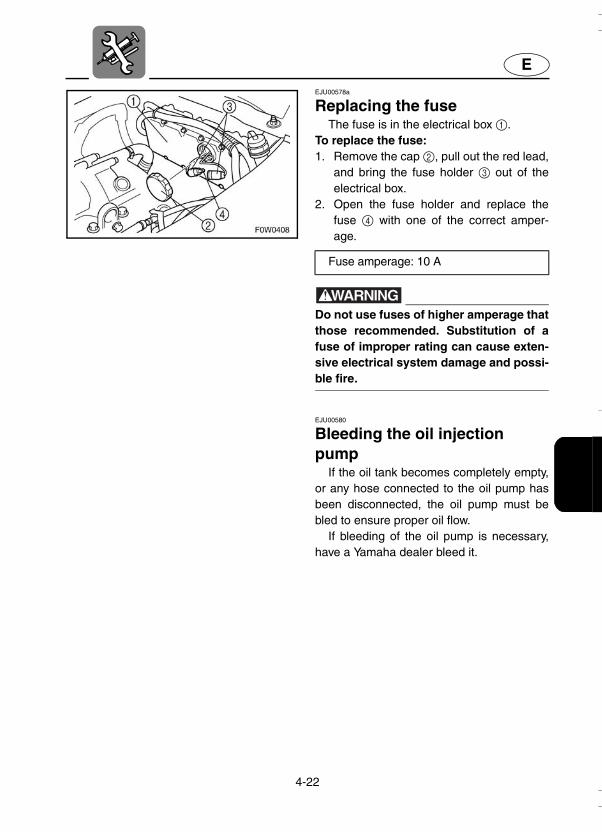
4-22
E
EJU00578a
Replacing the fuseThe fuse is in the electrical box 1.
To replace the fuse:1. Remove the cap 2, pull out the red lead,
and bring the fuse holder 3 out of theelectrical box.
2. Open the fuse holder and replace thefuse 4 with one of the correct amper-age.
WARNINGDo not use fuses of higher amperage thatthose recommended. Substitution of afuse of improper rating can cause exten-sive electrical system damage and possi-ble fire.
EJU00580
Bleeding the oil injection pump
If the oil tank becomes completely empty,or any hose connected to the oil pump hasbeen disconnected, the oil pump must bebled to ensure proper oil flow.
If bleeding of the oil pump is necessary,have a Yamaha dealer bleed it.
Fuse amperage: 10 A

4-23
E
EJU00753a
Adjusting the Yamaha Adjustable Sponson (Y.A.S.)
The Yamaha Adjustable Sponsons can beadjusted to enhance watercraft performanceaccording to operator preference and oper-ating conditions. (See page 2-20 for anexplanation of various positions.)To adjust the Y.A.S.:1. Remove the bolts 1 on both sponsons.2. Remove both sponsons, and then install
them in the desired position.NOTE:Be sure to install both sponsons to the samelevel.
3. Tighten the bolts on both sponsons tothe correct torque.
Tightening torque:18 N·m (1.8 kgf·m, 13 ft·lb)

4-24
E
EJU00588
SpecificationsMODEL
ITEMUnit GP800R
WATERCRAFT CAPACITYMaximum people on board Number of people 2Maximum load capacity kg (lb) 160 (353)DIMENSIONSLength mm (in) 2,930 (115.4)Width mm (in) 1,150 (45.3)Height mm (in) 1,020 (40.2)Dry weight kg (lb) 268 (591)PERFORMANCEMaximum output kW (PS) @ r/min 88.2 (120)@ 7,000Maximum fuel consumption L/h (US gal/h, Imp gal/h) 49.0 (12.9, 10.8)Cruising range at full throttle hr. 1.2Trolling speed r/min 1,250–1,350ENGINEEngine type 2-strokeNumber of cylinders 2Engine displacement cm3 (cu in) 784 (47.8)Bore & stroke mm (in) 80.0 × 78.0 (3.15 × 3.07)Compression ratio 6.6:1Lubrication system Variable oil injectionCooling system Water cooledStarting system Electric starterIgnition system Digital CDISpark plug BR8ES (NGK)Spark plug gap mm (in) 0.7–0.8 (0.028–0.031)Battery capacity V-AH 12-19 Charging system Flywheel magnetoDRIVE UNITPropulsion system Jet pumpJet pump type Axial flow, single stageImpeller rotation Counterclockwise (viewed from rear)Transmission Direct drive from engineJet thrust nozzle angle Degree 23 + 23Trim nozzle angle Degree -5, 0, 5, 10, 15FUEL AND OILRecommended fuel Regular unleaded gasolineMinimum octane rating PON
RON8690
Recommended engine oil YAMALUBE 2-W, or an equivalent NMMA-certified TC-W3 marine oil
Fuel tank capacityTotal L (US gal, Imp gal) 60 (15.9, 13.2) Reserve L (US gal, Imp gal) 10 (2.6, 2.2)
Oil tank capacity L (US gal, Imp gal) 5.5 (1.45, 1.21)

E
–MEMO–

E
5
EJU00594
TROUBLESHOOTING AND EMERGENCY
PROCEDURESTroubleshooting .......................................5-1
Troubleshooting chart.............................5-1Emergency procedures...........................5-4
Cleaning the jet intake and impeller.......5-4Jumping the battery ................................5-5Towing the watercraft .............................5-7Submerged watercraft ............................5-8

5-1
E
EJU00595
TroubleshootingIf you have any trouble with your watercraft, use this section to check for the possible
cause.If you cannot find the cause, or if the procedure for replacement or repair is not described
in this Owner’s/Operator’s Manual, have a Yamaha dealer perform the necessary service.
EJU00596a
Troubleshooting chartTROUBLE POSSIBLE CAUSE REMEDY PAGE
Engine does not start
Starter motor does not turn overEngine shut-off switch
Clip not in place Install clip2-8
Fuse Burned out Replace the fuse and check wiring
4-22
Battery Run down Recharge 4-19Poor terminal connec-tions
Tighten as required4-19
Terminal corroded Clean —Starter motor Faulty Have serviced by
Yamaha dealer—
Starter motor turns overFuel cock Turned to “OFF” Turn the fuel cock to
“ON”2-7
Fuel Empty Refill as soon as possi-ble
3-3
Stale or contaminated Have serviced by Yamaha dealer
4-11
Fuel tank Water or dirt present Have serviced by Yamaha dealer
4-11
Spark plug Fouled or defective Clean or replace 4-15Spark plug cap Not connected or loose Connect properly 4-15Crankcase Filled with water Crank engine with plug
out until clean5-8
Fuel filter Clogged or water pooled
Have serviced by Yamaha dealer
4-11
Choke Choke valve can not be closed surely by lever operation
Have serviced by Yamaha dealer —

5-2
E
Engine runs irregu-larly or stalls
Fuel Empty Refill as soon as possi-ble
3-3
Stale or contaminated Have serviced by Yamaha dealer
4-11
Choke Lever is moved to on Move back to original position
2-8
Fuel filter Clogged or water pooled
Have serviced by Yamaha dealer
4-11
Fuel tank Water or dirt present Have serviced by Yamaha dealer
4-11
Spark plug Fouled or defective Replace 4-15Incorrect heat range Replace 4-15Gap incorrect Adjust 4-15
Spark plug cap Loose Connect properly 4-15Cracked, torn, or dam-aged
Have serviced by Yamaha dealer
—
Electrical wir-ing
Loose connection Tighten or connect properly
—
Carburetor Incorrect idle adjust-ment
Adjust idle4-21
Clogged Have serviced by Yamaha dealer
—
Warning light or indicator blinks
Fuel level Empty Refill as soon as possi-ble
3-3
Engine oil level Empty Refill immediately 3-4Oil filter clogged Clean 4-12
Engine over-heated
Jet intake clogged Clean5-4
Low battery voltage
Battery voltage low Charge 4-19Battery terminal con-nected wrong
Connect properly4-19
TROUBLE POSSIBLE CAUSE REMEDY PAGE

5-3
E
Watercraft slow or loses power
Cavitation Jet intake clogged Clean 5-4Impeller damaged or worn
Have serviced by Yamaha dealer
—
Engine over-heated
Jet intake clogged Clean5-4
Fuel filter Clogged Have serviced by Yamaha dealer
4-11
Spark plug Fouled or defective Replace 4-15Incorrect heat range Replace 4-15Gap incorrect Adjust 4-15
Spark plug caps
Loose Connect properly4-15
Electrical wir-ing
Loose connection Tighten or connect properly
—
Fuel Stale or contaminated Have serviced by Yamaha dealer
4-11
Bilge Water in bilge Drain 3-7
TROUBLE POSSIBLE CAUSE REMEDY PAGE

5-4
E
EJU00597
Emergency proceduresEJU00598
Cleaning the jet intake and impeller
If weeds or debris get caught in the intakeor impeller, cavitation can occur, causing jetthrust to decrease even though enginespeed rises. If this condition is allowed tocontinue, the engine will overheat and mayseize. If there is any sign that the jet intakeor impeller is clogged with weeds or debris,beach the watercraft and check the intakeand impeller. Always stop the engine beforebeaching the watercraft.
WARNINGBefore attempting to remove weeds ordebris from the jet intake or impellerareas, shut the engine off and removethe clip from the engine shut-off switch.Severe injury or death could result fromcontact with the rotating parts of the jetpump.
1. Turn the watercraft on its side as shown.
CAUTION:● Place a suitable clean cloth or carpet-
ing underneath the watercraft to pro-tect it from abrasions and scratches.
● Always turn the watercraft over ontoits port (left) side.
● When turning the watercraft on itsside, support the bow so the handle-bars cannot be bent or damaged.

5-5
E
2. Remove any weeds or debris fromaround the drive shaft, impeller, pumphousing, and jet thrust nozzle.If debris is difficult to remove, consultyour Yamaha dealer.
CAUTION:Always avoid operating your watercraft inareas where weed growth is thick. If trav-eling in weeded areas is unavoidable,operate the engine alternately at partialthrottle and full throttle. Weeds tend toaccumulate more at a steady speed andat trolling speed. If weeds clog the intakeor impeller area and cause cavitation, fol-low the cleaning procedure above.
EJU00599
Jumping the batteryIf the watercraft battery has run down, the
engine can be started using a 12-volt bat-tery and jumper cables.
WARNINGBattery electrolyte is poisonous and dan-gerous, causing severe burns, etc. Elec-trolyte contains sulfuric acid. Avoidcontact with skin, eyes or clothing.AntidotesExternal: Flush with water. Internal: Drink large quantities of wateror milk. Follow with milk of magnesia,beaten egg or vegetable oil. Call physi-cian immediately.Eyes: Flush with water for 15 minutesand get prompt medical attention.Batteries give off explosive gases. Keepsparks, flame, cigarettes, etc. well away.If using or charging the battery in anenclosed area, make sure that it is wellventilated. Always shield your eyes whenworking near batteries.KEEP OUT OF THE REACH OF CHILDREN.
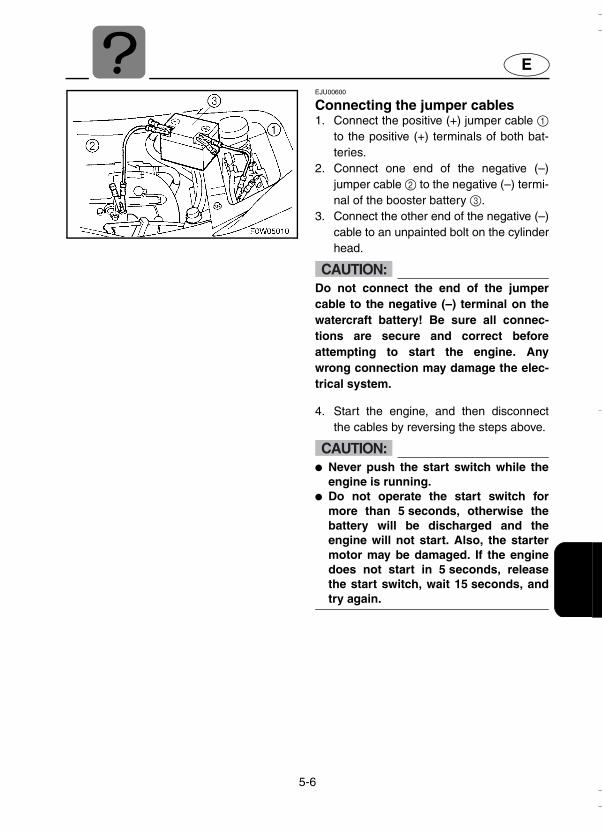
5-6
E
EJU00600
Connecting the jumper cables1. Connect the positive (+) jumper cable 1
to the positive (+) terminals of both bat-teries.
2. Connect one end of the negative (–)jumper cable 2 to the negative (–) termi-nal of the booster battery 3.
3. Connect the other end of the negative (–)cable to an unpainted bolt on the cylinderhead.
CAUTION:Do not connect the end of the jumpercable to the negative (–) terminal on thewatercraft battery! Be sure all connec-tions are secure and correct beforeattempting to start the engine. Anywrong connection may damage the elec-trical system.
4. Start the engine, and then disconnectthe cables by reversing the steps above.
CAUTION:● Never push the start switch while the
engine is running.● Do not operate the start switch for
more than 5 seconds, otherwise thebattery will be discharged and theengine will not start. Also, the startermotor may be damaged. If the enginedoes not start in 5 seconds, releasethe start switch, wait 15 seconds, andtry again.

5-7
E
EJU00603
Towing the watercraftIf the watercraft becomes inoperative in
the water, it can be towed to shore. If the watercraft must be towed in an
emergency using a tow line, the operatorshould ride the watercraft, holding onto thehandlebars.
CAUTION:● Tow the watercraft slowly; water may
enter the air intake and flood theengine compartment if the watercraftis towed too fast.
● Tow the watercraft using the bow eye 1only.
● The bow must be kept up out of thewater during towing to prevent waterfrom entering the engine compart-ment.
WARNING● The watercraft should only be towed in
an emergency. ● The tow line should be long enough so
that the watercraft will not collide withthe towing boat when slowing down. Agood rule of thumb is a tow line whichis three times the combined length ofthe towing boat and the watercraft. Ashorter length of rope can be used ifthe watercraft is towed very slowly.
● The operator of the towing boat mustkeep speed to a minimum and avoidtraffic or obstacles which could be ahazard to the rider on the watercraft.

5-8
E
EJU00604a
Submerged watercraftIf the watercraft is submerged or flooded
with water, follow the procedure below andconsult a Yamaha dealer as soon as possi-ble. Failure to do so may result in seriousengine damage!1. Beach the watercraft and remove the
stern drain plugs to drain the water fromthe engine compartment.
2. Turn the fuel cock knob to “OFF.”3. Remove the spark plugs and dry them
with a cloth.4. Without reinstalling the spark plugs,
crank the engine until all the water in thecylinders has been drained.
5. Install the stern drain plugs and thespark plugs.
6. Turn the fuel cock to “ON.”7. Launch the watercraft into the water, and
then run the engine for at least10 minutes. If the engine will not start,repeat steps above.
8. Turn the engine off. Turn the fuel cock to“OFF.”
9. Remove the silencer caps and spray arust inhibitor such as Yamaha Stor-RiteEngine Fogging Oil into the carburetorwhile cranking the engine.
10. Have the watercraft inspected by aYamaha dealer as soon as possible.

E
–MEMO–

E
6
EJU00608
APPENDIX
Limited warranty.......................................6-1
YAMAHA EXTENDED SERVICE (Y.E.S.) .......................................................6-3
Index...........................................................6-4
6-1
E
EJU00636
Limited warranty
YAMAHA MOTOR CORPORATION, U.S.A.WATER VEHICLE LIMITED WARRANTY
Yamaha Motor Corporation is proud of its heritage and reputation for producing products with high standards of quality and workman-ship. Product excellence provides the cornerstone for our commitment to customer satisfaction. The Yamaha Water Vehicle LimitedWarranty is your assurance of this commitment.
This warranty provides you with protection against the expense of repairs for your water vehicle that are required as a result of defectsin materials or workmanship. When maintained and utilized in the prescribed manner, you can count on your Yamaha water vehicle toprovide reliable service.
This warranty provides you with specific coverage and notes your responsibilities in maintaining and operating your water vehicle.Please take the time to read and become familiar with this warranty.
PERIOD OF WARRANTY. Any new Yamaha water vehicle purchased for pleasure use from an authorized Yamaha water vehicle dealerin the United States, will be warranted against defects in material or workmanship for a period of one (1) year from date of purchase,subject to exclusions noted herein. Any Yamaha Water Vehicle purchased and utilized for commercial applications will be warranted fora period of ninety [90] days from the date of purchase, subject to exclusions noted herein. Replacement parts used in warranty repairswill be warranted for the balance of the applicable warranty period.
The warranty described here applies to water vehicles purchased and registered for use in the United States only. For warranty provi-sions outside the United States, contact the particular country’s local Yamaha distributor.
OBTAINING REPAIRS UNDER WARRANTY. During the period of warranty, any authorized Yamaha water vehicle dealer will, free ofcharge, repair or replace, at Yamaha’s option, any parts adjudged defective by Yamaha due to faulty workmanship or material from thefactory. All parts replaced under warranty will become the property of Yamaha Motor Corporation, U.S.A.
CUSTOMER’S RESPONSIBILITY. Under the terms of this warranty, the customer will be responsible for ensuring that the water vehi-cle is properly operated, maintained, and stored as specified in the applicable Owner’s/Operator’s Manual.
The owner of the water vehicle shall give notice to an authorized Yamaha water vehicle dealer of any and all apparent defects within ten[10] days of discovery and make the vehicle available at that time for inspection and repairs at the dealer’s place of business.
GENERAL EXCLUSIONS FROM WARRANTY. This warranty will not cover the repair of damage if the damage is a result of abuse orneglect of the product. Examples of abuse and neglect include, but are not limited to:1. Racing or competition use, modification of original parts abnormal strain.2. Lack of proper maintenance and off season storage as described in the Owner’s/Operator’s Manual, installation of parts or acces-
sories that are not equivalent in design and quality to genuine Yamaha parts.3. Use of lubricants, oils, and fuel/oil mixtures that are not suitable for water vehicle motor use.4. Damage as a result of accidents, collisions, contact with foreign materials, or submersion.5. Growth of marine organisms on motor or hull surfaces.6. Normal deterioration.7. Gel coat stress cracks.
SPECIFIC PARTS EXCLUDED FROM WARRANTY.Parts replaced due to normal wear or routine maintenance such as oil, spark plugs, fuel filters, impeller and liner, and anodes are notcovered by warranty. Charges for transporting the water vehicle to and from an authorized Yamaha water vehicle dealer are excludedfrom warranty coverage.
TRANSFER OF WARRANTY. Transfer of the warranty from the original purchaser to any subsequent purchaser is possible by havingthe vehicle inspected by an authorized Yamaha water vehicle dealer and requesting the dealer to submit a change of registration toYamaha Motor Corporation. U.S.A. within ten [10] days of the transfer.
YAMAHA MOTOR CORPORATION, U.S.A. MAKES NO OTHER WARRANTY OF ANY KIND, EXPRESSED OR IMPLIED. ALL IMPLIED WAR-RANTIES OF MERCHANTABILITY AND FITNESS FOR A PARTICULAR PURPOSE WHICH EXCEED THE OBLIGATIONS AND TIME LIMITSSTATED IN THIS WARRANTY ARE HEREBY DISCLAIMED BY YAMAHA MOTOR CORPORATION, U.S.A. AND EXCLUDED FROM THISWARRANTY.
SOME STATES DO NOT ALLOW LIMITATIONS ON HOW LONG AN IMPLIED WARRANTY LASTS, SO THE ABOVE LIMITATION MAY NOTAPPLY TO YOU. ALSO EXCLUDED FROM THIS WARRANTY ARE ANY INCIDENTAL OR CONSEQUENTIAL DAMAGES INCLUDING LOSSOF USE. SOME STATES DO NOT ALLOW THE EXCLUSION OR LIMITATION OF INCIDENTAL OR CONSEQUENTIAL DAMAGES, SO THEABOVE EXCLUSION MAY NOT APPLY TO YOU.

6-2
E
THIS WARRANTY GIVES YOU SPECIFIC LEGAL RIGHTS, AND YOU MAY ALSO HAVE OTHER RIGHTS WHICH VARY FROM STATE TOSTATE.
YAMAHA MOTOR CORPORATION, U.S.A.Post Office Box 6555
Cypress, California 90630WARRANTY QUESTIONS AND ANSWERS
Q. What costs are my responsibility during the warranty period?A. The customer’s responsibility includes all costs of normal maintenance services, non-warranty repairs, accident and collision dam-
ages.
Q. What are some examples of “abnormal” strain, neglect, or abuse?A. These terms are general and overlap each other in areas. Specific examples include:
Running the water vehicle out of oil, operating the machine with a broken or damaged part which causes another part to fail, and soon. If you have any specific questions on operation or maintenance, please contact your Yamaha water vehicle dealer for advice.
Q. Does the warranty cover incidental costs such as transportation due to a failure?A. No. The warranty is limited to repair of the water vehicle itself.
Q. May I perform any or all of the recommended maintenance shown in the Owner’s/Operator’s Manual instead of having the dealer dothem?
A. Yes, if you are a qualified mechanic and follow the procedures specified in the Owner’s/Operator’s and Service Manual. We do rec-ommend, however, that items requiring special or equipment be done by a Yamaha water vehicle dealer.
Q. Will the warranty be void or cancelled if I do not operate or maintain my new water vehicle exactly as specified in the Owner’s/Oper-ator’s Manual?
A. No. The warranty on a new water vehicle cannot be “voided” or “cancelled”. However, if a particular failure is caused by opera-tion or maintenance other than as shown in the Owner’s/Operator’s Manual, that failure may not be covered under war-ranty.
Q. What responsibility does my dealer have under this warranty?A. Each Yamaha water vehicle dealer is expected to:
1. Completely set up each new water vehicle before sale.2. Explain the operation, maintenance, and warranty requirements to your satisfaction at the time of sale, and upon your request at
any later date. In addition, each Yamaha water vehicle dealer is held responsible for his setup, service and warranty repair work.
Q. Is the warranty transferable to second owners?A. Yes. The remainder of the existing warranty can be transferred upon request. The unit has to be inspected and re-registered by an
authorized Yamaha water vehicle dealer for the policy to remain effective.
CUSTOMER SERVICE
If your water vehicle requires warranty service, you must take it to any authorized Yamaha water vehicle dealer within the continentalUnited States. Be sure to bring your warranty registration card or other valid proof of the original date of purchase. If a question or prob-lem arises regarding warranty, first contact the owner of the dealership. Since all warranty matters are handled at the dealer level, thisperson is in the best position to help you. If you are still not satisfied and require additional assistance, please write:
YAMAHA MOTOR CORPORATION U.S.A.CUSTOMER RELATIONS DEPARTMENT
P.O. Box 6555Cypress, California 90630
CHANGE OF ADDRESS
The federal government requires each manufacturer to maintain a complete, up-to-date list of all first purchasers against the possibilityof a safety-related defect and recall. This list is complied from the purchase registrations sent to Yamaha Motor Corporation, U.S.A. bythe selling dealer at the time of your purchase.If you should move after you have purchased your new water vehicle, please advise us of your new address by sending a postcard list-ing your Yamaha model name, engine number, dealer number [or dealer’s name] as it is shown on your warranty card, your name andnew mailing address.Mail to:
YAMAHA MOTOR CORPORATION, U.S.A.P.O. Box 6555
Cypress, California 90630Attention: Warranty Department
This will ensure that Yamaha Motor Corporation, U.S.A. has an up-to-date registration record in accordance with federal law.

6-3
E
YAMAHA EXTENDED SERVICE (Y.E.S.)Keep your Yamaha protected even after your warranty expires with genuine Yamaha ExtendedService (Y.E.S.).●●●● Y.E.S. is designed and administered by Yamaha Motor Corporation to provide maximum owner
satisfaction. You get uninterrupted factory-backed coverage for extra peace of mind.●●●● Y.E.S. is flexible. You choose the plan that is right for you: 12 months, 24 months, or 36 months
beyond your warranty period.●●●● Y.E.S. is designed and administered by the same Yamaha people who handle your warranty
and it shows in the comprehensive coverage benefits. There are no mileage limitations. Cover-age is not limited to “moving parts” or the “drive train” like many other plans. And Y.E.S. coversmanufacturing defects just like the warranty. See the sample contract at your Yamaha dealer tosee how comforting uninterrupted factory-backed protection can be.
●●●● You do not have to pay anything for covered repairs. There is no deductible to pay, and repairsare not “pro-rated.” You do not have any “out-of-pocket” expenses for covered repairs.
●●●● In addition, Travel and Recreation Interruption Protection (TRIP) is included at no extra cost.TRIP gives you up to $150 reimbursement per occurrence for any reasonable expenses youincur because your Yamaha needs covered service: replacement vehicle rental, emergencytowing, phone calls, even food and lodging when you are away from home. This superb cover-age goes into effect when you purchase Y.E.S., so it applies to any warranty repairs as well ascovered repairs during your entire Y.E.S. plan period.
●●●● Y.E.S. coverage is honored at any authorized Yamaha dealer nationwide.
●●●● Y.E.S. coverage is transferable to a new owner if you sell or trade-in. That can make yourYamaha much more valuable!
This excellent Y.E.S. plan coverage is only available to Yamaha owners like you, and only whileyour Yamaha is still within the Yamaha Limited Warranty period. So visit your authorized Yamahadealer to get all the facts. He can show you how easy it is to protect your investment with YamahaExtended Service.We urge you to act now. You will get the excellent benefits of TRIP coverage right away, and youwill rest easy knowing you will have strong factory-backed protection even after your YamahaLimited Warranty expires. You can also save money: Y.E.S. costs less within the first 90 daysafter you buy your Yamaha. See your dealer today!
A special note:If visiting your dealer is not convenient, contact Yamaha with your Primary ID number (your enginenumber). We will be happy to help you get the Y.E.S. coverage you need.
Yamaha Service MarketingP.O. Box 6555Cypress, CA 90630(714) 761-7631
6-4
E
EJU00609
Index2-stroke engine oil................................... 3-4AAdjusting the carburetor ........................ 4-21Adjusting the trolling speed ................... 4-21Adjusting the Yamaha Adjustable Sponson (Y.A.S.) .................................. 4-23Approval label of Emission control certificate................................................. 1-2BBattery..............................................3-8, 4-5Beaching the watercraft ........................ 3-30Bilge ........................................................ 3-7Bleeding the oil injection pump ............. 4-22Boarding alone ...................................... 3-23Boarding and starting in deep water ..... 3-23Boarding with a passenger.................... 3-24Bow down.............................................. 2-12Bow up .................................................. 2-12CCapsized watercraft .............................. 3-25Caution labels ......................................... 1-5Choke lever ............................................. 2-8Cleaning and adjusting the spark plugs...................................................... 4-15Cleaning the jet intake and impeller ........ 5-4Cleaning the watercraft ........................... 4-6Connecting the jumper cables................. 5-6Cooling water pilot outlet..............2-10, 3-12Crossing ................................................ 1-15Cruising limitations .................................. 1-8DDocking the watercraft .......................... 3-30EEmergency procedures ........................... 5-4Emission control information ................... 1-2Engine break-in ..................................... 3-13Engine compartment ............................... 3-6Engine overheat warning indicator........ 2-18Engine overheat warning system.......... 2-13Engine serial number .............................. 1-1
Engine shut-off cord (lanyard) ...............3-11Engine shut-off switch .............................2-8Engine stop switch ..................................2-8Enjoy your watercraft responsibly .........1-19FFilling the fuel tank ..................................3-3Filling the oil tank ....................................3-4Fire extinguisher......................................3-9Fishing vessel right-of-way....................1-16Flushing the cooling system....................4-1Front storage compartment ...................2-19Fuel and oil..............................................3-1Fuel and oil systems ...............................3-6Fuel cock knob ........................................2-7Fuel filter ...............................................4-11Fuel meter .............................................2-17Fuel system.............................................4-4Fuel tank ...............................................4-11Fuel tank filler cap ...................................2-6Fuel warning indicator ...........................2-18GGasohol ...................................................3-2Gasoline ..................................................3-1Getting to know your watercraft ............3-19Give-way vessel ....................................1-14Glove compartment ...............................2-20HHandgrip................................................2-14Hazard information................................1-12Hood........................................................2-6Hour meter ............................................2-17Hull Identification Number (HIN)..............1-1IIdentification numbers .............................1-1Important labels.......................................1-3Inspecting and adjusting the throttle cable......................................................4-13Inspecting the battery............................4-19Inspecting the fuel system.....................4-10Inspecting the oil injection system.........4-12Inspecting the QSTS mechanism..........4-14Inspecting the steering cable ................4-13

6-5
E
JJet unit................................................... 3-11Jumping the battery................................. 5-5LLabel location .......................................... 1-3Learning to operate your watercraft ...... 3-19Leaving the watercraft........................... 3-18Limitations on who may operate the watercraft ................................................ 1-7Limited warranty...................................... 6-1Location of main components ................. 2-1Lubrication............................................... 4-3Lubrication points .................................. 4-16MMaintenance and adjustments ................ 4-7Manufactured date label.......................... 1-2Meeting ................................................. 1-15Multifunction information center ...2-15, 3-12NNarrow channels and bends ................. 1-16OOil filter .................................................. 4-12Oil tank .................................................. 4-12Oil tank filler cap...................................... 2-6Oil warning indicator.............................. 2-18Operating your watercraft...................... 3-19Operation .............................................. 3-13Operation of controls and other functions.................................................. 2-5Operation requirements .......................... 1-9Other labels............................................. 1-6Other sources........................................ 1-18Other special situations......................... 1-16Overtaking............................................. 1-16Owner’s/Operator’s Manual and tool kit...................................................... 4-8PPeriodic maintenance chart..................... 4-9Post-operation checks........................... 3-31Pre-operation check list........................... 3-5Pre-operation check points ..................... 3-6Pre-operation checks .............................. 3-5Primary Identification (PRI-ID) number ... 1-1
QQuick Shift Trim System (QSTS) selector..................................................2-11RReading buoys and other markers ........1-16Replacing the fuse ................................4-22Reset button..........................................2-16Riding watercraft with a passenger .......3-20Rough water operation..........................3-30Rules of the Road .................................1-14Rules when encountering vessels.........1-15SSafety information ...................................1-7Sailing vessel right-of-way ....................1-16Seat.........................................................2-5Specifications ........................................4-24Speedometer.........................................2-16Stand-on vessel ....................................1-14Starting and boarding in shallow water .....................................................3-22Starting from a dock ..............................3-22Starting the engine ................................3-15Starting the watercraft ...........................3-21Start switch..............................................2-9Steering and sailing rules ......................1-14Steering system ...........................2-10, 3-10Stopping the engine ..............................3-18Stopping the watercraft .........................3-29Storage....................................................4-1Storage compartments..........................2-19Submerged watercraft .............................5-8Switches................................................3-12TTachometer ...........................................2-16Throttle ..................................................3-10Throttle lever ...........................................2-9To get more boating safety information ............................................1-18Towing the watercraft ..............................5-7Transporting ..........................................3-33Troubleshooting ......................................5-1Troubleshooting chart .............................5-1Turning the watercraft ...........................3-27
6-6
E
UUnited States Coast Guard ................... 1-18WWarning labels ........................................ 1-4Watercraft characteristics...................... 1-12Watercraft Education and Training........ 1-18Water separator ...................................... 3-7YYamaha Adjustable Sponson (Y.A.S.) .. 2-20YAMAHA EXTENDED SERVICE (Y.E.S.).................................................... 6-3

Printed in USASeptember 2000—1.6 × 1 CRF0W-F8199-10(GP800A-Z)
Printed on recycled paper
YAMAHA MOTOR CORPORATION, USA