


Languages
Pages
Legal


1www.pablander.com
A QUICK Guide to Feathers creation with ZBRUSH by Pablo Munoz Gomez
Feathers
in zbrush
a quick guide to
6 Methodsto create detailed feathers and add complexity to your projects.
by Pablo Munoz Gomez
Including resources

2www.pablander.com
A QUICK Guide to Feathers creation with ZBRUSH by Pablo Munoz Gomez
A quick guide to create feathers in zbrush
INtro
Hey Guys, I have put together this very specific guide about the creation of feathers in ZBrush. In it, I will show you some of the processes I found to be very effective to producing feathers as well as giving you some tips to work with each mentioned method.
It’s a bit difficult to classify the tutorial into an advanced, intermediate or beginner category; therefore, I will show you 6 ways to go about creating feathers - you might find some of these very straight forward, others a bit harder to reproduce. So, you can treat this tutorial as a quick guide that contains fast and easy ways to produce something useful for your models / artwork or simply as a little document that you can refer back to. You may apply some of these methods to creating hair, scales, leaves, or alike.
As I had mentioned to my Twitter and Facebook followers, this is going to be a quick tutorial and certainly not as thorough as some of my previous eBooks. If you have any questions or comments, please feel free to contact me and I’ll be glad to help if I can.
Without further ado, let’s get into creating feathers...
First things first
To create a believable feather or a more accurate effect, it’s really important to look at real references, especially if you want to create a full wing.
As always, I did a bit of a study on feathers before diving into ZBrush and I found some very interesting stuff... The feathers of an owl, for instance, have a specific shape that reduces turbulence and helps the owl to have a silent flight! I created a couple of images for your reference: Feather Anatomy, Feather Types and Wing Feathers. You could use this as simple guide to create various types of feathers and to identify the purpose of each type of feather.
Feather Types:

3www.pablander.com
A QUICK Guide to Feathers creation with ZBRUSH by Pablo Munoz Gomez
In the image above I drew a few common feathers. Notice how the feathers for the tail, have an even width on both sides whereas the wing feather is narrower on one side. It’s also very interesting how the shape of the wing feathers gradually and slightly change the shape; being sharper at the tip on the feathers located away from the body of the bird and with a more rounded tip, as they get closer to the body of the bird.
Feather Anatomy:
Wing Feathers:

4www.pablander.com
A QUICK Guide to Feathers creation with ZBRUSH by Pablo Munoz Gomez
The approach to feathers
One of the things I know is hard when first approaching a project, is to know what method to use; this is especially because of the amount of tools that ZBrush has to offer. For this reason, I created a graphic that I think it could be a helpful starting point.
You have 3 primary methods in yellow, blue and red and 3 secondary methods in purple, green and orange. Essentially, you can create feathers with any of the primary methods but when you combine two, you’ll get a more interesting results. Each method has a rating (purely based on my opinion) of:
Complexity: refers to how many steps are necessary to get something that looks good as well as the time you could spend doing on it.
Details: refers to the amount of details and visual complexity that you can add to your project.
So how is the above image helpful? well, it really depends on what you are creating but basically this graphic could help you decide how to approach the creation of feathers for your model.

5www.pablander.com
A QUICK Guide to Feathers creation with ZBRUSH by Pablo Munoz Gomez
For instance, in the image below, I wanted the creature to be partially covered with feathers but not all areas required the same amount of details. Also, I wanted certain areas to be less busy and of course, mixing the different methods helped me to keep the model at a very decent number of polygons without compromising details.
The methods
For each of the following methods I will guide you through the creation of one single feather. Each method shared will also include some techniques and tips that could easily be applied to all of the methods, but I would nonetheless like to encourage experimentation!
MESH (primary “red” method)
Start by creating a polysphere and activating Dinamesh, Using the transpose master you can squash it to make it thin and then scale it upwards.
Add a cylinder and scale it in the Y axis to create the Rachi of the feather.
Be sure to make the cylinder a polymesh so you can edit it. You can use the Smooth Brush to soften the shape of the Rachi and the Pinch Brush to make the bottom and top part of the cylinder narrower.

6www.pablander.com
A QUICK Guide to Feathers creation with ZBRUSH by Pablo Munoz Gomez
With perspective off and from a front view, select the move tool and push things to get a rough silhouette of your feather.
Once you are happy with the overall shape, go to a side view and mask half of the feather (the back of it) using mask rectangular.
Now, you can use the Rake brush to sketch out the details of the feather. Then carve some more lines using the Dam_Standard_brush and the SmoothPeaks to polish the feather without loosing the cavities you created.
Now you can invert the mask and flatten the back a little bit.
To mirror the details to the other side, use mirror and weld, increase the Dynamesh resolution and “Re-dynamesh”.
TIP: Before beginning to add details, you could activate symmetry instead of masking one side. If you go for this option ,you could turn BackFaceMask to be able to work in the thin areas of your model.
Finally, you can use the CurveTube brush to add a bit of randomness in certain areas by creating thin individual barbs.
You can save this model as your base mesh and duplicate it to create other variations (you can keep the same model but simple variations with polypaint might do the trick).

7www.pablander.com
A QUICK Guide to Feathers creation with ZBRUSH by Pablo Munoz Gomez
Alpha (primary “blue” method)
This method is pretty straight forward, it doesn’t require much set up as long as you have some alphas of feathers (check the resources files, I have shared a few). Just load your alpha and start dragging it into the model.With little effort you can create something like this:
You can start with this method if you want to create a detailed base model and then use the previous method (Mesh) to add more realism and variations.
Creating an alpha is very easy, you could simply use the feather you created with the MESH method and generate an alpha from it. To do that, resize your document to a square, for this example I made it 1024x1024.
Drag your 3D model to the canvas and go to a front view (Holding shift while rotating will snap it to the view).
You can also press “F” to frame the model in to the canvas.
From the Alpha Palette expand the Transfer Sub-Pallete and click on the GrabDoc button. This will take whatever is in your current document and generate a depth map (or alpha), remember this is now an image you can Export and reuse anytime you want.
If you did more than one variation of feathers with the Mesh method, you can create an alpha for each one of
those and start to create a library of feather alphas.
TIP: With this type of alphas (feathers and hair), you don’t need the full shape because more often than not, the alphas will overlap, so to create the effect that the feathers are growing on top of each other, you can simply edit the image by adding a gradient:
Fibres (primary “yellow” method)
Fibremesh is an obvious option to do hair but to create feathers only using fibremesh settings we need to so some tweaking of the settings.
First create a sphere a plane or any simple object. Mask a portion of it and click preview in the fibremesh palette. the idea behind the feathers with fibremesh is to create two settings (sets of fibres): The Rachis and The Barbs.
8www.pablander.com
A QUICK Guide to Feathers creation with ZBRUSH by Pablo Munoz Gomez
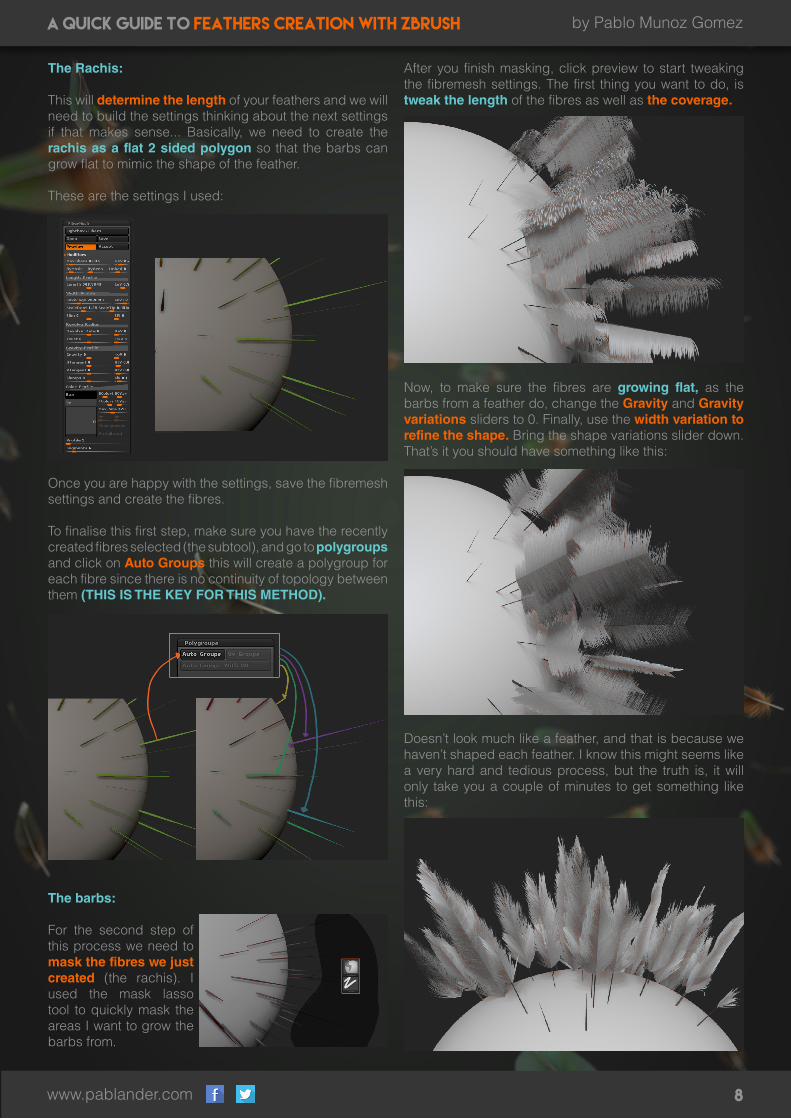
The Rachis:
This will determine the length of your feathers and we will need to build the settings thinking about the next settings if that makes sense... Basically, we need to create the rachis as a flat 2 sided polygon so that the barbs can grow flat to mimic the shape of the feather.
These are the settings I used:
Once you are happy with the settings, save the fibremesh settings and create the fibres.
To finalise this first step, make sure you have the recently created fibres selected (the subtool), and go to polygroups and click on Auto Groups this will create a polygroup for each fibre since there is no continuity of topology between them (THIS IS THE KEY FOR THIS METHOD).
The barbs:
For the second step of this process we need to mask the fibres we just created (the rachis). I used the mask lasso tool to quickly mask the areas I want to grow the barbs from.
After you finish masking, click preview to start tweaking the fibremesh settings. The first thing you want to do, is tweak the length of the fibres as well as the coverage.
Now, to make sure the fibres are growing flat, as the barbs from a feather do, change the Gravity and Gravity variations sliders to 0. Finally, use the width variation to refine the shape. Bring the shape variations slider down.That’s it you should have something like this:
Doesn’t look much like a feather, and that is because we haven’t shaped each feather. I know this might seems like a very hard and tedious process, but the truth is, it will only take you a couple of minutes to get something like this:
9www.pablander.com
A QUICK Guide to Feathers creation with ZBRUSH by Pablo Munoz Gomez
Basically, because we used the Auto Group feature, each rachi has its own polygroup. Therefore, each Barb we created with the second settings grows with individual polygroups linked to its rachi.
So all you need to do now is turn the Mask By Polygroup to 100 (Brush > Auto Masking > Mask By Polygroup).
Using the GroomShort brush with a low Z intensity (I used something like 12) you can quickly groom each feather without affecting the “surrounding” ones.
Morph Target Difference Mesh (secondary “purple” method)
This is probably the easiest out of the secondary methods. All it is, is making use of an alpha to create a mesh that we can edit (before we took a mesh to create and alpha, now we’ll take an alpha to create the mesh).
Start by adding a plain and make it a polymesh 3D. Subdivide it a few times to get enough resolutions so that the details in the alpha transfer nicely.
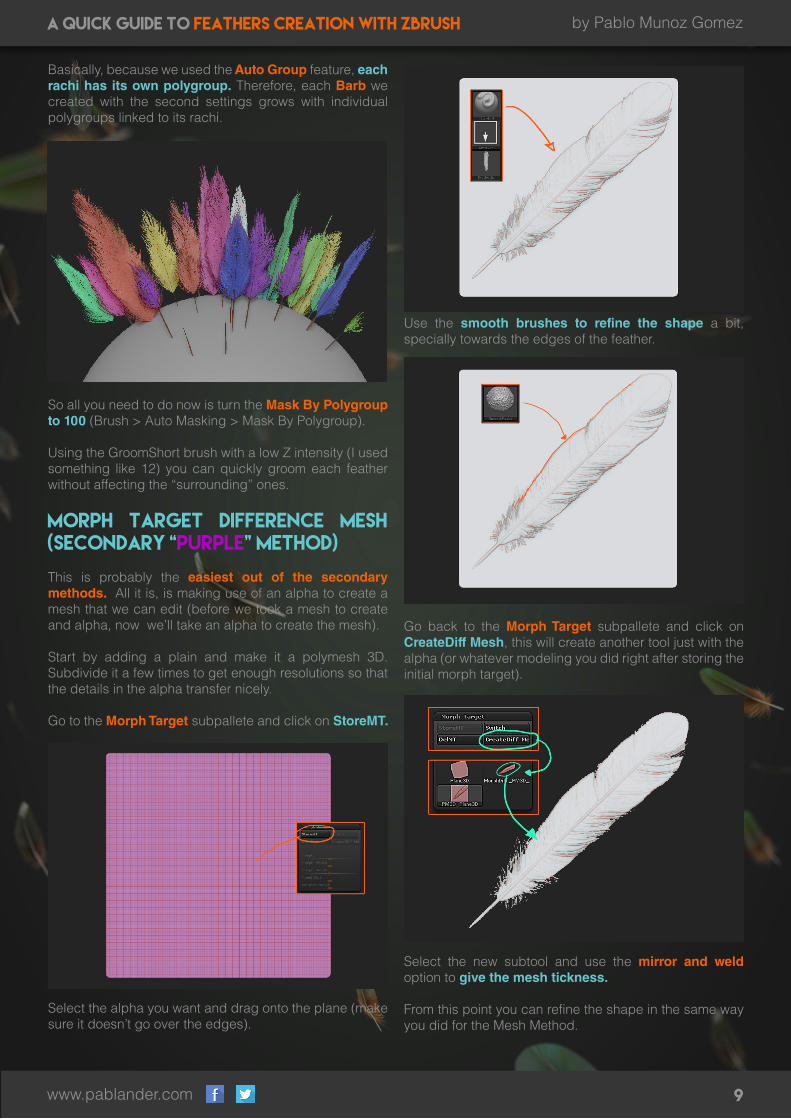
Go to the Morph Target subpallete and click on StoreMT.
Select the alpha you want and drag onto the plane (make sure it doesn’t go over the edges).
Use the smooth brushes to refine the shape a bit, specially towards the edges of the feather.
Go back to the Morph Target subpallete and click on CreateDiff Mesh, this will create another tool just with the alpha (or whatever modeling you did right after storing the initial morph target).
Select the new subtool and use the mirror and weld option to give the mesh tickness.
From this point you can refine the shape in the same way you did for the Mesh Method.

10www.pablander.com
A QUICK Guide to Feathers creation with ZBRUSH by Pablo Munoz Gomez
Texture With Alpha Driven By Fibermesh (secondary “green” method)
Ok, this method is obviously is a popular one since it allows to cover large areas with a lot of fibres. I am actually going to show you two ways you can go about creating feathers with this method. The first method which I’m going to call: WP feathers; is very very simple but it could give you great results for areas that you might want extra details. The second method, let’s name: T&A feathers; requires a bit more attention paid to the set up, but it gives a very cool effect.
WP Feathers (Width Profile Feathers):
Again, this is very, very simple. Just mask an area on your testing object and hit preview to generate some fibres. Bring the MaxFibres slider to a low number and increase the coverage value. This is what I got from default settings and just changing those two attributes:
The trick of this method consist of having more than 4 or 5 Segments and tweaking the width profile curve to get the shape of a feathers. That’s it!
You can play with the length and the curve shape to create 3 or 4 different FibreMesh settings and add variations to the area you want to cover with this method.
TIP: If you hit BPR and get something that looks like a tube or a cube rather than a flat plane, check the BPR settings, and change the “Sides” slider to 2 (so BPR will only render 2 sides for each fibre).
T&A Feathers (Texture & Alpha Feathers):
With this method, the idea is to set up the fibremesh settings so that we get flat rectangular shapes. Then, we can use a texture with alpha to create the feather. Before we start with the settings, we need to create an image to use, you can draw it or get an image of a feather from the internet and place it in a square document of 256px by 256px. Also, you have to make sure it has a black backround (black is what ZBrush will interpret as transparent. Here is what I used for this example:
Notice how squashed the feathers look in the square image, this is because I will use 3 or 4 segments in the settings of fibremesh so ZBrush will stretch it to fill the area covered by those segments.
You don’t have to use 4 segments, this will work even if you have just 1. But, if you want the feather to bend a bit,

11www.pablander.com
A QUICK Guide to Feathers creation with ZBRUSH by Pablo Munoz Gomez
you need at least 2 or 3:
Ok, back to fibremesh. Click preview to start tweaking the settings, first thing I do is change the coverage to the maximum value and make sure revolve and twist are in 0. Also I changed the ScaleRoot and ScaleTip to 1.
Under segments, we need to change the value to 5 and increase the Max Size value to 256, then click on the texture thumbnail to import the image of the feather with a black background. You should be able to see the texture in each one of the fibres. Hit the BPR button and you should get something like this:
Now, to make the black colour transparent, simply click on the transparent button next to the texture thumbnail. you’ll see something like this:
Finally - to get rid of the jagged edges click on Antialiased and you should end up with some fancy looking feathers:
The cool thing about this technique is that you can generate just a few fibres with one texture and repeat the process with other textures to quickly add variations to the feathers:

12www.pablander.com
A QUICK Guide to Feathers creation with ZBRUSH by Pablo Munoz Gomez
Fibers Grown From Mesh Area (secondary “orange” method)
This method is the one I used to create the feathers from the InsertMultiMesh feathers brush and I left it for last because we will need to do a few steps to get it working, to achieve the look we want.
In a nutshell, we will create the Rachis out of geometry (primitives) and we will grow some fibres from it to create the Barbs. Start by adding a cylinder3D to the canvas.
From the Initialize Sub-pallete, changed the HDivide to 6 and the VDivides to 32. Then, we can use the Deformation sub-pallete to modify the initial shape of the cylinder. I rotated it 90 degrees in the X axis, and scale it in Y.
Make it a Polymesh3D and we can start shaping it a bit more, I used the Smooth Brush on the tips and the inflate brush in the bottom area to enlarge it.
TIP: can turn radial symmetry to make sure the alterations you make to the cylinder are even.
Now we need to create the some polygroups. The idea here, is that only two sides (vertical) of the cylinder will generate the fibres but also we want to create some extra “sub-groups” to be able to groom the feathers with more control. the easiest way, is to hold Ctrl + Shift to hide the bottom section and then use the shortcut to group the visible area: Ctrl+W (if you prefer you can use the BaseMesh I provided in the resources and skip this step).
The first groups we need to create is the bottom section of the Feather that won’t have any feathers (The Quill or Calamus). Then, we need to isolate the top section and group two set of vertical loops opposite to each other like this:
To add extra control we want to group some individual polygons in the lower section of the rachi something like this:
Ok, now that we have the polygropus ready, we need to isolate the loops that we want to

13www.pablander.com
A QUICK Guide to Feathers creation with ZBRUSH by Pablo Munoz Gomez
grow the fibremesh from. Ctrl + Shift and a single click on a polygroup will isolate, Ctrl + Shift and drag will invert the selection, make sure you hide every face that won’t produce any fibres and then mask all the visible polygons.
You can unhide the rest of the cylinder and you won’t loose the mask. Click on preview from the Fibremesh subpallete and reset all the settings.
Make sure you have the Length variations (“LeV”) down to 0 as well as the Direction variation (NoV).
You have two options here: you can either play with the gravity slider to push the fibres up a bit; or, leave the fibres coming straight from the Rachi, and then use the grooming brushes to do that. I prefer to manually do it, so I will leave them straight. I just need to tweak the length, coverage and segments sliders:
If you are happy with your initial settings for the Barbs, you can save the fibremesh settings before we continue with the grooming.
Click on accept to generate the fibres, if you turn Polyframe on you’ll see that the fibres have the groups colour of the polygon from where they were created. This is super handy, because using the same technique from the Fibres Primary method, you can easily mask by polygroups and create those messy fluffy bits towards the bottom of the feather (Downy Barbs).
I use GroomHairShort with very low Z intensity to nudge the fibres into the shape I wanted and then I “pinch” the tips with GroomSpike.
For the rest of the feather and the tip, we need to use a combination of the GroomHairShort, the move tool and the Clip curve (to define a sharp outline).
I usually start with the move brush (make sure you are have perspective off and you are in a side view) and try to create the basic shape of the feather, then with the GroomHairShort, we can nudge the sides up.
There are a few ways to trim our feather but I think the best approach is using the clip curve brush and then carefully soothing the edges. Select the ClipCurve brush and holding Ctrl+Shift, drag the curve over your feather. The side of the curve with the shadow will be the side where the polygons will be clipped, you can hold Space bar at any moment to reposition the curve and you can also tap Alt while you are dragging the curve to add points to it.
At this point you should have a good looking feather, I suggest you save it as a ZTool and duplicate it in the subtool pallete. You can create many subtools each one being a slightly different feather and then create a InstertBrush so you can reuse your feathers and apply them to your project.

14www.pablander.com
A QUICK Guide to Feathers creation with ZBRUSH by Pablo Munoz Gomez
To create those little gaps on the feather to help with the realism and to add a bit of randomnes, You could use more polygroups before growing the Fibres, or you can mask areas and then push them apart.
Alternatively, I created the GroomFeatherGap Brush that you can use to quickly add gaps to your feather.
There is nothing too fancy to this brush, but it has the topology feature active. This means that it will only affect one fibre at a time, so you need to click and drag a few times to push the fibres apart.
Creating InsertMultiMesh brushes
Creating InsertMultiMesh brushes is super helpful to speed up your work-flow and it is also fun. Zbrush has made it easy to create these and all you we have to do while we have our feathers tool selected, is go to the brush palette, and at the bottom you’ll see a button that says Create InsertMultiMesh.
That’s it, you should have a New feather brush you can reuse. Don’t forget to save it!
Here are a couple of tips about insert brushes:
TIP 1: The orientation of your object in relation to the camera will determined the angle of insertion of the brush. If you want to change it, simple rotate your view and save a new insert brush.
TIP 2: (only applicable for InsertMULTImesh brushes) With the brush selected, you can press “N” to display a little pop-up window with all your insert meshes so you can quickly select which feather you want to insert. Alternatively you can choose the feather you want from the Modifiers sub-pallete in the Brush Palette.
Done!
That’s it guys - I hope this guide has been helpful. As I mentioned at the beginning, there is not a lot of super detailed information about each button or slider I used in the different methods I showed you, but I think they are for the most part, very easy to understand. Having said that, if you have questions, I’ll be happy to answer them if I can.
About the Resources
In the resources folder for this tutorial you should find a bunch of files. The reason I didn’t mentioned them much during this tutorial until now, is because they are objects, brushes and settings ready to go, so they wont really teach you much... These resources are basically the end result of what I explained for each method.
Feel free to use them as you wish!
As always - I sincerely appreciate your comments and “Likes”.
Just one more thing, to share the tutorial with your networks/colleagues, I would appreciate if you could pass on the link to the download, rather than transferring the files you had already downloaded.
Let me know what you do with the feathers; I will love to see your work! Happy ZBrushing!
Pablo Munoz G.
Top Related