Windows XP Embedded Appliance - VXL Technology ICA and Meta Frame ... Windows XP Embedded operating...
32
Windows XPE Administrator’s Guide Windows XP Embedded Appliance Administrator Guide © 2005-2006 VXL INSTRUMENTS LIMITED
Transcript of Windows XP Embedded Appliance - VXL Technology ICA and Meta Frame ... Windows XP Embedded operating...

Windows XPE Administrator’s Guide
Windows XP Embedded Appliance
Administrator Guide
© 2005-2006 VXL INSTRUMENTS LIMITED

Windows XPE Administrator’s Guide
Document Information Copyright and Trademark Notices Copyright 2005/2006 VXL Instruments Limited
ALL RIGHTS RESERVED.
Information in this document is subject to change without prior notice and does not represent a commitment on the part of the manufacturer. No part of this guide may be reproduced or transmitted in any form or means, electronic or mechanical, including photocopying and recording, for any purpose, without the express written permission of the manufacturer. XLmanage, Itona, are registered trademarks and trademarks of VXL Instruments Ltd. Citrix, ICA and Meta Frame are registered trademarks and trademarks of Citrix Systems, Inc. Windows XP, Windows 2003, Windows CE, Windows NT, Windows 2000, and RDP are registered trademarks and trademarks of Microsoft Corporation. All other registered trademarks are properties of their respective owners. Every effort has been made to make this guide as complete and as accurate as possible, but no warranty of fitness is implied. The authors and the publisher shall have neither responsibility nor liability to any person or entity with respect to loss or damages arising from the use of information contained in this guide.
Document Number: 14:03:2006:10:01:00:A27
First Edition January 2003
Revised March 2006

Windows XPE Administrator’s Guide
Introduction
Thank you for purchasing Itona XP appliance, the powerful and feature rich device from VXL. You will be pleasantly surprised with the robustness, user friendliness, ease of customization and manageability of the appliance. We recommend XL manage 1.27 or above for managing these appliances along with other VXL clients you may have in your network.
Getting Started Customizaton is the key feature of an Itona XP appliance. We offer several variants in order to satisfy the varied requirements of our customers. Therefore, the appliance contains common features as well as customized features.
This manual describes the common features which are specific to the Windows XP Embedded operating system that powers this terminal.
Customized features will be customer specific and documentation will be need based.
This manual is not intended to act as a replacement to Microsoft XP user guide. Therefore, basic knowledge of XP operating system usage is assumed.
The contents of the packing unit may vary depending on what model you have chosen to purchase, but in essence the following forms the normal contents:
• Itona XP Appliance
• This guide on printed matter or on a CD
• Power cable
• Mouse (if applicable)

Windows XPE Administrator’s Guide You may also have a rescue CD if you have elected to order one. This is used to rescue the unit if there is a catastrophic corruption of the flash storage system.
Setting up the Itona XP Appliance Setting up the Itona XP appliance is pure simplicity. If you follow the steps indicated below you should have your Itona XP appliance up and running with absolutely no trouble.
1. Unpack the unit and set it up on a desk taking care not to impair the ventilation ducts in any way. Vertical standing units should be installed in such a way that the ducts point upwards in order to maintain airflow, thereby cooling the unit. On some units you will find a “THIS WAY UP” sticker indicating the orientation of the product.
2. Next, plug in the keyboard and mouse into the sockets marked with the pictorial representation of a keyboard and mouse respectively. On some units these are coloured GREEN for MOUSE and PURPLE for KEYBOARDS. See figure below.
3. You should ensure that you insert the plugs into the correct sockets or you may cause damage to the terminal.

Windows XPE Administrator’s Guide
4. Next, plug in the cable that belongs to your monitor. This is sometimes coloured BLUE and should be carefully inserted into the VGA socket on the rear of the Itona XP appliance. See below.
5. You should now plug in your printer or any other device that you may need. It is always advisable to plug in devices PRIOR to introducing power to the unit.
The printer and serial ports are located on the rear panel.
6. Lastly, you can plug in the power cable.
a. In the case of internal power units you should plug in the provided mains cable directly into the socket at the rear of the appliance.
b. In the case of externally powered units you should firstly plug the cable from the power supply into the rear of the unit, followed by plugging in the mains power cable into the socket located on the power supply.
7. Finally, plug in the main power cable into the MAINS.
8. You are now ready to power up and go.

Windows XPE Administrator’s Guide
Administering the Itona XP Appliance When you power up the Itona XP appliance you will notice that the device starts much like a normal PC running Windows XP Professional.
The start-up screen looks like the one shown below.

Windows XPE Administrator’s Guide
Logging in as Administrator By default, the Itona XP automatically logs in using a pre-defined ‘user’ login. This login provides a very limited and locked down desktop.
In order to perform setting changes on the terminal you will need to log in as the Administrator.
To do this you can choose either of two methods:
Method 1:
a. Let the terminal log in under user mode.
b. Log off and keep the SHIFT key pressed down during log off and subsequent log in.
c. You will now see a login prompt.
d. Log in using the name Administrator.
e. Enter the password. The default is Administrator.
Method 2:
a. While the terminal is booting and displaying the XP Splash screen, keep the SHIFT key pressed down.
b. You will now see a login prompt.
c. Log in using the name Administrator.
d. Enter the password. The default is Administrator.
As with the Windows XP operating system, the Itona XP is equipped with a START menu at the bottom left side of the main screen.

Windows XPE Administrator’s Guide The START menu contains access to the programs that are embedded within the Itona XP together with access to the ADMIN PANEL for setting up the device parameters such as network, display etc.
The START menu also provides the administrator with the BUILD NUMBER of the firmware installed on the device.
You may be required to quote this number when requesting support.
To know the build number in administrator mode In administrator mode the build number won’t be directly visible in start menu. In this case to know the build number, go to ‘My Computer Properties check under registered to: you can find out the build number of the image.

Windows XPE Administrator’s Guide
EWF Manager In order to protect the day-to-day operation of the operating system, Windows XP Embedded contains a system Enhanced Write Filtering.

Windows XPE Administrator’s Guide
How does EWF work? The EWF as it is known, operates by providing a “shadow writing” system within the flash media.
When enabled, any writes to the storage media (such as setting changes etc) are written automatically in shadow mode to a protected area of the system. This allows you to make settings and changes, test and approve them prior to sealing them into the system.
Once any changes are approved, they can be either set to be permanent or deleted, thereby setting the system back to its original state.
Rebooting of the terminal does not erase the changes. This can only be done using RESTORE and COMMIT commands.
How to check the EWF Status? When the image is booted successfully, check the system tray(Right most corner of Task bar). The different cases are
1) It will show an icon ‘VXL EWF’ , if the status is ‘DISABLED’
2) It will show a Green circle, if the status is ‘ENABLED’
3) It will show a ‘question mark’ icon, if the status is unknown.
In all cases just keep the cursor on the icons, then you can see the status.
What to do when the EWF status is ‘Unknown’?
If the EWF status is ‘Unknown’, go to command prompt and type the following command ‘rundll32 ewfdll.dll,ConfigureEwf Start’(command is case sensitive). Then restart the computer. Now it will show the correct status in the system tray.
The EWF Manager Main Screen When the EWF Manager starts up, you will be presented with the following application screen.

Windows XPE Administrator’s Guide
The EWF Manager consists of several areas and command buttons. The following sections will detail each of these areas and command buttons in detail.
Volumes Area This section automatically detects the various drives and partitions that are available for protection using the EWF system. You may then select whichever drive or partition that you wish to perform EWF commands on.

Windows XPE Administrator’s Guide
Enable Command Button In order to ENABLE the EWF system onto a particular drive or partition you should:
1. Select the drive or partition
2. Click on the ENABLE COMMAND BUTTON

Windows XPE Administrator’s Guide
3. Click on the CLOSE button
4. The system will request a reboot.
This procedure enable the EWF system on the selected drive or partition.
Disable Command Button In order to DISABLE the EWF system on a particular drive or partition you should:
1. Select the drive or partition
2. Click on the DISABLE COMMAND BUTTON

Windows XPE Administrator’s Guide
3. Click on the CLOSE button
4. The system will request a reboot.
This procedure disables the EWF system on the selected drive or partition.
Restore Command Button In order to RESTORE the original contents of a particular drive or partition you should:
1. Select the drive or partition
2. Click on the RESTORE COMMAND BUTTON

Windows XPE Administrator’s Guide
3. Click on the CLOSE button
4. The system will request a reboot.
This procedure will now restore the original contents of the selected drive or partition.
Commit Command Button Once changes have been made, checked and approved by you, you will need to commit the changes to the system so that they are permanent.
1. Select the drive or partition
2. Click on the COMMIT COMMAND BUTTON
a. You may also click and select to DISABLE the EWF for the selected drive or partition upon reboot.

Windows XPE Administrator’s Guide
3. Click on the CLOSE button
4. The system will request a reboot.
This procedure will now commit the changes to the selected drive or partition.
Applying EWF Settings to Multiple Volumes The EWF Manager also allows you to make simultaneous changes to all the drive/partition volumes on your system.
1. Select the drive or partition
2. Click on the COMMAND BUTTON pertaining to the command of your choice. Example: ENABLE

Windows XPE Administrator’s Guide
3. Click on the APPLY TO ALL EWF VOLUMES check box
4. Click on the CLOSE button
5. The system will request a reboot.
This procedure will now apply any commands to all the drives or partitions on the system.
Cancelling Queued Commands If you have made a series of EWF commands and have not rebooted, the EWF Manager gives you the opportunity to cancel all queued commands.
1. Click on the CANCEL PENDING EWF COMMANDS button.

Windows XPE Administrator’s Guide
2. Click on the CLOSE button
All queued, pending commands have now been erased.
Protecting Your System – The EWF Blue Screen If you decide to use the EWF protection system, you must ensure that you shutdown and reboot the system using the START MENU shutdown and reboot options.
If you reset the Itona XP Appliance using the power switch or by removing the power cord, in cases where EWF is enabled and a COMMIT or RESTORE command is not performed the EWF system places the device in a protected mode and will reboot showing a BLUE SCREEN.
There is nothing to worry about, should this happen. Windows XPE and its EWF system is performing a procedure that is intended to protect your Itona XP appliance from damage.
The procedure for recovering from the EWF Blue Screen is as follows:
1. Power off the device
2. Power it back on

Windows XPE Administrator’s Guide 3. Press the F8 key repeatedly as soon as you see the Windows XP logo
boot process.
4. You will now see a series of four options
5. Select EWF Restore
6. On the next screen you will see two more options
7. Select “MultiDisk(0) HDD(0) Partition(0)”
8. On the following screen you will see two further options
9. Select “F2 to Restore”
The system will now boot up the system at the last restore point.
Should you have any questions, please contact VXL Technical Support.

Windows XPE Administrator’s Guide
Adding RDP connection By default, shortcut for RDP client will be available on the desktop. If it is not available, you can access it from ‘All Programs’ menu as shown below.
Click on Remote Desktop Connection’ icon and you will see a screen shown below.
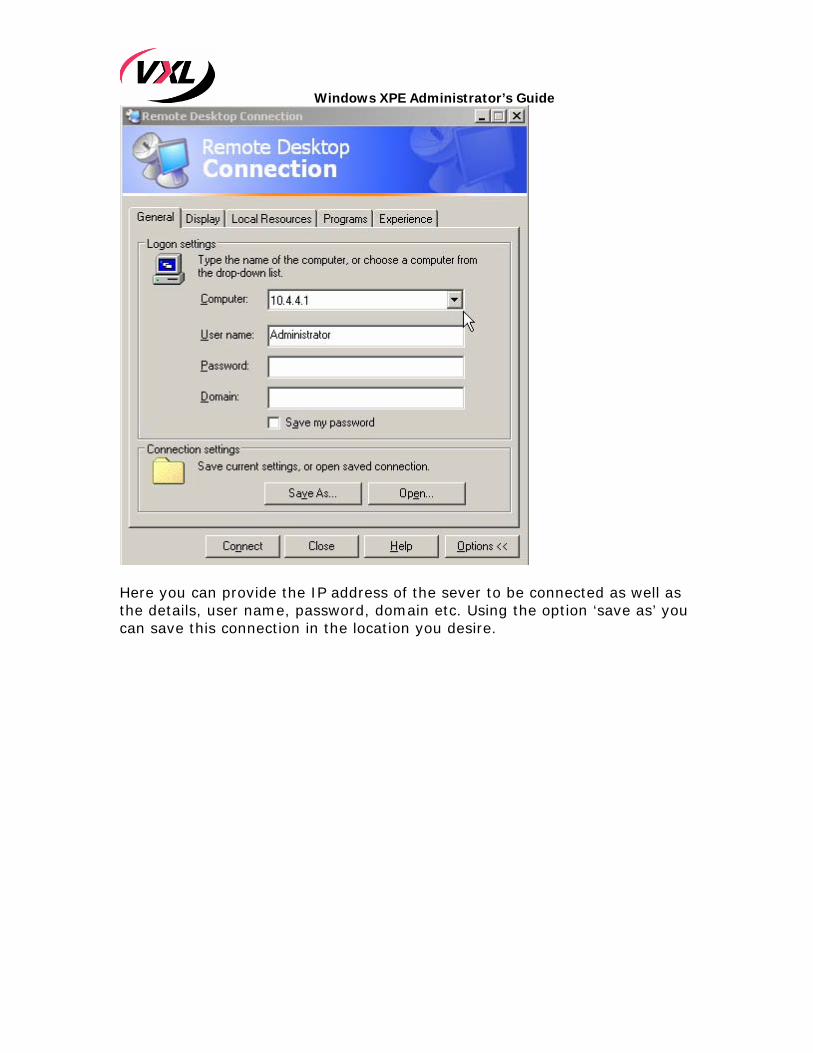
Here you can provide the IP address of the server to be connected and click on ‘connect’. It will connect to the server you specified. If you want to create one RDP connection for a particular server and save that connection, click on ‘Options’ and you will see a screen shown below.
Windows XPE Administrator’s Guide
Here you can provide the IP address of the sever to be connected as well as the details, user name, password, domain etc. Using the option ‘save as’ you can save this connection in the location you desire.

Windows XPE Administrator’s Guide
Adding ICA Connection Similar to RDP, you will find the shortcut for ICA on desktop or in ‘All Programs’ menu. Double click on the Citrix Program Neighborhood Icon and you will get the screen shown below.
Double click on the Application set manager you will get a new window as shown below.
Now double click on ‘Custom ICA connections’ to get the option ‘Add ICA connection’.

Windows XPE Administrator’s Guide
On double clicking this icon, Add New ICA Connection Wizard you will get.
Click on ‘Next’ and get the window to give details of the ICA connection

Windows XPE Administrator’s Guide
Continue with ‘Next’.
On clicking ‘Next’ you will get the following screen.

Windows XPE Administrator’s Guide
You can give Username and if you want to save the password, check the ‘save password’ box and click ‘Next’.

Windows XPE Administrator’s Guide In the above given box gives you the option of changing the display settings of the connecting configuration. If you want to use default settings check the boxes.
If you want the configuration to open with any particular application you can give it in the above box.

Windows XPE Administrator’s Guide
Now click on ‘Finish’. You will get a window as shown below.
Double click on the icon ‘ICA1’, the appliance will connect to the ICA server. You will see the following window.

Windows XPE Administrator’s Guide
For editing, deleting or renaming the connection right click on the icon ICA1.
Windows XPE Administrator’s Guide
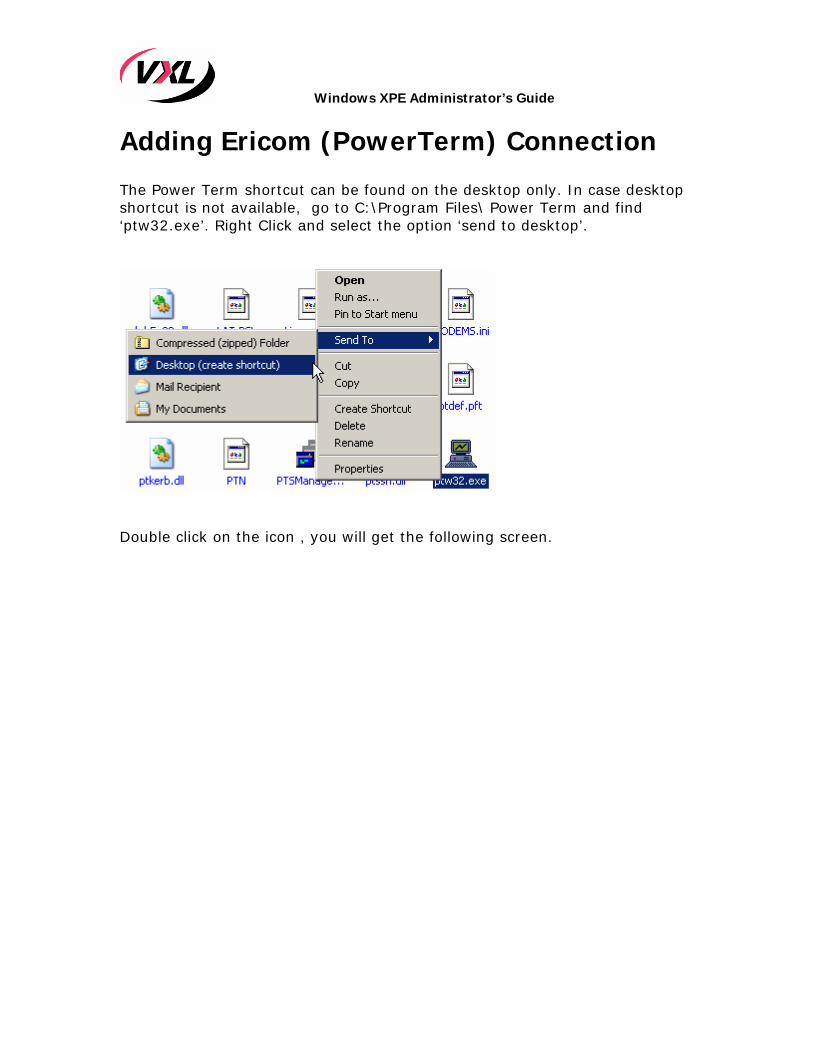
Adding Ericom (PowerTerm) Connection The Power Term shortcut can be found on the desktop only. In case desktop shortcut is not available, go to C:\Program Files\ Power Term and find ‘ptw32.exe’. Right Click and select the option ‘send to desktop’.
Double click on the icon , you will get the following screen.

Windows XPE Administrator’s Guide
In host name window, you can provide the IP address of the server to be connected. Other parameters like session type, Terminal type and ID etc can also be provided. To connect to the specified server, click on connect. You can use ‘save as’ option for saving the connection. Other options available are Rename, Modify, Delete, Close, help etc. On clicking ‘Connect’ you will get the screen with login prompt. You can enter the username and password for logging in.

Windows XPE Administrator’s Guide
To change the properties of the connections you can use different options available on menu bar.

Windows XPE Administrator’s Guide
Technical Support If you have any support issues or queries, please do not hesitate to contact VXL Technical Support by any of the following methods:
1. By web at http://www.vxl.net
a. Click SUPPORT on the left side menu
b. Click TECHNICAL SUPPORT
c. You will be presented with the following form:
d. Fill in the form and VXL Technical Support will deal with your issue.