Using VMware Horizon View Client for Windows - Horizon · PDF fileThis guide, Using VMware...
66
Using VMware Horizon View Client for Windows January 2014 Horizon View This document supports the version of each product listed and supports all subsequent versions until the document is replaced by a new edition. To check for more recent editions of this document, see http://www.vmware.com/support/pubs. EN-001179-02
Transcript of Using VMware Horizon View Client for Windows - Horizon · PDF fileThis guide, Using VMware...

Using VMware Horizon View Client forWindows
January 2014Horizon View
This document supports the version of each product listed andsupports all subsequent versions until the document isreplaced by a new edition. To check for more recent editionsof this document, see http://www.vmware.com/support/pubs.
EN-001179-02

Using VMware Horizon View Client for Windows
2 VMware, Inc.
You can find the most up-to-date technical documentation on the VMware Web site at:
http://www.vmware.com/support/
The VMware Web site also provides the latest product updates.
If you have comments about this documentation, submit your feedback to:
Copyright © 2014 VMware, Inc. All rights reserved. Copyright and trademark information.
VMware, Inc.3401 Hillview Ave.Palo Alto, CA 94304www.vmware.com

Contents
Using VMware Horizon View Client for Windows 5
1 System Requirements and Setup for Windows-Based View Clients 7
System Requirements for Windows Clients 7System Requirements for Real-Time Audio-Video 9Requirements for Using Multimedia Redirection (MMR) 9Requirements for Using Flash URL Redirection 11Requirements for Using Microsoft Lync with Horizon View Client 11Smart Card Authentication Requirements 12Client Browser Requirements for View Portal 13Supported Desktop Operating Systems 14Preparing View Connection Server for Horizon View Client 14Horizon View Client Data Collected by VMware 14
2 Installing View Client for Windows 17
Install View Client for Windows 17Configure the View Client Download Links Displayed in View Portal 18Installing View Client Silently 20
3 Configuring Horizon View Client for End Users 25
Using URIs to Configure Horizon View Client 26Configuring Certificate Checking for End Users 30Using the Group Policy Template to Configure VMware Horizon View Client for Windows 32Running View Client from the Command Line 42Using the Windows Registry to Configure Horizon View Client 45
4 Managing Server Connections and Desktops 47
Log In to a View Desktop 47Switch Desktops 49Log Off or Disconnect from a Desktop 50
5 Working in a View Desktop 51
Feature Support Matrix 51Internationalization 52Using Multiple Monitors 52Connect USB Devices 53Using the Real-Time Audio-Video Feature for Webcams and Microphones 56Copying and Pasting Text and Images 58Printing from a Remote Desktop 59Control Adobe Flash Display 60Using the Relative Mouse Feature for CAD and 3D Applications 60
VMware, Inc. 3

6 Troubleshooting Horizon View Client 63
What to Do If View Client Exits Unexpectedly 63Reset a Desktop 63Uninstalling Horizon View Client 64
Index 65
Using VMware Horizon View Client for Windows
4 VMware, Inc.

Using VMware Horizon View Client for Windows
This guide, Using VMware Horizon View Client for Windows, provides information about installing and usingVMware® Horizon View™ software on a Microsoft Windows client system to connect to a View desktop inthe datacenter.
The information in this document includes system requirements and instructions for installing and usingHorizon View Client for Windows.
This information is intended for administrators who need to set up a Horizon View deployment thatincludes Microsoft Windows client systems, such as desktops and laptops. The information is written forexperienced system administrators who are familiar with virtual machine technology and datacenteroperations.
VMware, Inc. 5

Using VMware Horizon View Client for Windows
6 VMware, Inc.

System Requirements and Setup forWindows-Based View Clients 1
Systems running View client components must meet certain hardware and software requirements.
View Client on Windows systems uses Microsoft Internet Explorer Internet settings, including proxysettings, when connecting to View Connection Server. Ensure that your Internet Explorer settings areaccurate and that you can access the View Connection Server URL through Internet Explorer.
This chapter includes the following topics:
n “System Requirements for Windows Clients,” on page 7
n “System Requirements for Real-Time Audio-Video,” on page 9
n “Requirements for Using Multimedia Redirection (MMR),” on page 9
n “Requirements for Using Flash URL Redirection,” on page 11
n “Requirements for Using Microsoft Lync with Horizon View Client,” on page 11
n “Smart Card Authentication Requirements,” on page 12
n “Client Browser Requirements for View Portal,” on page 13
n “Supported Desktop Operating Systems,” on page 14
n “Preparing View Connection Server for Horizon View Client,” on page 14
n “Horizon View Client Data Collected by VMware,” on page 14
System Requirements for Windows ClientsYou can install Horizon View Client for Windows on PCs or laptops that use a Microsoft Windows 8.x,Windows 7, Vista, or XP operating system.
The PC or laptop on which you install Horizon View Client, and the peripherals it uses, must meet certainsystem requirements.
Model Standard x86 or x86 64-bit compatible desktop or laptop computer
Memory At least 1GB of RAM
Operating systemsOS Version SP
Windows 8 or 8.1 32- or 64-bit N/A
Windows 7 32- or 64-bit None or SP1
Windows XP 32-bit SP3
Windows Vista 32-bit SP1 or SP2
VMware, Inc. 7

For Windows 7 and Windows Vista, the following editions are supported:Home, Enterprise, Professional/Business, and Ultimate. For Windows XP,Home and Professional editions are supported.
For Windows 8 and 8.1, the following editions are supported: Windows 8 or8.1 Pro - Desktop and Windows 8 or 8.1 Enterprise - Desktop.
View ConnectionServer, Security Server,and View Agent
Latest maintenance release of VMware View 4.6.x and later releases
If client systems connect from outside the corporate firewall, VMwarerecommends that you use a security server. With a security server, clientsystems will not require a VPN connection.
Display protocol forHorizon View
PCoIP or RDP
Hardware Requirementsfor PCoIP
n x86-based processor with SSE2 extensions, with a 800MHz or higherprocessor speed.
n Available RAM above system requirements to support various monitorsetups. Use the following formula as a general guide:
20MB + (24 * (# monitors) * (monitor width) * (monitor height))
As a rough guide, you can use the following calculations:
1 monitor: 1600 x 1200: 64MB
2 monitors: 1600 x 1200: 128MB
3 monitors: 1600 x 1200: 256MB
Hardware Requirementsfor RDP
n x86-based processor with SSE2 extensions, with a 800MHz or higherprocessor speed.
n 128MB RAM.
Software Requirementsfor RDP
n For Windows XP and Windows XP Embedded systems, use MicrosoftRDP 6.1.
n Windows Vista includes RDP 6.1, though RDP 7.1 is recommended.
n For Windows 7, use RDP 7.1 or 8.0. Windows 7 includes RDP 7.Windows 7 SP1 includes RDP 7.1.
n For Windows 8, use RDP 8.0. For Windows 8.1, use RDP 8.1.
n For Windows XP desktop virtual machines, you must install the RDPpatches listed in Microsoft Knowledge Base (KB) articles 323497 and884020. If you do not install the RDP patches, a Windows Sockets failederror message might appear on the client.
n The View Agent installer configures the local firewall rule for inboundRDP connections to match the current RDP port of the host operatingsystem, which is typically 3389. If you change the RDP port number, youmust change the associated firewall rules.
You can download Remote Desktop Client versions from the MicrosoftDownload Center.
Using VMware Horizon View Client for Windows
8 VMware, Inc.

System Requirements for Real-Time Audio-VideoReal-Time Audio-Video works with standard webcam, USB audio, and analog audio devices, and withstandard conferencing applications like Skype, WebEx, and Google Hangouts. To support Real-Time Audio-Video, your Horizon View deployment must meet certain software and hardware requirements.
Horizon View remotedesktop
The desktops must have View Agent 5.2 or later installed. The desktops mustalso have the corresponding Remote Experience Agent installed. Forexample, if View Agent 5.3 is installed, you must also install the RemoteExperience Agent from Horizon View 5.3 Feature Pack 1. See theVMware Horizon View Feature Pack Installation and Administration documentfor VMware Horizon View
Horizon View Clientsoftware
Horizon View Client 2.2 for Windows or a later release
Horizon View Clientcomputer or clientaccess device
n Real-Time Audio-Video is supported on all operating systems that runHorizon View Client for Windows. For details, see “SystemRequirements for Windows Clients,” on page 7.
n The webcam and audio device drivers must be installed, and thewebcam and audio device must be operable, on the client computer. Tosupport Real-Time Audio-Video, you do not have to install the devicedrivers on the desktop operating system where View Agent is installed.
Display protocol forHorizon View
PCoIP
Real-Time Audio-Video is not supported in RDP desktop sessions.
Requirements for Using Multimedia Redirection (MMR)Multimedia redirection (MMR) delivers the multimedia stream directly to client computers.
With MMR, the multimedia stream is processed, that is, decoded, on the client system. The client systemplays the media content, thereby offloading the demand on the ESXi host.
Because MMR is implemented differently on different operating systems, the system requirements for theWindows 7 operating system are different from the requirements for Windows Vista and earlier operatingsystems.
IMPORTANT Windows 8 View desktops do not support MMR. For these View agents, use Windows mediaredirection, included with RDP 7 and later.
MMR Support and Requirements for Windows 7 Operating SystemsTo use MMR on Windows 7 View desktops and Windows 7 or Windows 8 clients, your servers, virtualdesktops, and client computers must meet certain system requirements.
VMware softwarerequirements
n The Horizon View servers and desktops must be VMware Horizon View5.3 or a later release.
n On the virtual desktops, you must also install the latest RemoteExperience Agent. See the VMware Horizon View Feature Pack Installationand Administration document for VMware Horizon View 5.3 FeaturePack 1.
n On View Clients, you must install VMware Horizon View Client forWindows 2.2 or later.
Chapter 1 System Requirements and Setup for Windows-Based View Clients
VMware, Inc. 9
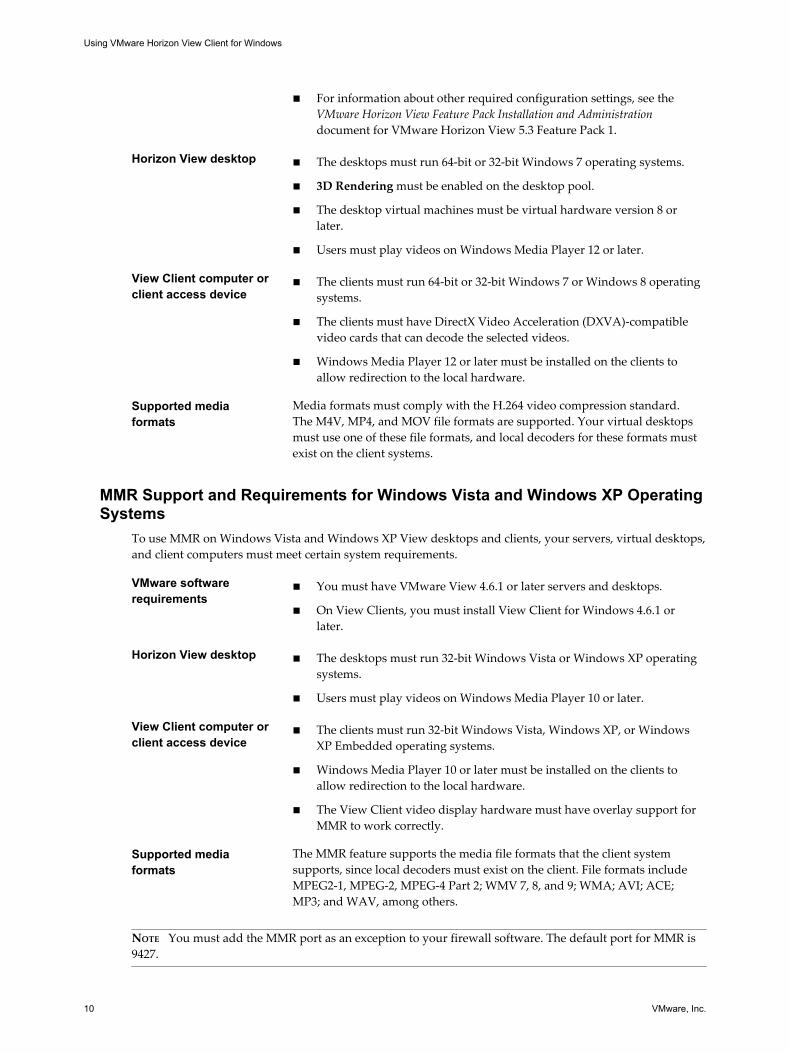
n For information about other required configuration settings, see theVMware Horizon View Feature Pack Installation and Administrationdocument for VMware Horizon View 5.3 Feature Pack 1.
Horizon View desktop n The desktops must run 64-bit or 32-bit Windows 7 operating systems.
n 3D Rendering must be enabled on the desktop pool.
n The desktop virtual machines must be virtual hardware version 8 orlater.
n Users must play videos on Windows Media Player 12 or later.
View Client computer orclient access device
n The clients must run 64-bit or 32-bit Windows 7 or Windows 8 operatingsystems.
n The clients must have DirectX Video Acceleration (DXVA)-compatiblevideo cards that can decode the selected videos.
n Windows Media Player 12 or later must be installed on the clients toallow redirection to the local hardware.
Supported mediaformats
Media formats must comply with the H.264 video compression standard.The M4V, MP4, and MOV file formats are supported. Your virtual desktopsmust use one of these file formats, and local decoders for these formats mustexist on the client systems.
MMR Support and Requirements for Windows Vista and Windows XP OperatingSystems
To use MMR on Windows Vista and Windows XP View desktops and clients, your servers, virtual desktops,and client computers must meet certain system requirements.
VMware softwarerequirements
n You must have VMware View 4.6.1 or later servers and desktops.
n On View Clients, you must install View Client for Windows 4.6.1 orlater.
Horizon View desktop n The desktops must run 32-bit Windows Vista or Windows XP operatingsystems.
n Users must play videos on Windows Media Player 10 or later.
View Client computer orclient access device
n The clients must run 32-bit Windows Vista, Windows XP, or WindowsXP Embedded operating systems.
n Windows Media Player 10 or later must be installed on the clients toallow redirection to the local hardware.
n The View Client video display hardware must have overlay support forMMR to work correctly.
Supported mediaformats
The MMR feature supports the media file formats that the client systemsupports, since local decoders must exist on the client. File formats includeMPEG2-1, MPEG-2, MPEG-4 Part 2; WMV 7, 8, and 9; WMA; AVI; ACE;MP3; and WAV, among others.
NOTE You must add the MMR port as an exception to your firewall software. The default port for MMR is9427.
Using VMware Horizon View Client for Windows
10 VMware, Inc.

Requirements for Using Flash URL RedirectionStreaming Flash content directly from Adobe Media Server to client endpoints lowers the load on thedatacenter ESXi host, removes the extra routing through the datacenter, and reduces the bandwidthrequired to simultaneously stream live video events to multiple client endpoints.
The Flash URL redirection feature uses a JavaScript that is embedded inside a Web page by the Web pageadministrator. Whenever a virtual desktop user clicks on the designated URL link from within a Web page,the JavaScript intercepts and redirects the ShockWave File (SWF) from the virtual desktop session to theclient endpoint. The endpoint then opens a local VMware Flash Projector outside of the virtual desktopsession and plays the media stream locally.
This feature is available when used in conjunction with the correct version of VMware Horizon ViewFeature Pack.
n Multicast support requires VMware Horizon View 5.2 Feature Pack 2 or later.
n Unicast support requires VMware Horizon View 5.3 Feature Pack 1 or later.
To use this feature, you must set up your Web page and your client devices. Client systems must meetcertain software requirements:
n For multicast support, client systems must use Horizon View Client 5.4 or 2.2 or later. For unicastsupport, client systems must use Horizon View Client 2.2 or later.
n Client systems must have IP connectivity to the Adobe Web server that hosts the ShockWave File (SWF)that initiates the multicast or unicast streaming. If needed, configure your firewall to open theappropriate ports to allow client devices to access this server.
n Client systems must have Adobe Flash Player 10.1 or later for Internet Explorer (which uses ActiveX).
For a list of the View desktop requirements for Flash URL redirection, and for instructions about how toconfigure a Web page to provide a multicast or unicast stream, see the VMware Horizon View Feature PackInstallation and Administration document.
Requirements for Using Microsoft Lync with Horizon View ClientYou can use a Microsoft Lync 2013 client on View desktops to participate in Unified Communications (UC)VoIP (voice over IP) and video chat calls with Lync certified USB audio and video devices. A dedicated IPphone is no longer required.
This architecture requires the installation of a Microsoft Lync 2013 client on the View desktop and aMicrosoft Lync VDI plug-in on the client endpoint. Customers can use the Microsoft Lync 2013 client forpresence, instant messaging, Web conferencing, and Microsoft Office functionality.
Whenever a Lync VoIP or video chat call occurs, the Lync VDI plug-in offloads all the media processingfrom the datacenter server to the client endpoint, and encodes all media into Lync-optimized audio andvideo codecs. This optimized architecture is highly scalable, results in lower network bandwidth used, andprovides point-to-point media delivery with support for high-quality real-time VoIP and video. For moreinformation, see the End User Computing Blog entry at http://blogs.vmware.com/euc/2013/06/the-abcs-of-deploying-vmware-horizon-view-5-2-with-microsoft-lync-2013.html.
NOTE Recording audio is not yet supported. This integration is supported only with the PCoIP displayprotocol.
This feature has the following requirements.
Operating system n Client operating system: 32- or 64-bit Windows 7 SP1 or Windows 8
Chapter 1 System Requirements and Setup for Windows-Based View Clients
VMware, Inc. 11

n Virtual machine (agent) operating system: 32- or 64-bit Windows 7 SP1
Client system software n Horizon View Client for Windows 5.3 or later for Windows 7 clientsystems, Horizon View Client 5.4 or later for Windows 8 client systems,or Horizon View Client for Windows 2.2 or later.
n 32-bit version of Microsoft Lync VDI Plug-in
IMPORTANT The 64-bit version of Microsoft Office must not be installedon the client machine. The 32-bit Microsoft Lync VDI plugin that isrequired is not compatible with 64-bit Microsoft Office 2013.
n Security certificate generated during Microsoft Lync Server 2013deployment must be imported into the Trusted Root CertificateAuthorities directory.
View desktop (agent)software
n Horizon View Agent 5.2 or later
n Microsoft Lync 2013 Client
The Lync 2013 client bit-level should match the bit-level of the virtualmachine operating system when using the Horizon View 5.2 agent. Ifyou use the Horizon View 5.3 agent, the Lync 2013 client bit-level is notrequired to match the bit-level of the virtual machine operating system.
n Security certificate generated during Microsoft Lync Server 2013deployment must be imported into the Trusted Root CertificateAuthorities directory
Required servers n A server running View Connection Server 5.2 or later
n A server running Microsoft Lync Server 2013
n A vSphere infrastructure to host the virtual machines
The vCenter Server and ESXi hosts must be running vSphere 5.0 or later.
Hardware n Hardware that supports each of the required software componentspreviously listed
n Client endpoint: 1.5GHz or faster CPU and a minimum of 2GB of RAMfor the Microsoft Lync 2013 Plug-in
Smart Card Authentication RequirementsClient systems that use a smart card for user authentication must meet certain requirements.
Each client system that uses a smart card for user authentication must have the following software andhardware:
n Horizon View Client
n A Windows-compatible smart card reader
n Smart card middleware
n Product-specific application drivers
You must also install product-specific application drivers on the remote desktops.
Using VMware Horizon View Client for Windows
12 VMware, Inc.

Horizon View supports smart cards and smart card readers that use a PKCS#11 or Microsoft CryptoAPIprovider. You can optionally install the ActivIdentity ActivClient software suite, which provides tools forinteracting with smart cards.
Users that authenticate with smart cards must have a smart card or USB smart card token, and each smartcard must contain a user certificate.
To install certificates on a smart card, you must set up a computer to act as an enrollment station. Thiscomputer must have the authority to issue smart card certificates for users, and it must be a member of thedomain you are issuing certificates for.
IMPORTANT When you enroll a smart card, you can choose the key size of the resulting certificate. To usesmart cards with local desktops, you must select a 1024-bit or 2048-bit key size during smart cardenrollment. Certificates with 512-bit keys are not supported.
The Microsoft TechNet Web site includes detailed information on planning and implementing smart cardauthentication for Windows systems.
In addition to meeting these requirements for Horizon View Client systems, other Horizon Viewcomponents must meet certain configuration requirements to support smart cards:
n For information about configuring View servers to support smart card use, see the topic "ConfigureSmart Card Authentication," in the VMware Horizon View Administration document.
n For information on tasks you might need to perform in Active Directory to implement smart cardauthentication, see the topics about preparing Active Directory for smart card authentication, in theVMware Horizon View Installation document .
Client Browser Requirements for View PortalFrom a client system, you can open a browser and browse to a View Connection Server instance. The Webpage that appears is a portal that contains links for downloading the installer file for Horizon View Client.
To use the portal to download a Horizon View Client installer, you must have one of the following Webbrowsers:
n Internet Explorer 8
n Internet Explorer 9
n Internet Explorer 10 (from a Windows 8 system in Desktop mode)
n Firefox 6 and later releases
n Safari 5 (on a Mac)
n Chrome 14 or later
If you administrator has installed VMware Horizon View HTML Access on the server, you might also see anicon for connecting to a virtual desktop using the browser, without installing any client software. Using thisHTML Access feature requires newer browsers:
n Chrome 28 or later
n Internet Explorer 9 or later
n Safari 6 or later
n Mobile Safari on iOS devices running iOS 6 or later
n Firefox 21 or later
Chapter 1 System Requirements and Setup for Windows-Based View Clients
VMware, Inc. 13

Supported Desktop Operating SystemsAdministrators create virtual machines with a guest operating system and install View Agent in the guestoperating system. End users can log in to these virtual machines from a client device.
For a list of the supported guest operating systems, see the "Supported Operating Systems for View Agent"topic in the Horizon View 4.6.x or 5.x installation documentation.
Preparing View Connection Server for Horizon View ClientAdministrators must perform specific tasks to enable end users to connect to remote desktops.
Before end users can connect to View Connection Server or a security server and access a remote desktop,you must configure certain pool settings and security settings:
n If you are using a security server, as VMware recommends, verify that you are using the latestmaintenance releases of View Connection Server 4.6.x and View Security Server 4.6.x or later releases.See the VMware Horizon View Installation documentation.
n If you plan to use a secure tunnel connection for client devices and if the secure connection isconfigured with a DNS host name for View Connection Server or a security server, verify that the clientdevice can resolve this DNS name.
To enable or disable the secure tunnel, in View Administrator, go to the Edit View Connection ServerSettings dialog box and use the check box called Use secure tunnel connection to desktop.
n Verify that a desktop pool has been created and that the user account that you plan to use is entitled toaccess the remote desktop. See the topics about creating desktop pools in the VMware Horizon ViewAdministration documentation.
n To use two-factor authentication with Horizon View Client, such as RSA SecurID or RADIUSauthentication, you must enable this feature on View Connection Server. RADIUS authentication isavailable with View 5.1 or later View Connection Server. For more information, see the topics abouttwo-factor authentication in the VMware Horizon View Administration documentation.
Horizon View Client Data Collected by VMwareIf your company participates in the customer experience improvement program, VMware collects data fromcertain Horizon View Client fields. Fields containing sensitive information are made anonymous.
NOTE This feature is available only if your Horizon View deployment uses View Connection Server 5.1 orlater. Client information is sent for View Client 2.0 and later clients.
VMware collects data on the clients to prioritize hardware and software compatibility. If your company'sadministrator has opted to participate in the customer experience improvement program, VMware collectsanonymous data about your deployment in order to improve VMware's response to customer requirements.No data that identifies your organization is collected. Horizon View Client information is sent first to ViewConnection Server and then on to VMware, along with data from Horizon View servers, desktop pools, andremote desktops.
Although the information is encrypted while in transit to View Connection Server, the information on theclient system is logged unencrypted in a user-specific directory. The logs do not contain any personallyidentifiable information.
To participate in the VMware customer experience improvement program, the administrator who installsView Connection Server can opt in while running the View Connection Server installation wizard, or anadministrator can set an option in View Administrator after the installation.
Using VMware Horizon View Client for Windows
14 VMware, Inc.

Table 1‑1. Data Collected from Horizon View Clients for the Customer Experience Improvement Program
DescriptionIs This Field MadeAnonymous? Example Value
Company that produced theHorizon View Client application
No VMware
Product name No VMware Horizon View Client
Client product version No The format is x.x.x-yyyyyy, where x.x.x is the client versionnumber and yyyyyy is the build number.
Client binary architecture No Examples include the following:n i386n x86_64n arm
Client build name No Examples include the following:n VMware-Horizon-View-Client-Win32-Windowsn VMware-Horizon-View-Client-Linuxn VMware-Horizon-View-Client-iOSn VMware-Horizon-View-Client-Macn VMware-Horizon-View-Client-Androidn VMware-Horizon-View-Client-WinStore
Host operating system No Examples include the following:n Windows 8.1n Windows 7, 64-bit Service Pack 1 (Build 7601 )n iPhone OS 5.1.1 (9B206)n Ubuntu 10.04.4 LTSn Mac OS X 10.7.5 (11G63)
Host operating system kernel No Examples include the following:n Windows 6.1.7601 SP1n Darwin Kernel Version 11.0.0: Sun Apr 8 21:52:26 PDT
2012; root:xnu-1878.11.10~1/RELEASE_ARM_S5L8945Xn Darwin 11.4.2n Linux 2.6.32-44-generic #98-Ubuntu SMP Mon Sep 24
17:27:10 UTC 2012n unknown (for Windows Store)
Host operating systemarchitecture
No Examples include the following:n x86_64n i386n armv71n ARM
Host system model No Examples include the following:n Dell Inc. OptiPlex 960n iPad3,3n MacBookPro8,2n Dell Inc. Precision WorkStation T3400 (A04 03/21/2008)
Host system CPU No Examples include the following:n Intel(R) Core(TM)2 Duo CPU E8400 @ 3.00GHn Intel(R) Core(TM)2 Quad CPU Q6600 @ 2.40GHn unknown (for iPad)
Chapter 1 System Requirements and Setup for Windows-Based View Clients
VMware, Inc. 15

Table 1‑1. Data Collected from Horizon View Clients for the Customer Experience Improvement Program(Continued)
DescriptionIs This Field MadeAnonymous? Example Value
Number of cores in the hostsystem's processor
No For example: 4
MB of memory on the host system No Examples include the following:n 4096n unknown (for Windows Store)
Using VMware Horizon View Client for Windows
16 VMware, Inc.

Installing View Client for Windows 2You can obtain the Windows-based View Client installer either from the VMware Web site or from ViewPortal, a Web access page provided by View Connection Server. You can set various startup options for endusers after View Client is installed.
This chapter includes the following topics:
n “Install View Client for Windows,” on page 17
n “Configure the View Client Download Links Displayed in View Portal,” on page 18
n “Installing View Client Silently,” on page 20
Install View Client for WindowsEnd users open View Client to connect to their virtual desktops from a client system. You can run aWindows-based installer file to install all components of View Client.
This procedure describes installing View Client by using an interactive installation wizard. If instead youwould like to use the command-line, silent installation feature of the Microsoft Windows Installer (MSI), see “Install View Client Silently,” on page 20.
Prerequisites
n Verify that the client system uses a supported operating system. See “System Requirements forWindows Clients,” on page 7.
n Verify that you have the URL for a download page that contains the VMware Horizon View Clientinstaller. This URL might be the VMware Downloads page at http://www.vmware.com/go/viewclients,or it might be the URL for a View Connection Server instance.
When you browse to a View Connection Server URL, by default the links on that portal page point tothe VMware Downloads page. You can configure the links to point to a different location. For moreinformation, see “Configure the View Client Download Links Displayed in View Portal,” on page 18.Depending on how the page is configured, you might also see a link forVMware Horizon View HTML Access. HTML Access allows you to connect to a virtual desktop usingthe browser, without installing any client software. Because VMware Horizon View Client offers morefeatures and better performance than the HTML Access client, VMware generally recommends that youinstall the client software.
n Verify that you can log in as an administrator on the client system.
n Verify that View Agent is not installed.
VMware, Inc. 17

n Prerequisites for USB redirection:
n Determine whether the person who uses the client device is allowed to access locally connectedUSB devices from a virtual desktop. If not, you can either deselect the USB Redirection componentthat the wizard presents or install the component but disable it using GPOs.
VMware recommends that you always install the USB Redirection component and use GPOs tocontrol USB access. This way, if you later want to enable USB redirection for a client, you will notneed to re-install View Client. For information, see the topic "View Client Configuration ADMTemplate Settings" in the chapter about configuring policies in the VMware Horizon ViewAdministration document.
n If you plan to install the USB Redirection component, verify that the Windows Automatic Updatefeature is not turned off on the client computer.
n Determine whether to use the feature that lets end users log in to View Client and their virtual desktopas the currently logged in user. Credential information that the user entered when logging in to theclient system is passed to the View Connection Server instance and ultimately to the virtual desktop.Some client operating systems do not support this feature.
n If you do not want to require end users to supply the fully qualified domain name (FQDN) of the ViewConnection Server instance, determine the FQDN so that you can supply it during installation.
Procedure
1 Log in to the client system as a user with administrator privileges.
2 On the client system, browse to the URL for downloading the installer file.
Select the appropriate installer file, where xxxxxx is the build number and y.y.y is the version number.
Option Action
View Client on 64-bit operatingsystems
Select VMware-Horizon-View-Client-x86_64-y.y.y-xxxxxx.exe,where y.y.y is the version number and xxxxxx is the build number.
View Client on 32-bit operatingsystems
Select VMware-Horizon-View-Client-x86-y.y.y-xxxxxx.exe, wherey.y.y is the version number and xxxxxx is the build number.
3 To start the View Client installation program, double-click the installer file.
4 Follow the prompts to install the components you want.
The VMware View Client service is installed on the Windows client computer.
The process name for View Client is vmware-view. The service names for the USB components are VMwareUSB Arbitration Service (VMUSBArbService) and VMware View USB (vmware-view-usbd).
What to do next
Start the View Client and verify that you can log in to the correct virtual desktop. See “Log In to a ViewDesktop,” on page 47.
Configure the View Client Download Links Displayed in View PortalBy default, when you open a browser and enter the URL of a View Connection Server instance, the portalpage that appears contains links to the VMware Download site for downloading Horizon View Client. Youcan change the default .
The default Horizon View Client links on portal page ensure that you are directed to the latest compatibleHorizon View Client installers. In some cases, however, you might want to have the links point to aninternal Web server, or you might want to make specific client versions available on your own ViewConnection Server. You can reconfigure the page to point to a different URL.
Using VMware Horizon View Client for Windows
18 VMware, Inc.

When you make links for Mac OS X, Linux, and Windows client systems, the correct operating systemspecific link is shown on the portal page. For example, if you browse to the portal page from a Windowssystem, only the link or links for Windows installers appear. You can make separate links for 32-bit and 64-bit installers. You can also make links for iOS and Android systems, but these operating systems are notautomatically detected, so that if you browse to the portal page from an iPad, for example, you see the linksfor both iOS and Android, if you created links for both.
IMPORTANT If you customize the portal page links, as described in this topic, and later installVMware Horizon View HTML Access on the server, your customized portal page is replaced by anHTML Access page. For information about customizing that page, see UsingVMware Horizon View HTML Access.
Prerequisites
n Download the installer files for the Horizon View Client types that you want to use in yourenvironment. The URL to the client download page is https://www.vmware.com/go/viewclients.
n Determine which HTTP server will host the installer files. The files can reside on a View ConnectionServer instance or on another HTTP server.
Procedure
1 On the HTTP server where the installer files will reside, create a folder for the installer files.
For example, to place the files in a downloads folder on the View Connection Server host, in the defaultinstallation directory, use the following path:
C:\Program Files\VMware\VMware View\Server\broker\webapps\downloads
The links to the files would then use URLs with the format https://server-name/downloads/client-installer-file-name. For example, a server with the name view.mycompany.com might use the followingURL for View Client for Windows: https://view.mycompany.com/downloads/VMware-Horizon-View-Client.exe. In this example, the folder named downloads is located in the webapps root folder.
2 Copy the installer files into the folder.
If the folder resides on View Connection Server, you can replace any files in this folder without havingto restart the VMware View Connection Server service.
3 On the View Connection Server machine, copy the portal-links.properties file and theportal.properties file located in install-path\Server\Extras\PortalExamples.
4 Create a portal folder the directory C:\ProgramData\VMware\VDM, and copy the portal-links.properties and portal.properties files into the portal folder.
5 Edit C:\ProgramData\VMware\VDM\portal\portal-links.properties file to point to the new location ofthe installer files.
You can edit the lines in this file and add to them if you need to create more links. You can also deletelines.
The following examples show properties for creating two links for View Client for Windows and twolinks for View Client for Linux:
link.win=https://server-name/downloads/VMware-Horizon-View-Client-x86_64-y.y.y-XXXX.exe#win
link.win.1=https://server-name/downloads/VMware-Horizon-View-Client-y.y.y-XXXX.exe#win
link.linux=https://server-name/downloads/VMware-Horizon-View-Client-x86_64-y.y.y-
XXXX.rpm#linux
link.linux.1=https://server-name/downloads/VMware-Horizon-View-Client-y.y.y-XXXX.tar.gz#linux
In this example, y.y.y-XXXX indicates the version and build number. The win text at the end of the lineindicates that this link should appear in the browser if the client has a Windows operating system. Usewin for Windows, linux for Linux, and mac for Mac OS X. For other operating systems, use unknown.
Chapter 2 Installing View Client for Windows
VMware, Inc. 19

6 Edit C:\ProgramData\VMware\VDM\portal\portal.properties file to specify the text to display for thelinks.
These lines appear in the section of the file called # keys based on key names in portal-links.properties.
The following example shows the text that corresponds to the links specified for link.win andlink.win.1:
text.win=View Client for Windows 32 bit Client users
text.win.1=View Client for Windows 64 bit Client users
7 Restart the VMware View Connection Server service.
When end users enter the URL for View Connection Server, they see links with the text you specified. Thelinks point to the locations you specified.
Installing View Client SilentlyYou can install View Client silently by typing the installer filename and installation options at the commandline. With silent installation, you can efficiently deploy View components in a large enterprise.
Install View Client SilentlyYou can use the silent installation feature of the Microsoft Windows Installer (MSI) to install View Client onseveral Windows computers. In a silent installation, you use the command line and do not have to respondto wizard prompts.
Prerequisites
n Verify that the client system uses a supported operating system. See “System Requirements forWindows Clients,” on page 7.
n Verify that you can log in as an administrator on the client system.
n Verify that View Agent is not installed.
n Determine whether to use the feature that lets end users log in to View Client and their virtual desktopas the currently logged in user. Credential information that the user entered when logging in to theclient system is passed to the View Connection Server instance and ultimately to the virtual desktop.Some client operating systems do not support this feature.
n Familiarize yourself with the MSI installer command-line options. See “Microsoft Windows InstallerCommand-Line Options,” on page 22.
n Familiarize yourself with the silent installation (MSI) properties available with View Client. See “SilentInstallation Properties for View Client,” on page 21.
n Determine whether to allow end users to access locally connected USB devices from their virtualdesktops. If not, set the MSI property, ADDLOCAL, to the list of features of interest and omit the USBfeature. For details, see “Silent Installation Properties for View Client,” on page 21.
n If you do not want to require end users to supply the fully qualified domain name (FQDN) of the ViewConnection Server instance, determine the FQDN so that you can supply it during installation.
Using VMware Horizon View Client for Windows
20 VMware, Inc.

Procedure
1 On the client system, download the View Client installer file from the VMware product page at http://www.vmware.com/go/viewclients.
Select the appropriate installer file, where xxxxxx is the build number and y.y.y is the version number.
Option Action
View Client on 64-bit operatingsystems
Select VMware-Horizon-View-Client-x86_64-y.y.y-xxxxxx.exe,where y.y.y is the version number and xxxxxx is the build number.
View Client on 32-bit operatingsystems
Select VMware-Horizon-View-Client-x86-y.y.y-xxxxxx.exe, wherey.y.y is the version number and xxxxxx is the build number.
2 Open a command prompt on the Windows client computer.
3 Type the installation command on one line.
This example installs View Client silently: VMware-Horizon-View-Client-x86-y.y.y-xxxxxx.exe /s /v"/qn ADDLOCAL=Core"
NOTE The Core feature is mandatory.
What to do next
Start the View Client and verify that you can log in to the correct virtual desktop. See “Log In to a ViewDesktop,” on page 47.
Silent Installation Properties for View ClientYou can include specific properties when you silently install View Client from the command line. You mustuse a PROPERTY=value format so that Microsoft Windows Installer (MSI) can interpret the properties andvalues.
Table 2-1 shows the View Client silent installation properties that you can use at the command-line.
Table 2‑1. MSI Properties for Silently Installing View Client
MSI Property Description Default Value
INSTALLDIR The path and folder in which the View Client software isinstalled.For example: INSTALLDIR=""D:\abc\my folder""The sets of two double quotes that enclose the path permit theMSI installer to interpret the space as a valid part of the path.This MSI property is optional.
%ProgramFiles%\VMware\VMware HorizonView Client
VDM_SERVER The fully qualified domain name (FQDN) of the ViewConnection Server instance to which View Client usersconnect by default. When you configure this property, ViewClient users do not have to supply this FQDN.For example: VDM_SERVER=cs1.companydomain.comThis MSI property is optional.
None
DESKTOP_SHORTCUT Configures a desktop shortcut icon for View Client.A value of 1 installs the shortcut. A value of 0 does not installthe shortcut.This MSI property is optional.
1
STARTMENU_SHORTCUT Configures a shortcut for View Client in the Start menu.A value of 1 installs the shortcut. A value of 0 does not installthe shortcut.This MSI property is optional.
1
Chapter 2 Installing View Client for Windows
VMware, Inc. 21

In a silent installation command, you can use the MSI property, ADDLOCAL=, to specify features that theView Client installer configures. Each silent-installation feature corresponds to a setup option that you canselect during an interactive installation.
Table 2-2 shows the View Client features you can type at the command line and the correspondinginteractive-installation options.
Table 2‑2. View Client Silent Installation Features and Interactive Custom Setup Options
Silent Installation Feature Custom Setup Option in an Interactive Installation
CoreIf you specify individual features with the MSI property,ADDLOCAL=, you must include Core.
None.During an interactive installation, the core View Clientfunctions are installed by default.
ThinPrint Virtual Printing
TSSO Log in as the currently logged-in Windows domain user
USB USB Redirection
Microsoft Windows Installer Command-Line OptionsTo install View components silently, you must use Microsoft Windows Installer (MSI) command-lineoptions and properties. The View component installers are MSI programs and use standard MSI features.You can also use MSI command-line options to uninstall View components silently.
For details about MSI, see the Microsoft Web site. For MSI command-line options, see the MicrosoftDeveloper Network (MSDN) Library Web site and search for MSI command-line options. To see MSIcommand-line usage, you can open a command prompt on the View component computer and typemsiexec /?.
To run a View component installer silently, you begin by silencing the bootstrap program that extracts theinstaller into a temporary directory and starts an interactive installation.
Table 2-3 shows the command-line options that control the installer's bootstrap program.
Table 2‑3. Command-Line Options for a View Component's Bootstrap Program
Option Description
/s Disables the bootstrap splash screen and extraction dialog, which prevents thedisplay of interactive dialogs.For example: VMware-viewconnectionserver-y.y.y-xxxxxx.exe /sThe /s option is required to run a silent installation. In the examples, xxxxxx isthe build number and y.y.y is the version number.
/v" MSI_command_line_options" Instructs the installer to pass the double-quote-enclosed string that you enter atthe command line as a set of options for MSI to interpret. You must encloseyour command-line entries between double quotes. Place a double quote afterthe /v and at the end of the command line.For example: VMware-viewagent-y.y.y-xxxxxx.exe /s /v"command_line_options"
To instruct the MSI installer to interpret a string that contains spaces, enclosethe string in two sets of double quotes. For example, you might want to installthe View component in an installation path name that contains spaces.For example: VMware-viewconnectionserver-y.y.y-xxxxxx.exe /s /v"command_line_options INSTALLDIR=""d:\abc\myfolder"""
In this example, the MSI installer passes on the installation-directory path anddoes not attempt to interpret the string as two command-line options. Note thefinal double quote that encloses the entire command line.The /v"command_line_options" option is required to run a silent installation.
Using VMware Horizon View Client for Windows
22 VMware, Inc.

You control the remainder of a silent installation by passing command-line options and MSI property valuesto the MSI installer, msiexec.exe. The MSI installer includes the View component's installation code. Theinstaller uses the values and options that you enter in the command line to interpret installation choices andsetup options that are specific to the View component.
Table 2-4 shows the command-line options and MSI property values that are passed to the MSI installer.
Table 2‑4. MSI Command-Line Options and MSI Properties
MSI Option or Property Description
/qn Instructs the MSI installer not to display the installer wizard pages.For example, you might want to install View Agent silently and use onlydefault setup options and features:VMware-viewagent-y.y.y-xxxxxx.exe /s /v"/qn"
In the examples, xxxxxx is the build number and y.y.y is the versionnumber.Alternatively, you can use the /qb option to display the wizard pages in anoninteractive, automated installation. As the installation proceeds, thewizard pages are displayed, but you cannot respond to them.The /qn or /qb option is required to run a silent installation.
INSTALLDIR (Optional) Specifies an alternative installation path for the Viewcomponent.Use the format INSTALLDIR=path to specify an installation path. You canignore this MSI property if you want to install the View component in thedefault path.
ADDLOCAL (Optional) Determines the component-specific features to install. In aninteractive installation, the View installer displays custom setup options toselect. The MSI property, ADDLOCAL, lets you specify these setup options onthe command line.To install all available custom setup options, enter ADDLOCAL=ALL.For example: VMware-viewagent-y.y.y-xxxxxx.exe /s /v"/qnADDLOCAL=ALL"
If you do not use the MSI property, ADDLOCAL, the default setup optionsare installed.To specify individual setup options, enter a comma-separated list of setupoption names. Do not use spaces between names. Use the formatADDLOCAL=value,value,value....
For example, you might want to install View Agent in a guest operatingsystem with the View Composer Agent and PCoIP features:VMware-viewagent-y.y.y-xxxxxx.exe /s /v"/qnADDLOCAL=Core,SVIAgent,PCoIP"
NOTE The Core feature is required in View Agent.
LOGINASCURRENTUSER_DISPLAY (Optional) Determines whether the Log in as current user check box isvisible on the Horizon View Client connection dialog box.Valid values are 1 (enabled) and 0 (disabled). The default is 1, whichmeans that the check box is visible, and users can select or deselect it andoverride its default value. When the check box is hidden, users cannotoverride its default value from the Horizon View Client connection dialogbox.
Chapter 2 Installing View Client for Windows
VMware, Inc. 23

Table 2‑4. MSI Command-Line Options and MSI Properties (Continued)
MSI Option or Property Description
LOGINASCURRENTUSER_DEFAULT (Optional) Specifies the default value of the Log in as current user checkbox on theHorizon View Client connection dialog box. Valid values are 1(enabled) and 0 (disabled). No default is set, which means that the checkbox is deselected, and users must provide identity and credentialinformation multiple times before they can access a remote desktop.When the Log in as current user check box is selected, the identity andcredential information that the user provided when logging in to the clientsystem is passed to the View Connection Server instance and ultimately tothe remote desktop.Use this option in conjunction with the LOGINASCURRENTUSER_DISPLAYoption. For example: LOGINASCURRENTUSER_DISPLAY=1LOGINASCURRENTUSER_DEFAULT=1
If a user runs Horizon View Client from the command line and specifiesthe logInAsCurrentUser option, that value overrides this setting.
REBOOT (Optional) You can use the REBOOT=ReallySuppress option to allowsystem configuration tasks to complete before the system reboots.
/l*v log_file (Optional) Writes logging information into the specified log file.For example: /l*v ""%TEMP%\vmmsi.log""This example generates a detailed log file that is similar to the loggenerated during an interactive installation.You can use this option to record custom features that might applyuniquely to your installation. You can use the recorded information tospecify installation features in future silent installations.
Example: Installation ExamplesIn the following examples, xxxxxx is the build number, y.y.y is the version number, install_folder is thepath to the installation folder, and view.mycompany.com is the name of a fictitious View Connection Serverinstance.
Default installation example:
VMware-Horizon-View-Client-x86_64-y.y.y-xxxxxx.exe /s /v"/qn REBOOT=ReallySuppress
INSTALLDIR=install_folder ADDLOCAL=ALL DESKTOP_SHORTCUT=1 STARTMENU_SHORTCUT=1
VDM_SERVER=view.mycompany.com /l*v "%TEMP%\log.txt""
Installation and configuration example for the Log In as Current User feature:
VMware-Horizon-View-Client-x86_64-y.y.y-xxxxxx.exe /s /v"/qn REBOOT=ReallySuppress
INSTALLDIR=install_folder ADDLOCAL=TSSO LOGINASCURRENTUSER_DISPLAY=1
LOGINASCURRENTUSER_DEFAULT=1 DESKTOP_SHORTCUT=1 STARTMENU_SHORTCUT=1
VDM_SERVER=view.mycompany.com /l*v "%TEMP%\log.txt""
Using VMware Horizon View Client for Windows
24 VMware, Inc.

Configuring Horizon View Client forEnd Users 3
Horizon View Client provides several configuration mechanisms to simplify the login and desktop selectionexperience for end users, and also to enforce security policies.
The following table shows some of the configuration settings that you can set in any of several ways. Formany other configuration settings, you must use a particular mechanism. For example, to use the setting forDisable Toaster Notifications, you must use a Group Policy setting..
Table 3‑1. Common Configuration Settings
Setting Mechanisms for Configuring
View Connection Server address URI, Group Policy, Command Line, Windows Registry
Active Directory user name URI, Group Policy, Command Line, Windows Registry
Log in as current user Group Policy, Command Line
Domain name URI, Group Policy, Command Line, Windows Registry
Desktop display name URI, Group Policy, Command Line
Window size URI, Group Policy, Command Line
Display protocol URI, Command Line
Options for redirecting USB devices URI, Group Policy, Command Line
Configuring certificate checking Group Policy, Windows Registry
Configuring SSL protocols andcryptographic algorithms
Group Policy, Windows Registry
This chapter includes the following topics:
n “Using URIs to Configure Horizon View Client,” on page 26
n “Configuring Certificate Checking for End Users,” on page 30
n “Using the Group Policy Template to Configure VMware Horizon View Client for Windows,” onpage 32
n “Running View Client from the Command Line,” on page 42
n “Using the Windows Registry to Configure Horizon View Client,” on page 45
VMware, Inc. 25

Using URIs to Configure Horizon View ClientUsing uniform resource identifiers (URIs), you can create a Web page or an email with links that end usersclick to launch Horizon View Client, connect to View Connection Server, and launch a specific desktop withspecific configuration options.
You can simplify the process of logging in to a remote desktop by creating Web or email links for end users.You create these links by constructing URIs that provide some or all of the following information, so thatyour end users do not need to supply it:
n View Connection Server address
n Port number for View Connection Server
n Active Directory user name
n RADIUS or RSA SecurID user name, if different from Active Directory user name
n Domain name
n Desktop display name
n Window size
n Desktop actions, including reset, log off, and start session
n Display protocol
n Options for redirecting USB devices
IMPORTANT To use this feature you must have Horizon View Client 2.0 or later.
To construct a URI, you use the vmware-view URI scheme with Horizon View Client specific path and queryparts.
NOTE You can use URIs to launch Horizon View Client only if the client software is already installed onend users' client computers.
Syntax for Creating vmware-view URIsSyntax includes the vmware-view URI scheme, a path part to specify the desktop, and, optionally, a query tospecify desktop actions or configuration options.
VMware Horizon View URI SpecificationUse the following syntax to create URIs for launching Horizon View Client:
vmware-view://[authority-part][/path-part][?query-part]
The only required element is the URI scheme, vmware-view. For some versions of some client operatingsystems, the scheme name is case-sensitive. Therefore, use vmware-view.
IMPORTANT In all parts, non-ASCII characters must first be encoded according to UTF-8 [STD63], and theneach octet of the corresponding UTF-8 sequence must be percent-encoded to be represented as URIcharacters.
For information about encoding for ASCII characters, see the URL encoding reference at http://www.utf8-chartable.de/.
authority-part Specifies the server address and, optionally, a user name, a non-default portnumber, or both. Server names must conform to DNS syntax.
Using VMware Horizon View Client for Windows
26 VMware, Inc.

To specify a user name, use the following syntax:
user1@server-address
Note that you cannot specify a UPN address, which includes the domain. Tospecify the domain, you can use the domainName query part in the URI.
To specify a port number, use the following syntax:
server-address:port-number
path-part Specifies the desktop. Use the desktop display name. If the display name hasa space in it, use the %20 encoding mechanism to represent the space.
query-part Specifies the configuration options to use or the desktop actions to perform.Queries are not case-sensitive. To use multiple queries, use an ampersand(&) between the queries. If queries conflict with each other, the last query inthe list is used. Use the following syntax:
query1=value1[&query2=value2...]
Supported QueriesThis topic lists the queries that are supported for this type of Horizon View Client. If you are creating URIsfor multiple types of clients, such as desktop clients and mobile clients, see the UsingVMware Horizon View Client guide for each type of client system.
action Table 3‑2. Values That Can Be Used with the action Query
Value Description
browse Displays a list of available desktops hosted on the specified server.You are not required to specify a desktop when using this action.
start-session Launches the specified desktop. If no action query is provided andthe desktop name is provided, start-session is the defaultaction.
reset Shuts down and restarts the specified desktop. Unsaved data islost. Resetting a remote desktop is the equivalent of pressing theReset button on a physical PC.
logoff Logs the user out of the guest operating system in the remotedesktop.
connectUSBOnInsert Connects a USB device to the foreground desktop when you plug in thedevice. This query is implicitly set if you specify the unattended query. Touse this query, you must set the action query to start-session or else nothave an action query. Valid values are yes and no. An example of the syntaxis connectUSBOnInsert=yes.
connectUSBOnStartup Redirects all USB devices to the desktop that are currently connected to theclient system. This query is implicitly set if you specify the unattended query.To use this query, you must set the action query to start-session or else nothave an action query. Valid values are yes and no. An example of the syntaxis connectUSBOnStartup=yes.
desktopLayout Sets the size of the window that displays the remote desktop. To use thisquery, you must set the action query to start-session or else not have anaction query.
Chapter 3 Configuring Horizon View Client for End Users
VMware, Inc. 27

Table 3‑3. Valid Values for the desktopLayout Query
Value Description
fullscreen Full screen on one monitor. This is the default.
multimonitor Full screen on all monitors.
windowLarge Large window.
windowSmall Small window.
WxH Custom resolution, where you specify the width by height,in pixels. An example of the syntax isdesktopLayout=1280x800.
desktopProtocol Valid values are RDP and PCoIP. For example, to specify PCoIP, use the syntaxdesktopProtocol=PCoIP.
domainName The domain associated with the user who is connecting to the remotedesktop.
tokenUserName Specifies the RSA or RADIUS user name. Use this query only if the RSA orRADIUS user name is different from the Active Directory user name. If youdo not specify this query and RSA or RADIUS authentication is required, theWindows user name is used. The syntax is tokenUserName=name.
unattended Creates a server connection in kiosk mode. If you use this query, do notspecify user information.
Examples of vmware-view URIsYou can create hypertext links or buttons with the vmware-view URI scheme and include these links in emailor on a Web page. Your end users can click these links to, for example, launch a particular remote desktopwith the startup options you specify.
URI Syntax ExamplesEach URI example is followed by a description of what the end user sees after clicking the URI link.
1 vmware-view://view.mycompany.com/Primary%20Desktop?action=start-session
Horizon View Client is launched and connects to the view.mycompany.com server. The login box promptsthe user for a user name, domain name, and password. After a successful login, the client connects tothe desktop whose display name is displayed as Primary Desktop, and the user is logged in to theguest operating system.
NOTE The default display protocol and window size are used. The default display protocol is PCoIP.The default window size is full screen.
2 vmware-view://view.mycompany.com:7555/Primary%20Desktop
This URI has the same effect as the previous example, except that it uses the nondefault port of 7555 forView Connection Server. (The default port is 443.) Because a desktop identifier is provided, the desktopis launched even though the start-session action is not included in the URI.
3 vmware-view://[email protected]/Finance%20Desktop?desktopProtocol=PCoIP
Horizon View Client is launched and connects to the view.mycompany.com server. In the login box, theUser name text box is populated with the name fred. The user must supply the domain name andpassword. After a successful login, the client connects to the desktop whose display name is displayedas Finance Desktop, and the user is logged in to the guest operating system. The connection uses thePCoIP display protocol.
Using VMware Horizon View Client for Windows
28 VMware, Inc.

4 vmware-view://[email protected]/Finance%20Desktop?domainName=mycompany
Horizon View Client is launched and connects to the view.mycompany.com server. In the login box, theUser name text box is populated with the name fred, and the Domain text box is populated withmycompany. The user must supply only a password. After a successful login, the client connects to thedesktop whose display name is displayed as Finance Desktop, and the user is logged in to the guestoperating system.
5 vmware-view://view.mycompany.com/
Horizon View Client is launched, and the user is taken to the login prompt for connecting to theview.mycompany.com server.
6 vmware-view://view.mycompany.com/Primary%20Desktop?action=reset
Horizon View Client is launched and connects to the view.mycompany.com server. The login box promptsthe user for a user name, domain name, and password. After a successful login, Horizon View Clientdisplays a dialog box that prompts the user to confirm the reset operation for Primary Desktop. Afterthe reset occurs, depending on the type of client, the user might see a message indicating whether thereset was successful.
NOTE This action is available only if the View administrator has enabled this feature for end users.
7 vmware-view://view.mycompany.com/Primary%20Desktop?action=start-
session&connectUSBOnStartup=true
This URI has the same effect as the first example, and all USB devices connected to the client system areredirected to the remote desktop.
8 vmware-view://
Horizon View Client is launched, and the user is taken to the page for entering the address of a ViewConnection Server instance.
HTML Code ExamplesYou can use URIs to make hypertext links and buttons to include in emails or on Web pages. The followingexamples show how to use the URI from the first URI example to code a hypertext link that says, Test Link,and a button that says, TestButton.
<html>
<body>
<a href="vmware-view://view.mycompany.com/Primary%20Desktop?action=start-session">Test
Link</a><br>
<form><input type="button" value="TestButton" onClick="window.location.href=
'vmware-view://view.mycompany.com/Primary%20Desktop?action=start-session'"></form> <br>
</body>
</html>
Chapter 3 Configuring Horizon View Client for End Users
VMware, Inc. 29

Configuring Certificate Checking for End UsersAdministrators can configure the certificate verification mode so that, for example, full verification is alwaysperformed.
Certificate checking occurs for SSL connections between View Connection Server and Horizon View Client.Administrators can configure the verification mode to use one of the following strategies:
n End users are allowed to choose the verification mode. The rest of this list describes the threeverification modes.
n (No verification) No certificate checks are performed.
n (Warn) End users are warned if a self-signed certificate is being presented by the server. Users canchoose whether or not to allow this type of connection.
n (Full security) Full verification is performed and connections that do not pass full verification arerejected.
For details about the types of verification checks performed, see “Certificate Checking Modes for HorizonView Client,” on page 30.
Use the Client Configuration ADM template file to set the verification mode. TheVMware Horizon View Client Configuration ADM template file (vdm_client.adm) is installed in theinstall-directory\VMware\VMware Horizon View Client\extras\ directory on the client system. By default,install-directory is C:\Program Files (x86). For information about using this template to control GPOsettings, see “Using the Group Policy Template to Configure VMware Horizon View Client for Windows,”on page 32.
NOTE You can also use the Client Configuration ADM template file to restrict the use of certaincryptographic algorithms and protocols before establishing an encrypted SSL connection. For moreinformation about this setting, see“Security Settings for Client GPOs,” on page 33.
If you do not want to configure the certificate verification setting as a group policy, you can also enablecertificate verification by adding the CertCheckMode value name to one of the following registry keys on theclient computer:
n For 32-bit Windows: HKEY_LOCAL_MACHINE\Software\VMware, Inc.\VMware VDM\Client\Security
n For 64-bit Windows: HKLM\SOFTWARE\Wow6432Node\VMware, Inc.\VMware VDM\Client\Security
Use the following values in the registry key:
n 0 implements Do not verify server identity certificates.
n 1 implements Warn before connecting to untrusted servers.
n 2 implements Never connect to untrusted servers.
If you configure both the group policy setting and the CertCheckMode setting in the registry key, the grouppolicy setting takes precedence over the registry key value.
Certificate Checking Modes for Horizon View ClientAdministrators and sometimes end users can configure whether client connections are rejected if any orsome server certificate checks fail.
Certificate checking occurs for SSL connections between View Connection Server and Horizon View Client.Certificate verification includes the following checks:
n Has the certificate been revoked?
Using VMware Horizon View Client for Windows
30 VMware, Inc.

n Is the certificate intended for a purpose other than verifying the identity of the sender and encryptingserver communications? That is, is it the correct type of certificate?
n Has the certificate expired, or is it valid only in the future? That is, is the certificate valid according tothe computer clock?
n Does the common name on the certificate match the host name of the server that sends it? A mismatchcan occur if a load balancer redirects Horizon View Client to a server that has a certificate that does notmatch the host name entered in Horizon View Client. Another reason a mismatch can occur is if youenter an IP address rather than a host name in the client.
n Is the certificate signed by an unknown or untrusted certificate authority (CA)? Self-signed certificatesare one type of untrusted CA.
To pass this check, the certificate's chain of trust must be rooted in the device's local certificate store.
NOTE For instructions about distributing a self-signed root certificate to all Windows client systems in adomain, see the topic called "Add the Root Certificate to Trusted Root Certification Authorities" in theVMware Horizon View Installation document.
When you use Horizon View Client to log in to a desktop, if your administrator has allowed it, you can clickConfigure SSL to set the certificate checking mode. You have three choices:
n Never connect to untrusted servers. If any of the certificate checks fails, the client cannot connect to theserver. An error message lists the checks that failed.
n Warn before connecting to untrusted servers. If a certificate check fails because the server uses a self-signed certificate, you can click Continue to ignore the warning. For self-signed certificates, thecertificate name is not required to match the View Connection Server name you entered inHorizon View Client.
You can also receive a warning if the certificate has expired.
n Do not verify server identity certificates. This setting means that View does not perform any certificatechecking.
If the certificate checking mode is set to Warn, you can still connect to a View Connection Server instancethat uses a self-signed certificate.
If an administrator later installs a security certificate from a trusted certificate authority, so that all certificatechecks pass when you connect, this trusted connection is remembered for that specific server. In the future,if that server ever presents a self-signed certificate again, the connection fails. After a particular serverpresents a fully verifiable certificate, it must always do so.
IMPORTANT If you previously configured your company's client systems to use a specific cipher via GPO,such as by configuring SSL Cipher Suite Order group policy settings, you must now use aHorizon View Client 2.3 group policy security setting included in the Horizon View ADM template file. See “Security Settings for Client GPOs,” on page 33. You can alternatively use the SSLCipherList registrysetting on the client. See “Using the Windows Registry to Configure Horizon View Client,” on page 45.
Chapter 3 Configuring Horizon View Client for End Users
VMware, Inc. 31

Using the Group Policy Template to ConfigureVMware Horizon View Client for Windows
VMware Horizon View Client includes a Group Policy Administrative (ADM) template file for configuringVMware Horizon View Client. You can optimize and secure remote desktop connections by adding thepolicy settings in this ADM template file to a new or existing GPO in Active Directory.
The Horizon View ADM template file contains both Computer Configuration and User Configuration grouppolicies.
n The Computer Configuration policies set policies that apply to Horizon View Client, regardless of whois running the client on the host.
n The User Configuration policies set Horizon View Client policies that apply to all users who arerunning Horizon View Client, as well as RDP connection settings. User Configuration policies overrideequivalent Computer Configuration policies.
Horizon View applies policies at desktop startup and when users log in.
The Horizon View Client Configuration ADM template file (vdm_client.adm) is installed in the install-directory\VMware\VMware Horizon View Client\extras\ directory on your client system. By default,install-directory is C:\Program Files (x86) on 64-bit system and C:\Program Files on 32-bit system. Youmust copy this file to your Active Directory server and use the Group Policy Management Editor to add thisadministrative template. For instructions, see the topic "Add View ADM Templates to a GPO" in theVMware Horizon View Client Administration document.
Scripting Definition Settings for Client GPOsYou can set policies for many of the same settings used when you run VMware Horizon View Client fromthe command line, including desktop size, name, and domain name, among others.
The following table describes the scripting definition settings in the VMware Horizon View ClientConfiguration ADM template file. The template provides a Computer Configuration and a UserConfiguration version of each scripting definition setting. The User Configuration setting overrides theequivalent Computer Configuration setting.
Table 3‑4. VMware Horizon View Client Configuration Template: Scripting Definitions
Setting Description
Automatically connect if only onelaunch item is entitled
(Horizon View Client 2.3 or later) Automatically connects to the desktopif it is the only one entitled for the usr. This setting spares the user fromhaving to select the desktop from a list that contains only one desktop.
Connect all USB devices to thedesktop on launch
Determines whether all of the available USB devices on the client systemare connected to the desktop when the desktop is launched.
Connect all USB devices to thedesktop when they are plugged in
Determines whether USB devices are connected to the desktop whenthey are plugged in to the client system.
DesktopLayout Specifies the layout of the VMware Horizon View Client window that auser sees when logging into a remote desktop. The layout choices are asfollows:n Full Screen
n Multimonitor
n Window - Large
n Window - Small
This setting is available only when the DesktopName to selectsetting is also set.
DesktopName to select Specifies the default desktop that VMware Horizon View Client usesduring login.
Using VMware Horizon View Client for Windows
32 VMware, Inc.
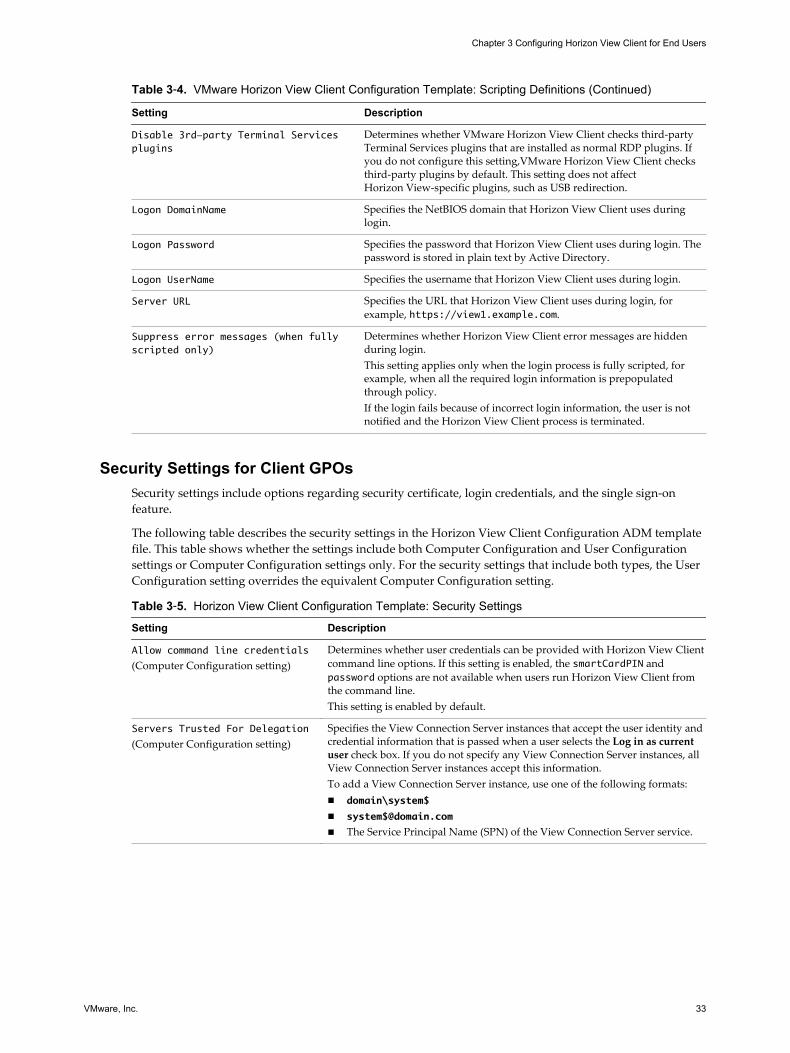
Table 3‑4. VMware Horizon View Client Configuration Template: Scripting Definitions (Continued)
Setting Description
Disable 3rd-party Terminal Servicesplugins
Determines whether VMware Horizon View Client checks third-partyTerminal Services plugins that are installed as normal RDP plugins. Ifyou do not configure this setting,VMware Horizon View Client checksthird-party plugins by default. This setting does not affectHorizon View-specific plugins, such as USB redirection.
Logon DomainName Specifies the NetBIOS domain that Horizon View Client uses duringlogin.
Logon Password Specifies the password that Horizon View Client uses during login. Thepassword is stored in plain text by Active Directory.
Logon UserName Specifies the username that Horizon View Client uses during login.
Server URL Specifies the URL that Horizon View Client uses during login, forexample, https://view1.example.com.
Suppress error messages (when fullyscripted only)
Determines whether Horizon View Client error messages are hiddenduring login.This setting applies only when the login process is fully scripted, forexample, when all the required login information is prepopulatedthrough policy.If the login fails because of incorrect login information, the user is notnotified and the Horizon View Client process is terminated.
Security Settings for Client GPOsSecurity settings include options regarding security certificate, login credentials, and the single sign-onfeature.
The following table describes the security settings in the Horizon View Client Configuration ADM templatefile. This table shows whether the settings include both Computer Configuration and User Configurationsettings or Computer Configuration settings only. For the security settings that include both types, the UserConfiguration setting overrides the equivalent Computer Configuration setting.
Table 3‑5. Horizon View Client Configuration Template: Security Settings
Setting Description
Allow command line credentials
(Computer Configuration setting)Determines whether user credentials can be provided with Horizon View Clientcommand line options. If this setting is enabled, the smartCardPIN andpassword options are not available when users run Horizon View Client fromthe command line.This setting is enabled by default.
Servers Trusted For Delegation
(Computer Configuration setting)Specifies the View Connection Server instances that accept the user identity andcredential information that is passed when a user selects the Log in as currentuser check box. If you do not specify any View Connection Server instances, allView Connection Server instances accept this information.To add a View Connection Server instance, use one of the following formats:n domain\system$
n The Service Principal Name (SPN) of the View Connection Server service.
Chapter 3 Configuring Horizon View Client for End Users
VMware, Inc. 33

Table 3‑5. Horizon View Client Configuration Template: Security Settings (Continued)
Setting Description
Certificate verification mode
(Computer Configuration setting)Configures the level of certificate checking that is performed byHorizon View Client. You can select one of these modes:n No Security. Horizon View does not perform certificate checking.n Warn But Allow. When the following server certificate issues occur, a
warning is displayed, but the user can continue to connect to ViewConnection Server:n A self-signed certificate is provided by Horizon View. In this case, it is
acceptable if the certificate name does not match the View ConnectionServer name provided by the user in Horizon View Client.
n A verifiable certificate that was configured in your deployment hasexpired or is not yet valid.
If any other certificate error condition occurs, Horizon View displays anerror dialog and prevents the user from connecting to View ConnectionServer.
Warn But Allow is the default value.n Full Security. If any type of certificate error occurs, the user cannot
connect to View Connection Server. Horizon View displays certificate errorsto the user.
When this group policy setting is configured, users can view the selectedcertificate verification mode in Horizon View Client but cannot configure thesetting. The SSL configuration dialog box informs users that the administratorhas locked the setting.When this setting is not configured or disabled, Horizon View Client users canselect a certificate verification mode.To allow a Horizon View server to perform checking of certificates provided byHorizon View Client, the client must make HTTPS connections to the ViewConnection Server or security server host. Certificate checking is not supportedif you off-load SSL to an intermediate device that makes HTTP connections tothe View Connection Server or security server host.For Windows clients, if you do not want to configure this setting as a grouppolicy, you can also enable certificate verification by adding the CertCheckModevalue name to one of the following registry keys on the client computer:n For 32-bit Windows: HKEY_LOCAL_MACHINE\Software\VMware,
Inc.\VMware VDM\Client\Security
n For 64-bit Windows: HKLM\SOFTWARE\Wow6432Node\VMware,Inc.\VMware VDM\Client\Security
Use the following values in the registry key:n 0 implements No Security.n 1 implements Warn But Allow.n 2 implements Full Security.If you configure both the group policy setting and the CertCheckMode setting inthe registry key, the group policy setting takes precedence over the registry keyvalue.
Default value of the 'Log inas current user' checkbox
(Computer and User Configurationsetting)
Specifies the default value of the Log in as current user check box ontheHorizon View Client connection dialog box.This setting overrides the default value specified during Horizon View Clientinstallation.If a user runs Horizon View Client from the command line and specifies thelogInAsCurrentUser option, that value overrides this setting.When the Log in as current user check box is selected, the identity andcredential information that the user provided when logging in to the clientsystem is passed to the View Connection Server instance and ultimately to theremote desktop. When the check box is deselected, users must provide identityand credential information multiple times before they can access a remotedesktop.This setting is disabled by default.
Using VMware Horizon View Client for Windows
34 VMware, Inc.

Table 3‑5. Horizon View Client Configuration Template: Security Settings (Continued)
Setting Description
Display option to Log in ascurrent user
(Computer and User Configurationsetting)
Determines whether the Log in as current user check box is visible on theHorizon View Client connection dialog box.When the check box is visible, users can select or deselect it and override itsdefault value. When the check box is hidden, users cannot override its defaultvalue from the Horizon View Client connection dialog box.You can specify the default value for the Log in as current user check box byusing the policy setting Default value of the 'Log in as current user'checkbox.This setting is enabled by default.
Enable jump list integration
(Computer Configuration setting)Determines whether a jump list appears in the Horizon View Client icon on thetaskbar of Windows 7 and later systems. The jump list lets users connect torecent View Connection Server instances and remote desktops.If Horizon View Client is shared, you might not want users to see the names ofrecent desktops. You can disable the jump list by disabling this setting.This setting is enabled by default.
Enable SSL encrypted frameworkchannel
(Computer and User Configurationsetting)
Determines whether SSL is enabled for Horizon View 5.0 and earlier desktops.Before Horizon View 5.0, the data sent over port TCP 32111 to the desktop wasnot encrypted.n Enable: Enables SSL, but allows fallback to the previous unencrypted
connection if the remote desktop does not have SSL support. For example,Horizon View 5.0 and earlier desktops do not have SSL support. Enable isthe default setting.
n Disable: Disables SSL. This setting is not recommended but might be usefulfor debugging or if the channel is not being tunneled and could potentiallythen be optimized by a WAN accelerator product.
n Enforce: Enables SSL, and refuses to connect to desktops with no SSLsupport .
Configures SSL protocols andcryptographic algorithms
(Computer and User Configurationsetting)
Configures the cipher list to restrict the use of certain cryptographic algorithmsand protocols before establishing an encrypted SSL connection. The cipher listconsists of one or more cipher strings separated by colons.NOTE All cipher strings are case-sensitive.If this feature is enabled, the default value is SSLv3:TLSv1:TLSv1.1:AES:!aNULL:@STRENGTH.That means that SSL v3.0, TLS v1.0, and TLS v1.1 are enabled. (SSL v2.0 and TLSv1.2 are disabled.)Cipher suites use 128- or 256-bit AES, remove anonymous DH algorithms, andthen sort the current cipher list in order of encryption algorithm key length.Reference link for the configuration: http://www.openssl.org/docs/apps/ciphers.html
Enable Single Sign-On forsmart card authentication
(Computer Configuration setting)
Determines whether single sign-on is enabled for smart card authentication.When single sign-on is enabled, Horizon View Client stores the encrypted smartcard PIN in temporary memory before submitting it to View Connection Server.When single sign-on is disabled, Horizon View Client does not display a customPIN dialog.
Ignore bad SSL certificatedate received from the server
(Computer Configuration setting)
(View 4.6 and earlier releases only) Determines whether errors that areassociated with invalid server certificate dates are ignored. These errors occurwhen a server sends a certificate with a date that has passed.
Ignore certificate revocationproblems
(Computer Configuration setting)
(View 4.6 and earlier releases only) Determines whether errors that areassociated with a revoked server certificate are ignored. These errors occurwhen the server sends a certificate that has been revoked and when the clientcannot verify a certificate's revocation status.This setting is disabled by default.
Chapter 3 Configuring Horizon View Client for End Users
VMware, Inc. 35

Table 3‑5. Horizon View Client Configuration Template: Security Settings (Continued)
Setting Description
Ignore incorrect SSLcertificate common name (hostname field)
(Computer Configuration setting)
(View 4.6 and earlier releases only) Determines whether errors that areassociated with incorrect server certificate common names are ignored. Theseerrors occur when the common name on the certificate does not match thehostname of the server that sends it.
Ignore incorrect usageproblems
(Computer Configuration setting)
(View 4.6 and earlier releases only) Determines whether errors that areassociated with incorrect usage of a server certificate are ignored. These errorsoccur when the server sends a certificate that is intended for a purpose otherthan verifying the identity of the sender and encrypting server communications.
Ignore unknown certificateauthority problems
(Computer Configuration setting)
(View 4.6 and earlier releases only) Determines whether errors that areassociated with an unknown Certificate Authority (CA) on the server certificateare ignored. These errors occur when the server sends a certificate that is signedby an untrusted third-party CA.
RDP Settings for Client GPOsYou can set group policies for options such as redirection of such things as audio, printers, ports, and otherdevices when you use the Microsoft RDP display protocol.
The following table describes the Remote Desktop Protocol (RDP) settings in the Horizon View ClientConfiguration ADM template file. All RDP settings are User Configuration settings.
Table 3‑6. Horizon View Client Configuration Administrative Template: RDP Settings
Setting Description
Audio redirection Determines whether audio information played on the remote desktop is redirected.Select one of the following settings:n Disable Audio: Audio is disabled.n Play VM (needed for VoIP USB Support): Audio plays within the remote
desktop. This setting requires a shared USB audio device to provide sound onthe client.
n Redirect to client: Audio is redirected to the client. This is the default mode.This setting applies only to RDP audio. Audio that is redirected through MMRplays in the client.
Audio capture redirection Determines whether the default audio input device is redirected from the client tothe remote session. When this setting is enabled, the audio recording device on theclient appears in the remote desktop and can record audio input.The default setting is disabled.
Bitmap cache file size inunit for number bpp bitmaps
Specifies the size of the bitmap cache, in kilobytes or megabytes, to use for specificbits per pixel (bpp) bitmap color settings.Separate versions of this setting are provided for the following unit and bppcombinations:n KB/8bppn MB/8bppn MB/16bppn MB/24bppn MB/32bpp
Bitmap caching/cachepersistence active
Determines whether persistent bitmap caching is used (active). Persistent bitmapcaching can improve performance, but it requires additional disk space.
Using VMware Horizon View Client for Windows
36 VMware, Inc.

Table 3‑6. Horizon View Client Configuration Administrative Template: RDP Settings (Continued)
Setting Description
Color depth Specifies the color depth of the remote desktop. Select one of the available settings:n 8 bitn 15 bitn 16 bitn 24 bitn 32 bitFor 24-bit Windows XP systems, you must enable the Limit Maximum Color Depthpolicy in Computer Configuration > Administrative Templates > WindowsComponents > Terminal Services and set it to 24 bits.
Cursor shadow Determines whether a shadow appears under the cursor on the remote desktop.
Desktop background Determines whether the desktop background appears when clients connect to aremote desktop.
Desktop composition (Windows Vista or later) Determines whether desktop composition is enabled onthe remote desktop.When desktop composition is enabled, individual windows no longer drawdirectly to the screen or primary display device as they did in previous versions ofMicrosoft Windows. Instead, drawing is redirected to off-screen surfaces in videomemory, which are then rendered into a desktop image and presented on thedisplay.
Enable compression Determines whether RDP data is compressed. This setting is enabled by default.
Enable Credential SecurityService Provider
Specifies whether the remote desktop connection uses Network LevelAuthentication (NLA). In Windows Vista, remote desktop connections requireNLA by default.If the guest operating system requires NLA for remote desktop connections, youmust enable this setting or Horizon View Client will not be able to connect to thedesktop.In addition to enabling this setting, you must also verify that the followingconditions are met:n Both the client and guest operating systems support NLA.n Direct client connections are enabled for the View Connection Server instance.
Tunneled connections are not supported with NLA.
Enable RDP Auto-Reconnect Determines whether the RDP client component attempts to reconnect to a remotedesktop after an RDP protocol connection failure. This setting has no effect if theUse secure tunnel connection to desktop option is enabled in View Administrator.This setting is disabled by default.NOTE RDP auto-reconnection is supported for desktops running View Agentversion 4.5 or later only. If a desktop has an earlier version of View Agent, somefeatures will not work.
Font smoothing (Windows Vista or later) Determines whether antialiasing is applied to the fonts onthe remote desktop.
Menu and window animation Determines whether animation for menus and windows is enabled when clientsconnect to a remote desktop.
Redirect clipboard Determines whether the local clipboard information is redirected when clientsconnect to the remote desktop.
Chapter 3 Configuring Horizon View Client for End Users
VMware, Inc. 37
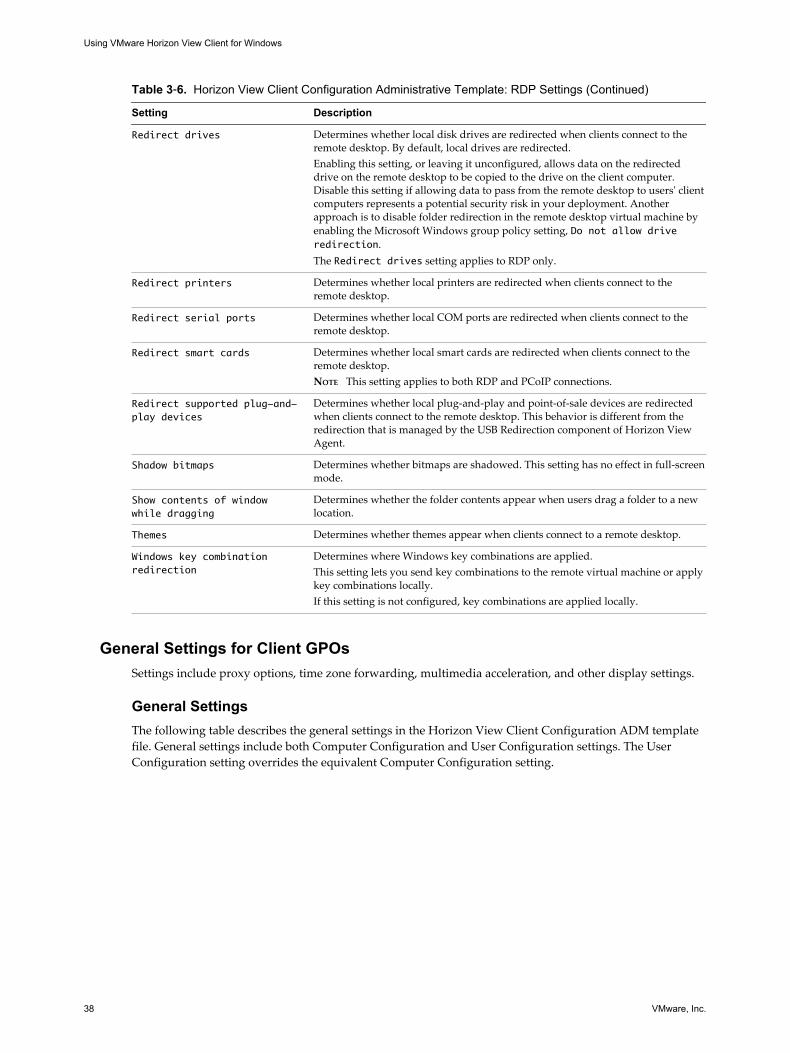
Table 3‑6. Horizon View Client Configuration Administrative Template: RDP Settings (Continued)
Setting Description
Redirect drives Determines whether local disk drives are redirected when clients connect to theremote desktop. By default, local drives are redirected.Enabling this setting, or leaving it unconfigured, allows data on the redirecteddrive on the remote desktop to be copied to the drive on the client computer.Disable this setting if allowing data to pass from the remote desktop to users' clientcomputers represents a potential security risk in your deployment. Anotherapproach is to disable folder redirection in the remote desktop virtual machine byenabling the Microsoft Windows group policy setting, Do not allow driveredirection.The Redirect drives setting applies to RDP only.
Redirect printers Determines whether local printers are redirected when clients connect to theremote desktop.
Redirect serial ports Determines whether local COM ports are redirected when clients connect to theremote desktop.
Redirect smart cards Determines whether local smart cards are redirected when clients connect to theremote desktop.NOTE This setting applies to both RDP and PCoIP connections.
Redirect supported plug-and-play devices
Determines whether local plug-and-play and point-of-sale devices are redirectedwhen clients connect to the remote desktop. This behavior is different from theredirection that is managed by the USB Redirection component of Horizon ViewAgent.
Shadow bitmaps Determines whether bitmaps are shadowed. This setting has no effect in full-screenmode.
Show contents of windowwhile dragging
Determines whether the folder contents appear when users drag a folder to a newlocation.
Themes Determines whether themes appear when clients connect to a remote desktop.
Windows key combinationredirection
Determines where Windows key combinations are applied.This setting lets you send key combinations to the remote virtual machine or applykey combinations locally.If this setting is not configured, key combinations are applied locally.
General Settings for Client GPOsSettings include proxy options, time zone forwarding, multimedia acceleration, and other display settings.
General SettingsThe following table describes the general settings in the Horizon View Client Configuration ADM templatefile. General settings include both Computer Configuration and User Configuration settings. The UserConfiguration setting overrides the equivalent Computer Configuration setting.
Using VMware Horizon View Client for Windows
38 VMware, Inc.

Table 3‑7. Horizon View Client Configuration Template: General Settings
Setting Description
Always on top
(User Configuration setting)Determines whether the Horizon View Client window is always the topmostwindow. Enabling this setting prevents the Windows taskbar from obscuring afull-screen Horizon View Client window. This setting is enabled by default.
Determines if the VMware ViewClient should use proxy.pacfile
(Computer Configuration setting)
(View 4.6 and earlier releases only) Determines whether Horizon View Clientuses a Proxy Auto Config (PAC) file. Enabling this setting causesHorizon View Client to use a PAC file.A PAC file (commonly called proxy.pac) helps Web browsers and other useragents find the appropriate proxy server for a particular URL or Web site request.If you enable this setting on a multi-core machine, the WinINet application thatHorizon View Client uses to find the proxy server information might crash.Disable this setting if this problem occurs on your machine.This setting is disabled by default.NOTE This setting applies to direct connections only. It does not affect tunnelconnections.
Disable time zone forwarding
(Computer Configuration setting)Determines whether time zone synchronization between the remote desktop andthe connected client is disabled.
Disable toast notifications
(Computer and User Configurationsetting)
Determines whether to disable toast notifications from Horizon View Client.Enable this setting if you do not want the user to see toast notifications in thecorner of the screen.NOTE If you enable this setting, the user does not see a 5-minute warning whenthe Session Timeout function is active.
Don't check monitor alignmenton spanning
(User Configuration setting)
By default, the client desktop does not span multiple monitors if the screens donot form an exact rectangle when they are combined. Enable this setting tooverride the default. This setting is disabled by default.
Enable multi-mediaacceleration
(User Configuration setting)
Determines whether multimedia redirection (MMR) is enabled on the client.MMR does not work correctly if the Horizon View Client video display hardwaredoes not have overlay support.
Enable relative mouse
(Computer and User Configurationsetting)
(Horizon View 5.2 and later releases only) Enables the relative mouse when usingthe PCoIP display protocol. Relative mouse mode improves mouse behavior forcertain graphics applications and games. If the remote desktop does not supportrelative mouse then this setting will not be used. This setting is disabled bydefault.
Enable the shade
(User Configuration setting)Determines whether the shade menu bar at the top of the Horizon View Clientwindow is visible. This setting is enabled by default.NOTE The shade menu bar is disabled by default for kiosk mode.
Tunnel proxy bypass addresslist
(Computer Configuration setting)
Specifies a list of tunnel addresses. The proxy server is not used for theseaddresses. Use a semicolon (;) to separate multiple entries.
URL for View Client onlinehelp
(Computer Configuration setting)
Specifies an alternate URL from which Horizon View Client can retrieve helppages. This setting is intended for use in environments that cannot retrieve theremotely-hosted help system because they do not have internet access.
Pin the shade
(User Configuration setting)Determines whether the pin on the shade at the top of the Horizon View Clientwindow is enabled and auto-hiding of the menu bar does not occur. This settinghas no effect if the shade is disabled. This setting is enabled by default.
Disable desktop disconnectmessages
(Computer and User Configurationsetting)
Specifies whether messages that are normally shown upon desktop disconnectionshould be disabled. These messages are shown by default.
Chapter 3 Configuring Horizon View Client for End Users
VMware, Inc. 39

USB Settings for Client GPOsYou can define USB policy settings for both Horizon View Agent and Horizon View Client for Windows.On connection, Horizon View Client downloads the USB policy settings from Horizon View Agent and usesthem in conjunction with the Horizon View Client USB policy settings to decide which devices it will allowto be available for redirection from the host machine.
The following table describes each policy setting for splitting composite USB in the Horizon View ClientConfiguration ADM template file. The settings apply at computer level. Horizon View Client preferentiallyreads the settings from the GPO at computer level, and otherwise from the registry atHKLM\Software\Policies\VMware, Inc.\VMware VDM\Client\USB. For a description of how Horizon Viewapplies the policies for splitting composite USB devices, see the topics about using policies to control USBredirection, in the VMware Horizon View Administration document.
Table 3‑8. Horizon View Client Configuration Template: USB Splitting Settings
Setting Properties
Allow Auto DeviceSplitting
Allow the automatic splitting of composite USB devices.The default value is undefined, which equates to false.
Exclude Vid/Pid DeviceFrom Split
Excludes a composite USB device specified by vendor and product IDs from splitting. Theformat of the setting is vid-xxx1_pid-yyy2[;vid-xxx2_pid-yyy2]...You must specify ID numbers in hexadecimal. You can use the wildcard character (*) inplace of individual digits in an ID.For example: vid-0781_pid-55**The default value is undefined.
Split Vid/Pid Device Treats the components of a composite USB device specified by vendor and product IDs asseparate devices. The format of the setting isvid-xxxx_pid-yyyy(exintf:zz[;exintf:ww ])You can use the exintf keyword to exclude components from redirection by specifyingtheir interface number. You must specify ID numbers in hexadecimal, and interfacenumbers in decimal including any leading zero. You can use the wildcard character (*) inplace of individual digits in an ID.For example: vid-0781_pid-554c(exintf:01;exintf:02)NOTE Horizon View does not automatically include the components that you have notexplicitly excluded. You must specify a filter policy such as Include Vid/Pid Device toinclude those components.The default value is undefined.
The following table describes each policy setting for filtering USB devices in the Horizon View ClientConfiguration ADM template file. The settings apply at computer level. Horizon View Client preferentiallyreads the settings from the GPO at computer level, and otherwise from the registry atHKLM\Software\Policies\VMware, Inc.\VMware VDM\Client\USB. For a description of how Horizon Viewapplies the policies for filtering USB devices, see the topics about configuring filter policy settings for USBredirection, in the VMware Horizon View Administration document.
Table 3‑9. Horizon View Client Configuration Template: USB Filtering Settings
Setting Properties
Allow Audio InputDevices
Allows audio input devices to be redirected.The default value is undefined, which equates to true.
Allow Audio OutputDevices
Allows audio output devices to be redirected.The default value is undefined, which equates to false.
Allow HIDBootable Allows input devices other than keyboards or mice that are available at boot time (alsoknown as hid-bootable devices) to be redirected.The default value is undefined, which equates to true.
Using VMware Horizon View Client for Windows
40 VMware, Inc.

Table 3‑9. Horizon View Client Configuration Template: USB Filtering Settings (Continued)
Setting Properties
Allow DeviceDescriptor FailsafeBehavior
Allows devices to be redirected even if the Horizon View Client fails to get theconfig/device descriptors.To allow a device even if it fails the config/desc, include it in the Include filters, suchIncludeVidPid or IncludePath.The default value is undefined, which equates to false.
Allow Other InputDevices
Allows input devices other than hid-bootable devices or keyboards with integratedpointing devices to be redirected.The default value is undefined, which equates to true.
Allow Keyboard andMouse Devices
Allows keyboards with integrated pointing devices (such as a mouse, trackball, or touchpad) to be redirected.The default value is undefined, which equates to false.
Allow Smart Cards Allows smart-card devices to be redirected.The default value is undefined, which equates to false.
Allow Video Devices Allows video devices to be redirected.The default value is undefined, which equates to true.
Disable RemoteConfiguration
Disables the use of View Agent settings when performing USB device filtering.The default value is undefined, which equates to false.
Exclude All Devices Excludes all USB devices from being redirected. If set to true, you can use other policysettings to allow specific devices or families of devices to be redirected. If set to false, youcan use other policy settings to prevent specific devices or families of devices from beingredirected.If you set the value of Exclude All Devices to true on View Agent, and this setting ispassed to Horizon View Client, the View Agent setting overrides the Horizon View Clientsetting.The default value is undefined, which equates to false.
Exclude Device Family Excludes families of devices from being redirected. The format of the setting isfamily_name_1[;family_name_2]...For example: bluetooth;smart-cardIf you have enabled automatic device splitting, Horizon View examines the device familyof each interface of a composite USB device to decide which interfaces should be excluded.If you have disabled automatic device splitting, Horizon View examines the device familyof the whole composite USB device.The default value is undefined.
Exclude Vid/Pid Device Excludes devices with specified vendor and product IDs from being redirected. The formatof the setting is vid-xxx1_pid-yyy2[;vid-xxx2_pid-yyy2]...You must specify ID numbers in hexadecimal. You can use the wildcard character (*) inplace of individual digits in an ID.For example: vid-0781_pid-****;vid-0561_pid-554cThe default value is undefined.
Exclude Path Exclude devices at specified hub or port paths from being redirected. The format of thesetting is bus-x1[/y1].../port-z1[;bus-x2[/y2].../port-z2]...You must specify bus and port numbers in hexadecimal. You cannot use the wildcardcharacter in paths.For example: bus-1/2/3_port-02;bus-1/1/1/4_port-ffThe default value is undefined.
Include Device Family Includes families of devices that can be redirected. The format of the setting isfamily_name_1[;family_name_2]...For example: storageThe default value is undefined.
Chapter 3 Configuring Horizon View Client for End Users
VMware, Inc. 41

Table 3‑9. Horizon View Client Configuration Template: USB Filtering Settings (Continued)
Setting Properties
Include Path Include devices at a specified hub or port paths that can be redirected. The format of thesetting is bus-x1[/y1].../port-z1[;bus-x2[/y2].../port-z2]...You must specify bus and port numbers in hexadecimal. You cannot use the wildcardcharacter in paths.For example: bus-1/2_port-02;bus-1/7/1/4_port-0fThe default value is undefined.
Include Vid/Pid Device Includes devices with specified vendor and product IDs that can be redirected. The formatof the setting is vid-xxx1_pid-yyy2[;vid-xxx2_pid-yyy2]...You must specify ID numbers in hexadecimal. You can use the wildcard character (*) inplace of individual digits in an ID.For example: vid-0561_pid-554cThe default value is undefined.
Running View Client from the Command LineYou can run View Client for Windows from the command line or from scripts. You might want to do this ifyou are implementing a kiosk-based application that grants end users access to desktop applications.
You use the vmware-view.exe command to run the View Client for Windows from the command line. Thecommand includes options that you can specify to change the behavior of View Client.
Horizon View Client Command UsageThe syntax of the vmware-view command controls the operation of Horizon View Client.
Use the following form of the vmware-view command from a Windows command prompt.
vmware-view [command_line_option [argument]] ...
The default path to the vmware-view command executable file depends on your system.
n On 32-bit systems, the path is C:\Program Files\VMware\VMware Horizon View Client\.
n On 64-bit systems, the path is C:\Program Files (x86)\VMware\VMware Horizon View Client\.
For your convenience, add this path to your PATH environment variable.
The following table shows the command-line options that you can use with the vmware-view command.
Table 3‑10. Horizon View Client Command-Line Options
Option Description
/? Displays the list of command options.
-connectUSBOnStartup When set to true, redirects all USB devices to the desktop that are currentlyconnected to the host. This option is implicitly set if you specify the-unattended option. The default is false.
-connectUSBOnInsert When set to true, connects a USB device to the foreground desktop whenyou plug in the device. This option is implicitly set if you specify the-unattended option. The default is false.
-desktopLayout window_size Specifies how to display the window for the desktop:
fullscreen Full screen display
multimonitor Multiple-monitor display
windowLarge Large window
windowSmall Small window
Using VMware Horizon View Client for Windows
42 VMware, Inc.

Table 3‑10. Horizon View Client Command-Line Options (Continued)
Option Description
-desktopName desktop_name Specifies the name of the desktop as it would appear in the Select Desktopdialog box. This is the name as you see it in the select desktop dialog.
-desktopProtocol protocol Specifies the desktop protocol to use as it would appear in the Select Desktopdialog box. The protocol can be PCOIP or RDP.
-domainName domain_name Specifies the domain that the end user uses to log in to Horizon View Client.
-file file_path Specifies the path of a configuration file that contains additional commandoptions and arguments. See “View Client Configuration File,” on page 44.
-h Shows help options.
-languageId Locale_ID Provides localization support for different languages in Horizon View Client.If a resource library is available, specify the Locale ID (LCID) to use. For USEnglish, enter the value 0x409.
-logInAsCurrentUser When set to true, uses the credential information that the end user provideswhen logging in to the client system to log in to the View Connection Serverinstance and ultimately to the View desktop. The default is false.
-nonInteractive Suppresses error message boxes when starting Horizon View Client from ascript. This option is implicitly set if you specify the -unattended option.
-noVMwareAddins Prevents loading of VMware-specific virtual channels such Virtual printing.
-password password Specifies the password that the end user uses to log in toHorizon View Client. You do not need to specify this option for clients inkiosk mode if you generate the password automatically.
-printEnvironmentInfo Displays the IP address, MAC address, and machine name of the clientdevice.
-serverURL connection_server Specifies the URL, IP address, or FQDN of the View Connection Serverinstance.
-SingleAutoConnect (Horizon View Client 2.3 or later) Specifies that if the user is entitled to onlyone remote destkop, after the user authenticates to the server, the desktop isautomatically connected and the user is logged in. This setting spares the userfrom having to select the desktop from a list that contains only one desktop.
-smartCardPIN PIN Specifies the PIN when an end user inserts a smart card to login.
-standalone Supported for backwards compatibility purposes. This is the default behaviorfor this client. Specifying -standalone is not necessary. Launches a secondinstance of the Horizon View Client that can connect to the same or adifferent View Connection Server.For multiple desktop connections to the same server or to a different server,using the secure tunnel is supported.NOTE The second desktop connection might not have access to localhardware, such as USB devices, smart, cards, printers, and multiple monitors.
Chapter 3 Configuring Horizon View Client for End Users
VMware, Inc. 43

Table 3‑10. Horizon View Client Command-Line Options (Continued)
Option Description
-unattended Runs Horizon View Client in a noninteractive mode that is suitable for clientsin kiosk mode. You must also specify:n The account name of the client, if you did not generate the account name
from the MAC address of the client device. The name must begin withthe string “custom-” or an alternate prefix that you have configured inADAM.
n The password of the client, if you did not generate a passwordautomatically when you set up the account for the client.
The -unattended option implicitly sets the -nonInteractive,-connectUSBOnStartup, -connectUSBOnInsert , and-desktopLayout multimonitoroptions.
-userName user_name Specifies the account name that the end user uses to log in toHorizon View Client. You do not need to specify this option for clients inkiosk mode if you generate the account name from the MAC address of theclient device.
Options that you specify on the command line or in the configuration file take precedence over any globalsystem policies that you have defined, which in turn override user policies.
You can specify all options by Active Directory group policies except for -file, -languageId,-printEnvironmentInfo, -smartCardPIN, and -unattended.
View Client Configuration FileYou can read command-line options for View Client from a configuration file.
You can specify the path of the configuration file as an argument to the -file file_path option of the vmware-view command. The file must be a Unicode (UTF-16) or ASCII text file.
Example: Example of a Configuration File for a Noninteractive ApplicationThe following example shows the contents of a configuration file for a noninteractive application.
-serverURL https://view.yourcompany.com
-userName autouser
-password auto123
-domainName companydomain
-desktopName autodesktop
-nonInteractive
Example: Example of a Configuration File for a Client in Kiosk ModeThe following example shows a client in kiosk mode whose account name is based on its MAC address. Theclient has an automatically generated password.
-serverURL 145.124.24.100
-unattended
Using VMware Horizon View Client for Windows
44 VMware, Inc.

Using the Windows Registry to Configure Horizon View ClientYou can define default settings for the Horizon View Client in the Windows Registry instead of specifyingthese settings on the command line. Policy entries take precedence over Windows Registry settings, andcommand-line settings take precedence over policy entries.
Table 3-11 shows the registry settings for logging in to Horizon View Client. These settings are locatedunder HKEY_CURRENT_USER\Software\VMware, Inc.\VMware VDM\Client\ in the registry. This location isspecific to a particular user, whereas the HKEY_LOCAL_MACHINE settings, described in the next table, arecomputer-wide settings and pertain to all local users and all domain users in a Windows domainenvironment who have permission to log in to the computer.
Table 3‑11. Horizon View Client Registry Settings for Credentials
Registry Setting Description
Password Specifies the default password.
UserName Specifies the default user name.
Table 3-12 shows the registry settings for Horizon View Client that do not include login credentials. Thelocation of these settings depends on the type of system:
n For 32-bit Windows: HKEY_LOCAL_MACHINE\Software\VMware, Inc.\VMware VDM\Client\
n For 64-bit Windows: HKLM\SOFTWARE\Wow6432Node\VMware, Inc.\VMware VDM\Client\
Table 3‑12. Horizon View Client Registry Settings
Registry Setting Description
DomainName Specifies the default domain name.
EnableShade Specifies whether the menu bar (shade) at the top of the Horizon View Client window is enabled.The menu bar is enabled by default except for clients in kiosk mode. A value of false disables themenu bar.
ServerURL Specifies the default View Connection Server instance by its URL, IP address, or FQDN.
The following table shows security settings that you can add. The location of these settings depends on thetype of system:
n For 32-bit Windows: HKEY_LOCAL_MACHINE\Software\VMware, Inc.\VMware VDM\Client\Security
n For 64-bit Windows: HKLM\SOFTWARE\Wow6432Node\VMware, Inc.\VMware VDM\Client\Security
Chapter 3 Configuring Horizon View Client for End Users
VMware, Inc. 45

Table 3‑13. Security Settings
Registry Setting Description and Valid Values
CertCheckMode Specifies the certificate checking mode.n 0 implements Do not verify server identity certificates.n 1 implements Warn before connecting to untrusted servers.n 2 implements Never connect to untrusted servers.
SSLCipherList Configures the cipher list to restrict the use of certain cryptographic algorithms and protocolsbefore establishing an encrypted SSL connection. The cipher list consists of one or morecipher strings separated by colons.NOTE All cipher strings are case-sensitive.If this feature is enabled, the default value is SSLv3:TLSv1:TLSv1.1:AES:!aNULL:@STRENGTH.That means that SSL v3.0, TLS v1.0, and TLS v1.1 are enabled. (SSL v2.0 and TLS v1.2 aredisabled.)Cipher suites use 128- or 256-bit AES, remove anonymous DH algorithms, and then sort thecurrent cipher list in order of encryption algorithm key length.Reference link for the configuration: http://www.openssl.org/docs/apps/ciphers.html
Using VMware Horizon View Client for Windows
46 VMware, Inc.

Managing Server Connections andDesktops 4
Use Horizon View Client to connect to View Connection Server or a security server and log in to or off of aremote desktop. For troubleshooting purposes, you can also reset a remote desktop assigned to you.
Depending on how the administrator configures policies for remote desktops, end users might be able toperform many operations on their desktops.
This chapter includes the following topics:
n “Log In to a View Desktop,” on page 47
n “Switch Desktops,” on page 49
n “Log Off or Disconnect from a Desktop,” on page 50
Log In to a View DesktopBefore you have end users access their virtual desktops, test that you can log in to a virtual desktop from aclient device. You can start View Client from the Start menu or a desktop shortcut on the client system.
In environments where a network connection is available, the user session is authenticated by ViewConnection Server.
Prerequisites
n Obtain the credentials you need to log in, such as a user name and password, RSA SecurID user nameand passcode, RADIUS authentication user name and passcode, or smart card personal identificationnumber (PIN).
n Obtain the domain name for logging in.
n Perform the administrative tasks described in “Preparing View Connection Server for Horizon ViewClient,” on page 14.
n If you are outside the corporate network and are not using a security server to access the remotedesktop, verify that your client device is set up to use a VPN connection and turn that connection on.
IMPORTANT VMware recommends using a security server rather than a VPN.
n Verify that you have the fully qualified domain name (FQDN) of the server that provides access to theremote desktop. You also need the port number if the port is not 443.
n If you plan to use the RDP display protocol to connect to a remote desktop, verify that theAllowDirectRDP View Agent group policy setting is enabled.
n If your administrator has allowed it, you can configure the certificate checking mode for the SSLcertificate presented by View Connection Server.
VMware, Inc. 47

To determine which mode to use, see “Certificate Checking Modes for Horizon View Client,” onpage 30.
Procedure
1 Double-click the VMware Horizon View Client desktop shortcut or click Start > Programs > VMware >VMware Horizon View Client.
2 (Optional) To set the certificate checking mode, click the Options button in the upper-left corner of thewindow and select Configure SSL.
As was mentioned in the prerequisites to this procedure, you can configure this option only if youradministrator has allowed it.
3 (Optional) To log in as the currently logged-in Windows domain user, click the Options button in theupper-left corner of the window and select Log in as current user.
This option is available if the Log in as current user module is installed on your client system, and ifyour administrator has enabled the global setting for this feature. Some companies choose not to enablethis feature.
4 Click the + Add Server button, enter the name of View Connection Server or a security server, and clickConnect.
Connections between Horizon View Client and View Connection Server always use SSL. The defaultport for SSL connections is 443. If View Connection Server is not configured to use the default port, usethe format shown in this example: view.company.com:1443.
You might see a message that you must confirm before the login dialog box appears.
5 If you are prompted for RSA SecurID credentials or RADIUS authentication credentials, enter the username and passcode and click Continue.
6 Enter the credentials of a user who is entitled to use at least one desktop pool, select the domain, andclick Login.
If you type the user name using the format user@domain, the name is treated as a user principal name(UPN) because of the @ sign, and the domain drop-down menu is disabled.
For information about creating desktop pools and entitling users to pools, see VMware Horizon ViewAdministration document.
7 (Optional) To configure display settings, either right-click a desktop icon or select a desktop icon andclick the Settings button in the upper-right corner of the screen.
Option Description
Display protocol If your administrator has allowed it, you can use the Connect Via list tochoose between PCoIP and Microsoft RDP display protocols. PCoIPprovides an optimized PC experience for the delivery of images, audio,and video content on the LAN or across the WAN.
Display layout Use the Display list to select a window size or to use multiple monitors.
8 Double-click a remote desktop icon to connect.
After you are connected, the View desktop window appears. If you had more than one desktop icon tochoose from, the desktop selector window also remains open, so that you can connect to multiple desktopsat the same time.
Using VMware Horizon View Client for Windows
48 VMware, Inc.

If authentication to View Connection Server fails or if View Client cannot connect to a desktop, perform thefollowing tasks:
n Determine whether View Connection Server is configured not to use SSL. View Client requires SSLconnections. Check whether the global setting in View Administrator for the Use SSL for clientconnections check box is deselected. If so, you must either select the check box, so that SSL is used, orset up your environment so that clients can connect to an HTTPS enabled load balancer or otherintermediate device that is configured to make an HTTP connection to View Connection Server.
n Verify that the security certificate for View Connection Server is working properly. If it is not, in ViewAdministrator, you might also see that the View Agent on desktops is unreachable and the TransferServer status shows that it is not ready. These are symptoms of additional connection problems causedby certificate problems.
n Verify that the tags set on the View Connection Server instance allow connections from this user. Seethe VMware Horizon View Administration document.
n Verify that the user is entitled to access this desktop. See the VMware Horizon View Administrationdocument.
n If you are using the RDP display protocol to connect to a View desktop, verify that the client computerallows remote desktop connections.
What to do next
Configure startup options. If you do not want to require end users to provide the host name of ViewConnection Server, or if you want to configure other startup options, use the View Client command-lineoptions to create a desktop shortcut. See “Running View Client from the Command Line,” on page 42.
Switch DesktopsIf you are connected to a desktop, you can switch to another desktop.
Procedure
u Select a remote desktop from the same server or a different server.
Option Action
Choose a remote desktop on thesame server
Perform either of the following actions:n From the Horizon View Client menu bar, select Options > Switch to
Other Desktop and select a desktop to view.n From the desktop selector window, double-click the icon representing
a different desktop pool. That desktop opens in a new window so thatyou have multiple desktops open, and you can switch between them.
Choose a remote desktop on adifferent server
If you are entitled to multiple desktops, so that the desktop selectorwindow is open, go to the desktop selector window, click the Options iconin the upper-left corner of the window and select Disconnect. You will bedisconnected from the current server and any open desktop sessions. Youcan then connect to a different server.If you are entitled to only one desktop, the desktop selector window is notopen. You must exit Horizon View Client and restart to connect to adifferent server.
Chapter 4 Managing Server Connections and Desktops
VMware, Inc. 49

Log Off or Disconnect from a DesktopIf you disconnect from a remote desktop without logging off, applications remain open.
Even if you do not have a remote desktop open, you can log off of the remote desktop operating system.Using this feature has the same result as sending Ctrl+Alt+Del to the desktop and then clicking Log Off.
NOTE The Windows key combination Ctrl+Alt+Del is not supported in remote desktops. To use theequivalent of pressing Ctrl+Alt+Del, select Desktop > Send Ctrl+Alt+Del from the menu bar.
Alternatively, in most cases, you can press Ctrl+Alt+Insert. On Windows 8.1 desktops, if you use theMicrosoft RDP display protocol, this key combination does not work.
Procedure
n Disconnect without logging off.
Option Action
From the remote desktop window Perform one of the following actions:n Click the Close button in the corner of the desktop window.n Select Options > Disconnect from the menu bar in the desktop
window.
From the desktop selector window The desktop selector window is open if you are entitled to multipledesktops on the server. Perform one of the following actions:n Click the Close button in the corner of the desktop selector window,
and click Yes in the warning box.n Click the options icon in the upper-left corner of the desktop selector
window, select Disconnect, and click Yes in the warning box.
NOTE Your View administrator can configure your desktop to automatically log off whendisconnected. In that case, any open programs in your desktop are stopped.
n Log off and disconnect from a desktop.
Option Action
From within the desktop OS Use the Windows Start menu to log off.
From the menu bar Select Options > Disconnect and Log Off.If you use this procedure, files that are open on the remote desktop will beclosed without being saved first.
n Log off when you do not have a remote desktop open.
If you use this procedure, files that are open on the remote desktop will be closed without being savedfirst.
a Start Horizon View Client, connect to the View Connection Server that provides access to theremote desktop, and supply your authentication credentials.
b Right-click the desktop icon and select Logoff.
Using VMware Horizon View Client for Windows
50 VMware, Inc.

Working in a View Desktop 5Horizon View provides the familiar, personalized desktop environment that end users expect. End users canaccess USB and other devices connected to their local computer, send documents to any printer that theirlocal computer can detect, authenticate with smart cards, and use multiple display monitors.
This chapter includes the following topics:
n “Feature Support Matrix,” on page 51
n “Internationalization,” on page 52
n “Using Multiple Monitors,” on page 52
n “Connect USB Devices,” on page 53
n “Using the Real-Time Audio-Video Feature for Webcams and Microphones,” on page 56
n “Copying and Pasting Text and Images,” on page 58
n “Printing from a Remote Desktop,” on page 59
n “Control Adobe Flash Display,” on page 60
n “Using the Relative Mouse Feature for CAD and 3D Applications,” on page 60
Feature Support MatrixMany features, such as RSA SecurID authentication, location-based printing, and PCoIP protocol, aresupported on most client operating systems. You must also take into consideration whether the feature issupported on the View desktop operating system.
When planning which display protocol and features to make available to your end users, use the followinginformation to determine which client operating systems and agent (View desktop) operating systemssupport the feature.
Table 5‑1. Features Supported on Windows-Based View Clients
FeatureWindows XPDesktop
Windows VistaDesktop
Windows 7Desktop
Windows 8Desktop
Windows Server2008 R2 Desktop
USB access X X X X X
Real-TimeAudio-Video(RTAV)
X X X X X
RDP displayprotocol
X X X X X
PCoIP displayprotocol
X X X X X
VMware, Inc. 51

Table 5‑1. Features Supported on Windows-Based View Clients (Continued)
FeatureWindows XPDesktop
Windows VistaDesktop
Windows 7Desktop
Windows 8Desktop
Windows Server2008 R2 Desktop
PersonaManagement
X X X X
Wyse MMR X X
Windows 7MMR
X
Location-basedprinting
X X X X
Virtual printing X X X X
Smart cards X X X X X
RSA SecurID orRADIUS
X X X X X
Single sign-on X X X X X
Multiplemonitors
X X X X X
For information about which editions of each client operating system are supported, or which service packs,see the system requirements topics.
Features that are supported on Windows desktops for Windows View Client have the following restrictions.
n Windows 8 desktops are supported only if you have Horizon View 5.2 or later servers and desktops.
n The real-time audio-video feature is supported only if you have Horizon View 5.2 with Feature Pack 2or later.
n Windows Server 2008 R2 desktops are supported only if you have Horizon View 5.3 or later servers anddesktops.
For descriptions of these features and their limitations, see the VMware Horizon View Architecture Planningdocument.
InternationalizationThe user interface and documentation are available in English, Japanese, French, German, SimplifiedChinese, Traditional Chinese, and Korean.
Using Multiple MonitorsRegardless of the display protocol, you can use multiple monitors with a View desktop.
If you use PCoIP, the display protocol from VMware, you can adjust the display resolution and rotationseparately for each monitor. PCoIP allows a true multiple-monitor session rather than a span mode session.
A span mode remote session is actually a single-monitor session. The monitors must be the same size andresolution, and the monitor layout must fit within a bounding box. If you maximize an application window,the window spans across all monitors. Microsoft RDP 6 uses span mode.
In a true multiple-monitor session, monitors can have different resolutions and sizes, and a monitor can bepivoted. If you maximize an application window, the window expands to the full screen of only the monitorthat contains it.
Using VMware Horizon View Client for Windows
52 VMware, Inc.

This feature has the following limitations:
n If you use PCoIP, the maximum number of monitors that you can use to display a View desktop is 4,with a resolution of up to 2560 X 1600. The maximum number of monitors that can be stacked verticallyis 2. When the 3D feature is enabled, up to 2 monitors are supported with a resolution of up to 1920 X1200.
n If you use Microsoft RDP 7, the maximum number of monitors that you can use to display a Viewdesktop is 16.
n If you use Microsoft RDP display protocol, you must have Microsoft Remote Desktop Connection(RDC) 6.0 or higher installed in the View desktop.
Connect USB DevicesYou can use locally attached USB devices, such as thumb flash drives, cameras, and printers, from a remotedesktop. This feature is called USB redirection.
When you use this feature, most USB devices that are attached to the local client system become availablefrom a menu in Horizon View Client. You use the menu to connect and disconnect the devices.
Using USB devices with remote desktops has the following limitations:
n When you access a USB device from a menu in Horizon View Client and use the device in a remotedesktop, you cannot access the device on the local computer.
n USB devices that do not appear in the menu, but are available in a remote desktop, include humaninterface devices such as keyboards and pointing devices. The remote desktop and the local computeruse these devices at the same time. Interaction with these devices can sometimes be slow because ofnetwork latency.
n Large USB disk drives can take several minutes to appear in the desktop.
n Some USB devices require specific drivers. If a required driver is not already installed on a remotedesktop, you might be prompted to install it when you connect the USB device to the remote desktop.
n If you plan to attach USB devices that use MTP drivers, such as Android-based Samsung smart phonesand tablets, you must set Horizon View Client to automatically connect USB devices to your remotedesktop. Otherwise, if you try to manually redirect the USB device by using a menu item, the devicewill not be redirected unless you unplug the device and then plug it in again.
n Webcams are not supported for USB redirection using the Connect USB Device menu. To use awebcam or audio input device, you must use the Real-Time Audio-Video feature. This feature isavailable when used in conjunction with VMware Horizon View 5.2 Feature Pack 2 or a later release.See “Using the Real-Time Audio-Video Feature for Webcams and Microphones,” on page 56.
n The redirection of USB audio devices depends on the state of the network and is not reliable. Somedevices require a high data throughput even when they are idle. If you have the Real-Time Audio-Video feature, included with VMware Horizon View 5.2 Feature Pack 2 or a later release, audio inputand output devices will work well using that feature, and you do not need to use USB redirection forthose devices.
Chapter 5 Working in a View Desktop
VMware, Inc. 53

You can connect USB devices to a remote desktop either manually or automatically.
NOTE Do not redirect USB devices such as USB Ethernet devices and touch screen devices to the remotedesktop. If you redirect a USB Ethernet device, your client system will lose network connectivity. If youredirect a touch screen device, the remote desktop will receive touch input but not keyboard input. If youhave set your virtual desktop to autoconnect USB devices, you can configure a policy to exclude specificdevices. See the topic "Configuring Filter Policy Settings for USB Devices" in the VMware Horizon ViewAdministration document.
IMPORTANT This procedure tells how to use a VMware Horizon View Client menu item to configureautoconnecting USB devices to a remote desktop. You can also configure autoconnecting by using theHorizon View Client command-line interface or by creating a group policy.
For more information about the command-line interface, see “Running View Client from the CommandLine,” on page 42. For more information about creating group policies, see the VMware Horizon ViewAdministration document.
Prerequisites
n To use USB devices with a remote desktop, the View administrator must have enabled the USB featurefor the remote desktop.
This task includes installing the USB Redirection component of View Agent. For instructions, see thechapter about creating and preparing virtual machines, in the VMware Horizon View Administrationdocument.
This task can also include setting group policies to allow USB redirection. For more information, see thesections "USB Settings for the View Agent," "USB Settings for the View Client," "Configuring DeviceSplitting Policy Settings for Composite USB Devices," and "Configuring Filter Policy Settings for USBDevices" in the VMware Horizon View Administration document.
n When Horizon View Client was installed, the USB Redirection component must have been installed. Ifyou did not include this component in the installation, run the installer again to modify the componentsand include the USB Redirection component.
Procedure
n Manually connect the USB device to a remote desktop.
a Connect the USB device to your local client system.
b From the VMware Horizon View Client menu bar, click Connect USB Device.
c Select the USB device.
The device is manually redirected from the local system to the remote desktop.
n Configure Horizon View Client to connect USB devices automatically to the remote desktop when youplug them in to the local system.
If you plan to connect devices that use MTP drivers, such as Android-based Samsung smart phones andtablets, be sure to use this autoconnect feature.
a Before you plug in the USB device, start Horizon View Client and connect to a remote desktop.
b From the VMware Horizon View Client menu bar, select Connect USB Device > Autoconnect USBDevices when Inserted.
c Plug in the USB device.
USB devices that you connect to your local system after you start Horizon View Client are redirected tothe remote desktop.
Using VMware Horizon View Client for Windows
54 VMware, Inc.

n Configure Horizon View Client to connect USB devices automatically to the remote desktop whenHorizon View Client starts.
a From the VMware Horizon View Client menu bar, select Connect USB Device > Autoconnect USBDevices at Startup.
b Plug in the USB device and restart Horizon View Client.
USB devices that are connected to the local system when you start Horizon View Client are redirectedto the remote desktop.
The USB device appears in the desktop. This might take up to 20 seconds. The first time you connect thedevice to the desktop you might be prompted to install drivers.
If the USB device does not appear in the desktop after several minutes, disconnect and reconnect the deviceto the client computer.
What to do next
If you have problems with USB redirection, see the topic about troubleshooting USB redirection problems inthe VMware Horizon View Administration document.
Configure Clients to Reconnect When USB Devices RestartIf you do not configure View Client to automatically connect USB devices to your View desktop, you canstill configure View Client to reconnect to specific devices that occasionally restart. Otherwise, when adevice restarts during an upgrade, the device will connect to the local system rather than to the Viewdesktop.
If you plan to attach a USB device such as a smart phone or tablet, which is automatically restarted duringoperating system upgrades, you can set View Client to reconnect that specific device to the View desktop.To perform this task, you edit a configuration file on the client.
If you use the Automatically Connect When Inserted option in View Client, all devices that you plug in tothe client system get redirected to the View desktop. If you do not want all devices to be connected, use thefollowing procedure to configure View Client so that only certain USB devices get automaticallyreconnected.
Prerequisites
Determine the hexadecimal format of the vendor ID (VID) and product ID (PID) of the device. Forinstructions see the VMware KB article at http://kb.vmware.com/kb/1011600.
Procedure
1 Use a text editor to open the config.ini file on the client.
OS Version File Path
Windows 7 C:\ProgramData\VMware\VMware USB ArbitrationService\config.ini
Windows XP C:\Documents and Settings\All Users\ApplicationData\VMware\VMware USB Arbitration Service\config.ini
2 Set the slow-reconnect property for the specific device or devices.
usb.quirks.device0 = "vid:pid slow-reconnect"
Here, vid:pid represent the vendor ID and product ID, in hexadecimal format, for the device. Forexample, the following lines set this property for two USB devices:
usb.quirks.device0 = "0x0529:0x0001 slow-reconnect"
usb.quirks.device1 = "0x0601:0x0009 slow-reconnect"
Chapter 5 Working in a View Desktop
VMware, Inc. 55

Specify the usb.quirks.deviceN device properties in order, starting from 0. For example, if the lineusb.quirks.device0 is followed by a line with usb.quirks.device2 rather than usb.quirks.device1,only the first line is read.
When devices such as smart phones and tablets undergo a firmware or operating system upgrade, theupgrade will succeed because the device will restart and connect to the View desktop that manages it.
Using the Real-Time Audio-Video Feature for Webcams andMicrophones
With the Real-Time Audio-Video feature, you can use your local computer's webcam or microphone onyour remote desktop.
This feature is available when used in conjunction with VMware Horizon View 5.2 Feature Pack 2 or a laterrelease. For information about setting up the Real-Time Audio-Video feature and configuring the frame rateand image resolution in a remote desktop, see the VMware Horizon View Feature Pack Installation andAdministration guide. For information about configuring these settings on client systems, see the VMwareknowledge base article Setting Frame Rates and Resolution for Real-Time Audio-Video on Horizon View Clients, at http://kb.vmware.com/kb/2053644.
To download a test application that verifies the correct installation and operation of the Real-Time Audio-Video functionality, go to http://labs.vmware.com/flings/real-time-audio-video-test-application. This testapplication is available as a VMware fling, and therefore no technical support is available for it.
When You Can Use Your WebcamIf your Horizon View administrator has configured the Real-Time Audio-Video feature, and if you use thePCoIP display protocol, a webcam that is built-in or connected to your local computer can be used on yourdesktop. You can use the webcam in conferencing applications such as Skype, Webex, or Google Hangouts.
During the setup of an application such as Skype, Webex, or Google Hangouts on your remote desktop, youcan choose VMware Virtual Microphone and VMware Virtual Webcam as input devices and VMwareVirtual Audio as output device from menus in the application. With many applications, however, thisfeature will just work, and selecting an input device will not be necessary.
If the webcam is currently being used by your local computer it cannot be used by the remote desktopsimultaneously. Also, if the webcam is being used by the remote desktop it cannot be used by your localcomputer at the same time.
IMPORTANT If you are using a USB webcam, do not connect it from the Connect USB Device menu inHorizon View Client. To do so routes the device through USB redirection, and the performance will beunusable for video chat.
If you have more than one webcam connected to your local computer, your administrator can configure apreferred webcam that will be used on your remote desktop. Consult with your Horizon Viewadministrator if you are not sure which webcam is selected.
Select a Preferred Webcam on a Windows Client SystemWith the Real-Time Audio-Video feature, if you have multiple webcams on your client system, only one ofthem is used on your View desktop. To specify which webcam is preferred, you can set a registry key value.
The preferred webcam is used on the remote desktop if it is available, and if not, another webcam is used.
Prerequisites
n Verify that you have a USB webcam installed and operational on your client system.
n Verify that you are using the PCoIP display protocol for your remote desktop.
Using VMware Horizon View Client for Windows
56 VMware, Inc.

Procedure
1 Attach the webcam you want to use.
2 Start a call and then stop a call.
This process creates a log file.
3 Open the debug log file with a text editor.
Operating System Log File Location
Windows XP C:\Documents and Settings\username\LocalSettings\Application Data\VMware\VDM\Logs\debug-20YY-MM-DD-XXXXXX.txt
Windows 7 or Windows 8 C:\Users\%username%\AppData\Local\VMware\VDM\Logs\debug-20YY-MM-DD-XXXXXX.txt
The format of the log file is debug-20YY-MM-DD-XXXXXX.txt , where 20YY is the year, MM is the month,DD is the day, and XXXXXX is a number.
4 Search the log file for [ViewMMDevRedir] VideoInputBase::LogDevEnum to find the log file entries thatreference the attached webcams.
Here is an excerpt from the log file identifying the Microsoft Lifecam HD-5000 webcam:
[ViewMMDevRedir] VideoInputBase::LogDevEnum - 2 Device(s) found
[ViewMMDevRedir] VideoInputBase::LogDevEnum - Index=0 Name=Integrated Webcam
UserId=vid_1bcf&pid_2b83&mi_00#7&1b2e878b&0&0000 SystemId=\\?\usb#vid_1bcf&pid_2b83&mi_00#
[ViewMMDevRedir] VideoInputBase::LogDevEnum - Index=1 Name=Microsoft LifeCam HD-5000
UserId=vid_045e&pid_076d&mi_00#8&11811f49&0&0000 SystemId=\\?\usb#vid_045e&pid_076d&mi_00#
5 Copy the user ID of the preferred webcam.
For example, copy vid_045e&pid_076d&mi_00#8&11811f49&0&0000 to set the Microsoft LifeCam HD-5000as the default webcam.
6 Start the Registry Editor (regedit.exe) and navigate to HKEY_LOCAL_MACHINE\SOFTWARE\VMware,Inc.\VMware VDM\RTAV.
7 Paste the ID portion of the string into the REG_SZ value, srcWCamId.
For example, paste vid_045e&pid_076d&mi_00#8&11811f49&0&0000 into srcWCamId.
8 Save your changes and exit the registry.
9 Start a new call.
Select a Default Microphone on a Windows Client SystemIf you have multiple microphones on your client system, only one of them is used on your View desktop. Tospecify which microphone is the default, you can use the Sound control on your client system.
With the Real-Time Audio-Video feature, audio input devices and audio output devices work withoutrequiring the use of USB redirection, and the amount network bandwidth required is greatly reduced.Analog audio input devices are also supported.
IMPORTANT If you are using a USB microphone, do not connect it from the Connect USB Device menu inHorizon View Client. To do so routes the device through USB redirection so that the device cannot use theReal-Time Audio-Video feature.
Chapter 5 Working in a View Desktop
VMware, Inc. 57

Prerequisites
n Verify that you have a USB microphone or another type of microphone installed and operational onyour client system.
n Verify that you are using the PCoIP display protocol for your remote desktop.
Procedure
1 If you are currently on a call, stop the call.
2 Right-click the speaker icon in your system tray and select Recording devices.
You can alternatively open the Sound control from the Control Panel and click the Recording tab.
3 In the Recording tab of the Sound dialog box, right-click the microphone you prefer to use.
4 Select Set as Default Device and click OK.
5 Start a new call from your View desktop.
Copying and Pasting Text and ImagesBy default, you can copy and paste text from your client system to a remote desktop. If your administratorenables the feature, you can also copy and paste text from a remote desktop to your client system orbetween two remote desktops. Some restrictions apply.
If you use the PCoIP display protocol and you are using a Horizon View 5.x or later remote desktop, yourView administrator can set this feature so that copy and paste operations are allowed only from your clientsystem to a remote desktop, or only from a remote desktop to your client system, or both, or neither.
Administrators configure the ability to copy and paste by using group policy objects (GPOs) that pertain toView Agent in remote desktops. For more information, see the topic about View PCoIP general sessionvariables in the VMware Horizon View Administration document, in the chapter about configuring policies.
Supported file formats include text, images, and RTF (Rich Text Format). The clipboard can accommodate1MB of data for copy and paste operations. If you are copying formatted text, some of the data is text andsome of the data is formatting information. For example, an 800KB document might use more than 1MB ofdata when it is copied because more than 200KB of RTF data might get put in the clipboard.
If you copy a large amount of formatted text or text and an image, when you attempt to paste the text andimage, you might see some or all of the plain text but no formatting or image. The reason is that the threetypes of data are sometimes stored separately. For example, depending on the type of document you arecopying from, images might be stored as images or as RTF data.
If the text and RTF data together use less than 1MB, the formatted text is pasted. Often the RTF data cannotbe truncated, so that if the text and formatting use more than 1MB, the RTF data is discarded, and plain textis pasted.
If you are unable to paste all of the formatted text and images you selected in one operation, you might needto copy and paste smaller amounts in each operation.
You cannot copy and paste files between a remote desktop and the file system on your client computer.
Using VMware Horizon View Client for Windows
58 VMware, Inc.

Printing from a Remote DesktopFrom a remote desktop, you can print to a virtual printer or to a USB printer that is attached to your clientcomputer. Virtual printing and USB printing work together without conflict.
Set Printing Preferences for the Virtual Printer FeatureThe virtual printing feature lets end users use local or network printers from a remote desktop withoutrequiring that additional print drivers be installed in the remote desktop. For each printer available throughthis feature, you can set preferences for data compression, print quality, double-sided printing, color, and soon.
After a printer is added on the local computer, Horizon View Client adds that printer to the list of availableprinters on the remote desktop. No further configuration is required. Users who have administratorprivileges can still install printer drivers on the remote desktop without creating a conflict with the virtualprinter component.
IMPORTANT This feature is not available for the following types of printers:
n USB printers that are using the USB redirection feature to connect to a virtual USB port in the remotedesktop
You must disconnect the USB printer from the remote desktop in order to use the virtual printingfeature with it.
n The Windows feature for printing to a file
Selecting the Print to file check box in a Print dialog box does not work. Using a printer driver thatcreates a file does work. For example, you can use a PDF writer to print to a PDF file.
This procedure is written for a remote desktop that has a Windows 7 or Windows 8.x (Desktop) operatingsystem. The procedure is similar but not exactly the same for Windows XP and Windows Vista.
Prerequisites
Verify that the Virtual Printing component of View Agent is installed on the remote desktop. In the remotedesktop file system, the drivers are located in C:\Program Files\Common Files\VMware\Drivers\VirtualPrinter.
Installing View Agent is one of the tasks required for preparing a virtual machine to be used as a remotedesktop. For more information, see the VMware Horizon View Administration document.
Procedure
1 In the Windows 7 or Windows 8.x remote desktop, click Start > Devices and Printers.
2 In the Devices and Printers window, right-click the default printer, select Printer Properties from thecontext menu, and select the printer.
In the remote desktop, virtual printers appear as <printer_name>#:<number>.
3 In the Printer Properties window, click the Device Setup tab and specify which settings to use.
4 On the General tab, click Preferences and specify which settings to use.
5 In the Printing Preferences dialog box, select the different tabs and specify which settings to use.
For the Page Adjustment advanced setting, VMware recommends that you retain the default settings.
6 Click OK.
Chapter 5 Working in a View Desktop
VMware, Inc. 59

Using USB PrintersIn an Horizon View environment, virtual printers and redirected USB printers can work together withoutconflict.
A USB printer is a printer that is attached to a USB port on the local client system. To send print jobs to aUSB printer, you can either use the USB redirection feature or use the virtual printing feature. USB printingcan sometimes be faster than virtual printing, depending on network conditions.
n You can use the USB redirection feature to attach a USB printer to a virtual USB port in the remotedesktop as long as the required drivers are also installed on the remote desktop.
If you use this redirection feature the printer is no longer logically attached to the physical USB port onthe client and this is why the USB printer does not appear in the list of local printers on the local clientmachine. This also means that you can print to the USB printer from the remote desktop but not fromthe local client machine.
In the remote desktop, redirected USB printers appear as <printer_name>.
For information about how to connect a USB printer, see “Connect USB Devices,” on page 53.
n On some clients, you can alternatively use the virtual printing feature to send print jobs to a USBprinter. If you use the virtual printing feature you can print to the USB printer from both the remotedesktop and the local client, and you do not need to install print drivers on the remote desktop.
Control Adobe Flash DisplayThe View administrator can set Adobe Flash content to display in your View desktop at a level designed toconserve computing resources. In some cases, these settings can result in low playback quality. By movingthe mouse pointer into the Adobe Flash content, you can override the Adobe Flash settings that your Viewadministrator specifies.
Adobe Flash display control is available for Internet Explorer sessions on Windows only, and for AdobeFlash versions 9 and 10 only. To control Adobe Flash display quality, Adobe Flash must not be running infull screen mode.
Procedure
1 From Internet Explorer in the View desktop, browse to the relevant Adobe Flash content and start it ifnecessary.
Depending on how your View administrator configured Adobe Flash settings, you might noticedropped frames or low playback quality.
2 Move the mouse pointer into the Adobe Flash content while it is playing.
Display quality is improved as long as the cursor remains in the Adobe Flash content.
3 To retain the improvement in quality, double-click inside the Adobe Flash content.
Using the Relative Mouse Feature for CAD and 3D ApplicationsIf you use the PCoIP display protocol when using CAD or 3D applications in a Horizon View 5.2 or laterdesktop, mouse performance improves when you enable the relative mouse feature.
In most circumstances, if you are using applications that do not require 3D rendering, View Client transmitsinformation about mouse pointer movements by using absolute coordinates. Using absolute coordinates, theclient renders the mouse movements locally, which improves performance, especially if you are outside thecorporate network.
Using VMware Horizon View Client for Windows
60 VMware, Inc.

For work that requires using graphics-intensive applications, such as AutoCAD, or for playing 3D videogames, you can improve mouse performance by enabling the relative mouse feature, which uses relative,rather than absolute, coordinates. To use this feature, select Options > Enable Relative Mouse from theView Client menu bar.
NOTE If you use View Client in windowed mode, rather than full screen mode, and the relative mousefeature is enabled, you might not be able to move the mouse pointer to the View Client menu options ormove the pointer outside of the View Client window. To resolve this situation, press Ctrl+Alt.
When the relative mouse feature is enabled, performance might be slow if you are outside the corporatenetwork, on a WAN.
IMPORTANT This feature requires a Horizon View 5.2 or later desktop, and you must turn on 3D renderingfor the desktop pool. For more information about pool settings and the options available for 3D rendering,see the VMware Horizon View Administration document.
Chapter 5 Working in a View Desktop
VMware, Inc. 61

Using VMware Horizon View Client for Windows
62 VMware, Inc.
Troubleshooting Horizon View Client 6You can solve most problems with Horizon View Client by resetting the desktop or by reinstalling theVMware Horizon View Client application.
This chapter includes the following topics:
n “What to Do If View Client Exits Unexpectedly,” on page 63
n “Reset a Desktop,” on page 63
n “Uninstalling Horizon View Client,” on page 64
What to Do If View Client Exits UnexpectedlyView Client might exit even if you do not close it.
Problem
View Client might exit unexpectedly. Depending on your View Connection Server configuration, you mightsee a message such as There is no secure connection to the View Connection Server. In some cases, nomessage is displayed.
Cause
This problem occurs when the connection to View Connection Server is lost.
Solution
u Restart View Client. You can connect successfully as soon as View Connection Server is running again.If you continue to have connection problems, contact your View administrator.
Reset a DesktopYou might need to reset a desktop if the desktop operating system stops responding. Resetting shuts downand restarts the desktop. Unsaved data is lost.
Resetting a remote desktop is the equivalent of pressing the Reset button on a physical PC to force the PC torestart. Any files that are open on the remote desktop will be closed without being saved first.
You can reset the desktop only if your View administrator has enabled this feature.
VMware, Inc. 63

Procedure
u Use the Reset Desktop command.
Option Action
From within the desktop OS Select Options > Reset Desktop from the menu bar.
From the desktop selection list a Start Horizon View Client, connect to the View Connection Server thatprovides access to the remote desktop, and supply your authenticationcredentials.
b Go to the desktop selector window, right-click the desktop icon andselect Reset Desktop.
The operating system in the remote desktop is rebooted. Horizon View Client disconnects from the desktop.
What to do next
Wait an appropriate amount of time for system startup before attempting to connect to the remote desktop.
Uninstalling Horizon View ClientYou can sometimes resolve problems with Horizon View Client by uninstalling and reinstalling theHorizon View Client application.
You uninstall Horizon View Client by using the same method that you usually use to uninstall any otherapplication.
For example, use the Add or Remove Programs applet available in your Windows operating system toremove the VMware Horizon View Client application.
After uninstalling is complete, you can reinstall the application.
See Chapter 2, “Installing View Client for Windows,” on page 17.
Using VMware Horizon View Client for Windows
64 VMware, Inc.

Index
Numerics3D applications 60
AADM template files, View components 32Adobe Flash video, control 60Adobe Media Server 11autoconnect USB devices 53
Bbrowser requirements 13
CCAD applications 60certificates, ignoring problems 30client software requirements 7client-side GPOs 32connect, USB devices 53, 55control, Adobe Flash video display 60copying text and images 58Ctrl+Alt+Delete 50customer experience program, desktop pool
data 14
Ddesktop
log off from 50reset 63switch 49
devices, connecting USB 53, 55disconnecting from a remote desktop 50display protocols
Microsoft RDP 51View PCoIP 51
Ffeature support matrix 51Firefox, supported versions 13Flash URL Redirection, system requirements 11
GGPO settings, general 38group policies 32
Hhardware requirements
for Windows systems 7smart card authentication 12
Horizon View Clientdisconnect from a desktop 50troubleshooting 63using View Portal to download 18
Iimages, copying 58Internet Explorer, supported versions 13
Llog off 50logging in to a virtual desktop 47
Mmedia file formats, supported 9microphone 57Microsoft Lync support 11Microsoft RDP 51, 52Microsoft Windows Installer
command-line options for silent installation 22properties for View Client 21
multimedia redirection (MMR) 9multiple monitors 52
Ooperating systems, supported on View Agent 14
Ppasting text and images 58PCoIP 51prerequisites for client devices 14print from a desktop 59printers, setting up 59
RRDP GPO settings 36Real-Time Audio-Video, system requirements 9registry
settings equivalent to command-linecommands 45
settings for View Client 45relative mouse 60
VMware, Inc. 65

reset desktop 63
Ssecurity servers 14security settings GPOs 33Send Ctrl+Alt+Del menu command 50server connections 47server certificate verification 30silent installation, View Client 20smart card authentication, requirements 12SSL certificates, verifying 30streaming multimedia 9switch desktops 49system requirements, for Windows 7
Ttext, copying 58thin client support 51ThinPrint setup 59
UUnified Communications 11uninstalling View Client 64UPNs, View Client 47URI examples 28URI syntax for View Clients 26URIs (uniform resource identifiers) 26USB devices
setting GPOs for 32using with View desktops 51
USB settings, GPOs 40USB printers 59, 60
Vvdm_client.adm file for setting GPOs 32verification modes for certificate checking 30View Agent, installation requirements 14View Client
command syntax 42configuration file 44configuring 25exits unexpectedly 63installation overview 17installing on a Windows PC or laptop 17installing silently on a Windows PC or
laptop 20registry settings 45running from the command line 42silent installation properties 21starting 17, 47system requirements for Windows 7
View components, command-line options forsilent installation 22
View Connection Server 14View Portal, browser requirements 13virtual printers 59virtual printing feature 51, 59virtual profiles 51vmware-view command
configuration file 44syntax 42
VoIP (voice over IP) 11
WWeb browser requirements 13webcam 56Windows, installing View Client on 7Windows computers, installing View Client 17Wyse MMR 51
Using VMware Horizon View Client for Windows
66 VMware, Inc.