Using Microsoft Publisher 2000 to Develop Local Language ...earlyliteracykit.prel.org/pdf/plan/Using...
26
P-CHILD PLAN 3 1 Using Microsoft Publisher 2000 to Develop Local Language Materials
Transcript of Using Microsoft Publisher 2000 to Develop Local Language ...earlyliteracykit.prel.org/pdf/plan/Using...

P-CHILD
PLAN 3 1
Using Microsoft Publisher 2000 to Develop Local Language Materials

P-CHILD
PLAN 3 2
Table of Contents
INTRODUCTION................................................................................................................. 3
GETTING STARTED .......................................................................................................... 4
UNDERSTANDING BOOK FOLD PUBLICATION............................................................. 6
CHANGING PAGE LAYOUT.............................................................................................. 7
PREVIEW OF PUBLISHER SCREEN ................................................................................ 8
SAVING YOUR DOCUMENT.............................................................................................. 9
UNDERSTANDING AND INSERTING PAGES ................................................................ 10
CREATING A COVER PAGE ........................................................................................... 13
Resizing Images .......................................................................................................................... 15
INSERTING TEXT............................................................................................................. 17
Resizing text boxes .................................................................................................................... 17
Moving text boxes....................................................................................................................... 17
Selecting font type and size ....................................................................................................... 17
UNDERSTANDING HOW TO PRINT YOUR BOOK ........................................................ 20
Printing Pages 1 & 8 ................................................................................................................... 20
Printing Pages 2 & 7 ................................................................................................................... 21
Printing Pages 3 & 6 ................................................................................................................... 22
Printing Pages 4 & 5 ................................................................................................................... 23
HELPFUL HINTS.............................................................................................................. 25
Toolbars ...................................................................................................................................... 25
The Menu Toolbar ....................................................................................................................... 25
The Standard Toolbar ................................................................................................................. 25
The Object Toolbar ..................................................................................................................... 25
Viewing Pictures While Searching............................................................................................. 26

P-CHILD
PLAN 3 3
Introduction
The Pacific region is diverse in culture and language. Much of the tradition is passed orally from generation to generation. As times have changed, so has the need for increased print literacy materials. Educators can now use Microsoft Publisher as one way to develop materials, including books and instructional resources in the local language. This manual will provide step-by-step directions to insert digital pictures, include text written in local languages, placing text in varying locations on the page, and adjusting the font style and size of text using the Microsoft Publisher software. In order to use this manual, the user must have Microsoft Publisher installed on their computer. This may or may not have been included with your computer. To check if the computer you are using has Microsoft Publisher, follow the directions below.
1. Click START in the bottom right hand corner. 2. Scroll to PROGRAMS. 3. On the right, a list of PROGRAMS should appear. Check to see if you have:
4. If you see the program, proceed with the directions in this guide. 5. If you do not see the program, obtain a copy of the software.
To develop books in the early grades, it is recommended that this manual be used in conjunction with Developing Leveled Early Readers.

P-CHILD
PLAN 3 4
Getting Started
• Click on Start, and scroll to Programs, then to Microsoft Publisher.
This window will appear when MS Publisher opens. Click the third tab, Blank Publications.
FYI. Here are other publications you can create using MS Publisher.

P-CHILD
PLAN 3 5
• Click on Book Fold in the list or on the icon.
• Once Book Fold is selected, click on Create at the bottom.
• A Publisher window will appear asking if you want to insert pages. Click YES. This will allow you to increase the number of pages in your book.

P-CHILD
PLAN 3 6
Understanding Book Fold Publication Using book fold is an ideal way to minimize the amount of paper used. Each page in the book fold is a half sheet of letter-sized paper. Two pages in book fold is one letter-sized piece of paper. When inserting pages, the MS Publisher will automatically ask if you want to insert pages in groups of four. Think of this as two pages that are the front of the paper, and two pages that are the back of the paper.
Two pages in Publisher equals one letter-sized piece of paper (8-1/2 x 11).
P-CHILD
PLAN 3 7
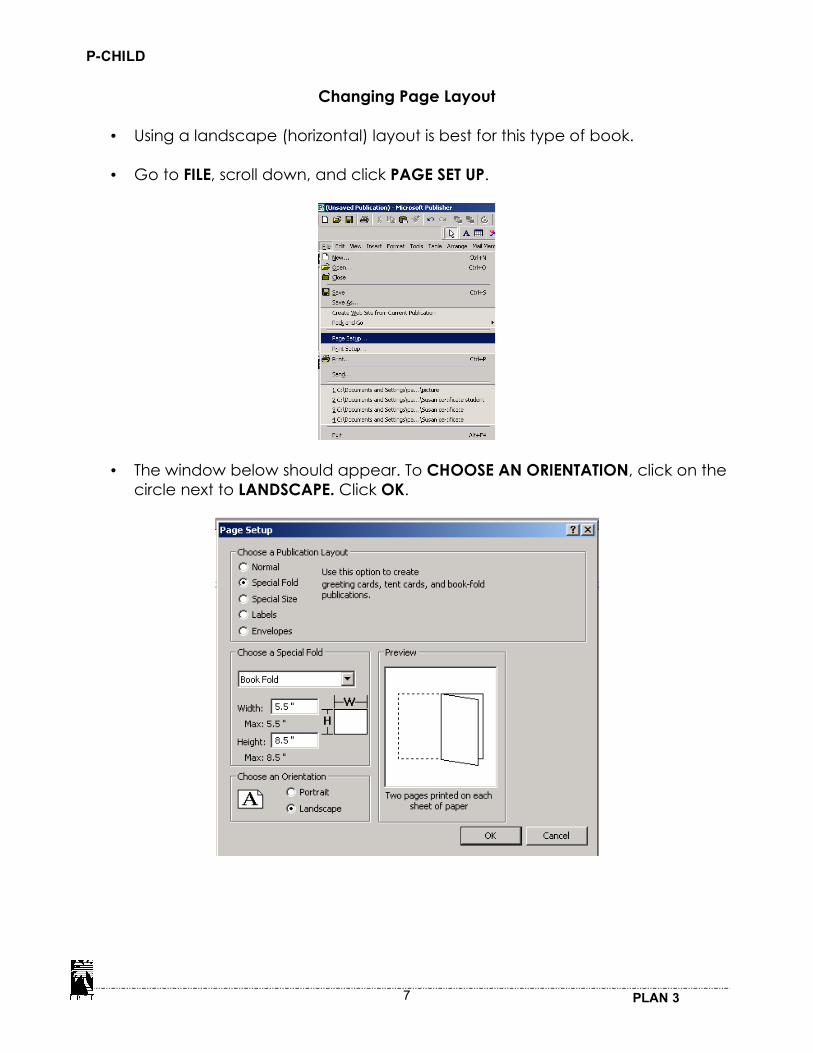
Changing Page Layout
• Using a landscape (horizontal) layout is best for this type of book. • Go to FILE, scroll down, and click PAGE SET UP.
• The window below should appear. To CHOOSE AN ORIENTATION, click on the circle next to LANDSCAPE. Click OK.
P-CHILD
PLAN 3 8
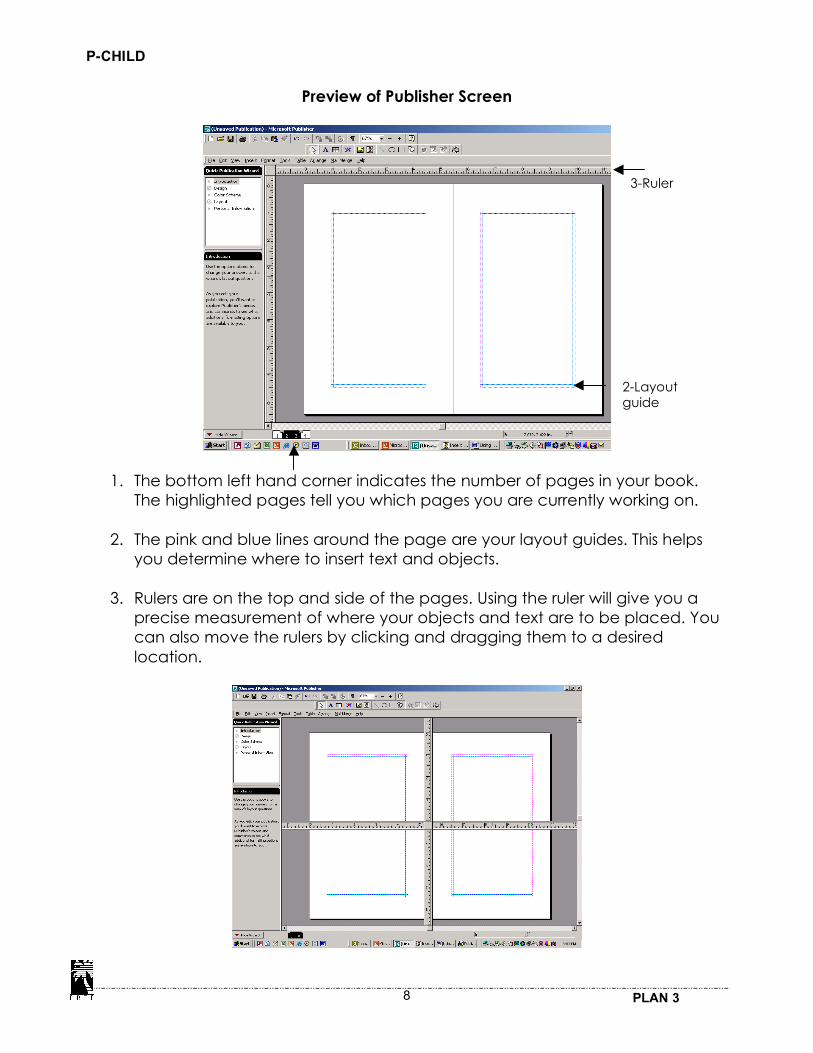
Preview of Publisher Screen
1. The bottom left hand corner indicates the number of pages in your book. The highlighted pages tell you which pages you are currently working on.
2. The pink and blue lines around the page are your layout guides. This helps
you determine where to insert text and objects.
3. Rulers are on the top and side of the pages. Using the ruler will give you a precise measurement of where your objects and text are to be placed. You can also move the rulers by clicking and dragging them to a desired location.
2-Layout guide
3-Ruler

P-CHILD
PLAN 3 9
Saving Your Document Saving your document in the beginning is helpful. To do this, scroll to FILE then down to SAVE.
• A SAVE AS window will appear. The SAVE IN: box at the top tells you where your document will be saved. If you do not want it to be saved in this location, select the desired location in the left hand column.
• Type in a FILE NAME at the bottom. Click SAVE.
• MS Publisher files are quite large. As you include more text and pictures to your book, SAVING will require you to be patient.
• MS Publisher has an automatic reminder that appears after a few minutes.
The MS Publisher SAVE window will appear. Click YES each time if you want to save your work.

P-CHILD
PLAN 3 10
Understanding and Inserting Pages
• At the bottom left-hand corner, click on page 1. This is the cover page. The other numbers indicate how many pages will be in the book. What you’ll want to remember is that this book is folded in half (i.e., one page is equal to a half sheet of letter-sized paper). Two pages are equal to one 8 ½” x 11” letter-sized paper.
• Ideally, you’ll want an even amount of pages, preferably in increments of
four. In this type of book, eight pages is appropriate (equal to two sheets of letter-sized paper with print on the front and back).
• To insert pages, go to the top menu bar, click on INSERT, then on PAGE.

P-CHILD
PLAN 3 11
• An insert window will appear asking NUMBER OF NEW PAGES and OPTIONS.
Since this is a book fold, you’ll always want to add pages in increments of four. Determine where you’ll want the pages added (BEFORE the current page you are on, or AFTER). Look at the bottom to see which page you are on.
• Inserting blank pages is always an option. This will allow you to insert more
text and pictures. Click OK.
On the bottom of the screen, you’ll notice that you now have eight pages.
Eight pages

P-CHILD
PLAN 3 12
The table below will help you decide how many pages and sheets of paper you will need for your book.
Number of Pages in Book Number of Letter-Sized Sheets (double sided)
4 1 8 2
12 3 16 4

P-CHILD
PLAN 3 13
Creating a Cover Page
• To create a cover page, click on page 1 at the bottom. At the top, click on the
text box icon . Draw a text box in the area where the title will be located. There should be black squares around the box. Use the black squares to resize the text box as needed and use the MOVE ICON (a picture of a moving van) to move the text box to the desired location. See page 17 for additional information on resizing, moving, and adjusting font size in text boxes.
• Before typing in your title, determine the font and size you want to use. Click on
the down arrow on the right side to change the font and size. Once selected, type in your title.
font type font size text box icon
• When inserting text or pictures, stay within the pink and blue lines. These lines are the printing margins. Any text or pictures outside of these lines may not be printed.

P-CHILD
PLAN 3 14
Inserting Pictures
In your book, you will have the option to use clip art or photo images taken from a digital camera or a scanner. For consistency, you should decide to use either all clip art or all photo images, not both. • Click on INSERT at top, scroll down to PICTURE, then click on FROM FILE.
• An INSERT PICTURE window will appear. The LOOK IN window at the top shows
where the computer is currently searching for your picture.
• To help you locate your picture, there are folders on the left side of the window. Click on the appropriate icon and continue searching for the file that your picture is in. Double click on the file once you have found it.

P-CHILD
PLAN 3 15
Resizing Images
• After you have inserted your picture, you may notice that the picture is larger than the book itself. The best way to resize your image is by scaling your picture. Scaling your picture will ensure that the image is resized proportionately.
• To resize your picture, right click on top of the image once. Scroll to CHANGE
PICTURE, then click on SCALE PICTURE to the right.
• A SCALE PICTURE window will appear. Decide what height and width percentage you want the image to be. Then click OK. The image should appear on the cover. You may need to do this several times until you find the desired proportion.

P-CHILD
PLAN 3 16
• To move your picture, click on the image and then DRAG the image to the desired spot. If your image does not move, click on it again and make sure there are black boxes around the border and the MOVE icon appears.
• At the bottom left, click on page 2. In the window, pages 2 and 3 will appear.

P-CHILD
PLAN 3 17
Inserting Text
• At the top, click on the TEXT BOX icon . In the area where the text will be, click and drag the size you would like the text box. Try to stay close to the pink and blue margin lines, as doing so may delete part of the text when printing. Resize your text box to fit the entire text.
Resizing Text Boxes • Click on one of the black squares around the text box. A RESIZE message
should appear. Click and drag the text box to the appropriate size. You may have to realign your text box so it is centered on the page.
Moving Text Boxes • Click on the center of a text box until there are black squares around it. • Move your cursor until you see a MOVE icon. When it appears, click once and
then drag the text box to the appropriate location. Selecting Font Type and Size
• Go to the font type box in the top menu bar. Click on the arrow and scroll to the font you want to use. To change the size, click on the arrow and then scroll to the size you want.
Font Type Font Size

P-CHILD
PLAN 3 18
• Go back to the text frame and type in your text.
• To insert an image, click outside of the text frame, then go to the top of the page and click on INSERT. Scroll to PICTURE then select FROM FILE.

P-CHILD
PLAN 3 19
• The INSERT PICTURE box will appear. Find the picture that matches the text and click on INSERT.
• If needed, refer back to the directions on the prior pages to MOVE and/or RESIZE YOUR PICTURE. Go to page 3 and insert text and a picture to match. Continue this process with the remainder of the book. To move to the next page, click on the page number at the bottom. Refer back to the previous pages of this manual for assistance.

P-CHILD
PLAN 3 20
Understanding How to Print Your Book
• Two pages will be printed on one sheet of paper. In an eight-page book, the pages printed together are:
o Pages 1 & 8 o Pages 2 & 7 o Pages 3 & 6 o Pages 4 & 5
• Except for page 1, you’ll have to manually feed your paper to print on both
sides. Each printer is different, so you need to remember how to rotate and flip your paper (e.g., does the print face up, down, left, right). Practice on scrap paper before printing the book on cardstock.
Printing Pages 1 & 8
• Insert one sheet of card stock into your paper tray. At the top, click FILE, scroll to PRINT.
• In the PRINT RANGE box, click on the circle next to PAGES FROM, then type 1
in each of the boxes. Click OK.

P-CHILD
PLAN 3 21
• After clicking on OK, a PUBLISHER window will appear asking if you want to print as a separate booklet. Click NO.
• Pages 1& 8 will now print.
Printing Pages 2 & 7
• Insert page 1 into your manual feed paper tray. Place it so page 2 & 7 will print on the blank side. At the top, click FILE, scroll down to PRINT. A PRINT window should appear.
• In the PRINT RANGE box, click on the circle next to PAGES from then type 2 in
each of the boxes. Click on the PROPERTIES BOX near the top.
• A PRINTER window will appear. Click on the PAPER tab. A picture of your printer will appear.
• In the PAPER SOURCE box, scroll to MANUAL FEED. • Click OK. Then click OK on the PRINT window.

P-CHILD
PLAN 3 22
• A PUBLISHER window will appear, asking if you want to print books separately. Click NO.
• Pages 2 & 7 will now print.
Printing Pages 3 & 6
• At the top, click FILE, scroll to PRINT. A PRINT window should appear. • In the PRINT RANGE box, click on the circle next to PAGES from then type in 3
in each of the boxes.
• Click on the PROPERTIES BOX near the top. • A PRINTER window will appear. Click on the PAPER tab. A picture of your
printer will appear. In the PAPER SOURCE box, scroll to MANUAL FEED. • Insert a blank sheet into your manual feed paper tray. • Click OK. Then click OK on the PRINT window.

P-CHILD
PLAN 3 23
• A PUBLISHER window will appear, asking if you want to print books
separately. Click NO.
• Pages 3 & 6 will now print.
Printing Pages 4 & 5
• Insert page 3 & 6 into your manual feed paper tray. Place it so pages 4 & 5 will print on the blank side. At the top, click FILE, scroll to PRINT. A PRINT window should appear.
• In the PRINT RANGE box, click on the circle next to PAGES from, then type 4 in
each of the boxes. Click on the PROPERTIES BOX near the top.
• A PRINTER window will appear. Click on the tab PAPER. A picture of your printer will appear.
• In the PAPER SOURCE box, scroll to MANUAL FEED. • Click OK. Then click OK on the PRINT window.

P-CHILD
PLAN 3 24
• A PUBLISHER window will appear, asking if you want to print books separately. Click NO.
• Pages 4 & 5 will now print. • Printing books can result in depleting your paper and ink quickly. Use scrap
paper and practice figuring out how to insert your paper in the correct direction so you can print on both sides.
• Laminate only the first page of your book to increase longevity. Use
cardstock on the remaining pages, which reduces the need to laminate.

P-CHILD
PLAN 3 25
Helpful Hints
Toolbars Toolbars allow the user to perform different tasks by simply clicking on an icon (picture). A sign will identify each tool by simply rolling over each icon. Below are the identified icons that you may routinely use while creating books. The Menu Toolbar The menu toolbar allows you to perform different functions. Clicking on each will show a menu of commands. The Standard Toolbar The Object Toolbar
Draw these objects
Insert a picture or clip art
Insert a table
Adjust font properties
Create new document
Open a saved document
Save
Cut, copy, paste, format painter
Undo, redo Print document
View image size
Help

P-CHILD
PLAN 3 26
Viewing Pictures While Searching
At the top toolbar, click on the icon, and scroll to PREVIEW. This will allow you to preview the picture while searching.
Clicking on this icon will take you directly to the clip art gallery. After locating the image you’ll want to use, click on it once and this toolbar will appear.
Click on this icon and your image will insert into the document automatically.