USER´S MANUAL EFS-150
47
User’s manual EFS-150 USER´S MANUAL EFS-150 2
Transcript of USER´S MANUAL EFS-150

User’s manual EFS-150
USER´S MANUAL EFS-150
2

User’s manual EFS-150
Table of contents1 Introduction....................................................................................................................................................................4
2 Disclaimer.......................................................................................................................................................................4
3 Abbreviations and acronyms............................................................................................................................................5
4 Application......................................................................................................................................................................5
5 Technical data ...............................................................................................................................................................6
6 Fusion splicer components..............................................................................................................................................6
7 Exterior...........................................................................................................................................................................7
8 Basics..............................................................................................................................................................................8
9 Order of operation...........................................................................................................................................................8
10 Connecting the splicer to power....................................................................................................................................8
11 Starting the splicer........................................................................................................................................................8
12 Fusion splicer menus.....................................................................................................................................................9
12.1 Setup menu...........................................................................................................................................................11
12.2 Func menu............................................................................................................................................................17
12.3 Info menu..............................................................................................................................................................19
13 Preparing the fiber......................................................................................................................................................22
13.1 Protective sleeve...................................................................................................................................................23
13.2 Stripping the fiber..................................................................................................................................................24
13.3 Cleaning the fiber..................................................................................................................................................25
13.4 Cleaving the fiber...................................................................................................................................................26
14 Splicing.......................................................................................................................................................................28
14.1 Shrink sleeve splice protection...............................................................................................................................35
15 General maintenance...................................................................................................................................................37
15.1 Electrode cleaning..................................................................................................................................................38
3

User’s manual EFS-150
15.2 Replacing the electrodes........................................................................................................................................41
15.3 Cleaning the fiber cleaver......................................................................................................................................41
15.4 Rotating the fiber cleaver blade.............................................................................................................................41
15.5 Replacing the cleaver blade...................................................................................................................................44
15.6 Adjusting the cleaver blade height.........................................................................................................................47
15.7 Cleaning the v-groove of the fusion splicer............................................................................................................48
15.8 Oven maintenance.................................................................................................................................................49
16 Troubleshooting..........................................................................................................................................................50
1 IntroductionThe EFS-150 incorporates all the best a fixed v-groove splicer can offer.
NOTE: The EFS-150 is a high precision instrument and should always be handled with care!
2 DisclaimerEmitor AB reserves the right to modify the product in any way without prior customer notification or any other form of notice.
In no event shall Emitor AB be liable for any damages of any type, incidental, indirect, consequential or other, originating from or relating to this manual or the information contained herein. While Emitor AB tries to make the user manual complete and accurate, it may contain mistakes, and the user uses it solely at his or her own risk.
4

User’s manual EFS-150
3 Abbreviations and acronymsThe following abbreviations and acronyms have been used in the text:
Abbreviation ExplanationB/W Black and whiteAC Alternating currentDC Direct currentMM Multi modeMMF Multi mode fiberSM Single modeSMF Single mode fiberRH Relative humidity
4 ApplicationSplicing and protection of most common types of SMF and MMF.
5

User’s manual EFS-150
5 Technical dataWeight: 1.8 kgDimensions: 176x166x100 mmAlignment:
Axial: AutomaticRadial: Fixed v-groove
Fusion technique: Arc fusionProcess: AutomaticTypical Loss: SMF 0.03dB
MMF 0.01dBSplice Programs: 2 factory defined
6 user definedDisplay: 71x49mm B/W
Power source:Battery: 9.6V DCPower supply:90-260V AC / 9V DC
Operating environment:Temperature 0˚C to 45˚CHumidity max 95% RH,
non-condensingStorage environment:
Temperature -20˚C to 60˚CHumidity max 98% RH,
non-condensingHeat oven (optional):
Weight: 0.18kgDimensions: 103x54x56mm
6 Fusion splicer componentsThe following components are standard for splicing in the field:
Item Description Quantity1 EFS Splicer 12 Heat oven 13 Power supply 14 Fiber cleaver 15 Battery charger 16 Battery 17 Fiber holders 250-400µm primary coating 1 pair8 RS232 cable 1
Table 1. Standard components of the EFS-150 fusion splicer
6

User’s manual EFS-150
7 Exterior Figure 1. Features on the EFS-150
7
Function key 2
Splice/oven button enable
Function key 3
Fiber holder support
Function key 4
Safety shield
Function key 1
RS232 connection
Oven connection
10V DC input
Power switch

User’s manual EFS-150
8 BasicsNOTE: The EFS-150 is a rugged field instrument designed to withstand field environment. However, to ensure best performance, it is important to keep maintenance as described in chapter 16 “General maintenance”.
9 Order of operation• Connect the splicer to a power source• Turn on the splicer• Select proper splice program• Prepare the fibers• Splice the fibers• Analyze the splice• Remove the fiber• Protect the splice
10 Connecting the splicer to powerConnect the power supply or the battery to the power input on the left side of the splicer.
11 Starting the splicerStart the splicer by pressing the button on the left side of the splicer away from you.
8

User’s manual EFS-150
12 Fusion splicer menusThe menu system is shown in figure 7.
• - menu. Setup of splice, oven and global parameters.• - function. Reset the alignment motors to start position.• - menu. Miscellaneous functions as arc cleaning, environmental calibration etc.• - menu. Version information and IP address.
Figure 2. The main menu
9

User’s manual EFS-150
Figure 3. Accessible commands from the fusion splicer menus
10

User’s manual EFS-150
12.1Setup menuThe Setup menu consists of four selections buttons, , , and .
Figure 4. Setup menu
• - menu. Selection of splice program.• - menu. Configuration of oven parameters. Each splice program will have its own
settings.• - menu. Configuration of global parameters.• - button. Return to the main menu.
11

User’s manual EFS-150
12.1.1 Prog menuThe Prog menu consists all splice programs.Browse with the and buttons and confirm the selected program with the button.
Figure 5. Prog menu
• - button. Browse down in the program list.• - button. Browse up in the program list.• - button. Confirm selection of the currently highlighted program and return to
the setup menu.• - button. Return to the setup menu.
See chapter 12.1.5 for further details.
12

User’s manual EFS-150
12.1.2 Oven menuThe oven menu consists of three parameters - heat, heating time and fan time. Valid values for these parameters are presented in Table 2 on page 15.
Browse down with the button and modify the value with the . Press the button to store all changes.
Figure 6. The oven menu
• - button. Browse down in the list of parameters.• - button. Modify the value of the highlighted parameter.• - button. Store current selection of all oven parameters and return to the setup
menu.• - button. Return to the setup menu.
13

User’s manual EFS-150
12.1.3 Misc menuThe Misc menu consists of five parameters - pause, estimate, pull test, oven and language. Valid values are presented in Table 2. Ovenand miscellaneous parameters
Browse down with the button and modify value with the . Press the button to store all changes.
Figure 7. The misc submenu
• - button. Browse down in the list of parameters.• - button. Modify the value of the highlighted parameter.• - button. Store current selection of all misc parameters and return to the setup
menu.• - button. Return to the setup menu.
14

User’s manual EFS-150
12.1.4 Oven and miscellaneous parametersList of Oven menu and Misc menu parameters.
Oven parameters
Explanation Allowed values
Heat Heat in percentage of maximum 50, 60, 70, 80, 90 and 100%Time Duration of heating sequence 30, 40, 50, 60, 70, 80, 90 and
100sFan time Duration of cooling sequence off (no fan), 10, 20 and 30s
Miscellaneous parameters
Explanation Allowed values
Pause Yes = Enable pause after prefuse with display of cleave angles
yes, no
Estimate Yes = Enable estimation yes, noPull test Yes = Enable pull test yes, noOven Yes = Enable oven toggle mode yes, noLanguage Language selection Available languages depend on
software revision.
Table 2. Oven and miscellaneous parameters.
15

User’s manual EFS-150
12.1.5 Selecting splice programThe splicer is pre-programmed with eight splice programs, three factory set programs and five user defined programs. The user defined programs can be modified by the user.
Program 1 (SMF) is intended for most SMF types, program 2 (MMF) is intended for most MMF types and program 3 (G655) is intended for fiber types with doped claddings as e.g. NZDF, DSF or LEAF.When selecting a user defined program for the first time, use the learn function according to chapter 12.3.2.1 “Learn mode”
• Press followed by to access the program list• Press or to select the desired program• Press to confirm the selection or to return to the main menu without changing settings.
16

User’s manual EFS-150
12.2 Func menuThe Func menu, available from the main menu, consists of four buttons, , , and .
Figure 8. The Func menu
• - function. Start the oven. The EFS-150 will return to splice mode after the action.
• - menu. Environmental calibration of the splicer when switching between environments.
• - function. Activate a cleaning arc between the electrodes and reset the electrode cleaning counter.
• - button. Return to the main menu.
17

User’s manual EFS-150
12.2.1 Calib menuIn the Calib menu, the splicer can be calibrated to compensate the arc for environmental conditions. The calibration is global and valid for all currents in all splice programs.
NOTE: The splicer calibrates itself every splice during normal operation. Therefore it is recommended to use the Calib menu only when switching between large variations in splicing conditions as e.g. from low altitude to high latitude.
Automatic compensation:• Set the splicer to the splice program suitable for the fiber type you are using• Prepare a fiber in the fiber holder without cutting it• Put the fiber holder in the splicer. The fiber should now stretch over the v-groove (both left and right side)• Close the splicer and press followed by • Press • The splicer will test the fiber and a suggested compensation will be displayed• Press to accept or to cancel
Manual compensation:• Modify the compensation value with and and confirm the compensation with the button.•
Figure 9. The Calib menu
• - Start automatic environmental compensation.• - button. Decrease the compensation by 7%.• - button. Increase the compensation by 7%.• - button. Store the displayed compensation.• - button. Return to the Func menu.
18

User’s manual EFS-150
12.3Info menuThe Info menu shows software version.The menu consists of four buttons, , , and
• - menu. Edit user information for the splice data storage.• - menu. Present splice statistics and enter the learn function.• - menu. Display various counters available to the user.• - button. Return to the Main menu.
12.3.1 User menuThe User menu shows four alphanumerical characters to create a “label” for the splice log. This “label” is attached to every splice in splice log and can be used as a tool to identify splices.The menu consists of four buttons, , , and
Figure 10. The User menu
• - button. Modify the highlighted alphanumerical character.• - button. Move the cursor to the next position.• - button. Store the set label.• - button. Return to the Main menu.
19

User’s manual EFS-150
12.3.2 Stat menuThe Stat menu shows statistical information about splices since last reset of the statistical counter.The statistical counter is reset in this menu.The learn function is used for optimizing splice program parameters for new fiber types. The learn function is only available in the user programs.
Figure 11. The Stat menu
• - mode. Set up parameters and the splicer for a new fiber type• - button. Reset the statistical counter• - button. Return to the Info menu
20

User’s manual EFS-150
12.3.2.1 Learn modeThe learn function is used to manually set up a user program according to a new fiber type.
1. Set up a loss measurement equipment2. Select a new splice program for the new fiber.
Prog 4-5 are copies of program 1 (SMF) and prog 6-8 are copies of program 2 (MMF)3. Enter the menu by pressing and . Edit the heat of the splice program by pressing or and when done.4. Prepare and insert the fiber in the splicer5. Switch to learn mode by pressing , and 6. Splice the fiber7. Measure the insertion loss
-If the loss is not acceptable, press and go back to step 3-If the loss is acceptable, continue
8. Press .NOTE: No indication is given on the screen when is pressed, this is normal
9. Press 10. Repeat from step 6 until 3 accepted splices are done.11. The splicer will automatically return back to normal mode after 3 successful splices and will be ready for use
21

User’s manual EFS-150
12.3.3 Count menuThe Count menu shows the counters:
• The statistical counter• The total counter• The cleaning counter and cleaning interval• The electrode counter and electrode replacement interval
By pressing , the electrode counter is reset after successful electrode replacement.
Figure 12. The Count menu
• - button. Reset the electrode counter• - button. Return to the Info menu
13 Preparing the fiberOften, incorrect handling or preparation causes splice loss. It is crucial to keep tools and fiber clean; the invested time used in fiber and tool handling is more than compensated for in reduced troubleshooting effort.
22

User’s manual EFS-150
13.1Protective sleeve• Before preparing the fiber for splicing, make sure to put the protective sleeve in place.
Figure 13. Introduction of the protecting sleeve
23

User’s manual EFS-150
13.2Stripping the fiber• Hold the stripping tool to the edge of the fiber holder. Press the handles together and pull firmly away from the fiber holder to
remove the coating.
Figure 14. Stripping the fiber
24

User’s manual EFS-150
13.3Cleaning the fiber• Use a pair of tweezers equipped with cotton buds soaked in alcohol (according to picture) or a similar tool • Press the tweezers together and clean the fiber with by moving the tweezers from the fiber holder towards the end of the fiber• Repeat, but rotate the tweezers• A squeaking sound indicates that the fiber is clean
Figure 15. Cleaning the stripped fiber
25

User’s manual EFS-150
13.4Cleaving the fiber• Position the fiber holder in the cleaver. Insert the fiber holder from above, not from the side.• Check that the fiber holder is properly in place• Move the knife towards you• Close the cleaver lid
Figure 16. Loading the cleaver
26

User’s manual EFS-150
• Move the knife to score the fiber• Lift the lid and remove the fiber holder.
Caution: Make sure not to contaminate the end of the fiber!
Figure 17. Scoring and cleaving the fiber.
• Remove the cut-off piece and dispose of it safely
The fiber is now prepared for splicing
27

User’s manual EFS-150
14 SplicingSelect the proper splice program. See Chapter 12.1.5 “Selecting splice program”.
• Make sure a reset has been performed since last splice.• Place the fiber holder
o Keep the fiber holder at an angle and move it passed its intended resting place.o Fold the fiber holder down until it makes contact with support surface.o Gently pull the fiber holder back until it snaps in place.
• Close the clamp to fix the holder.• Repeat for the other fiber holder
Figure 18. Insertion of the fiber holder in the fusion splicer
• Lower the fiber pressure foot slowly and lock the fibers in position• Close the safety shield
28

User’s manual EFS-150
Figure 19. Final preparation before splicing
The fiber should now be visible in the monitor.
29

User’s manual EFS-150
• Are the fibers clean?
Figure 20. Clean and dirty fiber
If not, re-do the stripping, cleaning and cleaving procedure
30

User’s manual EFS-150
• Are the cleave angles OK?
Figure 21. Fiber ends properly cleaved and poorly cleaved
If not, repeat the stripping, cleaning and cleaving procedure.
31

User’s manual EFS-150
• Are the fibers properly aligned?
Figure 22. Fibers properly aligned and fibers not properly aligned
If not, make sure the fiber holders are properly snapped into place and that the fiber pressure foot is down properly.If this does not help, clean the v-groove according to chapter 15.6. “Cleaning the v-groove of the fusion splicer”.
32

User’s manual EFS-150
• When ready, press the splice button. The fibers will be spliced automatically.
Figure 23. Splice button for initialization of the splicing process
33

User’s manual EFS-150
• The splice should look like in fig. 29.
Figure 24. A finished splice
34

User’s manual EFS-150
• Open the fiber holders to release the fiber.NOTE. Do not remove the fiber holder, only the fiber from the holder.
Figure 25. Remove the fiber with open fiber holders
• Protect the splice according to chapter 14.1 “Shrink sleeve splice protection”.
35

User’s manual EFS-150
14.1Shrink sleeve splice protectionThe oven snaps into position on the fusion splicer, on the front side.
The splicer has two modes – splice mode and oven mode.
OVEN MODERecommended when the heat oven is attached
The splice button will toggle between “oven”-function and “splice”-function.The oven is started after every splice by simply pressing the splice button.
SPLICE MODERecommended when no heat oven is attached
The splicer does not toggle between “oven” and “splice”.The splice button will function only as a splice button with no oven function.
In case the splicer is not in Oven Mode, the oven can also be initiated by pressing and from the splicer main menu. The splicer displays the text “Oven is on” as long as the oven is activated, but reverts immediately to splice mode and is ready for additional splices even with the oven on.
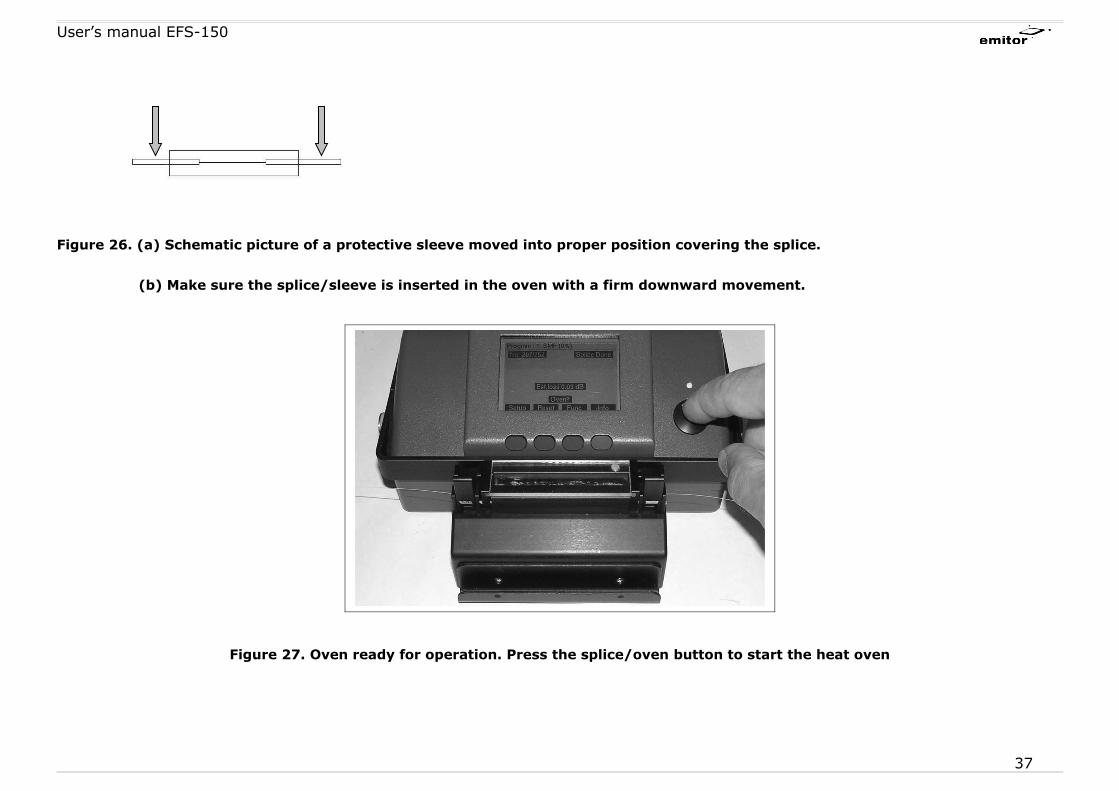
• Center the protective sleeve over the splice.• Lower the splice in to the heat oven while pulling gently to keep the fiber stretched.• Make sure the oven is ready for usage, and the text “Oven?” is displayed.• Push the fuse/oven button to start the oven. The splicer will start the oven and is immediately ready for the next splice.
NOTE: In some weather conditions, one heating cycle may not be sufficient to shrink the sleeve. In this case, initiate one more cycle by pressing and from the main menu.
• In case the splicer is not in Oven mode, the oven can also be started by pressing and from the main menu. Observe that the oven is started directly when is pressed. See chapter 12.2 Func menu for details.
36
User’s manual EFS-150
Figure 26. (a) Schematic picture of a protective sleeve moved into proper position covering the splice.
(b) Make sure the splice/sleeve is inserted in the oven with a firm downward movement.
Figure 27. Oven ready for operation. Press the splice/oven button to start the heat oven
37

User’s manual EFS-150
15 General maintenanceIn the table below, maintenance actions are listedAction Periodicity (number of splices) ParagraphCleaning electrodes (program) 20 15.1.1Cleaning electrodes (mechanically)
200 15.1.2
Replacing electrodes 2000Cleaning cleaver 25 15.2Rotating cleaver blade 1000 15.3Replacing cleaver blade After using all 12 pos 15.4Adjusting cleaver blade height After switching blade 15.5Cleaning the v-groove of the fiber splicer
When needed 15.6
Greasing the oven with silicon grease
When needed 15.7
Table 3. Maintenance actions and recommended interval
15.1Electrode cleaningTo maintain a stable arc that guarantees good results, the electrodes must be kept in excellent condition. Therefore it is essential that the electrodes are cleaned on a regular bases. The electrodes should be cleaned by arc after 20 splices and mechanically after 200 splices.
38

User’s manual EFS-150
15.1.1 Arc cleaning• Remove all fiber from the splicer.• Press the button sequence and from the main menu to start arc cleaning.• Repeat arcing 4-5 times or until no sizzling sound can be heard from the electrodes.• The user will be prompted automatically to repeat arc cleaning after another 20 splices.
15.1.2 Brush cleaning• Brush the electrodes gently with a fiberglass brush.
Brush gently along the electrode toward the tip thus avoiding to damage the tip and the other electrode.
• Clean the electrode pair according paragraph 15.1.1 Arc cleaning
15.2Cleaning the fiber cleaver• Use a cotton bud soaked in alcohol• Wipe gently along sides of the edge of the knife
Figure 28. Cleaning of the cleaver blade
39

User’s manual EFS-150
15.3Rotating the fiber cleaver blade• Loosen the screw in center of the blade
Figure 29. Loosening of the cleaver blade
40

User’s manual EFS-150
• Rotate to desired position
Figure 30. Rotation of the cleaver blade
• Tighten the screw in the center of the blade.Note: Make sure that the blade does not rotate during tightening.
41

User’s manual EFS-150
15.4Replacing the cleaver blade• Place the cleaver tilted on a table• Remove the screw in the center of the circular blade
Figure 31. Loosening of the cleaver blade
42

User’s manual EFS-150
• Use a pair of tweezers to remove the blade
Figure 32. Removal of the cleaver blade
• Use a pair of tweezers to mount a new blade
43
User’s manual EFS-150
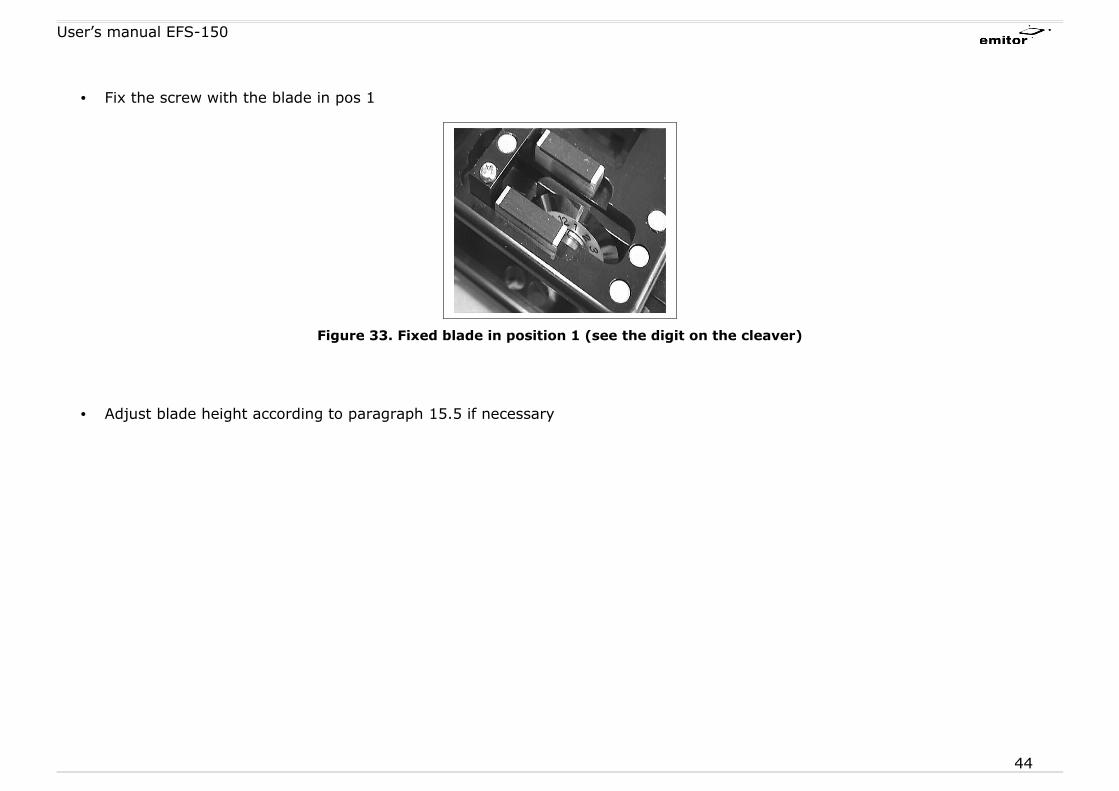
• Fix the screw with the blade in pos 1
Figure 33. Fixed blade in position 1 (see the digit on the cleaver)
• Adjust blade height according to paragraph 15.5 if necessary
44

User’s manual EFS-150
15.5Adjusting the cleaver blade height• Put stripped fiber in the cleaver• Close the lid• Slide the blade slowly passed the fiber and observe if any movement of the fiber can be detected.
When the knife is passing it will cause the fiber to move. When the movement is barely noticeable with the naked eye, the height is correctly adjusted.
• If the adjustment is not correct, proceed with height adjustment.
Figure 34. Cleaving blade adjustment
o Adjust the blade height by rotating the adjustment screwNOTE: The adjustment is very sensitive.
• Check blade height with fiber in the cleaver• If the position not ok, repeat the adjustment until a satisfactory result has been obtained
45

User’s manual EFS-150
15.6Cleaning the v-groove of the fusion splicerThe function of the high precision surface of the v-groove can be influenced by dirt. Whenever there is a consistent problem with fiber offset, try cleaning the surface as follows.
To clean the v-groove proceed as follows:• Cut a plastic cotton bud in two with a hobby knife at a sharp angle.• Use the sharp edge of the bud to clean the v-groove.• Move sharp end of the bud from the outer edge inwards a few times. Make sure enough pressure is applied to release possible
groove contaminants from both sides of the groove.
Figure 35. Cleaning the v-groove
46

User’s manual EFS-150
15.7Oven maintenanceThe oven needs to be cleaned and greased with regular intervals, to make removal of the shrink sleeves possible. Use silicon grease and apply it to the bottom of the oven with a cotton bud. See below.
Figure 36. Lubricating the oven with silicon grease
47

User’s manual EFS-150
16 Troubleshooting
Problem Cause Corrective measureSplicer does not turn on
-Power source not connected-Broken power source-Broken fuse-Battery too weak
-Connect power source-Check output voltage from power source (9V)-Return splicer for switch of fuse-Recharge the battery
Excessive fiber length
-Splicer not reset-Incorrectly cleaved fiber
-Reset splicer-Repeat cleaving
Alignment does not start
-Dirty fiber-General error
-Redo the fiber preparation-Power off/on
Bad cleave -Dirty cleaver blade-Incorrect height of the cleaver blade-Cleaver blade worn
-Clean the blade with alcohol-Adjust the blade height-Rotate blade to new position
Too much offset -Dirty v-groove-Dirty fiber holder-Worn fiber holder
-Clean the v-groove of the splicer (see chapter 15.6)-Clean the fiber holders of the splicer-Replace the fiber holder(s) of the splicer
Oven doesn’t work
-Blown fuse or unknown cause -Check oven parameters.-Return the oven for repair
Table 4. Troubleshooting suggestions
48