Pulsar Evolution 2200-3000 - Installation and User Manual - Multi Lang
Upload
edgar-carreiraCategory
view
237download
1
8/20/2019 Pulsar 150 user manual
http://slidepdf.com/reader/full/pulsar-150-user-manual 1/33
Dear Customer,
Congratulations on becoming the proud owner of a “Bajaj Pulsar 150 DTS-i” motorcycle, one of the finest motorcyclesin the country.
Your safety and the safety of others is extremely important. Hence, before you ride the bike, please read this Owner'sManual carefully and familiarize yourself with the operating mechanism, controls and maintenance requirements. This willensure you a long and trouble free ownership experience.
To keep your bike in perfect running condition and deliver consistent performance, we have specially programmed theperiodic maintenance services which includes 3 Free and 4 Paid services. We earnestly advise you to avail all theseservices at any of our Vehicle Dealers or Authorised Service Centres as per the schedule contained in this booklet
Your “Bajaj Pulsar 150 DTS-i” comes with a warranty of 2 Years or 30,000 Kms. whichever occurs earlier from the
date of sale. For details please refer to “Warranty : Scope & Limits” given in this manual.We urge you to entrust all your service needs to a Bajaj Dealer or Authorised Service Centre only. They are wellequipped with all necessary facilities / genuine parts / oil and trained manpower will ensure the best care for your bike.
Should you require any additional information or wish to convey any grievance you may contact us on our toll free no./ e-mail mentioned on front cover inner page of this manual.
SERVICE DEPARTMENT BAJAJ AUTO LIMITED
Thank you for choosing a B ajaj and w ish you unlimited m iles of happy r iding!!

8/20/2019 Pulsar 150 user manual
http://slidepdf.com/reader/full/pulsar-150-user-manual 2/33
Table of Contents
Description
Identification Data..........................................................................................................................................................................1
Technical Specifications................................................................................................................................................................ 2
Location of Parts...........................................................................................................................................................................3
How to Ride your Bike................................................................................................................................................................11
• Running In.......................................................................................................................................................................11
• Riding the Bike................................................................................................................................................................11
• Fuel Saving Tips.............................................................................................................................................................13
Safe Riding Tips..........................................................................................................................................................................14
General Maintenance Information...............................................................................................................................................15
• Engine Oil........................................................................................................................................................................15
• Battery..............................................................................................................................................................................17
• Monsoon Care................................................................................................................................................................18
Daily Safety Checks.....................................................................................................................................................................19
Non-use Maintenance................................................................................................................................................................. 20
Periodic Maintenance / Lubrication Chart.................................................................................................................................21
Schedule for Periodic Part Replacement...................................................................................................................................24
Warranty : Scope & Limits......................................................................................................................................................... 28
Service Records...........................................................................................................................................................................31.....................................................................................................................................................................
Service Coupons
Battery Warranty Card
DOC. NO.: 71110997 REV. 00, DEC. 09

8/20/2019 Pulsar 150 user manual
http://slidepdf.com/reader/full/pulsar-150-user-manual 3/33
Warning
This indicates that a potential hazard or injury to you or other persons and to the vehicle canhappen, if the advise provided is not followed.
Safety and Warning Information
Caution
This indicates that a potential hazard that could result in vehicle damage. Follow the adviseprovided with the caution.
The description and illustration in this booklet are not to be taken as binding on the manufacturers.
The essential features of the type described and illustrated herein remaining unaltered.
Bajaj Auto Limited reserves the right to carry out at any moment without being obliged to bring this
booklet upto-date.
Modifications on the vehicle, parts or accessories as may be convenient and necessary.
Notice
8/20/2019 Pulsar 150 user manual
http://slidepdf.com/reader/full/pulsar-150-user-manual 4/33
Identification Data
The Frame and Engine serial numbers are used to register the motorcycle. These are the unique alpha-numeric codes toidentify your vehicle from others of the same model and type.
1
Frame Number Location :On the LH side of steering tube.(Alpha-Numeric - 17 digits).
Engine Number Location :On LH side crankcase near gear change lever
(Alpha-Numeric - 11 digits)

8/20/2019 Pulsar 150 user manual
http://slidepdf.com/reader/full/pulsar-150-user-manual 5/332
Engine : 4 stroke, Single Cyl., Natural aircooled.
Bore x Stroke : 58.00 mm x 56.40 mm
Engine Displacement : 149.01 cc
Compression Ratio : 9.5 + 0.5 : 1
Max. Net Power : 15.05 Ps at 9000 rpm
Max. Net Torque : 12.45 Nm at 6500 rpm
Ignition System : Microprocessor controlled digitalCDI
Spark Plug : Champion RG 4 HC, 2 Nos.
Spark Plug Gap : 0.6 to 0.8 mm
Lubrication : Wet sump, Forced.
Transmission : 5 speed constant mesh.Front Brake : Hydraulic disc type.
Rear Brake : Mech. expanding shoe & drumtype.
Fuel Tank Capacity :Full : 15 litresReserve : 3.2 litresUsable Reserve : 2 litres
Dimensions :Length : 2055 mmWidth : 790 mmHeight : 1100 mmWheel base : 1320 mmMin. Turning radius : 2320 mm (Min.)Ground clearance : 165 mm (Min.)
Tyre Size Front : 2.75 x 17”, 41PRear : 100/90 x 17”, 55P
2Tyre Pressure Front : 1.75 kg/cm (25 PSI)
2Rear (Solo) : 2.00 kg/cm (28.5 PSI)
2Rear (Pillion) : 2.25 kg/cm (32 PSI)
Electrical System : 12 Volts DCHead Lamp : 35/35 W-HS1Pilot Lamp : 5 W Each 2 Nos.
Tail /Stop Lamp : LED/LED Turn Signal Lamp : 10 W (2 nos.)Neutral Indicator Lamp : LEDHi Beam Indicator Lamp : LED
Turn Pilot Indicator Lamp : LED
Side Stand Indi. Lamp : LEDSpeedometer Lamp : LED DisplayRear No. Plate Lamp : 5 WHorn : 12 V DC, 2 nos.Battery : 12V - 9 Ah
Vehicle Kerb Weight : 143 kg.
Gross Vehicle Weight : 273 kg.0
Climbing Ability : 28% (16 max)
Note : All dimensions are under UNLADEN condition.Above information is subject to change without any
notice.
Technical Specifications

8/20/2019 Pulsar 150 user manual
http://slidepdf.com/reader/full/pulsar-150-user-manual 6/33
3
Location of Parts
1. Fuel level indicator : Fuel level indicator shows available fuel in fuel tank & Reserve indicator also.2. Tachometer : It shows the engine speed in RPM.3. Odometer : The Odometer shows the total distance that the vehicle has accumulated.4. Steering cum Ignition switch : Key operated switch for Ignition ‘ON’/‘OFF’ & locking handle bar.5. Battery charge indicator : It shows battery charge condition.6. Speedometer : The vehicle speed will be display by digit.7. Trip meter reset button : Both trip meter can be reset to zero by pressing the button.8. Trip meter : The Trip meter shows the distance traveled since it was last reset to zero.9. Side stand indicator : When Side stand is ‘ON’, the Side stand indicator will lit.
10. Neutral indicator : When the transmission is in Neutral & Ignition switch ‘ON’, the Neutralindicator is lit.
11. Turn signal indicator (LH & RH) : When Turn signal switch is turned to Left or Right, Turn pilot indicator - LHor RH will flash.
12. Hi beam indicator : When Headlight is ‘ON’ & Hi beam is selected with engine running, Hi beamindicator will be lit.
1
3
4
2
6
9
10
7
8
12
5
11

8/20/2019 Pulsar 150 user manual
http://slidepdf.com/reader/full/pulsar-150-user-manual 7/33
4
Location of Parts
LOCK : Steering locked. Ignition OFF.
OFF : Steering unlock. Ignition OFF.
ON : Steering unlock. Ignition ON.
Steering cum Ignition Lock :It has three positions.
To Lock the Steering :
To lock the steering, turn the handle bar to the left orright. Push & release the key. Turn the key to “LOCK”position and remove the key.
To Unlock the Steering :
To unlock the steering, insert the key in steering cumignition lock & turn it clockwise to “OFF” or “ON”position.
Key :
A common key is used for ‘Steering cum Ignition lock’,‘Fuel tank cap’ and ‘Side cover lock’.

8/20/2019 Pulsar 150 user manual
http://slidepdf.com/reader/full/pulsar-150-user-manual 8/33
Location of Parts
Fuel Tank Cap• To open the fuel tank cap, lift the flap, insert the
key in the lock and turn it clockwise.
• To lock ‘Fuel Tank Cap’ gently press the cap.
Fuel TapFuel tap lever has following positions.
ON : When fuel level is above Reserve position.
RES : When fuel level is below Reserve position.
OFF : When fuel supply is to be cut off.
Fuel Tank Cap
FuelTap
O F F
ON
RES
5
8/20/2019 Pulsar 150 user manual
http://slidepdf.com/reader/full/pulsar-150-user-manual 9/33
Location of Parts
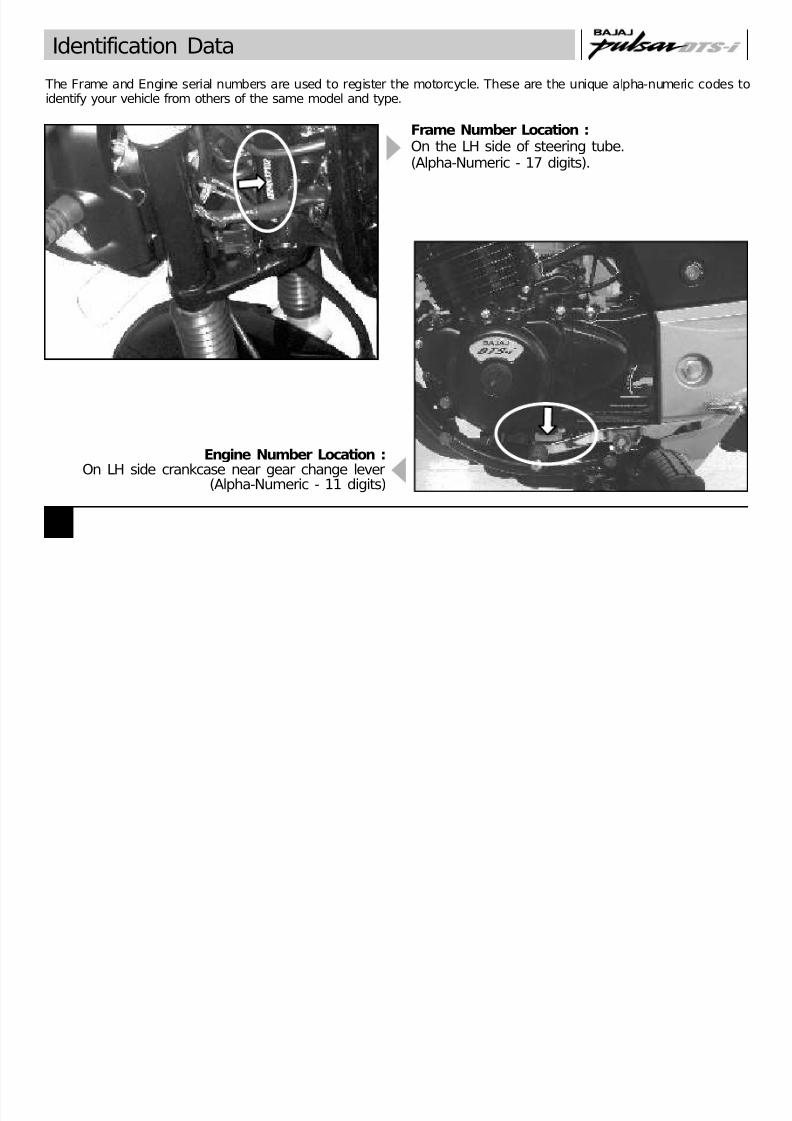
Left Handle Bar SwitchesA. Dipper Switch : When headlight is ON, High or Low
beam can be selected with the dipper switch. Hibeam indicator light located on Speedo console willlight up when high beam is selected.
: High Beam : Low beam
B. Turn Signal Switch : When the turn signal knob isturned to Left ( ) or Right ( ) respective indicator
will start blinking however the cancellation will takeplace automatically also when handle bar is throwback in straight position. It can also be cancelled bypressing the knob in other direction - manually.
A
B
C
D
C. Horn Button : ( ) Press button for sounding horn.D. Pass Switch : Press the switch to flash the head
light. It is used to give signal to vehicles comingfrom opposite side while overtaking.
6

8/20/2019 Pulsar 150 user manual
http://slidepdf.com/reader/full/pulsar-150-user-manual 10/33
G
F
E
Location of Parts
7
Right Handle Bar SwitchesE. Head Light Switch : It has 3 positions.
: All lamps 'OFF'.
: While engine running, Tail lamp, Meter lampand Pilot lamp/s ‘ON’.
: While engine running, Head lamp, Pilot lamp/s, Tail lamp and Meter lamps ‘ON’.
F. Starter Button :
Starter button operates the electric starter whenclutch lever is depressed with transmission in anygear.
It is recommended to start the engine with thetransmission in neutral.
G. Engine Kill Switch :
The engine kill switch is for emergency use. Duringemergency move the engine kill switch to the ‘OFF’( ) position.
CAUTION : While starting ensure that engine killswitch is in ON ( ) position. Keeping the killswitch in OFF position Engine will not start.

8/20/2019 Pulsar 150 user manual
http://slidepdf.com/reader/full/pulsar-150-user-manual 11/33
Location of Parts
8
A
B
D
C
Removal of Side Cover LH or RH• Insert the key into the cover lock and turn the key
clockwise & pull the ‘Side Cover’ out from thebottom.
• Pull front side of ‘Side Cover’ to release Lug (A)provided on ‘Side Cover’ from hole (B) provided on‘Fuel Tank’.
• Slide the ‘Side Cover’ forward (towards the engine)to release slot (D) provided on rear side of ‘Side
cover’ from bracket with rubber cap (C) provided on‘Chassis’.
• Take out ‘Side Cover’.
CAUTION : Remove cover as described above,otherwise the lugs may break.
Fitment of Side Cover LH or RH• Match slot (D) provided on rear side of ‘Side Cover’
with bracket (C) provided on ‘Chassis’ and slide‘Side Cover’ backward (towards Tail lamp).
• Match Lug (A) provided on front side of ‘Side Cover’with hole (B) provided on ‘Fuel Tank’ and press‘Side Cover’ inside.
• Match the lock plate of ‘Side Cover’ properly withbracket on ‘Chassis’ and Lock.
CAUTION : Fit cover as described above to ensureproper fitment.
8/20/2019 Pulsar 150 user manual
http://slidepdf.com/reader/full/pulsar-150-user-manual 12/33
Location of Parts
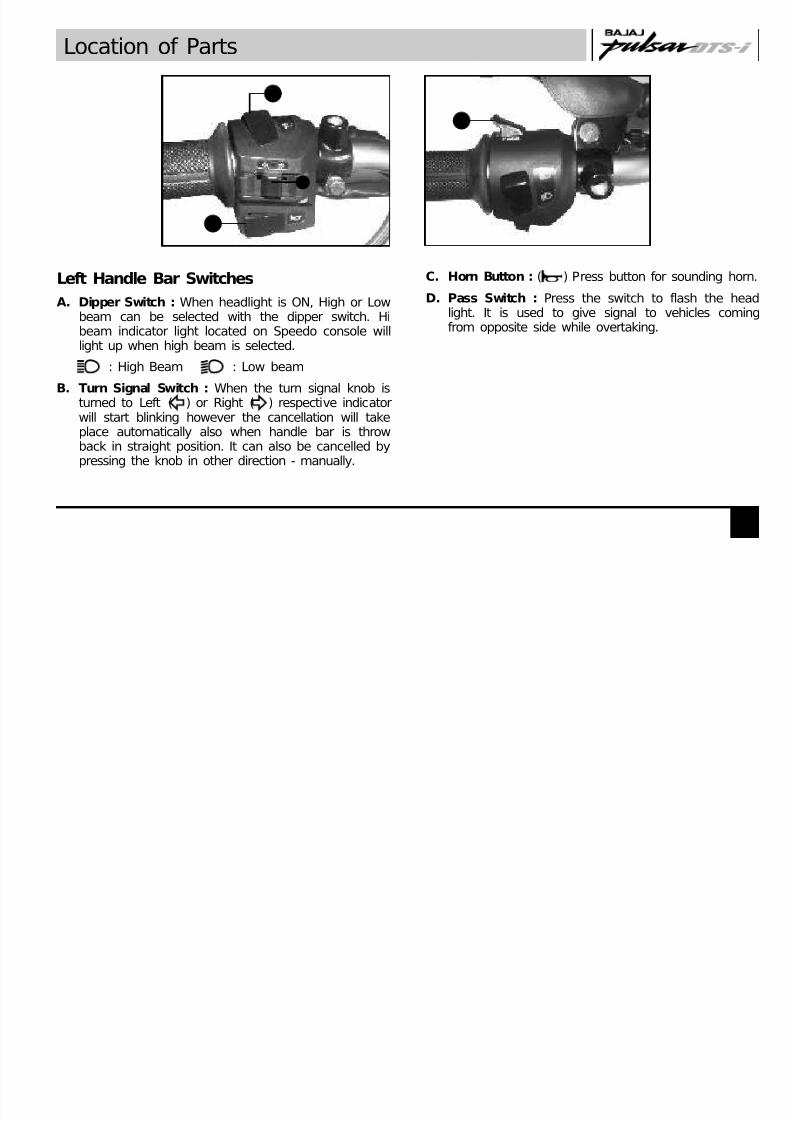
Battery• It is located inside the ‘Side Cover’ LH.
• Always maintain electrolyte level in each cellbetween max and min level lines.
• Always keep a watch on battery charge levelindicating icon, if it flashes (indicates battery is inlow charged condition), show the vehicle toauthorised BAL dealer.
Tool Kit Location• It is located below seat.
• 2 rubber straps are provided to hold the tool kit.
CAUTION : Always fit tool kit with rubber standstraps.
Battery
Tool Kit
9

8/20/2019 Pulsar 150 user manual
http://slidepdf.com/reader/full/pulsar-150-user-manual 13/33
Location of Parts
Removal of Seat• Remove ‘Side Cover’ LH.
• Pull the ‘Seat Release Cable’ (A) to release seatlock. Keeping cable pulled, tap the center of seat,lift the seat from rear end and slide it towards taillamp to remove seat.
Fitment of Seat• Match & insert the bracket (‘1’ of Fig. ‘B’) of seat
with slot (‘2’ of Fig. ‘B’) provided below fuel tankrear mounting on chassis.
• Push seat towards fuel tank and align lock rod (‘3’ of Fig. ‘C’) & seat lock (‘4’ of Fig. ‘C’). Then pressthe seat in middle from top to lock the seat.
A : Seat Release Cable
A
Fig. B
1
2
Fig. C
3
4
10

8/20/2019 Pulsar 150 user manual
http://slidepdf.com/reader/full/pulsar-150-user-manual 14/33
How to Ride Your Bike
11
Proper running-in is important for the better life andtrouble free performance of the vehicle.
• During first 2000 kms running-in period do notexceed following speed limits.
Kms 1st 2nd 3rd 4th 5th
0 - 1000 15 30 45 55 65
1000 - 2000 20 40 55 65 75
• Always keep the speed below the limits mentionedin the table.
• Do not race the engine excessively.• Do not start moving or race the engine immediatelyafter starting. Run the engine for a minute at idlespeed to give the oil a chance to workup into theengine.
Running IN
Riding the Bike
Before starting the vehicle and with the ignition key off,
adhere to the following first thing in the morning or aftera long period of non-use (whichever is the case).
Depress the clutch lever completely. Kick the kick leverall the way down to its stop, briskly a couple of times.Release the clutch lever.
Starting the Engine :
• Keep the fuel tap to ON or RES position.
• Turn ignition switch to ON position.
• Turn Kill switch to ( ) ON position.• Confirm that the vehicle (transmission) is in neutral.
• If the engine is cold or when starting for first time.Use choke for quick starting. Choke lever (A) islocated on LH side of Carburettor.
• Keep the throttle completely closed, push the starterbutton ( ) or kick the engine with kick starter lever.
• When the engine is warmed up enough to idlewithout using choke, return the choke to OFF
position.
A : Choke “OFF” B : Choke “ON”
A B

8/20/2019 Pulsar 150 user manual
http://slidepdf.com/reader/full/pulsar-150-user-manual 15/33
How to Ride Your Bike
12
WARNING : When shifting down to lower gear, donot shift at such a high speed that the engine rpmrises excessively and which may cause the rearwheel to skid.
Braking :• Close the throttle completely, leaving the clutch
engaged (except where shifting gears) so that theengine braking will help slow down the motorcycle.
• Shift down one gear at a time so that you are inNeutral when you come to a complete stop.
• Never lock the brakes, or it will cause the tyres toskid. When cornering, use brakes judiciously and donot de-clutch. Reduce your speed before you getinto the corner. For emergency braking, disregarddownshifting, and concentrate on applying thebrakes as hard as possible without skidding.
CAUTION : Do not operate the starter continuouslyfor more than 5 sec. After 3 continuous attempts ofcranking, the function gets disable for 20 sec.
NOTE : The motorcycle is equipped with a starterlockout switch. The vehicle can start in any gear whenclutch lever is depressed.
It is recommended to start the engine with thetransmission in neutral.
Moving Off :• Check that Center/Side stand is up.
• Depress the clutch lever.st• Shift into 1 gear.
• Open the throttle and release the clutch lever slowlyand simultaneously.
• As the clutch starts to engage, open the throttle alittle more, giving the engine just enough rpm tokeep it from stalling.
Shifting Gears :
• Close throttle & depress the clutch.• Shift into next higher or lower gear.
• Open the throttle and release the clutch lever slowlyand simultaneously.
Gear Shifting Sequence
3
2 N
1
4
5
Gear Shifting Lever

8/20/2019 Pulsar 150 user manual
http://slidepdf.com/reader/full/pulsar-150-user-manual 16/33
How to Ride Your Bike
13
• When stopping, always apply both brakes at thesame time. De-clutch as necessary to keep theengine from stalling.
Stopping the Vehicle :• Close the throttle completely.
• Shift the transmission into neutral.
• Bring the vehicle to complete stop.
• Turn the ignition switch off.
Parking :• Shift the transmission into neutral and turn the
ignition switch OFF.
• Support the motorcycle on a firm level surface withthe center or side stand.
CAUTION : Do not park on a soft or steeplyinclined surface or the motorcycle may fall over.
• Drive smoothly and steadily at speed between 40and 50 km/h .
• Drive at constant speed; avoid sudden accelerations& harsh braking as far as possible. Plan your tripsproperly with minimum start-stops.
• Change the gear judiciously according to the speedrequirements. Drive as far possible in highest gear.
Fuel Saving Tips
Fuel Check fuel lines and connections forleakage.
Spark plug Inspect and clean spark plug. Adjustelectrode gap.
Air filter Clean air filter element periodically.
Engine oil Check level. Use “Bajaj DTS-i10000” high performance engine oilfor top up or refill.
Brakes Ensure that the brakes are notdragging / binding.
Clutch Ensure correct clutch lever play.
Tyre pressure Always maintain the recommendedtyre pressure.
Carburettor Adjust idling speed.
Vehicle Maintenance (Ensure Following)
• Travel as light as possible; do not overload thevehicle above the specified payload.
• Stop the engine quickly at the end of the journey.Avoid excessive idling. For intermediate stoppages,
cut-off the engine if you want to stop for more thantwo minutes.
• Ensure Following Vehicle Maintenance.

8/20/2019 Pulsar 150 user manual
http://slidepdf.com/reader/full/pulsar-150-user-manual 17/33
Safe Riding Tips
14
• Always wear helmets whiledriving or riding. Your helmetsshould conform to appropriateIndian standards.
• Read thoroughly the instructionsin this manual and follow themcarefully.
• Avoid unnecessary accessories for the safety of bothrider and other motorists.
• Get familiar and follow traffic rules and regulations inyour states as well as general traffic signs.
• Familiarise yourself well with starting, acceleration and
braking of the vehicle.
• When applying the brakes, use both front and rearbrakes simultaneously. Applying only one brake maycause the vehicle to loose control.
• Riding at proper speed and avoiding unnecessaryacceleration and braking are important not only forsafety and low fuel consumption, but also for longerlife of the vehicle.
• During monsoon drive the vehicle more cautiously.Remember vehicles skid more easily during lightshowers.
• Drive cautiously. Start early & reach your destinationsafely.
• Always carry vehicle registration & insurance papers,and a valid driving licence with you.
• Avoid driving on loose sand or stones where vehicleis likely to skid.
• Properly wrap-up loose clothes while driving or ridingto avoid entangling in wheel or other objects on road.
• Always concentrate on riding for safety.

8/20/2019 Pulsar 150 user manual
http://slidepdf.com/reader/full/pulsar-150-user-manual 18/33
A
BB
15
• Check engine oil level every day before starting thevehicle.
• Always maintain engine oil level between upper &lower mark provided on cover RH.
Engine Oil Level Checking :
• Park the vehicle on level surface on center stand.
• Check oil level through oil inspection gauge as shownin photograph.
• Always maintain engine oil level between the upper(C) and lower (D) mark provided on Cover RH.
Engine Oil Capacity :• 1000 ml for refill and 1100 ml on engine overhaul.
Engine Oil
A : Oil Filler Cap
B : Oil Level Inspection Window
Bajaj DTS-i SAE 20W50 of API ‘SL’, J ASO10000 MA Grade
Replacement 1st replacement at 750 Kms. / 1stFrequency* service. Thereafter at every
10,000 Kms.
*For any other branded oil of equivalent gradereplacement frequency will be 5000 Kms.
Bajaj Auto recommends “Bajaj DTS-i 10000” engine oilfor 10,000 kms drain interval, better performance ofengine components & warranty benefits.
CAUTION :
• It is most important to adhere to recommendedgrade & frequency of oil change for the purposeof long life of critical engine components. Fordetails refer periodic maintenance chart.
• Do not reuse drained oil.
Recommended Oil :
“Bajaj DTS-i 10000” a high performanceengine oil developed by Bajaj auto,specially formulated for vehicles with DTS-i
engine.
General Maintenance Information

8/20/2019 Pulsar 150 user manual
http://slidepdf.com/reader/full/pulsar-150-user-manual 19/33
16
General Maintenance Information
Drive Chain Slackness• Chain top edge to be kept between the two marks
during chain slackness adjustment.
• Care should be taken, that the chain should neverrun dry.
• Lubricate chain from outside with SAE 90 oil atevery 500 kms.
• Chain slackness will have to be adjusted wheneverrequired.
Wheel Puncture :Use the recommended levers while removing the Tyre /
Tube for puncture work. This will avoid any damages tothe edges / scratches on paint of the wheel.
Tyre Pressure :
Keep appropriate tyre pressure as mentioned below toincrease life of the tyre & for better fuel consumption.
2Front 1.75 Kg/Cm (25.0 psi)
2Rear (Solo) 2.00 Kg/Cm (28.5 psi)
2Rear (with Pillion) 2.25 Kg/Cm (32.0 psi)
8/20/2019 Pulsar 150 user manual
http://slidepdf.com/reader/full/pulsar-150-user-manual 20/33
17
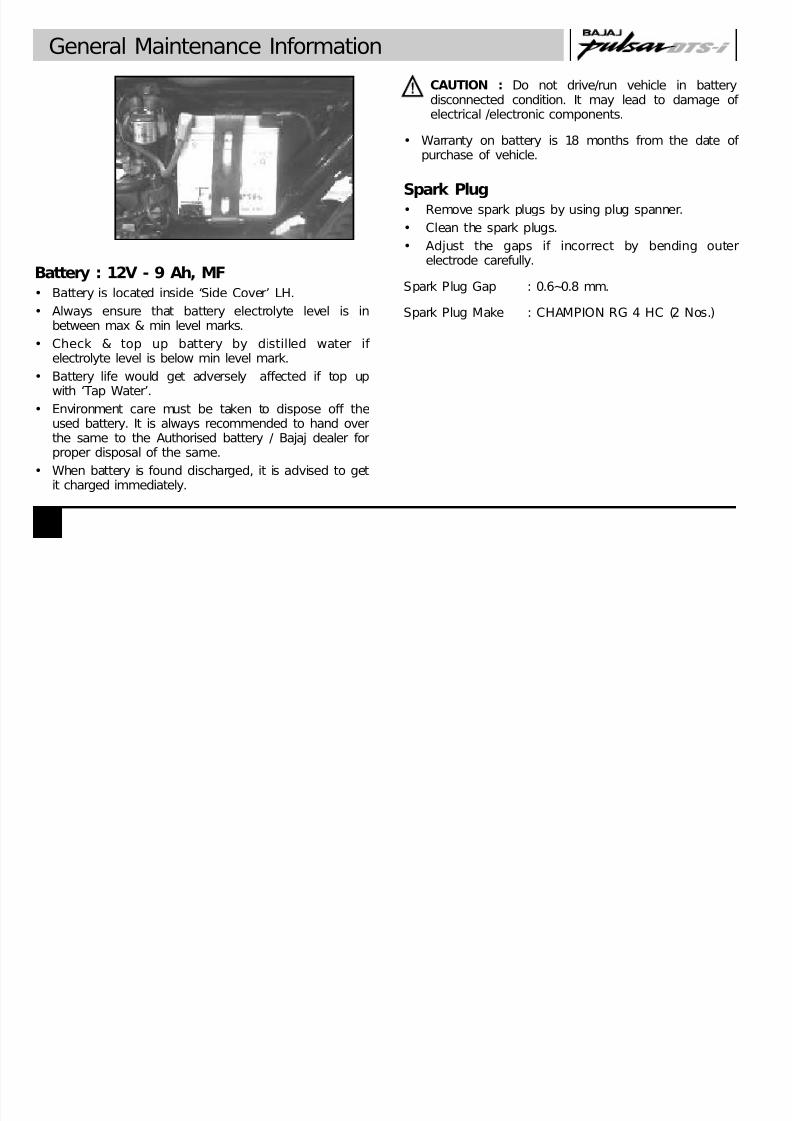
Battery : 12V - 9 Ah, MF
• Battery is located inside ‘Side Cover’ LH.
• Always ensure that battery electrolyte level is inbetween max & min level marks.
• Check & top up battery by distilled water ifelectrolyte level is below min level mark.
• Battery life would get adversely affected if top upwith ‘Tap Water’.
• Environment care must be taken to dispose off the
used battery. It is always recommended to hand overthe same to the Authorised battery / Bajaj dealer forproper disposal of the same.
• When battery is found discharged, it is advised to getit charged immediately.
CAUTION : Do not drive/run vehicle in batterydisconnected condition. It may lead to damage ofelectrical /electronic components.
• Warranty on battery is 18 months from the date ofpurchase of vehicle.
Spark Plug
• Remove spark plugs by using plug spanner.
• Clean the spark plugs.
• Adjust the gaps if incorrect by bending outerelectrode carefully.
Spark Plug Gap : 0.6~0.8 mm.
Spark Plug Make : CHAMPION RG 4 HC (2 Nos.)
General Maintenance Information

8/20/2019 Pulsar 150 user manual
http://slidepdf.com/reader/full/pulsar-150-user-manual 21/33
18
Front Brake Fluid Level
• Front brake fluid master cylinder reservoir is locatednear RH switch on handle bar.
• To check oil level, keep the vehicle on Centre standwith handle bar in straight ahead position.
• Always ensure that brake fluid level is above ‘MIN’mark given on inspection window.
• Use only DOT 3 or DOT 4 brake fluid (from sealedcontainer) to top up if required.
It is advisable that brake fluid should be replenished atevert 30,000 Kms or once in two years which everoccurs earlier.
Monsoon Care :
• It is suggested to customer to take appropriate carein area of heavy monsoon or high rainfall area. Theappropriate surface preventive coat to avoid rusting /poor surface finish on account of adverseatmospheric conditions.
• Vehicle cleaning to be done with soft & clean wetcloth to avoid scratches on painted parts.
• Clean & lubricate all the important parts as detailedin a periodic maintenance chart.
• Do not apply direct water jet on painted, electrical /electronic parts.
• Do not obstruct engine cooling by adding mudprotection sheet from front.
General Maintenance Information
8/20/2019 Pulsar 150 user manual
http://slidepdf.com/reader/full/pulsar-150-user-manual 22/33
Daily Safety Checks
19
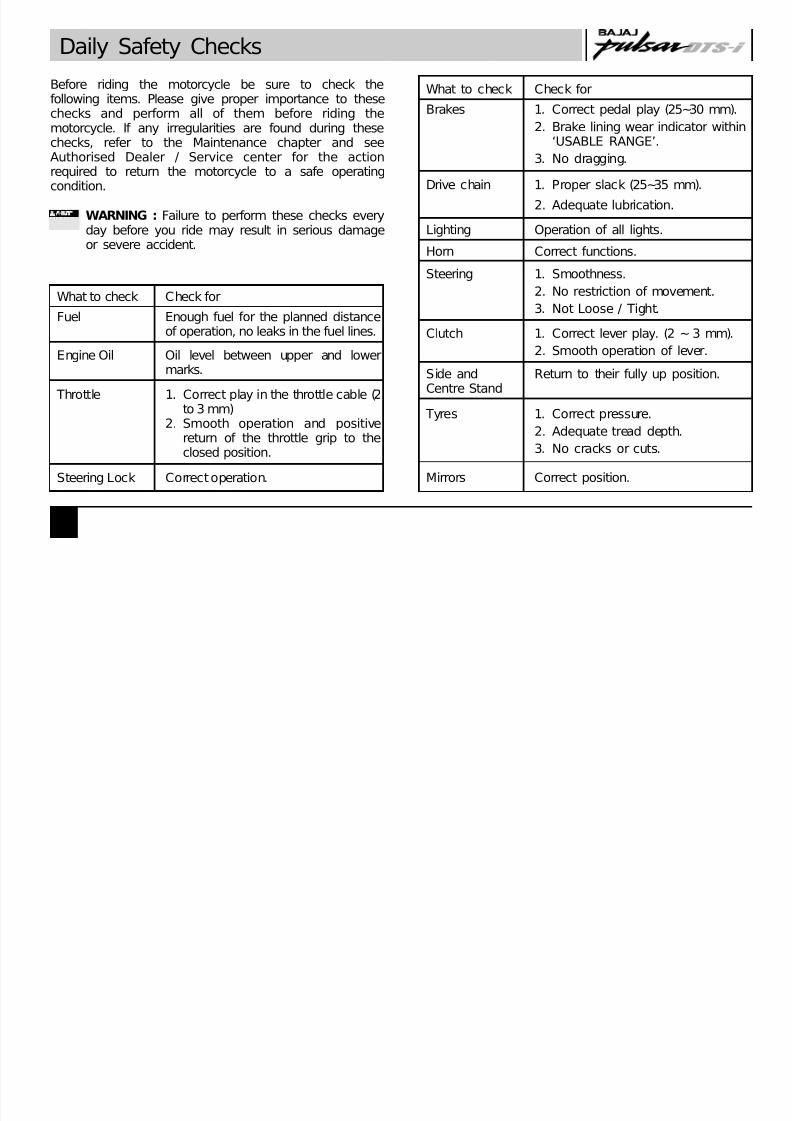
Before riding the motorcycle be sure to check thefollowing items. Please give proper importance to thesechecks and perform all of them before riding themotorcycle. If any irregularities are found during these
checks, refer to the Maintenance chapter and seeAuthorised Dealer / Service center for the actionrequired to return the motorcycle to a safe operatingcondition.
WARNING : Failure to perform these checks everyday before you ride may result in serious damageor severe accident.
What to check Check for
Fuel Enough fuel for the planned distanceof operation, no leaks in the fuel lines.
Engine Oil Oil level between upper and lowermarks.
Throttle 1. Correct play in the throttle cable (2to 3 mm)
2. Smooth operation and positivereturn of the throttle grip to theclosed position.
Steering Lock Correct operation.
What to check Check for
Brakes 1. Correct pedal play (25~30 mm).
2. Brake lining wear indicator within
‘USABLE RANGE’.3. No dragging.
Drive chain 1. Proper slack (25~35 mm).
2. Adequate lubrication.
Lighting Operation of all lights.
Horn Correct functions.
Steering 1. Smoothness.
2. No restriction of movement.
3. Not Loose / Tight.
Clutch 1. Correct lever play. (2 ~ 3 mm).
2. Smooth operation of lever.
Side and Return to their fully up position.Centre Stand
Tyres 1. Correct pressure.
2. Adequate tread depth.
3. No cracks or cuts.
Mirrors Correct position.

8/20/2019 Pulsar 150 user manual
http://slidepdf.com/reader/full/pulsar-150-user-manual 23/33
20
Non-Use Maintenance
Non-use maintenance is necessary if a vehicle remainsoff road for a longer duration (more than 15 days**). Thecorrect and careful non-use maintenance carried outbefore storing the vehicle will prevent the vehicle from
rusting and from such other non-operational damageslike fire hazards.
• Clean the entire vehicle thoroughly.
• Empty the fuel from the fuel tank and carburettorfloat bowl (if fuel is left in for a longer time, the fuelwill break and gummy substance could clog thecarburettor).
• Remove the spark plug and put several drops of 2Toil into the cylinder. Kick the engine over slowly a
few times to coat the cylinder wall with oil andinstall back the spark plug.
• Set the vehicle on a box or a stand so that both thewheels are raised off the ground.
• Spray oil on all unpainted metal surfaces to preventrusting. Avoid getting oil on rubber parts or brakeliners.
• Lubricate the control cables.
• Cover the entire vehicle neatly. Make sure that thestorage area is well ventilated and free from anysource of flames or spark.
• Fill 10% excess air pressure in both wheels.
** For Battery :
a. Remove battery and keep it on wooden plank, inproperly ventilated area.
b. Before taking the vehicle for use.
• Get the battery recharged from the AuthorisedService Center / Battery Dealer.
• Check and correct the electrolyte level and applypetroleum jelly on terminals (applicable to certainmodels).
Preparation for regular use after storage :
• Clean the vehicle
• Make sure the spark plug is tight.
• Fill the fuel tank with fuel.
• Change the engine oil.
• Check all the points listed in the Daily SafetyChecks section.
• Check and inflate tyres to the proper tyre pressure.

8/20/2019 Pulsar 150 user manual
http://slidepdf.com/reader/full/pulsar-150-user-manual 24/33
Periodic Maintenance and Lubrication Chart
21
1. Servicing 1st - 750 Kms / 30 Days2nd onward @5000 Kms
2. Engine idling speed / CO% A A A A A A A A
3. Valve tappet clearance A A A A A A A A
4. Engine oil* - Bajaj DTS-i 10000 R R R R R Replace at 10000 Kms*
5. Oil strainer / Centrifugal filter CL CL CL CL CL Clean at 10000 Kms
6. Engine oil filter / Paper oil filter R R R R R Replace at everyoil change
7. Spark plugs functioning / Gap (If applicable) C, A, R C, A C, A C, A R C, A C, A R Replace at every 15000 Kms
8. Air cleaner element Clean / Replace CL, R CL CL CL R CL CL R Clean at every 5000 KmsReplace at every 15000 Kms
9. Air filter cover ‘O’ Ring R R Replace at every 20000 Kms
10. Fuel cock sediment bowl cleaning CL CL CL CL CL CL CL
11. Carburettor float bowl cleaning CL CL CL CL Clean at every 10000 Kms
12. Carburettor rubber duct C, R C C C C R C C Replace at every 20000 kms
13. Fuel pipes C, R C C C C R C C Replace at every 20000 kms
14. Battery electrolyte level C, A C, A C, A C, A C, A C, A C, A C, A
15. Clutch lever free play C, A C, A C, A C, A C, A C, A C, A C, A
16. Throttle grip play C, A C, A C, A C, A C, A C, A C, A C, A
*For any other brand of oil (SAE 20W 0 API ‘SL’ JASO MA grade) drain interval i 5000 kms.5 s
More frequent cleaning may be required when driving in dusty condition.
RECOMMENDED FREQUENCY
ServicingSr.No.
Operation 1st
750
2nd
5000
3rd
10000
4th
15000
5th
20000
6th
25000
7th
30000Kms
8/20/2019 Pulsar 150 user manual
http://slidepdf.com/reader/full/pulsar-150-user-manual 25/33
22
Periodic Maintenance and Lubrication Chart
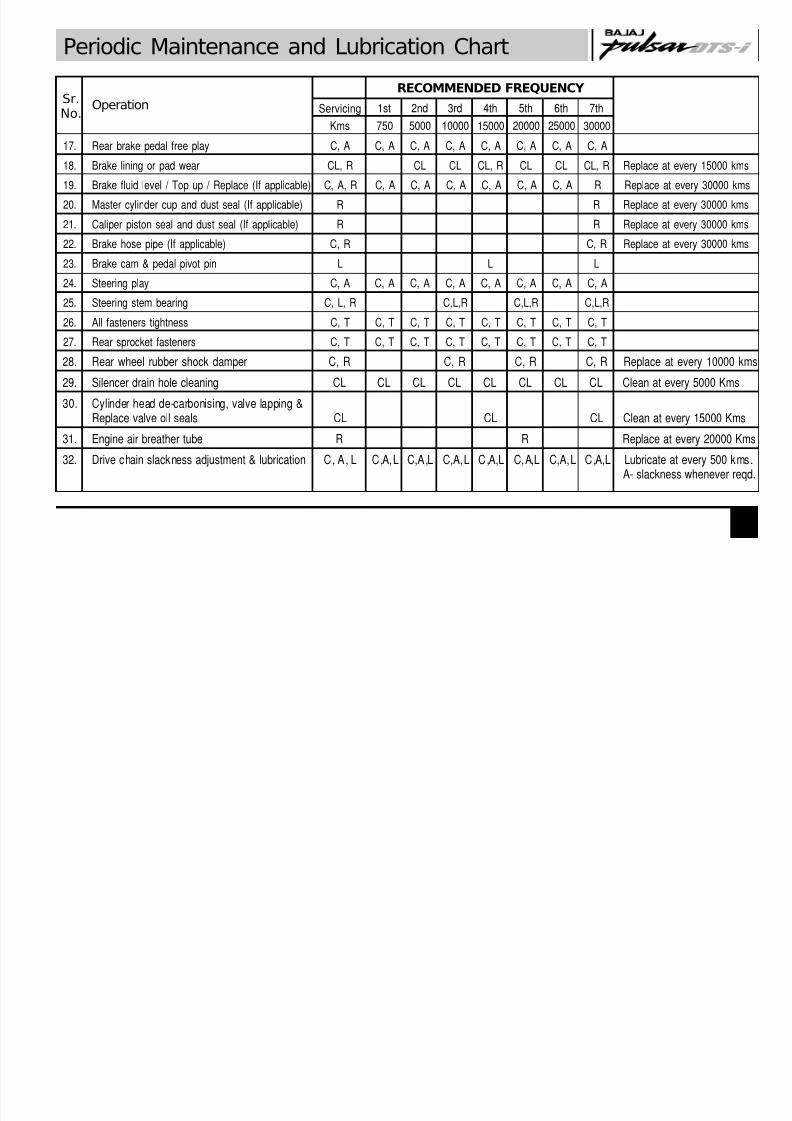
17. Rear brake pedal free play C, A C, A C, A C, A C, A C, A C, A C, A
18. Brake lining or pad wear CL, R CL CL CL, R CL CL CL, R Replace at every 15000 kms
19. Brake fluid level / Top up / Replace (If applicable) C, A, R C, A C, A C, A C, A C, A C, A R Replace at every 30000 kms
20. Master cylinder cup and dust seal (If applicable) R R Replace at every 30000 kms
21. Caliper piston seal and dust seal (If applicable) R R Replace at every 30000 kms
22. Brake hose pipe (If applicable) C, R C, R Replace at every 30000 kms
23. Brake cam & pedal pivot pin L L L
24. Steering play C, A C, A C, A C, A C, A C, A C, A C, A25. Steering stem bearing C, L, R C,L,R C,L,R C,L,R
26. All fasteners tightness C, T C, T C, T C, T C, T C, T C, T C, T
27. Rear sprocket fasteners C, T C, T C, T C, T C, T C, T C, T C, T
28. Rear wheel rubber shock damper C, R C, R C, R C, R Replace at every 10000 kms
29. Silencer drain hole cleaning CL CL CL CL CL CL CL CL Clean at every 5000 Kms
30. Cylinder head de-carbonising, valve lapping &
Replace valve oil seals CL CL CL Clean at every 15000 Kms31. Engine air breather tube R R Replace at every 20000 Kms
32. Drive chain slackness adjustment & lubrication C, A, L C,A,L C,A,L C,A,L C,A,L C,A,L C,A,L C,A,L Lubricate at every 500 kms.A- slackness whenever reqd.
RECOMMENDED FREQUENCY
ServicingSr.No.
Operation 1st
750
2nd
5000
3rd
10000
4th
15000
5th
20000
6th
25000
7th
30000Kms
8/20/2019 Pulsar 150 user manual
http://slidepdf.com/reader/full/pulsar-150-user-manual 26/33
Periodic Maintenance and Lubrication Chart
23
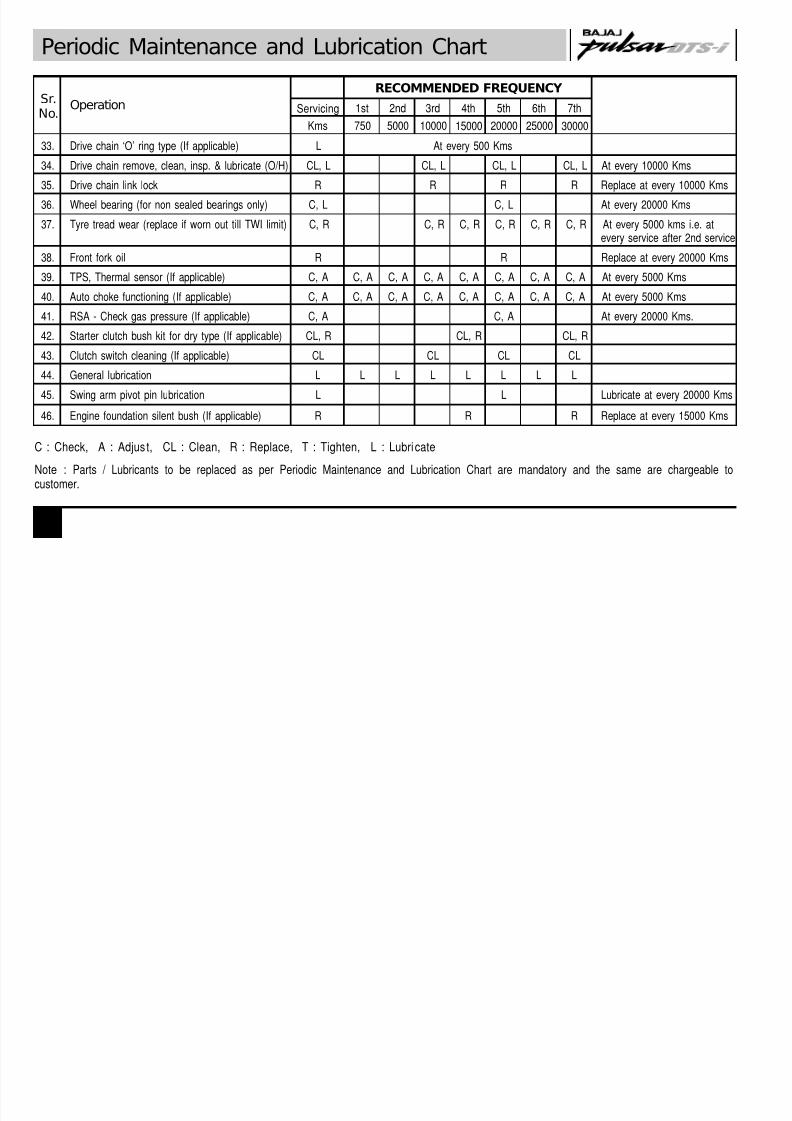
33. Drive chain ‘O’ ring type (If applicable) L At every 500 Kms
34. Drive chain remove, clean, insp. & lubricate (O/H) CL, L CL, L CL, L CL, L At every 10000 Kms
35. Drive chain link lock R R R R Replace at every 10000 Kms
36. Wheel bearing (for non sealed bearings only) C, L C, L At every 20000 Kms
37. Tyre tread wear (replace if worn out till TWI limit) C, R C, R C, R C, R C, R C, R At every 5000 kms i.e. atevery service after 2nd service
38. Front fork oil R R Replace at every 20000 Kms
39. TPS, Thermal sensor (If applicable) C, A C, A C, A C, A C, A C, A C, A C, A At every 5000 Kms
40. Auto choke functioning (If applicable) C, A C, A C, A C, A C, A C, A C, A C, A At every 5000 Kms
41. RSA - Check gas pressure (If applicable) C, A C, A At every 20000 Kms.
42. Starter clutch bush kit for dry type (If applicable) CL, R CL, R CL, R
43. Clutch switch cleaning (If applicable) CL CL CL CL
44. General lubrication L L L L L L L L
45. Swing arm pivot pin lubrication L L Lubricate at every 20000 Kms
46. Engine foundation silent bush (If applicable) R R R Replace at every 15000 Kms
RECOMMENDED FREQUENCY
ServicingSr.No.
Operation 1st
750
2nd
5000
3rd
10000
4th
15000
5th
20000
6th
25000
7th
30000Kms
C : Check, A : Adjust, CL : Clean, R : Replace, T : Tighten, L : Lubri cate
Note : Parts / Lubricants to be replaced as per Periodic Maintenance and Lubrication Chart are mandatory and the same are chargeable tocustomer.

8/20/2019 Pulsar 150 user manual
http://slidepdf.com/reader/full/pulsar-150-user-manual 27/33
24
Schedule for Periodic Part Replacement
Bajaj Auto recommends the following periodic parts replacement for optimum performance of your vehicle as per theschedule.
Qty
1000 ml
1
NIL
1000 ml
1
11
1
2 Nos.
1
1
2
1
1
2
1st Free
2nd Free
3rd Free
1st Paid
Engine Oil
Engine Oil Filter / Paper Oil Filter
NIL
Engine Oil
Engine Oil Filter / Paper Oil Filter
Steering Stem Bearing Cone Set (If Required)Rear Wheel Rubber Damper (If Required)
Drive Chain Link Lock
Spark Plug
Air Cleaner Element
Brake Pad / Shoe (If Required)
Valve Oil Seals
Cylinder Head Gasket
Starter Clutch Bush Kit (If applicable)
Engine foundation Silent Bush (If applicable)
Type of Service Item Description
30 - 45
240 Days
240 Days
120 Daysfrom
last service
Days
500 ~ 750
4500 ~ 5000
9500 ~ 10000
14500 ~ 15000
Kms limit

8/20/2019 Pulsar 150 user manual
http://slidepdf.com/reader/full/pulsar-150-user-manual 28/33
25
Schedule for Periodic Part Replacement
Qty
1000 ml
1
1
1
1
1
1
1
1
300 ml
NIL
2nd Paid
3rd Paid
Engine Oil
Engine Oil Filter / Paper Oil Filter
Air Filter Cover ‘O’ Ring
Carburettor Rubber Duct
Fuel Pipes
Steering Stem Bearing Cone Set (If Required)
Rear Wheel Rubber Dampers (If Required)
Engine Air Breather Tube
Drive Chain Link Lock
Front Fork Oil
NIL
Type of Service Item Description
120 Days
from lastservice
Days
19500 ~ 20000
24500 ~ 25000
Kms limit
1000 ml
1
2 Nos.
Engine Oil
Engine Oil Filter / Paper Oil Filter
Spark Plugs
4th Paid 29500 ~ 30000

8/20/2019 Pulsar 150 user manual
http://slidepdf.com/reader/full/pulsar-150-user-manual 29/33
26
Schedule for Periodic Part Replacement
Qty
1
11
75 ml
1
1
1
2
1
4th Paid
Air Cleaner Element
Brake Pad / Shoe
Brake Fluid (If applicable)
Steering Stem Bearing Cone Set (If Required)
Rear Wheel Rubber Damper (If Required)
Drive chain Lock
Valve Oil Seals
Cylinder Head Gasket
Type of Service Item Description
120 Daysfrom lastservice
Days
29500 ~ 30000
Kms limit
1Brake Hose Pipe (If applicable)
1
1
Master Cylinder Cup & Dust Seal (If applicable)
Caliper Piston Seal & Dust Seal (If applicable)
1
2
Starter Clutch Bush Kit (If applicable)
Engine Foundation Silent Bush (If applicable)
i i

8/20/2019 Pulsar 150 user manual
http://slidepdf.com/reader/full/pulsar-150-user-manual 30/33
28
Warranty Scope & Limits
Bajaj Auto Limited gives the following warranty inrespect of the motorcyclemanufactured by them.
Every possible care and precaution has been taken to
ensure quality in respect of the material & workmanshipin the vehicles manufactured by us. Bajaj Auto Limitedwill repair or replace at their Authorised Workshops, freeof charge, part or parts there of as may be found, onexamination, to have manufacturing defect within aperiod of 2 Years or 30,000 Kms., whichever occursearlier from the date of sale subject to fulfillment ofcondition stipulated in part A, B & C given here under
Warranty is applicable for only first owner of vehicle.
Part A:
Warranty claims in respect of such items like shockabsorbers, speedometers etc. though claimed throughus, are subject to the acceptance of the respectivemanufacturers. In all such cases the decision of therespective manufacturer will be final and binding.
Proprietory parts like tyres, tubes, battery and spark
plugs are warranted by their respective manufacturers(Only one year warranty from the date of purchase/asapplicable) and should be claimed on them directly bythe customer. Bajaj Auto Limited shall not be liable inany manner to replace them though their dealers will
“Bajaj Pulsar 150 DTS-i”give full assistance in preferring such claims onrespective manufacturers.
Bajaj Auto Limited undertake no liability in the matter ofconsequential loss or damage caused due to the failure
of the parts. Delay, if any, at the repairing workshop incarrying out repair to vehicle shall not be a ground forextending the warranty period, nor shall it give any rightto the customer for claiming any compensation fordamages.
Bajaj Auto Limited reserves the right either to repair orreplace the defective parts.
Where a defective part can be replaced by part/s ofalternative brand/s, which are normally used by BajajAuto Limited in the course of manufacture, Bajaj AutoLimited reserves the right to carry out the replacementby a part or parts of any such alternative brand/s.
This warranty and any claim arising there from is subjectto Pune jurisdiction only.
Part B:
No claim for exchange or repair can be considered
unless the customer :a. Ensures that immediately upon detection of the
defect, he approaches any nearest Authorised BajajVehicle Dealers and Recommended AuthorisedService Centers with the concerned vehicle and
W t S d Li it
8/20/2019 Pulsar 150 user manual
http://slidepdf.com/reader/full/pulsar-150-user-manual 31/33
Warranty : Scopes and Limits
29
enables him to remove and despatch the part/partsattributing to the manufacturing defect to theCompany.
b. Produces the Owner's Manual, in original, to enable
that dealer to verify the details.It must be expressly understood that claims forwardeddirectly to us by the owner / customers will not beentertained at all and such defective part/parts thusforwarded by them will lie at our factory at their ownrisk, and this warranty shall not be enforceable.
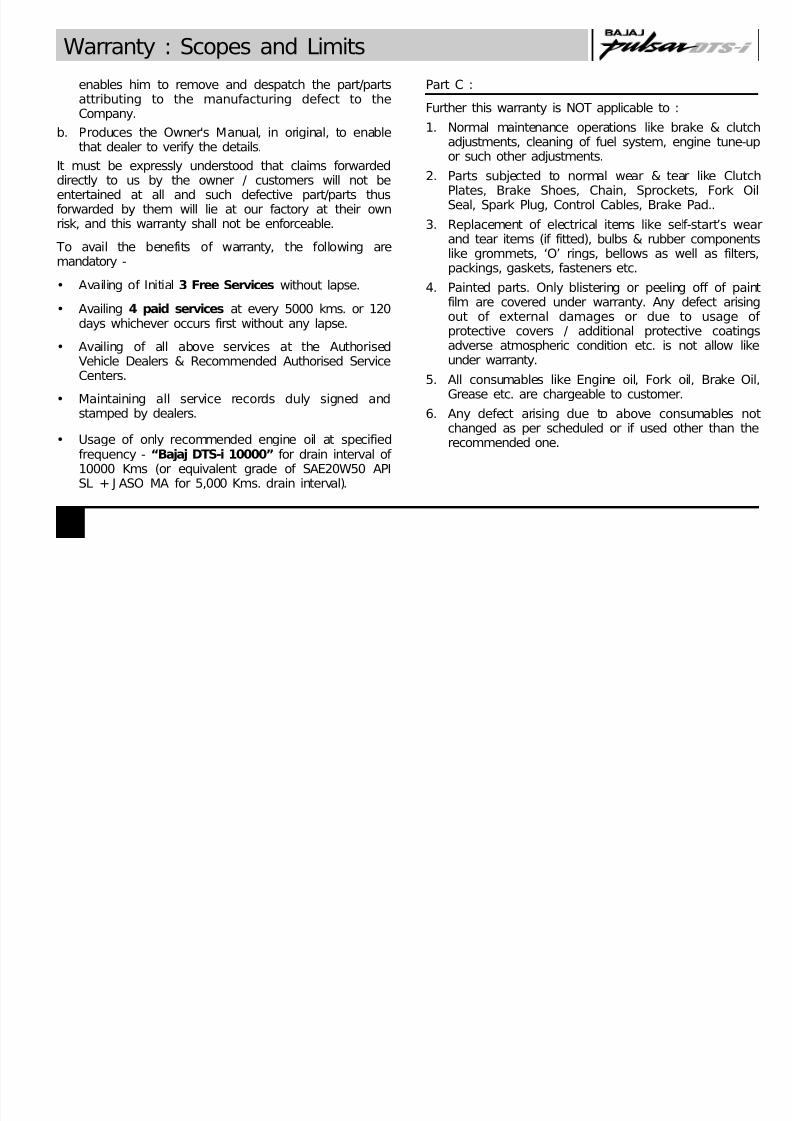
To avail the benefits of warranty, the following aremandatory -
• Availing of Initial 3 Free Services without lapse.
• Availing 4 paid services at every 5000 kms. or 120days whichever occurs first without any lapse.
• Availing of all above services at the AuthorisedVehicle Dealers & Recommended Authorised ServiceCenters.
• Maintaining all service records duly signed andstamped by dealers.
• Usage of only recommended engine oil at specifiedfrequency - “Bajaj DTS-i 10000” for drain interval of10000 Kms (or equivalent grade of SAE20W50 APISL + J ASO MA for 5,000 Kms. drain interval).
Part C :
Further this warranty is NOT applicable to :
1. Normal maintenance operations like brake & clutch
adjustments, cleaning of fuel system, engine tune-upor such other adjustments.
2. Parts subjected to normal wear & tear like ClutchPlates, Brake Shoes, Chain, Sprockets, Fork OilSeal, Spark Plug, Control Cables, Brake Pad..
3. Replacement of electrical items like self-start’s wearand tear items (if fitted), bulbs & rubber componentslike grommets, ‘O’ rings, bellows as well as filters,packings, gaskets, fasteners etc.
4. Painted parts. Only blistering or peeling off of paintfilm are covered under warranty. Any defect arisingout of external damages or due to usage ofprotective covers / additional protective coatingsadverse atmospheric condition etc. is not allow likeunder warranty.
5. All consumables like Engine oil, Fork oil, Brake Oil,Grease etc. are chargeable to customer.
6. Any defect arising due to above consumables not
changed as per scheduled or if used other than therecommended one.
W t S d Li it

8/20/2019 Pulsar 150 user manual
http://slidepdf.com/reader/full/pulsar-150-user-manual 32/33
30
Warranty : Scopes and Limits
7. All chrome plated parts are prone to rust orcorrosion in coastal area or in acidic environment ordue to neglected cleaning etc. However chrome filmpeeling is covered under warranty in general
atmospheric conditions. Blue/ Yellow colouration ofsilencer near exhaust port is permissible and hencenot covered under warranty.
8. Oxidation of unpainted/painted crankcase, cylinderblock, cylinder head etc. in acidic environment or ina coastal area.
9. Valve lapping (De-carbonizing) required to be doneat 15,000 kms, which is normal servicingrequirement.
10. Parts of the vehicle that have been subjected tomisuse, accident, negligent treatment OR whichhave been used in conjunction with parts & anequipment not manufactured or recommended foruse by Bajaj Auto Limited, if in the sole judgementof Bajaj Auto Limited, such use prematurely affectsthe performance and reliability of the vehicle.
11. Parts of the vehicle that have been altered and
modified or replaced in unauthorised manner likeuse of wider tyres, loud silencers etc and which inthe sole judgement of the Bajaj Auto Limited affectsits performance and reliability.
12. Vehicles which are not being serviced atrecommended dealers as per the service scheduledescribed or which have not been operated ormaintained in accordance with the instructions
maintained in the Owner’s Manual.13. Vehicles used for any competition or race and/or for
attempting to set up any kind of record.
14. Any failure arising due to use of adulterated or badquality fuel.
Parts affected due to bad fuel quality are notcovered Under warranty.
Bajaj Auto Limited reserves the right to make anychanges in design or to add any improvements on thevehicle at any time without incurring any obligation toinstall the same on a vehicle previously supplied andsold. Also, the conditions of this warranty are subject toalteration without any notice.
This warranty is the entire written warranty given by BajajAuto Limited for motorcycle’and no other person, including the Bajaj dealer or its or
his agent or employee is authorised to extend or enlargethis warranty.
“Bajaj Pulsar 150 DTS-i”
Use onl Bajaj Genuine Parts
8/20/2019 Pulsar 150 user manual
http://slidepdf.com/reader/full/pulsar-150-user-manual 33/33
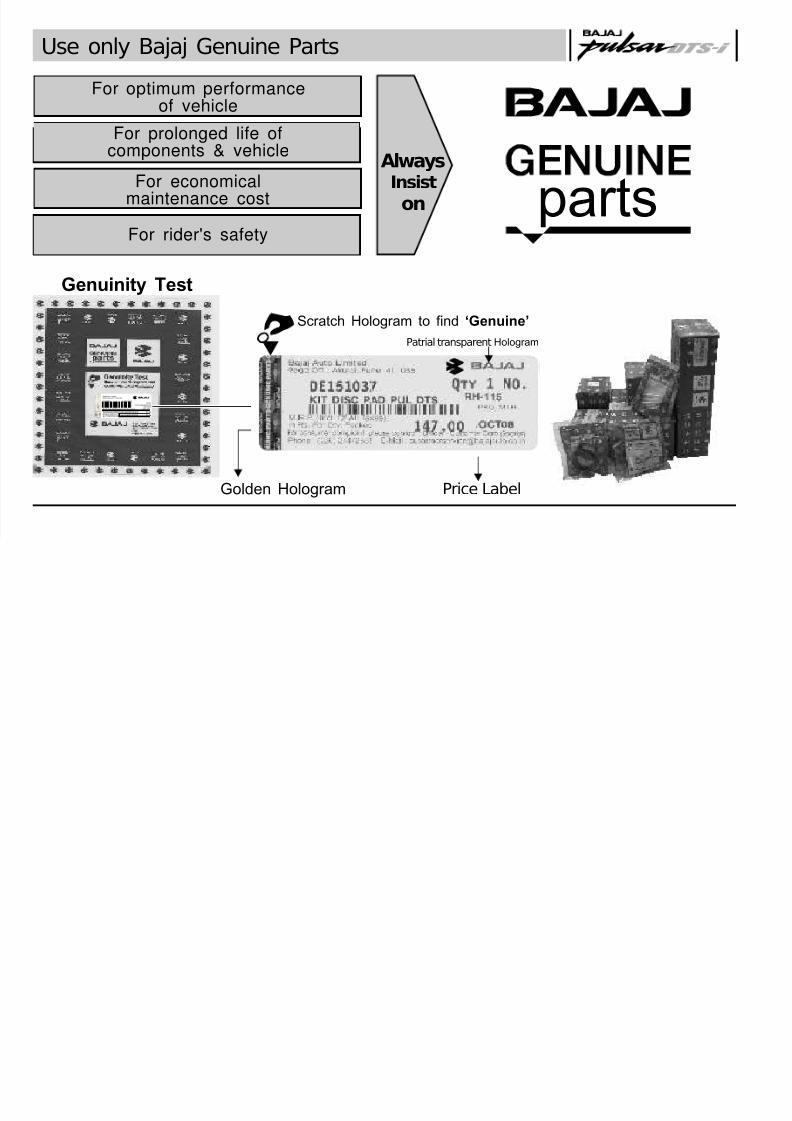
Use only Bajaj Genuine Parts
parts Always
Insist
on
For optimum performanceof vehicle
For prolonged life of
components & vehicle
For economicalmaintenance cost
Genuinity Test
G e n u i n e
M.R.P. (Incl. of AllTaxes) in Rs. for Qty. packed
57.43
03100802P0001
55.58
INASSAM, KARNATAKA, MANIPUR, M.P.,NAGALAND, U.P.,&UTTARANCHAL INOTHERSTATES
BajajAuto Limited Akurdi Pune 411 035 India
CLUTCHBOX
QTY. 1 NO.
PACKAGING MONTHMAY2003
Scratch Hologram to find ‘Genuine’
For rider's safety
Golden Hologram Price Label
Patrial transparent Hologram


![Optimal Frequency Ranges for SubMicrosecond Precision Pulsar …2017. 10. 17. · Pulsar Timing Michael T. Lam Transformative Science with GBO, 17 Oct 2017. ... 150 100 UT [June 23]](https://static.fdocuments.net/doc/165x107/6149b5d012c9616cbc68f02e/optimal-frequency-ranges-for-submicrosecond-precision-pulsar-2017-10-17-pulsar.jpg)