User manual EL-Skyport - MILSO
16
User manual EL-Skyport (ERS 2.0) Wireless Studio Remote Control Centre
Transcript of User manual EL-Skyport - MILSO

User manual
EL-Skyport (ERS 2.0)
Wire less Stud io Remote Contro l Centre

B e n u t z e r h a n d b u c h E l i n c h r o m EL-Skyport E R S 2 . 0
P a g e 2 o f 1 6
Contents Contents . . . . . . . . . . . . . . . . . . . . . . . . . . . . . . . . . . . . . . . . . . . . . . . . . . . . . . . . . . . . . . . . . . . . . . . . . . . . . . . . . . . . . . . . . . . . . . . . . . . . . . . . . . . . . . . . . . . 2 EL-Skyport Concept . . . . . . . . . . . . . . . . . . . . . . . . . . . . . . . . . . . . . . . . . . . . . . . . . . . . . . . . . . . . . . . . . . . . . . . . . . . . . . . . . . . . . . . . . . . . . . . . . . . . . 3 Insta l la t ion . . . . . . . . . . . . . . . . . . . . . . . . . . . . . . . . . . . . . . . . . . . . . . . . . . . . . . . . . . . . . . . . . . . . . . . . . . . . . . . . . . . . . . . . . . . . . . . . . . . . . . . . . . . . . . . 4
EL-Skyport Software Insta l la t ion . . . . . . . . . . . . . . . . . . . . . . . . . . . . . . . . . . . . . . . . . . . . . . . . . . . . . . . . . . . . . . . . . . . . . . . . . . . . . . . . . 4 EL-Skyport dr iver insta l lat ion . . . . . . . . . . . . . . . . . . . . . . . . . . . . . . . . . . . . . . . . . . . . . . . . . . . . . . . . . . . . . . . . . . . . . . . . . . . . . . . . . . . . . 4 Hardware . . . . . . . . . . . . . . . . . . . . . . . . . . . . . . . . . . . . . . . . . . . . . . . . . . . . . . . . . . . . . . . . . . . . . . . . . . . . . . . . . . . . . . . . . . . . . . . . . . . . . . . . . . . . . . . 4
Gett ing started . . . . . . . . . . . . . . . . . . . . . . . . . . . . . . . . . . . . . . . . . . . . . . . . . . . . . . . . . . . . . . . . . . . . . . . . . . . . . . . . . . . . . . . . . . . . . . . . . . . . . . . . . . 5 EL-Skyport main window .. . . . . . . . . . . . . . . . . . . . . . . . . . . . . . . . . . . . . . . . . . . . . . . . . . . . . . . . . . . . . . . . . . . . . . . . . . . . . . . . . . . . . . . . . . . . . 5 EL-Skyport main window .. . . . . . . . . . . . . . . . . . . . . . . . . . . . . . . . . . . . . . . . . . . . . . . . . . . . . . . . . . . . . . . . . . . . . . . . . . . . . . . . . . . . . . . . . . . . . 6
L is t v iew .. . . . . . . . . . . . . . . . . . . . . . . . . . . . . . . . . . . . . . . . . . . . . . . . . . . . . . . . . . . . . . . . . . . . . . . . . . . . . . . . . . . . . . . . . . . . . . . . . . . . . . . . . . . . . . . 6 Unit v iew .. . . . . . . . . . . . . . . . . . . . . . . . . . . . . . . . . . . . . . . . . . . . . . . . . . . . . . . . . . . . . . . . . . . . . . . . . . . . . . . . . . . . . . . . . . . . . . . . . . . . . . . . . . . . . . 7 Out let v iew .. . . . . . . . . . . . . . . . . . . . . . . . . . . . . . . . . . . . . . . . . . . . . . . . . . . . . . . . . . . . . . . . . . . . . . . . . . . . . . . . . . . . . . . . . . . . . . . . . . . . . . . . . . . . 7 Accessory v iew .. . . . . . . . . . . . . . . . . . . . . . . . . . . . . . . . . . . . . . . . . . . . . . . . . . . . . . . . . . . . . . . . . . . . . . . . . . . . . . . . . . . . . . . . . . . . . . . . . . . . . . . 8
Spec ia l features . . . . . . . . . . . . . . . . . . . . . . . . . . . . . . . . . . . . . . . . . . . . . . . . . . . . . . . . . . . . . . . . . . . . . . . . . . . . . . . . . . . . . . . . . . . . . . . . . . . . . . . . . 9 Flash set t ings: . . . . . . . . . . . . . . . . . . . . . . . . . . . . . . . . . . . . . . . . . . . . . . . . . . . . . . . . . . . . . . . . . . . . . . . . . . . . . . . . . . . . . . . . . . . . . . . . . . . . . . . . 9 Model l ing set t ings: . . . . . . . . . . . . . . . . . . . . . . . . . . . . . . . . . . . . . . . . . . . . . . . . . . . . . . . . . . . . . . . . . . . . . . . . . . . . . . . . . . . . . . . . . . . . . . . . . . . 9 Group/Al l : . . . . . . . . . . . . . . . . . . . . . . . . . . . . . . . . . . . . . . . . . . . . . . . . . . . . . . . . . . . . . . . . . . . . . . . . . . . . . . . . . . . . . . . . . . . . . . . . . . . . . . . . . . . . . . 9 Delay: . . . . . . . . . . . . . . . . . . . . . . . . . . . . . . . . . . . . . . . . . . . . . . . . . . . . . . . . . . . . . . . . . . . . . . . . . . . . . . . . . . . . . . . . . . . . . . . . . . . . . . . . . . . . . . . . . . . 9 Extras: . . . . . . . . . . . . . . . . . . . . . . . . . . . . . . . . . . . . . . . . . . . . . . . . . . . . . . . . . . . . . . . . . . . . . . . . . . . . . . . . . . . . . . . . . . . . . . . . . . . . . . . . . . . . . . . . . . 9
Preferences . . . . . . . . . . . . . . . . . . . . . . . . . . . . . . . . . . . . . . . . . . . . . . . . . . . . . . . . . . . . . . . . . . . . . . . . . . . . . . . . . . . . . . . . . . . . . . . . . . . . . . . . . . . . . . 10 Genera l . . . . . . . . . . . . . . . . . . . . . . . . . . . . . . . . . . . . . . . . . . . . . . . . . . . . . . . . . . . . . . . . . . . . . . . . . . . . . . . . . . . . . . . . . . . . . . . . . . . . . . . . . . . . . . . . . 10 Startup . . . . . . . . . . . . . . . . . . . . . . . . . . . . . . . . . . . . . . . . . . . . . . . . . . . . . . . . . . . . . . . . . . . . . . . . . . . . . . . . . . . . . . . . . . . . . . . . . . . . . . . . . . . . . . . . . 10 Communicat ion . . . . . . . . . . . . . . . . . . . . . . . . . . . . . . . . . . . . . . . . . . . . . . . . . . . . . . . . . . . . . . . . . . . . . . . . . . . . . . . . . . . . . . . . . . . . . . . . . . . . . . . 10 PnP . . . . . . . . . . . . . . . . . . . . . . . . . . . . . . . . . . . . . . . . . . . . . . . . . . . . . . . . . . . . . . . . . . . . . . . . . . . . . . . . . . . . . . . . . . . . . . . . . . . . . . . . . . . . . . . . . . . . . . 11 Table . . . . . . . . . . . . . . . . . . . . . . . . . . . . . . . . . . . . . . . . . . . . . . . . . . . . . . . . . . . . . . . . . . . . . . . . . . . . . . . . . . . . . . . . . . . . . . . . . . . . . . . . . . . . . . . . . . . . 11 Author . . . . . . . . . . . . . . . . . . . . . . . . . . . . . . . . . . . . . . . . . . . . . . . . . . . . . . . . . . . . . . . . . . . . . . . . . . . . . . . . . . . . . . . . . . . . . . . . . . . . . . . . . . . . . . . . . . 11 View .. . . . . . . . . . . . . . . . . . . . . . . . . . . . . . . . . . . . . . . . . . . . . . . . . . . . . . . . . . . . . . . . . . . . . . . . . . . . . . . . . . . . . . . . . . . . . . . . . . . . . . . . . . . . . . . . . . . . 11 Colour . . . . . . . . . . . . . . . . . . . . . . . . . . . . . . . . . . . . . . . . . . . . . . . . . . . . . . . . . . . . . . . . . . . . . . . . . . . . . . . . . . . . . . . . . . . . . . . . . . . . . . . . . . . . . . . . . . 11
Menu bar . . . . . . . . . . . . . . . . . . . . . . . . . . . . . . . . . . . . . . . . . . . . . . . . . . . . . . . . . . . . . . . . . . . . . . . . . . . . . . . . . . . . . . . . . . . . . . . . . . . . . . . . . . . . . . . . . 12 Fi le . . . . . . . . . . . . . . . . . . . . . . . . . . . . . . . . . . . . . . . . . . . . . . . . . . . . . . . . . . . . . . . . . . . . . . . . . . . . . . . . . . . . . . . . . . . . . . . . . . . . . . . . . . . . . . . . . . . . . . 12 Remote . . . . . . . . . . . . . . . . . . . . . . . . . . . . . . . . . . . . . . . . . . . . . . . . . . . . . . . . . . . . . . . . . . . . . . . . . . . . . . . . . . . . . . . . . . . . . . . . . . . . . . . . . . . . . . . . . 13 Edi t . . . . . . . . . . . . . . . . . . . . . . . . . . . . . . . . . . . . . . . . . . . . . . . . . . . . . . . . . . . . . . . . . . . . . . . . . . . . . . . . . . . . . . . . . . . . . . . . . . . . . . . . . . . . . . . . . . . . . . 14 Extras . . . . . . . . . . . . . . . . . . . . . . . . . . . . . . . . . . . . . . . . . . . . . . . . . . . . . . . . . . . . . . . . . . . . . . . . . . . . . . . . . . . . . . . . . . . . . . . . . . . . . . . . . . . . . . . . . . . 15 View .. . . . . . . . . . . . . . . . . . . . . . . . . . . . . . . . . . . . . . . . . . . . . . . . . . . . . . . . . . . . . . . . . . . . . . . . . . . . . . . . . . . . . . . . . . . . . . . . . . . . . . . . . . . . . . . . . . . . 16 Help . . . . . . . . . . . . . . . . . . . . . . . . . . . . . . . . . . . . . . . . . . . . . . . . . . . . . . . . . . . . . . . . . . . . . . . . . . . . . . . . . . . . . . . . . . . . . . . . . . . . . . . . . . . . . . . . . . . . . 16

B e n u t z e r h a n d b u c h E l i n c h r o m EL-Skyport E R S 2 . 0
P a g e 3 o f 1 6
EL-Skyport Concept EL-Skyport system makes the complete remote contro l of a l l EL-RX stud io f lash un i ts and mechanism poss ib le of a photo stud io.
Highlights:
• Remote contro l of a l l EL-RX stud io f lash un i ts wi th EL-Skyport modules connected. • Remote contro l of a l l EL-RX funct ions. • Addi t iona l extra features (de lay f lash, . . ) • Stor ing complete Setup • Snaps and s imple reproduct ion • Constant actua l i sat ions and extens ions • 100% compat ib ly wi th a l l EL-RX stud io f lash un i ts • and much more features bes ides
Structure:
The st ructure of the nav igator corresponds to the accompanying st ructure. The Stud io conta ins a l l f lash un i ts wi th the same f requency set t ing of a l l EL-Skyport modules . Thus each f requency channel (1 . .8) corresponds to a Stud io! A Stud io cons is ts of maximal ly 4 groups wi th 16 f lash un i ts each 64 stud io f lash un i ts . Each f lash un i t possesses at least one l ightn ing ex i t (wi th the compact f lash) and maximal ly four l ightn ing ex i ts (generators) . Each l ightn ing ex i t corresponds to a l ightn ing head. A def ined spat ia l pos i t ion in the Stud io can be ass igned to each l ightn ing head. At each l ightn ing head/ Out let can be at tached d i f ferent accessor ies . The data base for s tud io f lash un i ts and accessor ies i s constant ly updated. The contro l l ing of a l l EL-Skyport modules or EL-RX uni ts takes p lace b i -d i rect iona l . A l l a t t i tudes of each equipment are cyc l i ca l ly updated, thus the ind icator va lue in the sof tware a lways corresponds to the actua l va lue at the equipment . The contro l can for equipment, a se lected group or a l l dev ices take p lace. L ikewise a lso a re lat ive adjustment of l ightn ing and adjust ing l ight va lues i s ava i lab le wi th the new EL-Skyport vers ion. Thus the ach ievement can be ra ised or lowered for severa l dev ices, wi thout changing the re lat ionsh ip of the dev ices to each other . A l l f lash un i ts and set t ings can be stored in a EL-Skyport job f i le and ca l led up at any t ime aga in. A l l dev ices are updated automat ica l ly wi th the stored informat ion.
Studio
Group 1
U n i t 1
O u t l e t 1 A c c e s s o r y1
O u t l e t 4 A c c e s s o r y4
U n i t 1 6
O u t l e t 1 A c c e s s o r y1
O u t l e t 4 A c c e s s o r y4
Group 4
U n i t 1
O u t l e t 1 A c c e s s o r y1
O u t l e t 4 A c c e s s o r y4
U n i t 1 6
O u t l e t 1 A c c e s s o r y1
O u t l e t 4 A c c e s s o r y4
+
+
+
+
+
+
+
p ic tu re 1

B e n u t z e r h a n d b u c h E l i n c h r o m EL-Skyport E R S 2 . 0
P a g e 4 o f 1 6
Installation EL-Skyport Software Insta l lat ion The EL-Skyport Sof tware is updated cont inuous ly and can be downloaded f rom the E l inchrom Webs i te www.e l inchrom.com for f ree
Mac Ins ta l l a t ion 1. Star t Insta l la t ions- package (*.pkg) . 2 . The insta l la t ion package wi l l take you Step by Step through the Insta l la t ion.
W indows Ins ta l l a t ion 1. Star t Insta l la t ion program (*.exe) 3. The insta l la t ion package wi l l take you Step by Step through the Insta l la t ion.
You can overwr i te the prev ious EL-Skyport Sof tware a lways by a newer update. I t i s not necessary to un insta l l or de lete the prev ious vers ion. A l l prev ious Preferences are taken into the new vers ion.
EL-Skyport dr iver insta l lat ion The newest dr ivers for the EL-Skyport USB RX Modul you can get f rom the E l inchrom Webs i te www.e l inchrom.com for f ree a lso. There ex is t d i f ferent dr ivers for the fo l lowing operat ion systems:
• Mac OSX • Mac OSX ab T iger 10.4 und Inte l Mac • Windows T M 98SE, ME • Windows T M XP, 2000, Server 2003 • Windows T M XP, 2000, Server 2003 • Windows T M XP-64Bi t , Server 2003-64Bi t
The Insta l la t ion procedure you can f ind ins ide of the User Manual of the EL-Skyport USB RX Module.
Hardware For the wire less Remote contro l of EL-RX Stud io f lash un i ts you need the fo l lowing hardware modules:
EL -Skypor t USB-RX modu le Connect th is module on a f ree USB port of your Computer . Th is i s for wi re less data communicat ion wi th the connected EL-Skyport modules.
EL -Skypor t T ransce iver RX modu le Connect th is module to a l l actua l E l inchrom RX Stud io f lash un i ts ( l ike Sty le RX ser ies , D ig i ta l RX ser ies und Ranger RX ser ies) . Th is module i s for wi re less remote contro l by a computer wi th the EL-Skyport Sof tware and for wi re less f lash t r igger ing by the EL-Skyport Transmit ter module. Th is module i s power suppl ied by the connected EL-RX un i t .
EL -Skypor t Un iversa l Rece iver modu le Connect th is module to any Stud io f lash un i t wi th Synchron socket by the inc luded Synchron cord on ly . Th is module i s for wi re less f lash t r igger ing by the EL-Skyport Transmit ter module and for spec ia l features by a computer wi th the EL-Skyport Sof tware ( i .e . de lay f lash ing) . Th is module i s power suppl ied by an integrated L i - Ion bat tery , which must be recharged f rom t ime to t ime by the inc luded EL-Skyport charge wal l adapter .

B e n u t z e r h a n d b u c h E l i n c h r o m EL-Skyport E R S 2 . 0
P a g e 5 o f 1 6
Getting started Needs : Complete Insta l la t ion of the EL-Skyport Sof tware on your Computer and the necessary USB RX module dr iver .
1 . Se lect the same f requency channel on a l l EL-Skyport modules. Se lect channel 1 f i rs t (check p ic ture) . The f requency se lect ion of the USB RX module is set ins ide of the EL-Skyport sof tware.
2 . Connect the EL-Skyport USB RX module to a f ree USB port of your computer
3. Connect a EL-Skyport Transce iver RX module to each EL-RX Stud io f lash un i t or a EL-Skyport Universa l Rece iver module.
4 . Star t the EL-Skyport Sof tware. I f the USB Status LED (4) i s i l luminated than the data communicat ion is act ive. I f not , open the menu “Remote open”. The standard f requency channel i s channel 1 i f s tar ted the very f i rs t t ime!
5. Swi tch on now a l l EL-RX Stud io f lash un i ts and a l l EL-Skyport Universa l Rece iver modules.
6 . Af ter a short t ime de lay, a l l EL-RX Uni ts and Universa l modules are found and l i s ted in the EL-Skyport sof tware. With “SCAN” push button (5) you can rescan a l l , wi th push button (6) you can scan for a l l un i ts not found the f i rs t t ime.
7. C l i ck wi th le f t mouse button on the ‚+ ’ or the arrow ins ide of the Nav igator (2) in f ront of the l i s ted Stud io or Group. Th is wi l l expand the Stud io or Group.
8. C l i ck of one l i s ted f lash un i t name (7) . Now a l l un i t set t ings are d isp layed ins ide of the main window (10) of the se lected f lash un i t .
9 . In addi t ion you wi l l see un i t pane l windows for each EL-RX Stud io f lash un i t (11). You can act ivate or deact ivate th is extra v iew in the menu „V iew EL-RX show panel windows”. The EL-RX un i t name is shown on the windows t i t le (11) , the un i t type on the bottom (12) . You can h ide and show the main window by c l i ck on push button (13) .
1
2
3
4
5
6
7
8
9
10
p ic tu re 2
p i c tu re 3
p i c tu re 4
11
13
12

B e n u t z e r h a n d b u c h E l i n c h r o m EL-Skyport E R S 2 . 0
P a g e 6 o f 1 6
EL-Skyport main window List v iew Here a l l dev ices of the Stud ios or the se lected group become (as per . Nav igator se lect ion) in the l i s t (9) ind icated. In th is op in ion severa l dev ices in the l i s t (9) can be se lected and the i r at t i tudes wi th the he lp of the r ight spec ia l funct ion range be changed. The se lect ion of severa l dev ices ( l ines) success through SHIFT+LMB (LMB = le f t mouse button) or APPLE BUTTON+LMB or . CTRL+RMB. Further a context menu wi th spec ia l l i s t inst ruct ions is ava i lab le wi th the RMB (= r ight mouse button).
1 . Toolbar 2. Nav igator (expanded Stud io) 3. F lash un i t U2 (EL-Skyport
Universa l Modul) 4 . F lash out let/head of U2 5. Accessory of out let/head U2 6. Informat ion bar wi th loca l he lp
text 7 . Status bar of the USB RX data
communicat ion port 8 . P lug and P lay (PnP) s tatus
in format ion ( turn ing wheel i f act ive)
9. un i t - l i s t With se lected Stud io (nav igator) a l l dev ices in the Stud io are l i s ted. A group is se lected, a l l dev ices in th is group are l i s ted.
10. Popup window for spec ia l features (r ight)
11. Spec ia l features window area. 12. Nav igator windows increase or
make smal ler 13. Spec ia l funct ion windows open or
c lose.
1
2
9
3
4
5
6
11
10
7
8
12
13
p ic tu re 5
B e n u t z e r h a n d b u c h E l i n c h r o m EL-Skyport E R S 2 . 0
P a g e 7 o f 1 6
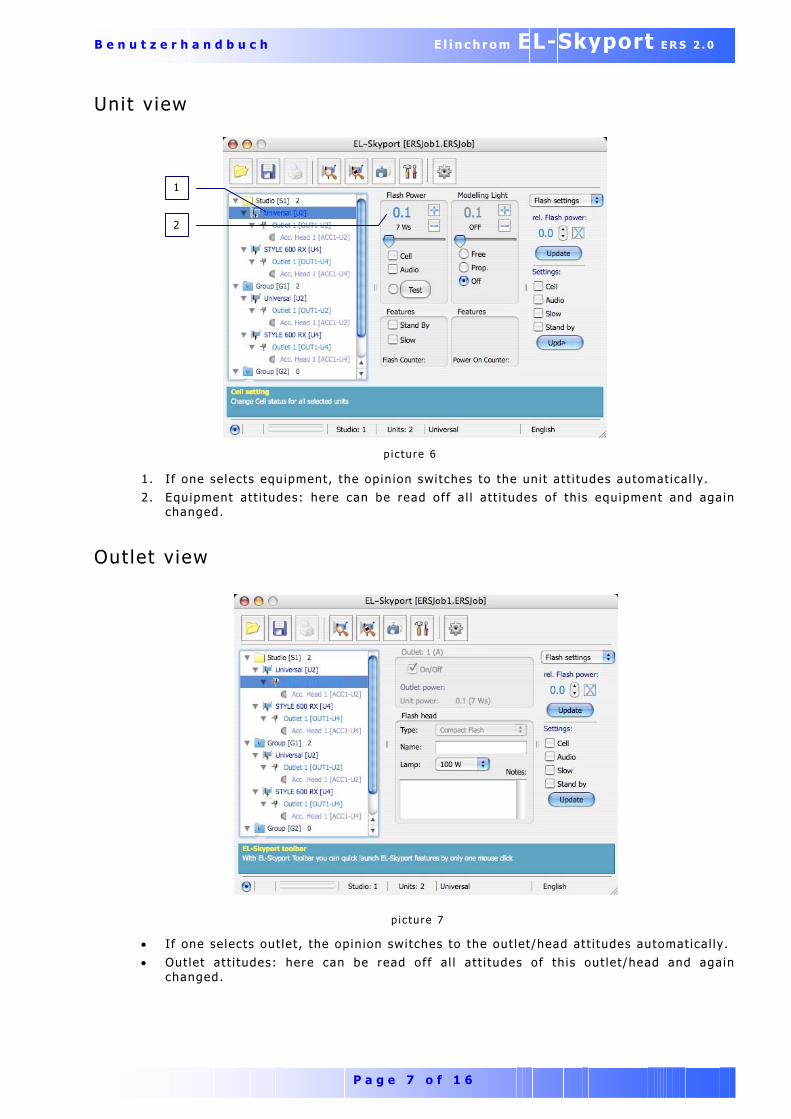
Unit v iew
1 . I f one se lects equipment, the op in ion swi tches to the un i t at t i tudes automat ica l ly . 2 . Equipment at t i tudes: here can be read of f a l l a t t i tudes of th is equ ipment and aga in
changed.
Out let v iew
• I f one se lects out let , the op in ion swi tches to the out let/head at t i tudes automat ica l ly . • Out let at t i tudes: here can be read of f a l l a t t i tudes of th is out let/head and aga in
changed.
1
2
p i c tu re 7
p i c tu re 6

B e n u t z e r h a n d b u c h E l i n c h r o m EL-Skyport E R S 2 . 0
P a g e 8 o f 1 6
Accessory v iew
• I f one se lects accessory, the op in ion swi tches to the accessory at t i tudes automat ica l ly .
• Accessory at t i tudes: here can be read of f a l l accessory of th is out let/head and aga in changed.
p i c tu re 8

B e n u t z e r h a n d b u c h E l i n c h r o m EL-Skyport E R S 2 . 0
P a g e 9 o f 1 6
Special features
Flash sett ings: Here the per formance adjustment can be changed re lat ive ly by the current f lash l ight ach ievement. Depending upon op in ion (s ing le or L is t op in ion) and af ter se lect ion (s ing le dev ice or Mul t ip le dev ices) the f lash ach ievement i s changed. With the arrow keys one can stop a pos i t ive or negat ive screen va lue in 1/10 steps. Pos i t ive va lue stands for an increase, negat ive va lue reduces the present f lash ach ievement by the adjusted va lue. With
update the new va lues are a lso taken over by the dev ices. Addi t iona l ly s t i l l the at t i tudes of photoe lectr ic ce l l can, Audio. . are adjusted. The assumpt ion of the new va lues takes p lace af ter manipu lat ion of the key update.
Model l ing sett ings: Corresponds to the f lash set t ings per formance adjustment however re lated to the adjust ing model l ing ach ievement. Addi t iona l ly the adjust ing l ight knows a lso proport iona l , Min imum, Maximal ly or to be swi tched of f .
Group/Al l : Here the at t i tudes of a l l dev ices of the Stud ios or the se lected group become (as per . Nav igator) changed, independent ly whether one or more l i s t entr ies are se lected.
De lay: With th is funct ion a l l se lected dev ices wi th a f lash de lay can be programmed. Here you can spec i fy retarded number of f lashes and the dece lerat ion t ime of the re lease. The de lay t ime can between approx. 5ms unt i l 17 seconds in 1ms steps to be adjusted. With the key act ivat ing the dev ices are se lected accord ing ly . With RESET the re lease de lay can be de leted aga in. The re lease de lay is s tored in the EL-Skyport modules. When swi tch ing of f these at t i tudes are lost .
Extras: Here spec ia l EL-Skyport funct ions i s ava i lab le: • F lash Standby swi tches the
re lease of f by the EL-Skyport t ransmit ter .
• Hold Standby ho lds the equipment in the Standby condi t ion, even i f data communicat ion to the E l -Skyport sof tware is interrupted.
• SW f lash group overwr i tes the group-se lector (HW-FG = hardware F lash group) the EL-Skyport of modules. Thus dev ices can be put by
sof tware in to another group of f lash t r igger ing. When swi tch ing of f th is at t i tude goes lost the group-se lector at the EL-Skyport module spec i f ies then the group of f lash re leases aga in!
The at t i tudes are programmed wi th updat ing into the EL-Skyport modules.
p i c tu re 11
p i c tu re 10
p i c tu re 13
p ic tu re 12p ic tu re 9

B e n u t z e r h a n d b u c h E l i n c h r o m EL-Skyport E R S 2 . 0
P a g e 1 0 o f 1 6
Preferences Genera l Select ion menu „ language“: Af ter a short actua l i sat ion of a l l program i tems, the EL Skyport sof tware language is changed. With „Save“ one can take over a l l changes, wi th „Cance l“ no changes are made, and wi th „Defau l t “ the defau l t set t ings restored. In the se lect ion f ie ld „Power s teps“ one can spec i fy the min imum steps dur ing change of ach ievement in the sof tware. The d isp lay corresponds to 1/10 screen steps. Addi t iona l ly one can spec i fy the s tandard EL-Skyport JOB f i le fo lder , in which one stores and ca l l s the complete Stud io set t ings up. Addi t iona l ly one can act ivate s t i l l spec ia l sound ef fects .
Startup Here the opt ions are spec i f ied wi th the program star t , l i ke Se lect ion of the USB RX module and the automat ic search for EL-Skyport modules in range are.
Communicat ion Se lec t ion o f the EL-Skypor t USB RX modu le In the se lect ion e lement (1) the act ive USB RX module i s ind icated. With the key „update“ one can update the l i s t . Se lect ion e lement (1) open around another USB RX module for the EL-Skyport sof tware to se lect .
F requency channe l se lec t ion F r equen z kana l e i n s t e l l u ng an den E L -S k ypo r t Modu l en The f requency channel at t i tude takes p lace wi th the Transce iver RX, Universa l Rece iver and the Transmit ter module by DIP swi tch. A spec i f i cat ion one can infer f rom the operat ing inst ruct ions of the ind iv idua l modules. The channel at t i tude of the USB RX module takes p lace by EL-Skyport sof tware.
F r equen z kana l e i n s t e l l u ng de s E L - S k ypo r t USB RX Modu l s
The f requency channel at t i tude of the USB RX module takes p lace in the EL-Skyport sof tware under „Extras Preferences“ wi th Windows™ or „EL Skyport Preferences“ wi th MAC.
In the communicat ion at t i tudes one can make the f requency set t ings by the se lect ion „Stud io 1. .8 “(2) , which corresponds to the f requency channels 1. .8 . The Dip conf igurat ion swi tch p ic ture shows the exact conf igurat ion pos i t ion of the ind iv idua l EL-Skyport modules.
In den Kommunikat ionse inste l lungen kann man d ie Frequenze inste l lungen durch d ie Auswahl
T ime r s Here you can stop the interva l at t i tudes for the data updat ing and data communicat ion. These at t i tudes are to be changed on ly for communicat ion prob lems.
1
2
3
p ic tu re 14
p ic tu re 15
p ic tu re 16

B e n u t z e r h a n d b u c h E l i n c h r o m EL-Skyport E R S 2 . 0
P a g e 1 1 o f 1 6
PnP Here the automat ic „P lug and P lay “(PnP) at t i tudes is made. These at t i tudes should not be changed, in order not to d is turb the automat ic search and at t i tude of a l l found EL-Skyport modules and EL-RX dev ices.
Table Here the ind icated co lumns are spec i f ied for the equipment op in ion in tabular form.
Author Depos i t your persona l data for the assumpt ion here into a l l i t s s tored job f i les .
V iew The EL-Skyport spec i f ies the v iew for the program star t .
Co lour Addi t iona l ly you can arrange the co lour in the EL-Skyport sof tware ind iv idua l .

B e n u t z e r h a n d b u c h E l i n c h r o m EL-Skyport E R S 2 . 0
P a g e 1 2 o f 1 6
Menu bar Fi le New. . Create and opens a new EL-Skyport job f i le . Here can be se lected between d i f ferent setups. Addi t iona l ly the job Wizard is ava i lab le , that takes you step by step through the EL-Skyport set t ings.
Open Open a stored EL-Skyport Job f i le . S ince in a job f i le a l l data and set t ings of the used f lash l ights wi th accessor ies are s tored, must the a l locat ions between the connected un i ts and the stored dev ices be adjusted/ l inked. When opening a job f i le compares the sof tware automat ica l ly a l l ex is t ing dev ices wi th the stored dev ices.
• I f th is compar ison agrees, a l l ex is t ing EL-RX uni ts wi th the stored data is updated automat ica l ly . To i t a l l be long the power and conf igurat ion set t ings of the EL-RX un i ts . A l l f ree f lash un i ts and f lash un i ts wi th un iversa l modules must be set manual ly .
• I f the compar ison does not agree, a manual adjustment must take p lace, that the a l locat ion of the ex is t ing dev ices wi th the stored dev ices spec i f ies . Here automat ica l ly the window for the manual a l locat ion/ l ing ing of the dev ices appears
Proceeding when opening stored EL-Skyport job f i les:
1. Swi tch on a l l EL-RX un i ts und EL-Skyport Universa l modules.
2 . Wai t , unt i l the EL-Skyport Sof tware has fond a l l ex is t ing un i ts and modules. Poss ib ly wi th “Search new” update.
3. Se lect Job f i le wi th „F i le Open“.
4. I f a l l stored devices agree with the exist ing devices in your TYPE and i ts ADDRESS, the al locat ion and actual izat ion are made automatical ly. Otherwise the window for the al locat ion/ l inking appears.
5. Now one connects the exist ing devices with the stored devices as fo l lows:
• Select an ex is t ing EL-RX Uni t ( le f t tab le) .
• Then se lect a s tored f i le un i t ( r ight tab le) which f i ts to the se lected ex is t ing un i t .
• Press „L ink” to l ink the se lected un i ts together . In the le f t tab le the equipment wi th a red po int i s marked as occupied. The r ight tab le shows now the exact a l locat ion of the dev ices and the dev ice addresses (un i t becomes green)
• If no exist ing devices should be present, one can make the l inkage with the data base LIBRARY in the left l ist .
6 . One must make these l inkages wi th a l l s tored dev ices.
7 . Af ter complete a l locat ion of the midd le f i le un i t l i s t (a l l l ines are marked wi th a green po int) conf i rm and open the f i le wi th “Ok”.
p i c tu re 17
p i c tu re 18
p i c tu re 19

B e n u t z e r h a n d b u c h E l i n c h r o m EL-Skyport E R S 2 . 0
P a g e 1 3 o f 1 6
Save The current EL-Skyport s tores job f i le . A l l set t ings and informat ion of the dev ices and stud io are stored.
Save as . . The current EL-Skyport s tores job f i le under another f i le name.
P r in t
Page se t t ings Here one can setup the page set t ings.
In fo rmat ion Here one can enter add i t iona l in format ion to i ts ERS job ( l ike Customer in format ion, Date and notes)
C lose Close EL-Skyport Sof tware. This instruction is to be found with MAC OSX under the menu EL-Skyport!
Remote Open Those opens up-to-date EL-Skyport USB RX inter face to the data communicat ion. The inter faces s tatus i s ind icated to the status border in the lower le f t corner .
C lose Those c loses act ive EL-Skyport USB RX inter face to the data communicat ion. The inter faces s tatus i s ind icated to the status border in the lower le f t corner .
Rese t Here on the one hand the USB RX module and a l l a t tached EL-Skyport modules i s reset and aga in s tar ted. Th is funct ion should be implemented for communicat ion prob lems.
Mute This funct ion makes i f act ivated an opt imal and fastest f lash t r igger ing of a l l EL-Skyport modules by the EL-Skyport Transmit ter module. Data communicat ion is act ive (Mute=deact ivated) can cause f lash t r igger synchron isat ion prob lems between Transmit ters module and the EL-Skyport modules (Transce iver RX and un iversa l Rece iver) . Th is can lead to longer f lash t r igger t ransmiss ion t imes. Funct ion is act ive ly th is by a f lash ing text “Mute” in the t i t le bar of the EL-Skyport sof tware window. Dur ing mut ing data communicat ion between the EL-Skyport sof tware and the EL-Skyport modules i s s topped. Dur ing mut ing no poss ib i l i ty ex is ts to update the current module and f lash un i t data at the PC/MAC (b i -d i rect iona l mut ing)!
Sti l l in development check future UPDATES on the ELINCHROM web pagewww.el inchrom.com

B e n u t z e r h a n d b u c h E l i n c h r o m EL-Skyport E R S 2 . 0
P a g e 1 4 o f 1 6
Search a l l Here for a l l EL-Skyport modules in range one searches automat ica l ly . Become once not a l l dev ices found, the inst ruct ion shou ld be implemented „Search new”. A l l dev ices are found automat ic and addressed by the sof tware. Th is funct ion is fu l ly automat ic and requi res no manual conf igurat ion of the dev ices. As soon as new dev ices are found, th is i s at the bot tom le f t hand corner faded in the s tatusba ( turn ing wheel) .
Search new This funct ion is for the extens ion of the automat ic un i t recogni t ion. Once not a l l dev ices are found, one can implement th is inst ruct ion severa l t imes one behind the other .
Ne t d iagnos t i c s . . This funct ion serves the rad io power of the se lected equipment.
1 . Se lect a s ing le Uni t ins ide of the Nav igator
2. Se lect command
Now a status window wi th the des ignat ion and address of the current equipment i s ind icated.
Ed i t Undo, Cut , Copy , Pas te , C lear Hier handel t es s ich um d ie a l lgemeinen Text- Bearbe i tungsmögl ichke i ten mit Zwischenspe icher .
Un i t l i s t This funct ion is act ive on ly in the l i s t v iew.
Add f r e e f l a s h un i t A f ree f lash un i t adds to the l i s t , wi thout any remote maintenance poss ib i l i ty over EL-Skyport . Th is funct ion is meant for a pure sof tware stud io wi thout rea l contro l .
R emove s e l e c t ed Delete a l l se lected un i ts of the l i s t
R e f r e sh un i t l i s t Update the complete un i t l i s t v iew out of the sof tware database.
C l e a r un i t l i s t De lete the complete un i t l i s t .
P roper t i es . . . Here depending upon se lect ion the appropr iate set t ings are d isp layed. For the se lect ion best the expanded nav igator window is su i tab le . Through c l i ck on “+” ind icat ion or the arrow before the appropr iate l ine wi l l expand the nav igator ( l ike Stud io opens a l l dev ices in the Stud io) . Or through a r ight mouse button c l i ck on the nav igator window opens context window wi th severa l funct ions. Here you se lect “expand a l l ” .
S t ud i o In the nav igator se lect Stud io and se lect Edit Properties to ind icate the stud io propert ies . Here one knows a name for the Stud io, the used camera and to the object ass ign. Through one c l i cks on the arrow addi t iona l notes can be added. For the d imens ion ing of the Stud ios severa l f ie lds are ava i lab le . The un i t i s user-dependent and is not used here.
p i c tu re 20

B e n u t z e r h a n d b u c h E l i n c h r o m EL-Skyport E R S 2 . 0
P a g e 1 5 o f 1 6
Group Zusätz l i che können S ie noch Not izen h inzufügen In the nav igator se lect group and se lect in the menu Edit Properties to ind icate the Group propert ies . Here one can ass ign a group name. Addi t iona l ones can add you st i l l notes
Un i t s In the nav igator or in the l i s t v iew one se lects a Uni t , then one se lects in the menu Edit Properties to ind icate the un i t propert ies . Here one can ass ign a name for th is un i t . The EL-RX f lash un i t or the EL-Skyport un iversa l module i s recognized automat ica l ly . For f ree un i ts one can spec i fy the type of dev ice manual ly . For EL-Skyport modules are ava i lab le s t i l l far in format ion of the current at t i tudes. Addi t iona l ones can add notes.
Ou t l e t To show propert ies one se lects the “Out let” ins ide of the nav igator , then one se lects Edit Properties to ind icate the propert ies of th is out let . Here one can ass ign a name for th is out let . For the pos i t ion ing of the l ightn ing head severa l f ie lds are ava i lab le . The d imens ion un i t i s user-dependent and is not used here. Addi t iona l ones can add notes.
Extras Res ta r t un i t ( s ) This inst ruct ion sending a restar t to a l l EL-RX f lash un i ts . Th is funct ion shou ld be implemented for communicat ion prob lems D ieser Befeh l führt e inen Neustar t a l ler EL-RX Stud iob l i tz l i chtgeräte aus. D iese Funkt ion so l l te be i Kommunikat ionsprob lemen ausgeführt werden
Change un i t address Here the se lected un i ts can be sh i f ted manual ly into a new group. I t the dev ice name and - type ind icated wi th the current group af f i l ia t ion and the ser ia l -number in th is group. F i rs t the new group (new Group) se lect , then af terwards a f ree un i t number (new uni t ) se lect and wi th ”OK” conf i rm.
P re fe rences Here one can make and change ind iv idua l program set t ings. This instruction is to be found with MAC OSX under the menu option EL-Skyport!
check a lso Preferences
The group organization into the EL-Skyport software is notidentical to f lash group at the EL-Skyport modules!
p ic tu re 21
p i c tu re 22
p i c tu re 23
p i c tu re 24

B e n u t z e r h a n d b u c h E l i n c h r o m EL-Skyport E R S 2 . 0
P a g e 1 6 o f 1 6
View Show EL-RX pane l s Here one can act ivate or deact ivate the v iew of the EL-RX panel windows. Depending upon se lect ion in the nav igator a l l dev ices in the Stud io or in the se lected group or as s ing le windows are ind icated. In the window t i t le the dev ice name (1) i s d isp layed, and at the lower edge of window the type of dev ice (2) i s ind icated. With the button (3) the main window is shown or h idden.
A r range EL-RX pane l s Here one can arrange the pane l windows of a l l EL-RX un i ts le f t , r ight , above or down. The sequence is accord ing to the assoc iated dev ice addresses.
S ta tus bar The Statusbar i s at the lower edge of window and shows d i f ferent program informat ion. To i t be long f rom lef t to r ight:
• Status for USB RX communicat ion port (open/c losed) • „P lug and P lay“ PnP Status • Progress bar for program commands • Act ive Stud io- and f requency channel • act ive s tud io f lash un i ts • Navigator se lect ion • Language at t i tude
Too lbar The Toolbar i s at the upper edge of window and makes poss ib le by mouse-c l i cks fast access to cer ta in funct ions.
In fobar The informat ion pane l i s over the s tatusbar at the lower edge of window and shows a short descr ipt ion of a l l funct ions and e lements in the program. The short ass is tance depends on the pos i t ion of the mouse cursor and the contro l e lement which is under i t .
Opt im ise Here the s ize of the main window is opt imised.
Las t V iew Here the last v iew of the main window is repa i red.
M in im ize This funct ion min imizes the main window on the most important e lements .
Show ERS T ips Here one can let add i t iona l he lp in format ion d i rect ly at the mouse cursor .
He lp Here one can ind icate the EL-Skyport to ass is tance up and ca l l program informat ion.
1
3
2
p ic tu re 25