
User Guide: EQ8096 High Density Edge QAM (Sv 6.2.0>) guide2.pdfUSER GUIDE EQ8096 High Density Edge...
34
ST.US.E10243.2 ENGLISH (UK) www.tandbergtv.com EQ8096 High Density Edge QAM USER GUIDE EQ8096 High Density Edge QAM Software Version 6.2.0 (and later)
Transcript of User Guide: EQ8096 High Density Edge QAM (Sv 6.2.0>) guide2.pdfUSER GUIDE EQ8096 High Density Edge...

ST.US.E10243.2
ENGLISH (UK)
www.tandbergtv.com
EQ8096 High Density Edge QAM
USER GUIDE
EQ8096 High Density Edge QAM
Software Version 6.2.0
(and later)

EQ8096 High Density Edge QAM
2
Trademarks
Ethernet is a registered trademark of Xerox Corporation.
Customer Services
Europe, Middle East Tel: +44 (0) 23 8048 4455 and Africa: Fax: +44 (0) 23 8048 4467 [email protected]
Americas: Tel: +888 671 1268 (US and Canada) Tel: +678 812 6255 (Outside of mainland US) [email protected]
China: Tel: +86 10 6856 0260 (Beijing) Tel: +852 2530 3215 (Hong Kong) [email protected]
Australia/NZ: Tel: +612 8923 0450 [email protected]
Internet Address: http://www.tandbergtv.com
Technical Training
International: Tel: +44 (0) 23 8048 4229 Fax: +44 (0) 23 8048 4467 [email protected]
This document and the information contained in it is the property of TANDBERG Television Ltd and may be the subject of patents pending and granted. It must not be used for commercial purposes nor copied, disclosed, reproduced, stored in a retrieval system or transmitted in any form or by any means (electronic, mechanical, photocopying, recording or otherwise), whether in whole or in part, without TANDBERG Television’s prior written agreement. © 2008 - 2009 TANDBERG Television Ltd.
All rights reserved.
Issue 2 first published in 2009 by: TANDBERG Television Ltd Registered Address: Unit 2 Strategic Park, Comines Way, Hedge End, Southampton, Hampshire, SO30 4DA United Kingdom Registered Company Number 03695535

EQ8096 High Density Edge QAM
3
Contents
1 Who Should Use This User Guide? ...........................................................................5 1.1 Read This First...............................................................................................................5 1.2 What Equipment is covered by This User Guide?.........................................................5 1.3 Card Assignment............................................................................................................6
2 Installing the Equipment .............................................................................................7 2.1 Introduction ....................................................................................................................7 2.2 Operating Voltage ..........................................................................................................7 2.3 Power Cable and Earthing .............................................................................................7 2.4 Connecting Up the EQ8096 ...........................................................................................8 2.5 Connecting the EQ8096 to the Power Supply ...............................................................9
3 Configuring the EQ8096 ............................................................................................11 3.1 Introduction ..................................................................................................................11 3.2 Establishing a Connection ...........................................................................................11 3.3 Configuration via the Web Pages ................................................................................13
4 Web Page Menus........................................................................................................16 4.1 Top Level .....................................................................................................................16 4.2 Status ...........................................................................................................................17 4.3 Device Info ...................................................................................................................17 4.4 Data Port Settings ........................................................................................................20 4.5 Modulation Settings......................................................................................................21 4.6 TS Construction Page Options ....................................................................................23 4.7 Engineering Tabbed Pages .........................................................................................27
5 Alarms .........................................................................................................................28 5.1 View Active Alarm Table ..............................................................................................28 5.2 Configure Active Alarms ..............................................................................................28 5.3 Alarm............................................................................................................................28
6 RF Output Channel Mappings / Allocations............................................................29 6.1 Overview ......................................................................................................................29 6.2 Standard Mapping........................................................................................................29 6.3 Distributed Mapping .....................................................................................................30 6.4 ‘6 Card’ Mapping ..........................................................................................................30
7 Materials Declarations...............................................................................................31

EQ8096 High Density Edge QAM
4
7.1 Overview ......................................................................................................................31 7.2 For the European Union...............................................................................................31 7.3 For China .....................................................................................................................31
8 Disposal of this Equipment.......................................................................................32 8.1 General.........................................................................................................................32 8.2 For the European Union...............................................................................................32
9 Recycling ....................................................................................................................33
10 Lithium Batteries........................................................................................................34 List of Figures Figure 1.1: Slot Numbering (Rear View)..................................................................................6 Figure 2.1: EQ8096 Rear Panel Component Parts .................................................................8 Figure 4.1: Web Tabbed Page ..............................................................................................16 Figure 4.2: Status Web Page.................................................................................................17 Figure 4.3: Device Info Tabbed Page....................................................................................17 Figure 4.4: Global Control Port Settings................................................................................18 Figure 4.5: Individual Control Port Settings...........................................................................19 Figure 4.6: Data Port Settings ...............................................................................................20 Figure 4.7: Modulator Tabbed Page......................................................................................21 Figure 4.8: Modulator Card Web Page..................................................................................21 Figure 4.9: RF Output Web Page ..........................................................................................22 Figure 4.10: TS Construction Tabbed Web Page .................................................................23 Figure 4.11: PID Range Selection .........................................................................................24 Figure 4.12: Output Transport Stream ID..............................................................................24 Figure 4.13: Transport Stream Component Set-up (RPC mode)..........................................25 Figure 4.14: Transport Stream (Non-RPC) Component Set-up ............................................25 Figure 4.15: Modify Program Count Set-up...........................................................................26 Figure 4.16: Transport Stream (Broadcast) Component Set-up ...........................................27 Figure 5.1: Alarms Web Page ...............................................................................................28 Figure 5.2: Active Alarm List..................................................................................................28
List of Tables Table 1.1: Equipment Model Descriptions...............................................................................5 Table 1.2: Card Assignment ....................................................................................................6 Table 2.1: Rear Panel Items....................................................................................................8 Table 2.2: AC Fuse Type and Rating ......................................................................................9 Table 6.1: Mapping for ’Standard’ Mode. ..............................................................................29 Table 6.2: Channel Allocations for ’Standard’ Mode (Example Slot 1). ................................29 Table 6.3: Mapping for ‘Distributed Input’ Mode (Example Slot 1)........................................30 Table 6.4: Channel Allocations for ‘Distributed Input’ Mode (Example Slot 1)......................30 Table 6.5: Channel Allocations for ‘6 card’ Mode (Example Slot 1). .....................................30

EQ8096 High Density Edge QAM
5
1 Who Should Use This User Guide?
1.1 Read This First
This User Guide is written for users of the EQ8096 High Density Edge QAM to assist in installation and operation. It is not intended to be a detailed source of information. This can be found in the Reference Guide companion document, which is issued on CD.
WARNING Do not remove the covers of this equipment. Hazardous voltages are present within this equipment and may be exposed if the covers are removed. Only TANDBERG Television trained and approved service engineers are permitted to service this equipment.
CAUTION Unauthorised maintenance or the use of non-approved replacements may affect the equipment specification and invalidate any warranties.
1.2 What Equipment is covered by This User Guide?
This User Guide covers the EQ8096 High Density Edge QAM, which is a digital cable product for use as a regional broadcast modulator.
The EQ8096 supports four redundant data input interfaces, eight (4+4) 1000BaseT Gigabit Ethernet port (fitted as standard) or eight (4+4) SFP Mini-GBIC option slots. Full Gigabit line rate is supported.
Table 1.1: Equipment Model Descriptions
Marketing Code Description Comments
EQ8096/BAS Base Unit Input card, single PSU, chassis, RJ-45 data input
EQ8096/HWO/12QAM 12-channel QAM Modulator One assembly provides up to 12 channels
EQ6800/SWO/DVBCA DVB Conditional Access and Scrambling
License key enabled option. Must be included at time of unit order if required.
EQ8096/HWO/DPS Dual PSUs
EQ8096/HWO/DTI DOCSIS Timing Interface Client daughter card
EQ8096/BAS/SFP Base unit, SFP Base unit with SFP data connection interface
EQ8096 High Density Edge QAM
6
Marketing Code Description Comments
EQ8096/BAS/48V Base Unit DC I/P Card, Simple PSU RJ-45, 48 V dc PSU
EQ8096/BAS/SFP/48V Base Unit DC, SFP I/P Card, Single PSU SFP, 48 V dc
EQ8096/HWO/DPS/48V Dual PSU 48 V dc (See Description)
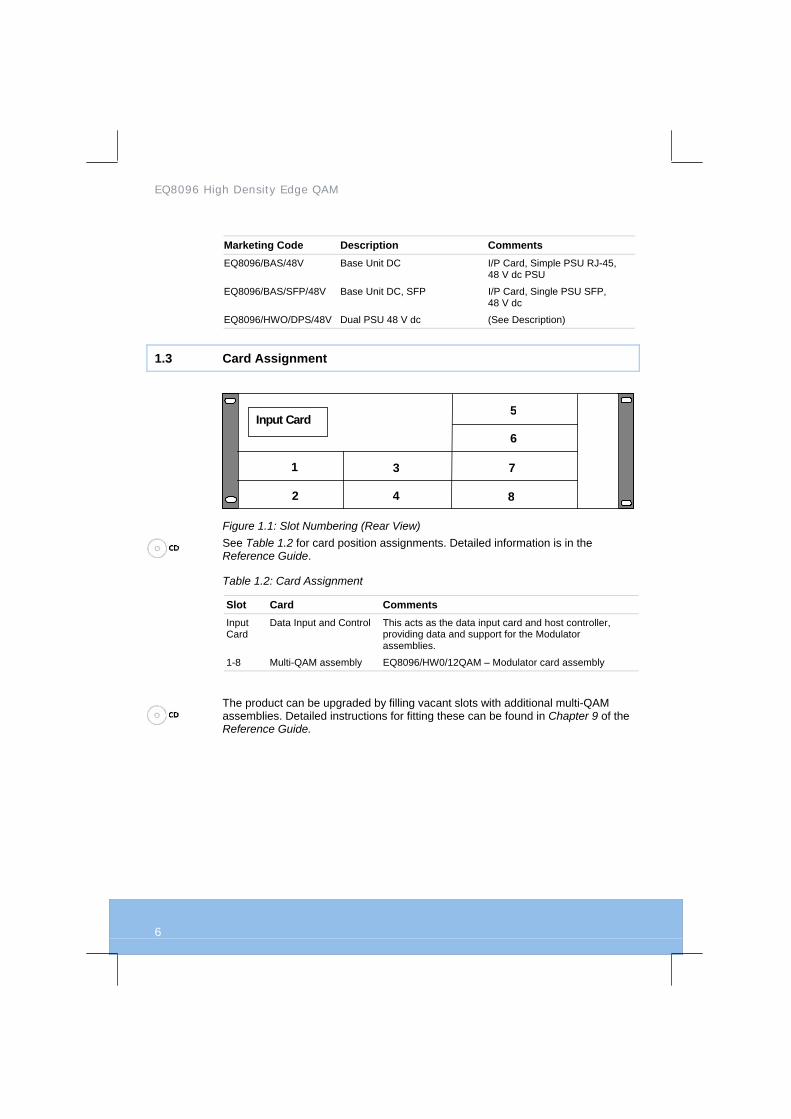
1.3 Card Assignment
Input Card
1
2
3
4
5
6
7
8
Figure 1.1: Slot Numbering (Rear View) See Table 1.2 for card position assignments. Detailed information is in the Reference Guide.
Table 1.2: Card Assignment
Slot Card Comments
Input Card
Data Input and Control This acts as the data input card and host controller, providing data and support for the Modulator assemblies.
1-8 Multi-QAM assembly EQ8096/HW0/12QAM – Modulator card assembly
The product can be upgraded by filling vacant slots with additional multi-QAM assemblies. Detailed instructions for fitting these can be found in Chapter 9 of the Reference Guide.

EQ8096 High Density Edge QAM
7
2 Installing the Equipment
2.1 Introduction
For best performance and reliability follow the instructions for site requirements and installation in the Reference Guide and only use installation accessories recommended by the manufacturers.
2.2 Operating Voltage
CAUTION This product should be operated only from the type of power source indicated on the marking label. If you are not sure of the type of power supply to your business, consult a qualified electrical engineer or your local power company.
NOTE
Refer to the Reference Guide for details of the colour codes used on the mains leads.
See Table 2.2 for fuse information and also the Reference Guide for a full power supply specification.
See Reference Guide, Annex B, Technical Specification for a full power supply specification. There are no links or switches to be altered for operation from different ac supplies.
2.3 Power Cable and Earthing
Check that the power cable is suitable for the country in which the unit is to be used.
WARNINGS 1. The Technical Earth is not a Protective earth for electric
shock protection. 2. This unit must be correctly earthed through the moulded plug
supplied. If the local mains supply does not have an earth conductor do not connect the unit. Contact Customer Services for advice.
3. Before connecting the unit to the supply, check the supply requirements in Annex B of the Reference Guide.

EQ8096 High Density Edge QAM
8
2.4 Connecting Up the EQ8096
Always use the specified cables supplied for signal integrity and compliance with EMC requirements (see the Reference Guide).
Figure 2.1: EQ8096 Rear Panel Component Parts
Table 2.1: Rear Panel Items
Type of Connector
Description
1000BaseT Data Inputs
The Gigabit Ethernet connections are RJ-45 connectors (EQ8096/BAS) and are auto-speed sensing between 10, 100 and 1000 Mbps. They can also be forced to 100 or 1000 Full Duplex.
On units ordered as EQ8096/BAS/SFP, the Gigabit Ethernet connections are Small Form Factor Pluggable (SFP) modules. These can only operate at 1000BaseT Full Duplex.
RF Output Ports The EQ8096 supports up to 96 RF output ports using F-type connectors. Each output port supports up to 4 adjacent RF channels. The RF output provides a user configurable parameter to control the output.
RS-232 This is an RS-232 control port for Engineering Use and is configured as a DTE device. It can be used for the initial setting up of the unit’s IP address.
CA Control Port Options
The EQ8096 supports two redundant Ethernet 10/100BaseT control ports via an RJ-45 connector mounted on the rear panel
Status Indicator An LED that provides an indication of the alarm status.
AC Input Connection for the mains input.
Technical Earth Connect the Modulator's Technical earth to a suitable point.
Data port 1-4 Primary & Secondary
ASI out
E8096/HWO/12QAM RF1-RF3 12 Channels
Status Indicator for RF Technical Earth
Control DOCSIS Timing Interface
Mains Connectors
RS-232 Serial
Conditional Access

EQ8096 High Density Edge QAM
9
NOTES
1. The unit is configured to receive data on either the SFP inputs or the copper RJ-45 input. Automatic switching between different types of input is not supported.
2. SFP modules are not included as standard. 3. Refer to the Reference Guide for further information.
2.5 Connecting the EQ8096 to the Power Supply
2.5.1 General Information
WARNINGS 1. Do not overload wall outlets and extension cords as this can
result in a risk of fire or electric shock. 2. As no mains switch is fitted to this unit, ensure the local
power supply is switched OFF before connecting the supply cord.
3. The unit is not fitted with an on/off switch. Ensure that the socket-outlet is installed near the equipment so that it is easily accessible. Failure to isolate the equipment properly may cause a safety hazard.
The EQ8096 can be fitted with dual power supplies each with a separate mains connector. The equipment load is automatically split between the two power supplies (if option fitted). If one power supply fails, the full load will be transferred to the remaining serviceable unit allowing the faulty unit to be replaced without switching off the equipment.
2.5.2 To Connect the Unit to the Local AC Power Supply:
1. Ensure the local ac supply is switched OFF.
2. Ensure the correct fuse type and rating has been fitted to both the equipment and the ac power cables.
3. Connect the ac power leads to the EQ8096 mains input connector and then to the local mains supply.
Table 2.2: AC Fuse Type and Rating
Power Supply Fuse Type and Rating 100-240 V ac IEC/EN 60127-2 Sheet 5 Bussmann
S505/Littelfuse 215 5 A, 250 V T HBC

EQ8096 High Density Edge QAM
10
NOTE
Refer to the Reference Guide for all power supply, fuse replacement, safety, EMC information and operating conditions.
2.5.3 DC Power Supply
NOTE
Only models EQ8096/BAS/48V, EQ8096/BAS/SFP/48V and EQ8096/HWO/DPS/48V use a dc power supply.
CAUTION This product should be operated only from the type of power source indicated on the marking label. If you are not sure of the type of power supply to your business, consult a qualified electrical engineer.
This product uses a –48 V dc power supply source (see Reference Guide - Annex B, Technical Specification) for a full power supply specification.

EQ8096 High Density Edge QAM
11
3 Configuring the EQ8096
3.1 Introduction
The EQ8096 is configured via a web browser with the IP Address set using the front panel controls/display. Once configured and connected, the unit operates without user intervention.
All user control parameters are stored in non-volatile memory to allow automatic restoration from power-up.
For information on parameters not mentioned refer to the Reference Guide.
3.2 Establishing a Connection
3.2.1 Assigning an IP Address
All EQ8096 units are shipped with an invalid Control Port IP address of 0.0.0.0. This must be configured to a local valid IP address before the product can be fully configured using the Front Panel keypad (see Reference Guide E10243.2, Chapter 2, Table 2.6) or via the RS-232 serial interface as follows:
Connect a cable between the Host Status port on the EQ8096 (9-way male D-Type) and a local PC using a straight through RS-232 cable.
Using a suitable terminal emulator on the PC set up the communication parameters.
NOTE
The EQ8096 serial port communications defaults to 115200 bit/s, 8 bit data, no parity, 1 stop bit.
Power cycle the EQ8096. The terminal emulator will display a boot sequence that will show the software version and control port IP settings. If the IP address is still at the factory default of 0.0.0.0 for all 4 ports, then the user will be required to assign a valid address to any of these.
Using the terminal, the user should enter the local IP address allocated to the unit using the command IPn xxx.xxx.xxx.xxx. (e.g. IP3 172.17.124.3) and then press return. ‘n’ is the control port index (1-4) as outlined below:
1. CA Main 2. CA Redundant 3. Control Main 4. Control Redundant

EQ8096 High Density Edge QAM
12
The IP Settings are effective immediately.
NOTE…
Since the default Gateway IP address is not set in the unit, the user will only be able to establish an Ethernet connection from an IP address on the same Sub-net. See Section 3.2.2 Changing the IP Address for description of how to set Subnet mask + gateway address.
3.2.2 Changing the IP Address
If the user accidentally sets the local address incorrectly, the EQ8096 may not be accessible via the browser. The IP address can be changed using the Front Panel keypad (see Table 2.6 in Reference Guide E10243.2) or using the following procedure:
Open a terminal emulation application on the PC.
NOTE
The EQ8096 serial port communications defaults to 115200 bit/s, 8 bit data, no parity, 1 stop bit.
Power cycle the EQ8096. The terminal emulator will display a boot sequence that gives the current control port settings.
Using the terminal, the user should enter the local IP address allocated to the unit using the command IPn xxx.xxx.xxx.xxx (e.g. IP 172.17.124.3) and then press return.
If required, the user may enter the local IP subnet mask allocated to the unit using the command IPMASKn xxx.xxx.xxx.xxx (e.g. IPMASK 255.255.0.0) and then press return.
If required, the user may enter the local IP gateway mask allocated to the unit using the command IPGATEWAY xxx.xxx.xxx.xxx (e.g. IPGATEWAY 192.168.63.254) and then press return.
The new IP settings will become active immediately. ‘n’ is the control port index (1-4) as outlined below: 1. CA Main 2. CA Redundant 3. Control Main 4. Control Redundant
The IP Settings are effective immediately.

EQ8096 High Density Edge QAM
13
3.2.3 Opening the Web Browser
Once the EQ8096 IP address has been activated, the user can open a web browser application and enter the following URL address: http://assigned IP address (where assigned IP address is the address set by the user).
This gives access to the web pages described in Section 4.
NOTE
If connecting through a LAN ensure that the option to use proxy server is switched off.
3.3 Configuration via the Web Pages
Once connected via the web browser interface the next steps in the installation procedure depend on the system in which the unit is being deployed. The following installation procedure assumes a simple laboratory system whereby the A/V source is connected directly to the EQ8096 and the EQ8096 is being controlled via its web interface.
If necessary configure the control port using the Control Port Settings option on the Device Info tabbed page (see Section 4.3.3).
NOTE
If the IP address is changed contact will be lost immediately.
Configure the data port using the Data Port Setting tab (see Section 4.4).
NOTE
If the control and data ports are configured to be on the same subnet they must be physically connected to the same network. Problems will occur where they are defined as being on the same subnet but there is a live connection to the data port that is not physically connected to the indicated network. This will cause the control port to “lock up”. In the event of this happening remove all data port connections and power cycle the unit.
The EQ8096 utilizes user defined UDP Ports along with optional multicast addresses (the destination or receiving address that streams are forwarded to) to construct each output Transport Stream. Services in the specified UDP flow are included in the output Transport Stream.

EQ8096 High Density Edge QAM
14
Further options for defining the structure of the output Transport Stream include user defined PID ranges for the PMT, ES and ECM for each output stream. The user can also set a Transport Stream ID for each output Transport Stream.
An optional MPTS mode can be selected, whereby a single MPTS input flow with a maximum bit-rate of 51.25 Mbps is passed through to the selected output either without any filtering or with only unreferenced PIDs filtered.
The following steps indicate the procedure to construct the output Transport Streams (TS Construction). See Section 4 for detailed descriptions of web page parameter configuration.
Set the output TSID as required.
The user can define PID ranges for the PMT, ES and ECM (where applicable). If not changed the default values displayed will be used.
For each output TS set the multicast address and UDP port number for each flow that is required to appear in that output stream.
A single MPTS per output can be passed through the unit with no filtering or re-mapping by selecting MPTS unfiltered mode. When this option is selected additional SPTS A/V flows cannot be added to the stream.
Configure the source to begin serving flows to the data port IP address or multicast addresses and UDP port numbers defined above.
Configure the global modulator settings using the Modulation Settings tab (see Section 4.5).
Configure each of the individual RF outputs by selecting the RF port on the picture on the Device Info tab or using the directory structure under the Modulation Settings tab.
The unit should now be locked to the input and generating valid QAM modulated Transport Streams.
NOTE
The user should ensure that the total bit-rate of the flows for each output Transport Stream does not exceed the available QAM bandwidth (determined by the global modulation settings and displayed on each of the modulation settings pages).
If Conditional Access is required and the option is available on the web pages this should now be configured.
CA control on dedicated ports cannot share with the unit control and monitoring port. If CA control is required on a separate network, enable the separate CA port and configure the IP settings as required. In this case the CA control will be via the 1000BaseT Data connector. The input stream should then be connected to the primary data port SFP GBIC 1.

EQ8096 High Density Edge QAM
15
NOTE
The EQ8096 supports service level scrambling only.

EQ8096 High Density Edge QAM
16
4 Web Page Menus
4.1 Top Level
The menu structure comprises a number of tabbed pages. Each page corresponds to a control or monitoring function of the EQ8096. Modulator Card 1-8…See Section 4.5.2
Menu
Set Unit Date/Time…………..See Section 4.3.2
Data Port Settings See Section 4.4
Control Port Settings……….. See Section 4.3.3Alarms…………………………See Section 4.3.4Trap Destination Table………See Section 4.3.5Version Information…………..See Section 4.3.6
Event Log……………………..See Se ction 4.3 .7 Set Unit Na me………………..See Section 4.3.8
Main tabbed page……………See Section 4.3.1 Device Info See Section 4.3
Status See Section 4.2
Main tabbed page……………See Section 4.5.1 Modulator Card 1-8…………. See Section 4.5.2 RF Outputs……………………See Section 4.5.3
PID Range Selection…………..See Section 4.6.1
Engineering See Section 4.7
Serial Number Alarm…………………..See information contained in Reference Guide Software Watchdog……………………See information contained in Reference Guide Debug Event Flags……………………See information contained in Reference Guide Unit Reset………………………………See information contained in Reference Guide Advanced Parameter Functions……..See information contained in Reference Guide
Help
Modulation Settings See Section 4.5
TS Construction See Section 4.6
Transport Stream (TSn)………..See Section 4.6.3Output Transport Stream ID…..See Section 4.6.2
Set Authentication Parameters...See Section 4.3.9Set License Key………………See Section 4.3.10
Figure 4.1: Web Tabbed Page

EQ8096 High Density Edge QAM
17
4.2 Status
This is the start-up web page and shows the current status of the unit.
The serial number, user defined unit name (if entered) and system up time are displayed, as well as any unmasked alarm conditions.
Figure 4.2: Status Web Page
For information regarding severity levels and alarm IDs, see the Reference Guide.
4.3 Device Info
4.3.1 Main Tabbed Page
Figure 4.4 shows the main tabbed web page for the Device Information. This gives access to further tabbed pages.
Figure 4.3: Device Info Tabbed Page

EQ8096 High Density Edge QAM
18
NOTE
This page does not automatically refresh itself. If left displayed the initial values in the time form remain unchanged as time passes, and will correspond to the page update timestamp in the top right hand corner until the operator enters new values, or uses the web page refresh button to get the current values from the unit.
4.3.2 Set Unit Date / Time
For information regarding setting the date and time, see the Reference Guide.
NOTE
This page does not automatically refresh itself. If left displayed the initial values in the time form remain unchanged as time passes, and will correspond to the page update timestamp in the top right hand corner until the operator enters new values, or uses the web page refresh button to get the current values from the unit.
4.3.3 Control Port Settings
To review the Control Port settings, on the Device Info tabbed page, click Control Port Settings to display the web page shown in Figure 4.4. The Top Level menu offers control for the Default Gateway (for control/management) and for specifying ARP request interval.
Figure 4.4: Global Control Port Settings
Each of the 4 ports can have their IP address and Mask changed. The link status of the port is also shown in Figure 4.5

EQ8096 High Density Edge QAM
19
Figure 4.5: Individual Control Port Settings
CAUTION If the Main Control Port IP address is changed, the new address will not take effect until the unit is power cycled. The Control Port will remain on the original IP address until this action is performed.
4.3.4 Alarms
The EQ8096 software provides functionality for handling, logging and displaying application alarms. All active alarms are displayed on the start-up Status page (see Section 4.2). The Event Log is a separate option on the Device Info tabbed page (see Section 4.3.7).
For information on the Alarms web pages, see Section 5 and Reference Guide.
4.3.5 Trap Destination Table
For information on the Trap Destination Table, see the Reference Guide.
4.3.6 Version Information
Provides version details and build configuration of the unit. For further information, see the Reference Guide.
4.3.7 Event Log
System events are sent to an event log and are prioritised to permit filtering. Logged entries are time and date stamped, and stored in a volatile file system.

EQ8096 High Density Edge QAM
20
4.3.8 Set Unit Name
A 32-bit alphanumeric name for the unit can be set. This is displayed on the status page.
4.3.9 Set Authentication parameters
When enabled (License Key required), the operator can specify the Username and Password to enable HTTP access and control of the EQ8096.
4.3.10 License Key
Can be used to input a License Key generated by TANDBERG Television, based on the unit’s Unique Serial Number.
4.4 Data Port Settings
The Data Port settings can be reviewed. Click Data Port Settings tabbed page to display the web page illustrated in Figure 4.6.
Set the required Data Port parameters: Port IP Address and Subnet mask. MAC checksum checking can be disabled if required.
Figure 4.6: Data Port Settings
NOTES
1. The user configurable parameter that selects the required input is stored so that the correct configuration is restored on power up.
2. SFP modules are not included as standard. Refer to the Reference Guide for further information.

EQ8096 High Density Edge QAM
21
4.5 Modulation Settings
4.5.1 Main Tabbed Page
This tabbed page gives access to the settings affecting the modulator.
Figure 4.7: Modulator Tabbed Page
4.5.2 Modulator Card 1-8
The status of each RF output can be reviewed on these web pages. Click on the appropriate Modulator Card to display the web page illustrated in Figure 4.8.
Figure 4.8: Modulator Card Web Page

EQ8096 High Density Edge QAM
22
4.5.3 RF Outputs
The RF Output settings can be reviewed for each physical connector. Click Output 1, 2 or 3 to display the web page illustrated in Figure 4.9.
Figure 4.9: RF Output Web Page
The Output Mode, Centre Frequency and Output Level for each RF Output can be set individually.
The Output Mode allows ON, OFF, TEST, DUAL TONE to be selected.
The contents of the enabled Transport Streams can be displayed by clicking on the appropriate link at the foot of the page.
When the output (i.e. Output Mode) is disabled, there is no output from that connector.
When the output is enabled, Transport Streams are mapped to a specific channel on a particular RF output. These are defined in Table 6.1: Mapping for ’Standard’ Mode.

EQ8096 High Density Edge QAM
23
NOTES
1. There is no support for individually setting the output power of each individual channel in a group.
2. The centre frequency is the frequency at the centre of the lower channel.
3. Transport Streams are built up using information under TS Construction.
4. The output port can be configured to source a sine-wave test signal at the frequency and output level configured for that output.
4.6 TS Construction Page Options
Figure 4.12 shows the TS Construction tabbed page. Options on this page allow the output Transport Streams to be configured.
Figure 4.10: TS Construction Tabbed Web Page
4.6.1 PID Range Selection
This provides the user with the option to specify the PID remapping mode to be used for the PMT, ES and ECM (where applicable) for each output Transport Stream. Two modes are available:
Range remapping
Cyclic remapping

EQ8096 High Density Edge QAM
24
If no value is entered the default value that appears on the GUI will be used.
Figure 4.11: PID Range Selection
4.6.2 Output Transport Stream ID
Each generated output Transport Stream can be given an identifier. This value is set using the Transport Stream ID as required. Values can be set in the range 0 – 65535. This value appears in the generated output PAT.
If no user value is entered the default value that appears on the GUI will be used.
Figure 4.12: Output Transport Stream ID
4.6.3 Transport Streams (TSn)
Configure the content of each Transport Stream by entering a multicast (or unicast) address and UDP port number for each of the input flows to be included in the output TS.
The status of each of the UDP input ports is shown for each flow.

EQ8096 High Density Edge QAM
25
A summary of the output rate available (defined by the modulation settings), actual component rate and the amount of free space available (null packets) is also displayed for information.
Figure 4.13: Transport Stream Component Set-up (RPC mode)
Figure 4.14: Transport Stream (Non-RPC) Component Set-up
Stream Mode Each SPTS input can be individually set for processing in any of 3 possible modes:
Auto – the EQ8096 will employ the automatic PID remap mode chosen in Section 4.6.1.

EQ8096 High Density Edge QAM
26
Unfiltered – the EQ8096 will pass through ALL PIDs on the flow (including PSI), unmodified. This mode should be used when multiplexing OOB data or SI traffic.
No Remap – the EQ8096 will process the stream as normal but no remapping will be performed.
Program Number Mode The program number allocation can be programmed into any of 3 possible modes:
Fixed – the EQ8096 will change the output Program number to be the same as the Program Index as shown on the GUI (1-32 or 1-n when in extended mode).
Pass Thru – the EQ8096 will simply pass the input Program number through to the Output Transport Stream.
User Defined – the operator can specify the Program number for each service in the Output Transport Stream.
Modify Program Count By default, each of the 96 Output Transport Streams supports the inclusion of up to 32 services. For denser Transport Streams, it is possible to allocate up to 64 services by entering the Modify Program Count page.
Figure 4.15: Modify Program Count Set-up
Selecting Between VOD/SDV and Broadcast Mode For each transport stream output it is possible to select a single MPTS input flow to appear at the output. The maximum bit-rate of the input MPTS is 51.25 Mbps.
When the QAM Channel is to be used for processing a single MPTS then ‘Unfiltered Single MPTS Input’ should be Enabled. The appropriate mode should then be chosen (Unfiltered, NoRemap, SI Drop).

EQ8096 High Density Edge QAM
27
Figure 4.16: Transport Stream (Broadcast) Component Set-up
Selecting Between SDV and Standard Mode The EQ8096 can be used in 2 environments; standard (manual/SNMP) control or using an SDV Server/ERM with the RPC protocol. This can be selected under the Engineering Tabbed Page, See Reference Guide (Chapter 3, Section 3.3.8). The unit must be rebooted after this selection is made. The TS Construction Tabbed Page will appear more informative and does not permit user entry of parameters.
NOTE
The software supports up to 64 programs/SPTSs per Transport Stream.
4.7 Engineering Tabbed Pages
See the Reference Guide for information on the Engineering tabbed page.

EQ8096 High Density Edge QAM
28
5 Alarms
5.1 View Active Alarm Table
The EQ8096 software provides functionality for handling, logging and displaying application alarms.
Figure 5.1: Alarms Web Page
5.2 Configure Active Alarms
The EQ8096 software provides the facility to mask any internal alarm and allocate the alarm severity.
Figure 5.2: Active Alarm List
5.3 Alarm
See the Reference Guide for descriptions of the alarms components.

EQ8096 High Density Edge QAM
29
6 RF Output Channel Mappings / Allocations
6.1 Overview
The EQ8096 supports 96 total QAM channels, spread across a maximum of 8 Output Cards. Each Output Card supports a maximum of 12 channels.
The EQ8096 can operate in 3 distinct mapping modes, depending on the installation requirements:
Standard (Direct) Mapping
Distributed (Striped) Mapping
‘6 Card’ Mapping The Mapping Mode can be configured from the 'Debug Event Flags’ menu under the 'Engineering' tab on the Web GUI. The default is Distributed and Six card mode DISABLED (Standard Mapping).
6.2 Standard Mapping
When configured in standard mapping mode (default), there is a direct relationship between input data ports and Output Cards and this can be seen in Table 6.1.
Table 6.1: Mapping for ’Standard’ Mode.
Data port Output Card Slot Transport Streams P1/S1 1, 2 1-24
P2/S2 3, 4 25-48
P3/S3 5, 6 49-72
P4/S4 7, 8 73-96
The Transport Streams are mapped logically as defined in Table 6.2. Channel designations defined in the tables are as seen from the rear of the unit.
Table 6.2: Channel Allocations for ’Standard’ Mode (Example Slot 1).
Output 1
Left most connector 2 3
Right most connector
Channel 1 2 3 4 1 2 3 4 1 2 3 4
Transport Stream
TS 1
TS 2
TS 3
TS 4
TS 5
TS 6
TS 7
TS 8
TS 9
TS 10
TS 11
TS 12

EQ8096 High Density Edge QAM
30
6.3 Distributed Mapping
Distributed mapping mode can be configured when installed within an RF redundant network. This is often referred to as ‘QAM Striping’.
The Data port (1-4) is directly mapped to the channel (1-4) on each spigot. Each data port covers all 8 Output cards therefore and the Transport Stream increments across RF connectors/spigots (1 -24).
Table 6.3: Mapping for ‘Distributed Input’ Mode (Example Slot 1).
Data port Spigot Channel Transport Streams P1/S1 1 1-24
P2/S2 2 25-48
P3/S3 3 49-72
P4/S4 4 73-96
Table 6.4: Channel Allocations for ‘Distributed Input’ Mode (Example Slot 1).
Output 1
Left most connector
2 3
Right most connector
Channel 1 2 3 4 1 2 3 4 1 2 3 4
Transport Stream
TS 1
TS 25
TS 49
TS 73
TS 2
TS 26
TS 50
TS 74
TS 3
TS 27
TS 51
TS 75
6.4 ‘6 Card’ Mapping
Operating in ‘6 Card mode’ configures the EQ8096 into a data efficient Input/Output mapping for use when 4 Annex A (8 MHz) channels are being used per spigot. When in this configuration, maximum bandwidth can be achieved using only 6 Output cards installed (72 QAMs).
Table 6.5: Channel Allocations for ‘6 card’ Mode (Example Slot 1).
Data Port Output Card Slot Transport Streams P1/S1 1, 2 1-18
P2/S2 2, 3 19-36
P3/S3 4, 5 37-54
P4/S4 5, 6 55-72

EQ8096 High Density Edge QAM
31
7 Materials Declarations
7.1 Overview
TANDBERG Television products are designed and manufactured in keeping with good environmental practise. Our component and materials selection policy prohibits the use of a range of potentially hazardous materials. In addition, we comply with relevant environmental legislation.
7.2 For the European Union
For product sold into the EU after 1st July 2006, we comply with the EU RoHS Directive. We also comply with the WEEE Directive.
7.3 For China
For product sold into China after 1st March 2007, we comply with the “Administrative Measure on the Control of Pollution by Electronic Information Products”. In the first stage of this legislation, content of six hazardous materials has to be declared together with a statement of the “Environmentally Friendly Use Period (EFUP)”: the time the product can be used in normal service life without leaking the hazardous materials. TANDBERG Television expects the normal use environment to be in an equipment room at controlled temperatures (around 22°C) with moderate humidity (around 60%) and clean air, near sea level, not subject to vibration or shock.
Where TANDBERG Television product contains potentially hazardous materials, this is indicated on the product by the appropriate symbol containing the EFUP. For TANDBERG Television products, the hazardous material content is limited to lead (Pb) in some solders. This is extremely stable in normal use and the EFUP is taken as 50 years, by comparison with the EFUP given for Digital Exchange/Switching Platform in equipment in Appendix A of “General Rule of Environment-Friendly Use Period of Electronic Information Products”. This is indicated by the product marking:
It is assumed that while the product is in normal use, any batteries associated with real-time clocks or battery-backed RAM will be replaced at the regular intervals.
The EFUP relates only to the environmental impact of the product in normal use, it does not imply that the product will continue to be supported for 50 years.
50

EQ8096 High Density Edge QAM
32
8 Disposal of this Equipment
8.1 General
Dispose of this equipment safely at the end of its life. Local codes and/or environmental restrictions may affect its disposal. Regulations, policies and/or environmental restrictions differ throughout the world. Contact your local jurisdiction or local authority for specific advice on disposal.
8.2 For the European Union
"This product is subject to the EU Directive 2002/96/EC on Waste Electrical and Electronic Equipment (WEEE) and should not be disposed of as unsorted municipal waste."

EQ8096 High Density Edge QAM
33
9 Recycling
TANDBERG Television provides assistance to customers and recyclers through our web site http://www.tandbergtv.com/ProductRecycling.ink Please contact TANDBERG Television’s customer services for assistance with recycling if this site does not show the information you require.
Where it is not possible to return the product to TANDBERG Television or its agents for recycling, the following general information may be of assistance:
Before attempting disassembly, ensure the product is completely disconnected from power and signal connections.
All major parts are marked or labelled to show their material content.
Depending on the date of manufacture, this product may contain lead in solder.
Some circuit boards may contain battery-backed memory devices.

EQ8096 High Density Edge QAM
34
10 Lithium Batteries
This equipment uses a single Lithium battery to allow an internal real-time clock to continue operating during periods when the unit is powered down. This cell is not a USA Environmental Protection Agency listed hazardous waste. It is fully encapsulated and should not be tampered with.