

SV9100 & InMail Voicemail Administration Guide · Page 1 of 13 SV9100 & InMail Voicemail...
13
Page 1 of 13 SV9100 & InMail Voicemail Administration Guide Service: 604 -856- 9155 Email: [email protected]
Transcript of SV9100 & InMail Voicemail Administration Guide · Page 1 of 13 SV9100 & InMail Voicemail...

Page 1 of 13
SV9100 & InMail Voicemail Administration Guide
Service: 604 -856- 9155
Email: [email protected]

Page 2 of 13
Service: 604 -856- 9155
Email: [email protected]
Table of Contents
Phone Outline............................................................................................................................ 3
Online Phone System Programming ............................................................................ 4
Logging in to Web Pro: ........................................................................................................................................... 4
Changing the Name of a Set: ................................................................................................................................. 4
System Speed Dials: ................................................................................................................................................. 4
Changing One Touch Key of a Set: ...................................................................................................................... 5
Changing One Touch Keys for Reception Console: (if Applicable) .......................................................... 5
Changing the Date & Time: ................................................................................................................................... 6
Online Voicemail Programming ..................................................................................... 6
Logging in to Univerge UM8000: ........................................................................................................................ 6
Resetting a Security Code ...................................................................................................................................... 6
Deleting a Mailbox .................................................................................................................................................... 7
Adding a Mailbox ...................................................................................................................................................... 7
Changing the Spelled Name of a Mailbox ........................................................................................................ 7
Changing the Email Address of a Mailbox (for Voicemail to Email) ........................................................ 8
Phone System Programming ............................................................................................ 9
Clearing Message Waiting Light .......................................................................................................................... 9
Camp On ....................................................................................................................................................................... 9
Picking Up a Call for Another Extension .......................................................................................................... 9
Swapping Extension Numbers ............................................................................................................................ 9
Changing Internal Dialing from Voice/Ring ................................................................................................... 9
Background Music .................................................................................................................................................... 9
Voicemail Programming .................................................................................................. 10
Record Company Greetings ................................................................................................................................10
Record Any Sub-Menus – if Applicable ............................................................................................................11
Activating/Deactivating Alternate Greeting ................................................................................................11
Add/Delete/Change Mailboxes .........................................................................................................................12
Important Note:
The extension and mailbox numbers referenced in this guide are the most commonly used configuration. It does not guarantee that your company will use the same extension and mailbox numbers due to each systems customized configuration. If you are unsure of what numbers were used in your configuration, please call or email the NATG service department.

Page 3 of 13
Service: 604 -856- 9155
Email: [email protected]
Phone Outline
Exit Exit’s out of various programming
Security Locks the phone for security purposes (IP Phones only)
Message Indicator Flashes when you have a voicemail (or a message waiting)
Soft Keys Corresponds with what the display says
Help Tells how a one touch key is programmed
One Touch Keys Programmable buttons for features, lines, int/ext numbers
Recall Transfers callers to an external number (if applicable)
Feature Used for programming
Answer Answers the First incoming call to a specific phone
Mic Mutes the microphone while on speakerphone
Menu Access to Company Directory, Call History and Ring Settings
Directory Speed Dials
Up Adjusts the volume on the ringer, handset and speaker
Down Adjusts the volume on the ringer, handset and speaker
Redial Review the last numbers dialed
Speaker Speakerphone
Transfer Transfers a call to another extension or external number
Hold Places the current call on hold
Page 4 of 13
Service: 604 -856- 9155
Email: [email protected]
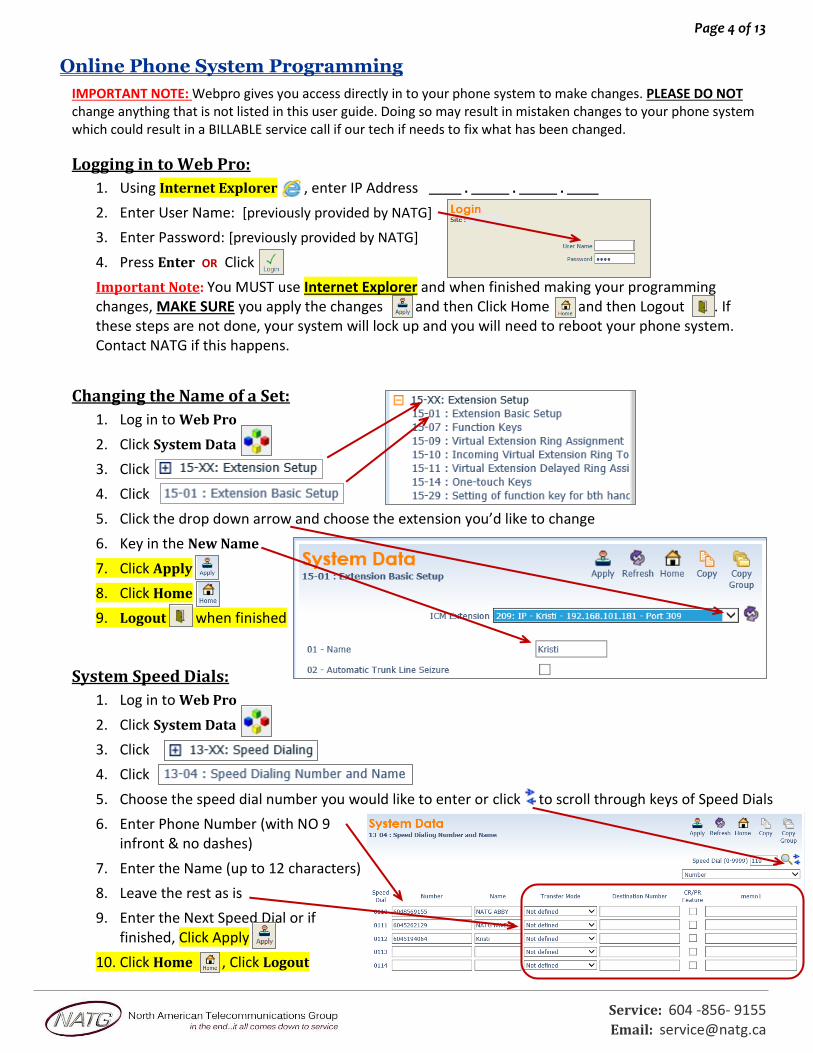
Online Phone System Programming
IMPORTANT NOTE: Webpro gives you access directly in to your phone system to make changes. PLEASE DO NOT change anything that is not listed in this user guide. Doing so may result in mistaken changes to your phone system which could result in a BILLABLE service call if our tech if needs to fix what has been changed.
Logging in to Web Pro:
1. Using Internet Explorer , enter IP Address . . .
2. Enter User Name: [previously provided by NATG]
3. Enter Password: [previously provided by NATG]
4. Press Enter OR Click
Important Note: You MUST use Internet Explorer and when finished making your programming changes, MAKE SURE you apply the changes and then Click Home and then Logout . If these steps are not done, your system will lock up and you will need to reboot your phone system. Contact NATG if this happens.
Changing the Name of a Set:
1. Log in to Web Pro
2. Click System Data
3. Click
4. Click
5. Click the drop down arrow and choose the extension you’d like to change
6. Key in the New Name
7. Click Apply
8. Click Home
9. Logout when finished
System Speed Dials:
1. Log in to Web Pro
2. Click System Data
3. Click
4. Click
5. Choose the speed dial number you would like to enter or click to scroll through keys of Speed Dials
6. Enter Phone Number (with NO 9 infront & no dashes)
7. Enter the Name (up to 12 characters)
8. Leave the rest as is
9. Enter the Next Speed Dial or if finished, Click Apply
10. Click Home , Click Logout

Page 5 of 13
Service: 604 -856- 9155
Email: [email protected]
Changing One Touch Key of a Set:
1. Log in to Web Pro 2. Click System Data 3. Click 4. Click 5. Click the drop down arrow and choose the extension you’d like to change
6. Choose the function key you would like to change (click to scroll through keys)
(ex: Function Key 01 would change key 1 on the phone (to find out the key you would like to change, From the phone you’re making changes to, Press Help key(by display) then press the key you’d like to program – the display will say Line Key “XX”)). To scroll to the next page of keys, click the right or left arrow.
7. Choose the feature you would like to program on that key with, example: 01 – DSS/One Touch (programs ext’s or external #’s) (Note: if making it a 01 – DSS/One touch,
you will need to enter the extension number OR 9 plus the phone number(no dashes) under Additional Data)
03 – Do Not Disturb (sends calls straight to VM) 10 – Call Forward Immediate (Call fwd’s phone to another extension or cell phone) 05 – Headset (if employee has a corded headset, they would need a headset key) 78 – Conversation Recording (when key is pressed, it records the conversation in to your VM)
8. Click Apply when finished
9. Click Home , Click Logout
Changing One Touch Keys for Reception Console: (if Applicable)
1. Log in to Web Pro 2. Click System Data 3. Click 4. Click 5. Choose the DSS key you would like to program/change (ex: DSS Key 01 would change key 1 on the
console (to find out the key you would like to change, From the phone you’re making changes to, Press Help key(by display) then press the key you’d like to program – the display will say Line
Key “XX”)). (click to scroll through keys)
6. Under Function, Choose 01 – DSS/One Touch
7. Under Additional Dial, enter Extension
Number OR 9 + Phone Number
8. Click Apply when finished
9. Click the arrows to move to the next page of DSS key’s OR
10. Click Home , Click Logout

Page 6 of 13
Service: 604 -856- 9155
Email: [email protected]
Changing the Date & Time:
1. Log in to Web Pro
2. Click System Data
3. Click
4. Click
5. Enter correct date and date information
6. Click Apply when finished
7. Click Home , Click Logout
Online Voicemail Programming
Logging in to Univerge UM8000:
1. Using Internet Explorer , enter IP Address . . . /admin
2. For your user name, Enter 9 followed by your extensions
3. For Password, enter your voicemail password
4. Press Enter OR Sign In
When Finished: Click Sign Out (top right corner of screen)
Resetting a Security Code
1. Log on to Voicemail System
2. Click Subscribers
3. Click Subscribers again
4. Click Profile
5. Click Search
6. Enter Name of employee or Click the drop down to enter by extension, then enter extension number, then click enter or Find
7. Click on employees name
8. Click
9. This will reset the security code to the default 9155
10. Click Save then Sign Out if finished
Page 7 of 13
Service: 604 -856- 9155
Email: [email protected]
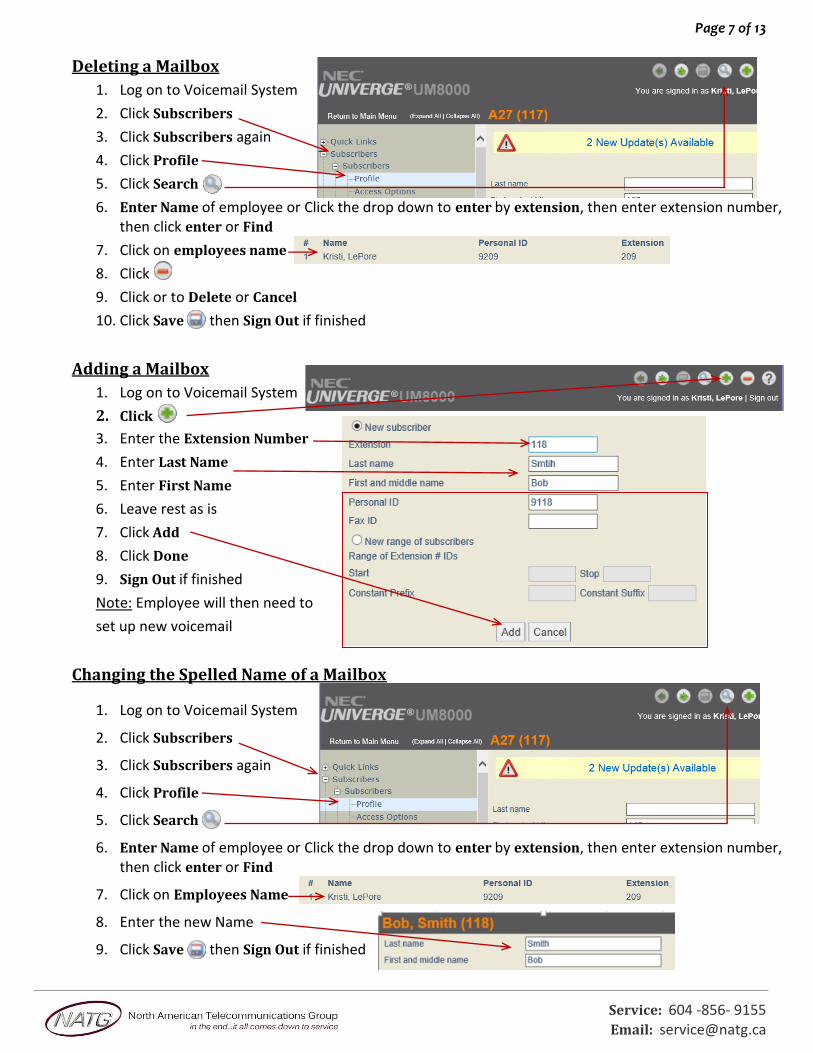
Deleting a Mailbox
1. Log on to Voicemail System
2. Click Subscribers
3. Click Subscribers again
4. Click Profile
5. Click Search
6. Enter Name of employee or Click the drop down to enter by extension, then enter extension number, then click enter or Find
7. Click on employees name
8. Click
9. Click or to Delete or Cancel
10. Click Save then Sign Out if finished
Adding a Mailbox
1. Log on to Voicemail System
2. Click
3. Enter the Extension Number
4. Enter Last Name
5. Enter First Name
6. Leave rest as is
7. Click Add
8. Click Done
9. Sign Out if finished
Note: Employee will then need to
set up new voicemail
Changing the Spelled Name of a Mailbox
1. Log on to Voicemail System
2. Click Subscribers
3. Click Subscribers again
4. Click Profile
5. Click Search
6. Enter Name of employee or Click the drop down to enter by extension, then enter extension number, then click enter or Find
7. Click on Employees Name
8. Enter the new Name
9. Click Save then Sign Out if finished
Page 8 of 13
Service: 604 -856- 9155
Email: [email protected]
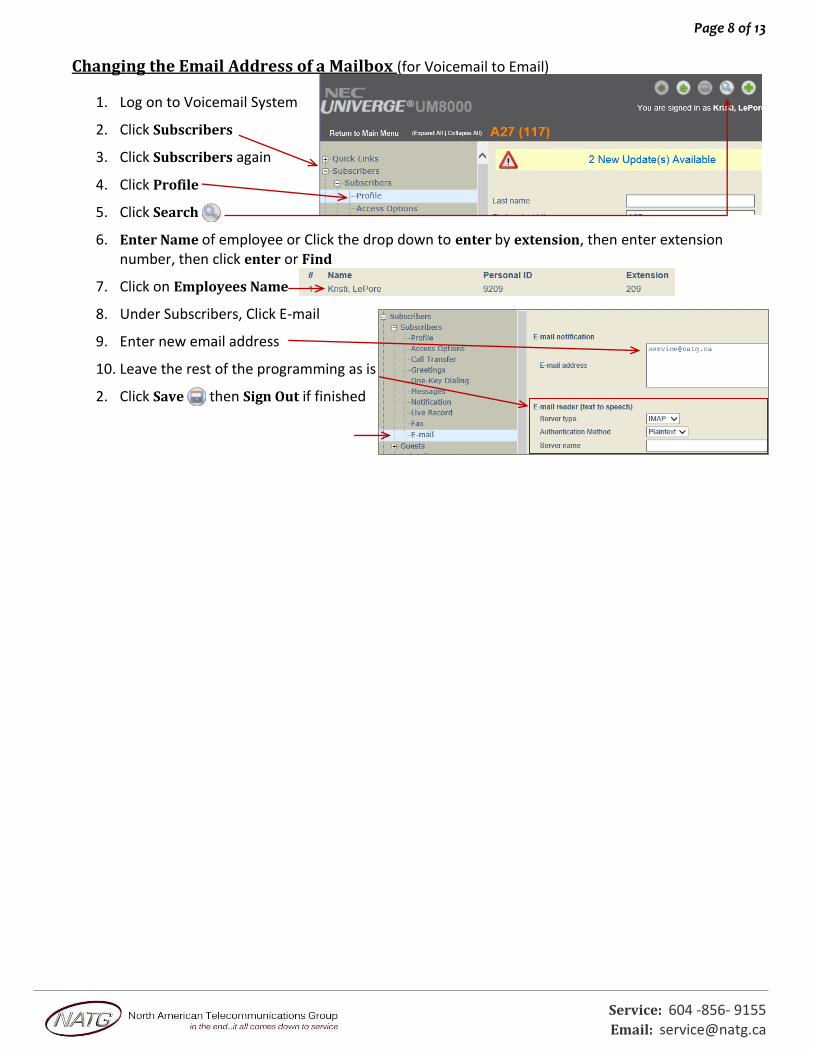
Changing the Email Address of a Mailbox (for Voicemail to Email)
1. Log on to Voicemail System
2. Click Subscribers
3. Click Subscribers again
4. Click Profile
5. Click Search
6. Enter Name of employee or Click the drop down to enter by extension, then enter extension number, then click enter or Find
7. Click on Employees Name
8. Under Subscribers, Click E-mail
9. Enter new email address
10. Leave the rest of the programming as is
2. Click Save then Sign Out if finished

Page 9 of 13
Service: 604 -856- 9155
Email: [email protected]
Phone System Programming
Clearing Message Waiting Light
Message Waiting is often activated by accident. When calling an employee, you have an option to press the MW (message waiting) soft key (on display). This feature activates their message light and prompts them on the display to call you back but also can mislead you to think you have a voicemail. If an employee contacts you saying their message light is on but they do not have voicemail, follow these instructions to cancel it: From the employee’s phone that is flashing:
1. Press SPEAKER key, dial 773 2. Press SPEAKER key
Camp On If an employee is on another call (or stepped away from their desk), you can camp on to their extension so when they hang up, their phone would ring you back instead. When you lift up your handset, you will hear it ringing their phone again.
1. To Camp On: 2. DIAL the person’s EXTENSION followed by the # key TO CANCEL: Press SPEAKER key, dial 770, and then speaker
Picking Up a Call for Another Extension
1. When you hear a phone ringing and would like to pick it up, 2. Lift Handset 3. Pres *# 4. You will be connected to whatever call was ringing first. NOTE: To connect to a specific extension, Dial ** followed by the extension number
Swapping Extension Numbers
From the employee’s phone that you’d like to swap 1. Press SPEAKER key, dial 797 2. Enter Password 1111 3. Enter the extension to swap it with 4. Press SPEAKER key
Changing Internal Dialing from Voice/Ring
When calling an employee’s extensions you can set the phone to either ring so the employee will have to pick it up(or speaker) or to voice so your voice pages through the speaker of their phone. Here are the instructions on how to change that per phone: From the employee’s phone that you would like to change:
1. Press SPEAKER key 2. Dial 721 for VOICE calls or 723 for RING tone
3. Press SPEAKER key
Background Music
1. Press SPEAKER key 2. Dial 725
3. Press SPEAKER key

Page 10 of 13
Service: 604 -856- 9155
Email: [email protected]
Voicemail Programming
Record Company Greetings
1. From extension (usually reception), press VOICEMAIL KEY
2. When prompted, enter your security code:
3. On the display, press the MORE soft key
4. Press MGR soft key
5. Press GREET soft key
6. It will say the system is in DAY MODE, would you like to change to alternate greeting mode: press 2 for NO
7. Press 1 to CHANGE the greetings for opening box
8. The current DAY GREETING will begin to play, press 1 to RECORD OR press 2 to SKIP to your NIGHT message
NOTE: while recording you may press * when you are finished OR # to re record
9. The current NIGHT MESSAGE will begin to play, press 1 to RECORD OR press 2 to SKIP to your ALTERNATE
greeting
10. The current ALTERNATE GREETING will begin to play, press 1 to record OR press 2 to return to the main menu
Example:
Day: Thank you for calling
If you know the extension of the person you are calling, please enter it now.
For our Company Directory, press 1 (Goes to Sub menu 200) – if Applicable
For hours of operation and location, press 2 (Goes to Sub menu 201) – if Applicable
To reach reception or leave a general message, please remain on the line or press 0.
Thank you for calling
Night: Thank you for calling
Our regular business hours are 8am to 5pm Monday to Friday.
If you know the extension of the person you are calling please enter it now.
For our Company Directory, press 1 (Goes to Sub menu 200) – if Applicable
For hours of operation and location, press 2 (Goes to Sub menu 201) – if Applicable
To reach reception or leave a general message, please remain on the line or press 0.
Thank you for calling
Alternate: Thank you for calling
We are currently closed for the “Christmas” Holiday and will reopen
If you know the extension of the person you are calling please enter it now.
For our Company Directory, press 1 (Goes to Sub menu 200) – if Applicable
For hours of operation and location, press 2 (Goes to Sub menu 201) – if Applicable
To reach reception or leave a general message, please remain on the line or press 0.
Thank you for calling
Page 11 of 13
Service: 604 -856- 9155
Email: [email protected]
Record Any Sub-Menus – if Applicable
1. From extension (usually reception) , press VOICEMAIL KEY
2. When Prompted, enter security code
3. Press LVMSG key on display
4. Press # # to enter by MAILBOX NUMBER
5. Enter the mailbox # you would like to record:
200 – Company Directory
201 – General Information
6. Follow prompts
Note: When asked if you would like to switch to your Alternate greeting, press 1 for yes. If asked if you would like to switch to your day and night greeting, press 2 for no. (you will want to leave the mailbox on alternate greeting)
COMPANY DIRECTORY: (Sub Menu 200) – if Applicable
▪ For , please press
▪ For , please press
▪ For , please press
▪ For , please press
GENERAL INFORMATION: (Sub Menu 201) – if Applicable
▪ Our regular business hours
▪ We are located at
▪ Our fax number is
▪ Please visit our website at
Activating/Deactivating Alternate Greeting
1. From extension (usually reception) , press VOICEMAIL KEY
2. When prompted, enter your security code:
3. On the display, press the MORE soft key
4. Press MGR soft key
5. Press GREET soft key
6. It will say the system is in DAY mode, would you like to change to alternate greeting mode: press 1 for yes
7. Hang up when finished
TO DEACTIVATE: follow steps 1 – 5. On step 6: it will say “the system is in alternate greeting mode, shall I leave it on?” Press 2 for no.

Page 12 of 13
Service: 604 -856- 9155
Email: [email protected]
Add/Delete/Change Mailboxes
1. From extension (usually reception) , press VOICEMAIL KEY
2. When prompted enter your security code
3. On the display see MORE press the soft key under that
4. On the display see MGR press key
5. On the display see SUBS … press key
6. ENTER the MAILBOX you would like to add, delete or change
7. Follow prompts;
a. The system will ask “WOULD LIKE TO RESET THE SECURITY CODE”, press 1 for YES or 2 for NO.
When resetting a security code, it will reset to the default 9155
b. Then it will ask if you would like to DELETE THE MAILBOX, press 1 for YES or 2 for NO.
When deleting a mailbox, you will need to re add one to that same extension. Follow steps 1 – 6 again, and then follow prompts.
8. Press SPEAKER key when all done
NOTE: When a staff member leaves the company and a new member comes, it’s highly recommended to delete the existing mailbox, then add a new one. This way all the information for that mailbox is up to date. IMPORTANT: When you delete a mailbox, all the messages in the mailbox are deleted as well.