Step-by-Step Guide to using eTenders
19
DEPARTMENT OF EDUCATION AND SKILLS Step-by-Step Guide to using eTenders For Procuring Consultants for Summer Works and Small Devolved projects Step-by-Step Guide to using eTenders 2 nd Edition, April 2016 Planning & Building Unit Department of Education and Science Tullamore, Co. Offaly. R35 Y2N5. Telephone: (057) 9324300 Web: http://www.education.ie http://www.energyineducation.ie PLANNING and BUILDING UNIT
Transcript of Step-by-Step Guide to using eTenders

DEPARTMENT OF EDUCATION AND SKILLS
Step-by-Step Guide to using eTenders For
Procuring Consultants for Summer Works and Small Devolved projects
Step-by-Step Guide to using eTenders
2nd Edition, April 2016
Planning & Building Unit Department of
Education and Science Tullamore, Co. Offaly.
R35 Y2N5. Telephone: (057) 9324300
Web: http://www.education.ie http://www.energyineducation.ie
PLANNING and BUILDING UNIT

Step by Step Guide to using eTenders 2nd Edition, April 2016
Department of Education and Skills, Planning and Building Unit
Page 2 of 19
Introduction to Contract Tender Management
EU Supply (EUS) Contract Tender Management (CTM) is a comprehensive tool that allows tenders to be created, distributed and evaluated without the need to create and manage paper documents. CTM makes the tendering process easier for both buyers and suppliers and covers the entire process including the contract management phase.
Tender Management is used by government organisations and general contractors to improve the efficiency of the tendering process. For those who respond to tenders, for example general contractors, sub-contractors and trades people, tender management simplifies and speeds up the process of formulating tender responses.
You can add all of the necessary drawings, specifications, schedules, tender documents and other attachments to the Request for Tender you issue or receive.
Buyers have access to a rich database of their chosen suppliers when issuing a Request for Tender. If appropriate, you can source potential new suppliers, complete with pre-qualification details, from the supplier database.
Suppliers are able to present information to initiating organisations at the time and place that purchasing decisions are made.
Tender Management offers you the following advantages:
Saves you time and money compared with traditional methods
Greatly improves the exchange and management of information
Improves accuracy throughout the tendering, quotation and contract process
Reduces time wasted on low value administration (faxes, phone, travelling)
Increases traceability
Web-based for easy access to information – anytime, anywhere
Accessing Tender Management
EU Supply (EUS) CTM (Contract Tender Management) is only available if
your company has registered to use this system

Step by Step Guide to using eTenders 2nd Edition, April 2016
Department of Education and Skills, Planning and Building Unit
Page 3 of 19
1. To access EUS CTM
When you open (http://www.etenders.gov.ie) this is the Home Page. Click on login ( )
If you are a new user you must register with eTenders and you need to register as a buyer. Email your details to [email protected]. An automatic email response is generated by eTenders which will give you your user name and a start-up password (which you can change if you wish). It is good practice to have a minimum of two people registered for any one contract notice (in case one person becomes indisposed). The second (or more) person(s) should be registered at this point. The email addresses given when registering should have the same unique email identifier, e.g. [email protected]; [email protected].
If you need other assistance please email the helpdesk on [email protected] or call the helpline at 021 243 92 77 (please dial +353 21 243 92 77 if you call outside of Ireland) during office hours ONLY (09:00 – 17:30).
The following EUS Tender Management Login Page is displayed:

Step by Step Guide to using eTenders 2nd Edition, April 2016
Department of Education and Skills, Planning and Building Unit
Page 4 of 19
Insert your Username and Password into the appropriate fields then click on the [Log in] button. Once you login with your Username and Password the following web page appears and this becomes your new Home Page:

Step by Step Guide to using eTenders 2nd Edition, April 2016
Department of Education and Skills, Planning and Building Unit
Page 5 of 19
2. Create a Workspace
To set up a new contract notice you need to first create a new Workspace: From the new home page, click on the ”My Request for Tenders” link (as below), under ”Buyer Services”. The ”My Request for Tenders” screen displays.
Click the [Create new Workspace] button.
Fill out the form. Ensure that mandatory fields (*) are completed. The project description field, under the heading ”Instructions to bidder”, is limited to 500 characters so the description need only be brief, e.g. ”4 classroom extension to existing 16 classroom school” or ”2000m2 extension to existing post-primary school”.
Click on the [Save] button.
Step by Step Guide to using eTenders 2nd Edition, April 2016
Department of Education and Skills, Planning and Building Unit
Page 6 of 19
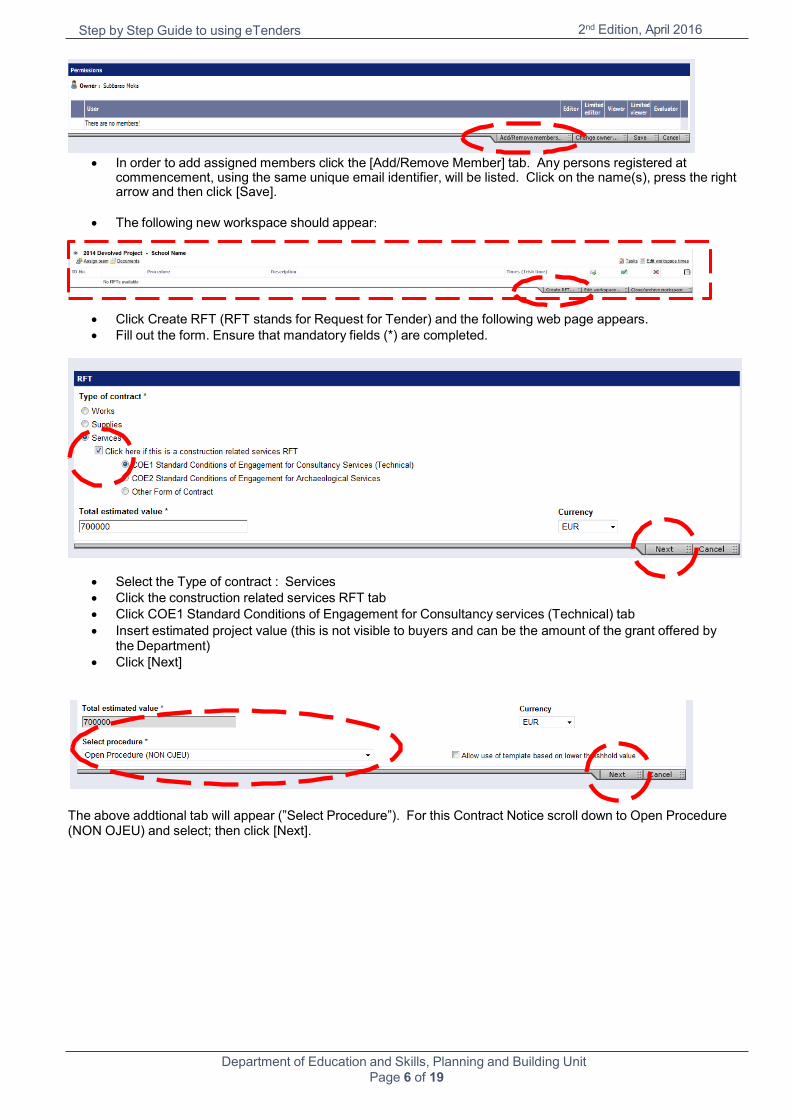
In order to add assigned members click the [Add/Remove Member] tab. Any persons registered at
commencement, using the same unique email identifier, will be listed. Click on the name(s), press the right arrow and then click [Save].
The following new workspace should appear:
Click Create RFT (RFT stands for Request for Tender) and the following web page appears.
Fill out the form. Ensure that mandatory fields (*) are completed.
Select the Type of contract : Services
Click the construction related services RFT tab
Click COE1 Standard Conditions of Engagement for Consultancy services (Technical) tab
Insert estimated project value (this is not visible to buyers and can be the amount of the grant offered by the Department)
Click [Next]
The above addtional tab will appear (”Select Procedure”). For this Contract Notice scroll down to Open Procedure (NON OJEU) and select; then click [Next].

Step by Step Guide to using eTenders 2nd Edition, April 2016
Department of Education and Skills, Planning and Building Unit
Page 7 of 19
Reference
Short description of the project (as before)
Detailed description of the project (full description of the scope of the project, maximum 2000 characters)
Response deadline: Normally allow minimum 20 calendar days excluding public holidays (Christmas
, Easter, etc.)
NB: Click the ”Disable submission of online proposals” tab (this will ensure that all tender
submission will submitted through hard copy or by direct email to the Contracting Authority,
i.e. not through eTenders) and press [Save].
There are no lots for this Contract Notice so press the [Skip] tab.
The following RFT Checklist now appears with a red ‘X’ tab on each item in the checklist. As each section is completed and filled the red ‘X’ will change to a green tick . When the check list indicates a full list of green ticks you know the RFT is complete. The following guidance will take you through each item on the Checklist and explain what to do.
The above web page appears. Fill in the following sections as shown above
Step by Step Guide to using eTenders 2nd Edition, April 2016
Department of Education and Skills, Planning and Building Unit
Page 8 of 19
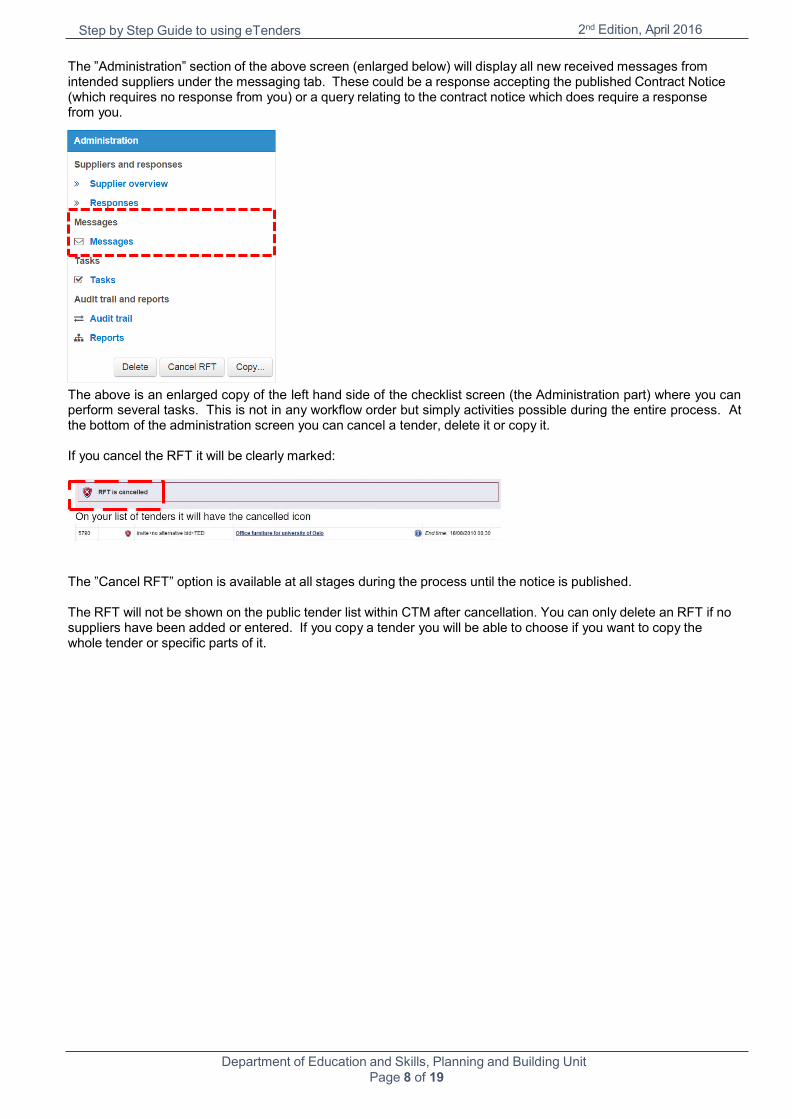
The ”Administration” section of the above screen (enlarged below) will display all new received messages from intended suppliers under the messaging tab. These could be a response accepting the published Contract Notice (which requires no response from you) or a query relating to the contract notice which does require a response from you.
The above is an enlarged copy of the left hand side of the checklist screen (the Administration part) where you can perform several tasks. This is not in any workflow order but simply activities possible during the entire process. At the bottom of the administration screen you can cancel a tender, delete it or copy it.
If you cancel the RFT it will be clearly marked:
The ”Cancel RFT” option is available at all stages during the process until the notice is published.
The RFT will not be shown on the public tender list within CTM after cancellation. You can only delete an RFT if no suppliers have been added or entered. If you copy a tender you will be able to choose if you want to copy the whole tender or specific parts of it.

Step by Step Guide to using eTenders 2nd Edition, April 2016
Department of Education and Skills, Planning and Building Unit
Page 9 of 19
The first two items on the checklist have already been done and will have changed to green ticks. The next item is ”Set Message Recipients”.
3. Set message recipients
Click on ”Set Message Recipients” on the right hand side of the checklist. This screen displays the assigned members (as input at Step 2 above). If you require certain members to be able to deal with queries you must insert a tick against them. The number of people assigned this responsibility should be limited. Assigned members can be given editor or viewer rights depending on the type of tasks you wish them to perform.
If there are no additional assigned members to this contract notice then you need not change the RFT. On the check list manually change red X tab to a green .
Step by Step Guide to using eTenders 2nd Edition, April 2016
Department of Education and Skills, Planning and Building Unit
Page 10 of 19
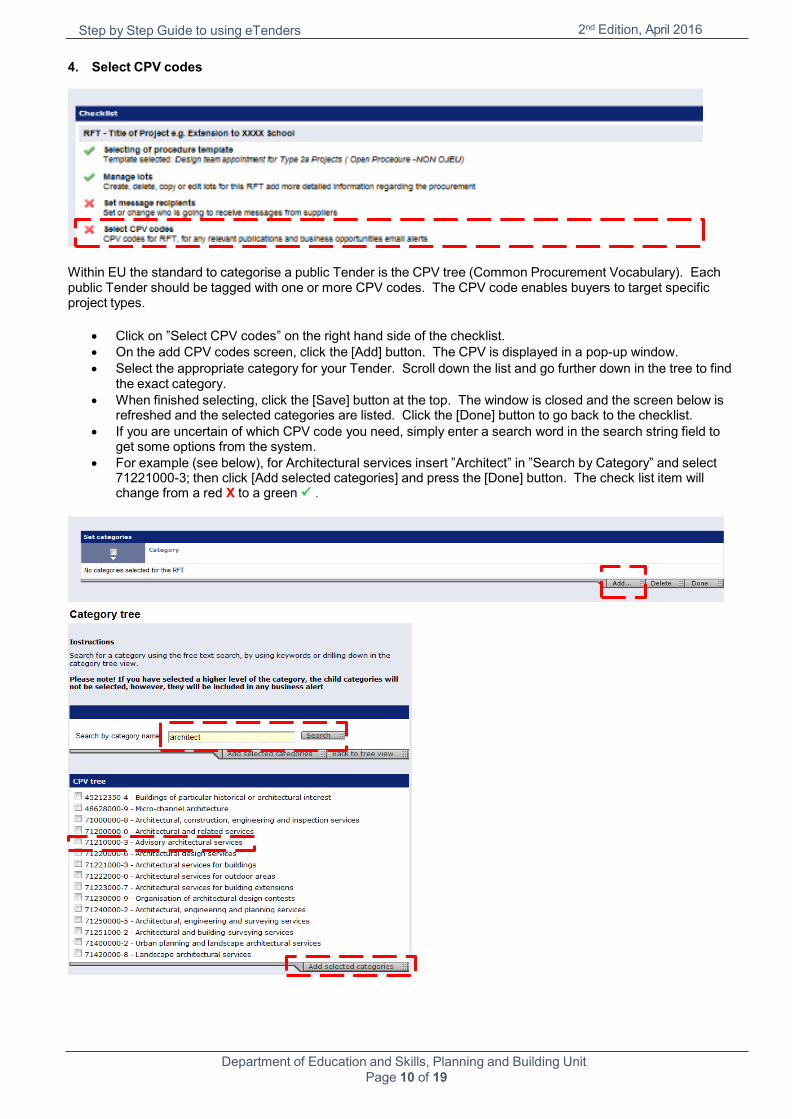
4. Select CPV codes
Within EU the standard to categorise a public Tender is the CPV tree (Common Procurement Vocabulary). Each public Tender should be tagged with one or more CPV codes. The CPV code enables buyers to target specific project types.
Click on ”Select CPV codes” on the right hand side of the checklist.
On the add CPV codes screen, click the [Add] button. The CPV is displayed in a pop-up window.
Select the appropriate category for your Tender. Scroll down the list and go further down in the tree to find the exact category.
When finished selecting, click the [Save] button at the top. The window is closed and the screen below is refreshed and the selected categories are listed. Click the [Done] button to go back to the checklist.
If you are uncertain of which CPV code you need, simply enter a search word in the search string field to get some options from the system.
For example (see below), for Architectural services insert ”Architect” in ”Search by Category” and select 71221000-3; then click [Add selected categories] and press the [Done] button. The check list item will change from a red X to a green .

Step by Step Guide to using eTenders 2nd Edition, April 2016
Department of Education and Skills, Planning and Building Unit
Page 11 of 19
Further guidance can be found on CPV Codes at http://etenders.gov.ie/publishing-guidance
5. RFT Dates / Planned activities in this process
Click on ”Edit” on the right hand side of the checklist.
From here you can edit all the dates relevant to the Tender, e.g. publishing date, response deadline, etc.
On the ”Edit Dates” screen, select which dates to use by selecting the checkbox. If you have created a Tender from a template you may be obliged to fill in some of the dates. Enter the dates and click [Save].
You also have an option to set some dates for the information of suppliers, for example:
Deadline of clarification questions: the deadline for suppliers to send clarification questions to the owner of
the tender (usually 5 days before the closing date for receipt of tenders).
Validity of tender: For how long the buyer wants this tender to be valid - Not Required for this contract
notice.
Planned award date: the estimated date for tender to be awarded - Not Required for this contract notice.
Publication of award – Insert a date approximately 4 weeks after the response deadline.
Press [Save].

Step by Step Guide to using eTenders 2nd Edition, April 2016
Department of Education and Skills, Planning and Building Unit
Page 12 of 19
6. Publication Sites
Click on ”Edit” on the right hand side of the checklist.
For this contract notice you see two options
Publication on eTenders website
Publication on Official Journal in Europe
Select eTenders website option (if not already pre-selected) and press [Save].
7. Pricing required (if any)
Click on “Title of Project” on the right hand side of the checklist.
This option is ticked as a default which means that the RFT is automatically set for electronic tendering. As we do not wish to receive tenders electronically through eTenders, this option must be un-ticked.
Click on the box to un-tick this option and press [Save]
The following tab should appear on your RFT check list.

Step by Step Guide to using eTenders 2nd Edition, April 2016
Department of Education and Skills, Planning and Building Unit
Page 13 of 19
8. Manage questionnaire
Click on “Title of Project” on the right hand side of the checklist. This is where you set up the response form the supplier will complete to answer this RFT.
As preset minimum requirements for this contract notice are within the documents to be uploaded (see next Checklist item 9 below), tick all of the boxes then delete the above requirement by pressing [Delete] and press [Done].
9. Documents
This tab allows you to upload documents from your own PC. Documents are uploaded using the upload facility. Documents can either be uploaded directly or scheduled to take place outside office hours if large amounts of data are to be uploaded.
To upload documents from your PC, click on “Documents” on the right hand side of the checklist.
Click on the [Upload files…] button. This allows you to browse your own PC to locate the documents (files and/or folders) for uploading. If folders are selected the folder hierarchy can be uploaded as well. It is therefore recommended that you structure the documents in folders as desired on the PC prior to upload. (The documents to be uploaded are those referred to in Section 4.3 of Guidance on Procuring Consultants for Small Works, 3rd Edition, February 2016.)

Step by Step Guide to using eTenders 2nd Edition, April 2016
Department of Education and Skills, Planning and Building Unit
Page 14 of 19
Click [Done].
10. Prepare zip file
To create a zip file with all documents that the suppliers can download, on the checklist click the right tab -
The owner of the tender is responsible for initiating zipping of the tender documents. When all documents have been uploaded, the owner uses the zip option in the checklist to prepare the zip file. If the zip file is not generated by the tender owner, the supplier can still download the tender documents individually.
The benefit for the suppliers is that the zip file will already be prepared so the documents are available for downloading without the supplier having to initiate the zipping process or download documents individually.
Zip documents
Step by Step Guide to using eTenders 2nd Edition, April 2016
Department of Education and Skills, Planning and Building Unit
Page 15 of 19
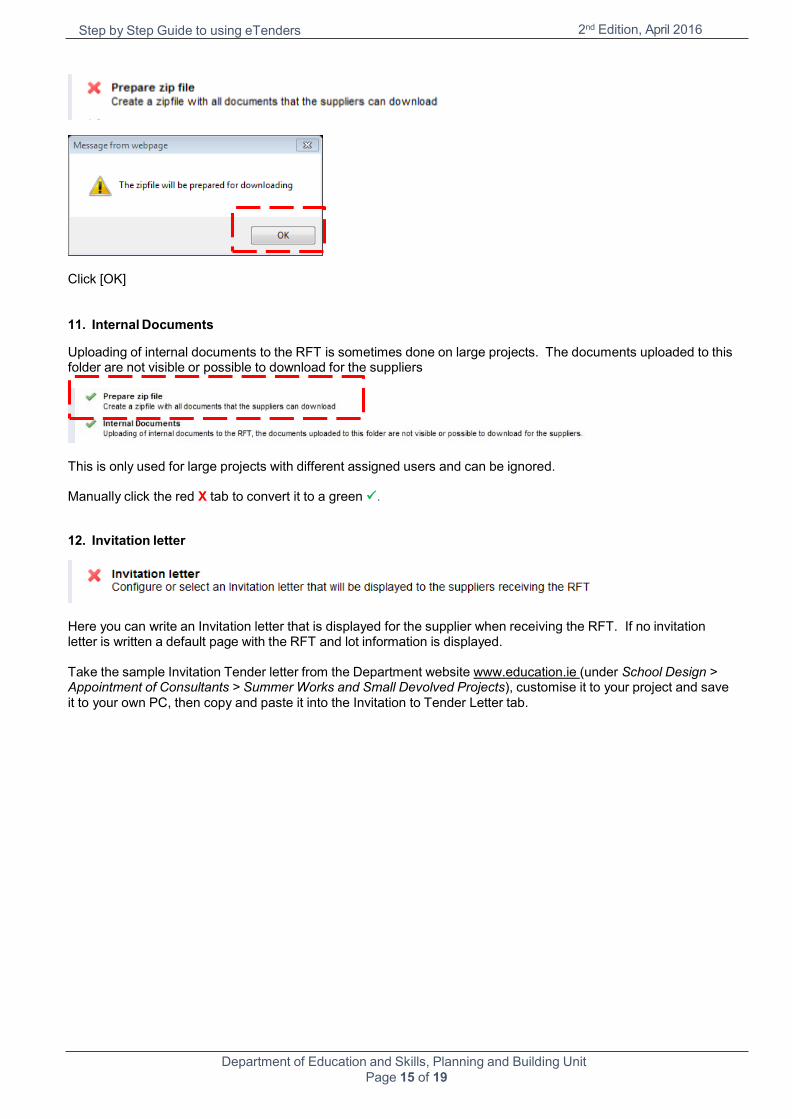
Click [OK]
11. Internal Documents
Uploading of internal documents to the RFT is sometimes done on large projects. The documents uploaded to this folder are not visible or possible to download for the suppliers
This is only used for large projects with different assigned users and can be ignored.
Manually click the red X tab to convert it to a green .
12. Invitation letter
Here you can write an Invitation letter that is displayed for the supplier when receiving the RFT. If no invitation letter is written a default page with the RFT and lot information is displayed.
Take the sample Invitation Tender letter from the Department website www.education.ie (under School Design > Appointment of Consultants > Summer Works and Small Devolved Projects), customise it to your project and save it to your own PC, then copy and paste it into the Invitation to Tender Letter tab.

Step by Step Guide to using eTenders 2nd Edition, April 2016
Department of Education and Skills, Planning and Building Unit
Page 16 of 19
The “Steps to insert a variable” box above can be ignored. Click on [Save] and [Done].
13. Set weights
This option relates to setting weightings for tender assessment criteria if tenders are obtained through “tender box” (i.e. electronically through eTenders). As we do not wish to receive tenders in this way, this section is not relevant to this contract notice. Manually click red symbol X; the tab will become a green as shown below.
14. Ensure approval before publishing
For this contract you do not need to assign any approval before publishing. Manually click red symbol X; the tab
will become a green as shown below.
15. Publish
Press the right tab on the checklist which will lead you to the following webpage:
Step by Step Guide to using eTenders 2nd Edition, April 2016
Department of Education and Skills, Planning and Building Unit
Page 17 of 19
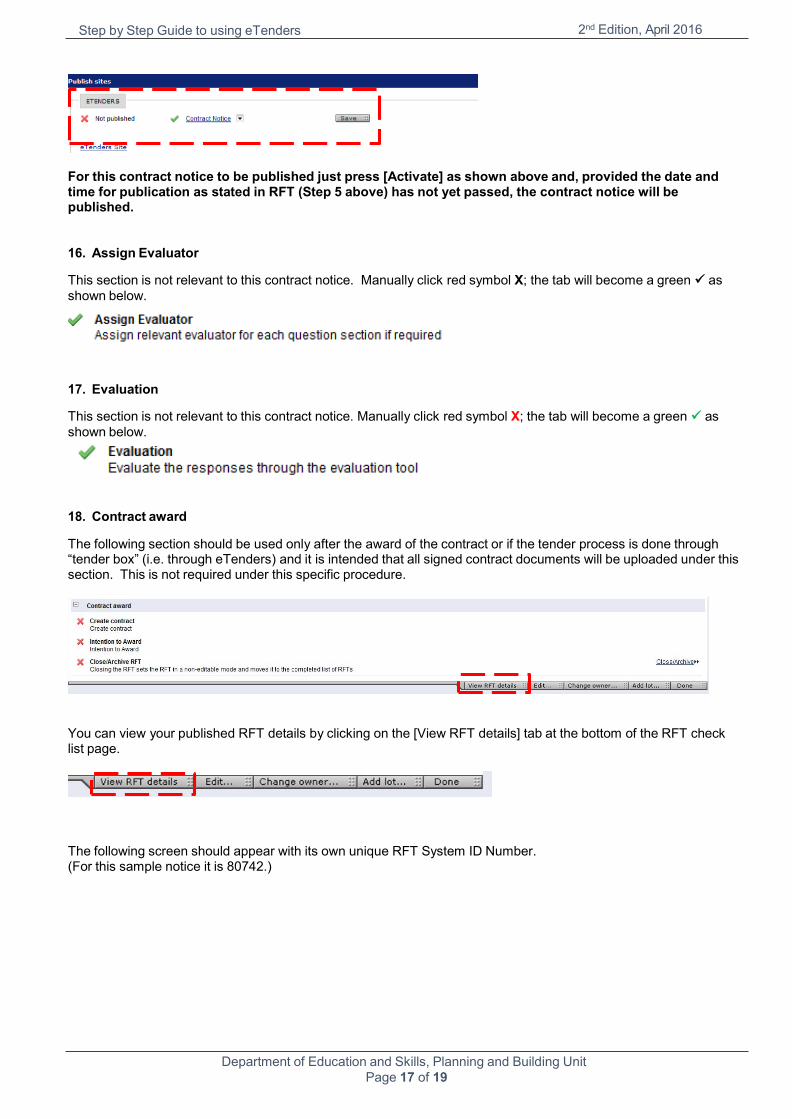
For this contract notice to be published just press [Activate] as shown above and, provided the date and time for publication as stated in RFT (Step 5 above) has not yet passed, the contract notice will be published.
16. Assign Evaluator
This section is not relevant to this contract notice. Manually click red symbol X; the tab will become a green as
shown below.
17. Evaluation
This section is not relevant to this contract notice. Manually click red symbol X; the tab will become a green as
shown below.
18. Contract award
The following section should be used only after the award of the contract or if the tender process is done through “tender box” (i.e. through eTenders) and it is intended that all signed contract documents will be uploaded under this section. This is not required under this specific procedure.
You can view your published RFT details by clicking on the [View RFT details] tab at the bottom of the RFT check list page.
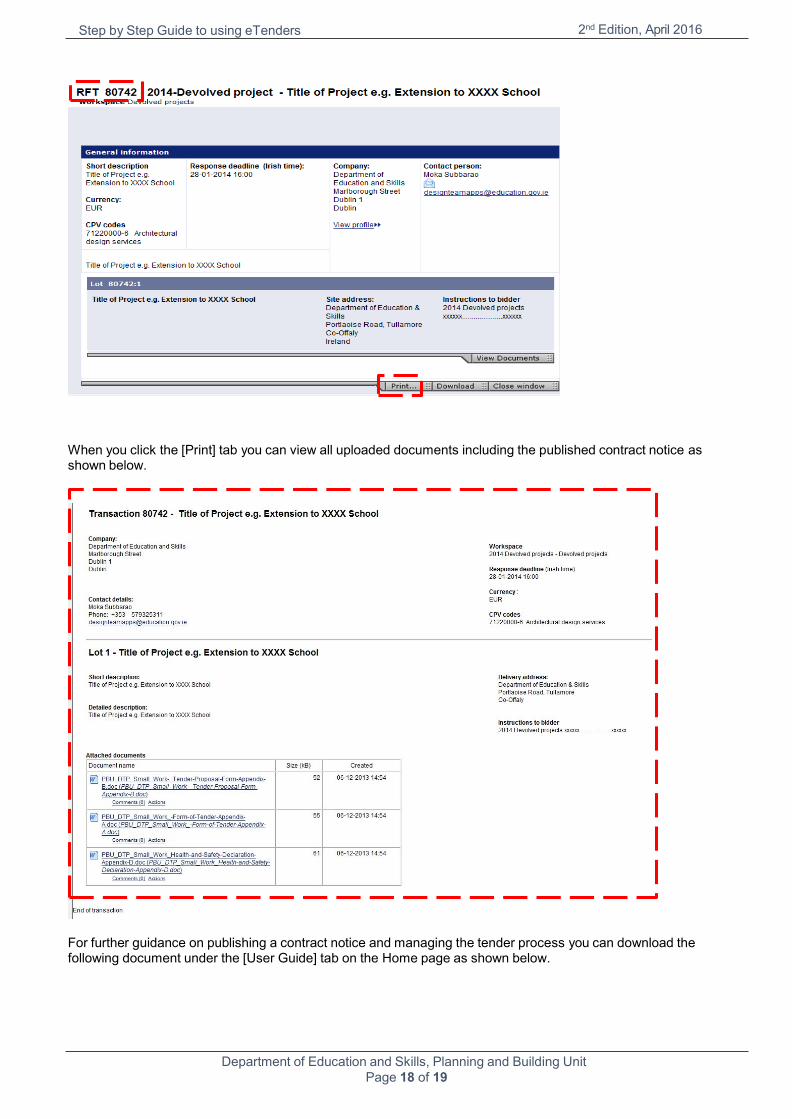
The following screen should appear with its own unique RFT System ID Number. (For this sample notice it is 80742.)
Step by Step Guide to using eTenders 2nd Edition, April 2016
Department of Education and Skills, Planning and Building Unit
Page 18 of 19
When you click the [Print] tab you can view all uploaded documents including the published contract notice as shown below.
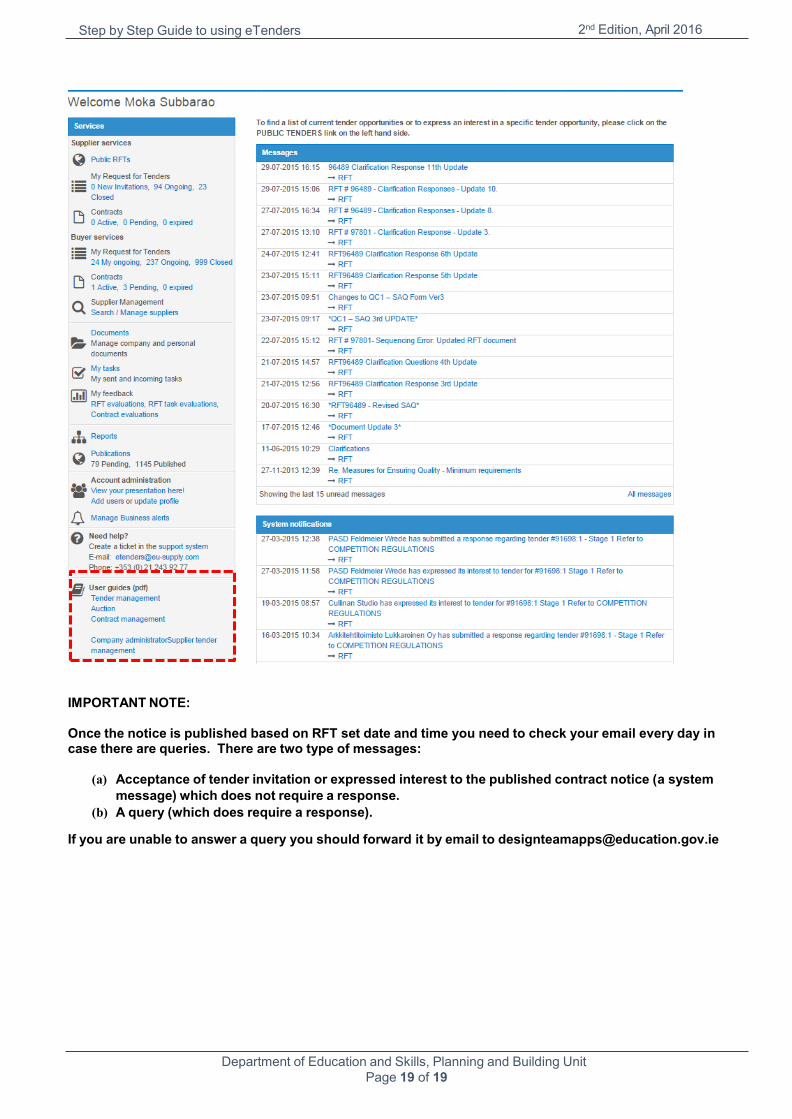
For further guidance on publishing a contract notice and managing the tender process you can download the following document under the [User Guide] tab on the Home page as shown below.
Step by Step Guide to using eTenders 2nd Edition, April 2016
Department of Education and Skills, Planning and Building Unit
Page 19 of 19
IMPORTANT NOTE:
Once the notice is published based on RFT set date and time you need to check your email every day in case there are queries. There are two type of messages:
(a) Acceptance of tender invitation or expressed interest to the published contract notice (a system
message) which does not require a response.
(b) A query (which does require a response).
If you are unable to answer a query you should forward it by email to [email protected]