SDL Passolo 2011 - Colorless green ideas sleep furiously
293
SDL Passolo 2011
Transcript of SDL Passolo 2011 - Colorless green ideas sleep furiously
SDL Passolo 2011


i
Inhaltsverzeichnis General ................................................................................................................ 1
Content Overview ............................................................................................... 1
Typographic Conventions ..................................................................................... 2
First Steps ............................................................................................................ 5
First steps .......................................................................................................... 5
The Start Page ................................................................................................... 5
Creating a Project ............................................................................................... 5
Updating and Alignment ...................................................................................... 6
Translating With Passolo ...................................................................................... 7
Translation Support............................................................................................. 8
Generating the Target File ................................................................................... 9
Extending Passolo ............................................................................................... 9
Passolo Projects ...................................................................................................11
Overview ..........................................................................................................11
Creating a New Project .......................................................................................12
Adding Source Files ............................................................................................13
Cascaded Projects ..............................................................................................14
The Project Window ...........................................................................................15
The Project Setup Dialog ....................................................................................22
Target Path Rules ..............................................................................................23
The Target path rule dialog .................................................................................24
Select Target Path Rule ......................................................................................27
Changing Folder Paths ........................................................................................28
The Source String List Properties Dialog ...............................................................28
The Source File Options Dialog ............................................................................30
The Language Dialog ..........................................................................................31
Translation List Properties ...................................................................................32
The Advanced Target File Options Dialog ..............................................................33
Default Settings for Languages ............................................................................35
Generating The Target File ..................................................................................35
User Files ..........................................................................................................35
Extracting User Files ..........................................................................................36
The Log File ......................................................................................................37
Transferring Existing Translations ........................................................................37
Project - Comment .............................................................................................39
Managing Project Tasks ......................................................................................39
User Management ..............................................................................................40
The Edit User Dialog ...........................................................................................41
Shared Mode .....................................................................................................41

Inhaltsverzeichnis
ii
Projects in Network Folders .................................................................................42
Extract Sub Projects ...........................................................................................43
Merge Projects ..................................................................................................43
User-defined Properties ......................................................................................44
String Lists ..........................................................................................................47
Creating String Lists ...........................................................................................47
Displaying String Lists ........................................................................................47
Search Functions ...............................................................................................55
Bookmarks........................................................................................................60
Updating String Lists ..........................................................................................61
Leverage ..........................................................................................................62
Leverage Options ...............................................................................................62
Deleted Texts ....................................................................................................63
Reset data ........................................................................................................64
Project Maintenance ...........................................................................................65
Options for String List Operations ........................................................................66
Inline Tags ........................................................................................................66
Inline Patterns ...................................................................................................68
Preparing the Translation.......................................................................................69
Editing a Source String List .................................................................................69
Protecting and Hiding Strings ..............................................................................69
Maximum Length of Strings ................................................................................70
Grouping Control Elements .................................................................................70
Using Comments ...............................................................................................71
Status and Attributes in the Source String List ......................................................71
Menu Accelerator Tables .....................................................................................72
The Translation ....................................................................................................73
Editing a Translation List.....................................................................................73
The Translation Window ......................................................................................74
Options for the Translation Window ......................................................................76
Translation Helpers ............................................................................................77
Using Glossaries ................................................................................................90
Interface to TM systems and termbases ................................................................93
SDL Trados .......................................................................................................93
SDLX Translation Suite ..................................................................................... 107
The dialog editor .............................................................................................. 110
The Menu Editor .............................................................................................. 115
HTML Editor .................................................................................................... 116
Text Renderer ................................................................................................. 117
Check Functions .............................................................................................. 119
Spelling Checker .............................................................................................. 124
Inhaltsverzeichnis
iii
Displaying a Reference Language ....................................................................... 128
Adding a Task ................................................................................................. 129
Locking Strings ................................................................................................ 130
Storing Translations ......................................................................................... 130
History ........................................................................................................... 131
Reports and Statistics ......................................................................................... 135
Reports and statistics ....................................................................................... 135
Statistics ........................................................................................................ 135
Reports .......................................................................................................... 136
Report setup ................................................................................................... 138
Binary Resources ................................................................................................ 141
Configuration of Binaries ................................................................................... 141
Displaying and Modifying Binaries ...................................................................... 142
Transferring Modifications ................................................................................. 142
Binary Editors.................................................................................................. 143
Add-Ins for User-defined Resources ................................................................... 147
Add-Ins ............................................................................................................. 149
Add-Ins for Passolo .......................................................................................... 149
Add-In Configuration ........................................................................................ 151
File Formats ....................................................................................................... 153
Microsoft .NET-Programs .................................................................................. 153
Microsoft Silverlight ......................................................................................... 157
Borland Delphi/C++ Programs ........................................................................... 158
Add-In for Windows 16 Bit Programs .................................................................. 161
Windows Resource Script (.rc) Files ................................................................... 161
XML Files ........................................................................................................ 165
HTML Files ...................................................................................................... 178
Java Programs ................................................................................................. 181
Text files ........................................................................................................ 185
Add-in for Microsoft Installer Files ...................................................................... 191
Add-in for Visual BASIC 6 Files .......................................................................... 191
ODBC Databases ............................................................................................. 191
Parser for Microsoft Excel Files .......................................................................... 199
Add-in for Portable Object (PO) files ................................................................... 201
Add-in for Palm OS Applications ......................................................................... 204
The SRX Segmenter ......................................................................................... 204
Export and Import Interfaces ............................................................................... 207
Export and Import Interfaces ............................................................................ 207
The Export Dialog ............................................................................................ 207
Target Folder .................................................................................................. 207
Importing files ................................................................................................. 209
Inhaltsverzeichnis
iv
Exporting Translation Bundles ........................................................................... 210
Text Format .................................................................................................... 214
Glossaries ....................................................................................................... 216
CSV Files ........................................................................................................ 216
XML Export/Import .......................................................................................... 218
TMX Export ..................................................................................................... 219
Exporting Terminology with TRADOS MultiTerm iX Export ..................................... 220
Exporting Terminology with TRADOS MultiTerm Export ......................................... 221
The Passolo Team Edition .................................................................................... 225
About the Team Edition .................................................................................... 225
License Management ........................................................................................ 225
Working with External Translators ...................................................................... 225
Trouble Shooting ............................................................................................. 226
Organize Export Licenses .................................................................................. 227
Synchronizing Translation Bundles ........................................................................ 229
Synchronizing Translation Bundles ..................................................................... 229
The Synchronization Steps ................................................................................ 229
FTP Server as Synchronization Storage ............................................................... 230
Simulation ......................................................................................................... 233
Testing the Application ..................................................................................... 233
Creating a Simulated Translation ....................................................................... 233
The Simulation/Debug Dialog ............................................................................ 233
Macros .............................................................................................................. 237
Macros Overview ............................................................................................. 237
Macro Administration ....................................................................................... 237
Creating a New Macro ...................................................................................... 238
Importing Macros............................................................................................. 238
The System Macro ........................................................................................... 238
Embedded Macros ............................................................................................ 239
Options ............................................................................................................. 241
Setting Options ............................................................................................... 241
System Settings .............................................................................................. 242
Advanced System Settings ................................................................................ 242
System Folders ................................................................................................ 243
Batch Mode for Passolo ....................................................................................... 245
Batch Mode for Passolo ..................................................................................... 245
Batch mode commands .................................................................................... 246
Settings for batch mode ................................................................................... 253
Other Functions .................................................................................................. 255
The Output Windows ........................................................................................ 255
Arrange and Dock Output Windows .................................................................... 255
Inhaltsverzeichnis
v
Customizing Toolbars ....................................................................................... 256
Shortcut Keys.................................................................................................. 257
Tools .............................................................................................................. 258
Command line parameters ................................................................................ 260
Hyperlinks ...................................................................................................... 262
Appendix ........................................................................................................... 265
Codepages ...................................................................................................... 265
Glossary Files .................................................................................................. 266
Language IDs .................................................................................................. 268
Regular Expressions ......................................................................................... 271
Key combinations for Passolo ............................................................................ 272
Glossary ............................................................................................................ 277
Index ................................................................................................................ 279

1
General
Content Overview
This manual is subdivided into these chapters, together with an appendix containing a glossary:
General
This chapter covers the typographic conventions employed in this Reference Manual.
First steps
This chapter provides notes on starting up Passolo for the first time.
Passolo Projects
This chapter explains the structure of translation projects as well as their administration with Passolo.
String Lists
This chapter covers the basic properties and editing options of source and translation lists.
Preparing the Translation
This chapter describe how source lists can be edited in order to optimize the subsequent translation process.
The Translation
This chapter explains the actual translation process with the program and illustrates
which editing options Passolo provides.
Reports and statistics
This chapter describes how to generate a statistical analysis of your projects and how to document your projects by creating reports.
Binary Resources
This chapter covers how binary resources such as bitmaps, icons, or cursors can be administered and edited with Passolo.
Add-Ins
This chapter describes how Passolo can be expanded by new functions through the use of
add-ins.
File Formats
This chapter describes all file formats that are supported by Passolo.
Export and Import Interfaces
This chapter describes how text resources can be exported for external editing, and then
be re-imported. This chapter also contains a description of an interface to the TRADOS translation tool.
Simulation
This chapter describes the options Passolo offers for checking the source files for general translatability.
SDL Passolo 2011
2
Macros
This chapter describes how to add new functions and automate repeating tasks by
defining macros.
The Team Edition
This chapter describes the features specific to the Team Edition of Passolo. This edition
allows you to generate translation bundles which can then be translated using the free
Translator Edition of Passolo.
Options
This provides an overview of all options that can be set up in Passolo.
Batch Mode for Passolo
This describes the batch mode, used to use Passolo in the command line.
Other Functions
This chapter contains further useful information that did not fit into any of the preceding chapters.
Appendix
The Appendix includes information about code pages, a description of glossary file
structures, and other information.
Typographic Conventions
Before starting to work with Passolo, you should familiarize yourself with the general and special typographical conventions used in this documentation.
General
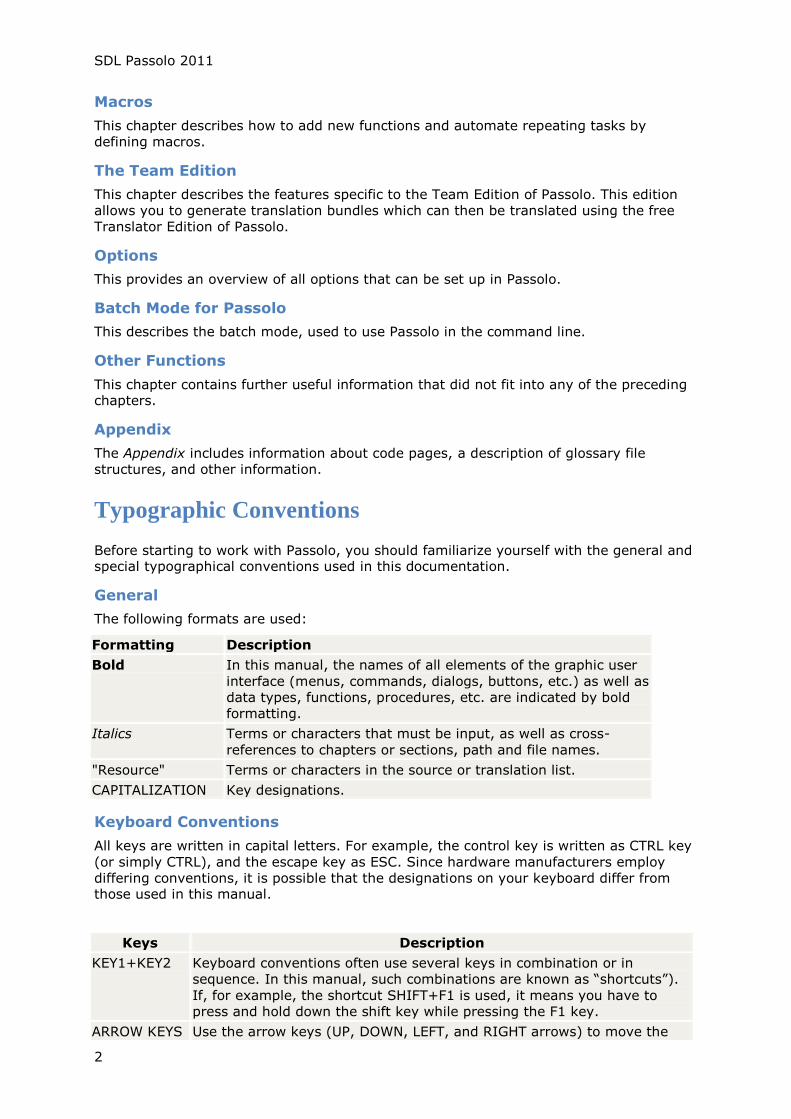
The following formats are used:
Formatting Description
Bold In this manual, the names of all elements of the graphic user
interface (menus, commands, dialogs, buttons, etc.) as well as
data types, functions, procedures, etc. are indicated by bold
formatting.
Italics Terms or characters that must be input, as well as cross-
references to chapters or sections, path and file names.
"Resource" Terms or characters in the source or translation list.
CAPITALIZATION Key designations.
Keyboard Conventions
All keys are written in capital letters. For example, the control key is written as CTRL key
(or simply CTRL), and the escape key as ESC. Since hardware manufacturers employ
differing conventions, it is possible that the designations on your keyboard differ from those used in this manual.
Keys Description
KEY1+KEY2 Keyboard conventions often use several keys in combination or in
sequence. In this manual, such combinations are known as ―shortcuts‖).
If, for example, the shortcut SHIFT+F1 is used, it means you have to
press and hold down the shift key while pressing the F1 key.
ARROW KEYS Use the arrow keys (UP, DOWN, LEFT, and RIGHT arrows) to move the

General
3
HOME, END,
PAGE UP,
PAGE DOWN
cursor in a text field. Some directional keys can be used in combination
(e.g., CTRL+HOME).
Numeric
keypad
Generally, your keyboard will be an "extended" keyboard that allows you
to use the numeric keypad to input numbers. To activate number entry,
press the NUM LOCK key.

5
First Steps
First steps
Starting Passolo
After installing Passolo you can start the program via the Windows Start menu (the Start
button in the lower left corner of your screen) or by double-clicking the desktop icon.
Passolo is Unicode enabled, i.e. it works with the Unicode character set which means it
is not subject to codepage-related issues. It is compatible with Windows XP, Vista and Windows 7
When the program is started, the start page (S. 5) appears first of all, where you can open existing projects or create new projects.
Information about getting started with Passolo
The Overview (S. 11) chapter explains the basic principle of how Passolo projects work.
Creating a New Project (S. 12) explains how to set up a new Passolo project.
The Project Window (S. 15) chapter describes how to manage the string lists in a project.
Editing a Translation List (S. 73) describes how to carry out a translation in Passolo.
The Generating the Target File (S. 9) chapter shows you how to generate the translated
target files.
The Start Page
The start window is displayed when SDL Passolo is started. Most of the window is taken
up by the list of recently opened projects. Mark the project to be opened and click on
Open. You can also choose the Mode in which the project is to be opened (see Shared
Mode, S. 41). Passolo saves the last selected mode for each project and shows the corresponding mode icon in the in the "Last opened" column.
The start page can be called up at any time using the Start Page command in the View menu.
The "Commands" field on the left contains links that can be used to open other existing projects or create a new project.
User
For many changes, Passolo saves the name of the user who made the changes. The
name from the Windows login is used as standard. However, you can also specify
another user name. The name can only be changed if no projects are open. For further information, please see User Management (S. 40).
SDL Passolo News
Important announcements about Passolo are reported here, e.g. when a new service
pack is available. Have a look in this field from time to time so that you are always up to date with the latest news.
Creating a Project
A Passolo Project contains all settings to read your localizable files and the translations to
all target languages.
SDL Passolo 2011
6
Creating a Project
1. Click on New in the File menu to display the Project Setup dialog.
2. Select a name for the new project, such as MyProject, and enter this in the Name
field.
3. Then enter the directory you want SDL Passolo to use to create and save the
project in the Location field.
4. Click on the Add source file button and select one or more source files that you
wish to translate.
5. Check the settings in the Source String List Properties dialog
6. Click on the Add language button and select the language into which you wish to
translate the source files in the Language dialog. Repeat this procedure for any
additional target languages.
7. Confirm all your settings by clicking on OK. The dialog closes and the appears
with the source files and languages specified by you.
Further information
The Project Setup Dialog (S. 22)
Adding Source Files (S. 13)
The Source String List Properties Dialog (S. 28)
The Language Dialog (S. 31)
The Project Window (S. 15)
Updating and Alignment
Once the project has been created, the string lists have to be generated. If you already
have localized target files, you can import these into the Passolo translation lists using the Alignment function.
Generating the String Lists
1. Open the new Passolo project, if it is not already open
2. Click on Update String List in the String List menu
3. In the Update Texts dialog, select the All string lists in project option
4. Click on OK
All source string lists and translation lists are now created. Double-clicking on one of the
lists in the project window opens the list and you can check that all of the texts to be
localized have been extracted. In the event of error messages, or if no texts have been extracted, you need to check the settings for the source string list.
Checking the Settings for a Source String List
1. Open the Passolo project, if it is not already open
2. In the project window, click once on the source string list that could not be read
(source string lists are displayed in blue)
3. Click on String List Settings in the Project menu
4. Check that the correct File path is set.
5. Check that the correct Parser is set. You may need information from the
developer for this.
First Steps
7
6. The source file may contain several languages. Check that the right Language to
extract has been selected. If you are not sure which language has been marked
for the texts to be localized, select All languages here.
7. Click on Options and check the parser-specific settings.
8. Click on Info to see what resources Passolo has found in the source file.
Aligning a Translation List
1. In the project window, click once on the translation list that you wish to align
(translation lists are displayed in black)
2. Click on Scan Target File (Alignment) in the String List menu
3. Check that the target file in question is specified correctly in the Scan target file
field.
4. If the target file contains several languages, select the language to be extracted.
5. Select the All strings in the target file are translated option.
6. Click the OK button
Further information
The Source String List Properties Dialog (S. 28)
Updating String Lists (S. 61)
Transferring Existing Translations (S. 37)
Translating With Passolo
The translation of the string lists is carried out in the Passolo project or in the exported translation bundles. The process is the same in both cases.
Translation of Texts in the Translation List
1. Open the Passolo project or the translation bundle, if it is not already open.
2. Double-click on the translation list you require (translation lists are displayed in
black).
3. Once the text list has opened, double-click on the first red entry, i.e. the first text
not yet translated.
4. Delete the existing text in the original language in the translation window.
5. Write the translation
6. Jump to the next string by pressing the Enter key or using the Ctrl+down key
combination
Further information
Exporting Translation Bundles (S. 210)
Editing a Translation List (S. 73)
SDL Passolo 2011
8
Translation Support
Passolo has a number of features to support the translator during translation.
Existing translations from the same or other Passolo projects can be used for pre-translation or for searching for translations of similar texts (fuzzy matching).
Translations can also be supplied from simple string lists (glossaries), extensive
Trados/SDLX Translation Memories or machine translation services on the internet (e.g. Google).
A spell check and other checks for general errors or software-specific errors ensure the
quality of the translations.
Using a Glossary for Pre-Translation
1. To check the current settings, click on Glossaries in the Tools menu.
2. Make sure that the glossary MFC.glo is activated.
3. Close the dialog.
4. Click on Options in the Tools menu and select the Translation Helpers/Pre-
Translation page.
5. In the list of providers, make sure that Common Glossaries/MFC.glo is
selected.
6. Close the Options dialog.
7. In the project window, open a translation list by double clicking on it.
8. Mark the texts that you wish to translate automatically (Ctrl-A marks all texts).
9. In the String menu, click on Pre-Translate String.
10. Passolo now searches for the marked strings and enters the found strings directly.
down
Using a Trados Translation Memory for Fuzzy Matching
1. Click on Options in the Tools menu and select the Translation Helpers/ Fuzzy
Matching page.
2. In the list of providers, select the entry SDL Trados Studio under Translation Add-
in
3. Click on Setup
4. The dialog for editing the translation memories is similar to the dialog in SDL
Trados Studio. Add an existing translation memory with a compatible language
pair. See SDL Trados Studio 2009, S. 94)
5. Back in the Options dialog, make sure that the newly created translation memory
is selected in the provider list.
6. Close the Options dialog.
7. In the project window, open a translation list by double clicking on it.
8. Mark an un-translated string and click on Find Fuzzy Translations in the String
menu.
9. If translations are now found that are similar to the searched string, these are
displayed in the Translation results window. The differences between the source
text found and the searched source text are shown in color.
10. Double-clicking on a fuzzy translation copies the text to the translation list. In
general, all the translation will need now is some editing.
First Steps
9
Checking the Translated Strings
1. Open the translation list
2. Click on Check All Strings in the String menu.
3. All errors found are displayed in the Check results window. Double clicking on the
error will take you straight to the relevant translation so that you can correct it.
Further information
Pre-Translation of Individual Strings (S. 78)
Using the Fuzzy List (S. 81)
Translating with the Concordance Search (S. 82)
Terminology Display (S. 83)
Pre-Translation Providers (S. 89)
Spell Checking (S. 124)
Check Functions (S. 119)
The Output Windows (S. 255)
Generating the Target File
The target file can be created at any time, even before the texts have been fully
translated.
Generating the Target File
1. Open the Passolo project, if it is not already open
2. In the project window, click once on the translation list of the target file you wish
to generate.
3. Click on Generate Target File in the String Lists menu.
4. Click on OK.
If the target file is not written as expected, you can check the settings of the translation
list. The settings of the source file may in some circumstances affect the generation of
the target file (see Updating and Alignment, S. 6)
Checking the Settings of a Translation List
1. In the project window, click once on the translation list for which you wish to
check the settings (source string lists are displayed in blue)
2. Click on String List Settings in the Project menu
3. Check that the correct Target file name has been set.
4. Click on Advanced and check the parser-specific settings.
Further information
Generating the Target File (S. 9)
Extending Passolo
Passolo offers a few options for expanding existing functions or adding new functions.
This means, for example, that localization with Passolo can be added to a personal
workflow.

SDL Passolo 2011
10
Further information
User-defined Properties (S. 44)
Macros Overview (S. 237)
Add-Ins for Passolo (S. 149)
11
Passolo Projects
Overview
A Passolo project consists of one or more source files and a certain number of languages.
Note: Passolo Essential allows only one source file in the project.
Source files are executable program files (*.EXE) and/or libraries (*.DLL), as well as
any other files containing source strings to be translated in one of the formats supported
by Passolo. For more information about the file formats that can be handled with Passolo,
please refer to Add-Ins for Passolo (S. 149). If, for example, two programs are to be
translated into three different languages, this creates six new applications. The six files
generated by Passolo are described as target files.
The Passolo project window displays all the components of a project, i.e. the source and
target files. Each of the fields displayed in the project window corresponds to a string
list. In the case of a source file, this is the source list, which comprises all the string
resources of the original file in a single column. A translation list is assigned to the
target file. This is basically a copy of the source list, but it contains an additional column
for the translated strings. The actual localization process in Passolo consists of editing
this second column in the translation list. Glossaries and a dialog editor are available to
support the user in this process. For further information about working with string lists,
please refer to Creating String Lists (S. 47).
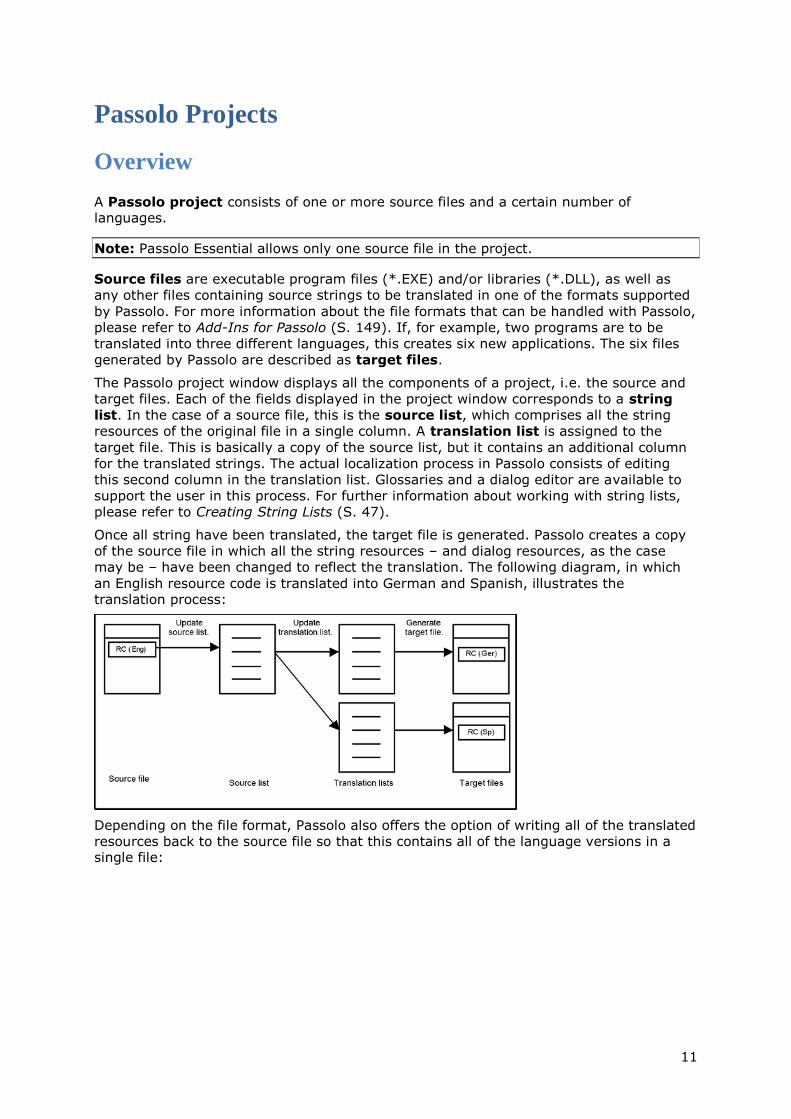
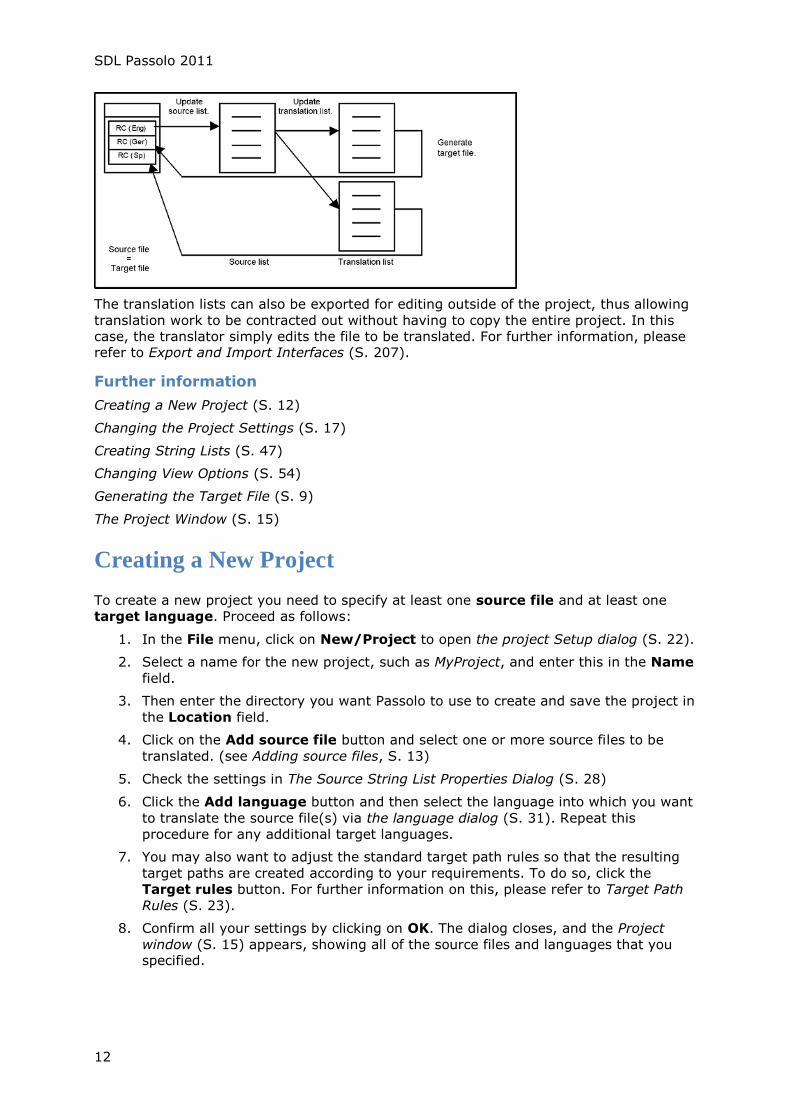
Once all string have been translated, the target file is generated. Passolo creates a copy
of the source file in which all the string resources – and dialog resources, as the case
may be – have been changed to reflect the translation. The following diagram, in which
an English resource code is translated into German and Spanish, illustrates the translation process:
Depending on the file format, Passolo also offers the option of writing all of the translated
resources back to the source file so that this contains all of the language versions in a single file:
SDL Passolo 2011
12
The translation lists can also be exported for editing outside of the project, thus allowing
translation work to be contracted out without having to copy the entire project. In this
case, the translator simply edits the file to be translated. For further information, please refer to Export and Import Interfaces (S. 207).
Further information
Creating a New Project (S. 12)
Changing the Project Settings (S. 17)
Creating String Lists (S. 47)
Changing View Options (S. 54)
Generating the Target File (S. 9)
The Project Window (S. 15)
Creating a New Project
To create a new project you need to specify at least one source file and at least one
target language. Proceed as follows:
1. In the File menu, click on New/Project to open the project Setup dialog (S. 22).
2. Select a name for the new project, such as MyProject, and enter this in the Name
field.
3. Then enter the directory you want Passolo to use to create and save the project in
the Location field.
4. Click on the Add source file button and select one or more source files to be
translated. (see Adding source files, S. 13)
5. Check the settings in The Source String List Properties Dialog (S. 28)
6. Click the Add language button and then select the language into which you want
to translate the source file(s) via the language dialog (S. 31). Repeat this
procedure for any additional target languages.
7. You may also want to adjust the standard target path rules so that the resulting
target paths are created according to your requirements. To do so, click the
Target rules button. For further information on this, please refer to Target Path
Rules (S. 23).
8. Confirm all your settings by clicking on OK. The dialog closes, and the Project
window (S. 15) appears, showing all of the source files and languages that you specified.
Passolo Projects
13
Adding Source Files
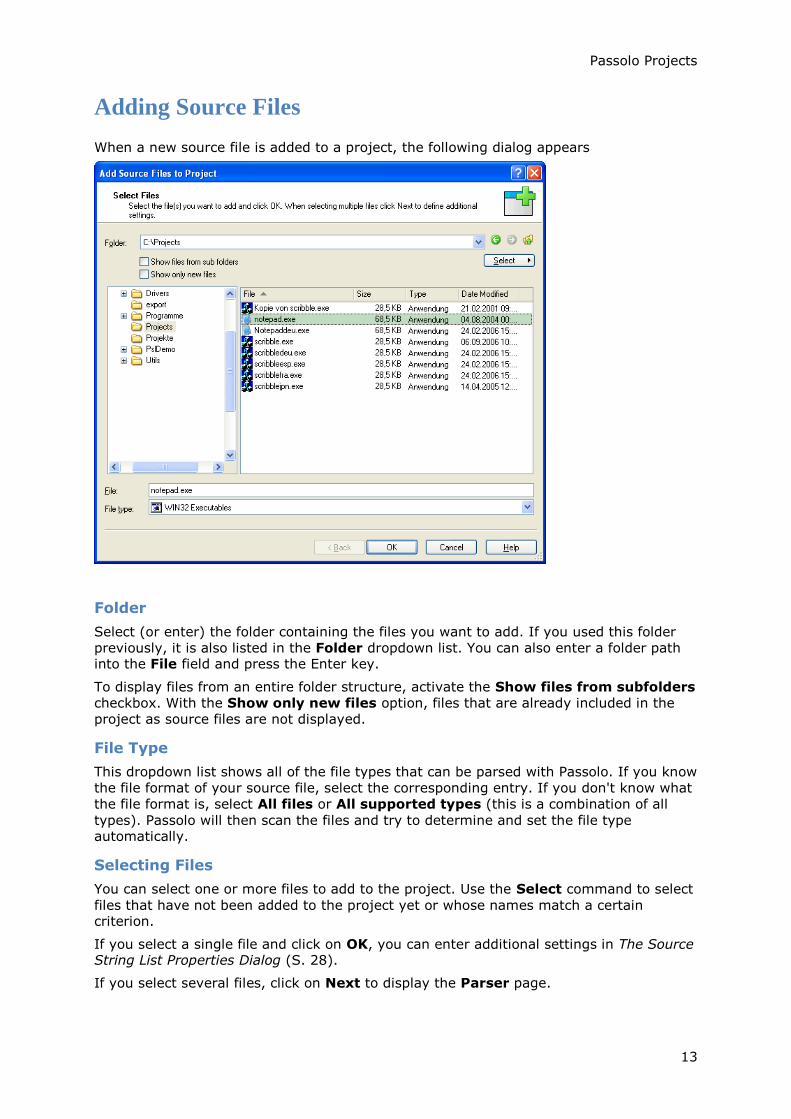
When a new source file is added to a project, the following dialog appears
Folder
Select (or enter) the folder containing the files you want to add. If you used this folder
previously, it is also listed in the Folder dropdown list. You can also enter a folder path into the File field and press the Enter key.
To display files from an entire folder structure, activate the Show files from subfolders
checkbox. With the Show only new files option, files that are already included in the
project as source files are not displayed.
File Type
This dropdown list shows all of the file types that can be parsed with Passolo. If you know
the file format of your source file, select the corresponding entry. If you don't know what
the file format is, select All files or All supported types (this is a combination of all
types). Passolo will then scan the files and try to determine and set the file type automatically.
Selecting Files
You can select one or more files to add to the project. Use the Select command to select
files that have not been added to the project yet or whose names match a certain criterion.
If you select a single file and click on OK, you can enter additional settings in The Source String List Properties Dialog (S. 28).
If you select several files, click on Next to display the Parser page.

SDL Passolo 2011
14
Parser
This page lists all of the files that you selected on the first page. The parser that will be
used to read the file is displayed next to each file.
To change the parser for a file or to let the parser be determined again, click on the
symbol. You can test the parser by selecting Show content. If there is no content in the file you should select another parser.
Click on Next to display the Source Language page.
Source Language
If all of the source files have the same language you should select that language now. If
not, or if you don't know the language, select The files have different languages.
Passolo will then check the content of each file to determine the language and set it
automatically. The selected default language is used for source files where this is not possible.
Click on Next to display the Target Path Rule page.
Target Path Rule
Please see The Target Path Rule Dialog (S. 24) for information about target path rules
If you have already defined a target path rule for the new source files, select Use existing target rule and then select the rule from the dropdown list
If you select Create a new target rule, a new rule will be created now. If, for example,
you are adding all of the files in a folder structure, you should create the Copy folder
rule. With this rule, a copy of the folder along with all of its subfolders is created for each target language.
Click on OK to add the selected files now.
Cascaded Projects
A cascaded project based on the target language of another project. All source files and
settings are automatically transferred from this project. The source lists contain the texts from the translation string lists in the base project.
More complex workflows can therefore be displayed. If the source files were created in a
"developer language" that has to first be translated into correct English, for example. The English then acts as a basis for translation into other languages.
Creating a cascaded project
To create a project, you need to specify the base project file and at least one target language. Proceed as follows:
1. Go to the Files menu and click on New/Cascaded Project to display the Project
Setup dialog (S. 22).
2. Select a name for the new project, such as MyProject, and enter this in the Name
field.
3. Geben Sie anschließend im Feld Verzeichnis den Pfad ein, in dem Passolo das
Projekt anlegen und speichern soll. It is recommended that you select the base
project folder here to ensure that the target path rule can be transferred
correctly, for example.
4. Specify the <strong>base project</strong> or click on "<img
src="../icons/icn_glossopen.gif">" and select it using the File Selection
Dialog.
5. Select the target language for the base project, which will serve as the base
language for the cascaded project.
Passolo Projects
15
6. Click the Add language button and then select the language into which you want
to translate the source file(s) via the language dialog (S. 31). Repeat this
procedure for any additional target languages.
7. Confirm all your settings by clicking on OK. The dialog closes, and the Project
window (S. 15) appears, showing all of the source files and languages that you specified.
Working with cascaded projects
You can work with cascaded projects in exactly the same way as with normal projects.
Please note the following points:
When updating the source lists, the original source files are not read. The texts
from the base project translation string lists are applied instead.
No additional source files can be added to the cascaded project. The list of source
files is applied when it is opened from the base project.
The source file settings cannot be changed in the cascaded project. These are also
transferred from the base project. Changes to the parser settings, for example,
must therefore be made in the base project.
The target path rules are taken from the base project. If these include the
placeholder (project folder), the cascaded project should be created in the same folder as the base project. (See Target Path Rule Dialog, S. 24)
The Project Window
The Project Window
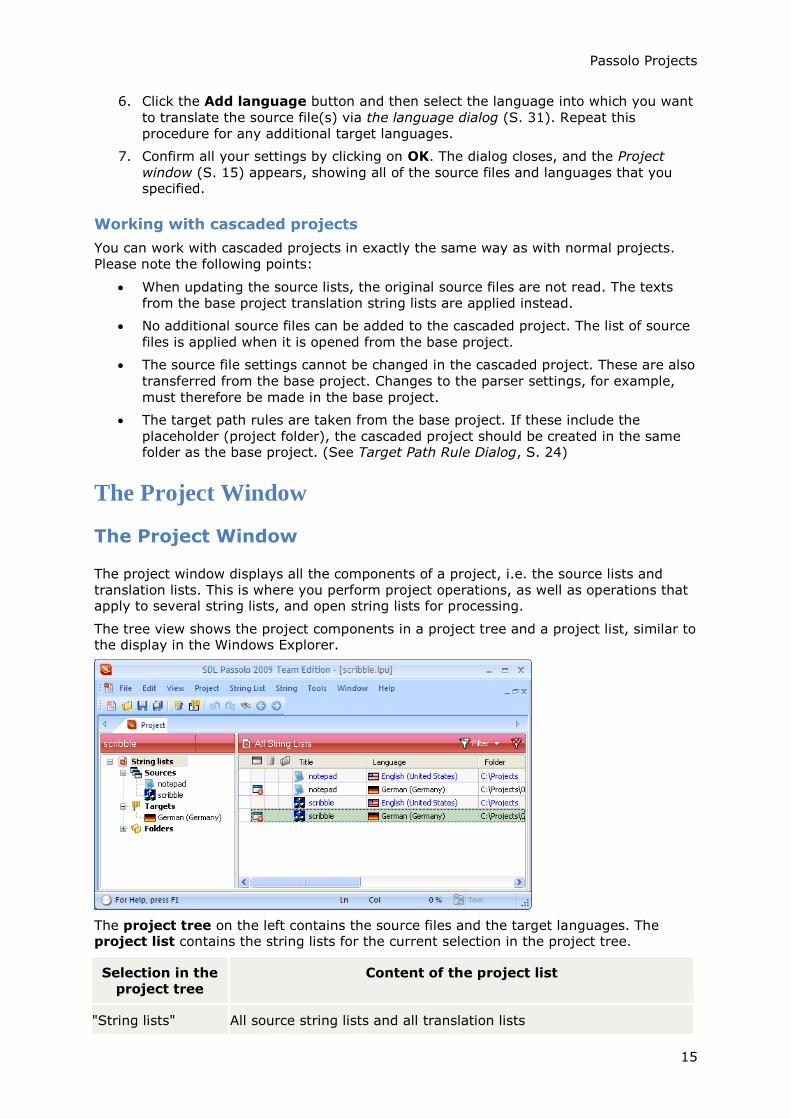
The project window displays all the components of a project, i.e. the source lists and
translation lists. This is where you perform project operations, as well as operations that apply to several string lists, and open string lists for processing.
The tree view shows the project components in a project tree and a project list, similar to the display in the Windows Explorer.
The project tree on the left contains the source files and the target languages. The project list contains the string lists for the current selection in the project tree.
Selection in the
project tree
Content of the project list
"String lists" All source string lists and all translation lists

SDL Passolo 2011
16
―Sources‖ All source string lists
Single source file,
e.g. ―scribble‖
Selected source string list and all corresponding translation lists
―Targets‖ All translation lists
Single target
language,
e.g. ―German‖
All translation lists for the selected language
"Folder" All source string lists and translation lists, grouped by source file or
target file folder
The displayed lists can be sorted according to different criteria. Click on a column header
to sort the list according to the contents of the column in ascending or descending
alphanumeric order. An arrow symbol in the column heading shows the current sorting selection. Clicking again on the same column header toggles the sorting direction.
To restore the original sorting according to the order of objects in the project, select
Sort, then Project Sorting from the View menu.
String List Status
The icons in the fields of the standard view, or in the project list of the tree view, indicate the status of the individual string lists:
Icon Description Comments
The indicated source file does not
exist.
Make sure the correct source file and path
are specified in the project settings.
The string list has not been created
yet.
Select the Create/Update String List
command from the String List menu.
The string list is not up to date,
because the source file or source
string list has been modified since the latest update.
Select the Create/Update String List
command from the String List menu.
The string list is open.
The target file does not exist. When all the string resources have been
translated, select the Generate Target File command from the String List menu.
The string list was exported as a
translation list (TRX) or as a non-
licensed translation bundle (TBA).
The string list cannot be edited until it has
been re-imported or released. For further
information, please see Exporting Translation Bundles (S. 210).
The string list was exported as a
licensed translation bundle.
The string list cannot be edited until it has
been re-imported or released. For further
information, please see Exporting Translation Bundles (S. 210).
The target file is no longer up to
date, because the original translation
list has been modified.
Select the Generate Target File command
from the String List menu.
Passolo Projects
17
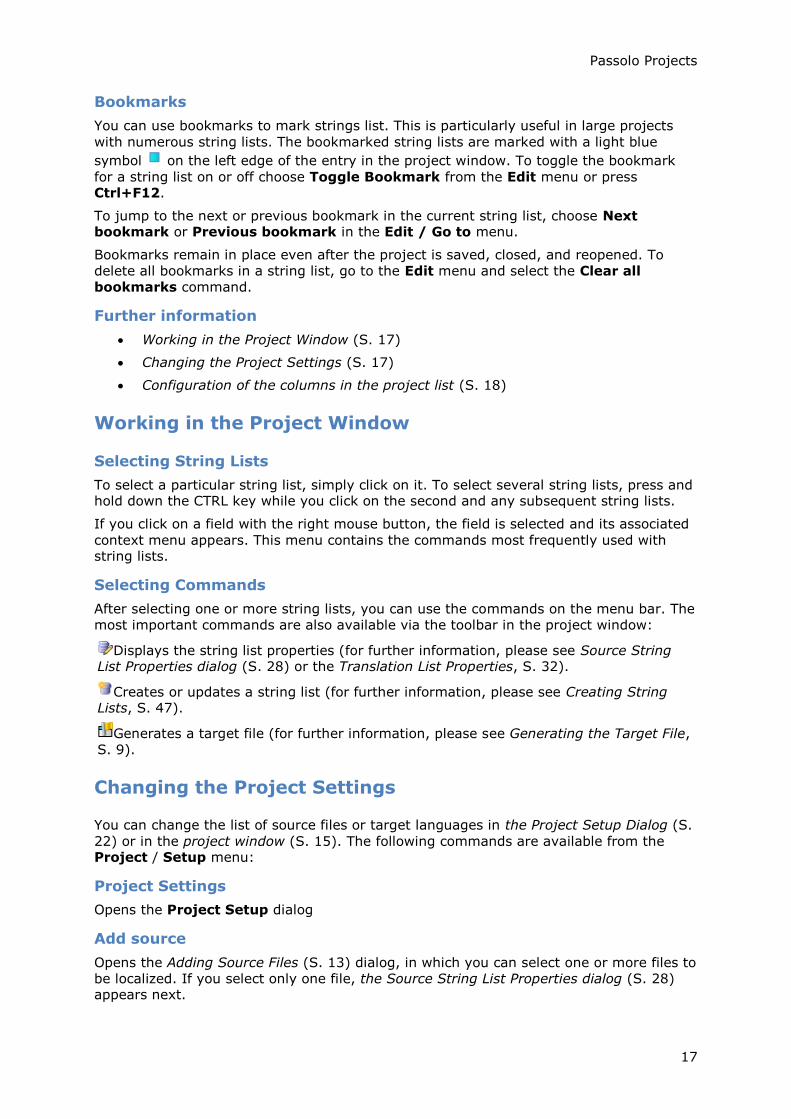
Bookmarks
You can use bookmarks to mark strings list. This is particularly useful in large projects
with numerous string lists. The bookmarked string lists are marked with a light blue
symbol on the left edge of the entry in the project window. To toggle the bookmark
for a string list on or off choose Toggle Bookmark from the Edit menu or press Ctrl+F12.
To jump to the next or previous bookmark in the current string list, choose Next bookmark or Previous bookmark in the Edit / Go to menu.
Bookmarks remain in place even after the project is saved, closed, and reopened. To
delete all bookmarks in a string list, go to the Edit menu and select the Clear all
bookmarks command.
Further information
Working in the Project Window (S. 17)
Changing the Project Settings (S. 17)
Configuration of the columns in the project list (S. 18)
Working in the Project Window
Selecting String Lists
To select a particular string list, simply click on it. To select several string lists, press and hold down the CTRL key while you click on the second and any subsequent string lists.
If you click on a field with the right mouse button, the field is selected and its associated
context menu appears. This menu contains the commands most frequently used with string lists.
Selecting Commands
After selecting one or more string lists, you can use the commands on the menu bar. The
most important commands are also available via the toolbar in the project window:
Displays the string list properties (for further information, please see Source String List Properties dialog (S. 28) or the Translation List Properties, S. 32).
Creates or updates a string list (for further information, please see Creating String Lists, S. 47).
Generates a target file (for further information, please see Generating the Target File,
S. 9).
Changing the Project Settings
You can change the list of source files or target languages in the Project Setup Dialog (S.
22) or in the project window (S. 15). The following commands are available from the Project / Setup menu:
Project Settings
Opens the Project Setup dialog
Add source
Opens the Adding Source Files (S. 13) dialog, in which you can select one or more files to
be localized. If you select only one file, the Source String List Properties dialog (S. 28) appears next.
SDL Passolo 2011
18
Delete source
This command removes the currently selected source file from the project. This also
deletes any associated translation lists.
Add language
Opens the Language Dialog (S. 31), where you can select a new language.
Delete language
This command removes the currently selected language from the project. This also
deletes any associated translation lists.
Delete translation list
If certain translation lists are not required – for example, when a specific source file is
not to be translated to all target languages – the corresponding translation lists can be
deleted. This helps to keep the project window "tidy" and also reduces the size of the project file.
In the project window, the lists then appear in the Deleted translation lists section. If
you later decide that you do need these lists you can restore them by right-clicking on
them and selecting Restore from the shortcut menu. The lists are thus returned to the
project structure. Before they can be edited, the translation lists have to be generated/updated. (See Creating String Lists, S. 47)
Move up
The currently selected source file or language is moved up one position. You can use this
function, for example, to move specific source files that you want to process to the top of the list for easier access.
Move down
The currently selected source file or language is moved down one position.
User-defined Properties
This command defines additional properties to be used in the project. (See User-defined Properties, S. 44)
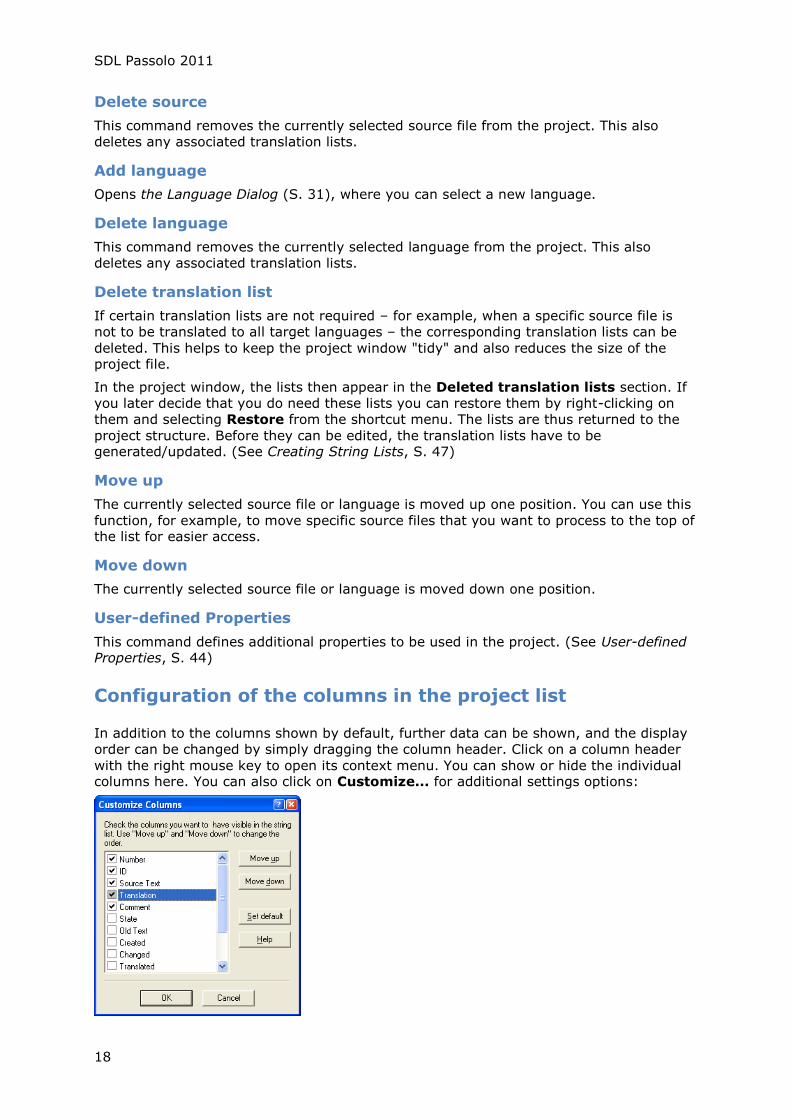
Configuration of the columns in the project list
In addition to the columns shown by default, further data can be shown, and the display
order can be changed by simply dragging the column header. Click on a column header
with the right mouse key to open its context menu. You can show or hide the individual columns here. You can also click on Customize... for additional settings options:

Passolo Projects
19
In the dialog Customize Columns the following data columns can be shown or hidden
by selecting the appropriate check box.
File status contains one of the icons used to indicate the status of the source or target file. (default)
String list status contains one of the icons used to indicate the status of the source string list or translation list. (default)
Is Open shows if a text list is currently opened.
Title displays the title of the string list. (default)
Language displays the language of the string list. (default)
Folder displays the path to the folder containing the source file / target file. (default)
Filename displays the name of the source file / target file. (default)
Size shows the number of strings in the list. Since some strings are only displayed in the
source string list, the value for a corresponding translation list may be slightly lower. (default)
Translated indicates how much of the string list (in percent) has already been
translated. If this column is made wide enough, it will also display a small bar graph representing the translation progress. (default)
File modified indicates when the source file / target file was last modified.
Parser indicates the parser used to process this file. (See Add-Ins for Passolo, S. 149)
Last update indicates when the string list was lasted updated.
Last modified indicates when the string list was lasted processed or otherwise modified.
Last generated indicates when a given target file was last generated – with source files this field is empty.
User shows which user is currently using the string list in projects that were opened in Shared Mode. (See Shared Mode, S. 41)
ID contains an ID used internally to identify the string list. This information is only needed for service purposes.
Custom1 - Custom4 These are four columns that can be used to display any user
defined content. (see below)
User defined columns
You can define up to four columns with any content you want to display. Select one of the columns from Custom1 to Custom4 and click on the Define button.
In the Customize Columns dialog you can specify the column heading and the content
to be displayed. The content is specified by entering the name of a user defined property
in angle brackets (see User-defined Properties, S. 44).
For example, if you have defined a "CountryCode" property with the name "20000" you
can enter "<20000>" as the column content and the CountryCode will be displayed in this extra column.
Tip: If you select a string in the translation list before you call up the Customize
Columns dialog the available properties are displayed when you click on the black
rectangle.
Sorting and Grouping in the Project Window
By default, the string lists in the project window are sorted by their order within the project file.

SDL Passolo 2011
20
You can also specify any other sorting order. Select a Sort submenu entry from the
View menu or click a column heading with the mouse to sort the content of the list by
the content of the chosen column in ascending or descending order. An arrow symbol
next to the column heading shows the current sorting selection. You can restore the
standard string list sorting order by clicking on the left-most, empty column heading field.
For a Grouped display of resources, choose Display in groups from the View/Sort
menu. This can be done even faster by right-clicking on the column title of a list. This
allows you to sort string lists, for example, by change date and display string lists that
were changed on a certain day in a group with "File changed on..." in the heading.
Filter Functions in the Project Window
With projects that have many string lists, it can be advantageous to display only those
string lists that correspond to specific criteria, e.g. all string lists that need to be updated.
The project window has a filter function for this purpose. You can define and save filters
with different criteria in order to select them quickly later on.
Selecting or removing filters.
Open the relevant string list and select Filter/Define from the View menu or click the
icon on the title bar to display the Filter settings for Project Window dialog. To
quickly select one of the stored filters, click the small arrow next to the icon.
To deactivate the filters, go to the Filter for… dialog and click the Remove filter
button. You can also select the Remove Filter command in the View menu, or click the
icon on the toolbar.
The filter dialog
In this dialog you can edit the current filter settings and manage stored filters. Additional input options appear as soon as you select one of the criteria.
Filter by file state
This filter displays string lists with a given file status, i.e. the status of the source or target file.
Passolo Projects
21
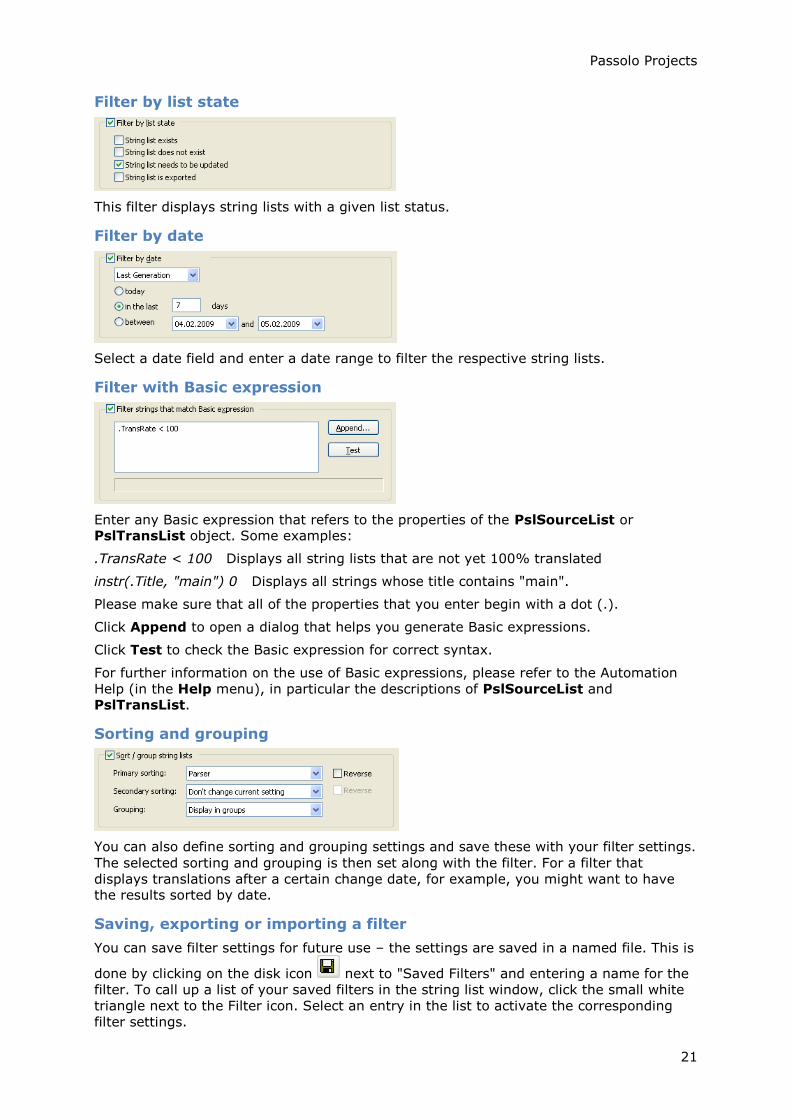
Filter by list state
This filter displays string lists with a given list status.
Filter by date
Select a date field and enter a date range to filter the respective string lists.
Filter with Basic expression
Enter any Basic expression that refers to the properties of the PslSourceList or PslTransList object. Some examples:
.TransRate < 100 Displays all string lists that are not yet 100% translated
instr(.Title, "main") 0 Displays all strings whose title contains "main".
Please make sure that all of the properties that you enter begin with a dot (.).
Click Append to open a dialog that helps you generate Basic expressions.
Click Test to check the Basic expression for correct syntax.
For further information on the use of Basic expressions, please refer to the Automation
Help (in the Help menu), in particular the descriptions of PslSourceList and PslTransList.
Sorting and grouping
You can also define sorting and grouping settings and save these with your filter settings.
The selected sorting and grouping is then set along with the filter. For a filter that
displays translations after a certain change date, for example, you might want to have the results sorted by date.
Saving, exporting or importing a filter
You can save filter settings for future use – the settings are saved in a named file. This is
done by clicking on the disk icon next to "Saved Filters" and entering a name for the
filter. To call up a list of your saved filters in the string list window, click the small white
triangle next to the Filter icon. Select an entry in the list to activate the corresponding
filter settings.
SDL Passolo 2011
22
To delete a saved filter, select the relevant entry in the Filter dialog and click the icon
You can also export the current filter to a file, for example if you want to send it to
another user. To do this, click on the icon and enter a file name for the filter. You may need to save the filter and give it a name first.
To import a filter, click on the icon and select the corresponding file.
The Project Setup Dialog
Select the Setup command from the Project menu to open the Project Setup dialog, where you can change the project properties.
This dialog shows the individual components of a project (source files and target
languages). Here you add additional components, delete existing ones, and modify various parameters.
The Name and Location fields indicate the project’s name and location. This information is defined when a project is first created.
All files that are to be translated as part of this Passolo project appear on the Source
Files page. All languages that the source files are to be translated into can be seen on
the Target Languages page. Both lists can also be displayed on top of one another. To do this, change the layout in the bottom left-hand corner.
Adding additional source files
1. Switch to the Source files page.
2. Click Add source file.
3. The Add Source Files dialog appears. (See Adding Source Files, S. 13)
4. After this, you should check the information shown in the Source string list
properties dialog (for more detailed information, please refer to the Source
string list properties dialog, S. 28).
Adding additional languages
1. Switch to the Target Languages page.
2. Click on the Add language button.
3. From the Language box, select the language into which you want to translate the
source file.
4. Choose any other language-specific options, such as Codepage and Font. See
The Language Dialog (S. 31).
Removing source files or target languages
1. In the associated list, mark the source file or language you wish to remove.
2. Then click on the Delete button.
3. A prompt appears, asking you to confirm the deletion. Only by responding yes to
this prompt will the entry and the associated object be removed.
Passolo Projects
23
Note that doing this will also delete all associated string lists: If you close the Project
Setup dialog by clicking on OK any changes and translations will subsequently no longer be available, even if you later add the same source file or language again.
Changing the sequence
Use the Move Up or Move Down buttons to change the sequence in which several
source files and/or languages are displayed in the list. You can also sort this list by Title
or File path by clicking the corresponding column headings. This only affects the display in the dialog, however, not in the project window.
Editing the target rules
To open the dialog of the same name, click on the Target Rules button. In this dialog
you can specify the rules for projects with multiple source files and target languages (for further information refer to The Target Path Rule Dialog, S. 24).
Target Path Rules
You can freely select the paths of target files for a project to meet your needs. If a given
project has several source files and target languages, this may become complicated if
you do it for each translation list. In addition, experience has proven that ordering target
files according to a specific principle is practical. In the Target path rules dialog you can
define different rules to generate the target paths for the project target files
automatically.
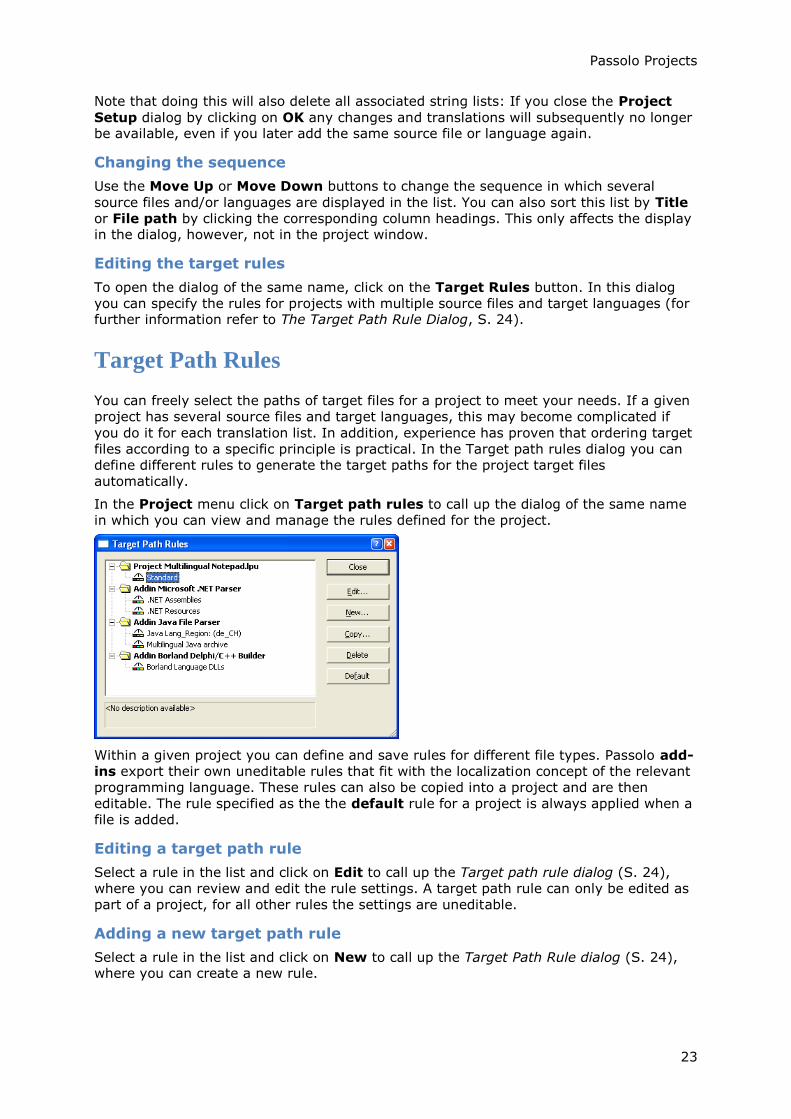
In the Project menu click on Target path rules to call up the dialog of the same name
in which you can view and manage the rules defined for the project.
Within a given project you can define and save rules for different file types. Passolo add-
ins export their own uneditable rules that fit with the localization concept of the relevant
programming language. These rules can also be copied into a project and are then
editable. The rule specified as the the default rule for a project is always applied when a
file is added.
Editing a target path rule
Select a rule in the list and click on Edit to call up the Target path rule dialog (S. 24),
where you can review and edit the rule settings. A target path rule can only be edited as
part of a project, for all other rules the settings are uneditable.
Adding a new target path rule
Select a rule in the list and click on New to call up the Target Path Rule dialog (S. 24), where you can create a new rule.
SDL Passolo 2011
24
Copying a target path rule
Select a rule in the list and click on Copy to copy the rule and call up the Target Path
Rule dialog (S. 24) – you can then review and edit the rule settings. A target path rule cannot be copied within saved rules or add-ins.
To copy a rule from an add-in to a project, click the entry and drag it with your mouse into the project. You can also copy rules from one project to another in the same way.
Deleting a target path rule
Select a rule in the list and click on Delete to remove this rule from the project. Rules from add-ins cannot be deleted.
Setting the default target path rule
In the list of rules select one of the rules contained in a project and click on Default to
make this the default rule. The default rule is applied to target files that result from
adding new source files or target languages to the project. The default rule is always shown at the top of the list.
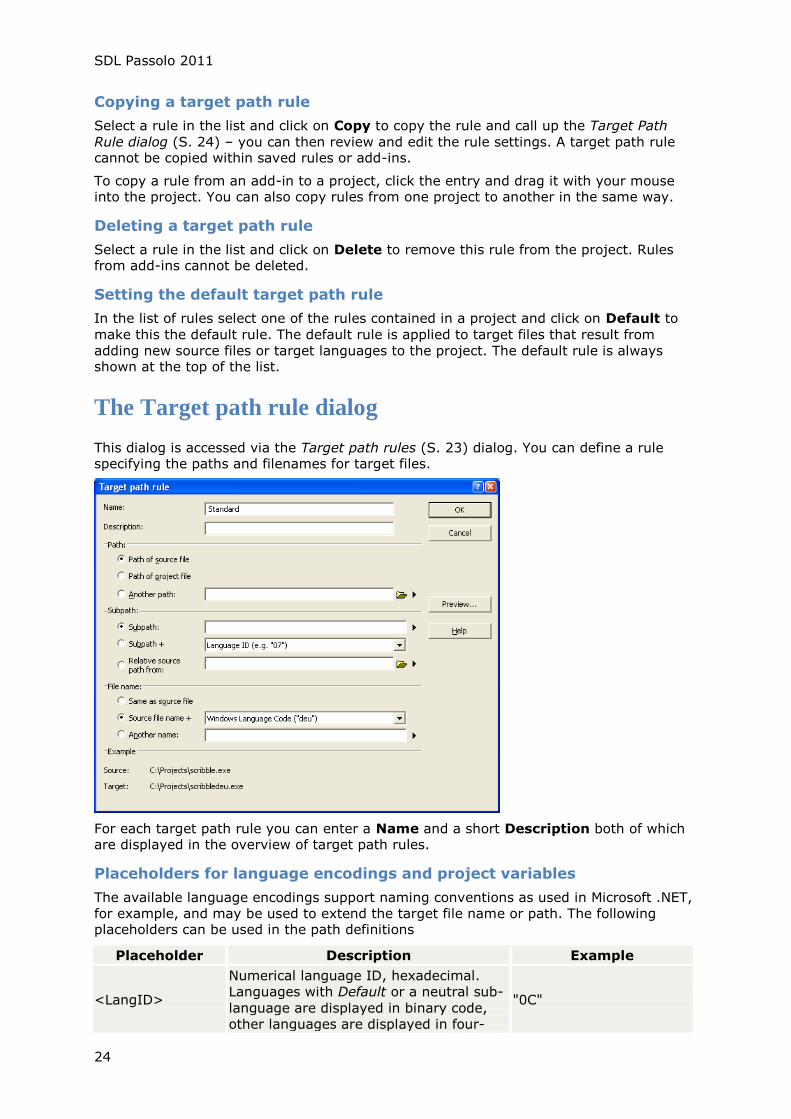
The Target path rule dialog
This dialog is accessed via the Target path rules (S. 23) dialog. You can define a rule specifying the paths and filenames for target files.
For each target path rule you can enter a Name and a short Description both of which are displayed in the overview of target path rules.
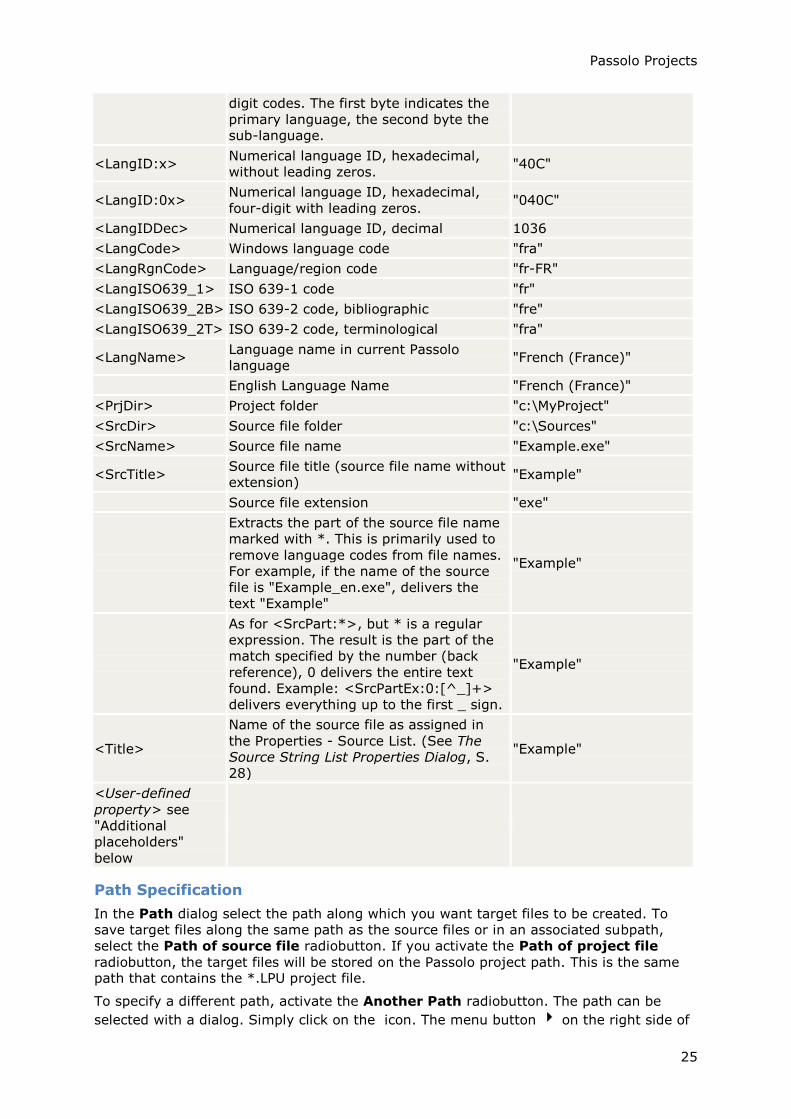
Placeholders for language encodings and project variables
The available language encodings support naming conventions as used in Microsoft .NET,
for example, and may be used to extend the target file name or path. The following placeholders can be used in the path definitions
Placeholder Description Example
<LangID>
Numerical language ID, hexadecimal.
Languages with Default or a neutral sub-
language are displayed in binary code,
other languages are displayed in four-
"0C"
Passolo Projects
25
digit codes. The first byte indicates the
primary language, the second byte the
sub-language.
<LangID:x> Numerical language ID, hexadecimal,
without leading zeros. "40C"
<LangID:0x> Numerical language ID, hexadecimal,
four-digit with leading zeros. "040C"
<LangIDDec> Numerical language ID, decimal 1036
<LangCode> Windows language code "fra"
<LangRgnCode> Language/region code "fr-FR"
<LangISO639_1> ISO 639-1 code "fr"
<LangISO639_2B> ISO 639-2 code, bibliographic "fre"
<LangISO639_2T> ISO 639-2 code, terminological "fra"
<LangName> Language name in current Passolo
language "French (France)"
English Language Name "French (France)"
<PrjDir> Project folder "c:\MyProject"
<SrcDir> Source file folder "c:\Sources"
<SrcName> Source file name "Example.exe"
<SrcTitle> Source file title (source file name without
extension) "Example"
Source file extension "exe"
Extracts the part of the source file name
marked with *. This is primarily used to
remove language codes from file names.
For example, if the name of the source
file is "Example_en.exe", delivers the
text "Example"
"Example"
As for <SrcPart:*>, but * is a regular
expression. The result is the part of the
match specified by the number (back
reference), 0 delivers the entire text
found. Example: <SrcPartEx:0:[^_]+>
delivers everything up to the first _ sign.
"Example"
<Title>
Name of the source file as assigned in
the Properties - Source List. (See The
Source String List Properties Dialog, S.
28)
"Example"
<User-defined
property> see
"Additional
placeholders"
below
Path Specification
In the Path dialog select the path along which you want target files to be created. To
save target files along the same path as the source files or in an associated subpath,
select the Path of source file radiobutton. If you activate the Path of project file
radiobutton, the target files will be stored on the Passolo project path. This is the same path that contains the *.LPU project file.
To specify a different path, activate the Another Path radiobutton. The path can be
selected with a dialog. Simply click on the icon. The menu button on the right side of
SDL Passolo 2011
26
the edit field offers a list of standardized language encodings and project variables. The
selected entry is inserted in the edit field as a placeholder (e.g. ).
Subpath Specification
The subpath is attached to the path specified above. Enter the desired partial path in the
field. This path name may also start with the entry (..\) if a higher ranking path is to be
used. The menu button on the right side of the edit field offers a list of standardized
language encodings and project variables. The selected entry is inserted in the edit field as a placeholder (e.g. ―‖).
If you activate the Subpath + language ID radiobutton, the numeric ID of the language
being used is attached to the target files’ subpath. This allows target files to be automatically assigned to different subfolders.
The Relative source path option serves to create target files in the same folder
structure as the source files. A subpath is added to the specified folder path, according to
the relation of the source file to a reference folder. All source files must be contained in
the reference folder or one of its subfolders.
Example:
Your source files are
c:\MyProgram\MainProgram.exe
c:\MyProgram\Graphic\GraphicRoutines.dll
c:\MyProgram\System\System.dll
The program files translated to German are to be saved to c:\MyProgram-deu, with the
DLLs in the same relative position. Please choose the following settings
Path – Another path: c:\MyProgram-<LangCode>
Subpath – Relative source path from: c:\MyProgram
File name: Same as source file
Thus, the German target files are:
c:\MyProgram-deu\MainProgram.exe
c:\MyProgram-deu\Graphic\GraphicRoutines.dll
c:\MyProgram-deu\System\System.dll
Before applying your settings, you can use the Preview function to confirm that they are correct. (see below)
File Name Specification
Target file names can also be configured in various ways: If you activate the Same as
source file radio button, the source file names are used unchanged. Activating either
the Source file name + language ID or Source file name + language code radiobuttons
attaches the numeric language ID or language code. To create your own file name, use
the Another name field. The menu button on the right side of the edit field offers a
list of standardized language encodings and project variables. The selected entry is
inserted in the edit field as a placeholder (e.g. ―‖).
Updating Existing Path Structures
If you change the target file rules, your new specifications will be applied as soon as you
create any new target files by adding source files or target languages. Previously defined
target files can be adapted with regard to a target path rule or connected permanently with a rule. (See the Translation List Properties (S. 32) dialog)

Passolo Projects
27
Preview
You can use the Preview function to see how the chosen settings will affect any existing
target files.
This dialog box shows all the target files as they would result from the current
specifications. You can keep this dialog box open while you make any further changes in the Target path rule dialog. The display will be updated automatically.
Additional placeholders
You can use additional placeholders by employing user-defined properties (see User-defined properties, S. 44).
For example, if you have defined a Country code property for languages, you can use the placeholder <country code> e.g. in Subpath:
Subpath Code <country code>
Select Target Path Rule
In this dialog you can choose a target path rule for one or more target files. It is opened from the Translation List Properties (S. 32) dialog
From the list of available rules stored in this project select the relevant target path rule
to be used. The information field below the list contains a short description of the rule –
the Preview field contains a preview of the target path that will be generated on the basis of the selected rule.
Use rule
With the option Use target path rule the target paths are revised according to the
selected rule. Nevertheless, you will still be able to edit the path in the Translation List
Properties (S. 32) dialog. If the rule is changed, there is no automatic update of the file paths.
Link to rule
With the option Link to rule the target path is always updated automatically whenever
the rule changes. In this case the target path can no longer be edited in the Translation list properties dialog.
To clear an existing link, choose the Clear link option. The path can them be edited
manually.
SDL Passolo 2011
28
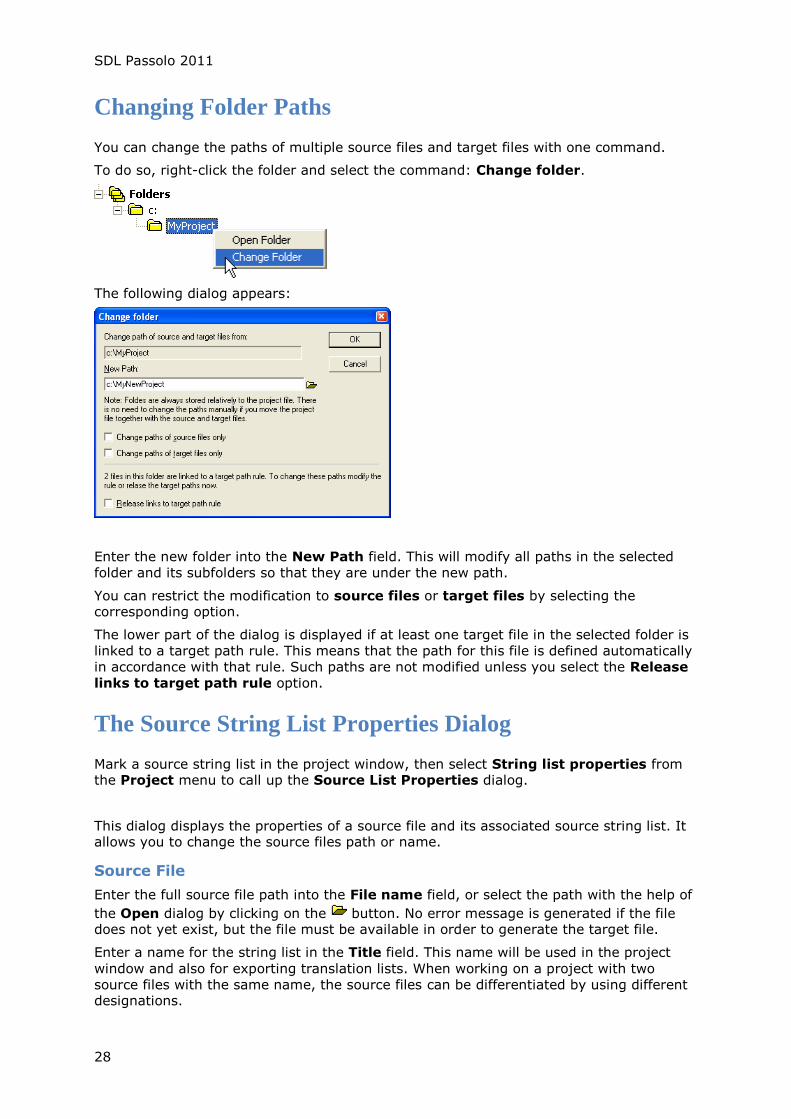
Changing Folder Paths
You can change the paths of multiple source files and target files with one command.
To do so, right-click the folder and select the command: Change folder.
The following dialog appears:
Enter the new folder into the New Path field. This will modify all paths in the selected
folder and its subfolders so that they are under the new path.
You can restrict the modification to source files or target files by selecting the corresponding option.
The lower part of the dialog is displayed if at least one target file in the selected folder is
linked to a target path rule. This means that the path for this file is defined automatically
in accordance with that rule. Such paths are not modified unless you select the Release
links to target path rule option.
The Source String List Properties Dialog
Mark a source string list in the project window, then select String list properties from the Project menu to call up the Source List Properties dialog.
This dialog displays the properties of a source file and its associated source string list. It allows you to change the source files path or name.
Source File
Enter the full source file path into the File name field, or select the path with the help of
the Open dialog by clicking on the button. No error message is generated if the file does not yet exist, but the file must be available in order to generate the target file.
Enter a name for the string list in the Title field. This name will be used in the project
window and also for exporting translation lists. When working on a project with two
source files with the same name, the source files can be differentiated by using different designations.

Passolo Projects
29
Parser
Passolo supports various file formats. Win32 applications, such as the ones generated by
Microsoft Developer Studio, for example, are processed directly by Passolo. In other
words, Passolo is the parser for Win32 applications. Other formats are processed by a
corresponding add-in, or by a system macro. For example, there are parsers for RC files
or .NET applications.
The correct parser will normally be selected automatically. If a certain file format can be
processed by several different parsers, however, you have the option of specifying the
parser to be used. For more detailed information about Passolo’s built-in and optional file parsers and their configuration, please refer to Add-Ins for Passolo (S. 149).
If the parser offers additional settings options, you can call these up by clicking on
Settings.
Segmenter
Certain file formats (such as HTML) require a Segmenter. This is an add-in that divides
long strings into shorter segments (in general, separate sentences). If a segmenter is
required, the suitable add-in is determined the first time the source string list is updated.
If you have several segmenter add-ins or want to make sure the correct segmenter is selected prior to the first update, you can make your selection here.
Passolo is supplied with an SRX segmenter (see The SRX Segmenter, S. 204).
On the other hand, most software file formats do not require a segmenter – with these
formats, no segmenter add-in is specified following an update. The selection of a
segmenter add-in for these formats has no effect on the extracted strings.
If the segmenter offers additional settings options, you can call these up by clicking on
Settings.
Language to extract
In general, the string resources contained in a source file are classified according to
language. If there are several languages available (in the source file), you will have to
indicate which of these languages are to be extracted from the source file to generate or
update the source string lists. Click on the button next to the field to obtain a list of the available languages.
In this list, click all the languages to be extracted, one after another. You also have the
option of choosing All languages or All languages except Neutral. The latter is
recommended for cases where it is ensured that only resources that are not to be translated, e.g. bitmaps, have been marked as NEUTRAL by the developer(s).
If you use Passolo to create multilingual programs, by setting up the source file as the
target file, you must be sure to select exactly the languages that were originally
contained in the source file to avoid extracting resources that have already been translated.
Codepage
The Codepage field is used if conversion from Unicode strings to DBCS (Double Byte
Character Set) strings (or vice versa) is required. Use the Default entry to select the
codepage that corresponds to the language being extracted. Experienced users can also
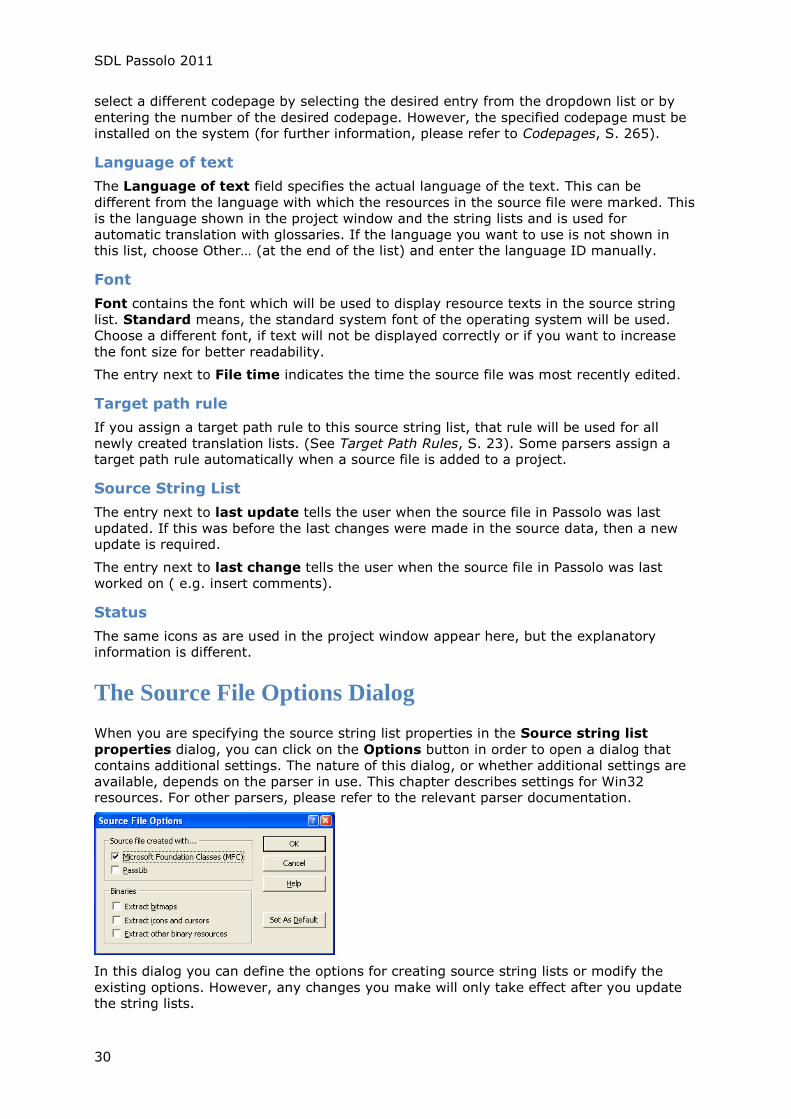
SDL Passolo 2011
30
select a different codepage by selecting the desired entry from the dropdown list or by
entering the number of the desired codepage. However, the specified codepage must be installed on the system (for further information, please refer to Codepages, S. 265).
Language of text
The Language of text field specifies the actual language of the text. This can be
different from the language with which the resources in the source file were marked. This
is the language shown in the project window and the string lists and is used for
automatic translation with glossaries. If the language you want to use is not shown in this list, choose Other… (at the end of the list) and enter the language ID manually.
Font
Font contains the font which will be used to display resource texts in the source string
list. Standard means, the standard system font of the operating system will be used.
Choose a different font, if text will not be displayed correctly or if you want to increase
the font size for better readability.
The entry next to File time indicates the time the source file was most recently edited.
Target path rule
If you assign a target path rule to this source string list, that rule will be used for all
newly created translation lists. (See Target Path Rules, S. 23). Some parsers assign a target path rule automatically when a source file is added to a project.
Source String List
The entry next to last update tells the user when the source file in Passolo was last
updated. If this was before the last changes were made in the source data, then a new update is required.
The entry next to last change tells the user when the source file in Passolo was last
worked on ( e.g. insert comments).
Status
The same icons as are used in the project window appear here, but the explanatory information is different.
The Source File Options Dialog
When you are specifying the source string list properties in the Source string list
properties dialog, you can click on the Options button in order to open a dialog that
contains additional settings. The nature of this dialog, or whether additional settings are
available, depends on the parser in use. This chapter describes settings for Win32 resources. For other parsers, please refer to the relevant parser documentation.
In this dialog you can define the options for creating source string lists or modify the
existing options. However, any changes you make will only take effect after you update the string lists.
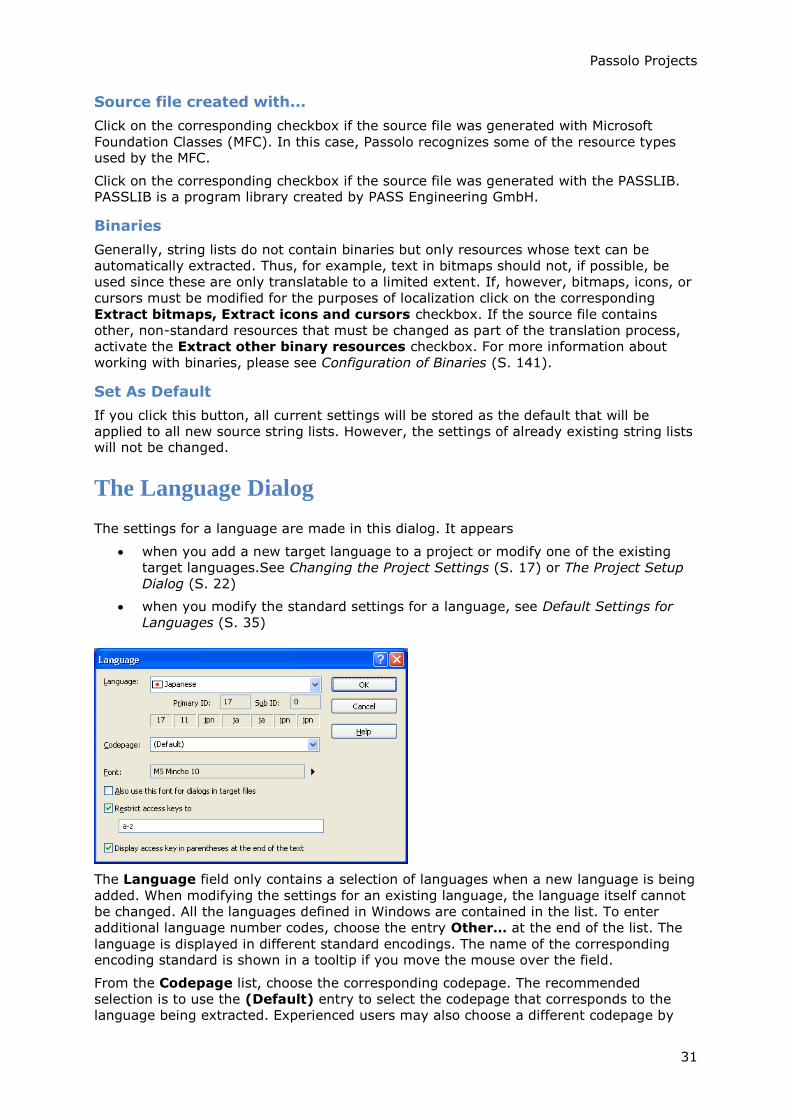
Passolo Projects
31
Source file created with...
Click on the corresponding checkbox if the source file was generated with Microsoft
Foundation Classes (MFC). In this case, Passolo recognizes some of the resource types used by the MFC.
Click on the corresponding checkbox if the source file was generated with the PASSLIB. PASSLIB is a program library created by PASS Engineering GmbH.
Binaries
Generally, string lists do not contain binaries but only resources whose text can be
automatically extracted. Thus, for example, text in bitmaps should not, if possible, be
used since these are only translatable to a limited extent. If, however, bitmaps, icons, or
cursors must be modified for the purposes of localization click on the corresponding
Extract bitmaps, Extract icons and cursors checkbox. If the source file contains
other, non-standard resources that must be changed as part of the translation process,
activate the Extract other binary resources checkbox. For more information about
working with binaries, please see Configuration of Binaries (S. 141).
Set As Default
If you click this button, all current settings will be stored as the default that will be
applied to all new source string lists. However, the settings of already existing string lists will not be changed.
The Language Dialog
The settings for a language are made in this dialog. It appears
when you add a new target language to a project or modify one of the existing
target languages.See Changing the Project Settings (S. 17) or The Project Setup
Dialog (S. 22)
when you modify the standard settings for a language, see Default Settings for
Languages (S. 35)
The Language field only contains a selection of languages when a new language is being
added. When modifying the settings for an existing language, the language itself cannot
be changed. All the languages defined in Windows are contained in the list. To enter
additional language number codes, choose the entry Other… at the end of the list. The
language is displayed in different standard encodings. The name of the corresponding encoding standard is shown in a tooltip if you move the mouse over the field.
From the Codepage list, choose the corresponding codepage. The recommended
selection is to use the (Default) entry to select the codepage that corresponds to the
language being extracted. Experienced users may also choose a different codepage by
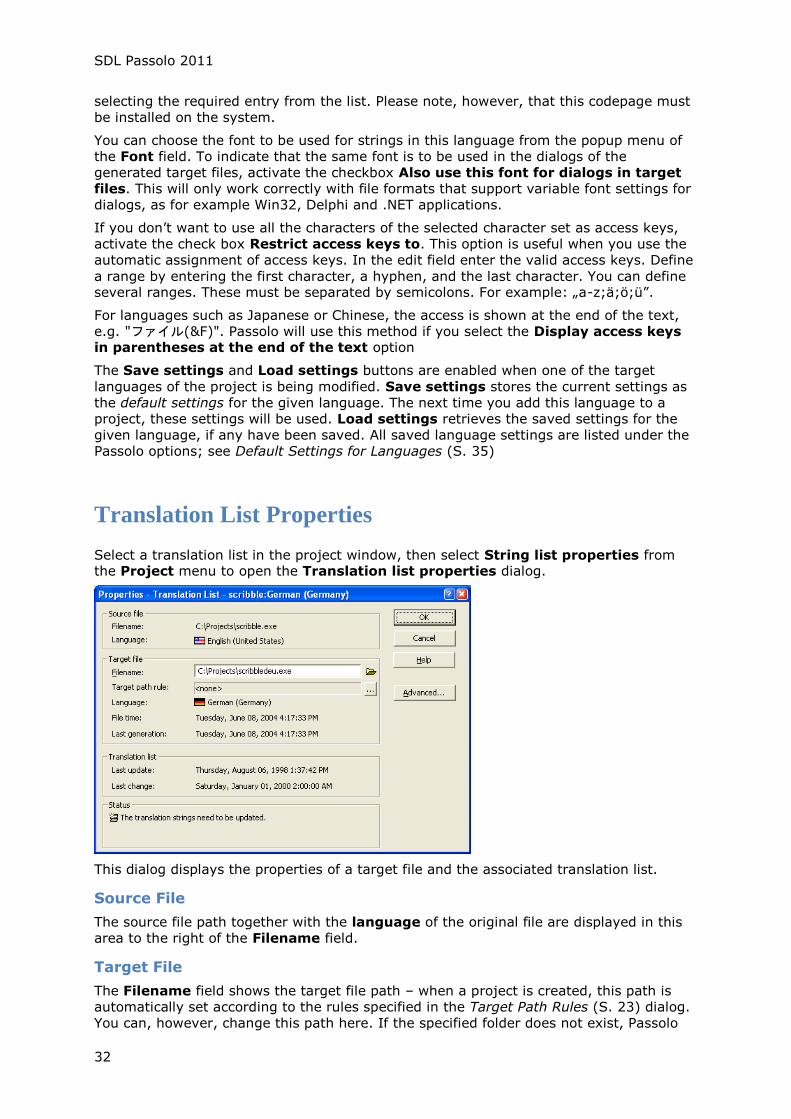
SDL Passolo 2011
32
selecting the required entry from the list. Please note, however, that this codepage must
be installed on the system.
You can choose the font to be used for strings in this language from the popup menu of
the Font field. To indicate that the same font is to be used in the dialogs of the
generated target files, activate the checkbox Also use this font for dialogs in target
files. This will only work correctly with file formats that support variable font settings for
dialogs, as for example Win32, Delphi and .NET applications.
If you don’t want to use all the characters of the selected character set as access keys,
activate the check box Restrict access keys to. This option is useful when you use the
automatic assignment of access keys. In the edit field enter the valid access keys. Define
a range by entering the first character, a hyphen, and the last character. You can define several ranges. These must be separated by semicolons. For example: „a-z;ä;ö;ü‖.
For languages such as Japanese or Chinese, the access is shown at the end of the text,
e.g. "ファイル(&F)". Passolo will use this method if you select the Display access keys in parentheses at the end of the text option
The Save settings and Load settings buttons are enabled when one of the target
languages of the project is being modified. Save settings stores the current settings as
the default settings for the given language. The next time you add this language to a
project, these settings will be used. Load settings retrieves the saved settings for the
given language, if any have been saved. All saved language settings are listed under the
Passolo options; see Default Settings for Languages (S. 35)
Translation List Properties
Select a translation list in the project window, then select String list properties from the Project menu to open the Translation list properties dialog.
This dialog displays the properties of a target file and the associated translation list.
Source File
The source file path together with the language of the original file are displayed in this
area to the right of the Filename field.
Target File
The Filename field shows the target file path – when a project is created, this path is
automatically set according to the rules specified in the Target Path Rules (S. 23) dialog.
You can, however, change this path here. If the specified folder does not exist, Passolo

Passolo Projects
33
creates it as soon as the target file is generated. If you don't want to change the path
manually, click on the [...] button to display the Select Target Path Rule (S. 27) dialog
If the target file is linked with a target path rule, the path cannot be edited. Click on the
button next to Target path rule to apply a target path rule or to link a rule with the target file. (See Select Target Path Rule, S. 27)
The specification next to the Language field indicates the target language into which the
text is to be translated. If a target file exists, the time the most recent edit took place as
well as that of the most recent update are indicated next to the File time and Last
generation fields, respectively. Normally, both these dates will be the same unless the target file was altered in some way since the most recent generation.
Translation List
The entry next to last update tells the user when the translation file in Passolo was last updated from the source file.
The entry next to last change indicates when the translation file in Passolo was last
modified (e.g. translations done). If this was before the last update, then it is necessary to check whether new texts have been added which need translating.
The entry next to Last generation indicates the time the target file was most recently
generated.
Status
The same icons as are used in the project window appear here, but the explanatory information is different.
Advanced
You can generate a resource DLL directly from a Win32 source file with Passolo. To do
this, you must specify a ".dll" file extension instead of, for example, an ".exe" extension
for the target file. A more detailed description of the options provided by Passolo to
create multilingual applications is given in the Quick Startup Guide under Creating
Multilingual Applications. For more information, please refer to The Advanced Target File Options Dialog (S. 33).
Un-Export
This button is displayed if the translation list is exported to a translation bundle.
Click the Un-Export button to reset the status of the translation list to un-exported; this
makes the translation list available for further processing.
Note: If you un-export a translation list, the corresponding translation bundle – including
all the translations it contains – can no longer be imported into a Passolo project.
You should use this function only if you are certain that the translator does not intend to
deliver a further version of the translation bundle with updated translations or
corrections, or if you want to reset the license slots for lost translation bundles. A
translation bundle may contain several translation lists. If all of the translation lists in a
translation bundle are un-exported, the corresponding license slot is automatically
released. For more information about this subject, please refer to About the Team Edition (S. 225).
The Advanced Target File Options Dialog
If you want to define the properties of a translation list in the Translation list
properties dialog, you can click on the Advanced button to open a dialog that contains
additional settings. The nature of this dialog, or whether additional settings are available,
SDL Passolo 2011
34
depends on the parser in use. This chapter describes settings for Win32 resources. For
other parsers, please refer to the relevant parser documentation.
The settings in this dialog define the behavior for generating target files. In order to
examine how a change to these options will affect the target files, you must have an
understanding of the Microsoft resource format. Please consult your Microsoft developer documentation in this regard.
Writing Resources to Target File...
When resources are written to the target file, the source file is copied and all resources
are replaced by the input translations. However, you can activate the Keep original
resources radio button, so that the previous resources are not replaced but the new
ones are added. In this case, the target file will contain all resources in both languages (the original and the target language version).
If the target file is the same as the source file, the original resources are always retained, regardless of the setting for this option.
The ...keep NEUTRAL resources option replaces only those resources that do not have
a language ID. Resources lacking a language ID (NEUTRAL) are retained. If resources
that should not be translated, e.g., cursors or icons, are marked as NEUTRAL in a source
file, you can use this option to create a multilingual application, in which the target file does not contain multiple instances of such resources.
Mark Resources with Original Language ID
If you activate this checkbox, the localized resources will not be marked with the target
language ID when they are written to the target file. Instead, the original language ID
will be retained. If the source and target files are the same, or if you have activated
Keep original resources radio button, the original resources will nonetheless be
overwritten since a given resource can only exist once with a given language ID.
Generate ‘Resource-Only’ DLL
Activating this checkbox creates a DLL containing only the resources as a target file. The file specified under Options/System will be used as the default DLL.
The Generate ‘resource-only’ DLL checkbox is automatically activated if the source file
is not a DLL file, but the target file is. If the target file is an .EXE file, the Generate ‘resource-only’ DLL option is automatically deactivated.
If you use other file types and wish to generate resource DLLs as target files, you must manually activate this option.
A more detailed description of the options provided by Passolo to create multilingual applications is given in the Quick Startup Guide under Creating Multilingual Applications.
Write checksum to PE header
If this checkbox is activated, the checksum of the target file is written to the PE header
(Portable Executable format metadata.) This may be necessary when localizing drivers, as these are checked by Windows to ensure that the checksum is correct.
Tag Version Info With Language ID
The target file version resource contains additional fields in which the target file language
is filled. This information is used by the operating system for display in the properties
window. Passolo will only change the language ID in the version resource if this option has been selected.
Mirror Application
To mirror the whole application for right-to-left languages like Arabic check this option.
This tells Windows that the main window of the application and all child windows should be mirrored.

Passolo Projects
35
Default Settings for Languages
The settings for a language can be defined as the default settings, so that they are automatically loaded whenever the given language is added to a project.
Select Tools, then Options, and then Language Settings to display the Language Settings dialog.
Click on New to generate the default settings for the selected language. This calls up the
Language dialog in which you can make the required settings. See The Language Dialog (S. 31)
Click on the Edit button to edit the default settings for the selected language.
Click on the Delete button to delete the default settings for the selected language.
Generating The Target File
In order to create the associated target files after editing a translation list, mark the
corresponding entry in the project window and then select the Generate Target File command from the String List menu.
This dialog allows you to specify whether you wish to generate only the marked target
file or all target files. To start the selected generation, close the dialog by clicking on OK.
Status and other information, as well as any error messages, are displayed in the output window Messages.
User Files
In addition to source string lists, translation lists and glossaries, projects also can contain
other files that are relevant to the localization project. These so-called user files are
stored in the Passolo project.
Click Project then Embedded Files and Insert User File to add a file to the current
project.
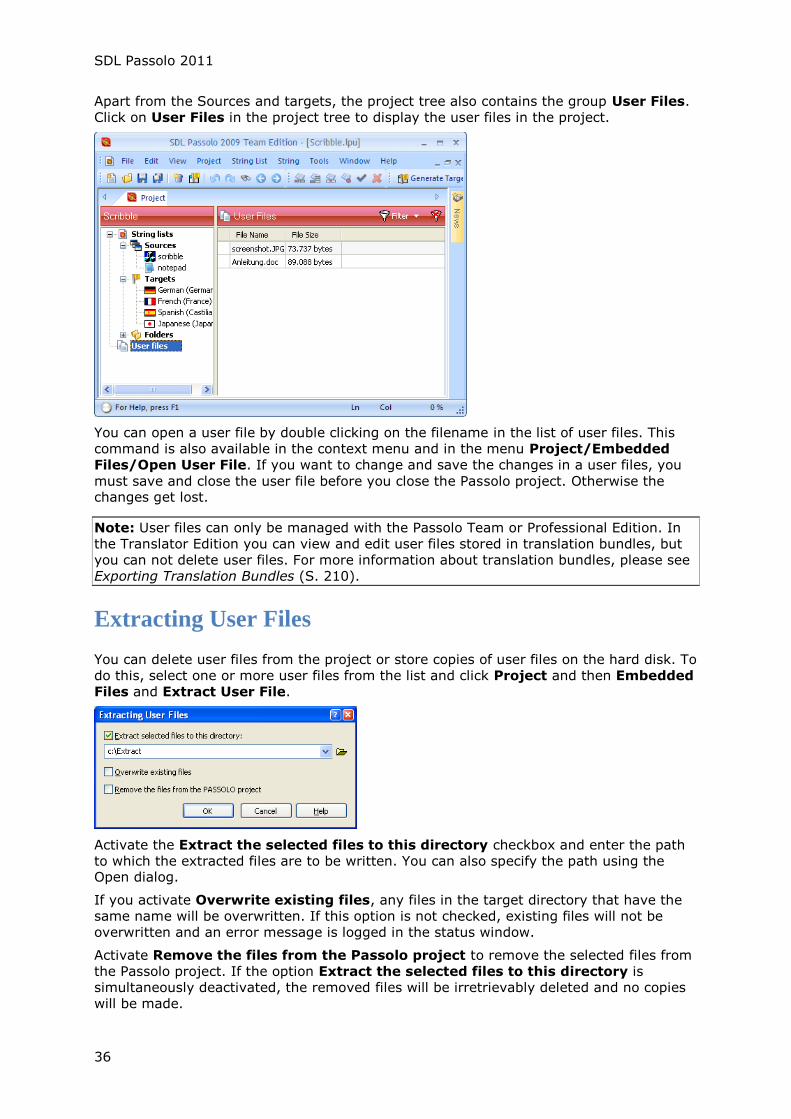
SDL Passolo 2011
36
Apart from the Sources and targets, the project tree also contains the group User Files.
Click on User Files in the project tree to display the user files in the project.
You can open a user file by double clicking on the filename in the list of user files. This
command is also available in the context menu and in the menu Project/Embedded
Files/Open User File. If you want to change and save the changes in a user files, you
must save and close the user file before you close the Passolo project. Otherwise the changes get lost.
Note: User files can only be managed with the Passolo Team or Professional Edition. In
the Translator Edition you can view and edit user files stored in translation bundles, but
you can not delete user files. For more information about translation bundles, please see
Exporting Translation Bundles (S. 210).
Extracting User Files
You can delete user files from the project or store copies of user files on the hard disk. To
do this, select one or more user files from the list and click Project and then Embedded
Files and Extract User File.
Activate the Extract the selected files to this directory checkbox and enter the path
to which the extracted files are to be written. You can also specify the path using the Open dialog.
If you activate Overwrite existing files, any files in the target directory that have the
same name will be overwritten. If this option is not checked, existing files will not be
overwritten and an error message is logged in the status window.
Activate Remove the files from the Passolo project to remove the selected files from
the Passolo project. If the option Extract the selected files to this directory is
simultaneously deactivated, the removed files will be irretrievably deleted and no copies
will be made.
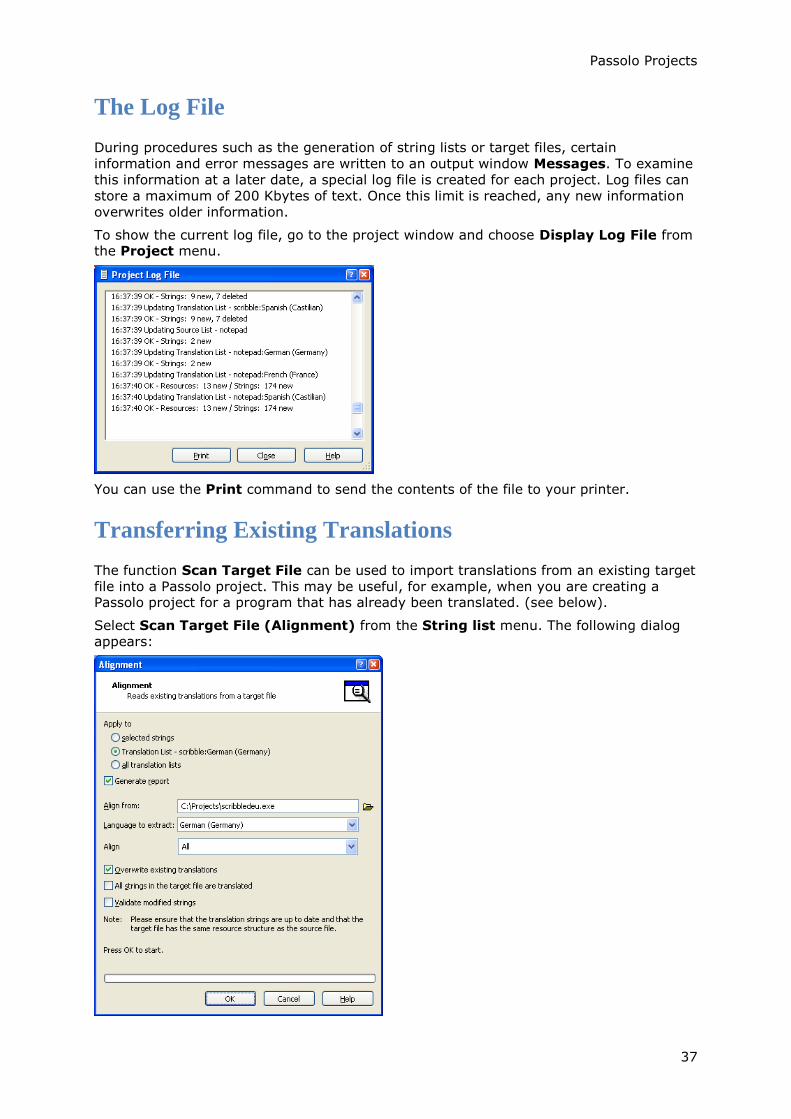
Passolo Projects
37
The Log File
During procedures such as the generation of string lists or target files, certain
information and error messages are written to an output window Messages. To examine
this information at a later date, a special log file is created for each project. Log files can
store a maximum of 200 Kbytes of text. Once this limit is reached, any new information
overwrites older information.
To show the current log file, go to the project window and choose Display Log File from the Project menu.
You can use the Print command to send the contents of the file to your printer.
Transferring Existing Translations
The function Scan Target File can be used to import translations from an existing target
file into a Passolo project. This may be useful, for example, when you are creating a Passolo project for a program that has already been translated. (see below).
Select Scan Target File (Alignment) from the String list menu. The following dialog
appears:
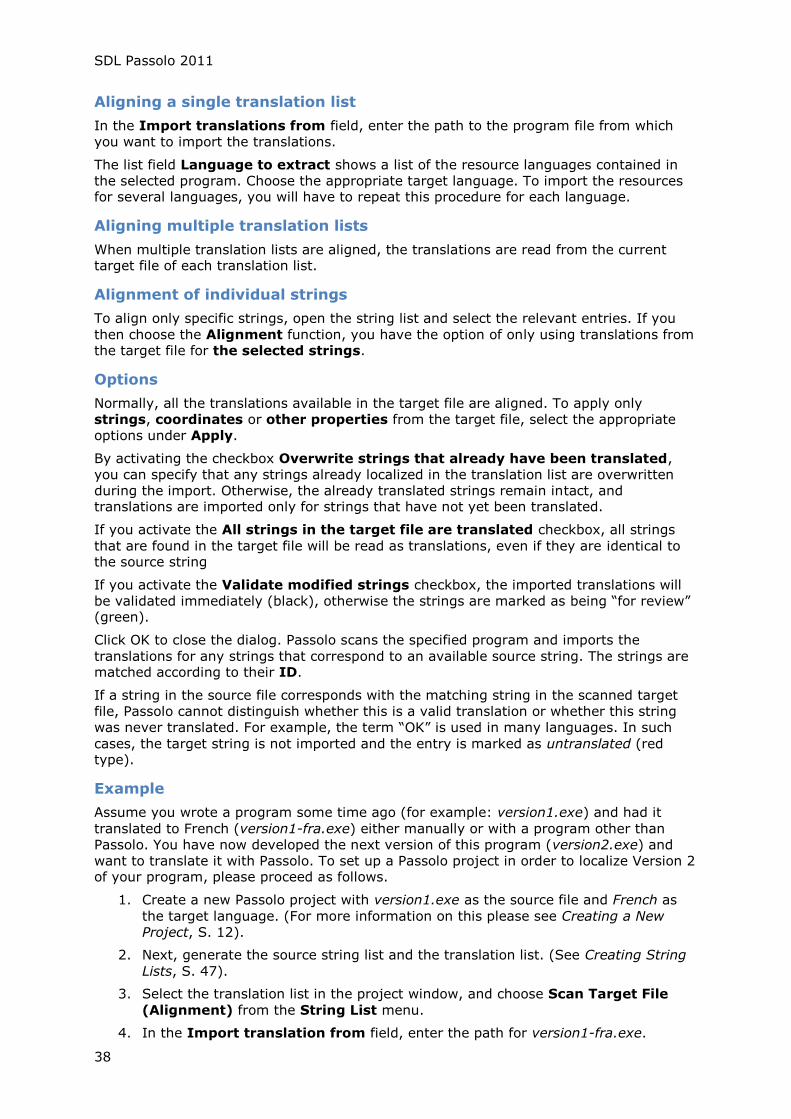
SDL Passolo 2011
38
Aligning a single translation list
In the Import translations from field, enter the path to the program file from which
you want to import the translations.
The list field Language to extract shows a list of the resource languages contained in
the selected program. Choose the appropriate target language. To import the resources for several languages, you will have to repeat this procedure for each language.
Aligning multiple translation lists
When multiple translation lists are aligned, the translations are read from the current target file of each translation list.
Alignment of individual strings
To align only specific strings, open the string list and select the relevant entries. If you
then choose the Alignment function, you have the option of only using translations from the target file for the selected strings.
Options
Normally, all the translations available in the target file are aligned. To apply only
strings, coordinates or other properties from the target file, select the appropriate
options under Apply.
By activating the checkbox Overwrite strings that already have been translated,
you can specify that any strings already localized in the translation list are overwritten
during the import. Otherwise, the already translated strings remain intact, and translations are imported only for strings that have not yet been translated.
If you activate the All strings in the target file are translated checkbox, all strings
that are found in the target file will be read as translations, even if they are identical to the source string
If you activate the Validate modified strings checkbox, the imported translations will
be validated immediately (black), otherwise the strings are marked as being ―for review‖ (green).
Click OK to close the dialog. Passolo scans the specified program and imports the
translations for any strings that correspond to an available source string. The strings are matched according to their ID.
If a string in the source file corresponds with the matching string in the scanned target
file, Passolo cannot distinguish whether this is a valid translation or whether this string
was never translated. For example, the term ―OK‖ is used in many languages. In such
cases, the target string is not imported and the entry is marked as untranslated (red type).
Example
Assume you wrote a program some time ago (for example: version1.exe) and had it
translated to French (version1-fra.exe) either manually or with a program other than
Passolo. You have now developed the next version of this program (version2.exe) and
want to translate it with Passolo. To set up a Passolo project in order to localize Version 2 of your program, please proceed as follows.
1. Create a new Passolo project with version1.exe as the source file and French as
the target language. (For more information on this please see Creating a New
Project, S. 12).
2. Next, generate the source string list and the translation list. (See Creating String
Lists, S. 47).
3. Select the translation list in the project window, and choose Scan Target File
(Alignment) from the String List menu.
4. In the Import translation from field, enter the path for version1-fra.exe.
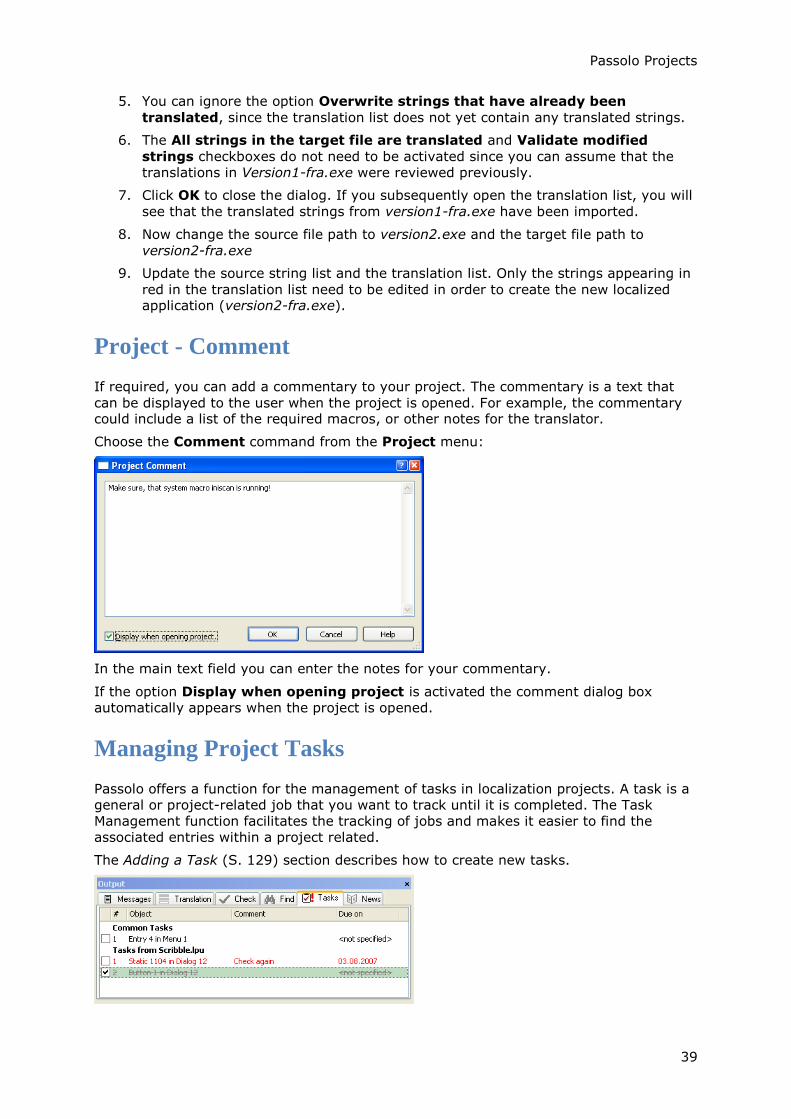
Passolo Projects
39
5. You can ignore the option Overwrite strings that have already been
translated, since the translation list does not yet contain any translated strings.
6. The All strings in the target file are translated and Validate modified
strings checkboxes do not need to be activated since you can assume that the
translations in Version1-fra.exe were reviewed previously.
7. Click OK to close the dialog. If you subsequently open the translation list, you will
see that the translated strings from version1-fra.exe have been imported.
8. Now change the source file path to version2.exe and the target file path to
version2-fra.exe
9. Update the source string list and the translation list. Only the strings appearing in
red in the translation list need to be edited in order to create the new localized application (version2-fra.exe).
Project - Comment
If required, you can add a commentary to your project. The commentary is a text that
can be displayed to the user when the project is opened. For example, the commentary could include a list of the required macros, or other notes for the translator.
Choose the Comment command from the Project menu:
In the main text field you can enter the notes for your commentary.
If the option Display when opening project is activated the comment dialog box
automatically appears when the project is opened.
Managing Project Tasks
Passolo offers a function for the management of tasks in localization projects. A task is a
general or project-related job that you want to track until it is completed. The Task
Management function facilitates the tracking of jobs and makes it easier to find the
associated entries within a project related.
The Adding a Task (S. 129) section describes how to create new tasks.
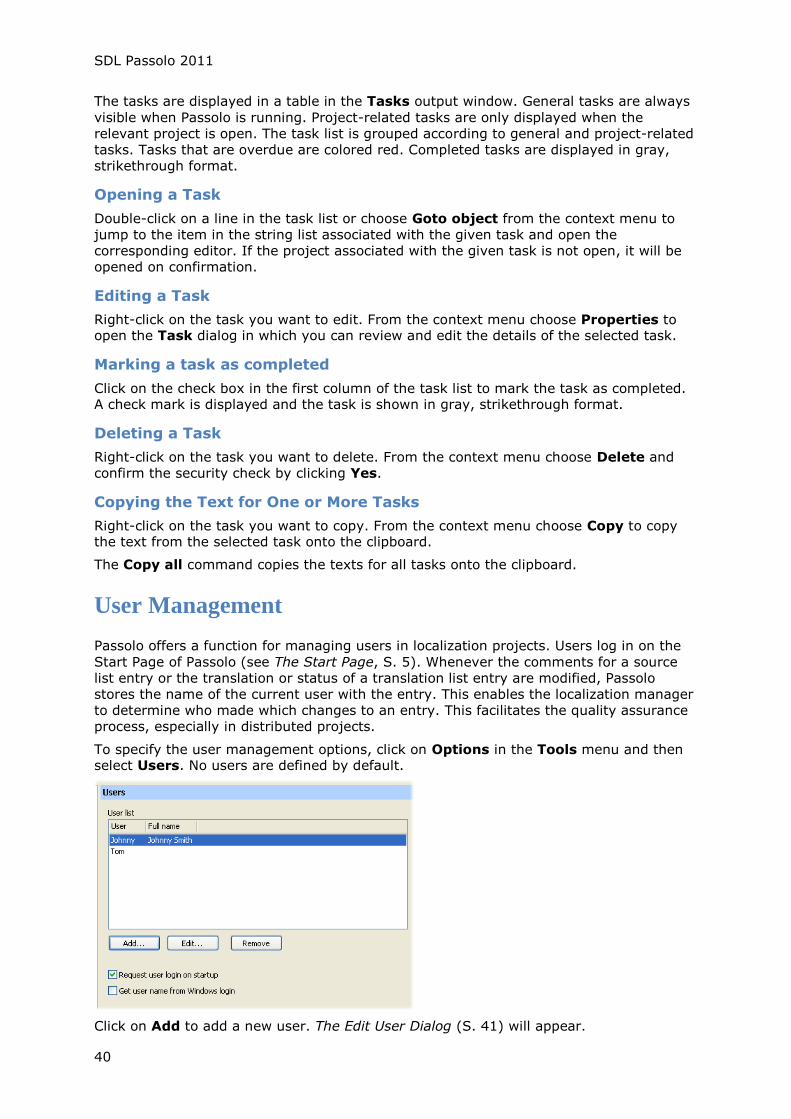
SDL Passolo 2011
40
The tasks are displayed in a table in the Tasks output window. General tasks are always
visible when Passolo is running. Project-related tasks are only displayed when the
relevant project is open. The task list is grouped according to general and project-related
tasks. Tasks that are overdue are colored red. Completed tasks are displayed in gray,
strikethrough format.
Opening a Task
Double-click on a line in the task list or choose Goto object from the context menu to
jump to the item in the string list associated with the given task and open the
corresponding editor. If the project associated with the given task is not open, it will be
opened on confirmation.
Editing a Task
Right-click on the task you want to edit. From the context menu choose Properties to open the Task dialog in which you can review and edit the details of the selected task.
Marking a task as completed
Click on the check box in the first column of the task list to mark the task as completed. A check mark is displayed and the task is shown in gray, strikethrough format.
Deleting a Task
Right-click on the task you want to delete. From the context menu choose Delete and
confirm the security check by clicking Yes.
Copying the Text for One or More Tasks
Right-click on the task you want to copy. From the context menu choose Copy to copy the text from the selected task onto the clipboard.
The Copy all command copies the texts for all tasks onto the clipboard.
User Management
Passolo offers a function for managing users in localization projects. Users log in on the
Start Page of Passolo (see The Start Page, S. 5). Whenever the comments for a source
list entry or the translation or status of a translation list entry are modified, Passolo
stores the name of the current user with the entry. This enables the localization manager
to determine who made which changes to an entry. This facilitates the quality assurance
process, especially in distributed projects.
To specify the user management options, click on Options in the Tools menu and then select Users. No users are defined by default.
Click on Add to add a new user. The Edit User Dialog (S. 41) will appear.
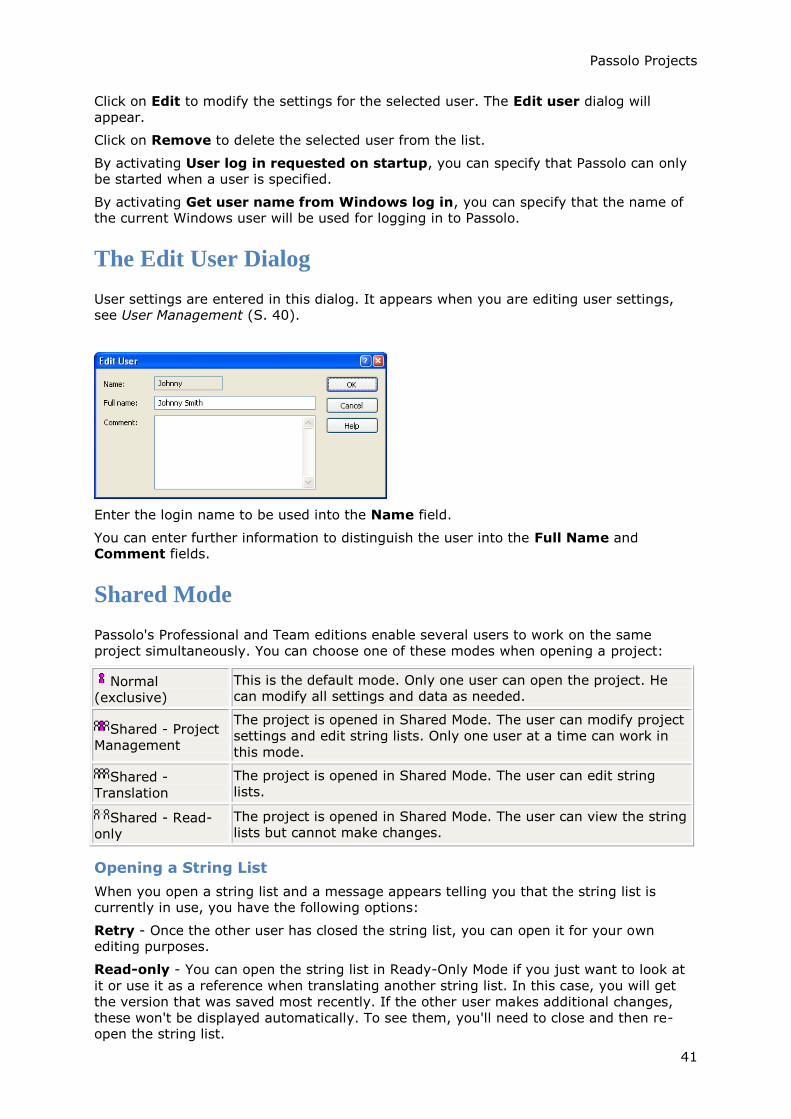
Passolo Projects
41
Click on Edit to modify the settings for the selected user. The Edit user dialog will
appear.
Click on Remove to delete the selected user from the list.
By activating User log in requested on startup, you can specify that Passolo can only be started when a user is specified.
By activating Get user name from Windows log in, you can specify that the name of the current Windows user will be used for logging in to Passolo.
The Edit User Dialog
User settings are entered in this dialog. It appears when you are editing user settings, see User Management (S. 40).
Enter the login name to be used into the Name field.
You can enter further information to distinguish the user into the Full Name and Comment fields.
Shared Mode
Passolo's Professional and Team editions enable several users to work on the same
project simultaneously. You can choose one of these modes when opening a project:
Normal
(exclusive)
This is the default mode. Only one user can open the project. He
can modify all settings and data as needed.
Shared - Project
Management
The project is opened in Shared Mode. The user can modify project
settings and edit string lists. Only one user at a time can work in
this mode.
Shared -
Translation
The project is opened in Shared Mode. The user can edit string
lists.
Shared - Read-
only
The project is opened in Shared Mode. The user can view the string
lists but cannot make changes.
Opening a String List
When you open a string list and a message appears telling you that the string list is currently in use, you have the following options:
Retry - Once the other user has closed the string list, you can open it for your own editing purposes.
Read-only - You can open the string list in Ready-Only Mode if you just want to look at
it or use it as a reference when translating another string list. In this case, you will get
the version that was saved most recently. If the other user makes additional changes,
these won't be displayed automatically. To see them, you'll need to close and then re-open the string list.

SDL Passolo 2011
42
Cancel - The text list will not be opened now
Projects in Network Folders
It is generally recommended that projects are opened on a local hard disk. Projects that
are on a network drive may be damaged if the connection is severed when saving. For this reason, they should be copied to a local hard disk for editing.
If the use of network drives cannot be avoided, for instance when you have several users
working on the same project (see Shared Mode, S. 41), Passolo creates a local copy of
the project. Changes can be saved there even without a connection. When the
connection becomes available again, the changes are also saved to the project on the network drive.
When you close a project for which all changes could not be saved yet, the following message appears:
Once it is possible to restore the connection to the network, click Retry.
If it is not possible to establish a connection, you can also save the local copy of the
project to a different folder. To do this, click Save copy and choose the location you
want to save the file to. Please note however that other users may continue to modify the original project on the network drive.
Permanent Unpacking of a Project File
Normally the files for a project are unpacked into a temporary folder for editing. They are repacked when the project is closed.
To minimize the risk of data loss as a result of network problems, you can also unpack
the project file permanently. The files are extracted to the same place as the project file,
in a *.content directory.
The time-consuming packing operations are not required for projects unpacked in this
way.
How to Unpack a Project
1. Open the project file you require
2. Make sure that no text files are open.
3. Click on the Settings /Unpack Project File command in the Project menu
4. Important: The project file must not be moved while a project is permanently
unpacked; otherwise the connection with the Contents folder will be lost.
How to Repack the Project
1. Open the project file you require

Passolo Projects
43
2. Make sure that no text files are open.
3. Click on Settings/Repack Project File in the Project menu.
4. The project file can now be moved again as required.
Extract Sub Projects
This function can be used to copy a part of the project to a new project or to split a
project into two parts.
To extract a sub-project:
1. Go to the Project menu and click on Setup/Extract Sub-Project
2. Enter the path of the new sub-project to be created in the New Project field
3. Select the method:
o Extract Source Files
The selected source lists are then extracted from the project along with all
target languages and the associated translation string lists.
A project with source files Source1 and Source2 and target languages
German, French can therefore be used to create a project Source2 →
German, French, for example.
o Extract translation string lists
The selected target languages are then extracted from the project along
with all source files.
A project with source files Source1 and Source2 and target languages
German, French can therefore be used to create a project Source1,
Source2 → French, for example.
o Extract translation string lists for cascaded project
The selected target languages are then also extracted from the project
along with all source files. The extracted project is simultaneously created
as a cascaded project (see Cascaded Projects, S. 14), which is based on
the current project. You then also need to specify the target language of
the current project, which constitutes the source language in the
cascaded project.
In general, you should also remove the extracted languages from the
current project when using this method. (See Point 5)
4. Select the source files or languages to be extracted under All items and click
Add.
5. The option Remove extracted string lists from current project essentially
splits the current project.
6. Click OK.
Tip: If you select source lists or languages in the project window, they will be displayed
in the list of items to be extracted before you select the Extract function.
Merge Projects
You can merge two projects. All of the second project's source files will then be transferred to the first project.

SDL Passolo 2011
44
If the second project includes target languages that do not exist in the first project,
these languages are created here. In this case, new translation string lists are created for the existing source files in the first project.
To merge projects:
1. Open the first project
2. Go to the Project menu and click on Setup/Merge Project
3. In the file selection dialog, select the project that you would like to merge with
the first project.
4. The information box shows which source files are merged and which target
languages may need to be created.
5. Check the information in the information box and click OK
User-defined Properties
You can define additional properties for objects in a Passolo project. For example, you
can create additional data fields for string lists and use them for target path rules. Or you
can define additional status values for strings that reflect the translation workflow for the
string.
To display the list of additional properties, open the project window and choose User-
defined Properties from the Project/Setup menu. You can Add new properties and Edit existing ones.
When you delete a property, all data linked to it is also deleted.
Defining an Additional Property
Enter a name for the property into the Prompt field. This name will be displayed in the properties window of the corresponding object.
The Type determines the contents of the property. This can be either a text, an integer
or a Boolean value (yes/no). The latter is displayed with a checkbox in the properties
window.
You must then choose which objects you want to use the property with. To avoid
consuming unnecessary memory, try to select only those objects for which the property is truly needed.

Passolo Projects
45
If you define a property for Source String, the value is generally transferred to the
corresponding translation string when the translation list is updated. If you don't want
this to happen and the property is required only for the source string, select the No transfer to translation option.
An additional Info text helps the user to set the values of the property.
The Name of the property can be accessed in macros by means of the Property
function. It is assigned automatically and does not normally need to be changed. You can
only specify your own property name when defining a new property. Click on Change
and enter a name for the property using either a number between 20000 and 29999 or a
text name that begins with "U:". This naming restriction is important so that Passolo can
distinguish the user-defined properties from properties created by an add-in or a macro..
Using the User-defined Properties
When you select an object, e.g. a language in the project window or a string in a
translation list, the user-defined properties are displayed on the More tab of the object's
properties window. You can also select several objects of the same type and enter a
value for all of these objects simultaneously.
For an example of how to use this property, please see The Target Path Rule Dialog (S. 24).


47
String Lists
Creating String Lists
When you create a new project, or add new source files or target languages to an
existing project, you will need to generate the corresponding string lists. Missing string
lists are identifiable by the icon in the project window. When a source string list is
created, the resources are extracted from a source file. When a translation list is
created, the resources are copied from the source string list and a column is added for the translation.
Select the relevant string list in the project window, and choose Update String List from the String List menu.
You can now specify whether only the selected string lists or all string lists for the project
are to be generated or updated. To start the corresponding procedure, click on OK.
Status and other information, as well as any error messages, are displayed in the output
window Messages.
Choose Generate report to receive a report on the changes to the string list resulting
from the update. To open the report, click the "Show report" link (underlined blue) in the
output window, or choose the Report command in the String List menu. (See Reports, S. 136)
If you activate the Preview changes option, the changes to the string lists are not
carried out, you just receive a report showing the potential changes that would result from the specified update.
Tip: The easiest way to create a single string list is to choose the Open String List
command or simply double click on the string list in the project window. If the string list
is missing, Passolo will suggest creating it on the fly.
Displaying String Lists
Displaying String Lists
Double-clicking on a field in the project window opens the relevant string list. If the
string list is missing, Passolo will suggest creating it on the fly. Each string list can be
opened only once. If you attempt to "reopen" an already open string list, the currently
available window will be activated and moved to the foreground. Open string lists are
identifiable by the icon in the project window.
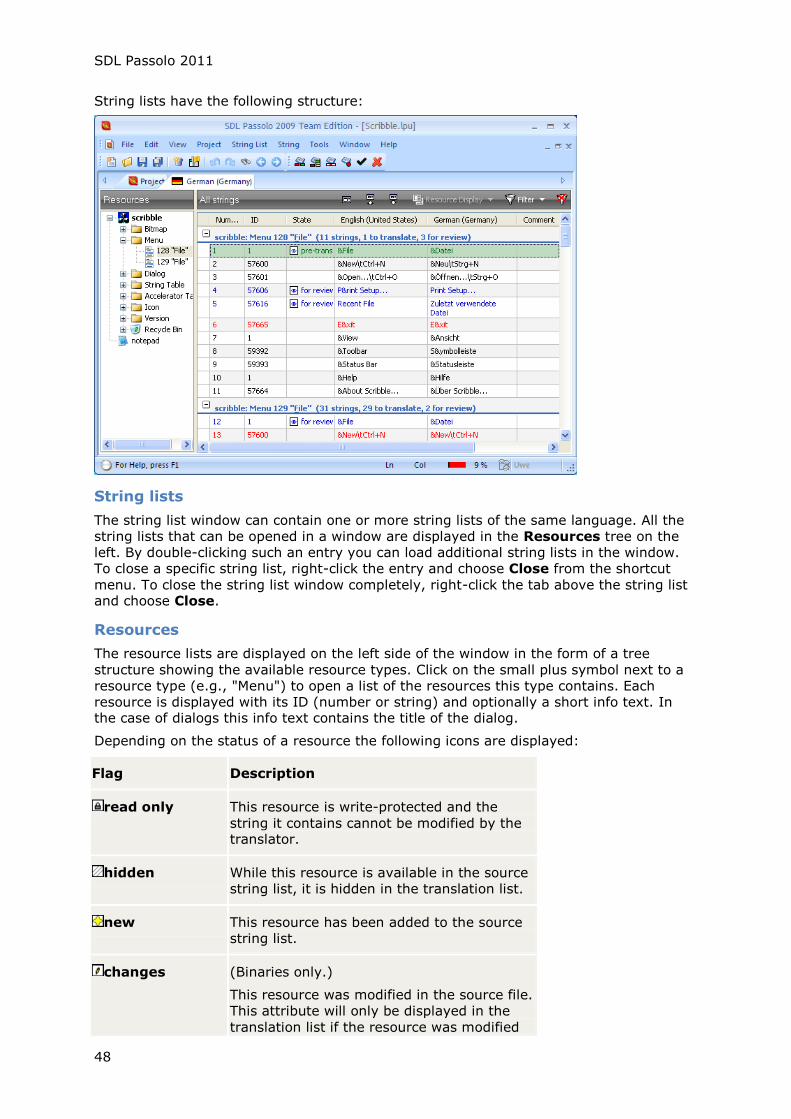
SDL Passolo 2011
48
String lists have the following structure:
String lists
The string list window can contain one or more string lists of the same language. All the
string lists that can be opened in a window are displayed in the Resources tree on the
left. By double-clicking such an entry you can load additional string lists in the window.
To close a specific string list, right-click the entry and choose Close from the shortcut
menu. To close the string list window completely, right-click the tab above the string list and choose Close.
Resources
The resource lists are displayed on the left side of the window in the form of a tree
structure showing the available resource types. Click on the small plus symbol next to a
resource type (e.g., "Menu") to open a list of the resources this type contains. Each
resource is displayed with its ID (number or string) and optionally a short info text. In the case of dialogs this info text contains the title of the dialog.
Depending on the status of a resource the following icons are displayed:
Flag Description
read only This resource is write-protected and the
string it contains cannot be modified by the translator.
hidden While this resource is available in the source
string list, it is hidden in the translation list.
new This resource has been added to the source
string list.
changes (Binaries only.)
This resource was modified in the source file.
This attribute will only be displayed in the
translation list if the resource was modified
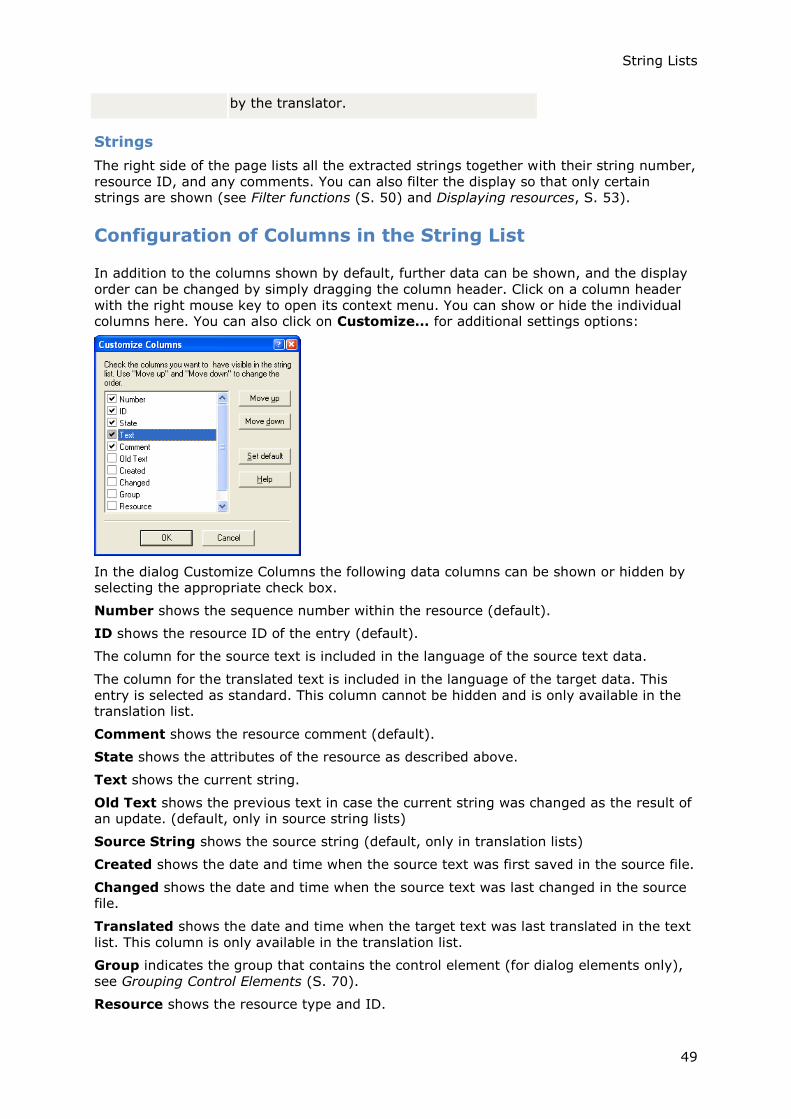
String Lists
49
by the translator.
Strings
The right side of the page lists all the extracted strings together with their string number,
resource ID, and any comments. You can also filter the display so that only certain strings are shown (see Filter functions (S. 50) and Displaying resources, S. 53).
Configuration of Columns in the String List
In addition to the columns shown by default, further data can be shown, and the display
order can be changed by simply dragging the column header. Click on a column header
with the right mouse key to open its context menu. You can show or hide the individual columns here. You can also click on Customize... for additional settings options:
In the dialog Customize Columns the following data columns can be shown or hidden by selecting the appropriate check box.
Number shows the sequence number within the resource (default).
ID shows the resource ID of the entry (default).
The column for the source text is included in the language of the source text data.
The column for the translated text is included in the language of the target data. This
entry is selected as standard. This column cannot be hidden and is only available in the translation list.
Comment shows the resource comment (default).
State shows the attributes of the resource as described above.
Text shows the current string.
Old Text shows the previous text in case the current string was changed as the result of an update. (default, only in source string lists)
Source String shows the source string (default, only in translation lists)
Created shows the date and time when the source text was first saved in the source file.
Changed shows the date and time when the source text was last changed in the source file.
Translated shows the date and time when the target text was last translated in the text
list. This column is only available in the translation list.
Group indicates the group that contains the control element (for dialog elements only),
see Grouping Control Elements (S. 70).
Resource shows the resource type and ID.
SDL Passolo 2011
50
Source Title shows the title of the source file. This can be useful when you are
displaying several string lists in the same window and you want to be able to assign strings to files.
User shows the user that made the last change to the entry, see User Management (S. 40).
Reference language displays the translation in another target language, see Displaying a Reference Language (S. 128).
Match shows the match value for pre-translated strings. (only in translation lists)
Origin shows the origin of pre-translated strings..
With Move up and Move down you can match the sequence of the display as you
prefer.
With the Set default button you can restore the standard settings (Number, ID, Source,
Target, Comment).
Custom1 - Custom4 These are four columns that can be used to display any user defined content. (see below)
User defined columns
You can define up to four columns with any content you want to display. Select one of
the columns from Custom1 to Custom4 and click on the Define button.
In the Customize Columns dialog you can specify the column heading and the content
to be displayed. The content is specified by entering the name of a user defined property in angle brackets (see User-defined properties, S. 44).
For example, if you have defined a property "TestValue" with the name "20001" you can
enter "<20001>" as the column content and the TestValue will be displayed in this extra
column.
Tip: If you select a string in the translation list before you call up the Customize
Columns dialog the available properties are displayed when you click on the black rectangle.
Sorting and Grouping String Lists
By default, the strings in a translation list are sorted according to their order in the
source file and grouped by resource type.
This can be changed to any other sorting. Select a Sort submenu entry from the View
menu or click a column heading with the mouse to sort the content of the list by the
content of the chosen column in ascending or descending order. An arrow symbol next to
the column heading shows the current sorting selection. You can restore the standard
string list sorting order by clicking on the left-most, empty column heading field.
For a Grouped display of resources, choose Display in groups from the View/Sort
menu. This can be done even faster by right-clicking on the column title of a list. This
allows you to sort strings, for example, by change date and display strings that were changed on a certain day in a group with "Created on..." in the heading.
Filter Functions
During translation it may be helpful not just to be able to search for individual strings
with specific attributes or flags, but also to have all the resources with specific properties
displayed in a list. For this purpose, Passolo integrates filters with various search criteria
for translation and source string lists to permit resource searches based on individual or

String Lists
51
combined properties. This allows you to display search results for resources that meet
very specific criteria, e.g., "not yet translated".
Selecting or removing a filter.
Open the relevant string list and select the Filter/Define command from the View
menu or click the icon on the title bar to open the Filter settings for... dialog. To
quickly select one of the stored filters, click the small arrow next to the icon.
To deactivate the filters, go to the Filter for… dialog and click the Remove filter
button. You can also select the Remove Filter command in the View menu, or click the
icon on the toolbar.
If the filtered search fails to find any strings that match the specified criteria, the
message ―No text matching current filter conditions found.‖ appears in the corresponding list.
The filter dialog
In this dialog you can edit the current filter settings and manage stored filters. Additional input options appear as soon as you select one of the criteria.
Filter by status
This filter enables the display of strings with a specified status. Different status choices are available for source string lists and translation lists.
Source string lists
Unchanged Displays strings that were not changed when the source string list was updated
Changed Displays strings that were changed when the source string list was updated
New Displays strings that were added when the source string list was updated
Translation lists
Validated (black) Displays strings that have been translated and validated
Untranslated (red) Displays strings that have not yet been translated
For review (blue) Displays strings that have been translated but still need to be validated
Auto translated (green) Displays strings that have been automatically pre-translated but not yet validated.
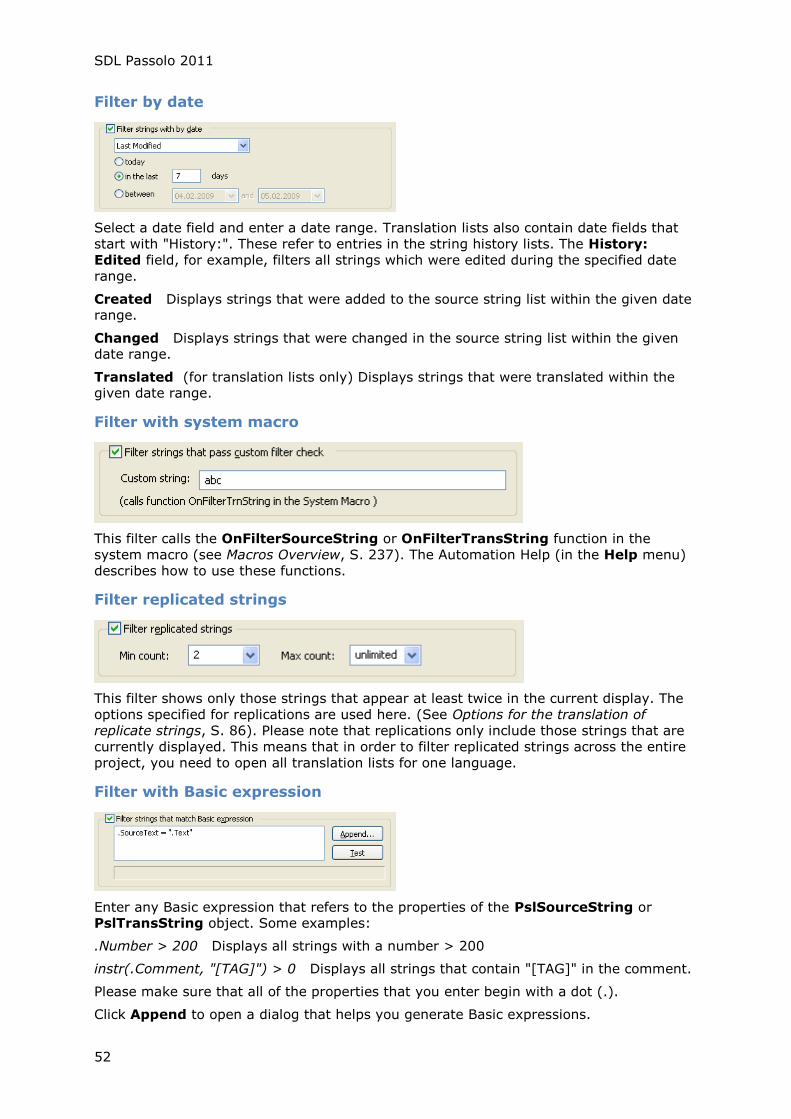
SDL Passolo 2011
52
Filter by date
Select a date field and enter a date range. Translation lists also contain date fields that
start with "History:". These refer to entries in the string history lists. The History:
Edited field, for example, filters all strings which were edited during the specified date
range.
Created Displays strings that were added to the source string list within the given date range.
Changed Displays strings that were changed in the source string list within the given date range.
Translated (for translation lists only) Displays strings that were translated within the given date range.
Filter with system macro
This filter calls the OnFilterSourceString or OnFilterTransString function in the
system macro (see Macros Overview, S. 237). The Automation Help (in the Help menu)
describes how to use these functions.
Filter replicated strings
This filter shows only those strings that appear at least twice in the current display. The
options specified for replications are used here. (See Options for the translation of
replicate strings, S. 86). Please note that replications only include those strings that are
currently displayed. This means that in order to filter replicated strings across the entire
project, you need to open all translation lists for one language.
Filter with Basic expression
Enter any Basic expression that refers to the properties of the PslSourceString or PslTransString object. Some examples:
.Number > 200 Displays all strings with a number > 200
instr(.Comment, "[TAG]") > 0 Displays all strings that contain "[TAG]" in the comment.
Please make sure that all of the properties that you enter begin with a dot (.).
Click Append to open a dialog that helps you generate Basic expressions.
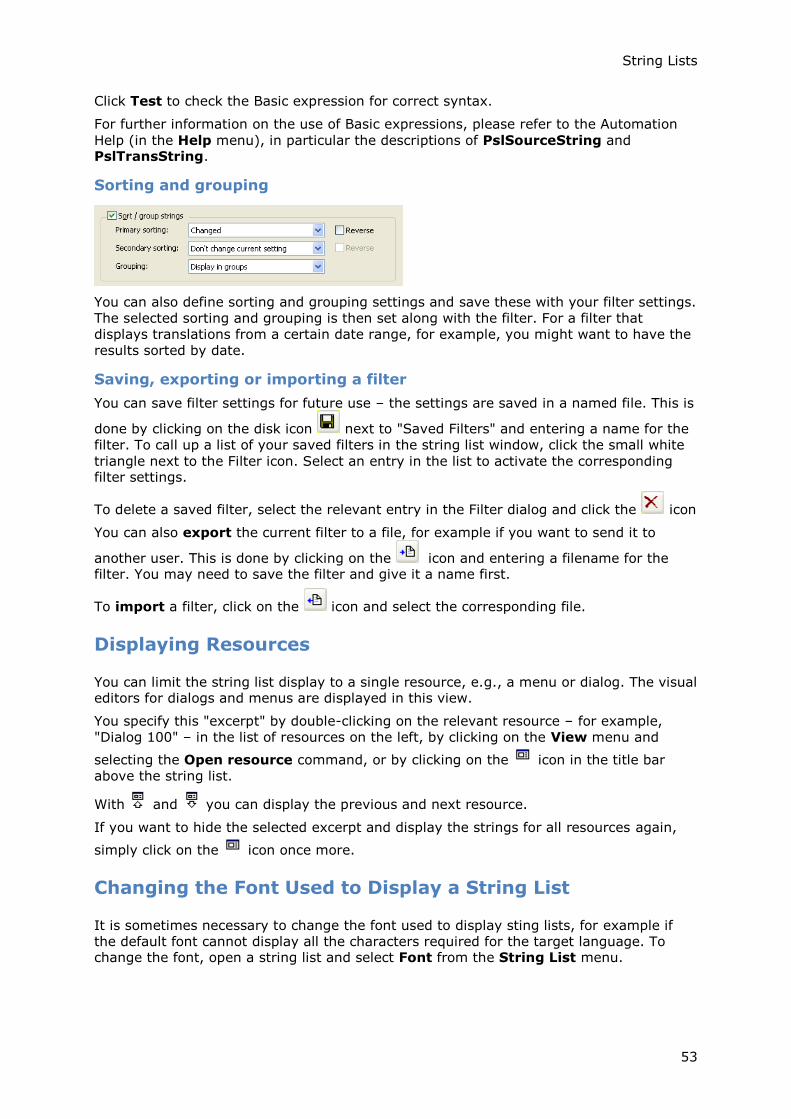
String Lists
53
Click Test to check the Basic expression for correct syntax.
For further information on the use of Basic expressions, please refer to the Automation
Help (in the Help menu), in particular the descriptions of PslSourceString and PslTransString.
Sorting and grouping
You can also define sorting and grouping settings and save these with your filter settings.
The selected sorting and grouping is then set along with the filter. For a filter that
displays translations from a certain date range, for example, you might want to have the
results sorted by date.
Saving, exporting or importing a filter
You can save filter settings for future use – the settings are saved in a named file. This is
done by clicking on the disk icon next to "Saved Filters" and entering a name for the
filter. To call up a list of your saved filters in the string list window, click the small white
triangle next to the Filter icon. Select an entry in the list to activate the corresponding filter settings.
To delete a saved filter, select the relevant entry in the Filter dialog and click the icon
You can also export the current filter to a file, for example if you want to send it to
another user. This is done by clicking on the icon and entering a filename for the filter. You may need to save the filter and give it a name first.
To import a filter, click on the icon and select the corresponding file.
Displaying Resources
You can limit the string list display to a single resource, e.g., a menu or dialog. The visual editors for dialogs and menus are displayed in this view.
You specify this "excerpt" by double-clicking on the relevant resource – for example,
"Dialog 100" – in the list of resources on the left, by clicking on the View menu and
selecting the Open resource command, or by clicking on the icon in the title bar
above the string list.
With and you can display the previous and next resource.
If you want to hide the selected excerpt and display the strings for all resources again,
simply click on the icon once more.
Changing the Font Used to Display a String List
It is sometimes necessary to change the font used to display sting lists, for example if
the default font cannot display all the characters required for the target language. To change the font, open a string list and select Font from the String List menu.
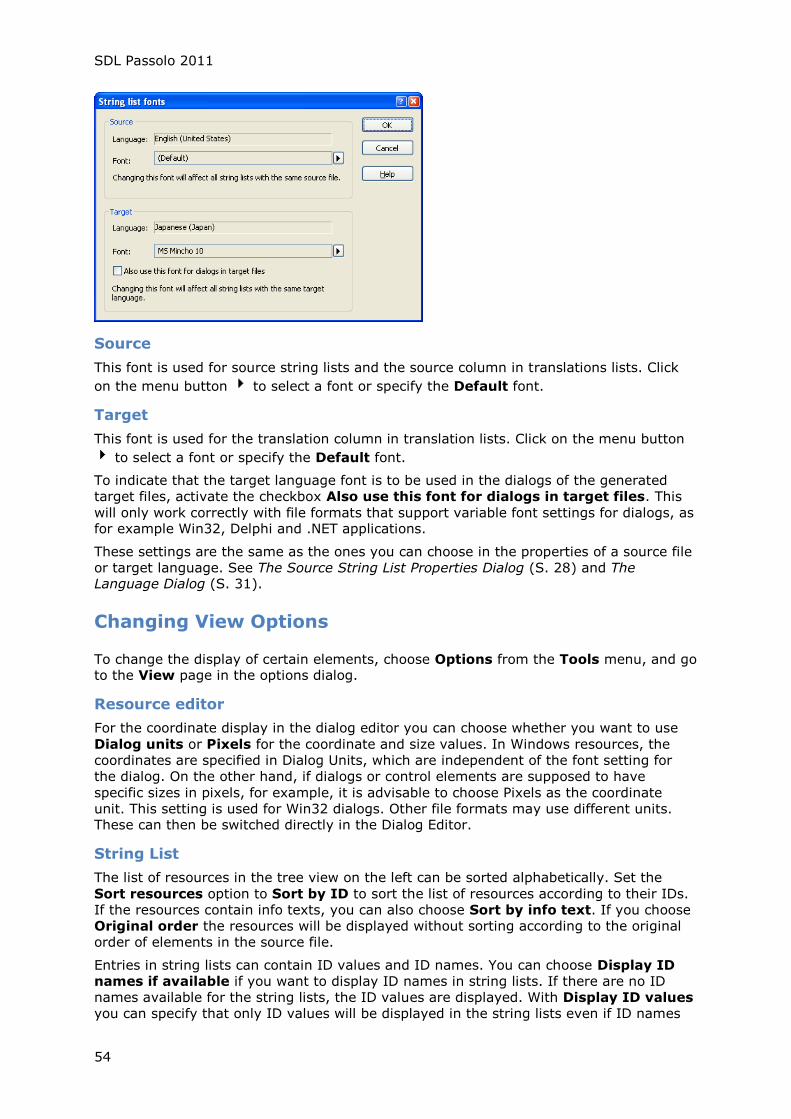
SDL Passolo 2011
54
Source
This font is used for source string lists and the source column in translations lists. Click
on the menu button to select a font or specify the Default font.
Target
This font is used for the translation column in translation lists. Click on the menu button
to select a font or specify the Default font.
To indicate that the target language font is to be used in the dialogs of the generated
target files, activate the checkbox Also use this font for dialogs in target files. This
will only work correctly with file formats that support variable font settings for dialogs, as for example Win32, Delphi and .NET applications.
These settings are the same as the ones you can choose in the properties of a source file
or target language. See The Source String List Properties Dialog (S. 28) and The Language Dialog (S. 31).
Changing View Options
To change the display of certain elements, choose Options from the Tools menu, and go to the View page in the options dialog.
Resource editor
For the coordinate display in the dialog editor you can choose whether you want to use
Dialog units or Pixels for the coordinate and size values. In Windows resources, the
coordinates are specified in Dialog Units, which are independent of the font setting for
the dialog. On the other hand, if dialogs or control elements are supposed to have
specific sizes in pixels, for example, it is advisable to choose Pixels as the coordinate
unit. This setting is used for Win32 dialogs. Other file formats may use different units. These can then be switched directly in the Dialog Editor.
String List
The list of resources in the tree view on the left can be sorted alphabetically. Set the
Sort resources option to Sort by ID to sort the list of resources according to their IDs.
If the resources contain info texts, you can also choose Sort by info text. If you choose
Original order the resources will be displayed without sorting according to the original
order of elements in the source file.
Entries in string lists can contain ID values and ID names. You can choose Display ID
names if available if you want to display ID names in string lists. If there are no ID
names available for the string lists, the ID values are displayed. With Display ID values
you can specify that only ID values will be displayed in the string lists even if ID names
String Lists
55
are available. You can also choose the option Display both to display both the ID values
and the ID names.
With Show state you can determine how status information such as "new" or
"translated" is to be displayed in the string lists. By default, the symbol and status text is
displayed. You can choose Symbols only if you are familiar with the meaning of the
symbols and you want to save some screen space. You can also display symbols in
different columns – each status is then displayed in a separate place.
The Display empty strings option determines whether empty strings are to be
displayed in the translation list. Please note that empty strings are always displayed in source string lists.
If Dynamic row height is activated, the row height in the string lists is adapted to the
length of the displayed stings. The strings are then displayed in multiple lines so that the
complete string is visible whenever possible. If this option is not activated, each row is displayed in a single line, which means the string may be truncated.
If the Synchronize resource tree selection option is activated, selecting a string in the string list automatically highlights the corresponding resource in the resource tree.
Application
Using the Restore last string list display when opening a project option, you can continue working from exactly the point where you last closed a project.
Search Functions
Finding strings
There are several ways of searching for a specific string within a string list.
Searching for string numbers
Choose Edit / Go to / String (Ctrl + G) to open the Go to... dialog, and then enter the number of the string you want to find (see Searching for a String Number, S. 55).
Recently changed strings
Using the Back and Forward functions in the Edit / Go to menu you can jump directly
to the most recently changed strings. This works like the Back/Forward commands in an Internet browser
Searching for text strings
Choose Edit / Find (Ctrl + F) to open the Find... dialog, and then enter the expression
you want to find and specify the relevant search options (see Finding Texts, S. 56).
Replacing text strings
When you search for text strings you can replace the matching expressions with a different text (see Replacing Texts, S. 58).
Finding Projects
The Finding Projects (S. 60) function searches for text in all projects within a folder on your computer.
Searching for a string number
Passolo assigns each string in a string list a unique number, which is identical in the
source string and translation lists. This string number does not change, even when the
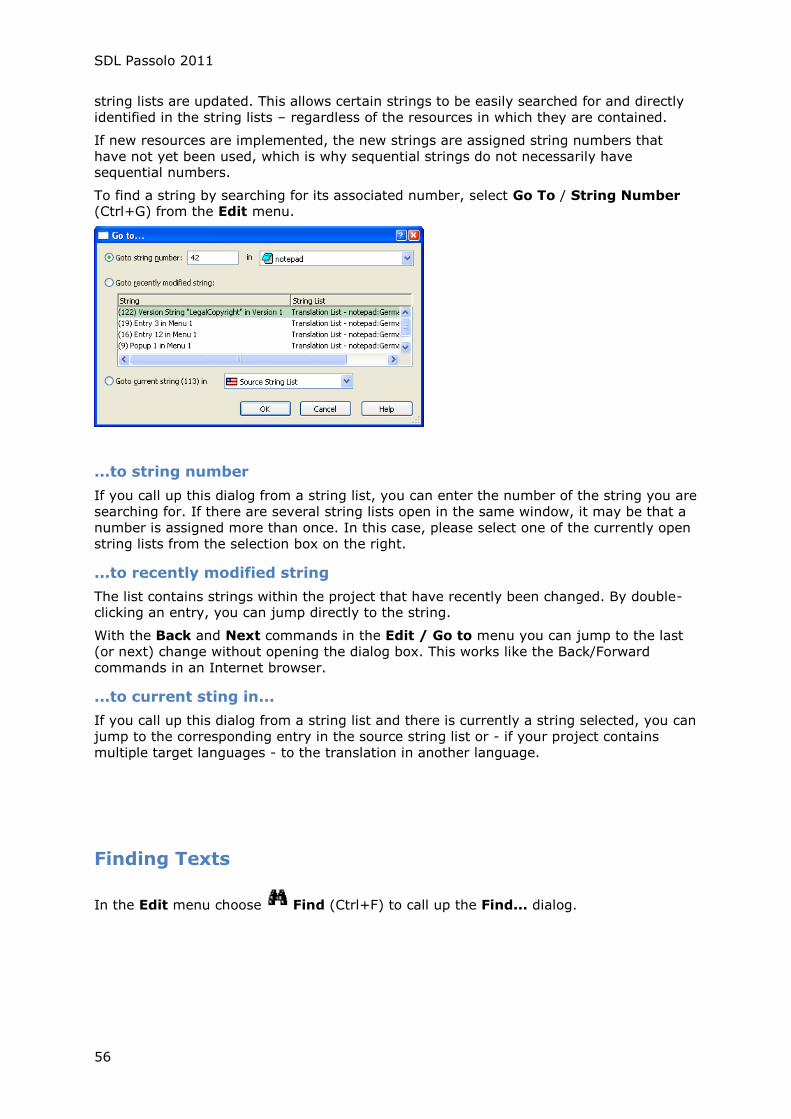
SDL Passolo 2011
56
string lists are updated. This allows certain strings to be easily searched for and directly
identified in the string lists – regardless of the resources in which they are contained.
If new resources are implemented, the new strings are assigned string numbers that
have not yet been used, which is why sequential strings do not necessarily have sequential numbers.
To find a string by searching for its associated number, select Go To / String Number (Ctrl+G) from the Edit menu.
...to string number
If you call up this dialog from a string list, you can enter the number of the string you are
searching for. If there are several string lists open in the same window, it may be that a
number is assigned more than once. In this case, please select one of the currently open
string lists from the selection box on the right.
...to recently modified string
The list contains strings within the project that have recently been changed. By double-clicking an entry, you can jump directly to the string.
With the Back and Next commands in the Edit / Go to menu you can jump to the last
(or next) change without opening the dialog box. This works like the Back/Forward
commands in an Internet browser.
...to current sting in...
If you call up this dialog from a string list and there is currently a string selected, you can
jump to the corresponding entry in the source string list or - if your project contains
multiple target languages - to the translation in another language.
Finding Texts
In the Edit menu choose Find (Ctrl+F) to call up the Find... dialog.
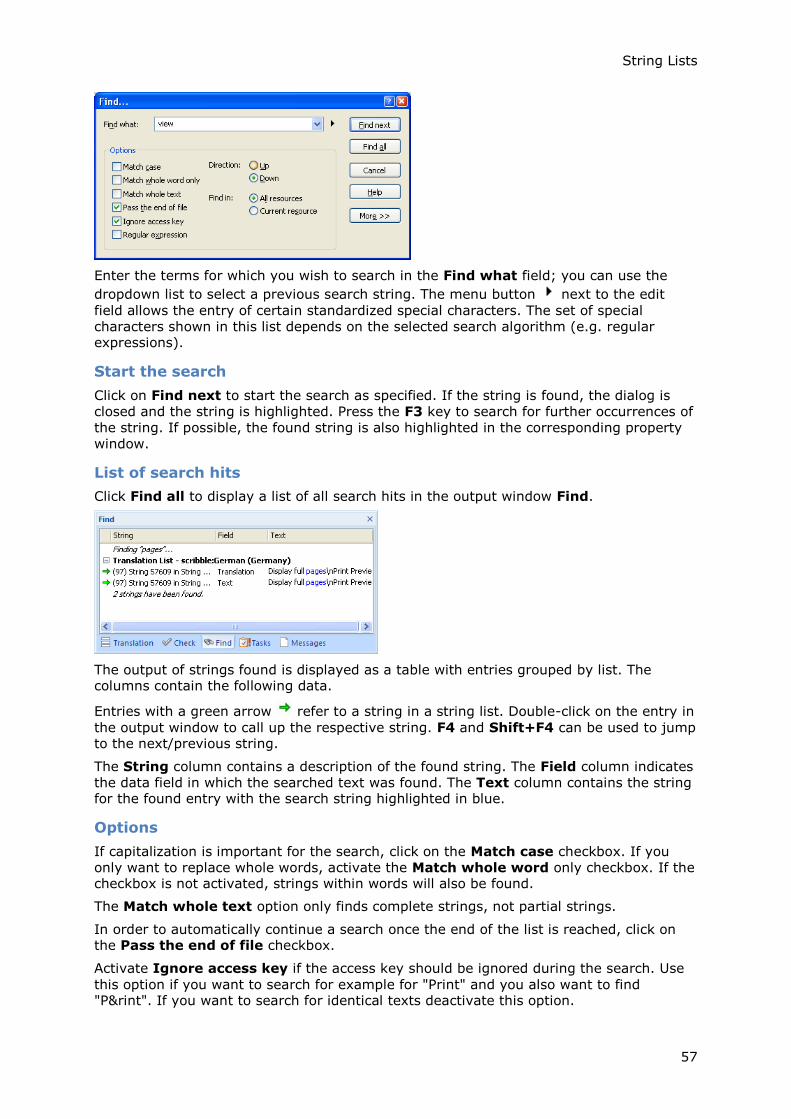
String Lists
57
Enter the terms for which you wish to search in the Find what field; you can use the
dropdown list to select a previous search string. The menu button next to the edit
field allows the entry of certain standardized special characters. The set of special
characters shown in this list depends on the selected search algorithm (e.g. regular expressions).
Start the search
Click on Find next to start the search as specified. If the string is found, the dialog is
closed and the string is highlighted. Press the F3 key to search for further occurrences of
the string. If possible, the found string is also highlighted in the corresponding property
window.
List of search hits
Click Find all to display a list of all search hits in the output window Find.
The output of strings found is displayed as a table with entries grouped by list. The columns contain the following data.
Entries with a green arrow refer to a string in a string list. Double-click on the entry in
the output window to call up the respective string. F4 and Shift+F4 can be used to jump to the next/previous string.
The String column contains a description of the found string. The Field column indicates
the data field in which the searched text was found. The Text column contains the string for the found entry with the search string highlighted in blue.
Options
If capitalization is important for the search, click on the Match case checkbox. If you
only want to replace whole words, activate the Match whole word only checkbox. If the checkbox is not activated, strings within words will also be found.
The Match whole text option only finds complete strings, not partial strings.
In order to automatically continue a search once the end of the list is reached, click on the Pass the end of file checkbox.
Activate Ignore access key if the access key should be ignored during the search. Use
this option if you want to search for example for "Print" and you also want to find "P&rint". If you want to search for identical texts deactivate this option.
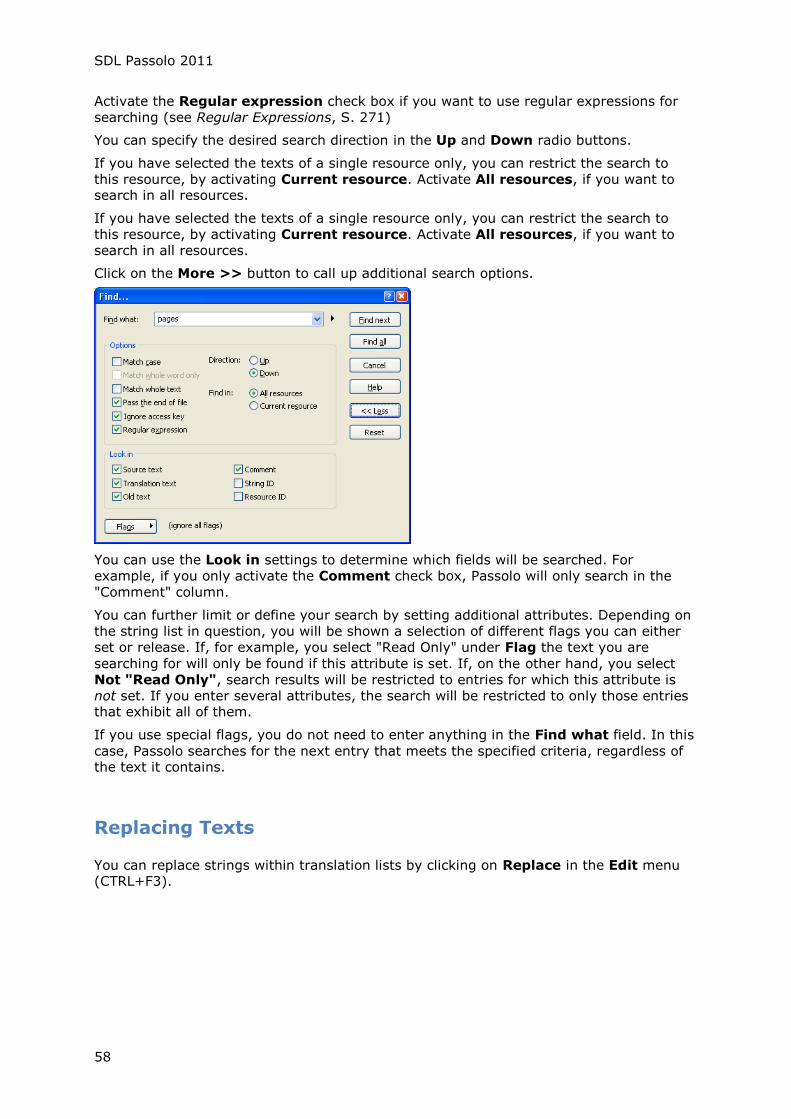
SDL Passolo 2011
58
Activate the Regular expression check box if you want to use regular expressions for
searching (see Regular Expressions, S. 271)
You can specify the desired search direction in the Up and Down radio buttons.
If you have selected the texts of a single resource only, you can restrict the search to
this resource, by activating Current resource. Activate All resources, if you want to search in all resources.
If you have selected the texts of a single resource only, you can restrict the search to
this resource, by activating Current resource. Activate All resources, if you want to
search in all resources.
Click on the More >> button to call up additional search options.
You can use the Look in settings to determine which fields will be searched. For
example, if you only activate the Comment check box, Passolo will only search in the
"Comment" column.
You can further limit or define your search by setting additional attributes. Depending on
the string list in question, you will be shown a selection of different flags you can either
set or release. If, for example, you select "Read Only" under Flag the text you are
searching for will only be found if this attribute is set. If, on the other hand, you select
Not "Read Only", search results will be restricted to entries for which this attribute is
not set. If you enter several attributes, the search will be restricted to only those entries that exhibit all of them.
If you use special flags, you do not need to enter anything in the Find what field. In this
case, Passolo searches for the next entry that meets the specified criteria, regardless of the text it contains.
Replacing Texts
You can replace strings within translation lists by clicking on Replace in the Edit menu (CTRL+F3).
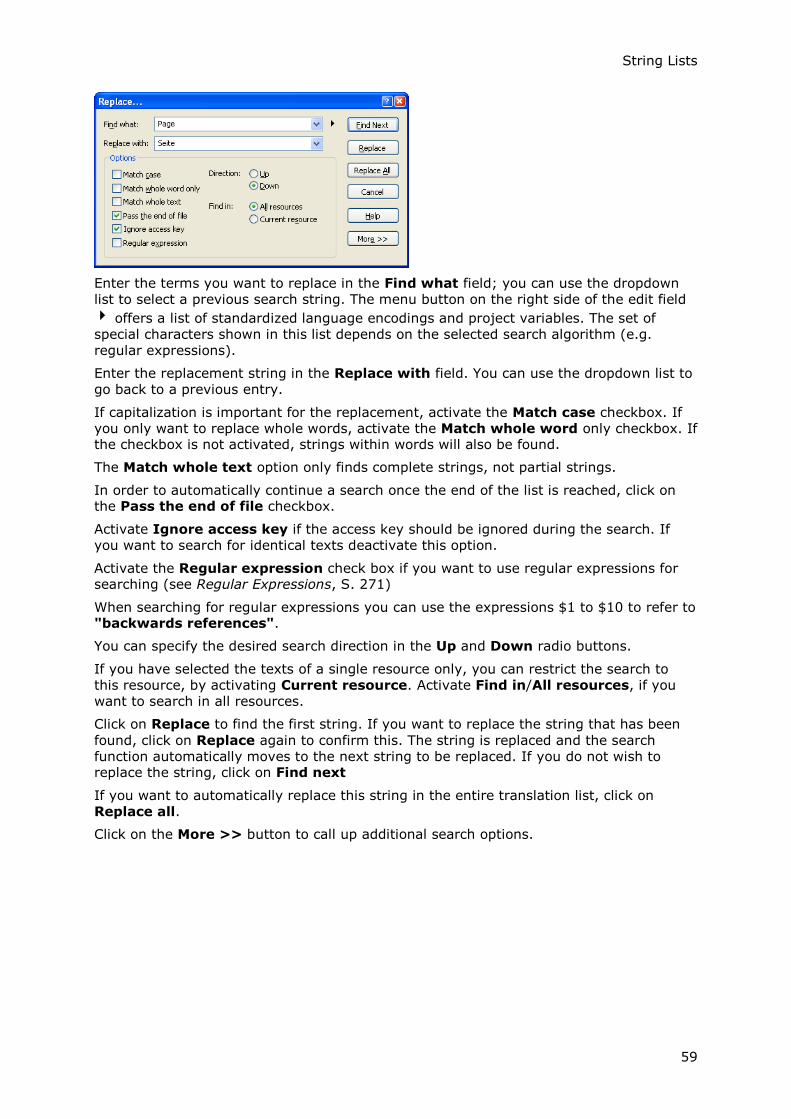
String Lists
59
Enter the terms you want to replace in the Find what field; you can use the dropdown
list to select a previous search string. The menu button on the right side of the edit field
offers a list of standardized language encodings and project variables. The set of
special characters shown in this list depends on the selected search algorithm (e.g.
regular expressions).
Enter the replacement string in the Replace with field. You can use the dropdown list to
go back to a previous entry.
If capitalization is important for the replacement, activate the Match case checkbox. If
you only want to replace whole words, activate the Match whole word only checkbox. If the checkbox is not activated, strings within words will also be found.
The Match whole text option only finds complete strings, not partial strings.
In order to automatically continue a search once the end of the list is reached, click on the Pass the end of file checkbox.
Activate Ignore access key if the access key should be ignored during the search. If
you want to search for identical texts deactivate this option.
Activate the Regular expression check box if you want to use regular expressions for searching (see Regular Expressions, S. 271)
When searching for regular expressions you can use the expressions $1 to $10 to refer to "backwards references".
You can specify the desired search direction in the Up and Down radio buttons.
If you have selected the texts of a single resource only, you can restrict the search to
this resource, by activating Current resource. Activate Find in/All resources, if you
want to search in all resources.
Click on Replace to find the first string. If you want to replace the string that has been
found, click on Replace again to confirm this. The string is replaced and the search
function automatically moves to the next string to be replaced. If you do not wish to replace the string, click on Find next
If you want to automatically replace this string in the entire translation list, click on
Replace all.
Click on the More >> button to call up additional search options.

SDL Passolo 2011
60
You can further limit or define your search by setting additional attributes. For example,
you can limit the replace function to strings that have not been reviewed by selecting the "for review" flag.
The Look in option is deactivated as only strings in the field can be replaced.
Finding Projects
This function searches for text in all projects within a folder on your computer. These projects do not need to have already been opened in Passolo.
Finding Text in Passolo Projects
1. Click on Find in Projects in the File menu to display the dialog for finding
projects.
2. Enter the required search options. Most fields correspond to a search for text
within a project (see Finding Texts, S. 56).
3. Enter the folder here in which the search is to be carried out and specify whether
its subfolders are also to be searched. You can refine the search to projects or
translation bundles.
4. Via Options, you can also specify a language. Only string lists in the language
you have selected will then be searched. Using this filter is recommended as it
makes the search significantly faster.
5. Click on Find next to start the search as specified. If relevant text is found, the
dialog closes, the relevant project is opened and the text is highlighted. Press the
F3 key to search for further occurrences of the string. Further projects may also
be opened if required.
6. Alternatively, you can also click on Find all to list all the matches in the Find
output window. Double clicking on a match marked with opens the project, if
required, and brings up the text. You can use the F4 and SHIFT+F4 keys to jump
to the next or the previous string.
Bookmarks
Bookmarks allow you to mark entries in order to subsequently return to them for
additional editing or checking. These entries are displayed with a light blue icon to
their left. To turn bookmarks on and off, use the Switch Bookmarks command in the
Edit menu, or use CTRL+F12.
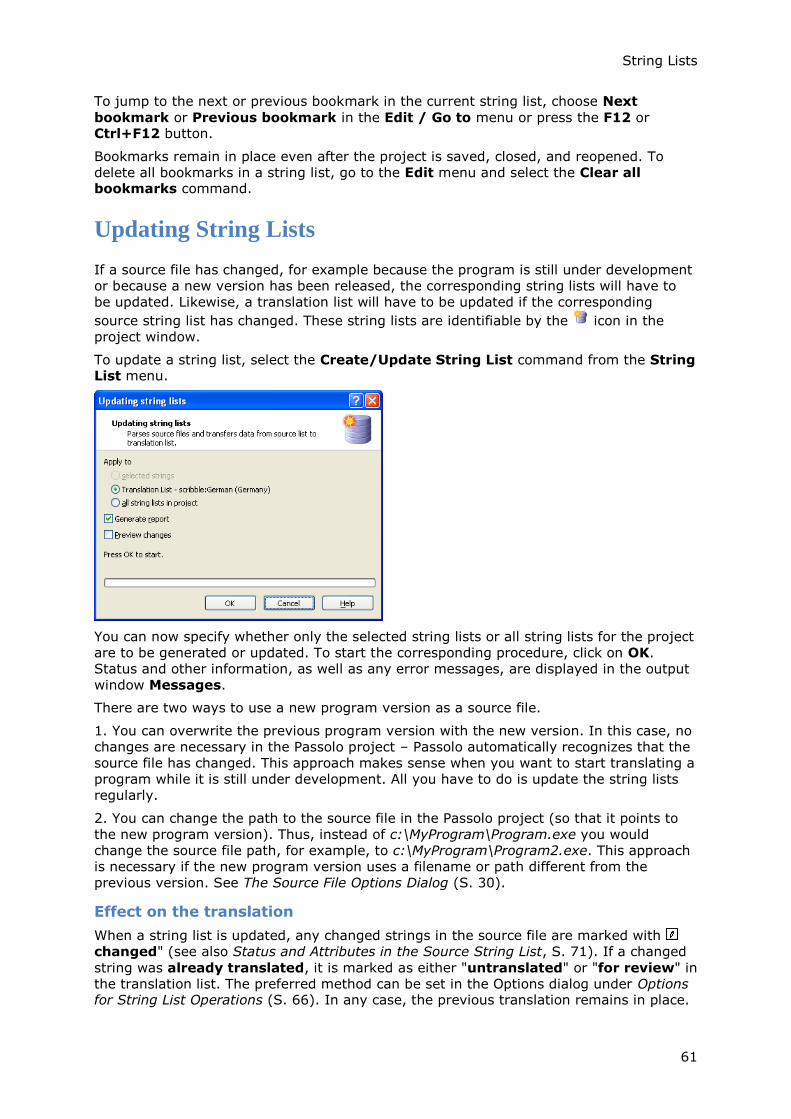
String Lists
61
To jump to the next or previous bookmark in the current string list, choose Next
bookmark or Previous bookmark in the Edit / Go to menu or press the F12 or Ctrl+F12 button.
Bookmarks remain in place even after the project is saved, closed, and reopened. To
delete all bookmarks in a string list, go to the Edit menu and select the Clear all bookmarks command.
Updating String Lists
If a source file has changed, for example because the program is still under development
or because a new version has been released, the corresponding string lists will have to
be updated. Likewise, a translation list will have to be updated if the corresponding
source string list has changed. These string lists are identifiable by the icon in the
project window.
To update a string list, select the Create/Update String List command from the String List menu.
You can now specify whether only the selected string lists or all string lists for the project
are to be generated or updated. To start the corresponding procedure, click on OK.
Status and other information, as well as any error messages, are displayed in the output
window Messages.
There are two ways to use a new program version as a source file.
1. You can overwrite the previous program version with the new version. In this case, no
changes are necessary in the Passolo project – Passolo automatically recognizes that the
source file has changed. This approach makes sense when you want to start translating a
program while it is still under development. All you have to do is update the string lists
regularly.
2. You can change the path to the source file in the Passolo project (so that it points to
the new program version). Thus, instead of c:\MyProgram\Program.exe you would
change the source file path, for example, to c:\MyProgram\Program2.exe. This approach
is necessary if the new program version uses a filename or path different from the
previous version. See The Source File Options Dialog (S. 30).
Effect on the translation
When a string list is updated, any changed strings in the source file are marked with
changed" (see also Status and Attributes in the Source String List, S. 71). If a changed
string was already translated, it is marked as either "untranslated" or "for review" in
the translation list. The preferred method can be set in the Options dialog under Options for String List Operations (S. 66). In any case, the previous translation remains in place.
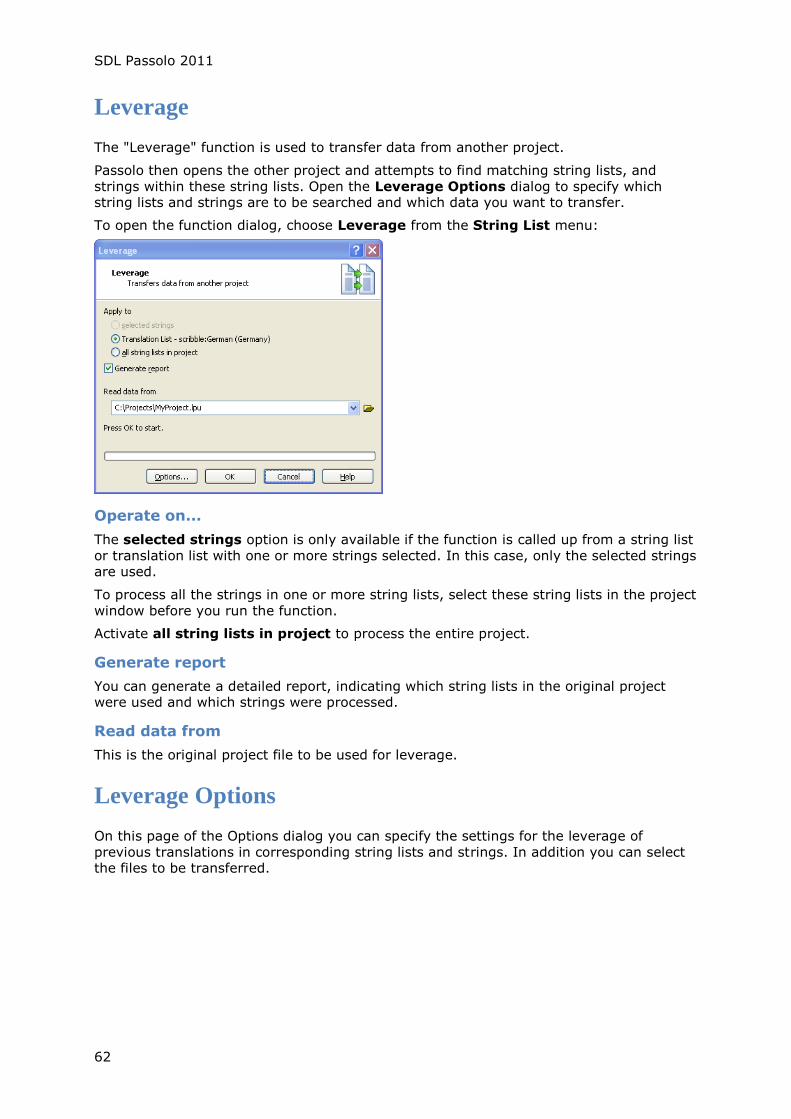
SDL Passolo 2011
62
Leverage
The "Leverage" function is used to transfer data from another project.
Passolo then opens the other project and attempts to find matching string lists, and
strings within these string lists. Open the Leverage Options dialog to specify which string lists and strings are to be searched and which data you want to transfer.
To open the function dialog, choose Leverage from the String List menu:
Operate on...
The selected strings option is only available if the function is called up from a string list
or translation list with one or more strings selected. In this case, only the selected strings are used.
To process all the strings in one or more string lists, select these string lists in the project
window before you run the function.
Activate all string lists in project to process the entire project.
Generate report
You can generate a detailed report, indicating which string lists in the original project were used and which strings were processed.
Read data from
This is the original project file to be used for leverage.
Leverage Options
On this page of the Options dialog you can specify the settings for the leverage of
previous translations in corresponding string lists and strings. In addition you can select the files to be transferred.

String Lists
63
Read strings with same...
When leveraging data, Passolo looks for a matching string list in the original project first.
For this setting, choose the properties that are to be compared. If you activate the
languages option, a string list is only used if it has exactly the same language. If you
activate the primary languages setting, only the primary language ID is compared, for
example a string list in American English is also taken into account for a string list is in British English.
If you activate the source file option, the full path to the source file has to match. With source file name only the name of the source file has to match.
Get data from strings with same...
Select the properties you want to compare when searching for a matching string in the leveraged string list.
Leverage Source Lists / Leverage Translation Lists
Select the data elements you want to transfer from the relevant list in the original
project.
Don't overwrite existing values when leveraging empty values
This option prevents some data elements (Max. length, comment, translation comment)
from being cleared. E.g. if this project contains a source text comment, but not the
corresponding text in the other project, then the current comment remains and will not be overwritten with the empty comment in the other project.
Deleted Texts
If the developer has removed certain elements such as strings, dialogs or menus from
the software, the corresponding strings and resources will also be deleted from the
source string list when an update is carried out. The deleted strings remain saved in the
respective translation lists of the project file, however. In the resource list, depicted as a
tree structure, there is an additional resource called Recycle Bin, which contains all the
deleted resources. This ensures that the type of resource, the ID and the strings remain
intact, including any advanced properties. All other information, such as the position of
strings within the dialogs, is lost.
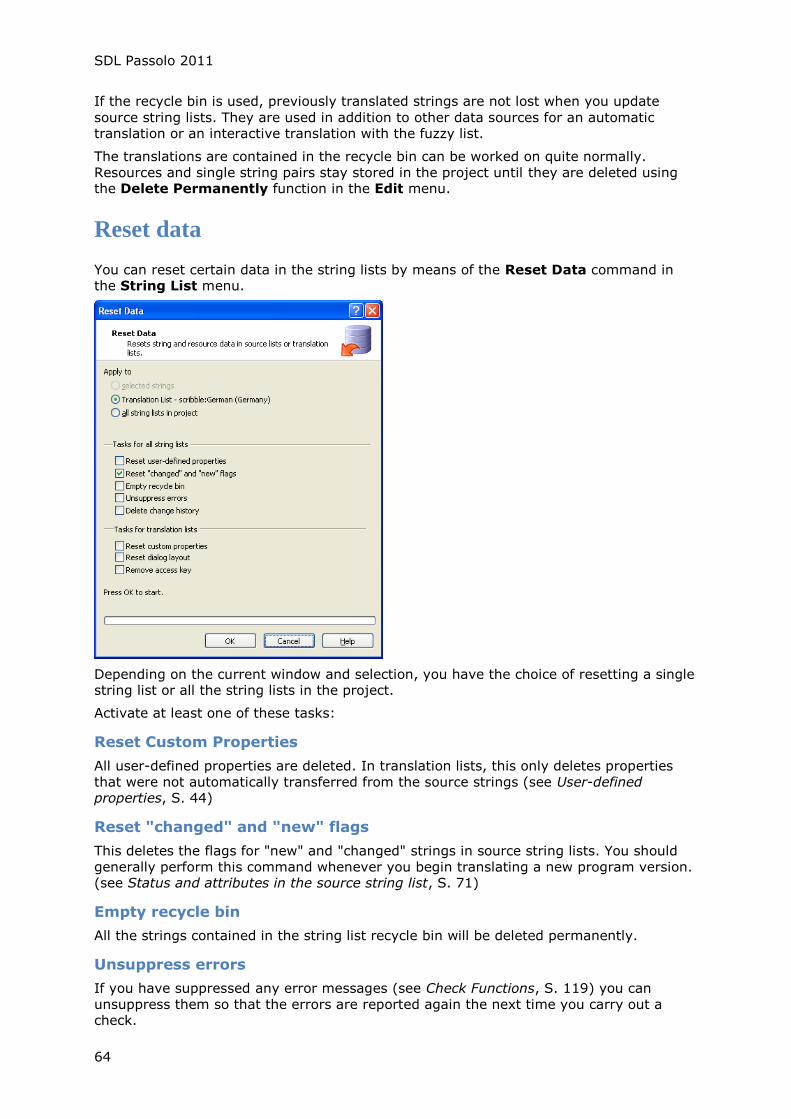
SDL Passolo 2011
64
If the recycle bin is used, previously translated strings are not lost when you update
source string lists. They are used in addition to other data sources for an automatic translation or an interactive translation with the fuzzy list.
The translations are contained in the recycle bin can be worked on quite normally.
Resources and single string pairs stay stored in the project until they are deleted using the Delete Permanently function in the Edit menu.
Reset data
You can reset certain data in the string lists by means of the Reset Data command in the String List menu.
Depending on the current window and selection, you have the choice of resetting a single string list or all the string lists in the project.
Activate at least one of these tasks:
Reset Custom Properties
All user-defined properties are deleted. In translation lists, this only deletes properties
that were not automatically transferred from the source strings (see User-defined properties, S. 44)
Reset "changed" and "new" flags
This deletes the flags for "new" and "changed" strings in source string lists. You should
generally perform this command whenever you begin translating a new program version. (see Status and attributes in the source string list, S. 71)
Empty recycle bin
All the strings contained in the string list recycle bin will be deleted permanently.
Unsuppress errors
If you have suppressed any error messages (see Check Functions, S. 119) you can
unsuppress them so that the errors are reported again the next time you carry out a check.
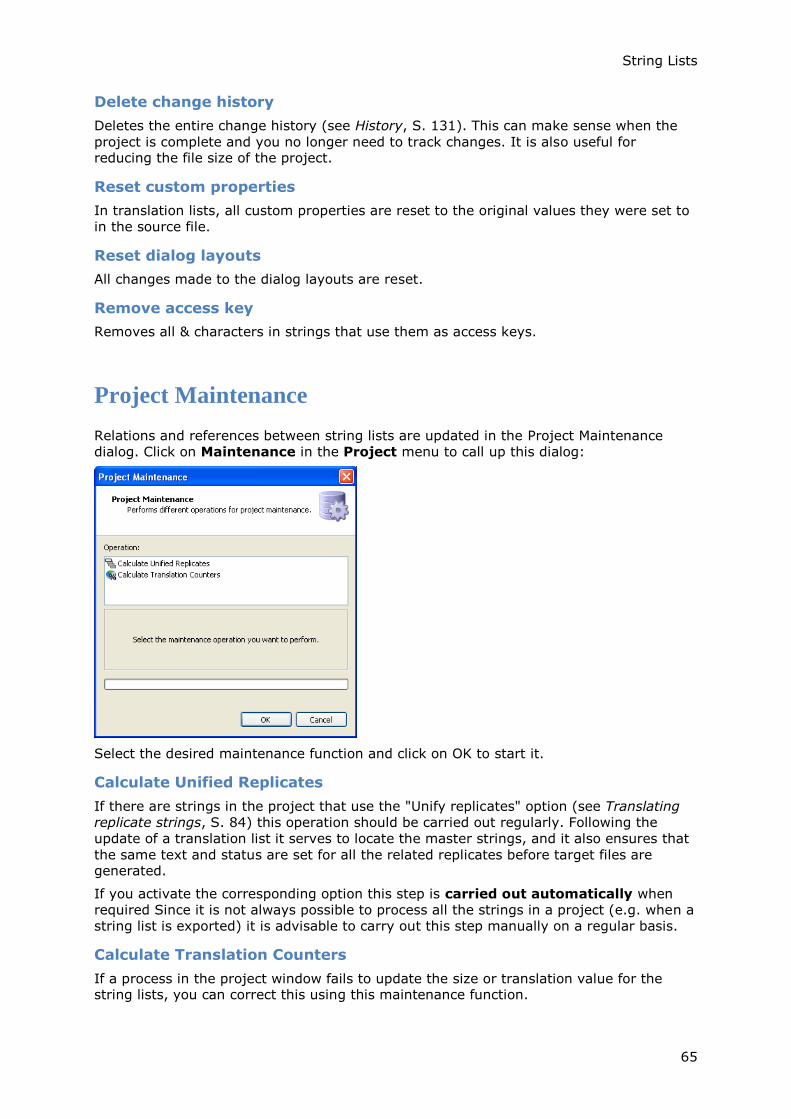
String Lists
65
Delete change history
Deletes the entire change history (see History, S. 131). This can make sense when the
project is complete and you no longer need to track changes. It is also useful for reducing the file size of the project.
Reset custom properties
In translation lists, all custom properties are reset to the original values they were set to
in the source file.
Reset dialog layouts
All changes made to the dialog layouts are reset.
Remove access key
Removes all & characters in strings that use them as access keys.
Project Maintenance
Relations and references between string lists are updated in the Project Maintenance
dialog. Click on Maintenance in the Project menu to call up this dialog:
Select the desired maintenance function and click on OK to start it.
Calculate Unified Replicates
If there are strings in the project that use the "Unify replicates" option (see Translating
replicate strings, S. 84) this operation should be carried out regularly. Following the
update of a translation list it serves to locate the master strings, and it also ensures that
the same text and status are set for all the related replicates before target files are generated.
If you activate the corresponding option this step is carried out automatically when
required Since it is not always possible to process all the strings in a project (e.g. when a
string list is exported) it is advisable to carry out this step manually on a regular basis.
Calculate Translation Counters
If a process in the project window fails to update the size or translation value for the string lists, you can correct this using this maintenance function.

SDL Passolo 2011
66
Options for String List Operations
Choose Options from the Tools menu, and go to the String list operations page to specify the options for processing string lists
Configuration of the recycle bin
Every source file and all of the translation files belonging to them has its own recycle bin.
To activate this function, select the respective control button Move deleted strings to
recycle bin in the Updating source string lists and Updating translation string lists groups.
Updating translation string lists
You can specify how Passolo should update the translation string lists here. You can
specify how the translation status changes when the source of a translated text or a source comment has been changed.
You can also choose what happens when the coordinates of the control elements are altered.
Generating target files
You can specify whether the source text or current translation string is written to the
target file for untranslated texts (red) or "for review" texts (blue or green) here.
Inline Tags
Inline tags are specially designated components within a string that contain formatting
instructions or other information. In some formats they are also used to designate
placeholders that are replaced at runtime with the corresponding data. The exact
formatting of tags depends on the text format used. In HTML and XML, tags are always enclosed in angle brackets, but other methods are also conceivable.
You can also define personal tags, for example to protect a product name (see Inline Patterns, S. 68).
Some examples:
HTML uses the and tags to format bold text.
This <b>text</b> is bold.
The IMG tag is used in HTML to embed images.
<img height=351 src="home_files/logo_mid4.gif" alt="Logo" width=153>
In XML, the meaning of the tags depends on the XML application
This is an inline tag
Example for placeholder tags
{'Number'} files were deleted from the {'Path'} folder!
Display of tags in Passolo
The strings in the string list always show the original text containing the original tags
(not replaced by placeholders). When the string is edited or displayed in the translation
window, the tags are shown as small yellow placeholder symbols. These yellow tag
symbols contain a short caption to help identify the tags. Optionally, tags can also be
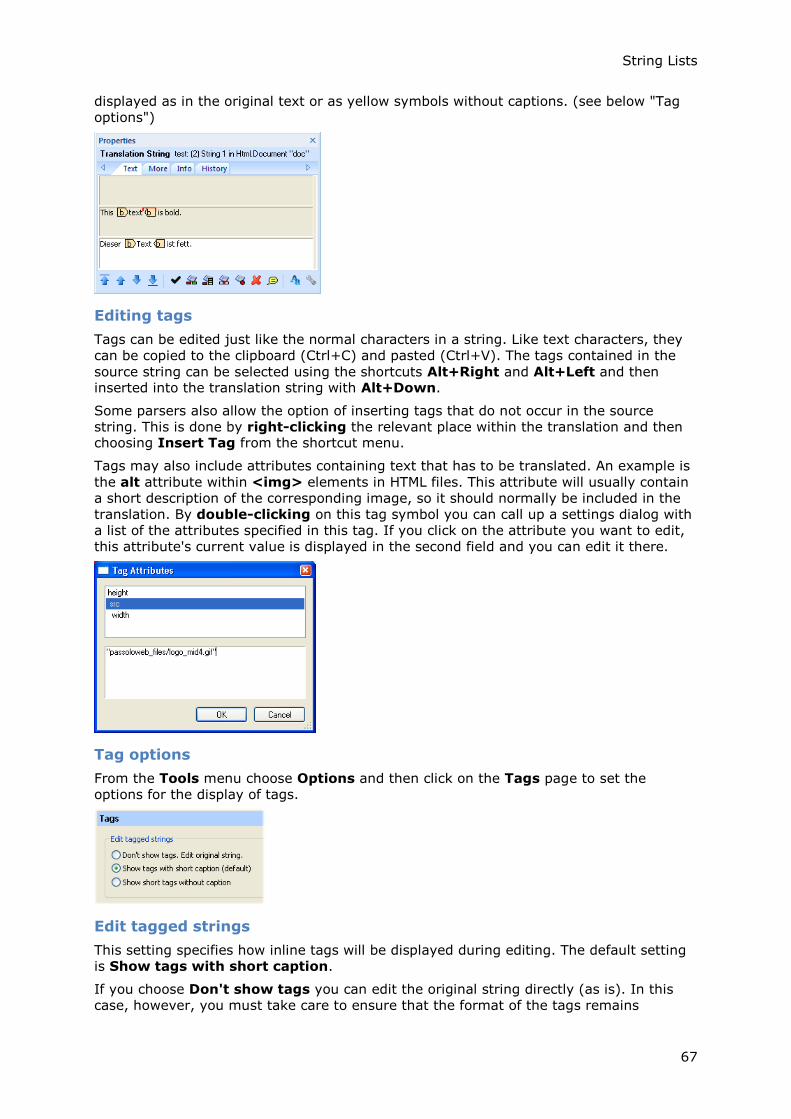
String Lists
67
displayed as in the original text or as yellow symbols without captions. (see below "Tag
options")
Editing tags
Tags can be edited just like the normal characters in a string. Like text characters, they
can be copied to the clipboard (Ctrl+C) and pasted (Ctrl+V). The tags contained in the
source string can be selected using the shortcuts Alt+Right and Alt+Left and then inserted into the translation string with Alt+Down.
Some parsers also allow the option of inserting tags that do not occur in the source
string. This is done by right-clicking the relevant place within the translation and then choosing Insert Tag from the shortcut menu.
Tags may also include attributes containing text that has to be translated. An example is
the alt attribute within <img> elements in HTML files. This attribute will usually contain
a short description of the corresponding image, so it should normally be included in the
translation. By double-clicking on this tag symbol you can call up a settings dialog with
a list of the attributes specified in this tag. If you click on the attribute you want to edit,
this attribute's current value is displayed in the second field and you can edit it there.
Tag options
From the Tools menu choose Options and then click on the Tags page to set the
options for the display of tags.
Edit tagged strings
This setting specifies how inline tags will be displayed during editing. The default setting
is Show tags with short caption.
If you choose Don't show tags you can edit the original string directly (as is). In this
case, however, you must take care to ensure that the format of the tags remains

SDL Passolo 2011
68
unchanged. If you enter an invalid format, e.g. an HTML tag that does not include the
closing angle bracket, the parser will no longer be able to generate the target file.
For a more compact display of strings you can choose Show short tags without
caption. In this case the tags are also displayed as a yellow symbol, but the symbol is narrower and contains no caption.
Inline Patterns
Personal tags (see Inline Tags, S. 66) can also be defined using inline patterns. This
method enables product names to be protected, for example, so that they cannot be changed by the translator.
Definition of a personal tag with an inline pattern
1. In the Project menu, click on Inline Patterns.
2. Select the General area to save the new pattern for no specific project or select
the project under which the new pattern is to be saved.
3. Click on Add.
4. In the Pattern Name field, enter a name for the new inline pattern, e.g. Product
name.
5. Enter the text to be searched for, e.g. SUPER PRODUCT.
Use a regular expression to search with more flexibility (see Regular
Expressions, S. 271).
6. In the Tagging field, select the Convert to inline tag option.
7. Close the dialog with OK.
The text SUPER PRODUCT is then displayed in the translation window as an inline
tag and it can also be moved or copied from the source text. Unlike the tags delivered by file parsers, the individually defined tags are displayed in violet.

69
Preparing the Translation
Editing a Source String List
You can perform a translation without ever having to edit the source string list.
However, the procedure described here simplifies and supports the actual translation
process.
Strings can be read-only so that they remain unchanged during translation.
Strings can be hidden so that they are not displayed at all during translation.
(SeeProtecting and Hiding Strings (S. 69) )
Strings can be given a maximum length so that translations that use too many
characters can be found. (See Maximum Length of Strings, S. 70)
Corrections to the source program can be marked to indicated that retranslation
is not necessary.
Strings may be assigned comments to support the translator during translation.
(See Using Comments, S. 71)
Control elements from complex dialogs can be grouped, which makes the dialog
easier to edit. (See Grouping Control Elements, S. 70)
The source list can be checked in order to indicate any existing problems (e.g.
spelling errors) to the developers. (See Check Functions, S. 119)
Protecting and Hiding Strings
Strings in the source string list can be protected or hidden. Protected resources and
strings are displayed to the translator but they cannot be edited or otherwise modified.
Hidden resource and strings cannot be seen by the translator, and thus are not available for processing.
When program libraries are used, additional resources that are never called up in the
application are often included. In these cases, it is practical to hide such resources, since
they are irrelevant to the translation. The source may also include strings that must not
be translated for localization. These can include, for example, internationally accepted
terms such units of measure or names. These types of entries should be protected and assigned an explanatory comment.
In particular, individual strings in dialogs that must not be translated should not be
hidden, but merely protected: Since hidden resources are displayed in the dialog editor in
order to allow them to be moved as required, it provides the translator with a greater
degree of transparency if the translation list and the dialog editor contain the same elements.
To edit a string in the source string list, use the Properties command in the entry’s
context menu to open the corresponding dialog (Source String x – Entry x) where you
can protect (Read Only checkbox) or hide (Hide checkbox) the current string. These
properties are then transferred to the source string list and are subsequently displayed in the "Status" column.
To protect or hide several strings at once, it is easier to go directly to the source string
list. Select the resources, or strings within the resources, and call up the Toggle "read only"/ "hide" flag command from the context menu.

SDL Passolo 2011
70
Maximum Length of Strings
For the localization of a program it may be necessary to limit the length of strings in the
translation. For each item in the source list a maximum string length can be specified,
and this restriction can be checked when testing the translation list. See Passolo Error Messages (S. 121).
To change the maximum string length for one or more entries in the source string list,
select the relevant entries in the list and choose Properties from the shortcut menu to
display the corresponding Properties window. Switch to the More tab and enter the maximum string length in the Max length field.
Grouping Control Elements
In complex dialogs it sometimes happens that software developers have placed several
control elements on top of each other. To simplify the localization of such dialogs, several
control elements can be grouped. Groups, or also individual control elements, can then
be hidden during the localization of the dialog. This reduces the number of control
elements being shown simultaneously and eases the navigation and selection of control
elements.
Some programming languages (e.g. Microsoft .NET and Borland Delphi/C++ Builder)
offer hierarchical dialogs. If you add a control element to a group, all of the elements
under it (child controls) will also be added to the group automatically.
The grouping procedure should normally be undertaken in the source string list when the
project is first created, because at this point (e.g. from developers’ feedback) information
is available concerning which control elements of a dialog will be shown together later on
at runtime. If the grouping is already specified in the source string list, the settings are also saved in the source string list and are therefore available in all languages.
or Group controls in the submenu Layout/Groups produces a new group which
contains the selected controls. Enter a name for the new group. It is possible to save the control elements in different groups.
or Ungroup in the sub menu Layout/Groups deletes the existing group.
or Add to group in the sub menu Layout/Groups adds the selected control
elements to the existing group.
or Remove from Group in the sub menu Layout/Groups removes the selected
control elements from the existing group.
or CTRL+K or Select next in the sub menu Layout/Groups shows the next group
of control elements. When the last defined group is shown, selecting this command again
hides all groups. Then the first group is continued. In addition it is possible to show a
certain group in the sub menu Layout/Groups/Selection. If the SHIFT button is
pressed while making menu selections several groups can be shown simultaneously.

Preparing the Translation
71
or Hide temporarily in the submenu Layout/Groups hides the selected controls
temporarily. When the text list is closed this characteristic is lost, and the control element is shown the next time the dialog field is opened.
or Unhide all in the sub menu Layout/Group shows again all of the controls which
were temporarily hidden in this dialog.
Displaying the Current Group
If there are groups defined in a dialog, the current group is shown in a status field next to the coordinates of an element:
Double-clicking on this field has the same effect as the command Select next, while right-clicking opens the Group menu from which you can select a group.
It is also possible to display the group setting of every element in the string list. This is
achieved by adding the Group column to the list display. See Configuration of Columns in the String List (S. 49).
Using Comments
You can add a note to entries in the source string list which will then appear in the
Properties dialog during translation.
Such comments support the translator and can be particularly helpful for "string table"
resources, in other words, for those resources that are not assigned to any dialog or
menu. The comment can be used, for example, to describe the context in which the
associated string is used.
Comments can also contain hyperlinks (see Hyperlinks, S. 262).
Status and Attributes in the Source String List
Resources in the source program can be modified or expanded during the course of a
software project. Passolo automatically recognizes such changes and displays them in blue after the source string list is updated
The Status column in the source string list shows the status of each string. Depending
on your settings, there will just be an icon displayed or also a status text. (see also
Changing View Options, S. 54)
Flag Description
new This is a new string that was added as a result of a source file update
changed
This is a changed string that was modified as a result of a source file
update. Existing translations remain intact, but they are flagged as
"untranslated" or "for review". The preferred method can be set in the
Options dialog. (see Options for String List Operations, S. 66)
moved This is a dialog element that was moved or resized as a result of a source
file update.
Correction
This string is flagged as a correction. The changes made by the
programmer do not require a new translation. To flag a string as a
correction, activate the corresponding setting in the source string
properties, before the translation list is updated.
read only This string can be viewed by the translator, but not changed. (see
Protecting and Hiding Strings, S. 69)

SDL Passolo 2011
72
hidden This string is not displayed in the translation list. (see Protecting and
Hiding Strings, S. 69)
Reset flags
The flags are required in connection with the update of a translation list. Even with
multiple updates of the source string lists these flags remain in place. Once all the
translation lists have been updated you can manually delete these flags. This also deletes any "old strings" that were contained in the source list before the latest update.
To reset the update flags, open the project window or the source string list and choose
Reset data from the String list menu. In the dialog, choose the Reset "changed" and
"new" flags. Depending on the current window and selection, you have the choice of resetting a single string list or all the string lists in the project.
Menu Accelerator Tables
A user alternative to the menu structure is the utilization of shortcuts (key combinations
with so-called accelerators or access keys) that are initiated with one or more keys.
Normally, a shortcut key combination is shown next to its associated menu entry. In the
resources of a source application, the actual menu entry and the key combination are
separated by a tab (for example, "Paste\tCTRL+V" or "Quit\tAlt+F4"). The actual key
combination, however, is filed in a table in its own resource category known as
"Accelerator".
In Passolo, functions to automatically match accelerator tables and menu entries have
been integrated so that a change to a key combination in the menu resource is
immediately reflected in the associated accelerator table. Thus, only menu entries need be changed.
However, since a program can contain several menus and accelerator tables, it must be
determined which menu and which accelerator table go together.
If a menu and accelerator have the same designation or ID, it is assumed that they form
a combined unit. Otherwise, assignment must be performed manually. To open the
Menu Accelerator Table, go to the String List menu and select the Menu Accelerator
Table command. This menu entry is only displayed if the source string list is open. Use
this dialog to add or delete associations.
During subsequent localization, only the accelerator in the menu entry will need to be
translated (e.g. "CTRL+Alt+Entf" - "Ctrl+Alt+Del"). The associated entry in the accelerator table is directly adjusted when the automatic translation function is called up.
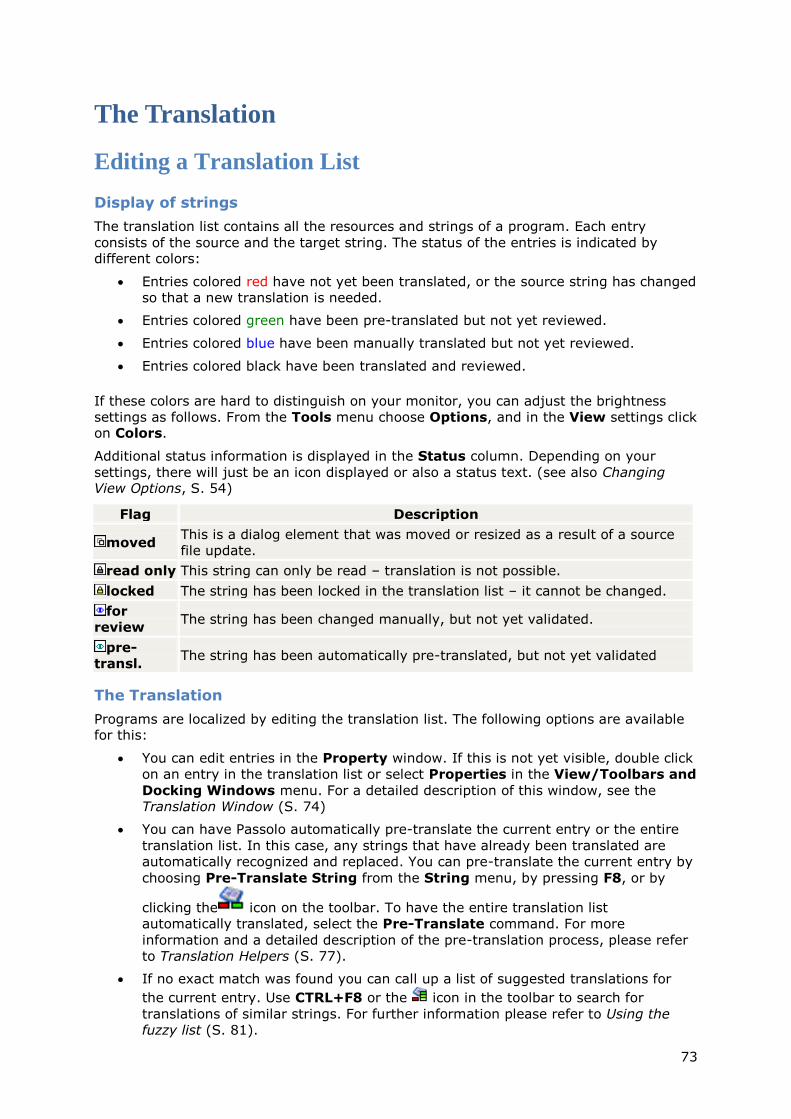
73
The Translation
Editing a Translation List
Display of strings
The translation list contains all the resources and strings of a program. Each entry
consists of the source and the target string. The status of the entries is indicated by different colors:
Entries colored red have not yet been translated, or the source string has changed
so that a new translation is needed.
Entries colored green have been pre-translated but not yet reviewed.
Entries colored blue have been manually translated but not yet reviewed.
Entries colored black have been translated and reviewed.
If these colors are hard to distinguish on your monitor, you can adjust the brightness
settings as follows. From the Tools menu choose Options, and in the View settings click on Colors.
Additional status information is displayed in the Status column. Depending on your
settings, there will just be an icon displayed or also a status text. (see also Changing View Options, S. 54)
Flag Description
moved This is a dialog element that was moved or resized as a result of a source
file update.
read only This string can only be read – translation is not possible.
locked The string has been locked in the translation list – it cannot be changed.
for
review The string has been changed manually, but not yet validated.
pre-
transl. The string has been automatically pre-translated, but not yet validated
The Translation
Programs are localized by editing the translation list. The following options are available for this:
You can edit entries in the Property window. If this is not yet visible, double click
on an entry in the translation list or select Properties in the View/Toolbars and
Docking Windows menu. For a detailed description of this window, see the
Translation Window (S. 74)
You can have Passolo automatically pre-translate the current entry or the entire
translation list. In this case, any strings that have already been translated are
automatically recognized and replaced. You can pre-translate the current entry by
choosing Pre-Translate String from the String menu, by pressing F8, or by
clicking the icon on the toolbar. To have the entire translation list
automatically translated, select the Pre-Translate command. For more
information and a detailed description of the pre-translation process, please refer
to Translation Helpers (S. 77).
If no exact match was found you can call up a list of suggested translations for
the current entry. Use CTRL+F8 or the icon in the toolbar to search for
translations of similar strings. For further information please refer to Using the
fuzzy list (S. 81).
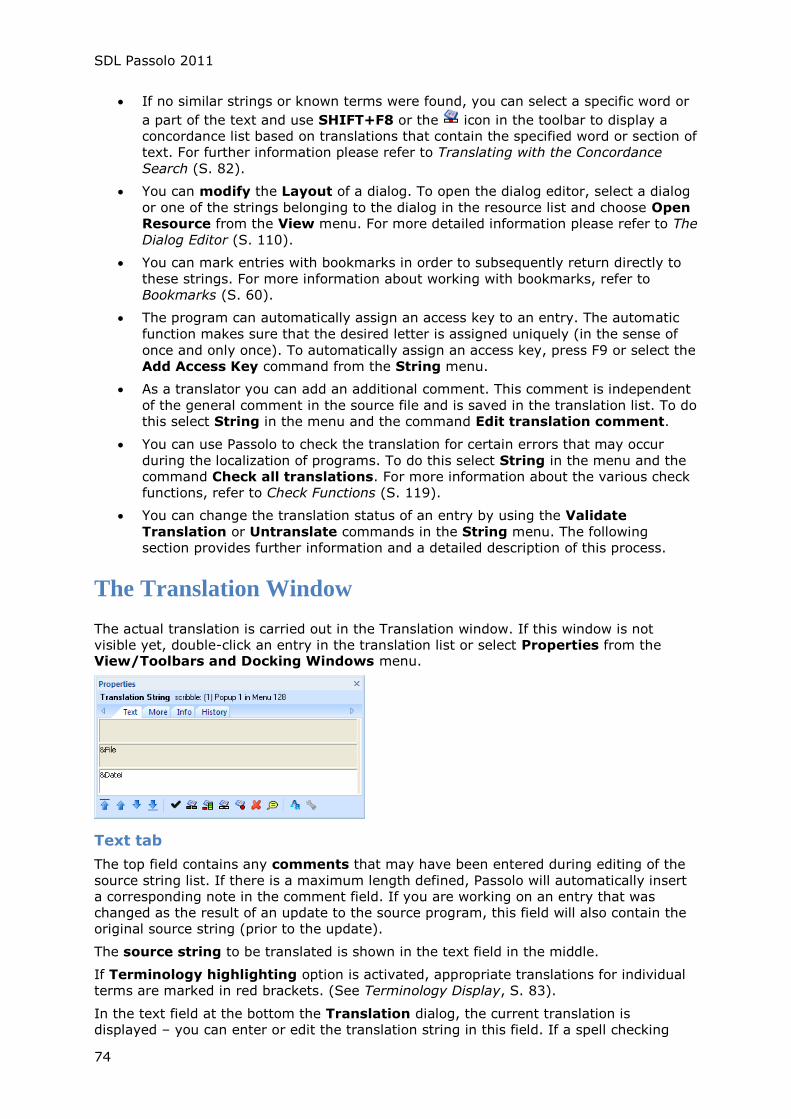
SDL Passolo 2011
74
If no similar strings or known terms were found, you can select a specific word or
a part of the text and use SHIFT+F8 or the icon in the toolbar to display a
concordance list based on translations that contain the specified word or section of
text. For further information please refer to Translating with the Concordance
Search (S. 82).
You can modify the Layout of a dialog. To open the dialog editor, select a dialog
or one of the strings belonging to the dialog in the resource list and choose Open
Resource from the View menu. For more detailed information please refer to The
Dialog Editor (S. 110).
You can mark entries with bookmarks in order to subsequently return directly to
these strings. For more information about working with bookmarks, refer to
Bookmarks (S. 60).
The program can automatically assign an access key to an entry. The automatic
function makes sure that the desired letter is assigned uniquely (in the sense of
once and only once). To automatically assign an access key, press F9 or select the
Add Access Key command from the String menu.
As a translator you can add an additional comment. This comment is independent
of the general comment in the source file and is saved in the translation list. To do
this select String in the menu and the command Edit translation comment.
You can use Passolo to check the translation for certain errors that may occur
during the localization of programs. To do this select String in the menu and the
command Check all translations. For more information about the various check
functions, refer to Check Functions (S. 119).
You can change the translation status of an entry by using the Validate
Translation or Untranslate commands in the String menu. The following
section provides further information and a detailed description of this process.
The Translation Window
The actual translation is carried out in the Translation window. If this window is not
visible yet, double-click an entry in the translation list or select Properties from the View/Toolbars and Docking Windows menu.
Text tab
The top field contains any comments that may have been entered during editing of the
source string list. If there is a maximum length defined, Passolo will automatically insert
a corresponding note in the comment field. If you are working on an entry that was
changed as the result of an update to the source program, this field will also contain the
original source string (prior to the update).
The source string to be translated is shown in the text field in the middle.
If Terminology highlighting option is activated, appropriate translations for individual
terms are marked in red brackets. (See Terminology Display, S. 83).
In the text field at the bottom the Translation dialog, the current translation is
displayed – you can enter or edit the translation string in this field. If a spell checking
The Translation
75
add-in is activated and the option to check spelling during entry is selected, and if there
is a corresponding dictionary available for the target language, any recognized spelling
errors will be marked with a wavy red underline. For methods of correction see Spell checking during entry (S. 124).
More tab
Special properties of the current string are listed in different categories – these properties can be modified for the translated version of the software.
The strings for certain dialog control elements may have the Multiline attribute
activated. This gives control certain additional attributes in the target file, so that it will
display multiline text. For example, buttons in Win32 applications are single-line controls
– in general. If the button text is too long, you can use a control setting to break the text
into multiple lines in order to achieve a better dialog layout. Exactly what effect this setting will have depends on the file system used.
The Right to left option is only displayed if this particular attribute has been specified
(see Options for the translation window, S. 76). This function is used for the translation
into, for example, Arabic or Hebrew, where entries concerning control elements written
to the right must be reversed when written to the target file. The list box contains
several options for changing the right/left styles. Exactly what effect this setting will have
depends on the file system used.
Depending on the type of control and the parser used, the current control may support
further custom properties which can be modified in context-dependent data fields. User-defined properties are also specified here. (see User-defined properties, S. 44)
Info tab
This tab contains further general information about the current control:
Created shows the date and time the string was first saved in the translation list.
Changed shows the date and time when the source text was last changed in the source
file.
Changed shows the date and time the string was last changed in the translation list.
User shows the user that made the last change to the entry, see User management (S.
40).
History tab
This tab displays the history of the translation string. (See Displaying the History, S. 132)
Navigation Toolbar
The lower area of the dialog contains a navigation toolbar containing functions to move
through the translation list and to edit a selected entry:
or CTRL+HOME jumps to the start of the translation list.
or CTRL+UP jumps to the previous entry in the translation list. If the translation
assistant is turned on, this function will behave as described in Options for the translation
assistant (S. 88).
or CTRL+DOWN jumps to the next entry in the translation list. If the translation
assistant is turned on, this function will behave as described in Options for the translation assistant (S. 88).
or CTRL+END jumps to the end of the translation list.
or CTRL+T validates the entry. Use this button to transfer a string to the target
language without translating it, or to confirm that an automatically translated string is correct.

SDL Passolo 2011
76
or F8 automatically translates the entry. The program searches for an appropriate
translation in the other entries of both the current and any other open project and in the
linked glossaries. For further information, please refer to Pre-Translation of individual strings (S. 78).
or CTRL+F8 searches for translations of similar strings. Depending on where the
insertion point is currently positioned, either the string belonging to the currently
selected entry in the translation list or the string shown in the translation window will be
used. If part of the string is selected in the translation window, Passolo will only look up
translations for the selected part. Contrary to translation without fuzzy list, you can also
look up translations for strings in the two upper text fields (comment and source string). For further information please refer to Using the fuzzy list (S. 81).
or Shift+F8 searches for translations of partial strings using the concordance function.
Before calling up the concordance function, highlight the section of text you want to find
a translation for. For further information please refer to Translating with the Concordance Search (S. 82).
or CTRL+F5 turns the translation assistant on and off. The translation assistant helps
to automate different tasks in connection with the translation of a string list. Depending
on the task and the user's preferences, the navigation method and the handling of
translated and untranslated strings can be specified. This can help reduce the required
number of mouse clicks or keystrokes and thus accelerate the translation process. See Options for the Translation Assistant (S. 88).
or CTRL+U undoes (i.e. retracts) the translation. The translated string is replaced by the source string.
adds a translator comment for this entry. Translator comments are saved in the
translation list as well as in the source list.
or Alt+A calls up the character table to access special letters, characters, symbols, and paragraph marks that cannot be input directly from the keyboard or via the ANSI code.
calls up the options tab for the configuration of the translation window. See Options for
the Translation Window (S. 76).
On the right side of the navigation bar the number of characters (C) and lines (L) in the
source and target strings is displayed. The first number refers to the source string, the second number to the target string.
Options for the Translation Window
To configure the translation window settings, choose Options from the Tools menu, and go to the Translation Window page.
Display
Using the Show tooltips check box you can specify that ToolTips will be displayed for the buttons on the navigation toolbar in the Properties window.
Use the Long lines field to specify how large entries are displayed in the translation
field. With Word Wrap, the string is automatically wrapped at the edge of the
translation field, even if the string does not contain an explicit line break at that point.
This view does not necessarily correspond to the display in the target file, but it allows
you to read the complete string without having to scroll horizontally. With Scroll
Horizontally, the string is not wrapped at the edge of the translation field. To display
parts of the string that are not visible you have to move the cursor within the translation
field. With Scroll Horizontally with Scrollbar, the string is not wrapped at the edge of
the translation field. To display parts of the string that are not visible you can move the
cursor in the translation field or use the scrollbar functions.
The Translation
77
The text in the edit field can be zoomed for easier viewing, if required. In the Zoom list
field, choose a value greater than 100%.
Behavior of the ENTER key
A radio button can be used to specify the function of the ENTER key in the translation
window. With Select next string, pressing the ENTER key closes the current string and
opens the next string in the translation list. In this case, line breaks within the text have
to be inserted using the key combination CTRL+ENTER. If the option Insert line feed is activated, pressing the ENTER key inserts a lines feed into the edited string.
Edit
The Keep white spaces at beginning and end of strings option is activated by
default. This ensures that the number of spaces or line breaks at the beginning or end of
a string is not changed by the translator. If, for example, the source text has a line break
at the end, the translated text will also always contain precisely one line break.
Generally, this means that high translation reliability is achieved. Deactivate this option if it is necessary to insert additional spaces in the translation.
The Validate strings when edited option is deactivated by default. This sets each entry
that is translated or edited to For review status so that it is colored blue. Deactivate this
option if you want to set the strings you translate or edit to Translated and validated
status.
With the option Allow direct editing of strings in the list box activated you can edit the current string in the translation list box by pressing F2 or by clicking the string.
The Emphasize terminology option is deactivated by default. If there is a translation
add-in activated that supports terminology highlighting, you will need to activate this option so that appropriate terms are marked with red brackets.
The Check directly after translating a string option carries out a check on an
individual string as soon as this has been modified and saved in the translation list. The
same options apply as for the check functions to be started manually (see Checking Options, S. 120).
Select the Check spelling as you type option if you want to search for spelling errors in
the background while you work in the translation window. As you type, the spelling
checker will automatically check the text and mark any recognized spelling errors with a wavy red underline.
If strings are modified as part of an update you can highlight the differences between the
previous and the current version of the source string list by activating the Mark source
string differences option. Deleted text is marked with a strikethrough and added text is
underlined.
Translation Helpers
Translation Helpers
An important quality aspect of localization is the consistent use of identical terms. Since,
depending on the complexity of an application, translation lists can be very extensive,
maintaining this consistency represents a great challenge to the translator. Using existing
translations speeds up the translating process and gives the translation greater consistency.
Passolo's pre-translation searches for matching translations in translation lists and
glossaries. The matches can be inserted in the current translation list automatically or
manually. The procedure differs slightly between translation lists and the translation
window. In the translation window you also have the option of searching for similar
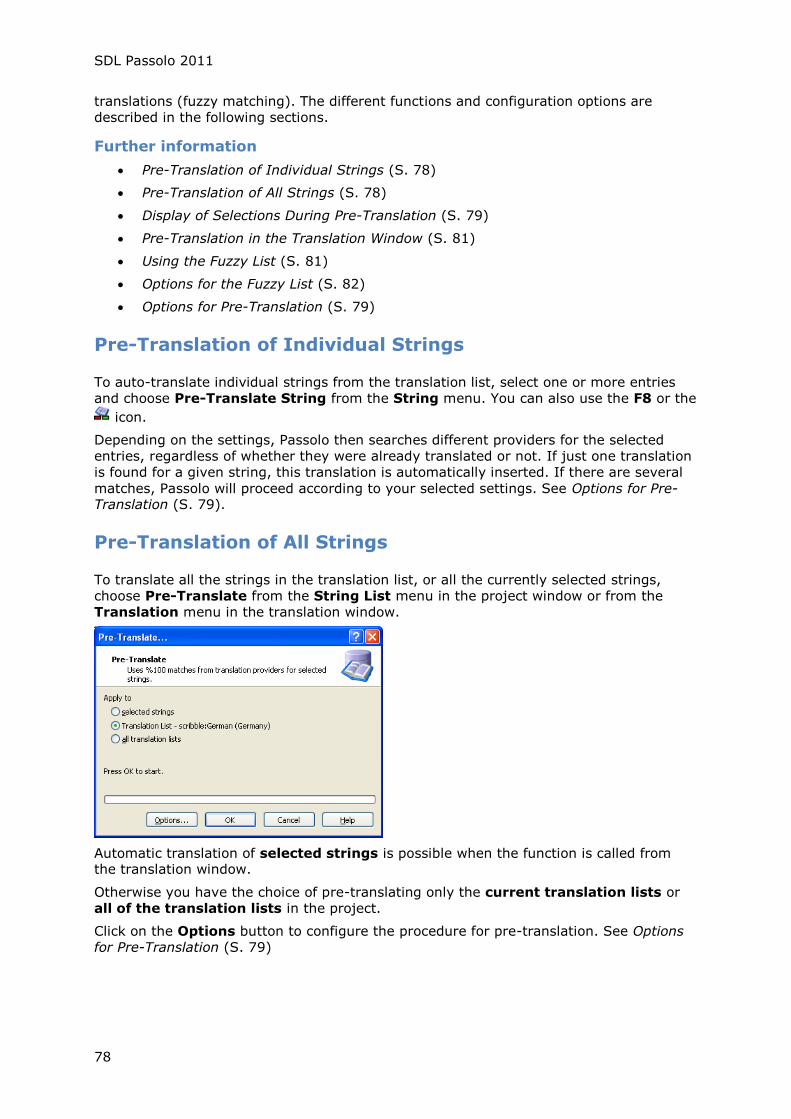
SDL Passolo 2011
78
translations (fuzzy matching). The different functions and configuration options are
described in the following sections.
Further information
Pre-Translation of Individual Strings (S. 78)
Pre-Translation of All Strings (S. 78)
Display of Selections During Pre-Translation (S. 79)
Pre-Translation in the Translation Window (S. 81)
Using the Fuzzy List (S. 81)
Options for the Fuzzy List (S. 82)
Options for Pre-Translation (S. 79)
Pre-Translation of Individual Strings
To auto-translate individual strings from the translation list, select one or more entries
and choose Pre-Translate String from the String menu. You can also use the F8 or the
icon.
Depending on the settings, Passolo then searches different providers for the selected
entries, regardless of whether they were already translated or not. If just one translation
is found for a given string, this translation is automatically inserted. If there are several
matches, Passolo will proceed according to your selected settings. See Options for Pre-Translation (S. 79).
Pre-Translation of All Strings
To translate all the strings in the translation list, or all the currently selected strings,
choose Pre-Translate from the String List menu in the project window or from the
Translation menu in the translation window.
Automatic translation of selected strings is possible when the function is called from the translation window.
Otherwise you have the choice of pre-translating only the current translation lists or
all of the translation lists in the project.
Click on the Options button to configure the procedure for pre-translation. See Options
for Pre-Translation (S. 79)
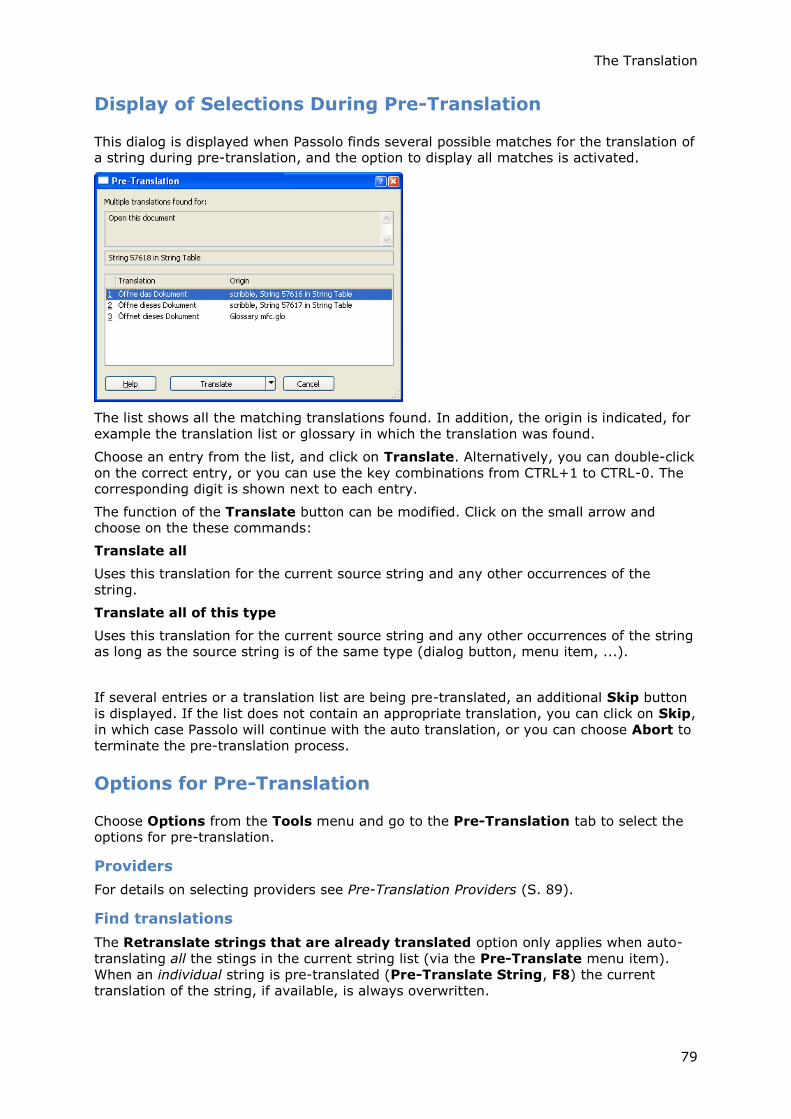
The Translation
79
Display of Selections During Pre-Translation
This dialog is displayed when Passolo finds several possible matches for the translation of a string during pre-translation, and the option to display all matches is activated.
The list shows all the matching translations found. In addition, the origin is indicated, for
example the translation list or glossary in which the translation was found.
Choose an entry from the list, and click on Translate. Alternatively, you can double-click
on the correct entry, or you can use the key combinations from CTRL+1 to CTRL-0. The corresponding digit is shown next to each entry.
The function of the Translate button can be modified. Click on the small arrow and choose on the these commands:
Translate all
Uses this translation for the current source string and any other occurrences of the
string.
Translate all of this type
Uses this translation for the current source string and any other occurrences of the string as long as the source string is of the same type (dialog button, menu item, ...).
If several entries or a translation list are being pre-translated, an additional Skip button
is displayed. If the list does not contain an appropriate translation, you can click on Skip,
in which case Passolo will continue with the auto translation, or you can choose Abort to
terminate the pre-translation process.
Options for Pre-Translation
Choose Options from the Tools menu and go to the Pre-Translation tab to select the options for pre-translation.
Providers
For details on selecting providers see Pre-Translation Providers (S. 89).
Find translations
The Retranslate strings that are already translated option only applies when auto-
translating all the stings in the current string list (via the Pre-Translate menu item).
When an individual string is pre-translated (Pre-Translate String, F8) the current
translation of the string, if available, is always overwritten.
SDL Passolo 2011
80
With this option you can specify which methods should be used to find already translated
strings. Depending the chosen settings, the number of translations found for a given string will be very different.
Select the option With exact match if the pre-translation should only be inserted when
the source strings match exactly. In this case the exact spelling including upper and
lower case, use of spaces and punctuation, as well as the access key have to match. If
you select a method to restrict the exact match requirement the option will be deactivated automatically.
Select the restriction Ignore case if automatic translations should be accepted even if the source strings differ regarding the use of upper and lower case.
Select the restriction Ignore access key if automatic translations should be accepted
even if the source strings differ regarding the use of the ampersand to specify the access
key.
Select the restriction Ignore spaces if automatic translations should be accepted even if
the source strings differ regarding the use of leading and trailing spaces Select the
restriction Ignore punctuation if automatic translations should be accepted even if the
source strings differ regarding the use of leading and trailing punctuation marks.
Note: These settings only apply to translations from projects and glossaries. The system
macro and the translation add-ins ignore these settings.
Use these settings to determine how to proceed if Passolo finds different translations for the same source text during pre-translation.
Besides the automatic selection of the first match, you also have the option of leaving the string untranslated.
It is also possible to set a bookmark for all multiple translations. (See Bookmarks, S.
60). You can then jump to the bookmarked entries using the F12 key, and then press
the F8 key to call up the list of matches without having to change the settings chosen here.
If you choose Display all matches, the list of matches will appear as soon as a multiple translation is found. See Display of Selections During Pre-Translation (S. 79).
If no match is found, you can also use fuzzy matching. In this case, the string with the
best match value is inserted as the translation, provided the value is above the specified
Minimum match. The settings for Fuzzy Matching apply. (See Options for the Fuzzy
List, S. 82). Strings translated in this way are marked as "pre-translated" and the match
value is stored. In the translation list you can display an additional column that shows
the match value. (See Configuration of Columns in the String List, S. 49). In addition, you can also allow the use of automatic translations.
Using translations
These options apply to pre-translation when working in translation lists.
If the Validate translated strings check box is selected, all pre-translated entries will
be marked as "translated". These entries are displayed in the translation list formatted in
black. Otherwise the status of entries is set to "pre-translated" – these entries are
displayed in the translation list formatted in green and have to be validated in a later step.
The option Insert unique access key... adds an ampersand character (&) to the string
if the original string also contains one. If you deactivate this option, the translated string
is entered without modification.
With the settings for Transfer these characters... you can specify which characters
should be kept at the beginning and end of the text during pre-translation. If you
activate the dot, for example, leading and trailing dots will be stripped from the text
before translation. The dots will be added to the translation according to the original source text.
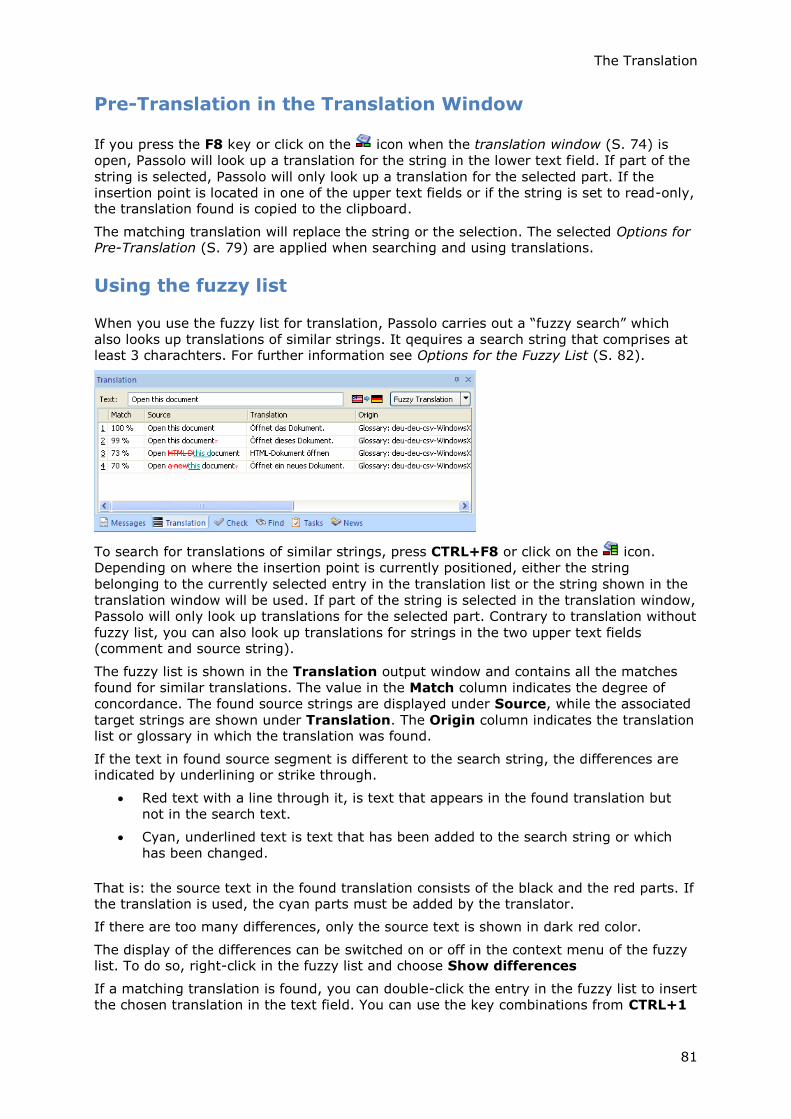
The Translation
81
Pre-Translation in the Translation Window
If you press the F8 key or click on the icon when the translation window (S. 74) is
open, Passolo will look up a translation for the string in the lower text field. If part of the
string is selected, Passolo will only look up a translation for the selected part. If the
insertion point is located in one of the upper text fields or if the string is set to read-only, the translation found is copied to the clipboard.
The matching translation will replace the string or the selection. The selected Options for Pre-Translation (S. 79) are applied when searching and using translations.
Using the fuzzy list
When you use the fuzzy list for translation, Passolo carries out a ―fuzzy search‖ which
also looks up translations of similar strings. It qequires a search string that comprises at least 3 charachters. For further information see Options for the Fuzzy List (S. 82).
To search for translations of similar strings, press CTRL+F8 or click on the icon.
Depending on where the insertion point is currently positioned, either the string
belonging to the currently selected entry in the translation list or the string shown in the
translation window will be used. If part of the string is selected in the translation window,
Passolo will only look up translations for the selected part. Contrary to translation without
fuzzy list, you can also look up translations for strings in the two upper text fields (comment and source string).
The fuzzy list is shown in the Translation output window and contains all the matches
found for similar translations. The value in the Match column indicates the degree of
concordance. The found source strings are displayed under Source, while the associated
target strings are shown under Translation. The Origin column indicates the translation list or glossary in which the translation was found.
If the text in found source segment is different to the search string, the differences are indicated by underlining or strike through.
Red text with a line through it, is text that appears in the found translation but
not in the search text.
Cyan, underlined text is text that has been added to the search string or which
has been changed.
That is: the source text in the found translation consists of the black and the red parts. If the translation is used, the cyan parts must be added by the translator.
If there are too many differences, only the source text is shown in dark red color.
The display of the differences can be switched on or off in the context menu of the fuzzy list. To do so, right-click in the fuzzy list and choose Show differences
If a matching translation is found, you can double-click the entry in the fuzzy list to insert
the chosen translation in the text field. You can use the key combinations from CTRL+1
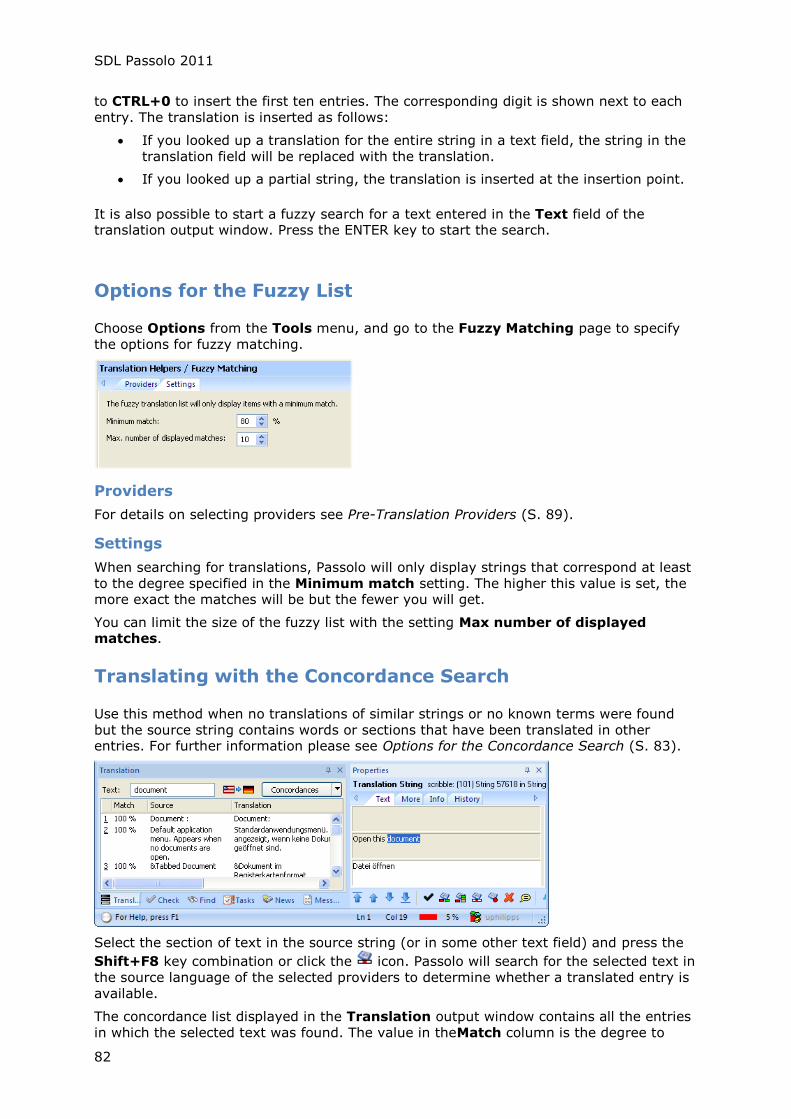
SDL Passolo 2011
82
to CTRL+0 to insert the first ten entries. The corresponding digit is shown next to each
entry. The translation is inserted as follows:
If you looked up a translation for the entire string in a text field, the string in the
translation field will be replaced with the translation.
If you looked up a partial string, the translation is inserted at the insertion point.
It is also possible to start a fuzzy search for a text entered in the Text field of the translation output window. Press the ENTER key to start the search.
Options for the Fuzzy List
Choose Options from the Tools menu, and go to the Fuzzy Matching page to specify
the options for fuzzy matching.
Providers
For details on selecting providers see Pre-Translation Providers (S. 89).
Settings
When searching for translations, Passolo will only display strings that correspond at least
to the degree specified in the Minimum match setting. The higher this value is set, the more exact the matches will be but the fewer you will get.
You can limit the size of the fuzzy list with the setting Max number of displayed matches.
Translating with the Concordance Search
Use this method when no translations of similar strings or no known terms were found
but the source string contains words or sections that have been translated in other entries. For further information please see Options for the Concordance Search (S. 83).
Select the section of text in the source string (or in some other text field) and press the
Shift+F8 key combination or click the icon. Passolo will search for the selected text in
the source language of the selected providers to determine whether a translated entry is
available.
The concordance list displayed in the Translation output window contains all the entries
in which the selected text was found. The value in theMatch column is the degree to
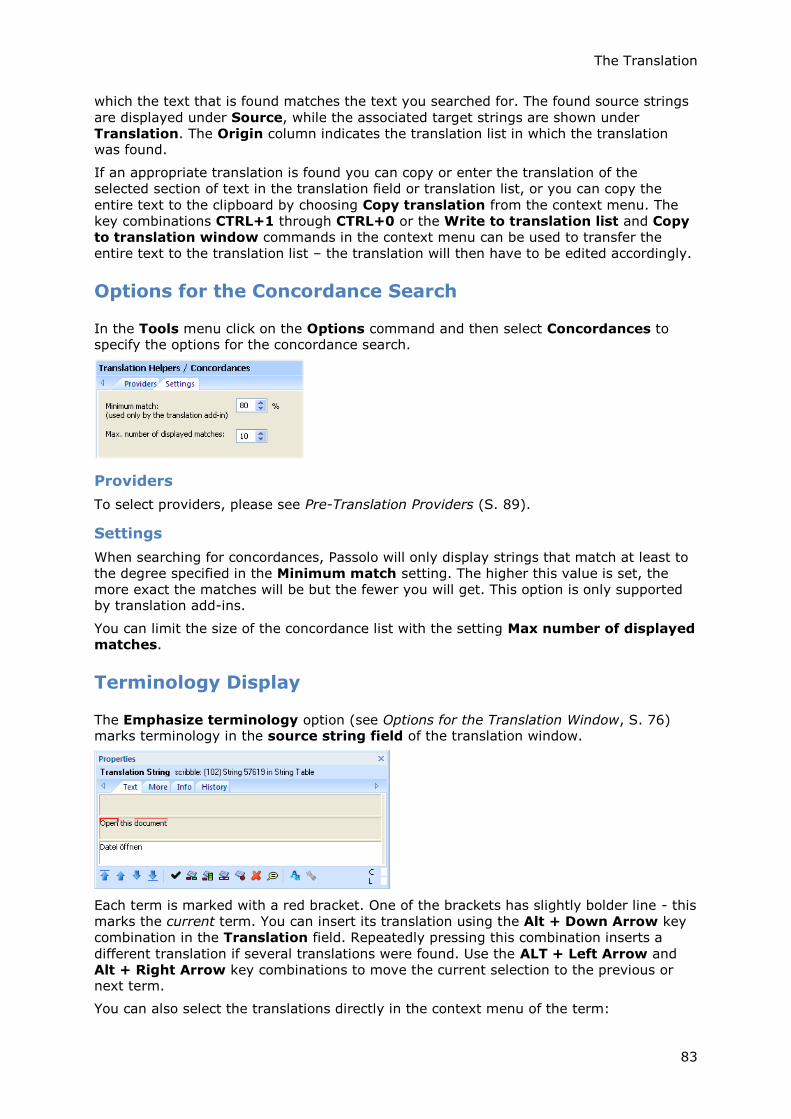
The Translation
83
which the text that is found matches the text you searched for. The found source strings
are displayed under Source, while the associated target strings are shown under
Translation. The Origin column indicates the translation list in which the translation was found.
If an appropriate translation is found you can copy or enter the translation of the
selected section of text in the translation field or translation list, or you can copy the
entire text to the clipboard by choosing Copy translation from the context menu. The
key combinations CTRL+1 through CTRL+0 or the Write to translation list and Copy
to translation window commands in the context menu can be used to transfer the
entire text to the translation list – the translation will then have to be edited accordingly.
Options for the Concordance Search
In the Tools menu click on the Options command and then select Concordances to specify the options for the concordance search.
Providers
To select providers, please see Pre-Translation Providers (S. 89).
Settings
When searching for concordances, Passolo will only display strings that match at least to
the degree specified in the Minimum match setting. The higher this value is set, the
more exact the matches will be but the fewer you will get. This option is only supported by translation add-ins.
You can limit the size of the concordance list with the setting Max number of displayed
matches.
Terminology Display
The Emphasize terminology option (see Options for the Translation Window, S. 76) marks terminology in the source string field of the translation window.
Each term is marked with a red bracket. One of the brackets has slightly bolder line - this
marks the current term. You can insert its translation using the Alt + Down Arrow key
combination in the Translation field. Repeatedly pressing this combination inserts a
different translation if several translations were found. Use the ALT + Left Arrow and
Alt + Right Arrow key combinations to move the current selection to the previous or next term.
You can also select the translations directly in the context menu of the term:

SDL Passolo 2011
84
You can use the Write to translation field and Copy to clipboard options to determine what happens when you click on the translation for a term.
The Write all to fuzzy translation list option transfers all of the translations for the term into the Translation output window.
If further information is available for a term, an additional window showing this
information appears when you mouse over the term. It shows the source text for the
translation, which may vary a bit from the selected term. If the terminology stems from the current project, you can click Go To to jump to the corresponding text.
Terminology Display in the Output Window
Besides the terminology markup in the source field, all currently found terms are
displayed in the output window Term Recognition. (The The Output Windows, S. 255).
The symbol buttons provide the commands Lookup Term and Write to Translation Window.
Providers
You can search for terminology in the current project, in glossaries or in other external
terminology databases that are connected to Passolo via an add-in (e.g. SDL MultiTerm, see Connection to the Termbase, S. 104).
Projects and glossaries need a QuickIndex in order to serve as terminology providers.
(See Pre-Translation Providers, S. 89)
Options for the Terminology
In the Tools menu click on the Options command and then select Terminology to specify the options for the terminology display.
Providers
For details on selecting providers please refer to Pre-Translation Providers (S. 89).
Setup
The terminology does not require any further settings.
Translating replicate strings
Software projects often contain replicate strings. To ensure consistent translation of
replicates that occur in various places throughout the software, Passolo offers a method
to proliferate a translation to all other occurrences that have the same source text. As
soon as you have entered a translation, Passolo searches for untranslated replicates and indicates the number of occurrences found (Translate replicates).

The Translation
85
If you click Yes the current translation will be used for all the repetitions found that have
the same source string. The replicates translated in this manner will be marked as
automatically translated and displayed in green text.
Depending on your settings, the entries found and the use of the translation may vary. See Options for the translation of replicate strings (S. 86).
Changing the automatic translation of replicates
To prevent the automatic replicate translation of individual strings you can mark the relevant strings in the source string list.
Select the string in the source string list
Make sure that the property window of the source string is visible
Click on the "More" tab
Activate the "No replicate translation" option
Unifying replicates
Replicate strings can also be unified. This means that 100% matching source strings are
unified in such a way that only the first occurrence of the string can be translated. The
remaining occurrences of the string cannot be translated and are not counted in the statistics.
This is how you unify replicate strings
Select the relevant strings in the source string list
Make sure that the property window of the source string is visible
Click on the "More" tab
Activate the "Unify replicates" option
Applying replicate translations
Only the first string from the unified replicates can be translated – this is called the
master string. The other replicates are set to read-only for the translator. It can happen
that the master string is exported to and translated in a translation bundle. To ensure
that all translations among the unified replicates are identical, after updating a
translation list and before generating the target file you should select the function
Calculate unified replicates in the Project Maintenance (S. 65) dialog. You can also specify that this is to be carried out automatically when required.
Example
Suppose you have two source string lists in which you want to unify the "Cancel" string.
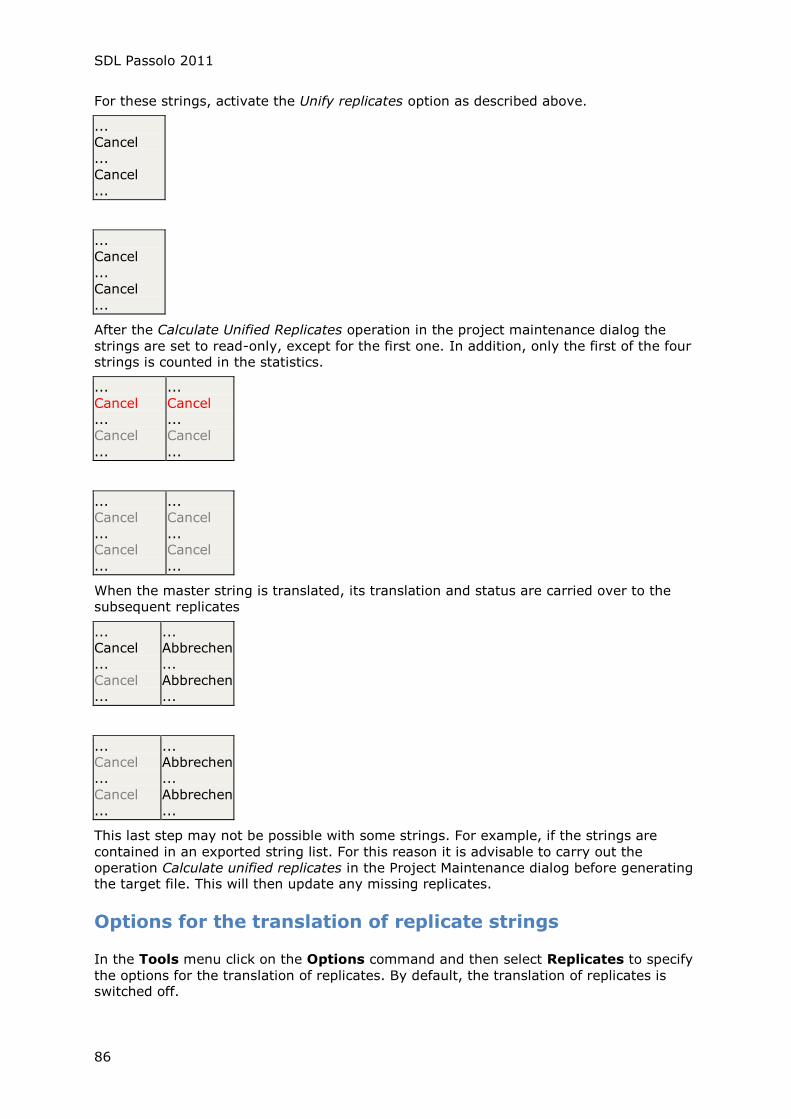
SDL Passolo 2011
86
For these strings, activate the Unify replicates option as described above.
...
Cancel
...
Cancel
...
...
Cancel
...
Cancel
...
After the Calculate Unified Replicates operation in the project maintenance dialog the
strings are set to read-only, except for the first one. In addition, only the first of the four strings is counted in the statistics.
...
Cancel
...
Cancel
...
...
Cancel
...
Cancel
...
...
Cancel
...
Cancel
...
...
Cancel
...
Cancel
...
When the master string is translated, its translation and status are carried over to the
subsequent replicates
...
Cancel
...
Cancel
...
...
Abbrechen
...
Abbrechen
...
...
Cancel
...
Cancel
...
...
Abbrechen
...
Abbrechen
...
This last step may not be possible with some strings. For example, if the strings are
contained in an exported string list. For this reason it is advisable to carry out the
operation Calculate unified replicates in the Project Maintenance dialog before generating the target file. This will then update any missing replicates.
Options for the translation of replicate strings
In the Tools menu click on the Options command and then select Replicates to specify
the options for the translation of replicates. By default, the translation of replicates is switched off.
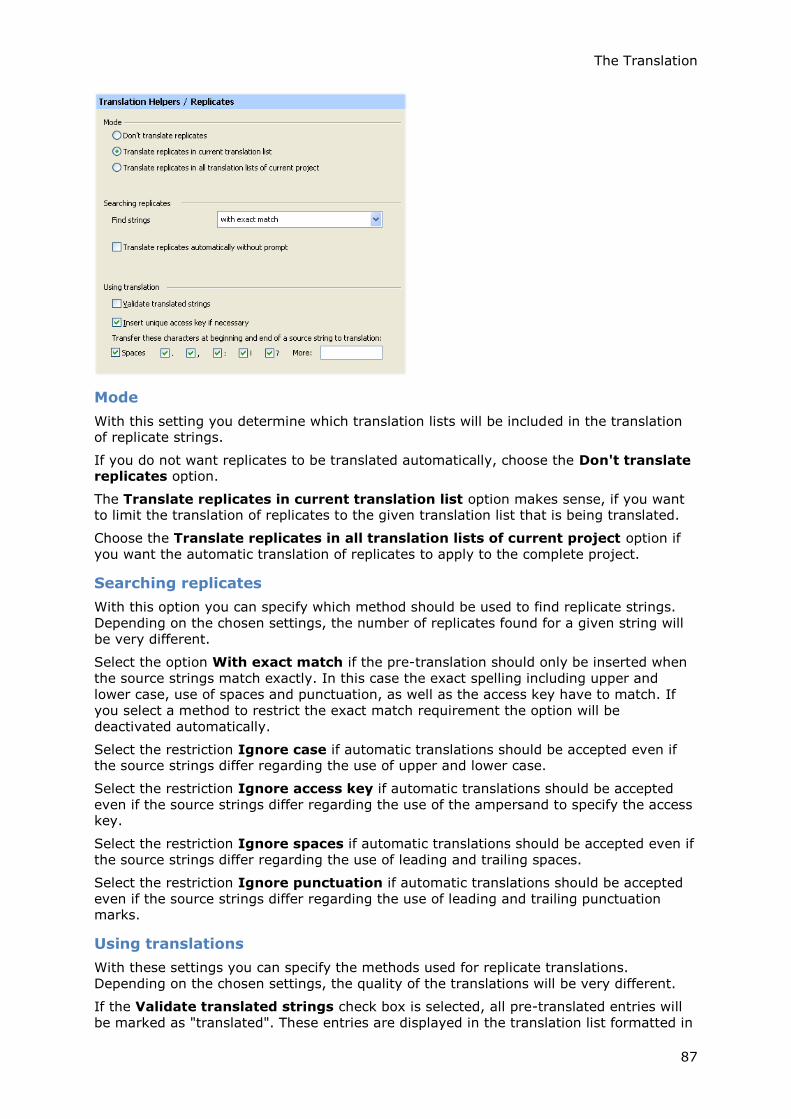
The Translation
87
Mode
With this setting you determine which translation lists will be included in the translation of replicate strings.
If you do not want replicates to be translated automatically, choose the Don't translate replicates option.
The Translate replicates in current translation list option makes sense, if you want to limit the translation of replicates to the given translation list that is being translated.
Choose the Translate replicates in all translation lists of current project option if
you want the automatic translation of replicates to apply to the complete project.
Searching replicates
With this option you can specify which method should be used to find replicate strings.
Depending on the chosen settings, the number of replicates found for a given string will
be very different.
Select the option With exact match if the pre-translation should only be inserted when
the source strings match exactly. In this case the exact spelling including upper and
lower case, use of spaces and punctuation, as well as the access key have to match. If
you select a method to restrict the exact match requirement the option will be
deactivated automatically.
Select the restriction Ignore case if automatic translations should be accepted even if the source strings differ regarding the use of upper and lower case.
Select the restriction Ignore access key if automatic translations should be accepted
even if the source strings differ regarding the use of the ampersand to specify the access key.
Select the restriction Ignore spaces if automatic translations should be accepted even if
the source strings differ regarding the use of leading and trailing spaces.
Select the restriction Ignore punctuation if automatic translations should be accepted
even if the source strings differ regarding the use of leading and trailing punctuation marks.
Using translations
With these settings you can specify the methods used for replicate translations.
Depending on the chosen settings, the quality of the translations will be very different.
If the Validate translated strings check box is selected, all pre-translated entries will
be marked as "translated". These entries are displayed in the translation list formatted in
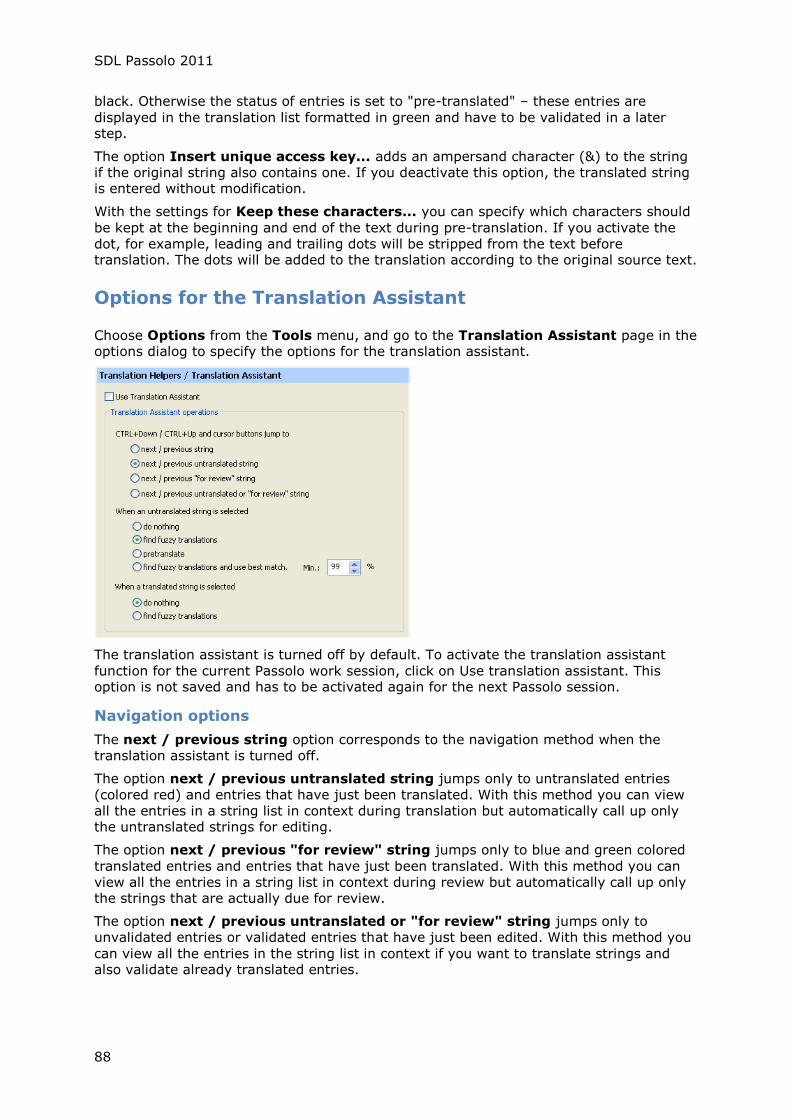
SDL Passolo 2011
88
black. Otherwise the status of entries is set to "pre-translated" – these entries are
displayed in the translation list formatted in green and have to be validated in a later step.
The option Insert unique access key... adds an ampersand character (&) to the string
if the original string also contains one. If you deactivate this option, the translated string is entered without modification.
With the settings for Keep these characters... you can specify which characters should
be kept at the beginning and end of the text during pre-translation. If you activate the
dot, for example, leading and trailing dots will be stripped from the text before translation. The dots will be added to the translation according to the original source text.
Options for the Translation Assistant
Choose Options from the Tools menu, and go to the Translation Assistant page in the options dialog to specify the options for the translation assistant.
The translation assistant is turned off by default. To activate the translation assistant
function for the current Passolo work session, click on Use translation assistant. This option is not saved and has to be activated again for the next Passolo session.
Navigation options
The next / previous string option corresponds to the navigation method when the
translation assistant is turned off.
The option next / previous untranslated string jumps only to untranslated entries
(colored red) and entries that have just been translated. With this method you can view
all the entries in a string list in context during translation but automatically call up only the untranslated strings for editing.
The option next / previous "for review" string jumps only to blue and green colored
translated entries and entries that have just been translated. With this method you can
view all the entries in a string list in context during review but automatically call up only the strings that are actually due for review.
The option next / previous untranslated or "for review" string jumps only to
unvalidated entries or validated entries that have just been edited. With this method you
can view all the entries in the string list in context if you want to translate strings and also validate already translated entries.
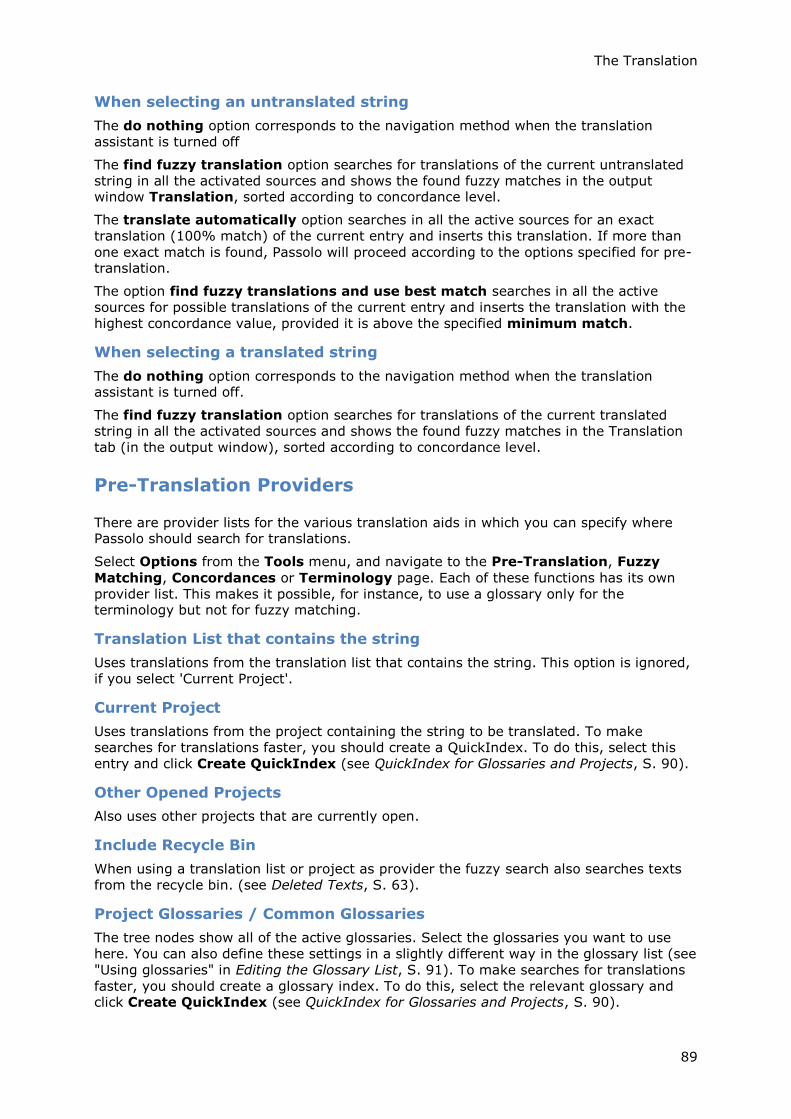
The Translation
89
When selecting an untranslated string
The do nothing option corresponds to the navigation method when the translation
assistant is turned off
The find fuzzy translation option searches for translations of the current untranslated
string in all the activated sources and shows the found fuzzy matches in the output window Translation, sorted according to concordance level.
The translate automatically option searches in all the active sources for an exact
translation (100% match) of the current entry and inserts this translation. If more than
one exact match is found, Passolo will proceed according to the options specified for pre-translation.
The option find fuzzy translations and use best match searches in all the active
sources for possible translations of the current entry and inserts the translation with the
highest concordance value, provided it is above the specified minimum match.
When selecting a translated string
The do nothing option corresponds to the navigation method when the translation assistant is turned off.
The find fuzzy translation option searches for translations of the current translated
string in all the activated sources and shows the found fuzzy matches in the Translation
tab (in the output window), sorted according to concordance level.
Pre-Translation Providers
There are provider lists for the various translation aids in which you can specify where Passolo should search for translations.
Select Options from the Tools menu, and navigate to the Pre-Translation, Fuzzy
Matching, Concordances or Terminology page. Each of these functions has its own
provider list. This makes it possible, for instance, to use a glossary only for the terminology but not for fuzzy matching.
Translation List that contains the string
Uses translations from the translation list that contains the string. This option is ignored,
if you select 'Current Project'.
Current Project
Uses translations from the project containing the string to be translated. To make
searches for translations faster, you should create a QuickIndex. To do this, select this
entry and click Create QuickIndex (see QuickIndex for Glossaries and Projects, S. 90).
Other Opened Projects
Also uses other projects that are currently open.
Include Recycle Bin
When using a translation list or project as provider the fuzzy search also searches texts
from the recycle bin. (see Deleted Texts, S. 63).
Project Glossaries / Common Glossaries
The tree nodes show all of the active glossaries. Select the glossaries you want to use
here. You can also define these settings in a slightly different way in the glossary list (see
"Using glossaries" in Editing the Glossary List, S. 91). To make searches for translations
faster, you should create a glossary index. To do this, select the relevant glossary and click Create QuickIndex (see QuickIndex for Glossaries and Projects, S. 90).

SDL Passolo 2011
90
System Macro
The system macro can be used during pre-translations and for fuzzy matching. You need
to start the system macro, which requires the PSL_OnAutoTranslate function. (See The System Macro, S. 238)
Translation Add-in
The tree nodes show all the translation add-ins that can be used with this function. You
can switch these on and off as translation aids here. Depending on what type of add-in it
is, each add-in also offers a selection of connections to translation databases. These are listed in a subordinate tree node.
Order
The order is only important for pre-translations. You can use the Move Up and Move Down buttons to change the order of the providers.
Settings
If you select an add-in, you can access its configuration by clicking Settings.
Create Index
Creates an index for the selected project or glossary. (See QuickIndex for Glossaries and Projects, S. 90).
QuickIndex for Glossaries and Projects
Passolo QuickIndex is a database that is generated from a glossary or a project in order
to speed up searches for translations. In addition, terminology based on translations
from glossaries and projects can only be displayed if a QuickIndex exists.
You can create both types of index in the glossary list (see Editing the Glossary List, S.
91) or in the translation provider list (see Pre-Translation Providers, S. 89). You can also create project glossaries by selecting Create QuickProject from the Project menu.
As soon as you start the indexation, a database is created in a subfolder in the same
location as the glossary and/or project file. In the case of very large glossaries of over
100,000 entries, this can take some time. However, this takes place in the background
so that you can continue to work with Passolo. You can check the current state of indexation in the glossary list.
You should always create a new Project QuickIndex if the content of the source string
lists was modified during an update. A new Glossary QuickIndex is only necessary if the glossary was modified.
Using Glossaries
Using Glossaries
Glossaries are dictionaries that the system consults during automatic translation. A
differentiation is made between general and project-specific glossaries.
General glossaries containing e.g. standard text translations for Windows programs
can be used with all projects.
Project glossaries, on the other hand, apply only to a specific project. You should only
use this for specific dictionaries that are either not required or not practical for other projects.

The Translation
91
To edit the list of glossaries, choose Glossaries from the Tools menu. This dialog shows
a list of all the general glossaries and project glossaries. (see Editing the glossary list, S. 91)
For further information about the glossary file format, please see Glossary Files (S. 266).
Editing the glossary list
To edit the list of glossaries, choose Glossaries from the Tools menu.
This dialog lists all the general glossaries and all the currently loaded project glossaries.
General glossaries
This list is stored on the current computer and is used for all projects opened on this
computer.
Project glossaries
Project glossaries are stored with the project. They may be stored as a reference to a
glossary file or embedded in the project file so that they are available wherever the
project is opened. The list also has a Project QuickIndex entry here. This serves to show the index status for the project itself. (See "Create QuickIndex" below)
Editing the glossary list
ClickAdd to select a new glossary. You may first need to specify whether you want to
add a general or a project glossary.
You can also copy glossaries to the glossary system folder (see System Folders, S.
243). The glossaries in this folder are automatically added to the list of general glossaries at startup and displayed with the prefix <Glossary>.
To edit a glossary using an external glossary editor, click Edit. The Editing glossaries section (see below) explains how to define glossary editors.
If you want to delete an existing glossary from the list, click Delete. In the case of
external glossary files, the corresponding entry is removed from the list, but the glossary
file remains in place. If you delete an embedded glossary, it is deleted from the Passolo project file.
You can deactivate a glossary instead of deleting it by unchecking the Activated option. The glossary will then remain in the list, but is not used for translation.
Glossaries are searched according to their order in the list. You can change the position of a glossary in the list by clicking onMove Up and Move Down.

SDL Passolo 2011
92
When a glossary is in use by Passolo, it has the status opened. This means that other
applications cannot access the glossary file for editing. A glossary is automatically closed
if there are no translation lists open that use this glossary. If an open glossary is no
longer required, it can be closed manually in order to free up memory. To do this, click
on Close Glossary.
Create QuickIndex
Creates a QuickIndex for the selected project or glossary (see QuickIndex for glossaries
and projects, S. 90). As soon as the status column shows QuickIndex available, the QuickIndex is used for search for translations.
Using glossaries
Glossaries can be used for different translation aids. For each glossary, you can specify what it is used for by activating the corresponding options.
Pre-translate Passolo searches the glossary for 100% translations of an existing
string. We recommend creating a QuickIndex for larger glossaries. This increases the search speed noticeably.
Fuzzy Matching Passolo searches the glossary for fuzzy matches for an existing string. An QuickIndex will also speed up the search here.
Concordances Searches for occurrences of a string within the glossary entries. This
function only works if the glossary has a QuickIndex.
Terminology Uses the glossary for terminology display in the translation window and
for checking for correct terminology (see Checking Options, S. 120). This function only works if the glossary has a QuickIndex.
Blocked words These glossaries contain terms that are not allowed in the translation.
If you want to use this check, please make sure that the "Blocked word ... in translation" option is activated in the checking options. (See Checking Options, S. 120)
Editing Glossaries
Passolo glossaries are "comma separated" files (CSV) that can be edited using any text
editor or CSV editor. A simple editor program for use with Passolo glossaries is available at www.passolo.com
To use an editor, you will need to specify the program. Click the arrow in the Edit button and select Configure editors. All your configured editors are listed in this dialog:
Click Add to add a new editor. Then enter the path to the editor program file and a name
to be used in the menu. The editor that you set as the Default editor will be opened
when you click Edit in the glossary list. The other editors can be access via the menu that opens when you click the arrow on the Edit button.
The Translation
93
Glossaries in Translation Bundles
Translation bundles may contain embedded glossaries. They are listed in the project
glossaries and they are labeled as (Embedded). Embedded glossaries are automatically loaded with the translation bundle and can not be deleted.
Interface to TM systems and termbases
Passolo offers interfaces to TM systems and termbases from different software makers,
which are generally used when the documentation of a software product is translated.
These interfaces enable improved consistency in the use of terminology between the
software and the documentation and increased re-use of translated segments both in the
software and the documentation. Depending on the functions supported by these
systems, the interfaces provide the following functions:
Automatic translation of translation lists using external translation memories
Display of a list of fuzzy matches from the TM system during interactive
translation and insertion of a selected translation
Concordance search in the external TM system from within Passolo
Highlighting of terminology found in the external termbase in the Passolo user
interface
Direct insertion of translated terms from the termbase
Option of opening the termbase to display further information about a term
Option of saving translated terms to the termbase from within Passolo
Export of translated terms to files that can be processed in the termbase
Export of translated segments to files that can be processed in the TM system
Export of untranslated segments to XML files that can be translated using the TM
system
Optional add-ins are offered for the following TM systems:
Older Trados and MultiTerm versions (S. 105)
Interface to SDL Trados and SDL MultiTerm (S. 93)
Interface to SDLX Translation Suite (S. 107)
SDL Trados
Interface to SDL Trados and SDL MultiTerm
SDL Trados Translator’s Workbench is a translation memory database system. SDL
MultiTerm is the SDL Trados terminology management system. Passolo offers several
add-ins for the different versions of SDL Trados and SDL MultiTerm.
Add-In SDL Trados 2006
This add-in provides the interface to Trados and MultiTerm from Version 3 and up to and including SDL Trados 2006 and SDL MultiTerm 2006.
See Older Trados and MultiTerm versions (S. 105).
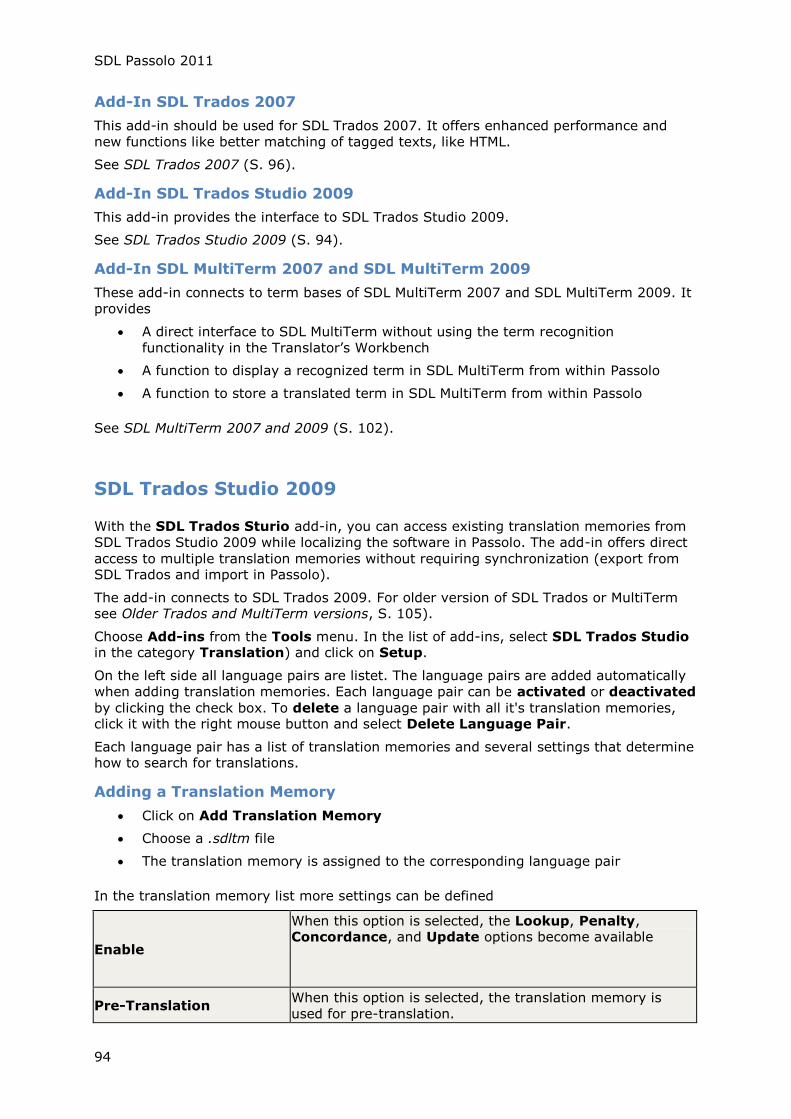
SDL Passolo 2011
94
Add-In SDL Trados 2007
This add-in should be used for SDL Trados 2007. It offers enhanced performance and
new functions like better matching of tagged texts, like HTML.
See SDL Trados 2007 (S. 96).
Add-In SDL Trados Studio 2009
This add-in provides the interface to SDL Trados Studio 2009.
See SDL Trados Studio 2009 (S. 94).
Add-In SDL MultiTerm 2007 and SDL MultiTerm 2009
These add-in connects to term bases of SDL MultiTerm 2007 and SDL MultiTerm 2009. It
provides
A direct interface to SDL MultiTerm without using the term recognition
functionality in the Translator’s Workbench
A function to display a recognized term in SDL MultiTerm from within Passolo
A function to store a translated term in SDL MultiTerm from within Passolo
See SDL MultiTerm 2007 and 2009 (S. 102).
SDL Trados Studio 2009
With the SDL Trados Sturio add-in, you can access existing translation memories from
SDL Trados Studio 2009 while localizing the software in Passolo. The add-in offers direct
access to multiple translation memories without requiring synchronization (export from SDL Trados and import in Passolo).
The add-in connects to SDL Trados 2009. For older version of SDL Trados or MultiTerm see Older Trados and MultiTerm versions, S. 105).
Choose Add-ins from the Tools menu. In the list of add-ins, select SDL Trados Studio in the category Translation) and click on Setup.
On the left side all language pairs are listet. The language pairs are added automatically
when adding translation memories. Each language pair can be activated or deactivated
by clicking the check box. To delete a language pair with all it's translation memories, click it with the right mouse button and select Delete Language Pair.
Each language pair has a list of translation memories and several settings that determine how to search for translations.
Adding a Translation Memory
Click on Add Translation Memory
Choose a .sdltm file
The translation memory is assigned to the corresponding language pair
In the translation memory list more settings can be defined
Enable
When this option is selected, the Lookup, Penalty, Concordance, and Update options become available
Pre-Translation When this option is selected, the translation memory is
used for pre-translation.
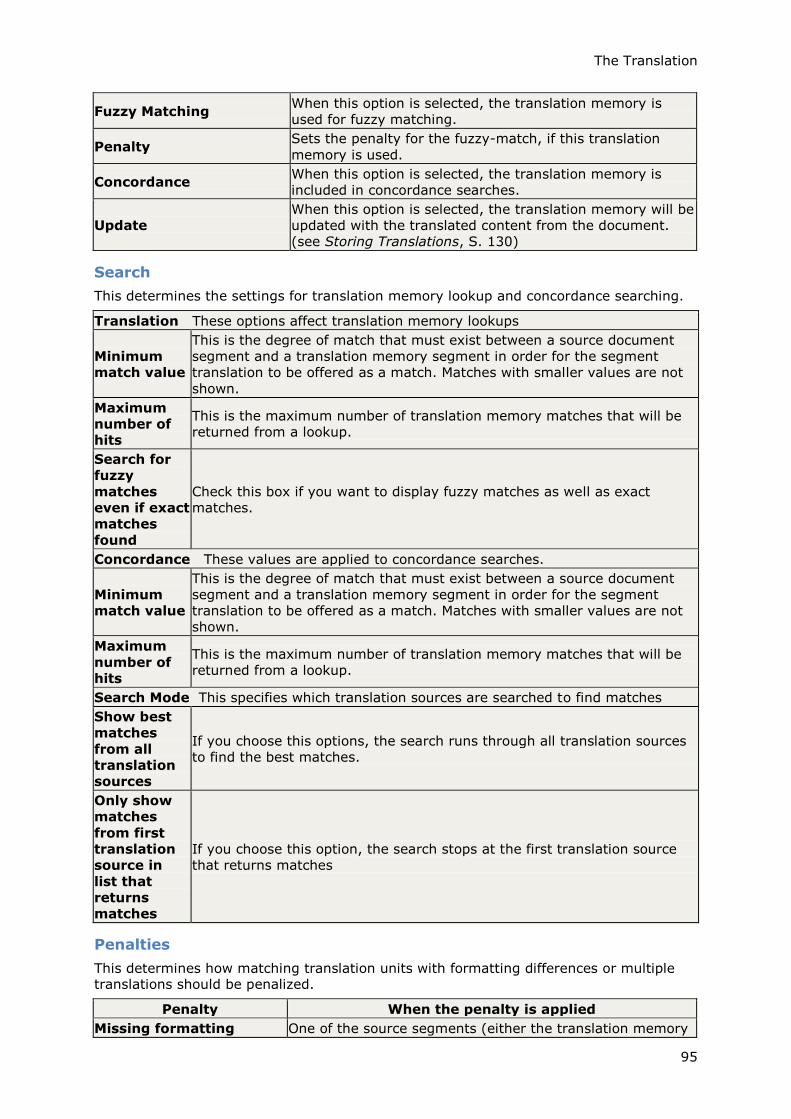
The Translation
95
Fuzzy Matching When this option is selected, the translation memory is
used for fuzzy matching.
Penalty Sets the penalty for the fuzzy-match, if this translation
memory is used.
Concordance When this option is selected, the translation memory is
included in concordance searches.
Update
When this option is selected, the translation memory will be
updated with the translated content from the document.
(see Storing Translations, S. 130)
Search
This determines the settings for translation memory lookup and concordance searching.
Translation These options affect translation memory lookups
Minimum
match value
This is the degree of match that must exist between a source document
segment and a translation memory segment in order for the segment
translation to be offered as a match. Matches with smaller values are not
shown.
Maximum
number of
hits
This is the maximum number of translation memory matches that will be
returned from a lookup.
Search for
fuzzy
matches
even if exact
matches
found
Check this box if you want to display fuzzy matches as well as exact
matches.
Concordance These values are applied to concordance searches.
Minimum
match value
This is the degree of match that must exist between a source document
segment and a translation memory segment in order for the segment
translation to be offered as a match. Matches with smaller values are not
shown.
Maximum
number of
hits
This is the maximum number of translation memory matches that will be
returned from a lookup.
Search Mode This specifies which translation sources are searched to find matches
Show best
matches
from all
translation
sources
If you choose this options, the search runs through all translation sources
to find the best matches.
Only show
matches
from first
translation
source in
list that
returns
matches
If you choose this option, the search stops at the first translation source
that returns matches
Penalties
This determines how matching translation units with formatting differences or multiple translations should be penalized.
Penalty When the penalty is applied
Missing formatting One of the source segments (either the translation memory
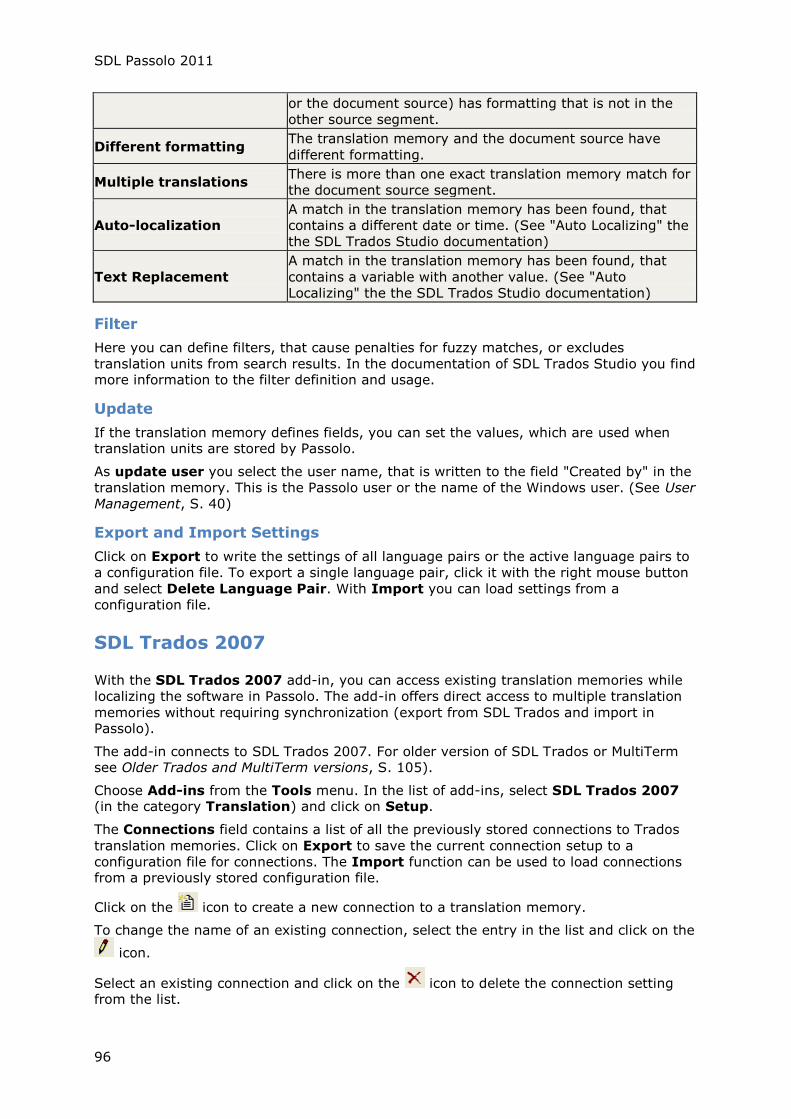
SDL Passolo 2011
96
or the document source) has formatting that is not in the
other source segment.
Different formatting The translation memory and the document source have
different formatting.
Multiple translations There is more than one exact translation memory match for
the document source segment.
Auto-localization
A match in the translation memory has been found, that
contains a different date or time. (See "Auto Localizing" the
the SDL Trados Studio documentation)
Text Replacement
A match in the translation memory has been found, that
contains a variable with another value. (See "Auto
Localizing" the the SDL Trados Studio documentation)
Filter
Here you can define filters, that cause penalties for fuzzy matches, or excludes
translation units from search results. In the documentation of SDL Trados Studio you find more information to the filter definition and usage.
Update
If the translation memory defines fields, you can set the values, which are used when translation units are stored by Passolo.
As update user you select the user name, that is written to the field "Created by" in the
translation memory. This is the Passolo user or the name of the Windows user. (See User
Management, S. 40)
Export and Import Settings
Click on Export to write the settings of all language pairs or the active language pairs to
a configuration file. To export a single language pair, click it with the right mouse button
and select Delete Language Pair. With Import you can load settings from a
configuration file.
SDL Trados 2007
With the SDL Trados 2007 add-in, you can access existing translation memories while
localizing the software in Passolo. The add-in offers direct access to multiple translation
memories without requiring synchronization (export from SDL Trados and import in Passolo).
The add-in connects to SDL Trados 2007. For older version of SDL Trados or MultiTerm see Older Trados and MultiTerm versions, S. 105).
Choose Add-ins from the Tools menu. In the list of add-ins, select SDL Trados 2007 (in the category Translation) and click on Setup.
The Connections field contains a list of all the previously stored connections to Trados
translation memories. Click on Export to save the current connection setup to a
configuration file for connections. The Import function can be used to load connections from a previously stored configuration file.
Click on the icon to create a new connection to a translation memory.
To change the name of an existing connection, select the entry in the list and click on the
icon.
Select an existing connection and click on the icon to delete the connection setting from the list.
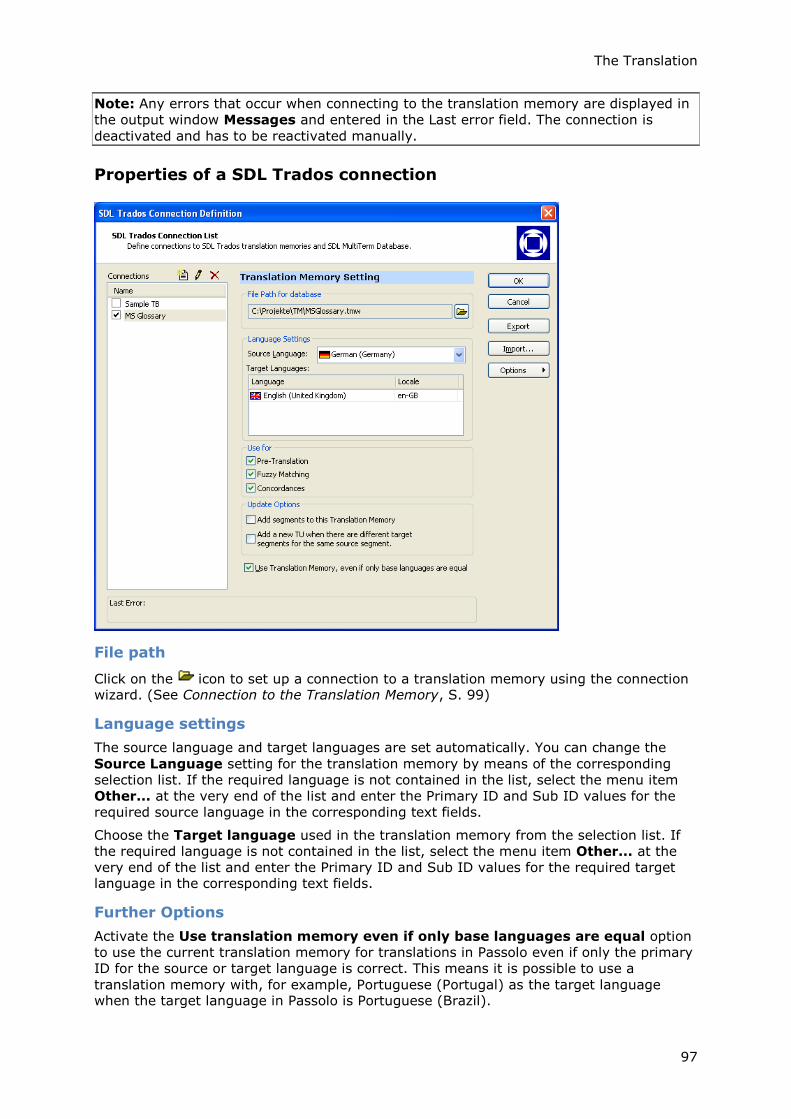
The Translation
97
Note: Any errors that occur when connecting to the translation memory are displayed in
the output window Messages and entered in the Last error field. The connection is
deactivated and has to be reactivated manually.
Properties of a SDL Trados connection
File path
Click on the icon to set up a connection to a translation memory using the connection wizard. (See Connection to the Translation Memory, S. 99)
Language settings
The source language and target languages are set automatically. You can change the
Source Language setting for the translation memory by means of the corresponding
selection list. If the required language is not contained in the list, select the menu item
Other... at the very end of the list and enter the Primary ID and Sub ID values for the
required source language in the corresponding text fields.
Choose the Target language used in the translation memory from the selection list. If
the required language is not contained in the list, select the menu item Other... at the
very end of the list and enter the Primary ID and Sub ID values for the required target language in the corresponding text fields.
Further Options
Activate the Use translation memory even if only base languages are equal option
to use the current translation memory for translations in Passolo even if only the primary
ID for the source or target language is correct. This means it is possible to use a
translation memory with, for example, Portuguese (Portugal) as the target language when the target language in Passolo is Portuguese (Brazil).
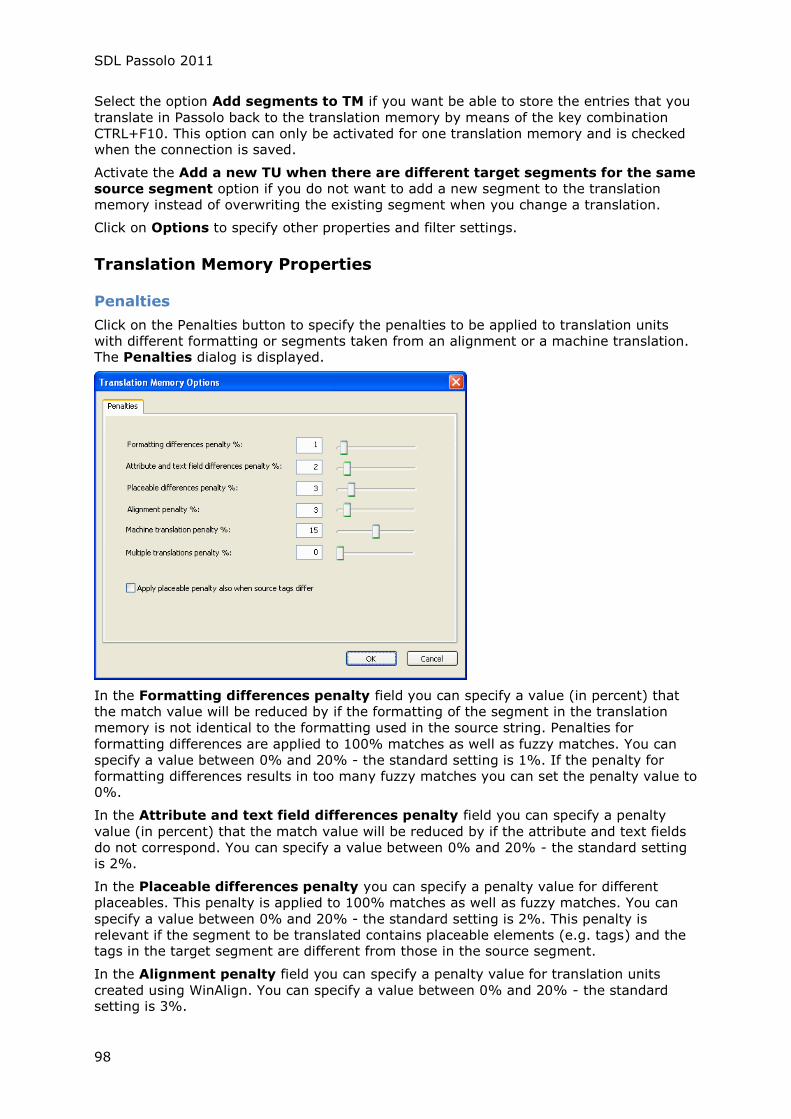
SDL Passolo 2011
98
Select the option Add segments to TM if you want be able to store the entries that you
translate in Passolo back to the translation memory by means of the key combination
CTRL+F10. This option can only be activated for one translation memory and is checked when the connection is saved.
Activate the Add a new TU when there are different target segments for the same
source segment option if you do not want to add a new segment to the translation
memory instead of overwriting the existing segment when you change a translation.
Click on Options to specify other properties and filter settings.
Translation Memory Properties
Penalties
Click on the Penalties button to specify the penalties to be applied to translation units
with different formatting or segments taken from an alignment or a machine translation. The Penalties dialog is displayed.
In the Formatting differences penalty field you can specify a value (in percent) that
the match value will be reduced by if the formatting of the segment in the translation
memory is not identical to the formatting used in the source string. Penalties for
formatting differences are applied to 100% matches as well as fuzzy matches. You can
specify a value between 0% and 20% - the standard setting is 1%. If the penalty for
formatting differences results in too many fuzzy matches you can set the penalty value to 0%.
In the Attribute and text field differences penalty field you can specify a penalty
value (in percent) that the match value will be reduced by if the attribute and text fields
do not correspond. You can specify a value between 0% and 20% - the standard setting is 2%.
In the Placeable differences penalty you can specify a penalty value for different
placeables. This penalty is applied to 100% matches as well as fuzzy matches. You can
specify a value between 0% and 20% - the standard setting is 2%. This penalty is
relevant if the segment to be translated contains placeable elements (e.g. tags) and the tags in the target segment are different from those in the source segment.
In the Alignment penalty field you can specify a penalty value for translation units
created using WinAlign. You can specify a value between 0% and 20% - the standard setting is 3%.

The Translation
99
In the Machine translation penalty field you can specify a penalty value for translation
units created using a machine translation system. You can specify a value between 0% and 20% - the standard setting is 15%.
In the Penalty for multiple 100% matches field you can specify a penalty value for
translation units that have corresponding source segments but different target segments.
This penalty is only applicable if the current translation memory allows multiple 100%
matches. You can specify a value between 0% and 20% - the standard setting is 1%.
Activate the Penalty for placeables when tags differ in source segment option if the penalty for placeable differences should always apply when the tags differ.
Project and Filter Settings
Project Settings
On the Project Settings tab you have the option of loading settings stored in Translator's
Workbench to an external file (Translator's Workbench Project Settings) with the
extension *.wps in order to use these settings for the connection.
Click on Load and select the required project settings file in the Open Project Settings
File dialog; then click on Open. The file is loaded and the relevant settings are displayed.
If necessary, click on Reset to delete any currently changed project settings.
Filter Settings
On the Filter Settings tab you have the option of loading settings stored in Translator's
Workbench to an external file (Translator's Workbench Filter Settings) with the extension
*.wfs in order to use these settings for the connection.
Click on Load and select the required filter settings file in the Open Filter Settings File
dialog; then click on Open. The file is loaded and the relevant settings are displayed.
If necessary, click on Reset to delete any current filter settings.
Connection to the Translation Memory
The Add-In can access local TMW files as well as the SDL Trados TM Server via an Intranet connection or an Internet connection (TM Anywhere)
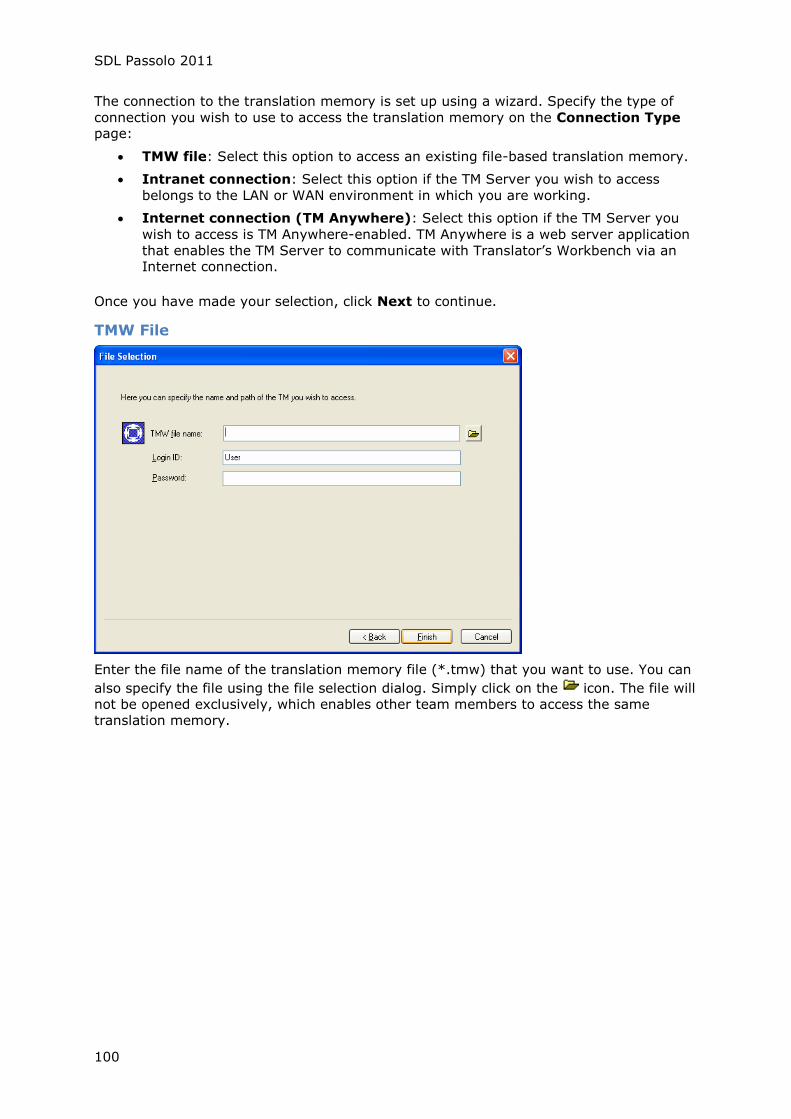
SDL Passolo 2011
100
The connection to the translation memory is set up using a wizard. Specify the type of
connection you wish to use to access the translation memory on the Connection Type page:
TMW file: Select this option to access an existing file-based translation memory.
Intranet connection: Select this option if the TM Server you wish to access
belongs to the LAN or WAN environment in which you are working.
Internet connection (TM Anywhere): Select this option if the TM Server you
wish to access is TM Anywhere-enabled. TM Anywhere is a web server application
that enables the TM Server to communicate with Translator’s Workbench via an Internet connection.
Once you have made your selection, click Next to continue.
TMW File
Enter the file name of the translation memory file (*.tmw) that you want to use. You can
also specify the file using the file selection dialog. Simply click on the icon. The file will
not be opened exclusively, which enables other team members to access the same
translation memory.
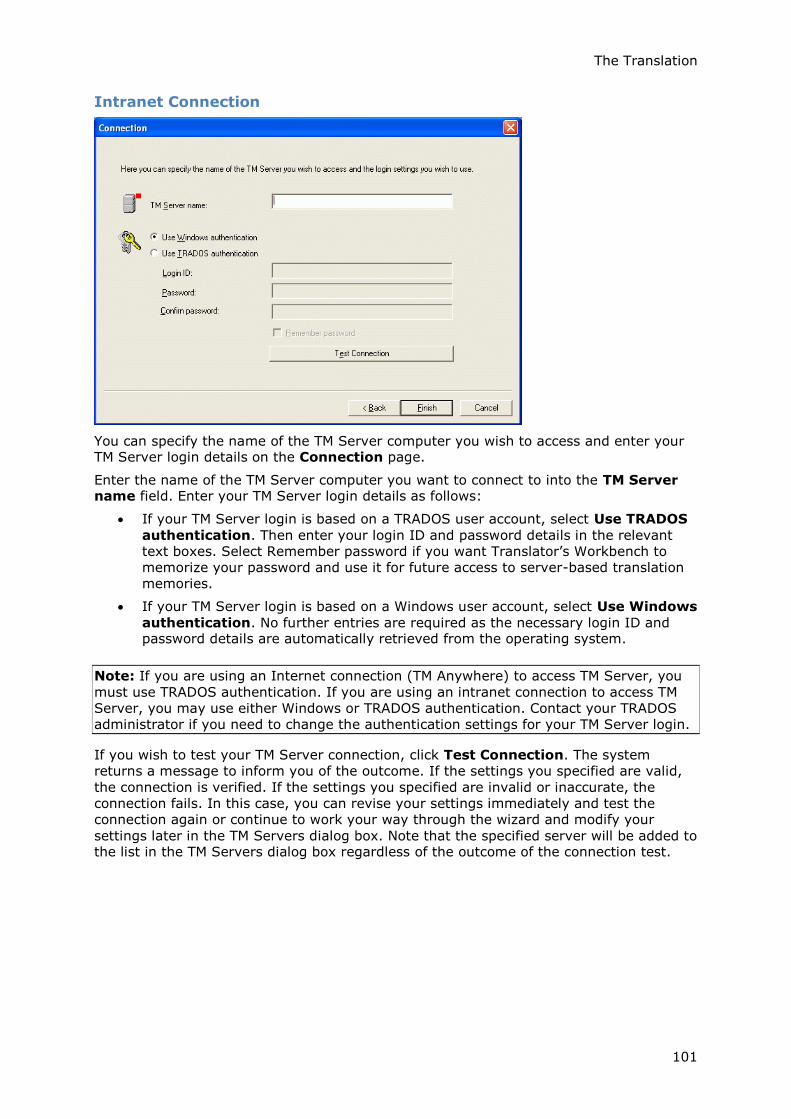
The Translation
101
Intranet Connection
You can specify the name of the TM Server computer you wish to access and enter your TM Server login details on the Connection page.
Enter the name of the TM Server computer you want to connect to into the TM Server name field. Enter your TM Server login details as follows:
If your TM Server login is based on a TRADOS user account, select Use TRADOS
authentication. Then enter your login ID and password details in the relevant
text boxes. Select Remember password if you want Translator’s Workbench to
memorize your password and use it for future access to server-based translation
memories.
If your TM Server login is based on a Windows user account, select Use Windows
authentication. No further entries are required as the necessary login ID and password details are automatically retrieved from the operating system.
Note: If you are using an Internet connection (TM Anywhere) to access TM Server, you
must use TRADOS authentication. If you are using an intranet connection to access TM
Server, you may use either Windows or TRADOS authentication. Contact your TRADOS
administrator if you need to change the authentication settings for your TM Server login.
If you wish to test your TM Server connection, click Test Connection. The system
returns a message to inform you of the outcome. If the settings you specified are valid,
the connection is verified. If the settings you specified are invalid or inaccurate, the
connection fails. In this case, you can revise your settings immediately and test the
connection again or continue to work your way through the wizard and modify your
settings later in the TM Servers dialog box. Note that the specified server will be added to the list in the TM Servers dialog box regardless of the outcome of the connection test.

SDL Passolo 2011
102
Internet Connection (TM Anywhere)
The Advanced page allows you to specify the protocol and port number you wish to use
to access the TM Anywhere server. This information is available from your TRADOS
administrator. Choose one of the following protocol options for communication with the
TM Anywhere server:
Hypertext Transfer Protocol (HTTP). If the TM Anywhere server employs SSL
(Secure Sockets Layer) technology and requires a secure connection, select that
suboption as well.
Transmission Control Protocol (TCP).
Enter the port you wish to use to access the TM Anywhere server into the Port Number
field. Click Use Default to specify the default port number for the protocol you selected
in the first step. Click Next to proceed to the Connection page.
SDL MultiTerm 2007 and 2009
With the SDL Trados 2007 and SDL Trados 2009 add-ins, you can access existing
translation memories while localizing the software in Passolo. These add-ins offer direct
access to multiple term bases without requiring synchronization (export from SDL MultiTerm and import in Passolo).
The add-in connects to term bases of SDL MultiTerm 2007 and SDL MultiTerm 2009
respectively. To load the add-in you need to have the corresponding version of MultiTerm
installed on your computer. For older version of MultiTerm see Older Trados and
MultiTerm versions (S. 105).
To define a MultiTerm connection hoose Add-ins from the Tools menu. In the tab
Translation select the add-in SDL MultiTerm 2007 or SDL MultiTerm 2009 and click on Settings....
The Connections list contains your configured connections to term bases. Click on
Export to save the current connection setup to a configuration file for connections. The
Import function can be used to load connections from a previously stored configuration file.
Click on the icon to create a new connection to a term base. Then enter a name for
the connection in the main window. Use the checkbox next to the connection name to
activate or deactivate a connection.
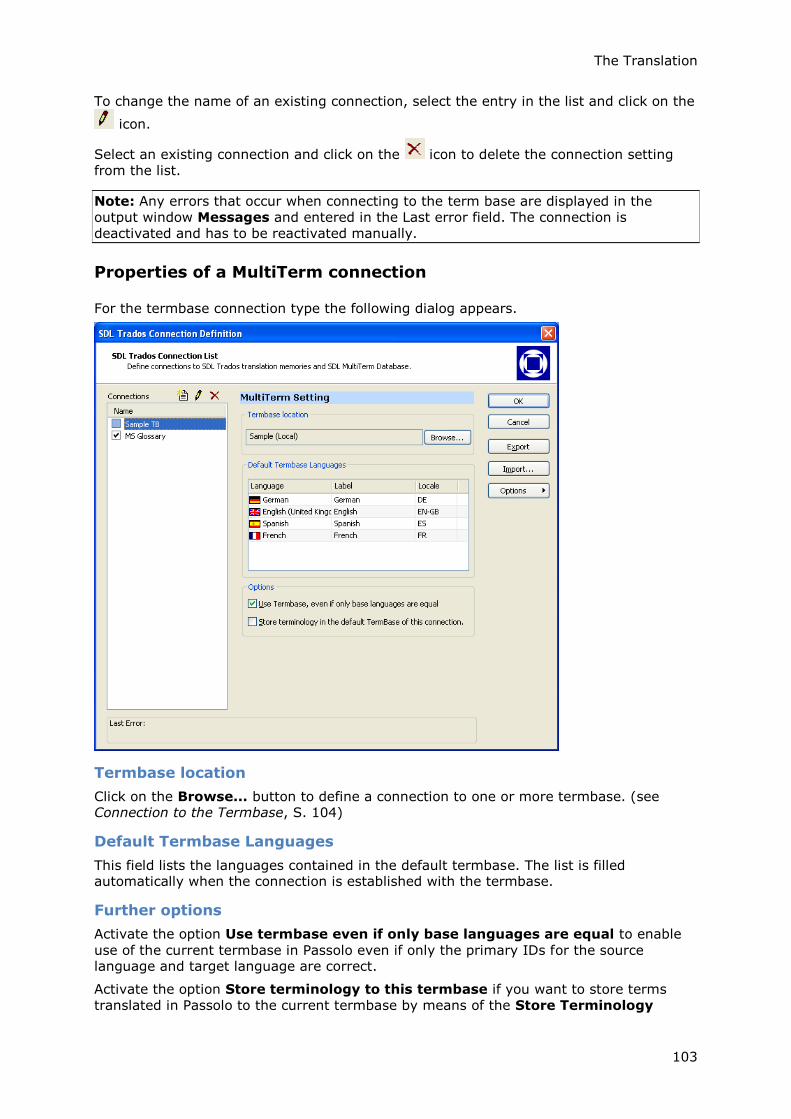
The Translation
103
To change the name of an existing connection, select the entry in the list and click on the
icon.
Select an existing connection and click on the icon to delete the connection setting
from the list.
Note: Any errors that occur when connecting to the term base are displayed in the
output window Messages and entered in the Last error field. The connection is
deactivated and has to be reactivated manually.
Properties of a MultiTerm connection
For the termbase connection type the following dialog appears.
Termbase location
Click on the Browse... button to define a connection to one or more termbase. (see Connection to the Termbase, S. 104)
Default Termbase Languages
This field lists the languages contained in the default termbase. The list is filled automatically when the connection is established with the termbase.
Further options
Activate the option Use termbase even if only base languages are equal to enable
use of the current termbase in Passolo even if only the primary IDs for the source language and target language are correct.
Activate the option Store terminology to this termbase if you want to store terms
translated in Passolo to the current termbase by means of the Store Terminology
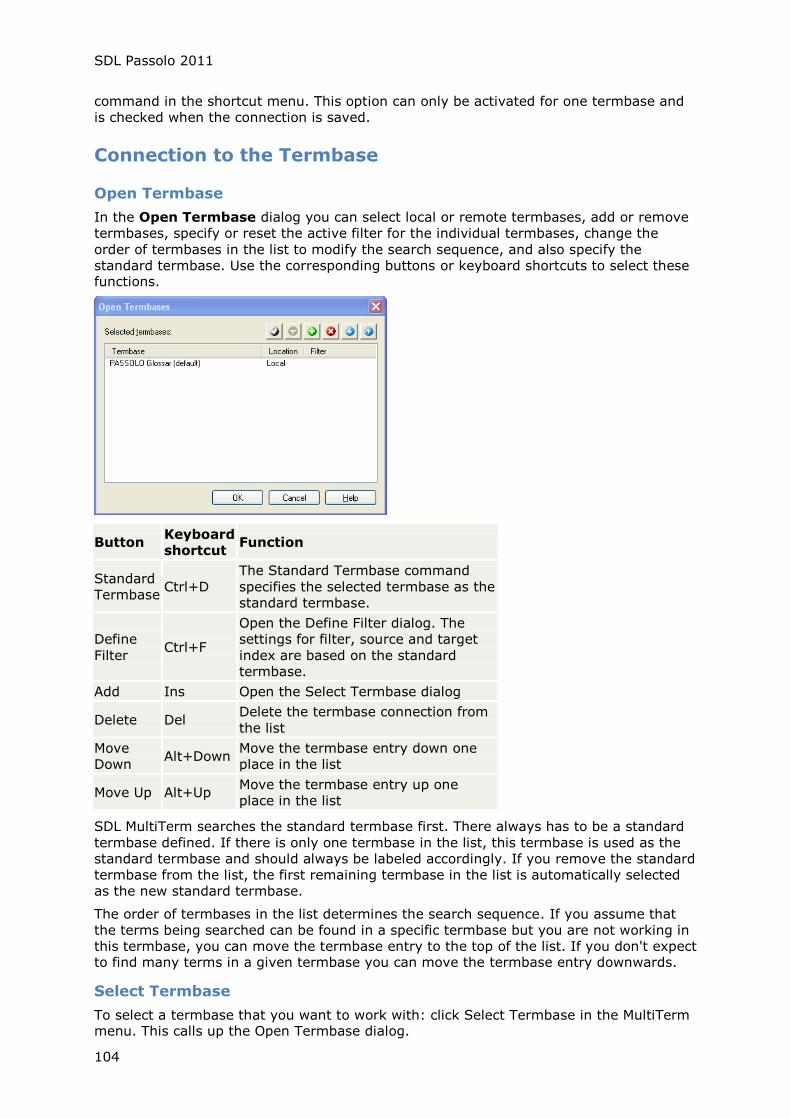
SDL Passolo 2011
104
command in the shortcut menu. This option can only be activated for one termbase and
is checked when the connection is saved.
Connection to the Termbase
Open Termbase
In the Open Termbase dialog you can select local or remote termbases, add or remove
termbases, specify or reset the active filter for the individual termbases, change the
order of termbases in the list to modify the search sequence, and also specify the
standard termbase. Use the corresponding buttons or keyboard shortcuts to select these functions.
Button Keyboard
shortcut Function
Standard
Termbase Ctrl+D
The Standard Termbase command
specifies the selected termbase as the
standard termbase.
Define
Filter Ctrl+F
Open the Define Filter dialog. The
settings for filter, source and target
index are based on the standard
termbase.
Add Ins Open the Select Termbase dialog
Delete Del Delete the termbase connection from
the list
Move
Down Alt+Down
Move the termbase entry down one
place in the list
Move Up Alt+Up Move the termbase entry up one
place in the list
SDL MultiTerm searches the standard termbase first. There always has to be a standard
termbase defined. If there is only one termbase in the list, this termbase is used as the
standard termbase and should always be labeled accordingly. If you remove the standard
termbase from the list, the first remaining termbase in the list is automatically selected
as the new standard termbase.
The order of termbases in the list determines the search sequence. If you assume that
the terms being searched can be found in a specific termbase but you are not working in
this termbase, you can move the termbase entry to the top of the list. If you don't expect to find many terms in a given termbase you can move the termbase entry downwards.
Select Termbase
To select a termbase that you want to work with: click Select Termbase in the MultiTerm menu. This calls up the Open Termbase dialog.

The Translation
105
When connecting to a local termbase activate the Local termbase option and select the
termbase from the list of local termbases. For a connection to a remote termbase
activate the Remote termbase (MultiTerm Server) option. This calls up the Connect to MultiTerm Server dialog.
Connect to MultiTerm Server
Enter your user name and password in the respective fields. In the Connection Properties
group, select the type of connection to MultiTerm Server. Choose the Standard LAN
option if you are connecting to MultiTerm Server via a standard LAN connection. Choose
the MultiTerm Anywhere option if you are connecting to MultiTerm Server via a SOAP
connection. In the MultiTerm Server computer field, enter the path (name of the
computer) where MultiTerm Server is installed.
Clicking on OK brings you back to the Select Termbases tab. A message in the status bar
indicates whether the registration was successful. If the connection fails, please repeat the steps described above or contact your MultiTerm administrator.
Older Trados and MultiTerm versions
With the add-in for SDL Trados 2006 you can access existing TRADOS translation
memories or terminology databases while localizing software in Passolo. The add-in
offers direct access to multiple translation memories without requiring synchronization (export from TRADOS and import in Passolo).
Choose Add-ins from the Tools menu. In the list of add-ins, select SDL Trados 2006 (in the category Translation) and click on Setup.

SDL Passolo 2011
106
The Connections field contains a list of all the previously stored connections to TRADOS translation memories.
Click on the icon to create a new connection to a TRADOS translation memory and enter a name for the connection.
Select an existing connection and click on the icon to edit the name of the
connection.
Select an existing connection and click on the icon to delete the connection setting from the list.
Activate the connections you want to use for translations in Passolo. If you do not want
to use a certain translation memory, deactivate the corresponding checkbox in the connection list.
Translation Memory
Click on the icon to set up a connection to a translation memory using the connection
wizard. (see Connection to the Translation Memory, S. 99)
Language settings
Choose the Source language used in the translation memory from the selection list. If
the required language is not contained in the list, select the menu item Other... at the
very end of the list and enter the Primary ID and Sub ID values for the required source language in the corresponding text fields.
Choose the Target language used in the translation memory from the selection list. If
the required language is not contained in the list, select the menu item Other... at the
very end of the list and enter the Primary ID and Sub ID values for the required target
language in the corresponding text fields.
If the languages used in the selected translation memory are not know, click on Test
languages. Passolo will then open the TRADOS Translator's Workbench, request the
source and target language of this translation memory, and enter the corresponding
languages for the connection setting.
The Translation
107
Further Options
Activate the Use TM if base languages are the same option to enable use of the
translation memory for translations in Passolo even if only the primary IDs of the source
and target languages are correct. This means it is possible to use a translation memory
with, for example, Portuguese (Portugal) as the target language when the target
language in Passolo is Portuguese (Brazil).
Select the Look up terminology option if you want to also use the terminology lookup
function with this translation memory. Known terms are then marked with a red bracket in the translation window.
Select the option Add segments to TM if you want be able to store the entries you
translate in Passolo back to the translation memory by means of the key combination
CTRL+F10. This option can only be used with one translation memory at a time.
Click on Export to save the current connection setup to a configuration file for TRADOS
TM connections. The Import function can be used to load connections from a previously stored configuration file.
SDLX Translation Suite
Interface to SDLX Translation Suite
SDLX Translation Suite is a set of translation tools offered by SDL International. It is part
of SDL Trados and comprises a translation memory as well as the SDL TermBase terminology database.
The add-in for SDLX enables you to access translations and terminology stored in SDLX
or SDL TermBase while localizing software in Passolo. The add-in offers direct access to
the SDLX components; synchronization (export from the TM and import in Passolo) is not required.
Setup
Choose Add-ins from the Tools menu. In the list of add-ins go to the Translation
section and select the SDLX and SDL TermBase entry – then click on the Setup...
button.
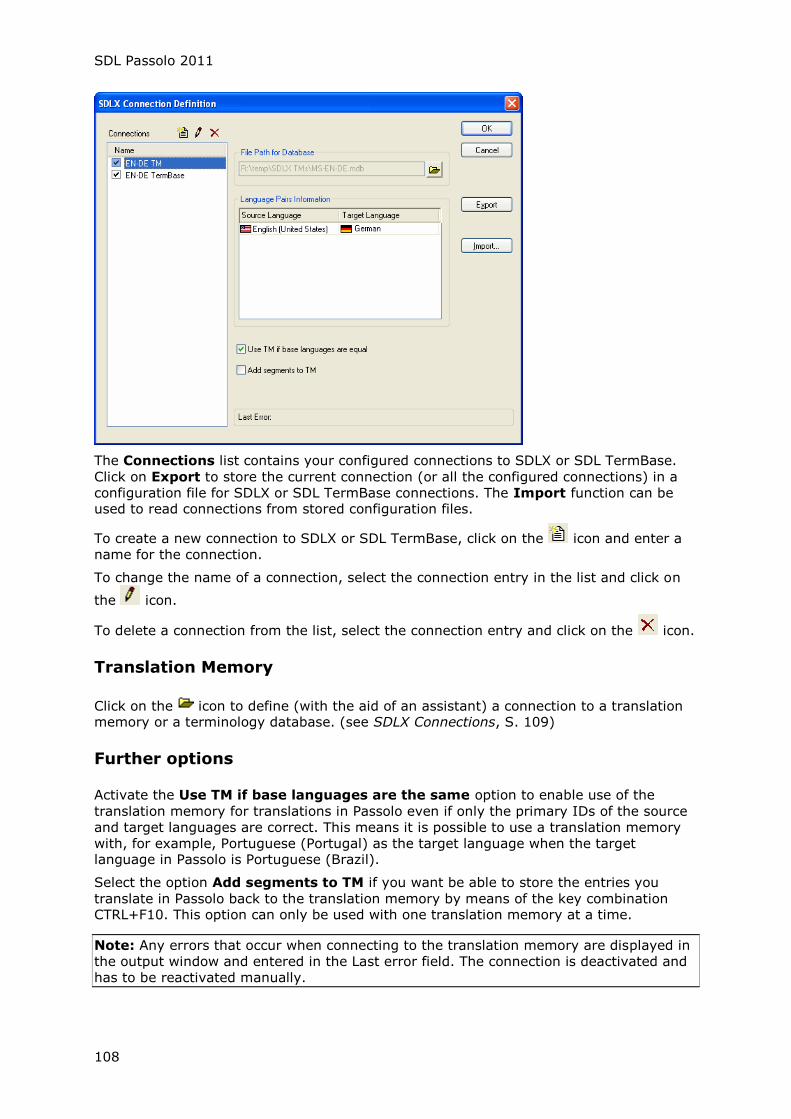
SDL Passolo 2011
108
The Connections list contains your configured connections to SDLX or SDL TermBase.
Click on Export to store the current connection (or all the configured connections) in a
configuration file for SDLX or SDL TermBase connections. The Import function can be used to read connections from stored configuration files.
To create a new connection to SDLX or SDL TermBase, click on the icon and enter a
name for the connection.
To change the name of a connection, select the connection entry in the list and click on
the icon.
To delete a connection from the list, select the connection entry and click on the icon.
Translation Memory
Click on the icon to define (with the aid of an assistant) a connection to a translation memory or a terminology database. (see SDLX Connections, S. 109)
Further options
Activate the Use TM if base languages are the same option to enable use of the
translation memory for translations in Passolo even if only the primary IDs of the source
and target languages are correct. This means it is possible to use a translation memory
with, for example, Portuguese (Portugal) as the target language when the target language in Passolo is Portuguese (Brazil).
Select the option Add segments to TM if you want be able to store the entries you
translate in Passolo back to the translation memory by means of the key combination CTRL+F10. This option can only be used with one translation memory at a time.
Note: Any errors that occur when connecting to the translation memory are displayed in
the output window and entered in the Last error field. The connection is deactivated and
has to be reactivated manually.
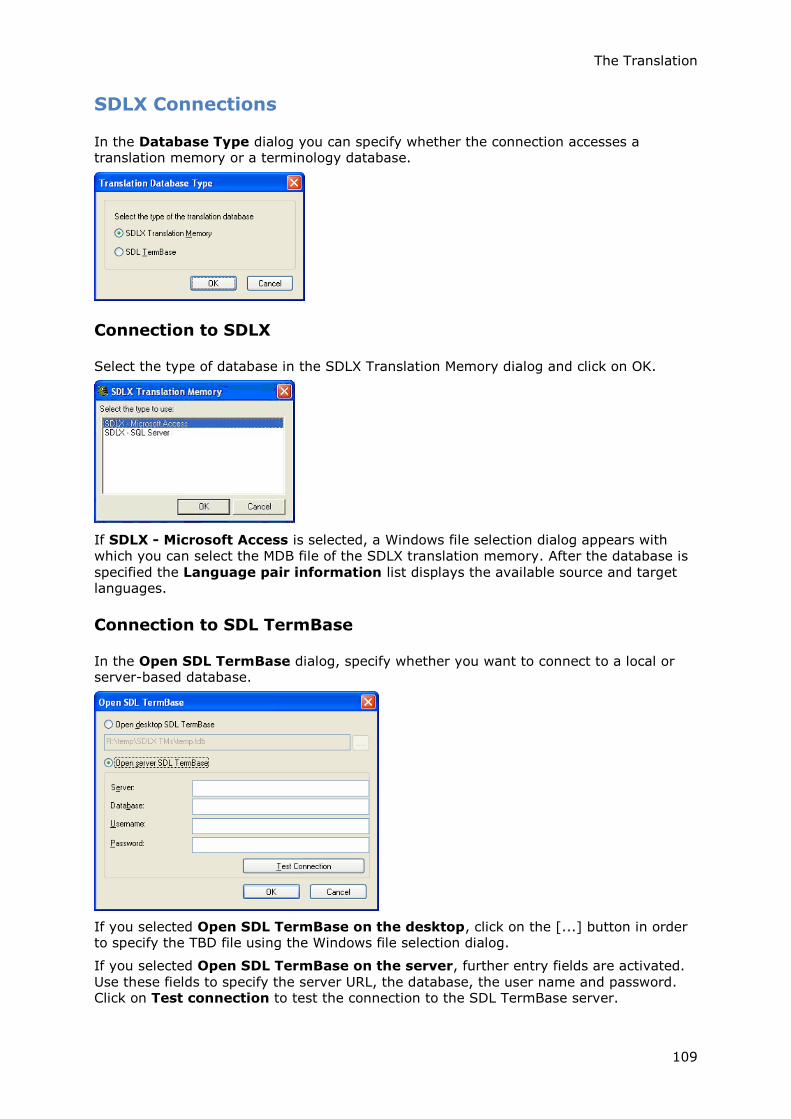
The Translation
109
SDLX Connections
In the Database Type dialog you can specify whether the connection accesses a translation memory or a terminology database.
Connection to SDLX
Select the type of database in the SDLX Translation Memory dialog and click on OK.
If SDLX - Microsoft Access is selected, a Windows file selection dialog appears with
which you can select the MDB file of the SDLX translation memory. After the database is
specified the Language pair information list displays the available source and target languages.
Connection to SDL TermBase
In the Open SDL TermBase dialog, specify whether you want to connect to a local or server-based database.
If you selected Open SDL TermBase on the desktop, click on the [...] button in order to specify the TBD file using the Windows file selection dialog.
If you selected Open SDL TermBase on the server, further entry fields are activated.
Use these fields to specify the server URL, the database, the user name and password. Click on Test connection to test the connection to the SDL TermBase server.

SDL Passolo 2011
110
Note: For a connection to SDL TermBase no data is shown in the Language pair
information list.
The dialog editor
The dialog editor
In the dialog editor, dialogs are displayed just as they appear in the program when it is
running. If the translation has resulted in changes in the string length, it may be necessary to adjust graphic elements or even the size of the dialog itself.
Selection and Display of Control Elements
You can use the mouse to select and move control elements. To move several elements
simultaneously, hold down the CTRL key while clicking on each element, or drag a
selection area over the desired elements
You can also enter coordinates directly. Just click on the position displayed in the status
bar of the dialog editor and enter a new value. Then use the ENTER key to apply this new value.
If you are changing several control elements simultaneously (e.g., adjusting the size of
buttons or defining the lower border of list fields), the element in the "group" that you
mark last will be used as the reference. While the other control elements are framed in
selection rectangles, this "reference element" can be recognized by a filled sizing handles.
You can specify whether the strings for control elements are always to be displayed in
black or in different colors according to their editing status. For further information on
this option, please refer to Changing view options (S. 54).
Additional functions required to adjust dialogs are available via the dialog editor toolbar and in the Layout menu described below.
Aligning Control Elements
or CTRL+LEFT aligns the selected control elements flush left.
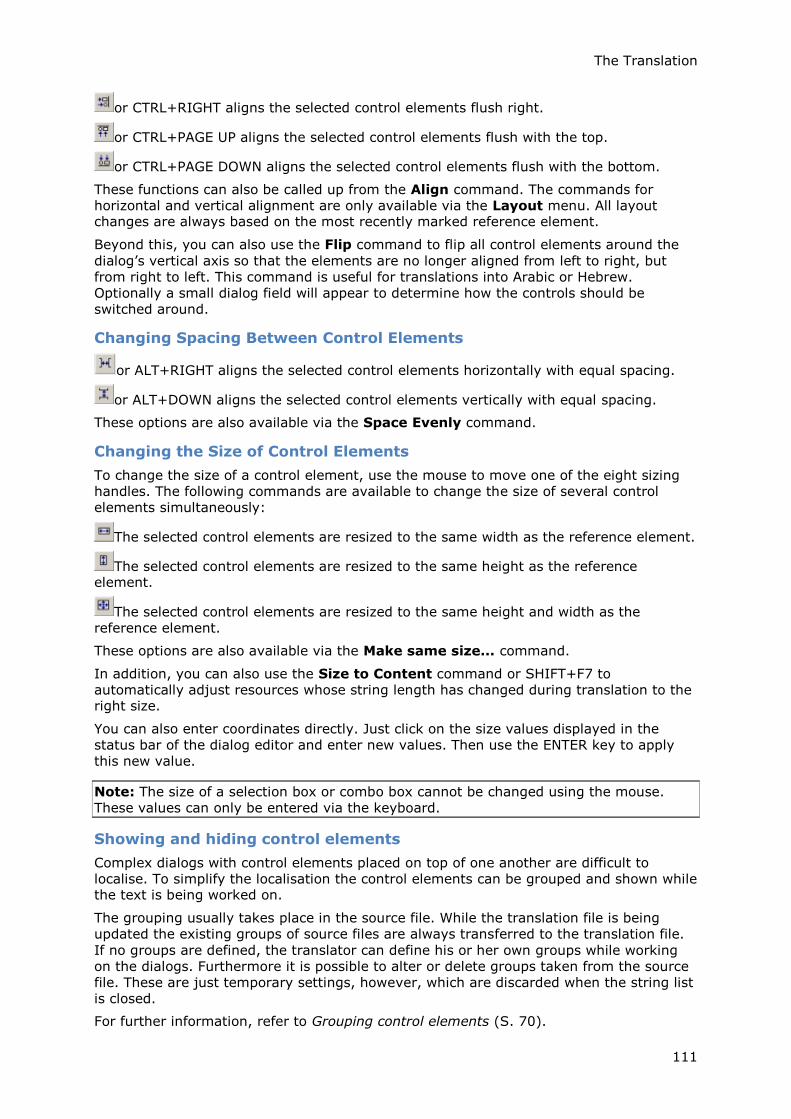
The Translation
111
or CTRL+RIGHT aligns the selected control elements flush right.
or CTRL+PAGE UP aligns the selected control elements flush with the top.
or CTRL+PAGE DOWN aligns the selected control elements flush with the bottom.
These functions can also be called up from the Align command. The commands for
horizontal and vertical alignment are only available via the Layout menu. All layout changes are always based on the most recently marked reference element.
Beyond this, you can also use the Flip command to flip all control elements around the
dialog’s vertical axis so that the elements are no longer aligned from left to right, but
from right to left. This command is useful for translations into Arabic or Hebrew.
Optionally a small dialog field will appear to determine how the controls should be
switched around.
Changing Spacing Between Control Elements
or ALT+RIGHT aligns the selected control elements horizontally with equal spacing.
or ALT+DOWN aligns the selected control elements vertically with equal spacing.
These options are also available via the Space Evenly command.
Changing the Size of Control Elements
To change the size of a control element, use the mouse to move one of the eight sizing
handles. The following commands are available to change the size of several control
elements simultaneously:
The selected control elements are resized to the same width as the reference element.
The selected control elements are resized to the same height as the reference element.
The selected control elements are resized to the same height and width as the
reference element.
These options are also available via the Make same size... command.
In addition, you can also use the Size to Content command or SHIFT+F7 to
automatically adjust resources whose string length has changed during translation to the right size.
You can also enter coordinates directly. Just click on the size values displayed in the
status bar of the dialog editor and enter new values. Then use the ENTER key to apply
this new value.
Note: The size of a selection box or combo box cannot be changed using the mouse.
These values can only be entered via the keyboard.
Showing and hiding control elements
Complex dialogs with control elements placed on top of one another are difficult to
localise. To simplify the localisation the control elements can be grouped and shown while the text is being worked on.
The grouping usually takes place in the source file. While the translation file is being
updated the existing groups of source files are always transferred to the translation file.
If no groups are defined, the translator can define his or her own groups while working
on the dialogs. Furthermore it is possible to alter or delete groups taken from the source
file. These are just temporary settings, however, which are discarded when the string list
is closed.
For further information, refer to Grouping control elements (S. 70).
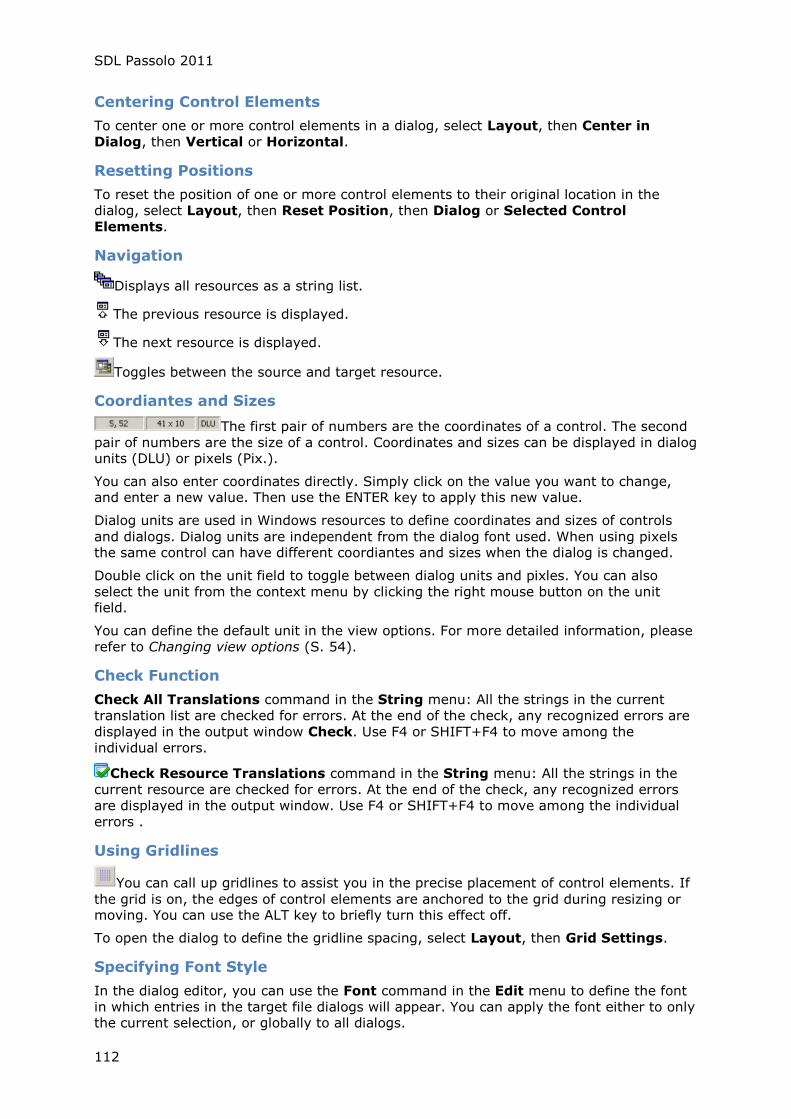
SDL Passolo 2011
112
Centering Control Elements
To center one or more control elements in a dialog, select Layout, then Center in
Dialog, then Vertical or Horizontal.
Resetting Positions
To reset the position of one or more control elements to their original location in the
dialog, select Layout, then Reset Position, then Dialog or Selected Control
Elements.
Navigation
Displays all resources as a string list.
The previous resource is displayed.
The next resource is displayed.
Toggles between the source and target resource.
Coordiantes and Sizes
The first pair of numbers are the coordinates of a control. The second
pair of numbers are the size of a control. Coordinates and sizes can be displayed in dialog units (DLU) or pixels (Pix.).
You can also enter coordinates directly. Simply click on the value you want to change, and enter a new value. Then use the ENTER key to apply this new value.
Dialog units are used in Windows resources to define coordinates and sizes of controls
and dialogs. Dialog units are independent from the dialog font used. When using pixels the same control can have different coordiantes and sizes when the dialog is changed.
Double click on the unit field to toggle between dialog units and pixles. You can also
select the unit from the context menu by clicking the right mouse button on the unit field.
You can define the default unit in the view options. For more detailed information, please
refer to Changing view options (S. 54).
Check Function
Check All Translations command in the String menu: All the strings in the current
translation list are checked for errors. At the end of the check, any recognized errors are
displayed in the output window Check. Use F4 or SHIFT+F4 to move among the
individual errors.
Check Resource Translations command in the String menu: All the strings in the
current resource are checked for errors. At the end of the check, any recognized errors
are displayed in the output window. Use F4 or SHIFT+F4 to move among the individual
errors .
Using Gridlines
You can call up gridlines to assist you in the precise placement of control elements. If
the grid is on, the edges of control elements are anchored to the grid during resizing or moving. You can use the ALT key to briefly turn this effect off.
To open the dialog to define the gridline spacing, select Layout, then Grid Settings.
Specifying Font Style
In the dialog editor, you can use the Font command in the Edit menu to define the font
in which entries in the target file dialogs will appear. You can apply the font either to only the current selection, or globally to all dialogs.

The Translation
113
Note:Some dialogs use the MS Shell Dlg font. This is not a real font but merely a
reference to a font used in the operating system. Passolo shows these dialogs in the font
which is installed in the current operating system for MS Shell Dlg. Further information
on this can be found in the technical literature.
Note:Windows offers the option of scaling the screen fonts, by means of a setting in the
Control Panel, so that the fonts are displayed larger than normal. When using the dialog
editor to adjust the size of graphic elements, the scaling of screen fonts should be
switched off. Otherwise there is a danger that the dialog elements will be trimmed off on
other systems.
Adjust Dialogs for Bidirectional Languages
In bidirectional languages such as Arabic and Hebrew, the script is generally written from right to left. In addition, the dialogs are also constructed in right-to-left order.
Passolo offers two options for adjusting dialogs to bidi languages. These settings are
specified in the Flip dialog, which you can call up by selecting Flip from the Layout menu.
Toggle right/left styles for all controls
The RTL (right to left) alignment flags are toggled for all the dialog controls, and the
controls are also repositioned by Passolo.
The advantage of this method is that the resulting dialog will be displayed correctly on all
operating systems, including Windows 95. The drawback is that any new controls added
to the dialog by way of an update are not yet set to toggled alignment and are still in their original (incorrect) position.
Mirror the dialog
This sets the WS_EX_LAYOUTRTL flag for the entire dialog. If this flag is set, the
operating system draws the dialog from right to left, starting from a reversed position.
With this setting, the controls do not have to be repositioned, and the setting applies to
all the controls contained in the dialog, even ones that have been added by subsequent
updates. This is the recommended method for Windows 98 and up. The drawback is that
this method will not work under Windows 95.
If you activate the Don't ask again option, Passolo will skip this dialog the next time you use the Flip function and will use the method selected here.
Automatic Layout
This function can be used to optimize the layout of one or more dialogs. The size and
arrangement of the dialog elements is adjusted automatically (see Layout Engine, S. 114).
From the String List menu, choose Automatic Layout. You can choose whether to
carry out the operation on the current resource, the selected translation lists or on all the translation lists in the project.
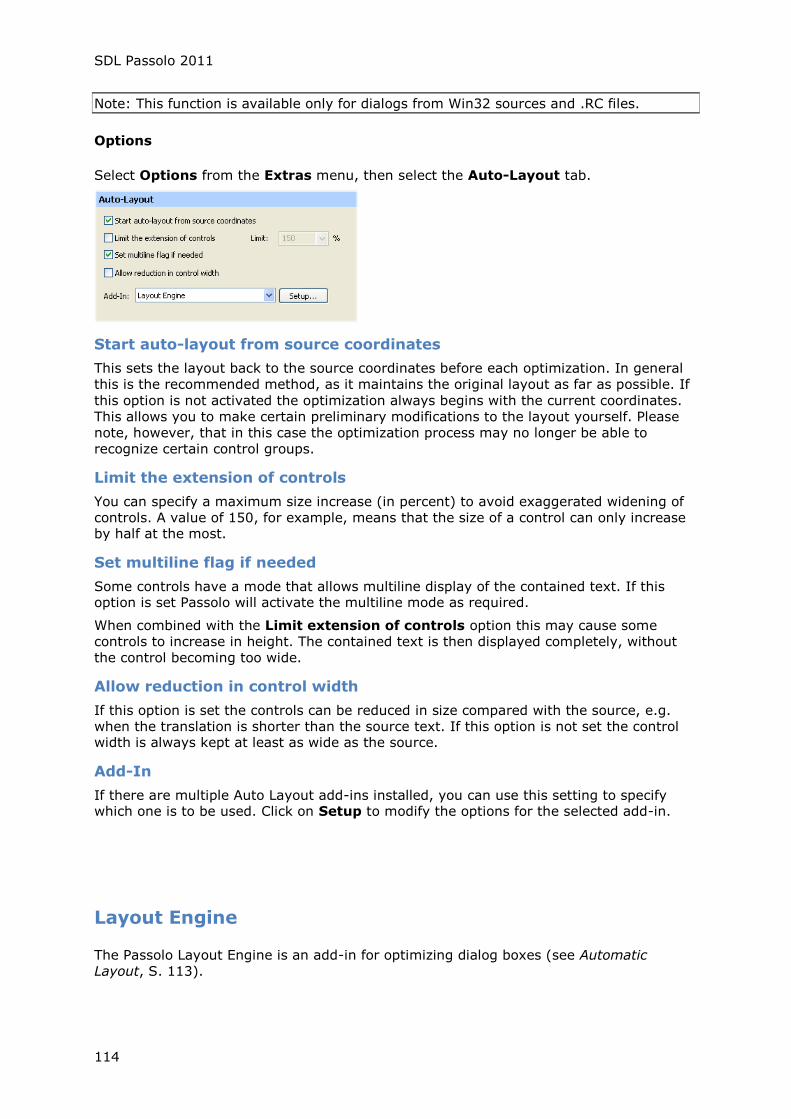
SDL Passolo 2011
114
Note: This function is available only for dialogs from Win32 sources and .RC files.
Options
Select Options from the Extras menu, then select the Auto-Layout tab.
Start auto-layout from source coordinates
This sets the layout back to the source coordinates before each optimization. In general
this is the recommended method, as it maintains the original layout as far as possible. If
this option is not activated the optimization always begins with the current coordinates.
This allows you to make certain preliminary modifications to the layout yourself. Please
note, however, that in this case the optimization process may no longer be able to
recognize certain control groups.
Limit the extension of controls
You can specify a maximum size increase (in percent) to avoid exaggerated widening of
controls. A value of 150, for example, means that the size of a control can only increase by half at the most.
Set multiline flag if needed
Some controls have a mode that allows multiline display of the contained text. If this option is set Passolo will activate the multiline mode as required.
When combined with the Limit extension of controls option this may cause some
controls to increase in height. The contained text is then displayed completely, without
the control becoming too wide.
Allow reduction in control width
If this option is set the controls can be reduced in size compared with the source, e.g.
when the translation is shorter than the source text. If this option is not set the control width is always kept at least as wide as the source.
Add-In
If there are multiple Auto Layout add-ins installed, you can use this setting to specify which one is to be used. Click on Setup to modify the options for the selected add-in.
Layout Engine
The Passolo Layout Engine is an add-in for optimizing dialog boxes (see Automatic
Layout, S. 113).
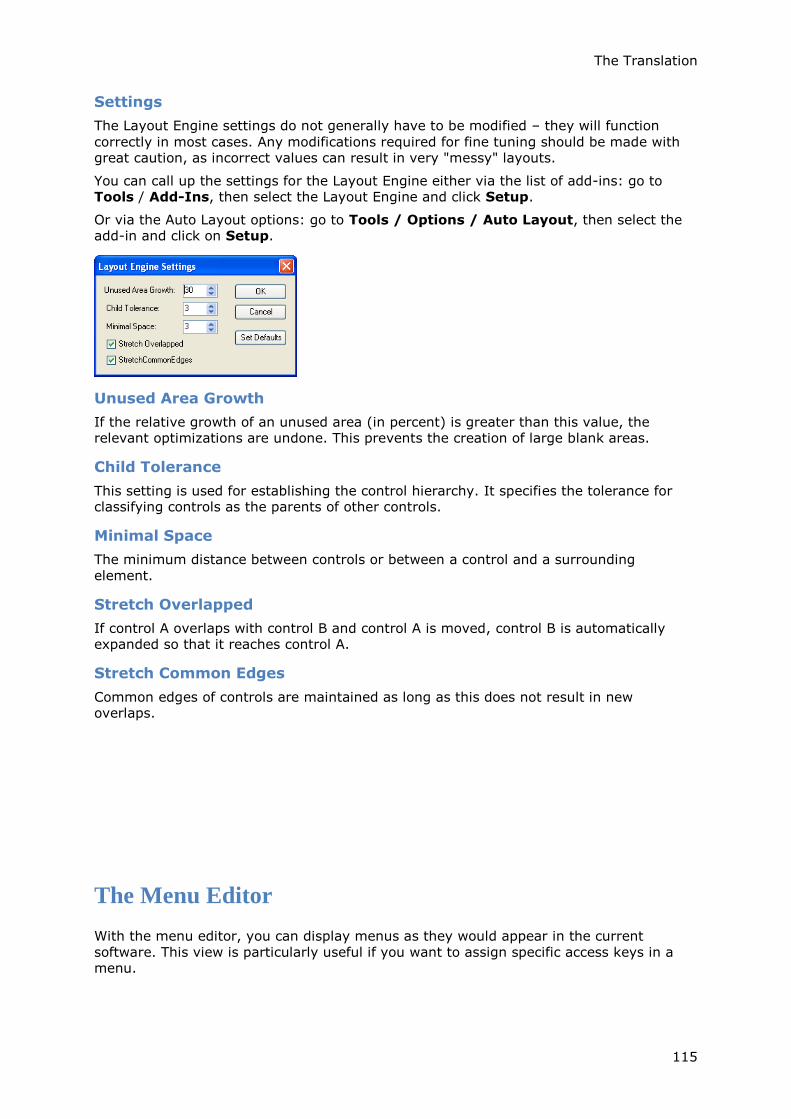
The Translation
115
Settings
The Layout Engine settings do not generally have to be modified – they will function
correctly in most cases. Any modifications required for fine tuning should be made with great caution, as incorrect values can result in very "messy" layouts.
You can call up the settings for the Layout Engine either via the list of add-ins: go to Tools / Add-Ins, then select the Layout Engine and click Setup.
Or via the Auto Layout options: go to Tools / Options / Auto Layout, then select the add-in and click on Setup.
Unused Area Growth
If the relative growth of an unused area (in percent) is greater than this value, the relevant optimizations are undone. This prevents the creation of large blank areas.
Child Tolerance
This setting is used for establishing the control hierarchy. It specifies the tolerance for classifying controls as the parents of other controls.
Minimal Space
The minimum distance between controls or between a control and a surrounding
element.
Stretch Overlapped
If control A overlaps with control B and control A is moved, control B is automatically expanded so that it reaches control A.
Stretch Common Edges
Common edges of controls are maintained as long as this does not result in new overlaps.
The Menu Editor
With the menu editor, you can display menus as they would appear in the current
software. This view is particularly useful if you want to assign specific access keys in a menu.
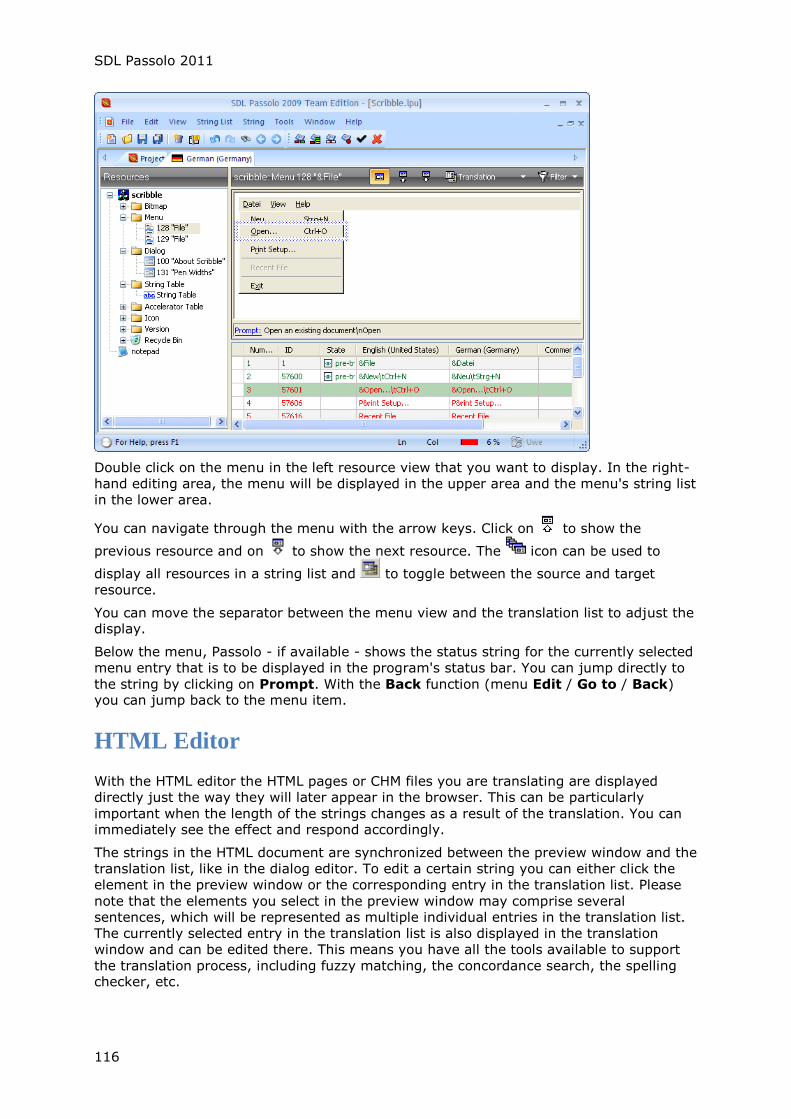
SDL Passolo 2011
116
Double click on the menu in the left resource view that you want to display. In the right-
hand editing area, the menu will be displayed in the upper area and the menu's string list
in the lower area.
You can navigate through the menu with the arrow keys. Click on to show the
previous resource and on to show the next resource. The icon can be used to
display all resources in a string list and to toggle between the source and target
resource.
You can move the separator between the menu view and the translation list to adjust the display.
Below the menu, Passolo - if available - shows the status string for the currently selected
menu entry that is to be displayed in the program's status bar. You can jump directly to
the string by clicking on Prompt. With the Back function (menu Edit / Go to / Back) you can jump back to the menu item.
HTML Editor
With the HTML editor the HTML pages or CHM files you are translating are displayed
directly just the way they will later appear in the browser. This can be particularly
important when the length of the strings changes as a result of the translation. You can immediately see the effect and respond accordingly.
The strings in the HTML document are synchronized between the preview window and the
translation list, like in the dialog editor. To edit a certain string you can either click the
element in the preview window or the corresponding entry in the translation list. Please
note that the elements you select in the preview window may comprise several
sentences, which will be represented as multiple individual entries in the translation list.
The currently selected entry in the translation list is also displayed in the translation
window and can be edited there. This means you have all the tools available to support
the translation process, including fuzzy matching, the concordance search, the spelling checker, etc.
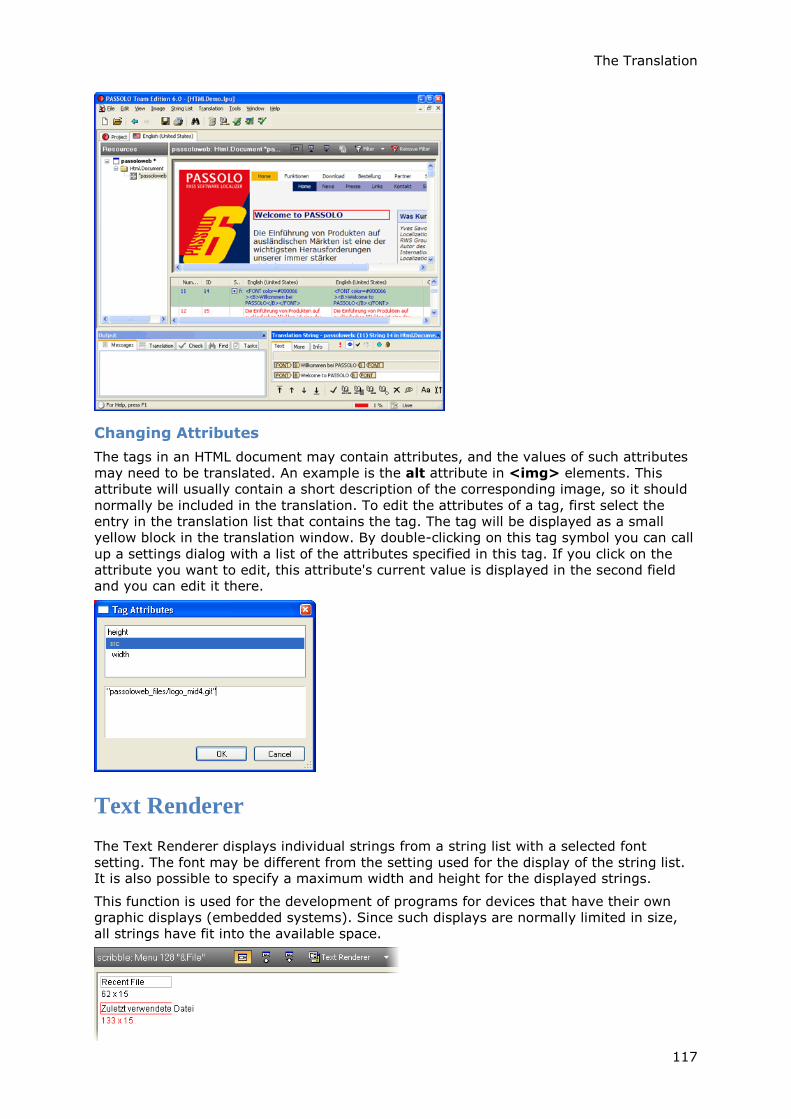
The Translation
117
Changing Attributes
The tags in an HTML document may contain attributes, and the values of such attributes
may need to be translated. An example is the alt attribute in <img> elements. This
attribute will usually contain a short description of the corresponding image, so it should
normally be included in the translation. To edit the attributes of a tag, first select the
entry in the translation list that contains the tag. The tag will be displayed as a small
yellow block in the translation window. By double-clicking on this tag symbol you can call
up a settings dialog with a list of the attributes specified in this tag. If you click on the
attribute you want to edit, this attribute's current value is displayed in the second field and you can edit it there.
Text Renderer
The Text Renderer displays individual strings from a string list with a selected font
setting. The font may be different from the setting used for the display of the string list. It is also possible to specify a maximum width and height for the displayed strings.
This function is used for the development of programs for devices that have their own
graphic displays (embedded systems). Since such displays are normally limited in size,
all strings have fit into the available space.
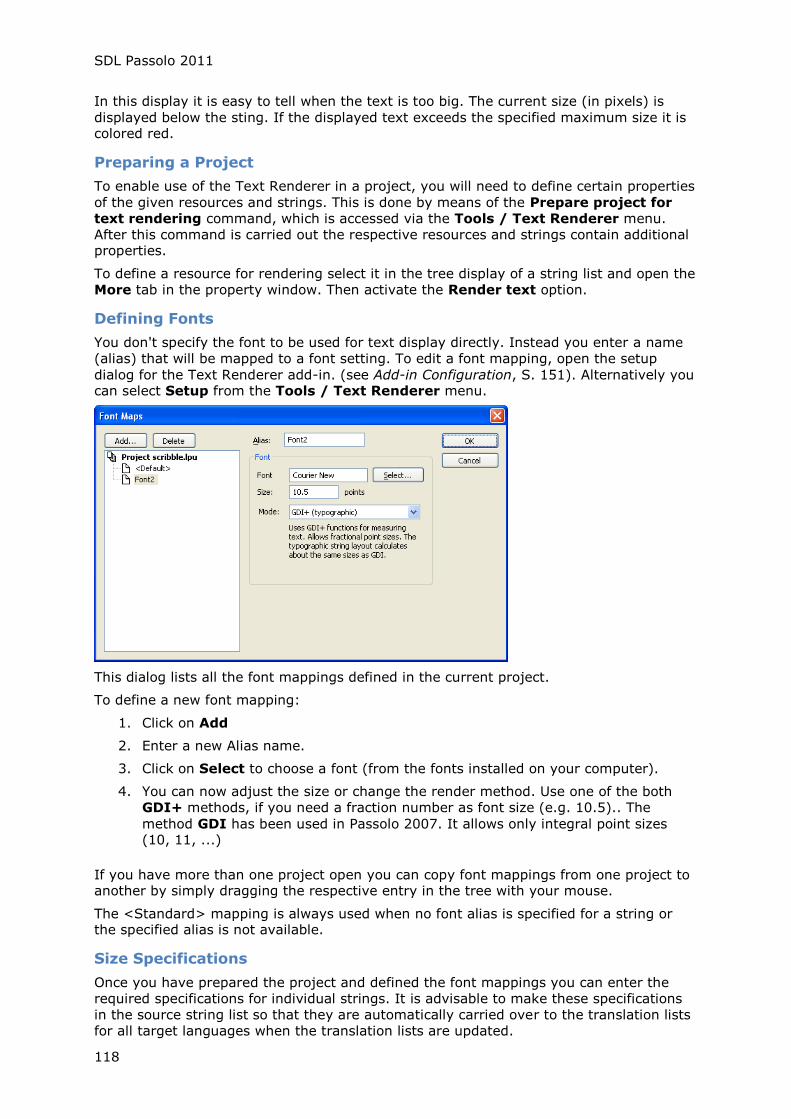
SDL Passolo 2011
118
In this display it is easy to tell when the text is too big. The current size (in pixels) is
displayed below the sting. If the displayed text exceeds the specified maximum size it is colored red.
Preparing a Project
To enable use of the Text Renderer in a project, you will need to define certain properties
of the given resources and strings. This is done by means of the Prepare project for
text rendering command, which is accessed via the Tools / Text Renderer menu.
After this command is carried out the respective resources and strings contain additional properties.
To define a resource for rendering select it in the tree display of a string list and open the
More tab in the property window. Then activate the Render text option.
Defining Fonts
You don't specify the font to be used for text display directly. Instead you enter a name
(alias) that will be mapped to a font setting. To edit a font mapping, open the setup
dialog for the Text Renderer add-in. (see Add-in Configuration, S. 151). Alternatively you can select Setup from the Tools / Text Renderer menu.
This dialog lists all the font mappings defined in the current project.
To define a new font mapping:
1. Click on Add
2. Enter a new Alias name.
3. Click on Select to choose a font (from the fonts installed on your computer).
4. You can now adjust the size or change the render method. Use one of the both
GDI+ methods, if you need a fraction number as font size (e.g. 10.5).. The
method GDI has been used in Passolo 2007. It allows only integral point sizes (10, 11, ...)
If you have more than one project open you can copy font mappings from one project to another by simply dragging the respective entry in the tree with your mouse.
The <Standard> mapping is always used when no font alias is specified for a string or the specified alias is not available.
Size Specifications
Once you have prepared the project and defined the font mappings you can enter the
required specifications for individual strings. It is advisable to make these specifications
in the source string list so that they are automatically carried over to the translation lists
for all target languages when the translation lists are updated.
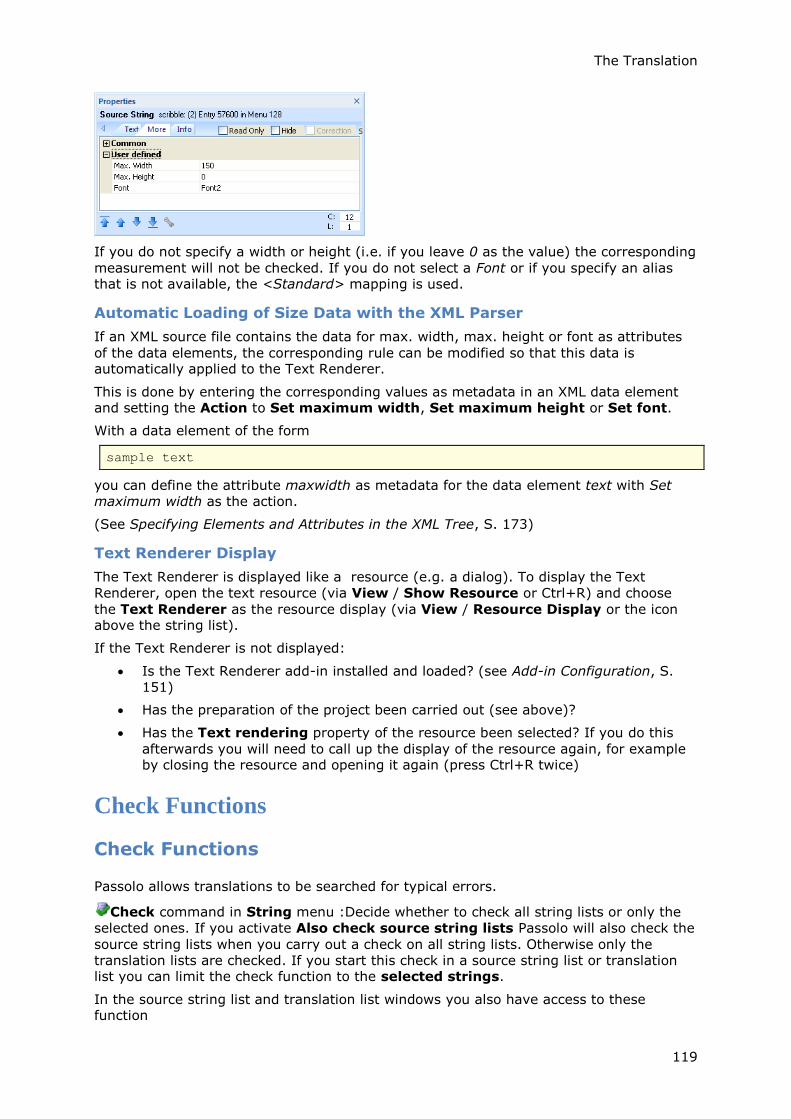
The Translation
119
If you do not specify a width or height (i.e. if you leave 0 as the value) the corresponding
measurement will not be checked. If you do not select a Font or if you specify an alias that is not available, the <Standard> mapping is used.
Automatic Loading of Size Data with the XML Parser
If an XML source file contains the data for max. width, max. height or font as attributes
of the data elements, the corresponding rule can be modified so that this data is automatically applied to the Text Renderer.
This is done by entering the corresponding values as metadata in an XML data element and setting the Action to Set maximum width, Set maximum height or Set font.
With a data element of the form
sample text
you can define the attribute maxwidth as metadata for the data element text with Set
maximum width as the action.
(See Specifying Elements and Attributes in the XML Tree, S. 173)
Text Renderer Display
The Text Renderer is displayed like a resource (e.g. a dialog). To display the Text
Renderer, open the text resource (via View / Show Resource or Ctrl+R) and choose
the Text Renderer as the resource display (via View / Resource Display or the icon above the string list).
If the Text Renderer is not displayed:
Is the Text Renderer add-in installed and loaded? (see Add-in Configuration, S.
151)
Has the preparation of the project been carried out (see above)?
Has the Text rendering property of the resource been selected? If you do this
afterwards you will need to call up the display of the resource again, for example by closing the resource and opening it again (press Ctrl+R twice)
Check Functions
Check Functions
Passolo allows translations to be searched for typical errors.
Check command in String menu :Decide whether to check all string lists or only the
selected ones. If you activate Also check source string lists Passolo will also check the
source string lists when you carry out a check on all string lists. Otherwise only the
translation lists are checked. If you start this check in a source string list or translation list you can limit the check function to the selected strings.
In the source string list and translation list windows you also have access to these function
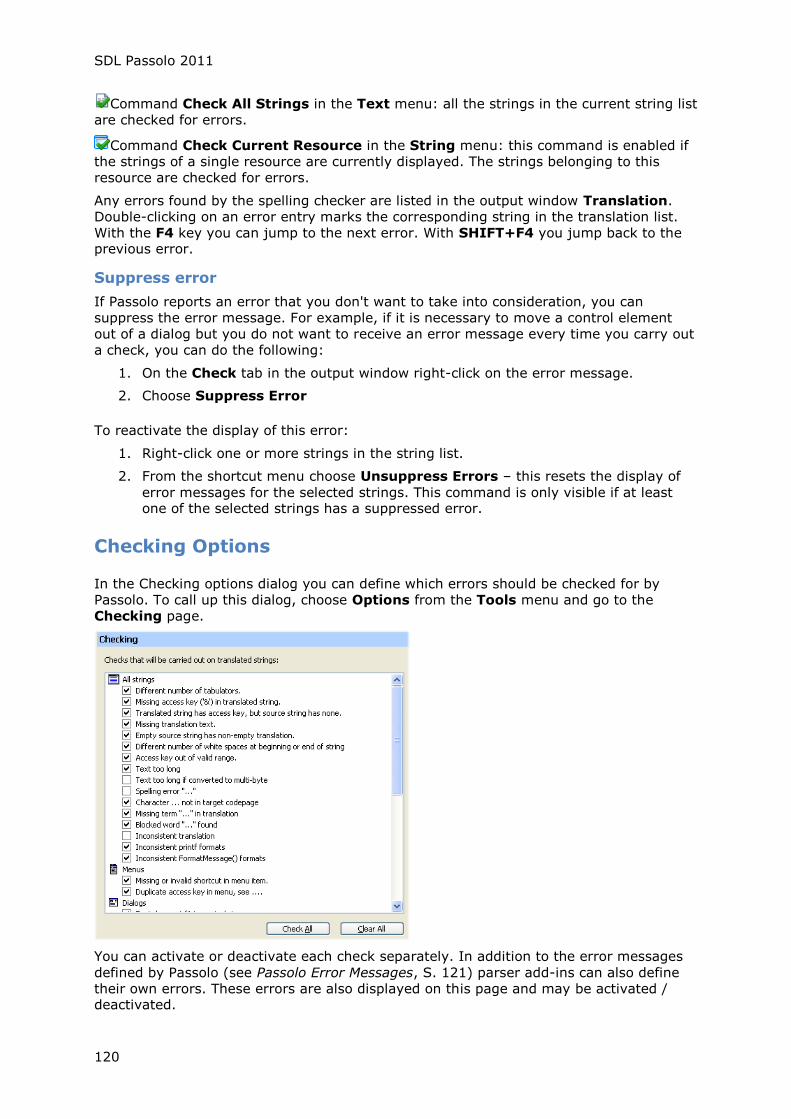
SDL Passolo 2011
120
Command Check All Strings in the Text menu: all the strings in the current string list
are checked for errors.
Command Check Current Resource in the String menu: this command is enabled if
the strings of a single resource are currently displayed. The strings belonging to this
resource are checked for errors.
Any errors found by the spelling checker are listed in the output window Translation.
Double-clicking on an error entry marks the corresponding string in the translation list.
With the F4 key you can jump to the next error. With SHIFT+F4 you jump back to the previous error.
Suppress error
If Passolo reports an error that you don't want to take into consideration, you can
suppress the error message. For example, if it is necessary to move a control element
out of a dialog but you do not want to receive an error message every time you carry out
a check, you can do the following:
1. On the Check tab in the output window right-click on the error message.
2. Choose Suppress Error
To reactivate the display of this error:
1. Right-click one or more strings in the string list.
2. From the shortcut menu choose Unsuppress Errors – this resets the display of
error messages for the selected strings. This command is only visible if at least one of the selected strings has a suppressed error.
Checking Options
In the Checking options dialog you can define which errors should be checked for by
Passolo. To call up this dialog, choose Options from the Tools menu and go to the
Checking page.
You can activate or deactivate each check separately. In addition to the error messages
defined by Passolo (see Passolo Error Messages, S. 121) parser add-ins can also define
their own errors. These errors are also displayed on this page and may be activated / deactivated.
The Translation
121
Passolo Error Messages
These error messages are displayed when you call up the Check functions (S. 119):
Standard errors
Different number of tabulators.
The number of tabs in the source and target strings is different. Tabs are
important formatting characters that may be required for programs to function
properly or for correct displays.
Access key ('&') not found in translation.
There is an access key at this point in the source string, but not in the target
string. Select Add Access Key from the String menu to automatically assign an access key.
Translated string has access key, but source string has none.
An access key was assigned in the translated string at a point where the original
source string did not contain one. Check whether the translated string is supposed
to have an access key at this location.
Missing translation text.
There is no translation for this entry in the translation list even though there is an
text in the source string list. Check whether the translated entry is supposed to be empty.
Empty source string has non-empty translation.
An entry in the source string list contains no text, but has a translation in the translation list. Make sure this entry definitely should contain a translation.
Different number of white spaces at beginning or end of string
Sometimes it is important to leave a space at the beginning or end of a text, with
texts which has been pieced together or for technical reasons. Check that the
number of such spaces in the translation file corresponds to the number in the source file.
Access key out of valid range
For every language a certain number of access keys exist. Check that the access keys in use correspond to the defined range.
Text too long
For each entry in the source string list you can define a maximum string length for the translation. Shorten the translation string.
Text too long if converted to multi-byte
If the string based on the target code page is converted to multi-byte representation, it exceeds the maximum length.
Spelling error
Spell checking can be defined for every supported language. Correct the spelling
errors in the translation list or arrange with the software development for corrections to be made in the source strings list.
character is not in the target code page
A string contains a character that cannot be displayed in the target language. If
your software is not Unicode enabled, this may cause problems with the display of the given string.
Missing term ... in translation
SDL Passolo 2011
122
The translation of a term is missing in the translation. The use of this check
function is only possible if there is at least one glossary defined for terminology checking. (see Editing the glossary list, S. 91)
Blocked word ... found
The translation contains a term that is not allowed. The use of this function is only
possible if there is at least one glossary defined for "Blocked word check". (see Editing the glossary list, S. 91)
Inconsistent translation
There is an pre-translation available for the source string, but this does not
correspond with the translation used.
Missing or invalid key combination (accelerator) in menu string.
The key combination (accelerator) is missing in one of the menu strings (e.g. "Ctrl
+ S") or has an invalid format.
Duplicate access key in menu.
The menu contains several entries for the same access key. You must select one,
unique access key for the menu. You can automatically assign an access key by selecting the Add Access Key command in the String menu.
Text does not fit to control size.
The text contains too many characters to be fully displayed within the boundaries
of the control element. Either enlarge the control element manually, or select the
Adjust Size to Content command from the Layout menu to define the optimum size.
Ignore the control size error if it appears already in the source file.
Some texts may be too long in the source file to be shown completely within the
control elements. This may be the programmers’ intention as the size of the
control elements should match the running time for example. Select this option to
avoid the error being shown.
Overlapping control element ...
Two control elements are overlapping. Use the dialog editor to reposition the control elements so they no longer overlap.
Control is not within the dialog borders.
The control element has been enlarged to such an extent that it no longer fits
within the actual boundaries of the dialog. Use the dialog editor to reposition the control element or to resize it.
Duplicate access key.
The same access key was assigned several times within the dialog. You must
specify a single, unique access key for the dialog. You can automatically assign an
access key by selecting the Add Access Key command in the String menu.
Invalid accelerator.
You have used a key combination (accelerator) that is not recognized. Check the combination you entered.
Duplicate accelerator.
The menu resource contains several entries with the same accelerator. You must select one, unique accelerator for each menu entry.
Inconsistent printf formats.
Format specifiers like %s or %d have to be preserved in the translation. Also the
order of format specifiers may not be changed. For further information refer to documentation about the programming language 'C'.
The Translation
123
Inconsistent FormatMessage() formats.
Special format specifiers are used in conjunction with FormatMessage(). They
normally look like %1, %2… but they can also include additional formatting
information such as %1!s!. The order of these format specifiers might change in
source and target text, but the format specifiers itself must be the same. For more information refer to the Microsoft API documentation for FormatMessage().
User Defined Checks
Additional checks can be defined using the inline patterns. For example, it is possible to check whether a product name is used unchanged in the translation.
Creation of a user-defined check with an inline pattern
1. In the Project menu, click on Inline Patterns.
2. Select the General area to save the new pattern for no specific project or select
the project under which the new pattern is to be saved.
3. Click on Add.
4. In the Pattern Name field, enter a name for the new inline pattern, e.g. Test
product name.
5. Enter the text to be searched for, e.g. SUPER PRODUCT.
Use a regular expression to search with more flexibility (see Regular
Expressions, S. 271).
6. In the Check field, select one of the required checking options:
o By means of the Must exist in translation if also exists in source
option it is possible to check that the found expressions are present in both
the source and the translation. In addition you can define, that thenumber
of matches, the exact text and the order must be the same in source
and translation.
o With the Must not exist in translation option it is possible to check the
translation for characters or text segments that are not permitted.
o With the Must exist in translation you can check whether specific
characters or text segments occur in the translation.
7. Click on Test, to expand the dialog with additional test functions. You can enter
any source text and a translation, and test the current pattern. When you click on
Check, the result of the check with the current rule is displayed. Also the matches
of the regular expression are shown.
8. Close the dialog with OK.
Testing the User-Defined Check
1. In the Inline Patterns dialog, select the pattern to be tested.
2. Click on Test >>.
3. Enter any source text with a translation.
4. Click on Check.
The result of the check is now displayed, as are the matches for the text in the search.
The inline patterns are either saved on the computer for no specific project ("General") or
within a project. The general patterns are available for all projects opened on the
computer. The patterns saved under the project can be used together with the project on
other computers. They are also transferred to a translation bundle during export.
SDL Passolo 2011
124
Copying Patterns
1. If you wish to copy a pattern from one project to another, make sure that both
projects are opened in Passolo before you display the Inline Pattern dialog.
2. Click on the required pattern in the tree structure and hold down the mouse
button
3. Move the rule to the area (general or project) where the pattern is to be copied,
and then release the mouse button.
User Defined Check Macros
In addition to the existing check functions, macros can be used to implement more
complex check routines with automatic correction. For more information on macros see chapter Macros Overview (S. 237).
Spelling Checker
Spell checking
Passolo provides different options for checking (and correcting) the spelling in source
string lists and translation lists.
Strings can be checked automatically during entry. (See Spell Checking During
Entry, S. 124)
An interactive check function can be used to search string lists for spelling errors
(see Spell checking a string list, S. 125)
Spell checking can be included as part of the standard check functions (see Spell
checking as a test function, S. 126).
The internal spell checking module can check the spelling in translation lists for 14
languages based internal algorithms. This module is available in all editions of Passolo.
Basic dictionaries for the following languages are integrated: Croatian, Czech, Danish,
Dutch, English (UK), English (USA), French, German, Italian, Polish, Spanish, Swedish,
Slovenian. Additionally, custom dictionaries can be created for each language.
The external add-in uses Microsoft Word to check the spelling. It requires a licensed
installation of Microsoft Word on the system. Microsoft Word version 2000 or later is
supported. The required dictionaries for the languages to be checked must also be
installed.
Further add-ins for other professional spell checking programs can be requested from
PASS Engineering.
Spell Checking During Entry
You can use this method to check for spelling errors while you translate. Whenever an
entry is displayed in the translation window, the spelling checker will automatically check
the text and mark any recognized spelling errors with a wavy red underline. If you find
these wavy underlines distracting, you can hide the underlines until you are ready to do error corrections.

The Translation
125
To correct an error proceed as follows:
Right-click on a word marked with a wavy red underline to select the relevant
error.
In the context menu click on Corrections to call up the list of possible corrections
and choose the spelling you want to use from this list.
In the context menu click on Add to custom dictionary to add a correctly
spelled word to the active custom dictionary if it is marked as a spelling error. The
wavy red underline will then be removed.
In the context menu click on Add to ignore list if you want to ignore the spelling
of this word without adding it to your user dictionary. The wavy red underline will
be removed and Passolo will ignore this spelling error for the rest of your current work session in Passolo.
Spell checking a string list
You can use this function to check for spelling errors and confirm each suggested
correction. This method is a good choice if you don't want to begin editing the translation list until the translation is completed
From the String menu choose Check spelling or press the F7 key to start the spelling
checker. Passolo checks all the translated entries in the translation list, beginning with
the currently selected entry. When Passolo finds a possible spelling error, you can select
a correction in the Spelling dialog. The title bar of the dialog indicates which program is being used for spell checking.
The context of the current entry is shown in the Checking field. By clicking the Go to
button you can discontinue the spelling check and jump directly to the relevant entry in
the translation list.
The Not in dictionary field indicates possible spelling errors. You can edit the text in
this field and then click Change – or you can choose the correct spelling from the list of Suggestions and click Change.
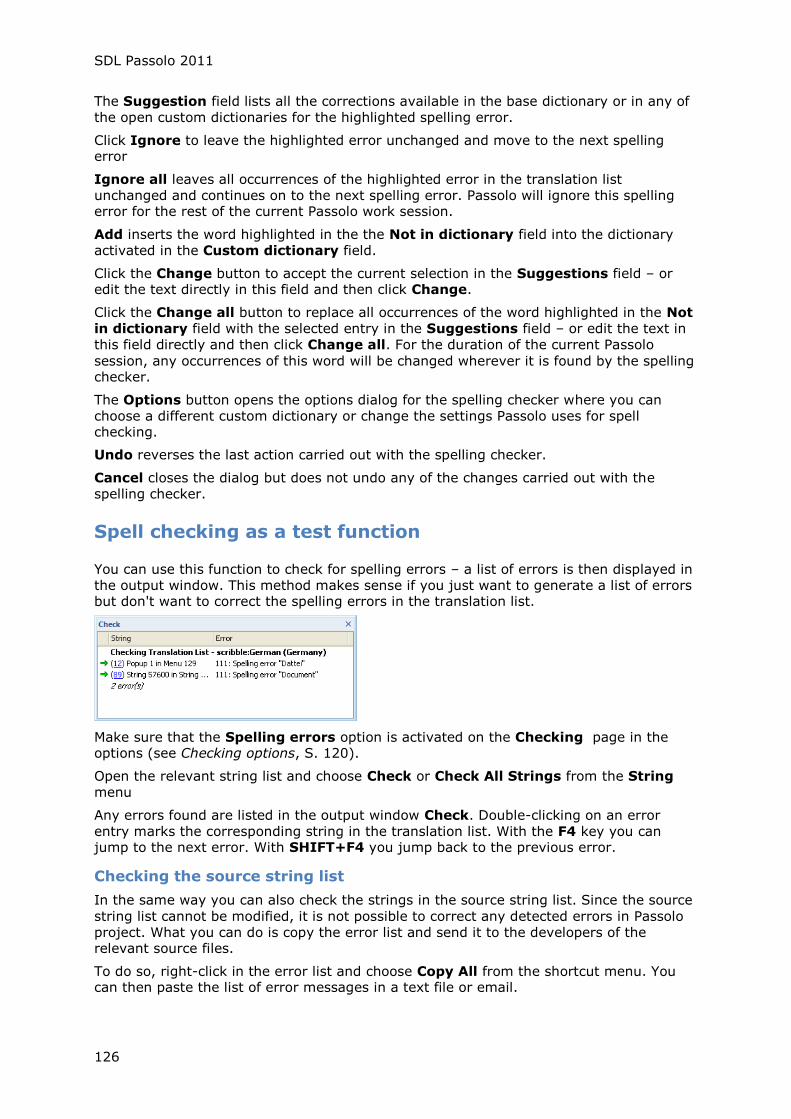
SDL Passolo 2011
126
The Suggestion field lists all the corrections available in the base dictionary or in any of
the open custom dictionaries for the highlighted spelling error.
Click Ignore to leave the highlighted error unchanged and move to the next spelling error
Ignore all leaves all occurrences of the highlighted error in the translation list
unchanged and continues on to the next spelling error. Passolo will ignore this spelling error for the rest of the current Passolo work session.
Add inserts the word highlighted in the the Not in dictionary field into the dictionary
activated in the Custom dictionary field.
Click the Change button to accept the current selection in the Suggestions field – or edit the text directly in this field and then click Change.
Click the Change all button to replace all occurrences of the word highlighted in the Not
in dictionary field with the selected entry in the Suggestions field – or edit the text in
this field directly and then click Change all. For the duration of the current Passolo
session, any occurrences of this word will be changed wherever it is found by the spelling checker.
The Options button opens the options dialog for the spelling checker where you can
choose a different custom dictionary or change the settings Passolo uses for spell checking.
Undo reverses the last action carried out with the spelling checker.
Cancel closes the dialog but does not undo any of the changes carried out with the
spelling checker.
Spell checking as a test function
You can use this function to check for spelling errors – a list of errors is then displayed in
the output window. This method makes sense if you just want to generate a list of errors but don't want to correct the spelling errors in the translation list.
Make sure that the Spelling errors option is activated on the Checking page in the options (see Checking options, S. 120).
Open the relevant string list and choose Check or Check All Strings from the String
menu
Any errors found are listed in the output window Check. Double-clicking on an error
entry marks the corresponding string in the translation list. With the F4 key you can jump to the next error. With SHIFT+F4 you jump back to the previous error.
Checking the source string list
In the same way you can also check the strings in the source string list. Since the source
string list cannot be modified, it is not possible to correct any detected errors in Passolo
project. What you can do is copy the error list and send it to the developers of the relevant source files.
To do so, right-click in the error list and choose Copy All from the shortcut menu. You can then paste the list of error messages in a text file or email.

The Translation
127
Spell checking options
In the Tools menu click on the Options command and then select Spell checking to
specify the spell checking options. By default Passolo uses the internal spelling checker
for the supported languages – for all other languages the spell checking function is
turned off.
Language-specific options
Choose a language entry from the Settings for selection box to display or modify the
spell checking options for that language. The list of languages includes only the standard
languages. With the Show regions option the list can be extended to include the available region settings for these languages.
In the Spell checker field, choose the program you want to use to check the spelling for the selected language.
In the Dictionaries field, choose the base dictionary you want to use to check the
spelling for the selected language. This selection can only be made when the internal spelling checker is used.
Custom dictionaries
During text entry the words used in the translation are compared with the entries in the
base dictionary. The base dictionary contains the most commonly used words in the
given language, but it certainly will not include an exhaustive list of proper names,
technical terms, abbreviations, and so forth. These words can be added to a custom
dictionary so that they are not marked as errors by the spelling checker. The available
custom dictionaries are listed in the Custom dictionaries field.
Click New to create a new custom dictionary. See Creating a new custom dictionary.
Click Add to add an existing custom dictionary to the list of custom dictionaries. In the
file selection dialog specify the custom dictionary file you want to use, and click OK.
Click the Edit button. This opens the custom dictionary in the dictionary editor allowing
you to add new words to the custom dictionary or also to edit or delete existing entries.
Press the RETURN key after each entry in the dictionary so that every word is in a
separate line. When you are finished editing the dictionary click File then Save – then close the editor by clicking File then Exit.
Click Remove to remove an existing custom dictionary from the list. You will need to
confirm the delete function in the dialog box that appears. If you also want to delete the respective dictionary file, activate the Delete file option in this dialog.
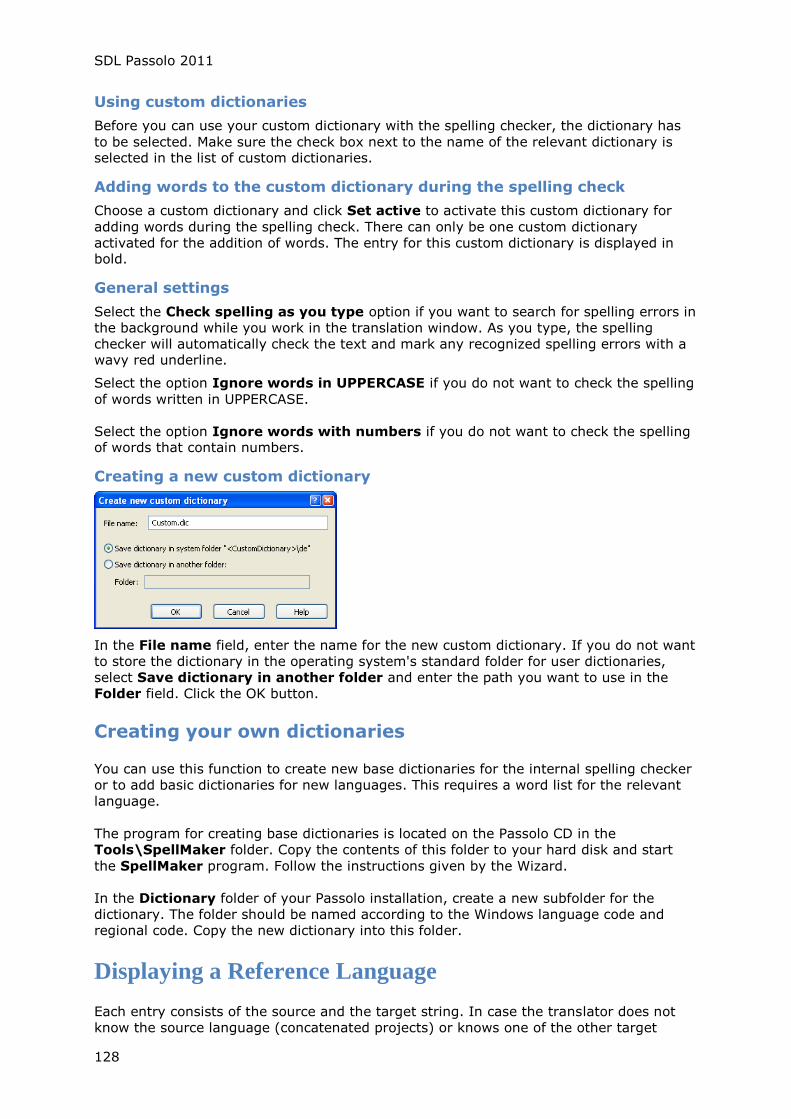
SDL Passolo 2011
128
Using custom dictionaries
Before you can use your custom dictionary with the spelling checker, the dictionary has
to be selected. Make sure the check box next to the name of the relevant dictionary is selected in the list of custom dictionaries.
Adding words to the custom dictionary during the spelling check
Choose a custom dictionary and click Set active to activate this custom dictionary for
adding words during the spelling check. There can only be one custom dictionary
activated for the addition of words. The entry for this custom dictionary is displayed in bold.
General settings
Select the Check spelling as you type option if you want to search for spelling errors in
the background while you work in the translation window. As you type, the spelling
checker will automatically check the text and mark any recognized spelling errors with a wavy red underline.
Select the option Ignore words in UPPERCASE if you do not want to check the spelling
of words written in UPPERCASE.
Select the option Ignore words with numbers if you do not want to check the spelling of words that contain numbers.
Creating a new custom dictionary
In the File name field, enter the name for the new custom dictionary. If you do not want
to store the dictionary in the operating system's standard folder for user dictionaries,
select Save dictionary in another folder and enter the path you want to use in the
Folder field. Click the OK button.
Creating your own dictionaries
You can use this function to create new base dictionaries for the internal spelling checker
or to add basic dictionaries for new languages. This requires a word list for the relevant
language.
The program for creating base dictionaries is located on the Passolo CD in the
Tools\SpellMaker folder. Copy the contents of this folder to your hard disk and start
the SpellMaker program. Follow the instructions given by the Wizard.
In the Dictionary folder of your Passolo installation, create a new subfolder for the
dictionary. The folder should be named according to the Windows language code and
regional code. Copy the new dictionary into this folder.
Displaying a Reference Language
Each entry consists of the source and the target string. In case the translator does not
know the source language (concatenated projects) or knows one of the other target

The Translation
129
languages in addition to the source language, it may helpful and might even be
necessary to display this other language in an additional column in the translation list, next to the source and target strings.
To add another column for a reference language to the translation list display, choose
Reference language from the String list menu. To include an additional column with
the reference language when exporting translation bundles, choose the Reference
language button in the Export Options for Translation Bundles (S. 212) dialog.
Activate the Reference option and choose the language to be displayed. The string lists
for the selected language should already be translated as far as possible.
When exporting translation bundles you can also select a different language as the
alternative source language. The selected language then replaces the current source language when this translation bundle is processed.
To remove the column with the reference language, activate the option Don't display an alternative source language.
Adding a Task
Select an individual entry in a source string list or translation list and choose Add Task
from the Edit menu (or the context menu) to create a new task. Enter the details in the Task dialog.
In the Comment field, enter a description of the task.
In the This is a field choose the type of task. Tasks are always project related. The
current project is automatically displayed in the Project field
A general task is only stored on the current computer. Thus, it is always visible
whenever Passolo is running. Use this method when the projects are only going to be
edited on one computer and all the defined tasks should be visible, regardless of whether
a project is open or not.
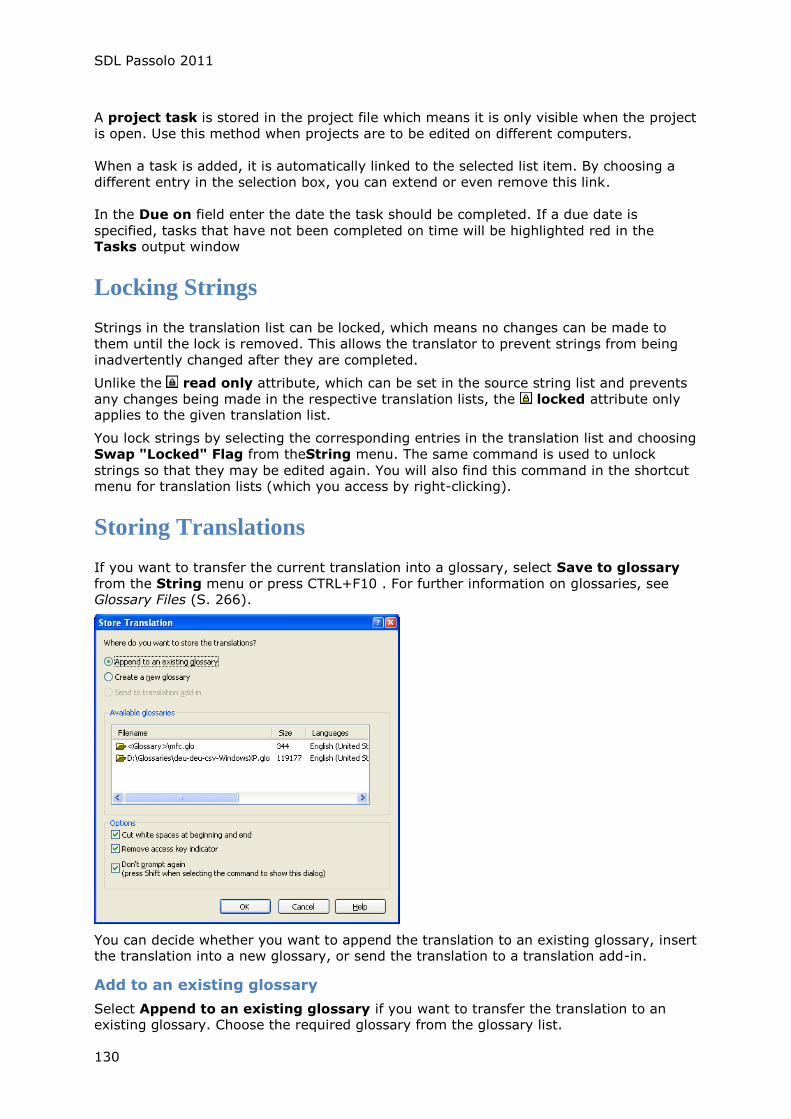
SDL Passolo 2011
130
A project task is stored in the project file which means it is only visible when the project
is open. Use this method when projects are to be edited on different computers.
When a task is added, it is automatically linked to the selected list item. By choosing a
different entry in the selection box, you can extend or even remove this link.
In the Due on field enter the date the task should be completed. If a due date is
specified, tasks that have not been completed on time will be highlighted red in the Tasks output window
Locking Strings
Strings in the translation list can be locked, which means no changes can be made to
them until the lock is removed. This allows the translator to prevent strings from being
inadvertently changed after they are completed.
Unlike the read only attribute, which can be set in the source string list and prevents
any changes being made in the respective translation lists, the locked attribute only applies to the given translation list.
You lock strings by selecting the corresponding entries in the translation list and choosing
Swap "Locked" Flag from theString menu. The same command is used to unlock
strings so that they may be edited again. You will also find this command in the shortcut menu for translation lists (which you access by right-clicking).
Storing Translations
If you want to transfer the current translation into a glossary, select Save to glossary
from the String menu or press CTRL+F10 . For further information on glossaries, see Glossary Files (S. 266).
You can decide whether you want to append the translation to an existing glossary, insert the translation into a new glossary, or send the translation to a translation add-in.
Add to an existing glossary
Select Append to an existing glossary if you want to transfer the translation to an existing glossary. Choose the required glossary from the glossary list.
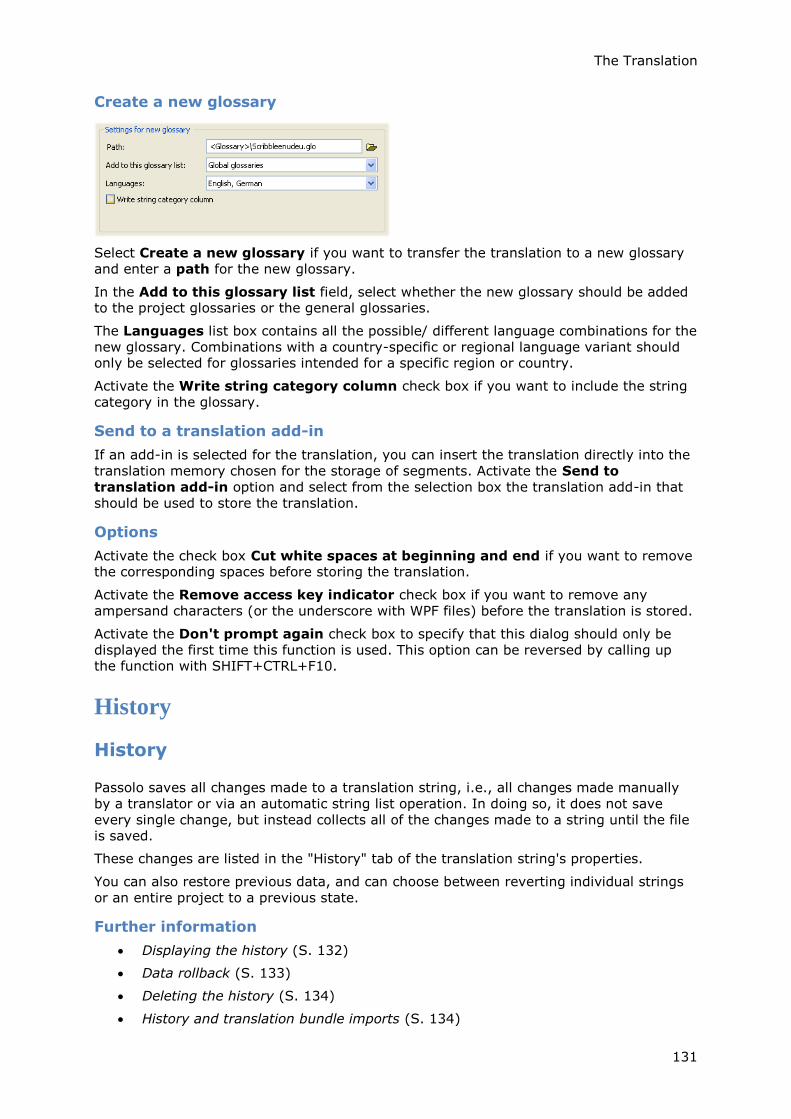
The Translation
131
Create a new glossary
Select Create a new glossary if you want to transfer the translation to a new glossary
and enter a path for the new glossary.
In the Add to this glossary list field, select whether the new glossary should be added to the project glossaries or the general glossaries.
The Languages list box contains all the possible/ different language combinations for the
new glossary. Combinations with a country-specific or regional language variant should only be selected for glossaries intended for a specific region or country.
Activate the Write string category column check box if you want to include the string
category in the glossary.
Send to a translation add-in
If an add-in is selected for the translation, you can insert the translation directly into the
translation memory chosen for the storage of segments. Activate the Send to
translation add-in option and select from the selection box the translation add-in that
should be used to store the translation.
Options
Activate the check box Cut white spaces at beginning and end if you want to remove the corresponding spaces before storing the translation.
Activate the Remove access key indicator check box if you want to remove any
ampersand characters (or the underscore with WPF files) before the translation is stored.
Activate the Don't prompt again check box to specify that this dialog should only be
displayed the first time this function is used. This option can be reversed by calling up the function with SHIFT+CTRL+F10.
History
History
Passolo saves all changes made to a translation string, i.e., all changes made manually
by a translator or via an automatic string list operation. In doing so, it does not save
every single change, but instead collects all of the changes made to a string until the file is saved.
These changes are listed in the "History" tab of the translation string's properties.
You can also restore previous data, and can choose between reverting individual strings
or an entire project to a previous state.
Further information
Displaying the history (S. 132)
Data rollback (S. 133)
Deleting the history (S. 134)
History and translation bundle imports (S. 134)
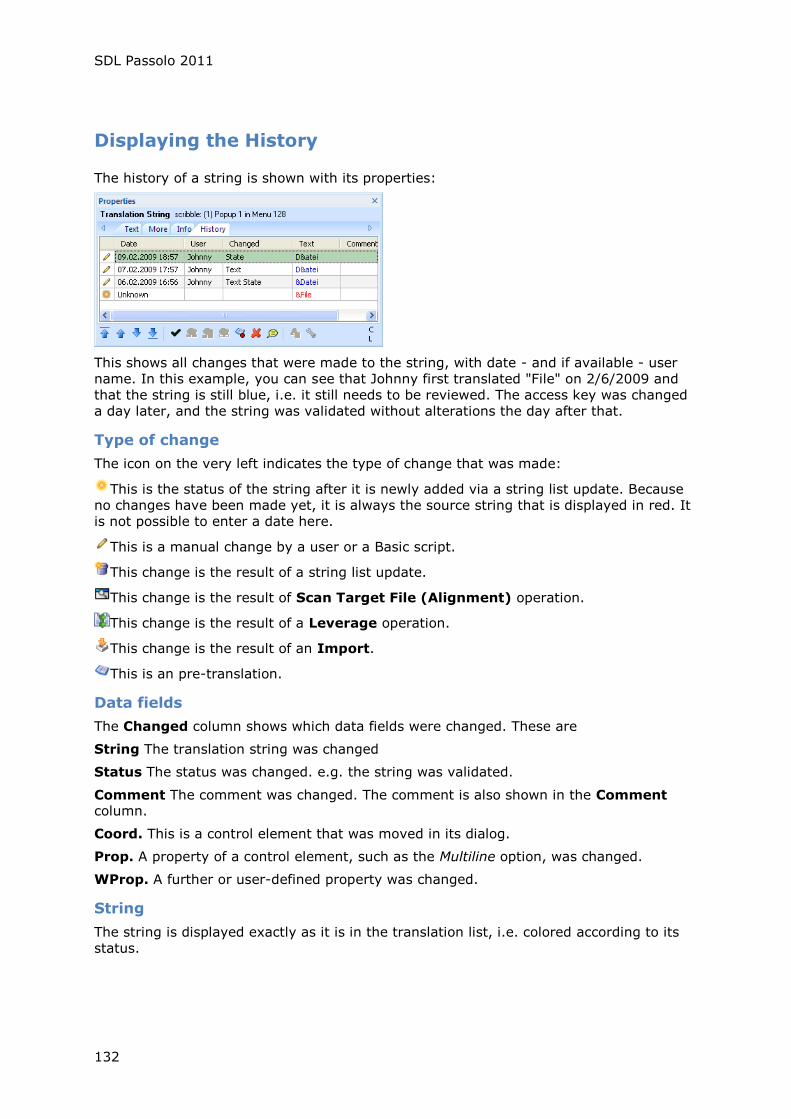
SDL Passolo 2011
132
Displaying the History
The history of a string is shown with its properties:
This shows all changes that were made to the string, with date - and if available - user
name. In this example, you can see that Johnny first translated "File" on 2/6/2009 and
that the string is still blue, i.e. it still needs to be reviewed. The access key was changed
a day later, and the string was validated without alterations the day after that.
Type of change
The icon on the very left indicates the type of change that was made:
This is the status of the string after it is newly added via a string list update. Because
no changes have been made yet, it is always the source string that is displayed in red. It
is not possible to enter a date here.
This is a manual change by a user or a Basic script.
This change is the result of a string list update.
This change is the result of Scan Target File (Alignment) operation.
This change is the result of a Leverage operation.
This change is the result of an Import.
This is an pre-translation.
Data fields
The Changed column shows which data fields were changed. These are
String The translation string was changed
Status The status was changed. e.g. the string was validated.
Comment The comment was changed. The comment is also shown in the Comment column.
Coord. This is a control element that was moved in its dialog.
Prop. A property of a control element, such as the Multiline option, was changed.
WProp. A further or user-defined property was changed.
String
The string is displayed exactly as it is in the translation list, i.e. colored according to its
status.
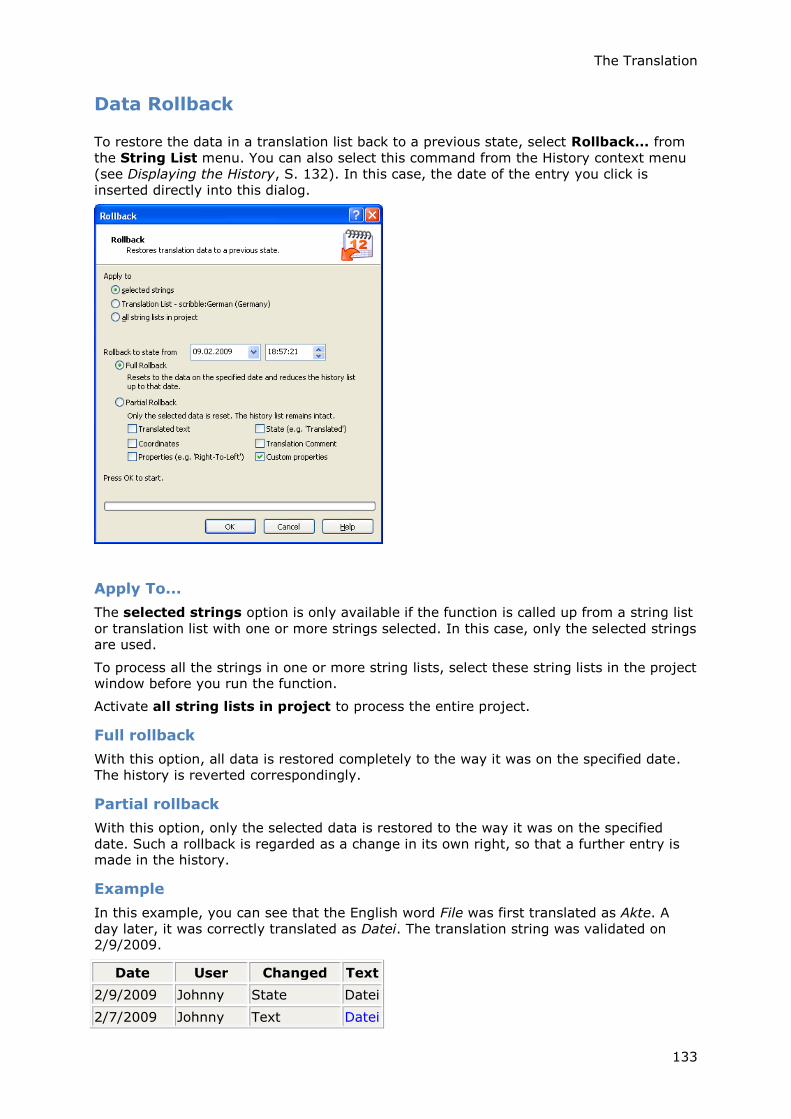
The Translation
133
Data Rollback
To restore the data in a translation list back to a previous state, select Rollback... from
the String List menu. You can also select this command from the History context menu
(see Displaying the History, S. 132). In this case, the date of the entry you click is
inserted directly into this dialog.
Apply To...
The selected strings option is only available if the function is called up from a string list
or translation list with one or more strings selected. In this case, only the selected strings are used.
To process all the strings in one or more string lists, select these string lists in the project window before you run the function.
Activate all string lists in project to process the entire project.
Full rollback
With this option, all data is restored completely to the way it was on the specified date.
The history is reverted correspondingly.
Partial rollback
With this option, only the selected data is restored to the way it was on the specified
date. Such a rollback is regarded as a change in its own right, so that a further entry is made in the history.
Example
In this example, you can see that the English word File was first translated as Akte. A
day later, it was correctly translated as Datei. The translation string was validated on 2/9/2009.
Date User Changed Text
2/9/2009 Johnny State Datei
2/7/2009 Johnny Text Datei
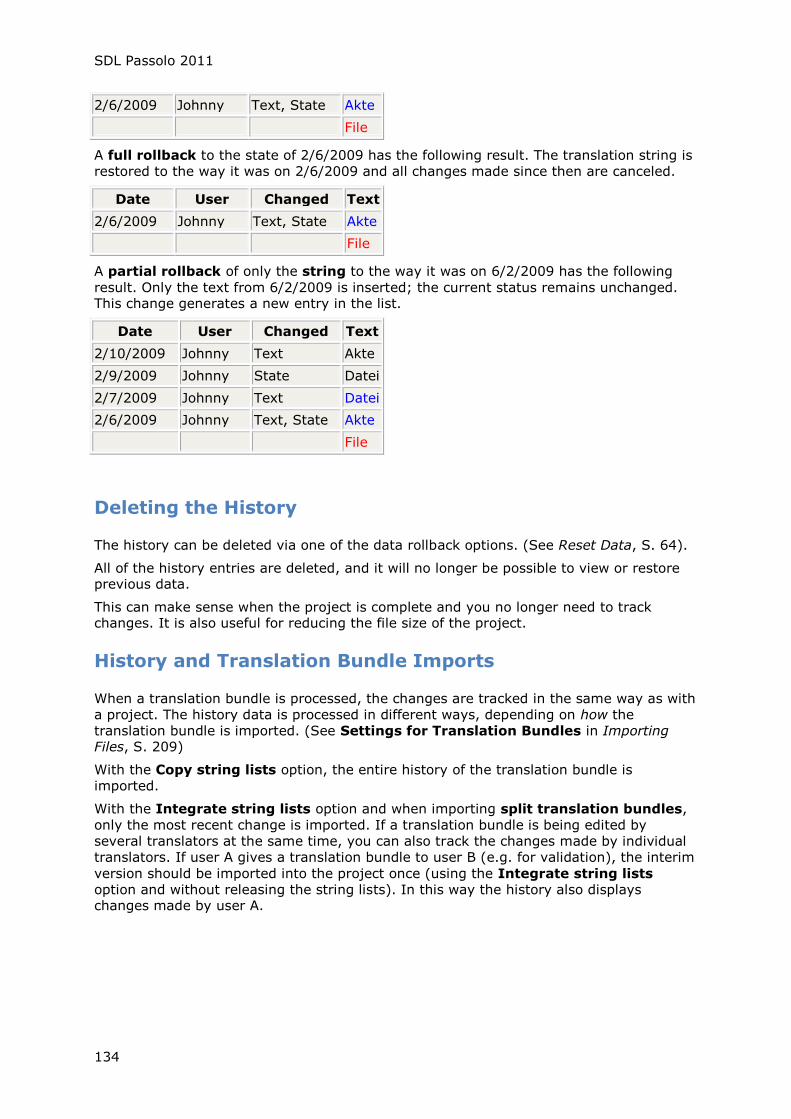
SDL Passolo 2011
134
2/6/2009 Johnny Text, State Akte
File
A full rollback to the state of 2/6/2009 has the following result. The translation string is
restored to the way it was on 2/6/2009 and all changes made since then are canceled.
Date User Changed Text
2/6/2009 Johnny Text, State Akte
File
A partial rollback of only the string to the way it was on 6/2/2009 has the following
result. Only the text from 6/2/2009 is inserted; the current status remains unchanged. This change generates a new entry in the list.
Date User Changed Text
2/10/2009 Johnny Text Akte
2/9/2009 Johnny State Datei
2/7/2009 Johnny Text Datei
2/6/2009 Johnny Text, State Akte
File
Deleting the History
The history can be deleted via one of the data rollback options. (See Reset Data, S. 64).
All of the history entries are deleted, and it will no longer be possible to view or restore previous data.
This can make sense when the project is complete and you no longer need to track changes. It is also useful for reducing the file size of the project.
History and Translation Bundle Imports
When a translation bundle is processed, the changes are tracked in the same way as with
a project. The history data is processed in different ways, depending on how the
translation bundle is imported. (See Settings for Translation Bundles in Importing Files, S. 209)
With the Copy string lists option, the entire history of the translation bundle is
imported.
With the Integrate string lists option and when importing split translation bundles,
only the most recent change is imported. If a translation bundle is being edited by
several translators at the same time, you can also track the changes made by individual
translators. If user A gives a translation bundle to user B (e.g. for validation), the interim
version should be imported into the project once (using the Integrate string lists
option and without releasing the string lists). In this way the history also displays changes made by user A.
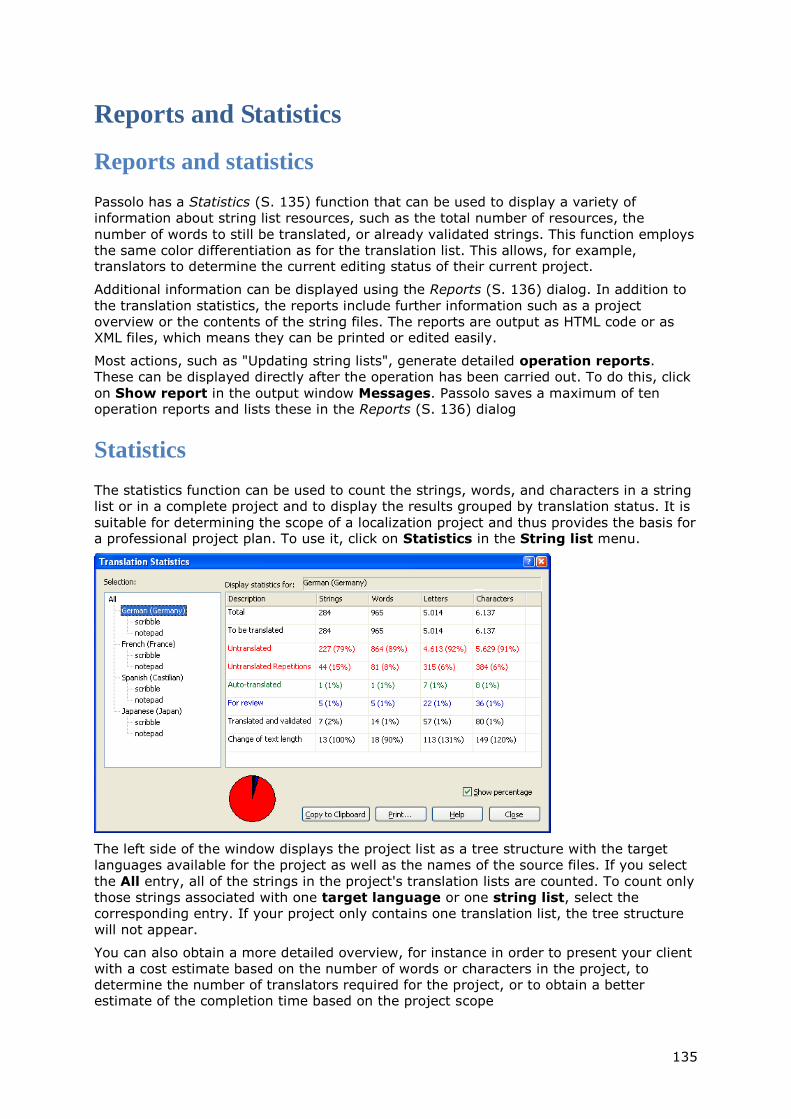
135
Reports and Statistics
Reports and statistics
Passolo has a Statistics (S. 135) function that can be used to display a variety of
information about string list resources, such as the total number of resources, the
number of words to still be translated, or already validated strings. This function employs
the same color differentiation as for the translation list. This allows, for example, translators to determine the current editing status of their current project.
Additional information can be displayed using the Reports (S. 136) dialog. In addition to
the translation statistics, the reports include further information such as a project
overview or the contents of the string files. The reports are output as HTML code or as XML files, which means they can be printed or edited easily.
Most actions, such as "Updating string lists", generate detailed operation reports.
These can be displayed directly after the operation has been carried out. To do this, click
on Show report in the output window Messages. Passolo saves a maximum of ten operation reports and lists these in the Reports (S. 136) dialog
Statistics
The statistics function can be used to count the strings, words, and characters in a string
list or in a complete project and to display the results grouped by translation status. It is
suitable for determining the scope of a localization project and thus provides the basis for a professional project plan. To use it, click on Statistics in the String list menu.
The left side of the window displays the project list as a tree structure with the target
languages available for the project as well as the names of the source files. If you select
the All entry, all of the strings in the project's translation lists are counted. To count only
those strings associated with one target language or one string list, select the
corresponding entry. If your project only contains one translation list, the tree structure
will not appear.
You can also obtain a more detailed overview, for instance in order to present your client
with a cost estimate based on the number of words or characters in the project, to
determine the number of translators required for the project, or to obtain a better estimate of the completion time based on the project scope
SDL Passolo 2011
136
Data Displayed
Strings Corresponds to the individual entries in the translation list.
Words The number of words in all the strings.
Letters The number of letters, e.g. a, Z, é
Characters The number of letters plus all the other characters such as spaces and
punctuation marks.
The statistics comprise
Total The total number of strings including repetitions and read-only strings
Total number
of strings to be
translated
The number of strings that have to be translated, including
repetitions.
Number of
untranslated
strings
The number of strings that have to be translated, without repetitions.
Number of
untranslated,
repeated
strings
The number of strings that have to be translated but occur again
somewhere else so that they can be translated using the pre-
translation or replicate functions.
Number of
strings to be
reviewed
The number of strings that have already been translated but not yet
validated
Number of
translated and
validated
strings
The number of strings that have already been translated and validated
Change of text
length in
translation
Indicates the difference in text length between the source strings and
the translated strings.
Further Processing of Data
To facilitate further processing of the data, you can use the Copy to clipboard button
which copies the contents of the table onto the clipboard. It can then be inserted e.g.
into a spreadsheet program. In this case, however, you are advised to deactivate the
Show percentage checkbox, as otherwise the percentage values will also be copied to
the insertion area, making direct evaluation difficult.
Reports
Passolo can generate different reports containing information on the current project.
To display a report, choose Report from the String list menu
The following dialog appears:
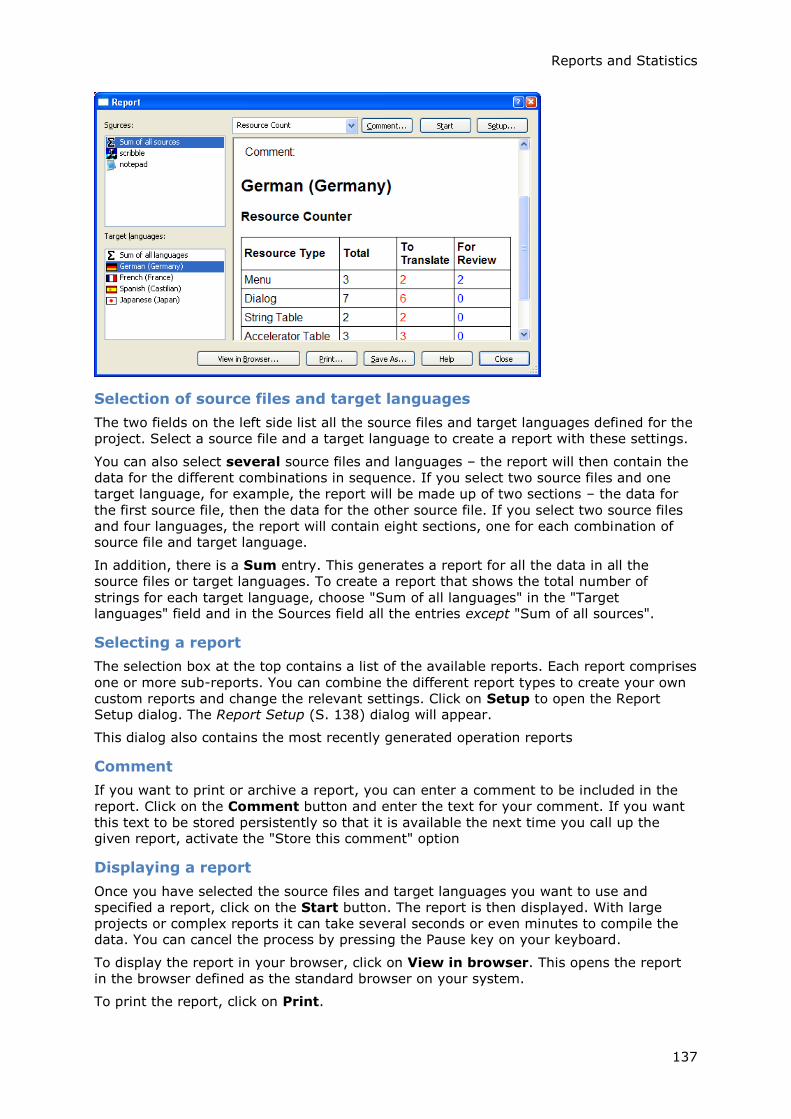
Reports and Statistics
137
Selection of source files and target languages
The two fields on the left side list all the source files and target languages defined for the
project. Select a source file and a target language to create a report with these settings.
You can also select several source files and languages – the report will then contain the
data for the different combinations in sequence. If you select two source files and one
target language, for example, the report will be made up of two sections – the data for
the first source file, then the data for the other source file. If you select two source files
and four languages, the report will contain eight sections, one for each combination of source file and target language.
In addition, there is a Sum entry. This generates a report for all the data in all the
source files or target languages. To create a report that shows the total number of
strings for each target language, choose "Sum of all languages" in the "Target languages" field and in the Sources field all the entries except "Sum of all sources".
Selecting a report
The selection box at the top contains a list of the available reports. Each report comprises
one or more sub-reports. You can combine the different report types to create your own
custom reports and change the relevant settings. Click on Setup to open the Report Setup dialog. The Report Setup (S. 138) dialog will appear.
This dialog also contains the most recently generated operation reports
Comment
If you want to print or archive a report, you can enter a comment to be included in the
report. Click on the Comment button and enter the text for your comment. If you want
this text to be stored persistently so that it is available the next time you call up the given report, activate the "Store this comment" option
Displaying a report
Once you have selected the source files and target languages you want to use and
specified a report, click on the Start button. The report is then displayed. With large
projects or complex reports it can take several seconds or even minutes to compile the data. You can cancel the process by pressing the Pause key on your keyboard.
To display the report in your browser, click on View in browser. This opens the report
in the browser defined as the standard browser on your system.
To print the report, click on Print.
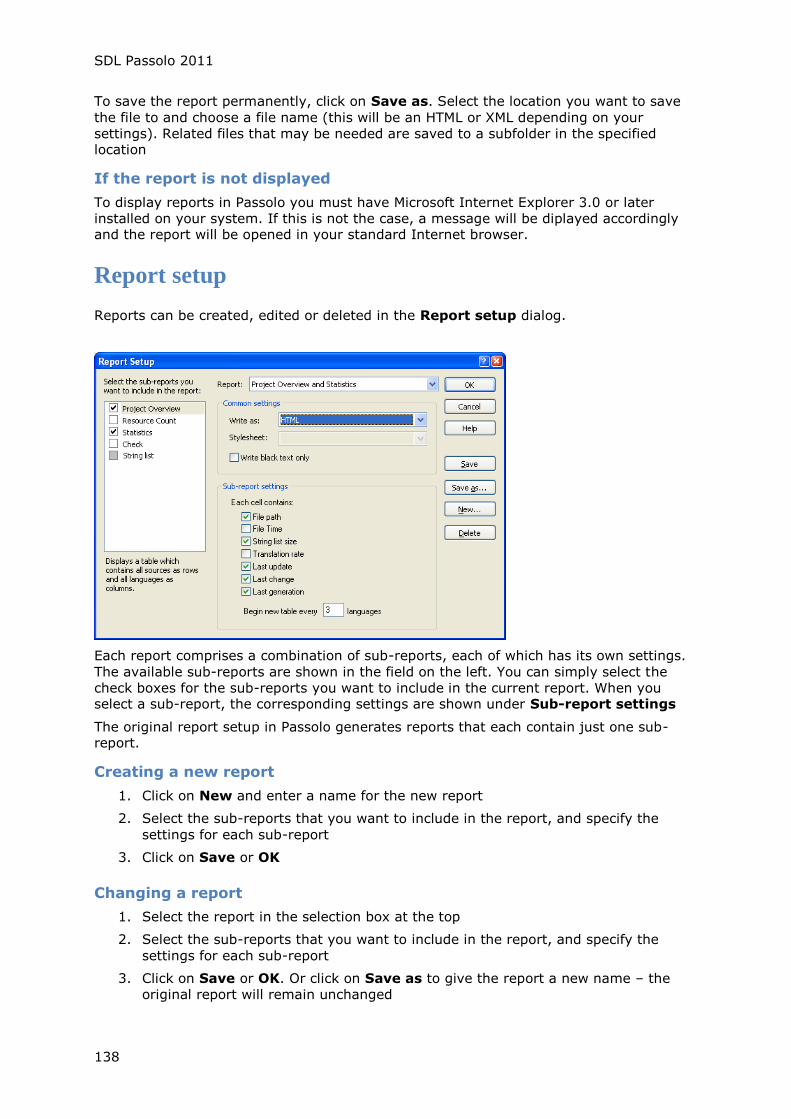
SDL Passolo 2011
138
To save the report permanently, click on Save as. Select the location you want to save
the file to and choose a file name (this will be an HTML or XML depending on your
settings). Related files that may be needed are saved to a subfolder in the specified location
If the report is not displayed
To display reports in Passolo you must have Microsoft Internet Explorer 3.0 or later
installed on your system. If this is not the case, a message will be diplayed accordingly and the report will be opened in your standard Internet browser.
Report setup
Reports can be created, edited or deleted in the Report setup dialog.
Each report comprises a combination of sub-reports, each of which has its own settings.
The available sub-reports are shown in the field on the left. You can simply select the
check boxes for the sub-reports you want to include in the current report. When you select a sub-report, the corresponding settings are shown under Sub-report settings
The original report setup in Passolo generates reports that each contain just one sub-report.
Creating a new report
1. Click on New and enter a name for the new report
2. Select the sub-reports that you want to include in the report, and specify the
settings for each sub-report
3. Click on Save or OK
Changing a report
1. Select the report in the selection box at the top
2. Select the sub-reports that you want to include in the report, and specify the
settings for each sub-report
3. Click on Save or OK. Or click on Save as to give the report a new name – the
original report will remain unchanged

Reports and Statistics
139
Deleting a report
1. Select the report in the selection box at the top
2. Click on Delete and then click Yes in the confirmation message
General settings
Select the desired output format:
HTML The report consists of an HTML file that is suitable for display or printing.
Some reports (e.g. statistics) use color formatting to display data. If you do not
want to use color formatting, activate the Use black text only option.
XML The report consists of an XML file that contains all of the report data. These
files can be edited with other programs. If you have an XSL stylesheet that you
want to use with your XML output, you can specify this so that it is referenced in
the XML file. This can be either a complete path to a .XSL file or the name of a file
in the system folder for stylesheets (see System folders, S. 243) For more information on XML and XSL, please consult relevant technical literature.
Sub-report "Project overview"
This sub-report creates a table containing data on all the string lists. Each row contains
the source files and the corresponding target files for a string list. Each cell contains data
from a source string list or a translation list. You can use the Sub-report settings to specify which data is shown
If your project contains numerous target languages, you can specify that a new table will be created after a certain number of languages.
The project overview is not affected by the source files and languages selected in the
Reports (S. 136) dialog. It always contains the data for the complete project.
Sub-report "Resource Count"
This sub-report shows a count of the resources contained in the string files. The data is
listed in table format. In addition to the total number of resources, the report also
indicates the number of resources with untranslated and the number with unvalidated
strings.
Sub-report "Statistics"
This sub-report generates a table, as with the Statistics (S. 135) function
Sub-report "Check"
This sub-report carries out a translation check (see Check functions, S. 119). If you
select the Compact option, only the number of errors found is shown. To obtain a list of
all errors that were found, uncheck this box. When you generate a report using "Sum of all sources" or "Sum of all languages", the report is always output in compact mode.
Sub-report "String list"
This sub-report outputs all of the strings in a string list. If you select HTML output, the
string list is output in a table, as in the string list window. If the string list window is
visible, you can choose whether you want to output to default columns or to columns
like those currently displayed in the string list window. (See Configuration of Columns in
the String List (S. 49). You can also use the same sort order and filter as shown in the
display. If the string list is currently not displayed, unsorted default columns are always output.
In the case of XML output, the file is output in the LPX format. This is an XML format that
describes Passolo string lists. A corresponding document type definition (DTD) is
available in the lpx10.dtd file, which is located in the Passolo installation folder. When a report is saved, this file is also copied.

SDL Passolo 2011
140

141
Binary Resources
Configuration of Binaries
Configuration of Binaries
Passolo is a program that supports you in the translation of software strings. Software
source files can, however, contain other resources such as bitmaps, icons, and cursors.
In developing software that is supposed to be adapted to the needs of international
users, it is important to bear in mind that bitmaps, icons, and cursors should remain
culture (and therefore language) independent. Neither should these resources contain any strings, and the symbols employed should be generally recognizable.
If, however, the source files you are localizing require that these resources also be
adjusted, you can use the binary editors integrated in Passolo to edit them. For more detailed information, please refer to Binary Editors (S. 143).
The software to be translated may also contain user-defined resources with embedded
strings. Aside from the option of selecting an external editing program for these types of
resources, add-ins can also be used for user-defined resources. Such add-ins are either
optionally available or must be specifically programmed. For further details, please refer
to Add-ins for user-defined resources (S. 147), and to Add-ins for Passolo (S. 149).
Naturally, you also have the option of linking an external editing program of your choice.
Choose Options from the Tools menu and go to the Binaries page to specify which programs you want to use to edit the various graphic formats.
The dialog displays a list of registered binaries together with the associated editing programs that will be called up to modify the resources.
Binary Editor Selection
By clicking on the New button in the Select Editor for Binaries dialog, you can specify new resource types or modify the configuration of existing ones.
Under Resource type enter the type name as it is used in the program being translated.
Since the names of standard resource types are already defined, these cannot be
changed.

SDL Passolo 2011
142
The information is transferred to the editing program in a temporary file. Enter the file
name extension to be used for this file in the Extension for temporary file field.
If you are using the internal editors to edit binaries, you can activate them with the aid of the Edit with internal editor radio button.
To call up the editor linked to the file name extension via the operating system, select the Edit with windows shell command radio button.
If you want program assignment to remain independent of the file name extension,
select the Edit with this application radio button then select the desired program from
the dialog that appears.
Displaying and Modifying Binaries
If you want to extract binaries from the source file, you must specify this action in the
Source File Options dialog before updating the source file (for more detailed information about this refer to The Source File Options Dialog, S. 30).
After the update, source string and translation lists will contain the desired resources. If
you double-click on one of these resources in the resource list, it will be saved to a
temporary file and the assigned editing program will be called up. You can now display
the resources and modify them as required. However, the modifications will only be
reflected in Passolo is you are editing a resource from the translation list that is not write
protected.
While the editing program is running, Passolo remains in a standby mode and carries out
no further operations. If you attempt to switch to Passolo, a message indicating that the
system expects you to exit from the editing program is generated. This message
disappears as soon as you close the editing program. However, if you want to continue to
use the editing program to edit later resources, you can also save the resources you have
already modified, switch to Passolo, and click on the Cancel button to continue working with Passolo.
Transferring Modifications
If you edit a binary in the translation list, you can specify whether this resource is to be
included during the generation of the target file. The resource’s Resource Properties
dialog contains a Write modifications to target file checkbox. This checkbox is normally
activated, that is, the target file will contain the modified resource. If you deactivate this
checkbox, the resource will not be transferred and the target file will contain the original
version from the source file. In addition, any modifications you make will be deleted
during the subsequent update to the translation list and the original resource from the source file will again be used.
If the resource in the target file changes, the resource you edited will be flagged with a
"c" attribute because it was not automatically overwritten with the source resource
during the string list update. In this case you must decide whether your modified version
should continue to be used, or whether you want to accept the new source resource and possibly modify it as well.
Example
The original German application contains a button on which a green "Ausfahrt" sign is
shown to symbolize exiting the program. In the localized English version you replace the
term "Ausfahrt" with "Exit". During a subsequent upgrade, the color of the exit sign is
changed from green to blue. After updating the string lists, the modified bitmap
(Ausfahrt) is flagged with a "c". You now determine that you can continue to use your
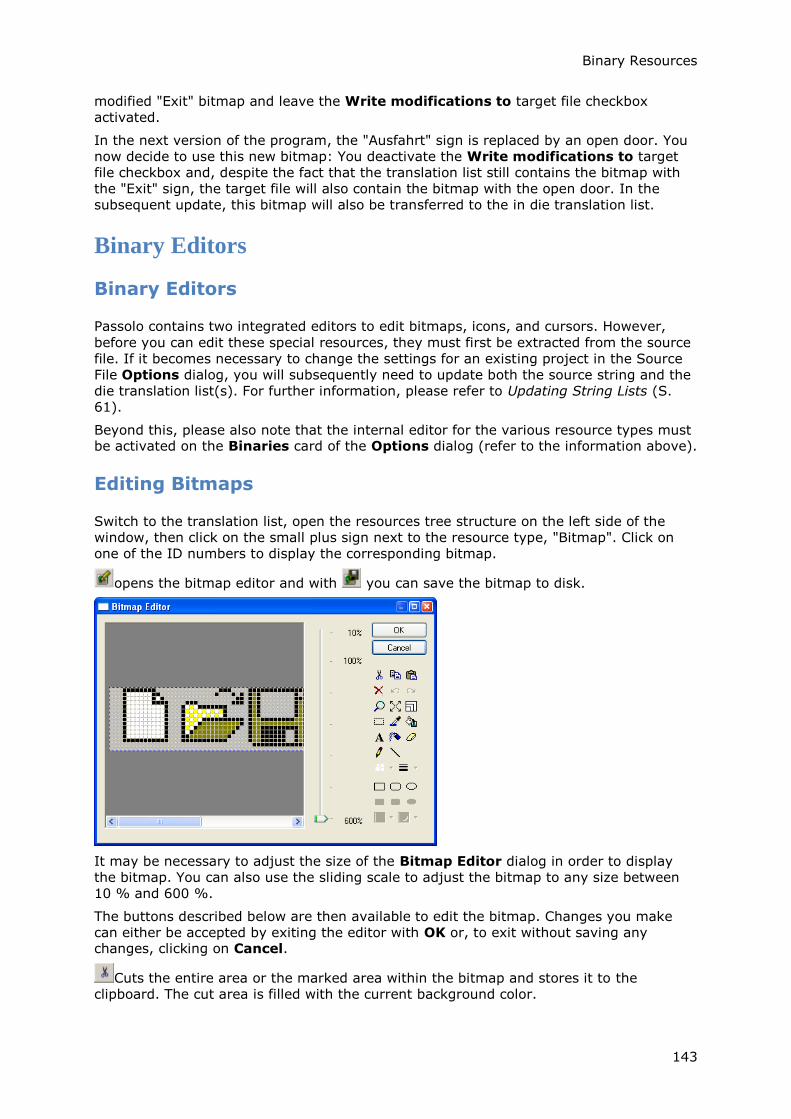
Binary Resources
143
modified "Exit" bitmap and leave the Write modifications to target file checkbox
activated.
In the next version of the program, the "Ausfahrt" sign is replaced by an open door. You
now decide to use this new bitmap: You deactivate the Write modifications to target
file checkbox and, despite the fact that the translation list still contains the bitmap with
the "Exit" sign, the target file will also contain the bitmap with the open door. In the
subsequent update, this bitmap will also be transferred to the in die translation list.
Binary Editors
Binary Editors
Passolo contains two integrated editors to edit bitmaps, icons, and cursors. However,
before you can edit these special resources, they must first be extracted from the source
file. If it becomes necessary to change the settings for an existing project in the Source
File Options dialog, you will subsequently need to update both the source string and the
die translation list(s). For further information, please refer to Updating String Lists (S.
61).
Beyond this, please also note that the internal editor for the various resource types must be activated on the Binaries card of the Options dialog (refer to the information above).
Editing Bitmaps
Switch to the translation list, open the resources tree structure on the left side of the
window, then click on the small plus sign next to the resource type, "Bitmap". Click on
one of the ID numbers to display the corresponding bitmap.
opens the bitmap editor and with you can save the bitmap to disk.
It may be necessary to adjust the size of the Bitmap Editor dialog in order to display
the bitmap. You can also use the sliding scale to adjust the bitmap to any size between
10 % and 600 %.
The buttons described below are then available to edit the bitmap. Changes you make
can either be accepted by exiting the editor with OK or, to exit without saving any changes, clicking on Cancel.
Cuts the entire area or the marked area within the bitmap and stores it to the
clipboard. The cut area is filled with the current background color.

SDL Passolo 2011
144
Copies the entire area or the marked area within the bitmap to the clipboard. The
copied section can then be pasted in the bitmap editor or in another program for additional editing.
Pastes "pixel content" from the clipboard into the bitmap. If you did not define a
specific area prior to pasting, the content is pasted into the upper, left-hand corner of the
bitmap. Use the area tool to define the area where you want the content to be pasted. If
the content is larger than the area you define, you can either choose to have only part of the content copied to it, or to have the area enlarged to hold the entire content.
Deletes the entire or the marked portion of the area and fills the resulting space with
the current background color.
or ALT+BACKPSACE or CTRL+Z undoes the previous action.
or CTRL+Y restores the previously undone action.
Changes the size of the bitmap in the editing window. When using the zoom function,
the left mouse button increases the scale, and the right mouse button decreases it. To hide this function, select a different drawing tool.
Optimally adjusts the bitmap image size to that of the editing window.
Defines the bitmap editing area. Other functions you select, such as cut, copy, paste,
fill, or text input, will then be applied to this marked area. You can move the marked
area by dragging it to the new position with the mouse, and you can change the size of
the area by dragging one of the sizing handles.
Selects the desired drawing color directly from the bitmap as if you were using an
eyedropper, and defines it as the color to be used for lines, strings, or other graphic elements.
Fills contiguous areas of the same color with the currently specified drawing color.
Opens the Text Tool with which you can add text to the bitmap. If you did not mark a
specific area, text input starts from the top, left-hand corner of the bitmap. To add text to a specific area, select the Text Tool first, then define the desired area.
Enter the text in the Text Tool dialog, where you can also define its font, direction, and formatting.
Activates the spray can that lets you randomly distribute dots of the currently
specified drawing color on the bitmap. The spray paint radius or "coating thickness" is determined by the current setting for the line width.
Activates the eraser with which you can remove areas of the bitmap which are then
filled in with the current background color. The size of the area erased is determined by the eraser width setting.
Activates the pencil with which you can sketch on the bitmap using the current drawing color. The thickness of the sketch line is determined by the line width setting.
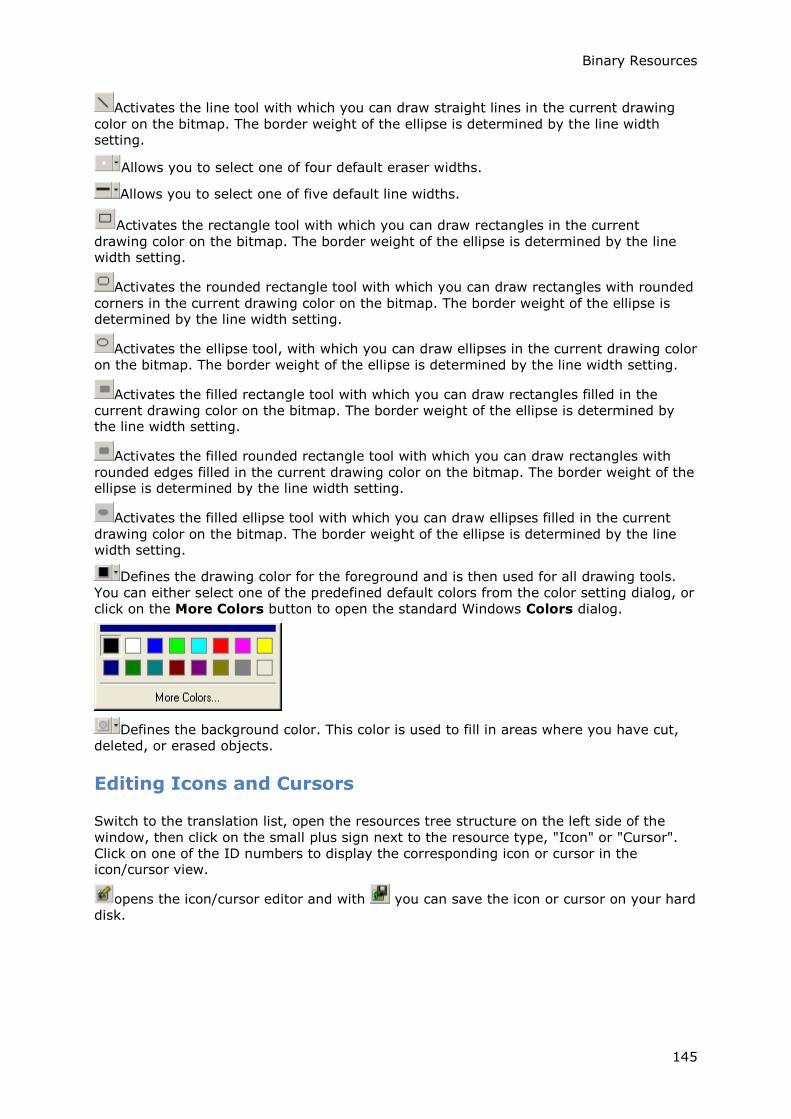
Binary Resources
145
Activates the line tool with which you can draw straight lines in the current drawing
color on the bitmap. The border weight of the ellipse is determined by the line width setting.
Allows you to select one of four default eraser widths.
Allows you to select one of five default line widths.
Activates the rectangle tool with which you can draw rectangles in the current
drawing color on the bitmap. The border weight of the ellipse is determined by the line width setting.
Activates the rounded rectangle tool with which you can draw rectangles with rounded
corners in the current drawing color on the bitmap. The border weight of the ellipse is determined by the line width setting.
Activates the ellipse tool, with which you can draw ellipses in the current drawing color
on the bitmap. The border weight of the ellipse is determined by the line width setting.
Activates the filled rectangle tool with which you can draw rectangles filled in the
current drawing color on the bitmap. The border weight of the ellipse is determined by the line width setting.
Activates the filled rounded rectangle tool with which you can draw rectangles with
rounded edges filled in the current drawing color on the bitmap. The border weight of the ellipse is determined by the line width setting.
Activates the filled ellipse tool with which you can draw ellipses filled in the current
drawing color on the bitmap. The border weight of the ellipse is determined by the line width setting.
Defines the drawing color for the foreground and is then used for all drawing tools.
You can either select one of the predefined default colors from the color setting dialog, or
click on the More Colors button to open the standard Windows Colors dialog.
Defines the background color. This color is used to fill in areas where you have cut,
deleted, or erased objects.
Editing Icons and Cursors
Switch to the translation list, open the resources tree structure on the left side of the
window, then click on the small plus sign next to the resource type, "Icon" or "Cursor".
Click on one of the ID numbers to display the corresponding icon or cursor in the icon/cursor view.
opens the icon/cursor editor and with you can save the icon or cursor on your hard
disk.
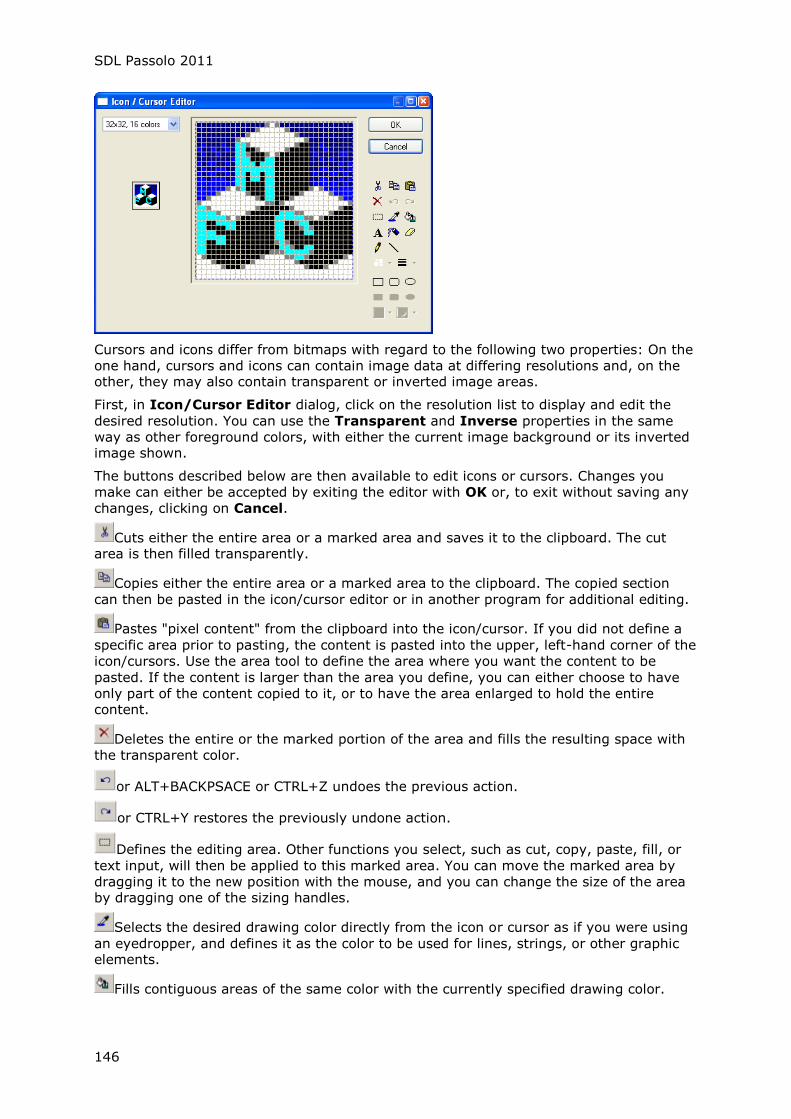
SDL Passolo 2011
146
Cursors and icons differ from bitmaps with regard to the following two properties: On the
one hand, cursors and icons can contain image data at differing resolutions and, on the other, they may also contain transparent or inverted image areas.
First, in Icon/Cursor Editor dialog, click on the resolution list to display and edit the
desired resolution. You can use the Transparent and Inverse properties in the same
way as other foreground colors, with either the current image background or its inverted image shown.
The buttons described below are then available to edit icons or cursors. Changes you
make can either be accepted by exiting the editor with OK or, to exit without saving any
changes, clicking on Cancel.
Cuts either the entire area or a marked area and saves it to the clipboard. The cut area is then filled transparently.
Copies either the entire area or a marked area to the clipboard. The copied section
can then be pasted in the icon/cursor editor or in another program for additional editing.
Pastes "pixel content" from the clipboard into the icon/cursor. If you did not define a
specific area prior to pasting, the content is pasted into the upper, left-hand corner of the
icon/cursors. Use the area tool to define the area where you want the content to be
pasted. If the content is larger than the area you define, you can either choose to have
only part of the content copied to it, or to have the area enlarged to hold the entire content.
Deletes the entire or the marked portion of the area and fills the resulting space with
the transparent color.
or ALT+BACKPSACE or CTRL+Z undoes the previous action.
or CTRL+Y restores the previously undone action.
Defines the editing area. Other functions you select, such as cut, copy, paste, fill, or
text input, will then be applied to this marked area. You can move the marked area by
dragging it to the new position with the mouse, and you can change the size of the area by dragging one of the sizing handles.
Selects the desired drawing color directly from the icon or cursor as if you were using
an eyedropper, and defines it as the color to be used for lines, strings, or other graphic elements.
Fills contiguous areas of the same color with the currently specified drawing color.
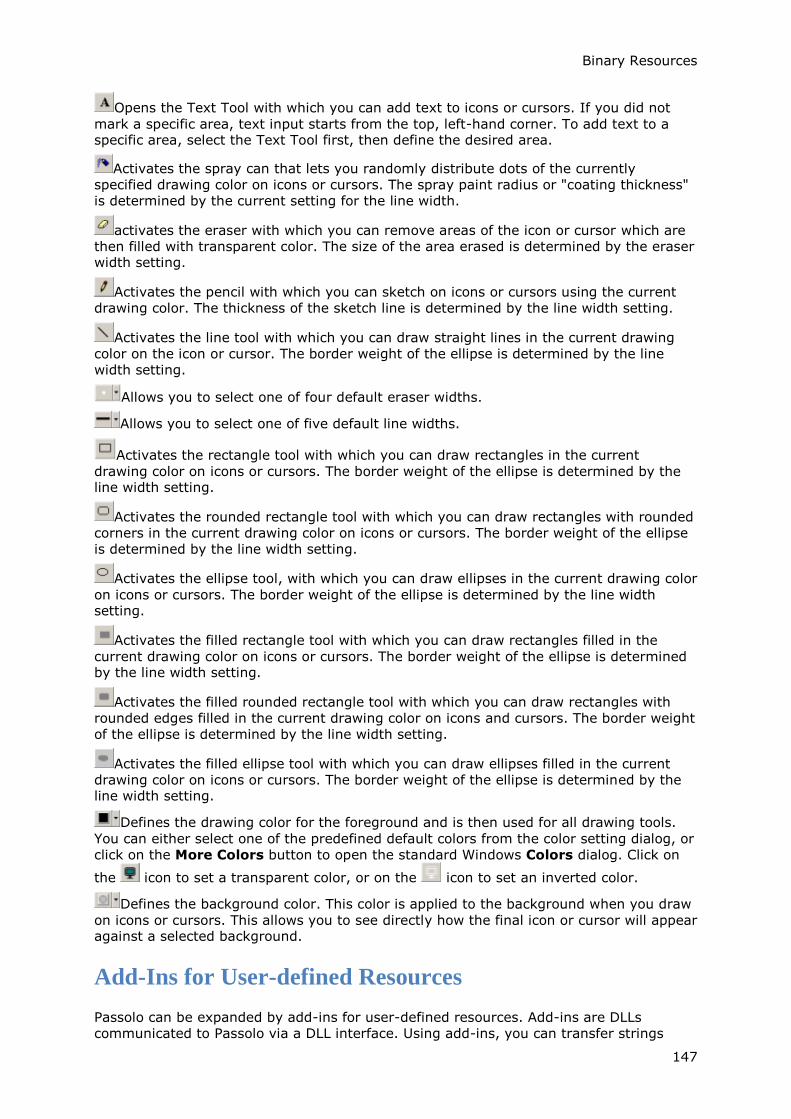
Binary Resources
147
Opens the Text Tool with which you can add text to icons or cursors. If you did not
mark a specific area, text input starts from the top, left-hand corner. To add text to a specific area, select the Text Tool first, then define the desired area.
Activates the spray can that lets you randomly distribute dots of the currently
specified drawing color on icons or cursors. The spray paint radius or "coating thickness"
is determined by the current setting for the line width.
activates the eraser with which you can remove areas of the icon or cursor which are
then filled with transparent color. The size of the area erased is determined by the eraser width setting.
Activates the pencil with which you can sketch on icons or cursors using the current
drawing color. The thickness of the sketch line is determined by the line width setting.
Activates the line tool with which you can draw straight lines in the current drawing
color on the icon or cursor. The border weight of the ellipse is determined by the line
width setting.
Allows you to select one of four default eraser widths.
Allows you to select one of five default line widths.
Activates the rectangle tool with which you can draw rectangles in the current
drawing color on icons or cursors. The border weight of the ellipse is determined by the line width setting.
Activates the rounded rectangle tool with which you can draw rectangles with rounded
corners in the current drawing color on icons or cursors. The border weight of the ellipse
is determined by the line width setting.
Activates the ellipse tool, with which you can draw ellipses in the current drawing color
on icons or cursors. The border weight of the ellipse is determined by the line width setting.
Activates the filled rectangle tool with which you can draw rectangles filled in the
current drawing color on icons or cursors. The border weight of the ellipse is determined by the line width setting.
Activates the filled rounded rectangle tool with which you can draw rectangles with
rounded edges filled in the current drawing color on icons and cursors. The border weight
of the ellipse is determined by the line width setting.
Activates the filled ellipse tool with which you can draw ellipses filled in the current
drawing color on icons or cursors. The border weight of the ellipse is determined by the line width setting.
Defines the drawing color for the foreground and is then used for all drawing tools.
You can either select one of the predefined default colors from the color setting dialog, or
click on the More Colors button to open the standard Windows Colors dialog. Click on
the icon to set a transparent color, or on the icon to set an inverted color.
Defines the background color. This color is applied to the background when you draw
on icons or cursors. This allows you to see directly how the final icon or cursor will appear against a selected background.
Add-Ins for User-defined Resources
Passolo can be expanded by add-ins for user-defined resources. Add-ins are DLLs
communicated to Passolo via a DLL interface. Using add-ins, you can transfer strings
SDL Passolo 2011
148
from user-defined resources into string lists. They can then be edited in the same way as
standard strings.
Note: If an ad-in is specified for a resource, the external resource editor will no longer
be used.
For further information on this subject, refer to Add-ins for Passolo (S. 149).
149
Add-Ins
Add-Ins for Passolo
Open interfaces allow Passolo to be expanded by new functions. These new functions are
implemented in the form of DLLs. Currently, several interfaces are defined with which
future expansions of Passolo will be offered. To find out about new tools, visit our Web site at http://www.passolo.com, or contact us by e-mail at [email protected].
Company customers that want to develop their own add-ins will be provided a license for
the Passolo Add-In API on request. In this case, please also contact
By default, the installed add-ins are available, i.e. they are loaded when required. To
modify the loading or other add-in specific settings, open the Add-ins dialog. (See Add-in Configuration, S. 151)
Export and Import Add-Ins
Using export and import Add-Ins, allows interfaces to other programs to be created that
function more efficiently than, for example, comma-separated formats.
Passolo Glossary
Export
Generates multilingual glossaries in Passolo format. (see
Glossaries, S. 216)
Passolo Glossary Maker Older version of Glossary Export for bilingual glossaries (see
Glossaries, S. 216)
Customizable Text
Export Exports strings as .CSV files. (see CSV Files, S. 216)
SDL Passolo XML
Export/Import
Exports strings for translation in other applications (see XML
Export/Import, S. 218)
SDL Trados MultiTerm
Export
Exports string for import in MultiTerm (see Exporting
Terminology with TRADOS MultiTerm Export, S. 221)
SDL Trados MultiTerm
iX Export
Exports string for import in MultiTerm (see Exporting
Terminology with TRADOS MultiTerm iX Export, S. 220)
SDL Passolo TMX
Export
Exports files to the Translation Memory eXchange format TMX
Level 2 (see TMX Export, S. 219)
Trados Text Export Exports translations in a text format that can be imported into
SDL Trados
Add-ins for different file formats
These add-ins allow you to process a range of other file formats besides Win32
applications. These may be either complete files (file parsers) or embedded resources in
a format different from the containing file (user resources). These add-ins are used when updating string lists, generating target files and sometimes also for the display of dialogs.
HTML Parser Parser for HTML files. This parser does not require any further
settings.
Text File Parser Parser for any text files. (see Add-in for Text Files, S. 185)
XML Parser Parser for XML files (see Add-In for XML Files, S. 165)
Java Parser Parser for Java programs (see Add-in for Java Programs, S. 181)
Microsoft .NET Parser
Parser for Microsoft .NET programs. All frameworks up to version
3.5 including WPF (Windows Presentation Foundation) are
supported. (see Add-in for Microsoft .NET Programs, S. 153)
MSI File Parser Parser for Microsoft Installer files. (see Add-in for Microsoft
Installer Files, S. 191)
ODBC Database Parser Parser for any databases with access via ODBC. (see Add-in for
SDL Passolo 2011
150
ODBC Databases, S. 191)
Parser for Palm OS
Applications
Parser for Palm OS programs (see Add-in for Palm OS
Applications, S. 204)
PO File Parser Parser for PO files. (see Add-in for Portable Object (PO) Files, S.
201)
RC File Parser Parser for RC files. (see Add-in for Windows Resource Script (.rc)
Files, S. 161)
Visual Basic 6 Parser Parser for Visual Basic 6 projects and forms. (see Add-in for
Visual BASIC 6 Files, S. 191)
Win 16Bit Parser Parser for programs that run under MS Windows 3.0 or 3.1. (see
Add-in for Windows 16 Bit Programs, S. 161)
Parser for Borland
Delphi/C++ Builder
Programs
Parser for programs created with Borland Delphi or Borland
Builder (see Add-Ins for Borland Delphi/C++ Builder Programs, S.
158)
Add-ins for Translation
These add-ins provide functions to look up translations and terminology in external
programs, including transparent integration of the results into the Passolo translation process.
SDL Trados 2007 Uses SDL Trados TM to search for translations. (see
Interface to SDL Trados and SDL MultiTerm, S. 93)
SDL Trados 2006 Uses SDL Trados up to version 7.x to search for translations.
(see Interface to SDL Trados and SDL MultiTerm, S. 93)
SDL MultiTerm 2007 Uses SDL Trados 2007 to mark terminology. (see Interface
to SDL Trados and SDL MultiTerm, S. 93)
SDL MultiTerm 2009 Uses SDL Trados 2009 to mark terminology. (see Interface
to SDL Trados and SDL MultiTerm, S. 93)
SDLX and SDL TermBase
Uses SDLX Translation Suite to search for translations and
display terminology. (see Interface to SDLX Translation
Suite, S. 107)
Add-Ins for Spell Checking
These add-ins can be used to extend the spell checking functions.
MS Word Spell Checker Uses MS Word to check spelling. (see Spell Checking
Options, S. 127)
Tool add-ins
These are add-ins that offer various supplementary functions for Passolo. The commands implemented by a tool add-in can be accessed via the Tools menu.
Layout Engine Add-in for optimizing dialog layouts (see Layout Engine, S.
114)
Inline Patterns Defines inline patterns for defining inline tags or user-
defined checks (see User Defined Checks, S. 123).
Text Display
Used by parser add-ins to display resource information in
text format. For example, the source text display of HTML
files is implemented using this add-in.
Text Renderer Provides a graphic display of individual strings in order to
test the dimensions. (see Text Renderer, S. 117)
Tagging
Converts tags between different formats. This add-in is
needed e.g. to export HTML strings into the TMX format
correctly.
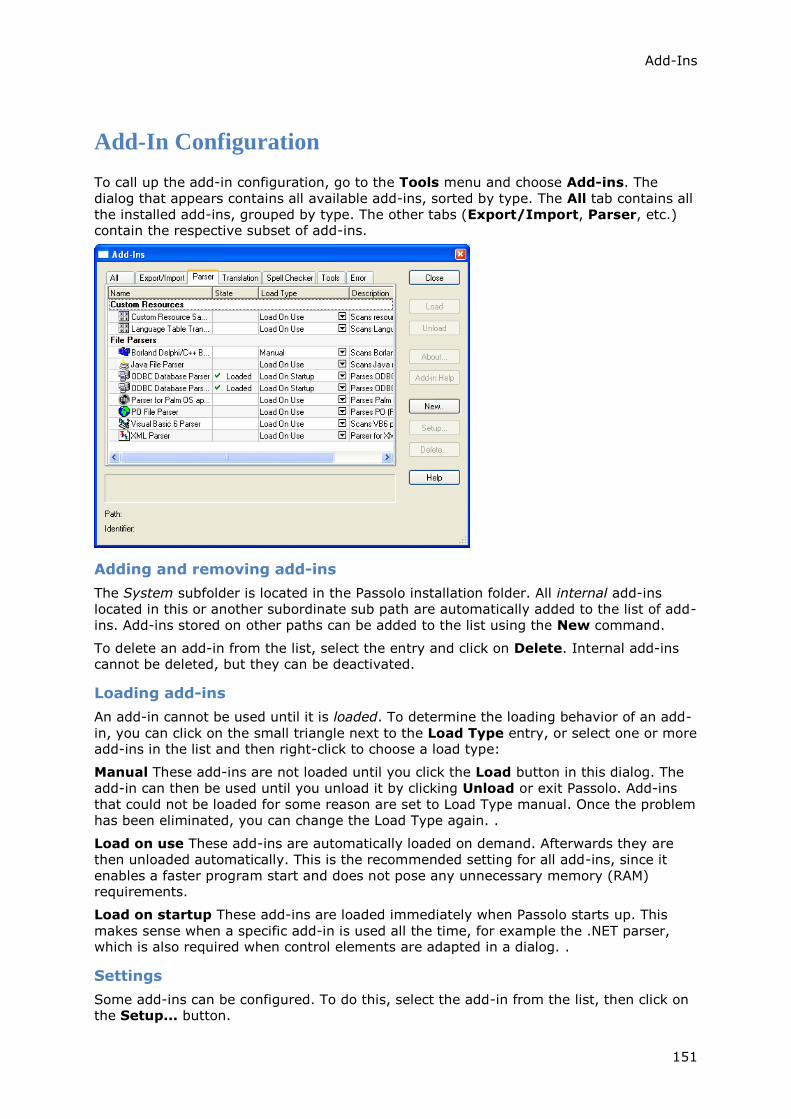
Add-Ins
151
Add-In Configuration
To call up the add-in configuration, go to the Tools menu and choose Add-ins. The
dialog that appears contains all available add-ins, sorted by type. The All tab contains all
the installed add-ins, grouped by type. The other tabs (Export/Import, Parser, etc.) contain the respective subset of add-ins.
Adding and removing add-ins
The System subfolder is located in the Passolo installation folder. All internal add-ins
located in this or another subordinate sub path are automatically added to the list of add-
ins. Add-ins stored on other paths can be added to the list using the New command.
To delete an add-in from the list, select the entry and click on Delete. Internal add-ins cannot be deleted, but they can be deactivated.
Loading add-ins
An add-in cannot be used until it is loaded. To determine the loading behavior of an add-
in, you can click on the small triangle next to the Load Type entry, or select one or more add-ins in the list and then right-click to choose a load type:
Manual These add-ins are not loaded until you click the Load button in this dialog. The
add-in can then be used until you unload it by clicking Unload or exit Passolo. Add-ins
that could not be loaded for some reason are set to Load Type manual. Once the problem
has been eliminated, you can change the Load Type again. .
Load on use These add-ins are automatically loaded on demand. Afterwards they are
then unloaded automatically. This is the recommended setting for all add-ins, since it
enables a faster program start and does not pose any unnecessary memory (RAM) requirements.
Load on startup These add-ins are loaded immediately when Passolo starts up. This
makes sense when a specific add-in is used all the time, for example the .NET parser, which is also required when control elements are adapted in a dialog. .
Settings
Some add-ins can be configured. To do this, select the add-in from the list, then click on the Setup... button.

SDL Passolo 2011
152
Add-in info and help
The About and Add-in Help buttons provide access to any available information on the
selected add-in. By right-clicking on an add-in in the list you can also access the following commands:
Open containing folder opens the folder containing the add-in in the Windows Explorer
File properties displays the system properties of the add-in file.

153
File Formats
Microsoft .NET-Programs
Add-In for Microsoft .NET Programs
The add-in for Microsoft .NET can be used to localize programs that were developed using
Microsoft Visual Basic from Version 7 or Microsoft C# and Microsoft .NET Framework. In
order to use the add-in, the Microsoft .NET framework or the Developer Studio 7 have to be installed. The add-in allows the following
Binary source data (Assemblies) and the resource data of the development
environment (RESX, RESOURCE, TXT) can be parsed.
String lists, dialogs and graphics can be edited.
The localization can be tested for errors.
The translated binary target data (Satellite-DLL) and the resource data can be
generated.
Further information
Files (S. 153)
Configuration of the Microsoft .NET Add-In (S. 153)
Special features of the dialog editor (S. 156)
Special font features (S. 156)
Files
The add-in for Microsoft .NET can work on binary files and sources files used in the
development environment. The resource files of the development environment are saved
in XML format. For these files there are name conventions which have to be kept in order to make the best use of Microsoft .NET’s localization technology.
Before adding Microsoft .NET source files to your project, specify the target path rules for
the relevant .NET file type (or copy the rules into the project), this is done in the Target Path Rules (S. 23) dialog.
The translated version of a resource file of the development environment is written in the
same directory as the source file. A language ID for the target language will be added to
the file name. The translations of binary files are saved in so-called satellite DLL’s. These
are stored in a subfolder relative to the source file. The name of the subfolder is based on
the language ID. The satellite DLL has the same name as the source file. The file
extension, however, is .RESOURCE.DLL. Further information on this topic can be found in
the Microsoft .NET developers’ documentation and in the book Internationalization and Localization using Microsoft .NET by Nick Symmonds, APRESS, ISBN 1-59059-002-3.
Configuration of the Microsoft .NET Add-In
The general settings and the settings for an individual project are displayed in the same dialog.
Accessing the settings for the .NET Add-In
1. In the Tools menu, click on Add-Ins....
2. Click on the Parser tab.
SDL Passolo 2011
154
3. Click once on the "Microsoft .NET Parser" option.
4. Click on <strong>Settings</strong>.
On the left, you can select each of the pages relating to the general settings and the
settings for the project currently loaded.
External References
In addition to standard controls, Microsoft .NET applications can make use of custom and
third-party controls. In order to work on the Microsoft .NET files and to optimize the
display of the relevant forms in the dialog editor, the additional controls are needed as
well as the Microsoft .NET files. This applies not only to binary files but also to the
resource files of the development environment. If Passolo parses or generates a target file, the required additional controls will be searched for in the following locations:
The directory in which the source file is saved.
The directory in which the Passolo project is saved.
The Referenced Assemblies sub-directory within the directory in which the Passolo
project is saved.
The directory specified in the "External References" settings.
The Passolo dialog editor and the Passolo translation list also search in the global
directory and project directory, but not in the directory of the source file.
Parser Options
On this page, specify whether - in addition to string lists, menus and forms - you also
want to import bitmaps, icons or other binary data into the Passolo string lists and
process them there.
When generating the target file you can choose whether to include all the resource data
(strings, coordinates, properties) in the satellite DLL or only the data that was changed
during translation. In the latter case, select the option Write only changed
information. This makes the satellite DLL smaller, but it can still be used for the
alignment function (see Transferring Existing Translations, S. 37).
If the option Embed Referenced Assemblies to Passolo Project is activated,
PASSOLO automatically saves all the required assemblies in the Passolo project and
unpacks them when, for example, forms are to be displayed. This option simplifies the
management of files, but the size of Passolo projects and translation bundles increases.
Moreover, this makes the assemblies available to all the Passolo users who are working
on the project. Since it is possible to reconstruct the source code from the assemblies, this procedure is not always preferred.
The Save processed assemblies option is active by default, because this increases the
speed at which the source string lists are updated. If this leads to problems, you can try
deactivating this option.
Custom Properties
The add-in for Microsoft .NET extracts all data which is usually required for the
localization. In special cases however it may be necessary to extract and work on
additional information. Click on Add, to add further properties which have to be extracted from the source file. This calls up the .NET Control Property dialog.
Under Property name, enter the name of the property (e.g. "DisplayMode") and under
Control element type enter the complete type name
(e.g. "MyWindowsControlLibrary.UserControl1"). Instead of the name of the control you
can also enter '*'. In this case the property will be extracted from every control.

File Formats
155
Deactivate the option Translatable to extract properties that contain structural
information for the construction of the form in the dialog editor. It will then not be possible for the translator to change these properties.
Text properties are added to the translation list as separate entries. All other properties
are converted into text and can be edited by using the command Custom Properties in
the shortcut menu or in the Edit menu. Properties with symbolic or enumerated values
can be edited by selecting the symbolic values in a listbox.
Excluded Properties
The add-in for Microsoft .NET extracts all text properties. There may be text properties,
however, that are not to be translated. These may either be marked as "not to be
translated" in the source string list, or the properties can be added to the list of excluded properties.
Enter the excluded properties here in the same format as the Additional properties.
Signing
It is possible to add "signatures" to an assemblies. Signatures can be use, for example,
to prevent changes being made to the assemblies downstream, as the assemblies can
then no longer be run. If the source assembly is signed, the satellite assemblies have to
be signed with the same key. This requires using the same keyfile as was used for
signing the source assembly. Up to Framework 1.1 and also for Framework 2.0 with
Managed C++ Assemblies the information on the key used for signing is stored in the
Assembly Info of the source assembly. This information is automatically evaluated by
Passolo and the key is searched for relative to the source file or the Passolo project and is used for signing the satellite assemblies.
.NET 2.0 assemblies developed in C# or Visual Basic contain no information in the
Assembly Info concerning the keyfile used for signing. For assemblies like these, either
enter the keyfile to be used under File Path for keyfile, or specify the directory in which
the keyfile should be sought under Search Directory for keyfile. When a relative path
is used, the keyfile is searched for relative to the source assembly or the Passolo project.
If the keyfile cannot be located, the satellite assemblies have to be signed subsequently.
If satellite assemblies are created for signed source assemblies, Passolo will inform you
via the output window as to whether or not the satellite assemblies were successfully signed.
Trouble Shooting
If an error occurs while a source file is being parsed, e.g. because a base form was not
found, or because a control element is missing, you can specify here how this should be handled.
Select
Ignore Parsing will be continued if possible.
Disable Visual Editing Parsing will be continued, but the Windows format will not be displayed in the dialog editor.
Abort Parsing Assembly Parsing will be aborted.
Diagnostic Report
Activate the diagnostic report to create a formatted HTML file during parsing,
containing detailed information about the process. Any errors that occur are identified in this file and information is also provided on further relevant support available.
As required, you can also choose whether to Log Operating System Details, Log Installed Software and/orLog InitializeComponent() Code in the diagnostic report.
The option Probe Component Types of WinForms lets Passolo create the used
controls when parsing the source file, which is otherwise only necessary for the display in
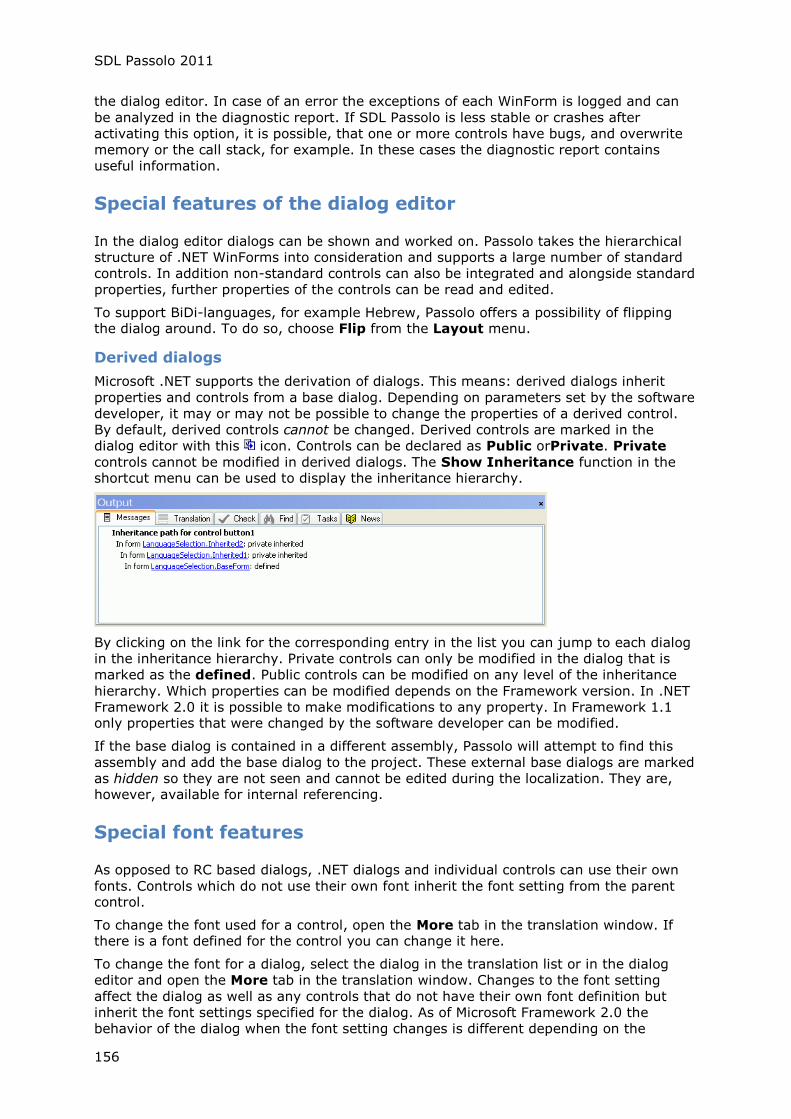
SDL Passolo 2011
156
the dialog editor. In case of an error the exceptions of each WinForm is logged and can
be analyzed in the diagnostic report. If SDL Passolo is less stable or crashes after
activating this option, it is possible, that one or more controls have bugs, and overwrite
memory or the call stack, for example. In these cases the diagnostic report contains
useful information.
Special features of the dialog editor
In the dialog editor dialogs can be shown and worked on. Passolo takes the hierarchical
structure of .NET WinForms into consideration and supports a large number of standard
controls. In addition non-standard controls can also be integrated and alongside standard
properties, further properties of the controls can be read and edited.
To support BiDi-languages, for example Hebrew, Passolo offers a possibility of flipping the dialog around. To do so, choose Flip from the Layout menu.
Derived dialogs
Microsoft .NET supports the derivation of dialogs. This means: derived dialogs inherit
properties and controls from a base dialog. Depending on parameters set by the software
developer, it may or may not be possible to change the properties of a derived control.
By default, derived controls cannot be changed. Derived controls are marked in the
dialog editor with this icon. Controls can be declared as Public orPrivate. Private
controls cannot be modified in derived dialogs. The Show Inheritance function in the shortcut menu can be used to display the inheritance hierarchy.
By clicking on the link for the corresponding entry in the list you can jump to each dialog
in the inheritance hierarchy. Private controls can only be modified in the dialog that is
marked as the defined. Public controls can be modified on any level of the inheritance
hierarchy. Which properties can be modified depends on the Framework version. In .NET
Framework 2.0 it is possible to make modifications to any property. In Framework 1.1 only properties that were changed by the software developer can be modified.
If the base dialog is contained in a different assembly, Passolo will attempt to find this
assembly and add the base dialog to the project. These external base dialogs are marked
as hidden so they are not seen and cannot be edited during the localization. They are, however, available for internal referencing.
Special font features
As opposed to RC based dialogs, .NET dialogs and individual controls can use their own
fonts. Controls which do not use their own font inherit the font setting from the parent control.
To change the font used for a control, open the More tab in the translation window. If there is a font defined for the control you can change it here.
To change the font for a dialog, select the dialog in the translation list or in the dialog
editor and open the More tab in the translation window. Changes to the font setting
affect the dialog as well as any controls that do not have their own font definition but
inherit the font settings specified for the dialog. As of Microsoft Framework 2.0 the
behavior of the dialog when the font setting changes is different depending on the
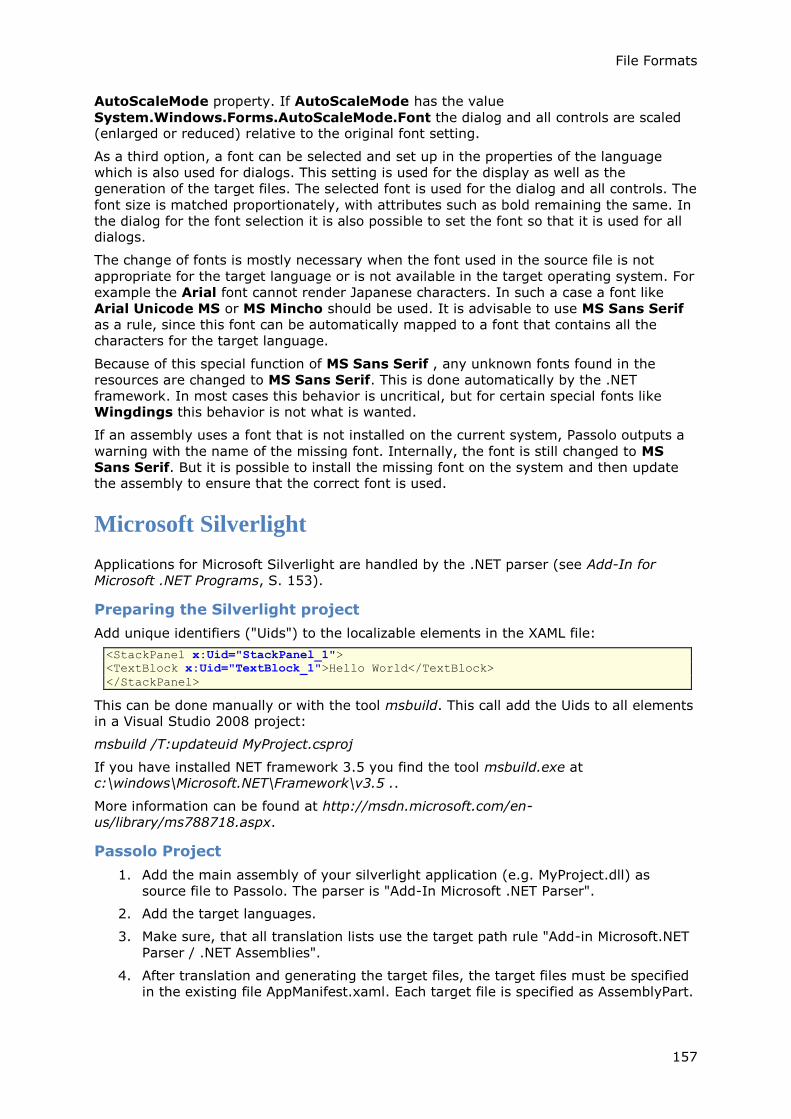
File Formats
157
AutoScaleMode property. If AutoScaleMode has the value
System.Windows.Forms.AutoScaleMode.Font the dialog and all controls are scaled (enlarged or reduced) relative to the original font setting.
As a third option, a font can be selected and set up in the properties of the language
which is also used for dialogs. This setting is used for the display as well as the
generation of the target files. The selected font is used for the dialog and all controls. The
font size is matched proportionately, with attributes such as bold remaining the same. In
the dialog for the font selection it is also possible to set the font so that it is used for all dialogs.
The change of fonts is mostly necessary when the font used in the source file is not
appropriate for the target language or is not available in the target operating system. For
example the Arial font cannot render Japanese characters. In such a case a font like
Arial Unicode MS or MS Mincho should be used. It is advisable to use MS Sans Serif
as a rule, since this font can be automatically mapped to a font that contains all the
characters for the target language.
Because of this special function of MS Sans Serif , any unknown fonts found in the
resources are changed to MS Sans Serif. This is done automatically by the .NET
framework. In most cases this behavior is uncritical, but for certain special fonts like Wingdings this behavior is not what is wanted.
If an assembly uses a font that is not installed on the current system, Passolo outputs a
warning with the name of the missing font. Internally, the font is still changed to MS
Sans Serif. But it is possible to install the missing font on the system and then update the assembly to ensure that the correct font is used.
Microsoft Silverlight
Applications for Microsoft Silverlight are handled by the .NET parser (see Add-In for
Microsoft .NET Programs, S. 153).
Preparing the Silverlight project
Add unique identifiers ("Uids") to the localizable elements in the XAML file:
<StackPanel x:Uid="StackPanel_1">
<TextBlock x:Uid="TextBlock_1">Hello World</TextBlock>
</StackPanel>
This can be done manually or with the tool msbuild. This call add the Uids to all elements in a Visual Studio 2008 project:
msbuild /T:updateuid MyProject.csproj
If you have installed NET framework 3.5 you find the tool msbuild.exe at c:\windows\Microsoft.NET\Framework\v3.5 ..
More information can be found at http://msdn.microsoft.com/en-
us/library/ms788718.aspx.
Passolo Project
1. Add the main assembly of your silverlight application (e.g. MyProject.dll) as
source file to Passolo. The parser is "Add-In Microsoft .NET Parser".
2. Add the target languages.
3. Make sure, that all translation lists use the target path rule "Add-in Microsoft.NET
Parser / .NET Assemblies".
4. After translation and generating the target files, the target files must be specified
in the existing file AppManifest.xaml. Each target file is specified as AssemblyPart.
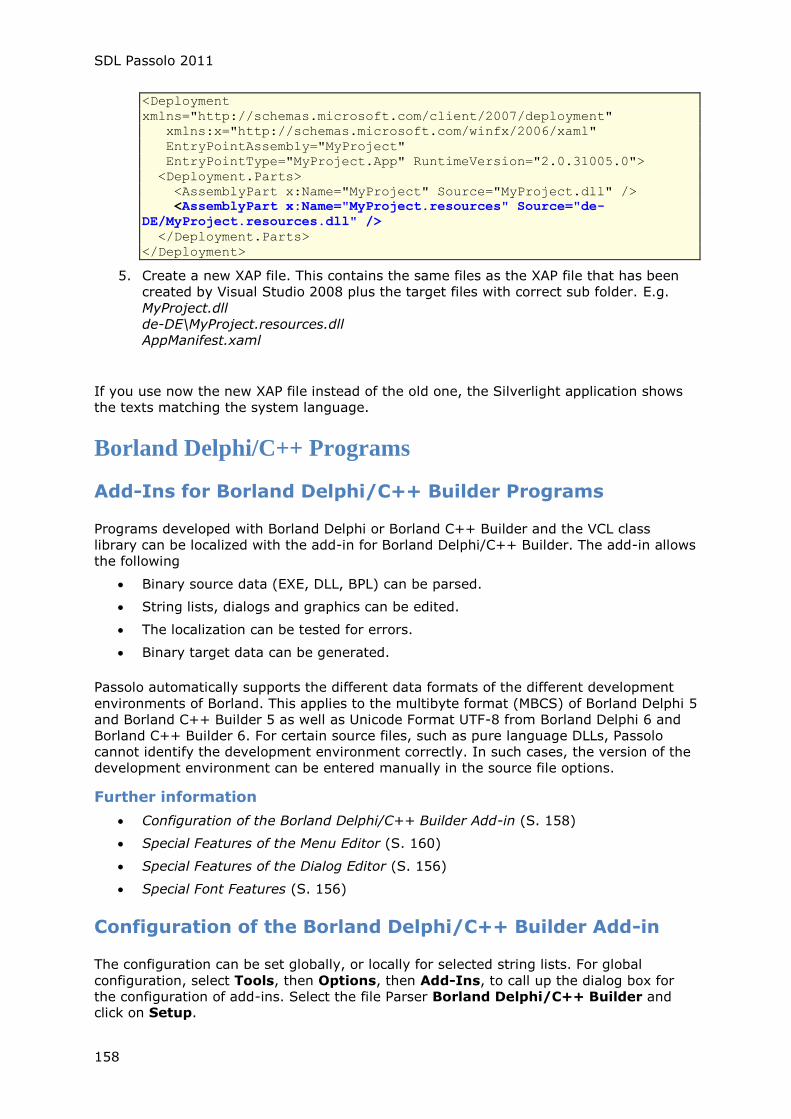
SDL Passolo 2011
158
<Deployment
xmlns="http://schemas.microsoft.com/client/2007/deployment"
xmlns:x="http://schemas.microsoft.com/winfx/2006/xaml"
EntryPointAssembly="MyProject"
EntryPointType="MyProject.App" RuntimeVersion="2.0.31005.0">
<Deployment.Parts>
<AssemblyPart x:Name="MyProject" Source="MyProject.dll" />
<AssemblyPart x:Name="MyProject.resources" Source="de-
DE/MyProject.resources.dll" />
</Deployment.Parts>
</Deployment>
5. Create a new XAP file. This contains the same files as the XAP file that has been
created by Visual Studio 2008 plus the target files with correct sub folder. E.g.
MyProject.dll
de-DE\MyProject.resources.dll
AppManifest.xaml
If you use now the new XAP file instead of the old one, the Silverlight application shows
the texts matching the system language.
Borland Delphi/C++ Programs
Add-Ins for Borland Delphi/C++ Builder Programs
Programs developed with Borland Delphi or Borland C++ Builder and the VCL class
library can be localized with the add-in for Borland Delphi/C++ Builder. The add-in allows
the following
Binary source data (EXE, DLL, BPL) can be parsed.
String lists, dialogs and graphics can be edited.
The localization can be tested for errors.
Binary target data can be generated.
Passolo automatically supports the different data formats of the different development
environments of Borland. This applies to the multibyte format (MBCS) of Borland Delphi 5
and Borland C++ Builder 5 as well as Unicode Format UTF-8 from Borland Delphi 6 and
Borland C++ Builder 6. For certain source files, such as pure language DLLs, Passolo
cannot identify the development environment correctly. In such cases, the version of the
development environment can be entered manually in the source file options.
Further information
Configuration of the Borland Delphi/C++ Builder Add-in (S. 158)
Special Features of the Menu Editor (S. 160)
Special Features of the Dialog Editor (S. 156)
Special Font Features (S. 156)
Configuration of the Borland Delphi/C++ Builder Add-in
The configuration can be set globally, or locally for selected string lists. For global
configuration, select Tools, then Options, then Add-Ins, to call up the dialog box for
the configuration of add-ins. Select the file Parser Borland Delphi/C++ Builder and click on Setup.
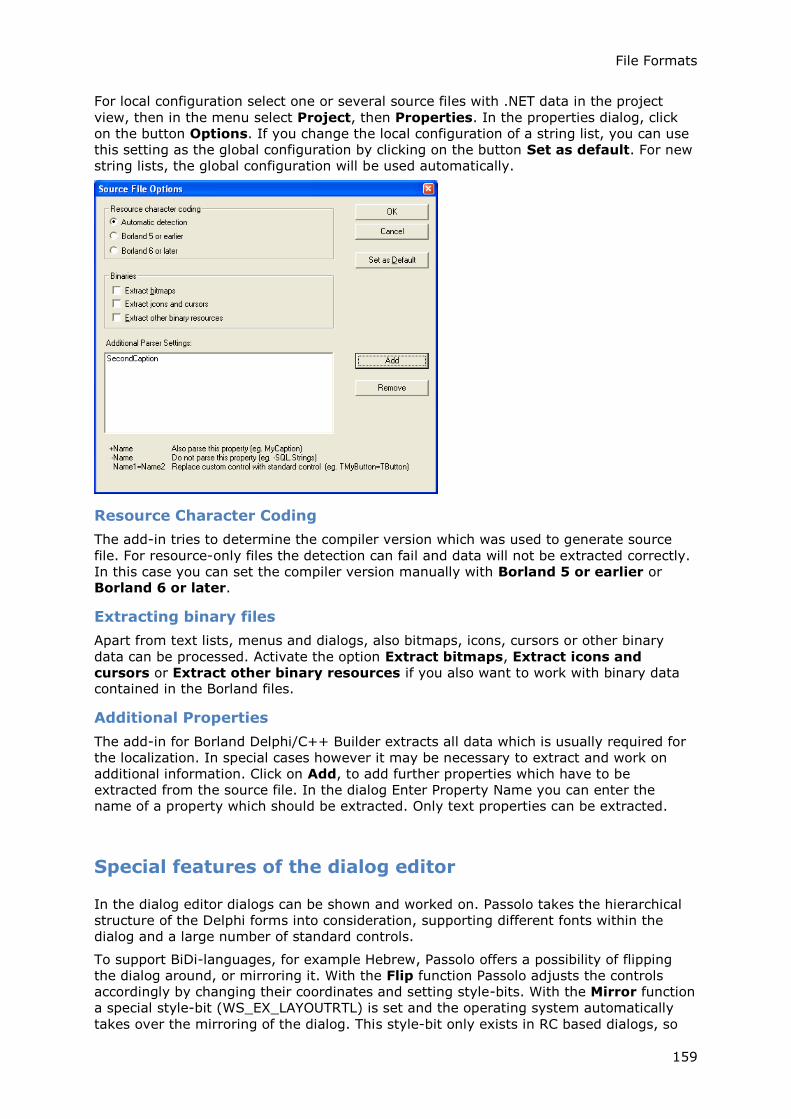
File Formats
159
For local configuration select one or several source files with .NET data in the project
view, then in the menu select Project, then Properties. In the properties dialog, click
on the button Options. If you change the local configuration of a string list, you can use
this setting as the global configuration by clicking on the button Set as default. For new
string lists, the global configuration will be used automatically.
Resource Character Coding
The add-in tries to determine the compiler version which was used to generate source
file. For resource-only files the detection can fail and data will not be extracted correctly.
In this case you can set the compiler version manually with Borland 5 or earlier or Borland 6 or later.
Extracting binary files
Apart from text lists, menus and dialogs, also bitmaps, icons, cursors or other binary
data can be processed. Activate the option Extract bitmaps, Extract icons and
cursors or Extract other binary resources if you also want to work with binary data contained in the Borland files.
Additional Properties
The add-in for Borland Delphi/C++ Builder extracts all data which is usually required for
the localization. In special cases however it may be necessary to extract and work on
additional information. Click on Add, to add further properties which have to be
extracted from the source file. In the dialog Enter Property Name you can enter the
name of a property which should be extracted. Only text properties can be extracted.
Special features of the dialog editor
In the dialog editor dialogs can be shown and worked on. Passolo takes the hierarchical
structure of the Delphi forms into consideration, supporting different fonts within the
dialog and a large number of standard controls.
To support BiDi-languages, for example Hebrew, Passolo offers a possibility of flipping
the dialog around, or mirroring it. With the Flip function Passolo adjusts the controls
accordingly by changing their coordinates and setting style-bits. With the Mirror function
a special style-bit (WS_EX_LAYOUTRTL) is set and the operating system automatically
takes over the mirroring of the dialog. This style-bit only exists in RC based dialogs, so
SDL Passolo 2011
160
the flip function can only be used for Borland dialogs. The right-to-left orientation can
also be changed separately for controls. Here too the mirror option does not apply to Borland-controls but the option Toggle alignment is supported.
Note: In Passolo the change from right/left line can only be displayed under a localized (
Arabic or Hebrew) hard drive system. This applies for the display in Passolo as well as for
the target data itself.
Note: To a large extent Borland software uses non-Unicode character sets and for the
conversion from Unicode the system code page is used. When a target language is being
used which cannot be displayed with the system code page, this leads to display errors in
dialogs in Passolo and in the target file. Therefore an operating system must always be
used which supports the target language as well as the appropriate code page.
Note: In Passolo you can only change right-to-left alignment. This setting only affects
controls with a right-to-left alignment property. Controls with no right-to-left alignment
property inherit the settings of the parent control. Therefore the property cannot be
changed for such controls.
Special features of the menu editor
In Passolo the Borland menus are not filed within the dialog but as separate resources
under the resource type menus. The name of a menu in Passolo is made up of the name
of the dialog in which the menu is contained, and the name of the menu itself.
The shortcuts of menus are not saved in text form but as a numerical code. Passolo
translates these numerical codes and always shows the shortcuts which match them in
English. When writing the target file, Passolo can use English as well as German descriptions, and generates the correct numerical code for them.
Special font features
As opposed to RC based dialogs, Borland dialogs and individual controls can use their
own fonts. Controls which do not use their own font inherit the font setting from the parent control.
To change the font of a control, select Edit in the menu, and then the command Custom Properties.
To change the font for the dialog and all the controls it contains, choose the command
Font in the Layout menu in the dialog view. The selected font is used for the dialog and
all controls. The font size is matched proportionately, with attributes such as bold
remaining the same. In the dialog for the font selection it is also possible to set the font so that it is used for all dialogs.
As a third option, a font can be selected and set up in the properties of the language
which is also used for dialogs. This setting is used for the display as well as the generation of the target files.
The change of fonts is mostly necessary when the font used in the source file is not
appropriate for the target language or is not available in the target operating system. For
example the font Arial cannot render Japanese characters. In such a case a font like Arial
Unicode MS or MS Mincho should be used.

File Formats
161
Note: To a large extent Borland uses non-Unicode character sets. For this reason
selecting the correct character set settings in the font dialog can be important. Otherwise
it may happen that the texts are not displayed correctly either in Passolo or in the target
file.
Add-In for Windows 16 Bit Programs
The add-in for the Windows 16 bit programs is an internal add-in and is available in all editions of Passolo apart from the Translator Edition.
Using this add-in Passolo can automatically read and write executable files (*.EXE)
and/or run time libraries (*.DLL) which have been developed for the 16 Bit operating system Windows 3.1 or Windows for Work Groups.
Settings for this add-in are not necessary. The dialog editor and menu editor work in the
same way as for the 32 bit Windows software.
With the Windows 16 bit programs the entries in string-tables may be no longer than 255
characters. Passolo checks entries in string-tables for this limitation and when generating target files makes sure that the limits are not exceeded.
Windows Resource Script (.rc) Files
Add-In for Windows Resource Script (.rc) Files
Passolo offers an RC File Parser add-in which allows you to edit resource files for
Windows programs in source file format.
Further information
Preprocessor Directives (S. 161)
Bitmaps, Icons, and Cursors (S. 162)
Generating the Target File (S. 9)
Options for RC Source Files (S. 164)
Options for RC Target Files (S. 164)
Preprocessor Directives
#if / #ifdef / #else / #elif / #endif
Normally, every conditional block is imported, regardless of whether the #if expression is
TRUE or not.
#ifdef _DEBUG
STRINGTABLE DISCARDABLE
BEGIN
IDS_VERSIONSTRING "Debug version"
END
#else
STRINGTABLE DISCARDABLEaaa
BEGIN
IDS_VERSIONSTRING "Release version"
END
#endif
In this example, both string tables are imported.

SDL Passolo 2011
162
Certain keywords are treated as ―defined‖ or ―undefined‖. In this case, the #if/#ifdef
expression is evaluated. The conditional block that is not imported will be written to the target file unchanged.
These are the keywords that are processed by default. The list can be modified for a given RC file. (see Options for RC Source Files, S. 164)
RC_INVOKED defined
PASSOLO_INVOKED defined
APSTUDIO_INVOKED undefined
Example:
#if defined(APSTUDIO_INVOKED)
... // This block is read by RC_PARSE
#else
... // This block is not read by RC_PARSE
#endif
You can use PASSOLO_INVOKED to mark blocks in the RC file that should not be
imported.
#ifndef PASSOLO_INVOKED
... // This block is not read by RC_PARSE
// but it will be compiled into the .res file
#endif
#include
Embedded files are not read by the RC file parser. If these files are to be localized, you
will have to add them to the Passolo project individually. It is also possible to translate
the file path. Passolo lists the corresponding files as #include resources. You can modify the path so that it points to the translated version of the file.
This example shows the modified #include paths for an MFC application. Translated
versions of afxres.rc and afxprint.rc are included with the MFC. To translate to another language, you will have to add afxres.rc to your project.
#define / #undef
RCParser does not evaluate #define or #undef expressions.
Bitmaps, Icons, and Cursors
To import bitmaps, icons, cursors, and other binary resources from the RC file, you will
have to set the appropriate options for the source file. See The Source File Options Dialog (S. 30)
The RC file parser will import binary resources if it can find the corresponding file. If files
are specified using a relative path, the RCParser searches for them relative to the RC file.
In this example, the parser searches for the files c:\AllBitmaps\Splash.bmp and
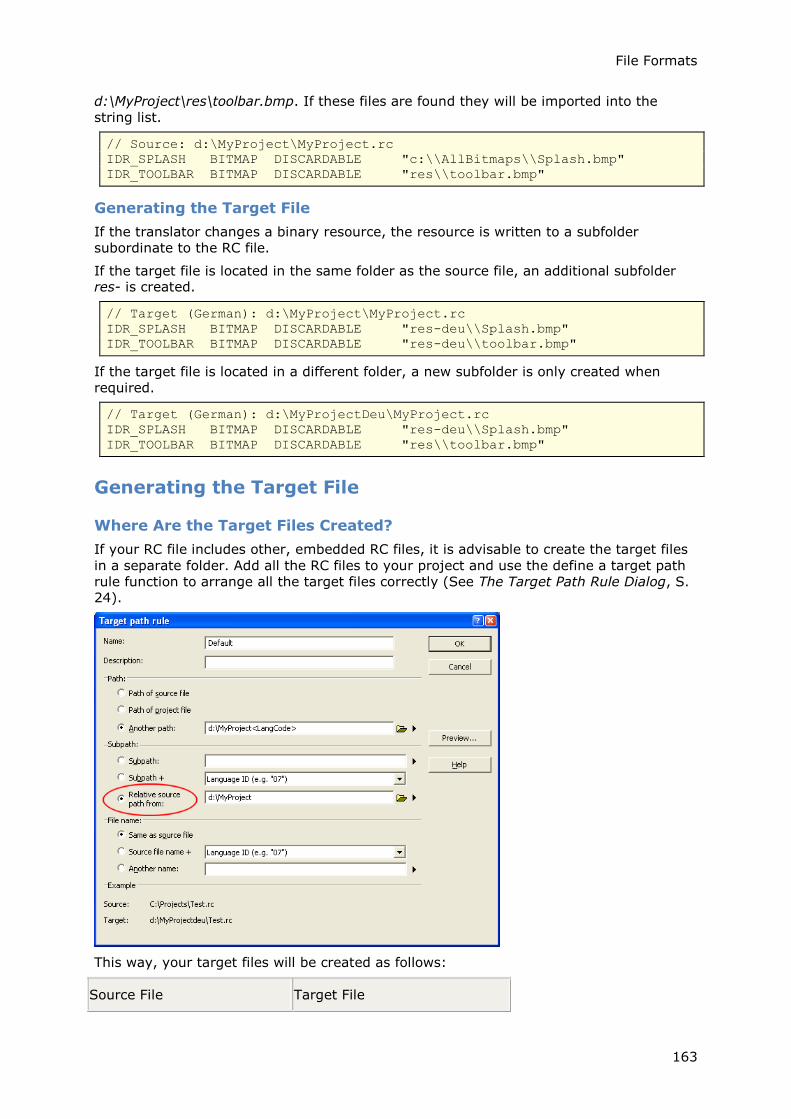
File Formats
163
d:\MyProject\res\toolbar.bmp. If these files are found they will be imported into the
string list.
// Source: d:\MyProject\MyProject.rc
IDR_SPLASH BITMAP DISCARDABLE "c:\\AllBitmaps\\Splash.bmp"
IDR_TOOLBAR BITMAP DISCARDABLE "res\\toolbar.bmp"
Generating the Target File
If the translator changes a binary resource, the resource is written to a subfolder
subordinate to the RC file.
If the target file is located in the same folder as the source file, an additional subfolder res- is created.
// Target (German): d:\MyProject\MyProject.rc
IDR_SPLASH BITMAP DISCARDABLE "res-deu\\Splash.bmp"
IDR_TOOLBAR BITMAP DISCARDABLE "res-deu\\toolbar.bmp"
If the target file is located in a different folder, a new subfolder is only created when
required.
// Target (German): d:\MyProjectDeu\MyProject.rc
IDR_SPLASH BITMAP DISCARDABLE "res-deu\\Splash.bmp"
IDR_TOOLBAR BITMAP DISCARDABLE "res\\toolbar.bmp"
Generating the Target File
Where Are the Target Files Created?
If your RC file includes other, embedded RC files, it is advisable to create the target files
in a separate folder. Add all the RC files to your project and use the define a target path
rule function to arrange all the target files correctly (See The Target Path Rule Dialog, S. 24).
This way, your target files will be created as follows:
Source File Target File
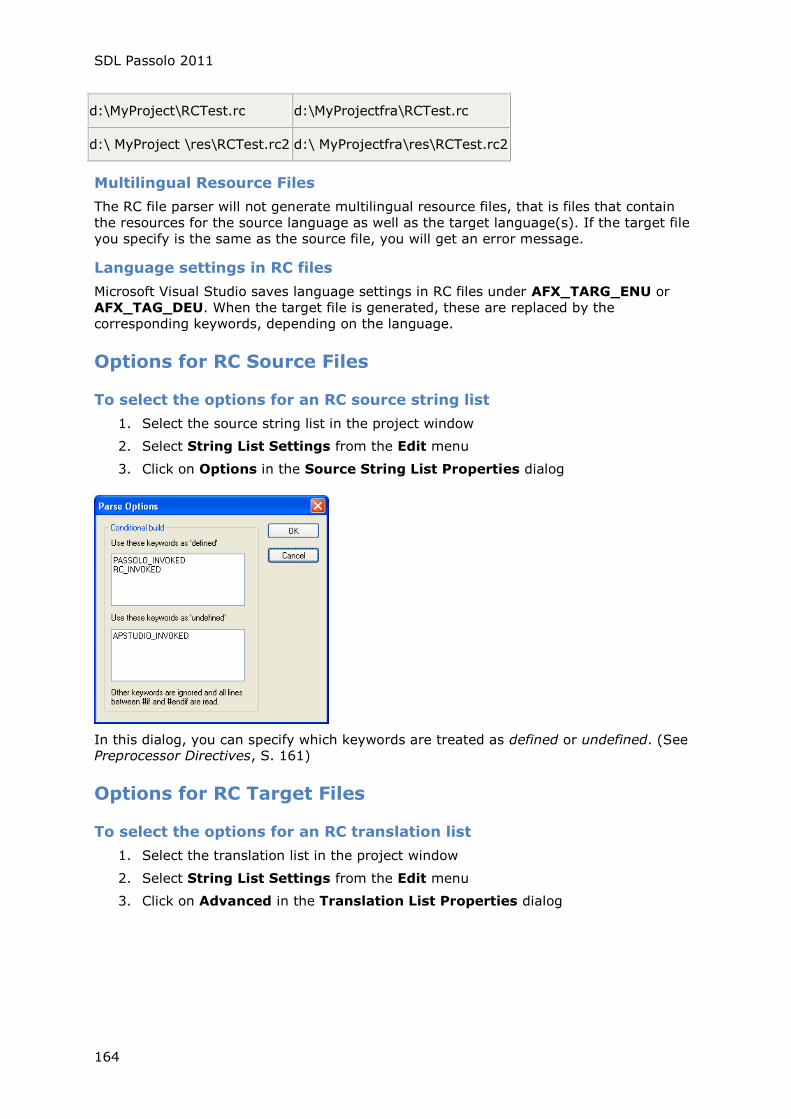
SDL Passolo 2011
164
d:\MyProject\RCTest.rc d:\MyProjectfra\RCTest.rc
d:\ MyProject \res\RCTest.rc2 d:\ MyProjectfra\res\RCTest.rc2
Multilingual Resource Files
The RC file parser will not generate multilingual resource files, that is files that contain
the resources for the source language as well as the target language(s). If the target file
you specify is the same as the source file, you will get an error message.
Language settings in RC files
Microsoft Visual Studio saves language settings in RC files under AFX_TARG_ENU or
AFX_TAG_DEU. When the target file is generated, these are replaced by the
corresponding keywords, depending on the language.
Options for RC Source Files
To select the options for an RC source string list
1. Select the source string list in the project window
2. Select String List Settings from the Edit menu
3. Click on Options in the Source String List Properties dialog
In this dialog, you can specify which keywords are treated as defined or undefined. (See Preprocessor Directives, S. 161)
Options for RC Target Files
To select the options for an RC translation list
1. Select the translation list in the project window
2. Select String List Settings from the Edit menu
3. Click on Advanced in the Translation List Properties dialog

File Formats
165
In this dialog, you can specify the encoding for the target file. Normally the first two or
three characters of a Unicode or UTF file contain a value that specifies the encoding. If
you don't want to write this byte order mark, select the corresponding option.
You can also specify, that backslashes are only written as \\, if there is no ambiguity in
escape sequences. For example, if you choose this option then "one\two" is written as
"one\\two", because \t is a tabulator. In contrast, "four\five" is written unchanged,
because \f is no valid escape sequence in RC files. If the option is not selected, backslash are always written as \\.
XML Files
Add-In for XML Files
The Add-In for XML files is an internal Add-In, available in all the editions of Passolo
except the Translator Edition.
With XML it is possible to describe texts that are more like continuous body texts, or data
formats based on identifiers. Whereas continuous body text is a domain of translation
memory systems, ID based XML documents, such as XLIFF format, can be processed extremely well using PASSOLO’s XML Add-In.
To enable processing of XML files, Passolo has to be set up to recognize the structure of
the XML file. For each XML document type, you can define rules that contain information about the data elements and attributes to be displayed or localized.
In addition to the extraction of text segments for translation and the integration of the
translated text into the target document, the XML Add-In also offers the option of editing
metadata. The metadata may include attributes or comments that provide additional
information relevant to the localization. Combined with PASSOLO’s macro functions, the
configuration options for the XML Add-In allow a high level of automation and a tight integration with XML based localization workflows.
Further information
Working with Rules (S. 166)
XML Rule Configuration (S. 168)
Definition of XML Rules (S. 168)
Specifying Elements and Attributes in the XML Tree (S. 173)
Working with XML Namespaces (S. 175)
Encoding of XML Files (S. 176)
Transferring Embedded Rules from Previous Passolo Versions (S. 177)
Processing XLIFF Files (S. 177)
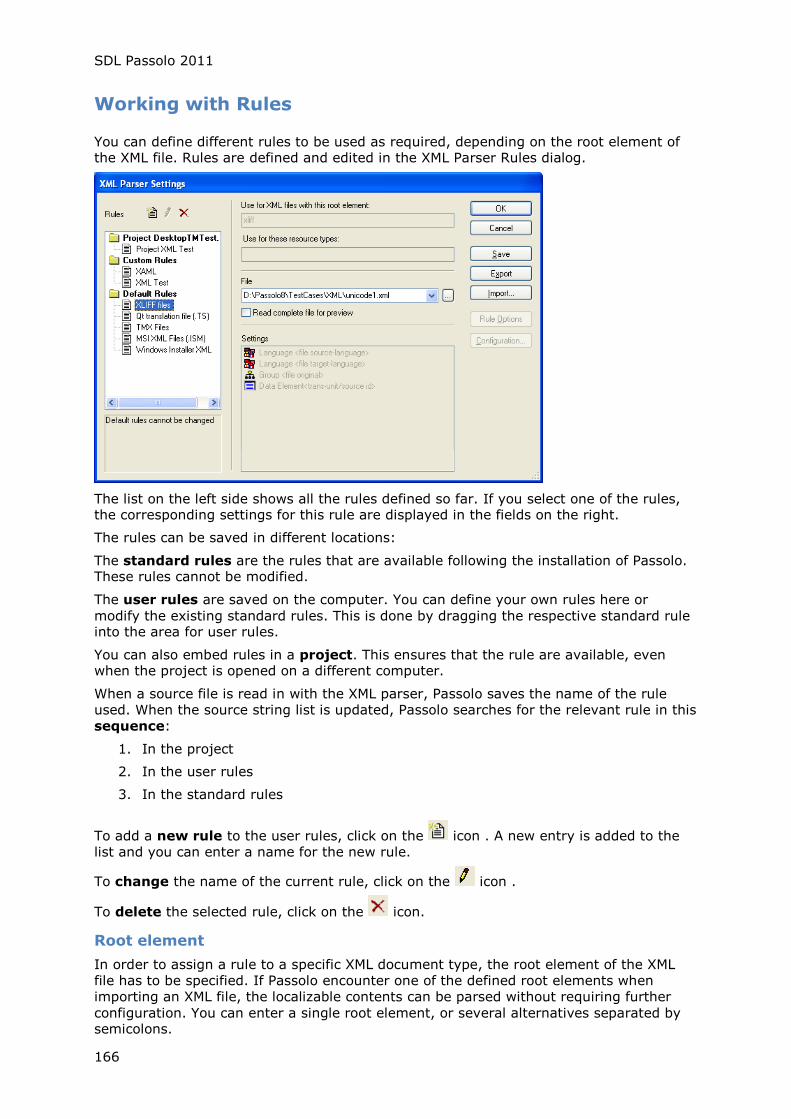
SDL Passolo 2011
166
Working with Rules
You can define different rules to be used as required, depending on the root element of the XML file. Rules are defined and edited in the XML Parser Rules dialog.
The list on the left side shows all the rules defined so far. If you select one of the rules, the corresponding settings for this rule are displayed in the fields on the right.
The rules can be saved in different locations:
The standard rules are the rules that are available following the installation of Passolo. These rules cannot be modified.
The user rules are saved on the computer. You can define your own rules here or
modify the existing standard rules. This is done by dragging the respective standard rule into the area for user rules.
You can also embed rules in a project. This ensures that the rule are available, even when the project is opened on a different computer.
When a source file is read in with the XML parser, Passolo saves the name of the rule
used. When the source string list is updated, Passolo searches for the relevant rule in this
sequence:
1. In the project
2. In the user rules
3. In the standard rules
To add a new rule to the user rules, click on the icon . A new entry is added to the
list and you can enter a name for the new rule.
To change the name of the current rule, click on the icon .
To delete the selected rule, click on the icon.
Root element
In order to assign a rule to a specific XML document type, the root element of the XML
file has to be specified. If Passolo encounter one of the defined root elements when
importing an XML file, the localizable contents can be parsed without requiring further
configuration. You can enter a single root element, or several alternatives separated by semicolons.
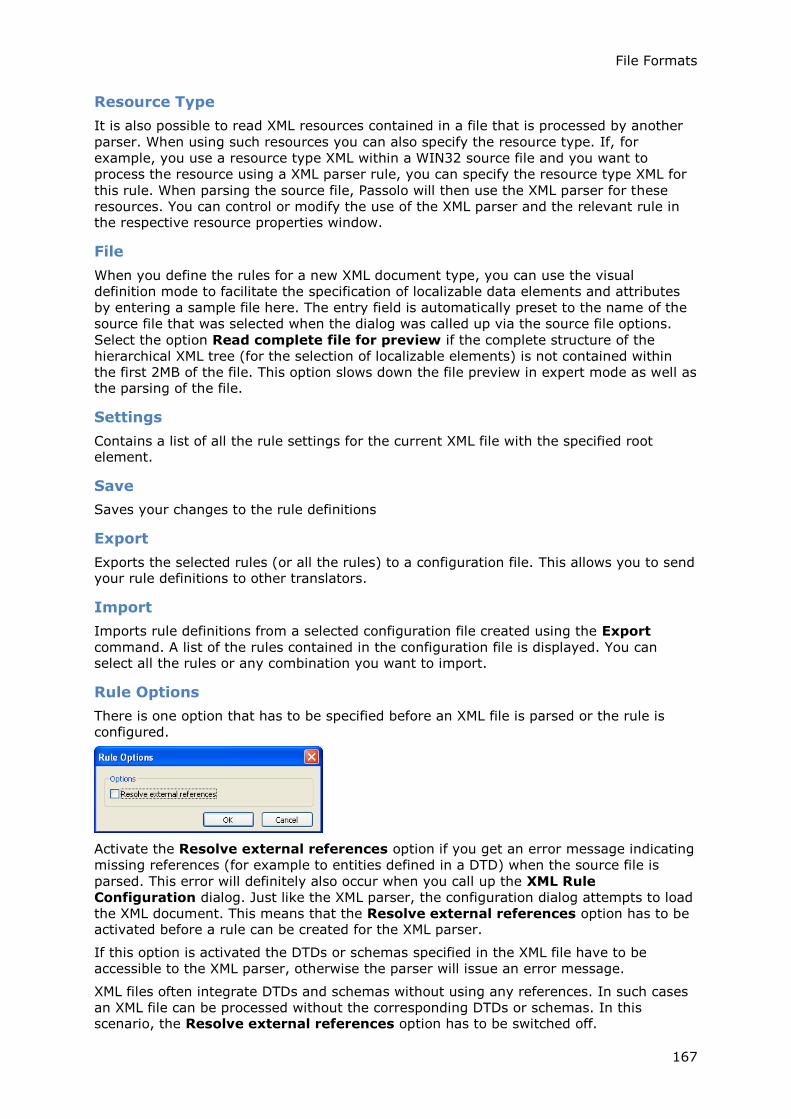
File Formats
167
Resource Type
It is also possible to read XML resources contained in a file that is processed by another
parser. When using such resources you can also specify the resource type. If, for
example, you use a resource type XML within a WIN32 source file and you want to
process the resource using a XML parser rule, you can specify the resource type XML for
this rule. When parsing the source file, Passolo will then use the XML parser for these
resources. You can control or modify the use of the XML parser and the relevant rule in the respective resource properties window.
File
When you define the rules for a new XML document type, you can use the visual
definition mode to facilitate the specification of localizable data elements and attributes
by entering a sample file here. The entry field is automatically preset to the name of the
source file that was selected when the dialog was called up via the source file options.
Select the option Read complete file for preview if the complete structure of the
hierarchical XML tree (for the selection of localizable elements) is not contained within
the first 2MB of the file. This option slows down the file preview in expert mode as well as the parsing of the file.
Settings
Contains a list of all the rule settings for the current XML file with the specified root element.
Save
Saves your changes to the rule definitions
Export
Exports the selected rules (or all the rules) to a configuration file. This allows you to send your rule definitions to other translators.
Import
Imports rule definitions from a selected configuration file created using the Export
command. A list of the rules contained in the configuration file is displayed. You can select all the rules or any combination you want to import.
Rule Options
There is one option that has to be specified before an XML file is parsed or the rule is
configured.
Activate the Resolve external references option if you get an error message indicating
missing references (for example to entities defined in a DTD) when the source file is
parsed. This error will definitely also occur when you call up the XML Rule
Configuration dialog. Just like the XML parser, the configuration dialog attempts to load
the XML document. This means that the Resolve external references option has to be activated before a rule can be created for the XML parser.
If this option is activated the DTDs or schemas specified in the XML file have to be
accessible to the XML parser, otherwise the parser will issue an error message.
XML files often integrate DTDs and schemas without using any references. In such cases
an XML file can be processed without the corresponding DTDs or schemas. In this scenario, the Resolve external references option has to be switched off.
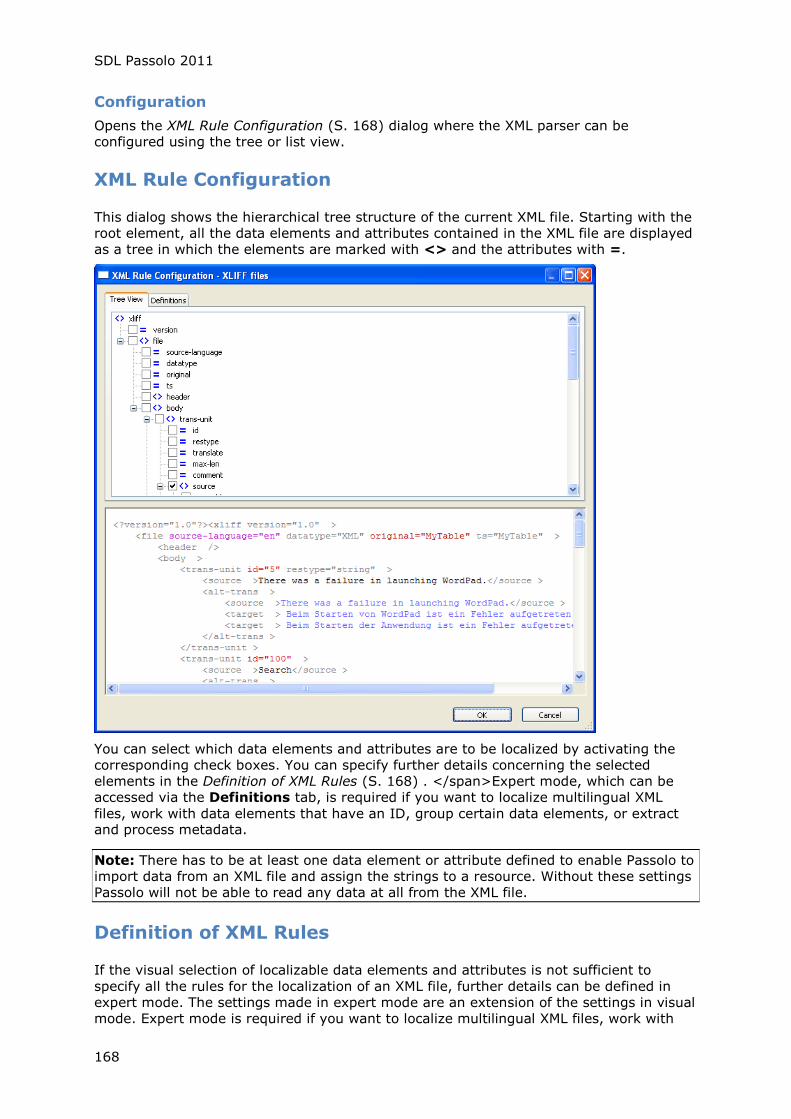
SDL Passolo 2011
168
Configuration
Opens the XML Rule Configuration (S. 168) dialog where the XML parser can be
configured using the tree or list view.
XML Rule Configuration
This dialog shows the hierarchical tree structure of the current XML file. Starting with the
root element, all the data elements and attributes contained in the XML file are displayed
as a tree in which the elements are marked with <> and the attributes with =.
You can select which data elements and attributes are to be localized by activating the
corresponding check boxes. You can specify further details concerning the selected
elements in the Definition of XML Rules (S. 168) . </span>Expert mode, which can be
accessed via the Definitions tab, is required if you want to localize multilingual XML
files, work with data elements that have an ID, group certain data elements, or extract and process metadata.
Note: There has to be at least one data element or attribute defined to enable Passolo to
import data from an XML file and assign the strings to a resource. Without these settings
Passolo will not be able to read any data at all from the XML file.
Definition of XML Rules
If the visual selection of localizable data elements and attributes is not sufficient to
specify all the rules for the localization of an XML file, further details can be defined in
expert mode. The settings made in expert mode are an extension of the settings in visual
mode. Expert mode is required if you want to localize multilingual XML files, work with
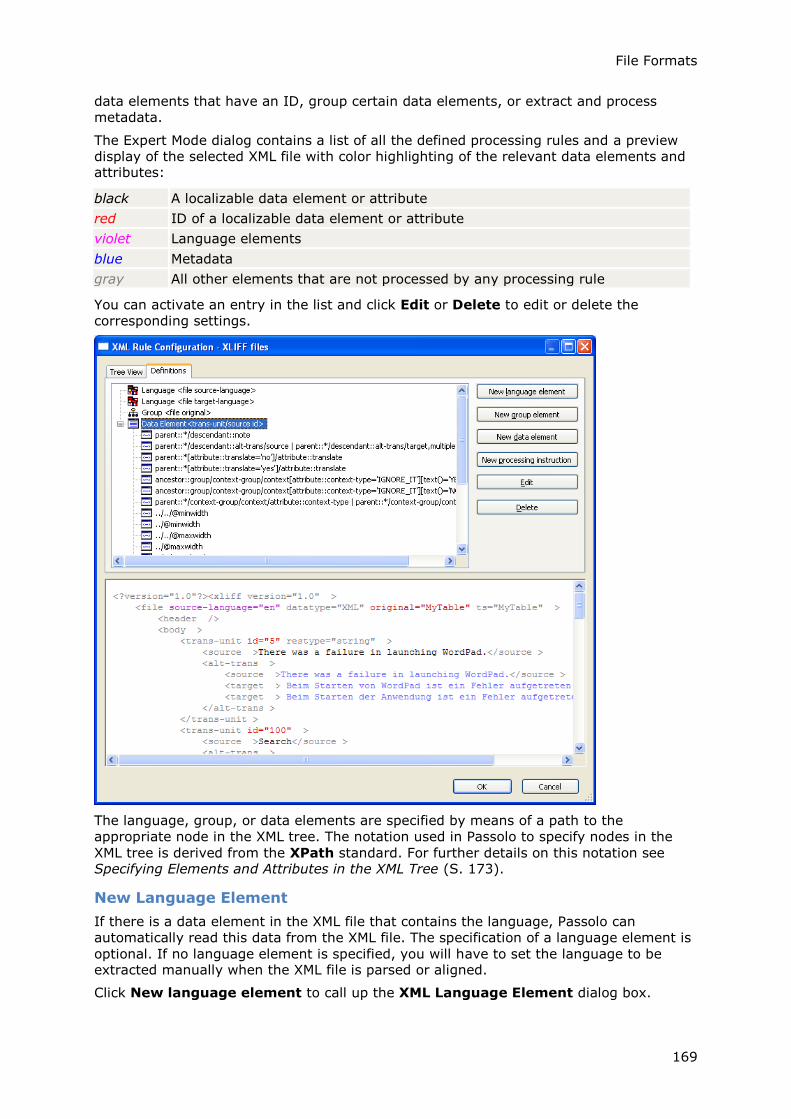
File Formats
169
data elements that have an ID, group certain data elements, or extract and process
metadata.
The Expert Mode dialog contains a list of all the defined processing rules and a preview
display of the selected XML file with color highlighting of the relevant data elements and attributes:
black A localizable data element or attribute
red ID of a localizable data element or attribute
violet Language elements
blue Metadata
gray All other elements that are not processed by any processing rule
You can activate an entry in the list and click Edit or Delete to edit or delete the
corresponding settings.
The language, group, or data elements are specified by means of a path to the
appropriate node in the XML tree. The notation used in Passolo to specify nodes in the
XML tree is derived from the XPath standard. For further details on this notation see Specifying Elements and Attributes in the XML Tree (S. 173).
New Language Element
If there is a data element in the XML file that contains the language, Passolo can
automatically read this data from the XML file. The specification of a language element is
optional. If no language element is specified, you will have to set the language to be extracted manually when the XML file is parsed or aligned.
Click New language element to call up the XML Language Element dialog box.
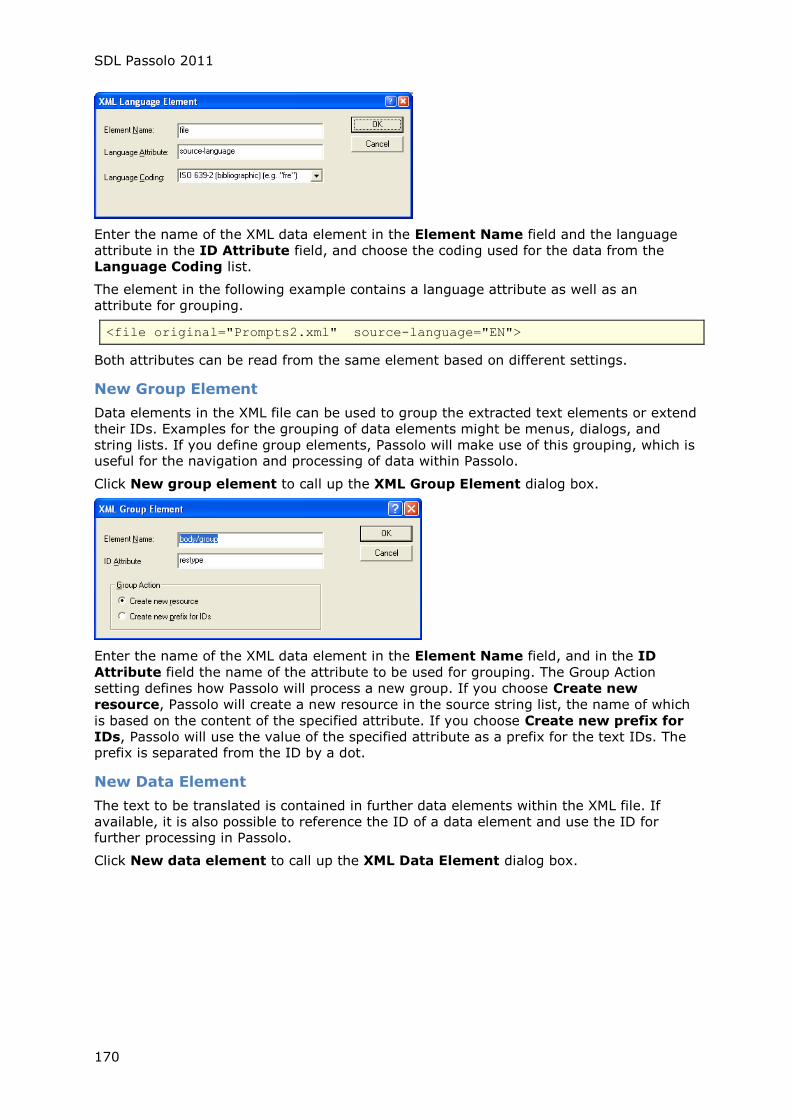
SDL Passolo 2011
170
Enter the name of the XML data element in the Element Name field and the language
attribute in the ID Attribute field, and choose the coding used for the data from the
Language Coding list.
The element in the following example contains a language attribute as well as an
attribute for grouping.
<file original="Prompts2.xml" source-language="EN">
Both attributes can be read from the same element based on different settings.
New Group Element
Data elements in the XML file can be used to group the extracted text elements or extend
their IDs. Examples for the grouping of data elements might be menus, dialogs, and
string lists. If you define group elements, Passolo will make use of this grouping, which is useful for the navigation and processing of data within Passolo.
Click New group element to call up the XML Group Element dialog box.
Enter the name of the XML data element in the Element Name field, and in the ID
Attribute field the name of the attribute to be used for grouping. The Group Action
setting defines how Passolo will process a new group. If you choose Create new
resource, Passolo will create a new resource in the source string list, the name of which
is based on the content of the specified attribute. If you choose Create new prefix for
IDs, Passolo will use the value of the specified attribute as a prefix for the text IDs. The prefix is separated from the ID by a dot.
New Data Element
The text to be translated is contained in further data elements within the XML file. If
available, it is also possible to reference the ID of a data element and use the ID for further processing in Passolo.
Click New data element to call up the XML Data Element dialog box.

File Formats
171
Enter the name of the XML data element in the Element Name field, and in the ID
Attribute field the name of the attribute to be used to generate the ID. If the ID
attribute or other metadata is contained in a parent data element, the two data element
names can be separated by a slash (/). Passolo will first search for the attributes or
metadata at the element’s own level – if it doesn't find them there, the search continues at the next parent level.
To save the translated text in a separate new element, activate the Translation
element checkbox. Enter a label for the element in the corresponding field. When the
target file is generated, Passolo will save the translation, including any relevant metadata, in this element.
Metadata
Metadata refers to attributes in the specified elements (and the values assigned to these
attributes) that can be used to control the processing of data in Passolo. Passolo can scan
these metadata attributes. They are then displayed on the Properties tab in the
translation window. In addition, it is possible to edit these user-defined properties when
parsing an XML file.
Enter the Attribute Name and select the associated Action from the list. If the action
you want to use is not available in the list, it can be performed by means of a macro that
is automatically carried out after parsing. The following example illustrates the different possibilities:
<trans-unit id="1" translate="yes" max-len="8" comment="This is a unit of
time"">
<source>sec</source>
<target xml:lang="IT">seg.</target>
</trans-unit>
For any entries in the source list that contain translate="no" the status will be set to
Read only and the text contained in the comment attribute will be inserted into the
comment field for the entry. The max-len attribute can be used in a macro to check the length of the translated text.

SDL Passolo 2011
172
Handling Spaces
Data elements in XML files often contain extra spaces. You can use the Leading &
trailing white spaces setting to specify how Passolo should handle these extra spaces.
If you choose Edit, the spaces are included in the text which means they can be edited
by the translator. If you choose Mask, the spaces are not included in the editable text,
but reinserted into the target file. If you choose Remove, the extra spaces are deleted completely from the editable text.
Handling Embedded Elements
The data elements in XML files can contain subordinate elements. You can use the
Embedded elements setting to specify how Passolo should handle these elements. If
you choose Include elements, the entry remains intact and the embedded elements are
inserted as tags. If you choose Split data, each new element creates a new entry. The following example would transform the element
<source>Normal text<bold>Bold text</bold>Normal text</source>
into either
Normal text <bold>Bold text </bold>Normal text
or
Normal text
Bold text
Normal text
depending on this setting. If you select Split data and evaluate elements the partial
elements are not necessarily added to the translation list, but are treated as separate
data elements. These sub-elements have to be specified in the configuration if they are to be added to the translation list.
Sentence level sub-segmentation
With this option you can specify that the data elements extracted from the XML file
should be segmented at sentence level according to the currently active segmentation
rules. For data elements that comprise several sentences, such as longer error messages
or help texts, there are then several lines in the translation list that can be translated and
processed separately. For further information about the segmentation of strings please refer to The SRX Segmenter (S. 204).
New Processing Instruction
Data from processing instructions in XML files can also be processed by Passolo. The
content of these processing instructions is passed to the subsequent element for further
processing. Thus, you can make use of comments, for example, that are stored separate from the data element.
Click New processing instruction to call up the XML Processing Instruction dialog.
Enter the processing instruction to be applied to the following element and choose the associated Action from the list box.

File Formats
173
Specifying Elements and Attributes in the XML Tree
The name of a language, group, or data element is specified by means of a path to the
appropriate node in the XML tree. This can be a complete path starting with the root
element of the XML tree, or a partial path, or simply the name of the required element.
The notation used in Passolo to specify nodes in the XML tree is derived from the XPath
standard. Compared to XPath there are a number of limitations and modifications that
have to be taken into consideration. In particular, please note that a complete path must be specified for certain nodes.
When elements are selected in the Interactive mode, Passolo always uses a complete
path to the specified XML node. If necessary, you can edit these paths in Expert mode, for example if you want to use a partial path or some other type of node specification.
Specifying paths and nodes
A complete path begins with a slash / and contains all the nodes along the XML tree up to
the specified element, for example /file/body/trans-unit/source. If the XML file also
contains trans-unit elements below other tree nodes, these will not be found with the path used above. In this case, a partial path or just the element name could be used.
Sometimes data elements of the same type may occur in different branches of the XML
tree. In such cases, a different setting would be required for each of the different paths
in order to extract all the relevant data elements. However, you can also specify an
element using a partial path or just the element name, which means it is possible to
capture all the different paths with a single setting. The simplest example is to use the
just name of the data element you want to extract, without indicating a path at all, for
example trans-unit. This specification extracts every trans-unit element from the XML file, regardless of where the elements are located in the XML tree.
A partial path can be used to specify that only data elements contained in a specific
parent element will be extracted, for example group/trans-unit. In this case, Passolo will
only extract trans-unit elements that are located directly within a group element.
Further path specifications can be made using the following variables and placeholders:
* Placeholder for any node name within a path
parent:: The parent element of the current data element
ancestor:: All the nodes leading up to the current data element in the XML tree,
i.e. the parent element, its parent element and so on up to the root
element of the tree
child:: The child elements of the current data element
descendant:: All the directly dependent nodes of the current data element, i.e. the
child elements, their respective child elements and so on up to the
final nodes.
Here are several examples for the use of these variables and placeholders:
parent::*/descendant::alt-trans/source – specifies all the nodes with the name source
that are children of an alt-trans element. The search is limited to alt-trans nodes that are
siblings of the current element as well as their direct descendants, i.e. child elements continuing down to the final nodes.
ancestor::*/attribute::datatype – specifies all the ancestor nodes that have a datatype attribute.
ancestor::group/context-group/context/attribute::context-type – specifies all the
ancestor nodes that contain a context element with a context-type attribute as a
descendant, whereby the parent element of context is a context-group element and the grandparent is a group element.
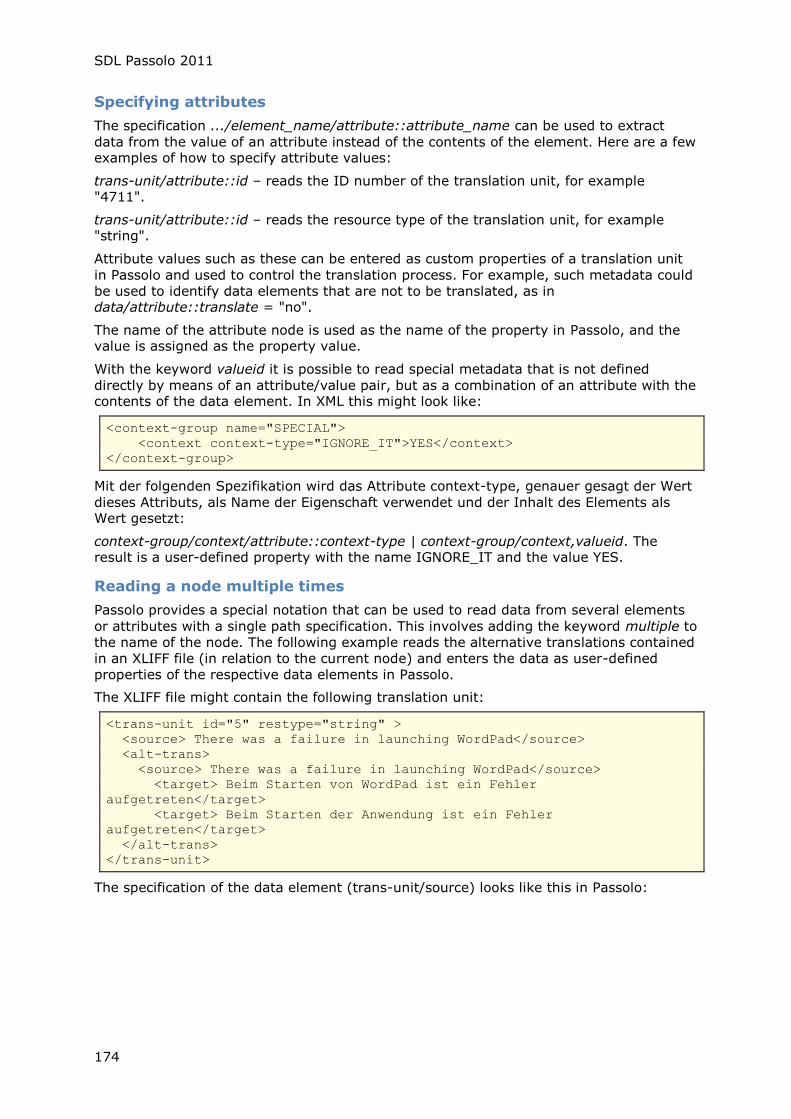
SDL Passolo 2011
174
Specifying attributes
The specification .../element_name/attribute::attribute_name can be used to extract
data from the value of an attribute instead of the contents of the element. Here are a few examples of how to specify attribute values:
trans-unit/attribute::id – reads the ID number of the translation unit, for example "4711".
trans-unit/attribute::id – reads the resource type of the translation unit, for example "string".
Attribute values such as these can be entered as custom properties of a translation unit
in Passolo and used to control the translation process. For example, such metadata could
be used to identify data elements that are not to be translated, as in data/attribute::translate = "no".
The name of the attribute node is used as the name of the property in Passolo, and the value is assigned as the property value.
With the keyword valueid it is possible to read special metadata that is not defined
directly by means of an attribute/value pair, but as a combination of an attribute with the contents of the data element. In XML this might look like:
<context-group name="SPECIAL">
<context context-type="IGNORE_IT">YES</context>
</context-group>
Mit der folgenden Spezifikation wird das Attribute context-type, genauer gesagt der Wert
dieses Attributs, als Name der Eigenschaft verwendet und der Inhalt des Elements als Wert gesetzt:
context-group/context/attribute::context-type | context-group/context,valueid. The result is a user-defined property with the name IGNORE_IT and the value YES.
Reading a node multiple times
Passolo provides a special notation that can be used to read data from several elements
or attributes with a single path specification. This involves adding the keyword multiple to
the name of the node. The following example reads the alternative translations contained
in an XLIFF file (in relation to the current node) and enters the data as user-defined
properties of the respective data elements in Passolo.
The XLIFF file might contain the following translation unit:
<trans-unit id="5" restype="string" >
<source> There was a failure in launching WordPad</source>
<alt-trans>
<source> There was a failure in launching WordPad</source>
<target> Beim Starten von WordPad ist ein Fehler
aufgetreten</target>
<target> Beim Starten der Anwendung ist ein Fehler
aufgetreten</target>
</alt-trans>
</trans-unit>
The specification of the data element (trans-unit/source) looks like this in Passolo:
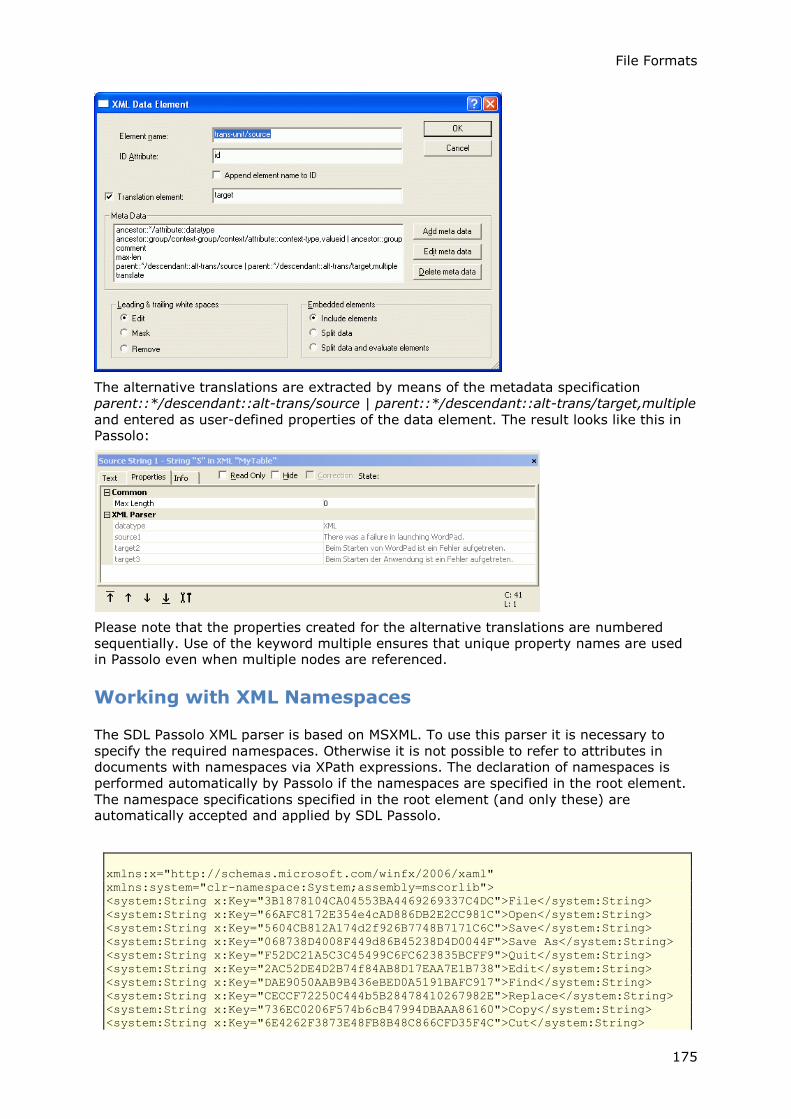
File Formats
175
The alternative translations are extracted by means of the metadata specification
parent::*/descendant::alt-trans/source | parent::*/descendant::alt-trans/target,multiple
and entered as user-defined properties of the data element. The result looks like this in Passolo:
Please note that the properties created for the alternative translations are numbered
sequentially. Use of the keyword multiple ensures that unique property names are used in Passolo even when multiple nodes are referenced.
Working with XML Namespaces
The SDL Passolo XML parser is based on MSXML. To use this parser it is necessary to
specify the required namespaces. Otherwise it is not possible to refer to attributes in
documents with namespaces via XPath expressions. The declaration of namespaces is
performed automatically by Passolo if the namespaces are specified in the root element.
The namespace specifications specified in the root element (and only these) are automatically accepted and applied by SDL Passolo.
xmlns:x="http://schemas.microsoft.com/winfx/2006/xaml"
xmlns:system="clr-namespace:System;assembly=mscorlib">
<system:String x:Key="3B1878104CA04553BA4469269337C4DC">File</system:String>
<system:String x:Key="66AFC8172E354e4cAD886DB2E2CC981C">Open</system:String>
<system:String x:Key="5604CB812A174d2f926B7748B7171C6C">Save</system:String>
<system:String x:Key="068738D4008F449d86B45238D4D0044F">Save As</system:String>
<system:String x:Key="F52DC21A5C3C45499C6FC623835BCFF9">Quit</system:String>
<system:String x:Key="2AC52DE4D2B74f84AB8D17EAA7E1B738">Edit</system:String>
<system:String x:Key="DAE9050AAB9B436eBED0A5191BAFC917">Find</system:String>
<system:String x:Key="CECCF72250C444b5B28478410267982E">Replace</system:String>
<system:String x:Key="736EC0206F574b6cB47994DBAAA86160">Copy</system:String>
<system:String x:Key="6E4262F3873E48FB8B48C866CFD35F4C">Cut</system:String>
SDL Passolo 2011
176
<system:String x:Key="373FC6B7F4DD4A12A4D63081859B2867">Paste</system:String>
</ResourceDictionary>
In the example above the namespaces
http://schemas.microsoft.com/winfx/2006/xaml/presentation,
http://schemas.microsoft.com/winfx/2006/xaml and clr-
namespace:System;assembly=mscorlib are used. The identifiers of the last two
namespaces are x and system. The first namespace is the default namespace and does
not have an identifier.
Namespace prefixes should be used in XPath expressions and in the list of attributes, e.g.
for the ID of an element, the qualified name x:Key is displayed, not just Key. Elements
and attributes that do not have a namespace prefix are automatically derived from the
default namespace. A namespace prefix still has to be provided in the settings for these
elements and attributes, however.
Passolo uses the prefix pdns for the default namespace. An XPath expression for an XLIFF file that does not specify the XLIFF namespace would look like this:
../child::note
If the fiile contains the XLIFF namespace as default namespace the XPath expression would be as follows:
../child::psns:note
Encoding of XML Files
Byte Order Marks (BOMs) can be provided for Unicode files. Contained in the first bytes of the file, the BOMs specify the Unicode encoding. The BOM codes are:
EF BB BF UTF-8
FF FE Little Endian
FE FF Big Endian
For files without BOMs the XML parser automatically assumes UTF-8 encoding (no
codepage specification). If the file uses codepage-based encoding it must begin with an
XML declaration containing the codepage specification. The following code sample shows the XML declaration for use of the ISO 8859-1 (Western European) character set.
XML files with BOMs should not contain an encoding declaration since the encoding is
already defined by the BOMs. Contradictory specifications through BOMs and encoding
declarations will result in an error when the file is parsed.
Note: With previous versions of the Passolo XML parser, target files based on Unicode
source files were always generated with UTF-8 encoding and without BOMs. As of SDL
Passolo 2009, the target files for Unicode-based source files are written in the same
encoding and with the same BOMs as the source file.
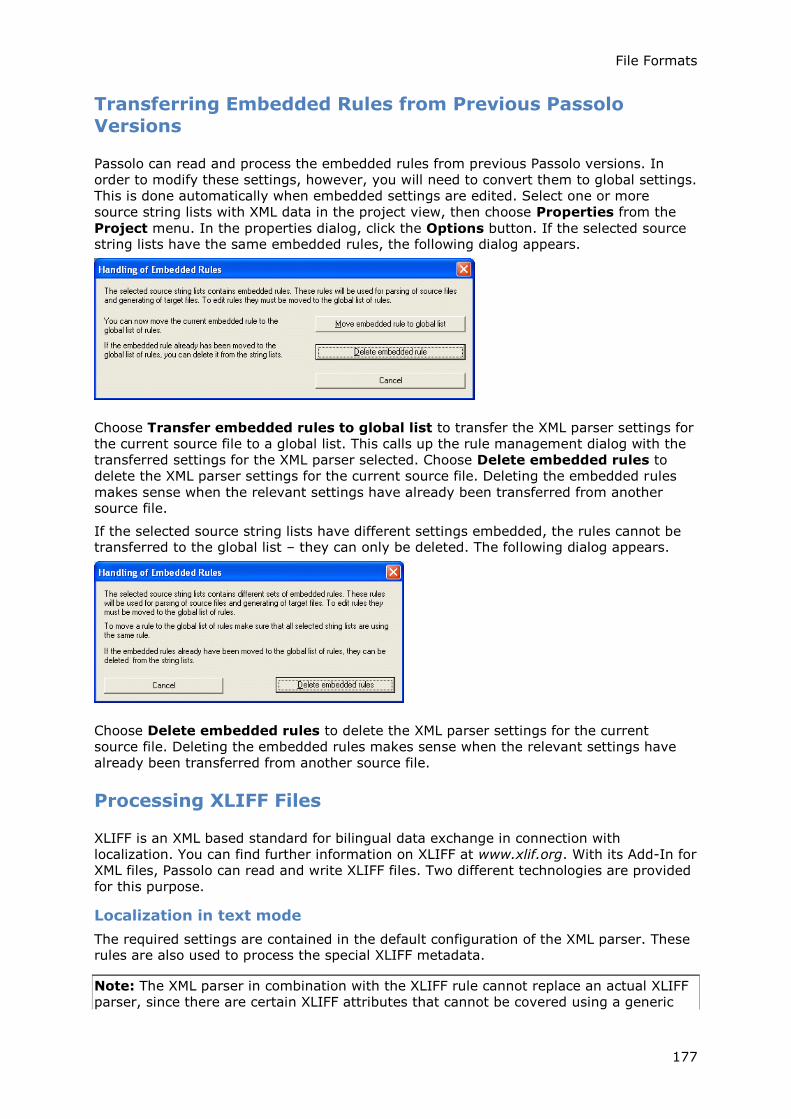
File Formats
177
Transferring Embedded Rules from Previous Passolo Versions
Passolo can read and process the embedded rules from previous Passolo versions. In
order to modify these settings, however, you will need to convert them to global settings.
This is done automatically when embedded settings are edited. Select one or more
source string lists with XML data in the project view, then choose Properties from the
Project menu. In the properties dialog, click the Options button. If the selected source string lists have the same embedded rules, the following dialog appears.
Choose Transfer embedded rules to global list to transfer the XML parser settings for
the current source file to a global list. This calls up the rule management dialog with the
transferred settings for the XML parser selected. Choose Delete embedded rules to
delete the XML parser settings for the current source file. Deleting the embedded rules
makes sense when the relevant settings have already been transferred from another source file.
If the selected source string lists have different settings embedded, the rules cannot be transferred to the global list – they can only be deleted. The following dialog appears.
Choose Delete embedded rules to delete the XML parser settings for the current
source file. Deleting the embedded rules makes sense when the relevant settings have
already been transferred from another source file.
Processing XLIFF Files
XLIFF is an XML based standard for bilingual data exchange in connection with
localization. You can find further information on XLIFF at www.xlif.org. With its Add-In for
XML files, Passolo can read and write XLIFF files. Two different technologies are provided
for this purpose.
Localization in text mode
The required settings are contained in the default configuration of the XML parser. These rules are also used to process the special XLIFF metadata.
Note: The XML parser in combination with the XLIFF rule cannot replace an actual XLIFF
parser, since there are certain XLIFF attributes that cannot be covered using a generic
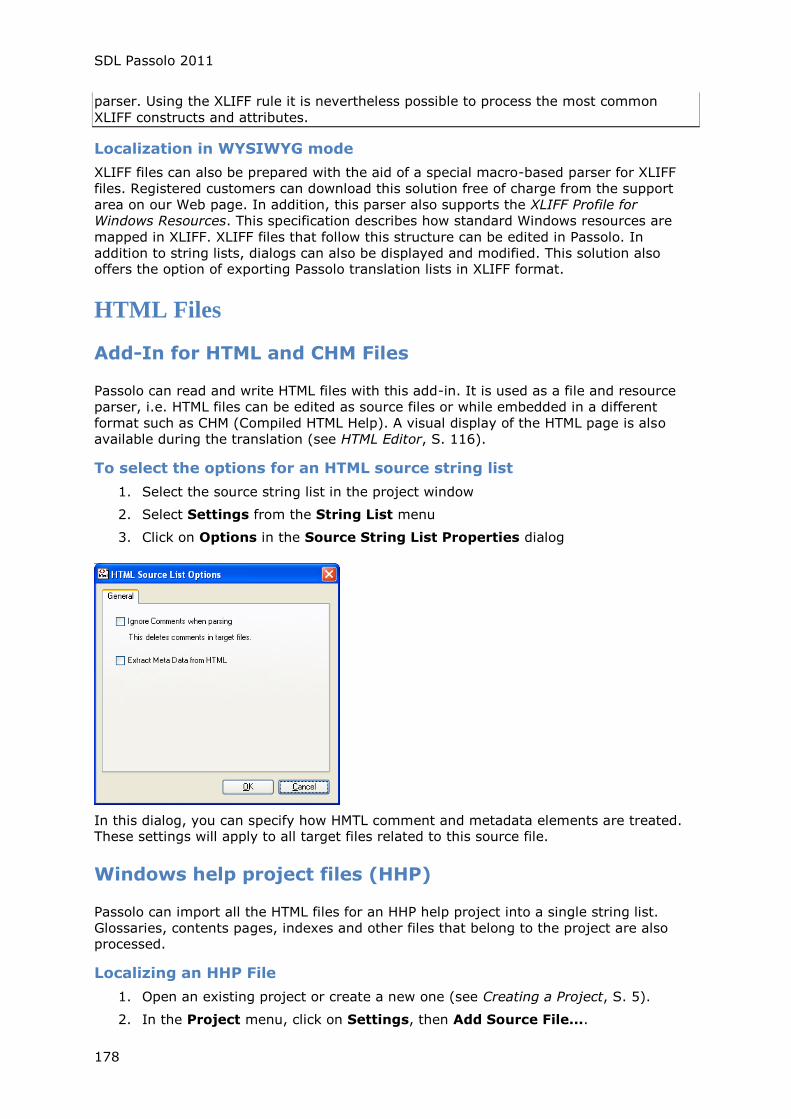
SDL Passolo 2011
178
parser. Using the XLIFF rule it is nevertheless possible to process the most common
XLIFF constructs and attributes.
Localization in WYSIWYG mode
XLIFF files can also be prepared with the aid of a special macro-based parser for XLIFF
files. Registered customers can download this solution free of charge from the support
area on our Web page. In addition, this parser also supports the XLIFF Profile for
Windows Resources. This specification describes how standard Windows resources are
mapped in XLIFF. XLIFF files that follow this structure can be edited in Passolo. In
addition to string lists, dialogs can also be displayed and modified. This solution also offers the option of exporting Passolo translation lists in XLIFF format.
HTML Files
Add-In for HTML and CHM Files
Passolo can read and write HTML files with this add-in. It is used as a file and resource
parser, i.e. HTML files can be edited as source files or while embedded in a different
format such as CHM (Compiled HTML Help). A visual display of the HTML page is also
available during the translation (see HTML Editor, S. 116).
To select the options for an HTML source string list
1. Select the source string list in the project window
2. Select Settings from the String List menu
3. Click on Options in the Source String List Properties dialog
In this dialog, you can specify how HMTL comment and metadata elements are treated. These settings will apply to all target files related to this source file.
Windows help project files (HHP)
Passolo can import all the HTML files for an HHP help project into a single string list.
Glossaries, contents pages, indexes and other files that belong to the project are also processed.
Localizing an HHP File
1. Open an existing project or create a new one (see Creating a Project, S. 5).
2. In the Project menu, click on Settings, then Add Source File....

File Formats
179
3. Navigate to the folder that contains the help project files and select the hhp file.
To filter the files displayed, you can set the File type to HTML files. Close the dialog by clicking on OK.
4. The Source String List Properties dialog is displayed. Ensure that Add-in HTML
parser is set as the Parser. As no language is entered in the hhp file, enter the correctString language.
5. Click on Options. In addition to the general settings that apply to all HTML files,
two other pages are also displayed:
On the File Handlingtab, you can specify how the files contained in the help
project are to be handled. For example, files can be embedded in the Passolo
project or simply copied to the target folder. Click on Add to enter a new file
specification with the corresponding editing mode.
On the Additional Filestab, you can specify additional files that are in the same folder as the help project file.
6. Confirm all open dialogs by clicking on OK; you will then be taken back to the
project window.
7. Ensure that the corresponding target files are located in different folders to the selected source file.
RoboHelp Projects
RoboHelp projects always also contain an hhp file, which you can select as a source file.
In addition, the same folder contains additional files, such as the RoboHelp project file or
BSSCDefault.h, that are required in the target folder.
1. Create a help project as described above.
2. To adapt the parser options, select the hpp source file in the project window and
in the String List menu, click on Settings.
3. Click on Options and switch to the Additional Files tab.
4. Click on Add.
5. Enter * as the file specification and select the options Include sub-folders and
Copy to translation folder. Close the dialog by clicking on OK. Instead of using
*, you can also enter the individual RoboHelp file types individually, e.g.:
BSSCDefault.h, *.hm, *.ali, etc.
Compiled help files (CHM)
Passolo can extract all the HTML files from a chm file and import these into a single string
list. Glossaries, contents pages, indexes and other files that belong to the project are also processed.
Localizing a CHM File
1. Open an existing project or create a new one (see Creating a Project, S. 5).
2. In the Project menu, click on Settings, then Add Source File....
3. Navigate to the folder that contains the help file and select the chm file. To filter
the files displayed, you can set the File type to HTML files. Close the dialog by clicking on OK.
4. The Source String List Properties dialog is displayed. Ensure that Add-in HTML
help parser is set as the Parser. As a language is not specified in the CHM file,
enter the correct Language of text.
5. Click on Options. In addition to the general settings that apply to all HTML files,
three further tabs are also displayed here:
On the CHM Options tab, you can configure various settings that apply to CHM
files (see below).
SDL Passolo 2011
180
On the File Handling tab, you can specify how the files contained in the CHM file
are to be handled. For example, files can be embedded in the Passolo project or
simply copied to the target folder. Click on Add to enter a new file specification
with the corresponding editing mode.
In the Additional Files tab, you can specify additional files that are in the same folder as the CHM file.
6. Confirm all open dialogs by clicking on OK; you will then be taken back to the project window.
CHM Options
To call up the options for CHM files, proceed as follows:
1. In the project window, click on the CHM source file to select it.
2. In the Project menu, click on String List Settings.
3. In the Source String List Properties dialog, click on Options
4. In the HTML Parser - Source File Propertiesdialog, click on the CHM
Options tab.
If you have a Windows help project file (HHP), you should add this here. In
general, this file will contain more information than can be extracted from the
CHM file. If you do not have a Windows HHP file, select Create project file automatically.
Note: If the CHM file was created by RoboHelp, you should specify that the
project file is to be created automatically, because RoboHelp only creates a
temporary valid project file when creating the CHM file. The HHP file in the
RoboHelp project folder does not contain all the necessary information.
If a CHM target file is generated, the files contained in the CHM source file will
be extracted, and translated by Passolo. You have the option of saving the
generated files, via Store to target folder, or deleting them again once the
target file is generated. As a general rule, it is a good idea to save the files, because these can be used to produce files in other formats if required, e.g PDF.
You can also compile the translated files directly in a CHM file via the Compile
CHM help file option. If the CHM file created contains errors, you may need to
search the settings and the created project file for missing elements. To carry
out out such a search, deactivate this option and use the Microsoft HTML Help Workshop to compile the CHM file.
The options described apply to all target languages for the same source. To change the settings for an individual target file, proceed as follows:
1. In the project window, click on the CHM target file to select it.
2. In the Project menu, click on String List Settings.
3. In the Translation List Properties dialog, click on Advanced.
4. Deactivate the setting Use source file options.
5. Configure the settings you require. In addition to the source file options,
in this section you can also enter another folder as the target folder for the translated files.

File Formats
181
Java Programs
Add-In for Java Programs
The Passolo Add-In for Java permits the localization of internationalized Java
applications. The add-in supports all the common resource formats used in source files,
in compiled binary files, and in compressed JAR files. The Passolo parser technology can be used for the various Java platforms: J2EE, J2SE and J2ME.
Property files have the file extension PROPERTIES and contain a simple list of IDs and strings.
ListResourceBundles are Java classes derived from the base java.util.ListResourceBundle
or from another class derived from ListResourceBundle. The Java add-in can process
source files with the file extension JAVA as well as compiled binary files with the file extension CLASS.
Like ListResourceBundles, ArrayResourceBundles are Java classes, but their setup is
slightly different. ArrayResourceBundles were introduced by Inprise Borland and Oracle.
Once again, the Java add-in can process both the source files and the compiled binary
files.
A JAR or WAR file can contain a complete Java application in compressed form, which
simplifies the distribution and administration of components. The Java add-in can extract
property files and ResourceBundles from the files contained in a JAR/WAR file, and can insert the translations into the JAR/WAR file in compliance with the Java conventions.
Further information
File Naming Conventions (S. 181)
Java Property Files (S. 182)
Java Resource Bundles (S. 183)
JAR and WAR Files (S. 183)
Configuring the Java Add-In (S. 183)
References (S. 184)
File Naming Conventions
For files containing Locale specific data, Java specifies naming conventions so that the
Java Runtime Engine can extract data from the files in the language required. Passolo
uses these conventions to determine the language of a file or establish the name of a
target file.
Before adding Java source files to your project, specify the target path rules for the
relevant Java file type (or copy the rules into the project). This is done in the Target Path Rules (S. 23) dialog.
The naming convention for Java files is of the form
BaseName[_Language[_Country[_Variant]]]. Starting, for example, with the file
myresources.properties, this means:
myresources.properties contains neutral data without a specific assigned language. If the
Java Runtime Engine has no other choice, it will use the data from this file. For these
files, Passolo suggests the language setting Neutral - the user has to go about specifying the language.
The file myresources_en.properties contains English data, without distinguishing between
British and American English, for example. For such files, Passolo automatically suggests English without a specific country code.
SDL Passolo 2011
182
The file myresources_en_GB.properties contains data in British English, in which case
Passolo automatically suggests British English.
Files with additional specification of a language variant are not supported by Passolo.
For further information on the Java naming conventions please refer to Java
Internationalization by Andy Deitsch and David Czarnecki, published by O’Reilly, or go to http://java.sun.com.
Java Property Files
Property files have a simple structure, similar to the structure of Windows INI files.
Passolo supports all the features offered by this format, including multiline strings, empty entries, ASCII escape sequences, and UNICODE escape sequences.
Java property files can be stored in ANSI or UNICODE format, and will be generated in
the same format by default after translation, using the target codepage where
appropriate. You can specify a different encoding for the target files in the Java options (see Configuring the Java Add-In, S. 183).
Escape sequences in source and target files
Escape sequences are character strings that cannot be entered directly into a string. For
instance, a line break cannot be inserted into a string in a properties file, because it
would end the string. The escape sequence '\n' is used instead. Other common escape
sequences are '\r' for carriage return and "\t' for tab. Because the backslash initiates the
escape sequence these cases, it cannot itself be used directly as a character. For this
reason a backslash has to be inserted using the escape sequence '\\'.
In theory, every character can be inserted as an escape sequence, either as '\xhh' (value
range of one byte) or '\uhhhh' (value range of one UTF-16 character). Inserting
characters that can be inserted normally in this way does not make sense, but it can be used when, for instance, a character cannot be inserted directly into an ANSI file.
When Passolo reads property files, it evaluates escape sequences and replaces them with
the actual characters, so that the translator does not need to worry about escape
sequences. When writing, it transforms any characters that cannot be inserted directly.
However these conversions are not always unique. The following escape sequences are
used for line breaks: '\n', 'x0a' and '\u000a'. Usually '\n' is used. If Passolo determines
that a different encoding is used in the source string, it will also use this for the target string.
The backslash is also used for empty characters that are part of a string, e.g. between an
ID or a delimiter (=) that identifies a string. The same applies to empty characters that
follow a string. Otherwise, simple empty characters before and after a string are deleted.
The escape sequence is '\<space>'. In this case Passolo also converts the leading and
trailing 'escaped' empty characters into proper empty characters that the translator can
then work with as usual. When writing, it inserts the leading and trailing empty
characters as escape sequences.
The final use for the backslash is as a line continuation marker in property files. A
backslash at the end of a line indicates that the text in the following line belongs to the
same string. Any leading and trailing empty spaces in the next line are deleted unless
they are inserted as '\<space>'. Passolo processes the line continuation marker and
assembles lines that belong together into one string. However, when writing, the string is output as one line and is not spread over several lines.
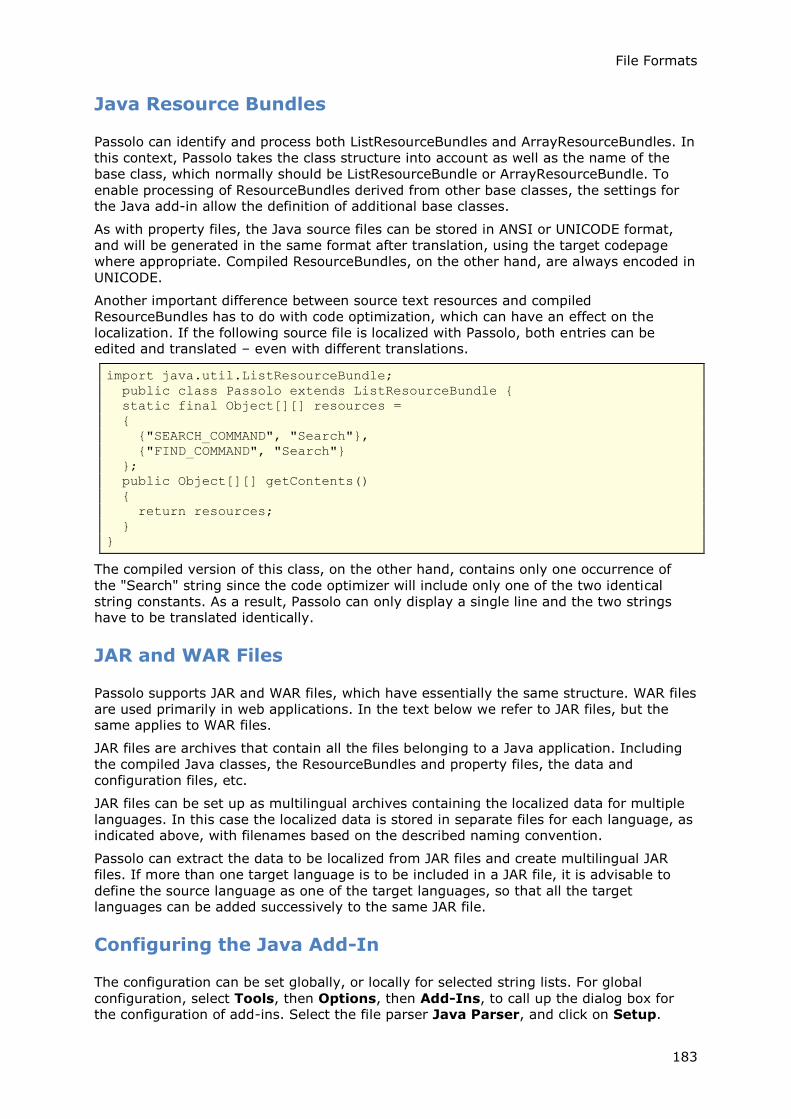
File Formats
183
Java Resource Bundles
Passolo can identify and process both ListResourceBundles and ArrayResourceBundles. In
this context, Passolo takes the class structure into account as well as the name of the
base class, which normally should be ListResourceBundle or ArrayResourceBundle. To
enable processing of ResourceBundles derived from other base classes, the settings for the Java add-in allow the definition of additional base classes.
As with property files, the Java source files can be stored in ANSI or UNICODE format,
and will be generated in the same format after translation, using the target codepage
where appropriate. Compiled ResourceBundles, on the other hand, are always encoded in
UNICODE.
Another important difference between source text resources and compiled
ResourceBundles has to do with code optimization, which can have an effect on the
localization. If the following source file is localized with Passolo, both entries can be edited and translated – even with different translations.
import java.util.ListResourceBundle;
public class Passolo extends ListResourceBundle {
static final Object[][] resources =
{
{"SEARCH_COMMAND", "Search"},
{"FIND_COMMAND", "Search"}
};
public Object[][] getContents()
{
return resources;
}
}
The compiled version of this class, on the other hand, contains only one occurrence of
the "Search" string since the code optimizer will include only one of the two identical
string constants. As a result, Passolo can only display a single line and the two strings have to be translated identically.
JAR and WAR Files
Passolo supports JAR and WAR files, which have essentially the same structure. WAR files
are used primarily in web applications. In the text below we refer to JAR files, but the same applies to WAR files.
JAR files are archives that contain all the files belonging to a Java application. Including
the compiled Java classes, the ResourceBundles and property files, the data and
configuration files, etc.
JAR files can be set up as multilingual archives containing the localized data for multiple
languages. In this case the localized data is stored in separate files for each language, as indicated above, with filenames based on the described naming convention.
Passolo can extract the data to be localized from JAR files and create multilingual JAR
files. If more than one target language is to be included in a JAR file, it is advisable to
define the source language as one of the target languages, so that all the target languages can be added successively to the same JAR file.
Configuring the Java Add-In
The configuration can be set globally, or locally for selected string lists. For global
configuration, select Tools, then Options, then Add-Ins, to call up the dialog box for the configuration of add-ins. Select the file parser Java Parser, and click on Setup.

SDL Passolo 2011
184
For local configuration, select one or more source string lists with Java data in the project
view, then select Properties from the Project menu. In the properties dialog, click the
Options button. If you change the local configuration of a string list, you can use this
setting as the global configuration by clicking on the button Set as default. For new
string lists, the global configuration will be used automatically.
If the application uses ResourceBundles that are not derived directly from
ListResourceBundle or ArrayResourceBundle, the respective base classes can be entered
in the field labeled Class names derived from ListResourceBundle or ArrayResourceBundle, with entries separated by spaces or semicolons.
The encoding for source property filesis normally recognized automatically. Files in 8
bit character set without BOMs (byte order marks) are then recognized as ANSI. If it
actually is UTF8 format, then select here "UTF8 without BOM".
Unless otherwise specified, the property target file is written using the same encoding as
the source file. With the ANSI format, the codepage that is specified for the target
language in the language settings is used when the target file is written. If you want to
use a different encoding for the target file, you can select ANSI, UTF-8, Unicode or
Unicode big endian instead of same as source files under Encoding for target property files.
If the property files or the source code files for ResourceBundles are to contain ASCII
characters only, the option Escape all characters above 0x7f as \uxxxx can be used to encode any non-ASCII characters as UNICODE escape sequences.
Choose the option Use static resource name "strings" for all non-archive files if
the file name is likely to change in the course of the project, for example in connection
with a version or date extension. This means that the strings will be linked correctly within the project even if the file names change.
With the Sentence level sub-segmentation option you can specify that the strings
extracted from the Java resources should be segmented at sentence level according to
the currently active segmentation rules. For strings that comprise several sentences,
such as longer error messages or help texts, there are then several lines in the
translation list that can be translated and processed separately. For further information
about the segmentation of strings please refer to The SRX Segmenter (S. 204).
Click on Set as default if you have changed the settings for a source file and want to use
these settings for new Java files.
References
Further information on the internationalization and localization of Java applications can be found in:
Java Internationalization, Andy Deitsch and David Czarnecki, published by O'Reilly, ISBN
0-596-00019-7.
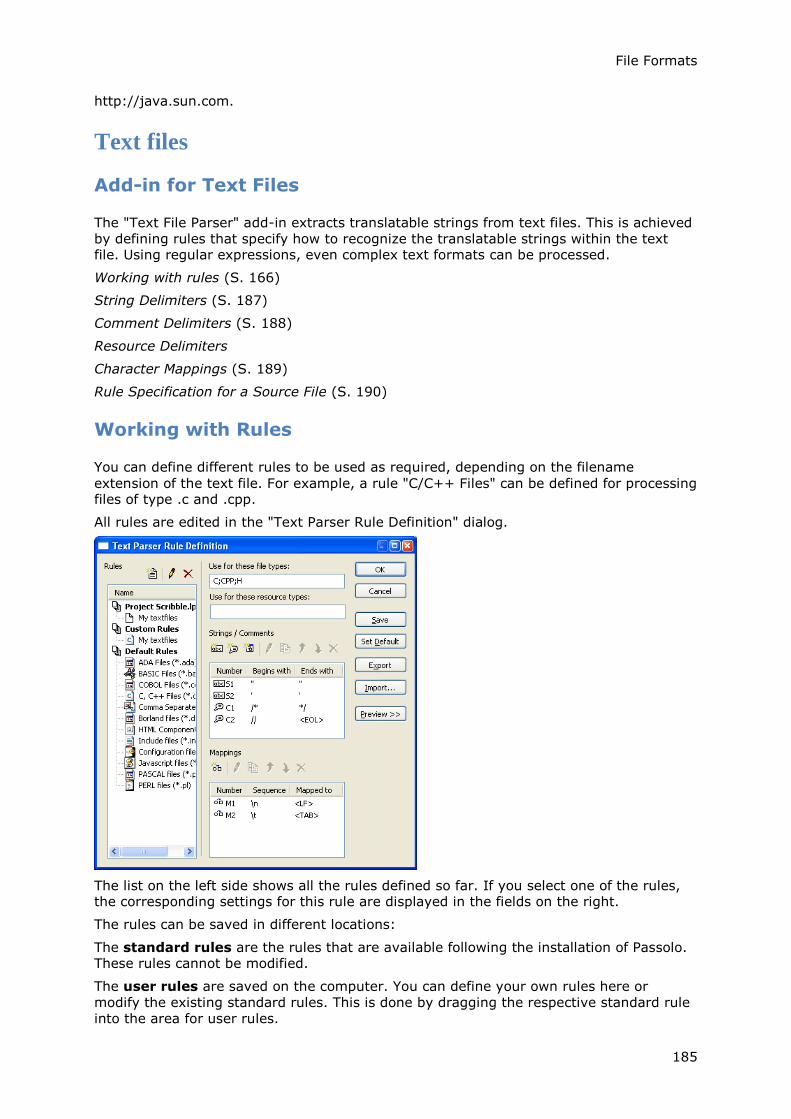
File Formats
185
http://java.sun.com.
Text files
Add-in for Text Files
The "Text File Parser" add-in extracts translatable strings from text files. This is achieved
by defining rules that specify how to recognize the translatable strings within the text file. Using regular expressions, even complex text formats can be processed.
Working with rules (S. 166)
String Delimiters (S. 187)
Comment Delimiters (S. 188)
Resource Delimiters
Character Mappings (S. 189)
Rule Specification for a Source File (S. 190)
Working with Rules
You can define different rules to be used as required, depending on the filename
extension of the text file. For example, a rule "C/C++ Files" can be defined for processing files of type .c and .cpp.
All rules are edited in the "Text Parser Rule Definition" dialog.
The list on the left side shows all the rules defined so far. If you select one of the rules, the corresponding settings for this rule are displayed in the fields on the right.
The rules can be saved in different locations:
The standard rules are the rules that are available following the installation of Passolo. These rules cannot be modified.
The user rules are saved on the computer. You can define your own rules here or
modify the existing standard rules. This is done by dragging the respective standard rule
into the area for user rules.
SDL Passolo 2011
186
You can also embed rules in a project. This ensures that the rule are available, even
when the project is opened on a different computer.
When a source file is read in with the text parser, Passolo saves the name of the rule
used. When the source string list is updated, Passolo searches for the relevant rule in this sequence:
1. In the project
2. In the user rules
3. In the standard rules
To add a new rule to the user rules, click on the icon . A new entry is added to the list and you can enter a name for the new rule.
To change the name of the current rule, click on the icon .
To delete the selected rule, click on the icon.
File types
In principle, rules can be defined independent of the file type. However, the application of
a rule to specific source file is facilitated if you specify a file type.
The file type is specified by entering a list of relevant file extensions, separated by semicolons. For example "c;cpp" for .c and .cpp files.
It is also possible to read text resources contained in a file that is processed by another
parser. When using such resources you can also specify the Resource Type. If, for
example, you use a resource type MYTEXT within a WIN32 source file and you want to
process the text resource using a text parser rule, you can specify the resource type
MYTEXT for this rule. When the source file is read, Passolo then uses the text parser for
this resource. You can control or modify the use of the text parser and the relevant rule in the respective resource properties window.
Strings / Comments
This list includes all the defined delimiters for strings, comments and resources.
Click on to add a new string delimiter (see String Delimiters, S. 187).
Click on to add a new comment delimiter (see Comment Delimiters, S. 188).
Click on to add a new resource delimiter (see Resource Delimiters).
The entries in this list can be sorted using and , but the sorting is only relevant in
certain special cases.
The other buttons can be used to edit, copy or delete the current entry.
Mappings
Click on to add a new character mapping (see Character Mappings, S. 189).
Save
Saves your changes to the rule definitions.
Set default
Deletes all your changes and resets the rule definitions to their original state.
Export
Exports the selected rules (or all the rules) to a configuration file. This allows you to send your rule definitions to other translators.
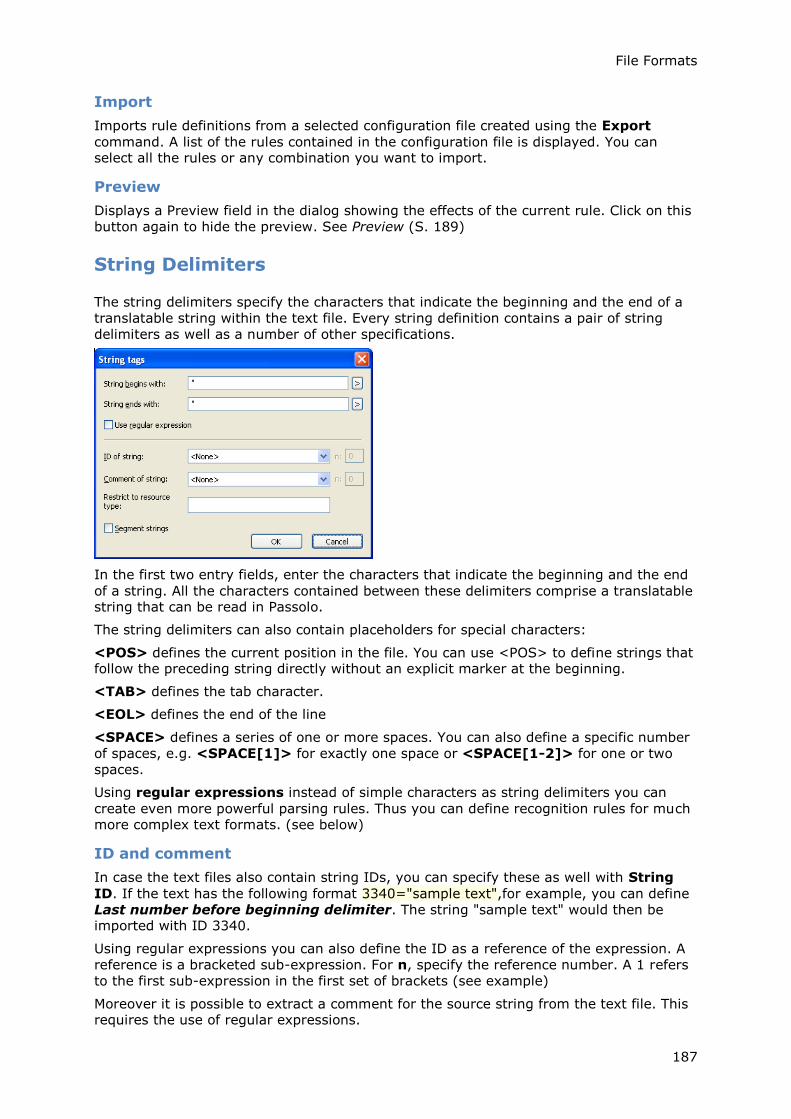
File Formats
187
Import
Imports rule definitions from a selected configuration file created using the Export
command. A list of the rules contained in the configuration file is displayed. You can select all the rules or any combination you want to import.
Preview
Displays a Preview field in the dialog showing the effects of the current rule. Click on this
button again to hide the preview. See Preview (S. 189)
String Delimiters
The string delimiters specify the characters that indicate the beginning and the end of a
translatable string within the text file. Every string definition contains a pair of string
delimiters as well as a number of other specifications.
In the first two entry fields, enter the characters that indicate the beginning and the end
of a string. All the characters contained between these delimiters comprise a translatable string that can be read in Passolo.
The string delimiters can also contain placeholders for special characters:
<POS> defines the current position in the file. You can use <POS> to define strings that follow the preceding string directly without an explicit marker at the beginning.
<TAB> defines the tab character.
<EOL> defines the end of the line
<SPACE> defines a series of one or more spaces. You can also define a specific number
of spaces, e.g. <SPACE[1]> for exactly one space or <SPACE[1-2]> for one or two
spaces.
Using regular expressions instead of simple characters as string delimiters you can
create even more powerful parsing rules. Thus you can define recognition rules for much more complex text formats. (see below)
ID and comment
In case the text files also contain string IDs, you can specify these as well with String
ID. If the text has the following format 3340="sample text",for example, you can define
Last number before beginning delimiter. The string "sample text" would then be imported with ID 3340.
Using regular expressions you can also define the ID as a reference of the expression. A
reference is a bracketed sub-expression. For n, specify the reference number. A 1 refers
to the first sub-expression in the first set of brackets (see example)
Moreover it is possible to extract a comment for the source string from the text file. This requires the use of regular expressions.
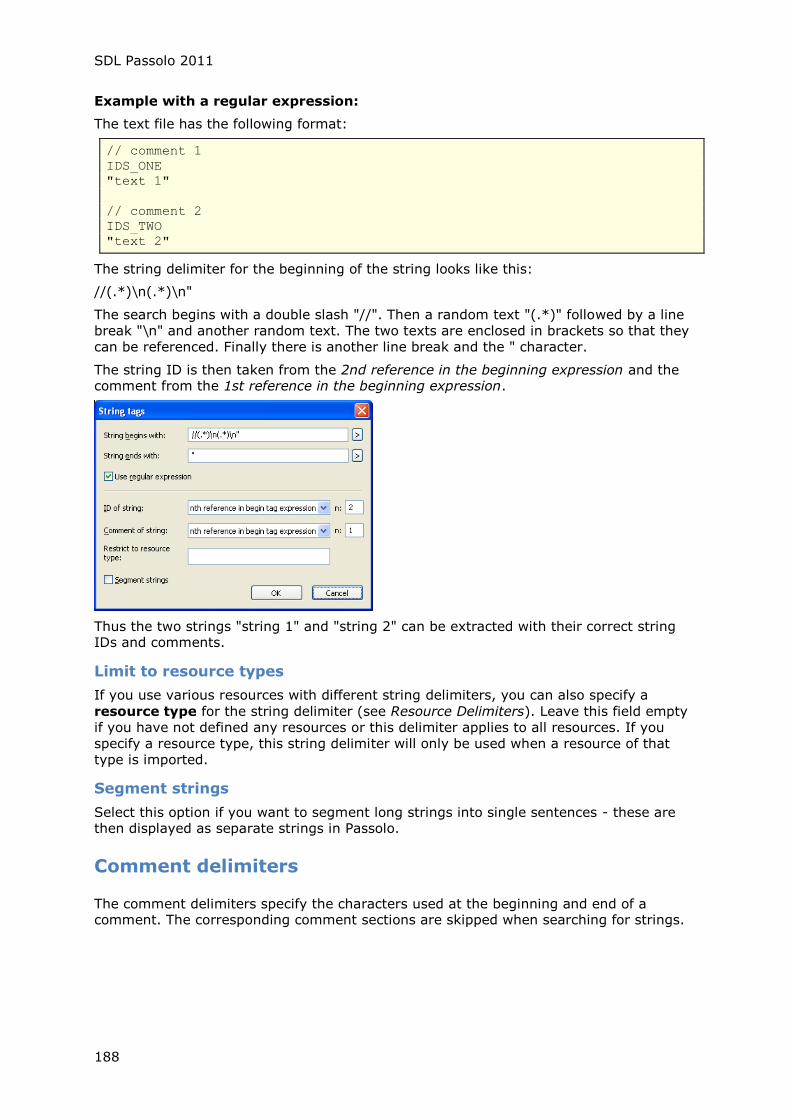
SDL Passolo 2011
188
Example with a regular expression:
The text file has the following format:
// comment 1
IDS_ONE
"text 1"
// comment 2
IDS_TWO
"text 2"
The string delimiter for the beginning of the string looks like this:
//(.*)\n(.*)\n"
The search begins with a double slash "//". Then a random text "(.*)" followed by a line
break "\n" and another random text. The two texts are enclosed in brackets so that they
can be referenced. Finally there is another line break and the " character.
The string ID is then taken from the 2nd reference in the beginning expression and the comment from the 1st reference in the beginning expression.
Thus the two strings "string 1" and "string 2" can be extracted with their correct string IDs and comments.
Limit to resource types
If you use various resources with different string delimiters, you can also specify a
resource type for the string delimiter (see Resource Delimiters). Leave this field empty
if you have not defined any resources or this delimiter applies to all resources. If you
specify a resource type, this string delimiter will only be used when a resource of that
type is imported.
Segment strings
Select this option if you want to segment long strings into single sentences - these are then displayed as separate strings in Passolo.
Comment delimiters
The comment delimiters specify the characters used at the beginning and end of a comment. The corresponding comment sections are skipped when searching for strings.
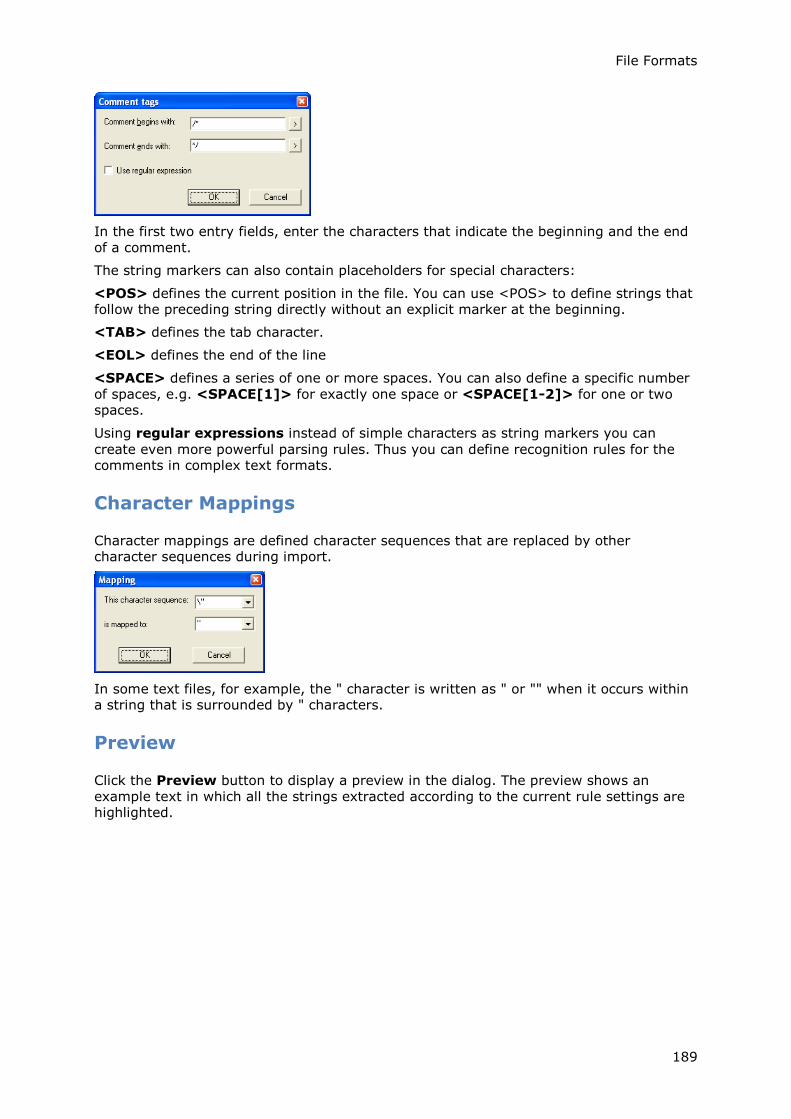
File Formats
189
In the first two entry fields, enter the characters that indicate the beginning and the end
of a comment.
The string markers can also contain placeholders for special characters:
<POS> defines the current position in the file. You can use <POS> to define strings that follow the preceding string directly without an explicit marker at the beginning.
<TAB> defines the tab character.
<EOL> defines the end of the line
<SPACE> defines a series of one or more spaces. You can also define a specific number
of spaces, e.g. <SPACE[1]> for exactly one space or <SPACE[1-2]> for one or two spaces.
Using regular expressions instead of simple characters as string markers you can
create even more powerful parsing rules. Thus you can define recognition rules for the comments in complex text formats.
Character Mappings
Character mappings are defined character sequences that are replaced by other character sequences during import.
In some text files, for example, the " character is written as " or "" when it occurs within a string that is surrounded by " characters.
Preview
Click the Preview button to display a preview in the dialog. The preview shows an
example text in which all the strings extracted according to the current rule settings are highlighted.

SDL Passolo 2011
190
File
Enter the path to the file you want to use as the example text. Or click the browse button [...] to use the Windows file selection dialog.
Codepage
If the text file is in ASCII format you should specify the correct codepage here to ensure that all the characters are displayed correctly.
Automatic update
If this option is selected the text file will be re-imported every time there is a change in
the rule definitions. Otherwise the update is not carried out until you click the Update button.
Options
You can specify a limit for the preview function. In this case, the text file will only be read
up to the specified limit. With large files this can make sense as otherwise there may be
a delay while the file is read. Normally the beginning of the file should be sufficient to determine whether the defined rules have the desired effect.
You can also display Line Numbers in the preview.
Text file
Displays the imported text file. All the matching strings are highlighted yellow. The
corresponding string markers indicating the beginning and end of the string are colored
blue and green. If you move the mouse over a highlighted part of the text and wait a
moment, the corresponding string delimiter ([S1], ...) used to segment this text is displayed. In addition the string ID is displayed, if available.
Imported strings
This list contains up to 500 imported strings including IDs and comments, if available.
Rule specification for a source file
If you add a text file to a Passolo project, you can specify in the source file options which
rule should be used for parsing.
Use rule

File Formats
191
Select the rule you want to use. By default the rule selection is set to <Automatic>
which means the rule will be determined automatically on the basis of the file extension. The selected rule is then saved, and can be checked or modified here.
Embed source file into project
Check this option to embed the source file to the project when the source list is updated. This allows to display it during translation, even if the original file is not available.
Text files which occur as resource in another file format are embedded by default. In this case you cannot clear this option.
Setup
Opens the Text parser rule definition dialog where you can edit the text file rules.
Add-in for Microsoft Installer Files
The add-in for Microsoft Installer files is an internal add-in available starting with the
Professional Edition of Passolo.
If the add-in is activated as described, Passolo can automatically read and write Microsoft Installer (*.MSI) files. Settings for this add-in are not necessary.
In connection with Microsoft Installer files it is important to note that the strings are
extracted from all the tables in the MSI file, but only a small selection of these tables and
entries actually has to be translated. Prior to translation, you should "prepare" the
project source string list by setting the entries that are not to be translated to hidden or read-only.
Add-in for Visual BASIC 6 Files
With this add-in, Passolo can automatically read and write Visual BASIC 6 projects and forms. Settings for this add-in are not necessary.
When Visual BASIC 6 project files (*.VBP) are added to the Passolo project, Passolo
analyzes the VBP file and adds any form files (*.FRM) contained in the VBP. It is also
possible to add form files (*.FRM) individually, as required.
The import of the FRM file falls into two areas. On the one hand, the dialog is extracted and can then be displayed and edited with the aid of the Passolo dialog editor.
In addition, any strings within the source string area that are enclosed in double quotes
are also extracted. This ensures that any "hard coded" strings can also be translated. The
IDs of the dialog elements are taken from the FRM file, whereas the IDs for the hard
coded strings correspond to the line numbers in the source code that contain the relevant strings.
ODBC Databases
Add-in for ODBC Databases
The Passolo database add-in allows the localization of strings stored in different
databases. The add-in is based on an application interface to the ADO (Microsoft ActiveX
Data Objects) technology, which in turn makes use of OLE DB, a library of COM interfaces that enables universal access to different database sources.
This add-in supports Microsoft Excel (*.xls), Microsoft Access (*.mdb), Microsoft SQL
Server, MySQL, Oracle, IBM DB2, Sybase and other databases for which a corresponding
ADO driver is available. It extracts the localizable strings stored in different tables of the
database. The Data Source Settings dialog allows the selection of table columns as the
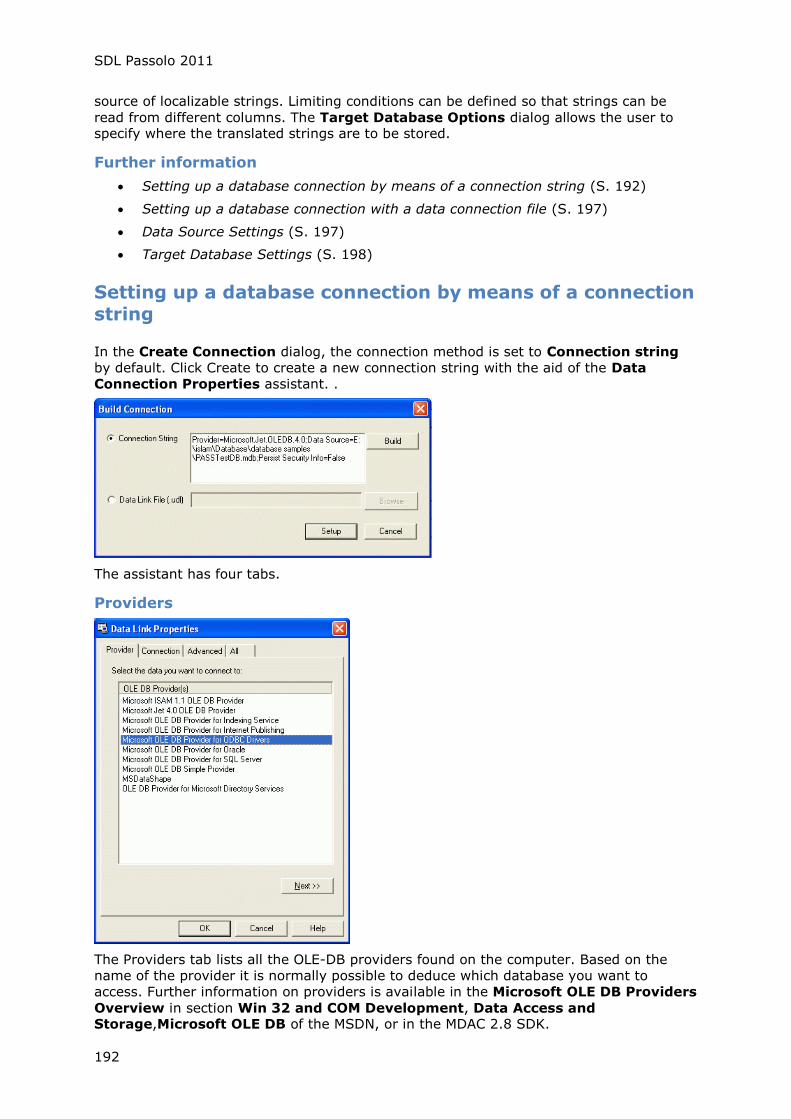
SDL Passolo 2011
192
source of localizable strings. Limiting conditions can be defined so that strings can be
read from different columns. The Target Database Options dialog allows the user to specify where the translated strings are to be stored.
Further information
Setting up a database connection by means of a connection string (S. 192)
Setting up a database connection with a data connection file (S. 197)
Data Source Settings (S. 197)
Target Database Settings (S. 198)
Setting up a database connection by means of a connection string
In the Create Connection dialog, the connection method is set to Connection string
by default. Click Create to create a new connection string with the aid of the Data
Connection Properties assistant. .
The assistant has four tabs.
Providers
The Providers tab lists all the OLE-DB providers found on the computer. Based on the
name of the provider it is normally possible to deduce which database you want to
access. Further information on providers is available in the Microsoft OLE DB Providers
Overview in section Win 32 and COM Development, Data Access and Storage,Microsoft OLE DB of the MSDN, or in the MDAC 2.8 SDK.
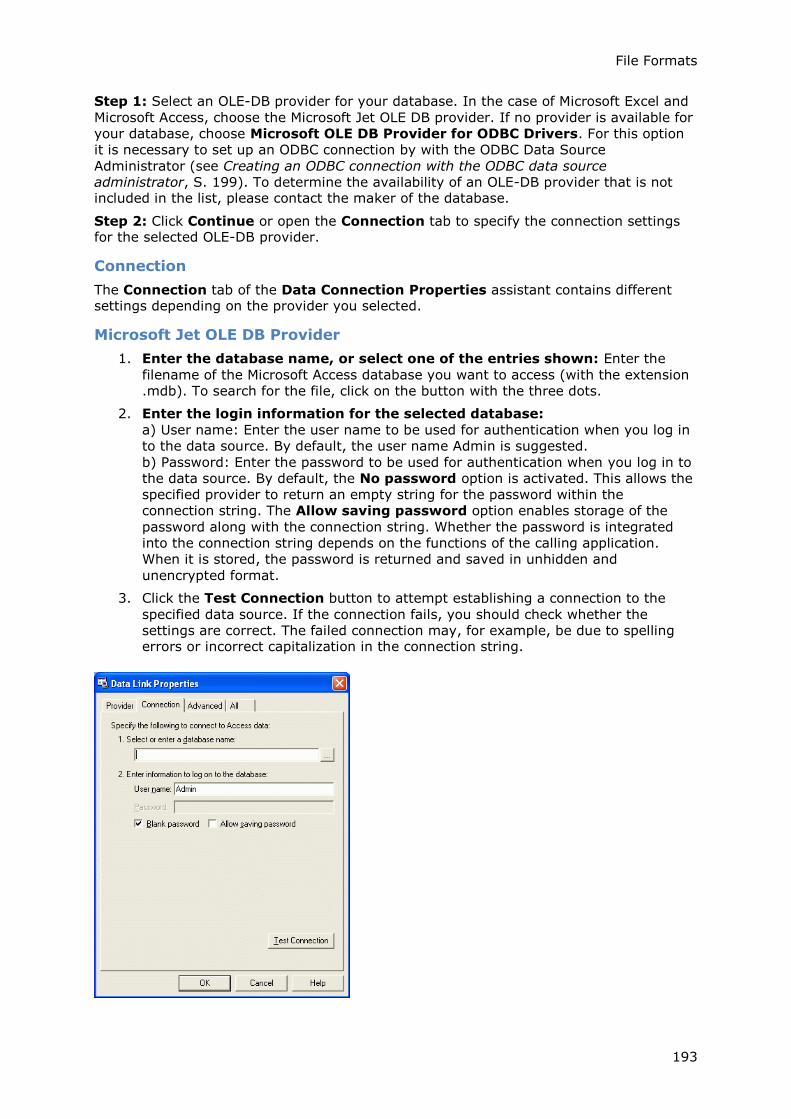
File Formats
193
Step 1: Select an OLE-DB provider for your database. In the case of Microsoft Excel and
Microsoft Access, choose the Microsoft Jet OLE DB provider. If no provider is available for
your database, choose Microsoft OLE DB Provider for ODBC Drivers. For this option
it is necessary to set up an ODBC connection by with the ODBC Data Source
Administrator (see Creating an ODBC connection with the ODBC data source
administrator, S. 199). To determine the availability of an OLE-DB provider that is not included in the list, please contact the maker of the database.
Step 2: Click Continue or open the Connection tab to specify the connection settings for the selected OLE-DB provider.
Connection
The Connection tab of the Data Connection Properties assistant contains different settings depending on the provider you selected.
Microsoft Jet OLE DB Provider
1. Enter the database name, or select one of the entries shown: Enter the
filename of the Microsoft Access database you want to access (with the extension
.mdb). To search for the file, click on the button with the three dots.
2. Enter the login information for the selected database:
a) User name: Enter the user name to be used for authentication when you log in
to the data source. By default, the user name Admin is suggested.
b) Password: Enter the password to be used for authentication when you log in to
the data source. By default, the No password option is activated. This allows the
specified provider to return an empty string for the password within the
connection string. The Allow saving password option enables storage of the
password along with the connection string. Whether the password is integrated
into the connection string depends on the functions of the calling application.
When it is stored, the password is returned and saved in unhidden and
unencrypted format.
3. Click the Test Connection button to attempt establishing a connection to the
specified data source. If the connection fails, you should check whether the
settings are correct. The failed connection may, for example, be due to spelling errors or incorrect capitalization in the connection string.
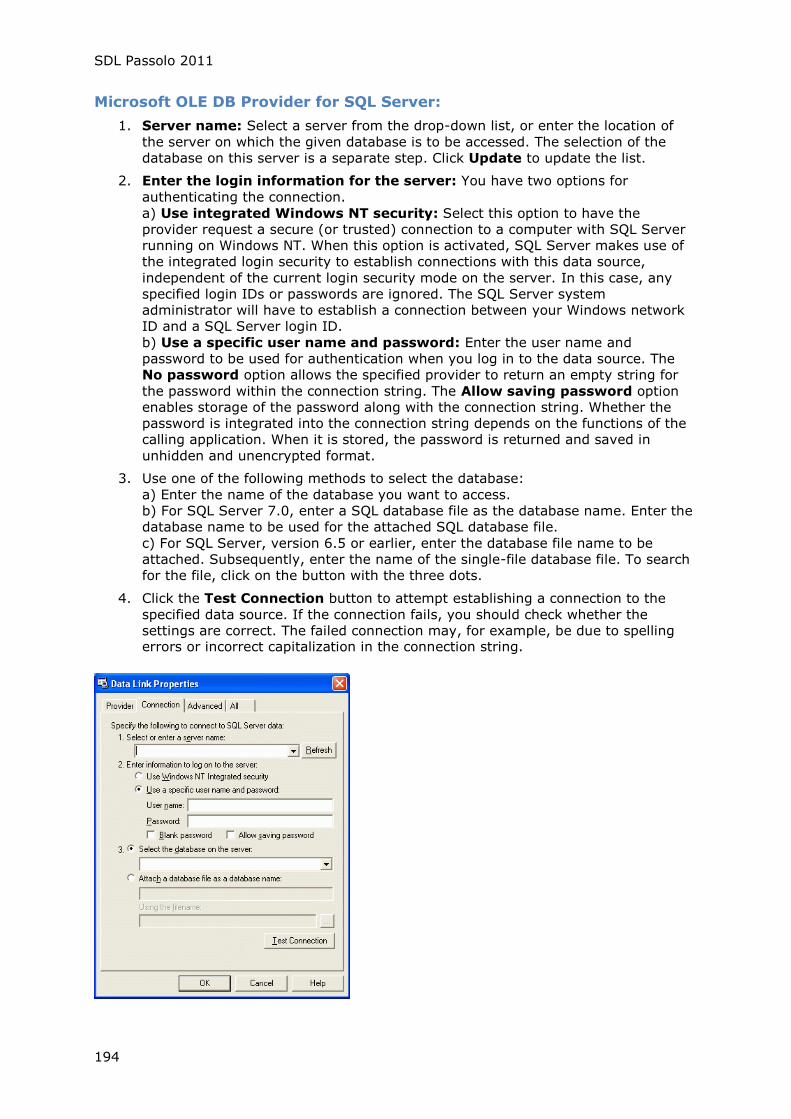
SDL Passolo 2011
194
Microsoft OLE DB Provider for SQL Server:
1. Server name: Select a server from the drop-down list, or enter the location of
the server on which the given database is to be accessed. The selection of the
database on this server is a separate step. Click Update to update the list.
2. Enter the login information for the server: You have two options for
authenticating the connection.
a) Use integrated Windows NT security: Select this option to have the
provider request a secure (or trusted) connection to a computer with SQL Server
running on Windows NT. When this option is activated, SQL Server makes use of
the integrated login security to establish connections with this data source,
independent of the current login security mode on the server. In this case, any
specified login IDs or passwords are ignored. The SQL Server system
administrator will have to establish a connection between your Windows network
ID and a SQL Server login ID.
b) Use a specific user name and password: Enter the user name and
password to be used for authentication when you log in to the data source. The
No password option allows the specified provider to return an empty string for
the password within the connection string. The Allow saving password option
enables storage of the password along with the connection string. Whether the
password is integrated into the connection string depends on the functions of the
calling application. When it is stored, the password is returned and saved in
unhidden and unencrypted format.
3. Use one of the following methods to select the database:
a) Enter the name of the database you want to access.
b) For SQL Server 7.0, enter a SQL database file as the database name. Enter the
database name to be used for the attached SQL database file.
c) For SQL Server, version 6.5 or earlier, enter the database file name to be
attached. Subsequently, enter the name of the single-file database file. To search
for the file, click on the button with the three dots.
4. Click the Test Connection button to attempt establishing a connection to the
specified data source. If the connection fails, you should check whether the
settings are correct. The failed connection may, for example, be due to spelling errors or incorrect capitalization in the connection string.

File Formats
195
Microsoft OLE DB Provider for Oracle
1. Server name: Enter the name of the server, on which the database you want to
access is located. Use the alias name as in the settings for tnsnames.ora or in
SQL*Plus.
2. Enter the login information for the selected database:
Enter the user name and the password to be used for authentication when you
log in to the data source. The No password option allows the specified provider
to return an empty string for the password within the connection string. The
Allow saving password option enables storage of the password along with the
connection string. Whether the password is integrated into the connection string
depends on the functions of the calling application. When it is stored, the
password is returned and saved in unhidden and unencrypted format.
3. Click the Test Connection button to attempt establishing a connection to the
specified data source. If the connection fails, you should check whether the
settings are correct. The failed connection may, for example, be due to spelling
errors or incorrect capitalization in the connection string.
Microsoft OLE DB Provider for ODBC Drivers
1. Use one of the following methods to enter the data source:
a) Use the data source name: Select or enter the name of the ODBC data
source (DSN, Data Source Name) you want to access. With the ODBC data source
administrator, you can add further data sources. Click Update to update the list.
b) Use connection string: Enables the entry or setup of an ODBC connection
string instead of using an existing data connection name. Clicking on Setup opens
the Select Data Source dialog. Once you have selected a data source, the
connection string for this data source is displayed on the Connection tab of the Data Connection Properties dialog.
If you select a File DSN, the resulting ODBC connection string is not based on a
DSN. The ODBC connection string is stored persistently in the data connection file
(with the extension .udl) and is not based on the selected File DSN.
If you select a Computer DSN, the resulting ODBC connection string is based on a
DSN. The ODBC connection string refers to the selected Computer DSN. If a user
on another system attempts to access the connection file (with the extension .udl), this user will also have to have the Computer DSN installed.
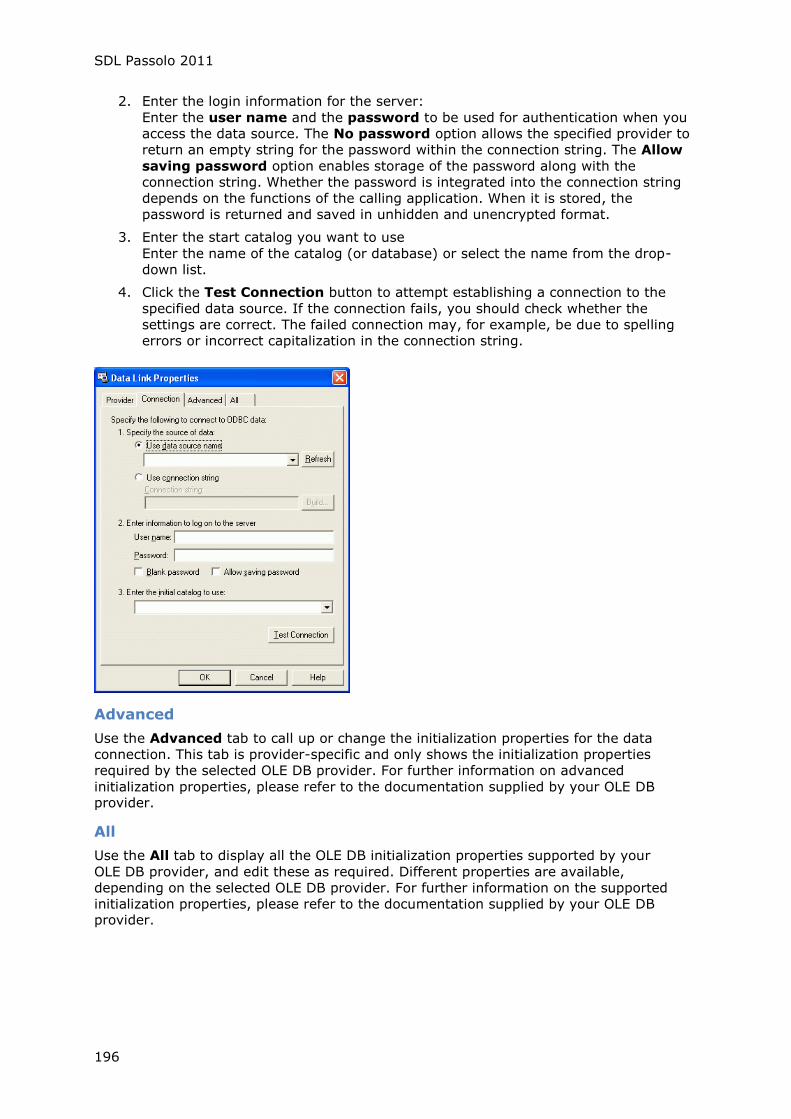
SDL Passolo 2011
196
2. Enter the login information for the server:
Enter the user name and the password to be used for authentication when you
access the data source. The No password option allows the specified provider to
return an empty string for the password within the connection string. The Allow
saving password option enables storage of the password along with the
connection string. Whether the password is integrated into the connection string
depends on the functions of the calling application. When it is stored, the
password is returned and saved in unhidden and unencrypted format.
3. Enter the start catalog you want to use
Enter the name of the catalog (or database) or select the name from the drop-
down list.
4. Click the Test Connection button to attempt establishing a connection to the
specified data source. If the connection fails, you should check whether the
settings are correct. The failed connection may, for example, be due to spelling
errors or incorrect capitalization in the connection string.
Advanced
Use the Advanced tab to call up or change the initialization properties for the data
connection. This tab is provider-specific and only shows the initialization properties
required by the selected OLE DB provider. For further information on advanced
initialization properties, please refer to the documentation supplied by your OLE DB provider.
All
Use the All tab to display all the OLE DB initialization properties supported by your
OLE DB provider, and edit these as required. Different properties are available,
depending on the selected OLE DB provider. For further information on the supported
initialization properties, please refer to the documentation supplied by your OLE DB provider.
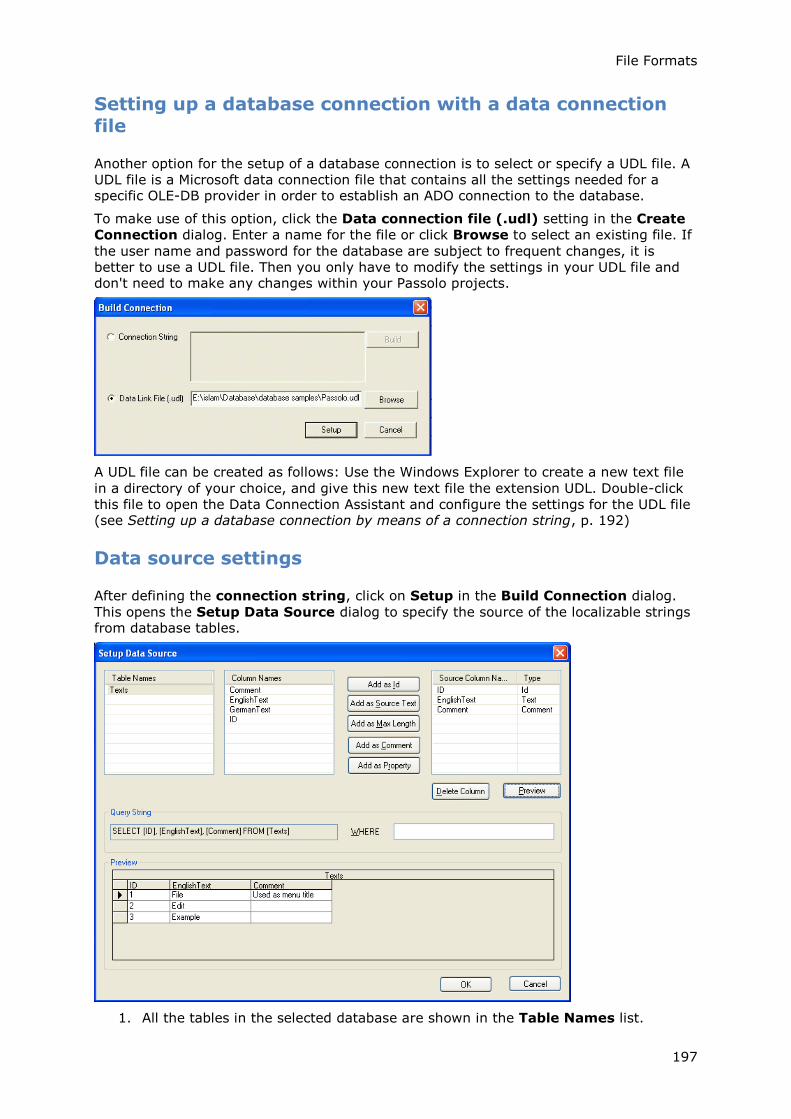
File Formats
197
Setting up a database connection with a data connection file
Another option for the setup of a database connection is to select or specify a UDL file. A
UDL file is a Microsoft data connection file that contains all the settings needed for a specific OLE-DB provider in order to establish an ADO connection to the database.
To make use of this option, click the Data connection file (.udl) setting in the Create
Connection dialog. Enter a name for the file or click Browse to select an existing file. If
the user name and password for the database are subject to frequent changes, it is
better to use a UDL file. Then you only have to modify the settings in your UDL file and don't need to make any changes within your Passolo projects.
A UDL file can be created as follows: Use the Windows Explorer to create a new text file
in a directory of your choice, and give this new text file the extension UDL. Double-click
this file to open the Data Connection Assistant and configure the settings for the UDL file (see Setting up a database connection by means of a connection string, p. 192)
Data source settings
After defining the connection string, click on Setup in the Build Connection dialog.
This opens the Setup Data Source dialog to specify the source of the localizable strings from database tables.
1. All the tables in the selected database are shown in the Table Names list.

SDL Passolo 2011
198
2. Select the table you want to use from this list. All the columns in the selected
table are then shown in the Column Names list.
3. To select the contents of a column as the ID for the translated text, highlight the
column and click the Add as ID button. The column name is then added to the
list on the right with ID as the type. One or more columns can be added with ID as the type.
Note: It is advisable to work with unique IDs for the source strings, otherwise the
translation can only be written to the database once. On any subsequent attempt to store
a translation to the database, the add-in would not be able to find the original source
string.
4. Select the column names from which source strings are to be extracted. In this
case, highlight the column and click the Add as Source Text button. Columns
that are not Text type cannot be added as source text columns.
5. You can also read Comments, Max Length specifications or other Properties
from the columns by adding them with the corresponding buttons. These values
are then entered in the Passolo source string list.
6. If you click the Preview button, the content of the selected language is displayed
in the preview table.
7. In the Query String edit box you can define a condition to limit the display to a
selection of strings in the given language. Put column names in quotation marks,
as shown in the left-hand field of the query. For example, column names in
Microsoft Excel or Microsoft Access databases have to be placed in angle brackets.
These markers should be entered for security reasons. If column names contain
keywords or spaces, this is necessary to ensure that the database can identify the
column names correctly.
8. Click Preview to display the changes.
9. Click OK if the strings displayed in the preview table correspond to the strings
that you want to extract from the database for translation, or Cancel if you want to close the dialog without saving your changes.
Target Database Settings
To specify how the translated strings are to be stored in the target database, open the
Properties dialog for the translation list and click Advanced to open the Target Database Options dialog.
File Formats
199
Replace existing text
This is the standard setting for the target database.
Note: If you work with unique IDs for the source strings, you have to be careful using
this option. A given translation can then only be written to the database once. On any
subsequent attempt to store a translation to the database, the add-in would not be able
to find the original source string.
Map translated column
With this option the translated strings for a source column can stored in another column.
If you choose this option, the list contains all the columns selected as source columns.
Click on the field under Translated Column and select the respective target column.
Add data record
With this option, each translated string is added as a new record in the table. In order to
distinguish between source and translation in the extended table, it is necessary to
specify a column containing a value that differs compared with the source data record,
e.g. the new language code. In the text field, enter the specific value to be used for all new data records.
Filter Strings
With this option you can specify that only Translated Strings or only Validated
Strings are to be stored.
Creating an ODBC connection with the ODBC data source administrator
1. In Windows 98 or Windows NT, go to Start, Settings, Control Panel and
double-click the Data Sources (ODBC) icon. In Windows 2000 or Windows XP,
go to Start, Control Panel, Administrative Tools and double-click the Data
Sources (ODBC) icon. This opens the ODBC Data Source Administrator.
2. Activate the System DSN tab and click the Add button.
3. Select the corresponding driver for your database from the list of drivers, and
then click Finish.
Access: Microsoft Access Driver (*.mdb)
Microsoft SQL Server: SQL Server.
4. Enter the name you want to use to refer to this data source. Specify the database
and other settings depending on the chosen driver. Different settings are required
for different drivers.
5. Click the OK button to return to the System DSN tab, and then click OK again to
exit the ODBC Data Source Administrator.
Parser for Microsoft Excel Files
The Passolo Excel add-in allows the localization of strings stored in Microsoft Excel files.
The localization concept is different from solutions offered by document translation tools.
The Excel add-in doesn't translate the whole document. It only extracts the content of a
selected column and stores the translations into a different column. In addition it supports processing meta data like IDs, length limitations and other properties.
This add-in overcomes the limitations of the Add-In for ODBC Databases where the
underlying Microsoft OLE DB driver for Excel is not Unicode compliant. This add-in supports all languages.
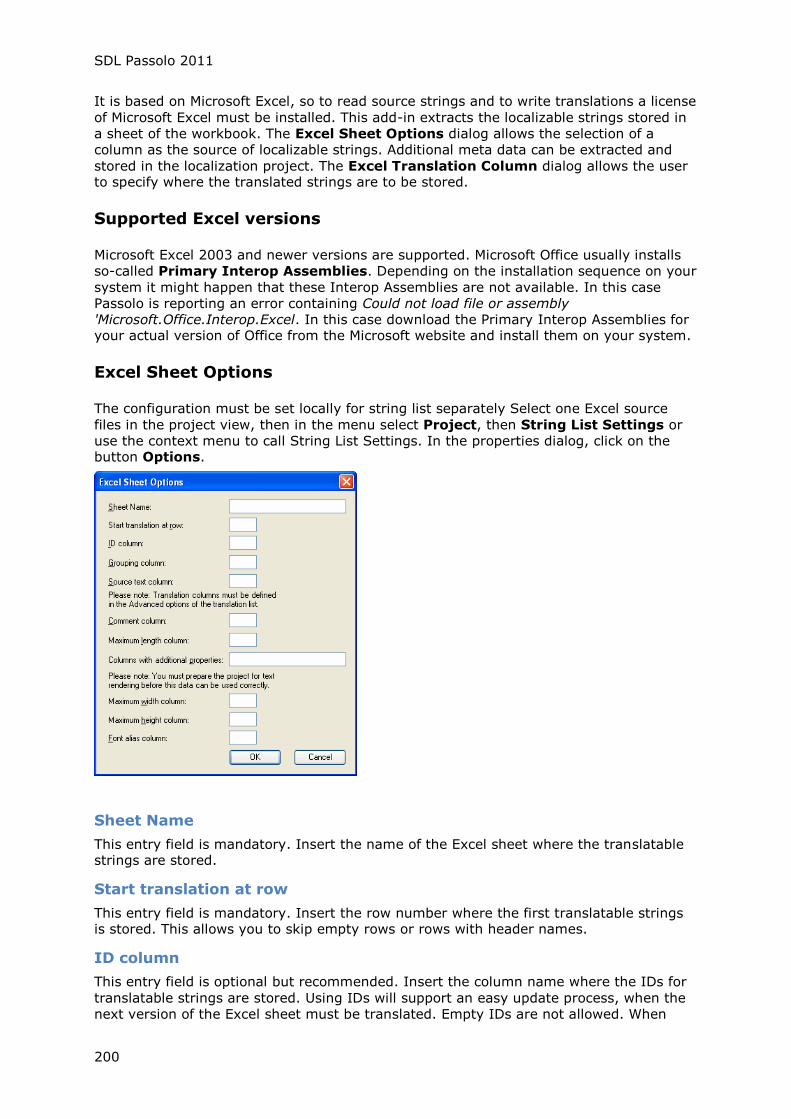
SDL Passolo 2011
200
It is based on Microsoft Excel, so to read source strings and to write translations a license
of Microsoft Excel must be installed. This add-in extracts the localizable strings stored in
a sheet of the workbook. The Excel Sheet Options dialog allows the selection of a
column as the source of localizable strings. Additional meta data can be extracted and
stored in the localization project. The Excel Translation Column dialog allows the user to specify where the translated strings are to be stored.
Supported Excel versions
Microsoft Excel 2003 and newer versions are supported. Microsoft Office usually installs
so-called Primary Interop Assemblies. Depending on the installation sequence on your
system it might happen that these Interop Assemblies are not available. In this case
Passolo is reporting an error containing Could not load file or assembly
'Microsoft.Office.Interop.Excel. In this case download the Primary Interop Assemblies for your actual version of Office from the Microsoft website and install them on your system.
Excel Sheet Options
The configuration must be set locally for string list separately Select one Excel source
files in the project view, then in the menu select Project, then String List Settings or
use the context menu to call String List Settings. In the properties dialog, click on the button Options.
Sheet Name
This entry field is mandatory. Insert the name of the Excel sheet where the translatable strings are stored.
Start translation at row
This entry field is mandatory. Insert the row number where the first translatable strings is stored. This allows you to skip empty rows or rows with header names.
ID column
This entry field is optional but recommended. Insert the column name where the IDs for
translatable strings are stored. Using IDs will support an easy update process, when the
next version of the Excel sheet must be translated. Empty IDs are not allowed. When
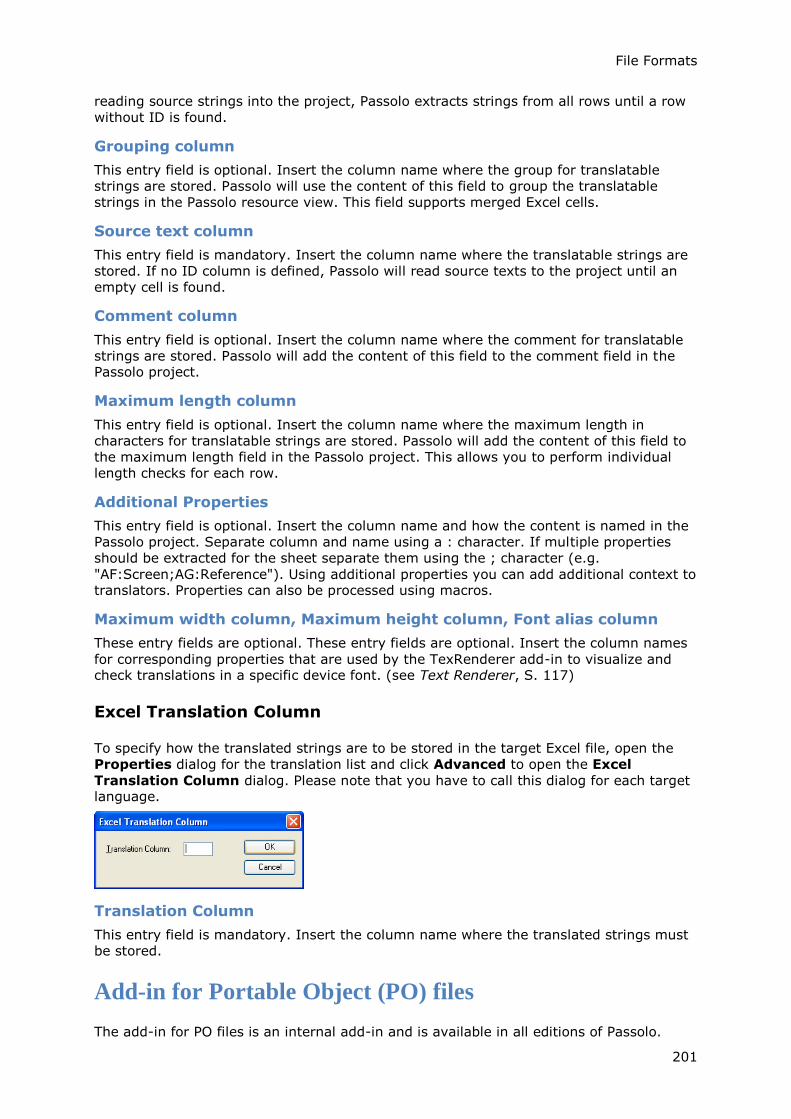
File Formats
201
reading source strings into the project, Passolo extracts strings from all rows until a row
without ID is found.
Grouping column
This entry field is optional. Insert the column name where the group for translatable
strings are stored. Passolo will use the content of this field to group the translatable
strings in the Passolo resource view. This field supports merged Excel cells.
Source text column
This entry field is mandatory. Insert the column name where the translatable strings are
stored. If no ID column is defined, Passolo will read source texts to the project until an
empty cell is found.
Comment column
This entry field is optional. Insert the column name where the comment for translatable
strings are stored. Passolo will add the content of this field to the comment field in the Passolo project.
Maximum length column
This entry field is optional. Insert the column name where the maximum length in
characters for translatable strings are stored. Passolo will add the content of this field to
the maximum length field in the Passolo project. This allows you to perform individual
length checks for each row.
Additional Properties
This entry field is optional. Insert the column name and how the content is named in the
Passolo project. Separate column and name using a : character. If multiple properties
should be extracted for the sheet separate them using the ; character (e.g.
"AF:Screen;AG:Reference"). Using additional properties you can add additional context to translators. Properties can also be processed using macros.
Maximum width column, Maximum height column, Font alias column
These entry fields are optional. These entry fields are optional. Insert the column names
for corresponding properties that are used by the TexRenderer add-in to visualize and check translations in a specific device font. (see Text Renderer, S. 117)
Excel Translation Column
To specify how the translated strings are to be stored in the target Excel file, open the
Properties dialog for the translation list and click Advanced to open the Excel
Translation Column dialog. Please note that you have to call this dialog for each target language.
Translation Column
This entry field is mandatory. Insert the column name where the translated strings must
be stored.
Add-in for Portable Object (PO) files
The add-in for PO files is an internal add-in and is available in all editions of Passolo.
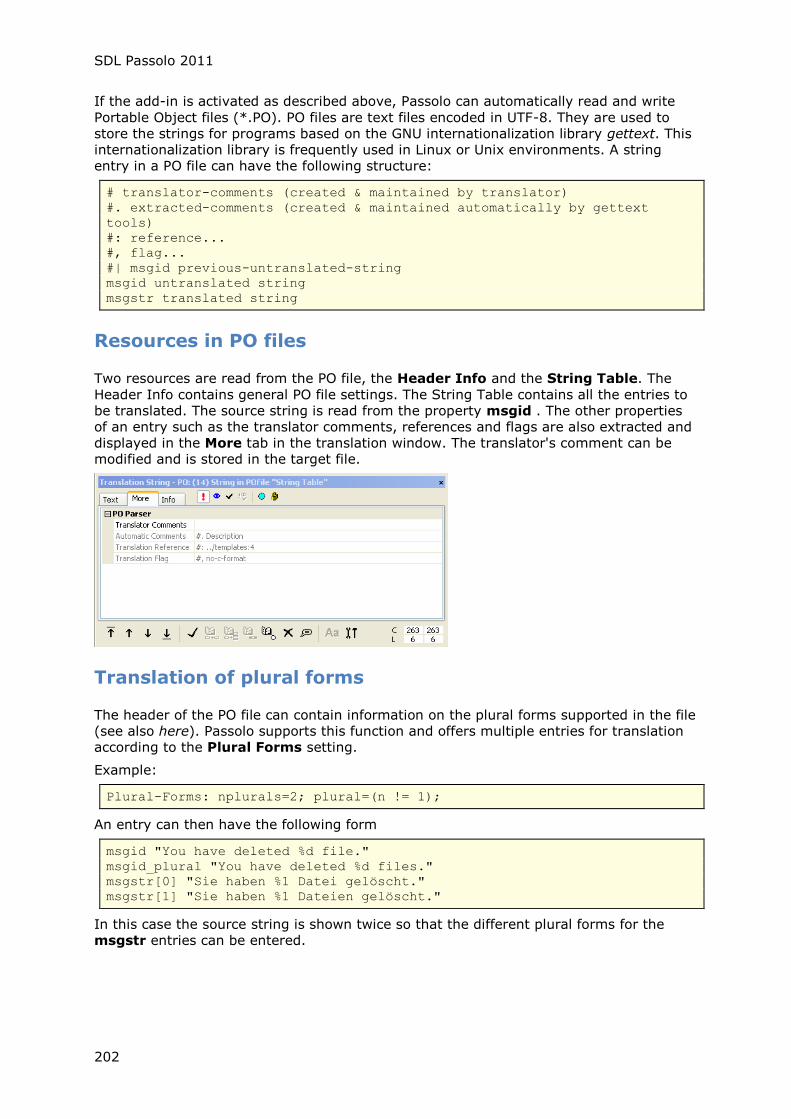
SDL Passolo 2011
202
If the add-in is activated as described above, Passolo can automatically read and write
Portable Object files (*.PO). PO files are text files encoded in UTF-8. They are used to
store the strings for programs based on the GNU internationalization library gettext. This
internationalization library is frequently used in Linux or Unix environments. A string
entry in a PO file can have the following structure:
# translator-comments (created & maintained by translator)
#. extracted-comments (created & maintained automatically by gettext
tools)
#: reference...
#, flag...
#| msgid previous-untranslated-string
msgid untranslated string
msgstr translated string
Resources in PO files
Two resources are read from the PO file, the Header Info and the String Table. The
Header Info contains general PO file settings. The String Table contains all the entries to
be translated. The source string is read from the property msgid . The other properties
of an entry such as the translator comments, references and flags are also extracted and
displayed in the More tab in the translation window. The translator's comment can be
modified and is stored in the target file.
Translation of plural forms
The header of the PO file can contain information on the plural forms supported in the file
(see also here). Passolo supports this function and offers multiple entries for translation
according to the Plural Forms setting.
Example:
Plural-Forms: nplurals=2; plural=(n != 1);
An entry can then have the following form
msgid "You have deleted %d file."
msgid_plural "You have deleted %d files."
msgstr[0] "Sie haben %1 Datei gelöscht."
msgstr[1] "Sie haben %1 Dateien gelöscht."
In this case the source string is shown twice so that the different plural forms for the
msgstr entries can be entered.

File Formats
203
Aligning previously translated PO files
PO files may already be (partly) translated. These translations can be read into the project by means of the function Scan Target File (Alignment).
Generating Machine Object (MO) files
The final step in the localization process is that the PO file generated by Passolo can be
converted to a binary Machine Object (MO) file using the msgfmt tool. If the translations
are compiled into a binary file, access to the translations by the running target
application is quicker.
The PO parser options dialog can be opened as follows. Click on Tools - Add-ins and
select the PO File Parser on the Parser tab. Click on the Setup button.
If the option Automatically compile MO file during target file generation is
activated, Passolo will also create an MO file every time the PO target file is generated.
This is done using the program specified under Path to msgfmt utility. The msgfmt
program also checks the PO file for errors and reports them to the output window Messages.
How to modify the options for a PO source string list
1. Select the source string list in the project window
2. Select String List Settings from the Edit menu
3. Click on Options in the Source String List Properties dialog
By default the PO file header is also extracted. This is necessary to enable the use of
plural forms (see above). In case of difficulties with the extraction of (faulty) file headers
you can deactivate this option.
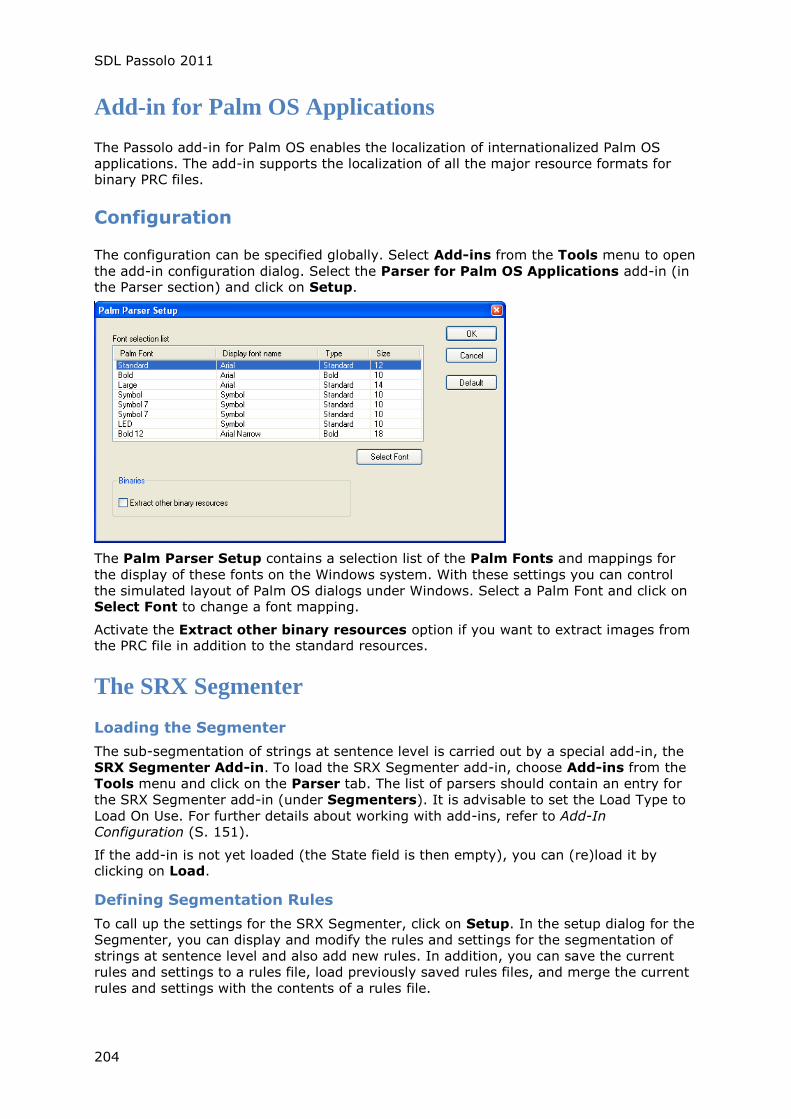
SDL Passolo 2011
204
Add-in for Palm OS Applications
The Passolo add-in for Palm OS enables the localization of internationalized Palm OS
applications. The add-in supports the localization of all the major resource formats for binary PRC files.
Configuration
The configuration can be specified globally. Select Add-ins from the Tools menu to open
the add-in configuration dialog. Select the Parser for Palm OS Applications add-in (in the Parser section) and click on Setup.
The Palm Parser Setup contains a selection list of the Palm Fonts and mappings for
the display of these fonts on the Windows system. With these settings you can control
the simulated layout of Palm OS dialogs under Windows. Select a Palm Font and click on Select Font to change a font mapping.
Activate the Extract other binary resources option if you want to extract images from the PRC file in addition to the standard resources.
The SRX Segmenter
Loading the Segmenter
The sub-segmentation of strings at sentence level is carried out by a special add-in, the
SRX Segmenter Add-in. To load the SRX Segmenter add-in, choose Add-ins from the
Tools menu and click on the Parser tab. The list of parsers should contain an entry for
the SRX Segmenter add-in (under Segmenters). It is advisable to set the Load Type to
Load On Use. For further details about working with add-ins, refer to Add-In Configuration (S. 151).
If the add-in is not yet loaded (the State field is then empty), you can (re)load it by clicking on Load.
Defining Segmentation Rules
To call up the settings for the SRX Segmenter, click on Setup. In the setup dialog for the
Segmenter, you can display and modify the rules and settings for the segmentation of
strings at sentence level and also add new rules. In addition, you can save the current
rules and settings to a rules file, load previously saved rules files, and merge the current
rules and settings with the contents of a rules file.
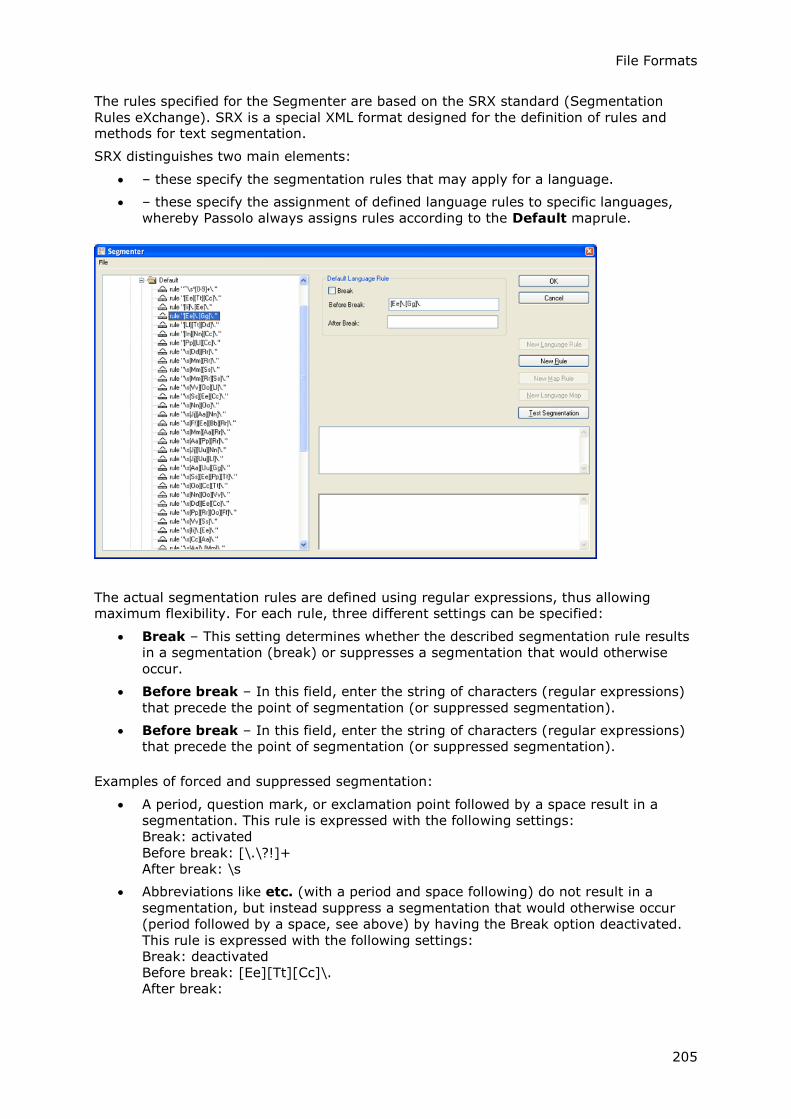
File Formats
205
The rules specified for the Segmenter are based on the SRX standard (Segmentation
Rules eXchange). SRX is a special XML format designed for the definition of rules and methods for text segmentation.
SRX distinguishes two main elements:
– these specify the segmentation rules that may apply for a language.
– these specify the assignment of defined language rules to specific languages,
whereby Passolo always assigns rules according to the Default maprule.
The actual segmentation rules are defined using regular expressions, thus allowing maximum flexibility. For each rule, three different settings can be specified:
Break – This setting determines whether the described segmentation rule results
in a segmentation (break) or suppresses a segmentation that would otherwise
occur.
Before break – In this field, enter the string of characters (regular expressions)
that precede the point of segmentation (or suppressed segmentation).
Before break – In this field, enter the string of characters (regular expressions)
that precede the point of segmentation (or suppressed segmentation).
Examples of forced and suppressed segmentation:
A period, question mark, or exclamation point followed by a space result in a
segmentation. This rule is expressed with the following settings:
Break: activated
Before break: [\.\?!]+
After break: \s
Abbreviations like etc. (with a period and space following) do not result in a
segmentation, but instead suppress a segmentation that would otherwise occur
(period followed by a space, see above) by having the Break option deactivated.
This rule is expressed with the following settings:
Break: deactivated
Before break: [Ee][Tt][Cc]\.
After break:
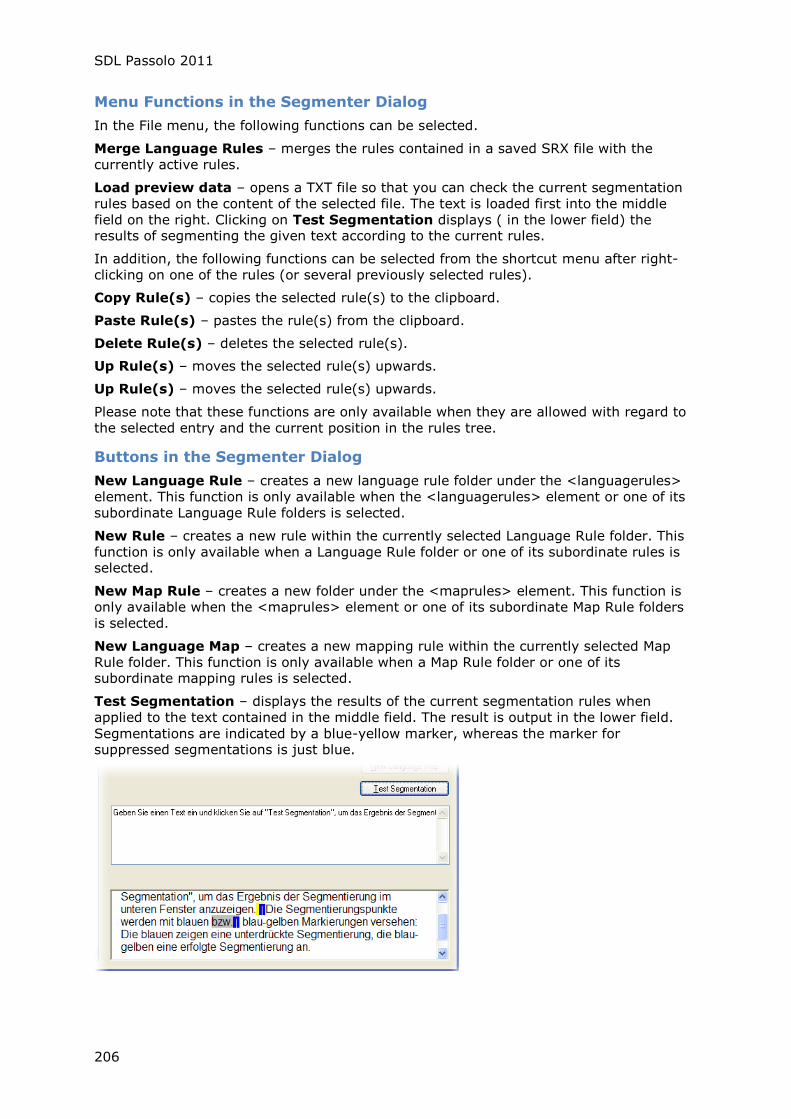
SDL Passolo 2011
206
Menu Functions in the Segmenter Dialog
In the File menu, the following functions can be selected.
Merge Language Rules – merges the rules contained in a saved SRX file with the
currently active rules.
Load preview data – opens a TXT file so that you can check the current segmentation
rules based on the content of the selected file. The text is loaded first into the middle
field on the right. Clicking on Test Segmentation displays ( in the lower field) the results of segmenting the given text according to the current rules.
In addition, the following functions can be selected from the shortcut menu after right-
clicking on one of the rules (or several previously selected rules).
Copy Rule(s) – copies the selected rule(s) to the clipboard.
Paste Rule(s) – pastes the rule(s) from the clipboard.
Delete Rule(s) – deletes the selected rule(s).
Up Rule(s) – moves the selected rule(s) upwards.
Up Rule(s) – moves the selected rule(s) upwards.
Please note that these functions are only available when they are allowed with regard to
the selected entry and the current position in the rules tree.
Buttons in the Segmenter Dialog
New Language Rule – creates a new language rule folder under the <languagerules>
element. This function is only available when the <languagerules> element or one of its
subordinate Language Rule folders is selected.
New Rule – creates a new rule within the currently selected Language Rule folder. This
function is only available when a Language Rule folder or one of its subordinate rules is selected.
New Map Rule – creates a new folder under the <maprules> element. This function is
only available when the <maprules> element or one of its subordinate Map Rule folders
is selected.
New Language Map – creates a new mapping rule within the currently selected Map
Rule folder. This function is only available when a Map Rule folder or one of its subordinate mapping rules is selected.
Test Segmentation – displays the results of the current segmentation rules when
applied to the text contained in the middle field. The result is output in the lower field.
Segmentations are indicated by a blue-yellow marker, whereas the marker for suppressed segmentations is just blue.
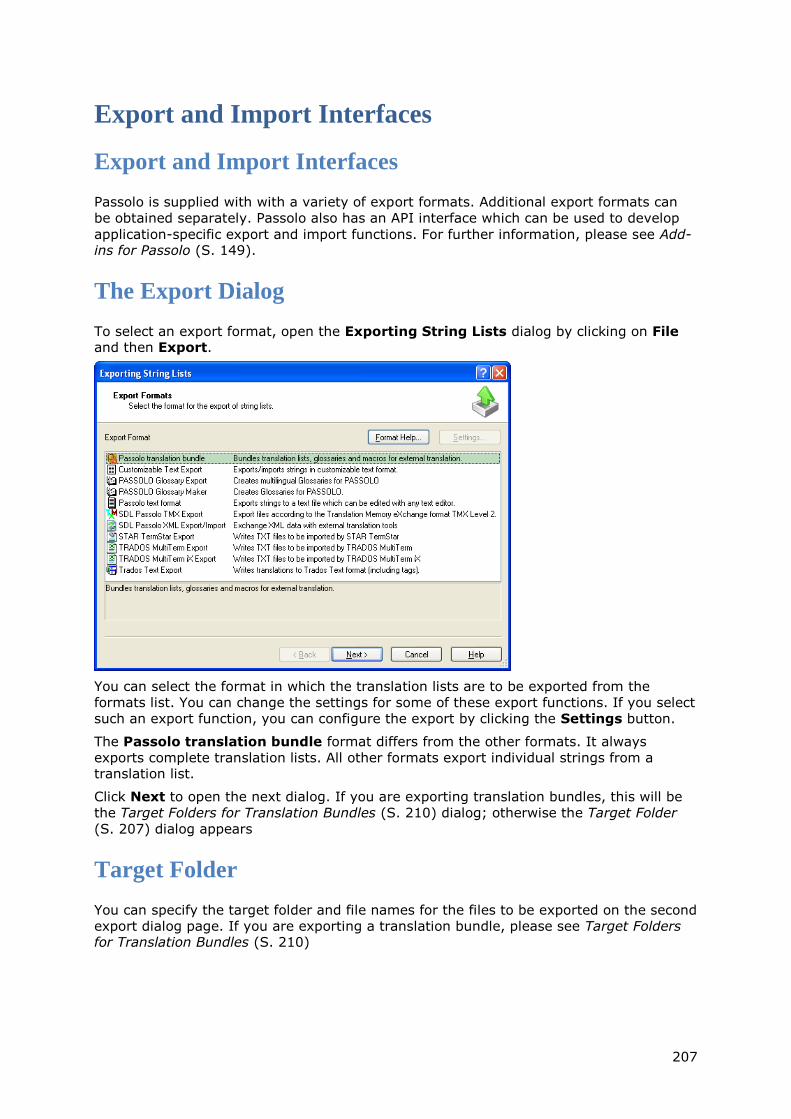
207
Export and Import Interfaces
Export and Import Interfaces
Passolo is supplied with with a variety of export formats. Additional export formats can
be obtained separately. Passolo also has an API interface which can be used to develop
application-specific export and import functions. For further information, please see Add-ins for Passolo (S. 149).
The Export Dialog
To select an export format, open the Exporting String Lists dialog by clicking on File and then Export.
You can select the format in which the translation lists are to be exported from the
formats list. You can change the settings for some of these export functions. If you select
such an export function, you can configure the export by clicking the Settings button.
The Passolo translation bundle format differs from the other formats. It always
exports complete translation lists. All other formats export individual strings from a translation list.
Click Next to open the next dialog. If you are exporting translation bundles, this will be
the Target Folders for Translation Bundles (S. 210) dialog; otherwise the Target Folder
(S. 207) dialog appears
Target Folder
You can specify the target folder and file names for the files to be exported on the second
export dialog page. If you are exporting a translation bundle, please see Target Folders for Translation Bundles (S. 210)
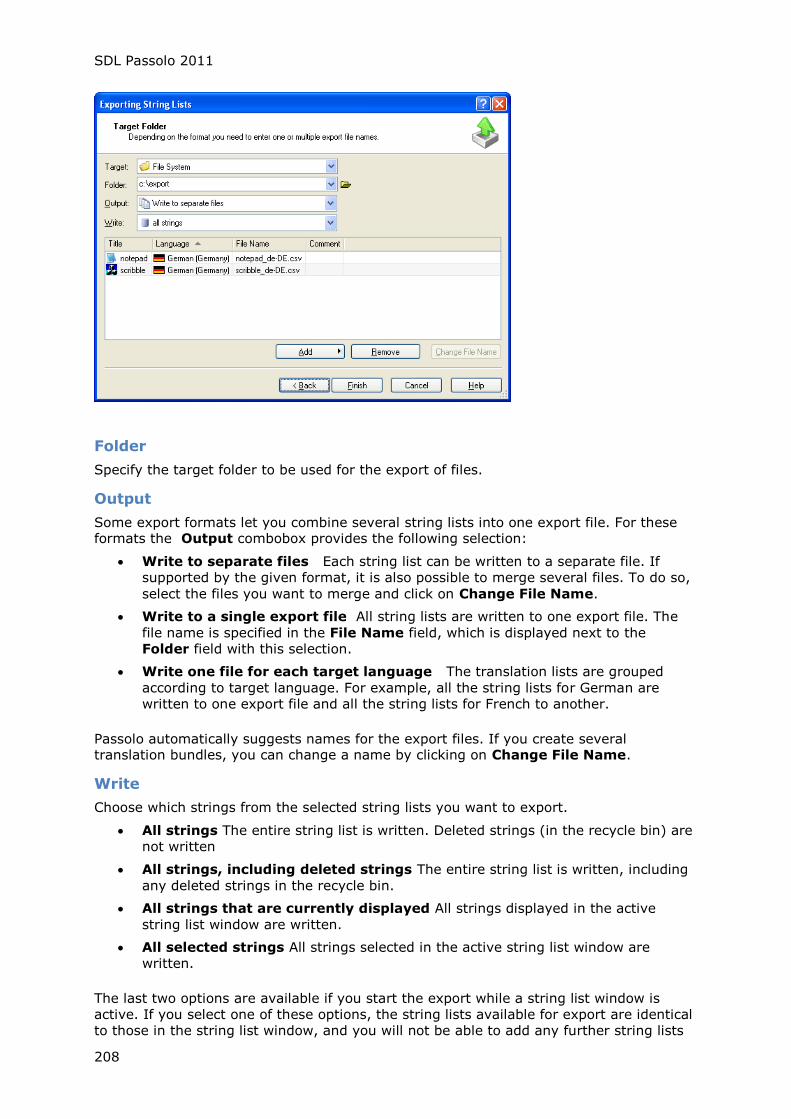
SDL Passolo 2011
208
Folder
Specify the target folder to be used for the export of files.
Output
Some export formats let you combine several string lists into one export file. For these formats the Output combobox provides the following selection:
Write to separate files Each string list can be written to a separate file. If
supported by the given format, it is also possible to merge several files. To do so,
select the files you want to merge and click on Change File Name.
Write to a single export file All string lists are written to one export file. The
file name is specified in the File Name field, which is displayed next to the
Folder field with this selection.
Write one file for each target language The translation lists are grouped
according to target language. For example, all the string lists for German are
written to one export file and all the string lists for French to another.
Passolo automatically suggests names for the export files. If you create several translation bundles, you can change a name by clicking on Change File Name.
Write
Choose which strings from the selected string lists you want to export.
All strings The entire string list is written. Deleted strings (in the recycle bin) are
not written
All strings, including deleted strings The entire string list is written, including
any deleted strings in the recycle bin.
All strings that are currently displayed All strings displayed in the active
string list window are written.
All selected strings All strings selected in the active string list window are
written.
The last two options are available if you start the export while a string list window is
active. If you select one of these options, the string lists available for export are identical
to those in the string list window, and you will not be able to add any further string lists

Export and Import Interfaces
209
Selecting string lists
The list shows all string lists that were selected in the project window before you opened
the export dialog. Click on Add to add additional string lists to the translation bundle.
Finish
Click on Finish to start the export as specified.
Importing files
To re-import a string list after external translation, select the Import command from the
File menu First, select one or more files using the Windows file selection dialog. The
following dialog appears:
Click on Add to select additional files to be imported. Click Remove to delete files from
the list. Click Setup to edit the settings for the currently selected format. These are, however, primarily related to exports and are not particularly meaningful for imports.
Tip: To add files, you can simply drag them into the window from Windows Explorer. This
is also possible without opening the Import dialog: Simply drag the file you want to
import onto the project window and select Import file from the selection dialog that
appears.
Check the format for each file that is to be imported. You can change the format by clicking on the small triangle or by right-clicking the entry.
Settings for Translation Bundles
Once you have imported the final version of the translation bundle, you need to release
the string lists so that further changes can be made to them within the project. If you
are only importing an interim version or are still waiting for translations from other
translators, you should not release the string lists as you will be unable to import further translation bundles after this.
Settings for Text-based Formats
If at least one of the files to be imported is in a text-based format (i.e., if it is anything other than a translation bundle), the Settings for Text-based Formats page appears.
By default, imported texts are marked as "for review". If you want them validated immediately, activate the corresponding setting on this page.
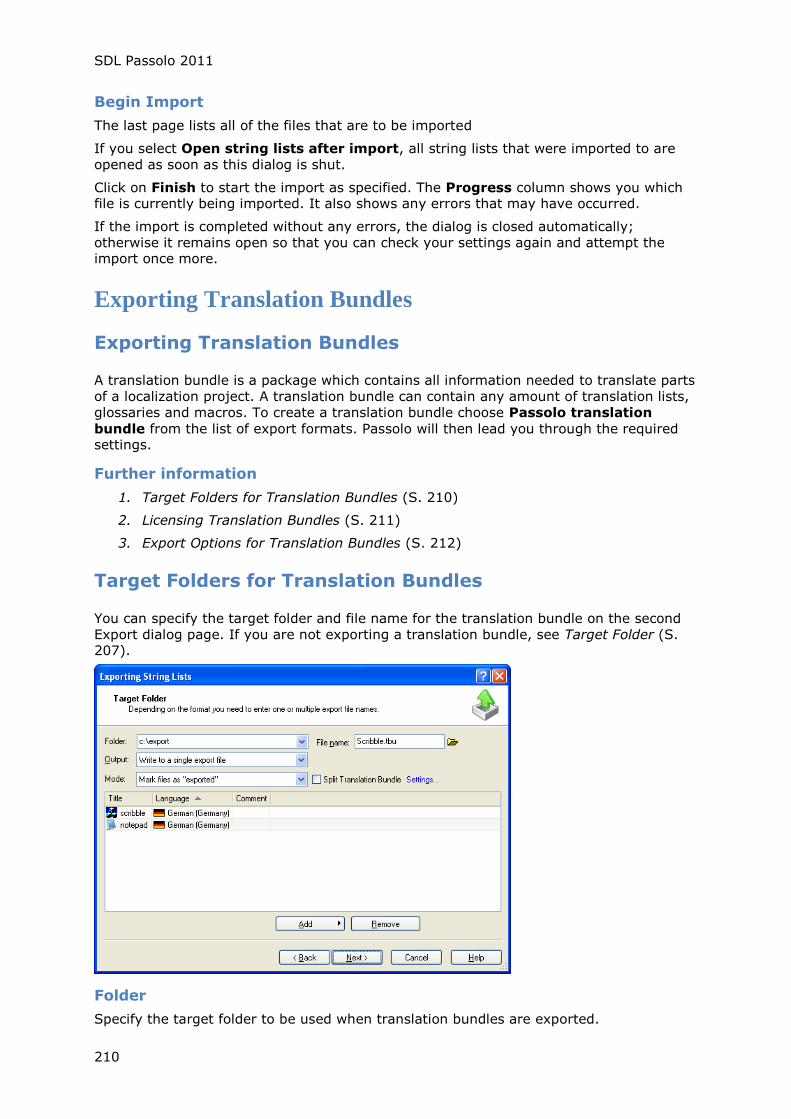
SDL Passolo 2011
210
Begin Import
The last page lists all of the files that are to be imported
If you select Open string lists after import, all string lists that were imported to are
opened as soon as this dialog is shut.
Click on Finish to start the import as specified. The Progress column shows you which file is currently being imported. It also shows any errors that may have occurred.
If the import is completed without any errors, the dialog is closed automatically;
otherwise it remains open so that you can check your settings again and attempt the import once more.
Exporting Translation Bundles
Exporting Translation Bundles
A translation bundle is a package which contains all information needed to translate parts
of a localization project. A translation bundle can contain any amount of translation lists,
glossaries and macros. To create a translation bundle choose Passolo translation
bundle from the list of export formats. Passolo will then lead you through the required settings.
Further information
1. Target Folders for Translation Bundles (S. 210)
2. Licensing Translation Bundles (S. 211)
3. Export Options for Translation Bundles (S. 212)
Target Folders for Translation Bundles
You can specify the target folder and file name for the translation bundle on the second
Export dialog page. If you are not exporting a translation bundle, see Target Folder (S. 207).
Folder
Specify the target folder to be used when translation bundles are exported.

Export and Import Interfaces
211
Output
Write to separate files Each string list can be written to a separate translation
bundle. You also have the option of merging several target files. To do so, select
the files you want to merge and click on Change File Name.
Write to a single export file All string lists are written to one translation
bundle. The file name is specified in the File Name field, which is displayed next
to the Folder field with this selection.
Write one file for each target language The translation lists are grouped
according to target language. For example, all the string lists for German are written to one translation bundle and all the string lists for French to another.
Passolo automatically suggests names for the translation bundles. If you create several translation bundles, you can change a name by clicking on Change File Name.
Mode
You should generally choose the Mark files as "exported" mode. This sets the string
lists in your project to read-only and allows you to re-import the translation bundle after
it has been translated. Exported translation lists are marked with this symbol in the
project window.
The Extract only... option means that a translation bundle is created that is intended
only for external processing. You would do this, for instance, to create a kind of glossary
or to distribute an interim version of the translation. The string lists remain editable within the project. However, such a translation bundle cannot subsequently be imported.
Split Translation Bundle
This option splits the translation bundles in multiple parts that can be distributed to
different translators. If you create three parts, for example, Passolo generates three
different translation bundles instead of one, with each file containing different sections
for translation. The three translation bundles can then be processed by three different
translators at the same time. The string lists are marked as "exported" until all three parts have been re-imported.
When splitting a translation bundle into parts with (approximately) the same size,
Passolo counts the words in untranslated strings and splits the translation bundle in such
a way that each part contains about the same number of words to be translated. The
alternative is to split the translation bundle into two parts: one containing the dialog resources and one with all the other resources.
Selecting String Lists
The list shows all string lists that were selected in the project window before you opened the export dialog. Click Add to add additional string lists to the translation bundle.
Click Next to move to the Licensing Translation Bundles (S. 211) (Team Edition) or Export Options for Translation Bundles (S. 212) page.
Licensing Translation Bundles
This dialog is only displayed in Passolo Team Edition. If you want to create a translation
bundle that can be edited using the free Passolo Translator Edition you will need to
license the translation bundle. To do so, select the Generate licensed translation
bundle option. One of the available license slots will now be associated with the
translation bundle.
Click on Next to move to the Export Options for Translation Bundles (S. 212) dialog.
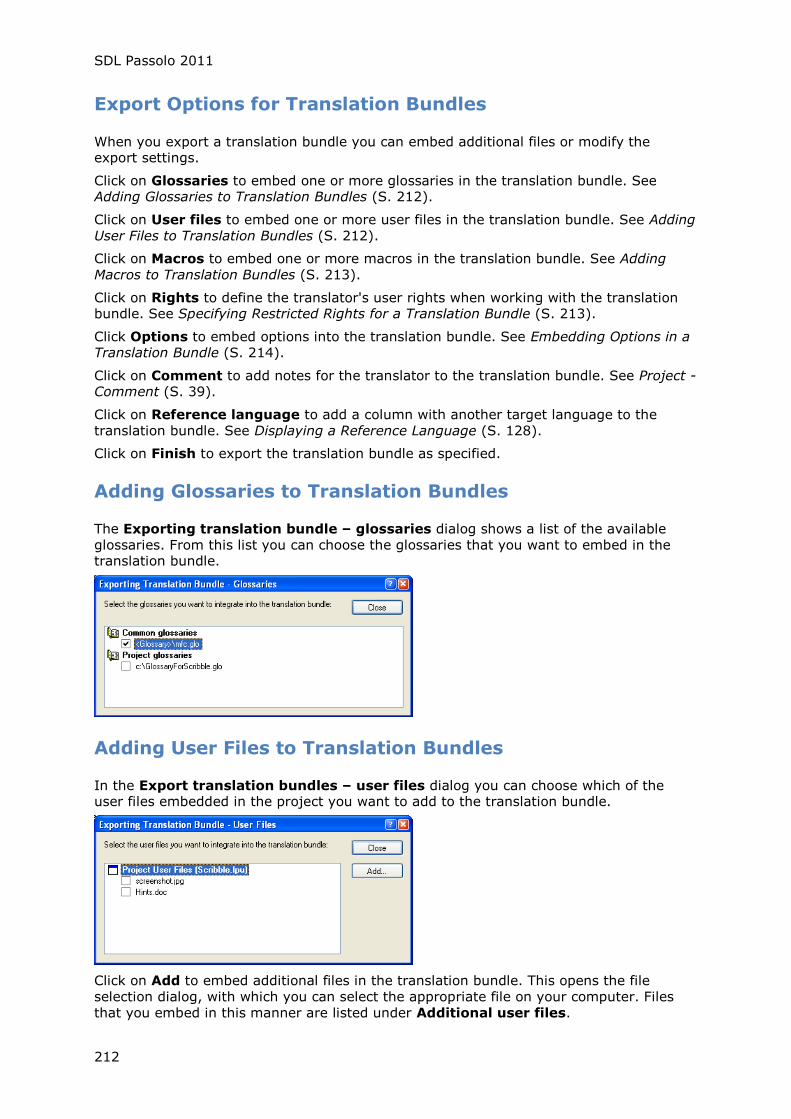
SDL Passolo 2011
212
Export Options for Translation Bundles
When you export a translation bundle you can embed additional files or modify the export settings.
Click on Glossaries to embed one or more glossaries in the translation bundle. See Adding Glossaries to Translation Bundles (S. 212).
Click on User files to embed one or more user files in the translation bundle. See Adding
User Files to Translation Bundles (S. 212).
Click on Macros to embed one or more macros in the translation bundle. See Adding
Macros to Translation Bundles (S. 213).
Click on Rights to define the translator's user rights when working with the translation bundle. See Specifying Restricted Rights for a Translation Bundle (S. 213).
Click Options to embed options into the translation bundle. See Embedding Options in a Translation Bundle (S. 214).
Click on Comment to add notes for the translator to the translation bundle. See Project - Comment (S. 39).
Click on Reference language to add a column with another target language to the
translation bundle. See Displaying a Reference Language (S. 128).
Click on Finish to export the translation bundle as specified.
Adding Glossaries to Translation Bundles
The Exporting translation bundle – glossaries dialog shows a list of the available
glossaries. From this list you can choose the glossaries that you want to embed in the translation bundle.
Adding User Files to Translation Bundles
In the Export translation bundles – user files dialog you can choose which of the user files embedded in the project you want to add to the translation bundle.
Click on Add to embed additional files in the translation bundle. This opens the file
selection dialog, with which you can select the appropriate file on your computer. Files
that you embed in this manner are listed under Additional user files.
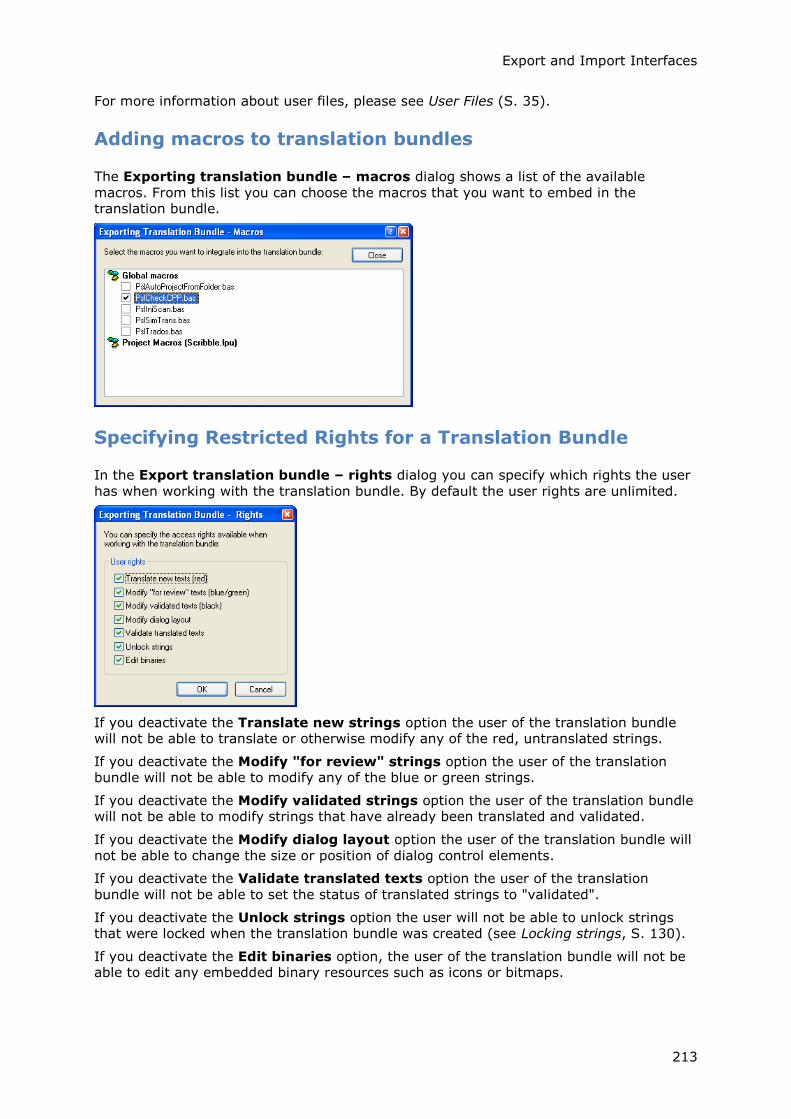
Export and Import Interfaces
213
For more information about user files, please see User Files (S. 35).
Adding macros to translation bundles
The Exporting translation bundle – macros dialog shows a list of the available
macros. From this list you can choose the macros that you want to embed in the translation bundle.
Specifying Restricted Rights for a Translation Bundle
In the Export translation bundle – rights dialog you can specify which rights the user
has when working with the translation bundle. By default the user rights are unlimited.
If you deactivate the Translate new strings option the user of the translation bundle will not be able to translate or otherwise modify any of the red, untranslated strings.
If you deactivate the Modify "for review" strings option the user of the translation bundle will not be able to modify any of the blue or green strings.
If you deactivate the Modify validated strings option the user of the translation bundle will not be able to modify strings that have already been translated and validated.
If you deactivate the Modify dialog layout option the user of the translation bundle will
not be able to change the size or position of dialog control elements.
If you deactivate the Validate translated texts option the user of the translation
bundle will not be able to set the status of translated strings to "validated".
If you deactivate the Unlock strings option the user will not be able to unlock strings that were locked when the translation bundle was created (see Locking strings, S. 130).
If you deactivate the Edit binaries option, the user of the translation bundle will not be able to edit any embedded binary resources such as icons or bitmaps.
SDL Passolo 2011
214
Embedding Options in a Translation Bundle
You can embed the current program options into the translation bundle with the Export
translation bundle – Options dialog. These options will then be used when the translator opens the translation bundle.
Select Embed current options to write all current options to the translation bundle. If
you have already defined profiles or option files, specify the file you want to use via Embed existing profile or option file field.
If you only want to embed a certain subset of options, you will need to create a
corresponding profile. To do this, click on Options and use the Export function located there. (See Exporting and importing options in Setting Options (S. 241).).
The Export Manager
The Export Manager dialog shows all active exports, i.e. the current translation bundles
in this project that are still marked as exported. In translation bundles, the Export Manager displays the information about the project to be exported.
You can call up the Export Manager by clicking on Export Manager in the File menu.
The List contains all connections to exported translation bundles and the connection to
the project to be exported. Click on an entry to display additional information and the
content of an export.
Synchronizing
If a translation bundle can be synchronized, you can call up individual synchronization
steps here. There is the option of changing the synchronization storage here. In the
Synchronization column of the list you can select which synchronization steps are to be
performed automatically with the Synchronize Exports command. More information about this can be found in the section Synchronizing Translation Bundles (S. 229).
Un-Export
If you un-export an export, the status of all translation lists contained in this export are set to "not exported" and it is released for editing again.
Note: Translation bundles that have been un-exported, including all the translations
contained within them, can no longer be imported into a Passolo project.
Use this function if you are sure that the translator will not be delivering another version
of the translation bundle with new translations or corrections, or if license slots are to be
restored for lost translation bundles. Further information on this topic can be found under
About the Team Edition (S. 225).
Text Format
You can export translation lists in ASCII format, which can be edited with any given
ASCII editor. This export format is available in the list of export formats, and is called
Passolo Text Format. However, it is generally recommended that exports be made to
translation bundles, which the translator can process using Passolo. Please also note that
with ASCII export, the string lists are not locked and the project can continue to be edited.
Click on Settings to configure the ASCII export.
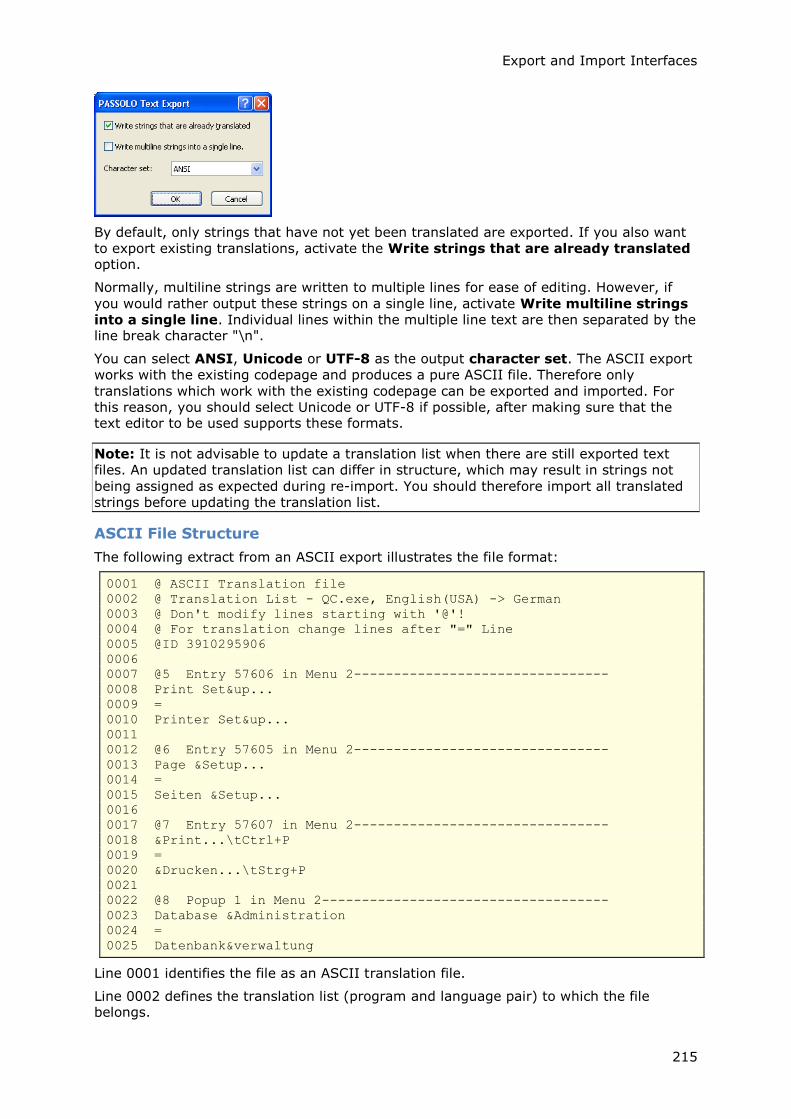
Export and Import Interfaces
215
By default, only strings that have not yet been translated are exported. If you also want
to export existing translations, activate the Write strings that are already translated option.
Normally, multiline strings are written to multiple lines for ease of editing. However, if
you would rather output these strings on a single line, activate Write multiline strings
into a single line. Individual lines within the multiple line text are then separated by the line break character "\n".
You can select ANSI, Unicode or UTF-8 as the output character set. The ASCII export
works with the existing codepage and produces a pure ASCII file. Therefore only
translations which work with the existing codepage can be exported and imported. For
this reason, you should select Unicode or UTF-8 if possible, after making sure that the text editor to be used supports these formats.
Note: It is not advisable to update a translation list when there are still exported text
files. An updated translation list can differ in structure, which may result in strings not
being assigned as expected during re-import. You should therefore import all translated
strings before updating the translation list.
ASCII File Structure
The following extract from an ASCII export illustrates the file format:
0001 @ ASCII Translation file
0002 @ Translation List - QC.exe, English(USA) -> German
0003 @ Don't modify lines starting with '@'!
0004 @ For translation change lines after "=" Line
0005 @ID 3910295906
0006
0007 @5 Entry 57606 in Menu 2--------------------------------
0008 Print Set&up...
0009 =
0010 Printer Set&up...
0011
0012 @6 Entry 57605 in Menu 2--------------------------------
0013 Page &Setup...
0014 =
0015 Seiten &Setup...
0016
0017 @7 Entry 57607 in Menu 2--------------------------------
0018 &Print...\tCtrl+P
0019 =
0020 &Drucken...\tStrg+P
0021
0022 @8 Popup 1 in Menu 2------------------------------------
0023 Database &Administration
0024 =
0025 Datenbank&verwaltung
Line 0001 identifies the file as an ASCII translation file.
Line 0002 defines the translation list (program and language pair) to which the file belongs.
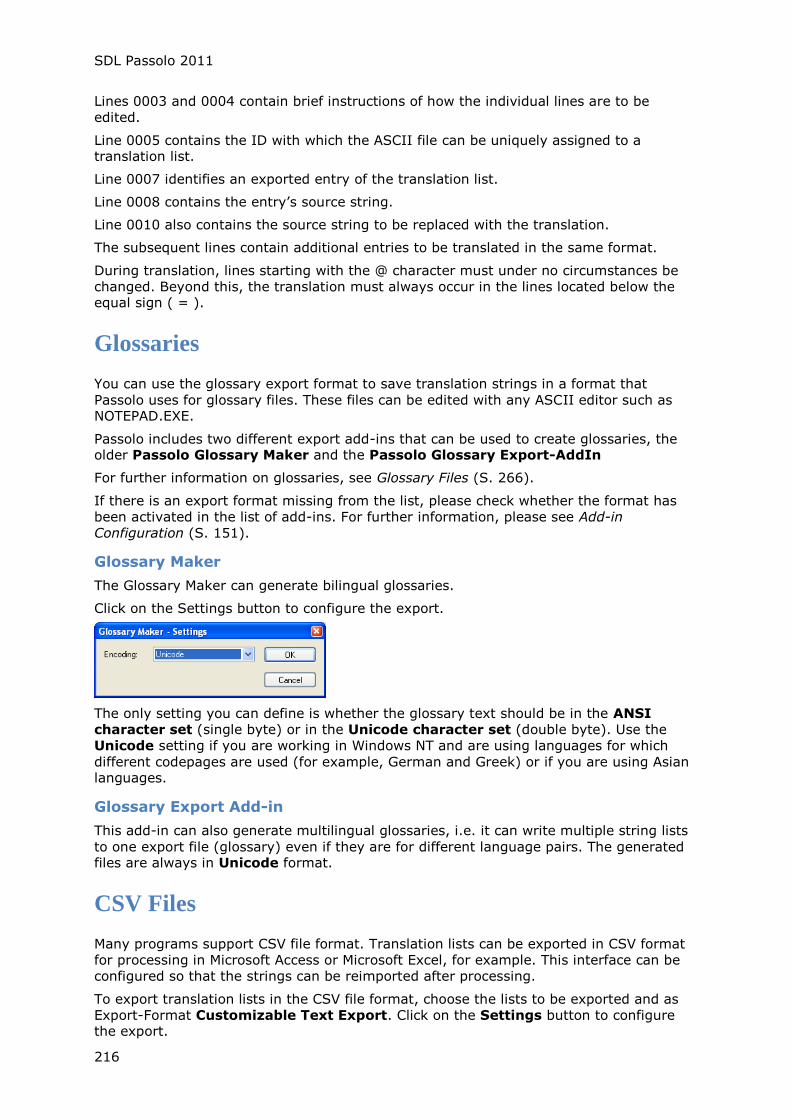
SDL Passolo 2011
216
Lines 0003 and 0004 contain brief instructions of how the individual lines are to be
edited.
Line 0005 contains the ID with which the ASCII file can be uniquely assigned to a translation list.
Line 0007 identifies an exported entry of the translation list.
Line 0008 contains the entry’s source string.
Line 0010 also contains the source string to be replaced with the translation.
The subsequent lines contain additional entries to be translated in the same format.
During translation, lines starting with the @ character must under no circumstances be
changed. Beyond this, the translation must always occur in the lines located below the equal sign ( = ).
Glossaries
You can use the glossary export format to save translation strings in a format that
Passolo uses for glossary files. These files can be edited with any ASCII editor such as NOTEPAD.EXE.
Passolo includes two different export add-ins that can be used to create glossaries, the older Passolo Glossary Maker and the Passolo Glossary Export-AddIn
For further information on glossaries, see Glossary Files (S. 266).
If there is an export format missing from the list, please check whether the format has
been activated in the list of add-ins. For further information, please see Add-in
Configuration (S. 151).
Glossary Maker
The Glossary Maker can generate bilingual glossaries.
Click on the Settings button to configure the export.
The only setting you can define is whether the glossary text should be in the ANSI
character set (single byte) or in the Unicode character set (double byte). Use the
Unicode setting if you are working in Windows NT and are using languages for which
different codepages are used (for example, German and Greek) or if you are using Asian languages.
Glossary Export Add-in
This add-in can also generate multilingual glossaries, i.e. it can write multiple string lists
to one export file (glossary) even if they are for different language pairs. The generated files are always in Unicode format.
CSV Files
Many programs support CSV file format. Translation lists can be exported in CSV format
for processing in Microsoft Access or Microsoft Excel, for example. This interface can be
configured so that the strings can be reimported after processing.
To export translation lists in the CSV file format, choose the lists to be exported and as
Export-Format Customizable Text Export. Click on the Settings button to configure the export.
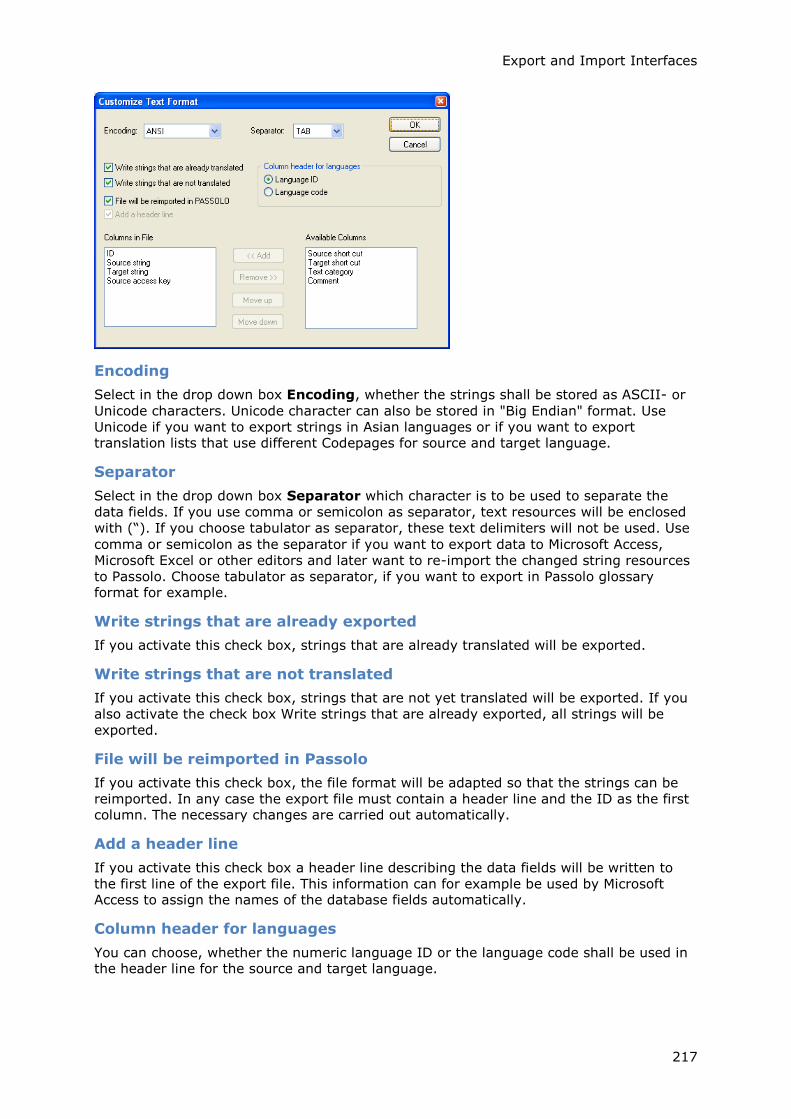
Export and Import Interfaces
217
Encoding
Select in the drop down box Encoding, whether the strings shall be stored as ASCII- or
Unicode characters. Unicode character can also be stored in "Big Endian" format. Use
Unicode if you want to export strings in Asian languages or if you want to export translation lists that use different Codepages for source and target language.
Separator
Select in the drop down box Separator which character is to be used to separate the
data fields. If you use comma or semicolon as separator, text resources will be enclosed
with (―). If you choose tabulator as separator, these text delimiters will not be used. Use
comma or semicolon as the separator if you want to export data to Microsoft Access,
Microsoft Excel or other editors and later want to re-import the changed string resources
to Passolo. Choose tabulator as separator, if you want to export in Passolo glossary format for example.
Write strings that are already exported
If you activate this check box, strings that are already translated will be exported.
Write strings that are not translated
If you activate this check box, strings that are not yet translated will be exported. If you
also activate the check box Write strings that are already exported, all strings will be
exported.
File will be reimported in Passolo
If you activate this check box, the file format will be adapted so that the strings can be
reimported. In any case the export file must contain a header line and the ID as the first column. The necessary changes are carried out automatically.
Add a header line
If you activate this check box a header line describing the data fields will be written to
the first line of the export file. This information can for example be used by Microsoft Access to assign the names of the database fields automatically.
Column header for languages
You can choose, whether the numeric language ID or the language code shall be used in the header line for the source and target language.

SDL Passolo 2011
218
Column Selection
The list Columns in File shows all data fields which the export file shall contain. To add
a data field, select the corresponding entry in the list of Available Columns and click
<< Add. To delete a data field from the list, select the entry in the list of Columns in File and click Remove >>.
The order of the data fields in the list Columns in File determines the order in data will
be written in the export file. You can change the order of the data fields by selecting a data field in the list and pressing Move up or Move down to move its position.
Note: If the file shall not be imported again and you export access keys or shortcuts as
own data fields, this information is removed from the source or target texts.
If you have activated the option File will be reimported in Passolo, you can import
the translation lists after external processing again. You don't need to carry out any
further adjustings when importing. Passolo can determine the format of the export file
and assign the file to the right translation list automatically.
Note: It is not advisable to update a translation list, as long as there are still exported
text files. An updated translation list can differ in structure and the imported strings
might not be assigned as expected. You are advised to import all translated strings
before updating the translation list.
XML Export/Import
The translation of XML files is supported by numerous translation programs. The SDL
Passolo XML Export/Import export format generates an XML file with a simple
structure containing untranslated entries from the Passolo project. Context information
such as the source and comments are also written to the XML file as attributes. After
translation in an external translation program, the strings are imported back into the Passolo project.
Export
Open the Exporting String Lists dialog. Choose SDL Passolo XML Export/Import as
the export format and, in the next dialog, select the translation lists to be exported. To export the strings, click Finish in the Exporting String Lists dialog.
Note: It is not advisable to update a string list as long as there are still exported strings
being processed. The updated translation list may have a different structure and
therefore it may no longer be possible to assign the imported strings correctly. For this
reason you are advised to import the translated strings before updating the translation
list.
Configurations
The subfolder System\XMLExpImp below the Passolo installation folder contains the DTD
for the XML files generated by Passolo as well as configuration files for different
translation tools. The relevant configuration files should be sent to the translators along with the exported SML file. The following configuration files are available:
Configuration
file name For processing with
SDLPassolo-
SDLTagEditor.ini SDL Trados TagEditor

Export and Import Interfaces
219
SDLPassolo-
SDLX.anl SDLX Translation Suite
SDLPassolo-
DVX.dvflt Déjà Vu X
SDLPassolo-
across.dst
across Language Server (version 3.5
and up)
SDLPassolo-
MemoQ.mxf MemoQ (version 2.1 and up)
STAR Transit: please contact STAR
customer support.
TMX Export
To make use of translations entered as part of the software localization when translating
the documentation in other translation tools, you will need to exchange the translated segments.
Translation Memory eXchange format is an XML based standard for the exchange of data
between different translation tools (see also www.lisa.org). The export format SDL
Passolo TMX Export creates a TMX file with translated entries from the Passolo project. The TMX file generated by Passolo corresponds to TMX 1.4 Level 2.
Export
Open the Exporting String Lists dialog. Select the export format SDL Passolo TMX Export. Click on the Settings... button to configure the export.
Export only
You can limit the strings to be exported by selecting options in the Export Only option
group. Only strings that meet all the requirements of the selected options will be exported.
The Sentences or paragraphs option specifies that only strings containing complete
sentences will be exported.
The Entries in String Table option specifies that only strings contained in the string
table will be exported.
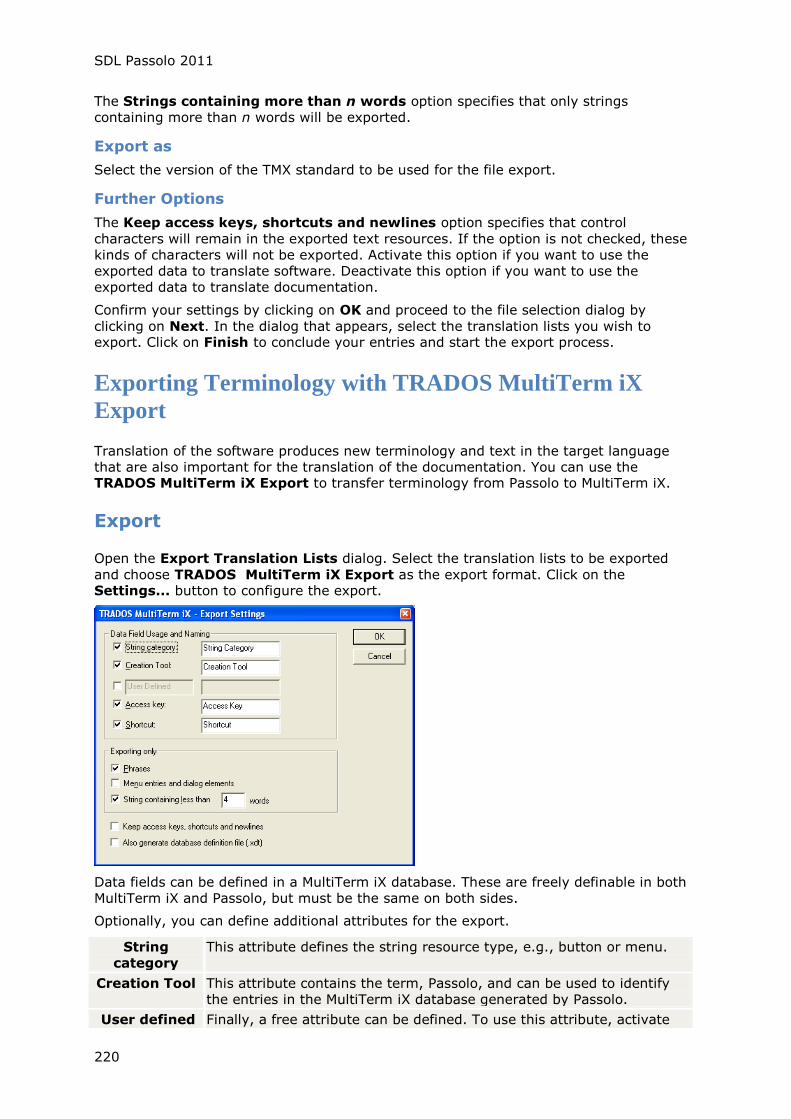
SDL Passolo 2011
220
The Strings containing more than n words option specifies that only strings
containing more than n words will be exported.
Export as
Select the version of the TMX standard to be used for the file export.
Further Options
The Keep access keys, shortcuts and newlines option specifies that control
characters will remain in the exported text resources. If the option is not checked, these
kinds of characters will not be exported. Activate this option if you want to use the
exported data to translate software. Deactivate this option if you want to use the
exported data to translate documentation.
Confirm your settings by clicking on OK and proceed to the file selection dialog by
clicking on Next. In the dialog that appears, select the translation lists you wish to export. Click on Finish to conclude your entries and start the export process.
Exporting Terminology with TRADOS MultiTerm iX
Export
Translation of the software produces new terminology and text in the target language
that are also important for the translation of the documentation. You can use the TRADOS MultiTerm iX Export to transfer terminology from Passolo to MultiTerm iX.
Export
Open the Export Translation Lists dialog. Select the translation lists to be exported
and choose TRADOS MultiTerm iX Export as the export format. Click on the Settings... button to configure the export.
Data fields can be defined in a MultiTerm iX database. These are freely definable in both
MultiTerm iX and Passolo, but must be the same on both sides.
Optionally, you can define additional attributes for the export.
String
category
This attribute defines the string resource type, e.g., button or menu.
Creation Tool This attribute contains the term, Passolo, and can be used to identify
the entries in the MultiTerm iX database generated by Passolo.
User defined Finally, a free attribute can be defined. To use this attribute, activate

Export and Import Interfaces
221
the checkbox and enter the attribute name (for example, project) in the
first input area and the attribute value (for example, Scribble Version
1.0) in the second input area.
Access key For strings from menus and dialogs, this attribute defines the access
key in the source and target string.
Shortcut For strings from menus and dialogs, this attribute defines the access
key in the source and target string.
You can limit the strings to be exported by selecting options in the Export Only option
group. Only strings that meet all the requirements of the selected options will be exported.
The Phrases option specifies that only strings that do not contain complete sentences will be exported.
The Menu entries and dialog elements option specifies that only strings originating from menus or dialogs will be exported.
The Strings containing less than n words option specifies that only strings containing fewer than n words will be exported.
The Keep access keys, shortcuts and newlines option specifies that control
characters will remain in the exported text resources. If the option is not checked, these
kinds of characters will not be exported. Activate this option if you want to use the
exported data to translate software. Deactivate this option if you want to use the
exported data to translate documentation.
If you select the Also generate database definition file (.xdt) option, Passolo will
create a database definition file for TRADOS MultiTerm iX to facilitate the import the of the terminology.
Confirm your settings by clicking on OK and proceed to the file selection dialog by
clicking on Next. In the dialog that appears, select the translation lists you wish to
export. Click on Finish to conclude your entries and start the export process.
Then call up TRADOS MultiTerm iX and choose Import from the File menu to transfer
the strings to the terminology database.
Exporting Terminology with TRADOS MultiTerm Export
Translation of the software produces new terminology and text in the target language
that are also important for the translation of the documentation. You can use the TRADOS MultiTerm Export to transfer terminology from Passolo to MultiTerm.
Export
Open the Export Translation Lists dialog. Select the translation lists to be exported
and choose TRADOS MultiTerm Export as the export format. Click on the Settings... button to configure the export.
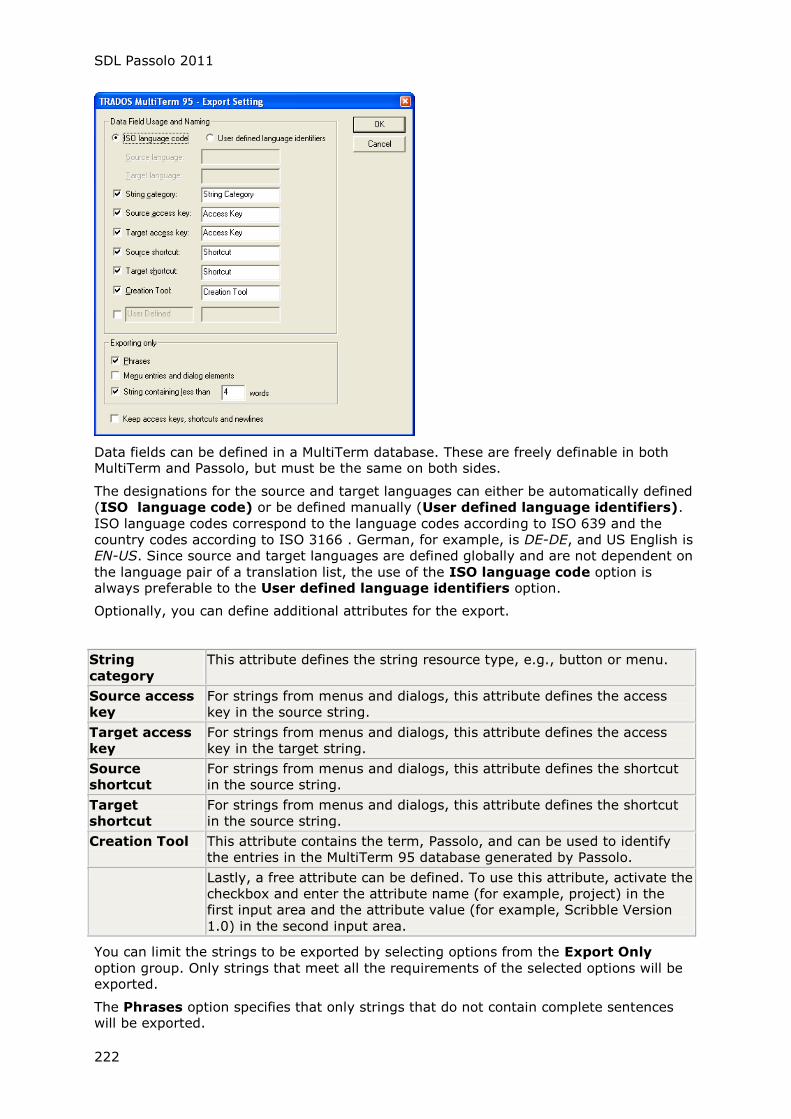
SDL Passolo 2011
222
Data fields can be defined in a MultiTerm database. These are freely definable in both MultiTerm and Passolo, but must be the same on both sides.
The designations for the source and target languages can either be automatically defined
(ISO language code) or be defined manually (User defined language identifiers).
ISO language codes correspond to the language codes according to ISO 639 and the
country codes according to ISO 3166 . German, for example, is DE-DE, and US English is
EN-US. Since source and target languages are defined globally and are not dependent on
the language pair of a translation list, the use of the ISO language code option is always preferable to the User defined language identifiers option.
Optionally, you can define additional attributes for the export.
String
category
This attribute defines the string resource type, e.g., button or menu.
Source access
key
For strings from menus and dialogs, this attribute defines the access
key in the source string.
Target access
key
For strings from menus and dialogs, this attribute defines the access
key in the target string.
Source
shortcut
For strings from menus and dialogs, this attribute defines the shortcut
in the source string.
Target
shortcut
For strings from menus and dialogs, this attribute defines the shortcut
in the source string.
Creation Tool This attribute contains the term, Passolo, and can be used to identify
the entries in the MultiTerm 95 database generated by Passolo.
Lastly, a free attribute can be defined. To use this attribute, activate the
checkbox and enter the attribute name (for example, project) in the
first input area and the attribute value (for example, Scribble Version
1.0) in the second input area.
You can limit the strings to be exported by selecting options from the Export Only
option group. Only strings that meet all the requirements of the selected options will be exported.
The Phrases option specifies that only strings that do not contain complete sentences will be exported.
Export and Import Interfaces
223
The Menu entries and dialog elements option specifies that only strings originating
from menus or dialogs will be exported.
The Strings containing less than n words option specifies that only strings containing fewer than n words will be exported.
The Keep access keys, shortcuts and newlines option specifies that control
characters will remain in the exported text resources. If the option is not checked, these
kinds of characters will not be exported. Activate this option if you want to use the
exported data to translate software. Deactivate this option if you want to use the exported data to translate documentation.
Confirm your settings by clicking on OK and proceed to the file selection dialog by
clicking on the Next button. In the dialog that appears, select the translation lists you wish to export. Click on Finish to conclude your input and start the export process.
Call up TRADOS MultiTerm and choose Import from the File menu to transfer the strings
to the terminology database.


225
The Passolo Team Edition
About the Team Edition
The Passolo Team Edition simplifies the management of localization projects with project members involved in different locations, such as external translators.
Parts of the localization project can be sent as so-called translation bundles to the
external translators.
A bundle can contain any number of translation lists, glossaries and macros. The
Exporting Translation Bundles (S. 210) section describes how to create translation bundles.
Both the Team Edition and the Professional Edition can create unlicensed translation
bundles. Unlicensed translation bundles can be opened and edited using the Passolo
Team/Professional editions.
In addition, the Team Edition can also create licensed translation bundles. Licensed
translation bundles can be processed with the Passolo Translator Edition. Unlike the full
featured Passolo Editions, the Translator Edition is not copy protected and can be downloaded from the Passolo website http://www.passolo.com.
Using the Team Edition and the Translator Editions, there is no need to provide external
translators with full featured Passolo licenses, or to exchange Passolo licenses.
License Management
The copy protection device of the Team Edition contains a fixed number of so-called
license slots. These license slots are used to manage the licensing of translation bundles
for the Translator Edition. When a licensed translation bundle is created, it will be
associated with a unique license slot. This license slot cannot be used for a new translation bundle until the exported licensed translation bundle is reimported.
The number of license slots determines how many licensed translation bundles can be exported at the same time (for processing with the Translator Edition).
A licensed translation bundle contains information identifying the occupied license slot
and the copy protection device of the Team Edition. When importing a licensed
translation bundle, Passolo checks whether the same copy protection device is being
used for import as for export. The license slot can only be unlocked successfully if the
copy protection device matches. For this reason, please make sure that you use the
same copy protection device for both exporting and importing licensed translation
bundles.
Since unlicensed translation bundles don’t use license slots, they can be imported and exported using different copy protection devices.
Further information
Working with External Translators (S. 225)
Trouble Shooting (S. 226)
Working with External Translators
After you have created a licensed translation bundle, send it to the translator for
processing. However, please note the following issues:
After the export of a translation bundle, the exported parts of the project can no
longer be worked on.
SDL Passolo 2011
226
Team Unlimited is the only Passolo edition that allows you to merge translation
bundles that were modified by several translators simultaneously. If you run short
of licensed translation bundles with the other Passolo editions, you can sequence
the translation process accordingly or purchase a Team Edition with more
licenses.
If the translator delivers only a partial translation, be sure to choose the Do not
release string lists option when you import the translation bundle. You can then
import the translation bundle as often as you want until the translator finishes the
job. For the final import this option can be switched off, or the Un-Export function
in the Translation List Properties (S. 32) dialog can be carried out following the
import.
The translator must not make any further changes to the translation bundle after
sending it back for final import into the project. Following the final import of the
translations and release of the translation lists, a new translation bundle can be
created and sent to the translator. Any subsequent changes made to the original translation bundle will be lost.
Trouble Shooting
If you follow the license management guidelines, you should have no problems working
with the Team Edition. The following chapter describes how to deal with specific
incidents.
Working with project backups
We generally recommend that you create regular backups of your project files. The
number of license slots determines how many licensed translation bundles can be exported at the same time (for processing with the Translator Edition).
If you are working with an older backup copy of your project that was created prior to
the export of any licensed translation bundles, you will not be able to import any such licensed translation bundles that were exported from a newer copy of the project.
What happens if a licensed translation bundle gets lost
You exported a translation bundle but the file was lost in the work process and there is
no backup copy on your computer, nor on the translator's computer. In this case you will have to release the exported translation bundle in the Team Edition.
Note:If the licensed translation bundle should reappear after this operation, it can no
longer be imported. The bundle file can then be deleted.
To release an exported translation bundle, please proceed as follows: Open the project
and select one of the translation lists that you exported. Open the properties dialog by
selecting the command Properties from the String List menu. Click Un-Export to undo
the export. This also releases the license slot that was associated with the licensed translation bundle.
What if a project gets lost
The current version of a project file has been misplaced in the workflow, and there is no
backup copy available. In this case you will have to release all the translation bundles
exported from this project. Then you can generate the project again and use the alignment function to recover translations that have already been done.
The current version of a project file has been misplaced in the workflow, and there is only
an older backup copy available. Open the backup copy of the project file and release any
translation bundles that were only exported in the newer version of the project (i.e. the missing version).

The Passolo Team Edition
227
Note: After this operation the released bundles can no longer be imported into the
Passolo project. The bundle files can be deleted.
To release an exported translation bundle, please proceed as follows: Select the
command Organize export licenses from the Tools menu. This calls up the Organize
export licenses dialog. Select the licenses you want to release, and click the Release license button.
In the Translation bundle field you can specify the file path of a translation bundle that is
no longer associated with any project. You can also select the translation bundle using the file selection dialog.
Once you confirm your entries by clicking on OK, the license slot for the selected
translation bundle is released.
Repeat this procedure for any translation bundles that are no longer associated with a project.
For further information, please refer to the Organize Export Licenses dialog.
What if the copy protection device is defective
In this case it is no longer possible to start Passolo correctly. Please contact our support
(e-mail to [email protected]). You will immediately receive a new copy protection
device and a description of how to re-import any exported translation bundles.
What if the computer is defective
Please unplug the copy protection device from the defective computer. Then install
Passolo on another computer and connect the copy protection device with the new
computer's USB or parallel interface. Once the installation of the current backup copies of your projects is complete, you can continue your work as usual.
Note:Since the list of entries displayed in the dialog Organize export licenses is stored in
the computer's registry , this list will not contain valid data after you change to a
different computer. Nevertheless, it is still possible to import valid bundles created with
this Team Edition.
Organize Export Licenses
Select Tools, then Organize export licenses to open the Organize Export Licenses dialog.
Note: You should only use this function in cases where a project file containing
translation bundles has been lost or when you are certain that the translation bundle is
no longer required. After a license slot is released, you will no longer be able to import
the associated translation bundle or any of the translations it contains. If all you want to
do is release one or more translation bundles, please use the Un-Export function in the
Translation List Properties (S. 32) dialog.

SDL Passolo 2011
228
This list shows you information about the license slots currently in use and the associated
translation bundles. Each list entry contains the name of the translation bundle, the date and time it was exported, and a comment, if one was entered for the translation bundle.
If projects or translation bundles have been lost and the corresponding license slots can
no longer be release by importing the bundles, you can release the license slots manually by selecting the entries in this list and clicking on Release license.
The display data for these list entries is stored in the registry of the work station used to
export the translation bundles. If you use the same Team Edition (and the same copy
protection device) on different work stations, the list will only show the license slots that were assigned to translation bundles on the current work station
If the copy protection device also contains other license slots that were assigned on other
work stations, the corresponding information cannot be displayed. In this case, the
license slots are shown as Unknown
For more information, please see License Management (S. 225).
229
Synchronizing Translation Bundles
Synchronizing Translation Bundles
Translation bundles created with the collaboration-compatible Team Edition of SDL
Passolo are automatically capable of being synchronized. This means that it is possible to
share update information and translations with the original project.
This makes it much easier to ensure an agile workflow, as there are no repeated imports
and re-exports. The translator always receives the latest version of the project, even if
the source files are still often subject to changes. The project manager has a very clear
overview of the current status of translation.
Data is exchanged via a shared network folder or via an FTP server.
Automatic synchronization is started by calling up the Synchronize Exports command
in the File menu. This data can be confined to certain translation bundles or synchronization directions via the Export Manager. (See The Export Manager, S. 214)
Further Information
FTP Server as Synchronization Storage (S. 230)
The Synchronization Steps
The Concept
Synchronization between the project and translation bundle is achieved via the exchange
of files. The project generates an update file containing the new and amended texts from
the source files. The translation bundle writes a translation file containing the changes made by the translator.
The Synchronization Storage
This is the location via which the files are exchanged. Both the project and the translation
bundle must have access to this location. This can be a shared network folder or an FTP server.
Changing the Synchronization Storage
The synchronization storage used is specified in the list produced by the Export Manager.
In order to change the synchronization storage, one of the synchronization steps must be called up manually in the Export Manager:
1. Click on Export Manager in the File menu
2. In projects:
1. Select one or more exports for which you wish to change the
synchronization storage.
2. Click on Write update
3. In the dialog which follows, click on Change location.
4. Select File System and enter the required network folder. Or select FTP and
click on OK. In this case, another dialog will appear in which you can
change the FTP settings. Then click on Start.
3. In translation bundles:
1. Select the entry under Exported From.
2. Click on Write translations
SDL Passolo 2011
230
3. Select File System and enter the required network folder. Or select FTP and
click on OK. In this case, another dialog will appear in which you can change the FTP settings. Then click on Start.
Automatic Synchronization
Automatic synchronization is started by calling up the Synchronize Exports command
in the File menu. All synchronization steps are performed automatically, apart from
those that have been disabled in the export manager, see The Export Manager (S. 214).
Write update
This synchronization step is performed by the project (or by translation bundles from
which further translation bundles have been exported). It should always be called up if a
translation list has been updated (see Updating String Lists, S. 61). The update file
(.tbupd) contains the current translation of all string lists contained in the translation bundle.
Writing Translations
This synchronization step is carried out by the translation bundle. It should be called up
regularly in order to copy the current translations into the project to be exported. The translation file (.tbtrans) contains all the string lists that have been changed.
Reading Translations
This synchronization step is performed by the project. The translation file written by the
translation bundle is imported into the project. This step corresponds to an import of the translation bundle without a release of the export.
Reading Update
This synchronization step is carried out by the translation bundle. The translation file
written by the project to be exported is read. The string lists for the translation bundle
then have the same structure as in the project. New source texts may have been added
or existing texts amended. It may also occur that texts already translated are deleted, as they are no longer contained in the source files.
FTP Server as Synchronization Storage
To use the FTP synchronization storage, you need an FTP server connection as a
minimum. You should also define the e-mail options, so that information can be exchanged more easily with the user.
The FTP server can even be used as the export destination for exporting the translation
bundle. All synchronization data is then exchanged via this server.
Definition of an FTP Servers
1. Click on Add-ins in the Tools menu.
2. Go to the Tools tab and click on FTP Export Target, then on Setup.
3. In the FTP Export Target Settings dialog, go to the FTP Connections page.
4. Click on New connection.
5. Give the new connection a name and enter the parameters for the FTP server.
6. Click on OK.
Synchronizing Translation Bundles
231
Definition of E-Mail Options
1. In the FTP Export Target Settings dialog, go to the E-Mail Options tab
2. Enter your personal e-mail address in the From field and check the subject and
the text.
3. If you have an SMTP server, specify the data under Send E-Mail with SMTP.
4. You can also send e-mails using the local e-mail client that has been installed
(e.g. Outlook). Selecting the Show dialog before sending e-mail option is recommended because this allows you to check the e-mail before it is sent.
Creating a User
1. In the FTP Export Target Settings dialog, go to the User page, if this has not
yet been displayed.
2. Click on New User
3. Enter the name, e-mail address and the FTP connection to be used.
4. Click on Add in the Languages section and select one or more languages for this
user.
5. In order to make it as easy as possible for the user to set up the translation job,
select the option: Start script: Send to E-mail address
The start script contains the data for the FTP connection used and for the
translation bundle. The translator only has to double click on this file to transfer
all the necessary data and automatically download the translation bundle.
Once these preparations are complete, a translation bundle can be sent to the translator via the FTP server.
Exporting a Translation Bundle via the FTP Server
These steps are the same as those for the normal export of a translation bundle. In the second dialog, the "FTP" is selected as the export destination.
1. In the Passolo project window, select the string lists to be exported
2. Click on Export in the File menu.
3. Select the export format Passolo translation bundle and click on Next.
4. Select the FTP entry as the Destination.
5. Select the Write one file for each target language option as the Output.
If you are exporting translation lists into several languages at the same time,
different translation bundles are generated for different translators.
6. Select the Mark files as "exported" mode.
Otherwise the translation bundles cannot be imported or synchronized.
7. Click on Next.
8. Configure other settings in the same way as described in the section Export
Options for Translation Bundles (S. 212) .
9. Click on Finish.
10. Once the translation bundles have been created, the Load Translation Bundles
to FTP Server dialog appears. Here you can check that each translation bundle
has been assigned to the right user and correct this if necessary. Click on Users
and settings to configure the settings as described above, if this has not already
been done.
11. Click on Start.
12. The translation bundles are copied to the FTP server and, depending on the
setting configured, an e-mail with the start script is sent to the translator.

SDL Passolo 2011
232
233
Simulation
Testing the Application
Using simulated translation, you can test your source files for general translatability
before considering localization. In this integrated test function, strings are systematically
altered and then used to create an application.
For example, you can change the length of all included text resources in order to test the
stability of the application. You can also insert, for example, language-specific characters (umlauts, special characters) in order to ensure that these are correctly displayed.
Creating a Simulated Translation
To create a simulated translation, select a target file in the project window, then select
the Simulate Translation command from the String List menu. This calls up the
Simulate Translated Target dialog. You can choose whether to carry out the simulated
translation for the current translation list only, or for all the translation lists in the project.
There are two ways to generate a simulated translation:
Generate target file with simulated translations
In this case, a target file is created – as with the "Generate Target File" function – but
instead of the current translations the target file contains simulated translation strings. No changes are made to the project or the contained translation lists.
Save simulated translations in project
In this case, a new target language is added to the project for the simulated translations
– for example, for the target language "German" the new target language "Sim.German"
is added. A translation list containing only the simulated translations is added for this
new target language. This way it is possible to modify the simulated translations or to
untranslate certain strings, if required. A simulated target file can be created by simply carrying out the "Generate Target File" function.
This method likewise has no effect on the original translation list.
Options
Click on Options to set various simulation parameters in the the Simulation/Debug
dialog (S. 233).
The Simulation/Debug Dialog
Select Tools, then Options, then Simulation/Debug, to open the dialog to configure a
simulated translation. This dialog also opens if you mark a translation list and then click on Simulate Translation in the String List menu.

SDL Passolo 2011
234
Simulate Translation
If this radio button is activated, a target file containing systematic changes to the source
strings is created. The following options allow you to control the manner in which the target strings are to be generated.
If you enter a value greater than 100 % (200 % maximum) in one of the Change string
length to fields, all the text resources will be lengthened accordingly by adding
underlines ( _ ) after the string. There are three different entries for source strings of
different lengths. To enlarge the dialog controls by the amount specified in the third field, select the option Resize dialog controls
In the fields Pre-text string and Post-text string you can add additional characters
that will then be added before or after each text resource. Click on the small black
triangle next to the field to insert a placeholder for the string ID, the string number or the source string, or a random character.
The option Generate language specific characters can be used to add accents to
certain characters (particularly to vowels), depending on the language. The example
illustrates how an "a" is replaced with an "ä" when translating from English to German.
Vice versa, when translating from German to English, the accents are removed. This way,
you can check whether the application correctly supports special characters. The
character map that defines the mapping of characters is in the same format as a Passolo
glossary and can be edited using the Glossary Editor (see the Editing glossaries section under Editing the glossary list, S. 91)
Activate the Don't change translated strings option if you only want to generate
simulated translations for untranslated strings. Already translated strings are then taken
"as is".
If you have already generated a conventional target file, you can activate the checkbox
Append "-sim" to target filename to prevent this file from being overwritten by the
simulated translation. If, for example, you have a regular target file named, APPLDEU.EXE, the simulated translation file will be designated as APPLDEU-SIM.EXE.
Debug
If you activate this radio button, you can generate a target file containing no resources
that are longer than those in the associated source strings. Use this option if the
application you translated does not run properly or the system crashes. Such errors may
be the result of memory areas that have been overwritten. The following three options are available:
Simulation
235
Do not extend strings
Passolo only translates resources that are not longer than the source string. If a
translation exceeds the source string length, the source string is merely copied.
Do not change string lengths
Passolo only translates resources that are not longer than the source string. If a
translation is shorter, the difference is made up with spaces so that the source and target strings remain the same length.
Keep source strings
Passolo ignores all translations and merely copies all source strings.


237
Macros
Macros Overview
Passolo includes a scripting engine that can process BASIC macros. With macros recurring tasks can be automated and Passolo functions can be changed or extended.
The Translator Edition of Passolo can run macros. With the Team Edition and Professional
Edition macros can be developed using a full featured development environment with editor and debugger.
The Automation Help contains detailed information on:
Automation and scripting
The SAX Basic programming language
The Passolo object model
The Passolo object reference
The SAX Basic reference
Please, visit our web site at http://www.passolo.com frequently to get the latest information about available scripts!
Macro Administration
To call up the list of available macros choose Tools from the menu, then Macros.
To run a macro, select it in the list and click on the Run button
If you work with the Professional Edition or the Team Edition of Passolo, you can edit and
develop macros with the macro editor. Click on the Edit button to open the macro editor
with a selected macro. You can open the macro editor directly from the menu by
choosing Tools and Open Basic IDE. The chapter The Basic Editor in the Automation
Help contains further information about the macro editor.
Click on New to create a new macro (see Creating a New Macro, S. 238).
The Set System Macro function serves to define the active system macro (see The System Macro, S. 238)
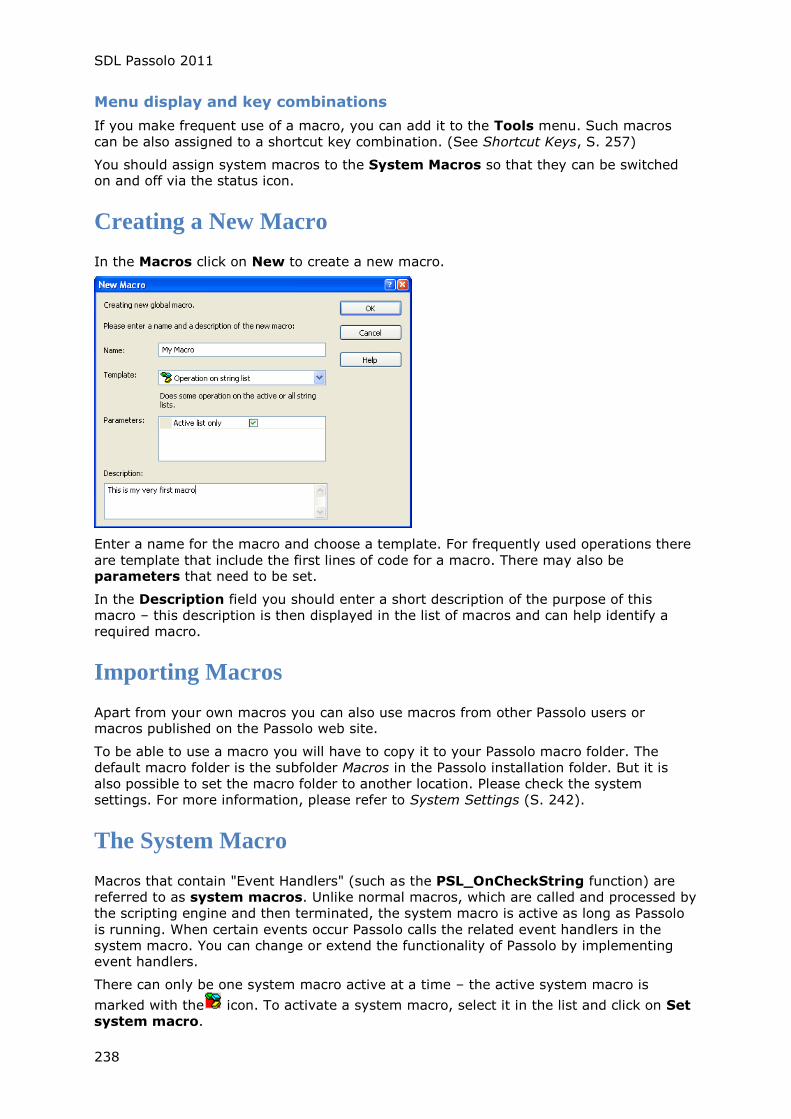
SDL Passolo 2011
238
Menu display and key combinations
If you make frequent use of a macro, you can add it to the Tools menu. Such macros
can be also assigned to a shortcut key combination. (See Shortcut Keys, S. 257)
You should assign system macros to the System Macros so that they can be switched on and off via the status icon.
Creating a New Macro
In the Macros click on New to create a new macro.
Enter a name for the macro and choose a template. For frequently used operations there
are template that include the first lines of code for a macro. There may also be parameters that need to be set.
In the Description field you should enter a short description of the purpose of this
macro – this description is then displayed in the list of macros and can help identify a
required macro.
Importing Macros
Apart from your own macros you can also use macros from other Passolo users or macros published on the Passolo web site.
To be able to use a macro you will have to copy it to your Passolo macro folder. The
default macro folder is the subfolder Macros in the Passolo installation folder. But it is
also possible to set the macro folder to another location. Please check the system
settings. For more information, please refer to System Settings (S. 242).
The System Macro
Macros that contain "Event Handlers" (such as the PSL_OnCheckString function) are
referred to as system macros. Unlike normal macros, which are called and processed by
the scripting engine and then terminated, the system macro is active as long as Passolo
is running. When certain events occur Passolo calls the related event handlers in the
system macro. You can change or extend the functionality of Passolo by implementing event handlers.
There can only be one system macro active at a time – the active system macro is
marked with the icon. To activate a system macro, select it in the list and click on Set
system macro.
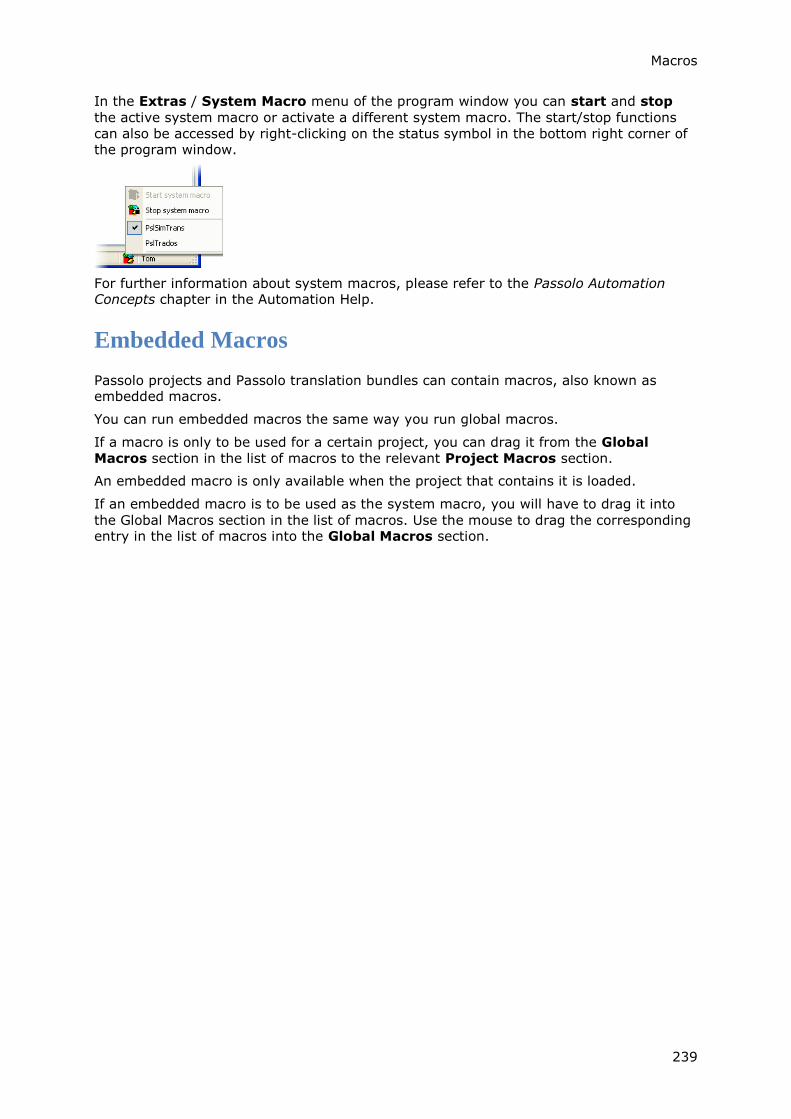
Macros
239
In the Extras / System Macro menu of the program window you can start and stop
the active system macro or activate a different system macro. The start/stop functions
can also be accessed by right-clicking on the status symbol in the bottom right corner of the program window.
For further information about system macros, please refer to the Passolo Automation Concepts chapter in the Automation Help.
Embedded Macros
Passolo projects and Passolo translation bundles can contain macros, also known as embedded macros.
You can run embedded macros the same way you run global macros.
If a macro is only to be used for a certain project, you can drag it from the Global
Macros section in the list of macros to the relevant Project Macros section.
An embedded macro is only available when the project that contains it is loaded.
If an embedded macro is to be used as the system macro, you will have to drag it into
the Global Macros section in the list of macros. Use the mouse to drag the corresponding entry in the list of macros into the Global Macros section.

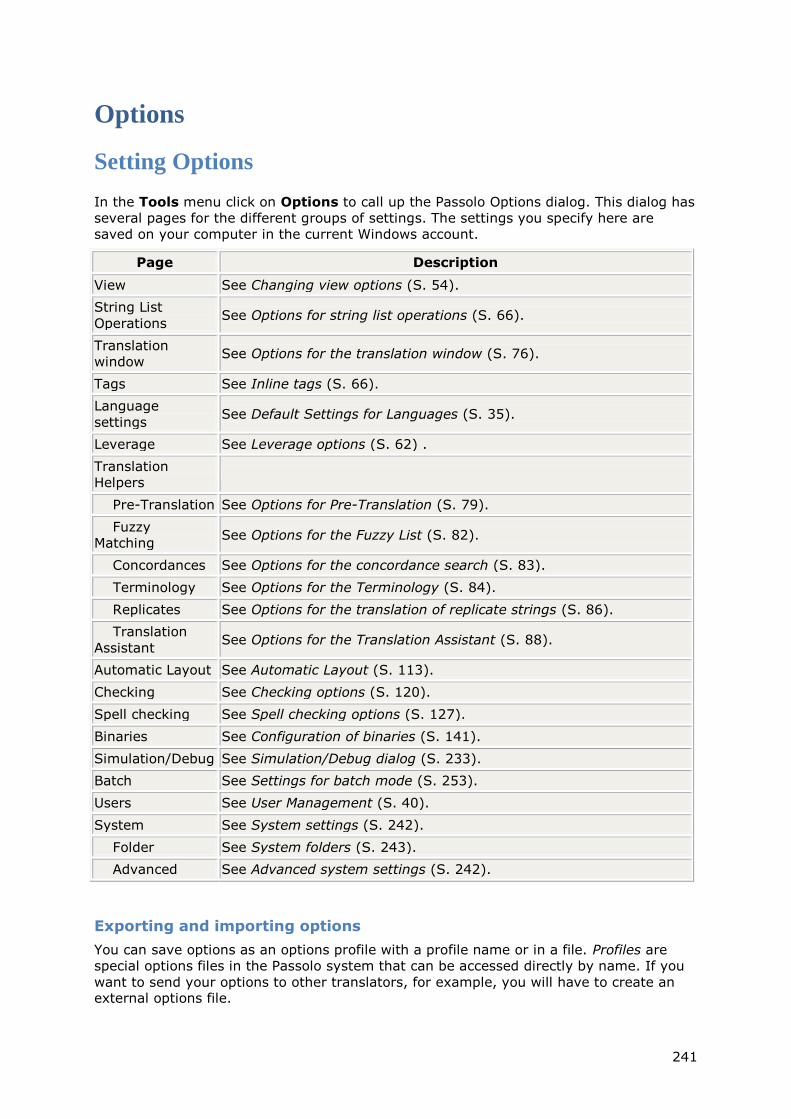
241
Options
Setting Options
In the Tools menu click on Options to call up the Passolo Options dialog. This dialog has
several pages for the different groups of settings. The settings you specify here are
saved on your computer in the current Windows account.
Page Description
View See Changing view options (S. 54).
String List
Operations See Options for string list operations (S. 66).
Translation
window See Options for the translation window (S. 76).
Tags See Inline tags (S. 66).
Language
settings See Default Settings for Languages (S. 35).
Leverage See Leverage options (S. 62) .
Translation
Helpers
Pre-Translation See Options for Pre-Translation (S. 79).
Fuzzy
Matching See Options for the Fuzzy List (S. 82).
Concordances See Options for the concordance search (S. 83).
Terminology See Options for the Terminology (S. 84).
Replicates See Options for the translation of replicate strings (S. 86).
Translation
Assistant See Options for the Translation Assistant (S. 88).
Automatic Layout See Automatic Layout (S. 113).
Checking See Checking options (S. 120).
Spell checking See Spell checking options (S. 127).
Binaries See Configuration of binaries (S. 141).
Simulation/Debug See Simulation/Debug dialog (S. 233).
Batch See Settings for batch mode (S. 253).
Users See User Management (S. 40).
System See System settings (S. 242).
Folder See System folders (S. 243).
Advanced See Advanced system settings (S. 242).
Exporting and importing options
You can save options as an options profile with a profile name or in a file. Profiles are
special options files in the Passolo system that can be accessed directly by name. If you
want to send your options to other translators, for example, you will have to create an external options file.
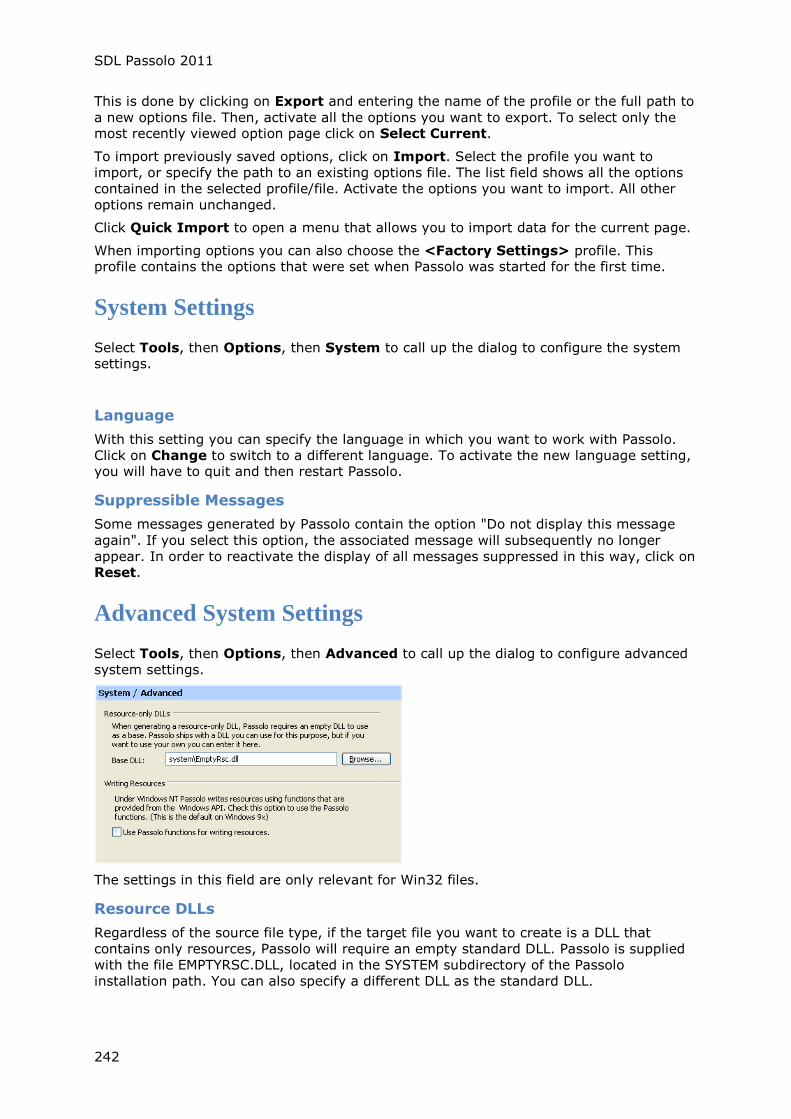
SDL Passolo 2011
242
This is done by clicking on Export and entering the name of the profile or the full path to
a new options file. Then, activate all the options you want to export. To select only the most recently viewed option page click on Select Current.
To import previously saved options, click on Import. Select the profile you want to
import, or specify the path to an existing options file. The list field shows all the options
contained in the selected profile/file. Activate the options you want to import. All other
options remain unchanged.
Click Quick Import to open a menu that allows you to import data for the current page.
When importing options you can also choose the <Factory Settings> profile. This profile contains the options that were set when Passolo was started for the first time.
System Settings
Select Tools, then Options, then System to call up the dialog to configure the system settings.
Language
With this setting you can specify the language in which you want to work with Passolo.
Click on Change to switch to a different language. To activate the new language setting, you will have to quit and then restart Passolo.
Suppressible Messages
Some messages generated by Passolo contain the option "Do not display this message
again". If you select this option, the associated message will subsequently no longer
appear. In order to reactivate the display of all messages suppressed in this way, click on Reset.
Advanced System Settings
Select Tools, then Options, then Advanced to call up the dialog to configure advanced
system settings.
The settings in this field are only relevant for Win32 files.
Resource DLLs
Regardless of the source file type, if the target file you want to create is a DLL that
contains only resources, Passolo will require an empty standard DLL. Passolo is supplied
with the file EMPTYRSC.DLL, located in the SYSTEM subdirectory of the Passolo
installation path. You can also specify a different DLL as the standard DLL.

Options
243
A more detailed description of the options provided by Passolo to create multilingual
applications is given in the Getting Started Guide under Creating Multilingual Applications.
For more detailed information, please refer to The Advanced Target File Options Dialog (S. 33) and The Language Dialog (S. 31).
Writing Resources
Passolo has an integrated parser and generator to extract resources from executables
and generate the target files. For Windows NT/2000/XP or Vista the functions provided
by the operating system are used by default. Activate the Use Passolo functions for
writing resources option if you always want to use the internal Passolo functions.
Select this option, if the executables generated with the operating system functions don’t run properly.
System Folders
To display the page for system folder settings click on Tools, Options, System / Folders.
The folders
Glossaries
This is the standard folder for common glossaries (see Editing the glossary list, S. 91).
Glossary files stored in this folder are automatically added to the glossary list.
Macros
This is the folder used for storing Passolo macros (see Macro Administration, S. 237)
Macro Templates
This folder contains templates for creating new macros.
Option Profiles
This folder is used for storing profiles if you only specify a name (and not a complete
path) when exporting options. (see the "Exporting and importing options" section in
Setting options, S. 241)
Stylesheets for Reports
This folder contains stylesheets for the XML reports generated by Passolo. (see Report setup, S. 138)
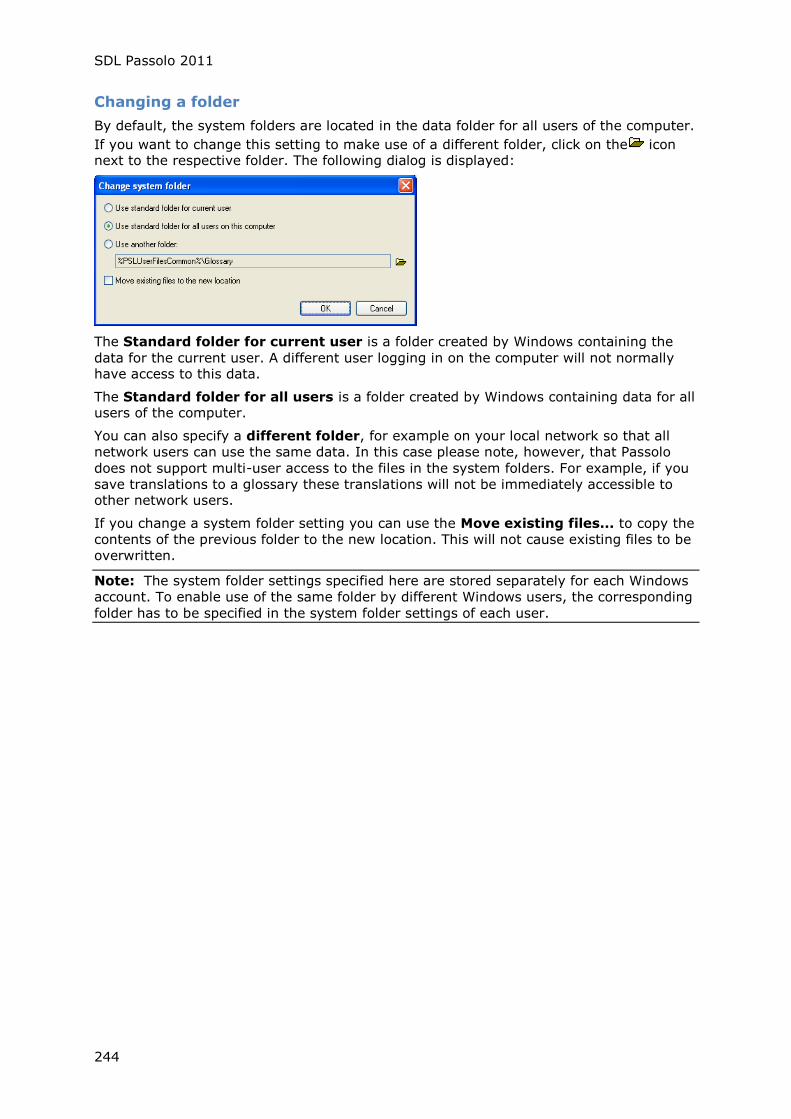
SDL Passolo 2011
244
Changing a folder
By default, the system folders are located in the data folder for all users of the computer.
If you want to change this setting to make use of a different folder, click on the icon next to the respective folder. The following dialog is displayed:
The Standard folder for current user is a folder created by Windows containing the
data for the current user. A different user logging in on the computer will not normally have access to this data.
The Standard folder for all users is a folder created by Windows containing data for all users of the computer.
You can also specify a different folder, for example on your local network so that all
network users can use the same data. In this case please note, however, that Passolo
does not support multi-user access to the files in the system folders. For example, if you
save translations to a glossary these translations will not be immediately accessible to other network users.
If you change a system folder setting you can use the Move existing files... to copy the
contents of the previous folder to the new location. This will not cause existing files to be
overwritten.
Note: The system folder settings specified here are stored separately for each Windows
account. To enable use of the same folder by different Windows users, the corresponding
folder has to be specified in the system folder settings of each user.

245
Batch Mode for Passolo
Batch Mode for Passolo
In batch mode Passolo is run using the command line or a console batch file. There are
various commands available that can used to carry out different operations
automatically, without user interaction.
For example, it is possible to generate all the German target files in a project by running Passolo with the following batch command:
"c:\Program Files\Passolo 6\psl.exe" c:\projects\myProject.lpu /generate
lang:German
The first component in the command is the path to the Passolo application. In this case,
the path is set in quotation marks, because it contains spaces. Without the quotation
marks, the console would try to run "c:\Program". If the path to your Passolo installation
is contained in the PATH environment variable on your system, you can simply use psl to
start Passolo.
This is then followed by the commands and parameters. These also have to be enclosed
in quotation marks if they contain spaces. For a complete description of the batch commands, please refer to the Batch Mode Commands (S. 246) section
Output in command console
Since Passolo is not a console application, the messages it outputs would not normally be
displayed in the console window. Using the /output command, you can redirect the
output to a file, or you can call up the utility program pslcmd.exe instead of the Passolo
application psl.exe. This is a simple console application that calls up Passolo and redirects
output to the console window. The commands for pslcmd.exe are the same as for
psl.exe.
pslcmd.exe can also be copied to a different folder to make it easier to call up. To run
Passolo, it searches the latest Passolo installation path. You can also specify the path to psl.exe in the environment variable PASSOLO_CMD:
c:\Projects>set PASSOLO_CMD=c:\program files\SDL Passolo 2007\psl.exe
c:\Projects>pslcmd myproject.lpu /generate lang:German
Generate "scribble:German(Germany)"
OK - Written to c:\projects\scribbledeu.exe
Generate "notepad:German(Germany)"
ERROR - The translation strings have not been created.
Return values
When exiting psl.exe or pslcmd.exe, the following return values are used:
3 Error updating a translation list
4 Error updating a source list
5 Error generating target file
10 Project not found
98 No free license available
99 No license found
SDL Passolo 2011
246
Batch mode commands
This chapter describes the commands available in batch mode in Passolo. The syntax
descriptions use square brackets [] to indicate optional parameters. Expressions in angle brackets <> are placeholders for text arguments.
Each command begins with a slash (/) or a minus sign (-). Subsequent expressions
without a slash or minus sign are parameters of the preceding command. Parameter
containing spaces have to be set in quotation marks ("my project.lpu").
You can enter multiple commands in one line, until the maximum length of a command
line is reached. When entering numerous commands in sequence, use of the /script command is recommended.
/addlang
Adds target languages to the current project. If the language to be added already exists
in the project, it is not added again unless the ignoreexisting parameter is used.
Syntax
/addlang[:] [lang:] [ignoreexisting]
Parameters
lang:<languagename>
Specifies the new language. <languagename> can be the
language name in English ("German"), the language code
("deu") or the language ID ("07"). If only one language is added,
the languagename parameter can be entered directly after the
addlang command
ignoreexisting Use this parameter to add a language to the project even if it
already exists as a target language.
Example
pslcmd c:\projects\myProject.lpu /addlang:"deu"
/addsource
Adds source files to the current project. If the source file to be added already exists in the project, it is not added again unless the ignoreexisting parameter is used.
Syntax
/addsource[:] [sourcefile:] [sourcefilelist:]
[sourcefolder:] [subfolders]
[sourcelang:] [parser:] [targetrule:]
[forcetargetrule:<name>] [ignoreexisting]
Parameters
sourcefile:<filepath> Specifies the new source file. You can use multiple
sourcefile parameters in order to add further source files.
sourcefilelist:<filepath> <filepath> is a text file containing a list of the source files
to be added to the project.
sourcefolder:<folderpath>
Specifies a folder containing source files. All the files in
this folder are added to the project. If the subfolders
parameter is used, all the files contained in subfolders of
the source folder are also added. If you specify a parser
Batch Mode for Passolo
247
only files that have one of the filename extensions
supported by the given parser will be added.
sourcelang:<languagename>
Specifies the language of the strings in the source files.
<languagename> can be the language name in English
("German"), the language code ("deu") or the language ID
("07"). (See Language IDs, S. 268)
parser:<parser>
Specifies the parser to be used for the added source files.
<parser> can be one of the following entries: Win32,
AddIn:<identifier> or Macro:<filename>. The add-in
identifiers are indicated in the Passolo add-in
administration, e.g. Borland Delphi/C++ Builderor
Microsoft .NET Parser. Please make sure that the identifier
is entered correctly.
targetrule:<name>
Specifies the target rule to be used for the new source
files. If no rule is specified, the standard rule is used. The
specified rule can be overwritten by the parser of the
source file.
forcetargetrule:<name>
Specifies the target rule to be used for the new source
files. The specified rule is also used, if the parser defines
an own target rule.
ignoreexisting Use this parameter to add a source file to the project even
if it already exists.
Example
Adds all the Delphi programs in c:\sources to the project.
pslcmd c:\projects\myProject.lpu /addsource:c:\sources\*.exe
"parser:Borland Delphi/C++ Builder"
/batch
This command is a combination of the /update and /generate commands. The string
lists are updated, and then the target files are generated. Use the /source command to limit the operation to specified source files.
This command ensures compatibility with previous versions of Passolo. Current batch files should make use of the /update and /generate commands.
Syntax
/batch
Parameters
<none>
Example
Updates all the string lists of a project and generates the target files
psl c:\projects\myProject.lpu /batch
/generate
Generates target files
Syntax
/generate [source:<title>] [sourcefile:<filepath>] [lang:<languagename>]
[id:<id>]
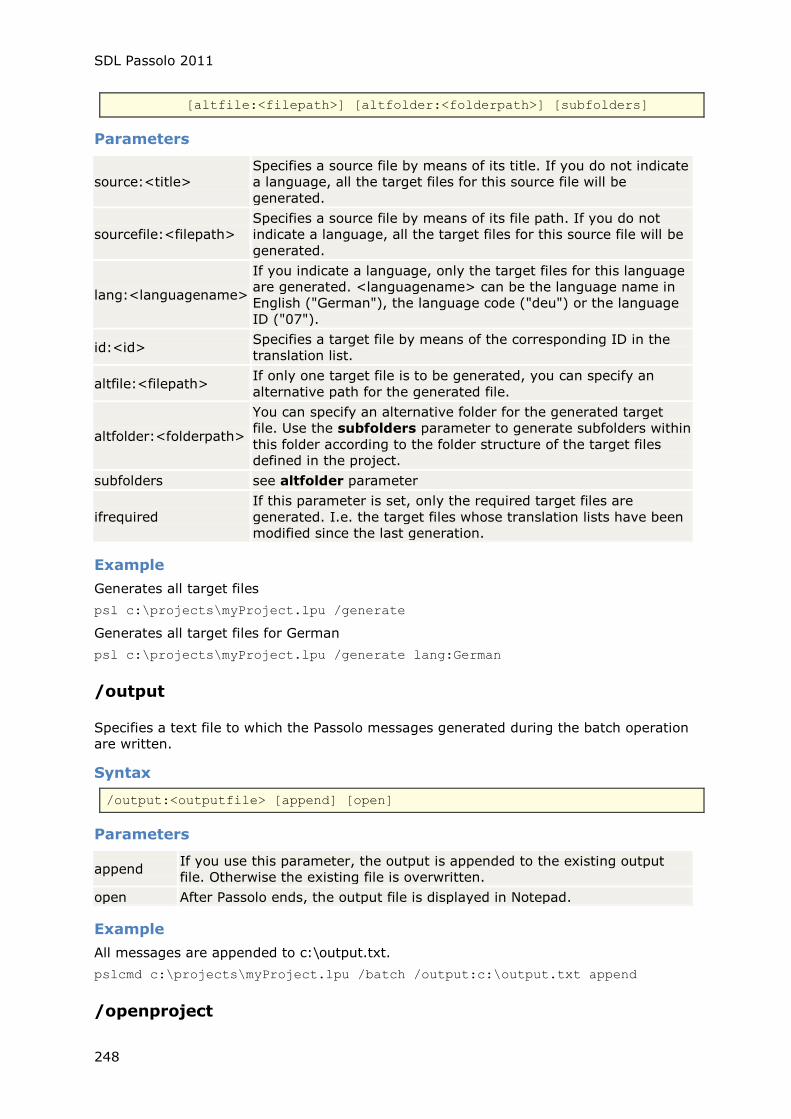
SDL Passolo 2011
248
[altfile:<filepath>] [altfolder:<folderpath>] [subfolders]
Parameters
source:<title>
Specifies a source file by means of its title. If you do not indicate
a language, all the target files for this source file will be
generated.
sourcefile:<filepath>
Specifies a source file by means of its file path. If you do not
indicate a language, all the target files for this source file will be
generated.
lang:<languagename>
If you indicate a language, only the target files for this language
are generated. <languagename> can be the language name in
English ("German"), the language code ("deu") or the language
ID ("07").
id:<id> Specifies a target file by means of the corresponding ID in the
translation list.
altfile:<filepath> If only one target file is to be generated, you can specify an
alternative path for the generated file.
altfolder:<folderpath>
You can specify an alternative folder for the generated target
file. Use the subfolders parameter to generate subfolders within
this folder according to the folder structure of the target files
defined in the project.
subfolders see altfolder parameter
ifrequired
If this parameter is set, only the required target files are
generated. I.e. the target files whose translation lists have been
modified since the last generation.
Example
Generates all target files
psl c:\projects\myProject.lpu /generate
Generates all target files for German
psl c:\projects\myProject.lpu /generate lang:German
/output
Specifies a text file to which the Passolo messages generated during the batch operation
are written.
Syntax
/output:<outputfile> [append] [open]
Parameters
append If you use this parameter, the output is appended to the existing output
file. Otherwise the existing file is overwritten.
open After Passolo ends, the output file is displayed in Notepad.
Example
All messages are appended to c:\output.txt.
pslcmd c:\projects\myProject.lpu /batch /output:c:\output.txt append
/openproject
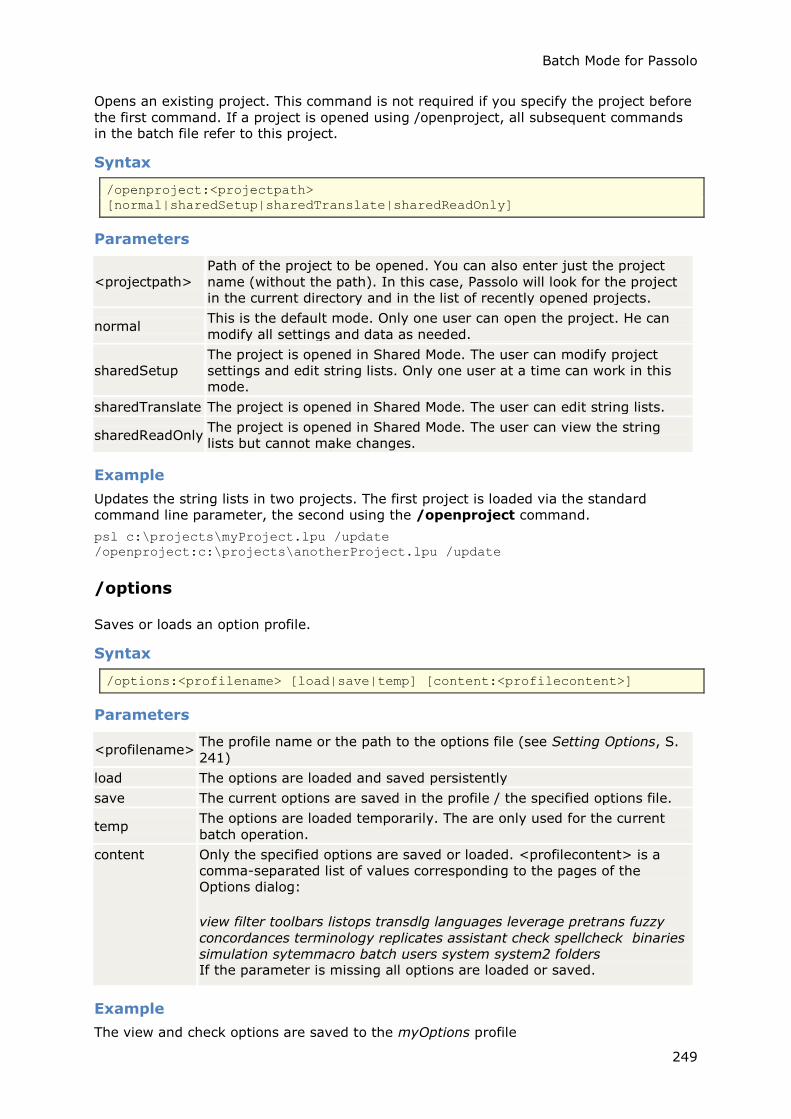
Batch Mode for Passolo
249
Opens an existing project. This command is not required if you specify the project before
the first command. If a project is opened using /openproject, all subsequent commands in the batch file refer to this project.
Syntax
/openproject:<projectpath>
[normal|sharedSetup|sharedTranslate|sharedReadOnly]
Parameters
<projectpath>
Path of the project to be opened. You can also enter just the project
name (without the path). In this case, Passolo will look for the project
in the current directory and in the list of recently opened projects.
normal This is the default mode. Only one user can open the project. He can
modify all settings and data as needed.
sharedSetup
The project is opened in Shared Mode. The user can modify project
settings and edit string lists. Only one user at a time can work in this
mode.
sharedTranslate The project is opened in Shared Mode. The user can edit string lists.
sharedReadOnly The project is opened in Shared Mode. The user can view the string
lists but cannot make changes.
Example
Updates the string lists in two projects. The first project is loaded via the standard
command line parameter, the second using the /openproject command.
psl c:\projects\myProject.lpu /update
/openproject:c:\projects\anotherProject.lpu /update
/options
Saves or loads an option profile.
Syntax
/options:<profilename> [load|save|temp] [content:<profilecontent>]
Parameters
<profilename> The profile name or the path to the options file (see Setting Options, S.
241)
load The options are loaded and saved persistently
save The current options are saved in the profile / the specified options file.
temp The options are loaded temporarily. The are only used for the current
batch operation.
content Only the specified options are saved or loaded. <profilecontent> is a
comma-separated list of values corresponding to the pages of the
Options dialog:
view filter toolbars listops transdlg languages leverage pretrans fuzzy
concordances terminology replicates assistant check spellcheck binaries
simulation sytemmacro batch users system system2 folders If the parameter is missing all options are loaded or saved.
Example
The view and check options are saved to the myOptions profile
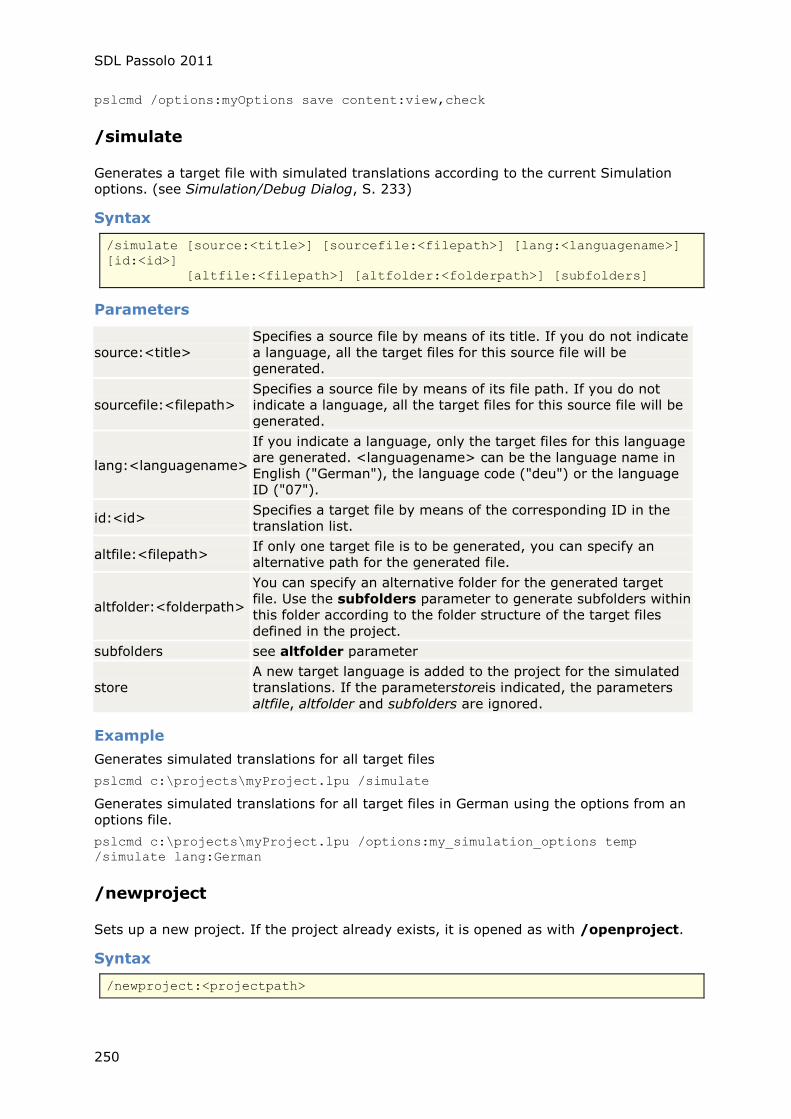
SDL Passolo 2011
250
pslcmd /options:myOptions save content:view,check
/simulate
Generates a target file with simulated translations according to the current Simulation options. (see Simulation/Debug Dialog, S. 233)
Syntax
/simulate [source:<title>] [sourcefile:<filepath>] [lang:<languagename>]
[id:<id>]
[altfile:<filepath>] [altfolder:<folderpath>] [subfolders]
Parameters
source:<title>
Specifies a source file by means of its title. If you do not indicate
a language, all the target files for this source file will be
generated.
sourcefile:<filepath>
Specifies a source file by means of its file path. If you do not
indicate a language, all the target files for this source file will be
generated.
lang:<languagename>
If you indicate a language, only the target files for this language
are generated. <languagename> can be the language name in
English ("German"), the language code ("deu") or the language
ID ("07").
id:<id> Specifies a target file by means of the corresponding ID in the
translation list.
altfile:<filepath> If only one target file is to be generated, you can specify an
alternative path for the generated file.
altfolder:<folderpath>
You can specify an alternative folder for the generated target
file. Use the subfolders parameter to generate subfolders within
this folder according to the folder structure of the target files
defined in the project.
subfolders see altfolder parameter
store
A new target language is added to the project for the simulated
translations. If the parameterstoreis indicated, the parameters
altfile, altfolder and subfolders are ignored.
Example
Generates simulated translations for all target files
pslcmd c:\projects\myProject.lpu /simulate
Generates simulated translations for all target files in German using the options from an
options file.
pslcmd c:\projects\myProject.lpu /options:my_simulation_options temp
/simulate lang:German
/newproject
Sets up a new project. If the project already exists, it is opened as with /openproject.
Syntax
/newproject:<projectpath>
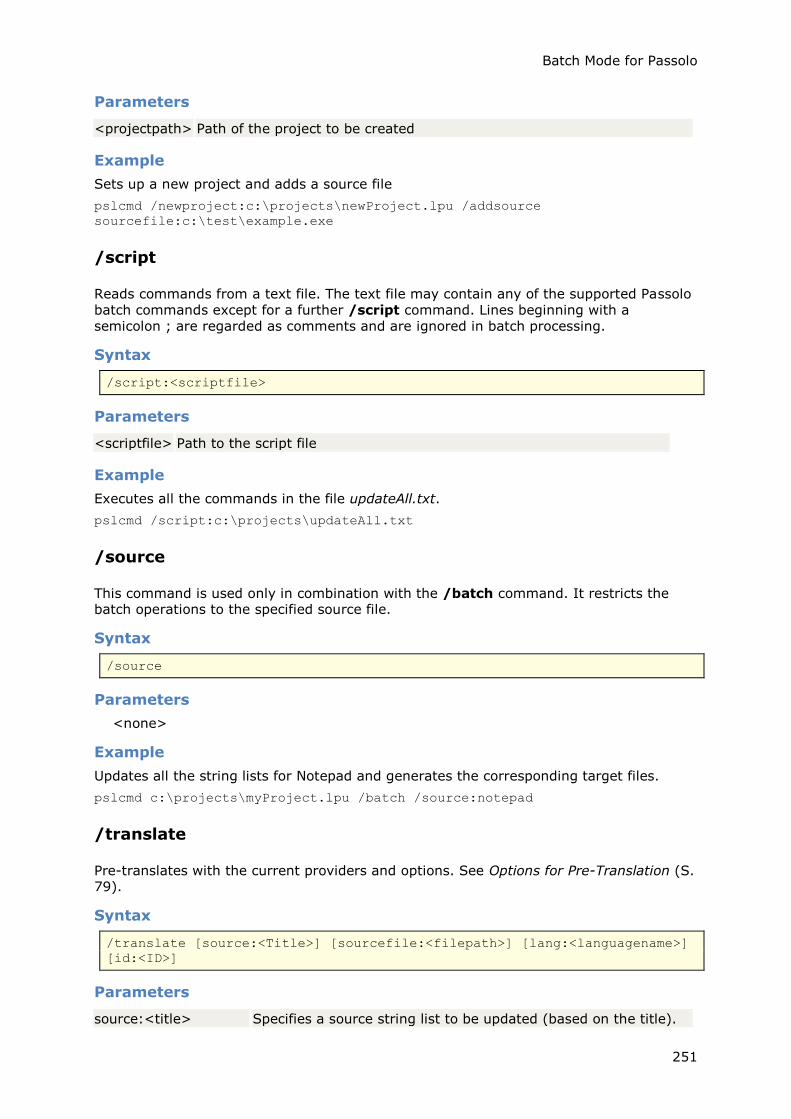
Batch Mode for Passolo
251
Parameters
<projectpath> Path of the project to be created
Example
Sets up a new project and adds a source file
pslcmd /newproject:c:\projects\newProject.lpu /addsource
sourcefile:c:\test\example.exe
/script
Reads commands from a text file. The text file may contain any of the supported Passolo
batch commands except for a further /script command. Lines beginning with a
semicolon ; are regarded as comments and are ignored in batch processing.
Syntax
/script:<scriptfile>
Parameters
<scriptfile> Path to the script file
Example
Executes all the commands in the file updateAll.txt.
pslcmd /script:c:\projects\updateAll.txt
/source
This command is used only in combination with the /batch command. It restricts the batch operations to the specified source file.
Syntax
/source
Parameters
<none>
Example
Updates all the string lists for Notepad and generates the corresponding target files.
pslcmd c:\projects\myProject.lpu /batch /source:notepad
/translate
Pre-translates with the current providers and options. See Options for Pre-Translation (S. 79).
Syntax
/translate [source:<Title>] [sourcefile:<filepath>] [lang:<languagename>]
[id:<ID>]
Parameters
source:<title> Specifies a source string list to be updated (based on the title).

SDL Passolo 2011
252
If you do not specify a language, all associated translation string
lists are translated.
sourcefile:<filepath>
Specifies a source string list to be updated (based on the file
path). If you do not specify a language, all associated translation
string lists are translated.
lang:<languagename>
If you specify a language, all translation string lists in this
language are translated. <languagename> can be the language
name in English ("German"), the language code ("deu") or the
language ID ("07").
id:<id>
Specifies the string list to be updated based on the ID. If you are
dealing with a source list and you do not specify a language, all
associated translation string lists are translated.
Example
Pre-translates the German translation string list for the source notepad.
pslcmd c:\projects\myProject.lpu /translate source:notepad lang:German
Pre-translates all German translation string lists for this project.
pslcmd c:\projects\myProject.lpu /translate lang:German
/update
Updates the source string lists and translation lists.
Syntax
/update [source:<title>] [sourcefile:<filepath>]
[altsourcefile:<filepath>]
[nosource] [lang:<languagename>] [notrans] [id:<id>]
Parameters
source:<Title>
Specifies a source list to be updated based on the title. If you do
not indicate a language and do not use the notrans parameter,
all the corresponding translation lists are also updated.
sourcefile:
Specifies a source list to be updated based on the source file
path. If you do not indicate a language and do not use the
notrans parameter, all the corresponding translation lists are
also updated.
altsourcefile:<filepath>
If just one source string list is updated (e.g. by indicating a
source parameter), you can specify an alternative source file to
be read instead of the file given in the project settings.
nosource With this parameter the update of source string lists is
prevented.
lang:<language>
If you indicate a language, only the translation lists for this
language are updated. can be the language name in English
("German"), the language code ("deu") or the language ID
("07").
notrans With this parameter the update of translation lists is prevented.
id:<id>
Specifies the string list to be updated based on the ID. If this is
a source string list and you do not indicate a language and do
not use the notrans parameter, all the corresponding
translation lists are also updated.
ifrequired If this parameter is set, only the required text lists are updated.
I.e. the text lists whose source files or respectively source lists

Batch Mode for Passolo
253
have been modified since the last generation.
Example
Updates the source string list for Notepad and the corresponding German translation list.
pslcmd c:\projects\myProject.lpu /update source:notepad lang:German
Updates all the source string lists
pslcmd c:\projects\myProject.lpu /update notrans
Updates the source string list for Notepad using an alternative source file
pslcmd c:\projects\myProject.lpu /update source:notepad
altsourcefile:"c:\examples\notepad.exe"
/writeoutput
Writes a line of text to the output window Translation and, if specified, the output file (see /output)
Syntax
/writeoutput:<textline>
Example
All messages are appended to c:\output.txt.
pslcmd c:\projects\myproject.lpu /writeoutput:"Start batch" /batch
/writeoutput:"Batch ended" /output:c:\output.txt append
Settings for batch mode
Whilst projects are being updated, Passolo may display messages that the user must
confirm. If Passolo is in batch mode and displays a message, the operation cannot be
completed without confirmation from the user. This means that the process that Passolo
called up is also blocked.
Select Tools, then Options, then Batch to call up the dialog to configure the system settings.
You can set the options so that Passolo does not display any messages in batch mode. Deactivate the Display message boxes checkbox.
If Passolo detects large differences between the current and original source file, this may
be intentional. However, it may also be that the string lists were inadvertently updated
on the basis of a source file that is not the update of the actual source file.
To prevent translations being lost, Passolo displays a warning message in these situations.
With the Allow deletion of more than 20 strings when updating option, you can
determine how Passolo should react in such situations in batch mode. If the option is activated, Passolo performs the update, otherwise the operation is aborted.
If Passolo is running a macro or is automated by another application messages can be
suppressed depending on these settings. For further information please refer to section

SDL Passolo 2011
254
Passolo.Application in the Automation Help. (choose Automation Help from the Help
menu)
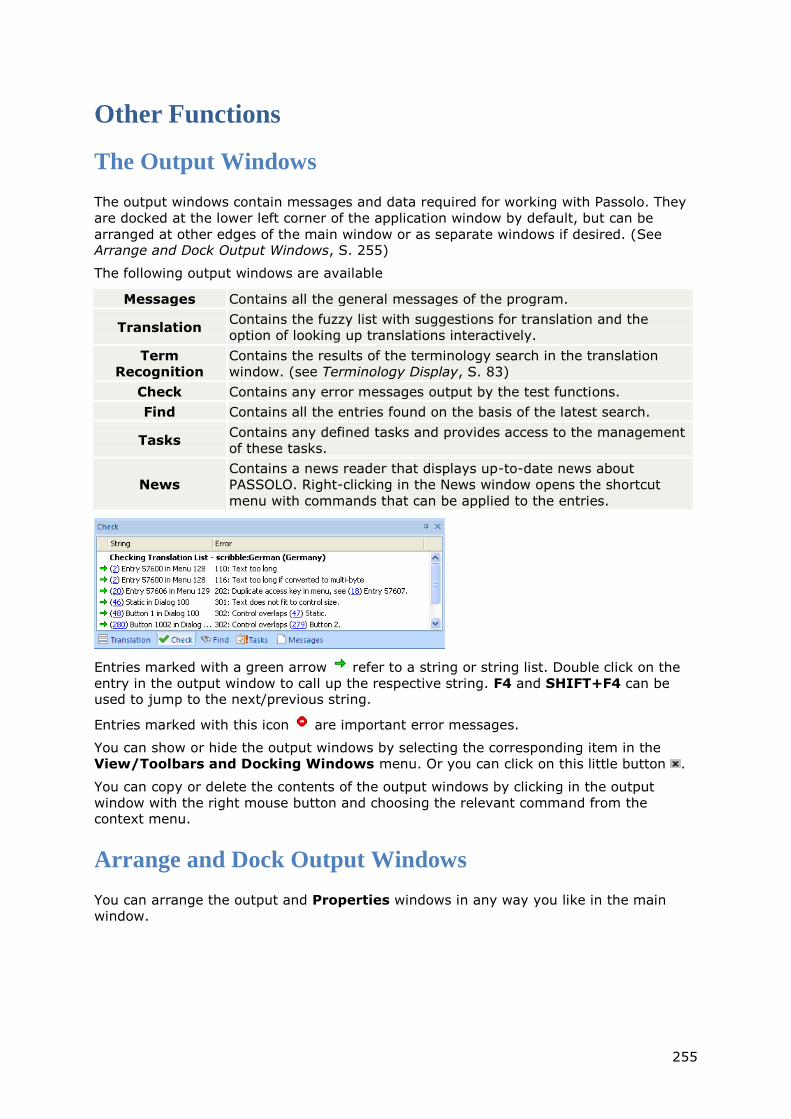
255
Other Functions
The Output Windows
The output windows contain messages and data required for working with Passolo. They
are docked at the lower left corner of the application window by default, but can be
arranged at other edges of the main window or as separate windows if desired. (See Arrange and Dock Output Windows, S. 255)
The following output windows are available
Messages Contains all the general messages of the program.
Translation Contains the fuzzy list with suggestions for translation and the
option of looking up translations interactively.
Term
Recognition
Contains the results of the terminology search in the translation
window. (see Terminology Display, S. 83)
Check Contains any error messages output by the test functions.
Find Contains all the entries found on the basis of the latest search.
Tasks Contains any defined tasks and provides access to the management
of these tasks.
News
Contains a news reader that displays up-to-date news about
PASSOLO. Right-clicking in the News window opens the shortcut
menu with commands that can be applied to the entries.
Entries marked with a green arrow refer to a string or string list. Double click on the
entry in the output window to call up the respective string. F4 and SHIFT+F4 can be used to jump to the next/previous string.
Entries marked with this icon are important error messages.
You can show or hide the output windows by selecting the corresponding item in the
View/Toolbars and Docking Windows menu. Or you can click on this little button .
You can copy or delete the contents of the output windows by clicking in the output
window with the right mouse button and choosing the relevant command from the context menu.
Arrange and Dock Output Windows
You can arrange the output and Properties windows in any way you like in the main
window.
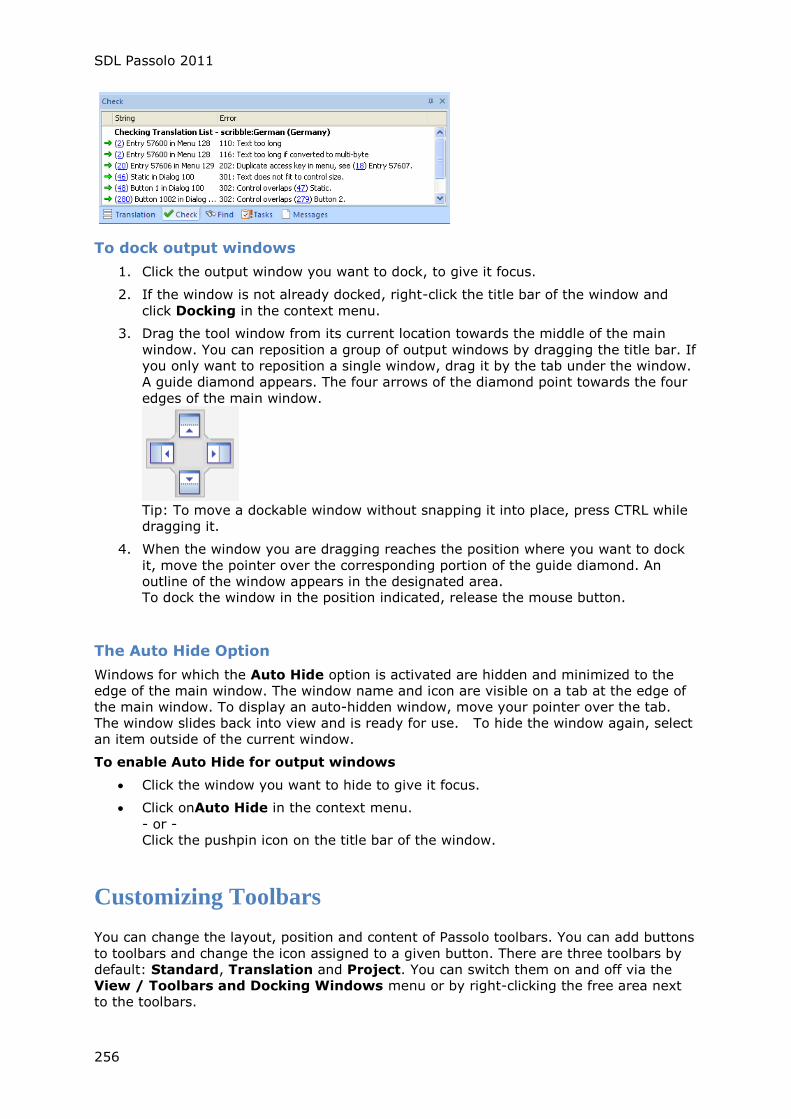
SDL Passolo 2011
256
To dock output windows
1. Click the output window you want to dock, to give it focus.
2. If the window is not already docked, right-click the title bar of the window and
click Docking in the context menu.
3. Drag the tool window from its current location towards the middle of the main
window. You can reposition a group of output windows by dragging the title bar. If
you only want to reposition a single window, drag it by the tab under the window.
A guide diamond appears. The four arrows of the diamond point towards the four
edges of the main window.
Tip: To move a dockable window without snapping it into place, press CTRL while
dragging it.
4. When the window you are dragging reaches the position where you want to dock
it, move the pointer over the corresponding portion of the guide diamond. An
outline of the window appears in the designated area. To dock the window in the position indicated, release the mouse button.
The Auto Hide Option
Windows for which the Auto Hide option is activated are hidden and minimized to the
edge of the main window. The window name and icon are visible on a tab at the edge of
the main window. To display an auto-hidden window, move your pointer over the tab.
The window slides back into view and is ready for use. To hide the window again, select
an item outside of the current window.
To enable Auto Hide for output windows
Click the window you want to hide to give it focus.
Click onAuto Hide in the context menu.
- or -
Click the pushpin icon on the title bar of the window.
Customizing Toolbars
You can change the layout, position and content of Passolo toolbars. You can add buttons
to toolbars and change the icon assigned to a given button. There are three toolbars by
default: Standard, Translation and Project. You can switch them on and off via the
View / Toolbars and Docking Windows menu or by right-clicking the free area next
to the toolbars.

Other Functions
257
To create a new toolbar
1. Click on Customize in the View / Toolbars and Docking Windows menu.
2. Go to the Toolbars tab in theCustomize dialog.
3. Then click on New.
4. Enter a name for the toolbar in the Toolbar Name field.
5. Click the OK button.
6. Close the Customize dialog
7. The new toolbar will appear in an undocked state. Drag it to the upper edge of the
window to dock it with the other toolbars.
To insert new buttons into a toolbar
1. Click on Customize in the View / Toolbars and Docking Windows menu.
2. Select the relevant menu from the Categories list
3. Drag the relevant command from the Commands list onto the toolbar.
4. Close the Customize dialog
To change the way a button is displayed in a toolbar
1. Click on Customize in the View / Toolbars and Docking Windows menu.
2. Right-click the command button
3. Click on Button Appearance in the context menu
4. Define the appearance of the button in the Button Appearance dialog
To sort the command buttons in a toolbar
1. Click on Customize in the View / Toolbars and Docking Windows menu.
2. Drag the relevant button to a new position within the same toolbar or to a
different toolbar
3. To remove a button, drag it out of the toolbar
Shortcut Keys
You can define the shortcut keys for all commands including tools and macros from the menu Tools.
To create a new shortcut key combination
1. Click on Customize in the View / Toolbars and Docking Windows menu.
2. Go to the Keyboard tab in theCustomize dialog.
3. Select the relevant command in the fields Category and Commands.
4. Place the cursor in the box Press new shortcut key, and then use the keyboard
to enter the key combination you intend to use for the command. If the key
combination is already assigned, the corresponding command is displayed.
5. Close the Customize dialog.
SDL Passolo 2011
258
To create a new shortcut key combination for a macro
1. Click on Macros in the Tools menu.
2. Choose the macro and select Extra in the combo box Menu.
3. Close the Macros dialog.
4. Click on Customize in the View / Toolbars and Docking Windows menu.
5. Go to the Keyboard tab in theCustomize dialog.
6. Choos the Category Custom Tools.
7. Select the name of the macro in the list Commands.
8. Place the cursor in the box Press new shortcut key, and then use the keyboard
to enter the key combination you intend to use for the command. If the key
combination is already assigned, the corresponding command is displayed.
9. Click the Assign button.
10. Close the Customize dialog.
To remove a shortcut key combination
1. Click on Customize in the View / Toolbars and Docking Windows menu.
2. Go to the Keyboard tab in theCustomize dialog.
3. Select the relevant command in the fields Category and Commands.
4. Choose the key combination under Current Keys.
5. Click on Remove.
6. Close the Customize dialog.
Tools
You can add your own commands (Tools) to the Extras menu. These are either user-
defined or available via Tool Add-Ins. User-defined tools are either macros or other commands used for opening programs or web pages
General tools are saved to the hard disk independently of the project, while project
tools are saved in the project. You can display the general tools as well as the project tools specific to the current project by clicking on Extras.
Tools from Add-Ins
If an add-in was used to define tools, these are displayed in a submenu of the Extras
menu. The name of the submenu is the name of the add-in. For instance, if an add-in
named Supplementary functions implements two tools, Tool 1 and Tool 2, these two tools
appear in the Supplementary functions submenu.
User-defined Tools
To open the dialog used to manage tools, select Adjust tools... from the Extras menu.
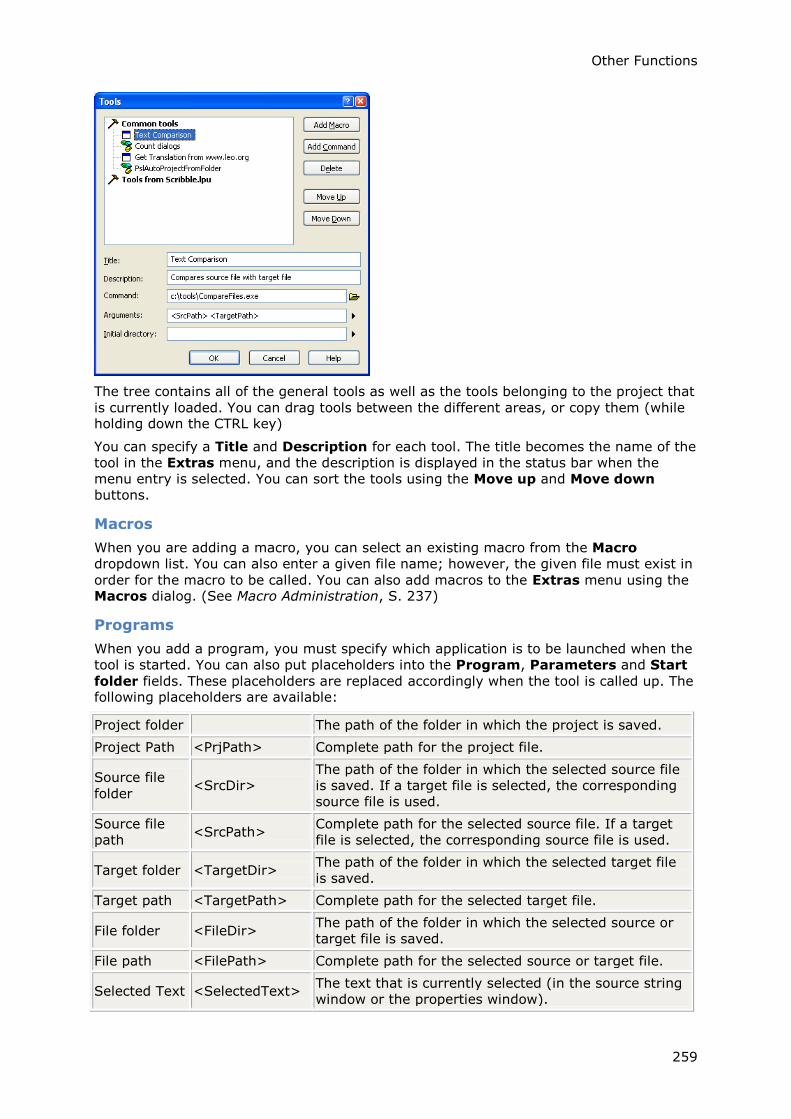
Other Functions
259
The tree contains all of the general tools as well as the tools belonging to the project that
is currently loaded. You can drag tools between the different areas, or copy them (while holding down the CTRL key)
You can specify a Title and Description for each tool. The title becomes the name of the
tool in the Extras menu, and the description is displayed in the status bar when the
menu entry is selected. You can sort the tools using the Move up and Move down
buttons.
Macros
When you are adding a macro, you can select an existing macro from the Macro
dropdown list. You can also enter a given file name; however, the given file must exist in
order for the macro to be called. You can also add macros to the Extras menu using the Macros dialog. (See Macro Administration, S. 237)
Programs
When you add a program, you must specify which application is to be launched when the
tool is started. You can also put placeholders into the Program, Parameters and Start
folder fields. These placeholders are replaced accordingly when the tool is called up. The following placeholders are available:
Project folder The path of the folder in which the project is saved.
Project Path <PrjPath> Complete path for the project file.
Source file
folder <SrcDir>
The path of the folder in which the selected source file
is saved. If a target file is selected, the corresponding
source file is used.
Source file
path <SrcPath>
Complete path for the selected source file. If a target
file is selected, the corresponding source file is used.
Target folder <TargetDir> The path of the folder in which the selected target file
is saved.
Target path <TargetPath> Complete path for the selected target file.
File folder <FileDir> The path of the folder in which the selected source or
target file is saved.
File path <FilePath> Complete path for the selected source or target file.
Selected Text <SelectedText> The text that is currently selected (in the source string
window or the properties window).
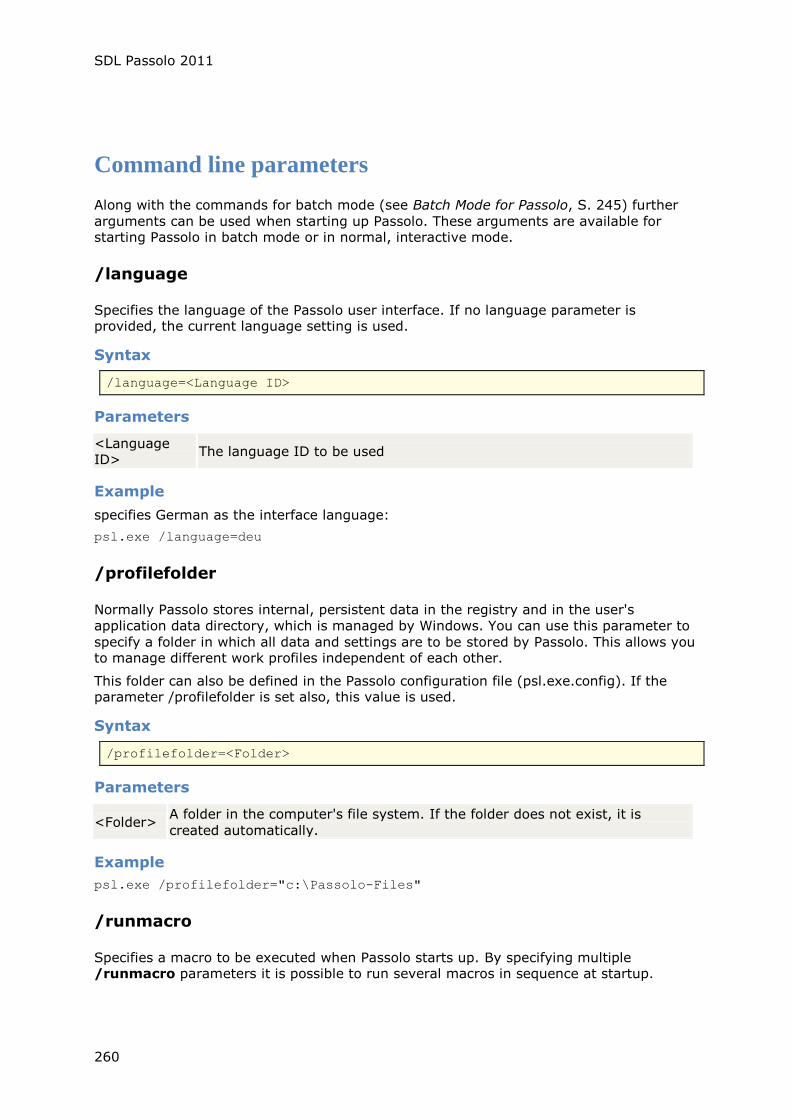
SDL Passolo 2011
260
Command line parameters
Along with the commands for batch mode (see Batch Mode for Passolo, S. 245) further
arguments can be used when starting up Passolo. These arguments are available for starting Passolo in batch mode or in normal, interactive mode.
/language
Specifies the language of the Passolo user interface. If no language parameter is provided, the current language setting is used.
Syntax
/language=<Language ID>
Parameters
<Language
ID> The language ID to be used
Example
specifies German as the interface language:
psl.exe /language=deu
/profilefolder
Normally Passolo stores internal, persistent data in the registry and in the user's
application data directory, which is managed by Windows. You can use this parameter to
specify a folder in which all data and settings are to be stored by Passolo. This allows you to manage different work profiles independent of each other.
This folder can also be defined in the Passolo configuration file (psl.exe.config). If the parameter /profilefolder is set also, this value is used.
Syntax
/profilefolder=<Folder>
Parameters
<Folder> A folder in the computer's file system. If the folder does not exist, it is
created automatically.
Example
psl.exe /profilefolder="c:\Passolo-Files"
/runmacro
Specifies a macro to be executed when Passolo starts up. By specifying multiple /runmacro parameters it is possible to run several macros in sequence at startup.
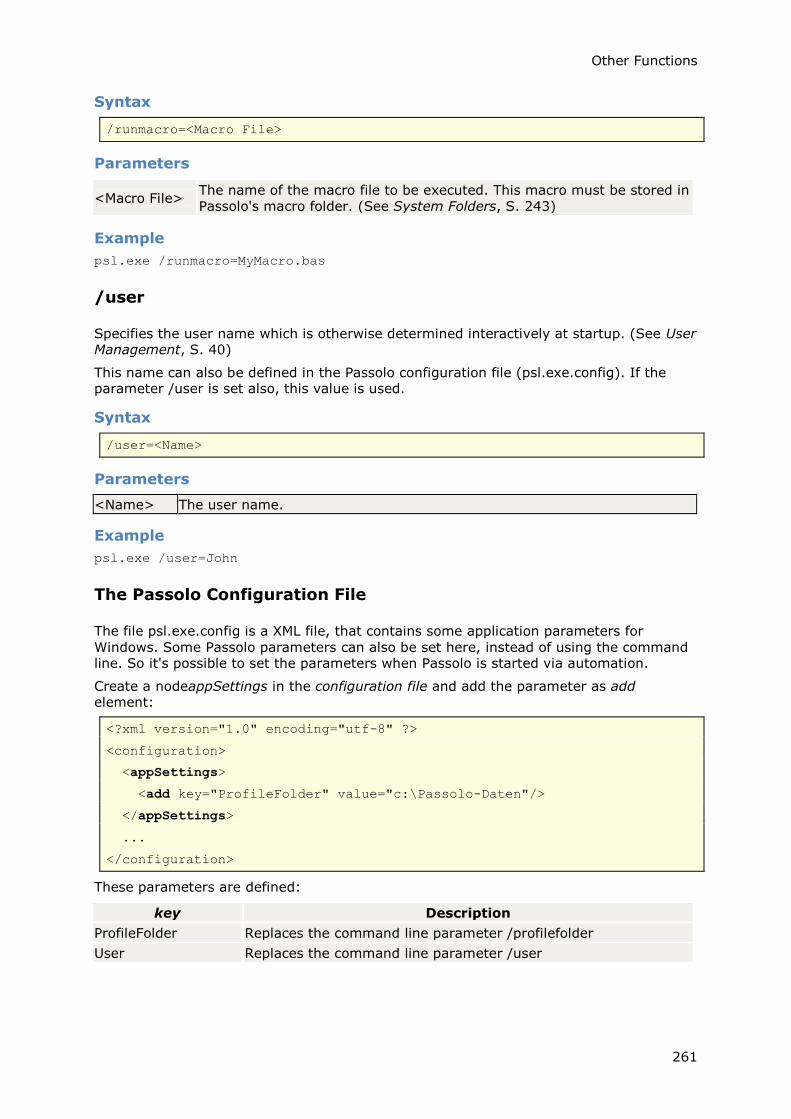
Other Functions
261
Syntax
/runmacro=<Macro File>
Parameters
<Macro File> The name of the macro file to be executed. This macro must be stored in
Passolo's macro folder. (See System Folders, S. 243)
Example
psl.exe /runmacro=MyMacro.bas
/user
Specifies the user name which is otherwise determined interactively at startup. (See User Management, S. 40)
This name can also be defined in the Passolo configuration file (psl.exe.config). If the parameter /user is set also, this value is used.
Syntax
/user=<Name>
Parameters
<Name> The user name.
Example
psl.exe /user=John
The Passolo Configuration File
The file psl.exe.config is a XML file, that contains some application parameters for
Windows. Some Passolo parameters can also be set here, instead of using the command line. So it's possible to set the parameters when Passolo is started via automation.
Create a nodeappSettings in the configuration file and add the parameter as add element:
<?xml version="1.0" encoding="utf-8" ?>
<configuration>
<appSettings>
<add key="ProfileFolder" value="c:\Passolo-Daten"/>
</appSettings>
...
</configuration>
These parameters are defined:
key Description
ProfileFolder Replaces the command line parameter /profilefolder
User Replaces the command line parameter /user
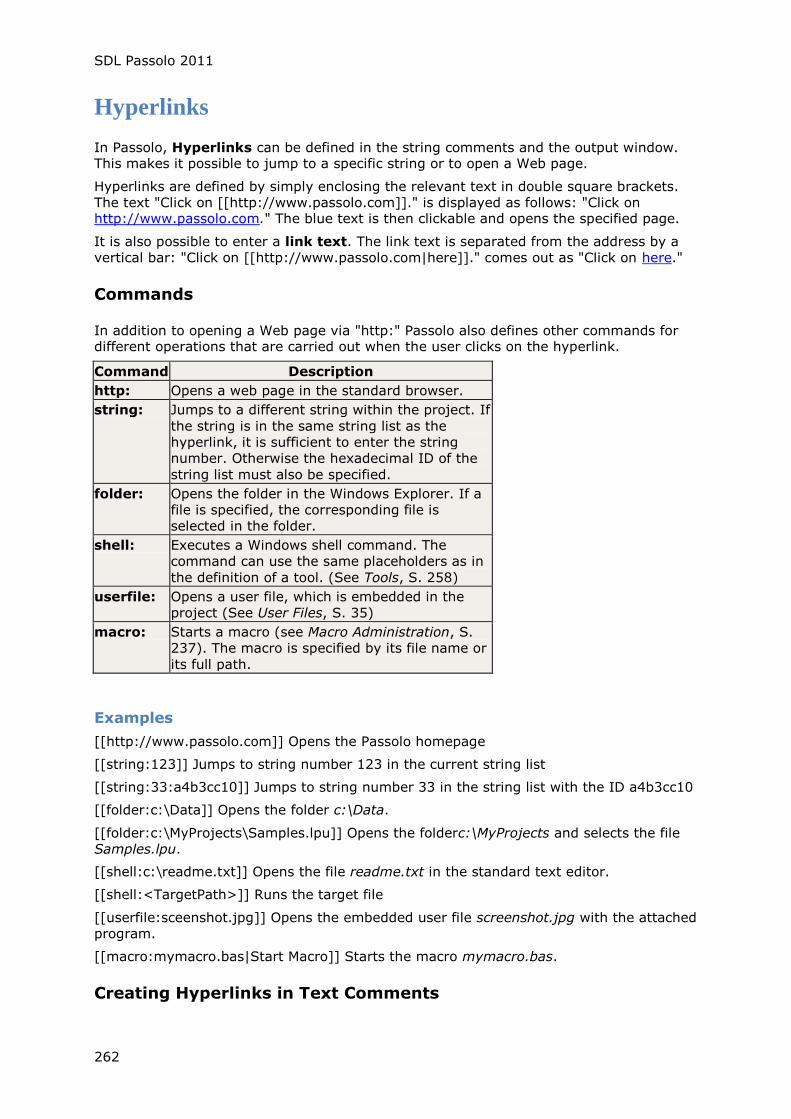
SDL Passolo 2011
262
Hyperlinks
In Passolo, Hyperlinks can be defined in the string comments and the output window. This makes it possible to jump to a specific string or to open a Web page.
Hyperlinks are defined by simply enclosing the relevant text in double square brackets.
The text "Click on [[http://www.passolo.com]]." is displayed as follows: "Click on http://www.passolo.com." The blue text is then clickable and opens the specified page.
It is also possible to enter a link text. The link text is separated from the address by a
vertical bar: "Click on [[http://www.passolo.com|here]]." comes out as "Click on here."
Commands
In addition to opening a Web page via "http:" Passolo also defines other commands for different operations that are carried out when the user clicks on the hyperlink.
Command Description
http: Opens a web page in the standard browser.
string: Jumps to a different string within the project. If
the string is in the same string list as the
hyperlink, it is sufficient to enter the string
number. Otherwise the hexadecimal ID of the
string list must also be specified.
folder: Opens the folder in the Windows Explorer. If a
file is specified, the corresponding file is
selected in the folder.
shell: Executes a Windows shell command. The
command can use the same placeholders as in
the definition of a tool. (See Tools, S. 258)
userfile: Opens a user file, which is embedded in the
project (See User Files, S. 35)
macro: Starts a macro (see Macro Administration, S.
237). The macro is specified by its file name or
its full path.
Examples
[[http://www.passolo.com]] Opens the Passolo homepage
[[string:123]] Jumps to string number 123 in the current string list
[[string:33:a4b3cc10]] Jumps to string number 33 in the string list with the ID a4b3cc10
[[folder:c:\Data]] Opens the folder c:\Data.
[[folder:c:\MyProjects\Samples.lpu]] Opens the folderc:\MyProjects and selects the file
Samples.lpu.
[[shell:c:\readme.txt]] Opens the file readme.txt in the standard text editor.
[[shell:<TargetPath>]] Runs the target file
[[userfile:sceenshot.jpg]] Opens the embedded user file screenshot.jpg with the attached
program.
[[macro:mymacro.bas|Start Macro]] Starts the macro mymacro.bas.
Creating Hyperlinks in Text Comments

Other Functions
263
Hyperlinks can be inserted using the format described above when entering comments in
the source string list (see Using Comments, S. 71) or when adding translation comments.
When the comment is displayed in the translation list, the brackets are removed and the link text is shown (if available).
Creating Hyperlinks in the Output Window Messages
The hyperlinks in the output window Messages are generally created automatically by
Passolo. In addition, the macro command Output can be used to write any other text to
the output window. If the text written to the output window contains a section in square brackets, this will be interpreted as a hyperlink.


265
Appendix
Codepages
If a character set is stored in a single byte (8 bits) a total of 28 different characters
(numbers, letters, or paragraph marks) can be displayed. In the past, these 256
characters were adequate for all EDP purposes.
However, with the spread of computers throughout the world, it became necessary to
support additional languages which, in addition to Latin script, also employ other special characters or accented letters.
A solution to this problem was offered by so-called "codepages" with which binary values
from 32 to 255 (0x20 to 0xFF) could be displayed for the character set required for the
language in question. Thus, all Windows codepages always contain the same character
sets – including Latin letters – in the binary range from 32 to 127 (0x20 to 0x7F). Above 128 (0x80), the codepage assignments differ.
Most European languages (and therefore, scripts) can be displayed using a single
codepage (Latin 1, Codepage 1252). Currently, there are a total of eight ANSI codepages for languages that can manage with 256 characters:
Codepage Description Example
1250 Latin 2 (Central Europe) Albanian, Polish
1251 Cyrillic (Slavic) Bulgarian, Russian
1252 Latin 1 (ANSI) German, French
1253 Greek Greek
1254 Latin 5 (Turkish) Turkish
1255 Hebrew Hebrew
1256 Arabic Arabic
1257 Baltic Estonian, Lithuanian
The following codepages were designed for Asian languages which, due to the number of
characters and syllables they employ, cannot manage with a single byte character set (SBCS system):
Codepage Description Example
932 Japanese Japan
936 Chinese (simplified) People’s Republic of China,
Singapore
949 Korean Korea
950 Chinese (traditional) Hong Kong, Taiwan
Using Codepages
Codepage information is always required when data must be copied between Unicode and single/double byte character sets.
The resources Passolo reads from a source application are always in Unicode character
set format. In the ASCII version of Passolo resources are converted from Unicode to
double byte character set format when a source file is read. The procedure is reversed when a target file is generated.
Translation should be performed under an operating system that supports the target
language codepage and contains the appropriate character set. If you perform a Greek
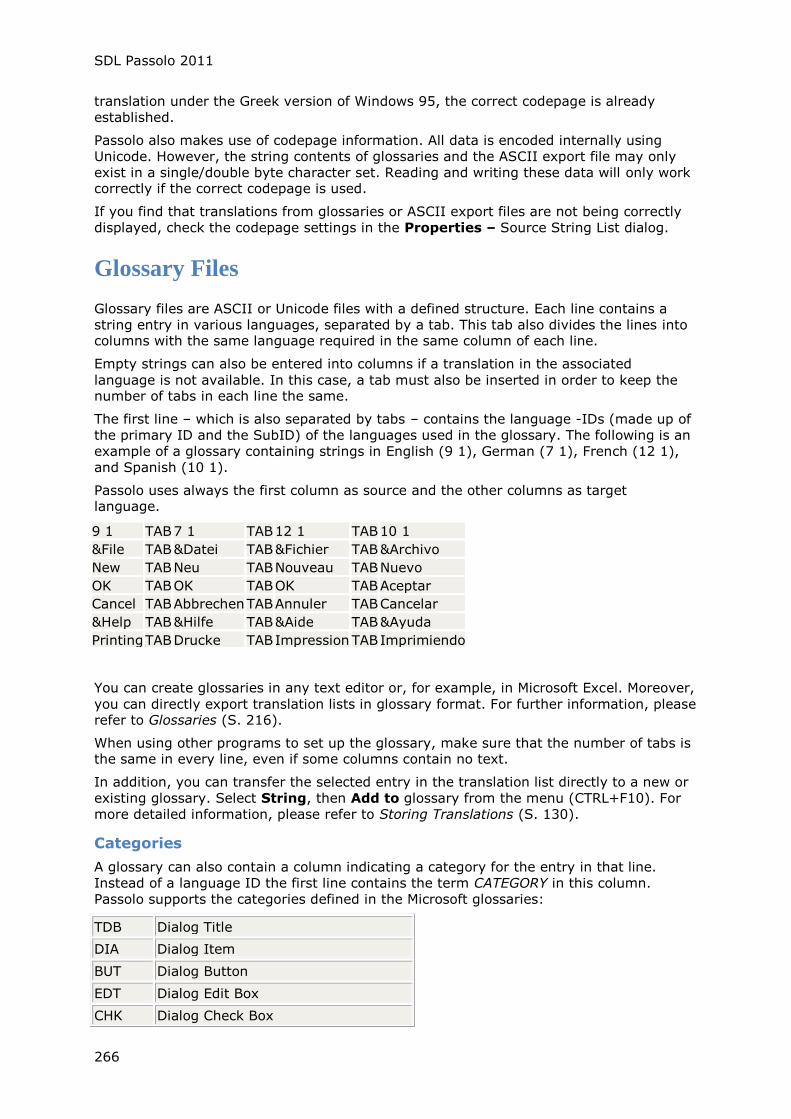
SDL Passolo 2011
266
translation under the Greek version of Windows 95, the correct codepage is already
established.
Passolo also makes use of codepage information. All data is encoded internally using
Unicode. However, the string contents of glossaries and the ASCII export file may only
exist in a single/double byte character set. Reading and writing these data will only work correctly if the correct codepage is used.
If you find that translations from glossaries or ASCII export files are not being correctly
displayed, check the codepage settings in the Properties – Source String List dialog.
Glossary Files
Glossary files are ASCII or Unicode files with a defined structure. Each line contains a
string entry in various languages, separated by a tab. This tab also divides the lines into columns with the same language required in the same column of each line.
Empty strings can also be entered into columns if a translation in the associated
language is not available. In this case, a tab must also be inserted in order to keep the number of tabs in each line the same.
The first line – which is also separated by tabs – contains the language -IDs (made up of
the primary ID and the SubID) of the languages used in the glossary. The following is an
example of a glossary containing strings in English (9 1), German (7 1), French (12 1),
and Spanish (10 1).
Passolo uses always the first column as source and the other columns as target language.
9 1 TAB 7 1 TAB 12 1 TAB 10 1
&File TAB &Datei TAB &Fichier TAB &Archivo
New TAB Neu TAB Nouveau TAB Nuevo
OK TAB OK TAB OK TAB Aceptar
Cancel TAB Abbrechen TAB Annuler TAB Cancelar
&Help TAB &Hilfe TAB &Aide TAB &Ayuda
Printing TAB Drucke TAB Impression TAB Imprimiendo
You can create glossaries in any text editor or, for example, in Microsoft Excel. Moreover,
you can directly export translation lists in glossary format. For further information, please refer to Glossaries (S. 216).
When using other programs to set up the glossary, make sure that the number of tabs is the same in every line, even if some columns contain no text.
In addition, you can transfer the selected entry in the translation list directly to a new or
existing glossary. Select String, then Add to glossary from the menu (CTRL+F10). For
more detailed information, please refer to Storing Translations (S. 130).
Categories
A glossary can also contain a column indicating a category for the entry in that line.
Instead of a language ID the first line contains the term CATEGORY in this column.
Passolo supports the categories defined in the Microsoft glossaries:
TDB Dialog Title
DIA Dialog Item
BUT Dialog Button
EDT Dialog Edit Box
CHK Dialog Check Box
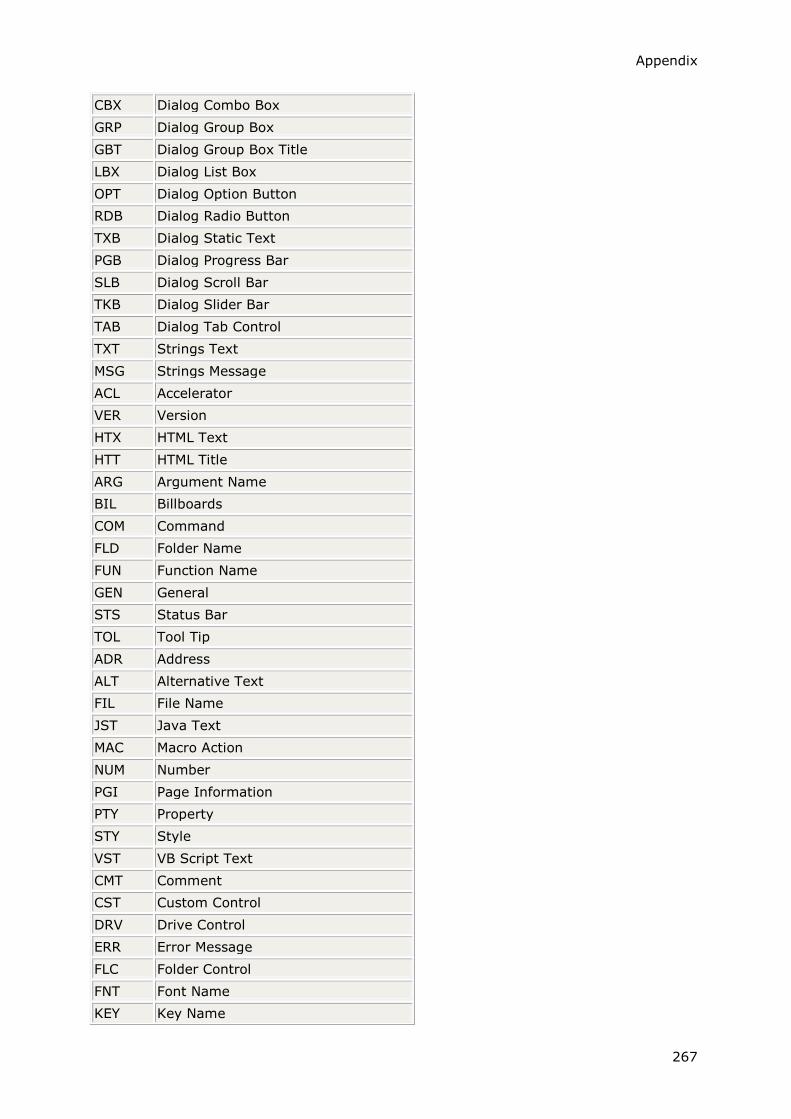
Appendix
267
CBX Dialog Combo Box
GRP Dialog Group Box
GBT Dialog Group Box Title
LBX Dialog List Box
OPT Dialog Option Button
RDB Dialog Radio Button
TXB Dialog Static Text
PGB Dialog Progress Bar
SLB Dialog Scroll Bar
TKB Dialog Slider Bar
TAB Dialog Tab Control
TXT Strings Text
MSG Strings Message
ACL Accelerator
VER Version
HTX HTML Text
HTT HTML Title
ARG Argument Name
BIL Billboards
COM Command
FLD Folder Name
FUN Function Name
GEN General
STS Status Bar
TOL Tool Tip
ADR Address
ALT Alternative Text
FIL File Name
JST Java Text
MAC Macro Action
NUM Number
PGI Page Information
PTY Property
STY Style
VST VB Script Text
CMT Comment
CST Custom Control
DRV Drive Control
ERR Error Message
FLC Folder Control
FNT Font Name
KEY Key Name
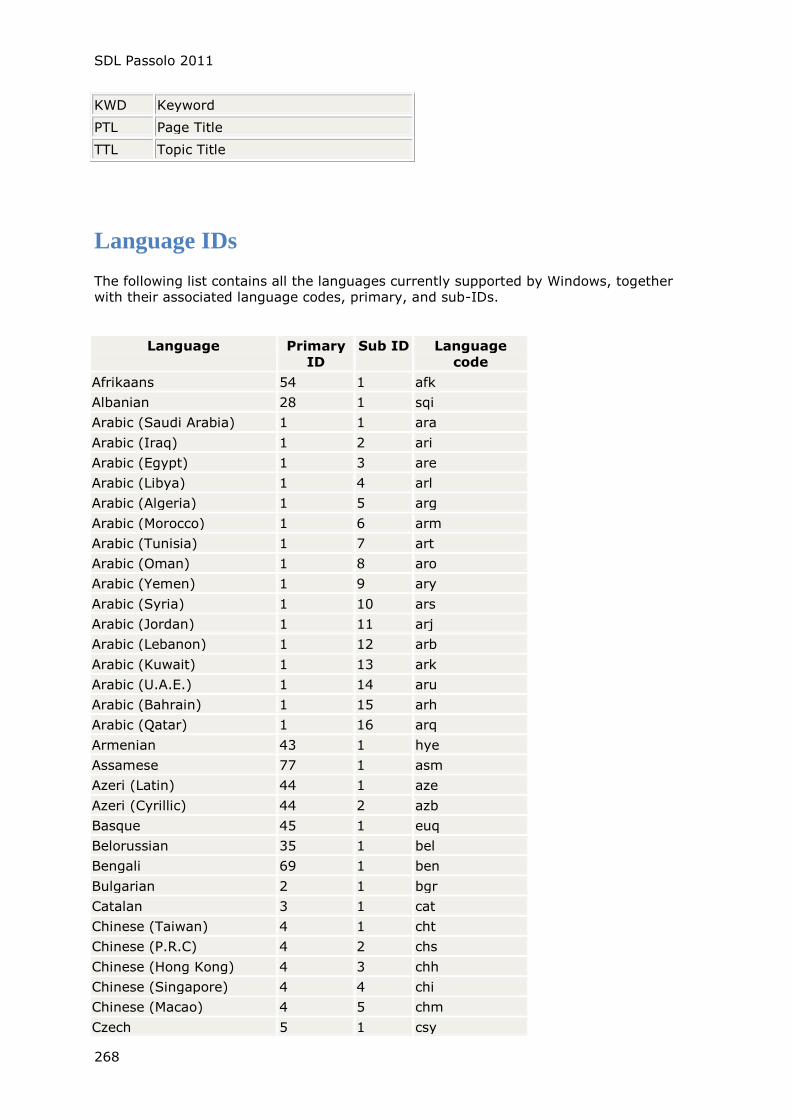
SDL Passolo 2011
268
KWD Keyword
PTL Page Title
TTL Topic Title
Language IDs
The following list contains all the languages currently supported by Windows, together with their associated language codes, primary, and sub-IDs.
Language Primary
ID
Sub ID Language
code
Afrikaans 54 1 afk
Albanian 28 1 sqi
Arabic (Saudi Arabia) 1 1 ara
Arabic (Iraq) 1 2 ari
Arabic (Egypt) 1 3 are
Arabic (Libya) 1 4 arl
Arabic (Algeria) 1 5 arg
Arabic (Morocco) 1 6 arm
Arabic (Tunisia) 1 7 art
Arabic (Oman) 1 8 aro
Arabic (Yemen) 1 9 ary
Arabic (Syria) 1 10 ars
Arabic (Jordan) 1 11 arj
Arabic (Lebanon) 1 12 arb
Arabic (Kuwait) 1 13 ark
Arabic (U.A.E.) 1 14 aru
Arabic (Bahrain) 1 15 arh
Arabic (Qatar) 1 16 arq
Armenian 43 1 hye
Assamese 77 1 asm
Azeri (Latin) 44 1 aze
Azeri (Cyrillic) 44 2 azb
Basque 45 1 euq
Belorussian 35 1 bel
Bengali 69 1 ben
Bulgarian 2 1 bgr
Catalan 3 1 cat
Chinese (Taiwan) 4 1 cht
Chinese (P.R.C) 4 2 chs
Chinese (Hong Kong) 4 3 chh
Chinese (Singapore) 4 4 chi
Chinese (Macao) 4 5 chm
Czech 5 1 csy
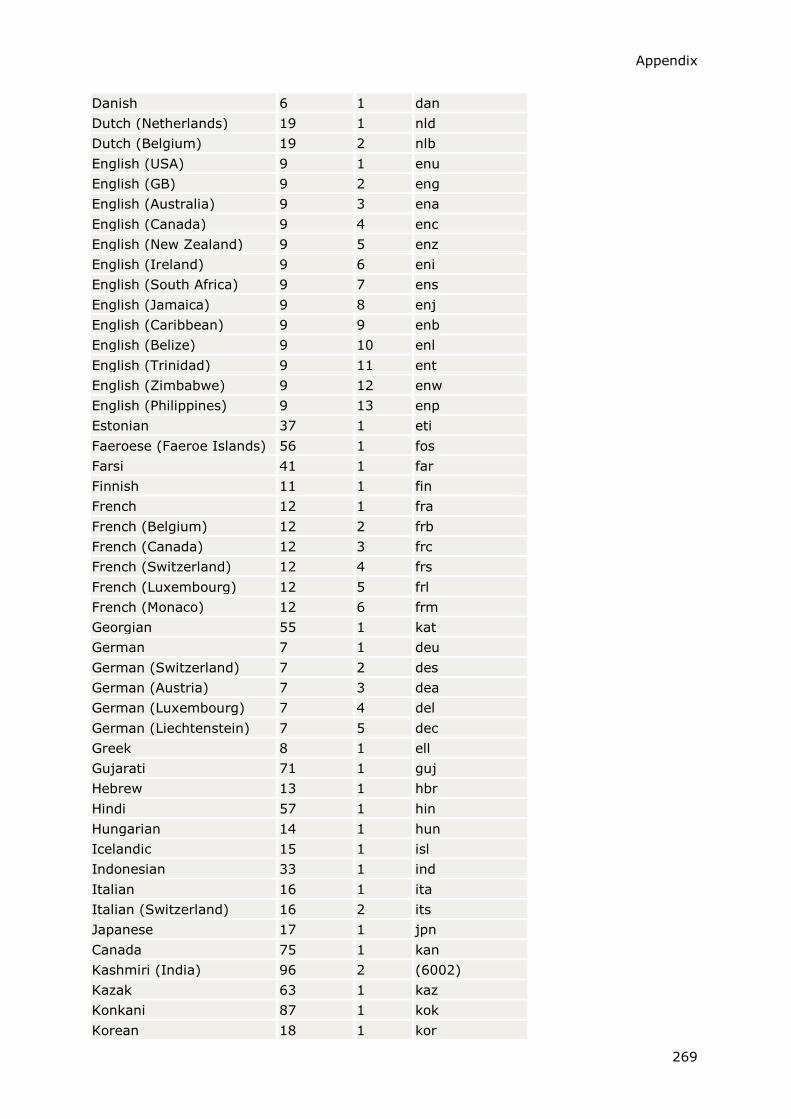
Appendix
269
Danish 6 1 dan
Dutch (Netherlands) 19 1 nld
Dutch (Belgium) 19 2 nlb
English (USA) 9 1 enu
English (GB) 9 2 eng
English (Australia) 9 3 ena
English (Canada) 9 4 enc
English (New Zealand) 9 5 enz
English (Ireland) 9 6 eni
English (South Africa) 9 7 ens
English (Jamaica) 9 8 enj
English (Caribbean) 9 9 enb
English (Belize) 9 10 enl
English (Trinidad) 9 11 ent
English (Zimbabwe) 9 12 enw
English (Philippines) 9 13 enp
Estonian 37 1 eti
Faeroese (Faeroe Islands) 56 1 fos
Farsi 41 1 far
Finnish 11 1 fin
French 12 1 fra
French (Belgium) 12 2 frb
French (Canada) 12 3 frc
French (Switzerland) 12 4 frs
French (Luxembourg) 12 5 frl
French (Monaco) 12 6 frm
Georgian 55 1 kat
German 7 1 deu
German (Switzerland) 7 2 des
German (Austria) 7 3 dea
German (Luxembourg) 7 4 del
German (Liechtenstein) 7 5 dec
Greek 8 1 ell
Gujarati 71 1 guj
Hebrew 13 1 hbr
Hindi 57 1 hin
Hungarian 14 1 hun
Icelandic 15 1 isl
Indonesian 33 1 ind
Italian 16 1 ita
Italian (Switzerland) 16 2 its
Japanese 17 1 jpn
Canada 75 1 kan
Kashmiri (India) 96 2 (6002)
Kazak 63 1 kaz
Konkani 87 1 kok
Korean 18 1 kor

SDL Passolo 2011
270
Latvian 38 1 lvi
Lithuanian 39 1 lth
Lithuanian (old) 39 2 ltc
Macedonian 47 1 mki
Malay (Malaysia) 62 1 msl
Malay (Brunei/Darussalam) 62 2 msb
Malayalam 76 1 mal
Manipuri 88 1 (58)
Marathi 78 1 mar
Nepalese (India) 97 2 (6102)
Norwegian (Bokmal) 20 1 nor
Norwegian (Nynorsk) 20 2 non
Oriya 72 1 ori
Polish 21 1 plk
Portuguese 22 2 ptg
Portuguese (Brazil) 22 1 ptb
Punjabi 70 1 pan
Romanian 24 1 rom
Russian 25 1 rus
Sanskrit 79 1 san
Serbo-Croatian (Latin) 26 2 srl
Serbo-Croatian (Cyrillic) 26 3 srb
Sindhi 89 1 (59)
Slovak 27 1 sky
Slovenian 36 1 slv
Spanish (Castilian) 10 1 esp
Spanish (Mexico) 10 2 esm
Spanish (Modern) 10 3 esn
Spanish (Guatemala) 10 4 esg
Spanish (Costa Rica) 10 5 esc
Spanish (Panama) 10 6 esa
Spanish (Dom. Republic) 10 7 esd
Spanish (Venezuela) 10 8 esv
Spanish (Columbia) 10 9 eso
Spanish (Peru) 10 10 esr
Spanish (Argentina) 10 11 ess
Spanish (Ecuador) 10 12 esf
Spanish (Chile) 10 13 esl
Spanish (Uruguay) 10 14 esy
Spanish (Paraguay) 10 15 esz
Spanish (Bolivia) 10 16 esb
Spanish (El Salvador) 10 17 ese
Spanish (Honduras) 10 18 esh
Spanish (Nicaragua) 10 19 esi
Spanish (Puerto Rico) 10 20 esu
Swahili 65 1 swh
Swedish 29 1 sve

Appendix
271
Swedish (Finland) 29 2 svf
Tamil 73 1 tam
Tatar 68 1 tat
Telugu 74 1 tel
Thai 30 1 tha
Turkish 31 1 trk
Ukrainian 34 1 ukr
Urdu (Pakistan) 32 1 urp
Urdu (India) 32 2 uri
Uzbek (Latin) 67 1 uzb
Uzbek (Cyrillic) 67 2 uzc
Vietnamese 42 1 vit
Regular Expressions
Regular expressions are defined search patterns that you can use to search for complex
search expressions in a string list. Regular expressions are often avoided, even by
experienced programmers, because of their complexity and their very cryptic appearance
— but they are very powerful search tools.
A few examples of the syntax of regular expressions
Name Syntax Description
Wildcard character . The dot represents a wildcard character. The expression
str.ng, for example, will find string or strang.
Quantity of
characters [ab]
Searches for one of the specified characters. str[ia]ng, for
example, will find string or strang, but not strung.
Character range [a-z]
Searches for one of the characters in the specified range.
str[a-j]ng, for example, will find string or strang, but not
strung.
Characters outside
of the range [^a-z]
Searches for one of the characters that is not within the
specified range. str[^a-j]ng, for example, will find strung,
but not string.
Start of line. ^ Searches for a start of line. ^op will find op in open menu,
but not in top menu.
End of line $ Searches for an end of line. ^nu will find nu in open menu,
but not in menu text.
0 or more matches * The preceding expression may appear never, once or
several times. te+st will find tst, test or teeeest.
1 or more
matches. +
The preceding expression may appear once or several
times. te+st will find test or teeeest, but not test.
Group () Puts a sub-expression into a group. (te)+st will find test or
tetest, but not teest.
Or | Finds one of the specified sub-expressions, (stri|stra)ng
finds string or strang.
The library for regular expressions used by Passolo is fully compatible with the syntax of
Perl 5. For further information on Perl and especially on regular expressions, please consult the Internet or relevant reference works.
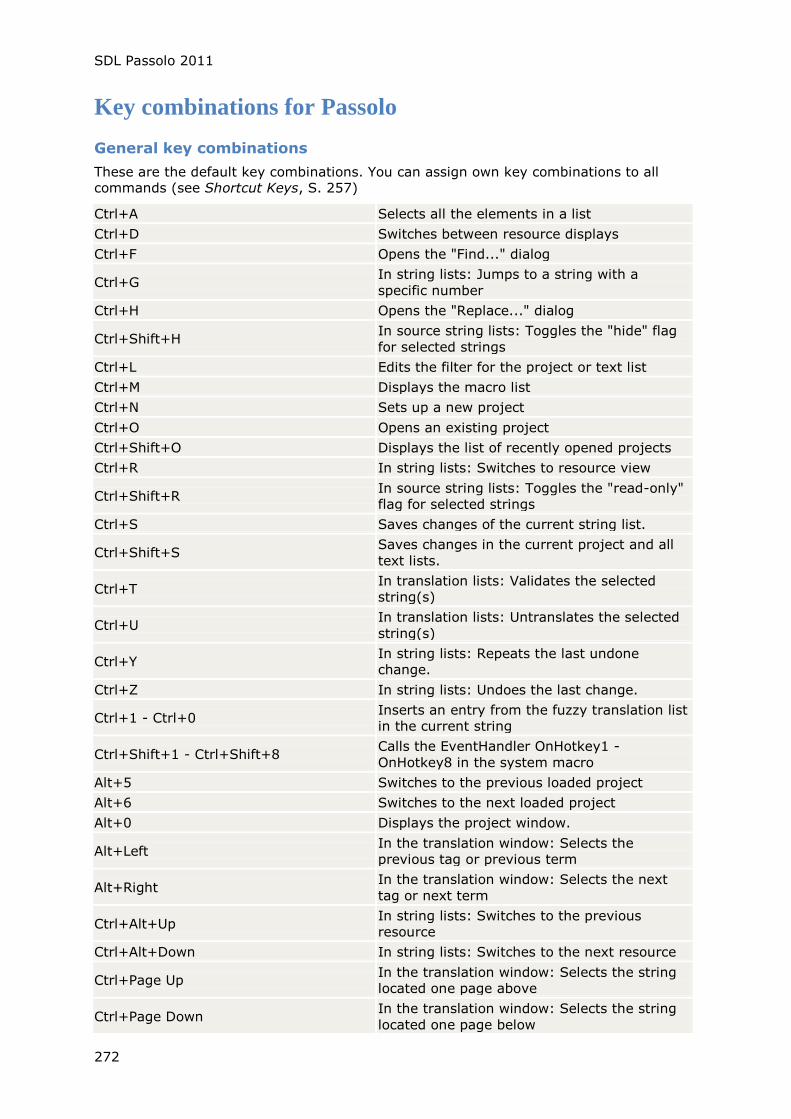
SDL Passolo 2011
272
Key combinations for Passolo
General key combinations
These are the default key combinations. You can assign own key combinations to all commands (see Shortcut Keys, S. 257)
Ctrl+A Selects all the elements in a list
Ctrl+D Switches between resource displays
Ctrl+F Opens the "Find..." dialog
Ctrl+G In string lists: Jumps to a string with a
specific number
Ctrl+H Opens the "Replace..." dialog
Ctrl+Shift+H In source string lists: Toggles the "hide" flag
for selected strings
Ctrl+L Edits the filter for the project or text list
Ctrl+M Displays the macro list
Ctrl+N Sets up a new project
Ctrl+O Opens an existing project
Ctrl+Shift+O Displays the list of recently opened projects
Ctrl+R In string lists: Switches to resource view
Ctrl+Shift+R In source string lists: Toggles the "read-only"
flag for selected strings
Ctrl+S Saves changes of the current string list.
Ctrl+Shift+S Saves changes in the current project and all
text lists.
Ctrl+T In translation lists: Validates the selected
string(s)
Ctrl+U In translation lists: Untranslates the selected
string(s)
Ctrl+Y In string lists: Repeats the last undone
change.
Ctrl+Z In string lists: Undoes the last change.
Ctrl+1 - Ctrl+0 Inserts an entry from the fuzzy translation list
in the current string
Ctrl+Shift+1 - Ctrl+Shift+8 Calls the EventHandler OnHotkey1 -
OnHotkey8 in the system macro
Alt+5 Switches to the previous loaded project
Alt+6 Switches to the next loaded project
Alt+0 Displays the project window.
Alt+Left In the translation window: Selects the
previous tag or previous term
Alt+Right In the translation window: Selects the next
tag or next term
Ctrl+Alt+Up In string lists: Switches to the previous
resource
Ctrl+Alt+Down In string lists: Switches to the next resource
Ctrl+Page Up In the translation window: Selects the string
located one page above
Ctrl+Page Down In the translation window: Selects the string
located one page below

Appendix
273
Ctrl+Up In the translation window: Selects the
previous string
Ctrl+Down In the translation window: Selects the next
string
Ctrl+Home In the translation window: Selects the first
string in the string list
Ctrl+End In the translation window: Selects the last
string in the string list
Ctrl+Tab Switches to the next string list window / the
project window
Ctrl+Shift+Tab Switches to the previous string list window /
the project window
Enter Opens the selected element
Alt+Enter Displays the properties of the selected
element
F1 Calls up the (context sensitive) Passolo help
F2 In string lists: Edits the currently selected
string right in the list
F3 Repeats the last search proceeding
downwards
Shift+F3 Repeats the last search proceeding upwards
Ctrl+F3 Opens the "Replace..." dialog
Alt+F3 Opens the "Find..." dialog
F4 Jumps to the next error
Shift+F4 Jumps to the previous error
Ctrl+F4 Closes the current string list or project
F5 In the project window: Refreshes the display
Ctrl+F5 Switches on the translation assistant
F7 Starts the spelling checker
Ctrl+F7 Starts the check function for the current
resource
Alt+F7 Starts the check function for all the strings in
the string list
F8 Pre-translates the currently selected string.
Shift+F8 Performs a concordance search for the
currently selected string
Ctrl+F8 Generates the list of fuzzy translations for the
currently selected string
F9 In translation lists: Inserts an access key for
the current string.
Ctrl+F10 Saves the current translation in a glossary or
a translation memory
Ctrl+Shift+F10 Displays the dialog for saving translations in a
glossary or a translation memory.
Alt+F11 Calls up the Basic IDE
F12 Jumps to the next bookmark
Shift+F12 Jumps to the previous bookmark
Ctrl+F12 Toggles the bookmark for the current string
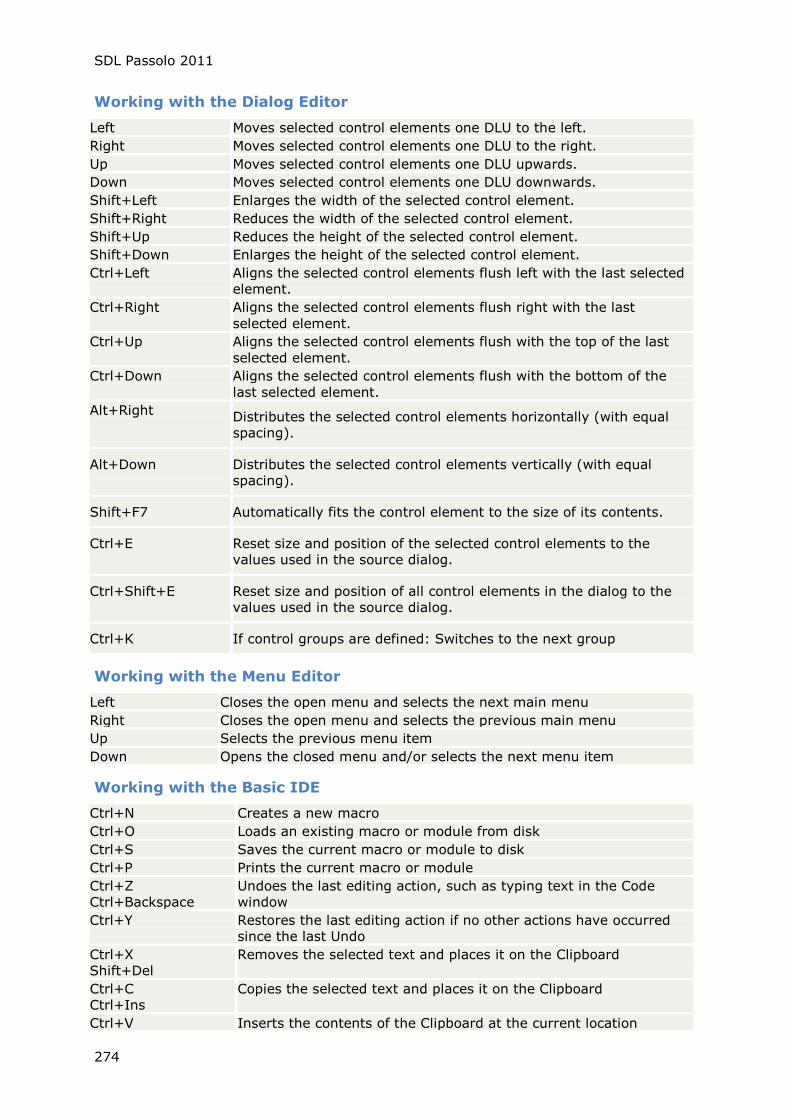
SDL Passolo 2011
274
Working with the Dialog Editor
Left Moves selected control elements one DLU to the left.
Right Moves selected control elements one DLU to the right.
Up Moves selected control elements one DLU upwards.
Down Moves selected control elements one DLU downwards.
Shift+Left Enlarges the width of the selected control element.
Shift+Right Reduces the width of the selected control element.
Shift+Up Reduces the height of the selected control element.
Shift+Down Enlarges the height of the selected control element.
Ctrl+Left Aligns the selected control elements flush left with the last selected
element.
Ctrl+Right Aligns the selected control elements flush right with the last
selected element.
Ctrl+Up Aligns the selected control elements flush with the top of the last
selected element.
Ctrl+Down Aligns the selected control elements flush with the bottom of the
last selected element.
Alt+Right Distributes the selected control elements horizontally (with equal
spacing).
Alt+Down Distributes the selected control elements vertically (with equal
spacing).
Shift+F7 Automatically fits the control element to the size of its contents.
Ctrl+E Reset size and position of the selected control elements to the
values used in the source dialog.
Ctrl+Shift+E Reset size and position of all control elements in the dialog to the
values used in the source dialog.
Ctrl+K If control groups are defined: Switches to the next group
Working with the Menu Editor
Left Closes the open menu and selects the next main menu
Right Closes the open menu and selects the previous main menu
Up Selects the previous menu item
Down Opens the closed menu and/or selects the next menu item
Working with the Basic IDE
Ctrl+N Creates a new macro
Ctrl+O Loads an existing macro or module from disk
Ctrl+S Saves the current macro or module to disk
Ctrl+P Prints the current macro or module
Ctrl+Z
Ctrl+Backspace
Undoes the last editing action, such as typing text in the Code
window
Ctrl+Y Restores the last editing action if no other actions have occurred
since the last Undo
Ctrl+X
Shift+Del
Removes the selected text and places it on the Clipboard
Ctrl+C
Ctrl+Ins
Copies the selected text and places it on the Clipboard
Ctrl+V Inserts the contents of the Clipboard at the current location

Appendix
275
Shift+Ins
Delete Deletes the currently selected text
Tab Shifts all the lines in the selection to the next tab stop
Shift+Tab Shifts all the lines in the selection to the previous tab stop
Ctrl+F Searches for specified text in the current macro
Ctrl+R Replaces specified text in the current macro
F3 Finds or replaces the next occurrence of the last entered string
Ctrl+Space Call up AutoComplete for the string being typed
Ctrl+I Shows a popup containing information about the parameters of the
selected function or statement
Ctrl+1.. Ctrl+9 Displays the selected macro or module window
Ctrl+A Activates the currently selected macro
F1 Shows the Basic language help for the keyword at the current
insertion point
Shift+F1 Lists all the functions of the Basic language
Testing and debugging of macros
Ctrl+G Displays the Immediate window
Ctrl+W Displays the Watch window
Ctrl+T Displays the Call Stack window
F5 Starts or continues running the current macro
Esc Stops running the current macro
F8 Executes to the next line. If the current line is a subroutine, the
macro stops on the first line of that subroutine.
Shift+F8 Executes to the next line. If the current line is a subroutine, the
macro executes the subroutine completely
Ctrl+F8 Executes to the end the current subroutine or function call
F7 Executes the code up to the current line
F9 Toggles the break point on the current line
Shift+Ctrl+F9 Clears all break points
Shift+F9 Shows the value of the expression under the cursor in the
Immediate window
Ctrl+F9 Adds the expression under the cursor to the Watch window
Working with the User Dialog Editor
Delete Deletes the currently selected control
Ctrl+X
Shift+Del
Removes the selected control and places it on the Clipboard
Ctrl+C
Ctrl+Ins
Copies the selected control onto the Clipboard
Ctrl+V
Shift+Ins
Inserts the control on the Clipboard at the current position


277
Glossary
Codepage
The ANSI codepage uses 8 bits for the encoding of characters, and thus can display 256
different characters. That means it only contains a limited number of extra characters in
addition to the standard characters A-Z. A codepage specifies which letters are assigned
to each character code. For example, there is a codepage for European languages
containing characters like ä, ú or î and another codepage that contains all the characters for Russian.
In order to display an ANSI-encoded text correctly, it is necessary to know which
codepage was used. For a list of the codepages used in MS Windows, see the Codepages (S. 265) section.
DBCS
DBCS (Double Byte Character Set) is a character set in which a character is represented
by one or two bytes. This character set is used, for example, in the Japanese version of
Windows 95. Different codepages also describe different DBCS character sets. As a
result, it can be difficult to transfer DBCS strings between systems with different standard codepages.
Properties window
A dockable window in which the properties of an object (string list, language, resource, source string or translation string) can be displayed and edited.
It is opened by double-clicking an object or by selecting the "Properties" command in the
shortcut menu of the object. If the Properties window is already open, it is enough to simply select the object.
The properties window for translation lists is also referred to as the "translation window"
Glossary files
A Passolo glossary file is a text file containing strings in different languages. These tables
are used for automatic translation.
Project window
The first window displayed when Passolo opens a project. This window lists all the source
files, languages and string lists contained in the project and provides an overview of the
current project status. This is the central point from which string list windows are
opened. In order to perform operations on multiple string lists, they have to be carried out in the project window.
Source file
A source file is a program file to be translated in Passolo. The file type depends on the
parser. For example, the source files for WIN32 are usually .EXE files or .DLL runtime
libraries, whereas the source files for the text parser are (structured) text files. The
source file may also refer to a database or an SQL query when working with the database parser.
The purpose of Passolo is to localize these source files. The translated version of the
source file is referred to as the target file.
Source string list
The source string list contains all the string resources from a source file that require
localization. You can also edit the source string list in order to hide specific strings or
exclude them from the translation process.
SDL Passolo 2011
278
Resource
The strings contained in a source file are generally grouped as resources. These may be
dialogs, menus or some other grouping. Some resources such as bitmaps do not contain strings and are then processed as objects.
Resource ID
Each resource in a source file is assigned an identifier (ID). This may be a number or a
designator. If possible, a unique ID should be used to ensure that resources can be identified uniquely.
Language ID
Under Windows, each language is assigned a unique number. This "Language ID" is
made up of a primary ID and a sub ID. In most cases it is not necessary to enter these
values explicitly, since Passolo contains a list of the languages supported by Windows.
However, Passolo does offer the option of entering language IDs directly since additional
languages that are currently not covered may be added. You can find a list of the
supported languages codes in programming guides or on the Web, for example at http://www.microsoft.com/opentype/otspec/lcid-cp.txt.
String
Passolo refers to the smallest translatable unit of text within a source file as a string. All
strings are display and can be edited in the string list window. Each string is assigned to
a resource. Strings in a source string list are also called source strings whereas strings in a translation list are referred to as translation string.
String list
A list of strings to be edited in Passolo. A differentiation is made between source string
lists and translation lists. Source string lists contain the strings from a source file while
the actual translation is performed in the translation lists. All the string lists in a project are displayed in the project window.
String list window
Window in Passolo in which one or more string lists are displayed. On the left there is a
tree structure showing all the related resources and on the right a list containing the strings.
Unicode
A 16 bit character set that supports the display of characters in any language (including Chinese and Japanese). Generally, resource strings are saved in Unicode.
Target file
A target file is the localized version of a source file. Generally, this is a copy of the source file in which all the resources and strings have been translated to a target language.
Translation list
A string list containing all the strings of a source file as source string/translation pairs.
The translator edits the strings in the column for the target language. A fully edited translation list thus contains all strings in both languages.
Translation window
Another name for the properties window belonging to a translation list.
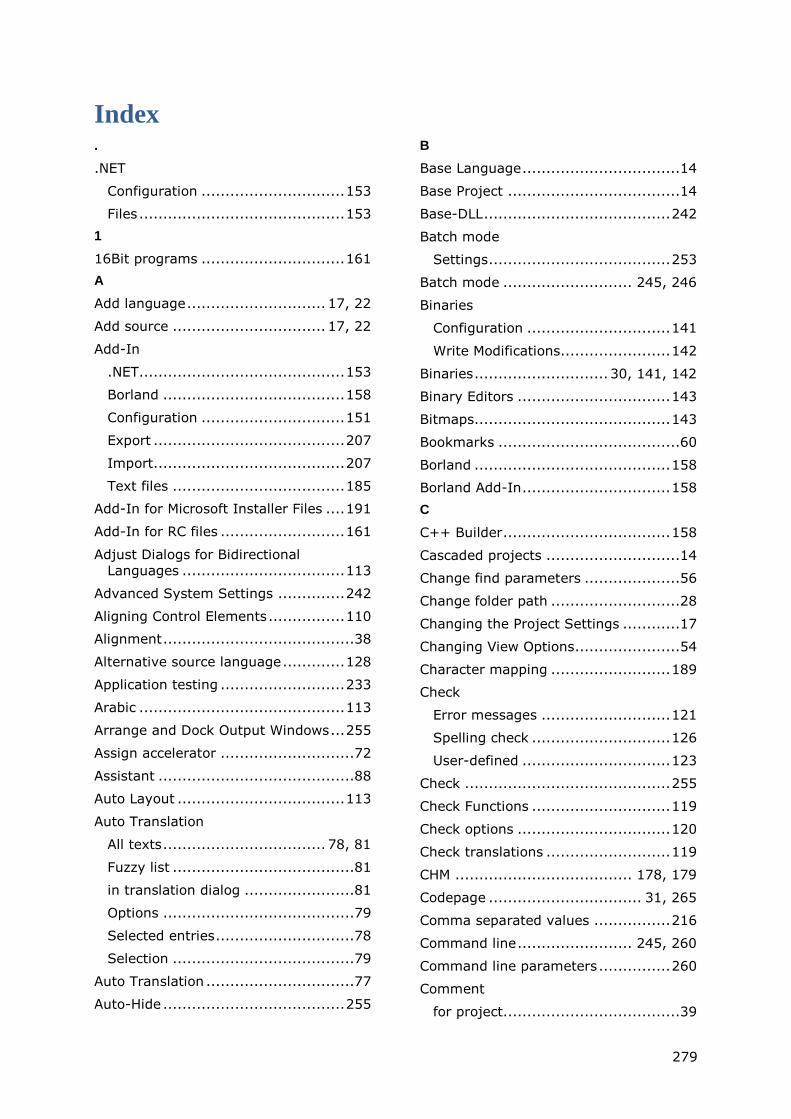
279
Index .
.NET
Configuration .............................. 153
Files ........................................... 153
1
16Bit programs .............................. 161
A
Add language ............................. 17, 22
Add source ................................ 17, 22
Add-In
.NET........................................... 153
Borland ...................................... 158
Configuration .............................. 151
Export ........................................ 207
Import........................................ 207
Text files .................................... 185
Add-In for Microsoft Installer Files .... 191
Add-In for RC files .......................... 161
Adjust Dialogs for Bidirectional
Languages .................................. 113
Advanced System Settings .............. 242
Aligning Control Elements ................ 110
Alignment ........................................38
Alternative source language ............. 128
Application testing .......................... 233
Arabic ........................................... 113
Arrange and Dock Output Windows ... 255
Assign accelerator ............................72
Assistant .........................................88
Auto Layout ................................... 113
Auto Translation
All texts .................................. 78, 81
Fuzzy list ......................................81
in translation dialog .......................81
Options ........................................79
Selected entries .............................78
Selection ......................................79
Auto Translation ...............................77
Auto-Hide ...................................... 255
B
Base Language .................................14
Base Project ....................................14
Base-DLL ....................................... 242
Batch mode
Settings ...................................... 253
Batch mode ........................... 245, 246
Binaries
Configuration .............................. 141
Write Modifications ....................... 142
Binaries ............................ 30, 141, 142
Binary Editors ................................ 143
Bitmaps ......................................... 143
Bookmarks ......................................60
Borland ......................................... 158
Borland Add-In ............................... 158
C
C++ Builder ................................... 158
Cascaded projects ............................14
Change find parameters ....................56
Change folder path ...........................28
Changing the Project Settings ............17
Changing View Options ......................54
Character mapping ......................... 189
Check
Error messages ........................... 121
Spelling check ............................. 126
User-defined ............................... 123
Check ........................................... 255
Check Functions ............................. 119
Check options ................................ 120
Check translations .......................... 119
CHM ..................................... 178, 179
Codepage ................................ 31, 265
Comma separated values ................ 216
Command line ........................ 245, 260
Command line parameters ............... 260
Comment
for project.....................................39

SDL Passolo 2011
280
Comment delimiters ........................ 188
Common task ................................. 129
Concept ...........................................11
Concordance
Options ........................................83
Concordance ....................................82
Configuration File ........................... 260
Configure Columns ..................... 18, 49
Connection to Termbank.................. 104
Conventions ...................................... 2
Coordinates ................................... 110
Copy protection .............................. 225
Create project ..................................12
Creating a Project .............................. 5
Creating String Lists .........................47
CSV .............................................. 216
Current Group ..................................70
Cursors ......................................... 145
Customize tools .............................. 258
Customizing Toolbars ...................... 256
D
Data Bases .................................... 191
Data element ................................. 168
Debug ........................................... 233
Defective dongle............................. 226
Delete Language ..............................17
Delete source file ..............................17
Delete translation lists .......................17
Deleted Texts ...................................63
Delphi ........................................... 158
Desktop ........................................... 5
Dialog Editor
.NET........................................... 156
Borland ...................................... 159
Dialog Editor .................................. 110
Dictionaries for spelling check .......... 128
Dictionary ...................................... 128
Display reference language .............. 128
Displaying and Modifying Binaries ..... 142
Displaying String Lists .......................47
Displaying the History ..................... 132
Docking ......................................... 255
DotNet
Configuration .............................. 153
Files ........................................... 153
DotNet .......................................... 153
E
Editing a Source String List ................69
Editing a Translation List ...................73
Editing Bitmaps .............................. 143
Editing Icons and Cursors ................ 145
Editor for binary resources ............... 141
Embedded Macros .......................... 239
Embedding options ......................... 214
EmptyRsc ...................................... 242
Encoding of XML Files ...................... 176
Enter key ........................................76
Error messages .............................. 121
Excel Parser ................................... 199
Export
ASCII ......................................... 214
CSV ........................................... 216
Exporting Translation Bundles ....... 210
Files ........................................... 207
Glossaries ................................... 216
Text Format ................................ 214
Export ........................................... 207
Export formats ............................... 207
Export licenses
Exporting Translation Bundles ....... 227
Export Manager .............................. 214
Export mode .................................. 168
Exporting glossaries ........................ 216
Exporting options ........................... 241
Exporting Translation Bundles
Export licenses ............................ 227
Glossaries ................................... 212
Licensing .................................... 211
Macros ....................................... 213
Rights ........................................ 213
Settings ...................................... 212
Target Folder .............................. 210
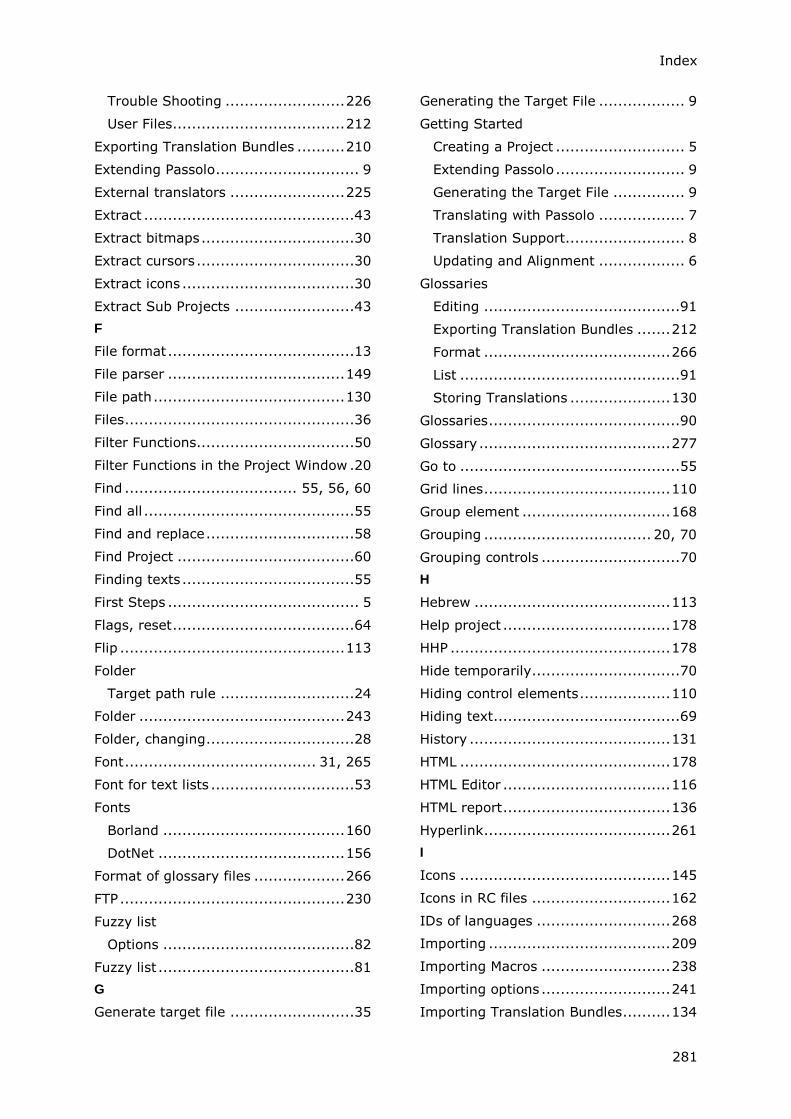
Index
281
Trouble Shooting ......................... 226
User Files .................................... 212
Exporting Translation Bundles .......... 210
Extending Passolo .............................. 9
External translators ........................ 225
Extract ............................................43
Extract bitmaps ................................30
Extract cursors .................................30
Extract icons ....................................30
Extract Sub Projects .........................43
F
File format .......................................13
File parser ..................................... 149
File path ........................................ 130
Files ................................................36
Filter Functions.................................50
Filter Functions in the Project Window .20
Find .................................... 55, 56, 60
Find all ............................................55
Find and replace ...............................58
Find Project .....................................60
Finding texts ....................................55
First Steps ........................................ 5
Flags, reset ......................................64
Flip ............................................... 113
Folder
Target path rule ............................24
Folder ........................................... 243
Folder, changing ...............................28
Font ........................................ 31, 265
Font for text lists ..............................53
Fonts
Borland ...................................... 160
DotNet ....................................... 156
Format of glossary files ................... 266
FTP ............................................... 230
Fuzzy list
Options ........................................82
Fuzzy list .........................................81
G
Generate target file ..........................35
Generating the Target File .................. 9
Getting Started
Creating a Project ........................... 5
Extending Passolo ........................... 9
Generating the Target File ............... 9
Translating with Passolo .................. 7
Translation Support......................... 8
Updating and Alignment .................. 6
Glossaries
Editing .........................................91
Exporting Translation Bundles ....... 212
Format ....................................... 266
List ..............................................91
Storing Translations ..................... 130
Glossaries ........................................90
Glossary ........................................ 277
Go to ..............................................55
Grid lines ....................................... 110
Group element ............................... 168
Grouping ................................... 20, 70
Grouping controls .............................70
H
Hebrew ......................................... 113
Help project ................................... 178
HHP .............................................. 178
Hide temporarily ...............................70
Hiding control elements ................... 110
Hiding text .......................................69
History .......................................... 131
HTML ............................................ 178
HTML Editor ................................... 116
HTML report ................................... 136
Hyperlink ....................................... 261
I
Icons ............................................ 145
Icons in RC files ............................. 162
IDs of languages ............................ 268
Importing ...................................... 209
Importing Macros ........................... 238
Importing options ........................... 241
Importing Translation Bundles .......... 134
SDL Passolo 2011
282
Indexing ..........................................90
Info ................................................74
Inline Patterns .................................68
Inline-Patterns ............................... 123
Inline-Tags ......................................66
Interface to TM Systems ....................93
J
JAR Files ........................................ 183
Java
File names .................................. 181
JAR Files ..................................... 183
Property files ............................... 182
References .................................. 184
Resource bundles ........................ 183
Java-Add-In
Configuration .............................. 183
Java-Add-In ................................... 183
K
Key combinations ................... 257, 272
L
Language ................................ 31, 242
Language ID ....................................34
Language IDs ................................. 268
Languages ................................. 22, 35
Last project ...................................... 5
Layout .......................................... 110
Layout Engine ................................ 114
Length of texts .................................70
Leverage .........................................62
License management ...................... 225
Licensing ....................................... 211
Locking ......................................... 130
Log file ............................................37
Log in .............................................. 5
M
Macros
administrate ................................ 237
Embedded Macros ........................ 239
Exporting Translation Bundles ....... 213
Folder ........................................ 242
Importing ................................... 238
Overview .................................... 237
System macro ............................. 238
Maintenance ....................................65
Menu accelerator table ......................72
Menu display .................................. 115
Menu editor
Borland ...................................... 160
Menu editor ................................... 115
Merge .............................................44
Merge Projects .................................44
Metadata ....................................... 168
MFC ................................................30
Mirror............................................ 113
Mirror the application ........................34
MSI .............................................. 191
Multi user mode ...............................42
MultiTerm .............................. 102, 221
MultiTerm iX .................................. 220
N
Namespaces .................................. 175
NET .............................................. 153
Network folder .................................42
New Project .....................................12
News ............................................ 255
O
ODBC ............................................ 191
Open resource..................................53
Operation report ............................. 135
Operations on text lists .....................66
Options
Add-Ins ...................................... 151
Auto Translation ............................79
Check Functions .......................... 120
Concordance search .......................83
Fuzzy Matching ..............................82
Operations on text lists...................66
Replicates .....................................86
Source File ....................................30
Spelling Checker .......................... 127
Target file .....................................34
Translation Assistant ......................88
View ............................................54
Index
283
Options ......................................... 241
Options for Leveraging ......................62
Options for RC Source Files .............. 164
Options for RC Target Files .............. 164
Options, embed .............................. 214
Original resources .............................34
Output window
Find .............................................55
Translation ....................................81
Output window ......................... 81, 255
Overview ..................................... 1, 11
P
Palm OS ........................................ 204
Parameters .................................... 260
Parser ..................................... 13, 149
Passolo error messages ................... 121
Patterns ..........................................68
Preview (Text file parser) ................ 189
Problems with translation bundles .... 226
profilefolder ................................... 260
Project comment ..............................39
Project list
Columns .......................................18
Project Maintenance ..........................65
Project settings .......................... 17, 22
Project task ................................... 129
Project window
Commands ...................................17
Tasks ...........................................40
Project window .................................15
Property files ................................. 182
Providers .........................................89
psl.exe.config ................................. 260
Q
Quick Import.................................. 241
QuickIndex ......................................90
R
RC files
Bitmaps ...................................... 162
Cursors ...................................... 162
Icons .......................................... 162
Preprocessor directives ................. 161
Target file ................................... 163
RC files ......................................... 161
Read target file ................................38
Read Translations ........................... 229
Read Update .................................. 229
Recycle bin ................................ 63, 66
Reference language ........................ 128
Regular expression ...........................58
Regular Expressions ................ 123, 271
Rendering Text ............................... 117
Repack ............................................42
Re-pack project file ...........................42
Replace ...........................................58
Replace resources .............................34
Replicates
Options ........................................86
Replicates ........................................84
Report ................................... 135, 138
Reports ......................................... 136
Reset ..............................................64
Reset Data.......................................64
Resource bundles ........................... 183
Resource DLL ........................... 34, 242
Resources
Display .........................................47
Show ...........................................53
Restrict access key ...........................31
Return values ................................. 245
Right-left styles .............................. 113
Rights
Exporting Translation Bundles ....... 213
RoboHelp ....................................... 178
Rollback ........................................ 133
Rules for target files .........................27
Rules for text files .................. 185, 190
S
SDL MultiTerm ............................... 102
SDL Trados (older versions) ...............96
SDL Trados Studio ............................94
Segmenter..................................... 204
Selection .........................................79

SDL Passolo 2011
284
Settings
Source String List ..........................28
Translation List ..............................32
Settings .................................... 45, 74
Settings for reports ......................... 138
Shared Mode ....................................42
Show all resources ............................53
Silverlight ...................................... 157
Simulate Translation ....................... 233
Simulation ..................................... 233
Sorting and Grouping in the Project Window ........................................20
Sorting String Lists ...........................50
Source File ......................................13
Source files ......................................22
Source String List
edit ..............................................69
Settings ........................................28
Status ..........................................71
Spelling Checker
Dictionaries ................................. 128
during the input ........................... 124
Options ...................................... 127
Translation List ............................ 125
When checking the translation ....... 126
Spelling Checker............................. 124
SRX Segmenter .............................. 204
Standard settings for languages .........35
Start Page ........................................ 5
Starting Passolo ................................ 5
Statistics ............................... 135, 136
Status
Translation List ..............................32
Status and Attributes in the Source String List .....................................71
Status text .................................... 115
Storing Translations ........................ 130
String List
Configure Columns .........................49
Filtering ........................................50
Font .............................................53
Sort .............................................50
Update ................................... 47, 61
String Lists ......................................47
Strings
Deleted ........................................63
Display .........................................47
Suppress error ............................... 119
Suppress errors .............................. 119
Sync. Storage ................................ 229
Synchronization Storage .................. 229
Synchronize .................... 214, 229, 230
System Folders .............................. 243
System macro ................................ 238
System Settings ............................. 242
T
Tags ...............................................66
Target file ........................................35
Target Folder
Exporting Translation Bundles ....... 210
Target Folder ................................. 207
Target path rule ................... 23, 24, 27
Target rule .......................... 23, 24, 27
Target, reading ................................38
Task ............................................. 129
Tasks ..............................................40
Team Edition .................................. 225
Term Bank ..................................... 104
Termbase ...................................... 102
Terminology ........................ 83, 84, 102
Testing the Application .................... 233
Text ................................................74
Text comments ................................71
Text delimiters ............................... 187
Text file add-in ............................... 185
Text files
Character mapping ...................... 189
Comments .................................. 188
Preview ...................................... 189
Rule ........................................... 190
Rules.......................................... 185
Text delimiters ............................ 187
Text Format ................................... 214

Index
285
Text length ......................................70
Text list
Create ..........................................47
Text number ....................................55
Text Renderer ................................ 117
TM Systems .....................................93
Toolbars ........................................ 256
Tools ............................................. 258
Trados
MultiTerm ................................... 221
MultiTerm iX ............................... 220
Workbench ...................................96
Trados Studio...................................94
Transferring Existing translations ........38
Transferring Modifications ................ 142
Translate all .....................................79
Translate replicates...........................84
Translating with Passolo ..................... 7
Translating with the Concordance Search
...................................................82
Translation Assistant
Options ........................................88
Translation dialog
Options ........................................76
Spell checking ............................. 124
Translation dialog .............................74
Translation List
Settings ........................................32
Spelling Checker .......................... 125
Translation List.................................73
Translation lists, delete .....................17
Translation Support ........................... 8
Translations, locking ....................... 130
U
Unify Replicates ................................84
Unifying replicates ............................84
Unpack ............................................42
Un-pack project file ..........................42
Update ...................................... 61, 66
Updating and Alignment ..................... 6
User.......................................... 41, 74
User Defined Checks ....................... 123
User dictionary ............................... 127
User Files
Exporting Translation Bundles ....... 212
Extract .........................................37
User Files .................................. 36, 37
User name ........................................ 5
User-defined Properties .....................45
User-defined resources .................... 147
Using Comments ..............................71
V
Version block ...................................34
View options ....................................54
Visual Basic ................................... 191
W
Wavy red underline ......................... 124
Windows user ..................................41
Working in the Project Window ...........17
Working with External Translators .... 225
Write translations ........................... 229
Write Update.................................. 229
WS_EX_LAYOUTRTL ........................ 113
X
XLIFF ............................................ 177
XML .............................................. 165
XML add-in
Configuration ........ 166, 168, 173, 177
Export mode ............................... 168
XML add-in .................................... 165
XML Namespaces ............................ 175
XML tree ....................................... 173