RETRO READYTHEME CUSTOMIZATION - Miva
13
Updated November 12, 2014 RETRO READYTHEME CUSTOMIZATION
Transcript of RETRO READYTHEME CUSTOMIZATION - Miva

Updated November 12, 2014
RETRO READYTHEME CUSTOMIZATION

Installing the Retro ReadyThemeThese instructions are for installing a ReadyTheme to a brand new store. If you have an existing store, please contact support.
1. Got to http://www.miva.com/mm5/merchant.mvc?Screen=readythemes&Store_Code=MIVA and down-load the theme you want. For this guide we are downloading and installing the Retro ReadyTheme.
2. Go to your Miva 9 Admin, click on Menu, scroll down and select “User Interface.”
3. Select Frameworks, click on the upload button, select “Upload-Overwrite.”
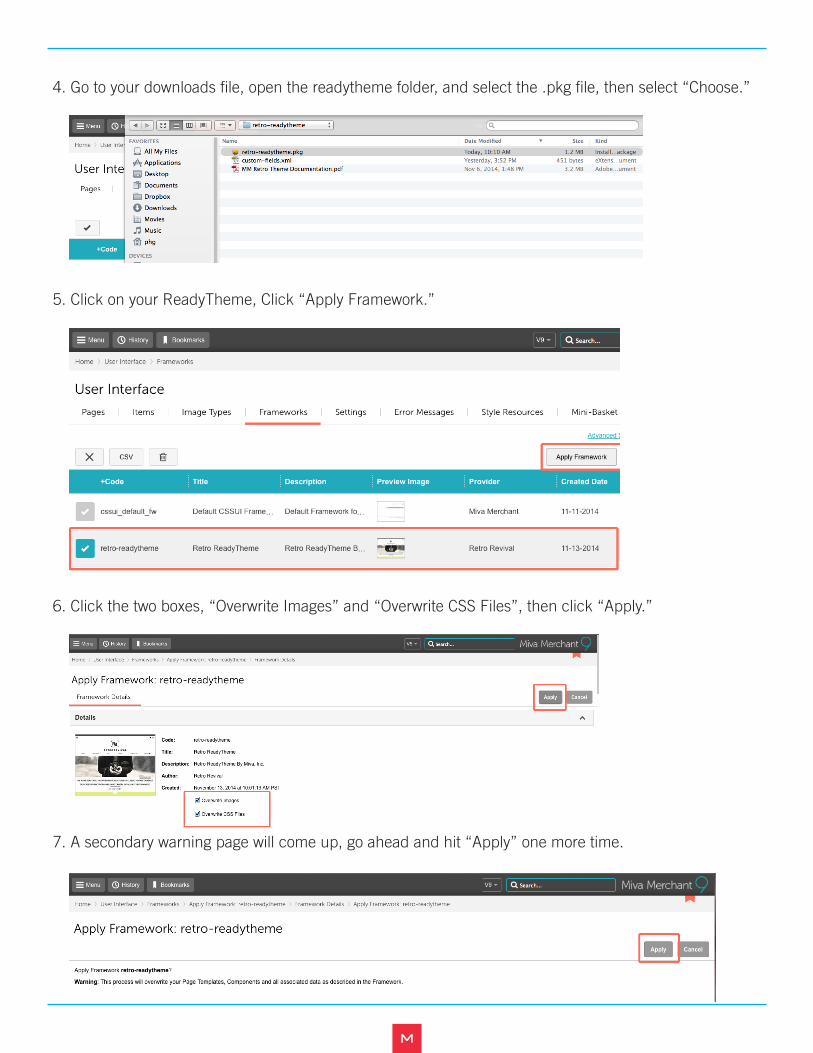
4. Go to your downloads file, open the readytheme folder, and select the .pkg file, then select “Choose.”
5. Click on your ReadyTheme, Click “Apply Framework.”
6. Click the two boxes, “Overwrite Images” and “Overwrite CSS Files”, then click “Apply.”
7. A secondary warning page will come up, go ahead and hit “Apply” one more time.

8. Install Product Image Custom FieldsThis may or might not need to be done, depending on future updates for this theme. Go to
Utlities, Add/Remove Modules and see if “Product Image Custom Fields” is in the “Available
Modules” area. If it is, click on the install button. If it’s down below under “Installed Mod-
ules” then you can skip to the next step.
Install XML file for Product Custom FieldsThe Suivant Theme, in addition to the pkg file, also has an excel file that needs to be
uploaded and installed. This excel file will allow you to add custom fields (product flags) to
your products such as “Sale,” “Hot,” or “New.” Here’s how to install this file:
9. Go to Menu, then scroll down to “Data Management”
10. Under “Import/Export” and Select “Import Data and Settings in XML Provisioning Format”

11. Upload “custom-fields.xml” from your downloads file

Customizable Areas in the Retro ReadyTheme
1. Header Logo
2. Main Navigation
4. Banners
5. Featured Products
5. Featured Products
5. Featured Products
6. Custom Fields
7. Secondary Featured Prod-
ucts
8. Storefront Promo 1 & 2
9. Banners
10. Bottom Logo
11. Footer Navigation
12. Social Icons
6. Custom Fields
6. Custom Fields
3. Hero Image

Accessing the Retro ReadyTheme1. Click on the Menu2. Click on ReadyTheme
Replace the Top Logo with Alternate ImageUNDER SETTINGS TAB
1. Go to Logo Type/Logo Image2. Click on “Select Logo”3. Upload your logo to replace the current one. Click on “Select” in the bottom right corner.4. Click “Update” in the top right corner.

Replace Top Logo with TextUNDER SETTINGS TAB
If you don’t have a logo, you can use plain text in it’s place.1. Next to “Logo type” click on Image Drop Down Menu2. Select: Text”3. Enter “Store Name” and “Store Tagline”4. Click “Update” in top right corner.
Enable Social Media IconsUNDER SETTINGS TAB
1. Click “Enable Social Icons”3. Enter your links for whichever platforms you are on
(empty fields will not show an icon on your Storefront page)4. Click “Update”
Enable Third Party Social Sharing CodeUNDER SETTINGS TAB
1. If you have a 3rd Party Social Sharing Code, click the “Enable Social Sharing Code” box2. Enter your code into the “3rd Party Social Sharing Code” Field3. Click “Update”

Enable Trust SymbolUNDER SETTINGS TAB
1. If you have a SSL Site Seal, Click the “Active” box.2. Enter your code into the :SSL Site Seal or Trust Symbol: field 3. Click “Update”
Updating Images - Main “Hero” ImageUNDER IMAGES TAB
1. Select “SFNT: Hero Image”2. Click the pencil icon to edit/replace the image3. Under the “Image” field, click “Select Image” and upload your new image4. Update your “Alt Text” as well as any other appropriate fields.5. Click “Save”
Update “Hero Mobile” Image There is also a separate Hero image for mobile settings. Make sure you replace this as well. UNDER IMAGES TAB
1. Select “SFNT: Hero Image Mobile”2. Click the pencil icon to edit/replace the image3. Under the “Image” field, click “Select Image” and upload your new image4. Update your “Alt Text” as well as any other appropriate fields.5. Click “Save”

Update “Promo 1” ImageUNDER IMAGES TAB
1. Select “SFNT: Promo 1”2. Click the pencil icon to edit/replace the image3. Under the “Image” field, click “Select Image” and upload your new image4. Update your “Alt Text” as well as any other appropriate fields.5. Click “Save”
Update “Promo 2” ImageUNDER IMAGES TAB
1. Select “SFNT: Promo 2”2. Click the pencil icon to edit/replace the image3. Under the “Image” field, click “Select Image” and upload your new image4. Update your “Alt Text” as well as any other appropriate fields.5. Click “Save”
Replace the Bottom Logo with Alternate ImageUNDER IMAGES TAB
1. Click on “Footer Logo” 2. Click the pencil icon to edit/replace the image3. Under the “Image” field, click “Select Image” and upload your new image4. Update your “Alt Text” as well as any other appropriate fields.5. Click “Save”
Update Top Banner TextUNDER BANNERS TAB
1. Select “SFNT: Brief Site Description”2. Click the pencil icon to edit/replace the image3. In the “Message” field, enter your new text4. Click “Save”

Update Bottom Banner TextUNDER BANNERS TAB
1. Select “SFNT: Footer Text”2. Click the pencil icon to edit/replace the image3. Enter your new text in the “Message” field.4. Click “Save”
Update Navigation Pages ContentUNDER CONTENT SECTIONS TAB
1. Click on the page you’d like to change2. Click on the pencil icon to edit it3. Under the “Content” field change your information4. Click “Save”

Update Featured ProductsUNDER PRODUCT LISTINGS TAB
1. Select SFNT: Featured Products2. Click on the pencil icon to edit3. Under “Custom Fields” select the items you want to display, then click select to move them over into
the secondary box. 4. Under “Products to Display” choose where you want the products to pull from5. Fill in any other applicable fields6. Click “Save”
Update Custom FieldsUNDER CATALOG/PRODUCTS/CUSTOM FIELDS
1. Go up to “Menu”2. Click on “Catalog”3. Click on the product you want to display on Storefront Page4. Select the “Open” icon5. Choose “Custom Fields”6. Fill out the “Product Type” field and the “Short Description” field7. Click “Update” in the top right corner8. Proceed with any other products you want to display on homepage.

Update Main NavigationUNDER NAVIGATION SETS TAB
1. Hover (don’t click) over “Main Navigation”2. Click on the page icon with an arrow on it in the left column3. Click on any item you want to update4. Click on the pencil icon to edit it and update to your navigation choices5. Under “Link” choose where you would like the navigation to go to6. Continue until all navigation is updated, click “Save”
Update Footer NavigationUNDER NAVIGATION SETS TAB
1. Hover (don’t click) over “Footer Navigation”2. Click on the page icon with an arrow on it in the left column3. Click on any item you want to update4. Click on the pencil icon to edit it and update to your navigation choices5. Under “Link” choose where you would like the navigation to go to6. Continue until all navigation is updated, click “Save”