
REGISTER YOUR NEW PRODUCT TODAY! By registering your new ...
30
1 USE AND CARE GUIDE · IPL2000 MINI HAIR REMOVAL SYSTEM REGISTER YOUR NEW PRODUCT TODAY! By registering your new LumaRx™ product, you will receive these important benefits: Proof of Ownership • Product Protection • Product Registration • Special Offers Register online at: www.Luma-Rx.com
Transcript of REGISTER YOUR NEW PRODUCT TODAY! By registering your new ...

1
USE AND CARE GUIDE · IPL2000
MINI HAIR REMOVAL SYSTEM
REGISTER YOUR NEW PRODUCT TODAY! By registering your new LumaRx™ product, you will receive these important benefits:
Proof of Ownership • Product Protection • Product Registration • Special OffersRegister online at: www.Luma-Rx.com

Contents
PAGE
4 Introducing the LumaRx™ Mini Hair Removal System
5 How does the LumaRx™ Mini Hair Removal System work?
6 Getting to know your LumaRx™ Mini Hair Removal System
10 Uses for the LumaRx™ Mini Hair Removal System (Indications)
14 Who should not use the LumaRx™ Mini Hair Removal System (Contraindications)
15 Warnings
16 Precautions
19 Risks
21 What to expect during and after treatment
23 Using the LumaRx™ Mini Hair Removal System for treatment
Step 1: Clean, shave and dry
Step 2: Turn on the LumaRx Mini Hair Removal System
Step 3: Test your skin tone
Step 4: Choose energy level
A. Testing the LumaRx Mini Hair Removal System on a small patch of skin
B. Changing energy levels
Step 5: Flash your skin
Other treatment tips
40 After your LumaRx™ Mini Hair Removal System treatment
Cleaning the LumaRx Mini Hair Removal System
Recharging the LumaRx Mini Hair Removal System
Replacing the Treatment Head
DISPOSAL OF the LumaRx Mini Hair Removal System
47 Troubleshooting
53 Contact information, specifications, labeling
54 Customer service, performance guarantee
56 Treatment cards
PAGE

4 5
Introducing the LumaRx™ Mini Hair Removal System
Congratulations on the purchase of your new LumaRx Mini Hair Removal System! The LumaRx Mini Hair Removal System is a new breakthrough product that uses Intense Pulsed Light (“IPL”), to remove unwanted hair at home. The LumaRx Mini Hair Removal System utilizes the same clinically proven technology as professional dermatologists and salons use, but optimized for personal treatment of smaller areas in the privacy and comfort of your own home. Unlike most at-home hair removal methods, the LumaRx Mini Hair Removal System doesn’t cut or pull out hair; it actually uses light energy to work below the skin’s surface to disable active hairs at the root. You should gradually notice fewer hairs in the treatment area within a few weeks, with results generally improving over time.
The LumaRx Mini Hair Removal System is intended for use on:• Female Facial Hair (cheeks, sideburns,
chin, neck areas, and above the lips) • Male and Female Body Hair
(underarms, bikini line, legs, arms, stomach and chest).
NOTE: the LumaRx Mini Hair Removal System isn’t for everyone. Please review the Contraindications, Warnings and Precautions (see table of contents) to determine if the LumaRx Mini Hair Removal System is OK for you to use.
How does the LumaRx™ Mini Hair Removal System work?
Light-based hair removal is a well-established technology that has been in use worldwide for over 15 years. The LumaRx Mini Hair Removal System uses this technology to flash your skin with an intense pulse of light. The energy in the pulse works under the surface of your skin to target hairs at the root, helping to break the hair growth cycle. Because the energy in the pulse of light targets dark coloring, it works best on darker hair. To avoid targeting (and possibly damaging) dark skin, you should use the LumaRx Mini Hair Removal System only on light-to-medium skin tones. How Many Treatments are Needed?Individual hairs go through a continuous growth cycle with phases of active growth and phases of rest. Like other laser or light-based treatments, the LumaRx Mini Hair Removal System affects only hairs that are in the active growth phase. Your initial regimen should be spread out over 1 month to ensure that you target the most number of active hairs (including those that recently cycled from the resting phase).
We recommend that you use the LumaRx Mini Hair Removal System every other week, over 1 month (for a total of 3 treatments) on each area. If you have redness, blistering or other skin irritation in the treatment area after your first treatment, do not treat. Wait until the skin returns to normal before using the LumaRx Mini Hair Removal System again. If the irritation does not go away with 2-3 days, contact Customer Service (see table of contents)Use the Treatment Record Cards (see table of contents) to help keep track of your treatments.Results aren’t immediate, but you should have noticeably fewer hairs within 1 to 2 weeks after you start treatment. During this time, it may look like the hair is still growing, but it is actually being “pushed out.” You may or may not see these hairs fall out.

6 7
Inside your LumaRx Mini Hair Removal System box, you will find:
Getting To know your LumaRx™ Mini Hair Removal System
A. LumaRx Mini Hair Removal System (including a treatment head)
B. Charging Cord
C. Instructions for Use A.
B.
B.C.
D. Flash Window E. Contact Sensors F. Display G. Energy Level ButtonH. Power ButtonI. Treatment HeadJ. Release TabsK. Skin Tone TesterL. Flash Button
F.
G.
H.
D.
E.
I.
J.
K.
L.
8 9
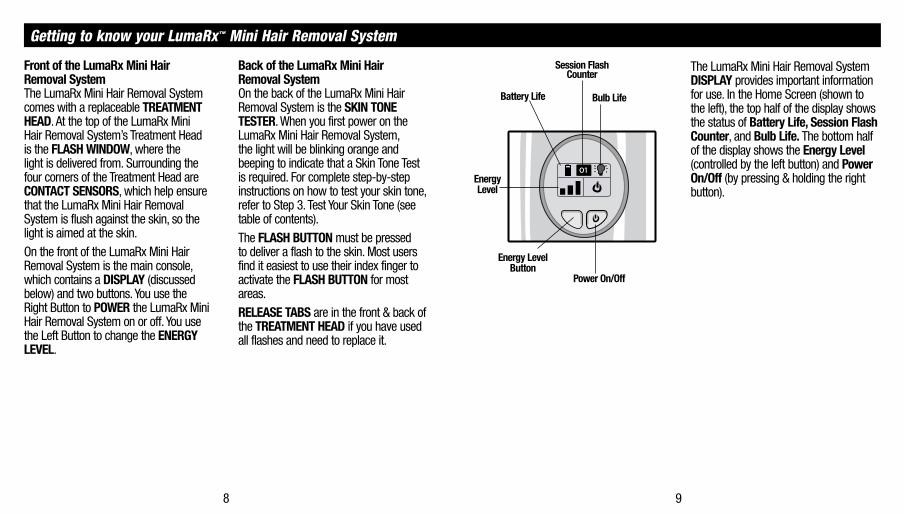
Front of the LumaRx Mini Hair Removal System The LumaRx Mini Hair Removal System comes with a replaceable TREATMENT HEAD. At the top of the LumaRx Mini Hair Removal System’s Treatment Head is the FLASH WINDOW, where the light is delivered from. Surrounding the four corners of the Treatment Head are CONTACT SENSORS, which help ensure that the LumaRx Mini Hair Removal System is flush against the skin, so the light is aimed at the skin.On the front of the LumaRx Mini Hair Removal System is the main console, which contains a DISPLAY (discussed below) and two buttons. You use the Right Button to POWER the LumaRx Mini Hair Removal System on or off. You use the Left Button to change the ENERGY LEVEL.
Back of the LumaRx Mini Hair Removal System On the back of the LumaRx Mini Hair Removal System is the SKIN TONE TESTER. When you first power on the LumaRx Mini Hair Removal System, the light will be blinking orange and beeping to indicate that a Skin Tone Test is required. For complete step-by-step instructions on how to test your skin tone, refer to Step 3. Test Your Skin Tone (see table of contents).The FLASH BUTTON must be pressed to deliver a flash to the skin. Most users find it easiest to use their index finger to activate the FLASH BUTTON for most areas.RELEASE TABS are in the front & back of the TREATMENT HEAD if you have used all flashes and need to replace it.
01
The LumaRx Mini Hair Removal System DISPLAY provides important information for use. In the Home Screen (shown to the left), the top half of the display shows the status of Battery Life, Session Flash Counter, and Bulb Life. The bottom half of the display shows the Energy Level (controlled by the left button) and Power On/Off (by pressing & holding the right button).
Session Flash Counter
Bulb LifeBattery Life
Energy Level Button
Power On/Off
Energy Level
Getting to know your LumaRx™ Mini Hair Removal System

10 11
LumaRx is an over-the-counter device intended to provide phototherapeutic light to the body. It is also intended for the removal of unwanted hair by using a selective photothermal treatment. It is also indicated for the removal of unwanted body and/or facial hair in adults with Fitzpatrick Skin Types I-IV. LumaRx is also intended for permanent reduction in unwanted hair. Permanent hair reduction is defined as the long-term, stable reduction in the number of hairs regrowing when measured at 6, 9 and 12 months after the completion of a treatment regimen.LumaRx should only be used on LIGHT TO MEDIUM SKIN TONES.LumaRx comes with a built-in SKIN TONE TESTER that is designed to help prevent treating skin that may be too dark.LumaRx is most effective on DARKER HAIR. (Refer to Hair Color Chart.) LumaRx is intended for use on female facial hair on the cheeks, sideburns, chin, neck areas, and above the lips.LumaRx can also be used on male and female body hair below the neck, including underarms, bikini line, leg, arms, chest and stomach.
What is the LumaRx™ Mini Hair Removal System used for? (Indications)
Skin Tone The LumaRx Mini Hair Removal System is intended for use only on light to medium skin tones. To determine if your Skin Tone is suitable to use with the LumaRx Mini Hair Removal System, compare your skin in the intended treatment areas with the Skin Tone Chart. If it matches the Light to Medium Skin Tones, you can use the LumaRx Mini Hair Removal System. If your Skin Tone in the intended treatment area matches the Dark Skin Tones below, DO NOT use the LumaRx Mini Hair Removal System. The LumaRx Mini Hair Removal System also has a built-in SKIN TONE TESTER that is designed to help prevent flashing on skin that is too dark for treatment. Test each different area you wish to treat with the Skin Tone Chart and SKIN TONE TESTER before treating. Some areas are darker than others.If you have tanned skin in the intended treatment area, DO NOT use the LumaRx Mini Hair Removal System in those areas as your skin may be too dark for treatment. You should wait until your tan has completely faded from any intended treatment area before using the LumaRx Mini Hair Removal System.
Hair Color The light energy targets dark coloring in hair, and therefore works best on DARKER HAIR (black, dark brown, brown or dark blond). DO NOT use the LumaRx
Mini Hair Removal System on LIGHTER HAIR (light blond, red, grey or white hairs or “peach fuzz”). The LumaRx Mini Hair Removal System will not work on LIGHTER HAIR.
PaleBeige Beige Light Brown
MediumBrown Dark Brown Black
Black Brown Dark Blond Light Blond RedPeach Fuzz/White/Gray

12 13
Treatment Areas Male & Female Body SitesThe LumaRx Mini Hair Removal System is intended for use on Male and Female Body hair on underarms, bikini line, legs, arms, chest and stomach. If you have unwanted DARKER HAIR in any of these area, the table on the next page lists the typical number of flashes needed to cover a 1” x 2” treatment area. Treat in a GRID-LIKE PATTERN – slight overlaps are OK, but DO NOT flash the same EXACT spot multiple times during 1 treatment session. Use the SESSION FLASH COUNTER to help you track the number of flashes delivered. Record treatments in the TREATMENT CARDS (see table of contents). A typical 1” by 2” treatment area will
require 10 flashes.
1”
2”
1 2
3 4
5 6
7 8
9 10
FLASHWINDOW
Session Flash Counter Female Facial SitesThe LumaRx Mini Hair Removal System is intended for use on female facial hair on the cheeks, sideburns, chin, neck areas, and above the lips (see illustration). If you have unwanted DARKER HAIR in any of these areas, the table below lists the typical number of
DO NOT use the LumaRx Mini Hair Removal System on or around EYES, EYE LASHES or EYE BROWS. Doing so can cause serious and permanent eye injury.DO NOT use the LumaRx Mini Hair Removal System on MALE BEARDS. See Contraindications on page 14.
EACH SIDEBURN : 10 FLASHES
EACH CHEEK : 25 FLASHES
ABOVE LIPS : 10 FLASHES
CHIN : 20 FLASHES
NECK : 25 FLASHES
What is the LumaRx™ Mini Hair Removal System used for? (Indications)
flashes to treat the entire site (NOTE: for spot treatments of unwanted hair, fewer flashes may be needed.) Use the SESSION FLASH COUNTER to help you track the number of flashes delivered. Record treatments in the TREATMENT CARDS (see table of contents).

14 15
Important Safety Information – Read Before Use!The LumaRx Mini Hair Removal System is not designed for everyone. Please read and consider the information in the following section before use.
• DO NOT USE the LumaRx Mini Hair Removal System if you have DARK SKIN. Darker skin may absorb too much light energy which could cause skin swelling, temporary blisters, or could change the color of your skin. Refer to the Skin Tone Chart (see “Indications” in table of contents) to determine if your Skin Tone is suitable for use with the LumaRx Mini Hair Removal System. You should test each different area of skin you want to treat. Some areas are darker than others.
• DO NOT USE the LumaRx Mini Hair Removal System on TATTOOS, DARK BROWN or BLACK SPOTS (such as dark freckles, birthmarks, moles, or warts), LIPS, NIPPLES, GENITALS or AROUND THE ANUS. These areas have darker skin and may absorb too much light energy which could cause skin swelling, temporary blisters, or could change the color of your skin.
• DO NOT USE the LumaRx Mini Hair Removal System ON OR AROUND EYES, EYEBROWS or EYELASHES. Doing so can cause serious and permanent eye injury.
• DO NOT USE the LumaRx Mini Hair Removal System anywhere on the MALE FACE, HEAD OR NECK.
Who should not use the LumaRx™ Mini Hair Removal System? (Contraindications) Warnings
The LumaRx Mini Hair Removal System is a powerful device. As such, it should be used with special attention to safety. Please read all warnings and safety precautions before use and follow them strictly when using the LumaRx Mini Hair Removal System.
DO NOT flash in an environment where the emission of light could cause an explosion, such as in the presence of gas, in oxygen rich environments, or near flammable anesthetics.
KEEP OUT OF REACH OF CHILDREN! DO NOT leave the LumaRx Mini Hair Removal System unattended around children as the cords represent a choking hazard. Children should be supervised to ensure that they do not play with the appliance.
The LumaRx Mini Hair Removal System SHOULD NOT be used by anyone under the age of 18.
DO NOT use the LumaRx Mini Hair Removal System if you have a known sensitivity to light (photosensitivity) or are taking medications that make your skin more sensitive to light, as the LumaRx Mini Hair Removal System may injure your skin or make existing conditions worse.

16 17
Precautions
The LumaRx Mini Hair Removal System is a powerful device. As such it should be used with special attention to safety. Please read all warnings and safety precautions before use and follow them strictly when using the LumaRx Mini Hair Removal System.
• DO NOT use the LumaRx Mini Hair Removal System if you have TANNED SKIN in the intended treatment area, as your skin may be too dark and treatment in tanned areas could temporarily cause skin swelling, blisters, or could change the color of your skin. Wait until your tan has faded in the treatment area before treating.
• DO NOT use the LumaRx Mini Hair Removal System on skin with MAKEUP applied, as treating in those areas could temporarily cause skin swelling, blisters or could change the color of your skin. Make sure to thoroughly clean the intended treatment area before using the LumaRx Mini Hair Removal System.
• DO NOT flash the LumaRx Mini Hair Removal System on the identical treatment spot multiple times during the same session, as this could temporarily cause skin swelling, blisters, or could change the color of your skin.
• DO NOT treat any more than once every two weeks, as this will not speed up results, but could increase likelihood of skin swelling, blistering or changing the color of your skin.
• DO NOT use the LumaRx Mini Hair Removal System on damaged skin, including open wounds, cold sores, sunburns, or areas where you have had a skin peel or other skin resurfacing procedure within the last 6-8 weeks.
• DO NOT use the LumaRx Mini Hair Removal System on irritated skin, including rashes or swollen skin. These conditions can make the skin more sensitive to the light treatment. Wait for the affected area to heal before using the LumaRx Mini Hair Removal System.
• DO NOT use the LumaRx Mini Hair Removal System if your skin is sensitive to light. In order to determine if you can use the LumaRx Mini Hair Removal System, perform a test on a small patch of skin and wait 24 hours to determine if there are any adverse reactions before using the LumaRx Mini Hair Removal System more broadly. See steps for testing on a patch of skin (see Step 4, Part A in table of contents). Contact Customer Service (see table of contents) for more information or assistance.
• DO NOT use the LumaRx Mini Hair Removal System if you are or may be pregnant or are breast-feeding. The LumaRx Mini Hair Removal System has not been tested on pregnant women. Hormonal changes are common during pregnancy or breast-feeding and could increase skin sensitivity and the risk of skin injury.
• DO NOT flash the LumaRx Mini Hair Removal System against any material other than skin.
• DO NOT use the LumaRx Mini Hair Removal System for any purpose other than hair removal.
• DO NOT use the LumaRx Mini Hair Removal System on any area where you may someday want your hair to grow back. The results may be permanent and irreversible.
• DO NOT cover any part of the LumaRx Mini Hair Removal System ventilation slots during use, as they help to keep the device cool during operation. Covering the ventilation slots could result in the LumaRx Mini Hair Removal System overheating.
• DO NOT use the LumaRx Mini Hair Removal System if the box packaging or the device appears damaged or if any part of the LumaRx Mini Hair Removal System is cracked or broken. Doing so could increase the risk of skin or eye injury from the flash lamp. Contact Customer Service for assistance (see table of contents).

18 19
• DO NOT allow the LumaRx Mini Hair Removal System to become damp or wet. DO NOT use the LumaRx Mini Hair Removal System near bathtubs, showers, basins, or other vessels containing water. Failure to follow these precautions can cause electrocution or electric shock. Contact Customer Service for assistance (see table of contents).
• DO NOT operate the LumaRx Mini Hair Removal System with an unapproved charging cord, or if it has a damaged plug or charging cord. Keep the LumaRx Mini Hair Removal System cord away from heated surfaces (such as stoves, fireplaces, radiators or furnaces). Failure to follow these precautions can cause electrocution or electric shock. Contact Customer Service for assistance (see table of contents).
• DO NOT open the LumaRx Mini Hair Removal System (except to replace the replaceable TREATMENT HEAD) or attempt to repair your LumaRx Mini Hair Removal System as it contains no user-serviceable parts. Trying to open the LumaRx Mini Hair
Removal System may also damage the device and will void your warranty. Please contact Customer Service (see table of contents) if you have a broken or damaged device. Failure to follow these precautions can cause electrocution or electric shock.
• Hair removal by lasers or intense pulsed light (IPL) can cause increased hair growth in some individuals.
• If you’ve had professional or clinical or self-administered laser or IPL or electrolysis hair removal treatments, wait at least 6 months before using the LumaRx Mini Hair Removal System. If you’ve waxed, plucked or epilated hair in the treatment area, wait at least 6 weeks before using the LumaRx Mini Hair Removal System. The device uses the hair under your skin to disable your hair at the root, so it is not effective if the hair has been pulled out.
Risks
It is important to use the LumaRx Mini Hair Removal System properly. Make sure that you follow all the warnings (see table of contents), and that you do not use the device if it is not right for you. If you do not understand any of the warnings, or have any questions, please contact Customer Service (see table of contents). If you use the LumaRx Mini Hair Removal System as directed, the risks are low:
• Your skin may become red within 24 hours after treatment. This redness generally clears up within a few hours. If the redness does not go away within 2–3 days, contact Customer Service (see table of contents).
• You may develop temporary blisters, although these are unlikely for people with lighter skin tones. If you do develop a blister, stop using the LumaRx Mini Hair Removal System, clean the blister and cover it with a bandage and change daily to help prevent the blister from becoming infected. If you need more information, contact Customer Service (see table of contents).
• In rare cases, some users might see an increase in the number of hairs growing. This increase is usually temporary and due to hair growth cycles. However, if after beginning use of the LumaRx Mini Hair Removal System you believe that the number of hairs regrowing in the treated area has increased since you started treatment, stop using the LumaRx Mini Hair Removal System and contact Customer Service (see table of contents).
The following symptoms affected no participants in the clinical study, but have been reported with other hair-removal lasers or IPL devices:
• Skin swelling, especially around the hair follicle where you may notice the skin is slightly higher than surrounding areas. If the swelling doesn’t go away within 2–3 days, stop using the LumaRx Mini Hair Removal System and contact Customer Service (see table of contents).
Precautions Risks

20 21
• Skin discoloration. If you notice that your Skin Tone in the treatment area has changed, stop using the LumaRx Mini Hair Removal System and contact Customer Service (see table of contents).
• Eye Injury. Flashing any laser or IPL device near or around the eyes could cause serious and permanent eye injury. This is very unlikely as long as the device is used as indicated.
• If you have a history of cold sores in the intended treatment area, you may experience a recurrence of a cold sore after using the LumaRx Mini Hair Removal System in those areas.
Risks What to expect during and after treatment
During TreatmentFor many people, using the LumaRx Mini Hair Removal System is their first experience with a light-based device. Here are some things to expect during treatment:
• A Flash of Light: The flash of light that you see is only part of the light produced by the LumaRx Mini Hair Removal System and should not be harmful to your eyes. The LumaRx Mini Hair Removal System Contact Sensors help ensure that most of the light is directed into the skin. The remaining visible light should not be harmful to the eyes, and special eye protection is not needed as long as you follow the directions for using the LumaRx Mini Hair Removal System in this manual. The LumaRx Mini Hair Removal System should NOT be used on or around the eyes, eyelashes or eyebrows.
• A Sensation of Warmth and Tingling: It is normal to feel a warm and tingling sensation with each flash. Many people describe this sensation to be
like a rubber band lightly snapped against the skin. However, sensations vary by person and treatment area. If the sensation is too intense or painful, stop using the LumaRx Mini Hair Removal System and contact Customer Service before using again.
Immediately After the First Treatment
• Visible changes to the hair are unlikely at this point. During and just after your LumaRx Mini Hair Removal System session, it is not uncommon to see some very mild redness, mostly around the hairs themselves. This is normal and typically clears up within a few hours. If the redness does not go away within 2 days, contact Customer Service (see table of contents).
• If you have redness, blistering or other skin irritation in the treatment area, DO NOT perform treatment. Wait until the skin returns to normal before using the LumaRx Mini Hair Removal System again. If the irritation does not go away within 3 days, contact Customer Service.

22 23
One to Two Weeks after the First Treatment
• Hairs in the treated area will begin to fall out gradually, but it is unlikely you will notice significant reduction in hair at this stage.
• Make sure to complete the full treatment schedule to ensure you hit all hairs in the growth phase in the targeted area.
Once you’ve become familiar with the LumaRx Mini Hair Removal System and read all the information on the preceding pages, including the WARNINGS and PRECAUTIONS, you’re ready to use the LumaRx Mini Hair Removal System.This section explains step-by-step how to operate the LumaRx Mini Hair Removal System. Read this entire section carefully before you start treatment. Then refer back to it later as you follow the steps.Before using your LumaRx Mini Hair Removal System for the first time, we recommend that you fully charge the device (see “After Your LumaRx Mini Hair Removal System Treatment” in table of contents). NOTE: the LumaRx Mini Hair Removal System cannot be operated while it is plugged in or being charged.The first time you use the LumaRx Mini Hair Removal System, you should test it on a small patch of skin (see table of contents).
STEP 1: CLEAN, SHAVE, AND DRY Before using the LumaRx Mini Hair Removal System, prepare the treatment area by thoroughly Cleaning, Shaving and Drying the intended treatment area. It is important that you remove any makeup from the treatment area. Removing surface hair and cleaning the skin helps to minimize the sensation felt from the LumaRx Mini Hair Removal System flashes and allows the energy to penetrate to the hair root. Because the LumaRx Mini Hair Removal System works below the skin, the device is still effective even if hairs are not clearly visible.
What to expect during and after treatment Using the LumaRx™ Mini Hair Removal System for treatment
Two Weeks after the Third Treatment
• You should see a noticeable reduction in hairs in the treated area. Also, any new hair growth should be lighter and finer.
• At this point, additional treatments on the same area should only be done as needed to target hairs that have recently entered the active cycle. Wait two weeks between any further treatments. Otherwise you only need to use the LumaRx Mini Hair Removal System for occasional touch-ups, where necessary, or to treat another area.

24 25
TESTING SKIN TONE (REPEAT FOR EVERY AREA YOU INTEND TO TREAT)A. Locate the SKIN TONE TESTERThe SKIN TONE TESTER is the blinking orange light on the back of the LumaRx Mini Hair Removal System.
Press right button to power up the device.
STEP 3: TEST YOUR SKIN TONEEach time you turn the LumaRx Mini Hair Removal System on, you will be prompted to test your skin tone with the SKIN TONE TESTER. The LumaRx Mini Hair Removal System will play a melody to remind you to test, and you will see the animated image to the right on the DISPLAY.NOTE: Using the LumaRx Mini Hair Removal System on darker skin tones can result in damage to the skin (such as burns, blisters or skin discoloration). To help protect against such damage, the LumaRx Mini Hair Removal System requires that you test your skin tone before every use. Since some skin areas are darker than others, test each different area you want to treat.
STEP 2: TURN ON the LumaRx Mini Hair Removal SystemUnplug the LumaRx Mini Hair Removal System from the charger. The LumaRx Mini Hair Removal System will not operate when it is plugged in.Press the POWER Button (right button on the front of the device) to turn the power on.To turn the LumaRx Mini Hair Removal System off, press and hold the right button for at least 2 seconds.
Using the LumaRx™ Mini Hair Removal System for treatment
Device must be unlocked with SKIN TONE TESTER. Turn device over to test.
SKIN TONE TESTER will be blinking ORANGE when it is ready to test.
Place skin in intended treatment area directly on light to test.
DO NOT use the LumaRx Mini Hair Removal System on tanned skin. Even if your natural skin tone is light, tanning makes it darker—potentially too dark for treatment. With tanned skin, wait until the tan has completely faded before using the LumaRx Mini Hair Removal System on that area.Always use the SKIN TONE TESTER to determine if your Skin is too dark to treat with the LumaRx Mini Hair Removal System by placing the SKIN TONE TESTER on the area to be treated. Make sure your skin in this area is clean and dry, and shave if it is necessary to be sure it is free of hair.

26 27
B. Skin Tone Test: Place SKIN TONE TESTER firmly against skin in intended treatment area (cheek in the below photo) and hold for 2 seconds. NOTE: the blinking orange light MUST be touching skin for a proper reading. The reading will take place automatically.
Before Skin Tone Test: Light is blinking orange and the LumaRx Mini Hair
Removal System is beeping
C. Is skin suitable for treatment?SOLID ORANGE LIGHT & “BUZZ” = SKIN MAY BE TOO DARKIf the light is solid ORANGE and the LumaRx Mini Hair Removal System “BUZZES,” your skin in that area may be too dark for treatment.If your Skin Tone is not suitable for treatment, the sensor light will turn solid orange and the device will “buzz” once. After 5 seconds, you can re-try the Skin Tone Test, starting at Step 1, above.
SOLID ORANGE LIGHT and “BUZZ” = Skin Tone may be too dark in that area for treatment. You can re-try another area.
Using the LumaRx™ Mini Hair Removal System for treatment
SOLID GREEN LIGHT & “BEEP” = SKIN TONE IS OKIf your skin tone is OK for treatment, the sensor light will turn green and a high-pitched “BEEP BEEP” will sound, indicating that the LumaRx Mini Hair Removal System is ready for treatment. The display will change to show status information. NOTE: If you believe your skin is suitable based on the Skin Tone chart (see Indications in table of contents), but the SKIN TONE TESTER will not enable the device, contact Customer Service (see table of contents).
NOTES:
• After 5 minutes, the LumaRx Mini Hair Removal System will automatically Power Off. If you Power the device on again, you will need to use the SKIN TONE TESTER to use the LumaRx Mini Hair Removal System.
• Some areas of the skin are darker than others. You must use the SKIN TONE TESTER on each different area you want to treat.
• If you feel the SKIN TONE TESTER has not made a proper reading, you may try again after 5 seconds. If you believe your skin is suitable based on the Skin Tone chart on page 10 but the SKIN TONE TESTER will not enable the device, contact Customer Service.
• If you have tanned skin in the intended treatment area, DO NOT use the the LumaRx Mini Hair Removal System in those areas as your skin may be too dark for treatment. You should wait until your tan has completely faded from any intended treatment area before using the LumaRx Mini Hair Removal System.
SOLID GREEN LIGHT and “BEEP BEEP” = Skin Tone is OK to treat in that area. You should proceed to the next step.

28 29
STEP 4: CHOOSE ENERGY LEVELAs with any new skin care product, we recommend testing the LumaRx Mini Hair Removal System on a patch of skin before your first full treatment or before treating a new area. A. TESTING the LumaRx Mini Hair Removal System ON A SMALL PATCH OF SKIN Testing the LumaRx Mini Hair Removal System helps you determine the appropriate Energy Level to use the first time you use the device, or for each new treatment area. Higher Energy Levels are more effective at removing hair, but may be less comfortable. To get the best results with the LumaRx Mini Hair Removal System, you should use the highest Energy Level setting that’s comfortable and does not cause an adverse skin reaction.
To test the LumaRx Mini Hair Removal System on a new treatment area, follow these steps: 1. Start at Energy Level 1. The LumaRx
Mini Hair Removal System defaults to Energy Level 1 (one bar), which is where you should start the Patch of Skin Test.
2. Flash your Skin (see table of contents). With the LumaRx Mini Hair Removal System at Energy Level 1, treat your skin with one single flash by firmly placing the flash window flat against skin (you should hear a “BEEP BEEP” and the SKIN TONE TESTER light should be GREEN). Press the FLASH BUTTON to deliver a flash.
Using the LumaRx™ Mini Hair Removal System for treatment
Mild to moderate discomfort is normal. If you feel more than moderate pain, stop using the LumaRx Mini Hair Removal System immediately and call Customer Service (see table of contents) for help.
• If a flash delivered at Energy Level 1 feels tolerable, press the ENERGY LEVEL button once to change to Energy Level 2. Move the device to a different spot and flash the LumaRx Mini Hair Removal System one more time. Repeat this process until you find the setting that feels right for you.
• Wait 24 hours and then look at the test area. If the skin appears normal, proceed with your first full treatment at that setting. Record this level in your Treatment Card (see table of contents).
If you notice blistering, burns, changes in your Skin Tone, or any other side effects, or if you are not sure about the outcome of the test, DO NOT USE the LumaRx Mini Hair Removal System and contact Customer Service (see table of contents).Repeat the test if you decide to try the LumaRx Mini Hair Removal System on a different part of the face, or if your skin tone has changed.

30 31
B. CHANGING ENERGY LEVELSEnergy Level Bars indicate the intensity of the LumaRx Mini Hair Removal System light pulse delivered to your skin, from the lowest level (Level 1, or one bar) to the highest level (Level 3, or three bars). Higher levels improve hair removal results, but may be less comfortable. To get the best results, you should use the highest setting that’s comfortable and that does not cause an adverse skin reaction (based on Patch of Skin Test, see table of contents).
ENERGY LEVEL BARS and ENERGY LEVEL BUTTON
01
Energy Level
Press Energy Level Button
Energy Level Display:
1 2 3
Pressing Energy Level button twice increases to Energy Level 3. Pressing one more time will cycle back to Energy Level 1.
Pressing Energy Level button once increases to Energy Level 2.
The LumaRx Mini Hair Removal System defaults to Level 1 upon start-up.
After reaching Level 3, pressing the ENERGY LEVEL BUTTON again resets the LumaRx Mini Hair Removal System to Energy Level 1.
Using the LumaRx™ Mini Hair Removal System for treatment
There are 3 energy settings on the the LumaRx Mini Hair Removal System. When the LumaRx Mini Hair Removal System is turned on, the device defaults to the lowest energy level, Level 1 (one bar). To change the Energy Level, press the ENERGY LEVEL BUTTON (the left button below the Display). Once the energy level has reached level 3, pressing the ENERGY LEVEL BUTTON will return the device to energy level 1. The number of ENERGY LEVEL BARS will coincide with the change in energy level.

32 33
STEP 5: FLASH YOUR SKINAfter testing skin tone and setting the desired Energy Level, you are ready to use the LumaRx Mini Hair Removal System to treat your skin.A. LOCATE FLASH WINDOW AND CONTACT SENSORSThe FLASH WINDOW has four CONTACT SENSORS that surround it (the CONTACT SENSORS are embedded in the treatment head and are not visible). All of the CONTACT SENSORS must be touching skin for the LumaRx Mini Hair Removal System to flash.
CONTACT SENSORS
If ALL CONTACT SENSORS are NOT in full contact with the skin and you attempt to press the FLASH BUTTON, the LumaRx Mini Hair Removal System will “BUZZ” twice and will not emit a flash. Double check that the contact sensors are in full contact with the skin. Try pressing the FLASH WINDOW more firmly against skin.If the CONTACT SENSORS are in full contact with the skin, you should hear a “CHIRP” sound, and the LED on the back of the device will be SOLID GREEN, indicating the LumaRx Mini Hair Removal System is ready to flash. The LumaRx Mini Hair Removal System will deliver a flash if you press the FLASH BUTTON (without losing contact with skin).
ALL CONTACT SENSORS are NOT flush against skin. The device will “BUZZ” if you press the FLASH BUTTON and will NOT flash. Contact Sensors must be in full contact with the skin.
ALL CONTACT SENSORS ARE flush against the skin. The device will “CHIRP” if contact sensors are flush against the skin. If you press the FLASH BUTTON, the device will deliver a flash.
Using the LumaRx™ Mini Hair Removal System for treatment
B. Firmly press FLASH WINDOW against skinCarefully, but firmly place the LumaRx Mini Hair Removal System FLASH WINDOW directly on the treatment area, making sure the skin is spread evenly and smoothly.For example, if you are treating your lip area, stretch your top lip over your teeth to make it as smooth as possible. The light will be SOLID GREEN if contact sensors are touching skin.
34 35
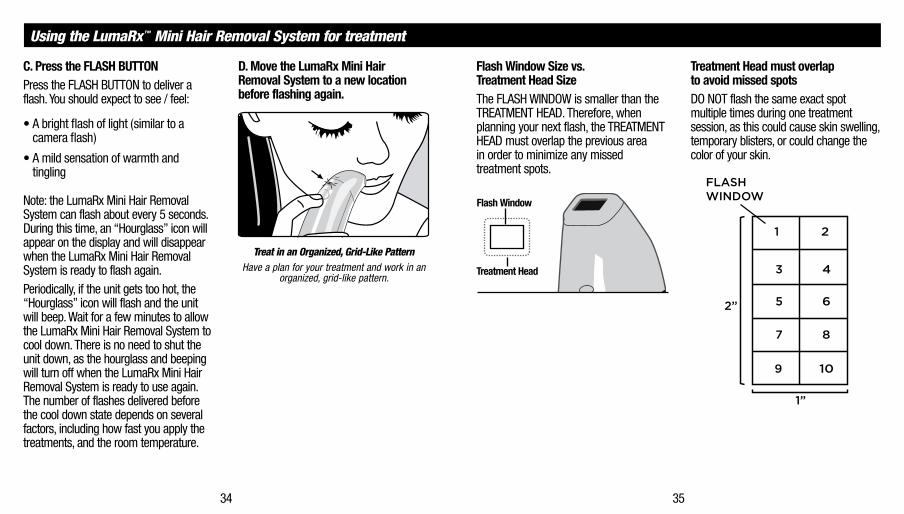
C. Press the FLASH BUTTON Press the FLASH BUTTON to deliver a flash. You should expect to see / feel:
• A bright flash of light (similar to a camera flash)
• A mild sensation of warmth and tingling
Note: the LumaRx Mini Hair Removal System can flash about every 5 seconds. During this time, an “Hourglass” icon will appear on the display and will disappear when the LumaRx Mini Hair Removal System is ready to flash again.Periodically, if the unit gets too hot, the “Hourglass” icon will flash and the unit will beep. Wait for a few minutes to allow the LumaRx Mini Hair Removal System to cool down. There is no need to shut the unit down, as the hourglass and beeping will turn off when the LumaRx Mini Hair Removal System is ready to use again. The number of flashes delivered before the cool down state depends on several factors, including how fast you apply the treatments, and the room temperature.
Treat in an Organized, Grid-Like Pattern Have a plan for your treatment and work in an
organized, grid-like pattern.
D. Move the LumaRx Mini Hair Removal System to a new location before flashing again.
Flash Window Size vs. Treatment Head SizeThe FLASH WINDOW is smaller than the TREATMENT HEAD. Therefore, when planning your next flash, the TREATMENT HEAD must overlap the previous area in order to minimize any missed treatment spots.
Flash Window
Treatment Head
1”
2”
1 2
3 4
5 6
7 8
9 10
FLASHWINDOW
Using the LumaRx™ Mini Hair Removal System for treatment
Treatment Head must overlap to avoid missed spotsDO NOT flash the same exact spot multiple times during one treatment session, as this could cause skin swelling, temporary blisters, or could change the color of your skin.

36 37
Using the LumaRx™ Mini Hair Removal System for treatment
Recommended Treatment Schedule:
Your initial regimen should be spread out over 1 month to ensure that you target the most number of active hairs (including those that recently cycled from the resting phase). We recommend that you use the LumaRx Mini Hair Removal System
For Body Sites
1”
2”
1 2 3 4 5
6 7 8 9 10
For a typical 1” by 2” treatment area, you should use 10 flashes.
once a week every other week (for a total of 3 treatments) on each area. If you have redness, blistering or other skin irritation in the treatment area, DO NOT perform the treatment. Wait until the skin returns to normal before using the LumaRx Mini Hair Removal System again. If the irritation does not go away within 3 days, contact Customer Service.
For Female Facial SitesSuggested Numbers of Flashes
SIDEBURN : 10
CHEEK : 25
ABOVE LIPS : 10
CHIN : 20
NECK : 25
Use the Session Flash Counter: The Session Flash Counter is located on the LumaRx Mini Hair Removal System display and should be used with the Suggested Number of Flashes (shown above) for each treatment area. Note: the Session Flash Counter resets to zero each time you power the LumaRx Mini Hair Removal System off.
01
Session Flash Counter will reset each time you power on the LumaRx Mini Hair Removal System.
Test skin before treating a new area.

38 39
Record flashes in the TREATMENT CARDS: Use the TREATMENT CARDS (see table of contents) to track the number of flashes used, ENERGY LEVEL, and to schedule your next treatment.
OTHER TREATMENT TIPS
• Perform your treatments at night before going to bed, so that any lingering redness will most likely disappear by morning.
• If you’ve waxed hair in the treatment area, wait 6 weeks before using the LumaRx Mini Hair Removal System. The device uses the hair under your skin to disable your hair at the root, so it is not effective if the hair has been pulled out.
• The number of flashes delivered before the cool down state depends on several factors, including how fast you apply the treatments and the room temperature.
• Use the highest Energy Level setting that’s comfortable for you and that does not cause an adverse reaction. Higher Energy Levels are more effective.
Using the LumaRx™ Mini Hair Removal System for treatment
• Shave immediately before treating the area. Doing this will let you use a higher Energy Level, because there will be less hair to heat up and the treatment will sting less. How well you shave will make a big difference in how the treatment feels (see table of contents).
• Periodically, if the device gets too hot, the “Hourglass” icon will flash and the unit will beep. Wait for a few minutes to allow the LumaRx Mini Hair Removal System to cool down. There is no need to shut the unit down, as the hourglass icon will disappear when the LumaRx Mini Hair Removal System is ready to use again.

40 41
NOTE: the LumaRx Mini Hair Removal System battery is not user replaceable. When the fill color of the LumaRx Mini Hair Removal System is low, you should charge your LumaRx Mini Hair Removal System soon or you may not be able to complete your treatment.
When your LumaRx Mini Hair Removal System session is over, we suggest the following:
• Be sure to record your treatment in the Treatment Cards(see table of contents).
• Turn the LumaRx Mini Hair Removal System off by pressing and holding the POWER BUTTON (right button below the Display) for at least 2 seconds.
• After each hair removal session, clean your LumaRx Mini Hair Removal System, especially the CAP and LIGHT WINDOW (see “Cleaning the LumaRx Mini Hair Removal System” in table of contents).
• After cleaning, store your LumaRx Mini Hair Removal System in its original box and keep it away from water.
• You may wish to charge your device overnight, so that it is ready for your next treatment (see “Recharging the LumaRx Mini Hair Removal System” in table of contents).
CLEANING the LumaRx Mini Hair Removal SystemAfter each session, clean the LumaRx Mini Hair Removal System, especially the LIGHT WINDOW, the CONTACT SENSORS, and the SKIN TESTER window.
DO NOT place any part of the LumaRx Mini Hair Removal System in water or other liquids. If any part of the LumaRx Mini Hair Removal System gets wet, DO NOT USE. Contact Customer Service (see table of contents). As with any electrical device, a wet LumaRx Mini Hair Removal System could cause electrocution or electric shock.
• Make sure the LumaRx Mini Hair Removal System is turned off. Remove the LumaRx Mini Hair Removal System CHARGING CORD from the device and wall socket before cleaning.
• Use a clean, lint-free cloth or a cotton swab to gently wipe the LumaRx Mini Hair Removal System surface and especially the CAP, LIGHT WINDOW, CONTACT SENSORS and the SKIN TESTER window. If needed, you can
After your LumaRx™ Mini Hair Removal System treatment
dampen the cloth or cotton swab with water and mild soap. Allow the LumaRx Mini Hair Removal System to dry completely before using again.
• If you still need to remove dirt or debris, you can use your fingernail or a firm piece of plastic like a credit card. Be careful not to damage the FLASH WINDOW.
DO NOT attempt to open or repair your LumaRx Mini Hair Removal System device. Only authorized LumaRx Hair Removal System repair centers are permitted to perform repairs.RECHARGING the LumaRx Mini Hair Removal System
01
Low Battery Life
We recommend recharging the LumaRx Mini Hair Removal System after each use to ensure that the device is fully-charged and ready for your next treatment. You can check the status of the battery in the upper left on the display:
01
Battery Life

42 43
While the device is charging, you will see the following: the plug symbol on the display and the Battery Status icon will update as the charge progresses.
Battery is charging
Battery is fully-charged and needs to be unplugged to use
When the LumaRx Mini Hair Removal System battery is fully charged, you will hear a “Beep” and the Battery Level will be completely filled. The Charging Cord icon will be blinking to indicate that the device needs to be unplugged in order to use again.
To recharge your device, attach the included charging cord to the bottom of the LumaRx Mini Hair Removal System and place the plug into a standard household electrical socket. NOTE: that the included charging cord is specified as part of medical equipment, you should only use the included charging cord.NOTE: The LumaRx Mini Hair Removal System will NOT operate while it is being charged. To use the LumaRx Mini Hair Removal System, unplug the charging cord and press the right button to power up the device.
Battery Life Empty
If the LumaRx Mini Hair Removal System Battery Life is empty and unable to deliver another flash, the LumaRx Mini Hair Removal System will beep once and you will see the Empty Battery & Charging Cord alternate blinking. You must re-charge your LumaRx Mini Hair Removal System in order to use again.
REPLACING THE TREATMENT HEADWhen the TREATMENT HEAD has used up its available flashes, it must be replaced. The Bulb Life Remaining icon on the display warns you when the number of remaining flashes is low.
When the TREATMENT HEAD has fewer than 5% flashes remaining, the fill color blinks. When all flashes have been used, the LumaRx Mini Hair Removal System will “BEEP” and the empty bulb icon will blink to indicate that the TREATMENT HEAD can no longer deliver flashes and must be replaced.
01
Bulb Life
After your LumaRx™ Mini Hair Removal System treatment

44 45
Status
Bulb Life Remaining display
Icon
Full Partially Full Empty
Bulb Life is empty and the entire bulb is blinking. The TREATMENT HEAD must be replaced for additional treatments.
As you continue to use your Bulb, the Bulb Fill Color decreases. When there are fewer than 5% flashes left, the Bulb Fill Color will Start to blink.
Bulb Fill Color solid indicating bulb is new.
NOTE: The TREATMENT HEAD MUST be replaced if the LAMP TUBE is broken.Once you have determined that the TREATMENT HEAD must be replaced, follow the instructions below to obtain a new TREATMENT HEAD and replace the old one with the new one.1. Obtain a new TREATMENT HEAD. Check www.Luma-Rx.com to order a replacement or locate a retailer near you.2. Turn the POWER SWITCH off. Unplug the CHARGING CORD from the electrical outlet, if recharging.3. Grasp the TREATMENT HEAD with
Press and hold right button for 2 seconds to power off the device.
Press tabs on top & bottom of Treatment Head and gently pull up.
After your LumaRx™ Mini Hair Removal System treatment
one hand, press on the release tabs, and pull gently to remove. Discard the used cartridge in accordance with your local regulations. 4. With the replacement TREATMENT
HEAD in hand, ensure that the FLASH WINDOW is on the same side as the Display. Carefully align the tabs in the appropriate slots. 5. Gently push the new TREATMENT

46 47
DISPOSAL OF the LumaRx Mini Hair Removal SystemPlease follow the local, state and/or government requirements for disposal or recycling of battery-powered electronic devices for your LumaRx Mini Hair Removal System, replacement head, or any of its accessories.
PROBLEM POSSIBLE CAUSE WHAT YOU SHOULD DO
My LumaRx Mini Hair Removal System does not start.
The LumaRx Mini Hair Removal System system isn’t charged. You should hear the LumaRx Mini Hair Removal System beep twice and the following screen:
Make sure the device is fully charged – plug CHARGING CORD into wall socket. The Battery Charging icon should be activated. When the device is fully charged, the battery indicator will be full.
The TREATMENT HEAD is not present or not fully attached. You should hear 2 “BEEPS” and see the following screen:
Check to ensure that the TREATMENT HEAD is properly affixed to the DEVICE. When the TREATMENT HEAD is properly attached, you should hear a “click” and the lights and audible tones will stop. For instructions on how to check that the TREATMENT HEAD is properly affixed, see table of contents.
Troubleshooting
HEAD into place, making sure the head is securely attached. Take care not to touch or damage the tabs or circuit board on the TREATMENT HEAD.
6. Turn on your LumaRx Mini Hair Removal System. After you successfully test your skin tone with the SKIN TONE TESTER (see table of contents), you should see the Bulb Life reset to full in the top right corner of the display.
After your LumaRx™ Mini Hair Removal System treatment Troubleshooting

48 49
PROBLEM POSSIBLE CAUSE WHAT YOU SHOULD DO
When I place the LumaRx Mini Hair Removal System against my skin, nothing happens. The DEVICE doesn’t beep, even after a few seconds.
You may need to perform a SKIN TONE TEST. You should hear a melody and see this screen on the Display:
Place the blinking orange light directly against skin in the intended treatment area. For safety reasons, the LumaRx Mini Hair Removal System may require you to perform another SKIN TONE TEST if you don’t use it for 5 minutes. If you take a break in the middle of a treatment, or turn off the device, you may need to perform another SKIN TONE TEST to use the LumaRx Mini Hair Removal System again. See table of contents for “Testing Skin Tone”.
The CONTACT SENSORS aren’t in full contact with the skin.
Check that all the CONTACT SENSORS are touching your skin. The LumaRx Mini Hair Removal System won’t work unless all four CONTACT SENSORS are flush against your skin. See Step 5: Flash Your Skin in table of contents.
You are trying to treat a small area, such as between the eye brows or near the eyes.
For your safety, the LumaRx Mini Hair Removal System should NOT be used anywhere near the eyes, eye brows or eye lashes.
PROBLEM POSSIBLE CAUSE WHAT YOU SHOULD DO
A flash of light is not emitted when I press the FLASH BUTTON.
The CONTACT SENSORS are not in full contact with the skin.
Check that all the CONTACT SENSORS are touching your skin. The LumaRx Mini Hair Removal System won’t work unless all four CONTACT SENSORS are flush against your skin. See Step 5: Flash Your Skin in table of contents.
You have not waited enough time between flashes for the LumaRx Mini Hair Removal System bulb to recover.
The LumaRx Mini Hair Removal System requires about 5 seconds to recharge between flashes. When your LumaRx Mini Hair Removal System is ready to flash (and assuming the CONTACT SENSORS are flush against the skin), the device will “CHIRP” and the light will be SOLID GREEN to confirm that it is ready to flash.
The TREATMENT HEAD has used up all flashes and needs to be replaced. You should see the BULB LIFE empty and flashing on and off.
Make sure that the BULB LIFE gauge is not empty and blinking. If it is flashing, power the LumaRx Mini Hair Removal System down and replace the TREATMENT HEAD. Refer to “Replacing the TREATMENT HEAD” in table of contents.
Troubleshooting

50 51
PROBLEM POSSIBLE CAUSE WHAT YOU SHOULD DO
A flash of light is not emitted when I press the FLASH BUTTON.
The LumaRx Mini Hair Removal System needs some time to cool down. You should hear the LumaRx Mini Hair Removal System “BEEP” once and see the following “hourglass and ther-mometer” icon on the display.
Wait for a few minutes for the LumaRx Mini Hair Removal System to cool down. There is no need to shut the unit down, as the hourglass and thermometer icons will disappear when the LumaRx Mini Hair Removal System is ready to use again. Under normal operating conditions, this is an uncommon occurrence. However this situation can arise if the device becomes too hot. When this happens, the LumaRx Mini Hair Removal System needs a few minutes to cool down in order to ensure safe operation of the device.
PROBLEM POSSIBLE CAUSE WHAT YOU SHOULD DO
I used the LumaRx Mini Hair Remo-val System SKIN TONE TESTER and it buzzed and was lit ORANGE.
Your skin may be too dark (see the Skin Tone Chart in table of contents).
You cannot use the LumaRx Mini Hair Removal System with your Skin Tone. Please contact Customer Service (see table of contents).
You didn’t use the SKIN TONE TESTER correctly.
If the SKIN TONE TESTER (blinking orange light) isn’t firmly touching skin, the LumaRx Mini Hair Removal System will sound a rejection tone. Try pressing the SKIN TONE TESTER firmly against skin – see Step 5: Flash Your Skin in table of contents.
The SKIN TONE TESTER isn’t working.
Please contact Customer Service (see table of contents) for help.
Troubleshooting

52 53
PROBLEM POSSIBLE CAUSE WHAT YOU SHOULD DO
The LumaRx Mini Hair Removal System isn’t working, is beeping and showing the following (including a reference number):
The LumaRx Mini Hair Removal System isn’t working properly and may need to be serviced.
Turn the device OFF and restart. If the device displays the error code again, contact Customer Service (see table of contents) for help and provide them with the reference number displayed.
PROBLEM POSSIBLE CAUSE WHAT YOU SHOULD DO
Dirt or debris is stuck to the LumaRx Mini Hair Removal System window.
The LumaRx Mini Hair Removal System needs to be cleaned.
Read “After Your IPL Treatment” (see table of contents) for instructions on how to clean your LumaRx Mini Hair Removal System. If you still can’t get it clean, contact Customer Service (see table of contents) for help.
DO NOT attempt to open or repair your LumaRx Mini Hair Removal System. Only authorized LumaRx repair centers are permitted to perform repairs.
Opening the LumaRx Mini Hair Removal System may expose you to dangerous electrical components and to pulsed light energy, either of which may cause serious bodily damage and/or permanent eye injury. Trying to open the LumaRx Mini Hair Removal System may also damage the device and will void your warranty. Please contact LumaRx Customer Service (see table of contents) if you have a broken or damaged device in need of repair.
!006
Troubleshooting Contact information
Labeling
Specifications
1. 4cm2
5 secXenon Flash Lamp (IPL)8 J/cm2 (+/- 20%)600-1200 nm100-240Vac, 50/60Hz, 0.2A (external charger)IEC 60335
Spot SizeSpeedTechnologyMax Energy LevelWavelengthElectrical RequirementsOperation and Safety
!
Type BF Applied Part
Class II Equipment
Caution
Symbol Title
Keep dry.
DO NOT throw away the device or treatment head with the normal household waste, but hand it in at an official collection point for recycling.
Symbol Title
Customer Service: 800-736-4648Online: www.Luma-Rx.com
Address: Spectrum Brands, Inc., 3001 Deming Way
Middleton, WI 53562Document #: 610-00008, Rev G
Read the Use and Care Guide.
54 55
LumaRx™ is a trademark of Spectrum Brands, Inc. Questions or comments:
For more information please visit www.Luma-Rx.com. If your LumaRx system is broken, damaged, in need of repair, or for any other user assistance, please contact Customer Service: 800-736-4648 or visit www.Luma-Rx.com
Dist. by: Spectrum Brands, Inc., Middleton, WI 53562 1/15 2013-2-18-60
Made in China.
T22-0003043 © 2015 Spectrum Brands, Inc.
Limited Two-Year WarrantySpectrum Brands, Inc. warrants this product against any defects that are due to faulty material or workmanship for a two-year period from the original date of consumer purchase. This warranty does not include damage to the product resulting from accident or misuse.If the product should become defective within the warranty period, we will replace it free of charge. Return your product and sales receipt with your name, address and day time phone number to: Spectrum Brands, 507 Stokely Dr., P.O. Box 1, Deforest, WI 53532. For more information call 800-736-4648.
SPECTRUM BRANDS, INC. SHALL NOT BE RESPONSIBLE FOR ANY INCIDENTAL, SPECIAL OR CONSEQUENTIAL DAMAGES RESULTING FROM THE USE OF THIS PRODUCT. ALL IMPLIED WARRANTIES, INCLUDING BUT NOT LIMITED TO IM PLIED WARRANTIES OF FITNESS AND MERCHANTABILITY, ARE LIMITED IN DURATION TO TWO YEARS FROM DATE OF ORIGINAL PURCHASE.
This warranty gives you specific legal rights and you may also have other rights which vary from state to state. Some states do not allow the exclusion or limitation of incidental, special or consequential damages.SPECTRUM BRANDS, INC. MONEY-BACK OFFER
If within 90 days after you have purchased your LumaRx product, you are not satisfied and would like a refund, return it with the sales slip indicating purchase price and date of purchase to the retailer from whom it was purchased. Spectrum Brands, Inc. will reimburse all retailers who accept the product within 90 days from the date of purchase. If you have any questions concerning the money-back guarantee, please call 800-736-4648 in the U.S.
Performance guarantee
Performance guarantee
For more information about the LumaRx Mini Hair Removal System, please visit www.Luma-Rx.com. If your LumaRx Mini Hair Removal System is broken, damaged, in need of repair, or for any other LumaRx assistance, please contact LumaRx Customer Service: 1-800-736-4648
Customer service
KEEP ORIGINAL SALES RECEIPT AS PROOF OF PURCHASE FOR WARRANTY PURPOSES.
This warranty does not cover products damaged by the following:• Accident, misuse, abuse or alteration
of the product• Servicing by unauthorized persons• Use with unauthorized accessories• Connecting it to incorrect current and
voltage• Any other conditions beyond our control
56 57
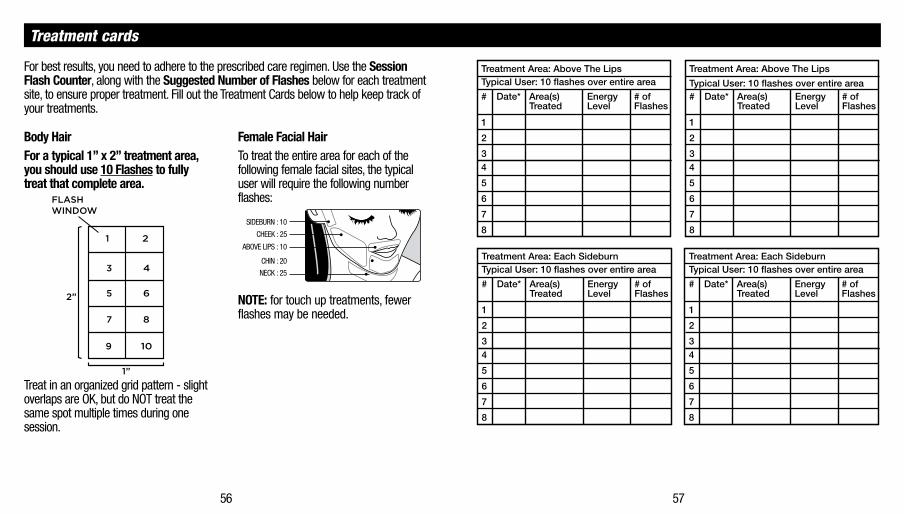
For best results, you need to adhere to the prescribed care regimen. Use the Session Flash Counter, along with the Suggested Number of Flashes below for each treatment site, to ensure proper treatment. Fill out the Treatment Cards below to help keep track of your treatments.
Female Facial Hair To treat the entire area for each of the following female facial sites, the typical user will require the following number flashes:
NOTE: for touch up treatments, fewer flashes may be needed.
Body HairFor a typical 1” x 2” treatment area, you should use 10 Flashes to fully treat that complete area.
Treat in an organized grid pattern - slight overlaps are OK, but do NOT treat the same spot multiple times during one session.
SIDEBURN : 10
CHEEK : 25
ABOVE LIPS : 10
CHIN : 20
NECK : 25
1”
2”
1 2
3 4
5 6
7 8
9 10
FLASHWINDOW
Treatment cards
Treatment Area: Above The Lips
Date* Area(s)Treated
EnergyLevel
# ofFlashes
#
1
2
34
5
6
7
8
Typical User: 10 flashes over entire areaTreatment Area: Above The Lips
Date* Area(s)Treated
EnergyLevel
# ofFlashes
#
1
2
34
5
6
7
8
Typical User: 10 flashes over entire area
Treatment Area: Each Sideburn
Date* Area(s)Treated
EnergyLevel
# ofFlashes
#
1
2
34
5
6
7
8
Typical User: 10 flashes over entire areaTreatment Area: Each Sideburn
Date* Area(s)Treated
EnergyLevel
# ofFlashes
#
1
2
34
5
6
7
8
Typical User: 10 flashes over entire area
Treatment Area: Each Cheek
Date* Area(s)Treated
EnergyLevel
# ofFlashes
#
1
2
34
5
6
7
8
Typical User: 25 flashes over entire areaTreatment Area: Each Cheek
Date* Area(s)Treated
EnergyLevel
# ofFlashes
#
1
2
34
5
6
7
8
Typical User: 25 flashes over entire area
Treatment Area: Chin
Date* Area(s)Treated
EnergyLevel
# ofFlashes
#
1
2
34
5
6
7
8
Typical User: 20 flashes over entire areaTreatment Area: Chin
Date* Area(s)Treated
EnergyLevel
# ofFlashes
#
1
2
34
5
6
7
8
Typical User: 20 flashes over entire area
Treatment Area: Neck
Date* Area(s)Treated
EnergyLevel
# ofFlashes
#
1
2
34
5
6
7
8
Typical User: 25 flashes over entire areaTreatment Area: Neck
Date* Area(s)Treated
EnergyLevel
# ofFlashes
#
1
2
34
5
6
7
8
Typical User: 25 flashes over entire area
Treatment Area:
Date* Area(s)Treated
EnergyLevel
# ofFlashes
#
1
2
34
5
6
7
8
Typical User: 10 flashes over 1”x2” areaTreatment Area
Date* Area(s)Treated
EnergyLevel
# ofFlashes
#
1
2
34
5
6
7
8
Typical User: 10 flashes over 1”x2” area

58 59
Treatment cards
Treatment Area: Above The Lips
Date* Area(s)Treated
EnergyLevel
# ofFlashes
#
1
2
34
5
6
7
8
Typical User: 10 flashes over entire areaTreatment Area: Above The Lips
Date* Area(s)Treated
EnergyLevel
# ofFlashes
#
1
2
34
5
6
7
8
Typical User: 10 flashes over entire area
Treatment Area: Each Sideburn
Date* Area(s)Treated
EnergyLevel
# ofFlashes
#
1
2
34
5
6
7
8
Typical User: 10 flashes over entire areaTreatment Area: Each Sideburn
Date* Area(s)Treated
EnergyLevel
# ofFlashes
#
1
2
34
5
6
7
8
Typical User: 10 flashes over entire area
Treatment Area: Each Cheek
Date* Area(s)Treated
EnergyLevel
# ofFlashes
#
1
2
34
5
6
7
8
Typical User: 25 flashes over entire areaTreatment Area: Each Cheek
Date* Area(s)Treated
EnergyLevel
# ofFlashes
#
1
2
34
5
6
7
8
Typical User: 25 flashes over entire area
Treatment Area: Chin
Date* Area(s)Treated
EnergyLevel
# ofFlashes
#
1
2
34
5
6
7
8
Typical User: 20 flashes over entire areaTreatment Area: Chin
Date* Area(s)Treated
EnergyLevel
# ofFlashes
#
1
2
34
5
6
7
8
Typical User: 20 flashes over entire area
Treatment Area: Neck
Date* Area(s)Treated
EnergyLevel
# ofFlashes
#
1
2
34
5
6
7
8
Typical User: 25 flashes over entire areaTreatment Area: Neck
Date* Area(s)Treated
EnergyLevel
# ofFlashes
#
1
2
34
5
6
7
8
Typical User: 25 flashes over entire area
Treatment Area:
Date* Area(s)Treated
EnergyLevel
# ofFlashes
#
1
2
34
5
6
7
8
Typical User: 10 flashes over 1”x2” areaTreatment Area
Date* Area(s)Treated
EnergyLevel
# ofFlashes
#
1
2
34
5
6
7
8
Typical User: 10 flashes over 1”x2” area