recip + usa instructions - QVC
32
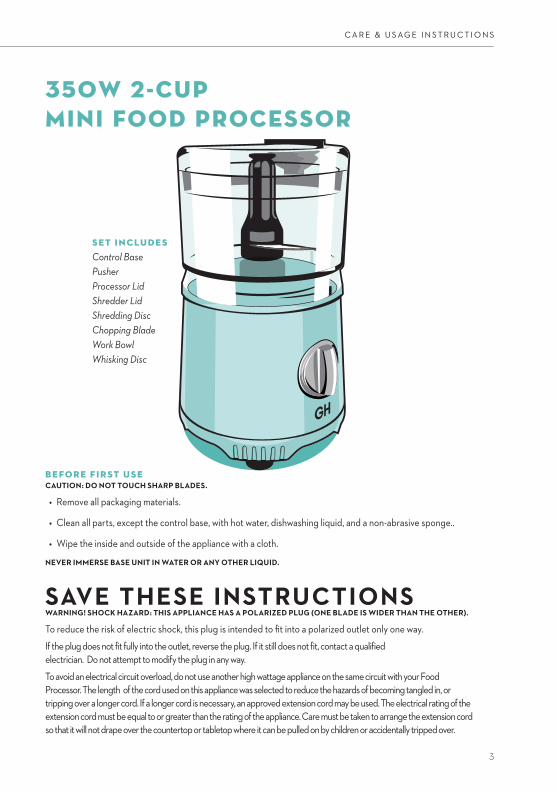
recip + usa instructions 350W 2-CUP MINI FOOD PROCESSOR
Transcript of recip + usa instructions - QVC

recip� + usa� instructions
350W 2-CUP MINI FOOD PROCESSOR
GOOD HOUSEKEEPING
2
IMPORTANT SAFEGUARDSWHEN USING ELECTRICAL APPLIANCES, BASIC SAFETY PRECAUTIONS SHOULD BE FOLLOWED
For questions or concerns, contact us at product@foodfi ght.hk • 866.231.6384
• Read and save all instructions.
• To protect against risk of electrical shock, do not immerse base, motor, cord, or plug in water or other liquid.
• Close supervision is necessary when any appliance is used by or near children.
• This appliance should not be used by children.
• Unplug cord from outlet when not in use, before putting on or taking off parts, and before cleaning.
• Avoid contacting moving parts.
• Do not operate any appliance with a damaged cord or plug.
• Do not operate aft er the appliance malfunctions, is damaged in any manner, or is dropped.
• Use only accessories or replacement parts by the manufacturer.
• Do not use your food processor if any part is broken.
• Do not use appliance outdoors.
• Do not let cord hang over edge of table or counter, or touch hot surfaces.
• Keep hands and utensils away from moving blade and disc while processing food.
• Keep hands and utensils away from moving blade and disc while processing food to reduce the risk of severe personal injury and/or damage to the Food Processor.
• The blade and disc are sharp. Handle carefully. Store out of reach of children.
• To reduce the risk of injury, never place cutting blade or disc on base without fi rst putting bowl properly in place.
• Be certain lid is securely locked in place before operating appliance..
• Always remove the cutting blades fi rst before cleaning or emptying food from the bowl.
• Do not attempt to interfere with the lid interlock mechanism.
• Make sure the blade or disc has come to a full stop before removing lid.
• Use caution when removing blade and disc from the bowl, when emptying the bowl, and when cleaning.
• Be sure to turn switch to off position after each use. Always use the pusher to clear the food chute. When this method is not possible, turn the motor off and disassemble unit to remove the remaining food.
• The appliance is not intended for commercial, professional or industrial use. It is designed and built exclusively for household use only.
• Never use appliance for a longer period or with a larger amount of ingredients other than that recommended by appliance manufacturer.
• Never chop ice in the food processor.
• Do not place on or near a hot gas or electric burner or in a heated oven.
• Do not use appliance for other than intended use.
C A R E & U S AG E I N S T R U C T I O N S
3
B E FO RE FI RST US ECAUTION: DO NOT TOUCH SHARP BLADES.
• Remove all packaging materials.
• Clean all parts, except the control base, with hot water, dishwashing liquid, and a non-abrasive sponge..
• Wipe the inside and outside of the appliance with a cloth.
NEVER IMMERSE BASE UNIT IN WATER OR ANY OTHER LIQUID.
SAVE THESE INSTRUCTIONSWARNING! SHOCK HAZARD: THIS APPLIANCE HAS A POLARIZED PLUG (ONE BLADE IS WIDER THAN THE OTHER).
To reduce the risk of electric shock, this plug is intended to fi t into a polarized outlet only one way.
If the plug does not fit fully into the outlet, reverse the plug. If it still does not fit, contact a qualified
electrician. Do not attempt to modify the plug in any way.
To avoid an electrical circuit overload, do not use another high wattage appliance on the same circuit with your Food
Processor. The length of the cord used on this appliance was selected to reduce the hazards of becoming tangled in, or
tripping over a longer cord. If a longer cord is necessary, an approved extension cord may be used. The electrical rating of the
extension cord must be equal to or greater than the rating of the appliance. Care must be taken to arrange the extension cord
so that it will not drape over the countertop or tabletop where it can be pulled on by children or accidentally tripped over.
350W 2-CUP
MINI FOOD PROCESSOR
S ET I N CLU D E SControl Base
Pusher
Processor Lid
Shredder Lid
Shredding Disc
Chopping Blade
Work Bowl
Whisking Disc
GOOD HOUSEKEEPING
4
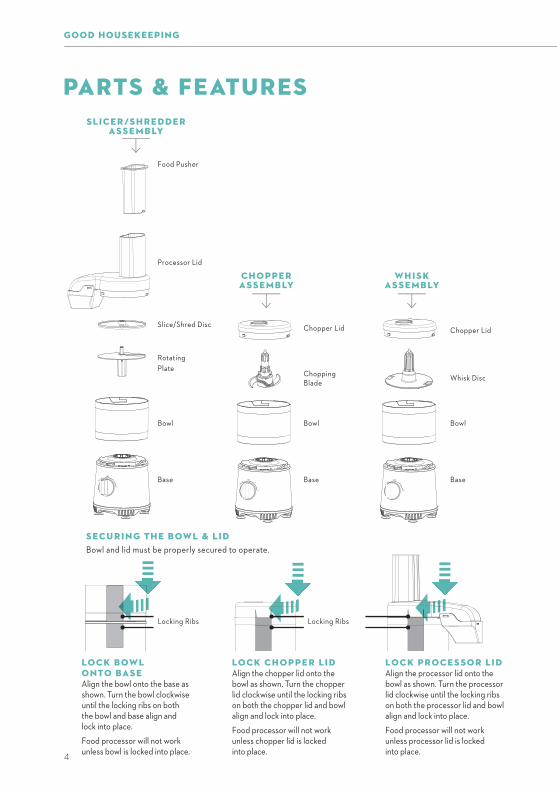
Base
Bowl
Rotating
Plate
Slice/Shred Disc
Processor Lid
Locking Ribs Locking Ribs
Food Pusher
OFF
PULSE 1
2
CH O PPE RAS S E M B LY
Base
Bowl
Chopping Blade
Chopper Lid
OFF
PULSE 1
2
Base
Bowl
Whisk Disc
Chopper Lid
WH IS KAS S E M B LY
OFF
PULSE 1
2
LOCK CH OPPE R LI DAlign the chopper lid onto the bowl as shown. Turn the chopper lid clockwise until the locking ribs on both the chopper lid and bowl align and lock into place.
Food processor will not work unless chopper lid is locked into place.
LOCK PROCE S SO R LI D Align the processor lid onto the bowl as shown. Turn the processor lid clockwise until the locking ribs on both the processor lid and bowl align and lock into place.
Food processor will not work unless processor lid is locked into place.
LOCK BOWL O NTO BAS EAlign the bowl onto the base as shown. Turn the bowl clockwise until the locking ribs on both the bowl and base align and lock into place.
Food processor will not work unless bowl is locked into place.
PARTS & FEATURES
S ECU RI N G TH E BOWL & LI DBowl and lid must be properly secured to operate.
S LI CE R/S H RE D D E RAS S E M B LY
C A R E & U S AG E I N S T R U C T I O N S
5
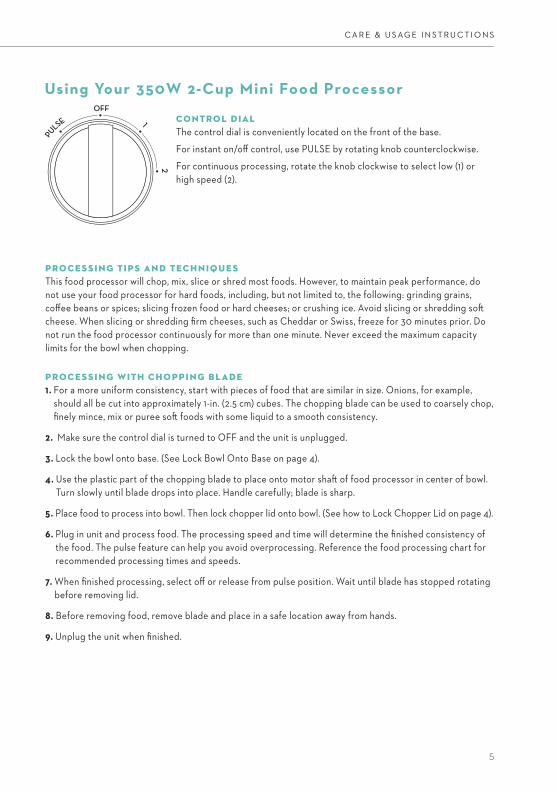
Using Your 350W 2-Cup Mini Food ProcessorOFF
PULSE 1
2
CO NTRO L D IALThe control dial is conveniently located on the front of the base.
For instant on/off control, use PULSE by rotating knob counterclockwise.
For continuous processing, rotate the knob clockwise to select low (1) or
high speed (2).
PROCE S S I N G TI PS AN D TECH N IQU E SThis food processor will chop, mix, slice or shred most foods. However, to maintain peak performance, do
not use your food processor for hard foods, including, but not limited to, the following: grinding grains,
coff ee beans or spices; slicing frozen food or hard cheeses; or crushing ice. Avoid slicing or shredding soft
cheese. When slicing or shredding fi rm cheeses, such as Cheddar or Swiss, freeze for 30 minutes prior. Do
not run the food processor continuously for more than one minute. Never exceed the maximum capacity
limits for the bowl when chopping.
PRO CE S S I N G WITH CH O PPI N G B L AD E1. For a more uniform consistency, start with pieces of food that are similar in size. Onions, for example,
should all be cut into approximately 1-in. (2.5 cm) cubes. The chopping blade can be used to coarsely chop,
fi nely mince, mix or puree soft foods with some liquid to a smooth consistency.
2. Make sure the control dial is turned to OFF and the unit is unplugged.
3. Lock the bowl onto base. (See Lock Bowl Onto Base on page 4).
4. Use the plastic part of the chopping blade to place onto motor shaft of food processor in center of bowl.
Turn slowly until blade drops into place. Handle carefully; blade is sharp.
5. Place food to process into bowl. Then lock chopper lid onto bowl. (See how to Lock Chopper Lid on page 4).
6. Plug in unit and process food. The processing speed and time will determine the fi nished consistency of
the food. The pulse feature can help you avoid overprocessing. Reference the food processing chart for
recommended processing times and speeds.
7. When fi nished processing, select off or release from pulse position. Wait until blade has stopped rotating
before removing lid.
8. Before removing food, remove blade and place in a safe location away from hands.
9. Unplug the unit when fi nished.
GOOD HOUSEKEEPING
6
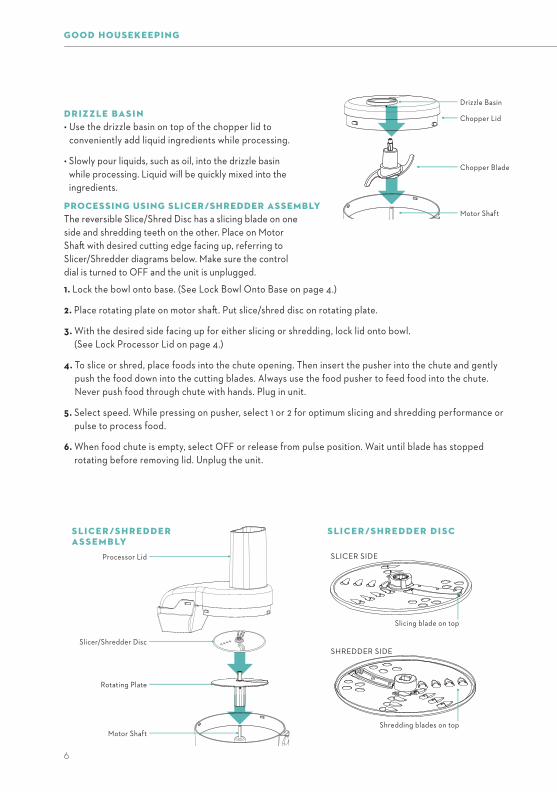
Drizzle Basin
Chopper Lid
Chopper Blade
Motor Shaft
S LI CE R/S H RE D D E R AS S E M B LY
Processor Lid
Slicer/Shredder Disc
Rotating Plate
Motor Shaft
S LI CE R/S H RE D D E R D ISC
Slicing blade on top
Shredding blades on top
SLICER SIDE
SHREDDER SIDE
D RIZZLE BAS I N• Use the drizzle basin on top of the chopper lid to
conveniently add liquid ingredients while processing.
• Slowly pour liquids, such as oil, into the drizzle basin
while processing. Liquid will be quickly mixed into the
ingredients.
PROCESSING USING SLICER/SHREDDER ASSEMBLYThe reversible Slice/Shred Disc has a slicing blade on one
side and shredding teeth on the other. Place on Motor
Shaft with desired cutting edge facing up, referring to
Slicer/Shredder diagrams below. Make sure the control
dial is turned to OFF and the unit is unplugged.
1. Lock the bowl onto base. (See Lock Bowl Onto Base on page 4.)
2. Place rotating plate on motor shaft . Put slice/shred disc on rotating plate.
3. With the desired side facing up for either slicing or shredding, lock lid onto bowl.
(See Lock Processor Lid on page 4.)
4. To slice or shred, place foods into the chute opening. Then insert the pusher into the chute and gently
push the food down into the cutting blades. Always use the food pusher to feed food into the chute.
Never push food through chute with hands. Plug in unit.
5. Select speed. While pressing on pusher, select 1 or 2 for optimum slicing and shredding performance or
pulse to process food.
6. When food chute is empty, select OFF or release from pulse position. Wait until blade has stopped
rotating before removing lid. Unplug the unit.
C A R E & U S AG E I N S T R U C T I O N S
7
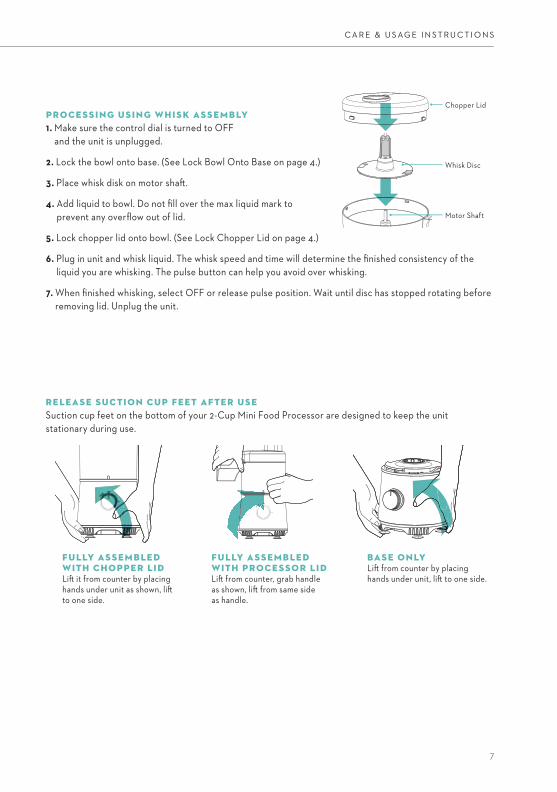
PROCE S S I N G US I N G WH IS K AS S E M B LY1. Make sure the control dial is turned to OFF
and the unit is unplugged.
2. Lock the bowl onto base. (See Lock Bowl Onto Base on page 4.)
3. Place whisk disk on motor shaft .
4. Add liquid to bowl. Do not fi ll over the max liquid mark to
prevent any overfl ow out of lid.
5. Lock chopper lid onto bowl. (See Lock Chopper Lid on page 4.)
6. Plug in unit and whisk liquid. The whisk speed and time will determine the fi nished consistency of the
liquid you are whisking. The pulse button can help you avoid over whisking.
7. When fi nished whisking, select OFF or release pulse position. Wait until disc has stopped rotating before
removing lid. Unplug the unit.
Chopper Lid
Whisk Disc
Motor Shaft
OFF
P
1
2
OFF
FU LLY AS S E M B LE D WITH PROCE S SO R LI DLift from counter, grab handle as shown, lift from same side as handle.
BAS E O N LYLift from counter by placinghands under unit, lift to one side.
FU LLY AS S E M B LE DWITH CH O PPE R LI DLift it from counter by placing hands under unit as shown, lift to one side.
RE LE AS E SU CTIO N CU P FE ET AFTE R US ESuction cup feet on the bottom of your 2-Cup Mini Food Processor are designed to keep the unit
stationary during use.
GOOD HOUSEKEEPING
8
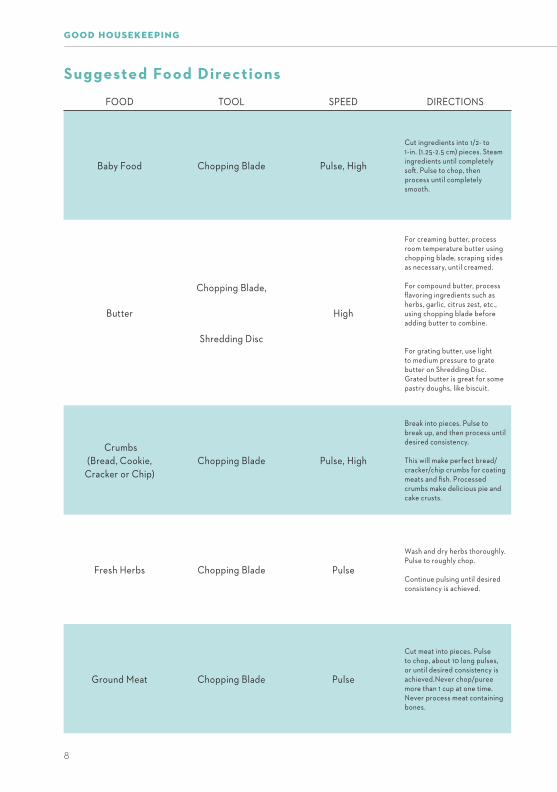
Suggested Food Directions
FOOD TOOL SPEED DIRECTIONS
Baby Food Chopping Blade Pulse, High
Cut ingredients into 1/2- to 1-in. (1.25-2.5 cm) pieces. Steam ingredients until completely soft . Pulse to chop, then process until completely smooth.
Butter
Chopping Blade,
Shredding Disc
High
For creaming butter, process room temperature butter using chopping blade, scraping sides as necessary, until creamed.
For compound butter, process fl avoring ingredients such as herbs, garlic, citrus zest, etc., using chopping blade before adding butter to combine.
For grating butter, use light to medium pressure to grate butter on Shredding Disc. Grated butter is great for some pastry doughs, like biscuit.
Crumbs
(Bread, Cookie,
Cracker or Chip)
Chopping Blade Pulse, High
Break into pieces. Pulse to break up, and then process until desired consistency.
This will make perfect bread/ cracker/chip crumbs for coating meats and fi sh. Processed crumbs make delicious pie and cake crusts.
Fresh Herbs Chopping Blade Pulse
Wash and dry herbs thoroughly. Pulse to roughly chop.
Continue pulsing until desired consistency is achieved.
Ground Meat Chopping Blade Pulse
Cut meat into pieces. Pulse to chop, about 10 long pulses, or until desired consistency is achieved.Never chop/puree more than 1 cup at one time. Never process meat containing bones.
C A R E & U S AG E I N S T R U C T I O N S
9
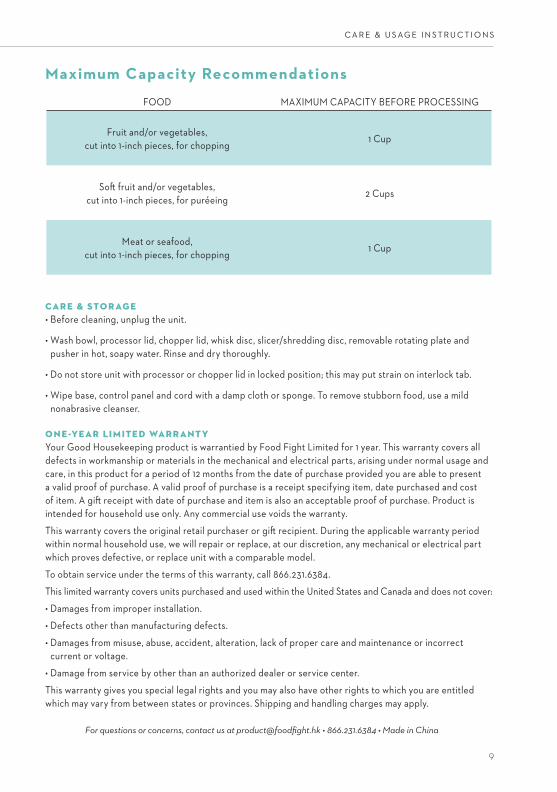
FOOD MAXIMUM CAPACITY BEFORE PROCESSING
Fruit and/or vegetables,
cut into 1-inch pieces, for chopping1 Cup
Soft fruit and/or vegetables,
cut into 1-inch pieces, for puréeing2 Cups
Meat or seafood,
cut into 1-inch pieces, for chopping1 Cup
CARE & STO R AG E• Before cleaning, unplug the unit.
• Wash bowl, processor lid, chopper lid, whisk disc, slicer/shredding disc, removable rotating plate and
pusher in hot, soapy water. Rinse and dry thoroughly.
• Do not store unit with processor or chopper lid in locked position; this may put strain on interlock tab.
• Wipe base, control panel and cord with a damp cloth or sponge. To remove stubborn food, use a mild
nonabrasive cleanser.
Maximum Capacity Recommendations
O N E-YE AR LI M ITE D WARR ANT Y Your Good Housekeeping product is warrantied by Food Fight Limited for 1 year. This warranty covers all
defects in workmanship or materials in the mechanical and electrical parts, arising under normal usage and
care, in this product for a period of 12 months from the date of purchase provided you are able to present
a valid proof of purchase. A valid proof of purchase is a receipt specifying item, date purchased and cost
of item. A gift receipt with date of purchase and item is also an acceptable proof of purchase. Product is
intended for household use only. Any commercial use voids the warranty.
This warranty covers the original retail purchaser or gift recipient. During the applicable warranty period
within normal household use, we will repair or replace, at our discretion, any mechanical or electrical part
which proves defective, or replace unit with a comparable model.
To obtain service under the terms of this warranty, call 866.231.6384.
This limited warranty covers units purchased and used within the United States and Canada and does not cover:
• Damages from improper installation.
• Defects other than manufacturing defects.
• Damages from misuse, abuse, accident, alteration, lack of proper care and maintenance or incorrect
current or voltage.
• Damage from service by other than an authorized dealer or service center.
This warranty gives you special legal rights and you may also have other rights to which you are entitled
which may vary from between states or provinces. Shipping and handling charges may apply.
For questions or concerns, contact us at product@foodfi ght.hk • 866.231.6384 • Made in China
GOOD HOUSEKEEPING RECIPES
10
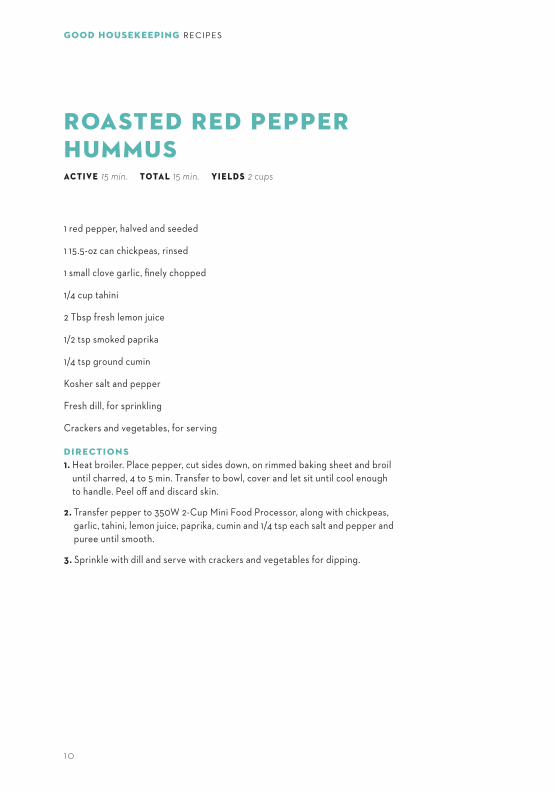
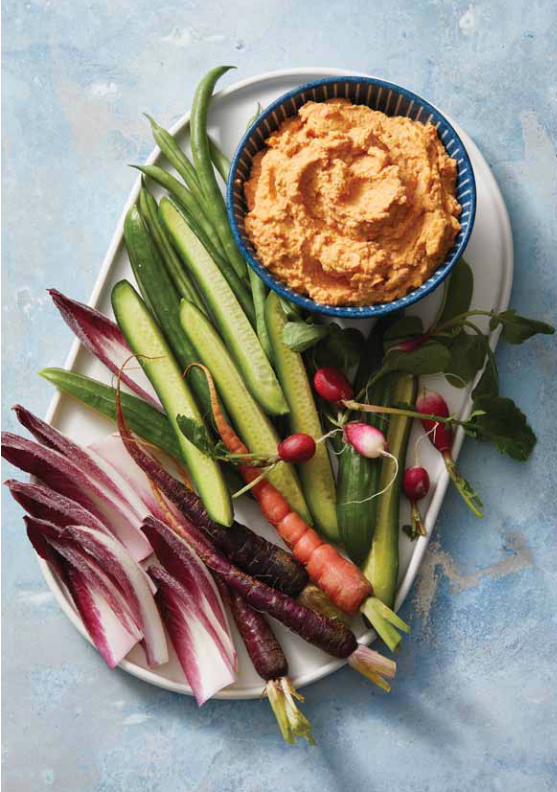
ROASTED RED PEPPER HUMMUS ACTIVE 15 min. TOTAL 15 min. YI E LDS 2 cups
1 red pepper, halved and seeded
1 15.5-oz can chickpeas, rinsed
1 small clove garlic, fi nely chopped
1/4 cup tahini
2 Tbsp fresh lemon juice
1/2 tsp smoked paprika
1/4 tsp ground cumin
Kosher salt and pepper
Fresh dill, for sprinkling
Crackers and vegetables, for serving
D I RECTI O N S1. Heat broiler. Place pepper, cut sides down, on rimmed baking sheet and broil
until charred, 4 to 5 min. Transfer to bowl, cover and let sit until cool enough
to handle. Peel off and discard skin.
2. Transfer pepper to 350W 2-Cup Mini Food Processor, along with chickpeas,
garlic, tahini, lemon juice, paprika, cumin and 1/4 tsp each salt and pepper and
puree until smooth.
3. Sprinkle with dill and serve with crackers and vegetables for dipping.
GOOD HOUSEKEEPING RECIPES
12
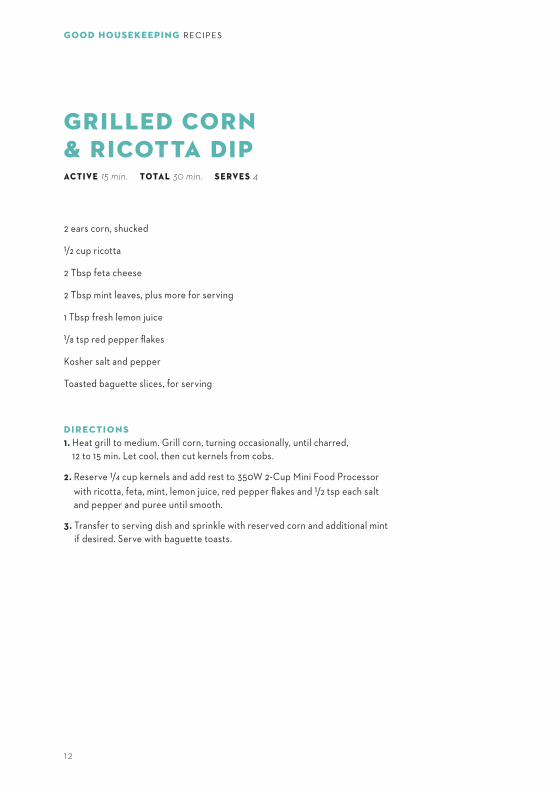
GRILLED CORN & RICOTTA DIP ACTIVE 15 min. TOTAL 30 min. S E RVE S 4
2 ears corn, shucked
1/2 cup ricotta
2 Tbsp feta cheese
2 Tbsp mint leaves, plus more for serving
1 Tbsp fresh lemon juice
1/8 tsp red pepper fl akes
Kosher salt and pepper
Toasted baguette slices, for serving
D I RECTI O N S1. Heat grill to medium. Grill corn, turning occasionally, until charred,
12 to 15 min. Let cool, then cut kernels from cobs.
2. Reserve 1/4 cup kernels and add rest to 350W 2-Cup Mini Food Processor
with ricotta, feta, mint, lemon juice, red pepper fl akes and 1/2 tsp each salt
and pepper and puree until smooth.
3. Transfer to serving dish and sprinkle with reserved corn and additional mint
if desired. Serve with baguette toasts.


GOOD HOUSEKEEPING RECIPES
14
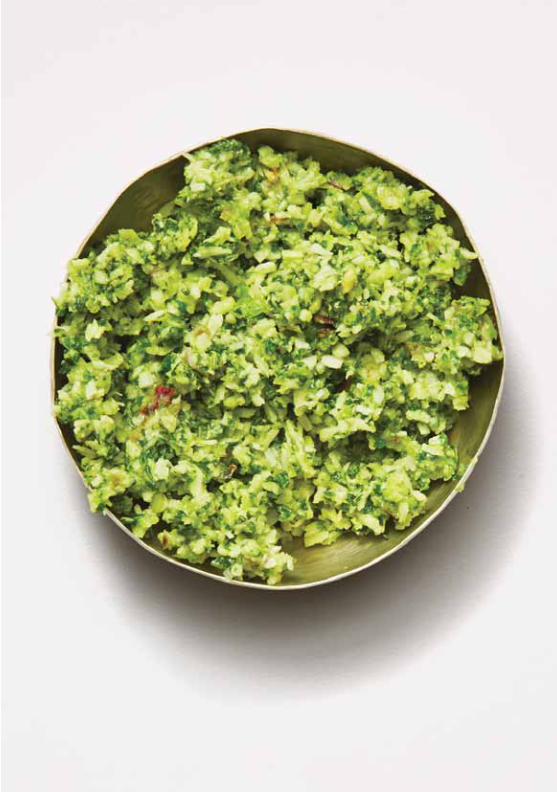
SRI LANKAN MINT SAMBAL ACTIVE 15 min. TOTAL TI M E 15 min. YI E LDS 1 1/3 cups
1/2 cup unsweetened shredded coconut
1 jalapeño, chopped
2 cloves garlic, chopped
1/4 small red onion, chopped
1 packed cup mint leaves
2 Tbsp fresh lime juice
Kosher salt
D I RECTI O N S1. In 350W 2-Cup Mini Food Processor, pulse coconut, jalapeño, garlic and
onion until combined, resembling fi ne crumbs and beginning to come
together (add 1 to 2 Tbsp water and scrape sides if necessary).
2. Add mint and pulse to fi nely chop. Transfer to bowl and stir in lime juice and
1/2 tsp salt.

GOOD HOUSEKEEPING RECIPES
16
ARUGULA PESTO ACTIVE 5 min. TOTAL 5 min. YI E LDS 3/4 cup
2 cups baby arugula
1/3 cup grated Parmesan cheese
1/4 cup pine nuts, toasted
1 Tbsp fresh lemon juice
1 clove garlic
1/2 cup extra virgin olive oil
Kosher salt
D I RECTI O N SIn 350W 2-Cup Mini Food Processor, pulse arugula, Parmesan, pine nuts,
lemon juice, garlic, olive oil and 1/4 tsp salt until smooth.


GOOD HOUSEKEEPING RECIPES
18
ZESTY BEET DIPACTIVE 5 min. TOTAL 5 min. YI E LDS 1 1/4 cups
8 oz cooked beets (about 5 small beets)
1⁄3 cup walnuts, toasted
1⁄4 cup prepared horseradish, squeezed of excess
moisture
1⁄4 cup plain Greek yogurt
1 Tbsp fresh lemon juice
1 Tbsp olive oil
Kosher salt and pepper
D I RECTI O N SIn 350W 2-Cup Mini Food Processor, puree
beets, walnuts, horseradish, yogurt, lemon
juice, oil, and 1⁄2 tsp each salt and pepper until
very smooth.
BEST EVER SPINACH-ARTICHOKE DIPACTIVE 5 min. TOTAL 5 min. YI E LDS 1 3/4 cups
1 14-oz can artichoke hearts, rinsed, squeezed of
excess moisture and patted dry
1 cup packed baby spinach
1⁄2 cup canned cannellini beans, rinsed
1 scallion, chopped
Finely grated zest of 1 lemon (about 1 Tbsp),
plus 2 Tbsp juice
1 oz fi nely grated Parmesan
Black pepper
D I RECTI O N SIn 350W 2-Cup Mini Food Processor, puree
artichoke hearts, spinach, beans, scallion,
lemon zest and juice, Parmesan and 1⁄2 tsp
pepper until fi nely chopped.
ZUCCHANOUSHACTIVE 5 min. TOTAL 5 min. YI E LDS 3/4 cup
1⁄2 lb small zucchini (1 1⁄2 to 2), quartered lengthwise
1 1⁄2 Tbsp olive oil, divided
Kosher salt and pepper
1 small clove garlic
2 Tbsp tahini
1 Tbsp fresh lemon juice
2 Tbsp mint leaves, divided
1 Tbsp pine nuts, toasted
D I RECTI O N S1. Heat grill to medium. Toss zucchini with 1⁄2
Tbsp oil and 1⁄2 tsp salt and grill until tender
and evenly charred, 8 to 10 minutes.
2. Transfer zucchini to 350W 2-Cup Mini Food
Processor along with garlic, tahini, lemon
juice and 1 Tbsp mint and pulse to combine.
With motor running on low speed, drizzle
in remaining Tbsp olive oil and puree until
mostly smooth, increasing speed if necessary.
3. Chop remaining mint. Serve zucchini mixture
topped with mint and pine nuts.
CHARRED SALSAACTIVE 15 min. TOTAL 20 min. YIE LDS 1 1/2 cups
1⁄2 pound tomatoes, halved if large
1⁄2 small yellow onion (skin on), halved
1 small clove garlic, skin on
1⁄2 jalapeño
1⁄4 cup cilantro
Kosher salt
D I RECTI O N S1. Heat grill to medium-high. Grill tomatoes,
onion, garlic and jalapeño, turning
occasionally, until charred on all sides, about
10 min total. Let cool 10 min.
2. Remove skins from onion and garlic and
transfer all vegetables to 350W 2-Cup Mini
Food Processor . Add cilantro and 1⁄2 tsp salt
and puree until mostly smooth.

GOOD HOUSEKEEPING RECIPES
20
HONEY-HARISSA GRILLED CARROTSACTIVE 15 min. TOTAL 25 min. S E RVE S 4
1 bunch thin carrots with tops, scrubbed and trimmed
1 Tbsp olive oil
1 tsp honey
1⁄2 tsp harissa paste
2 Tbsp plain 2% Greek yogurt
1 Tbsp tahini
1 Tbsp fresh lemon juice
Kosher salt and pepper
1 Tbsp pistachios, toasted, fi nely chopped
D I RECTI O N S1. Heat grill to low. Halve any large carrots lengthwise if needed to ensure that
all carrots are of similar width. In large bowl, whisk together oil, honey and
harissa. Add carrots and toss to coat.
2. Place carrots on grill (perpendicular to grates) and grill, covered, rolling or
turning carrots halfway through until charred and tender, 10 to 12 minutes.
Transfer to platter.
3. Meanwhile, in 350W 2-Cup Mini Food Processor, puree yogurt, tahini, lemon
juice and 1⁄8 tsp each salt and pepper. Gradually drizzle in 1 Tbsp warm water,
adding more if mixture seems too thick. Drizzle over carrots and sprinkle
with pistachios.

GOOD HOUSEKEEPING RECIPES
22
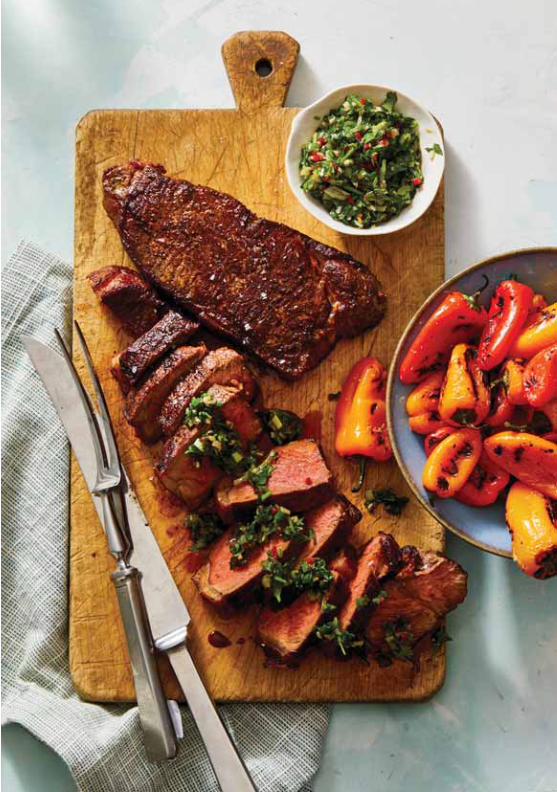
STEAK & GRILLED PEPPERSWITH CHIMICHURRIACTIVE 25 min. TOTAL 25 min. S E RVE S 6
1 lb mixed mini peppers
3 Tbsp olive oil, divided
Kosher salt and pepper
2 12-ounce strip steaks (about 1 1⁄2-in. thick), trimmed
1⁄2 cup fl at-leaf parsley
1⁄2 cup fresh cilantro
2 Tbsp red wine vinegar
2 scallions, cut in 1-in. pieces
1 small clove garlic, grated
1⁄2 large red chile, seeded and fi nely chopped
D I RECTI O N S1. Heat grill to medium. In large bowl, toss peppers with 1 Tbsp oil and 1⁄4 tsp
each salt and pepper. Season steaks with 1⁄4 tsp each salt and pepper.
2. Grill steak and peppers, covered, turning peppers occasionally until peppers
are lightly charred and tender, 5 to 7 minutes, and steak is cooked to desired
doneness, 5 to 8 minutes per side. Transfer peppers to platter and steak to
cutting board and let rest at least 5 minutes before slicing.
3. Meanwhile, in a 350W 2-Cup Mini Food Processor, pulse herbs to chop. Add
vinegar, scallions, garlic, and chile and pulse to combine. Serve with steak
and peppers.

GOOD HOUSEKEEPING RECIPES
24
AVOCADO DIPACTIVE 15 min. TOTAL 20 min. YI E LDS 1 1/2 cups
1 small poblano pepper
1 clove garlic, not peeled
1⁄2 jalapeño
1⁄2 small onion, halved
1 Tbsp olive oil
1 ripe avocado
1⁄2 bunch cilantro, including stems, roughly chopped
2 Tbsp fresh lime juice
Kosher salt
Totchos, for serving
D I RECTI O N S1. Heat broiler. On rimmed baking sheet, toss poblano, garlic, jalapeño and
onion with oil. Broil, turning peppers once halfway through, until vegetables
are deeply charred, 6 to 8 min. Let cool, then use paper towel to remove any
skins and seeds.
2. Transfer vegetables to 350W 2-Cup Mini Food Processor along with
avocado, cilantro, lime juice, 2 Tbsp water and 1⁄2 tsp salt and puree until
smooth, adding 1 to 2 Tbsp more water if needed. Serve with Totchos if
desired.
TOTCHOSACTIVE 5 min. TOTAL 30 min. S E RVE S 4
1 pound frozen potato tots
1 Tbsp olive oil
1 tsp chili powder
1⁄2 tsp ground cumin
1⁄2 tsp ground coriander
1⁄8 tsp cayenne
1⁄2 cup fi nely grated extra-sharp Cheddar cheese
D I RECTI O N S1. Heat oven to 425°F. On large rimmed baking sheet, toss tots with oil and
spices, roast 20 min.
2. Sprinkle with Cheddar and roast until tots are golden brown and cheese has
melted, 6 to 8 min..

GOOD HOUSEKEEPING RECIPES
26
PEA PESTO PAPPARDELLE ACTIVE 25 min. TOTAL 25 min. S E RVE S 4
12 oz pappardelle
1 1⁄2 cups fresh or frozen peas, divided
1 tsp grated lemon zest
1⁄2 cup ricotta
Kosher salt and pepper
Chopped chives, for serving
D I RECTI O N S1. Cook pappardelle to pkg directions. Reserve 1 cup cooking water; drain and
return pasta to pot.
2. While pasta is cooking, pulse 1 cup peas in 350W 2-Cup Mini Food Processor
to roughly chop. Add ricotta and lemon zest and pulse a few times to
combine (there should still be some chopped peas). Season with 1⁄2 tsp each
salt and pepper.
3. Toss pasta with ricotta mixture, remaining 1⁄2 cup peas, and 1⁄2 cup pasta
water, adding more pasta water if the pasta seems dry. Sprinkle with
chopped chives, if desired.

GOOD HOUSEKEEPING RECIPES
28
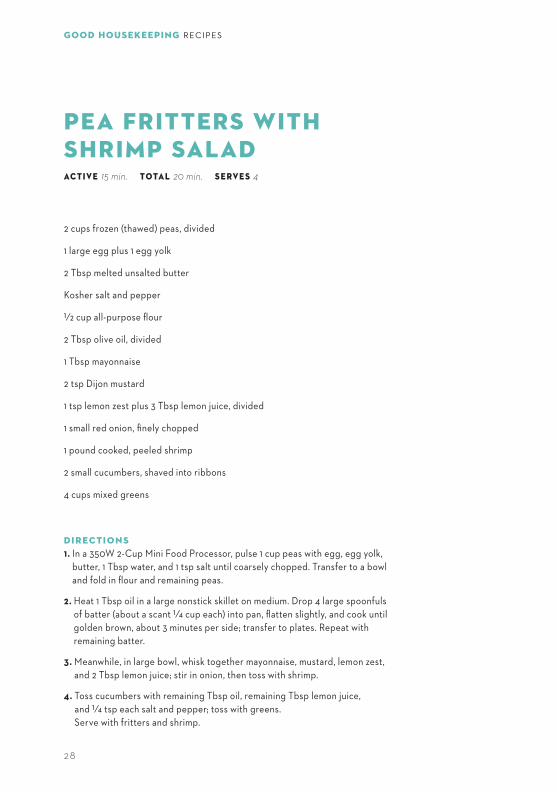
PEA FRITTERS WITH SHRIMP SALADACTIVE 15 min. TOTAL 20 min. S E RVE S 4
2 cups frozen (thawed) peas, divided
1 large egg plus 1 egg yolk
2 Tbsp melted unsalted butter
Kosher salt and pepper
1⁄2 cup all-purpose fl our
2 Tbsp olive oil, divided
1 Tbsp mayonnaise
2 tsp Dijon mustard
1 tsp lemon zest plus 3 Tbsp lemon juice, divided
1 small red onion, fi nely chopped
1 pound cooked, peeled shrimp
2 small cucumbers, shaved into ribbons
4 cups mixed greens
D I RECTI O N S1. In a 350W 2-Cup Mini Food Processor, pulse 1 cup peas with egg, egg yolk,
butter, 1 Tbsp water, and 1 tsp salt until coarsely chopped. Transfer to a bowl
and fold in fl our and remaining peas.
2. Heat 1 Tbsp oil in a large nonstick skillet on medium. Drop 4 large spoonfuls
of batter (about a scant 1⁄4 cup each) into pan, fl atten slightly, and cook until
golden brown, about 3 minutes per side; transfer to plates. Repeat with
remaining batter.
3. Meanwhile, in large bowl, whisk together mayonnaise, mustard, lemon zest,
and 2 Tbsp lemon juice; stir in onion, then toss with shrimp.
4. Toss cucumbers with remaining Tbsp oil, remaining Tbsp lemon juice,
and 1⁄4 tsp each salt and pepper; toss with greens.
Serve with fritters and shrimp.
GOOD HOUSEKEEPING RECIPES
30
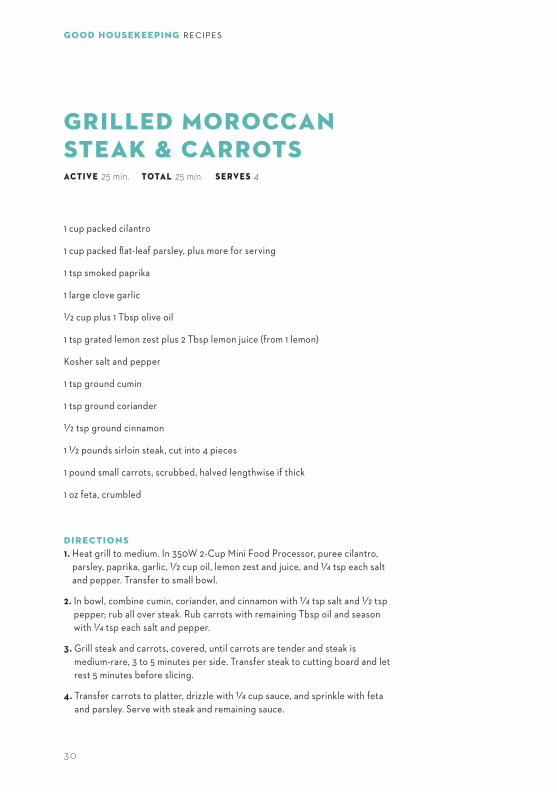
GRILLED MOROCCANSTEAK & CARROTS ACTIVE 25 min. TOTAL 25 min. S E RVE S 4
1 cup packed cilantro
1 cup packed fl at-leaf parsley, plus more for serving
1 tsp smoked paprika
1 large clove garlic
1⁄2 cup plus 1 Tbsp olive oil
1 tsp grated lemon zest plus 2 Tbsp lemon juice (from 1 lemon)
Kosher salt and pepper
1 tsp ground cumin
1 tsp ground coriander
1⁄2 tsp ground cinnamon
1 1⁄2 pounds sirloin steak, cut into 4 pieces
1 pound small carrots, scrubbed, halved lengthwise if thick
1 oz feta, crumbled
D I RECTI O N S1. Heat grill to medium. In 350W 2-Cup Mini Food Processor, puree cilantro,
parsley, paprika, garlic, 1⁄2 cup oil, lemon zest and juice, and 1⁄4 tsp each salt
and pepper. Transfer to small bowl.
2. In bowl, combine cumin, coriander, and cinnamon with 1⁄4 tsp salt and 1⁄2 tsp
pepper; rub all over steak. Rub carrots with remaining Tbsp oil and season
with 1⁄4 tsp each salt and pepper.
3. Grill steak and carrots, covered, until carrots are tender and steak is
medium-rare, 3 to 5 minutes per side. Transfer steak to cutting board and let
rest 5 minutes before slicing.
4. Transfer carrots to platter, drizzle with 1⁄4 cup sauce, and sprinkle with feta
and parsley. Serve with steak and remaining sauce.

GOOD HOUSEKEEPING RECIPES
32