Processing Open Enrollment Applications Quick …schoolchoice2.sp.brevardschools.org/Shared...
8
1 Processing Open Enrollment Applications Quick Reference Guide for Schools Division of Equity, Innovation and Choice Brevard Public Schools How To Steps Access Website Access the Scribbles Software application processing website by means of the following: https://brevardflc.scriborder.com/appListIA http://schoolchoice.sp.brevardschools.org/ChoiceApp/default.aspx o This link takes you to the Division of Equity, Innovation and Choice (EIC) SharePoint site; then, click on the tab under the logo for the type of application your school processes, Program or Location Login to Website Use the new login information to access the website for your school New, employee specific login information was sent in November via email to each person identified as the processor for the school To add a processor for the school, please have the school principal send an email to Christine Davis at [email protected] o In the request, remember to send the person’s first and last name and their email address Select an App Type 2017-18 EPO 2017-18 ELO 2016-17 Moved During School Year Click, in the black bar, the PROCESS ORDERS button to access the application type that you want to review The PROCESS ORDERS button is your default tool to exit an order and go back to the main screen Click here for password reset
Transcript of Processing Open Enrollment Applications Quick …schoolchoice2.sp.brevardschools.org/Shared...
1
Processing Open Enrollment Applications Quick Reference Guide for Schools
Division of Equity, Innovation and Choice Brevard Public Schools
How To Steps
Access Website
Access the Scribbles Software application processing website by means of the following:
https://brevardflc.scriborder.com/appListIA
http://schoolchoice.sp.brevardschools.org/ChoiceApp/default.aspx o This link takes you to the Division of Equity, Innovation and Choice (EIC) SharePoint site;
then, click on the tab under the logo for the type of application your school processes, Program or Location
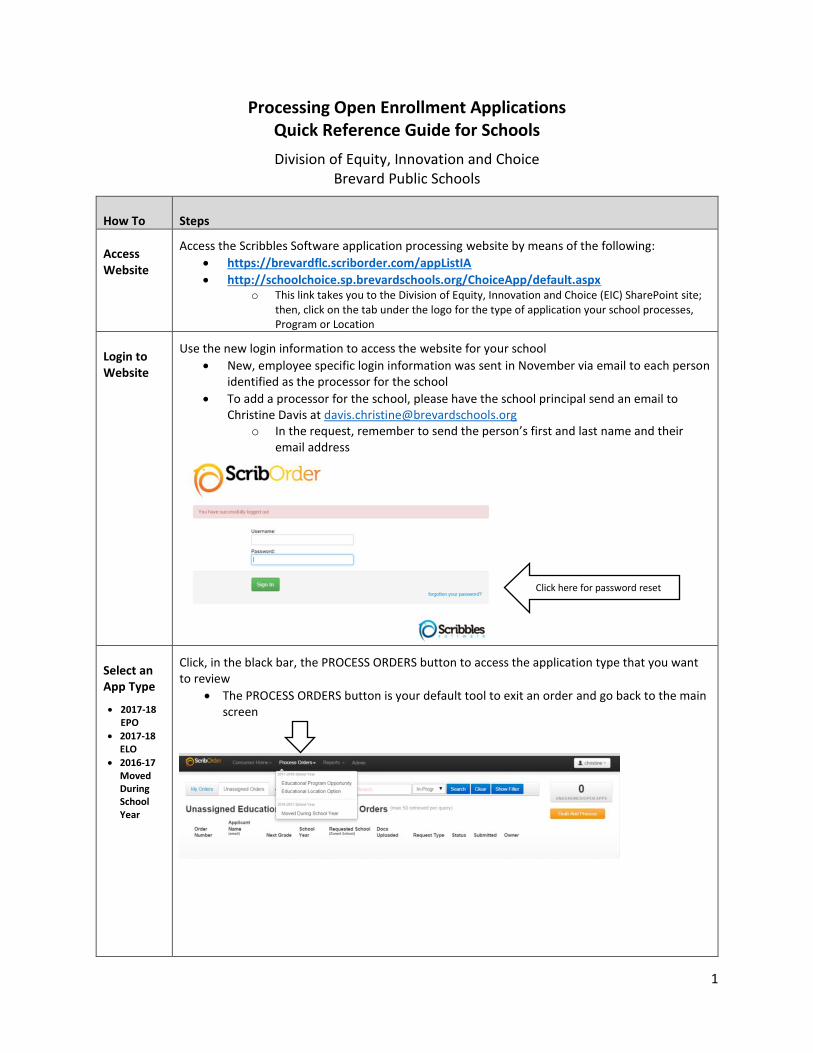
Login to Website
Use the new login information to access the website for your school
New, employee specific login information was sent in November via email to each person identified as the processor for the school
To add a processor for the school, please have the school principal send an email to Christine Davis at [email protected]
o In the request, remember to send the person’s first and last name and their email address
Select an App Type
2017-18 EPO
2017-18 ELO
2016-17 Moved During School Year
Click, in the black bar, the PROCESS ORDERS button to access the application type that you want to review
The PROCESS ORDERS button is your default tool to exit an order and go back to the main screen
Click here for password reset
2
Learn the Site
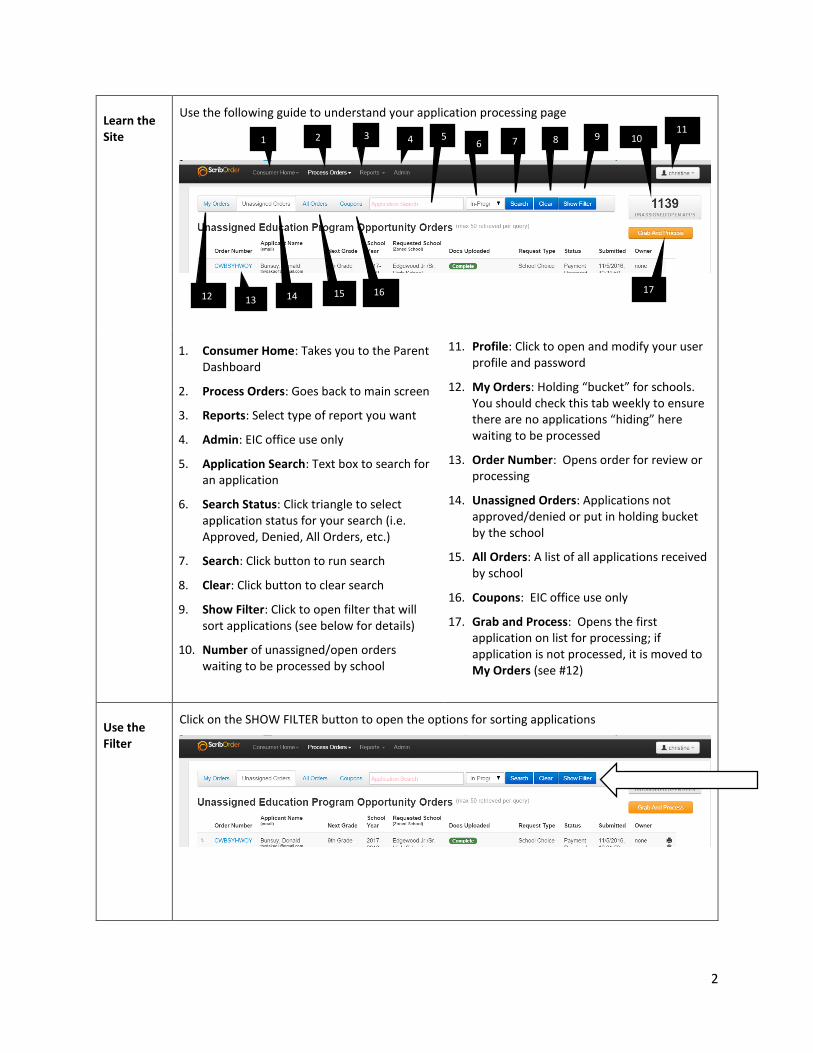
Use the following guide to understand your application processing page
1. Consumer Home: Takes you to the Parent Dashboard
2. Process Orders: Goes back to main screen
3. Reports: Select type of report you want
4. Admin: EIC office use only
5. Application Search: Text box to search for an application
6. Search Status: Click triangle to select application status for your search (i.e. Approved, Denied, All Orders, etc.)
7. Search: Click button to run search
8. Clear: Click button to clear search
9. Show Filter: Click to open filter that will sort applications (see below for details)
10. Number of unassigned/open orders waiting to be processed by school
11. Profile: Click to open and modify your user profile and password
12. My Orders: Holding “bucket” for schools. You should check this tab weekly to ensure there are no applications “hiding” here waiting to be processed
13. Order Number: Opens order for review or processing
14. Unassigned Orders: Applications not approved/denied or put in holding bucket by the school
15. All Orders: A list of all applications received by school
16. Coupons: EIC office use only
17. Grab and Process: Opens the first application on list for processing; if application is not processed, it is moved to My Orders (see #12)
Use the Filter
Click on the SHOW FILTER button to open the options for sorting applications
13
4
12
1 2 3
14 15 16
5 6
11 7 8 9 10
17
3
Sorting Apps for Processing Ease
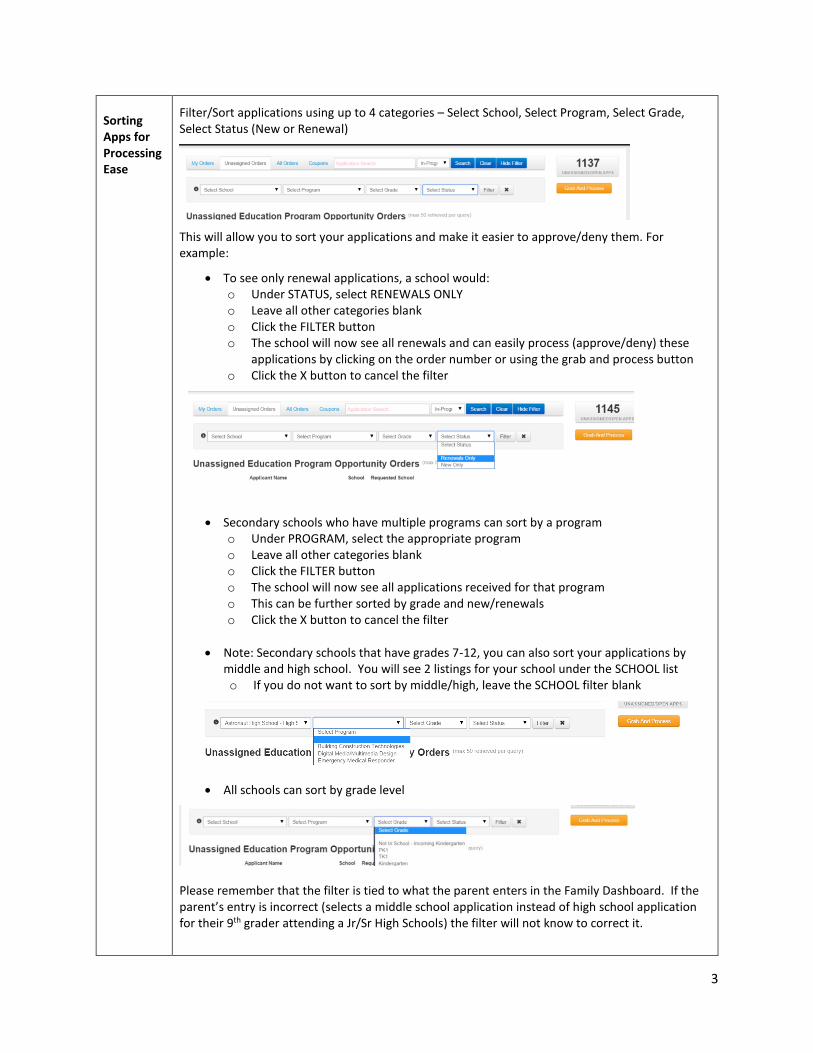
Filter/Sort applications using up to 4 categories – Select School, Select Program, Select Grade, Select Status (New or Renewal)
This will allow you to sort your applications and make it easier to approve/deny them. For example:
To see only renewal applications, a school would: o Under STATUS, select RENEWALS ONLY o Leave all other categories blank o Click the FILTER button o The school will now see all renewals and can easily process (approve/deny) these
applications by clicking on the order number or using the grab and process button o Click the X button to cancel the filter
Secondary schools who have multiple programs can sort by a program o Under PROGRAM, select the appropriate program o Leave all other categories blank o Click the FILTER button o The school will now see all applications received for that program o This can be further sorted by grade and new/renewals o Click the X button to cancel the filter
Note: Secondary schools that have grades 7-12, you can also sort your applications by middle and high school. You will see 2 listings for your school under the SCHOOL list o If you do not want to sort by middle/high, leave the SCHOOL filter blank
All schools can sort by grade level
Please remember that the filter is tied to what the parent enters in the Family Dashboard. If the parent’s entry is incorrect (selects a middle school application instead of high school application for their 9th grader attending a Jr/Sr High Schools) the filter will not know to correct it.

4
Processing Apps
Processing an application (Principal Approve/Deny) is done in 4 easy steps:
1. Open the application in 1 of 2 ways: a. Clicking the blue order number, or b. Clicking the Grab and Process button
2. Once the application is open, review information and attached documents a. See below for directions on how to modify the data in the application if
corrections are needed
a. To view documents, click the hyperlinks b. To add attachments for parents, click the green ADD FILES button
c. See below for directions on how to send a request to a parent for missing documents or information
Click to open attachment
Click to add files Click to open list

5
3. Add work comments (if applicable) a. These are internal comments which the parents cannot see b. When adding a comment, please include the date and your name c. Click the SAVE PROGRESS button to save your message
4. Approve/Deny the application a. Click on one of the green buttons b. Select a reason for the approval or denial
i. IMPORTANT: remember parents will be able to see the reason you selected on their family dashboard and/or in an email
Print application
To print a one-page summary of the application, click the light blue PRINT button
If you want to print the full application, use the print feature on your keyboard (Press Ctrl and the letter P simultaneously). Note: full applications may take 6+ pages when printed
Add work comments here to help track
application modifications,
parent/school communications, and
other issues related to this application
Click to Approve/Deny
You MUST select a reason for the
approval/denial; remember parents
can see your selection

6
Edit Data in Apps
Schools can edit most information in an application.
When making a change, please remember to click the SAVE PROGRESS button
It is also highly recommended that the school report the change in the work comments
Request Info
There are 2 ways to request additional information from parents
1. Push the REQUEST INFORMATION button and type in your comment a. This will send your message to the parent’s email and text their phone (if
applicable) b. It also posts the message on the parent’s Family Dashboard account c. This is a computer generated request; therefore, there is no way for the parent
to respond back directly to the message
2. You can also email the parent by pushing the picture of the envelop next to the parent’s email address.
a. This will send the parent an email from your outlook account. b. The parent can then respond back to you
Searching When searching the system for an application, use the search address bar
You can type in a complete name or a partial spelling, as long as you put a star (*) after the partial spelling (i.e. Davis or Dav*)

7
Verify BPS Employee
ELO Only
As part of an employee’s work condition, a full-time BPS employee does not pay the application fee for an Educational Location Option (ELO) application.
Note: All employees pay the application fee for an Educational Program Opportunity (EPO)
In order to receive this employee benefit; the employee must:
Be the legal guardian of the child (i.e., grandparent doing an application for daughter’s child would not quality)
Enter their employee number and location number (i.e., school or department number) on their family dashboard
Check the appropriate box in the application, identifying themselves as an employee
Note: substitutes are not full-time employees; therefore, do not qualify for this benefit
Schools will need to verify employee status PRIOR TO processing the ELO application
In the black bar, go to Reports and click on EMPLOYEE VERIFICATION REPORT
Use the filter to sort the employee applications for your school (if applicable)
Click the blue order number to open the application (if needed)
Confirm/Deny employee status by clicking the appropriate button on the right o Please note, your selection will show up on the applicant’s family
dashboard
Confirming employee status will move the application into your unassigned orders for processing
Denying employee status will deny the application, and the parent will need to: o Modify their Profile in their Family Dashboard to correctly reflect their
employee status o Submit a new application
8
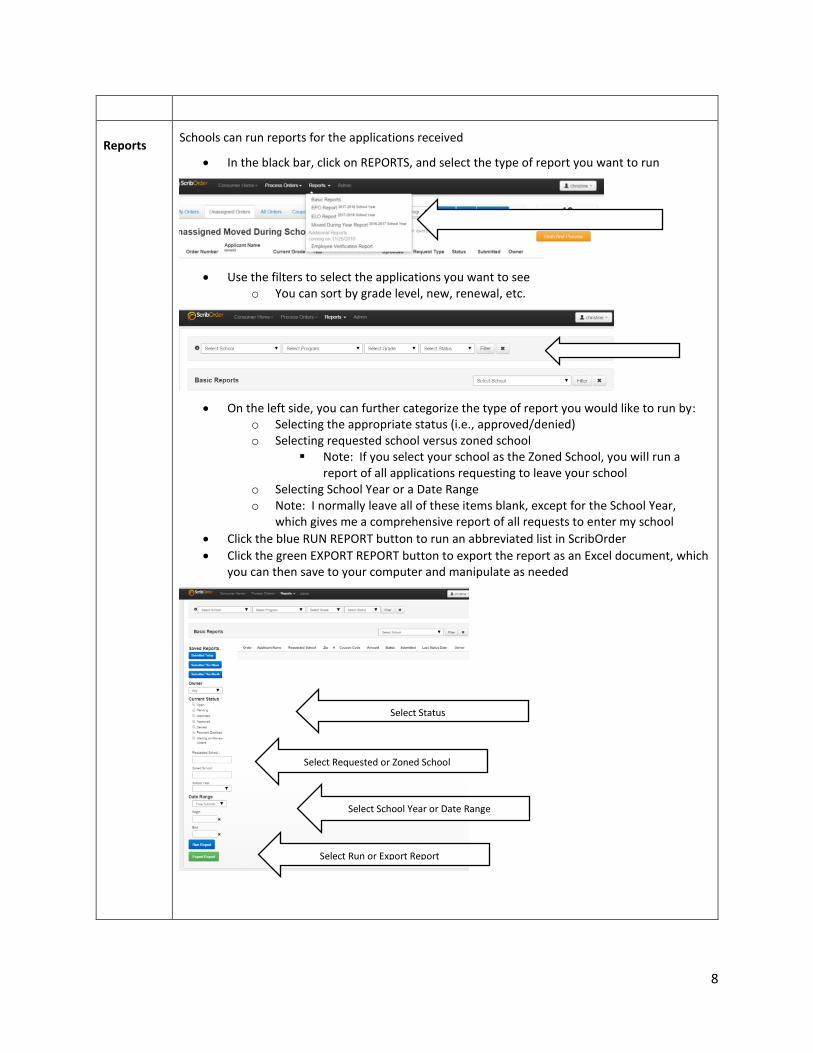
Reports Schools can run reports for the applications received
In the black bar, click on REPORTS, and select the type of report you want to run
Use the filters to select the applications you want to see o You can sort by grade level, new, renewal, etc.
On the left side, you can further categorize the type of report you would like to run by: o Selecting the appropriate status (i.e., approved/denied) o Selecting requested school versus zoned school
Note: If you select your school as the Zoned School, you will run a report of all applications requesting to leave your school
o Selecting School Year or a Date Range o Note: I normally leave all of these items blank, except for the School Year,
which gives me a comprehensive report of all requests to enter my school
Click the blue RUN REPORT button to run an abbreviated list in ScribOrder
Click the green EXPORT REPORT button to export the report as an Excel document, which you can then save to your computer and manipulate as needed
Select Status
Select Requested or Zoned School
Select School Year or Date Range
Select Run or Export Report