PRESERVATION Tech Notes - nps.gov · NUMBER 14 Reinforcing ... of the deteriorated condition of the...
4
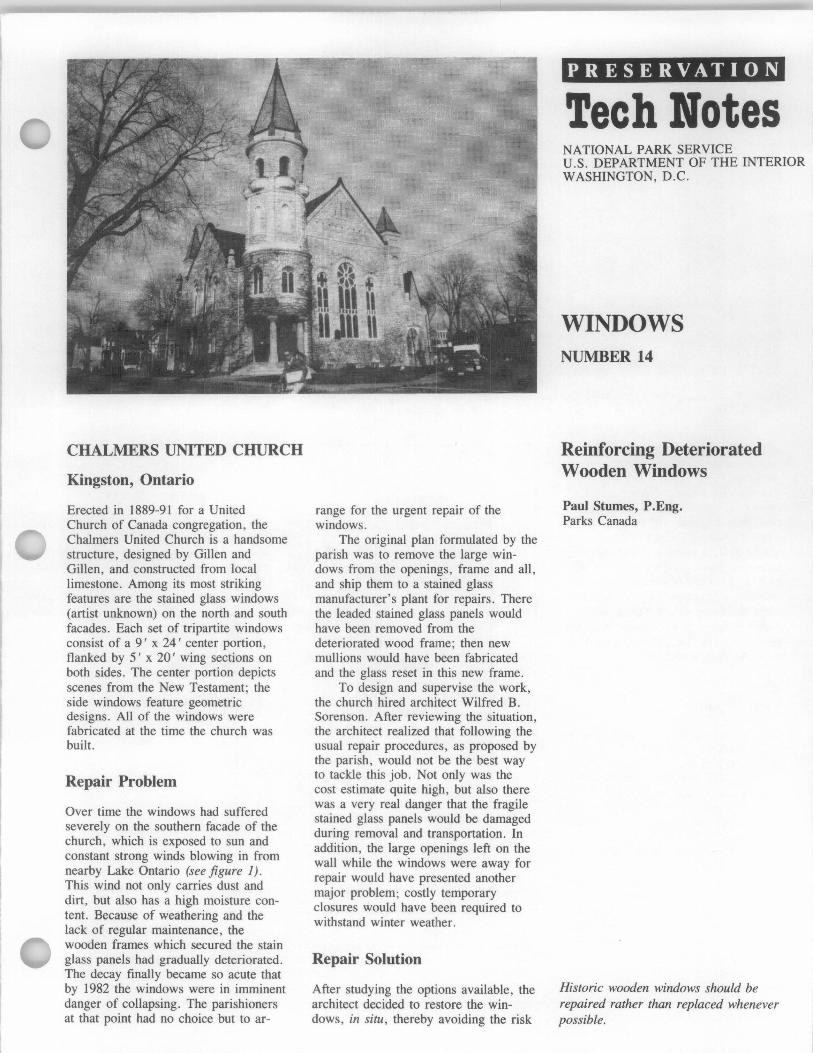
CHALMERS UNITED CHURCH Kingston, Ontario Erected in 1889-91 for a United Church of Canada congregation , the Chalmers United Church is a handsome structure, designed by Gillen and Gillen, and constructed from local limestone. Among its most striking features are the stained glass windows (artist unknown) on the north and south facades. Each set of tripartite windows consist of a 9' x 24' center portion, flanked by 5 ' x 20' wing sections on both sides. The center portion depicts scenes from the New Testament; the side windows feature geometric designs. All of the windows were fabricated at the time the church was built. Repair Problem Over time the windows had suffered severely on the southern facade of the church, which is exposed to sun and constant strong winds blowing in from nearby Lake Ontario (see figure 1). This wind not only carries dust and dirt, but also has a high moisture con- tent. Because of weathering and the lack of regular maintenance, the wooden frames which secured the stain glass panels had gradually deteriorated. The decay finally became so acute that by 1982 the windows were in imminent danger of collapsing. The parishioners at that point had no choice but to ar- range for the urgent repair of the windows . The original plan formulated by the parish was to remove the large win- dows from the openings, frame and all, and ship them to a stained glass manufacturer's plant for repairs . There the leaded stained glass panels would have been removed from the deteriorated wood frame ; then new mullions would have been fabricated and the glass reset in this new frame. To design and supervise the work, the church hired architect Wilfred B. Sorenson. After reviewing the situation, the architect realized that following the usual repair procedures, as proposed by the parish, would not be the best way to tackle this job. Not only was the cost estimate quite high, but also there was a very real danger that the fragile stained glass panels would be damaged during removal and transportation. In addition, the large openings left on the wall while the windows were away for repair would have presented another major problem; costly temporary closures would have been required to withstand winter weather. Repair Solution After studying the options available , the architect decided to restore the win- dows , in situ , thereby avoiding the risk PRESERVATION Tech Notes NATIONAL PARK SERVICE U.S. DEPARTMENT OF THE INTERIOR WASHINGTON, D.C. WINDOWS NUMBER 14 Reinforcing Deteriorated Wooden Windows Paul Stumes, P .Eng. Parks Canada Historic wooden windows should be repaired rather than replaced whenever possible.
Transcript of PRESERVATION Tech Notes - nps.gov · NUMBER 14 Reinforcing ... of the deteriorated condition of the...
CHALMERS UNITED CHURCH
Kingston, Ontario
Erected in 1889-91 for a United Church of Canada congregation , the Chalmers United Church is a handsome structure, designed by Gillen and Gillen, and constructed from local limestone. Among its most striking features are the stained glass windows (artist unknown) on the north and south facades. Each set of tripartite windows consist of a 9' x 24' center portion, flanked by 5 ' x 20' wing sections on both sides. The center portion depicts scenes from the New Testament; the side windows feature geometric designs. All of the windows were fabricated at the time the church was built.
Repair Problem
Over time the windows had suffered severely on the southern facade of the church, which is exposed to sun and constant strong winds blowing in from nearby Lake Ontario (see figure 1). This wind not only carries dust and dirt, but also has a high moisture content. Because of weathering and the lack of regular maintenance, the wooden frames which secured the stain glass panels had gradually deteriorated. The decay finally became so acute that by 1982 the windows were in imminent danger of collapsing. The parishioners at that point had no choice but to ar-
range for the urgent repair of the windows.
The original plan formulated by the parish was to remove the large windows from the openings, frame and all, and ship them to a stained glass manufacturer' s plant for repairs . There the leaded stained glass panels would have been removed from the deteriorated wood frame ; then new mullions would have been fabricated and the glass reset in this new frame.
To design and supervise the work, the church hired architect Wilfred B. Sorenson. After reviewing the situation, the architect realized that following the usual repair procedures, as proposed by the parish, would not be the best way to tackle this job. Not only was the cost estimate quite high, but also there was a very real danger that the fragile stained glass panels would be damaged during removal and transportation. In addition, the large openings left on the wall while the windows were away for repair would have presented another major problem; costly temporary closures would have been required to withstand winter weather.
Repair Solution
After studying the options available, the architect decided to restore the windows, in situ , thereby avoiding the risk
PRESERVATION
Tech Notes NATIONAL PARK SERVICE U.S. DEPARTMENT OF THE INTERIOR WASHINGTON, D.C.
WINDOWS NUMBER 14
Reinforcing Deteriorated Wooden Windows
Paul Stumes, P .Eng. Parks Canada
Historic wooden windows should be repaired rather than replaced whenever possible.
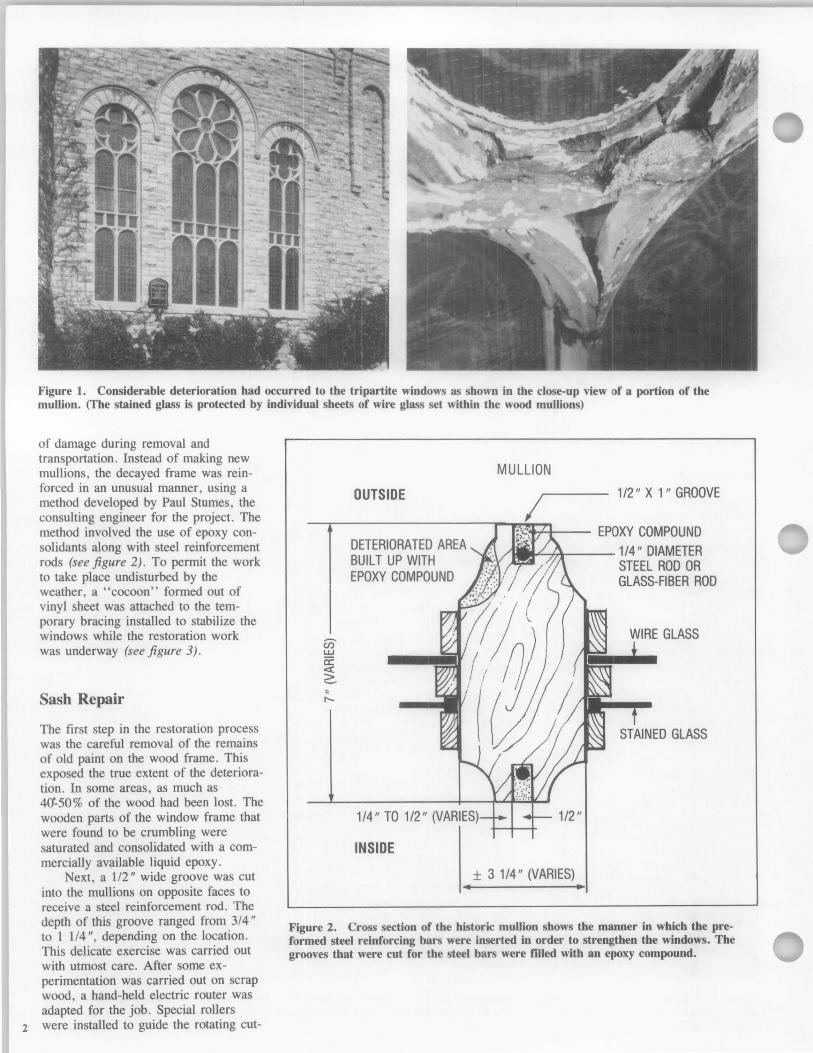
Figure 1. Considerable deterioration had occurred to the tripartite windows as shown in the close-up view of a portion of the mullion. (The stained glass is protected by individual sheets of wire glass set within the wood mullions)
of damage during removal and transportation. Instead of making new mullions, the decayed frame was reinforced in an unusual manner, using a method developed by Paul Stumes, the consulting engineer for the project. The method involved the use of epoxy consolidants along with steel reinforcement rods (see figure 2). To permit the work to take place undisturbed by the weather, a "cocoon" formed out of vinyl sheet was attached to the temporary bracing installed to stabilize the windows while the restoration work was underway (see figure 3).
Sash Repair
The first step in the restoration process was the careful removal of the remains of old paint on the wood frame . This exposed the true extent of the deterioration. In some areas, as much as 40~50% of the wood had been lost. The wooden parts of the window frame that were found to be crumbling were saturated and consolidated with a commercially available liquid epoxy .
Next, a 112" wide groove was cut into the mullions on opposite faces to receive a steel reinforcement rod. The depth of this groove ranged from 3/4" to 1 114", depending on the location. This delicate exercise was carried out with utmost care. After some experimentation was carried out on scrap wood, a hand-held electric router was adapted for the job. Special rollers
2 were installed to guide the rotating cut-
OUTSIDE
DETERIORATED AREA BUILT UP WITH EPOXY COMPOUND
1/4" TO 1/2" (VARIE
INSIDE
MULLION
1/2" X 1" GROOVE
EPOXY COMPOUND
~"""""7i---1/4" DIAMETER
± 3 1/4" (VARIES)
STEEL ROD OR GLASS-FIBER ROD
Figure 2. Cross section of the historic mullion shows the manner in which the preformed steel reinforcing bars were inserted in order to strengthen the windows. The grooves that were cut for the steel bars were filled with an epoxy compound.

Figure 3. A vinyl cocoon placed over the windows allowed the repair work to be carried out even in inclement weather.
ting bit (see figure 4) . Notwithstanding the usefulness of this apparatus, the real success of the operation can be attributed to the skill of the craftsman who guided the tool. The wooden mullions varied in size; on a typical 3 114" wide mullion, the outer edge where the groove was cut was 1 112 " wide. In cutting a 112" groove on the outer edge, only 1/2" of wood remained on either side. A slight deviation of the tool could have seriously damaged the mullions.
After the grooves were cut, the wood was treated with a wood preservative on all exposed sides to prevent possible decay . The wood preservative had to be selected with special care because most such products are not compatible with the epoxy resins which were used for the stabilization work. Wood samples were treated with different types of preservatives and tested for compatibility with the epoxies
Figure 4. Once the old paint had been carefully removed, grooves were cut in the mullions using an electric router fitted with special guide rollers.
selected for the project. A relatively inexpensive, locally available product was found to be most suitable, and all exposed wood was saturated with it.
For reinforcement , 114" diameter steel bars (the same type used to reinforce concrete) were painstakingly bent to match the curves of the mullions. The shape of the bars had to be accurate, within a tolerance of 118" in any direction, in order to fit comfortably in the 112" wide grooves which followed the complex curves of the windows (see figure 5). Because of the deteriorated condition of the wood, the steel bars could not be forced into the grooves without the danger of splitting the frames apart. In a few instances where the steel rods could not be suitably shaped, braided fiberglass strands were used instead.
With the reinforcement in place, the grooves were filled with an epoxy compound, thus completely embedding
the steel in epoxy. The epoxy used for this project - the high-modulus, thixotropic Sikadur gel in which some Union Carbide phenolic microballoons had been added for more firmness and improved workability - had the consistency of a stiff paste. This mixture had the advantage of remaining in position and retaining its shape wherever it was placed. If a fluid epoxy had been used on these vertical windows, special molds would have had to be fabricated and positioned to prevent the liquid from spilling out before it hardened. After this paste epoxy cured, it achieved a strong adhesive bond with the wood of the mullions and the reinforcing steel bars, creating a sturdy composite window frame.
In many places, due to the advanced decay, the fine details of the mullions crumbled into unrecognizable shapes. In these areas, the original form was recreated using the epoxy
Figure 5. Details of the mullions as the strengthening process was carried out. Left: The grooves had to be carefully cut both because of the deteriorated condition of the wood and due to the relative thinness of the outer edge of the mullion. Right: Reinforcing bars are positioned in the grooves prior to being encased in an epoxy compound. 3

paste like modeling clay. Skillful hands of the craftman sculpted fill-ins which blended perfectly into the curvature of the wooden mullions. After the epoxy paste hardened, only the color was different from the wood; the shape and the texture were the same. To complete the work, the windows were then primed and painted (see figure 6).
Evaluation
This method not only restored the church windows without any breakage of the precious stained glass, but also retained as much of the original fabric
PROJECT DATA:
Building: Chalmers United Church Kingston, Ontario Canada
Project Date: 1983
Architect: Wilfred B. Sorensen Kingston, Ontario Canada
of the wooden frame as possible. Fortunately the frames were wide enough to permit the installation of reinforcing rods. Problems associated with placing a new frame into a usually deformed old opening were avoided. In addition to preserving the original architectural components, this method was successful in terms of church operations and budget. Since the windows were not removed, the functioning of the church was not disturbed during restoration, and the repair of the windows in situ was achieved at a cost 25 % less than that of just fabricating a new frame.
Consulting Engineer: Paul Stumes, P.Eng. Parks Canada Ottawa, Ontario Canada
Contractor: Whitby Gather Kingston, Ontario Canada
Figure 6. Repairing the historic frames resulted in a 25% savings over fabrication of new ones. The work included paint removal, reinforcing of the mullions, consolidation of the deteriorated wood, and repainting.
Materials:
Epoxy Paste: high-modulus, thixotropic Sikadur Gel with Union Carbide's phenolic microballoons added
Epoxy Consolidant: Sika's liquid Colma-Dur epoxy Sika Chemical of Canada, Ltd., Point Claire, Quebec, Canada or Sika Chemical Corp. P.O. Box 297 Lyndhurst, New York
Project Cost: $11,000.00
This PRESERVATION TECH NOTES was prepared by the National Park Service. Charles E. Fisher, Preservation Assistance Division, National Park Service, serves as Technical Coordinator for the PRESERVATION TECH NOTES. Substantial portions of the text have been reprinted from an article entitled "A Fitting Solution ... For Onsite Window Restoration," which appeared in the Fall 1983 issue of Technology & Conservation . We would like to thank its publisher, Susan E. Schur, for her kind permission to use the copyrighted material. Special thanks also go to Peter Charles, Center for Architectural Conservation, Georgia Tech,
niques and practices described herein conform to the established National Park Service policies, procedures, and standards. This Tech Note was prepared pursuant to the National Historic Preservation Act Amendments of 1980, which direct the Secretary of the Interior to develop and make available to government agencies and individuals information concerning professional methods and techniques for the preservation of historic properties.
and to the following Preservation Assistance Division staff who contributed to the production of this Tech Note: Michael 1. Auer, H. Ward Jandl, Theresa Robinson, and Brenda Siler.
PRESERVATION TECH NOTES are designed to provide practical information on practice and innovative tehcniques for suc-
4 cessfully maintaining and preserving cultural resources. All tech-
Comments on the usefulness of this information are welcomed and should be addressed to Tech Notes, Preservation Assistance Division, National Park Service, P.O. Box 37127, Washington, D.C . 20013-7127. The material in this publication is protected under copyright laws and cannot be reproduced without the permission of the publisher of Technology & Conservation.
ISSN: 0741-9023 PTN-19 November 1986