PRESERVATION Tech Rotes · PRESERVATION Tech Rotes ... AND FREE STANDING FROM MARBLE WALL ... Tbe...
6
VILLARD HOUSES New York, New York The originial residences known as the Villard Houses were designed by the firm of McKim, Mead and White and constructed in the 1880s in the style of a Neo-Italian Rennaissance palaz- zo. The interiors of the buildings con- tain a remarkably high quality of design and workmanship with exten- sive use of decorative paintings, mosaics, paneling and marble. The elegant interior staircases which con- tribute to the richness of the interior spaces were constructed in a variety of designs and materials (see figure 1). In the late 1970s, the Villard Houses were adapted to serve as function rooms for an adjacent hotel while portions were retained for use as existing offices. As part of the pro- ject, a system was designed for fitting the staircases with temporary protec- tive coverings to avoid damage while still allowing for their use in the course of the extensive renovation work. Problem Historic staircases were rarely designed to take the abuse which occurs during major renovation work. Even when trash chutes and material hoists are located through windows, staircases are still subjected to dirt and heavy wear during construction work, and the risk remains of incurring costly or irreparable damage. Stairwall mate- rials such as marble, wood wainscot- ing and Lincrusta wall covering, as well as balustrades and stair treads, are particularly vulnerable to damage. Where there are tight turns and nar- row staircases, the risks of damage are even greater. Closing off the stairs usually is not practical either because the stairs are needed for daily use during construction or must be kept open for job safety. In most instances, the best pre- servation approach and the one that often proves economical in the long run is to provide sound and effective protection of the staircase in situ. The project architect should be the one to design a protection system for the staircase. In designing the protective sys- tem, care should be taken to protect the walls, the balustrade, and the staircase itself. With the Villard Houses, a simple, practical and effec- tive system was developed to protect the staircases during the renovation work. The wide range of staircase designs, decoration, and finish work found in the Villard Houses furnished ample opportunity to test the broad applicability of this protective system. It is described in the following sec- tions, with some liberty taken in mak- ing minor refinements for the benefit of others wishing to use it. PRESERVATION Tech Rotes NATIONAL PARK SERVICE U.S. DEPARTMENT OF INTERIOR WASHINGTON, D.C. TEMPORARY PROTECTION NUMBER 1 Temporary Protection of Historic Stairways during Rehabilitation Work Charles E. Fisher Preservation Assistance Division National Park Service Significant interior features in historic buildings should be protected during construction work.
Transcript of PRESERVATION Tech Rotes · PRESERVATION Tech Rotes ... AND FREE STANDING FROM MARBLE WALL ... Tbe...

VILLARD HOUSES
New York, New York
The originial residences known as the Villard Houses were designed by the firm of McKim, Mead and White and constructed in the 1880s in the style of a Neo-Italian Rennaissance palazzo. The interiors of the buildings contain a remarkably high quality of design and workmanship with extensive use of decorative paintings, mosaics, paneling and marble. The elegant interior staircases which contribute to the richness of the interior spaces were constructed in a variety of designs and materials (see figure 1).
In the late 1970s, the Villard Houses were adapted to serve as function rooms for an adjacent hotel while portions were retained for use as existing offices. As part of the project, a system was designed for fitting the staircases with temporary protective coverings to avoid damage while still allowing for their use in the course of the extensive renovation work.
Problem
Historic staircases were rarely designed to take the abuse which occurs during major renovation work. Even when trash chutes and material hoists are located through windows, staircases are still subjected to dirt and heavy wear during construction work, and
the risk remains of incurring costly or irreparable damage. Stairwall materials such as marble, wood wainscoting and Lincrusta wall covering, as well as balustrades and stair treads, are particularly vulnerable to damage. Where there are tight turns and narrow staircases, the risks of damage are even greater. Closing off the stairs usually is not practical either because the stairs are needed for daily use during construction or must be kept open for job safety.
In most instances, the best preservation approach and the one that often proves economical in the long run is to provide sound and effective protection of the staircase in situ. The project architect should be the one to design a protection system for the staircase.
In designing the protective system, care should be taken to protect the walls, the balustrade, and the staircase itself. With the Villard Houses, a simple, practical and effective system was developed to protect the staircases during the renovation work. The wide range of staircase designs, decoration, and finish work found in the Villard Houses furnished ample opportunity to test the broad applicability of this protective system. It is described in the following sections, with some liberty taken in making minor refinements for the benefit of others wishing to use it.
PRESERVATION
Tech Rotes NATIONAL PARK SERVICE U.S. DEPARTMENT OF INTERIOR WASHINGTON, D.C.
TEMPORARY PROTECTION NUMBER 1
Temporary Protection of Historic Stairways during Rehabilitation Work
Charles E. Fisher Preservation Assistance Division National Park Service
Significant interior features in historic buildings should be protected during construction work.
2
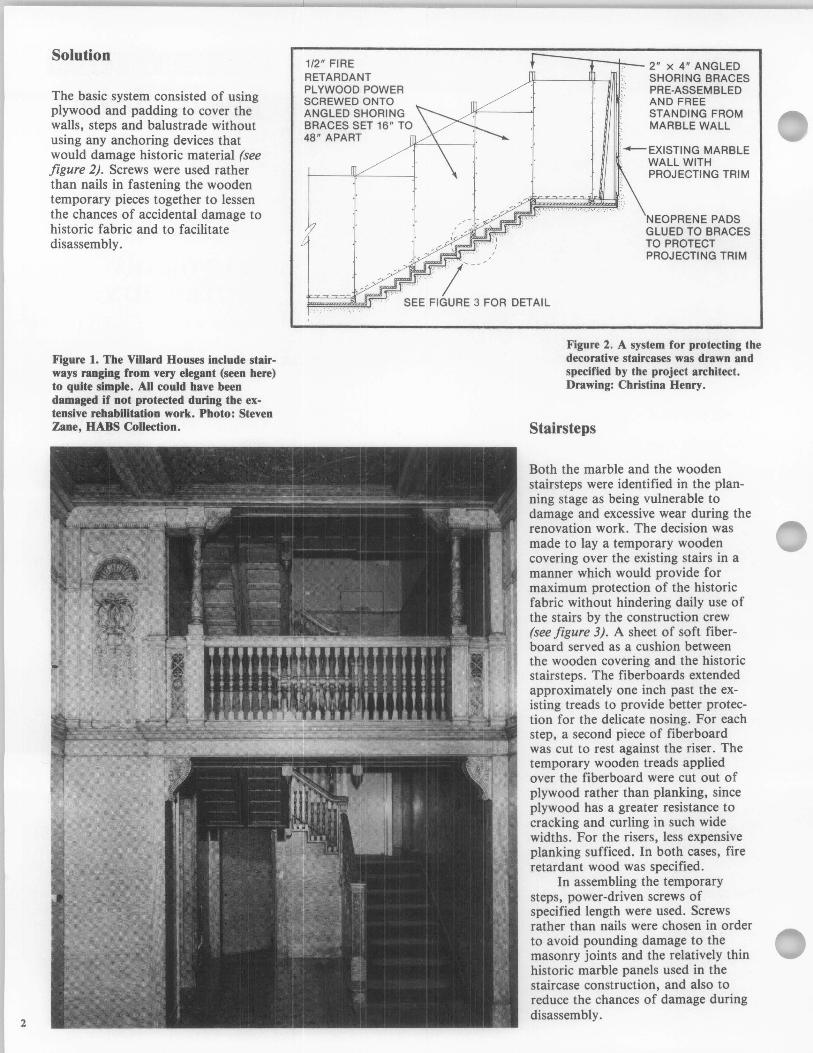
Solution
The basic system consisted of using plywood and padding to cover the walls, steps and balustrade without using any anchoring devices that would damage historic material (see figure 2). Screws were used rather than nails in fastening the wooden temporary pieces together to lessen the chances of accidental damage to historic fabric and to facilitate disassembly.
Figure 1. The Villard Houses include stairways ranging from very elegant (seen here) to quite simple. All could have been damaged if not protected during the extensive rehabilitation work. Photo: Steven Zane, HABS Collection.
1/2" FIRE RETARDANT PLYWOOD POWER SCREWED ONTO ANGLED SHORING BRACES SET 16" TO 48" APART
2" x 4" ANGLED SHORING BRACES PRE·ASSEMBLED AND FREE STANDING FROM MARBLE WALL
--EXISTING MARBLE WALL WITH PROJECTING TRIM
NEOPRENE PADS GLUED TO BRACES TO PROTECT PROJECTING TRIM
~~~~~= SEE FIGURE 3 FOR DETAIL
Figure 2. A system for protecting the decorative staircases was drawn and specified by the project architect. Drawing: Christina Henry.
Stairsteps
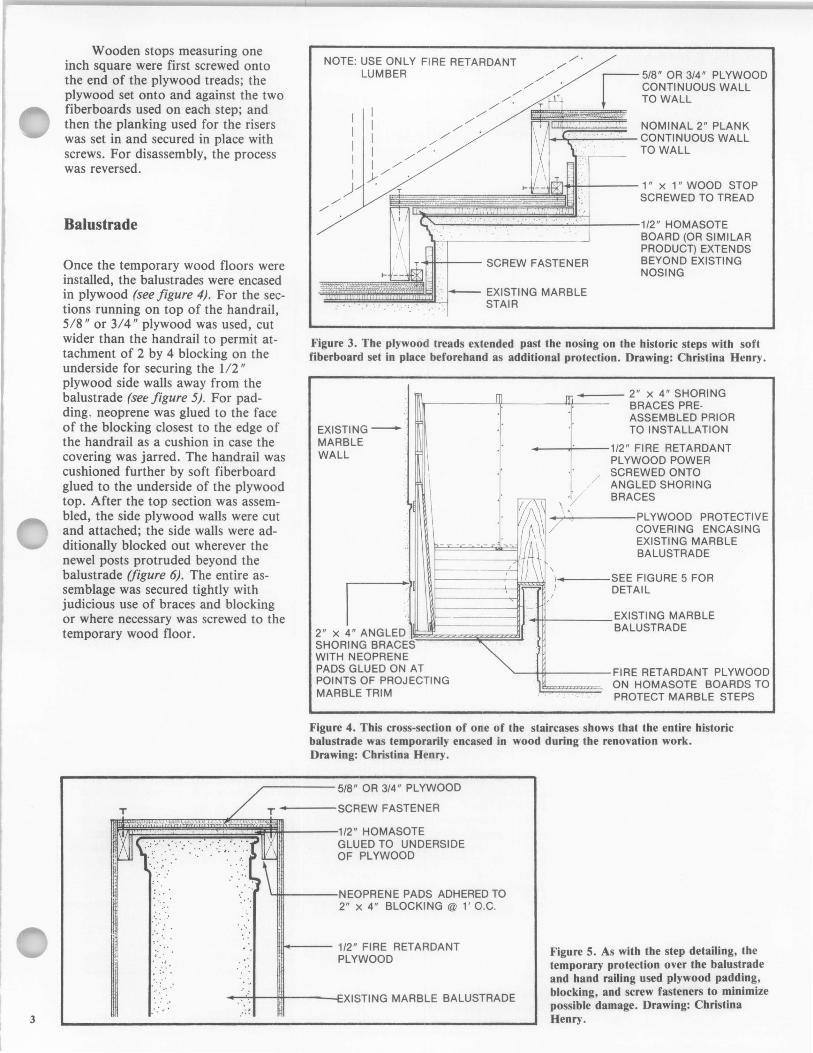
Both the marble and the wooden stairsteps were identified in the planning stage as being vulnerable to damage and excessive wear during the renovation work. The decision was made to lay a temporary wooden covering over the existing stairs in a manner which would provide for maximum protection of the historic fabric without hindering daily use of the stairs by the construction crew (see figure 3). A sheet of soft fiberboard served as a cushion between the wooden covering and the historic stairsteps. The fiberboards extended approximately one inch past the existing treads to provide better protection for the delicate nosing. For each step, a second piece of fiberboard was cut to rest against the riser. The temporary wooden treads applied over the fiberboard were cut out of plywood rather than planking, since plywood has a greater resistance to cracking and curling in such wide widths. For the risers, less expensive planking sufficed. In both cases, fire retardant wood was specified.
In assembling the temporary steps, power-driven screws of specified length were used. Screws rather than nails were chosen in order to avoid pounding damage to the masonry joints and the relatively thin historic marble panels used in the staircase construction, and also to reduce the chances of damage during disassembly.
3
Wooden stops measuring one inch square were first screwed onto the end of the plywood treads; the plywood set onto and against the two fiberboards used on each step; and then the planking used for the risers was set in and secured in place with screws. For disassembly, the process was reversed.
Balustrade
Once the temporary wood floors were installed, the balustrades were encased in plywood (see figure 4). For the sections running on top of the handrail, 5/8" or 3/4" plywood was used, cut wider than the handrail to permit attachment of 2 by 4 blocking on the underside for securing the 112 " plywood side walls away from the balustrade (see figure 5). For padding, neoprene was glued to the face of the blocking closest to the edge of the handrail as a cushion in case the covering was jarred. The handrail was cushioned further by soft fiberboard glued to the underside of the plywood top. After the top section was assembled, the side plywood walls were cut and attached; the side walls were additionally blocked out wherever the newel posts protruded beyond the balustrade (figure 6). The entire assemblage was secured tightly with judicious use of braces and blocking or where necessary was screwed to the temporary wood floor.
NOTE: USE ONLY FIRE RETARDANT LUMBER
./ ./
./ ./
./
./ ./
./. ./
5/8" OR 3/4" PLYWOOD CONTINUOUS WALL TO WALL
I I I I I
/' ./
./ ./ NOMINAL 2" PLANK
f--' ......... ~---':-- CONTINUOUS WALL
I ./ ./
./. TO WALL
) J-:./
JQ7I-H+--- 1" x 1" WOOD STOP ./
./ ./~~~~~~~~~~~~~;1 ____ SCREWEDTOTREAD 1/2" HOMASOTE
I-
+114-- SCREW FASTENER
EXISTING MARBLE STAIR
BOARD (OR SIMILAR PRODUCT) EXTENDS BEYOND EXISTING NOSING
Figure 3. The plywood treads extended past the nosing on the historic steps with soft fiberboard set in place beforehand as additional protection. Drawing: Christina Henry.
EXISTINGMARBLE WALL
.,
'. L-
ES E
AT
\ I
\
r fl
.. ~ y . /~\ 7!' J
----,: ~\\ \
\ . f---- ~ I
/ , -
I~
~ 2" x 4" ANGLED SHORING BRAC WITH NEOPREN PADS GLUED ON POINTS OF PRO MARBLE TRIM
JECTI NG
•
1/2"
2 B " x 4" SHORING RACES PRE· SSEMBLED PRIOR o INSTALLATION
A T
PLY FIRE RETARDANT
WOOD POWER EWED ONTO SCR
ANG LED SHORING CES BRA
SEE DET
EXI
PLYWOOD PROTECTIVE COVERING ENCASING EXISTING MARBLE BALUSTRADE
FIGURE 5 FOR AIL
STING MARBLE USTRADE BAL
FIR ON
E RETARDANT PLYWOOD HOMASOTE BOARDS TO
PROTECT MARBLE STEPS
Figure 4. This cross-section of one of the staircases shows that the entire historic balustrade was temporarily encased in wood during the renovation work. Drawing: Christina Henry.
~----5/8" OR 3/4" PLYWOOD T/ T · SCREW FASTENER
~~~~~~.<~,~,~! ~~~~~~~~-------i,~ 1 ~ " < ,'J ~ g~~;Ev~g~~ERSIDE : \ .... :' :,".>, ~ \
~: :~'.'" '.:::': YiIIi ----NEOPRENE PADS ADHERED TO
2" x 4" BLOCKING @ l ' O,C, .:: ','
,' . "
" ".
~ ..
.; ..
.: .. '
HI~--- 1/2" FIRE RETARDANT PLYWOOD
-,...,..--+tI----+-::::XISTING MARBLE BALUSTRADE
Figure 5. As with the step detailing, the temporary protection over the balustrade and hand railing used plywood padding, blocking, and screw fasteners to minimize possible damage. Drawing: Christina Henry.
_---llM-------------------EXIsTING MARBLE WALL AND PROJECTING TRIM PRIOR TO INSTALLATION OF PROTECTIVE PANELS
~-------------1/2" FIRE
j II
RETARDANT PLYWOOD 4' x 8' SHEETS IN PLACE SCREWED TO SHORING BRACES
JIoI---------2" x 4" ANGLED SHORING BRACES SET 16" TO 48" APART
~--- EXISTING MARBLE WALL WITH PROJECTING TRIM
~-----NEOPRENEPADS GLUED TO BACK OF 2" x 4" BRACES AT POINTS OF CONTACT WITH PROJECTING TRIM
---~r-H-+-+t1It-+-tt1Ir+---- FI RE RETARDANT ~--------------4, PLYWOOD OVER
HOMASOTE BOARDS TO PROTECT MARBLE STAIRS
\~++-H++-t----- 1" x 4" BOTTOM STRINGER NOTCHED INTO ANGLED BRACE
)-____________ ~~~;t----2" x 4" BOTTOM PLATE FOR BRACE-LENGTH APPROXI MATEL Y 12"
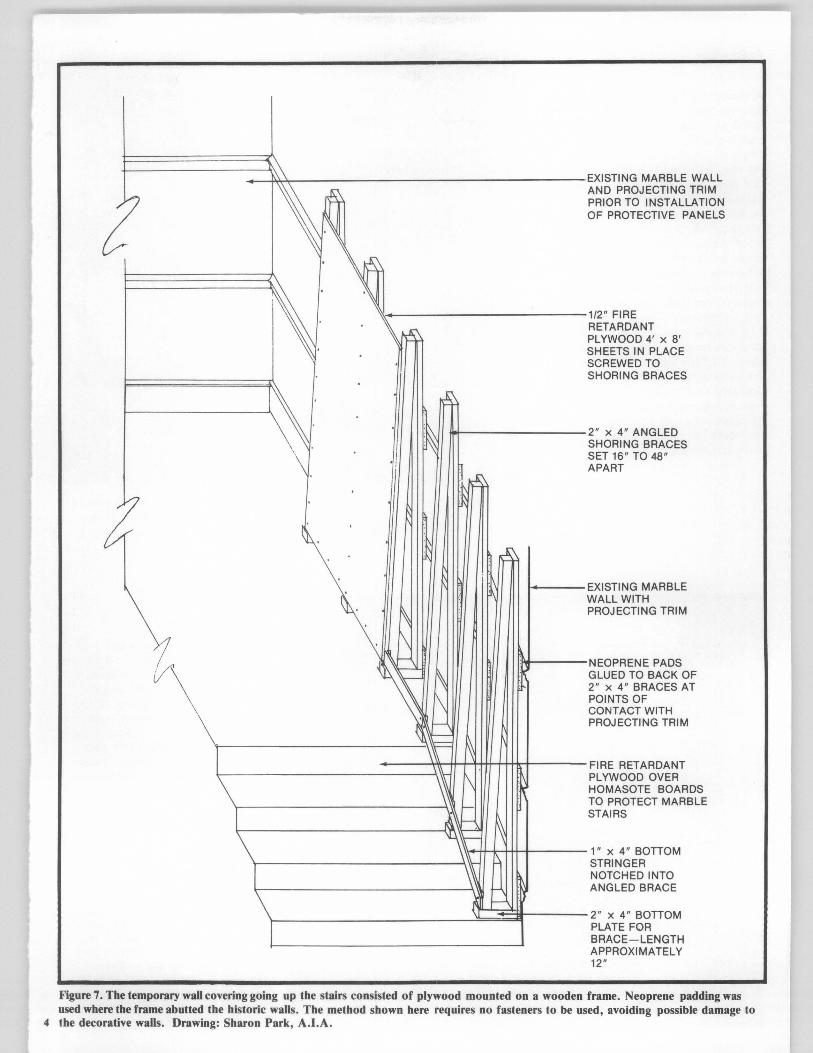
Figure 7. The temporary waD covering going up the stairs consisted of plywood mounted on a wooden frame. Neoprene padding was used where the frame abutted the historic walls. The method shown here requires no fasteners to be used, avoiding possible damage to
4 the decorative walls. Drawing: Sharon Park, A.LA.
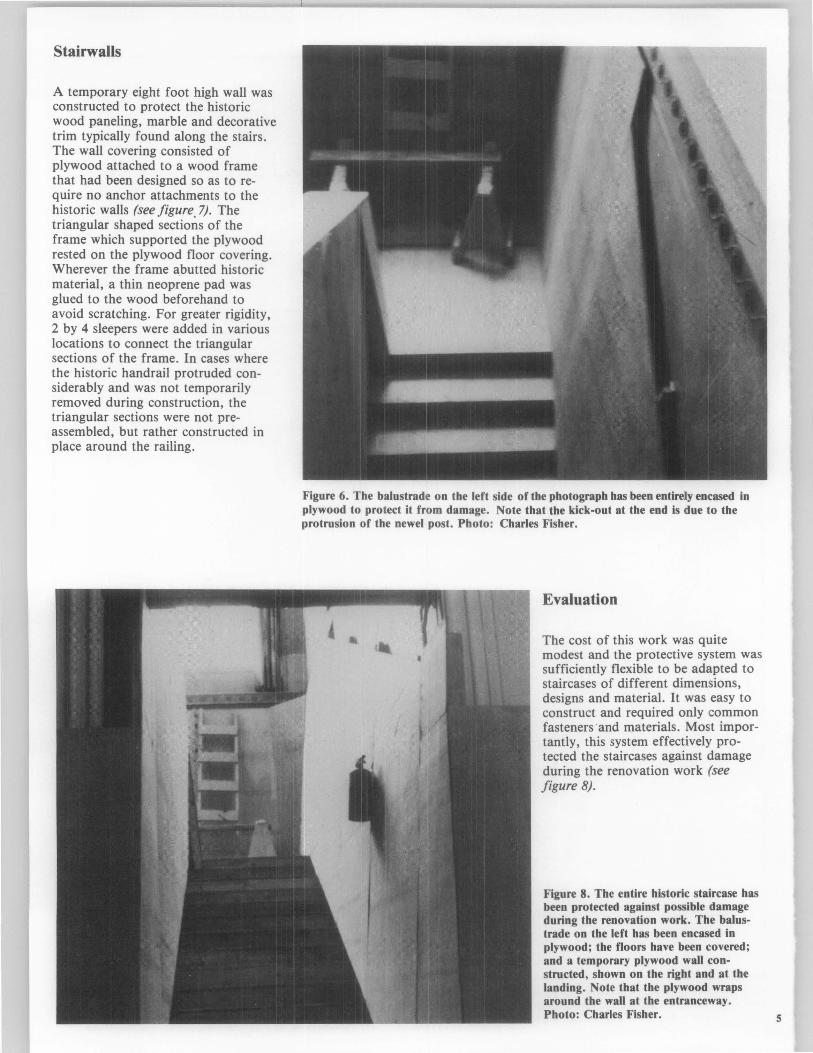
Stairwalls
A temporary eight foot high wall was constructed to protect the historic wood paneling, marble and decorative trim typically found along the stairs. The wall covering consisted of plywood attached to a wood frame that had been designed so as to require no anchor attachments to the historic walls (see figure 7). The triangular shaped sectio~s of the frame which supported the plywood rested on the plywood floor covering. Wherever the frame abutted historic material, a thin neoprene pad was glued to the wood beforehand to avoid scratching. For greater rigidity, 2 by 4 sleepers were added in various locations to connect the triangular sections of the frame. In cases where the historic handrail protruded considerably and was not temporarily removed during construction, the triangular sections were not preassembled, but rather constructed in place around the railing.
Figure 6. The balustrade on the left side of the photograph has been entirely encased in plywood to protect it from damage. Note that the kick-out at the end is due to the protrusion of the newel post. Photo: Charles Fisher.
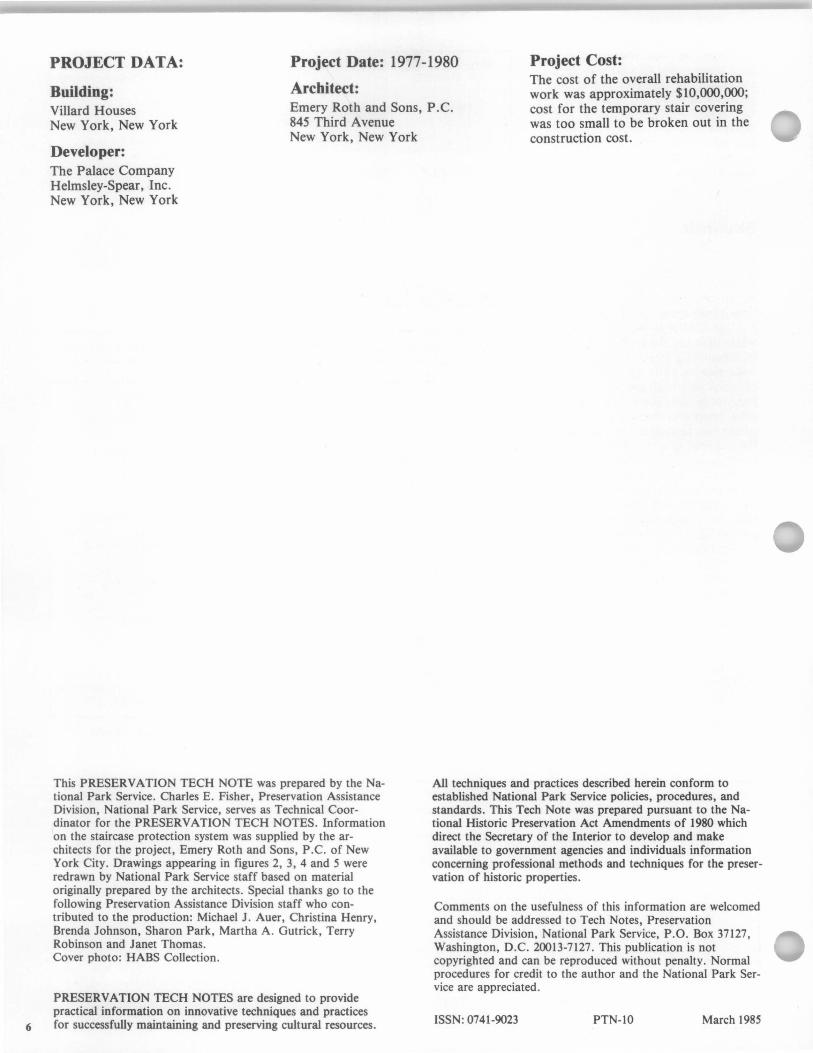
Evaluation
The cost of this work was quite modest and the protective system was sufficiently flexible to be adapted to staircases of different dimensions, designs and material. It was easy to construct and required only common fasteners "and materials. Most importantly, this system effectively protected the staircases against damage during the renovation work (see figure 8).
Figure 8. Tbe entire bistoric staircase bas been protected against possible damage during tbe renovation work. Tbe balustrade on the left has been encased in plywood; the floors have been covered; and a temporary plywood wall constructed, shown on the right and at the landing. Note that the plywood wraps around the wall at the entranceway. Photo: Charles Fisher. 5
6
PROJECT DATA:
Building:
Project Date: 1977-1980
Architect:
Project Cost: The cost of the overall rehabilitation work was approximately $10,000,000; cost for the temporary stair covering was too small to be broken out in the construction cost.
Villard Houses New York, New York
Emery Roth and Sons, P .C. 845 Third Avenue
Developer: The Palace Company Helmsley-Spear, Inc. New York, New York
New York, New York
This PRESERVATION TECH NOTE was prepared by the National Park Service. Charles E. Fisher, Preservation Assistance Division, National Park Service, serves as Technical Coordinator for the PRESERVATION TECH NOTES. Information on the staircase protection system was supplied by the architects for the project, Emery Roth and Sons, P.C. of New York City. Drawings appearing in figures 2, 3,4 and 5 were redrawn by National Park Service staff based on material originally prepared by the architects. Special thanks go to the following Preservation Assistance Division staff who contributed to the production: Michael J. Auer, Christina Henry, Brenda Johnson, Sharon Park, Martha A. Gutrick, Terry Robinson and Janet Thomas. Cover photo: HABS Collection.
PRESERVATION TECH NOTES are designed to provide practical information on innovative techniques and practices for successfully maintaining and preserving cultural resources.
All techniques and practices described herein conform to established National Park Service policies, procedures, and standards. This Tech Note was prepared pursuant to the National Historic Preservation Act Amendments of 1980 which direct the Secretary of the Interior to develop and make available to government agencies and individuals information concerning professional methods and techniques for the preservation of historic properties.
Comments on the usefulness of this information are welcomed and should be addressed to Tech Notes, Preservation Assistance Division, National Park Service, P.O. Box 37127, Washington, D.C. 20013-7127. This publication is not copyrighted and can be reproduced without penalty. Normal procedures for credit to the author and the National Park Service are appreciated.
ISSN: 0741-9023 PTN-IO March 1985