Piper Archer III 1
24
Piper Archer III 1
Transcript of Piper Archer III 1

Piper Archer III 1

Piper Archer III 2
Flying Club - Archer III For Microsoft Flight Simulator X Steam Edition
Pilot’s Guide
CONTENTS
INTRODUCTION ............................................................................................................. 3 INSTALLATION ............................................................................................................... 3 SETTING UP FLIGHT SIMULATOR FOR FLYING CLUB ............................................... 4 HOW TO ACCESS THE AIRCRAFT ............................................................................... 4 KEEPING A RECORD OF YOUR FLIGHTS ................................................................... 5 THE INSTRUMENT PANELS AND VIRTUAL COCKPITS .............................................. 6 ARCHER III PANEL ......................................................................................................... 7
Main Panel .................................................................................................................... 7 Panel Switch Icons ....................................................................................................... 9 Annunciator Panel ........................................................................................................ 9 Overhead (Electrical) Panel ........................................................................................ 10 Flaps Panel ................................................................................................................. 10 Fuel Switch ................................................................................................................. 10 Sub panel Selection .................................................................................................... 11 In-cockpit kneeboard - checklists ................................................................................ 11
ARCHER III RADIO OPERATION ................................................................................. 12 Operation - General .................................................................................................... 12 Operation - Audio Control System .............................................................................. 12 Operation - ADF ......................................................................................................... 13 Operation - COM / NAV units ..................................................................................... 15 Operation - Transponder ............................................................................................ 16 Operation - GPS ......................................................................................................... 18 Operation - DME ......................................................................................................... 19 Operation - Autopilot ................................................................................................... 20
Special Click Areas in Virtual Cockpit ............................................................................ 22 Credits ........................................................................................................................... 23 Copyrights ..................................................................................................................... 23 Piracy............................................................................................................................. 24

Piper Archer III 3
INTRODUCTION Thank you for purchasing this aircraft expansion for Microsoft Flight Simulator X Steam Edition. The Archer III is a descendant of the hugely popular Cherokee series. A single-engine all-metal aircraft introduced in 1994, its versatility and reliability have made it one of the most popular aircraft in General Aviation around the globe. This simulated version is the latest member to join Just Flight's Flying Club family of high quality and easy to fly GA (General Aviation) aircraft and helicopters. Modelled to highest standards with a flight model made by an industry leader in the field, this aircraft is as near to an exact replica of the original as it can be. We hope you enjoy this aircraft and you can find out more about our other great flight simulation products from www.justflight.com
INSTALLATION Installation is handled by Steam after purchase of the product. After purchasing the product the files will be downloaded and installation into the Scenery Library will be automatic. UPDATES Updates to the product will automatically be deployed, downloaded and installed via Steam to all users who own the product. TECHNICAL SUPPORT To obtain technical support (in English) please visit the Support pages at justflight.com. As a Just Flight customer you can obtain free technical support for any Just Flight or Just Trains product. For support specifically on the Steam version of the add-on please contact Dovetail Games. https://dovetailgames.kayako.com REGULAR NEWS To get the latest news about Just Flight products, sign up for our newsletter at justflight.com/newsletter. You can also keep up to date with Just Flight via Facebook (www.facebook.com/justflight) and Twitter (www.twitter.com/justflight).

Piper Archer III 4
SETTING UP FLIGHT SIMULATOR FOR FLYING CLUB NOTE: The flight model is optimised to work with the settings detailed below. Flight Simulator needs to be set up to allow aircraft to operate realistically. This is how: Start Flight Simulator and load an aircraft. Open Load Aircraft>Realism settings menu. In the ‘Flight model’ section Move the General slider to one notch right of the middle setting. We recommend you set the ‘Crash tolerance’ slider to zero. Tick ON in the ‘Instrument and Lights’ section: Pilot Controls aircraft lights and Gyro drift. Ensure that ‘Display indicated airspeed’ is set ON. Tick ON in the ‘Engine’ section ‘Enable Auto Mixture’ and ‘Unlimited Fuel’. If you have a set of rudder pedals or a joystick that has a rudder function then tick OFF ‘Autorudder’ in the ‘Flight Controls’ section. In the ‘Crashes and damage’ area we recommend that you set ‘Ignore crashes and damage’ to ON. When finished click ‘OK’.
HOW TO ACCESS THE AIRCRAFT Flight Simulator X:
- Start Flight Simulator. - Load a default Flight Simulator aircraft. - When the aircraft has loaded access the ‘Aircraft’ then, ‘Select aircraft’ menu. - Click on the ‘Publisher’ drop down menu and select ‘Just Flight Ltd’ - In the ‘Aircraft manufacturer’ drop down menu select ‘Piper’. - In the ‘Aircraft type’ drop down menu select the model ‘Archer III PA28-181’. - Select which version you wish to fly.

Piper Archer III 5
KEEPING A RECORD OF YOUR FLIGHTS Just like real world flying you can keep a logbook of the hours you fly. Each of the Flying Club aircraft has a ‘running time’ meter – normally referred to as a Hobbs meter after the manufacturer’s name. This meter runs every time you select the aircraft. If you wish you can note the time elapsed on the meter every time you fly and use the FS logbook to keep track of your time. Filling in your logbook - FSX Just like real world flying you can keep a logbook of the hours you fly. Each of the Flying Club aircraft has a ‘running time’ meter – normally referred to as a Hobbs meter after the manufacturer’s name. This meter runs every time you select the aircraft. If you wish you can note the time elapsed on the meter every time you fly and use the FS logbook to keep track of your time. In FSX the logbook operation is far more automatic and simplified that in FS2004. Accessing the logbook Start FSX and click on ‘PILOT RECORDS’ on the left side menu. Click on the ‘Logbook’ Tab at the top. On this page you will see a record of your flights – note you must have taken off to have the times register in the log book. On this page you can edit various details if you wish.
Piper Archer III 6
THE INSTRUMENT PANELS AND VIRTUAL COCKPITS The Archer III has a 2D and a VC (virtual cockpit) instrument panel. In the 2D instrument situation you have a set position panel, in the VC situation you can pan around and zoom in and out of the cockpit area. Using your keyboard Numpad numbers (1- 9) in the 2D cockpit or a Coolie hat on your joystick in the VC. In the VC you can move your viewpoint in the following way: Zoom in coarse: + key Zoom out coarse: - Key Zoom in fine: Shift (plus) + key Zoom out fine: Shift (plus) – Key Move up: Shift+Enter keys. Move Down: Shift+Backspace keys. Move left: Control+Shift+Backspace keys. Move right: Control+Shift+Enter keys. There is no ‘pan around’ facility in the VC available via the keyboard – you need a joystick with a ‘coolie hat’ for this operation. There is no ‘reset view’ option in the VC and the only way to reset the view is by selecting another aircraft.

Piper Archer III 7
ARCHER III PANEL
Main Panel
1. Clock 2. ASI (Airspeed indicator). In Landing Panel View the airspeed Indicator can be enlarged. 3. Artificial horizon 4. Switch panel view: Full Panel / Landing Panel View The Landing Panel View is a reduced size panel to allow better outside visibility during approaches and
landings. In Landing Panel View the airspeed indicator (2) and altimeter (5) can be enlarged. 5. Altimeter with altimeter calibration knob. In Landing Panel View the altimeter can be enlarged. 6. Annunciator Day/Night switch (see ‘Annunciator Panel’ below for details) 7. Annunciator lights panel (see ‘Annunciator Panel’ below for details) 8. VOR 1 indicator 9. Annunciator test switch (see ‘Annunciator Panel’ below for details) 10. VOR 2 indicator 11. Magnetic compass 12. Audio control panel 13. Distance Measuring Equipment (DME Nav) 14. NAV/GPS mode switch 15. Autopilot 16. Transponder 17. GPS 18.Automatic Direction Finder (ADF) 19. COM/NAV 2 Radio 20. COM/NAV 1 Radio

Piper Archer III 8
21. ADF indicator 22. Suction gauge 23. Turn & Bank indicator 24. Panel lights switch 25. DI (Direction indicator) 26. VSI (Vertical Speed indicator) 27. Fuel tank quantity indicator 28. Indicator fuel pressure, engine oil pressure, engine oil temperature 29. Tachometer 30. Exhaust gas temperature gauge 31. Throttle control 32. Radio master switch 33. Mixture control 34. Carburettor heat control 35. Pitot heat switch 36. Hobbs meter 37. Sub panel switch icons 38. Standby vacuum supply switch and indicator

Piper Archer III 9
Panel Switch Icons 1. Kneeboard 2. Map 3. GPS 4. Flaps panel 5. Yokes hide/display 6. ATC window 7. Radio stack 8. Fuel panel 9. Overhead (electrical) panel 10. Park Animations on/off. When the aircraft is parked on the ground with engines off and parking brakes set, then activating this item will show additional items and animations in external views, such as pilot's accessories, wheel chocks, aircraft tie down points and ropes and pitot tube covers.
Annunciator Panel 1. Low Bus warning light 2. Pitot heat off/inop annunciator 3. Starter enabled annunciator 4. Test button. Press to test all annunciator/warning lights. All lights will illuminate. 5. Vacuum inoperative warning light 6. Alternator inoperative warning light 7. Low oil pressure warning light 8. Day/night switch. Changes the brightness of the annunciator/warning lights between bright (day) and dim (night). Day setting:
Night setting:

Piper Archer III 10
Overhead (Electrical) Panel
1. Engine starter switch 2. Engine primer 3. Battery switch 4. Alternator switch 5. Fuel pump switch 6. Left magneto switch 7. Right magneto switch 8. Landing lights switch 9. Navigation lights switch 10. Strobe lights switch
Flaps Panel
1. Rudder trim indicator 2. Rudder trim knob 3. Flaps lever 4. Elevator trim wheel 5. Elevator trim indicator
Fuel Switch
1. No fuel tank selected 2. Left fuel tank selected 3. Right fuel tank selected

Piper Archer III 11
Sub panel Selection SHIFT+1 = Shows/hides the main panel SHIFT+2 = Shows/hides the yokes SHIFT+3 = Shows/hides the upper panel SHIFT+4 = Shows/hides the fuel switch SHIFT+5 = Shows/hides the flaps panel SHIFT+6 = Shows/hides the radio stack SHIFT+7 = Shows/hides the default GPS SHIFT+8 = Shows/hides the mini panel SHIFT+9 = Shows/hides the OAT gauge
In-cockpit kneeboard - checklists All the Flying Club aircraft have customised checklists that are available for in-cockpit viewing. SHIFT + F10 keys in FSX on your keyboard to bring these up. This opens the Electronic Kneeboard. Cycling through F10 or SHIFT + F10 keys will display the various pages available and will also close the kneeboard when you have gone through each page.

Piper Archer III 12
ARCHER III RADIO OPERATION
The radio units on this aircraft cover the full range of navigation and communication devices that are available for a general aviation aircraft. In detail the aircraft is equipped with 1) Custom Audio Control System 2) Custom ADF system 3) Custom VHF Communication/Navigation Transceivers 4) Custom Transponder 5) Custom GPS 6) Custom DME 7) Custom autopilot
Operation - General Powering ON the avionics. Each radio has its own ON/OFF switch. By default individual avionic units will be OFF when you load the aircraft. In order to use the radios you need to switch them ON individually. As in reality the procedure should always be to switch ON radios AFTER the engine has been started and to switch OFF all radios BEFORE engine shutdown. For details on operation please see the sections below.
Operation - Audio Control System
The unit controls as many as three transceivers and six receivers, including the internal marker beacon receiver and its three-light presentation. It provides transceiver and receiver outputs to speaker or headphones or both. In this simulation speaker and headphone outputs are linked to each other. Intercom functions are not simulated.

Piper Archer III 13
Operating the Marker Beacon Receiver The unit has a built-in marker beacon receiver with a three-light display. It gives you a visual and aural signal when you pass over a 75 MHz beacon. The blue, amber, and white lights on the faceplate—as well as the audio tone—identify the beacon type (outer, middle or airway/inner marker). The MKR buttons must be ‘in’ for the marker beacon receiver to provide an audio signal at beacon passage.
Audio Control - Receiver Selection A set of push buttons on the console control all receiver audio distribution functions. To listen to a specific receiver, simply press the corresponding headphone or speaker button ‘in.’ To disconnect that receiver, press the button again.
Audio Control - Transmitter Selection The rotary selector switch on the right side of the console connects the microphone to either COMM 1 or COMM 2. Other switch positions are for cabin address and ramp hailer. In this software they are not modelled.
Operation - ADF
The ADF radio (Automatic Direction Finder) is linked to the ADF indicator on your panel. For details and general advice about using the ADF please see your Flight Simulator help.
Turning ON/OFF Left-click on the OFF/VOL knob to turn the radio ON or OFF. You will know that the radio is powered ON when the display is active.
Frequency Selection The active frequency (to which the ADF is tuned) is displayed in the left side of the window at all times. A standby frequency is displayed in the right side of the window. The standby frequency can be changed by clicking on the frequency select knobs – these are the concentrically placed round knobs on the right of the unit. The standby frequency will increment/decrement according to the areas you click: Upper left quadrant: - 10 kHz Upper right quadrant: + 10 kHz Lower left quadrant: - 0.1 kHz Lower right quadrant: + 0.1 kHz

Piper Archer III 14
The standby frequency selected may then be switched into the active window by pressing the ‘FRQ’ button. The standby and active frequencies will be exchanged (flip-flopped).
Operating the Timers The ADF radio has two built-in timers: a Flight Timer (FLT) and an Elapsed Time timer (ET). The display of the Flight Time or Elapsed Time are displayed alternatively by pressing the FLT/ET button.
Flight timer
The flight timer continues to count up and will always be automatically reset to 0:00 whenever power is interrupted, for example by turning the unit off.
Elapsed timer
The elapsed timer may be reset back to 00:00 by clicking on the SET/RST button. It will then start counting up again.

Piper Archer III 15
The elapsed timer also has a count-down mode. To enter the count-down mode, press and hold the SET/RST button for about two seconds. The display will show 00:00 and the timer is in the ET ‘set’ mode.
A time up to 59 minutes, 59 seconds may be preset using the concentric knobs on the right side of the unit. The preset time will be displayed and remains unchanged until the SET/RST button is pressed again which will start the elapsed timer counting down. When the timer reaches 00:00 it will start to count up again.
Operation - COM / NAV units
This unit combines a VHF COM radio with a NAV transceiver (Transmitter-Receiver), linked to the VOR indicator of the aircraft. For general use and operations of the VOR system and indicators please refer to the Flight Simulator help. The left side of the COM/NAV unit hold all displays and controls to operate the COM part, the right side is the NAV part. The Archer includes two of these units, one linked to COM1 / NAV1, the other one linked to COM2 / NAV2.
Turning ON/OFF Left-click on the OFF/VOL knob to turn the unit ON or OFF. This will affect the COMM and NAV part equally. You will know that the radio is powered ON when the display is active.
Frequency Selection Both the COM and NAV part have frequency display showing the active frequency on the left side of the display and the standby frequency on the right side of the display similar to the ADF unit. The standby frequency can be changed by clicking on the frequency selection knobs with the same kind of click areas on each rotary knob that can be found on the ADF unit as well. Frequencies can be swapped by clicking on the white rectangular shaped swap buttons between/below the USE and STBY display.

Piper Archer III 16
NAV IDENT The NAV radio has an additional button to enable the audibly IDENT the signal broadcasted by most navigational aids. Press the PULL IDENT button to hear this Morse code signal, click the button a second time to silence it.
Operation - Transponder
The Transponder unit is a standard transponder unit similar to default transponder found in Flight Simulator. For general information about transponders please refer to the Flight Simulator help. The transponder is powered on by setting the rotary selector to the STBY, ALT or ON position. The button also has a TEST position which will perform a display self-test.
Operation Modes OFF: Setting the rotary knob to OFF will power off the transponder. ON: The transponder in Mode A operations. In the real world Mode A just supplies position information to a ground station without transmitting Altitude information. The R indicator will blink to indicate that the transponder is functioning properly and replying to interrogations from the ground.

Piper Archer III 17
ALT: The transponder is operating in Mode A/C operations. In the real world Mode C supplies position information to a ground station as well as the Aircraft’s altitude. The R indicator will blink to indicate that the transponder is functioning properly and replying to interrogations from the ground.
SBY: This mode is not simulated on this aircraft. TST: The Transponder will perform a display self test
Code Selection The transponder can be set to codes from 0000 to 7777. To select the code press the numbered buttons at the bottom of the front panel. Pushing one of the keys begins the code selection sequence. The new code is not activated until the fourth key is entered. Pressing the CLR key moves the code back to the previous digit. Pressing the CLR key when the cursor is on the first digit will cancel the data entry and restore the previous code. The numbers 8 and 9 are not used for code entry. Although they have no effect in Flight Simulator as in the real world the recognised Transponder codes are: - Code 0021 VFR Flight below 5000 ft (Germany) - Code 0022 VFR Flight above 5000 ft (Germany) - Code 1200 VFR Flight (USA) - Code 7000 VFR Flight (UK) - Code 7500 Hijack - Code 7600 Radio Failure - Code 7700 Emergency - Code 7777 Military Interceptor Operations
Other functions IDENT mode When you are asked to ‘Ident or Squawk’ by ATC, press the small IDENT button. VFR Sets the transponder to the pre-programmed VFR code (7000). CLR Resets the Count Up Timer During code selection this key cancels the last entry and moves the cursor one step to the left.

Piper Archer III 18
Operation - GPS
The GPS in this simulation is a very simplified version of the original GPS fitted into this aircraft. A click spot on this gauge allows you to bring up the default Flight Simulator GPS unit.
Turning ON/OFF Left-click on the large OFF/ON knob to turn the GPS ON or OFF. A test page will appear for a couple of seconds.
GPS display After self test has ended the main (and only) GPS page will appear, showing a selection of information on three lines.
Line 1: UTC date in format DD-MM-YYYY and time in format hh:mm Line 2: Current aircraft latitude and longitude Line 3: ICAO ID of the next (closest) airport, the bearing to it and distance.
Default GPS click spot Clicking into the GPS display will open the default Flight Simulator GPS in a separate panel window.
Piper Archer III 19
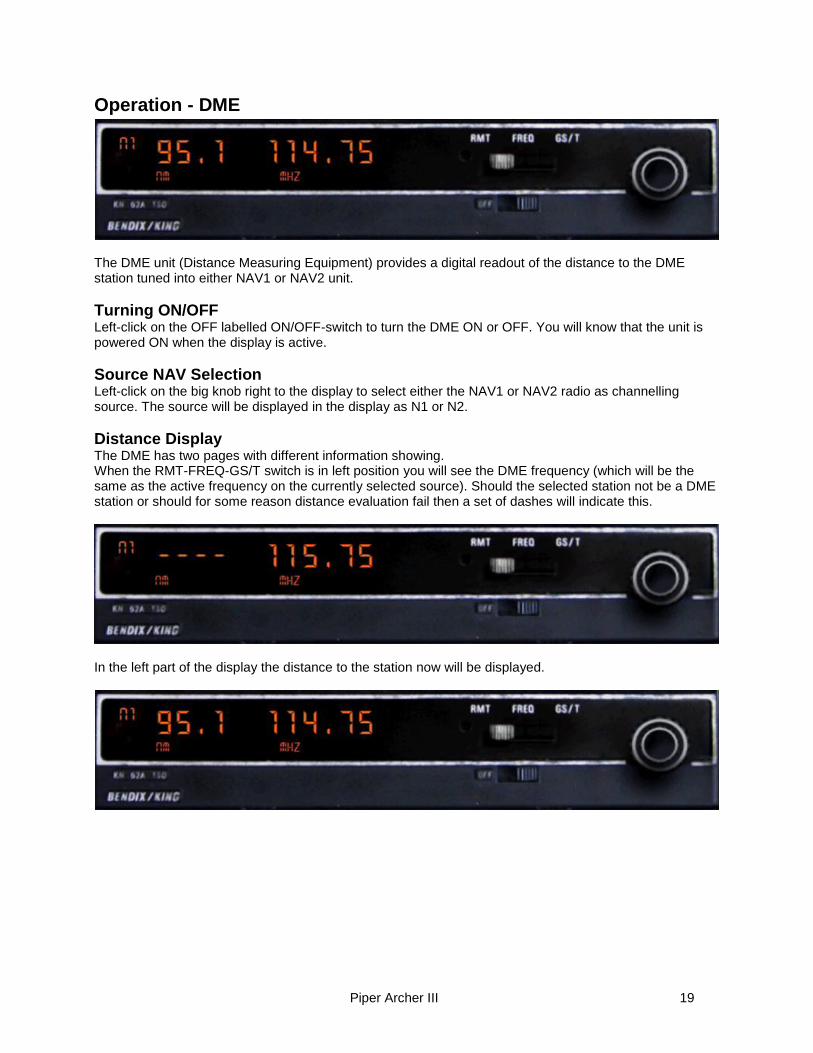
Operation - DME
The DME unit (Distance Measuring Equipment) provides a digital readout of the distance to the DME station tuned into either NAV1 or NAV2 unit.
Turning ON/OFF Left-click on the OFF labelled ON/OFF-switch to turn the DME ON or OFF. You will know that the unit is powered ON when the display is active.
Source NAV Selection Left-click on the big knob right to the display to select either the NAV1 or NAV2 radio as channelling source. The source will be displayed in the display as N1 or N2.
Distance Display The DME has two pages with different information showing. When the RMT-FREQ-GS/T switch is in left position you will see the DME frequency (which will be the same as the active frequency on the currently selected source). Should the selected station not be a DME station or should for some reason distance evaluation fail then a set of dashes will indicate this.
In the left part of the display the distance to the station now will be displayed.

Piper Archer III 20
GS/T Display With the 3-way switch set to position GS/T the unit will display distance, groundspeed and time-to-station relative to the DME station.
The aircraft must be in motion for these values being calculated properly, otherwise the speed will display as ‘0’ and time as ‘--’. Please note that the groundspeed is not the absolute aircraft forward speed over ground but the ground speed relative to the DME station.
Operation - Autopilot
The autopilot on this aircraft is a simulation of the one fitted in the real Archer. It is a Single Axis system, offering lateral modes only.
Turning ON/OFF Left-click on the AP labelled button to turn the autopilot ON or OFF. You will know that the unit is powered ON when the display is active.
Heading Mode Selector Button Push the HDG button to select the Heading mode, which commands the airplane to turn to and maintain the heading selected by the heading bug on the DI. A new heading may be selected at any time and will result in the airplane turning to the new heading.

Piper Archer III 21
Navigation Model Selector Button
Push the NAV button to arm the navigation mode. The mode provides automatic beam capture and tracking of VOR or GPS as selected with the NAV/GPS switch, which is located on the panel right to the radio stack. NAV mode is recommended for en-route navigation tracking.
Approach Mode Selector Button
Push the APR button to arm the Approach mode. This mode provides automatic beam capture and tracking of the VOR1 signal. APR mode is recommended for instrument approaches.
Back Course Approach Mode Selector Button
Push the REV button to arm the Back Course approach mode. This mode functions similarly to the approach mode except that the autopilot response to LOC signals is reversed.

Piper Archer III 22
Special Click Areas in Virtual Cockpit In Virtual Cockpit view you can not only freely move your head and eye point but you can also operate all the gauges and some objects inside the aircraft by with your mouse. Some of the objects can be removed to allow for better visibility at the instrument panel or the outside area. Show/hide yokes Click on either of the yokes to remove them for better instrument visibility. Click on the yoke hole on the panel to display the yokes Show/hide passengers Click on a passenger to remove them. Click on the empty seat to display the passengers. This works best when using the right seat / right seat passenger as click area.

Piper Archer III 23
Credits Many thanks to all those who have kindly assisted in development of this aircraft Aircraft Aéroclub Bastia Saint-Exupéry
Additional gauge programming Wolfgang Schwarz
Product manager Alex Ford
Utilities Programming Wolfgang Schwarz
Product Research Marc Siegel
Installer Programming Richard Slater
Aircraft development Marc Siegel
Manual creation Alex Ford Wolfgang Schwarz
Flight dynamic modelling Rob Young
Manual editing Rufus Golesworthy
Sounds Rob Young
Production Andy Payne, Dermot Stapleton
Gauge development Martin ‘Timo’ Lubda Wolfgang Schwarz
Copyrights ©2007 Just Flight. All rights reserved. Just Flight and the Just Flight logo are trademarks of Mastertronic Group Limited, 1st Floor, Benjamin Street, London EC1M 5QG, United Kingdom. All trademarks and brand names are trademarks or registered trademarks of the respective owners and their use herein does not imply any association or endorsement by any third party.
Piper Archer III 24
Piracy We at Just Flight have invested significant time, effort and money to develop, manufacture and publish any of our flight simulation products. This includes rewarding the programmers and artists whose creativity contributes so much to the products we all enjoy. A pirate, otherwise known as a thief, simply pays a few pence for a gold disc, places it into a CD-writer, clicks a record button, and makes over £4.00 profit PER SALE for his troubles. This is actually more profit than the publishers and developers make from the sale of an original title. Piracy is not just the domain of the casual domestic user in his or her back room, but it is also a multi-million pound business conducted by criminals often with associations with the illegal drugs trade. Buying pirated copies of programs directly support these illegal operations. In addition to this there is the real risk that the pirate product will be of inferior quality and will often contain mechanisms that degrade the performance of the game. The people who really suffer from game piracy are the artists, programmers and other committed game development staff. Piracy & theft directly affects people, and their families. Loss of revenue to the games industry through piracy means many are losing their jobs due to cut-backs that have to be made to ensure developers and publishers survive. The logical outcome of this is that eventually there would be no more Flight Simulation programs commercially available. Some of the most highly regarded, hard-working and creative people in the UK and around the world are losing their jobs while the pirates line their own pockets with YOUR money. Where's the justice in that? It's not just copying software that is against the law, owning copied software also constitutes a criminal offence; so anyone buying from these people is also at risk of arrest and prosecution. To find out more about the implications of piracy please press the Piracy button on our website at www.justflight.com