Pioneer Wind Fairing Kit 43249, 43250, 43251...Nov 29, 2018 · Pioneer Wind Fairing Kit 43249,...
5
Important Information Page 1 of 5 Pioneer Wind Fairing Kit 43249, 43250, 43251 Important: Please read these instructions carefully prior to installation. Please refer to your fitting instruction to ensure that the alloy tray is installed correctly. Check the contents of this kit before commencing fitment and report any discrepancies. Warning: Do not attempt to fit the accessory to your vehicle unless you fully understand these fitting instructions. Please direct any questions regarding fitting to the dealer from where the roof racks were purchased. Use only non-stretch fastening ropes or straps. Recommendations: It is essential that all bolt connections be checked after driving a short distance when you first install your roof racks. Bolt connections should be checked again at regular intervals (once a week is enough, depending on road conditions, usage, loads and distances travelled). You should also check the roof racks and accessories each time they are re-fitted. Always make sure to fasten your load securely. Please also ensure that all loads are evenly distributed and that the centre of gravity is kept as low as possible and must be entirely contained within the extents of the roof racks. Fairing must be installed facing the front of the vehicle as specified in this instruction. Rack System must be removed when putting vehicle through an automatic car wash. Caution: The handling characteristics of the vehicle changes when you transport a load on the roof. For safety reasons we recommend you exercise extreme care when transporting wind-resistant loads. Special consideration must be taken into account when cornering and braking. Note: The fairing is designed to minimise oncoming wind noise, it will not reduce all wind noise. The fairing cannot minimise noise generated from crosswinds. Note for Dealers and Fitters: It is your responsibility to ensure these fitting instructions are given to the end user or client Rhino-Rack, 22 Hanson Pl, Eastern Creek NSW 2766, Australia Document No: R1459 (02) 8846 1900 Prepared By: K.Everett Issue No: 03 rhinorack.com.au Authorised By: W.Davis Issue Date: 29/11/2018 These instructions remain the property of Rhino-Rack Australia Pty. Ltd. and may not be used or changed for any other purpose than intended.
Transcript of Pioneer Wind Fairing Kit 43249, 43250, 43251...Nov 29, 2018 · Pioneer Wind Fairing Kit 43249,...
Important Information
Page 1 of 5
Pioneer Wind Fairing Kit 43249, 43250, 43251Important: Please read these instructions carefully prior to installation.
Please refer to your fi tting instruction to ensure that the alloy tray is installed correctly.Check the contents of this kit before commencing fi tment and report any discrepancies.
Warning: Do not attempt to fi t the accessory to your vehicle unless you fully understand these fi tting instructions. Please direct any questions regarding fi tting to the dealer from where the roof racks were purchased.
Use only non-stretch fastening ropes or straps.
Recommendations: It is essential that all bolt connections be checked after driving a short distance when you fi rst install your roof racks. Bolt connections should be checked again at regular intervals (once a week is enough, depending on road conditions, usage, loads and distances travelled). You should also check the roof racks and accessories each time they are re-fi tted. Always make sure to fasten your load securely. Please also ensure that all loads are evenly distributed and that the centre of gravity is kept as low as possible and must be entirely contained within the extents of the roof racks. Fairing must be installed facing the front of the vehicle as specifi ed in this instruction.
Rack System must be removed when putting vehicle through an automatic car wash.
Caution: The handling characteristics of the vehicle changes when you transport a load on the roof. For safety reasons we recommend you exercise extreme care when transporting wind-resistant loads. Special consideration must be taken into account when cornering and braking.
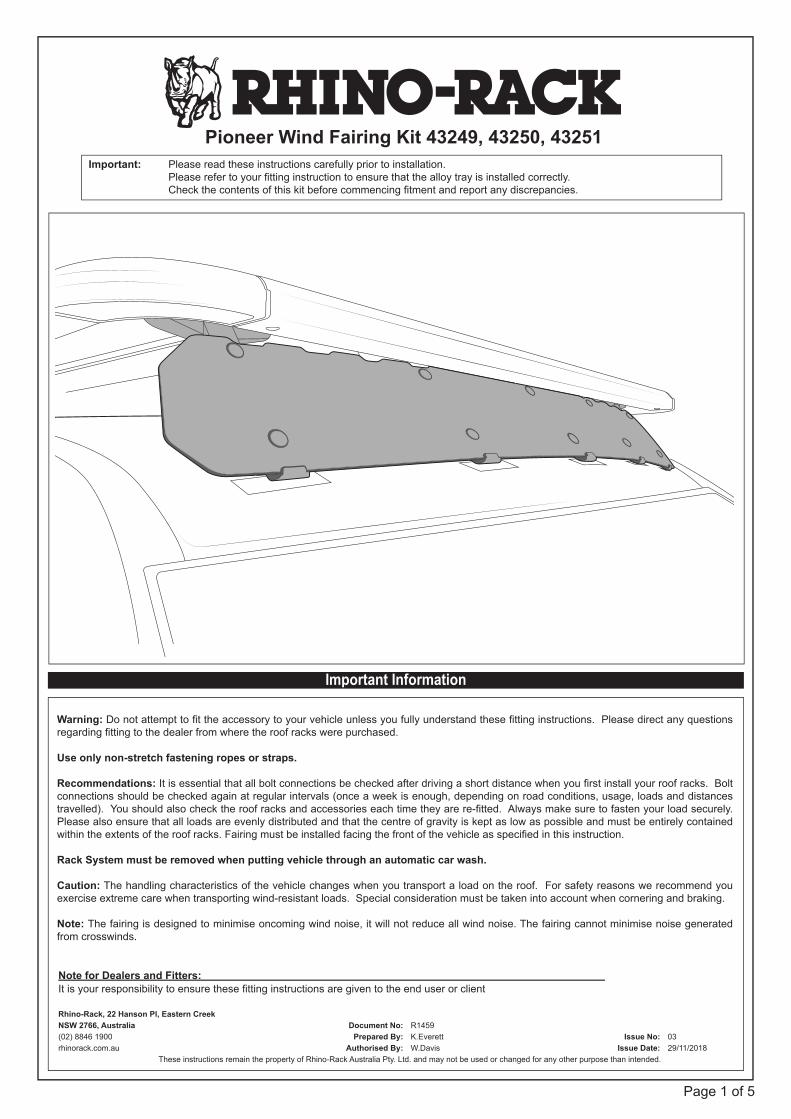
Note: The fairing is designed to minimise oncoming wind noise, it will not reduce all wind noise. The fairing cannot minimise noise generated from crosswinds.
Note for Dealers and Fitters: It is your responsibility to ensure these fi tting instructions are given to the end user or client
Rhino-Rack, 22 Hanson Pl, Eastern CreekNSW 2766, Australia Document No: R1459(02) 8846 1900 Prepared By: K.Everett Issue No: 03rhinorack.com.au Authorised By: W.Davis Issue Date: 29/11/2018
These instructions remain the property of Rhino-Rack Australia Pty. Ltd. and may not be used or changed for any other purpose than intended.
rodr
Small Controlled
Pioneer Wind Fairing Kit 43249, 43250, 43251
Page 2 of 5
Parts List
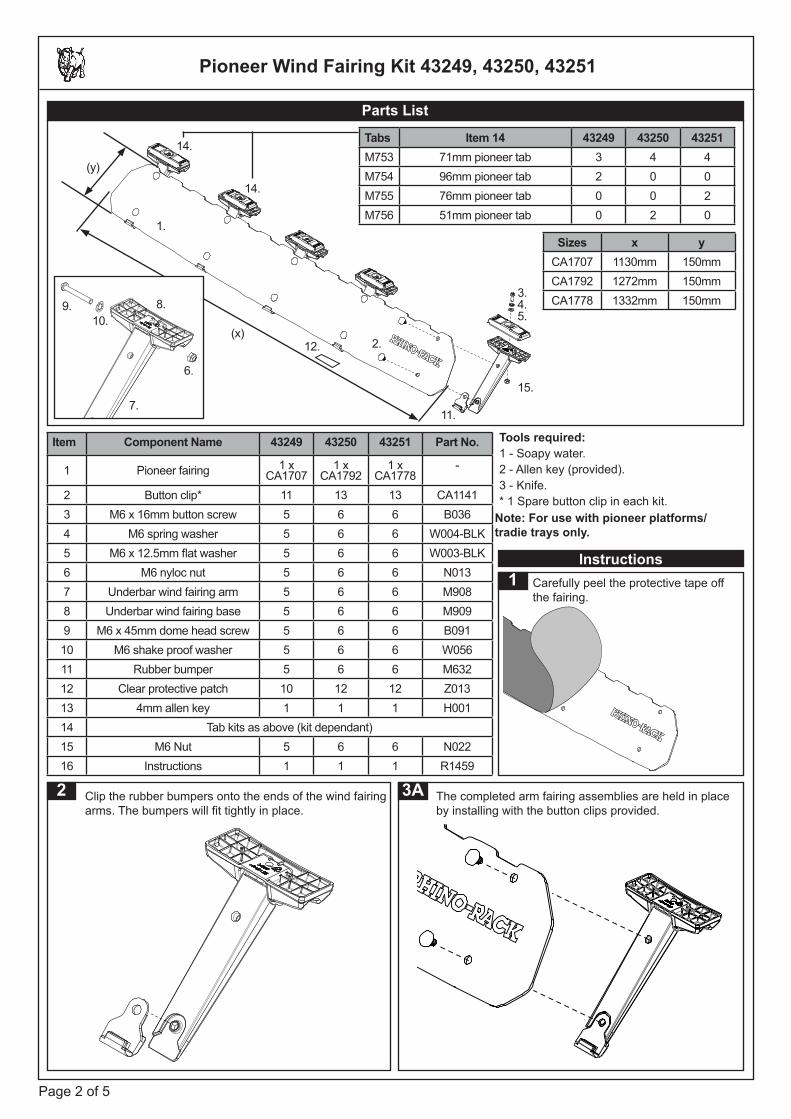
Item Component Name 43249 43250 43251 Part No.
1 Pioneer fairing 1 x CA1707
1 xCA1792
1 xCA1778
-
2 Button clip* 11 13 13 CA11413 M6 x 16mm button screw 5 6 6 B0364 M6 spring washer 5 6 6 W004-BLK5 M6 x 12.5mm fl at washer 5 6 6 W003-BLK6 M6 nyloc nut 5 6 6 N0137 Underbar wind fairing arm 5 6 6 M9088 Underbar wind fairing base 5 6 6 M9099 M6 x 45mm dome head screw 5 6 6 B09110 M6 shake proof washer 5 6 6 W05611 Rubber bumper 5 6 6 M63212 Clear protective patch 10 12 12 Z01313 4mm allen key 1 1 1 H00114 Tab kits as above (kit dependant) 15 M6 Nut 5 6 6 N02216 Instructions 1 1 1 R1459
Instructions
Tools required:1 - Soapy water.2 - Allen key (provided).3 - Knife.* 1 Spare button clip in each kit.
2 Clip the rubber bumpers onto the ends of the wind fairing arms. The bumpers will fi t tightly in place.
3A The completed arm fairing assemblies are held in place by installing with the button clips provided.
1 Carefully peel the protective tape off the fairing.
Note: For use with pioneer platforms/ tradie trays only.
Tabs Item 14 43249 43250 43251M753 71mm pioneer tab 3 4 4M754 96mm pioneer tab 2 0 0M755 76mm pioneer tab 0 0 2M756 51mm pioneer tab 0 2 0
Sizes x yCA1707 1130mm 150mmCA1792 1272mm 150mmCA1778 1332mm 150mm
1.
2.
3.
15.
14.
12.
4.5.
14.
11.
9.10.
7.
6.
(x)
(y)
9.10.
8.
Pioneer Wind Fairing Kit 43249, 43250, 43251
Page 3 of 5
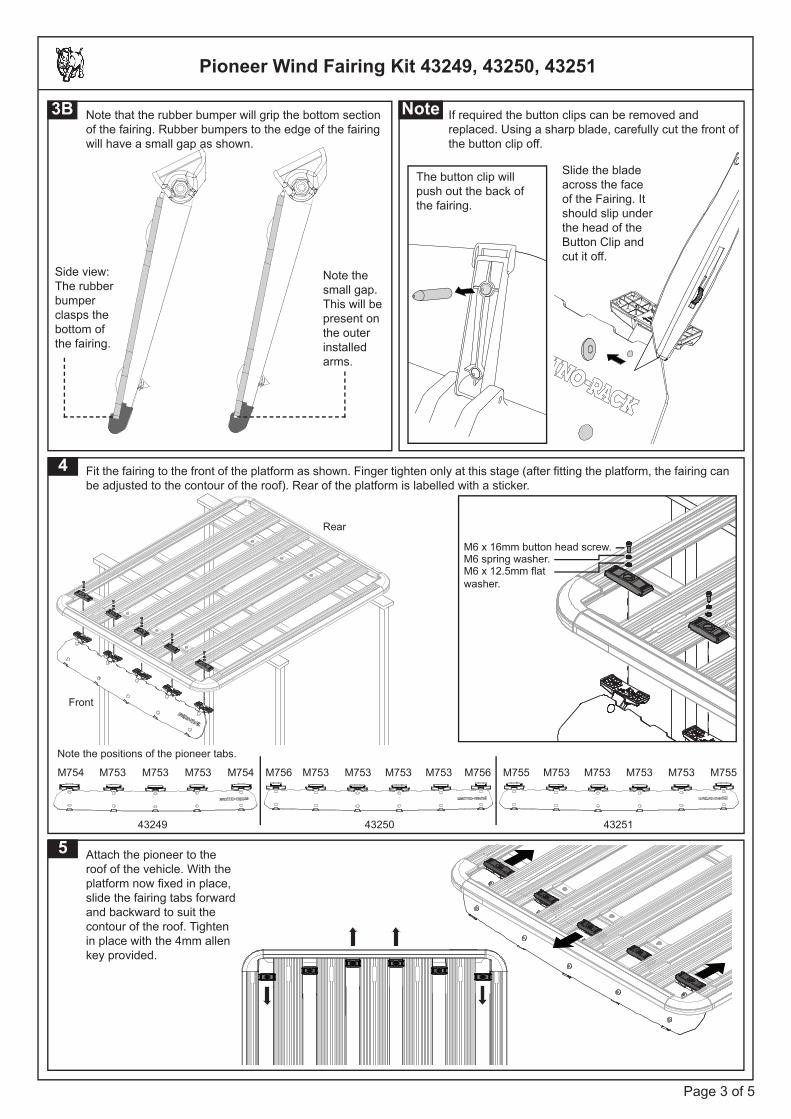
3B Note that the rubber bumper will grip the bottom section of the fairing. Rubber bumpers to the edge of the fairing will have a small gap as shown.
Note If required the button clips can be removed and replaced. Using a sharp blade, carefully cut the front of the button clip off .
Side view: The rubber bumper clasps the bottom of the fairing.
Note the small gap. This will be present on the outer installed arms.
Slide the blade across the face of the Fairing. It should slip under the head of the Button Clip and cut it off .
The button clip will push out the back of the fairing.
4 Fit the fairing to the front of the platform as shown. Finger tighten only at this stage (after fi tting the platform, the fairing can be adjusted to the contour of the roof). Rear of the platform is labelled with a sticker.
Front
Rear
M6 x 16mm button head screw.M6 spring washer.M6 x 12.5mm fl atwasher.
Note the positions of the pioneer tabs.
43249 43250 43251
M753 M753 M753M754 M754 M753 M753 M753 M753M756 M756 M753 M753 M753 M753M755 M755
Attach the pioneer to the roof of the vehicle. With the platform now fi xed in place, slide the fairing tabs forward and backward to suit the contour of the roof. Tighten in place with the 4mm allen key provided.
5
Pioneer Wind Fairing Kit 43249, 43250, 43251
Page 4 of 5
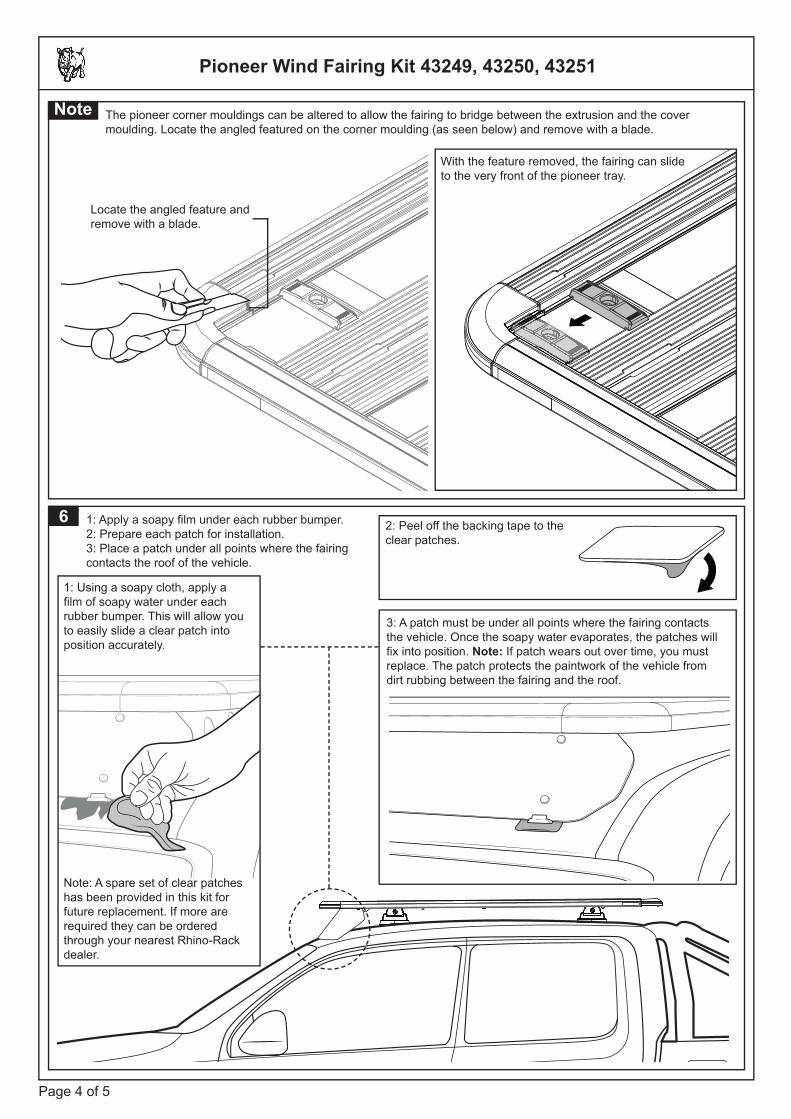
1: Apply a soapy fi lm under each rubber bumper.2: Prepare each patch for installation.3: Place a patch under all points where the fairing contacts the roof of the vehicle.
6 2: Peel off the backing tape to the clear patches.
3: A patch must be under all points where the fairing contacts the vehicle. Once the soapy water evaporates, the patches will fi x into position. Note: If patch wears out over time, you must replace. The patch protects the paintwork of the vehicle from dirt rubbing between the fairing and the roof.
1: Using a soapy cloth, apply a fi lm of soapy water under each rubber bumper. This will allow you to easily slide a clear patch into position accurately.
Note The pioneer corner mouldings can be altered to allow the fairing to bridge between the extrusion and the cover moulding. Locate the angled featured on the corner moulding (as seen below) and remove with a blade.
Locate the angled feature and remove with a blade.
With the feature removed, the fairing can slide to the very front of the pioneer tray.
Note: A spare set of clear patches has been provided in this kit for future replacement. If more are required they can be ordered through your nearest Rhino-Rack dealer.

Pioneer Wind Fairing Kit 43249, 43250, 43251
Page 5 of 5
A The fairing can be set back well inside the pioneer tray if required.
Important Information B1 If required, the fairing system can be trimmed to allow
for possible obstruction from leg kits, accessories or vehicle aerials.
Mark out the area of the fairing on one side you wish to remove.
B2 1: Remove the fairing from the roof and score along the references made previously with a blade. 2: Holding the fairing on ether side of the scoring, fl ex the unit and snap the marked section off the fairing.
B3 Transfer the snapped off section to the other side of the fairing. Use this as a guide to mark up the remaining side. Repeat steps B1 and B2.
Snap the marked section off the fairing.
C The fairing kits can be installed to selected pioneer welded trays. Note: The clamp mouldings are set back behind the front corner plastic pieces.


![10%-32 43250%,6%798 750%,2 - JSBi · Þ Þ "!# $ % & (' *) + ' *)-,. 0/ , 5 & r []\_^(` []\_^(` & []\_^(`](https://static.fdocuments.net/doc/165x107/5f29ba5a08f8ca237b0b7124/10-32-432506798-7502-jsbi-0-.jpg)