P66 MEE PPPM mWWeebb iSSeerrvviicceess ... MEE PPPM mWWeebb iSSeerrvviicceess Prrooggrraammiinngg...
79
P6 EPPM Web Services Programming Guide 16 R1 March 2016
Transcript of P66 MEE PPPM mWWeebb iSSeerrvviicceess ... MEE PPPM mWWeebb iSSeerrvviicceess Prrooggrraammiinngg...

PP66 EEPPPPMM WWeebb SSeerrvviicceess PPrrooggrraammmmiinngg GGuuiiddee
1166 RR11
MMaarrcchh 22001166


3
Contents
Introduction............................................................................................. 5
Architecture .............................................................................................. 6
Standards ................................................................................................. 6
What's New In P6 EPPM Web Services ................................................................. 7
What's Changed this Release .................................................................... 7
Interface Change Details ......................................................................... 9
About P6 EPPM Web Services ........................................................................ 10
Business Object Based Services ............................................................... 10
Job Service ...................................................................................... 12
Spread Service .................................................................................. 12
Import and Export Services .................................................................... 13
Using P6 EPPM Web Services ......................................................................... 13
Demonstration Applications .......................................................................... 14
Generating a Java Keystore and Public/Private Key Pair ........................................ 15
Configure P6 EPPM Web Services to Use Username Token with Encryption and Digital Signatures ........................................................................................................... 16
Run P6 EPPM Web Services Demo ................................................................... 17
Using the Client Stub Classes ........................................................................ 17
Handling the Apache CXF Java Client Timeout .................................................... 18
P6 EPPM Web Services Standards .................................................................. 19
WS-Policy ............................................................................................... 19
WS-Security ............................................................................................. 19
WS-Addressing .......................................................................................... 20
Example: Using WS-Addressing with P6 EPPM Web Services from Java ................. 20
Enabling WS-Policy .................................................................................... 25
Authentication and Session Management ........................................................ 26
Authentication Using Username Token Profile .................................................... 27
Authentication Using Oracle Web Services Manager .............................................. 29
Prerequisites .................................................................................... 29
Creating a Domain and Administration Server for P6 EPPM Web Services .............. 30
Enabling Oracle Web Services Manager Authentication Using WebLogic Enterprise Manager .................................................................................................... 32
Enabling Oracle Web Services Manager Authentication for P6 Team Member Using WebLogic Enterprise Manager ................................................................. 34
Consuming P6 EPPM Web Services over HTTPS (SSL) Using Username Token Profile ........ 36
Authentication Using SAML Token Profile .......................................................... 38
Authentication Using HTTP Cookies ................................................................. 44
Java Client Example: Authentication Using HTTP Cookies ................................ 44

P6 EPPM Web Services Programming Guide
4
Best Practices ......................................................................................... 46
Using Filters ............................................................................................ 46
Filter Examples .................................................................................. 47
Performance Tips ...................................................................................... 49
Security ................................................................................................. 50
Security ................................................................................................. 50
Transport Level Security using HTTPS .............................................................. 50
Consuming P6 EPPM Web Services over HTTPS (SSL) From Java using HTTP Cookies ........ 51
Message Level Security ............................................................................... 51
Application Level Security ............................................................................ 53
Defining User Access to Resources ........................................................... 54
How to Set Security Privileges ....................................................................... 55
How to Set Global Security Privileges ....................................................... 55
How to Set Project Security ................................................................... 55
How to Set Resource Security ................................................................. 56
Global Profile Definitions ............................................................................. 57
Project Profile Definitions ............................................................................ 67
Troubleshooting P6 EPPM Web Services .......................................................... 75
About Logging .......................................................................................... 75
Configuring the Logging Level................................................................. 75
Setting Logging On and Off .................................................................... 75
For More Information ................................................................................ 76
Where to Get Documentation ........................................................................ 76
Documentation Accessibility ......................................................................... 76
Where to Get Training ................................................................................ 76
Where to Get Support ................................................................................. 77
Legal Notices .......................................................................................... 79

5
P6 EPPM Web Services is an integration technology that extends P6 business objects and functionality. Based on open standards including SOAP, XML and WSDL, P6 EPPM Web Services enables developers to leverage standard interfaces to create integrated software solutions that interoperate with a wide variety of enterprise software applications running on a diversity of hardware and operating system platforms.
In This Section
Architecture ............................................................................................................... 6 Standards .................................................................................................................. 6 What's New In P6 EPPM Web Services .................................................................... 7 About P6 EPPM Web Services ................................................................................ 10 Using P6 EPPM Web Services ................................................................................ 13 Demonstration Applications ..................................................................................... 14 Generating a Java Keystore and Public/Private Key Pair ........................................ 15 Configure P6 EPPM Web Services to Use Username Token with Encryption and Digital Signatures ............................................................................................................... 16 Run P6 EPPM Web Services Demo ........................................................................ 17 Using the Client Stub Classes ................................................................................. 17 Handling the Apache CXF Java Client Timeout ....................................................... 18
Introduction

P6 EPPM Web Services Programming Guide
6
Architecture
P6 EPPM Web Services Employs Web-based Technology
The P6 EPPM Web Services platform employs Web-based technology to handle requests from external programs. External client programs use P6 EPPM Web Services by creating a request and sending it to the application server using the SOAP protocol which is essentially XML over HTTP. Having received the request, P6 EPPM invokes whatever business logic is required to service the request. The client application need not understand the semantics of this processing. Responses or requests from P6 EPPM simply follow the same path in reverse.
Contract First Approach
P6 EPPM Web Services uses a contract first approach in which WSDL files are used to describe itself to requesting applications. The WSDL uses the Document/Literal Wrapped style to describe the services and their operations. The Document/Literal Wrapped style indicates that P6 EPPM Web Services exchange messages as SOAP envelopes that contain a message body and an optional message header. The message body is comprised of an XML document that is constrained by a WSDL description of the web service. Furthermore, the message body contains an operation name that defines the outer wrapper element for both the request and response messages. The contract first approach is supported by a broad-based set of tools, promotes stability, and enables you to generate your own API.
Protocols and Processing Modes
P6 EPPM Web Services supports both asynchronous and synchronous processing of requests over either of the HTTP or HTTPS protocols. Your client program can use any combination of HTTP, HTTPS , asynchronous, or synchronous protocols and processing modes to invoke any of the operations.
The current version uses WS-Security UsernameToken Profile to authenticate your client program's requests by default. You can also choose to configure P6 EPPM Web Services to use SAML tokens for authentication. Previous versions of P6 EPPM Web Services used HTTP cookies for authentication. Although the use of HTTP cookies is deprecated, support for HTTP Cookies has been maintained in the current version to avoid rendering code that you wrote against earlier versions incompatible with the current version. However, UsernameToken Profile is the preferred method of authentication.
Additionally, P6 EPPM Web Services supports the use of clustering for load balancing. It uses MTOM attachments for import/export operations.
Standards
P6 EPPM Web Services is WS-I (Web Services Interoperability Organization) Basic Profile Version 1.1 compliant. For additional details about the WS-I Basic Profile Version 1.1, please refer to the WS-I web site at http://www.ws-i.org/. At the time of this writing, the Basic Profile Version 1.1 specification was available at http://www.ws-i.org/Profiles/BasicProfile-1.1.html.

Introduction
7
What's New In P6 EPPM Web Services
What's Changed this Release
The following changes have been made for this release.
User Service- New Operations
New operations include:
GetSecondaryBaselineProject
SetSecondaryBaselineProject
GetTertiaryBaselineProject
SetTertiaryBaselineProject
These can be used to get or set a user's specified secondary or tertiary project baseline.
Project Service- New Operations
The new operation, IsProjectLocked, can be used to check whether or not a project is locke
Calendar Service- New Operations
New operations include:
GetStandardTotalWorkHours
GetTotalWorkHours
GetHolidayExceptionDates
These can be used to get the total work hours or standard total work hours for a given date or get a list of the holidays or exceptions that occur on a specific date.
GlobalProfile Service- New Operations
The new operation, HasPrivilege, returns a boolean for whether or nto a global profile has a specified privilege.
ProjectPortfolio Service- New Operations
New operations include:
AddProjects
GetProjectObjectIds
RemoveProjects
ContainsProjects
These operations can be used to add projects to a project portfolio, get an array of project IDs for a specified portfolio, remove projects from a portfolio, and to return a boolean if a portfolio contains a specified project.

P6 EPPM Web Services Programming Guide
8
ResourceTeam Service- New Operations
New operations include:
AddResource
GetResourceObjectIds
RemoveResources
ContainsResource
These operations can be used to add resources to a resource team, get an array of project IDs for a specified resource team, remove resources from a resource team, and to return a boolean if a resource team contains a specified resource.
RoleTeam Service- New Operation
New operations include:
AddRoles
GetRoleObjectIds
RemoveRoles
ContainsRole
These operations can be used to add roles to a team, get an array of role IDs for a specified team, remove roles from a team, and to return a boolean if a team contains a specified role.
Shift Service- New Operation
New operations include:
AddShiftPeriod
RemoveShiftPeriod
RemoveAllShiftPeriods
GetShiftPeriodDuration
These operations can be used to add a shift period with the start hour,get an array of shift period durations, and to remove one or all shift periods from a .
UDFType Service - New Operation
The new operation, GetUDFFieldName, get composed field names that are used for loading UDF data.

Introduction
9
Interface Change Details
The following table provides an overview of updated field lengths, updated values, new fields, and new enumerations.
WSDL Field Level Changes
Export.wsdl New Fields
ActivityFieldType
ProjectFieldType
RelationshipFieldType
ResourceAssignmentFieldType
Relationship.wsdl New Fields
PredecessorFinishDate
PredecessorStartDate
PredecessorWbsName
SuccessorFinishDate
SuccessorStartDate
SuccessorWbsName
BaselineProject.wsdl New enumeration for HistoryInterval
Daily
ResourceAssignment.wsdl New Fields
ActivityActualFinish
ReviewRequired
Project.wsdl New Fields
TeamMemberDisplayPlannedUnit
User.wsdl New Fields
TeamMemberDisplayQRQuickAccess
TeamMemberResourceFilter
UserLicense.wsdl New enumeration for LicenseType
Visualizer

P6 EPPM Web Services Programming Guide
10
About P6 EPPM Web Services
P6 EPPM Web Services can be divided into four categories of services. See the following for more information.
Business Object Based Services
Create, Read, Update, and Delete Operations
Business object based services provide create, read, update, and delete operations, depending on whether the business object supports the respective operation. Most business objects implement all four operations.
Users familiar with SOA terminology might prefer the term entity services instead of the term business object based services when referring to these services.
Additionally, some business object based services contain a special readxxxpath operation that provides hierarchical information about the business object. As an example, you can determine where in the EPS hierarchy a particular project resides by passing its ProjectObjectId into the ReadProjectEPSPath operation. The operation returns a collection of ancestor elements. The following business object based services contain a ReadxxxPath operation:
Service ReadxxxPath Operation
ActivityCode ReadActivityCodePath
CostAcount ReadCostAccountPath
Document ReadDocumentPath
EPS ReadEPSPath
ReadProjectEPSPath
FundingSource ReadFundingSourcePath
OBS ReadOBSPath
ProjectCode ReadProjectCodePath
Resource ReadResourcePath
ResourceCode ReadResourceCodePath
Role ReadRolePath
WBS ReadActivityWBSPath
ReadWBSPath

Introduction
11
Special Operations
Three services support special operations unique to their scope, beyond Create, Read, Update, Delete, and ReadxxxPath:
Project Service
CopyBaseline
CopyProject
CopyProjectAsBaseline
CopyProjectAsReflection
CopyWBSFromTemplate
ConvertProjectToBaseline
CalculateProjectScore
CreateCopyAsTemplate
CreateProjectFromTemplate
PublishProject
User Service
ReadUserBaselines
UpdateUserBaselines
SetUserPassword
SetMailServerPassword
WBS Service
CopyWBSFromTemplate
User Defined Fields (UDFs)
Some business objects support UDFs. UDFs enable users to add custom fields and values to the project database. For example, additional activity data, such as delivery dates and purchase order numbers, can be tracked using UDFs. Not all business objects support UDFs. Business objects that support UDFs include the Activity, ActivityExpense, ActivityStep, ActivityStepTemplateItem, BaselineProject, Document, EPS, Project, ProjectIssue, Risk, Resource, ResourceAssignment, and WBS objects.
Some UDF values are based on calculations. The UDFValue service has a ReadCalculatedUDFValues operation that you use to obtain the value of a calculated field after any calculations have been made.

P6 EPPM Web Services Programming Guide
12
Job Service
The Job service provides operations that you use to initiate and process specialized jobs. These operations include the following:
ApplyActuals
CancelJob
GetCurrentJobs
Level
Schedule
StorePeriodPerformance
SummarizeProject
SummarizeEPS
RecalculateAssignmentCosts
ReadJobLog
ReadJobStatus
Spread Service
The Spread service provides the following operations that you use to read time-phased unit and cost data:
ReadActivitySpread
ReadEPSSpread
ReadProjectSpread
ReadResourceAssignmentSpread
ReadProjectResourceSpread
ReadWBSResourceSpread
ReadProjectRoleSpread
ReadWBSRoleSpread
ReadWBSSpread
UpdateResourceAssignmentSpread
The ReadActivitySpread and ReadResourceAssignmentSpread operations return live spread data.The data returned from the other Spread service operations is summarized data and is current as of the last date the summarizer was run for a project.

Introduction
13
Import and Export Services
The Import and Export services provide the following operations that you use to import and export projects from and to XML:
Import Service
CreateNewProject
UpdateExistingProject
Export Service
ExportProject
Using P6 EPPM Web Services
Where to Begin
Step 1: Decide on a server to host P6 EPPM Web Services
You will need to choose and configure an Application/Web Server and then deploy P6 EPPM Web Services into the Application Server. For information about which Application/Web Server P6 EPPM Web Services supports, refer to the P6 EPPM Web Services Administration Guide.
Step 2: Decide on an authentication method
The next step is to determine how client service requestors should establish and authenticate their credentials with the server. P6 EPPM Web Services supports three choices:
Authentication using UsernameToken Profile
Authentication using SAML
Authentication using HTTP Cookies (deprecated)
See the P6 EPPM Web Services Configuration Guide for your server for more information about how to configure the Application/Web Server.
Step 3: Decide on a client technology
The next step is to decide on the client technology that you will be using with P6 EPPM Web Services from the many client technologies that are available that can utilize P6 EPPM Web Services interfaces. BPM, BPEL, and .NET are examples of technologies that can utilize P6 EPPM Web Services interfaces.
P6 EPPM Web Services has been tested with Java client technologies.
Step 4: Use P6 EPPM Web Services to interact with P6 EPPM
Depending on the decision you made on step 2, use either of the following steps to use P6 EPPM Web Services:
If your server is configured to use a UsernameToken for authentication, follow these steps:
1) Write client code to send and receive P6 EPPM Web Services messages, supplying valid authentication information based upon the authentication method you chose in step two.
2) Call P6 EPPM Web Services operations as required by your program.

P6 EPPM Web Services Programming Guide
14
Demonstration Applications
P6 EPPM Web Services includes a demonstration application with pre-compiled binaries and source code for Java development platforms.
This simple application demonstrates how to perform the following tasks:
1) How to authenticate your credentials when sending SOAP requests to the server.
If using UsernameToken profile to authenticate, how to send your user name and password with each SOAP request that you make.
If using SAML to authenticate, how to exchange SAML assertions.
If using HTTP cookies to authenticate, how to use the Authenticate service to log in to P6 EPPM Web Services with the user name and password to obtain a cookie. Then send the cookie in any SOAP requests you make during the current session.
2) How to protect the confidentiality of your messages by encrypting message elements.
3) How to ensure the integrity of your messages with digital signatures.
4) How to check to see if a project exists in the database with the same ProjectId specified by the Project Id in the demonstration application's interface.
5) How to delete the specified project if it exists.
6) How to read the Parent/Root EPS.
7) How to create the project specified by the ProjectId.
8) How to create three activities under a project. These activities have the following Ids: P6WS-Test Activity1, P6WS-Test Activity2, and P6WS-Test Activity3.
9) How to export the project specified by the ProjectId.
Note: Encryption is not supported when using Import/Export operations.
10) How to log out of P6 EPPM Web Services if using HTTP cookies to authenticate.
Additional demos will be listed in My Oracle Support's Knowledge Articles under ID 910106.1 as they become available.

Introduction
15
Generating a Java Keystore and Public/Private Key Pair
Before you use the P6 EPPM Web Services encryption and digital signatures features you need to generate a public/private key pair.
To generate a Java keystore and public/private key pair
First, make sure that you are using the supported JDK version for this release. Refer to the Tested Configurations document for supported version information. Next, ensure that the bin folder of the JDK is set to your system path. Then perform the following steps:
1) On the Web Server where P6 EPPM Web Services is deployed, open a command prompt and execute the keytool command using the following as an example:
keytool -validity 3600 -genkey -keyalg RSA -alias mykeys -keystore keystore.jks
If necessary, modify the preceding command for your environment.
2) Enter the appropriate information as prompted by the system prompts. For example:
keystore password: demo123 first and last name: demo user organizational unit: demo org organization: demo city: demo city state: demo state country code: us
Type yes when prompted if the information is correct. Press enter when prompted to enter a key password (do not enter anything)
Notes:
The proceeding responses are for example purposes only. Substitute the appropriate responses for your environment.
After performing the steps above your keystore will be generated in the location specified in step 1. The keystore contains the private key that will be used by P6 EPPM Web Services and the public key that will be used by the client. The P6 EPPM Web Services demo application is an example of a client that can be set up to use a public key.
Typically you will need to export the certificate containing the public key from the keystore and import that public key into a keystore accessible by the client. For the sake of clarity, this procedure documents how to use the same keystore for both the client and P6 EPPM Web Services.
3) Copy the keystore to a location that is accessible by P6 EPPM Web Services and the P6 EPPM Web Services client application. The P6 EPPM Web Services Demo program is a client application. If P6 EPPM Web Services is on a different machine than P6 Professional, copy the keystore to both machines.

P6 EPPM Web Services Programming Guide
16
Configure P6 EPPM Web Services to Use Username Token with Encryption and Digital Signatures
1) Complete the steps outlined in Generating a Java Keystore and Public/Private Key Pair (on page 15)
2) Launch the Primavera P6 Administrator and log in.
3) In the Primavera P6 Administrator, click the Configurations tab, and expand Custom/Web Services/Security/Authentication.
4) In the Username Token Profile folder:
a. Change the mode to Username Token Profile.
b. Expand Username Token Profile/Nonce, and set Require Nonce to true.
5) In the Created folder, set Require Created to true.
6) In the Security folder, expand Message Protection:
a. Set Require Timestamp to true.
b. Set Require Digital Signatures for Incoming Messages to true.
c. Set Require Encryption for Incoming Messages to true.
d. In File Location, enter the full path to your Java keystore.
e. In KeyStore Password, enter a password.
f. In Private Key Alias, enter an alias.
g. In Private Key Password, enter a password.
Note: If you did not enter a different key password when you generated the keystore, this will be the same password as the keystore password.
h. Set Encrypt Response to true.
i. Click Save Changes.
7) Restart the application.

Introduction
17
Run P6 EPPM Web Services Demo
1) Start the P6 EPPM Web Services Demo application. Enter a valid username and password for a user in the P6 database. Enter the hostname and port number of the P6 EPPM Web Services installation. Click next.
2) Depending on whether you have configured your system to use UsernameToken Profile or SAML for authentication, select Use UsernameToken Profile... or Use SAML.... Then click Next.
3) Select Enable encryption...... and Enable signing.......
4) If you have configured your system to use SAML, de-select Sign SAML..... Then click Next.
5) Click Browse and select the keystore you created previously.
6) Enter the keystore password.
7) Enter the certificate alias. Click next.
8) Click Start. The demo should run successfully if everything has been done correctly.
Note: Encryption is not supported when using Import/Export operations.
Using the Client Stub Classes
When you install P6 EPPM Web Services, the installation program creates the following folder:
<p6_webservices_installation_folder>\client\Java\JAX-WS\stubs\
Add the following jar file to the classpath:
p6ws-jaxws-client.jar

P6 EPPM Web Services Programming Guide
18
Handling the Apache CXF Java Client Timeout
If you are using CXF, you can control the client timeout by programmatically obtaining the HTTPConduit from the proxy and setting the ConnectionTimeout and ReceiveTimeout properties.
For example:
import org.apache.cxf.frontend.ClientProxy; import org.apache.cxf.transport.http.HTTPConduit; import org.apache.cxf.transports.http.configuration.HTTPClientPolicy; import com.primavera.ws.p6.job.JobPortType; //... JobPortType port = testCase.getJobServicePort(); org.apache.cxf.endpoint.Client client = ClientProxy.getClient(port); HTTPConduit httpConduit = (HTTPConduit)client.getConduit(); HTTPClientPolicy policy = httpConduit.getClient(); // set time to wait for response in milliseconds. zero means unlimited policy.setReceiveTimeout(0);
Or, you can control the client timeout by modifying the spring configuration for the client http-conduit file.
Please refer to the CXF User's Guide for information about using the http-conduit file to control the client timeout. At the time of this writing, the CXF User's Guide was available at http://cwiki.apache.org/CXF20DOC.

P6 EPPM Web Services Standards
19
WS-Policy
P6 EPPM Web Services Policy provides a mechanism for associating a policy expression with a specific web service. The policy expression describes the service's capabilities and any constraints that can be applied to those capabilities. The WS-Policy specification outlines the use of the following elements to form the policy expression:
Policy
All
ExactlyOne
PolicyReference
The WS-Policy standards permit these elements to be used inside the service port definitions in the wsdl files or as part of an external attachment. At the time of this writing, additional information about the WS-Policy standard could be found at:
http://www.w3.org/TR/ws-policy/
P6 EPPM Web Services
P6 uses an external attachment file to support WS-Policy. By default, the use of this attachment file is disabled. However, you can enable the attachment file and use WS-Policy to assert HTTPS and/or WS-Addressing on a per-service basis. The underlying support is provided by CXF.
WS-Security
Transport level protocols such as HTTPS provides a level of security at the transport layer of the OSI Model. The WS-Security standard comprises a number of standards and headers that provide a level of security for your services that goes beyond the security provided by the transport layer. These standards and headers define mechanisms for:
Including authentication tokens
Including nonce
Encrypting messages
Signing messages
Adding timestamps to messages
At the time of this writing, additional information about the WS-Security standard could be found at:
http://docs.oasis-open.org/wss/2004/01/oasis-200401-wss-soap-message-security-1.0.pdf
P6 EPPM Web Services Standards

P6 EPPM Web Services Programming Guide
20
P6 EPPM Web Services
Using UsernameToken Profile, P6 EPPM Web Services allows you to secure messages with an authentication token, nonce and timestamp. P6 EPPM Web Services supports UsernameToken Profile with nonce\timestamp or without nonce\timestamp. P6 EPPM Web Services also supports SAML assertions, message encryption, digital signatures and message timestamp.
WS-Security support in P6 EPPM Web Services is implemented using Oracle Security Developer Tools (OSDT). If your application requires WS-Security features, OSDT jar files can be used in conjunction with P6 EPPM Web Services. The source code for the P6 EPPM Web Services demo project provides examples of how to use OSDT with P6 EPPM Web Services.
WS-Addressing
WS-Addressing is a specification for including message routing information within SOAP headers. The WS-Addressing specification contains a mechanism for including endpoint references and message addressing properties in the SOAP header. Client and server based software can use the WS-Addressing information in the message header to route, identify, and group SOAP based messages.
For additional information about WS-Addressing, please refer to the WS-Addressing specification. At the time of this writing, additional information about WS-Addressing could be found at:
http://www.w3.org/TR/ws-addr-core
P6 EPPM Web Services
The current release of P6 EPPM Web Services provides support for WS-Addressing through the Apache CXF services framework. You can use WS-Addressing techniques with both synchronous and asynchronous P6 EPPM Web Services calls. Additionally, using WS-Policy with P6 EPPM Web Services, you can require the use of WS-Addressing on a per-service basis.
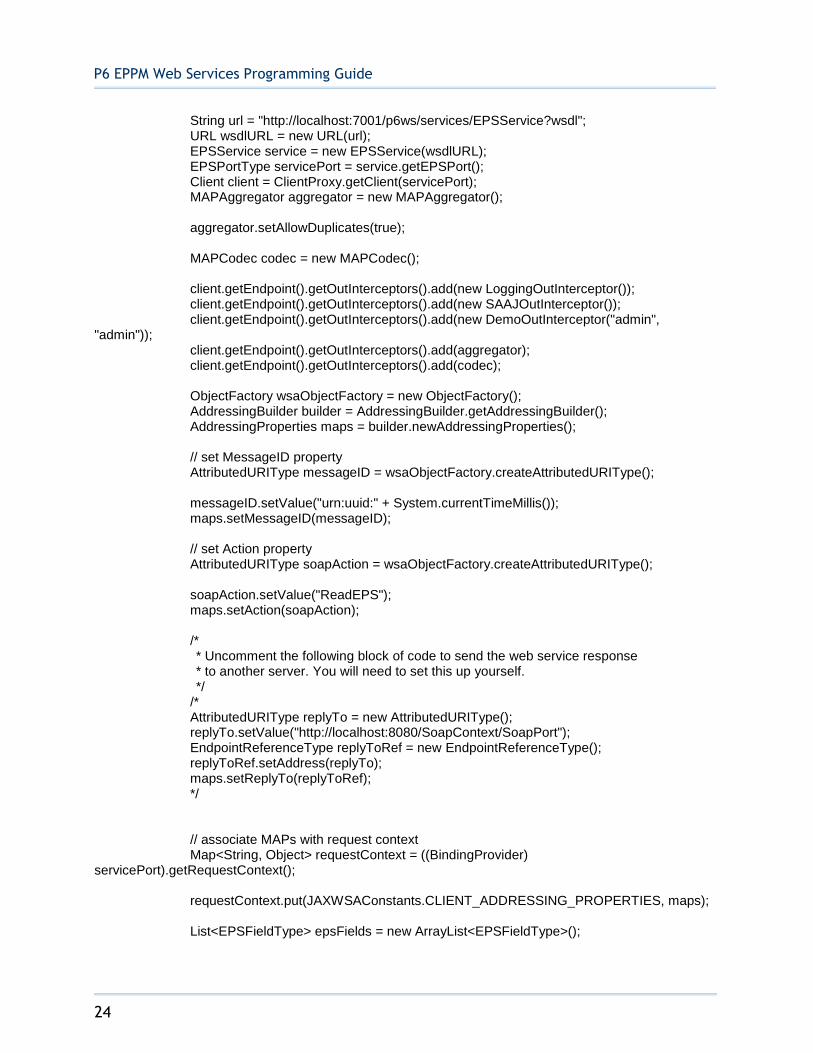
Example: Using WS-Addressing with P6 EPPM Web Services from Java
This example sets the messageId, Action, ReplyTo, and RelatesTo properties and illustrates the use of WS-Addressing when using P6 EPPM Web Services to print out all of the EPS in the database.
This example assumes that the P6 EPPM Web Services Server has been configured to use UsernameToken Profile for authentication

P6 EPPM Web Services Standards
21
package com.oracle.pgbu.integration.ws; import java.util.Date; import javax.xml.soap.SOAPMessage; import oracle.security.crypto.util.Utils; import oracle.security.xmlsec.util.Base64; import oracle.security.xmlsec.util.XMLUtils; import oracle.security.xmlsec.wss.WSSecurity; import oracle.security.xmlsec.wss.WSUCreated; import oracle.security.xmlsec.wss.WSUExpires; import oracle.security.xmlsec.wss.WSUTimestamp; import oracle.security.xmlsec.wss.soap.WSSOAPEnvelope; import oracle.security.xmlsec.wss.username.UsernameToken; import oracle.security.xmlsec.wss.util.WSSTokenUtils; import oracle.security.xmlsec.wss.util.WSSUtils; import org.apache.cxf.binding.soap.SoapFault; import org.apache.cxf.binding.soap.SoapMessage; import org.apache.cxf.binding.soap.SoapVersion; import org.apache.cxf.interceptor.Fault; import org.apache.cxf.phase.AbstractPhaseInterceptor; import org.apache.cxf.phase.Phase; import org.w3c.dom.Element; /** * * @author adavidson * */ public class DemoOutInterceptor extends AbstractPhaseInterceptor<SoapMessage> { //~ Static fields/initializers ----------------------------------------------------------------- private static final String TIMESTAMP_ID_PREFIX = "Timestamp-"; private static final String SCHEMA_DATE_TIME = "http://www.w3.org/2001/XMLSchema/dateTime"; private String username = null; private String password = null; //~ Instance fields ---------------------------------------------------------------------------- //~ Constructors ------------------------------------------------------------------------------- public DemoOutInterceptor(String username, String password) { super(Phase.POST_MARSHAL); this.username = username; this.password = password; } //~ Methods ------------------------------------------------------------------------------------

P6 EPPM Web Services Programming Guide
22
public void handleMessage(SoapMessage message) throws Fault { SoapVersion version = message.getVersion(); try { SOAPMessage soapMessage = message.getContent(SOAPMessage.class); WSSOAPEnvelope wsEnvelope = new WSSOAPEnvelope(soapMessage.getSOAPPart().getEnvelope()); // Create the Oracle WSSecurity element so we can add security information to SOAP header WSSecurity sec = WSSecurity.newInstance(wsEnvelope.getOwnerDocument()); sec.setAttributeNS("http://schemas.xmlsoap.org/soap/envelope/", "mustUnderstand", "1"); wsEnvelope.addSecurity(sec); // Remember information on the authentication elements so we can encrypt and sign them later String authTokenId = null; // Add the UsernameToken information, including Nonce token and Created time // Also, store the WsuId so we can sign with it later, if encryption is enabled authTokenId = XMLUtils.randomName(); addUsernameToken(sec, authTokenId); // Add Timestamp information to the header addTimestamp(sec, wsEnvelope); } catch (Exception ex) { throw new SoapFault("Error while creating security credentials.", ex, version.getSender()); } } private Element addUsernameToken(WSSecurity sec, String wsuId) { // Create the basic UsernameToken information with the specified username and password UsernameToken unToken = WSSTokenUtils.createUsernameToken(wsuId, username, null, null, password.toCharArray()); // A timestamp that the server checks to see if this message has taken too long to reach the server unToken.setCreatedDate(new Date()); // A token to help prevent replay attacks // If a second message with the same Nonce data is sent, it would be rejected by the server unToken.setNonce(Base64.fromBase64(XMLUtils.randomName())); sec.addUsernameToken(unToken); return unToken.getElement(); } private String addTimestamp(WSSecurity sec, WSSOAPEnvelope wsEnvelope)

P6 EPPM Web Services Standards
23
{ WSUTimestamp timestamp = new WSUTimestamp(wsEnvelope.getOwnerDocument()); sec.setTimestamp(timestamp); WSUCreated created = new WSUCreated(wsEnvelope.getOwnerDocument(), SCHEMA_DATE_TIME); created.setValue(new Date()); WSUExpires expires = new WSUExpires(wsEnvelope.getOwnerDocument(), SCHEMA_DATE_TIME); expires.setValue(Utils.minutesFrom(new Date(), 30)); timestamp.setCreated(created); timestamp.setExpires(expires); String rawTimestampId = TIMESTAMP_ID_PREFIX + XMLUtils.randomName(); WSSUtils.addWsuIdToElement(rawTimestampId, timestamp.getElement()); return rawTimestampId; } } package com.oracle.pgbu.integration.ws; import java.net.URL; import java.util.ArrayList; import java.util.List; import java.util.Map; import javax.xml.ws.BindingProvider; import org.apache.cxf.binding.soap.saaj.SAAJOutInterceptor; import org.apache.cxf.endpoint.Client; import org.apache.cxf.frontend.ClientProxy; import org.apache.cxf.interceptor.LoggingOutInterceptor; import org.apache.cxf.ws.addressing.AddressingBuilder; import org.apache.cxf.ws.addressing.AddressingProperties; import org.apache.cxf.ws.addressing.AttributedURIType; import org.apache.cxf.ws.addressing.EndpointReferenceType; import org.apache.cxf.ws.addressing.JAXWSAConstants; import org.apache.cxf.ws.addressing.MAPAggregator; import org.apache.cxf.ws.addressing.ObjectFactory; import org.apache.cxf.ws.addressing.soap.MAPCodec; import com.primavera.ws.p6.eps.EPS; import com.primavera.ws.p6.eps.EPSFieldType; import com.primavera.ws.p6.eps.EPSPortType; import com.primavera.ws.p6.eps.EPSService; public class AddressingDemo { /** * @param args */ public static void main(String[] args) throws Exception {
P6 EPPM Web Services Programming Guide
24
String url = "http://localhost:7001/p6ws/services/EPSService?wsdl"; URL wsdlURL = new URL(url); EPSService service = new EPSService(wsdlURL); EPSPortType servicePort = service.getEPSPort(); Client client = ClientProxy.getClient(servicePort); MAPAggregator aggregator = new MAPAggregator(); aggregator.setAllowDuplicates(true); MAPCodec codec = new MAPCodec(); client.getEndpoint().getOutInterceptors().add(new LoggingOutInterceptor()); client.getEndpoint().getOutInterceptors().add(new SAAJOutInterceptor()); client.getEndpoint().getOutInterceptors().add(new DemoOutInterceptor("admin", "admin")); client.getEndpoint().getOutInterceptors().add(aggregator); client.getEndpoint().getOutInterceptors().add(codec); ObjectFactory wsaObjectFactory = new ObjectFactory(); AddressingBuilder builder = AddressingBuilder.getAddressingBuilder(); AddressingProperties maps = builder.newAddressingProperties(); // set MessageID property AttributedURIType messageID = wsaObjectFactory.createAttributedURIType(); messageID.setValue("urn:uuid:" + System.currentTimeMillis()); maps.setMessageID(messageID); // set Action property AttributedURIType soapAction = wsaObjectFactory.createAttributedURIType(); soapAction.setValue("ReadEPS"); maps.setAction(soapAction); /* * Uncomment the following block of code to send the web service response * to another server. You will need to set this up yourself. */ /* AttributedURIType replyTo = new AttributedURIType(); replyTo.setValue("http://localhost:8080/SoapContext/SoapPort"); EndpointReferenceType replyToRef = new EndpointReferenceType(); replyToRef.setAddress(replyTo); maps.setReplyTo(replyToRef); */ // associate MAPs with request context Map<String, Object> requestContext = ((BindingProvider) servicePort).getRequestContext(); requestContext.put(JAXWSAConstants.CLIENT_ADDRESSING_PROPERTIES, maps); List<EPSFieldType> epsFields = new ArrayList<EPSFieldType>();

P6 EPPM Web Services Standards
25
epsFields.add(EPSFieldType.OBJECT_ID); epsFields.add(EPSFieldType.ID); epsFields.add(EPSFieldType.NAME); // Read all EPS in the database. If you've redirected the response to another // server (by specifying the ReplyTo WS Adressing header), the following // call will not return any results. The results will be sent to the // server specified in the ReplyTo field. List<EPS> ePSs = servicePort.readEPS(epsFields, null, null); if (ePSs != null) { for (EPS eps : ePSs) { System.out.println(eps.getName()); } } } }
Enabling WS-Policy
P6 EPPM Web Services uses an external attachment file to support WS-Policy. The cxf.xml file contains the reference to the external file. The reference to the external file is commented out in the cxf.xml that is supplied in the default P6 EPPM Web Services server deployment, which disables WS-Policy. However, you can uncomment this reference to enable WS-Policy before deploying P6 EPPM Web Services to the server.
The external file, policies.xml, asserts that HTTPS and WS-Addressing is required for all of the P6 EPPM Web Services. Therefore, if you uncomment the reference to the external attachment file before deploying P6 EPPM Web Services on the server, all client requests to P6 EPPM Web Services that are processed by that deployment will need to include HTTPS and WS-Addressing information in the message headers. However, if you want to remove one or both of these requirements from a specific P6 EPPM Web Services, you can customize WS-Policy by removing the HTTPS and/or WS-Addressing assertions for that service from the external attachment file.
See the P6 EPPM Web Services Programming Guide for additional information on enabling and customizing WS-Policy.

P6 EPPM Web Services Programming Guide
26
When you use P6 EPPM Web Services, you must authenticate your credentials with the server. The server can be configured to authenticate user credentials with one of the following methods:
Authentication using Username Token Profile
Security Assertion Markup Language (SAML) 1.1 or 2.0
Authentication using HTTP Cookies
Authentication using Oracle Web Services Manager (OWSM)
Note: UsernameToken Profile (with or without nonce) is the preferred method of authentication. Support for HTTP cookies has been maintained in the current version to avoid rendering code that you wrote against earlier versions of P6 EPPM Web Services incompatible with the current version of P6 EPPM Web Services. The default method of authentication is UsernameToken Profile with nonce. You use the P6 Administration Application to change the authentication method on the server via the P6 EPPM Web Services/Security/Authentication/Mode setting.
Authentication and Session Management

Authentication and Session Management
27
Authentication Using Username Token Profile
UsernameToken Profile describes how a web service client application can supply a user name and an optional password in the message request that the web service server can use to authenticate the requester's identity.
Nonce is a token that contains a random value and is used to prevent replay attacks. A replay attack occurs when an attacker steals or intercepts a UsernameToken as it is used in legitimate transmissions and then fraudulently retransmits the UsernameToken in an attempt to gain access.
To help eliminate replay attacks, Nonce and Created elements are generated and included in the UsernameToken element of messages that the client sends to the server. The server checks the Nonce element against a cache of received nonces and verifies that the nonce does not match any of the nonces in its cache. The server can then reject messages that either have no Nonce element or have a Nonce element that has a matching Nonce element in its cache. Additionally, by requiring a Created element in the message and by comparing the server's current time against the time specified by the Created element in the message, the server can determine whether the difference between the two timestamps falls within an allowable window of time and then reject any messages with differences that exceed the window.
Nonce should be used in combination with Message level encryption or HTTPS for optimal protection.
At the time of this writing, additional information about the nonce could be found at in the following specification:
http://docs.oasis-open.org/wss/v1.1/wss-v1.1-spec-os-UsernameTokenProfile.pdf
If the P6 EPPM Web Services application has been configured to use UsernameToken Profile for authentication, the server uses both a user name and a password to authenticate the message.
To configure the server to authenticate user credentials using Username Token Profile, perform the following steps:
1) Launch the Administration Application.
2) On the Configurations tab, set the Web Services/Security/Authentication/Mode setting to Username Token Profile.
3) On the Configurations tab, set the Web Services/Security/Authentication/Username Token Profile settings for Nonce and Created as appropriate.
a. Set Require Nonce to true to enable Nonce
b. If you set Require Nonce to true, set the Nonce Cache Timeout to an appropriate time in seconds.
c. If you set Require Nonce to true, set the Created/Require Created to true to require a timestamp.
The following example shows the syntax of the <UsernameToken> element:
<UsernameToken> <Username>...</Username> <Password Type="...">...</Password> </UsernameToken>
Additionally, the Java example below shows how to use the UsernameToken.

P6 EPPM Web Services Programming Guide
28
Step one: Create the Username Token
For example, the following code snippet was extracted from the DemoOutInterceptor.java file that is included with the demo:
// Create the basic UsernameToken information with the specified username and password UsernameToken unToken = WSSTokenUtils.createUsernameToken(wsuId, m_demoInfo.username, null, null, m_demoInfo.password.toCharArray()); // A timestamp that the server checks to see if this message has taken too long to reach the server unToken.setCreatedDate(new Date()); // A token to help prevent replay attacks // If a second message with the same Nonce data is sent within a configurable amount of time, it would be rejected by the server unToken.setNonce(Base64.fromBase64(XMLUtils.randomName())); sec.addUsernameToken(unToken); // ....
Step two: Configure the CXF outgoing properties for including UsernameToken Information
For example, the following code snippet was extracted from the WSDemo.java file that is included with the demo:
if (m_demoInfo.authMode == USERNAME_TOKEN_MODE || m_demoInfo.authMode == SAML_MODE) { client.getEndpoint().getOutInterceptors().add(new SAAJOutInterceptor()); client.getEndpoint().getInInterceptors().add(new SAAJInInterceptor()); // To do UsernameToken or SAML, we use our own Interceptor // This will also handle encryption, if enabled client.getEndpoint().getOutInterceptors().add(new DemoOutInterceptor(m_demoInfo)); // However, we only need a custom inbound Interceptor if we know that the server // is sending back encrypted messages. if (m_demoInfo.encEnabled && m_demoInfo.encInbound) { client.getEndpoint().getInInterceptors().add(new DemoInInterceptor()); } }
Refer the demo source to view the code snippets above within their context.

Authentication and Session Management
29
Authentication Using Oracle Web Services Manager
Oracle Web Services Manager (OWSM) provides the business agility to respond to security threats and security breaches by allowing policy changes to be enforced in real time without the need to interrupt the running business processes.
The benefits of using OWSM with P6 EPPM includes:
Centrally define and store security policies applied to the Web services.
Monitor run time security events such as failed authentication or authorization.
Avoids the need for developers to understand security specifications and security implementation details.
Provides visibility and control of the policies through a centralized administration interface offered by Oracle Enterprise Manager.
Prerequisites
Ensure that you have installed Oracle Fusion Middleware SOA Suite and have created the Oracle MDS and OPSS schema. Oracle MDS schema is a prerequisite for the Oracle Fusion Middleware SOA Suite. Oracle OPPS schema is needed to extend the P6 EPPM Web Services domain to work with the Fusion MIddleware SOA Suite.
See Tested Configurations for supported versions of Oracle Fusion Middleware.
For information on how to create the Oracle MDS and OPSS schema, see the Oracle Fusion Middleware Creating Schemas with the Repository Creation Utility guide on Oracle Technical Network.

P6 EPPM Web Services Programming Guide
30
Creating a Domain and Administration Server for P6 EPPM Web Services
To create a domain and administration server for P6 EPPM Web Services:
1) Open the Fusion Middleware Configuration Wizard by completing the following:
a. Navigate to <Oracle_Home>\oracle_common\common\bin.
b. Run config.cmd (if Windows) or config.sh (if UNIX).
2) On the Configuration Type screen, complete the following:
a. Select Create a new domain.
b. Browse to the location at which the new domain will be created.
3) On the Template screen, complete the following:
a. Select Create Domain Using Product Templates:
b. In the Template Categories menu, select All Templates.
c. Select the following from the Available Templates window:
Basic WebLogic Server Domain
Oracle Enterprise Manager
Oracle WSM Policy Manager
Oracle JRF
WebLogic Coherence Cluster Extension
4) On the Administrator Account screen, complete the following:
a. In the Name field, enter a name for the domain administrator.
b. In the Password field, enter a password for the domain administrator.
c. In the Confirm Password field, enter the password that you entered in the Password field.
5) On the Domain Mode and JDK screen, complete the following:
a. Under Domain Mode, select one of the following:
Development
Production
b. Under JDK, select a supported JDK. For supported JDKs, see Tested Configurations.
6) On the Database Configuration Type screen, complete the following:
a. Under Specify AutoConfiguration Options Using:, select RCU Data.
b. Fill in each field, using the connection information that you specified for the Service Table component in the Repository Creation Utility (RCU).
c. Click Get RCU Configuration to retrieve the schema information.
d. In the Schema Password field, enter the password for the schema owner.
7) On the JDBC Components Schema screen, complete the following:
a. Fill in each field, using the connection information that you specified for the Service Table component in the Repository Creation Utility (RCU).
b. In the Schema Password fields of the table, enter the password for each component schema.
c. Select the schema in the table.

Authentication and Session Management
31
d. Click Test Selected Connections to ensure that the credentials for each schema are valid.
8) On the Advanced Configuration screen, select Administration Server.
9) On the Administration Server screen, complete the following:
a. In the Server Name field, enter a name for the administration server.
b. In the Listen Address field menu, select the appropriate listen address.
c. In the Listen Port field, enter the listen port number.
d. In the Server Groups menu, select the following:
WSM-CACHE-SVR
WSMPM-MAN-SVR
10) On the Configuration Summary screen, click Create.

P6 EPPM Web Services Programming Guide
32
Enabling Oracle Web Services Manager Authentication Using WebLogic Enterprise Manager
To enable OWSM authentication using WebLogic Enterprise Manager:
1) Create a user in security realms of the Weblogic Administration Console.
a. Log in to the WebLogic Administration Console as an administrative user using the following URL:
http://<Host_Name>:<Port>/console
b. In the Change Center pane, select Lock & Edit.
c. In the Domain Structure pane, select Security Realms.
d. Select myrealm in the security realm list.
e. In the Settings for myream page, select Users and Groups.
Note: The name of the tab reflects the name of the security realm that you
selected.
f. In the Users toolbar, click New and then complete the following:
In the Name field, enter a name for the user.
In the Password field, enter a password for the user.
In the Confirm Password field, re-enter the password from the previous field.
Click OK.
Note: The user added in security realms should also exist in the P6 EPPM database.
2) Log in to WebLogic Enterprise Manager using the following URL:
http://<Host_Name>:<Port>/em
3) Navigate to the P6 EPPM domain using the Target Navigation directory.
4) Deploy P6 EPPM Web Services, using p6ws.ear, in WebLogic Enterprise Manager.
For information on how to deploy P6 EPPM Web Services in WebLogic Enterprise Manager, refer to the Deploying ADF Applications Using Fusion Middleware Control section of the Oracle Fusion Middleware Administering Oracle Fusion Middleware guide.
5) Create a WSM Policy Set using the following settings:
a. On the Create Policy Set: Enter Resource Scope page, in the Type of Resources menu, select SOAP Web Service.
b. On the Create Policy Set: Enter Resource Scope page, complete the following:
In the Domain Name field, enter the name of the domain on which <0P_ProdName_P6_WS is deployed.
In the Application Module Name or Connection Name field, enter p6ws.war.
a. On the Edit Policy Set: Add Policy References page, attach an OWSM policy to the Policy Set.

Authentication and Session Management
33
Note: For detailed instructions on how to create a WSM Policy Set, refer to the instructions in Using Fusion Middleware Control section under Creating a Policy Set in the Fusion Middleware Security and Administrator's Guide for Web Services guide.
6) Select OWSM as the authentication mode in Primavera P6 Administrator.
a. Log in to Primavera P6 Administrator using the following URL:
http://<Host_Name>:<Port>/p6/action/adminconfig
b. Expand your P6 EPPM configuration.
c. Expand Web Services/Security/Authentication.
d. In the Mode field, select Owsm.
e. Click Save.
7) Restart the P6 EPPM Web Services server.

P6 EPPM Web Services Programming Guide
34
Enabling Oracle Web Services Manager Authentication for P6 Team Member Using WebLogic Enterprise Manager
To enable OWSM authentication for P6 Team Member using WebLogic Enterprise Manager:
1) Log in to WebLogic Enterprise Manager using the following URL:
http://<Host_Name>:<Port>/em
2) Navigate to the P6 Team Member domain using the Target Navigation directory.
3) Right-click the P6 Team Member domain and then select Web Services and WSM Policy Sets.
4) Click Create.
5) Create a WSM Policy Set using the following settings:
a. On the Create Policy Set: Enter Resource Scope page, in the Type of Resources menu, select SOAP Web Service.
b. On the Create Policy Set: Enter Resource Scope page, complete the following:
In the Domain Name field, enter the name of the domain on which <0P_ProdName_P6_WS is deployed.
In the Application Module Name or Connection Name field, enter p6tm.war.
a. On the Edit Policy Set: Add Policy References page, select oracle/multi_token_rest_service_policy.
Note: For detailed instructions on how to create a WSM Policy Set, refer to the instructions in Using Fusion Middleware Control section under Creating a Policy Set in the Fusion Middleware Security and Administrator's Guide for Web Services guide.
6) Create a user in security realms of the Weblogic Administration Console.
a. Log in to the WebLogic Administration Console as an administrative user using the following URL:
http://<Host_Name>:<Port>/console
b. In the Change Center pane, select Lock & Edit.
c. In the Domain Structure pane, select Security Realms.
d. Select myrealm in the security realm list.
e. In the Settings for myream page, select Users and Groups.
Note: The name of the tab reflects the name of the security realm that you
selected.
7) Restart WebLogic and ensure that you can see the LDAP users in Users and Groups.
Note: The user added in security realms should also exist in the P6 EPPM database.
8) Navigate to the Provider tab.
9) Click New.
10) In the Create a New Authentication Provider window, complete the following:

Authentication and Session Management
35
a. In the Name field, enter a name for the authentication provider.
b. In the Type list, select LDAPAuthenticator.
c. Click OK.
11) In the Provider tab, select the provider that you just created.
12) In the Control Flag list, select SUFFICIENT and then click Save.
13) Navigate to the Provider Specific tab.
14) Enter the details for your LDAP server in the Connection and Users sections.
15) Restart the WebLogic server.

P6 EPPM Web Services Programming Guide
36
Consuming P6 EPPM Web Services over HTTPS (SSL) Using Username Token Profile
Consuming P6 EPPM Web Services over the Secure Sockets Layer involves several steps:
1) Setting up the application server to use SSL
2) Creating client code that sets up and uses an SSL connection
The following additions in bold to the demo source provide an example of how you could implement client code that sets up and uses an SSL connection.
Note: The following snippet is for example purposes only and does not include all of the changes that would need to be made to the demo source to successfully use SSL with the demo.

Authentication and Session Management
37
private int readEPS() throws Exception { String url = makeHttpURLString(m_demoInfo.hostname, m_demoInfo.port, EPS_SERVICE); URL wsdlURL = new URL(url); EPSService service = new EPSService(wsdlURL); EPSPortType servicePort = service.getEPSPort(); Client client = ClientProxy.getClient(servicePort); //..Set up and use an SSL connection HTTPConduit httpConduit = (HTTPConduit)client.getConduit(); TLSClientParameters tlsParams = new TLSClientParameters(); tlsParams.setSecureSocketProtocol("SSL"); httpConduit.setTlsClientParameters(tlsParams); //.. List<EPSFieldType> epsFields = new ArrayList<EPSFieldType>(); epsFields.add(EPSFieldType.OBJECT_ID); epsFields.add(EPSFieldType.ID); epsFields.add(EPSFieldType.NAME); // ParentObjectId will be null for all root level EPS List<EPS> EPSs = servicePort.readEPS(epsFields, "ParentObjectId is null", null); if ((EPSs == null) || (EPSs.size() == 0)) { System.out.println("No EPS node available"); return 0; } else { return EPSs.get(0).getObjectId().intValue(); } }

P6 EPPM Web Services Programming Guide
38
Authentication Using SAML Token Profile
Security Assertion Markup Language (SAML)
The Security Assertion Markup Language (SAML) standard defines an XML-based mechanism for exchanging messages that contain security information in the form of assertions. A SAML assertion contains one or more statements about a user. There are three different types of statements that are defined by the SAML specification:
Authentication statements define how and when the user was authenticated
Attribute statements provide details about the user
Authorization decision statements identify what the user is permitted to do
SAML messages follow a request and response protocol for requesting and receiving assertions in which SAML Request and Response elements are included within the body of a SOAP messages that are exchanged between SAML requesters and SAML responders. SAML messages provides a mechanism that you can use to implement SSO with P6 EPPM Web Services. Support for the SAML method of authentication is available in P6 EPPM Web Services.
For additional information about SAML, please refer to the Security Assertion Markup Language (SAML) v1.1 and 2.0 specification sets. These specification sets contain information about SAML assertions, protocol, bindings, profiles, and conformance. At the time of this writing, these specifications were available at:
http://www.oasis-open.org/specs/
Note: The following procedure demonstrates how to use SAML 1.1 with P6 EPPM Web Services. For additional information, refer to the sample code in the SAML11.java file in the P6 EPPM Web Services ws\demo\Java\JAX-WS\src\com\primavera\wsclient\demo folder. If you are using SAML 2.0 with P6 EPPM Web Services, refer to the sample code in the SAML2.java file in the P6 EPPM Web Services in this folder.
When using SAML, the P6 Authentication mode must be set to WebSSO or LDAP.
To configure the server to authenticate user credentials using SAML:
1) Launch the Administration Application.
2) On the Configurations tab:
a. Set the Web Services/Security/Authentication/Mode setting to SAML Token Profile.
b. Set the Web Services/Security/Authentication/SAML Token Profile/SAML Version setting to 1.1 or 2.0.
c. Set the Web Services/Security/Require Signed SAML Token to true.
d. Set the Web Services/Security/Authentication/SAML Token Profile/SAML Tokens/Issuer setting to a valid issuer for the SAML token. Separate multiple valid users with a space.
e. Set the Web Services/Security/Authentication/SAML Token Profile/SAML Tokens/IssueInstant Timeout setting to an appropriate value in seconds.
f. Set the SAML Tokens information to the appropriate values for your environment.
g. Set the Signed SAML Tokens information to the appropriate values for your environment.

Authentication and Session Management
39
3) On the Authentication tab, set the Authentication/Login Mode to WebSSO or LDAP.
Step one: Create the SAML Token
Note: This step only applies to SAML 1.1. For information on creating SAML tokens for SAML 2.0, see .
For example, the following code snippet was extracted from the DemoOutInterceptor.java file that is included with the P6 EPPM Web Services demo application:

P6 EPPM Web Services Programming Guide
40
private Element addSAMLAssertion(WSSecurity sec, WSSOAPEnvelope wsEnvelope) throws Exception { SAMLInitializer.initialize(1, 1); Document aDoc = wsEnvelope.getOwnerDocument(); // Create all the information that we need for our own SAML assertion // And since we're acting as the identity provider, we also specify how the user authenticated AuthenticationStatement statement = new AuthenticationStatement(aDoc); statement.setAuthenticationMethod(SAMLURI.authentication_method_password); statement.setAuthenticationInstant(new Date()); statement.setSubject(createSAMLSubject(aDoc, m_demoInfo.username)); String assertionId = XMLUtils.randomName(); Date notBefore = new Date(); Date notOnOrAfter = Utils.minutesFrom(notBefore, 5); // Create the assertion element we need based on all the information above Assertion assertion = createAssertion(aDoc, assertionId, SAML_ISSUER, notBefore, notOnOrAfter, SAML_ISSUER, statement); SAMLAssertionToken samlToken = new SAMLAssertionToken(assertion); sec.addSAMLAssertionToken(samlToken); // Finally, to prove that the assertion that we're sending out is actually from the identity provider (us), // we can sign the message with our private key. if (m_demoInfo.samlSigned) { // We just need to load the digital certificate and private key from the keystore specified KeyStore keyStore = KeyStore.getInstance(m_demoInfo.samlKeystoreType); keyStore.load(new FileInputStream(m_demoInfo.samlKeystore), m_demoInfo.samlKeystorepass.toCharArray()); String privateKeyPassword = m_demoInfo.samlKeypass; PrivateKey privateKey = (PrivateKey)keyStore.getKey(m_demoInfo.samlAlias, privateKeyPassword.toCharArray()); // And we can use the private key to sign our assertion, // verifying that the message comes from us assertion.sign(privateKey, null); } return assertion.getElement(); }
Step two: Configure the CXF outgoing properties for including SAML Information
For example, the following code snippet was extracted from the WSDemo.java file that is included with the P6 EPPM Web Services demo application:

Authentication and Session Management
41
if (m_demoInfo.authMode == USERNAME_TOKEN_MODE || m_demoInfo.authMode == SAML_MODE) { client.getEndpoint().getOutInterceptors().add(new SAAJOutInterceptor()); client.getEndpoint().getInInterceptors().add(new SAAJInInterceptor()); // To do UsernameToken or SAML, we use our own Interceptor // This will also handle encryption, if enabled client.getEndpoint().getOutInterceptors().add(new DemoOutInterceptor(m_demoInfo)); // However, we only need a custom inbound Interceptor if we know that the server // is sending back encrypted messages. if (m_demoInfo.encEnabled && m_demoInfo.encInbound) { client.getEndpoint().getInInterceptors().add(new DemoInInterceptor()); } }
Refer to the demo source to view the code snippets above within their context.
Additional information can be found at:
http://www.oracle.com/technetwork/testcontent/index-093386.html
Including SAML 2.0 Tokens in SOAP Requests
The SAML token that was downloaded in the above step should be included in SOAP WS-Security header.

P6 EPPM Web Services Programming Guide
42
Sample Reference Code is given below:- public static Element addSAMLAssertion(WSSecurity sec, WSSOAPEnvelope wsEnvelope) throws Exception { Document aDoc = wsEnvelope.getOwnerDocument(); Document samlxml = getSAMLXML(); NodeList assrtList = samlxml.getElementsByTagNameNS(SAML2URI.ns_saml, "Assertion"); Element element = (Element)assrtList.item(0); Node importedNode = aDoc.importNode(element, true); sec.appendChild(importedNode); return samlxml.getDocumentElement(); } private static Document getSAMLXML() throws Exception { return parseDomContent(new FileInputStream(new File("c:\\samlassertion.xml"))); } public static Document parseDomContent(InputStream is) throws ParserConfigurationException, SAXException, IOException { DocumentBuilderFactory docbf = DocumentBuilderFactory.newInstance(); docbf.setNamespaceAware(true); DocumentBuilder docBuilder = docbf.newDocumentBuilder(); return docBuilder.parse(is); }
To generate a SAML 2.0 token, access the following URL to generate a SAML token:
http://<identity_provider_host>:<identity_provider_port>/p6ws/downlo
adtoken
Note: The URL should be configured as a protected resource in Oracle Access Manager. For more information about protecting P6 EPPM resources, refer to the Primavera Oracle Access Manager Configuration Guide.
After you access the URL, you will be redirected to an IdP page in which you will need to enter your username and password. Upon successfully logging in to the IdP, you will be prompted to
download samlassertion.xml.

Authentication and Session Management
43
Including SAML Tokens in SOAP Requests
Use the SAML 2.0 token that you generated above in SOAP WS-Security headers.
For example:
public static Element addSAMLAssertion(WSSecurity sec, WSSOAPEnvelope wsEnvelope) throws Exception {
Document aDoc = wsEnvelope.getOwnerDocument();
Document samlxml = getSAMLXML(); NodeList assrtList = samlxml.getElementsByTagNameNS(SAML2URI.ns_saml, "Assertion");
Element element = (Element)assrtList.item(0); Node importedNode = aDoc.importNode(element, true); sec.appendChild(importedNode);
return samlxml.getDocumentElement(); }
private static Document getSAMLXML() throws Exception { return parseDomContent(new FileInputStream(new
File("c:\\samlassertion.xml"))); }
public static Document parseDomContent(InputStream is) throws
ParserConfigurationException, SAXException, IOException { DocumentBuilderFactory docbf = DocumentBuilderFactory.newInstance(); docbf.setNamespaceAware(true);
DocumentBuilder docBuilder = docbf.newDocumentBuilder(); return docBuilder.parse(is); }

P6 EPPM Web Services Programming Guide
44
Authentication Using HTTP Cookies
If the P6 EPPM Web Services Server has been configured to use HTTP cookies for authentication from the Primavera P6 Administrator, you must call the Authentication service Login operation to establish a session and obtain a cookie before you can use any other P6 web service.
See Authentication Service in the P6 EPPM Web Services Reference Manual for additional information about using the Authentication service and the Login operation.
Note: UsernameToken Profile is the preferred method of authentication. Support for HTTP Cookies has been maintained in the current version to avoid rendering code that you created against previous versions of P6 EPPM Web Services incompatible with the current version of P6 EPPM Web Services.
To configure the server to authenticate user credentials using HTTP cookies, perform the following steps:
1) Launch the Administration Application.
2) On the Configurations tab, set the Web Services/Security/Authentication/Mode setting to Cookies.
Java Client Example: Authentication Using HTTP Cookies
The following code snippets show how to use CXF generated Java client stubs to obtain and use a cookie to manage your P6 EPPM Web Services session:
Step one: Create the Authentication stub
For example:
URL wsdlURL = new URL("http://serverName:portNumber/p6ws/services/AuthenticationService?wsdl"); AuthenticationService service = new AuthenticationService(wsdlURL); AuthenticationServicePortType servicePort = service.getAuthenticationServiceSOAP12PortHttp(); BindingProvider bp = (BindingProvider)servicePort;

Authentication and Session Management
45
Step two: Invoke the Login operation
For example:
Boolean success = servicePort.login(userName, password, 1, true);
If the Login operation is successful, it sends an XML message similar to the following:
HTTP/1.1 200 OK Server: Apache-Coyote/1.1 Set-Cookie: JSESSIONID=6FBA83AE67D2E057CEC45B05A0414DB2; Path=/p6ws Accept: text/xml, text/html, image/gif, image/jpeg, *; q=.2, */*; q=.2 Content-Type: text/xml;charset=utf-8 Content-Length: 254 Date: Thu, 03 Apr 2008 16:04:25 GMT <SOAP-ENV:Envelope xmlns:SOAP-ENV="http://schemas.xmlsoap.org/soap/envelope/"><SOAP-ENV:Header/><SOAP-ENV:Body><LoginReturn xmlns="http://xmlns.oracle.com/Primavera/P6/WS/Authentication/V1"><return>true</return></LoginReturn></SOAP-ENV:Body></SOAP-ENV:Envelope>
Step three: Retrieve the cookie from the response message
For example:
private static List<String> cookieHeaders = null; Map<String, List<String>> responseHeaders = (Map<String, List<String>>)responseContext.get("javax.xml.ws.http.response.headers"); cookieHeaders = responseHeaders.get("Set-Cookie");
Step four: Use the cookie in all subsequent calls to P6 EPPM Web Services in current session
For example:
Map<String, List<String>> headers = (Map<String, List<String>>)bp.getRequestContext().get("javax.xml.ws.http.request.headers"); if (headers == null) { headers = new HashMap<String, List<String>>(); bp.getRequestContext().put("javax.xml.ws.http.request.headers", headers); } headers.put("cookie", cookieHeaders);
P6 EPPM Web Services Programming Guide
46
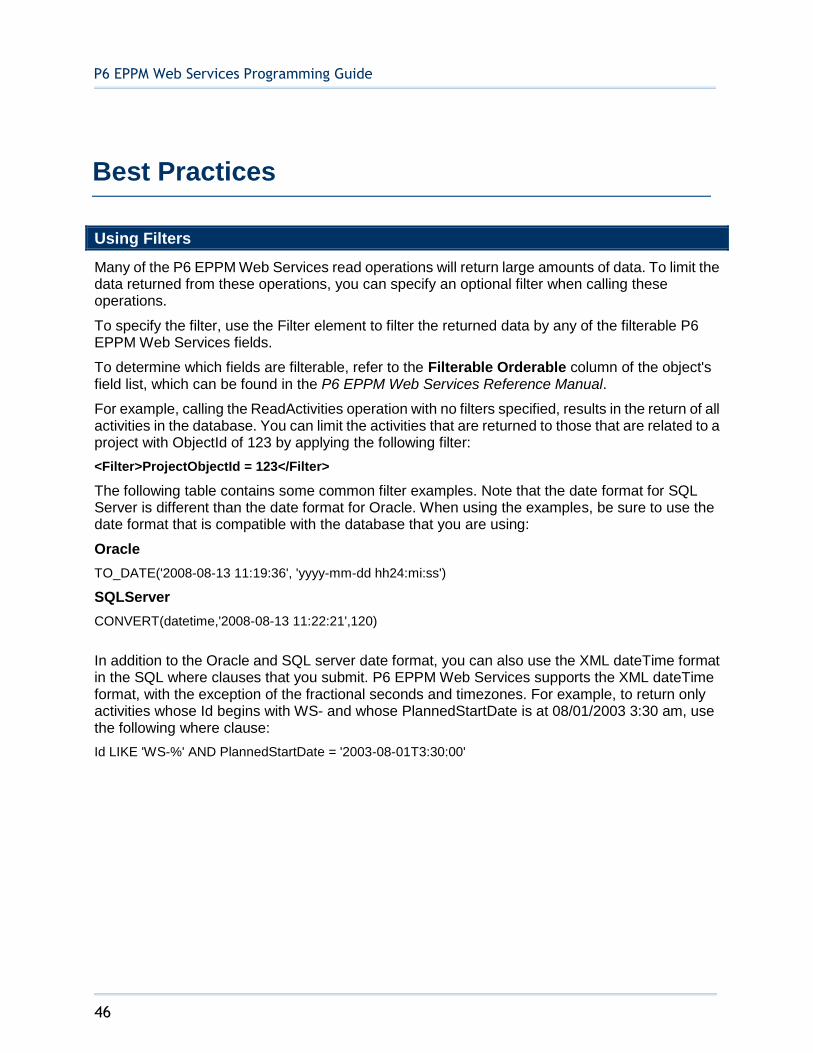
Using Filters
Many of the P6 EPPM Web Services read operations will return large amounts of data. To limit the data returned from these operations, you can specify an optional filter when calling these operations.
To specify the filter, use the Filter element to filter the returned data by any of the filterable P6 EPPM Web Services fields.
To determine which fields are filterable, refer to the Filterable Orderable column of the object's field list, which can be found in the P6 EPPM Web Services Reference Manual.
For example, calling the ReadActivities operation with no filters specified, results in the return of all activities in the database. You can limit the activities that are returned to those that are related to a project with ObjectId of 123 by applying the following filter:
<Filter>ProjectObjectId = 123</Filter>
The following table contains some common filter examples. Note that the date format for SQL Server is different than the date format for Oracle. When using the examples, be sure to use the date format that is compatible with the database that you are using:
Oracle
TO_DATE('2008-08-13 11:19:36', 'yyyy-mm-dd hh24:mi:ss')
SQLServer
CONVERT(datetime,'2008-08-13 11:22:21',120)
In addition to the Oracle and SQL server date format, you can also use the XML dateTime format in the SQL where clauses that you submit. P6 EPPM Web Services supports the XML dateTime format, with the exception of the fractional seconds and timezones. For example, to return only activities whose Id begins with WS- and whose PlannedStartDate is at 08/01/2003 3:30 am, use the following where clause:
Id LIKE 'WS-%' AND PlannedStartDate = '2003-08-01T3:30:00'
Best Practices

Best Practices
47
Filter Examples
Note: The following examples use the ReadActivities Operation of the Activity Service
To accomplish this Use this
Return only activities whose Id is WS-0.
Id = 'WS-0'
Return all activities whose id is not equal to WS-0.
Id != 'WS-0'
Return all activities whose ObjectId is equal to 123.
ObjectId = 123
Only return activities whose Id begins with WS-.
Id LIKE 'WS-%'
Return all activities whose ObjectId falls between 123 and 150, inclusively.
ObjectId BETWEEN 123 AND 150
Return all activities whose ObjectId is outside of the range of 0 to 123.
ObjectId NOT BETWEEN 0 AND 123
Return only activities that have an ObjectId of 123, 134, 152, or 165.
ObjectId IN (123, 134, 152, 165)
Return all activities whose Id begins with WS- and whose PrimaryResourceObjectId is null.
Id LIKE 'WS-%' AND PrimaryResourceObjectId IS NULL
Return only activities whose Id begins with WS- and whose PlannedStartDate is not null.
Id LIKE 'WS-%' AND PlannedStartDate IS NOT NULL
Return only activities whose Id begins with WS- and whose IsCritical flag is Y.
Id LIKE 'WS-%' AND IsCritical = 'Y'
Return only activities whose Id begins with WS- and whose PlannedLaborUnits is 0.
Id LIKE 'WS-%' AND PlannedLaborUnits= 0
Return only activities whose Id begins with WS- and whose PlannedLaborUnits is between 1 and 10, inclusive.
Id LIKE 'WS-%' AND (PlannedLaborUnits >= 1 AND PlannedLaborUnits <= 10)

P6 EPPM Web Services Programming Guide
48
Return only activities whose Id begins with WS- and whose PlannedLaborUnits is greater than or equal to 0.
Id LIKE 'WS-%' AND PlannedLaborUnits >= 0
Return only activities whose Id begins with WS- and whose MaxActivityIdLength is not 1, 2, or 3.
Id LIKE 'WS-%' AND MaxActivityIdLength IS NOT (1, 2, or 3)
Return only activities whose Id begins with WS- and whose LaborUnitsPercentComplete is not 0.06.
Id LIKE 'WS-%' AND LaborUnitsPercentComplete != 0.06
Return only activities whose Id begins with WS- and whose LaborUnitsPercentComplete is less than or equal to 85.
Id LIKE 'WS-%' AND LaborUnitsPercentComplete <= 85
Return only activities whose Id begins with WS- and whose EstimatedWeight is greater than or equal to 1.
Id LIKE 'WS-%' AND EstimatedWeight >= 1
Return only activities whose Id begins with WS- and whose AnticipatedStartDate is greater than or equal to its PlannedStartDate.
Id LIKE 'WS-%' AND AnticipatedStartDate >= PlannedStartDate
Return only activities whose Id begins with WS- and whose PlannedStartDate is at 01/01/2003 3:30 pm.
Oracle
Id LIKE 'WS-%' AND PlannedStartDate =TO_DATE('2003-01-01 15:30:00', 'yyyy-mm-dd hh24:mi:ss')
SQLServer
Id LIKE 'WS-%' AND PlannedStartDate =CONVERT(datetime,'2003-01-01 15:30:00',120)
Return only activities whose Id begins with WS- and whose PlannedStartDate is less than 12/01/2003.
Oracle
Id LIKE 'WS-%' AND PlannedStartDate < TO_DATE('2003-12-01 00:00:00', 'yyyy-mm-dd hh24:mi:ss')
SQLServer
Id LIKE 'WS-%' AND PlannedStartDate < CONVERT(datetime,'2003-12-01 00:00:00',120)

Best Practices
49
Return only activities whose Id begins with WS- and whose PlannedStartDate is at 12/01/2003 3:30 pm.
Oracle
Id LIKE 'WS-%' AND PlannedStartDate =TO_DATE('2003-12-01 15:30:00', 'yyyy-mm-dd hh24:mi:ss')
SQLServer
Id LIKE 'WS-%' AND PlannedStartDate =CONVERT(datetime,'2003-12-01 15:30:00',120)
Return only activities with a ProjectObjectId of 123 and whose PlannedDuration and RemainingDuration total 100 and the RemainingDuration minus the PlannedDuration is 0.
ProjectObjectId = 123 AND PlannedDuration + RemainingDuration = 100 and RemainingDuration - PlannedDuration = 0
Return only activities with a ProjectObjectId of 123 and a DurationType of DT_FixedDrtn.
ProjectObjectId = 123 AND DurationType = ''Fixed Duration and Units/Time''
Performance Tips
Oracle recommends using the following practices to optimize performance:
If possible, login as a user with the Admin Superuser global security profile.
When using the read operations, load only the fields that are absolutely necessary and use filters to limit the numbers of objects that return.
Note: Depending on the load and capacity or the server's network, memory and CPU resources, read operations can cause server time outs and out of memory conditions. If this occurs, you should fine-tune the filters used in the read operation to limit the size of the returned data.
When reading large amounts of project related data, use the Export operation to export the data to an XML file. Then parse the data in the XML file to pull out the relevant information.

P6 EPPM Web Services Programming Guide
50
Security
P6 EPPM Web Services provides security at both the transport and the application levels. Refer to the following links for further information:
1) Transport Level Security using HTTPS (on page 50)
Consuming P6 EPPM Web Services over HTTPS (SSL) From Java using HTTP Cookies (on page 51)
2) Message level security
Username Token
SAML
Digital signatures
Timestamps
Encryption
3) Application Level Security (on page 53)
Global Profile Definitions (on page 57)
Project Profile Definitions (on page 67)
Defining User Access to Resources (on page 54)
Transport Level Security using HTTPS
P6 EPPM Web Services supports the use of HTTPS (Hypertext Transfer Protocol over Secure Socket Layer) to achieve secure communication at the transport layer of the OSI Model. All Oracle P6 EPPM Web Services support both the HTTPS and HTTP protocols. Although you can use either protocol when using the web services, Oracle strongly recommends using HTTPS to call the Authentication service since you must specify a Username and Password when you call the Authentication service's Login operation.
See Consuming P6 EPPM Web Services over HTTPS (SSL) From Java using HTTP Cookies (on page 51) for additional details about using HTTPS with the Java programming language.
Security

Security
51
Consuming P6 EPPM Web Services over HTTPS (SSL) From Java using HTTP Cookies
The following Java example invokes the Login operation of the Authentication P6 EPPM Web Services over the Secure Sockets Layer.
import com.primavera.ws.p6.authentication.AuthenticationService; import com.primavera.ws.p6.authentication.AuthenticationServicePortType; import org.apache.cxf.configuration.jsse.TLSClientParameters; import org.apache.cxf.frontend.ClientProxy; import org.apache.cxf.transport.http.HTTPConduit; //... System.setProperty("javax.net.ssl.trustStore","C:/keystore_certs/server.keystore"); URL wsdlURL = new URL("https://localhost:8443/p6ws/services/AuthenticationService?wsdl"); AuthenticationService service = new AuthenticationService(wsdlURL); AuthenticationServicePortType port = service.getAuthenticationServiceSOAP12PortHttp(); org.apache.cxf.endpoint.Client client = ClientProxy.getClient(port); HTTPConduit httpConduit = (HTTPConduit)client.getConduit(); TLSClientParameters tlsParams = new TLSClientParameters(); tlsParams.setSecureSocketProtocol("SSL"); httpConduit.setTlsClientParameters(tlsParams); port.login("admin", "admin", 1,true);
Message Level Security
Message-level security includes some of the security benefits of SSL, but with additional flexibility and features. With message-level security the SOAP message itself is encrypted. When you use message-level security, you can specify that only individual parts or elements of the message be signed, encrypted, or required, whereas the encryption used by the transport level security, SSL, is "all or nothing": either the entire SOAP message is encrypted or it is not encrypted at all.
Message-level security specifies whether the SOAP messages between a client application and the Web Service invoked by the client should be digitally signed or encrypted, or both. It also can specify a shared security context between the Web Service and client in the event that they exchange multiple SOAP messages. You can use message-level security to assure:
Confidentiality, by encrypting message parts
Integrity, by digital signatures
Authentication, by requiring username or SAML tokens
Encrypting Messages
You can configure P6 EPPM Web Services with the following message level encryption settings:
No message level encryption is allowed
Server require at least one element in request messages be encrypted
Server require at least one element in request messages be encrypted and server encrypts the response messages
Configuring P6 EPPM Web Services to encrypt P6 request/respond messages or request messages, involves the following tasks:

P6 EPPM Web Services Programming Guide
52
Task One: Determine keystore requirements
You will need a public/private key pair. Determine whether to use an existing keystore or create a new keystore. If you do not already have a keystore that you can use for P6 EPPM Web Services on the server on which P6 EPPM Web Services is deployed, follow the procedure below to create one.
1) On the server, open a command prompt.
2) Navigate to the <JAVA_HOME>\jdk\bin directory
3) The name of your keystore and the names and aliases of the user information that it contains will vary depending on your specific requirements. As an example, enter the following code to create a key for the P6 EPPM Web Services user Sam in a new keystore called mytestkeystore at c:\temp. Change the location as appropriate:
keytool -validity 3600 -genkeypair -dname "CN=Sam Moore, OU=samDept, O=samOrg, L=samHome, S=Florida, C=US" -keyalg RSA -sigalg Sha1WithRSA -keystore mytestkeystore.jks -alias sam
4) Enter keystore password: mytestkeystore.
5) Enter key password for sam: sampwd.
Task Two: Set up the server to require encryption:
1) In the Primavera P6 Administrator, locate the Web Services/Security/Message Protection section.
2) Set the Encryption for Incoming Messages setting to true to require that P6 EPPM Web Services request messages be encrypted. When this setting is true, at least one element in each P6 EPPM Web Services request message must be encrypted.
3) Set the Encrypt Response setting to true to require that P6 EPPM Web Services response messages be encrypted. When the Encrypt Response setting and the Encryption for Incoming Messages setting are both set true, the server encrypts everything inside of the body element of P6 EPPM Web Services response messages.
4) Change the File Location setting to point to the location of the keystore. You determined the location of the keystore in task one.
5) Change the Keystore Password setting to the password of the keystore determined in task one.
6) Change the Private Key Alias setting to the alias of the private keystore determined in task one.
7) Change the Private Key Password setting to the password of the private keystore determined in task one.

Security
53
Task Three: Export the certificate to a new keystore
1) Open a command prompt on the server.
2) Navigate to <JAVA_HOME>\jdk\bin directory.
3) Enter the following code to export the certificate to a new keystore. Change the keystore and alias as appropriate:
keytool -export -keystore mytestkeystore.jks -alias sam -file sam.cer
4) Copy the sam.cer file to any client machines that are authorized to send request messages to the server.The sam.cer file contains the public key that clients will need to be able to send encrypted request messages to the server.
Task Four: Import the certificate
1) Open a command prompt on the client.
2) Navigate to the location on the client machine that contains the public key certificate file, for example sam.cer file.
3) Enter the following code to import the certificate to a new keystore. Change the alias and keystore as appropriate:
keytool -import -alias sam -file sam.cer -keystore mykeystore.jks
4) Since the keystore doesn't yet exist, it will be created, and you will be prompted for a keystore password; type whatever password you want.
Application Level Security
Application level security is similar to P6 EPPM client/server products. To use P6 EPPM Web Services, you must log in as a user that has the appropriate product access privileges to access P6 EPPM Web Services as well as any other P6 EPPM applications that you will be accessing.
Additional security privileges determine each user’s access to data.
To ensure security at various levels of data, P6 EPPM provides two sets of security profiles:
Global profiles define a user’s access to application-wide information and settings, such as the enterprise project structure (EPS), resources, roles, and cost accounts. Each user must be assigned a global profile. In addition to any global profiles that you define, P6 EPPM provides two predefined global profiles: Admin Superuser and No Global Privileges. The Admin Superuser profile allows complete access to all global information and all projects.
Project profiles define a user’s access to project-specific information. In addition to any project profiles that you define, P6 EPPM provides a predefined project profile called Project Superuser. The Project Superuser profile allows complete access to elements within a project.
P6 EPPM does not require that each user be assigned a project profile; however, users cannot access projects unless they are assigned a project profile or the global profile, Admin Superuser.
Global and project security profiles both apply when using P6 EPPM Web Services. P6 EPPM Web Services throws a fault if a user attempts to perform an action that is restricted by a security profile.

P6 EPPM Web Services Programming Guide
54
Defining User Access to Resources
In addition to the global and project profiles, an administrator uses resource security to restrict a user’s access to resources. Each user can have access to all resources, no resources, or a limited number of resources in the resource hierarchy. To restrict access to a limited number of resources, you can designate each user’s root resource by assigning each user to a resource in the resource hierarchy. The position of the assigned resource in the hierarchy determines the user’s resource access.
Users with restricted resource access can still view and edit all current project resource assignments if they have the proper project privileges.
An administrator can grant one of the following three types of resource access to each user:
All Resource Access: Disables resource security and provides access to all resources. This is the default option for upgrading users. Admin Superusers always have all resource access, no matter what option is selected.
No Resource Access: Does not provide access to any resources. This is the default option for new users. With no resource access, the user cannot view any global resource data in the resource dictionary.
Resource Node: Provides access to one selected resource (root resource node) and all its children in the resource hierarchy. Users with this restricted access can view global resource data for resources they have access to.
Note: You need the Edit Users global privilege to manage resource
security.
Additional Information: How to Set Security Privileges (on page 55).

Security
55
How to Set Security Privileges
How to Set Global Security Privileges
You can define an unlimited number of global profiles. In addition, there are two global profiles that are predefined: Admin Superuser and No Global Privileges. These predefined profiles have the following GlobalProfileObjectIds and constants:
GlobalProfileObjectId Constant
Admin Superuser 12
No Global Privilege -1
The Admin Superuser profile allows complete access to all global information and all projects. This profile is assigned to the user Admin when you install P6 EPPM. For security reasons, you should limit the Admin Superuser assignment to only those individuals who require access to all data.
The No Global Privileges profile restricts access to global data. Assign this profile to anyone who is strictly a P6 Progress Reporter user.
Use the following steps to set a Global Security privilege:
1) Using HTTPS, log in with a user that has the Edit Security profile privilege.
2) Choose an existing global profile or use the CreateGlobalProfiles operation to create a new global profile.
3) If you are setting the global security privilege for a new user, use the CreateUsers operation, passing in the GlobalProfileObjectId of the global security global security profile.
4) If you are setting the global security privilege for existing users, call the UpdateUsers operation, passing in the appropriate GlobalProfileObjectId for the users that you are updating.
How to Set Project Security
You can define an unlimited number of project profiles in P6 Professional. In addition, P6 Professional provides a predefined project profile called Project Superuser. The Project Superuser profile allows complete access to elements within a project.
The Project Superuser ProjectProfileObjectId is predefined with the constant 23.
Use the following steps to set a project security privilege:
1) Using HTTPS, log in with a user that has the Edit Security profile privilege.
2) Choose one or more existing project profiles or use the CreateProjectProfiles operation to create new project profiles.
3) If necessary, call the CreateUserOBS operation with the appropriate OBSObjectId and ProjectProfileObjectId for the profiles that you created in step 2.
4) If necessary, call the UpdateUserOBS operation with the appropriate OBSObjectId and ProjectProfileObjectId for the profiles that you chose or created in step 2.

P6 EPPM Web Services Programming Guide
56
How to Set Resource Security
Project access supercedes resource access.
AllResourceAccessFlag: A flag that determines whether the user has all resource access (true) or restricted resource access (false). Admin Superusers always have all resource access.
You can set the AllResourceAccessFlag using the UpdateUsers operation.
1) Using HTTPS, log in with a user that has the Edit Security profile privilege.
2) Choose a UserObjectId of user. You can use the ReadUsers operation to list the users.
3) Choose the ResourceId of a resource. You can use the ReadResources operation to list the resources.
4) Use the CreateResourceAccess operation to expand or limit access to the resource you chose in step 3 by the user you chose in step 2.

Security
57
Global Profile Definitions
A global profile definition specifies the individual access privileges associated with the profile. For a global profile, access privileges apply to application-wide information and settings. The module requires you to assign a global profile to each user.
The following table defines each global privilege:
Privilege Name Description
Add Delete Secure Codes Determines whether the profile will enable users to create and remove all secure project codes, global and EPS-level activity codes, and resource codes and code values data, as well as all secure issue codes and code values data. This privilege also selects the 'Edit Secure Codes,' 'Assign Secure Codes,' and 'View Secure Codes' global privileges.
Add Edit Delete Activity Step Templates Determines whether the profile will enable users to create, modify, and remove Activity Step Templates, which are used to add a set of common steps to multiple activities.
Add Edit Delete Categories and Overhead Codes
Determines whether the profile will enable users to create, modify, and remove categories and overhead codes data, which can be applied to all projects. Overhead codes are only available to P6 Progress Reporter users.
Add Edit Delete Cost Accounts Determines whether the profile will enable users to create, modify, and remove cost accounts data.
Add Edit Delete Currencies Determines whether the profile will enable users to create, modify, and remove currencies data.
Add Edit Delete Financial Period Dates Determines whether the profile will enable users to create, modify, and remove financial periods data. To edit period data, users must also have the 'Edit Period Performance' project privilege assigned to their profile.

P6 EPPM Web Services Programming Guide
58
Add Edit Delete Funding Sources Determines whether the profile will enable users to create, modify, and remove funding source data.
Add Edit Delete Global Activity and Assignment Views and Filters
Determines whether the profile will enable users to create, modify, and remove global activity and resource assignment layouts, views, and filters.
Add Edit Delete Global Calendars Determines whether the profile will enable users to create, modify, and remove global calendars data.
Add Edit Delete Global Dashboards Determines whether the profile will enable users to create, modify, and remove global dashboards.
Add Edit Delete Global Portfolios Determines whether the profile will enable users to create, modify, and remove global portfolio configurations in Manage Portfolios Views.
Add Edit Delete Global Project WBS Portfolio Views and Filters
Determines whether the profile will enable users to create, modify, and remove global project, WBS, and portfolio layouts, views, and filters. This privilege is required to save view changes made to the Portfolio Analysis page.
Add Edit Delete Global Reports Determines whether the profile will enable users to create, modify, and remove global reports, including editing report groups and global report batches and saving global reports created or modified in P6 Professional.
Add Edit Delete Global Resource and Role Teams
Determines whether the profile will enable users to create, modify, and remove global Resource Teams and Role Teams. A Resource/Role Team is a collection of resources/roles.
Add Edit Delete Global Scenarios Determines whether the profile will enable users to create, modify, and remove scenarios configurations in the Manage Scenarios link.

Security
59
Add Edit Delete Issue Forms Determines whether the profile will enable users to create, modify, and remove issue forms.
Add/Edit/Delete Locations option Determines whether the profile will enable users to create, modify, and remove locations data.
Add Edit Delete OBS Determines whether the profile will enable users to create, modify, and remove hierarchical data for the global Organizational Breakdown Structure.
Add Edit Delete Project Templates Determines whether the profile will enable users to create, modify, and remove templates that can be used when creating new projects. To create project templates, users must also have the 'Add Projects' project privilege assigned to their profile. To modify templates, you must have the same project privileges that are required to modify projects. To delete project templates, users must also have the 'Delete Projects' project privilege assigned to their profile.
Add Edit Delete Rate Types and Units of Measure
Determines whether the profile will enable users to create, modify, and remove resource rate types and units of measure data.
Add Edit Delete Resource Calendars Determines whether the profile will enable users to create, modify, and remove resource calendars data. This privilege also enables users to edit Shifts in P6 Professional.
Add Edit Delete Resource Curves Determines whether the profile will enable users to create, modify, and remove resource distribution curves definitions.
Add Edit Delete Risk Categories Matrices and Thresholds
Determines whether the profile will enable users to create, modify, and remove risk categories, risk scoring matrices, and risk thresholds data.

P6 EPPM Web Services Programming Guide
60
Add Edit Delete Roles Determines whether the profile will enable users to create, modify, and remove roles data.
Add Edit Delete Security Profiles Determines whether the profile will enable users to create, modify, and remove global and project security profiles, which grant access to application-wide and project-specific information.
Add Edit Delete Timesheet Period Dates Determines whether the profile will enable users to create, modify, and remove individual timesheet periods and batches of timesheet periods.
Add Edit Delete User Defined Fields Determines whether the profile will enable users to create, modify, and remove User Defined fields. Even without this privilege, users can still display User Defined fields information.
Add Edit Delete User Interface Views Determines whether the profile will enable users to create, modify, and remove user interface view configurations, which control the functionality users can access in P6.
Add Edit Delete Users Determines whether the profile will enable users to create, modify, and remove P6 EPPM user data. To search the LDAP directory when provisioning, users must also have the Provision Users from LDAP global privilege.
Add Global Activity Codes Determines whether the profile will enable users to create global activity codes and code values data. This privilege also selects the 'Edit Global Activity Codes' global privilege.
Add Global Issue Codes Determines whether the profile will enable users to create global issue codes and code values data. This privilege also selects the 'Edit Global Issue Codes' global privilege.

Security
61
Add Project Codes Determines whether the profile will enable users to create project codes and code values data. This privilege also selects the 'Edit Project Codes' global privilege.
Add Resource Codes Determines whether the profile will enable users to create resource codes and code values data. This privilege also selects the 'Edit Resource Codes' global privilege.
Add Resources Determines whether the profile will enable users to create resource data. This privilege also selects the 'Edit Resources' global privilege.
Administer Global External Applications Determines whether the profile will enable users to create, modify, and remove entries in the list of global external applications in P6 Professional.
Administer Global Scheduled Services Determines whether users have the privilege to modify settings on the Global Scheduled Services dialog box. You can modify the following publishing services if you have this privilege: Publish Enterprise Data, Publish Enterprise Summaries, Publish Resource Management, Publish Security. With this privilege, you can enable the service, choose how often the service will run, and at what time the service will run.
Administer Project Scheduled Services Determines whether the profile will enable users to set up the Apply Actuals, Summarize, Schedule, and Level scheduled services to run at specific time intervals.
Approve Resource Timesheets Determines whether the profile will enable users to approve or reject submitted timesheets as a Resource Manager.

P6 EPPM Web Services Programming Guide
62
Assign Secure Codes Determines whether the profile will enable users to assign all secure project codes, global and EPS-level activity codes, and resource codes and code values data, as well as all secure issue codes and code values data. This privilege also selects the 'View Secure Codes' global privilege.
Delete Global Activity Codes Determines whether the profile will enable users to remove global activity codes and code values data. This privilege also selects the 'Add Global Activity Codes' and 'Edit Global Activity Codes' global privileges.
Delete Global Issue Codes Determines whether the profile will enable users to create global issue codes and code values data. This privilege also selects the 'Edit Global Issue Codes' global privilege.
Delete Project Codes Determines whether the profile will enable users to remove project codes and code values data. This privilege also selects the 'Add Project Codes' and 'Edit Project Codes' global privileges.
Delete Resource Codes Determines whether the profile will enable users to remove resource codes and code values data. This privilege also selects the 'Add Resource Codes' and 'Edit Resource Codes' global privileges.
Delete Resources Determines whether the profile will enable users to remove resource data. This privilege also selects the 'Add Resources' and 'Edit Resources' global privileges.
Edit Application Settings Determines whether the profile will enable users to modify application settings, which set global preferences for P6 EPPM.
Edit Global Activity Codes Determines whether the profile will enable users to modify global activity codes data. This privilege also enables users to create, modify, and remove global activity code values.

Security
63
Edit Global Change Definitions Determines whether the profile will enable users to create, modify, and remove Global Change specifications available to all users in P6 Professional.
Edit Global Issue Codes Determines whether the profile will enable users to modify global issue codes data. This privilege also enables users to create, modify, and remove global issue code values.
Edit Global Tracking Layouts Determines whether the profile will enable users to create, modify, and remove global tracking layouts in P6 Professional.
Edit Project Codes Determines whether the profile will enable users to modify project codes data. This privilege also enables users to create, modify, and remove project code values.
Edit Projects from Scorecards Determines whether the profile will enable users to create, modify, and remove projects from scorecards in the Portfolio View portlet and the Portfolio Analysis page. This privilege is required to save data changes made to the Portfolio Analysis page.The following project privileges are also required for scorecards: 'Edit Project Details Except Costs and Financials' to edit project data, 'View Project Costs and Financials' to view project cost data, 'Edit WBS Costs and Financials' to edit project cost data, 'Create Project' to add a project, and 'Delete Project' to delete a project.
Edit Resource Codes Determines whether the profile will enable users to modify resource codes data. This privilege also enables users to create, modify, and remove resource code values.

P6 EPPM Web Services Programming Guide
64
Edit Resources Determines whether the profile will enable users to modify resource data. This privilege also enables users to assign, modify, and remove role assignments. To display resources' price/unit in reports, users must have this privilege and the 'View Resource and Role Costs and Financials' global privilege assigned to their profile. To display resource skill level (a resource’s role proficiency) in the application and in reports, users must have this privilege and the 'View Resource Role Proficiency' global privilege assigned to their profile.
Edit Secure Codes Determines whether the profile will enable users to modify all secure project codes, global and EPS-level activity codes, and resource codes and code values data, as well as all secure issue codes and code values data. This privilege also selects the 'Assign Secure Codes' and 'View Secure Codes' global privileges.
Import XER and MPX Determines whether the profile will enable users to import projects, resources, and roles from XER and MPX formats using P6 Professional. To create new projects when importing, users must also have the 'Create Project' project privilege assigned to their profile. Users must be an Admin or Project Superuser to update a project from XER formats.
Import XLS Determines whether the profile will enable users to import projects, resources, and roles from XLS files. Users must also be a Project Superuser to update a project from XLS format.

Security
65
Import XML Determines whether the profile will enable users to import projects from P6, P6 Professional, and Microsoft Project using XML format. To create new projects when importing, users must also have the 'Create Project' project privilege assigned to their profile.
Note: For Microsoft Project imports, you can only create a new project (not update an existing one) during import. Also, P6 supports imports from Microsoft Project 2007, while P6 Professional supports imports from Microsoft Project 2002.
Provision Users from LDAP Determines whether the profile will enable users to search the LDAP directory when provisioning. For users who do not have this privilege assigned to their profile, the option to load an LDIF file to provision users will still be enabled. To search the LDAP directory, users also must also have the 'Add Edit Delete Users' global privilege.
View All Global and Project Data via SDK Determines whether the profile will enable users to view All Global and Project Data via SDK. For Admin Superusers, access to the P6 Professional SDK will be read/write. For all other users, access will be read only.

P6 EPPM Web Services Programming Guide
66
View Resource and Role Costs and Financials
Determines whether the profile will enable users to display all values for labor, material, and nonlabor resource costs, price/unit values for roles, and costs for resource and resource assignments User Defined fields. For users who do not have this privilege assigned to their profile, all areas that display monetary values for labor, material, and nonlabor resources and roles will display dashes and cannot be edited. For resources, such areas include resource price/unit, values in resource spreadsheets and histograms in Resource Analysis and Team Usage, and Cost data types for Resource User Defined fields. For roles, the area is the price/unit value in roles data. To display resources' price/unit, users must have this privilege and the 'Edit Resources' global privilege assigned to their profile.
View Resource Role Proficiency Determines whether the profile will enable users to display, group/sort, filter, search, and report on resource and role proficiency. To display resource skill level (a resource’s role proficiency), users must have this privilege and the Edit Resources global privilege assigned to their profile.
View Secure Codes Determines whether the profile will enable users to display all secure project codes, global and EPS-level activity codes, and resource codes and code values data, as well as all secure issue codes and code values data.

Security
67
Project Profile Definitions
A project profile defines a set of privileges for access to project-specific information. Project profiles are assigned to users based on the OBS hierarchy. To control access to project-specific information, you create project profiles, and then assign specific OBS elements and associated project profiles to individual users. The assigned OBS element determines the EPS and WBS elements for which the user can access project information. The assigned project profile determines the type of access privileges the user has to that project information.
The following table defines each Project privilege:
Privilege Name Description
Add Edit Activities Except Relationships Determines whether the profile will enable users to create and modify all activity information in projects, except activity relationships. Users assigned a profile with this privilege can also designate another user as an activity owner. To modify activity IDs, users must also have the 'Edit Activity ID' project privilege assigned to their profile. To use the Recalculate Assignment Costs feature, users must also have the 'View Project Costs and Financials' project privilege assigned to their profile.
Add Edit Activity Resource Requests Determines whether the profile will enable users to create and modify resource requests for activities.
Add Edit Delete Activity Relationships Determines whether the profile will enable users to create, modify, and remove activity relationships assigned to projects.
Add Edit Delete EPS Except Costs and Financials
Determines whether the profile will enable users to create, modify, and remove EPS hierarchy nodes, edit EPS notebook, and edit all EPS-related data except financial information.
Add Edit Delete Expenses Determines whether the profile will enable users to create, modify, and remove expenses assigned to projects.
Add Edit Delete Issues and Issue Thresholds
Determines whether the profile will enable users to create, modify, and remove thresholds and issues assigned to projects. The privilege also enables users to assign issue codes to project issues.

P6 EPPM Web Services Programming Guide
68
Add Edit Delete Project Baselines Determines whether the profile will enable users to create, modify, and remove baselines for projects.
Add Edit Delete Project Calendars Determines whether the profile will enable users to create, modify, and remove calendars assigned to projects.
Add Edit Delete Resource Assignments for Resource Planning
Determines whether the profile will enable users to assign, modify, and remove resource assignments on a project or WBS level in Resources. This privilege also enables users to define search criteria and conduct a search for resource assignments. For users who do not have this privilege assigned to their profile, the resource assignment information on the Planning page is read-only for that particular project or WBS. Since project-level security privileges go down to the WBS level, it is possible to be able to assign a resource to one WBS in a project and not another.
Add Edit Delete Risks Determines whether the profile will enable users to create, modify, and remove risks assigned to projects.
Add Edit Delete Role Assignments for Resource Planning
Determines whether the profile will enable users to assign, modify, and remove role assignments on a project or WBS level in Resources. This privilege also enables users to define search criteria for role assignments. For users who do not have this privilege assigned to their profile, role assignment information on the Planning page is read-only for that particular project or WBS. Since project-level security privileges go down to the WBS level, it is possible to be able to assign a role to one WBS in a project and not another.

Security
69
Add Edit Delete Template Documents Determines whether the profile will enable users to create, modify, remove project template documents. If the content repository is installed and configured, this privilege also enables users to check out and start reviews for project template documents. A profile must be assigned the 'Add Edit Delete Work Products and Documents' project privilege before you can select this privilege.
Add Edit Delete WBS Except Costs and Financials
Determines whether the profile will enable users to create, modify, and remove WBS hierarchy nodes, notebook entries, earned value settings, milestones (steps), work products and documents, and dates.
Add Edit Delete Work Products and Documents
Determines whether the profile will enable users to create, modify, and remove project documents that do not have a security policy applied. Document security policies are available only in P6 and only for documents stored in the content repository. When the content repository is installed and configured, this privilege also enables users to create document folders in P6.
Add Edit Project Level Layouts Determines whether the profile will enable users to create, modify, and remove project level layouts in the Activities, Assignments, or WBS windows in P6 Professional.
Add Edit Workgroups Determines whether the profile will enable users to create and modify workgroups.
Add EPS Activity Codes Determines whether the profile will enable users to create EPS-level activity codes and code values. This privilege also selects the 'Edit EPS Activity Codes' project privilege.
Add Project Activity Codes Determines whether the profile will enable users to create project activity codes and code values data. This privilege also selects the 'Edit Project Activity Codes' project privilege.

P6 EPPM Web Services Programming Guide
70
Add Projects Determines whether the profile will enable users to create, copy, and paste projects within the EPS node. To create project templates, users must also have the 'Add Edit Delete Project Templates' global privilege assigned to their profile.
Administer Project External Applications Determines whether the profile will enable users to modify entries in the External Applications feature in P6 Professional.
Allow Integration with ERP System Determines whether the profile will enable users to send project data to an integrated Oracle system using the Send to ERP feature on the Activities page in the Projects section. This is a project level privilege and is not specific to each level of the WBS.
Apply Actuals Determines whether the profile will enable users to apply actuals to activities in projects.
Approve Timesheets as Project Manager Determines whether the profile will enable users to approve or reject submitted timesheets as a Project Manager in Timesheet Approval.
Assign Project Baselines Determines whether the profile will enable users to assign project baselines to projects. To assign project baselines, users must also have the 'Edit Project Details Except Costs and Financials' project privilege assigned to their profile.
Check In and Check Out Projects Determines whether the profile will enable users to check projects out to work remotely and then check them back in using P6 Professional.
Delete Activities Determines whether the profile will enable users to remove activities from projects.
Delete EPS Activity Codes Determines whether the profile will enable users to remove EPS-level activity codes and code values data. This privilege also selects the 'Add EPS Activity Codes' and 'Edit EPS Activity Codes' project privileges.

Security
71
Delete Project Activity Codes Determines whether the profile will enable users to remove project activity codes and code values data. This privilege also selects the 'Add Project Activity Codes' and 'Edit Project Activity Codes' project privileges.
Delete Project Data with Timesheet Actuals Determines whether the profile will enable users to delete activities and resource assignments for projects that have timesheet actuals. To delete project data at all different levels (activity, WBS, project, and EPS), users must also have the appropriate privileges assigned to their profile. For example, to delete activities with timesheet actuals, users must also have the 'Delete Activities' project privilege assigned to their profile. To delete activities and WBS nodes with timesheet actuals, users must additionally have the 'Add Edit Delete WBS Except Costs and Financials' project privilege assigned to their profile.
Delete Projects Determines whether the profile will enable users to delete, cut, and paste projects within the EPS node. To delete project templates, users must also have the 'Add/Edit/Delete Project Templates' global privilege assigned to their profile.
Delete Workgroups Determines whether the profile will enable users to remove workgroups.
Edit Activity ID Determines whether the profile will enable users to modify activity IDs. To modify activity IDs, users must also have the 'Add Edit Activities Except Relationships' project privilege assigned to their profile.
Edit Committed Flag for Resource Planning Determines whether the profile will enable users to identify committed resource and role assignments on a project or WBS level on the Planning page. The 'Add Edit Delete Resource Assignments for Resource Planning' project privilege is also required for this functionality.

P6 EPPM Web Services Programming Guide
72
Edit Contract Management Project Link Determines whether the profile will enable users to create, edit, and delete a link to Contract Management projects.
Edit EPS Activity Codes Determines whether the profile will enable users to modify the name of EPS-level activity codes. This privilege also enables users to create, modify, and remove EPS-level activity code values
Edit EPS Costs and Financials Determines whether the profile will enable users to modify EPS budget logs, funding sources, and spending plans.
Edit Future Periods Determines whether the profile will enable users to enter, modify, and delete future period assignment values in the Original or Planned Units and Remaining (Early) Units fields of the Resource Usage Spreadsheet using P6 Professional. The 'Add Edit Activities Except Relationships' project privilege is also required for this functionality.
Edit Period Performance Determines whether the profile will enable users to modify period performance values for labor and nonlabor units as well as labor, nonlabor, material, and expense costs using P6 Professional. The 'Add Edit Activities Except Relationships' and 'View Project Costs Financials' project privileges are also required for this functionality.
Edit Project Activity Codes Determines whether the profile will enable users to modify project activity codes data. This privilege also enables users to create, modify, and remove project activity code values.

Security
73
Edit Project Details Except Costs and Financials
Determines whether the profile will enable users to edit fields in General, Defaults, Resources, and Settings tabs in Project preferences. This privilege also enables users to assign or remove a risk scoring matrix to a project in the Risk Scoring Matrices page in Enterprise Data. To assign a project baselines, users must also have the 'Assign Project Baselines' project privilege assigned to their profile.
Edit Project Reports Determines whether the profile will enable users to modify reports, modify report batches, and export reports for projects in P6 Professional.
Edit Publication Priority Determines whether the profile will enable users to set a publish project priority. Publish project priority determines the relative importance one project has to others when multiple projects are submitted to the service queue at the same time.
Edit WBS Costs and Financials Determines whether the profile will enable users to modify WBS budget logs, funding sources, spending plan, and financial data at the project level. This privilege also enables users to edit cost data at the activity level, including resource assignments. This privilege also selects the 'View Project Costs and Financials' project privilege.
Edit Workspace and Workgroup Preferences
Determines whether the profile will enable users to customize the project workspace and workgroup preferences.
Import and View Contract Manager Data Determines whether the profile will enable users to import and display data from Contract Management in P6 Professional.
Level Resources Determines whether the profile will enable users to level resources in projects. This privilege also selects the 'Schedule Project' project privilege.

P6 EPPM Web Services Programming Guide
74
Monitor Project Thresholds Determines whether the profile will enable users to run the threshold monitor for projects in P6 Professional.
Publish Project Website Determines whether the profile will enable users to publish a Web site for projects in P6 Professional.
Run Baseline Update Determines whether the profile will enable users to update baselines assigned to projects with new project information using the Update Baseline tool in P6 Professional.
Run Global Change Determines whether the profile will enable users to run Global Change specifications to update activity detail information in P6 Professional.
Schedule Projects Determines whether the profile will enable users to schedule projects.
Store Period Performance Determines whether the profile will enable users to track actual this period values for actual units and costs in projects. The 'Add Edit Activities Except Relationships' project privilege is also required for this functionality.
Summarize Projects Determines whether the profile will enable users to summarize data for all projects in the EPS.
View Project Costs and Financials Determines whether the profile will enable users to display all monetary values for projects. For users who do not have this privilege assigned to their profile, all areas that display monetary values will display dashes and cannot be edited. To use the Recalculate Assignment Costs feature, users must also have the 'Add Edit Activities Except Relationships' project privilege assigned to their profile. To display the resource price/unit, users must have the 'View Resource and Role Costs and Financials' global privilege assigned to their profile.
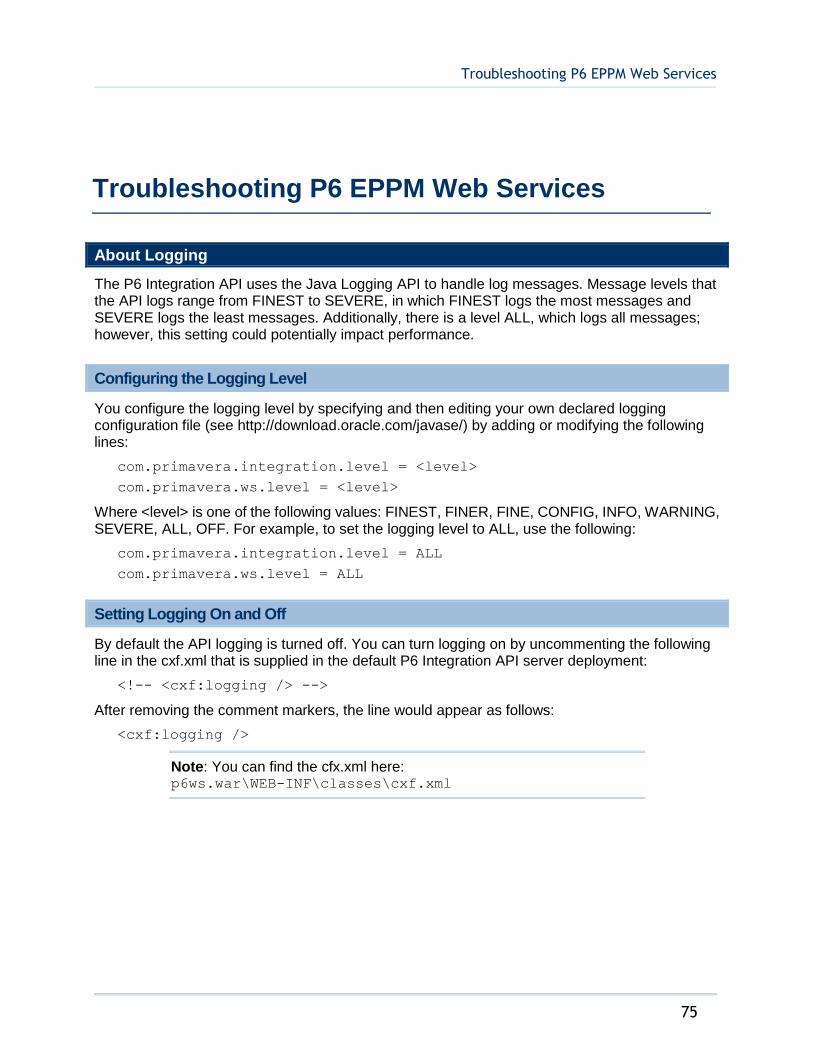
Troubleshooting P6 EPPM Web Services
75
About Logging
The P6 Integration API uses the Java Logging API to handle log messages. Message levels that the API logs range from FINEST to SEVERE, in which FINEST logs the most messages and SEVERE logs the least messages. Additionally, there is a level ALL, which logs all messages; however, this setting could potentially impact performance.
Configuring the Logging Level
You configure the logging level by specifying and then editing your own declared logging configuration file (see http://download.oracle.com/javase/) by adding or modifying the following lines:
com.primavera.integration.level = <level>
com.primavera.ws.level = <level>
Where <level> is one of the following values: FINEST, FINER, FINE, CONFIG, INFO, WARNING, SEVERE, ALL, OFF. For example, to set the logging level to ALL, use the following:
com.primavera.integration.level = ALL
com.primavera.ws.level = ALL
Setting Logging On and Off
By default the API logging is turned off. You can turn logging on by uncommenting the following line in the cxf.xml that is supplied in the default P6 Integration API server deployment:
<!-- <cxf:logging /> -->
After removing the comment markers, the line would appear as follows:
<cxf:logging />
Note: You can find the cfx.xml here: p6ws.war\WEB-INF\classes\cxf.xml
Troubleshooting P6 EPPM Web Services

P6 EPPM Web Services Programming Guide
76
Where to Get Documentation
Complete documentation libraries for P6 EPPM releases are available on the Oracle Technology Network (OTN) at:
http://www.oracle.com/technetwork/documentation/primavera-093289.html
From this location you can either view libraries online or download them to have local copies. We recommend viewing them from OTN to ensure you always access the latest versions, including critical corrections and enhancements.
The documentation assumes a standard setup of the product, with full access rights to all features and functions.
Help System Access
P6 EPPM is configured to access its help systems on OTN. However, downloadable versions of the help systems are also available on OTN if you need to download, deploy, and access a local copy.
Documentation Accessibility
For information about Oracle's commitment to accessibility, visit the Oracle Accessibility Program website at http://www.oracle.com/pls/topic/lookup?ctx=acc&id=docacc.
Access to Oracle Support
Oracle customers that have purchased support have access to electronic support through My Oracle Support. For information, visit http://www.oracle.com/pls/topic/lookup?ctx=acc&id=info or visit http://www.oracle.com/pls/topic/lookup?ctx=acc&id=trs if you are hearing impaired.
Where to Get Training
To access comprehensive training for all Primavera products, go to:
http://education.oracle.com
Oracle Learning Library
The Oracle Learning Library (OLL) provides online learning content covering Primavera products. Content includes whitepapers, videos, tutorials, articles, demos, step-by-step instructions to accomplish specific tasks, and self-paced interactive learning modules.
To access the learning library’s Primavera content, go to:
http://www.oracle.com/oll/primavera
For More Information

For More Information
77
Where to Get Support
If you have a question about using Oracle products that you or your network administrator cannot resolve with information in the documentation or help, click http://support.oracle.com. This page provides the latest information on contacting Oracle Global Customer Support, knowledge articles, and the support renewals process. For more information about working with Support, visit https://support.oracle.com/epmos/faces/DocumentDisplay?id=888813.2 to view Support Tools & Tips.
Using Primavera's Support Resource Centers
Primavera’s Support Resource Center provides links to important support and product information. Primavera's Product Information Centers (PICs) organize documents found on My Oracle Support (MOS), providing quick access to product and version specific information such as important knowledge documents, Release Value Propositions, and Oracle University training. PICs also offer documentation on Lifetime Management, from planning to installs, upgrades, and maintenance.
Visit https://support.oracle.com/epmos/faces/DocumentDisplay?id=1486951.1 to access links to all of the current PICs.
PICs also provide access to:
Communities which are moderated by Oracle providing a place for collaboration among industry peers to share best practices.
News from our development and strategy groups.
Education via a list of available Primavera product trainings through Oracle University. The Oracle Advisor Webcast program brings interactive expertise straight to the desktop using Oracle Web Conferencing technology. This capability brings you and Oracle experts together to access information about support services, products, technologies, best practices, and more.
Creating a Service Request
P6 EPPM integrates with different Oracle applications; when you create a Service Request, be sure to open the request with the proper Support team. To ensure you reach the proper Support team, enter the correct product information when you create the Service Request. Each product has its own support line.
Use the Primavera P6 EPPM support line when you are having installation, configuration, or connection issues related to P6 EPPM.
Use one of the following support lines when you are having installation or configuration issues that do not relate to P6 EPPM.
Oracle WebLogic Server
Oracle Database Server
BI Publisher
BPM
Oracle WebCenter Content Core Capabilities (formerly Universal Content Management)
Oracle Enterprise Manager

P6 EPPM Web Services Programming Guide
78
Oracle Access Manager
Oracle AutoVue
Keeping Your Software Up to Date
To ensure you have the latest versions of your products, be sure to download and install all available patch sets from http://support.oracle.com.
Finding Security-related Patches
To get the latest information about Critical Patch Updates, visit http://www.oracle.com/technetwork/topics/security/alerts-086861.html.
79
Oracle Primavera P6 EPPM Web Services Programming Guide
Copyright © 2008, 2016, Oracle and/or its affiliates. All rights reserved. Oracle and Java are registered trademarks of Oracle and/or its affiliates. Other names may be trademarks of their respective owners.
This software and related documentation are provided under a license agreement containing restrictions on use and disclosure and are protected by intellectual property laws. Except as expressly permitted in your license agreement or allowed by law, you may not use, copy, reproduce, translate, broadcast, modify, license, transmit, distribute, exhibit, perform, publish or display any part, in any form, or by any means. Reverse engineering, disassembly, or decompilation of this software, unless required by law for interoperability, is prohibited.
The information contained herein is subject to change without notice and is not warranted to be error-free. If you find any errors, please report them to us in writing.
If this is software or related documentation that is delivered to the U.S. Government or anyone licensing it on behalf of the U.S. Government, the following notice is applicable:
U.S. GOVERNMENT END USERS: Oracle programs, including any operating system, integrated software, any programs installed on the hardware, and/or documentation, delivered to U.S. Government end users are “commercial computer software" pursuant to the applicable Federal Acquisition Regulation and agency-specific supplemental regulations. As such, use, duplication, disclosure, modification, and adaptation of the programs, including any operating system, integrated software, any programs installed on the hardware, and/or documentation, shall be subject to license terms and license restrictions applicable to the programs. No other rights are granted to the U.S. Government.
This software or hardware is developed for general use in a variety of information management applications. It is not developed or intended for use in any inherently dangerous applications, including applications that may create a risk of personal injury. If you use this software or hardware in dangerous applications, then you shall be responsible to take all appropriate failsafe, backup, redundancy, and other measures to ensure its safe use. Oracle Corporation and its affiliates disclaim any liability for any damages caused by use of this software or hardware in dangerous applications.
This software or hardware and documentation may provide access to or information on content, products and services from third-parties. Oracle Corporation and its affiliates are not responsible for and expressly disclaim all warranties of any kind with respect to third-party content, products, and services. Oracle Corporation and its affiliates will not be responsible for any loss, costs, or damages incurred due to your access to or use of third-party content, products, or services.
Legal Notices