
Sparx Systems Keystore Service User Guide - Enterprise Architect

Objectives of this Lab
In this Lab you will learn how to perform the following tasks with Encryption Facility for z/OS:
• Creating a Java Keystore• Creating an OpenPGP Keyring• Creating new RSA key pairs• Creating OpenPGP certificates• Exporting OpenPGP certificates• Importing OpenPGP certificates• Encrypting Data• Decrypting Data• Creating a RACF Keyring• Generating a certificate and key pair in RACF• Generating a certificate and key pair in RACF with the private key
in ICSFs PKDS protected by the Master Key• Connecting a RACF certificate to a RACF keyring• Using your RACF certificate with Encryption Facility to encrypt data• Using your private keys from RACF with Encryption Facility to
decrypt data• Using your private keys from ICSFs PKDS protected by the Master
Key to decrypt data• Exporting your RACF certificate into an OpenPGP certificate• Invoking EF from USS shell scripts• Invoking EF from JCL using the JZOS Java Batch Launcher• Using USS files with EF• Using datasets with EF• Modifying EF configuration options• Signing data with your private key• Verifying signatures with your public key

Lab Exercise Steps
In steps 1 through 10 you will configure settings for Encryption Facility, generate a new RSA key pair in a Java keystore, generate an OpenPGP certificate, generate an OpenPGP keyring, and export your OpenPGP certificate to the filesystem.
In many of the steps in this lab you will be modifying preconfigured settings to use your lab user ID. For example, the settings will need to be modified from sharbxx to use your lab user ID. The intent is to guide you through the various EF settings and configuration options that are needed to perform EF commands.
1) Logon to the Share Lab System: mvs1.centers.ihost.com
TSO logon ID: sharbxx
See Appendix 1 if you need additional help logging on to the share lab system.
Note: Wherever the lab shows sharbxx substitute your userid, e.g. sharb02.
2) Go into OMVS:
OPTION ===> omvs
3) Go to directory, /sharelab/sharbxx/eflab, for the exercises in this lab:
cd /sharelab/sharbxx/eflab
4) List the files in this directory with the unix ls -al command:
ls -al
You should see:• CSDEncryptionFacility.jar - the Encryption Facility for z/OS OpenPGP Jar file• ibmef.config – Encryption Facility for z/OS OpenPGP configuration file• data.txt – a sample data file that you will encrypt in this lab• Unix shell scripts with file extension .sh that will be used in the following steps
5) Open the Encryption Facility for z/OS OpenPGP configuration file in oedit to change some of the preconfigured settings.
oedit ibmef.config
Scroll down through the settings to get familiar with all the EF command options.
Modify the KEY_RING_FILENAME location to use your lab user ID. This option specifies the location and name of your EF OpenPGP Keyring.

KEY_RING_FILENAME /sharelab/sharbxx/eflab/ibmpkring.ikr
Modify the JAVA_KEY_STORE_NAME location to use your lab user ID. This option specifies the location and name of your Java Keystore.
JAVA_KEY_STORE_NAME /sharelab/sharbxx/eflab/ibmef.jks
F3 to exit and get back to a command prompt.
Note: If you receive the following message when opening any of the files in this lab just hit enter.
Truncation warning. The data you are editing is variable length data with atleast one record that ends with a blank. Saving the data will result in removal of any trailing blanks from all records. You can issue the PRESERVE ON command if you don't want the blanks removed.
6) Next you will generate an RSA key pair in a Java Keystore and import the public key in OpenPGP certificate format to a new OpenPGP Keyring.
Edit the generateEFKeys.sh shell script.
oedit generateEFKeys.sh
Notice that the location of the z/OS product registration and deregistration services binaries are added to the CLASSPATH and LIBPATH in this shell script and all others used in this lab. This is because EF must register and deregister itself with these services when it runs.
Alittle further down you will see some local variables that are used by this script.
Modify the EFHOMEDIR variable to use your user ID's lab directory.
EFHOMEDIR=/sharelab/sharbxx/eflab
Modify the key_alias and user_id variables to use your user ID number.
key_alias=sharbxx.key.alias.1user_id=sharbxx
Down further in the Main section you will find messages printed out by the script indicating what the script is doing, and the actual invocation of the EF command using the variables you just modified from above.
See appendix 3 and 4 for a description of the EF command and options used in this job.
Enter F3 to save the changes and get back to the command prompt.
7) Generate a new key pair using the generateEFKeys.sh shell script. This script will create a new RSA key pair in a Java keystore in your lab directory. Then it will create an OpenPGP

certificate containing the public key and put that into the EF OpenPGP Keyring in your lab directory.
./generateEFKeys.sh
8) Use the list command again to see the new Java keystore and OpenPGP Keyring containing your key material.
ls -al
You should see the Java Keystore with filename, ibmef.jks. This keystore will contain your full RSA key pair.
You should see the OpenPGP Keyring and associated index files with names ibmpkring.ikr, ibmpkring.ikr.kidx, ibmpkring.ikr.uidx. This keyring will contain your public key in OpenPGP certificate format.
9) Next you will export your public key in an OpenPGP certificate to the file system so that it can be shared with other members of the lab.
Edit the exportEFKeys.sh shell script:
oedit exportEFKeys.sh
Modify the EFHOMEDIR to use your lab ID.
EFHOMEDIR=/sharelab/sharbxx/eflab
Modify the user_id variable to use the same user ID you specified in the previous generateEFKeys.sh script. For example:
user_id=sharbxx
See appendix 3 and 4 for a description of the EF command and options used in this job.
Enter F3 to save the changes and get back to the command prompt.
10) Run the exportEFKeys.sh script to export your OpenPGP certificate to the /tmp/eflab directory.
./exportEFKeys.sh
This script also displays the ASCII ARMOR OpenPGP Certificate contents to you.
In steps 11 through 24 you will import other OpenPGP certificates from members of the lab, encrypt data for them, and decrypt data that they have encrypted for you.
11) List the contents of the /tmp/eflab directory to ensure your certificate has been successfully exported to this directory and to also look for other lab members certificates.

ls /tmp/eflab
Your certificate's name should contain your user ID with the .asc file extension.
Write down the name of some of the other certificates you find in the /tmp/eflab directory. You will be importing these into your OpenPGP keyring in the following steps. Then you will use these certificates to exchange encrypted data with other members of the lab. Find out the user ID of the lab member to your left and right so you can use there certificates to encrypt data in the steps later on in this lab.
12) Next you will be importing other lab members OpenPGP certificates from the /tmp/eflab directory.
Open the importEFKeys.sh in oedit.
oedit importEFKeys.sh
Modify the EFHOMEDIR to use your lab ID.
EFHOMEDIR=/sharelab/sharbxx/eflab
Modify the certificates variable to specify the location and names of the certificates you want to import. Optionally, if you want to import all certificates from the /tmp/eflab directory with file extension .asc, leave this variable as is and make no modification.
certificates=”$TMPDIR/*.asc”
Note: If your specifying multiple certificates separate them with spaces, and make sure to enclose the entire list of certificates with double quotes.
See appendix 3 and 4 for a description of the EF command and options used in this job.
Enter F3 to save the changes and get back to the command prompt.
13) Run the importEFKeys.sh script to import OpenPGP certificate from the /tmp/eflab directory.
./importEFKeys.sh
14) Next you will use EF's display command to display all of the key material you have generated and imported to this point.
Open the displayEFKeys.sh in oedit.
oedit displayEFKeys.sh
Modify the EFHOMEDIR to use your lab ID.

EFHOMEDIR=/sharelab/sharbxx/eflab
See appendix 3 and 4 for a description of the EF command and options used in this job.
Enter F3 to save the changes and get back to the command prompt.
15) Run the displayEFKeys.sh script to display all of the key material you have generated and imported to this point.
./displayEFKeys.sh
Take note of and write down the user IDs of the certificates you imported from the /tmp/eflab directory. You will use these user IDs to encrypt data for others in the lab. If you don't already know the user ID of the person to your left and right in the lab, talk to them now to find out there user ID.
Note, if the output from the display script scrolls past the screen display, you can pipe the output to the unix more command to scroll through it. For example, enter ./displayEFKeys.sh | more at the command prompt and continually press enter to scroll through all of the output.
16) Next you will encrypt data for other members in the lab.
Open the encryptData.sh script in oedit.
oedit encryptData.sh
Modify the EFHOMEDIR to use your lab ID.
EFHOMEDIR=/sharelab/sharbxx/eflab
Modify the user_id variable to use your lab ID.
user_id=sharbxx
Modify the recipients variable to specify all the user IDs you want to encrypt data for. Your data will be encrypted by a symmetric session key, which will be wrapped by each of your recipients public keys. This will produce 1 output file that can be decrypted by each of your recipients. Add your own user ID to the recipient list so that you can decrypt the encrypted file as well.
The recipients list must be enclosed by double quotes and each user ID must be separated by a comma. Do not add spaces between user IDs.
recipients="sharbxx,sharbxx"
See appendix 3 and 4 for a description of the EF command and options used in this job.
Enter F3 to save the changes and get back to the command prompt.
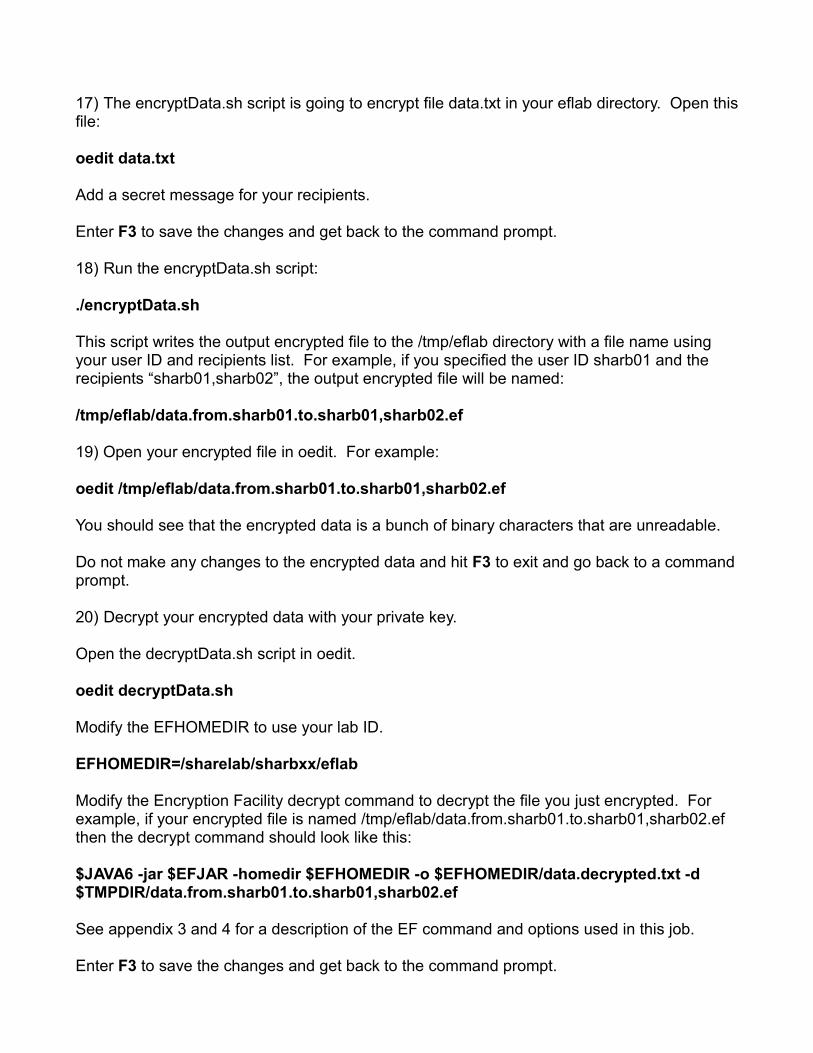
17) The encryptData.sh script is going to encrypt file data.txt in your eflab directory. Open this file:
oedit data.txt
Add a secret message for your recipients.
Enter F3 to save the changes and get back to the command prompt.
18) Run the encryptData.sh script:
./encryptData.sh
This script writes the output encrypted file to the /tmp/eflab directory with a file name using your user ID and recipients list. For example, if you specified the user ID sharb01 and the recipients “sharb01,sharb02”, the output encrypted file will be named:
/tmp/eflab/data.from.sharb01.to.sharb01,sharb02.ef
19) Open your encrypted file in oedit. For example:
oedit /tmp/eflab/data.from.sharb01.to.sharb01,sharb02.ef
You should see that the encrypted data is a bunch of binary characters that are unreadable.
Do not make any changes to the encrypted data and hit F3 to exit and go back to a command prompt.
20) Decrypt your encrypted data with your private key.
Open the decryptData.sh script in oedit.
oedit decryptData.sh
Modify the EFHOMEDIR to use your lab ID.
EFHOMEDIR=/sharelab/sharbxx/eflab
Modify the Encryption Facility decrypt command to decrypt the file you just encrypted. For example, if your encrypted file is named /tmp/eflab/data.from.sharb01.to.sharb01,sharb02.ef then the decrypt command should look like this:
$JAVA6 -jar $EFJAR -homedir $EFHOMEDIR -o $EFHOMEDIR/data.decrypted.txt -d $TMPDIR/data.from.sharb01.to.sharb01,sharb02.ef
See appendix 3 and 4 for a description of the EF command and options used in this job.
Enter F3 to save the changes and get back to the command prompt.

21) Run the decryptData.sh script.
./decryptData.sh
This script will decrypt the file to your lab directory using file name data.decrypted.txt. For example:
/sharelab/sharbxx/eflab/data.decrypted.txt
22) Open the decrypted file in oedit to ensure it contains your original secret message.
oedit /sharelab/sharbxx/eflab/data.decrypted.txt
F3 to exit and go back to a command prompt.
23) Now attempt to decrypt messages from other members in the lab. Since you exported your OpenPGP certificate to the /tmp/eflab directory, the other lab members should have imported your certificate and encrypted their data with it following the instructions from the previous steps. List the files in /tmp/eflab directory and look for encrypted files that are using your user ID.
ls /tmp/eflab
If there are no files for you to decrypt at this time skip to step 25 and come back to this step at the end of the lab.
24) Write down the names of the files that are encrypted using your user ID. Then open back up your decryptData.sh script and modify it to decrypt one of the files that are encrypted for you. You can also modify the output file location so you don't overwrite your previously decrypted message. For example you could specify a new output file like this:
-o $EFHOMEDIR/data.decrypted2.txt
In steps 25 through 37 you will create a RACF Keyring, create a key pair in RACF, and connect the X.509 certificate for that key pair to your RACF Keyring. Then you will export the X.509 certificate to an OpenPGP certificate, encrypt some data with your public key, and decrypt the data with your private key.
25) Next we will exit out of OMVS and go back to ISPF. Type exit at the command line and hit enter at the exit prompt.
26) Enter option 3.4 to go to the Data Set List Utility.
27) Enter your lab user ID name followed by .EFLAB.JCL to go to the data set that will be used for this part of the lab.
SHARBxx.EFLAB.JCL
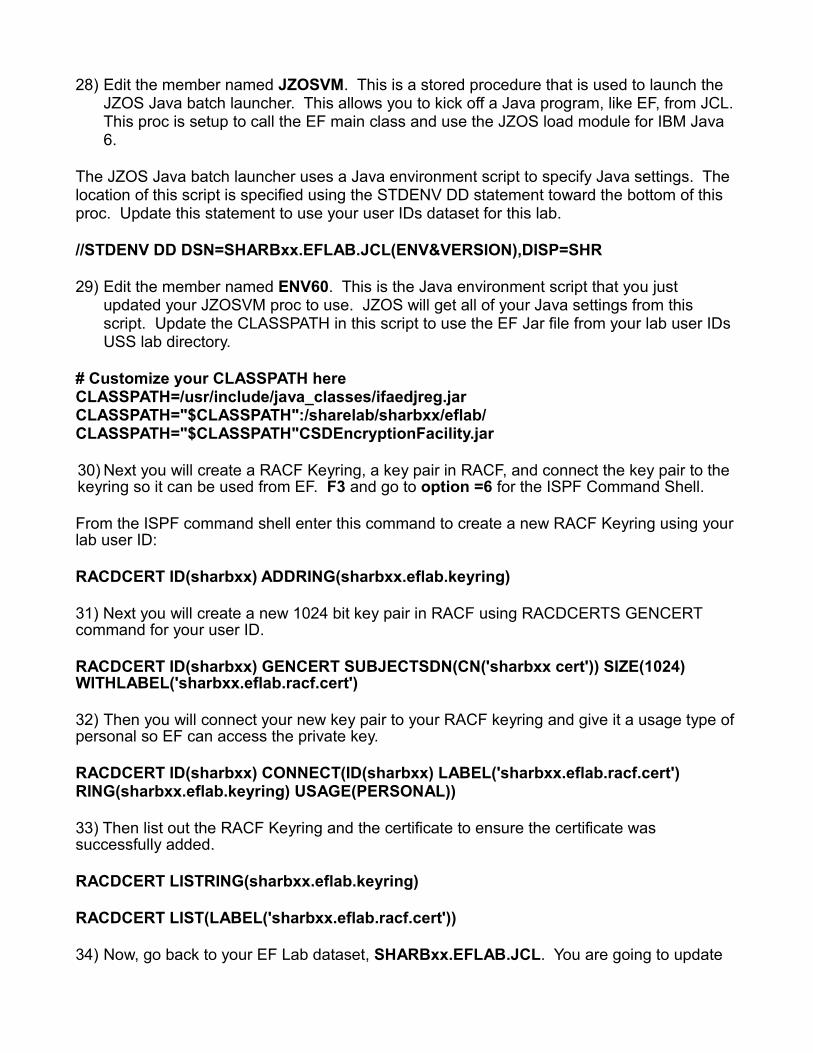
28) Edit the member named JZOSVM. This is a stored procedure that is used to launch the JZOS Java batch launcher. This allows you to kick off a Java program, like EF, from JCL.This proc is setup to call the EF main class and use the JZOS load module for IBM Java 6.
The JZOS Java batch launcher uses a Java environment script to specify Java settings. The location of this script is specified using the STDENV DD statement toward the bottom of this proc. Update this statement to use your user IDs dataset for this lab.
//STDENV DD DSN=SHARBxx.EFLAB.JCL(ENV&VERSION),DISP=SHR
29) Edit the member named ENV60. This is the Java environment script that you just updated your JZOSVM proc to use. JZOS will get all of your Java settings from this script. Update the CLASSPATH in this script to use the EF Jar file from your lab user IDs USS lab directory.
# Customize your CLASSPATH here CLASSPATH=/usr/include/java_classes/ifaedjreg.jarCLASSPATH="$CLASSPATH":/sharelab/sharbxx/eflab/ CLASSPATH="$CLASSPATH"CSDEncryptionFacility.jar
30) Next you will create a RACF Keyring, a key pair in RACF, and connect the key pair to the keyring so it can be used from EF. F3 and go to option =6 for the ISPF Command Shell.
From the ISPF command shell enter this command to create a new RACF Keyring using your lab user ID:
RACDCERT ID(sharbxx) ADDRING(sharbxx.eflab.keyring)
31) Next you will create a new 1024 bit key pair in RACF using RACDCERTS GENCERT command for your user ID.
RACDCERT ID(sharbxx) GENCERT SUBJECTSDN(CN('sharbxx cert')) SIZE(1024) WITHLABEL('sharbxx.eflab.racf.cert')
32) Then you will connect your new key pair to your RACF keyring and give it a usage type of personal so EF can access the private key.
RACDCERT ID(sharbxx) CONNECT(ID(sharbxx) LABEL('sharbxx.eflab.racf.cert')RING(sharbxx.eflab.keyring) USAGE(PERSONAL))
33) Then list out the RACF Keyring and the certificate to ensure the certificate was successfully added.
RACDCERT LISTRING(sharbxx.eflab.keyring)
RACDCERT LIST(LABEL('sharbxx.eflab.racf.cert'))
34) Now, go back to your EF Lab dataset, SHARBxx.EFLAB.JCL. You are going to update

some JCL that is going to invoke EF and use your RACF Keyring. First you will edit the EFDISPLY member. This JCL calls EF with the display command and the following options that override the ibmef.config EF configuration file. Modify these options to use your lab user IDs USS homedir, your RACF Keyring name and your RACF user ID.
-homedir /sharelab/sharbxx/eflab-keystore sharbxx.eflab.keyring -keystore-type JCERACFKS -racf-keyring-userid sharbxx
See appendix 3 and 4 for a description of the EF command and options used in this job.
Go to the SDSF job log by entering s.st from the ISPF command prompt and search for the output from the EFDISPLY job. Select this job output and scroll to the bottom to see the output from the EF display command. You should see your RACF certificate and your OpenPGP certificates in the output.
35) Next you will modify the EFEXPORT member of your EF Lab dataset. This JCL will export your RACF certificates public key into an OpenPGP certificate. Update the -homedir option to use your USS lab home directory. Update the -keystore and -racf-keyring-userid options like you did in the previous step to use your lab user ID. Then update the -o option to specify the EF lab files dataset:
SHARBxx.EFLAB.FILES
This will job will export the OpenPGP certificate to the data set member named SHARBxx.EFLAB.FILES(RACFCERT). Browse this data set member and check the EFEXPORT job output in SDSF to make sure the job ran successfully.
36) Next you will modify the EFENCRYP member of the EF Lab JCL dataset. Update the options to use your USS lab home directory, your RACF certificate, your lab output files dataset, your RACF keyring, your RACF user ID, and your USS eflab directory.
-homedir /sharelab/sharbxx/eflab-rA sharbxx.eflab.racf.cert -o //SHARBxx.EFLAB.FILES(ENCRDATA) -keystore sharbxx.eflab.keyring -keystore-type JCERACFKS -racf-keyring-userid sharbxx -e /sharelab/sharbxx/eflab/data.txt
See appendix 3 and 4 for a description of the EF command and options used in this job.
Submit this job to encrypt the data with your RACF certicate.Browse the job output in the EFENCRYP job in SDSF to ensure it ran successfully.Browse the binary encrypted data in SHARBxx.EFLAB.FILES(ENCRDATA).
37) Next you will decrypt your encrypted file. Modify the EFDECRYP member of the EF Lab JCL dataset. Update the options to use your USS lab home directory, your lab output files dataset, your RACF keyring, your RACF user ID, and your encrypted file.

-homedir /sharelab/sharbxx/eflab-o //SHARBxx.EFLAB.FILES(DECRDATA)-keystore sharbxx.eflab.keyring-keystore-type JCERACFKS-racf-keyring-userid sharbxx-d //SHARBxx.EFLAB.FILES(ENCRDATA)
See appendix 3 and 4 for a description of the EF command and options used in this job.
Submit this job to decrypt the data with your RACF certificate.Browse the job output in the EFDECRYP job in SDSF to ensure your job ran successfully.Browse the decrypted data in SHARBxx.EFLAB.FILES(DECRDATA).
In steps 38 through 48 you will generate 2 new key pairs using a RACF Keyring that protects the private key with ICSF's MK in the PKDS. Then you will encrypt and sign data with your keypairs and decrypt and verify the signature.
38) Next you will create a RACF Keyring, an RSA key pair that uses ICSF's MK's to protect the private key in the ICSF PKDS, and connect the key pair to the keyring so it can be used from EF. F3 and go to option =6 for the ISPF Command Shell.
From the ISPF command shell enter this command to create a new RACF Keyring using your lab user ID:
RACDCERT ID(sharbxx) ADDRING(sharbxx.eflab.cca.keyring)
39) Next you will create a new 2048 bit key pair in RACF using RACDCERTS GENCERT command and the RSA PKDS keywords which specifies a PKDS label name to use for storing the private key. For example:
RACDCERT ID(sharbxx) GENCERT SUBJECTSDN(CN('sharbxx 2048 cert')) SIZE(2048) WITHLABEL('sharbxx.eflab.cca.cert') RSA (PKDS(sharbxx.eflab.cca.cert))
40) Then you will connect your new key pair to your RACF keyring and give it a usage type of personal so EF can access the private key.
RACDCERT ID(sharbxx) CONNECT(ID(sharbxx) LABEL('sharbxx.eflab.cca.cert')RING(sharbxx.eflab.cca.keyring) USAGE(PERSONAL))
41) Then list out the RACF Keyring and the certificate to ensure the certificate was successfully added.
RACDCERT LISTRING(sharbxx.eflab.cca.keyring)
RACDCERT LIST(LABEL('sharbxx.eflab.cca.cert'))
42) Now, go back to your EF Lab dataset, SHARBxx.EFLAB.JCL. You are going to update some JCL that is going to invoke EF and use your RACF Keyring and ICSF. First you will edit the EFDISPL2 member. This JCL calls EF with the display command and the following

options that override the ibmef.config EF configuration file. Modify these options to use your USS homedir, your new RACF Keyring name and your RACF user ID. Notice that the keystore type and jce provider list options in this JCL specify to use ICSF and hardware cryptography.
-homedir /sharelab/sharbxx/eflab -keystore sharbxx.eflab.cca.keyring -keystore-type JCECCARACFKS -racf-keyring-userid sharbxx -jce-providers com.ibm.crypto.hdwrCCA.provider.IBMJCECCA
See appendix 3 and 4 for a description of the EF command and options used in this job.
Go to the SDSF job log by entering s.st from the ISPF command prompt and search for the output from the EFDISPL2 job. Select this job output and scroll to the bottom to see the output from the EF display command. You should see your RACF certificate and your OpenPGP certificates in the output.
43) Next you will modify the EFEXPOR2 member of your EF Lab dataset. This JCL will export your RACF certificates public key into an OpenPGP certificate. Update the -homedir option to use your USS lab home directory. Update the -keystore and -racf-keyring-userid options like you did in the previous step to use your lab user ID. Update the output file to use your output lab dataset. Specify your new certificate as an argument to the export command.
-homedir /sharelab/sharbxx/eflab -o //SHARBxx.EFLAB.FILES(RACFCER2) -keystore sharbxx.eflab.cca.keyring -keystore-type JCECCARACFKS -racf-keyring-userid sharbxx -jce-providers com.ibm.crypto.hdwrCCA.provider.IBMJCECCA -eA sharbxx.eflab.cca.cert
See appendix 3 and 4 for a description of the EF command and options used in this job.
Run this job and it will export the OpenPGP certificate to the data set member named SHARBxx.EFLAB.FILES(RACFCER2). Browse this data set member to view the certificate. Check the joblog output to make sure the job ran successfully.
44) Next you will create a new 2048 bit key pair in RACF using RACDCERTS GENCERT command and the RSA PKDS keywords which specifies a PKDS label name to use for storing the private key. This key pair will be used for adding a signature to your encrypted data. For example:
RACDCERT ID(sharbxx) GENCERT SUBJECTSDN(CN('sharbxx 2048 cert2')) SIZE(2048) WITHLABEL('sharbxx.eflab.cca.cert2') RSA (PKDS (sharbxx.eflab.cca.cert2))
45) Then you will connect your new key pair to your RACF keyring and give it a usage type of personal so EF can access the private key.

RACDCERT ID(sharbxx) CONNECT(ID(sharbxx) LABEL('sharbxx.eflab.cca.cert2')RING(sharbxx.eflab.cca.keyring) USAGE(PERSONAL))
46) Then list out the RACF Keyring and the certificate to ensure the certificate was successfully added.
RACDCERT LISTRING(sharbxx.eflab.cca.keyring)
RACDCERT LIST(LABEL('sharbxx.eflab.cca.cert2'))
47) Next you will modify the EFENCRY2 member of the EF Lab JCL dataset. Update the options to use your USS lab home directory, your new RACF certificates, your lab output files dataset, your RACF keyring, your RACF user ID, and your USS eflab directory.
-homedir /sharelab/sharbxx/eflab -rA sharbxx.eflab.cca.cert -signers-key-alias sharbxx.eflab.cca.cert2 -o //SHARBxx.EFLAB.FILES(ENCRDAT2) -keystore sharbxx.eflab.cca.keyring -keystore-type JCECCARACFKS -racf-keyring-userid sharbxx -jce-providers com.ibm.crypto.hdwrCCA.provider.IBMJCECCA -e -s //SHARBxx.EFLAB.FILES(DATA)
See appendix 3 and 4 for a description of the EF command and options used in this job.
Submit this job to encrypt and sign the data with your certificates.Browse the job output in the EFENCRY2 job in SDSF to ensure it ran successfully.Browse the encrypted data in SHARBxx.EFLAB.FILES(ENCRDAT2).
48) Next you will decrypt and verify your encrypted and signed data. Modify the EFDECRY2 member of the EF Lab JCL dataset. Update the options to use your USS lab home directory, your lab output files dataset, your RACF keyring, your RACF user ID, and your encrypted file.
-homedir /sharelab/sharbxx/eflab-o //SHARBxx.EFLAB.FILES(DECRDAT2)-keystore sharbxx.eflab.cca.keyring-keystore-type JCECCARACFKS-racf-keyring-userid sharbxx-jce-providers com.ibm.crypto.hdwrCCA.provider.IBMJCECCA-d //SHARBxx.EFLAB.FILES(ENCRDAT2)
See appendix 3 and 4 for a description of the EF command and options used in this job.
Submit this job to decrypt and verify the data with your RACF certificates.Browse the job output in the EFDECRY2 job in SDSF.Browse the decrypted data in SHARBxx.EFLAB.FILES(DECRDAT2).
49) Try out JCL dataset member name EFIMPORT.
This job will re-import the first RACF certificate that you exported into an OpenPGP certificate.Check the joblog for results.Then modify this job to re-import the second RACF certificate you exported into an OpenPGP certificate.
50) Try out JCL dataset member name EFGENKEY. This job will generate a new RSA key pair in your Java keystore and import the public key into your OpenPGP keyring. Specify a new key alias and user ID.Check the joblog for results.
51) Look over Appendixes 2, 3 and 4 for EF command syntax and available commands and options. Using the USS shell scripts and JCL jobs from this lab, try out different commands and command options.
Thank You!!!
I hope you enjoyed the lab!!!

Appendix 1
Some commands for the TSO session (3270 interface)
Start emulatora. Double Click on the icon providedThis starts a Pcomm 3270 session using mvs1.centers.ihost.com.Note: The Enter key is the right Ctrl key
Logon to MVS systema. When prompted for Userid/ Password/Appl, just enter TSO in the Application field and hit enter
b. Enter Userid: sharbxx(Wherever the lab shows sharbxx substitute your userid, e.g. sharb02)
c. Password: given by the instructor
d. Hit enter when you see ***, you will be in the ISPF main panel
Logoff from MVS systema. Keep hitting PF3 until you are presented with this panelLog Data Set (SHARBxx.SPFLOG1.LIST) Disposition: Process Option . . . . 1. Print data set and delete 2. Delete data set without printing 3. Keep data set - Same (allocate same data set in next session) 4. Keep data set - New (allocate new data set in next session)

b. Enter option 2c. Enter logoff
Open a OMVS sessiona. From ISPF main panel, enter option 6b. Enter: omvs
Exit a OMVS sessiona. From OMVS shell, type ‘exit’
Using the oedit editor / ISPF editora. From OMVS shell, type ‘oedit <filename>b. From the line numbers columns (on the left side):
i – insert a line (i 20 – insert 20 lines)c – copy a linem – move a linea – paste a line that you’ve copied using ‘c’ or moved using ‘m’ after the current
line d – delete a line (d 20 – delete 20 lines)
c. From Command ===> f xx – find the occurrences of xxc xx yy – change the occurrence of xx to yy (PF6 to repeat the change to the
other occurrences)d. PF3 to save the file and exit (If you want to exit without saving, type ‘cancel’ on Command===> line)

Appendix 2
EF OpenPGP Command SyntaxAll Encryption Facility for OpenPGP commands have the following syntax.-homedir must appear before all the options, all the options must appearbefore the commands, and the commands must appear before the arguments.
java -jar CSDEncryptionFacility.jar [-homedir name] [options] commands [args]
where:• homedir name is the name of the directory that contains the configuration file
ibmef.config that contains specified options to use with the command.• options is the name of one or more options to use on the command line and always
starts with -. These option values override values in the configuration file.• commands is the name of one or more commands and always starts with -.• arguments specifies one or more targets of the command, for example, file name,
certificate, alias, and so forth.

Appendix 3
EF OpenPGP Commands -s file
signs an OpenPGP message
-b filesigns an OpenPGP message and create a file containing signature
-e fileencrypts using a session key protected by public key cryptography
-c fileencrypts using a session key protected by a passphrase
-compress filecompresses data into an OpenPGP message
-d filedecrypts an OpenPGP message
-v [detached_signature] signed_file
verifies a signed OpenPGP message
-pP [user_IDs...]lists information about public keys in key ring file by user ID
-pA [alias...]lists information about public keys in keystore by alias
-pK [key_ID...]lists information about public keys in keystore and key ring file by key ID
-ggenerates key pair
-i file [file...]imports OpenPGP certificate(s)
-eP [user_ID...]exports OpenPGP certificate(s) by user ID(s)
-eK key_ID [key_ID...]
exports OpenPGP certificate(s) by key ID(s)
-eA alias [alias...]

exports OpenPGP certificate(s) by alias(es)
-prepare key_label [key_label...]prepares Java keystore to use existing keys in ICSF
-xP user_ID [user_ID...]deletes OpenPGP certificate(s) by user ID(s)
-xK key_ID [key_ID...]deletes OpenPGP and X.509 certificate(s) by key ID(s)
-xA alias [alias...]deletes X.509 certificate(s) by alias(es)
-hdisplays help information
-list-algolists all supported algorithms
-rebuild-key-indexrebuilds index of key ring file

Appendix 4
EF OpenPGP Command Options
-o filespecifies output file
-aASCII armor to be used for export
-rP userID_1,userID_2,..,userID_Nrecipient's user ID(s)
-rK keyID_1,keyID_2,..,keyID_Nrecipient's key ID(s)
-rA alias_1,alias_2,..,alias_Nrecipient's alias(es)
-z numbercompression0 - no compression is used1 - best speed is used9 - best compression is used-1 - default compression is useddefault value: 0
-t charsetcharacter sete.g. UTF-8
-commentcomment to be added to ASCII Armor header
-no-savedata is displayed on screen and not saved
-use-embedded-fileunpacked data written to filename specified in data packet
-cipher-name cipher_algo_nameestablishes cipher algorithm for encryptiondefault value: TRIPLE_DES
-digest-name digest_algo_nameestablishes digest algorithm for message digestdefault value: SHA_1
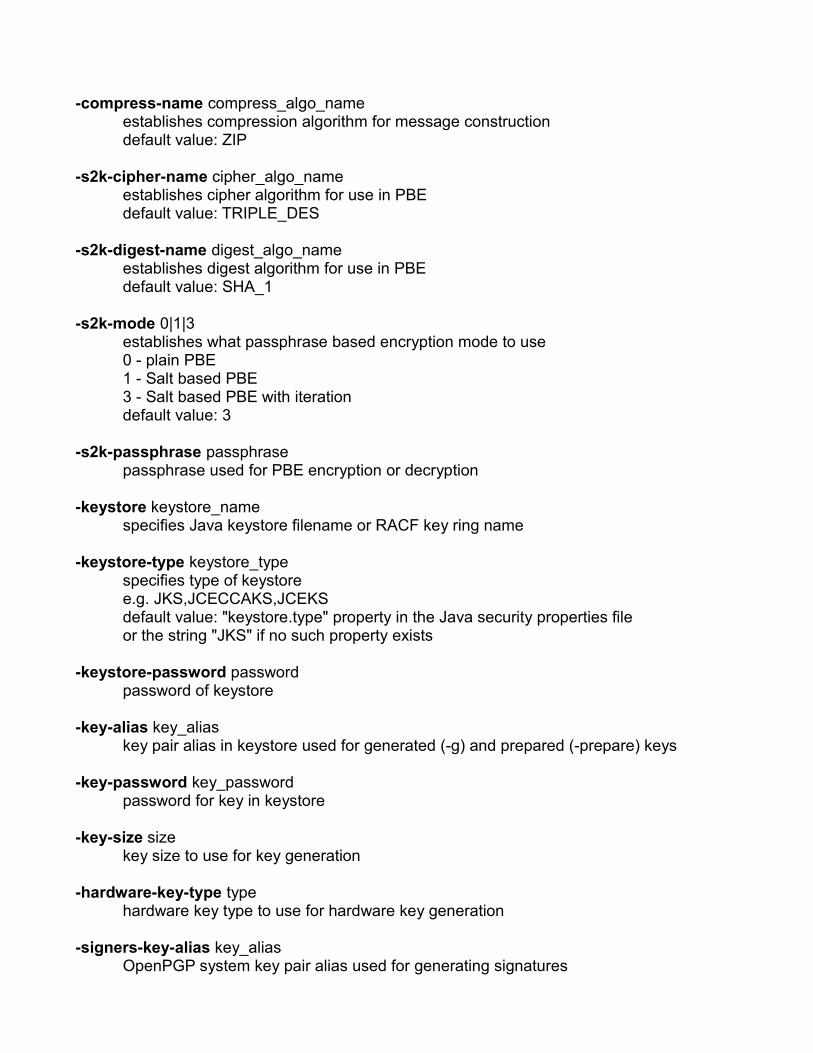
-compress-name compress_algo_nameestablishes compression algorithm for message constructiondefault value: ZIP
-s2k-cipher-name cipher_algo_nameestablishes cipher algorithm for use in PBEdefault value: TRIPLE_DES
-s2k-digest-name digest_algo_nameestablishes digest algorithm for use in PBEdefault value: SHA_1
-s2k-mode 0|1|3establishes what passphrase based encryption mode to use0 - plain PBE1 - Salt based PBE3 - Salt based PBE with iterationdefault value: 3
-s2k-passphrase passphrasepassphrase used for PBE encryption or decryption
-keystore keystore_namespecifies Java keystore filename or RACF key ring name
-keystore-type keystore_typespecifies type of keystoree.g. JKS,JCECCAKS,JCEKSdefault value: "keystore.type" property in the Java security properties fileor the string "JKS" if no such property exists
-keystore-password password
password of keystore
-key-alias key_aliaskey pair alias in keystore used for generated (-g) and prepared (-prepare) keys
-key-password key_password
password for key in keystore
-key-size sizekey size to use for key generation
-hardware-key-type typehardware key type to use for hardware key generation
-signers-key-alias key_aliasOpenPGP system key pair alias used for generating signatures

-signers-key-password key_passwordpassword for OpenPGP system key pair alias used for generating signatures
-system-CA-key-alias key_aliasalias used to sign newly generated key pair's certificate
-system-CA-key-password CA_key_passwordpassword for CA key in keystore
-racf-keyring-userid user_IDspecifies user ID for RACF key ring
-trust-value numberassigns trust value to an OpenPGP certificate
-trust-commentadds comment about trust to an OpenPGP certificate
-log-file file_nameHFS/zFS filename to which trace information is written
-debug masktakes a mask to activate logging by component
-debug-level numberestablishes granularity of debug information
-debug-onactivates debug information which is printed to STDERR while executing
-yesanswers yes to most interactive questions
-noanswers no to most interactive questions
-jce-providers provdr1,provdr2,..,provdrNspecifies the JCE providers to prefix to the provider list defined in the master security properties filee.g., com.ibm.crypto.hdwrCCA.provider.IBMJCECCA
-use-mdcadds a modification detection code packet to encrypted messages
-batch-exportenables batch mode processing for certificate export
-batch-generate algorithm,[number_of_multiples]

enables batch mode processing for key pair generation
-dn-common-name namespecifies the common name of a distinguished name
-dn-country-code country_codespecifies the country code of a distinguished name
-dn-locality localityspecifies the locality of a distinguished name
-dn-organization organizationspecifies the organization of a distinguished name
-dn-organization-unit organization_unitspecifies the organization unit of a distinguished name
-dn-state statespecifies the state of a distinguished name
-hidden-key-idspecifies speculative key ID support
-openPGP-days-valid days_validspecifies the number of days a newly generated OpenPGP certificate is to be valid
-sub-key-alias key_aliasspecifies the alias for a new subkey during key generation
-userID-comment commentspecifies a user ID comment for an OpenPGP certificate during key generation and key
export
-userID-email emailspecifies a user ID email address for an OpenPGP certificate during key generation
and key export
-userID-name namespecifies a user ID name for an OpenPGP certificate during key generation and key
export
-x509-days-valid days_valid specifies the number of days an X.509 certificate is to be valid

Appendix 5
RACDCERT Commands
Examples:
RACDCERT ID(sharb01) ADDRING(sharb01.eflab.keyring)
RACDCERT ID(sharb01) GENCERT SUBJECTSDN(CN('sharb01 cert')) SIZE(1024) WITHLABEL('sharb01.eflab.racf.cert')
RACDCERT ID(sharb01) CONNECT(ID(sharb01) LABEL('sharb01.eflab.racf.cert')RING(sharb01.eflab.keyring) USAGE(PERSONAL))
RACDCERT LISTRING(sharb01.eflab.keyring)
RACDCERT LIST(LABEL('sharb01.eflab.racf.cert'))
RACDCERT DELRING(sharb01.eflab.keyring)
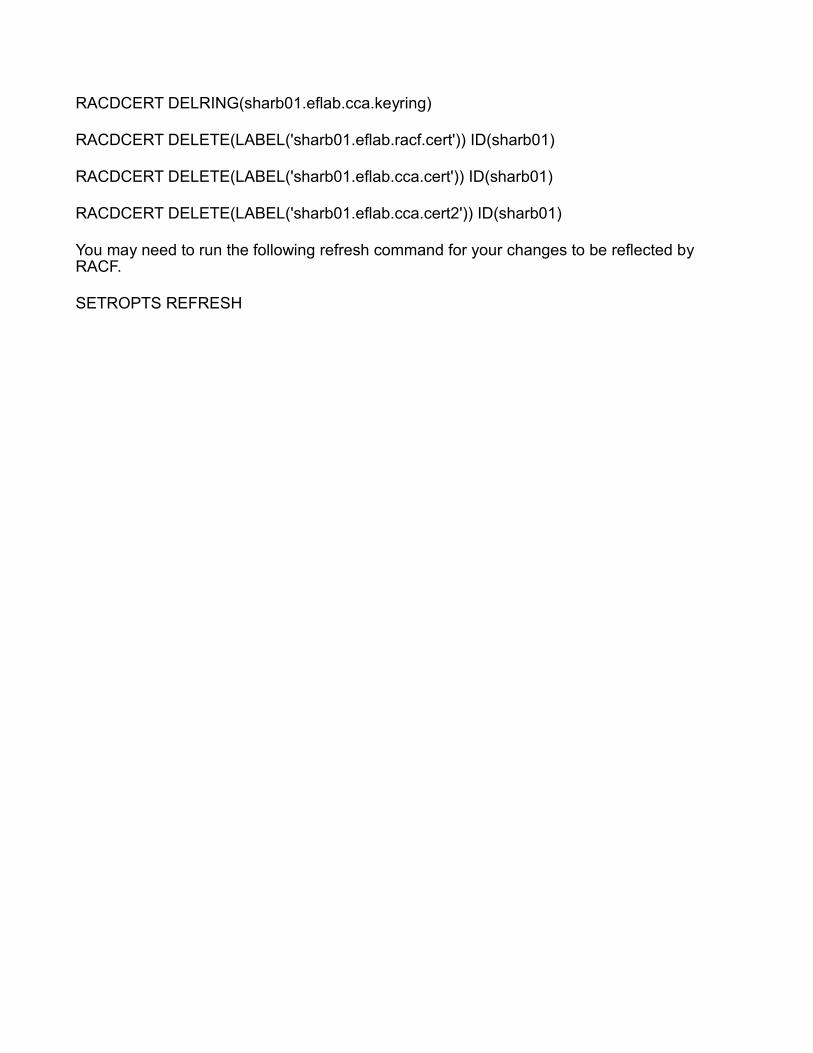
RACDCERT DELRING(sharb01.eflab.cca.keyring)
RACDCERT DELETE(LABEL('sharb01.eflab.racf.cert')) ID(sharb01)
RACDCERT DELETE(LABEL('sharb01.eflab.cca.cert')) ID(sharb01)
RACDCERT DELETE(LABEL('sharb01.eflab.cca.cert2')) ID(sharb01)
You may need to run the following refresh command for your changes to be reflected by RACF.
SETROPTS REFRESH


![MSc System and Network Engineering - de Laata hardware-backed Keystore service to the Android OS [15]. The Keystore consists of multiple components, two of which are [16]: 1.Keymaster](https://static.fdocuments.net/doc/165x107/5f0668217e708231d417d691/msc-system-and-network-engineering-de-laat-a-hardware-backed-keystore-service.jpg)


