MyLab and Mastering Integration with Blackboard ... /_files/_Winter_2015_PDFs/My Lab... · then on...
122
MyLab and Mastering Integration with Blackboard Implementation Guide
Transcript of MyLab and Mastering Integration with Blackboard ... /_files/_Winter_2015_PDFs/My Lab... · then on...

MyLab and Mastering
Integration with Blackboard
Implementation Guide

TABLE OF CONTENTS Before You Begin .............................................................................. 4
Module 1: Connecting Your Blackboard course to Mylab & Mastering 6
Lesson 1: Making sure the Pearson Building Block is available ....................................... 6
Lesson 2: Connecting Blackboard with Mylab and Mastering ....................................... 10
Lesson 3: Creating links from Blackboard to Mylab & Mastering ................................... 17
Lesson 4: Create a Quick MyLab Link for Your Students ............................................. 22
Lesson 5: How to reset the connection between Blackboard and Mylab & Mastering ....... 26
Lesson 6: How to Copy An Integrated Course For Use in Future Semesters ................... 28
Lesson 7: How Students Connect from Blackboard to Mylab & Mastering ...................... 29
Module 2: Moving grades from Mylab & Mastering to Blackboard ... 34
Module 3: Grade Transfer and Grade Sync for Mastering ................ 39
Lesson 1: How to transfer grades to Blackboard From mastering ................................. 39
Lesson 2: How to Sync grades with Blackboard and Mastering .................................... 43
Lesson 3: Troubleshooting the grade Sync and Transfer Process ................................. 55
Module 4: Grade Transfer and Grade Sync for XL-Based MyLabs .... 57
Lesson 1: How to transfer grades to Blackboard ........................................................ 57
Lesson 2: How to Sync grades with Blackboard ......................................................... 62
Lesson 3: Troubleshooting the grade Sync and Transfer Process ................................. 76
Module 5: Grade Transfer and Grade Sync for Pegasus-based MyLabs ....................................................................................................... 79
Lesson 1: How to transfer grades to Blackboard ........................................................ 79
Lesson 2: How to Sync Grades to Blackboard ............................................................ 84
Lesson 3: Troubleshooting the grade Sync and Transfer Process ................................. 96
Module 6: Grade Transfer for Native-Based MyLabs ....................... 98
Lesson 1: How to transfer grades to Blackboard ........................................................ 98
Lesson 2: Troubleshooting the Grade Transfer Process ............................................. 102

3
Module 7: Creating Coordinator and Member Courses .................. 104
Module 8: Tips to Assure Your Integration is A Success ............... 118
Lesson 1: Integrated Courses: No Course IDs used ................................................. 118
Lesson 2: The Diagnostics Report & 24/7 Support ................................................... 119
Lesson 3: Additional Support Resources ................................................................. 122

BEFORE YOU BEGIN Hello and welcome! Whether you are new to integrating a MyLab & Mastering course with a Learning Management System such as Blackboard, Canvas or Desire2Learn and seeking guidance for getting started, or are seeking more information about the integration, you have come to the right place!
Here’s what you will get from the Interactive Training Guide:
• Just-in-time assistance for setting up your integration
• Best practices and strategies for effective implementation of the integration
• Helpful step-by-step videos of the procedures you need to follow
As you work through the lessons in the Interactive Training Guide, you will notice the following icons:
Click to watch a video showing you the steps for completing the activity.
Click to start a practice module where you can work through the steps of an interactive simulation to complete the activity.
Click to open up the relevant Instructor Help page for the topic.

5
Where to go for help
I am having difficulty setting up my instructor account
Pearson 24/7 Customer Support
The program is not displaying correctly on my computer
Pearson 24/7 Customer Support
I would like additional assistance with setting up the integration
Educator Support Page

MODULE 1: CONNECTING YOUR BLACKBOARD COURSE TO MYLAB & MASTERING
The Blackboard learning management system can be easily integrated with Pearson MyLab and Mastering. In the following pages you’ll go step-by-step through this process.
LESSON 1: MAKING SURE THE PEARSON BUILDING BLOCK IS AVAILABLE
Before you can link your Blackboard course to a Pearson MyLab, you must first make sure that the MyLab Building Block is installed and activated.
1. Sign in to your Blackboard course.
2. Click the Tools link in the left navigation panel. Typically, the Pearson MyLab Building Block will be found in the Tools area, but you may also find it under Control Panel -> Course Tools -> Pearson’s MyLab / Mastering.

7
3. If you find Pearson’s MyLab & Mastering on the Tools page, then it is installed in your course and you can skip to the next lesson. If you do NOT find the Building Block here, then continue to step 4.

8
4. If you did not find Pearson’s MyLab & Mastering in the above steps, then in the Control Panel, click the Customization link and then click Tool Availability.

9
5. Scroll down the list of available tools until you find two rows entitled, Pearson’s
MyLab and Mastering (Content) and Pearson’s MyLab and Mastering (Tools). Click the two checkboxes as shown in the image below and then click Submit. If the Pearson’s MyLab & Mastering options are not available here, please contact your campus Blackboard administrator to have them installed.
6. When you return to the Tools page you’ll now see that the Pearson MyLab and Mastering Building Block is available to you. You can now proceed to lesson 2 in this module.

MODULE 1: INTEGRATING BLACKBOARD WITH MYLAB AND MASTERING
LESSON 2: CONNECTING BLACKBOARD WITH MYLAB AND MASTERING
1. Click the Tools link from your Blackboard homepage.

11
2. Click the Pearson’s MyLab and Mastering Building Block.
3. Click Select a MyLab and Mastering product to use with this course.

12
4. Read and accept the license agreement.
5. Sign in with your Pearson instructor account. Use the “Forgot your username or password?” link rather than creating a new account. If you don’t have an instructor account, contact your Pearson sales rep.

13
That’s it – your Blackboard instructor credentials are now linked with your Pearson credentials.
6. Click the Get Started button.
7. In the following example, I'll create a new course by searching for an author’s last name, but you have several other options:
a. Copy a MyLab & Mastering course you already have in your Pearson account. Make sure that the course you select is not one that is already in progress – that is, one that has students enrolled and future assignments set up.
b. Create a new MyLab & Mastering course by entering an author’s name or a keyword (e.g., anatomy).
c. Copy another instructor’s course. You can do this by clicking the small text link that says, “Or copy from another instructor”. You will need to enter the other instructor’s course ID in order to use this feature.

14
8. Once you have made your selection from the choices in step 7, you’ll see a page with search results similar to the one below:
9. Find the MyLab & Mastering you want to connect to your Blackboard course and click Select Course Materials.
10. On the next page, fill in your course information. VERY IMPORTANT: leave the starting date alone. Even if your Blackboard course starts in the future, do not change the MyLab & Mastering start date.

15
11. That’s it – your Blackboard course and your Pearson MyLab & Mastering are all linked
up!
12. Important: the linking will not happen immediately. Look for the confirmation email that lets you know when your MyLab and Mastering course is available and ready for use.
a. Links from your Blackboard course to MyLab & Mastering will not work until you have received this email. You should receive the email within an hour,

16
but it may take up to 24 hours depending upon the server traffic.
b. If you do not receive the email within 24 hours, check your spam filter. The email will come from [email protected] so you may want to add this address to your approved senders list.
13. Return to your Blackboard course. You will not see the newly created links until you either refresh the Blackboard page, or click Tools, then the Pearson’s MyLab and Mastering link.
a. All MyLab & Mastering courses will provide a Course Home link for your students.
b. Depending on your specific MyLab & Mastering, you may also see links to other major components, such as “All Assignments”, “Gradebook”, “Study Plan” and others. Students typically only see the Course Home link until/unless you make other links available to them later on.

MODULE 1: INTEGRATING BLACKBOARD WITH MYLAB AND MASTERING
LESSON 3: CREATING LINKS FROM BLACKBOARD TO MYLAB & MASTERING
If your MyLab & Mastering provides more than just a Course Home link, then you can make these additional links available to your students. In this lesson we'll learn how to make these links available to students, as well as how to move and delete these links.
You’ll also learn how to reset the connection between your Blackboard course and your MyLab & Mastering if you want to connect a different Pearson course to your Blackboard course. Inside your Blackboard course, here’s what the Tools->MyLab and Mastering area looks like if you have more than just the Course Home link:

18
1. In your Blackboard course, make sure you are in Edit mode.
2. Click the plus sign in the upper left side of the navigation panel.
3. Click Content Area:
4. Name the new Content Area anything you wish (in this example I’ll just call it “MyLab Links”) and make it available to users.

19
5. Click this new Content Area and then click the Publisher Content tab:

20
6. Choose Pearson’s MyLab and Mastering in the drop down menu.
7. The list of links you can make available to your students appears. In this example you see 4 links. You’ll have anywhere from 1 to perhaps 8 such links you can put into your Blackboard course.

21
8. Choose one or all of these links and then click Submit.
9. After you click Submit the links will appear like this in your Blackboard course:
Important: remember that these links will take your students to the major sections in your MyLab & Mastering course - Pearson does not currently offer links to specific sections of any MyLabs. You cannot, for example, create a link that will take students to a specific quiz or homework.

MODULE 1: INTEGRATING BLACKBOARD WITH MYLAB AND MASTERING
LESSON 4: CREATE A QUICK MYLAB LINK FOR YOUR STUDENTS
Students can access your connected MyLab by clicking on the Blackboard Tools link, and then on the link called Pearson’s MyLab and Mastering as shown below:
This will lead to the Pearson’s MyLab and Mastering page within Blackboard which contains whatever links your lab makes available to students. In some cases this includes only a link to the MyLab and Mastering homepage, but other links may be included:

23
However, some Blackboard courses do not have a Tools link for students. Here’s how to create a link in your Blackboard navigation that will lead students to your MyLab.
1. Make sure you are in Edit mode in your Blackboard course.
2. From the homepage of your Blackboard course, click the small plus sign at the top left of the navigation bar:
3. From the pop-up menu that appears, scroll down and click the Tool Link option.

24
4. In the pop-up, give the link you’re about to create a name, such as Pearson MyLab
or simply MyLab:
5. Click on the drop-down menu to the right of Type: and choose Pearson’s MyLab and Mastering (Tools):

25
6. Then click the checkbox to make sure that this new link will be available to users (students):
7. After clicking the Submit button you will see that you have a new link that your students can click which will show them whatever links they have that can take them to your MyLab.

MODULE 1: INTEGRATING BLACKBOARD WITH MYLAB AND
MASTERING
LESSON 5: HOW TO RESET THE CONNECTION BETWEEN BLACKBOARD AND MYLAB & MASTERING
1. Go into the area of your Blackboard course that contains the Pearson MyLab & Mastering Building Block. Typically this is found in the Tools area or under Course Tools.

27
2. Scroll down until you see the Reset MyLab and Mastering Course Association and click it.
3. Be certain that you want to reset this connection. Any student data you may have associated with your Blackboard course and MyLab & Mastering will be lost. If you are certain, click Ok.

MODULE 1: INTEGRATING BLACKBOARD WITH MYLAB AND MASTERING
LESSON 6: HOW TO COPY AN INTEGRATED COURSE FOR USE IN FUTURE SEMESTERS
1. When you copy a Blackboard course for use in another term, you’ll notice that any links you created to a MyLab in this previous course are present in the new Blackboard course.
2. When you click any of the links to a MyLab from a previous semester, the links WILL NOT lead to a previous MyLab.
3. Instead, you will begin the registration process again. Please see Module 1, Lesson 1 for detailed steps.
4. You’ll see the privacy page after you click any MyLab & Mastering. Please review and click I Accept.
5. You will then be allowed to make a copy of your previous MyLab (you will not be asked to re-link your Blackboard and Pearson instructor credentials).
6. Give the newly copied course a name.
7. Leave the start date at today – as always, do not change the start date no matter when your course begins.
8. Give the course an end date.
9. Click Copy.
10. When you receive your confirmation email, you can now click any of the links you created in the previous semester and they will lead to the newly copied MyLab & Mastering.

29
LESSON 7: HOW STUDENTS CONNECT FROM BLACKBOARD TO MYLAB & MASTERING
1. Important: Students NO NOT use a course ID when your Blackboard course is integrated with MyLab and Mastering. You may have provided students with your MyLab & Mastering course ID in the past, but when you are integrating Blackboard with MyLab and Mastering, the course ID plays no part in the process and could make things more difficult for students. Bottom line: even if you know your MyLab and Mastering course ID don’t give it to students – tell them to go into your Blackboard course and connect to Pearson’s MyLab & Mastering from there as shown below.
2. Students log in to your Blackboard course and click one of the links to Pearson’s MyLab and Mastering. This is very similar to what instructors do when they create their link to MyLab & Mastering. Typically the link is found inside the Tools or Course Tools area of your Blackboard course. An example is shown below:

30
3. In this example, the instructor has created a Tools Link for students called MyLab
Links.
4. The first time a student clicks a link like the ones above to MyLab & Mastering, they will first be asked to agree to our Privacy Policy:

31
5. On the next screen, students will be asked to either sign in with a Pearson student account, or create a new Pearson student account. Important: students should use the “Forgot your username or password” tool before they create a new account. Creating multiple Pearson accounts can create confusion in the future.
6. On the next screen students can: a) redeem an access code they purchased in the bookstore, b) purchase access using a credit card or PayPal account, or c) use temporary access and then pay for access at a later time.

32
7. If students chose temporary access they will receive email reminders that they need to purchase access before the expiration date expires. A best practice is to wait until the 14-day temporary access period has ended before upgrading to permanent access. If students wait until the 14 days have ended, they can enter their Blackboard course and click a MyLab link to go through the above registration process.
8. When the purchase process is complete, students will see this screen and can click the Go to your course button.

33
9. The new MyLab & Mastering will open in a new browser tab.

MODULE 2: MOVING GRADES FROM MYLAB & MASTERING TO BLACKBOARD
You can get your grades from MyLab & Mastering to Blackboard in two ways. Grade Transfer: the transfer process involves going into your MyLab & Mastering course gradebook and exporting your grades in MyLab & Mastering format to a .csv file. You then go into the Full Grade Center in your Blackboard course and upload this file into your Blackboard gradebook. Grade Sync: some MyLab & Mastering courses are enabled for grade sync, which means that you can set them up so that grades from your MyLab & Mastering gradebook will be sent over to Blackboard; from there you can decide which grades to have the system integrate into your Blackboard gradebook. Which option is available to you? The best way to determine this is to go into your MyLab & Mastering gradebook. Match up the look of your gradebook to the images that follow and you’ll know what options are available to you.
Return to the Table of Contents

35
Gradebook 1 – Capable of Grade Transfer and Grade Sync: The gradebook shown in the image below is based on what we call the Mastering platform and is used for Mastering products such as: MasteringBiology, MasteringPhysics, MasteringAstronomy, MasteringEngineering, MasteringChemistry, MasteringGenetics, Mastering EnvironmentalScience, MasteringHealthandNutrition, MasteringGeology, MasteringGeography, MasteringOceanography, MasteringA&P, and MasteringMicrobiology. Click the question mark to go to a page with a full listing of MyLab and Mastering product names and their platforms.
Turn to the module in this manual called Grade Transfer and Grade Sync on the Mastering Platform to see how these processes are done.
Return to the Table of Contents
36
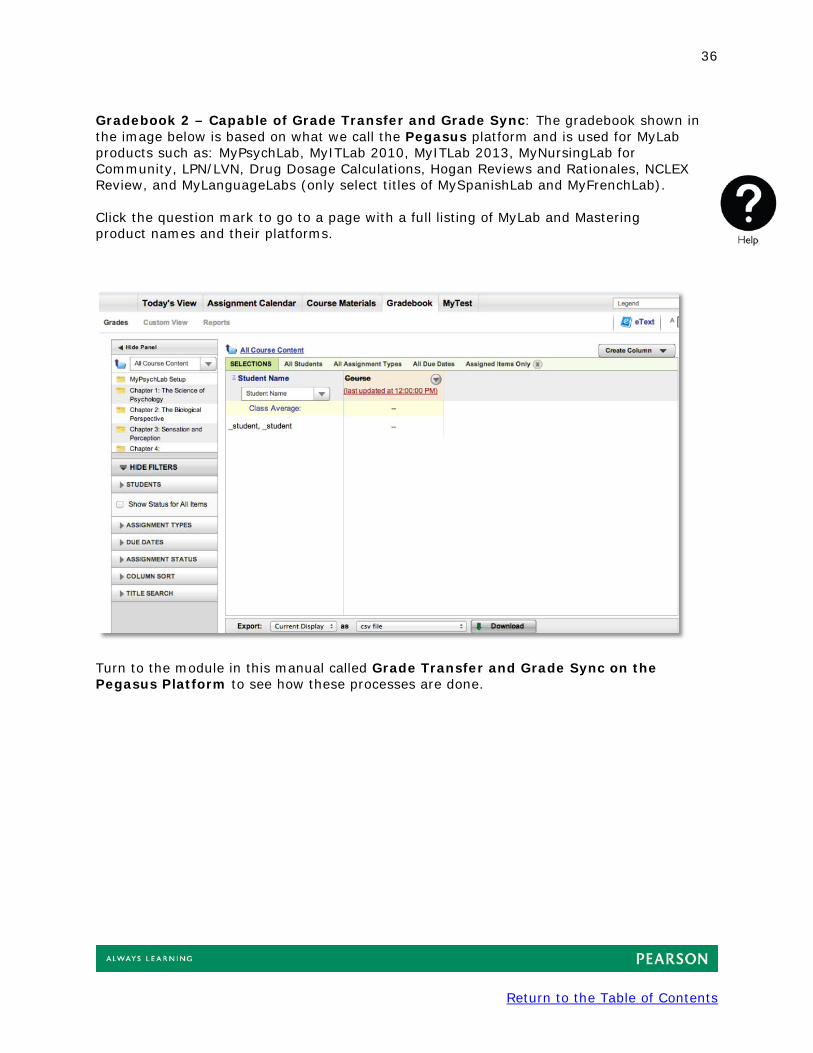
Gradebook 2 – Capable of Grade Transfer and Grade Sync: The gradebook shown in the image below is based on what we call the Pegasus platform and is used for MyLab products such as: MyPsychLab, MyITLab 2010, MyITLab 2013, MyNursingLab for Community, LPN/LVN, Drug Dosage Calculations, Hogan Reviews and Rationales, NCLEX Review, and MyLanguageLabs (only select titles of MySpanishLab and MyFrenchLab). Click the question mark to go to a page with a full listing of MyLab and Mastering product names and their platforms.
Turn to the module in this manual called Grade Transfer and Grade Sync on the Pegasus Platform to see how these processes are done.
Return to the Table of Contents

37
Gradebook 3 - Capable of Grade Transfer and Grade Sync: The gradebook shown below is based on what we call the XL platform and it is used for MyLab products such as: MyEconLab, MyAccountingLab, MyOmLab, MyFinanceLab, MyEngineeringLab, MyWritingLab, MyReadingLab, MySkillsLab, MyFoundationsLab, MyStudentSuccessLab, MyMathLab, MyStatLab, MyReadinessTest and MyLiteratureLab. Click the question mark to go to a page with a full listing of MyLab and Mastering product names and their platforms.
Turn to the module in this manual called Grade Transfer and Grade Sync on the XL Platform to see how these processes are done.
Return to the Table of Contents

38
Gradebook 4 – Capable only of Grade Transfer: the gradebook shown is based on what we call the Native platform and it is used for MyLab products such as the MyEducationLabs. Other MyLabs using this platform are: MyEducationLabs, MyMISLab, MyManagementLab, MyMarketingLab, MyBizLab, MyBCommLab, MyNursingLab, RealEHRPrep, Neighborhood 2.0, MyCJLab, MyBradyLab, NCCERConnect, MyMedicalTerminologyLab, MyHealthProfessionsLab, MyCulinaryLab, MyHospitalityLab, MyHVACLab, MyLegalStudiesLab and MyServSafeLab. This gradebook can utilize the grade transfer process.
Turn to the module in this manual called Grade Transfer on the Native Platform to see how these processes are done.
Return to the Table of Contents

MODULE 3: GRADE TRANSFER AND GRADE SYNC FOR MASTERING
LESSON 1: HOW TO TRANSFER GRADES TO BLACKBOARD FROM MASTERING
1. Go into your Mastering gradebook. You can enter your Mastering gradebook starting from your Blackboard course or by logging in at the pearsonmylab.com site.
2. Follow the steps below to export your Mastering grades: Manage>Export Gradebook Data>Export Scores Select a Format for Your Export>Formatted for Blackboard-MyLab/Mastering.
3. Make sure to select Formatted for Blackboard-MyLab & Mastering.
Return to the Table of Contents

40
4. Download the .csv file to your desktop.
5. Close Mastering if you wish.
6. Return to your Blackboard course.
7. In Blackboard, navigate to the Full Grade Center.
Return to the Table of Contents

41
8. In the Full Grade Center, click the Manage tab and then select Upload Pearson’s
MyLab and Mastering Grades.
9. On the next screen, click the Browse My Computer button and select the file you downloaded from Mastering. Click the Submit button.
Return to the Table of Contents

42
10. On the next screen you can choose all or only some of the grades from Mastering to import to Blackboard.
11. Blackboard will create new columns in your Blackboard gradebook to contain any new assignments and it will simply update any existing Mastering columns with new grades if there are any.
12. Your grades have been transferred from Mastering to Blackboard:
Return to the Table of Contents

MODULE 3: GRADE TRANSFER AND GRADE SYNC FOR MASTERING
LESSON 2: HOW TO SYNC GRADES WITH BLACKBOARD AND
MASTERING
You do not need to alter or create any settings in your Mastering gradebook in order to have it send grades to a linked Blackboard course.
1. We recommend that as soon as you link to a Mastering course you should create a new assignment. Doing so will allow you to see when you return to the Blackboard gradebook that this assignment is ready to be sync’d.
2. Return to your Blackboard course and click Pearson’s MyLab and Mastering link.
Return to the Table of Contents

44
3. On the next page scroll down to the Support Tools area and click Manage Pearson MyLab / Mastering Grades.
Return to the Table of Contents

45
Section 1: Grade Synchronization Settings
1. Start the grade sync setup process by clicking the second link on the left side –
Grade Synchronization Settings:
2. You may see an error message like the one below, but there’s no need to worry – it will go away once the setup process is complete.
3. Important: your goal in this first step of the setup process is to create a folder in Blackboard that will hold the grades that come over from Pearson. Throughout the semester you’ll be checking that folder to see what new grades have come in, and you’ll be deciding which of these grades you actually want included in your Blackboard gradebook.
4. To create this folder, click the Browse button. You’ll get a small popup window. You can create this folder anywhere in your Blackboard course, and if you already have a section in Blackboard called Content you can select this folder, as shown in the image below:
Return to the Table of Contents

46
5. If you have a Content folder and have selected it as shown here, then proceed to step 11; , if you don’t have a Content folder you can easily create an area in Blackboard to hold your Pearson grades. Here’s how to do this.
6. Close the pop-up window.
7. Click the + sign at the top of the left navigation area in Blackboard (if you don’t see the + sign, then go over the right side of the screen and make sure you are in Edit mode).
Return to the Table of Contents

47
8. As the image above shows:
a) Add a Content Area.
b) Call it something like Mastering Grades
c) DO NOT make it available to users.
d) Click Submit.
9. This will create a new hidden folder in your navigation area.
10. Click the Grade Synchronization Settings link again in the Pearson Building Block, as in step 1 above.
11. Click the Browse button.
Return to the Table of Contents

48
Section 2: Settings
1. In the Settings area, click the button next to Automatically Assign Gradable Items to the Default Folder Location from the Off to the On position.
2. Click Yes to the right of Include these Gradable Items in Grade Center Calculations.
3. Email Notifications: enter your email address if you wish to receive an email every time the sync system creates a new grade column in your Blackboard gradebook.
4. Category: decide whether you want to use any categories you may have set up in Mastering in your Blackboard gradebook.
5. See the image below for a summary of these suggested settings:
6. “Automatically Assign Gradable Items to the Default Folder Location”: ON
7. “Include these Gradable Items in Grade Center Calculations”: YES
8. Email Notifications: you might want to fill in your email address so that you get a notification whenever a new grade column is created in your gradebook. You can return here and remove your email address at a later point if you wish.
Return to the Table of Contents

49
9. After you have made these selections, click Submit.
You have completed the key processes in the grade sync setup process. From here on you shouldn’t need to return to this page unless you want to enter (or remove) your email address in the Email Notifications area. The next part of the grade sync process is to go to the Set Up Grade Synchronization Settings area. You may return to this area several times throughout your course to indicate to the system exactly which grades you want sync’d with your Blackboard gradebook.
Return to the Table of Contents

50
Section 3: Setting Up Grade Synchronization
Your goal in this part of the sync process:
1. Return to the Pearson Building Block and then to Manage Pearson MyLab and Mastering Grades. Click the first link in the upper left, Set Up Grade Synchronization, as shown below:
2. If you see the No Components Found message on The Add Gradable Items page, it means that: a) you have yet not set up an assignment for your students in Mastering, or b) you recently set up an assignment, but the system has not yet received any information that the assignment exists.
Return to the Table of Contents

51
3. If you receive the No components found error, please return to this part of the sync setup process at a later time. You could also speak with your campus Blackboard administrator to ask how often the Pearson Building Block has been set up to check for new assignments available to sync.
4. When items from Mastering appear on the Gradable Items page, you are ready to choose which ones you wish to sync with your Blackboard gradebook. You can choose all or only some of the items from Mastering.
5. After you have made your selections, click Submit.
6. This process will send these assignments to your Blackboard gradebook. If the assignment is new, then a new column will be created. If the assignment has previously been sync’d, then the column previously created will be updated with any new grades.
7. You may choose to do a “forced refresh” of the grades by clicking the Refresh Pearson Grades link.
Return to the Table of Contents

52
8. On this page you may see some assignments listed. Choose the ones you want to force a refresh of, and click Submit.
Return to the Table of Contents

53
Section 4: Viewing Your Newly Synched Grades
1. To see the newly synched grades, go to the Full Grade Center in Blackboard:
2. You may need to drag over to the right to see the new columns that were created by the sync process.
Return to the Table of Contents

54
Return to the Table of Contents

MODULE 3: GRADE TRANSFER AND GRADE SYNC FOR MASTERING
LESSON 3: TROUBLESHOOTING THE GRADE SYNC AND TRANSFER PROCESS
Q1: I’m still getting the “no components found” error.
This error indicates that the system can’t find any assignments from Mastering that are set to sync with Blackboard. Make sure that you have dated assignments set up in Mastering for your students to take. If you have these assignments set up but are still getting this message, check Q2.
Q2: It seems to be taking a long time for grades to sync. Speak to your campus Blackboard administrator to find out if an automatic sync schedule has been set up for your campus. Sync schedules can be set by the admin such that the servers check anywhere from every 30 minutes to perhaps every 2 hours. They can also be set to never check for new grades (in order to reduce the load on the servers). If the admin has set the sync schedule to “never”, then instructors will need to manually refresh the grades themselves as shown above every time they want to see new grades.
Q3: How can I get help from Pearson if my Blackboard admin says that the Pearson Building Block is set up correctly?
In order to get the fastest help possible, please use the Send Us A Message form. This will create an incident report number we can use to quickly resolve the issue.
Q4: I have more than one column in my gradebook for the same assignment.
Unfortunately, columns in the Blackboard gradebook cannot be deleted – but they can be hidden. We suggest that you hide one of the columns. You might also want to move these hidden columns to the end of the gradebook just to get them out of your way. If you wish, you could also ask your on-campus Blackboard admin to see if that person can delete the column(s) for you.
Q5: How do I disable the sync process? Navigate to the Grade Synchronization Settings area of your course and click the button from On to Off.
Return to the Table of Contents

56
Q6: When I do a grade transfer, I’m getting an “Unenrolled User” error from Blackboard.
An “unenrolled user” is a student who is listed in the MyLab gradebook export but who is not listed as being a student in your course. This typically occurs when a student was able to gain access to your MyLab without having gone through your Blackboard course. Students who have previously used a MyLab may be familiar with the process of obtaining a Course ID from their instructor. Remember not to give students your MyLab course ID. If students get your course ID and then go to: www.PearsonMyLab.com they could register and gain access to your MyLab and begin doing any tests you may have created there. If students log in through the Pearson site and not through your Blackboard course, then Blackboard will not know who they are and will not be able to add their grades from the MyLab to the Blackboard gradebook.
How to fix this? Students who are “unenrolled” need to go into your Blackboard course and click a link such as the All Assignments link. Clicking the Course Home link will NOT resolve this issue. After clicking All Assignments, students will be asked to log into their Pearson account. After this is done, the Blackboard system will be able to recognize the student on the next grade import and “unenrolled user” will not appear.
Q7: I want to create a create a new column in my gradebook by combining several assignments – should I do that in MyLab and Mastering or in Blackboard? “Calculated columns” will not at this time sync with Blackboard. We recommend that you create such grade columns in your Blackboard gradebook.
Return to the Table of Contents

MODULE 4: GRADE TRANSFER AND GRADE SYNC FOR XL-BASED MYLABS
LESSON 1: HOW TO TRANSFER GRADES TO BLACKBOARD
1. Go into your MyLab gradebook. You can enter your MyLab gradebook starting from your Blackboard course or by logging in at the pearsonmylab.com site.
2. Follow these steps to export your MyLab grades: Gradebook>Export Data>Advanced Export>Give your export a name (perhaps using today’s date), select an Export Type (in this example it’s the often-used “Student Assignment Results”) and for Spreadsheet Layout choose>Formatted for Blackboard-MyLab/Mastering.
3. The image below may be helpful:
Return to the Table of Contents

58
4. You can leave the other options at their default values.
5. After clicking the Submit Request button at the bottom of the page, you’ll see an Export Confirmation pop-up box indicating that a file will be sent to you shortly.
6. You will receive an email with a .csv file attached, typically within an hour. During high load times (e.g., midterm and finals week) it may take up to 24 hours for the exported grades file to arrive.
7. You can close your MyLab if you wish.
8. When the email arrives, download the .csv file to your computer.
9. With the.csv file ready to upload, return to your Blackboard course and navigate to the Full Grade Center.
10. In the Full Grade Center, click the Manage tab and then select Upload Pearson’s MyLab and Mastering Grades.
Return to the Table of Contents

59
11. On the next screen, click the Browse My Computer button and select the file you downloaded from Mastering. Click the Submit button.
Return to the Table of Contents

60
12. On the next screen, you can choose all or only some of the grades from Mastering to import to Blackboard.
13. Blackboard will create new columns in your Blackboard gradebook to contain any new assignments, and it will simply update any existing Mastering columns with new grades if there are any.
14. Your grades have been transferred from Mastering to Blackboard:
Return to the Table of Contents

61
If the transfer process does not go as shown here, check lesson 3 in this section on troubleshooting.
Return to the Table of Contents
MODULE 4: GRADE TRANSFER AND GRADE SYNC FOR XL-BASED MYLABS
LESSON 2: HOW TO SYNC GRADES WITH BLACKBOARD
Section 1: Setting Up Your MyLab for Grade Sync
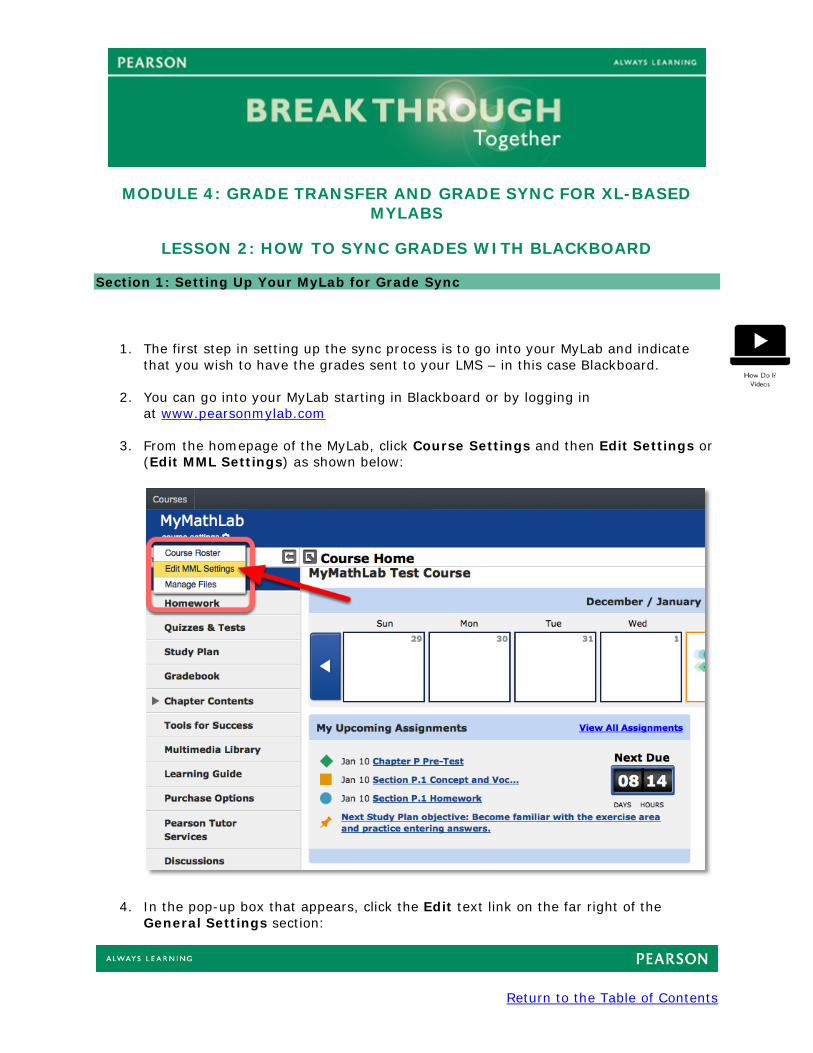
1. The first step in setting up the sync process is to go into your MyLab and indicate that you wish to have the grades sent to your LMS – in this case Blackboard.
2. You can go into your MyLab starting in Blackboard or by logging in at www.pearsonmylab.com
3. From the homepage of the MyLab, click Course Settings and then Edit Settings or (Edit MML Settings) as shown below:
4. In the pop-up box that appears, click the Edit text link on the far right of the General Settings section:
Return to the Table of Contents

63
5. After clicking the Edit link, you will see these options:
6. You have two options at this point: a) you can have all of your assignments sent to Blackboard or b) you can click Cancel and select only some of your grades to be sent to Blackboard.
7. If you check the box next to Manage results in the Blackboard gradebook and click Save (and then OK in the next box) and return to Blackboard, you will see all
Return to the Table of Contents

64
the MyLab assignment titles listed (whether you actually required student to take them or not), and you must decide which assignments you actually want included in your Blackboard gradebook.
Note: Checking this box means that you do not have to decide on an assignment-by-assignment basis whether to sync to Blackboard or not. One possible disadvantage is that if your MyLab contains a hundred (or more) possible assignments, then all of them will be listed in our Blackboard sync area and you must go through all of them and check whether to send grades from that assignment to your Blackboard gradebook. 8. Your other option is to click the Cancel button in this pop-up and decide on an
assignment-by-assignment basis whether to sync the grade to Blackboard. Let’s see how that’s done.
9. First, create one assignment. This can be an assignment which you delete later if you wish.
10. After creating the assignment, go into your Assignment Manager tool and find the assignment.
11. Click the Modify link in the upper right corner and then click Manage in the sub-menu.
12. On the next screen, click the More Assignment Tools drop down and select Change Assignment Settings.
Return to the Table of Contents

65
13. This will reveal a new column called Send to Blackboard. Checking the box next to any assignment will send the grades for this assignment to Blackboard.
14. Those are your two synchronization options for these MyLabs. After choosing one or the other you can now return to your Blackboard course to complete the synchronization setup there.
Return to the Table of Contents

66
Section 2: Setting Up Your Blackboard Course for Grade Sync
1. Return to your Blackboard course and click the Pearson Building Block.
2. On the next page scroll down to the Support Tools area and click Manage Pearson MyLab / Mastering Grades.
Return to the Table of Contents

67
Section 3: Grade Synchronization Settings
1. Start the grade sync setup process by clicking the second link on the left side –
Grade Synchronization Settings:
2. You may see an error message like the one below, but there’s no need to worry – it will go away once the setup process is complete.
3. Important: your goal in this first step of the setup process is to create a folder in
Blackboard that will hold the grades that come over from Pearson. Throughout the semester, you’ll be checking that folder to see what new grades have come in and you’ll be deciding which of these grades you actually want included in your Blackboard gradebook.
4. To create this folder, click the Browse button. You’ll get a small popup window. You can create this folder anywhere in your Blackboard course and if you already have a
Return to the Table of Contents

68
section in Blackboard called Content, you can select this folder as shown in the image below:
5. If you have a Content folder and have selected it as shown here, then proceed to step 1 in Section 4 to configure the Settings. If you don’t have a Content folder you can easily create an area in Blackboard to hold your Pearson grades. Here’s how to do this.
6. Close the pop-up window.
7. Click the + sign at the top of the left navigation area in Blackboard (if you don’t see the + sign, then go over the right side of the screen and make sure you are in Edit mode).
Return to the Table of Contents

69
8. As the image above shows: a) Add a Content Area. b) Call it something like MyLab Grades. c) DO NOT make it available to users. d) Click Submit.
9. This will create a new hidden folder in your navigation area.
10. Click the Grade Synchronization Settings link again in the Pearson Building Block, as in step 1 above.
11. Click the Browse button and select this new folder. You may not need to look in this folder, but the Blackboard system will check it to see if Pearson has sent any new grades into the folder.
12. You may now proceed to Section 4: Settings.
Return to the Table of Contents

70
Section 4: Settings
1. In the Settings area, click the button next to Automatically Assign Gradable Items to the Default Folder Location from the Off to the On position.
2. Click Yes to the right of Include these Gradable Items in Grade Center Calculations.
3. Email Notifications: enter your email address if you wish to receive an email every time the sync system creates a new grade column in your Blackboard gradebook.
4. Category: decide whether you want to use any categories you may have set up in MyLab in your Blackboard gradebook.
5. See the image below for a summary of these suggested settings:
6. “Automatically Assign Gradable Items to the Default Folder Location”: ON
7. “Include these Gradable Items in Grade Center Calculations”: YES
Return to the Table of Contents

71
8. Email Notifications: you might want to fill in your email address so that you get a notification whenever a new grade column is created in your gradebook. You can return here and remove your email address at a later point if you wish.
9. After you have made these selections, click Submit. You have completed the key processes in the grade sync setup process. From here on you shouldn’t need to return to this page unless you want to enter (or remove) your email address in the Email Notifications area. The next part of the grade sync process is to go to the Set Up Grade Synchronization Settings area. You may return to this area several times throughout your course to indicate to the system exactly which grades you want sync’d with your Blackboard gradebook.
Return to the Table of Contents

72
Section 5: Setting Up Grade Synchronization
Your goal in this part of the sync process:
1. Return to the Pearson Building Block and then to Manage Pearson MyLab and Mastering Grades. Click the first link in the upper left, Set Up Grade Synchronization, as shown below:
2. If you see the No Components Found message on The Add Gradable Items page, it means that: a) you have yet not set up an assignment for your students in Mastering or b) you recently set up an assignment, but the system has not yet received any information that the assignment exists.
Return to the Table of Contents

73
3. If you receive the No components found error, please return to this part of the sync setup process at a later time. You could also speak with your campus Blackboard administrator to ask how often the Pearson Building Block has been set up to check for new assignments available to sync.
4. When items from Mastering appear on the Gradable Items page, you are ready to choose which ones you wish to sync with your Blackboard gradebook. You can choose all or only some of the items from Mastering.
5. After you have made your selections, click Submit.
6. This process will send these assignments to your Blackboard gradebook. If the assignment is new, then a new column will be created. If the assignment has previously been sync’d, then the column previously created will be updated with any new grades.
Return to the Table of Contents

74
7. You may choose to do a “forced refresh” of the grades by clicking the Refresh Pearson Grades link.
8. On this page you may see some assignments listed. Choose the ones you want to force a refresh of, and click Submit.
Return to the Table of Contents

75
Section 6: Viewing Your Newly Sync’d Grades
1. To see the newly sync’d grades, go to the Full Grade Center in Blackboard:
2. You may need to drag over to the right to see the new columns that were created by the sync process.
Return to the Table of Contents

76
MODULE 4: GRADE TRANSFER AND GRADE SYNC FOR XL-BASED MYLABS
LESSON 3: TROUBLESHOOTING THE GRADE SYNC AND TRANSFER PROCESS
Q1: I’m still getting the “no components found” error.
This error indicates that the system can’t find any assignments from MyLab that are set to sync with Blackboard. Make sure that you have dated assignments set up in your MyLab for your students to take. If you have these assignments set up but are still getting this message, check Q2.
Q2: It seems to be taking a long time for grades to sync.
Speak to your campus Blackboard administrator to find out if an automatic sync schedule has been set up for your campus. Sync schedules can be set by the admin such that the servers check anywhere from every 30 minutes to perhaps every 2 hours. They can also be set to never check for new grades (in order to reduce the load on the servers). If the admin has set the sync schedule to “never”, then instructors will need to manually refresh the grades themselves as shown above every time they want to see new grades.
Return to the Table of Contents

77
Q3: How can I get help from Pearson if my Blackboard admin says that the Pearson Building Block is set up correctly?
In order to get the fastest help possible, please use the Send Us A Message form. This will create an incident report number we can use to quickly resolve the issue.
Q4: I have more than one column in my gradebook for the same assignment.
Unfortunately, columns in the Blackboard gradebook cannot be deleted – but they can be hidden. We suggest that you hide one of the columns. You might also want to move these hidden columns to the end of the gradebook just to get them out of your way. If you wish, you could also ask your on-campus Blackboard admin to see if that person can delete the column(s) for you.
Q5: How do I disable the sync process?
Navigate to the Grade Synchronization Settings area of your course and click the button from On to Off.
Q6: When I do a grade transfer, I’m getting an “Unenrolled User” error from Blackboard.
An “unenrolled user” is a student who is listed in the MyLab gradebook export but who is not listed as being a student in your course. This typically occurs when a student was able to gain access to your MyLab without having gone through your Blackboard course. Students who have previously used a MyLab may be familiar with the process of obtaining a Course ID from their instructor. Remember not to give students your MyLab course ID. If students get your course ID and then go to: www.PearsonMyLab.com they could register and gain access to your MyLab and begin doing any tests you may have created there. If students log in through the Pearson site and not through your Blackboard course then Blackboard will not know who they are and will not be able to add their grades from the MyLab to the Blackboard gradebook.
How to fix this?
Students who are “unenrolled” need to go into your Blackboard course and click a link such as the All Assignments link. Clicking the Course Home link will NOT resolve this issue. After clicking All Assignments, students will be asked to log into their Pearson account. After this is done, the Blackboard system will be able to recognize the student on the next grade import and “unenrolled user” will not appear.
Return to the Table of Contents

78
Q7: I want to create a create a new column in my gradebook by combining several assignments – should I do that in MyLab and Mastering or in Blackboard? “Calculated columns” will not at this time sync with Blackboard. We recommend that you create such grade columns in your Blackboard gradebook.
Return to the Table of Contents

MODULE 5: GRADE TRANSFER AND GRADE SYNC FOR PEGASUS-BASED MYLABS
LESSON 1: HOW TO TRANSFER GRADES TO BLACKBOARD
1. Go into your MyLab gradebook. You can enter your MyLab gradebook starting from your Blackboard course or by logging in at the pearsonmylab.com site.
2. Follow these steps to export your MyLab grades: a) Navigate to the name of the assignment you wish to transfer into Blackboard. b) At the bottom of your gradebook you’ll see a bar that contains Export>select Current Display to export the grades from the assignment. c) Next to “as”, select Blackboard-MyLab& Mastering.
3. Click the Download button and your browser will download a .csv file to your computer.
4. The image below may be helpful:
Return to the Table of Contents

80
5. You can close your MyLab now if you wish.
6. With the.csv file ready to upload, return to your Blackboard course and navigate to the Full Grade Center.
Return to the Table of Contents

81
7. In the Full Grade Center, click the Manage tab and then select Upload Pearson’s MyLab and Mastering Grades.
Return to the Table of Contents

82
8. On the next screen, click the Browse My Computer button and select the file you downloaded from the MyLab. Click the Submit button.
9. On the next screen, you can choose all or only some of the grades from the MyLab to import to Blackboard.
Return to the Table of Contents

83
10. Blackboard will create new columns in your Blackboard gradebook to contain any new assignments, and it will simply update any existing MyLab columns with new grades if there are any.
11. Your grades have been transferred from your MyLab to Blackboard:
Return to the Table of Contents

MODULE 5: GRADE TRANSFER AND GRADE SYNC FOR PEGASUS-BASED MYLABS
LESSON 2: HOW TO SYNC GRADES TO BLACKBOARD
Section 1: Setting Up Assignments in the MyLab for Sync’ing
1. Begin the sync process by going into your MyLab gradebook. You will be indicating, on an assignment-by-assignment basis, whether you want each assignment to sync with Blackboard.
2. Click Instructor Grades & Assignments and then Gradebook.
3. First, create an assignment (you can delete it later if you wish).
4. After creating an assignment, navigate to that assignment in the gradebook. In this example, we have created an assignment called “Take the Chapter 01 Test”.
Return to the Table of Contents

85
5. To the left of every assignment you will see an arrow pointing downward. Click that arrow and you will see a list of options:
6. Click Synchronize with LMS. After a moment you’ll see two back-and-forth arrows
next to the down arrow and a message in green in the upper left indicating that the assignment is set to sync with Blackboard.
7. You’ll need to create the above settings for every assignment you wish to sync with Blackboard.
Return to the Table of Contents

86
Section 2: Setting Up Your Blackboard Course for Grade Sync
1. Return to your Blackboard course and click the Pearson Building Block.
2. On the next page scroll down to the Support Tools area and click Manage Pearson MyLab / Mastering Grades.
Return to the Table of Contents

87
Section 3: Grade Synchronization Settings
13. Start the grade sync setup process by clicking the second link on the left side –
Grade Synchronization Settings:
14. You may see an error message like the one below, but there’s no need to worry – it will go away once the setup process is complete.
15. Important: your goal in this first step of the setup process is to create a folder in
Blackboard that will hold the grades that come over from Pearson. Throughout the semester, you’ll be checking that folder to see what new grades have come in and you’ll be deciding which of these grades you actually want included in your
Return to the Table of Contents

88
Blackboard gradebook.
16. To create this folder, click the Browse button. You’ll get a small popup window. You can create this folder anywhere in your Blackboard course and if you already have a section in Blackboard called Content, you can select this folder as shown in the image below:
17. If you have a Content folder and have selected it as shown here, then proceed to step 1 in Section 4 to configure the Settings. If you don’t have a Content folder you can easily create an area in Blackboard to hold your Pearson grades. Here’s how to do this.
18. Close the pop-up window.
19. Click the + sign at the top of the left navigation area in Blackboard (if you don’t see the + sign, then go over the right side of the screen and make sure you are in Edit mode).
Return to the Table of Contents

89
20. As the image above shows: a) Add a Content Area. b) Call it something like MyLab Grades. c) DO NOT make it available to users. d) Click Submit.
21. This will create a new hidden folder in your navigation area.
22. Click the Grade Synchronization Settings link again in the Pearson Building Block, as in step 1 above.
23. Click the Browse button and select this new folder. You may not need to look in this folder, but the Blackboard system will check it to see if Pearson has sent any new grades into the folder.
24. You may now proceed to Section 4: Settings.
Return to the Table of Contents
90
Section 4: Settings
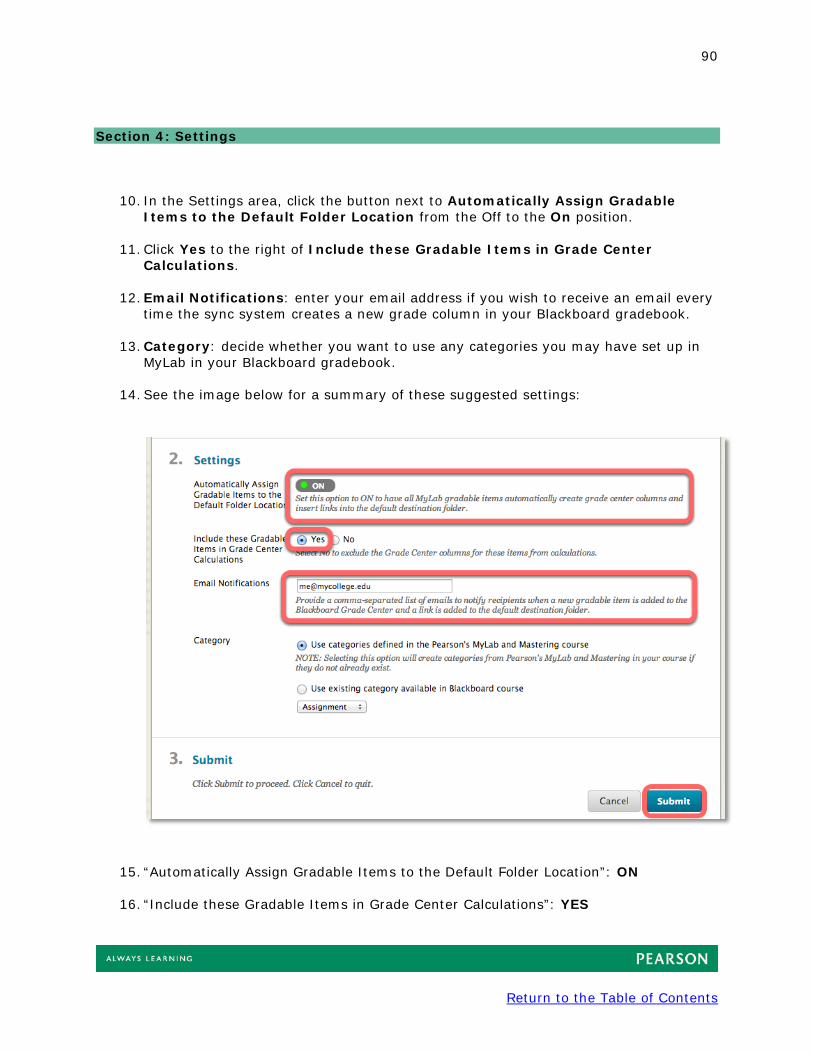
10. In the Settings area, click the button next to Automatically Assign Gradable Items to the Default Folder Location from the Off to the On position.
11. Click Yes to the right of Include these Gradable Items in Grade Center Calculations.
12. Email Notifications: enter your email address if you wish to receive an email every time the sync system creates a new grade column in your Blackboard gradebook.
13. Category: decide whether you want to use any categories you may have set up in MyLab in your Blackboard gradebook.
14. See the image below for a summary of these suggested settings:
15. “Automatically Assign Gradable Items to the Default Folder Location”: ON
16. “Include these Gradable Items in Grade Center Calculations”: YES
Return to the Table of Contents

91
17. Email Notifications: you might want to fill in your email address so that you get a notification whenever a new grade column is created in your gradebook. You can return here and remove your email address at a later point if you wish.
18. After you have made these selections, click Submit. You have completed the key processes in the grade sync setup process. From here on you shouldn’t need to return to this page unless you want to enter (or remove) your email address in the Email Notifications area. The next part of the grade sync process is to go to the Set Up Grade Synchronization Settings area. You may return to this area several times throughout your course to indicate to the system exactly which grades you want sync’d with your Blackboard gradebook.
Section 5: Setting Up Grade Synchronization
Your goal in this part of the sync process:
9. Return to the Pearson Building Block and then to Manage Pearson MyLab and Mastering Grades. Click the first link in the upper left, Set Up Grade Synchronization, as shown below:
10. If you see the No Components Found message on The Add Gradable Items page, it means that: a) you have yet not set up an assignment for your students in Mastering or b) you recently set up an assignment, but the system has not yet received any information that the assignment exists.
Return to the Table of Contents

92
11. If you receive the No components found error, please return to this part of the sync setup process at a later time. You could also speak with your campus Blackboard administrator to ask how often the Pearson Building Block has been set up to check for new assignments available to sync.
12. When items from Mastering appear on the Gradable Items page, you are ready to choose which ones you wish to sync with your Blackboard gradebook. You can choose all or only some of the items from Mastering.
Return to the Table of Contents

93
13. After you have made your selections, click Submit.
14. This process will send these assignments to your Blackboard gradebook. If the assignment is new, then a new column will be created. If the assignment has previously been sync’d, then the column previously created will be updated with any new grades.
15. You may choose to do a “forced refresh” of the grades by clicking the Refresh Pearson Grades link.
16. On this page you may see some assignments listed. Choose the ones you want to force a refresh of, and click Submit.
Return to the Table of Contents

94
Section 6: Viewing Your Newly Sync’d Grades
3. To see the newly sync’d grades, go to the Full Grade Center in Blackboard:
Return to the Table of Contents

95
4. You may need to drag over to the right to see the new columns that were created by the sync process.
5. This completes the instructions on the grade sync process.
Return to the Table of Contents
MODULE 5: GRADE TRANSFER AND GRADE SYNC FOR PEGASUS-BASED MYLABS
LESSON 3: TROUBLESHOOTING THE GRADE SYNC AND TRANSFER PROCESS
Q1: I’m still getting the “no components found” error.
This error indicates that the system can’t find any assignments from MyLab that are set to sync with Blackboard. Make sure that you have dated assignments set up in your MyLab for your students to take. If you have these assignments set up but are still getting this message, check Q2.
Q2: It seems to be taking a long time for grades to sync.
Speak to your campus Blackboard administrator to find out if an automatic sync schedule has been set up for your campus. Sync schedules can be set by the admin such that the servers check anywhere from every 30 minutes to perhaps every 2 hours. They can also be set to never check for new grades (in order to reduce the load on the servers). If the admin has set the sync schedule to “never”, then instructors will need to manually refresh the grades themselves as shown above every time they want to see new grades.
Q3: How can I get help from Pearson if my Blackboard admin says that the Pearson Building Block is set up correctly?
In order to get the fastest help possible, please use the Send Us A Message form. This will create an incident report number we can use to quickly resolve the issue.
Q4: I have more than one column in my gradebook for the same assignment.
Unfortunately, columns in the Blackboard gradebook cannot be deleted – but they can be hidden. We suggest that you hide one of the columns. You might also want to move these hidden columns to the end of the gradebook just to get them out of your way. If you wish, you could also ask your on-campus Blackboard admin to see if that person can delete the column(s) for you.
Q5: How do I disable the sync process?
Navigate to the Grade Synchronization Settings area of your course and click the button from On to Off.
Return to the Table of Contents

97
Q6: When I do a grade transfer, I’m getting an “Unenrolled User” error from Blackboard.
An “unenrolled user” is a student who is listed in the MyLab gradebook export but who is not listed as being a student in your course. This typically occurs when a student was able to gain access to your MyLab without having gone through your Blackboard course. Students who have previously used a MyLab may be familiar with the process of obtaining a Course ID from their instructor. Remember not to give students your MyLab course ID. If students get your course ID and then go to: www.PearsonMyLab.com they could register and gain access to your MyLab and begin doing any tests you may have created there. If students log in through the Pearson site and not through your Blackboard course then Blackboard will not know who they are and will not be able to add their grades from the MyLab to the Blackboard gradebook.
How to fix this?
Students who are “unenrolled” need to go into your Blackboard course and click a link such as the All Assignments link. Clicking the Course Home link will NOT resolve this issue. After clicking All Assignments, students will be asked to log into their Pearson account. After this is done, the Blackboard system will be able to recognize the student on the next grade import and “unenrolled user” will not appear.
Q7: I want to create a create a new column in my gradebook by combining several assignments – should I do that in MyLab and Mastering or in Blackboard?
“Calculated columns” will not at this time sync with Blackboard. We recommend that you create such grade columns in your Blackboard gradebook
Return to the Table of Contents

MODULE 6: GRADE TRANSFER FOR NATIVE-BASED MYLABS
LESSON 1: HOW TO TRANSFER GRADES TO BLACKBOARD
1. Go into your MyLab gradebook. You can enter your MyLab gradebook starting from your Blackboard course or by logging in at the pearsonmylab.com site.
2. Follow these steps to export your MyLab grades: Go into your Gradebook>click the Export Gradebook button>choose Blackboard-MyLab & Mastering.csv.
3. Download the .csv file to your computer.
4. The image below may be helpful:
5. You can now close your MyLab if you wish.
6. With the.csv file ready to upload, return to your Blackboard course and navigate to the Full Grade Center.
Return to the Table of Contents

99
7. In the Full Grade Center, click the Manage tab and then select Upload Pearson’s MyLab & Mastering Grades.
8. On the next screen, click the Browse My Computer button and select the file you
downloaded from your MyLab. Click the Submit button.
Return to the Table of Contents

100
9. On the next screen, you can choose all or only some of the grades from your MyLab to import to Blackboard.
10. Blackboard will create new columns in your Blackboard gradebook to contain any new assignments and it will simply update any existing Mastering columns with new grades if there are any.
11. Your grades have been transferred from Mastering to Blackboard:
Return to the Table of Contents

101
If the transfer process does not go as shown here, check lesson 2 in this section on troubleshooting.
Return to the Table of Contents

MODULE 6: GRADE TRANSFER FOR NATIVE-BASED MYLABS
LESSON 2: TROUBLESHOOTING THE GRADE TRANSFER PROCESS
Q1: When I do a grade transfer, I’m getting a message an “Unenrolled User” error from Blackboard.
An “unenrolled user” is a student who is listed in the MyLab gradebook export but who is not listed as being a student in your course. This typically occurs when a student was able to gain access to your MyLab without having gone through your Blackboard course. Students who have previously used a MyLab may be familiar with the process of obtaining a Course ID from their instructor. Remember not to give students your MyLab course ID. If students get your course ID and then go to: www.PearsonMyLab.com they could register and gain access to your MyLab and begin doing any tests you may have created there. If students log in through the Pearson site and not through your Blackboard course then Blackboard will not know who they are and will not be able to add their grades from the MyLab to the Blackboard gradebook.
How to fix this?
What you need to do is to find the Blackboard Student ID for each of these “unenrolled students” and add it to the .csv file that was exported from the MyLab. Once each student has a Blackboard Student ID in this .csv file, the file can successfully be uploaded to your Blackboard gradebook. The steps for finding a student’s Blackboard student ID are:
1. In your Blackboard course, navigate into the Pearson MyLab & Mastering Building
Block area.
2. Scroll down to the Support Tools section.
3. Click the Roster Information link.
4. On the next page you’ll see a list of all the students in your Blackboard course and their Blackboard Student IDs:
Return to the Table of Contents

103
5. Select and copy this number.
6. Open the .csv file you exported from the MyLab in Excel.
7. In this spreadsheet you’ll find a column entitled Blackboard Student ID. Find the student(s) for whom this cell is blank and paste in their Blackboard student ID.
8. Do this for every student who has a blank cell for Blackboard Student ID.
9. Save this Excel file. You can now successfully import it into your Blackboard grade book.
We recommend that you keep this saved Excel file for future use. Every time you conduct a grade export from your MyLab, you should open the new file and this older Excel file. Copy the column with all the Blackboard Student IDs and paste it into the newly exported grade file, making sure, of course, that the students are in the same order as the previous export so that the IDs line up with the correct student.
Return to the Table of Contents

MODULE 7: CREATING COORDINATOR AND MEMBER COURSES
XL-MyLabs allow for situations where you want to have a course coordinator create a “master” (or “shell”) course that other instructors/adjuncts make copies of and use in their classes.
Course coordinators can make changes to these master courses prior to them being copied, and the instructors who copy them will “inherit” these modified MyLabs. Essentially, the process is this:
The coordinator does the following:
1. Creates a new MyLab course in the Pearson portal: www.pearsonmylab.com 2. During the creation of this course, the coordinator makes sure the new course is
available for copy. 3. In XL labs, the coordinator changes one setting to make this a coordinator course. 4. The coordinator can then customize this master course if desired. 5. The coordinator copies down the course ID and gives it to the other instructors (but
NEVER gives the course ID to students).
The instructors who are going to use this master/coordinator course:
1. Go into their Blackboard course and go to the Pearson Building Block. 2. On the Select MyLab & Mastering page, instructors click the "Or copy from
another instructor" text link. 3. Instructors enter the course ID of the master course. 4. These instructors also DO NOT give out the course ID to their students. Coordinators have the ability to enter and view each member course and to look at the grades of all students enrolled in one of their member courses.
Return to the Table of Contents

MODULE 7: CREATING COORDINATOR AND MEMBER COURSES
Section A: Creating the Coordinator Course
1. Begin the process of creating a coordinator course NOT in Blackboard, but rather by going to www.pearsonmylab.com and logging in with your instructor credentials.
2. On your MyLab & Mastering homepage, click the Create/Copy Course button (the example below contains only one previous course – your account may contain no courses or perhaps many).
Return to the Table of Contents

106
3. Create the course you will soon modify to be your coordinator course by searching for the course materials you wish to use.
Return to the Table of Contents

107
4.
5. On the next screen, in addition to creating a name and start and end dates, two things are very important: a) leave the Course Start Date set to today, and b) make sure to check the circle next to Make Available for Copy.
Return to the Table of Contents

108
6. After clicking the Create Course Now button, you will be told that the new course is being created and you will receive an email when it is ready for you.
7. When the course is created, click the course name and go into the new course. You’ll now set it up so that it is designated in our system as a coordinator course.
8. From the new MyLab homepage, click the Course Settings text link (this link might also say Edit MML Settings):
Return to the Table of Contents

109
9. In the pop-up box, click the Edit link in the General Settings area:
Return to the Table of Contents

110
10. Click the drop-down list to the right of Type of Course to Create and select
Coordinator:
11. You may now make any modifications to this course that you wish. These modifications will appear in the member courses.
12. You need to copy or write down the course ID to give to the instructors who will be copying this course (not to be given to students):
Return to the Table of Contents

111
Section 2: How You and Other Instructors Can Use the Coordinator Course ID to Create Member Courses
1. Instructors begin by logging into their Blackboard course and going to the Pearson MyLab and Mastering link:
2. These instructors should follow the linking to Pearson and the course creation process in much the same way that any course is created through Blackboard. The privacy policy is accepted (this appears only if this is the first time this instructor has connected a Blackboard course to a MyLab)…
Return to the Table of Contents

112
3. …and the instructor logs in using his/her Pearson instructor account.
Return to the Table of Contents

113
4. On the Select MyLab & Mastering page, the instructor clicks on the text link that says Or copy from another instructor:
5. On the next page the instructor types in the course ID he/she received from the coordinator:
6. A new member course is created. Instructors should a) give the new course their own name, b) leave the start date set to today, and c) leave the option to copy the course at No.
Return to the Table of Contents

114
7. That’s it! There are a few more things to know.
8. Coordinators can create a member course from their coordinator course that they themselves can use:
Return to the Table of Contents

115
9. To do this, coordinators can use either the course ID as other instructors do, or simply select the coordinator course from their list of MyLab courses:
10. From their MyLab homepage list of courses, coordinator courses will be designated with the letters “Coord” in front of the title the coordinator gave the course, and a link icon with the words Linked Course Materials will appear:
Return to the Table of Contents

116
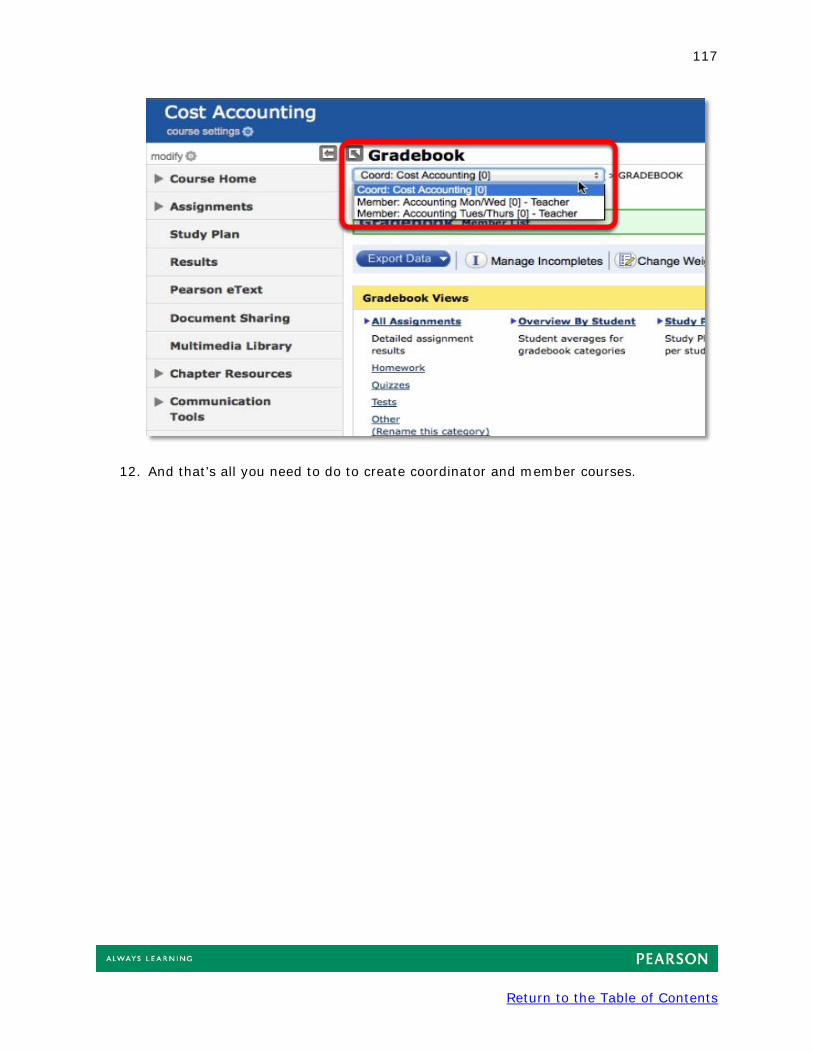
11. Coordinators can see the gradebooks for all member courses either by going into those courses, or by simply going into their master course, then into the gradebook area and clicking the drop-down list at the top of the page:
Return to the Table of Contents
117
12. And that’s all you need to do to create coordinator and member courses.
Return to the Table of Contents

MODULE 8: TIPS TO ASSURE YOUR INTEGRATION IS A SUCCESS
LESSON 1: INTEGRATED COURSES: NO COURSE IDS USED
Do Not Give Your Students a Course ID: if you have previously used a Pearson MyLab or Mastering product as a standalone product, then part of the student enrollment process involves sending the students the courses ID. This is not done for integrated MyLab courses.
Students who have taken a Pearson MyLab & Mastering course in the past may be familiar with the need for a course ID and may ask you for one. Tell them that it is not needed and that they are to go to your Blackboard course, click the link you have made available to them to enter your MyLab, and follow the onscreen directions to register and gain access to the lab.
Students only need the following to register for your MyLab:
1. A Pearson student ID: if students have ever created a Pearson student id in the past, they should be ready to log in with that ID. If they don’t have it, then they should use the “Forgot your username or password?” tool. If they have never created a Pearson student ID, then they can create one at the beginning of the registration process.
2. An Access Code or Payment Method: after logging in (or creating a new Pearson student ID), students will be asked to pay for access to the MyLab using either an access code they typically buy in the bookstore, or through the use of a credit card or PayPal account.
3. Temporary Access: students can get 14-day temporary access to your MyLab and then pay for access at a later time.
Return to the Table of Contents

MODULE 8: TIPS TO ASSURE YOUR INTEGRATION IS A SUCCESS
LESSON 2: THE DIAGNOSTICS REPORT & 24/7 SUPPORT
If you ever need to contact Pearson support: http://247pearsoned.custhelp.com you may be asked to provide us with your Diagnostics report. This little bit of information can help us to more quickly resolve your issue.
Here’s how to find your Diagnostics report:
1. Go into your Blackboard course.
2. Navigate to the Pearson Building Block and click it:
Return to the Table of Contents

120
3. On the next page you’ll see the links to your MyLab:
4. Scroll down to the bottom of this page and click the Diagnostics link:
5. On the next page, click the Export File button if you have one. This will download a .txt file to your computer. Send this or have it ready when you contact support.
Return to the Table of Contents

121
6. If you don’t have the Export File button, just drag your mouse across all the information on this page and copy that text into an email or support ticket.
Return to the Table of Contents

MODULE 8: TIPS TO ASSURE YOUR INTEGRATION IS A SUCCESS
LESSON 3: ADDITIONAL SUPPORT RESOURCES
Our Troubleshooting Page: click the question mark to go to the Troubleshooting page, which contains frequently asked questions about various aspects of the integration process.
Educator Support Page: The most up-to-date list of educator support resources can be found on our “Use with Your Local LMS” educator support page. You’ll find:
• Links to our live online webinar training that covers many of the same topics that are in this guide
• A link to our YouTube video playlist
• A Getting Started PDF guide for your students Click below to visit this page.
Return to the Table of Contents