
MULTIFUNCTIONAL DIGITAL SYSTEMS TopAccess Guide Toshiba/Black_And_White... · Source code of the...
310
MULTIFUNCTIONAL DIGITAL SYSTEMS TopAccess Guide
Transcript of MULTIFUNCTIONAL DIGITAL SYSTEMS TopAccess Guide Toshiba/Black_And_White... · Source code of the...
MULTIFUNCTIONAL DIGITAL SYSTEMS
TopAccess Guide


SOFTWARE LICENSE AGREEMENT 1
SOFTWARE LICENSE AGREEMENT
INSTALLING OR OTHERWISE USING THIS SOFTWARE PRODUCT CONSTITUTES YOUR ACCEPTANCE OF THE FOLLOWING TERMS AND CONDITIONS (UNLESS A SEPARATE LICENSE IS PROVIDED BY THE SUPPLIER OF APPLICABLE SOFTWARE IN WHICH CASE SUCH SEPARATE LICENSE SHALL APPLY). IF YOU DO NOT ACCEPT THESE TERMS, YOU MAY NOT INSTALL OR USE THIS SOFTWARE, AND YOU MUST PROMPTLY RETURN THE SOFTWARE TO THE LOCATION WHERE YOU OBTAINED IT.
THE SOFTWARE INSTALLED ON THIS PRODUCT INCLUDES NUMEROUS INDIVIDUAL SOFTWARE COMPONENTS, EACH HAVING ITS OWN APPLICABLE END USER LICENSE AGREEMENT (“EULA”). INFORMATION RELATING TO THE EULAS MAY BE FOUND IN AN ELECTRONIC FILE INCLUDED ON THE USER DOCUMENTATION CD-ROM INCLUDED HEREWITH; HOWEVER, ALL SOFTWARE AND DOCUMENTATION DEVELOPED OR CRE-ATED BY OR FOR TOSHIBA TEC CORPORATION (“TTEC”) ARE PROPRIETARY PROD-UCTS OF TTEC AND ARE PROTECTED BY COPYRIGHT LAWS, INTERNATIONAL TREATY PROVISIONS, AND OTHER APPLICABLE LAWS.
Grant of LicenseThis is a legal agreement between you, the end-user (“You”), and TTEC and its suppliers. This software, fonts (including their typefaces) and related documentation (“Software”) is licensed for use with the system CPU on which it was installed (“System”) in accordance with the terms con-tained in this Agreement. This Software is proprietary to TTEC and/or its suppliers.
TTEC and its suppliers disclaim responsibility for the installation and/or use of this Software, and for the results obtained by using this Software. You may use one copy of the Software as installed on a single System, and may not copy the Software for any reason except as neces-sary to use the Software on a single System. Any copies of the Software shall be subject to the conditions of this Agreement.
You may not, nor cause or permit any third party to, modify, adapt, merge, translate, reverse compile, reverse assemble, or reverse engineer the Software. You may not use the Software, except in accordance with this license. No title to the intellectual property in the Software is transferred to you and full ownership is retained by TTEC or its suppliers. Source code of the Software is not licensed to you. You will be held legally responsible for any copyright infringe-ment, unauthorized transfer, reproduction or use of the Software or its documentation.
TermThis license is effective until terminated by TTEC or upon your failure to comply with any term of this Agreement. Upon termination, you agree to destroy all copies of the Software and its docu-mentation.
You may terminate this license at any time by destroying the Software and its documentation and all copies.
Disclaimer of WarrantyTHIS SOFTWARE IS PROVIDED “AS IS” WITHOUT WARRANTY OF ANY KIND, EITHER EXPRESS OR IMPLIED, INCLUDING, BUT NOT LIMITED TO, THE IMPLIED WARRANTIES OF MERCHANTABILITY, FITNESS FOR A PARTICULAR PURPOSE, TITLE, AND NON-INFRINGEMENT. TTEC AND ITS SUPPLIERS DISCLAIM ANY WARRANTY RELATING TO THE QUALITY AND PERFORMANCE OF THE SOFTWARE. IF THE SOFTWARE PROVES DEFECTIVE, YOU (AND NOT TTEC OR ITS SUPPLIERS) SHALL BE RESPONSIBLE FOR THE ENTIRE COST OF ALL NECESSARY SERVICING, REPAIR OR CORRECTION. TTEC AND ITS SUPPLIERS DO NOT WARRANT THAT THE FUNCTIONS CONTAINED IN THE SOFTWARE WILL MEET YOUR REQUIREMENTS OR THAT THE OPERATION OF THE SOFTWARE WILL BE UNINTERRUPTED OR ERROR FREE.

2 SOFTWARE LICENSE AGREEMENT
ALL INFORMATION CONTAINED HEREIN THAT IS PROVIDED BY TTEC AND ITS AFFILI-ATES PURSUANT TO A EULA IS PROVIDED “AS IS” WITHOUT WARRANTY OF ANY KIND, EITHER EXPRESS OR IMPLIED.
Limitation of LiabilityIN NO EVENT WILL TTEC OR ITS SUPPLIERS BE LIABLE TO YOU FOR ANY DAMAGES, WHETHER IN CONTRACT, TORT, OR OTHERWISE (EXCEPT PERSONAL INJURY OR DEATH RESULTING FROM NEGLIGENCE ON THE PART OF TTEC OR ITS SUPPLIERS), INCLUDING WITHOUT LIMITATION ANY LOST PROFITS, LOST DATA, LOST SAVINGS OR OTHER INCIDENTAL, SPECIAL OR CONSEQUENTIAL DAMAGES ARISING OUT OF THE USE OR INABILITY TO USE THE SOFTWARE, EVEN IF TTEC OR ITS SUPPLIERS HAVE BEEN ADVISED OF THE POSSIBILITY OF SUCH DAMAGES, NOR FOR THIRD PARTY CLAIMS.
U.S. Government Restricted RightsThe Software is provided with RESTRICTED RIGHTS. Use, duplication or disclosure by the U.S. Government is subject to restrictions set forth in subdivision (b) (3) (ii) or (c) (i) (ii) of the Rights in Technical Data and Computer Software Clause set forth in 252.227-7013, or 52.227-19 (c) (2) of the DOD FAR, as appropriate. Contractor/Manufacturer is TOSHIBA TEC Corporation, 6-78, Minami-cho, Mishima-shi, Shizuoka-ken, 411-8520, Japan.
GeneralYou may not sublicense, lease, rent, assign or transfer this license or the Software. Any attempt to sublicense, lease, rent, assign or transfer any of the rights, duties or obligations hereunder is void. You agree that you do not intend to, and will not ship, transmit (directly or indirectly) the Software, including any copies of the Software, or any technical data contained in the Software or its media, or any direct product thereof, to any country or destination prohibited by the United States Government. This license shall be governed by the laws of Japan or, at the election of a Supplier of TTEC concerned with a dispute arising from or relating to this Agreement, the laws of the Country designated from time to time by the relevant Supplier of TTEC. If any provision or portion of this Agreement shall be found to be illegal, invalid or unenforceable, the remaining provisions or portions shall remain in full force and effect.
YOU ACKNOWLEDGE THAT YOU HAVE READ THIS LICENSE AGREEMENT AND THAT YOU UNDERSTAND ITS PROVISIONS. YOU AGREE TO BE BOUND BY ITS TERMS AND CONDITIONS. YOU FURTHER AGREE THAT THIS LICENSE AGREEMENT CONTAINS THE COMPLETE AND EXCLUSIVE AGREEMENT BETWEEN YOU AND TTEC AND ITS SUPPLI-ERS AND SUPERSEDES ANY PROPOSAL OR PRIOR AGREEMENT, ORAL OR WRITTEN, OR ANY OTHER COMMUNICATION RELATING TO THE SUBJECT MATTER OF THIS LICENSE AGREEMENT.
TOSHIBA TEC Corporation, 6-78, Minami-cho, Mishima-shi, Shizuoka-ken, 411-8520, Japan.
TRADEMARKS AND COPYRIGHT 3
TRADEMARKS AND COPYRIGHT
TrademarksThe official name of Windows 98 is Microsoft Windows 98 Operating System.The official name of Windows Me is Microsoft Windows Me Operating System.The official name of Windows 2000 is Microsoft Windows 2000 Operating System.The official name of Windows XP is Microsoft Windows XP Operating System.The official name of Windows Server 2003 is Microsoft Windows Server 2003 Operating System.Microsoft, Windows, Windows NT, and the brand names and product names of other Microsoft products are trademarks of Microsoft Corporation in the US and other countries.Apple, AppleTalk, Macintosh, Mac, TrueType, and LaserWriter are trademarks of Apple Computer, Inc. in the US and other countries.Postscript is a trademark of Adobe Systems Incorporated.Netscape is a trademark of Netscape Communications Corporation.IBM, AT and AIX are trademarks of International Business Machines Corporation.NOVELL, NetWare, and NDS are trademarks of Novell, Inc.Other company names and product names in this manual are the trademarks of their respec-tive companies.
Copyright© 2005 TOSHIBA TEC CORPORATION All rights reservedUnder the copyright laws, this manual cannot be reproduced in any form without prior written permission of TTEC. No patent liability is assumed, however, with respect to the use of the infor-mation contained herein.
4 Preface
Preface
Thank you for purchasing e-STUDIO452 Series or e-STUDIO282 Series Multifunctional Digital Systems. This TopAccess Guide explains the instructions for users and administrators to set up and manage the e-STUDIO452 Series or e-STUDIO282 Series using TopAccess. Read this guide before using your e-STUDIO452 Series or e-STUDIO282 Series. Keep this guide within easy reach, and use it to configure an environmentthat makes best use of the e-STUDIO’s functions.
About This GuideThis manual explains how to set up and manage network functions using the TopAccess user functions — such as network job management and template registration — from client comput-ers via a network.For information about Control Panel operation, see the Operator’s Manual for Basic Function or User Functions Guide.
ConventionsThe term “this equipment” in this manual refers to the e-STUDIO452 Series or e-STUDIO282 Series.The term “e-Filing” in this manual is an abbreviation of “electronic filing”.
Lineup of Our ManualsThank you for purchasing the TOSHIBA multifunctional digital systems e-STUDIO452 Series or e-STUDIO282 Series.We have provided you with these manuals for the operation of this equipment. Select and read the manual best suited to your needs.
Quick Start GuideThis Quick Start Guide describes the initial setup method of this equip-ment and accessories of this product such as operator’s manuals and CD-ROMs.

Preface 5
Operator’s Manual Basic FunctionsThis Operator’s Manual Basic Functions describes how to use the basic functions of this equipment mainly focusing on the copying function.Also this manual contains safety precautions for users to be observed. Be sure to read it first carefully.
User Functions GuideThis User Functions Guide describes the functions and settings under the [USER FUNCTIONS] button on the control panel of this equipment.
Other guides are provided by the User Documentation CD-ROM in PDF files:TopAccess GuideThis TopAccess Guide explains how to operate and set up the network functions such as the network scanning function and job management, using the TopAccess (Web-based utility) from client computers.
6 Preface
Network Administration GuideThis Network Administration Guide explains the guidelines for setting up network servers to provide various network services, and troubleshoot-ing for network administrators.
Printing GuideThis Printing Guide explains how to install the client software for printing from Microsoft Windows, Apple Mac OS, and UNIX computers, and print to the equipment.
Scanning GuideThis Scanning Guide explains how to operate the scanning function of this equipment.
e-Filing GuideThis e-Filing Guide explains how to operate the e-Filing function using the TWAIN driver, File Downloader and e-Filing web utility.
Network Fax GuideThis Network Fax Guide explains how to use the network fax function that enable users to operate fax and internet fax sending from a client computer via network.
Preface 7
To read manuals in PDF (Portable Document Format) filesViewing and printing this operator’s manual in PDF files require that you install Adobe Reader or Adobe Acrobat Reader on your PC. If Adobe Reader or Adobe Acrobat Reader is not installed on your PC, download and install it from the website of Adobe Systems Incorporated.
User Management GuideThis User Management Guide describes how to manage this equipment using the functions of “Department Management”, “User Management Setting” and “User Authentication for Scan to E-mail”.
8 Preface
Precautions in this manualTo ensure correct and safe use of this equipment, this operator’s manual describes safety pre-cautions according to the three levels shown below.You should fully understand the meaning and importance of these items before reading this manual.
Other than the above, this manual also describes information that may be useful for the opera-tion of this equipment with the following signage:
Indicates a potentially hazardous situation which, if not avoided, could result in death, serious injury, or serious damage, or fire in the equipment or sur-rounding assets.
Indicates a potentially hazardous situation which, if not avoided, may result in minor or moderate injury, partial damage of the equipment or surrounding assets, or loss of data.
Indicates a procedure you should follow to ensure the optimal performance of the equipment and problem-free copying.
Describes handy information that is useful to know when operating the equip-ment.
Pages describing items related to what you are currently doing. See these pages as required.
TABLE OF CONTENTS 9
TABLE OF CONTENTS
SOFTWARE LICENSE AGREEMENT ..........................................................1
TRADEMARKS AND COPYRIGHT...............................................................3
Preface...........................................................................................................4
Chapter 1 Overview
TopAccess Overview .................................................................................14
Accessing TopAccess End-User Mode ....................................................15TopAccess Web Site ...............................................................................16
Chapter 2 Checking Device Status
TopAccess Device Tab Page.....................................................................20Device Status Indicators..........................................................................21
Chapter 3 Managing Jobs
Managing Print Jobs ..................................................................................24Displaying Print Jobs...............................................................................24Deleting a Print Job .................................................................................25Releasing a Print Job ..............................................................................25
Managing Fax/Internet Fax Jobs...............................................................27Displaying Fax/Internet Fax Jobs ............................................................27Deleting a Fax Transmission Job ............................................................27
Managing Scan Jobs..................................................................................29Displaying Scan Jobs ..............................................................................29Deleting a Scan Job ................................................................................29
Chapter 4 Displaying Job Logs
Displaying Print Job Logs .........................................................................32
Displaying Transmission Journals ...........................................................33
Displaying Reception Journals .................................................................35
Displaying Scan Job Logs.........................................................................37
Chapter 5 Registering from TopAccess
Managing Templates ..................................................................................40Registering Private Template Groups .....................................................40Registering Private Templates ................................................................48Displaying Public Templates ...................................................................78

10 TABLE OF CONTENTS
Managing Address Book ...........................................................................80Managing Contacts in the Address Book ................................................80Managing Groups in the Address Book...................................................87
Managing Mailboxes ..................................................................................90Setting Up an Open Mailbox....................................................................91Deleting an Open Mailbox .......................................................................97
Chapter 6 Managing Counters
Viewing Counters .....................................................................................100Displaying the Total Counter .................................................................100Displaying the Department Counter ......................................................100
Chapter 7 TopAccess Administrator Mode
Features and Functions ...........................................................................105About Setup from TopAccess................................................................105About Maintenance from TopAccess.....................................................106About Registration from TopAccess......................................................107About Other Administrative Functions in TopAccess ............................107
Accessing TopAccess Administrator Mode ..........................................108
Setting up from TopAccess.....................................................................110Setting up Device Settings ....................................................................110Setting up Network Settings ..................................................................115Setting up Copier Settings.....................................................................150Setting up Fax Settings .........................................................................153Setting up Save as file Settings.............................................................158Setting up Email Settings ......................................................................165Setting up Internet Fax Settings ............................................................168Setting up Printer Settings.....................................................................171Setting up Print Service Settings...........................................................177Displaying Version Information..............................................................183
Maintaining from TopAccess ..................................................................184About the Maintenance Functions.........................................................184Updating the Software...........................................................................185Removing the Client Software...............................................................187Backing up Data ....................................................................................188Restoring Data from Backup File...........................................................190Deleting the Data from Local Folder......................................................193Managing Directory Service ..................................................................194Setting up Notification............................................................................197Importing and Exporting the Address Book...........................................202Importing and Exporting the Department Code.....................................206Exporting the Logs, Journals, and Counters .........................................209

TABLE OF CONTENTS 11
Clearing the Logs and Journals.............................................................211
Registering from TopAccess...................................................................213About the Registrations .........................................................................213Registering Public Templates................................................................213Registering Fax and Internet Fax Received Forward ............................222
Displaying Message Log..........................................................................237
Managing Department Code....................................................................238Displaying the Department List and Counters .......................................238Clearing the Department Counters........................................................240Registering or modifying the Department Code ....................................242Deleting the Department Code..............................................................244
Setting up User Management ..................................................................247Enabling Department Management.......................................................247Setting up User Management Setting....................................................250Setting up User Authentication for Scan to E-mail ................................278
Chapter 8 Troubleshooting
TopAccess Error Messages ....................................................................286Print Job Status Messages....................................................................286Transmission/Reception Journal Status Messages...............................286Scan Job Status Messages...................................................................291Message Log.........................................................................................296
INDEX .......................................................................................................................................301

12 TABLE OF CONTENTS

1.Overview
This section describes overview of the TopAccess functions.
TopAccess Overview ..............................................................................................14Accessing TopAccess End-User Mode.................................................................15
TopAccess Web Site .........................................................................................................................16
1 Overview
14 TopAccess Overview
TopAccess Overview
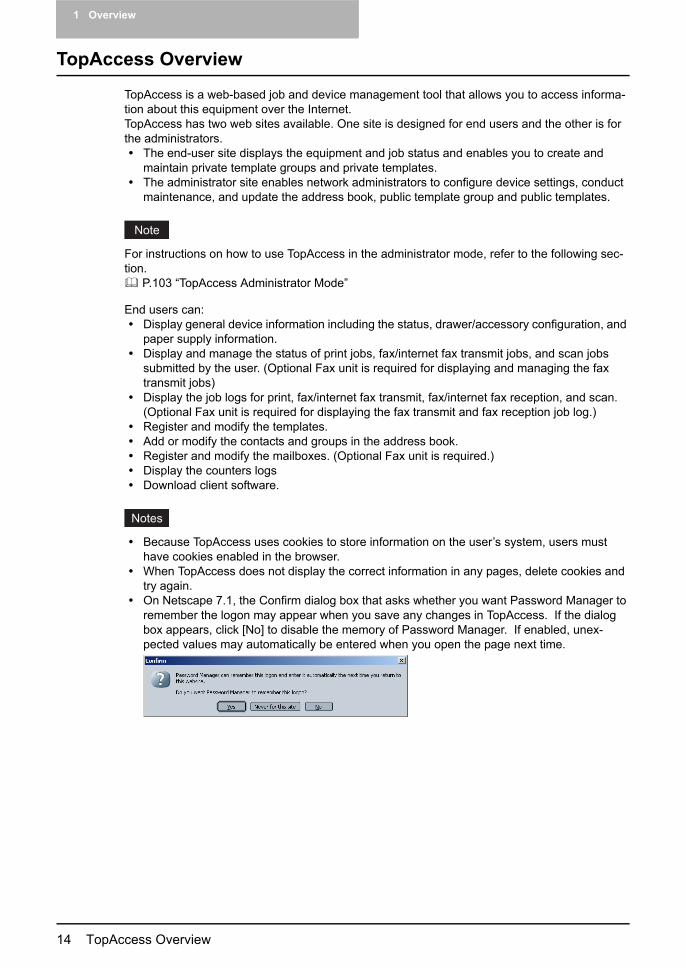
TopAccess is a web-based job and device management tool that allows you to access informa-tion about this equipment over the Internet.TopAccess has two web sites available. One site is designed for end users and the other is for the administrators.
The end-user site displays the equipment and job status and enables you to create and maintain private template groups and private templates.The administrator site enables network administrators to configure device settings, conduct maintenance, and update the address book, public template group and public templates.
For instructions on how to use TopAccess in the administrator mode, refer to the following sec-tion.
P.103 “TopAccess Administrator Mode”
End users can:Display general device information including the status, drawer/accessory configuration, and paper supply information.Display and manage the status of print jobs, fax/internet fax transmit jobs, and scan jobs submitted by the user. (Optional Fax unit is required for displaying and managing the fax transmit jobs)Display the job logs for print, fax/internet fax transmit, fax/internet fax reception, and scan. (Optional Fax unit is required for displaying the fax transmit and fax reception job log.)Register and modify the templates.Add or modify the contacts and groups in the address book.Register and modify the mailboxes. (Optional Fax unit is required.)Display the counters logsDownload client software.
Because TopAccess uses cookies to store information on the user’s system, users must have cookies enabled in the browser.When TopAccess does not display the correct information in any pages, delete cookies and try again.On Netscape 7.1, the Confirm dialog box that asks whether you want Password Manager to remember the logon may appear when you save any changes in TopAccess. If the dialog box appears, click [No] to disable the memory of Password Manager. If enabled, unex-pected values may automatically be entered when you open the page next time.

Accessing TopAccess End-User Mode 15
Accessing TopAccess End-User Mode
To operate TopAccess, this equipment should be connected to the network and be configured with the TCP/IP settings. After you complete the TCP/IP setup, you can access to TopAccess web site to operate various functions from your computer using a web browser such as Netscape Navigator and Internet Explorer.You can use the TopAccess web-based utility from a Windows, Macintosh or Unix operating sys-tem environment. The following browsers are supported:
WindowsInternet Explorer 5.5 or laterNetscape Navigator 7.1 or later
MacintoshSafari 2.0Netscape Navigator 7.1 or later
UnixNetscape Navigator 7.1 or later
Accessing TopAccess in end-user mode
1 To navigate to TopAccess, enter the following URL on the address box of your Internet browser.
http://<IP Address> or http://<Device Name>
For exampleWhen the IP address of the equipment is “10.10.70.105”:
http://10.10.70.105When the device name of this equipment is “mfp-00c67861”:
http://mfp-00c67861
When SSL for the HTTP network service is enabled, the alert message may appear when you enter the URL in the address box. In that case, please click [Yes] to proceed the operation.
1 Overview
16 Accessing TopAccess End-User Mode
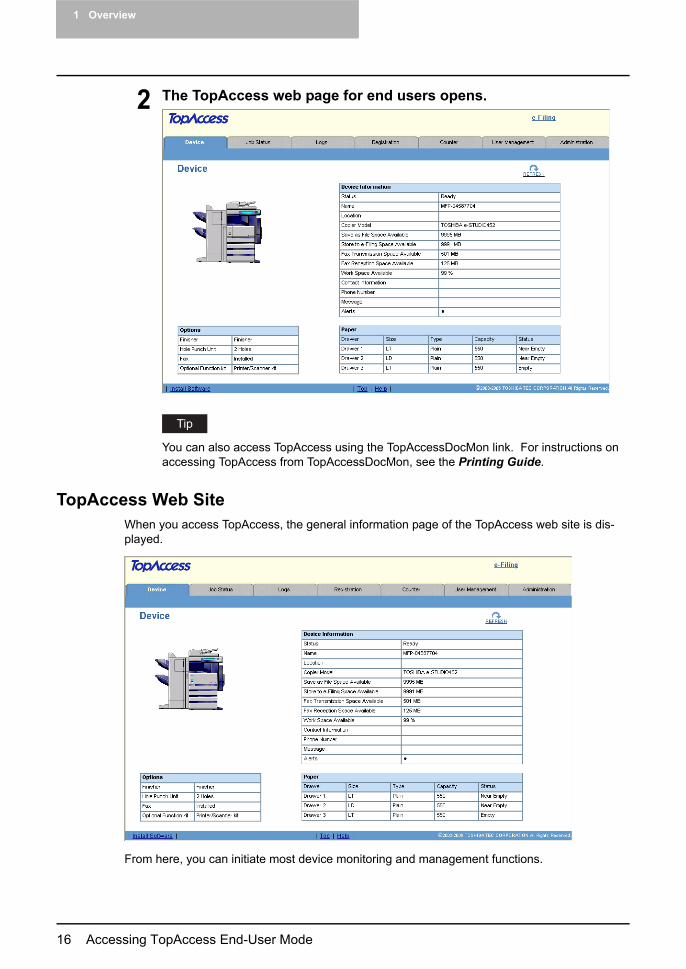
2 The TopAccess web page for end users opens.
You can also access TopAccess using the TopAccessDocMon link. For instructions on accessing TopAccess from TopAccessDocMon, see the Printing Guide.
TopAccess Web SiteWhen you access TopAccess, the general information page of the TopAccess web site is dis-played.
From here, you can initiate most device monitoring and management functions.
Accessing TopAccess End-User Mode 17
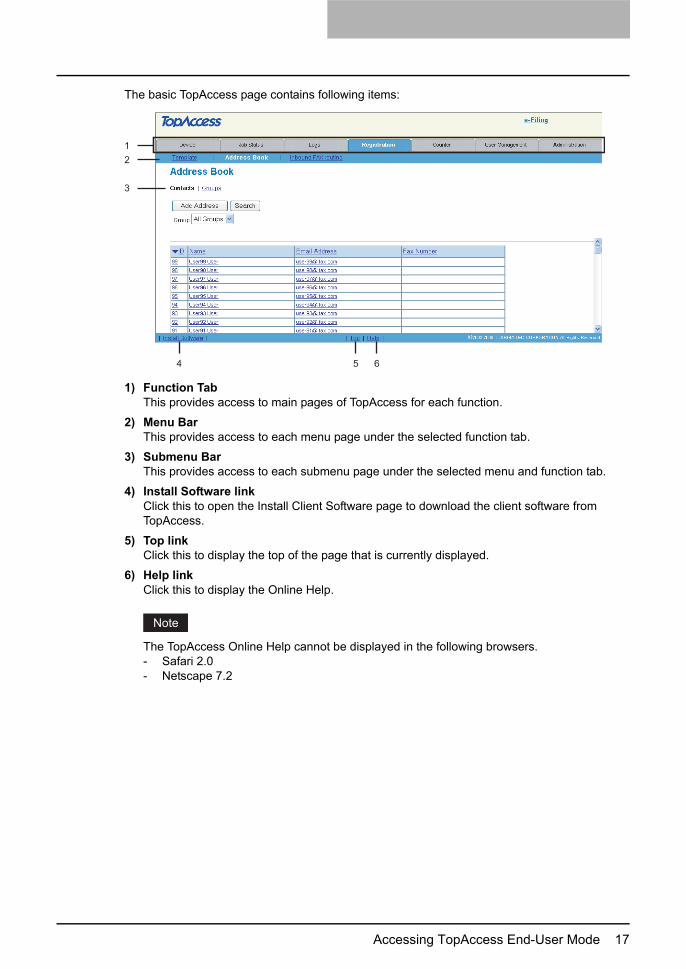
The basic TopAccess page contains following items:
1) Function TabThis provides access to main pages of TopAccess for each function.
2) Menu BarThis provides access to each menu page under the selected function tab.
3) Submenu BarThis provides access to each submenu page under the selected menu and function tab.
4) Install Software linkClick this to open the Install Client Software page to download the client software from TopAccess.
5) Top linkClick this to display the top of the page that is currently displayed.
6) Help linkClick this to display the Online Help.
The TopAccess Online Help cannot be displayed in the following browsers.- Safari 2.0- Netscape 7.2
1
2
3
4 5 6

1 Overview
18 Accessing TopAccess End-User Mode
2.Checking Device Status
This section describe the Device tab page of TopAccess end-user mode
TopAccess Device Tab Page..................................................................................20Device Status Indicators....................................................................................................................21

2 Checking Device Status
20 TopAccess Device Tab Page
TopAccess Device Tab Page
TopAccess opens with the end-user Device tab, which includes a picture of the device. At any time, the end-user may click Refresh to update the TopAccess status information.This tab shows the following information about the device:
1) Device InformationThe Device Information list shows the following information.- Status — Displays the device status.- Name — Displays the name of this equipment.- Location — Displays the equipment’s location.- Copier Model — Displays the model name of this equipment.- Save as File Space Available — Displays the available size to store the Save as file
documents.- Store to e-Filing Space Available — Displays the available size to store the e-Filing
documents.- Fax Transmission Space Available — Displays the available size to send the fax data.
This is displayed only when the fax unit is installed.- Fax Reception Space Available — Displays the available size to receive the fax data.
This is displayed only when the fax unit is installed.- Work Space Available — Displays the percentages of available hard disk space to store
the temporary data.- Contact Information — Displays the contact name of the person responsible for manag-
ing this device.- Phone Number — Displays the phone number of the person responsible for managing
this device.- Message — Displays the administrative message.- Alerts — Displays the alert message. Errors are in red and warnings are in yellow.
2) OptionsThe Options list shows the status of optional unit.- Finisher — Displays the type of finisher installed.- Hole Punch Unit — Displays whether the hole punch unit is installed.- Fax — Displays whether the fax unit is installed.- Optional Function kit — Displays whether the optional function kit is installed.- Automatic Duplexing Unit — Displays whether the optional Automatic Duplexing Unit is
installed. (e-STUDIO282 Series Only)
1
3
2

TopAccess Device Tab Page 21
3) PaperThe Paper list shows the drawer status.- Drawer — Lists the installed drawers.- Size — Displays the paper size set in each drawer.- Type — Displays the paper type set in each drawer.- Capacity — Displays the maximum paper capacity that can be set in each drawer.- Status — Displays the consumption status in each drawer.
Device Status IndicatorsYou can use TopAccess to check if this equipment requires maintenance. The Device Summary window includes a device icon that displays visual Device Status Indicators in the event of a device malfunction.
Printer Error 1
The above printer error icon indicates that non-recommended toner is used. For information on resolving the error condition, refer to “REPLACE TONER CARTRIDGE SYMBOL” in Operator’s Manual for Basic Function.Printer Error 2
The above printer error icon indicates:- You need to remove paper from standard output tray.- You need to remove paper from Job Separator.- You need to remove paper from Finisher tray.- You need to remove staples jammed in the Finisher. For information on resolving the
error condition, refer to “CLEAR PAPER SYMBOL” in Operator’s Manual for Basic Function.
- You need to clear hole punches from Finisher. For information on resolving the error con-dition, refer to “DISPOSING OF THE PUNCHED PAPER BITS (OPTIONAL)” in Opera-tor’s Manual for Basic Function.
- Non-recommended toner is being used. For information on resolving the error condition, refer to “REPLACE TONER CARTRIDGE SYMBOL” in Operator’s Manual for Basic Function.
- You need to remove excess staples from the Saddle Stitch Finisher.- You performed saddle stitch printing using mixed paper sizes.- Cannot load paper from the LCF.- Cannot output to inner tray.
Cover Open
The Cover Open error icon indicates that you need to close the cover.Drawer Open
The Drawer Open error icon shows which drawer is open: upper, middle, or lower. You must close the specified drawer to resume printing and copying functions.

2 Checking Device Status
22 TopAccess Device Tab Page
Toner Empty
The Toner Empty icon indicate that the toner is empty.For information on resolving the error condition, refer to “REPLACE TONER CARTRIDGE SYMBOL” in Operator’s Manual for Basic Function.Toner Full
The Toner Full error icon indicates you need to replace the toner container. For information on resolving the error condition, refer to “REPLACE TONER BAG SYMBOL” in Operator’s Manual for Basic Function.Paper Empty
The Out of Paper error icon shows which drawer is empty: upper, middle, or lower. A paper out condition does not necessarily terminate a print or copy job. If Auto-select options are configured, printing and copying may continue by drawing paper from a different drawer. Refer to the TopAccess online Help for instructions on setting up Auto-Select mode. For information on resolving the error condition, refer to “ADD PAPER SYMBOL” in Operator’s Manual for Basic Function.Paper Jam
The Device Status icon varies depending on where a paper jam occurred in the copier. This graphic illustrates the possible locations. For information on resolving the error condition, refer to “CLEAR PAPER SYMBOL” in Operator’s Manual for Basic Function.Staple Empty
The Add Staples error icon indicates you need to add staples to the finisher. For information on resolving the error condition, refer to “ADDING STAPLES (OPTIONAL)” in Operator’s Manual for Basic Function.Serviceman Calls
The Service Call error icon indicates that a call for service is needed. Contact your service representative.

3.Managing Jobs
Using TopAccess, end users can display and delete print jobs, fax transmission jobs, and scan jobs released by end users.
Managing Print Jobs...............................................................................................24Displaying Print Jobs.........................................................................................................................24Deleting a Print Job...........................................................................................................................25Releasing a Print Job ........................................................................................................................25
Managing Fax/Internet Fax Jobs ...........................................................................27Displaying Fax/Internet Fax Jobs......................................................................................................27Deleting a Fax Transmission Job......................................................................................................27
Managing Scan Jobs ..............................................................................................29Displaying Scan Jobs........................................................................................................................29Deleting a Scan Job ..........................................................................................................................29

3 Managing Jobs
24 Managing Print Jobs
Managing Print Jobs
Using TopAccess, you can display, delete and release print jobs that are currently in the queue.
Displaying Print Jobs
Accessing the Print menu page in the Job Status tab
1 Click the Job Status tab and click the Print menu.The Print menu page is displayed.
2 If your print job previously released is not displayed in the list, click the [REFRESH] icon at the upper right in the page.
The print jobs that had finished printing are displayed in the Log tab.To sort the print jobs list so that a particular job is easier to be found, click the appro-priate table heading. The page refreshes to display the information in the order you requested.
The Print menu page displays following information for each print job.
1) User NameDisplays the computer name that released the print job.
2) Date TimeDisplays the date and time when the print job was released from the client computers.
3) TypeDisplays the print job type.
4) PaperDisplays the paper size of the print jobs.
5) PagesDisplays the number of pages the print job contains.
6) SetsDisplays the number of copies set in the print jobs.

Managing Print Jobs 25
Deleting a Print JobYou can delete jobs that are stored in the queue.
The private print jobs cannot be deleted by users. To delete the private print jobs from TopAc-cess, you must log in as an administrator in the Administration tab page first, then display the Print menu page. If you log in as an administrator, the [Delete All Private Print Jobs] button is additionally displayed at the next of the release button.You can click [Delete All Private Print Jobs] button to delete all private jobs in the list. It may take a time to delete all private print jobs.
Deleting a print job
1 Click the Job Status tab and click the Print menu.The Print menu page is displayed.
2 Select an option button at the left of the print job that you want to delete.
You can select only one print job at a time.
3 Click [Delete].Selected print job is deleted.
Releasing a Print JobYou can print jobs that are stored in the queue.
The private print jobs cannot be released from TopAccess.
Releasing a print job
1 Click the Job Status tab and click the Print menu.The Print menu page is displayed.
3 Managing Jobs
26 Managing Print Jobs
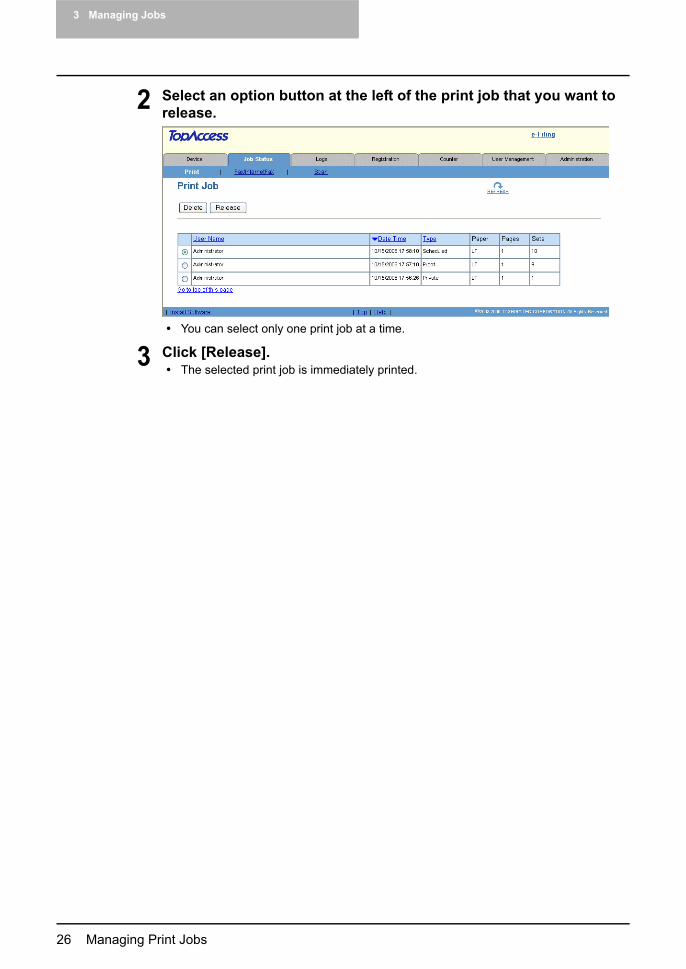
2 Select an option button at the left of the print job that you want to release.
You can select only one print job at a time.
3 Click [Release].The selected print job is immediately printed.

Managing Fax/Internet Fax Jobs 27
Managing Fax/Internet Fax Jobs
Using TopAccess, you can display and delete fax transmission jobs including fax transmission and Internet Fax transmission.
Displaying Fax/Internet Fax Jobs
Accessing the Fax/Internet Fax menu page in the Job Status tab
1 Click the Job Status tab and click the Fax/Internet Fax menu.The Fax/Internet Fax menu page is displayed.
2 If your fax transmission job previously released is not displayed in the list, click the [REFRESH] icon at the upper right in the page.
The transmission jobs that had finished the transmission are displayed in the Log tab.To sort the fax transmission jobs list so that a particular job is easier to be found, click the appropriate table heading. The page refreshes to display the information in the order you requested.
The Fax/Internet Fax menu page displays following information for each fax transmission job.
1) File No.Displays the file number to identify the fax transmission job.
2) TODisplays the destinations set to the fax transmission job.
3) Date TimeDisplays the date and time when the fax transmission job is released from the Touch Panel Display or client computer using the N/W-Fax driver.
4) PagesDisplays the number of pages the fax transmission job contains.
5) Delay TimeDisplays the delayed time set to the fax transmission job.
Deleting a Fax Transmission JobYou can delete a fax transmission job.
3 Managing Jobs
28 Managing Fax/Internet Fax Jobs
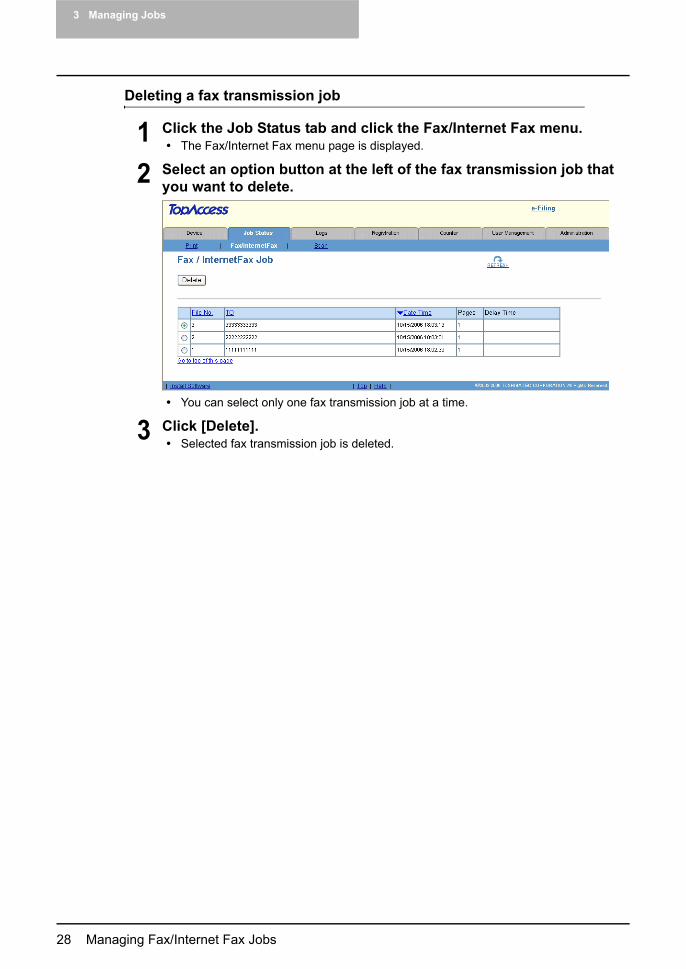
Deleting a fax transmission job
1 Click the Job Status tab and click the Fax/Internet Fax menu.The Fax/Internet Fax menu page is displayed.
2 Select an option button at the left of the fax transmission job that you want to delete.
You can select only one fax transmission job at a time.
3 Click [Delete].Selected fax transmission job is deleted.
Managing Scan Jobs 29
Managing Scan Jobs
Using TopAccess, you can display and delete scan jobs that are currently in the queue.
Displaying Scan Jobs
Accessing the Scan menu page in the Job Status tab
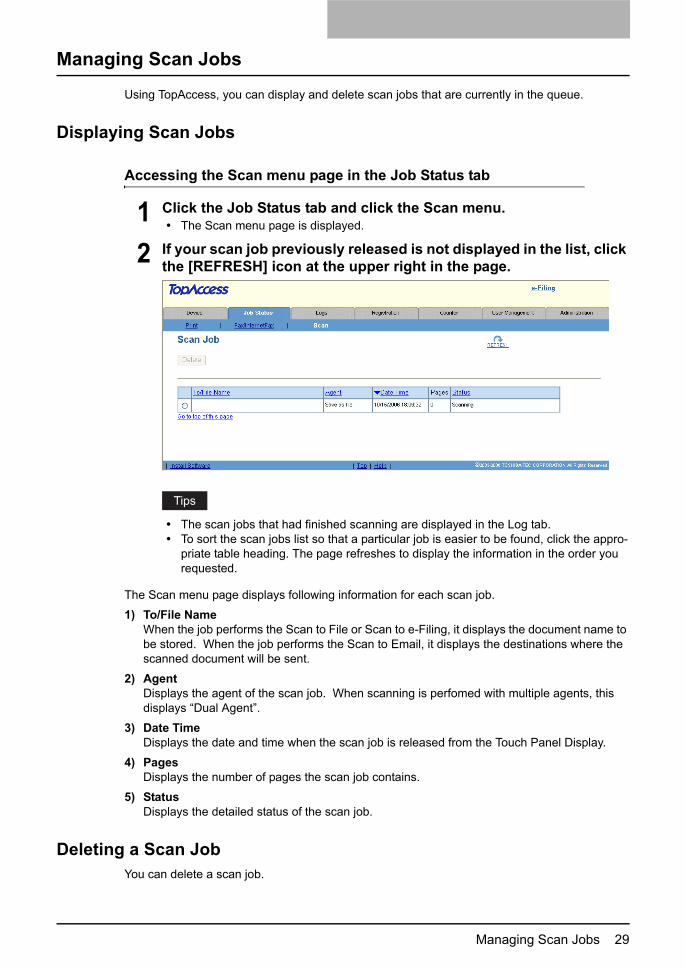
1 Click the Job Status tab and click the Scan menu.The Scan menu page is displayed.
2 If your scan job previously released is not displayed in the list, click the [REFRESH] icon at the upper right in the page.
The scan jobs that had finished scanning are displayed in the Log tab.To sort the scan jobs list so that a particular job is easier to be found, click the appro-priate table heading. The page refreshes to display the information in the order you requested.
The Scan menu page displays following information for each scan job.
1) To/File NameWhen the job performs the Scan to File or Scan to e-Filing, it displays the document name to be stored. When the job performs the Scan to Email, it displays the destinations where the scanned document will be sent.
2) AgentDisplays the agent of the scan job. When scanning is perfomed with multiple agents, this displays “Dual Agent”.
3) Date TimeDisplays the date and time when the scan job is released from the Touch Panel Display.
4) PagesDisplays the number of pages the scan job contains.
5) StatusDisplays the detailed status of the scan job.
Deleting a Scan JobYou can delete a scan job.

3 Managing Jobs
30 Managing Scan Jobs
Deleting a scan job
1 Click the Job Status tab and click the Scan menu.The Scan menu page is displayed.
2 Select an option button at the left of the scan job that you want to delete.
You can select only one scan job at a time.
3 Click [Delete].Selected scan job is deleted.

4.Displaying Job Logs
Using TopAccess, end users can display print job logs, transmission journals, reception journals, and scan job logs.
Displaying Print Job Logs......................................................................................32Displaying Transmission Journals........................................................................33Displaying Reception Journals .............................................................................35Displaying Scan Job Logs .....................................................................................37

4 Displaying Job Logs
32 Displaying Print Job Logs
Displaying Print Job Logs
Using TopAccess, you can display the print job logs printed on this equipment.
Accessing the Print menu page in the Logs tab
1 Click the Logs tab and click the Print menu.The Print menu page is displayed.
2 Click the [REFRESH] icon at the upper right in the page to obtain the update information.
To sort the print job logs list so that a particular job log is easier to be found, click the appropriate table heading. The page refreshes to display the information in the order you requested.
The Print menu page displays following information for each print job log.
1) User NameDisplays the computer name that released the print job. Click the header link to sort the print job list by user name.
2) Date TimeDisplays the date and time that the print job was released from the client computers. Click the header link to sort the print job list by Date and Time.
3) TypeDisplays the print job type. Click the header link to sort the print job list by print job type.
4) PaperDisplays the paper size of the print jobs.
5) PagesDisplays the number of pages the print job contains.
6) SetsDisplays the number of copies set in print jobs.

Displaying Transmission Journals 33
Displaying Transmission Journals
Using TopAccess, you can display the transmission journals that this equipment sent by fax, Internet Fax transmission, and E-mail.
Accessing the Transmission menu page in the Logs tab
1 Click the Logs tab and click the Transmission menu.The Transmission menu page is displayed.
2 Click the [REFRESH] icon at the upper right in the page to obtain the update information.
To sort the transmission journals list so that a particular transmission journal is easier to be found, click the appropriate table heading. The page refreshes to display the informa-tion in the order you requested.
The Transmission menu page displays following information for each transmission journal.
1) No.Displays the serial number of the journals.
2) File No.Displays the file number to identify the transmission job.
3) Date TimeDisplays the date and time the transmission job was performed.
4) DurationDisplays the time length taken for the transmissions. If it takes more than 1 hour, “59:59” is indicated.
5) PagesDisplays the number of pages the transmission job contains.
6) TODisplays the destinations set to the transmission job.
7) DeptDisplays the department name.

4 Displaying Job Logs
34 Displaying Transmission Journals
8) ModeDisplays the transmission mode.The transmission mode is displayed with the combination of 2-digit alphabet code, 3-digit numeric code, and up to 4-digit supplemental code.For example: EC 604
9) StatusDisplays the result of the transmission.
10)LineDisplays the line used.
2 digit alphabet code(Communication Mode)
1st numeric code(bps)
2nd numeric code
(Resolution)
3rd numeric code
(Mode)
Up to 4 digitsupplemental code
EC: ECMG3: G3
0: 24001: 48002: 72003: 96004: 120005: 144006: V.34
0: 8x3.851: 8x7.72: 8x15.44: 16x15.48: 300 dpiB: 600 dpiD 150 dpi
0: MH1: MR2: MMR3: JBIG
P: PollingSB: MailboxSR/R: Relay mailboxSF/F: Forward mailboxML: Internet FaxI: N/W-FaxO: Offramp Gateway

Displaying Reception Journals 35
Displaying Reception Journals
Using TopAccess, you can display the reception journals that this equipment received by fax, Internet Fax transmission, and E-mail.
Accessing the Reception menu page in the Logs tab
1 Click the Logs tab and click the Reception menu.The Reception menu page is displayed.
2 Click the [REFRESH] icon at the upper right in the page to obtain the update information.
To sort the reception journals list so that a particular reception journal is easier to be found, click the appropriate table heading. The page refreshes to display the information in the order you requested.
The Reception menu page displays following information for each reception journal.
1) No.Displays the serial number of the journals.
2) File No.Displays the file number to identify the received job.
3) Date TimeDisplays the date and time of receiving the job.
4) DurationDisplays the time length taken for the receptions. If it takes more than 1 hour, “59:59” is indi-cated.
5) PagesDisplays the number of pages the received job contains.
6) FromDisplays the sender’s email address or fax number of the received job.
7) DeptDisplays the department number.

4 Displaying Job Logs
36 Displaying Reception Journals
8) ModeDisplays the reception mode.The reception mode is displayed with the combination of 2-digit alphabet code, 3-digit numeric code, and up to 4-digit supplemental code.For example: EC 604
9) StatusDisplays the result of the reception.
10)LineDisplays the line used.
2 digit alphabet code(Communication Mode)
1st numeric code(bps)
2nd numeric code
(Resolution)
3rd numeric code
(Mode)
Up to 4 digitsupplemental code
EC: ECMG3: G3
0: 24001: 48002: 72003: 96004: 120005: 144006: V.34
0: 8x3.851: 8x7.72: 8x15.44: 16x15.48: 300 dpiB: 600 dpiD 150 dpi
0: MH1: MR2: MMR3: JBIG
P: PollingSB: MailboxSR/R: Relay mailboxSF/F: Forward mailboxML: Internet FaxI: N/W-FaxO: Onramp Gateway

Displaying Scan Job Logs 37
Displaying Scan Job Logs
Using TopAccess, you can display scan job logs that this equipment performed.
Accessing the Scan menu page in the Logs menu
1 Click the Logs tab and click the Scan menu.The Scan menu page is displayed.
2 Click the [REFRESH] icon at the upper right in the page to obtain the update information.
To sort the scan job logs list so that a particular scan job log is easier to be found, click the appropriate table heading. The page refreshes to display the information in the order you requested.
The Scan menu page displays following information for each scan job log.
1) To/File NameWhen the job performed the Scan to File or Scan to e-Filing, it displays the document name that was stored. When the job performed the Scan to Email, it displays the destinations where the scanned document was sent.
2) User NameDisplays the user name of the scan job.
3) AgentDisplays the agent of the scan job.
4) Date TimeDisplays the date and time when the scan job was released from the Control Panel.
5) PagesDisplays the number of pages the scan job contains.
6) ModeDisplays the transmission mode using the 6 character codes. Each code describes the details of the transmission mode as below.
Code Format: AA B C D EAA: This describes the job type.- CA: Copy and File, Copy and Store to e-Filing- CT: Copy to e-Filing- FS: Relay Mailbox Transmission- FF: Fax Received Forward- FE: Internet Fax Received Forward

4 Displaying Job Logs
38 Displaying Scan Job Logs
- ST: Scan to File, Scan to e-Filing, Scan to Email- FA: Fax and Save as File- PA: Print and e-Filing- PT: Print to e-Filing- IA: N/W-Fax and Save as File- BE: e-Filing to Email- RS: Remote Scan
B: This describes the transmission type.- 0: e-Filing- 1: Email (SMTP)- 2: FTP- 3: SMB- 4: Local- 5: NetWare IPX/SPX- 6: USB- 7: NetWare TCP/IP- 9: Remote Scan
C: This describes the resolution.- 0: 100 dpi- 1: 150 dpi- 2: 200 dpi- 3: 300 dpi- 4: 400 dpi- 5: 600 dpi- A: 8x3.85 (line/mm) (203x98)- B: 8x7.7 (line/mm) (203x196)- C: 8x15.4 (line/mm) (203x391)- D: 16x15.4 (line/mm) (400x391)
D: This describes the file format.- 0: e-Filing- 1: TIFF (Multi)- 2: TIFF (Single)- 3: PDF (Multi)- 4: JPEG- 5: PDF (Single)
E: This describes the file color mode. This always indicates “B” (Black) for this equipment.
7) StatusDisplays the detailed result status of the scan job.

5.Registering from TopAccess
This section describes the instruction on how to register templates, address book, and mailboxes.
Managing Templates...............................................................................................40Registering Private Template Groups ...............................................................................................40Registering Private Templates ..........................................................................................................48Displaying Public Templates .............................................................................................................78
Managing Address Book........................................................................................80Managing Contacts in the Address Book ..........................................................................................80Managing Groups in the Address Book ............................................................................................87
Managing Mailboxes...............................................................................................90Setting Up an Open Mailbox .............................................................................................................91Deleting an Open Mailbox.................................................................................................................97

5 Registering from TopAccess
40 Managing Templates
Managing Templates
Templates contain preset information for the operation of the copiers, scans, and fax and Inter-net Fax transmissions so that users can perform these operations easily by selecting the tem-plate button on the Touch Panel Display.Templates are stored in groups. There are up to 200 private template groups and one public group. Each group can contain up to 60 templates.
There is the “Useful Template” group that the useful templates have been registered in the private template group.Templates in the public group are created and maintained by the administrator. The public group can be accessed by all users, but some of the templates may be designed for specific purposes and have passwords assigned to them. For more information about setting up the public templates, see the following section.
P.213 “Registering Public Templates”
Templates in private template groups are based on particular group profiles. Private groups can be assigned passwords. You can also assign passwords to individual templates. If it has no password assigned at either the template or group level, a “private” template is accessible to all users.In practice, you may not need to create templates or groups yourself. The administrator and other users may have set up all the templates you need for your work. Before creating any tem-plate, look on your system to see what templates are available.When users set up the templates and template group for the first time, you must first create a template group according to how templates are grouped, and then register the template that you require.
P.40 “Registering Private Template Groups” P.48 “Registering Private Templates”
In addition, you can also display the templates list registered in the public group. P.78 “Displaying Public Templates”
Templates can be managed using the Touch Panel Display. For managing templates from the Touch Panel Display, please see the Operator’s Manual for Basic Function.
Registering Private Template GroupsBefore registering private templates, you have to register the private template group. You can classify the private templates according to every department, every user, and a use by register-ing the private template groups.Also each private template group can be protected by the password.
P.40 “Setting Group Information” P.43 “Setting Group Password” P.46 “Resetting Group Information”
Setting Group InformationYou can define up to 200 private template groups. To define the private template groups, you can specify the group name, owner, and email notification setting.
Managing Templates 41
Setting a private template group information
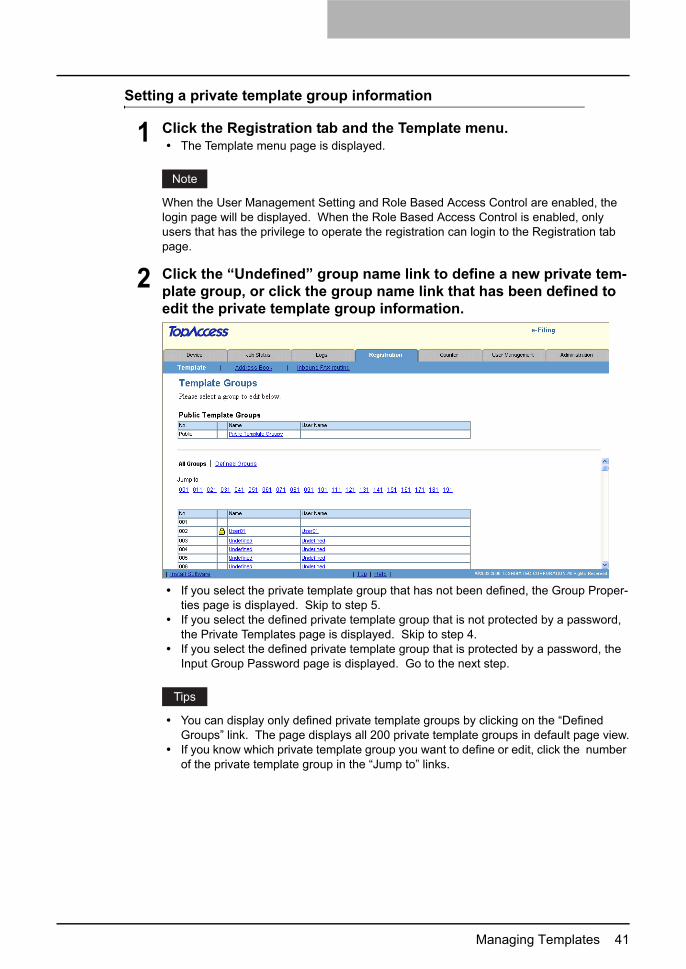
1 Click the Registration tab and the Template menu.The Template menu page is displayed.
When the User Management Setting and Role Based Access Control are enabled, the login page will be displayed. When the Role Based Access Control is enabled, only users that has the privilege to operate the registration can login to the Registration tab page.
2 Click the “Undefined” group name link to define a new private tem-plate group, or click the group name link that has been defined to edit the private template group information.
If you select the private template group that has not been defined, the Group Proper-ties page is displayed. Skip to step 5.If you select the defined private template group that is not protected by a password, the Private Templates page is displayed. Skip to step 4.If you select the defined private template group that is protected by a password, the Input Group Password page is displayed. Go to the next step.
You can display only defined private template groups by clicking on the “Defined Groups” link. The page displays all 200 private template groups in default page view.If you know which private template group you want to define or edit, click the number of the private template group in the “Jump to” links.
5 Registering from TopAccess
42 Managing Templates
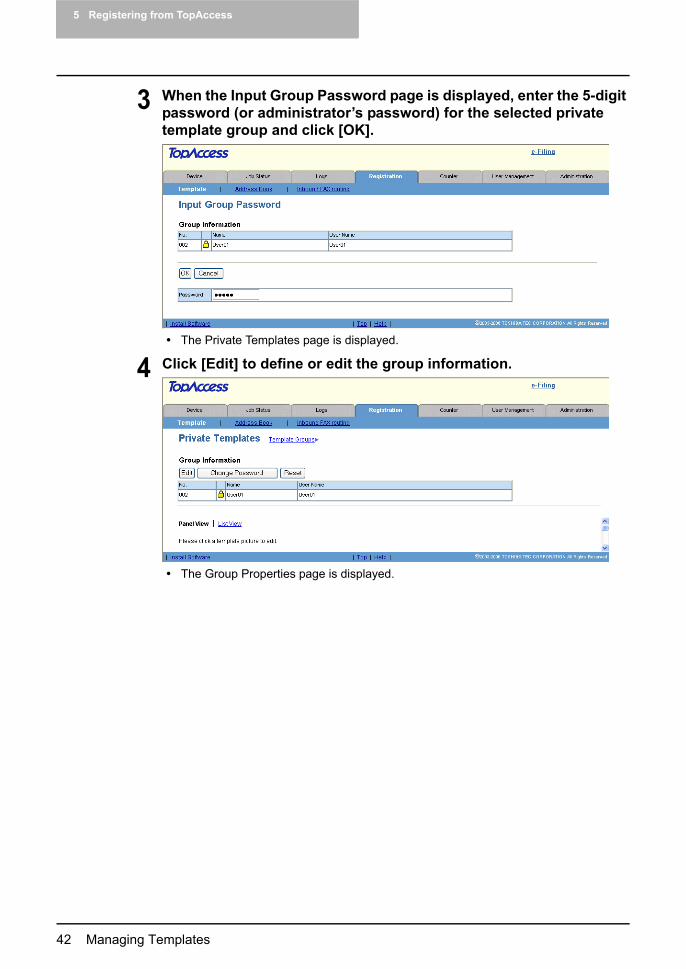
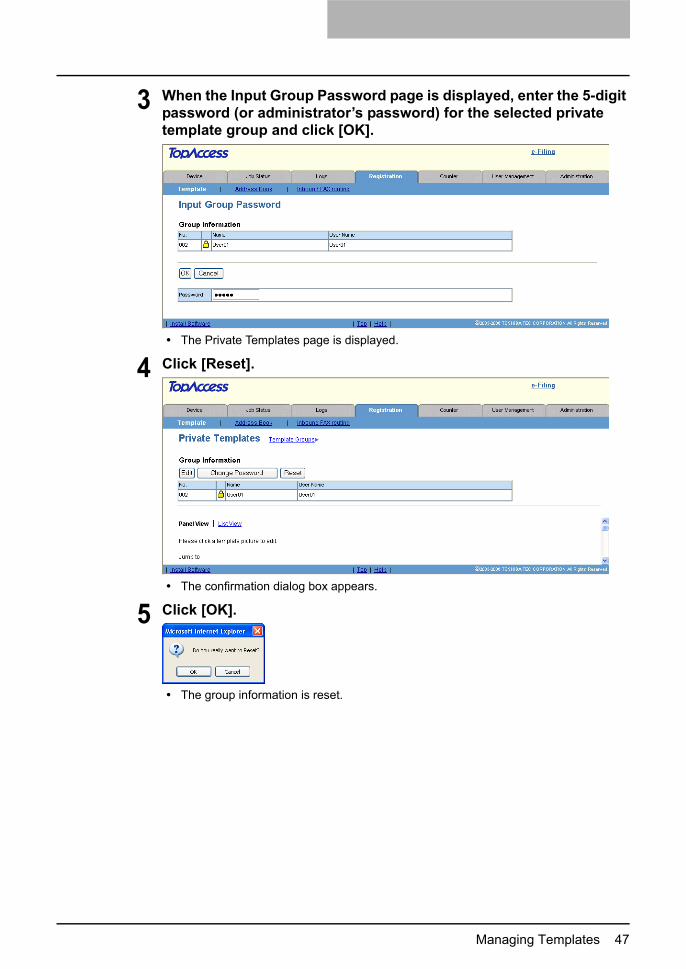
3 When the Input Group Password page is displayed, enter the 5-digit password (or administrator’s password) for the selected private template group and click [OK].
The Private Templates page is displayed.
4 Click [Edit] to define or edit the group information.
The Group Properties page is displayed.

Managing Templates 43
5 Enter the items below as desired.
Number — Displays the number of the private template group.Name — Enter the name of the private template group.User Name — Enter the owner name of the private template group.Notification — Enter the default email address where the notification will be sent. The email address entered here will be displayed in the Panel Settings page and can be selected for the destination of the notifications when creating a private template in this group.
6 Click [Save] to apply changes.
7 You can continue setting the group password, or registering or editing templates in the group, as required.
P.43 “Setting Group Password” P.48 “Registering Private Templates”
Setting Group PasswordTo set the group password, you must register the private template group first. You can set the password for the group that you have already registered.
Setting the group password
1 Click the Registration tab and the Template menu.The Template menu page is displayed.
When the User Management Setting and Role Based Access Control are enabled, the login page will be displayed. When the Role Based Access Control is enabled, only users that has the privilege to operate the registration can login to the Registration tab page.

5 Registering from TopAccess
44 Managing Templates
2 Click the group name link that you want to set or to modify the group password.
If you select the private template group that is not protected by a password, the Pri-vate Templates page is displayed. Skip to step 4.If you select the private template group that is protected by a password, the Input Group Password page is displayed. Go to the next step.
You can display only defined private template groups by clicking on the “Defined Groups” link. The page displays all 200 private template groups in default page view.If you know which private template group you want to define or edit, click the number of the private template group in the “Jump to” links.
3 When the Input Group Password page is displayed, enter the 5-digit password (or administrator’s password) for the selected private template group and click [OK].
The Private Templates page is displayed.

Managing Templates 45
4 Click [Change Password] to set the password for the private tem-plate group.
The Change Group Password page is displayed.
5 Enter the old password in the Old Password field, and new pass-word in the New Password and Retype Password fields.
You can only use 5-digit numbers for the password.If the password has not been set to the group, leave the Old Password field blank.Leaving the New Password and Retype Password field blank releases password pro-tection for the group.
6 Click [Save].The confirmation dialog box appears.
7 Click [OK].
The group password is set or modified.

5 Registering from TopAccess
46 Managing Templates
Resetting Group InformationYou can reset the group information that you no longer require and turn it to an undefined group.
If you reset the group information, all private templates registered in the group will be deleted.
Resetting group information
1 Click the Registration tab and the Template menu.The Template menu page is displayed.
When the User Management Setting and Role Based Access Control are enabled, the login page will be displayed. When the Role Based Access Control is enabled, only users that has the privilege to operate the registration can login to the Registration tab page.
2 Click the group name link that you want to reset.
If you select the private template group that is not protected by a password, the Pri-vate Templates page is displayed. Skip to step 4.If you select the private template group that is protected by a password, the Input Group Password page is displayed. Go to the next step.
You can display only defined private template groups by clicking on the “Defined Groups” link. The page displays all 200 private template groups in default page view.If you know which private template group you want to define or edit, click the number of private template group in the “Jump to” links.
Managing Templates 47
3 When the Input Group Password page is displayed, enter the 5-digit password (or administrator’s password) for the selected private template group and click [OK].
The Private Templates page is displayed.
4 Click [Reset].
The confirmation dialog box appears.
5 Click [OK].
The group information is reset.
5 Registering from TopAccess
48 Managing Templates
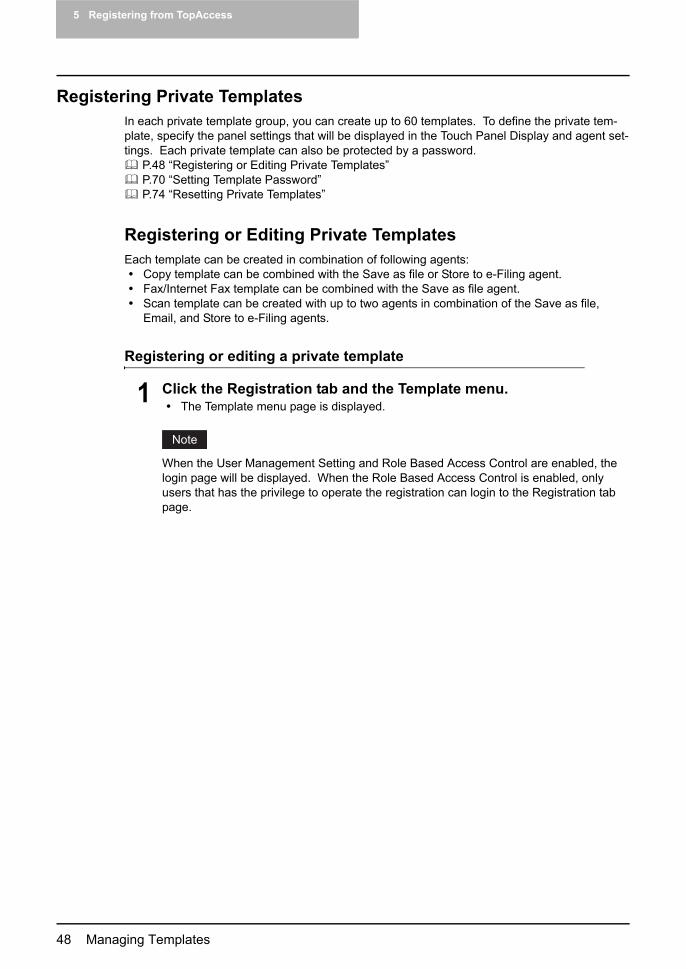
Registering Private TemplatesIn each private template group, you can create up to 60 templates. To define the private tem-plate, specify the panel settings that will be displayed in the Touch Panel Display and agent set-tings. Each private template can also be protected by a password.
P.48 “Registering or Editing Private Templates” P.70 “Setting Template Password” P.74 “Resetting Private Templates”
Registering or Editing Private TemplatesEach template can be created in combination of following agents:
Copy template can be combined with the Save as file or Store to e-Filing agent.Fax/Internet Fax template can be combined with the Save as file agent.Scan template can be created with up to two agents in combination of the Save as file, Email, and Store to e-Filing agents.
Registering or editing a private template
1 Click the Registration tab and the Template menu.The Template menu page is displayed.
When the User Management Setting and Role Based Access Control are enabled, the login page will be displayed. When the Role Based Access Control is enabled, only users that has the privilege to operate the registration can login to the Registration tab page.

Managing Templates 49
2 Click the group name link where you want to register or edit the pri-vate template.
If you select the private template group that is not protected by a password, the Pri-vate Templates page is displayed. Skip to step 4.If you select the private template group that is protected by a password, the Input Group Password page is displayed. Go to the next step.
You can display only defined private template groups by clicking on the “Defined Groups” link. The page displays all 200 private template groups in default page view.If you know which private template group you want to define or edit, click the number of the private template group in the “Jump to” links.
3 When the Input Group Password page is displayed, enter the 5-digit password (or administrator’s password) for the selected private template group and click [OK].
The Private Templates page is displayed.

5 Registering from TopAccess
50 Managing Templates
4 From the templates list, click the “Undefined” icon to register a new template, or click defined icon to edit the template.
If the templates list is displayed in the List view, click the “Undefined” template name to register new template, or click the defined template name to edit the template.If you select the private template that has not been defined, the Template Properties page to select agents is displayed. Skip to step 7.If you select the defined private template that is not protected by a password, the Template Properties page is displayed. Skip to step 6.If you select the defined private template that is protected by a password, the Input Template Password page is displayed. Go to the next step.
You can change the template list view by clicking on either “Panel View” or “List View”.If you know which private template you want to define or edit, click the number of the private template in the “Jump to” links.

Managing Templates 51
5 When the Input Template Password page is displayed, enter the 5-digit password (or administrator’s password) for selected private template and click [OK].
The Template Properties page is displayed.
6 Click [Edit] to define or edit the template properties.
The Template Properties page to select agents is displayed.
5 Registering from TopAccess
52 Managing Templates
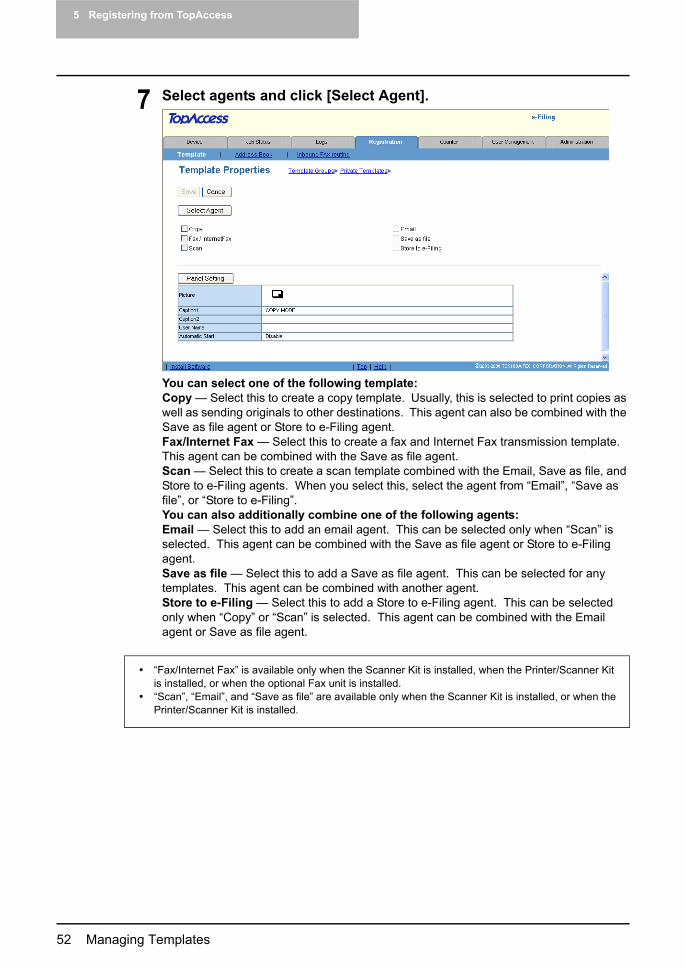
7 Select agents and click [Select Agent].
You can select one of the following template:Copy — Select this to create a copy template. Usually, this is selected to print copies as well as sending originals to other destinations. This agent can also be combined with the Save as file agent or Store to e-Filing agent.Fax/Internet Fax — Select this to create a fax and Internet Fax transmission template. This agent can be combined with the Save as file agent.Scan — Select this to create a scan template combined with the Email, Save as file, and Store to e-Filing agents. When you select this, select the agent from “Email”, “Save as file”, or “Store to e-Filing”.You can also additionally combine one of the following agents:Email — Select this to add an email agent. This can be selected only when “Scan” is selected. This agent can be combined with the Save as file agent or Store to e-Filing agent.Save as file — Select this to add a Save as file agent. This can be selected for any templates. This agent can be combined with another agent.Store to e-Filing — Select this to add a Store to e-Filing agent. This can be selected only when “Copy” or “Scan” is selected. This agent can be combined with the Email agent or Save as file agent.
“Fax/Internet Fax” is available only when the Scanner Kit is installed, when the Printer/Scanner Kit is installed, or when the optional Fax unit is installed.“Scan”, “Email”, and “Save as file” are available only when the Scanner Kit is installed, or when the Printer/Scanner Kit is installed.
Managing Templates 53
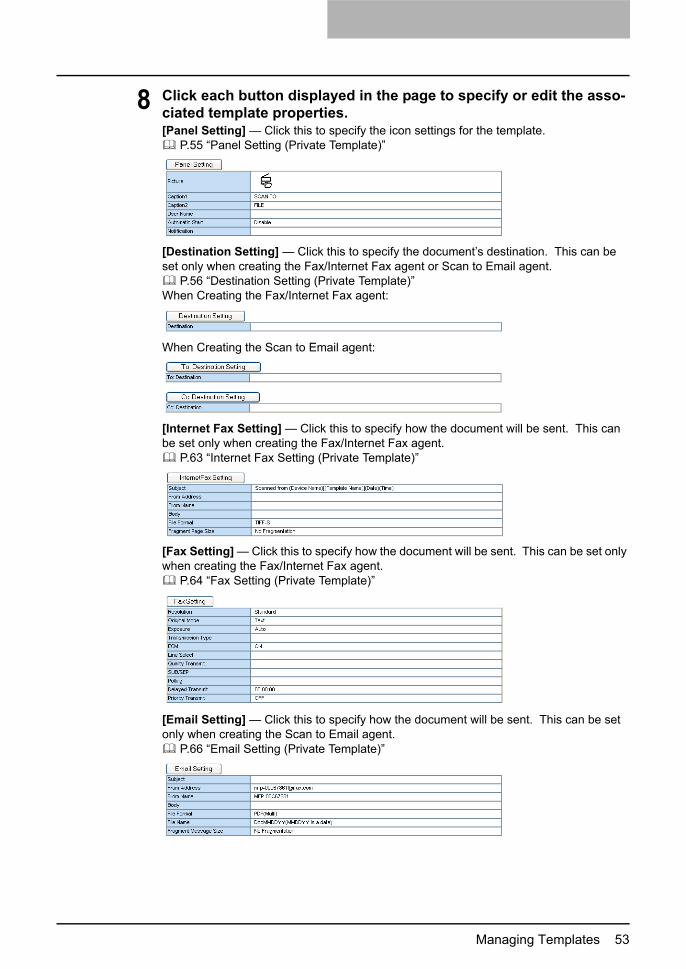
8 Click each button displayed in the page to specify or edit the asso-ciated template properties.[Panel Setting] — Click this to specify the icon settings for the template.
P.55 “Panel Setting (Private Template)”
[Destination Setting] — Click this to specify the document’s destination. This can be set only when creating the Fax/Internet Fax agent or Scan to Email agent.
P.56 “Destination Setting (Private Template)”When Creating the Fax/Internet Fax agent:
When Creating the Scan to Email agent:
[Internet Fax Setting] — Click this to specify how the document will be sent. This can be set only when creating the Fax/Internet Fax agent.
P.63 “Internet Fax Setting (Private Template)”
[Fax Setting] — Click this to specify how the document will be sent. This can be set only when creating the Fax/Internet Fax agent.
P.64 “Fax Setting (Private Template)”
[Email Setting] — Click this to specify how the document will be sent. This can be set only when creating the Scan to Email agent.
P.66 “Email Setting (Private Template)”

5 Registering from TopAccess
54 Managing Templates
[Save as file Setting] — Click this to specify how the document will be stored in local hard disk or network folder. This can be set only when creating the Save as file agent.
P.67 “Save as file Setting (Private Template)”
[Box Setting] — Click this to specify how the document will be stored in the Box. This can be set only when creating the Scan to e-Filing agent.
P.69 “Box Setting (Private Template)”
[Scan Setting] — Click this to specify how the document will be scanned. This can be set only when creating the Save as file agent, Scan to Email agent, and Scan to e-Filing agent. This cannot be set when combining the Fax/Internet Fax agent.
P.70 “Scan Setting (Private Template)”
9 After configuring the desired template properties, click [Save].The template properties are registered.
10 The template has been registered or edited. You can click the Tem-plate Groups link at the upper side of the page to return to the Tem-plate menu page.

Managing Templates 55
— Panel Setting (Private Template)In the Panel Settings page, specify how the icon for the template is displayed in the Touch Panel Display, and the notification settings for the template.
1) PictureThis indicates the icon that will be displayed in the Touch Panel Display. The icon is auto-matically designated according to the agent that you select.
2) Caption1Enter the text that will be displayed next to the icon in the Touch Panel Display. You can enter up to 11 alphanumeric characters.
3) Caption2Enter the text that will be displayed next to the icon in the Touch Panel Display. You can enter up to 11 alphanumeric characters.
4) User NameEnter the owner name of the template.
5) Automatic StartSelect whether the automatic start function is enabled or disabled. When this is enabled, the operation will be automatically started when you press the template button from the TEM-PLATE menu on the Touch Panel Display without pressing the [START] button.
6) Notification — Send email when an error occursSelect this to send a notification message to the specified email address when an error occurs.
7) Notification — Send email when job is completedSelect this to send a notification message to the specified email address when a job is com-pleted.
8) Notification — Email toSelect to send the notification message to the email address that is set to the public group, or enter an email address to which the notification message will be sent.
1
2
3
4
5
6
7
8
5 Registering from TopAccess
56 Managing Templates
When you enable the Notification setting, make sure to set up the Email settings in the Email submenu page of the Setup menu in the TopAccess Administrator’s mode. For instructions on how to set up the Email settings, refer to the Network Administration Guide.
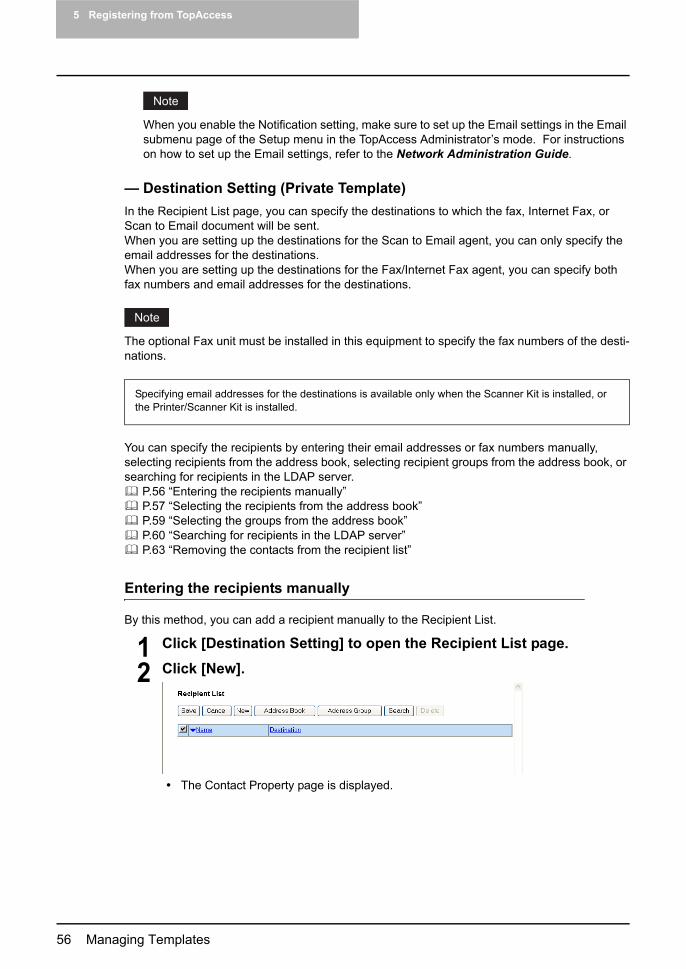
— Destination Setting (Private Template)In the Recipient List page, you can specify the destinations to which the fax, Internet Fax, or Scan to Email document will be sent.When you are setting up the destinations for the Scan to Email agent, you can only specify the email addresses for the destinations.When you are setting up the destinations for the Fax/Internet Fax agent, you can specify both fax numbers and email addresses for the destinations.
The optional Fax unit must be installed in this equipment to specify the fax numbers of the desti-nations.
You can specify the recipients by entering their email addresses or fax numbers manually, selecting recipients from the address book, selecting recipient groups from the address book, or searching for recipients in the LDAP server.
P.56 “Entering the recipients manually” P.57 “Selecting the recipients from the address book” P.59 “Selecting the groups from the address book” P.60 “Searching for recipients in the LDAP server” P.63 “Removing the contacts from the recipient list”
Entering the recipients manually
By this method, you can add a recipient manually to the Recipient List.
1 Click [Destination Setting] to open the Recipient List page.
2 Click [New].
The Contact Property page is displayed.
Specifying email addresses for the destinations is available only when the Scanner Kit is installed, or the Printer/Scanner Kit is installed.
Managing Templates 57
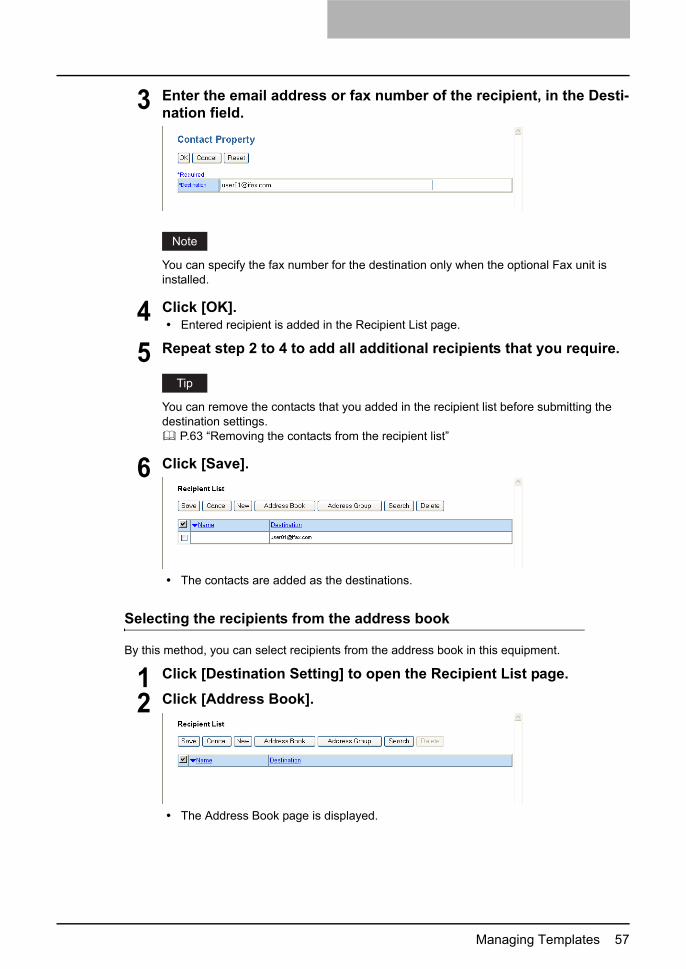
3 Enter the email address or fax number of the recipient, in the Desti-nation field.
You can specify the fax number for the destination only when the optional Fax unit is installed.
4 Click [OK].Entered recipient is added in the Recipient List page.
5 Repeat step 2 to 4 to add all additional recipients that you require.
You can remove the contacts that you added in the recipient list before submitting the destination settings.
P.63 “Removing the contacts from the recipient list”
6 Click [Save].
The contacts are added as the destinations.
Selecting the recipients from the address book
By this method, you can select recipients from the address book in this equipment.
1 Click [Destination Setting] to open the Recipient List page.
2 Click [Address Book].
The Address Book page is displayed.

5 Registering from TopAccess
58 Managing Templates
3 Check the Email boxes of users you want to add as the Email recip-ients or Internet Fax recipients, and check the Fax boxes of users you want to add as the Fax recipients.
When you are creating the Scan to Email template, only the Email check boxes are displayed in the Address Book page.You can specify the fax number for the destination only when the optional Fax unit is installed.
If you want to sort recipient list by a specific group, select the desired group name at the Group drop down box.
4 Click [Add].Selected recipients are added in the Recipient List page.
You can remove the contacts that you added in the recipient list before submitting the destination settings.
P.63 “Removing the contacts from the recipient list”

Managing Templates 59
5 Click [Save].
The contacts are added as the destinations.
Selecting the groups from the address book
By this method, you can select groups from the address book.
1 Click [Destination Setting] to open the Recipient List page.
2 Click [Address Group].
The Address Group page is displayed.
3 Check the Group boxes that contains the desired recipients.

5 Registering from TopAccess
60 Managing Templates
4 Click [Add].All recipients in the selected groups are added in the Recipient List page.
You can remove the contacts that you added in the recipient list before submitting the destination settings.
P.63 “Removing the contacts from the recipient list”
5 Click [Save].
The contacts are added as the destinations.
Searching for recipients in the LDAP server
By this method, you can search for recipients in the registered LDAP server and in the address book.
The LDAP server must be registered by an administrator. P.194 “Managing Directory Service”
1 Click [Destination Setting] to open the Recipient List page.
2 Click [Search].
The Search Contact page is displayed.
Managing Templates 61
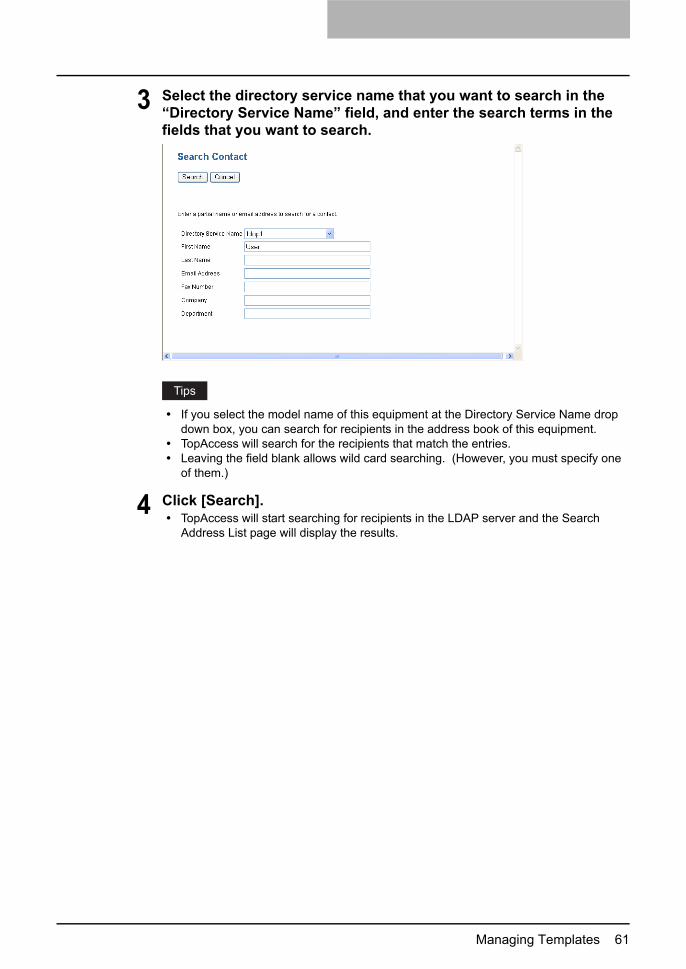
3 Select the directory service name that you want to search in the “Directory Service Name” field, and enter the search terms in the fields that you want to search.
If you select the model name of this equipment at the Directory Service Name drop down box, you can search for recipients in the address book of this equipment.TopAccess will search for the recipients that match the entries.Leaving the field blank allows wild card searching. (However, you must specify one of them.)
4 Click [Search].TopAccess will start searching for recipients in the LDAP server and the Search Address List page will display the results.

5 Registering from TopAccess
62 Managing Templates
5 Check the Email boxes of users to add the Email recipients or Inter-net Fax recipients, and check the Fax boxes of users to add the Fax recipients.
When you are creating the Scan to Email template, the ID check boxes are displayed in the Search Address List page.You can specify the fax number for the destination only when the optional Fax unit is installed.
6 Click [Add].The selected recipients are added in the Recipient List page.
You can remove the contacts that you added in the recipient list before submitting the destination settings.
P.63 “Removing the contacts from the recipient list”
7 Click [Save].
The contacts are added as the destinations.

Managing Templates 63
Removing the contacts from the recipient list
1 Check the check boxes of the contacts that you want to remove from the recipient list, and click [Delete].
The selected contacts are removed from the recipient list.
— Internet Fax Setting (Private Template)In the Internet Fax Setting page, you can specify the content of the Internet Fax to be sent.
1) SubjectThis sets the subject of the Internet Faxes. Select “Scanned from (Device Name) [(Template Name)] (Date) (Time)” to automatically insert the subject or enter the desired subject in the field.
2) From AddressEnter the email address of the sender. When the recipient replies to received document, the message will be sent to this email address.
3) From NameEnter the sender name of the Internet Fax.
1
2
3
4
5
6
5 Registering from TopAccess
64 Managing Templates
4) BodyEnter the body message of the Internet Fax. You can enter up to 1000 characters (including spaces).
5) File FormatOnly “TIFF-S” format can be selected.
6) Fragment Page SizeSelect the size of the message fragmentation.
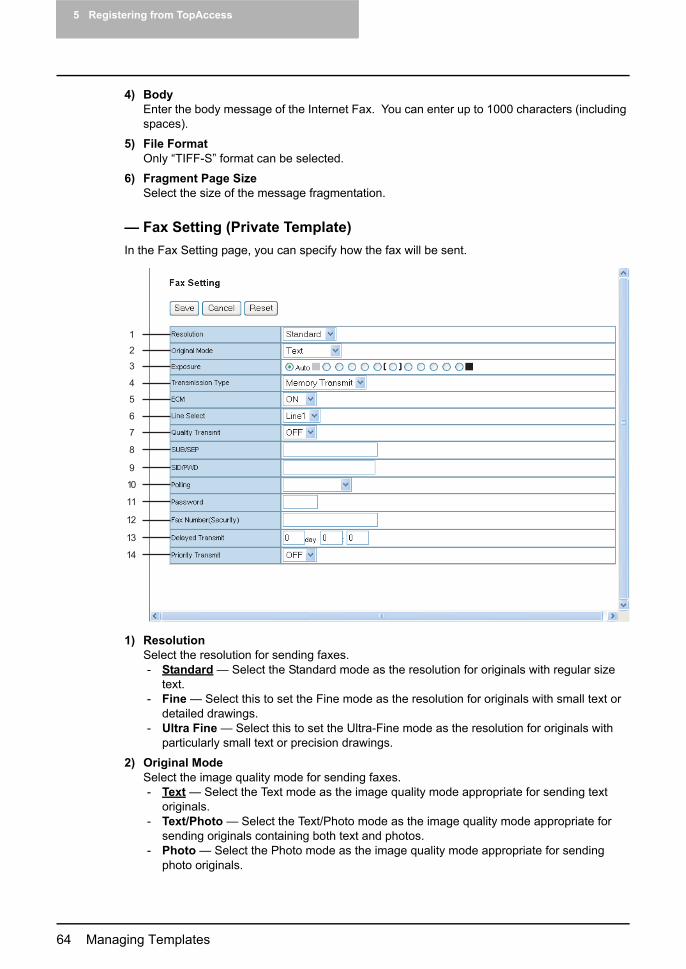
— Fax Setting (Private Template)In the Fax Setting page, you can specify how the fax will be sent.
1) ResolutionSelect the resolution for sending faxes.- Standard — Select the Standard mode as the resolution for originals with regular size
text.- Fine — Select this to set the Fine mode as the resolution for originals with small text or
detailed drawings.- Ultra Fine — Select this to set the Ultra-Fine mode as the resolution for originals with
particularly small text or precision drawings.
2) Original ModeSelect the image quality mode for sending faxes.- Text — Select the Text mode as the image quality mode appropriate for sending text
originals.- Text/Photo — Select the Text/Photo mode as the image quality mode appropriate for
sending originals containing both text and photos.- Photo — Select the Photo mode as the image quality mode appropriate for sending
photo originals.
14
13
12
11
10
1
2
3
4
5
6
7
8
9
Managing Templates 65
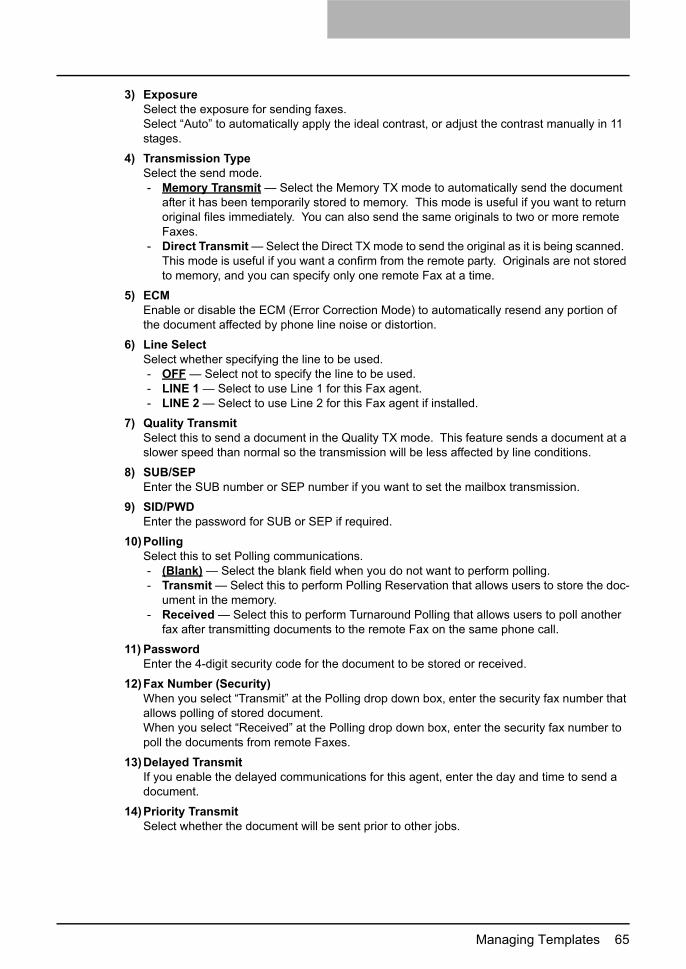
3) ExposureSelect the exposure for sending faxes.Select “Auto” to automatically apply the ideal contrast, or adjust the contrast manually in 11 stages.
4) Transmission TypeSelect the send mode.- Memory Transmit — Select the Memory TX mode to automatically send the document
after it has been temporarily stored to memory. This mode is useful if you want to return original files immediately. You can also send the same originals to two or more remote Faxes.
- Direct Transmit — Select the Direct TX mode to send the original as it is being scanned. This mode is useful if you want a confirm from the remote party. Originals are not stored to memory, and you can specify only one remote Fax at a time.
5) ECMEnable or disable the ECM (Error Correction Mode) to automatically resend any portion of the document affected by phone line noise or distortion.
6) Line SelectSelect whether specifying the line to be used.- OFF — Select not to specify the line to be used.- LINE 1 — Select to use Line 1 for this Fax agent.- LINE 2 — Select to use Line 2 for this Fax agent if installed.
7) Quality TransmitSelect this to send a document in the Quality TX mode. This feature sends a document at a slower speed than normal so the transmission will be less affected by line conditions.
8) SUB/SEPEnter the SUB number or SEP number if you want to set the mailbox transmission.
9) SID/PWDEnter the password for SUB or SEP if required.
10)PollingSelect this to set Polling communications.- (Blank) — Select the blank field when you do not want to perform polling.- Transmit — Select this to perform Polling Reservation that allows users to store the doc-
ument in the memory.- Received — Select this to perform Turnaround Polling that allows users to poll another
fax after transmitting documents to the remote Fax on the same phone call.
11) PasswordEnter the 4-digit security code for the document to be stored or received.
12)Fax Number (Security)When you select “Transmit” at the Polling drop down box, enter the security fax number that allows polling of stored document.When you select “Received” at the Polling drop down box, enter the security fax number to poll the documents from remote Faxes.
13)Delayed TransmitIf you enable the delayed communications for this agent, enter the day and time to send a document.
14)Priority TransmitSelect whether the document will be sent prior to other jobs.

5 Registering from TopAccess
66 Managing Templates
— Email Setting (Private Template)In the Email Setting page, you can specify the content of the Scan to Email document to be sent.
1) SubjectThis sets the subject of the Scan to Email documents. Select “Scanned from (Device Name) [(Template Name)] (Date) (Time)” to automatically apply the subject, or enter the desired subject in the field.
2) From AddressEnter the email address of the sender. When the recipient replies, the message will be sent to this email address.
3) From NameEnter the sender name of the Scan to Email document.
4) BodyEnter the body message of the Scan to Email documents. You can enter up to 1000 charac-ters (including spaces).
5) File FormatSelect the file format of the scanned image.- TIFF (Multi) — Select this to save scanned images as a Multi-page TIFF file.- TIFF (Single) — Select this to save scanned images separately as Single-page TIFF
files.- PDF (Multi) — Select this to save scanned images as a Multi-page PDF file.- PDF (Single) — Select this to save scanned images separately as Single-page PDF
files.
6) File NameSelect how the scanned file will be named. Select “DocYYMMDD” to name as it described, or you can enter the desired file name in the field. When you want to add the date and time in the file name, check the “Add the date and time to a file name” check box.
7) Fragment Message SizeSelect the size of the message fragmentation.
1
2
3
4
5
6
7
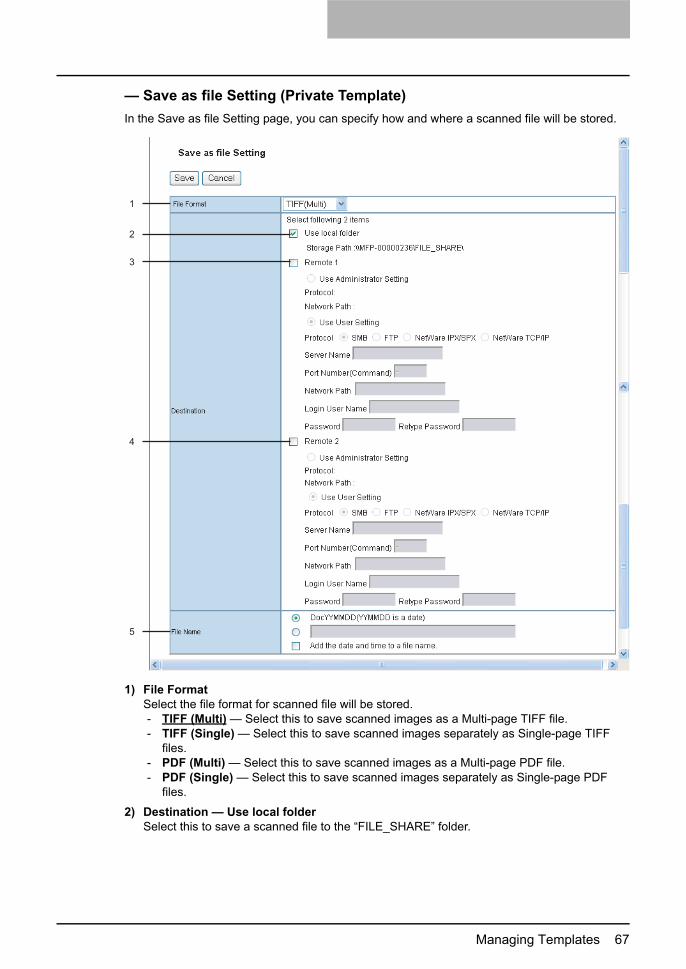
Managing Templates 67
— Save as file Setting (Private Template)In the Save as file Setting page, you can specify how and where a scanned file will be stored.
1) File FormatSelect the file format for scanned file will be stored.- TIFF (Multi) — Select this to save scanned images as a Multi-page TIFF file.- TIFF (Single) — Select this to save scanned images separately as Single-page TIFF
files.- PDF (Multi) — Select this to save scanned images as a Multi-page PDF file.- PDF (Single) — Select this to save scanned images separately as Single-page PDF
files.
2) Destination — Use local folderSelect this to save a scanned file to the “FILE_SHARE” folder.
1
2
3
4
5
5 Registering from TopAccess
68 Managing Templates
3) Destination — Remote 1Check this box to save a scanned file to the Remote 1. How you can set this item depends on how your administrator configured the Save as file settings.If the Remote 1 does not allow to specify a network folder, you can only select “Use Adminis-trator Settings”. The protocol and the network path are displayed below this item.If the Remote 1 allows to specify a network folder, you can select “Use User Settings” and specify the network folder settings by entering the following items:
ProtocolSelect the protocol to be used for uploading a scanned file to the network folder.- SMB — Select this to send a scanned file to the network folder using the SMB protocol.- FTP — Select this to send a scanned file to the FTP server.- NetWare IPX/SPX — Select this to send a scanned file to the NetWare file server using
the IPX/SPX protocol.- NetWare TCP/IP — Select this to send a scanned file to the NetWare file server using
the TCP/IP protocol.
Server NameWhen you select “FTP” as the protocol, enter the FTP server name or IP address where a scanned file will be sent. For example, to send a scanned file to the “ftp://192.168.1.1/user/scanned” FTP folder in the FTP server, enter “192.168.1.1” in this field. You can specify the directory at the “Network Path” field.When you select “NetWare IPX/SPX” as the protocol, enter the NetWare file server name or Tree/Context name (when NDS is available).When you select “NetWare TCP/IP” as the protocol, enter the IP address of the NetWare file server.
Port Number (Command)Enter the port number to be used for controls if you select “FTP” as the protocol. Generally “-” is entered for the control port. When “-” is entered, the default port number, that is set for FTP Client by an administrator, will be used. If you do not know the default port number for FTP Client, ask your administrator and change this option if you want to use another port number.
Network PathEnter the network path to store a scanned file.When you select “SMB” as the protocol, enter the network path to the network folder. For example, to specify the “users\scanned” folder in the computer named “Client01”, enter “\\Client01\users\scanned\”.When you select “FTP” as the protocol, enter the directory in the specified FTP server. For example, to specify the “ftp://192.168.1.1/user/scanned” FTP folder in the FTP server, enter “user/scanned”.When you select “NetWare IPX/SPX” or “NetWare TCP/IP” as the protocol, enter the folder path in the NetWare file server. For example, to specify the “sys\scan” folder in the NetWare file server, enter “\sys\scan”.
Login User NameEnter the login user name to access a SMB server, an FTP server, or NetWare file server, if required. When you select “FTP” as the protocol, an anonymous login is assumed if you leave this field blank.
PasswordEnter the password to access a SMB server, an FTP server, or NetWare file server, if required.
Retype PasswordEnter the same password again for a confirmation.

Managing Templates 69
4) Destination — Remote 2Check this box to save a scanned file to the Remote 2. How you can set this item depends on how your administrator configured the Save as file settings.If the Remote 2 does not allow to specify a network folder, you can only select “Use Adminis-trator Settings”. The protocol and the network path are displayed below this item.If the Remote 2 allows to specify a network folder, you can specify the network folder set-tings. Please refer to the description of the Remote 1 option for each item.
5) File NameSelect how the scanned file will be named. Select “DocYYMMDD” to name as it described, or you can enter the desired file name in the field. When you want to add the date and time in the file name, check the “Add the date and time to a file name” check box.
— Box Setting (Private Template)In the Box Setting page, you can specify how scanned images will be stored in the Box.
1) DestinationSpecify the destination box number for e-Filing.
Box NumberSelect the Box number where scanned images will be stored.
PasswordEnter the password if the specified Box number requires a password.
Retype PasswordEnter the password again if the specified Box number requires a password.
2) Folder NameEnter the name of the folder where scanned images will be stored. If the specified named folder does not exit, the folder will automatically created.
3) Document NameSelect how the scanned file will be named. Select “DocYYMMDD” to name as it described, or you can enter the desired file name in the field.
1
2
3
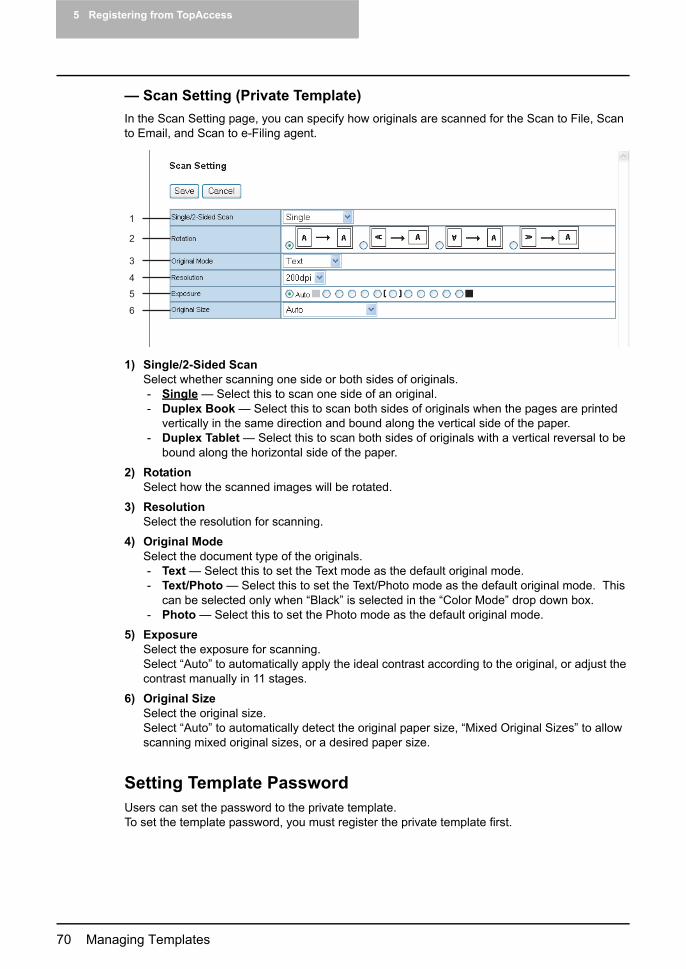
5 Registering from TopAccess
70 Managing Templates
— Scan Setting (Private Template)In the Scan Setting page, you can specify how originals are scanned for the Scan to File, Scan to Email, and Scan to e-Filing agent.
1) Single/2-Sided ScanSelect whether scanning one side or both sides of originals.- Single — Select this to scan one side of an original.- Duplex Book — Select this to scan both sides of originals when the pages are printed
vertically in the same direction and bound along the vertical side of the paper.- Duplex Tablet — Select this to scan both sides of originals with a vertical reversal to be
bound along the horizontal side of the paper.
2) RotationSelect how the scanned images will be rotated.
3) ResolutionSelect the resolution for scanning.
4) Original ModeSelect the document type of the originals.- Text — Select this to set the Text mode as the default original mode.- Text/Photo — Select this to set the Text/Photo mode as the default original mode. This
can be selected only when “Black” is selected in the “Color Mode” drop down box.- Photo — Select this to set the Photo mode as the default original mode.
5) ExposureSelect the exposure for scanning.Select “Auto” to automatically apply the ideal contrast according to the original, or adjust the contrast manually in 11 stages.
6) Original SizeSelect the original size.Select “Auto” to automatically detect the original paper size, “Mixed Original Sizes” to allow scanning mixed original sizes, or a desired paper size.
Setting Template PasswordUsers can set the password to the private template.To set the template password, you must register the private template first.
1
2
3
4
5
6

Managing Templates 71
Setting the template password
1 Click the Registration tab and the Template menu.The Template menu page is displayed.
When the User Management Setting and Role Based Access Control are enabled, the login page will be displayed. When the Role Based Access Control is enabled, only users that has the privilege to operate the registration can login to the Registration tab page.
2 Click the group name link that contains the private template that you want to edit.
If the selected private template group is protected by a password, the Input Group Password page is displayed. If not, the Group Information page is displayed.
You can display only defined private template groups by clicking on the “Defined Groups” link. The page displays all 200 private template groups as default page view.If you know which private template group you want to define or edit, click number of the private template group in the “Jump to” links.

5 Registering from TopAccess
72 Managing Templates
3 When the Input Group Password page is displayed, enter the 5-digit password (or administrator’s password) for selected private tem-plate group and click [OK].
The Group Information page is displayed.
4 From the templates list, click the template icon that you want to set or change the password.
If the templates list is displayed in the List view, click the template name that you want to set or modify the password.If the selected private template is protected by a password, the Input Template Pass-word page is displayed. If not, the Template Information page is displayed.
You can change the template list view by clicking on either “Panel View” or “List View”.If you know which private template you want to define or edit, click the number of the private template in the “Jump to” links.

Managing Templates 73
5 When the Input Template Password page is displayed, enter the 5-digit password (or administrator’s password) for selected private template and click [OK].
The Template Information page is displayed.
6 Click [Change Password] to set the password for the private tem-plate.
The Change Template Password page is displayed.
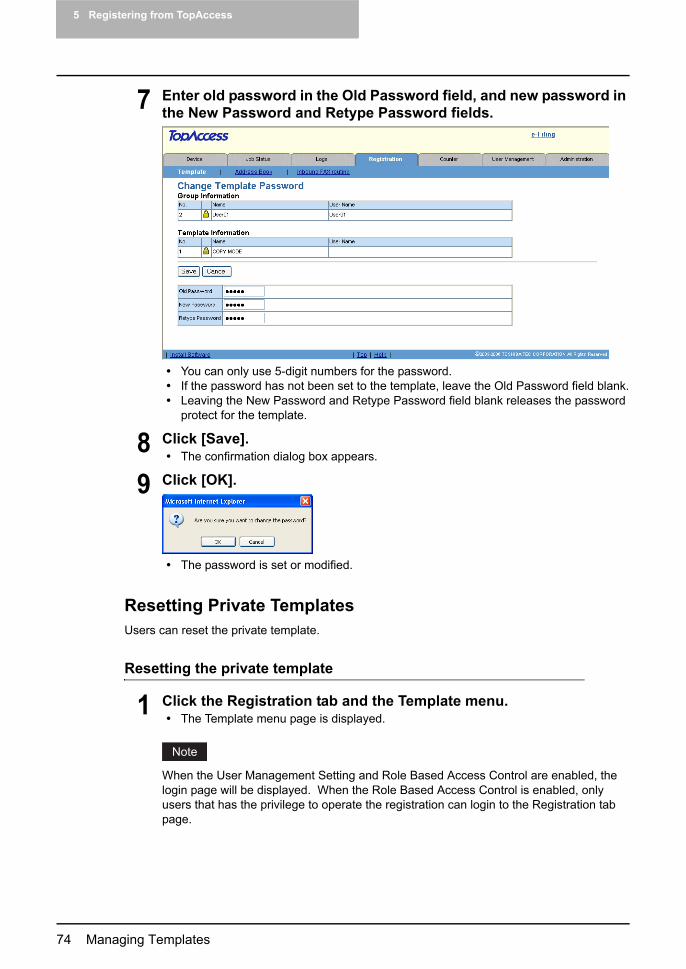
5 Registering from TopAccess
74 Managing Templates
7 Enter old password in the Old Password field, and new password in the New Password and Retype Password fields.
You can only use 5-digit numbers for the password.If the password has not been set to the template, leave the Old Password field blank.Leaving the New Password and Retype Password field blank releases the password protect for the template.
8 Click [Save].The confirmation dialog box appears.
9 Click [OK].
The password is set or modified.
Resetting Private TemplatesUsers can reset the private template.
Resetting the private template
1 Click the Registration tab and the Template menu.The Template menu page is displayed.
When the User Management Setting and Role Based Access Control are enabled, the login page will be displayed. When the Role Based Access Control is enabled, only users that has the privilege to operate the registration can login to the Registration tab page.

Managing Templates 75
2 Click the group name link that contains the private template that you want to reset.
If you select the private template group that is not protected by a password, the Pri-vate Templates page is displayed. Skip to step 4.If you select the private template group that is protected by a password, the Input Group Password page is displayed. Go to the next step.
You can display only defined private template groups by clicking on the “Defined Groups” link. The page displays all 200 private template groups as default page view.If you know which private template group you want to define or edit, click the number of the private template group in the “Jump to” links.
3 When the Input Group Password page is displayed, enter the 5-digit password (or administrator’s password) for selected private tem-plate group and click [OK].
The Private Templates page is displayed.
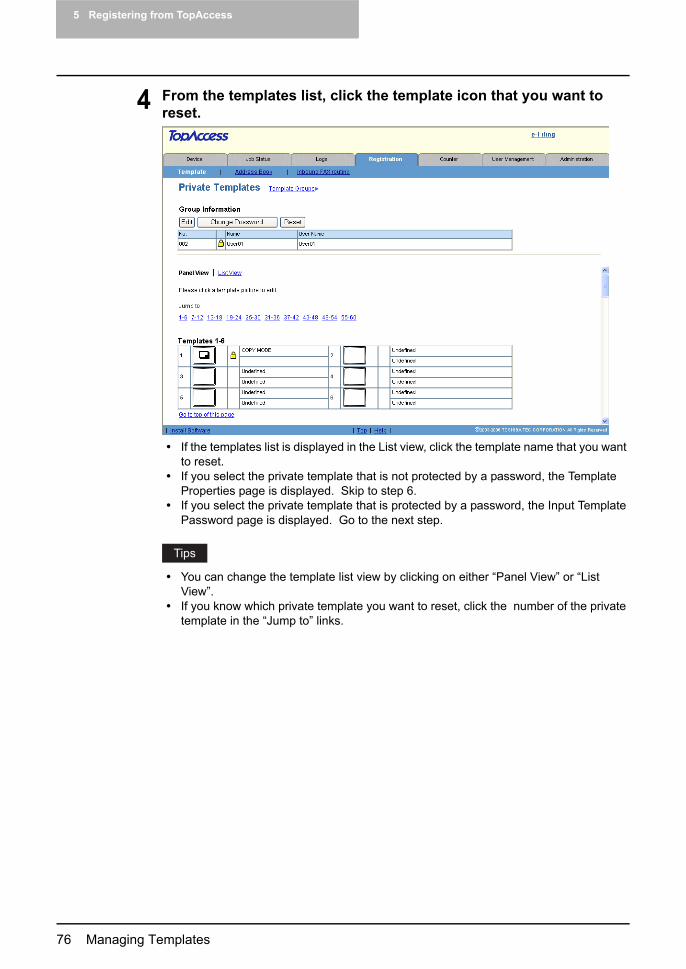
5 Registering from TopAccess
76 Managing Templates
4 From the templates list, click the template icon that you want to reset.
If the templates list is displayed in the List view, click the template name that you want to reset.If you select the private template that is not protected by a password, the Template Properties page is displayed. Skip to step 6.If you select the private template that is protected by a password, the Input Template Password page is displayed. Go to the next step.
You can change the template list view by clicking on either “Panel View” or “List View”.If you know which private template you want to reset, click the number of the private template in the “Jump to” links.

Managing Templates 77
5 When the Input Template Password page is displayed, enter the 5-digit password (or administrator’s password) for selected private template and click [OK].
The Template Properties page is displayed.
6 Click [Reset Template].
The confirmation dialog box appears.
7 Click [OK].
The selected template is reset.

5 Registering from TopAccess
78 Managing Templates
Displaying Public TemplatesEnd users can also display the templates list in the public group so that users can see what tem-plates are available.
Displaying templates in the public group
1 Click the Registration tab and the Template menu.The Template menu page is displayed.
When the User Management Setting and Role Based Access Control are enabled, the login page will be displayed. When the Role Based Access Control is enabled, only users that has the privilege to operate the registration can login to the Registration tab page.
2 Click the group name link of the Public Template Groups list.

Managing Templates 79
3 The templates list in the public group is displayed.
You can change the template list view by clicking on either “Panel View” or “List View”.If you know which public template you want to view, click the number of the public template in the “Jump to” links.

5 Registering from TopAccess
80 Managing Address Book
Managing Address Book
This equipment comes with the Address Book feature that enables users to manage who receives Scan to Email, Internet Fax transmission, and fax transmission.In the Address Book menu page at the Registration tab in TopAccess, you can add, edit, and delete recipient information. You can also create groups that multiple contacts can be assigned.
P.80 “Managing Contacts in the Address Book” P.87 “Managing Groups in the Address Book”
Address Book can be also managed using the Touch Panel Display. See the User Functions Guide.
Managing Contacts in the Address BookThere are two ways to manage contacts in the Address Book:
Add, edit, or delete a contact manually. P.80 “Adding, Editing, or Deleting Contacts Manually”
Add new contact searching for a recipient from the LDAP server. P.85 “Adding New Contact from the LDAP Server”
Adding, Editing, or Deleting Contacts ManuallyYou can add or edit a contact by entering recipient information manually. You can also delete the contact from the Address Book.
P.80 “Adding or editing a contact” P.84 “Deleting a contact”
Adding or editing a contact
1 Click the Registration tab and the Address Book menu.The Address Book menu page is displayed.
When the User Management Setting and Role Based Access Control are enabled, the login page will be displayed. When the Role Based Access Control is enabled, only users that has the privilege to operate the registration can login to the Registration tab page.

Managing Address Book 81
2 Click [Add Address] to add new contact, or click the contact link that you want to edit in the contacts list.
The Contact Properties page is displayed.

5 Registering from TopAccess
82 Managing Address Book
3 Enter following items to specify the recipient information.
First Name — Enter the first name of the recipient. You can enter up to 32 characters.Last Name — Enter the last name of the recipient. You can enter up to 32 characters.Email Address — Enter the email address of the recipient. You can enter up to 192 characters.Fax Number — Enter the fax number of the recipient. You can enter up to 128 characters.2nd Fax Number — Enter the 2nd fax number of the recipient. You can enter up to 128 characters.Company — Enter the company name of the recipient. You can enter up to 64 characters.Department — Enter the department name of the recipient. You can enter up to 64 characters.Keyword — Enter the comment of the recipient. You can enter up to 256 characters.
You must specify either the “First Name” or “Last Name” field and either the “Email Address” or “Fax Number” field to register the contact.You cannot send originals to the fax numbers without the optional Fax unit even if you set up the contact that the fax number is specified.
You can clear the entered values in each field by clicking [Reset].You can cancel adding or editing a contact by clicking [Cancel].
4 If you are registering a fax recipient, click [Fax Setting]. Otherwise, skip to Step 6.
The Fax Settings page is displayed.
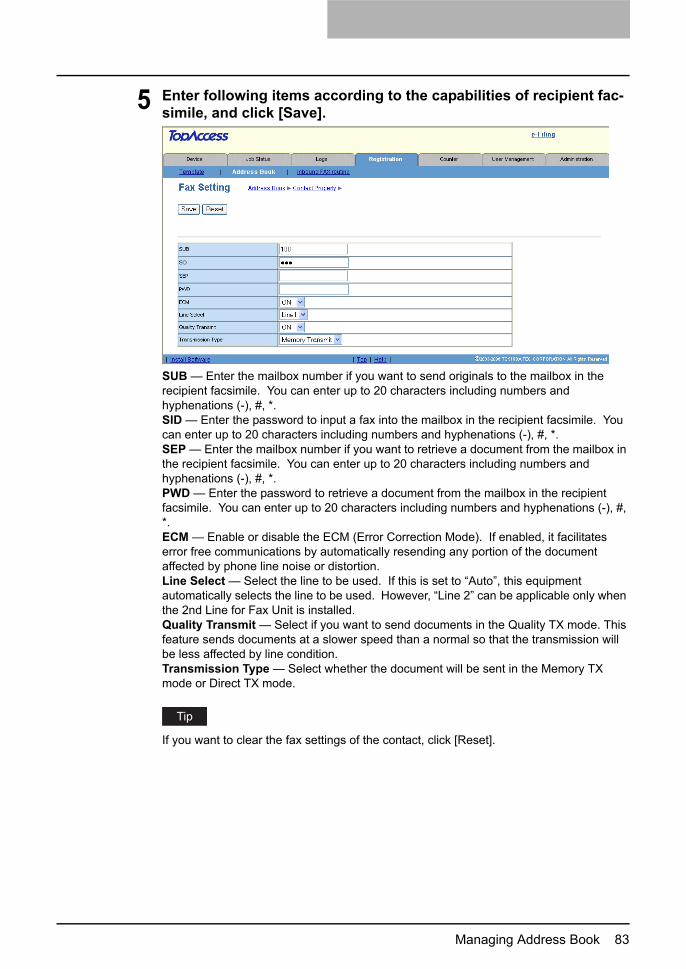
Managing Address Book 83
5 Enter following items according to the capabilities of recipient fac-simile, and click [Save].
SUB — Enter the mailbox number if you want to send originals to the mailbox in the recipient facsimile. You can enter up to 20 characters including numbers and hyphenations (-), #, *.SID — Enter the password to input a fax into the mailbox in the recipient facsimile. You can enter up to 20 characters including numbers and hyphenations (-), #, *.SEP — Enter the mailbox number if you want to retrieve a document from the mailbox in the recipient facsimile. You can enter up to 20 characters including numbers and hyphenations (-), #, *.PWD — Enter the password to retrieve a document from the mailbox in the recipient facsimile. You can enter up to 20 characters including numbers and hyphenations (-), #, *.ECM — Enable or disable the ECM (Error Correction Mode). If enabled, it facilitates error free communications by automatically resending any portion of the document affected by phone line noise or distortion.Line Select — Select the line to be used. If this is set to “Auto”, this equipment automatically selects the line to be used. However, “Line 2” can be applicable only when the 2nd Line for Fax Unit is installed.Quality Transmit — Select if you want to send documents in the Quality TX mode. This feature sends documents at a slower speed than a normal so that the transmission will be less affected by line condition.Transmission Type — Select whether the document will be sent in the Memory TX mode or Direct TX mode.
If you want to clear the fax settings of the contact, click [Reset].

5 Registering from TopAccess
84 Managing Address Book
6 In the Contact Properties page, click [Save] to add new contact.
Deleting a contact
1 Click the Registration tab and the Address Book menu.The Address Book menu page is displayed.
When the User Management Setting and Role Based Access Control are enabled, the login page will be displayed. When the Role Based Access Control is enabled, only users that has the privilege to operate the registration can login to the Registration tab page.
2 Click the link that you want to delete in the contacts list.
The Contact Properties page is displayed.

Managing Address Book 85
3 Click [Delete].
The contact is deleted from the Address Book.
Adding New Contact from the LDAP ServerYou can search for contacts in the LDAP server and add them to the Address Book. To use the LDAP search feature, the administrator must configure the directory service. Before operating the LDAP search, please ask your administrator if the Directory Service has been configured.
Adding new contact from the LDAP server
1 Click the Registration tab and the Address Book menu.The Address Book menu page is displayed.
When the User Management Setting and Role Based Access Control are enabled, the login page will be displayed. When the Role Based Access Control is enabled, only users that has the privilege to operate the registration can login to the Registration tab page.
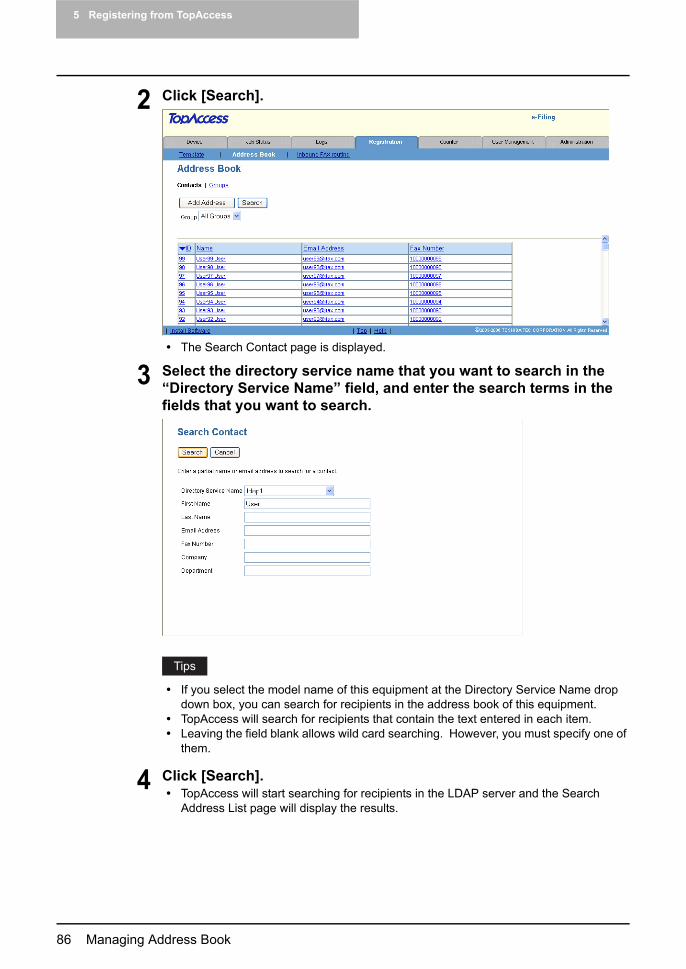
5 Registering from TopAccess
86 Managing Address Book
2 Click [Search].
The Search Contact page is displayed.
3 Select the directory service name that you want to search in the “Directory Service Name” field, and enter the search terms in the fields that you want to search.
If you select the model name of this equipment at the Directory Service Name drop down box, you can search for recipients in the address book of this equipment.TopAccess will search for recipients that contain the text entered in each item.Leaving the field blank allows wild card searching. However, you must specify one of them.
4 Click [Search].TopAccess will start searching for recipients in the LDAP server and the Search Address List page will display the results.

Managing Address Book 87
5 Check the boxes of contacts that you want to add to the Address Book.
You can select all users in the list by clicking on the button.
6 Click [Add].Selected contacts are added in the Address Book.
Managing Groups in the Address BookYou can create groups that contain the multiple recipients. This enables you to specify the groups for the destinations instead of specifying each recipient separately when operating Scan to Email, or fax or Internet Fax transmission. You can also delete groups.
P.87 “Adding or editing a group” P.89 “Deleting a group”
Adding or editing a group
1 Click the Registration tab and the Address Book menu.The Address Book menu page is displayed.
When the User Management Setting and Role Based Access Control are enabled, the login page will be displayed. When the Role Based Access Control is enabled, only users that has the privilege to operate the registration can login to the Registration tab page.
2 Click the Group submenu.The Group submenu page is displayed.
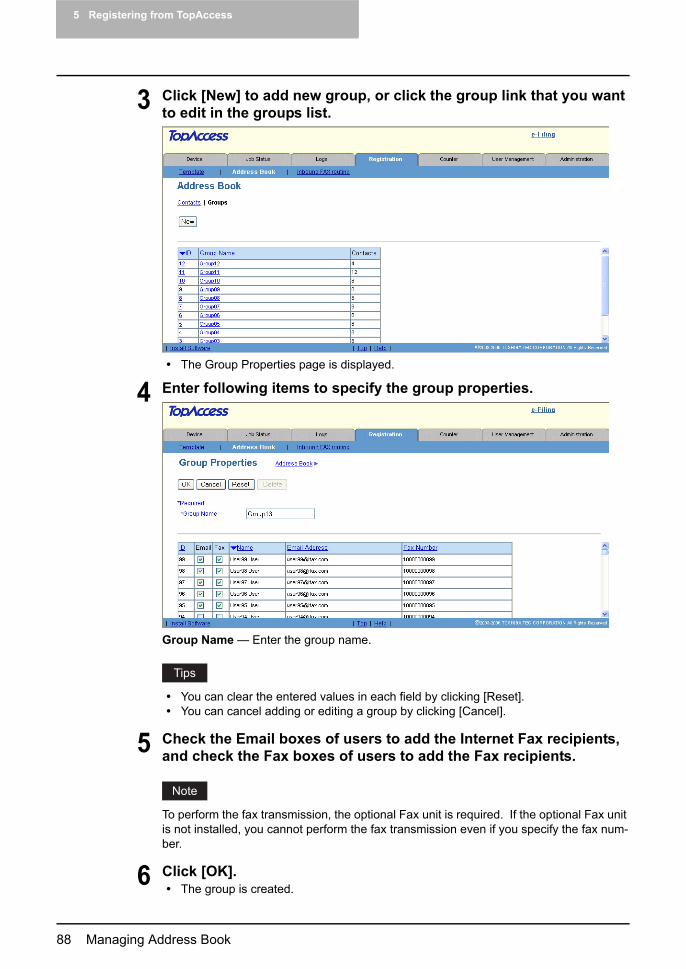
5 Registering from TopAccess
88 Managing Address Book
3 Click [New] to add new group, or click the group link that you want to edit in the groups list.
The Group Properties page is displayed.
4 Enter following items to specify the group properties.
Group Name — Enter the group name.
You can clear the entered values in each field by clicking [Reset].You can cancel adding or editing a group by clicking [Cancel].
5 Check the Email boxes of users to add the Internet Fax recipients, and check the Fax boxes of users to add the Fax recipients.
To perform the fax transmission, the optional Fax unit is required. If the optional Fax unit is not installed, you cannot perform the fax transmission even if you specify the fax num-ber.
6 Click [OK].The group is created.

Managing Address Book 89
Deleting a group
1 Click the Registration tab and the Address Book menu.The Address Book menu page is displayed.
When the User Management Setting and Role Based Access Control are enabled, the login page will be displayed. When the Role Based Access Control is enabled, only users that has the privilege to operate the registration can login to the Registration tab page.
2 Click the Group submenu.The Group submenu page is displayed.
3 Click the group link that you want to delete in the groups list.
The Group Properties page is displayed.
4 Click [Delete].
Selected group is deleted.

5 Registering from TopAccess
90 Managing Mailboxes
Managing Mailboxes
Mailboxes can be managed only when the optional Fax unit is installed.
Mailboxes can be managed using the Touch Panel Display. See the Operator’s Manual for Facsimile Function.
This equipment supports the ITU-T compatible mailboxes that allow storage and retrieval of doc-uments via mailboxes that are already set up in a mailbox hub.
The following three types of Mailboxes are available:
Confidential mailboxThe Confidential Box allows a one-time document retrieval from the mailbox. Once a document is retrieved, it is cleared. If a new document is sent to the same box number where another doc-ument is stored, it is added to the existing box. You can also set up a password requirement for accessing the Confidential Box for document retrieval, to prevent unauthorized retrieval of docu-ments.
Bulletin Board mailboxThe Bulletin Board Box allows multiple document retrievals from the same mailbox. Once a document is retrieved, it is not cleared. If a new document is sent to the same Box, it replaces the existing one. You can set up a password requirement for accessing the Bulletin Board Box for document reservation.
Forward mailboxThe Forward mailbox allows you to transmit a received fax to various destinations, using the fol-lowing agents:
Internet/Fax (Relay) agent — When a document has been sent to a mailbox, this equip-ment can call up the remote Fax via the public switched telephone line, or send the Internet Fax via the Internet according to the destinations registered in the mailbox. After the relay transmission, the transmission result list will be sent specified remote Fax. It is also possible to set up a password requirement.Save as file agent — The received faxes in this mailbox are forwarded to the local folder in this equipment or network folders.Email agent — The received faxes in this mailbox are forwarded to the email addresses recipients specified in the mailbox.Store to e-Filing agent — The received faxes in this mailbox are forwarded to the Box in this equipment. The data stored in the Box can be printed later, and also can be managed using the e-Filing web utility, which is a web-based utility that allows you to display, print, and merge the files in the Box.
Sending and storage of documents to a mailbox hub and retrieval of documents from a mailbox hub is possible only on an ITU-T compliant facsimile. Only ITU-T compliant facsimiles can be used as Mailbox hubs. This equipment is provided with mailbox hub functions.
Using TopAccess, you can set up, edit, and delete mailboxes on this equipment.
The Save as file agent and Email agent are available only when the Scanner Kit is installed, or when the Printer/Scanner Kit is installed.

Managing Mailboxes 91
Setting Up an Open MailboxTo carry out ITU-T communications, you must first set up an Open Mailbox in the mailbox hub. You can set up a maximum of 300 mailboxes.
Setting up or editing a mailbox
1 Click the Registration tab and the Inbound FAX routing menu.The Inbound FAX routing menu page is displayed.
When the User Management Setting and Role Based Access Control are enabled, the login page will be displayed. When the Role Based Access Control is enabled, only users that has the privilege to operate the registration can login to the Registration tab page.
2 Click [New] to set up new mailbox, or click the box number link that you want to edit in the mailboxes list.
If you click [New], skip to step 5.If you click the box number link that is not protected by a password, skip to step 4.If you click the box number link that is protected by a password, go to the next step.
3 Enter the 5-digit password (or administrator’s password) for the mailbox and click [OK].

5 Registering from TopAccess
92 Managing Mailboxes
4 Click [Edit].
5 Select agents and click [Select Agent].
Confidential — Select this to create a Confidential mailbox.Bulletin Board — Select this to create a Bulletin Board mailbox.Forward — Select this to create a relay station mailbox. When you select this, select the agent from “Internet/Fax(Relay)”, “Save as file”, “Email”, or “Store to e-Filing”.
Internet/Fax(Relay) — Select this to create a Forward mailbox of Internet/Fax (Relay) agent. This agent can be combined with the Save as file or Store to e-Filing agent.Save as file — Select this to create a Forward mailbox of the Save as file agent. This agent can be combined with the Internet/Fax(Relay), Email, or Store to e-Filing agent.Email — Select this to create a Forward mailbox of the Email agent. This agent can be combined with the Save as file agent or Store to e-Filing agent.Store to e-Filing — Select this to create a Forward mailbox of the Store to e-Filing agent. This agent can be combined with the Internet/Fax(Relay) agent, Save as file agent, or Email agent.
“Email”, and “Save as file” are available only when the Scanner Kit is installed, or when the Printer/Scanner Kit is installed.
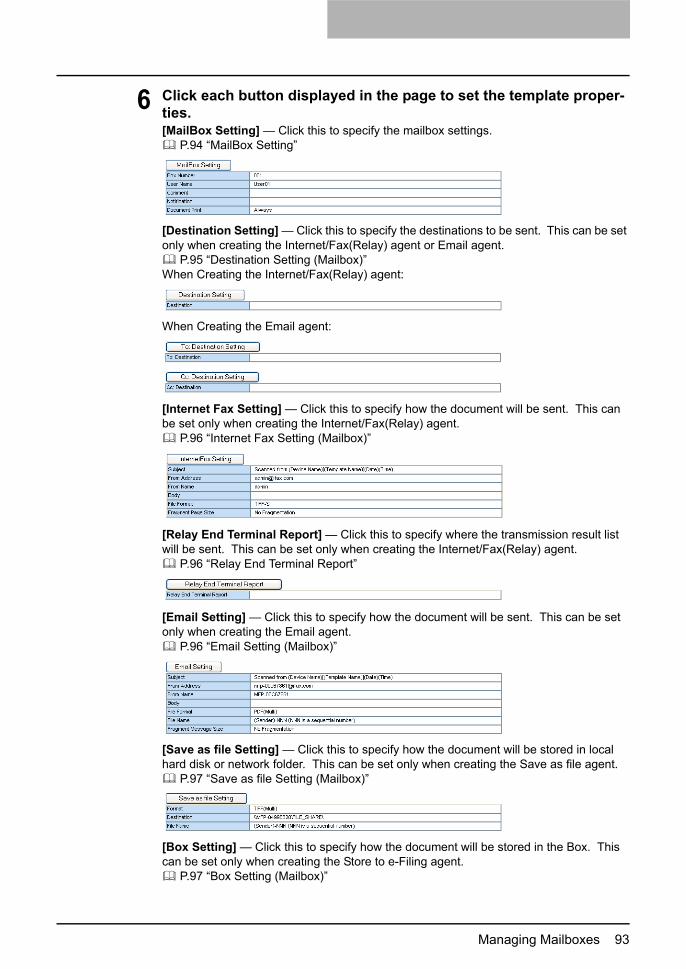
Managing Mailboxes 93
6 Click each button displayed in the page to set the template proper-ties.[MailBox Setting] — Click this to specify the mailbox settings.
P.94 “MailBox Setting”
[Destination Setting] — Click this to specify the destinations to be sent. This can be set only when creating the Internet/Fax(Relay) agent or Email agent.
P.95 “Destination Setting (Mailbox)”When Creating the Internet/Fax(Relay) agent:
When Creating the Email agent:
[Internet Fax Setting] — Click this to specify how the document will be sent. This can be set only when creating the Internet/Fax(Relay) agent.
P.96 “Internet Fax Setting (Mailbox)”
[Relay End Terminal Report] — Click this to specify where the transmission result list will be sent. This can be set only when creating the Internet/Fax(Relay) agent.
P.96 “Relay End Terminal Report”
[Email Setting] — Click this to specify how the document will be sent. This can be set only when creating the Email agent.
P.96 “Email Setting (Mailbox)”
[Save as file Setting] — Click this to specify how the document will be stored in local hard disk or network folder. This can be set only when creating the Save as file agent.
P.97 “Save as file Setting (Mailbox)”
[Box Setting] — Click this to specify how the document will be stored in the Box. This can be set only when creating the Store to e-Filing agent.
P.97 “Box Setting (Mailbox)”

5 Registering from TopAccess
94 Managing Mailboxes
7 After configuring the desired mailbox properties, click [Save].The mailbox properties are registered.
MailBox SettingIn the MailBox Settings page, specify the general information of the mailbox such as the box number, password, owner, comment, and notification.
The “Notification” and “Document Print” options are not available when creating the Confidential mailbox or Bulletin Board mailbox.
1) Box NumberEnter the box number of the mailbox. You can enter up to 20 characters including numbers, sharp marks (#), and asterisks (*).You can also specify the sender’s fax number to enable the Inbound Fax Routing when reg-istering a Forward mailbox. If you specify the sender’s fax number here, the faxes that are received from the specified fax number will be routed according to the mailbox settings.
Specifying email addresses for the destinations is available only when the Scanner Kit is installed, or the Printer/Scanner Kit is installed.
1
2
3
4
5
6
Managing Mailboxes 95
The Inbound Fax Routing is available only for a Forward mailbox. If you select “Confi-dential” or “Bulletin Board” as an agent, you cannot specify the fax number.When a fax is sent from the specified fax number with a box number (or sub address), the Inbound Fax Routing will not apply to the transmission and it is processed according to the specified box number (or sub address) settings.
2) PasswordEnter the box password if you want to protect the mailbox by the password. You can enter up to 20 characters including numbers, sharp marks (#), and asterisks (*).
3) User NameEnter the user name of this mailbox. You can enter up to 64 characters.
4) CommentEnter the comment. You can enter up to 64 characters.
5) NotificationThis specifies how the notification message will be sent when an error occurs.
Send email when an error occursSelect this to send a notification message to the specified email address when an error occurs.
Send email when job is completedSelect this to send a notification message to the specified email address when an job is com-pleted.
Email AddressEnter an email address that the notification message will be sent.
When you enable the Notification setting, make sure to set up the Email settings in the Email submenu page of the Setup menu in the TopAccess Administrator’s mode. For instructions on how to set up the Email settings, refer to the Network Administration Guide.
6) Document PrintSelect whether printing the document sent to this mailbox.
Destination Setting (Mailbox)In the Recipient List page, you can specify the destinations of the Internet/Fax (Relay), or Email agent.When you are setting up the destinations for the Email agent, you can only specify the email addresses for the destinations.When you are setting up the destinations for the Internet/Fax (Relay) agent, you can specify both fax numbers and email addresses for the destinations.You can specify the recipients by entering their email addresses or fax numbers manually, selecting recipients from the address book, selecting recipient groups from the address book, or searching for recipients in the LDAP server.
The methods of entering the recipients manually and searching for the recipients in the LDAP server are not available if you are setting the destination for the Internet/Fax (Relay) agent.
The instructions on how to setting up the destination setting for the mailbox is same as setting up the destination setting for the private template.

5 Registering from TopAccess
96 Managing Mailboxes
P.56 “Destination Setting (Private Template)”
Internet Fax Setting (Mailbox)In the Internet Fax Settings page, you can specify the content of the Internet Fax to be sent.The instructions on how to setting up the Internet Fax settings for the mailbox is same as setting up the Internet Fax settings for the private template.
P.63 “Internet Fax Setting (Private Template)”
Relay End Terminal ReportIn the Relay End Terminal Report page, you can specify a recipient that the transmission result list will be sent.
Adding the relay end terminal report recipients
1 Click [Relay End Terminal Report].The Relay End Terminal Report page is displayed.
2 Enter the fax number or Email address, or select an Email or Fax option button of a user that you want to send the transmission result list.
You can clear the selected option button by clicking [Reset].
You cannot specify more than 1 recipient for the destination of the Relay End Terminal Report.
3 Click [Save].The selected recipient is set for the transmission result list recipient.
Email Setting (Mailbox)In the Email Settings page, you can specify the content of email document to be sent.
Managing Mailboxes 97
The instructions on how to setting up the Email setting for the mailbox is same as setting up the Email setting for the private template.
P.66 “Email Setting (Private Template)”
Save as file Setting (Mailbox)In the Save as file Setting page, you can specify how and where a received fax will be stored.The instructions on how to setting up the Save as file setting for the mailbox is same as setting up the Save as file setting for the private template.
P.67 “Save as file Setting (Private Template)”
Box Setting (Mailbox)In the Box Setting page, you can specify how a received fax will be stored in the Box.The instructions on how to setting up the Box setting for the mailbox is same as setting up the Box setting for the private template.
P.69 “Box Setting (Private Template)”
Deleting an Open MailboxYou can delete an existing Open Mailbox from TopAccess.
If you want to delete an Open Mailbox, the document must first be retrieved, printed, or canceled from the Open Mailbox.
Deleting an mailbox
1 Click the Registration tab and the Inbound FAX routing menu.The Inbound FAX routing menu page is displayed.
When the User Management Setting and Role Based Access Control are enabled, the login page will be displayed. When the Role Based Access Control is enabled, only users that has the privilege to operate the registration can login to the Registration tab page.

5 Registering from TopAccess
98 Managing Mailboxes
2 Click the box number link that you want to delete in the mailboxes list.
If you click the box number link that is not protected by a password, skip to step 4.If you click the box number link that is protected by a password, go to the next step.
3 Enter the password for the mailbox and click [OK].
The MailBoxes Properties page is displayed.
4 Click [Delete].
The confirmation dialog box appears.
5 Click [OK].
Selected mailbox is deleted.

6.Managing Counters
This section describes about the Counter tab page of TopAccess end-user mode.
Viewing Counters..................................................................................................100Displaying the Total Counter ...........................................................................................................100Displaying the Department Counter ................................................................................................100
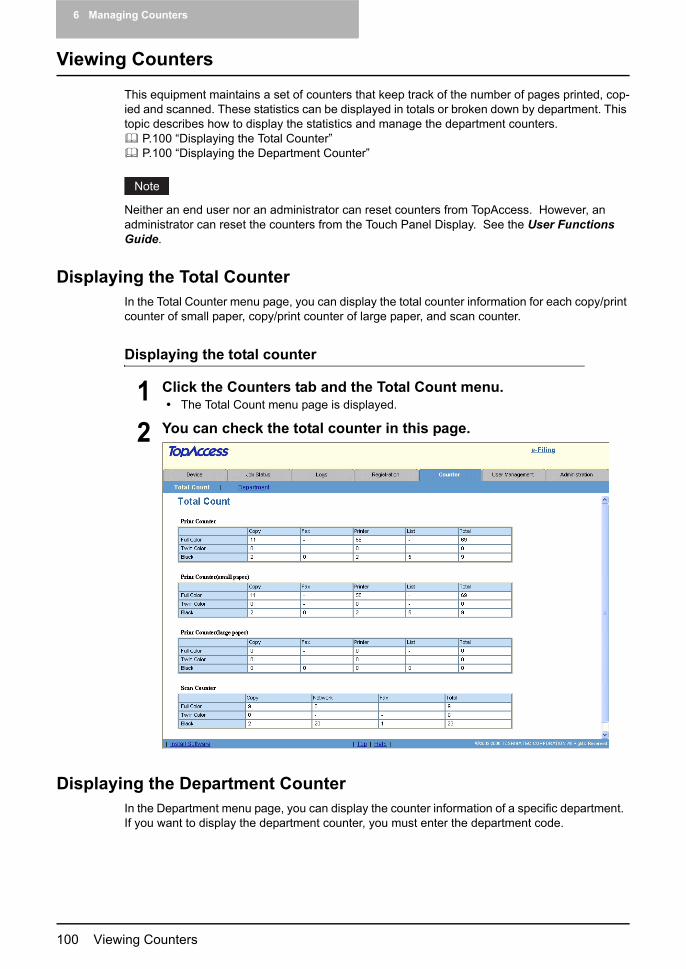
6 Managing Counters
100 Viewing Counters
Viewing Counters
This equipment maintains a set of counters that keep track of the number of pages printed, cop-ied and scanned. These statistics can be displayed in totals or broken down by department. This topic describes how to display the statistics and manage the department counters.
P.100 “Displaying the Total Counter” P.100 “Displaying the Department Counter”
Neither an end user nor an administrator can reset counters from TopAccess. However, an administrator can reset the counters from the Touch Panel Display. See the User Functions Guide.
Displaying the Total CounterIn the Total Counter menu page, you can display the total counter information for each copy/print counter of small paper, copy/print counter of large paper, and scan counter.
Displaying the total counter
1 Click the Counters tab and the Total Count menu.The Total Count menu page is displayed.
2 You can check the total counter in this page.
Displaying the Department CounterIn the Department menu page, you can display the counter information of a specific department. If you want to display the department counter, you must enter the department code.

Viewing Counters 101
Displaying the department counter
1 Click the Counters tab and the Department menu.The Department menu page is displayed.
2 Enter a department code that you want to display the counter in the “Department Code” field and click [Enter].
The department counter for specified department is displayed.
3 Click the department name link to display the detailed counters for the department.
4 The Department Information page opens.

6 Managing Counters
102 Viewing Counters
7.TopAccess Administrator Mode
This section describes about administrative functions of TopAccess.
Features and Functions .......................................................................................105About Setup from TopAccess..........................................................................................................105About Maintenance from TopAccess...............................................................................................106About Registration from TopAccess ................................................................................................107About Other Administrative Functions in TopAccess ......................................................................107
Accessing TopAccess Administrator Mode .......................................................108Setting up from TopAccess .................................................................................110
Setting up Device Settings ..............................................................................................................110Setting up Network Settings............................................................................................................115Setting up Copier Settings ..............................................................................................................150Setting up Fax Settings ...................................................................................................................153Setting up Save as file Settings ......................................................................................................158Setting up Email Settings ................................................................................................................165Setting up Internet Fax Settings......................................................................................................168Setting up Printer Settings ..............................................................................................................171Setting up Print Service Settings.....................................................................................................177Displaying Version Information........................................................................................................183
Maintaining from TopAccess ...............................................................................184About the Maintenance Functions...................................................................................................184Updating the Software.....................................................................................................................185Removing the Client Software.........................................................................................................187Backing up Data..............................................................................................................................188Restoring Data from Backup File ....................................................................................................190Deleting the Data from Local Folder ...............................................................................................193Managing Directory Service ............................................................................................................194Setting up Notification .....................................................................................................................197Importing and Exporting the Address Book.....................................................................................202Importing and Exporting the Department Code...............................................................................206Exporting the Logs, Journals, and Counters ...................................................................................209Clearing the Logs and Journals ...................................................................................................... 211
Registering from TopAccess ...............................................................................213

About the Registrations...................................................................................................................213Registering Public Templates..........................................................................................................213Registering Fax and Internet Fax Received Forward......................................................................222
Displaying Message Log......................................................................................237Managing Department Code ................................................................................238
Displaying the Department List and Counters.................................................................................238Clearing the Department Counters .................................................................................................240Registering or modifying the Department Code ..............................................................................242Deleting the Department Code........................................................................................................244
Setting up User Management ..............................................................................247Enabling Department Management ................................................................................................247Setting up User Management Setting .............................................................................................250Setting up User Authentication for Scan to E-mail ..........................................................................278
Features and Functions 105
Features and Functions
With the TopAccess web-based device management utility in the administrator mode, you can configure network and device settings, display and filter message and job logs, and control cur-rent jobs using a web browser.
About Setup from TopAccessFollowing setup options are performed from TopAccess in the administrator mode:
Configuring device settingsAn administrator can configure the device settings such as device information, energy save, date and time, and language for TopAccess web utility.
Configuring network settingsAn administrator can configure the network settings such as TCP/IP, IPX/SPX, AppleTalk, Bon-jour, LDAP Session, DNS Session, DDNS Session, SMB Session, NetWare Session, HTTP Net-work Service, SMTP Client, SMTP Server, POP3 Network Service, SNTP Service, FTP Client, FTP Server, SNMP Network Service, and Security Service.
Configuring copier settingsAn administrator can configure the default copier settings such as original mode exposure, bypass feed, book > 2, magazine sort, 2in1/4in1, maximum copies, auto 2-sided mode, and sorter mode priority.
Configuring fax settingsAn administrator can configure the facsimile device settings such as terminal ID, fax number, line 2 number, ringer volume, monitor volume, completion volume, reception mode, remote RX, dial type, dial type (line 2), line-2 mode, resolution, original mode, exposure, TTI, RTI, ECM, dis-card, reduction, duplex print, alternation, recovery transmit, journal auto print, memory transmis-sion report, multi transmission report, polling report, and relay station report.
The fax settings are available only when the fax option is installed on this equipment.
Configuring save as file settingsAn administrator can configure the save as file settings such as storage maintenance, destina-tion, remote 1, remote 2, N/W-Fax destination, and N/W-Fax folder.
Configuring Email settingsAn administrator can configure the Email settings such as file format, fragment message size, and default body strings.
Configuring Internet Fax settingsAn administrator can configure the Internet Fax settings such as fragment page size and default body strings.
Configuring printer settingsAn administrator can configure the default printer settings such as number of days to save pri-vate, proof and invalid jobs, duplex printing, default paper size, default paper type, default orien-tation, default stapling, default output tray, PCL form line, PCL font pitch, PCL font point size, PCL font number, auto paper size conversion, and print startup page.
7 TopAccess Administrator Mode
106 Features and Functions
Configuring print service settingsAn administrator can configure the print services such as Raw TCP/IP print, LPD print, IPP print, FTP print, NetWare print, and Email print.
About Maintenance from TopAccessFollowing maintenance options are performed from TopAccess in the administrator mode:
Updating client softwareAn administrator can update the client software saved in this equipment. When a new version of client software is released, an administrator should update the client software in this equipment so clients can install new versions of their client software from TopAccess.
Removing client softwareAn administrator can remove client software saved in this equipment.
Creating backup filesAn administrator can save the data in the address book, mailboxes, and templates as files for backups.
Restoring data from backup filesAn administrator can restore the data in the address book, mailboxes, and templates using the backup files.
Deleting data in hard diskAn administrator can delete data such as scan, transmission, and reception data in the hard disk. Use this feature to delete data periodically for restoring the hard disk space if there is not enough disk space for operation.
Registering the directory serviceAn administrator can add or delete directory service for LDAP servers. If any LDAP servers are registered, clients can search for data using the registered LDAP servers to add new Email addresses to the address book.
Setting up the notification settingsAn administrator can enable or disable Email notifications for specific events that occur in this equipment. An administrator specifies the Email address to send a notification.
Importing and exporting address book dataAn administrator can import/export the address book data in CSV format.
Importing and exporting department code dataAn administrator can import/export the department code data in CSV format.
Exporting logsAn administrator can export the logs and journals in CSV format such as print job logs, fax trans-mit journals, fax reception journals, scan logs, and message logs.
Clearing logsAn administrator can clear the logs and journals in CSV format such as print job logs, fax trans-mit journals, fax reception journals, scan logs, and message logs.
Features and Functions 107
About Registration from TopAccessRegistering is performed from TopAccess in the administrator mode:
Registering public templatesAn administrator can register public templates that are available for all users.
Registering Fax or Internet Fax Received ForwardAn administrator can register the agents for the relay transmission of received faxes or Internet Faxes. Using these agents, an administrator can collect the all received faxes by transmitting them to another internet fax device, saving them as a file in the hard disk or network folders, sending them to specific Email addresses, or storing to e-Filing.
The Fax Received Forward is available only when the fax option is installed on this equipment.
About Other Administrative Functions in TopAccess
Displaying message logsAn administrator can display the message logs from TopAccess in the administrator mode.
Registering department codesAn administrator can manage department codes from the Counter tab.
Setting up authenticationAn administrator can configure the authentication for the operations in this equipment.

7 TopAccess Administrator Mode
108 Accessing TopAccess Administrator Mode
Accessing TopAccess Administrator Mode
TopAccess, web-based utility available on this equipment, allows you to manage this equipment remotely via the Internet or via your company’s intranet.To operate TopAccess, this equipment should be connected to the network and configured with the TCP/IP settings. After you complete the TCP/IP setup, you can access to the TopAccess web site to operate various functions from your computer using a Web browser such as Netscape Navigator and Internet Explorer.You can use the TopAccess web-based utility from a Windows, Macintosh or Unix operating sys-tem environment. The following browsers are supported:
WindowsInternet Explorer 5.5 or laterNetscape Navigator 7.1 or later
MacintoshSafari 2.0Netscape Navigator 7.1 or later
UnixNetscape Navigator 7.1 or later
Accessing TopAccess in the administrator mode
1 To navigate to TopAccess, enter the following URL on the address box of your Internet browser.
http://<IP Address> or http://<Device Name>
For exampleWhen the IP address of the equipment is “10.10.70.105”:
http://10.10.70.105When the device name of this equipment is “mfp-00c67861”:
http://mfp-00c67861
When SSL for the HTTP network service is enabled, the alert message may appear when you enter the URL in the address box. In that case, please click [Yes] to proceed the operation.
2 The TopAccess web page opens.

Accessing TopAccess Administrator Mode 109
3 Click the [Administration] tab.
The Login page is displayed.
4 Enter the administrator password in the “Password” field. Then click [Login].
You cannot change a name in the User Name field. It always must be “Admin” to login TopAccess in the administrator mode.The Setup page is displayed.
The default administrator password is “123456” if you have not change the administrator password.
5 Click the menu and submenu to display the desired page.
To logout from the administrator mode, click the Logout link that is displayed in the upper right.
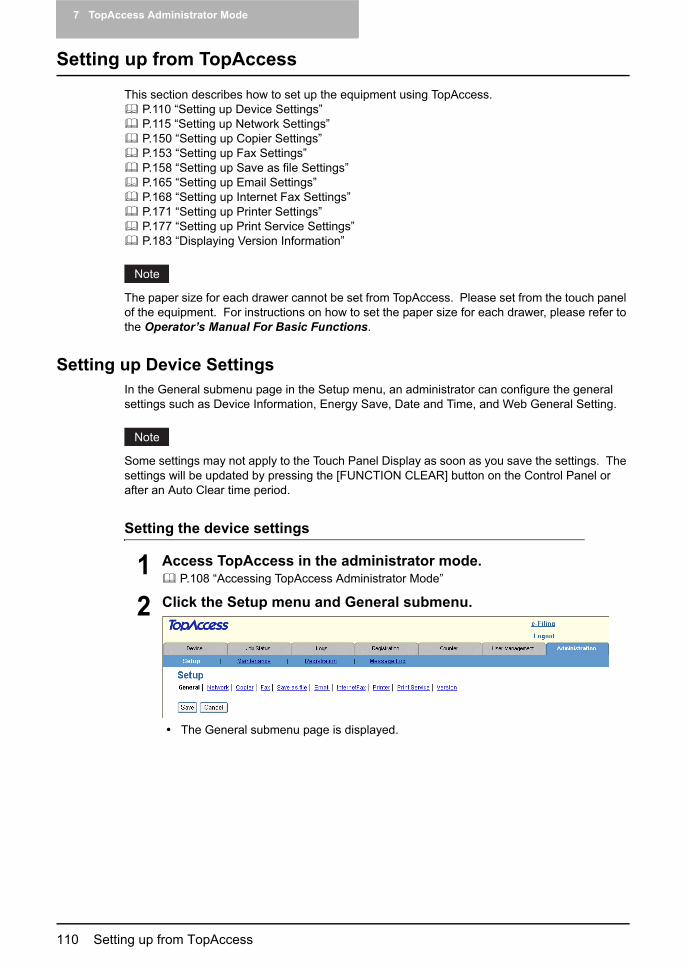
7 TopAccess Administrator Mode
110 Setting up from TopAccess
Setting up from TopAccess
This section describes how to set up the equipment using TopAccess. P.110 “Setting up Device Settings” P.115 “Setting up Network Settings” P.150 “Setting up Copier Settings” P.153 “Setting up Fax Settings” P.158 “Setting up Save as file Settings” P.165 “Setting up Email Settings” P.168 “Setting up Internet Fax Settings” P.171 “Setting up Printer Settings” P.177 “Setting up Print Service Settings” P.183 “Displaying Version Information”
The paper size for each drawer cannot be set from TopAccess. Please set from the touch panel of the equipment. For instructions on how to set the paper size for each drawer, please refer to the Operator’s Manual For Basic Functions.
Setting up Device SettingsIn the General submenu page in the Setup menu, an administrator can configure the general settings such as Device Information, Energy Save, Date and Time, and Web General Setting.
Some settings may not apply to the Touch Panel Display as soon as you save the settings. The settings will be updated by pressing the [FUNCTION CLEAR] button on the Control Panel or after an Auto Clear time period.
Setting the device settings
1 Access TopAccess in the administrator mode. P.108 “Accessing TopAccess Administrator Mode”
2 Click the Setup menu and General submenu.
The General submenu page is displayed.

Setting up from TopAccess 111
3 In the General submenu page, set the device settings as required.
In the General submenu page, you can set the following: P.112 “Setting up the Device Information” P.113 “Setting up the Energy Save” P.114 “Setting up the Time and Date” P.114 “Setting up the Web General Setting”
4 Click [Save].The confirmation dialog box appears.
If you want to restore the current settings without saving the changes, click [Cancel]. Clicking [Cancel] cannot restore the defaults. This can only clear the changes and restore the current settings before saving the changes.
5 Click [OK] to apply the changes.
When using the Internet Explorer, the settings that are displayed in each field may not be changed even if you change the settings and click [Save]. However, the settings have been changed in the equipment. In that case, click the General submenu then the page displays the current settings in each field.
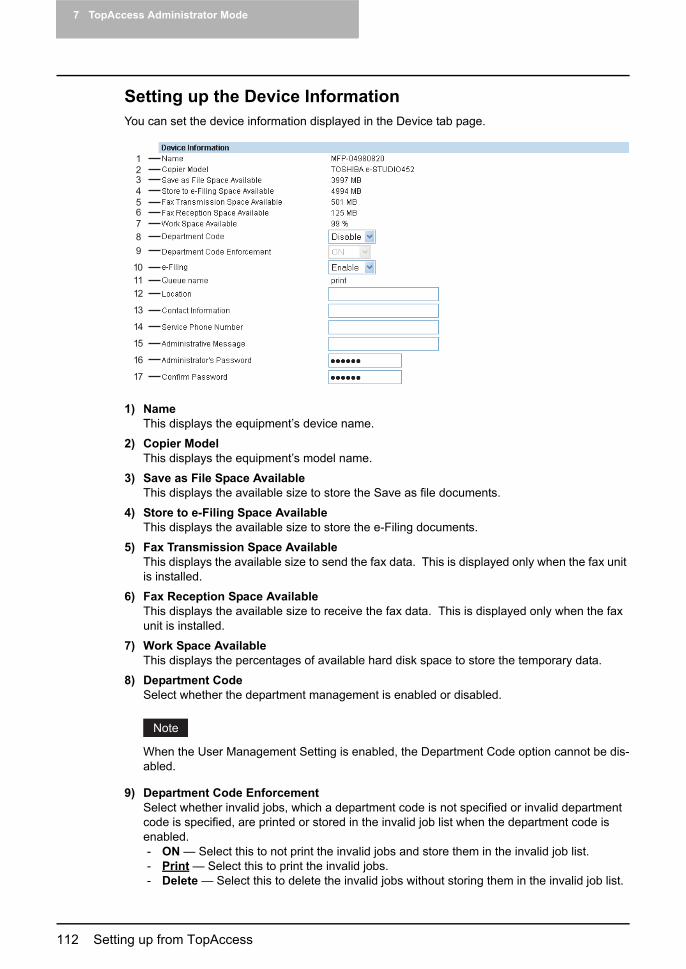
7 TopAccess Administrator Mode
112 Setting up from TopAccess
Setting up the Device InformationYou can set the device information displayed in the Device tab page.
1) NameThis displays the equipment’s device name.
2) Copier ModelThis displays the equipment’s model name.
3) Save as File Space AvailableThis displays the available size to store the Save as file documents.
4) Store to e-Filing Space AvailableThis displays the available size to store the e-Filing documents.
5) Fax Transmission Space AvailableThis displays the available size to send the fax data. This is displayed only when the fax unit is installed.
6) Fax Reception Space AvailableThis displays the available size to receive the fax data. This is displayed only when the fax unit is installed.
7) Work Space AvailableThis displays the percentages of available hard disk space to store the temporary data.
8) Department CodeSelect whether the department management is enabled or disabled.
When the User Management Setting is enabled, the Department Code option cannot be dis-abled.
9) Department Code EnforcementSelect whether invalid jobs, which a department code is not specified or invalid department code is specified, are printed or stored in the invalid job list when the department code is enabled.- ON — Select this to not print the invalid jobs and store them in the invalid job list.- Print — Select this to print the invalid jobs.- Delete — Select this to delete the invalid jobs without storing them in the invalid job list.
1
2
3
4
5
6
7
8
9
10
11
12
13
14
15
16
17

Setting up from TopAccess 113
If the Department Code Enforcement is set to ON and the SNMP communication is enabled in the printer driver, the user will be prompted to enter the correct department code if an invalid department code was entered in the printer driver.The Department Code Enforcement setting is not applied when the User Management Setting is enabled.
10)e-FilingSelect whether the e-Filing functions are enabled or disabled.
11) Queue nameDisplay the queue name for SMB printing. This queue name is used when users use the dis-covery function of the installer to obtain the network queue during the installation.
12)LocationEnter the name of the department or site. This is displayed in the Device tab page that appears first when accessing the TopAccess web site for users.
13)Contact InformationEnter the name or title of the contact person for this equipment. This is displayed in the Device tab page that appears first when accessing the TopAccess web site for users.
14)Service Phone NumberEnter the phone number for service on this equipment. This is displayed in the Device tab page that appears first when accessing the TopAccess web site for users.
15)Administrative MessageEnter the message about this equipment for all users to read. This is displayed in the Device tab page that appears first when accessing the TopAccess web site for users.
16)Administrator’s PasswordIf you want to change the administrator’s password used to log in functions from the Touch Panel Display and TopAccess, enter a new password. You can enter alphanumeric charac-ters of 6 or more and 10 or less for the administrator’s password. You cannot leave this field blank.
17)Confirm PasswordEnter a new password that you entered in the “Administrator’s password” field.
Setting up the Energy SaveYou can set the time to enter the Auto Clear, Auto Power Save and Auto Power Off mode.
1) Auto ClearSelect how long this equipment can remain inactive before the Touch Panel Display auto-matically returns to the default display and settings.
2) Auto Power SaveSelect how long this equipment can remain inactive before entering the power save mode.
3) Sleep/Auto Shut OffSelect how long this equipment can remain inactive before entering the sleep mode or auto shut off mode.
1
2
3

7 TopAccess Administrator Mode
114 Setting up from TopAccess
Setting up the Time and DateYou can set the date, time, time zone, and date format. You can also enable the daylight mode.
1) Date/TimeTo adjust the date, select year in the first field, select month in the second field, and enter date in the third field.To adjust the time, enter hour in the fourth field, and enter time in the fifth field.
2) Time ZoneSelect the time zone where this equipment is located.
3) Date FormatSelect the date format.
4) Daylight ModeSelect “ON” to set the daylight saving time system.
Setting up the Web General SettingYou can set the displayed language of TopAccess, and session timer to automatically log out from the administrator mode.
1) WEB LanguageSelect the displayed language of TopAccess.
2) Session TimerEnter how long you want this equipment to preserve the session data of TopAccess. You can enter any integer between 5 to 999. This setting also applies to the session data of e-Fil-ing web utility.
1
2
3
4
1
2
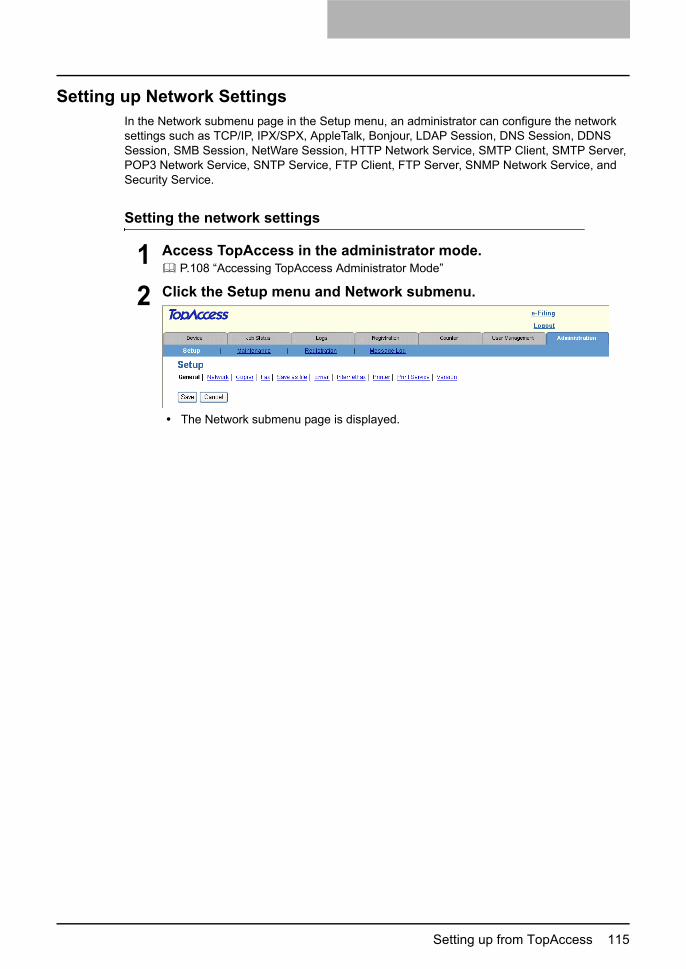
Setting up from TopAccess 115
Setting up Network SettingsIn the Network submenu page in the Setup menu, an administrator can configure the network settings such as TCP/IP, IPX/SPX, AppleTalk, Bonjour, LDAP Session, DNS Session, DDNS Session, SMB Session, NetWare Session, HTTP Network Service, SMTP Client, SMTP Server, POP3 Network Service, SNTP Service, FTP Client, FTP Server, SNMP Network Service, and Security Service.
Setting the network settings
1 Access TopAccess in the administrator mode. P.108 “Accessing TopAccess Administrator Mode”
2 Click the Setup menu and Network submenu.
The Network submenu page is displayed.

7 TopAccess Administrator Mode
116 Setting up from TopAccess
3 In the Network submenu page, click link or scroll the page to find the setting table, and click the button of the setting to set the net-work settings as required.
In the Network submenu page, you can set the following: P.117 “Setting up the TCP/IP” P.120 “Setting up the IPX/SPX” P.121 “Setting up the AppleTalk” P.121 “Setting up the Bonjour” P.122 “Setting up the LDAP Session” P.122 “Setting up the DNS Session” P.123 “Setting up the DDNS Session” P.125 “Setting up the SMB Session” P.128 “Setting up the NetWare Session” P.129 “Setting up the HTTP Network Service” P.129 “Setting up the SMTP Client” P.132 “Setting up the SMTP Server” P.133 “Setting up the POP3 Network Service” P.134 “Setting up the SNTP Service” P.135 “Setting up the FTP Client” P.135 “Setting up the FTP Server” P.136 “Setting up the SNMP Network Service” P.137 “Setting up the Security Service”
4 Click [Set] to save the settings and close the sub window.
5 Click [Save].The confirmation dialog box appears.
If you want to restore the current settings without saving the changes, click [Cancel]. Clicking [Cancel] cannot restore the defaults. This can only clear the changes and restore the current settings before saving the changes.

Setting up from TopAccess 117
6 Click [OK] to apply the changes.
This equipment starts initializing the network interface card to apply the changes
During the initialization of the network interface card, the network will not be available. TopAccess will display “Please restart after waiting a few minutes.” During the initializa-tion, the Touch Panel Display will display “NETWORK INITIALIZING”. When this mes-sage disappears, TopAccess will once again be available.
Setting up the TCP/IPYou can set the TCP/IP protocol to enable communication over TCP/IP. The TCP/IP must be configured to enable TopAccess, SMB printing, Raw TCP or LPR printing, IPP printing, Save as file to network folder, Scan to Email, and Internet Fax.
1) Ethernet Speed Duplex ModeSelect the ethernet speed.
1
2
3
4
5
6
7
8
9
10
11
12

7 TopAccess Administrator Mode
118 Setting up from TopAccess
When you select a specific ethernet speed, you must select the same ethernet speed as set in the connected network. If you do not know the ethernet speed that must be used, select “AUTO”.
2) Address ModeSelect how to set the IP address.- Static IP — Select this to assign the static IP address manually. When this is selected,
enter the static IP address in the IP Address field.- Dynamic — Select this to assign the IP address using the DHCP with Auto-IP address-
ing enabled. When this is selected, the IP address, subnet mask, default gateway, pri-mary WINS server address, secondary WINS server address, POP3 server address, and SMTP server address can be automatically obtained from the DHCP server if the net-work supports the DHCP, and the IP address can be also assigned using Auto-IP addressing even if the network does not support the DHCP.
- No AutoIP — Select this to assign the IP address using the DHCP with Auto-IP address-ing disabled. When this is selected, the IP address, subnet mask, default gateway, pri-mary WINS server address, secondary WINS server address, POP3 server address, and SMTP server address can be automatically obtained from the DHCP server if the net-work supports the DHCP, but the last IP address will not be used if the equipment cannot communicate with the DHCP server.
3) Obtain a Domain Name automaticallySelect “Enable” when you want to obtain a domain name automatically using the DHCP server. This setting will apply only when “No AutoIP” or “Dynamic” is selected in the Address Mode option.
When the DHCP server does not have a domain name, the blank data is set to in the domain name even if you set the correct domain name manually in the DDNS Session. In that case, select “Disable” here and set the correct domain name in the DDNS Session.
P.123 “Setting up the DDNS Session”
4) Obtain a Domain Server Address automaticallySelect “Enable” when you want to obtain a domain server address automatically using the DHCP server. This setting will apply only when “No AutoIP” or “Dynamic” is selected in the Address Mode option.
When the DHCP server does not have a primary and secondary DNS server addresses, the blank data is set to in the primary and secondary DNS server addresses even if you set the correct primary and secondary DNS server addresses manually in the DNS Session. In that case, select “Disable” here and set the correct primary and secondary DNS server address in the DNS Session.
P.122 “Setting up the DNS Session”
5) Obtain a WINS Server Address automaticallySelect “Enable” when you want to obtain a primary or secondary WINS server address auto-matically using the DHCP server. This setting will apply only when “No AutoIP” or “Dynamic” is selected in the Address Mode option.
Setting up from TopAccess 119
When the DHCP server does not have a primary and secondary WINS server addresses, the blank data is set to in the primary and secondary WINS server addresses even if you set the correct primary and secondary WINS server addresses manually in the SMB Session. In that case, select “Disable” here and set the correct primary and secondary WINS server address in the SMB Session.
P.125 “Setting up the SMB Session”
6) Obtain a SMTP Server Address automaticallySelect “Enable” when you want to obtain a SMTP server address automatically using the DHCP server. This setting will apply only when “No AutoIP” or “Dynamic” is selected in the Address Mode option.
When the DHCP server does not have a SMTP server address, the blank data is set to in the SMTP server address even if you set the correct SMTP server address manually in the SMTP Client. In that case, select “Disable” here and set the correct SMTP server address in the SMTP Client.
P.129 “Setting up the SMTP Client”
7) Obtain a POP3 Server Address automaticallySelect “Enable” when you want to obtain a POP3 server address automatically using the DHCP server. This setting will apply only when “No AutoIP” or “Dynamic” is selected in the Address Mode option.
When the DHCP server does not have a POP3 server address, the blank data is set to in the POP3 server address even if you set the correct POP3 server address manually in the POP3 Network Service. In that case, select “Disable” here and set the correct POP3 server address in the POP3 Network Service.
P.133 “Setting up the POP3 Network Service”
8) Obtain a SNTP Server Address automaticallySelect “Enable” when you want to obtain a SNTP server address automatically using the DHCP server. This setting will apply only when “No AutoIP” or “Dynamic” is selected in the Address Mode option.
When the DHCP server does not have a SNTP server address, the blank data is set to in the SNTP server address even if you set the correct SNTP server address manually in the SNTP Network Service. In that case, select “Disable” here and set the correct SNTP server address in the SNTP Network Service.
P.136 “Setting up the SNMP Network Service”
9) IP AddressEnter the static IP address that is assigned to this equipment when “Static IP” is selected in the “Address Mode” drop down box.
10)Subnet maskEnter the subnet mask if required when “Static IP” is selected in the “Address Mode” drop down box.
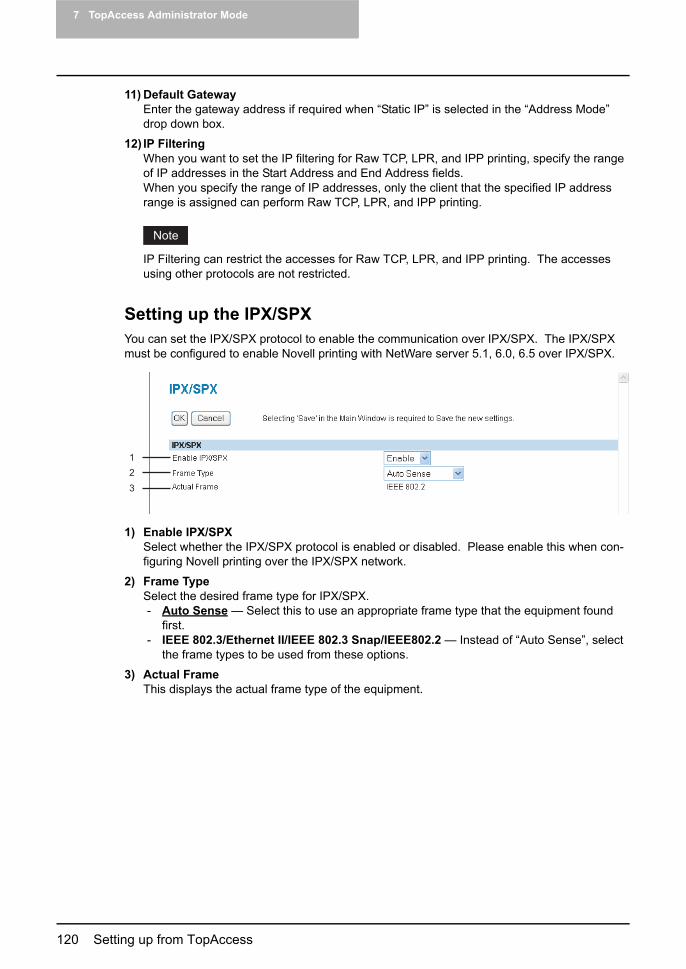
7 TopAccess Administrator Mode
120 Setting up from TopAccess
11) Default GatewayEnter the gateway address if required when “Static IP” is selected in the “Address Mode” drop down box.
12) IP FilteringWhen you want to set the IP filtering for Raw TCP, LPR, and IPP printing, specify the range of IP addresses in the Start Address and End Address fields.When you specify the range of IP addresses, only the client that the specified IP address range is assigned can perform Raw TCP, LPR, and IPP printing.
IP Filtering can restrict the accesses for Raw TCP, LPR, and IPP printing. The accesses using other protocols are not restricted.
Setting up the IPX/SPXYou can set the IPX/SPX protocol to enable the communication over IPX/SPX. The IPX/SPX must be configured to enable Novell printing with NetWare server 5.1, 6.0, 6.5 over IPX/SPX.
1) Enable IPX/SPXSelect whether the IPX/SPX protocol is enabled or disabled. Please enable this when con-figuring Novell printing over the IPX/SPX network.
2) Frame TypeSelect the desired frame type for IPX/SPX.- Auto Sense — Select this to use an appropriate frame type that the equipment found
first.- IEEE 802.3/Ethernet II/IEEE 802.3 Snap/IEEE802.2 — Instead of “Auto Sense”, select
the frame types to be used from these options.
3) Actual FrameThis displays the actual frame type of the equipment.
1
2
3

Setting up from TopAccess 121
Setting up the AppleTalkYou can set the protocol to enable communication over AppleTalk. The AppleTalk must be con-figured to enable AppleTalk printing from Macintosh computers.
1) Enable Apple TalkSelect whether the AppleTalk protocol is enabled or disabled. Please enable this when con-figuring AppleTalk printing.
2) Device NameEnter the device name of the equipment that will be displayed in the AppleTalk network.
3) Desired ZoneEnter the zone name where the equipment will connect — if required. If you leave an aster-isk in this field, the equipment will connect to the default zone.
Setting up the BonjourIn Bonjour, you can enable or disable the Bonjour networking that is available for Mac OS X.
1) Enable BonjourSelect whether the Bonjour is enabled or disabled.
2) Link-Local Host NameEnter the DNS host name of this equipment.
3) Service NameEnter the device name of this equipment that will be displayed in the Bonjour network.
1
2
3
1
2
3
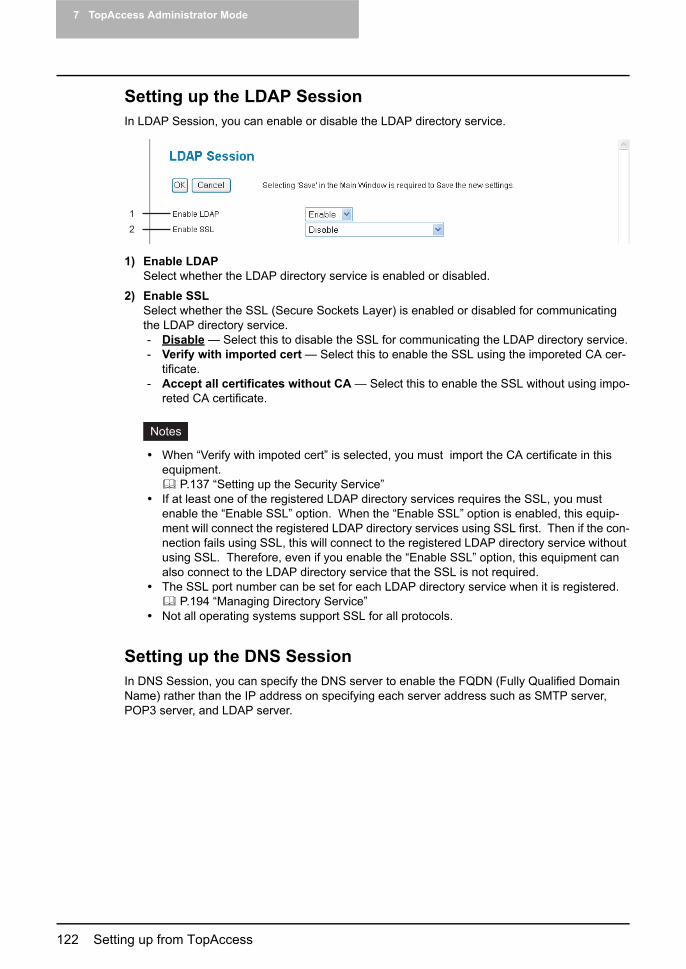
7 TopAccess Administrator Mode
122 Setting up from TopAccess
Setting up the LDAP SessionIn LDAP Session, you can enable or disable the LDAP directory service.
1) Enable LDAPSelect whether the LDAP directory service is enabled or disabled.
2) Enable SSLSelect whether the SSL (Secure Sockets Layer) is enabled or disabled for communicating the LDAP directory service.- Disable — Select this to disable the SSL for communicating the LDAP directory service.- Verify with imported cert — Select this to enable the SSL using the imporeted CA cer-
tificate.- Accept all certificates without CA — Select this to enable the SSL without using impo-
reted CA certificate.
When “Verify with impoted cert” is selected, you must import the CA certificate in this equipment.
P.137 “Setting up the Security Service”If at least one of the registered LDAP directory services requires the SSL, you must enable the “Enable SSL” option. When the “Enable SSL” option is enabled, this equip-ment will connect the registered LDAP directory services using SSL first. Then if the con-nection fails using SSL, this will connect to the registered LDAP directory service without using SSL. Therefore, even if you enable the “Enable SSL” option, this equipment can also connect to the LDAP directory service that the SSL is not required.The SSL port number can be set for each LDAP directory service when it is registered.
P.194 “Managing Directory Service”Not all operating systems support SSL for all protocols.
Setting up the DNS SessionIn DNS Session, you can specify the DNS server to enable the FQDN (Fully Qualified Domain Name) rather than the IP address on specifying each server address such as SMTP server, POP3 server, and LDAP server.
1
2
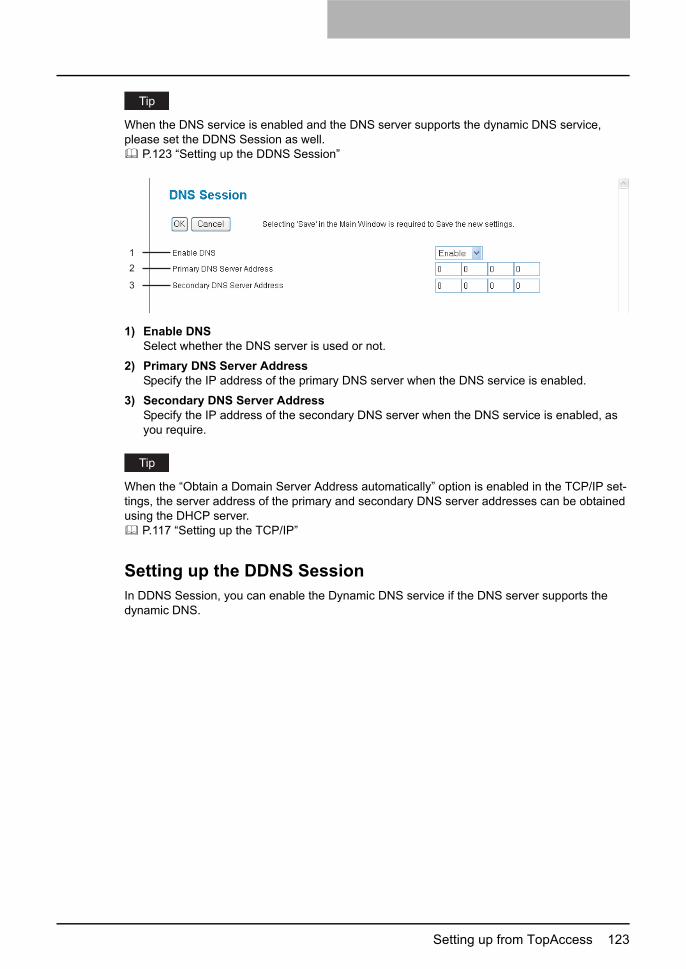
Setting up from TopAccess 123
When the DNS service is enabled and the DNS server supports the dynamic DNS service, please set the DDNS Session as well.
P.123 “Setting up the DDNS Session”
1) Enable DNSSelect whether the DNS server is used or not.
2) Primary DNS Server AddressSpecify the IP address of the primary DNS server when the DNS service is enabled.
3) Secondary DNS Server AddressSpecify the IP address of the secondary DNS server when the DNS service is enabled, as you require.
When the “Obtain a Domain Server Address automatically” option is enabled in the TCP/IP set-tings, the server address of the primary and secondary DNS server addresses can be obtained using the DHCP server.
P.117 “Setting up the TCP/IP”
Setting up the DDNS SessionIn DDNS Session, you can enable the Dynamic DNS service if the DNS server supports the dynamic DNS.
1
2
3
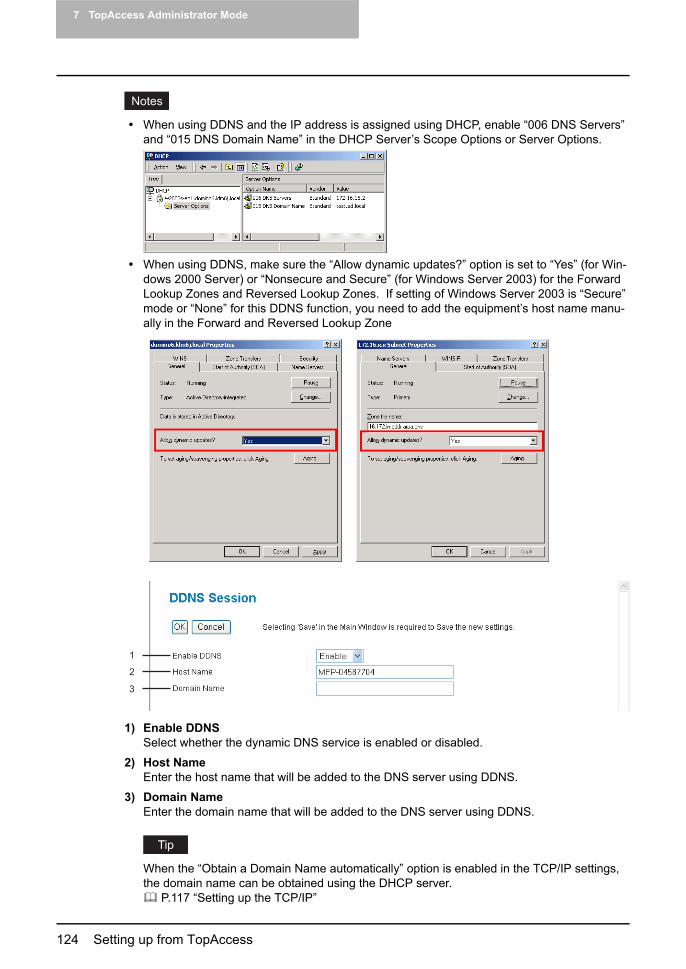
7 TopAccess Administrator Mode
124 Setting up from TopAccess
When using DDNS and the IP address is assigned using DHCP, enable “006 DNS Servers” and “015 DNS Domain Name” in the DHCP Server’s Scope Options or Server Options.
When using DDNS, make sure the “Allow dynamic updates?” option is set to “Yes” (for Win-dows 2000 Server) or “Nonsecure and Secure” (for Windows Server 2003) for the Forward Lookup Zones and Reversed Lookup Zones. If setting of Windows Server 2003 is “Secure” mode or “None” for this DDNS function, you need to add the equipment’s host name manu-ally in the Forward and Reversed Lookup Zone
1) Enable DDNSSelect whether the dynamic DNS service is enabled or disabled.
2) Host NameEnter the host name that will be added to the DNS server using DDNS.
3) Domain NameEnter the domain name that will be added to the DNS server using DDNS.
When the “Obtain a Domain Name automatically” option is enabled in the TCP/IP settings, the domain name can be obtained using the DHCP server.
P.117 “Setting up the TCP/IP”
1
2
3

Setting up from TopAccess 125
Setting up the SMB SessionIn SMB Session, you can specify the SMB network properties to access this equipment through a Microsoft Windows Network and enable SMB printing. When you enable the SMB, users can also browse the local folder in the equipment. You can also specify the WINS server when the WINS server is used to enable the Windows print sharing and Windows file sharing services between the different subnets.
1) SMB Server ProtocolSelect whether the SMB protocol is enabled or disabled.- Enable — Select this to enable SMB.- Disable — Select this to disable SMB.- Disable Print Share — Select this to enable the file sharing service using SMB, but dis-
able SMB printing.- Disable File Share — Select this to enable SMB printing, but disable the file sharing ser-
vice using SMB.
2) NetBIOS NameEnter the NetBIOS name of this equipment. The equipment uses “MFP-<NIC Serial Num-ber>” as the default NetBIOS name.
You can enter only alphanumeric characters and “-” (hyphenation) for NetBIOS name. If you use any other characters, a warning message will be displayed.
3) LogonEnter the workgroup or domain that this equipment joins.- Workgroup — Select this and enter the workgroup name when the equipment will logon
in the workgroup. All client computers can access this equipment without a user name and password.
1
2
3
4
5
6
7
8
9
10
11
7 TopAccess Administrator Mode
126 Setting up from TopAccess
- Domain — Select this and enter the domain name when the equipment will logon in the domain. Any client computers which are not a member of the domain will need a valid user name and password to access this equipment. Use this for a more secure access to this equipment.
When the “Obtain a Domain Name automatically” option is enabled in the TCP/IP settings, the domain name can be obtained using the DHCP server.
P.117 “Setting up the TCP/IP”
You can enter only alphanumeric characters and symbols except following characters for Workgroup.; : “ < > * + = \ | ? ,If you use any other characters, a warning message will be displayed.
4) Primary Domain ControllerSpecify the server name or IP address of the primary domain controller when this equipment will logon the domain network.
5) Backup Domain ControllerSpecify the server name or IP address of the backup domain controller when this equipment will logon the domain network, if required. If the Primary Domain Controller is unavailable, the Backup Domain Controller will be used to logon.
If the wrong primary or backup domain controller is specified, the NIC INITIALIZING mes-sage will be displayed for 5 to 10 minutes while this equipment searches for the primary or backup domain controller. In that case, correct the primary or backup domain controller set-ting after the NIC INITIALIZING message disappears.
6) Logon User NameEnter a valid user name that is able to logon the specified domain.
7) PasswordEnter the password for the specified logon user name to logon the domain network.
8) Primary WINS ServerSpecify the IP address of the primary WINS server when the WINS server is used to provide the NetBIOS name in your local area network. This option would be more useful to access this equipment using the NetBIOS Name form a different subnet.
When the “Obtain a WINS Server Address automatically” option is enabled in the TCP/IP settings, the primary and secondary WINS server address can be obtained using the DHCP server.
P.117 “Setting up the TCP/IP”
9) Secondary WINS ServerSpecify the IP address of the secondary WINS server as you require when the WINS server is used to provide NetBIOS name in your local area network. If the Primary WINS Server is unavailable, the Secondary WINS Server will be used.

Setting up from TopAccess 127
When the “Obtain a WINS Server Address automatically” option is enabled in the TCP/IP settings, the primary and secondary WINS server address can be obtained using the DHCP server.
P.117 “Setting up the TCP/IP”
If “0.0.0.0” is entered for Primary WINS Server and Secondary WINS Server, this equipment will not use the WINS server.
10)SMB Signing of SMB ServerSelect whether SMB Signing is enabled or disabled when a client accesses this equipment using SMB, such as when a client accesses the shared folder in this equipment.- If client agrees, digital signature is done for the communication — Select this to use
the digital signature to secure the communication only when a client accesses this equip-ment with a digital signature. Even if a client accesses this equipment without a digital signature, the communication is allowed without the digital signature.
- Digital signature is always done for the communication on the server side — Select this to allow the communication only when a client accesses this equipment with a digital signature. When a client accesses this equipment without a digital signature, the com-munication is not allowed.
- Digital signature isn’t done for the communication for the server — Select this to allow the communication only when a client accesses this equipment without a digital sig-nature. When a client is set as that it will always access a SMB server with a digital sig-nature, the communication is not allowed.
If you do not know whether the SMB Signing of SMB Client is enabled or disabled in the cli-ent computers, it is recommended to select “If client agrees, digital signature is done for the communication”. If this is set incorrectly, the SMB communication may become unavailable.
11) SMB Signing of SMB ClientSelect whether SMB Signing is enabled or disabled when this equipment accesses the cli-ents using SMB, such as when this equipment stores the scanned data in the network folder using SMB.- If server agrees, digital signature is done for the communication — Select this to
use the digital signature to secure the communication to a SMB server only when the SMB Signing of SMB Server that this equipment accesses is enabled. If the SMB Sign-ing of SMB Server is disabled in a SMB server, the communication is performed without the digital signature.
- Digital signature is always done for the communication on the client side — Select this to make that this equipment always accesses a SMB server with a digital signature. When the SMB Signing of SMB Server is disabled in a SMB server, the communication is not allowed.
- Digital signature isn’t done for the communication for the client — Select this to communicate a SMB server without the digital signature. If the SMB Signing of SMB Server is always enabled in a SMB server, the communication is not allowed.

7 TopAccess Administrator Mode
128 Setting up from TopAccess
If you do not know whether the SMB Signing of SMB Server is enabled or disabled in the SMB servers, it is recommended to select “If server agrees, digital signature is done for the communication”. If this is set incorrectly, the SMB communication may become unavailable.When communicating the Windows Server 2003 as a SMB server, it is recommended to select “If server agrees, digital signature is done for the communication” or “Digital signa-ture is always done for the communication on the client side”, because the SMB Signing of SMB Server is enabled on the Windows Server 2003 as the default.
Setting up the NetWare SessionIn NetWare Session, you can set the NetWare Bindery or NDS service. This must be set when configuring a Novell printing environment.
1) Enable BinderySelect whether the NetWare Bindery mode for Novell printing is enabled or disabled. When you configure a Novell printing environment with the NetWare server in bindery mode, you must enable this.
2) Enable NDSSelect whether the NetWare NDS mode for Novell printing is enabled or disabled. When you configure a Novell printing environment with the NetWare server in NDS mode, you must enable this. When this is enabled, you should also specify the context and tree for the NDS.
3) ContextEnter the NDS context that the NetWare print server for this equipment is located.
4) TreeEnter the NDS tree.
5) Search rootEnter the NetWare server name that this equipment preferentially searches for the queues.
1
2
3
4
5
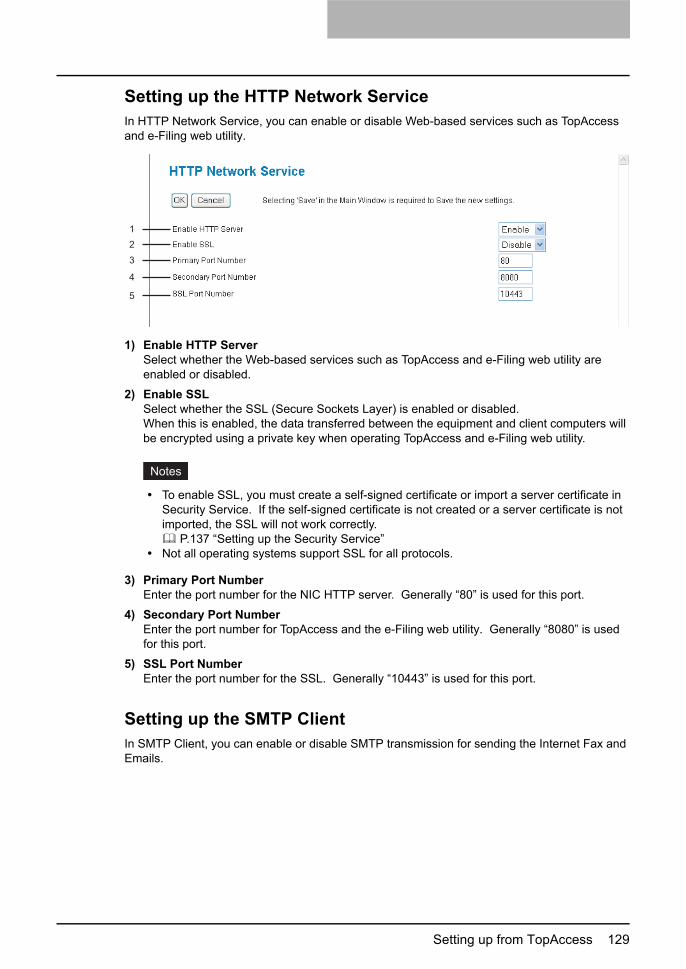
Setting up from TopAccess 129
Setting up the HTTP Network ServiceIn HTTP Network Service, you can enable or disable Web-based services such as TopAccess and e-Filing web utility.
1) Enable HTTP ServerSelect whether the Web-based services such as TopAccess and e-Filing web utility are enabled or disabled.
2) Enable SSLSelect whether the SSL (Secure Sockets Layer) is enabled or disabled.When this is enabled, the data transferred between the equipment and client computers will be encrypted using a private key when operating TopAccess and e-Filing web utility.
To enable SSL, you must create a self-signed certificate or import a server certificate in Security Service. If the self-signed certificate is not created or a server certificate is not imported, the SSL will not work correctly.
P.137 “Setting up the Security Service”Not all operating systems support SSL for all protocols.
3) Primary Port NumberEnter the port number for the NIC HTTP server. Generally “80” is used for this port.
4) Secondary Port NumberEnter the port number for TopAccess and the e-Filing web utility. Generally “8080” is used for this port.
5) SSL Port NumberEnter the port number for the SSL. Generally “10443” is used for this port.
Setting up the SMTP ClientIn SMTP Client, you can enable or disable SMTP transmission for sending the Internet Fax and Emails.
1
2
3
4
5

7 TopAccess Administrator Mode
130 Setting up from TopAccess
A From Address setting is also required to send Internet Fax and Emails. For information about the From Address setting, please refer to the following sections.
P.165 “Setting up Email Settings” P.168 “Setting up Internet Fax Settings”
The From Address can be also determined automatically when the User Management Setting is enabled. For more information about the User Management Setting, please refer to User Man-agement Guide.
1) Enable SMTP ClientWhen this is enabled, this equipment sends an Internet Fax and an Email to the specified SMTP server for transmission over the Internet.
2) Enable SSLSelect whether the SSL (Secure Sockets Layer) is enabled or disabled for SMTP transmis-sion.- Disable — Select this to disable the SSL for SMTP transmission.- Verify with imported cert — Select this to enable the SSL using the imporeted CA cer-
tificate.- Accept all certificates without CA — Select this to enable the SSL without using impo-
reted CA certificate.
When “Verify with impoted cert” is selected, you must import the CA certificate in this equipment.
P.137 “Setting up the Security Service”Not all operating systems support SSL for all protocols.
3) SSL/TLSSelect the protocol for the SSL when the “Enable SSL” option is enabled.- STARTTLS — Select this to send a message in TLS (Transport Layer Security) using
STARTTLS that is the extension command for SMTP transmission.- Over SSL — Select this to send a message in SLL (Secure Socket Layer).
When you select “Over SSL”, please make sure to change the port number correctly. Gener-ally, “465” port is used for the Over SSL instead of “25” port.
1
2
3
4
5
6
7
8
9
10

Setting up from TopAccess 131
4) SMTP Server AddressEnter the IP address or FQDN (Fully Qualified Domain Name) of the SMTP server when “Enable SMTP Client” is enabled.
If you use FQDN to specify the SMTP server, you must configure the DNS server and enable the DNS in the DNS Session.
When the “Obtain a SMTP Server Address automatically” option is enabled in the TCP/IP settings, the SMTP server address can be obtained using the DHCP server.
P.117 “Setting up the TCP/IP”
5) POP Before SMTPSelect whether the POP Before SMTP authentication is enabled or disabled.
6) AuthenticationSelect the type of the authentication to access the SMTP server.- Disable — Select this to access the SMTP server using no authentication.- Plain — Select this to access the SMTP server using the plain authentication.- Login — Select this to access the SMTP server using the login authentication.- CRAM-MD5 — Select this to access the SMTP server using the CRAM-MD5 authentica-
tion.- Digest-MD5 — Select this to access the SMTP server using the Digest-MD5 authentica-
tion.- NTLM(IWA) — Select this to access the SMTP server using the NTLM (IWA) authentica-
tion.- Kerberos — Select this to access the SMTP server using the Kerberos authentication.- Auto — Select this to access the SMTP server using the appropriate authentication that
this equipment detects.
7) Login NameEnter the login name to access the SMTP server if the SMTP authentication is enabled.
8) PasswordEnter the password to access the SMTP server if the SMTP authentication is enabled.
9) Maximum Email / Internet Fax SizeSelect the maximum size that this equipment allows to send using the SMTP.
10)Port NumberEnter the port number for accessing the SMTP server when “Enable SMTP Client” is enabled. The port number depends on the port setting in the SMTP server. Generally “25” is used.
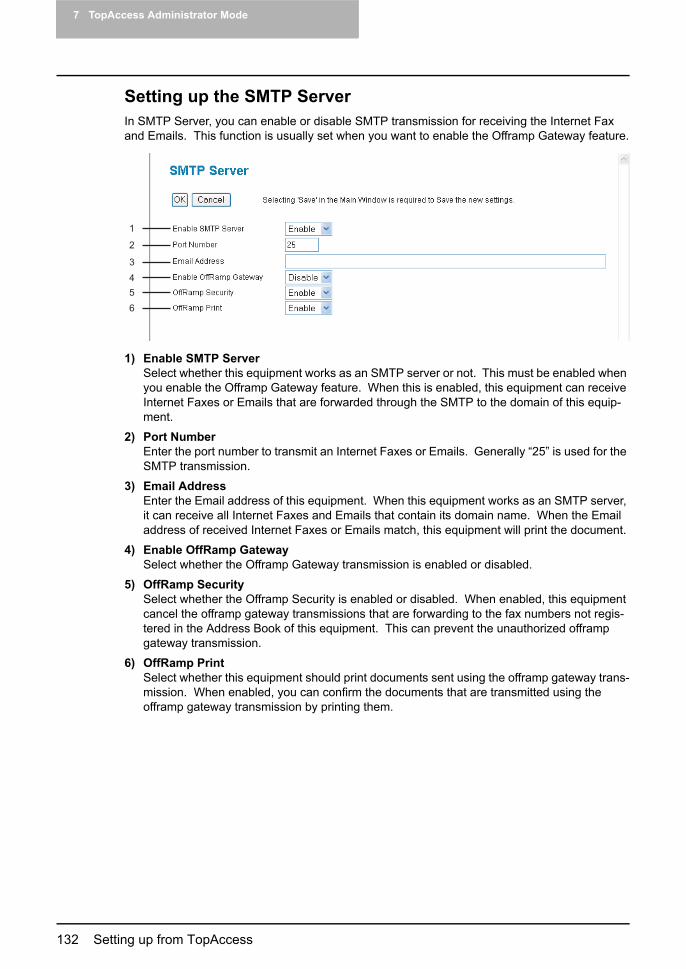
7 TopAccess Administrator Mode
132 Setting up from TopAccess
Setting up the SMTP ServerIn SMTP Server, you can enable or disable SMTP transmission for receiving the Internet Fax and Emails. This function is usually set when you want to enable the Offramp Gateway feature.
1) Enable SMTP ServerSelect whether this equipment works as an SMTP server or not. This must be enabled when you enable the Offramp Gateway feature. When this is enabled, this equipment can receive Internet Faxes or Emails that are forwarded through the SMTP to the domain of this equip-ment.
2) Port NumberEnter the port number to transmit an Internet Faxes or Emails. Generally “25” is used for the SMTP transmission.
3) Email AddressEnter the Email address of this equipment. When this equipment works as an SMTP server, it can receive all Internet Faxes and Emails that contain its domain name. When the Email address of received Internet Faxes or Emails match, this equipment will print the document.
4) Enable OffRamp GatewaySelect whether the Offramp Gateway transmission is enabled or disabled.
5) OffRamp SecuritySelect whether the Offramp Security is enabled or disabled. When enabled, this equipment cancel the offramp gateway transmissions that are forwarding to the fax numbers not regis-tered in the Address Book of this equipment. This can prevent the unauthorized offramp gateway transmission.
6) OffRamp PrintSelect whether this equipment should print documents sent using the offramp gateway trans-mission. When enabled, you can confirm the documents that are transmitted using the offramp gateway transmission by printing them.
1
2
3
4
5
6

Setting up from TopAccess 133
Setting up the POP3 Network ServiceIn POP3 Network Service, you can specify the POP3 server to receive an Internet Fax and Emails.
1) Enable POP3 ClientSelect whether retrieving an Internet Fax and an Email from the POP3 server is enabled or disabled.
2) Enable SSLSelect whether the SSL (Secure Sockets Layer) is enabled or disabled for POP3 transmis-sion.- Disable — Select this to disable the SSL for POP3 transmission.- Verify with imported cert — Select this to enable the SSL using the imporeted CA cer-
tificate.- Accept all certificates without CA — Select this to enable the SSL without using impo-
reted CA certificate.
When “Verify with impoted cert” is selected, you must import the CA certificate in this equipment.
P.137 “Setting up the Security Service”Not all operating systems support SSL for all protocols.
3) POP3 Server AddressEnter the IP address or FQDN (Fully Qualified Domain Name) of the POP3 server when “Enable POP3 Client” is enabled.
If you use FQDN to specify the POP3 server, you must configure the DNS server and enable the DNS in the DNS Session.
When the “Obtain a POP3 Server Address automatically” option is enabled in the TCP/IP settings, the POP3 server address can be obtained using the DHCP server.
P.117 “Setting up the TCP/IP”
1
2
3
4
5
6
7
8
9
10
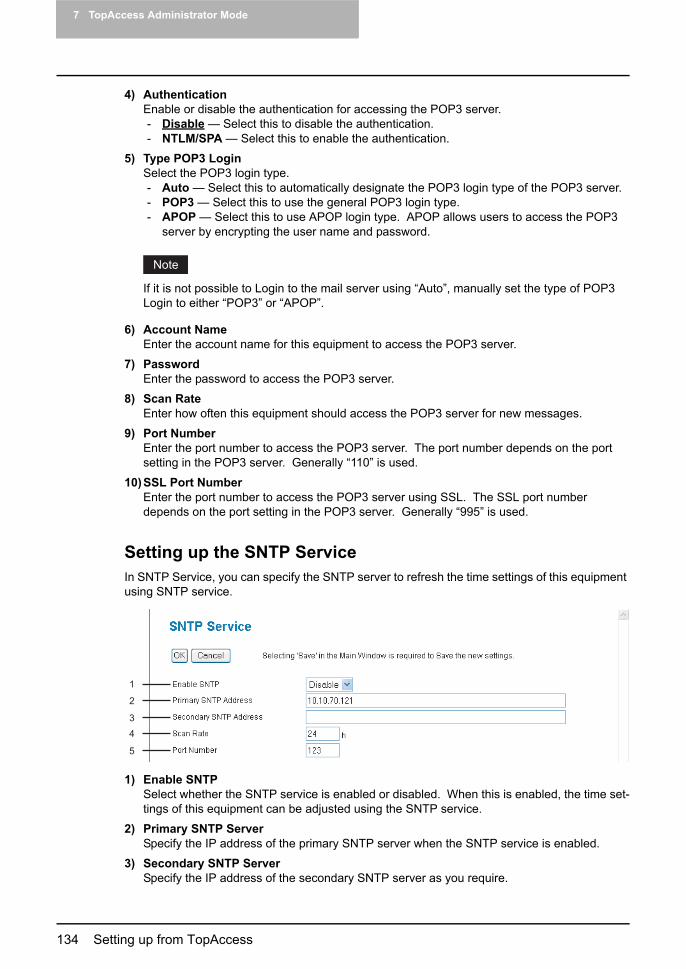
7 TopAccess Administrator Mode
134 Setting up from TopAccess
4) AuthenticationEnable or disable the authentication for accessing the POP3 server.- Disable — Select this to disable the authentication.- NTLM/SPA — Select this to enable the authentication.
5) Type POP3 LoginSelect the POP3 login type.- Auto — Select this to automatically designate the POP3 login type of the POP3 server.- POP3 — Select this to use the general POP3 login type.- APOP — Select this to use APOP login type. APOP allows users to access the POP3
server by encrypting the user name and password.
If it is not possible to Login to the mail server using “Auto”, manually set the type of POP3 Login to either “POP3” or “APOP”.
6) Account NameEnter the account name for this equipment to access the POP3 server.
7) PasswordEnter the password to access the POP3 server.
8) Scan RateEnter how often this equipment should access the POP3 server for new messages.
9) Port NumberEnter the port number to access the POP3 server. The port number depends on the port setting in the POP3 server. Generally “110” is used.
10)SSL Port NumberEnter the port number to access the POP3 server using SSL. The SSL port number depends on the port setting in the POP3 server. Generally “995” is used.
Setting up the SNTP ServiceIn SNTP Service, you can specify the SNTP server to refresh the time settings of this equipment using SNTP service.
1) Enable SNTPSelect whether the SNTP service is enabled or disabled. When this is enabled, the time set-tings of this equipment can be adjusted using the SNTP service.
2) Primary SNTP ServerSpecify the IP address of the primary SNTP server when the SNTP service is enabled.
3) Secondary SNTP ServerSpecify the IP address of the secondary SNTP server as you require.
1
2
3
4
5
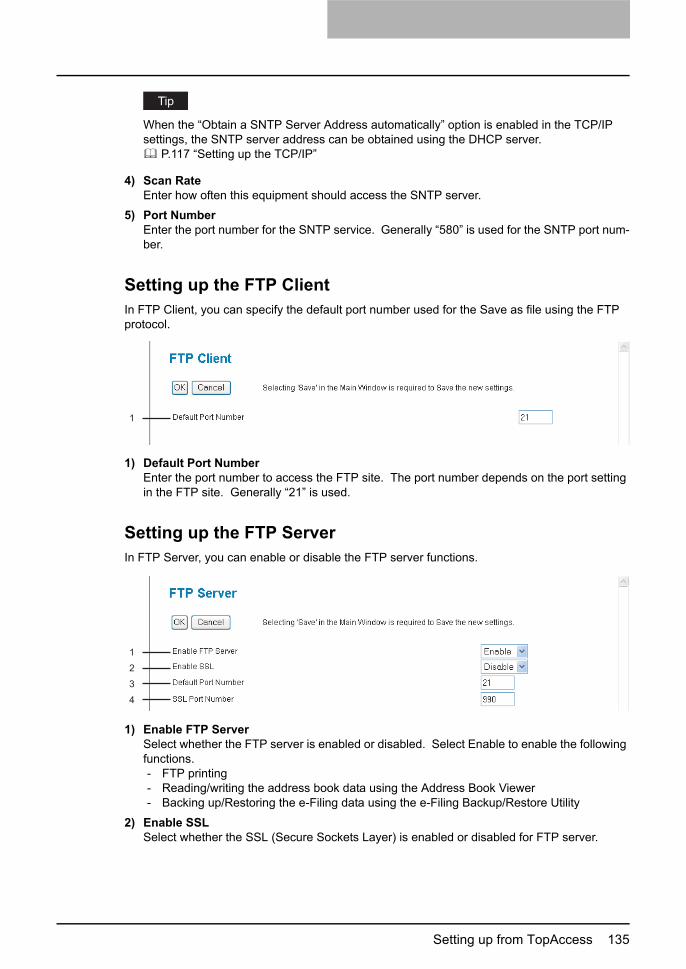
Setting up from TopAccess 135
When the “Obtain a SNTP Server Address automatically” option is enabled in the TCP/IP settings, the SNTP server address can be obtained using the DHCP server.
P.117 “Setting up the TCP/IP”
4) Scan RateEnter how often this equipment should access the SNTP server.
5) Port NumberEnter the port number for the SNTP service. Generally “580” is used for the SNTP port num-ber.
Setting up the FTP ClientIn FTP Client, you can specify the default port number used for the Save as file using the FTP protocol.
1) Default Port NumberEnter the port number to access the FTP site. The port number depends on the port setting in the FTP site. Generally “21” is used.
Setting up the FTP ServerIn FTP Server, you can enable or disable the FTP server functions.
1) Enable FTP ServerSelect whether the FTP server is enabled or disabled. Select Enable to enable the following functions.- FTP printing- Reading/writing the address book data using the Address Book Viewer- Backing up/Restoring the e-Filing data using the e-Filing Backup/Restore Utility
2) Enable SSLSelect whether the SSL (Secure Sockets Layer) is enabled or disabled for FTP server.
1
1
2
3
4

7 TopAccess Administrator Mode
136 Setting up from TopAccess
To enable SSL, you must create a self-signed certificate or import a server certificate in Security Service. If the self-signed certificate is not created or a server certificate is not imported, the SSL will not work correctly.
P.137 “Setting up the Security Service”Not all operating systems support SSL for all protocols.
3) Default Port NumberEnter the port number for the FTP server. Generally “21” is used.
4) SSL Port NumberEnter the port number that is used to access this equipment using FTP with SSL. Generally “990” is used.
Setting up the SNMP Network ServiceIn SNMP Network Service, you can enable or disable the SNMP to monitor the device status using a network monitoring utility. If an administrator wants to monitor the device status with a monitoring utility, programmed to fit the MIB, you must enable the SNMP and SNMP Traps.
1) Enable SNMPSelect whether the SNMP monitoring with MIB is enabled or disabled. This must be enabled to allow users to connect using TopAccessDocMon, TWAIN driver, File Downloader, and the Address Book Viewer.
2) Read CommunityEnter the SNMP read community name for the SNMP access.
1
2
3
4
5
6
7
8
Setting up from TopAccess 137
If you specify a community name other than “public” for the Read Community, the appli-cations that use MIB (TopAccessDocMon, TWAIN driver, File Downloader, and Address Book Viewer) will be unavailable. The SNMP communication of the printer driver also will be unavailable, so that the obtaining the configurations, confirming the department code, and obtaining the available boxes in e-Filing will be disabled.When you set the “Read Community” option blank, the SNMP communication between the SNMP Browser of Client PC and this equipment will be disabled.
3) Read Write CommunityEnter the SNMP Read Write community name for the SNMP access.
If you specify a community name other than “private” for the Read Write Community, the applications that use MIB (TopAccessDocMon, TWAIN driver, File Downloader, and Address Book Viewer) will be unavailable. The SNMP communication of the printer driver also will be unavailable, so that the obtaining the configurations, confirming the department code, and obtaining the available boxes in e-Filing will be disabled.When you set the “Read Write Community” option blank, the SNMP communication between the SNMP Browser of Client PC and this equipment will be disabled.
4) Enable Authentication TrapSelect whether sending a SNMP Traps when this equipment is accessed using SNMP from a different read community.
5) Enable Alerts TrapSelect whether sending a SNMP Traps when an alert condition occurs.
6) IP Trap Address 1-10Enter the IP address where the SNMP Traps will be sent. You can specify up to 10 addresses.
7) IP Trap CommunityEnter the trap community name for the IP Traps.
8) IPX Trap AddressEnter the IPX address where the SNMP Traps will be sent.
Setting up the Security ServiceIn Security Service, you can install the certificate for the authentication with the RADIUS server in the Wireless LAN network, create or install a server certificate to enable SSL for the HTTP Network Service, FTP Server, and IPP Print Service, and install CA certificates to be used for SSL of LDAP, SMTP Client, and POP3 Network Service.
P.138 “Installing Certificate for Wireless LAN” P.139 “Installing Server Certificate” P.146 “Installing CA Certificate”

7 TopAccess Administrator Mode
138 Setting up from TopAccess
— Installing Certificate for Wireless LANWhen you want to set the 802.1x authentication with the RADIUS server for the optional Wire-less LAN Module (GN-1041), you must install user certificate and CA certificate as required.
This equipment supports CA certificate and User certificate that are the following encoding format.- CA Certificate : DER, BASE64, PKCS#7- User Certificate: PKCS#12
This equipment supports md5RSA and sha1RSA certificate. Please make sure to use the certificate in these algorithms.
For further information about the Wireless LAN, please see Operator’s Manual for Wireless LAN Module which is included in the CD-ROM for the GN-1041 Wireless LAN Module.
Installing certificate for Wireless LAN
1 Click [Security Service].
The Security Service page is displayed.
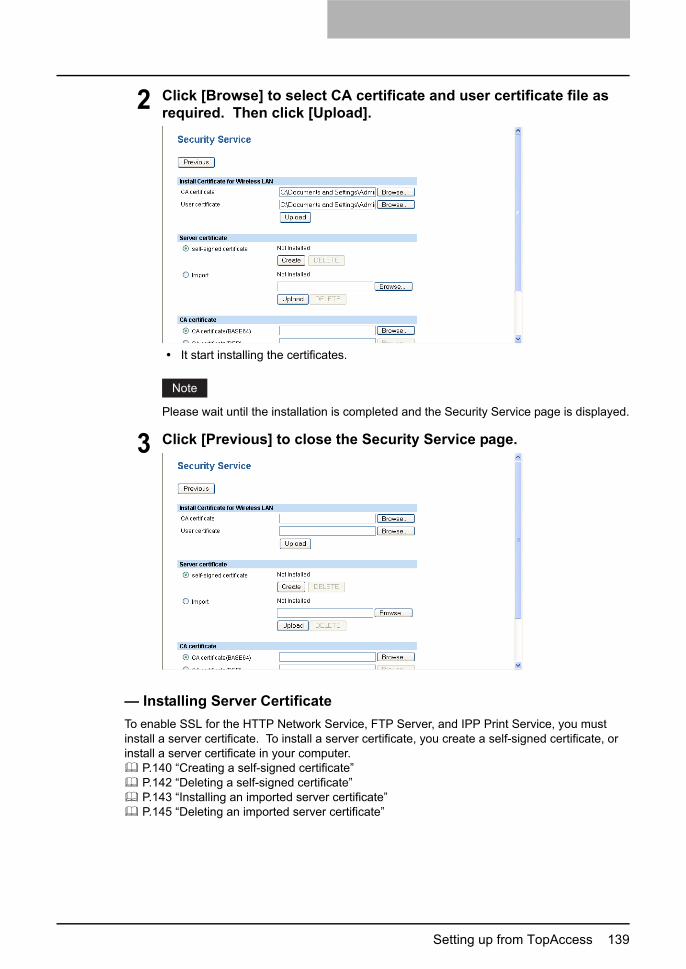
Setting up from TopAccess 139
2 Click [Browse] to select CA certificate and user certificate file as required. Then click [Upload].
It start installing the certificates.
Please wait until the installation is completed and the Security Service page is displayed.
3 Click [Previous] to close the Security Service page.
— Installing Server CertificateTo enable SSL for the HTTP Network Service, FTP Server, and IPP Print Service, you must install a server certificate. To install a server certificate, you create a self-signed certificate, or install a server certificate in your computer.
P.140 “Creating a self-signed certificate” P.142 “Deleting a self-signed certificate” P.143 “Installing an imported server certificate” P.145 “Deleting an imported server certificate”

7 TopAccess Administrator Mode
140 Setting up from TopAccess
Creating a self-signed certificate
1 Click [Security Service].
The Security Service page is displayed.
2 Select “self-signed certificate” below “Server certificate” and click [Create].
The Create self-signed certificate page is displayed.
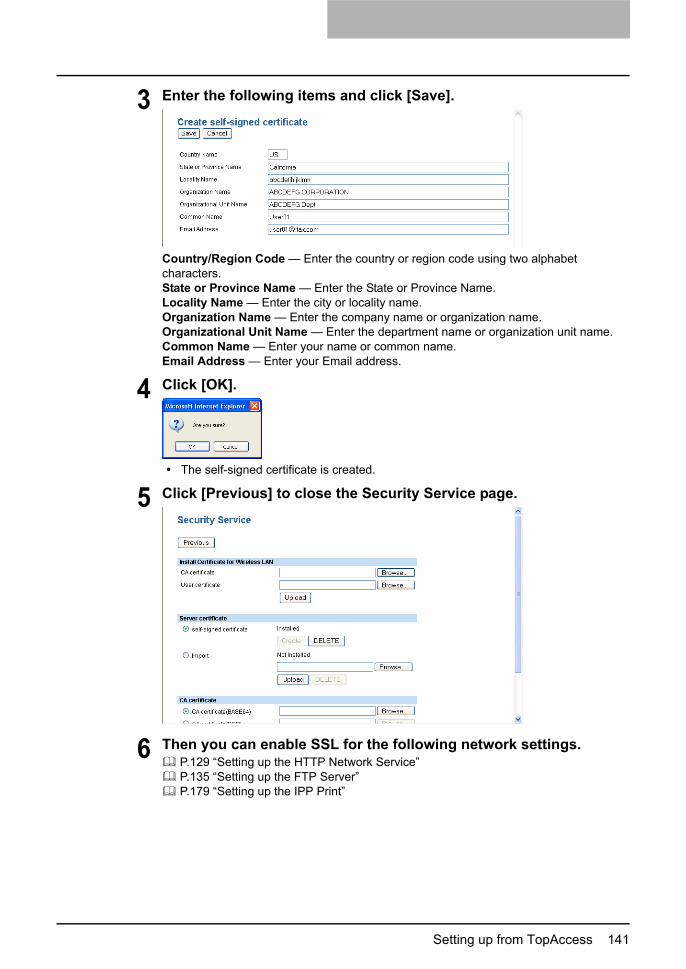
Setting up from TopAccess 141
3 Enter the following items and click [Save].
Country/Region Code — Enter the country or region code using two alphabet characters.State or Province Name — Enter the State or Province Name.Locality Name — Enter the city or locality name.Organization Name — Enter the company name or organization name.Organizational Unit Name — Enter the department name or organization unit name.Common Name — Enter your name or common name.Email Address — Enter your Email address.
4 Click [OK].
The self-signed certificate is created.
5 Click [Previous] to close the Security Service page.
6 Then you can enable SSL for the following network settings. P.129 “Setting up the HTTP Network Service” P.135 “Setting up the FTP Server” P.179 “Setting up the IPP Print”
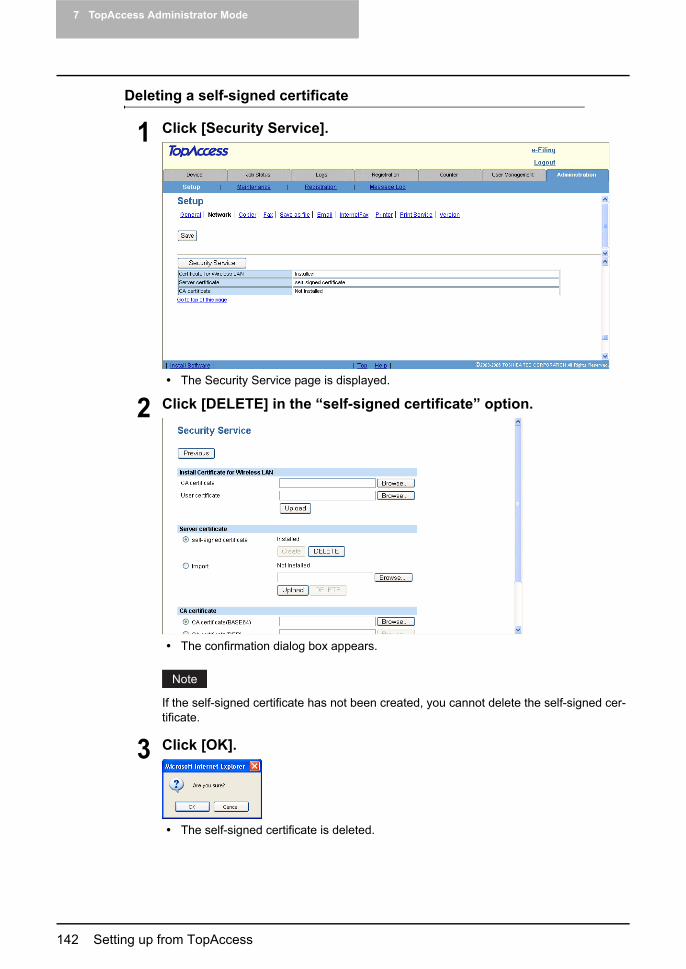
7 TopAccess Administrator Mode
142 Setting up from TopAccess
Deleting a self-signed certificate
1 Click [Security Service].
The Security Service page is displayed.
2 Click [DELETE] in the “self-signed certificate” option.
The confirmation dialog box appears.
If the self-signed certificate has not been created, you cannot delete the self-signed cer-tificate.
3 Click [OK].
The self-signed certificate is deleted.
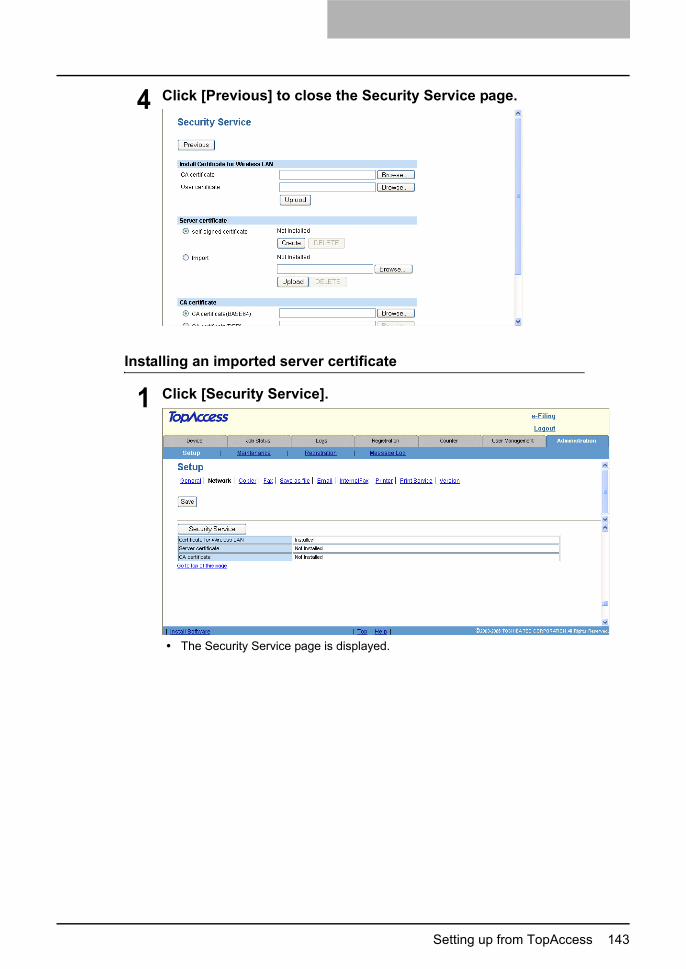
Setting up from TopAccess 143
4 Click [Previous] to close the Security Service page.
Installing an imported server certificate
1 Click [Security Service].
The Security Service page is displayed.
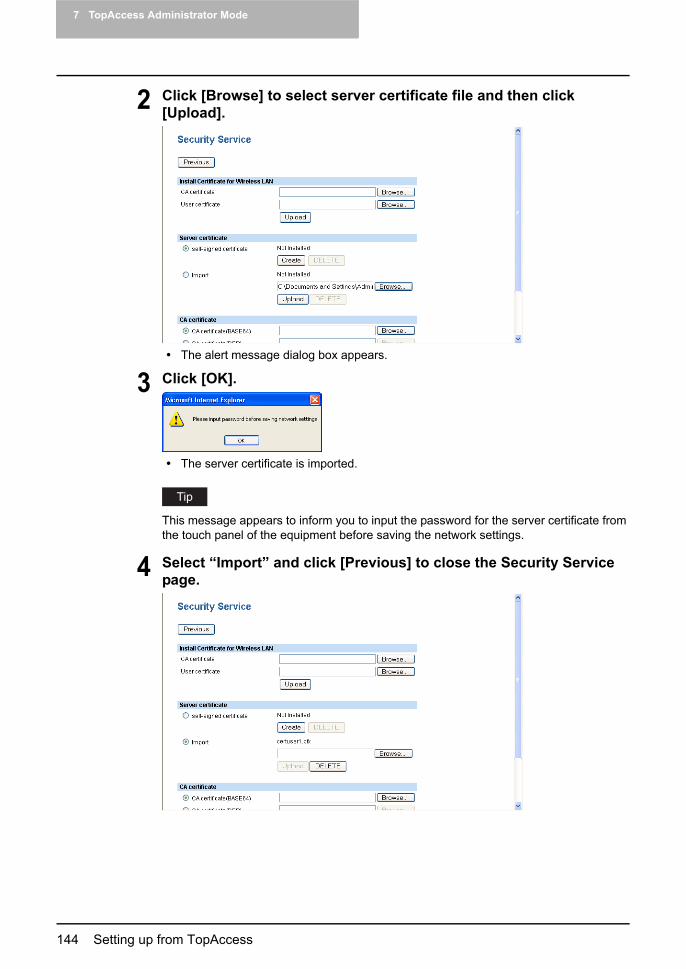
7 TopAccess Administrator Mode
144 Setting up from TopAccess
2 Click [Browse] to select server certificate file and then click [Upload].
The alert message dialog box appears.
3 Click [OK].
The server certificate is imported.
This message appears to inform you to input the password for the server certificate from the touch panel of the equipment before saving the network settings.
4 Select “Import” and click [Previous] to close the Security Service page.

Setting up from TopAccess 145
5 Before enabling SSL, you must input the password for the imported server certificate from the touch panel of the equipment.For instructions on how to input the password, please refer to the following section in User Functions Guide.Chapter 4 “SETTING ITEMS (ADMIN)”
- “SETTING NETWORK FUNCTIONS”- “Setting the User Certificate”
6 Then you can enable SSL for the following network settings. P.129 “Setting up the HTTP Network Service” P.135 “Setting up the FTP Server” P.179 “Setting up the IPP Print”
Deleting an imported server certificate
1 Click [Security Service].
The Security Service page is displayed.
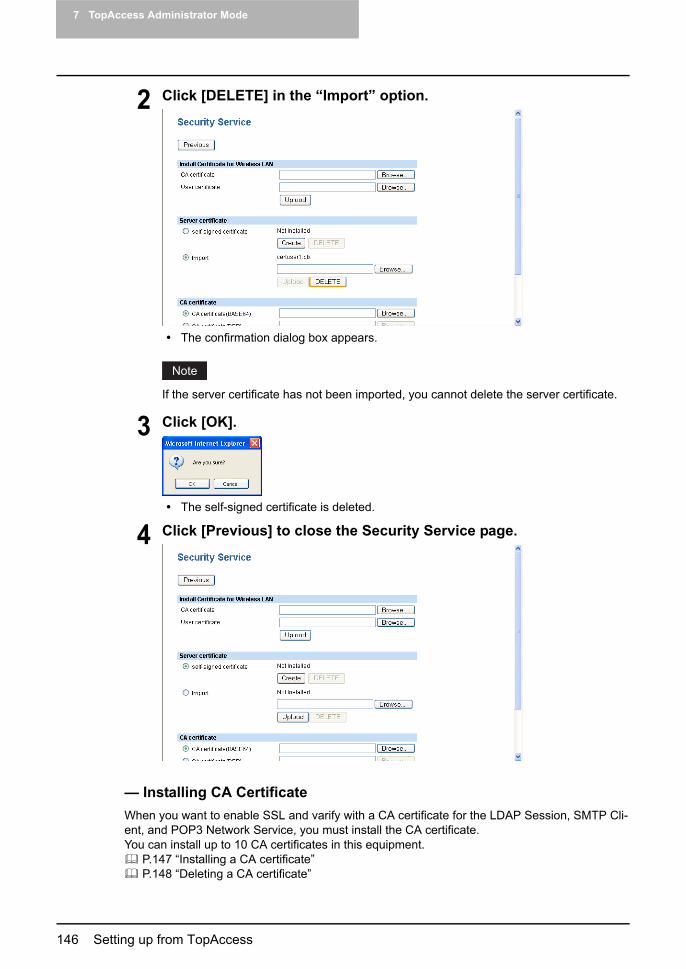
7 TopAccess Administrator Mode
146 Setting up from TopAccess
2 Click [DELETE] in the “Import” option.
The confirmation dialog box appears.
If the server certificate has not been imported, you cannot delete the server certificate.
3 Click [OK].
The self-signed certificate is deleted.
4 Click [Previous] to close the Security Service page.
— Installing CA CertificateWhen you want to enable SSL and varify with a CA certificate for the LDAP Session, SMTP Cli-ent, and POP3 Network Service, you must install the CA certificate.You can install up to 10 CA certificates in this equipment.
P.147 “Installing a CA certificate” P.148 “Deleting a CA certificate”

Setting up from TopAccess 147
Installing a CA certificate
1 Click [Security Service].
The Security Service page is displayed.
2 Select the encryption of the CA certificate and click [Browse] to select a CA certificate file. Then click [Upload].
The CA certificate is installed.
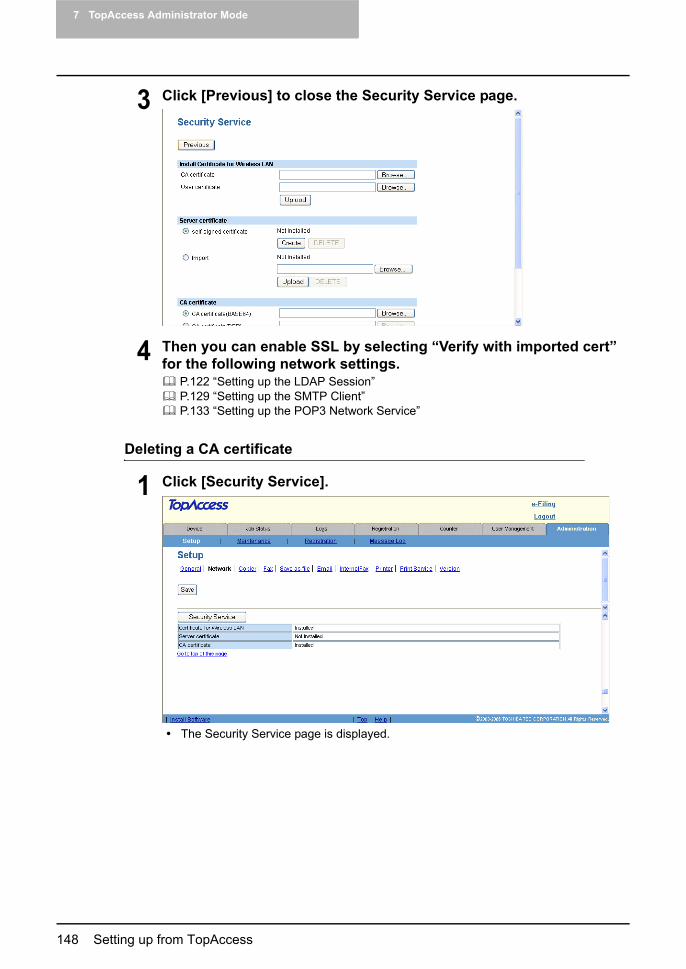
7 TopAccess Administrator Mode
148 Setting up from TopAccess
3 Click [Previous] to close the Security Service page.
4 Then you can enable SSL by selecting “Verify with imported cert” for the following network settings.
P.122 “Setting up the LDAP Session” P.129 “Setting up the SMTP Client” P.133 “Setting up the POP3 Network Service”
Deleting a CA certificate
1 Click [Security Service].
The Security Service page is displayed.

Setting up from TopAccess 149
2 Select the CA certificate file that you want to delete in the “Certifi-cate File” list, and click [DELETE].
The confirmation dialog box appears.
3 Click [OK].
The self-signed certificate is deleted.
4 Click [Previous] to close the Security Service page.
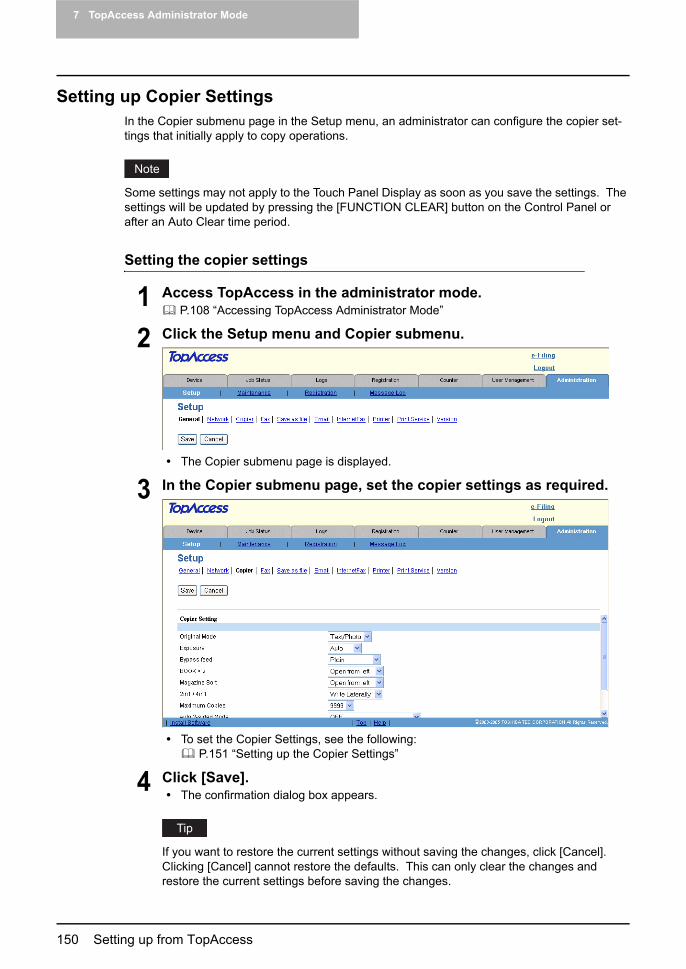
7 TopAccess Administrator Mode
150 Setting up from TopAccess
Setting up Copier SettingsIn the Copier submenu page in the Setup menu, an administrator can configure the copier set-tings that initially apply to copy operations.
Some settings may not apply to the Touch Panel Display as soon as you save the settings. The settings will be updated by pressing the [FUNCTION CLEAR] button on the Control Panel or after an Auto Clear time period.
Setting the copier settings
1 Access TopAccess in the administrator mode. P.108 “Accessing TopAccess Administrator Mode”
2 Click the Setup menu and Copier submenu.
The Copier submenu page is displayed.
3 In the Copier submenu page, set the copier settings as required.
To set the Copier Settings, see the following: P.151 “Setting up the Copier Settings”
4 Click [Save].The confirmation dialog box appears.
If you want to restore the current settings without saving the changes, click [Cancel]. Clicking [Cancel] cannot restore the defaults. This can only clear the changes and restore the current settings before saving the changes.

Setting up from TopAccess 151
5 Click [OK] to apply the changes.
When using the Internet Explorer, the settings that are displayed in each field may not be changed even if you change the settings and click [Save]. However, the settings have been changed in the equipment. In that case, click the Copier submenu then the page displays the current settings in each field.
Setting up the Copier SettingsIn Copier Settings, you can set the default copier settings that apply for copy operation from the Touch Panel Display.
1) Original ModeSelect the default original mode for black/white originals.
2) ExposureSelect the type of image density for black and white copy.- Auto — Select this to set the Auto mode as the default exposure for black and white
copy. The Auto mode automatically detects the density of the original to make copies at the optimum exposure.
- Manual — Select this to set the Manual mode as the default exposure for black and white copy. The manual mode manually specifies the density of the original.
3) Bypass TraySelect the default paper type for the Bypass Tray.
4) BOOK > 2Select the default page arrangement of the book-type originals for Book to 2-sided copy.- Open from left — Select this to copy the booklet originals that are read from a left page.- Open from right — Select this to copy the booklet originals that are read from a right
page.
5) Magazine SortSelect the default page arrangement for magazine sort copy.- Open from left — Select this to set to create a booklet that can be read from a left page.- Open from right — Select this to set to create a booklet that can be read from a right
page.
6) 2in1/4in1Select the default page arrangement for 2in1/4in1 copy.
1
2
3
4
5
6
7
8
9

7 TopAccess Administrator Mode
152 Setting up from TopAccess
- Write Laterally — Select this to copy each two pages or four pages from right to left or top to bottom. When the portrait originals are copied using 2in1 or 4in1, this equipment copies them from right to left. When the landscape originals are copied using 2in1 or 4in1, this equipment copies them from to bottom.
- Write Vertically — Select this to copy each two pages or four pages from left to right or top to bottom. When the portrait originals are copied using 2in1 or 4in1, this equipment copies them from left to right. When the landscape originals are copied using 2in1 or 4in1, this equipment copies them from to bottom.
7) Maximum CopiesSelect the maximum numbers of pages that users can specify for copying. You can select either “999”, “99”, or “9” for the Maximum Copies.
8) Auto 2-sided ModeSelect how the 2-sided mode initially applies to copy settings when originals are set in the Automatic Document Feeder.- OFF — Select this to initially apply [1->1 SIMPLEX] when originals are set in the Auto-
matic Document Feeder.- One-sided/Double-sided — Select this to initially apply [1->2 DUPLEX] when originals
are set in the Automatic Document Feeder.- Double-sided/Double-sided — Select this to initially apply [2->2 DUPLEX] when origi-
nals are set in the Automatic Document Feeder.- User Selection — Select this to initially display the screen to select the 2-sided mode
when originals are set in the Automatic Document Feeder.
9) Sorter Mode PrioritySelect the default sort mode for copying.

Setting up from TopAccess 153
Setting up Fax SettingsIn the Fax submenu page in the Setup menu, an administrator can configure the fax device set-tings and the settings initially apply to fax operations.
Some settings may not apply to the Touch Panel Display as soon as you save the settings. The settings will be updated by pressing the [FUNCTION CLEAR] button on the Control Panel or after an Auto Clear time period.The Fax submenu page in the Setup menu is available only when the optional Fax unit is installed.
Setting the fax settings
1 Access TopAccess in the administrator mode. P.108 “Accessing TopAccess Administrator Mode”
2 Click the Setup menu and Fax submenu.
The Fax submenu page is displayed.
3 In the Fax submenu page, set the fax settings as required.
To set the Fax Settings, see the following: P.155 “Setting up the Fax Settings”
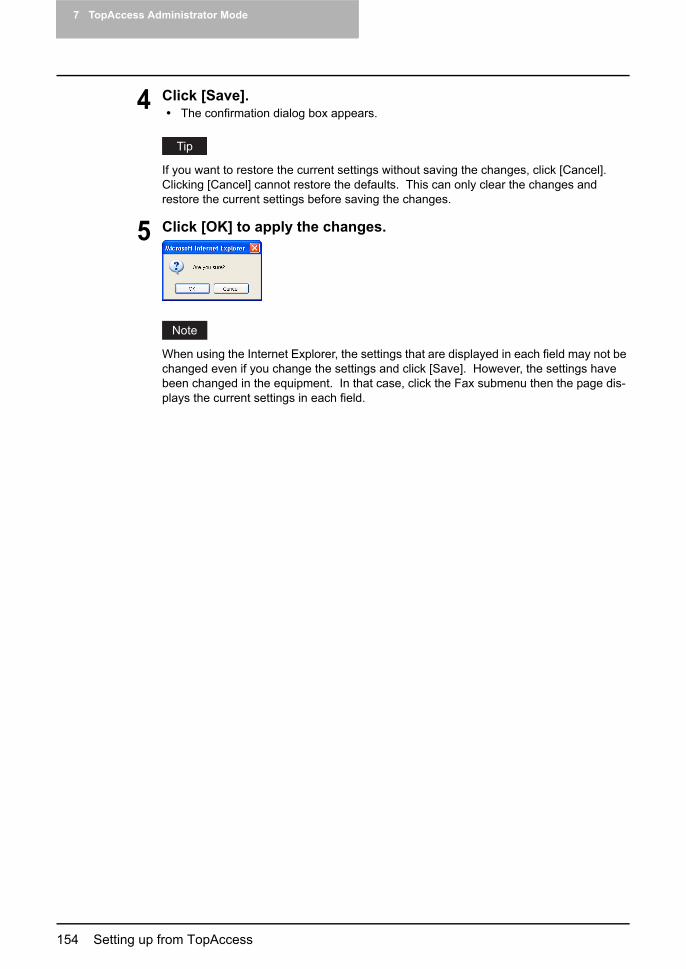
7 TopAccess Administrator Mode
154 Setting up from TopAccess
4 Click [Save].The confirmation dialog box appears.
If you want to restore the current settings without saving the changes, click [Cancel]. Clicking [Cancel] cannot restore the defaults. This can only clear the changes and restore the current settings before saving the changes.
5 Click [OK] to apply the changes.
When using the Internet Explorer, the settings that are displayed in each field may not be changed even if you change the settings and click [Save]. However, the settings have been changed in the equipment. In that case, click the Fax submenu then the page dis-plays the current settings in each field.
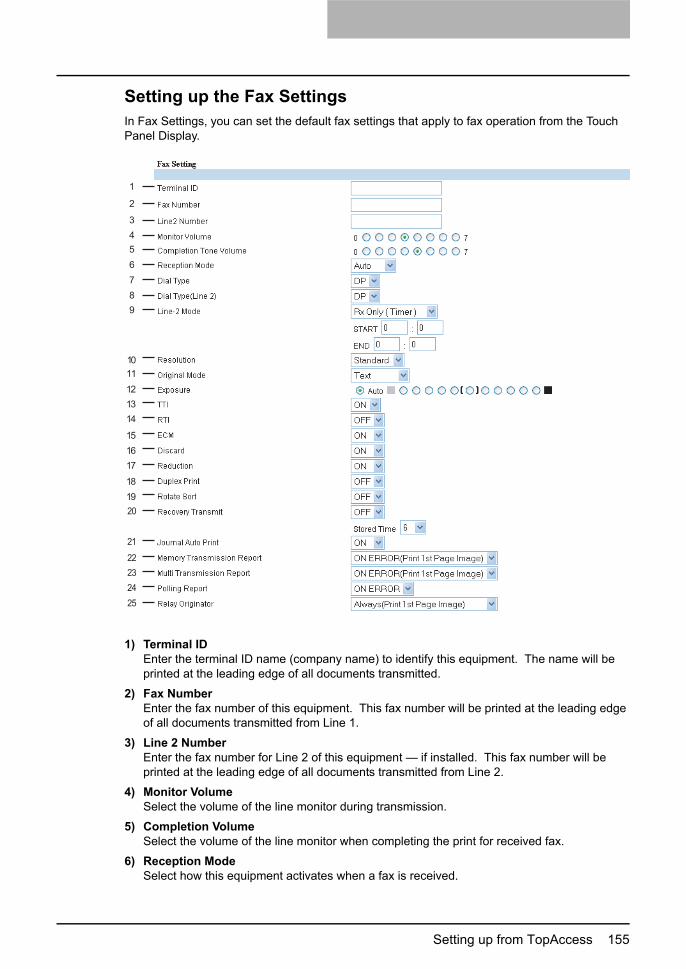
Setting up from TopAccess 155
Setting up the Fax SettingsIn Fax Settings, you can set the default fax settings that apply to fax operation from the Touch Panel Display.
1) Terminal IDEnter the terminal ID name (company name) to identify this equipment. The name will be printed at the leading edge of all documents transmitted.
2) Fax NumberEnter the fax number of this equipment. This fax number will be printed at the leading edge of all documents transmitted from Line 1.
3) Line 2 NumberEnter the fax number for Line 2 of this equipment — if installed. This fax number will be printed at the leading edge of all documents transmitted from Line 2.
4) Monitor VolumeSelect the volume of the line monitor during transmission.
5) Completion VolumeSelect the volume of the line monitor when completing the print for received fax.
6) Reception ModeSelect how this equipment activates when a fax is received.
20
12
11
10
1
2
3
4
5
6
7
8
9
13
14
15
16
17
18
19
21
22
23
24
25

7 TopAccess Administrator Mode
156 Setting up from TopAccess
- Auto — Select this to automatically receive incoming originals when the bell rings. Select this when the line is being used exclusively by the fax transmission.
- Manual — Select this to manually receive incoming originals after pressing the Start but-ton on the Control Panel.
7) Dial TypeSelect the dial type for the Line 1.DP — Select this to use the Dial Pulse type for the Line 1.MF — Select this to user the Multi-frequency type for the Line 1.
8) Dial Type (Line 2)Select the dial type for the Line 2, if installed.DP — Select this to use the Dial Pulse type for the Line 2.MF — Select this to use Multi-frequency type for the Line 2.
9) Line-2 ModeSelect how the Line 2 is used, if installed.- Tx/Rx — Select this to use Line 2 for sending and receiving a fax.- Rx Only (24 Hour) — Select this to use Line 2 only for receiving a fax.- Rx Only (Timer) — Select this to use Line 2 only for receiving a fax during specified
time. When this is selected, enter the start time and end time that Line 2 is used for only receiving a fax.
10)ResolutionSelect the default resolution for sending faxes.- Standard — Select this to set the Standard mode as the default resolution appropriate
for the originals in which the text is regular size.- Fine — Select this to set the Fine mode as the default resolution appropriate for the orig-
inals in which the text is small or a detailed drawing is contained.- Ultra Fine — Select this to set the Ultra-Fine mode as the default resolution appropriate
for the originals in which the text is particularly small or a precision drawing is contained.
11) Original ModeSelect the default image quality mode for sending faxes.- Text — Select this to set the Text mode as the default image quality mode appropriate for
sending text originals.- Text/Photo — Select this to set the Text/Photo mode as the default image quality mode
appropriate for sending originals containing both text and photos.- Photo — Select this to set the Photo mode as the default image quality mode appropri-
ate for sending photo originals.
12)ExposureSelect the default exposure for sending faxes.Select “Auto” to automatically apply the ideal contrast according to the original or select the contrast manually in 11 stages.
13)TTISelect whether printing a transmission header (TTI) to identify the sender of received faxes.
14)RTISelect whether printing a reception header (RTI) on received faxes to clearly identify the time, date, and page count of received faxes.
15)ECMSelect whether enabling or disabling the ECM (Error Correction Mode) to automatically re-send any portion of the document affected by phone line noise or distortion.
16)DiscardSelect whether discarding the lower portion of the received fax image if it is larger than the recording paper.

Setting up from TopAccess 157
17)ReductionSelect whether reducing the received fax image if it is larger than the effective printing area of the recording paper.
18)Duplex PrintSelect whether printing the received fax images on both sides of the recording paper.
19)Rotate SortSelect whether rotating the output direction in the tray for each reception.
20)Recovery TransmitSelect whether re-transmitting a fax after failing the initially specified number of redial attempts. When this is enabled, select the stored time length from 1 to 24 hours.
21)Journal Auto PrintSelect whether automatically printing a transmission and reception journal after every trans-mission is completed.
22)Memory Transmission ReportSelect how to print a result report after a memory transmission.- OFF — Select this to not print a memory transmission report.- Always — Select this to print a memory transmission report with all page images for
each memory transmission is completed.- ON ERROR — Select this to print a memory transmission report with all page images
only when the memory transmission is not successfully completed.- Always (Print 1st Page Image) — Select this to print a memory transmission report with
the 1st page image for each memory transmission is completed.- ON ERROR (Print 1st Page Image) — Select this to print a memory transmission report
with the 1st page image only when the memory transmission is not successful.
23)Multi Transmission ReportSelect how to print a result report after a multi-address transmission.- OFF — Select this to not print a multi-address transmission report.- Always — Select this to print a multi-address transmission report with all page images
for each multi-address transmission is completed.- ON ERROR — Select this to print a multi-address transmission report with all page
images only when the multi-address transmission is not successfully completed.- Always (Print 1st Page Image) — Select this to print a multi-address transmission
report with the 1st page image for each multi-address transmission is completed.- ON ERROR (Print 1st Page Image) — Select this to print a multi-address transmission
report with the 1st page image only when the multi-address transmission is not success-ful.
24)Polling ReportSelect how to print a result report after a multi-polling reception.- OFF — Select this to not print a multi-polling report.- Always — Select this to print a multi-polling report for each multi-polling reception.- ON ERROR — Select this to print a multi-polling report only when the multi-polling recep-
tion is not successful.
25)Relay OriginatorSelect how to print a result report after a relay transmission.- OFF — Select this to not print a relay station report.- Always — Select this to print a relay station report with all page images for each relay
transmission is completed.- ON ERROR — Select this to print a relay station report with all page images only when
the relay transmission is not successful.- Always (Print 1st Page Image) — Select this to print a relay station report with the 1st
page image for each relay transmission is completed.- ON ERROR (Print 1st Page Image) — Select this to print a relay station report with the
1st page image only when the relay transmission is not successful.

7 TopAccess Administrator Mode
158 Setting up from TopAccess
Setting up Save as file SettingsIn the Save as file submenu page in the Setup menu, an administrator can configure the Save as file settings that apply to the Save as file operations. An administrator also configures the Save as file settings that apply to the Save as file operation using the N/W-Fax driver.
Some settings may not apply to the Touch Panel Display as soon as you save the settings. The settings will be updated by pressing the [FUNCTION CLEAR] button on the Control Panel or after an Auto Clear time period.
Setting the Save as file settings
1 Access TopAccess in the administrator mode. P.108 “Accessing TopAccess Administrator Mode”
2 Click the Setup menu and Save as file submenu.
The Save as file submenu page is displayed.
The settings in the Save as file submenu page are only applied when the Scanner Kit is installed, or when the Printer/Scanner Kit is installed.
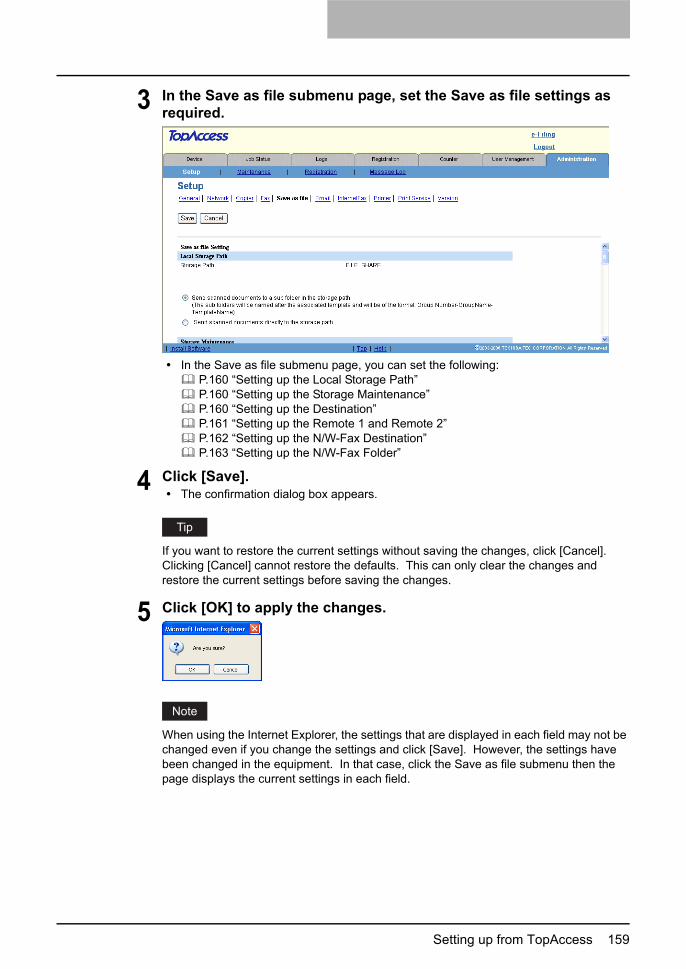
Setting up from TopAccess 159
3 In the Save as file submenu page, set the Save as file settings as required.
In the Save as file submenu page, you can set the following: P.160 “Setting up the Local Storage Path” P.160 “Setting up the Storage Maintenance” P.160 “Setting up the Destination” P.161 “Setting up the Remote 1 and Remote 2” P.162 “Setting up the N/W-Fax Destination” P.163 “Setting up the N/W-Fax Folder”
4 Click [Save].The confirmation dialog box appears.
If you want to restore the current settings without saving the changes, click [Cancel]. Clicking [Cancel] cannot restore the defaults. This can only clear the changes and restore the current settings before saving the changes.
5 Click [OK] to apply the changes.
When using the Internet Explorer, the settings that are displayed in each field may not be changed even if you change the settings and click [Save]. However, the settings have been changed in the equipment. In that case, click the Save as file submenu then the page displays the current settings in each field.
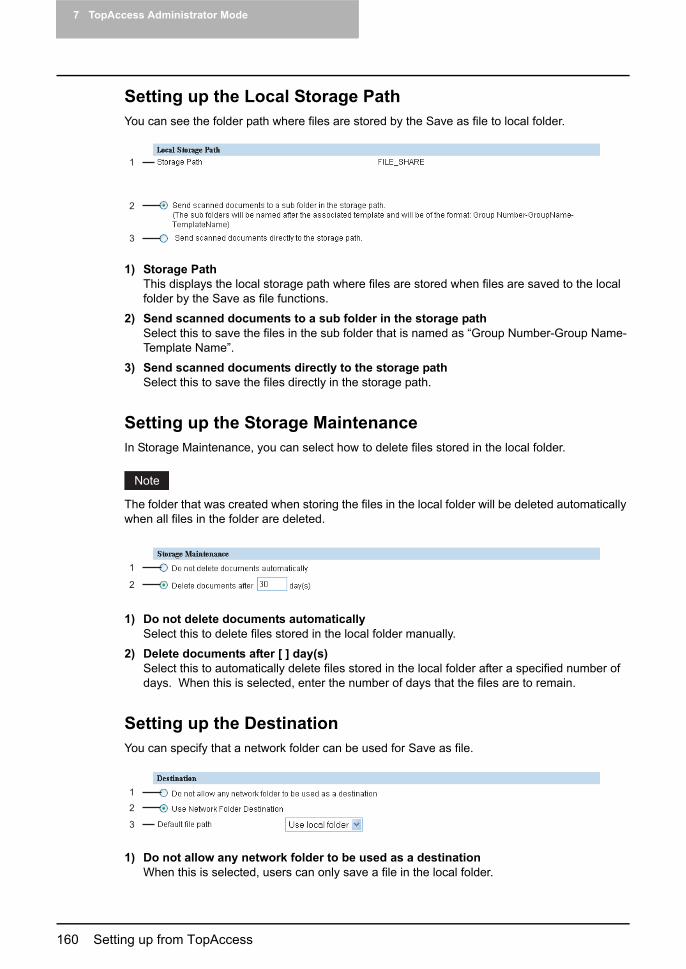
7 TopAccess Administrator Mode
160 Setting up from TopAccess
Setting up the Local Storage PathYou can see the folder path where files are stored by the Save as file to local folder.
1) Storage PathThis displays the local storage path where files are stored when files are saved to the local folder by the Save as file functions.
2) Send scanned documents to a sub folder in the storage pathSelect this to save the files in the sub folder that is named as “Group Number-Group Name-Template Name”.
3) Send scanned documents directly to the storage pathSelect this to save the files directly in the storage path.
Setting up the Storage MaintenanceIn Storage Maintenance, you can select how to delete files stored in the local folder.
The folder that was created when storing the files in the local folder will be deleted automatically when all files in the folder are deleted.
1) Do not delete documents automaticallySelect this to delete files stored in the local folder manually.
2) Delete documents after [ ] day(s)Select this to automatically delete files stored in the local folder after a specified number of days. When this is selected, enter the number of days that the files are to remain.
Setting up the DestinationYou can specify that a network folder can be used for Save as file.
1) Do not allow any network folder to be used as a destinationWhen this is selected, users can only save a file in the local folder.
1
2
3
1
2
1
2
3

Setting up from TopAccess 161
2) Use Network Folder DestinationWhen this is selected, set the Remote 1 and Remote 2 settings to specify how users can select the network folders for Save as file destination.
When you select “Use Network Folder Destination”, make sure both “Remote 1” and “Remote 2” are set properly. For example, even if you want to specify only the Remote 1, you must select “Allow user to select network folder to be used as a destination” for the Remote 2. When you select “Use Network Folder Destination”, “Allow the following network folder to be used as a destination” is initially selected for both Remote 1 and Remote 2 and other fields are left blank. If you do not change the settings, the error message to ask you to enter the required items to complete the setup will be displayed.
3) Default file pathSelect the destination that will be set as the default destination when performing Save as file from the Touch Panel Display.
Setting up the Remote 1 and Remote 2In the Remote 1 and Remote 2, you can specify how users can select the network folders for Save as file destination when you select “Use Network Folder Destination” in the Destination setting. You can specify two network folders; Remote 1 and Remote 2. The setting items are the same in the Remote 1 and Remote 2.
1) Allow the following network folder to be used as a destinationSelect this to restrict users to select only the network folder that you specified. Otherwise, select “Allow user to select network folder to be used as a destination”.
2) ProtocolSelect the protocol to be used for uploading a file to the network folder.- SMB — Select this to send a file to the network folder using the SMB protocol.- FTP — Select this to send a file to the FTP server.- NetWare IPX/SPX — Select this to send a file to the NetWare file server using the IPX/
SPX protocol.- NetWare TCP/IP — Select this to send a file to the NetWare file server using the TCP/IP
protocol.
1
2
3
4
5
6
7 8
9
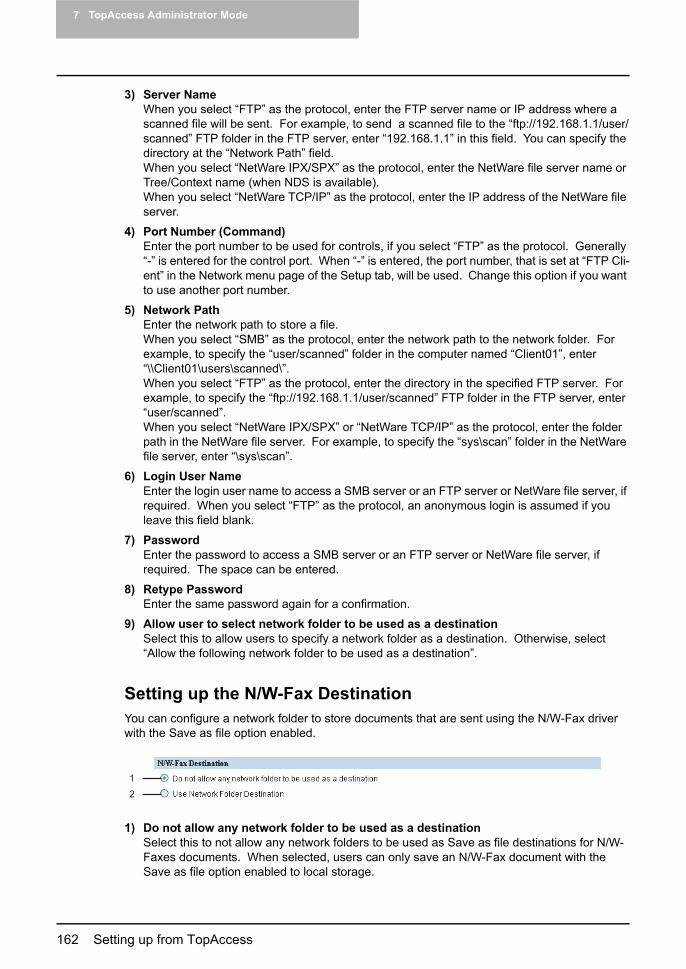
7 TopAccess Administrator Mode
162 Setting up from TopAccess
3) Server NameWhen you select “FTP” as the protocol, enter the FTP server name or IP address where a scanned file will be sent. For example, to send a scanned file to the “ftp://192.168.1.1/user/scanned” FTP folder in the FTP server, enter “192.168.1.1” in this field. You can specify the directory at the “Network Path” field.When you select “NetWare IPX/SPX” as the protocol, enter the NetWare file server name or Tree/Context name (when NDS is available).When you select “NetWare TCP/IP” as the protocol, enter the IP address of the NetWare file server.
4) Port Number (Command)Enter the port number to be used for controls, if you select “FTP” as the protocol. Generally “-” is entered for the control port. When “-” is entered, the port number, that is set at “FTP Cli-ent” in the Network menu page of the Setup tab, will be used. Change this option if you want to use another port number.
5) Network PathEnter the network path to store a file.When you select “SMB” as the protocol, enter the network path to the network folder. For example, to specify the “user/scanned” folder in the computer named “Client01”, enter “\\Client01\users\scanned\”.When you select “FTP” as the protocol, enter the directory in the specified FTP server. For example, to specify the “ftp://192.168.1.1/user/scanned” FTP folder in the FTP server, enter “user/scanned”.When you select “NetWare IPX/SPX” or “NetWare TCP/IP” as the protocol, enter the folder path in the NetWare file server. For example, to specify the “sys\scan” folder in the NetWare file server, enter “\sys\scan”.
6) Login User NameEnter the login user name to access a SMB server or an FTP server or NetWare file server, if required. When you select “FTP” as the protocol, an anonymous login is assumed if you leave this field blank.
7) PasswordEnter the password to access a SMB server or an FTP server or NetWare file server, if required. The space can be entered.
8) Retype PasswordEnter the same password again for a confirmation.
9) Allow user to select network folder to be used as a destinationSelect this to allow users to specify a network folder as a destination. Otherwise, select “Allow the following network folder to be used as a destination”.
Setting up the N/W-Fax DestinationYou can configure a network folder to store documents that are sent using the N/W-Fax driver with the Save as file option enabled.
1) Do not allow any network folder to be used as a destinationSelect this to not allow any network folders to be used as Save as file destinations for N/W-Faxes documents. When selected, users can only save an N/W-Fax document with the Save as file option enabled to local storage.
1
2
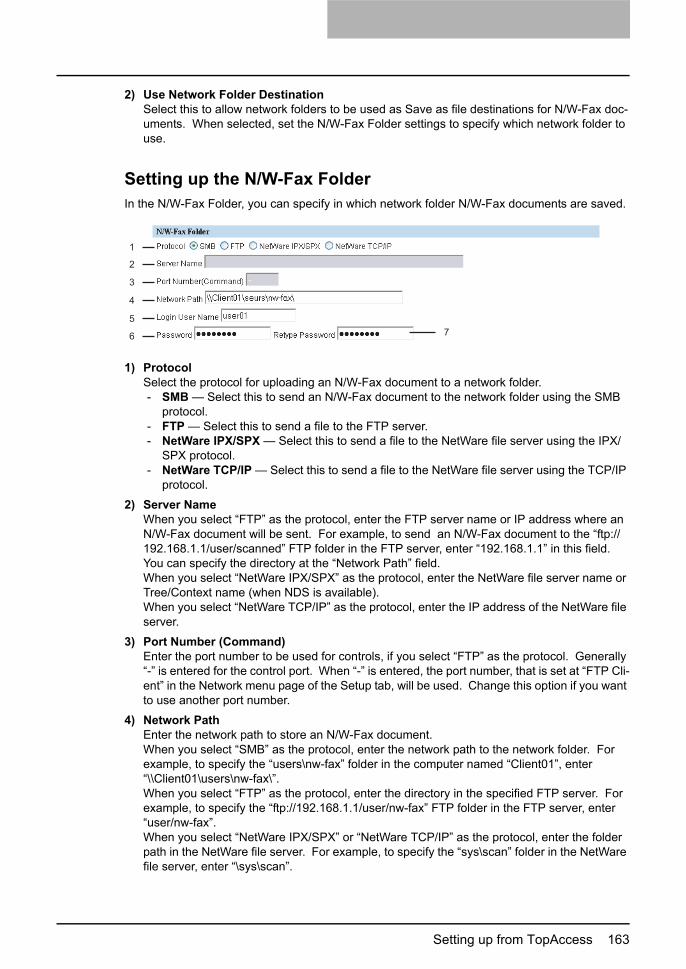
Setting up from TopAccess 163
2) Use Network Folder DestinationSelect this to allow network folders to be used as Save as file destinations for N/W-Fax doc-uments. When selected, set the N/W-Fax Folder settings to specify which network folder to use.
Setting up the N/W-Fax FolderIn the N/W-Fax Folder, you can specify in which network folder N/W-Fax documents are saved.
1) ProtocolSelect the protocol for uploading an N/W-Fax document to a network folder.- SMB — Select this to send an N/W-Fax document to the network folder using the SMB
protocol.- FTP — Select this to send a file to the FTP server.- NetWare IPX/SPX — Select this to send a file to the NetWare file server using the IPX/
SPX protocol.- NetWare TCP/IP — Select this to send a file to the NetWare file server using the TCP/IP
protocol.
2) Server NameWhen you select “FTP” as the protocol, enter the FTP server name or IP address where an N/W-Fax document will be sent. For example, to send an N/W-Fax document to the “ftp://192.168.1.1/user/scanned” FTP folder in the FTP server, enter “192.168.1.1” in this field. You can specify the directory at the “Network Path” field.When you select “NetWare IPX/SPX” as the protocol, enter the NetWare file server name or Tree/Context name (when NDS is available).When you select “NetWare TCP/IP” as the protocol, enter the IP address of the NetWare file server.
3) Port Number (Command)Enter the port number to be used for controls, if you select “FTP” as the protocol. Generally “-” is entered for the control port. When “-” is entered, the port number, that is set at “FTP Cli-ent” in the Network menu page of the Setup tab, will be used. Change this option if you want to use another port number.
4) Network PathEnter the network path to store an N/W-Fax document.When you select “SMB” as the protocol, enter the network path to the network folder. For example, to specify the “users\nw-fax” folder in the computer named “Client01”, enter “\\Client01\users\nw-fax\”.When you select “FTP” as the protocol, enter the directory in the specified FTP server. For example, to specify the “ftp://192.168.1.1/user/nw-fax” FTP folder in the FTP server, enter “user/nw-fax”.When you select “NetWare IPX/SPX” or “NetWare TCP/IP” as the protocol, enter the folder path in the NetWare file server. For example, to specify the “sys\scan” folder in the NetWare file server, enter “\sys\scan”.
1
2
3
4
5
67
7 TopAccess Administrator Mode
164 Setting up from TopAccess
5) Login User NameEnter the login user name to access a SMB server, FTP server, or NetWare file server, if required. When you select “FTP” as the protocol, anonymous login is assumed if you leave this field blank.
6) PasswordEnter the password to access a SMB server, FTP server, or NetWare file server, if required. The space can be entered.
7) Retype PasswordEnter the same password again for a confirmation.
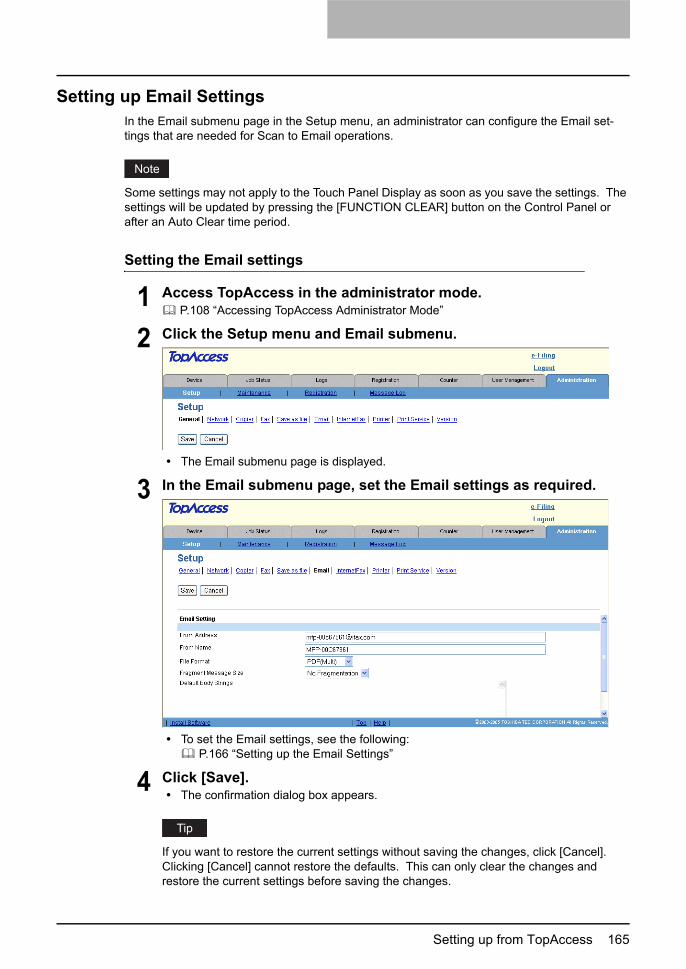
Setting up from TopAccess 165
Setting up Email SettingsIn the Email submenu page in the Setup menu, an administrator can configure the Email set-tings that are needed for Scan to Email operations.
Some settings may not apply to the Touch Panel Display as soon as you save the settings. The settings will be updated by pressing the [FUNCTION CLEAR] button on the Control Panel or after an Auto Clear time period.
Setting the Email settings
1 Access TopAccess in the administrator mode. P.108 “Accessing TopAccess Administrator Mode”
2 Click the Setup menu and Email submenu.
The Email submenu page is displayed.
3 In the Email submenu page, set the Email settings as required.
To set the Email settings, see the following: P.166 “Setting up the Email Settings”
4 Click [Save].The confirmation dialog box appears.
If you want to restore the current settings without saving the changes, click [Cancel]. Clicking [Cancel] cannot restore the defaults. This can only clear the changes and restore the current settings before saving the changes.

7 TopAccess Administrator Mode
166 Setting up from TopAccess
5 Click [OK] to apply the changes.
When using the Internet Explorer, the settings that are displayed in each field may not be changed even if you change the settings and click [Save]. However, the settings have been changed in the equipment. In that case, click the Email submenu then the page displays the current settings in each field.
Setting up the Email SettingsYou can specify the file format, fragment message size, and default body strings that apply to the Scan to Email documents.
1) From AddressEnter the email address of this equipment.
You must enter the email address in the “From Address” field to enable the Scan to Email unless the From Address is being determined automatically by the User Management Set-ting. For more information about User Management Setting, refer to the User Management Guide.
2) From NameEnter the name of this equipment.
3) File FormatSelect the file format of files to be sent when scanning.- TIFF (Multi) — Select this to save scanned images as a Multi-page TIFF file.- TIFF (Single) — Select this to save scanned images separately as Single-page TIFF
files.- PDF (Multi) — Select this to save scanned images as a Multi-page PDF file.- PDF (Single) — Select this to save scanned images separately as Single-page PDF
files.
4) Fragment Message SizeSelect the size for the message fragmentation.
1
2
3
4
5

Setting up from TopAccess 167
5) Default Body StringsEnter the body text that will be automatically entered in the Body field when users operate Scan to Email from the Touch Panel Display. This sets only the default body text, so that it can be changed on each operation by users.
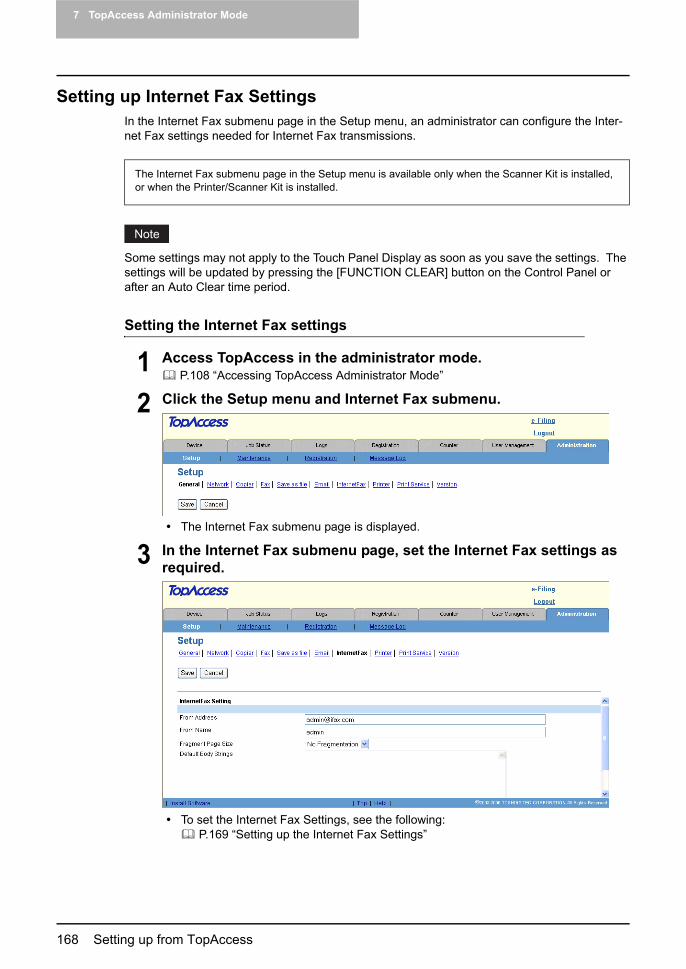
7 TopAccess Administrator Mode
168 Setting up from TopAccess
Setting up Internet Fax SettingsIn the Internet Fax submenu page in the Setup menu, an administrator can configure the Inter-net Fax settings needed for Internet Fax transmissions.
Some settings may not apply to the Touch Panel Display as soon as you save the settings. The settings will be updated by pressing the [FUNCTION CLEAR] button on the Control Panel or after an Auto Clear time period.
Setting the Internet Fax settings
1 Access TopAccess in the administrator mode. P.108 “Accessing TopAccess Administrator Mode”
2 Click the Setup menu and Internet Fax submenu.
The Internet Fax submenu page is displayed.
3 In the Internet Fax submenu page, set the Internet Fax settings as required.
To set the Internet Fax Settings, see the following: P.169 “Setting up the Internet Fax Settings”
The Internet Fax submenu page in the Setup menu is available only when the Scanner Kit is installed, or when the Printer/Scanner Kit is installed.

Setting up from TopAccess 169
4 Click [Save].The confirmation dialog box appears.
If you want to restore the current settings without saving the changes, click [Cancel]. Clicking [Cancel] cannot restore the defaults. This can only clear the changes and restore the current settings before saving the changes.
5 Click [OK] to apply the changes.
When using the Internet Explorer, the settings that are displayed in each field may not be changed even if you change the settings and click [Save]. However, the settings have been changed in the equipment. In that case, click the Internet Fax submenu then the page displays the current settings in each field.
Setting up the Internet Fax SettingsYou can specify the fragment page size and default body strings that apply to the Internet Faxes.
1) From AddressEnter the email address of this equipment.
You must enter the email address in the “From Address” field to enable the Internet Fax unless the From Address is being determined automatically by the User Management Set-ting. For more information about User Management Setting, refer to the User Management Guide.
2) From NameEnter the name of this equipment.
3) Fragment Page SizeSelect the size for the message fragmentation.
1
2
3
4
5
7 TopAccess Administrator Mode
170 Setting up from TopAccess
4) Default Body StringsEnter the body text that will be automatically entered in the Body field when users operate Scan to Internet Fax from the Touch Panel Display. This sets only the default body text, so that it can be changed on each operation by users.
5) Body Strings TransmissionSelect whether the body strings will be send or not.

Setting up from TopAccess 171
Setting up Printer SettingsIn the Printer submenu page in the Setup menu, an administrator can configure how the printer works and the printer options needed for the raw print jobs.
Setting the Printer settings
1 Access TopAccess in the administrator mode. P.108 “Accessing TopAccess Administrator Mode”
2 Click the Setup menu and Printer submenu.
The Printer submenu page is displayed.
3 In the Printer submenu page, set the Printer settings as required.
To set the Printer Settings, see the following: P.172 “Setting up the General Setting” P.172 “Setting up the Default Raw Job Setting” P.174 “Setting up the Raw Job Setting”
4 Click [Save].The confirmation dialog box appears.
If you want to restore the current settings without saving the changes, click [Cancel]. Clicking [Cancel] cannot restore the defaults. This can only clear the changes and restore the current settings before saving the changes.
The Printer submenu page in the Setup menu is available only when the Printer Kit or the Printer/Scan-ner Kit is installed.

7 TopAccess Administrator Mode
172 Setting up from TopAccess
5 Click [OK] to apply the changes.
When using the Internet Explorer, the settings that are displayed in each field may not be changed even if you change the settings and click [Save]. However, the settings have been changed in the equipment. In that case, click the Printer submenu then the page displays the current settings in each field.
Setting up the General SettingIn General Setting, you can specify the printer related options.
1) Number of days to save Private, Proof and Invalid JobsSelect the number of days that this equipment retains the jobs in the Private, Proof, and Invalid queues. Select “Indefinite” to save all jobs in the queues until users delete the jobs manually, or select the period until they are deleted.
2) LT<-->A4/LD<-->A3Select whether printing a document intended for that one paper size can be printed on paper of a different size. For example, you can print a document set up for Letter size on A4 paper. When disabled, this equipment will prompt users for the correct paper size.
3) Print Startup PageSelect whether printing the startup page every time this equipment is powered on. The star-tup page is the NIC Configuration page. You can also print the startup page from the Touch Panel Display manually.
Setting up the Default Raw Job SettingIn Default Raw Job Setting, you can specify the default raw job setting, which applies a raw job that no queue name is specified or specified queue name does not exist.
1
2
3

Setting up from TopAccess 173
You can also add LPR queue names and specify the raw job setting for each queue. P.174 “Setting up the Raw Job Setting”
1) Raw jobs - Duplex PrintingSelect whether a raw job will be printed on both sides of the paper.
The “Raw jobs - Duplex Printing” option is available only when the Automatic Duplexer Unit is installed.
2) Raw jobs - Default Paper SizeSelect the default paper size that applies to a raw job.
3) Raw jobs - Default Paper TypeSelect the default paper type that applies to a raw job.
4) Raw jobs - Default OrientationSelect the default orientation that applies to a raw job.
5) Raw jobs - Default StaplingSelect whether a raw job will be stapled.
6) Raw jobs - Default Output TraySelect the default output tray that applies to a raw job. A banner page that is created by Net-Ware, UNIX, and Windows operating systems also will be outputted to the tray set here.
7) PCL Form LineEnter the number of lines printed per page.
8) PCL Font PitchEnter the font pitch when the selected font number represents a fixed pitch scalable font. Pitch is measured by characters per inch, so a 10-pitch is ten characters per inch.
9) PCL Font Point SizeEnter the font size when the selected font number represents a proportionally spaced scal-able font. The Font Size option allows you to determine the point size (height) of the default font.
12
11
10
1
2
3
4
5
6
7
8
9
13
14

7 TopAccess Administrator Mode
174 Setting up from TopAccess
10)PCL Font NumberEnter the font number of the internal PCL font to be used as the default font for printing. You can check the font numbers and internal PCL fonts in the Internal PCL Font List. Please see the Printing Guide for the font number of internal PCL fonts,
11) PCL Line TerminationSelect the type of the line termination.
12)Symbol setSelect the symbol set that applies to a raw job.
13)Paper SourceSelect the paper source that applies to a raw job.
14)Do not Print Blank PagesSelect whether blank pages are printed or not.
Setting up the Raw Job SettingIn Raw Job Setting, you can add up to 16 LPR queue names and specify the raw job setting for each queue. These queue names can be used when printing without a printer driver, such as printing from Unix workstation.You can add, edit, or delete a LPR queue.
P.174 “Adding or Editing a LPR queue” P.176 “Deleting a LPR queue”
Adding or Editing a LPR queue
1 To add a new LPR queue, click [Add] in Raw Job Setting.To edit an existing LPR queue, select a radio button of a queue that you want to edit and click [Edit].
The Add New LPR Queue page is displayed.
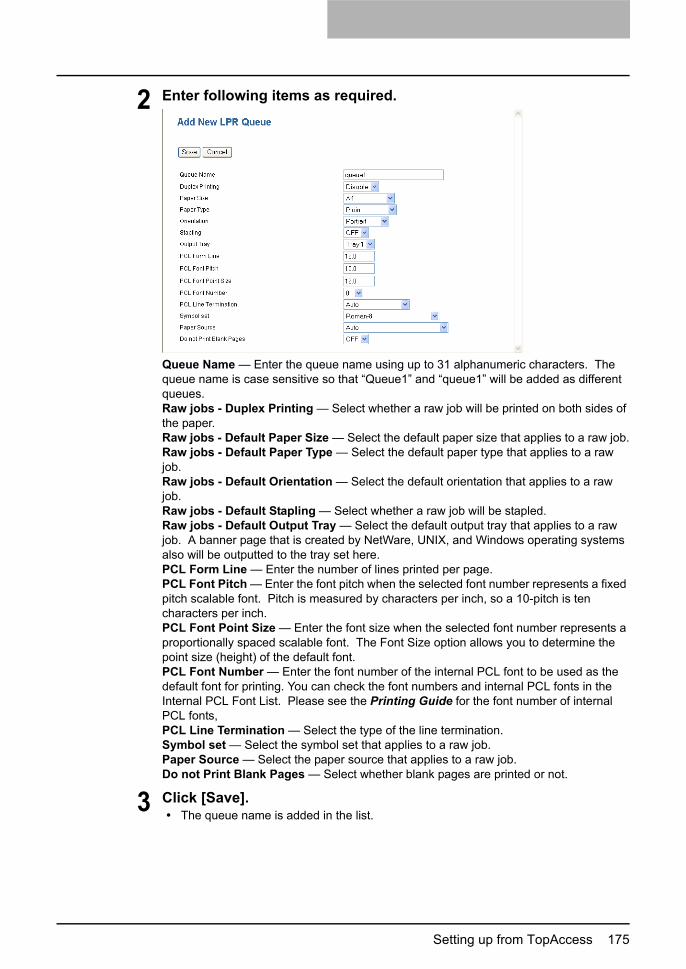
Setting up from TopAccess 175
2 Enter following items as required.
Queue Name — Enter the queue name using up to 31 alphanumeric characters. The queue name is case sensitive so that “Queue1” and “queue1” will be added as different queues.Raw jobs - Duplex Printing — Select whether a raw job will be printed on both sides of the paper.Raw jobs - Default Paper Size — Select the default paper size that applies to a raw job.Raw jobs - Default Paper Type — Select the default paper type that applies to a raw job.Raw jobs - Default Orientation — Select the default orientation that applies to a raw job.Raw jobs - Default Stapling — Select whether a raw job will be stapled.Raw jobs - Default Output Tray — Select the default output tray that applies to a raw job. A banner page that is created by NetWare, UNIX, and Windows operating systems also will be outputted to the tray set here.PCL Form Line — Enter the number of lines printed per page.PCL Font Pitch — Enter the font pitch when the selected font number represents a fixed pitch scalable font. Pitch is measured by characters per inch, so a 10-pitch is ten characters per inch.PCL Font Point Size — Enter the font size when the selected font number represents a proportionally spaced scalable font. The Font Size option allows you to determine the point size (height) of the default font.PCL Font Number — Enter the font number of the internal PCL font to be used as the default font for printing. You can check the font numbers and internal PCL fonts in the Internal PCL Font List. Please see the Printing Guide for the font number of internal PCL fonts, PCL Line Termination — Select the type of the line termination.Symbol set — Select the symbol set that applies to a raw job.Paper Source — Select the paper source that applies to a raw job.Do not Print Blank Pages — Select whether blank pages are printed or not.
3 Click [Save].The queue name is added in the list.
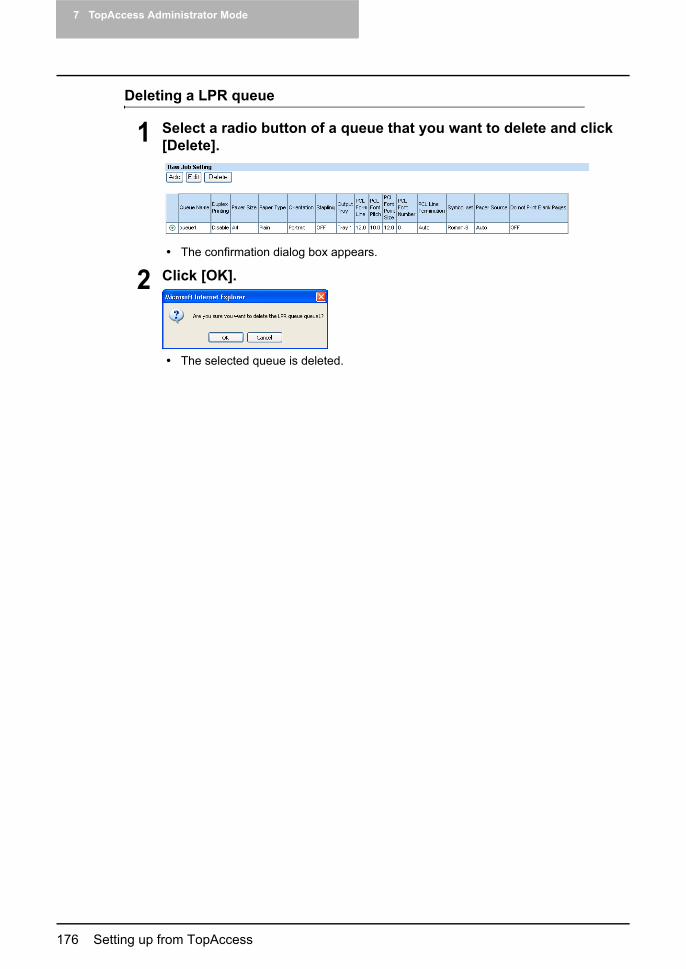
7 TopAccess Administrator Mode
176 Setting up from TopAccess
Deleting a LPR queue
1 Select a radio button of a queue that you want to delete and click [Delete].
The confirmation dialog box appears.
2 Click [OK].
The selected queue is deleted.

Setting up from TopAccess 177
Setting up Print Service SettingsIn the Print Service submenu page in the Setup menu, an administrator can configure such print services as Raw TCP Print, LPD Print, IPP Print, FTP Print, NetWare Print, and Email Print.
Setting the Print Service settings
1 Access TopAccess in the administrator mode. P.108 “Accessing TopAccess Administrator Mode”
2 Click the Setup menu and Print Service submenu.
The Scan to Print Service submenu page is displayed.
3 In the Print Service submenu page, set the Print Service settings as required.
In the Print Service submenu page, you can set the following: P.178 “Setting up the Raw TCP Print” P.178 “Setting up the LPD Print” P.179 “Setting up the IPP Print” P.180 “Setting up the FTP Print” P.181 “Setting up the NetWare Print” P.181 “Setting up the Email Print”
The Print Service submenu page in the Setup menu is available only when the Printer Kit or the Printer/Scanner Kit is installed.

7 TopAccess Administrator Mode
178 Setting up from TopAccess
4 Click [Save].The confirmation dialog box appears.
If you want to restore the current settings without saving the changes, click [Cancel]. Clicking [Cancel] cannot restore the defaults. This can only clear the changes and restore the current settings before saving the changes.
5 Click [OK] to apply the changes.
When using the Internet Explorer, the settings that are displayed in each field may not be changed even if you change the settings and click [Save]. However, the settings have been changed in the equipment. In that case, click the Print Service submenu then the page displays the current settings in each field.
Setting up the Raw TCP PrintIn Raw TCP Print, you can enable or disable the Raw TCP print service.
1) Enable Raw TCPEnable or disable Raw TCP print service.
2) Port NumberIf enabling the Raw TCP, enter the Raw TCP port number for the Raw TCP print. Generally “9100” is used.
3) Enable Raw bi-directionalEnable or disable Raw bi-directional communication.
Setting up the LPD PrintIn LPD Print, you can set the LPD print options to enable the LPD/LPR print service.
1) Enable LPDEnable or disable LPD print service.
2) Port NumberIf enabling the LPD, enter the LPD port number. Generally “515” is used.
1
2
3
1
2
3

Setting up from TopAccess 179
3) BannersSelect whether printing a banner page for each print job using LPR printing.
Setting up the IPP PrintIn IPP Print, you can set the IPP Print options to enable the IPP print service.
1) Enable IPPEnable or disable IPP print service.
2) Port80 EnableEnable or disable the Port80 for IPP printing. Port631 is usually used for the IPP access so users must specify to the URL, i.e. “http://<IP address or DNS name>:631/Print”, for the IPP port. When this is enabled, this equipment allows IPP access through the Port80, which is the default port for the HTTP access so users do not have to specify the port number in the IPP port, i.e. “http://<IP address or DNS name>/Print”.
3) Port NumberIf enabling the IPP, enter the IPP port number. Generally “631” is used.
4) URLDisplay the URL for IPP printing. You cannot change the URL for IPP printing. This URL should be set as the print port when users set up the printer driver for IPP printing.
5) Enable SSLEnable or disable the SSL for IPP printing.
To enable SSL, you must create a self-signed certificate or import a server certificate in Security Service. If the self-signed certificate is not created or a server certificate is not imported, the SSL will not work correctly.
P.137 “Setting up the Security Service”When the SLL is enabled, users can print to the IPP print port using the SSL. To print the IPP print port using the SSL, specify the following URL for the IPP print port.
https://<IP Address>:<SSL Port Number>/PrintNot all operating systems support SSL for all protocols.
6) SSL Port NumberEnter the port number for SSL. Generally “443” is used.
11
10
1
2
3
4
5
6
7
8
9
12

7 TopAccess Administrator Mode
180 Setting up from TopAccess
7) SSL URLDisplay the SSL URL for IPP printing. You cannot change the SSL URL for IPP printing. This SLL URL should be set as the print port when users set up the printer driver for IPP printing if the SSL for IPP printing is enabled.
8) Administrator’s NameEnter the user name of the administrator’s client computer. When logging in to the client computer using this administrator’s name, an administrator can delete all jobs in the IPP queue by selecting [Cancel All Documents] command in the [File] menu of printer queue dia-log box on Windows.
9) Administrator’s PasswordEnter the password of user to be allowed to perform the [Cancel All Documents] function.
10)AuthenticationEnable or disable the authentication for creating the IPP queue on the client computers. When this is enabled, the dialog box to enter a user name and password will be displayed when a user creates the IPP print port.- Disable — Select this to disable the authentication.- Basic — Select this to enable the authentication.
When IPP printing is used for printing from Macintosh computer, do not enable the authenti-cation. The Mac OS do not support the authentication for IPP printing.
11) User NameEnter the user name when the Authentication option is enabled. Users must enter this user name to create a IPP queue on the client computers.
12)PasswordEnter the password when the Authentication option is enabled. Users must enter this pass-word to create a IPP queue on the client computers. “password” has been set as the default.
Setting up the FTP PrintIn FTP Print, you can set the FTP Print options to enable the FTP print service.
1) Enable FTP PrintingEnable or disable FTP print service.
2) Port NumberEnter the FTP port number for FTP printing. Generally “21” is used.
3) Print User NameEnter the user name who attempt FTP printing. If you leave this field blank, the default user name “Print” is used.
4) Print PasswordEnter the password if you want to request the login password of users who attempt FTP printing.
1
2
3
4

Setting up from TopAccess 181
Setting up the NetWare PrintIn NetWare Print, you can set the NetWare print options to enable the Novell print service.
1) Login NameEnter the print server name that is created in the NetWare file server.
2) PasswordEnter the password that is set to the print server, if required.
3) Print Queue Scan RateEnter how frequently to scan the print queues for print jobs. This should be entered in sec-ond. You can enter between 1 to 255.
Setting up the Email PrintIn Email Print, you can set how the Email print jobs are printed.
1) Enable Print HeaderSelect whether to print the Email header when receiving Email print jobs.
2) Enable Print Message BodySelect whether to print the body message when receiving Email print jobs.
3) Maximum Email Body PrintEnter the maximum number of pages to print the body strings of the received Email print job. You can enter between 1 to 99.
4) Enable Print Email ErrorSelect whether to print the report when an error occurs for Email printing.
5) Enable Email Error ForwardSelect whether to send an error message to an administrative Email address when Email printing cannot be completed.
6) Email Error Transfer AddressIf enabling the Email Error Forward, enter an administrative Email address where the error message is sent.
7) Enable Partial EmailSelect whether to print Email jobs that are partially received.
1
2
3
1
2
3
4
5
6
7
8
9
7 TopAccess Administrator Mode
182 Setting up from TopAccess
8) Partial Wait TimeEnter how long this equipment should wait before printing a partial Email job. This should be entered in hour.
9) MDN ReplySelect whether sending the MDN message reply or not when the equipment receives an Email print job with a MDN request.
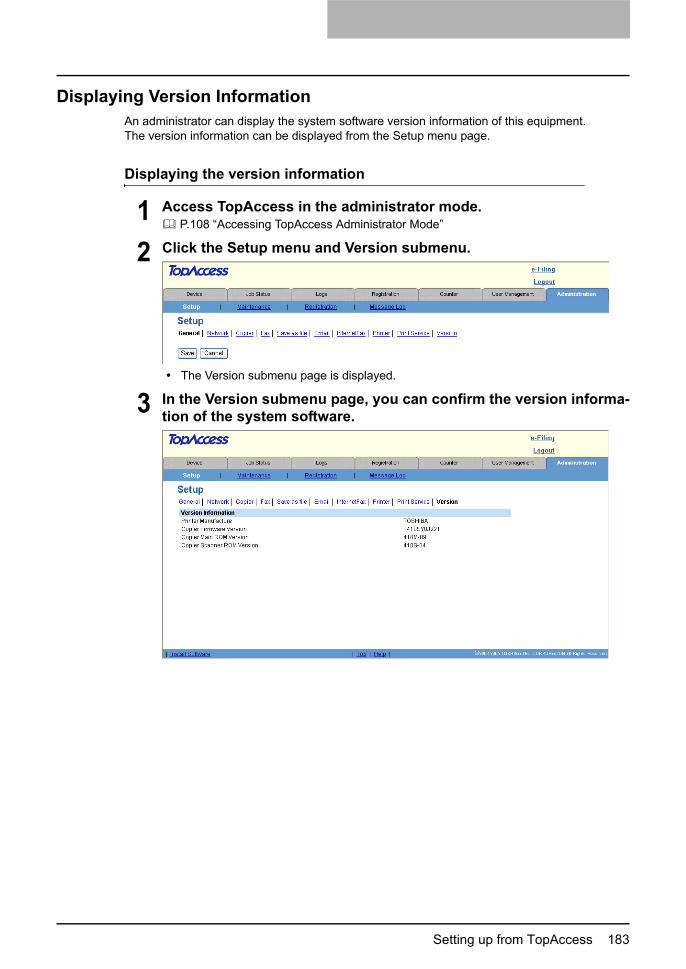
Setting up from TopAccess 183
Displaying Version InformationAn administrator can display the system software version information of this equipment.The version information can be displayed from the Setup menu page.
Displaying the version information
1 Access TopAccess in the administrator mode. P.108 “Accessing TopAccess Administrator Mode”
2 Click the Setup menu and Version submenu.
The Version submenu page is displayed.
3 In the Version submenu page, you can confirm the version informa-tion of the system software.

7 TopAccess Administrator Mode
184 Maintaining from TopAccess
Maintaining from TopAccess
This section details procedures for maintaining this equipment. It covers backing up and restor-ing files, deleting files stored on this equipment, and updating the software on TopAccess.
About the Maintenance FunctionsIn the Maintenance menu of the TopAccess administrator mode, an administrator can perform the following maintenance:
Updating client software in TopAccessAn administrator can upload client software that allows users to download to their computers from TopAccess. This maintenance feature is used to upload new versions of software in TopAccess.
P.185 “Updating the Software”
Removing client software from TopAccessAn administrator can remove client software that restricts users from downloading software from TopAccess. This maintenance feature is used to disable specific software in TopAccess.
P.187 “Removing the Client Software”
Backing up data in the hard diskAn administrator can create backup files of address book, mailboxes, and templates in the hard disk. This maintenance feature is used to create the backup files before updating the system software or hard disk replacement, etc.
P.188 “Backing up Data”
Restoring data from the backup filesAn administrator can restore the address book, mailboxes, and templates data from the backup files. This maintenance feature is used to restore the data after updating the system software or hard disk replacement, etc.
P.190 “Restoring Data from Backup File”
Deleting files stored in the hard diskAn administrator can delete scanned data, transmission data, and reception data in the hard disk. This maintenance feature must be operated periodically to maintain the hard disk space for future operation.
P.193 “Deleting the Data from Local Folder”
Registering directory serviceAn administrator can register the directory service properties of the LDAP (Lightweight Directory Access Protocol) server.
P.194 “Managing Directory Service”
Setting up notificationsAn administrator can enable the notifications by Emails and specify the events causing the noti-fications.
P.197 “Setting up Notification”
Importing or exporting address book dataThis equipment allows you to import and export address book data in CSV format.
P.202 “Importing and Exporting the Address Book”
Importing or exporting department codeAn administrator can import and export department code data in CSV format.
P.206 “Importing and Exporting the Department Code”
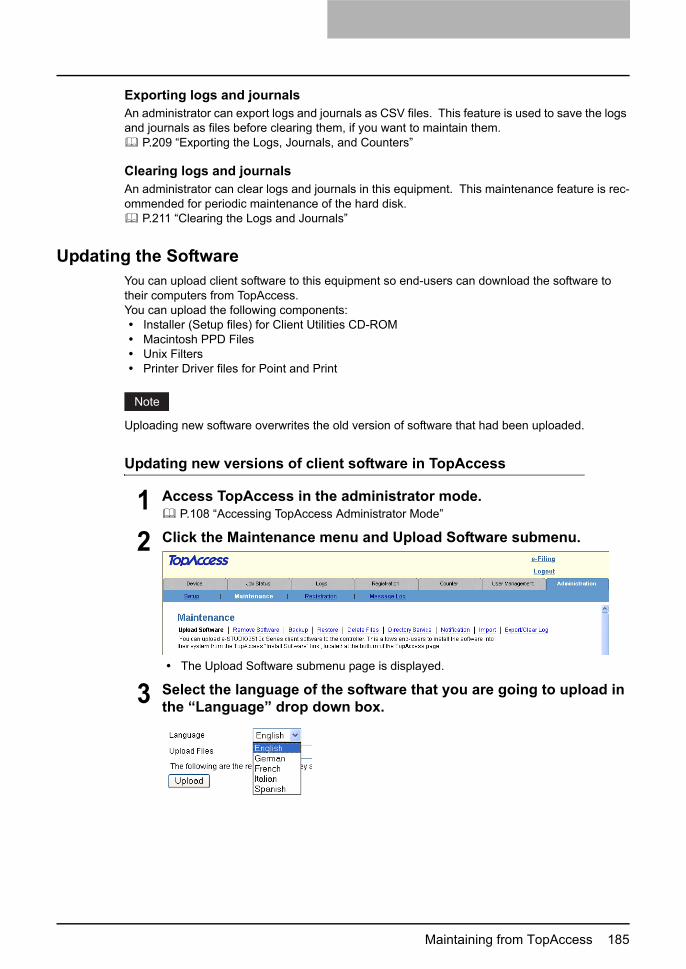
Maintaining from TopAccess 185
Exporting logs and journalsAn administrator can export logs and journals as CSV files. This feature is used to save the logs and journals as files before clearing them, if you want to maintain them.
P.209 “Exporting the Logs, Journals, and Counters”
Clearing logs and journalsAn administrator can clear logs and journals in this equipment. This maintenance feature is rec-ommended for periodic maintenance of the hard disk.
P.211 “Clearing the Logs and Journals”
Updating the SoftwareYou can upload client software to this equipment so end-users can download the software to their computers from TopAccess. You can upload the following components:
Installer (Setup files) for Client Utilities CD-ROMMacintosh PPD FilesUnix FiltersPrinter Driver files for Point and Print
Uploading new software overwrites the old version of software that had been uploaded.
Updating new versions of client software in TopAccess
1 Access TopAccess in the administrator mode. P.108 “Accessing TopAccess Administrator Mode”
2 Click the Maintenance menu and Upload Software submenu.
The Upload Software submenu page is displayed.
3 Select the language of the software that you are going to upload in the “Language” drop down box.
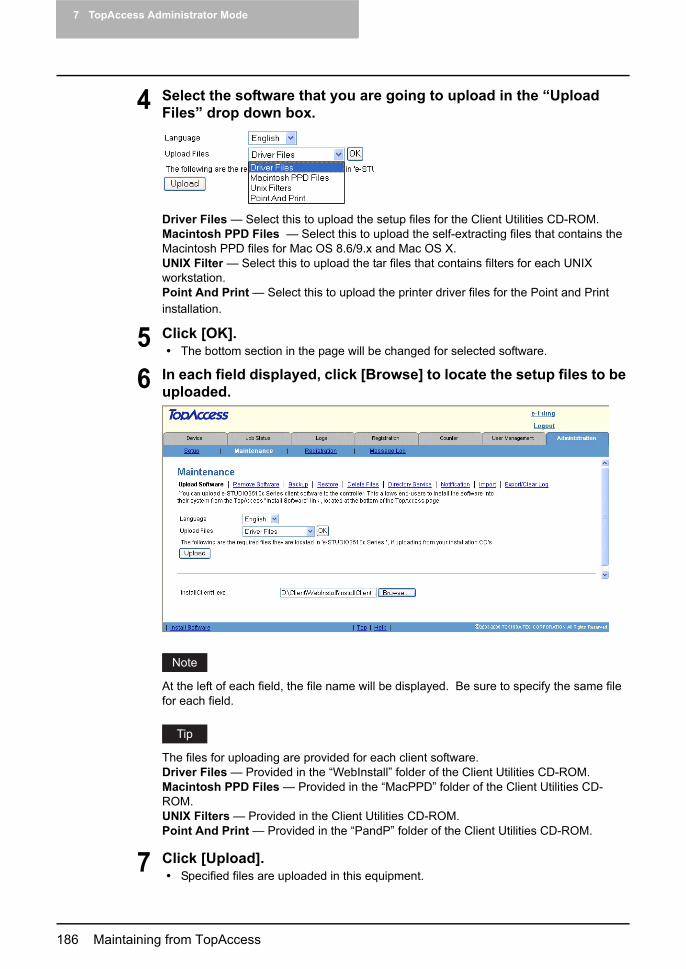
7 TopAccess Administrator Mode
186 Maintaining from TopAccess
4 Select the software that you are going to upload in the “Upload Files” drop down box.
Driver Files — Select this to upload the setup files for the Client Utilities CD-ROM.Macintosh PPD Files — Select this to upload the self-extracting files that contains the Macintosh PPD files for Mac OS 8.6/9.x and Mac OS X.UNIX Filter — Select this to upload the tar files that contains filters for each UNIX workstation.Point And Print — Select this to upload the printer driver files for the Point and Print installation.
5 Click [OK].The bottom section in the page will be changed for selected software.
6 In each field displayed, click [Browse] to locate the setup files to be uploaded.
At the left of each field, the file name will be displayed. Be sure to specify the same file for each field.
The files for uploading are provided for each client software.Driver Files — Provided in the “WebInstall” folder of the Client Utilities CD-ROM.Macintosh PPD Files — Provided in the “MacPPD” folder of the Client Utilities CD-ROM.UNIX Filters — Provided in the Client Utilities CD-ROM.Point And Print — Provided in the “PandP” folder of the Client Utilities CD-ROM.
7 Click [Upload].Specified files are uploaded in this equipment.
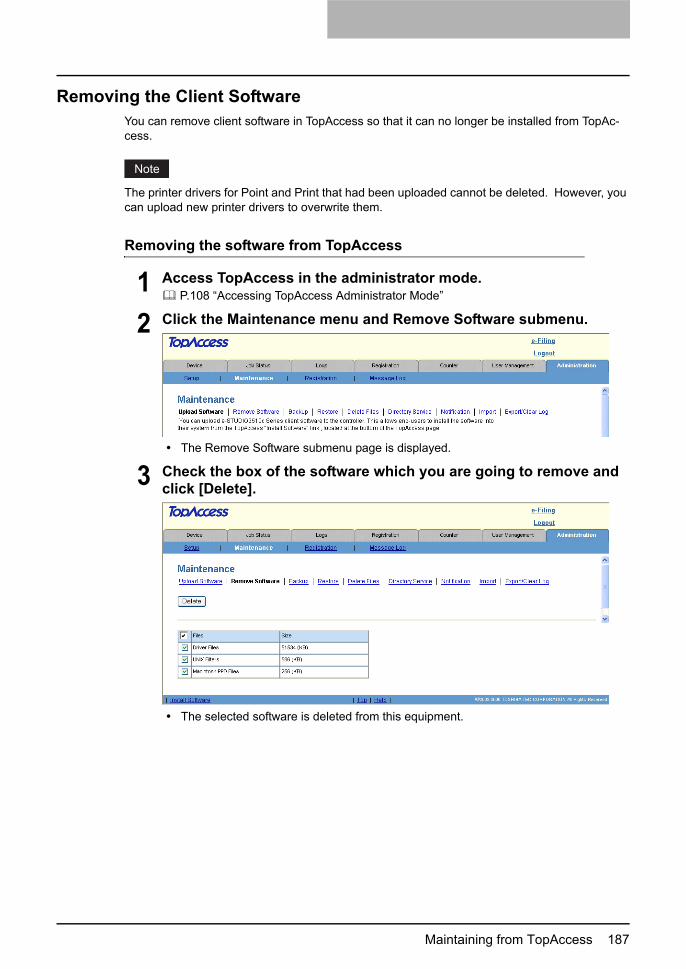
Maintaining from TopAccess 187
Removing the Client SoftwareYou can remove client software in TopAccess so that it can no longer be installed from TopAc-cess.
The printer drivers for Point and Print that had been uploaded cannot be deleted. However, you can upload new printer drivers to overwrite them.
Removing the software from TopAccess
1 Access TopAccess in the administrator mode. P.108 “Accessing TopAccess Administrator Mode”
2 Click the Maintenance menu and Remove Software submenu.
The Remove Software submenu page is displayed.
3 Check the box of the software which you are going to remove and click [Delete].
The selected software is deleted from this equipment.
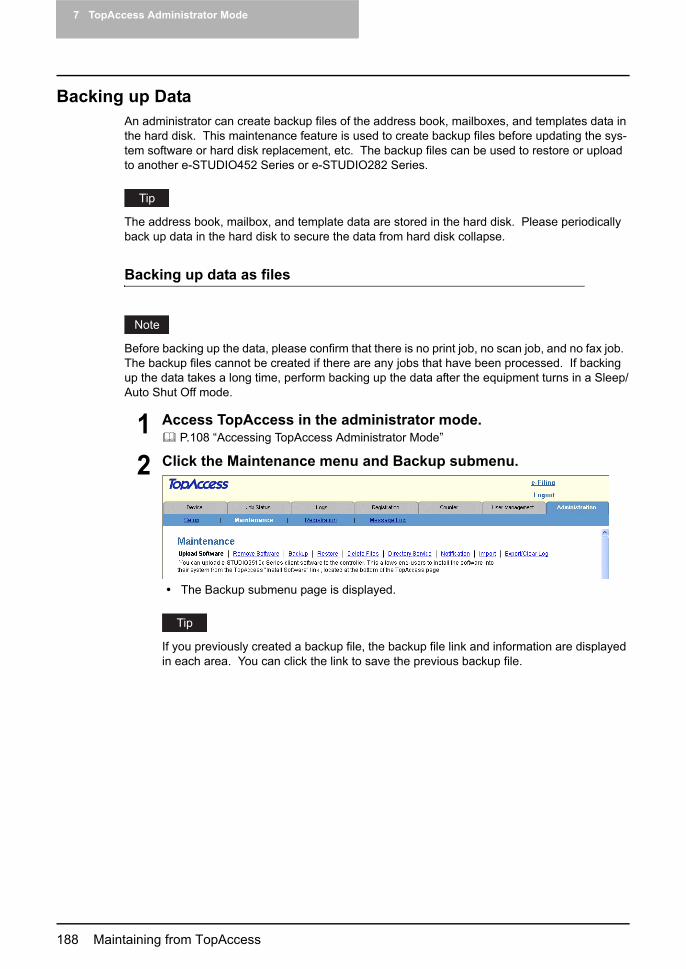
7 TopAccess Administrator Mode
188 Maintaining from TopAccess
Backing up DataAn administrator can create backup files of the address book, mailboxes, and templates data in the hard disk. This maintenance feature is used to create backup files before updating the sys-tem software or hard disk replacement, etc. The backup files can be used to restore or upload to another e-STUDIO452 Series or e-STUDIO282 Series.
The address book, mailbox, and template data are stored in the hard disk. Please periodically back up data in the hard disk to secure the data from hard disk collapse.
Backing up data as files
Before backing up the data, please confirm that there is no print job, no scan job, and no fax job. The backup files cannot be created if there are any jobs that have been processed. If backing up the data takes a long time, perform backing up the data after the equipment turns in a Sleep/Auto Shut Off mode.
1 Access TopAccess in the administrator mode. P.108 “Accessing TopAccess Administrator Mode”
2 Click the Maintenance menu and Backup submenu.
The Backup submenu page is displayed.
If you previously created a backup file, the backup file link and information are displayed in each area. You can click the link to save the previous backup file.
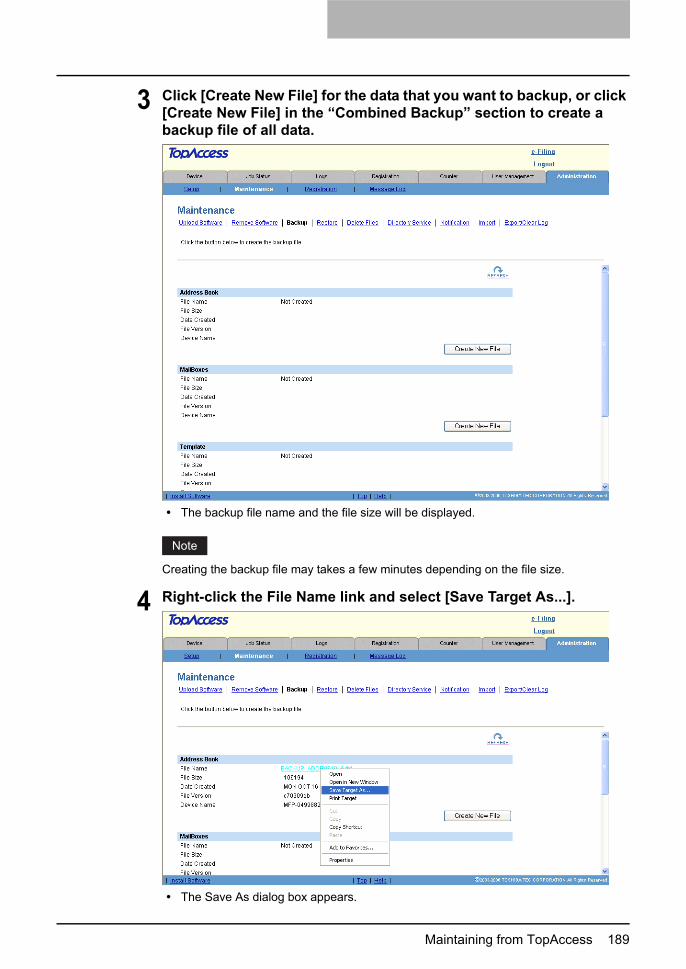
Maintaining from TopAccess 189
3 Click [Create New File] for the data that you want to backup, or click [Create New File] in the “Combined Backup” section to create a backup file of all data.
The backup file name and the file size will be displayed.
Creating the backup file may takes a few minutes depending on the file size.
4 Right-click the File Name link and select [Save Target As...].
The Save As dialog box appears.

7 TopAccess Administrator Mode
190 Maintaining from TopAccess
5 Select the file location and select “All Files” in the “Save as type” drop down box.
It is recommended to save the backup file as it is named. If you change the file name, the equipment cannot restore the data from the backup files. The file name of each backup data must be the following name:- Address Book: BACKUP_ADDR<date>.tbf- MailBoxes: BACKUP_MBOX<date>.tbf- Template: BACKUP_TEMP<date>.tbf- Combined Backup: BACKUP_ALL<date>.tbf
6 Click [Save].The backup file is saved in the selected location.
Restoring Data from Backup FileAn administrator can restore the address book, mailboxes, and templates data using the backup files. This maintenance feature is used to restore data from backup files after updating the sys-tem software or hard disk replacement, etc., to recover the original environments. Also you can upload the data in different equipment using this Function.
Restoring data from backup files
Before restoring the data from backup files, please confirm that there is no print job, no scan job, and no fax job. The backup files cannot be restored if there are any jobs that have been pro-cessed. If restoring the data takes a long time, perform restoring the data after the equipment turns in a Sleep/Auto Shut Off mode.
1 Access TopAccess in the administrator mode. P.108 “Accessing TopAccess Administrator Mode”
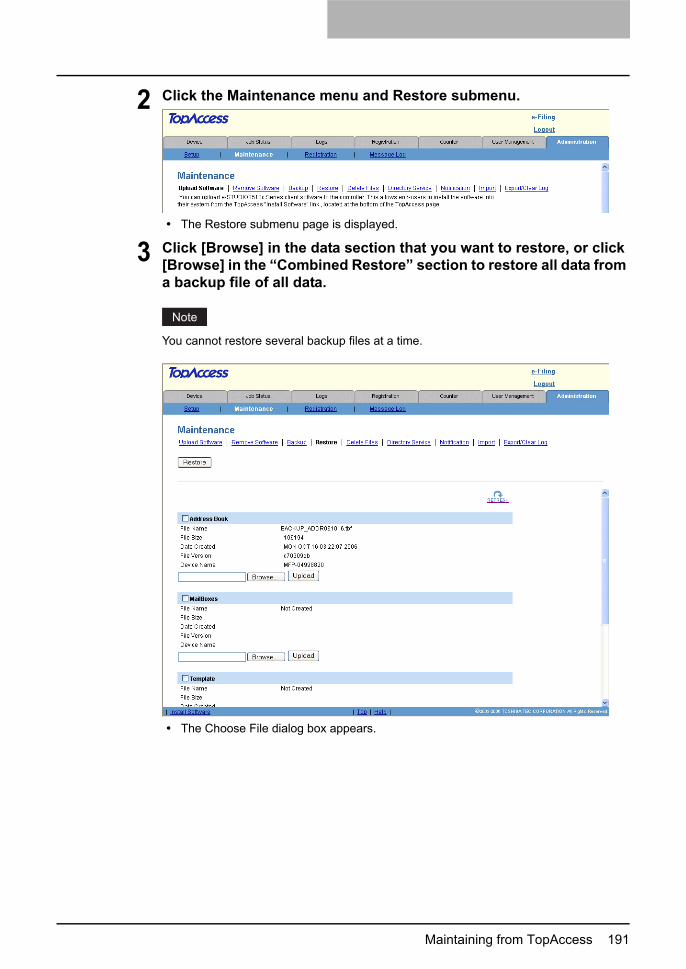
Maintaining from TopAccess 191
2 Click the Maintenance menu and Restore submenu.
The Restore submenu page is displayed.
3 Click [Browse] in the data section that you want to restore, or click [Browse] in the “Combined Restore” section to restore all data from a backup file of all data.
You cannot restore several backup files at a time.
The Choose File dialog box appears.

7 TopAccess Administrator Mode
192 Maintaining from TopAccess
4 Select a backup file and click [Open].
The file version and device name of selected backup file will be displayed.
If the backup file name is not the name as shown below, the equipment cannot restore the data from the backup files.- Address Book: BACKUP_ADDR<date>.tbf- MailBoxes: BACKUP_MBOX<date>.tbf- Template: BACKUP_TEMP<date>.tbf- Combined Backup: BACKUP_ALL<date>.tbf
5 Click [Upload].
The Restore screen displays the backup file information.

Maintaining from TopAccess 193
6 Check the box of data that you uploaded a backup file and click [Restore].
The restore process begins. This procedure may take several minutes.
Deleting the Data from Local FolderAn administrator can delete information such as, scanned data, transmission data, and recep-tion data that are stored in the local folder using the Save as file function. It is recommended to delete the stored data periodically to maintain the hard disk.
Deleting data
1 Access TopAccess in the administrator mode. P.108 “Accessing TopAccess Administrator Mode”
2 Click the Maintenance menu and Delete Files submenu.
The Delete Files submenu page is displayed.
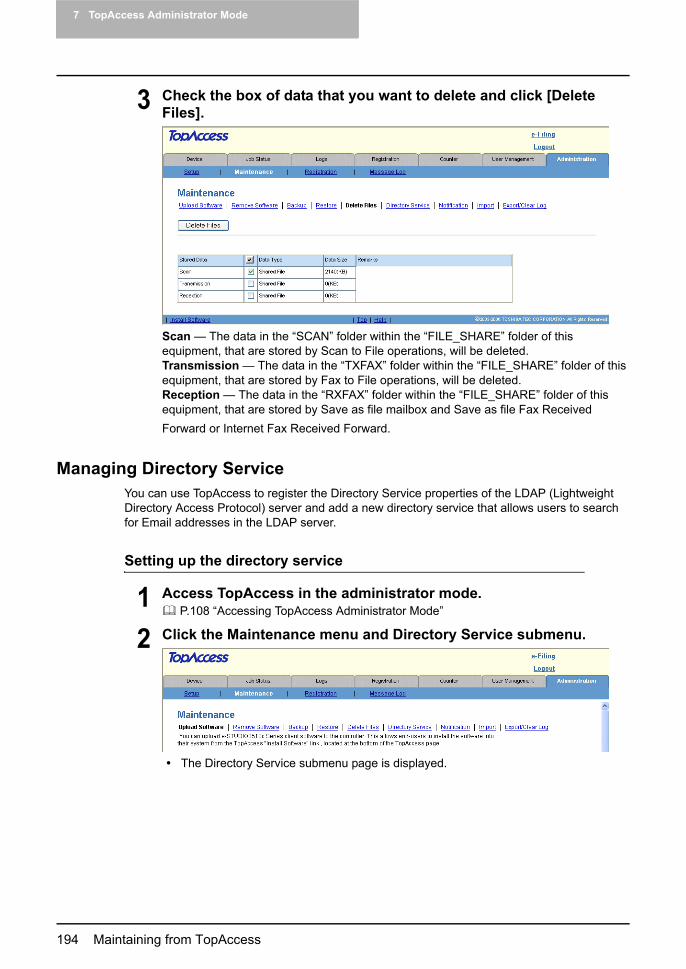
7 TopAccess Administrator Mode
194 Maintaining from TopAccess
3 Check the box of data that you want to delete and click [Delete Files].
Scan — The data in the “SCAN” folder within the “FILE_SHARE” folder of this equipment, that are stored by Scan to File operations, will be deleted.Transmission — The data in the “TXFAX” folder within the “FILE_SHARE” folder of this equipment, that are stored by Fax to File operations, will be deleted.Reception — The data in the “RXFAX” folder within the “FILE_SHARE” folder of this equipment, that are stored by Save as file mailbox and Save as file Fax Received Forward or Internet Fax Received Forward.
Managing Directory ServiceYou can use TopAccess to register the Directory Service properties of the LDAP (Lightweight Directory Access Protocol) server and add a new directory service that allows users to search for Email addresses in the LDAP server.
Setting up the directory service
1 Access TopAccess in the administrator mode. P.108 “Accessing TopAccess Administrator Mode”
2 Click the Maintenance menu and Directory Service submenu.
The Directory Service submenu page is displayed.

Maintaining from TopAccess 195
3 Click [New] to add a new Directory Service, or click the Directory Service name link to edit the Directory Service properties.
The Directory Service Properties page is displayed.
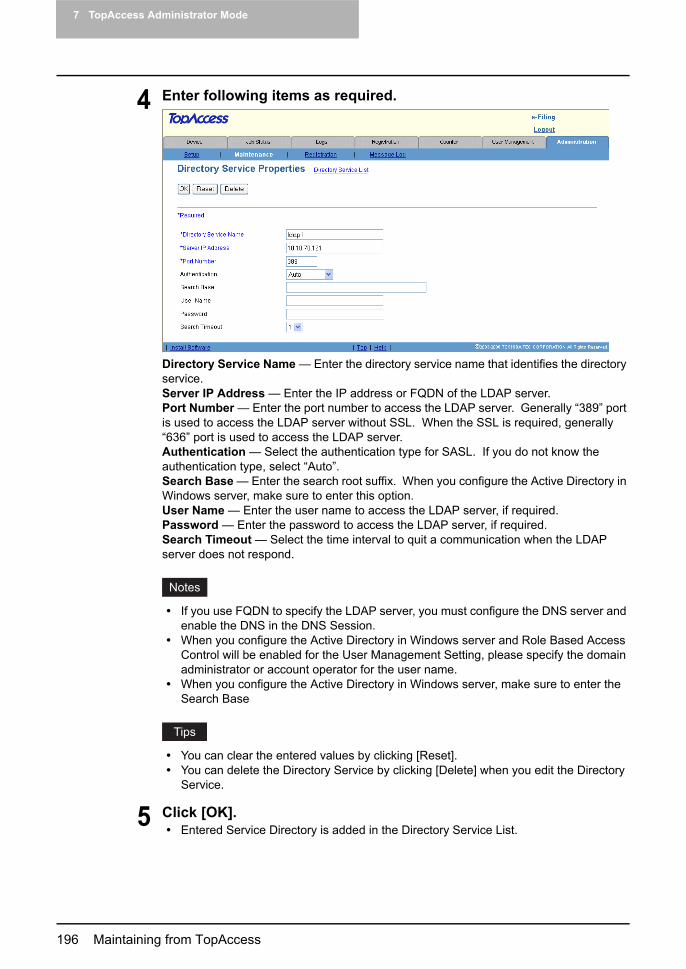
7 TopAccess Administrator Mode
196 Maintaining from TopAccess
4 Enter following items as required.
Directory Service Name — Enter the directory service name that identifies the directory service.Server IP Address — Enter the IP address or FQDN of the LDAP server.Port Number — Enter the port number to access the LDAP server. Generally “389” port is used to access the LDAP server without SSL. When the SSL is required, generally “636” port is used to access the LDAP server.Authentication — Select the authentication type for SASL. If you do not know the authentication type, select “Auto”.Search Base — Enter the search root suffix. When you configure the Active Directory in Windows server, make sure to enter this option.User Name — Enter the user name to access the LDAP server, if required.Password — Enter the password to access the LDAP server, if required.Search Timeout — Select the time interval to quit a communication when the LDAP server does not respond.
If you use FQDN to specify the LDAP server, you must configure the DNS server and enable the DNS in the DNS Session.When you configure the Active Directory in Windows server and Role Based Access Control will be enabled for the User Management Setting, please specify the domain administrator or account operator for the user name.When you configure the Active Directory in Windows server, make sure to enter the Search Base
You can clear the entered values by clicking [Reset].You can delete the Directory Service by clicking [Delete] when you edit the Directory Service.
5 Click [OK].Entered Service Directory is added in the Directory Service List.
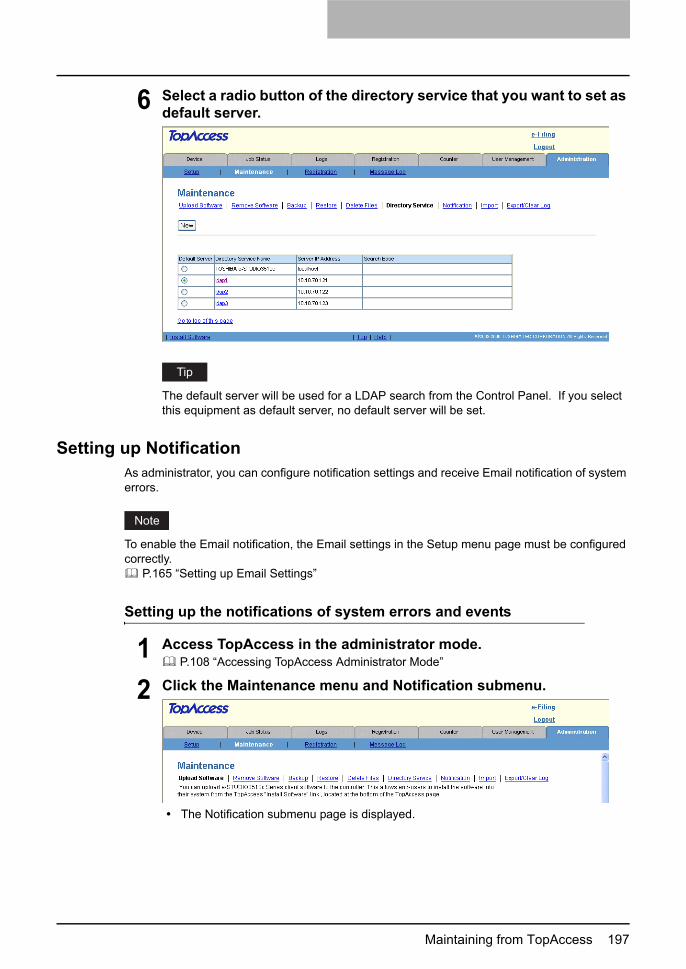
Maintaining from TopAccess 197
6 Select a radio button of the directory service that you want to set as default server.
The default server will be used for a LDAP search from the Control Panel. If you select this equipment as default server, no default server will be set.
Setting up NotificationAs administrator, you can configure notification settings and receive Email notification of system errors.
To enable the Email notification, the Email settings in the Setup menu page must be configured correctly.
P.165 “Setting up Email Settings”
Setting up the notifications of system errors and events
1 Access TopAccess in the administrator mode. P.108 “Accessing TopAccess Administrator Mode”
2 Click the Maintenance menu and Notification submenu.
The Notification submenu page is displayed.

7 TopAccess Administrator Mode
198 Maintaining from TopAccess
3 In Email Settings, check the box “Notify administrator at Email Address” to enable the notifications, and enter the administrator’s Email address where the notifications are sent.
4 In General Notification Events, check the boxes for general events to be notified.
“Used toner container is Full” is not diaplyed for e-STUDIO282 Series.

Maintaining from TopAccess 199
5 In Received Fax/Internet Fax Notification Events, check the boxes for the events and status to be notified.
6 In Any Scan Notification Events, check the boxes for scanning sta-tus to be notified.
7 In Scan Notification Events, check the boxes for scanning status to be notified.

7 TopAccess Administrator Mode
200 Maintaining from TopAccess
8 In e-Filing Notification Events, check the boxes for the status to be notified.
When these are enabled, the following events will be notified.When “Warning” is enabled:- Hard Disk space for Electronic Filing is nearly full.- Document(s) will expire in a few days.When “Information” is enabled:- Initialize e-Filing Box.
In order to notify whether the e-Filing operations are successfully performed, please set the notification settings in the box properties using the e-Filing web utility. For instruc-tions on how to set the notification settings in the box properties using the e-Filing web utility, please refer to the e-Filing Guide.
9 In Fax Received Forward Notification Events, check the boxes for the events to be notified.
Even if you check the items in the Fax Received Forward Notification Events, Emails are sent only when the optional Fax unit is installed.
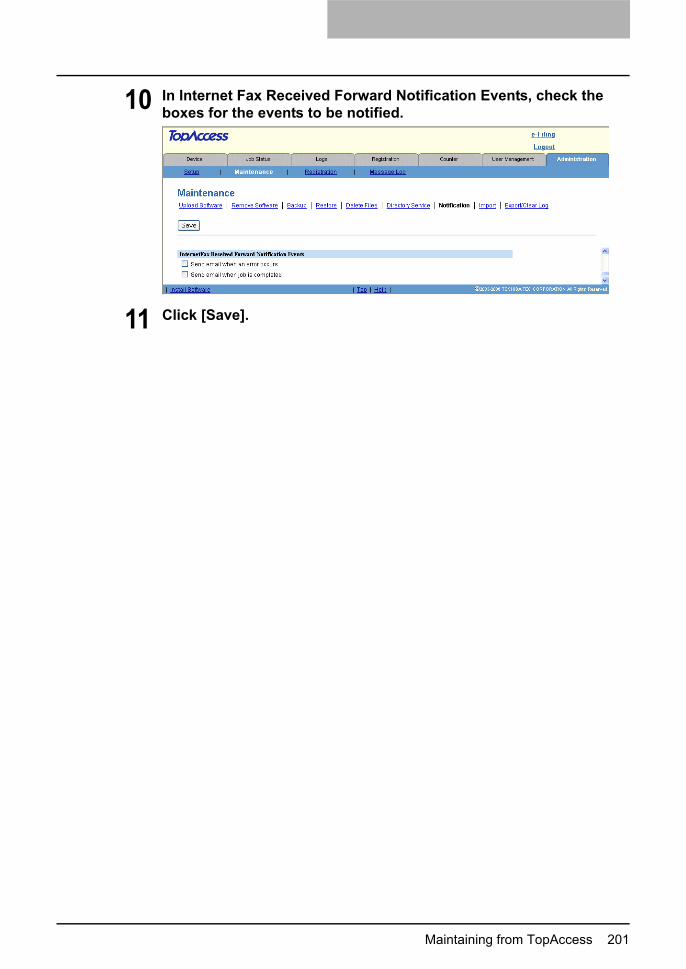
Maintaining from TopAccess 201
10 In Internet Fax Received Forward Notification Events, check the boxes for the events to be notified.
11 Click [Save].

7 TopAccess Administrator Mode
202 Maintaining from TopAccess
Importing and Exporting the Address BookThis equipment allows you to import and export address book data in CSV format.
P.202 “Importing the Address Book Data” P.204 “Exporting the Address Book Data”
Importing the Address Book DataYou can import address information that has been exported from another TopAccess address book or from a different address book program. The imported file must be the comma delimited CSV file and created in the suitable format for the TopAccess address book. The imported address book data will be added in the existing address book.The format for the TopAccess address book is as below:
If an address data of any entry items exceeds the number of characters as describe below, the address data will not be imported.- First Name: 32 characters- Last Name: 32 characters- Email Address: 192 characters- Tel Number: 128 characters- Company: 64 characters- Department: 64 characters
Importing the address book data from a CSV file
Before importing the address book data, please confirm that there is no print job, no scan job, and no fax job. The address book data cannot be imported if there are any jobs that have been processed. If importing the address book data takes a long time, perform restoring the data after the equipment turns in a Sleep/Auto Shut Off mode.
1 Access TopAccess in the administrator mode. P.108 “Accessing TopAccess Administrator Mode”
2 Click the Maintenance menu and Import submenu.
The Import submenu page is displayed.
"First Name","Last Name","Email Address","Tel Number","Company","Department""User01","User","[email protected]","00000000001","12345 COMPANY","Dept01""User02","User","[email protected]","00000000002","12345 COMPANY","Dept01""User03","User","[email protected]","00000000003","12345 COMPANY","Dept01"

Maintaining from TopAccess 203
3 Click [Browse...] in the Address Book area.
The Choose File dialog box appears.
4 Select the CSV file that contains address book data and click [Open].
5 Click [IMPORT].
The data is imported to the address book.
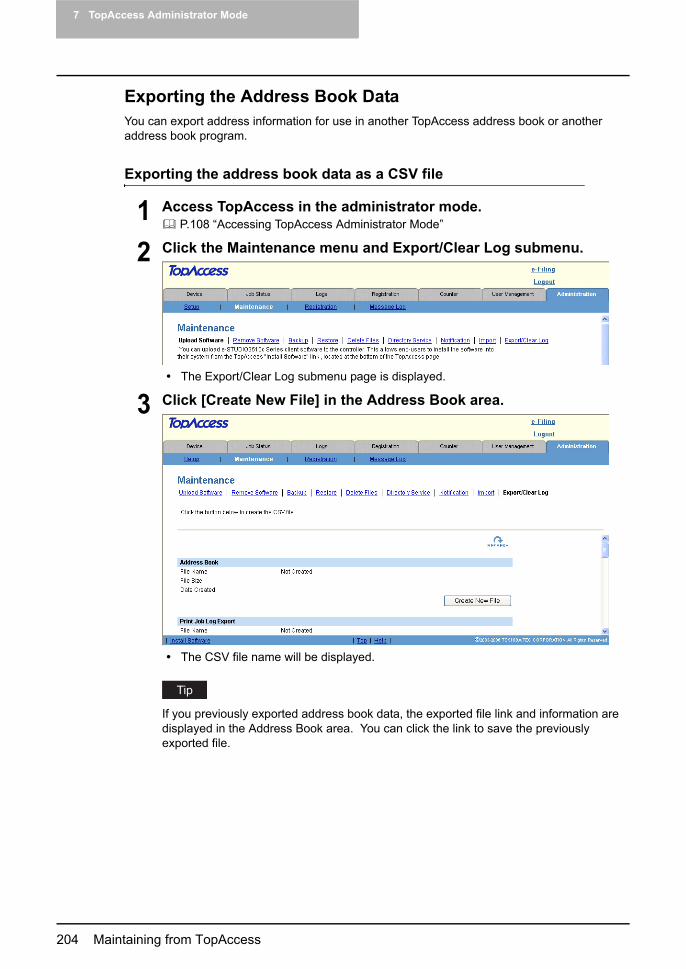
7 TopAccess Administrator Mode
204 Maintaining from TopAccess
Exporting the Address Book DataYou can export address information for use in another TopAccess address book or another address book program.
Exporting the address book data as a CSV file
1 Access TopAccess in the administrator mode. P.108 “Accessing TopAccess Administrator Mode”
2 Click the Maintenance menu and Export/Clear Log submenu.
The Export/Clear Log submenu page is displayed.
3 Click [Create New File] in the Address Book area.
The CSV file name will be displayed.
If you previously exported address book data, the exported file link and information are displayed in the Address Book area. You can click the link to save the previously exported file.

Maintaining from TopAccess 205
4 Right-click the File Name link and select [Save Target As...].
The Save As dialog box appears.
5 Select the file location and select “All Files” or “.csv Document” in the “Save as type” drop down box.
6 Click [Save]The CSV file that contains the address book data is saved in a selected location.
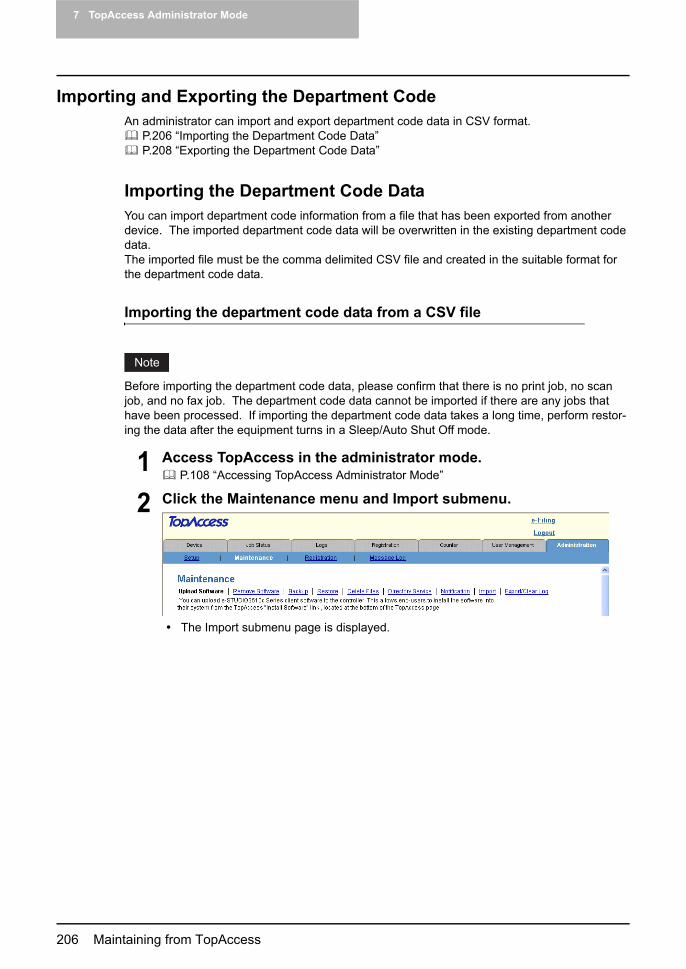
7 TopAccess Administrator Mode
206 Maintaining from TopAccess
Importing and Exporting the Department CodeAn administrator can import and export department code data in CSV format.
P.206 “Importing the Department Code Data” P.208 “Exporting the Department Code Data”
Importing the Department Code DataYou can import department code information from a file that has been exported from another device. The imported department code data will be overwritten in the existing department code data.The imported file must be the comma delimited CSV file and created in the suitable format for the department code data.
Importing the department code data from a CSV file
Before importing the department code data, please confirm that there is no print job, no scan job, and no fax job. The department code data cannot be imported if there are any jobs that have been processed. If importing the department code data takes a long time, perform restor-ing the data after the equipment turns in a Sleep/Auto Shut Off mode.
1 Access TopAccess in the administrator mode. P.108 “Accessing TopAccess Administrator Mode”
2 Click the Maintenance menu and Import submenu.
The Import submenu page is displayed.

Maintaining from TopAccess 207
3 Click [Browse...] in the Department Code area.
The Choose File dialog box appears.
4 Select the CSV file that contains department code data and click [Open].
5 Click [Import].
The data is imported to the department code.
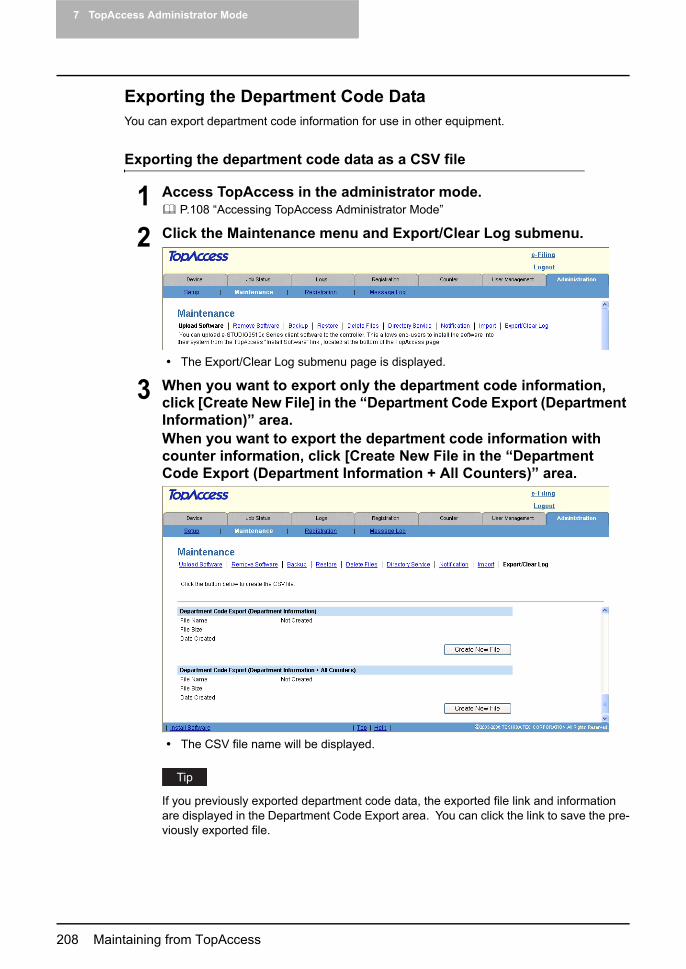
7 TopAccess Administrator Mode
208 Maintaining from TopAccess
Exporting the Department Code DataYou can export department code information for use in other equipment.
Exporting the department code data as a CSV file
1 Access TopAccess in the administrator mode. P.108 “Accessing TopAccess Administrator Mode”
2 Click the Maintenance menu and Export/Clear Log submenu.
The Export/Clear Log submenu page is displayed.
3 When you want to export only the department code information, click [Create New File] in the “Department Code Export (Department Information)” area.When you want to export the department code information with counter information, click [Create New File in the “Department Code Export (Department Information + All Counters)” area.
The CSV file name will be displayed.
If you previously exported department code data, the exported file link and information are displayed in the Department Code Export area. You can click the link to save the pre-viously exported file.
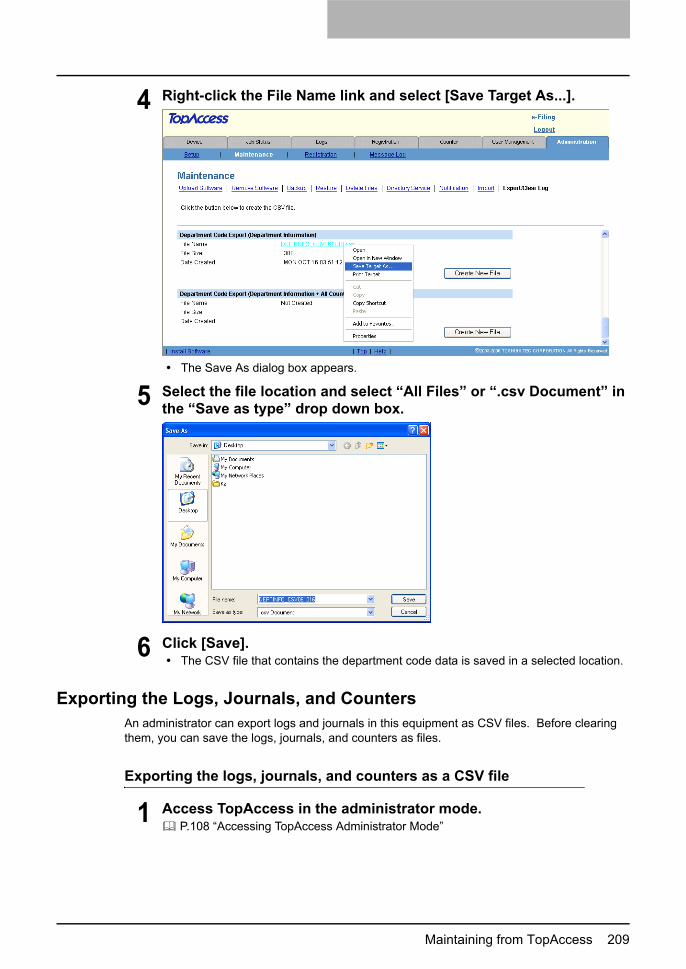
Maintaining from TopAccess 209
4 Right-click the File Name link and select [Save Target As...].
The Save As dialog box appears.
5 Select the file location and select “All Files” or “.csv Document” in the “Save as type” drop down box.
6 Click [Save].The CSV file that contains the department code data is saved in a selected location.
Exporting the Logs, Journals, and CountersAn administrator can export logs and journals in this equipment as CSV files. Before clearing them, you can save the logs, journals, and counters as files.
Exporting the logs, journals, and counters as a CSV file
1 Access TopAccess in the administrator mode. P.108 “Accessing TopAccess Administrator Mode”

7 TopAccess Administrator Mode
210 Maintaining from TopAccess
2 Click the Maintenance menu and Export/Clear Log submenu.
The Export/Clear Log submenu page is displayed.
3 Click [Create New File] in the area of logs or journals that you want to export.You can export the following logs and journals.
Print Job LogFax Transmission JournalFax Reception JournalScan LogMessage LogDepartment Code (Small/Large Counter)
The CSV file name will be displayed.
If you previously exported data, the exported file link and information are displayed in each area. You can click the link to save the previously exported file.

Maintaining from TopAccess 211
4 Right-click the File Name link and select [Save Target As...].
The Save As dialog box appears.
5 Select the file location and select “All Files” or “.csv Document” in the “Save as type” drop down box.
6 Click [Save].The CSV file that contains the logs or journals data is saved in a selected location.
Clearing the Logs and JournalsAn administrator can clear logs and journals in this equipment. This maintenance procedure is recommended periodically to maintain the hard disk.
Clearing the logs and journals
1 Access TopAccess in the administrator mode. P.108 “Accessing TopAccess Administrator Mode”

7 TopAccess Administrator Mode
212 Maintaining from TopAccess
2 Click the Maintenance menu and Export/Clear Log submenu.
The Export/Clear Log submenu page is displayed.
3 Click [Clear Logs] in the area of logs or journals that you want to clear.
The selected logs are cleared.
Registering from TopAccess 213
Registering from TopAccess
About the RegistrationsIn the Registration menu in the TopAccess administrator mode, an administrator can register the public Templates, and relay transmissions of received faxes/internet faxes.
Public TemplateAn administrator can create public templates that are held in a public template group available to everyone.
P.213 “Registering Public Templates”
Fax Received Forward, Internet Fax Received ForwardAn administrator can register the agent to which all received faxes/internet faxes are forwarded so that he or she can check the documents.
P.222 “Registering Fax and Internet Fax Received Forward”
The Fax Received Forward can be registered only when the optional Fax unit is installed.
Registering Public TemplatesAdministrators create and maintain public templates and manage the public template group. Users can display and use public templates but cannot modify them.The public group can contain up to 60 public templates. Typically, these are general-purpose templates available to all users.TopAccess in the administrator mode allows the following operations for managing the public templates:
P.213 “Creating or Editing the Public Templates” P.219 “Resetting the Public Template”
Creating or Editing the Public TemplatesUse the Templates page to set up and modify templates.
Creating or Editing the public templates
1 Access TopAccess in the administrator mode. P.108 “Accessing TopAccess Administrator Mode”
2 Click the Registration menu and Public Template submenu.The Public Template submenu page is displayed.

7 TopAccess Administrator Mode
214 Registering from TopAccess
3 From the templates list, click the “Undefined” icon to register a new template, or click defined icon to edit the template.
If the templates list is displayed in the List view, click the “Undefined” template name to register new template, or click the defined template name to edit the template.If you select the public template that has not been defined, the Template Properties page to select agents is displayed. Skip to step 5.If you select the defined private template, the Template Properties page is displayed. Go to the next step.
You can change the template list view by clicking on either “Panel View” or “List View”.If you know which public template you want to define or edit, click the number of the the public template in the “Jump to” links.
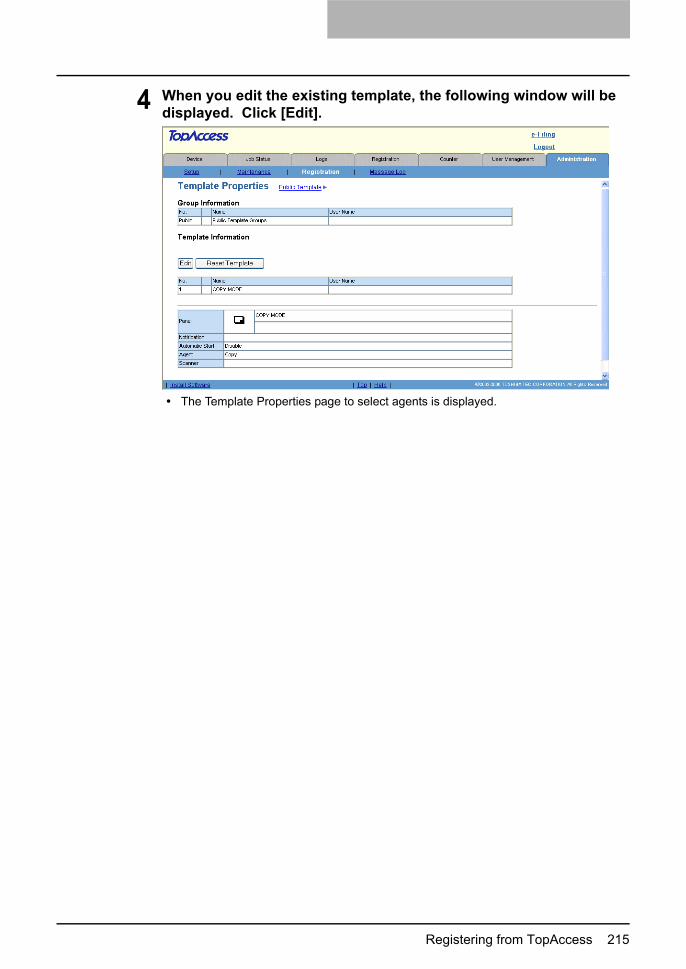
Registering from TopAccess 215
4 When you edit the existing template, the following window will be displayed. Click [Edit].
The Template Properties page to select agents is displayed.

7 TopAccess Administrator Mode
216 Registering from TopAccess
5 Select agents and click [Select Agent].
You can select one of the following templates:Copy — Select this to create a copy template. Usually, this is selected to print copies as well as sending originals to other destinations. This agent can also be combined with the Save as file agent or Store to e-Filing agent.Fax/Internet Fax — Select this to create a fax and Internet Fax transmission template. This agent can be combined with the Save as file agent.Scan — Select this to create a scan template combined with the Email, Save as file, and Store to e-Filing agents. When you select this, select the agent from “Email”, “Save as file”, or “Store to e-Filing”.You can also additionally combine one of the following agents:Email — Select this to add an email agent. This can be selected only when “Scan” is selected. This agent can be combined with the Save as file agent or Store to e-Filing agent.Save as file — Select this to add a Save as file agent. This can be selected for any templates. This agent can be combined with another agent.Store to e-Filing — Select this to add a Store to e-Filing agent. This can be selected only when “Copy” or “Scan” is selected. This agent can be combined with the Email agent or Save as file agent.
“Fax/Internet Fax” is available only when the Scanner Kit is installed, when the Printer/Scanner Kit is installed, or when the optional Fax unit is installed.“Scan”, “Email”, and “Save as file” are available only when the Scanner Kit is installed, or when the Printer/Scanner Kit is installed.
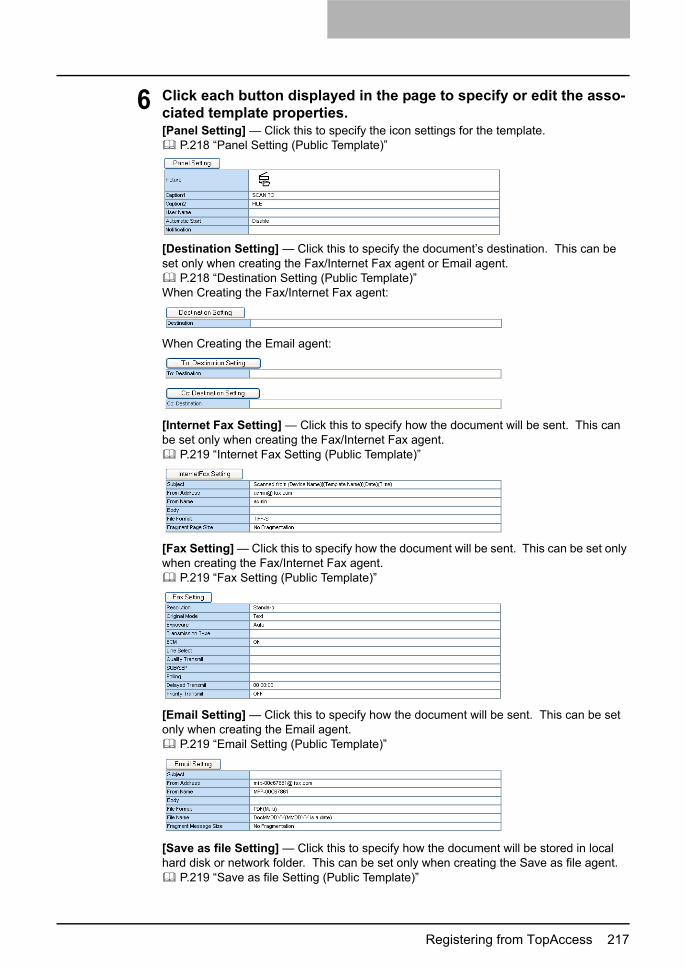
Registering from TopAccess 217
6 Click each button displayed in the page to specify or edit the asso-ciated template properties.[Panel Setting] — Click this to specify the icon settings for the template.
P.218 “Panel Setting (Public Template)”
[Destination Setting] — Click this to specify the document’s destination. This can be set only when creating the Fax/Internet Fax agent or Email agent.
P.218 “Destination Setting (Public Template)”When Creating the Fax/Internet Fax agent:
When Creating the Email agent:
[Internet Fax Setting] — Click this to specify how the document will be sent. This can be set only when creating the Fax/Internet Fax agent.
P.219 “Internet Fax Setting (Public Template)”
[Fax Setting] — Click this to specify how the document will be sent. This can be set only when creating the Fax/Internet Fax agent.
P.219 “Fax Setting (Public Template)”
[Email Setting] — Click this to specify how the document will be sent. This can be set only when creating the Email agent.
P.219 “Email Setting (Public Template)”
[Save as file Setting] — Click this to specify how the document will be stored in local hard disk or network folder. This can be set only when creating the Save as file agent.
P.219 “Save as file Setting (Public Template)”
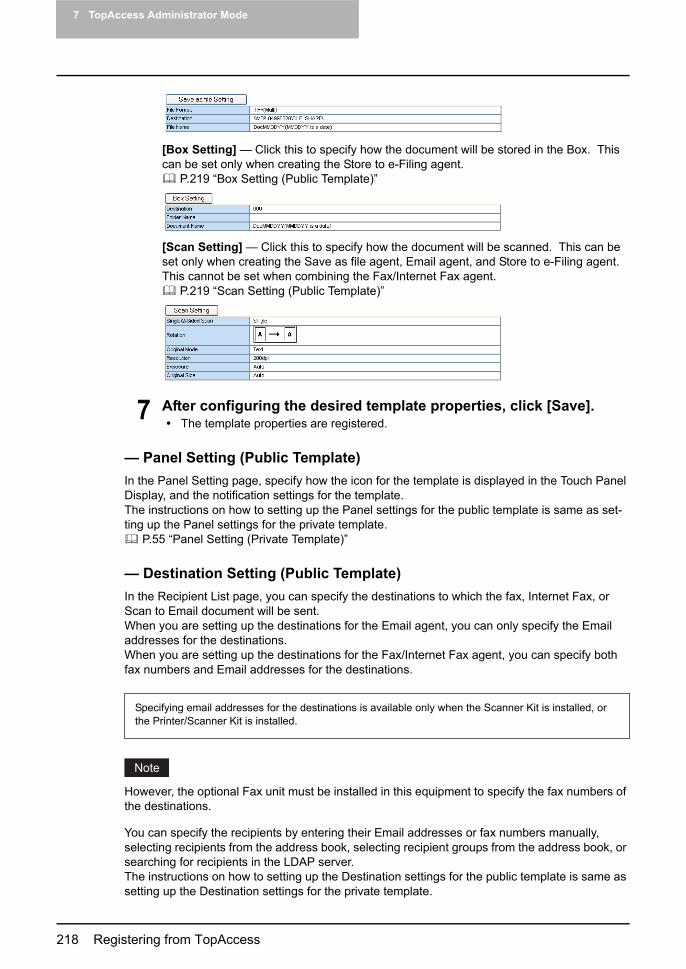
7 TopAccess Administrator Mode
218 Registering from TopAccess
[Box Setting] — Click this to specify how the document will be stored in the Box. This can be set only when creating the Store to e-Filing agent.
P.219 “Box Setting (Public Template)”
[Scan Setting] — Click this to specify how the document will be scanned. This can be set only when creating the Save as file agent, Email agent, and Store to e-Filing agent. This cannot be set when combining the Fax/Internet Fax agent.
P.219 “Scan Setting (Public Template)”
7 After configuring the desired template properties, click [Save].The template properties are registered.
— Panel Setting (Public Template)In the Panel Setting page, specify how the icon for the template is displayed in the Touch Panel Display, and the notification settings for the template.The instructions on how to setting up the Panel settings for the public template is same as set-ting up the Panel settings for the private template.
P.55 “Panel Setting (Private Template)”
— Destination Setting (Public Template)In the Recipient List page, you can specify the destinations to which the fax, Internet Fax, or Scan to Email document will be sent.When you are setting up the destinations for the Email agent, you can only specify the Email addresses for the destinations.When you are setting up the destinations for the Fax/Internet Fax agent, you can specify both fax numbers and Email addresses for the destinations.
However, the optional Fax unit must be installed in this equipment to specify the fax numbers of the destinations.
You can specify the recipients by entering their Email addresses or fax numbers manually, selecting recipients from the address book, selecting recipient groups from the address book, or searching for recipients in the LDAP server.The instructions on how to setting up the Destination settings for the public template is same as setting up the Destination settings for the private template.
Specifying email addresses for the destinations is available only when the Scanner Kit is installed, or the Printer/Scanner Kit is installed.

Registering from TopAccess 219
P.56 “Destination Setting (Private Template)”
— Internet Fax Setting (Public Template)In the Internet Fax Settings page, you can specify the content of the Internet Fax to be sent.The instructions on how to setting up the Internet Fax settings for the public template is same as setting up the Internet Fax settings for the private template.
P.63 “Internet Fax Setting (Private Template)”
— Fax Setting (Public Template)In the Fax Setting page, you can specify how the fax will be sent.The instructions on how to setting up the Fax settings for the public template is same as setting up the Fax settings for the private template.
P.64 “Fax Setting (Private Template)”
— Email Setting (Public Template)In the Email Setting page, you can specify the content of the Scan to Email document to be sent.The instructions on how to setting up the Email settings for the public template is same as set-ting up the Email settings for the private template.
P.66 “Email Setting (Private Template)”
— Save as file Setting (Public Template)In the Save as file Setting page, you can specify how and where a scanned file will be stored.The instructions on how to setting up the Save as file settings for the public template is same as setting up the Save as file settings for the private template.
P.67 “Save as file Setting (Private Template)”
— Box Setting (Public Template)In the Box Setting page, you can specify how scanned images will be stored in the Box.The instructions on how to setting up the Box settings for the public template is same as setting up the Box settings for the private template.
P.69 “Box Setting (Private Template)”
— Scan Setting (Public Template)In the Scan Setting page, you can specify how originals are scanned for the Save as file, Email, and Store to e-Filing agent.The instructions on how to setting up the Scan settings for the public template is same as setting up the Scan settings for the private template.
P.70 “Scan Setting (Private Template)”
Resetting the Public TemplateYou can reset the public template that you registered.You can reset a public template that you select, or you can reset all public templates that are registered in the Public Template Group.
P.219 “Resetting a Public Template” P.221 “Resetting All Public Templates”
— Resetting a Public TemplateTo reset an unnecessary public template, perform the following procedure.
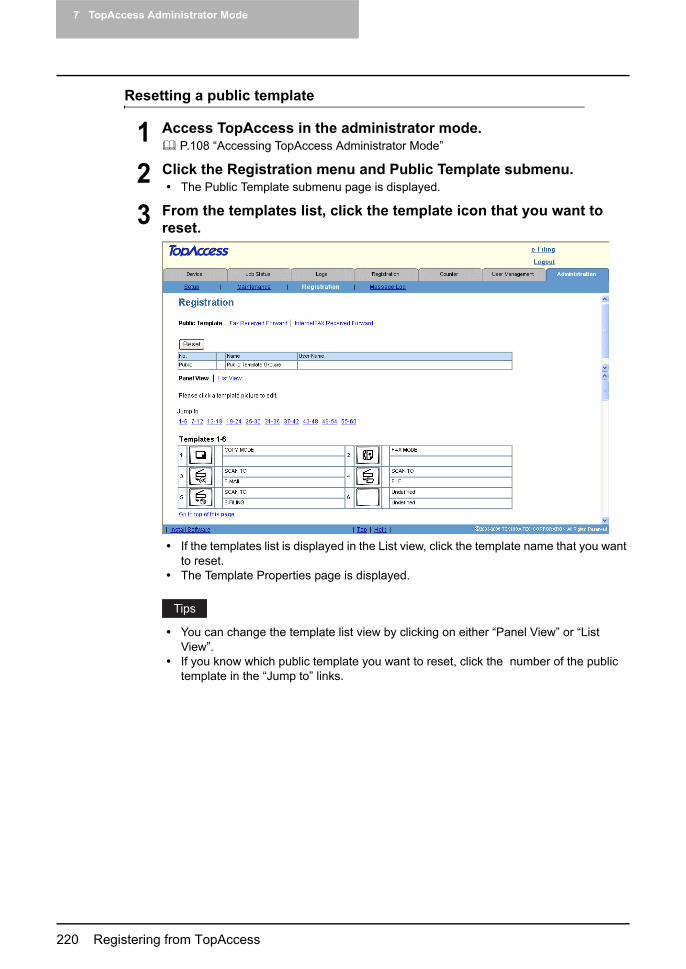
7 TopAccess Administrator Mode
220 Registering from TopAccess
Resetting a public template
1 Access TopAccess in the administrator mode. P.108 “Accessing TopAccess Administrator Mode”
2 Click the Registration menu and Public Template submenu.The Public Template submenu page is displayed.
3 From the templates list, click the template icon that you want to reset.
If the templates list is displayed in the List view, click the template name that you want to reset.The Template Properties page is displayed.
You can change the template list view by clicking on either “Panel View” or “List View”.If you know which public template you want to reset, click the number of the public template in the “Jump to” links.

Registering from TopAccess 221
4 Click [Reset Template].
The confirmation dialog box appears.
5 Click [OK].
The selected template is cleared.
— Resetting All Public TemplatesTo reset all public templates, perform the following procedure.
Resetting all public templates
1 Access TopAccess in the administrator mode. P.108 “Accessing TopAccess Administrator Mode”
2 Click the Registration menu and Public Template submenu.The Public Template submenu page is displayed.

7 TopAccess Administrator Mode
222 Registering from TopAccess
3 Click [Reset].
The confirmation dialog box appears.
4 Click [OK].
The group information is cleared.
Registering Fax and Internet Fax Received ForwardThe Fax Received Forward and Internet Fax Received Forward allow you to transmit received fax or Internet Faxes to specific destinations — to check all fax and Internet Faxes received.
The Fax Received Forward can be registered only when the optional Fax unit is installed.When the 2nd line board is installed, the received faxes are forwarded to the specified des-tinations according to the Fax Received Forward setting regardless of whether the faxes are received through line 1 or line 2.
The received fax and Internet Faxes can be transmitted to following destinations:Other Internet Fax devicesLocal folder in this equipment or network foldersEmail addressesBox in this equipment
The Internet Fax Received Forward is available only when the Scanner Kit is installed, or when the Printer/Scanner Kit is installed.

Registering from TopAccess 223
Registering the Fax or Internet Fax Received Forward
The procedures to register the Fax Received Forward and Internet Fax Received Forward are almost the same.
1 Access TopAccess in the administrator mode. P.108 “Accessing TopAccess Administrator Mode”
2 Click the Registration menu and Fax Received Forward submenu to register the Fax Received Forward, or click the Internet Fax Received Forward submenu to register the Internet Fax Received Forward.
When you click the Fax Received Forward submenu, the Fax Received Forward sub-menu page is displayed.When you click the Internet Fax Received Forward submenu, the Internet Fax Received Forward submenu page is displayed.

7 TopAccess Administrator Mode
224 Registering from TopAccess
3 Check the “Forward” check box and select the desired agents and click [Select Agent].
To disable the Fax Received Forward or Internet Fax Received Forward, uncheck the “Forward” check box and click [Select Agent], and then click [Save].
Internet Fax — Select this to transmit received fax or Internet Faxes to another Internet Fax devices. This agent can be combined with the Save as file agent or Store to e-Filing agent.Save as file — Select this to transmit received fax or Internet Faxes to local folder in this equipment or to network folders. This agent can be combined with another agent.Email — Select this to transmit received fax or Internet Faxes to Email addresses. This agent can be combined with the Save as file agent or Store to e-Filing agent.Store to e-Filing — Select this to transmit received fax or Internet Faxes to e-Filing. This agent can be combined with another agent.
The image quality of the file that is stored by Save as file, Email, and Store to e-Filing is different from the output of the received fax when it is printed.
“Internet Fax”, “Save as file”, and “Email” are available only when the Scanner Kit is installed, or when the Printer/Scanner Kit is installed.

Registering from TopAccess 225
4 Select when the Fax or Internet Fax Received Forward document will be printed in the “Document Print” drop down box.
Always — Select this to always print a forwarded document.ON ERROR — Select this to print a forwarded document when an error occurs.
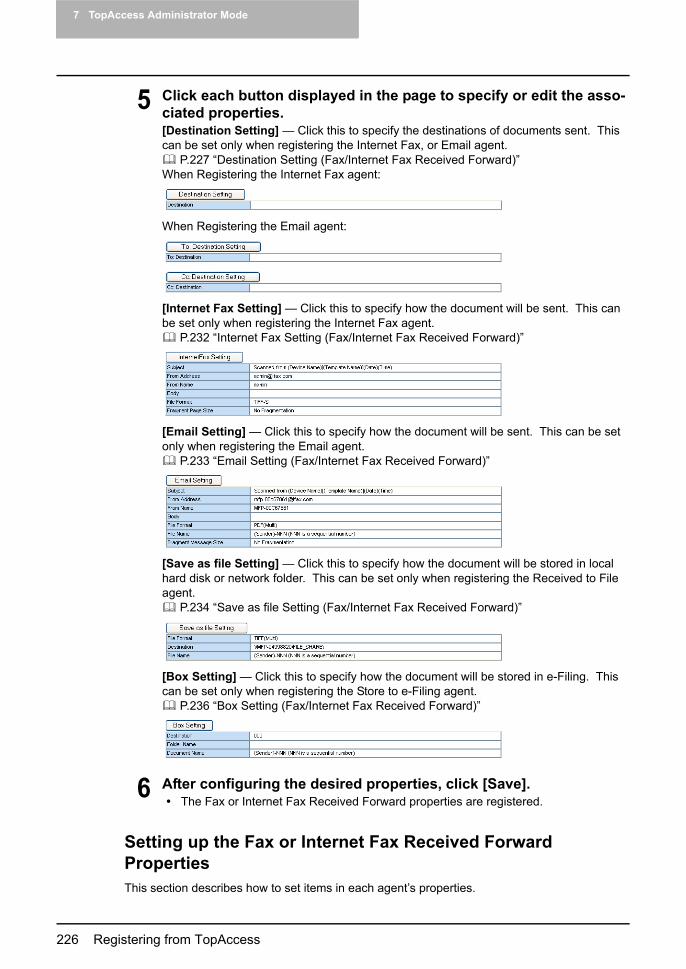
7 TopAccess Administrator Mode
226 Registering from TopAccess
5 Click each button displayed in the page to specify or edit the asso-ciated properties.[Destination Setting] — Click this to specify the destinations of documents sent. This can be set only when registering the Internet Fax, or Email agent.
P.227 “Destination Setting (Fax/Internet Fax Received Forward)”When Registering the Internet Fax agent:
When Registering the Email agent:
[Internet Fax Setting] — Click this to specify how the document will be sent. This can be set only when registering the Internet Fax agent.
P.232 “Internet Fax Setting (Fax/Internet Fax Received Forward)”
[Email Setting] — Click this to specify how the document will be sent. This can be set only when registering the Email agent.
P.233 “Email Setting (Fax/Internet Fax Received Forward)”
[Save as file Setting] — Click this to specify how the document will be stored in local hard disk or network folder. This can be set only when registering the Received to File agent.
P.234 “Save as file Setting (Fax/Internet Fax Received Forward)”
[Box Setting] — Click this to specify how the document will be stored in e-Filing. This can be set only when registering the Store to e-Filing agent.
P.236 “Box Setting (Fax/Internet Fax Received Forward)”
6 After configuring the desired properties, click [Save].The Fax or Internet Fax Received Forward properties are registered.
Setting up the Fax or Internet Fax Received Forward PropertiesThis section describes how to set items in each agent’s properties.

Registering from TopAccess 227
— Destination Setting (Fax/Internet Fax Received Forward)In the Recipient List page, you can specify the destinations to which the received faxes or Inter-net Faxes will be transmitted.You can specify the recipients by entering Email addresses manually, selecting recipients from the address book, selecting recipient groups from the address book, or searching for recipients in the LDAP server.
P.227 “Entering the recipients manually” P.228 “Selecting the recipients from the address book” P.229 “Selecting the groups from the address book” P.230 “Searching for recipients in the LDAP server” P.232 “Removing the contacts from the recipient list”
Entering the recipients manually
Using this method, you can add a recipient manually to the Recipient List.
1 Click [Destination Setting] to open the Recipient List page.
2 Click [New].
The Contact Property page is displayed.
3 Enter the Email address of the recipient, in the Destination field.
4 Click [OK].Entered recipient is added in the Recipient List page.
5 Repeat step 2 to 4 to add all recipients you require.
You can remove the contacts that you added in the recipient list before saving the desti-nation settings.
P.232 “Removing the contacts from the recipient list”
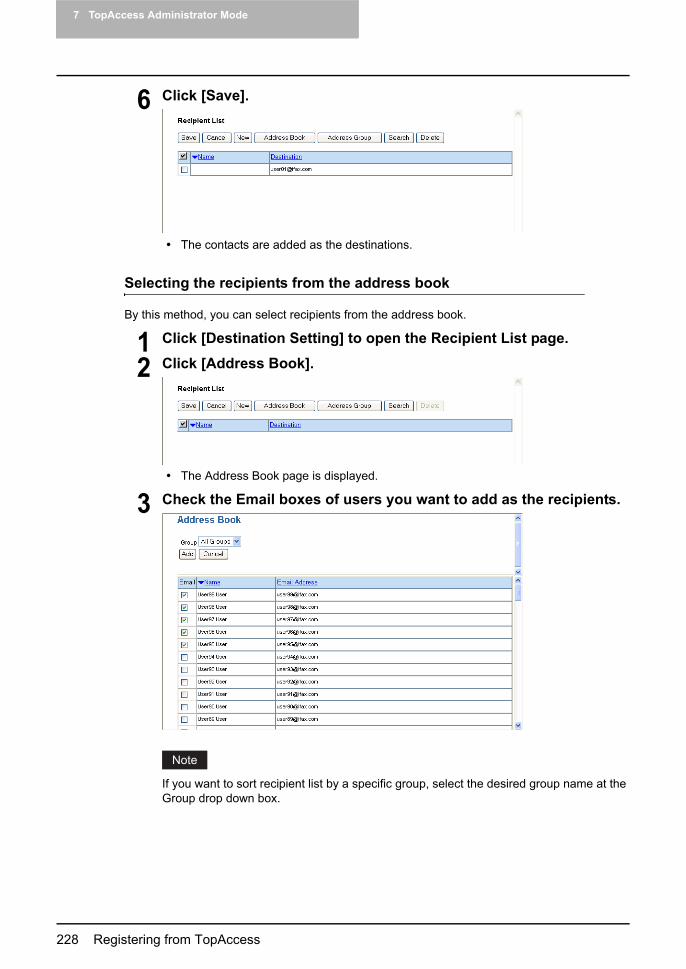
7 TopAccess Administrator Mode
228 Registering from TopAccess
6 Click [Save].
The contacts are added as the destinations.
Selecting the recipients from the address book
By this method, you can select recipients from the address book.
1 Click [Destination Setting] to open the Recipient List page.
2 Click [Address Book].
The Address Book page is displayed.
3 Check the Email boxes of users you want to add as the recipients.
If you want to sort recipient list by a specific group, select the desired group name at the Group drop down box.

Registering from TopAccess 229
4 Click [Add].The selected recipients are added in the Recipient List page.
You can remove the contacts that you added in the recipient list before saving the desti-nation settings.
P.232 “Removing the contacts from the recipient list”
5 Click [Save].
The contacts are added as the destinations.
Selecting the groups from the address book
By this method, you can select groups from the address book.
1 Click [Destination Setting] to open the Recipient List page.
2 Click [Address Group].
The Address Group page is displayed.
3 Check the Group boxes that contain the desired recipients.
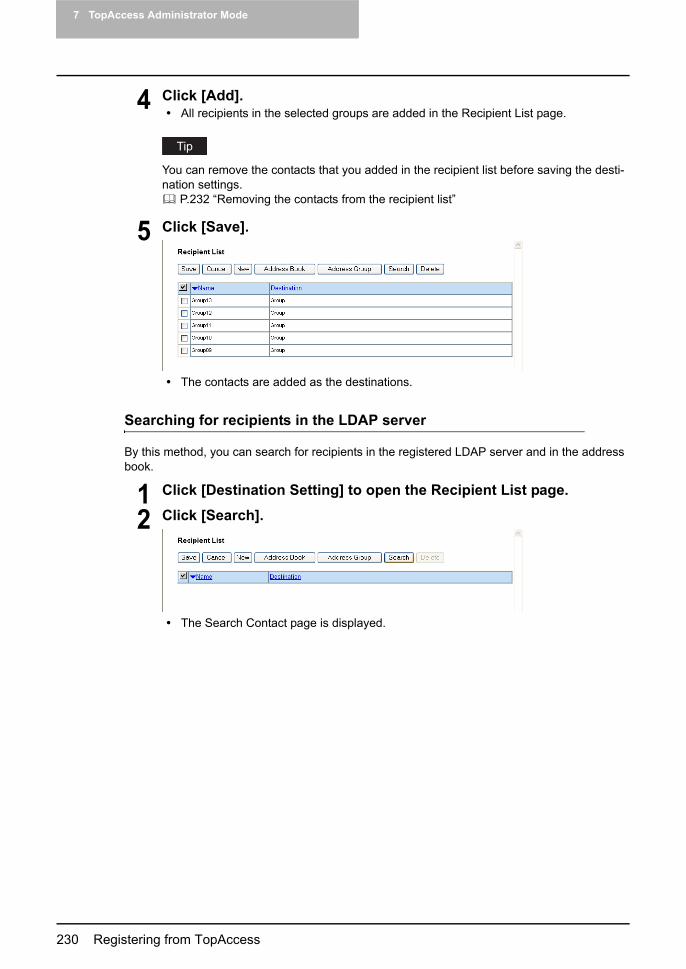
7 TopAccess Administrator Mode
230 Registering from TopAccess
4 Click [Add].All recipients in the selected groups are added in the Recipient List page.
You can remove the contacts that you added in the recipient list before saving the desti-nation settings.
P.232 “Removing the contacts from the recipient list”
5 Click [Save].
The contacts are added as the destinations.
Searching for recipients in the LDAP server
By this method, you can search for recipients in the registered LDAP server and in the address book.
1 Click [Destination Setting] to open the Recipient List page.
2 Click [Search].
The Search Contact page is displayed.
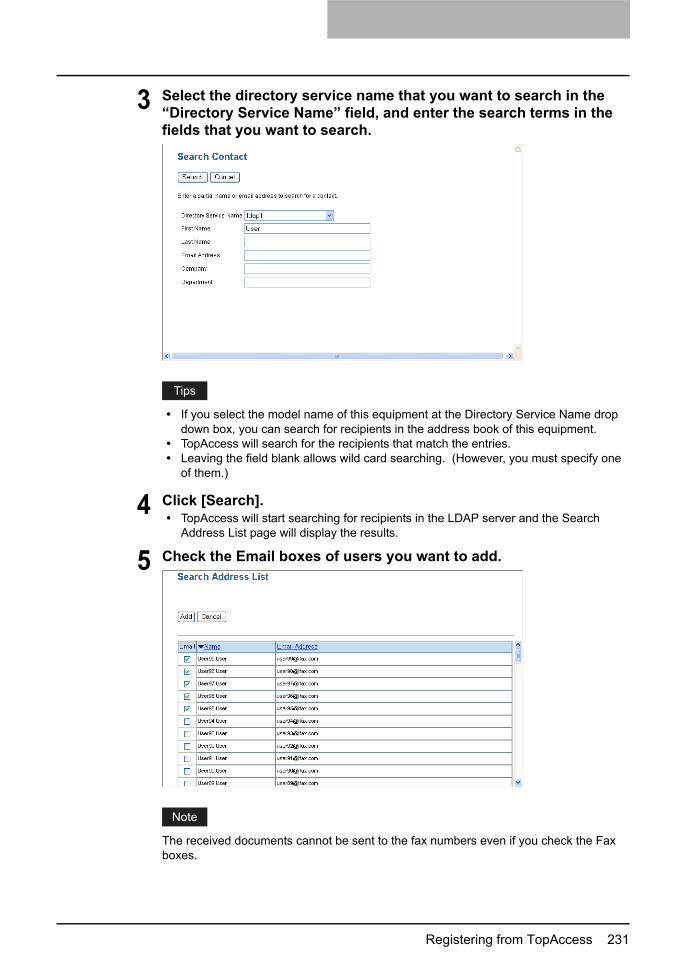
Registering from TopAccess 231
3 Select the directory service name that you want to search in the “Directory Service Name” field, and enter the search terms in the fields that you want to search.
If you select the model name of this equipment at the Directory Service Name drop down box, you can search for recipients in the address book of this equipment.TopAccess will search for the recipients that match the entries.Leaving the field blank allows wild card searching. (However, you must specify one of them.)
4 Click [Search].TopAccess will start searching for recipients in the LDAP server and the Search Address List page will display the results.
5 Check the Email boxes of users you want to add.
The received documents cannot be sent to the fax numbers even if you check the Fax boxes.

7 TopAccess Administrator Mode
232 Registering from TopAccess
6 Click [Add].The selected recipients are added in the Recipient List page.
You can remove the contacts that you added in the recipient list before saving the desti-nation settings.
P.232 “Removing the contacts from the recipient list”
7 Click [Save].
The contacts are added as the destinations.
Removing the contacts from the recipient list
1 Check the check boxes of the contacts that you want to remove from the recipient list, and click [Delete].
The selected contacts are removed from the recipient list.
— Internet Fax Setting (Fax/Internet Fax Received Forward)In the Internet Fax Setting page, you can specify the content of the Internet Fax to be sent.The instructions on how to setting up the Internet Fax settings for the Fax or Internet Fax Received Forward is same as setting up the Internet Fax settings for the private template.
P.63 “Internet Fax Setting (Private Template)”
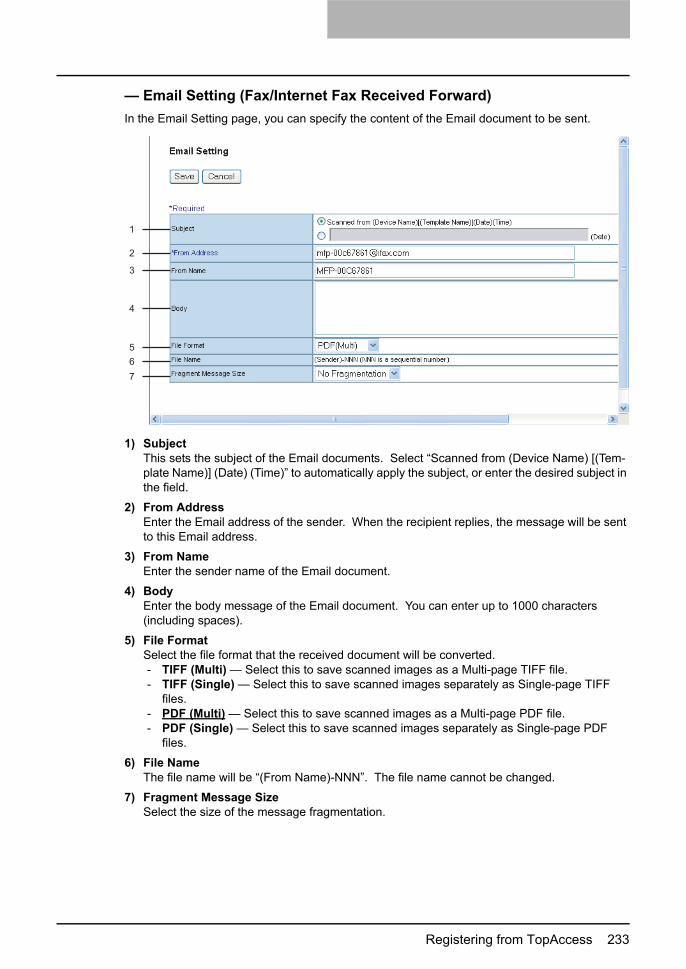
Registering from TopAccess 233
— Email Setting (Fax/Internet Fax Received Forward)In the Email Setting page, you can specify the content of the Email document to be sent.
1) SubjectThis sets the subject of the Email documents. Select “Scanned from (Device Name) [(Tem-plate Name)] (Date) (Time)” to automatically apply the subject, or enter the desired subject in the field.
2) From AddressEnter the Email address of the sender. When the recipient replies, the message will be sent to this Email address.
3) From NameEnter the sender name of the Email document.
4) BodyEnter the body message of the Email document. You can enter up to 1000 characters (including spaces).
5) File FormatSelect the file format that the received document will be converted.- TIFF (Multi) — Select this to save scanned images as a Multi-page TIFF file.- TIFF (Single) — Select this to save scanned images separately as Single-page TIFF
files.- PDF (Multi) — Select this to save scanned images as a Multi-page PDF file.- PDF (Single) — Select this to save scanned images separately as Single-page PDF
files.
6) File NameThe file name will be “(From Name)-NNN”. The file name cannot be changed.
7) Fragment Message SizeSelect the size of the message fragmentation.
1
2
3
4
5
6
7

7 TopAccess Administrator Mode
234 Registering from TopAccess
— Save as file Setting (Fax/Internet Fax Received Forward)In the Save as file Setting page, you can specify how and where a received document will be stored.
1) File FormatSelect the file format that the received document will be converted.- TIFF (Multi) — Select this to save scanned images as a Multi-page TIFF file.- TIFF (Single) — Select this to save scanned images separately as Single-page TIFF
files.- PDF (Multi) — Select this to save scanned images as a Multi-page PDF file.- PDF (Single) — Select this to save scanned images separately as Single-page PDF
files.
2) Destination — Use local folderSelect this to save a received document to the “FILE_SHARE” folder.
1
2
3
4
5

Registering from TopAccess 235
3) Destination — Remote 1Check this box to save a scanned file to the Remote 1. How you can set this item depends on how your administrator configured the Save as file settings.If the Remote 1 does not allow to specify a network folder, you can only select “Use Adminis-trator Settings”. The protocol and the network path are displayed below this item.If the Remote 1 allows to specify a network folder, you can select “Use User Settings” and specify the network folder settings by entering the following items:
ProtocolSelect the protocol to be used for uploading a scanned file to the network folder.- SMB — Select this to send a scanned file to the network folder using the SMB protocol.- FTP — Select this to send a scanned file to the FTP server.- NetWare IPX/SPX — Select this to send a scanned file to the NetWare file server using
the IPX/SPX protocol.- NetWare TCP/IP — Select this to send a scanned file to the NetWare file server using
the TCP/IP protocol.
Server NameWhen you select “FTP” as the protocol, enter the FTP server name or IP address where a scanned file will be sent. For example, to send a scanned file to the “ftp://192.168.1.1/user/scanned” FTP folder in the FTP server, enter “192.168.1.1” in this field. You can specify the directory at the “Network Path” field.When you select “NetWare IPX/SPX” as the protocol, enter the NetWare file server name or Tree/Context name (when NDS is available).When you select “NetWare TCP/IP” as the protocol, enter the IP address of the NetWare file server.
Port Number (Command)Enter the port number to be used for controls if you select “FTP” as the protocol. Generally “-” is entered for the control port. When “-” is entered, the default port number, that is set for FTP Client by an administrator, will be used. If you do not know the default port number for FTP Client, ask your administrator and change this option if you want to use another port number.
Network PathEnter the network path to store a scanned file.When you select “SMB” as the protocol, enter the network path to the network folder. For example, to specify the “users\scanned” folder in the computer named “Client01”, enter “\\Client01\users\scanned\”.When you select “FTP” as the protocol, enter the directory in the specified FTP server. For example, to specify the “ftp://192.168.1.1/user/scanned” FTP folder in the FTP server, enter “user/scanned”.When you select “NetWare IPX/SPX” or “NetWare TCP/IP” as the protocol, enter the folder path in the NetWare file server. For example, to specify the “sys\scan” folder in the NetWare file server, enter “\sys\scan”.
Login User NameEnter the login user name to access a SMB server, an FTP server, or NetWare file server, if required. When you select “FTP” as the protocol, an anonymous login is assumed if you leave this field blank.
PasswordEnter the password to access a SMB server, an FTP server, or NetWare file server, if required.
Retype PasswordEnter the same password again for a confirmation.

7 TopAccess Administrator Mode
236 Registering from TopAccess
4) Destination — Remote 2Check this box to save a received document to the Remote 2. How you can set this item depends on how the 2st Folder has been set up in the Save as file submenu in the Setup menu.If the Remote 2 does not allow to specify a network folder, you can only select “Use Adminis-trator Settings”. The protocol and the network path are displayed below this item.If the Remote 2 allows to specify a network folder, you can select “Use User Settings” and specify the network folder settings. Please refer to the description of the Remote 1 option for each item.
5) File NameDisplay how the a received document will be named. You cannot change the file name.
Up to 999 files that are sent from the same sender can be stored in a same destination. If 999 files that are sent from the same sender have already been stored in the specified desti-nation, this equipment will print the received document of the same sender instead of storing as file.
— Box Setting (Fax/Internet Fax Received Forward)In the Box Setting page, you can specify how a received document will be stored in the Box.
1) DestinationSpecify the destination box number for e-Filing.
Box NumberEnter the Box number where a received document will be stored.
PasswordEnter the password if the specified Box number requires a password.
Retype PasswordEnter the password again if the specified Box number requires a password.
2) Folder NameEnter the name of the folder where a received document will be stored.
3) Document NameDisplay how the a received document will be named. You cannot change the document name.
1
2
3
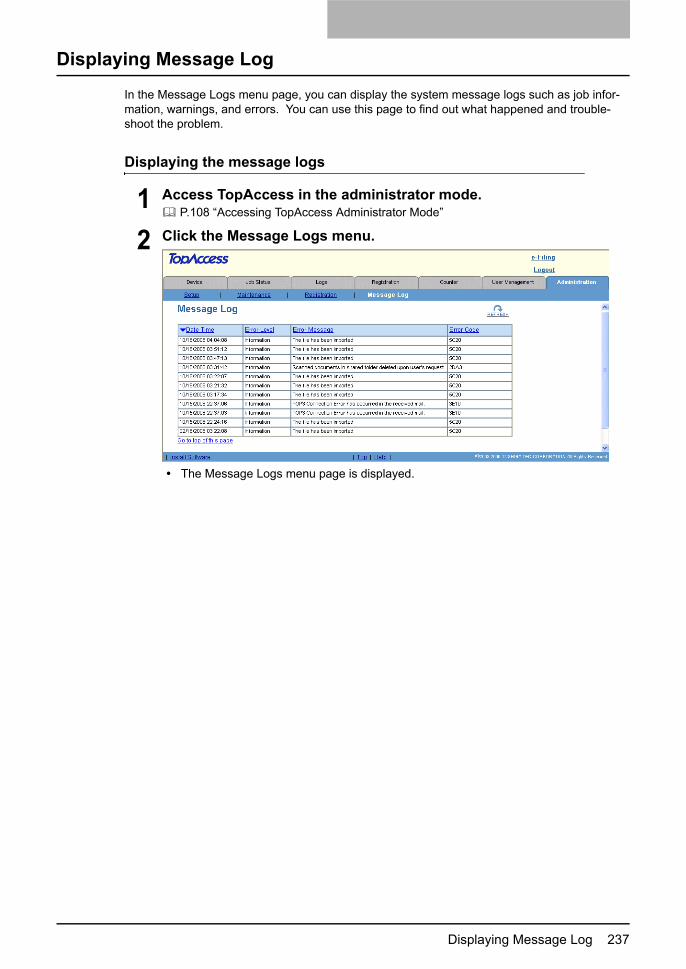
Displaying Message Log 237
Displaying Message Log
In the Message Logs menu page, you can display the system message logs such as job infor-mation, warnings, and errors. You can use this page to find out what happened and trouble-shoot the problem.
Displaying the message logs
1 Access TopAccess in the administrator mode. P.108 “Accessing TopAccess Administrator Mode”
2 Click the Message Logs menu.
The Message Logs menu page is displayed.
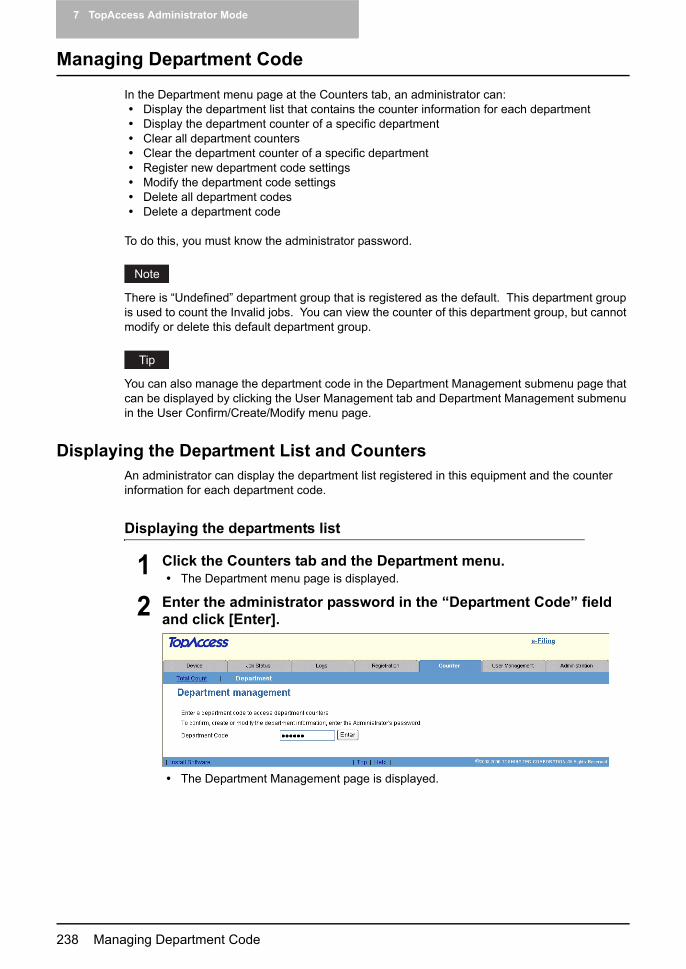
7 TopAccess Administrator Mode
238 Managing Department Code
Managing Department Code
In the Department menu page at the Counters tab, an administrator can:Display the department list that contains the counter information for each departmentDisplay the department counter of a specific departmentClear all department countersClear the department counter of a specific departmentRegister new department code settingsModify the department code settingsDelete all department codesDelete a department code
To do this, you must know the administrator password.
There is “Undefined” department group that is registered as the default. This department group is used to count the Invalid jobs. You can view the counter of this department group, but cannot modify or delete this default department group.
You can also manage the department code in the Department Management submenu page that can be displayed by clicking the User Management tab and Department Management submenu in the User Confirm/Create/Modify menu page.
Displaying the Department List and CountersAn administrator can display the department list registered in this equipment and the counter information for each department code.
Displaying the departments list
1 Click the Counters tab and the Department menu.The Department menu page is displayed.
2 Enter the administrator password in the “Department Code” field and click [Enter].
The Department Management page is displayed.
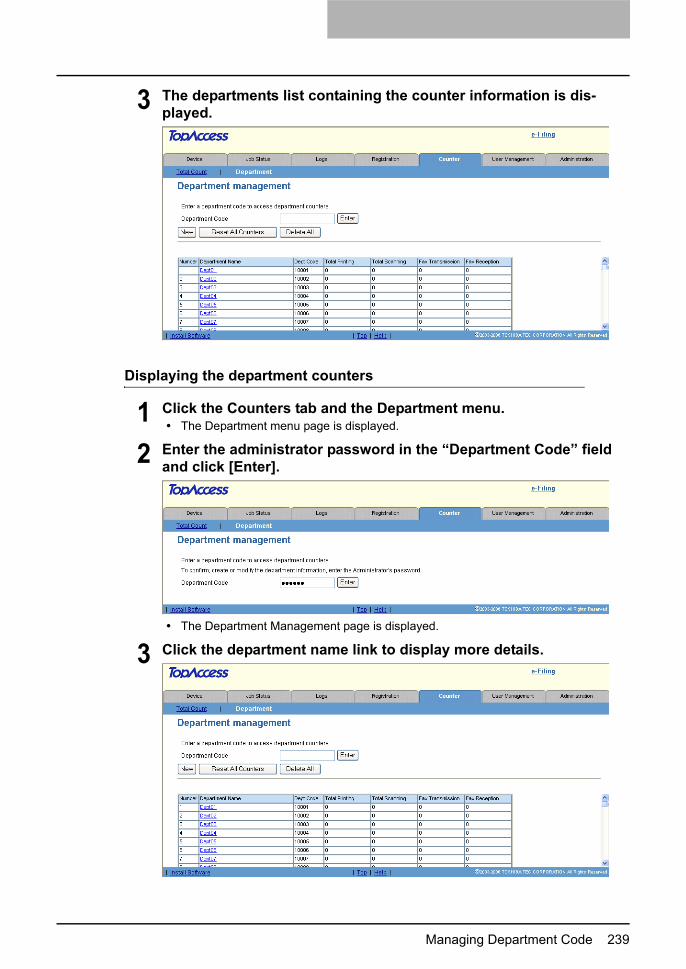
Managing Department Code 239
3 The departments list containing the counter information is dis-played.
Displaying the department counters
1 Click the Counters tab and the Department menu.The Department menu page is displayed.
2 Enter the administrator password in the “Department Code” field and click [Enter].
The Department Management page is displayed.
3 Click the department name link to display more details.

7 TopAccess Administrator Mode
240 Managing Department Code
4 The Department Information page opens.
Clearing the Department CountersAn administrator can clear the counters for all departments at one time, or individually.
Clearing all department counters
1 Click the Counters tab and the Department menu.The Department menu page is displayed.
2 Enter the administrator password in the “Department Code” field and click [Enter].
The Department Management page is displayed.
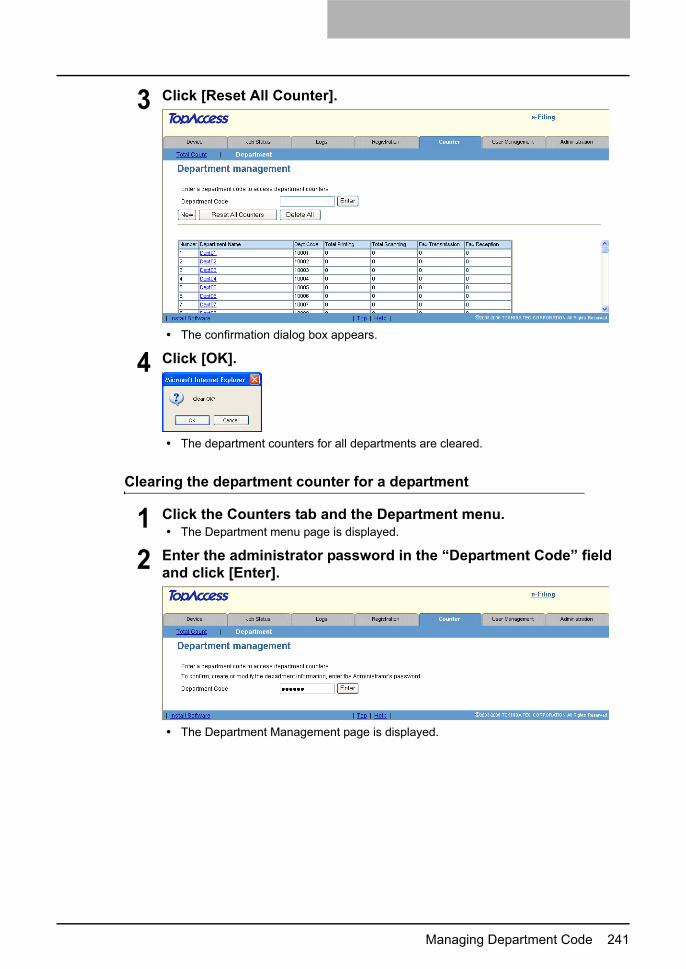
Managing Department Code 241
3 Click [Reset All Counter].
The confirmation dialog box appears.
4 Click [OK].
The department counters for all departments are cleared.
Clearing the department counter for a department
1 Click the Counters tab and the Department menu.The Department menu page is displayed.
2 Enter the administrator password in the “Department Code” field and click [Enter].
The Department Management page is displayed.
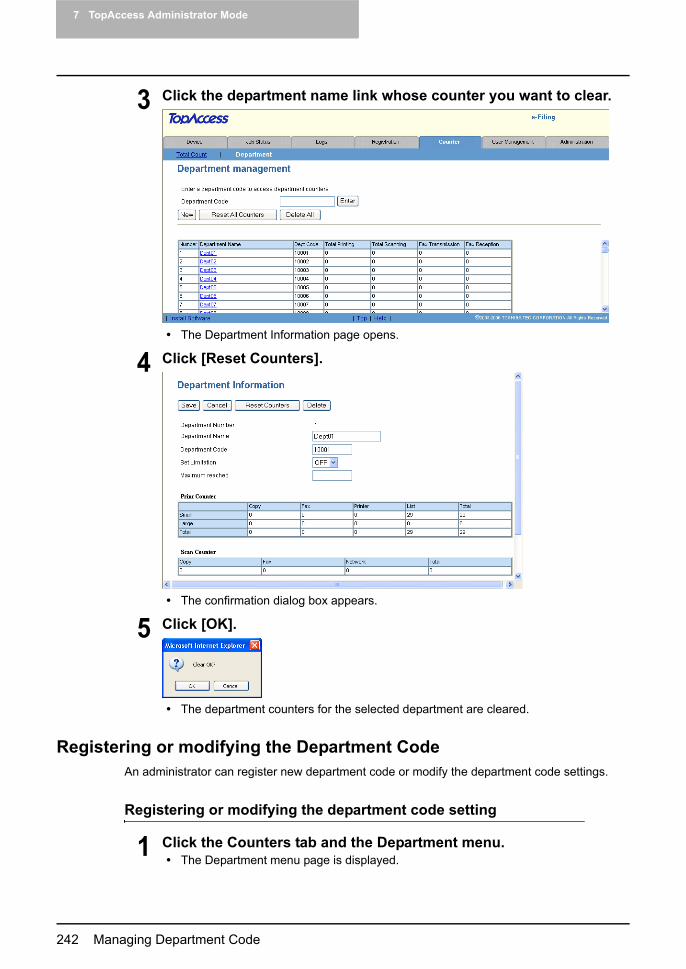
7 TopAccess Administrator Mode
242 Managing Department Code
3 Click the department name link whose counter you want to clear.
The Department Information page opens.
4 Click [Reset Counters].
The confirmation dialog box appears.
5 Click [OK].
The department counters for the selected department are cleared.
Registering or modifying the Department CodeAn administrator can register new department code or modify the department code settings.
Registering or modifying the department code setting
1 Click the Counters tab and the Department menu.The Department menu page is displayed.
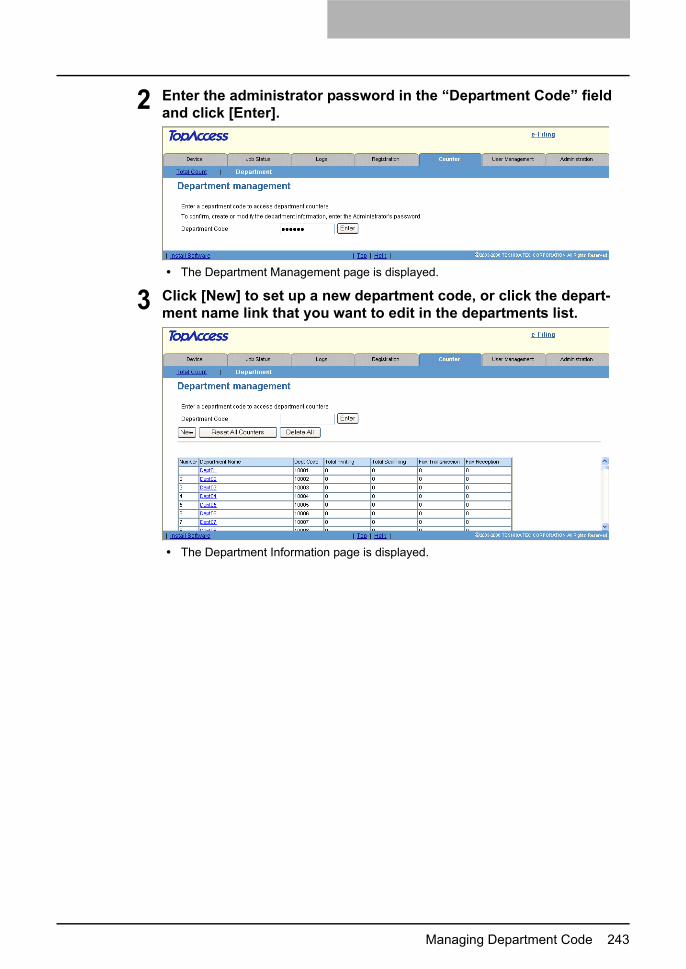
Managing Department Code 243
2 Enter the administrator password in the “Department Code” field and click [Enter].
The Department Management page is displayed.
3 Click [New] to set up a new department code, or click the depart-ment name link that you want to edit in the departments list.
The Department Information page is displayed.

7 TopAccess Administrator Mode
244 Managing Department Code
4 Enter following items to specify the department information.
Department Name — Enter the department name to identify the department code. You can enter up to 20 characters.Department Code — Enter a 5-digit department code.Set Limitation — Select whether enabling the limitation for outputs for this department code. When you select “ON”, enter the maximum number of outputs for this department code in the “Maximum reached” field.Maximum reached — Enter the maximum number of outputs for this department code when the “Set Limitation” option is enabled.
When the number of outputs exceeds the limitation during the job is being printed, few copies that exceeds the limitation are printed and counted because the equipment can-not stop the job immediately.
5 Click [Save].The department code is added or edited.
Deleting the Department CodeAn administrator can delete all department code settings at one time, or individually.
Deleting all department code settings
1 Click the Counters tab and the Department menu.The Department menu page is displayed.
2 Enter the administrator password in the “Department Code” field and click [Enter].
The Department Management page is displayed.
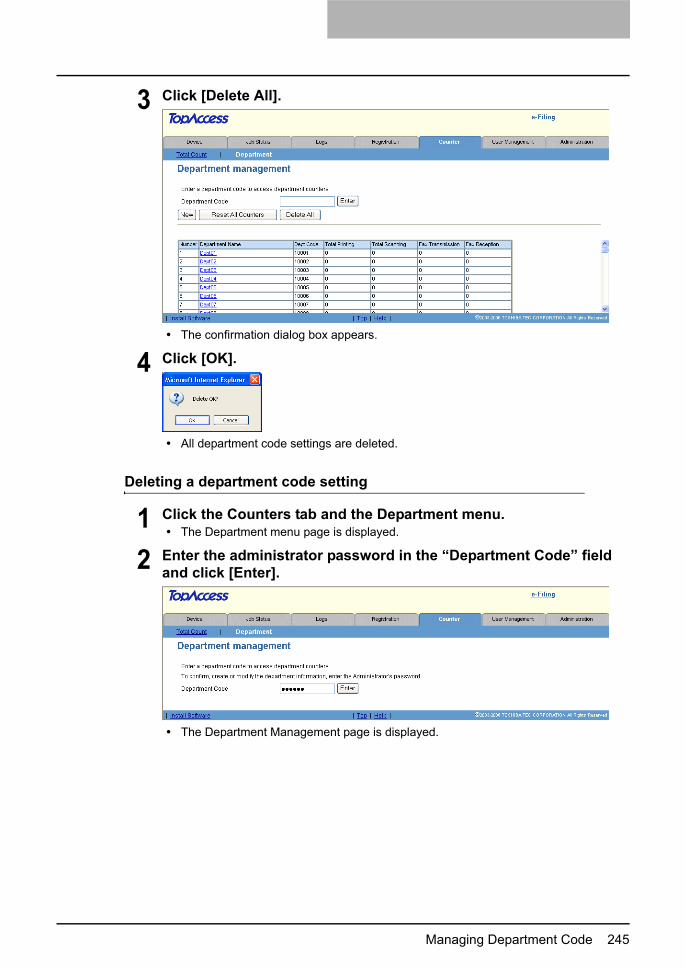
Managing Department Code 245
3 Click [Delete All].
The confirmation dialog box appears.
4 Click [OK].
All department code settings are deleted.
Deleting a department code setting
1 Click the Counters tab and the Department menu.The Department menu page is displayed.
2 Enter the administrator password in the “Department Code” field and click [Enter].
The Department Management page is displayed.
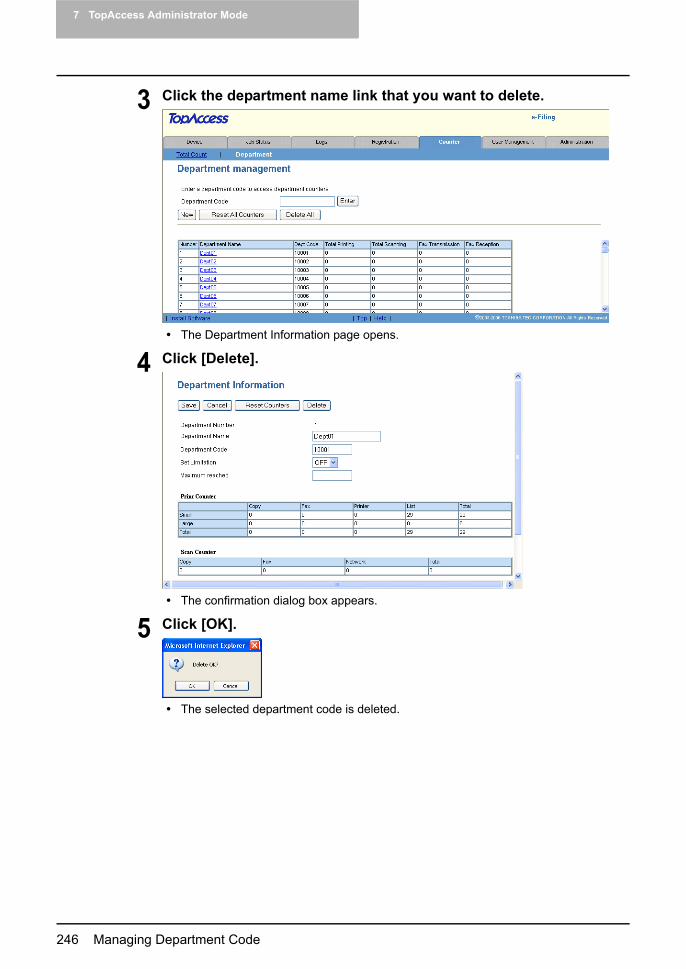
7 TopAccess Administrator Mode
246 Managing Department Code
3 Click the department name link that you want to delete.
The Department Information page opens.
4 Click [Delete].
The confirmation dialog box appears.
5 Click [OK].
The selected department code is deleted.
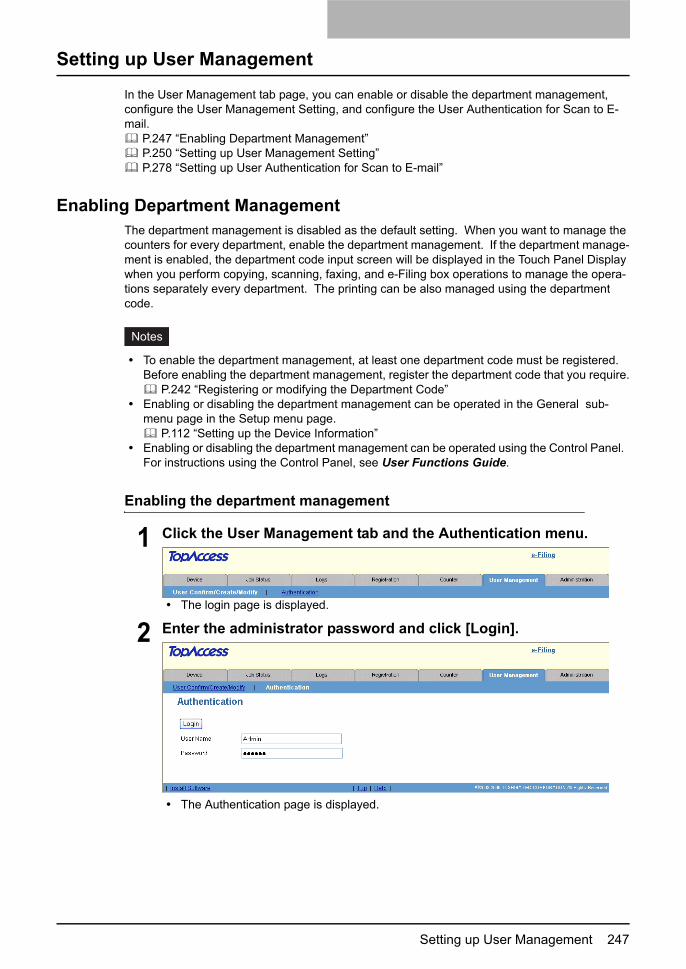
Setting up User Management 247
Setting up User Management
In the User Management tab page, you can enable or disable the department management, configure the User Management Setting, and configure the User Authentication for Scan to E-mail.
P.247 “Enabling Department Management” P.250 “Setting up User Management Setting” P.278 “Setting up User Authentication for Scan to E-mail”
Enabling Department ManagementThe department management is disabled as the default setting. When you want to manage the counters for every department, enable the department management. If the department manage-ment is enabled, the department code input screen will be displayed in the Touch Panel Display when you perform copying, scanning, faxing, and e-Filing box operations to manage the opera-tions separately every department. The printing can be also managed using the department code.
To enable the department management, at least one department code must be registered. Before enabling the department management, register the department code that you require.
P.242 “Registering or modifying the Department Code”Enabling or disabling the department management can be operated in the General sub-menu page in the Setup menu page.
P.112 “Setting up the Device Information”Enabling or disabling the department management can be operated using the Control Panel. For instructions using the Control Panel, see User Functions Guide.
Enabling the department management
1 Click the User Management tab and the Authentication menu.
The login page is displayed.
2 Enter the administrator password and click [Login].
The Authentication page is displayed.

7 TopAccess Administrator Mode
248 Setting up User Management
3 Click [Department Setting].
The Department Setting page opens.
4 Specify the following items and click [Finish].
Department CodeSelect whether the department management is enabled or disabled.
When the User Management Setting is enabled, the Department Code option cannot be disabled.
Setting up User Management 249
Department Code EnforcementSelect whether invalid jobs, which a department code is not specified or invalid department code is specified, are printed or stored in the invalid job list when the department code is enabled.ON — Select this to not print the invalid jobs and store them in the invalid job list.Print — Select this to print the invalid jobs.Delete — Select this to delete the invalid jobs without storing them in the invalid job list.
If the Department Code Enforcement is set to ON and the SNMP communication is enabled in the printer driver, the user will be prompted to enter the correct department code if an invalid department code was entered in the printer driver.The Department Code Enforcement setting is not applied when the User Manage-ment Setting is enabled.

7 TopAccess Administrator Mode
250 Setting up User Management
Setting up User Management SettingWhen the User Management Setting is enabled, users must enter the user name and password before operating this equipment. Therefore, you can secure the equipment from the unexpected users.
When the User Management Setting is enabled, the following functions will be available.The counters for each user can be managed.The limitations for each user can be set.Up to 10000 users can be registered.The user name and password will be required to operate the [COPY], [SCAN], [e-FILING], [FAX], [TEMPLATE], [USER FUNCTIONS], and [JOB STATUS] buttons.The user name and password will be required to operate the e-Filing web utility.The print jobs can be accepted only from the computer of which the login user name can be attested. (When the Windows Domain Authentication or LDAP Authentication is used, the computer must also join the domain.)When the Windows Domain or LDAP Authentication is used, the user information will be reg-istered automatically in the equipment when a user enters the user name and password in the User Authentication screen and then enter the department code.
The following table shows which function will use the User Management Setting.
Operation Authentication Remarks
Control Panel COPY Yes
SCAN Yes
e-FILING Yes
FAX Yes
EXTENSION No
JOB STATUS Yes
ACCESS No
INTERRUPT Yes
TEMPLATE Yes
USER FUNCTIONS Yes
Web TopAccess No
e-Filing Yes
Client Software Printer DriverN/W-Fax Driver
Yes(User Name Only)
The computer must login the domain.
TopAccessDocMon No
File Downloader No
TWAIN Driver No
Backup/Restore No
Address Book Viewer No
Setting up User Management 251
Please remember the following limitations and considerations for the User Management Setting.- The jobs cannot be printed or deleted from TopAccess. When you want to print or delete the
jobs, please perform the operation from the [JOB STATUS] button on the Control Panel.- The department codes that any users are registered cannot be deleted. If you want to delete
the department codes, make sure that the no user is registered in the department codes that you want to delete.
- When the Windows Domain or LDAP Authentication is enabled, the password setting in the User Information will not be used for the authentication. Do not specify the password for the User Information when the Windows Domain or LDAP Authentication is used.
- When the user’s jobs are in progress or the user currently log in the touch panel, the user information cannot be deleted or you cannot reset the user’s counters.
Before registering the user information, enable the User Management Setting. P.251 “Enabling User Management Setting”
After you enable the User Management Setting, register the user information. P.261 “Managing User Information”
When you enable the User Management Setting, the department management will be enabled automatically. However, no department code has been registered, you cannot enable the User Management Setting. In that case, please register the department code before enabling the User Management Setting.
P.242 “Registering or modifying the Department Code”
Enabling User Management SettingThis equipment supports the following methods for the User Management Setting.
Windows Domain AuthenticationWhen your network manages the network users using the Windows Domain, this equipment can be managed using the Windows Domain Authentication.When this is configured, users must enter the user name and password that is registered in the Windows Domain to perform any operations on the Control Panel of this equipment.
P.252 “Enabling Windows Domain Authentication”LDAP AuthenticationWhen your network manages the network users using the LDAP, this equipment can be managed using the LDAP Authentication.When this is configured, users must enter the user name and password that is registered in the LDAP server to perform any operations on the Control Panel of this equipment.
P.256 “Enabling LDAP Authentication”MFP Local AuthenticationWhen you do not have any network authentication systems in your network, you can use the MFP Local Authentication.When this is configured, users must enter the user name and password that is registered in the MFP to perform any operations on the Control Panel of this equipment.
P.260 “Enabling MFP Local Authentication”
If you want to change the authentication method, please change the domain name and pass-word settings of the User Information as required. It’s easy to change the settings of the User Information using the Export/Import function.
P.270 “Exporting User Information and Counters” P.273 “Importing User Information”
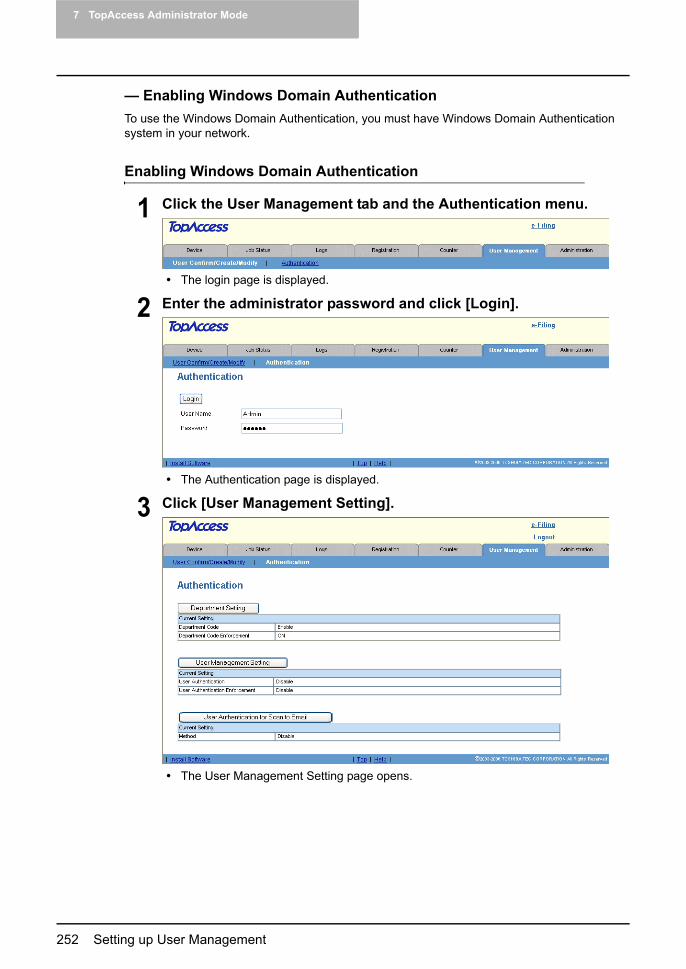
7 TopAccess Administrator Mode
252 Setting up User Management
— Enabling Windows Domain AuthenticationTo use the Windows Domain Authentication, you must have Windows Domain Authentication system in your network.
Enabling Windows Domain Authentication
1 Click the User Management tab and the Authentication menu.
The login page is displayed.
2 Enter the administrator password and click [Login].
The Authentication page is displayed.
3 Click [User Management Setting].
The User Management Setting page opens.

Setting up User Management 253
4 Select “Enable” in the “User Authentication” drop down box, and select how invalid jobs are processed in the “User Authentication Enforcement” drop down box. Then click [Next].
In the “User Authentication Enforcement” drop down box, select whether invalid jobs, which an authentication failed, are printed or stored in the invalid job list.- ON — Select this to not print the invalid jobs and store them in the invalid job list.- Print — Select this to print the invalid jobs.- Delete — Select this to delete the invalid jobs without storing them in the invalid
job list.
You can disable the User Management Setting by selecting “Disable” and click [Next].
5 Select “Windows Domain Authentication” and click [Next].
If you want to automatically register user information that is entered by users in the authentication screen on the touch panel, TopAccess, and e-Filing web utility, check the “Create User Information Automatically” check box.
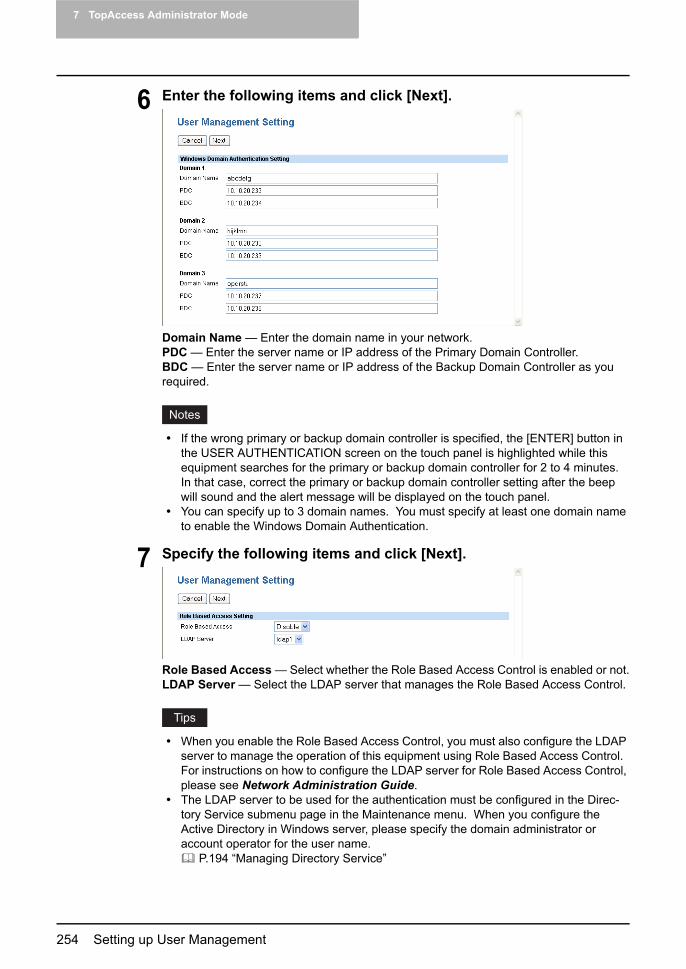
7 TopAccess Administrator Mode
254 Setting up User Management
6 Enter the following items and click [Next].
Domain Name — Enter the domain name in your network.PDC — Enter the server name or IP address of the Primary Domain Controller.BDC — Enter the server name or IP address of the Backup Domain Controller as you required.
If the wrong primary or backup domain controller is specified, the [ENTER] button in the USER AUTHENTICATION screen on the touch panel is highlighted while this equipment searches for the primary or backup domain controller for 2 to 4 minutes. In that case, correct the primary or backup domain controller setting after the beep will sound and the alert message will be displayed on the touch panel.You can specify up to 3 domain names. You must specify at least one domain name to enable the Windows Domain Authentication.
7 Specify the following items and click [Next].
Role Based Access — Select whether the Role Based Access Control is enabled or not.LDAP Server — Select the LDAP server that manages the Role Based Access Control.
When you enable the Role Based Access Control, you must also configure the LDAP server to manage the operation of this equipment using Role Based Access Control. For instructions on how to configure the LDAP server for Role Based Access Control, please see Network Administration Guide.The LDAP server to be used for the authentication must be configured in the Direc-tory Service submenu page in the Maintenance menu. When you configure the Active Directory in Windows server, please specify the domain administrator or account operator for the user name.
P.194 “Managing Directory Service”

Setting up User Management 255
8 Specify how the From Address is set for Scan to Email.
When the User Authentication for Scan to Email is not enabled, these settings are not used for Scan to Email.
Setting Address is 'User Name + @ + Mail Domain Name' — Select this to set the From Address as “User Name@Mail Domain Name”, whose “User Name” is the user name that is entered on the Touch Panel Display for the authentication, and “Mail Domain Name” is the domain name that is entered in the “Mail Domain Name” field.When this is selected, enter the domain name in the “Mail Domain Name” field.Setting Address is searching from 'User Name' of LDAP — Select this to set the From Address as the email address that is searched from the LDAP server.When this is selected, this equipment will search the user name, which is entered on the Touch Panel Display for the authentication, from the records of the attribute type in the LDAP server that you specify in the “LDAP Server” drop down box and “Attribute type of ‘User Name’” field.If the user name is found, this equipment sets the From Address as the email address of the user name registered in the LDAP server.If the user name is not found in the LDAP server, this equipment sets the From Address as the “User Name@Mail Domain Name”, whose “User Name” is the user name that is entered on the Touch Panel Display for the authentication, and “Mail Domain Name” is the domain name that is entered in the “Mail Domain Name” field.When this is selected, select the LDAP server in the “LDAP Server” drop down box, enter the attribute type to search the user name in the “Attribute type of ‘User Name’” field, and the domain name that is used when the user name is not found in the “Mail Domain Name” field.From Address is acquired from Email setting — Select this to set the From Address as the email address set in the Email setting.From Address cannot be edited in Scan to Email — Check this box if you do not want to allow users to edit the From Address.
9 Click [Finish].The Windows Domain Authentication is enabled.

7 TopAccess Administrator Mode
256 Setting up User Management
— Enabling LDAP AuthenticationTo enable the LDAP Authentication, you must have LDAP directory service in your network.
Before enabling the LDAP Authentication, please see “Setting up LDAP Authentication Ser-vice” in the Network Administration Guide.To enable LDAP with SSL, please see the following section.
P.122 “Setting up the LDAP Session”
Enabling LDAP Authentication
1 Click the User Management tab and the Authentication menu.
The login page is displayed.
2 Enter the administrator password and click [Login].
The Authentication page is displayed.
3 Click [User Management Setting].
The User Management Setting page opens.

Setting up User Management 257
4 Select “Enable” in the “User Authentication” drop down box, and select how invalid jobs are processed in the “User Authentication Enforcement” drop down box. Then click [Next].
In the “User Authentication Enforcement” drop down box, select whether invalid jobs, which an authentication failed, are printed or stored in the invalid job list.- ON — Select this to not print the invalid jobs and store them in the invalid job list.- Print — Select this to print the invalid jobs.- Delete — Select this to delete the invalid jobs without storing them in the invalid
job list.
You can disable the User Management Setting by selecting “Disable” and click [Next].
5 Select “LDAP Authentication” and click [Next].
If you want to automatically register user information that is entered by users in the authentication screen on the touch panel, TopAccess, and e-Filing web utility, check the “Create User Information Automatically” check box.
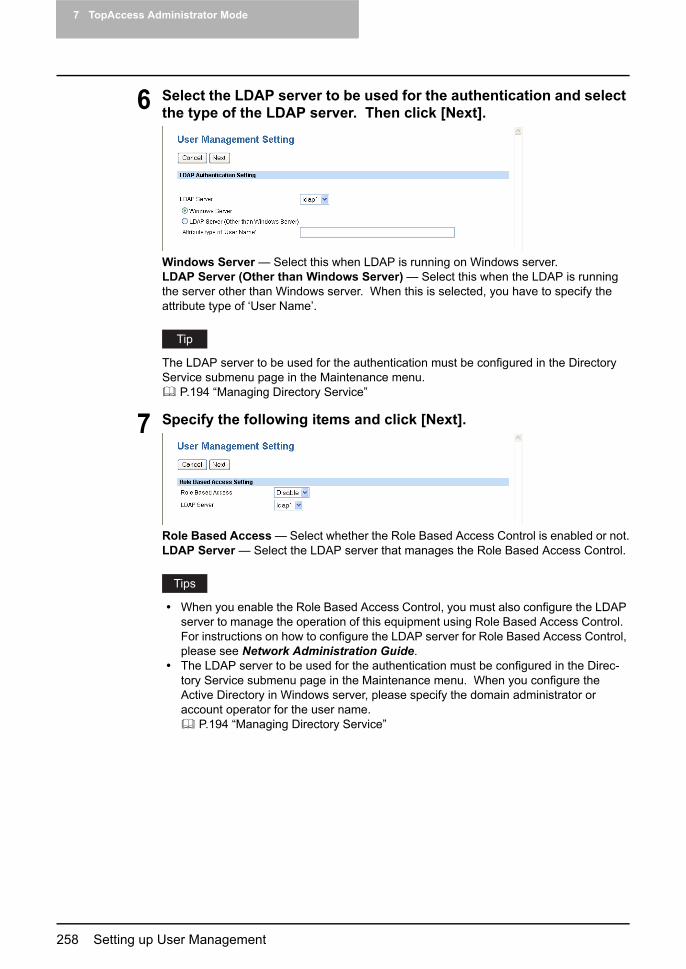
7 TopAccess Administrator Mode
258 Setting up User Management
6 Select the LDAP server to be used for the authentication and select the type of the LDAP server. Then click [Next].
Windows Server — Select this when LDAP is running on Windows server.LDAP Server (Other than Windows Server) — Select this when the LDAP is running the server other than Windows server. When this is selected, you have to specify the attribute type of ‘User Name’.
The LDAP server to be used for the authentication must be configured in the Directory Service submenu page in the Maintenance menu.
P.194 “Managing Directory Service”
7 Specify the following items and click [Next].
Role Based Access — Select whether the Role Based Access Control is enabled or not.LDAP Server — Select the LDAP server that manages the Role Based Access Control.
When you enable the Role Based Access Control, you must also configure the LDAP server to manage the operation of this equipment using Role Based Access Control. For instructions on how to configure the LDAP server for Role Based Access Control, please see Network Administration Guide.The LDAP server to be used for the authentication must be configured in the Direc-tory Service submenu page in the Maintenance menu. When you configure the Active Directory in Windows server, please specify the domain administrator or account operator for the user name.
P.194 “Managing Directory Service”
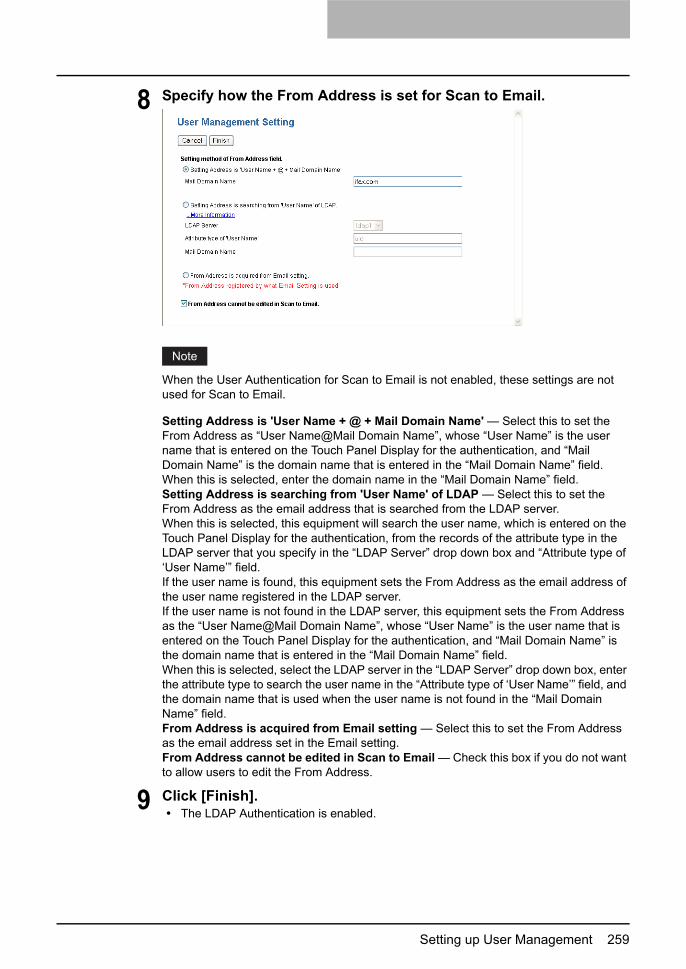
Setting up User Management 259
8 Specify how the From Address is set for Scan to Email.
When the User Authentication for Scan to Email is not enabled, these settings are not used for Scan to Email.
Setting Address is 'User Name + @ + Mail Domain Name' — Select this to set the From Address as “User Name@Mail Domain Name”, whose “User Name” is the user name that is entered on the Touch Panel Display for the authentication, and “Mail Domain Name” is the domain name that is entered in the “Mail Domain Name” field.When this is selected, enter the domain name in the “Mail Domain Name” field.Setting Address is searching from 'User Name' of LDAP — Select this to set the From Address as the email address that is searched from the LDAP server.When this is selected, this equipment will search the user name, which is entered on the Touch Panel Display for the authentication, from the records of the attribute type in the LDAP server that you specify in the “LDAP Server” drop down box and “Attribute type of ‘User Name’” field.If the user name is found, this equipment sets the From Address as the email address of the user name registered in the LDAP server.If the user name is not found in the LDAP server, this equipment sets the From Address as the “User Name@Mail Domain Name”, whose “User Name” is the user name that is entered on the Touch Panel Display for the authentication, and “Mail Domain Name” is the domain name that is entered in the “Mail Domain Name” field.When this is selected, select the LDAP server in the “LDAP Server” drop down box, enter the attribute type to search the user name in the “Attribute type of ‘User Name’” field, and the domain name that is used when the user name is not found in the “Mail Domain Name” field.From Address is acquired from Email setting — Select this to set the From Address as the email address set in the Email setting.From Address cannot be edited in Scan to Email — Check this box if you do not want to allow users to edit the From Address.
9 Click [Finish].The LDAP Authentication is enabled.

7 TopAccess Administrator Mode
260 Setting up User Management
— Enabling MFP Local AuthenticationWhen no network authentication system is configured in your network, you can enable the MFP Local Authentication.The MFP Local Authentication uses the account information that is registered in this equipment for the authentication. Therefore, you must register the user account information first before enabling the MFP Local Authentication. This equipment also manages the counters for each user if the MFP Local Authentication is enabled.
P.262 “Creating or modifying user information”After you register the user information, enable the MFP Local Authentication.
P.260 “Enabling MFP Local Authentication”
Enabling MFP Local Authentication
1 Click the User Management tab and the Authentication menu.
The login page is displayed.
2 Enter the administrator password and click [Login].
The Authentication page is displayed.
3 Click [User Management Setting].
The User Management Setting page opens.
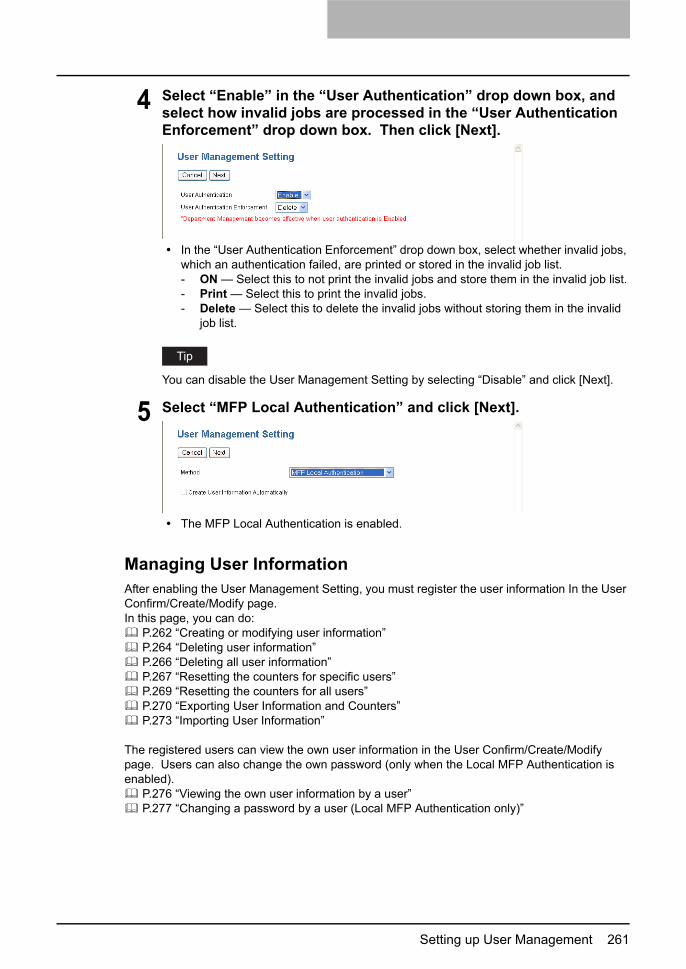
Setting up User Management 261
4 Select “Enable” in the “User Authentication” drop down box, and select how invalid jobs are processed in the “User Authentication Enforcement” drop down box. Then click [Next].
In the “User Authentication Enforcement” drop down box, select whether invalid jobs, which an authentication failed, are printed or stored in the invalid job list.- ON — Select this to not print the invalid jobs and store them in the invalid job list.- Print — Select this to print the invalid jobs.- Delete — Select this to delete the invalid jobs without storing them in the invalid
job list.
You can disable the User Management Setting by selecting “Disable” and click [Next].
5 Select “MFP Local Authentication” and click [Next].
The MFP Local Authentication is enabled.
Managing User InformationAfter enabling the User Management Setting, you must register the user information In the User Confirm/Create/Modify page.In this page, you can do:
P.262 “Creating or modifying user information” P.264 “Deleting user information” P.266 “Deleting all user information” P.267 “Resetting the counters for specific users” P.269 “Resetting the counters for all users” P.270 “Exporting User Information and Counters” P.273 “Importing User Information”
The registered users can view the own user information in the User Confirm/Create/Modify page. Users can also change the own password (only when the Local MFP Authentication is enabled).
P.276 “Viewing the own user information by a user” P.277 “Changing a password by a user (Local MFP Authentication only)”
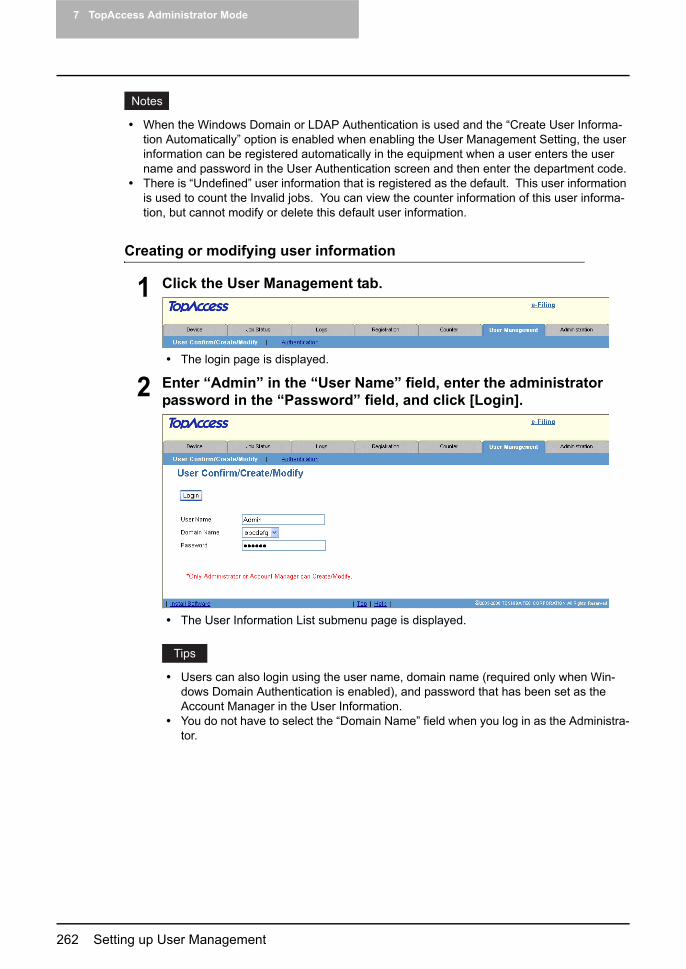
7 TopAccess Administrator Mode
262 Setting up User Management
When the Windows Domain or LDAP Authentication is used and the “Create User Informa-tion Automatically” option is enabled when enabling the User Management Setting, the user information can be registered automatically in the equipment when a user enters the user name and password in the User Authentication screen and then enter the department code.There is “Undefined” user information that is registered as the default. This user information is used to count the Invalid jobs. You can view the counter information of this user informa-tion, but cannot modify or delete this default user information.
Creating or modifying user information
1 Click the User Management tab.
The login page is displayed.
2 Enter “Admin” in the “User Name” field, enter the administrator password in the “Password” field, and click [Login].
The User Information List submenu page is displayed.
Users can also login using the user name, domain name (required only when Win-dows Domain Authentication is enabled), and password that has been set as the Account Manager in the User Information.You do not have to select the “Domain Name” field when you log in as the Administra-tor.
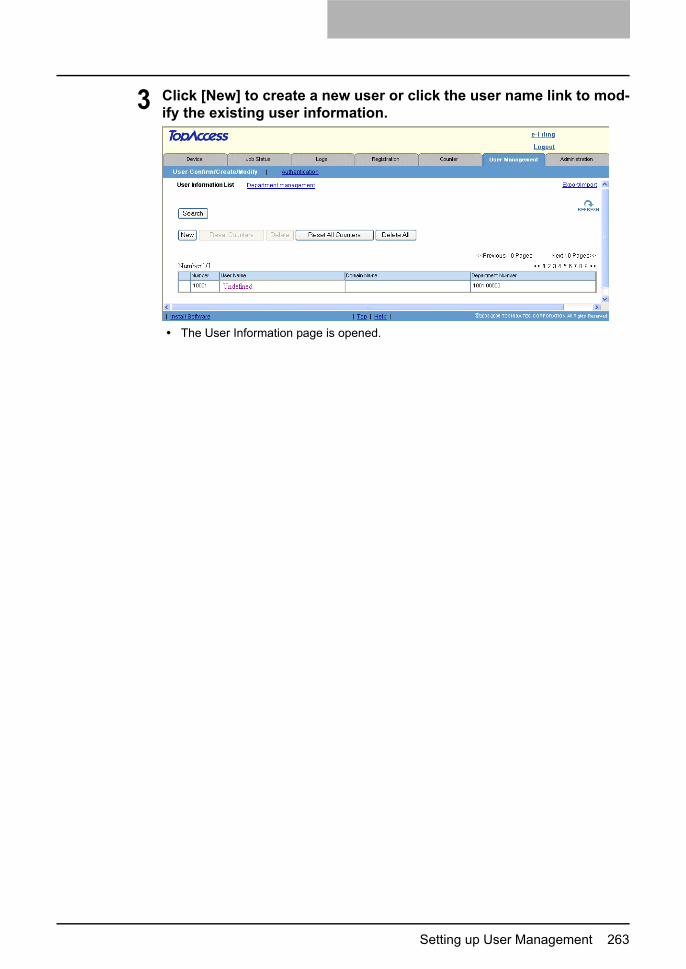
Setting up User Management 263
3 Click [New] to create a new user or click the user name link to mod-ify the existing user information.
The User Information page is opened.
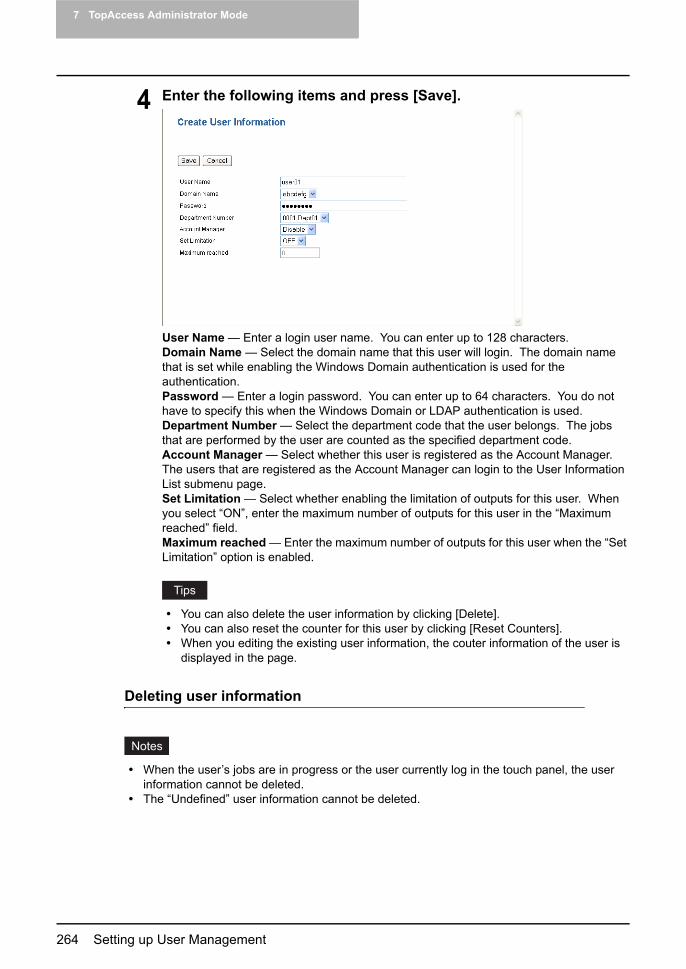
7 TopAccess Administrator Mode
264 Setting up User Management
4 Enter the following items and press [Save].
User Name — Enter a login user name. You can enter up to 128 characters.Domain Name — Select the domain name that this user will login. The domain name that is set while enabling the Windows Domain authentication is used for the authentication.Password — Enter a login password. You can enter up to 64 characters. You do not have to specify this when the Windows Domain or LDAP authentication is used.Department Number — Select the department code that the user belongs. The jobs that are performed by the user are counted as the specified department code.Account Manager — Select whether this user is registered as the Account Manager. The users that are registered as the Account Manager can login to the User Information List submenu page.Set Limitation — Select whether enabling the limitation of outputs for this user. When you select “ON”, enter the maximum number of outputs for this user in the “Maximum reached” field.Maximum reached — Enter the maximum number of outputs for this user when the “Set Limitation” option is enabled.
You can also delete the user information by clicking [Delete].You can also reset the counter for this user by clicking [Reset Counters].When you editing the existing user information, the couter information of the user is displayed in the page.
Deleting user information
When the user’s jobs are in progress or the user currently log in the touch panel, the user information cannot be deleted.The “Undefined” user information cannot be deleted.

Setting up User Management 265
1 Click the User Management tab.
The login page is displayed.
2 Enter “Admin” in the “User Name” field, enter the administrator password in the “Password” field, and click [Login].
The User Information List submenu page is displayed.
Users can also login using the user name, domain name (required only when Win-dows Domain Authentication is enabled), and password that has been set as the Account Manager in the User Information.You do not have to select the “Domain Name” field when you log in as the Administra-tor.
3 Check the boxes of users that you want to delete and click [Delete].
The confirmation dialog box appears.
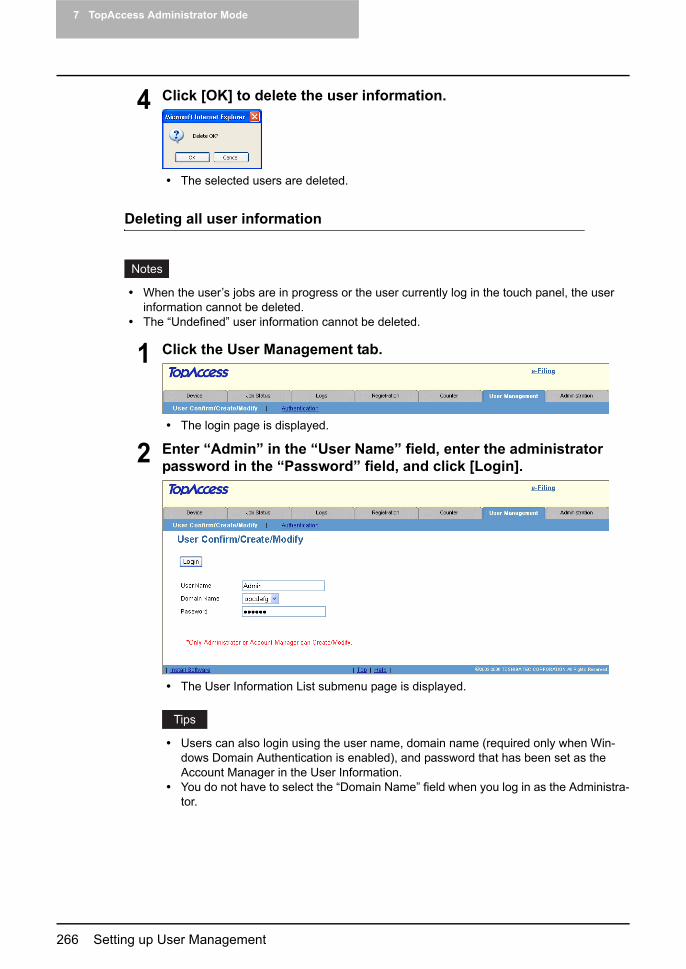
7 TopAccess Administrator Mode
266 Setting up User Management
4 Click [OK] to delete the user information.
The selected users are deleted.
Deleting all user information
When the user’s jobs are in progress or the user currently log in the touch panel, the user information cannot be deleted.The “Undefined” user information cannot be deleted.
1 Click the User Management tab.
The login page is displayed.
2 Enter “Admin” in the “User Name” field, enter the administrator password in the “Password” field, and click [Login].
The User Information List submenu page is displayed.
Users can also login using the user name, domain name (required only when Win-dows Domain Authentication is enabled), and password that has been set as the Account Manager in the User Information.You do not have to select the “Domain Name” field when you log in as the Administra-tor.

Setting up User Management 267
3 Click [Delete All].
The confirmation dialog box appears.
4 Click [OK] to delete all user information.
The counters of selected users are cleared.
Resetting the counters for specific users
When the user’s jobs are in progress or the user currently log in the touch panel, you cannot reset the user’s counters.
1 Click the User Management tab.
The login page is displayed.

7 TopAccess Administrator Mode
268 Setting up User Management
2 Enter “Admin” in the “User Name” field, enter the administrator password in the “Password” field, and click [Login].
The User Information List submenu page is displayed.
Users can also login using the user name, domain name (required only when Win-dows Domain Authentication is enabled), and password that has been set as the Account Manager in the User Information.You do not have to select the “Domain Name” field when you log in as the Administra-tor.
3 Check the boxes of users that you want to reset counters and click [Reset Counters].
The confirmation dialog box appears.
4 Click [OK] to reset the counters.
The counters of selected users are cleared.

Setting up User Management 269
Resetting the counters for all users
When the user’s jobs are in progress or the user currently log in the touch panel, you cannot reset the user’s counters.
1 Click the User Management tab.
The login page is displayed.
2 Enter “Admin” in the “User Name” field, enter the administrator password in the “Password” field, and click [Login].
The User Information List submenu page is displayed.
Users can also login using the user name, domain name (required only when Win-dows Domain Authentication is enabled), and password that has been set as the Account Manager in the User Information.You do not have to select the “Domain Name” field when you log in as the Administra-tor.

7 TopAccess Administrator Mode
270 Setting up User Management
3 Click [Reset All Counters].
The confirmation dialog box appears.
4 Click [OK] to reset all counters.
The counters of selected users are cleared.
Exporting User Information and Counters
The user information can be exported as a CSV file for use in other equipment.
1 Click the User Management tab.
The login page is displayed.

Setting up User Management 271
2 Enter “Admin” in the “User Name” field, enter the administrator password in the “Password” field, and click [Login].
The User Information List submenu page is displayed.
Users can also login using the user name, domain name (required only when Win-dows Domain Authentication is enabled), and password that has been set as the Account Manager in the User Information.You do not have to select the “Domain Name” field when you log in as the Administra-tor.
3 Click the “Export/Import” link at the upper right of the page.
The Export/Import window appears.
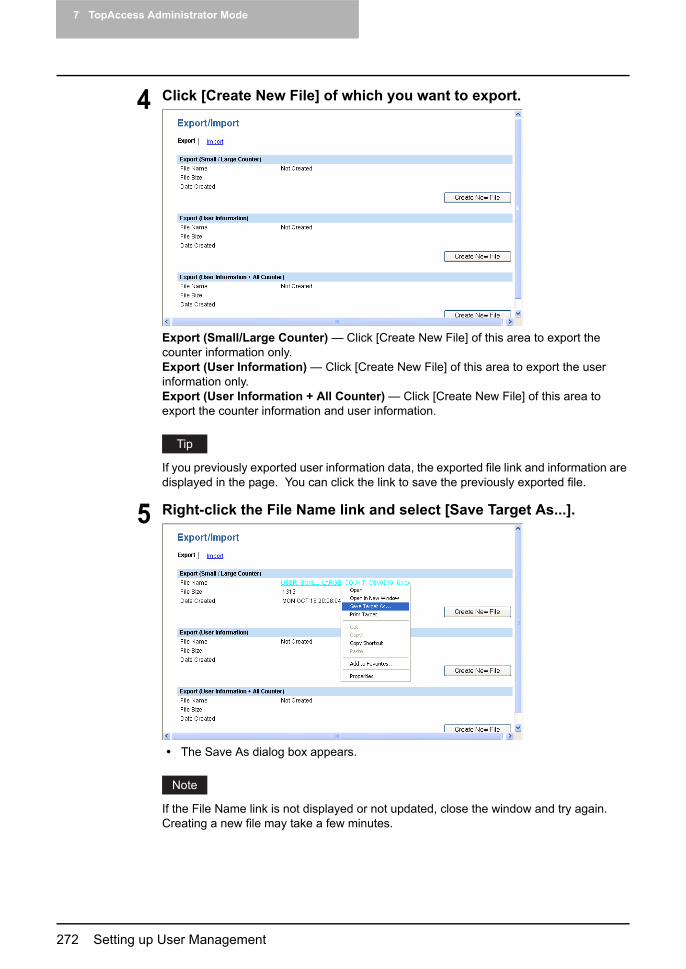
7 TopAccess Administrator Mode
272 Setting up User Management
4 Click [Create New File] of which you want to export.
Export (Small/Large Counter) — Click [Create New File] of this area to export the counter information only.Export (User Information) — Click [Create New File] of this area to export the user information only.Export (User Information + All Counter) — Click [Create New File] of this area to export the counter information and user information.
If you previously exported user information data, the exported file link and information are displayed in the page. You can click the link to save the previously exported file.
5 Right-click the File Name link and select [Save Target As...].
The Save As dialog box appears.
If the File Name link is not displayed or not updated, close the window and try again. Creating a new file may take a few minutes.

Setting up User Management 273
6 Select the file location and select “All Files” in the “Save as type” drop down box. Then click [Save].
The CSV file that contains the user information data is saved in a selected location.
Importing User Information
You can import user information from a file that has been exported from another device such as e-STUDIO3510c Series, e-STUDIO451c Series, e-STUDIO850 Series, e-STUDIO452 Series, and e-STUDIO282 Series. The imported file must be the comma delimited CSV file and created in the suitable format for the user information data.
Before importing the user information data, please confirm that there is no print job, no scan job, and no fax job. The user information data cannot be imported if there are any jobs that have been processed. If importing the user information data takes a long time, perform restoring the data after the equipment turns in a Sleep/Auto Shut Off mode. It may take a long time when there are too many user information or the data includes the too long user name or domain name.Before importing the CSV file, please confirm that all required data for each item is entered in the CSV file. The required items vary depending on the authentication type.* Yes = Required, No = Not Required
ItemsWin-dows
DomainLDAP Local Supplements
UserId Yes Yes Yes
Username Yes Yes Yes
Password No No Yes The value must be deleted for Windows Domain or LDAP.
Domainname Yes No No The value must be deleted for LDAP or Local.
Department Code Yes Yes Yes
Access Manager No No No When the value is blank, the value is set to “0”.0 = Disable, 1 = Enable
Rolebase No No No When the value is blank, the value is set to “0”.0 = Disable, 1 = Enable
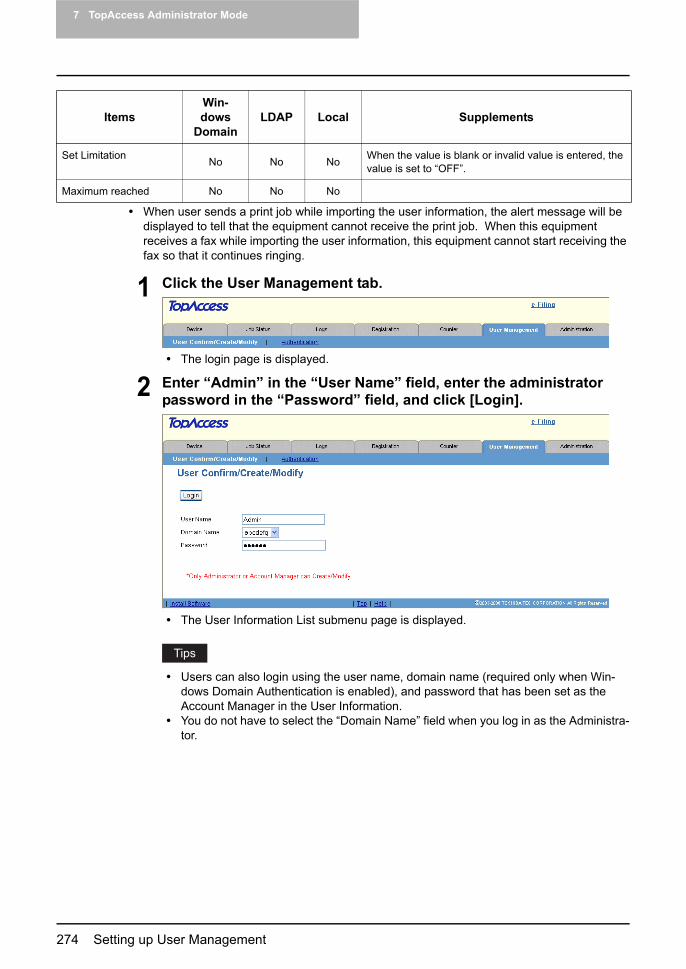
7 TopAccess Administrator Mode
274 Setting up User Management
When user sends a print job while importing the user information, the alert message will be displayed to tell that the equipment cannot receive the print job. When this equipment receives a fax while importing the user information, this equipment cannot start receiving the fax so that it continues ringing.
1 Click the User Management tab.
The login page is displayed.
2 Enter “Admin” in the “User Name” field, enter the administrator password in the “Password” field, and click [Login].
The User Information List submenu page is displayed.
Users can also login using the user name, domain name (required only when Win-dows Domain Authentication is enabled), and password that has been set as the Account Manager in the User Information.You do not have to select the “Domain Name” field when you log in as the Administra-tor.
Set Limitation No No No When the value is blank or invalid value is entered, the value is set to “OFF”.
Maximum reached No No No
ItemsWin-dows
DomainLDAP Local Supplements

Setting up User Management 275
3 Click the “Export/Import” link at the upper right of the page.
The Export/Import window appears.
4 Click Import menu and click [Browse...].
The Choose file dialog box appears.
5 Select the CSV file that contains user information data and click [Open].
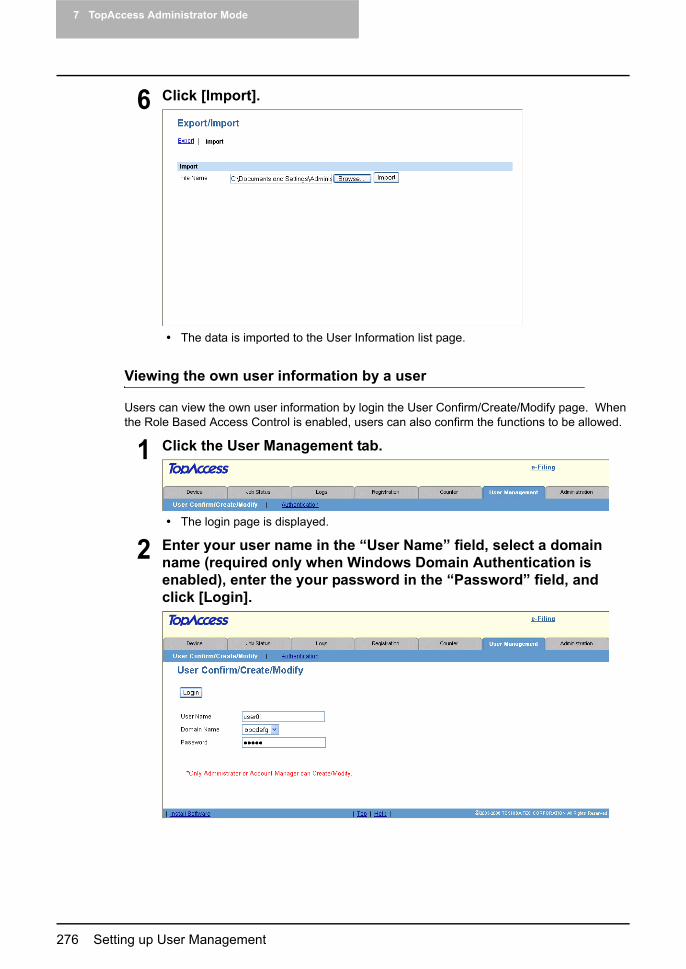
7 TopAccess Administrator Mode
276 Setting up User Management
6 Click [Import].
The data is imported to the User Information list page.
Viewing the own user information by a user
Users can view the own user information by login the User Confirm/Create/Modify page. When the Role Based Access Control is enabled, users can also confirm the functions to be allowed.
1 Click the User Management tab.
The login page is displayed.
2 Enter your user name in the “User Name” field, select a domain name (required only when Windows Domain Authentication is enabled), enter the your password in the “Password” field, and click [Login].

Setting up User Management 277
3 The User Information page is displayed.
Changing a password by a user (Local MFP Authentication only)
When the Local MFP Authentication is enabled, not only an administrator or account managers but also each registered user can change the password himself.
1 Click the User Management tab.
The login page is displayed.
2 Enter your user name in the “User Name” field, enter the your pass-word in the “Password” field, and click [Login].
The User Information page is displayed.

7 TopAccess Administrator Mode
278 Setting up User Management
3 Click [Change Password].
The Change Password window appears.
4 Enter the following items and click [Save].
Old Password — Enter your login password.New Password — Enter a new login password. You can enter up to 64 characters.Retype Password — Enter a new login password again.
5 Click [OK].
The password is changed.
Setting up User Authentication for Scan to E-mailWhen the User Authentication for Scan to Email is enabled, users must enter the user name and password before performing Scan to E-mail.You can select either the SMTP or LDAP for User Authentication for Scan to Email.
P.279 “Enabling User Authentication for Scan to Email (SMTP)” P.281 “Enabling User Authentication for Scan to Email (LDAP)”
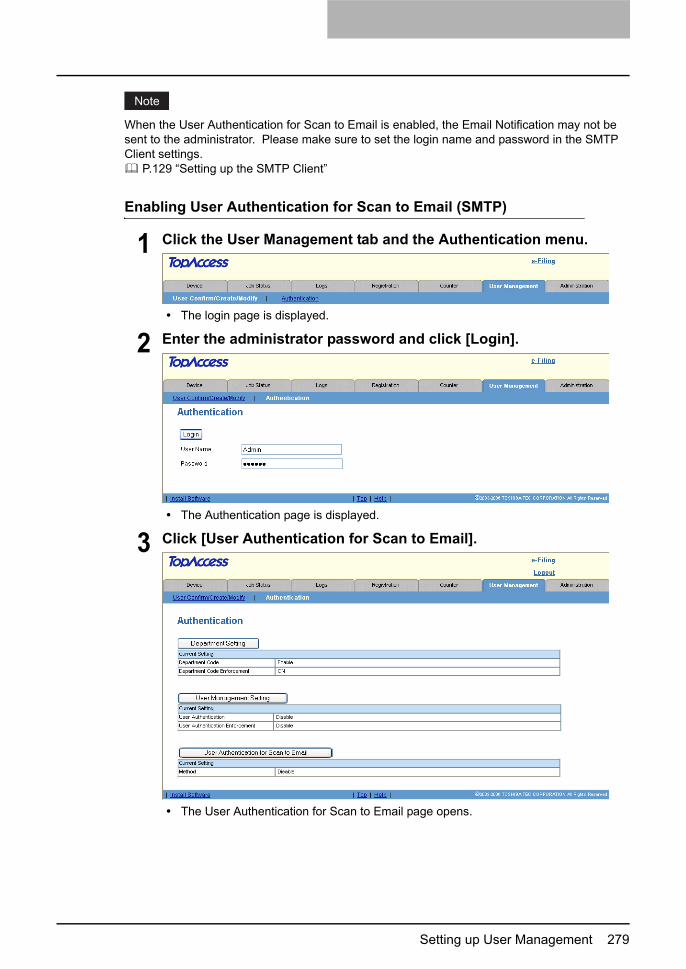
Setting up User Management 279
When the User Authentication for Scan to Email is enabled, the Email Notification may not be sent to the administrator. Please make sure to set the login name and password in the SMTP Client settings.
P.129 “Setting up the SMTP Client”
Enabling User Authentication for Scan to Email (SMTP)
1 Click the User Management tab and the Authentication menu.
The login page is displayed.
2 Enter the administrator password and click [Login].
The Authentication page is displayed.
3 Click [User Authentication for Scan to Email].
The User Authentication for Scan to Email page opens.

7 TopAccess Administrator Mode
280 Setting up User Management
4 Select “SMTP” in the “Method” drop down box and click [Next].
This equipment can set the authentication for Scan to Email, but cannot set the authentication for Internet Fax transmission. If you do not want to allow users to per-form the Internet Fax transmission, check the “Internet Fax Not Allowed” check box. When you check on this box, users no longer perform the Internet Fax transmission.When you want to disable the User Authentication for Scan to Email, select “Disable” in the “Method” and click [Next].
5 Enter the IP address or FQDN (Fully Qualified Domain Name) of the SMTP server and select the authentication type in the “Authentica-tion” drop down box. Then click [Next].
If you have set the SMTP Client settings in the Network setup page, the setting values of the SMTP Client settings in the Network setup page are reflected in these settings.
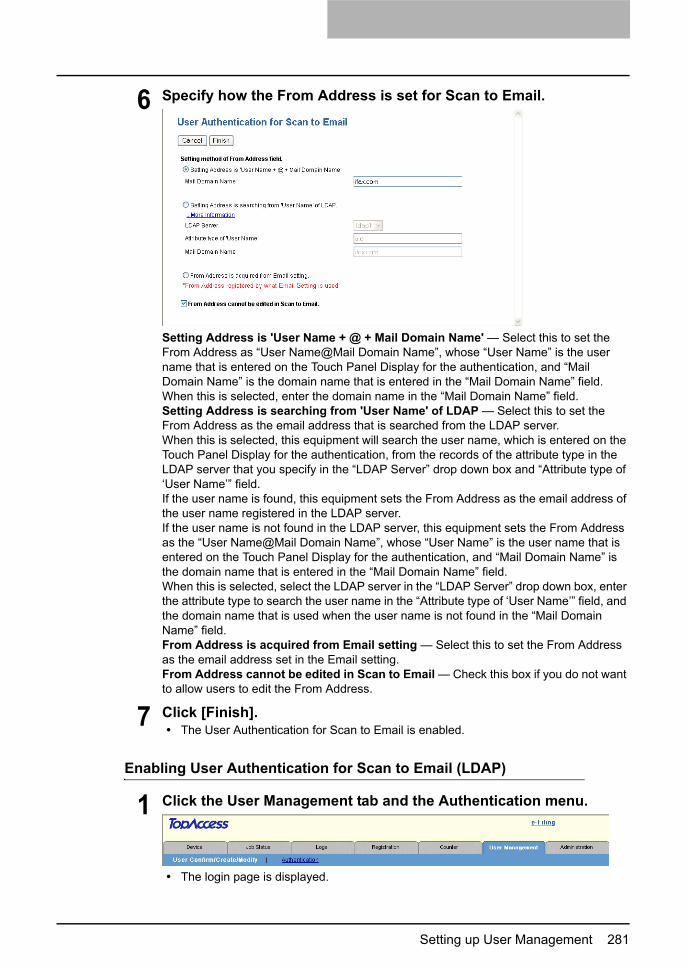
Setting up User Management 281
6 Specify how the From Address is set for Scan to Email.
Setting Address is 'User Name + @ + Mail Domain Name' — Select this to set the From Address as “User Name@Mail Domain Name”, whose “User Name” is the user name that is entered on the Touch Panel Display for the authentication, and “Mail Domain Name” is the domain name that is entered in the “Mail Domain Name” field.When this is selected, enter the domain name in the “Mail Domain Name” field.Setting Address is searching from 'User Name' of LDAP — Select this to set the From Address as the email address that is searched from the LDAP server.When this is selected, this equipment will search the user name, which is entered on the Touch Panel Display for the authentication, from the records of the attribute type in the LDAP server that you specify in the “LDAP Server” drop down box and “Attribute type of ‘User Name’” field.If the user name is found, this equipment sets the From Address as the email address of the user name registered in the LDAP server.If the user name is not found in the LDAP server, this equipment sets the From Address as the “User Name@Mail Domain Name”, whose “User Name” is the user name that is entered on the Touch Panel Display for the authentication, and “Mail Domain Name” is the domain name that is entered in the “Mail Domain Name” field.When this is selected, select the LDAP server in the “LDAP Server” drop down box, enter the attribute type to search the user name in the “Attribute type of ‘User Name’” field, and the domain name that is used when the user name is not found in the “Mail Domain Name” field.From Address is acquired from Email setting — Select this to set the From Address as the email address set in the Email setting.From Address cannot be edited in Scan to Email — Check this box if you do not want to allow users to edit the From Address.
7 Click [Finish].The User Authentication for Scan to Email is enabled.
Enabling User Authentication for Scan to Email (LDAP)
1 Click the User Management tab and the Authentication menu.
The login page is displayed.

7 TopAccess Administrator Mode
282 Setting up User Management
2 Enter the administrator password and click [Login].
The Authentication page is displayed.
3 Click [User Authentication for Scan to Email].
The User Authentication for Scan to Email page opens.
4 Select “LDAP” in the “Method” drop down box and click [Next].
This equipment can set the authentication for Scan to Email, but cannot set the authentication for Internet Fax transmission. If you do not want to allow users to per-form the Internet Fax transmission, check the “Internet Fax Not Allowed” check box. When you check on this box, users no longer perform the Internet Fax transmission.When you want to disable the User Authentication for Scan to Email, select “Disable” in the “Method” and click [Next].

Setting up User Management 283
5 Select the LDAP server to be used for the authentication and click [Next].
The LDAP server to be used for the authentication must be configured in the Directory Service submenu page in the Maintenance menu.
P.194 “Managing Directory Service”

7 TopAccess Administrator Mode
284 Setting up User Management
6 Specify how the From Address is set for Scan to Email.
Setting Address is 'User Name + @ + Mail Domain Name' — Select this to set the From Address as “User Name@Mail Domain Name”, whose “User Name” is the user name that is entered on the Touch Panel Display for the authentication, and “Mail Domain Name” is the domain name that is entered in the “Mail Domain Name” field.When this is selected, enter the domain name in the “Mail Domain Name” field.Setting Address is searching from 'User Name' of LDAP — Select this to set the From Address as the email address that is searched from the LDAP server.When this is selected, this equipment will search the user name, which is entered on the Touch Panel Display for the authentication, from the records of the attribute type in the LDAP server that you specify in the “LDAP Server” drop down box and “Attribute type of ‘User Name’” field.If the user name is found, this equipment sets the From Address as the email address of the user name registered in the LDAP server.If the user name is not found in the LDAP server, this equipment sets the From Address as the “User Name@Mail Domain Name”, whose “User Name” is the user name that is entered on the Touch Panel Display for the authentication, and “Mail Domain Name” is the domain name that is entered in the “Mail Domain Name” field.When this is selected, select the LDAP server in the “LDAP Server” drop down box, enter the attribute type to search the user name in the “Attribute type of ‘User Name’” field, and the domain name that is used when the user name is not found in the “Mail Domain Name” field.From Address is acquired from Email setting — Select this to set the From Address as the email address set in the Email setting.From Address cannot be edited in Scan to Email — Check this box if you do not want to allow users to edit the From Address.
7 Click [Finish].The User Authentication for Scan to Email is enabled.
8.Troubleshooting
This chapter describes the most common TopAccess errors and provides steps to resolve the conditions. If the problem persists after you have followed all of the steps, make sure to note what you were trying to do and any error messages appear, etc. — and then contact your service representative.
TopAccess Error Messages .................................................................................286Print Job Status Messages..............................................................................................................286Transmission/Reception Journal Status Messages.........................................................................286Scan Job Status Messages.............................................................................................................291Message Log...................................................................................................................................296
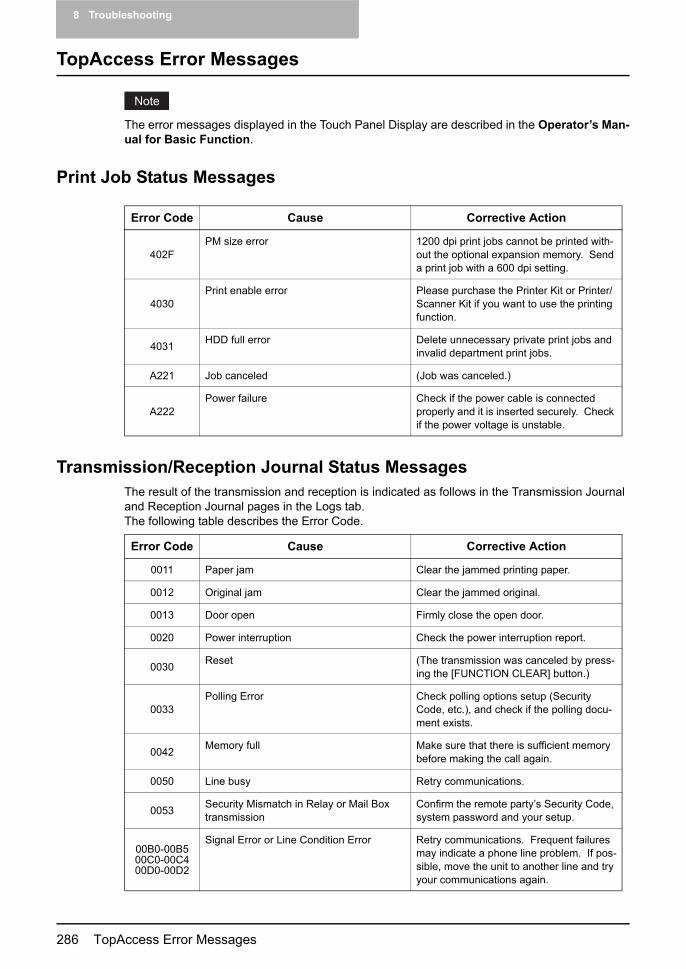
8 Troubleshooting
286 TopAccess Error Messages
TopAccess Error Messages
The error messages displayed in the Touch Panel Display are described in the Operator’s Man-ual for Basic Function.
Print Job Status Messages
Transmission/Reception Journal Status MessagesThe result of the transmission and reception is indicated as follows in the Transmission Journal and Reception Journal pages in the Logs tab.The following table describes the Error Code.
Error Code Cause Corrective Action
402FPM size error 1200 dpi print jobs cannot be printed with-
out the optional expansion memory. Send a print job with a 600 dpi setting.
4030Print enable error Please purchase the Printer Kit or Printer/
Scanner Kit if you want to use the printing function.
4031 HDD full error Delete unnecessary private print jobs and invalid department print jobs.
A221 Job canceled (Job was canceled.)
A222Power failure Check if the power cable is connected
properly and it is inserted securely. Check if the power voltage is unstable.
Error Code Cause Corrective Action
0011 Paper jam Clear the jammed printing paper.
0012 Original jam Clear the jammed original.
0013 Door open Firmly close the open door.
0020 Power interruption Check the power interruption report.
0030 Reset (The transmission was canceled by press-ing the [FUNCTION CLEAR] button.)
0033Polling Error Check polling options setup (Security
Code, etc.), and check if the polling docu-ment exists.
0042 Memory full Make sure that there is sufficient memory before making the call again.
0050 Line busy Retry communications.
0053 Security Mismatch in Relay or Mail Box transmission
Confirm the remote party’s Security Code, system password and your setup.
00B0-00B500C0-00C400D0-00D2
Signal Error or Line Condition Error Retry communications. Frequent failures may indicate a phone line problem. If pos-sible, move the unit to another line and try your communications again.

TopAccess Error Messages 287
00E8HDD error Retry communications. If the error still
occurs, contact your service representa-tive.
00F0Software failure Retry communications. If the error still
occurs, contact your service representa-tive.
00F1Hardware noise Retry communications. If the error still
occurs, contact your service representa-tive.
1C10
System access abnormality Turn the power OFF and then back ON. Perform the job in error again. If the error still occurs, contact your service represen-tative.
1C11
Insufficient memory When there are running jobs, perform the job in error again after the completion of the running jobs. If the error still occurs, turn the power OFF and then back ON, and perform the job again.
1C12 Message reception error Turn the power OFF and then back ON. Perform the job in error again.
1C13 Message transmission error Turn the power OFF and then back ON. Perform the job in error again.
1C14
Invalid parameter When a template is used, form the tem-plate again. If the error still occurs, turn the power OFF and then back ON, and perform the job again.
1C15
Exceeding file capacity Ask your administrator to change the “Fragment Page Size” setting for the Inter-net Fax setting, or reduce the number of pages and perform the job again.
1C20
System management module access abnormality
Turn the power OFF and then back ON. Perform the job in error again. If the recovery is still not completed, contact your service representative.
1C21-1C22
Job control module access abnormality Turn the power OFF and then back ON. Perform the job in error again. If the recovery is still not completed, contact your service representative.
1C30
Directory creation failure Check if the access privilege to the stor-age directory is writable. Check if the server or local disk has a sufficient space in disk capacity.
1C31
File creation failure Check if the access privilege to the stor-age directory is writable. Check if the server or local disk has a sufficient space in disk capacity.
Error Code Cause Corrective Action
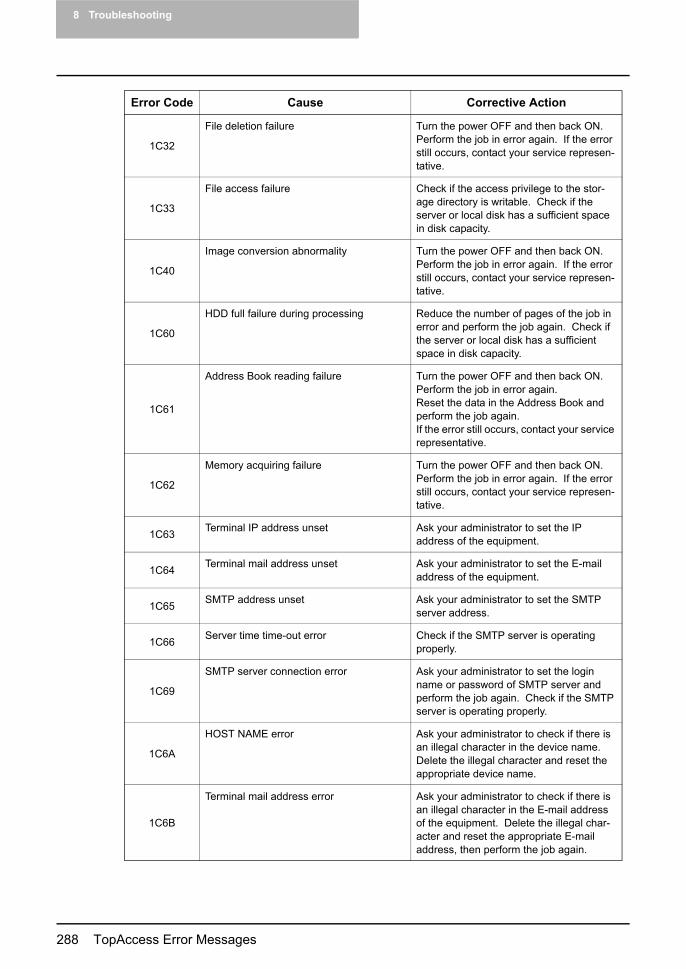
8 Troubleshooting
288 TopAccess Error Messages
1C32
File deletion failure Turn the power OFF and then back ON. Perform the job in error again. If the error still occurs, contact your service represen-tative.
1C33
File access failure Check if the access privilege to the stor-age directory is writable. Check if the server or local disk has a sufficient space in disk capacity.
1C40
Image conversion abnormality Turn the power OFF and then back ON. Perform the job in error again. If the error still occurs, contact your service represen-tative.
1C60
HDD full failure during processing Reduce the number of pages of the job in error and perform the job again. Check if the server or local disk has a sufficient space in disk capacity.
1C61
Address Book reading failure Turn the power OFF and then back ON. Perform the job in error again.Reset the data in the Address Book and perform the job again.If the error still occurs, contact your service representative.
1C62
Memory acquiring failure Turn the power OFF and then back ON. Perform the job in error again. If the error still occurs, contact your service represen-tative.
1C63 Terminal IP address unset Ask your administrator to set the IP address of the equipment.
1C64 Terminal mail address unset Ask your administrator to set the E-mail address of the equipment.
1C65 SMTP address unset Ask your administrator to set the SMTP server address.
1C66 Server time time-out error Check if the SMTP server is operating properly.
1C69
SMTP server connection error Ask your administrator to set the login name or password of SMTP server and perform the job again. Check if the SMTP server is operating properly.
1C6A
HOST NAME error Ask your administrator to check if there is an illegal character in the device name. Delete the illegal character and reset the appropriate device name.
1C6B
Terminal mail address error Ask your administrator to check if there is an illegal character in the E-mail address of the equipment. Delete the illegal char-acter and reset the appropriate E-mail address, then perform the job again.
Error Code Cause Corrective Action
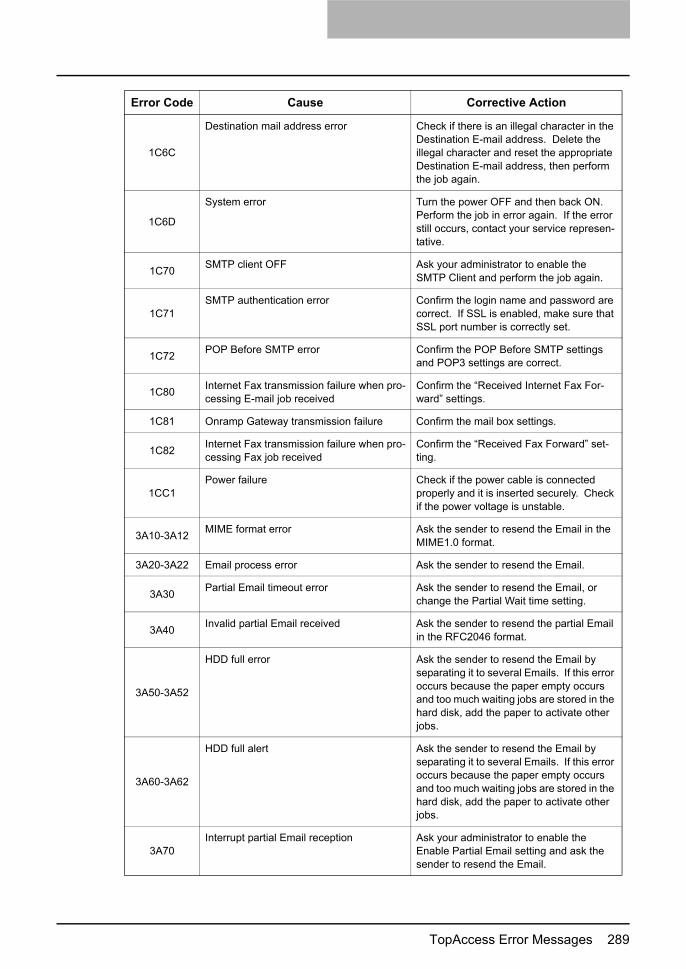
TopAccess Error Messages 289
1C6C
Destination mail address error Check if there is an illegal character in the Destination E-mail address. Delete the illegal character and reset the appropriate Destination E-mail address, then perform the job again.
1C6D
System error Turn the power OFF and then back ON. Perform the job in error again. If the error still occurs, contact your service represen-tative.
1C70 SMTP client OFF Ask your administrator to enable the SMTP Client and perform the job again.
1C71SMTP authentication error Confirm the login name and password are
correct. If SSL is enabled, make sure that SSL port number is correctly set.
1C72 POP Before SMTP error Confirm the POP Before SMTP settings and POP3 settings are correct.
1C80 Internet Fax transmission failure when pro-cessing E-mail job received
Confirm the “Received Internet Fax For-ward” settings.
1C81 Onramp Gateway transmission failure Confirm the mail box settings.
1C82 Internet Fax transmission failure when pro-cessing Fax job received
Confirm the “Received Fax Forward” set-ting.
1CC1Power failure Check if the power cable is connected
properly and it is inserted securely. Check if the power voltage is unstable.
3A10-3A12 MIME format error Ask the sender to resend the Email in the MIME1.0 format.
3A20-3A22 Email process error Ask the sender to resend the Email.
3A30 Partial Email timeout error Ask the sender to resend the Email, or change the Partial Wait time setting.
3A40 Invalid partial Email received Ask the sender to resend the partial Email in the RFC2046 format.
3A50-3A52
HDD full error Ask the sender to resend the Email by separating it to several Emails. If this error occurs because the paper empty occurs and too much waiting jobs are stored in the hard disk, add the paper to activate other jobs.
3A60-3A62
HDD full alert Ask the sender to resend the Email by separating it to several Emails. If this error occurs because the paper empty occurs and too much waiting jobs are stored in the hard disk, add the paper to activate other jobs.
3A70Interrupt partial Email reception Ask your administrator to enable the
Enable Partial Email setting and ask the sender to resend the Email.
Error Code Cause Corrective Action

8 Troubleshooting
290 TopAccess Error Messages
3A80-3A82Partial Email disabled Ask your administrator to enable the
Enable Partial Email setting and ask the sender to resend the Email.
3B10-3B12 Email format error Ask the sender to resend the Email.
3B20-3B22 Context-Type error Ask the sender to resend the Email with attached files that are the TIFF format.
3B30-3B32 Invalid character set Ask the sender to resend the Email in the ISO-8559-1/2 format.
3B40-3B42 Email decode error Ask the sender to resend the Email.
3C10-3C13 TIFF analysis error Ask the sender to resend the Email with attached files that are the TIFF format.
3C20-3C22TIFF compression error Ask the sender to resend the Email with
attached TIFF files in the MH, MR, MMR, or JBIG compression.
3C30-3C32
TIFF resolution error Ask the sender to resend the Email with attached TIFF files whose resolution is either 200x100, 200x200, 200x400, 300x300, or 400x400 dpi.
3C40-3C42TIFF paper size error Ask the sender to resend the Email with
attached TIFF files that can be printed on the paper available for this equipment.
3C50-3C52 Offramp transmission error Ask the sender to specify the correct fax numbers and resend the Email.
3C60-3C62
Offramp security error Confirm that specified fax numbers are registered in the address book of the equipment. If not, register the fax num-bers in the address book and ask the sender to resend the Email with correct fax numbers.
3C70 Power failure Confirm the job is recovered or not. If not, ask the sender to resend the Email.
3D10
Destination address error Ask your administrator whether the DNS and mail server settings are correctly set. If they are correctly set, ask the sender to confirm the destination address is correct.
3D20
Exceeding maximum offramp destinations Ask the sender to specify up to 40 destina-tions for one offramp gateway job. The equipment cannot perform the offramp gateway transmission for more than 40 destinations.
3D30 Fax unit is not installed Make sure the Fax unit is installed, or con-nected correctly.
3E10
POP3 server communication error Ask your administrator that the POP3 server address is correctly set, or the POP3 server works properly. If SSL is enabled, make sure that SSL port number is correctly set.
Error Code Cause Corrective Action
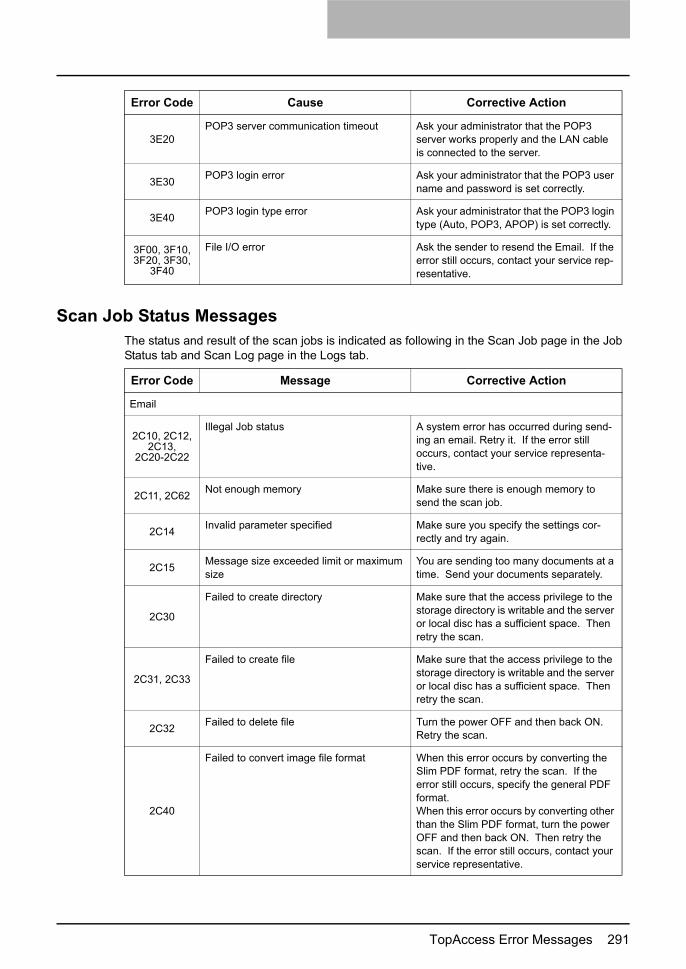
TopAccess Error Messages 291
Scan Job Status MessagesThe status and result of the scan jobs is indicated as following in the Scan Job page in the Job Status tab and Scan Log page in the Logs tab.
3E20POP3 server communication timeout Ask your administrator that the POP3
server works properly and the LAN cable is connected to the server.
3E30 POP3 login error Ask your administrator that the POP3 user name and password is set correctly.
3E40 POP3 login type error Ask your administrator that the POP3 login type (Auto, POP3, APOP) is set correctly.
3F00, 3F10, 3F20, 3F30,
3F40
File I/O error Ask the sender to resend the Email. If the error still occurs, contact your service rep-resentative.
Error Code Cause Corrective Action
Error Code Message Corrective Action
2C10, 2C12,2C13,
2C20-2C22
Illegal Job status A system error has occurred during send-ing an email. Retry it. If the error still occurs, contact your service representa-tive.
2C11, 2C62 Not enough memory Make sure there is enough memory to send the scan job.
2C14 Invalid parameter specified Make sure you specify the settings cor-rectly and try again.
2C15 Message size exceeded limit or maximum size
You are sending too many documents at a time. Send your documents separately.
2C30
Failed to create directory Make sure that the access privilege to the storage directory is writable and the server or local disc has a sufficient space. Then retry the scan.
2C31, 2C33
Failed to create file Make sure that the access privilege to the storage directory is writable and the server or local disc has a sufficient space. Then retry the scan.
2C32 Failed to delete file Turn the power OFF and then back ON. Retry the scan.
2C40
Failed to convert image file format When this error occurs by converting the Slim PDF format, retry the scan. If the error still occurs, specify the general PDF format.When this error occurs by converting other than the Slim PDF format, turn the power OFF and then back ON. Then retry the scan. If the error still occurs, contact your service representative.
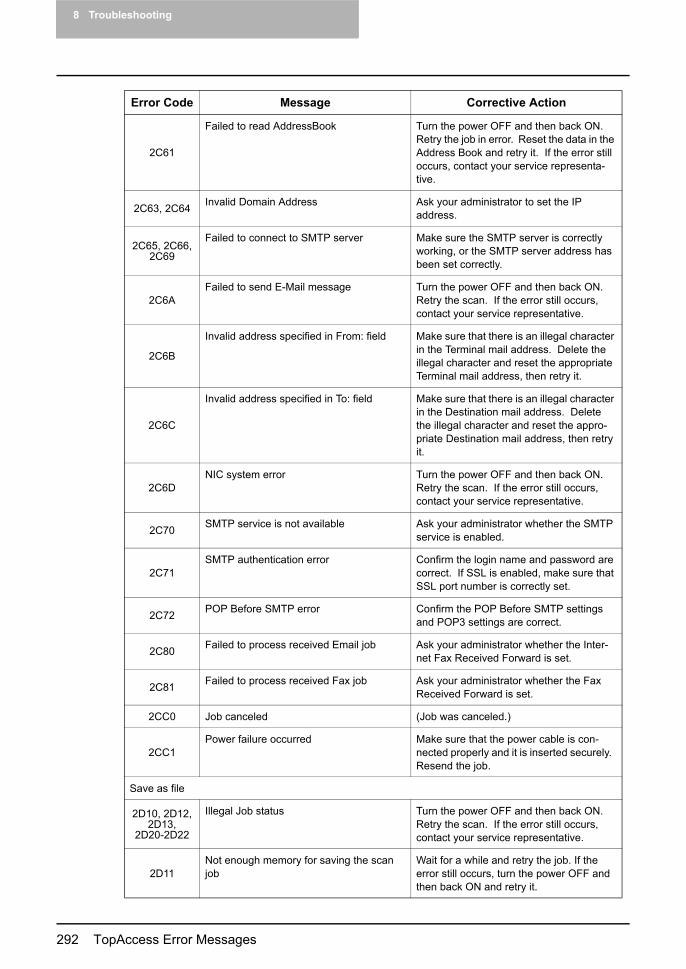
8 Troubleshooting
292 TopAccess Error Messages
2C61
Failed to read AddressBook Turn the power OFF and then back ON. Retry the job in error. Reset the data in the Address Book and retry it. If the error still occurs, contact your service representa-tive.
2C63, 2C64 Invalid Domain Address Ask your administrator to set the IP address.
2C65, 2C66,2C69
Failed to connect to SMTP server Make sure the SMTP server is correctly working, or the SMTP server address has been set correctly.
2C6AFailed to send E-Mail message Turn the power OFF and then back ON.
Retry the scan. If the error still occurs, contact your service representative.
2C6B
Invalid address specified in From: field Make sure that there is an illegal character in the Terminal mail address. Delete the illegal character and reset the appropriate Terminal mail address, then retry it.
2C6C
Invalid address specified in To: field Make sure that there is an illegal character in the Destination mail address. Delete the illegal character and reset the appro-priate Destination mail address, then retry it.
2C6DNIC system error Turn the power OFF and then back ON.
Retry the scan. If the error still occurs, contact your service representative.
2C70 SMTP service is not available Ask your administrator whether the SMTP service is enabled.
2C71SMTP authentication error Confirm the login name and password are
correct. If SSL is enabled, make sure that SSL port number is correctly set.
2C72 POP Before SMTP error Confirm the POP Before SMTP settings and POP3 settings are correct.
2C80 Failed to process received Email job Ask your administrator whether the Inter-net Fax Received Forward is set.
2C81 Failed to process received Fax job Ask your administrator whether the Fax Received Forward is set.
2CC0 Job canceled (Job was canceled.)
2CC1Power failure occurred Make sure that the power cable is con-
nected properly and it is inserted securely. Resend the job.
Save as file
2D10, 2D12,2D13,
2D20-2D22
Illegal Job status Turn the power OFF and then back ON. Retry the scan. If the error still occurs, contact your service representative.
2D11Not enough memory for saving the scan job
Wait for a while and retry the job. If the error still occurs, turn the power OFF and then back ON and retry it.
Error Code Message Corrective Action

TopAccess Error Messages 293
2D14An internal error occurred Turn the power OFF and then back ON,
and retry the job. If the error still occurs, contact your service representative.
2D15 Exceeding maximum file capacity Divide the file into several files, or retry in a single-page format.
2D30
Failed to create directory Make sure that the access privilege to the storage directory is writable and also the disk in the directory has enough space, and then retry the job. If more than one job is performed simultaneously, the error may occur because the disk temporarily runs out of space. In this case, wait for a while and retry the job. If the error still occurs, turn the power OFF and then back ON, and then retry it.
2D31, 2D33
Failed to create file Make sure that the access privilege to the storage directory is writable and also the disk in the directory has enough space, and then retry the job. If more than one job is performed simultaneously, the error may occur because the disk temporarily runs out of space. In this case, wait for a while and retry the job. If the error still occurs, turn the power OFF and then back ON, and then retry it.
2D32 Failed to delete file Turn the power OFF and then back ON. Retry the scan.
2D40
Failed to convert image file format When this error occurs by converting the Slim PDF format, retry the scan. If the error still occurs, specify the general PDF format.When this error occurs by converting other than the Slim PDF format, turn the power OFF and then back ON. Then retry the scan. If the error still occurs, contact your service representative.
2D60Failed to copy file Turn the power OFF and then back ON.
Retry the scan. If the error still occurs, contact your service representative.
2D62
Failed to connect to network destination. Check destination path.
Make sure the network folder is shared in your network and retry the scan. If the error still occurs, ask your administrator to confirm whether the IP address or path of the server is correct. Also make sure that the server is operating properly.
2D63 Specified network path is invalid. Check destination path.
Make sure you specify correct network folder and retry the scan.
2D64
Logon to file server failed. Check user-name and password.
Make sure you specify correct user name and password to logon the file server, or you specify correct file server. Then retry the scan.
Error Code Message Corrective Action
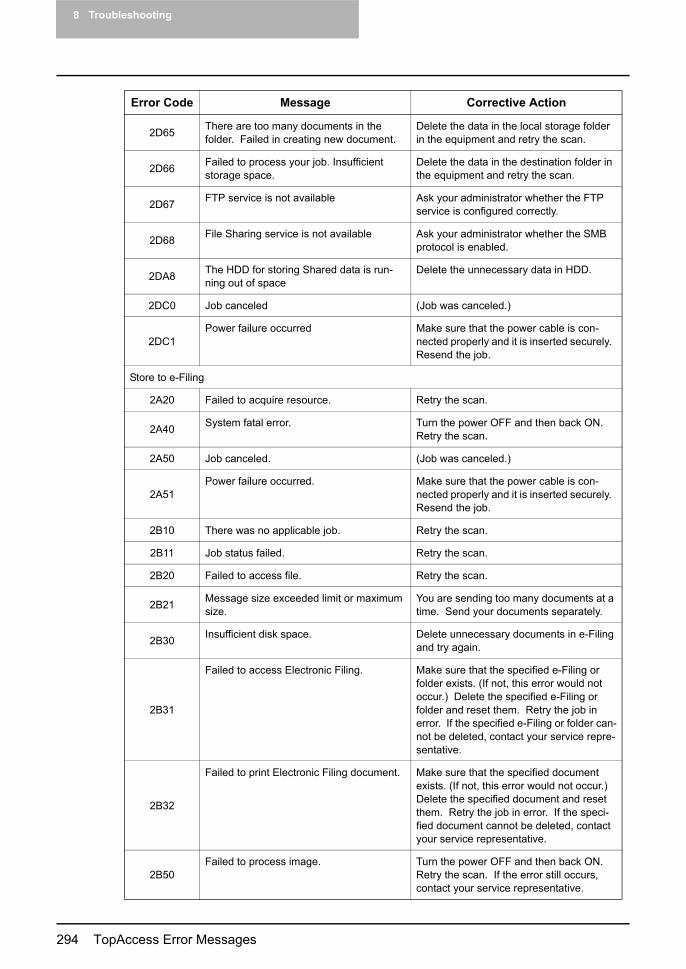
8 Troubleshooting
294 TopAccess Error Messages
2D65 There are too many documents in the folder. Failed in creating new document.
Delete the data in the local storage folder in the equipment and retry the scan.
2D66 Failed to process your job. Insufficient storage space.
Delete the data in the destination folder in the equipment and retry the scan.
2D67 FTP service is not available Ask your administrator whether the FTP service is configured correctly.
2D68 File Sharing service is not available Ask your administrator whether the SMB protocol is enabled.
2DA8 The HDD for storing Shared data is run-ning out of space
Delete the unnecessary data in HDD.
2DC0 Job canceled (Job was canceled.)
2DC1Power failure occurred Make sure that the power cable is con-
nected properly and it is inserted securely. Resend the job.
Store to e-Filing
2A20 Failed to acquire resource. Retry the scan.
2A40 System fatal error. Turn the power OFF and then back ON. Retry the scan.
2A50 Job canceled. (Job was canceled.)
2A51Power failure occurred. Make sure that the power cable is con-
nected properly and it is inserted securely. Resend the job.
2B10 There was no applicable job. Retry the scan.
2B11 Job status failed. Retry the scan.
2B20 Failed to access file. Retry the scan.
2B21 Message size exceeded limit or maximum size.
You are sending too many documents at a time. Send your documents separately.
2B30 Insufficient disk space. Delete unnecessary documents in e-Filing and try again.
2B31
Failed to access Electronic Filing. Make sure that the specified e-Filing or folder exists. (If not, this error would not occur.) Delete the specified e-Filing or folder and reset them. Retry the job in error. If the specified e-Filing or folder can-not be deleted, contact your service repre-sentative.
2B32
Failed to print Electronic Filing document. Make sure that the specified document exists. (If not, this error would not occur.) Delete the specified document and reset them. Retry the job in error. If the speci-fied document cannot be deleted, contact your service representative.
2B50Failed to process image. Turn the power OFF and then back ON.
Retry the scan. If the error still occurs, contact your service representative.
Error Code Message Corrective Action

TopAccess Error Messages 295
2B51
Failed to process print image. Make sure that the Function List can be printed out. Retry the print. If the error still occurs, contact your service representa-tive.
2B60 The folder was renamed. A folder of the same name already existed.
The same named folder cannot be created in the same box.
2B70 The document was renamed. A document of the same name already existed.
The same named document cannot be created in the same box or folder.
2B71The storage period of e-Filing documents will expire
Check if necessary documents are stored in e-Filing. The documents will be deleted in few days.
2B80 The HDD for storing e-Filing data is run-ning out of space.
Delete unnecessary documents in e-Filing.
2B90Insufficient Memory. Turn the power OFF and then back ON.
Retry the scan. If the error still occurs, contact your service representative.
2BA0
Invalid Box password specified. Make sure that the password is correct and retry the scan, or reset the password and retry the scan. When this error occurs for the print of the data in the e-Filing, per-form the print with the administrator’s password. If the recovery is still not com-pleted or in case of invalid password for the operation other printing (opening the file, etc.), contact your service representa-tive.
2BA1 Incorrect paper size Make sure to specify the supported paper size.
2BB0 Job canceled (Job was canceled.)
2BB1Power failure occurred Make sure that the power cable is con-
nected properly and it is inserted securely. Resend the job.
2BC0System fatal error. Turn the power OFF and then back ON.
Retry the scan. If the error still occurs, contact your service representative.
2BC1Failed to acquire resource. Turn the power OFF and then back ON.
Retry the scan. If the error still occurs, contact your service representative.
2BD0Power failure occurred during restoring. Make sure that the power cable is con-
nected properly and it is inserted securely. Resend the job.
2BE0 Failed to obtain the machine parameters. Turn the power OFF and then back ON. Retry the scan.
2BF0 Reached the maximum number of pages. Reduce the pages and print again.
2BF1 Reached the maximum number of docu-ments.
Delete the documents from the boxes or folders.
2BF2 Reached the maximum number of folders. Delete the folders from the boxes.
Error Code Message Corrective Action
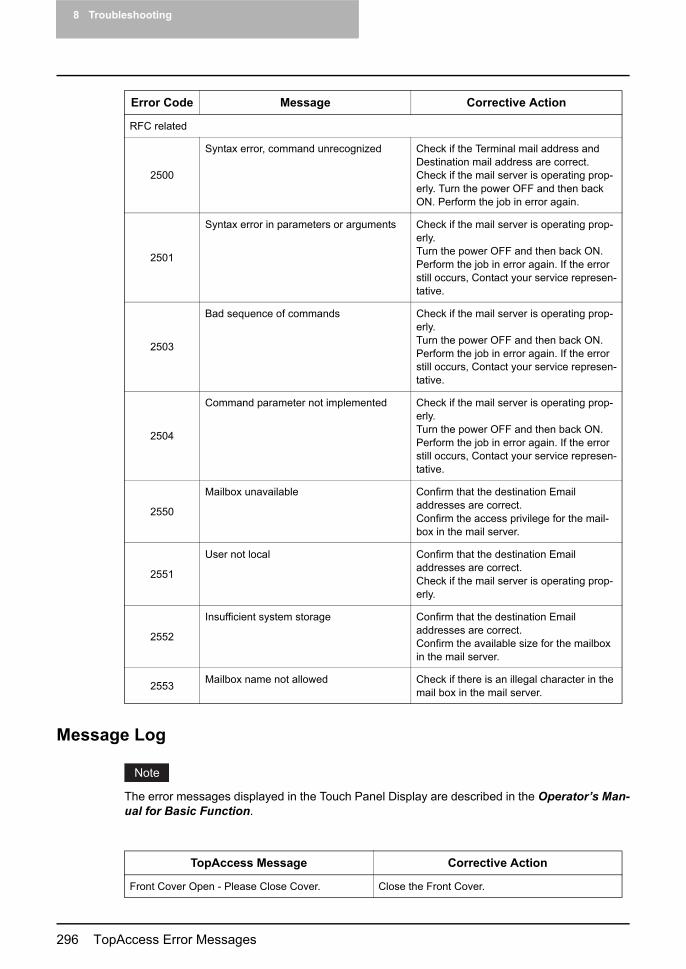
8 Troubleshooting
296 TopAccess Error Messages
Message Log
The error messages displayed in the Touch Panel Display are described in the Operator’s Man-ual for Basic Function.
RFC related
2500
Syntax error, command unrecognized Check if the Terminal mail address and Destination mail address are correct. Check if the mail server is operating prop-erly. Turn the power OFF and then back ON. Perform the job in error again.
2501
Syntax error in parameters or arguments Check if the mail server is operating prop-erly.Turn the power OFF and then back ON.Perform the job in error again. If the error still occurs, Contact your service represen-tative.
2503
Bad sequence of commands Check if the mail server is operating prop-erly.Turn the power OFF and then back ON.Perform the job in error again. If the error still occurs, Contact your service represen-tative.
2504
Command parameter not implemented Check if the mail server is operating prop-erly.Turn the power OFF and then back ON.Perform the job in error again. If the error still occurs, Contact your service represen-tative.
2550
Mailbox unavailable Confirm that the destination Email addresses are correct.Confirm the access privilege for the mail-box in the mail server.
2551
User not local Confirm that the destination Email addresses are correct.Check if the mail server is operating prop-erly.
2552
Insufficient system storage Confirm that the destination Email addresses are correct.Confirm the available size for the mailbox in the mail server.
2553 Mailbox name not allowed Check if there is an illegal character in the mail box in the mail server.
Error Code Message Corrective Action
TopAccess Message Corrective Action
Front Cover Open - Please Close Cover. Close the Front Cover.

TopAccess Error Messages 297
Paper Feeding Cover Open - Please Close Cover. Close the Paper Feeding Cover.
Transfer/Transport unit Open - Please Close Cover.
Close the Transfer/Transport unit.
Large Capacity Feeder Cover Open - Please Close Cover.
Close the Large Capacity Feeder Cover.
Drawer Open - Please Close Cover. Close the drawer.
Automatic Duplexing Unit Cover Open - Please Close Cover.
Close the Automatic Duplexing Unit Cover.
Relay Unit Cover Open - Please Close Cover. Close the Relay Unit Cover.
Finisher Joint Cover Open - Please Close Cover. Close the Finisher Joint Cover.
Staple Door Open - Please Close Cover. Close the Staple Door.
Lower Tray Delivery Cover Open - Please Close Cover.
Close the Lower Tray Delivery Cover.
Lower Tray Front Cover Open - Please Close Cover.
Close the Lower Tray Front Cover.
Punch Unit Front Cover Open - Please Close Cover.
Close the Punch Unit Front Cover.
Hole Punch Unit Open - Please Close Cover. Close the Hole Punch Unit.
Paper Jam in Auto Duplexer Unit - Please Clear Paper Path
Refer to HELP on the Touch Panel Display to remove jammed paper.
Paper Jam in Printer - Please Clear Paper Path Refer to HELP on the Touch Panel Display to remove jammed paper.
Paper Ejection Jam - Please Clear Paper Path Refer to HELP on the Touch Panel Display to remove jammed paper.
Paper Insertion Jam - Please Clear Paper Path Refer to HELP on the Touch Panel Display to remove jammed paper.
Staple Jam in Finisher - Please Clear Staple Remove jammed staples from the Finisher. Refer to the Operator’s Manual for Basic Function for instruction.
Staple Jam in Saddle Stitch Finisher - Please Clear Staple
Remove jammed staples from the Saddle Stitch Finisher. Refer to the Operator’s Manual for Basic Function for instruction.
Hole Punch Jam in Finisher - Please Clear Hole Punch
Clear hole punches from the Finisher. Refer to the Operator’s Manual for Basic Function for instruction.
Used Toner Container Full - Please Replace. Replace the toner container. Refer to the Opera-tor’s Manual for Basic Function for instruction.This message does not displayed for e-STUDIO282 Series.
Toner Not Recognized - Please Check Toner. Check and adjust the toner bottle.
Black Toner Empty - Please Refill. Replace the black toner. Refer to the Operator’s Manual for Basic Function for instruction.
TopAccess Message Corrective Action
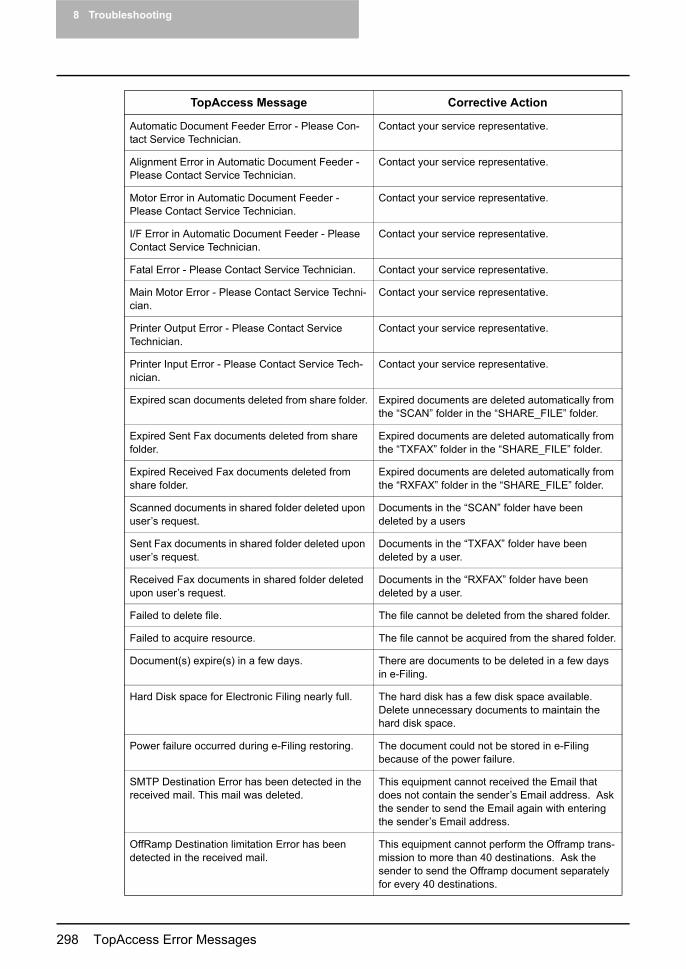
8 Troubleshooting
298 TopAccess Error Messages
Automatic Document Feeder Error - Please Con-tact Service Technician.
Contact your service representative.
Alignment Error in Automatic Document Feeder - Please Contact Service Technician.
Contact your service representative.
Motor Error in Automatic Document Feeder - Please Contact Service Technician.
Contact your service representative.
I/F Error in Automatic Document Feeder - Please Contact Service Technician.
Contact your service representative.
Fatal Error - Please Contact Service Technician. Contact your service representative.
Main Motor Error - Please Contact Service Techni-cian.
Contact your service representative.
Printer Output Error - Please Contact Service Technician.
Contact your service representative.
Printer Input Error - Please Contact Service Tech-nician.
Contact your service representative.
Expired scan documents deleted from share folder. Expired documents are deleted automatically from the “SCAN” folder in the “SHARE_FILE” folder.
Expired Sent Fax documents deleted from share folder.
Expired documents are deleted automatically from the “TXFAX” folder in the “SHARE_FILE” folder.
Expired Received Fax documents deleted from share folder.
Expired documents are deleted automatically from the “RXFAX” folder in the “SHARE_FILE” folder.
Scanned documents in shared folder deleted upon user’s request.
Documents in the “SCAN” folder have been deleted by a users
Sent Fax documents in shared folder deleted upon user’s request.
Documents in the “TXFAX” folder have been deleted by a user.
Received Fax documents in shared folder deleted upon user’s request.
Documents in the “RXFAX” folder have been deleted by a user.
Failed to delete file. The file cannot be deleted from the shared folder.
Failed to acquire resource. The file cannot be acquired from the shared folder.
Document(s) expire(s) in a few days. There are documents to be deleted in a few days in e-Filing.
Hard Disk space for Electronic Filing nearly full. The hard disk has a few disk space available. Delete unnecessary documents to maintain the hard disk space.
Power failure occurred during e-Filing restoring. The document could not be stored in e-Filing because of the power failure.
SMTP Destination Error has been detected in the received mail. This mail was deleted.
This equipment cannot received the Email that does not contain the sender’s Email address. Ask the sender to send the Email again with entering the sender’s Email address.
OffRamp Destination limitation Error has been detected in the received mail.
This equipment cannot perform the Offramp trans-mission to more than 40 destinations. Ask the sender to send the Offramp document separately for every 40 destinations.
TopAccess Message Corrective Action

TopAccess Error Messages 299
Fax Unit Error has been occurred in the received mail.
This equipment cannot perform the Offramp trans-mission without the optional Fax unit.
POP3 Connection Error has been occurred in the received mail.
Make sure the POP3 server is properly running. Make sure correct IP address of the POP3 server is assigned.
POP3 Connection Timeout Error has been occurred in the received mail.
Make sure that the network cable is correctly con-nected. Make sure the POP3 server is properly running.
POP3 Login Error has been occurred in the received mail.
Make sure the correct login name and password is specified.
POP3 Login Error occurred in the received mail Make sure that the POP3 login type (Auto, POP3, APOP) is set correctly.
File I/O Error has been occurred in this mail. The mail could not be received until File I/O is recov-ered.
Turn OFF then ON the power and confirm if the equipment can receive the Internet Fax. If the Internet Fax document cannot be received, con-firm that any files other than TIFF and text files are attached in the Internet Fax.
Hard Disk space for File Share nearly full. The hard disk has a few disk space available. Delete unnecessary documents to maintain the hard disk space.
Domain - General Failure during Authentication Please verify the Network Settings again and retry connecting to the domain controller.
Domain - Invalid Username or Password Please recheck the username and password and Please confirm if the Caps Lock key is switched on by accident.
Domain - Server not present in Network The server is not on network or it could not be located. Also please check the DNS and DDNS settings on TopAccess.
Domain - User account is disabled on Server Please confirm the User attributes on the server. This can be verified in -> Active Directory Users and Computers.
Domain - User account has expired and cannot be used for logon
Please change the account expiration date and retry again. The expiration date can be modified from Active Directory Users and Computers.
Domain - User account is locked and cannot be used for logon
The lockout duration could be specified in account lockout security policy. If so please retry after the lockout duration.
Domain - Invalid logon hours for the User The Administrator has set restrictions on the logon hours. The logon hours can be modified from Active Directory Users and Computers.
Active Directory Domain - Clock Skew error due to difference in Time between Server and MFP
The clocks need to be synchronized. Please con-firm if SNTP is configured correctly on the equip-ment.
Active Directory Domain - Kerberos Ticket has expired and cannot be used for Authentication
Please confirm the validity period of the ticket set by the Kerberos server. Please retry again after the fresh ticket is issued.
TopAccess Message Corrective Action

8 Troubleshooting
300 TopAccess Error Messages
Active Directory Domain - Verification of the Ticket has failed
Please verify the username and password and retry again. If the problem persists please contact the Administrator.
Active Directory Domain-The Domain specified could not be found
Please enter the correct domain name in network settings. If the problem persists please contact the Administrator for the correct realm name for your server.
Information Failed User Authentication Check DomainName/UserName/Password
SNTP Server - Connect Error has occurred The equipment could not connect to the SNTP Server. Please confirm the SNTP settings.
TopAccess Message Corrective Action
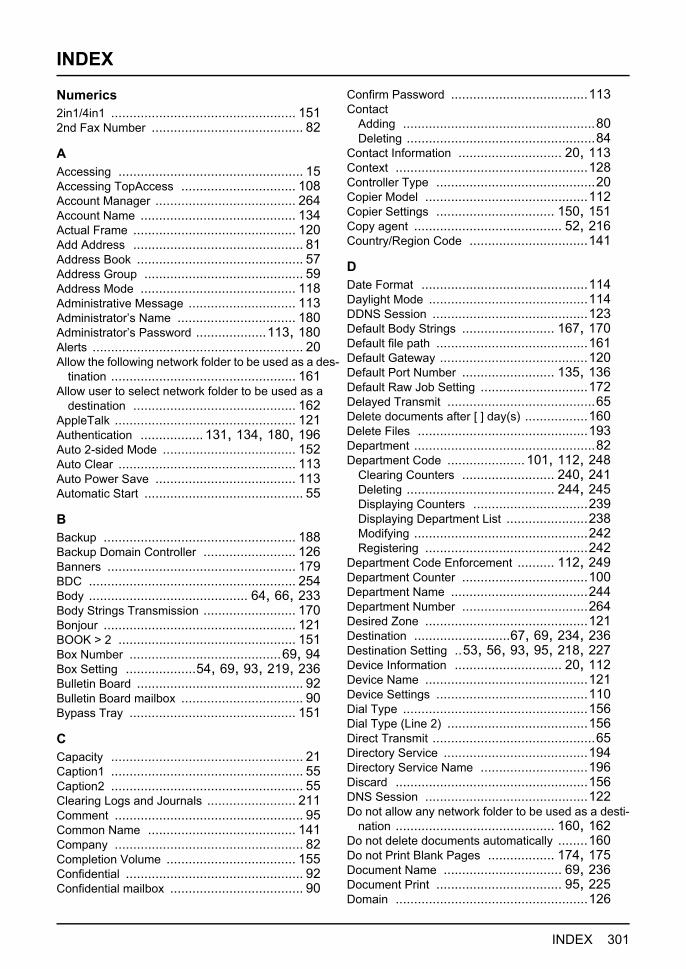
INDEX 301
INDEX
Numerics2in1/4in1 .................................................. 1512nd Fax Number ......................................... 82
AAccessing .................................................. 15Accessing TopAccess ............................... 108Account Manager ...................................... 264Account Name .......................................... 134Actual Frame ............................................ 120Add Address .............................................. 81Address Book ............................................. 57Address Group ........................................... 59Address Mode .......................................... 118Administrative Message ............................. 113Administrator’s Name ................................ 180Administrator’s Password ...................113, 180Alerts ......................................................... 20Allow the following network folder to be used as a des-
tination .................................................. 161Allow user to select network folder to be used as a
destination ............................................ 162AppleTalk ................................................. 121Authentication ................. 131, 134, 180, 196Auto 2-sided Mode .................................... 152Auto Clear ................................................ 113Auto Power Save ...................................... 113Automatic Start ........................................... 55
BBackup .................................................... 188Backup Domain Controller ......................... 126Banners ................................................... 179BDC ........................................................ 254Body ........................................... 64, 66, 233Body Strings Transmission ......................... 170Bonjour .................................................... 121BOOK > 2 ................................................ 151Box Number .........................................69, 94Box Setting ...................54, 69, 93, 219, 236Bulletin Board ............................................. 92Bulletin Board mailbox ................................. 90Bypass Tray ............................................. 151
CCapacity .................................................... 21Caption1 .................................................... 55Caption2 .................................................... 55Clearing Logs and Journals ........................ 211Comment ................................................... 95Common Name ........................................ 141Company ................................................... 82Completion Volume ................................... 155Confidential ................................................ 92Confidential mailbox .................................... 90
Confirm Password .....................................113Contact
Adding ....................................................80Deleting ...................................................84
Contact Information ............................ 20, 113Context ....................................................128Controller Type ...........................................20Copier Model ............................................112Copier Settings ................................ 150, 151Copy agent ........................................ 52, 216Country/Region Code ................................141
DDate Format .............................................114Daylight Mode ...........................................114DDNS Session ..........................................123Default Body Strings ......................... 167, 170Default file path .........................................161Default Gateway ........................................120Default Port Number ......................... 135, 136Default Raw Job Setting .............................172Delayed Transmit ........................................65Delete documents after [ ] day(s) .................160Delete Files ..............................................193Department .................................................82Department Code ..................... 101, 112, 248
Clearing Counters ......................... 240, 241Deleting ........................................ 244, 245Displaying Counters ...............................239Displaying Department List ......................238Modifying ...............................................242Registering ............................................242
Department Code Enforcement .......... 112, 249Department Counter ..................................100Department Name .....................................244Department Number ..................................264Desired Zone ............................................121Destination ..........................67, 69, 234, 236Destination Setting ..53, 56, 93, 95, 218, 227Device Information ............................. 20, 112Device Name ............................................121Device Settings .........................................110Dial Type ..................................................156Dial Type (Line 2) ......................................156Direct Transmit ............................................65Directory Service .......................................194Directory Service Name .............................196Discard ....................................................156DNS Session ............................................122Do not allow any network folder to be used as a desti-
nation ........................................... 160, 162Do not delete documents automatically ........160Do not Print Blank Pages .................. 174, 175Document Name ................................ 69, 236Document Print .................................. 95, 225Domain ....................................................126

302 INDEX
Domain Name ..................................124, 254Drawer ....................................................... 21Duplex Print ............................................. 157
EECM ........................................... 65, 83, 156Email Address ............................. 82, 95, 132Email agent ...................52, 90, 92, 216, 224Email Error Transfer Address ..................... 181Email Setting .......... 53, 66, 93, 96, 219, 233Email Settings ..................................165, 166Email to ..................................................... 55Enable Alerts Trap .................................... 137Enable Apple Talk ..................................... 121Enable Authentication Trap ........................ 137Enable Bindery ......................................... 128Enable Bonjour ......................................... 121Enable DDNS ........................................... 124Enable DNS ............................................. 123Enable Email Error Forward ....................... 181Enable FTP Printing .................................. 180Enable FTP Server ................................... 135Enable HTTP Server ................................. 129Enable IPP ............................................... 179Enable IPX/SPX ....................................... 120Enable LDAP ............................................ 122Enable LPD .............................................. 178Enable NDS ............................................. 128Enable OffRamp ....................................... 132Enable Partial Email .................................. 181Enable POP3 Client .................................. 133Enable Print Email Error ............................ 181Enable Print Header .................................. 181Enable Print Message Body ....................... 181Enable Raw bi-directional .......................... 178Enable Raw TCP ...................................... 178Enable SMTP Client .................................. 130Enable SMTP Server ................................. 132Enable SNMP ........................................... 136Enable SNTP ........................................... 134Enable SSL .............122, 129, 130, 133, 135Energy Save ............................................ 113Ethernet Speed Duplex Mode ..................... 117Export/Clear Log .............. 204, 208, 210, 212Exporting
Address Book Data ................................ 204Department Code .................................. 208Journals ................................................ 209Logs ..................................................... 209
Exposure ............................ 65, 70, 151, 156
FFax ............................................................ 20Fax Number .......................................82, 155Fax Number (Security) ................................ 65Fax Reception Space Available ............20, 112
Fax Setting ............................53, 64, 82, 219Fax Settings .................................... 153, 155Fax Transmission Jobs
Deleting ...................................................27Displaying ...............................................27
Fax Transmission Space Available ....... 20, 112Fax/Internet Fax agent ........................ 52, 216File Format ...........64, 66, 67, 166, 233, 234File Name ............................66, 69, 233, 236Fine ...........................................................64Finisher ......................................................20First Name ..................................................82Folder Name ...................................... 69, 236Forward ............................................. 92, 224Forward mailbox ..........................................90Fragment Message Size ............. 66, 166, 233Fragment Page Size ........................... 64, 169Frame Type ..............................................120From Address ............. 63, 66, 166, 169, 233From Name ................ 63, 66, 166, 169, 233FTP Client ................................................135FTP Server ...............................................135Function Tab ...............................................17
GGeneral
Device Information .................................112Energy Save ..........................................113Time Stamp ...........................................114Web General Setting ..............................114
General Setting .........................................172Group
Adding ....................................................87Deleting ...................................................89Editing ....................................................87
Group Name ...............................................88
HHelp link .....................................................17Hole Punch Unit ..........................................20Host Name ...............................................124HTTP Network Service ...............................129
IImport ............................................. 202, 206Importing
Address Book Data .................................202Department Code ...................................206
Inbound Fax Routing ...................................94Install Software link ......................................17Internet Fax agent .....................................224Internet Fax Settings 53, 63, 93, 96, 168, 169,
219, .....................................................232Internet/Fax (Relay) agent ............................90Internet/Fax(Relay) ......................................92IP Address ................................................119

INDEX 303
IP Filtering ................................................ 120IP Trap Address 1-10 ................................ 137IP Trap Community ................................... 137IPX Trap Address ..................................... 137IPX/SPX .................................................. 120ITU-T ......................................................... 90
JJournal Auto Print ..................................... 157
KKeyword .................................................... 82
LLast Name ................................................. 82LDAP Authentication ................................. 251LDAP server .........................................60, 85LDAP Session .......................................... 122Line 2 Number .......................................... 155Line Select ...........................................65, 83Line-2 Mode ............................................. 156Link-Local Host Name ............................... 121Locality Name ........................................... 141Location .............................................20, 113Login Name ......................................131, 181Login page ............................................... 109Login User Name ............... 68, 162, 164, 235Logon User Name ..................................... 126LT<-->A4/LD<-->A3 .................................. 172
MMagazine Sort .......................................... 151MailBox Setting .....................................93, 94Maintenance
Backup ................................................. 188Delete Files ........................................... 193Directory Service ................................... 194Export/Clear Log ........... 204, 208, 210, 212Import ...........................................202, 206Notification ............................................ 197Remove Software .................................. 187Restore ................................................. 191Upload Software .................................... 185
Maintenance from TopAccess .................... 106Maintenance Functions .............................. 184Managing
Address Book .......................................... 80Counters ................................................. 99Fax/Internet Fax Jobs ............................... 27Mailboxes ............................................... 90Print Jobs ................................................ 24Scan Jobs ............................................... 29
Maximum Copies ...................................... 152Maximum Email / Internet Fax Size ............. 131Maximum Email Body Print ........................ 181Maximum reached ............................244, 264
MDN Reply ...............................................182Memory Transmission Report .....................157Memory Transmit ........................................65Menu Bar ...................................................17Message ....................................................20Message Logs ..........................................237MFP Local Authentication .................. 251, 261Monitor Volume .........................................155Multi Transmission Report ..........................157
NName .................................................. 20, 43NetBIOS Name .........................................125NetWare Session ......................................128Network
AppleTalk ..............................................121Bonjour .................................................121DDNS Session .......................................123DNS Session .........................................122FTP Client .............................................135FTP Server ............................................135HTTP Network Service ...........................129IPX/SPX ................................................120LDAP Session ........................................122NetWare Session ...................................128POP3 Network Service ...........................133SMB Session .........................................125SMTP Client ..........................................129SMTP Server .........................................132SNMP Network Service ...........................136TCP/IP ..................................................117
Network Path .....................68, 162, 163, 235Network Settings .......................................115Notification ............................43, 55, 95, 197Number of days to save Private, Proof and Invalid
Jobs ......................................................172
OObtain a Domain Name automatically ..........118Obtain a Domain Server Address automatically 118Obtain a POP3 Server Address automatically 119Obtain a SMTP Server Address automatically 119Obtain a SNTP Server Address automatically 119Obtain a WINS Server Address automatically 118OffRamp Print ...........................................132OffRamp Security ......................................132Open Mailbox
Deleting ...................................................97Setting up ................................................91
Optional Function ........................................20Options ......................................................20Organization Name ....................................141Organizational Unit Name ..........................141Original Mode ......................64, 70, 151, 156Original Size ...............................................70

304 INDEX
PPanel Setting ............................... 53, 55, 218Paper ........................................................ 21Paper Source ...................................174, 175Partial Wait Time ...................................... 182Password 65, 68, 69, 95, 126, 131, 134, 162,
164, .................................... 181, 196, 235PCL Font Number .............................174, 175PCL Font Pitch .................................173, 175PCL Font Point Size ..........................173, 175PCL Form Line .................................173, 175PCL Line Termination ........................174, 175PDC ........................................................ 254Phone Number ........................................... 20Picture ....................................................... 55Polling Report ........................................... 157POP Before SMTP .................................... 131POP3 Network Service .............................. 133POP3 Server Address ............................... 133Port Number .................... 135, 178, 179, 180
Directory Service Properties .................... 196FTP Client .....................................135, 136POP3 Network Service ........................... 134SMTP Client .......................................... 131SMTP Server ......................................... 132
Port Number (Command) .... 68, 162, 163, 235Port80 Enable .......................................... 179Primary DNS Server Address ..................... 123Primary Domain Controller ......................... 126Primary Port Number ................................. 129Primary SNTP Server ................................ 134Primary WINS Server ................................ 126Print Job Logs ............................................ 32Print Jobs
Deleting .................................................. 25Displaying ............................................... 24Releasing ................................................ 25
Print Password ......................................... 180Print Queue Scan Rate .............................. 181Print Service
Email Print ............................................ 181FTP Print .............................................. 180IPP Print ............................................... 179LPD Imaging ......................................... 178NetWare Imaging ................................... 181Raw TCP Print ....................................... 178
Print Service Settings ................................ 177Print Startup Page ..................................... 172Print User Name ....................................... 180Printer Settings ......................................... 171Priority Transmit ......................................... 65Private Template Groups ............................. 40Protocol ............................ 68, 161, 163, 235
Public TemplateCreating ................................................213Editing ..................................................213
PWD ..........................................................83
QQuality Transmit ................................... 65, 83Queue Name ............................................175Queue name .............................................113
RRaw Job Setting ........................................174Raw jobs - Default Orientation ........... 173, 175Raw jobs - Default Output Tray .......... 173, 175Raw jobs - Default Paper Size ........... 173, 175Raw jobs - Default Paper Type .......... 173, 175Raw jobs - Default Stapling ............... 173, 175Raw jobs - Duplex Printing ................ 173, 175Read Community ......................................136Read Write Community ..............................137Reception Journals ......................................35Reception Mode ........................................155Recovery Transmit ....................................157Reduction .................................................157Registration
About ....................................................213Fax Received Forward ............................222Internet Fax Received Forward ................222Public Template .....................................213
Registration from TopAccess ......................107Relay End Terminal Report ................... 93, 96Relay Originator ........................................157Remote 1 .......................................... 68, 235Remote 2 .......................................... 69, 236Remove Software ......................................187Reset All Counter ......................................241Reset Counters .........................................242Resolution ................................... 64, 70, 156Restore ....................................................191Retype Password ........ 68, 69, 162, 164, 235Role Based Access .......................... 254, 258Rotate Sort ...............................................157Rotation .....................................................70RTI ..........................................................156
SSave as file
Local Storage Path .................................160N/W-Fax Destination ...............................162N/W-Fax Folder ......................................163Remote 1 ..............................................161Remote 2 ..............................................161Storage Maintenance ..............................160
Save as file agent .......... 52, 90, 92, 216, 224Save as file Setting ..54, 67, 93, 97, 219, 234Save as file Settings ..................................158
INDEX 305
Save as File Space Available ...............20, 112Scan agent .........................................52, 216Scan Job Logs ............................................ 37Scan Jobs
Deleting .................................................. 29Displaying ............................................... 29
Scan Rate ........................................134, 135Scan Setting ................................ 54, 70, 219Search .................................................60, 86Search Base ............................................ 196Search root .............................................. 128Search Timeout ........................................ 196Secondary DNS Server Address ................. 123Secondary Port Number ............................ 129Secondary SNTP Server ............................ 134Secondary WINS Server ............................ 126Security Service ........................................ 137Select Agent .....................................216, 224self-signed certificate ................................. 140Send email when an error occurs ............55, 95Send email when job is completed ..........55, 95SEP .....................................................65, 83Server IP Address ..................................... 196Server Name ..................... 68, 162, 163, 235Service Name ........................................... 121Service Phone Number .............................. 113Session Timer .......................................... 114Set Limitation ...................................244, 264Setup
Copier .................................................. 150Email .................................................... 165Fax ....................................................... 153General ................................................ 110Internet Fax ........................................... 168Network ................................................ 115Print Service .......................................... 177Printer .................................................. 171Save as file ........................................... 158Version ................................................. 183
Setup from TopAccess .............................. 105SID ............................................................ 83SID/PWD ................................................... 65Single/2-Sided Scan .................................... 70Size ........................................................... 21Sleep/Auto Shut Off .................................. 113SMB Server Protocol ................................. 125SMB Session ............................................ 125SMB Signing of SMB Client ........................ 127SMB Signing of SMB Server ...................... 127SMTP Client ............................................. 129SMTP Server ............................................ 132SMTP Server Address ............................... 131SNMP Network Service ............................. 136SNTP Service ........................................... 134Sorter Mode Priority .................................. 152SSL Port Number ..............................134, 136
SSL URL ..................................................180SSL/TLS ..................................................130Standard ....................................................64State or Province Name .............................141Status ................................................. 20, 21Status Messages
Print Job ................................................286Scan Job ...............................................291Transmission/Reception Journal ..............286
Storage Path .............................................160Store to e-Filing agent .... 52, 90, 92, 216, 224Store to e-Filing Space Available .......... 20, 112SUB .................................................... 65, 83Subject ........................................ 63, 66, 233Submenu Bar ..............................................17Subnet mask .............................................119Symbol set ...................................... 174, 175
TTCP/IP .....................................................117Templates ..................................................40
Editing ............................................. 48, 80Registering ..............................................48
Terminal ID ...............................................155Time Stamp ..............................................114Top link ......................................................17TopAccess in administrator mode ...............106TopAccess in the administrator mode . 105, 107Total Counter ............................................100Transmission Journals .................................33Transmission Type ............................... 65, 83Tree .........................................................128TTI ...........................................................156Type ..........................................................21Type POP3 Login ......................................134
UUltra Fine ...................................................64Upload Software ........................................185URL .........................................................179Use local folder .................................. 67, 234Use Network Folder Destination ......... 161, 163User Authentication Enforcement 253, 257, 261User Authentication for Scan to Email . 279, 282User Management Setting ......... 252, 256, 260User Name ............................43, 55, 95, 196
WWeb General Setting .................................114WEB Language .........................................114Windows Domain Authentication .................251Work Space Available ......................... 20, 112Workgroup ................................................125

306 INDEX

DP-3540/4540DP-2050/2340/2840
OME050109C0

2-17-2, HIGASHIGOTANDA, SHINAGAWA-KU, TOKYO, 141-8664, JAPAN
MULTIFUNCTIONAL DIGITAL SYSTEMSTopAccess Guide
©2005 TOSHIBA TEC CORPORATION All rights reservedR05092093602-TTEC
Ver03 2006-07