Modifying Reports in CLIPclip.com/wp-content/uploads/Modifingreports.pdf · Modifying Reports in...
14
Modifying Reports-1 Modifying Reports in CLIP ///////////////////////// ////////////////////////////////////////////////////////////////////////////////////////////////////////////////////////////////////////////////////////////////////////////////////////////////////////////////////////////////// Modifying your Reports, Statements and Invoices NOTE: This is an advanced function. If you are not comfortable with comput- ers then you should not attempt the following steps. After you make changes to forms CLIP no longer will support that form if you get errors. Applying an update will reset all the forms back to factory settings. In CLIPxe you have the ability to modify almost all of the reports, invoices and statements. There are advantages and disadvantages to this so be care- ful and consider well before you modify these report files. Advantages: The obvious is that you make the report, invoice or statment look exactly like you want. If you want to adjust the position of the name, the color or font of different sections or just re-adjust the whole statement or invoice to your liking. Disadvantages: Once you modify the report file, it is unique to you. Sensible Software, Inc. will not support the new form. You could end up with errors or you could lose your changes for whatever reason. When you install updates from SSI the install program will install the standard reports over your modified ones, erasing your changes. We try to make the install check for modified dates and not overwrite your changes but we strongly advise you to protect your- self in this area. Make sure that you make a copy of any report that you change. Copy it to another directory or area of your hard drive so that if you ever lose it, you can copy it back. Modified reports are “data” make sure you keep back- ups of your reports along with your data. Once you have weighed the advantages and disadvantages, if you decide to go ahead and modify the report file, proceed with the instructions. The steps to modifying a report file are as follows: 1. Understand a little about report files 2. Identify the report that you want to modify 3. Use the Dot Prompt to get into the report designer 4. Make the changes you desire 5. Save the report back to your hard drive 6. Test the report A little information about report files: The report files in Foxpro are actually tables or data bases that contain all of the definitions. There are always two files for any report. One will have the extension “FRT” and the other will be an “FRX”. For example, if a report is called “jobcost” it would have two files on the hard drive, “jobcost.frt” and “jobcost.frx”. If you want to copy a report you need to copy both files or the report will be ruined. There is an interface in Foxpro that allows you to change the reports “inter- actively” This allows you to move things around, change the fonts, colors, background, size, etc... You access this interface by typing in “MODIFY REPORT reportname” where “reportname” is the name of the report you want to modify. All of the modifiable reports are in the CLIPv/REP directory. Keep your modi-
Transcript of Modifying Reports in CLIPclip.com/wp-content/uploads/Modifingreports.pdf · Modifying Reports in...

Modifying Reports-1
Modifying Reports in CLIP ///////////////////////// //////////////////////////////////////////////////////////////////////////////////////////////////////////////////////////////////////////////////////////////////////////////////////////////////////////////////////////////////
Modifying your Reports, Statements and Invoices
NOTE: This is an advanced function. If you are not comfortable with comput-ers then you should not attempt the following steps. After you make changes to forms CLIP no longer will support that form if you get errors. Applying an update will reset all the forms back to factory settings.
In CLIPxe you have the ability to modify almost all of the reports, invoices and statements. There are advantages and disadvantages to this so be care-ful and consider well before you modify these report files.
Advantages:The obvious is that you make the report, invoice or statment look exactly like you want. If you want to adjust the position of the name, the color or font of different sections or just re-adjust the whole statement or invoice to your liking.
Disadvantages:Once you modify the report file, it is unique to you. Sensible Software, Inc. will not support the new form. You could end up with errors or you could lose your changes for whatever reason. When you install updates from SSI the install program will install the standard reports over your modified ones, erasing your changes. We try to make the install check for modified dates and not overwrite your changes but we strongly advise you to protect your-self in this area.Make sure that you make a copy of any report that you change. Copy it to another directory or area of your hard drive so that if you ever lose it, you can copy it back. Modified reports are “data” make sure you keep back-ups of your reports along with your data.
Once you have weighed the advantages and disadvantages, if you decide to go ahead and modify the report file, proceed with the instructions.The steps to modifying a report file are as follows:1. Understand a little about report files2. Identify the report that you want to modify3. Use the Dot Prompt to get into the report designer4. Make the changes you desire5. Save the report back to your hard drive6. Test the report
A little information about report files:The report files in Foxpro are actually tables or data bases that contain all of the definitions. There are always two files for any report. One will have the extension “FRT” and the other will be an “FRX”. For example, if a report is called “jobcost” it would have two files on the hard drive, “jobcost.frt” and “jobcost.frx”. If you want to copy a report you need to copy both files or the report will be ruined.There is an interface in Foxpro that allows you to change the reports “inter-actively” This allows you to move things around, change the fonts, colors, background, size, etc...You access this interface by typing in “MODIFY REPORT reportname” where “reportname” is the name of the report you want to modify.All of the modifiable reports are in the CLIPv/REP directory. Keep your modi-
Modifying Reports-2
///////////////////////// //////////////////////////////////////////////////////////////////////////////////////////////////////////////////////////////////////////////////////////////////////////////////////////////////////////////////////////////////
Modifying Reports in CLIP
fied reports in this same directory and CLIP will use yours instead of the original ones.
Identifying the report you want to modify.The easiest way to know what report goes to what function is to identify the function in CLIP that produces the report. The reports that are used to create the balance forward statements and invoices that are accessed from either
Billing Process or Mid-Month billing :Plain paper statement or invoice = b0plainLaser Statement 12256 or laser Invoice 12351 Offset determines which form is used: 0 offset = b12256l0 1 offset = b12256l1 2 offset = b12256l2Small Statement 12328 or Small Invoice 12352 0 offset = b12328l0 1 offset = b12328l1 2 offset = b12328l2Small Statement or Small Invoice Pin Feed = b12354
Notice that CLIP determines which form to use based on the form chosen and the offset.Route Sheet Invoices Report files start with “pi”Plain Paper = piplain12345 - 0 offset = pi12345012345 - 1 offset = pi12345112345 - 2 offset = pi123452Service Ticket = svr_tick
Route Sheets :Route Sheet = rtsheetRoute Sheet with bar code = rtsheetbAbbreviated Route Sheet = rtshortExpanded Route Sheet = rst_expSummary Sheet = susheet
Project Report files:Project Detail Landscape mode = pj_dtl_lProject Detail Portrait mode = pj_dtl_pLoad List = pj_loadMaterials Required Landscape = pj_matlMaterials Required Portrait = pj_matpProfit Loss analysis = pj_plProject Proposal = PJ_propProject Work Order = PJ_wkordContract = PJ_contr

Modifying Reports-3
Modifying Reports in CLIP ///////////////////////// //////////////////////////////////////////////////////////////////////////////////////////////////////////////////////////////////////////////////////////////////////////////////////////////////////////////////////////////////
Special Invoices:Plain Paper = inv_plaiPlain paper statement = inv_stmt123511 0 offset = i1235110123511 1 offset = i1235111123511 2 offset = i1235112123521 0 offset = i1235210123521 1 offset = i1235211123521 2 offset = i1235212
Word Processor Reports Accessed from Other Utilities/Word ProcessorHeader and Footer chosen -wpheadftOnly Header chosen -wpheadcuEstimate Table Chosen -wpheadesNo header but footer -wplainftNo header or Footer -wpplain
The tutorial that follows is based on making small changes to the b0plain form. This report is the plain paper statement or invoice from the Mid Month or End of Month billing screen.
Note: Make a backup of your entire CLIP program before changing any reports. You might have to restore a report if you make a mistake in your editing.
Modifying Reports-4
///////////////////////// //////////////////////////////////////////////////////////////////////////////////////////////////////////////////////////////////////////////////////////////////////////////////////////////////////////////////////////////////
Modifying Reports in CLIP
Getting into the Report Designer
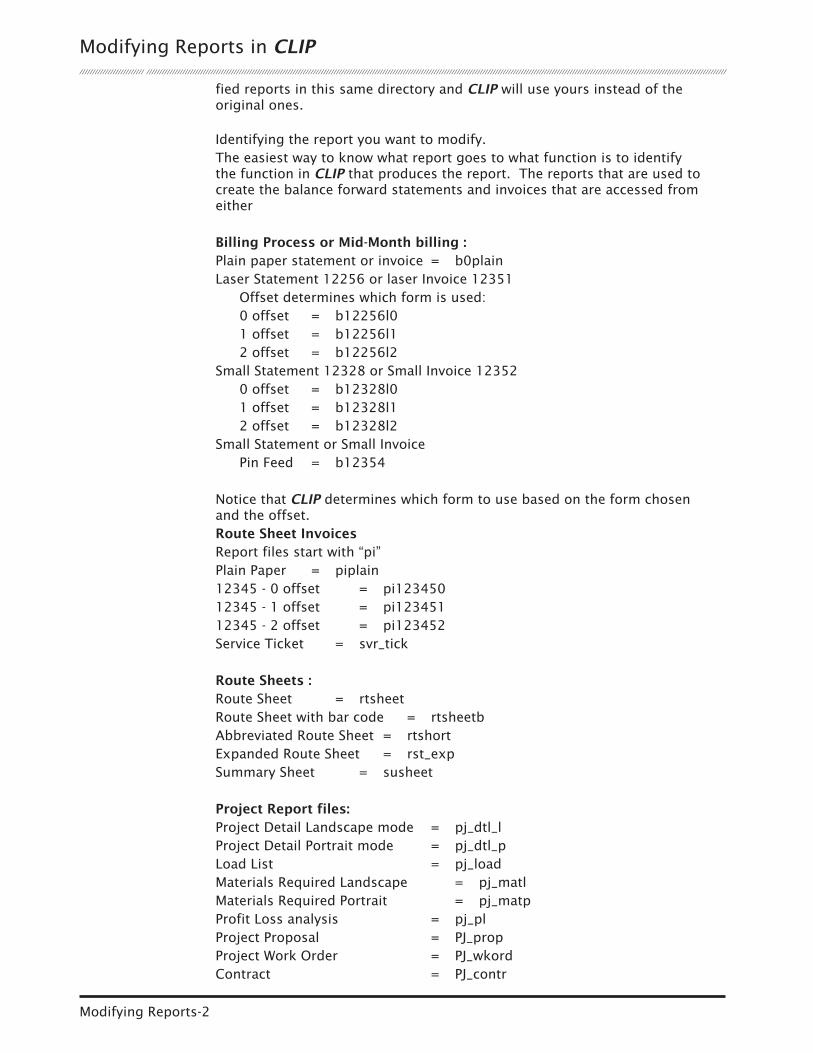
In CLIP many places there are 3 “...” located next to the form you want to modify. Go to Billing > Mid-Month BillingSelect the Plain Paper Statement from the pull down list and select the “...”
-
Maximize both the Report screen and the CLIP screen to get the best view.
Note: If your logo appears in the background, you will be able to modify your logo on the screen to adjust it as desired. (To get your logo to print on the statements and invoices, you must save it as a BMP file, call it “cologo” and place it in the BMP directory of your CLIP.)

Modifying Reports-5
Modifying Reports in CLIP ///////////////////////// //////////////////////////////////////////////////////////////////////////////////////////////////////////////////////////////////////////////////////////////////////////////////////////////////////////////////////////////////
Changing the position of an object on a form.Lets change the position of the billing name for our customer. We will want to move it over to the right a little bit. In order to change the position we first need to select the “objects” that we want to move. We can do this one at a time by clicking on an object. When the object is selected, you will see handles around the object and the “object” menu at the top of the screen will be enabled.
To select more than one object at a time, you can hold the shift key down and click on each subsequent object. You can also start the mouse on the form where there is no object and drag a box around the objects you wish to select.
Once the objects are selected, you can use the arrow buttons on your key-board to change the position. Press the right arrow button 5 times to move the address over 5 pixels to the right.
Changing the color, font os size of an object.If you want your customer’s name and address select the object and at the top select Format > Font.

Modifying Reports-6
///////////////////////// //////////////////////////////////////////////////////////////////////////////////////////////////////////////////////////////////////////////////////////////////////////////////////////////////////////////////////////////////
Modifying Reports in CLIP
You can make changes using the Font Menu.
Changing the font of an object.Select the object you want to change and then pull down the object menu and choose font.
Modifying Reports-7
Modifying Reports in CLIP ///////////////////////// //////////////////////////////////////////////////////////////////////////////////////////////////////////////////////////////////////////////////////////////////////////////////////////////////////////////////////////////////
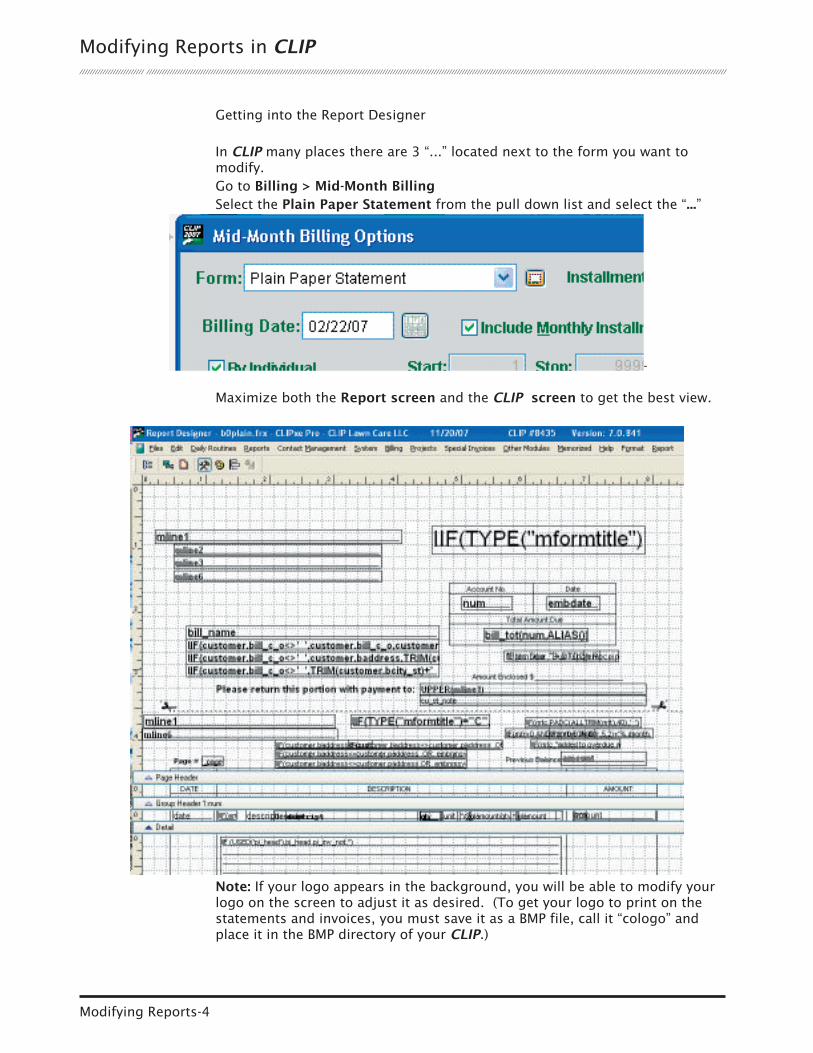
Select the font and size that you want.
Press Okay and you will return to the form designer.
Notice that if you enlarged the font, you would have to adjust the objects to fit or they would overlap each other.
Deleting an object from a report.If you are sure that you do not want an object to be displayed on a report, you can delete it by simply selecting it and pressing your delete button.
Copying an objectIn most cases you can copy an object from one part of the report to another simply by selecting it and pressing “copy” from the edit menu and then “paste” from the edit menu. You will see a copy of the object to the right and lower than the original object and it will be selected. “Grab” it with your mouse and move it down to the area you want.
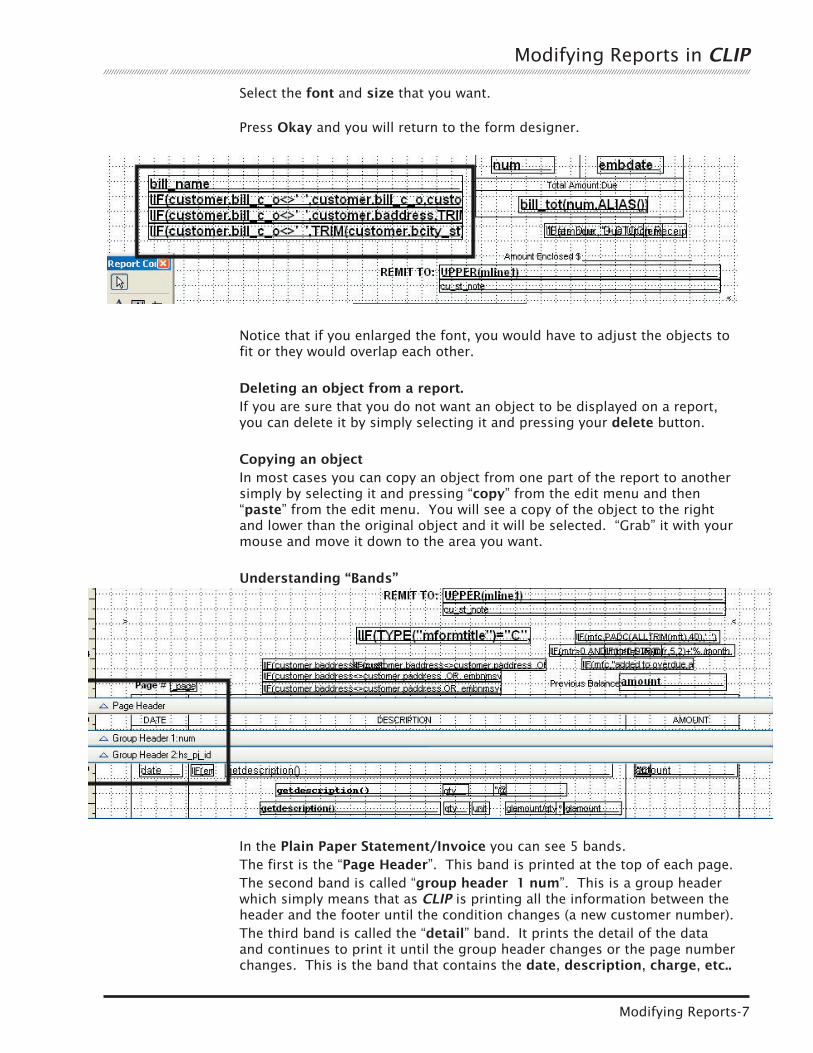
Understanding “Bands”
In the Plain Paper Statement/Invoice you can see 5 bands. The first is the “Page Header”. This band is printed at the top of each page. The second band is called “group header 1 num”. This is a group header which simply means that as CLIP is printing all the information between the header and the footer until the condition changes (a new customer number).The third band is called the “detail” band. It prints the detail of the data and continues to print it until the group header changes or the page number changes. This is the band that contains the date, description, charge, etc..

Modifying Reports-8
///////////////////////// //////////////////////////////////////////////////////////////////////////////////////////////////////////////////////////////////////////////////////////////////////////////////////////////////////////////////////////////////
Modifying Reports in CLIP
for all the transactions for the customer.The fourth band is the “Group Footer 1 num” and it signifies the end of the group. This band is empty because there is no information that we want to print when the customer number changes. In other reports, there will be sub-totals and such under this band.The last band is the “Page Footer”. This is where we print the information we want on the bottom of the page.
You can adjust the bands by grabbing the square at the left of the footer and moving it up or down as needed. You cannot move the band higher than the lowest object in the band.
Understanding the programming behind objects.Objects have code that makes them appear or disappear as requested by the user from the menus and options. You can see this code by double clicking on the object.

Modifying Reports-9
Modifying Reports in CLIP ///////////////////////// //////////////////////////////////////////////////////////////////////////////////////////////////////////////////////////////////////////////////////////////////////////////////////////////////////////////////////////////////
If you double click on the descript field (description of the transaction) then you will see the dialog box above. If you click on the “Print When” button, you will then see the print when dia-log box. This shows if there is a condition that needs to be met in order for the decription to print.
Click on the 3 “...” to see the expression that CLIP uses to determine wether the decsription should print or not.

Modifying Reports-10
///////////////////////// //////////////////////////////////////////////////////////////////////////////////////////////////////////////////////////////////////////////////////////////////////////////////////////////////////////////////////////////////
Modifying Reports in CLIP
Notice that the expression is: code = “W” AND EMPTY(hs_dt_tax) AND NOT embpdetThe means that CLIP will first check to see if the code is a “W” or a note, then see if the project detail tax is empty (it is not a detail item on a project) and then see if the variable from end of month billing or mid-month billing is not set to Arial Font. If the detail currently printing matches all of these con-ditions, the line will print. You can see how these conditions can get rather complex. Press escape to get out of this dialog.The “Remove line if blank” does what it sounds like it does, if the line is blank, don’t print anything, just skip it. That way, if all of the objects in a line are blank, there will be no line feed on the printer.
Select Cancel to return to the Report Designer.

Modifying Reports-11
Modifying Reports in CLIP ///////////////////////// //////////////////////////////////////////////////////////////////////////////////////////////////////////////////////////////////////////////////////////////////////////////////////////////////////////////////////////////////
Notice that there is another “descript” object under the one that we just worked on. If you look at the code for that one, you will find that it has almost the same code with the exception of the variable for “embpnoteb”. This is how we fullfill the desires of the operator. If you choose, “Print notes in Arial Font” we use the descript underneath. If you “un-check” that option we use the standard one. So, even though it looks like we change the font depending on what you choose from the billing screen, what we are doing is printing one object or the other depending on your choice.Enough of this. Let’s get something more useful.
Editing text on a ReportLets change the text of the “Total Amount Due” to “Pay this amount”.
Notice the text above the “bill_tot(num)” field. Notice the “A” tool in the con-trol box. Press the “A” tool and then click in the center of the “Total Amount Due” text.

Modifying Reports-12
///////////////////////// //////////////////////////////////////////////////////////////////////////////////////////////////////////////////////////////////////////////////////////////////////////////////////////////////////////////////////////////////
Modifying Reports in CLIP
The cursor should show up in the text of the object.Use the back space and the delete key to remove the text.
Type in the new text “Pay this amount”. When you are done typing in the text, click on the arrow tool on the upper left hand side of the report design-er.
You have just changed the text.To create new text, just click on the “A” text tool and then click anywhere on the form and type out the text you want. After you type it out, you can change the font and size by using the same method outlined above.
Explanation of the tools on the report designer.The tools for the report designer are on the floating control box.The first one is the arrow or pointing device. You use this tools to select object to move or modify.The “A” tool is for modifying or creating text.

Modifying Reports-13
Modifying Reports in CLIP ///////////////////////// //////////////////////////////////////////////////////////////////////////////////////////////////////////////////////////////////////////////////////////////////////////////////////////////////////////////////////////////////
The “ab” tool is for adding fields or variables to the report.The line tool is for drawing lines on the form. You can change the thickness of the line by selecting the line and using the Format > Pen.
The “square” and “oval” tools are for drawing boxes with either sharp cor-ners or rounded corners.The picture tool is for adding bitmaps to your form.
When you are finished modifying the form, hold down the CTRL key and press the “W” to save the report. The reports are saved into a seperate folder inside of the CLIPv folder called CustomReports. This is done so when up-dates are applied they will not overwrite your changes.
To test your report, run it from the menu and see your changes. If you get an error, chances are you have mis-spelled something. You may need to jump back and forth between the designer and printing a sample out to get it the way you want.
If you need to, you can restore from your backups and try to modify it again.
Have fun and be creative!
Modifying Reports-14
///////////////////////// //////////////////////////////////////////////////////////////////////////////////////////////////////////////////////////////////////////////////////////////////////////////////////////////////////////////////////////////////
Modifying Reports in CLIP