
Linux Systems Administration: Sed, Awk, and...
60
Linux Systems Administration: Sed, Awk, and Perl Lesson 1: Introduction to Scripting Before We Start Coding Logging Into the Server What is Scripting? Line Editing Patterns as Addresses Search and Replace Handing in a Quiz or Objective Lesson 2: Sed Sed Multiple Commands Output Redirection Sed Script Files Lesson 3: Awk Awk Awk Example Lesson 4: Basic Shell Scripting Shell Scripts Shell Variables IF Statements Wrap Up Lesson 5: Perl What is Perl? Getting Started Variables Operators Lesson 6: If Statements and Loops If Statements Embedded Ifs and Multiple Conditions String Conditions Lesson 7: Loops While Loops For Loops Last and Next Lesson 8: Arrays and Hashes Arrays Printing Array Foreach Hashes
Transcript of Linux Systems Administration: Sed, Awk, and...

Linux Systems Administration: Sed, Awk, and PerlLesson 1: Int ro duct io n t o Script ing
Before We Start Coding
Logging Into the Server
What is Scripting?
Line Editing
Patterns as Addresses
Search and ReplaceHanding in a Quiz or Objective
Lesson 2: SedSed
Multiple Commands
Output Redirection
Sed Script Files
Lesson 3: AwkAwk
Awk Example
Lesson 4: Basic Shell Script ingShell Scripts
Shell Variables
IF Statements
Wrap Up
Lesson 5: PerlWhat is Perl?
Getting Started
Variables
Operators
Lesson 6 : If St at ement s and Lo o psIf Statements
Embedded Ifs and Multiple Conditions
String Conditions
Lesson 7: Lo o psWhile Loops
For Loops
Last and Next
Lesson 8 : Arrays and HashesArrays
Printing Array
Foreach
Hashes

Using Foreach with Hashes
Lesson 9 : InputGetting Input
In More Ways Than One
Still More Ways
Opening a File fo r Reading
Lesson 10: Dat a Manipulat io nSplit
Push
Reverse and Jo in
Chomp
Lesson 11: Fun wit h Regular Expressio nsRegular Expressions
Quick Review
Multipliers
Special Characters
The Escape Character
Lesson 12: Mo re Fun wit h Regular Expressio nsRegular Expression Commands
Search and Replace
Translate
Not-so Regular Expressions
Search and Replace with Back References
Evaluation o f the Replacement String
Wrap Up
Lesson 13: Funct io nsFunctions
Libraries
Lesson 14: Direct o ries and FilesReading Directories
File Tests
File Manipulation
Running System Commands
Lesson 15: Recursive Direct o ry SearchRecursion
Recursive Directory Search
Removing . and ..
Making the Search Recursive
Making the Output Better
Copyright © 1998-2014 O'Reilly Media, Inc.

Copyright © 1998-2014 O'Reilly Media, Inc.
This work is licensed under a Creative Commons Attribution-ShareAlike 3.0 Unported License.See http://creativecommons.org/licenses/by-sa/3.0/legalcode for more information.

Introduction to Scripting
Before We Start CodingIn order to succeed in this course, you need a so lid understanding o f Linux system administration practices. If youhaven't met this prerequisite yet, the OST Linux Systems Administration course series is a good place to learn thoseskills. The next step in your development as a systems engineer is to gain a working knowledge o f system andnetwork security. After all, if you've spent the time to set up a server environment, the last thing you want is acompromise o f your systems to force a rebuild. In addition, programmers with the ability to maintain systems' securityare becoming increasingly valued by employers.
Learning with O'Reilly School of Technology CoursesAs with every O'Reilly School o f Technology course, we'll take a user-active approach to learning. This means that you(the user) will be active! You'll learn by do ing, building live programs, testing them and experimenting with them—hands-on!
To learn a new skill o r techno logy, you have to experiment. The more you experiment, the more you learn. Our systemis designed to maximize experimentation and help you learn to learn a new skill.
We'll program as much as possible to be sure that the principles sink in and stay with you.
Each time we discuss a new concept, you'll put it into code and see what YOU can do with it. On occasion we'll evengive you code that doesn't work, so you can see common mistakes and how to recover from them. Making mistakesis actually another good way to learn.
Above all, we want to help you to learn to learn. We give you the too ls to take contro l o f your own learning experience.
When you complete an OST course, you know the subject matter, and you know how to expand your knowledge, soyou can handle changes like software and operating system updates.
Here are some tips for using O'Reilly School o f Technology courses effectively:
T ype t he co de. Resist the temptation to cut and paste the example code we give you. Typing the codeactually gives you a feel fo r the programming task. Then play around with the examples to find out what elseyou can make them do, and to check your understanding. It's highly unlikely you'll break anything byexperimentation. If you do break something, that's an indication to us that we need to improve our system!T ake yo ur t ime. Learning takes time. Rushing can have negative effects on your progress. Slow down andlet your brain absorb the new information thoroughly. Taking your time helps to maintain a relaxed, positiveapproach. It also gives you the chance to try new things and learn more than you o therwise would if youblew through all o f the coursework too quickly.Experiment . Wander from the path o ften and explore the possibilities. We can't anticipate all o f yourquestions and ideas, so it's up to you to experiment and create on your own. Your instructor will help if yougo completely o ff the rails.Accept guidance, but do n't depend o n it . Try to so lve problems on your own. Going frommisunderstanding to understanding is the best way to acquire a new skill. Part o f what you're learning isproblem so lving. Of course, you can always contact your instructor fo r hints when you need them.Use all available reso urces! In real- life problem-so lving, you aren't bound by false limitations; in OSTcourses, you are free to use any resources at your disposal to so lve problems you encounter: the Internet,reference books, and online help are all fair game.Have f un! Relax, keep practicing, and don't be afraid to make mistakes! Your instructor will keep you at ituntil you've mastered the skill. We want you to get that satisfied, "I'm so coo l! I did it!" feeling. And you'll havesome pro jects to show off when you're done.
Lesson FormatWe'll try out lo ts o f examples in each lesson. We'll have you write code, look at code, and edit existing code. The codewill be presented in boxes that will indicate what needs to be done to the code inside.
Whenever you see white boxes like the one below, you'll type the contents into the editor window to try the exampleyourself. The CODE TO TYPE bar on top o f the white box contains directions for you to fo llow:

CODE TO TYPE:
White boxes like this contain code for you to try out (type into a file to run).
If you have already written some of the code, new code for you to add looks like this. If we want you to remove existing code, the code to remove will look like this. We may also include instructive comments that you don't need to type.
We may run programs and do some other activities in a terminal session in the operating system or o ther command-line environment. These will be shown like this:
INTERACTIVE SESSION:
The plain black text that we present in these INTERACTIVE boxes is provided by the system (not for you to type). The commands we want you to type look like this.
Code and information presented in a gray OBSERVE box is fo r you to inspect and absorb. This information is o ftenco lor-coded, and fo llowed by text explaining the code in detail:
OBSERVE:
Gray "Observe" boxes like this contain information (usually code specifics) for you to observe.
The paragraph(s) that fo llow may provide addition details on inf o rmat io n that was highlighted in the Observe box.
We'll also set especially pertinent information apart in "Note" boxes:
Note Notes provide information that is useful, but not abso lutely necessary for performing the tasks at hand.
Tip Tips provide information that might help make the too ls easier fo r you to use, such as shortcut keys.
WARNING Warnings provide information that can help prevent program crashes and data loss.
The CodeRunner ScreenThis course is presented in CodeRunner, OST's self-contained environment. We'll discuss the details later, but here'sa quick overview of the various areas o f the screen:

These videos explain how to use CodeRunner:
File Management Demo
Code Editor Demo
Coursework Demo
Logging Into the ServerYou will use CodeRunner to log into one o f our Linux-based servers in order to complete your coursework. To dothat, click the New T erminal ( ) button in CodeRunner, and enter your O'Reilly School username and password whenprompted. This will automatically log you on to the correct server, where you'll see this kind o f prompt:
INTERACTIVE SESSION:
cold1:~$
When you see this prompt, you are logged in and ready to work! After you finish working on your coursework, log outfrom the machine using the exit command:
INTERACTIVE SESSION:
cold1:~$ exit
Great! You know to access your Linux prompt. Now, before we start using Linux, I'd like you to know a little about itshistory and why you've made a smart decision in choosing to learn the language:
What is Scripting?Script ing is the term applied to a small program that is typically used to make a large job easier or to automate arepetitive task. A script might be run using cron to ro tate system logs every few days. You can also use scripts to cleano ld users out o f the password file or to retain statistics about system usage over time.
In this lesson, you will learn how to use sed and awk on the command line. Beginning with these concepts, you willsee how powerful Perl can be in the hands o f a systems administrator.

Line EditingBefore we get into sed, we need to gain a basic understanding o f line editing. You are probably very familiar with texteditors and word processors that allow you to look at a document while you move around and make changes. This issometimes called full text editing because you can see the entire document.
Line editing, on the o ther hand, is used to make changes to a single line o f a file at a time. This is done using special,editing commands rather than making the changes by hand.
Let's use ed (a standard Unix line editor) to make this all a little clearer. First we need a file to edit. Copy/httpd/conf/httpd.conf into your home directory on the co ld.
After the command prompt, type the fo llowing commands:
cold:~$ cp /httpd/conf/httpd.conf .
Now we can line edit our copy o f the file.
After the command prompt, type the fo llowing commands:
cold:~$ ed httpd.conf1168702p qcold:~$
The first thing you will no tice is that ed reports the number o f characters in the file. I am not really sure why a line editorreports the number o f characters, but it does. After displaying the number o f characters, your cursor just sits therewithout a prompt. ed has positioned you at the last line o f the file and is waiting for you to tell it what to do. The finalinstruction used was the q command to quit the current editing session. Use p to print the current line. In the exampleabove, the last line o f the httpd.conf file is empty.
Note The standard Unix method o f typing ct rl+c to break out o f a command will no t work with ed.
It does not do us much good to just sit on the last line o f a file. We can specify a different line by typing a number. Forexample, if we want to go to line 5, we would just type 5 .
After the command prompt, type the fo llowing commands:
cold:~$ ed httpd.conf11687025ServerRoot /httpd
Hitting 5 causes ed to print out line 5 and make it our current position.
Type the fo llowing blue text:
dp#PidFile /httpd/logs/httpd.pid - moved to /etc/httpd/conf.d/local.incw1168684qcold:~$
The d command deletes the current line. After deleting line 5 we printed out the current line. We are still on line 5, but theo ld line is gone (we are at what used to be line 6). w is typed to save our changes. This writes the file. Finally, eddisplays the updated to tal number o f characters in the file after writing.
Typing one command at a time can be pretty boring though. Lucky for us, ed allows us to combine commands into asingle string.

After the command prompt, type the fo llowing commands:
cold:~$ ed httpd.conf11686845dpScoreBoardFile /httpd/logs/httpd.scoreboardwq1168614cold:~$
The first string says, "go to line 5, delete the line, and then print the current line (the new line 5)." This string can bebroken up into two parts: the address and the command. The address in this case is simply a line number. That is allfine and good, but it is only useful to use a line number if we know exactly where we want to make changes.
Patterns as AddressesInstead o f using line numbers, ed allows us to pick lines that match a specified pattern. Patterns are Unix regularexpressions contained inside two forward slashes (/). Let us find and print the first line that contains "htdocs".
After the command prompt, type the fo llowing commands:
cold:~$ ed httpd.conf1168614/htdocs/#DocumentRoot /httpd/htdocs
Chances are, there are multiple lines that will match that pattern. We can use g to run a global command.
Type the fo llowing blue text:
g/htdocs/#DocumentRoot /httpd/htdocs#DocumentRoot "/home/webpages/userworld/htdocs"
The print command is implied. Let us look at what we have. This is a global pattern that is a regular expression. Thedefault command is to print out the matching lines. Hmmm... global regular expression print. You remember the grepcommand right? That is no co incidence.
Imagine for a moment that this is not an important file (actually, it is not, it is just a copy). We can add commands to ouraddress pattern.
Type the fo llowing blue text:
g/htdocs/dq?qcold:~$
We have just deleted every line that contains "htdocs". Oops. If you try to quit ed after making changes and withoutwriting the file first, it will give you a question mark "?". If you want to quit without saving changes, just type q a secondtime.
Search and ReplaceAnother common use for a line editor is search and replace. The s (o r switch) command exists specifically fo r thispurpose. The s command requires that you give it a pattern for which to search and something with which to replacethe pattern. It looks like this:
OBSERVE:
s/pattern/replacement/

Recall that we needed to use the g flag in order to use a command on every line that matched the address pattern. Thesame is true for the switch command. It will only replace the first occurrence o f the pattern within a line unless wespecify o therwise with a trailing g. Put this together with what we already know and we can replace every occurrence o f"specific" with "precise".
After the command prompt, type the fo llowing commands:
cold:~$ ed httpd.conf1168614g/specific/s/specific/precise/gp# you might expect, make sure that you have preciseally enabled it
This command will match any line with "specific" in it and then replace every occurrence o f "specific" with "precise."The current line becomes the last line where a change took place. Printing the line shows that the results may not be aswe intended. Remember, we are matching a pattern, not just words. That is how "specifically" became "preciseally". Abetter set o f commands would include spaces on either side o f "specific" like the fo llowing:
Observe the fo llowing:
g/ specific /s/ specific / precise /gg/ specific$/s/ specific$/ precise/g/^specific /s/^specific /precise /
The first command would replace "specific" found in the middle o f a line. Do you remember what the o ther two woulddo?
Handing in a Quiz or Objective
After you finish the lesson, you have quizzes and objectives to complete that allow you to demonstrate theconcepts you have learned. Under the lesson heading, there is an objective and/or quiz item. Click on this toreveal the instructions. When you finish, scro ll down the top half o f the CodeRunner screen and click theHand in button on the right side o f the window. You will use the same procedure to hand in all objectives.(Don't use the Drop In box, but simply click the Hand In button to hand in any files created. This button willalert your mentor that your work is ready to be evaluated.
Copyright © 1998-2014 O'Reilly Media, Inc.
This work is licensed under a Creative Commons Attribution-ShareAlike 3.0 Unported License.See http://creativecommons.org/licenses/by-sa/3.0/legalcode for more information.

Sed
SedWhen we want to write scripts that can use the capabilities o f ed we look to sed. You can think o f this as Scripting withEd. First, let us learn how to use sed on the command line.
Unlike ed, we can not use sed interactively. We have to give sed a file and a list o f commands to perform on it. Let usapply some of the same commands we went through with ed to sed to see how sed operates.
After the command prompt, type the fo llowing commands:
cold:~$ sed -n '/htdocs/p' httpd.conf#DocumentRoot /httpd/htdocs#DocumentRoot "/home/webpages/userworld/htdocs"
This is the same output we got when we used g/ht do cs/ with ed. One o f the major differences between sed and ed isthat sed looks at every line in the file automatically. As a result we do not have to include the beginning g. Additionally,sed will print out every line in the file regardless o f whether it was changed, unless we tell it no t to with the -n flag.(Printing out every line is useful fo r output redirection, as we will see later.) Also , distinguishing sed from ed is theinclusion o f the p command to print out the lines that were changed or, in this case, the lines that matched the patternof "htdocs".
Let us redo another one o f our previous examples.
After the command prompt, type the fo llowing commands:
cold:~$ sed -n 's/specific/precise/gp' httpd.conf# Note that from this point forward you must preciseally allow# you might expect, make sure that you have preciseally enabled it
Notice that we did not include the address pattern. Since sed looks at every line o f the file, when the address andreplacement pattern are the same, it is not necessary to include the address pattern. However, we could replace onlyon lines that contain "Note".
After the command prompt, type the fo llowing commands:
cold:~$ sed -n '/Note/s/specific/precise/gp' httpd.conf# Note that from this point forward you must preciseally allow
Multiple CommandsSed will also execute more than one command as it reads through the lines o f a file. There are two ways we can getsed to execute multiple commands simultaneously. One way is to use the -e flag for each command we want toexecute.
After the command prompt, type the fo llowing commands:
cold:~$ sed -n -e '/htdocs/p' -e '/Indexes/p' httpd.conf#DocumentRoot /httpd/htdocs#DocumentRoot "/home/webpages/userworld/htdocs"Options FollowSymLinks ExecCGI Indexes IncludesOptions FollowSymLinks Indexes Includes# This may also be "None", "All", or any combination of "Indexes",Options Indexes FollowSymLinks ExecCGI IncludesOptions Indexes MultiViews

Let us try another example.
After the command prompt, type the fo llowing commands:
cold:~$ sed -n -e '/Indexes/p' -e '/ndexes/p' httpd.confOptions FollowSymLinks ExecCGI Indexes IncludesOptions FollowSymLinks ExecCGI Indexes IncludesOptions FollowSymLinks Indexes IncludesOptions FollowSymLinks Indexes Includes# This may also be "None", "All", or any combination of "Indexes",# This may also be "None", "All", or any combination of "Indexes",Options Indexes FollowSymLinks ExecCGI IncludesOptions Indexes FollowSymLinks ExecCGI IncludesOptions Indexes MultiViewsOptions Indexes MultiViews# server-generated indexes. These are only displayed for FancyIndexed# directory indexes.
This proves that both commands get executed on each line. We have already printed the line with the first command,but the second command matches the line as well and ends causing it to be printed again.
Another way to use multiple commands is to separate them with a semi-co lon.
After the command prompt, type the fo llowing commands:
cold:~$ sed -n '/htdocs/s/home/house/g ; /htdocs/p' httpd.conf#DocumentRoot /httpd/htdocs#DocumentRoot "/house/webpages/userworld/htdocs"
This command replaces "home" with "house" on any line that contains "htdocs." Also, any line with "htdocs" is printedregardless o f whether a change took place.
Output RedirectionWe can make changes to the lines o f a file, but how do we save them? By taking advantage o f Unix output redirection.Remember we are using the -n option to keep sed from printing out all o f the lines. If we remove that option, the entirefile, with any changes, will be printed to standard output. We can redirect this output to another file.
After the command prompt, type the fo llowing commands:
cold:~$ sed '/htdocs/s/home/house/g' httpd.conf > httpd2.conf
This command line makes the desired changes to the lines and prints all o f the lines to the new file: httpd2.conf. Whenyou are not using the -n option, you typically do not want to use the print option (p) either. Do ing so would cause thelines to print out twice.
WARNING Remember, we can not write to the same file from which we are reading. Attempting to do this cancause unpredictable results.
Once the file is written we can move it back to the original file.
After the command prompt, type the fo llowing commands:
cold:~$ sed '/htdocs/s/home/house/g' httpd.conf > httpd2.confcold:~$ mv httpd2.conf httpd.conf
Now let us learn how to delete lines that contain "Indexes" or "indexes".

After the command prompt, type the fo llowing commands:
cold:~$ sed '/[Ii]ndexes/d' httpd.conf > httpd2.conf
Instead o f deleting lines or replacing whole patterns, we have the option o f translation. The idea behind translation isthat you can replace one set o f characters with another set, but they do not have to be in any particular order or next toeach o ther. Here is an example:
After the command prompt, type the fo llowing commands:
cold:~$ sed -n 'y/DR/dr/ ; /htdocs/p' httpd.conf#documentroot /httpd/htdocs#documentroot "/home/webpages/userworld/htdocs"
Notice, we are not replacing "DR" with "dr", but instead we are translating any uppercase D to a lowercase D and anyuppercase R to a lowercase r. "DocumentRoot" becomes "documentroot". Keep in mind though, the changes areapplied on any line with a capital D or R, not just the ones we printed out. You are not restricted to using like letterseither. We could have replaced A with z or t with 3.
Sed Script FilesEditing long sed commands at the prompt can be time consuming, especially if we want to use them over and over. Toget around this little hassle we write sed scripts. Create a file called changes.sed that contains the fo llowing sedcommands:
Type the fo llowing in changes.sed:
/Indexes/ds/ document / letter /gs/ document$/ letter/s/^document /letter //htdocs/s/home/house/gw httpd2.conf
Here the w command writes lines to a file. It allows us create the output file in the script instead o f redirecting the outputon the command line. Let us add the -n flag back into the sed command line.
After the command prompt, type the fo llowing commands:
cold:~$ sed -nf changes.sed httpd.conf
The -f flag lets us specify the script file to use when processing our file.
Sed, just like most Unix commands, can read from standard input rather than reading a file. All we have to do is pipethe output from another command into sed.
After the command prompt, type the fo llowing commands:
cold:~$ ps aux |sed -n 'y/1234567890/abcdefghij/ ; /username/p'username acdii j.j j.b bcbh acfj pts/j S Aprcj j:jj -bashusername aedge j.j j.b bccf achj pts/b S Mayja j:jj -bashusername cagcj j.j j.a bedh gdd pts/b R ab:df j:jj ps auxusername cagca j.j j.j acdh dbh pts/b S ab:df j:jj sed -n y/abcdefgh
You can read about many more sed commands on the sed man page. See you at the next lesson!
Copyright © 1998-2014 O'Reilly Media, Inc.
This work is licensed under a Creative Commons Attribution-ShareAlike 3.0 Unported License.See http://creativecommons.org/licenses/by-sa/3.0/legalcode for more information.

See http://creativecommons.org/licenses/by-sa/3.0/legalcode for more information.

Awk
AwkAwk is the companion o f sed. It works almost the same way, by examining each line o f input. The main differencebetween the two is that awk automatically divides each line into fields, sed does not. Awk divides a line into fields byseparating words divided by spaces, but later we will learn how to change the field separator to anything we want. Butright now, let us look at how to print out every line that contains "sendmail" using awk.
After the command prompt, type the fo llowing commands:
cold:~$ awk '/Indexes/ { print $0 }' httpd.confOptions FollowSymLinks ExecCGI Indexes IncludesOptions FollowSymLinks Indexes Includes# This may also be "None", "All", or any combination of "Indexes",Options Indexes FollowSymLinks ExecCGI IncludesOptions Indexes MultiViews
Here we have matched the line and used the print command to print out $0 . Since awk divided the line into fields, weneed a way to reference them. $0 references the entire line. If we wanted to print out just the second field, it would be aneasy change.
After the command prompt, type the fo llowing commands:
cold:~$ awk '/Indexes/ { print $2 }' httpd.confFollowSymLinksFollowSymLinksThisIndexesIndexes
Cool, huh? But using httpd.conf does not really show off the true power o f awk. Let us try working with a different file.
After the command prompt, type the fo llowing commands:
cold:~$ cp /etc/passwd .
You are already familiar enough with /etc/passwd to know that it has co lon separated fields. Let us make awk separateby co lons instead o f spaces.
After the command prompt, type the fo llowing commands:
cold:~$ awk -F ":" '{ print $1 }' passwdrootbindaemon...
This command prints out the first field, which happens to contain the usernames. We can print out whichever field wewant though. Having only this basic understanding o f awk, we can see immediately how useful it is when combinedwith o ther Unix commands. Check out the command below:
Observe the fo llowing:
kill -9 `ps aux |grep username |awk '{ print $2 }'`
The same thing could be done without grep, though it would be slightly slower.

Observe the fo llowing:
kill -9 `ps aux |awk '/username/ { print $2 }'`
The commands inside o f the back ticks (`) are executed first and the resulting output is used as a list fo r kill -9 . ps auxretrieves a list o f all o f the running processes and the output is piped to awk which prints out the second field o f anyline that contains "username". The second field happens to be the PID o f the processes. The result is that all o f theprocesses owned by that username get killed.
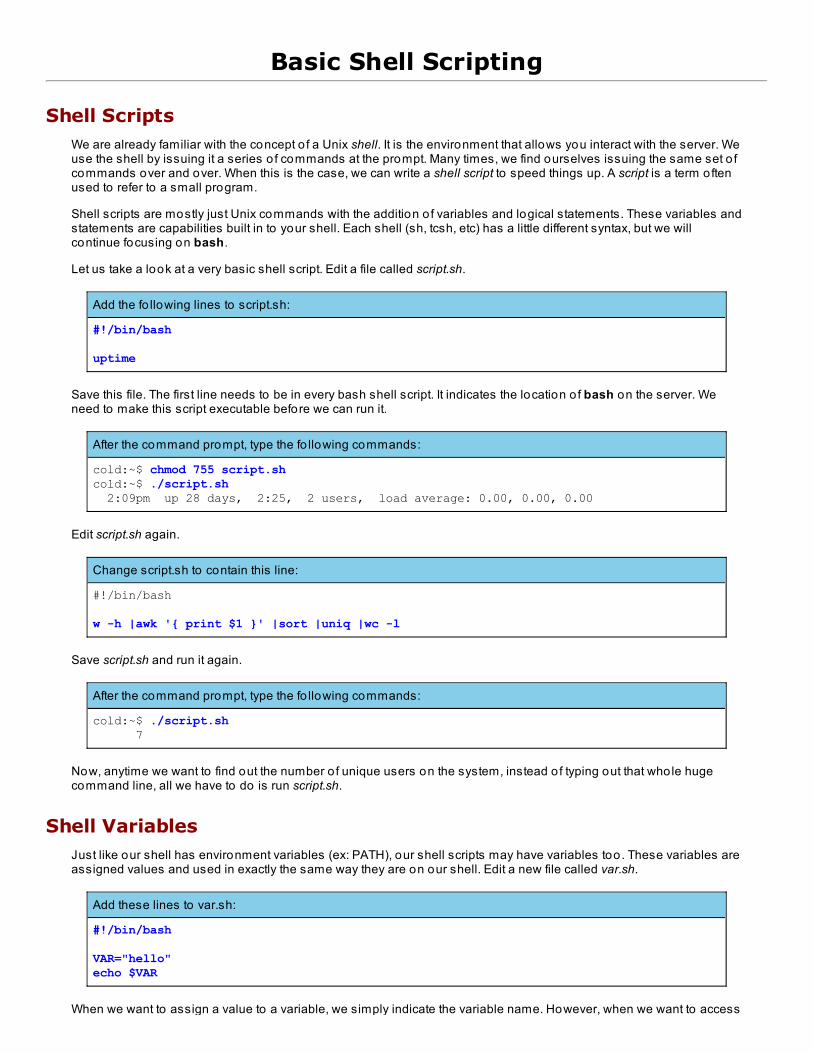
Awk ExampleLet us say we want to find out the to tal number o f unique users currently logged into a system. We can retrieve a list o fusers with the w command.
After the command prompt, type the fo llowing commands:
cold:~$ w 11:09am up 1:37, 1 user, load average: 0.00, 0.00, 0.00USER TTY FROM LOGIN@ IDLE JCPU PCPU WHATkbutson pts/8 cold.useractive. 10:36am 0.00s 0.09s 0.02s w
Hmm...well, that was not very hard. We have just one unique user (there may be more when you try it). Let us look at anexample o f a server that is a little more active. In your home directory you will find a file called w.txt. Let us look at thecontents o f this file.
After the command prompt, type the fo llowing commands:
cold:~$ cat w.txt 3:36pm up 24 days, 20:17, 22 users, load average: 0.05, 0.06, 0.08USER TTY FROM LOGIN@ IDLE JCPU PCPU WHATjohndoe2 ttyq0 v1740426-a.domai 10:31am 5:03m 0.05s 0.05s -bash fsmith ttypf work987.useracti 2:01pm 1:20m 4.08s 4.03s pine johndoe2 ttyq3 work1.useractive 11:25am 14:12 0.19s 0.19s -bash alexandr ttyp6 host.useractive. 8:08am 2:06m 0.08s 0.08s -bash johndoe2 ttyq5 work1.useractive 11:28am 3:51m 0.06s 0.06s -bash george11 ttypd work56.useractiv Mon 1pm 0.00s 0.60s 0.07s w monkey ttyq7 work2.useractive 2:02pm 27:21 0.66s ? -george11 ttyq8 work56.useractiv 1:11pm 1:54 1.20s 0.94s emacs -ljohndoe2 ttyq2 work1.useractive 11:24am 3:38m 0.22s ? -johndoe2 ttyp0 v1740426-a.domai 1:18am 5:23m 0.29s 0.13s slogin fmonkey ttyp1 v1825631-a.domai Mon12pm 3:40 0.27s 0.27s -bash george11 ttyp5 v1740426-a.domai 2:08am 6:12m 0.09s 0.09s -bash johndoe2 ttyp8 work1.useractive Fri 2pm 18:59 0.23s ? -mouse ttype v946166-a.domain 12:41pm 10:59 0.88s 0.84s /usr/locmonkey ttyq9 monkeybar.useract 11:56am 50:37 0.64s 0.51s emacs ijohndoe2 ttypb work1.useractive 11:21am 3:23m 0.07s 0.07s -bash monkey ttyp7 v1825631-a.domai Mon12pm 10:58m 0.63s 0.51s emacs inmouse ttyp3 v946166-a.domain 12:43pm 2:22 1.43s ? -catdog ttyp9 work52.useractiv 3:06pm 8:31 1.15s 1.13s pine monkey ttyp4 v1825631-a.domai 1:29am 11:33m 0.39s 0.31s emacs infsmith ttyqc work987.useracti 1:19pm 2:06m 0.07s 0.07s -tcsh
If we count these, we will see that there are 7 unique users. Our goal is to retrieve that number directly by using severalUnix commands. How do we build something that will accomplish this? Well, think about how you counted them. Thefirst step was to eliminate all o f the stuff that did not matter, everything that is not a username. We began by getting rido f the header information provided by w so that all o f the lines retrieved were o f the same format. Lucky for us, w had a-h flag that suppressed the headers. Output representing w -h was stored in a file called wh.txt.
The next step is to take all o f the lines (which now look pretty much the same) and figure out how to return only theusernames. This is where awk comes in handy.

After the command prompt, type the fo llowing commands:
cold:~$ cat w.txt |awk '{ print $1 }'johndoe2fsmithjohndoe2alexandrjohndoe2george11monkeygeorge11johndoe2johndoe2monkeygeorge11johndoe2mousemonkeyjohndoe2monkeymousecatdogmonkeyfsmith
That is already a lo t easier to read. Unix provides us with another useful command called uniq. This command willremove duplicates from a sorted list. But how do get your list sorted in the first place? Since sorting is a pretty commontask, I bet Unix has a so rt command.
After the command prompt, type the fo llowing commands:
cold:~$ cat wh.txt |awk '{ print $1 }' |sort |uniqalexandrcatdogfsmithgeorge11johndoe2monkeymouse
Almost there. This is really easy to read, but remember our ultimate goal is to find the actual number o f unique users.The wc command stands for word count. With the -l (a lo wercase L) option, wc will return the number o f lines (whichis also the number o f unique users).
After the command prompt, type the fo llowing commands:
cold:~$ cat w.txt |awk '{ print $1 }' |sort |uniq |wc -l 7
Awesome.
As this example shows, it is useful to think o f all these different Unix commands as too ls in a too lbox. In most cases,using only one too l won't do the job, but using many too ls together in the right order can so lve almost any problem.
Copyright © 1998-2014 O'Reilly Media, Inc.
This work is licensed under a Creative Commons Attribution-ShareAlike 3.0 Unported License.See http://creativecommons.org/licenses/by-sa/3.0/legalcode for more information.
Basic Shell Scripting
Shell ScriptsWe are already familiar with the concept o f a Unix shell. It is the environment that allows you interact with the server. Weuse the shell by issuing it a series o f commands at the prompt. Many times, we find ourselves issuing the same set o fcommands over and over. When this is the case, we can write a shell script to speed things up. A script is a term oftenused to refer to a small program.
Shell scripts are mostly just Unix commands with the addition o f variables and logical statements. These variables andstatements are capabilities built in to your shell. Each shell (sh, tcsh, etc) has a little different syntax, but we willcontinue focusing on bash.
Let us take a look at a very basic shell script. Edit a file called script.sh.
Add the fo llowing lines to script.sh:
#!/bin/bash
uptime
Save this file. The first line needs to be in every bash shell script. It indicates the location o f bash on the server. Weneed to make this script executable before we can run it.
After the command prompt, type the fo llowing commands:
cold:~$ chmod 755 script.shcold:~$ ./script.sh 2:09pm up 28 days, 2:25, 2 users, load average: 0.00, 0.00, 0.00
Edit script.sh again.
Change script.sh to contain this line:
#!/bin/bash
w -h |awk '{ print $1 }' |sort |uniq |wc -l
Save script.sh and run it again.
After the command prompt, type the fo llowing commands:
cold:~$ ./script.sh 7
Now, anytime we want to find out the number o f unique users on the system, instead o f typing out that whole hugecommand line, all we have to do is run script.sh.
Shell VariablesJust like our shell has environment variables (ex: PATH), our shell scripts may have variables too. These variables areassigned values and used in exactly the same way they are on our shell. Edit a new file called var.sh.
Add these lines to var.sh:
#!/bin/bash
VAR="hello"echo $VAR
When we want to assign a value to a variable, we simply indicate the variable name. However, when we want to access

the variable, we need to use the "$" symbol. Save and execute var.sh.
After the command prompt, type the fo llowing commands:
cold:~$ chmod 755 var.shcold:~$ ./var.shhello
In fact, we can even access existing environment variables.
Add this line to var.sh
#!/bin/bash
VAR=helloecho $VARecho $PATH
Again, let us save and execute var.sh.
After the command prompt, type the fo llowing commands:
cold:~$ ./var.shhello/users/username/.gemhome/bin:/usr/local/bin:/bin:/usr/bin:/usr/local/sbin:/usr/sbin:/sbin
The next step is to assign the output o f a command (or set o f commands) to a variable that we can use later. Edit theprevious script.sh file again.
Add these lines to script.sh:
#!/bin/bash
NUM=`w -h |awk '{ print $1 }' |sort |uniq |wc -l`echo $NUM
Here, we have added backward single quotation marks around our command string to indicate that we want to storethe output in NUM. By the way, the backward quotation mark key is the same key as the tilde (~) key.
After the command prompt, type the fo llowing commands:
cold:~$ ./script.sh2
IF StatementsMany times, we will want to execute a certain series o f commands only if a variable has a specific value. To test fo rthese conditions, we need to use an if statement. Let us try it. Edit script.sh again.
Add these lines to script.sh:
#!/bin/bash
NUM=`w -h |awk '{ print $1 }' |sort |uniq |wc -l`echo $NUM
if [ $NUM = 2 ]; then w echo $NUMfi
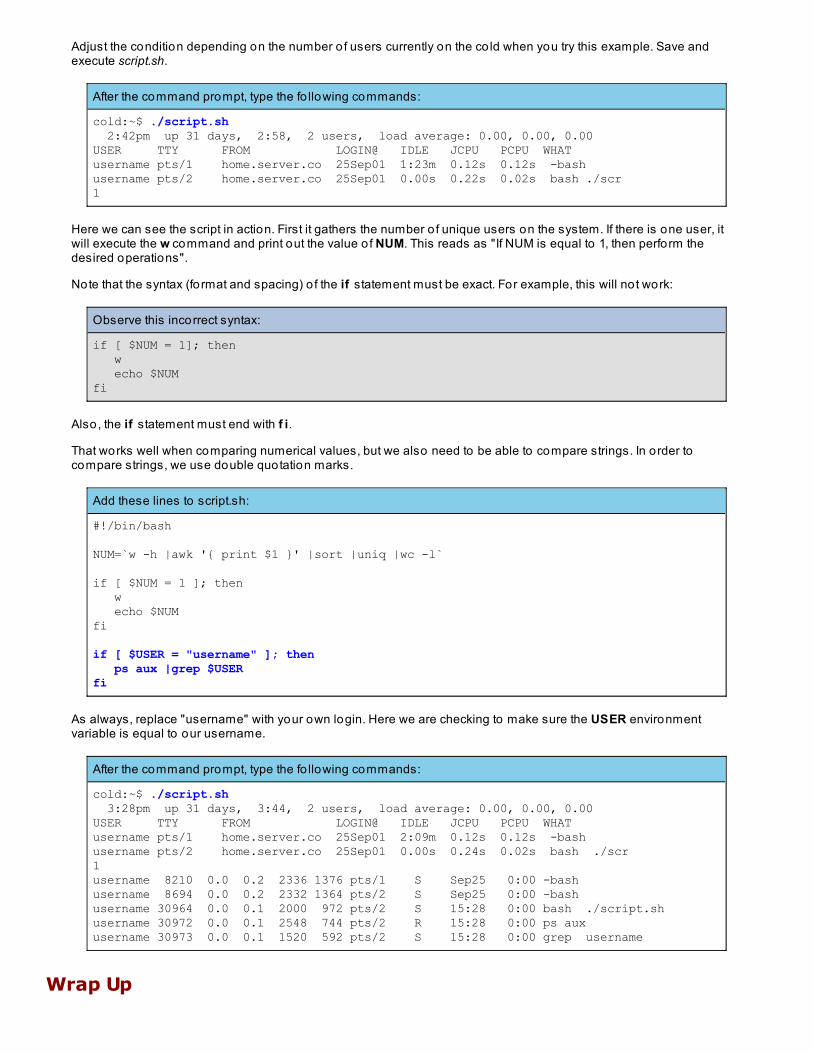
Adjust the condition depending on the number o f users currently on the co ld when you try this example. Save andexecute script.sh.
After the command prompt, type the fo llowing commands:
cold:~$ ./script.sh 2:42pm up 31 days, 2:58, 2 users, load average: 0.00, 0.00, 0.00USER TTY FROM LOGIN@ IDLE JCPU PCPU WHATusername pts/1 home.server.co 25Sep01 1:23m 0.12s 0.12s -bash username pts/2 home.server.co 25Sep01 0.00s 0.22s 0.02s bash ./scr1
Here we can see the script in action. First it gathers the number o f unique users on the system. If there is one user, itwill execute the w command and print out the value o f NUM. This reads as "If NUM is equal to 1, then perform thedesired operations".
Note that the syntax (fo rmat and spacing) o f the if statement must be exact. For example, this will no t work:
Observe this incorrect syntax:
if [ $NUM = 1]; then w echo $NUMfi
Also, the if statement must end with f i.
That works well when comparing numerical values, but we also need to be able to compare strings. In order tocompare strings, we use double quotation marks.
Add these lines to script.sh:
#!/bin/bash
NUM=`w -h |awk '{ print $1 }' |sort |uniq |wc -l`
if [ $NUM = 1 ]; then w echo $NUMfi
if [ $USER = "username" ]; then ps aux |grep $USERfi
As always, replace "username" with your own login. Here we are checking to make sure the USER environmentvariable is equal to our username.
After the command prompt, type the fo llowing commands:
cold:~$ ./script.sh 3:28pm up 31 days, 3:44, 2 users, load average: 0.00, 0.00, 0.00USER TTY FROM LOGIN@ IDLE JCPU PCPU WHATusername pts/1 home.server.co 25Sep01 2:09m 0.12s 0.12s -bash username pts/2 home.server.co 25Sep01 0.00s 0.24s 0.02s bash ./scr1username 8210 0.0 0.2 2336 1376 pts/1 S Sep25 0:00 -bashusername 8694 0.0 0.2 2332 1364 pts/2 S Sep25 0:00 -bashusername 30964 0.0 0.1 2000 972 pts/2 S 15:28 0:00 bash ./script.shusername 30972 0.0 0.1 2548 744 pts/2 R 15:28 0:00 ps auxusername 30973 0.0 0.1 1520 592 pts/2 S 15:28 0:00 grep username
Wrap Up

Shell scripts are used most o ften during system startup when o ther scripting languages might not be available. Take atlook at /etc/rc.d/rc.sysinit fo r a good shell script example.
With the increasing popularity o f Perl, people are using shell scripts much less for day-to-day scripting needs. As aresult, we will be focusing on Perl fo r the rest o f this course.
Copyright © 1998-2014 O'Reilly Media, Inc.
This work is licensed under a Creative Commons Attribution-ShareAlike 3.0 Unported License.See http://creativecommons.org/licenses/by-sa/3.0/legalcode for more information.

Perl
What is Perl?The first version o f Perl (Practical Extraction and Report Language) was written by Larry Wall in 1987. Since its creation,Perl has become popular with systems administrators because o f its ease o f use and power with text manipulation. Itis more versatile than sed or awk and is typically easier to write than o ther languages. Perl is an immensely popularlanguage for writing CGI scripts, but we will be concentrating on its usefulness to systems administrators.
Perl is an interpreted language, meaning that its instructions are converted into machine code while a Perl script isexecuted. Conversely, a compiled language is converted to machine language before its execution.
We are go ing to spend the next few lessons becoming familiar with the fundamentals o f Perl syntax before applying itto systems administrator tasks.
Note If you have taken our CGI/Perl class, a lo t o f the Perl syntax will be familiar to you. However, theapplication o f Perl in a non-CGI environment will be something you are not familiar with yet.
Getting StartedThe first thing we need to do is locate the Perl executable. We can find it by using the code below:
After the command prompt, type the fo llowing commands:
cold:~$ which perl/usr/local/bin/perl
The very first line o f our Perl scripts will contain the location o f the Perl executable. Let us go ahead and write our firstPerl script. Edit a file called test.pl so that it contains the fo llowing lines:
Add these lines to test.pl
#!/usr/local/bin/perl
print "blaa";
This may sound a tad obvious, but it is important to make sure that the first line starts at the very beginning on the farleft side. Also, notice that the print statement ends in a semi-co lon. Most lines in Perl will end in a semi-co lon becausethat denotes the end o f a statement. Save the script and exit your editor.
After the command prompt, type the fo llowing commands:
cold:~$ ./test.plbash: ./test.pl: Permission denied
Hmm...that is not good. We have to make the script executable before we can use it.
After the command prompt, type the fo llowing commands:
cold:~$ chmod 755 test.plcold:~$ ./test.plblaacold:~$
We just printed out "blaa", but it would be a little nicer if it were on a line by itself.

Make this change to test.pl
#!/usr/local/bin/perl
print "blaa\n";
The backslash (\) is called the escape character in Perl. This indicates to Perl that the character right after it should betreated specially. For instance, the combination o f \n represents a new line. The escape character can also be used toprint quotes that would o therwise interfere with our print statement.
Make this change to test.pl:
#!/usr/local/bin/perl
print "\"blaa\"\n";
Save test.pl and try it out.
After the command prompt, type the fo llowing commands:
cold:~$ ./test.pl"blaa"
There are many more escape characters that we will learn about as we go.
VariablesJust printing out lines o f text does not do us much good on its own though. Let us go over some different variabletypes in Perl. A variable can be thought o f as a box that contains a piece o f data. When storing something in a variable,it does not matter if it is a number or a string.
Make the fo llowing changes to test.pl:
#!/usr/local/bin/perl
$var = 3;$var2 = "This is a string";
print "$var\n";print "$var2\n";
Save and test.
After the command prompt, type the fo llowing commands:
cold:~$ ./test.pl3This is a string
Regular variables in Perl always start with $ . Here, we have created a couple o f simple variables and printed them out.They are not particularly useful individually though. We need to be able to change the values o f those variables anduse them in conjunction with each o ther.
OperatorsIn the previous example, when we created our variables we gave them values with the assignment operator o r equalssign (=). We can also perform mathematical operations on them. Let us create a new file called operator.pl with thefo llowing lines:

Add these lines to operator.pl:
#!/usr/local/bin/perl
$var1 = 3;$var2 = 5;
$var3 = $var1 + $var2; # $var3 equals 8 (3+5)$var4 = $var3 * $var2; # $var4 equals 40 (8*5)$var5 = ($var4 / $var2) - $var3; # $var5 equals 0 ((40/5) - 8)
print "$var3 $var4 $var5\n";
Here we can see that basic math operations work just fine. Test this script to make sure you get the right values.Remember, you will have to make the file executable before you can run it.
NoteComments in Perl start with a pound sign (#). Anything after a pound sign is ignored when the script isexecuting. Comments are used to explain the code to o ther programmers who look at your code. It isalways a good idea to comment your code especially as your code gets more complex.
Make the fo llowing changes to operator.pl:
#!/usr/local/bin/perl
$var1 = 3;$var2 = 5;
$var1 = $var1 ** $var2; # $var1 equals 243$var3 = $var1 % $var2; # $var3 equals 3
print "$var1 $var3\n";
Notice that we can use a variable in the operation to assign it a new value. Here we have used the current value o f$var1 to come up with a new one. The exponent operator (**) raises $var1 to the power o f $var2.
An operator you might not be familiar with is the modulus (%). This is not a percentage operation. The modulus actslike a division operation except that, instead o f returning the answer, it returns the remainder. For example: 5 % 2 = 1 (5divided by 2 equals 2 with a remainder o f 1).
All o f these operations deal with numbers, but we know that a variable can store a string as well. Two strings can be"added" together with the concatenation operator (which happens to be a period).
Make the fo llowing changes to operator.pl
#!/usr/local/bin/perl
$var1 = 3;$var2 = 5;$string1 = "This is my ";$string2 = "sentence.";
$var1 = $var1 ** $var2;$var3 = $var1 % $var2;$string1 = $string1.$string2." Neat, huh?";
print "$var1 $var3\n";print "$string1\n";
The concatenation operator simply pushes all the strings together into one string. Save operator.pl and test it out.

After the command prompt, type the fo llowing commands:
cold:~$ ./operator.pl243 3This is my sentence. Neat, huh?
Perl provides us with shortcuts fo r a lo t o f operations. Here is a table o f operator shortcuts and their expandedversions.
Sho rt cut Fully Expanded
$var += 3; $var = $var + 3
$var -= 3; $var = $var - 3
$var /= 3; $var = $var / 3
$var *= 3; $var = $var * 3
$var **= 3; $var = $var ** 3
$var++; $var = $var + 1
$var--+= 3; $var = $var - 1 + 3
Copyright © 1998-2014 O'Reilly Media, Inc.
This work is licensed under a Creative Commons Attribution-ShareAlike 3.0 Unported License.See http://creativecommons.org/licenses/by-sa/3.0/legalcode for more information.
If Statements and Loops
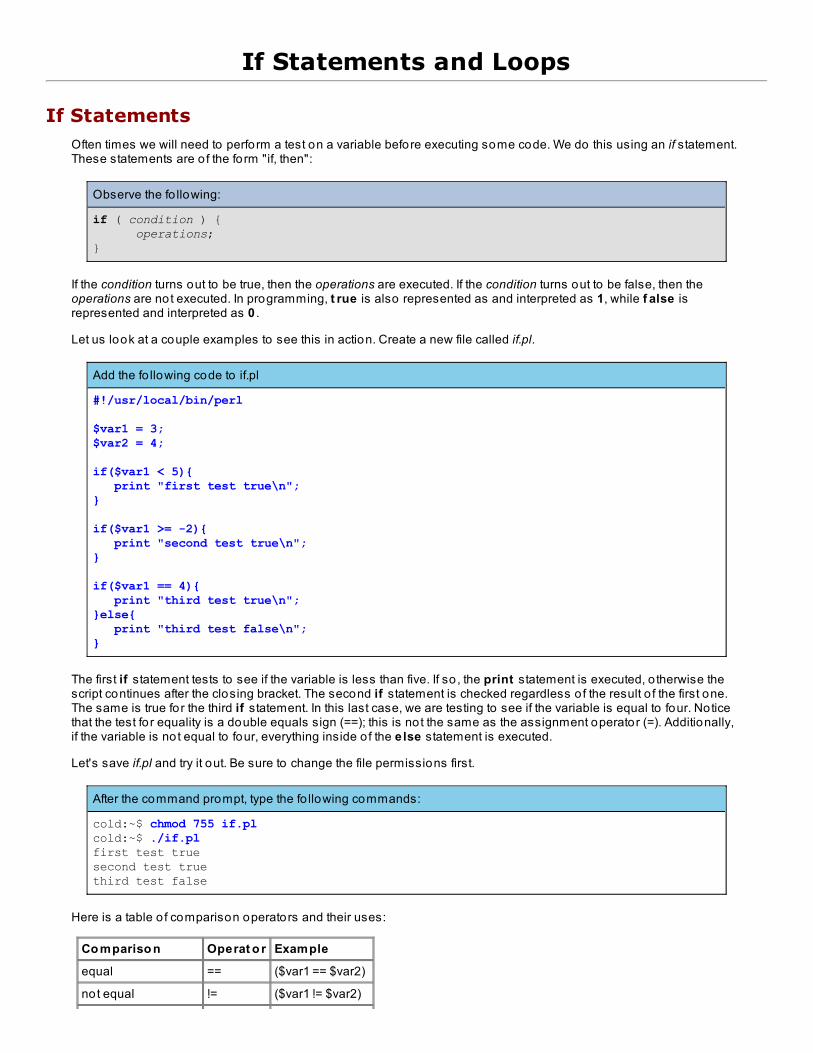
If StatementsOften times we will need to perform a test on a variable before executing some code. We do this using an if statement.These statements are o f the form "if, then":
Observe the fo llowing:
if ( condition ) { operations;}
If the condition turns out to be true, then the operations are executed. If the condition turns out to be false, then theoperations are not executed. In programming, t rue is also represented as and interpreted as 1, while f alse isrepresented and interpreted as 0 .
Let us look at a couple examples to see this in action. Create a new file called if.pl.
Add the fo llowing code to if.pl
#!/usr/local/bin/perl
$var1 = 3;$var2 = 4;
if($var1 < 5){ print "first test true\n";}
if($var1 >= -2){ print "second test true\n";}
if($var1 == 4){ print "third test true\n";}else{ print "third test false\n";}
The first if statement tests to see if the variable is less than five. If so , the print statement is executed, o therwise thescript continues after the closing bracket. The second if statement is checked regardless o f the result o f the first one.The same is true for the third if statement. In this last case, we are testing to see if the variable is equal to four. Noticethat the test fo r equality is a double equals sign (==); this is not the same as the assignment operator (=). Additionally,if the variable is not equal to four, everything inside o f the else statement is executed.
Let's save if.pl and try it out. Be sure to change the file permissions first.
After the command prompt, type the fo llowing commands:
cold:~$ chmod 755 if.plcold:~$ ./if.plfirst test truesecond test truethird test false
Here is a table o f comparison operators and their uses:
Co mpariso n Operat o r Example
equal == ($var1 == $var2)
not equal != ($var1 != $var2)
less than < ($var1 < $var2)
greater than > ($var1 > $var2)
less than or equal <= ($var1 <= $var2)
greater than or equal >= ($var1 >= $var2)
not ! (!($var1 < $var2))
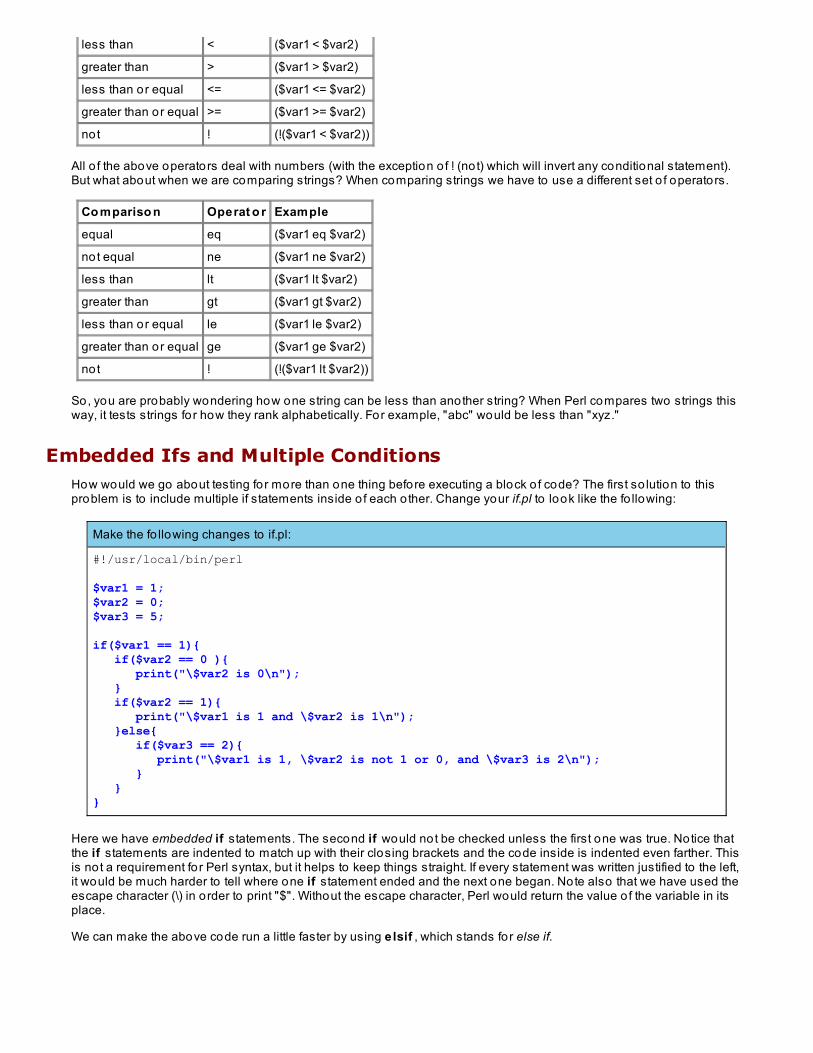
All o f the above operators deal with numbers (with the exception o f ! (not) which will invert any conditional statement).But what about when we are comparing strings? When comparing strings we have to use a different set o f operators.
Co mpariso n Operat o r Example
equal eq ($var1 eq $var2)
not equal ne ($var1 ne $var2)
less than lt ($var1 lt $var2)
greater than gt ($var1 gt $var2)
less than or equal le ($var1 le $var2)
greater than or equal ge ($var1 ge $var2)
not ! (!($var1 lt $var2))
So, you are probably wondering how one string can be less than another string? When Perl compares two strings thisway, it tests strings for how they rank alphabetically. For example, "abc" would be less than "xyz."
Embedded Ifs and Multiple ConditionsHow would we go about testing for more than one thing before executing a block o f code? The first so lution to thisproblem is to include multiple if statements inside o f each o ther. Change your if.pl to look like the fo llowing:
Make the fo llowing changes to if.pl:
#!/usr/local/bin/perl
$var1 = 1;$var2 = 0;$var3 = 5;
if($var1 == 1){ if($var2 == 0 ){ print("\$var2 is 0\n"); } if($var2 == 1){ print("\$var1 is 1 and \$var2 is 1\n"); }else{ if($var3 == 2){ print("\$var1 is 1, \$var2 is not 1 or 0, and \$var3 is 2\n"); } }}
Here we have embedded if statements. The second if would not be checked unless the first one was true. Notice thatthe if statements are indented to match up with their closing brackets and the code inside is indented even farther. Thisis not a requirement fo r Perl syntax, but it helps to keep things straight. If every statement was written justified to the left,it would be much harder to tell where one if statement ended and the next one began. Note also that we have used theescape character (\) in order to print "$". Without the escape character, Perl would return the value o f the variable in itsplace.
We can make the above code run a little faster by using elsif , which stands for else if.

Make the fo llowing changes to if.pl:
#!/usr/local/bin/perl
$var1 = 1;$var2 = 0;$var3 = 5;
if($var1 == 1){ if($var2 == 0 ){ print("\$var2 is 0\n"); }elsif($var2 == 1){ print("\$var1 is 1 and \$var2 is 1\n"); }else{ if($var3 == 2){ print("\$var1 is 1, \$var2 is not 1 or 0, and \$var3 is 2\n"); } }}
This code has the same output as before. Save and test if.pl to see the results.
Embedded if statements are not the only way to test fo r multiple conditions. We can use several tests fo r the samecondition.
Make the fo llowing changes to if.pl:
#!/usr/local/bin/perl
$var1 = 1;$var2 = 0;$var3 = 5;
if(($var1 == 1) && ($var2 == 1)){ print("\$var1 is 1 and \$var2 is 1\n");}
if(($var1 == 1) && ($var2 != 1) && ($var3 == 2)){ print("\$var1 is 1, \$var2 is not 1, and \$var3 is 2\n");}
if(($var1 == 1) || ($var2 == 1)){ print("\$var1 or \$var2 equals 1\n");}
The if statements are still testing to see if the conditions are true, but the conditions are a little more complicated. In thefirst case, the print statement will only be executed if $var1 and $var2 are equal to 1. A double ampersand (&&)represents "AND", while a double pipe (||) represents "OR". The condition for the last if statement returns true if eitherone (or both) o f the tests is true.
Let's test this code.
After the command prompt, type the fo llowing commands:
cold:~$ ./if.pl$var1 or $var2 equals 1
String ConditionsWe mentioned before that strings do not use the normal conditional operators. Let us do a quick example to show thisin action. Edit a new file called ifstring.pl.

Add the fo llowing code to ifstring.pl:
#!/usr/local/bin/perl
$var1 = "hello";$var2 = "goodbye";$var3 = "hello";
if($var1 eq $var3){ print "These two strings are the same: $var1 $var3\n";}if($var1 ne $var2){ print "These two strings are not the same: $var1 $var2\n";}if($var1 lt $var2){ print "$var1 comes before $var2\n";}else{ print "$var1 comes after $var2\n";}
Save and run ifstring.pl.
After the command prompt, type the fo llowing commands:
cold:~$ chmod 755 ifstring.plcold:~$ ./ifstring.plThese two strings are the same: hello helloThese two strings are not the same: hello goodbyehello comes after goodbye
Copyright © 1998-2014 O'Reilly Media, Inc.
This work is licensed under a Creative Commons Attribution-ShareAlike 3.0 Unported License.See http://creativecommons.org/licenses/by-sa/3.0/legalcode for more information.

Loops
While LoopsAn extension o f the if statements in the previous lesson is the ability to keep checking the condition and keepexecuting the code over and over. This is done with loops. let us start by looking at while loops. Create a new filecalled while.pl to use for these examples.
Add the fo llowing code to while.pl:
#!/usr/local/bin/perl
$i = 0;
while($i < 3){ print "$i\n";}
Save and test this example. Be sure to change the file permissions before testing it.
$i starts out as zero which causes the condition o f the while statement to be true. The value o f $i is printed out andthe condition is checked again. The condition is still true so the print statement is executed yet again. This is what'sknown as an infinite loop. It will go on forever until we stop it. If you're testing out a program and it seems to be stalled,there's a good chance you've got an accidental infinite loop.
Note Remember, we can hit Ct rl+c to break out o f a program in Unix.
let us modify our program slightly so that it will no t run forever.
Make the fo llowing changes to while.pl:
#!/usr/local/bin/perl
$i = 0;
while($i < 3){ print "$i\n"; $i++;}
Excellent. Now, $i will be incremented by one every time through the loop. The value will be printed out when it is 0 , 1,and 2, but when $i equals 3 the condition will be false and the loop will end. let us check it out.
After the command prompt, type the fo llowing commands:
cold:~$ ./while.pl012
Pretty simple, right? Later we will see that we are not limited to simple math tests in our conditions. Lots o f Perlfunctions will return true or false values based on the success o f what they were trying to do. There are many ways toprovide useful test conditions for a loop.
For LoopsUsing a variable such as $i to loop a specific number o f times is very common. There is another type o f loop that isbuilt perfectly fo r this situation. The difference between the two is that with a f o r loop the initial value, condition, andchange are all contained in one spot. let us create a script called for.pl to demonstrate the workings o f a "fo r loop".

Make the fo llowing change to while.pl:
#!/usr/local/bin/perl
for($i=0 ; $i < 3 ; $i++){ print "$i\n";}
Notice that the three parts o f the f o r statement are separated by semi-co lons. And we aren't limited to using suchsimple increments, any expression will do .
Last and NextThere are many times that we don't want to execute all o f the code within a loop. Maybe we've met the first condition,but if another condition is met we want to exit the loop immediately. Perhaps we don't want to exit the loop, but juststart over at the beginning. Both o f these situations are made possible by last and next .
last works just how its name implies. It makes the current iteration o f the loop the last one. The loop will no t evenfinish executing the rest o f its code block. Go back and modify your while.pl script.
Make the fo llowing change to while.pl:
#!/usr/local/bin/perl
$i = 0;
while($i < 10){ print "$i\n"; if($i > 5){ print "Oh no! \$i is greater than 5!\n"; last; } $i++;}
After the command prompt, type the fo llowing commands:
cold:~$ ./while.pl0123456Oh no! $i is greater than 5!
Is this the output you expected?
Now let us take a look at next .
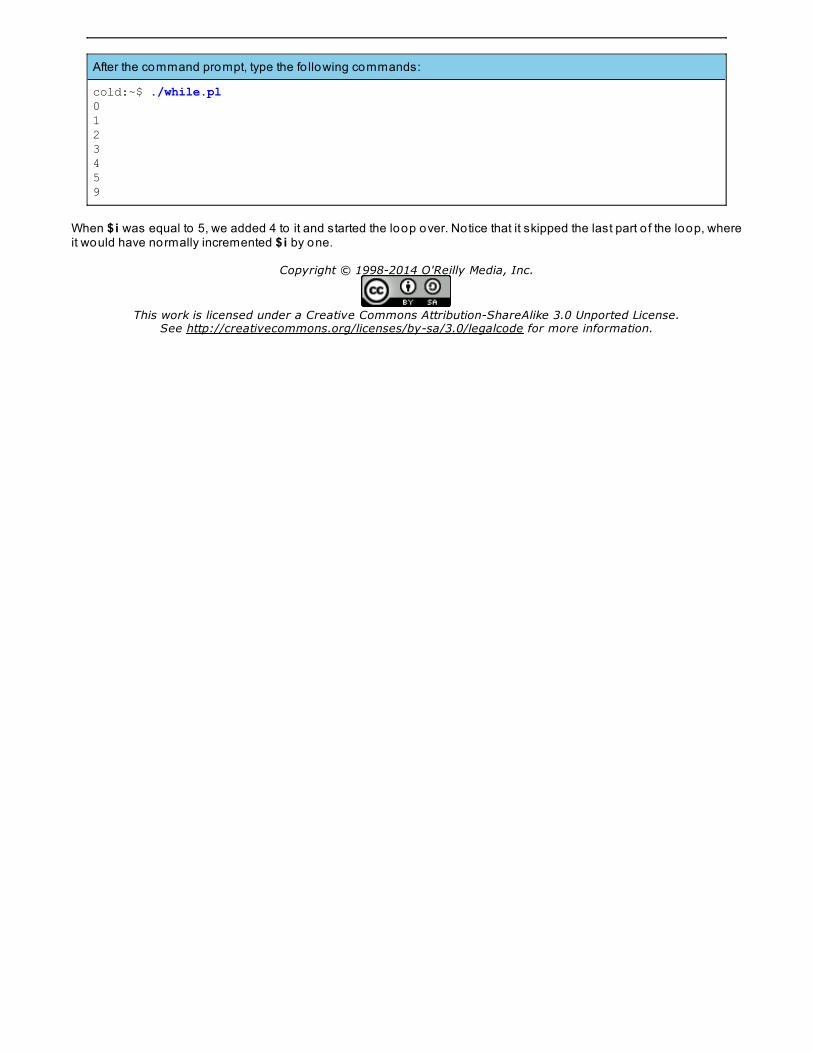
After the command prompt, type the fo llowing commands:
cold:~$ ./while.pl0123459
When $i was equal to 5, we added 4 to it and started the loop over. Notice that it skipped the last part o f the loop, whereit would have normally incremented $i by one.
Copyright © 1998-2014 O'Reilly Media, Inc.
This work is licensed under a Creative Commons Attribution-ShareAlike 3.0 Unported License.See http://creativecommons.org/licenses/by-sa/3.0/legalcode for more information.
Arrays and Hashes
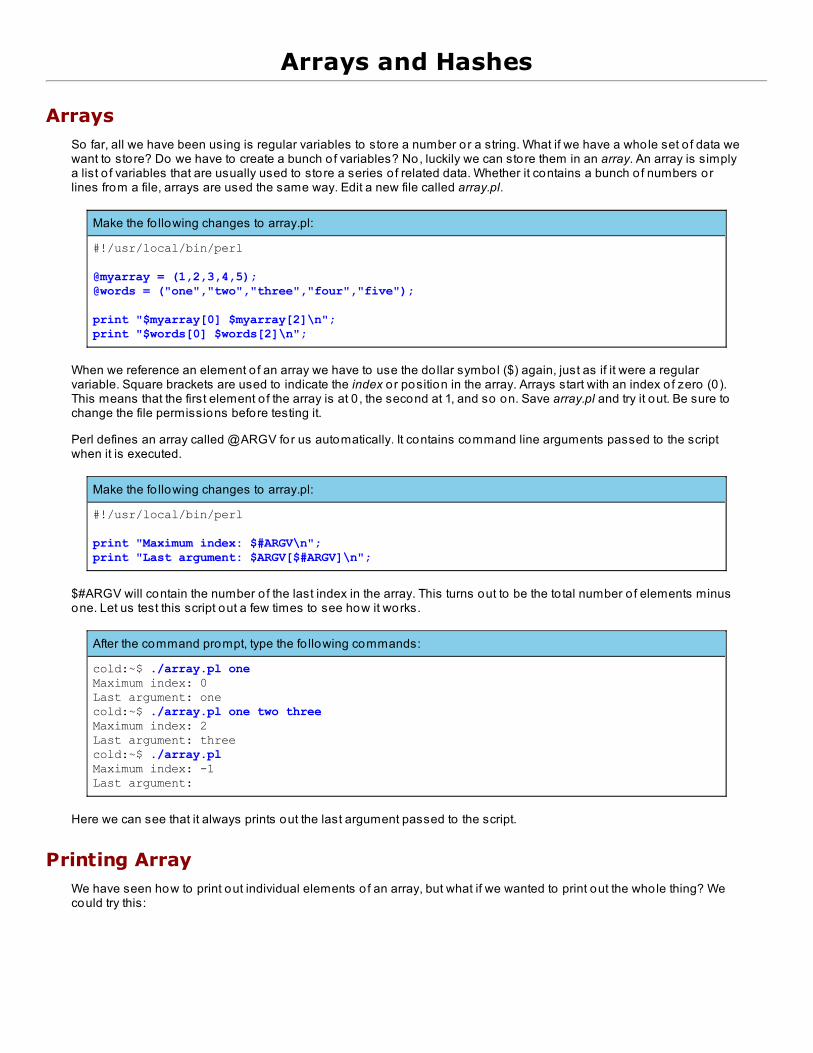
ArraysSo far, all we have been using is regular variables to store a number or a string. What if we have a whole set o f data wewant to store? Do we have to create a bunch o f variables? No, luckily we can store them in an array. An array is simplya list o f variables that are usually used to store a series o f related data. Whether it contains a bunch o f numbers orlines from a file, arrays are used the same way. Edit a new file called array.pl.
Make the fo llowing changes to array.pl:
#!/usr/local/bin/perl
@myarray = (1,2,3,4,5);@words = ("one","two","three","four","five");
print "$myarray[0] $myarray[2]\n";print "$words[0] $words[2]\n";
When we reference an element o f an array we have to use the do llar symbol ($) again, just as if it were a regularvariable. Square brackets are used to indicate the index o r position in the array. Arrays start with an index o f zero (0).This means that the first element o f the array is at 0 , the second at 1, and so on. Save array.pl and try it out. Be sure tochange the file permissions before testing it.
Perl defines an array called @ARGV for us automatically. It contains command line arguments passed to the scriptwhen it is executed.
Make the fo llowing changes to array.pl:
#!/usr/local/bin/perl
print "Maximum index: $#ARGV\n";print "Last argument: $ARGV[$#ARGV]\n";
$#ARGV will contain the number o f the last index in the array. This turns out to be the to tal number o f elements minusone. Let us test this script out a few times to see how it works.
After the command prompt, type the fo llowing commands:
cold:~$ ./array.pl oneMaximum index: 0Last argument: onecold:~$ ./array.pl one two threeMaximum index: 2Last argument: threecold:~$ ./array.plMaximum index: -1Last argument:
Here we can see that it always prints out the last argument passed to the script.
Printing ArrayWe have seen how to print out individual elements o f an array, but what if we wanted to print out the whole thing? Wecould try this:

Make the fo llowing changes to array.pl:
#!/usr/local/bin/perl
@words = ("one","two","three","four","five");
print @words;
But that probably is not the result we want.
After the command prompt, type the fo llowing commands:
cold:~$ ./array.plonetwothreefourfivecold:~$
Yuck. That is horrible. It would be nice if we could print each element, one at a time, and add a newline or something.We need a way to start at the beginning o f the array and stop at the end. Using a while loop so lves this problem.
Make the fo llowing changes to array.pl:
#!/usr/local/bin/perl
@words = ("one","two","three","four","five");
$i=0;while($i <= $#words){ print "$words[$i]\n"; $i++;}
The index o f the array starts at zero so that is where we will start our variable. We increment $i every time through theloop (progressing through the elements o f the array) as long as it is less than or equal to the maximum index. Theresults look a little better than before.
After the command prompt, type the fo llowing commands:
cold:~$ ./array.plonetwothreefourfive
This method is obviously not just useful fo r printing an array. It allows us to perform operations on each element o f thearray separately. We will get lo ts o f practice with this concept in the later lessons.
ForeachA f o reach loop allows us do something for each element in a list. Check this out:
Make the fo llowing changes to array.pl:
#!/usr/local/bin/perl
@words = ("one","two","three","four","five");
foreach $elem (@words){ print "$elem\n";}
Pretty nice, huh? The output is exactly the same as before, plus the code is a little easier to understand.
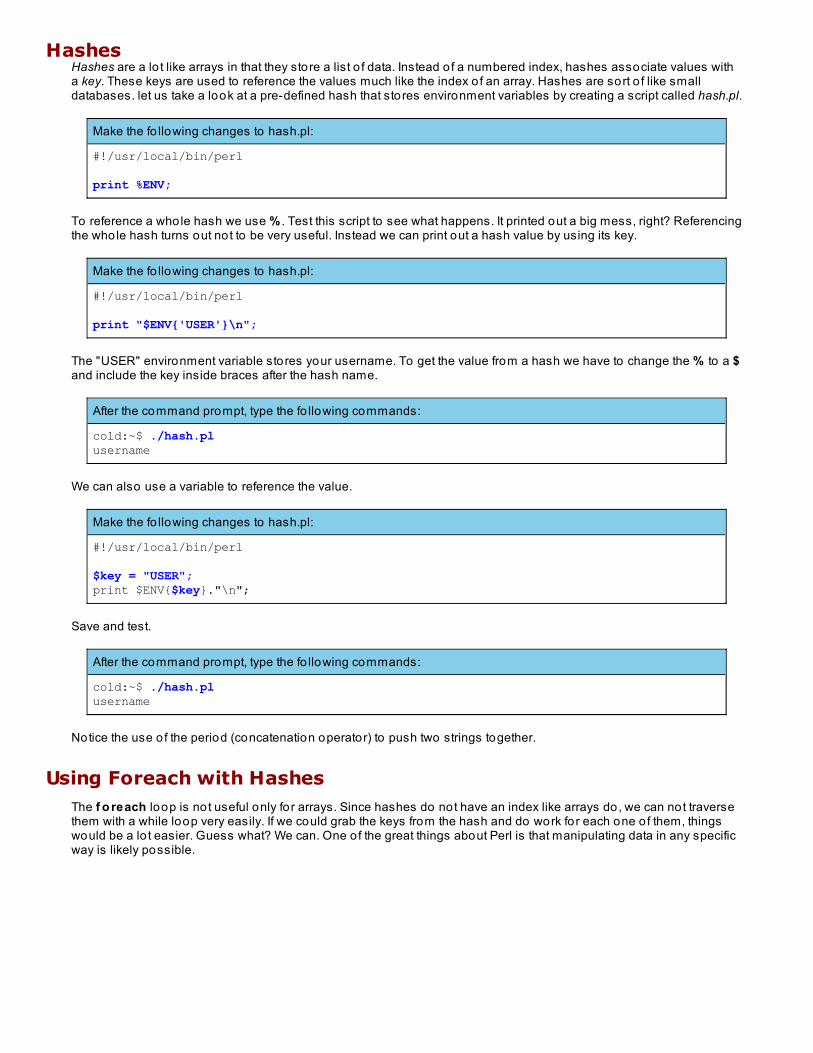
HashesHashes are a lo t like arrays in that they store a list o f data. Instead o f a numbered index, hashes associate values witha key. These keys are used to reference the values much like the index o f an array. Hashes are sort o f like smalldatabases. let us take a look at a pre-defined hash that stores environment variables by creating a script called hash.pl.
Make the fo llowing changes to hash.pl:
#!/usr/local/bin/perl
print %ENV;
To reference a whole hash we use % . Test this script to see what happens. It printed out a big mess, right? Referencingthe whole hash turns out not to be very useful. Instead we can print out a hash value by using its key.
Make the fo llowing changes to hash.pl:
#!/usr/local/bin/perl
print "$ENV{'USER'}\n";
The "USER" environment variable stores your username. To get the value from a hash we have to change the % to a $and include the key inside braces after the hash name.
After the command prompt, type the fo llowing commands:
cold:~$ ./hash.plusername
We can also use a variable to reference the value.
Make the fo llowing changes to hash.pl:
#!/usr/local/bin/perl
$key = "USER";print $ENV{$key}."\n";
Save and test.
After the command prompt, type the fo llowing commands:
cold:~$ ./hash.plusername
Notice the use o f the period (concatenation operator) to push two strings together.
Using Foreach with HashesThe f o reach loop is not useful only fo r arrays. Since hashes do not have an index like arrays do, we can not traversethem with a while loop very easily. If we could grab the keys from the hash and do work for each one o f them, thingswould be a lo t easier. Guess what? We can. One o f the great things about Perl is that manipulating data in any specificway is likely possible.
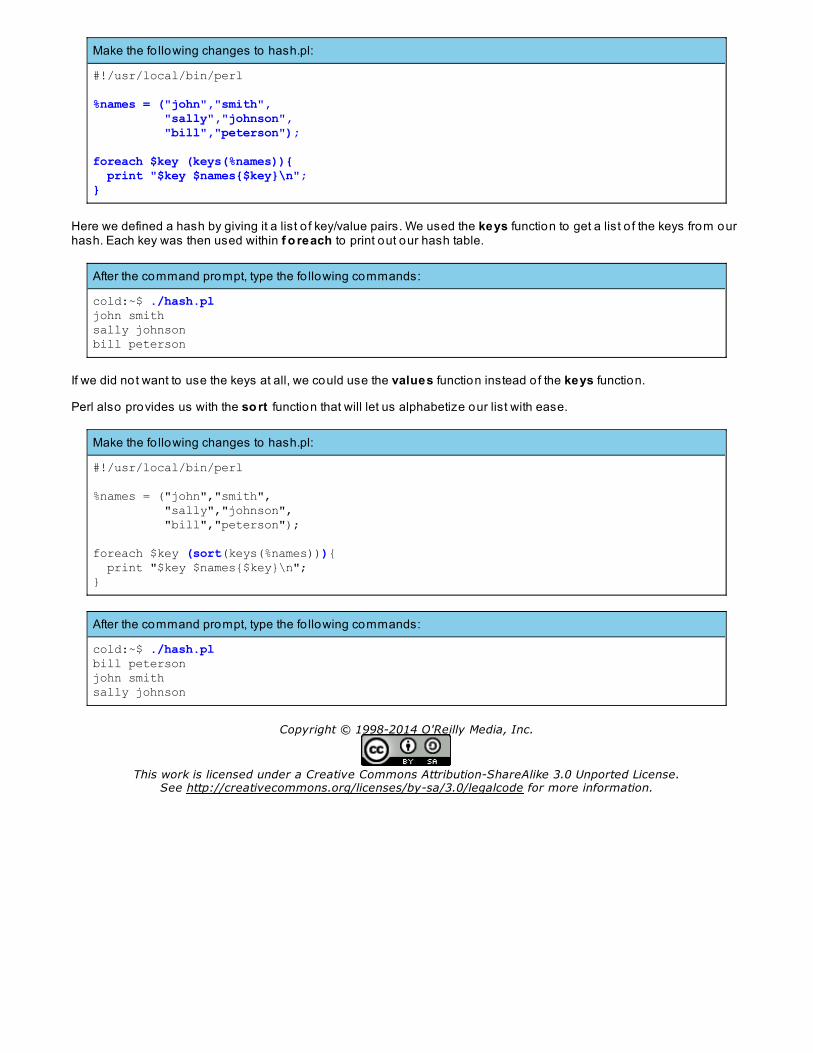
Make the fo llowing changes to hash.pl:
#!/usr/local/bin/perl
%names = ("john","smith", "sally","johnson", "bill","peterson");
foreach $key (keys(%names)){ print "$key $names{$key}\n";}
Here we defined a hash by giving it a list o f key/value pairs. We used the keys function to get a list o f the keys from ourhash. Each key was then used within f o reach to print out our hash table.
After the command prompt, type the fo llowing commands:
cold:~$ ./hash.pljohn smithsally johnsonbill peterson
If we did not want to use the keys at all, we could use the values function instead o f the keys function.
Perl also provides us with the so rt function that will let us alphabetize our list with ease.
Make the fo llowing changes to hash.pl:
#!/usr/local/bin/perl
%names = ("john","smith", "sally","johnson", "bill","peterson");
foreach $key (sort(keys(%names))){ print "$key $names{$key}\n";}
After the command prompt, type the fo llowing commands:
cold:~$ ./hash.plbill petersonjohn smithsally johnson
Copyright © 1998-2014 O'Reilly Media, Inc.
This work is licensed under a Creative Commons Attribution-ShareAlike 3.0 Unported License.See http://creativecommons.org/licenses/by-sa/3.0/legalcode for more information.

Input
Getting InputUp until this po int we have really just been learning about basic Perl syntax. Now it is time to get some real work done.Let us try to do the same sort o f things we were do ing with sed by searching for a pattern in a file and printing out theline. First, we have to get input.
One simple way o f getting input is to capture the output o f another Unix command. We do this by using back ticks. Editinput.pl.
Add the fo llowing code to input.pl:
#!/usr/local/bin/perl
@input = `cat /etc/protocols`;
foreach $line (@input){ if($line =~ /ICMP/){ print $line; }}
Some of this we have seen before and some we have not. Getting our input takes place as an assignment operationfor an array. @input will contain an element fo r each line o f the contents from /etc/protocols. We already know that wecan use f o reach to look at each line o f an array. All we need to do now is to search for a pattern. In the if statementwe have another condition operator that we have not seen before. Using =~ allows us to match our variable against apattern. In this case, we want to see if $line contains "ICMP". If a line matches the pattern it is printed out, o therwise thef o reach loop just goes on to the next line.
Note The companion operator to =~ is !~ . It allows us to match all lines that do not contain a specific pattern.
After the command prompt, type the fo llowing commands:
cold:~$ chmod 755 input.plcold:~$ ./input.plicmp 1 ICMP # internet control message protocolipv6-icmp 58 IPv6-ICMP # ICMP for IPv6
In More Ways Than OneWith Perl is that there is almost always more than one way to perform a particular task. Instead o f cat ing a file inside o fthe Perl script, why not just use a Unix pipe? We know how to pipe output to a command, so we only need to learn howto read from standard input (STDIN) with our script. Not a problem.
Make the fo llowing changes to input.pl:
#!/usr/local/bin/perl
@input = <STDIN>;
foreach $line (@input){ if($line =~ /ICMP/){ print $line; }}
The only difference here is that we are getting our input from STDIN instead o f from a Unix command directly. Let ussee it in action.

After the command prompt, type the fo llowing commands:
cold:~$ cat /etc/protocols | ./input.plicmp 1 ICMP # internet control message protocolipv6-icmp 58 IPv6-ICMP # ICMP for IPv6
This method o f grabbing the contents o f the file allows us to change the input without modifying the script.
Still More WaysA variation on the above technique is to eliminate the use o f the @input array altogether. We can use a while loop toperform operations on the lines o f STDIN while they are coming into the script. This takes advantage o f the fact thatSTDIN is a stream. A stream can be thought o f as a continuous flow o f data instead o f a static amount that you mightread from a file. The condition o f the while loop will continue to be true as long as it hasn't reached the end o f the inputstream.
Make the fo llowing changes to input.pl:
#!/usr/local/bin/perl
while(<STDIN>){ if($_ =~ /ICMP/){ print $_; }}
What is $_ all about? This is a special variable that Perl uses to represent a default pattern matching space. It will beequal to each line o f STDIN and can be used just like any o ther variable. The neat part about $_ is that since it is thedefault space, it is not always necessary to include it. Check this out:
Make the fo llowing changes to input.pl:
#!/usr/local/bin/perlwhile(<STDIN>){ if(/ICMP/){ print; }}
That looks a lo t simpler, correct? Instead o f piping in the contents o f a file as input, let us use this script to observe thewhile loop treating the input as a stream. If we run the script by itself, it is still expecting input, so we have to type itourselves.
After the command prompt, type the fo llowing commands:
cold:~$ ./input.plhellowhat is happening?ICMPICMPwe are creating the stream as we goto end the stream, hit Ctrl+d
We can see what we are typing, but behind the scenes our script is using it as input. This becomes apparent when wetype ICMP. As soon as we hit enter on that line it is used as the next pattern space in the while loop. It matches thepattern and our script prints out ICMP. Then we continue on with the stream. To end the stream we have to hit Ct rl+d.In Unix, this sends an EOF (end of file) which indicates the end o f the input stream. The loop will end and Perl willcontinue on with the rest o f the script.
Opening a File for ReadingGood grief. How many ways are there to get input? Lots.

Instead o f grabbing stuff from standard input or capturing the output o f a command, we can open a file directly.
Make the fo llowing changes to input.pl:
#!/usr/local/bin/perl
open(FILE,"/etc/protocols");
while(<FILE>){ if(/ICMP/){ print; }}
close(FILE);
Save and test this script to make sure you get the same output as before. The o pen function creates a filehandle fromwhich to read. It is used just like STDIN was used before. We need to clo se the file when we are done with it.
If we do not want to keep the file open the whole time, we can store the contents in an array and close the file beforedo ing any work on its contents.
Observe the fo llowing:
#!/usr/local/bin/perl
open(FILE,"/etc/protocols");@lines = <FILE>;close(FILE);
foreach $line (@lines){ if($line =~ /ICMP/){ print $line; }}
We will discuss later how we can open files for writing; either by creating a new file or appending to an existing one.
Copyright © 1998-2014 O'Reilly Media, Inc.
This work is licensed under a Creative Commons Attribution-ShareAlike 3.0 Unported License.See http://creativecommons.org/licenses/by-sa/3.0/legalcode for more information.

Data Manipulation
SplitRecall that we used awk to break up the fields o f the password file. Perl uses the split command to let us to the samething. Let us edit a new script called passwd.pl.
Add the fo llowing code to passwd.pl:
#!/usr/local/bin/perl
open(FILE,"/etc/passwd");@lines = <FILE>;close(FILE);
foreach $line (@lines){ @fields = split(/:/,$line); print "$fields[0]\n";}
Just like before, we are reading in a file (/etc/passwd) and putting the contents into an array. Then we use f o reach toperform an operation on each line o f the array.
The split command takes a string, in this case $line , and divides it into an array o f strings. It separates the elementsby whatever pattern is given as its first argument. Each time through the loop, @f ields contains data for the next line.
Save and test the above script.
PushCurrently, passwd.pl prints out a list o f usernames as they appear in the /etc/passwd file. But we want an alphabetizedlist instead. We know we can easily so rt a list, that is not the issue. Somehow we have to create a list o f usernamesthat can be sorted later. One way to do this would require a variable to "increment" each time through the f o reachloop, like so:
Observe the fo llowing:
$i=0;foreach $line (@lines){ @fields = split(/:/,$line); print "$fields[0]\n"; $users[$i] = $fields[0]; $i++;}
That seems like an awful lo t o f work just to add a new element into an array. It would be nice if we could just pushsomething onto an array.
Add the fo llowing code to passwd.pl:
#!/usr/local/bin/perl
open(FILE,"/etc/passwd");@lines = <FILE>;close(FILE);
foreach $line (@lines){ @fields = split(/:/,$line); push(@users,$fields[0]);}

The push function adds a list to the end o f an array. Instead o f a list, we are just adding a single element. The onlything left to do is to print out the sorted list.
Add the fo llowing code to passwd.pl:
#!/usr/local/bin/perl
open(FILE,"/etc/passwd");@lines = <FILE>;close(FILE);
foreach $line (@lines){ @fields = split(/:/,$line); push(@users,$fields[0]);}
foreach $user (sort(@users)){ print "$user\n";}
When you test this script, you will see that the usernames are now printed out in alphabetical o rder.
Note The push function has a counterpart called unshif t which does exactly the same thing except the newelements are added to the beginning o f the array instead o f to the end.
Reverse and JoinPretend for a moment that we need a printout o f the password file with its entries reversed; one where all o f the fieldsare in the opposite order. We know for a fact that there are seven fields in the password file so we could reverse themby hand.
Add the fo llowing code to passwd.pl:
#!/usr/local/bin/perl
open(FILE,"/etc/passwd");@lines = <FILE>;close(FILE);
foreach $line (@lines){ @fields = split(/:/,$line); push(@users,$fields[0]); print "$fields[6]:$fields[5]:$fields[4]:$fields[3]:$fields[2]:$fields[1]:$fields[0]\n";}
foreach $user (sort(@users)){ print "$user\n";}
This would work, but it is really a rather rough way o f do ing it. As always with Perl, there's probably a better way.

Add the fo llowing code to passwd.pl:
#!/usr/local/bin/perl
open(FILE,"/etc/passwd");@lines = <FILE>;close(FILE);
foreach $line (@lines){ @fields = split(/:/,$line); push(@users,$fields[0]); @rfields = reverse(@fields); $newline = join(":",@rfields); print "$newline\n";}
foreach $user (sort(@users)){ print "$user\n";}
The reverse function does exactly what its name implies. It takes an array, reverses the elements, and outputs a newarray. We could still use a large print statement to output the new lines, but that's an awful lo t o f work. What if we werenot dealing with a known number o f fields? Fortunately, Perl gives us split to break up the fields and it gives us jo in toput them back together. To use jo in, all we have to do is specify a string to use as a separator and a list o f elements tojo in. Be sure and save this script before trying it out.
After the command prompt, type the fo llowing commands:
hottub:~$ ./passwd.pl |head/bin/bash:/root:root:0:0:x:root
:/bin:bin:1:1:x:bin
:/sbin:daemon:2:2:x:daemon
:/var/adm:adm:4:3:x:adm
:/var/spool/lpd:lp:7:4:x:lp
Whoa! Ho ld on a second. I thought we were supposed to have reversed lines, so why is it all broken up like this? Letus examine what is happening a little closer by looking at the first line o f /etc/passwd.
This is the whole line, correct? Well, no t really. The key to understanding this problem is realizing that the line has anewline character at the end o f it.
This is what the line actually looks like. Notice that we have that newline character at the end.
Our line is split up at all o f the co lons, giving us seven separate elements. Then we reverse the order o f the elements.
Notice that the newline remains with the last field.
After rejo ining the line back together with co lons, we can see how the newline is embedded into the new line. When weprint this line out, the newline causes a line break even though we might not have intended it.

ChompThis trailing newline problem is so common that Perl has a special function specifically designed to get rid o f it when itoccurs. There is a function called cho p that removes the last character from all o f the elements in a list. That's good,but we could accidentally remove characters that are not newlines. Fortunately we have the cho mp function. Itremoves all o f the newlines from each item in a list (o r nothing if there is not a newline). Let us check this out in action.
Add the fo llowing code to passwd.pl:
#!/usr/local/bin/perl
open(FILE,"/etc/passwd");@lines = <FILE>;close(FILE);
foreach $line (@lines){ @fields = split(/:/,$line); chomp(@fields); push(@users,$fields[0]); @rfields = reverse(@fields); $newline = join(":",@rfields); print "$newline\n";}
foreach $user (sort(@users)){ print "$user\n";}
Save this script and try it out. Notice that this time we get the results we expected to get the first time.
Instead o f giving cho mp a whole list, we could have just given it the last field (which we know had the newline).
OBSERVE:
chomp($fields[$#fields]);
Since we hsve removed the newline, we need to re-add it before printing it out. It is simple enough just to add on thenewline as part o f the print statement.
NoteSome of the entries in /etc/passwd do not have a shell listed. If we were to remove the newline from $linebefore using split , we would lose the last field. Since nothing would exist after the last co lon, an elementis not created. Thus, when we use jo in the extra co lon is lost. Try it out and see. See you at the nextlesson!
Copyright © 1998-2014 O'Reilly Media, Inc.
This work is licensed under a Creative Commons Attribution-ShareAlike 3.0 Unported License.See http://creativecommons.org/licenses/by-sa/3.0/legalcode for more information.

Fun with Regular Expressions
Regular ExpressionsSo up until now we have claimed that Perl makes text manipulation easy. Regular expressions are what gives Perl a lo to f its power. Unfortunately, working with regular expressions is not easy. Simple word matching patterns aren't difficult,but regular expressions can get very complex. For this reason, we're go ing to spend some extra time on regularexpressions.
Unix regular expressions and Perl regular expressions aren't identical. They have very similar, but a lo t o f the thingsthat can be done with Perl will no t work on the Unix command line.
Quick ReviewLet us briefly go over what we already know about regular expressions. We know that matching a simple string is fairlyeasy. We just include it inside o f a pair o f fo rward slashes.
/st ring/
A group o f characters can be matched by using brackets. For example
/[abc]/
will match a, b, o r c. We can combine these to come up with something like this:
/str[io ]ng/
Let's look carefully at the way Perl would use this regular expression to match a string. Say we're searching for thispattern in the string below:
We start at the first character and continue searching until we match the first thing in the pattern.
After we see an S , we look for t and r. If bo th o f those are found, we try to match the group [io ] .
The "u" is not an i o r an o so we stop matching. We continue through the string looking for the beginning o f our patternagain.
Here it is. Does the [io ] group match?
It sure does. So now all we have to do is check for ng, if that matches we are done.
We have found our match! We can stop searching for the pattern now.

We can even match whole classes o f data by using a dash.
/[A-Z a-z]t r[a-z]ng[0-9]/
MultipliersMultipliers allow us to match part o f a pattern more than once. For instance, what if I wanted to match "Ned" and "need"with the same expression? Somehow I have to match multiple e 's.
/[Nn]e+d/
The plus sign (+) stands for one or more. This expression will match an upper or lowercase n, fo llowed by one ormore e 's and a d. But what if we needed to match "Nd" as well?
/[Nn]e*d/
The star (*) works in the same way except that it stands for zero or more. The last simple multiplier we should talk aboutis the question mark (?). The question mark lets us match zero or one o f something. It is kind o f like asking, "Is thereone o f these?"
/ab?c/
This would match abc and ac. Another way to use multipliers is to specify the minimum and maximum values directlyusing braces. There are three main ways to define a multiplier using braces. First, a single number in braces, such as{4} , means it will match exactly 4 times. If we fo llow that up with a comma, as in {4 ,} , it would match 4 or more times.The third and final way would be to specify a maximum value. To match 4 to 6 times we would use {4 ,6} . Let us seehow this method can be used to make equivalents to the simple multipliers we already talked about.
+ can be represented by {1,}* can be represented by {0 ,}? can be represented by {0 ,1}
Special CharactersIf there is one thing Perl has a lo t o f, it is special characters. The + , *, and ? from above are examples o f specialcharacters (characters that have special meanings depending on how they are used).
Two very useful special characters are the karat (^) and the do llar sign ($ ). When used in a regular expression, the ^symbol will match the beginning o f a line and $ matches the end. For example, if we wanted to match all lines thatcontain "The" at the beginning we would use this:
/^T he/
Matching the end o f a line works much the same way.
/t he end$/
$ matches before any newline characters so you do not have to worry about those getting in the way. Let us not fo rgetthat these two are special characters. Remember that $ is used when we reference variables as well. The ^ also hasanother use. If it is included at the beginning o f a character group with the brackets, it no t match the list. Let us look atan example:
/st r[^io ]ng/
In this case, the grouping will match anything but i and o . Another special character is the period (.). We have alreadyseen that it can be used as the concatenation operator fo r strings. But inside o f a regular expression it is a wholedifferent story. A period represents any character.
/st r.ng/
This expression will match "string", "strong", "str9ng", etc. The only thing a period will no t match is a newline. Periodsare o ften used in conjunction with multipliers.
/^T he.*nice/
Here we are matching any line that starts with "The" and contains any number o f characters fo llowed by "nice". That isall fine and good, but you are probably wondering how we would match an actual period in the text.
The Escape Character

The escape character, represented by a backslash (\), indicates to Perl that the character right after it should be treateddifferently than it normally would. This is used for two main purposes. First, it can make special characters have nospecial meaning or it can make ordinary characters take on a new meaning.
Say we wanted to match a period inside o f our text. Let us take it a little further and try to match a do llar amount. Thedecimal po int and the do llar sign are both special characters.
/\$ [0-9]*\.[0-9]*/
The escape character has been used here to disregard the normal meaning o f the do llar sign and decimal po int. Canyou spot any problems with the expression? Is it really useful? Are there any cases where the expression would notmatch a do llar amount? Aha! This expression will no t match things like $1,000.00 and $5. Here is a better way(changes are in blue ):
/\$ [,0-9]*\.?[0-9]{0 ,2} /
The escape character functions with quotes, semi-co lons, at symbols (@), etc. As mentioned, the escape characternot only removes the special meaning from some symbols, it also adds meaning to o thers. Below is a table o f themost commonly used o f these:
Character Matches
\w alphanumeric, including underscore (_)
\s whitespace
\d numeric
\n a newline
\W non-alphanumeric
\S non-whitespace
\D non-digit
These special characters are used in a regular expressions just like any o ther character or group o f characters. Youare do ing great! See you at the next lesson.
Copyright © 1998-2014 O'Reilly Media, Inc.
This work is licensed under a Creative Commons Attribution-ShareAlike 3.0 Unported License.See http://creativecommons.org/licenses/by-sa/3.0/legalcode for more information.

More Fun with Regular Expressions
Regular Expression CommandsRemember at the beginning o f this course we were working with sed and we used g to fo rce a pattern to match asmany times as possible? Perl lets us do the same thing with the same command.
/st r[io ]ng/g
Continuing with our example, instead o f stopping after the first match we can continue until the end o f the string.
Perl, like Unix, is case sensitive. This means that it treats upper and lower case letters differently. This can causeproblems if we are looking for a specific word, but we do not know if it is at the beginning o f a sentence or maybe evenin all upper case letters. We could use character groupings like this:
/[Ww][Oo ][Rr][Dd]/
That is a little ridiculous, though, don't you think? Instead we can use a regular expression command.
/wo rd/i
That is a lo t easier to look at. The i tells Perl to be case insensitive.
Search and ReplaceAlright, so we know how to match patterns in strings which helps us identify lines and gather information. But how canwe change those lines quickly and easily? Search and replace with Perl looks a lo t like it did with Sed. Using the scommand we can give Perl a pattern to look for and something to replace that pattern. Imagine for a moment that weneed to change some of our users' default shells. A lo t o f them are using sbin but we have renamed it sysbin.
Add the fo llowing code to passwd.pl:
#!/usr/local/bin/perl
$oldfile = "/etc/passwd"; $newfile = "/users/username/passwd";
open(FILE,"$oldfile");open(NEW,">$newfile");
while(<FILE>){ $_ =~ s/sbin/sysbin/; print NEW;}
close(FILE);close(NEW);
Most o f this program works by setting up the files and reading in the lines that we need to modify. The search andreplace is done on a single line. That is why regular expressions are so powerful. However, this is not the bestexpression we could have used. Keep in mind that Perl will replace the first instance o f "sbin" that it finds. What if one o fthe user names was "sbinder?" We would have a problem then. The fo llowing regular expression would be a littlebetter:
s/\/sbin\//\/sysbin/;

Nobody is go ing to have a login name of "/sbin/", that is fo r sure. Regular expressions are powerful, but they can alsobe dangerous. For those having a difficult time reading the above regex here is a reader-friendly view:
s/ \/sbin\/ / \/sysbin /; #We are escaping the slashes o f "/sbin/" and "/sysbin"
TranslateThe translation command, t r, looks like search and replace when you first see it, but it acts a lo t differently. Instead o freplacing an entire pattern with something else, translation takes a list o f characters and replaces them withcorresponding characters from a replacement list. Let us write a script called translate.pl that converts all o f the uppercase letters from input into lower case letters.
Add the fo llowing code to translate.pl:
#!/usr/local/bin/perl
while(<STDIN>){ $_ =~ tr/[A-Z]/[a-z]/; print;}
Save this script so we can test it out.
After the command prompt, type the fo llowing commands:
cold:~$ chmod 755 translate.plcold:~$ echo "ABC" |./translate.plabc
Here we have translated entire groupings o f characters. We do not have to use only single letters. Here are morepossible translations.
t r/123/abc/t r/\' /\" /
Not-so Regular ExpressionsSo far we have learned how to match patterns in strings and even replace those patterns with o ther strings. We knowwe can pull parts o f the string into o ther variables if we use functions like split . However, sometimes the string is notgo ing to be divided up nicely by spaces or co lons. If this is the case, how can we grab parts out o f the string easily?The answer: parentheses.
Parentheses can be used as part o f a pattern to store a match in a temporary variable. Create a file called grab.pl.
Add the fo llowing code to grab.pl:
#!/usr/local/bin/perl
while(<STDIN>){ if(/str([io])ng/){ $vowel = $1; print "We matched $vowel\n"; }}
This script tests each line o f input fo r the given regular expression. The difference is that when there is a match, thevowel that was part o f the match gets stored in $1.

After the command prompt, type the fo llowing commands:
cold:~$ ./grab.plstringWe matched iCtrl+c
The entire word "string" was matched, but only the "i" was stored in a variable. Try it again with "strong" and see whathappens. We can use as many sets o f parenthesis as we want and the variables will be named in numerical o rder.
Perl allows us to use the stored matches in the same regular expression in which it was matched. This is done byusing the escape character and is known as a back reference.
Make the fo llowing changes to grab.pl:
#!/usr/local/bin/perl
while(<STDIN>){ if(/str([io])ng\1/){ $vowel = $1; print "We matched $vowel\n"; }}
We have only added one thing, but let us see how it changes the functionality o f the script.
After the command prompt, type the fo llowing commands:
cold:~$ ./grab.plstringiWe matched istrongoWe matched ostringoCtrl+c
Search and Replace with Back ReferencesWhen do ing a search and replace, we can include part (or all) o f the search pattern in the replace string, or even modifythe matched string before using it as a replacement. Let's write a script that will switch the first two fields o f co londelimited lines. Copy translate.pl to switch.pl and make the fo llowing changes:
Make the fo llowing changes to switch.pl:
#!/usr/local/bin/perl
while(<STDIN>){ $_ =~ s/^([^:]*:)([^:]*:)/\2\1/; print;}
Let's save this and make sure it works before we try to figure it out.
After the command prompt, type the fo llowing commands:
cold:~$ tail /etc/passwd |./switch.pl...x:username:507:507::/users/username:/bin/bash
That regular expression sure looks complicated, but the trick is to break it down into pieces. Here we have the wholething:
s/^([^:]*:)([^:]*:)/\2\1/

The first s indicates that this is a search and replace operation. That gives us two parts to deal with: the pattern and thereplacement string.
^([^:]*:)([^:]*:)
Examining the pattern more closely, we can see three main parts. The first karat matches the beginning o f the string.Now we've got two parts that look exactly the same.
([^:]*:)
This expression matches zero or more characters that aren't co lons fo llowed by a single co lon. Then the match isstored in a temporary variable. In this case, we do not want to use a period to match all characters because it wouldhave matched co lons too. That is not so bad. Now let us look at the replacement string.
\2\1
This is simply two back references to temporary variables. We've reversed the order to switch them around. Let us putit all back together again.
s/^([^:]*:)([^:]*:)/\2\1/
Do you see how we are making two matches and reversing them?
Evaluation of the Replacement StringSometimes it is not enough just to use a back reference as part o f the replacement string. We may want to grab thematched string, perform some operations on it, and then use it as a replacement. Here is one method o f do ing that:
Observe the fo llowing:
#!/usr/local/bin/perl
while(<STDIN>){ if(/([ts]?he)/){ $new = ucfirst($1); $_ =~ s/$1/$new/; print; }}
The ucf irst function takes a string and capitalizes the first character. This script finds a line that contains "the", "she",or "he". Then it capitalizes the first letter and replaces the original match with the new and improved one.
Of course, there is an easier way. We do not have to do so much work. The e command will evaluate the replacementstring as normal Perl code before using it as a replacement. Here is a better way to do the previous example:
Observe the fo llowing:
#!/usr/local/bin/perl
while(<STDIN>){ $_ =~ s/([ts]?he)/ucfirst($1)/e; print;}
Note that when the replacement string is evaluated we can not use the escape character back reference. We have touse the temporary variable name.
Wrap UpThe trickiest part about regular expressions is taking a problem and figuring out how to apply a regular expression tohelp so lve it. This is where lo ts o f practice comes in handy.
Copyright © 1998-2014 O'Reilly Media, Inc.

This work is licensed under a Creative Commons Attribution-ShareAlike 3.0 Unported License.See http://creativecommons.org/licenses/by-sa/3.0/legalcode for more information.

Functions
FunctionsWe use functions in our scripts to perform specific tasks. We have used lo ts o f them already, including print , split andso rt . These are each pre-defined methods for do ing specific tasks. We could write the code ourselves using o therparts o f Perl, but we choose to use these functions because they help to clean up the overall look o f our script (thatand it's easier than writing our own).
Sometimes we have scripts that use the same section o f code over and over. Other times we may have a huge pieceof code that we only use once, but it still manages to clutter up our script. In these cases (and a few others) we maywant to define our own functions or subroutines. Let's start a new script named f unct io n.pl:
CODE TO TYPE:
#!/usr/local/bin/perl
open(PASSWD,"/etc/passwd");@passwd = <PASSWD>;close(PASSWD);
foreach $line (@passwd){ $line =~ s/^([^:]*:)([^:]*:)/\2\1/; $line =~ tr/[A-Z]/[a-z]/; @fields = split(/:/,$line); chomp(@fields); @rfields = reverse(@fields); $newline = join(":",@rfields); print "$newline\n";}
This script takes lines from the /etc/passwd file and displays them scrambled in the conso le. It is not a particularlyuseful script, but we are go ing to play with it so we can experiment with the functions. Let's remove the guts o f thisscript into a separate Perl function.
CODE TO TYPE:
#!/usr/local/bin/perl
open(PASSWD,"/etc/passwd");@passwd = <PASSWD>;close(PASSWD);
foreach $line (@passwd){ $newline = messup($line); print "$newline\n";}
sub messup { my $line = shift(@_);
$line =~ s/^([^:]*:)([^:]*:)/\2\1/; $line =~ tr/[A-Z]/[a-z]/; @fields = split(/:/,$line); chomp(@fields); @rfields = reverse(@fields); $newline = join(":",@rfields);
return $newline;}
The top part o f the script is unchanged except that we have replaced most o f the code with this line:
$newline = messup($line);

The new messup function takes a line and converts it into a new, messed up line. At the bottom of the script we havedefined the function. You can see all o f the lines that we removed from our original script, but there are a few new partsnow.
sub messup{
This line defines the beginning o f our function (subroutine). There is a matching closing brace (}) at the end. The nextline might be the most important part:
my $line = shif t (@_);
Functions would not be nearly as useful if they could not receive input and return results. When a function is invoked,the arguments that are passed to it are stored in a list called @_. It works sort o f like the temporary variable $_, but itworks like an array instead o f a single variable. The shif t function returns the first element from the list, which in thiscase is the only variable we gave as an argument. Next we assign this value to $line . The addition o f my makes thevariable private to the subroutine so it will no t get confused with o ther variables o f the same name found in our mainscript.
ret urn $newline;
This returns our new line back to the main script.
But let's get back to functions making programming easier—so far, this new function just seems like a lo t o f extra work.That's true at first, but we can perform the same operation again with very little extra effort. Make the fo llowing change tof unct io n.pl:
CODE TO TYPE:
#!/usr/local/bin/perl
open(PASSWD,"/etc/passwd");@passwd = <PASSWD>;close(PASSWD);
foreach $line (@passwd){ $newline = messup($line); $newline = messup($newline); print "$newline\n";}
sub messup { my $line = shift(@_);
$line =~ s/^([^:]*:)([^:]*:)/\2\1/; $line =~ tr/[A-Z]/[a-z]/; @fields = split(/:/,$line); chomp(@fields); @rfields = reverse(@fields); $newline = join(":",@rfields);
return $newline;}
Here we performed the same set o f operations a second time. All we had to do was add an additional call to thefunction instead o f writing out all o f that code again. Save and test this script to see the results.
LibrariesAnother benefit to writing functions is that we can reuse them in future scripts. We just copy them into new scripts or putthem into a library. A library is a set o f pre-written functions that are set aside in a separate file fo r use in o ther scripts.Let's copy messup from f unct io n.pl into a library. To remove the code marked for deletion, highlight it and press[Ct rl+x].

Make the fo llowing changes to function.pl:
#!/usr/local/bin/perl
require 'mess-lib.pl';
open(PASSWD,"/etc/passwd");@passwd = <PASSWD>;close(PASSWD);
foreach $line (@passwd){ $newline = messup($line); $newline = messup($newline); print "$newline\n";}
sub messup{ my $line = shift(@_);
$line =~ s/^([^:]*:)([^:]*:)/\2\1/; $line =~ tr/[A-Z]/[a-z]/; @fields = split(/:/,$line); chomp(@fields); @rfields = reverse(@fields); $newline = join(":",@rfields);
return $newline;}
The new require line tells Perl to include the contents o f mess-lib.pl (which we'll create in a moment) when it runs.We could write lo ts o f o ther scripts that use the mess-lib.pl library as well. All we need to include is the require line.Now, create the mess-lib.pl file. The name of this file doesn't really matter (as long as our require statement abovematches it), but it is helpful if the name indicates what the file contains—but you knew that. Add the fo llowing code tomess-lib.pl (first, press [Ct rl+v] to insert the code we removed from function.pl):
CODE TO TYPE:
sub messup{ my $line = shift(@_);
$line =~ s/^([^:]*:)([^:]*:)/\2\1/; $line =~ tr/[A-Z]/[a-z]/; @fields = split(/:/,$line); chomp(@fields); @rfields = reverse(@fields); $newline = join(":",@rfields);
return $newline;}
1;
This is the exact same function we worked on before with the exception o f that last line. Perl library files must return"true", so every library file needs to end with a 1;. Save this file.
Also, if we have to change how messup works, we would only have to change one file instead o f all o f our scripts.Good job! Let's move on to the next lesson.
Copyright © 1998-2014 O'Reilly Media, Inc.
This work is licensed under a Creative Commons Attribution-ShareAlike 3.0 Unported License.See http://creativecommons.org/licenses/by-sa/3.0/legalcode for more information.

Directories and Files
Reading DirectoriesIn order to perform operations on a directory full o f files, it becomes necessary to be able to list the directory'scontents. To do this we would use ls on the command line. We could do the same in Perl by using back ticks tocapture the output. But it would be better to use a few of Perl's built- in functions to read the directory. Write a scriptcalled list.pl that will list the contents o f the current directory.
Add the fo llowing code into list.pl:
#!/usr/bin/perl
opendir(CURRENT,".");@list = readdir(CURRENT);closedir(CURRENT);
foreach $item (@list){ print "$item\n";}
These three new functions are fairly self-explanatory. We open the directory, read its contents into an array, and finally,close the directory when we are finished. Save this script and test it.
After the command prompt, type the fo llowing commands:
cold:~$ ./list.pl...cgi.emacshtml_css.ncftp.bash_login.bash_history.error_loglinux4.ssh
There are a couple things to notice about this output. First, the contents are not listed alphabetically. They are listed inthe order that they were created. In most cases you do not really need an alphabetical list so there is no po int in Perlwasting the time to do it. The second thing to note is that dot files show up automatically. Let us change our script so itdoes not list files that begin with a dot.
Make the fo llowing changes to list.pl:
#!/usr/bin/perl
opendir(CURRENT,".");@list = readdir(CURRENT);closedir(CURRENT);
foreach $item (@list){ if($item !~ /^\./){ print "$item\n"; }}
Instead o f simply printing out the file names, we could open the files and perform operations on them.
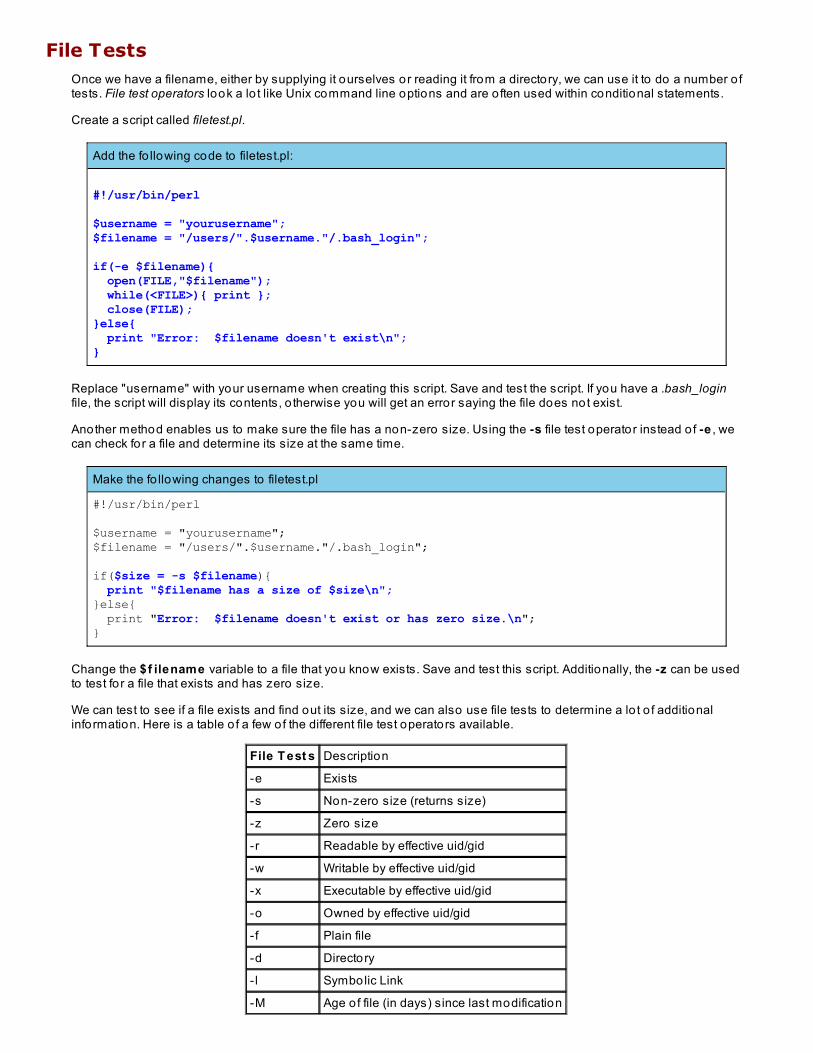
File TestsOnce we have a filename, either by supplying it ourselves or reading it from a directory, we can use it to do a number o ftests. File test operators look a lo t like Unix command line options and are o ften used within conditional statements.
Create a script called filetest.pl.
Add the fo llowing code to filetest.pl:
#!/usr/bin/perl
$username = "yourusername";$filename = "/users/".$username."/.bash_login";
if(-e $filename){ open(FILE,"$filename"); while(<FILE>){ print }; close(FILE);}else{ print "Error: $filename doesn't exist\n";}
Replace "username" with your username when creating this script. Save and test the script. If you have a .bash_loginfile, the script will display its contents, o therwise you will get an error saying the file does not exist.
Another method enables us to make sure the file has a non-zero size. Using the -s file test operator instead o f -e , wecan check for a file and determine its size at the same time.
Make the fo llowing changes to filetest.pl
#!/usr/bin/perl
$username = "yourusername";$filename = "/users/".$username."/.bash_login";
if($size = -s $filename){ print "$filename has a size of $size\n";}else{ print "Error: $filename doesn't exist or has zero size.\n";}
Change the $f ilename variable to a file that you know exists. Save and test this script. Additionally, the -z can be usedto test fo r a file that exists and has zero size.
We can test to see if a file exists and find out its size, and we can also use file tests to determine a lo t o f additionalinformation. Here is a table o f a few of the different file test operators available.
File T est s Description
-e Exists
-s Non-zero size (returns size)
-z Zero size
-r Readable by effective uid/gid
-w Writable by effective uid/gid
-x Executable by effective uid/gid
-o Owned by effective uid/gid
-f Plain file
-d Directory
-l Symbolic Link
-M Age o f file (in days) since last modification

The effective user or group id is typically go ing to be the uid/gid o f the user executing the script.
File ManipulationWe now know quite a bit about gathering information on a file. Now let us learn how to modify things. We can changethe permissions using the chmo d function.
Observe the fo llowing:
chmod(0755,$filename);
This works just the way you would expect, except fo r one important difference. The numerical permissions must startwith a zero in order fo r them to be interpreted correctly.
A file can be renamed with a function called, logically enough, rename . Using it is pretty simple.
Observe the fo llowing:
rename($oldname,$newname);
Not everything is named quite so intuitively though. For instance, to delete a file we use unlink. Creating hard links andsymbolic links is done with link and symlink respectively.
There seems to be something missing here though. How would we copy a file? There is not a command specificallyfor this purpose built into Perl. This is one o f many cases where you find it might be easier to use a simple Unixcommand instead. Fortunately this is not a problem.
Running System CommandsPerl provides two ways to run a Unix command directly. (These are in addition to using back ticks to capture the outputo f a command in a variable.) The first method is the syst em function. We simply give syst em a string or list to run asa Unix command.
Observe the fo llowing examples:
system("cp $filename $newfilename");
system("find",@ARGV);
When syst em executes its command, the Perl script will wait fo r it to finish before continuing. This is necessary whenthe results o f your system command are needed by the rest o f the script. In case you do not want to wait fo r theexternal command to finish, you can always background it with an ampersand (&) as part o f the command string.
A second, similar method to use is the exec function. The main difference between exec and syst em is that exec willterminate the originating Perl script and replace it with the new command. Therefore, it is only useful at the end o f ascript, typically fo r running a shell o r something like that.
WARNING
Reusing user input on the command line with a system call can be dangerous in cases when thePerl script is running as a different user than the person executing it (CGI scripts and suid scripts).For example, if you grab user input and they input "; some command" as an argument, thesemico lon would represent the end o f the first command. This would allow the second arbitrarycommand to run on the system. User input should always be parsed for special characters with aregular expression before being used in a system call.
Copyright © 1998-2014 O'Reilly Media, Inc.
This work is licensed under a Creative Commons Attribution-ShareAlike 3.0 Unported License.See http://creativecommons.org/licenses/by-sa/3.0/legalcode for more information.

Recursive Directory Search
RecursionYou have probably heard o f "recursion" even if you are not entirely familiar with the concept. The idea behind recursionis to focus on a problem, divide it into increasingly small problems o f the same type and find so lutions for the smallerproblems. At this po int, you can back up and see that the entire big problem has been so lved.
In Perl, a recursive sub-routine would call itself over and over as it makes progress towards a base case. The basecase is the smallest part o f the problem with a "known" so lution. Recursion can be a difficult concept to get your mindaround at first, so let us look at an example.
Recursive Directory SearchLet us say we want to get a list o f all the directories underneath a given starting po int. Essentially we want the sameresults that f ind ./ -t ype d would return, but we sre go ing to build a Perl script ourselves to make the output lookbetter.
Where do we start? Well, before we write any code at all, let's make a plan. We know how to open a directory and readits contents. Using file tests we can also find the name of o ther directories within the first one. Once we get a list o fthose directories we can list their contents as well. The problem is that we do not know how far this is go ing to go. Butdo you see the pattern? Even if we are five directories deep, we are do ing the same thing: reading a directory andgetting a list o f o ther directories within it.
Let's write a function that does just that. Create a script file called rd.pl.
Add the fo llowing code to rd.pl:
#!/usr/local/bin/perl
$startdir = "/lib";
list_dirs($startdir);
sub list_dirs{ my $dir = shift(@_);
opendir(TOP,$dir); my @files = readdir(TOP); closedir(TOP);
foreach $file (@files){ if(-d "$dir/$file"){ print "$file\n"; } }}
The list _dirs function reads the directory it is given to get a list o f files. Then it tests those files to see which ones aredirectories. Notice that when this happens we have to include the first directory as part o f the test (-d "$dir/$f ile" ) sothat the path is correct. Save and test this script:

After the command prompt, type the fo llowing commands:
cold:~$ ./rd.plkbdsecurityrtkaiomodulesterminfo.i686..udevfirmware
Excellent. Now the idea here is to take these new directories and do the same thing over and over again until there areno more directories left. There is one problem, however. What happens if we run our function on the . and ..directories? These are the current and previous directories. If our script is allowed to list the contents o f thesedirectories as well, it will never end. It will keep go ing back and forth while the problem grows ever larger. To preventthis, we prevent . and .. from being added to the list o f new directories.
Note Remember, if you find yourself in an infinite loop, you can quit your process by hitting Ctrl+c at thecommand line.
Removing . and ..Once we have listed all o f the files, we will sort them so we end up with . and .. at the top o f our array. It is simpleenough to remove them before do ing any more processing.
Make the fo llowing changes to rd.pl:
#!/usr/local/bin/perl
$startdir = "/lib";
list_dirs($startdir);
sub list_dirs{ my $dir = shift(@_);
opendir(TOP,$dir); my @files = readdir(TOP); closedir(TOP);
@files = sort(@files); shift(@files); shift(@files);
foreach $file (@files){ if(-d "$dir/$file"){ print "$file\n"; } }}
That is all there is to it. We no longer have to worry about those two special directories. Save and test the script tomake sure they are gone.
Making the Search RecursiveOur script lists all o f the directories in the starting directory. But that is only the first step. It seems like it would be muchharder to make our script keep searching all the way down through each o f the directories. But wait a second, thelist _dirs function will find directories in any directory we give it. So if we pass it one o f the newly found directories, itwill continue on as if that is the new starting po int. And, as it turns out, this can be done with a single line o f code.

Make the fo llowing changes to rd.pl:
#!/usr/local/bin/perl
$startdir = "/lib";
list_dirs($startdir);
sub list_dirs{ my $dir = shift(@_);
opendir(TOP,$dir); my @files = readdir(TOP); closedir(TOP);
@files = sort(@files); shift(@files); shift(@files);
foreach $file (@files){ if(-d "$dir/$file"){ print "$file\n"; list_dirs("$dir/$file"); } }}
All we have done is add a line that continues the search down the next branch o f the directory tree. In the next branch,the same thing will happen and the search will continue all the way down until there are no more directories.
Save and test the script. You should see a lo t o f directory names all in a big co lumn. So now we have got the list o fdirectories, but the only problem is that it is really hard to tell what goes where. It would be nice if the subdirectorieswere indented slightly from their parent directories.
Making the Output BetterLook over and make these changes:

Make the fo llowing changes to rd.pl:
#!/usr/local/bin/perl
$startdir = "/lib";
$level = 0;
list_dirs($startdir,$level);
sub list_dirs{ my $dir = shift (@_); my $lev = shift (@_);
opendir(TOP,$dir); my @files = readdir(TOP); closedir(TOP);
@files = sort(@files); shift(@files); shift(@files);
foreach $file (@files){ if(-d "$dir/$file"){ spaces($lev); print "$file\n"; list_dirs("$dir/$file",$lev+1); } }
}
sub spaces{ my($num) = shift(@_); for($i=0;$i<$num;$i++){ print " "; }}
Test the script to see the new output. As part o f a quiz you will be describing how this works. Good luck!
Copyright © 1998-2014 O'Reilly Media, Inc.
This work is licensed under a Creative Commons Attribution-ShareAlike 3.0 Unported License.See http://creativecommons.org/licenses/by-sa/3.0/legalcode for more information.


![Awk: Generating reports - supinfo.com1LIN-14]Awk-Generating-Reports.pdf · Awk: Generating reports Publications Courses Web sites Linux Technologies: Edge Computing Conferences FOSDEM](https://static.fdocuments.net/doc/165x107/5c695db809d3f242168cf051/awk-generating-reports-1lin-14awk-generating-reportspdf-awk-generating.jpg)