Running and Testing named See …archive.oreilly.com/oreillyschool/courses/asac2/Linux/Unix 2... ·...
44
Linux/Unix 2: Networking and DNS Lesson 1: Introduction to Networking Introduction The Structure of a Network T CP/IP Handing in a Quiz or Objective Lesson 2: Binary Numbers Binary Numbers IP Addresses Network, Broadcast, and Subnets Subnet Mask Example Prefix Length Notation The Hardware Lesson 3: If conf ig Ifconfig Hostnames and Domain names Routing Basics Lesson 4: Configuring an Ethernet Device About this lesson The Console Connecting to your Console Bringing the Network Up and Down Disconnecting from the console Lesson 5: Network at Startup Startup Scripts Rebooting the System Putting things back the way they were Lesson 6: Services and Ports Services and Ports xinetd Wu-ftpd Turning off services inetd Lesson 7: Access Control Access Control Access Control Files Denying a host Mostly Closed Policy Lesson 8: DNS /etc/hosts /etc/resolv.conf in-addr.arpa whois Caching Types of DNS servers Lesson 9: Bind Bind /etc/named.conf Zone Files Lesson 10: More on BIND in-addr.apra Zone Files
Transcript of Running and Testing named See …archive.oreilly.com/oreillyschool/courses/asac2/Linux/Unix 2... ·...

Linux/Unix 2: Networking and DNS
Lesson 1: Introduction to NetworkingIntroduct ionThe Structure of a NetworkTCP/IP
Handing in a Quiz or Object iveLesson 2: Binary Numbers
Binary NumbersIP AddressesNetwork, Broadcast, and SubnetsSubnet Mask ExamplePref ix Length Notat ionThe Hardware
Lesson 3: IfconfigIfconf igHostnames and Domain namesRout ing Basics
Lesson 4: Configuring an Ethernet DeviceAbout this lessonThe ConsoleConnect ing to your ConsoleBringing the Network Up and DownDisconnect ing f rom the console
Lesson 5: Network at StartupStartup ScriptsReboot ing the SystemPutt ing things back the way they were
Lesson 6: Services and PortsServices and PortsxinetdWu-f tpdTurning of f servicesinetd
Lesson 7: Access ControlAccess ControlAccess Control FilesDenying a hostMost ly Closed Policy
Lesson 8: DNS/etc/hosts/etc/resolv.confin-addr.arpawhoisCachingTypes of DNS servers
Lesson 9: BindBind/etc/named.confZone Files
Lesson 10: More on BINDin-addr.apra Zone Files

The localhost zone f ileDownloading BIND
Lesson 11: Sett ing Up the Secondary DNSnamed.confPreparat ions for Start ing namedRunning and Test ing named
Copyright © 1998-2014 O'Reilly Media, Inc.
This work is licensed under a Creat ive Commons Attribut ion-ShareAlike 3.0 Unported License.See ht tp://creat ivecommons.org/licenses/by-sa/3.0/legalcode for more informat ion.

Introduction to Networking
IntroductionBefore taking this course, you should understand basic Unix file manipulation and be able to install and run programson a server. You should also be able to keep track o f users and the processes they are running on a server. However,none o f this will do us much good unless you understand how the server is connected to the rest o f the internet. All o four users aren't go ing to come into the o ffice to login to the computer, they need to be able to access it from thenetwork.
In this course, you'll learn the basics o f networking. We will begin by discussing the structure o f IP addresses.Eventually you will set up your own DNS server.
NoteAll o f the examples, quizzes, and objectives for this course should be completed in the Unix Sandbo x. Ifyou have never taken an O'Reilly School o f Technology (OST) System Administration course, pleaseclick here to learn about the different features o f this too l.
The Structure of a NetworkBefore you can begin to understand the commands and configuration necessary to set up a network, you need to learna little about how our server will interact with the rest o f the computers around it. All o f the computers and o thernetworking devices on the internet are connected through some physical means, usually some form of cable ortelephone line. But these days many o f them use wireless connections. This physical hardware forms the first layer fo rnetwork communication and each type o f hardware has its own rules o f communication.
This graphic represents the physical connections between your computer at home and the rest o f the internet. Yourcomputer is connected to your ISP's (Internet Service Provider) network which probably has a bunch o f o ther users andsome servers. The ISP is then connected to the internet. OST's servers are also connected through our networkprovider.
Hardware is just one o f many layers o f network communication. In order fo r everything to work correctly there have tobe rules or protocols, that define how information is passed down from the user to the hardware. This series o fpro toco ls usually fo llows a structure similar to that o f the OSI mo del.
When people started building networks so computers could communicate with each o ther, they quickly realized thatthey needed to agree on how to do it. There is a lo t o f equipment invo lved in creating a network. Cables, hardwaredevices, and software are made by different manufacturers. All these manufacturers got together and developedpro t o co ls fo r how hardware would work with operating systems, how cable would work with hardware, how softwarewould receive and transmit information, etc.
The OSI model is part o f the agreement among manufacturers for producing equipment to work with the network.Below is a list o f layers that are part o f that model. If you manufacture things in the net wo rk layer, then you must tocomply with the pro toco ls used in the t ranspo rt layer and the dat a link layer.

OSI Mo del Layers
Application (e.g., telnet program)
Presentation (e.g., Telnet, SSH pro toco ls)
Session (e.g., Operating System)
Transport (e.g., TCP - Transmission Contro l Pro toco l, and UDP)
Network (e.g., internet pro toco l)
Data Link (e.g., ethernet pro toco l)
Physical (e.g., cables and Hubs)
It's not important to know the details o f the OSI model fo r this course, but you should be aware that it exists to helpmaintain hardware and software compatibility. Click here for a more detailed description o f the OSI Model.
TCP/IPAt some po int, you have probably heard the term T CP/IP . TCP/IP is a set o f pro toco ls that is used for networkcommunication. TCP/IP varies from the OSI model in that it doesn't have seven unique layers.
Although TCP/IP has an application layer, it doesn't have a presentation or session layer. There is a transport layer(just like the OSI model) and a network layer (usually referred to as the internet layer fo r TCP/IP). The last two layers o fthe OSI model (data link and physical) are both combined into a host-to-network layer. Because there isn't a specifiedpro toco l fo r the host-to-network layer, it can work across almost any type o f physical network.
TCP/IP uses IP addresses to keep track o f each machine so it knows where to send data. This is a lo t like your mailingaddress, which tells people where to send you letters, packages, and (unfortunately) bills. We'll learn all about themakeup o f IP addresses in the next lesson.
Handing in a Quiz or Objective
After you have read the lesson you have quizzes and objectives to complete that allow you to demonstratethe concepts you have learned. Under the lesson heading there is an objective and/or quiz item. Click on thisto reveal the instructions. When you are finished, scro ll down the top half o f the Coderunner screen and selectthe button that reads Hand in at the right side o f the window. You will use the same procedure to hand inobjectives. Please do not use the Drop In box but simply click on the Hand In button to hand in any filescreated. This button will alert your mentor that you are ready to be evaluated.
Copyright © 1998-2014 O'Reilly Media, Inc.
This work is licensed under a Creative Commons Attribution-ShareAlike 3.0 Unported License.See http://creativecommons.org/licenses/by-sa/3.0/legalcode for more information.

Binary Numbers
Binary NumbersBefore you can understand how IP addresses work, you should have a good understanding o f the binary numbersystem. In our daily lives we use what's known as the base 10 number system. We use the digits 0 through 9 torepresent any number we wish. Each position in the number represents a power o f 10. The number 5, fo r example, isthe same thing as 5 * 100 , o r 5 * 1. To get larger numbers we just add on another higher order digit.
23 2*101 + 3*100 = 20 + 3 = 23
4523 4*103 + 5*102 + 2*101 + 3*100 = 4000 + 500 + 20 + 3 = 4523
111 1*102 + 1*101 + 1*100 = 100 + 10 + 1 = 111
Computers use the binary number system. This is because a computer can only keep track o f information as a 0 or 1(o ff o r on). It works the same way as the base 10 system, except that you are dealing with powers o f 2 instead o fpowers o f 10.
1 1*20 = 1
111 1*22 + 1*21 + 1*20 = 4 + 2 + 1 = 7
1010 1*23 + 0*22 + 1*21 + 0*20 = 8 + 0 + 2 + 0 = 10
Each digit in a binary number is called a bit. Using an eight bit number you can represent any base 10 number fromzero (00000000) to 255 (11111111). Complicated math isn't really necessary as long as you know what each o f thebits stands for.
Bit 1/0 1/0 1/0 1/0 1/0 1/0 1/0 1/0
Value 128 64 32 16 8 4 2 1
If there's a 1, you simply add the corresponding value to the to tal. For example, 00010000 would be 16 and00010001 would be 17. If this still seems a little confusing, here's some more information on binary numbers.
IP AddressesIn order fo r computers to talk to each o ther on the internet, they have to know where the o ther is located. Over TCP/IP,this is done with an IP (Internet Pro toco l) address. An IP address is represented by four 8-bit binary numbers. Thisallows for approximately 4.3 billion different addresses.
11000000 10101000 00000001 00000001
192 168 1 1
This number would be represented as 192.168.1.1, o therwise known as dotted quad notation.
Just giving a computer an IP address won't do any good because not all computers are connected to each o therdirectly. You have to pass the information through a lo t o f different places in order fo r it to reach its destination. Youcan't drive from New York to San Francisco without traveling through o ther cities. The internet is divided into lo ts o fdifferent segments that talk to each o ther. Each segment is referred to as a network and each individual machine on anetwork is called a host. For this reason, an IP address is divided into a network portion and a host portion. Thedifference between the network portion and the host portion is sort o f like the difference between the city you live in andyour street address. When the IP addresses were first created, the size o f the network portion and the host portionwere determined by dividing all o f the addresses into multiple classes. The class divisions were also used to assignpeople IP addresses. Large companies would get a class A, while smaller companies would get a class B or class C.All o f the addresses were divided into five classes.
Original IP Address Classes
Class Range
A 0.xxx.xxx.xxx - 127.xxx.xxx.xxx

B 128.xxx.xxx.xxx - 191.xxx.xxx.xxx
C 192.xxx.xxx.xxx - 223.xxx.xxx.xxx
Class D and class E addresses were also defined. The red x's represent part o f the network address and the blue x's are part o f the host address.
Network, Broadcast, and SubnetsLet's give ourselves a class C network o f 192.168.1.xxx. Two o f the addresses are automatically used up--thenetwork address o f 192.168.1.0 and the broadcast address o f 192.168.1.255 . The network address is used whenreferring to the network itself, and the broadcast address is used to refer to all o f the hosts on that network. This meansyou can have 254 hosts on the network. That's quite a few hosts to connect on the same IP network! We need a way tosplit up the network into smaller parts.
All classes also have what's called a subnet mask. By default a class C network has a subnet mask o f 255.255.255.0 .(Note that the "on" bits are the same ones represented by red x's in the table above.) In fact, this default mask is reallythe only thing the o ld class structure is used for anymore. By changing the subnet mask, we can split up the large IPnetwork into two or more smaller networks. The subnet mask is then used to determine which portion o f an IP addressdefines the network and which defines the host. Let's look at our network again:
11111111 11111111 11111111 00000000 subnet mask (255.255.255.0 )11000000 10101000 00000001 00000001 ip address o f the first host (192.168.1.1)
Now let's split it into two subnets instead o f one. We'll do this by converting one o f the host bits into an additionalnetwork bit. The new subnet mask would be as fo llows:
11111111 11111111 11111111 10000000 (255.255.255.128)
But now, we have two networks and two broadcast addresses as well. This is because the green number, althoughpart o f the network portion, can be either a one or a zero . For the network addresses, all o f the ho st bits are 0 and forthe broadcast addresses, all o f the ho st bits are 1.
11000000 10101000 00000001 00000000 1st network address (192.168.1.0 )11000000 10101000 00000001 01111111 1st broadcast address (192.168.1.127 )
11000000 10101000 00000001 10000000 2nd network address (192.168.1.128)11000000 10101000 00000001 11111111 2nd broadcast address (192.168.1.255 )
The subnet mask is useful because when coupled with a host IP address, it provides all o f the necessary informationabout a subnet. Let's say we're given the fo llowing pair:
subnet mask: 255.255.255.128host address: 192.168.1.140
The subnet mask lets us determine the network and host parts o f the IP address. From this IP address and subnetmask, we know the network and broadcast addresses for all o f the subnets, as well as which subnet contains the host(which happen to be the second set from above).
The subnet mask is like a filter telling us which parts are for the network and which are for the hosts. But why not justgive the IP address and network address? Isn't that enough to describe it? Not really.
network address: 192.168.1.0host address: 192.168.1.22
From this pair we know that the host is on the 192.168.1.0 network. However, there is no way o f knowing whether thatnetwork is split into multiple subnets or not. We don't know if 192.168.1.140 is on the same subnet as 192.168.1.22.
Subnet Mask ExampleA slightly more complicated example would be as fo llows:
subnet mask: 255.255.255.224host address: 192.168.1.163
Let's break it down, piece by piece. The subnet mask ends in 224, which looks like 11100000 in binary. This gives useight separate subnets.
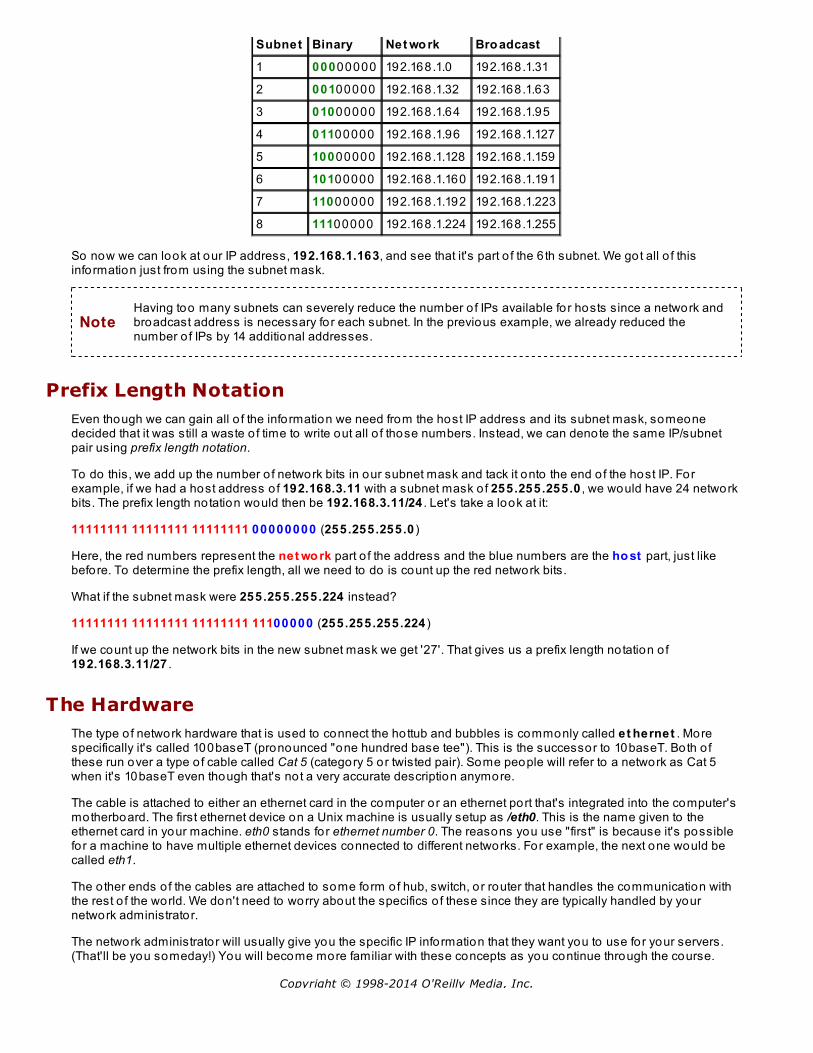
Subnet Binary Net wo rk Bro adcast
1 00000000 192.168.1.0 192.168.1.31
2 00100000 192.168.1.32 192.168.1.63
3 01000000 192.168.1.64 192.168.1.95
4 01100000 192.168.1.96 192.168.1.127
5 10000000 192.168.1.128 192.168.1.159
6 10100000 192.168.1.160 192.168.1.191
7 11000000 192.168.1.192 192.168.1.223
8 11100000 192.168.1.224 192.168.1.255
So now we can look at our IP address, 192.168.1.163, and see that it's part o f the 6 th subnet. We got all o f thisinformation just from using the subnet mask.
NoteHaving too many subnets can severely reduce the number o f IPs available for hosts since a network andbroadcast address is necessary for each subnet. In the previous example, we already reduced thenumber o f IPs by 14 additional addresses.
Prefix Length NotationEven though we can gain all o f the information we need from the host IP address and its subnet mask, someonedecided that it was still a waste o f time to write out all o f those numbers. Instead, we can denote the same IP/subnetpair using prefix length notation.
To do this, we add up the number o f network bits in our subnet mask and tack it onto the end o f the host IP. Forexample, if we had a host address o f 192.168.3.11 with a subnet mask o f 255.255.255.0 , we would have 24 networkbits. The prefix length notation would then be 192.168.3.11/24 . Let's take a look at it:
11111111 11111111 11111111 00000000 (255.255.255.0 )
Here, the red numbers represent the net wo rk part o f the address and the blue numbers are the ho st part, just likebefore. To determine the prefix length, all we need to do is count up the red network bits.
What if the subnet mask were 255.255.255.224 instead?
11111111 11111111 11111111 11100000 (255.255.255.224 )
If we count up the network bits in the new subnet mask we get '27'. That gives us a prefix length notation o f192.168.3.11/27 .
The HardwareThe type o f network hardware that is used to connect the hottub and bubbles is commonly called et hernet . Morespecifically it's called 100baseT (pronounced "one hundred base tee"). This is the successor to 10baseT. Both o fthese run over a type o f cable called Cat 5 (category 5 or twisted pair). Some people will refer to a network as Cat 5when it's 10baseT even though that's not a very accurate description anymore.
The cable is attached to either an ethernet card in the computer or an ethernet port that's integrated into the computer'smotherboard. The first ethernet device on a Unix machine is usually setup as /eth0. This is the name given to theethernet card in your machine. eth0 stands for ethernet number 0. The reasons you use "first" is because it's possiblefor a machine to have multiple ethernet devices connected to different networks. For example, the next one would becalled eth1.
The o ther ends o f the cables are attached to some form of hub, switch, or router that handles the communication withthe rest o f the world. We don't need to worry about the specifics o f these since they are typically handled by yournetwork administrator.
The network administrator will usually give you the specific IP information that they want you to use for your servers.(That'll be you someday!) You will become more familiar with these concepts as you continue through the course.
Copyright © 1998-2014 O'Reilly Media, Inc.

Copyright © 1998-2014 O'Reilly Media, Inc.
This work is licensed under a Creative Commons Attribution-ShareAlike 3.0 Unported License.See http://creativecommons.org/licenses/by-sa/3.0/legalcode for more information.

Ifconfig
IfconfigThe if co nf ig command is used to setup the network devices on a Unix machine. All o f the network devices on thehottub are already configured, so let's use if co nf ig to view the current setup.
After the command prompt, type the fo llowing commands:
hottub:~$ ifconfig eth0eth0 Link encap:Ethernet HWaddr 00:02:B3:09:7E:FD inet addr:204.212.246.154 Bcast:204.212.246.191 Mask:255.255.255.192 UP BROADCAST RUNNING MULTICAST MTU:1500 Metric:1 RX packets:65093 errors:0 dropped:0 overruns:0 frame:0 TX packets:27415 errors:0 dropped:0 overruns:0 carrier:0 collisions:144 txqueuelen:100 RX bytes:39742309 TX bytes:3264987 (3.1 Mb) Base address:0x4000 Memory:fc200000-fc220000
The important information about eth0 is highlighted above with co lors. The inet addr is simply the IP address that hasbeen assigned to it. Then we have the Bcast (broadcast) and Mask (subnet mask) which are already familiar. HWaddrstands for hardware address. This is a unique number for that specific ethernet device. No device will have that samehardware address since each manufacturer is given a different set to use. A lo t o f network pro toco ls and services willkeep track o f hosts by their hardware address. The rest o f the information is not likely to be important to you, so wewon't worry about it now.
Take a look at another device.
After the command prompt, type the fo llowing commands:
hottub:~$ ifconfig lolo Link encap:Local Loopback inet addr:127.0.0.1 Mask:255.0.0.0 UP LOOPBACK RUNNING MTU:3924 Metric:1 RX packets:2126 errors:0 dropped:0 overruns:0 frame:0 TX packets:2126 errors:0 dropped:0 overruns:0 carrier:0 collisions:0 txqueuelen:0 RX bytes:4226 (4.1 Kb) TX bytes:4226 (4.1 Kb)
Notice that the link type is no longer ethernet; it's Lo cal Lo o pback. The lo device provides a sort o f fake networkconnection that "loops back" to itself.
Note The 127.0 .0 .0 network used on the loopback device is reserved specifically fo r this purpose.
Try typing if co nf ig all by itself to get a look at all o f the active devices on the hottub.
After the command prompt, type the fo llowing commands:
hottub:~$ ifconfig
Hostnames and Domain namesUp to this po int you've seen hosts with numerical addresses. Given this information, you might be wondering why werefer hottub.useractive.com instead o f 202.246.212.154. This is made possible by the do main name syst em o rDNS . This system maps names to IP addresses. Each name can be divided into two parts, a hostname and a domainname. (This is sort o f like the host and network portion o f IP addresses.) Let's use ho t t ub.useract ive.co m as anexample. ho t t ub is the host name and useract ive.co m is the domain name. There are usually many different hostsusing the same domain name.
There is a very handy command called ho st that allows you to determine an IP address given a hostname or viceversa.

After the command prompt, type the fo llowing commands:
hottub:~$ host hottub.useractive.comhottub.useractive.com has address 63.171.219.83
This information gives the IP address for hottub.useractive.com. We also could have entered an IP address instead o fa hostname.
Routing BasicsYou now know that the internet is made up o f lo ts o f different networks that are interconnected. Since each computercan't be directly connected to all o f the o thers, there must be some way for information to get from one to the next.
With TCP/IP, information that needs to be sent is broken up into smaller parts called segments. Other pro toco ls andmost networks refer to these as packets.
Packets contain the data that needs to be sent as well as information about the data's origin and destination. Thesepackets typically travel from the originating host through a bunch o f different routers until they reach their destination. Arouter is a hardware device used to send packets to the correct place. It does this using a set o f defined routesdepending on a packet's destination. Your server also has a set o f routes. Usually there's one route for each networkdevice.
In the first lesson there was a graphic that represented the internet as a big black line that connects everything together.That's not very accurate. The internet really looks more like this:
Whoa! What a mess! You can see how confusing it is to send data somewhere. That's why we need to define routes.
Using the ro ut e command, we can see the routes that are set up on hottub.
After the command prompt, type the fo llowing commands:
hottub:~$ routeKernel IP routing tableDestination Gateway Genmask Flags Metric Ref Use Iface10.0.0.0 * 255.255.0.0 U 0 0 0 eth164.5.96.128 * 255.255.255.192 U 0 0 0 eth0127.0.0.0 * 255.0.0.0 U 0 0 0 lodefault 64.5.96.129 0.0.0.0 UG 0 0 0 eth0
Your table may have many more entries than what you see above. However, the structure should be the same.
The first thing listed for each route is the Dest inat io n network. There is a route in red that is defined for the networkattached to each device. The last route is the def ault route. A packet that is destined for a network not listed will gohere.
Next is the Gat eway. The gateway is the IP address or hostname of the next router on the way to the destination. If you

see a * in the gateway field, it means that that device is part o f that network so no gateway is necessary.
The Genmask is simply the subnet mask. Why do they call it a genmask? Your guess is as good as mine. In the caseof the default route you'll no tice that the mask is 0 .0 .0 .0 . This is because, like we said above, the default route is fo revery host on any network not already defined.
The Flags field contains a U if the route is "up." G stands for gateway and H stands for host.
If ace is the name of the network interfaces with which we are already familiar.
This graphic represents the major routes on the hottub. There is the main route through the OST gateway that gives thehottub access to the internet. Then we have a route to the 10.0 .0 .0 network where all o f the bubbles reside. Thebubbles can't get to the internet and nobody from the outside can get to the bubbles without logging into the hottub first.We aren't do ing this to be mean; it's fo r security reasons.
If you want to make sure you are connected to a specific host, you can use ping. ping sends what is known as ICMPECHO_REQUEST packets. By default, ping sends one packet every second. You will have to hit Ct rl+c in order tobreak out o f this command.
After the command prompt, type the fo llowing commands:
hottub:~$ ping hot.useractive.comPING hot.useractive.com (209.16.196.243) from 204.212.246.154 : 56(84) bytes ofdata.64 bytes from hot.useractive.com (209.16.196.243): icmp_seq=0 ttl=247 time=28.677 msec64 bytes from hot.useractive.com (209.16.196.243): icmp_seq=1 ttl=247 time=38.414 msec64 bytes from hot.useractive.com (209.16.196.243): icmp_seq=2 ttl=247 time=37.338 msec64 bytes from hot.useractive.com (209.16.196.243): icmp_seq=3 ttl=247 time=28.641 msec64 bytes from hot.useractive.com (209.16.196.243): icmp_seq=4 ttl=247 time=29.190 msec64 bytes from hot.useractive.com (209.16.196.243): icmp_seq=5 ttl=247 time=28.957 msecCtrl+c--- hot.useractive.com ping statistics ---6 packets transmitted, 6 packets received, 0% packet lossround-trip min/avg/max/mdev = 28.641/31.869/38.414/4.266 ms
We see a line for every packet that is responded to by the target host. They all have an ICMP sequence number(icmp_seq) and the amount o f time it took to get a response. Once we hit Ct rl+c, ping gives us a nice little report thatincludes the to tal amount o f packet s t hat were lo st . Lost packets mean that there is probably something wrong withthe network connection or there is just way too much traffic fo r the speed o f the connection somewhere along the line.
Note Some machines require that you have root access before running ping. This is because it's possible to"ping flood" a host, thereby reducing the efficiency o f its network connection.
Another useful command is t racero ut e . It's sort o f like ping in that it can indicate a good connection to a remotehost. T racero ut e goes a step further in that it gives the hostname or IP address o f every router between the twomachines. Each successive router through which a packet travels is called a hop.

After the command prompt, type the fo llowing commands:
hottub:~$ traceroute hot.useractive.comtraceroute to hot.useractive.com (64.5.69.48), 30 hops max, 38 byte packets 1 64.5.96.129 (64.5.96.129) 1.498 ms 1.546 ms 1.681 ms 2 bacchus.soltec.net (64.5.64.11) 11.525 ms 5.099 ms 5.067 ms 3 gw.soltec.net (64.5.64.1) 3.642 ms 3.354 ms 3.616 ms 4 hot (64.5.69.48) 3.683 ms 3.756 ms 3.659 ms
If fo r some reason you can't connect to a host you know is there, t racero ut e can show you the location o f theproblem. This way you'll know immediately if you should contact your network provider or if it's a problem on the o therend.
Let's look at another example.
After the command prompt, type the fo llowing commands:
hottub:~$ traceroute www.cnn.comtraceroute: Warning: www.cnn.com has multiple addresses; using207.25.71.20traceroute to cnn.com (207.25.71.20), 30 hops max, 38 byte packets 1 gw-useractive.fgi.net (204.212.246.129) 1.346 ms 1.298 ms 1.385 ms 2 gw3-champaign.fgi.net (204.212.246.3) 6.380 ms 6.399 ms 6.419 ms 3 gw1-champaign.fgi.net (204.212.246.1) 7.238 ms 7.159 ms 7.211 ms 4 gw-noc.fgi.net (204.212.192.1) 13.846 ms 11.789 ms 11.837 ms 5 sl-gw31-chi-7-0-TS9.sprintlink.net (160.81.92.245) 15.105 ms 15.110 ms 15.363 ms 6 sl-bb21-chi-4-0.sprintlink.net (144.232.26.29) 17.611 ms 15.430 ms 15.382 ms 7 sl-bb21-atl-12-0.sprintlink.net (144.232.18.34) 27.918 ms 27.743 ms 27.699 ms 8 sl-gw11-atl-8-0.sprintlink.net (144.232.12.86) 27.745 ms 27.923 ms 27.841 ms 9 * sl-cnn-2-0-0.sprintlink.net (144.232.194.130) 87.883 ms !X *10 * sl-cnn-2-0-0.sprintlink.net (144.232.194.130) 35.120 ms !X *11 * sl-cnn-2-0-0.sprintlink.net (144.232.194.130) 28.067 ms !X *15 * *Ctrl+c
Something is not quite right here...let's try to ping the host.
After the command prompt, type the fo llowing commands:
hottub:~$ ping www.cnn.comWarning: no SO_TIMESTAMP support, falling back to SIOCGSTAMPPING cnn.com (207.25.71.22) from 204.212.246.154 : 56(84) bytes of data.From sl-cnn-2-0-0.sprintlink.net (144.232.194.130): Packet filteredFrom sl-cnn-2-0-0.sprintlink.net (144.232.194.130): Packet filteredFrom sl-cnn-2-0-0.sprintlink.net (144.232.194.130): Packet filteredCtrl+c--- cnn.com ping statistics ---29 packets transmitted, 0 packets received, +3 errors, 100% packet loss
Note You may not see the "Packet filtered" messages.
Packet f ilt ered indicates that cnn.com probably isn't letting ICMP packets through. If you didn't see this message, itwould appear that www.cnn.com is down when it really is not. This is obvious if you visit the websitehttp://www.cnn.com.
Copyright © 1998-2014 O'Reilly Media, Inc.
This work is licensed under a Creative Commons Attribution-ShareAlike 3.0 Unported License.See http://creativecommons.org/licenses/by-sa/3.0/legalcode for more information.

Configuring an Ethernet Device
About this lessonIn this lesson you'll be messing around with network connections and even disconnecting your bubble computer fromthe network. What if the computer isn't connected to the network? How will we get it back online? Luckily there areprograms in place so that you can connect to the conso le o f the computer. Think o f the conso le as the screen youwould see if you were sitting and looking at the monitor that is connected directly to the computer.
This lesson discusses the conso le and how we will connect to it in this course. Once you are able to connect to theconso le we'll learn about networking Unix machines.
The ConsoleThere are many ways you can access a Unix system. The main mode o f access is through a terminal, which usuallyincludes a keyboard and a video monitor. You've been using ssh and telnet fo r terminal emulation. For each terminalconnected to the Unix system, the kernel runs a process called a t t y that accepts input from the terminal, and sendsoutput to the terminal (t t y stands fort elet ype). tty processes are general programs and must be to ld the capabilities o fthe terminal in order to read from and write to the terminal correctly. If the tty process receives incorrect informationabout the terminal type, unexpected results can occur.
After the command prompt, type the fo llowing commands:
hottub:~$ fingerLogin Name Tty Idle Login Time Office Office Phonecertjosh pts/3 18 Feb 11 14:31 (cold.useractive.com)certjosh pts/7 5 Feb 11 14:40 (faucet.useractive.com)certjosh pts/9 Feb 11 16:21 (cold.useractive.com)kerryvb pts/8 1:36 Feb 11 14:41 (faucet.useractive.com)root root tty1 8d Feb 2 17:19tljohnsn pts/1 19 Feb 11 14:22 (office.useractive.com)
Check out the t t y co lumn. For each login there is either a tty number or pts number. pt s stands for psuedo t erminal.These are the terminals to which people are connected. Notice that one person can be connected to multiple terminalsusing multiple shell sessions. The tty is not important to understand for this lesson.
In this course you've been using an Applet that is a t erminal emulat o r and you've been using the ssh and telnetprograms to connect to the machines. These shells are actually running on something called a conso le.
Every Unix system has a main co nso le that is connected directly to the machine. The conso le is a special type o fterminal that is recognized when the system is started. Some Unix system operations must be performed at theconso le. Typically, the conso le is only accessible by the system operators and administrators, and usually only bysitting at the monitor that is directly connected to the machine.
In this course we will be connecting to the conso le through a program we wrote called co nso le .
Connecting to your Console
After the command prompt, type the fo llowing commands:
hottub:~$ console
You'll be prompted to login as usual. Use the same login information you used before. You'll no tice a prompt thatlooks like this:
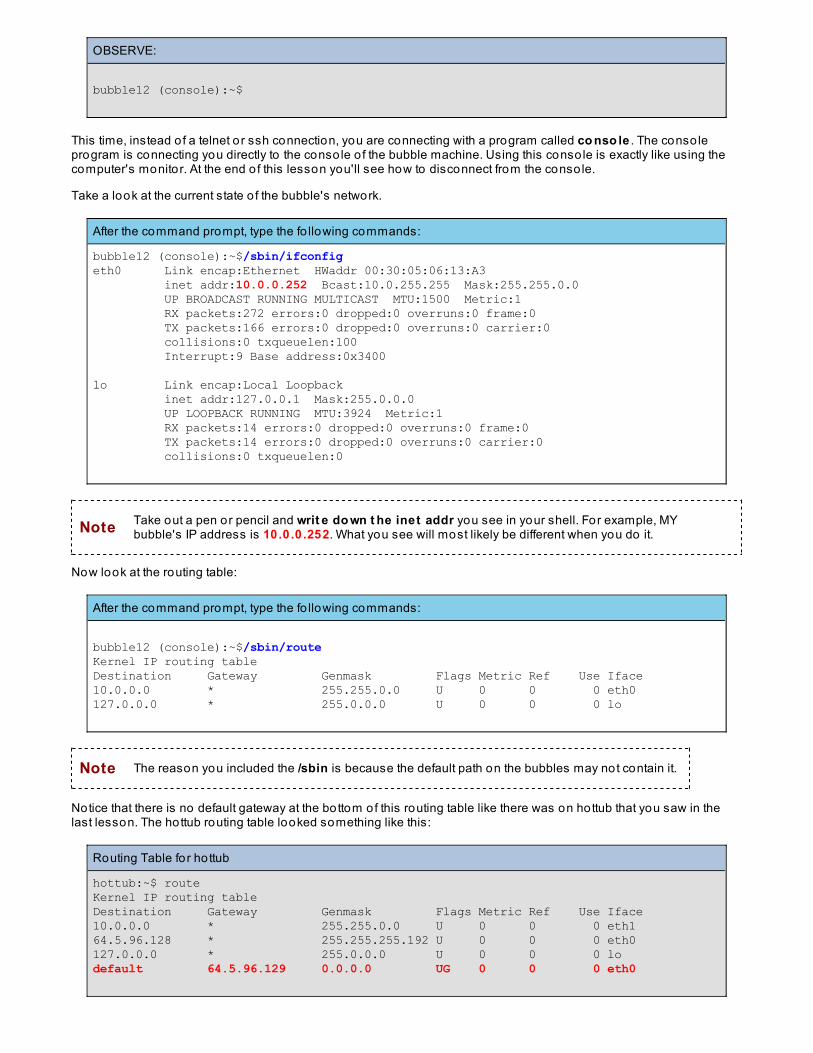
OBSERVE:
bubble12 (console):~$
This time, instead o f a telnet or ssh connection, you are connecting with a program called co nso le . The conso leprogram is connecting you directly to the conso le o f the bubble machine. Using this conso le is exactly like using thecomputer's monitor. At the end o f this lesson you'll see how to disconnect from the conso le.
Take a look at the current state o f the bubble's network.
After the command prompt, type the fo llowing commands:
bubble12 (console):~$/sbin/ifconfigeth0 Link encap:Ethernet HWaddr 00:30:05:06:13:A3 inet addr:10.0.0.252 Bcast:10.0.255.255 Mask:255.255.0.0 UP BROADCAST RUNNING MULTICAST MTU:1500 Metric:1 RX packets:272 errors:0 dropped:0 overruns:0 frame:0 TX packets:166 errors:0 dropped:0 overruns:0 carrier:0 collisions:0 txqueuelen:100 Interrupt:9 Base address:0x3400
lo Link encap:Local Loopback inet addr:127.0.0.1 Mask:255.0.0.0 UP LOOPBACK RUNNING MTU:3924 Metric:1 RX packets:14 errors:0 dropped:0 overruns:0 frame:0 TX packets:14 errors:0 dropped:0 overruns:0 carrier:0 collisions:0 txqueuelen:0
Note Take out a pen or pencil and writ e do wn t he inet addr you see in your shell. For example, MYbubble's IP address is 10.0 .0 .252. What you see will most likely be different when you do it.
Now look at the routing table:
After the command prompt, type the fo llowing commands:
bubble12 (console):~$/sbin/routeKernel IP routing tableDestination Gateway Genmask Flags Metric Ref Use Iface10.0.0.0 * 255.255.0.0 U 0 0 0 eth0127.0.0.0 * 255.0.0.0 U 0 0 0 lo
Note The reason you included the /sbin is because the default path on the bubbles may not contain it.
Notice that there is no default gateway at the bottom of this routing table like there was on hottub that you saw in thelast lesson. The hottub routing table looked something like this:
Routing Table for hottub
hottub:~$ routeKernel IP routing tableDestination Gateway Genmask Flags Metric Ref Use Iface10.0.0.0 * 255.255.0.0 U 0 0 0 eth164.5.96.128 * 255.255.255.192 U 0 0 0 eth0127.0.0.0 * 255.0.0.0 U 0 0 0 lodefault 64.5.96.129 0.0.0.0 UG 0 0 0 eth0

Since your bubble doesn't have a default gateway it doesn't have access to the internet right now. To see this, try usingthe ping command to reach another computer. Try to ping a computer that is on the internet to see if you can reach it.
After the command prompt, type the fo llowing commands:
bubble12 (console):~$ping cold.useractive.comconnect: Network is unreachable
You cannot ping co ld.useractive.com. Because hottub is on the same local area network as the bubble machine, youCAN ping hottub:
After the command prompt, type the fo llowing commands:
bubble12 (console):~$ ping hottubPING hottub (10.0.0.1) from 10.0.0.11 : 56(84) bytes of data.64 bytes from hottub (10.0.0.1): icmp_seq=0 ttl=255 time=12.905 msec64 bytes from hottub (10.0.0.1): icmp_seq=1 ttl=255 time=49.622 msec64 bytes from hottub (10.0.0.1): icmp_seq=2 ttl=255 time=49.587 msec64 bytes from hottub (10.0.0.1): icmp_seq=3 ttl=255 time=49.593 msec64 bytes from hottub (10.0.0.1): icmp_seq=4 ttl=255 time=49.582 msec--- hottub ping statistics ---5 packets transmitted, 5 packets received, 0% packet lossround-trip min/avg/max/mdev = 12.905/42.257/49.622/14.678 ms
To break out o f the ping command, type Ct rl - C
You are seeing packets come back from the hottub computer. They're talking! Now let's make it so that you can talk tocomputers on the internet.
From the last lesson, you should know that your bubble computer needs a default gateway in order to be on theinternet. Let's add a default gateway. You will need to be a superuser in order to do this.
After the command prompt, type the fo llowing commands:
bubble12 (console):~$su suusernamePassword:bubble12 (console):~#
Under most circumstances we would have a gateway that would route traffic to the rest o f the internet. In order fo r thisto work, we would need to set up a default route. The gateway will likely be the first host on your network. For us, this isthe hottub.
After the command prompt, type the fo llowing commands:
bubble12 (console)~:# /sbin/route add default gw 10.0.0.1bubble12 (console)~:# /sbin/routeKernel IP routing tableDestination Gateway Genmask Flags Metric Ref Use Iface10.0.0.0 * 255.255.0.0 U 0 0 0 eth0127.0.0.0 * 255.0.0.0 U 0 0 0 lodefault hottub 0.0.0.0 UG 0 0 0 eth0
Perfect. Now try pinging co ld.useractive.com again:

After the command prompt, type the fo llowing commands:
bubble12 (console):~#ping cold.useractive.comPING cold.useractive.com (64.5.69.49) from 10.0.0.252: 56 data bytes64 bytes from 64.5.69.49: icmp_seq=0 ttl=255 time=0.3 ms64 bytes from 64.5.69.49: icmp_seq=1 ttl=255 time=0.2 ms64 bytes from 64.5.69.49: icmp_seq=2 ttl=255 time=0.2 ms64 bytes from 64.5.69.49: icmp_seq=3 ttl=255 time=0.2 ms64 bytes from 64.5.69.49: icmp_seq=4 ttl=255 time=0.2 ms64 bytes from 64.5.69.49: icmp_seq=5 ttl=255 time=0.2 ms64 bytes from 64.5.69.49: icmp_seq=6 ttl=255 time=0.2 ms64 bytes from 64.5.69.49: icmp_seq=7 ttl=255 time=0.3 ms
--- cold.useractive.com ping statistics ---8 packets transmitted, 8 packets received, 0% packet lossround-trip min/avg/max = 0.2/0.2/0.3 ms
Now let's remove the default gateway (because we're go ing to do it another way in the next lesson):
After the command prompt, type the fo llowing commands:
bubble12 (console):~#/sbin/route del default
Look at the routing table and make sure that the default gateway is gone.
Bringing the Network Up and DownFirst, let's bring down the current ethernet settings. This will stop the ethernet device from listening on the network.
After the command prompt, type the fo llowing commands:
bubble12 (console):~# /sbin/ifconfig eth0 downbubble12 (console):~# /sbin/ifconfiglo Link encap:Local Loopback inet addr:127.0.0.1 Mask:255.0.0.0 UP LOOPBACK RUNNING MTU:3924 Metric:1 RX packets:16 errors:0 dropped:0 overruns:0 frame:0 TX packets:16 errors:0 dropped:0 overruns:0 carrier:0 collisions:0 txqueuelen:0
bubble12 (console):~# /sbin/routeKernel IP routing tableDestination Gateway Genmask Flags Metric Ref Use Ife127.0.0.0 * 255.0.0.0 U 0 0 0 lo
. Take the time to compare this ifconfig with the previous one. Your bubble computer is no longer connected to thehottub computer. We can prove this by trying to ping the hottub.
After the command prompt, type the fo llowing commands:
bubble12 (console):~# ping hottubconnect: Network is unreachable
Just as suspected, the bubble network is down.
Now let's bring up the bubble's ethernet. We'll be using the same address you wrote down earlier in the lesson.
Note If you forgot your address, you can find it by typing cat /et c/sysco nf ig/net wo rk-script s/if cf g-et h0 .
You'll also be using a subnet mask o f 255.255.0 .0 which will put us on the same network (10.0 .0 .0) as the hottub.
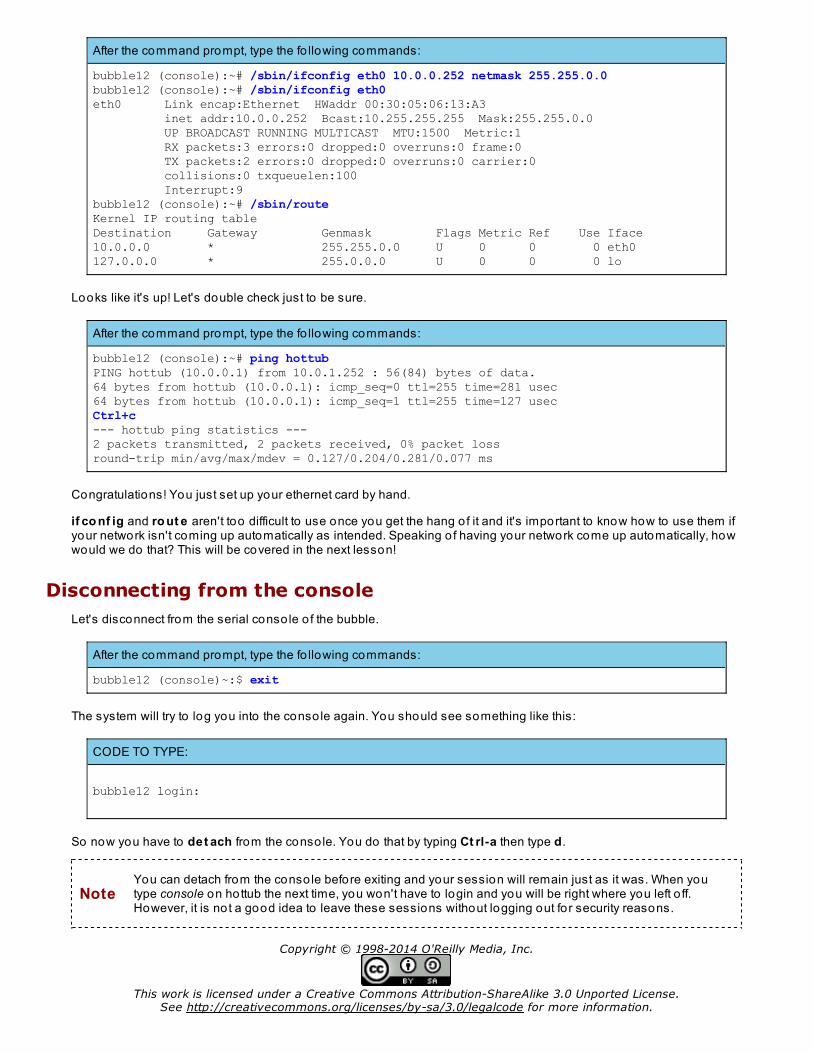
After the command prompt, type the fo llowing commands:
bubble12 (console):~# /sbin/ifconfig eth0 10.0.0.252 netmask 255.255.0.0bubble12 (console):~# /sbin/ifconfig eth0eth0 Link encap:Ethernet HWaddr 00:30:05:06:13:A3 inet addr:10.0.0.252 Bcast:10.255.255.255 Mask:255.255.0.0 UP BROADCAST RUNNING MULTICAST MTU:1500 Metric:1 RX packets:3 errors:0 dropped:0 overruns:0 frame:0 TX packets:2 errors:0 dropped:0 overruns:0 carrier:0 collisions:0 txqueuelen:100 Interrupt:9 bubble12 (console):~# /sbin/routeKernel IP routing tableDestination Gateway Genmask Flags Metric Ref Use Iface10.0.0.0 * 255.255.0.0 U 0 0 0 eth0127.0.0.0 * 255.0.0.0 U 0 0 0 lo
Looks like it's up! Let's double check just to be sure.
After the command prompt, type the fo llowing commands:
bubble12 (console):~# ping hottubPING hottub (10.0.0.1) from 10.0.1.252 : 56(84) bytes of data.64 bytes from hottub (10.0.0.1): icmp_seq=0 ttl=255 time=281 usec64 bytes from hottub (10.0.0.1): icmp_seq=1 ttl=255 time=127 usecCtrl+c--- hottub ping statistics ---2 packets transmitted, 2 packets received, 0% packet lossround-trip min/avg/max/mdev = 0.127/0.204/0.281/0.077 ms
Congratulations! You just set up your ethernet card by hand.
if co nf ig and ro ut e aren't too difficult to use once you get the hang o f it and it's important to know how to use them ifyour network isn't coming up automatically as intended. Speaking o f having your network come up automatically, howwould we do that? This will be covered in the next lesson!
Disconnecting from the consoleLet's disconnect from the serial conso le o f the bubble.
After the command prompt, type the fo llowing commands:
bubble12 (console)~:$ exit
The system will try to log you into the conso le again. You should see something like this:
CODE TO TYPE:
bubble12 login:
So now you have to det ach from the conso le. You do that by typing Ct rl-a then type d.
NoteYou can detach from the conso le before exiting and your session will remain just as it was. When youtype console on hottub the next time, you won't have to login and you will be right where you left o ff.However, it is not a good idea to leave these sessions without logging out fo r security reasons.
Copyright © 1998-2014 O'Reilly Media, Inc.
This work is licensed under a Creative Commons Attribution-ShareAlike 3.0 Unported License.See http://creativecommons.org/licenses/by-sa/3.0/legalcode for more information.


Network at Startup
Startup ScriptsIn the last lesson you learned how to change the IP address o f your bubble using the if co nf ig command. You alsolearned how to connect your bubble to the internet using the ro ut e command to specify a default gateway. In thislesson, you'll learn how to set the IP address and gateway automatically when the machine is started. We will do thisby altering the network startup scripts.
Red Hat Linux (tm) has made it fairly easy to set up your network so that it will start automatically. There are a series o fscripts (small programs) in /e t c/sysco nf ig/net wo rk-script s that will do most o f the work for you.
Let's begin by looking at the /e t c/sysco nf ig/net wo rk configuration file. Login to your bubble via the conso le.Remember, to do this you must enter the hottub and type co nso le .
After the command prompt, type the fo llowing commands:
bubble12 (console):~$ cd /etc/sysconfigbubble12 (console):/etc/sysconfig$ cat networkNETWORKING=yesFORWARD_IPV4=falseHOSTNAME=bubble12.private.useractive.com
As you can see, this file specifies that, yes, we do want to have a network set up for us. The host name of the machineis also specified here.
In order to connect to the internet every time the machine is booted, we must specify a GATEWAY in this file as well.Remember, your bubble doesn't have a default gateway specified (you added one using route and removed it usingroute in the last lesson). Let's add this line to the file.
Login to the bubble as a superuser.
After the command prompt, type the fo llowing commands:
bubble12 (console):/etc/sysconfig$ su suusernamePassword:bubble12 (console):/etc/sysconfig#
Using your favorite Unix editor (emacs, pico , or vi), add the fo llowing line to /e t c/sysco nf ig/net wo rk.
Add this line to /etc/sysconfig/network:
GATEWAY=10.0.0.1
Here's what it should look like when you're done:
After the command prompt, type the fo llowing commands:
bubble12 (console):/etc/sysconfig# cat networkNETWORKING=yesFORWARD_IPV4=falseHOSTNAME=bubble12.private.useractive.comGATEWAY=10.0.0.1
Now let's make it so that the IP address o f the machine is set to a different address than the one you are currentlyusing. Go into the net wo rk-script s directory.

After the command prompt, type the fo llowing commands:
bubble12 (console):/etc/sysconfig# cd network-scriptsbubble12 (console):/etc/sysconfig/network-scripts# lsifcfg-eth0 ifdown ifdown-sl ifup-plip ifup-sitifcfg-eth0.bak ifdown-ipv6 ifup ifup-plusb ifup-slifcfg-eth0.dhcp ifdown-post ifup-aliases ifup-post network-functionsifcfg-eth0~ ifdown-ppp ifup-ipv6 ifup-ppp network-functions-ipv6ifcfg-lo ifdown-sit ifup-ipx ifup-routes
We've only got one more file to edit, and that's ifcfg-eth0. There is one o f these files for every network device on themachine. Take a look at the current setup:
After the command prompt, type the fo llowing commands:
bubble12 (console):/etc/sysconfig/network-scripts# cat ifcfg-eth0DEVICE=eth0ONBOOT=YESIPADDR=10.0.0.12NETMASK=255.255.0.0NETWORK=10.0.0.0BROADCAST=10.0.255.255
Note Be sure to take out a pencil and write down the number that's listed in the IPADDR line. The one listedabove is 10.0 .0 .12, but yours will be different. We will be using this number later in the lesson.
In this part o f the lesson, you will change the ifcfg-eth0 file and restart the computer. Then you'll change it back to itsoriginal state.
First, find an open IP address to use. To do that, ping some addresses on your network to see if any o f them are open.
The IP addresses in your network are o f the form 10.0 .x.x where the x is a number between 0 and 255; one possibilitywould be 10.0 .253.2. If it is available you will have 100% packet loss.
After the command prompt, type the fo llowing commands:
bubble12 (console):/etc/sysconfig/network-scripts#ping 10.0.253.2
If it does not have 100% packet loss, try another one until you find one that does. Once you've found an IP address o fthe form 10.0 .x.x that isn't being used, write it down. You will be using it in the next example.
Edit ifcfg-eth0 so that it looks like this:
DEVICE=eth0ONBOOT=YESIPADDR=10.0.x.xNETMASK=255.255.0.0NETWORK=10.0.0.0BROADCAST=10.0.255.255
Make sure that 10.0 .x.x is the number you just found (it won't be 10.0 .x.x).
There are two scripts that will allow us to test the new settings-- if do wn and if up. Both scripts are located in the samedirectory.

After the command prompt, type the fo llowing commands:
bubble12 (console):/etc/sysconfig/network-scripts# ./ifdown eth0bubble12 (console):/etc/sysconfig/network-scripts# ./ifup eth0bubble12 (console):/etc/sysconfig/network-scripts# /sbin/routeKernel IP routing tableDestination Gateway Genmask Flags Metric Ref Use Ife10.0.0.0 * 255.255.0.0 U 0 0 0 eth0127.0.0.0 * 255.0.0.0 U 0 0 0 lodefault hottub.private. 0.0.0.0 UG 0 0 0 eth0
Looks good! The real test will be when we actually restart the machine.
Note Different Linux distributions may use a file called /e t c/rc.d/rc.inet 1 instead o f these configuration files.
Rebooting the SystemTo test out our new settings we're go ing to reboot the bubble remotely. Since we're connected to the conso le, we canwatch the shutdown process, as well as part o f the boot process.
After the command prompt, type the fo llowing commands:
bubble12 (console):/etc/sysconfig/network-scripts# /sbin/shutdown -r now
The -r flag stands for reboot. We could also use -h (halt), but then the system would not restart (please don't do -h).We also specified that the system should restart no w. Under conditions where there are o ther users logged in, it's agood idea to give them time to finish up their work and log o ff before shutting down the system. You can do this byreplacing no w with the number o f minutes to wait before rebooting. The system will broadcast to all o f the users on thesystem when the system will go down. You will always broadcast a system- wide message that the system is go ingdown.
Observe the fo llowing:
Broadcast message from root (ttyS0) Wed Apr 4 15:10:12 2001...
The system is going down for reboot NOW !!INIT: Switching to runlevel: 6
You will then see a lo t o f information listed on the screen. Part o f them will be shutdown messages that look similar tothis:
Observe the fo llowing:
Stopping cron daemon: [ OK ]
The output will pause for a few seconds while the machine restarts. Then you'll see a bunch o f kernel messages aswell as commands used to run Red Hat startup scripts. When it's finished, you will see a prompt to login to theconso le again. Go ahead and login now.
Note There is a small chance that the output will stop with a message about "maximal mount count." Just waita couple minutes and the reboot will continue.
Observe the fo llowing:
...Bringing up interface eth0: [ OK ]...Starting cron daemon: [ OK ]...

NoteYou should always halt a Unix machine before turning it o ff. Most Unix machines need to write data that'sbeing stored in memory to the disk before they should be restarted. Failing to do so usually just results ina file system check on startup, but it's possible for a disk to become corrupted and data to be lost.
Putting things back the way they wereSince these files do not belong to us, we should put them back the way they were before logging out o f the bubble. Weonly modified two files, so that's all we have to change.
Edit /e t c/sysco nf ig/net wo rk and /e t c/sysco nf ig/net wo rk-script s/if cf g-et h0 now. When you're finished, youshould obtain the fo llowing results:
After the command prompt, type the fo llowing commands: *** BE SURE YOU SEE THE SAME RESULTS ASTHOSE LISTED BELOW ***
bubble12 (console):~# cat /etc/sysconfig/networkNETWORKING=yesFORWARD_IPV4=falseHOSTNAME=bubble12.private.useractive.combubble12 (console):~# cat /etc/sysconfig/network-scripts/ifcfg-eth0DEVICE=eth0ONBOOT=yesIPADDR=put your original IP address here!NETMASK=255.255.0.0NETWORK=10.0.0.0BROADCAST=10.0.255.255
Now rest art the machine again (/sbin/shutdown -r now). Once it's back up, logout o f the bubble and close theconso le connection (Ctrl+a, d).
From this po int on, we'll be connecting to the bubbles the usual way (by typing the bubble command once you are inthe hottub).
Copyright © 1998-2014 O'Reilly Media, Inc.
This work is licensed under a Creative Commons Attribution-ShareAlike 3.0 Unported License.See http://creativecommons.org/licenses/by-sa/3.0/legalcode for more information.

Services and Ports
Services and PortsOur server can o ffer lo ts o f different services such as telnet, ftp, and httpd. These are all different things that we provideto the rest o f the world. When the server receives a packet we have to know what service to direct it to . We don't know ifit's a request fo r an HTML file or if someone wants to login via telnet. We get around this problem by assigning eachservice a port.
These ports are defined in /etc/services. Let's browse through this file a little bit.
After the command prompt, type the fo llowing commands:
hottub:~$ less /etc/services
Here is an excerpt:
Observe the fo llowing:
ftp-data 20/tcpftp-data 20/udpftp 21/tcpftp 21/udpssh 22/tcp # SSH Remote Login Protocolssh 22/udp # SSH Remote Login Protocoltelnet 23/tcptelnet 23/udp# 24 - private mail systemsmtp 25/tcp mailsmtp 25/udp mailtime 37/tcp timservertime 37/udp timserverrlp 39/tcp resource # resource locationrlp 39/udp resource # resource locationnameserver 42/tcp name # IEN 116
The first part is the service name, fo llowed by the port number and pro toco l. The last two fields are aliases for theservice, if there are any, and comments. For the most part, these port assignments are standard across all Unixsystems. Telnet is always go ing to be port 23 and FTP will always be port 21. You'll no tice that there are two pro toco lslisted: TCP and UDP. We've mentioned that TCP is used for most o f the data we'll be sending back and forth, but UDPis used quite a bit as well.
The difference between them is that the TCP pro toco l makes sure that data has made it to its destination, while UDPdoesn't have any such sanity checks built in to it.
With a specified port, the service can "listen" on that port fo r incoming packets. TCP and UDP packets will contain thedestination port as part o f the information being sent. So everything ends up working out just fine.
xinetdxinet d is the extended internet services daemon. The daemon is configured to listen on a bunch o f different ports fo rincoming packets. Then it starts the required service when it's needed. The reason for this is that it saves systemresources by not having every service running all o f the time.
Each service is configured separately fo r xinet d, either in a file called /etc/xinetd.conf o r in a service specific file locatedin the /etc/xinetd.d directory.
Connect to a bubble using the bubble command. Let's take a look at /etc/xinetd.conf.

After the command prompt, type the fo llowing commands:
bubble12~$ cat /etc/xinetd.conf## Simple configuration file for xinetd## Some defaults, and include /etc/xinetd.d/
defaults{ instances = 60 log_type = SYSLOG authpriv log_on_success = HOST PID log_on_failure = HOST RECORD}
includedir /etc/xinetd.d
Most o f this is just represents default values for all services. We really don't need to worry about these values, but youshould man xinet d.co nf fo r more information. Notice the includedir line at the bottom. Let's take a look at the/etc/xinetd.d directory.
After the command prompt, type the fo llowing commands:
bubble12~$ cd /etc/xinetd.dbubble12:/etc/xinetd.d$ ls chargen daytime echo telnet time wu-ftpd chargen-udp daytime-udp echo-udp tftp time-udp
The information contained in these files could have been included directly in the xinetd.conf file. Keeping everythingseparated just helps to keep things a little more organized. Let's look at t e lnet and f t p.
After the command prompt, type the fo llowing commands:
bubble12:/etc/xinetd.d$ cat telnet# default: on# description: The telnet server serves telnet sessions; it uses \# unencrypted username/password pairs for authentication.service telnet{ flags = REUSE socket_type = stream wait = no user = root server = /usr/sbin/in.telnetd log_on_failure += USERID disable= no}
Notice that the actual telnet server is called in.t e lnet d. All servers that are run out o f xinet d typically start with "in" andend in "d" which denotes a daemon. You should read the man page for xinetd.conf fo r information on the o thersettings.
After the command prompt, type the fo llowing commands:
bubble12:/etc/xinetd.d$ cat wu-ftpd |grep server# description: The wu-ftpd FTP server serves FTP connections. It uses \ server = /usr/sbin/in.ftpd server_args = -l -a
Again, the server is named in.f t pd. The server_args setting lets you pass flags to the server process when it'sstarted. The -l flag specifies that every ftp session will be logged. -a indicates that the ftpaccess file will be used. Theftpaccess file is located in /etc and serves as a configuration file fo r the ftp server. In most cases the default settings willbe sufficient unless we need to allow anonymous uploads to our server.

Wu-ftpdLet's go over the FTP server in a little more detail.
First, any username found in /etc/ftpusers is not allowed to ftp into the server. This helps prevent security problems withpeople trying to login as root or o ther restricted users.
All o f the subdirectories for the ftp server are contained within /var/ftp (another typical place would be /home/ftp). Insideof this, any files that are publically o ffered will be in the pub subdirectory. These are accessed when someone logs intothe ftp server anonymously. If a user logs in with their username and password, they will be given their home directoryinstead o f /var/ftp.
Many times a server will allow people to upload files anonymously. To do this we would need to create an incomingdirectory.
After the command prompt, type the fo llowing commands:
bubble12:/etc/xinetd.d# mkdir /var/ftp/incoming
Just creating the directory won't do us any good. The anonymous user needs to have write access to incoming.
After the command prompt, type the fo llowing commands:
bubble12:/etc/xinetd.d# chmod 777 /var/ftp/incoming
Now the directory is setup, but the FTP server still won't allow people to upload to it. We have to add a line to the/etc/ftpaccess file like we stated earlier. Edit /etc/ftpaccess with your favorite editor and add the fo llowing line at the endof the file.
Add the fo llowing line to /etc/ftpaccess:
upload /var/ftp /incoming yes ftp daemon 0666
This specifies that inside o f the root ftp directory (/var/ftp) there is a directory called /incoming that allows uploads. Thefiles created by the upload will be owned by "ftp" with a group o f "daemon." The file permissions will be set to mode0666.
Turning off servicesA freshly installed Unix machine, right out o f the box, typically isn't a very secure platform. One o f the first things thatshould be done is to turn o ff services that aren't needed. Let's take another look at the services that xinet d is o ffering.
After the command prompt, type the fo llowing commands:
bubble12:/etc/xinetd.d$ ls chargen daytime echo telnet time wu-ftpd chargen-udp daytime-udp echo-udp tftp time-udp
t f t p stands for Trivial File Transfer Pro toco l. It is used for allowing public access to files on your server. tftpd is o ftenused when booting a machine o ff o f a network or something similar because it doesn't require any sort o f login orpassword. This also makes it completely unnecessary for us to have it available.
In order to disable a service provided by xinet d, we need to get that service's configuration file out o f /etc/xinetd.d. Oneway to do this is to delete the file, but then if we want to re-enable the service later we'd have to build the configurationfile again. Instead, let's create a directory inside o f /etc/xinetd.d called off. Then move the unwanted configuration fileinto the off directory. We'll need to su first.
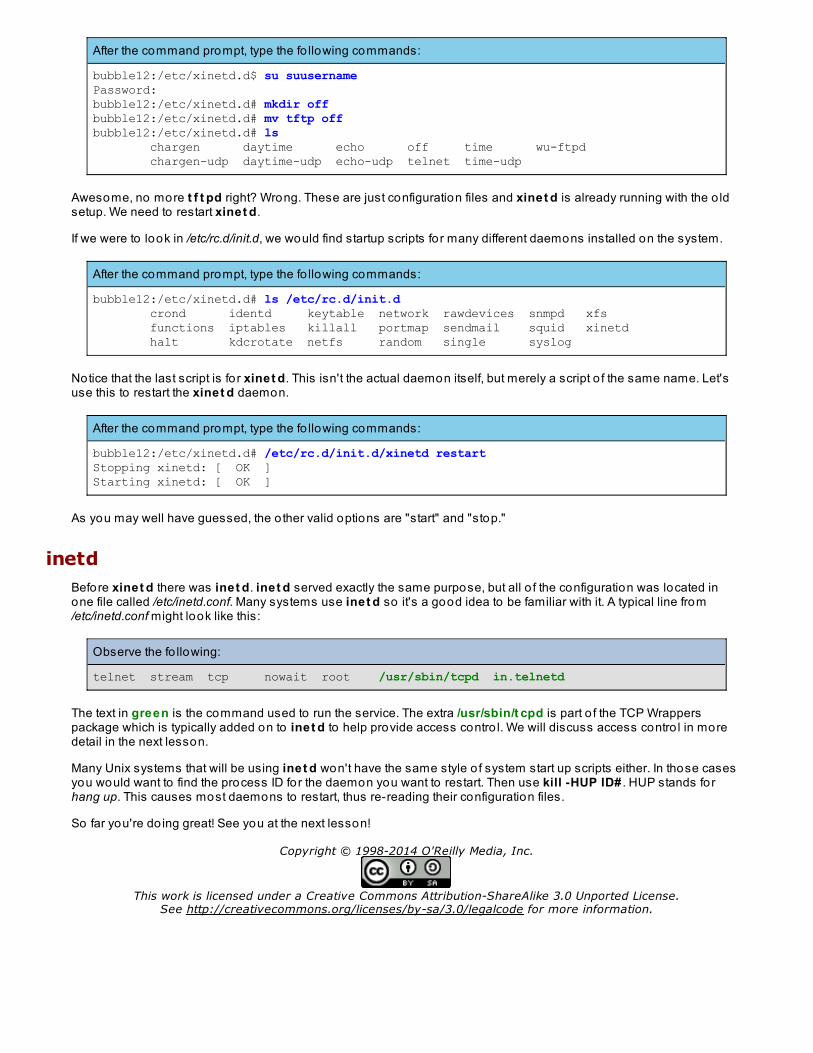
After the command prompt, type the fo llowing commands:
bubble12:/etc/xinetd.d$ su suusernamePassword:bubble12:/etc/xinetd.d# mkdir offbubble12:/etc/xinetd.d# mv tftp offbubble12:/etc/xinetd.d# ls chargen daytime echo off time wu-ftpd chargen-udp daytime-udp echo-udp telnet time-udp
Awesome, no more t f t pd right? Wrong. These are just configuration files and xinet d is already running with the o ldsetup. We need to restart xinet d.
If we were to look in /etc/rc.d/init.d, we would find startup scripts fo r many different daemons installed on the system.
After the command prompt, type the fo llowing commands:
bubble12:/etc/xinetd.d# ls /etc/rc.d/init.d crond identd keytable network rawdevices snmpd xfs functions iptables killall portmap sendmail squid xinetd halt kdcrotate netfs random single syslog
Notice that the last script is fo r xinet d. This isn't the actual daemon itself, but merely a script o f the same name. Let'suse this to restart the xinet d daemon.
After the command prompt, type the fo llowing commands:
bubble12:/etc/xinetd.d# /etc/rc.d/init.d/xinetd restartStopping xinetd: [ OK ]Starting xinetd: [ OK ]
As you may well have guessed, the o ther valid options are "start" and "stop."
inetdBefore xinet d there was inet d. inet d served exactly the same purpose, but all o f the configuration was located inone file called /etc/inetd.conf. Many systems use inet d so it's a good idea to be familiar with it. A typical line from/etc/inetd.conf might look like this:
Observe the fo llowing:
telnet stream tcp nowait root /usr/sbin/tcpd in.telnetd
The text in green is the command used to run the service. The extra /usr/sbin/t cpd is part o f the TCP Wrapperspackage which is typically added on to inet d to help provide access contro l. We will discuss access contro l in moredetail in the next lesson.
Many Unix systems that will be using inet d won't have the same style o f system start up scripts either. In those casesyou would want to find the process ID for the daemon you want to restart. Then use kill -HUP ID# . HUP stands forhang up. This causes most daemons to restart, thus re-reading their configuration files.
So far you're do ing great! See you at the next lesson!
Copyright © 1998-2014 O'Reilly Media, Inc.
This work is licensed under a Creative Commons Attribution-ShareAlike 3.0 Unported License.See http://creativecommons.org/licenses/by-sa/3.0/legalcode for more information.
Access Control
Access ControlAccess control is our ability to restrict who is allowed to connect to our server and use the services it o ffers. This lets usrestrict hosts and/or networks that we do not trust. Perhaps we have a server that needs access to the internet, but weonly want to be able to connect to it from a few select computers. Maybe we want everyone to be able to FTP to ourmachine, but we'd like to restrict who is allowed to telnet. All o f this can be done by configuring the access contro l files.
If a system has the o lder inet d, it should have TCP Wrappers installed to give us this ability. TCP Wrappers is simplyan add-on that provides us with the access contro l abilities that inet d lacks. Fortunately, the same functionality is parto f xinet d so we don't have to learn two different ways o f do ing it.
Access Control FilesThere are two configuration files that are used to setup access contro l. These are /etc/hosts.allow and /etc/hosts.deny.The use o f these two files has become fairly standard so it is very important that we learn how to use them.
When a host tries to connect to the server, hosts.allow is checked first to see if the host has access. If access is notspecifically granted, the hosts.deny file is checked to see if access is denied. If the connecting host is not specificallydenied either, it will be allowed to connect. This will become more clear as we learn how to grant and deny access toour server.
Right now, neither one o f these files should have any information in them. Currently, every host is allowed to connectto our server (ignoring the fact that it's not directly connected to the internet).
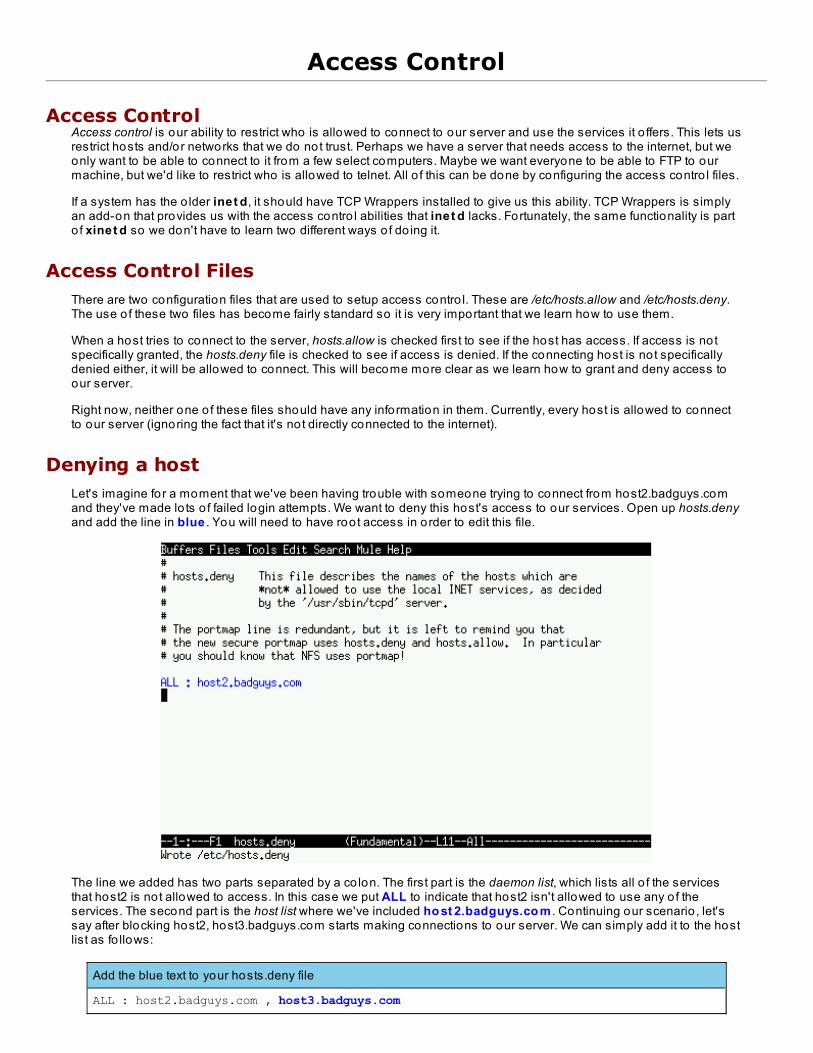
Denying a hostLet's imagine for a moment that we've been having trouble with someone trying to connect from host2.badguys.comand they've made lo ts o f failed login attempts. We want to deny this host's access to our services. Open up hosts.denyand add the line in blue . You will need to have root access in order to edit this file.
The line we added has two parts separated by a co lon. The first part is the daemon list, which lists all o f the servicesthat host2 is not allowed to access. In this case we put ALL to indicate that host2 isn't allowed to use any o f theservices. The second part is the host list where we've included ho st 2.badguys.co m . Continuing our scenario , let'ssay after blocking host2, host3.badguys.com starts making connections to our server. We can simply add it to the hostlist as fo llows:
Add the blue text to your hosts.deny file
ALL : host2.badguys.com , host3.badguys.com

We can use a comma to separate several hosts. Now let's add a second line that will block all traffic from every host inthe baddudes.com domain.
Add the blue text to your hosts.deny file
ALL : host2.badguys.com , host3.badguys.com , .baddudes.com
The leading dot acts like a wildcard so that every host will be denied access. We can also deny IP addresses or IPblocks.
Add the blue text to your hosts.deny file
ALL : host2.badguys.com , host3.badguys.com , .baddudes.comALL : 199.3.14. , 207.239.115.11
The trailing dot in 199.3.14. works just like the leading dot in domain names. It acts as a wildcard to represent all o f thehosts in that IP range. Excellent. We know how to block hosts by either their domain name, IP address, or even awhole block o f IPs.
Let's look in more depth at the daemon list now. We don't have to deny every service to these hosts. We can be veryselective. There is a group o f hosts in the notallbad.com domain that needs to have FTP access to our servers, but wedon't trust them to do anything else. In this case, we could do something like the fo llowing:
Add the blue text to your hosts.deny file
ALL : host2.badguys.com , host3.badguys.com , .baddudes.comALL : 199.3.14. , 207.239.115.11ALL EXCEPT in.ftpd : .notallbad.com
If we wanted, we could even use the EXCEPT keyword in the host list.
Add the blue text to your hosts.deny file
ALL : host2.badguys.com , host3.badguys.com , .baddudes.comALL : 199.3.14. , 207.239.115.11ALL EXCEPT in.ftpd : .notallbad.com EXCEPT joe.notallbad.com
Here, every host in .notallbad.com is denied access to every service but FTP, except fo r joe.notallbad.com. Instead o fusing the ALL keyword, we could give a list o f services to be denied.
Add the blue text to your hosts.deny file
ALL : host2.badguys.com , host3.badguys.com , .baddudes.comALL : 199.3.14. , 207.239.115.11ALL EXCEPT in.ftpd : .notallbad.com EXCEPT joe.notallbad.comin.telnetd, in.fingerd : .mostlyokay.com
Save hosts.deny and quit your editor.
Overall, we've denied a few hosts, but everybody else is still allowed to connect (even though hosts.allow is empty).This is known as a mostly open access po licy. It means the same as it sounds. A few people are denied access, butmost people are allowed to connect to all o f our services.
Mostly Closed PolicyThe opposite schoo l o f thought would be to use a mostly closed po licy. The idea here is to allow a few specific hostsand deny everyone else. We'll do this by first adding entries in hosts.allow. Luckily, entries in hosts.allow have the exactsame format as entries in hosts.deny. Open up hosts.allow and add the fo llowing lines:
Add the blue text to your hosts.allow file
ALL : hottub.private.useractive.com, .trusted.com, ben.goodguys.com in.telnetd, in.ftpd : george.mostlyokay.comALL EXCEPT in.telnetd : bigbird.friendly.com
All o f these hosts and services will be allowed to connect to our server. The final step in a mostly closed po licy is todeny everyone else. Save hosts.allow and open up hosts.deny. Remove all o ther entries in hosts.deny except this:
Add the blue text to your hosts.deny file
ALL : ALL
It's always a good idea to do this part last. We wouldn't want to deny connections from everyone without givingourselves a way back in first. That would get kind o f tricky. Right now, you'll still be able to connect to your bubble fromthe hottub, but the o ther bubbles won't be able to use any o f the services on your server.
Whether you use a mostly open or mostly closed access po licy depends a lo t on the type o f server you're running. Amostly closed po licy tends to be more secure, but it is really a pain if there are a lo t o f people that need to be able toconnect to the server.
For more information, you should read the man pages on hosts.allow and hosts.deny.
Copyright © 1998-2014 O'Reilly Media, Inc.
This work is licensed under a Creative Commons Attribution-ShareAlike 3.0 Unported License.See http://creativecommons.org/licenses/by-sa/3.0/legalcode for more information.
DNS
/etc/hostsThe previous lesson mentioned the need for domain names, but it didn't go into any depth about how they work.Whenever you try to do anything by specifying a hostname, whether it's by telneting somewhere or typing a URL inyour browser window, your computer needs to translate that name into an IP address before it can attempt to make aconnection. This will typically take place without your notice.
Observe the fo llowing:
bubble12:~$ telnet hottub.private.useractive.comTrying 10.0.0.1...telnet: Unable to connect to remote host: Connection refused
Here the t e lnet program tells you it's trying to connect to an IP address even though you typed in a hostname. Whena Unix machine needs to translate a hostname into an IP address, it first consults a local file called /etc/hosts. Let's takea look at this file:
After the command prompt, type the fo llowing commands:
bubble12:~$ cat /etc/hosts127.0.0.1 localhost10.0.0.12 bubble126.private.useractive.com10.0.0.1 hottub.private.useractive.com hottub
Most likely the file you are viewing has many more entries (those entries are machines that you and o ther students areusing). On the left side is the IP address and on the right side are the aliases that can be used to refer to that IPaddress. It acts like a simplified version o f a DNS table. You can add more entries in this file. The benefit o f having thisfile is that your computer won't have to make an outside request fo r an IP address because it already knows it.
Note The drawback to /etc/hosts is that if someone changes their IP address, the entries will no t updatethemselves and they will always po int to the o ld address until you change it.
/etc/resolv.confLet's say we're looking for an IP address that isn't in /etc/hosts. What happens next? Do we have to call up the siteadministrator and ask him for the IP address o f his machine? Thankfully no. The next thing looked at is the/etc/resolv.conf file.
After the command prompt, type the fo llowing commands:
bubble12:~$ cat /etc/resolv.confsearch private.useractive.com useractive.comnameserver 10.0.0.1
The search line specifies domain suffixes to search through. For example, if you type t e lnet www, it will look forwww.private.useractive.com first and then look for www.useractive.com. Without a search order it's sort o f like saying,"I live in Springfield." There are 24 states in the U.S. with a city o f Springfield. The computer wouldn't know what to dowithout giving it some direction.
The nameserver line specifies which DNS server to use when trying to lookup a domain name. There are typically twoor three nameserver lines to allow for redundancy.
Note A large number o f domains in the search order can be convenient, but it will also reduce the responsetime from the DNS server since it has to search through all o f them.
Let's say our computer is trying to lookup www.useract ive.co m . It's not in /etc/hosts so it looks up the IP address o f

the nameserver (10.0 .0 .1). The computer then asks the DNS server, "Hey, what's the IP address o fwww.useractive.com?" There are two situations in which the DNS server will immediately know the IP address. The firstis when the DNS server happens to be the authoritative server fo r the useractive.com domain. Second, it's possiblethat the DNS server has already received a request fo r www.useractive.com and it has cached the IP address so itdoesn't have to look it up again. If either o f those are the case, the DNS server will respond to our computer, telling itthe IP address o f www.useractive.com is 209.16.196.242.
What if the DNS server doesn't know the IP address though? How does it find out? The DNS server will query a rootlevel nameserver to find out the IP address o f the authoritative nameserver fo r useractive.com. The root levelnameservers contain information for where to find the top level domain (.com, .edu, .net, .o rg, etc) nameservers. OurDNS server then asks the .com nameserver fo r the IP address o f the DNS server on the next level down(useractive.com). The .com nameserver responds with the IP address o f the useractive.com nameserver. Then arequest is made to the useractive.com nameserver fo r the IP address o f www.useractive.com. Finally, we get aresponse o f 209.16.196.242. It seems fairly complex, but it typically happens in a matter o f seconds at most.
in-addr.arpaWe've discussed how to find an IP address if you know the domain name of a website. We also need a way to find thedomain name if we know the IP address. The special in-addr.arpa domain lets us do just that.
The in-addr.arpa domain is used to find the domain name using an IP address. This is sometimes called a reverselo o kup. The format o f every domain name is such that the beginning o f the name is very specif ic and the end o f thename is very bro ad:
f aucet .useract ive.co mco ld.useract ive.co m
IP address are just the opposite. Recall from lesson 2 that the network address is listed first, fo llowed by the hostaddress. The in-addr.arpa domain is used to list IP addresses in the same format as domain names. It is really just anIP address in reverse. For example, a webserver IP address o f 209.16.196.242 would have an in-addr.arpa domainof 242.196.16.209.in-addr.arpa.
whoisHow can we find out more about a domain name? Who owns it? What are the names o f it's DNS servers? We'll findthese things out by using the who is command. When you register a domain with a registrar they need lo ts o f differentcontact information from you. This information is made available publicly in case there are any problems with thedomain.
If you are logged into a bubble right now, exit , because we will need access to the rest o f the internet from hottub tolook up this information.
After the command prompt, type the fo llowing commands:
hottub:~$ whois linux.org... Domain Name: LINUX.ORG Registrar: NETWORK SOLUTIONS, INC. Whois Server: whois.networksolutions.com Referral URL: www.networksolutions.com Name Server: NS.INVLOGIC.COM Name Server: NS0.AITCOM.NET Updated Date: 28-jul-2000...
I've omitted lo ts o f information to save space. The information returned includes the name of registrar, the primary andsecondary DNS servers for the domain, and farther down, the administrative contact information.
NoteIf who is only returns a small amount o f information, you can use who is -h who isserver to specify thewhois server fo r another lookup attempt. Replace whoisserver with the Whois Server name from the firstresponse you received.

CachingThe process o f querying all o f these different nameservers to lookup a hostname seems like a pain, but happens veryquickly, partly because DNS servers cache information that they've already looked up. This allows for a fasterresponse and it reduces the load on the higher level nameservers.
The way caching works is when a DNS server receives a request fo r an IP address, it queries all o f the necessarynameservers. Then it remembers all o f those addresses so that later, when asked for the same hostname or oneunder the same domain, it either knows the answer right away or only needs to make one query instead o f several.
The drawback to caching is that the information isn't up-to-date. Let's use ho st and ho st -v to look upwww.oreillyschoo l.com twice in a row.
After the command prompt, type the fo llowing commands:
hottub:~$ host www.oreillyschool.com www.oreillyschool.com has address 63.171.219.89
hottub:~$ host -v www.oreillyschool.com Trying "www.oreillyschool.com" ;; ->>HEADER<<- opcode: QUERY, status: NOERROR, id: 28111 ;; flags: qr rd ra; QUERY: 1, ANSWER: 1, AUTHORITY: 3, ADDITIONAL: 3 ;; QUESTION SECTION: ;www.oreillyschool.com. IN A ;; ANSWER SECTION: www.oreillyschool.com. 472 IN A 63.171.219.89 ;; AUTHORITY SECTION: oreillyschool.com. 472 IN NS ns1.useractive.com. oreillyschool.com. 472 IN NS ns2.useractive.com. oreillyschool.com. 472 IN NS ns4.useractive.com. oreillyschool.com. 472 IN NS secretmeeting.oreillyschool.com. ;; ADDITIONAL SECTION: secretmeeting.oreillyschool.com. 472 IN A 50.17.197.6 Received 164 bytes from 127.0.0.1#53 in 19 ms
Notice the flags in the header section o f the second output. You will see qr rd ra flags but it is lacking an aa flag. Thataa flag is fo r aut ho rit at ive (not cached) so we get a no t aut ho rit at ive answer. What this means is that our DNSserver didn't ask the oreillyschoo l.com nameserver the second time because it had the answer cached. It's just lettingus know that it's not 100% sure that's the right address.
It's fo r this reason that the cached information needs to expire so the DNS server won't be full o f incorrect information.When a nameserver responds with an IP address, it includes a time to live. After this time elapses, the cache entry isdiscarded.
Types of DNS serversThere are two main types o f DNS servers: primary and secondary. A primary DNS server fo r a domain is authoritative,meaning it's the one in charge. A secondary server is a backup. Every so o ften is asks the primary server fo r thecorrect information. It is used in case the primary server crashes or if there are enough DNS queries that a singleserver would be overloaded. Often times there are multiple secondary servers.
Typically a DNS server will be a primary or secondary server fo r all o f it's domains. However, a DNS server can beauthoritative for some domains while being secondary for o thers. This is the situation we will use while setting up ourown DNS server.
See you at the next lesson!
Copyright © 1998-2014 O'Reilly Media, Inc.

Copyright © 1998-2014 O'Reilly Media, Inc.
This work is licensed under a Creative Commons Attribution-ShareAlike 3.0 Unported License.See http://creativecommons.org/licenses/by-sa/3.0/legalcode for more information.

Bind
BindThe software package that a DNS server typically runs is called BIND (Berkeley Internet Name Domain). This packageincludes the nameserver daemon which is called named as well as a few utilities including ho st . The hottub is set upas the primary server fo r the private.useractive.com domain. Let's go over the configuration for hottub's DNS server toget a feel fo r it. There's a lo t o f information, so we'll just take it one step at a time.
/etc/named.confThe main configuration file fo r the nameserver is /etc/named.conf. You probably could have guessed that by now, huh?Take a look at /etc/named.conf o n t he ho t t ub and then we'll go over it piece by piece.
Observe this line from /etc/named.conf on hottub:
options { directory "/var/named";};
The /etc/named.conf file contains different statements o f the form:
st at ement -t ype { inst ruct io ns; } ;
The first statement in our configuration file is the o pt io ns statement. This sets up global options for the nameserver.The only option we've included here is direct o ry " /var/named";. This specifies the working directory o f the server.Any database, cache, or zone files will be found somewhere under that directory. Let's look at the next statement in/etc/named.conf.
Observe this line from /etc/named.conf:
// root levelzone "." { type hint; file "root.cache";};
This is a zo ne statement. Every zone statement refers to a specific domain. Here, the "." is the root level domain. Thezone statements also need a t ype . This is a special zone because it provides named with a "hint" as to where to findthe root level servers. The root.cache file is found in /var/named, since that is the directory we specified earlier. Itcontains information regarding the root level server IP addresses.
Note Comments in named.conf begin with //
The next zone is the reverse lookup entry fo r the local loopback network.
Observe this line from /etc/named.conf:
// localhostzone "0.0.127.in-addr.arpa" { type master; file "pz/127.0.0";};
Here, the network address is 127.0 .0 .0 . Since we only need the domain portion and not the host portion, we don't usethe last zero when converting it into its in-addr.arpa equivalent. The mast er type means that our DNS server will be aprimary server fo r this zone. The zone information will be stored in /var/named/pz/127.0.0. pz is a directory inside o f/var/named where we've stored our primary zone files. You can call this whatever you want. Some people use primaryor master instead. We'll check out the zone files shortly.

Observe this line from /etc/named.conf:
zone "0.0.10.in-addr.arpa" { type master; file "pz/10.0.0";};
This is just like the previous example except that it's fo r a different IP range. Again, this server will respond as if it's theprimary nameserver fo r 0 .0 .10.in-addr.arpa. The final entry in hottub's /etc/named.conf is fo r the actualprivate.useractive.com domain.
Observe this line from /etc/named.conf:
// // Our Primaries// zone "private.useractive.com" { type master; file "pz/private.useractive.com";};
The private.useractive.com entry is a lo t easier to read than those in-addr.arpa entries. Here, like before, the zoneinformation will be stored in a file called /var/named/pz/private.useractive.com
That's pretty much all we need to know about /etc/named.conf. It's just a series o f different statements about zones andsome options. However, there are tons o f different configuration options that you can read about in the named.confman page.
NoteThe o lder versions o f BIND don't use a /etc/named.conf file. Instead they use a /etc/named.boot file thatrequires a different configuration. Versions 8 .2.3 and 9 .x o f BIND have some security fixes that o lderversions do not. If you come across a machine using an o lder version o f BIND you should considerupgrading it as soon as possible, especially if it's as o ld as version 4.x
Zone FilesZone files contain all o f the information about a particular domain. Let's take a look at the zone file fo rprivate.useractive.com
After the command prompt, type the fo llowing commands:
hottub:~$ head -n 25 /var/named/pz/private.useractive.com@ IN SOA ns1.private.useractive.com. root.private.useractive.com. ( 5 ;serial 21600 ;refresh 3600 ;retry 1209600 ;expire 172800 ;ttl ) IN NS ns1.private.useractive.com. IN MX 5 mail.private.useractive.com.
; This machinens1 IN A 10.0.0.1 hottub IN A 10.0.0.1mail IN A 10.0.0.1
; Cnameswhirlpool IN CNAME hottubbathtub IN CNAME hottub
; The bubblesbubble2 IN A 10.0.0.2bubble3 IN A 10.0.0.3bubble4 IN A 10.0.0.4bubble5 IN A 10.0.0.5bubble6 IN A 10.0.0.6
Let's break this file up for discussion.
Observe the fo llowing line(s):
@ IN SOA ns1.private.useractive.com. root.private.useractive.com. ( 5 ;serial 21600 ;refresh 6 hours 3600 ;retry 1 hour 1209600 ;expire 2 weeks 172800 ;ttl 2 days )
The @ symbol is shorthand for the domain itself: private.useractive.com. This is an Internet class record so we includethe IN. Next is the type o f record we're handling, in this case, SOA. SOA stands for start of authority. The authoritativenameserver fo r a domain is always go ing to have an SOA record in the zone file.
ns1.privat e .useract ive.co m. is the name of the primary DNS server fo r this domain. Notice that the name ends in aperiod. This is because named will attempt to append the .private.useractive.com domain to the end o f any name thatdoesn't end in a period. It seems silly now, but it saves a lo t o f hassle for the o ther records down below.
After the primary nameserver entry comes the email address o f the person in charge o f maintaining the zoneinformation. ro o t .privat e .useract ive.co m. (note the period) doesn't look like a typical email address, but that'sbecause you would need to replace the first period with @. It then becomes, [email protected].
Inside o f the parentheses are a bunch o f numbers. The first o f is called the serial number. This acts as a sort o f versionnumber for the zone information. It is used by secondary nameservers to determine if their information is up-to-date ornot. It's fo r this reason that you need to increase the serial value whenever you change the information in your zonefiles.
The rest o f the numbers indicate a length o f time (in seconds). The refresh number is how often the secondarynameservers are supposed to contact the primary nameserver to check and see if their information is correct. If fo rsome reason the secondary nameserver can't connect, it will try again after the retry period has passed. It will keeptrying until it can connect to the primary server. If the expire time passes and the secondary server has been unable toconnect to the primary server, the secondary server will stop responding to information about that zone. Thesecondary server decides that the information is too o ld and probably isn't accurate anymore. Finally, the ttl number isthe time to live number we discussed earlier. It tells machines how long they should cache data from this server.
All o f these times can be changed depending on the typical frequency o f domain updates and the tradeoff o f load on

the primary nameserver.
Note Comments in a zone file begin with a semi-co lon.
The rest o f the entries in the zone file are all a lo t easier to decipher than the SOA record.
Observe the fo llowing line(s):
IN NS ns1.private.useractive.com.
This is an NS o r nameserver record. It specifies the name of a nameserver fo r this domain. The entry starts with ablank space because the origin domain (private.useractive.com) is implied for NS entries (though we could havewritten it out if we wanted). This is the primary nameserver fo r this domain, but secondary nameservers would be listedhere as well.
Observe the fo llowing line(s):
IN MX 5 mail.private.useractive.com.
Here we have a mail exchanger (MX) record. This is the mail exchanger record for the entire domain. The blank at thebeginning o f this line is not automatically assumed to be the origin domain as with the NS records. Here, the blanksimply repeats the name from the line above it. It just so happens that the line above was for the origin domain.mail.privat e .useract ive.co m. is the name of our mail exchanger, but what's this 5 all about? MX records also havea preference value. It's simply a way o f listing several mail exchangers for redundancy purposes, while keeping track o fwhich one would be the best to use. Typically, two or more would be listed and the one with the lowest preferencewould be used first. Any mail sent to someone at this domain (i.e. [email protected]) will be directed to themail exchanger.
Mail sent to hosts instead o f to the domain itself (i.e. [email protected]) will be delivered to that host,unless the host has its own MX entries.
Note You'll learn a lo t more about mail exchangers in the Sendmail course.
Observe the fo llowing line(s):
; This machinens1 IN A 10.0.0.1 hottub IN A 10.0.0.1mail IN A 10.0.0.1
These are address records. They're probably the easiest to understand and they're really the whole po int o f DNS.Address records define a name to be mapped to an IP address. Since the names here don't end in a period thedomain is added to the end. The first one, fo r example, says that ns1.private.useractive.com has an address o f10.0 .0 .1. Notice though, that all three o f these entries have the same IP address. This is because ns1 is also known ashottub and mail. A single machine can have multiple names. It's also possible for a hostname to have multiple IPaddresses (in the case o f routers or load balancing applications).
Note The host listed as the mail exchanger must have an address entry. In this case it'smail.private.useractive.com.
Observe the fo llowing line(s):
; Cnameswhirlpool IN CNAME hottubbathtub IN CNAME hottub
CNAME stands for canonical name. These are aliases for o ther hostnames. CNAME records are o ften used when thehostname of a machine is changed. Typically you still want the o ld name to work until everyone knows it has changed.During a nameserver lookup, the alias will be replaced by the real hostname. Let's check this out.

After the command prompt, type the fo llowing commands:
hottub:~$ host whirlpool whirlpool.private.useractive.com is a nickname for hottub.private.useractive.comhottub.private.useractive.com has address 10.0.0.1
Finally, we have a lo t more address records.
Observe the fo llowing line(s):
; The bubblesbubble2 IN A 10.0.0.2bubble3 IN A 10.0.0.3bubble4 IN A 10.0.0.4bubble5 IN A 10.0.0.5bubble6 IN A 10.0.0.6
These are the hostnames and IP addresses for all o f the bubbles. We could have given them any names, but wenamed them in numerical o rder to help keep things neat.
There's a lo t o f information to digest in this lesson. You might want to go back and read through it a few times. Next,we're go ing to discuss the reverse lookup zone files for the in-addr.arpa addresses.
Copyright © 1998-2014 O'Reilly Media, Inc.
This work is licensed under a Creative Commons Attribution-ShareAlike 3.0 Unported License.See http://creativecommons.org/licenses/by-sa/3.0/legalcode for more information.

More on BIND
in-addr.apra Zone FilesSo far, we've covered the format o f a zone file fo r a primary domain, but what about the reverse lookup o f IPaddresses? We'll need to take a look at the zone file fo r 0 .0 .10.in-addr.arpa. I don't remember the location o f the zonefile though, so let's take a look back in /etc/named.conf. We could open up the file and search for it, but I bet we couldmake a quick and educated guess with just a little more information.
After the command prompt, type the fo llowing commands:
hottub:~$ cat /etc/named.conf |grep file file "root.cache"; file "pz/127.0.0"; file "pz/10.0.0"; file "pz/private.useractive.com";
This is a list o f all o f the zone files from /etc/named.conf. If you remember from the previous lesson that all o f thesefiles are under /var/named, it's not much o f a stretch to assume that /var/named/pz/10.0.0 is the file we want to look atnow.
After the command prompt, type the fo llowing commands:
hottub:~$ head -n 15 /var/named/pz/10.0.0@ IN SOA ns1.private.useractive.com. root.private.useractive.com. ( 5 ; Serial 21600 ; Refresh 3600 ; Retry 1209600 ; Expire 172800) ; Minimum TTL IN NS ns1.private.useractive.com.
; this machine1 IN PTR ns1.private.useractive.com.
; the bubbles2 IN PTR bubble2.private.useractive.com.3 IN PTR bubble3.private.useractive.com.4 IN PTR bubble4.private.useractive.com.
The first thing we see is an SOA record. The primary nameserver is ns1.private.useractive.com. (If you have anyproblems, you should email [email protected] substituting an @ for the first period.) The NS record is stillthe same.
The only new things are all o f these PTR or pointer entries. These are the opposite o f the address records we saw inthe private.useractive.com zone file. On the left side is the "hostname" which is actually the host part o f the IP address.On the far right is the hostname to which it po ints. We have to include the full domain name with a trailing periodbecause this is the zone file fo r 0 .0 .10.in-addr.arpa. If we didn't include our domain name, the origin would beappended to it. For example, if we just said bubble2, it would end up as bubble2.0 .0 .10.in-addr.arpa, which is completenonsense.
Be aware that 10.0 .0 .1 only po ints to ns1.private.useractive.com. For the domain, ns1, hottub, and mail all had anaddress o f 10.0 .0 .1 in the zone file. This is because ns1 is the "real" name of the machine as far as the rest o f theinternet is concerned, and a reverse lookup is only go ing to return one hostname.
The localhost zone fileDNS servers are only go ing to have reverse lookup zone files for IP ranges o f which they are in charge. There isusually a zone file fo r the 127.0 .0 .0 range o f local IP addresses as well. Since nobody can own that range, DNSservers will always keep track o f the local loopback IP range.

After the command prompt, type the fo llowing commands:
hottub:~$ cat /var/named/pz/127.0.0@ IN SOA ns.linux.bogus. hostmaster.linux.bogus. ( 1 ; Serial 28800 ; Refresh 7200 ; Retry 604800 ; Expire 86400) ; Minimum TTL IN NS ns.linux.bogus.1 IN PTR localhost.
The localhost range is fo r internal use only, so the information contained in the zone file is typically useless for allpractical purposes. For example, if you have a problem you're supposed to contact [email protected]. That'sobviously not go ing to work.
Downloading BINDIn the first course o f this series we had you download and install ssh by downloading a tar.gz file and compiling thesoftware yourself. With BIND we're go ing to take advantage o f the fact that we're using Red Hat Linux and we have therpm package manager available to us. Before we login to a bubble, let's use rpm to find out which specific packagewe're looking for. We know that the DNS server daemon is called named. Let's find out the full path for named.
After the command prompt, type the fo llowing commands:
hottub:~$ which named/usr/sbin/named
rpm has a query feature that let's you figure out what package a file belongs to . We'll use the q flag for query and the fflag to specify a filename. (Read the man page on rpm fo r more query options.)
After the command prompt, type the fo llowing commands:
hottub:~$ rpm -qf /usr/sbin/namedbind-9.2.4-22.e13
Alright, now we know what to find. The package has already been downloaded to the hottub's ftp server, so let's goahead and login to a bubble by using the bubble command.
After the command prompt, type the fo llowing commands:
hottub:~$ bubbleRebooting the bubble (10.0.0.152), this make take a couple [email protected]'s password: Last login: Tue Apr 17 10:55:06 2001No mail.bubble12:~$
Now we need to connect to hottub's ftp server and download the bind package.
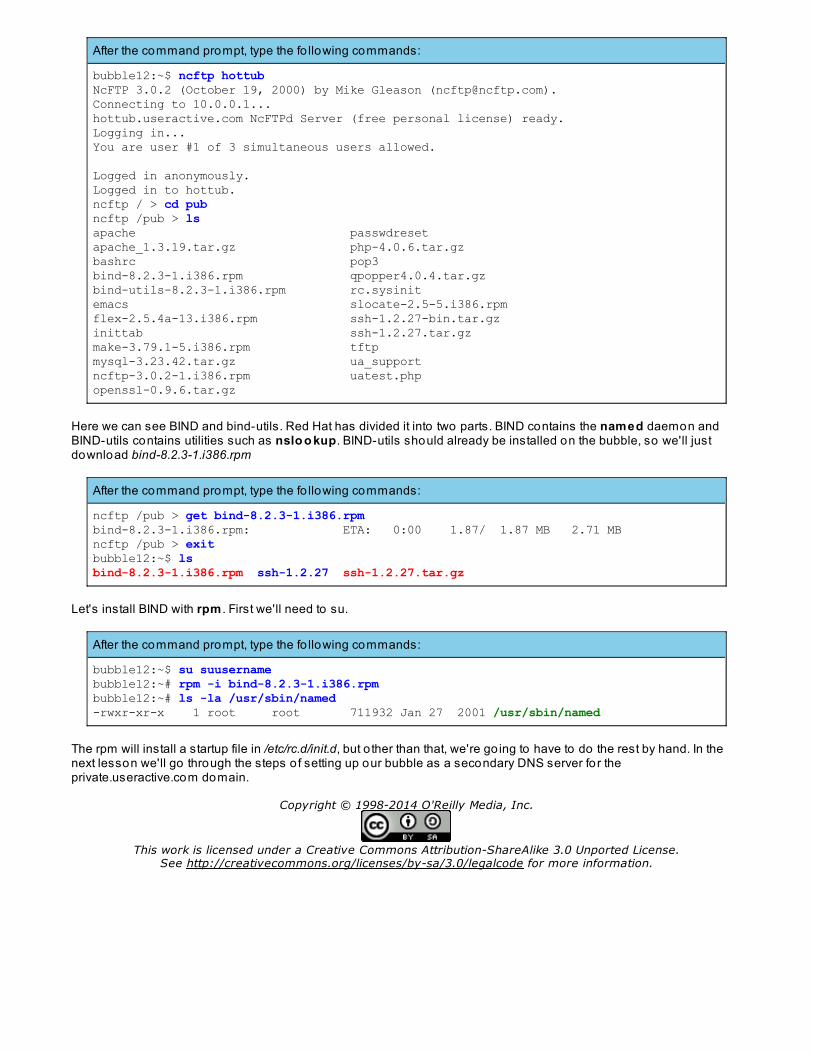
After the command prompt, type the fo llowing commands:
bubble12:~$ ncftp hottub NcFTP 3.0.2 (October 19, 2000) by Mike Gleason ([email protected]).Connecting to 10.0.0.1... hottub.useractive.com NcFTPd Server (free personal license) ready.Logging in...You are user #1 of 3 simultaneous users allowed.
Logged in anonymously.Logged in to hottub. ncftp / > cd pubncftp /pub > lsapache passwdresetapache_1.3.19.tar.gz php-4.0.6.tar.gz bashrc pop3bind-8.2.3-1.i386.rpm qpopper4.0.4.tar.gzbind-utils-8.2.3-1.i386.rpm rc.sysinitemacs slocate-2.5-5.i386.rpmflex-2.5.4a-13.i386.rpm ssh-1.2.27-bin.tar.gzinittab ssh-1.2.27.tar.gzmake-3.79.1-5.i386.rpm tftpmysql-3.23.42.tar.gz ua_supportncftp-3.0.2-1.i386.rpm uatest.phpopenssl-0.9.6.tar.gz
Here we can see BIND and bind-utils. Red Hat has divided it into two parts. BIND contains the named daemon andBIND-utils contains utilities such as nslo o kup. BIND-utils should already be installed on the bubble, so we'll justdownload bind-8.2.3-1.i386.rpm
After the command prompt, type the fo llowing commands:
ncftp /pub > get bind-8.2.3-1.i386.rpmbind-8.2.3-1.i386.rpm: ETA: 0:00 1.87/ 1.87 MB 2.71 MBncftp /pub > exitbubble12:~$ lsbind-8.2.3-1.i386.rpm ssh-1.2.27 ssh-1.2.27.tar.gz
Let's install BIND with rpm . First we'll need to su.
After the command prompt, type the fo llowing commands:
bubble12:~$ su suusernamebubble12:~# rpm -i bind-8.2.3-1.i386.rpmbubble12:~# ls -la /usr/sbin/named-rwxr-xr-x 1 root root 711932 Jan 27 2001 /usr/sbin/named
The rpm will install a startup file in /etc/rc.d/init.d, but o ther than that, we're go ing to have to do the rest by hand. In thenext lesson we'll go through the steps o f setting up our bubble as a secondary DNS server fo r theprivate.useractive.com domain.
Copyright © 1998-2014 O'Reilly Media, Inc.
This work is licensed under a Creative Commons Attribution-ShareAlike 3.0 Unported License.See http://creativecommons.org/licenses/by-sa/3.0/legalcode for more information.

Setting Up the Secondary DNS
named.confFor this lesson, all o f our work will take place on the bubbles as the super user. If you aren't already logged into one,do so now.
Alright, so we have named installed, but we still have to configure it. Let's start by creating an /etc/named.conf file. It'sgo ing to be very similar to the one on the hottub, so we may as well start by copying that one.
After the command prompt, type the fo llowing commands:
bubble12:~# scp username@hottub:/etc/named.conf /etcusername@hottub's password:named.conf | 0 KB | 0.5 kB/s | ETA: 00:00:00 | 100%
Open up /etc/named.conf in your favorite editor and let's make some changes.
In the first section o f the file the only thing we've changed is the comment at the top indicating the location o f the file onbubble.private.useractive.com. The o pt io ns section is still the same and we'll be the master o f our own localhost IPzone. It's in the next section that we'll have to make some changes.
Both o f these zone statements should look very familiar, but we've made a few changes. First, and probably the mostimportant, we've changed the zone type to slave instead o f master. This indicates that we want to be a secondarynameserver fo r those domains. Next, we've made a slight change to the location o f the zone files. Instead o f pz, weshould store these in something along the lines o f sz, which stands for secondary zones. Our server will ask theprimary DNS server fo r the zone information, so we don't need to create these files, they will be created for us.
Finally, using the mast ers option we list the nameserver that we want to obtain our zone data from. In this case, wewant to contact the hottub that has an IP address o f 10.0 .0 .1. The inclusion o f brackets and semi-co lons is necessaryfor named to read the configuration file correctly.
Preparations for Starting namedNow, let's set up a few things we've specified in named.conf. For instance, let's check to make sure the /var/nameddirectory exists.
After the command prompt, type the fo llowing commands:
bubble12:~# cd /varbubble12:/var# ls agentx db lib lock mail nis preserve spool ucd-snmp cache ftp local log named opt run tmpbubble12:/var# cd namedbubble12:/var/named# lsbubble12:/var/named#
Excellent. /var/named exists, but we still need to make the pz and sz directories inside o f it.
After the command prompt, type the fo llowing commands:
bubble12:/var/named# mkdir pz ; mkdir sz
We also need to get a copy o f the root.cache file so our DNS server knows where to look for the root levelnameservers. We can copy this over from hottub as well.
After the command prompt, type the fo llowing commands:
bubble12:/var/named# scp username@hottub:/var/named/root.cache .usernamed@hottub's password:root.cache | 1 KB | 1.4 kB/s | ETA: 00:00:00 | 100%
Note An updated version can be found at ftp.rs.internic.net.
There is one more file we can copy from the hottub because it's exactly the same as what we'll be using. That's the127.0 .0 zone file.
After the command prompt, type the fo llowing commands:
bubble12:/var/named# scp username@hottub:/var/named/pz/127.0.0 pzusernamed@hottub's password:pz | 0 KB | 0.4 kB/s | ETA: 00:00:00 | 100%
Well, we've got a few files that we need and named.conf is setup, what next? Now we get to start our nameserver andmake sure everything worked.
Running and Testing namedHere we go...
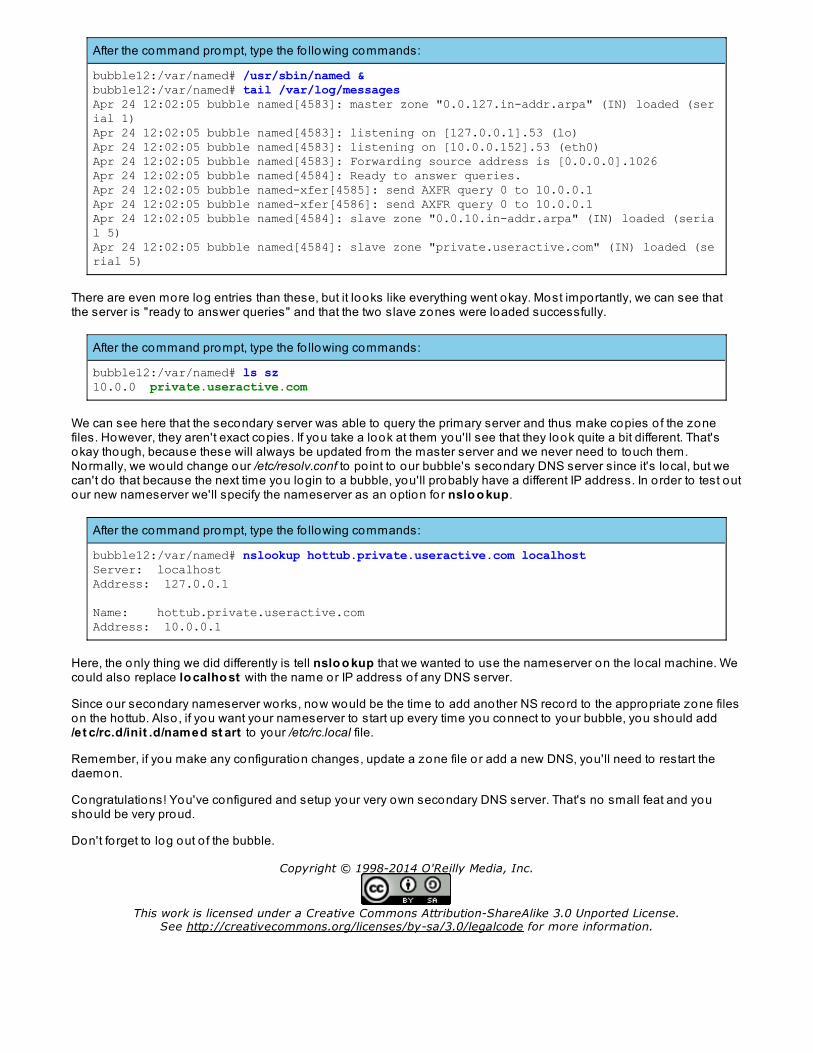
After the command prompt, type the fo llowing commands:
bubble12:/var/named# /usr/sbin/named &bubble12:/var/named# tail /var/log/messagesApr 24 12:02:05 bubble named[4583]: master zone "0.0.127.in-addr.arpa" (IN) loaded (serial 1)Apr 24 12:02:05 bubble named[4583]: listening on [127.0.0.1].53 (lo)Apr 24 12:02:05 bubble named[4583]: listening on [10.0.0.152].53 (eth0)Apr 24 12:02:05 bubble named[4583]: Forwarding source address is [0.0.0.0].1026Apr 24 12:02:05 bubble named[4584]: Ready to answer queries.Apr 24 12:02:05 bubble named-xfer[4585]: send AXFR query 0 to 10.0.0.1Apr 24 12:02:05 bubble named-xfer[4586]: send AXFR query 0 to 10.0.0.1Apr 24 12:02:05 bubble named[4584]: slave zone "0.0.10.in-addr.arpa" (IN) loaded (serial 5)Apr 24 12:02:05 bubble named[4584]: slave zone "private.useractive.com" (IN) loaded (serial 5)
There are even more log entries than these, but it looks like everything went okay. Most importantly, we can see thatthe server is "ready to answer queries" and that the two slave zones were loaded successfully.
After the command prompt, type the fo llowing commands:
bubble12:/var/named# ls sz10.0.0 private.useractive.com
We can see here that the secondary server was able to query the primary server and thus make copies o f the zonefiles. However, they aren't exact copies. If you take a look at them you'll see that they look quite a bit different. That'sokay though, because these will always be updated from the master server and we never need to touch them.Normally, we would change our /etc/resolv.conf to po int to our bubble's secondary DNS server since it's local, but wecan't do that because the next time you login to a bubble, you'll probably have a different IP address. In order to test outour new nameserver we'll specify the nameserver as an option for nslo o kup.
After the command prompt, type the fo llowing commands:
bubble12:/var/named# nslookup hottub.private.useractive.com localhostServer: localhostAddress: 127.0.0.1
Name: hottub.private.useractive.comAddress: 10.0.0.1
Here, the only thing we did differently is tell nslo o kup that we wanted to use the nameserver on the local machine. Wecould also replace lo calho st with the name or IP address o f any DNS server.
Since our secondary nameserver works, now would be the time to add another NS record to the appropriate zone fileson the hottub. Also, if you want your nameserver to start up every time you connect to your bubble, you should add/e t c/rc.d/init .d/named st art to your /etc/rc.local file.
Remember, if you make any configuration changes, update a zone file or add a new DNS, you'll need to restart thedaemon.
Congratulations! You've configured and setup your very own secondary DNS server. That's no small feat and youshould be very proud.
Don't fo rget to log out o f the bubble.
Copyright © 1998-2014 O'Reilly Media, Inc.
This work is licensed under a Creative Commons Attribution-ShareAlike 3.0 Unported License.See http://creativecommons.org/licenses/by-sa/3.0/legalcode for more information.