Intro to Lightroom - Style Design College€¦ · Intro to Lightroom PH2-POD2-IL Importing and...
21
Intro to Lightroom PH2-POD2-IL Importing and organizing images in Lightroom Viewing and using your catalogue in the Library module, and exporting photos once done. Applying basic adjustments in the Develop module Understanding basic workflow in the slide show, printing and web gallery modules. SDC Tutorial Notes. 1. Successfully importing photos into Lightroom 2. Understanding the Library module & it's basic workflow 3. Applying basic adjustments in the Develop module 4. Succesfully exporting photos out of Lightroom 5. Understanding basic workflow to creating slide shows 6. Understanding basic workflow to printing photos 7. Understanding the basic workflow to creating web galleries Adobe Photoshop Lightroom offers a complete environment for digital photography, from raw capture to creative output. Start with the Library module where you import images into your Lightroom catalogue, move seamlessly to the Develop module to perform advanced image adjustments or export them to Photoshop, and share your photos as slideshows, prints or web pages. The particular module will focus on the intro to Lightroom , the basic interface and screen shot as well as importing and getting started.
Transcript of Intro to Lightroom - Style Design College€¦ · Intro to Lightroom PH2-POD2-IL Importing and...

Intro to Lightroom PH2-POD2-IL
Importing and organizing images in Lightroom
Viewing and using your catalogue in the Library module, and exporting photos once done.
Applying basic adjustments in the Develop module
Understanding basic workflow in the slide show, printing and web gallery modules.
SDC Tutorial Notes.
1. Successfully importing photos into Lightroom
2. Understanding the Library module & it's basic workflow
3. Applying basic adjustments in the Develop module
4. Succesfully exporting photos out of Lightroom
5. Understanding basic workflow to creating slide shows
6. Understanding basic workflow to printing photos
7. Understanding the basic workflow to creating web galleries
Adobe Photoshop Lightroom offers a complete environment for digital photography, from raw capture to creative output. Start with the Library module where you import images into your Lightroom catalogue, move seamlessly to the Develop module to perform advanced image adjustments or export them to Photoshop, and share your photos as slideshows, prints or web pages.
The particular module will focus on the intro to Lightroom , the basic interface and screen shot as well as importing and getting started.
PH2-POD2-IL
Adobe Photoshop Lightroom offers a complete environment for digital photography, from raw capture to creative output. Start with the Library module where you import images into your Lightroom catalogue, move seamlessly to the Develop module to perform advanced image adjustments or export them to Photoshop, and share your photos as slideshows, prints or web pages.
The particular module will focus on the intro to Lightroom , the basic interface and screen shot as well as importing and getting started. We will cover the following:
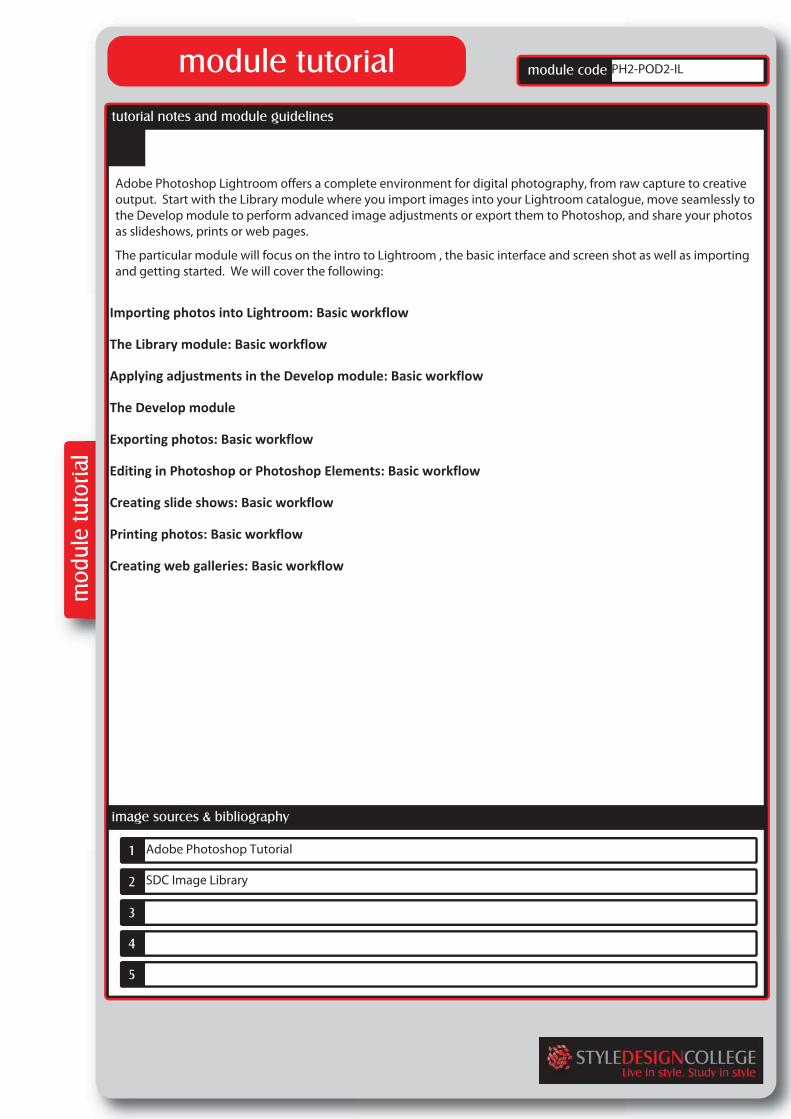
Importing photos into Lightroom: Basic workflow
The Library module: Basic workflow
Applying adjustments in the Develop module: Basic workflow
The Develop module
Exporting photos: Basic workflow
Editing in Photoshop or Photoshop Elements: Basic workflow
Creating slide shows: Basic workflow
Printing photos: Basic workflow
Creating web galleries: Basic workflow
Adobe Photoshop Tutorial
SDC Image Library
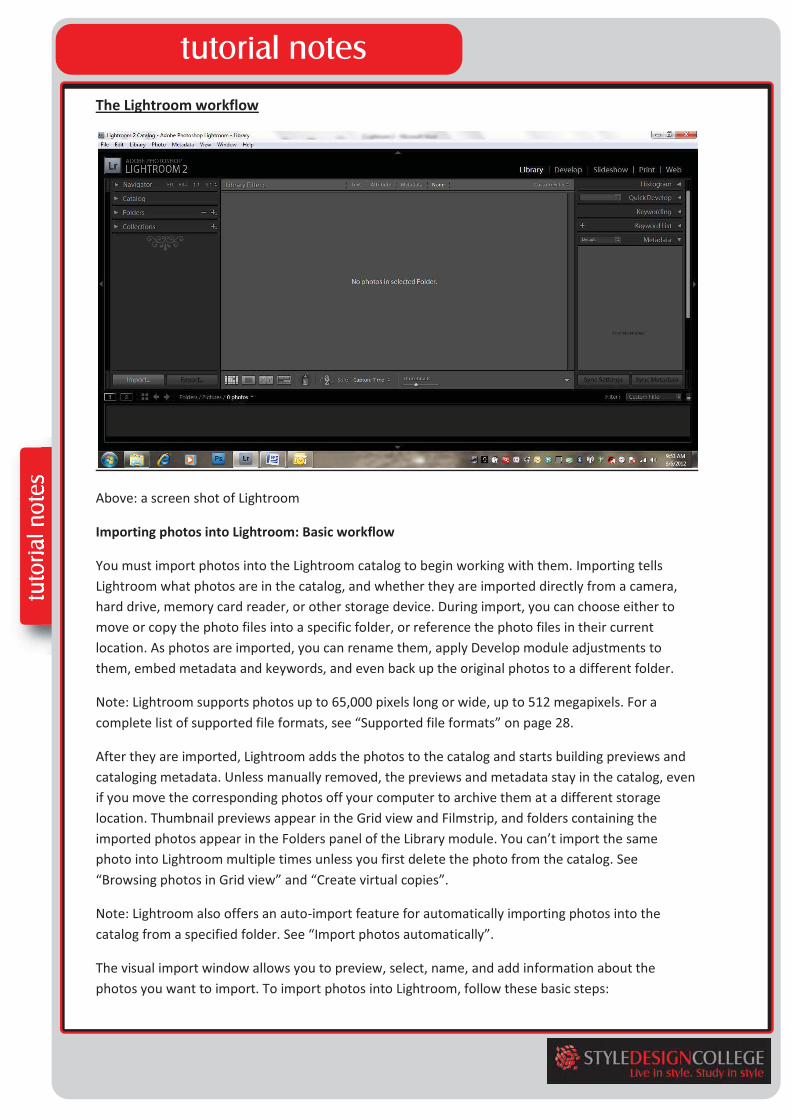
The Lightroom workflow
Above: a screen shot of Lightroom
Importing photos into Lightroom: Basic workflow
You must import photos into the Lightroom catalog to begin working with them. Importing tells Lightroom what photos are in the catalog, and whether they are imported directly from a camera, hard drive, memory card reader, or other storage device. During import, you can choose either to move or copy the photo files into a specific folder, or reference the photo files in their current location. As photos are imported, you can rename them, apply Develop module adjustments to them, embed metadata and keywords, and even back up the original photos to a different folder.
Note: Lightroom supports photos up to 65,000 pixels long or wide, up to 512 megapixels. For a complete list of supported file formats, see “Supported file formats” on page 28.
After they are imported, Lightroom adds the photos to the catalog and starts building previews and cataloging metadata. Unless manually removed, the previews and metadata stay in the catalog, even if you move the corresponding photos off your computer to archive them at a different storage location. Thumbnail previews appear in the Grid view and Filmstrip, and folders containing the imported photos appear in the Folders panel of the Library module. You can’t import the same photo into Lightroom multiple times unless you first delete the photo from the catalog. See “Browsing photos in Grid view” and “Create virtual copies”.
Note: Lightroom also offers an auto-import feature for automatically importing photos into the catalog from a specified folder. See “Import photos automatically”.
The visual import window allows you to preview, select, name, and add information about the photos you want to import. To import photos into Lightroom, follow these basic steps:

1. Connect the camera or memory card reader to your computer.
In addition to cameras and memory card readers, Lightroom imports photos from any folder on the hard drive, CDs or DVDs, and other storage devices. You can also import photos from another Lightroom catalog or from Photoshop Elements.
To have Lightroom start automatically when you plug in a camera or card reader, choose Lightroom > Preferences (Mac OS) or Edit > Preferences (Windows). In General, look under Import Options and select Show Import Dialog When A Memory Card Is Detected.
2. Select the location of the photos to import.
To bring photos into the catalog, do any of the following:
•Click the Import button in the Library module.
•Choose File > Import Photos.
•Drag a folder that contains photos or drag a group of photos into the Grid view of the Library module.
Use the Source panel on the left side of the import window to navigate to the folder that contains the photos you want to import.
Above: Importing photos through the top toolbar > File option.
Below: Importing photos throug the shortcut function.

3. Choose how to add the photos to your catalog.
In the center of the import window, choose whether to import photos by referencing them, by copying or moving them to a specified directory, or by copying photos as Digital Negative (DNG) files. If you copy or move photos, specify where to put them using the Destination panel on the right side of the window. See “Import photos into a catalog” on page 30.
4. Preview and select photos.
Using the previews in the center of the window, select the photos that you want to import.
5. (Optional) Back up your photos as they’re importing.
If you’re copying or moving photos into the catalog, specify whether to make a one-time backup of the original photos as they’re imported. See “Back up photos during import”.
6. Select the type of previews to display.
Standard-size previews provide higher quality photos in the Grid view. Selecting Minimal uses the embedded previews in photos and initially displays photos faster. See “Specify initial previews when importing”.
7. (Optional) Give your files a custom name.
When copying or moving photos into the catalog, Lightroom by default imports photos using their current filenames. You can customize the name by choosing an option from the File Renaming panel. For example, you can add a sequence number. See “Rename photos when importing”.
8. (Optional) Set options for importing your photos.

In the Apply During Import panel, set options to apply Develop settings, metadata, or keywords to the photos as they’re imported. See “Apply Develop settings to photos when importing” and “Apply metadata to photos when importing”.
9. Click Import.
Lightroom displays a progress bar in the upper-left corner of the window as it imports the photos. Then it renders thumbnails in the central area of the Library module.
The Library module: Basic workflow
The Library module is where you view, sort, manage, organize, compare, and rate the photos in your catalog. It’s your home base for working with photos after importing them into Lightroom.
Photos are displayed in the central area of the Library module in any of four views:
Grid view
Displays photos as thumbnails in cells, which can be viewed in compact and expanded sizes. The Grid view gives you an overview of your entire catalog or specific groups of photos for rotating, sorting, organizing, and managing. Options are available for viewing information about photos, including their ratings, color labels, and Pick or Rejected flags in the cells. If you photographed a series of similar photos, they can be neatly grouped in a stack with the thumbnail of the best showing. See “Finding photos in the catalog” and “Grouping photos into stacks”.
Loupe view
Displays a single photo. Controls let you view the entire photo or zoom in to see part of it. Zoom levels up to 11:1 are available. When you’re in the Grid or Survey view, double-clicking a photo displays the image in Loupe view.
Compare view
Displays photos side by side so that you can evaluate them.
Survey view
Displays the active photo with selected photos so that you can evaluate them. The active photo has a white border. Change the active photo by clicking a different thumbnail, and deselect a photo in Survey view by clicking the X in the lower-right corner of the thumbnail.
The Library module contains buttons and commands for switching between views. See “Switching between Grid, Loupe, Compare, and Survey views”. You can also display these views of the Library module in a second window, which you can view on a second monitor, if you have one. See “Displaying the Library on a second monitor”.
Below: Different viewing modes in Lightroom

The panels on the left side of the Library module are primarily for displaying specific photos. Use them to navigate and manage the folders that contain your photos, to view your collections of photos, and to adjust the zoom level of your photos in Loupe view. See “View the contents of a folder” and “Photo collections”.
Below: Left Panel Toolbar, click on arrow to open each window.
The Library Filter bar at the top of the Grid view allows you to find photos by selecting categories of metadata; filtering by flags, ratings, and color labels; and performing a text search. Being able to search for and find photos is important when you want to locate specific images, assemble a group

of photos into a slide show or web photo gallery, or print your photos on a contact sheet. See “Find photos using the Library Filter bar”.
The panels on the right side of the Library module let you view a histogram of the active photo, and view and add metadata and keyword tags to photos. The Quick Develop panel lets you quickly apply tone adjustments to photos. The tone adjustments in the Quick Develop panel in the Library module are the same as their counterparts in the Develop module. However, the Develop module has more precise controls for making adjustments and corrections to the image. See “Adjust images using the histogram”, “Viewing and editing metadata”, and “Using the Quick Develop panel”.
Depending on the view, the toolbar below the preview area contains controls for sorting, applying ratings, rotating photos, playing an impromptu slide show, or viewing information about the photo. See “Show controls in the Library module toolbar”.
Like all modules in Lightroom, the Library module displays the Filmstrip along the bottom. Applying filters to show only certain photos in the Filmstrip determines which photos appear in the Grid view. See “Filter photos in the Filmstrip and Grid view”.
Below: the right toolbar as open in the Library Mode.

Applying adjustments in the Develop module: Basic workflow
The Develop module in Lightroom includes controls for globally adjusting the color and tonal scale of your photos, as well as for making local adjustments. All the adjustments you make in Lightroom are nondestructive. With nondestructive editing, your original file is not altered, whether it’s a camera raw file or a rendered file such as a JPEG or TIFF. Your edits are stored in Lightroom as a set of instructions that are applied to your photo in memory. Nondestructive editing means you can explore and create different versions of your photo without degrading your original image data.
Because edits are stored in Lightoom as instructions, you do not need to save them in the traditional sense. When you print or export your photos, for example, the adjustments are included. You only need to save your changes if you want them to be available to Adobe Bridge or Camera Raw. See “Synchronize Lightroom metadata with Camera Raw and Adobe Bridge”.
The Develop module
A. Presets, Snapshots, History, and Collections panels B. Histogram C. RGB values D. Tool strip E. Adjustment panels F. Navigator zoom controls G. Toolbar
Photos in the following formats can be edited in Lightroom: camera raw (including DNG), JPEG, TIFF, and PSD. Applying adjustments to photos is a subjective and individual process. Use the following steps as a guide for editing photos in the Develop module.
Below: the Develop module. This is the most important part of Lightroom as this is where photo editing takes place
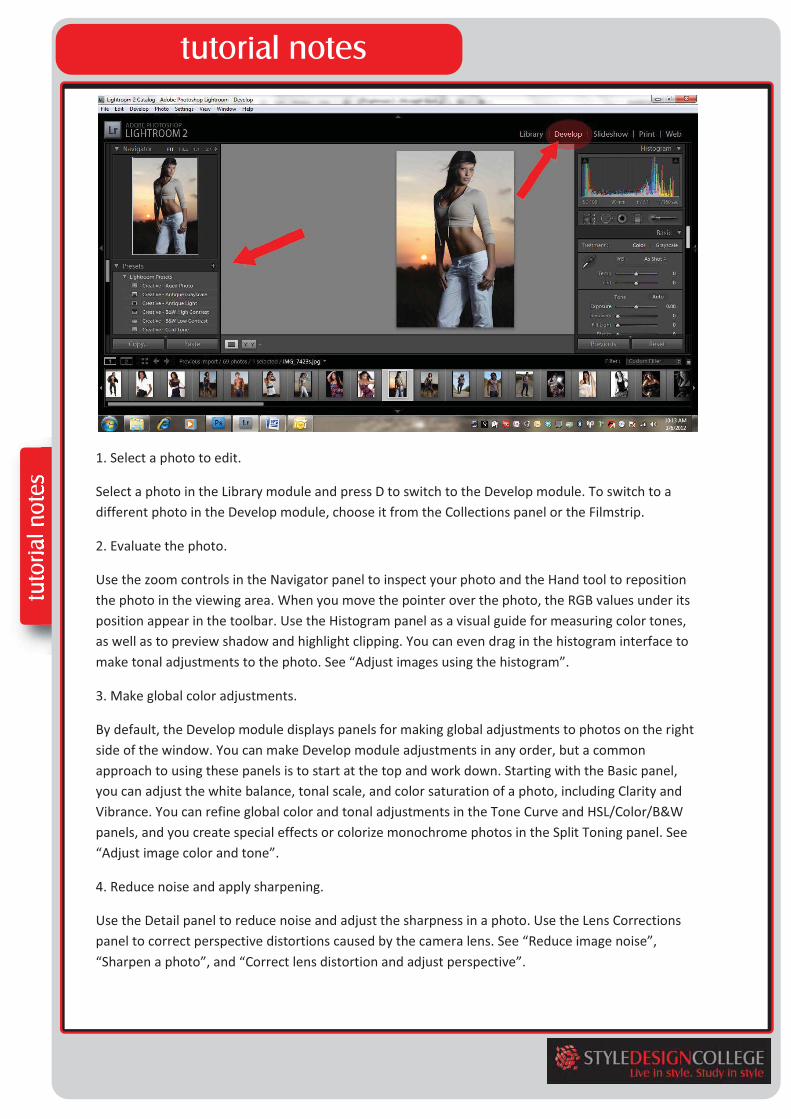
1. Select a photo to edit.
Select a photo in the Library module and press D to switch to the Develop module. To switch to a different photo in the Develop module, choose it from the Collections panel or the Filmstrip.
2. Evaluate the photo.
Use the zoom controls in the Navigator panel to inspect your photo and the Hand tool to reposition the photo in the viewing area. When you move the pointer over the photo, the RGB values under its position appear in the toolbar. Use the Histogram panel as a visual guide for measuring color tones, as well as to preview shadow and highlight clipping. You can even drag in the histogram interface to make tonal adjustments to the photo. See “Adjust images using the histogram”.
3. Make global color adjustments.
By default, the Develop module displays panels for making global adjustments to photos on the right side of the window. You can make Develop module adjustments in any order, but a common approach to using these panels is to start at the top and work down. Starting with the Basic panel, you can adjust the white balance, tonal scale, and color saturation of a photo, including Clarity and Vibrance. You can refine global color and tonal adjustments in the Tone Curve and HSL/Color/B&W panels, and you create special effects or colorize monochrome photos in the Split Toning panel. See “Adjust image color and tone”.
4. Reduce noise and apply sharpening.
Use the Detail panel to reduce noise and adjust the sharpness in a photo. Use the Lens Corrections panel to correct perspective distortions caused by the camera lens. See “Reduce image noise”, “Sharpen a photo”, and “Correct lens distortion and adjust perspective”.
Use the Before/After button in the toolbar to see the results of your edits, or simply press \ to cycle between before and after views. Use the History panel to return to any previous edit. Click the plus sign (+) in the Snapshots panel to capture any editing state that you can return to at a later time.
5. Retouch and correct flaws.
At any time, use the Crop Overlay, Red Eye Correction, and Spot Removal tools to crop and straighten your photo and to remove red eye, dust, and spots. To apply a postcrop vignette or film grain effect, use the options in the Effects panel. See “Adjust crop and rotation”, “Remove red-eye”, “Heal spots and blemishes”, “Apply a postcrop vignette”, and “Simulate film grain”.
6. Apply local color adjustments.
Color correct specific areas of a photo by using the Adjustment Brush tool or the Graduated Filter tool. See “Apply local adjustments”.
7. Apply adjustments to other photos.
You can apply edits from one photo to many others. For example, apply a set of edits to all of the photos from a specific shoot that require the same global adjustments. You can copy and paste them, or synchronize them. When you copy or synchronize corrections, Lightroom allows you to select the specific edits that you want to apply to the other photos. You can also use the Painter tool in the Grid view of the Library to apply Develop settings from one photo to another. See “Apply Develop adjustments to other photos”.
Exporting photos: Basic workflow
In Lightroom, you do not save photos in the traditional sense. Instead, you export photos. You can export photos in a variety of file formats suitable for a wide range of uses. For example, you can export photos as JPEGs to send in e-mail or share online, or as TIFFs for a print publication.
When you export photos, you create new files that include Develop module adjustments and other changes you’ve made to the photos’ XMP data. When exporting, options are available for specifying a photo’s filename, color space, pixel dimensions, and resolution. Export settings can be saved as presets for reuse.
The Publish Services panel allows you to export and upload JPEG photos directly from Lightroom to photo-sharing websites. See “Export from Lightroom to Facebook”.
To export photos from Lightroom, follow these basic steps:
1. Select the photos to export.
Select photos from the Grid view or the Filmstrip. See “Selecting photos in the Grid view and the Filmstrip”.
2. Export photos and choose a destination.
Choose File > Export or click the Export button in the Library module. Choose Export To > Hard Drive in the pop-up menu at the top of the dialog box.

The number of photos being exported appears at the top of the Export dialog box.
3. (Optional) Choose an export preset.
Lightroom has several premade presets to make it easier to export photos to disk in specific file formats. For example, the For E-mail preset generates a small, low-resolution JPEG image suitable for sending to a client as an e-mail attachment. If desired, select any of these presets from the left side of the Export dialog box and skip to Step 6. See “Export photos using presets”.
4. Specify export options.
Specify a destination folder, naming conventions, and other options in the various Export dialog box panels. For example, you can opt to add the exported photos to the current catalog. See “Export photos to disk or CD”.
5. (Optional) Save your export settings.
To save your export settings for reuse, click Add to create an export preset. See “Save export settings as presets”.
6. Click Export.
Above: Export using shortcut function, make sure your photos are selected.
Below: Export using File> export route on top toolbar.

Editing in Photoshop or Photoshop Elements: Basic workflow
You can edit photos using Adobe Photoshop, Adobe Photoshop Elements, or another application from within the Library or Develop module in Lightroom. Lightroom automatically uses Photoshop or Photoshop Elements as an external editor if you have either application installed on your computer. You can designate other applications to function as external editors, as well as set file format and other options, in the External Editing preferences. See “Specify external editing preferences”.
Lightroom provides several ways to edit photos in Photoshop CS4 or later. You can simply edit them in their current format, or open them as a Smart Object. You can also merge a series of shots into a panorama, merge to HDR, or open two or more photos as one layered image in Photoshop. When you save edits to a photo in Photoshop, Lightroom automatically imports the new photo into the catalog. See “Open photos in Photoshop or Photoshop Elements”.
To edit your photo using Photoshop or Photoshop Elements from within Lightroom, you must have one of those applications installed on your computer. Then, follow these steps:
1. Select a photo to edit.
In the Lightroom Library or Develop module, select the photo you want to edit. Then, choose Photo > Edit In > Edit In Adobe Photoshop or Edit In Adobe Photoshop Elements. If you’re opening a camera raw file in Photoshop CS4 or later, Photoshop opens the photo directly. If you’re opening a TIFF, JPEG, or PSD file, choose to open a copy of the photo with Lightroom adjustments applied, or open a copy of the original photo.
2. Edit in Photoshop or Photoshop Elements.

Perform your desired edits in Photoshop or Photoshop Elements, and when you’re ready to commit to them, choose File > Save.
3. Return to Lightroom.
Switch back to Lightroom. In the Library Grid view, a new version of your photo appears next to the original. The new photo contains the edits you made in Photoshop or Photoshop Elements. The original photo is untouched.
Important: When saving from Photoshop or Photoshop Elements, be sure to turn on the Maximize Compatibility option so that Lightroom can read the images. Photoshop CS3 and later automatically save PSD files from Lightroom with maximum compatibility.
Creating slide shows: Basic workflow
In the Slideshow module, you can create slide shows to present photos on screen with music and transitions. The left panels contain a list of slide show templates and a preview of their layouts. The Slide Editor view in the center of the workspace displays the photos in a slide template. The toolbar below the Slide Editor contains controls for playing a preview of the slide show, refining the selection, and adding text to the slides. The right panels contain controls for specifying how the photos appear in the template layout, modifying the template, adding text to the slide layout, and selecting playback settings.
The Slideshow module
A. Slide Editor view B. Template preview C. Slide show templates D. Panels for setting layout and playback options E. Playback controls F. Rotate and Add Text tools
If you want to share a slide show or play it on another computer, you can export the slide show as an Adobe PDF file, which plays without music, or as a video file, which includes music.

You can also play an impromptu slide show from the Library or Develop module. An impromptu slide show plays using the current template and settings in the Slideshow module. This is a convenient way to view images at full screen and rate, rotate, or delete images in a folder using keyboard shortcuts.
Below: the slideshow module
To create a slide show, follow these basic steps:
1. Select images from the Library.
In the Library module, select photos in the Grid view or Filmstrip. Or use the Folders or Collections panel to select a folder or a collection of photos to use for the slide show. See “Selecting photos in the Grid view and the Filmstrip”.
2. Arrange the slide order.
Switch to the Slideshow module. If are using a collection or a folder with no subfolders as the source, drag the photos in the Filmstrip to arrange them in the desired order. See “Rearrange slide order” and “Randomize the slide order”.
3. Choose a template in the Slideshow module.
Move the pointer over a template name in the Template Browser on the left side of the workspace to see a preview of the template. Click a template name to select it for your slide show. See “Choose a slide show template”.
4. (Optional) Customize the template.
Customize your slide show by modifying the Options, Layout, Overlays, Backdrop, and Titles settings. For example, add a drop shadow; specify whether to show your identity plate or a caption; and
specify a color or image for the background. See “Adding overlays to slides” and “Set the slide background”.
Note: Save your modifications as a custom template if you want to use them again later. See “Choose a slide show template”.
5. Set playback options.
Set slide duration and transition options. You can also specify introductory and ending slides, and select a music playlist to accompany the slide show. See “Set slide and transition duration” and “Play music with a slide show”.
6. Preview or play the slide show.
Click the Preview Slideshow button in the toolbar to display the slide show in the Slideshow Editor view. Click the Play button to play the slide show as a full-screen presentation on your computer. See “Preview a slide show” and “Play a slide show”.
7. Export the slide show if you plan to share it.
Save your slide show as an MP4 video that can play with transitions and music or as a static PDF document that others can open. Click the Export Video or Export PDF button. See “Export a slide show”.
8. (Optional) Save the layout as a custom template or as an output collection.
Save your slide show layout as a custom template so you can reuse it easily. Or save the slide show settings as an output collection. An output collection lets you easily return to a specific set of output options for a collection of photos. You can also easily swap photos in the output collection while preserving specific Slideshow, Print, or Web module settings. See “Create custom slide show templates” and “Save slide show settings as a slide show collection”.
Printing photos: Basic workflow
The Print module lets you specify the page layout and print options for printing photos and contact sheets on your printer. The left panels contain a list of templates and a preview of their page layouts. The area in the center of the Print module displays the photos in a template. The right panels contain controls for specifying how the photos appear in the layout; modifying the template; adding text to the printed page; and selecting settings for print color management, resolution, and sharpening.
The Print module
A. Template Browser B. Panels for specifying layout and output options C. Show Previous Page and Show Next Page buttons D. Page number
Below: the print module in Lightroom.
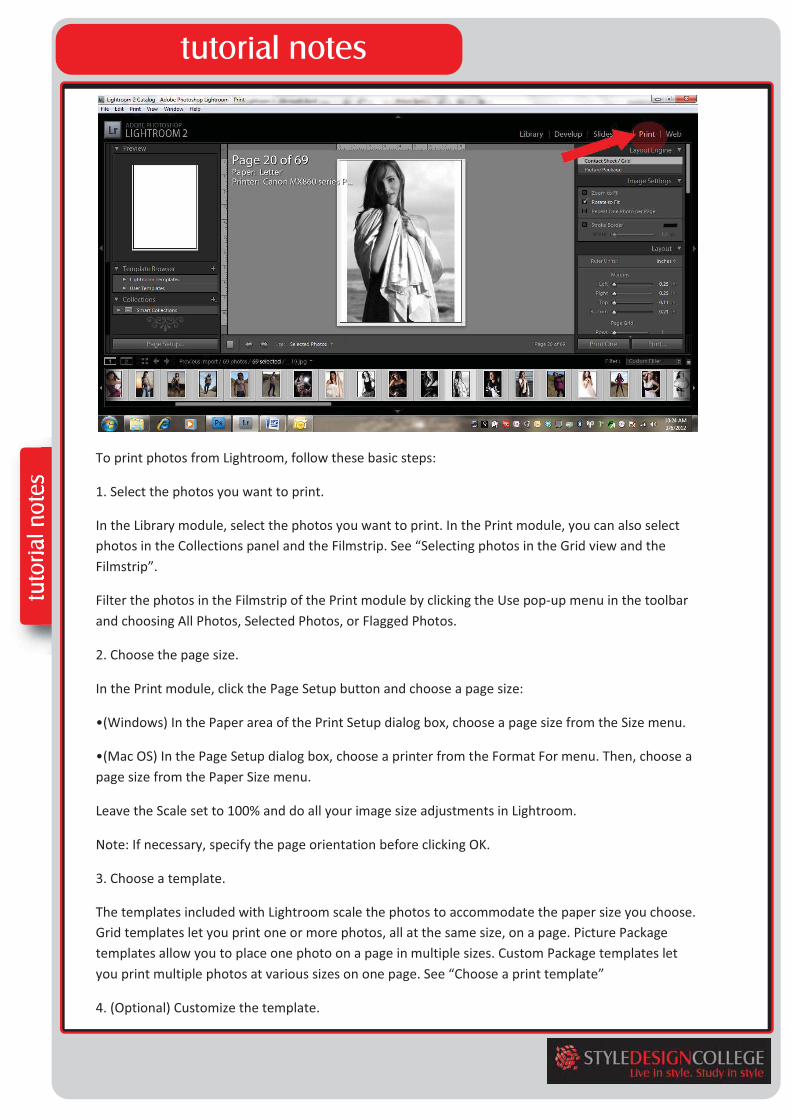
To print photos from Lightroom, follow these basic steps:
1. Select the photos you want to print.
In the Library module, select the photos you want to print. In the Print module, you can also select photos in the Collections panel and the Filmstrip. See “Selecting photos in the Grid view and the Filmstrip”.
Filter the photos in the Filmstrip of the Print module by clicking the Use pop-up menu in the toolbar and choosing All Photos, Selected Photos, or Flagged Photos.
2. Choose the page size.
In the Print module, click the Page Setup button and choose a page size:
•(Windows) In the Paper area of the Print Setup dialog box, choose a page size from the Size menu.
•(Mac OS) In the Page Setup dialog box, choose a printer from the Format For menu. Then, choose a page size from the Paper Size menu.
Leave the Scale set to 100% and do all your image size adjustments in Lightroom.
Note: If necessary, specify the page orientation before clicking OK.
3. Choose a template.
The templates included with Lightroom scale the photos to accommodate the paper size you choose. Grid templates let you print one or more photos, all at the same size, on a page. Picture Package templates allow you to place one photo on a page in multiple sizes. Custom Package templates let you print multiple photos at various sizes on one page. See “Choose a print template”
4. (Optional) Customize the template.
For a grid layout, such as a 4-x-5 contact sheet, modify the template using the controls in the Image Settings and Layout panels. For example, zoom to fill the photos in the cell, add a stroke border, and adjust margins and cell size. You can also drag the guides in the work area to resize cells.
For Picture Package and Custom Package templates, you can drag cells freely in the work area and specify options in the Image Settings panel. Use the Rulers, Grid & Guides panel to adjust the display of the work area. Use the Cells panel to add new cells or pages to the layout.
See “Specify how photos fill an image cell” on page 161, “Specify rulers and guides”, “Modify page margins and cell size (Single Image/Contact Sheet layouts)”, and “Customize package layouts”.
5. (Optional) Add text and other extras.
In the Page panel, specify whether to print a background color, your identity plate, and a copyright watermark. See “Printing overlay text and graphics”.
6. Specify the print settings.
In the Print Job panel, do any of the following:
•Specify a print resolution or leave the setting at its default (240 ppi). See “Set print resolution”.
•Specify how color management is handled for your photos. Choose from the Profile and Rendering Intent pop-up menus. See “Set print color management”.
•Select whether to use Draft Mode Printing. See “Print in draft mode”.
•Select whether to sharpen the photos for printing. If you select Print Sharpening, use the pop-up menu to choose how much sharpening to apply. See “Sharpen a photo for print”.
7. (Optional) Save the print layout and options as a template or as an output collection.
If you plan to reuse your print settings, including layout and overlay options, save the settings as a custom print template. Or save the settings as an output collection to preserve a set of specific Print module options with a collection of photos. See “Work with custom print templates” and “Save print settings as a print collection”.
8. Click the Print button and specify printer driver options.
Choose the printer and set the printer options before clicking OK (Windows) or Print (Mac OS). If Lightroom is managing the color, turn off any color management in the printer settings.
Creating web galleries: Basic workflow
The Web module lets you create web photo galleries, which are websites that feature thumbnail images that link to larger versions of the photos. The panels on the left side of the Web module in Lightroom contain a list of templates and a preview of their page layouts. The center pane is the image display area, which automatically updates as you make changes, and also lets you navigate between the index and other pages in your web photo gallery. Panels on the right have controls for specifying how the photos appear in the template layout, modifying the template, adding text to the
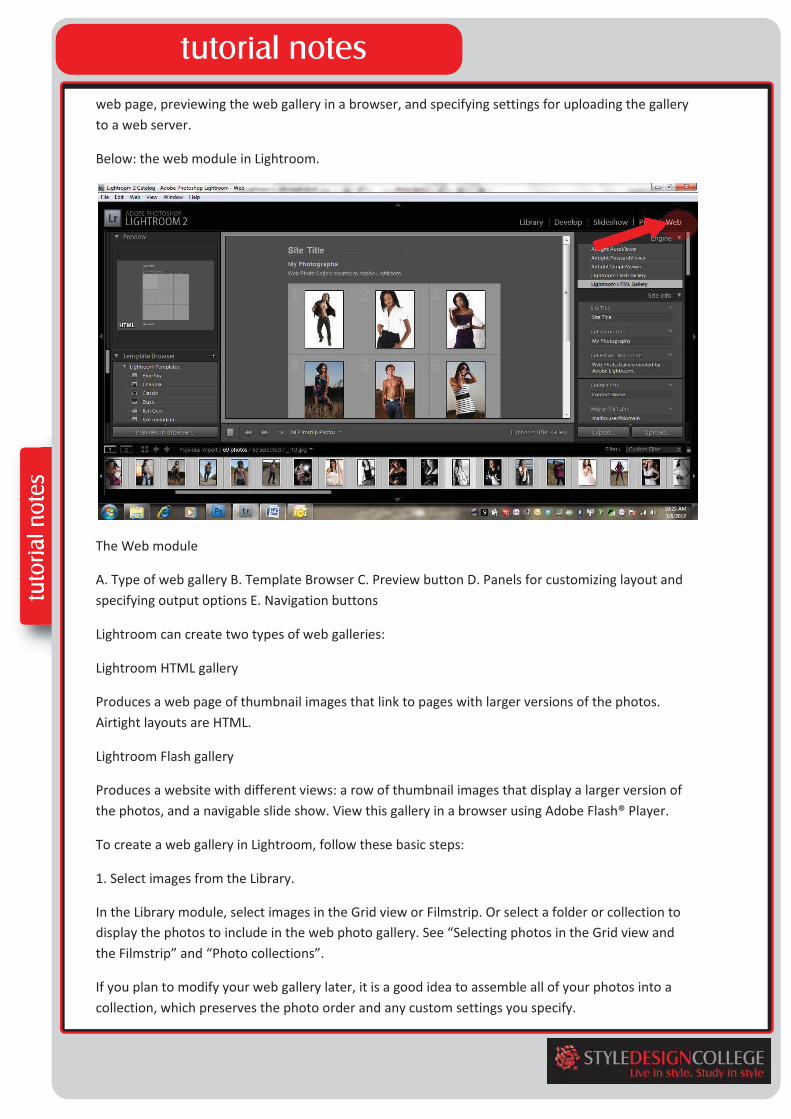
web page, previewing the web gallery in a browser, and specifying settings for uploading the gallery to a web server.
Below: the web module in Lightroom.
The Web module
A. Type of web gallery B. Template Browser C. Preview button D. Panels for customizing layout and specifying output options E. Navigation buttons
Lightroom can create two types of web galleries:
Lightroom HTML gallery
Produces a web page of thumbnail images that link to pages with larger versions of the photos. Airtight layouts are HTML.
Lightroom Flash gallery
Produces a website with different views: a row of thumbnail images that display a larger version of the photos, and a navigable slide show. View this gallery in a browser using Adobe Flash® Player.
To create a web gallery in Lightroom, follow these basic steps:
1. Select images from the Library.
In the Library module, select images in the Grid view or Filmstrip. Or select a folder or collection to display the photos to include in the web photo gallery. See “Selecting photos in the Grid view and the Filmstrip” and “Photo collections”.
If you plan to modify your web gallery later, it is a good idea to assemble all of your photos into a collection, which preserves the photo order and any custom settings you specify.

You can filter the photos in the Filmstrip of the Web module by clicking the Use pop-up menu in the toolbar and choosing All Photos, Selected Photos, or Flagged Photos.
2. Go to the Web module.
The photos that you selected appear in both the Filmstrip and the work area in the center of the Web module.
3. Rearrange the photo order.
If you assembled your photos into a collection or if you’ve selected a folder that does not contain other folders, drag photos in the Filmstrip to rearrange them in the order that you want them to appear in the gallery. See “Rearrange web gallery photo order”.
4. Choose a template.
Move your pointer over a template name in the Template Browser to see a small preview. Click a template name to select it for your web gallery.
5. Enter website information.
In the Site Info panel, type a title for your website, a title for your gallery, and a description. You can also enter your e-mail address so that visitors to your gallery can click your name to send you an e-mail. See “Add titles, description, and contact information to web photo galleries”.
6. (Optional) Specify the web gallery appearance.
In the Color Palette panel, click the color box next to the element that you want to modify and choose a new color for it. See “Choose colors for gallery elements”.
7. (Optional) Specify the gallery layout.
In the Appearance panel, modify the gallery layout by setting the Grid options (for HTML galleries) or choosing from the Layout menu (for Flash galleries). For Flash galleries, you can also specify the size of the thumbnail images and the enlarged photo in the Appearance panel. See “Specify the appearance of Lightroom HTML galleries” and “Specify the appearance of Lightroom Flash galleries”
8. (Optional) Specify the text that appears with the photos.
In the Image Info panel, type or choose the metadata to display as the title and caption for each photo. Leave the Title or Caption boxes unchecked if you don’t want text to appear under the photos. See “Display photo titles and captions in web photo galleries”.
9. (Optional) Add a copyright watermark.
Display a copyright watermark web gallery photos by selecting a watermark in the Output Settings panel. See “Display a copyright watermark in web photo galleries”.
10. Specify the output settings.

In the Output Settings panel, specify the quality of the enlarged view of a photo and whether to apply output sharpening.
11. Preview your web gallery in a browser.
At the bottom of the work area, click Preview In Browser. Lightroom opens a preview of your web gallery in your default browser. See “Preview a web photo gallery”.
12. Export or upload your web photo gallery.
After you finish your gallery, you can either export the files to a specific location or upload the gallery to a web server. In the Upload Settings panel, choose Web Server from the FTP Server menu, or choose Edit Settings to specify settings in the Configure FTP File Transfer dialog box. If necessary, consult your ISP for help with FTP settings. See “Preview, export, and upload web photo galleries”.
13. (Optional) Save the web layout and options as a template or as an output collection.
If you plan to reuse your web gallery settings, including layout and upload options, save the settings as a custom web template. Or save the settings as an output collection to preserve a set of specific Web module options with a collection of photos. See “Create custom web gallery templates” and “Save web settings as a web collection”