INSTRUCTION BOOKLET - Flexifoil · Navaro Buggy Instruction Manual 2 Safety Thank you for...
11
Navaro Buggy Instruction Manual 1 INSTRUCTION BOOKLET
Transcript of INSTRUCTION BOOKLET - Flexifoil · Navaro Buggy Instruction Manual 2 Safety Thank you for...

Nav
aro
Bugg
y In
stru
ctio
n M
anua
l
1
INSTRUCTION BOOKLET

Nav
aro
Bugg
y In
stru
ctio
n M
anua
l
2
Safety
Thank you for purchasing your new Flexifoil buggy. If operated and looked after properly, your new buggy will serve you well. Before assembling and using this buggy, you must take time to read and understand the following instructions andsafety warnings.
IMPORTANT
This buggy has been designed for kite traction only and no other means of propulsionshould be used.
SAFETY FIRST
Kite traction activities, including kite buggying, are extreme sports, which can be bothexhilarating and dangerous. You must read and abide by the following safety warningsto ensure that you have a great kite buggying experience.
SAFETY WARNINGS
WEATHER CONDITIONS
Never use your buggy in conditions that are too extreme or winds that are too strong for your skill level or your equipment.
Never kite buggy if you cannot safely handle the power of your kite. Use a smaller kite or wait for lighter wind.
Gusty winds can cause difficulties for the inexperienced flier. Wait for steady (clean) winds.
GENERAL
Read all instructions and safety guidelines be-fore using Flexifoil products.
Use extreme caution when using kite traction equipment. Improper use of this equipment can cause injury or death.
Traction kites are not parachutes or paragliders and must not be used as such.
Do not use this buggy under the influence of alcohol or mindaltering drugs.
LEARNING
Do not attempt to kite buggy until you have mas-tered control of your traction kite.
Beginners should learn to kite buggy in lighter winds or seek tuition from an authorised instructor.

Nav
aro
Bugg
y In
stru
ctio
n M
anua
l
3
Safety
LOCATION / SITE ASSESSMENT
EQUIPMENT
INSURANCE
Do not kite buggy near overhead power cables, roads, airports, cars, railways, people or ani-mals.
Always behave in a responsible manner and respect other site users.
Always select a buggy site free from people and obstacles and dangerous items such as broken glass. Stay away from unsecured kites and lines on the ground as a kite can relaunch itself at any time. Disable your kite and lines on the ground when not in use.
Never kite buggy on congested beaches and fields or where your activity could injure some-one.
Respect nature. Don’t leave any rubbish behind.
Always maintain plenty of clear space around you in all directions. A kite can pull you down wind for a considerable distance.
Make sure you have permission from the site owner, if applicable.
Always check all of your equipment (buggy, kite, lines, harness, safety gear etc.) before using it. Do not kite buggy with worn or damaged lines or equipment. Repair or replace accordingly.
Always kite buggy with the appropriate safety equipment (helmet, knee and elbow pads, strong shoes, suitable eyewear, gloves etc.). Never at-tach yourself permanently to the kite.
Kite lines and bridles under tension can cut like a knife and can cause serious injury or death.
Always keep your kite lines away from people, animals and other buggy pilots.Never allow inexperienced kite fliers to use your equipment.
Remember you are responsible for the safe op-eration of your kite, buggy and equipment. Use common sense.
We recommend that you use Copaslip on all nuts and bolts before assembly.
We strongly recommend you take out a third party liability insurance that covers kite buggying.

Nav
aro
Bugg
y In
stru
ctio
n M
anua
l
4
A) Pair of rear axle Hi Tensile Steel bolts, Pair of NutsB) Stainless steel bolt and large washer for front fork.C) 4 x 65mm Stainless steel bolts and nuts for connecting the side tubes to the rear axle & to the front down tube..D) Stainless steel front axle, 2 front axle spacers, stainless steel washer and a stainless steel bolt.E) Not Shown in Image. Bearings X 6, Internal wheel bearing Spacers x 3
Box contents
3x Wheels (Un-inflated) with fitted bearings
1x Front fork down-tube with fitted bearing brushes
1x Seat 2x Adjustable spanners
1x Back axle 1x Product registration card
1x Front fork 1x Left and 1x right side frame
A B
C
D
Nav
aro
Bugg
y In
stru
ctio
n M
anua
l
5
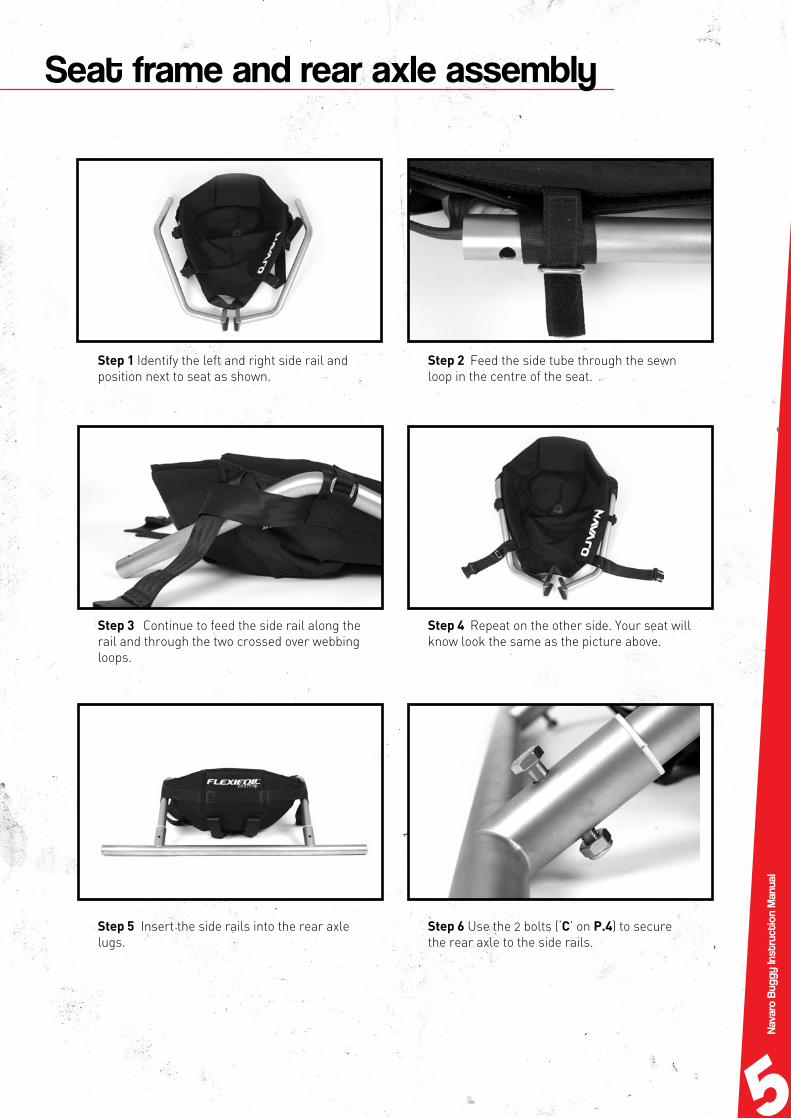
Step 2 Feed the side tube through the sewn loop in the centre of the seat.
Step 1 Identify the left and right side rail and position next to seat as shown.
Step 4 Repeat on the other side. Your seat will know look the same as the picture above.
Step 3 Continue to feed the side rail along the rail and through the two crossed over webbing loops.
Seat frame and rear axle assembly
Step 6 Use the 2 bolts (‘C’ on P.4) to secure the rear axle to the side rails.
Step 5 Insert the side rails into the rear axle lugs.

Nav
aro
Bugg
y In
stru
ctio
n M
anua
l
6
Step 3 Push the front square downtube between the side rail brackets
Step 4 Using the nuts and bolts identified as ‘C’ on P.4 secure the front downtube into place, and tighten with the adjustable spanner.
Step 1 Pull the seat forwards, on the frame, enabling you to easily pull the front webbing loop over the front of the side rails.
Step 2 The front of the seat should now look like this.
Connecting front fork down tube
Step 1 Insert front forks through the bottom ofthe head tube as shown. Ensure the bushings arepresent and in good condition.
Step 2 Tightly secure the forks using the stainless bolt and washer (B fro m P.4).
Front fork assembly

Nav
aro
Bugg
y In
stru
ctio
n M
anua
l
7
Step 5 The buggy is now ready for wheels.
Step 3 Wrap front webbing strap around side rails and connect underneath buggy seat.
Step 4 Make sure the clip is under seat but above the square downtube.
Step 1 Wrap the straps (connected to each side of the seat) around the side frames TWICE as indicated. Feed the longer of the 2 straps around the axle and connect the buckles together. Pull tight.
Step 2 Take both rear straps (connected to the bottom of the seat) around the back axle and connect the buckles together. Pull tight.
Securing the seat to the frame

Nav
aro
Bugg
y In
stru
ctio
n M
anua
l
8
When you inflate the wheel check the tyre is correctly seated on the hub. If it is not, deflate and then re-inflate.
Step 1 Slide the front axle identi-fied as “D” on P.4 through the side of the front fork with a locating hole and fit one wheel spacer on the inside.
Step 1: Push bearing into the centre of the wheel hubs. Some force may be required (a rubber mallet can be used if bearings are a tight fit).
Step 2 Hold the wheel in position and push the axle through the wheel. Fit the remaining spacer.
Step 2 Turn the wheel over and push the bearing spacer into centre of wheel.
Step 3 Place Spacer identified as “D” on P.4 over the side of the front fork and using the small bolt identified as “D”, tighten the front axle using a spanner.
Step 3 Push bearing into Centre of the hub ensuring that the spacer is between the bearings.
Wheel assembly
Mounting the front wheel
Inflating the wheels

Nav
aro
Bugg
y In
stru
ctio
n M
anua
l
9
Step 5 Using the inside nut and the adjustable spanner, tighten the nut onto the rear axle to secure the rear wheel.
Step 3 Place wheel and bolt into the rear axle. Step 4 Using the adjustable Spanner tighten rear axle bolt to rear axle.
Step 1 Slide the axle bolt identified as “A” on P.4 through each rear axle wheel.
Step 2 Lightly tighten the nut identified as “A” on P.4 onto the rear axle bolt using the 2 adjustable spanners. N.B Do not over tighten this nut.
Mounting the rear wheels

Nav
aro
Bugg
y In
stru
ctio
n M
anua
l
10
Now you are ready to ride!
Front View
Rear View

Nav
aro
Bugg
y In
stru
ctio
n M
anua
l
11
Taking good care of your buggy will ensure it has a long and trouble free life. We suggest that you take note of the following maintenance tips.
FRAME
SEAT
FRONT FORK BUSHES
WHEELS AND BEARINGS
The frame is made with high grade stainless steel and is virtually maintenance free. However, if your buggy is muddy or has been used on the beach in salt water conditions, we recommend that you hose it down thoroughly with fresh water at the end of the day. Inspect the frame for damage and cracks periodically. Do not attempt to repair frame damage your-self, contact your local dealer or Flexifoil International for advice.
The seat can be hosed down at the end of the day. If it is very dirty, you can hand wash it in warm water using a non-bleaching detergent. Allow it to completely dry naturally, before packing it away. Check the seat for wear periodically. Repair any damage prior to next use.
The front fork rotates in the down-tube in special hardwearing nylon bushes. It is advisable to periodically remove the front fork from the down-tube to clean the assembly. After cleaning, lightly spray the front fork with a Teflon based lubricant and re-assemble. A little play in the assembly is normal, but if there is excessive wear, replace the bushes. Replacements are available from your dealer.
Wheels and bearings will, due to their nature, wear with use. Periodically remove the wheels from the buggy for mainte-nance.
Hose the wheels down with fresh water and dry them thoroughly. When completely dry, spray all bearings lightly with a Teflon based lubricant (most bicycle or motorcycle chain sprays are suitable).
Check the plastic wheel hub for damage and cracks. Replace if damage is found. Hubs cannot be repaired. Correct re-placements can be obtained from your dealer.
Check the tyres for damage and wear. Replace worn and damaged tyres with new ones of the correct size and type.
Bearings should be replaced with new ones when they become worn. Wear can be detected by spinning the wheel on the front axle bolt while holding the axle in both hands. If the wheel is reluctant to spin freely (after lubrication) or has a lot of sideways movement, replace the bearings. Check all wheels. Correct replacements can be obtained from your dealer.
The rear axle bolts are made from hi-tensile steel (not stainless). This is because stainless steel bolts, when screwed into the stainless steel frame, can “lock up” making them unremovable. Periodically clean the rear axle bolts to prolong life.
Care & Maintenance