InfinityLab Quick-Connect Bio-inert Heat Exchanger ... Technologies InfinityLab Quick-Connect...
12
Agilent Technologies InfinityLab Quick-Connect Bio-inert Heat Exchanger Installation in an Agilent 1260 Infinity II MCT This technical note describes the installation of Bio-inert Heat Exchangers to an Agilent 1260 Infinity II MCT. Contents Installation 2 Installing UHP Fittings 5 Installation of stainless steel cladded PEEK capillaries to Soft Connectors 9 Installation of the Bio-inert Zero Dead Volume (ZDV) Union 11
Transcript of InfinityLab Quick-Connect Bio-inert Heat Exchanger ... Technologies InfinityLab Quick-Connect...

InfinityLab Quick-Connect Bio-inert Heat ExchangerInstallation in an Agilent 1260 Infinity II MCT
This technical note describes the installation of Bio-inert Heat Exchangers to an Agilent 1260 Infinity II MCT.
Contents
Installation 2
Installing UHP Fittings 5
Installation of stainless steel cladded PEEK capillaries to Soft Connectors 9
Installation of the Bio-inert Zero Dead Volume (ZDV) Union 11
Agilent Technologies

Installation
Tools required p/n Description
5043-0915 Fitting mounting toolfor bio-inert capillaries
8710-0510 Wrench open 1/4 — 5/16 inch5023-2502 Hex driver SW-6.35, slitted
Parts required p/n Description
G5667-81005 Capillary PK/ST 0.17 mm x 500 mm RLO/RLO (bio-inert)*
* supplied with the G5668-68705 Accessory Kit Bio-inert Multisampler
5067-4780 Capillary 300 ID 0.17 w/Socket OD 1.6 BIO†
† supplied with the G7116-68715 Accessory Kit 1260 MCT Bio
G7116-60041 Quick-Connect Heat Exchanger Bio-inert†
5067-5403 UHP fitting†
5067-4741 ZDV union (Bio-inert)†
G7116-68003 Column Holder Clips (2/Pk) †
2
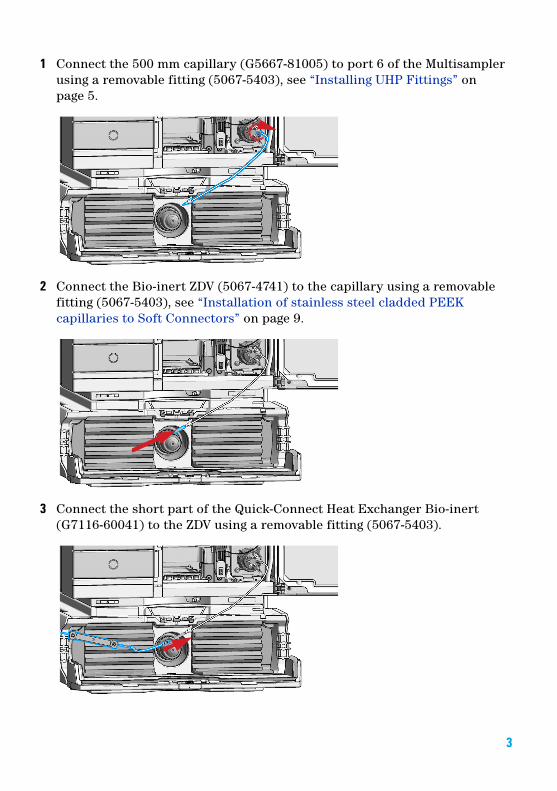
1 Connect the 500 mm capillary (G5667-81005) to port 6 of the Multisampler using a removable fitting (5067-5403), see “Installing UHP Fittings” on page 5.
2 Connect the Bio-inert ZDV (5067-4741) to the capillary using a removable fitting (5067-5403), see “Installation of stainless steel cladded PEEK capillaries to Soft Connectors” on page 9.
3 Connect the short part of the Quick-Connect Heat Exchanger Bio-inert (G7116-60041) to the ZDV using a removable fitting (5067-5403).
3
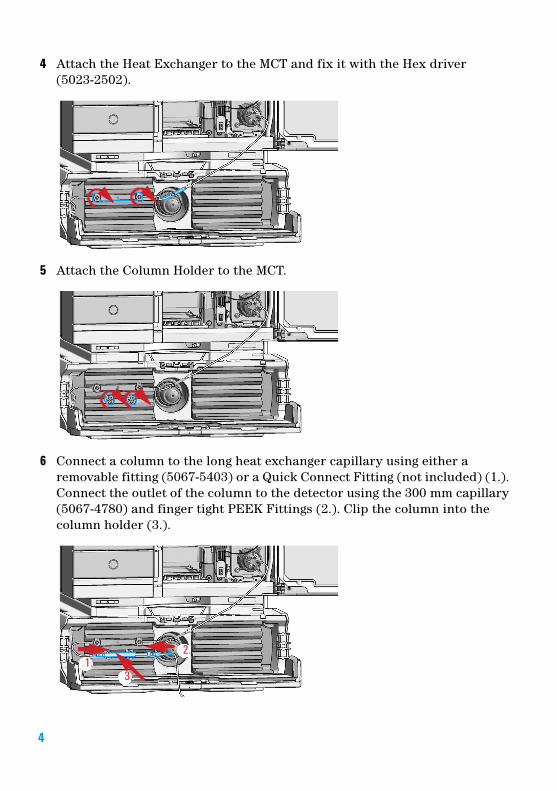
4 Attach the Heat Exchanger to the MCT and fix it with the Hex driver (5023-2502).
5 Attach the Column Holder to the MCT.
6 Connect a column to the long heat exchanger capillary using either a removable fitting (5067-5403) or a Quick Connect Fitting (not included) (1.). Connect the outlet of the column to the detector using the 300 mm capillary (5067-4780) and finger tight PEEK Fittings (2.). Clip the column into the column holder (3.).
4
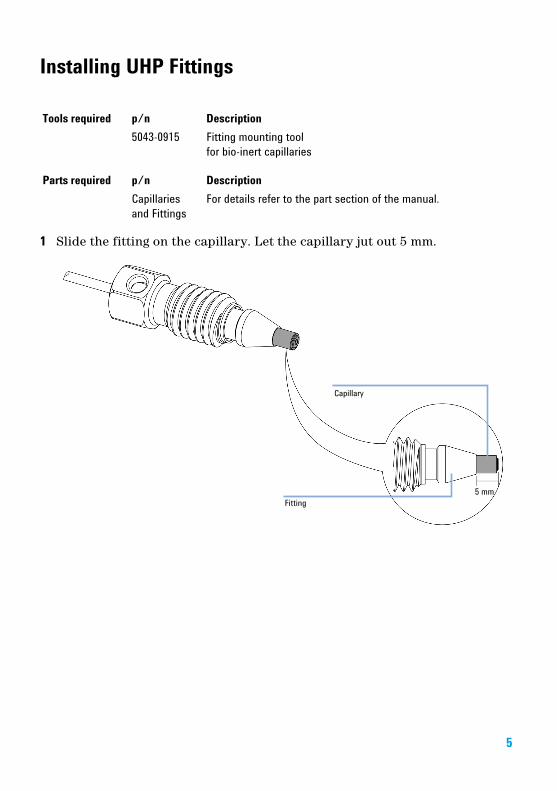
Installing UHP Fittings
1 Slide the fitting on the capillary. Let the capillary jut out 5 mm.
Tools required p/n Description
5043-0915 Fitting mounting toolfor bio-inert capillaries
Parts required p/n Description
Capillaries and Fittings
For details refer to the part section of the manual.
5
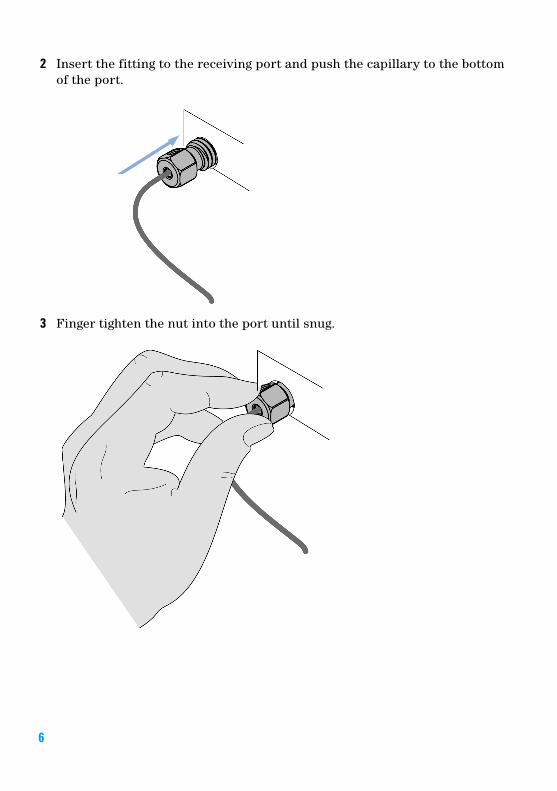
2 Insert the fitting to the receiving port and push the capillary to the bottom of the port.
3 Finger tighten the nut into the port until snug.
6

4 Use Fitting mounting tool (5043-0915) or a 5 mm hex wrench for fixing the fitting (maximum torque 0.8 Nm).
CAUTION Potential damage of capillaries
➔ Do not remove fittings from used capillaries.
7

5 When using UHP-FF fittings with bioinert capillaries, do not try to remove fittings from these capillaries. Bio-inert capillaries are using a PEEK front end, which may expand under pressure especially when being in contact with some organic solvents. If a fitting is moved across an expanded PEEK end, there is a risk of damaging the capillary by ripping off its end. Before re-installing such capillaries, push the ferrule towards the rear site for a small distance.
Figure 1 Capillary fitting
8

Installation of stainless steel cladded PEEK capillaries to Soft ConnectorsUse this procedure for soft connectors, which are typically made from PEEK. These are the following connections:
• to and from all bio-inert valves (injection valve in the autosampler and valves in the thermostatted column compartment and 1290 Infinity Valve Drive),
• bio-inert ZDV unions (detector flow cells, multi-draw upgrade kit, capillary to capillary connections, for example, for heat exchangers),
• to the autosampler needle and
• to PEEK columns (like many bio-inert columns).
For the installation of bio-inert ZDV unions, see “Installation of the Bio-inert Zero Dead Volume (ZDV) Union” on page 11.
First installation of a capillary to a soft connector
1 When tightening a fitting for the first time, start from the finger-tight position (which does not necessarily need to be a vertical wrench position) and rotate the wrench by 180 – 210 °. Staying below 180 ° (grey arrow) will not be sufficiently tight, more than 210 ° (red arrow) could damage the capillary.
9
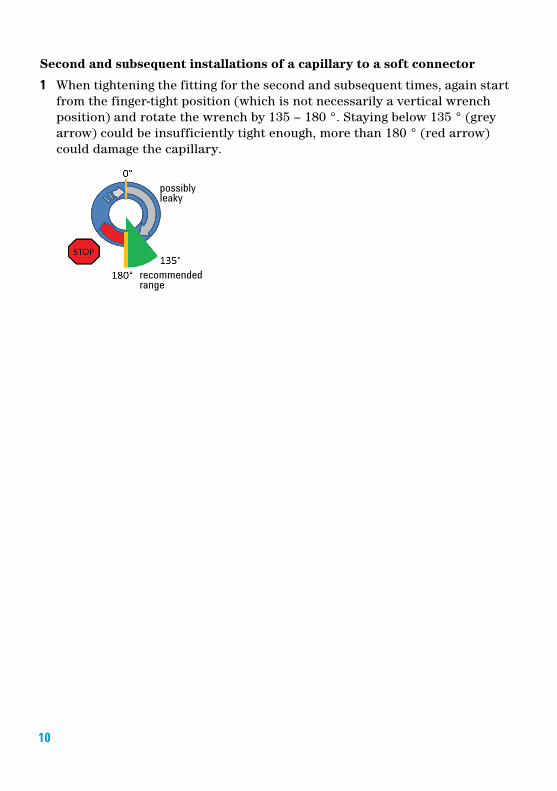
Second and subsequent installations of a capillary to a soft connector
1 When tightening the fitting for the second and subsequent times, again start from the finger-tight position (which is not necessarily a vertical wrench position) and rotate the wrench by 135 – 180 °. Staying below 135 ° (grey arrow) could be insufficiently tight enough, more than 180 ° (red arrow) could damage the capillary.
10
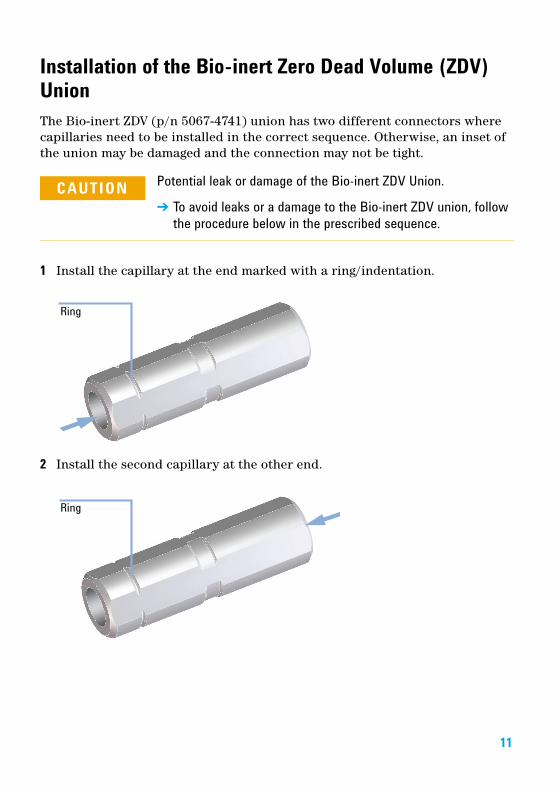
Installation of the Bio-inert Zero Dead Volume (ZDV) UnionThe Bio-inert ZDV (p/n 5067-4741) union has two different connectors where capillaries need to be installed in the correct sequence. Otherwise, an inset of the union may be damaged and the connection may not be tight.
1 Install the capillary at the end marked with a ring/indentation.
2 Install the second capillary at the other end.
CAUTION Potential leak or damage of the Bio-inert ZDV Union.
➔ To avoid leaks or a damage to the Bio-inert ZDV union, follow the procedure below in the prescribed sequence.
11

*G7116-90130**G7116-90130*G7116-90130
Part Number:G7116-90130
Edition: 08/2017Printed in Germany
© Agilent Technologies, Inc 2017
Agilent Technologies, IncHewlett-Packard-Strasse 8
76337 Waldbronn, Germany