
Implementation Getting Started with Your Financials Cloud · PDF fileCash Management Rapid...
136
Oracle Financials Cloud Getting Started with Your Implementation Release 13 (update 17D)
Transcript of Implementation Getting Started with Your Financials Cloud · PDF fileCash Management Rapid...

OracleFinancials CloudGetting Started with YourImplementation
Release 13 (update 17D)

Oracle Financials CloudGetting Started with Your Implementation
Release 13 (update 17D)Part Number E89161-02Copyright © 2011-2017, Oracle and/or its affiliates. All rights reserved.
Authors: Mary Kalway, Kathryn Wohnoutka, Angie Shahi, Reshma Shaik
This software and related documentation are provided under a license agreement containing restrictions on use and disclosure and are protected byintellectual property laws. Except as expressly permitted in your license agreement or allowed by law, you may not use, copy, reproduce, translate, broadcast,modify, license, transmit, distribute, exhibit, perform, publish, or display any part, in any form, or by any means. Reverse engineering, disassembly, ordecompilation of this software, unless required by law for interoperability, is prohibited.
The information contained herein is subject to change without notice and is not warranted to be error-free. If you find any errors, please report them tous in writing.
If this is software or related documentation that is delivered to the U.S. Government or anyone licensing it on behalf of the U.S. Government, then thefollowing notice is applicable:
U.S. GOVERNMENT END USERS: Oracle programs, including any operating system, integrated software, any programs installed on the hardware, and/or documentation, delivered to U.S. Government end users are "commercial computer software" pursuant to the applicable Federal Acquisition Regulationand agency-specific supplemental regulations. As such, use, duplication, disclosure, modification, and adaptation of the programs, including any operatingsystem, integrated software, any programs installed on the hardware, and/or documentation, shall be subject to license terms and license restrictionsapplicable to the programs. No other rights are granted to the U.S. Government.
This software or hardware is developed for general use in a variety of information management applications. It is not developed or intended for use inany inherently dangerous applications, including applications that may create a risk of personal injury. If you use this software or hardware in dangerousapplications, then you shall be responsible to take all appropriate fail-safe, backup, redundancy, and other measures to ensure its safe use. OracleCorporation and its affiliates disclaim any liability for any damages caused by use of this software or hardware in dangerous applications.
Oracle and Java are registered trademarks of Oracle and/or its affiliates. Other names may be trademarks of their respective owners.
Intel and Intel Xeon are trademarks or registered trademarks of Intel Corporation. All SPARC trademarks are used under license and are trademarks orregistered trademarks of SPARC International, Inc. AMD, Opteron, the AMD logo, and the AMD Opteron logo are trademarks or registered trademarks ofAdvanced Micro Devices. UNIX is a registered trademark of The Open Group.
This software or hardware and documentation may provide access to or information about content, products, and services from third parties. OracleCorporation and its affiliates are not responsible for and expressly disclaim all warranties of any kind with respect to third-party content, products, andservices unless otherwise set forth in an applicable agreement between you and Oracle. Oracle Corporation and its affiliates will not be responsible for anyloss, costs, or damages incurred due to your access to or use of third-party content, products, or services, except as set forth in an applicable agreementbetween you and Oracle.
The business names used in this documentation are fictitious, and are not intended to identify any real companies currently or previously in existence.
Oracle customers that have purchased support have access to electronic support through My Oracle Support. For information, visit http://www.oracle.com/pls/topic/lookup?ctx=acc&id=info or visit http://www.oracle.com/pls/topic/lookup?ctx=acc&id=trs if you are hearing impaired.

Oracle Financials CloudGetting Started with Your Implementation
Contents
Preface i
1 Introducing Oracle Financials Cloud 1Introduction to Implementing Oracle Financials Cloud: Overview ............................................................................... 1
Oracle Financials Cloud: Overview ............................................................................................................................ 1
Using Infolets to Identify Issues and Prioritize Tasks ................................................................................................. 7
Using Work Areas to Streamline Business Processes ............................................................................................... 8
Working with Your System Integrator: Overview ........................................................................................................ 9
Purchasing and Activating Oracle Cloud Application Services: Highlights .................................................................. 9
2 Getting Started with Oracle Cloud Security 13Implementing Financials Security: Overview ............................................................................................................ 13
General Ledger Security: Explained ........................................................................................................................ 13
Payables Security: Explained .................................................................................................................................. 14
Other Financials Security Considerations: Explained ................................................................................................ 14
Oracle Cloud Application Services Security: Explained ............................................................................................ 15
Signing in and Accessing Setup Tasks: Procedure ................................................................................................. 16
Define Implementation Users Tasks: Points to Consider ......................................................................................... 17
Creating Implementation Users: Procedure ............................................................................................................. 18
Creating Data Roles for Implementation Users: Procedure ...................................................................................... 19
Data Security .......................................................................................................................................................... 20

Oracle Financials CloudGetting Started with Your Implementation
3 Implementing Oracle Financials Cloud 39Functional Setup Manager: Overview ...................................................................................................................... 39
Who Uses the Functional Setup Manager: Points to Consider ................................................................................ 39
Functional Setup Manager Components: How They Work Together ....................................................................... 39
Functional Setup Manager Work Areas: How They Work Together ......................................................................... 41
Implementation Process: Explained ......................................................................................................................... 41
Enabling Offerings: Explained .................................................................................................................................. 42
Configuring Offerings: Procedure ............................................................................................................................ 43
Adopting New Functionality: Explained ................................................................................................................... 43
Opting into New Features After Upgrade: Explained ............................................................................................... 43
Managing Offering Setup: Explained ....................................................................................................................... 44
Getting Started with an Implementation: Overview .................................................................................................. 45
Define Financials Configuration for Rapid Implementation: Overview ........................................................................ 46
Creating an Oracle Financials Cloud Rapid Implementation Project: Worked Example ............................................. 47
Common Financials Configuration ........................................................................................................................... 48
Ledger Configuration ............................................................................................................................................... 53
Invoicing and Payments Configuration .................................................................................................................... 63
Expenses Configuration .......................................................................................................................................... 65
Fixed Assets Configuration ...................................................................................................................................... 66
Receivables Configuration ....................................................................................................................................... 68
4 Configuring Financial Reporting 73Configuring Financial Reporting: Overview ............................................................................................................... 73
Financial Reporting Center: How It Works .............................................................................................................. 73
Define Financial Reporting Center ........................................................................................................................... 76
Configure Smart View Client for Users .................................................................................................................... 77
Configure Financial Reporting Studio Client for Users ............................................................................................. 80
Define Essbase Database Connections in Workspace ............................................................................................ 80
Creating a Financial Report: Procedure ................................................................................................................... 82

Oracle Financials CloudGetting Started with Your Implementation
5 Using Rapid Implementation Spreadsheets 97Create Chart of Accounts, Ledger, Legal Entities, and Business Units in Spreadsheets: Explained .......................... 97
Create Charts of Accounts, Ledgers, Legal Entities, and Business Units in Spreadsheets: How It Works ................. 99
Create Hierarchies in a Spreadsheet: Example ..................................................................................................... 110
Cross-Validation Rules in General Ledger: Overview ............................................................................................. 111
Cross-Validation Rules Spreadsheet: Explained .................................................................................................... 112
Cash Management Rapid Implementation: Overview ............................................................................................. 114
Tax Configuration Workbook: Explained ................................................................................................................ 116
Creating Tax Setup Using the Tax Configuration Workbook: Worked Example ...................................................... 117
Budget Uploads .................................................................................................................................................... 118
6 Understanding External Data Integration 123External Data Integration Services for Oracle Cloud: Overview .............................................................................. 123
Integration with Financial External Systems: Points to Consider ............................................................................ 124

Oracle Financials CloudGetting Started with Your Implementation
Oracle Financials CloudGetting Started with Your Implementation
Preface
i
PrefaceThis preface introduces information sources that can help you use the application.
Oracle Applications HelpUse help icons to access help in the application. If you don't see any help icons on your page, click the Show Help
icon in the global header. Not all pages have help icons. You can also access Oracle Applications Help at https://fusionhelp.oracle.com.
Using Applications HelpWatch: This video tutorial shows you how to find help and use help features.
You can also read Using Applications Help.
Additional Resources• Community: Use Oracle Cloud Customer Connect to get information from experts at Oracle, the partner
community, and other users.
• Guides and Videos: Go to the Oracle Help Center to find guides and videos.
• Training: Take courses on Oracle Cloud from Oracle University .
ConventionsThe following table explains the text conventions used in this guide.
Convention Meaning
boldface Boldface type indicates user interface elements, navigation paths, or values you enter or select.
monospace Monospace type indicates file, folder, and directory names, code examples, commands, and URLs.
> Greater than symbol separates elements in a navigation path.
Documentation AccessibilityFor information about Oracle's commitment to accessibility, visit the Oracle Accessibility Program website at OracleAccessibility Program .
Access to Oracle SupportOracle customers that have purchased support have access to electronic support through My Oracle Support. Forinformation, visit http://www.oracle.com/pls/topic/lookup?ctx=acc&id=info or visit http://www.oracle.com/pls/topic/lookup?ctx=acc&id=trs if you are hearing impaired.

Oracle Financials CloudGetting Started with Your Implementation
Preface
ii
Comments and SuggestionsPlease give us feedback about Oracle Applications Help and guides! You can send e-mail to:[email protected].

Oracle Financials CloudGetting Started with Your Implementation
Chapter 1Introducing Oracle Financials Cloud
1
1 Introducing Oracle Financials Cloud
Introduction to Implementing Oracle Financials Cloud:OverviewYou can use the rapid implementation features to implement users, security, enterprise structures, banks, tax, ledgers, andfinancial subledgers. This document provides a high-level introduction to Oracle Financials Cloud.
Note: This guide covers the basic requirements used to create an implementation project. The tasks presentedin this document are intended for a quick introduction or pilot implementation. This document doesn't include allsetup and security tasks that are appropriate for a complete implementation.
The rapid implementation setups for Financials include implementing:
• Users
• Enterprise structures
• Bank, branches, and bank accounts
• Tax
• Ledgers
• Business units
• Financial reporting
• Payables and payments
• Assets
• Expense reporting
• Receivables and payments
References to related help accompany each of the steps. Help and additional information are available from:
• Oracle Cloud Help Center (docs.oracle.com)
• Oracle Fusion Applications Help embedded in the applications
Oracle Financials Cloud: OverviewOracle Financials Cloud delivers a complete solution that includes:
• General Ledger
• Intercompany Accounting
• Payables
• Receivables
• Payments
• Cash Management

Oracle Financials CloudGetting Started with Your Implementation
Chapter 1Introducing Oracle Financials Cloud
2
• Tax
• Expenses
• Assets
Use these applications with their integrated social networking tools, business intelligence, compliance reporting, and mobiledata access to facilitate:
• Financial accounting
• Transaction processing
• Payment delivery
• Cash reconciliation
• Employee expense processing
• Asset management
Oracle Financials Cloud Services
Financial Accounting
Transaction Processing
Payment Delivery Employee Expense Processing
Asset Management
C
Cash Reconciliation

Oracle Financials CloudGetting Started with Your Implementation
Chapter 1Introducing Oracle Financials Cloud
3
Access data through pages that contain:
• Navigation tools in the global area of the Home page.
Settings and Actions menuHome Global
search WatchlistNavigator menu
Logo Favorites and recent items Notifications Accessibility Show (Hide)
Help
• Icons that you can use to navigate to pages.
Oracle Financials CloudGetting Started with Your Implementation
Chapter 1Introducing Oracle Financials Cloud
4
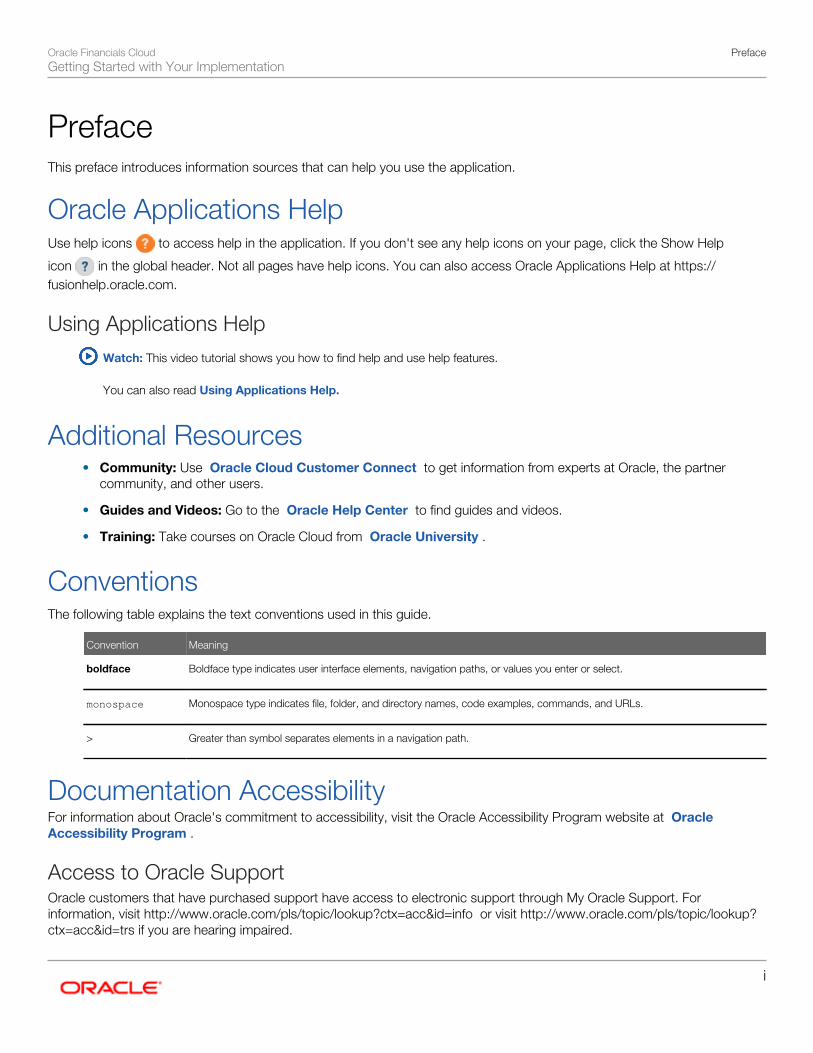
• Infolets as part of an Infolets page or work area.
Oracle Financials CloudGetting Started with Your Implementation
Chapter 1Introducing Oracle Financials Cloud
5
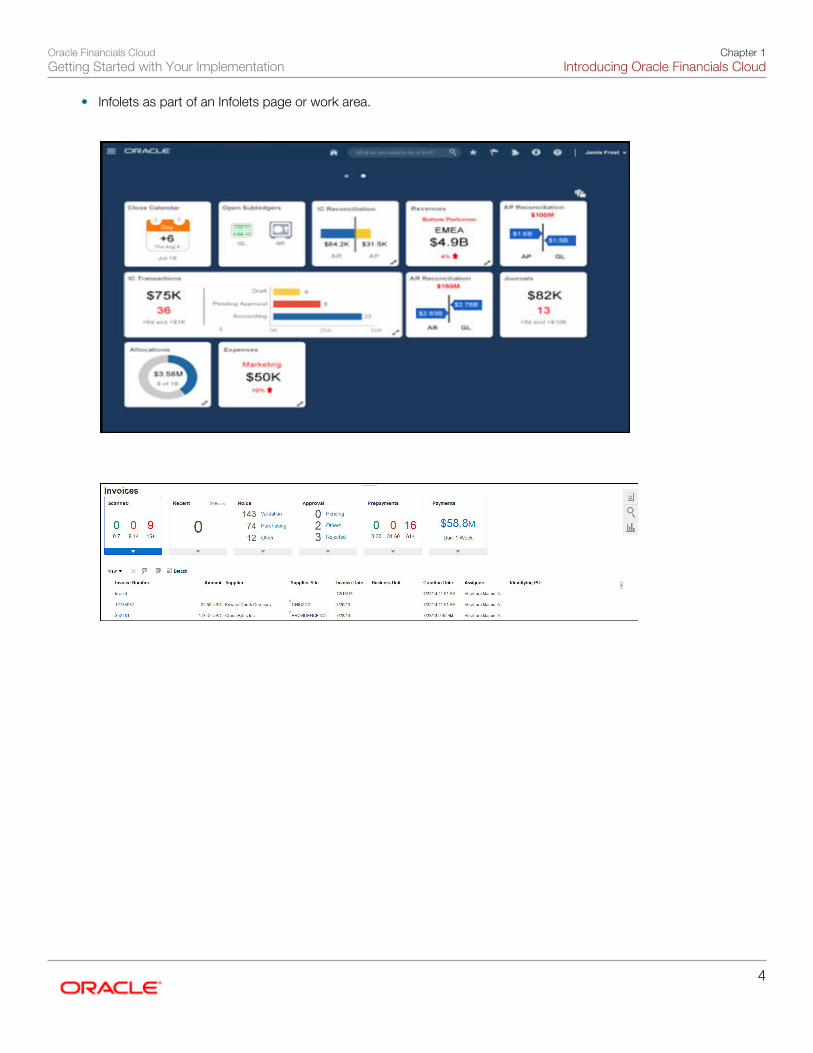
• Panel tabs for tasks, searching, and analytics accessed by icons on the page.
Oracle Financials CloudGetting Started with Your Implementation
Chapter 1Introducing Oracle Financials Cloud
6
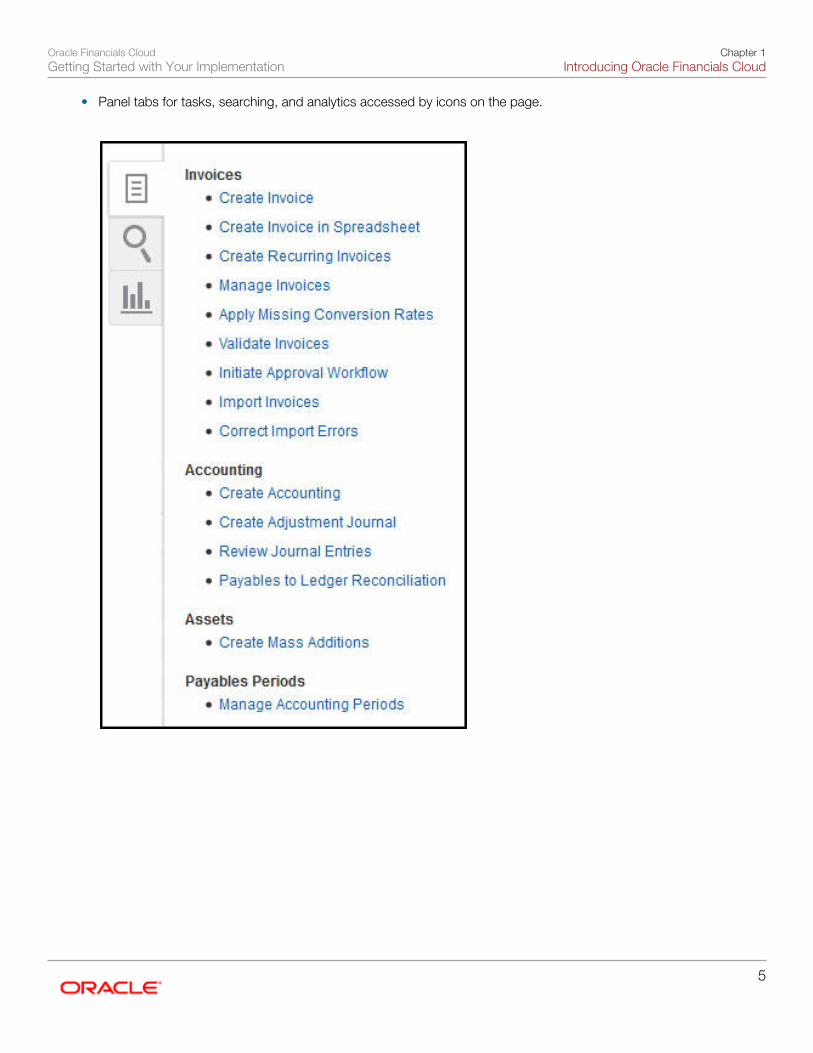
• Transaction details as part of a work area.
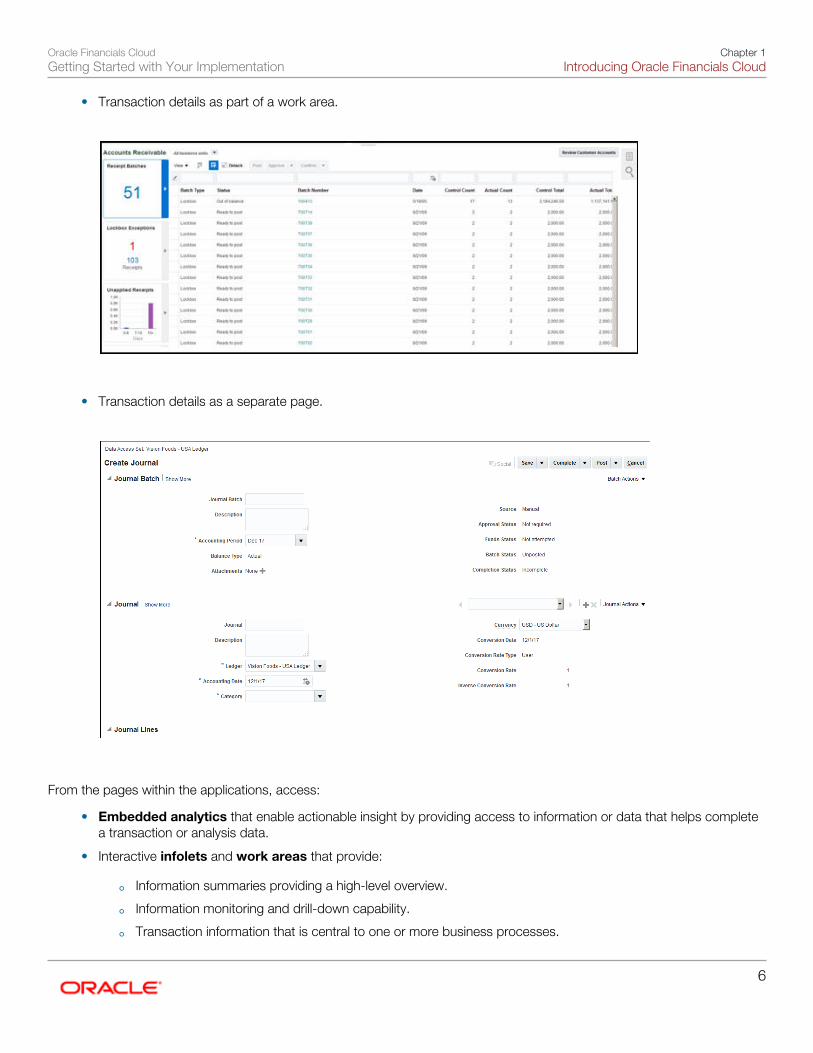
• Transaction details as a separate page.
From the pages within the applications, access:
• Embedded analytics that enable actionable insight by providing access to information or data that helps completea transaction or analysis data.
• Interactive infolets and work areas that provide:
◦ Information summaries providing a high-level overview.
◦ Information monitoring and drill-down capability.
◦ Transaction information that is central to one or more business processes.

Oracle Financials CloudGetting Started with Your Implementation
Chapter 1Introducing Oracle Financials Cloud
7
◦ Business intelligence content that is complementary to one or more business processes.
• Real-time reporting that allows:
◦ Viewing relevant reports and analytics for each individual work area.
◦ Exploring predefined analyses.
◦ Creating and editing of analyses from the Reports and Analytics pane or work area.
◦ Optionally, access to the Oracle Business Intelligence (BI) Enterprise Edition through the Reports andAnalytics pane. New objects and changes to existing objects that you make in Oracle BI Enterprise Editionare reflected and available from Oracle Financials Cloud.
◦ Viewing and running financial reports from the Financial Reporting Center which is a single point of entry forgeneral ledger financial reporting functions. The Financial Reporting Center includes:
• Tools to create and format financial report including Financial Reporting Studio and Workspace.• Live and interactive financial reports with multiple output options including HTML, PDF, Excel, or Excel
in Query Ready mode using Smart View Enabled formats.• Drill down to underlying journals and subledger transactions with the Account Inspector.• Multiple reporting methods for ad hoc analysis, efficient monitoring, and tracking of key account
balances in real time with the Account Monitor.
Using Infolets to Identify Issues and Prioritize Tasks
Video
Watch: This video tutorial shows you how infolets assess financial activities to drive focus on potential issues and correctiveaction. The content of this video is also covered in text topics.
OverviewUse infolets to gain real-time insight into common financial activities and prioritize your daily activities. Understand yourorganization's status using graphs and indicators to focus on issues in general accounting and cash transactions.
This overview gives a brief outline of the General Accounting infolets and the tasks you can accomplish using them.
Navigate to the General Accounting Infolets page using the page control icons on the home page. You can perform thefollowing activities using infolets:
• Configure individual infolets according to your financial specifications. For example, you can adjust the thresholdsby flipping the infolet to expose the filtering criteria. When you flip the infolet back, the data now represents the newthresholds.
• Configure infolets in other ways to align with your business practices. For example, you can edit a title using theActions icon on the infolet. You can also select what views you want to enable, such as a summary front and backview or an expanded view displaying additional details.
• Access underlying reports and pages from the information displayed on the infolet. For example, you can drill downto review the detailed information and make corrections on that same page, if necessary.
Oracle Financials CloudGetting Started with Your Implementation
Chapter 1Introducing Oracle Financials Cloud
8
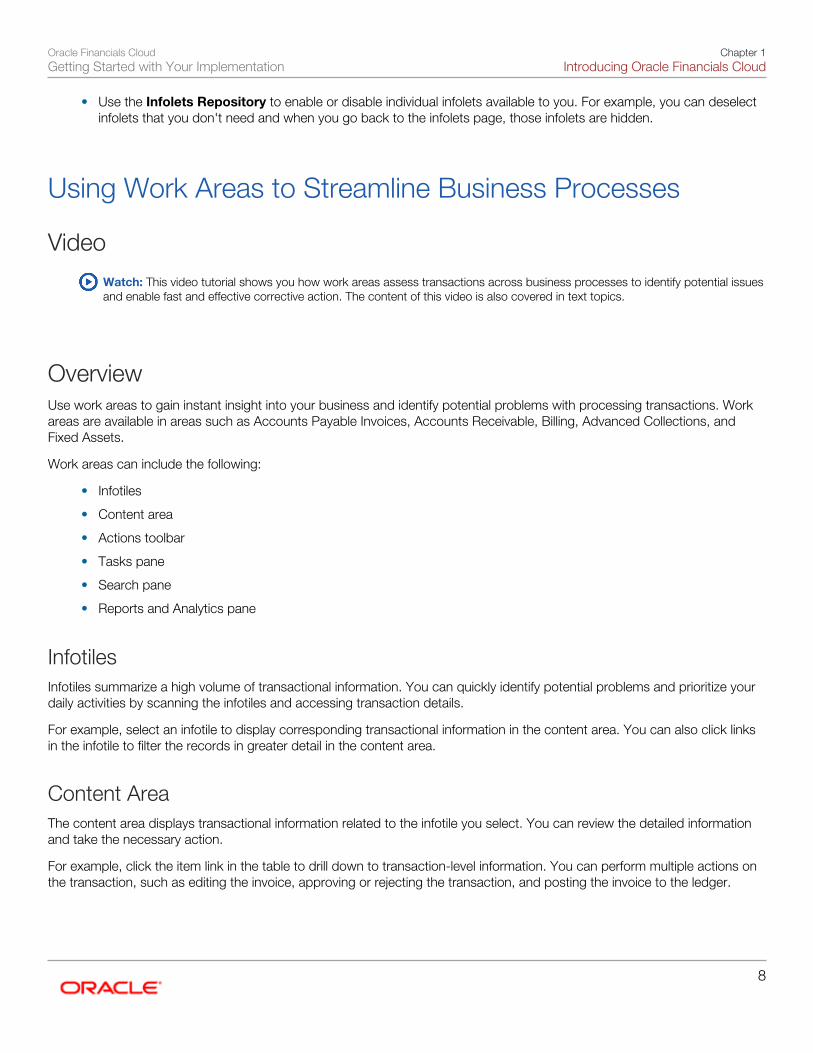
• Use the Infolets Repository to enable or disable individual infolets available to you. For example, you can deselectinfolets that you don't need and when you go back to the infolets page, those infolets are hidden.
Using Work Areas to Streamline Business Processes
Video
Watch: This video tutorial shows you how work areas assess transactions across business processes to identify potential issuesand enable fast and effective corrective action. The content of this video is also covered in text topics.
OverviewUse work areas to gain instant insight into your business and identify potential problems with processing transactions. Workareas are available in areas such as Accounts Payable Invoices, Accounts Receivable, Billing, Advanced Collections, andFixed Assets.
Work areas can include the following:
• Infotiles
• Content area
• Actions toolbar
• Tasks pane
• Search pane
• Reports and Analytics pane
InfotilesInfotiles summarize a high volume of transactional information. You can quickly identify potential problems and prioritize yourdaily activities by scanning the infotiles and accessing transaction details.
For example, select an infotile to display corresponding transactional information in the content area. You can also click linksin the infotile to filter the records in greater detail in the content area.
Content AreaThe content area displays transactional information related to the infotile you select. You can review the detailed informationand take the necessary action.
For example, click the item link in the table to drill down to transaction-level information. You can perform multiple actions onthe transaction, such as editing the invoice, approving or rejecting the transaction, and posting the invoice to the ledger.

Oracle Financials CloudGetting Started with Your Implementation
Chapter 1Introducing Oracle Financials Cloud
9
Actions ToolbarThe actions toolbar allows you to perform a range of activities on one or more rows you select in the content area.
For example, select a transaction row and use the View menu to view the transaction in more detail. You can export the datato an Excel worksheet, detach the pane, approve or reject one or more transactions, as well as apply additional filters.
Tasks PaneThe Tasks pane includes tasks that are related to the work area and that you have access to perform.
For example, create an invoice, review journal entries, create mass additions, and manage accounting periods within a taskpane.
Search PaneSearch enables you to find a specific transaction using search criteria related to the work area.
For example, search on an invoice number or supplier in the Invoices work area to find a specific transaction.
Reports and Analytics PaneThe Reports and Analytics pane contains predefined reports as well as a folder for you to set up your own reports.
For example, use the predefined reports to perform a deeper analysis on invoices above a certain dollar amount without aPO. You can also access reports that you have copied and modified and stored in your own folder.
Working with Your System Integrator: OverviewAfter you determine the applications that you want to implement, complete any steps that you determined are neededfor your implementation plan in Oracle Global Human Resources Cloud first to ensure that dependencies with the OracleFinancials Cloud are met.
For information about best practices for implementing Oracle HCM Cloud, see Oracle Global Human Resources CloudGetting Started with Your Implementation.
Your system integrator uses his or her implementation expertise to help you with a smooth transition to Oracle FinancialsCloud. They also use the Rapid Implementation task list to help you achieve a successful implementation in the shortest timepossible.
Purchasing and Activating Oracle Cloud ApplicationServices: HighlightsPurchase and activate Oracle Cloud Application Services from the Oracle Cloud web site, https://cloud.oracle.com.

Oracle Financials CloudGetting Started with Your Implementation
Chapter 1Introducing Oracle Financials Cloud
10
The whole process involves:
• Requesting and activating trial subscriptions.
• Purchasing and activating your services.
• Verifying that the services are activated, monitoring the services, and performing other administrative tasks.
Purchasing and activating any Oracle Cloud service is described in the Oracle Cloud: Getting Started with Oracle Cloudguide. Many administrative tasks are covered in the Oracle Cloud: Managing and Monitoring Oracle Cloud guide. All of thefollowing references in this section point to one of these guides.
Note: Not everything in these guides is relevant to Oracle Cloud Application Services, for example details aboutOracle Java Cloud Service and Oracle Database Cloud Service.
Terminology and User Roles• Before you proceed, you should understand terms that are used in documentation about Oracle Cloud. Refer to the
Oracle Cloud: Getting Started with Oracle Cloud guide.
See: Oracle Cloud Terminology
• You should also be familiar with roles for users of the Oracle Cloud web site or of the actual service. Refer to theOracle Cloud: Getting Started with Oracle Cloud guide.
See: Oracle Cloud User Roles and Privileges
Requesting and Activating Trial Subscriptions• Oracle Cloud Application Services are available through free trial subscriptions. After you request trial subscriptions,
you activate, monitor, and manage the services for use before purchase. Refer to the Oracle Cloud: Getting Startedwith Oracle Cloud guide.
See: Overview of Subscribing to an Oracle Cloud Service Trial
Purchasing and Activating Services• Your buyer or an Oracle sales representative orders a cloud service and specifies information about the account
administrator during the ordering process. Refer to the Oracle Cloud: Getting Started with Oracle Cloud guide.
See: Ordering an Oracle Cloud Service
• The account administrator receives an e-mail with a link to activate the service. As part of activation, the accountadministrator provides information about the administrator who performs the functions of both the serviceadministrator and the identity domain administrator. Refer to the Oracle Cloud: Getting Started with Oracle Cloudguide.
See: Activating Your Order
Next Steps• The administrator who was identified during the activation process:
◦ Verifies that the service is activated. Refer to the Oracle Cloud: Getting Started with Oracle Cloud guide.
Oracle Financials CloudGetting Started with Your Implementation
Chapter 1Introducing Oracle Financials Cloud
11
See: Verifying That a Service Is Running
◦ Manages and monitors the service. Refer to the Oracle Cloud: Managing and Monitoring Oracle Cloud guide.
See: Managing and Monitoring Oracle Cloud Accounts
See: Managing and Monitoring Oracle Cloud Services
◦ Optionally create initial administrator and implementation users before enterprise structures setup.
• Alternatively, the administrator sets up enterprise structures and then creates service users, includingfunctional implementors.
• Functional implementors perform configuration and setup steps.
• Developers can add features to extend the application.
Oracle Financials CloudGetting Started with Your Implementation
Chapter 1Introducing Oracle Financials Cloud
12
Oracle Financials CloudGetting Started with Your Implementation
Chapter 2Getting Started with Oracle Cloud Security
13
2 Getting Started with Oracle Cloud Security
Implementing Financials Security: OverviewOracle Financials Cloud predefines common job roles such as Accounts Payable Manager and General AccountingManager. You can use these roles, modify them, or create job roles as needed. A user can be assigned more than one role,so don't define a role that includes all the accesses needed for every user.
For a listing of the predefined job roles in Oracle Financials Cloud and their intended purposes, see the Oracle FinancialsCloud Security Reference Manual in the Oracle Help Center (http://docs.oracle.com).
For more information on securing your applications, see the Oracle ERP Cloud Securing Oracle ERP Cloud guide in theOracle Help Center (http://docs.oracle.com).
General Ledger Security: ExplainedGeneral ledger functions and data are secured through job roles, data access sets, and segment value security rules.
Functional SecurityFunctional security, which is what you can do, is managed using job roles. The following job roles are predefined for OracleFusion General Ledger:
• General Accounting Manager
• General Accountant
• Financial Analyst
Each job role includes direct privilege grants, as well as duty role assignments, to provide access to application functions thatcorrespond to their responsibilities. For example, the General Accounting Manager role grants comprehensive access to allGeneral Ledger functions to the general accounting manager, controller, and chief financial officer in your organization.
Data SecurityData security, which controls what action can be taken against which data, is managed using:
• Data access sets
• Segment value security rules
Data access sets can be defined to grant access to a ledger, ledger set, or specific primary balancing segment valuesassociated with a ledger. You decide whether each data access set provides read-only access or read and write access tothe ledger, ledger set, or specific primary balancing segment values, which typically represent your legal entities that belong tothat ledger. Primary balancing segment values without a specific legal entity association can also be directly assigned to theledger.
Segment value security rules control access to data that is tagged with the value set values associated with any segment inyour chart of accounts.

Oracle Financials CloudGetting Started with Your Implementation
Chapter 2Getting Started with Oracle Cloud Security
14
Security Assignment
Use the Security Console to assign users roles (job roles, as well as roles created for segment value security rules or others).Use the Manage Data Access Set Data Access for Users task to assign users data access sets as the security context pairedwith their General Ledger job role assignments.
For more information about security assignments, see the Securing Oracle ERP Cloud guide.
Payables Security: ExplainedIn Oracle Fusion Payables you secure access to invoices and payments by business unit. You can access invoices andpayments for viewing or processing only in the business units to which you have permission. The permission must beexplicitly granted to each user.
You assign users to the appropriate security context, such as a business unit, for job roles using the Manage Data Access forUsers page.
Payables is integrated to the document repository for processing scanned invoices. Edit access to the document repository isgranted to the following predefined roles:
• Accounts Payable Manager
• Accounts Payable Specialist
• Accounts Payable Supervisor
The following predefined roles have view-only access to the document repository:
• Financial Application Administrator
• Cost Accountant
• Project Accountant
Other Financials Security Considerations: ExplainedCommon functionality that is not job specific, such as creating expense reports and purchase requisitions, are granted toabstract roles like Employee, Line Manager, and Purchase Requester.
Oracle Financials Cloud includes the following roles that are designed for initial implementation and the ongoing managementof setup and reference data:
• Application Implementation Manager: Used to manage implementation projects and assign implementationtasks.
• Application Implementation Consultant: Used to access all setup tasks.
Note: For the ongoing management of setup and reference data, the Financial Application Administrator, apredefined administrator role, provides access to all financial setup tasks.
Segregation of Duties Considerations

Oracle Financials CloudGetting Started with Your Implementation
Chapter 2Getting Started with Oracle Cloud Security
15
Segregation of duties (SOD) separates activities such as approving, recording, processing, and reconciling results so you canmore easily prevent or detect unintentional errors and willful fraud.
Oracle Financials Cloud includes roles that have been defined with a knowledge of a set of SOD policies that are included inthe Oracle Cloud Access Controls Governor product. The job roles are based on those commonly defined in business andthe duty definitions are defined using the Oracle Cloud SOD policies.
For example, the privilege Create Payments is incompatible with the privilege Approve Invoice. The predefined AccountsPayable Manager role has the privileges of Force Approve Invoices and Create Payments. When you assess andbalance the cost of duty segregation against reduction of risk, you may determine that the Accounts Payable Manager roleis not allowed to perform force approve invoices and remove this privilege.
To learn more about the policies and roles, see the Oracle Financials Cloud Security Reference Manual in the Oracle HelpCenter (http://docs.oracle.com).
Data Security Considerations
• Use segment value security rules to restrict access to transactions, journal entries, and balances based on certainvalues in the chart of accounts, such as specific companies and cost center values, to individual roles.
• Use data access set security for Oracle Fusion General Ledger users to control read or write access to entireledgers or portions of the ledger represented as primary balancing segment values, such as specific legal entities orcompanies.
For more information on securing your applications, see the Oracle ERP Cloud Securing Oracle ERP Cloud guide in theOracle Help Center (http://docs.oracle.com).
Oracle Cloud Application Services Security: ExplainedSecurity in Oracle Cloud Application Services is the same as for any other kind of Oracle Fusion Applications deployment.However, the experience of getting started and managing initial users is slightly different.
Aspects of security that are specific to Oracle Cloud Application Services involve the following:
• Initial environment and sign in
• Initial user administration
• Infrastructure
Aspects of security that are equivalent for any type of deployment involve the following:
• Ongoing user administration
• Managing roles and security policies
Initial Environment and Sign InOracle provides your account administrator with a link to activate and access the service. Oracle creates one initial user foryou. Sign in as the initial user to create other users, including the service administrator, the identity domain administrator, andusers who must perform implementation tasks.

Oracle Financials CloudGetting Started with Your Implementation
Chapter 2Getting Started with Oracle Cloud Security
16
Initial User AdministrationIf your enterprise requires additional implementation users for security administration before setting up enterprise structures,the service administrator performs the Define Implementation Users tasks.
Defining implementation users can include these tasks:
• Creating users
• Creating data roles
• Provisioning users with roles
The service administrator can also perform delegated administration tasks such as resetting passwords of otheradministrators.
Ongoing User AdministrationAfter you set up basic enterprise structures, create and manage users by using the hiring processes in Human CapitalManagement (HCM) or performing the Manage Users task.
User management includes provisioning users with roles that provide access to functions and data in Oracle CloudApplication Services. You can also set up rules that automate role provisioning according to your criteria. You set up theserules through the Manage HCM Role Provisioning Rules task.
Managing Roles and Security PoliciesThe Oracle Fusion Applications security reference implementation provides predefined roles and policies, as well as data roletemplate that generate data roles for non-HCM users based on your enterprise structures setup.
You can view the security reference implementation using the following resources:
• User interfaces where you perform application security tasks
• Security reference manuals for each offering
To update the security reference implementation with roles and policy modifications needed by your enterprise, use taskssuch as:
• Manage Job Roles
• Manage Data Security Policies
• Manage Duties
Signing in and Accessing Setup Tasks: ProcedureWhen your test environment is ready, Oracle sends s an e-mail to the person designated as the administrator when yousigned up for the service. This e-mail includes the link to your service, a temporary password, and instructions on how toaccess an offering-specific Welcome Note on My Oracle Support (support.oracle.com). You must read this note and followthe instructions before signing in.
Implementation users perform the key setup tasks to start your implementation. As part of your initial setup, add animplementation user, and give them their login credentials and the url for your Oracle Applications. Before you generate tasklists, implementors and application users can access setup tasks by searching for the task in the Setup and MaintenanceOverview page. After task lists have been generated, users can access their assigned tasks or the task lists for the offerings

Oracle Financials CloudGetting Started with Your Implementation
Chapter 2Getting Started with Oracle Cloud Security
17
included in their project. For example, the Define Common Applications Configuration task list for each offering includes theDefine Implementation Users tasks.
The following procedure assumes that the administrator has not yet configured an offering and set up task lists.
1. Access your Oracle Cloud Application Services from the link provided by Oracle.2. Sign in using the administrator user account and password provided by Oracle based on your activation request.
Initial sign-in prompts you to reset your password.3. Access tasks as follows:
a. Go to Navigator > more... > Tools > Setup and Maintenance.b. On the Overview page, click the All Tasks tab.c. Search for the task by entering the name in the Search field.d. Click Search.e. In the search results, perform the task by clicking its Go to Task icon.
Define Implementation Users Tasks: Points to ConsiderThe Define Implementation Users task list includes tasks for creating users, optionally creating data roles, and provisioningusers with roles before you have set up enterprise structures. After you have set up enterprise structures, do not use theDefine Implementation Users tasks for creating any users that you need a Human Capital Management (HCM) record for.
Note: Oracle Fusion Applications offerings include HCM core functionality. Performing the Manage Users taskto create users always creates an associated HCM record even if you are not implementing full HCM.
Create Implementation UsersYou can use the Create Implementation Users task:
• Before you set up enterprise structures if your enterprise needs additional users such as a dedicated securityadministrator or implementation users for setting up enterprise structures
• If you require user accounts that must not have an associated HCM record
The service administrator user that is provided by Oracle for generating task lists and setting up enterprise structures is a usercreated using this task. The service administrator user is provisioned with the following roles:
• IT Security Manager
• Application Implementation Consultant
• Application Diagnostics Administrator
Create Data Roles for Implementation UsersThe predefined Application Implementation Consultant role may be too broad for your security needs. As an alternative toprovisioning an implementation user with the Application Implementation Consultant role to access all enterprise structures,you may need implementation users with access restricted to enterprise structures for specific products. Use the CreateData Roles for Implementation Users task to create a data role based on a job role with less broad access, such as the HCMApplication Administrator job role.

Oracle Financials CloudGetting Started with Your Implementation
Chapter 2Getting Started with Oracle Cloud Security
18
For example, you can create a View All data role, such as a View All Financials Application Administrator data role. This datarole is based on the Financials Application Administrator job role and combines the privileges that have been granted to thatrole with unrestricted access to data on the secured objects that the role is authorized to access.
Provision Roles to Implementation UsersThe Create Implementation Users task includes provisioning the user you have created with predefined roles.
For example, assign a role to the implementation user that provides the access necessary for setting up the enterprise.Depending on need, provision the implementation user with the predefined Applications Implementation Consultant role.
Caution: The Application Implementation Consultant has broad access. It is a very useful role forexperimentation or setting up a pilot environment, but may not be suitable for implementation users in a fullimplementation project or for application users.
After you set up basic enterprise structures, you can provision additional users with product family-specific administrator dataroles, such as a data role based on the predefined Financials Applications Administrator.
If you create additional roles, such as optionally creating data roles before enterprise structures setup, provision those roles toexisting implementation users by performing the Provision Roles to Implementation Users task.
Creating Implementation Users: ProcedureUse the Create Implementation Users task to create users in the Security Console that assist in the setup and configurationof your application or service. These users don't have associated records in Human Capital Management (HCM). Inmost instances, these are the users who set up enterprise structures and manage security. If the single administratorOracle provides is sufficient for configuring offerings, generating task lists, and setting up enterprise structures, additionalimplementation users aren't required.
Aspects of defining implementation users include:
• Creating implementation users
• Provisioning roles to implementation users
• Defining Implementation Users after Enterprise Structures Setup
Note: The following tasks assume that the administrator hasn't configured an offering or set up task lists.
Creating Implementation UsersThis procedure creates additional users for security administration and setting up enterprise structures.
1. Sign in as the administrator user.
Note: The administrator user provided by Oracle is provisioned with the IT Security Manager job role.
2. Access the Create Implementation Users task.3. Select the Users tab in the Security Console to open the User Accounts page. Click the Add User Account button..

Oracle Financials CloudGetting Started with Your Implementation
Chapter 2Getting Started with Oracle Cloud Security
19
4. Enter name, e-mail, and password values in the User Information region.
◦ You need not enter a User Name value. It is automatically generated according to the user-name-generationrule selected in the General Administration page.
◦ Although the First Name value is not required, you are expected to enter one if the selected user-name-generation rule makes use of the first name or the first-name initial.
◦ The Password value must conform to the password policy established in the General Administration page.The Confirm Password value must match the Password value.
◦ An external identifier is the user's ID in another system, such as a single sign-on account ID if single sign-on isenabled.
a. In the Organization field, enter Xellerate Users. Or click the Search icon, then in the Organization Searchsub window, click the Search arrow without entering anything in the Search field, select the Xellerate Usersorganization in the search results, and click Add.
b. Set the User Type.c. Enter the desired user login and password.
5. Click Save.
Provisioning Roles to Implementation UsersCreating an implementation user includes provisioning the user with roles. Review the available predefined roles by eitherviewing them in the user interfaces where security tasks are performed or in the security reference implementation manual foreach Oracle Fusion Applications offering.
1. Click Add Roles to assign other roles. Search for roles you want to assign, select them, then click Add RoleMembership. Select Done when you are finished.
2. In the Roles table, select Assignable for any role that can be delegated to another user.3. Click Save and Close.4. Repeat steps 1-3 to add other roles.
If you are creating an application implementation consultant user for setting up enterprise structures and need to limit theiraccess to data, create data roles using the Create Data Roles for Implementation Users task and then provision those roles tothe user you have created by performing the Provision Roles to Implementation Users task.
Defining Users after Enterprise Structures SetupDo not use the Create Implementation Users task after your enterprise has been set up unless you need users without anassociated HCM record.
Once you have basic enterprise structures set up, such as a legal entity and business unit, you can create implementationusers by the following means:
• Manage Users task
• Hiring processes if you are implementing Human Capital Management (HCM)
Creating Data Roles for Implementation Users: ProcedureIf implementation users help you set up your product-specific enterprise structures, then you may want to provide theimplementation users with limited data access. You must create your data roles. You use the Create Data Roles forImplementation Users task.

Oracle Financials CloudGetting Started with Your Implementation
Chapter 2Getting Started with Oracle Cloud Security
20
The following task assumes that the administrator has not yet configured an offering or set up task lists. If basic enterprisestructures have been set up, provision automatically generated data roles to users.
Creating a View All Data RoleYou create a View All data role, such as a View All Financials Application Administrator data role, so that when you provisionthis role to an implementation user using the Provision Roles to Implementation Users, the user's access is restricted toFinancials data on the secured objects that the role is authorized to access. You also should create a HCM ApplicationAdministrator View All data role to help you set up users in core HCM.
1. Sign into your Oracle Applications Cloud service with the IT Security Manager role.2. Click the Setup and Maintenance tile on the home page.3. On the All Tasks tab of the Overview page, search for and select the Create Data Roles for Implementation Users
task.4. In the Manage HCM Data Roles page, click the Create Data Role icon. For details about Manage HCM Data Roles
tasks, see the Oracle HCM Cloud Workforce Deployment Implementation Guide.5. Create a View All data role, such as a HCM Application Administrator View All data role with the Human Capital
Management Application Administrator as the base job role. In Security Criteria, make the following selections:
a. Grant access to all data for all the security profiles by selecting View All for each field.b. Grant access for Person and Public Person by selecting View All People.c. Click Review.d. Verify the data is correct.e. Click Submit.
6. Provision the implementation user who sets up HCM with this View All data role, such as the HCM ApplicationAdministrator View All data role, by performing the Create Implementation Users task.
Note: After an implementation user with a View All data role has completed HCM setup, revoke the role byperforming the Revoke Data Role from Implementation Users task. Provision the View All data role only whenHCM setup changes are necessary.
Data Security
Data Access Set Security: OverviewData Access Sets secure access to ledgers, ledger sets, and portions of ledgers using primary balancing segment values.If you have primary balancing segment values assigned to a legal entity, then you can use this feature to secure access tospecific legal entities.
You can combine ledger and ledger set assignments in single data access sets if the ledgers share a common chart ofaccounts and calendar. If you have primary balancing segment values assigned to a legal entity within the ledger, thenyou can use data access sets to secure access to specific legal entities. You can also secure access to primary balancingsegments assigned directly to the ledger.
When a ledger or ledger set is created, a data access set for that ledger or ledger set is automatically created, giving full readand write access to those ledgers. You can also manually create data access sets to give read and write access, or read-onlyaccess to entire ledgers or portions of the ledger represented as primary balancing segment values.

Oracle Financials CloudGetting Started with Your Implementation
Chapter 2Getting Started with Oracle Cloud Security
21
The following figure shows that a data access set consists of an access set type and an access level. The access set typecan be set to full ledger or primary balancing segment value. The access level can be read only or read and write.
Data Access Set
Access Set Type
Primary Balancing
Segment Value
Access Level
Full Ledger Read Only Read and Write
The Full Ledger access set type provides access to the entire ledger or ledger set. This could be for read-only access orboth read and write access to the entire ledger.
The Primary Balancing Segment Value access set type provides access to one or more primary balancing segment valuesfor that ledger. This access set type security can be specified by parent or detail primary balancing segment values. Thespecified parent value and all its descendants, including middle level parents and detail values are secured. You can specifyread only, read and write access, or combination of both, for different primary balancing segment values for different ledgersand ledger sets.
Data Access Set Security: ExamplesThis example shows a data access set that secures access by using primary balancing segment values that correspond tolegal entities.
Scenario
The following figure shows a data access set for the US Financial Services Ledger. The access set type is Primary BalancingSegment Value, with each primary balancing segment value representing different legal entities. Read-only access has beenassigned to primary balancing segment value 131, which represents the Insurance legal entity. Read and write access hasbeen assigned to primary balancing segment values 101 and 102, which represent the Banks and Capital legal entities.
For this data access set, the user can:
• View the journals, balances, and reports for primary balancing segment value 131 for the Insurance legal entity.

Oracle Financials CloudGetting Started with Your Implementation
Chapter 2Getting Started with Oracle Cloud Security
22
• Create journals and update balances, as well as view journals, balances and reports for primary balancing segmentvalue 101 and 102 for legal entities Banks and Capital.
US Financial Services Ledger
Access Level
Primary Balancing SegmentValues
Actions
Read and Write
View, Create, Post JournalsView and Update Balances
View and Run Reports
101 Banks
102 Capital
Read Only
131 Insurance
View JournalsView Balances
View and Run Reports
Note: In financial reporting, the list of ledgers isn't secured by data access sets when viewing a report inPreview mode. Users can view the names of ledgers they don't have privileges to view. However, the data froma secured ledger doesn't appear on the report.
Segment Value Security: ExplainedSet up segment value security rules on value sets to control access to parent or detail segment values for chart of accountssegments, also called flexfield segments. Segment value security rules restrict data entry, online inquiry, and reporting.
Secured Value SetsWhen you enable security on a value set, access to all values for that value set is denied. To control access to value setvalues, you enable security on the value set, create conditions, and then assign the conditions to roles. The roles should becreated solely for the purpose of segment value security. The roles are then assigned to users.
If a value set is secured, every usage of that value set in a chart of accounts structure instance is secured. For example thesame security applies if that value set is:
• Used for two or more segments in the same chart of accounts, such as the primary balancing and intercompanysegments
• Shared across different segments of different charts of accounts

Oracle Financials CloudGetting Started with Your Implementation
Chapter 2Getting Started with Oracle Cloud Security
23
Secured Segment ValuesSegment value security applies mainly when data is created or updated, and when account combinations are queried.When you have access to secured account values, you can view and use those secured values across all modules of theapplications where there are references to accounting flexfields including:
• Transaction entry pages
• Balances and transactions inquiry pages
• Setup pages
• Reports
On setup pages, you can still view referenced account combinations with secured account values, even if you haven't beengranted access to those secured values. However, if you try to update such references, you can't use those secured values.On reports, you can view balances for secured account values only if you have access to those secured values.
Note: You can enforce segment value security for inquiries and reporting based on any hierarchy, evenhierarchies that aren't published to the reporting cube.
Segment Value Security ImplementationYou implement segment value security using the Security Console and these pages: Manage Value Sets, Manage Chart ofAccounts Structures, Publish Account Hierarchies.

Oracle Financials CloudGetting Started with Your Implementation
Chapter 2Getting Started with Oracle Cloud Security
24
The following figure shows the steps for defining and implementing security rules for segment values.
Manage Chart of Accounts Structures Page
Security Console Manage Value Sets Page
Create roles for segment value
securityEnable security
Create conditions
Create policies
Deploy the flexfield
Assign roles to users
Publish Account Hierarchies Page
Publish account hierarchy version
To define segment value security roles:
1. Create segment value security roles.2. Enable security on the value set.
Note: You can enable security only on value sets with a type of Independent.
3. Create conditions for the rule.4. Create policies to associate the conditions with the role.5. Deploy the accounting flexfield.6. Publish the account hierarchies.
Oracle Financials CloudGetting Started with Your Implementation
Chapter 2Getting Started with Oracle Cloud Security
25
7. Assign the role to users.
Whenever you assign segment value security roles to a user, the rules from the user's assigned roles can be applied together.All of the segment value security roles assigned to a user pertaining to a given value set are simultaneously applied when theuser works with that value set. For example, one rule provides access to cost center 110 and another rule provides accessto all cost centers. A user with both of these segment value security rules has access to all cost centers when working in acontext where that value set matters.
Segment Value Security ConditionsWhen you create a condition, you specify an operator. The following table describes the operators that you can use.
Operator Usage
Equal to
• Provides access to a specific detail or child value.• Don't use to provide access to a parent value.
Not equal to
• Provides access to all detail and child values, except the one that you specify.• Don't use to provide access to a parent value.
Between
• Provides access to a detail range of values.
Is descendant of
• Provides access to the parent value itself and all of its descendants including middle levelparents and detail values.
Is last descendant of
• Provides access to the last descendants for example, the detail values of a parent value.
Tip: For the operators Is descendant of and Is last descendant of:• Specify an account hierarchy (tree) and a tree version to use these operators.• Understand that the security rule applies across all the tree versions of the specified hierarchy, as well as all
hierarchies associated with the same value set of the specified hierarchy.
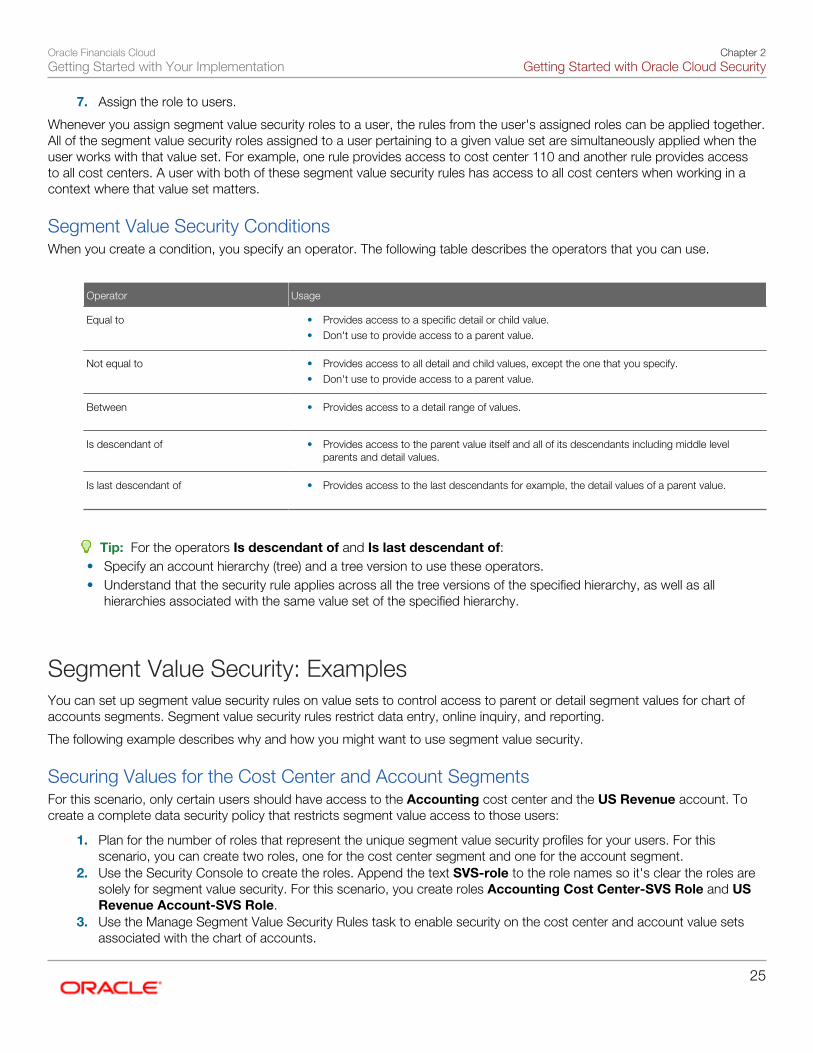
Segment Value Security: ExamplesYou can set up segment value security rules on value sets to control access to parent or detail segment values for chart ofaccounts segments. Segment value security rules restrict data entry, online inquiry, and reporting.
The following example describes why and how you might want to use segment value security.
Securing Values for the Cost Center and Account SegmentsFor this scenario, only certain users should have access to the Accounting cost center and the US Revenue account. Tocreate a complete data security policy that restricts segment value access to those users:
1. Plan for the number of roles that represent the unique segment value security profiles for your users. For thisscenario, you can create two roles, one for the cost center segment and one for the account segment.
2. Use the Security Console to create the roles. Append the text SVS-role to the role names so it's clear the roles aresolely for segment value security. For this scenario, you create roles Accounting Cost Center-SVS Role and USRevenue Account-SVS Role.
3. Use the Manage Segment Value Security Rules task to enable security on the cost center and account value setsassociated with the chart of accounts.

Oracle Financials CloudGetting Started with Your Implementation
Chapter 2Getting Started with Oracle Cloud Security
26
4. Create a condition for each value set. For example, the condition for the Accounting cost center is that the costcenter is equal to Accounting.
5. Create a policy to associate the conditions to the roles. For example, create a policy to assign the condition for theAccounting cost center to the role Accounting Cost Center-SVS Role.
6. Use the Security Console to assign the appropriate role to the appropriate user. For example, assign the roleAccounting Cost Center-SVS Role to the users who should have access to the Accounting cost center.
Enabling Security on a Chart of Accounts: Worked ExampleThis example demonstrates how to enable security on a chart of accounts to control access to specific segment values.
The following table summarizes the key decisions for this scenario.
Decisions to Consider In This Example
Which segment in the chart of accounts must be restricted?
Cost center
Which cost center values have to be granted to different users?
• Child values 110 to 120• Child value 310• Parent value 400 and all its children• All cost centers
What's the name of the value set for the Cost Center segment?
Cost Center Main
What's the name of the user who can access cost centers 110 to120?
Casey Brown
What's the name of the tree for the accounting flexfield?
All Corporate Cost Centers
What version of the tree hierarchy does the condition apply to?
V5
Summary of the Tasks and PrerequisitesThis example includes details of the following tasks you perform when defining and implementing segment value security.
1. Define roles for segment value security rules.2. Enable segment value security for the value set.3. Define the conditions.4. Define the policies.5. Deploy the accounting flexfield.6. Publish the account hierarchies.7. Assign segment value security roles to users.
Perform the following prerequisites before enabling security on a chart of accounts:
• To work with the Security Console, you need the IT Security Manager role assigned to your user setup.
• To work with value sets and profile options, you need the Financial Application Administrator role.
• Set the Enable Data Security Polices and User Membership Edit profile to Yes.

Oracle Financials CloudGetting Started with Your Implementation
Chapter 2Getting Started with Oracle Cloud Security
27
Defining Roles for Segment Value Security RulesTo create a complete data security policy, create the roles first so that they're available forassignment to the segment value security rules.
1. In the Tools work area, open the Security Console.2. Perform the following steps four times to create four roles.3. Click Create Role.4. On the Create Role page, complete the fields as shown in this table, and then click Next, Next, Next, Next, Next,
Save and Close.5. Click OK and complete the fields, as shown in this table.
Field Role 1 Role 2 Role 3 Role 4
Role NameCost Center 110-120SVS Role
Cost Center 310 SVSRole
Cost Center 400 SVSRole
Cost Center All SVSRole
Role CodeCC_ 110_120_SVS_ROLE
CC_ 310_SVS_ROLE
CC_ 400_SVS_ROLE
CC_ ALL_SVS_ROLE
Role CategoryDefault
Default
Default
Default
DescriptionAccess to cost centers110 to 120.
Access to cost center310.
Access to parent costcenter 400 and all itschildren.
Access to all costcenters.
The following figure shows the Create Role page for the first role, which is Cost Center 110-120 SVS Role. The rolecode, role category, and description fields are complete.

Oracle Financials CloudGetting Started with Your Implementation
Chapter 2Getting Started with Oracle Cloud Security
28
Enabling Segment Value Security for the Value Set1. In the Setup and Maintenance work area, search for and select the Manage Segment Value Security Rules task.2. In the Value Set Code field, enter Cost Center Main and click Search.3. In the Search Results section, click Edit to open the Edit Value Set page.4. Select the Security enabled option.5. In the Data Security Resource Name field, enter Secure_Main_Cost_Center_Values.6. Click Save.
The following figure shows the Edit Value Set page for the Cost Center Main value set. Security is enabled and adata security resource name has been entered.
Defining the ConditionsUse conditions to specify the segment values that require security.Segment value security rules that provide access to all segment values, and segment value security rules that provide accessto single nonparent segment values, don't need a condition. Instead, you can define the policy to cover all values, and youcan define a policy to cover a single nonparent segment value provided that you know the internal ID for that segment value. Ifyou don't know the internal ID, you can create a condition for that single segment value.
In this scenario, the internal ID for segment value 310 isn't known, so the following steps create all of the conditions, exceptfor the access to all cost centers, which the policy definition can cover.
1. Click Edit Data Security to open the Edit Data Security page.2. On the Condition tab, click Create to open the Create Database Resource Condition window.3. Enter CC 110 - 120 in the Name field.4. Enter Cost Centers 110 to 120 in the Display Name field.

Oracle Financials CloudGetting Started with Your Implementation
Chapter 2Getting Started with Oracle Cloud Security
29
5. Accept the default value of All for the Match field.Matching to all conditions means that all conditions apply simultaneously. Matching to any condition means that anyof the conditions would apply.
6. Click Add in the Conditions section.7. Select VALUE for the Column Name field.8. Select Between for the Operator field.
Note: You can select one of the following operators: Equal to, Not equal to, Between, Is descendant of,Is last descendant of.
9. Enter 110 in the first Value field and 120 in the second Value field.
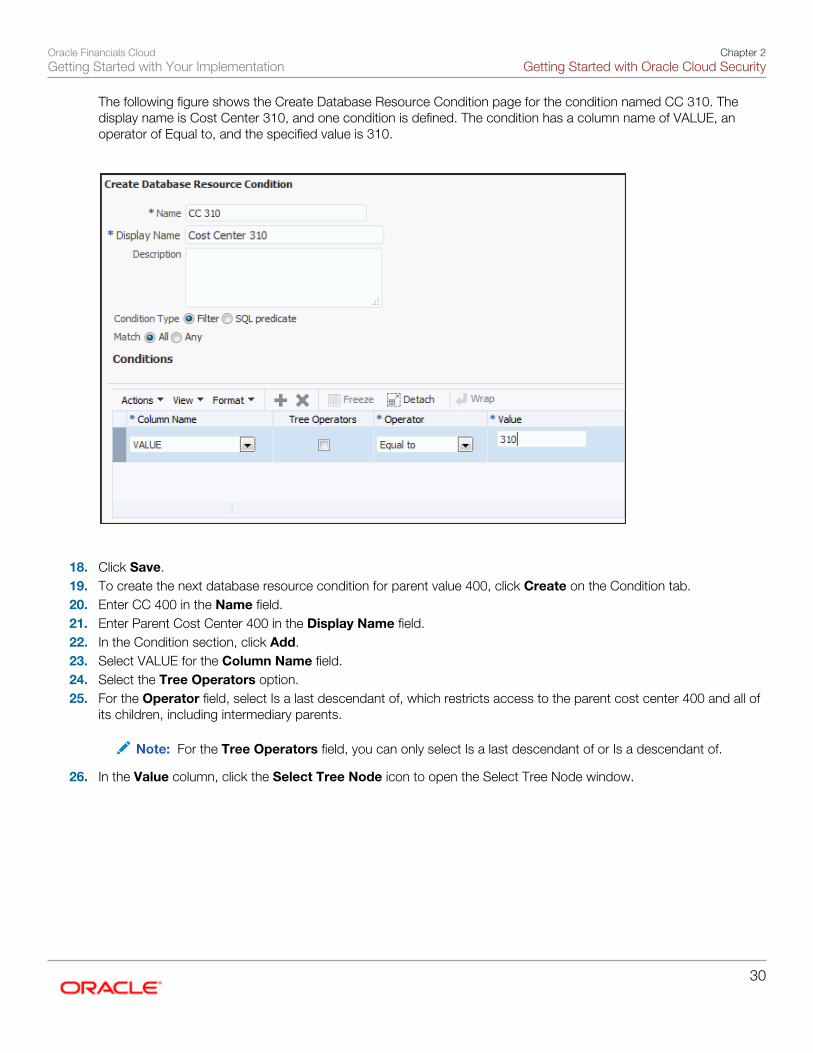
The following figure shows the Create Database Resource Condition page for the condition named CC 110 - 120.The display name is Cost Centers 110 to 120, and one condition is defined. The condition has a column name ofVALUE, an operator of Between, and the specified values are 110 and 120.
10. Click Save.11. To create the next database resource condition for segment value 310, click Create on the Condition tab.12. Enter CC 310 in the Name field.13. Enter Cost Center 310 in the Display Name field.14. Click Add in the Conditions section.15. Select VALUE for the Column Name field.16. Select Equal to for the Operator field.17. In the Value field, enter 310.
The following figure shows the definition of the second condition.
Oracle Financials CloudGetting Started with Your Implementation
Chapter 2Getting Started with Oracle Cloud Security
30
The following figure shows the Create Database Resource Condition page for the condition named CC 310. Thedisplay name is Cost Center 310, and one condition is defined. The condition has a column name of VALUE, anoperator of Equal to, and the specified value is 310.
18. Click Save.19. To create the next database resource condition for parent value 400, click Create on the Condition tab.20. Enter CC 400 in the Name field.21. Enter Parent Cost Center 400 in the Display Name field.22. In the Condition section, click Add.23. Select VALUE for the Column Name field.24. Select the Tree Operators option.25. For the Operator field, select Is a last descendant of, which restricts access to the parent cost center 400 and all of
its children, including intermediary parents.
Note: For the Tree Operators field, you can only select Is a last descendant of or Is a descendant of.
26. In the Value column, click the Select Tree Node icon to open the Select Tree Node window.
Oracle Financials CloudGetting Started with Your Implementation
Chapter 2Getting Started with Oracle Cloud Security
31
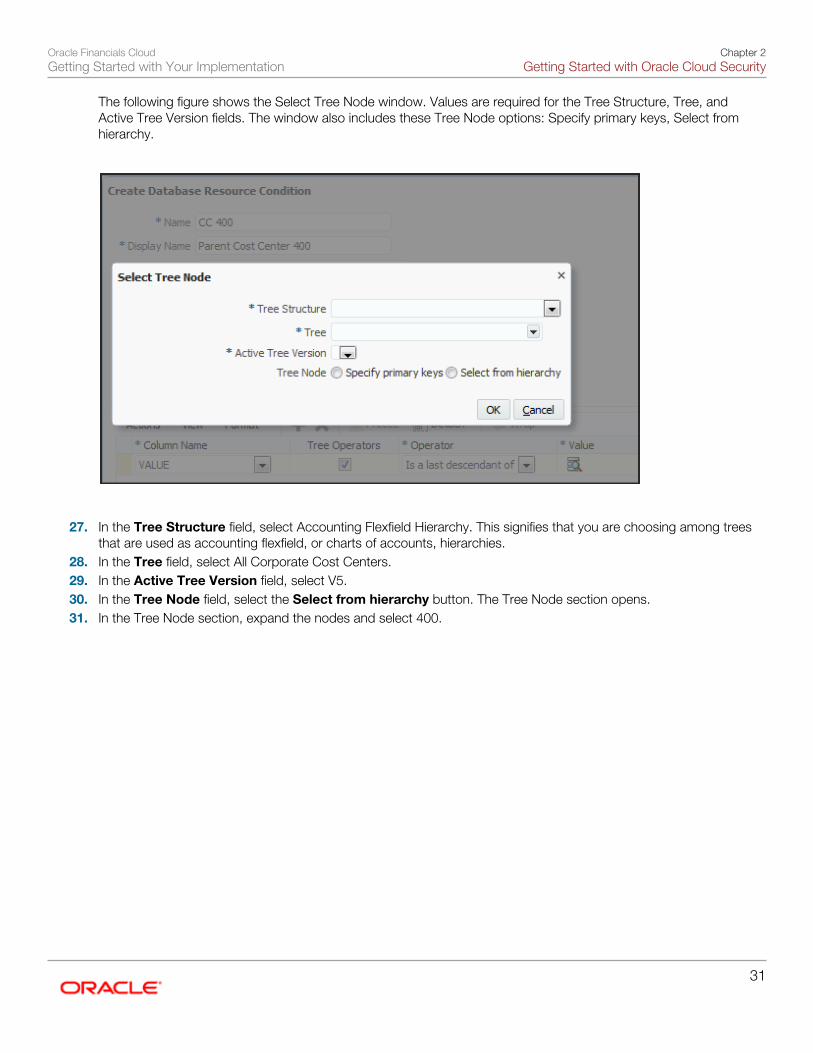
The following figure shows the Select Tree Node window. Values are required for the Tree Structure, Tree, andActive Tree Version fields. The window also includes these Tree Node options: Specify primary keys, Select fromhierarchy.
27. In the Tree Structure field, select Accounting Flexfield Hierarchy. This signifies that you are choosing among treesthat are used as accounting flexfield, or charts of accounts, hierarchies.
28. In the Tree field, select All Corporate Cost Centers.29. In the Active Tree Version field, select V5.30. In the Tree Node field, select the Select from hierarchy button. The Tree Node section opens.31. In the Tree Node section, expand the nodes and select 400.

Oracle Financials CloudGetting Started with Your Implementation
Chapter 2Getting Started with Oracle Cloud Security
32
The following figure shows the Select Tree Node window after completing the fields in steps 27 through 31.
32. Click OK.

Oracle Financials CloudGetting Started with Your Implementation
Chapter 2Getting Started with Oracle Cloud Security
33
The following figure shows the resulting Create Database Resource Condition page for the condition named CC400. The display name is Parent Cost Center 400 and one condition is defined. The condition has a column name ofVALUE, an enabled Tree Operators option, an operator called Is a last descendant of, and a value of 400.
33. Click Save.
Defining the PoliciesCreate policies to assign conditions to segment value security roles.
1. On the Edit Data Security page, click the Policy tab.2. Click Create to open the Create Policy window.3. On the General Information tab, enter Policy for 110-120 in the Name field.4. Accept the default value of General Ledger in the Module field.5. Enter 9/1/16 in the Start Date field.

Oracle Financials CloudGetting Started with Your Implementation
Chapter 2Getting Started with Oracle Cloud Security
34
The following figure shows the General Information tab on the Create Policy page for the policy named Policy for110-120. The start date for the policy is 9/1/16.
6. Select the Role tab and click Add to open the Select and Add window.7. Enter 110 in the Role Name field.8. Select hcm in the Application field.
Roles with the Default category are created in the hcm application.9. Click Search.
The following figure shows the Select and Add Roles window with the search results. The role retrieved by thesearch results is named Cost Center 110-120 SVS Role.
10. Select Cost Center 110-120 SVS Role and click OK.

Oracle Financials CloudGetting Started with Your Implementation
Chapter 2Getting Started with Oracle Cloud Security
35
The following figure shows the Role tab on the Create Policy page with the role that was populated by the searchresults.
11. Select the Rule tab.12. Accept the default setting of Multiple Values in the Row Set field.
Note: The Row Set field determines the range of value set values affected by the policy.
◦ If Multiple Values is selected, a condition must be specified.
◦ If All Values is selected, then the policy grants access to all values in the value set and no condition isneeded.
◦ If Single Value is selected, then the internal Value ID for the segment value must be specified and nocondition is needed.
13. Click Search on the Condition field.14. Select Cost Centers 110 to 120 for the Condition field and click OK.
The following figure shows the Rule tab on the Create Policy page. The selected row set is Multiple Values and thecondition is Cost Centers 110 to 120.
15. Click Save and Close.16. Click OK to confirm.17. Repeat steps 2 through 13 to create the rest of the policies, using the values in the following table.

Oracle Financials CloudGetting Started with Your Implementation
Chapter 2Getting Started with Oracle Cloud Security
36
Field Policy 2 Policy 3 Policy 4
General Information tab, Name
Policy for 310
Policy for 400
Policy for all cost centers
General Information tab, StartDate
9/1/16
9/1/16
9/1/16
Role tab, Role Name
Cost Center 310 SVS Role
Cost Center 400 SVS Role
Cost Center All SVS Role
Rule tab, Row Set
Multiple Values
Multiple Values
All Values
Rule tab, Condition
Cost Center 310
Parent Cost Center 400
Not Applicable
18. Click Done.
Deploying the Accounting FlexfieldYou must deploy the accounting flexfield for the segment value security changes to take effect.
1. In the Setup and Maintenance work area, search for and select the Manage Chart of Accounts Structures task.2. In the Module field, select General Ledger and click Search.3. Select the row for the Accounting Flexfield and click Deploy Flexfield.
The following figure shows the Manage Chart of Accounts Structure page after searching for General Ledgermodules. The search results display a row with a key flexfield named Accounting Flexfield.
4. Click OK.
Publishing the Account Hierarchies1. In the Setup and Maintenance work area, search for and select the Publish Account Hierarchies task.2. In the Hierarchy field, select All Corporate Cost Centers.3. In the Hierarchy Version field, select V5.4. Click Search.5. In the Search Results section, expand the hierarchy row.6. Select the row for the hierarchy version V5.7. Click Publish.
Oracle Financials CloudGetting Started with Your Implementation
Chapter 2Getting Started with Oracle Cloud Security
37
8. Click OK.
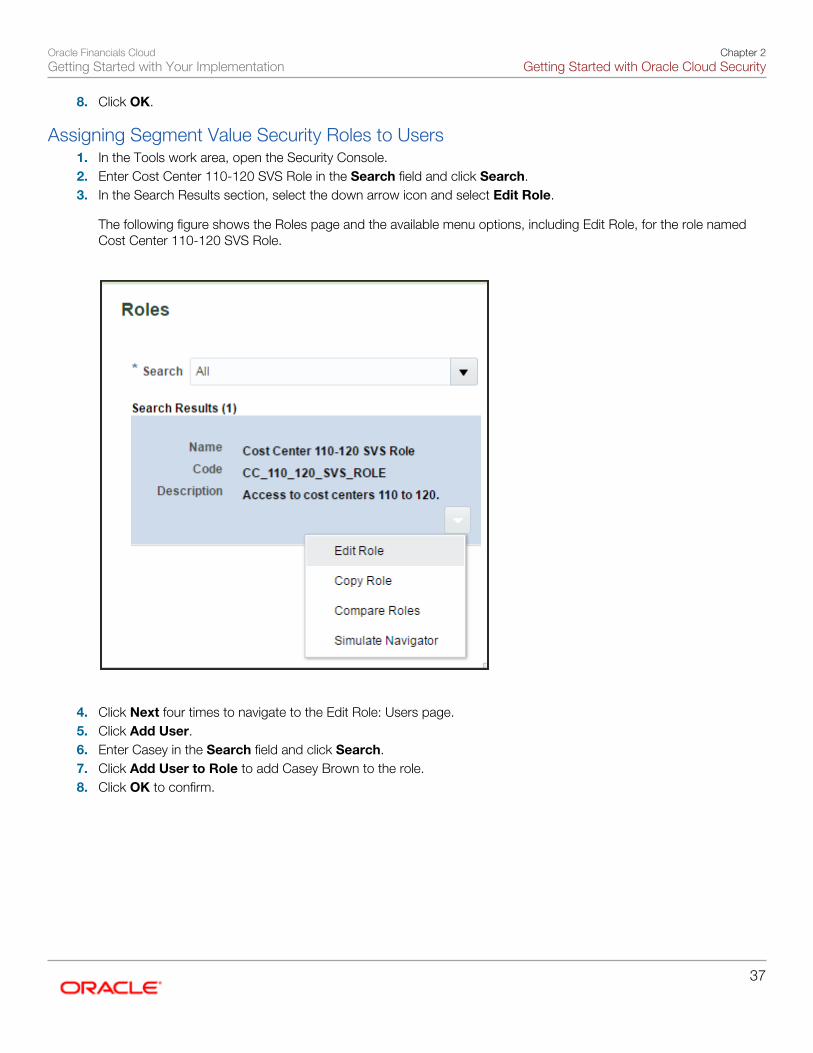
Assigning Segment Value Security Roles to Users1. In the Tools work area, open the Security Console.2. Enter Cost Center 110-120 SVS Role in the Search field and click Search.3. In the Search Results section, select the down arrow icon and select Edit Role.
The following figure shows the Roles page and the available menu options, including Edit Role, for the role namedCost Center 110-120 SVS Role.
4. Click Next four times to navigate to the Edit Role: Users page.5. Click Add User.6. Enter Casey in the Search field and click Search.7. Click Add User to Role to add Casey Brown to the role.8. Click OK to confirm.

Oracle Financials CloudGetting Started with Your Implementation
Chapter 2Getting Started with Oracle Cloud Security
38
The following figure shows the Edit Role page for the Cost Center 110-120 SVS Role with the user Casey Brownselected.
9. Repeat steps 2 through 8 to add the other roles to different users as needed.

Oracle Financials CloudGetting Started with Your Implementation
Chapter 3Implementing Oracle Financials Cloud
39
3 Implementing Oracle Financials Cloud
Functional Setup Manager: OverviewOracle Functional Setup Manager provides an integrated, end-to-end process for functional administrators to manage theimplementation and maintenance of Oracle Applications Cloud.
Functional Setup Manager offers the following:
• Standardized application configuration and setup experience
• Feature opt-in for a best fit configuration
• Flexible processes for managing setup:
◦ Setup by functional areas for an adopt-as-you-go approach
◦ Implementation projects to manage setup
◦ Upload file to enter setup data in bulk
• Guided task list for end-to-end setup requirements
• Export and import services for setup data migration between environments
• Comprehensive reporting on setup data
Who Uses the Functional Setup Manager: Points toConsiderBusiness users who are responsible for configuring feature opt-in and managing setup data are the primary users ofFunctional Setup Manager.
Security AccessThe Application Implementation Consultant job role has full access to perform all Functional Setup Manager-related activities.Other user must include the Functional Setups User role in addition to other roles or privileges needed to perform specificsetup activities.
For more detailed information about security requirements for Functional Setup Manager, refer to the Oracle ApplicationsCloud Security Reference for Common Features guide in the All Books for Oracle Cloud page of the Oracle Help Center(docs.oracle.com).
Related Topics
• Oracle Applications Cloud Security Reference for Common Features
Oracle Financials CloudGetting Started with Your Implementation
Chapter 3Implementing Oracle Financials Cloud
40
Functional Setup Manager Components: How They WorkTogetherOfferings, functional areas, features, and setup tasks work together in your implementation.
OfferingsAn offering represents a collection of business processes that are supported by Oracle Applications Cloud. Each subscriptionof Oracle Cloud provides license to use one or more offerings and they are the starting point of all implementations. Anoffering consists of multiple functional areas and features.
Functional AreasA functional area represents one or more business subprocesses and activities within its parent offering. It may representa core operation of the offering or may represent an optional activity which may or may not be applicable to your business.When you start to implement an offering by enabling it, core functional areas are enabled automatically. You have a choiceto opt into and enable an optional functional area or to opt out of it. A functional area may be divided into smaller functionalareas creating a hierarchy to help you to decide what to opt into one step at a time. Some of the functional areas may beapplicable to more than one offering. Once you set up a shared functional area, you do not have to set it up again whenimplementing another parent offering. However, Oracle recommends that during successive implementation of the otherparents you verify if there are any offering-specific tasks that may still require your attention.
FeaturesFeatures are optional business practices or methods applicable to the functional areas. Like functional areas, you can decideto opt into or opt out of features depending on the requirements of your business processes. Features can be one of threedifferent types:
• Yes or No: These features allow you either to opt into or to opt out of them and are represented by a single checkbox. You select them to opt into or deselect them to opt out.
• Single Choice: These features offer multiple choices but allow you to select only one option. Select the optionapplicable to your business processes.
• Multi-Choice: These features offer multiple choices but allow you to select more than one of the choices. Eachchoice is presented with a check box. Select all that apply to your business processes by checking the appropriatechoices.
Setup TasksSetup tasks represent the work necessary to set up an offering and the business processes and activities that the offeringrepresents to make them ready for transaction processing. Perform these tasks to enter setup data when you implement anoffering.
Tasks representing setup requirements of the offerings and the functional areas are grouped into task lists and are organizedin a hierarchy. For example, all setup tasks of an offering are grouped into a task list which includes subtask lists thatrepresent setup of functional areas within the offering. This helps you gain visibility into setup data that are related to eachother, helping you to manage setup.

Oracle Financials CloudGetting Started with Your Implementation
Chapter 3Implementing Oracle Financials Cloud
41
Functional Setup Manager Work Areas: How They WorkTogetherUse the My Enterprise and Setup and Maintenance work areas to manage feature opt-in and setup of your subscribedofferings.
My Enterprise Work Area GroupThe following work areas are part of My Enterprise:
• Offerings: This work area shows all available offerings. Review and opt into your subscribed offerings when you areready to implement. Oracle Applications Cloud are available for use only after the relevant offerings and their relatedfeatures are opted into by enabling them. This helps you to configure Oracle Applications Cloud according to whatyour enterprise needs to use and exclude any irrelevant features. Get started by reviewing the description of theofferings and the related documents, which helps you to determine what features to opt into and how to plan forimplementation.
• New Features: This work area highlights the new features that have been introduced in the latest release version togive more visibility to what is new in Oracle Applications Cloud. After upgrade, review this page to get a quick view ofthe newly introduced features and to decide whether to opt into any of them.
• Enterprise: This work area allows you to enter your enterprise-specific information related to your Oracle ApplicationsCloud.
• Subscriptions: This work area shows your subscriptions for Oracle Applications Cloud.
Setup and Maintenance Work AreaThe Setup and Maintenance work area is for managing setup data required by Oracle Applications Cloud. After you opt intoand enable one or more offerings in the Offerings work area, use this work area to manage setup.
Implementation Process: ExplainedA functional implementation of Oracle Applications Cloud typically includes the following steps.
• Plan
• Configure
• Setup
• Deploy
• Maintain
PlanIdentify the offerings you want to implement. Evaluate what functional areas and features to opt into and prepare accordinglyfor their setup requirements.

Oracle Financials CloudGetting Started with Your Implementation
Chapter 3Implementing Oracle Financials Cloud
42
For more detailed information, refer to the Planning an Implementation chapter in the Using Functional Setup Manager guide.
ConfigureOpt into the offerings, functional areas, and features that best fit your business requirements by enabling them.
For more detailed information, refer to the Configuring Offerings chapter in the Using Functional Setup Manager guide.
SetupUse setup tasks to enter setup data necessary for your enabled offerings and functional areas. Typically, you set up and verifyyour transaction processes in a test environment before starting to transact in a production environment.
For more detailed information, refer to the following chapters in the Using Functional Setup Manager guide:
• Managing Offering Setup
• Managing Setup Using Implementation Projects
• Managing Setup Using Alternative Processes
DeployMove your verified setup data from the test environment to a production environment and deploy to all users to starttransaction processing.
For more detailed information, refer to the Exporting and Importing Setup Data chapter in the Using Functional SetupManager guide.
MaintainUpdate setup data or opt into configuration of the functional areas and features as necessary when your businessrequirements change over time.
Related Topics
• Using Functional Setup Manager
Enabling Offerings: ExplainedOfferings and their functional areas are presented in an expandable and collapsible hierarchy to facilitate progressive decisionmaking regarding whether or not you want to implement them. An offering or its functional areas can either be opted into ornot opted into for implementation. Implementation managers decide which offerings to enable for implementation. Althoughall of the functional areas that represent core functionality of an offering are automatically enabled for implementation whena parent offering is enabled for implementation, you can select which of the optional functional areas are enabled. You canidentify which functionality is already opted into by looking at the check box in the Enable column.
Related Topics
• Configuring Offerings
Oracle Financials CloudGetting Started with Your Implementation
Chapter 3Implementing Oracle Financials Cloud
43
Configuring Offerings: ProcedureEnable offerings to modify functionality so that it matches the services you plan to implement.
Enable OfferingsTo enable offerings, follow these steps:
1. Select Navigator > My Enterprise > Offerings work area to open the Offerings page. You need the ConfigureOracle Fusion Applications Offering privilege.
2. Select the offering you want to implement.3. Click Opt In Features button to go to the Opt In page.4. In the Opt In page, select the Enable check box for the offering.5. Review functional area hierarchy. Select the Enable check box to opt into functional areas as applicable to your
business operations.6. Click the Edit icon in the Features column for the functional area you enabled to opt into and enable applicable
features.
◦ Depending on the feature type, a check box for Yes or No features or an Edit icon for single and multiplechoice features is displayed in the Enable column.
◦ To enable a feature, select the check box for Yes or No types or click Edit and select the appropriate choicesfor single and multiple choice features.
7. Click Done when you're finished to return to the Opt In page.8. Click Done to return to the Offerings page.
Repeat the same steps for each offering you want to implement or if you must change the opt-in configuration of anyfunctional areas or features of an enabled offering.
Related Topics• Configuring Offerings
Adopting New Functionality: ExplainedAs your business needs change or expand, you may need to adopt new functionality not included in your initialimplementation. You can adopt any new functionality for your subscribed offerings to satisfy your business needs. Allfunctionality available for an offering is listed in the Opt In page whether or not you have opted into it. In order to opt into newfunctionality, make sure that its parent in the hierarchy is already selected. Additionally, Functional Setup Manager providesyou easy access to learn more about any feature by clicking the feature's Help icon.
Opting into New Features After Upgrade: ExplainedNew functional areas and features for an offering you implemented are often introduced in the later revisions of OracleApplications Cloud. You can use the New Features work area to explore and learn about what has been introduced in the lastupgrade of your applications and decide whether to opt into them.

Oracle Financials CloudGetting Started with Your Implementation
Chapter 3Implementing Oracle Financials Cloud
44
You can review the new functional areas and features of all your enabled offerings or focus on only one of them. For eachfunctional area or feature, you can view its opt-in status, check whether it requires setup, and access additional help topics tolearn more details.
Related Topics
• Reviewing and Opting into New Features after Upgrade: Procedure
• Opting into New Features After Upgrade: Procedure
Managing Offering Setup: ExplainedAfter you enable an offering and configure the opt-in selection of its functional areas and features, you can set up the offeringby using its functional areas as a guide. This adopt-as-you-go approach to functional setup gives you the flexibility to setup different functional areas of the offering at different times. For example, you can begin with setup of the functional areasyou require immediately to start transactions. You can then set up other functional areas as you adopt additional offeringfunctionality over time. This setup process is ideal for an enterprise looking for a simpler implementation approach that followssetup best-practices.
For example, you can begin with setup of the functional areas you require immediately to start transactions. You can then setup other functional areas as you adopt additional offering functionality over time. This setup process is ideal for an enterpriselooking for a simpler implementation approach that follows setup best practices.
Functional AreasWhen using this method, you start by selecting one of the offerings you enabled. Based on your opt-in configuration, all itsenabled functional areas, which include core and optional functional areas, are automatically displayed in a list to guide youthrough the setup tasks. The display order reflects the sequence in which the functional areas should be set up becausesetup data of the functional areas listed higher up in the list are usually prerequisite for those shown lower in the list. Anyfunctional area for which setup is mandatory is marked with an asterisk.
Functional areas that are applicable to more than one of your enabled offerings is marked as shared to allow you to evaluatewhether they were previously set up during the implementation of another offering. Even if a shared functional area was set uppreviously, you may still need to evaluate if it requires additional setup data for the offering you are presently implementing.
For some functional areas, Quick Setup may be available to implement its basic functionality quickly. A Quick Setup iconnext to a functional area indicates if Quick Setup is available. You can use this task instead of the setup task list to set upthose functional areas.
Setup TasksFor each functional area, a sequenced list of tasks representing the setup best practices according to your opt-inconfiguration of the features is shown to guide you through optimal implementation requirements. Use the tasks to enter thesetup data they represent. Like functional areas, the display order of the tasks always reflects the sequence in which theyshould be performed to address setup data dependencies.
Required Tasks
Only the required setup tasks are shown by default to minimize your setup effort and to make the offering ready fortransactions sooner. However, you can also review the rest of the tasks in the list, which are typically optional or have
Oracle Financials CloudGetting Started with Your Implementation
Chapter 3Implementing Oracle Financials Cloud
45
predefined default values based on common use cases, and decide whether your implementation must change their defaultsetup data.
Tasks with Scope
If any setup data is segmented by a specific attribute or scope, you may need to perform the task iteratively. If so, you mustselect a qualifying scope value prior to performing the task. You can pick a scope value that was previously selected, select anew scope value, or create a new scope value and then select it. The selected value is a qualifying attribute of the setup dataand therefore, different setup data can be entered for the different scope values.
Note: You cannot perform a task if you do not have the proper security privileges.
Related Topics• Setting up Offerings
• Setting Up Offerings with Scope
• Setting Up Offerings: Procedure
Getting Started with an Implementation: OverviewTo start an implementation, set up one or more initial users. In an Oracle Fusion Applications environment, use the super usercreated during installation and provisioning. For an Oracle Cloud implementation, use the initial administrator provided byOracle. Because applications is secure as delivered by Oracle, the process of enabling the necessary setup access for initialusers requires the following steps:
1. As you start an implementation, sign in as the user with initial access: either the Oracle Fusion Applicationsinstallation super user or the initial Oracle Cloud administrator user.
2. Select an offering to implement and then enable the offering and the associated functional areas. Once the offering isenabled, you generate the setup tasks needed to implement the offering.
3. Perform the following security tasks:a. Synchronize users and roles in the Lightweight Directory Access Protocol (LDAP) store with HCM user
management. Use the Run User and Roles Synchronization Process task.b. Create an IT security manager user by using the Create Implementation Users task.
4. As the newly created IT security manager user, sign in to Oracle Fusion Applications and set up at least oneimplementation user for setting up enterprise structures.
a. Create an implementation user by using the Create Implementation Users task.b. Provision the implementation user with the Application Implementation Manager job role or the Application
Implementation Consultant job role by using the Security Console Users tab. The Application ImplementationConsultant job role inherits from all product-specific application administrators and entitles the necessary ViewAll access to all secured objects.
c. Optionally, create a data role for an implementation user who needs only the limited access of a product-specific Application Administrator. Use the Create Data Role for Implementation Users task. Then assign theresulting data role to the implementation user by using the Create Implementation Users task.
Related Topics• User and Role Synchronization: Explained
• Enterprise Structures: Overview

Oracle Financials CloudGetting Started with Your Implementation
Chapter 3Implementing Oracle Financials Cloud
46
• Creating Data Roles for Implementation Users: Procedure
Define Financials Configuration for Rapid Implementation:OverviewUse the Define Financials Configuration for Rapid Implementation task list to streamline your setup configuration to focus onlyon the critical setup steps. The rapid implementation task list minimizes the time needed for you to complete your key setupsand enable the day-to-day use of Oracle Financials Cloud.
The rapid implementation task list includes tasks that are:
• Critical setup tasks for initial setup.
• Setup steps that are required by most users.
To create an implementation project that includes the Define Financials Configuration for Rapid Implementation task list, usethe Manage Implementation Projects page in the Setup and Maintenance work area. The application implementation managercan modify the task list and assign and track each task.
Note: You are not restricted to only the setup configuration in the rapid implementation task list. You canmanually add the standard Financials offering task lists and tasks to your rapid implementation project to changeand update your setup.
Task ListsThe Define Financials Configuration for Rapid Implementation task list contains the following task lists. These task listsincorporate setup tasks related to specific functional areas within your Oracle Financials Cloud implementation.
Task List Description
Define Common FinancialsConfiguration for Rapid Implementation
Define the common configuration for Oracle Financials Cloud rapid implementation, which includesenterprise structures and banks setup.
Define Transaction Taxes for RapidImplementation
Configure tax setup according to local and international tax requirements.
Define Financials Security Configurationfor Rapid Implementation
Define the configuration for user and data roles setup for Oracle Financials Cloud rapidimplementation.
Define Ledger Configuration for RapidImplementation
Define the configuration for General Ledger rapid implementation that includes general ledger andintercompany.
Define Financial Reporting CenterConfiguration for Rapid Implementation
Define the configuration for Financial Reporting Center rapid implementation that includes setup forfinancial reporting and integration with planning and financial management applications.
Define Invoicing and PaymentsConfiguration for Rapid Implementation
Define invoicing and payments configuration for Payables rapid implementation.

Oracle Financials CloudGetting Started with Your Implementation
Chapter 3Implementing Oracle Financials Cloud
47
Task List Description
Define Expenses Configuration for RapidImplementation
Define corporate expense policies and rules, expense types, and expense report approval rules forExpenses rapid implementation.
Define Fixed Assets Configuration forRapid Implementation
Define the configuration for Assets rapid implementation.
Define Receivables Configuration forRapid Implementation
Define the configuration for Receivables rapid implementation.
Note: The Open First Period task is a required task and is also part of the Define Financials Configuration forRapid Implementation task list.
Configuring Rapid Implementation Tasks ListsBased on the applications you are implementing, you can streamline your task lists even more. For example, when you areonly implementing:
• Payables, Expenses, and Assets: Delete the Define Receivables Configuration for Rapid Implementation task listsfrom your implementation project:
• Receivables: Delete the following task lists from your implementation project:
◦ Define Invoicing and Payments Configuration for Rapid Implementation
◦ Define Expenses Configuration for Rapid Implementation
◦ Define Fixed Assets Configuration for Rapid Implementation
Creating an Oracle Financials Cloud Rapid ImplementationProject: Worked ExampleThis example shows how to create an implementation project for the Oracle Financials Cloud rapid implementation task list.
The following table summarizes key decisions for this scenario:
Decision to Consider In This Example
What applications are included in thisimplementation?
The Oracle Financials Cloud applications being implemented are:
• General Ledger• Financial Reporting Center• Payables• Receivables• Expenses
Oracle Financials CloudGetting Started with Your Implementation
Chapter 3Implementing Oracle Financials Cloud
48
Decision to Consider In This Example
• Assets• Cash Management• Tax
Are the setup requirements unique tothis organization?
No
Can the rapid implementation tasklists and tasks be used for thisimplementation?
Yes
Creating the Implementation Project1. Click Navigator > Setup and Maintenance.2. On the Setup page, open the panel tab and click Manage Implementation Projects.3. On the Implementation Projects page, click the Create icon in the Search Results table.4. On the Create Implementation Project: Enter Basic Information page, enter Implementation Project-
FIN_Rapid_Implementation in the Name field.5. Click in the Description field to automatically update the name in the description.6. Click the Save and Open Project button.7. On the Implementation Project: Implementation Project-FIN_Rapid_Implementation page, click Add in the Task Lists
and Tasks table.8. On the Select and Add: Task Lists and Task dialog box, enter %Rapid Implementation% in the Name field.
Use wildcard characters if you do not know the exact name of the task list or task.9. Click Search.
10. Select the Define Financials Configuration for Rapid Implementation row.11. Click Done.12. On the Implementation Project: Implementation Project-FIN_Rapid_Implementation page, expand the task list to see
the task lists and tasks associated with your implementation project.13. Click Done.
Common Financials Configuration
Define Geographies: OverviewSetting up your geography structure and master geographies correctly in the Trading Community Model is critical to theproper utilization and management of Oracle Enterprise Resource Planning (ERP) Cloud applications.
The geography structure and master geography data is shared across multiple product families and applications. Addressvalidation ensures complete and valid master address data across all location entities across product applications. In addition,complete and valid master data is critical to ensure accurate transaction tax calculation.
You can either define your geography structure and corresponding master geographies manually or import these geographyentities. Options include using the:
1. Manage Geographies page
Oracle Financials CloudGetting Started with Your Implementation
Chapter 3Implementing Oracle Financials Cloud
49
2. Manage File Import Activities task
For more information about managing your geographies, see the Define Geographies section in the Define EnterpriseStructures chapter in the Oracle Financials Cloud Implementing Common Features guide on Oracle Help Center (https://docs.oracle.com).
Manage GeographiesUse the Manage Geographies page to manually define your geography structure, hierarchy, mapping, and validation.Manually define your geographies when you have a simple geography requirement with a limited number of geographieswithin an individual country.
Manage File Import ActivitiesYou can upload the geography structure and hierarchy using the Manage File Import Activities task. Once you upload yourgeography data successfully, you can use the Manage Geographies page to:
• Validate your data
• Enable geography validation
• Enable tax validation
Set the address validation for applicable countries to Error to ensure that no invalid or incomplete master address data iscreated for any location entities. The accuracy of master address data is critical to successful implementations.
Use data import when you have more complex geography requirements, such as for the United States and Canada.
Related Topics• Geography Structure, Hierarchy, and Validation: How They Fit Together
• Managing Geography Structures, Hierarchies, and Validation: Worked Example
• Importing Geographies Using File-Based Import: Explained
• Oracle Financials Cloud Implementing Common Features
Implementing Enterprise Structures: ProcedureThe enterprise structures tasks provide a framework for developing and managing your chart of accounts, ledgers, legalentities, and business units to meet your accounting and reporting requirements.
Setting Up Enterprise StructuresThe tasks in the following list relate to the setup of enterprise structures and appear in the Setup and Maintenance workarea. These are the basic steps for setup. These tasks are part of the Define Enterprise Structures Configuration for RapidImplementation task list and are also included in the Define Common Financials Configuration for Rapid Implementation tasklist. In your task list, these tasks may be interspersed with other tasks that do not have to be performed before you can useOracle Financials Cloud. Each task is performed by the Application Implementation Consultant.
All documentation references are from the Oracle Financials Cloud Implementing Enterprise Structures and General Ledgerguide.
1. Manage geographies.
◦ Perform the Manage Geographies task to enable the list of values for address fields in user interfaces.
Oracle Financials CloudGetting Started with Your Implementation
Chapter 3Implementing Oracle Financials Cloud
50
◦ See: Geographies chapter: Define Geographies: Overview
2. Create chart of accounts, ledger, legal entities, and business units in a spreadsheet.
◦ Perform the Create Chart of Accounts, Ledger, Legal Entities, and Business Units in Spreadsheettask to create a spreadsheet for entering the primary ledger and all accompanying enterprise structures.Spreadsheet entry includes the chart of accounts with segment values and account hierarchies, associatedbusiness units, and associated legal entities. In addition, the spreadsheet includes the rules for generatingsequential identifiers for transactions recorded in the application and certain setup objects along with theiraccounting specifications for various modules of Oracle Financials Cloud.
◦ See: Financial Structures chapter
• Create Chart of Accounts, Ledger, Legal Entities, and Business Units in Spreadsheets: Explained• Create Chart of Accounts, Ledger, Legal Entities, and Business Units in Spreadsheets: How They're
Processed3. Upload the chart of accounts.
◦ Perform the Upload Chart of Accounts task to load the chart of accounts structure, including segments andvalue sets, from the spreadsheet.
◦ See: Financial Structures chapter: Create Chart of Accounts, Ledger, Legal Entities, and Business Units inSpreadsheets: How They're Processed
4. Upload the ledger, legal entities, and business units.
◦ Perform the Upload Ledger, Legal Entities, and Business Units task to load key enterprise structures,including the ledger, legal entities, and business units that are dependent on the chart of accounts.
◦ See: Financial Structures chapter: Create Chart of Accounts, Ledger, Legal Entities, and Business Units inSpreadsheets: How They're Processed.
5. Create cross-validation rules.
◦ Perform the Create Cross Validation Rules in Spreadsheet task for the chart of accounts to determine theaccount combinations that users can create dynamically as they enter transactions or journal entries.
◦ See: Financial Structures chapter
• Cross-Validation Rules in General Ledger: Overview• Cross-Validation Rules: Explained• Cross-Validation Rules: Points to Consider• Cross-Validation Rules Spreadsheet: Explained
After performing the enterprise structures tasks, run the Enterprise Structures Setup Report and diagnostic tests for theenterprise structures setup data.
• See: Enterprise Structures Introduction chapter
◦ Enterprise Structures Setup Report: Explained
◦ Running Diagnostic Tests for Enterprise Structures Setup Data: Explained
Related Topics
• Oracle Financials Cloud Implementing Enterprise Structures and General Ledger

Oracle Financials CloudGetting Started with Your Implementation
Chapter 3Implementing Oracle Financials Cloud
51
Implementing Cash Management: ProcedureThe Oracle Fusion Cash Management product provides a framework for developing and managing your banks, bankbranches, and bank accounts.
Setting Up Cash ManagementThe tasks in the following list relate to the setup and uploading of banks, bank branches, and bank accounts. These are thebasic tasks that appear in the Setup and Maintenance work area.
For setting up cash management, each task is performed by the Application Implementation Consultant. All documentationreferences are from the Oracle Financials Cloud Implementing Payables Invoice to Pay guide, Cash Management andBanking Configuration chapter.
1. Create banks, branches, and accounts in a spreadsheet.
◦ Perform the task Create Banks, Branches, and Accounts in Spreadsheet to create your bank, branch,and account information.
2. Upload banks, branches, and accounts.
◦ Perform the task Upload Banks, Branches, and Accounts to import your bank, branch, and accountinformation into Cash Management.
◦ See:
• Cash Management Rapid Implementation: Overview
Related Topics
• Oracle Financials Cloud Implementing Payables Invoice to Pay
Implementing Tax: ProcedureOracle Fusion Tax provides a single-point solution for managing your transaction and withholding tax requirements.
Oracle Fusion Tax:
• Uniformly delivers tax services to all core Oracle Fusion application business flows through one application interface.
• Provides features for uploading third-party tax partner content.
• Is configurable and scalable for adding and maintaining country-specific tax content.
Setting Up Oracle Fusion TaxThe Define Taxes for Rapid Implementation task list provides you the required and most frequently used setup tasks forimplementation scenarios. Using spreadsheets, you can upload your tax setups to create tax regimes, taxes, tax rates, andtax rules as an example.
Use the standard Define Tax Configuration task list for the ongoing incremental maintenance of your tax setup and thoselimited tax configurations that cannot be set up or updated using the rapid implementation approach.
Oracle Financials CloudGetting Started with Your Implementation
Chapter 3Implementing Oracle Financials Cloud
52
When setting up Oracle Fusion Tax, each task is performed by the Application Implementation Consultant or the TaxManager. All documentation references are from these chapters in the Oracle Financials Cloud Implementing Tax guide:
• Tax Configuration Using Rapid Implementation
• Tax Configuration
1. Manage tax regimes.
◦ Perform the task Manage Tax Regimes to create and maintain tax regimes for the taxes in each country andgeographic region where a separate tax or collection of taxes apply.
Use the Tax Configuration Workbook to upload all common tax regime setups. Use the Tax ImplementationWorkbook to upload your organization-specific setups such as tax regime subscriptions.
You can also use the individual Tax Regimes and Tax Regime Subscriptions spreadsheets to exclusivelycreate tax regimes and tax regime subscriptions.
◦ See:
• Tax Configuration Workbook: Explained• Creating Tax Setup Using the Tax Configuration Workbook: Worked Example• Creating Tax Setup Using Tax Partner Content in the Tax Configuration Workbook: Worked Example• Tax Implementation Workbook: Explained• Creating Tax Setup Using the Tax Implementation Workbook: Worked Example• Creating a Tax Regime Using the Manage Tax Regimes Spreadsheet: Worked Example
2. Run jurisdiction and rates upload program.
◦ For SaaS (Oracle Cloud) implementations, run the Import Tax Configuration Content job.
◦ See:
• Tax Configuration Content Upload Program: How It Is Processed3. Manage taxes.
◦ Perform the task Manage Taxes to create and maintain details for the taxes of tax regimes.
Use the Tax Configuration Workbook to upload all common tax setups.
You can also use the individual Taxes spreadsheet to create taxes for a tax regime or a collection of taxregimes. In addition, you can use the individual Tax Accounts spreadsheet to create tax account assignments.
◦ See:
• Tax Configuration Workbook: Explained• Creating Tax Setup Using the Tax Configuration Workbook: Worked Example• Creating Tax Setup Using Tax Partner Content in the Tax Configuration Workbook: Worked Example• Creating Tax Setup Using the Tax Implementation Workbook: Worked Example
4. Manage tax rates and tax recovery rates.
◦ Perform the task Manage Tax Rates and Tax Recovery Rates to create and maintain details for tax ratesand tax recovery rates.
Use the Tax Configuration Workbook to upload all common tax rate and tax recovery rate setups.

Oracle Financials CloudGetting Started with Your Implementation
Chapter 3Implementing Oracle Financials Cloud
53
You can also use the individual Tax Rates, Tax Rate Accounts, Tax Recovery Rates, and Tax Recovery RateAccounts spreadsheets to create tax statuses, tax jurisdictions, tax rates, tax recovery rates, and tax accountswhere needed.
◦ See:
• Tax Configuration Workbook: Explained• Creating Tax Setup Using the Tax Configuration Workbook: Worked Example• Creating Tax Setup Using Tax Partner Content in the Tax Configuration Workbook: Worked Example
5. Manage tax rules.
◦ Perform the task Manage Tax Rules to create and maintain tax rules that define the conditions under whichthe exceptions to the default taxability apply.
Use the Tax Implementation Workbook to upload organization-specific tax rule setups.
You can also use the individual Tax Rules spreadsheet to create tax rules details.
◦ See:
• Tax Implementation Workbook: Explained• Creating Tax Setup Using the Tax Implementation Workbook: Worked Example
6. Manage tax registrations.
◦ Perform the task Manage Tax Registrations to create and maintain tax registration information related to aparty's transaction tax obligation with a tax authority for a tax jurisdiction where it conducts business.
Use the Tax Implementation Workbook to upload your organization-specific tax registrations.
◦ See:
• Tax Registrations: Explained7. Manage tax exemptions.
◦ Perform the task Manage Tax Exemptions to create and maintain tax exemptions to reduce or increase thetax rate applied to a transaction.
◦ See:
• Tax Exemptions: Explained8. Manage simulator transactions.
◦ Perform the task Manage Simulator Transactions to verify tax configuration for taxes that are enabled forsimulation or for both simulation and transactions by processing real-time transactions without affecting activedata.
◦ See:
• Tax Simulator: Explained
Related Topics
• Oracle Financials Cloud Implementing Tax
Oracle Financials CloudGetting Started with Your Implementation
Chapter 3Implementing Oracle Financials Cloud
54
Ledger Configuration
Implementing General Ledger: ProcedureThe Define Ledger Configuration for Rapid Implementation and Define Financial Reporting Configuration for RapidImplementation task lists provide a framework for developing and managing general ledger features including ledger sets,journal approval rules, and the Financial Reporting Center.
Setting Up General LedgerThe tasks in the following lists relate to the setup of general ledger. These are the basic steps for setup. These tasks appearin the setup task list that was generated in the Setup and Maintenance work area. In your task list, these tasks may beinterspersed with other tasks that are not required to implement Oracle Financials Cloud.
For setting up general ledger, each task is performed by the Application Implementation Consultant.
Define Ledger Configuration for Rapid ImplementationAll documentation references are from the Oracle Financials Cloud Implementing Enterprise Structures and General Ledgerguide, unless otherwise noted.
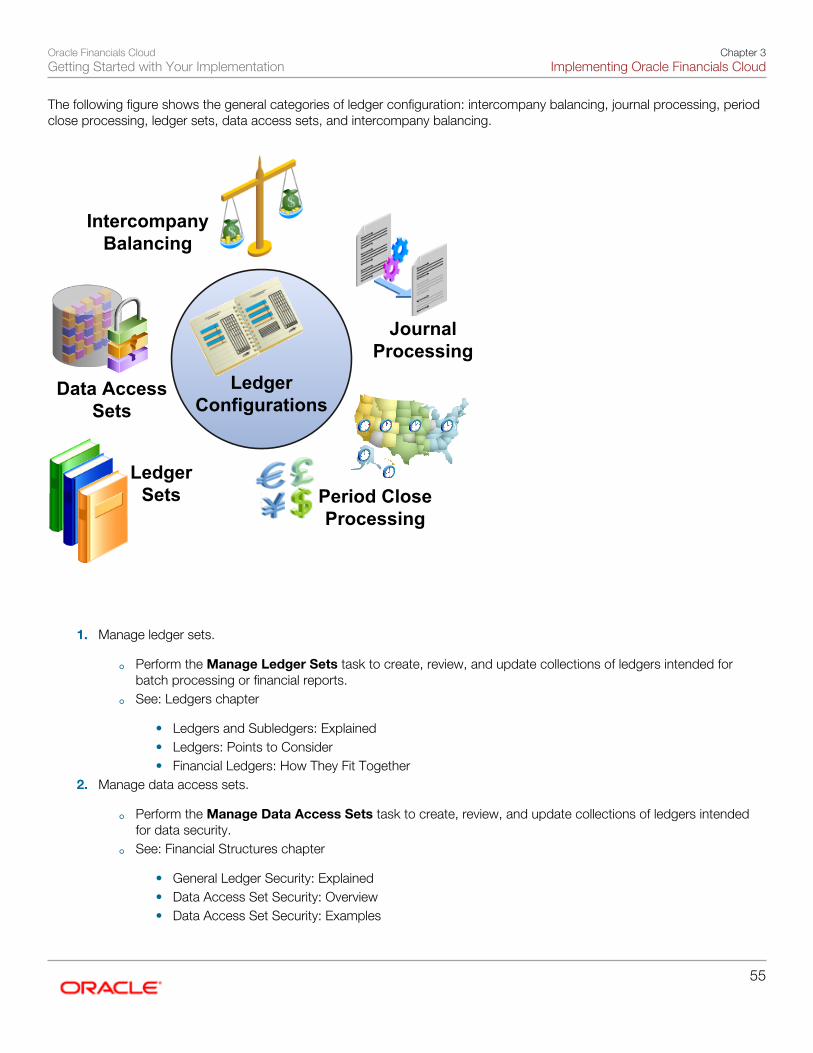
Oracle Financials CloudGetting Started with Your Implementation
Chapter 3Implementing Oracle Financials Cloud
55
The following figure shows the general categories of ledger configuration: intercompany balancing, journal processing, periodclose processing, ledger sets, data access sets, and intercompany balancing.
Intercompany Balancing
Data Access Sets
Ledger Configurations
Journal Processing
Period Close Processing
Ledger Sets
1. Manage ledger sets.
◦ Perform the Manage Ledger Sets task to create, review, and update collections of ledgers intended forbatch processing or financial reports.
◦ See: Ledgers chapter
• Ledgers and Subledgers: Explained• Ledgers: Points to Consider• Financial Ledgers: How They Fit Together
2. Manage data access sets.
◦ Perform the Manage Data Access Sets task to create, review, and update collections of ledgers intendedfor data security.
◦ See: Financial Structures chapter
• General Ledger Security: Explained• Data Access Set Security: Overview• Data Access Set Security: Examples
Oracle Financials CloudGetting Started with Your Implementation
Chapter 3Implementing Oracle Financials Cloud
56
3. Create segment value security rules.
◦ Perform the Create Segment Value Security Rules in Spreadsheet task to define segment value securityfor value sets.
◦ See: Financial Structures chapter
• General Ledger Security: Explained• Segment Value Security: Explained
4. Manage intercompany balancing rules.
◦ Perform the Manage Intercompany Balancing Rules task to define rules to assign intercompanyreceivables and intercompany payables accounts for transactions unbalanced by legal entity or managemententity.
◦ See: Intercompany Processing Rules chapter
• Intercompany Balancing Rules: Explained• Intercompany System Options: Explained• Managing Intercompany Organizations: Points to Consider• Maintaining Customer and Supplier Assignments: Points to Consider• Intercompany Reconciliation: Explained
5. Manage journal approval rules.
◦ Perform the Manage Journal Approval Rules task to review and update rules to route journal entriesthrough an approval process.
◦ See: General Ledger Options chapter
• Approving Journals: Points to Consider• Creating Journal Approval Rules
6. Manage settings for automatic journal posting.
◦ Perform the Manage AutoPost Criteria Sets task to define, review and update settings for automatic journalposting.
◦ See: General Ledger Options chapter
• Creating an AutoPost Criteria Set: Worked Example• Manually Generating the AutoPost Process: Examples
7. Manage settings for automatic journal reversal.
◦ Perform the Manage Journal Reversal Criteria Sets task to define, review, and update settings forautomatic journal reversal.
◦ See: General Ledger Options chapter, Automatic Journal Reversals: How They Are Processed
8. Manage accounting and reporting sequences.
◦ Perform the Manage Accounting and Reporting Sequences task to define, review, and updatesequencing definitions for journal posting and period close.
◦ See: General Ledger Options chapter
• Accounting and Reporting Sequences: Overview• Defining Journal Sequences Manually: Explained• What happens if I enable sequencing in the rapid implementation spreadsheet?

Oracle Financials CloudGetting Started with Your Implementation
Chapter 3Implementing Oracle Financials Cloud
57
9. Manage allocations and periodic entries.
◦ Perform the Manage Allocations and Periodic Entries task to create, review, and update allocation andperiodic definitions and journal entries. Generate journal entries from the allocation and periodic definitions.
◦ See: Period Close chapter• Allocation and Periodic Entries: Overview• Calculation Manager: Overview• Oracle Essbase Balances Cubes: Overview• Creating an Allocation Rule and Generating Allocations• Allocation Security: Explained• Recurring Journals: Overview• Recurring Journal Types: Explained
10. Manage revaluation definitions.
◦ Perform the Manage Revaluations task to review and update existing calculations of unrealized gains andlosses on foreign currency transactions, and to define new calculations.
◦ See: Period Close chapter• Revaluation Process: Explained• Accounting for Unrealized Gain or Loss on Revaluation: Explained• Income Statement Accounts Revaluation Rule: Explained• Revaluing Across Multiple Balancing Segments: Worked Example
11. Manage historical rates.
◦ Perform the Manage Historical Rates task to review and update existing currency historical conversioninformation, and to create conversion information.
◦ See: Financial Structures chapter• Entering Daily Rates Manually: Worked Example• Updating Currency Rates: Worked Example
12. Open the first period.
◦ Perform the Open First Period task to open the first accounting period so you can begin recordingtransactions.
◦ See: Period Close chapter: Opening First Period: Overview
◦ See: Ledgers chapter: Close Monitor: Overview
Define Financial Reporting Center Configuration for Rapid ImplementationAll documentation references are from the Oracle Financials Cloud Implementing Enterprise Structures and General Ledgerguide, Financial Reporting chapter, unless otherwise noted.
1. Define Financial Reporting Center configuration:
◦ Perform the Define Financial Reporting Center Configuration task to define and manage technicalconfiguration options for the Financial Reporting Center.
◦ See:• Financial Reporting Center: How It Works• Setting Up Your Financial Reporting Center: Critical Choices• Migrating Financial Reports: Instructions

Oracle Financials CloudGetting Started with Your Implementation
Chapter 3Implementing Oracle Financials Cloud
58
• Mobile Financial Reporting Implementation: Points to Consider2. Define Essbase database connections.
◦ Perform the Define Essbase Database Connections in Workspace task to define database connectionsto connect to Essbase in Workspace.
◦ See: Setting Up Your Financial Reporting Center: Critical Choices
3. Configure the Financial Reporting Studio client:
◦ Perform the Configure Financial Reporting Studio Client for Users task to install the Financial ReportingStudio client on users' computers to create financial reports.
◦ See: Setting Up Your Financial Reporting Center: Critical Choices
4. Configure the Smart View client.
◦ Perform the Configure Smart View Client for Users task to install the Smart View client on users'computers to perform balance inquiry.
◦ See: Setting Up Your Financial Reporting Center: Critical Choices
5. Create financial statements.
◦ Perform the Create Financial Statements task to create, review, and update report definitions formanagement and statutory financial statements.
◦ See: Create Financial Statements: Explained
6. Define budget scenarios.
◦ Perform the Define Budget Scenarios task to define scenarios to track budgets for different periods orforecasts.
◦ See: Budget Configuration chapter
• Budget Uploads: Overview• Importing Budget Data from a Flat File: Explained• Loading Data to the Budget Interface Table: Explained• Importing Budget Data from a Spreadsheet: Explained
Related Topics
• Oracle Financials Cloud Implementing Enterprise Structures and General Ledger
Intercompany Balancing Rules: ExplainedIntercompany balancing rules are used to generate the accounts needed to balance journals that are out of balance by legalentity or primary balancing segment values. You specify the intercompany receivables and intercompany payables accountsthat you want to use as the template for building the intercompany receivables and intercompany payables accounts. Theintercompany balancing feature then uses these rules to generate the accounts of the balancing lines it creates.
Journals lines are first summarized by the legal entity and are balanced by the legal entity. Since a legal entity can have manyprimary balancing segment values, it is possible that a journal could have multiple lines for a legal entity with different primarybalancing segment values. In that case, when intercompany balancing is done, the lowest primary balancing segment valuewithin each legal entity in the journal is used. After this, balancing occurs across balancing segment values within each legalentity.

Oracle Financials CloudGetting Started with Your Implementation
Chapter 3Implementing Oracle Financials Cloud
59
These same rules are also used to generate the intercompany receivables account and intercompany payables account oftransactions entered in the Intercompany module.
The intercompany balancing rules are also used to generate the intercompany receivables account for the provider side of anintercompany transaction. The balancing rules also used to generate the intercompany payables account for the receiver sideof an intercompany transaction.
Defining Intercompany Balancing RulesYou can define intercompany balancing rules at the following levels:
1. Primary balancing segment2. Legal entity3. Ledger4. Chart of accounts
The rules are evaluated in the order shown. For example, you can define a Primary Balancing Segment rule and a Legal Entitylevel rule. If both rules can be used to balance a particular journal, the Primary Balancing Segment rule is used, as it has ahigher precedence.
You have flexibility in defining your intercompany balancing rules. You can have a simple setup in which you define one rulefor your chart of accounts. This rule is used for all intercompany balancing for all ledgers that use this chart of accounts.Alternatively, you can have a more granular set of rules. For example, you can define a different rule for each legal entity andone chart of accounts rule to cover any gaps in your rule definitions. You can gain even more granularity by defining rules forspecific journal and category combinations or intercompany transaction types.
Using Chart of Accounts Rules for IntercompanyUse chart of accounts rules for intercompany balancing. You have flexibility in defining your intercompany balancing rules withthe setup of a single chart of accounts rule to use for all ledgers that use this chart of accounts. When you create a chart ofaccounts rule, you specify the chart of accounts, intercompany receivables, and intercompany payables accounts you wantto use, as well as the source and category. It is recommended that the intercompany receivables account be an asset typeaccount, and the intercompany payables account be a liability type account.
You can define rules that are applied to a specific source and category, such as Payables and Invoices, or a specificintercompany transaction type, such as Intercompany Sales. Alternatively, you can choose to create rules for all sources andcategories by selecting the source of Other and the category of Other.
Intercompany Balancing will then evaluate the journal source and journal category combination in determining which rule touse for balancing. The order of precedence is as follows.
• Specific journal source and journal category
• Specific journal source and journal category of Other
• Journal source of Other and specific journal category
• Journal source of Other and journal category of Other
Additional Intercompany Balancing and Clearing Company OptionsAdditional Intercompany Balancing and Clearing options are used to balance the second balancing segment or the thirdbalancing segment or both, when a transaction is unbalanced by one of these segments but is already balanced by theprimary balancing segment. This option is defined for a ledger but you can create rules for various Source and Categorycombinations.

Oracle Financials CloudGetting Started with Your Implementation
Chapter 3Implementing Oracle Financials Cloud
60
Additional Intercompany Balancing and Clearing options include the following settings:
• Intercompany Receivables and Intercompany Payables accounts: You can use as the accounts as the template tobuild balancing accounts for balancing segment 2 and balancing segment 3 when the journal is already balanced byprimary balancing segment.
• Summarization options: You can choose to summarize lines within a legal entity before balancing lines are generatedby choosing the Summary Net option. Alternatively choose the Detail options so lines are not summarized beforebalancing within a legal entity. Note that summarization always applies to balancing lines generated in a cross legalentity scenario.
• Clearing company options: Oracle recommends always setting clearing company options to handle many-to-manyjournals as this avoids balancing failing during General Ledger Posting or Subledger Accounting Create Accountingprocess.
Clearing Company OptionsYou can choose to set clearing company options to balance a many-to-many journal. Set the following options to manageyour clearing company balancing.
• Clearing Company Condition: Choose when to use a clearing company.
◦ Use clearing company only for intracompany journals.
◦ Use clearing company for all many-to-many journals.
◦ Error out if many-to-many journal. This is the default value for this option.
• Clearing Company Source: Choose how the clearing company value is derived for your balancing lines, from thefollowing options:
◦ Default clearing balancing segment value.
◦ Manually entered clearing balancing segment value. Note that if you select Manually entered clearingbalancing segment value, you will need to manually enter a value in the create journals screen. This option willnot work for subledger accounting entries as they do not have a field on the user interface to enter this value.
• Clearing Company Value: If you selected Default clearing balancing segment value for Source, you must select aprimary balancing segment value in this field. This is the value used to balance your intracompany or many-to-manyjournals.
Intercompany Balancing Rules: ExamplesThis topic provides examples of intercompany balancing rules and the intercompany balancing lines generated. These rulesare used to generate the accounts needed to balance journals that are out of balance by legal entity or primary balancingsegment values.
Intercompany Balancing Rules PrecedenceIn this example the legal Entity InFusion Textiles intercompany manufacturing activities are tracked separately from its non-manufacturing activities. In order to achieve this legal entity level rules are defined specifically between the legal entity InFusionTextiles and the two manufacturing legal entities, InFusion Products (East) and InFusion Products (West). A chart of accountsrule is created to cover all other intercompany activities.
Setup
• InFusion USA Chart of Accounts as shown in the following table.

Oracle Financials CloudGetting Started with Your Implementation
Chapter 3Implementing Oracle Financials Cloud
61
Segment Name Company (CO) Cost Center (CC) Division (DIV) Account (ACCT) Intercompany (IC)
Segment Qualifier
Primary BalancingSegment
Second BalancingSegment
Third BalancingSegment
Account
IntercompanySegment
• Ledger, Legal Entity, Primary Balancing Segment Value Assignments as shown in the following table.
Ledger Legal Entity Primary Balancing Segment Value
InFusion USA
InFusion Farms
3100, 3200, 3300, 3400, 3500
InFusion USA
InFusion Textiles
4000
InFusion USA
InFusion Products (East)
5000
InFusion USA
InFusion Products (West)
6000
InFusion USA
1000, 9000
• Chart of Accounts Rule as shown in the following table.
Rule Number Chart ofAccounts
AR Account AP Account Source Category Transaction Type
1
InFusionUSA Chart ofAccounts
1000 - 000 -0000 - 13050 -0000
1000 - 000 -0000 - 21050 -0000
Other
Other
None
• Legal Entity Level Rule as shown in the following table.
Rule No. From LegalEntity
To LegalEntity
AR Account AP Account Source Category TransactionType
2
InFusionTextiles
InFusionProducts(West)
1000 - 000 -0000 - 13020- 0000
1000 - 000 -0000 - 21020- 0000
Other
Other
None
3
InFusionTextiles
InFusionProducts(East)
1000 - 000 -0000 - 13030- 0000
1000 - 000 -0000 - 21030- 0000
Other
Other
None
• Journal Balancing
◦ Journal before Balancing as shown in the following table.

Oracle Financials CloudGetting Started with Your Implementation
Chapter 3Implementing Oracle Financials Cloud
62
Line Line Type LegalEntity
CO CC DIV ACCT IC Debit Credit
1
Expense
InFusionFarms
3100
100
1200
52330
0000
150
2
Expense
InFusionProducts(East)
5000
100
1200
52340
0000
200
3
Expense
InFusionProducts(West)
6000
200
1300
52345
0000
300
4
Liability
InFusionTextiles
4000
500
1300
40118
0000
650
• Journal Balancing
◦ Journal after Balancing as shown in the following table.
UsesRule
Line LineType
LegalEntity
CO CC DIV ACCT IC Debit Credit
1
Expense
InFusionFarms
3100
100
1200
52330
0000
150
2
Expense
InFusionProducts(East)
5000
100
1200
52340
0000
200
3
Expense
InFusionProducts(West)
6000
200
1300
52345
0000
300
4
Liability
InFusionTextiles
4000
500
1300
40118
0000
650
1
5
IC AR
InFusionTextiles
4000
500
1300
13050
3100
150
1
6
IC AP
InFusionFarms
3100
100
1200
21050
4000
150
3
7
IC AR
InFusionTextiles
4000
500
1300
13030
5000
200
1
8
IC AP
InFusionProducts(East)
5000
100
1200
21050
4000
200
2
9
IC AR
InFusionTextiles
4000
500
1300
13020
6000
300

Oracle Financials CloudGetting Started with Your Implementation
Chapter 3Implementing Oracle Financials Cloud
63
UsesRule
Line LineType
LegalEntity
CO CC DIV ACCT IC Debit Credit
1
10
IC AP
InFusionProducts(West)
6000
200
1300
21050
4000
300
Invoicing and Payments Configuration
Implementing Payables and Payments: ProcedureTo get started with Oracle Fusion Payables and Oracle Fusion Payments, the Invoicing and Payments Configuration for RapidImplementation task list provides a framework for managing setups for Oracle Fusion Procurement that are required to set upPayables, as well as the setup steps of common options, distribution sets, and invoice tolerances for Payables and the setupsteps of disbursement system options, payment methods, and payment process profiles for Payments.
Setting Up Payables and PaymentsThe tasks in the following list relate to the setup of Payables and Payments.
For setting up Payables and Payments, each task is performed by the Application Implementation Consultant. References tohelp topics in the following tasks are from the following publications:
• Oracle Financials Cloud Implementing Payables Invoice to Pay
◦ General Payables Options chapter, Manage Common Options for Payables and Procurement section
◦ Payables Configuration chapter
◦ Disbursements chapter
• Oracle Procurement Cloud Implementing Procurement
◦ Define Purchasing Configuration chapter, Define Procurement Agents section
• Oracle Procurement Cloud Using Procurement
◦ Manage Supplier Information chapter, Manage Supplier Profiles section
1. Configure Procurement business function, procurement agents, and suppliers.
◦ Perform the task Configure Procurement Business Function, Procurement Agents, and Suppliers,which includes configuring:
• The procurement business function for the procurement business unit to specify procurementdocument control, document defaults, document numbering, and related settings.
• Procurement agent access to information, such as purchasing documents and suppliers.• Suppliers, sites, and other supplier-related information.
◦ See: Define Procurement Agents section
• Create Procurement Agent: Critical Choices
Oracle Financials CloudGetting Started with Your Implementation
Chapter 3Implementing Oracle Financials Cloud
64
◦ See: Manage Supplier Profiles section
• Supplier Model: Explained• Supplier Import Process: Explained• Supplier Sites and Supplier Site Assignments: Explained
2. Manage common options for Payables and Procurement.
◦ Perform the task Manage Common Options for Payables and Procurement to set the controls anddefault values that are used by both Payables and Procurement, such as the default liability account andwhether to accrue expense items at time of receipt or at period end.
◦ See: Manage Common Options for Payables and Procurement section
• Common Options for Payables and Procurement: Critical Choices• Default Distributions: Explained• Offset Segments: Critical Choices• Accruing Expense Items: Critical Choices
Note: You can skip this step if you have used the Rapid Implementation spreadsheet for General Ledgerto create the ledger, legal entities, and business units.
3. Manage distribution sets.
◦ Perform the task Manage Distribution Sets to define a distribution set, which is a list of accounts with orwithout percentages. When you create an invoice that is not associated with a purchase order, you can enterthe distribution set name to automatically create the invoice distributions with a predefined set of accounts.If the distribution set has percentages, the invoice line amount is automatically distributed to the accounts,otherwise you must enter the amounts manually.
◦ See: Payables Configuration chapter
• Distribution Sets: Explained4. Manage invoice tolerances.
◦ Perform the task Manage Invoice Tolerances to define acceptable variances between invoice, purchaseorder, and receipt information. You can define both percentage-based and amount-based tolerances.Invoices that exceed the specified tolerances are placed on hold during the invoice validation process.
◦ See: Payables Configuration chapter
• Invoice Tolerances: Explained5. Manage disbursement system options.
Note: Payments provides predefined setups for Steps 5 to 7. You do not need to modify the predefinedsetups unless you want to change disbursement system options, or configure different payment methodsor payment process profiles.
◦ Perform the task Manage Disbursement System Options to manage payment processing options at theenterprise and business unit level.
6. Manage payment methods.
◦ Perform the task Manage Payment Methods to define or manage payment methods and to attach orupdate validations that are assigned to them. See:
• Payment Methods: Explained

Oracle Financials CloudGetting Started with Your Implementation
Chapter 3Implementing Oracle Financials Cloud
65
• Payment Method Defaulting: Explained• Setting Up User-Defined Validations for Payment Methods or for Payment Files: Worked Example
7. Manage payment process profiles.
◦ Perform the task Manage Payment Process Profiles to define or manage payment process profiles, whichare entities that determine the payment processing type, grouping of installments, grouping of payments, andthe definition of usage rules based on payment methods, disbursement bank accounts, business units, andcurrencies. See:
• Payment Process Profiles: Explained
Related Topics
• Implementing Payables Invoice to Pay
• Implementing Procurement
• Using Procurement
Expenses Configuration
Implementing Expenses: ProcedureThe Define Expenses Configuration for Rapid Implementation task list provides a framework for developing and managingyour system options, expense report templates, approval rules, and conversion rates and policies.
The tasks in the Define Expenses Configuration for Rapid Implementation task list enable expense entry, approval, andreimbursement processing in Expenses.
Setting Up ExpensesTo set up Expenses, each task is performed by the Application Implementation Consultant. References to help topics in thefollowing tasks are from the Oracle Financials Cloud Implementing Expenses: Expense Policies and Rules chapter.
1. Manage expenses system options.
◦ Perform the task Manage Expenses System Options to define setup options for managing expense entryand processing for all business units.
◦ Confirm that the default settings are aligned with your business practices.
2. Manage expense report templates.
◦ Perform the task Manage Expense Report Templates to define expense types applicable to your companyand group them into expense templates. Expense templates are defined by business units. The expensetemplates available in expense report entry is determined by the business unit of the employees.
◦ Specify receipt requirements when you define expense types.
◦ See:
• Expense Templates: Points to Consider• Can expense types be used across expense templates?• Configuring Expense Policies: Points to Consider.

Oracle Financials CloudGetting Started with Your Implementation
Chapter 3Implementing Oracle Financials Cloud
66
3. Manage expense approval rules.
◦ Perform the task Manage Expense Approval Rules to define expense report approval rules based on yourcompany's approval policies.
◦ Modify the predefined rules as needed.
◦ See:
• Configuring Approval Rules: Explained• Defining Approval Rules: Explained
Note: To enable audit of expense reports, you must define audit rules in addition to approval rules.
4. Manage conversion rates and policies.
◦ Perform the task Manage Conversion Rates and Policies to select the conversion rate type for eachbusiness unit.
◦ See: Configuring Expense Policies: Points to Consider
Related Topics
• Oracle Financials Cloud Implementing Expenses
Fixed Assets Configuration
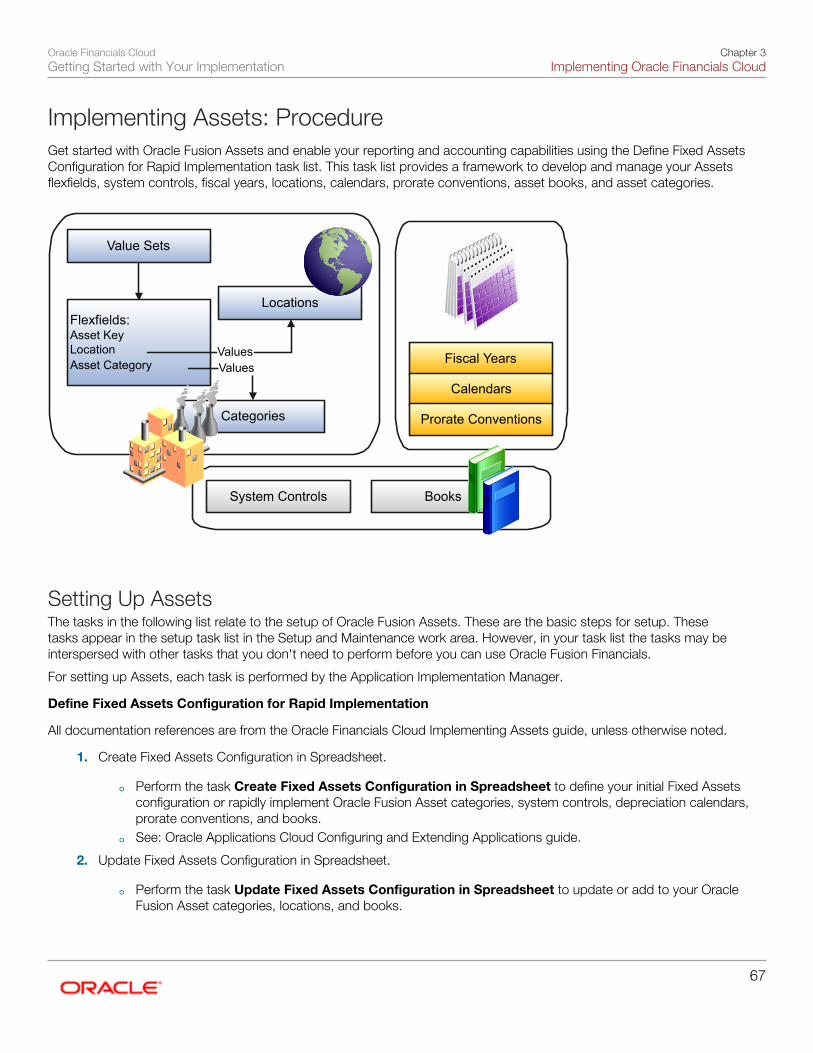
Oracle Financials CloudGetting Started with Your Implementation
Chapter 3Implementing Oracle Financials Cloud
67
Implementing Assets: ProcedureGet started with Oracle Fusion Assets and enable your reporting and accounting capabilities using the Define Fixed AssetsConfiguration for Rapid Implementation task list. This task list provides a framework to develop and manage your Assetsflexfields, system controls, fiscal years, locations, calendars, prorate conventions, asset books, and asset categories.
Value Sets
Flexfields:Asset KeyLocationAsset Category
System Controls
Fiscal Years
Locations
Calendars
Prorate Conventions
Books
Categories
ValuesValues
Setting Up AssetsThe tasks in the following list relate to the setup of Oracle Fusion Assets. These are the basic steps for setup. Thesetasks appear in the setup task list in the Setup and Maintenance work area. However, in your task list the tasks may beinterspersed with other tasks that you don't need to perform before you can use Oracle Fusion Financials.
For setting up Assets, each task is performed by the Application Implementation Manager.
Define Fixed Assets Configuration for Rapid Implementation
All documentation references are from the Oracle Financials Cloud Implementing Assets guide, unless otherwise noted.
1. Create Fixed Assets Configuration in Spreadsheet.
◦ Perform the task Create Fixed Assets Configuration in Spreadsheet to define your initial Fixed Assetsconfiguration or rapidly implement Oracle Fusion Asset categories, system controls, depreciation calendars,prorate conventions, and books.
◦ See: Oracle Applications Cloud Configuring and Extending Applications guide.
2. Update Fixed Assets Configuration in Spreadsheet.
◦ Perform the task Update Fixed Assets Configuration in Spreadsheet to update or add to your OracleFusion Asset categories, locations, and books.
Oracle Financials CloudGetting Started with Your Implementation
Chapter 3Implementing Oracle Financials Cloud
68
3. Upload Fixed Assets Configuration in Spreadsheet.
◦ Perform the task Upload Fixed Assets Configuration in Spreadsheet to load the key flexfield structure,system controls, calendar, prorate convention, asset book, location combination, and category assignment tothe book created or updated in the spreadsheet.
Related Topics
• Oracle Financials Cloud Implementing Assets
• System Controls: Explained
• Depreciation Methods: Explained
Receivables Configuration
Implementing Receivables and Payments: ProcedureThe Receivables task list provides a framework for developing and managing your accounts receivable environment. Thisincludes the necessary setups in Oracle Fusion Receivables and the related setups in Oracle Fusion Payments.
Defining the Receivables and Payments ConfigurationThe tasks in the following list relate to the setup of Receivables and Payments for Receivables. These are the basic steps forsetup.
For setting up Receivables and Payments for Receivables, each task is performed by the Application ImplementationConsultant. All documentation references are from these chapters in Oracle Financials Cloud Implementing ReceivablesCredit to Cash:
• Define Common Accounts Receivable Configuration
• Manage Receivables System Options
• Define Customer Billing Configuration
• Define Customer Payments
• Configure Payment System Connectivity
• Define Funds Capture
• Define Customer
1. Manage Receivables system options.
◦ Perform the task Manage Receivables System Options to manage the basic settings of your Receivablesenvironment.
◦ See: Manage Receivables System Options chapter:
• Updating System Option Records: Critical Choices• Using Header Level Rounding: Example• Tax Invoice Printing Options• Tuning Segments: Explained
Oracle Financials CloudGetting Started with Your Implementation
Chapter 3Implementing Oracle Financials Cloud
69
• Log File Message Levels: Explained• Transaction Delivery E-Mail Subject Line: Examples• Transaction Delivery Using E-Mail: How It Works• Setting Up Oracle B2B to Send Receivables Transactions in XML: Procedures• Setting Up B2B XML Invoicing for Receivables: Explained• Processing XML Transactions for Receivables: Explained
2. Manage Receivables activities.
◦ Perform the task Manage Receivables Activities to set up default accounting information for all activities inaccounts receivable other than transaction processing and receipt processing.
◦ See: Define Common Accounts Receivable Configuration: Define Receivables Activities section:
• Receivables Activity Types• GL Account Source• Tax Rate Code Source
3. Manage AutoAccounting rules.
◦ Perform the task Manage AutoAccounting Rules to set up default accounting information for Receivablestransaction processing.
◦ See: Define Customer Billing Configuration: Define AutoAccounting section:
• AutoAccounting Account Types and Segment Values• AutoAccounting Structure: Points to Consider• Using AutoAccounting to Derive Accounting Flexfield Segments: Example
4. Manage remit-to addresses.
◦ Perform the task Manage Remit-to Addresses to assign remit-to addresses to Receivables transactions.
◦ See: Define Customer Billing Configuration: FAQs for Remit-to Addresses section:
• How can I use remit-to addresses?• How does AutoInvoice validate remit-to addresses?• How can I define a default remit-to address?• Why did the country appear?• Why do I verify the address?
5. Manage standard memo lines.
◦ Perform the task Manage Standard Memo Lines to define memo lines for line items that are not inventoryitems.
◦ See: Define Customer Billing Configuration: Define Memo Lines section: Revenue Accounts and Memo Lines:Explained
6. Manage system security options.
◦ Perform the task Manage System Security Options to enable the credit card and bank account encryptionand masking.
◦ Define Payments Security chapter: System Security Options: Critical Choices.
7. Manage funds capture payment methods.
◦ Perform the task Manage Funds Capture Payment Methods to define funds capture payment methods toenable customers to remit payments. Payments supports bank account transfers for automated funds captureprocessing.
Oracle Financials CloudGetting Started with Your Implementation
Chapter 3Implementing Oracle Financials Cloud
70
8. Manage funds capture process profiles.
◦ Perform the task Manage Funds Capture Process Profiles to define profiles for funds capture processingwith rules for authorization and settlement handling.
◦ See: Define Funds Capture chapter: Funds Capture Process Profile: Explained
9. Manage internal payees.
◦ Perform the task Manage Internal Payees to set up one or more business units that use a paymentprocessor or gateway to receive funds from customers.
10. Manage payment systems.
◦ Perform the task Manage Payment Systems to define external organizations, such as banks or paymentprocessors, that process funds capture and disbursement transactions.
◦ See: Configure Payment System Connectivity chapter
• Validations: Critical Choices• Formats: Explained• Transmission Protocol: Explained• Transmission Configuration: Explained• Configuring Your Communication Channel to a Payment System: Explained• Payment System: Explained• Payment System Account: Explained• Importing a Security Credential File: Procedures
11. Manage receipt classes and methods.
◦ Perform the task Manage Receipt Classes and Methods to set up the steps required for receipts and toset up default accounting information for receipt processing.
◦ See: Define Customer Payments: Define Receipt Classes and Methods section:
• Remittance Methods and Clearance Methods• Automatic Receipt Processing: Points to Consider• Fund Transfer Error Handling: Explained• Remittance Bank Accounts: Explained
12. Manage lockbox.
◦ Perform the task Manage Lockbox to set up a lockbox to create receipts automatically from data suppliedby your remittance bank.
◦ See: Define Customer Payments: Define Lockbox section:
• Processing Lockbox Files: How It Works• Lockbox Interface Table AR_PAYMENTS_INTERFACE_ALL• Using a Custom Matching Rule with Lockbox: Explained• Match Receipts By Method: Explained
13. Manage transmission formats for lockbox.
◦ Perform the task Manage Transmission Formats for Lockbox to set up lockbox transmission formats. Thetransmission formats ensure that data is correctly transferred from your remittance bank.
◦ See: Define Customer Payments: Define Transmission Formats for Lockbox section:
• Validating the Lockbox File Transmission: How It Works• Lockbox Transmission Formats

Oracle Financials CloudGetting Started with Your Implementation
Chapter 3Implementing Oracle Financials Cloud
71
• Lockbox Transmission Format Record Types• Lockbox Transmission Format Field Types
14. Manage statement cycles.
◦ Perform the task Manage Statement Cycles to set up statements and statement cycles that determinewhen to send statements to your customers.
◦ See: Define Common Accounts Receivable Configuration: Define Statements section:
• Setting Up for Statements: Procedure• Statement Cycles: Example
15. Create customer.
◦ Perform the task Create Customer to create customer records for all organizations and persons with whomyou do business.
◦ See: Define Customer chapter: Define Customer Account section and Manage Customers section:
• Customer Account Relationships: Explained• Customer Account Uses: Points to Consider• Customer Addresses: Points to Consider• Related Contact Sites: Explained• Customer and Party: Explained• Party Relationships: Explained• Preparing Customer Data for Upload: Points to Consider• Validating Unique Values in the Customer Spreadsheet Upload: Examples• Customer Listing Report
16. Manage approval limits.
◦ Perform the task Manage Approval Limits to set approval limits for each of your users for specifictransactions and amount ranges per currency.
◦ See: Define Common Accounts Receivable Configuration: Define Approval Limits section: Approval LimitsDocument Types.
Related Topics
• Oracle Financials Cloud Implementing Receivables Credit to Cash

Oracle Financials CloudGetting Started with Your Implementation
Chapter 3Implementing Oracle Financials Cloud
72

Oracle Financials CloudGetting Started with Your Implementation
Chapter 4Configuring Financial Reporting
73
4 Configuring Financial Reporting
Configuring Financial Reporting: OverviewConfigure the following financial tools to report and analyze your accounting data: Financial Reporting Center, Smart View,Financial Reporting Studio, and Workspace.
Financial Reporting Center: How It WorksThe Financial Reporting Center is intended to be the primary user interface for financials end users to access all seven reporttypes.
Financial Reporting Center Overview
The Financial Reporting Center includes these report types: Financial Reporting Studio Reports, Account Groups andSunburst, Smart View Reports, Oracle Transactional Business Intelligence Analyses, Oracle Transactional BusinessIntelligence Dashboards, Oracle Business Intelligence Publisher Reports, and Business Intelligence Mobile Apps. Otherreporting tools are also available to run the same seven report types.
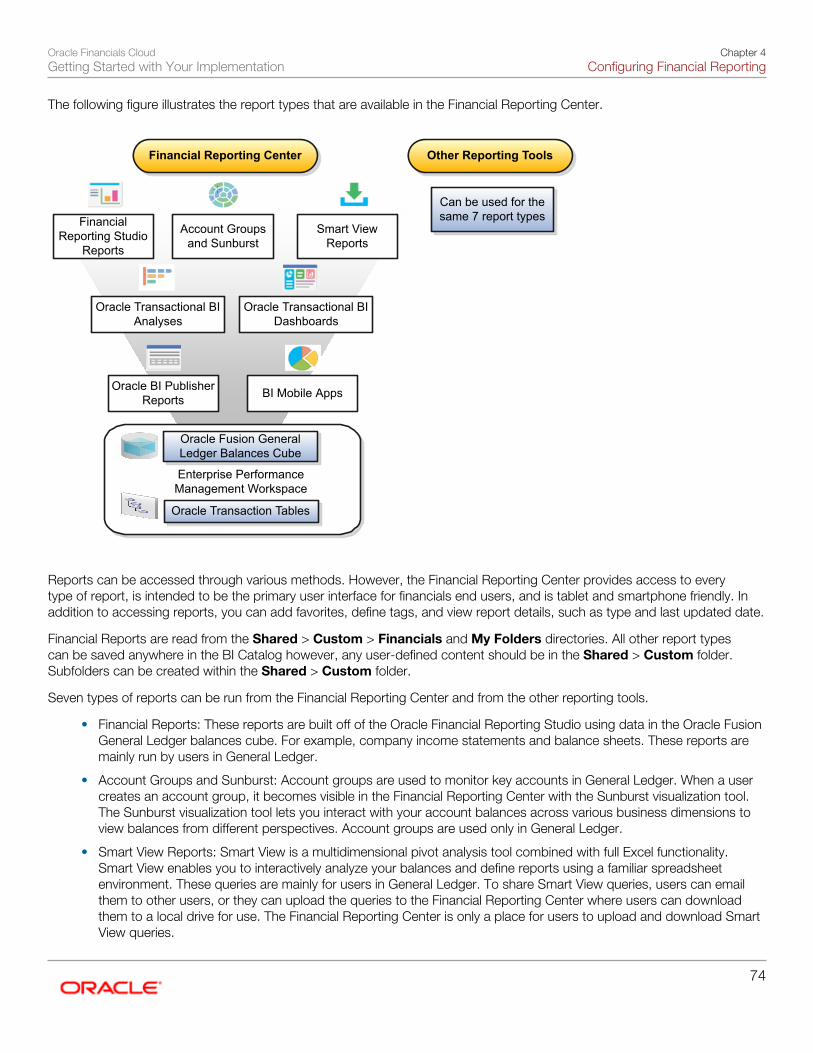
Oracle Financials CloudGetting Started with Your Implementation
Chapter 4Configuring Financial Reporting
74
The following figure illustrates the report types that are available in the Financial Reporting Center.
Financial Reporting Studio
Reports
Oracle Fusion General Ledger Balances Cube
Oracle Transaction Tables
Enterprise Performance Management Workspace
Account Groups and Sunburst
Smart View Reports
Oracle Transactional BI Analyses
Oracle Transactional BI Dashboards
Oracle BI Publisher Reports BI Mobile Apps
Financial Reporting Center Other Reporting Tools
Can be used for the same 7 report types
Reports can be accessed through various methods. However, the Financial Reporting Center provides access to everytype of report, is intended to be the primary user interface for financials end users, and is tablet and smartphone friendly. Inaddition to accessing reports, you can add favorites, define tags, and view report details, such as type and last updated date.
Financial Reports are read from the Shared > Custom > Financials and My Folders directories. All other report typescan be saved anywhere in the BI Catalog however, any user-defined content should be in the Shared > Custom folder.Subfolders can be created within the Shared > Custom folder.
Seven types of reports can be run from the Financial Reporting Center and from the other reporting tools.
• Financial Reports: These reports are built off of the Oracle Financial Reporting Studio using data in the Oracle FusionGeneral Ledger balances cube. For example, company income statements and balance sheets. These reports aremainly run by users in General Ledger.
• Account Groups and Sunburst: Account groups are used to monitor key accounts in General Ledger. When a usercreates an account group, it becomes visible in the Financial Reporting Center with the Sunburst visualization tool.The Sunburst visualization tool lets you interact with your account balances across various business dimensions toview balances from different perspectives. Account groups are used only in General Ledger.
• Smart View Reports: Smart View is a multidimensional pivot analysis tool combined with full Excel functionality.Smart View enables you to interactively analyze your balances and define reports using a familiar spreadsheetenvironment. These queries are mainly for users in General Ledger. To share Smart View queries, users can emailthem to other users, or they can upload the queries to the Financial Reporting Center where users can downloadthem to a local drive for use. The Financial Reporting Center is only a place for users to upload and download SmartView queries.

Oracle Financials CloudGetting Started with Your Implementation
Chapter 4Configuring Financial Reporting
75
Note: To upload a Smart View report to the Financial Reporting Center: select the Open Workspace forFinancial Reports task, navigate to the BI Catalog, and select Upload from the Tasks section. Be sure toupload the Excel file to one of the folder locations mentioned previously.
• Oracle Transactional Business Intelligence Analyses: These analyses and reports are built off of transactionaltables using subject areas. These reports can be run by users in General Ledger, Payables, Receivables, CashManagement, Intercompany, and so on.
• Oracle Transactional Business Intelligence Dashboards: Dashboards put all the information, functions, and actionsthat a business user must have to do their job in one place. Dashboards are built off of Oracle TransactionalBusiness Intelligence objects like analyses and reports. These reports can be run by users in General Ledger,Payables, Receivables, Cash Management, Intercompany, and so on.
• Oracle Business Intelligence Publisher Reports: Most of these reports are predefined and must first be submittedand resubmitted to see the latest data by the Oracle Enterprise Scheduler through the Scheduled Processesnavigation. These reports can be run by users in General Ledger, Payables, Receivables, Cash Management,Intercompany, and so on.
• BI Mobile Apps: Oracle Business Intelligence Mobile App Designer is an application that enables you to createmultitouch information-driven applications with rich interaction, rich visualization, and rich media, for mobile devicessuch as iPhone, iPad, Android phone, tablet, and more. These reports can be run by users in General Ledger,Payables, Receivables, Cash Management, Intercompany, and so on.
Other Reporting Tools OverviewSix other tools are available for reporting in Financials.
The following table lists the other reporting tools and the types of reports they support.
Other Reporting Tools Report Type
General Accounting Dashboard andAccount Inspector
Account Groups
Reports and Analytics
Oracle Transactional Business Intelligence Objects
BI Catalog
All Report Types, Except Oracle Business Intelligence Publisher Reports
Enterprise Performance ManagementWorkspace
Reports, Books, Snapshot Reports, Snapshot Books, Financial Reporting Batches, and BatchScheduler
Enterprise Scheduler System
Oracle Business Intelligence Publisher Reports
Even though the Financial Reporting Center is designed to be the main user interface for a financial end user's reportingneeds, some users may choose to use any of the six other tools for reporting in financials, such as:
• General Accounting Dashboard, which provides access to Account Groups: Uses the Account Monitor to efficientlymonitor and track key account balances in real time.
• Account Inspector: Perform ad hoc queries from account groups and financial reports through drill down tounderlying journals and subledger transactions.

Oracle Financials CloudGetting Started with Your Implementation
Chapter 4Configuring Financial Reporting
76
• Reports and Analytics: This reporting tool has a panel that reflects the folder structure of the BI Catalog. Userscan access and run any Oracle Transactional Business Intelligence analysis, report or dashboard. Users can't runFinancial Reports or Oracle Business Intelligence Publisher reports from this interface. This interface can be used byall financials users.
• BI Catalog: A component of the Enterprise Performance Management Workspace where you can run all reporttypes, except for Oracle Business Intelligence Publisher reports.
• Enterprise Performance Management Workspace: Create reports, books, snapshot reports, snapshot books,Financial Reporting batches, and batch scheduler, and schedule batches to automatically run and burst to email.
• Enterprise Scheduler System: Only Oracle Business Intelligence Publisher reports can be submitted from thisinterface. Users access this interface by navigating to Tools > Scheduled Processes. Most financial users haveaccess to this interface to run standard reports for General Ledger, Payables, Receivables, and so on.
Related Topics
• Setting Up Your Financial Reporting Center: Critical Choices
Define Financial Reporting CenterThe Financial Reporting Center is a tool for accessing, designing, and presenting financial reports and analytic data.
Configure Financial Reporting CenterYou have access to reports through the folder structure in the Financial Reporting Center and Workspace that's installed withOracle Fusion Financials. Your Oracle Fusion Business Intelligence (BI) administrator defines the folder structure in Workspaceyour company's security requirements for folders and reports, as well as report distribution requirements for financial reportingbatches.
Security can be set on folders and reports from Workspace. The BI Catalog stores both the Financial Reports and the BIPublisher Reports. Your BI administrator grants access to the folders and reports that you need.
Create and Secure a Folder StructureTo create a folder or subfolder:
1. From the Financial Reporting Center, open the Tasks pane and click the Open Workspace for Financial Reportstask.
2. From the Navigate menu, select Applications, then BI Catalog.3. On the Oracle BI Catalog page, go to the location in the Folders panel where you want to create the folder.4. In the Oracle BI Catalog toolbar, click New and select Folder.5. On the New Folder window, enter the folder name.6. Click OK.
To assign permissions to a folder:
1. From the Financial Reporting Center, open the Tasks pane and click the Open Workspace for Financial Reportstask.
2. From the Navigate menu, select Applications, then BI Catalog.3. Search for the folder to which you want to assign permissions.4. Go to the Tasks panel and click Permissions.
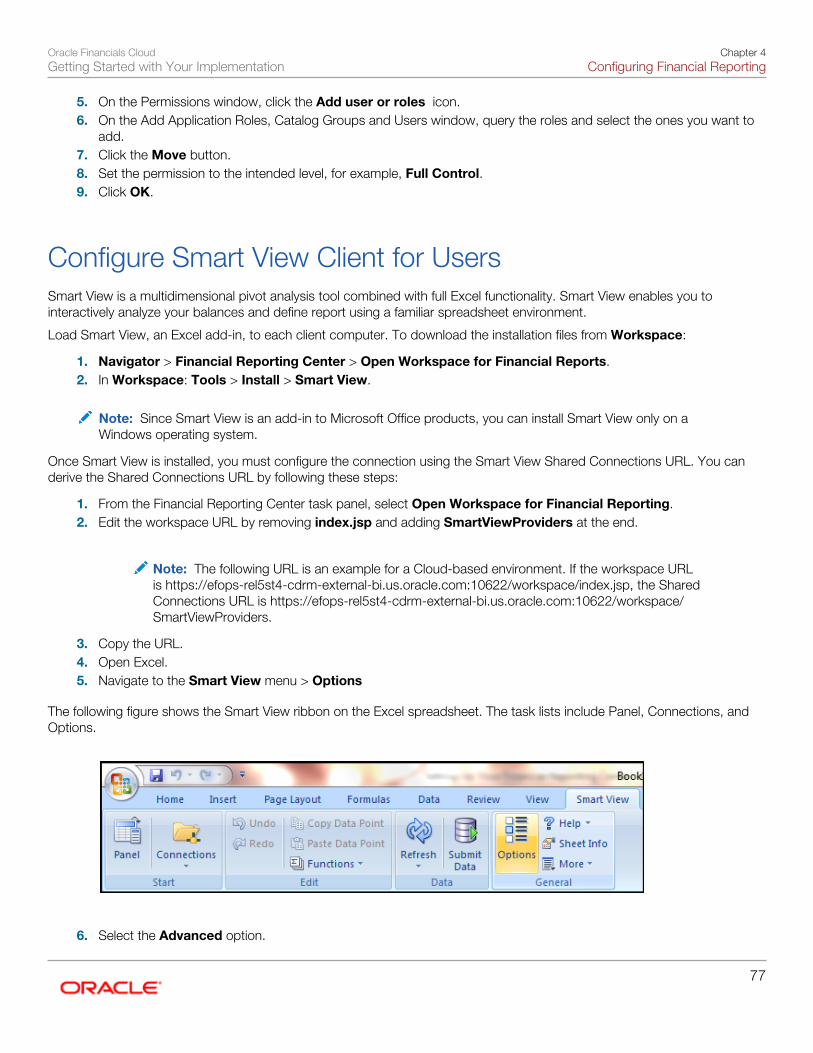
Oracle Financials CloudGetting Started with Your Implementation
Chapter 4Configuring Financial Reporting
77
5. On the Permissions window, click the Add user or roles icon.6. On the Add Application Roles, Catalog Groups and Users window, query the roles and select the ones you want to
add.7. Click the Move button.8. Set the permission to the intended level, for example, Full Control.9. Click OK.
Configure Smart View Client for UsersSmart View is a multidimensional pivot analysis tool combined with full Excel functionality. Smart View enables you tointeractively analyze your balances and define report using a familiar spreadsheet environment.
Load Smart View, an Excel add-in, to each client computer. To download the installation files from Workspace:
1. Navigator > Financial Reporting Center > Open Workspace for Financial Reports.2. In Workspace: Tools > Install > Smart View.
Note: Since Smart View is an add-in to Microsoft Office products, you can install Smart View only on aWindows operating system.
Once Smart View is installed, you must configure the connection using the Smart View Shared Connections URL. You canderive the Shared Connections URL by following these steps:
1. From the Financial Reporting Center task panel, select Open Workspace for Financial Reporting.2. Edit the workspace URL by removing index.jsp and adding SmartViewProviders at the end.
Note: The following URL is an example for a Cloud-based environment. If the workspace URLis https://efops-rel5st4-cdrm-external-bi.us.oracle.com:10622/workspace/index.jsp, the SharedConnections URL is https://efops-rel5st4-cdrm-external-bi.us.oracle.com:10622/workspace/SmartViewProviders.
3. Copy the URL.4. Open Excel.5. Navigate to the Smart View menu > Options
The following figure shows the Smart View ribbon on the Excel spreadsheet. The task lists include Panel, Connections, andOptions.
6. Select the Advanced option.

Oracle Financials CloudGetting Started with Your Implementation
Chapter 4Configuring Financial Reporting
78
The following figure shows the Options window with the Advanced option selected. The shared connections URL appears inthe General section.
7. Paste the URL in the Shared Connections URL field.8. Click OK.
For more information about configuring the Smart View client for users, see Oracle Hyperion Smart View for Office User'sGuide for Oracle Hyperion Smart View.
To connect Oracle Fusion General Ledger Balances cubes in Smart View:
1. Open Smart View from your Start menu > Programs > Microsoft Office > Microsoft Excel 2007.2. Go to the Smart View menu > Open, in the Start on the ribbon > click the Smart View panel that appears in the
drop down box under the ribbon. This launches a task pane.3. Click the Shared Connections button on the task pane.4. Sign in with your user name and password.
The following figure shows the Sign In window for connecting to the database.
5. Click the Select Server list icon to proceed.

Oracle Financials CloudGetting Started with Your Implementation
Chapter 4Configuring Financial Reporting
79
The following figure shows the Shared Connections section on the Smart View panel. The Select Server to proceed field isselected and two values appear in the drop-down list: Oracle Essbase, Oracle Hyperion Financial Reporting.
Note: If the Essbase Server is not there, then it has to be added. Use the following steps:
a. Click the Add Essbase Server link.b. Specify the Essbase Server login and password.c. Expand the Essbase server and locate its cube.
6. Select Oracle Essbase from the list of shared connections.7. Click the Expand to expand the list of cubes.8. Expand your cube that has the name of your chart of accounts.
The following figure shows the Shared Connections section on the Smart View panel. The Oracle Essbase server isexpanded, showing several cubes.
9. Click db. A list of functions appears.10. Click the analysis link.
Note: You must perform these steps only once for a new server and database.
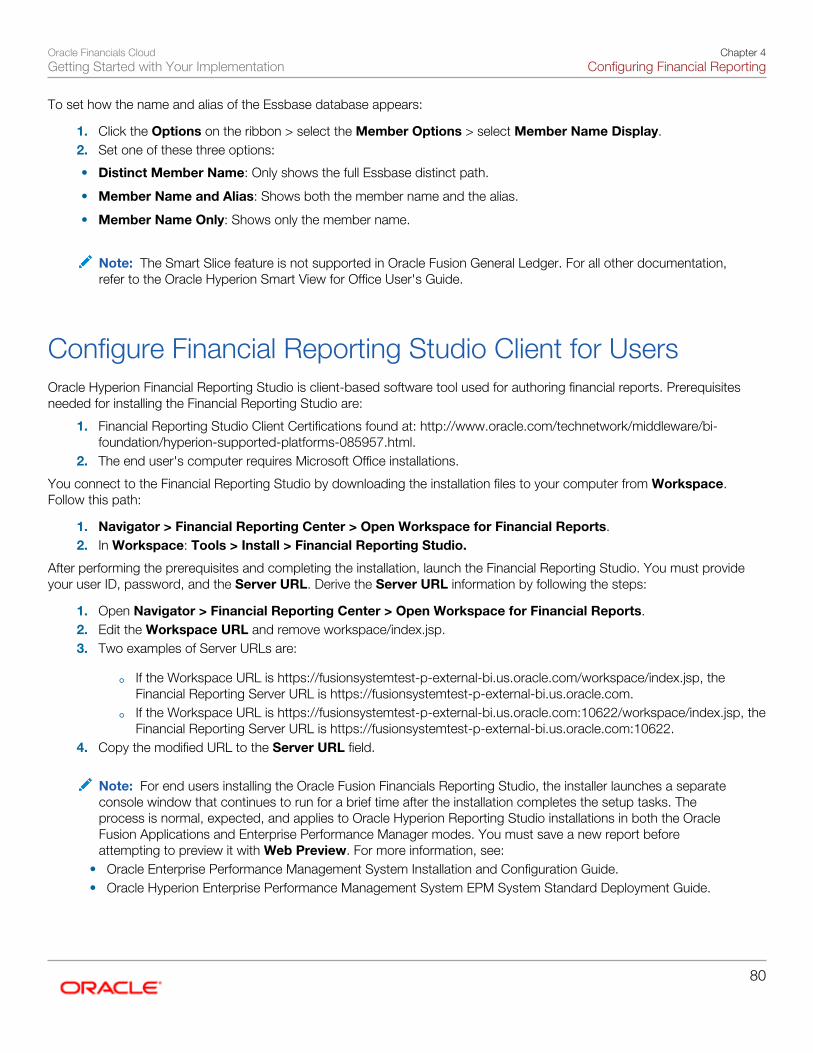
Oracle Financials CloudGetting Started with Your Implementation
Chapter 4Configuring Financial Reporting
80
To set how the name and alias of the Essbase database appears:
1. Click the Options on the ribbon > select the Member Options > select Member Name Display.2. Set one of these three options:
• Distinct Member Name: Only shows the full Essbase distinct path.
• Member Name and Alias: Shows both the member name and the alias.
• Member Name Only: Shows only the member name.
Note: The Smart Slice feature is not supported in Oracle Fusion General Ledger. For all other documentation,refer to the Oracle Hyperion Smart View for Office User's Guide.
Configure Financial Reporting Studio Client for UsersOracle Hyperion Financial Reporting Studio is client-based software tool used for authoring financial reports. Prerequisitesneeded for installing the Financial Reporting Studio are:
1. Financial Reporting Studio Client Certifications found at: http://www.oracle.com/technetwork/middleware/bi-foundation/hyperion-supported-platforms-085957.html.
2. The end user's computer requires Microsoft Office installations.
You connect to the Financial Reporting Studio by downloading the installation files to your computer from Workspace.Follow this path:
1. Navigator > Financial Reporting Center > Open Workspace for Financial Reports.2. In Workspace: Tools > Install > Financial Reporting Studio.
After performing the prerequisites and completing the installation, launch the Financial Reporting Studio. You must provideyour user ID, password, and the Server URL. Derive the Server URL information by following the steps:
1. Open Navigator > Financial Reporting Center > Open Workspace for Financial Reports.2. Edit the Workspace URL and remove workspace/index.jsp.3. Two examples of Server URLs are:
◦ If the Workspace URL is https://fusionsystemtest-p-external-bi.us.oracle.com/workspace/index.jsp, theFinancial Reporting Server URL is https://fusionsystemtest-p-external-bi.us.oracle.com.
◦ If the Workspace URL is https://fusionsystemtest-p-external-bi.us.oracle.com:10622/workspace/index.jsp, theFinancial Reporting Server URL is https://fusionsystemtest-p-external-bi.us.oracle.com:10622.
4. Copy the modified URL to the Server URL field.
Note: For end users installing the Oracle Fusion Financials Reporting Studio, the installer launches a separateconsole window that continues to run for a brief time after the installation completes the setup tasks. Theprocess is normal, expected, and applies to Oracle Hyperion Reporting Studio installations in both the OracleFusion Applications and Enterprise Performance Manager modes. You must save a new report beforeattempting to preview it with Web Preview. For more information, see:
• Oracle Enterprise Performance Management System Installation and Configuration Guide.• Oracle Hyperion Enterprise Performance Management System EPM System Standard Deployment Guide.

Oracle Financials CloudGetting Started with Your Implementation
Chapter 4Configuring Financial Reporting
81
Define Essbase Database Connections in WorkspaceYou must create database connections so you can access the cubes from Workspace and Financial Reporting Studio.
Note: Ledger setup has to be completed before the database connection can be created. Oracle FusionGeneral Ledger balances cubes are created as part of ledger setup. Each combination of chart of accounts andaccounting calendar has a separate cube. Each cube needs database connection.
Steps to define a database connection are:
1. From the Financial Reporting Center work area, open the Tasks panel and select the Open Workspace forFinancial Reports task.
2. From within the workspace, select the Navigate menu > Applications > BI Catalog.3. From the Tools menu, select Database Connection Manager.4. On the Database Connection Manager window, click New.5. Enter a user-friendly name for the database connection name.6. Enter Essbase as the Type, your server, user name, and password.7. Select Application (cube) and Database from the list of values.8. Expand the Application name to see the related database, for example, db.

Oracle Financials CloudGetting Started with Your Implementation
Chapter 4Configuring Financial Reporting
82
The following figure shows the Database Connection Properties window with the completed fields from steps 6 through 9.
9. Click OK twice to save your selections.10. Click Close to save the connection.
For more information about configuring Essbase database connections in Workspace see: Oracle Essbase DatabaseAdministrator's Guide.
Note: The database connection is available in both Workspace and Financial Reporting Studio. Optionally, thedatabase connection can be set up in Financial Reporting Studio while entering the grids on a report.
Creating a Financial Report: ProcedureIn Oracle Hyperion Financial Reporting Studio, you can design traditional financial report formats such as balance sheets,profit and loss statements, and cash flow reports. You can also design nontraditional reports for financial or analytic data thatinclude text and graphics. Use Financial Reporting Studio, a client-based application launched from your desktop, to createyour reports.
Perform the following tasks to define a basic income statement.
1. Open Financial Reporting Studio on your desktop and sign in with your user name, password, and server URL.

Oracle Financials CloudGetting Started with Your Implementation
Chapter 4Configuring Financial Reporting
83
Tip: The first time you sign in, copy the Financial Reports Workspace URL into the Server URL fieldand remove workspace/index.jsp from the end of the URL.
The following figure shows an example of the Financial Reporting Studio sign-in window, with the user name, password, andserver URL fields populated.
2. On the Standard toolbar, click the New Report icon. The report designer opens.3. On the Designer toolbar, click the Insert Grid icon. Grids are tables that contain data from external database
connections.4. Drag to select the area for the grid. The Select a Database Connection window opens.
Tip: When creating a grid, best practice is to leave space in the designer area for other objects, suchas a company logo and report title.
5. On the Select a Database Connection window, click the Database Connection list and select your database. Aunique cube exists for each combination of chart of accounts and accounting calendar.

Oracle Financials CloudGetting Started with Your Implementation
Chapter 4Configuring Financial Reporting
84
The following figure shows an example of the Select a Database Connection window, with the connection, user name, andpassword fields populated.
Tip: Best practice is to always turn on suppression in financial reports. This should be done at theDatabase Connection Server level. You can verify the setting by doing the following: highlight the grid,and from the menu, select Task > Data Query Optimization Settings. The normal best practicefor most reports is to turn suppression on for the entire grid, and then turn suppression off for certaincolumns and rows that must always display. For more information about suppression settings, refer tothe Using the Basic Option in Conditional Suppression section in the Designing with Financial ReportingStudio for Oracle Planning and Budgeting Cloud guide at http://docs.oracle.com/cloud/latest/epm-common/CSFSU/ch09s04s02.html#BEGIN.
6. Click OK. The Dimension Layout window opens.
Arrange Dimensions and Define RowsUse the Dimension Layout window to arrange the dimensions on the report. Use the Select Members window to select therevenue and expense accounts to include on the report.
1. On the Dimension Layout window, drag the dimensions from the Point of View frame as follows:
a. Accounting Period dimension to the Columns frame.b. Account dimension to the Rows frame.c. Company dimension to the Pages frame.

Oracle Financials CloudGetting Started with Your Implementation
Chapter 4Configuring Financial Reporting
85
The following figure shows the Dimension Layout window. The Company dimension is in the Pages frame, the AccountingPeriod dimension is in the Columns frame, and the Account dimension is in the Rows frame.
2. Click OK. The Dimension Layout window closes. The grid is inserted with the specified layout.3. Select the revenues account.
a. Double-click the Account cell on the grid. The Select Members window opens.b. Click the Remove All icon to deselect the default account member.c. In the Available area, expand the Account member, and continue expanding until you reach the revenue
account for the report. You can also use the search to find your account.d. Select the account and click the Add icon to move the account to the Selected area.

Oracle Financials CloudGetting Started with Your Implementation
Chapter 4Configuring Financial Reporting
86
The following figure shows the Select Members window for the Account dimension. The Account member is expanded andthe revenues account for the report, which is 40000, appears in the Selected area of the window.
4. Click OK. The Select Members window closes.5. Save the report.
a. From the File menu, select Save As.b. Select the My Folders directory and enter a report name.c. Click Save.
6. Insert a blank row to add space between the revenue and expense accounts.
a. Select the row after the revenues account and right-click the row header.b. From the Insert Row menu, select Text.
7. Insert a row for the expense accounts.
a. Select the row after the new blank row and right-click the row header.b. From the Insert Row menu, select Data. The default value for the new row contains the revenue account.
8. Select the expense accounts.
a. Double-click the new expense account cell in row 3. The Select Members window opens.b. Click the Remove All icon to deselect the default revenues account.c. In the Available area, expand the Account member, and continue expanding until you reach the expense
accounts.d. Select the accounts and click the Add icon to move the accounts to the Selected area.e. Select the Place selections into separate rows option to create a separate row in the grid for each
account.

Oracle Financials CloudGetting Started with Your Implementation
Chapter 4Configuring Financial Reporting
87
The following figure shows the Select Members window for the Account dimension. The Account member is expanded andthe expense accounts for the report appear in the Selected area of the window. The selected accounts are 50000, 60000,and 70000. The option called Place selections into separate rows is selected.
9. Click OK. The grid now includes the expense accounts.10. Save the report and leave it open for the next activity.11. You can preview the report in HTML or PDF format using the File menu or toolbar.
Add a FormulaDefine a formula to summarize the expense account balances.
1. Select the row after the last expense account row and right-click the row header.2. From the Insert Row menu, select Formula.3. Click in the empty cell in the new row. The cell properties sheet opens.4. On the cell properties sheet, select the Custom Heading option and enter Total Expenses.5. Select the row header for the formula row, which in this example is row 6.6. In the Formula bar, click the Sum(0) button to enter the formula into the formula text box.7. Enter the cell references for the expense accounts into the formula, between the parentheses. In this example, the
completed formula is Sum([3], [4], [5]).
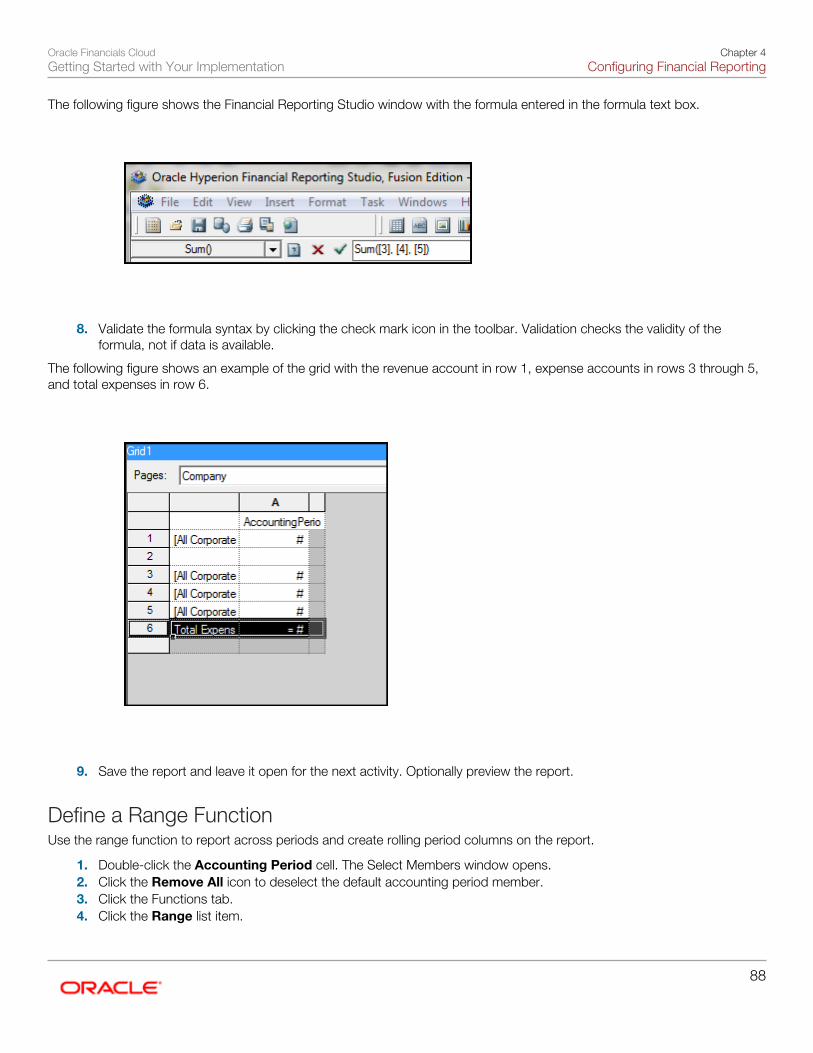
Oracle Financials CloudGetting Started with Your Implementation
Chapter 4Configuring Financial Reporting
88
The following figure shows the Financial Reporting Studio window with the formula entered in the formula text box.
8. Validate the formula syntax by clicking the check mark icon in the toolbar. Validation checks the validity of theformula, not if data is available.
The following figure shows an example of the grid with the revenue account in row 1, expense accounts in rows 3 through 5,and total expenses in row 6.
9. Save the report and leave it open for the next activity. Optionally preview the report.
Define a Range FunctionUse the range function to report across periods and create rolling period columns on the report.
1. Double-click the Accounting Period cell. The Select Members window opens.2. Click the Remove All icon to deselect the default accounting period member.3. Click the Functions tab.4. Click the Range list item.
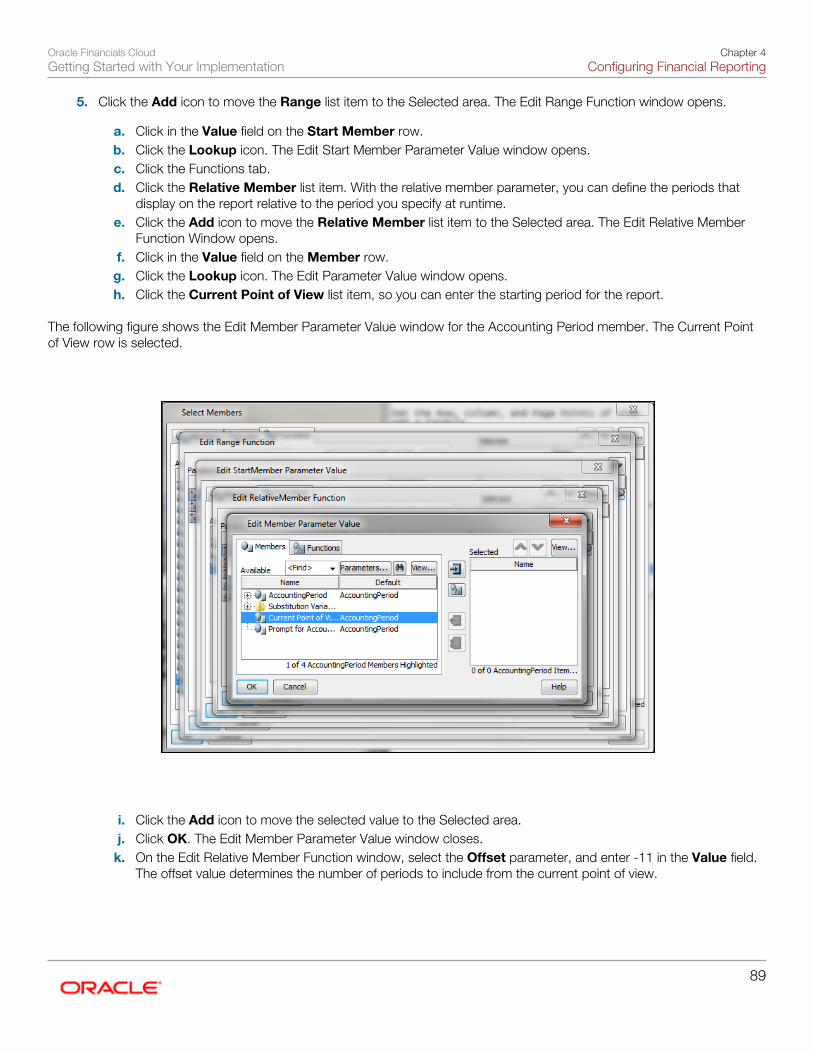
Oracle Financials CloudGetting Started with Your Implementation
Chapter 4Configuring Financial Reporting
89
5. Click the Add icon to move the Range list item to the Selected area. The Edit Range Function window opens.
a. Click in the Value field on the Start Member row.b. Click the Lookup icon. The Edit Start Member Parameter Value window opens.c. Click the Functions tab.d. Click the Relative Member list item. With the relative member parameter, you can define the periods that
display on the report relative to the period you specify at runtime.e. Click the Add icon to move the Relative Member list item to the Selected area. The Edit Relative Member
Function Window opens.f. Click in the Value field on the Member row.g. Click the Lookup icon. The Edit Parameter Value window opens.h. Click the Current Point of View list item, so you can enter the starting period for the report.
The following figure shows the Edit Member Parameter Value window for the Accounting Period member. The Current Pointof View row is selected.
i. Click the Add icon to move the selected value to the Selected area.j. Click OK. The Edit Member Parameter Value window closes.
k. On the Edit Relative Member Function window, select the Offset parameter, and enter -11 in the Value field.The offset value determines the number of periods to include from the current point of view.

Oracle Financials CloudGetting Started with Your Implementation
Chapter 4Configuring Financial Reporting
90
The following figure shows the Edit Relative Member Function window. The Offset parameter is selected and the valueentered is -11.
l. Click OK. The Edit Relative Member Function window closes.m. Click OK. The Edit Start Member Parameter Value window closes.
6. On the Edit Range Function window, click the End Member list item.7. Click in the Value field and click the Lookup icon. The Edit End Member Parameter Value window opens.
a. Click the Current Point of View list item.b. Click the Add icon to move the value to the Selected area.c. Click OK. The Edit End Member Parameter Value window closes.
8. Click OK. The Edit Range Function window closes.9. Click OK. The Select Members window closes.
10. Save the report and leave it open for the next activity. Optionally preview the report.
Define the Grid Point of ViewDefine dimensions for the grid point of view. The grid point of view ensures the same initial default value every time for everyuser.
1. Select the grid.2. Right-click and select Grid Point of View from the list.
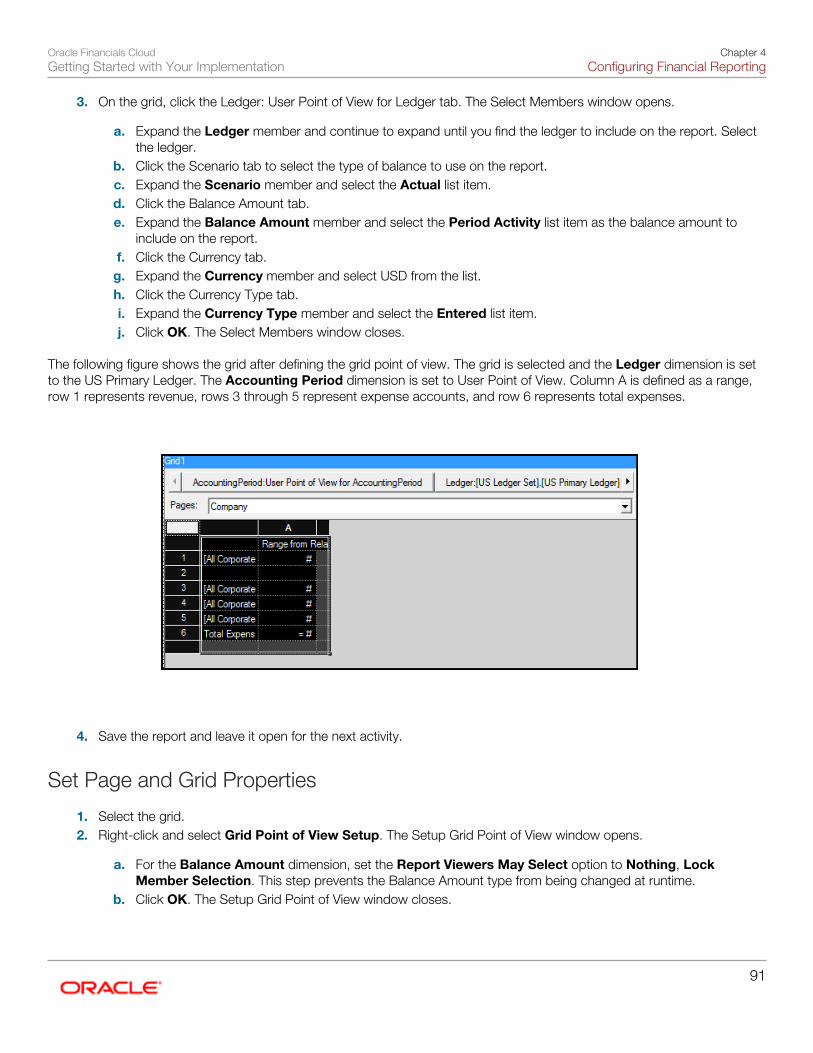
Oracle Financials CloudGetting Started with Your Implementation
Chapter 4Configuring Financial Reporting
91
3. On the grid, click the Ledger: User Point of View for Ledger tab. The Select Members window opens.
a. Expand the Ledger member and continue to expand until you find the ledger to include on the report. Selectthe ledger.
b. Click the Scenario tab to select the type of balance to use on the report.c. Expand the Scenario member and select the Actual list item.d. Click the Balance Amount tab.e. Expand the Balance Amount member and select the Period Activity list item as the balance amount to
include on the report.f. Click the Currency tab.g. Expand the Currency member and select USD from the list.h. Click the Currency Type tab.i. Expand the Currency Type member and select the Entered list item.j. Click OK. The Select Members window closes.
The following figure shows the grid after defining the grid point of view. The grid is selected and the Ledger dimension is setto the US Primary Ledger. The Accounting Period dimension is set to User Point of View. Column A is defined as a range,row 1 represents revenue, rows 3 through 5 represent expense accounts, and row 6 represents total expenses.
4. Save the report and leave it open for the next activity.
Set Page and Grid Properties
1. Select the grid.2. Right-click and select Grid Point of View Setup. The Setup Grid Point of View window opens.
a. For the Balance Amount dimension, set the Report Viewers May Select option to Nothing, LockMember Selection. This step prevents the Balance Amount type from being changed at runtime.
b. Click OK. The Setup Grid Point of View window closes.

Oracle Financials CloudGetting Started with Your Implementation
Chapter 4Configuring Financial Reporting
92
3. Set a runtime prompt for the Company dimension to provide the flexibility of selecting any company or combinationof companies at runtime.
a. On the grid, double-click the Pages label. The Select Members window opens.b. Click the Remove All icon to deselect the default Company member.c. Select the Prompt for Company list item.d. Click the Add icon to move the selection to the Selected area.e. Click OK. The Define Prompt window opens.f. Click the Lookup icon in the Default Member field. The Select Members window opens.g. Click the Remove All icon to deselect the default Company member.h. Expand the Company member, and continue expanding until you find and select the default companies to
display in the prompt.i. Click the Add icon to move the companies to the Selected area.j. Click OK. The Select Members window closes.
k. Click the Member Labels in Prompt Selection Dialog list and select the Alias list item. The actualcompany label displays in the prompt list of values instead of a numeric company value, making the promptmore user-friendly.
The following figure shows the Define Prompts window for the Company dimension. The default members are companies101 and 102, and the prompt for member labels is set to Alias.
l. Click OK. The Define Prompts window closes.
4. On the Grid Properties sheet:
a. Click the Drill Through option to enable drill through from the report to the detail balances represented on thereport.
b. Click the Suppression list item to view the suppression settings.c. Enter 0 in the Zero Values field to suppress the display of zero dollar rows on the report.
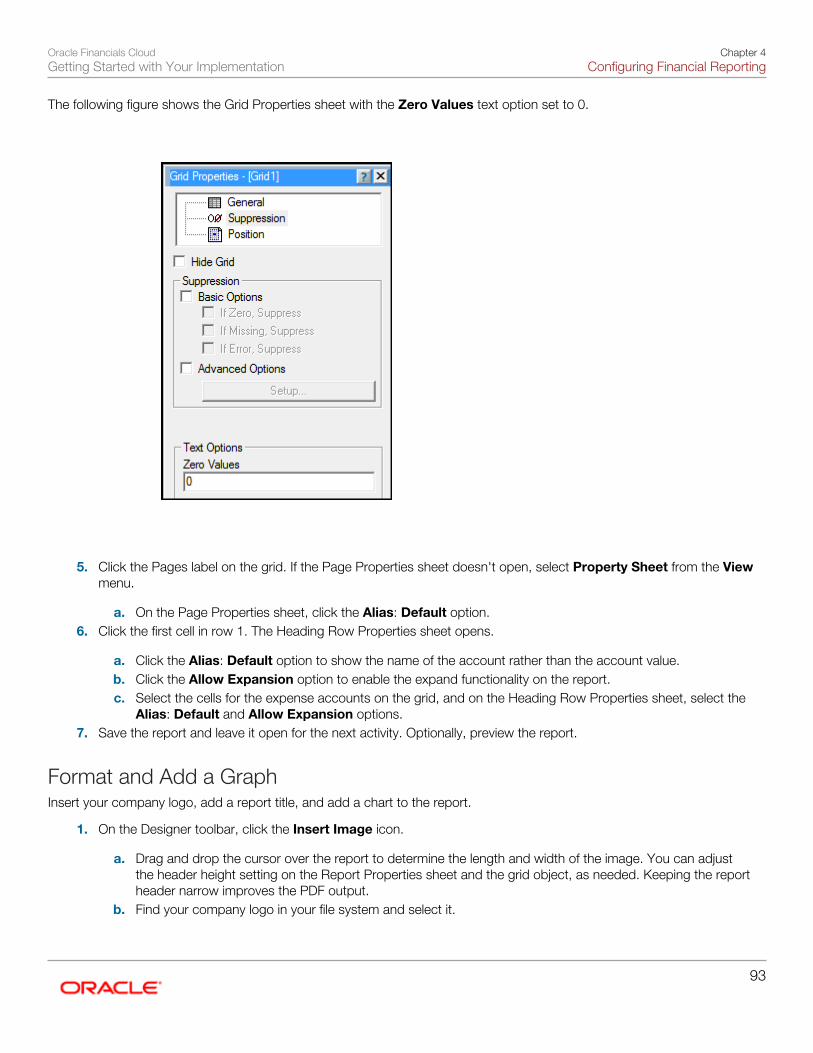
Oracle Financials CloudGetting Started with Your Implementation
Chapter 4Configuring Financial Reporting
93
The following figure shows the Grid Properties sheet with the Zero Values text option set to 0.
5. Click the Pages label on the grid. If the Page Properties sheet doesn't open, select Property Sheet from the Viewmenu.
a. On the Page Properties sheet, click the Alias: Default option.6. Click the first cell in row 1. The Heading Row Properties sheet opens.
a. Click the Alias: Default option to show the name of the account rather than the account value.b. Click the Allow Expansion option to enable the expand functionality on the report.c. Select the cells for the expense accounts on the grid, and on the Heading Row Properties sheet, select the
Alias: Default and Allow Expansion options.7. Save the report and leave it open for the next activity. Optionally, preview the report.
Format and Add a GraphInsert your company logo, add a report title, and add a chart to the report.
1. On the Designer toolbar, click the Insert Image icon.
a. Drag and drop the cursor over the report to determine the length and width of the image. You can adjustthe header height setting on the Report Properties sheet and the grid object, as needed. Keeping the reportheader narrow improves the PDF output.
b. Find your company logo in your file system and select it.
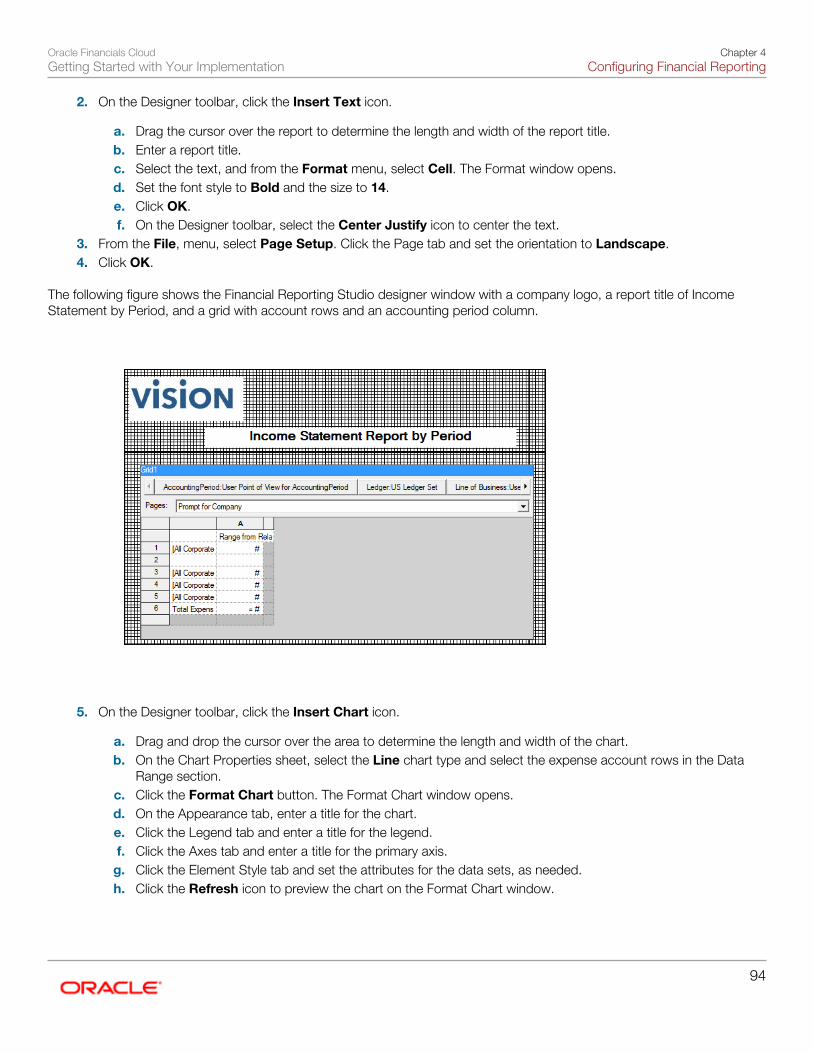
Oracle Financials CloudGetting Started with Your Implementation
Chapter 4Configuring Financial Reporting
94
2. On the Designer toolbar, click the Insert Text icon.
a. Drag the cursor over the report to determine the length and width of the report title.b. Enter a report title.c. Select the text, and from the Format menu, select Cell. The Format window opens.d. Set the font style to Bold and the size to 14.e. Click OK.f. On the Designer toolbar, select the Center Justify icon to center the text.
3. From the File, menu, select Page Setup. Click the Page tab and set the orientation to Landscape.4. Click OK.
The following figure shows the Financial Reporting Studio designer window with a company logo, a report title of IncomeStatement by Period, and a grid with account rows and an accounting period column.
5. On the Designer toolbar, click the Insert Chart icon.
a. Drag and drop the cursor over the area to determine the length and width of the chart.b. On the Chart Properties sheet, select the Line chart type and select the expense account rows in the Data
Range section.c. Click the Format Chart button. The Format Chart window opens.d. On the Appearance tab, enter a title for the chart.e. Click the Legend tab and enter a title for the legend.f. Click the Axes tab and enter a title for the primary axis.g. Click the Element Style tab and set the attributes for the data sets, as needed.h. Click the Refresh icon to preview the chart on the Format Chart window.
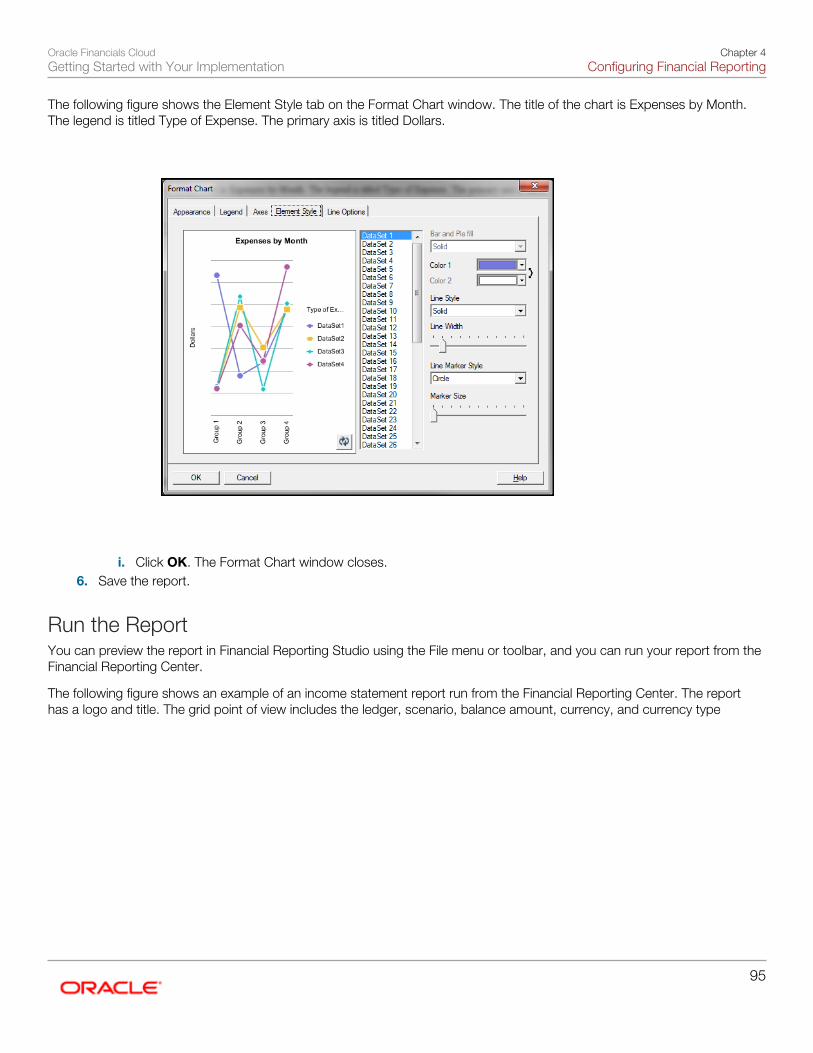
Oracle Financials CloudGetting Started with Your Implementation
Chapter 4Configuring Financial Reporting
95
The following figure shows the Element Style tab on the Format Chart window. The title of the chart is Expenses by Month.The legend is titled Type of Expense. The primary axis is titled Dollars.
i. Click OK. The Format Chart window closes.6. Save the report.
Run the ReportYou can preview the report in Financial Reporting Studio using the File menu or toolbar, and you can run your report from theFinancial Reporting Center.
The following figure shows an example of an income statement report run from the Financial Reporting Center. The reporthas a logo and title. The grid point of view includes the ledger, scenario, balance amount, currency, and currency type

Oracle Financials CloudGetting Started with Your Implementation
Chapter 4Configuring Financial Reporting
96
dimensions. The company dimension is at the page level. Twelve accounting periods appear as columns and the revenue andexpense accounts appear as rows. The chart displays expenses by month.
Related Topics
• Defining a Basic Financial Report
• Adding Formulas to a Financial Report
• Defining Range Functions for a Financial Report
• Adding Grid Points of View for a Financial Report
• Setting the Page and Grid Properties for a Financial Report

Oracle Financials CloudGetting Started with Your Implementation
Chapter 5Using Rapid Implementation Spreadsheets
97
5 Using Rapid Implementation Spreadsheets
Create Chart of Accounts, Ledger, Legal Entities, andBusiness Units in Spreadsheets: ExplainedRepresent your enterprise structures in your chart of accounts, ledger, legal entities, and business unit configuration to trackand report on financial objectives and meet reporting requirements. These components provide the underlying structure fororganizing financial information and reporting.
The chart of accounts within the ledger facilitates:
• Aggregating data from different operations, from within an operation, and from different business flows
• Consistent definitions to your stakeholders in compliance with legislative and corporate reporting standards and aidsin management decisions
Rapid implementation is a way to configure a financial enterprise and financial reporting structures quickly using sheets in aworkbook that upload lists of:
• Companies (legal entities)
• Ledgers by country
• Business units
• Chart of accounts and segment values
• Segment value hierarchies
• Financial sequences
• Required subledger accounts
Once the sheets have been uploaded, the application creates:
• Chart of accounts structure and instance
• Segment value hierarchies
• Key accounts such as retained earnings
• Required subledger accounts
• Accounting calendar
• Primary ledger for each country represented on the legal entities sheet
• Legal entities and their locations
• Business units
• Document and journal sequencing
• Set of Financial Reporting reports
• Three account groups
The following figure illustrates the flow of the enterprise structure setup.
Legal entities (companies) incur transactions that are identified by business units with business functions. Transactions thatare recorded in subledgers are transferred to the ledger. A ledger is characterized by a calendar, a currency, and a chart

Oracle Financials CloudGetting Started with Your Implementation
Chapter 5Using Rapid Implementation Spreadsheets
98
of accounts. A chart of accounts consists of segments, some of which are assigned segment labels, such as cost center,natural account, and primary balancing segment. Legal entities can be assigned primary balancing segment values.
Legal Entities (Companies) Incurred
Transactions
Business Units
Cost Centers
Balancing Segments
Ledger
Subledgers
Natural Accounts
Recorded in
Chart of Accounts
Other Segments
Calendar
Currency
Identified by
Transferred toSubledger Accounting
Method
Additional information for some of the common setup objects depicted in the figure follows:
• Legal Entity: Identifies a recognized party with rights and responsibilities given by legislation, which has the right toown property and the responsibility to account for itself.
• Business Units: Performs one or many business functions that can be rolled up in a management hierarchy. Abusiness unit can process transactions on behalf of many legal entities. Usually a business unit has a manager,strategic objectives, a level of autonomy, and responsibility for its profit and loss. When created through thespreadsheet, all available business functions are automatically enabled for the business unit.

Oracle Financials CloudGetting Started with Your Implementation
Chapter 5Using Rapid Implementation Spreadsheets
99
• Ledger: Maintains records and is a required component in your configuration. The rapid implementation process:
◦ Creates primary ledgers by combining the chart of accounts, calendar, and currency as well as other requiredoptions defined in the rapid implementation workbook.
◦ Assigns the standard accrual subledger accounting method to the primary ledger. The subledger accountingmethod is used to group subledger journal entry rule sets together to define a consistent accountingtreatment.
◦ Creates a General Ledger balances cube for each ledger with a unique chart of accounts and calendarcombination. Each segment is created as a dimension in the balances cube along with the standard cubedimensions.
• Subledger: Captures detailed transactional information, such as supplier invoices, customer payments, and assetacquisitions. Uses subledger accounting to transfer transactional balances to the ledger where they are posted.
• Chart of Accounts: Configures accounts that consist of components called segments. Accounts are used torecord balances and organize financial information and reporting.
• Segment: Identifies one of the components of a chart of accounts, which when combined with other segments,creates an account combination for recording transactions and journal entries. A segment is associated with a valueset, which provides the set of values for that segment, along with the formatting and validation for those values.
• Segment Label: Identifies certain segments in a chart of accounts and assigns special functionality to thosesegments.
◦ Balancing Segment: Ensures that all journals balance for each balancing segment value or combination ofmultiple balancing segment values for financial processes and reports. The three balancing segment labelsare: Primary Balancing Segment, Second Balancing Segment, and Third Balancing Segment.
◦ Natural Account: Determines the account type (asset, liability, expense, revenue, or equity) and specificcategorization of the financial activity. Facilitates General Ledger processes, such as closing of the incomestatement accounts to retained earnings at the beginning of a new fiscal year.
◦ Cost Center: Facilitates grouping of natural accounts by functional cost types, accommodating tracking ofspecific business expenses across natural accounts.
With the rapid implementation workbook you can also:
• Create more than one hierarchy for any of your chart of accounts segments during initial setup. You can also createadditional hierarchies and hierarchy versions, as well as update existing hierarchy versions, after the initial setup isdone by uploading the rapid implementation spreadsheet data.
• Create sequences for each legal entity or ledger based on the predefined country defaults. Document sequences arecreated for: Payables invoices, Payments, Receivables invoices, Receivables credit memos, Receivables adjustmentactivities. Reporting and accounting journal sequences are created for subledger journals and General Ledgerjournals.
Create Charts of Accounts, Ledgers, Legal Entities, andBusiness Units in Spreadsheets: How It WorksThe rapid implementation process for setting up the enterprise structure includes the following steps:
1. Downloading the Rapid Implementation for General Ledger workbook.2. Entering data into the sheets.3. Verifying the entered data and resolving any errors.4. Uploading the chart of accounts file.

Oracle Financials CloudGetting Started with Your Implementation
Chapter 5Using Rapid Implementation Spreadsheets
100
5. After successful upload of the chart of accounts file, uploading the general ledger, legal entity, and business unit filewith the rest of the configuration.
The rapid implementation enterprise structure configuration is meant to be used as a one-time initialization. To the extent thatyou want to make certain allowed modifications to the configuration, you generally have to make those changes directly inthe applications. After initial upload of the ledger, legal entity, and business unit file, the fundamental accounting configurationframework is only created once and is permanently set. This framework includes the ledger and its assigned chart ofaccounts, calendar and currency assignment, and the associated definitions of those components.
Workbook OverviewDownload the workbook from the Setup and Maintenance work area using the task Create Chart of Accounts, Ledger, LegalEntities, and Business Units in Spreadsheet.
The workbook includes the following sheets:
• Instructions
• Chart of Accounts, Calendar, and Ledger
• Business Units
• Companies and Legal Entities
• Natural Accounts
• Financial Sequences
New sheets for entering segment values and hierarchies for additional segments of your chart of accounts can be createdautomatically. After you enter the segments on the Chart of Accounts, Calendar, and Ledger sheet, click the Add SegmentSheets or Generate Additional Hierarchy buttons.
InstructionsReview the Instructions sheet for important information about how to use the workbook and submit the accountingconfiguration. The sheet includes data preparation requirements, setup object concepts, and best practices andrecommendations. Instructions on how to create additional hierarchies or additional hierarchy versions are also included.
Use the sample completed workbook to familiarize yourself with how to enter data, preview the sample report, and generatethe required upload files.
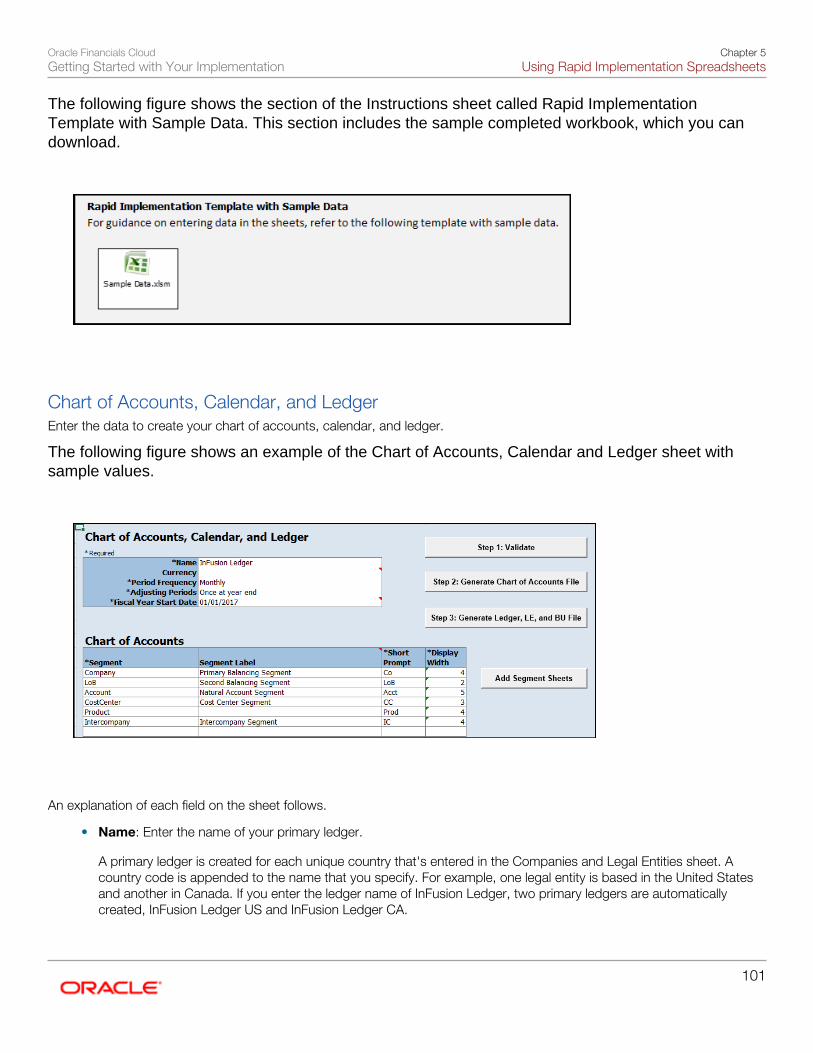
Oracle Financials CloudGetting Started with Your Implementation
Chapter 5Using Rapid Implementation Spreadsheets
101
The following figure shows the section of the Instructions sheet called Rapid ImplementationTemplate with Sample Data. This section includes the sample completed workbook, which you candownload.
Chart of Accounts, Calendar, and LedgerEnter the data to create your chart of accounts, calendar, and ledger.
The following figure shows an example of the Chart of Accounts, Calendar and Ledger sheet withsample values.
An explanation of each field on the sheet follows.
• Name: Enter the name of your primary ledger.
A primary ledger is created for each unique country that's entered in the Companies and Legal Entities sheet. Acountry code is appended to the name that you specify. For example, one legal entity is based in the United Statesand another in Canada. If you enter the ledger name of InFusion Ledger, two primary ledgers are automaticallycreated, InFusion Ledger US and InFusion Ledger CA.
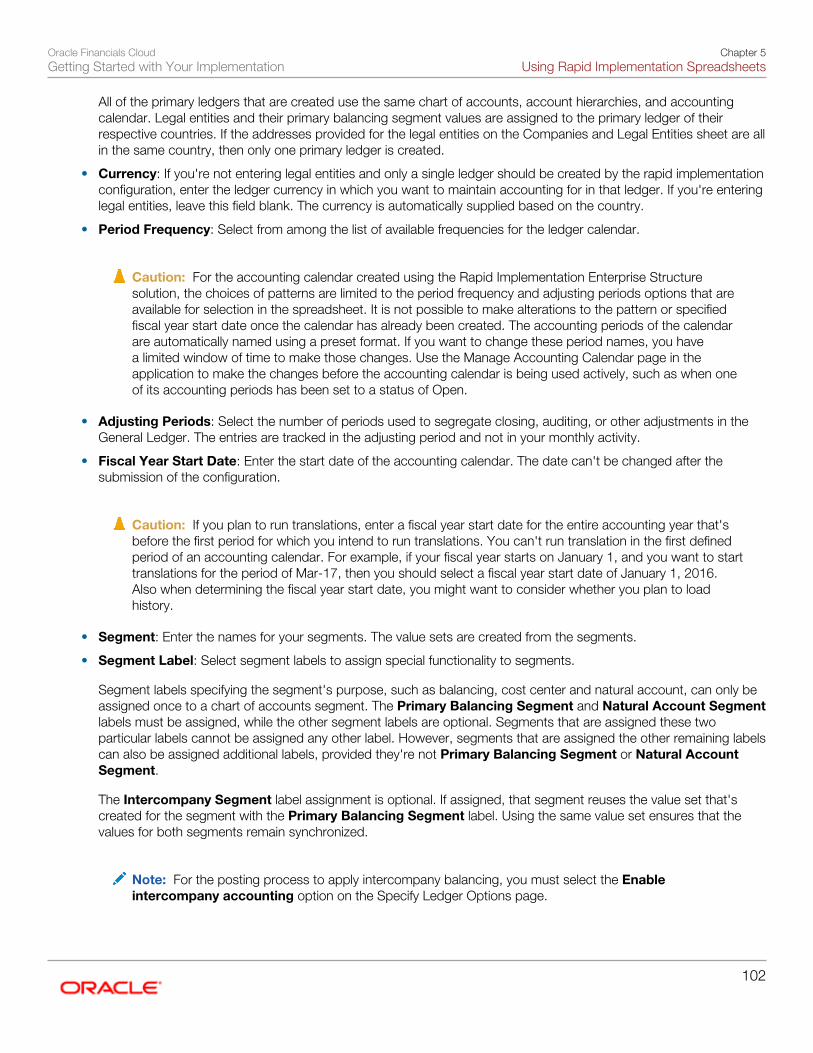
Oracle Financials CloudGetting Started with Your Implementation
Chapter 5Using Rapid Implementation Spreadsheets
102
All of the primary ledgers that are created use the same chart of accounts, account hierarchies, and accountingcalendar. Legal entities and their primary balancing segment values are assigned to the primary ledger of theirrespective countries. If the addresses provided for the legal entities on the Companies and Legal Entities sheet are allin the same country, then only one primary ledger is created.
• Currency: If you're not entering legal entities and only a single ledger should be created by the rapid implementationconfiguration, enter the ledger currency in which you want to maintain accounting for in that ledger. If you're enteringlegal entities, leave this field blank. The currency is automatically supplied based on the country.
• Period Frequency: Select from among the list of available frequencies for the ledger calendar.
Caution: For the accounting calendar created using the Rapid Implementation Enterprise Structuresolution, the choices of patterns are limited to the period frequency and adjusting periods options that areavailable for selection in the spreadsheet. It is not possible to make alterations to the pattern or specifiedfiscal year start date once the calendar has already been created. The accounting periods of the calendarare automatically named using a preset format. If you want to change these period names, you havea limited window of time to make those changes. Use the Manage Accounting Calendar page in theapplication to make the changes before the accounting calendar is being used actively, such as when oneof its accounting periods has been set to a status of Open.
• Adjusting Periods: Select the number of periods used to segregate closing, auditing, or other adjustments in theGeneral Ledger. The entries are tracked in the adjusting period and not in your monthly activity.
• Fiscal Year Start Date: Enter the start date of the accounting calendar. The date can't be changed after thesubmission of the configuration.
Caution: If you plan to run translations, enter a fiscal year start date for the entire accounting year that'sbefore the first period for which you intend to run translations. You can't run translation in the first definedperiod of an accounting calendar. For example, if your fiscal year starts on January 1, and you want to starttranslations for the period of Mar-17, then you should select a fiscal year start date of January 1, 2016.Also when determining the fiscal year start date, you might want to consider whether you plan to loadhistory.
• Segment: Enter the names for your segments. The value sets are created from the segments.
• Segment Label: Select segment labels to assign special functionality to segments.
Segment labels specifying the segment's purpose, such as balancing, cost center and natural account, can only beassigned once to a chart of accounts segment. The Primary Balancing Segment and Natural Account Segmentlabels must be assigned, while the other segment labels are optional. Segments that are assigned these twoparticular labels cannot be assigned any other label. However, segments that are assigned the other remaining labelscan also be assigned additional labels, provided they're not Primary Balancing Segment or Natural AccountSegment.
The Intercompany Segment label assignment is optional. If assigned, that segment reuses the value set that'screated for the segment with the Primary Balancing Segment label. Using the same value set ensures that thevalues for both segments remain synchronized.
Note: For the posting process to apply intercompany balancing, you must select the Enableintercompany accounting option on the Specify Ledger Options page.

Oracle Financials CloudGetting Started with Your Implementation
Chapter 5Using Rapid Implementation Spreadsheets
103
Caution: If you plan to implement segment value security rules for the segment that's assignedthe Primary Balancing Segment label, then don't assign the Intercompany Segment label to asegment on this sheet. Segment value security rules are assigned at the value set level. Sharing thevalue set between the two segments causes security conflicts because segment value enforcement issimultaneously applied in the same way to both segments. For example, you define a segment valuesecurity rule for the Company segment where a user can only access company 01. Since the value set isshared, that user also can't transact with other companies in an intercompany transaction. Instead, followthese steps:
a. Include the intercompany segment in the sheet, but don't assign it the IntercompanySegment label.
b. Click the Add Segment Sheets button to add a sheet for the intercompany value set.c. Create the values for your intended intercompany segment on the new sheet. Assign the
same values to the intercompany segment as you have for the primary balancing segmentand maintain this consistency going forward.
d. Complete the Upload Chart of Accounts task. Before starting the Upload Ledger, LegalEntities, and Business Units task, navigate to the Manage Chart of Accounts Structurestask from the Functional Setup Manager.
e. Assign the Intercompany Segment label to the intercompany segment of the chart ofaccounts on the Edit Key Flexfield Segment page.
f. Redeploy the key flexfield.
• Short Prompt: Enter a short name for the segment, which is used on applications pages.
• Display Width: Enter the segment size. Select the size carefully and leave room for growth. For example, if you have89 cost centers, enter 3 for the display length to allow for more than 100 cost centers in the future.
• Add Segment Sheets: Select this button to create sheets for additional segments. Sheets are provided only for theCompany and Natural Accounts segments.
From the new segment sheet, you can click the Generate Additional Hierarchy button to create more than onehierarchy for any chart of account segment. A worksheet is then automatically created and populated with the dataalready entered for that segment. Change this data as required for the new hierarchy. You can create additionalhierarchies during initial setup, or after the initial setup is done.
Caution: You can't change the chart of accounts, accounting calendar, or currency for your ledgers after thesetup is created.
Business UnitsEnter the name of your business units and related default legal entities.
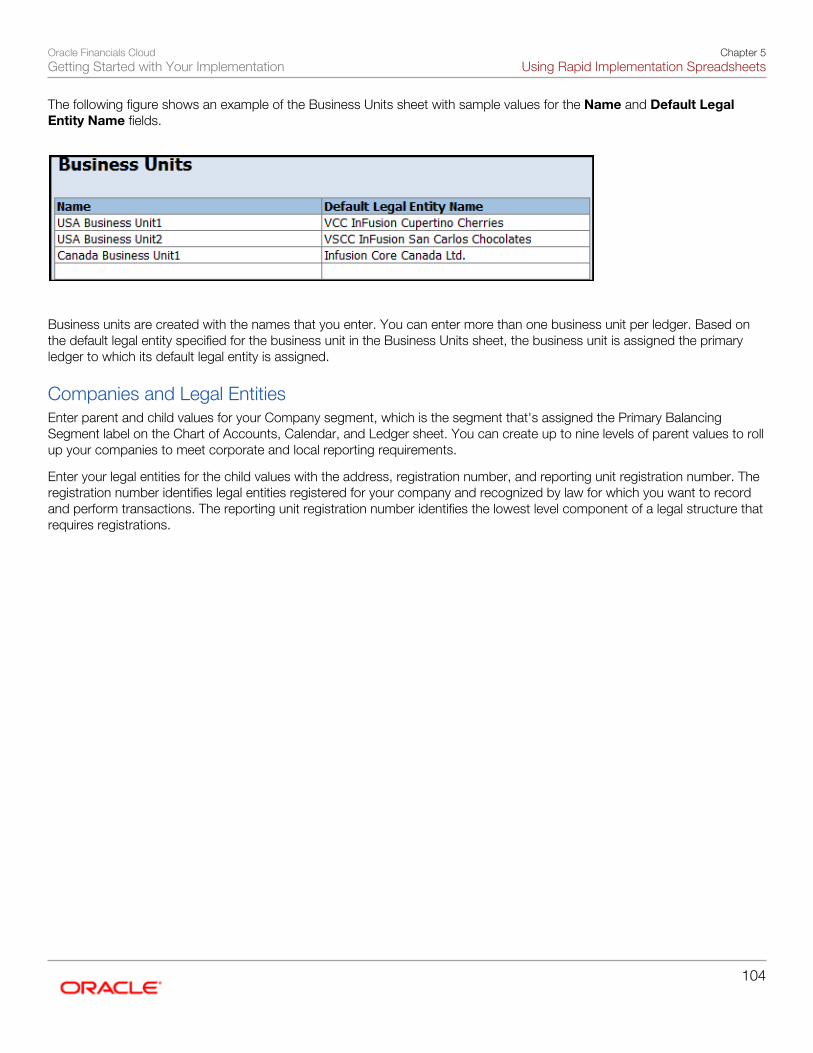
Oracle Financials CloudGetting Started with Your Implementation
Chapter 5Using Rapid Implementation Spreadsheets
104
The following figure shows an example of the Business Units sheet with sample values for the Name and Default LegalEntity Name fields.
Business units are created with the names that you enter. You can enter more than one business unit per ledger. Based onthe default legal entity specified for the business unit in the Business Units sheet, the business unit is assigned the primaryledger to which its default legal entity is assigned.
Companies and Legal EntitiesEnter parent and child values for your Company segment, which is the segment that's assigned the Primary BalancingSegment label on the Chart of Accounts, Calendar, and Ledger sheet. You can create up to nine levels of parent values to rollup your companies to meet corporate and local reporting requirements.
Enter your legal entities for the child values with the address, registration number, and reporting unit registration number. Theregistration number identifies legal entities registered for your company and recognized by law for which you want to recordand perform transactions. The reporting unit registration number identifies the lowest level component of a legal structure thatrequires registrations.

Oracle Financials CloudGetting Started with Your Implementation
Chapter 5Using Rapid Implementation Spreadsheets
105
The following figure shows part of the Companies and Legal Entities sheet with sample values. The sheet includes columnsfor different levels of parent values, the child value, and company description. The Legal Entity columns include name,identifier, country, address information, and registration numbers.
To create additional hierarchies for the company segment for reporting or other purposes, click the Generate AdditionalHierarchy button. A worksheet is automatically created and populated with the data already entered for that segment.Change this data as required for the new hierarchy. You can create additional hierarchies during initial setup, or after the initialsetup is done.
When a new hierarchy sheet is created, the name for that sheet is derived by adding a counter to the sheet name. Forexample, when you click Generate Additional Hierarchy on the Companies and Legal Entities sheet, the new sheet isnamed Companies and Legal Entities 1. When you click Generate Additional Hierarchy again, another sheet is generatedwith the name Companies and Legal Entities 2.
Note: Adding legal entity information isn't supported on a new hierarchy sheet for the Company segment.
Natural AccountsEnter account hierarchies, account values, and specify account types.
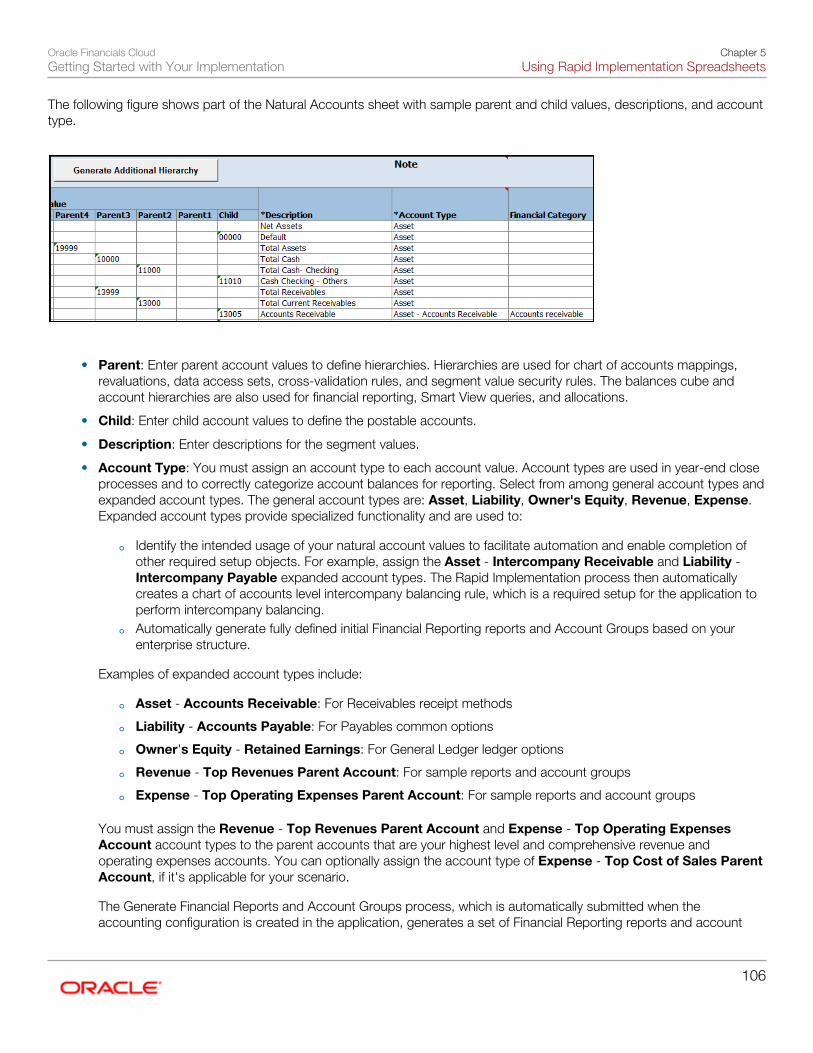
Oracle Financials CloudGetting Started with Your Implementation
Chapter 5Using Rapid Implementation Spreadsheets
106
The following figure shows part of the Natural Accounts sheet with sample parent and child values, descriptions, and accounttype.
• Parent: Enter parent account values to define hierarchies. Hierarchies are used for chart of accounts mappings,revaluations, data access sets, cross-validation rules, and segment value security rules. The balances cube andaccount hierarchies are also used for financial reporting, Smart View queries, and allocations.
• Child: Enter child account values to define the postable accounts.
• Description: Enter descriptions for the segment values.
• Account Type: You must assign an account type to each account value. Account types are used in year-end closeprocesses and to correctly categorize account balances for reporting. Select from among general account types andexpanded account types. The general account types are: Asset, Liability, Owner's Equity, Revenue, Expense.Expanded account types provide specialized functionality and are used to:
◦ Identify the intended usage of your natural account values to facilitate automation and enable completion ofother required setup objects. For example, assign the Asset - Intercompany Receivable and Liability -Intercompany Payable expanded account types. The Rapid Implementation process then automaticallycreates a chart of accounts level intercompany balancing rule, which is a required setup for the application toperform intercompany balancing.
◦ Automatically generate fully defined initial Financial Reporting reports and Account Groups based on yourenterprise structure.
Examples of expanded account types include:
◦ Asset - Accounts Receivable: For Receivables receipt methods
◦ Liability - Accounts Payable: For Payables common options
◦ Owner's Equity - Retained Earnings: For General Ledger ledger options
◦ Revenue - Top Revenues Parent Account: For sample reports and account groups
◦ Expense - Top Operating Expenses Parent Account: For sample reports and account groups
You must assign the Revenue - Top Revenues Parent Account and Expense - Top Operating ExpensesAccount account types to the parent accounts that are your highest level and comprehensive revenue andoperating expenses accounts. You can optionally assign the account type of Expense - Top Cost of Sales ParentAccount, if it's applicable for your scenario.
The Generate Financial Reports and Account Groups process, which is automatically submitted when theaccounting configuration is created in the application, generates a set of Financial Reporting reports and account

Oracle Financials CloudGetting Started with Your Implementation
Chapter 5Using Rapid Implementation Spreadsheets
107
groups according to the accounting configuration defined in the workbook. The top parent accounts are used as thebasis for deriving the accounts referenced in the reports and in the Account Groups.
The immediate descendants of the top parent accounts are used to define the rows on the reports. Dependingon whether both the top operating expense and top cost of sales accounts are tagged, different variations of theincome statements are generated. If the optional top cost of sales account is provided, the Financial Reportingreports that are income statements also include a gross margin section.
Caution: Assign account types carefully. If you assign an incorrect account type to a natural accountsegment value, accounting entries are recorded incorrectly and financial statements are inaccurate.Misclassified accounts are also potentially handled incorrectly at year end, with actual balances eithergetting zeroed out to retained earnings, or accumulating into the next year.
• Financial Category: Select a value to identify groups of accounts for reporting with Oracle Transactional BusinessIntelligence. Accounts that are tagged with expanded account types are automatically assigned a financial category.You can override the default category or leave it out.
• Generate Additional Hierarchy: To create additional hierarchies for the natural account segment for reporting orfor other purposes, click the Generate Additional Hierarchy button. A worksheet is automatically created andpopulated with the data already entered for that segment. Change this data as required for the new hierarchy. Youcan create additional hierarchies during initial setup or after the initial setup is done.
Financial SequencesEnable document or journal sequences to assign unique numbers to transactions to meet legal requirements.
The following figure shows the Financial Sequences sheet with sample values for the Restart and Initial Value columns.
Document sequences are created for these transactions: Payables invoices, Payments, Receivables invoices, Receivablescredit memos, Receivables adjustment activities. Reporting and accounting journal sequences are created for Subledgerjournals and General Ledger journals.
For each transaction, you can provide values for the following fields:
• Restart: Set when to restart the numbering: Annually, Monthly, Never.
• Initial Value: Specify the beginning number in the sequence.

Oracle Financials CloudGetting Started with Your Implementation
Chapter 5Using Rapid Implementation Spreadsheets
108
How The Worksheets Are ProcessedAfter you complete the worksheets, proceed with validation, sample report preview, and file upload.
1. On the Chart of Accounts, Calendar, and Ledger sheet, click the Step 1: Validate button.
The validation checks the worksheets for missing or inappropriate setups. Errors are marked as actionable items ina validation report sheet that's dynamically generated. You can review the anomalies and make the corrections asindicated. The Field column on the validation report notes the issue. Click the text link to navigate to the appropriatefield in the sheet that must be updated. When the validation is successful, a message appears with the option ofpreviewing a sample of the reports that are automatically generated as part of the enterprise configuration.
The following figure shows the message that appears after a successful validation.
If you select to preview the sample report, a new sheet is automatically created called Preview Report. The previewincorporates elements of the setup that you provided. The rows on the report are derived based on the top parentrevenue and expense account values that you tagged on the Natural Accounts sheet. The preview also reflects thereporting hierarchy for your natural accounts.
The following figure shows an example of the sample Financial Reporting report.

Oracle Financials CloudGetting Started with Your Implementation
Chapter 5Using Rapid Implementation Spreadsheets
109
You can use the preview to validate whether the hierarchy setup aligns to your reporting needs. If the natural accounthierarchy requires adjustments, this is your chance to make those corrections before actually creating the accounthierarchies in the application. You can modify your enterprise structure setup, validate the spreadsheet, and previewthe revised sample reports for as many times as you need. The account hierarchies are created when you finallysubmit the accounting configuration in the rapid implementation spreadsheet.
2. Click Step 2: Generate Chart of Accounts File. The process generates a data file called ChartOfAccounts.xmlwith the entered chart of accounts and hierarchies setup data. Save the file to a network or local drive.
3. Click Step 3: Generate Ledger, LE, and BU File. The process generates a data file calledFinancialsCommonEntities.xml with the entered ledger, legal entities, and business unit setup data. Save the file to anetwork or local drive.
4. In the Setup and Maintenance work area, search for the Upload Chart of Accounts task. The Upload EnterpriseStructures and Hierarchies process is launched.
5. Accept the default selection of the Upload Enterprise Structure option.6. Click Browse and select the first file that you saved called ChartOfAccounts.xml.7. Click Submit.8. Verify that the process completed without errors or warnings.9. In the Setup and Maintenance work area, search for the task Upload Ledger, Legal Entities, and Business
Units. The Upload Enterprise Structures and Hierarchies process is launched.10. Accept the default selection of the Upload Enterprise Structure option.11. Click Browse and select the second file that you saved called FinancialsCommonEntities.xml.12. Click Submit.

Oracle Financials CloudGetting Started with Your Implementation
Chapter 5Using Rapid Implementation Spreadsheets
110
13. Verify that the process completed without errors or warnings.
An individual set of the following Financial Reporting reports is generated for each ledger that's defined within the rapidimplementation accounting configuration. If multiple primary ledgers are created as part of your configuration, a set ofFinancial Reporting reports is generated for each ledger.
• Income Statement
• Consolidated Income Statement
• Rolling Quarterly Income Statement
• Rolling Monthly Income Statement
• Trial Balances by Ledger Currency
• Trial Balances by Entered Currency
The process also generates three account groups. These include two for the infolets, Revenues and Expenses, and one forthe Close Monitor called Close Monitor Summary Income Statement. A set of these three account groups is generated for thebalances cube, to be shared among all the ledgers that are part of that balances cube.
Additional Hierarchies After Initial SetupTo create additional hierarchies and hierarchy versions, or to update existing hierarchy versions after the initial setup:
1. Click the Generate Additional Hierarchy button on the applicable segment sheet. A new worksheet isautomatically created and populated with the data already entered for that segment. Change the data as required.
2. Click the Generate File for This Hierarchy Only button. This generates a .zip file for the particular hierarchy.3. In the Setup and Maintenance work area, search for the Upload Chart of Accounts task. The Upload Enterprise
Structures and Hierarchies process page opens.4. Select the Upload Hierarchy option.5. Select from among the following options and provide values for the required parameters:
a. Create hierarchy: Select to create another account hierarchy. Specify the value set, tree code, and start date.b. Create version: Select to render a new version of an existing account hierarchy. Specify a value set, tree code,
tree version, and start date.c. Update existing version: Select to edit an existing version of an account hierarchy. Specify a value set, tree
code, and tree version.6. Click Choose File and select the .zip file that you saved earlier.7. Click Submit.
Related Topics
• Trees: Overview
• Financial Reporting Reports and Account Groups: How They're Generated
Create Hierarchies in a Spreadsheet: ExampleUse the Hierarchies Only sheet to create new hierarchies or new versions of existing hierarchies after enterprise structureshave been created using the Rapid Implementation spreadsheet.

Oracle Financials CloudGetting Started with Your Implementation
Chapter 5Using Rapid Implementation Spreadsheets
111
ScenarioPlan your new hierarchies or new versions carefully, including the following requirements:
• Compile the hierarchy in the specified format and save the file.
• Use the Account Type attribute that is mandatory for the Natural Account segment.
• Optionally, use the Financial Category attribute for the Natural Account segment.
Note: Only one Hierarchies Only sheet can be created at a time. After uploading a hierarchy, delete the datain the sheet and add new hierarchy data.
Use the following steps to create your hierarchy.
1. Click the Create Only Hierarchies button on the COA, Calendar and Ledger sheet to generate the HierarchiesOnly sheet.
2. Compile the hierarchy in this sheet in the format provided.3. Click the Validate button. A Validation Report is generated if there are any errors. Correct these errors to proceed.4. Correct these errors and proceed.5. Click the Generate Hierarchy File button. The process generates a .zip file for the new hierarchy. Save this file.6. From the Setup and Maintenance page in the Functional Setup Manager, search for and select the Upload Chart
of Accounts task.7. Click on the Upload Hierarchy radio button.8. Select Create New Hierarchy or Create New Version radio button9. Under the Create New Hierarchy option, select the Value Set, enter the Tree Code and Start Date.
10. Click the Choose File button.11. Select the file you saved.12. Click Submit.13. Under the Create New Version option, select the Value Set and Tree Code.14. Enter the Tree Version Name and Start Date.15. Click the Choose File button and select the file you saved.16. Click Submit.17. Navigate to the Scheduled Processes page.18. Verify that the process completed without errors or warnings.
Cross-Validation Rules in General Ledger: OverviewYou can use cross-validation rules to determine the valid account combinations that can be dynamically created as usersenter transactions or journal entries. Once enabled, a cross-validation rule determines whether a selected value for aparticular segment of an account combination can be combined with specific values in other segments to form a newaccount combination.
For example, your organization has determined that the company Operations can't use the cost center Marketing. You candefine a cross-validation rule such that, if the company is Operations, then validate that the cost center isn't Marketing. Newaccount combinations have to satisfy all of the cross-validation rules enabled for the chart of accounts before they can becreated.

Oracle Financials CloudGetting Started with Your Implementation
Chapter 5Using Rapid Implementation Spreadsheets
112
Entry and MaintenanceYou can create cross-validation rules using the Create Cross Validation Rules in Spreadsheet task or the Manage Cross-Validations Rules task. Use the spreadsheet task to quickly enter large volumes of rules during implementation. Use theManage Cross-Validation Rules task to add a one-off rule or edit existing rules.
To edit error messages for cross-validation rules, use the Manage Messages for General Ledger task.
Tip: When you export or import cross-validation rules to a new instance using an export or import project in theFunctional Setup Manager, you must add the Manage Messages for General Ledger task before the ManageCross-Validation Rules task. You must export or import the messages before exporting or importing the cross-validation rules.
Existing Account CombinationsIf account combinations already exist that violate newly enabled cross-validation rules, those account combinations continueto be valid. Before disabling existing account combinations that violate your rules and that you no longer use, move thebalances in those accounts to the correct accounts. Then disable the account combinations manually to prevent furtherposting. Best practice is to define and enable cross-validation rules before: account combinations are created, transactions orjournal entries are imported or entered, balances are loaded.
Related Topics
• Cross-Validation Rules: Explained
• Cross-Validation Rules: Points to Consider
• Creating Cross-Validation Rules in a Spreadsheet: Worked Example
• Managing Cross-Validation Rule Violations: How It Works
Cross-Validation Rules Spreadsheet: ExplainedThe rapid implementation solution provides a template for defining cross-validation rules in a spreadsheet. Cross-validationrules determine whether a selected value for a particular segment of an account combination can be combined with specificvalues in the other segments to form a new account combination.
You can download the spreadsheet using the Create Cross Validation Rules in a Spreadsheet task. This task is included inthe following task lists:
• Define Common Financials Configuration for Rapid Implementation
• Define Enterprise Structures Configuration for Rapid Implementation
Note: The spreadsheet can only create cross-validation rules. To update existing cross-validation rules, use theManage Cross-Validation Rules task.

Oracle Financials CloudGetting Started with Your Implementation
Chapter 5Using Rapid Implementation Spreadsheets
113
Spreadsheet OverviewThe cross-validation rules spreadsheet includes two sheets. One sheet provides the template for creating cross-validationrules and the other sheet has instructions. The Instructions sheet includes:
• An overview
• An explanation of the template
• Steps to fill in the template
• An example
The following figure shows the Create Cross-Validation Rules sheet.
The following table describes each field and column on the sheet.
Field or Column Description
Worksheet Status
The upload results for the worksheet. The application updates this field when you submit thespreadsheet.
Chart of Accounts
The chart of accounts for which the cross-validation rules are defined.
Changed
The indicator that the row has been updated. The application updates this field.
Row Status
The upload results for the row. The application updates this field when you submit the spreadsheet.
Name
The name that uniquely identifies the cross-validation rules in a deployment.
Description
The purpose for the cross-validation rule.
Error Message
The explanation to users for why the attempted combination violates the cross-validation rule.
Condition Filter Segment The segments of the chart of accounts that constitute the condition filter.
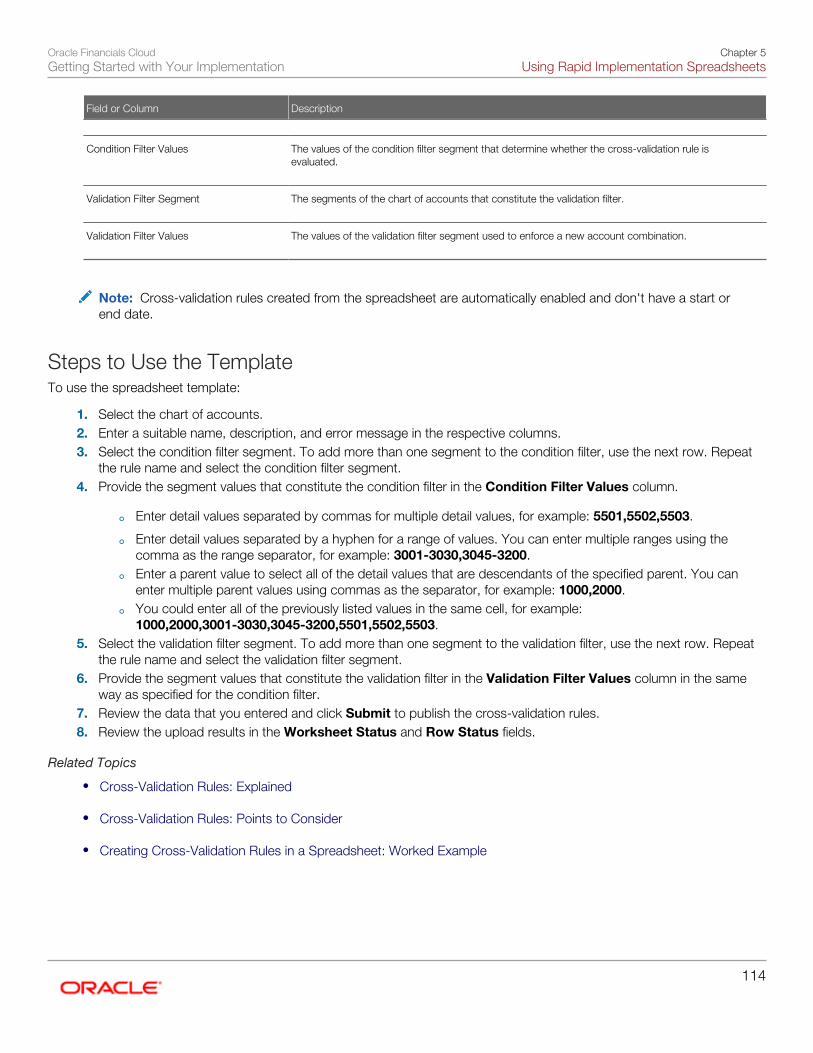
Oracle Financials CloudGetting Started with Your Implementation
Chapter 5Using Rapid Implementation Spreadsheets
114
Field or Column Description
Condition Filter Values
The values of the condition filter segment that determine whether the cross-validation rule isevaluated.
Validation Filter Segment
The segments of the chart of accounts that constitute the validation filter.
Validation Filter Values
The values of the validation filter segment used to enforce a new account combination.
Note: Cross-validation rules created from the spreadsheet are automatically enabled and don't have a start orend date.
Steps to Use the TemplateTo use the spreadsheet template:
1. Select the chart of accounts.2. Enter a suitable name, description, and error message in the respective columns.3. Select the condition filter segment. To add more than one segment to the condition filter, use the next row. Repeat
the rule name and select the condition filter segment.4. Provide the segment values that constitute the condition filter in the Condition Filter Values column.
◦ Enter detail values separated by commas for multiple detail values, for example: 5501,5502,5503.
◦ Enter detail values separated by a hyphen for a range of values. You can enter multiple ranges using thecomma as the range separator, for example: 3001-3030,3045-3200.
◦ Enter a parent value to select all of the detail values that are descendants of the specified parent. You canenter multiple parent values using commas as the separator, for example: 1000,2000.
◦ You could enter all of the previously listed values in the same cell, for example:1000,2000,3001-3030,3045-3200,5501,5502,5503.
5. Select the validation filter segment. To add more than one segment to the validation filter, use the next row. Repeatthe rule name and select the validation filter segment.
6. Provide the segment values that constitute the validation filter in the Validation Filter Values column in the sameway as specified for the condition filter.
7. Review the data that you entered and click Submit to publish the cross-validation rules.8. Review the upload results in the Worksheet Status and Row Status fields.
Related Topics
• Cross-Validation Rules: Explained
• Cross-Validation Rules: Points to Consider
• Creating Cross-Validation Rules in a Spreadsheet: Worked Example

Oracle Financials CloudGetting Started with Your Implementation
Chapter 5Using Rapid Implementation Spreadsheets
115
Cash Management Rapid Implementation: OverviewUse Microsoft Excel templates to rapidly implement the following setup objects:
• Banks
• Bank Branches
• Bank Accounts
Functional Setup Manager TasksThe following are the Functional Setup Manager tasks that are required to be performed to rapidly create the setup objectsdata:
• Create Banks, Branches, and Accounts in Spreadsheet: Downloads the rapid implementation excel spreadsheettemplate. Enter the bank, branch, and bank account data in this spreadsheet, and generate the data file to beloaded.
• Upload Banks, Branches, and Accounts: Launches the Upload Banks, Branches, and Accounts process with thedata file to be uploaded as the parameter. You must upload the data file generated from the previous task.
Preparing DataPrepare your bank, branch, and account information to enter into the spreadsheet template.
• Bank information requires the country, name, and number.
• Branch information requires name, number, BIC code, and alternate name.
• Account information requires name, number, currency, legal entity, type, and IBAN.
After you finish preparing the data in the spreadsheet, click the Generate Banks, Branches, and Accounts File button. Savethe generated XML file.
Loading DataUse the following steps to load your data.
• From Functional Setup Manager, search for and select Upload Banks, Branches, and Accounts task. This tasklaunches the Upload Banks, Branches, and Accounts process.
• Select the XML file you have saved earlier and submit the process.
• Verify in the process monitor that the process completed successfully.
• Review the banks, branches, and accounts created.
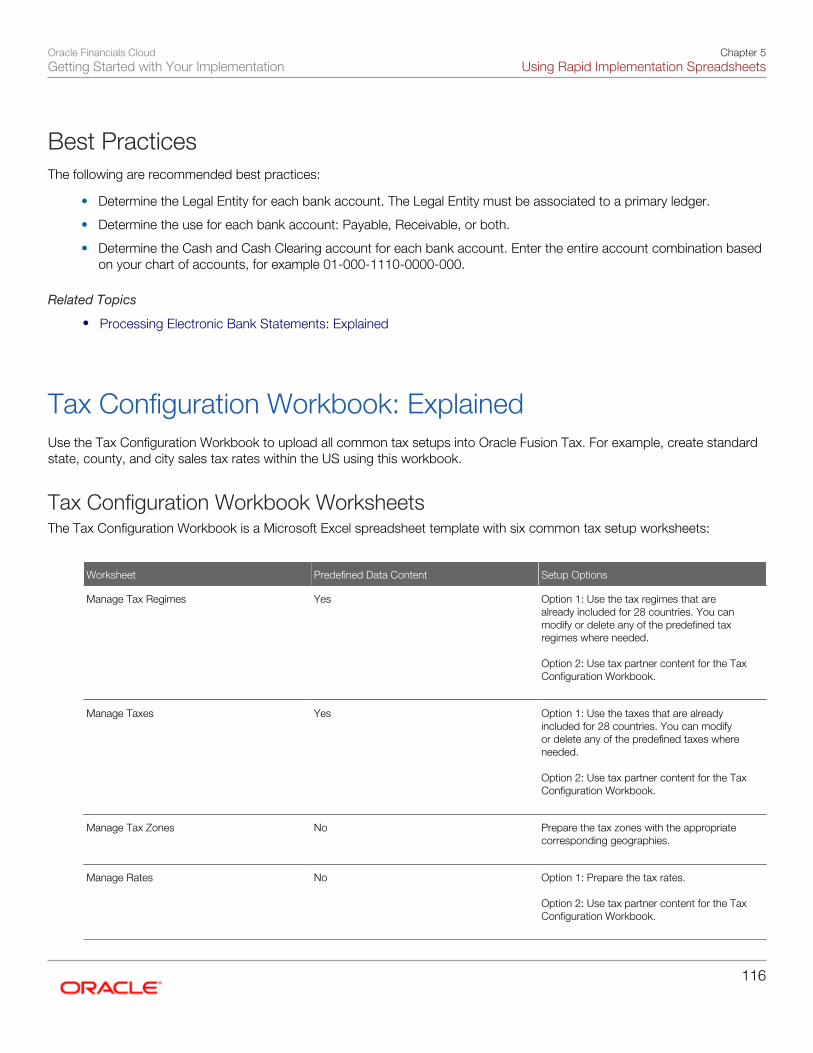
Oracle Financials CloudGetting Started with Your Implementation
Chapter 5Using Rapid Implementation Spreadsheets
116
Best PracticesThe following are recommended best practices:
• Determine the Legal Entity for each bank account. The Legal Entity must be associated to a primary ledger.
• Determine the use for each bank account: Payable, Receivable, or both.
• Determine the Cash and Cash Clearing account for each bank account. Enter the entire account combination basedon your chart of accounts, for example 01-000-1110-0000-000.
Related Topics
• Processing Electronic Bank Statements: Explained
Tax Configuration Workbook: ExplainedUse the Tax Configuration Workbook to upload all common tax setups into Oracle Fusion Tax. For example, create standardstate, county, and city sales tax rates within the US using this workbook.
Tax Configuration Workbook WorksheetsThe Tax Configuration Workbook is a Microsoft Excel spreadsheet template with six common tax setup worksheets:
Worksheet Predefined Data Content Setup Options
Manage Tax Regimes
Yes
Option 1: Use the tax regimes that arealready included for 28 countries. You canmodify or delete any of the predefined taxregimes where needed. Option 2: Use tax partner content for the TaxConfiguration Workbook.
Manage Taxes
Yes
Option 1: Use the taxes that are alreadyincluded for 28 countries. You can modifyor delete any of the predefined taxes whereneeded. Option 2: Use tax partner content for the TaxConfiguration Workbook.
Manage Tax Zones
No
Prepare the tax zones with the appropriatecorresponding geographies.
Manage Rates
No
Option 1: Prepare the tax rates. Option 2: Use tax partner content for the TaxConfiguration Workbook.

Oracle Financials CloudGetting Started with Your Implementation
Chapter 5Using Rapid Implementation Spreadsheets
117
Worksheet Predefined Data Content Setup Options
Manage Tax Thresholds
No
Option 1: Prepare the tax thresholds ormaximum taxes. Option 2: Use tax partner content for the TaxConfiguration Workbook.
Manage Tax Recovery Rates
No
Option 1: Prepare the tax recovery rates. Option 2: Use tax partner content for the TaxConfiguration Workbook.
Related Topics
• Creating Tax Setup Using Tax Partner Content in the Tax Configuration Workbook: Worked Example
Creating Tax Setup Using the Tax Configuration Workbook:Worked ExampleThis example shows how to create standard state, county, and city sales tax rates within the US using the Tax ConfigurationWorkbook.
The following table summarizes key decisions for this scenario:
Decision to Consider In This Example
What tax setup are you creating?
Tax Rates
Do you have exception rulesfor calculating US sales tax ontransactions?
No
Do you use tax partner content?
No
Creating Tax SetupThe steps to create tax rates in the Tax Configuration Workbook are:
1. On the Manage Tax Regimes page, click Download Tax Configuration Workbook in the Rapid SetupSpreadsheets list in the Search Results table.
2. Save the Tax Configuration Workbook in your local directory.3. Review the detailed Tax Configuration Workbook instructions tab.4. For the Manage Tax Regimes and Manage Taxes worksheets, use the predefined content for US sales tax. You can
modify or delete the predefined content where needed.5. Using the instructions and the column help text, populate the required setups in the Manage Rates worksheet.

Oracle Financials CloudGetting Started with Your Implementation
Chapter 5Using Rapid Implementation Spreadsheets
118
6. After completing the Tax Rates worksheet, click the Generate CSV File button in the Instructions tab.7. A macro launches and saves the:
a. Entire Tax Configuration Workbook data in a comma separated values (CSV) file.b. CSV file into a single zipped file attachment.
8. Save the zipped file attachment in your local directory.9. On the Manage Tax Regimes page, click Upload Tax Configuration Workbook in the Rapid Setup Spreadsheets
list in the Search Results table.10. Browse your local directory in which you saved the zipped file attachment and select the file.11. Click Open and then click Upload.12. Note the process ID and access the Monitor Upload and Download Processes tab.13. Click the Refresh icon and ensure that the process ID completes with a Succeeded status.
◦ If the status of the upload process is Succeeded, you can view your setups using the search criteria in thispage.
◦ If the upload process failed with a status other than Succeeded, check the details in the corresponding errorlog, correct any file errors, and upload the file again.
Related Topics
• Creating Tax Setup Using Tax Partner Content in the Tax Configuration Workbook: Worked Example
Budget Uploads
Budget Uploads: OverviewIn Oracle General Ledger, you can load budget data to perform variance reporting.
If you use a third-party budgeting application or don't use a budgeting application, there are two ways to load budgets intothe GL Balances Cube.
• Importing Budget Data from a Flat File: Export budget data from your budgeting application to a commaseparated values .csv file. Use the Import General Ledger Budget Balances file-based data import to prepare andgenerate flat files in a .csv format. You can use Oracle Application Development Framework Desktop Integratorcorrection worksheets to correct validation errors, delete rows with errors, and resubmit the corrected error rows.
Note: For more information about file-based data import, see the File-Based Data Import for OracleFinancials Cloud guide.
• Importing Budget Data from a Spreadsheet: You can access the budget load spreadsheet from the GeneralAccounting Dashboard. Enter, load, and correct budget data in the ADF Desktop Integrator spreadsheet tool.Use this tool to prepare and load budget data for multiple ledgers and periods with a common chart of accountsinstance. The list of values and the web picker help you select valid values. This simplified data entry reduces errorsand alerts you to errors as you enter the data in the spreadsheet. Error correction is done in the same spreadsheet.
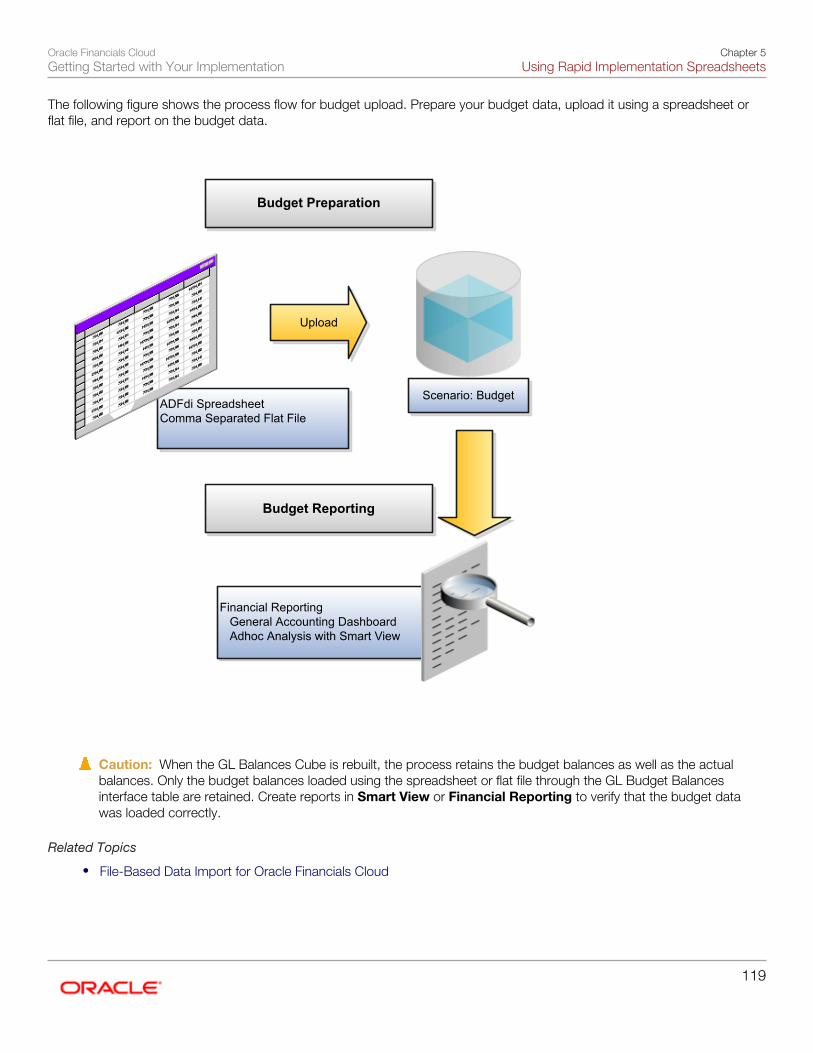
Oracle Financials CloudGetting Started with Your Implementation
Chapter 5Using Rapid Implementation Spreadsheets
119
The following figure shows the process flow for budget upload. Prepare your budget data, upload it using a spreadsheet orflat file, and report on the budget data.
Upload
Budget Preparation
ADFdi SpreadsheetComma Separated Flat File
Scenario: Budget
Financial Reporting General Accounting Dashboard Adhoc Analysis with Smart View
Budget Reporting
Caution: When the GL Balances Cube is rebuilt, the process retains the budget balances as well as the actualbalances. Only the budget balances loaded using the spreadsheet or flat file through the GL Budget Balancesinterface table are retained. Create reports in Smart View or Financial Reporting to verify that the budget datawas loaded correctly.
Related Topics
• File-Based Data Import for Oracle Financials Cloud

Oracle Financials CloudGetting Started with Your Implementation
Chapter 5Using Rapid Implementation Spreadsheets
120
Importing Budget Data from a Spreadsheet: ExplainedYou can use the Create Budgets spreadsheet to enter, load, and correct budget data. To open the spreadsheet, navigate tothe General Accounting Dashboard and select the Create Budgets in Spreadsheet task.
Budget ImportThe spreadsheet uses the Oracle ADF Desktop Integration Add-In for Excel, which is the same add-in used by the CreateJournals spreadsheet. The spreadsheet uses an interface table called the GL_BUDGET_INTERFACE and requires the BudgetEntry duty. The budget import uses the Accounting Scenario value set for the budget being loaded. The Run Name is used asan identifier for the imported data set.
The spreadsheet budget import:
• Supports multiple ledgers but a single chart of accounts instance
• Allows multiple calendars and periods
• Supports entered currencies in addition to the ledger currency
• Contains user-friendly lists of values
• Performs most validations on the worksheet
• Secures values by data access sets
Note: The spreadsheet includes a Row Status column that shows if the rows upload successfully or with errors.Use the spreadsheet where the data was entered to enter the corrections.
Importing Budget Data from a Flat File: ExplainedUse the Upload Budgets processes to integrate budget information from other budgeting applications such as OracleHyperion Planning. You can load your budget amounts to the General Ledger balances cube by populating theGL_BUDGET_INTERFACE table and running the Validate and Upload Budgets process. You can load budgets for multipleperiods and for multiple ledgers with the same chart of accounts in a single load process. Note that the budget data isn'tloaded to the GL_BALANCES table and only loaded to the balances cube for variance reporting purposes.
Note: You can load data to interface tables using predefined templates and the Load Interface File for Importscheduled process, which are both part of the External Data Integration Services for Oracle Cloud. For moreinformation about file-based data import, see the File Based Data Import guide for your cloud services.
Assigning Values for Columns in the GL_BUDGET_INTERFACE TableFor budget import to be successful, you must enter values in the columns of the interface table that require values.
The following table describes the columns that require values.
Name Value
RUN_NAME
Enter a name to identify the budget data set being imported.
STATUS Enter the value NEW to indicate that you are loading new budget data.

Oracle Financials CloudGetting Started with Your Implementation
Chapter 5Using Rapid Implementation Spreadsheets
121
Name Value
LEDGER_ID
Enter the appropriate ledger ID value for the budget amount. You can view the ledger ID for yourledgers on the Manage Primary Ledgers page. The ledger ID column is hidden by default, but youcan display it from the View Columns menu. If you enter multiple ledgers for the same run name, allof the ledgers must share the same chart of accounts.
BUDGET_NAME
Enter the appropriate budget name value for the budget line. You define the budget names in theAccounting Scenario value set.
PERIOD_NAME
Enter the period name that you are loading the budget data for. You can load budget data to NeverOpened, Future Enterable, and Open periods only.
CURRENCY_CODE
Enter the currency for the budget.
SEGMENT1 to SEGMENT30
Enter valid and enabled account values for each segment in the chart of accounts.
BUDGET_AMOUNT
Enter the amount in the ledger currency for account types, expense and assets.
OBJECT_ VERSION_ NUMBER
For Oracle Cloud implementations, leave this field blank as the application automatically populatesthis when you load the data from the secure FTP server. For other implementations, you can set thecolumn to a value of 1.
These columns remain blank because the budget import process either uses these columns for internal processing, ordoesn't currently use them.
• CHART_OF_ACCOUNTS_ID
• CODE_COMBINATION_ID
• ERROR_MESSAGE
• CREATION_DATE
• CREATED_BY
• LAST_UPDATE_DATE
• LAST_UPDATE_LOGIN
• LAST_UPDATED_BY
• REQUEST_ID
• LOAD_REQUEST_ID
Related Topics
• External Data Integration Services for Oracle Cloud: Overview
• File Based Data Import for Oracle Financials Cloud

Oracle Financials CloudGetting Started with Your Implementation
Chapter 5Using Rapid Implementation Spreadsheets
122
Loading Data to the Budget Interface Table: ExplainedLoad the budget amounts to the interface table by performing the following steps.
1. Export budget data from your budgeting application to a comma separated values (.csv) file. The file-based dataimport for Import General Ledger Budget Balances has a template that you can use. For more information about file-based data import, see the File Based Data Import for Oracle Financials Cloud guide.
2. Upload the zipped .csv file to the UCM directory fin/budgetBalance/import.3. Launch the scheduled process called Load Interface File for Import and select the following parameters:
◦ Import process: Validate and Upload Budgets
◦ Data file: Select the name of the zipped .csv file
4. Run the Validate and Upload Budgets process to load the budget amounts to the General Ledger balances cube.5. Review the logs for validation errors. If there are validation errors, correct the data in the template and regenerate
the .csv file. Then resubmit the data by repeating steps 3 and 4.
Related Topics
• Budget Correction with Oracle ADF Desktop Integrator: Explained
• File Based Data Import for Oracle Financials Cloud

Oracle Financials CloudGetting Started with Your Implementation
Chapter 6Understanding External Data Integration
123
6 Understanding External Data Integration
External Data Integration Services for Oracle Cloud:OverviewUse External Data Integration Services for Oracle Cloud to load data into Oracle Fusion Applications from external sources,such as legacy systems and third-party applications.
External Data Integration Services for Oracle Cloud include the following components:
• Templates to structure, format, and generate the data file according to the requirements of the target applicationtables.
• File-based load process to load the data files into the interface tables.
• Application-specific data import processes to transfer data from interface tables to the application tables in yourOracle Fusion Applications.
The following flow diagram outlines the steps involved in loading data from external sources.
Download the File Import template
Prepare data file using template
Upload file to Universal Content
Management
Load data to interface table
Errors
Load process purges interface
table
Correct data in data file
Errors
Import data to application table using import job
No Yes
Correct data in interface table using ADFdi spreadsheet
Data successfully uploaded to product
tables
Yes
No

Oracle Financials CloudGetting Started with Your Implementation
Chapter 6Understanding External Data Integration
124
For further information, see Using External Data Integration Services for Oracle ERP Cloud (2102800.1) on My Oracle Supportat https://support.oracle.com.
Related Topics
• Using External Data Integration Services for Oracle ERP Cloud
Integration with Financial External Systems: Points toConsiderOracle Fusion Applications provides:
• Flexibility for external systems integration.
• Many spreadsheets as an easy method for entering and loading key setup data into the applications.
The following are some of the ways you might use external system integration.
• Tax and conversion rates
• Payroll processing
• Bank statement reconciliation
• Budget preparation
Tax and Conversion RatesTax rates may vary depending on the geographical location of the customer or supplier, the type of product, and otherfactors.
• If your tax rates do not change frequently:
◦ Enter or copy a tax rate feed of new or updated tax rates into the spreadsheet loader.
◦ Upload the spreadsheet.
Note: Similar processes are used for foreign exchange conversion rates, which can change daily.• Few foreign currency transactions: Use the spreadsheet loader.• Many foreign currency transactions: Use a supplier for a direct load into the Daily Rates open interface. The
application validates the rows in the interface table and then makes changes in the Daily Rates table.
Payroll ProcessingIf you are processing your payroll using an application other than Oracle Fusion Global Payroll:
• Use a spreadsheet template to load the data and create a postable journal entry in the Oracle Fusion GeneralLedger.
• Post the journal entry to reflect the payroll expense on your financial statements.
Oracle Financials CloudGetting Started with Your Implementation
Chapter 6Understanding External Data Integration
125
Set up the file from the payroll system to summarizes payments by cost center rather than detailed employee data.Summarized balances data is the level of detail relevant for the financial reporting and provides the confidentiality required forpayroll information,
Note: Oracle Fusion Financials marks the spreadsheet with clear error messages on the problematic rows, forexample, a new cost center that must be setup, for ease of correction.
Bank Statement ReconciliationBank statements are often received daily and follow a fixed format. With Oracle Fusion Cash Management:
• Establish a transfer of the statements from the bank to the open interface.
• Run the automated process to load the bank statement file.
• Run the reconciliation process.
Note: If there are any errors in the file, the reconciliation process stops. The load process indicates the errors soyou can follow up with the bank and receive a corrected file.
Budget PreparationsThere are two approaches to preparing your budgets:
1. For simple budgeting:
◦ Distribute the current actual results and prior budget numbers to the relevant finance professionals usingspreadsheets.
◦ Collect and consolidate the spreadsheets.
◦ Load the spreadsheets to the Essbase cube.
◦ Compare actual results against budgets using all of the Oracle Fusion Financials reporting and analysis tools,including Account Monitor, Account Inspector, Smart View, and Financial Reporting.
2. For more complex budgeting use Oracle Hyperion Planning on the Oracle Cloud, alongside Oracle Fusion Financials.Advantages include:
◦ Advanced tools to handle complex budgeting scenarios.
◦ Direct flow of data between the two applications.
◦ Simplified distribution and collection of budget data.
Note: For more information on external data integration see: Oracle Financials Cloud ImplementingCommon Features guide: External Integration chapter: External Data Integration Services for OracleCloud.

Oracle Financials CloudGetting Started with Your Implementation
Chapter 6Understanding External Data Integration
126

Oracle Financials CloudGetting Started with Your Implementation
Glossary
127
Glossary
action
The kind of access, such as view or edit, named in a security policy.
balancing segment
A chart of accounts segment used to automatically balance all journal entries for each value of this segment.
chart of accounts
The account structure your organization uses to record transactions and maintain account balances.
clearing company
The intercompany clearing entity used to balance the journal.
condition
The part of a data security policy that specifies what portions of a database resource are secured.
data dimension
A stripe of data accessible by a user. Sometimes referred to as data security context.
data role
A role for a defined set of data describing the job a user does within that defined set of data. A data role inherits job orabstract roles and grants entitlement to access data within a specific dimension of data based on data security policies. Atype of enterprise role.
data role template
A set of instructions that specifies which base roles to combine with which dimension values to create a set of data securitypolicies.
data security
The control of access and action a user can take against which data.
data security policy
A grant of entitlement to a role on an object or attribute group for a given condition.
database resource
An applications data object at the instance, instance set, or global level, which is secured by data security policies.
Oracle Financials CloudGetting Started with Your Implementation
Glossary
128
enterprise
An organization with one or more legal entities under common control.
entitlement
Grant of access to functions and data. Oracle Fusion Middleware term for privilege.
function security
The control of access to a page or a specific use of a page. Function security controls what a user can do.
job role
A role, such as an accounts payable manager or application implementation consultant, that usually identifies and aggregatesthe duties or responsibilities that make up the job.
journal
An element of a journal entry consisting of the name, accounting date, category, ledger, and currency for single currencyjournal entries. Used to group journal lines.
legal entity
An entity identified and given rights and responsibilities under commercial law through the registration with country'sappropriate authority.
offering
A comprehensive grouping of business functions, such as Sales or Product Management, that is delivered as a unit tosupport one or more business processes.
primary balancing segment value
A segment value used to represent a legal entity in the chart of accounts and automatically balance all intercompany andintracompany transactions and journal entries.
role
Controls access to application functions and data.
role provisioning
The automatic or manual allocation of a role to a user.
security reference implementation
Predefined function and data security that includes role based access control, and policies that protect functions, and data.The reference implementation supports identity management, access provisioning, and security enforcement across thetools, data transformations, access methods, and the information life cycle of an enterprise.
subject area
A set of columns, or pieces of data, related to a specific business object or area.


![Skaffold - storage.googleapis.com · [getting-started getting-started] Hello world! [getting-started getting-started] Hello world! [getting-started getting-started] Hello world! 5.](https://static.fdocuments.net/doc/165x107/5ec939f2a76a033f091c5ac7/skaffold-getting-started-getting-started-hello-world-getting-started-getting-started.jpg)


